Toaster User Manual
Copyright © 2010-2016 Linux Foundation
Permission is granted to copy, distribute and/or modify this document under the terms of the Creative Commons Attribution-Share Alike 2.0 UK: England & Wales as published by Creative Commons.
Manual Notes
This version of the Toaster User Manual is for the 1.8.2 release of the Yocto Project. To be sure you have the latest version of the manual for this release, go to the Yocto Project documentation page and select the manual from that site. Manuals from the site are more up-to-date than manuals derived from the Yocto Project released TAR files.
If you located this manual through a web search, the version of the manual might not be the one you want (e.g. the search might have returned a manual much older than the Yocto Project version with which you are working). You can see all Yocto Project major releases by visiting the Releases page. If you need a version of this manual for a different Yocto Project release, visit the Yocto Project documentation page and select the manual set by using the "ACTIVE RELEASES DOCUMENTATION" or "DOCUMENTS ARCHIVE" pull-down menus.
To report any inaccuracies or problems with this manual, send an email to the Yocto Project discussion group at
yocto@yoctoproject.comor log into the freenode#yoctochannel.
| Revision History | |
|---|---|
| Revision 1.8 | April 2015 |
| Released with the Yocto Project 1.8 Release. | |
| Revision 1.8.1 | November 2015 |
| Released with the Yocto Project 1.8.1 Release. | |
| Revision 1.8.2 | March 2016 |
| Released with the Yocto Project 1.8.2 Release. | |
Table of Contents
Chapter 1. Introduction
Table of Contents
Toaster is a web interface to the Yocto Project's OpenEmbedded build system. The interface enables you to configure and run your builds. Information about builds is collected and stored in a database. You can use Toaster to configure and start builds on multiple remote build servers.
Note
This release of Toaster does allow you to configure and initiate builds. However, you cannot use Toaster to customize image recipes, which still must either be done by hand or through Hob. As Toaster matures, it eventually will equal and surpass Hob functionality, at which time Hob will be deprecated.
For more information on Hob, see the "Image Development Using Hob" section in the Yocto Project Development Manual.
1.1. Toaster Operational Modes
You can use Toaster in Analysis Mode or Build Mode:
Analysis Mode: In Analysis Mode, you can record builds and statistics. In this Mode, you directly access the
bitbakecommand, which you then use to build images.Analysis Mode requires you to have first started Toaster and then to initiate your build using the
bitbakecommand from the shell. Toaster must be started before the build or it will not collect build data.Toaster has the following capabilities in Analysis Mode:
See what was built (recipes and packages) and what packages were installed into your final image.
Browse the directory structure of your image.
See the value of all variables in your build configuration, and which files set each value.
Examine error, warning and trace messages to aid in debugging.
See information about the BitBake tasks executed and reused during your build, including those that used shared state.
See dependency relationships between recipes, packages and tasks
See performance information such as build time, task time, CPU usage, and disk I/O.
Build Mode: In Build Mode, Toaster handles the build configuration, scheduling and execution. In this mode, all your interaction with the build system happens through the web interface. You do not have direct access to the
bitbakecommand.Using this mode, you configure and start your builds within Toaster's GUI. Each project can be configured for a specific version of the build system. As shipped, Toaster supports Yocto Project Releases 1.7 and beyond.
Toaster has all the same capabilities in Build Mode as it does in Analysis Mode plus the following:
Browse layers listed in the various layer sources that are available in your project (e.g. the OpenEmbedded Metadata Index at http://layers.openembedded.org/layerindex/).
Import your own layers for building.
Add and remove layers from your configuration.
Set configuration variables.
Select a target or multiple targets to build.
Start your builds.
1.2. Installation Options
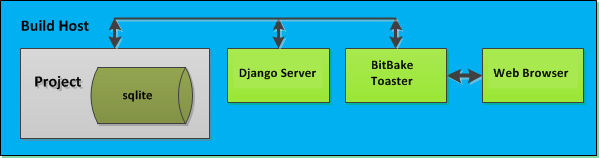
You can set Toaster up to run as a local instance or as a shared hosted service. Regardless of how you set up Toaster, both Analysis and Build Modes are available.
When Toaster is set up as a local instance, all the components reside on a single build host. Fundamentally, a local instance of Toaster is suited for a single user developing on a single build host.
 |
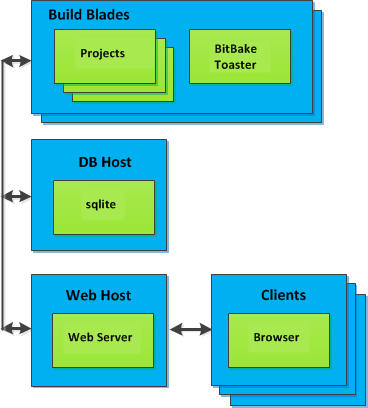
Toaster as a hosted service is suited for multiple users developing across several build hosts. When Toaster is set up as a hosted service, its components can be spread across several machines:
 |
Chapter 2. Preparing to Use Toaster
Table of Contents
This chapter describes how you need to prepare your system in order to use Toaster.
2.1. Setting Up the Basic System Requirements
You first need to be sure your build system is set up to run the Yocto Project. See the "What You Need and How You Get It" section in the Yocto Project Quick Start for information on how to set up your system for the Yocto Project.
2.2. Establishing Toaster System Dependencies
Toaster requires extra Python dependencies and
daemon
in order to run.
A Toaster requirements file named
toaster-requirements.txt defines the
Python dependencies.
The requirements file is located in the
bitbake directory, which is located in the
root directory of the
Source Directory
(e.g. poky/bitbake/toaster-requirements.txt).
The dependencies appear in a pip,
install-compatible format.
2.2.1. Optionally Setting Up a Python Virtual Environment
It is highly recommended that you use a Python virtual environment that allows you to maintain a dedicated Python executable and its own set of installed modules. Doing so separates the executable from the Python and modules provided by the operating system and therefore avoids any version conflicts.
Follow these steps to set up your virtual environment. These steps assume a Ubuntu distribution:
Install
virtualenv: Install the supportedpython-virtualenvpackage from your distribution rather than usingpip.$ sudo apt-get install python-virtualenvCreate and Activate a Virtual Environment:
     $ virtualenv venv
     $ source venv/bin/activate
Note
If you do choose to set up a virtual environment in which to run Toaster, you must initialize that virtual environment each time you want to start Toaster. Use the following to initialize the environment just before you start Toaster:
$ source venv/bin/activate
2.2.2. Install Toaster Packages
You need to install the packages that Toaster requires. Use this command:
$ pip install -r bitbake/toaster-requirements.txt
2.2.3. Install daemon
Toaster depends on
daemon.
Depending on your distribution, how you install
daemon differs:
Debian-Based Systems: If you are running a Debian-based distribution, install
daemonusing the following command:$ sudo apt-get install daemonNon-Debian-Based Systems: If you are not running a Debian-based distribution (Redhat-based distribution such as Fedora), you need to download the file relevant to the architecture and then install
daemonmanually. Following are the commands for 64-bit distributions:$ wget http://libslack.org/daemon/download/daemon-0.6.4-1.x86_64.rpm $ sudo rpm -i daemon-0.6.4-1.x86_64.rpmHere are the commands for a 32-bit distribution:
$ wget http://libslack.org/daemon/download/daemon-0.6.4-1.i686.rpm $ sudo rpm -i daemon-0.6.4-1.i686.rpm
Chapter 3. Setting Up and Using Toaster
Table of Contents
3.1. Using Toaster in Analysis Mode
This section describes how to use Toaster in Analysis Mode after setting Toaster up as a local instance or as a hosted service.
3.1.1. Setting Up Locally and Running in Analysis Mode
Follow these steps to set up a local instance of Toaster and then run in Analysis Mode:
Prepare your Build System: Be sure your system has the Toaster requirements by following the steps in the "Establishing Toaster System Dependencies" section.
Get Set Up to Use the Yocto Project: Get the requirements set up so that you can use the Yocto Project to build images. See the "What You Need and How You Get It" section in the Yocto Project Quick Start for information.
Source your Build Environment Setup Script: From your Source Directory (e.g.
poky/build), source the build environment setup scriptoe-init-build-envoroe-init-build-env-memres.Start Toaster: From the Build Directory, start Toaster:
$ source toaster startStart Your Build Using BitBake: Use the
bitbakecommand to start your build. Here is an example that builds thecore-image-minimalimage:$ bitbake core-image-minimalOpen Your Browser: Open your browser and visit
http://host:port/toastergui. For host and port values, see the output of thesource toaster startcommand. For information on how to use Toaster, see the "Using the Toaster Web Interface" section.
3.1.2. Setting Up a Hosted Service and Running in Analysis Mode
A hosted service resides on a shared server and allows multiple users to take advantage of Toaster.
In a production environment, you might want to have multiple local instances of the Toaster Logging Interface running on various remote build machines, and have those local instances access and use a single web server. To do this, you need to do the following:
Maintain a common SQL database.
Set up separate instances of BitBake servers and Toaster Logging Interfaces for each of those separate BitBake servers.
The common SQL database allows the Web server to show data from all the various BitBake builds. Setting the SQL database outside of any Build Directory maintains a separation between the various builds. The BitBake servers, the SQL server, and the Web server or servers can be run on separate machines.
Follow these steps to set up and run a hosted service and run Toaster in Analysis Mode:
Note
The steps assume a Toaster installation path of/opt/bitbake/.
Prepare your Build System: Be sure your system has the Toaster requirements by following the steps in the "Establishing Toaster System Dependencies" section.
Get Set Up to Use the Yocto Project: Get the requirements set up so that you can use the Yocto Project to build images. See the "What You Need and How You Get It" section in the Yocto Project Quick Start for information.
Install and Set up the Database Server: You can use any SQL server out of the box. It is recommended that you use
mysql-serverbecause it has the advantages of advanced SQL features along with a fast and reliable database. However, setting upmysql-serveris more complex and might require a Database Administrator to tune it.Another supported database backend is
sqlite3. Withsqlite3, you have the advantage of no configuration and an easy installation. However, Toaster still requires direct access to the backend. Thesqlitebackend is also slower as compared tomysql-server, and has no transactional support.You should set up proper username and password access on the shared database for everyone that will be using Toaster. You need administrator rights for the root account, which is not the same thing as root access on the machine. Here is an example that installs
mysql-serverand sets up some user accounts and the database.$ apt-get install mysql-server $ mysql -u root mysql> CREATE USER 'newuser'@'localhost' IDENTIFIED BY 'password'; mysql> GRANT ALL PRIVILEGES ON * . * TO 'newuser'@'localhost'; mysql> GRANT ALL PRIVILEGES ON * . * TO 'newuser'@'localhost'; mysql> CREATE DATABASE 'toaster';You need a separate clone of the Source Repositories for the Database Server. This clone is only used for getting the latest Toaster files. You can set this up using the following Git command. Be sure to set up the directory outside of any Build Directories.
$ git clone git://git.yoctoproject.org/pokyIn the separately cloned tree for the Database Server, edit the
bitbake/lib/toaster/toastermain/settings.pyfile so that theDATABASESvalue points to the previously created database server. Use the username and password established earlier. Here is an example:$ cat /opt/bitbake/lib/toaster/toastermain/settings.py ... DATABASES = { 'default': { 'ENGINE': 'django.db.backends.mysql', 'NAME': 'toaster', 'USER': 'newuser', 'PASSWORD': 'password', 'HOST': '192.168.0.25', 'PORT': '3306', } ...Install and Set Up the Web Server: For a production environment, it is recommended that you install and set up a front-end web server. This server allows for load balancing and multi-threading over Toaster and
djangoWSGI. Here is an example that uses Apache web server.$ apt-get install apache2 libapache2-mod-wsgi $ a2enmod wsgi $ cat /etc/apache2/sites-available/000-default.conf ... # the WSGIPythonPath is global WSGIPythonPath /opt/bitbake/lib/toaster/ ... #snip - in VirtualHost WSGIScriptAlias / /opt/bitbake/lib/toaster/toastermain/wsgi.py <Directory //opt/bitbake/lib/toaster/toastermain/> <Files wsgi.py> Require all granted </Files> </Directory> ...You need to collect static media from Toaster and continue configuring Apache to serve that static media:
     $ mkdir /var/www.html/static && cd /var/www.html/static
     $ /opt/bitbake/lib/toaster/manage.py collectstatic
     $ cat /etc/apache2/sites-available/000-default.conf

        ...

     # in VirtualHost, AHEAD of the WSGIScriptAlias definition
     Alias /static/ /var/www.html/static/

     <Directory /var/www.html/static/>
     Require all granted
     </Directory>

        ...

     WSGIScript Alias / /opt/bitbake/lib/toaster/toastermain/wsgi.py

        ...
Start Toaster: Synchronize the databases for toaster, and then start up the web server. Here is an example that continues with the assumed components from the previous steps:
     $ /opt/bitbake/lib/toaster/manage.py syncdb
     $ /opt/bitbake/lib/toaster/manage.py migrate orm
     $ /opt/bitbake/lib/toaster/manage.py migrate bldcontrol

     $ service apache2 restart
You can find general documentation on
manage.pyat the Django site. For reference information on Toaster-specificmanage.pycommands, see the "Useful Commands" section.Enable Build Logging to the Common SQL Server for Each Build Directory you are Using: You need to make sure that the
toasterclass and build history are enabled. This is done in atoaster.conffile that is created automatically by the toasterstartcommand, and that lives inside the Build Directory in/conf/toaster.conf.That file should include the following line:
INHERIT += "toaster buildhistory"For information on build history, see the "Maintaining Build Output Quality" section in the Yocto Project Development Manual.
You also need to point to the database that you set up in step 3. You can do this by exporting the
DATABASE_URLvariable as follows:export DATABASE_URL=mysql://newuser:password@192.168.0.25:3306/toasterThis example assumes that you are using
mysql-server. The IP address should be the IP address of your database server.Source your Build Environment Setup Script: From your Source Directory on each of the build systems, (e.g.
poky/build), source the build environment setup script (i.e.oe-init-build-envoroe-init-build-env-memres).Start the BitBake Server: Start the BitBake server using the following command:
$ bitbake --postread conf/toaster.conf --server-only -t xmlrpc -B localhost:0 && export BBSERVER=localhost:-1Start the Logging Server: Start the Toaster Logging Interface using the following command:
$ nohup bitbake --observe-only -u toasterui >toaster_ui.log &Note
No hard-coded ports are used in the BitBake options as there is enough code to runautodiscoveryfor BitBake ports. Doing so prevents collisions.Start Builds Using BitBake: Use the
bitbakecommand to start a build on a build system. Here is an example that builds thecore-image-minimalimage:$ bitbake core-image-minimalWhen you are finished with a build in a given Build Directory, be sure to
killthe BitBake server for that build area:$ bitbake -m
For information on how to use the Toaster web interface, see the "Using the Toaster Web Interface" section.
3.2. Using Toaster in Build Mode
This section describes how to use Toaster in Build Mode after setting Toaster up as a local instance or as a hosted service.
3.2.1. Setting Up Locally and Running in Build Mode
Follow these steps to set up a local instance of Toaster and then run in Build Mode:
Prepare your Build System: Be sure your system has the Toaster requirements by following the steps in the "Establishing Toaster System Dependencies" section.
Get Set Up to Use the Yocto Project: Get the requirements set up so that you can use the Yocto Project to build images. See the "What You Need and How You Get It" section in the Yocto Project Quick Start for information.
Start Toaster: From the root of the source directory (e.g
poky/), run the following command:$ bitbake/bin/toasterCreate a Superuser: Django will ask you if you want to create a superuser. You can skip this step, but it is recommended that you create a superuser. You can use the superuser to access the Django administration interface and make changes to the Toaster configuration.
Select the Build Log Directory: Toaster asks you to specify the directory where you want to store the build log files. Choosing a directory for these files makes sure they are always available to you. If you do not choose a directory, the logs can disappear (e.g. deleting the Build Directory).
When Toaster prompts you for the Build Log directory, you can select the suggested default or provide a path to a different directory.
Specify the Layer Checkout Directory: Toaster asks you to specify the directory into which layers are checked out. Toaster clones any layers needed for your builds inside this directory.
When Toaster prompts you for the Layer checkout directory, you can select the suggested default or provide a path to a different directory.
Specify the Build Directory Path: Toaster asks you to specify the path to the Build Directory. You can select the suggested default or provide a path to a different directory.
Choose Whether or not to Import a Default Toaster Configuration File: Toaster asks you if you want to import a default Toaster configuration file. Toaster configurations are stored in JSON files called
toasterconf.json. For information on JSON files, see the "JSON Files" section.You can skip importing a configuration file by entering "0" at the prompt. However, it is recommended that you import one of the configuration files listed during this step. You can always amend the imported configuration during a later stage through the Django administration interface.
For general information on Django, see the available documentation. You can also find information on Toaster-specific
manage.pycommands in the "Useful Commands" section.Open the Browser: If no browser window appears, open your favorite browser and enter the following:
http://localhost:8000/toasterguiYou can now use the Toaster web interface.
3.2.2. Setting Up a Hosted Service and Running in Build Mode
Follow these steps to set up a hosted service and run Toaster in Build Mode:
Prepare your Build System: Be sure your system has the Toaster requirements by following the steps in the "Establishing Toaster System Dependencies" section.
Get Set Up to Use the Yocto Project: Get the requirements set up so that you can use the Yocto Project to build images. See the "What You Need and How You Get It" section in the Yocto Project Quick Start for information.
Be Sure Management is Enabled: If you are running Toaster under Apache, you need to be sure management is enabled. To enable management, set
MANAGEDto "True" by adding the following to thebitbake/lib/toaster/settings.pyfile:MANAGED="True"Install and Set up the Database Server: You can use any SQL server out of the box. It is recommended that you use
mysql-serverbecause it has the advantages of advanced SQL features along with a fast and reliable database. However, setting upmysql-serveris more complex and might require a Database Administrator to tune it.Another supported database backend is
sqlite3. Withsqlite3, you have the advantage of no configuration and an easy installation. However, Toaster still requires direct access to the backend. Thesqlitebackend is also slower as compared tomysql-server, and has no transactional support.You should set up proper username and password access on the shared database for everyone that will be using Toaster. You need administrator rights for the root account, which is not the same thing as root access on the machine. Here is an example that installs
mysql-serverand sets up some user accounts and the database.$ apt-get install mysql-server $ mysql -u root mysql> CREATE USER 'newuser'@'localhost' IDENTIFIED BY 'password'; mysql> GRANT ALL PRIVILEGES ON * . * TO 'newuser'@'localhost'; mysql> GRANT ALL PRIVILEGES ON * . * TO 'newuser'@'localhost'; mysql> CREATE DATABASE 'toaster';You need a separate clone of the Source Repositories for the Database Server. This clone is only used for getting the latest Toaster files. You can set this up using the following Git command. Be sure to set up the directory outside of any Build Directories.
$ git clone git://git.yoctoproject.org/pokyIn the separately cloned tree for the Database Server, edit the
bitbake/lib/toaster/toastermain/settings.pyfile so that theDATABASESvalue points to the previously created database server. Use the username and password established earlier. Here is an example:$ cat /opt/bitbake/lib/toaster/toastermain/settings.py ... DATABASES = { 'default': { 'ENGINE': 'django.db.backends.mysql', 'NAME': 'toaster', 'USER': 'newuser', 'PASSWORD': 'password', 'HOST': '192.168.0.25', 'PORT': '3306', } ...Create the Database Use the following commands to create the default database structure:
     $ bitbake/lib/toaster/manage.py syncdb
     $ bitbake/lib/toaster/manage.py migrate orm
     $ bitbake/lib/toaster/manage.py migrate bldcontrol
The interface asks you if you want to create a superuser. Do not skip this step. You will use the superuser account to access the administration interface and make changes to the Toaster configuration.
Select Where the Build Process Takes Place: You need to create three directories for storing build artifacts, downloading sources, and running builds. All three directories need to be writable by the user, which is "poky" in this example. The build artifacts directory needs to readable by the apache user. You also need free disk space in the range of 100 Gbytes. Following are three suggested directories:
     /home/poky/buildartifacts/
     /home/poky/build/
     /home/poky/sources/
Set Up the
toasterconf.jsonFile: Download the hostedtoasterconf.jsonfile from the Yocto Project wiki and edit it to suit your environment. For information on the relevant sections of the file, see the "JSON Files" section.After editing the file, load it by running the following:
$ bitbake/lib/toaster/manage.py loadconf path-to-toasterconf.json-fileFor reference information on Toaster-specific
manage.py, see the "Useful Commands" section.Check the Toaster Settings: Configure the build environment by running the following:
$ bitbake/lib/toaster/manage.py checksettingsWhen prompted, paste in the directory paths created previously during Step 7. For reference information on Toaster-specific
manage.py, see the "Useful Commands" section.Install and Set Up the Web Server: For a production environment, it is recommended that you install and set up a front-end web server. This server allows for load balancing and multi-threading over Toaster and
djangoWSGI. Here is an example that uses Apache web server:$ apt-get install apache2 libapache2-mod-wsgi $ a2enmod wsgi $ cat /etc/apache2/sites-available/000-default.conf ... # the WSGIPythonPath is global WSGIPythonPath /opt/bitbake/lib/toaster/ ... #snip - in VirtualHost WSGIScriptAlias / /opt/bitbake/lib/toaster/toastermain/wsgi.py <Directory //opt/bitbake/lib/toaster/toastermain/> <Files wsgi.py> Require all granted </Files> </Directory> ...You need to collect static media from Toaster and continue configuring Apache to serve that static media:
     $ mkdir /var/www.html/static && cd /var/www.html/static
     $ /opt bitbake/lib/toaster/manage.py collectstatic
     $ cat /etc/apache2/sites-available/000-default.conf

        ...

     # in VirtualHost, AHEAD of the WSGIScriptAlias definition
     Alias /static/ /var/www.html/static/

     <Directory /var/www.html/static/>
     Require all granted
     </Directory>

        ...

     WSGIScript Alias / /opt/bitbake/lib/toaster/toastermain/wsgi.py

        ...
Start Toaster: Synchronize the databases for Toaster, and then start up the web server. Here is an example that continues with the assumed components from the previous steps:
     $ /opt/bitbake/lib/toaster/manage.py syncdb
     $ /opt/bitbake/lib/toaster/manage.py migrate orm
     $ /opt/bitbake/lib/toaster/manage.py migrate bldcontrol

     $ service apache2 restart
For reference information on the
manage.pycommands used here, see the "Useful Commands" section.Set up Build Control and Open the Web Interface: You need to run the build control manager. You can do this as shown in the following example:
     # as the "poky" user, start the runbuilds command in a loop (or put it in crontab!)
     $ sudo -i -u poky
     $ while true; do /opt/bitbake/lib/toaster/manage.py runbuilds; sleep 10; done

     # open up the web interface
     $ xdg-open http://[server-address]/toastergui/
It is suggested that you enable build control by setting
runbuildsin thecrontabas follows:$ crontab -l * * * * * /opt/bitbake/lit/toaster/manage.py runbuildsOpen the Browser: Once the Apache server is running, connect to it with your favorite browser and verify that the Toaster interface comes up:
http://localhost:8000/toasterguiYou can track accesses and errors in the Apache service logs.
3.3. Using the Toaster Web Interface
The Toaster web interface allows you to do the following:
Browse published layers in the OpenEmbedded Metadata Index that are available for your selected version of the build system.
Import your own layers for building.
Add and remove layers from your configuration.
Set configuration variables.
Select a target or multiple targets to build.
Start your builds.
See what was built (recipes and packages) and what packages were installed into your final image.
Browse the directory structure of your image.
See the value of all variables in your build configuration, and which files set each value.
Examine error, warning and trace messages to aid in debugging.
See information about the BitBake tasks executed and reused during your build, including those that used shared state.
See dependency relationships between recipes, packages and tasks.
See performance information such as build time, task time, CPU usage, and disk I/O.
Following are several videos that show how to use the Toaster GUI:
Build Configuration: This video overviews and demonstrates build configuration for Toaster.
Toaster Homepage and Table Controls: This video goes over the Toaster entry page, and provides an overview of the data manipulation capabilities of Toaster, which include search, sorting and filtering by different criteria.
Build Dashboard: This video shows you the build dashboard, a page providing an overview of the information available for a selected build.
Image Information: This video walks through the information Toaster provides about images: packages installed and root file system.
Configuration: This video provides Toaster build configuration information.
Tasks: This video shows the information Toaster provides about the tasks run by the build system.
Recipes and Packages Built: This video shows the information Toaster provides about recipes and packages built.
Performance Data: This video shows the build performance data provided by Toaster.
Chapter 4. Concepts and Reference
Table of Contents
In order to configure and use Toaster, you should understand some
concepts and have some basic command reference material available.
This final chapter provides conceptual information on layer sources,
releases, and JSON configuration files.
Also provided is a quick look at some useful
manage.py commands that are Toaster-specific.
Information on manage.py commands does exist
across the Web and the information in this manual by no means
attempts to provide a command comprehensive reference.
4.1. Layer Source
In general, a "layer source" is a source of information about existing layers. In particular, we are concerned with layers that you can use with the Yocto Project and Toaster. This chapter describes a particular type of layer source called a "layer index."
A layer index is a web application that contains information about a set of custom layers. A good example of an existing layer index is the OpenEmbedded Metadata Index. A public instance of this layer index exists at http://layers.openembedded.org. You can find the code for this layer index's web application at http://git.yoctoproject.org/cgit/cgit.cgi/layerindex-web/.
When you tie a layer source into Toaster, it can query the layer
source through a
REST
API, store the information about the layers in the Toaster
database, and then show the information to users.
Users are then able to view that information and build layers
from Toaster itself without worrying about cloning or editing
the BitBake layers configuration file
bblayers.conf.
Tying a layer source into Toaster is convenient when you have many custom layers that need to be built on a regular basis by a community of developers. In fact, Toaster comes pre-configured with the OpenEmbedded Metadata Index.
Note
You do not have to use a layer source to use Toaster. Tying into a layer source is optional.
4.1.1. Setting Up and Using a Layer Source
To use your own layer source, you need to set up the layer source and then tie it into Toaster. This section describes how to tie into a layer index in a manner similar to the way Toaster ties into the OpenEmbedded Metadata Index.
4.1.1.1. Understanding Your Layers
The obvious first step for using a layer index is to have several custom layers that developers build and access using the Yocto Project on a regular basis. This set of layers needs to exist and you need to be familiar with where they reside. You will need that information when you set up the code for the web application that "hooks" into your set of layers.
For general information on layers, see the "BSP Layers" and "Using the Yocto Project's BSP Tools" sections in the Yocto Project Board Support Package (BSP) Developer's Guide.
4.1.1.2. Configuring Toaster to Hook Into Your Layer Index
If you want Toaster to use your layer index, you must host the web application in a server to which Toaster can connect. You also need to give Toaster the information about your layer index. In other words, you have to configure Toaster to use your layer index. This section describes two methods by which you can configure and use your layer index.
In the previous section, the code for the OpenEmbedded Metadata Index (i.e. http://layers.openembedded.org) was referenced. You can use this code, which is at http://git.yoctoproject.org/cgit/cgit.cgi/layerindex-web/, as a base to create your own layer index.
4.1.1.2.1. Use the Administration Interface
Access the administration interface through a
browser by entering the URL of your Toaster instance and
adding "/admin" to the end of the
URL.
As an example, if you are running Toaster locally, use
the following URL:
http://127.0.0.1:8000/admin
The administration interface has a "Layer sources" section that includes an "Add layer source" button. Click that button and provide the required information. Make sure you select "layerindex" as the layer source type.
4.1.1.2.2. Use the toasterconf.json File
If you do not want to use the Administration
Interface, you can edit the
toasterconf.json
file and reload it to Toaster.
When you set up Toaster in Build Mode, you are prompted to select a Toaster configuration file. This configuration file is used to set up the initial configuration values within the Toaster database including the layer sources. Three versions of the configuration file exist:
The first version of the file is found in the
confdirectory of themeta-yoctolayer (i.e.meta-yocto/conf/toasterconf.json). This version contains the default Yocto Project configuration for Toaster. You are prompted to select this file during the Toaster set up process if you had cloned thepokyrepository (i.e.git://git.yoctoproject.org/poky).The second version of the file is in the
confdirectory of theopenembedded-corelayer (i.e.meta/conf/toasterconf.json). This version contains the default OpenEmbedded configuration for Toaster. You are prompted to select this file during the Toaster set up process if you had cloned theopenembedded-corerepository (i.e.git://git.openembedded.org/openembedded-core).The third version is a sample configuration useful for when you want to set up a hosted service in Build Mode. You can find this version on the File:Toasterconf.json.txt.patch wiki page.
4.1.1.2.3. Edit the Configuration File
Edit the version of the
toasterconf.json file you
used to set up your Toaster instance.
In the file, you will find a section for layer sources
such as the following:
     "layersources": [
         {
             "name": "Local Yocto Project",
             "sourcetype": "local",
             "apiurl": "../../",
             "branches": ["HEAD", "fido", "dizzy"],
             "layers": [
                 {
                     "name": "openembedded-core",
                     "local_path": "meta",
                     "vcs_url": "remote:origin",
                     "dirpath": "meta"
                 },
                 {
                     "name": "meta-yocto",
                     "local_path": "meta-yocto",
                     "vcs_url": "remote:origin",
                     "dirpath": "meta-yocto"
                 },
                 {
                     "name": "meta-yocto-bsp",
                     "local_path": "meta-yocto-bsp",
                     "vcs_url": "remote:origin",
                     "dirpath": "meta-yocto-bsp"
                 }

             ]
         },
         {
             "name": "OpenEmbedded",
             "sourcetype": "layerindex",
             "apiurl": "http://layers.openembedded.org/layerindex/api/",
             "branches": ["fido", "dizzy"]
         },
         {
             "name": "Imported layers",
             "sourcetype": "imported",
             "apiurl": "",
             "branches": ["fido", "dizzy", "HEAD"]

         }
     ],
You should add your own layer source to this section by following the same format used for the "OpenEmbedded" layer source shown above.
Give your layer source a name, provide the URL of your layer source API, use the source type "layerindex", and indicate which branches from your layer source you want to make available through Toaster. For example, the OpenEmbedded layer source makes available only its "fido" and "dizzy" branches.
The branches must match the branch you set when configuring your releases. For example, if you configure one release in Toaster by setting its branch to "branch-one" and you configure another release in Toaster by setting its branch to "branch-two", the branches in your layer source should be "branch-one" and "branch-two" as well. Doing so creates a connection between the releases and the layer information from your layer source. Thus, when users create a project with a given release, they will see the appropriate layers from your layer source. This connection ensures that only layers that are compatible with the selected project release can be selected for building.
Once you have added this information to the
toasterconf.json file, save your
changes.
In a terminal window, navigate to the directory that
contains the Toaster database, which by default is the
root of the Yocto Project
Source Directory.
Once you are located in that directory, run the
"loadconf" command, which takes as
an argument the full path to the
toasterconf.json file you just edited.
For example, if you cloned the
poky repository and you edited the
meta-yocto/conf/toasterconf.json file,
you would type something like the following:
$ bitbake/lib/toaster/manage.py loadconf /home/scottrif/poky/meta-yocto/conf/toasterconf.json
After entering this command, you need to update the
Toaster database with the information coming from your
new layer source.
To do that, you should run the
"lsupdates" command from the directory
that contains the Toaster database.
Here is an example:
$ bitbake/lib/toaster/manage.py lsupdates
If Toaster can reach the API URL, you should see a message telling you that Toaster is updating the layer source information.
Once the information has been updated, verify the new layer information is available by using the Toaster web interface. To do that, visit the "All compatible layers" page inside a Toaster project. The layers from your layer source should be listed there.
4.2. Releases
When you create a Toaster project using the web interface, you are asked to choose a "Release." In the context of Toaster, the term "Release" refers to a set of layers and a BitBake version the OpenEmbedded build system uses to build something. As shipped, Toaster is pre-configured with releases that correspond to Yocto Project release branches. However, you can modify, delete, and create new releases according to your needs. This section provides some background information on releases.
4.2.1. Pre-Configured Releases
As shipped, Toaster is configured to use a specific set of releases. Of course, you can always configure Toaster to use any release. For example, you might want your project to build against a specific commit of any of the "out-of-the-box" releases. Or, you might want your project to build against different revisions of OpenEmbedded and BitBake.
As shipped, Toaster is configured to work with the following releases:
Yocto Project 1.7 "Dizzy" or OpenEmbedded "Dizzy": This release causes your Toaster projects to build against the head of the dizzy branch at http://git.yoctoproject.org/cgit/cgit.cgi/poky/log/?h=dizzy or http://git.openembedded.org/openembedded-core/commit/?h=dizzy.
Yocto Project 1.8 "Fido" or OpenEmbedded "Fido": This release causes your Toaster projects to build against the head of the fido branch at http://git.yoctoproject.org/cgit/cgit.cgi/poky/log/?h=fido or http://git.openembedded.org/openembedded-core/commit/?h=fido.
Local Yocto Project or Local OpenEmbedded: This release causes your Toaster Projects to build against the head of the
pokyoropenembedded-coreclone you have local to the machine running Toaster.
4.2.2. What Makes Up a Release?
A release consists of the following:
Name: The name of the release (
name). This release name never appears in the the Toaster web interface. Consequently, a user never sees the release name.Description: The textual description of the release (
description). This description is what users encounter when creating projects with the Toaster web interface. When you configure your release, be sure to use a description that sufficiently describes and is understandable. If Toaster has more than one release configured, the release descriptions appear listed in a drop down menu when a user creates a new project. If Toaster has only one release configured, all projects created using the web interface take that release and the drop down menu does not display in the Toaster web interface.BitBake: The Bitbake version (
bitbake) used to build layers set in the current release. This version is described by a name, a Git URL, a branch in the Git URL, and a directory path in the Git repository. As an example, consider the following snippet from a Toaster JSON configuration file. This BitBake version uses the fido branch from the OpenEmbedded repository:"bitbake" : [ { "name": "fido", "giturl": "git://git.openembedded.org/bitbake", "branch": "1.26", "dirpath": "" } ]Here is more detail on each of the items that comprise the BitBake version:
Name: A string (
name) used to refer to the version of BitBake you are using with Toaster. This name is never exposed through Toaster.Git URL: The URL (
giturl) for the BitBake Git repository cloned for Toaster projects.Branch: The Git branch, or revision, (
branch) of the BitBake repository used with Toaster.Directory Path: The sub-directory of the BitBake repository (
dirpath). If the Git URL includes more than one repository, you need to set this directory. If the URL does not include more than a single repository, you can setdirpathto a null string (i.e. "").
Branch: The branch for the layer source (
branch) used with the release. For example, for the OpenEmbedded layer source, the "fido" and "dizzy" branches are available.Default Layers: The set of default layers (
defaultlayers) automatically added to the project configuration when a project is created.Layer Source Priorities A specification of layer source priorities (
layersourcepriority). In order for Toaster to work as intended, the "Imported layers" layer source should have the highest priority, which means that layers manually imported by users with the "Import layer" functionality will always be visible and available for selection.Help Text: Help text (
helptext) that explains what the release does when selected. This help text appears below the release drop-down menu when you create a Toaster project. The help text should assist users in making the correct decision regarding the release to use for a given project.
To summarize what comprises a release, consider the following
example from a Toaster JSON file.
The configuration names the release "fido" and uses the
"fido" branch provided by the layer source of type
"layerindex", which is called "OpenEmbedded", and sets
the openembedded-core layer as the one
to be added by default to any projects created in Toaster.
The BitBake version used would be defined as shown earlier
in the previous list:
     "releases": [
         {
             "name": "fido",
             "description": "OpenEmbedded fido",
             "bitbake": "fido",
             "branch": "fido",
             "defaultlayers": [ "openembedded-core" ],
             "layersourcepriority": { "Imported layers": 99, "Local OpenEmbedded" : 10, "OpenEmbedded" :  0 },
             "helptext": "Toaster will run your builds using the OpenEmbedded fido branch."
         }
     ]
4.3. JSON Files
If you are going to be using Toaster in Build Mode, it must be initially configured before use. Configuration customizes layer source settings and Toaster defaults for all users and is performed by the person responsible for Toaster Configuration (i.e the Toaster Administrator). The Toaster Administrator performs this configuration through the Django administration interface.
To make it easier to initially start Toaster, you can import a
pre-defined configuration file using the
loadconf
command.
Note
The configuration file is a JSON-formatted text file with specific fields that Toaster recognizes. It is not a data dump from the database, so it cannot be loaded directly in the database.
By convention, the supplied configuration files are named
toasterconf.json.
The Toaster Administrator can customize the file prior to loading
it into Toaster.
When you set up Toaster locally to run in Build Mode, the system
startup script actively looks for compatible configuration files
and prompts you to select a file to load if it detects that the
database has not been configured.
4.3.1. Configuration File Choices
Three versions of the configuration file exist:
The
meta-yocto/conf/toasterconf.jsonin theconfdirectory of the Yocto Project'smeta-yoctolayer. This version contains the default Yocto Project configuration for Toaster. You are prompted to select this file during the Toaster set up process if you cloned thepokyrepository (i.e.http://git.yoctoproject.org/poky).The
meta/conf/toasterconf.jsonin theconfdirectory of the OpenEmbedded'sopenembedded-corelayer. This version contains the default OpenEmbedded configuration for Toaster. You are prompted to select this file during the Toaster set up process if you had cloned theopenembedded-corerepository (i.e.git://git.openembedded.org/openembedded-core).The
Toasterconf.json.txt.patchlocated on the File:Toasterconf.json.txt.patch wiki page. This version of the file is useful as a sample configuration for when you want to set up Toaster as a hosted service in Build Mode.
4.3.2. File Structure
The toasterconf.json file consists of
easily readable areas: configuration, layer sources, BitBake,
default release, and releases.
4.3.2.1. Configuration Area
This area of the JSON file sets which variables are exposed to users through the Toaster web interface. Users can easily edit these variables.
The variables you set here are displayed in the
"Configuration variables" page in Toaster.
Minimally, you should set the
MACHINE
variable, which appears to users as part of the project
page in Toaster.
Here is the default config area:
     "config": {
         "MACHINE"      : "qemux86",
         "DISTRO"       : "poky",
         "IMAGE_FSTYPES": "ext3 jffs2 tar.bz2",
         "IMAGE_INSTALL_append": "",
         "PACKAGE_CLASSES": "package_rpm",
         "SDKMACHINE"   : "x86_64"
     },
4.3.2.2. Layer Sources Area
This area of the JSON file defines the layer sources Toaster uses. Toaster reads layer information from layer sources. Three types of layer sources exist that Toaster recognizes: Local, LayerIndex, and Imported.
The Local layer source reads layers from Git clones available on your local drive. Using a local layer source enables you to easily test Toaster.
Note
If you are setting up a hosted version of Toaster, it does not make sense to have a local layer source.
The LayerIndex layer source uses a REST API exposed by instances of the Layer Index application (e.g the public http://layers.openembedded.org/) to read layer data.
The Imported layer source is reserved for layer data manually introduced by the user or Toaster Administrator through the GUI. This layer source lets users import their own layers and build them with Toaster. You should not remove the imported layer source.
Here is the default layersources area:
     "layersources": [
         {
             "name": "Local Yocto Project",
             "sourcetype": "local",
             "apiurl": "../../",
             "branches": ["HEAD", "fido", "dizzy"],
             "layers": [
                 {
                     "name": "openembedded-core",
                     "local_path": "meta",
                     "vcs_url": "remote:origin",
                     "dirpath": "meta"
                 },
                 {
                     "name": "meta-yocto",
                     "local_path": "meta-yocto",
                     "vcs_url": "remote:origin",
                     "dirpath": "meta-yocto"
                 },
                 {
                     "name": "meta-yocto-bsp",
                     "local_path": "meta-yocto-bsp",
                     "vcs_url": "remote:origin",
                     "dirpath": "meta-yocto-bsp"
                 }

             ]
         },
         {
             "name": "OpenEmbedded",
             "sourcetype": "layerindex",
             "apiurl": "http://layers.openembedded.org/layerindex/api/",
             "branches": ["fido", "dizzy"]
         },
         {
             "name": "Imported layers",
             "sourcetype": "imported",
             "apiurl": "",
             "branches": ["fido", "dizzy", "HEAD"]

         }
     ],
4.3.2.3. BitBake Area
This area of the JSON file defines the version of BitBake Toaster uses. As shipped, Toaster is configured to recognize three versions of BitBake: fido, dizzy, and HEAD.
Note
HEAD is a special option that builds whatever is available on disk, without checking out any remote Git repositories.
Here is the default bitbake area:
     "bitbake" : [
         {
             "name": "fido",
             "giturl": "remote:origin",
             "branch": "fido",
            "dirpath": "bitbake"
        },
        {
             "name": "dizzy",
             "giturl": "remote:origin",
             "branch": "dizzy",
             "dirpath": "bitbake"
         },
         {
             "name": "HEAD",
             "giturl": "remote:origin",
             "branch": "HEAD",
             "dirpath": "bitbake"
         }
     ],
4.3.2.4. Default Area
This area of the JSON file establishes a default release used by Toaster. As shipped, Toaster uses the "fido" release.
Here is the statement in the JSON file that establishes the default release:
"defaultrelease": "fido",
4.3.2.5. Releases Area
This area of the JSON file defines the versions of the OpenEmbedded build system Toaster recognizes. As shipped, Toaster is configured to work with the four releases described in the "Pre-Configured Releases" section.
Here is the default releases area:
     "releases": [
         {
             "name": "fido",
             "description": "Yocto Project 1.8 Fido",
             "bitbake": "fido",
             "branch": "fido",
             "defaultlayers": [ "openembedded-core", "meta-yocto", "meta-yocto-bsp"],
             "layersourcepriority": { "Imported layers": 99, "Local Yocto Project" : 10, "OpenEmbedded" :  0 },
             "helptext": "Toaster will run your builds with the tip of the <a href=\"http://git.yoctoproject.org/cgit/cgit.cgi/poky/log/?h=fido\">Yocto Project 1.8 \"Fido\"</a> branch."
         },
         {
             "name": "dizzy",
             "description": "Yocto Project 1.7 Dizzy",
             "bitbake": "dizzy",
             "branch": "dizzy",
             "defaultlayers": [ "openembedded-core", "meta-yocto", "meta-yocto-bsp"],
             "layersourcepriority": { "Imported layers": 99, "Local Yocto Project" : 10, "OpenEmbedded" :  0 },
             "helptext": "Toaster will run your builds with the tip of the <a href=\"http://git.yoctoproject.org/cgit/cgit.cgi/poky/log/?h=dizzy\">Yocto Project 1.7 \"Dizzy\"</a> branch."
         },
         {
             "name": "local",
             "description": "Local Yocto Project",
             "bitbake": "HEAD",
             "branch": "HEAD",
             "defaultlayers": [ "openembedded-core", "meta-yocto", "meta-yocto-bsp"],
             "layersourcepriority": { "Imported layers": 99, "Local Yocto Project" : 10, "OpenEmbedded" :  0 },
             "helptext": "Toaster will run your builds with the version of the Yocto Project you have cloned or downloaded to your computer."
         }
     ]
4.4. Useful Commands
In addition to the web user interface and the scripts that start
and stop Toaster, command-line commands exist through the
manage.py management script.
You can find general documentation on
manage.py at the
Django
site.
However, several manage.py commands have been
created that are specific to Toaster and are used to control
configuration and back-end tasks.
You can locate these commands in the
Source Directory
(e.g. poky) at
bitbake/lib/manage.py.
This section documents those commands.
Note
When using manage.py commands given
a default configuration, you must be sure that your
working directory is set to the
Build Directory.
Using manage.py commands from the
Build Directory allows Toaster to find the
toaster.sqlite file, which is located
in the Build Directory.
For non-default database configurations, it is possible
that you can use manage.py commands
from a directory other than the Build directory.
To do so, the
toastermain/settings.py file must be
configured to point to the correct database backend.
4.4.1. buildslist
The buildslist command lists all builds
that Toaster has recorded.
Access the command as follows:
$ bitbake/lib/toaster/manage.py buildslist
The command returns a list, which includes numeric identifications, of the builds that Toaster has recorded in the current database.
You need to run the buildslist command
first to identify existing builds in the database before
using the
builddelete
command.
Here is an example that assumes default repository and build
directory names:
     $ cd ~/poky/build
     $ python ../bitbake/lib/toaster/manage.py buildslist
If your Toaster database had only one build, the above
buildslist command would return something
like the following:
1: qemux86 poky core-image-minimal
4.4.2. builddelete
The builddelete command deletes data
associated with a build.
Access the command as follows:
$ bitbake/lib/toaster/manage.py builddelete build_id
The command deletes all the build data for the specified
build_id.
This command is useful for removing old and unused data from
the database.
Prior to running the builddelete
command, you need to get the ID associated with builds
by using the
buildslist
command.
4.4.3. perf
The perf command measures Toaster
performance.
Access the command as follows:
$ bitbake/lib/toaster/manage.py perf
The command is a sanity check that returns page loading times in order to identify performance problems.
4.4.4. checksettings
The checksettings command verifies
existing Toaster settings.
Access the command as follows:
$ bitbake/lib/toaster/manage.py checksettings
In Build Mode, Toaster uses settings that are based on the
database to configure the building tasks.
The checksettings command verifies that
the database settings are valid in the sense that they have
the minimal information needed to start a build.
In order for the checksettings command
to work, the database must be correctly set up and not have
existing data.
To be sure the database is ready, you can run the following:
$ bitbake/lib/toaster/manage.py syncdb
$ bitbake/lib/toaster/manage.py migrate orm
$ bitbake/lib/toaster/manage.py migrate bldcontrol
After running these commands, you can run the
checksettings command.
4.4.5. loadconf
The loadconf command loads an
existing Toaster configuration file (JSON file).
You must run this on a new database that does not have any
data.
Running this command on an existing database that has data
results in errors.
Access the command as follows:
$ bitbake/lib/toaster/manage.py loadconf filepath
The loadconf command configures a database
based on the supplied existing
toasterconf.json file.
For information on the toasterconf.json,
see the
"JSON Files"
section.
4.4.6. runbuilds
The runbuilds command launches
scheduled builds.
Access the command as follows:
$ bitbake/lib/toaster/manage.py runbuilds
The runbuilds command checks if
scheduled builds exist in the database and then launches them
per schedule.
The command returns after the builds start but before they
complete.
The Toaster Logging Interface records and updates the database
when the builds complete.