Yocto Project Mega-Manual
Copyright © 2010-2016 Linux Foundation
Permission is granted to copy, distribute and/or modify this document under the terms of the Creative Commons Attribution-Share Alike 2.0 UK: England & Wales as published by Creative Commons.
Note
For the latest version of this manual associated with this Yocto Project release, see the Yocto Project Mega-Manual from the Yocto Project website.| Revision History | |
|---|---|
| Revision 1.8 | April 2015 |
| Released with the Yocto Project 1.8 Release. | |
| Revision 2.0 | October 2015 |
| Released with the Yocto Project 2.0 Release. | |
| Revision 2.1 | April 2016 |
| Released with the Yocto Project 2.1 Release. | |
| Revision 2.1.1 | August 2016 |
| Released with the Yocto Project 2.1.1 Release. | |
| Revision 2.1.2 | December 2016 |
| Released with the Yocto Project 2.1.2 Release. | |
Abstract
The Yocto Project Mega-Manual is a concatenation of the published Yocto Project HTML manuals for the given release. The manual exists to help users efficiently search for strings across the entire Yocto Project documentation set.Yocto Project Quick Start
Copyright © 2010-2016 Linux Foundation
Permission is granted to copy, distribute and/or modify this document under the terms of the Creative Commons Attribution-Share Alike 2.0 UK: England & Wales as published by Creative Commons.
Note
For the latest version of this manual associated with this Yocto Project release, see the Yocto Project Quick Start from the Yocto Project website.Abstract
1. Welcome!
Welcome to the Yocto Project! The Yocto Project is an open-source collaboration project whose focus is developers of embedded Linux systems. Among other things, the Yocto Project uses a build host based on the OpenEmbedded (OE) project, which uses the BitBake tool, to construct complete Linux images. The BitBake and OE components are combined together to form a reference build host, historically known as Poky.
If you do not have a system that runs Linux and you want to give the Yocto Project a test run, you might consider using the Yocto Project Build Appliance. The Build Appliance allows you to build and boot a custom embedded Linux image with the Yocto Project using a non-Linux development system. See the Yocto Project Build Appliance for more information.
This quick start is written so that you can quickly get a build host set up to use the Yocto Project and then build some Linux images. Rather than go into great detail about the Yocto Project and its many capabilities, this quick start provides the minimal information you need to try out the Yocto Project using a supported Linux build host. Reading and using the quick start should result in you having a basic understanding of what the Yocto Project is and how to use some of its core components. You will also have worked through steps to produce two images: one that is suitable for emulation and one that boots on actual hardware. The examples highlight the ease with which you can use the Yocto Project to create images for multiple types of hardware.
For more detailed information on the Yocto Project, you can reference these resources:
Website: The Yocto Project Website provides the latest builds, breaking news, full development documentation, and access to a rich Yocto Project Development Community into which you can tap.
FAQs: Lists commonly asked Yocto Project questions and answers. You can find two FAQs: Yocto Project FAQ on a wiki, and the "FAQ" chapter in the Yocto Project Reference Manual.
Developer Screencast: The Getting Started with the Yocto Project - New Developer Screencast Tutorial provides a 30-minute video created for users unfamiliar with the Yocto Project but familiar with Linux build hosts. While this screencast is somewhat dated, the introductory and fundamental concepts are useful for the beginner.
2. Introducing the Yocto Project Development Environment
The Yocto Project through the OpenEmbedded build system provides an open source development environment targeting the ARM, MIPS, PowerPC, and x86 architectures for a variety of platforms including x86-64 and emulated ones. You can use components from the Yocto Project to design, develop, build, debug, simulate, and test the complete software stack using Linux, the X Window System, GTK+ frameworks, and Qt frameworks.
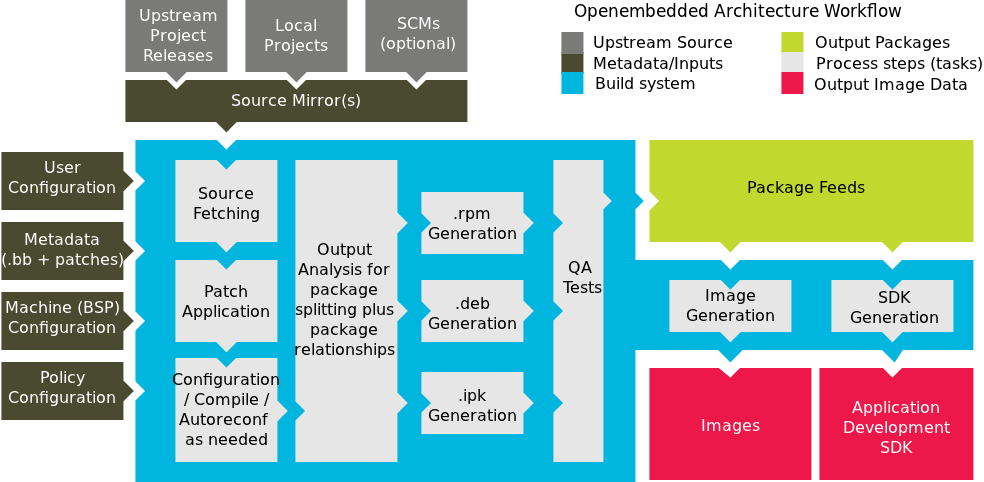 |
The Yocto Project Development Environment
Here are some highlights for the Yocto Project:
Provides a recent Linux kernel along with a set of system commands and libraries suitable for the embedded environment.
Makes available system components such as X11, GTK+, Qt, Clutter, and SDL (among others) so you can create a rich user experience on devices that have display hardware. For devices that do not have a display or where you wish to use alternative UI frameworks, these components need not be installed.
Creates a focused and stable core compatible with the OpenEmbedded project with which you can easily and reliably build and develop.
Fully supports a wide range of hardware and device emulation through the Quick EMUlator (QEMU).
Provides a layer mechanism that allows you to easily extend the system, make customizations, and keep them organized.
You can use the Yocto Project to generate images for many kinds of devices. As mentioned earlier, the Yocto Project supports creation of reference images that you can boot within and emulate using QEMU. The standard example machines target QEMU full-system emulation for 32-bit and 64-bit variants of x86, ARM, MIPS, and PowerPC architectures. Beyond emulation, you can use the layer mechanism to extend support to just about any platform that Linux can run on and that a toolchain can target.
Another Yocto Project feature is the Sato reference User Interface. This optional UI that is based on GTK+ is intended for devices with restricted screen sizes and is included as part of the OpenEmbedded Core layer so that developers can test parts of the software stack.
3. Setting Up to Use the Yocto Project
The following list shows what you need in order to use a Linux-based build host to use the Yocto Project to build images:
Build Host A build host with a minimum of 50 Gbytes of free disk space that is running a supported Linux distribution (i.e. recent releases of Fedora, openSUSE, CentOS, Debian, or Ubuntu).
Build Host Packages Appropriate packages installed on the build host.
The Yocto Project A release of the Yocto Project.
3.1. The Linux Distribution
The Yocto Project team verifies each release against recent versions of the most popular Linux distributions that provide stable releases. In general, if you have the current release minus one of the following distributions, you should have no problems.
Ubuntu
Fedora
openSUSE
CentOS
Debian
For a more detailed list of distributions that support the Yocto Project, see the "Supported Linux Distributions" section in the Yocto Project Reference Manual.
The OpenEmbedded build system should be able to run on any modern distribution that has the following versions for Git, tar, and Python.
Git 1.8.3.1 or greater
tar 1.24 or greater
Python 2.7.3 or greater excluding Python 3.x, which is not supported.
If your build host does not meet any of these three listed version requirements, you can take steps to prepare the system so that you can still use the Yocto Project. See the "Required Git, tar, and Python Versions" section in the Yocto Project Reference Manual for information.
3.2. The Build Host Packages
Required build host packages vary depending on your build machine and what you want to do with the Yocto Project. For example, if you want to build an image that can run on QEMU in graphical mode (a minimal, basic build requirement), then the build host package requirements are different than if you want to build an image on a headless system or build out the Yocto Project documentation set.
Collectively, the number of required packages is large if you want to be able to cover all cases.
Note
In general, you need to have root access and then install the required packages. Thus, the commands in the following section may or may not work depending on whether or not your Linux distribution hassudo installed.
The following list shows the required packages needed to build an image that runs on QEMU in graphical mode (e.g. essential plus graphics support). For lists of required packages for other scenarios, see the "Required Packages for the Host Development System" section in the Yocto Project Reference Manual.
Ubuntu and Debian
     $ sudo apt-get install gawk wget git-core diffstat unzip texinfo gcc-multilib \
     build-essential chrpath socat libsdl1.2-dev xterm
Fedora
     $ sudo dnf install gawk make wget tar bzip2 gzip python unzip perl patch \
     diffutils diffstat git cpp gcc gcc-c++ glibc-devel texinfo chrpath \
     ccache perl-Data-Dumper perl-Text-ParseWords perl-Thread-Queue perl-bignum socat \
     findutils which SDL-devel xterm
OpenSUSE
     $ sudo zypper install python gcc gcc-c++ git chrpath make wget python-xml \
     diffstat makeinfo python-curses patch socat libSDL-devel xterm
CentOS
     $ sudo yum install gawk make wget tar bzip2 gzip python unzip perl patch \
     diffutils diffstat git cpp gcc gcc-c++ glibc-devel texinfo chrpath socat \
     perl-Data-Dumper perl-Text-ParseWords perl-Thread-Queue SDL-devel xterm
Note
CentOS 6.x users need to ensure that the required versions of Git, tar and Python are available. For details, See the "Required Git, tar, and Python Versions" section in the Yocto Project Reference Manual for information.
3.3. Yocto Project Release
The last requirement you need to meet before using the
Yocto Project is getting a Yocto Project release.
It is recommended that you get the latest Yocto Project release
by setting up (cloning in
Git terms) a
local copy of the poky Git repository on
your build host and then checking out the latest release.
Doing so allows you to easily update to newer Yocto Project
releases as well as contribute back to the Yocto Project.
Here is an example from an Ubuntu build host that clones the
poky repository and then checks out the
latest Yocto Project Release (i.e. 2.1.2):
     $ git clone git://git.yoctoproject.org/poky
     Cloning into 'poky'...
     remote: Counting objects: 226790, done.
     remote: Compressing objects: 100% (57465/57465), done.
     remote: Total 226790 (delta 165212), reused 225887 (delta 164327)
     Receiving objects: 100% (226790/226790), 100.98 MiB | 263 KiB/s, done.
     Resolving deltas: 100% (165212/165212), done.
     $ git checkout krogoth
You can also get the Yocto Project Files by downloading Yocto Project releases from the Yocto Project website.
For more information on getting set up with the Yocto Project release, see the "Yocto Project Release" item in the Yocto Project Development Manual.
4. Building Images
Now that you have your system requirements in order, you can give Yocto Project a try. You can try out Yocto Project using either the command-line interface or using Toaster, which uses a graphical user interface. If you want to try out the Yocto Project using a GUI, see the Toaster User Manual for information on how to install and set up Toaster.
You can try out the Yocto Project using the command-line interface by finishing this quick start, which presents steps that let you do the following:
Build a
qemux86reference image and run it in the QEMU emulator.Easily change configurations so that you can quickly create a second image, which would be for MinnowBoard MAX-compatible boards.
Note
The steps in this section do not provide detail, but rather provide minimal, working commands and examples designed to just get you started. For more details, see the appropriate manuals in the Yocto Project manual set.
Use the following commands to build your image. The OpenEmbedded build system creates an entire Linux distribution, including the toolchain, from source.
Note about Network Proxies
By default, the build process searches for source code using a pre-determined order through a set of locations. If you are working behind a firewall and your build host is not set up for proxies, you could encounter problems with the build process when fetching source code (e.g. fetcher failures or Git failures).
If you do not know your proxy settings, consult your local network infrastructure resources and get that information. A good starting point could also be to check your web browser settings. Finally, you can find more information on using the Yocto Project behind a firewall in the Yocto Project Reference Manual FAQ and on the "Working Behind a Network Proxy" wiki page.
Be Sure Your Build Host is Set Up: The steps to build an image in this section depend on your build host being properly set up. Be sure you have worked through the requirements described in the "Setting Up to Use the Yocto Project" section.
Check Out Your Branch: Be sure you are in the Source Directory (e.g.
poky) and then check out the branch associated with the latest Yocto Project Release:$ cd ~/poky $ git checkout -b krogoth origin/krogothGit's
checkoutcommand checks out the current Yocto Project release into a local branch whose name matches the release (i.e.krogoth). The local branch tracks the upstream branch of the same name. Creating your own branch based on the released branch ensures you are using the latest files for that release.Initialize the Build Environment: Run the
oe-init-build-envenvironment setup script to define the OpenEmbedded build environment on your build host.$ source oe-init-build-envAmong other things, the script creates the Build Directory, which is
buildin this case and is located in the Source Directory. After the script runs, your current working directory is set to the Build Directory. Later, when the build completes, the Build Directory contains all the files created during the build.Note
For information on running a memory-resident BitBake, see theoe-init-build-env-memressetup script.Examine Your Local Configuration File: When you set up the build environment, a local configuration file named
local.confbecomes available in aconfsubdirectory of the Build Directory. Before using BitBake to start the build, you can look at this file and be sure your general configurations are how you want them:To help conserve disk space during builds, you can add the following statement to your project's configuration file, which for this example is
poky/build/conf/local.conf. Adding this statement deletes the work directory used for building a recipe once the recipe is built.INHERIT += "rm_work"By default, the target machine for the build is
qemux86, which produces an image that can be used in the QEMU emulator and is targeted at an Intel® 32-bit based architecture. Further on in this example, this default is easily changed through theMACHINEvariable so that you can quickly build an image for a different machine.Another consideration before you build is the package manager used when creating the image. The default
local.conffile selects the RPM package manager. You can control this configuration by using thePACKAGE_CLASSESSelection of the package manager is separate from whether package management is used at runtime in the target image.
For additional package manager selection information, see the "
package.bbclass" section in the Yocto Project Reference Manual.
Start the Build: Continue with the following command to build an OS image for the target, which is
core-image-satoin this example:Note
Depending on the number of processors and cores, the amount of RAM, the speed of your Internet connection and other factors, the build process could take several hours the first time you run it. Subsequent builds run much faster since parts of the build are cached.$ bitbake core-image-satoFor information on using the
bitbakecommand, see the "BitBake" section in the Yocto Project Reference Manual, or see the "BitBake Command" section in the BitBake User Manual. For information on other targets, see the "Images" chapter in the Yocto Project Reference Manual.Simulate Your Image Using QEMU: Once this particular image is built, you can start QEMU and run the image:
$ runqemu qemux86If you want to learn more about running QEMU, see the "Using the Quick EMUlator (QEMU)" chapter in the Yocto Project Development Manual.
Exit QEMU: Exit QEMU by either clicking on the shutdown icon or by opening a terminal, typing
poweroff, and then pressing "Enter".
The following steps show how easy it is to set up to build an
image for a new machine.
These steps build an image for the MinnowBoard MAX, which is
supported by the Yocto Project and the
meta-intel intel-corei7-64
and intel-core2-32 Board Support Packages
(BSPs).
Note
The MinnowBoard MAX ships with 64-bit firmware. If you want to use the board in 32-bit mode, you must download the 32-bit firmware.
Create a Local Copy of the
meta-intelRepository: Building an image for the MinnowBoard MAX requires themeta-intellayer. Use thegit clonecommand to create a local copy of the repository inside your Source Directory, which ispokyin this example:$ cd $HOME/poky $ git clone git://git.yoctoproject.org/meta-intel Cloning into 'meta-intel'... remote: Counting objects: 11988, done. remote: Compressing objects: 100% (3884/3884), done. Receiving objects: 100% (11988/11988), 2.93 MiB | 2.51 MiB/s, done. remote: Total 11988 (delta 6881), reused 11752 (delta 6645) Resolving deltas: 100% (6881/6881), done. Checking connectivity... done.By default when you clone a Git repository, the "master" branch is checked out. Before you build your image that uses the
meta-intellayer, you must be sure that both repositories (meta-intelandpoky) are using the same releases. Consequently, you need to checkout out the "krogoth" release after cloningmeta-intel:$ cd $HOME/poky/meta-intel $ git checkout krogoth Branch krogoth set up to track remote branch krogoth from origin. Switched to a new branch 'krogoth'Configure the Build: To configure the build, you edit the
bblayers.confandlocal.conffiles, both of which are located in thebuild/confdirectory.Here is a quick way to make the edits. The first command uses the
bitbake-layers add-layercommand to add themeta-intellayer, which contains theintel-core*BSPs to the build. The second command selects the BSP by setting theMACHINEvariable.$ cd $HOME/poky/build $ bitbake-layers add-layer "$HOME/poky/meta-intel" $ echo 'MACHINE = "intel-corei7-64"' >> conf/local.confNotes
If you want a 64-bit build, use the following:
$ echo 'MACHINE = "intel-corei7-64"' >> conf/local.confIf you want 32-bit images, use the following:
$ echo 'MACHINE = "intel-core2-32"' >> conf/local.confBuild an Image for MinnowBoard MAX: The type of image you build depends on your goals. For example, the previous build created a
core-image-satoimage, which is an image with Sato support. It is possible to build many image types for the MinnowBoard MAX. Some possibilities arecore-image-base, which is a console-only image. Another choice could be acore-image-full-cmdline, which is another console-only image but has more full-features Linux system functionality installed. For types of images you can build using the Yocto Project, see the "Images" chapter in the Yocto Project Reference Manual.Because configuration changes are minimal to set up for this second build, the OpenEmbedded build system can re-use files from previous builds as much as possible. Re-using files means this second build will be much faster than an initial build. For this example, the
core-image-baseimage is built:$ bitbake core-image-baseOnce the build completes, the resulting console-only image is located in the Build Directory here:
tmp/deploy/images/intel-corei7-64/core-image-base-intel-corei7-64.hddimgWrite the Image: You can write the image to a USB key, SATA drive, or SD card by using the
mkefidisk.shscript, which is included in thepokyrepository atscripts/contrib/mkefidisk.sh:$ sudo $HOME/source/poky/scripts/contrib/mkefidisk.shHOST_DEVICE\ tmp/deploy/images/intel-corei7-64/core-image-base-intel-corei7-64.hddimgTARGET_DEVICEIn the previous command,
HOST_DEVICEis the device node on the build host (e.g./dev/sdcor/dev/mmcblk0).TARGET_DEVICEis the name of the device as the MinnowBoard MAX sees it (e.g./dev/sdaor/dev/mmcblk0).Boot the Hardware: With the boot device provisioned, you can insert the media into the MinnowBoard MAX and boot the hardware. The board should automatically detect the media and boot to the bootloader and subsequently the operating system.
If the board does not boot automatically, you can boot it manually from the EFI shell as follows:
     Shell> connect -r
     Shell> map -r
     Shell> fs0:
     Shell> bootx64
Note
For a 32-bit image use the following:Shell> bootia32
5. Next Steps
If you completed all the steps in the previous section then congratulations! What now?
Depending on what you primary interests are with the Yocto Project, you could consider any of the following:
Visit the Yocto Project Web Site: The official Yocto Project web site contains information on the entire project. Visiting this site is a good way to familiarize yourself with the overall project.
Look Through the Yocto Project Development Manual: The Yocto Project Development Manual is a great place to get a feel for how to use the Yocto Project. The manual contains conceptual and procedural information that covers common development models and introduces the Yocto Project open source development environment. The manual also contains several targeted sections that cover specific common tasks such as understanding and creating layers, customizing images, writing new recipes, working with libraries, and configuring and patching the kernel.
Look Through the Yocto Project Software Development Kit (SDK) Developer's Guide: The Yocto Project Software Development Kit (SDK) Developer's Guide describes how to use both the standard SDK and the extensible SDK, which are used primarily for application development. This manual also provides an example workflow that uses the popular Eclipse™ development environment. See the "Workflow using Eclipse™" section.
Learn About Board Support Packages (BSPs): If you want to learn about BSPs, see the Yocto Project Board Support Packages (BSP) Developer's Guide.
Learn About Toaster: Toaster is a web interface to the Yocto Project's OpenEmbedded build system. If you are interested in using this type of interface to create images, see the Toaster User Manual.
Have Available the Yocto Project Reference Manual The Yocto Project Reference Manual, unlike the rest of the Yocto Project manual set, is comprised of material suited for reference rather than procedures. You can get build details, a closer look at how the pieces of the Yocto Project development environment work together, information on various technical details, guidance on migrating to a newer Yocto Project release, reference material on the directory structure, classes, and tasks. The Yocto Project Reference Manual also contains a fairly comprehensive glossary of variables used within the Yocto Project.
 |
Chapter 1. The Yocto Project Development Manual
1.1. Introduction
Welcome to the Yocto Project Development Manual! This manual provides information on how to use the Yocto Project to develop embedded Linux images and user-space applications that run on targeted devices. The manual provides an overview of image, kernel, and user-space application development using the Yocto Project. Because much of the information in this manual is general, it contains many references to other sources where you can find more detail. For example, you can find detailed information on Git, repositories, and open source in general in many places on the Internet. Another example specific to the Yocto Project is how to quickly set up your host development system and build an image, which you find in the Yocto Project Quick Start.
The Yocto Project Development Manual does, however, provide
guidance and examples on how to change the kernel source code,
reconfigure the kernel, and develop an application using
devtool.
Note
By default, using the Yocto Project creates a Poky distribution. However, you can create your own distribution by providing key Metadata. A good example is Angstrom, which has had a distribution based on the Yocto Project since its inception. Other examples include commercial distributions like Wind River Linux, Mentor Embedded Linux, ENEA Linux and others. See the "Creating Your Own Distribution" section for more information.1.2. What This Manual Provides
The following list describes what you can get from this manual:
Information that lets you get set up to develop using the Yocto Project.
Information to help developers who are new to the open source environment and to the distributed revision control system Git, which the Yocto Project uses.
An understanding of common end-to-end development models and tasks.
Information about common development tasks generally used during image development for embedded devices.
Information on using the Yocto Project integration of the QuickEMUlator (QEMU), which lets you simulate running on hardware an image you have built using the OpenEmbedded build system.
Many references to other sources of related information.
1.3. What this Manual Does Not Provide
This manual will not give you the following:
Step-by-step instructions when those instructions exist in other Yocto Project documentation: For example, the Yocto Project Software Development Kit (SDK) Developer's Guide manual contains detailed instructions on how to install an SDK, which is used to develop applications for target hardware.
Reference material: This type of material resides in an appropriate reference manual. For example, system variables are documented in the Yocto Project Reference Manual.
Detailed public information that is not specific to the Yocto Project: For example, exhaustive information on how to use Git is covered better through the Internet than in this manual.
1.4. Other Information
Because this manual presents overview information for many different topics, supplemental information is recommended for full comprehension. The following list presents other sources of information you might find helpful:
Yocto Project Website: The home page for the Yocto Project provides lots of information on the project as well as links to software and documentation.
Yocto Project Quick Start: This short document lets you get started with the Yocto Project and quickly begin building an image.
Yocto Project Reference Manual: This manual is a reference guide to the OpenEmbedded build system, which is based on BitBake. The build system is sometimes referred to as "Poky".
Yocto Project Software Development Kit (SDK) Developer's Guide: This guide provides information that lets you get going with the standard or extensible SDK. An SDK, with its cross-development toolchains, allows you to develop projects inside or outside of the Yocto Project environment.
Yocto Project Board Support Package (BSP) Developer's Guide: This guide defines the structure for BSP components. Having a commonly understood structure encourages standardization.
Yocto Project Linux Kernel Development Manual: This manual describes how to work with Linux Yocto kernels as well as provides a bit of conceptual information on the construction of the Yocto Linux kernel tree.
Yocto Project Profiling and Tracing Manual: This manual presents a set of common and generally useful tracing and profiling schemes along with their applications (as appropriate) to each tool.
Toaster User Manual: This manual introduces and describes how to set up and use Toaster, which is a web interface to the Yocto Project's OpenEmbedded Build System.
Eclipse IDE Yocto Plug-in: A step-by-step instructional video that demonstrates how an application developer uses Yocto Plug-in features within the Eclipse IDE.
FAQ: A list of commonly asked questions and their answers.
Release Notes: Features, updates and known issues for the current release of the Yocto Project.
Toaster: An Application Programming Interface (API) and web-based interface to the OpenEmbedded build system, which uses BitBake, that reports build information.
Build Appliance: A virtual machine that enables you to build and boot a custom embedded Linux image with the Yocto Project using a non-Linux development system.
Bugzilla: The bug tracking application the Yocto Project uses. If you find problems with the Yocto Project, you should report them using this application.
Yocto Project Mailing Lists: To subscribe to the Yocto Project mailing lists, click on the following URLs and follow the instructions:
http://lists.yoctoproject.org/listinfo/yocto for a Yocto Project Discussions mailing list.
http://lists.yoctoproject.org/listinfo/poky for a Yocto Project Discussions mailing list about the OpenEmbedded build system (Poky).
http://lists.yoctoproject.org/listinfo/yocto-announce for a mailing list to receive official Yocto Project announcements as well as Yocto Project milestones.
http://lists.yoctoproject.org/listinfo for a listing of all public mailing lists on
lists.yoctoproject.org.
Internet Relay Chat (IRC): Two IRC channels on freenode are available for Yocto Project and Poky discussions:
#yoctoand#poky, respectively.OpenEmbedded: The build system used by the Yocto Project. This project is the upstream, generic, embedded distribution from which the Yocto Project derives its build system (Poky) and to which it contributes.
BitBake: The tool used by the OpenEmbedded build system to process project metadata.
BitBake User Manual: A comprehensive guide to the BitBake tool. If you want information on BitBake, see this manual.
Quick EMUlator (QEMU): An open-source machine emulator and virtualizer.
Chapter 2. Getting Started with the Yocto Project
This chapter introduces the Yocto Project and gives you an idea of what you need to get started. You can find enough information to set up your development host and build or use images for hardware supported by the Yocto Project by reading the Yocto Project Quick Start.
The remainder of this chapter summarizes what is in the Yocto Project Quick Start and provides some higher-level concepts you might want to consider.
2.1. Introducing the Yocto Project
The Yocto Project is an open-source collaboration project focused on embedded Linux development. The project currently provides a build system that is referred to as the OpenEmbedded build system in the Yocto Project documentation. The Yocto Project provides various ancillary tools for the embedded developer and also features the Sato reference User Interface, which is optimized for stylus-driven, low-resolution screens.
You can use the OpenEmbedded build system, which uses BitBake, to develop complete Linux images and associated user-space applications for architectures based on ARM, MIPS, PowerPC, x86 and x86-64.
Note
By default, using the Yocto Project creates a Poky distribution. However, you can create your own distribution by providing key Metadata. See the "Creating Your Own Distribution" section for more information.While the Yocto Project does not provide a strict testing framework, it does provide or generate for you artifacts that let you perform target-level and emulated testing and debugging. Additionally, if you are an Eclipse™ IDE user, you can install an Eclipse Yocto Plug-in to allow you to develop within that familiar environment.
2.2. Getting Set Up
Here is what you need to use the Yocto Project:
Host System: You should have a reasonably current Linux-based host system. You will have the best results with a recent release of Fedora, openSUSE, Debian, Ubuntu, or CentOS as these releases are frequently tested against the Yocto Project and officially supported. For a list of the distributions under validation and their status, see the "Supported Linux Distributions" section in the Yocto Project Reference Manual and the wiki page at Distribution Support.
You should also have about 50 Gbytes of free disk space for building images.
Packages: The OpenEmbedded build system requires that certain packages exist on your development system (e.g. Python 2.7). See "The Build Host Packages" section in the Yocto Project Quick Start and the "Required Packages for the Host Development System" section in the Yocto Project Reference Manual for the exact package requirements and the installation commands to install them for the supported distributions.
Yocto Project Release: You need a release of the Yocto Project locally installed on your development system. The documentation refers to this set of locally installed files as the Source Directory. You create your Source Directory by using Git to clone a local copy of the upstream
pokyrepository, or by downloading and unpacking a tarball of an official Yocto Project release. The preferred method is to create a clone of the repository.Working from a copy of the upstream repository allows you to contribute back into the Yocto Project or simply work with the latest software on a development branch. Because Git maintains and creates an upstream repository with a complete history of changes and you are working with a local clone of that repository, you have access to all the Yocto Project development branches and tag names used in the upstream repository.
Note
You can view the Yocto Project Source Repositories at http://git.yoctoproject.org/cgit.cgiThe following transcript shows how to clone the
pokyGit repository into the current working directory. The command creates the local repository in a directory namedpoky. For information on Git used within the Yocto Project, see the "Git" section.$ git clone git://git.yoctoproject.org/poky Cloning into 'poky'... remote: Counting objects: 226790, done. remote: Compressing objects: 100% (57465/57465), done. remote: Total 226790 (delta 165212), reused 225887 (delta 164327) Receiving objects: 100% (226790/226790), 100.98 MiB | 263 KiB/s, done. Resolving deltas: 100% (165212/165212), done.For another example of how to set up your own local Git repositories, see this wiki page, which describes how to create local Git repositories for both
pokyandmeta-intel.You can also get the Yocto Project Files by downloading Yocto Project releases from the Yocto Project website. From the website, you just click "Downloads" in the navigation pane to the left to display all Yocto Project downloads. Current and archived releases are available for download. Nightly and developmental builds are also maintained at http://autobuilder.yoctoproject.org/pub/nightly/. One final site you can visit for information on Yocto Project releases is the Releases wiki.
Yocto Project Kernel: If you are going to be making modifications to a supported Yocto Project kernel, you need to establish local copies of the source. You can find Git repositories of supported Yocto Project kernels organized under "Yocto Linux Kernel" in the Yocto Project Source Repositories at http://git.yoctoproject.org/cgit.cgi.
This setup can involve creating a bare clone of the Yocto Project kernel and then copying that cloned repository. You can create the bare clone and the copy of the bare clone anywhere you like. For simplicity, it is recommended that you create these structures outside of the Source Directory, which is usually named
poky.As an example, the following transcript shows how to create the bare clone of the
linux-yocto-3.19kernel and then create a copy of that clone.Note
When you have a local Yocto Project kernel Git repository, you can reference that repository rather than the upstream Git repository as part of theclonecommand. Doing so can speed up the process.In the following example, the bare clone is named
linux-yocto-3.19.git, while the copy is namedmy-linux-yocto-3.19-work:$ git clone --bare git://git.yoctoproject.org/linux-yocto-3.19 linux-yocto-3.19.git Cloning into bare repository 'linux-yocto-3.19.git'... remote: Counting objects: 3983256, done. remote: Compressing objects: 100% (605006/605006), done. remote: Total 3983256 (delta 3352832), reused 3974503 (delta 3344079) Receiving objects: 100% (3983256/3983256), 843.66 MiB | 1.07 MiB/s, done. Resolving deltas: 100% (3352832/3352832), done. Checking connectivity... done.Now create a clone of the bare clone just created:
     $ git clone linux-yocto-3.19.git my-linux-yocto-3.19-work
     Cloning into 'my-linux-yocto-3.19-work'...
     done.
     Checking out files: 100% (48440/48440), done.
The
meta-yocto-kernel-extrasGit Repository: Themeta-yocto-kernel-extrasGit repository contains Metadata needed only if you are modifying and building the kernel image. In particular, it contains the kernel BitBake append (.bbappend) files that you edit to point to your locally modified kernel source files and to build the kernel image. Pointing to these local files is much more efficient than requiring a download of the kernel's source files from upstream each time you make changes to the kernel.You can find the
meta-yocto-kernel-extrasGit Repository in the "Yocto Metadata Layers" area of the Yocto Project Source Repositories at http://git.yoctoproject.org/cgit.cgi. It is good practice to create this Git repository inside the Source Directory.Following is an example that creates the
meta-yocto-kernel-extrasGit repository inside the Source Directory, which is namedpokyin this case:$ cd ~/poky $ git clone git://git.yoctoproject.org/meta-yocto-kernel-extras meta-yocto-kernel-extras Cloning into 'meta-yocto-kernel-extras'... remote: Counting objects: 727, done. remote: Compressing objects: 100% (452/452), done. remote: Total 727 (delta 260), reused 719 (delta 252) Receiving objects: 100% (727/727), 536.36 KiB | 240 KiB/s, done. Resolving deltas: 100% (260/260), done.Supported Board Support Packages (BSPs): The Yocto Project supports many BSPs, which are maintained in their own layers or in layers designed to contain several BSPs. To get an idea of machine support through BSP layers, you can look at the index of machines for the release.
The Yocto Project uses the following BSP layer naming scheme:
meta-bsp_namewhere
bsp_nameis the recognized BSP name. Here is an example:meta-raspberrypiSee the "BSP Layers" section in the Yocto Project Board Support Package (BSP) Developer's Guide for more information on BSP Layers.
A useful Git repository released with the Yocto Project is
meta-intel, which is a parent layer that contains many supported BSP Layers. You can locate themeta-intelGit repository in the "Yocto Metadata Layers" area of the Yocto Project Source Repositories at http://git.yoctoproject.org/cgit.cgi.Using Git to create a local clone of the upstream repository can be helpful if you are working with BSPs. Typically, you set up the
meta-intelGit repository inside the Source Directory. For example, the following transcript shows the steps to clonemeta-intel.Note
Be sure to work in themeta-intelbranch that matches your Source Directory (i.e.poky) branch. For example, if you have checked out the "master" branch ofpokyand you are going to usemeta-intel, be sure to checkout the "master" branch ofmeta-intel.$ cd ~/poky $ git clone git://git.yoctoproject.org/meta-intel.git Cloning into 'meta-intel'... remote: Counting objects: 11917, done. remote: Compressing objects: 100% (3842/3842), done. remote: Total 11917 (delta 6840), reused 11699 (delta 6622) Receiving objects: 100% (11917/11917), 2.92 MiB | 2.88 MiB/s, done. Resolving deltas: 100% (6840/6840), done. Checking connectivity... done.The same wiki page referenced earlier covers how to set up the
meta-intelGit repository.Eclipse Yocto Plug-in: If you are developing applications using the Eclipse Integrated Development Environment (IDE), you will need this plug-in. See the "Setting up the Eclipse IDE" section in the Yocto Project Software Development Kit (SDK) Developer's Guide for more information.
2.3. Building Images
The build process creates an entire Linux distribution, including the toolchain, from source. For more information on this topic, see the "Building Images" section in the Yocto Project Quick Start.
The build process is as follows:
Make sure you have set up the Source Directory described in the previous section.
Initialize the build environment by sourcing a build environment script (i.e.
oe-init-build-envoroe-init-build-env-memres).Optionally ensure the
conf/local.confconfiguration file, which is found in the Build Directory, is set up how you want it. This file defines many aspects of the build environment including the target machine architecture through theMACHINEvariable, the packaging format used during the build (PACKAGE_CLASSES), and a centralized tarball download directory through theDL_DIRvariable.Build the image using the
bitbakecommand. If you want information on BitBake, see the BitBake User Manual.Run the image either on the actual hardware or using the QEMU emulator.
2.4. Using Pre-Built Binaries and QEMU
Another option you have to get started is to use pre-built binaries. The Yocto Project provides many types of binaries with each release. See the "Images" chapter in the Yocto Project Reference Manual for descriptions of the types of binaries that ship with a Yocto Project release.
Using a pre-built binary is ideal for developing software
applications to run on your target hardware.
To do this, you need to be able to access the appropriate
cross-toolchain tarball for the architecture on which you are
developing.
If you are using an SDK type image, the image ships with the complete
toolchain native to the architecture (i.e. a toolchain designed to
run on the
SDKMACHINE).
If you are not using an SDK type image, you need to separately download
and install the stand-alone Yocto Project cross-toolchain tarball.
Regardless of the type of image you are using, you need to download the pre-built kernel that you will boot in the QEMU emulator and then download and extract the target root filesystem for your target machine’s architecture. You can get architecture-specific binaries and file systems from machines. You can get installation scripts for stand-alone toolchains from toolchains. Once you have all your files, you set up the environment to emulate the hardware by sourcing an environment setup script. Finally, you start the QEMU emulator. You can find details on all these steps in the Yocto Project Software Development Kit (SDK) Developer's Guide. You can learn more about using QEMU with the Yocto Project in the "Using the Quick EMUlator (QEMU)" section.
Using QEMU to emulate your hardware can result in speed issues
depending on the target and host architecture mix.
For example, using the qemux86 image in the emulator
on an Intel-based 32-bit (x86) host machine is fast because the target and
host architectures match.
On the other hand, using the qemuarm image on the same Intel-based
host can be slower.
But, you still achieve faithful emulation of ARM-specific issues.
To speed things up, the QEMU images support using distcc
to call a cross-compiler outside the emulated system.
If you used runqemu to start QEMU, and the
distccd application is present on the host system, any
BitBake cross-compiling toolchain available from the build system is automatically
used from within QEMU simply by calling distcc.
You can accomplish this by defining the cross-compiler variable
(e.g. export CC="distcc").
Alternatively, if you are using a suitable SDK image or the appropriate
stand-alone toolchain is present,
the toolchain is also automatically used.
Note
Several mechanisms exist that let you connect to the system running on the QEMU emulator:QEMU provides a framebuffer interface that makes standard consoles available.
Generally, headless embedded devices have a serial port. If so, you can configure the operating system of the running image to use that port to run a console. The connection uses standard IP networking.
SSH servers exist in some QEMU images. The
core-image-satoQEMU image has a Dropbear secure shell (SSH) server that runs with the root password disabled. Thecore-image-full-cmdlineandcore-image-lsbQEMU images have OpenSSH instead of Dropbear. Including these SSH servers allow you to use standardsshandscpcommands. Thecore-image-minimalQEMU image, however, contains no SSH server.You can use a provided, user-space NFS server to boot the QEMU session using a local copy of the root filesystem on the host. In order to make this connection, you must extract a root filesystem tarball by using the
runqemu-extract-sdkcommand. After running the command, you must then point therunqemuscript to the extracted directory instead of a root filesystem image file.
Chapter 3. The Yocto Project Open Source Development Environment
This chapter helps you understand the Yocto Project as an open source development project. In general, working in an open source environment is very different from working in a closed, proprietary environment. Additionally, the Yocto Project uses specific tools and constructs as part of its development environment. This chapter specifically addresses open source philosophy, using the Yocto Project in a team environment, source repositories, Yocto Project terms, licensing, the open source distributed version control system Git, workflows, bug tracking, and how to submit changes.
3.1. Open Source Philosophy
Open source philosophy is characterized by software development directed by peer production and collaboration through an active community of developers. Contrast this to the more standard centralized development models used by commercial software companies where a finite set of developers produces a product for sale using a defined set of procedures that ultimately result in an end product whose architecture and source material are closed to the public.
Open source projects conceptually have differing concurrent agendas, approaches, and production. These facets of the development process can come from anyone in the public (community) that has a stake in the software project. The open source environment contains new copyright, licensing, domain, and consumer issues that differ from the more traditional development environment. In an open source environment, the end product, source material, and documentation are all available to the public at no cost.
A benchmark example of an open source project is the Linux kernel, which was initially conceived and created by Finnish computer science student Linus Torvalds in 1991. Conversely, a good example of a non-open source project is the Windows® family of operating systems developed by Microsoft® Corporation.
Wikipedia has a good historical description of the Open Source Philosophy here. You can also find helpful information on how to participate in the Linux Community here.
3.2. Using the Yocto Project in a Team Environment
It might not be immediately clear how you can use the Yocto Project in a team environment, or scale it for a large team of developers. One of the strengths of the Yocto Project is that it is extremely flexible. Thus, you can adapt it to many different use cases and scenarios. However, these characteristics can cause a struggle if you are trying to create a working setup that scales across a large team.
To help with these types of situations, this section presents some of the project's most successful experiences, practices, solutions, and available technologies that work well. Keep in mind, the information here is a starting point. You can build off it and customize it to fit any particular working environment and set of practices.
3.2.1. System Configurations
Systems across a large team should meet the needs of two types of developers: those working on the contents of the operating system image itself and those developing applications. Regardless of the type of developer, their workstations must be both reasonably powerful and run Linux.
3.2.1.1. Application Development
For developers who mainly do application level work on top of an existing software stack, the following list shows practices that work best. For information on using a Software Development Kit (SDK), see the Yocto Project Software Development Kit (SDK) Developer's Guide:
Use a pre-built toolchain that contains the software stack itself. Then, develop the application code on top of the stack. This method works well for small numbers of relatively isolated applications.
When possible, use the Yocto Project plug-in for the Eclipse™ IDE and SDK development practices. For more information, see the "Yocto Project Software Development Kit (SDK) Developer's Guide".
Keep your cross-development toolchains updated. You can do this through provisioning either as new toolchain downloads or as updates through a package update mechanism using
opkgto provide updates to an existing toolchain. The exact mechanics of how and when to do this are a question for local policy.Use multiple toolchains installed locally into different locations to allow development across versions.
3.2.1.2. Core System Development
For core system development, it is often best to have the build system itself available on the developer workstations so developers can run their own builds and directly rebuild the software stack. You should keep the core system unchanged as much as possible and do your work in layers on top of the core system. Doing so gives you a greater level of portability when upgrading to new versions of the core system or Board Support Packages (BSPs). You can share layers amongst the developers of a particular project and contain the policy configuration that defines the project.
Aside from the previous best practices, there exists a number of tips and tricks that can help speed up core development projects:
Use a Shared State Cache (sstate) among groups of developers who are on a fast network. The best way to share sstate is through a Network File System (NFS) share. The first user to build a given component for the first time contributes that object to the sstate, while subsequent builds from other developers then reuse the object rather than rebuild it themselves.
Although it is possible to use other protocols for the sstate such as HTTP and FTP, you should avoid these. Using HTTP limits the sstate to read-only and FTP provides poor performance.
Have autobuilders contribute to the sstate pool similarly to how the developer workstations contribute. For information, see the "Autobuilders" section.
Build stand-alone tarballs that contain "missing" system requirements if for some reason developer workstations do not meet minimum system requirements such as latest Python versions,
chrpath, or other tools. You can install and relocate the tarball exactly as you would the usual cross-development toolchain so that all developers can meet minimum version requirements on most distributions.Use a small number of shared, high performance systems for testing purposes (e.g. dual, six-core Xeons with 24 Gbytes of RAM and plenty of disk space). Developers can use these systems for wider, more extensive testing while they continue to develop locally using their primary development system.
Enable the PR Service when package feeds need to be incremental with continually increasing PR values. Typically, this situation occurs when you use or publish package feeds and use a shared state. You should enable the PR Service for all users who use the shared state pool. For more information on the PR Service, see the "Working With a PR Service".
3.2.2. Source Control Management (SCM)
Keeping your Metadata and any software you are developing under the control of an SCM system that is compatible with the OpenEmbedded build system is advisable. Of the SCMs BitBake supports, the Yocto Project team strongly recommends using Git. Git is a distributed system that is easy to backup, allows you to work remotely, and then connects back to the infrastructure.
Note
For information about BitBake, see the BitBake User Manual.
It is relatively easy to set up Git services and create
infrastructure like
http://git.yoctoproject.org,
which is based on server software called
gitolite with cgit
being used to generate the web interface that lets you view the
repositories.
The gitolite software identifies users
using SSH keys and allows branch-based
access controls to repositories that you can control as little
or as much as necessary.
Note
The setup of these services is beyond the scope of this manual. However, sites such as these exist that describe how to perform setup:Git documentation: Describes how to install
gitoliteon the server.The
gitolitemaster index: All topics forgitolite.Interfaces, frontends, and tools: Documentation on how to create interfaces and frontends for Git.
3.2.3. Autobuilders
Autobuilders are often the core of a development project. It is here that changes from individual developers are brought together and centrally tested and subsequent decisions about releases can be made. Autobuilders also allow for "continuous integration" style testing of software components and regression identification and tracking.
See "Yocto Project Autobuilder" for more information and links to buildbot. The Yocto Project team has found this implementation works well in this role. A public example of this is the Yocto Project Autobuilders, which we use to test the overall health of the project.
The features of this system are:
Highlights when commits break the build.
Populates an sstate cache from which developers can pull rather than requiring local builds.
Allows commit hook triggers, which trigger builds when commits are made.
Allows triggering of automated image booting and testing under the QuickEMUlator (QEMU).
Supports incremental build testing and from-scratch builds.
Shares output that allows developer testing and historical regression investigation.
Creates output that can be used for releases.
Allows scheduling of builds so that resources can be used efficiently.
3.2.4. Policies and Change Flow
The Yocto Project itself uses a hierarchical structure and a
pull model.
Scripts exist to create and send pull requests
(i.e. create-pull-request and
send-pull-request).
This model is in line with other open source projects where
maintainers are responsible for specific areas of the project
and a single maintainer handles the final "top-of-tree" merges.
Note
You can also use a more collective push model. Thegitolite software supports both the
push and pull models quite easily.
As with any development environment, it is important to document the policy used as well as any main project guidelines so they are understood by everyone. It is also a good idea to have well structured commit messages, which are usually a part of a project's guidelines. Good commit messages are essential when looking back in time and trying to understand why changes were made.
If you discover that changes are needed to the core layer of the project, it is worth sharing those with the community as soon as possible. Chances are if you have discovered the need for changes, someone else in the community needs them also.
3.2.5. Summary
This section summarizes the key recommendations described in the previous sections:
Use Git as the source control system.
Maintain your Metadata in layers that make sense for your situation. See the "Understanding and Creating Layers" section for more information on layers.
Separate the project's Metadata and code by using separate Git repositories. See the "Yocto Project Source Repositories" section for information on these repositories. See the "Getting Set Up" section for information on how to set up local Git repositories for related upstream Yocto Project Git repositories.
Set up the directory for the shared state cache (
SSTATE_DIR) where it makes sense. For example, set up the sstate cache on a system used by developers in the same organization and share the same source directories on their machines.Set up an Autobuilder and have it populate the sstate cache and source directories.
The Yocto Project community encourages you to send patches to the project to fix bugs or add features. If you do submit patches, follow the project commit guidelines for writing good commit messages. See the "How to Submit a Change" section.
Send changes to the core sooner than later as others are likely to run into the same issues. For some guidance on mailing lists to use, see the list in the "How to Submit a Change" section. For a description of the available mailing lists, see the "Mailing Lists" section in the Yocto Project Reference Manual.
3.3. Yocto Project Source Repositories
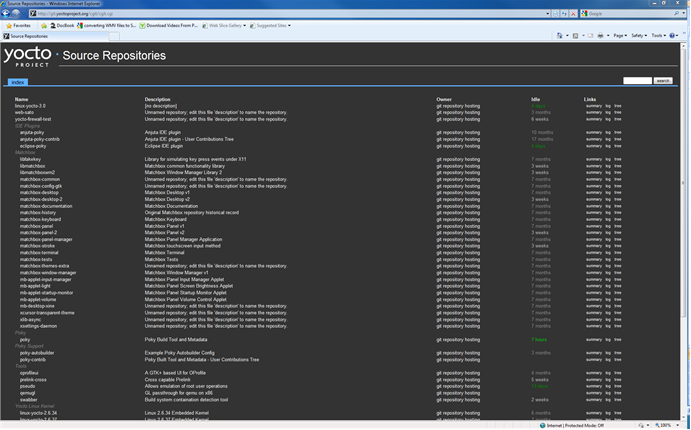
The Yocto Project team maintains complete source repositories for all Yocto Project files at http://git.yoctoproject.org/cgit/cgit.cgi. This web-based source code browser is organized into categories by function such as IDE Plugins, Matchbox, Poky, Yocto Linux Kernel, and so forth. From the interface, you can click on any particular item in the "Name" column and see the URL at the bottom of the page that you need to clone a Git repository for that particular item. Having a local Git repository of the Source Directory, which is usually named "poky", allows you to make changes, contribute to the history, and ultimately enhance the Yocto Project's tools, Board Support Packages, and so forth.
For any supported release of Yocto Project, you can also go to the
Yocto Project Website and
select the "Downloads" tab and get a released tarball of the
poky repository or any supported BSP tarballs.
Unpacking these tarballs gives you a snapshot of the released
files.
Notes
The recommended method for setting up the Yocto Project Source Directory and the files for supported BSPs (e.g.,
meta-intel) is to use Git to create a local copy of the upstream repositories.Be sure to always work in matching branches for both the selected BSP repository and the Source Directory (i.e.
poky) repository. For example, if you have checked out the "master" branch ofpokyand you are going to usemeta-intel, be sure to checkout the "master" branch ofmeta-intel.
In summary, here is where you can get the project files needed for development:
Source Repositories: This area contains IDE Plugins, Matchbox, Poky, Poky Support, Tools, Yocto Linux Kernel, and Yocto Metadata Layers. You can create local copies of Git repositories for each of these areas.
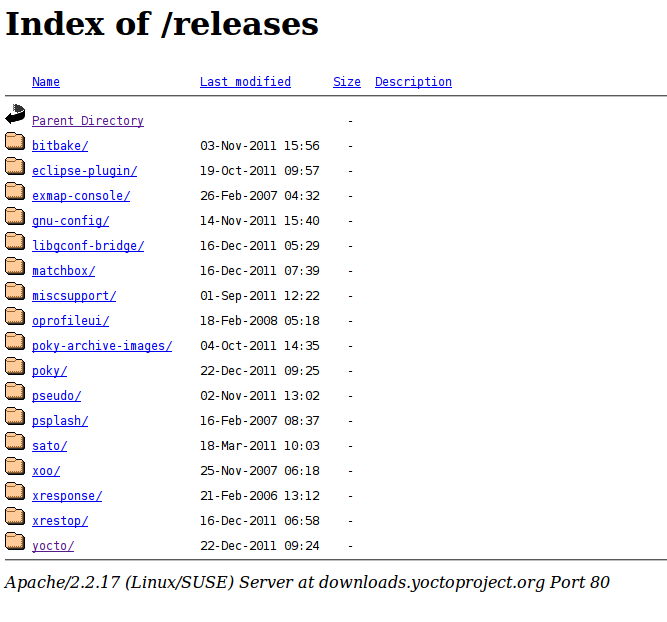
Index of /releases: This is an index of releases such as the Eclipse™ Yocto Plug-in, miscellaneous support, Poky, Pseudo, installers for cross-development toolchains, and all released versions of Yocto Project in the form of images or tarballs. Downloading and extracting these files does not produce a local copy of the Git repository but rather a snapshot of a particular release or image.
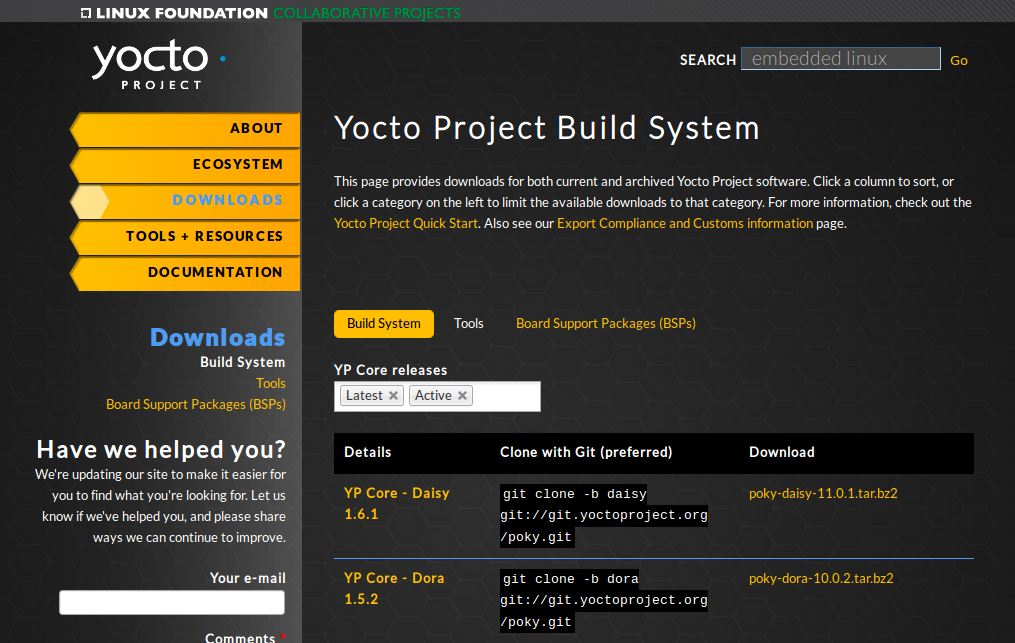
"Downloads" page for the Yocto Project Website: Access this page by going to the website and then selecting the "Downloads" tab. This page allows you to download any Yocto Project release or Board Support Package (BSP) in tarball form. The tarballs are similar to those found in the Index of /releases: area.
3.4. Yocto Project Terms
Following is a list of terms and definitions users new to the Yocto Project development environment might find helpful. While some of these terms are universal, the list includes them just in case:
Append Files: Files that append build information to a recipe file. Append files are known as BitBake append files and
.bbappendfiles. The OpenEmbedded build system expects every append file to have a corresponding recipe (.bb) file. Furthermore, the append file and corresponding recipe file must use the same root filename. The filenames can differ only in the file type suffix used (e.g.formfactor_0.0.bbandformfactor_0.0.bbappend).Information in append files extends or overrides the information in the similarly-named recipe file. For an example of an append file in use, see the "Using .bbappend Files" section.
Note
Append files can also use wildcard patterns in their version numbers so they can be applied to more than one version of the underlying recipe file.BitBake: The task executor and scheduler used by the OpenEmbedded build system to build images. For more information on BitBake, see the BitBake User Manual.
Build Directory: This term refers to the area used by the OpenEmbedded build system for builds. The area is created when you
sourcethe setup environment script that is found in the Source Directory (i.e.oe-init-build-envoroe-init-build-env-memres). TheTOPDIRvariable points to the Build Directory.You have a lot of flexibility when creating the Build Directory. Following are some examples that show how to create the directory. The examples assume your Source Directory is named
poky:Create the Build Directory inside your Source Directory and let the name of the Build Directory default to
build:$ cd $HOME/poky $ source oe-init-build-envCreate the Build Directory inside your home directory and specifically name it
test-builds:$ cd $HOME $ source poky/oe-init-build-env test-buildsProvide a directory path and specifically name the Build Directory. Any intermediate folders in the pathname must exist. This next example creates a Build Directory named
YP-15.0.2in your home directory within the existing directorymybuilds:$cd $HOME $ source $HOME/poky/oe-init-build-env $HOME/mybuilds/YP-15.0.2
Note
By default, the Build Directory containsTMPDIR, which is a temporary directory the build system uses for its work.TMPDIRcannot be under NFS. Thus, by default, the Build Directory cannot be under NFS. However, if you need the Build Directory to be under NFS, you can set this up by settingTMPDIRin yourlocal.conffile to use a local drive. Doing so effectively separatesTMPDIRfromTOPDIR, which is the Build Directory.Classes: Files that provide for logic encapsulation and inheritance so that commonly used patterns can be defined once and then easily used in multiple recipes. For reference information on the Yocto Project classes, see the "Classes" chapter of the Yocto Project Reference Manual. Class files end with the
.bbclassfilename extension.Configuration File: Configuration information in various
.conffiles provides global definitions of variables. Theconf/local.confconfiguration file in the Build Directory contains user-defined variables that affect every build. Themeta-poky/conf/distro/poky.confconfiguration file defines Yocto "distro" configuration variables used only when building with this policy. Machine configuration files, which are located throughout the Source Directory, define variables for specific hardware and are only used when building for that target (e.g. themachine/beaglebone.confconfiguration file defines variables for the Texas Instruments ARM Cortex-A8 development board). Configuration files end with a.conffilename extension.Cross-Development Toolchain: In general, a cross-development toolchain is a collection of software development tools and utilities that run on one architecture and allow you to develop software for a different, or targeted, architecture. These toolchains contain cross-compilers, linkers, and debuggers that are specific to the target architecture.
The Yocto Project supports two different cross-development toolchains:
A toolchain only used by and within BitBake when building an image for a target architecture.
A relocatable toolchain used outside of BitBake by developers when developing applications that will run on a targeted device.
Creation of these toolchains is simple and automated. For information on toolchain concepts as they apply to the Yocto Project, see the "Cross-Development Toolchain Generation" section in the Yocto Project Reference Manual. You can also find more information on using the relocatable toolchain in the Yocto Project Software Development Kit (SDK) Developer's Guide.
Image: An image is an artifact of the BitBake build process given a collection of recipes and related Metadata. Images are the binary output that run on specific hardware or QEMU and are used for specific use-cases. For a list of the supported image types that the Yocto Project provides, see the "Images" chapter in the Yocto Project Reference Manual.
Layer: A collection of recipes representing the core, a BSP, or an application stack. For a discussion specifically on BSP Layers, see the "BSP Layers" section in the Yocto Project Board Support Packages (BSP) Developer's Guide.
Metadata: The files that BitBake parses when building an image. In general, Metadata includes recipes, classes, and configuration files. In the context of the kernel ("kernel Metadata"), it refers to Metadata in the
metabranches of the kernel source Git repositories.OE-Core: A core set of Metadata originating with OpenEmbedded (OE) that is shared between OE and the Yocto Project. This Metadata is found in the
metadirectory of the Source Directory.OpenEmbedded Build System: The build system specific to the Yocto Project. The OpenEmbedded build system is based on another project known as "Poky", which uses BitBake as the task executor. Throughout the Yocto Project documentation set, the OpenEmbedded build system is sometimes referred to simply as "the build system". If other build systems, such as a host or target build system are referenced, the documentation clearly states the difference.
Note
For some historical information about Poky, see the Poky term.Package: In the context of the Yocto Project, this term refers to a recipe's packaged output produced by BitBake (i.e. a "baked recipe"). A package is generally the compiled binaries produced from the recipe's sources. You "bake" something by running it through BitBake.
It is worth noting that the term "package" can, in general, have subtle meanings. For example, the packages referred to in the "The Build Host Packages" section are compiled binaries that, when installed, add functionality to your Linux distribution.
Another point worth noting is that historically within the Yocto Project, recipes were referred to as packages - thus, the existence of several BitBake variables that are seemingly mis-named, (e.g.
PR,PV, andPE).Package Groups: Arbitrary groups of software Recipes. You use package groups to hold recipes that, when built, usually accomplish a single task. For example, a package group could contain the recipes for a company’s proprietary or value-add software. Or, the package group could contain the recipes that enable graphics. A package group is really just another recipe. Because package group files are recipes, they end with the
.bbfilename extension.Poky: The term "poky" can mean several things. In its most general sense, it is an open-source project that was initially developed by OpenedHand. With OpenedHand, poky was developed off of the existing OpenEmbedded build system becoming a commercially supportable build system for embedded Linux. After Intel Corporation acquired OpenedHand, the project poky became the basis for the Yocto Project's build system.
Within the Yocto Project source repositories,
pokyexists as a separate Git repository you can clone to yield a local copy on your host system. Thus, "poky" can refer to the local copy of the Source Directory used for development within the Yocto Project.Finally, "poky" can refer to the default
DISTRO(i.e. distribution) created when you use the Yocto Project in conjunction with thepokyrepository to build an image.Recipe: A set of instructions for building packages. A recipe describes where you get source code, which patches to apply, how to configure the source, how to compile it and so on. Recipes also describe dependencies for libraries or for other recipes. Recipes represent the logical unit of execution, the software to build, the images to build, and use the
.bbfile extension.Source Directory: This term refers to the directory structure created as a result of creating a local copy of the
pokyGit repositorygit://git.yoctoproject.org/pokyor expanding a releasedpokytarball.Note
Creating a local copy of thepokyGit repository is the recommended method for setting up your Source Directory.Sometimes you might hear the term "poky directory" used to refer to this directory structure.
Note
The OpenEmbedded build system does not support file or directory names that contain spaces. Be sure that the Source Directory you use does not contain these types of names.The Source Directory contains BitBake, Documentation, Metadata and other files that all support the Yocto Project. Consequently, you must have the Source Directory in place on your development system in order to do any development using the Yocto Project.
When you create a local copy of the Git repository, you can name the repository anything you like. Throughout much of the documentation, "poky" is used as the name of the top-level folder of the local copy of the poky Git repository. So, for example, cloning the
pokyGit repository results in a local Git repository whose top-level folder is also named "poky".While it is not recommended that you use tarball expansion to set up the Source Directory, if you do, the top-level directory name of the Source Directory is derived from the Yocto Project release tarball. For example, downloading and unpacking
poky-krogoth-15.0.2.tar.bz2results in a Source Directory whose root folder is namedpoky-krogoth-15.0.2.It is important to understand the differences between the Source Directory created by unpacking a released tarball as compared to cloning
git://git.yoctoproject.org/poky. When you unpack a tarball, you have an exact copy of the files based on the time of release - a fixed release point. Any changes you make to your local files in the Source Directory are on top of the release and will remain local only. On the other hand, when you clone thepokyGit repository, you have an active development repository with access to the upstream repository's branches and tags. In this case, any local changes you make to the local Source Directory can be later applied to active development branches of the upstreampokyGit repository.For more information on concepts related to Git repositories, branches, and tags, see the "Repositories, Tags, and Branches" section.
Task: A unit of execution for BitBake (e.g.
do_compile,do_fetch,do_patch, and so forth).Upstream: A reference to source code or repositories that are not local to the development system but located in a master area that is controlled by the maintainer of the source code. For example, in order for a developer to work on a particular piece of code, they need to first get a copy of it from an "upstream" source.
3.5. Licensing
Because open source projects are open to the public, they have different licensing structures in place. License evolution for both Open Source and Free Software has an interesting history. If you are interested in this history, you can find basic information here:
In general, the Yocto Project is broadly licensed under the Massachusetts Institute of Technology (MIT) License. MIT licensing permits the reuse of software within proprietary software as long as the license is distributed with that software. MIT is also compatible with the GNU General Public License (GPL). Patches to the Yocto Project follow the upstream licensing scheme. You can find information on the MIT license here. You can find information on the GNU GPL here.
When you build an image using the Yocto Project, the build process uses a
known list of licenses to ensure compliance.
You can find this list in the
Source Directory at
meta/files/common-licenses.
Once the build completes, the list of all licenses found and used during that build are
kept in the
Build Directory at
tmp/deploy/licenses.
If a module requires a license that is not in the base list, the build process generates a warning during the build. These tools make it easier for a developer to be certain of the licenses with which their shipped products must comply. However, even with these tools it is still up to the developer to resolve potential licensing issues.
The base list of licenses used by the build process is a combination of the Software Package Data Exchange (SPDX) list and the Open Source Initiative (OSI) projects. SPDX Group is a working group of the Linux Foundation that maintains a specification for a standard format for communicating the components, licenses, and copyrights associated with a software package. OSI is a corporation dedicated to the Open Source Definition and the effort for reviewing and approving licenses that conform to the Open Source Definition (OSD).
You can find a list of the combined SPDX and OSI licenses that the
Yocto Project uses in the
meta/files/common-licenses directory in your
Source Directory.
For information that can help you maintain compliance with various open source licensing during the lifecycle of a product created using the Yocto Project, see the "Maintaining Open Source License Compliance During Your Product's Lifecycle" section.
3.6. Git
The Yocto Project makes extensive use of Git, which is a free, open source distributed version control system. Git supports distributed development, non-linear development, and can handle large projects. It is best that you have some fundamental understanding of how Git tracks projects and how to work with Git if you are going to use the Yocto Project for development. This section provides a quick overview of how Git works and provides you with a summary of some essential Git commands.
For more information on Git, see http://git-scm.com/documentation. If you need to download Git, go to http://git-scm.com/download.
3.6.1. Repositories, Tags, and Branches
As mentioned earlier in the section "Yocto Project Source Repositories", the Yocto Project maintains source repositories at http://git.yoctoproject.org/cgit.cgi. If you look at this web-interface of the repositories, each item is a separate Git repository.
Git repositories use branching techniques that track content change (not files) within a project (e.g. a new feature or updated documentation). Creating a tree-like structure based on project divergence allows for excellent historical information over the life of a project. This methodology also allows for an environment from which you can do lots of local experimentation on projects as you develop changes or new features.
A Git repository represents all development efforts for a given project.
For example, the Git repository poky contains all changes
and developments for Poky over the course of its entire life.
That means that all changes that make up all releases are captured.
The repository maintains a complete history of changes.
You can create a local copy of any repository by "cloning" it with the Git
clone command.
When you clone a Git repository, you end up with an identical copy of the
repository on your development system.
Once you have a local copy of a repository, you can take steps to develop locally.
For examples on how to clone Git repositories, see the
"Getting Set Up" section.
It is important to understand that Git tracks content change and
not files.
Git uses "branches" to organize different development efforts.
For example, the poky repository has
several branches that include the current
krogoth branch, the
master branch, and many branches for past
Yocto Project releases.
You can see all the branches by going to
http://git.yoctoproject.org/cgit.cgi/poky/ and
clicking on the
[...]
link beneath the "Branch" heading.
Each of these branches represents a specific area of development.
The master branch represents the current or most recent
development.
All other branches represent offshoots of the master
branch.
When you create a local copy of a Git repository, the copy has the same set
of branches as the original.
This means you can use Git to create a local working area (also called a branch)
that tracks a specific development branch from the source Git repository.
in other words, you can define your local Git environment to work on any development
branch in the repository.
To help illustrate, here is a set of commands that creates a local copy of the
poky Git repository and then creates and checks out a local
Git branch that tracks the Yocto Project 2.1.2 Release (Krogoth) development:
     $ cd ~
     $ git clone git://git.yoctoproject.org/poky
     $ cd poky
     $ git checkout -b krogoth origin/krogoth
In this example, the name of the top-level directory of your local Source Directory is "poky" and the name of that local working area (local branch) you just created and checked out is "krogoth". The files in your local repository now reflect the same files that are in the "krogoth" development branch of the Yocto Project's "poky" upstream repository. It is important to understand that when you create and checkout a local working branch based on a branch name, your local environment matches the "tip" of that development branch at the time you created your local branch, which could be different from the files at the time of a similarly named release. In other words, creating and checking out a local branch based on the "krogoth" branch name is not the same as cloning and checking out the "master" branch. Keep reading to see how you create a local snapshot of a Yocto Project Release.
Git uses "tags" to mark specific changes in a repository.
Typically, a tag is used to mark a special point such as the final
change before a project is released.
You can see the tags used with the poky Git
repository by going to
http://git.yoctoproject.org/cgit.cgi/poky/ and
clicking on the
[...]
link beneath the "Tag" heading.
Some key tags are
dizzy-12.0.0,
fido-13.0.0,
jethro-14.0.0, and
krogoth-15.0.2.
These tags represent Yocto Project releases.
When you create a local copy of the Git repository, you also have access to all the tags. Similar to branches, you can create and checkout a local working Git branch based on a tag name. When you do this, you get a snapshot of the Git repository that reflects the state of the files when the change was made associated with that tag. The most common use is to checkout a working branch that matches a specific Yocto Project release. Here is an example:
     $ cd ~
     $ git clone git://git.yoctoproject.org/poky
     $ cd poky
     $ git checkout -b my-krogoth-15.0.2 krogoth-15.0.2
In this example, the name of the top-level directory of your local Yocto Project
Files Git repository is poky.
And, the name of the local branch you have created and checked out is
my-krogoth-15.0.2.
The files in your repository now exactly match the Yocto Project 2.1.2
Release tag (krogoth-15.0.2).
It is important to understand that when you create and checkout a local
working branch based on a tag, your environment matches a specific point
in time and not the entire development branch.
3.6.2. Basic Commands
Git has an extensive set of commands that lets you manage changes and perform collaboration over the life of a project. Conveniently though, you can manage with a small set of basic operations and workflows once you understand the basic philosophy behind Git. You do not have to be an expert in Git to be functional. A good place to look for instruction on a minimal set of Git commands is here. If you need to download Git, you can do so here, although any reasonably current Linux distribution should already have an installable package for Git.
If you do not know much about Git, you should educate yourself by visiting the links previously mentioned.
The following list briefly describes some basic Git operations as a way to get started. As with any set of commands, this list (in most cases) simply shows the base command and omits the many arguments they support. See the Git documentation for complete descriptions and strategies on how to use these commands:
git init: Initializes an empty Git repository. You cannot use Git commands unless you have a.gitrepository.git clone: Creates a local clone of a Git repository. During collaboration, this command allows you to create a local Git repository that is on equal footing with a fellow developer’s Git repository.git add: Stages updated file contents to the index that Git uses to track changes. You must stage all files that have changed before you can commit them.git commit: Creates a "commit" that documents the changes you made. Commits are used for historical purposes, for determining if a maintainer of a project will allow the change, and for ultimately pushing the change from your local Git repository into the project’s upstream (or master) repository.git status: Reports any modified files that possibly need to be staged and committed.git checkoutbranch-name: Changes your working branch. This command is analogous to "cd".git checkout –bworking-branch: Creates a working branch on your local machine where you can isolate work. It is a good idea to use local branches when adding specific features or changes. This way if you do not like what you have done you can easily get rid of the work.git branch: Reports existing local branches and tells you the branch in which you are currently working.git branch -Dbranch-name: Deletes an existing local branch. You need to be in a local branch other than the one you are deleting in order to deletebranch-name.git pull: Retrieves information from an upstream Git repository and places it in your local Git repository. You use this command to make sure you are synchronized with the repository from which you are basing changes (.e.g. the master branch).git push: Sends all your committed local changes to an upstream Git repository (e.g. a contribution repository). The maintainer of the project draws from these repositories when adding changes to the project’s master repository or other development branch.git merge: Combines or adds changes from one local branch of your repository with another branch. When you create a local Git repository, the default branch is named "master". A typical workflow is to create a temporary branch for isolated work, make and commit your changes, switch to your local master branch, merge the changes from the temporary branch into the local master branch, and then delete the temporary branch.git cherry-pick: Choose and apply specific commits from one branch into another branch. There are times when you might not be able to merge all the changes in one branch with another but need to pick out certain ones.gitk: Provides a GUI view of the branches and changes in your local Git repository. This command is a good way to graphically see where things have diverged in your local repository.git log: Reports a history of your changes to the repository.git diff: Displays line-by-line differences between your local working files and the same files in the upstream Git repository that your branch currently tracks.
3.7. Workflows
This section provides some overview on workflows using Git. In particular, the information covers basic practices that describe roles and actions in a collaborative development environment. Again, if you are familiar with this type of development environment, you might want to just skip this section.
The Yocto Project files are maintained using Git in a "master" branch whose Git history tracks every change and whose structure provides branches for all diverging functionality. Although there is no need to use Git, many open source projects do so. For the Yocto Project, a key individual called the "maintainer" is responsible for the "master" branch of a given Git repository. The "master" branch is the “upstream” repository where the final builds of the project occur. The maintainer is responsible for accepting changes from other developers and for organizing the underlying branch structure to reflect release strategies and so forth.
Note
For information on finding out who is responsible for (maintains) a particular area of code, see the "How to Submit a Change" section.
The project also has an upstream contribution Git repository named
poky-contrib.
You can see all the branches in this repository using the web interface
of the
Source Repositories organized
within the "Poky Support" area.
These branches temporarily hold changes to the project that have been
submitted or committed by the Yocto Project development team and by
community members who contribute to the project.
The maintainer determines if the changes are qualified to be moved
from the "contrib" branches into the "master" branch of the Git
repository.
Developers (including contributing community members) create and maintain cloned repositories of the upstream "master" branch. These repositories are local to their development platforms and are used to develop changes. When a developer is satisfied with a particular feature or change, they "push" the changes to the appropriate "contrib" repository.
Developers are responsible for keeping their local repository up-to-date with "master". They are also responsible for straightening out any conflicts that might arise within files that are being worked on simultaneously by more than one person. All this work is done locally on the developer’s machines before anything is pushed to a "contrib" area and examined at the maintainer’s level.
A somewhat formal method exists by which developers commit changes and push them into the "contrib" area and subsequently request that the maintainer include them into "master" This process is called “submitting a patch” or "submitting a change." For information on submitting patches and changes, see the "How to Submit a Change" section.
To summarize the environment: a single point of entry exists for changes into the project’s "master" branch of the Git repository, which is controlled by the project’s maintainer. And, a set of developers exist who independently develop, test, and submit changes to "contrib" areas for the maintainer to examine. The maintainer then chooses which changes are going to become a permanent part of the project.
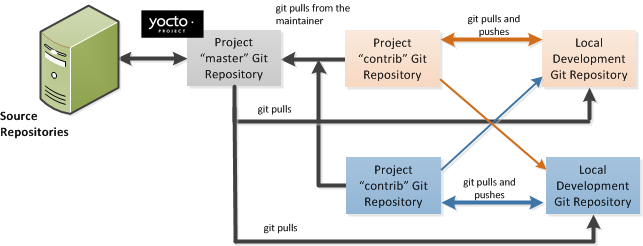 |
While each development environment is unique, there are some best practices or methods that help development run smoothly. The following list describes some of these practices. For more information about Git workflows, see the workflow topics in the Git Community Book.
Make Small Changes: It is best to keep the changes you commit small as compared to bundling many disparate changes into a single commit. This practice not only keeps things manageable but also allows the maintainer to more easily include or refuse changes.
It is also good practice to leave the repository in a state that allows you to still successfully build your project. In other words, do not commit half of a feature, then add the other half as a separate, later commit. Each commit should take you from one buildable project state to another buildable state.
Use Branches Liberally: It is very easy to create, use, and delete local branches in your working Git repository. You can name these branches anything you like. It is helpful to give them names associated with the particular feature or change on which you are working. Once you are done with a feature or change and have merged it into your local master branch, simply discard the temporary branch.
Merge Changes: The
git mergecommand allows you to take the changes from one branch and fold them into another branch. This process is especially helpful when more than a single developer might be working on different parts of the same feature. Merging changes also automatically identifies any collisions or "conflicts" that might happen as a result of the same lines of code being altered by two different developers.Manage Branches: Because branches are easy to use, you should use a system where branches indicate varying levels of code readiness. For example, you can have a "work" branch to develop in, a "test" branch where the code or change is tested, a "stage" branch where changes are ready to be committed, and so forth. As your project develops, you can merge code across the branches to reflect ever-increasing stable states of the development.
Use Push and Pull: The push-pull workflow is based on the concept of developers "pushing" local commits to a remote repository, which is usually a contribution repository. This workflow is also based on developers "pulling" known states of the project down into their local development repositories. The workflow easily allows you to pull changes submitted by other developers from the upstream repository into your work area ensuring that you have the most recent software on which to develop. The Yocto Project has two scripts named
create-pull-requestandsend-pull-requestthat ship with the release to facilitate this workflow. You can find these scripts in thescriptsfolder of the Source Directory. For information on how to use these scripts, see the "Using Scripts to Push a Change Upstream and Request a Pull" section.Patch Workflow: This workflow allows you to notify the maintainer through an email that you have a change (or patch) you would like considered for the "master" branch of the Git repository. To send this type of change, you format the patch and then send the email using the Git commands
git format-patchandgit send-email. For information on how to use these scripts, see the "How to Submit a Change" section.
3.8. Tracking Bugs
The Yocto Project uses its own implementation of Bugzilla to track bugs. Implementations of Bugzilla work well for group development because they track bugs and code changes, can be used to communicate changes and problems with developers, can be used to submit and review patches, and can be used to manage quality assurance. The home page for the Yocto Project implementation of Bugzilla is http://bugzilla.yoctoproject.org.
Sometimes it is helpful to submit, investigate, or track a bug against the Yocto Project itself such as when discovering an issue with some component of the build system that acts contrary to the documentation or your expectations. Following is the general procedure for submitting a new bug using the Yocto Project Bugzilla. You can find more information on defect management, bug tracking, and feature request processes all accomplished through the Yocto Project Bugzilla on the wiki page.
Always use the Yocto Project implementation of Bugzilla to submit a bug.
When submitting a new bug, be sure to choose the appropriate Classification, Product, and Component for which the issue was found. Defects for the Yocto Project fall into one of seven classifications: Yocto Project Components, Infrastructure, Build System & Metadata, Documentation, QA/Testing, Runtime and Hardware. Each of these Classifications break down into multiple Products and, in some cases, multiple Components.
Use the bug form to choose the correct Hardware and Architecture for which the bug applies.
Indicate the Yocto Project version you were using when the issue occurred.
Be sure to indicate the Severity of the bug. Severity communicates how the bug impacted your work.
Select the appropriate "Documentation change" item for the bug. Fixing a bug may or may not affect the Yocto Project documentation.
Provide a brief summary of the issue. Try to limit your summary to just a line or two and be sure to capture the essence of the issue.
Provide a detailed description of the issue. You should provide as much detail as you can about the context, behavior, output, and so forth that surrounds the issue. You can even attach supporting files for output from logs by using the "Add an attachment" button.
Be sure to copy the appropriate people in the "CC List" for the bug. See the "How to Submit a Change" section for information about finding out who is responsible for code.
Submit the bug by clicking the "Submit Bug" button.
3.9. How to Submit a Change
Contributions to the Yocto Project and OpenEmbedded are very welcome. Because the system is extremely configurable and flexible, we recognize that developers will want to extend, configure or optimize it for their specific uses. You should send patches to the appropriate mailing list so that they can be reviewed and merged by the appropriate maintainer.
Before submitting any change, be sure to find out who you should be notifying. Several methods exist through which you find out who you should be copying or notifying:
Maintenance File: Examine the
maintainers.incfile, which is located in the Source Directory atmeta-poky/conf/distro/include, to see who is responsible for code.Board Support Package (BSP) README Files: For BSP maintainers of supported BSPs, you can examine individual BSP
READMEfiles. In addition, some layers (such as themeta-intellayer), include aMAINTAINERSfile which contains a list of all supported BSP maintainers for that layer.Search by File: Using Git, you can enter the following command to bring up a short list of all commits against a specific file:
git shortlog --filenameJust provide the name of the file for which you are interested. The information returned is not ordered by history but does include a list of all committers grouped by name. From the list, you can see who is responsible for the bulk of the changes against the file.
For a list of the Yocto Project and related mailing lists, see the "Mailing lists" section in the Yocto Project Reference Manual.
Here is some guidance on which mailing list to use for what type of change:
For changes to the core Metadata, send your patch to the openembedded-core mailing list. For example, a change to anything under the
metaorscriptsdirectories should be sent to this mailing list.For changes to BitBake (anything under the
bitbakedirectory), send your patch to the bitbake-devel mailing list.For changes to
meta-poky, send your patch to the poky mailing list.For changes to other layers hosted on
yoctoproject.org(unless the layer's documentation specifies otherwise), tools, and Yocto Project documentation, use the yocto mailing list.For additional recipes that do not fit into the core Metadata, you should determine which layer the recipe should go into and submit the change in the manner recommended by the documentation (e.g. README) supplied with the layer. If in doubt, please ask on the yocto or openembedded-devel mailing lists.
When you send a patch, be sure to include a "Signed-off-by:" line in the same style as required by the Linux kernel. Adding this line signifies that you, the submitter, have agreed to the Developer's Certificate of Origin 1.1 as follows:
     Developer's Certificate of Origin 1.1

     By making a contribution to this project, I certify that:

     (a) The contribution was created in whole or in part by me and I
         have the right to submit it under the open source license
         indicated in the file; or

     (b) The contribution is based upon previous work that, to the best
         of my knowledge, is covered under an appropriate open source
         license and I have the right under that license to submit that
         work with modifications, whether created in whole or in part
         by me, under the same open source license (unless I am
         permitted to submit under a different license), as indicated
         in the file; or

     (c) The contribution was provided directly to me by some other
         person who certified (a), (b) or (c) and I have not modified
         it.

     (d) I understand and agree that this project and the contribution
         are public and that a record of the contribution (including all
         personal information I submit with it, including my sign-off) is
         maintained indefinitely and may be redistributed consistent with
         this project or the open source license(s) involved.
In a collaborative environment, it is necessary to have some sort of standard or method through which you submit changes. Otherwise, things could get quite chaotic. One general practice to follow is to make small, controlled changes. Keeping changes small and isolated aids review, makes merging/rebasing easier and keeps the change history clean when anyone needs to refer to it in future.
When you make a commit, you must follow certain standards established by the OpenEmbedded and Yocto Project development teams. For each commit, you must provide a single-line summary of the change and you should almost always provide a more detailed description of what you did (i.e. the body of the commit message). The only exceptions for not providing a detailed description would be if your change is a simple, self-explanatory change that needs no further description beyond the summary. Here are the guidelines for composing a commit message:
bug-idProvide a single-line, short summary of the change. This summary is typically viewable in the "shortlist" of changes. Thus, providing something short and descriptive that gives the reader a summary of the change is useful when viewing a list of many commits. This short description should be prefixed by the recipe name (if changing a recipe), or else the short form path to the file being changed.
For the body of the commit message, provide detailed information that describes what you changed, why you made the change, and the approach you used. It may also be helpful if you mention how you tested the change. Provide as much detail as you can in the body of the commit message.
If the change addresses a specific bug or issue that is associated with a bug-tracking ID, include a reference to that ID in your detailed description. For example, the Yocto Project uses a specific convention for bug references - any commit that addresses a specific bug should use the following form for the detailed description:
Fixes [YOCTO #bug-id]detailed description of change
You can find more guidance on creating well-formed commit messages at this OpenEmbedded wiki page: http://www.openembedded.org/wiki/Commit_Patch_Message_Guidelines.
The next two sections describe general instructions for both pushing changes upstream and for submitting changes as patches.
3.9.1. Using Scripts to Push a Change Upstream and Request a Pull
The basic flow for pushing a change to an upstream "contrib" Git repository is as follows:
Make your changes in your local Git repository.
Stage your changes by using the
git addcommand on each file you changed.Commit the change by using the
git commitcommand. Be sure to provide a commit message that follows the project’s commit message standards as described earlier.Push the change to the upstream "contrib" repository by using the
git pushcommand.Notify the maintainer that you have pushed a change by making a pull request. The Yocto Project provides two scripts that conveniently let you generate and send pull requests to the Yocto Project. These scripts are
create-pull-requestandsend-pull-request. You can find these scripts in thescriptsdirectory within the Source Directory.Using these scripts correctly formats the requests without introducing any whitespace or HTML formatting. The maintainer that receives your patches needs to be able to save and apply them directly from your emails. Using these scripts is the preferred method for sending patches.
For help on using these scripts, simply provide the
-hargument as follows:$ poky/scripts/create-pull-request -h $ poky/scripts/send-pull-request -h
You can find general Git information on how to push a change upstream in the Git Community Book.
3.9.2. Using Email to Submit a Patch
You can submit patches without using the create-pull-request and
send-pull-request scripts described in the previous section.
However, keep in mind, the preferred method is to use the scripts.
Depending on the components changed, you need to submit the email to a specific mailing list. For some guidance on which mailing list to use, see the list in the "How to Submit a Change" section. For a description of the available mailing lists, see the "Mailing Lists" section in the Yocto Project Reference Manual.
Here is the general procedure on how to submit a patch through email without using the scripts:
Make your changes in your local Git repository.
Stage your changes by using the
git addcommand on each file you changed.Commit the change by using the
git commit --signoffcommand. Using the--signoffoption identifies you as the person making the change and also satisfies the Developer's Certificate of Origin (DCO) shown earlier.When you form a commit, you must follow certain standards established by the Yocto Project development team. See the earlier section "How to Submit a Change" for Yocto Project commit message standards.
Format the commit into an email message. To format commits, use the
git format-patchcommand. When you provide the command, you must include a revision list or a number of patches as part of the command. For example, either of these two commands takes your most recent single commit and formats it as an email message in the current directory:$ git format-patch -1or
$ git format-patch HEAD~After the command is run, the current directory contains a numbered
.patchfile for the commit.If you provide several commits as part of the command, the
git format-patchcommand produces a series of numbered files in the current directory – one for each commit. If you have more than one patch, you should also use the--coveroption with the command, which generates a cover letter as the first "patch" in the series. You can then edit the cover letter to provide a description for the series of patches. For information on thegit format-patchcommand, seeGIT_FORMAT_PATCH(1)displayed using theman git-format-patchcommand.Note
If you are or will be a frequent contributor to the Yocto Project or to OpenEmbedded, you might consider requesting a contrib area and the necessary associated rights.Import the files into your mail client by using the
git send-emailcommand.Note
In order to usegit send-email, you must have the the proper Git packages installed. For Ubuntu, Debian, and Fedora the package isgit-email.The
git send-emailcommand sends email by using a local or remote Mail Transport Agent (MTA) such asmsmtp,sendmail, or through a directsmtpconfiguration in your Gitconfigfile. If you are submitting patches through email only, it is very important that you submit them without any whitespace or HTML formatting that either you or your mailer introduces. The maintainer that receives your patches needs to be able to save and apply them directly from your emails. A good way to verify that what you are sending will be applicable by the maintainer is to do a dry run and send them to yourself and then save and apply them as the maintainer would.The
git send-emailcommand is the preferred method for sending your patches since there is no risk of compromising whitespace in the body of the message, which can occur when you use your own mail client. The command also has several options that let you specify recipients and perform further editing of the email message. For information on how to use thegit send-emailcommand, seeGIT-SEND-EMAIL(1)displayed using theman git-send-emailcommand.
Chapter 4. Common Development Models
Many development models exist for which you can use the Yocto Project. This chapter overviews simple methods that use tools provided by the Yocto Project:
System Development: System Development covers Board Support Package (BSP) development and kernel modification or configuration. For an example on how to create a BSP, see the "Creating a New BSP Layer Using the yocto-bsp Script" section in the Yocto Project Board Support Package (BSP) Developer's Guide. For more complete information on how to work with the kernel, see the Yocto Project Linux Kernel Development Manual.
User Application Development: User Application Development covers development of applications that you intend to run on target hardware. For information on how to set up your host development system for user-space application development, see the Yocto Project Software Development Kit (SDK) Developer's Guide. For a simple example of user-space application development using the Eclipse™ IDE, see the "Developing Applications Using Eclipse™" section.
Temporary Source Code Modification: Direct modification of temporary source code is a convenient development model to quickly iterate and develop towards a solution. Once you implement the solution, you should of course take steps to get the changes upstream and applied in the affected recipes.
Image Development using Toaster: You can use Toaster to build custom operating system images within the build environment. Toaster provides an efficient interface to the OpenEmbedded build that allows you to start builds and examine build statistics.
Using a Development Shell: You can use a
devshellto efficiently debug commands or simply edit packages. Working inside a development shell is a quick way to set up the OpenEmbedded build environment to work on parts of a project.
4.1. System Development Workflow
System development involves modification or creation of an image that you want to run on a specific hardware target. Usually, when you want to create an image that runs on embedded hardware, the image does not require the same number of features that a full-fledged Linux distribution provides. Thus, you can create a much smaller image that is designed to use only the features for your particular hardware.
To help you understand how system development works in the Yocto Project, this section covers two types of image development: BSP creation and kernel modification or configuration.
4.1.1. Developing a Board Support Package (BSP)
A BSP is a collection of recipes that, when applied during a build, results in an image that you can run on a particular board. Thus, the package when compiled into the new image, supports the operation of the board.
Note
For a brief list of terms used when describing the development process in the Yocto Project, see the "Yocto Project Terms" section.
The remainder of this section presents the basic
steps used to create a BSP using the Yocto Project's
BSP Tools.
Although not required for BSP creation, the
meta-intel repository, which contains
many BSPs supported by the Yocto Project, is part of the example.
For an example that shows how to create a new layer using the tools, see the "Creating a New BSP Layer Using the yocto-bsp Script" section in the Yocto Project Board Support Package (BSP) Developer's Guide.
The following illustration and list summarize the BSP creation general workflow.
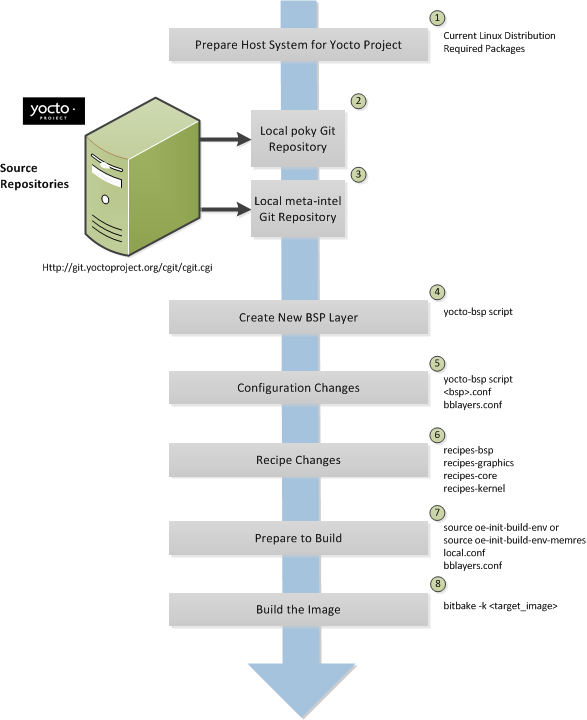 |
Set up your host development system to support development using the Yocto Project: See the "The Linux Distribution" and the "The Build Host Packages" sections both in the Yocto Project Quick Start for requirements.
Establish a local copy of the project files on your system: You need this Source Directory available on your host system. Having these files on your system gives you access to the build process and to the tools you need. For information on how to set up the Source Directory, see the "Getting Set Up" section.
Establish the
meta-intelrepository on your system: Having local copies of these supported BSP layers on your system gives you access to layers you might be able to build on or modify to create your BSP. For information on how to get these files, see the "Getting Set Up" section.Create your own BSP layer using the
yocto-bspscript: Layers are ideal for isolating and storing work for a given piece of hardware. A layer is really just a location or area in which you place the recipes and configurations for your BSP. In fact, a BSP is, in itself, a special type of layer. The simplest way to create a new BSP layer that is compliant with the Yocto Project is to use theyocto-bspscript. For information about that script, see the "Creating a New BSP Layer Using the yocto-bsp Script" section in the Yocto Project Board Support (BSP) Developer's Guide.Another example that illustrates a layer is an application. Suppose you are creating an application that has library or other dependencies in order for it to compile and run. The layer, in this case, would be where all the recipes that define those dependencies are kept. The key point for a layer is that it is an isolated area that contains all the relevant information for the project that the OpenEmbedded build system knows about. For more information on layers, see the "Understanding and Creating Layers" section. For more information on BSP layers, see the "BSP Layers" section in the Yocto Project Board Support Package (BSP) Developer's Guide.
Note
Five BSPs exist that are part of the Yocto Project release:
beaglebone(ARM),mpc8315e(PowerPC), andedgerouter(MIPS). The recipes and configurations for these five BSPs are located and dispersed within the Source Directory.Three core Intel BSPs exist as part of the Yocto Project release in the
meta-intellayer:intel-core2-32, which is a BSP optimized for the Core2 family of CPUs as well as all CPUs prior to the Silvermont core.intel-corei7-64, which is a BSP optimized for Nehalem and later Core and Xeon CPUs as well as Silvermont and later Atom CPUs, such as the Baytrail SoCs.intel-quark, which is a BSP optimized for the Intel Galileo gen1 & gen2 development boards.
When you set up a layer for a new BSP, you should follow a standard layout. This layout is described in the "Example Filesystem Layout" section of the Board Support Package (BSP) Development Guide. In the standard layout, you will notice a suggested structure for recipes and configuration information. You can see the standard layout for a BSP by examining any supported BSP found in the
meta-intellayer inside the Source Directory.Make configuration changes to your new BSP layer: The standard BSP layer structure organizes the files you need to edit in
confand severalrecipes-*directories within the BSP layer. Configuration changes identify where your new layer is on the local system and identify which kernel you are going to use. When you run theyocto-bspscript, you are able to interactively configure many things for the BSP (e.g. keyboard, touchscreen, and so forth).Make recipe changes to your new BSP layer: Recipe changes include altering recipes (
.bbfiles), removing recipes you do not use, and adding new recipes or append files (.bbappend) that you need to support your hardware.Prepare for the build: Once you have made all the changes to your BSP layer, there remains a few things you need to do for the OpenEmbedded build system in order for it to create your image. You need to get the build environment ready by sourcing an environment setup script (i.e.
oe-init-build-envoroe-init-build-env-memres) and you need to be sure two key configuration files are configured appropriately: theconf/local.confand theconf/bblayers.conffile. You must make the OpenEmbedded build system aware of your new layer. See the "Enabling Your Layer" section for information on how to let the build system know about your new layer.The entire process for building an image is overviewed in the section "Building Images" section of the Yocto Project Quick Start. You might want to reference this information.
Build the image: The OpenEmbedded build system uses the BitBake tool to build images based on the type of image you want to create. You can find more information about BitBake in the BitBake User Manual.
The build process supports several types of images to satisfy different needs. See the "Images" chapter in the Yocto Project Reference Manual for information on supported images.
You can view a video presentation on "Building Custom Embedded Images with Yocto" at Free Electrons. After going to the page, just search for "Embedded". You can also find supplemental information in the Yocto Project Board Support Package (BSP) Developer's Guide. Finally, there is helpful material and links on this wiki page. Although a bit dated, you might find the information on the wiki helpful.
4.1.2. Modifying the Kernel
Kernel modification involves changing the Yocto Project kernel, which could involve changing
configuration options as well as adding new kernel recipes.
Configuration changes can be added in the form of configuration fragments, while recipe
modification comes through the kernel's recipes-kernel area
in a kernel layer you create.
The remainder of this section presents a high-level overview of the Yocto Project kernel architecture and the steps to modify the kernel. You can reference the "Patching the Kernel" section for an example that changes the source code of the kernel. For information on how to configure the kernel, see the "Configuring the Kernel" section. For more information on the kernel and on modifying the kernel, see the Yocto Project Linux Kernel Development Manual.
4.1.2.1. Kernel Overview
Traditionally, when one thinks of a patched kernel, they think of a base kernel source tree and a fixed structure that contains kernel patches. The Yocto Project, however, employs mechanisms that, in a sense, result in a kernel source generator. By the end of this section, this analogy will become clearer.
You can find a web interface to the Yocto Project kernel source repositories at http://git.yoctoproject.org. If you look at the interface, you will see to the left a grouping of Git repositories titled "Yocto Linux Kernel." Within this group, you will find several kernels supported by the Yocto Project:
linux-yocto-3.14- The stable Yocto Project kernel to use with the Yocto Project Releases 1.6 and 1.7. This kernel is based on the Linux 3.14 released kernel.linux-yocto-3.17- An additional, unsupported Yocto Project kernel used with the Yocto Project Release 1.7. This kernel is based on the Linux 3.17 released kernel.linux-yocto-3.19- The stable Yocto Project kernel to use with the Yocto Project Release 1.8. This kernel is based on the Linux 3.19 released kernel.linux-yocto-4.1- The stable Yocto Project kernel to use with the Yocto Project Release 2.0. This kernel is based on the Linux 4.1 released kernel.linux-yocto-4.4- The stable Yocto Project kernel to use with the Yocto Project Release 2.1. This kernel is based on the Linux 4.4 released kernel.linux-yocto-dev- A development kernel based on the latest upstream release candidate available.
Note
Long Term Support Initiative (LTSI) for Yocto Project kernels is as follows:For Yocto Project releases 1.7, 1.8, and 2.0, the LTSI kernel is
linux-yocto-3.14.For Yocto Project release 2.1, the LTSI kernel is
linux-yocto-4.1.
The kernels are maintained using the Git revision control system that structures them using the familiar "tree", "branch", and "leaf" scheme. Branches represent diversions from general code to more specific code, while leaves represent the end-points for a complete and unique kernel whose source files, when gathered from the root of the tree to the leaf, accumulate to create the files necessary for a specific piece of hardware and its features. The following figure displays this concept:
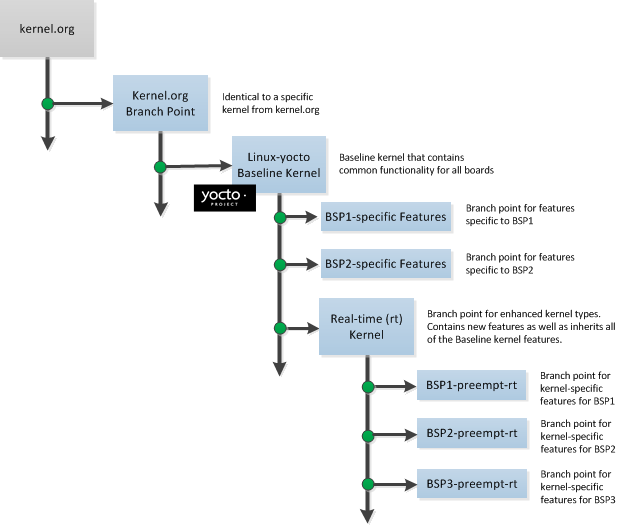 |
Within the figure, the "Kernel.org Branch Point" represents the point in the tree
where a supported base kernel is modified from the Linux kernel.
For example, this could be the branch point for the linux-yocto-3.19
kernel.
Thus, everything further to the right in the structure is based on the
linux-yocto-3.19 kernel.
Branch points to the right in the figure represent where the
linux-yocto-3.19 kernel is modified for specific hardware
or types of kernels, such as real-time kernels.
Each leaf thus represents the end-point for a kernel designed to run on a specific
targeted device.
The overall result is a Git-maintained repository from which all the supported kernel types can be derived for all the supported devices. A big advantage to this scheme is the sharing of common features by keeping them in "larger" branches within the tree. This practice eliminates redundant storage of similar features shared among kernels.
Note
Keep in mind the figure does not take into account all the supported Yocto Project kernel types, but rather shows a single generic kernel just for conceptual purposes. Also keep in mind that this structure represents the Yocto Project source repositories that are either pulled from during the build or established on the host development system prior to the build by either cloning a particular kernel's Git repository or by downloading and unpacking a tarball.
Upstream storage of all the available kernel source code is one thing, while representing and using the code on your host development system is another. Conceptually, you can think of the kernel source repositories as all the source files necessary for all the supported kernels. As a developer, you are just interested in the source files for the kernel on which you are working. And, furthermore, you need them available on your host system.
Kernel source code is available on your host system a couple of different ways. If you are working in the kernel all the time, you probably would want to set up your own local Git repository of the kernel tree. If you just need to make some patches to the kernel, you can access temporary kernel source files that were extracted and used during a build. We will just talk about working with the temporary source code. For more information on how to get kernel source code onto your host system, see the "Yocto Project Kernel" bulleted item earlier in the manual.
What happens during the build?
When you build the kernel on your development system, all files needed for the build
are taken from the source repositories pointed to by the
SRC_URI variable
and gathered in a temporary work area
where they are subsequently used to create the unique kernel.
Thus, in a sense, the process constructs a local source tree specific to your
kernel to generate the new kernel image - a source generator if you will.
The following figure shows the temporary file structure created on your host system when the build occurs. This Build Directory contains all the source files used during the build.
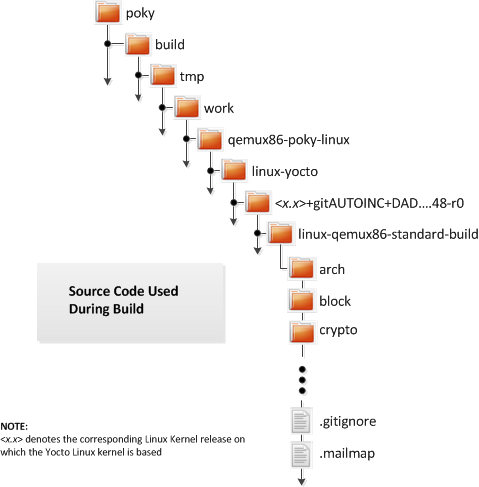 |
Again, for additional information on the Yocto Project kernel's architecture and its branching strategy, see the Yocto Project Linux Kernel Development Manual. You can also reference the "Patching the Kernel" section for a detailed example that modifies the kernel.
4.1.2.2. Kernel Modification Workflow
This illustration and the following list summarizes the kernel modification general workflow.
 |
Set up your host development system to support development using the Yocto Project: See "The Linux Distribution" and "The Build Host Packages" sections both in the Yocto Project Quick Start for requirements.
Establish a local copy of project files on your system: Having the Source Directory on your system gives you access to the build process and tools you need. For information on how to get these files, see the bulleted item "Yocto Project Release" earlier in this manual.
Establish the temporary kernel source files: Temporary kernel source files are kept in the Build Directory created by the OpenEmbedded build system when you run BitBake. If you have never built the kernel in which you are interested, you need to run an initial build to establish local kernel source files.
If you are building an image for the first time, you need to get the build environment ready by sourcing an environment setup script (i.e.
oe-init-build-envoroe-init-build-env-memres). You also need to be sure two key configuration files (local.confandbblayers.conf) are configured appropriately.The entire process for building an image is overviewed in the "Building Images" section of the Yocto Project Quick Start. You might want to reference this information. You can find more information on BitBake in the BitBake User Manual.
The build process supports several types of images to satisfy different needs. See the "Images" chapter in the Yocto Project Reference Manual for information on supported images.
Make changes to the kernel source code if applicable: Modifying the kernel does not always mean directly changing source files. However, if you have to do this, you make the changes to the files in the Build Directory.
Make kernel configuration changes if applicable: If your situation calls for changing the kernel's configuration, you can use
menuconfig, which allows you to interactively develop and test the configuration changes you are making to the kernel. Saving changes you make withmenuconfigupdates the kernel's.configfile.Warning
Try to resist the temptation to directly edit an existing.configfile, which is found in the Build Directory attmp/sysroots/. Doing so, can produce unexpected results when the OpenEmbedded build system regenerates the configuration file.machine-name/kernelOnce you are satisfied with the configuration changes made using
menuconfigand you have saved them, you can directly compare the resulting.configfile against an existing original and gather those changes into a configuration fragment file to be referenced from within the kernel's.bbappendfile.Additionally, if you are working in a BSP layer and need to modify the BSP's kernel's configuration, you can use the
yocto-kernelscript as well asmenuconfig. Theyocto-kernelscript lets you interactively set up kernel configurations.Rebuild the kernel image with your changes: Rebuilding the kernel image applies your changes.
4.2. Application Development Workflow Using an SDK
Standard and extensible Software Development Kits (SDK) make it easy to develop applications inside or outside of the Yocto Project development environment. Tools exist to help the application developer during any phase of development. For information on how to install and use an SDK, see the Yocto Project Software Development Kit (SDK) Developer's Guide.
4.3. Modifying Source Code
A common development workflow consists of modifying project source files that are external to the Yocto Project and then integrating that project's build output into an image built using the OpenEmbedded build system. Given this scenario, development engineers typically want to stick to their familiar project development tools and methods, which allows them to just focus on the project.
Several workflows exist that allow you to develop, build, and test code that is going to be integrated into an image built using the OpenEmbedded build system. This section describes two:
devtool: A set of tools to aid in working on the source code built by the OpenEmbedded build system. Section "Usingdevtoolin Your Workflow" describes this workflow. If you want more information that showcases the workflow, click here for a presentation by Trevor Woerner that, while somewhat dated, provides detailed background information and a complete working tutorial.Quilt: A powerful tool that allows you to capture source code changes without having a clean source tree. While Quilt is not the preferred workflow of the two, this section includes it for users that are committed to using the tool. See the "Using Quilt in Your Workflow" section for more information.
4.3.1. Using devtool in Your Workflow
As mentioned earlier, devtool helps
you easily develop projects whose build output must be part of
an image built using the OpenEmbedded build system.
Three entry points exist that allow you to develop using
devtool:
devtool adddevtool modifydevtool upgrade
The remainder of this section presents these workflows.
4.3.1.1. Use devtool add to Integrate New Code
The devtool add command generates
a new recipe based on existing source code.
This command takes advantage of the
workspace
layer that many devtool commands
use.
The command is flexible enough to allow you to extract source
code into both the workspace or a separate local Git repository
and to use existing code that does not need to be extracted.
Depending on your particular scenario, the arguments and options
you use with devtool add form different
combinations.
The following diagram shows common development flows
you would use with the devtool add
command:
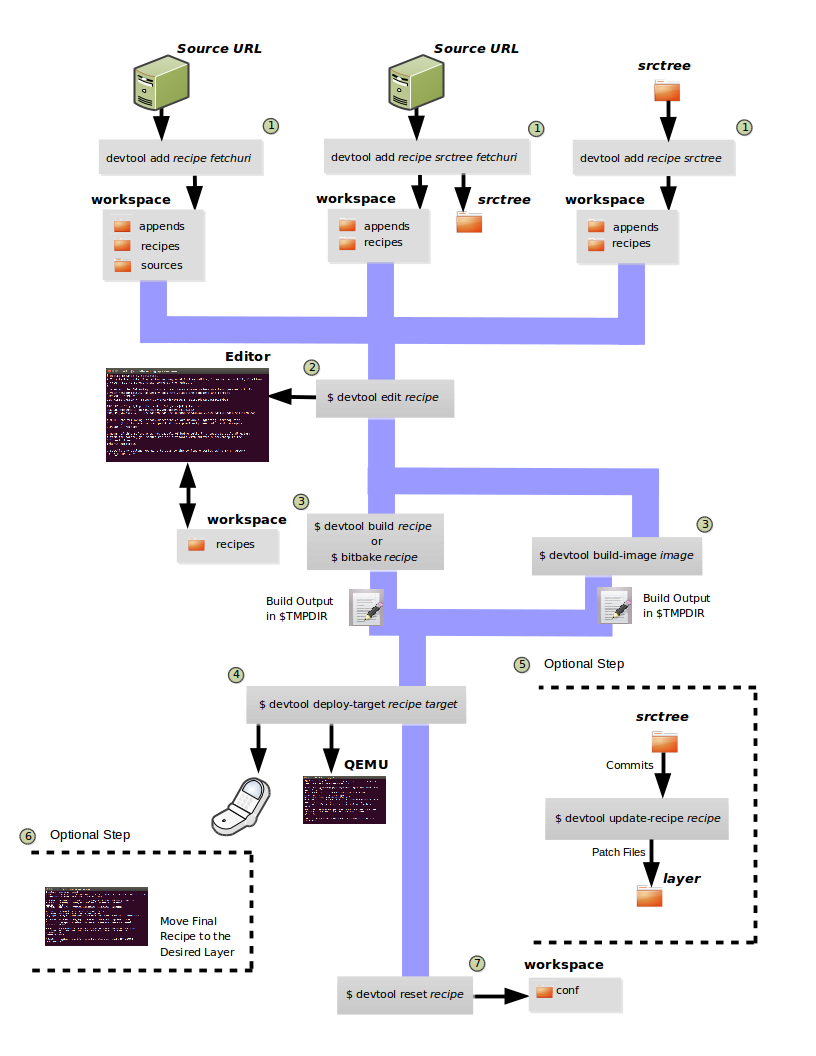
Generating the New Recipe: The top part of the flow shows three scenarios by which you could use
devtool addto generate a recipe based on existing source code.In a shared development environment, it is typical where other developers are responsible for various areas of source code. As a developer, you are probably interested in using that source code as part of your development using the Yocto Project. All you need is access to the code, a recipe, and a controlled area in which to do your work.
Within the diagram, three possible scenarios feed into the
devtool addworkflow:Left: The left scenario represents a common situation where the source code does not exist locally and needs to be extracted. In this situation, you just let it get extracted to the default workspace - you do not want it in some specific location outside of the workspace. Thus, everything you need will be located in the workspace:
$ devtool addrecipe fetchuriWith this command,
devtoolcreates a recipe and an append file in the workspace as well as extracts the upstream source files into a local Git repository also within thesourcesfolder.Middle: The middle scenario also represents a situation where the source code does not exist locally. In this case, the code is again upstream and needs to be extracted to some local area - this time outside of the default workspace. As always, if required
devtoolcreates a Git repository locally during the extraction. Furthermore, the first positional argumentsrctreein this case identifies where thedevtool addcommand will locate the extracted code outside of the workspace:$ devtool addrecipe srctree fetchuriIn summary, the source code is pulled from
fetchuriand extracted into the location defined bysrctreeas a local Git repository.Within workspace,
devtoolcreates both the recipe and an append file for the recipe.Right: The right scenario represents a situation where the source tree (srctree) has been previously prepared outside of the
devtoolworkspace.The following command names the recipe and identifies where the existing source tree is located:
$ devtool addrecipe srctreeThe command examines the source code and creates a recipe for it placing the recipe into the workspace.
Because the extracted source code already exists,
devtooldoes not try to relocate it into the workspace - just the new the recipe is placed in the workspace.Aside from a recipe folder, the command also creates an append folder and places an initial
*.bbappendwithin.
Edit the Recipe: At this point, you can use
devtool edit-recipeto open up the editor as defined by the$EDITORenvironment variable and modify the file:$ devtool edit-reciperecipeFrom within the editor, you can make modifications to the recipe that take affect when you build it later.
Build the Recipe or Rebuild the Image: At this point in the flow, the next step you take depends on what you are going to do with the new code.
If you need to take the build output and eventually move it to the target hardware, you would use
devtool build:Note
You could usebitbaketo build the recipe as well.$ devtool buildrecipeOn the other hand, if you want an image to contain the recipe's packages for immediate deployment onto a device (e.g. for testing purposes), you can use the
devtool build-imagecommand:$ devtool build-imageimageDeploy the Build Output: When you use the
devtool buildcommand to build out your recipe, you probably want to see if the resulting build output works as expected on target hardware.Note
This step assumes you have a previously built image that is already either running in QEMU or running on actual hardware. Also, it is assumed that for deployment of the image to the target, SSH is installed in the image and if the image is running on real hardware that you have network access to and from your development machine.You can deploy your build output to that target hardware by using the
devtool deploy-targetcommand:$ devtool deploy-targetrecipe targetThe
targetis a live target machine running as an SSH server.You can, of course, also deploy the image you build using the
devtool build-imagecommand to actual hardware. However,devtooldoes not provide a specific command that allows you to do this.Optionally Update the Recipe With Patch Files: Once you are satisfied with the recipe, if you have made any changes to the source tree that you want to have applied by the recipe, you need to generate patches from those changes. You do this before moving the recipe to its final layer and cleaning up the workspace area
devtooluses. This optional step is especially relevant if you are using or adding third-party software.To convert commits created using Git to patch files, use the
devtool update-recipecommand.Note
Any changes you want to turn into patches must be committed to the Git repository in the source tree.$ devtool update-reciperecipeMove the Recipe to its Permanent Layer: Before cleaning up the workspace, you need to move the final recipe to its permanent layer. You must do this before using the
devtool resetcommand if you want to retain the recipe.Reset the Recipe: As a final step, you can restore the state such that standard layers and the upstream source is used to build the recipe rather than data in the workspace. To reset the recipe, use the
devtool resetcommand:$ devtool resetrecipe
4.3.1.2. Use devtool modify to Enable Work on Code Associated with an Existing Recipe
The devtool modify command prepares the
way to work on existing code that already has a recipe in
place.
The command is flexible enough to allow you to extract code,
specify the existing recipe, and keep track of and gather any
patch files from other developers that are
associated with the code.
Depending on your particular scenario, the arguments and options
you use with devtool modify form different
combinations.
The following diagram shows common development flows
you would use with the devtool modify
command:
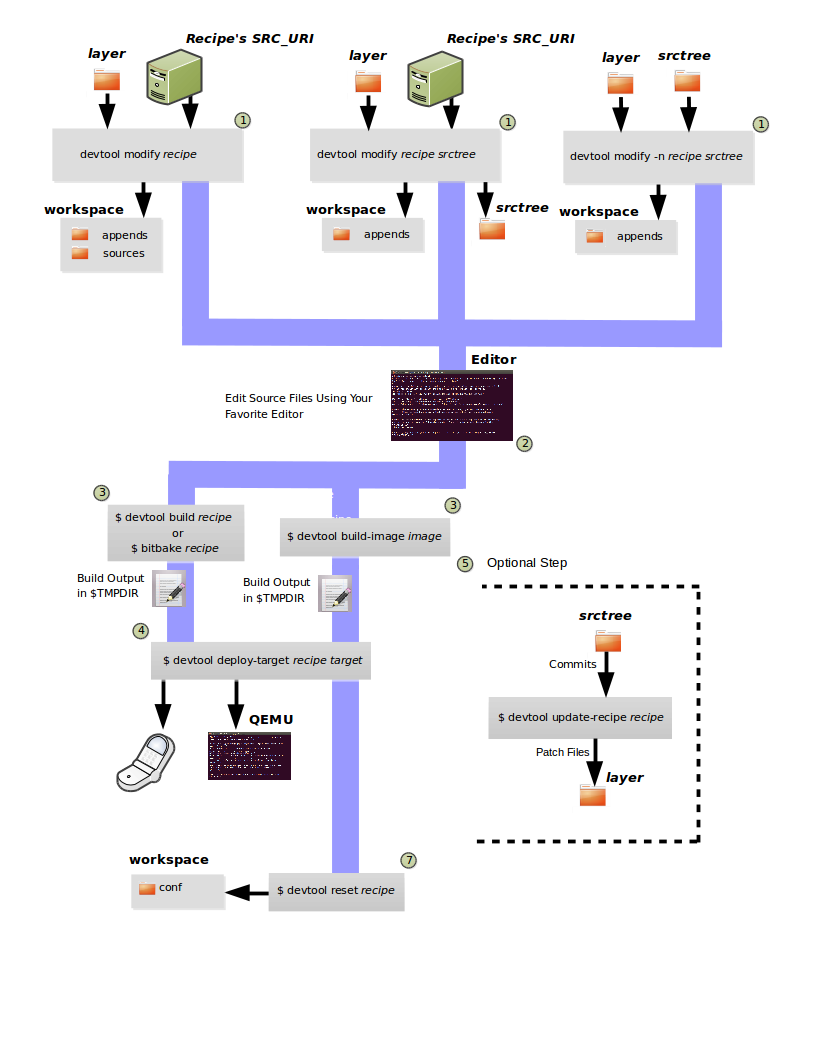
Preparing to Modify the Code: The top part of the flow shows three scenarios by which you could use
devtool modifyto prepare to work on source files. Each scenario assumes the following:The recipe exists in some layer external to the
devtoolworkspace.The source files exist upstream in an un-extracted state or locally in a previously extracted state.
The typical situation is where another developer has created some layer for use with the Yocto Project and their recipe already resides in that layer. Furthermore, their source code is readily available either upstream or locally.
Left: The left scenario represents a common situation where the source code does not exist locally and needs to be extracted. In this situation, the source is extracted into the default workspace location. The recipe, in this scenario, is in its own layer outside the workspace (i.e.
meta-layername).The following command identifies the recipe and by default extracts the source files:
$ devtool modifyrecipeOnce
devtoollocates the recipe, it uses theSRC_URIvariable to locate the source code and any local patch files from other developers are located.Note
You cannot provide an URL forsrctreewhen using thedevtool modifycommand.With this scenario, however, since no
srctreeargument exists, thedevtool modifycommand by default extracts the source files to a Git structure. Furthermore, the location for the extracted source is the default area within the workspace. The result is that the command sets up both the source code and an append file within the workspace with the recipe remaining in its original location.Middle: The middle scenario represents a situation where the source code also does not exist locally. In this case, the code is again upstream and needs to be extracted to some local area as a Git repository. The recipe, in this scenario, is again in its own layer outside the workspace.
The following command tells
devtoolwhat recipe with which to work and, in this case, identifies a local area for the extracted source files that is outside of the default workspace:$ devtool modifyrecipe srctreeAs with all extractions, the command uses the recipe's
SRC_URIto locate the source files. Once the files are located, the command by default extracts them. Providing thesrctreeargument instructsdevtoolwhere place the extracted source.Within workspace,
devtoolcreates an append file for the recipe. The recipe remains in its original location but the source files are extracted to the location you provided withsrctree.Right: The right scenario represents a situation where the source tree (
srctree) exists as a previously extracted Git structure outside of thedevtoolworkspace. In this example, the recipe also exists elsewhere in its own layer.The following command tells
devtoolthe recipe with which to work, uses the "-n" option to indicate source does not need to be extracted, and usessrctreeto point to the previously extracted source files:$ devtool modify -nrecipe srctreeOnce the command finishes, it creates only an append file for the recipe in the workspace. The recipe and the source code remain in their original locations.
Edit the Source: Once you have used the
devtool modifycommand, you are free to make changes to the source files. You can use any editor you like to make and save your source code modifications.Build the Recipe: Once you have updated the source files, you can build the recipe. You can either use
devtool buildorbitbake. Either method produces build output that is stored inTMPDIR.Deploy the Build Output: When you use the
devtool buildcommand orbitbaketo build out your recipe, you probably want to see if the resulting build output works as expected on target hardware.Note
This step assumes you have a previously built image that is already either running in QEMU or running on actual hardware. Also, it is assumed that for deployment of the image to the target, SSH is installed in the image and if the image is running on real hardware that you have network access to and from your development machine.You can deploy your build output to that target hardware by using the
devtool deploy-targetcommand:$ devtool deploy-targetrecipe targetThe
targetis a live target machine running as an SSH server.You can, of course, also deploy the image you build using the
devtool build-imagecommand to actual hardware. However,devtooldoes not provide a specific command that allows you to do this.Optionally Create Patch Files for Your Changes: After you have debugged your changes, you can use
devtool update-recipeto generate patch files for all the commits you have made.Note
Patch files are generated only for changes you have committed.$ devtool update-reciperecipeBy default, the
devtool update-recipecommand creates the patch files in a folder named the same as the recipe beneath the folder in which the recipe resides, and updates the recipe'sSRC_URIstatement to point to the generated patch files.Note
You can use the "--appendLAYERDIR" option to cause the command to create append files in a specific layer rather than the default recipe layer.Restore the Workspace: The
devtool resetrestores the state so that standard layers and upstream sources are used to build the recipe rather than what is in the workspace.$ devtool resetrecipe
4.3.1.3. Use devtool upgrade to Create a Version of the Recipe that Supports a Newer Version of the Software
The devtool upgrade command updates
an existing recipe so that you can build it for an updated
set of source files.
The command is flexible enough to allow you to specify
source code revision and versioning schemes, extract code into
or out of the devtool workspace, and
work with any source file forms that the fetchers support.
Depending on your particular scenario, the arguments and options
you use with devtool upgrade form different
combinations.
The following diagram shows a common development flow
you would use with the devtool modify
command:
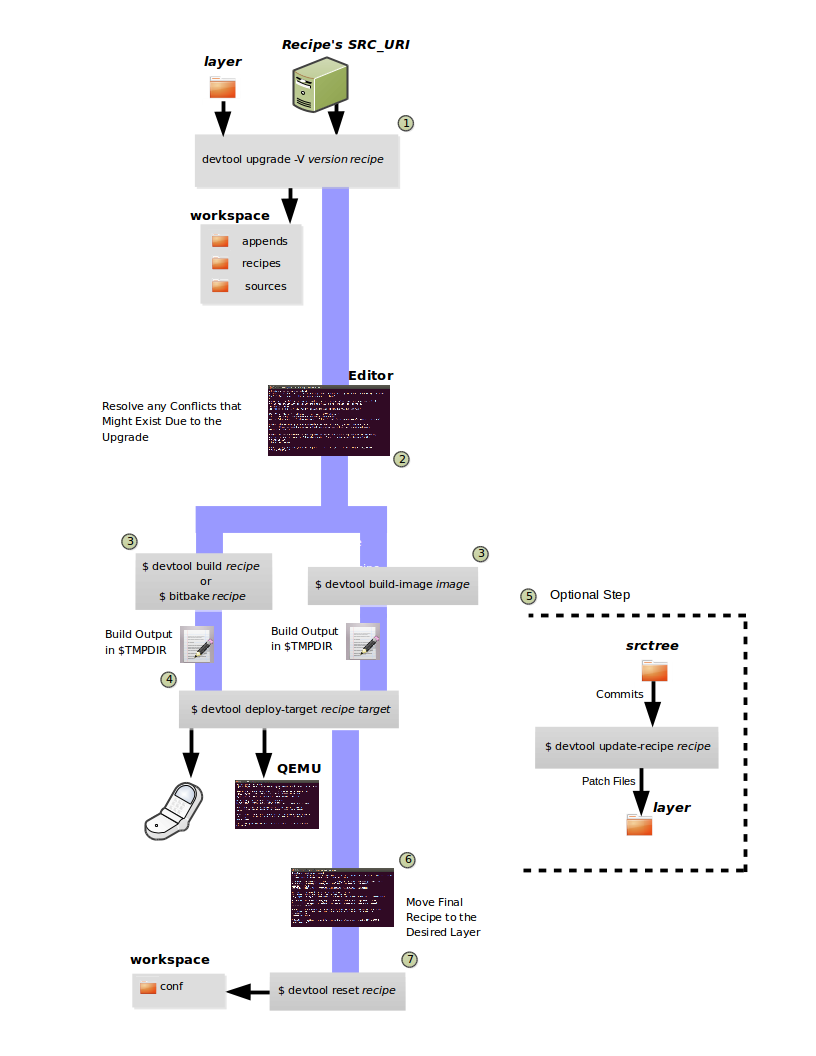
Initiate the Upgrade: The top part of the flow shows a typical scenario by which you could use
devtool upgrade. The following conditions exist:The recipe exists in some layer external to the
devtoolworkspace.The source files for the new release exist adjacent to the same location pointed to by
SRC_URIin the recipe (e.g. a tarball with the new version number in the name, or as a different revision in the upstream Git repository).
A common situation is where third-party software has undergone a revision so that it has been upgraded. The recipe you have access to is likely in your own layer. Thus, you need to upgrade the recipe to use the newer version of the software:
$ devtool upgrade -Vversion recipeBy default, the
devtool upgradecommand extracts source code into thesourcesdirectory in the workspace. If you want the code extracted to any other location, you need to provide thesrctreepositional argument with the command as follows:$ devtool upgrade -Vversion recipe srctreeAlso, in this example, the "-V" option is used to specify the new version. If the source files pointed to by the
SRC_URIstatement in the recipe are in a Git repository, you must provide the "-S" option and specify a revision for the software.Once
devtoollocates the recipe, it uses theSRC_URIvariable to locate the source code and any local patch files from other developers are located. The result is that the command sets up the source code, the new version of the recipe, and an append file all within the workspace.Resolve any Conflicts created by the Upgrade: At this point, there could be some conflicts due to the software being upgraded to a new version. This would occur if your recipe specifies some patch files in
SRC_URIthat conflict with changes made in the new version of the software. If this is the case, you need to resolve the conflicts by editing the source and following the normalgit rebaseconflict resolution process.Before moving onto the next step, be sure to resolve any such conflicts created through use of a newer or different version of the software.
Build the Recipe: Once you have your recipe in order, you can build it. You can either use
devtool buildorbitbake. Either method produces build output that is stored inTMPDIR.Deploy the Build Output: When you use the
devtool buildcommand orbitbaketo build out your recipe, you probably want to see if the resulting build output works as expected on target hardware.Note
This step assumes you have a previously built image that is already either running in QEMU or running on actual hardware. Also, it is assumed that for deployment of the image to the target, SSH is installed in the image and if the image is running on real hardware that you have network access to and from your development machine.You can deploy your build output to that target hardware by using the
devtool deploy-targetcommand:$ devtool deploy-targetrecipe targetThe
targetis a live target machine running as an SSH server.You can, of course, also deploy the image you build using the
devtool build-imagecommand to actual hardware. However,devtooldoes not provide a specific command that allows you to do this.Optionally Create Patch Files for Your Changes: After you have debugged your changes, you can use
devtool update-recipeto generate patch files for all the commits you have made.Note
Patch files are generated only for changes you have committed.$ devtool update-reciperecipeBy default, the
devtool update-recipecommand creates the patch files in a folder named the same as the recipe beneath the folder in which the recipe resides, and updates the recipe'sSRC_URIstatement to point to the generated patch files.Move the Recipe to its Permanent Layer: Before cleaning up the workspace, you need to move the final recipe to its permanent layer. You can either overwrite the original recipe or you can overlay the upgraded recipe into a separate layer. You must do this before using the
devtool resetcommand if you want to retain the upgraded recipe.Restore the Workspace: The
devtool resetrestores the state so that standard layers and upstream sources are used to build the recipe rather than what is in the workspace.$ devtool resetrecipe
4.3.2. devtool Quick Reference
devtool has more functionality than simply
adding a new recipe and the supporting Metadata to a temporary
workspace layer.
This section provides a short reference on
devtool and its commands.
4.3.2.1. Getting Help
The easiest way to get help with the
devtool command is using the
--help option:
     usage: devtool [--basepath BASEPATH] [--bbpath BBPATH] [-d] [-q]
                    [--color COLOR] [-h]
                    <subcommand> ...

     OpenEmbedded development tool

     optional arguments:
       --basepath BASEPATH  Base directory of SDK / build directory
       --bbpath BBPATH      Explicitly specify the BBPATH, rather than getting it
                            from the metadata
       -d, --debug          Enable debug output
       -q, --quiet          Print only errors
       --color COLOR        Colorize output (where COLOR is auto, always, never)
       -h, --help           show this help message and exit

     subcommands:
       Beginning work on a recipe:
         add                  Add a new recipe
         modify               Modify the source for an existing recipe
         upgrade              Upgrade an existing recipe
       Getting information:
         status               Show workspace status
         search               Search available recipes
       Working on a recipe in the workspace:
         build                Build a recipe
         edit-recipe          Edit a recipe file in your workspace
         configure-help       Get help on configure script options
         update-recipe        Apply changes from external source tree to recipe
         reset                Remove a recipe from your workspace
       Testing changes on target:
         deploy-target        Deploy recipe output files to live target machine
         undeploy-target      Undeploy recipe output files in live target machine
         build-image          Build image including workspace recipe packages
       Advanced:
         create-workspace     Set up workspace in an alternative location
         extract              Extract the source for an existing recipe
         sync                 Synchronize the source tree for an existing recipe
     Use devtool <subcommand> --help to get help on a specific command
As directed in the general help output, you can get more
syntax on a specific command by providing the command
name and using --help:
     $ devtool add --help
     usage: devtool add [-h] [--same-dir | --no-same-dir] [--fetch URI]
                        [--version VERSION] [--no-git] [--binary] [--also-native]
                        [--src-subdir SUBDIR]
                        [recipename] [srctree] [fetchuri]

     Adds a new recipe to the workspace to build a specified source tree. Can
     optionally fetch a remote URI and unpack it to create the source tree.

     positional arguments:
       recipename            Name for new recipe to add (just name - no version,
                             path or extension). If not specified, will attempt to
                             auto-detect it.
       srctree               Path to external source tree. If not specified, a
                             subdirectory of
                             /home/scottrif/poky/build/workspace/sources will be
                             used.
       fetchuri              Fetch the specified URI and extract it to create the
                             source tree

     optional arguments:
       -h, --help            show this help message and exit
       --same-dir, -s        Build in same directory as source
       --no-same-dir         Force build in a separate build directory
       --fetch URI, -f URI   Fetch the specified URI and extract it to create the
                             source tree (deprecated - pass as positional argument
                             instead)
       --version VERSION, -V VERSION
                             Version to use within recipe (PV)
       --no-git, -g          If fetching source, do not set up source tree as a git
                             repository
       --binary, -b          Treat the source tree as something that should be
                             installed verbatim (no compilation, same directory
                             structure). Useful with binary packages e.g. RPMs.
       --also-native         Also add native variant (i.e. support building recipe
                             for the build host as well as the target machine)
       --src-subdir SUBDIR   Specify subdirectory within source tree to use
4.3.2.2. The Workspace Layer Structure
devtool uses a "Workspace" layer
in which to accomplish builds.
This layer is not specific to any single
devtool command but is rather a common
working area used across the tool.
The following figure shows the workspace structure:
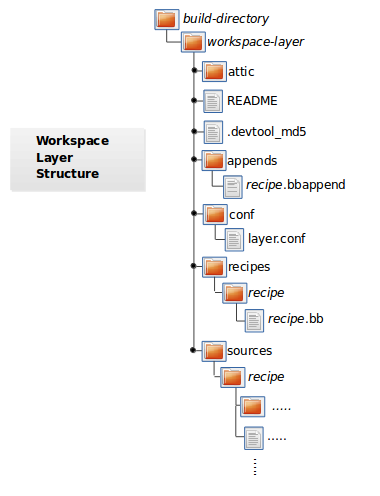 |
     attic - A directory created if devtool believes it preserve
             anything when you run "devtool reset".  For example, if you
             run "devtool add", make changes to the recipe, and then
             run "devtool reset", devtool takes notice that the file has
             been changed and moves it into the attic should you still
             want the recipe.

     README - Provides information on what is in workspace layer and how to
              manage it.

     .devtool_md5 - A checksum file used by devtool.

     appends - A directory that contains *.bbappend files, which point to
               external source.

     conf - A configuration directory that contains the layer.conf file.

     recipes - A directory containing recipes.  This directory contains a
               folder for each directory added whose name matches that of the
               added recipe.  devtool places the recipe.bb file
               within that sub-directory.

     sources - A directory containing a working copy of the source files used
               when building the recipe.  This is the default directory used
               as the location of the source tree when you do not provide a
               source tree path.  This directory contains a folder for each
               set of source files matched to a corresponding recipe.
4.3.2.3. Adding a New Recipe to the Workspace Layer
Use the devtool add command to add a new recipe
to the workspace layer.
The recipe you add should not exist -
devtool creates it for you.
The source files the recipe uses should exist in an external
area.
The following example creates and adds a new recipe named
jackson to a workspace layer the tool creates.
The source code built by the recipes resides in
/home/scottrif/sources/jackson:
$ devtool add jackson /home/scottrif/sources/jackson
If you add a recipe and the workspace layer does not exist, the command creates the layer and populates it as described in "The Workspace Layer Structure" section.
Running devtool add when the
workspace layer exists causes the tool to add the recipe,
append files, and source files into the existing workspace layer.
The .bbappend file is created to point
to the external source tree.
4.3.2.4. Extracting the Source for an Existing Recipe
Use the devtool extract command to
extract the source for an existing recipe.
When you use this command, you must supply the root name
of the recipe (i.e. no version, paths, or extensions), and
you must supply the directory to which you want the source
extracted.
Additional command options let you control the name of a development branch into which you can checkout the source and whether or not to keep a temporary directory, which is useful for debugging.
4.3.2.5. Synchronizing a Recipe's Extracted Source Tree
Use the devtool sync command to
synchronize a previously extracted source tree for an
existing recipe.
When you use this command, you must supply the root name
of the recipe (i.e. no version, paths, or extensions), and
you must supply the directory to which you want the source
extracted.
Additional command options let you control the name of a development branch into which you can checkout the source and whether or not to keep a temporary directory, which is useful for debugging.
4.3.2.6. Modifying an Existing Recipe
Use the devtool modify command to begin
modifying the source of an existing recipe.
This command is very similar to the
add
command except that it does not physically create the
recipe in the workspace layer because the recipe already
exists in an another layer.
The devtool modify command extracts the
source for a recipe, sets it up as a Git repository if the
source had not already been fetched from Git, checks out a
branch for development, and applies any patches from the recipe
as commits on top.
You can use the following command to checkout the source
files:
$ devtool modify recipe
Using the above command form, devtool uses
the existing recipe's
SRC_URI
statement to locate the upstream source, extracts the source
into the default sources location in the workspace.
The default development branch used is "devtool".
4.3.2.7. Edit an Existing Recipe
Use the devtool edit-recipe command
to run the default editor, which is identified using the
EDITOR variable, on the specified recipe.
When you use the devtool edit-recipe
command, you must supply the root name of the recipe
(i.e. no version, paths, or extensions).
Also, the recipe file itself must reside in the workspace
as a result of the devtool add or
devtool upgrade commands.
However, you can override that requirement by using the
"-a" or "--any-recipe" option.
Using either of these options allows you to edit any recipe
regardless of its location.
4.3.2.8. Updating a Recipe
Use the devtool update-recipe command to
update your recipe with patches that reflect changes you make
to the source files.
For example, if you know you are going to work on some
code, you could first use the
devtool modify
command to extract the code and set up the workspace.
After which, you could modify, compile, and test the code.
When you are satisfied with the results and you have committed
your changes to the Git repository, you can then
run the devtool update-recipe to create the
patches and update the recipe:
$ devtool update-recipe recipe
If you run the devtool update-recipe
without committing your changes, the command ignores the
changes.
Often, you might want to apply customizations made to your
software in your own layer rather than apply them to the
original recipe.
If so, you can use the
-a or --append
option with the devtool update-recipe
command.
These options allow you to specify the layer into which to
write an append file:
$ devtool update-recipe recipe -a base-layer-directory
The *.bbappend file is created at the
appropriate path within the specified layer directory, which
may or may not be in your bblayers.conf
file.
If an append file already exists, the command updates it
appropriately.
4.3.2.9. Upgrading a Recipe
Use the devtool upgrade command
to upgrade an existing recipe to a new upstream version.
The command puts the upgraded recipe file into the
workspace along with any associated files, and extracts
the source tree to a specified location should patches
need rebased or added to as a result of the upgrade.
When you use the devtool upgrade command,
you must supply the root name of the recipe (i.e. no version,
paths, or extensions), and you must supply the directory
to which you want the source extracted.
Additional command options let you control things such as
the version number to which you want to upgrade (i.e. the
PV),
the source revision to which you want to upgrade (i.e. the
SRCREV,
whether or not to apply patches, and so forth.
4.3.2.10. Resetting a Recipe
Use the devtool reset command to remove a
recipe and its configuration (e.g. the corresponding
.bbappend file) from the workspace layer.
Realize that this command deletes the recipe and the
append file.
The command does not physically move them for you.
Consequently, you must be sure to physically relocate your
updated recipe and the append file outside of the workspace
layer before running the devtool reset
command.
If the devtool reset command detects that
the recipe or the append files have been modified, the
command preserves the modified files in a separate "attic"
subdirectory under the workspace layer.
Here is an example that resets the workspace directory that
contains the mtr recipe:
     $ devtool reset mtr
     NOTE: Cleaning sysroot for recipe mtr...
     NOTE: Leaving source tree /home/scottrif/poky/build/workspace/sources/mtr as-is; if you no
        longer need it then please delete it manually
     $
4.3.2.11. Building Your Recipe
Use the devtool build command to cause the
OpenEmbedded build system to build your recipe.
The devtool build command is equivalent to
bitbake -c populate_sysroot.
When you use the devtool build command,
you must supply the root name of the recipe (i.e. no version,
paths, or extensions).
You can use either the "-s" or the "--disable-parallel-make"
option to disable parallel makes during the build.
Here is an example:
$ devtool build recipe
4.3.2.12. Building Your Image
Use the devtool build-image command
to build an image, extending it to include packages from
recipes in the workspace.
Using this command is useful when you want an image that
ready for immediate deployment onto a device for testing.
For proper integration into a final image, you need to
edit your custom image recipe appropriately.
When you use the devtool build-image
command, you must supply the name of the image.
This command has no command line options:
$ devtool build-image image
4.3.2.13. Deploying Your Software on the Target Machine
Use the devtool deploy-target command to
deploy the recipe's build output to the live target machine:
$ devtool deploy-target recipe target
The target is the address of the
target machine, which must be running an SSH server (i.e.
user@hostname[:destdir]).
This command deploys all files installed during the
do_install
task.
Furthermore, you do not need to have package management enabled
within the target machine.
If you do, the package manager is bypassed.
Notes
The deploy-target
functionality is for development only.
You should never use it to update an image that will be
used in production.
4.3.2.14. Removing Your Software from the Target Machine
Use the devtool undeploy-target command to
remove deployed build output from the target machine.
For the devtool undeploy-target command to
work, you must have previously used the
devtool deploy-target
command.
$ devtool undeploy-target recipe target
The target is the address of the
target machine, which must be running an SSH server (i.e.
user@hostname).
4.3.2.15. Creating the Workspace Layer in an Alternative Location
Use the devtool create-workspace command to
create a new workspace layer in your
Build Directory.
When you create a new workspace layer, it is populated with the
README file and the
conf directory only.
The following example creates a new workspace layer in your current working and by default names the workspace layer "workspace":
$ devtool create-workspace
You can create a workspace layer anywhere by supplying a pathname with the command. The following command creates a new workspace layer named "new-workspace":
$ devtool create-workspace /home/scottrif/new-workspace
4.3.2.16. Get the Status of the Recipes in Your Workspace
Use the devtool status command to
list the recipes currently in your workspace.
Information includes the paths to their respective
external source trees.
The devtool status command has no
command-line options:
devtool status
Following is sample output after using
devtool add
to create and add the mtr_0.86.bb recipe
to the workspace directory:
     $ devtool status
     mtr: /home/scottrif/poky/build/workspace/sources/mtr (/home/scottrif/poky/build/workspace/recipes/mtr/mtr_0.86.bb)
     $
4.3.2.17. Search for Available Target Recipes
Use the devtool search command to
search for available target recipes.
The command matches the recipe name, package name,
description, and installed files.
The command displays the recipe name as a result of a
match.
When you use the devtool search command,
you must supply a keyword.
The command uses the keyword when
searching for a match.
4.3.3. Using Quilt in Your Workflow
Quilt is a powerful tool that allows you to capture source code changes without having a clean source tree. This section outlines the typical workflow you can use to modify source code, test changes, and then preserve the changes in the form of a patch all using Quilt.
Tip
With regard to preserving changes to source files if you clean a recipe or haverm_work enabled,
the workflow described in the
"Using devtool in Your Workflow"
section is a safer development flow than than the flow that
uses Quilt.
Follow these general steps:
Find the Source Code: Temporary source code used by the OpenEmbedded build system is kept in the Build Directory. See the "Finding Temporary Source Code" section to learn how to locate the directory that has the temporary source code for a particular package.
Change Your Working Directory: You need to be in the directory that has the temporary source code. That directory is defined by the
Svariable.Create a New Patch: Before modifying source code, you need to create a new patch. To create a new patch file, use
quilt newas below:$ quilt new my_changes.patchNotify Quilt and Add Files: After creating the patch, you need to notify Quilt about the files you plan to edit. You notify Quilt by adding the files to the patch you just created:
$ quilt add file1.c file2.c file3.cEdit the Files: Make your changes in the source code to the files you added to the patch.
Test Your Changes: Once you have modified the source code, the easiest way to your changes is by calling the
do_compiletask as shown in the following example:$ bitbake -c compile -fpackageThe
-for--forceoption forces the specified task to execute. If you find problems with your code, you can just keep editing and re-testing iteratively until things work as expected.Note
All the modifications you make to the temporary source code disappear once you run thedo_cleanordo_cleanalltasks using BitBake (i.e.bitbake -c cleanandpackagebitbake -c cleanall). Modifications will also disappear if you use thepackagerm_workfeature as described in the "Building Images" section of the Yocto Project Quick Start.Generate the Patch: Once your changes work as expected, you need to use Quilt to generate the final patch that contains all your modifications.
$ quilt refreshAt this point, the
my_changes.patchfile has all your edits made to thefile1.c,file2.c, andfile3.cfiles.You can find the resulting patch file in the
patches/subdirectory of the source (S) directory.Copy the Patch File: For simplicity, copy the patch file into a directory named
files, which you can create in the same directory that holds the recipe (.bb) file or the append (.bbappend) file. Placing the patch here guarantees that the OpenEmbedded build system will find the patch. Next, add the patch into theSRC_URIof the recipe. Here is an example:SRC_URI += "file://my_changes.patch"
4.3.4. Finding Temporary Source Code
You might find it helpful during development to modify the temporary source code used by recipes to build packages. For example, suppose you are developing a patch and you need to experiment a bit to figure out your solution. After you have initially built the package, you can iteratively tweak the source code, which is located in the Build Directory, and then you can force a re-compile and quickly test your altered code. Once you settle on a solution, you can then preserve your changes in the form of patches. If you are using Quilt for development, see the "Using Quilt in Your Workflow" section for more information.
During a build, the unpacked temporary source code used by recipes
to build packages is available in the Build Directory as
defined by the
S variable.
Below is the default value for the S variable as defined in the
meta/conf/bitbake.conf configuration file in the
Source Directory:
S = "${WORKDIR}/${BP}"
You should be aware that many recipes override the S variable.
For example, recipes that fetch their source from Git usually set
S to ${WORKDIR}/git.
Note
TheBP
represents the base recipe name, which consists of the name and version:
BP = "${BPN}-${PV}"
The path to the work directory for the recipe
(WORKDIR)
is defined as follows:
${TMPDIR}/work/${MULTIMACH_TARGET_SYS}/${PN}/${EXTENDPE}${PV}-${PR}
The actual directory depends on several things:
As an example, assume a Source Directory top-level folder
named poky, a default Build Directory at
poky/build, and a
qemux86-poky-linux machine target
system.
Furthermore, suppose your recipe is named
foo_1.3.0.bb.
In this case, the work directory the build system uses to
build the package would be as follows:
poky/build/tmp/work/qemux86-poky-linux/foo/1.3.0-r0
Now that you know where to locate the directory that has the temporary source code, you can use a Quilt as described in section "Using Quilt in Your Workflow" to make your edits, test the changes, and preserve the changes in the form of patches.
4.4. Image Development Using Toaster
Toaster is a web interface to the Yocto Project's OpenEmbedded build system. You can initiate builds using Toaster as well as examine the results and statistics of builds. See the Toaster User Manual for information on how to set up and use Toaster to build images.
4.5. Using a Development Shell
When debugging certain commands or even when just editing packages,
devshell can be a useful tool.
When you invoke devshell, all tasks up to and
including
do_patch
are run for the specified target.
Then, a new terminal is opened and you are placed in
${S},
the source directory.
In the new terminal, all the OpenEmbedded build-related environment variables are
still defined so you can use commands such as configure and
make.
The commands execute just as if the OpenEmbedded build system were executing them.
Consequently, working this way can be helpful when debugging a build or preparing
software to be used with the OpenEmbedded build system.
Following is an example that uses devshell on a target named
matchbox-desktop:
$ bitbake matchbox-desktop -c devshell
This command spawns a terminal with a shell prompt within the OpenEmbedded build environment.
The OE_TERMINAL
variable controls what type of shell is opened.
For spawned terminals, the following occurs:
The
PATHvariable includes the cross-toolchain.The
pkgconfigvariables find the correct.pcfiles.The
configurecommand finds the Yocto Project site files as well as any other necessary files.
Within this environment, you can run configure or compile
commands as if they were being run by
the OpenEmbedded build system itself.
As noted earlier, the working directory also automatically changes to the
Source Directory (S).
To manually run a specific task using devshell,
run the corresponding run.* script in
the
${WORKDIR}/temp
directory (e.g.,
run.do_configure.pid).
If a task's script does not exist, which would be the case if the task was
skipped by way of the sstate cache, you can create the task by first running
it outside of the devshell:
$ bitbake -c task
Notes
Execution of a task's
run.*script and BitBake's execution of a task are identical. In other words, running the script re-runs the task just as it would be run using thebitbake -ccommand.Any
run.*file that does not have a.pidextension is a symbolic link (symlink) to the most recent version of that file.
Remember, that the devshell is a mechanism that allows
you to get into the BitBake task execution environment.
And as such, all commands must be called just as BitBake would call them.
That means you need to provide the appropriate options for
cross-compilation and so forth as applicable.
When you are finished using devshell, exit the shell
or close the terminal window.
Notes
It is worth remembering that when using
devshellyou need to use the full compiler name such asarm-poky-linux-gnueabi-gccinstead of just usinggcc. The same applies to other applications such asbinutils,libtooland so forth. BitBake sets up environment variables such asCCto assist applications, such asmaketo find the correct tools.It is also worth noting that
devshellstill works over X11 forwarding and similar situations.
Chapter 5. Common Tasks
- 5.1. Understanding and Creating Layers
- 5.2. Customizing Images
- 5.3. Writing a New Recipe
- 5.3.1. Overview
- 5.3.2. Locate or Automatically Create a Base Recipe
- 5.3.3. Storing and Naming the Recipe
- 5.3.4. Understanding Recipe Syntax
- 5.3.5. Running a Build on the Recipe
- 5.3.6. Fetching Code
- 5.3.7. Unpacking Code
- 5.3.8. Patching Code
- 5.3.9. Licensing
- 5.3.10. Configuring the Recipe
- 5.3.11. Compilation
- 5.3.12. Installing
- 5.3.13. Enabling System Services
- 5.3.14. Packaging
- 5.3.15. Properly Versioning Pre-Release Recipes
- 5.3.16. Post-Installation Scripts
- 5.3.17. Testing
- 5.3.18. Examples
- 5.4. Adding a New Machine
- 5.5. Working With Libraries
- 5.6. Enabling GObject Introspection Support
- 5.7. Optionally Using an External Toolchain
- 5.8. Creating Partitioned Images
- 5.9. Configuring the Kernel
- 5.10. Patching the Kernel
- 5.11. Making Images More Secure
- 5.12. Creating Your Own Distribution
- 5.13. Creating a Custom Template Configuration Directory
- 5.14. Building a Tiny System
- 5.15. Building Images for More than One Machine
- 5.16. Working with Packages
- 5.17. Working with Source Files
- 5.18. Building Software from an External Source
- 5.19. Selecting an Initialization Manager
- 5.20. Selecting a Device Manager
- 5.21. Using an External SCM
- 5.22. Creating a Read-Only Root Filesystem
- 5.23. Performing Automated Runtime Testing
- 5.24. Debugging With the GNU Project Debugger (GDB) Remotely
- 5.25. Debugging Parallel Make Races
- 5.26. Maintaining Open Source License Compliance During Your Product's Lifecycle
- 5.27. Using the Error Reporting Tool
This chapter describes fundamental procedures such as creating layers, adding new software packages, extending or customizing images, porting work to new hardware (adding a new machine), and so forth. You will find that the procedures documented here occur often in the development cycle using the Yocto Project.
5.1. Understanding and Creating Layers
The OpenEmbedded build system supports organizing Metadata into multiple layers. Layers allow you to isolate different types of customizations from each other. You might find it tempting to keep everything in one layer when working on a single project. However, the more modular your Metadata, the easier it is to cope with future changes.
To illustrate how layers are used to keep things modular, consider
machine customizations.
These types of customizations typically reside in a special layer,
rather than a general layer, called a Board Support Package (BSP)
Layer.
Furthermore, the machine customizations should be isolated from
recipes and Metadata that support a new GUI environment,
for example.
This situation gives you a couple of layers: one for the machine
configurations, and one for the GUI environment.
It is important to understand, however, that the BSP layer can
still make machine-specific additions to recipes within the GUI
environment layer without polluting the GUI layer itself
with those machine-specific changes.
You can accomplish this through a recipe that is a BitBake append
(.bbappend) file, which is described later
in this section.
5.1.1. Layers
The Source Directory
contains both general layers and BSP
layers right out of the box.
You can easily identify layers that ship with a
Yocto Project release in the Source Directory by their
folder names.
Folders that represent layers typically have names that begin with
the string meta-.
Note
It is not a requirement that a layer name begin with the prefixmeta-, but it is a commonly
accepted standard in the Yocto Project community.
For example, when you set up the Source Directory structure,
you will see several layers:
meta,
meta-skeleton,
meta-selftest,
meta-poky, and
meta-yocto-bsp.
Each of these folders represents a distinct layer.
As another example, if you set up a local copy of the
meta-intel Git repository
and then explore the folder of that general layer,
you will discover many Intel-specific BSP layers inside.
For more information on BSP layers, see the
"BSP Layers"
section in the Yocto Project Board Support Package (BSP)
Developer's Guide.
5.1.2. Creating Your Own Layer
It is very easy to create your own layers to use with the OpenEmbedded build system. The Yocto Project ships with scripts that speed up creating general layers and BSP layers. This section describes the steps you perform by hand to create a layer so that you can better understand them. For information about the layer-creation scripts, see the "Creating a New BSP Layer Using the yocto-bsp Script" section in the Yocto Project Board Support Package (BSP) Developer's Guide and the "Creating a General Layer Using the yocto-layer Script" section further down in this manual.
Follow these general steps to create your layer:
Check Existing Layers: Before creating a new layer, you should be sure someone has not already created a layer containing the Metadata you need. You can see the
OpenEmbedded Metadata Indexfor a list of layers from the OpenEmbedded community that can be used in the Yocto Project.Create a Directory: Create the directory for your layer. While not strictly required, prepend the name of the folder with the string
meta-. For example:meta-mylayer meta-GUI_xyz meta-mymachineCreate a Layer Configuration File: Inside your new layer folder, you need to create a
conf/layer.conffile. It is easiest to take an existing layer configuration file and copy that to your layer'sconfdirectory and then modify the file as needed.The
meta-yocto-bsp/conf/layer.conffile demonstrates the required syntax:# We have a conf and classes directory, add to BBPATH BBPATH .= ":${LAYERDIR}" # We have recipes-* directories, add to BBFILES BBFILES += "${LAYERDIR}/recipes-*/*/*.bb \ ${LAYERDIR}/recipes-*/*/*.bbappend" BBFILE_COLLECTIONS += "yoctobsp" BBFILE_PATTERN_yoctobsp = "^${LAYERDIR}/" BBFILE_PRIORITY_yoctobsp = "5" LAYERVERSION_yoctobsp = "3"Here is an explanation of the example:
The configuration and classes directory is appended to
BBPATH.Note
All non-distro layers, which include all BSP layers, are expected to append the layer directory to theBBPATH. On the other hand, distro layers, such asmeta-poky, can choose to enforce their own precedence overBBPATH. For an example of that syntax, see thelayer.conffile for themeta-pokylayer.The recipes for the layers are appended to
BBFILES.The
BBFILE_COLLECTIONSvariable is then appended with the layer name.The
BBFILE_PATTERNvariable is set to a regular expression and is used to match files fromBBFILESinto a particular layer. In this case,LAYERDIRis used to makeBBFILE_PATTERNmatch within the layer's path.The
BBFILE_PRIORITYvariable then assigns a priority to the layer. Applying priorities is useful in situations where the same recipe might appear in multiple layers and allows you to choose the layer that takes precedence.The
LAYERVERSIONvariable optionally specifies the version of a layer as a single number.
Note the use of the
LAYERDIRvariable, which expands to the directory of the current layer.Through the use of the
BBPATHvariable, BitBake locates class files (.bbclass), configuration files, and files that are included withincludeandrequirestatements. For these cases, BitBake uses the first file that matches the name found inBBPATH. This is similar to the way thePATHvariable is used for binaries. It is recommended, therefore, that you use unique class and configuration filenames in your custom layer.Add Content: Depending on the type of layer, add the content. If the layer adds support for a machine, add the machine configuration in a
conf/machine/file within the layer. If the layer adds distro policy, add the distro configuration in aconf/distro/file within the layer. If the layer introduces new recipes, put the recipes you need inrecipes-*subdirectories within the layer.Note
In order to be compliant with the Yocto Project, a layer must contain a README file.
5.1.3. Best Practices to Follow When Creating Layers
To create layers that are easier to maintain and that will not impact builds for other machines, you should consider the information in the following sections.
5.1.3.1. Avoid "Overlaying" Entire Recipes
Avoid "overlaying" entire recipes from other layers in your
configuration.
In other words, do not copy an entire recipe into your
layer and then modify it.
Rather, use an append file (.bbappend)
to override
only those parts of the original recipe you need to modify.
5.1.3.2. Avoid Duplicating Include Files
Avoid duplicating include files.
Use append files (.bbappend)
for each recipe
that uses an include file.
Or, if you are introducing a new recipe that requires
the included file, use the path relative to the original
layer directory to refer to the file.
For example, use
require recipes-core/package/file.inc
instead of require file.inc.
If you're finding you have to overlay the include file,
it could indicate a deficiency in the include file in
the layer to which it originally belongs.
If this is the case, you should try to address that
deficiency instead of overlaying the include file.
For example, you could address this by getting the
maintainer of the include file to add a variable or
variables to make it easy to override the parts needing
to be overridden.
5.1.3.3. Structure Your Layers
Proper use of overrides within append files and placement of machine-specific files within your layer can ensure that a build is not using the wrong Metadata and negatively impacting a build for a different machine. Following are some examples:
Modifying Variables to Support a Different Machine: Suppose you have a layer named
meta-onethat adds support for building machine "one". To do so, you use an append file namedbase-files.bbappendand create a dependency on "foo" by altering theDEPENDSvariable:DEPENDS = "foo"The dependency is created during any build that includes the layer
meta-one. However, you might not want this dependency for all machines. For example, suppose you are building for machine "two" but yourbblayers.conffile has themeta-onelayer included. During the build, thebase-filesfor machine "two" will also have the dependency onfoo.To make sure your changes apply only when building machine "one", use a machine override with the
DEPENDSstatement:DEPENDS_one = "foo"You should follow the same strategy when using
_appendand_prependoperations:DEPENDS_append_one = " foo" DEPENDS_prepend_one = "foo "As an actual example, here's a line from the recipe for gnutls, which adds dependencies on "argp-standalone" when building with the musl C library:
DEPENDS_append_libc-musl = " argp-standalone"Note
Avoiding "+=" and "=+" and using machine-specific_appendand_prependoperations is recommended as well.Place Machine-Specific Files in Machine-Specific Locations: When you have a base recipe, such as
base-files.bb, that contains aSRC_URIstatement to a file, you can use an append file to cause the build to use your own version of the file. For example, an append file in your layer atmeta-one/recipes-core/base-files/base-files.bbappendcould extendFILESPATHusingFILESEXTRAPATHSas follows:FILESEXTRAPATHS_prepend := "${THISDIR}/${BPN}:"The build for machine "one" will pick up your machine-specific file as long as you have the file in
meta-one/recipes-core/base-files/base-files/. However, if you are building for a different machine and thebblayers.conffile includes themeta-onelayer and the location of your machine-specific file is the first location where that file is found according toFILESPATH, builds for all machines will also use that machine-specific file.You can make sure that a machine-specific file is used for a particular machine by putting the file in a subdirectory specific to the machine. For example, rather than placing the file in
meta-one/recipes-core/base-files/base-files/as shown above, put it inmeta-one/recipes-core/base-files/base-files/one/. Not only does this make sure the file is used only when building for machine "one", but the build process locates the file more quickly.In summary, you need to place all files referenced from
SRC_URIin a machine-specific subdirectory within the layer in order to restrict those files to machine-specific builds.
5.1.3.4. Other Recommendations
We also recommend the following:
Store custom layers in a Git repository that uses the
meta-format.layer_nameClone the repository alongside other
metadirectories in the Source Directory.
Following these recommendations keeps your Source Directory and its configuration entirely inside the Yocto Project's core base.
5.1.4. Enabling Your Layer
Before the OpenEmbedded build system can use your new layer,
you need to enable it.
To enable your layer, simply add your layer's path to the
BBLAYERS
variable in your conf/bblayers.conf file,
which is found in the
Build Directory.
The following example shows how to enable a layer named
meta-mylayer:
     LCONF_VERSION = "6"

     BBPATH = "${TOPDIR}"
     BBFILES ?= ""

     BBLAYERS ?= " \
       $HOME/poky/meta \
       $HOME/poky/meta-poky \
       $HOME/poky/meta-yocto-bsp \
       $HOME/poky/meta-mylayer \
       "
BitBake parses each conf/layer.conf file
as specified in the BBLAYERS variable
within the conf/bblayers.conf file.
During the processing of each
conf/layer.conf file, BitBake adds the
recipes, classes and configurations contained within the
particular layer to the source directory.
5.1.5. Using .bbappend Files
Recipes used to append Metadata to other recipes are called
BitBake append files.
BitBake append files use the .bbappend file
type suffix, while the corresponding recipes to which Metadata
is being appended use the .bb file type
suffix.
A .bbappend file allows your layer to make
additions or changes to the content of another layer's recipe
without having to copy the other recipe into your layer.
Your .bbappend file resides in your layer,
while the main .bb recipe file to
which you are appending Metadata resides in a different layer.
Append files must have the same root names as their corresponding
recipes.
For example, the append file
someapp_2.1.2.bbappend must apply to
someapp_2.1.2.bb.
This means the original recipe and append file names are version
number-specific.
If the corresponding recipe is renamed to update to a newer
version, the corresponding .bbappend file must
be renamed (and possibly updated) as well.
During the build process, BitBake displays an error on starting
if it detects a .bbappend file that does
not have a corresponding recipe with a matching name.
See the
BB_DANGLINGAPPENDS_WARNONLY
variable for information on how to handle this error.
Being able to append information to an existing recipe not only avoids duplication, but also automatically applies recipe changes in a different layer to your layer. If you were copying recipes, you would have to manually merge changes as they occur.
As an example, consider the main formfactor recipe and a
corresponding formfactor append file both from the
Source Directory.
Here is the main formfactor recipe, which is named
formfactor_0.0.bb and located in the
"meta" layer at
meta/recipes-bsp/formfactor:
     SUMMARY = "Device formfactor information"
     SECTION = "base"
     LICENSE = "MIT"
     LIC_FILES_CHKSUM = "file://${COREBASE}/LICENSE;md5=4d92cd373abda3937c2bc47fbc49d690 \
                    file://${COREBASE}/meta/COPYING.MIT;md5=3da9cfbcb788c80a0384361b4de20420"
     PR = "r45"

     SRC_URI = "file://config file://machconfig"
     S = "${WORKDIR}"

     PACKAGE_ARCH = "${MACHINE_ARCH}"
     INHIBIT_DEFAULT_DEPS = "1"

     do_install() {
	     # Install file only if it has contents
             install -d ${D}${sysconfdir}/formfactor/
             install -m 0644 ${S}/config ${D}${sysconfdir}/formfactor/
	     if [ -s "${S}/machconfig" ]; then
	             install -m 0644 ${S}/machconfig ${D}${sysconfdir}/formfactor/
	     fi
     }
In the main recipe, note the
SRC_URI
variable, which tells the OpenEmbedded build system where to
find files during the build.
Following is the append file, which is named
formfactor_0.0.bbappend and is from the
Raspberry Pi BSP Layer named
meta-raspberrypi.
The file is in recipes-bsp/formfactor:
FILESEXTRAPATHS_prepend := "${THISDIR}/${PN}:"
By default, the build system uses the
FILESPATH
variable to locate files.
This append file extends the locations by setting the
FILESEXTRAPATHS
variable.
Setting this variable in the .bbappend
file is the most reliable and recommended method for adding
directories to the search path used by the build system
to find files.
The statement in this example extends the directories to include
${THISDIR}/${PN},
which resolves to a directory named
formfactor in the same directory
in which the append file resides (i.e.
meta-raspberrypi/recipes-bsp/formfactor/formfactor.
This implies that you must have the supporting directory
structure set up that will contain any files or patches you
will be including from the layer.
Using the immediate expansion assignment operator
:= is important because of the reference to
THISDIR.
The trailing colon character is important as it ensures that
items in the list remain colon-separated.
Note
BitBake automatically defines the
THISDIR variable.
You should never set this variable yourself.
Using "_prepend" as part of the
FILESEXTRAPATHS ensures your path
will be searched prior to other paths in the final
list.
Also, not all append files add extra files.
Many append files simply exist to add build options
(e.g. systemd).
For these cases, your append file would not even
use the FILESEXTRAPATHS statement.
5.1.6. Prioritizing Your Layer
Each layer is assigned a priority value.
Priority values control which layer takes precedence if there
are recipe files with the same name in multiple layers.
For these cases, the recipe file from the layer with a higher
priority number takes precedence.
Priority values also affect the order in which multiple
.bbappend files for the same recipe are
applied.
You can either specify the priority manually, or allow the
build system to calculate it based on the layer's dependencies.
To specify the layer's priority manually, use the
BBFILE_PRIORITY
variable.
For example:
BBFILE_PRIORITY_mylayer = "1"
Note
It is possible for a recipe with a lower version number
PV
in a layer that has a higher priority to take precedence.
Also, the layer priority does not currently affect the
precedence order of .conf
or .bbclass files.
Future versions of BitBake might address this.
5.1.7. Managing Layers
You can use the BitBake layer management tool to provide a view
into the structure of recipes across a multi-layer project.
Being able to generate output that reports on configured layers
with their paths and priorities and on
.bbappend files and their applicable
recipes can help to reveal potential problems.
Use the following form when running the layer management tool.
$ bitbake-layers command [arguments]
The following list describes the available commands:
help:Displays general help or help on a specified command.show-layers:Shows the current configured layers.show-recipes:Lists available recipes and the layers that provide them.show-overlayed:Lists overlayed recipes. A recipe is overlayed when a recipe with the same name exists in another layer that has a higher layer priority.show-appends:Lists.bbappendfiles and the recipe files to which they apply.show-cross-depends:Lists dependency relationships between recipes that cross layer boundaries.add-layer:Adds a layer tobblayers.conf.remove-layer:Removes a layer frombblayers.confflatten:Flattens the layer configuration into a separate output directory. Flattening your layer configuration builds a "flattened" directory that contains the contents of all layers, with any overlayed recipes removed and any.bbappendfiles appended to the corresponding recipes. You might have to perform some manual cleanup of the flattened layer as follows:Non-recipe files (such as patches) are overwritten. The flatten command shows a warning for these files.
Anything beyond the normal layer setup has been added to the
layer.conffile. Only the lowest priority layer'slayer.confis used.Overridden and appended items from
.bbappendfiles need to be cleaned up. The contents of each.bbappendend up in the flattened recipe. However, if there are appended or changed variable values, you need to tidy these up yourself. Consider the following example. Here, thebitbake-layerscommand adds the line#### bbappended ...so that you know where the following lines originate:... DESCRIPTION = "A useful utility" ... EXTRA_OECONF = "--enable-something" ... #### bbappended from meta-anotherlayer #### DESCRIPTION = "Customized utility" EXTRA_OECONF += "--enable-somethingelse"Ideally, you would tidy up these utilities as follows:
     ...
     DESCRIPTION = "Customized utility"
     ...
     EXTRA_OECONF = "--enable-something --enable-somethingelse"
     ...
5.1.8. Creating a General Layer Using the yocto-layer Script
The yocto-layer script simplifies
creating a new general layer.
Note
For information on BSP layers, see the "BSP Layers" section in the Yocto Project Board Specific (BSP) Developer's Guide.The default mode of the script's operation is to prompt you for information needed to generate the layer:
The layer priority.
Whether or not to create a sample recipe.
Whether or not to create a sample append file.
Use the yocto-layer create sub-command
to create a new general layer.
In its simplest form, you can create a layer as follows:
$ yocto-layer create mylayer
The previous example creates a layer named
meta-mylayer in the current directory.
As the yocto-layer create command runs,
default values for the prompts appear in brackets.
Pressing enter without supplying anything for the prompts
or pressing enter and providing an invalid response causes the
script to accept the default value.
Once the script completes, the new layer
is created in the current working directory.
The script names the layer by prepending
meta- to the name you provide.
Minimally, the script creates the following within the layer:
The
confdirectory: This directory contains the layer's configuration file. The root name for the file is the same as the root name your provided for the layer (e.g.layer.confThe
COPYING.MITfile: The copyright and use notice for the software.The
READMEfile: A file describing the contents of your new layer.
If you choose to generate a sample recipe file, the script
prompts you for the name for the recipe and then creates it
in layer/recipes-example/example/.bb file and a
directory, which contains a sample
helloworld.c source file, along with
a sample patch file.
If you do not provide a recipe name, the script uses
"example".
If you choose to generate a sample append file, the script
prompts you for the name for the file and then creates it
in layer/recipes-example-bbappend/example-bbappend/.bbappend file and a
directory, which contains a sample patch file.
If you do not provide a recipe name, the script uses
"example".
The script also prompts you for the version of the append file.
The version should match the recipe to which the append file
is associated.
The easiest way to see how the yocto-layer
script works is to experiment with the script.
You can also read the usage information by entering the
following:
$ yocto-layer help
Once you create your general layer, you must add it to your
bblayers.conf file.
Here is an example where a layer named
meta-mylayer is added:
     BBLAYERS = ?" \
        /usr/local/src/yocto/meta \
        /usr/local/src/yocto/meta-poky \
        /usr/local/src/yocto/meta-yocto-bsp \
        /usr/local/src/yocto/meta-mylayer \
        "
Adding the layer to this file enables the build system to locate the layer during the build.
5.2. Customizing Images
You can customize images to satisfy particular requirements. This section describes several methods and provides guidelines for each.
5.2.1. Customizing Images Using local.conf
Probably the easiest way to customize an image is to add a
package by way of the local.conf
configuration file.
Because it is limited to local use, this method generally only
allows you to add packages and is not as flexible as creating
your own customized image.
When you add packages using local variables this way, you need
to realize that these variable changes are in effect for every
build and consequently affect all images, which might not
be what you require.
To add a package to your image using the local configuration
file, use the
IMAGE_INSTALL
variable with the _append operator:
IMAGE_INSTALL_append = " strace"
Use of the syntax is important - specifically, the space between
the quote and the package name, which is
strace in this example.
This space is required since the _append
operator does not add the space.
Furthermore, you must use _append instead
of the += operator if you want to avoid
ordering issues.
The reason for this is because doing so unconditionally appends
to the variable and avoids ordering problems due to the
variable being set in image recipes and
.bbclass files with operators like
?=.
Using _append ensures the operation takes
affect.
As shown in its simplest use,
IMAGE_INSTALL_append affects all images.
It is possible to extend the syntax so that the variable
applies to a specific image only.
Here is an example:
IMAGE_INSTALL_append_pn-core-image-minimal = " strace"
This example adds strace to the
core-image-minimal image only.
You can add packages using a similar approach through the
CORE_IMAGE_EXTRA_INSTALL
variable.
If you use this variable, only
core-image-* images are affected.
5.2.2. Customizing Images Using Custom IMAGE_FEATURES and
EXTRA_IMAGE_FEATURES
Another method for customizing your image is to enable or
disable high-level image features by using the
IMAGE_FEATURES
and EXTRA_IMAGE_FEATURES
variables.
Although the functions for both variables are nearly equivalent,
best practices dictate using IMAGE_FEATURES
from within a recipe and using
EXTRA_IMAGE_FEATURES from within
your local.conf file, which is found in the
Build Directory.
To understand how these features work, the best reference is
meta/classes/core-image.bbclass.
This class lists out the available
IMAGE_FEATURES
of which most map to package groups while some, such as
debug-tweaks and
read-only-rootfs, resolve as general
configuration settings.
In summary, the file looks at the contents of the
IMAGE_FEATURES variable and then maps
or configures the feature accordingly.
Based on this information, the build system automatically
adds the appropriate packages or configurations to the
IMAGE_INSTALL
variable.
Effectively, you are enabling extra features by extending the
class or creating a custom class for use with specialized image
.bb files.
Use the EXTRA_IMAGE_FEATURES variable
from within your local configuration file.
Using a separate area from which to enable features with
this variable helps you avoid overwriting the features in the
image recipe that are enabled with
IMAGE_FEATURES.
The value of EXTRA_IMAGE_FEATURES is added
to IMAGE_FEATURES within
meta/conf/bitbake.conf.
To illustrate how you can use these variables to modify your
image, consider an example that selects the SSH server.
The Yocto Project ships with two SSH servers you can use
with your images: Dropbear and OpenSSH.
Dropbear is a minimal SSH server appropriate for
resource-constrained environments, while OpenSSH is a
well-known standard SSH server implementation.
By default, the core-image-sato image
is configured to use Dropbear.
The core-image-full-cmdline and
core-image-lsb images both
include OpenSSH.
The core-image-minimal image does not
contain an SSH server.
You can customize your image and change these defaults.
Edit the IMAGE_FEATURES variable
in your recipe or use the
EXTRA_IMAGE_FEATURES in your
local.conf file so that it configures the
image you are working with to include
ssh-server-dropbear or
ssh-server-openssh.
Note
See the "Images" section in the Yocto Project Reference Manual for a complete list of image features that ship with the Yocto Project.5.2.3. Customizing Images Using Custom .bb Files
You can also customize an image by creating a custom recipe that defines additional software as part of the image. The following example shows the form for the two lines you need:
     IMAGE_INSTALL = "packagegroup-core-x11-base package1 package2"

     inherit core-image
Defining the software using a custom recipe gives you total
control over the contents of the image.
It is important to use the correct names of packages in the
IMAGE_INSTALL
variable.
You must use the OpenEmbedded notation and not the Debian notation for the names
(e.g. glibc-dev instead of libc6-dev).
The other method for creating a custom image is to base it on an existing image.
For example, if you want to create an image based on core-image-sato
but add the additional package strace to the image,
copy the meta/recipes-sato/images/core-image-sato.bb to a
new .bb and add the following line to the end of the copy:
IMAGE_INSTALL += "strace"
5.2.4. Customizing Images Using Custom Package Groups
For complex custom images, the best approach for customizing
an image is to create a custom package group recipe that is
used to build the image or images.
A good example of a package group recipe is
meta/recipes-core/packagegroups/packagegroup-base.bb.
If you examine that recipe, you see that the
PACKAGES
variable lists the package group packages to produce.
The inherit packagegroup statement
sets appropriate default values and automatically adds
-dev, -dbg, and
-ptest complementary packages for each
package specified in the PACKAGES
statement.
Note
Theinherit packages should be
located near the top of the recipe, certainly before
the PACKAGES statement.
For each package you specify in PACKAGES,
you can use
RDEPENDS
and
RRECOMMENDS
entries to provide a list of packages the parent task package
should contain.
You can see examples of these further down in the
packagegroup-base.bb recipe.
Here is a short, fabricated example showing the same basic pieces:
     DESCRIPTION = "My Custom Package Groups"

     inherit packagegroup

     PACKAGES = "\
         packagegroup-custom-apps \
         packagegroup-custom-tools \
         "

     RDEPENDS_packagegroup-custom-apps = "\
         dropbear \
         portmap \
         psplash"

     RDEPENDS_packagegroup-custom-tools = "\
         oprofile \
         oprofileui-server \
         lttng-tools"

     RRECOMMENDS_packagegroup-custom-tools = "\
         kernel-module-oprofile"
In the previous example, two package group packages are created with their dependencies and their
recommended package dependencies listed: packagegroup-custom-apps, and
packagegroup-custom-tools.
To build an image using these package group packages, you need to add
packagegroup-custom-apps and/or
packagegroup-custom-tools to
IMAGE_INSTALL.
For other forms of image dependencies see the other areas of this section.
5.2.5. Customizing an Image Hostname
By default, the configured hostname (i.e.
/etc/hostname) in an image is the
same as the machine name.
For example, if
MACHINE
equals "qemux86", the configured hostname written to
/etc/hostname is "qemux86".
You can customize this name by altering the value of the
"hostname" variable in the
base-files recipe using either
an append file or a configuration file.
Use the following in an append file:
hostname="myhostname"
Use the following in a configuration file:
hostname_pn-base-files = "myhostname"
Changing the default value of the variable "hostname" can be useful in certain situations. For example, suppose you need to do extensive testing on an image and you would like to easily identify the image under test from existing images with typical default hostnames. In this situation, you could change the default hostname to "testme", which results in all the images using the name "testme". Once testing is complete and you do not need to rebuild the image for test any longer, you can easily reset the default hostname.
Another point of interest is that if you unset the variable, the image will have no default hostname in the filesystem. Here is an example that unsets the variable in a configuration file:
hostname_pn-base-files = ""
Having no default hostname in the filesystem is suitable for environments that use dynamic hostnames such as virtual machines.
5.3. Writing a New Recipe
Recipes (.bb files) are fundamental components
in the Yocto Project environment.
Each software component built by the OpenEmbedded build system
requires a recipe to define the component.
This section describes how to create, write, and test a new
recipe.
Note
For information on variables that are useful for recipes and for information about recipe naming issues, see the "Required" section of the Yocto Project Reference Manual.
5.3.1. Overview
The following figure shows the basic process for creating a new recipe. The remainder of the section provides details for the steps.
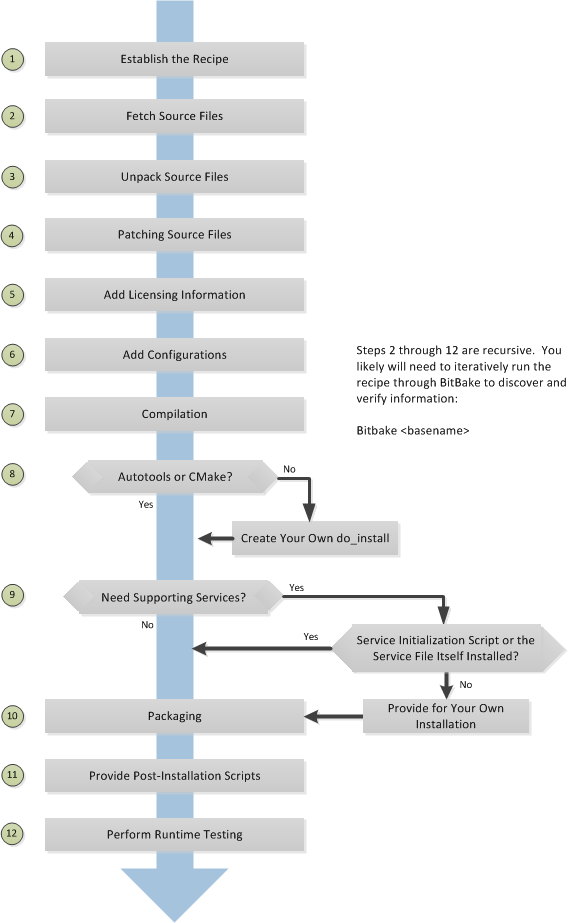 |
5.3.2. Locate or Automatically Create a Base Recipe
You can always write a recipe from scratch. However, two choices exist that can help you quickly get a start on a new recipe:
recipetool: A tool provided by the Yocto Project that automates creation of a base recipe based on the source files.Existing Recipes: Location and modification of an existing recipe that is similar in function to the recipe you need.
5.3.2.1. Creating the Base Recipe Using recipetool
recipetool automates creation of
a base recipe given a set of source code files.
As long as you can extract or point to the source files,
the tool will construct a recipe and automatically
configure all pre-build information into the recipe.
For example, suppose you have an application that builds
using Autotools.
Creating the base recipe using
recipetool results in a recipe
that has the pre-build dependencies, license requirements,
and checksums configured.
To run the tool, you just need to be in your
Build Directory
and have sourced the build environment setup script
(i.e.
oe-init-build-env
or
oe-init-build-env-memres).
Here is the basic recipetool syntax:
Note
Runningrecipetool -h or
recipetool create -h produces the
Python-generated help, which presented differently
than what follows here.
     recipetool -h
     recipetool create [-h]
     recipetool [-d] [-q] [--color auto | always | never ] create -o OUTFILE [-m] [-x EXTERNALSRC] source

          -d       Enables debug output.
          -q       Outputs only errors (quiet mode).
          --color  Colorizes the output automatically, always, or never.
          -h       Displays Python generated syntax for recipetool.
          create   Causes recipetool to create a base recipe.  The create
                   command is further defined with these options:

                   -o OUTFILE      Specifies the full path and filename for the generated
                                   recipe.
                   -m              Causes the recipe to be machine-specific rather than
                                   architecture-specific (default).
                   -x EXTERNALSRC  Fetches and extracts source files from source
                                   and places them in EXTERNALSRC.
                                   source must be a URL.
                   -h              Displays Python-generated syntax for create.
                   source          Specifies the source code on which to base the
                                   recipe.
Running recipetool create -o OUTFILE
creates the base recipe and locates it properly in the
layer that contains your source files.
Following are some syntax examples:
Use this syntax to generate a recipe based on source.
Once generated, the recipe resides in the existing source
code layer:
recipetool create -o OUTFILE source
Use this syntax to generate a recipe using code that you
extract from source.
The extracted code is placed in its own layer defined
by EXTERNALSRC.
recipetool create -o OUTFILE -x EXTERNALSRC source
Use this syntax to generate a recipe based on source.
The options direct recipetool to
run in "quiet mode" and to generate debugging information.
Once generated, the recipe resides in the existing source
code layer:
recipetool create -o OUTFILE source
5.3.2.2. Locating and Using a Similar Recipe
Before writing a recipe from scratch, it is often useful to discover whether someone else has already written one that meets (or comes close to meeting) your needs. The Yocto Project and OpenEmbedded communities maintain many recipes that might be candidates for what you are doing. You can find a good central index of these recipes in the OpenEmbedded metadata index.
Working from an existing recipe or a skeleton recipe is the best way to get started. Here are some points on both methods:
Locate and modify a recipe that is close to what you want to do: This method works when you are familiar with the current recipe space. The method does not work so well for those new to the Yocto Project or writing recipes.
Some risks associated with this method are using a recipe that has areas totally unrelated to what you are trying to accomplish with your recipe, not recognizing areas of the recipe that you might have to add from scratch, and so forth. All these risks stem from unfamiliarity with the existing recipe space.
Use and modify the following skeleton recipe: If for some reason you do not want to use
recipetooland you cannot find an existing recipe that is close to meeting your needs, you can use the following structure to provide the fundamental areas of a new recipe.DESCRIPTION = "" HOMEPAGE = "" LICENSE = "" SECTION = "" DEPENDS = "" LIC_FILES_CHKSUM = "" SRC_URI = ""
5.3.3. Storing and Naming the Recipe
Once you have your base recipe, you should put it in your own layer and name it appropriately. Locating it correctly ensures that the OpenEmbedded build system can find it when you use BitBake to process the recipe.
Storing Your Recipe: The OpenEmbedded build system locates your recipe through the layer's
conf/layer.conffile and theBBFILESvariable. This variable sets up a path from which the build system can locate recipes. Here is the typical use:BBFILES += "${LAYERDIR}/recipes-*/*/*.bb \ ${LAYERDIR}/recipes-*/*/*.bbappend"Consequently, you need to be sure you locate your new recipe inside your layer such that it can be found.
You can find more information on how layers are structured in the "Understanding and Creating Layers" section.
Naming Your Recipe: When you name your recipe, you need to follow this naming convention:
basename_version.bbUse lower-cased characters and do not include the reserved suffixes
-native,-cross,-initial, or-devcasually (i.e. do not use them as part of your recipe name unless the string applies). Here are some examples:cups_1.7.0.bb gawk_4.0.2.bb irssi_0.8.16-rc1.bb
5.3.4. Understanding Recipe Syntax
Understanding recipe file syntax is important for writing recipes. The following list overviews the basic items that make up a BitBake recipe file. For more complete BitBake syntax descriptions, see the "Syntax and Operators" chapter of the BitBake User Manual.
Variable Assignments and Manipulations: Variable assignments allow a value to be assigned to a variable. The assignment can be static text or might include the contents of other variables. In addition to the assignment, appending and prepending operations are also supported.
The following example shows some of the ways you can use variables in recipes:
S = "${WORKDIR}/postfix-${PV}" CFLAGS += "-DNO_ASM" SRC_URI_append = " file://fixup.patch"Functions: Functions provide a series of actions to be performed. You usually use functions to override the default implementation of a task function or to complement a default function (i.e. append or prepend to an existing function). Standard functions use
shshell syntax, although access to OpenEmbedded variables and internal methods are also available.The following is an example function from the
sedrecipe:do_install () { autotools_do_install install -d ${D}${base_bindir} mv ${D}${bindir}/sed ${D}${base_bindir}/sed rmdir ${D}${bindir}/ }It is also possible to implement new functions that are called between existing tasks as long as the new functions are not replacing or complementing the default functions. You can implement functions in Python instead of shell. Both of these options are not seen in the majority of recipes.
Keywords: BitBake recipes use only a few keywords. You use keywords to include common functions (
inherit), load parts of a recipe from other files (includeandrequire) and export variables to the environment (export).The following example shows the use of some of these keywords:
export POSTCONF = "${STAGING_BINDIR}/postconf" inherit autoconf require otherfile.incComments: Any lines that begin with the hash character (
#) are treated as comment lines and are ignored:# This is a comment
This next list summarizes the most important and most commonly used parts of the recipe syntax. For more information on these parts of the syntax, you can reference the Syntax and Operators chapter in the BitBake User Manual.
Line Continuation:
\- Use the backward slash (\) character to split a statement over multiple lines. Place the slash character at the end of the line that is to be continued on the next line:VAR = "A really long \ line"Note
You cannot have any characters including spaces or tabs after the slash character.Using Variables:
${...}- Use the${syntax to access the contents of a variable:VARNAME}SRC_URI = "${SOURCEFORGE_MIRROR}/libpng/zlib-${PV}.tar.gz"Quote All Assignments:
"- Use double quotes around the value in all variable assignments.value"VAR1 = "${OTHERVAR}" VAR2 = "The version is ${PV}"Conditional Assignment:
?=- Conditional assignment is used to assign a value to a variable, but only when the variable is currently unset. Use the question mark followed by the equal sign (?=) to make a "soft" assignment used for conditional assignment. Typically, "soft" assignments are used in thelocal.conffile for variables that are allowed to come through from the external environment.Here is an example where
VAR1is set to "New value" if it is currently empty. However, ifVAR1has already been set, it remains unchanged:VAR1 ?= "New value"In this next example,
VAR1is left with the value "Original value":VAR1 = "Original value" VAR1 ?= "New value"Appending:
+=- Use the plus character followed by the equals sign (+=) to append values to existing variables.Note
This operator adds a space between the existing content of the variable and the new content.Here is an example:
SRC_URI += "file://fix-makefile.patch"Prepending:
=+- Use the equals sign followed by the plus character (=+) to prepend values to existing variables.Note
This operator adds a space between the new content and the existing content of the variable.Here is an example:
VAR =+ "Starts"Appending:
_append- Use the_appendoperator to append values to existing variables. This operator does not add any additional space. Also, the operator is applied after all the+=, and=+operators have been applied and after all=assignments have occurred.The following example shows the space being explicitly added to the start to ensure the appended value is not merged with the existing value:
SRC_URI_append = " file://fix-makefile.patch"You can also use the
_appendoperator with overrides, which results in the actions only being performed for the specified target or machine:SRC_URI_append_sh4 = " file://fix-makefile.patch"Prepending:
_prepend- Use the_prependoperator to prepend values to existing variables. This operator does not add any additional space. Also, the operator is applied after all the+=, and=+operators have been applied and after all=assignments have occurred.The following example shows the space being explicitly added to the end to ensure the prepended value is not merged with the existing value:
CFLAGS_prepend = "-I${S}/myincludes "You can also use the
_prependoperator with overrides, which results in the actions only being performed for the specified target or machine:CFLAGS_prepend_sh4 = "-I${S}/myincludes "Overrides: - You can use overrides to set a value conditionally, typically based on how the recipe is being built. For example, to set the
KBRANCHvariable's value to "standard/base" for any targetMACHINE, except for qemuarm where it should be set to "standard/arm-versatile-926ejs", you would do the following:KBRANCH = "standard/base" KBRANCH_qemuarm = "standard/arm-versatile-926ejs"Overrides are also used to separate alternate values of a variable in other situations. For example, when setting variables such as
FILESandRDEPENDSthat are specific to individual packages produced by a recipe, you should always use an override that specifies the name of the package.Indentation: Use spaces for indentation rather than than tabs. For shell functions, both currently work. However, it is a policy decision of the Yocto Project to use tabs in shell functions. Realize that some layers have a policy to use spaces for all indentation.
Using Python for Complex Operations:
${@- For more advanced processing, it is possible to use Python code during variable assignments (e.g. search and replacement on a variable).python_code}You indicate Python code using the
${@syntax for the variable assignment:python_code}SRC_URI = "ftp://ftp.info-zip.org/pub/infozip/src/zip${@d.getVar('PV',1).replace('.', '')}.tgzShell Function Syntax: Write shell functions as if you were writing a shell script when you describe a list of actions to take. You should ensure that your script works with a generic
shand that it does not require anybashor other shell-specific functionality. The same considerations apply to various system utilities (e.g.sed,grep,awk, and so forth) that you might wish to use. If in doubt, you should check with multiple implementations - including those from BusyBox.
5.3.5. Running a Build on the Recipe
Creating a new recipe is usually an iterative process that requires using BitBake to process the recipe multiple times in order to progressively discover and add information to the recipe file.
Assuming you have sourced a build environment setup script (i.e.
oe-init-build-env
or
oe-init-build-env-memres)
and you are in the
Build Directory,
use BitBake to process your recipe.
All you need to provide is the
basename
$ bitbake basename
During the build, the OpenEmbedded build system creates a
temporary work directory for each recipe
(${WORKDIR})
where it keeps extracted source files, log files, intermediate
compilation and packaging files, and so forth.
The per-recipe temporary work directory is constructed as follows and depends on several factors:
BASE_WORKDIR ?= "${TMPDIR}/work"
WORKDIR = "${BASE_WORKDIR}/${MULTIMACH_TARGET_SYS}/${PN}/${EXTENDPE}${PV}-${PR}"
As an example, assume a Source Directory top-level folder named
poky, a default Build Directory at
poky/build, and a
qemux86-poky-linux machine target system.
Furthermore, suppose your recipe is named
foo_1.3.0.bb.
In this case, the work directory the build system uses to
build the package would be as follows:
poky/build/tmp/work/qemux86-poky-linux/foo/1.3.0-r0
Inside this directory you can find sub-directories such as
image, packages-split,
and temp.
After the build, you can examine these to determine how well
the build went.
Note
You can find log files for each task in the recipe'stemp directory (e.g.
poky/build/tmp/work/qemux86-poky-linux/foo/1.3.0-r0/temp).
Log files are named log.taskname
(e.g. log.do_configure,
log.do_fetch, and
log.do_compile).
You can find more information about the build process in the "A Closer Look at the Yocto Project Development Environment" chapter of the Yocto Project Reference Manual.
You can also reference the following variables in the Yocto Project Reference Manual's glossary for more information:
5.3.6. Fetching Code
The first thing your recipe must do is specify how to fetch
the source files.
Fetching is controlled mainly through the
SRC_URI
variable.
Your recipe must have a SRC_URI variable
that points to where the source is located.
For a graphical representation of source locations, see the
"Sources"
section in the Yocto Project Reference Manual.
The
do_fetch
task uses the prefix of each entry in the
SRC_URI variable value to determine which
fetcher to use to get your source files.
It is the SRC_URI variable that triggers
the fetcher.
The
do_patch
task uses the variable after source is fetched to apply
patches.
The OpenEmbedded build system uses
FILESOVERRIDES
for scanning directory locations for local files in
SRC_URI.
The SRC_URI variable in your recipe must
define each unique location for your source files.
It is good practice to not hard-code pathnames in an URL used
in SRC_URI.
Rather than hard-code these paths, use
${PV},
which causes the fetch process to use the version specified in
the recipe filename.
Specifying the version in this manner means that upgrading the
recipe to a future version is as simple as renaming the recipe
to match the new version.
Here is a simple example from the
meta/recipes-devtools/cdrtools/cdrtools-native_3.01a20.bb
recipe where the source comes from a single tarball.
Notice the use of the
PV
variable:
SRC_URI = "ftp://ftp.berlios.de/pub/cdrecord/alpha/cdrtools-${PV}.tar.bz2"
Files mentioned in SRC_URI whose names end
in a typical archive extension (e.g. .tar,
.tar.gz, .tar.bz2,
.zip, and so forth), are automatically
extracted during the
do_unpack
task.
For another example that specifies these types of files, see
the
"Autotooled Package"
section.
Another way of specifying source is from an SCM.
For Git repositories, you must specify
SRCREV
and you should specify
PV
to include the revision with
SRCPV.
Here is an example from the recipe
meta/recipes-kernel/blktrace/blktrace_git.bb:
SRCREV = "d6918c8832793b4205ed3bfede78c2f915c23385"
PR = "r6"
PV = "1.0.5+git${SRCPV}"
SRC_URI = "git://git.kernel.dk/blktrace.git \
file://ldflags.patch"
If your SRC_URI statement includes
URLs pointing to individual files fetched from a remote server
other than a version control system, BitBake attempts to
verify the files against checksums defined in your recipe to
ensure they have not been tampered with or otherwise modified
since the recipe was written.
Two checksums are used:
SRC_URI[md5sum] and
SRC_URI[sha256sum].
If your SRC_URI variable points to
more than a single URL (excluding SCM URLs), you need to
provide the md5 and
sha256 checksums for each URL.
For these cases, you provide a name for each URL as part of
the SRC_URI and then reference that name
in the subsequent checksum statements.
Here is an example:
SRC_URI = "${DEBIAN_MIRROR}/main/a/apmd/apmd_3.2.2.orig.tar.gz;name=tarball \
${DEBIAN_MIRROR}/main/a/apmd/apmd_${PV}.diff.gz;name=patch
SRC_URI[tarball.md5sum] = "b1e6309e8331e0f4e6efd311c2d97fa8"
SRC_URI[tarball.sha256sum] = "7f7d9f60b7766b852881d40b8ff91d8e39fccb0d1d913102a5c75a2dbb52332d"
SRC_URI[patch.md5sum] = "57e1b689264ea80f78353519eece0c92"
SRC_URI[patch.sha256sum] = "7905ff96be93d725544d0040e425c42f9c05580db3c272f11cff75b9aa89d430"
Proper values for md5 and
sha256 checksums might be available
with other signatures on the download page for the upstream
source (e.g. md5,
sha1, sha256,
GPG, and so forth).
Because the OpenEmbedded build system only deals with
sha256sum and md5sum,
you should verify all the signatures you find by hand.
If no SRC_URI checksums are specified
when you attempt to build the recipe, or you provide an
incorrect checksum, the build will produce an error for each
missing or incorrect checksum.
As part of the error message, the build system provides
the checksum string corresponding to the fetched file.
Once you have the correct checksums, you can copy and paste
them into your recipe and then run the build again to continue.
Note
As mentioned, if the upstream source provides signatures for verifying the downloaded source code, you should verify those manually before setting the checksum values in the recipe and continuing with the build.
This final example is a bit more complicated and is from the
meta/recipes-sato/rxvt-unicode/rxvt-unicode_9.20.bb
recipe.
The example's SRC_URI statement identifies
multiple files as the source files for the recipe: a tarball, a
patch file, a desktop file, and an icon.
SRC_URI = "http://dist.schmorp.de/rxvt-unicode/Attic/rxvt-unicode-${PV}.tar.bz2 \
file://xwc.patch \
file://rxvt.desktop \
file://rxvt.png"
When you specify local files using the
file:// URI protocol, the build system
fetches files from the local machine.
The path is relative to the
FILESPATH
variable and searches specific directories in a certain order:
${BP},
${BPN},
and files.
The directories are assumed to be subdirectories of the
directory in which the recipe or append file resides.
For another example that specifies these types of files, see the
"Single .c File Package (Hello World!)"
section.
The previous example also specifies a patch file.
Patch files are files whose names usually end in
.patch or .diff but
can end with compressed suffixes such as
diff.gz and
patch.bz2, for example.
The build system automatically applies patches as described
in the
"Patching Code" section.
5.3.7. Unpacking Code
During the build, the
do_unpack
task unpacks the source with
${S}
pointing to where it is unpacked.
If you are fetching your source files from an upstream source
archived tarball and the tarball's internal structure matches
the common convention of a top-level subdirectory named
${BPN}-${PV},
then you do not need to set S.
However, if SRC_URI specifies to fetch
source from an archive that does not use this convention,
or from an SCM like Git or Subversion, your recipe needs to
define S.
If processing your recipe using BitBake successfully unpacks
the source files, you need to be sure that the directory
pointed to by ${S} matches the structure
of the source.
5.3.8. Patching Code
Sometimes it is necessary to patch code after it has been
fetched.
Any files mentioned in SRC_URI whose
names end in .patch or
.diff or compressed versions of these
suffixes (e.g. diff.gz are treated as
patches.
The
do_patch
task automatically applies these patches.
The build system should be able to apply patches with the "-p1"
option (i.e. one directory level in the path will be stripped
off).
If your patch needs to have more directory levels stripped off,
specify the number of levels using the "striplevel" option in
the SRC_URI entry for the patch.
Alternatively, if your patch needs to be applied in a specific
subdirectory that is not specified in the patch file, use the
"patchdir" option in the entry.
As with all local files referenced in
SRC_URI
using file://, you should place
patch files in a directory next to the recipe either
named the same as the base name of the recipe
(BP
and
BPN)
or "files".
5.3.9. Licensing
Your recipe needs to have both the
LICENSE
and
LIC_FILES_CHKSUM
variables:
LICENSE: This variable specifies the license for the software. If you do not know the license under which the software you are building is distributed, you should go to the source code and look for that information. Typical files containing this information includeCOPYING,LICENSE, andREADMEfiles. You could also find the information near the top of a source file. For example, given a piece of software licensed under the GNU General Public License version 2, you would setLICENSEas follows:LICENSE = "GPLv2"The licenses you specify within
LICENSEcan have any name as long as you do not use spaces, since spaces are used as separators between license names. For standard licenses, use the names of the files inmeta/files/common-licenses/or theSPDXLICENSEMAPflag names defined inmeta/conf/licenses.conf.LIC_FILES_CHKSUM: The OpenEmbedded build system uses this variable to make sure the license text has not changed. If it has, the build produces an error and it affords you the chance to figure it out and correct the problem.You need to specify all applicable licensing files for the software. At the end of the configuration step, the build process will compare the checksums of the files to be sure the text has not changed. Any differences result in an error with the message containing the current checksum. For more explanation and examples of how to set the
LIC_FILES_CHKSUMvariable, see the "Tracking License Changes" section in the Yocto Project Reference Manual.To determine the correct checksum string, you can list the appropriate files in the
LIC_FILES_CHKSUMvariable with incorrect md5 strings, attempt to build the software, and then note the resulting error messages that will report the correct md5 strings. See the "Fetching Code" section for additional information.Here is an example that assumes the software has a
COPYINGfile:LIC_FILES_CHKSUM = "file://COPYING;md5=xxx"When you try to build the software, the build system will produce an error and give you the correct string that you can substitute into the recipe file for a subsequent build.
5.3.10. Configuring the Recipe
Most software provides some means of setting build-time configuration options before compilation. Typically, setting these options is accomplished by running a configure script with some options, or by modifying a build configuration file.
Note
As of Yocto Project Release 7.1, some of the core recipes that package binary configuration scripts now disable the scripts due to the scripts previously requiring error-prone path substitution. The OpenEmbedded build system usespkg-config now, which is much more
robust.
You can find a list of the *-config
scripts that are disabled list in the
"Binary Configuration Scripts Disabled"
section in the Yocto Project Reference Manual.
A major part of build-time configuration is about checking for
build-time dependencies and possibly enabling optional
functionality as a result.
You need to specify any build-time dependencies for the
software you are building in your recipe's
DEPENDS
value, in terms of other recipes that satisfy those
dependencies.
You can often find build-time or runtime
dependencies described in the software's documentation.
The following list provides configuration items of note based on how your software is built:
Autotools: If your source files have a
configure.acfile, then your software is built using Autotools. If this is the case, you just need to worry about modifying the configuration.When using Autotools, your recipe needs to inherit the
autotoolsclass and your recipe does not have to contain ado_configuretask. However, you might still want to make some adjustments. For example, you can setEXTRA_OECONFto pass any needed configure options that are specific to the recipe.CMake: If your source files have a
CMakeLists.txtfile, then your software is built using CMake. If this is the case, you just need to worry about modifying the configuration.When you use CMake, your recipe needs to inherit the
cmakeclass and your recipe does not have to contain ado_configuretask. You can make some adjustments by settingEXTRA_OECMAKEto pass any needed configure options that are specific to the recipe.Other: If your source files do not have a
configure.acorCMakeLists.txtfile, then your software is built using some method other than Autotools or CMake. If this is the case, you normally need to provide ado_configuretask in your recipe unless, of course, there is nothing to configure.Even if your software is not being built by Autotools or CMake, you still might not need to deal with any configuration issues. You need to determine if configuration is even a required step. You might need to modify a Makefile or some configuration file used for the build to specify necessary build options. Or, perhaps you might need to run a provided, custom configure script with the appropriate options.
For the case involving a custom configure script, you would run
./configure --helpand look for the options you need to set.
Once configuration succeeds, it is always good practice to
look at the log.do_configure file to
ensure that the appropriate options have been enabled and no
additional build-time dependencies need to be added to
DEPENDS.
For example, if the configure script reports that it found
something not mentioned in DEPENDS, or
that it did not find something that it needed for some
desired optional functionality, then you would need to add
those to DEPENDS.
Looking at the log might also reveal items being checked for,
enabled, or both that you do not want, or items not being found
that are in DEPENDS, in which case
you would need to look at passing extra options to the
configure script as needed.
For reference information on configure options specific to the
software you are building, you can consult the output of the
./configure --help command within
${S} or consult the software's upstream
documentation.
5.3.11. Compilation
During a build, the do_compile task
happens after source is fetched, unpacked, and configured.
If the recipe passes through do_compile
successfully, nothing needs to be done.
However, if the compile step fails, you need to diagnose the failure. Here are some common issues that cause failures.
Note
For cases where improper paths are detected for configuration files or for when libraries/headers cannot be found, be sure you are using the more robustpkg-config.
See the note in section
"Configuring the Recipe"
for additional information.
Parallel build failures: These failures manifest themselves as intermittent errors, or errors reporting that a file or directory that should be created by some other part of the build process could not be found. This type of failure can occur even if, upon inspection, the file or directory does exist after the build has failed, because that part of the build process happened in the wrong order.
To fix the problem, you need to either satisfy the missing dependency in the Makefile or whatever script produced the Makefile, or (as a workaround) set
PARALLEL_MAKEto an empty string:PARALLEL_MAKE = ""For information on parallel Makefile issues, see the "Debugging Parallel Make Races" section.
Improper host path usage: This failure applies to recipes building for the target or
nativesdkonly. The failure occurs when the compilation process uses improper headers, libraries, or other files from the host system when cross-compiling for the target.To fix the problem, examine the
log.do_compilefile to identify the host paths being used (e.g./usr/include,/usr/lib, and so forth) and then either add configure options, apply a patch, or do both.Failure to find required libraries/headers: If a build-time dependency is missing because it has not been declared in
DEPENDS, or because the dependency exists but the path used by the build process to find the file is incorrect and the configure step did not detect it, the compilation process could fail. For either of these failures, the compilation process notes that files could not be found. In these cases, you need to go back and add additional options to the configure script as well as possibly add additional build-time dependencies toDEPENDS.Occasionally, it is necessary to apply a patch to the source to ensure the correct paths are used. If you need to specify paths to find files staged into the sysroot from other recipes, use the variables that the OpenEmbedded build system provides (e.g.
STAGING_BINDIR,STAGING_INCDIR,STAGING_DATADIR, and so forth).
5.3.12. Installing
During do_install, the task copies the
built files along with their hierarchy to locations that
would mirror their locations on the target device.
The installation process copies files from the
${S},
${B},
and
${WORKDIR}
directories to the
${D}
directory to create the structure as it should appear on the
target system.
How your software is built affects what you must do to be sure your software is installed correctly. The following list describes what you must do for installation depending on the type of build system used by the software being built:
Autotools and CMake: If the software your recipe is building uses Autotools or CMake, the OpenEmbedded build system understands how to install the software. Consequently, you do not have to have a
do_installtask as part of your recipe. You just need to make sure the install portion of the build completes with no issues. However, if you wish to install additional files not already being installed bymake install, you should do this using ado_install_appendfunction using the install command as described in the "Manual" bulleted item later in this list.Other (using
make install): You need to define ado_installfunction in your recipe. The function should calloe_runmake installand will likely need to pass in the destination directory as well. How you pass that path is dependent on how theMakefilebeing run is written (e.g.DESTDIR=${D},PREFIX=${D},INSTALLROOT=${D}, and so forth).For an example recipe using
make install, see the "Makefile-Based Package" section.Manual: You need to define a
do_installfunction in your recipe. The function must first useinstall -dto create the directories under${D}. Once the directories exist, your function can useinstallto manually install the built software into the directories.You can find more information on
installat http://www.gnu.org/software/coreutils/manual/html_node/install-invocation.html.
For the scenarios that do not use Autotools or
CMake, you need to track the installation
and diagnose and fix any issues until everything installs
correctly.
You need to look in the default location of
${D}, which is
${WORKDIR}/image, to be sure your
files have been installed correctly.
Notes
During the installation process, you might need to modify some of the installed files to suit the target layout. For example, you might need to replace hard-coded paths in an initscript with values of variables provided by the build system, such as replacing
/usr/bin/with${bindir}. If you do perform such modifications duringdo_install, be sure to modify the destination file after copying rather than before copying. Modifying after copying ensures that the build system can re-executedo_installif needed.oe_runmake install, which can be run directly or can be run indirectly by theautotoolsandcmakeclasses, runsmake installin parallel. Sometimes, a Makefile can have missing dependencies between targets that can result in race conditions. If you experience intermittent failures duringdo_install, you might be able to work around them by disabling parallel Makefile installs by adding the following to the recipe:PARALLEL_MAKEINST = ""See
PARALLEL_MAKEINSTfor additional information.
5.3.13. Enabling System Services
If you want to install a service, which is a process that usually starts on boot and runs in the background, then you must include some additional definitions in your recipe.
If you are adding services and the service initialization
script or the service file itself is not installed, you must
provide for that installation in your recipe using a
do_install_append function.
If your recipe already has a do_install
function, update the function near its end rather than
adding an additional do_install_append
function.
When you create the installation for your services, you need
to accomplish what is normally done by
make install.
In other words, make sure your installation arranges the output
similar to how it is arranged on the target system.
The OpenEmbedded build system provides support for starting services two different ways:
SysVinit: SysVinit is a system and service manager that manages the init system used to control the very basic functions of your system. The init program is the first program started by the Linux kernel when the system boots. Init then controls the startup, running and shutdown of all other programs.
To enable a service using SysVinit, your recipe needs to inherit the
update-rc.dclass. The class helps facilitate safely installing the package on the target.You will need to set the
INITSCRIPT_PACKAGES,INITSCRIPT_NAME, andINITSCRIPT_PARAMSvariables within your recipe.systemd: System Management Daemon (systemd) was designed to replace SysVinit and to provide enhanced management of services. For more information on systemd, see the systemd homepage at http://freedesktop.org/wiki/Software/systemd/.
To enable a service using systemd, your recipe needs to inherit the
systemdclass. See thesystemd.bbclassfile located in your Source Directory. section for more information.
5.3.14. Packaging
Successful packaging is a combination of automated processes performed by the OpenEmbedded build system and some specific steps you need to take. The following list describes the process:
Splitting Files: The
do_packagetask splits the files produced by the recipe into logical components. Even software that produces a single binary might still have debug symbols, documentation, and other logical components that should be split out. Thedo_packagetask ensures that files are split up and packaged correctly.Running QA Checks: The
insaneclass adds a step to the package generation process so that output quality assurance checks are generated by the OpenEmbedded build system. This step performs a range of checks to be sure the build's output is free of common problems that show up during runtime. For information on these checks, see theinsaneclass and the "QA Error and Warning Messages" chapter in the Yocto Project Reference Manual.Hand-Checking Your Packages: After you build your software, you need to be sure your packages are correct. Examine the
${WORKDIR}/packages-splitdirectory and make sure files are where you expect them to be. If you discover problems, you can setPACKAGES,FILES,do_install(_append), and so forth as needed.Splitting an Application into Multiple Packages: If you need to split an application into several packages, see the "Splitting an Application into Multiple Packages" section for an example.
Installing a Post-Installation Script: For an example showing how to install a post-installation script, see the "Post-Installation Scripts" section.
Marking Package Architecture: Depending on what your recipe is building and how it is configured, it might be important to mark the packages produced as being specific to a particular machine, or to mark them as not being specific to a particular machine or architecture at all.
By default, packages apply to any machine with the same architecture as the target machine. When a recipe produces packages that are machine-specific (e.g. the
MACHINEvalue is passed into the configure script or a patch is applied only for a particular machine), you should mark them as such by adding the following to the recipe:PACKAGE_ARCH = "${MACHINE_ARCH}"On the other hand, if the recipe produces packages that do not contain anything specific to the target machine or architecture at all (e.g. recipes that simply package script files or configuration files), you should use the
allarchclass to do this for you by adding this to your recipe:inherit allarchEnsuring that the package architecture is correct is not critical while you are doing the first few builds of your recipe. However, it is important in order to ensure that your recipe rebuilds (or does not rebuild) appropriately in response to changes in configuration, and to ensure that you get the appropriate packages installed on the target machine, particularly if you run separate builds for more than one target machine.
5.3.15. Properly Versioning Pre-Release Recipes
Sometimes the name of a recipe can lead to versioning
problems when the recipe is upgraded to a final release.
For example, consider the
irssi_0.8.16-rc1.bb recipe file in
the list of example recipes in the
"Storing and Naming the Recipe"
section.
This recipe is at a release candidate stage (i.e.
"rc1").
When the recipe is released, the recipe filename becomes
irssi_0.8.16.bb.
The version change from 0.8.16-rc1
to 0.8.16 is seen as a decrease by the
build system and package managers, so the resulting packages
will not correctly trigger an upgrade.
In order to ensure the versions compare properly, the
recommended convention is to set
PV
within the recipe to
"previous_version+current_version".
You can use an additional variable so that you can use the
current version elsewhere.
Here is an example:
REALPV = "0.8.16-rc1"
PV = "0.8.15+${REALPV}"
5.3.16. Post-Installation Scripts
Post-installation scripts run immediately after installing
a package on the target or during image creation when a
package is included in an image.
To add a post-installation script to a package, add a
pkg_postinst_PACKAGENAME() function to
the recipe file (.bb) and replace
PACKAGENAME with the name of the package
you want to attach to the postinst
script.
To apply the post-installation script to the main package
for the recipe, which is usually what is required, specify
${PN}
in place of PACKAGENAME.
A post-installation function has the following structure:
pkg_postinst_PACKAGENAME() {
# Commands to carry out
}
The script defined in the post-installation function is called when the root filesystem is created. If the script succeeds, the package is marked as installed. If the script fails, the package is marked as unpacked and the script is executed when the image boots again.
Sometimes it is necessary for the execution of a post-installation script to be delayed until the first boot. For example, the script might need to be executed on the device itself. To delay script execution until boot time, use the following structure in the post-installation script:
pkg_postinst_PACKAGENAME() {
if [ x"$D" = "x" ]; then
# Actions to carry out on the device go here
else
exit 1
fi
}
The previous example delays execution until the image boots
again because the environment variable D
points to the directory containing the image when
the root filesystem is created at build time but is unset
when executed on the first boot.
Note
Equivalent support for pre-install, pre-uninstall, and post-uninstall scripts exist by way ofpkg_preinst,
pkg_prerm, and
pkg_postrm, respectively.
These scrips work in exactly the same way as does
pkg_postinst with the exception that they
run at different times.
Also, because of when they run, they are not applicable to
being run at image creation time like
pkg_postinst.
5.3.17. Testing
The final step for completing your recipe is to be sure that the software you built runs correctly. To accomplish runtime testing, add the build's output packages to your image and test them on the target.
For information on how to customize your image by adding specific packages, see the "Customizing Images" section.
5.3.18. Examples
To help summarize how to write a recipe, this section provides some examples given various scenarios:
Recipes that use local files
Using an Autotooled package
Using a Makefile-based package
Splitting an application into multiple packages
Adding binaries to an image
5.3.18.1. Single .c File Package (Hello World!)
Building an application from a single file that is stored
locally (e.g. under files) requires
a recipe that has the file listed in the
SRC_URI
variable.
Additionally, you need to manually write the
do_compile and
do_install tasks.
The S
variable defines the directory containing the source code,
which is set to
WORKDIR
in this case - the directory BitBake uses for the build.
SUMMARY = "Simple helloworld application"
SECTION = "examples"
LICENSE = "MIT"
LIC_FILES_CHKSUM = "file://${COMMON_LICENSE_DIR}/MIT;md5=0835ade698e0bcf8506ecda2f7b4f302"
SRC_URI = "file://helloworld.c"
S = "${WORKDIR}"
do_compile() {
${CC} helloworld.c -o helloworld
}
do_install() {
install -d ${D}${bindir}
install -m 0755 helloworld ${D}${bindir}
}
By default, the helloworld,
helloworld-dbg, and
helloworld-dev packages are built.
For information on how to customize the packaging process,
see the
"Splitting an Application into Multiple Packages"
section.
5.3.18.2. Autotooled Package
Applications that use Autotools such as autoconf and
automake require a recipe that has a source archive listed in
SRC_URI and
also inherit the
autotools
class, which contains the definitions of all the steps
needed to build an Autotool-based application.
The result of the build is automatically packaged.
And, if the application uses NLS for localization, packages with local information are
generated (one package per language).
Following is one example: (hello_2.3.bb)
SUMMARY = "GNU Helloworld application"
SECTION = "examples"
LICENSE = "GPLv2+"
LIC_FILES_CHKSUM = "file://COPYING;md5=751419260aa954499f7abaabaa882bbe"
SRC_URI = "${GNU_MIRROR}/hello/hello-${PV}.tar.gz"
inherit autotools gettext
The variable
LIC_FILES_CHKSUM
is used to track source license changes as described in the
"Tracking License Changes" section.
You can quickly create Autotool-based recipes in a manner similar to the previous example.
5.3.18.3. Makefile-Based Package
Applications that use GNU make also require a recipe that has
the source archive listed in
SRC_URI.
You do not need to add a do_compile step since by default BitBake
starts the make command to compile the application.
If you need additional make options, you should store them in the
EXTRA_OEMAKE
variable.
BitBake passes these options into the GNU make invocation.
Note that a do_install task is still required.
Otherwise, BitBake runs an empty do_install task by default.
Some applications might require extra parameters to be passed to the compiler.
For example, the application might need an additional header path.
You can accomplish this by adding to the
CFLAGS variable.
The following example shows this:
CFLAGS_prepend = "-I ${S}/include "
In the following example, mtd-utils is a makefile-based package:
SUMMARY = "Tools for managing memory technology devices"
SECTION = "base"
DEPENDS = "zlib lzo e2fsprogs util-linux"
HOMEPAGE = "http://www.linux-mtd.infradead.org/"
LICENSE = "GPLv2+"
LIC_FILES_CHKSUM = "file://COPYING;md5=0636e73ff0215e8d672dc4c32c317bb3 \
file://include/common.h;beginline=1;endline=17;md5=ba05b07912a44ea2bf81ce409380049c"
# Use the latest version at 26 Oct, 2013
SRCREV = "9f107132a6a073cce37434ca9cda6917dd8d866b"
SRC_URI = "git://git.infradead.org/mtd-utils.git \
file://add-exclusion-to-mkfs-jffs2-git-2.patch \
"
PV = "1.5.1+git${SRCPV}"
S = "${WORKDIR}/git/"
EXTRA_OEMAKE = "'CC=${CC}' 'RANLIB=${RANLIB}' 'AR=${AR}' 'CFLAGS=${CFLAGS} -I${S}/include -DWITHOUT_XATTR' 'BUILDDIR=${S}'"
do_install () {
oe_runmake install DESTDIR=${D} SBINDIR=${sbindir} MANDIR=${mandir} INCLUDEDIR=${includedir}
}
PACKAGES =+ "mtd-utils-jffs2 mtd-utils-ubifs mtd-utils-misc"
FILES_mtd-utils-jffs2 = "${sbindir}/mkfs.jffs2 ${sbindir}/jffs2dump ${sbindir}/jffs2reader ${sbindir}/sumtool"
FILES_mtd-utils-ubifs = "${sbindir}/mkfs.ubifs ${sbindir}/ubi*"
FILES_mtd-utils-misc = "${sbindir}/nftl* ${sbindir}/ftl* ${sbindir}/rfd* ${sbindir}/doc* ${sbindir}/serve_image ${sbindir}/recv_image"
PARALLEL_MAKE = ""
BBCLASSEXTEND = "native"
5.3.18.4. Splitting an Application into Multiple Packages
You can use the variables
PACKAGES and
FILES
to split an application into multiple packages.
Following is an example that uses the libxpm recipe.
By default, this recipe generates a single package that contains the library along
with a few binaries.
You can modify the recipe to split the binaries into separate packages:
require xorg-lib-common.inc
SUMMARY = "Xpm: X Pixmap extension library"
LICENSE = "BSD"
LIC_FILES_CHKSUM = "file://COPYING;md5=51f4270b012ecd4ab1a164f5f4ed6cf7"
DEPENDS += "libxext libsm libxt"
PE = "1"
XORG_PN = "libXpm"
PACKAGES =+ "sxpm cxpm"
FILES_cxpm = "${bindir}/cxpm"
FILES_sxpm = "${bindir}/sxpm"
In the previous example, we want to ship the sxpm
and cxpm binaries in separate packages.
Since bindir would be packaged into the main
PN
package by default, we prepend the PACKAGES
variable so additional package names are added to the start of list.
This results in the extra FILES_*
variables then containing information that define which files and
directories go into which packages.
Files included by earlier packages are skipped by latter packages.
Thus, the main PN package
does not include the above listed files.
5.3.18.5. Packaging Externally Produced Binaries
Sometimes, you need to add pre-compiled binaries to an
image.
For example, suppose that binaries for proprietary code
exist, which are created by a particular division of a
company.
Your part of the company needs to use those binaries as
part of an image that you are building using the
OpenEmbedded build system.
Since you only have the binaries and not the source code,
you cannot use a typical recipe that expects to fetch the
source specified in
SRC_URI
and then compile it.
One method is to package the binaries and then install them as part of the image. Generally, it is not a good idea to package binaries since, among other things, it can hinder the ability to reproduce builds and could lead to compatibility problems with ABI in the future. However, sometimes you have no choice.
The easiest solution is to create a recipe that uses
the
bin_package
class and to be sure that you are using default locations
for build artifacts.
In most cases, the bin_package class
handles "skipping" the configure and compile steps as well
as sets things up to grab packages from the appropriate
area.
In particular, this class sets noexec
on both the
do_configure
and
do_compile
tasks, sets
FILES_${PN} to "/" so that it picks
up all files, and sets up a
do_install
task, which effectively copies all files from
${S} to ${D}.
The bin_package class works well when
the files extracted into ${S} are
already laid out in the way they should be laid out
on the target.
For more information on these variables, see the
FILES,
PN,
S,
and
D
variables in the Yocto Project Reference Manual's variable
glossary.
If you can't use the bin_package
class, you need to be sure you are doing the following:
Create a recipe where the
do_configureanddo_compiletasks do nothing:do_configure[noexec] = "1" do_compile[noexec] = "1"Alternatively, you can make these tasks an empty function.
Make sure your
do_installtask installs the binaries appropriately.Ensure that you set up
FILES(usuallyFILES_${PN}) to point to the files you have installed, which of course depends on where you have installed them and whether those files are in different locations than the defaults.
5.4. Adding a New Machine
Adding a new machine to the Yocto Project is a straightforward process. This section describes how to add machines that are similar to those that the Yocto Project already supports.
Note
Although well within the capabilities of the Yocto Project, adding a totally new architecture might require changes togcc/glibc and to the site
information, which is beyond the scope of this manual.
For a complete example that shows how to add a new machine, see the "Creating a New BSP Layer Using the yocto-bsp Script" section in the Yocto Project Board Support Package (BSP) Developer's Guide.
5.4.1. Adding the Machine Configuration File
To add a new machine, you need to add a new machine
configuration file to the layer's
conf/machine directory.
This configuration file provides details about the device
you are adding.
The OpenEmbedded build system uses the root name of the
machine configuration file to reference the new machine.
For example, given a machine configuration file named
crownbay.conf, the build system
recognizes the machine as "crownbay".
The most important variables you must set in your machine configuration file or include from a lower-level configuration file are as follows:
TARGET_ARCH(e.g. "arm")PREFERRED_PROVIDER_virtual/kernelMACHINE_FEATURES(e.g. "apm screen wifi")
You might also need these variables:
SERIAL_CONSOLES(e.g. "115200;ttyS0 115200;ttyS1")KERNEL_IMAGETYPE(e.g. "zImage")IMAGE_FSTYPES(e.g. "tar.gz jffs2")
You can find full details on these variables in the reference
section.
You can leverage existing machine .conf
files from meta-yocto-bsp/conf/machine/.
5.4.2. Adding a Kernel for the Machine
The OpenEmbedded build system needs to be able to build a kernel
for the machine.
You need to either create a new kernel recipe for this machine,
or extend an existing kernel recipe.
You can find several kernel recipe examples in the
Source Directory at
meta/recipes-kernel/linux
that you can use as references.
If you are creating a new kernel recipe, normal recipe-writing
rules apply for setting up a
SRC_URI.
Thus, you need to specify any necessary patches and set
S
to point at the source code.
You need to create a do_configure task that
configures the unpacked kernel with a
defconfig file.
You can do this by using a make defconfig
command or, more commonly, by copying in a suitable
defconfig file and then running
make oldconfig.
By making use of inherit kernel and
potentially some of the linux-*.inc files,
most other functionality is centralized and the defaults of the
class normally work well.
If you are extending an existing kernel recipe, it is usually
a matter of adding a suitable defconfig
file.
The file needs to be added into a location similar to
defconfig files used for other machines
in a given kernel recipe.
A possible way to do this is by listing the file in the
SRC_URI and adding the machine to the
expression in
COMPATIBLE_MACHINE:
COMPATIBLE_MACHINE = '(qemux86|qemumips)'
For more information on defconfig files,
see the
"Changing the Configuration"
section in the Yocto Project Linux Kernel Development Manual.
5.4.3. Adding a Formfactor Configuration File
A formfactor configuration file provides information about the target hardware for which the image is being built and information that the build system cannot obtain from other sources such as the kernel. Some examples of information contained in a formfactor configuration file include framebuffer orientation, whether or not the system has a keyboard, the positioning of the keyboard in relation to the screen, and the screen resolution.
The build system uses reasonable defaults in most cases.
However, if customization is
necessary, you need to create a machconfig file
in the meta/recipes-bsp/formfactor/files
directory.
This directory contains directories for specific machines such as
qemuarm and qemux86.
For information about the settings available and the defaults, see the
meta/recipes-bsp/formfactor/files/config file found in the
same area.
Following is an example for "qemuarm" machine:
HAVE_TOUCHSCREEN=1
HAVE_KEYBOARD=1
DISPLAY_CAN_ROTATE=0
DISPLAY_ORIENTATION=0
#DISPLAY_WIDTH_PIXELS=640
#DISPLAY_HEIGHT_PIXELS=480
#DISPLAY_BPP=16
DISPLAY_DPI=150
DISPLAY_SUBPIXEL_ORDER=vrgb
5.5. Working With Libraries
Libraries are an integral part of your system. This section describes some common practices you might find helpful when working with libraries to build your system:
5.5.1. Including Static Library Files
If you are building a library and the library offers static linking, you can control
which static library files (*.a files) get included in the
built library.
The PACKAGES
and FILES_*
variables in the
meta/conf/bitbake.conf configuration file define how files installed
by the do_install task are packaged.
By default, the PACKAGES variable includes
${PN}-staticdev, which represents all static library files.
Note
Some previously released versions of the Yocto Project defined the static library files through${PN}-dev.
Following is part of the BitBake configuration file, where you can see how the static library files are defined:
PACKAGE_BEFORE_PN ?= ""
PACKAGES = "${PN}-dbg ${PN}-staticdev ${PN}-dev ${PN}-doc ${PN}-locale ${PACKAGE_BEFORE_PN} ${PN}"
PACKAGES_DYNAMIC = "^${PN}-locale-.*"
FILES = ""
FILES_${PN} = "${bindir}/* ${sbindir}/* ${libexecdir}/* ${libdir}/lib*${SOLIBS} \
${sysconfdir} ${sharedstatedir} ${localstatedir} \
${base_bindir}/* ${base_sbindir}/* \
${base_libdir}/*${SOLIBS} \
${base_prefix}/lib/udev/rules.d ${prefix}/lib/udev/rules.d \
${datadir}/${BPN} ${libdir}/${BPN}/* \
${datadir}/pixmaps ${datadir}/applications \
${datadir}/idl ${datadir}/omf ${datadir}/sounds \
${libdir}/bonobo/servers"
FILES_${PN}-bin = "${bindir}/* ${sbindir}/*"
FILES_${PN}-doc = "${docdir} ${mandir} ${infodir} ${datadir}/gtk-doc \
${datadir}/gnome/help"
SECTION_${PN}-doc = "doc"
FILES_SOLIBSDEV ?= "${base_libdir}/lib*${SOLIBSDEV} ${libdir}/lib*${SOLIBSDEV}"
FILES_${PN}-dev = "${includedir} ${FILES_SOLIBSDEV} ${libdir}/*.la \
${libdir}/*.o ${libdir}/pkgconfig ${datadir}/pkgconfig \
${datadir}/aclocal ${base_libdir}/*.o \
${libdir}/${BPN}/*.la ${base_libdir}/*.la"
SECTION_${PN}-dev = "devel"
ALLOW_EMPTY_${PN}-dev = "1"
RDEPENDS_${PN}-dev = "${PN} (= ${EXTENDPKGV})"
FILES_${PN}-staticdev = "${libdir}/*.a ${base_libdir}/*.a ${libdir}/${BPN}/*.a"
SECTION_${PN}-staticdev = "devel"
RDEPENDS_${PN}-staticdev = "${PN}-dev (= ${EXTENDPKGV})"
5.5.2. Combining Multiple Versions of Library Files into One Image
The build system offers the ability to build libraries with different target optimizations or architecture formats and combine these together into one system image. You can link different binaries in the image against the different libraries as needed for specific use cases. This feature is called "Multilib."
An example would be where you have most of a system compiled in 32-bit mode using 32-bit libraries, but you have something large, like a database engine, that needs to be a 64-bit application and uses 64-bit libraries. Multilib allows you to get the best of both 32-bit and 64-bit libraries.
While the Multilib feature is most commonly used for 32 and 64-bit differences, the approach the build system uses facilitates different target optimizations. You could compile some binaries to use one set of libraries and other binaries to use a different set of libraries. The libraries could differ in architecture, compiler options, or other optimizations.
Several examples exist in the
meta-skeleton layer found in the
Source Directory:
conf/multilib-example.confconfiguration fileconf/multilib-example2.confconfiguration filerecipes-multilib/images/core-image-multilib-example.bbrecipe
5.5.2.1. Preparing to Use Multilib
User-specific requirements drive the Multilib feature. Consequently, there is no one "out-of-the-box" configuration that likely exists to meet your needs.
In order to enable Multilib, you first need to ensure your recipe is
extended to support multiple libraries.
Many standard recipes are already extended and support multiple libraries.
You can check in the meta/conf/multilib.conf
configuration file in the
Source Directory to see how this is
done using the
BBCLASSEXTEND
variable.
Eventually, all recipes will be covered and this list will
not be needed.
For the most part, the Multilib class extension works automatically to
extend the package name from ${PN} to
${MLPREFIX}${PN}, where MLPREFIX
is the particular multilib (e.g. "lib32-" or "lib64-").
Standard variables such as
DEPENDS,
RDEPENDS,
RPROVIDES,
RRECOMMENDS,
PACKAGES, and
PACKAGES_DYNAMIC
are automatically extended by the system.
If you are extending any manual code in the recipe, you can use the
${MLPREFIX} variable to ensure those names are extended
correctly.
This automatic extension code resides in multilib.bbclass.
5.5.2.2. Using Multilib
After you have set up the recipes, you need to define the actual
combination of multiple libraries you want to build.
You accomplish this through your local.conf
configuration file in the
Build Directory.
An example configuration would be as follows:
MACHINE = "qemux86-64"
require conf/multilib.conf
MULTILIBS = "multilib:lib32"
DEFAULTTUNE_virtclass-multilib-lib32 = "x86"
IMAGE_INSTALL_append = " lib32-glib-2.0"
This example enables an
additional library named lib32 alongside the
normal target packages.
When combining these "lib32" alternatives, the example uses "x86" for tuning.
For information on this particular tuning, see
meta/conf/machine/include/ia32/arch-ia32.inc.
The example then includes lib32-glib-2.0
in all the images, which illustrates one method of including a
multiple library dependency.
You can use a normal image build to include this dependency,
for example:
$ bitbake core-image-sato
You can also build Multilib packages specifically with a command like this:
$ bitbake lib32-glib-2.0
5.5.2.3. Additional Implementation Details
Generic implementation details as well as details that are specific to package management systems exist. Following are implementation details that exist regardless of the package management system:
The typical convention used for the class extension code as used by Multilib assumes that all package names specified in
PACKAGESthat contain${PN}have${PN}at the start of the name. When that convention is not followed and${PN}appears at the middle or the end of a name, problems occur.The
TARGET_VENDORvalue under Multilib will be extended to "-vendormlmultilib" (e.g. "-pokymllib32" for a "lib32" Multilib with Poky). The reason for this slightly unwieldy contraction is that any "-" characters in the vendor string presently break Autoconf'sconfig.sub, and other separators are problematic for different reasons.
'
For the RPM Package Management System, the following implementation details exist:
A unique architecture is defined for the Multilib packages, along with creating a unique deploy folder under
tmp/deploy/rpmin the Build Directory. For example, considerlib32in aqemux86-64image. The possible architectures in the system are "all", "qemux86_64", "lib32_qemux86_64", and "lib32_x86".The
${MLPREFIX}variable is stripped from${PN}during RPM packaging. The naming for a normal RPM package and a Multilib RPM package in aqemux86-64system resolves to something similar tobash-4.1-r2.x86_64.rpmandbash-4.1.r2.lib32_x86.rpm, respectively.When installing a Multilib image, the RPM backend first installs the base image and then installs the Multilib libraries.
The build system relies on RPM to resolve the identical files in the two (or more) Multilib packages.
For the IPK Package Management System, the following implementation details exist:
The
${MLPREFIX}is not stripped from${PN}during IPK packaging. The naming for a normal RPM package and a Multilib IPK package in aqemux86-64system resolves to something likebash_4.1-r2.x86_64.ipkandlib32-bash_4.1-rw_x86.ipk, respectively.The IPK deploy folder is not modified with
${MLPREFIX}because packages with and without the Multilib feature can exist in the same folder due to the${PN}differences.IPK defines a sanity check for Multilib installation using certain rules for file comparison, overridden, etc.
5.5.3. Installing Multiple Versions of the Same Library
Situations can exist where you need to install and use multiple versions of the same library on the same system at the same time. These situations almost always exist when a library API changes and you have multiple pieces of software that depend on the separate versions of the library. To accommodate these situations, you can install multiple versions of the same library in parallel on the same system.
The process is straightforward as long as the libraries use
proper versioning.
With properly versioned libraries, all you need to do to
individually specify the libraries is create separate,
appropriately named recipes where the
PN part of the
name includes a portion that differentiates each library version
(e.g.the major part of the version number).
Thus, instead of having a single recipe that loads one version
of a library (e.g. clutter), you provide
multiple recipes that result in different versions
of the libraries you want.
As an example, the following two recipes would allow the
two separate versions of the clutter
library to co-exist on the same system:
clutter-1.6_1.6.20.bb
clutter-1.8_1.8.4.bb
Additionally, if you have other recipes that depend on a given
library, you need to use the
DEPENDS
variable to create the dependency.
Continuing with the same example, if you want to have a recipe
depend on the 1.8 version of the clutter
library, use the following in your recipe:
DEPENDS = "clutter-1.8"
5.6. Enabling GObject Introspection Support
GObject introspection is the standard mechanism for accessing GObject-based software from runtime environments. GObject is a feature of the GLib library that provides an object framework for the GNOME desktop and related software. GObject Introspection adds information to GObject that allows objects created within it to be represented across different programming languages. If you want to construct GStreamer pipelines using Python, or control UPnP infrastructure using Javascript and GUPnP, GObject introspection is the only way to do it.
This section describes the Yocto Project support for generating
and packaging GObject introspection data.
GObject introspection data is a description of the
API provided by libraries built on top of GLib framework,
and, in particular, that framework's GObject mechanism.
GObject Introspection Repository (GIR) files go to
-dev packages,
typelib files go to main packages as they
are packaged together with libraries that are introspected.
The data is generated when building such a library, by linking the library with a small executable binary that asks the library to describe itself, and then executing the binary and processing its output.
Generating this data in a cross-compilation environment is difficult because the library is produced for the target architecture, but its code needs to be executed on the build host. This problem is solved with the OpenEmbedded build system by running the code through QEMU, which allows precisely that. Unfortunately, QEMU does not always work perfectly as mentioned in the xxx section.
5.6.1. Enabling the Generation of Introspection Data
Enabling the generation of introspection data (GIR files) in your library package involves the following:
Inherit the
gobject-introspectionclass.Make sure introspection is not disabled anywhere in the recipe or from anything the recipe includes. Also, make sure that "gobject-introspection-data" is not in
DISTRO_FEATURES_BACKFILL_CONSIDEREDand that "qemu-usermode" is not inMACHINE_FEATURES_BACKFILL_CONSIDERED. If either of these conditions exist, nothing will happen.Try to build the recipe. If you encounter build errors that look like something is unable to find
.solibraries, check where these libraries are located in the source tree and add the following to the recipe:GIR_EXTRA_LIBS_PATH = "${B}/something/.libs"Note
See recipes in theoe-corerepository that use thatGIR_EXTRA_LIBS_PATHvariable as an example.Look for any other errors, which probably mean that introspection support in a package is not entirely standard, and thus breaks down in a cross-compilation environment. For such cases, custom-made fixes are needed. A good place to ask and receive help in these cases is the Yocto Project mailing lists.
Note
Using a library that no longer builds against the latest Yocto Project release and prints introspection related errors is a good candidate for the previous procedure.
5.6.2. Disabling the Generation of Introspection Data
You might find that you do not want to generate introspection data. Or, perhaps QEMU does not work on your build host and target architecture combination. If so, you can use either of the following methods to disable GIR file generations:
Add the following to your distro configuration:
DISTRO_FEATURES_BACKFILL_CONSIDERED = "gobject-introspection-data"Adding this statement disables generating introspection data using QEMU but will still enable building introspection tools and libraries (i.e. building them does not require the use of QEMU).
Add the following to your machine configuration:
MACHINE_FEATURES_BACKFILL_CONSIDERED = "qemu-usermode"Adding this statement disables the use of QEMU when building packages for your machine. Currently, this feature is used only by introspection recipes and has the same effect as the previously described option.
Note
Future releases of the Yocto Project might have other features affected by this option.
If you disable introspection data, you can still obtain it through other means such as copying the data from a suitable sysroot, or by generating it on the target hardware. The OpenEmbedded build system does not currently provide specific support for these techniques.
5.6.3. Testing that Introspection Works in an Image
Use the following procedure to test if generating introspection data is working in an image:
Make sure that "gobject-introspection-data" is not in
DISTRO_FEATURES_BACKFILL_CONSIDEREDand that "qemu-usermode" is not inMACHINE_FEATURES_BACKFILL_CONSIDERED.Build
core-image-sato.Launch a Terminal and then start Python in the terminal.
Enter the following in the terminal:
>>> from gi.repository import GLib >>> GLib.get_host_name()For something a little more advanced, enter the following:
http://python-gtk-3-tutorial.readthedocs.org/en/latest/introduction.html
5.6.4. Known Issues
The following know issues exist for GObject Introspection Support:
qemu-ppc64immediately crashes. Consequently, you cannot build introspection data on that architecture.x32 is not supported by QEMU. Consequently, introspection data is disabled.
musl causes transient GLib binaries to crash on assertion failures. Consequently, generating introspection data is disabled.
Because QEMU is not able to run the binaries correctly, introspection is disabled for some specific packages under specific architectures (e.g.
gcr,libsecret, andwebkit).
5.7. Optionally Using an External Toolchain
You might want to use an external toolchain as part of your development. If this is the case, the fundamental steps you need to accomplish are as follows:
Understand where the installed toolchain resides. For cases where you need to build the external toolchain, you would need to take separate steps to build and install the toolchain.
Make sure you add the layer that contains the toolchain to your
bblayers.conffile through theBBLAYERSvariable.Set the
EXTERNAL_TOOLCHAINvariable in yourlocal.conffile to the location in which you installed the toolchain.
A good example of an external toolchain used with the Yocto Project
is Mentor Graphics®
Sourcery G++ Toolchain.
You can see information on how to use that particular layer in the
README file at
http://github.com/MentorEmbedded/meta-sourcery/.
You can find further information by reading about the
TCMODE
variable in the Yocto Project Reference Manual's variable glossary.
5.8. Creating Partitioned Images
Creating an image for a particular hardware target using the
OpenEmbedded build system does not necessarily mean you can boot
that image as is on your device.
Physical devices accept and boot images in various ways depending
on the specifics of the device.
Usually, information about the hardware can tell you what image
format the device requires.
Should your device require multiple partitions on an SD card, flash,
or an HDD, you can use the OpenEmbedded Image Creator,
wic, to create the properly partitioned image.
The wic command generates partitioned images
from existing OpenEmbedded build artifacts.
Image generation is driven by partitioning commands contained
in an Openembedded kickstart file (.wks)
specified either directly on the command line or as one of a
selection of canned .wks files as shown
with the wic list images command in the
"Using an Existing Kickstart File"
section.
When applied to a given set of build artifacts, the result is an
image or set of images that can be directly written onto media and
used on a particular system.
The wic command and the infrastructure
it is based on is by definition incomplete.
Its purpose is to allow the generation of customized images,
and as such was designed to be completely extensible through a
plug-in interface.
See the
"Plug-ins"
section for information on these plug-ins.
This section provides some background information on
wic, describes what you need to have in
place to run the tool, provides instruction on how to use
wic, and provides several examples.
5.8.1. Background
This section provides some background on the
wic utility.
While none of this information is required to use
wic, you might find it interesting.
The name "wic" is derived from OpenEmbedded Image Creator (oeic). The "oe" diphthong in "oeic" was promoted to the letter "w", because "oeic" is both difficult to remember and pronounce.
wicis loosely based on the Meego Image Creator (mic) framework. Thewicimplementation has been heavily modified to make direct use of OpenEmbedded build artifacts instead of package installation and configuration, which are already incorporated within the OpenEmbedded artifacts.wicis a completely independent standalone utility that initially provides easier-to-use and more flexible replacements for a couple bits of existing functionality in OE Core'simage-liveclass andmkefidisk.shscript. The difference betweenwicand those examples is that withwicthe functionality of those scripts is implemented by a general-purpose partitioning language, which is based on Redhat kickstart syntax.
5.8.2. Requirements
In order to use the wic utility
with the OpenEmbedded Build system, your system needs
to meet the following requirements:
The Linux distribution on your development host must support the Yocto Project. See the "Supported Linux Distributions" section in the Yocto Project Reference Manual for this list of distributions.
The standard system utilities, such as
cp, must be installed on your development host system.You need to have the build artifacts already available, which typically means that you must have already created an image using the Openembedded build system (e.g.
core-image-minimal). While it might seem redundant to generate an image in order to create an image usingwic, the current version ofwicrequires the artifacts in the form generated by the build system.You must build several native tools, which are tools built to run on the build system:
$ bitbake parted-native dosfstools-native mtools-nativeYou must have sourced one of the build environment setup scripts (i.e.
oe-init-build-envoroe-init-build-env-memres) found in the Build Directory.
5.8.3. Getting Help
You can get general help for the wic
by entering the wic command by itself
or by entering the command with a help argument as follows:
$ wic -h
$ wic --help
Currently, wic supports two commands:
create and list.
You can get help for these commands as follows:
$ wic help command
You can also get detailed help on a number of topics
from the help system.
The output of wic --help
displays a list of available help
topics under a "Help topics" heading.
You can have the help system display the help text for
a given topic by prefacing the topic with
wic help:
$ wic help help_topic
You can find out more about the images
wic creates using the existing
kickstart files with the following form of the command:
$ wic list image help
where imagedirectdisk or
mkefidisk.
5.8.4. Operational Modes
You can use wic in two different
modes, depending on how much control you need for
specifying the Openembedded build artifacts that are
used for creating the image: Raw and Cooked:
Raw Mode: You explicitly specify build artifacts through command-line arguments.
Cooked Mode: The current
MACHINEsetting and image name are used to automatically locate and provide the build artifacts.
Regardless of the mode you use, you need to have the build
artifacts ready and available.
Additionally, the environment must be set up using the
oe-init-build-env
or
oe-init-build-env-memres
script found in the
Build Directory.
5.8.4.1. Raw Mode
The general form of the 'wic' command in raw mode is:
$ wic create image_name.wks [options] [...]
Where:
image_name.wks
An OpenEmbedded kickstart file. You can provide
your own custom file or use a file from a set of
existing files as described by further options.
-o OUTDIR, --outdir=OUTDIR
The name of a directory in which to create image.
-i PROPERTIES_FILE, --infile=PROPERTIES_FILE
The name of a file containing the values for image
properties as a JSON file.
-e IMAGE_NAME, --image-name=IMAGE_NAME
The name of the image from which to use the artifacts
(e.g. core-image-sato).
-r ROOTFS_DIR, --rootfs-dir=ROOTFS_DIR
The path to the /rootfs directory to use as the
.wks rootfs source.
-b BOOTIMG_DIR, --bootimg-dir=BOOTIMG_DIR
The path to the directory containing the boot artifacts
(e.g. /EFI or /syslinux) to use as the .wks bootimg
source.
-k KERNEL_DIR, --kernel-dir=KERNEL_DIR
The path to the directory containing the kernel to use
in the .wks boot image.
-n NATIVE_SYSROOT, --native-sysroot=NATIVE_SYSROOT
The path to the native sysroot containing the tools to use
to build the image.
-s, --skip-build-check
Skips the build check.
-D, --debug
Output debug information.
Note
You do not need root privileges to runwic.
In fact, you should not run as root when using the
utility.
5.8.4.2. Cooked Mode
The general form of the wic command
using Cooked Mode is:
$ wic create kickstart_file -e image_name
Where:
kickstart_file
An OpenEmbedded kickstart file. You can provide your own
custom file or supplied file.
image_name
Specifies the image built using the OpenEmbedded build
system.
This form is the simplest and most user-friendly, as it
does not require specifying all individual parameters.
All you need to provide is your own
.wks file or one provided with the
release.
5.8.5. Using an Existing Kickstart File
If you do not want to create your own
.wks file, you can use an existing
file provided by the wic installation.
Use the following command to list the available files:
$ wic list images
directdisk Create a 'pcbios' direct disk image
mkefidisk Create an EFI disk image
When you use an existing file, you do not have to use the
.wks extension.
Here is an example in Raw Mode that uses the
directdisk file:
$ wic create directdisk -r rootfs_dir -b bootimg_dir \
-k kernel_dir -n native_sysroot
Here are the actual partition language commands
used in the mkefidisk.wks file to generate
an image:
# short-description: Create an EFI disk image
# long-description: Creates a partitioned EFI disk image that the user
# can directly dd to boot media.
part /boot --source bootimg-efi --ondisk sda --label msdos --active --align 1024
part / --source rootfs --ondisk sda --fstype=ext3 --label platform --align 1024
part swap --ondisk sda --size 44 --label swap1 --fstype=swap
bootloader --timeout=10 --append="rootwait rootfstype=ext3 console=ttyPCH0,115200 console=tty0 vmalloc=256MB snd-hda-intel.enable_msi=0"
5.8.6. Examples
This section provides several examples that show how to use
the wic utility.
All the examples assume the list of requirements in the
"Requirements" section
have been met.
The examples assume the previously generated image is
core-image-minimal.
5.8.6.1. Generate an Image using an Existing Kickstart File
This example runs in Cooked Mode and uses the
mkefidisk kickstart file:
$ wic create mkefidisk -e core-image-minimal
Checking basic build environment...
Done.
Creating image(s)...
Info: The new image(s) can be found here:
/var/tmp/wic/build/mkefidisk-201310230946-sda.direct
The following build artifacts were used to create the image(s):
ROOTFS_DIR: /home/trz/yocto/yocto-image/build/tmp/work/minnow-poky-linux/core-image-minimal/1.0-r0/rootfs
BOOTIMG_DIR: /home/trz/yocto/yocto-image/build/tmp/work/minnow-poky-linux/core-image-minimal/1.0-r0/core-image-minimal-1.0/hddimg
KERNEL_DIR: /home/trz/yocto/yocto-image/build/tmp/sysroots/minnow/usr/src/kernel
NATIVE_SYSROOT: /home/trz/yocto/yocto-image/build/tmp/sysroots/x86_64-linux
The image(s) were created using OE kickstart file:
/home/trz/yocto/yocto-image/scripts/lib/image/canned-wks/mkefidisk.wks
This example shows the easiest way to create an image
by running in Cooked Mode and using the
-e option with an existing kickstart
file.
All that is necessary is to specify the image used to
generate the artifacts.
Your local.conf needs to have the
MACHINE
variable set to the machine you are using, which is
"minnow" in this example.
The output specifies the exact image created as well as
where it was created.
The output also names the artifacts used and the exact
.wks script that was used to generate
the image.
Note
You should always verify the details provided in the output to make sure that the image was indeed created exactly as expected.
Continuing with the example, you can now directly
dd the image to a USB stick, or
whatever media for which you built your image,
and boot the resulting media:
$ sudo dd if=/var/tmp/wic/build/mkefidisk-201310230946-sda.direct of=/dev/sdb
[sudo] password for trz:
182274+0 records in
182274+0 records out
93324288 bytes (93 MB) copied, 14.4777 s, 6.4 MB/s
[trz@empanada ~]$ sudo eject /dev/sdb
5.8.6.2. Using a Modified Kickstart File
Because wic image creation is driven
by the kickstart file, it is easy to affect image creation
by changing the parameters in the file.
This next example demonstrates that through modification
of the directdisk kickstart file.
As mentioned earlier, you can use the command
wic list images to show the list
of existing kickstart files.
The directory in which these files reside is
scripts/lib/image/canned-wks/
located in the
Source Directory.
Because the available files reside in this directory, you
can create and add your own custom files to the directory.
Subsequent use of the wic list images
command would then include your kickstart files.
In this example, the existing
directdisk file already does most
of what is needed.
However, for the hardware in this example, the image will
need to boot from sdb instead of
sda, which is what the
directdisk kickstart file uses.
The example begins by making a copy of the
directdisk.wks file in the
scripts/lib/image/canned-wks
directory and then changing the lines that specify the
target disk from which to boot.
$ cp /home/trz/yocto/yocto-image/scripts/lib/image/canned-wks/directdisk.wks \
/home/trz/yocto/yocto-image/scripts/lib/image/canned-wks/directdisksdb.wks
Next, the example modifies the
directdisksdb.wks file and changes all
instances of "--ondisk sda"
to "--ondisk sdb".
The example changes the following two lines and leaves the
remaining lines untouched:
part /boot --source bootimg-pcbios --ondisk sdb --label boot --active --align 1024
part / --source rootfs --ondisk sdb --fstype=ext3 --label platform --align 1024
Once the lines are changed, the example generates the
directdisksdb image.
The command points the process at the
core-image-minimal artifacts for the
Next Unit of Computing (nuc)
MACHINE
the local.conf.
$ wic create directdisksdb -e core-image-minimal
Checking basic build environment...
Done.
Creating image(s)...
Info: The new image(s) can be found here:
/var/tmp/wic/build/directdisksdb-201310231131-sdb.direct
The following build artifacts were used to create the image(s):
ROOTFS_DIR: /home/trz/yocto/yocto-image/build/tmp/work/nuc-poky-linux/core-image-minimal/1.0-r0/rootfs
BOOTIMG_DIR: /home/trz/yocto/yocto-image/build/tmp/sysroots/nuc/usr/share
KERNEL_DIR: /home/trz/yocto/yocto-image/build/tmp/sysroots/nuc/usr/src/kernel
NATIVE_SYSROOT: /home/trz/yocto/yocto-image/build/tmp/sysroots/x86_64-linux
The image(s) were created using OE kickstart file:
/home/trz/yocto/yocto-image/scripts/lib/image/canned-wks/directdisksdb.wks
Continuing with the example, you can now directly
dd the image to a USB stick, or
whatever media for which you built your image,
and boot the resulting media:
$ sudo dd if=/var/tmp/wic/build/directdisksdb-201310231131-sdb.direct of=/dev/sdb
86018+0 records in
86018+0 records out
44041216 bytes (44 MB) copied, 13.0734 s, 3.4 MB/s
[trz@empanada tmp]$ sudo eject /dev/sdb
5.8.6.3. Creating an Image Based on core-image-minimal and crownbay-noemgd
This example creates an image based on
core-image-minimal and a
crownbay-noemgd
MACHINE
that works right out of the box.
$ wic create directdisk -e core-image-minimal
Checking basic build environment...
Done.
Creating image(s)...
Info: The new image(s) can be found here:
/var/tmp/wic/build/directdisk-201309252350-sda.direct
The following build artifacts were used to create the image(s):
ROOTFS_DIR: /home/trz/yocto/yocto-image/build/tmp/work/crownbay_noemgd-poky-linux/core-image-minimal/1.0-r0/rootfs
BOOTIMG_DIR: /home/trz/yocto/yocto-image/build/tmp/sysroots/crownbay-noemgd/usr/share
KERNEL_DIR: /home/trz/yocto/yocto-image/build/tmp/sysroots/crownbay-noemgd/usr/src/kernel
NATIVE_SYSROOT: /home/trz/yocto/yocto-image/build/tmp/sysroots/crownbay-noemgd/usr/src/kernel
The image(s) were created using OE kickstart file:
/home/trz/yocto/yocto-image/scripts/lib/image/canned-wks/directdisk.wks
5.8.6.4. Using a Modified Kickstart File and Running in Raw Mode
This next example manually specifies each build artifact
(runs in Raw Mode) and uses a modified kickstart file.
The example also uses the -o option
to cause wic to create the output
somewhere other than the default
/var/tmp/wic directory:
$ wic create ~/test.wks -o /home/trz/testwic --rootfs-dir \
/home/trz/yocto/yocto-image/build/tmp/work/crownbay_noemgd-poky-linux/core-image-minimal/1.0-r0/rootfs \
--bootimg-dir /home/trz/yocto/yocto-image/build/tmp/sysroots/crownbay-noemgd/usr/share \
--kernel-dir /home/trz/yocto/yocto-image/build/tmp/sysroots/crownbay-noemgd/usr/src/kernel \
--native-sysroot /home/trz/yocto/yocto-image/build/tmp/sysroots/x86_64-linux
Creating image(s)...
Info: The new image(s) can be found here:
/home/trz/testwic/build/test-201309260032-sda.direct
The following build artifacts were used to create the image(s):
ROOTFS_DIR: /home/trz/yocto/yocto-image/build/tmp/work/crownbay_noemgd-poky-linux/core-image-minimal/1.0-r0/rootfs
BOOTIMG_DIR: /home/trz/yocto/yocto-image/build/tmp/sysroots/crownbay-noemgd/usr/share
KERNEL_DIR: /home/trz/yocto/yocto-image/build/tmp/sysroots/crownbay-noemgd/usr/src/kernel
NATIVE_SYSROOT: /home/trz/yocto/yocto-image/build/tmp/sysroots/crownbay-noemgd/usr/src/kernel
The image(s) were created using OE kickstart file:
/home/trz/test.wks
For this example,
MACHINE
did not have to be specified in the
local.conf file since the artifact is
manually specified.
5.8.7. Plug-ins
Plug-ins allow wic functionality to
be extended and specialized by users.
This section documents the plugin interface, which is
currently restricted to source plug ins.
Source plug ins provide a mechanism to customize
various aspects of the image generation process in
wic, mainly the contents of
partitions.
The plug ins provide a mechanism for mapping values
specified in .wks files using the
--source keyword to a
particular plugin implementation that populates a
corresponding partition.
A source plugin is created as a subclass of
SourcePlugin.
The plugin file containing it is added to
scripts/lib/wic/plugins/source/ to
make the plugin implementation available to the
wic implementation.
For more information, see
scripts/lib/wic/pluginbase.py.
Source plugins can also be implemented and added by
external layers.
As such, any plugins found in a
scripts/lib/wic/plugins/source/
directory in an external layer are also made
available.
When the wic implementation needs
to invoke a partition-specific implementation, it looks
for the plugin that has the same name as the
--source parameter given to
that partition.
For example, if the partition is set up as follows:
part /boot --source bootimg-pcbios ...
The methods defined as class members of the plugin
having the matching bootimg-pcbios.name
class member are used.
To be more concrete, here is the plugin definition that
matches a
--source bootimg-pcbios usage,
along with an example
method called by the wic implementation
when it needs to invoke an implementation-specific
partition-preparation function:
class BootimgPcbiosPlugin(SourcePlugin):
name = 'bootimg-pcbios'
@classmethod
def do_prepare_partition(self, part, ...)
If the subclass itself does not implement a function, a
default version in a superclass is located and
used, which is why all plugins must be derived from
SourcePlugin.
The SourcePlugin class defines the
following methods, which is the current set of methods
that can be implemented or overridden by
--source plugins.
Any methods not implemented by a
SourcePlugin subclass inherit the
implementations present in the
SourcePlugin class.
For more information, see the
SourcePlugin source for details:
do_prepare_partition(): Called to do the actual content population for a partition. In other words, the method prepares the final partition image that is incorporated into the disk image.do_configure_partition(): Called beforedo_prepare_partition(). This method is typically used to create custom configuration files for a partition (e.g. syslinux or grub configuration files).do_install_disk(): Called after all partitions have been prepared and assembled into a disk image. This method provides a hook to allow finalization of a disk image, (e.g. writing an MBR).do_stage_partition(): Special content-staging hook called beforedo_prepare_partition(). This method is normally empty.Typically, a partition just uses the passed-in parameters (e.g. the unmodified value of
bootimg_dir). However, in some cases things might need to be more tailored. As an example, certain files might additionally need to be taken frombootimg_dir + /boot. This hook allows those files to be staged in a customized fashion.Note
get_bitbake_var()allows you to access non-standard variables that you might want to use for this.
This scheme is extensible.
Adding more hooks is a simple matter of adding more
plugin methods to SourcePlugin and
derived classes.
The code that then needs to call the plugin methods uses
plugin.get_source_plugin_methods()
to find the method or methods needed by the call.
Retrieval of those methods is accomplished
by filling up a dict with keys
containing the method names of interest.
On success, these will be filled in with the actual
methods.
Please see the wic
implementation for examples and details.
5.8.8. OpenEmbedded Kickstart (.wks) Reference
The current wic implementation supports
only the basic kickstart partitioning commands:
partition (or part
for short) and bootloader.
Note
Future updates will implement more commands and options. If you use anything that is not specifically supported, results can be unpredictable.
The following is a list of the commands, their syntax,
and meanings.
The commands are based on the Fedora
kickstart versions but with modifications to
reflect wic capabilities.
You can see the original documentation for those commands
at the following links:
5.8.8.1. Command: part or partition
Either of these commands create a partition on the system and uses the following syntax:
part [mntpoint]
partition [mntpoint]
If you do not provide
mntpoint, wic creates a partition
but does not mount it.
The mntpoint
/: For example,path/,/usr, or/homeswap: The created partition is used as swap space.
Specifying a mntpoint causes
the partition to automatically be mounted.
Wic achieves this by adding entries to the filesystem
table (fstab) during image generation.
In order for wic to generate a valid fstab, you must
also provide one of the --ondrive,
--ondisk, or
--use-uuid partition options as part
of the command.
Here is an example using "/" as the mountpoint.
The command uses "--ondisk" to force the partition onto
the sdb disk:
part / --source rootfs --ondisk sdb --fstype=ext3 --label platform --align 1024
Here is a list that describes other supported options you
can use with the part and
partition commands:
--size: The minimum partition size in MBytes. Specify an integer value such as 500. Do not append the number with "MB". You do not need this option if you use--source.--source: This option is awic-specific option that names the source of the data that populates the partition. The most common value for this option is "rootfs", but you can use any value that maps to a valid source plugin. For information on the source plugins, see the "Plugins" section.If you use
--source rootfs,wiccreates a partition as large as needed and to fill it with the contents of the root filesystem pointed to by the-rcommand-line option or the equivalent rootfs derived from the-ecommand-line option. The filesystem type used to create the partition is driven by the value of the--fstypeoption specified for the partition. See the entry on--fstypethat follows for more information.If you use
--source,plugin-namewiccreates a partition as large as needed and fills it with the contents of the partition that is generated by the specified plugin name using the data pointed to by the-rcommand-line option or the equivalent rootfs derived from the-ecommand-line option. Exactly what those contents and filesystem type end up being are dependent on the given plugin implementation.If you do not use the
--sourceoption, thewiccommand creates an empty partition. Consequently, you must use the--sizeoption to specify the size of the empty partition.--ondiskor--ondrive: Forces the partition to be created on a particular disk.--fstype: Sets the file system type for the partition. Valid values are:ext4ext3ext2btrfssquashfsswap
--fsoptions: Specifies a free-form string of options to be used when mounting the filesystem. This string will be copied into the/etc/fstabfile of the installed system and should be enclosed in quotes. If not specified, the default string is "defaults".--label label: Specifies the label to give to the filesystem to be made on the partition. If the given label is already in use by another filesystem, a new label is created for the partition.--active: Marks the partition as active.--align (in KBytes): This option is awic-specific option that says to start a partition on an x KBytes boundary.--no-table: This option is awic-specific option. Using the option reserves space for the partition and causes it to become populated. However, the partition is not added to the partition table.--extra-space: This option is awic-specific option that adds extra space after the space filled by the content of the partition. The final size can go beyond the size specified by the--sizeoption. The default value is 10 Mbytes.--overhead-factor: This option is awic-specific option that multiplies the size of the partition by the option's value. You must supply a value greater than or equal to "1". The default value is "1.3".--part-type: This option is awic-specific option that specifies the partition type globally unique identifier (GUID) for GPT partitions. You can find the list of partition type GUIDs at http://en.wikipedia.org/wiki/GUID_Partition_Table#Partition_type_GUIDs.--use-uuid: This option is awic-specific option that causeswicto generate a random GUID for the partition. The generated identifier is used in the bootloader configuration to specify the root partition.--uuid: This option is awic-specific option that specifies the partition UUID.
5.8.8.2. Command: bootloader
This command specifies how the boot loader should be configured and supports the following options:
Note
Bootloader functionality and boot partitions are implemented by the various--source
plugins that implement bootloader functionality.
The bootloader command essentially provides a means of
modifying bootloader configuration.
--timeout: Specifies the number of seconds before the bootloader times out and boots the default option.--append: Specifies kernel parameters. These parameters will be added to the syslinuxAPPENDorgrubkernel command line.--configfile: Specifies a user-defined configuration file for the bootloader. You can provide a full pathname for the file or a file that exists in thecanned-wksfolder. This option overrides all other bootloader options.
5.9. Configuring the Kernel
Configuring the Yocto Project kernel consists of making sure the
.config file has all the right information
in it for the image you are building.
You can use the menuconfig tool and
configuration fragments to make sure your
.config file is just how you need it.
You can also save known configurations in a
defconfig file that the build system can use
for kernel configuration.
This section describes how to use menuconfig,
create and use configuration fragments, and how to interactively
modify your .config file to create the
leanest kernel configuration file possible.
For more information on kernel configuration, see the "Changing the Configuration" section in the Yocto Project Linux Kernel Development Manual.
5.9.1. Using menuconfig
The easiest way to define kernel configurations is to set them through the
menuconfig tool.
This tool provides an interactive method with which
to set kernel configurations.
For general information on menuconfig, see
http://en.wikipedia.org/wiki/Menuconfig.
To use the menuconfig tool in the Yocto Project development
environment, you must launch it using BitBake.
Thus, the environment must be set up using the
oe-init-build-env
or
oe-init-build-env-memres
script found in the
Build Directory.
You must also be sure of the state of your build in the
Source Directory.
The following commands run menuconfig
assuming the Source Directory's top-level folder is
~/poky:
$ cd poky
$ source oe-init-build-env
$ bitbake linux-yocto -c kernel_configme -f
$ bitbake linux-yocto -c menuconfig
Once menuconfig comes up, its standard
interface allows you to interactively examine and configure
all the kernel configuration parameters.
After making your changes, simply exit the tool and save your
changes to create an updated version of the
.config configuration file.
Consider an example that configures the linux-yocto-3.14
kernel.
The OpenEmbedded build system recognizes this kernel as
linux-yocto.
Thus, the following commands from the shell in which you previously sourced the
environment initialization script cleans the shared state cache and the
WORKDIR
directory and then runs menuconfig:
$ bitbake linux-yocto -c menuconfig
Once menuconfig launches, use the interface
to navigate through the selections to find the configuration settings in
which you are interested.
For example, consider the CONFIG_SMP configuration setting.
You can find it at Processor Type and Features under
the configuration selection Symmetric Multi-processing Support.
After highlighting the selection, use the arrow keys to select or deselect
the setting.
When you are finished with all your selections, exit out and save them.
Saving the selections updates the .config configuration file.
This is the file that the OpenEmbedded build system uses to configure the
kernel during the build.
You can find and examine this file in the Build Directory in
tmp/work/.
The actual .config is located in the area where the
specific kernel is built.
For example, if you were building a Linux Yocto kernel based on the
Linux 3.14 kernel and you were building a QEMU image targeted for
x86 architecture, the
.config file would be located here:
poky/build/tmp/work/qemux86-poky-linux/linux-yocto-3.14.11+git1+84f...
...656ed30-r1/linux-qemux86-standard-build
Note
The previous example directory is artificially split and many of the characters in the actual filename are omitted in order to make it more readable. Also, depending on the kernel you are using, the exact pathname forlinux-yocto-3.14... might differ.
Within the .config file, you can see the kernel settings.
For example, the following entry shows that symmetric multi-processor support
is not set:
# CONFIG_SMP is not set
A good method to isolate changed configurations is to use a combination of the
menuconfig tool and simple shell commands.
Before changing configurations with menuconfig, copy the
existing .config and rename it to something else,
use menuconfig to make
as many changes as you want and save them, then compare the renamed configuration
file against the newly created file.
You can use the resulting differences as your base to create configuration fragments
to permanently save in your kernel layer.
Note
Be sure to make a copy of the.config and don't just
rename it.
The build system needs an existing .config
from which to work.
5.9.2. Creating a defconfig File
A defconfig file is simply a
.config renamed to "defconfig".
You can use a defconfig file
to retain a known set of kernel configurations from which the
OpenEmbedded build system can draw to create the final
.config file.
Note
Out-of-the-box, the Yocto Project never ships adefconfig or
.config file.
The OpenEmbedded build system creates the final
.config file used to configure the
kernel.
To create a defconfig, start with a
complete, working Linux kernel .config
file.
Copy that file to the appropriate
${PN}
directory in your layer's
recipes-kernel/linux directory, and rename
the copied file to "defconfig".
Then, add the following lines to the linux-yocto
.bbappend file in your layer:
FILESEXTRAPATHS_prepend := "${THISDIR}/${PN}:"
SRC_URI += "file://defconfig"
The
SRC_URI
tells the build system how to search for the file, while the
FILESEXTRAPATHS
extends the
FILESPATH
variable (search directories) to include the
${PN} directory you created to hold the
configuration changes.
Note
The build system applies the configurations from thedefconfig file before applying any
subsequent configuration fragments.
The final kernel configuration is a combination of the
configurations in the defconfig
file and any configuration fragments you provide.
You need to realize that if you have any configuration
fragments, the build system applies these on top of and
after applying the existing defconfig file configurations.
For more information on configuring the kernel, see the "Changing the Configuration" and "Generating Configuration Files" sections, both in the Yocto Project Linux Kernel Development Manual.
5.9.3. Creating Configuration Fragments
Configuration fragments are simply kernel options that appear in a file
placed where the OpenEmbedded build system can find and apply them.
Syntactically, the configuration statement is identical to what would appear
in the .config file, which is in the
Build Directory:
tmp/work/arch-poky-linux/linux-yocto-release_specific_string/linux-arch-build_type
It is simple to create a configuration fragment.
For example, issuing the following from the shell creates a configuration fragment
file named my_smp.cfg that enables multi-processor support
within the kernel:
$ echo "CONFIG_SMP=y" >> my_smp.cfg
Note
All configuration fragment files must use the.cfg extension in order for the
OpenEmbedded build system to recognize them as a
configuration fragment.
Where do you put your configuration fragment files?
You can place these files in the same area pointed to by
SRC_URI.
The OpenEmbedded build system picks up the configuration and
adds it to the kernel's configuration.
For example, suppose you had a set of configuration options
in a file called myconfig.cfg.
If you put that file inside a directory named
linux-yocto that resides in the same
directory as the kernel's append file and then add a
SRC_URI statement such as the following
to the kernel's append file, those configuration options
will be picked up and applied when the kernel is built.
SRC_URI += "file://myconfig.cfg"
As mentioned earlier, you can group related configurations into multiple files and
name them all in the SRC_URI statement as well.
For example, you could group separate configurations specifically for Ethernet and graphics
into their own files and add those by using a SRC_URI statement like the
following in your append file:
SRC_URI += "file://myconfig.cfg \
file://eth.cfg \
file://gfx.cfg"
5.9.4. Fine-Tuning the Kernel Configuration File
You can make sure the .config file is as lean or efficient as
possible by reading the output of the kernel configuration fragment audit,
noting any issues, making changes to correct the issues, and then repeating.
As part of the kernel build process, the
do_kernel_configcheck task runs.
This task validates the kernel configuration by checking the final
.config file against the input files.
During the check, the task produces warning messages for the following
issues:
Requested options that did not make the final
.configfile.Configuration items that appear twice in the same configuration fragment.
Configuration items tagged as "required" that were overridden.
A board overrides a non-board specific option.
Listed options not valid for the kernel being processed. In other words, the option does not appear anywhere.
Note
Thedo_kernel_configcheck task can
also optionally report if an option is overridden during
processing.
For each output warning, a message points to the file that contains a list of the options and a pointer to the configuration fragment that defines them. Collectively, the files are the key to streamlining the configuration.
To streamline the configuration, do the following:
Start with a full configuration that you know works - it builds and boots successfully. This configuration file will be your baseline.
Separately run the
do_kernel_configmeanddo_kernel_configchecktasks.Take the resulting list of files from the
do_kernel_configchecktask warnings and do the following:Drop values that are redefined in the fragment but do not change the final
.configfile.Analyze and potentially drop values from the
.configfile that override required configurations.Analyze and potentially remove non-board specific options.
Remove repeated and invalid options.
After you have worked through the output of the kernel configuration audit, you can re-run the
do_kernel_configmeanddo_kernel_configchecktasks to see the results of your changes. If you have more issues, you can deal with them as described in the previous step.
Iteratively working through steps two through four eventually yields
a minimal, streamlined configuration file.
Once you have the best .config, you can build the Linux
Yocto kernel.
5.9.5. Determining Hardware and Non-Hardware Features for the Kernel Configuration Audit Phase
This section describes part of the kernel configuration audit
phase that most developers can ignore.
During this part of the audit phase, the contents of the final
.config file are compared against the
fragments specified by the system.
These fragments can be system fragments, distro fragments,
or user specified configuration elements.
Regardless of their origin, the OpenEmbedded build system
warns the user if a specific option is not included in the
final kernel configuration.
In order to not overwhelm the user with configuration warnings, by default the system only reports on missing "hardware" options because a missing hardware option could mean a boot failure or that important hardware is not available.
To determine whether or not a given option is "hardware" or "non-hardware", the kernel Metadata contains files that classify individual or groups of options as either hardware or non-hardware. To better show this, consider a situation where the Yocto Project kernel cache contains the following files:
kernel-cache/features/drm-psb/hardware.cfg
kernel-cache/features/kgdb/hardware.cfg
kernel-cache/ktypes/base/hardware.cfg
kernel-cache/bsp/mti-malta32/hardware.cfg
kernel-cache/bsp/fsl-mpc8315e-rdb/hardware.cfg
kernel-cache/bsp/qemu-ppc32/hardware.cfg
kernel-cache/bsp/qemuarma9/hardware.cfg
kernel-cache/bsp/mti-malta64/hardware.cfg
kernel-cache/bsp/arm-versatile-926ejs/hardware.cfg
kernel-cache/bsp/common-pc/hardware.cfg
kernel-cache/bsp/common-pc-64/hardware.cfg
kernel-cache/features/rfkill/non-hardware.cfg
kernel-cache/ktypes/base/non-hardware.cfg
kernel-cache/features/aufs/non-hardware.kcf
kernel-cache/features/ocf/non-hardware.kcf
kernel-cache/ktypes/base/non-hardware.kcf
kernel-cache/ktypes/base/hardware.kcf
kernel-cache/bsp/qemu-ppc32/hardware.kcf
The following list provides explanations for the various files:
hardware.kcf: Specifies a list of kernel Kconfig files that contain hardware options only.non-hardware.kcf: Specifies a list of kernel Kconfig files that contain non-hardware options only.hardware.cfg: Specifies a list of kernelCONFIG_options that are hardware, regardless of whether or not they are within a Kconfig file specified by a hardware or non-hardware Kconfig file (i.e.hardware.kcfornon-hardware.kcf).non-hardware.cfg: Specifies a list of kernelCONFIG_options that are not hardware, regardless of whether or not they are within a Kconfig file specified by a hardware or non-hardware Kconfig file (i.e.hardware.kcfornon-hardware.kcf).
Here is a specific example using the
kernel-cache/bsp/mti-malta32/hardware.cfg:
CONFIG_SERIAL_8250
CONFIG_SERIAL_8250_CONSOLE
CONFIG_SERIAL_8250_NR_UARTS
CONFIG_SERIAL_8250_PCI
CONFIG_SERIAL_CORE
CONFIG_SERIAL_CORE_CONSOLE
CONFIG_VGA_ARB
The kernel configuration audit automatically detects these
files (hence the names must be exactly the ones discussed here),
and uses them as inputs when generating warnings about the
final .config file.
A user-specified kernel Metadata repository, or recipe space
feature, can use these same files to classify options that are
found within its .cfg files as hardware
or non-hardware, to prevent the OpenEmbedded build system from
producing an error or warning when an option is not in the
final .config file.
5.10. Patching the Kernel
Patching the kernel involves changing or adding configurations to an existing kernel, changing or adding recipes to the kernel that are needed to support specific hardware features, or even altering the source code itself.
Note
You can use theyocto-kernel script
found in the Source Directory
under scripts to manage kernel patches and configuration.
See the "Managing kernel Patches and Config Items with yocto-kernel"
section in the Yocto Project Board Support Packages (BSP) Developer's Guide for
more information.
This example creates a simple patch by adding some QEMU emulator console
output at boot time through printk statements in the kernel's
calibrate.c source code file.
Applying the patch and booting the modified image causes the added
messages to appear on the emulator's console.
The example assumes a clean build exists for the qemux86
machine in a
Source Directory
named poky.
Furthermore, the Build Directory is
build and is located in poky and
the kernel is based on the Linux 3.4 kernel.
Also, for more information on patching the kernel, see the "Applying Patches" section in the Yocto Project Linux Kernel Development Manual.
5.10.1. Create a Layer for your Changes
The first step is to create a layer so you can isolate your
changes.
Rather than use the yocto-layer script
to create the layer, this example steps through the process
by hand.
If you want information on the script that creates a general
layer, see the
"Creating a General Layer Using the yocto-layer Script"
section.
These two commands create a directory you can use for your layer:
$ cd ~/poky
$ mkdir meta-mylayer
Creating a directory that follows the Yocto Project layer naming conventions sets up the layer for your changes. The layer is where you place your configuration files, append files, and patch files. To learn more about creating a layer and filling it with the files you need, see the "Understanding and Creating Layers" section.
5.10.2. Finding the Kernel Source Code
Each time you build a kernel image, the kernel source code is fetched and unpacked into the following directory:
${S}/linux
See the "Finding Temporary Source Code"
section and the
S variable
for more information about where source is kept during a build.
For this example, we are going to patch the
init/calibrate.c file
by adding some simple console printk statements that we can
see when we boot the image using QEMU.
5.10.3. Creating the Patch
Two methods exist by which you can create the patch:
devtool and
Quilt.
For kernel patches, the Git workflow is more appropriate.
This section assumes the Git workflow and shows the steps specific to
this example.
Change the working directory: Change to where the kernel source code is before making your edits to the
calibrate.cfile:$ cd ~/poky/build/tmp/work/qemux86-poky-linux/linux-yocto-${PV}-${PR}/linuxBecause you are working in an established Git repository, you must be in this directory in order to commit your changes and create the patch file.
Edit the source file: Edit the
init/calibrate.cfile to have the following changes:void calibrate_delay(void) { unsigned long lpj; static bool printed; int this_cpu = smp_processor_id(); printk("*************************************\n"); printk("* *\n"); printk("* HELLO YOCTO KERNEL *\n"); printk("* *\n"); printk("*************************************\n"); if (per_cpu(cpu_loops_per_jiffy, this_cpu)) { . . .Stage and commit your changes: These Git commands display the modified file, stage it, and then commit the file:
$ git status $ git add init/calibrate.c $ git commit -m "calibrate: Add printk example"Generate the patch file: This Git command creates the a patch file named
0001-calibrate-Add-printk-example.patchin the current directory.$ git format-patch -1
5.10.4. Set Up Your Layer for the Build
These steps get your layer set up for the build:
Create additional structure: Create the additional layer structure:
$ cd ~/poky/meta-mylayer $ mkdir conf $ mkdir recipes-kernel $ mkdir recipes-kernel/linux $ mkdir recipes-kernel/linux/linux-yoctoThe
confdirectory holds your configuration files, while therecipes-kerneldirectory holds your append file and your patch file.Create the layer configuration file: Move to the
meta-mylayer/confdirectory and create thelayer.conffile as follows:# We have a conf and classes directory, add to BBPATH BBPATH .= ":${LAYERDIR}" # We have recipes-* directories, add to BBFILES BBFILES += "${LAYERDIR}/recipes-*/*/*.bb \ ${LAYERDIR}/recipes-*/*/*.bbappend" BBFILE_COLLECTIONS += "mylayer" BBFILE_PATTERN_mylayer = "^${LAYERDIR}/" BBFILE_PRIORITY_mylayer = "5"Notice
mylayeras part of the last three statements.Create the kernel recipe append file: Move to the
meta-mylayer/recipes-kernel/linuxdirectory and create thelinux-yocto_3.4.bbappendfile as follows:FILESEXTRAPATHS_prepend := "${THISDIR}/${PN}:" SRC_URI += "file://0001-calibrate-Add-printk-example.patch"The
FILESEXTRAPATHSandSRC_URIstatements enable the OpenEmbedded build system to find the patch file. For more information on using append files, see the "Using .bbappend Files" section.Put the patch file in your layer: Move the
0001-calibrate-Add-printk-example.patchfile to themeta-mylayer/recipes-kernel/linux/linux-yoctodirectory.
5.10.5. Set Up for the Build
Do the following to make sure the build parameters are set up for the example. Once you set up these build parameters, they do not have to change unless you change the target architecture of the machine you are building:
Build for the correct target architecture: Your selected
MACHINEdefinition within thelocal.conffile in the Build Directory specifies the target architecture used when building the Linux kernel. By default,MACHINEis set toqemux86, which specifies a 32-bit Intel® Architecture target machine suitable for the QEMU emulator.Identify your
meta-mylayerlayer: TheBBLAYERSvariable in thebblayers.conffile found in thepoky/build/confdirectory needs to have the path to your localmeta-mylayerlayer. By default, theBBLAYERSvariable contains paths tometa,meta-poky, andmeta-yocto-bspin thepokyGit repository. Add the path to yourmeta-mylayerlocation:BBLAYERS ?= " \ $HOME/poky/meta \ $HOME/poky/meta-poky \ $HOME/poky/meta-yocto-bsp \ $HOME/poky/meta-mylayer \ "
5.10.6. Build the Modified QEMU Kernel Image
The following steps build your modified kernel image:
Be sure your build environment is initialized: Your environment should be set up since you previously sourced the
oe-init-build-envscript. If it is not, source the script again frompoky.$ cd ~/poky $ source oe-init-build-envClean up: Be sure to clean the shared state out by using BitBake to run from within the Build Directory the
do_cleansstatetask as follows:$ bitbake -c cleansstate linux-yoctoNote
Never remove any files by hand from thetmp/deploydirectory inside the Build Directory. Always use the various BitBake clean tasks to clear out previous build artifacts. For information on the clean tasks, see the "do_clean", "do_cleanall", and "do_cleansstate" sections all in the Yocto Project Reference Manual.Build the image: Next, build the kernel image using this command:
$ bitbake -k linux-yocto
5.10.7. Boot the Image and Verify Your Changes
These steps boot the image and allow you to see the changes
Boot the image: Boot the modified image in the QEMU emulator using this command:
$ runqemu qemux86Verify the changes: Log into the machine using
rootwith no password and then use the following shell command to scroll through the console's boot output.# dmesg | lessYou should see the results of your
printkstatements as part of the output.
5.11. Making Images More Secure
Security is of increasing concern for embedded devices. Consider the issues and problems discussed in just this sampling of work found across the Internet:
"Security Risks of Embedded Systems" by Bruce Schneier
"Internet Census 2012" by Carna Botnet
"Security Issues for Embedded Devices" by Jake Edge
When securing your image is of concern, there are steps, tools, and variables that you can consider to help you reach the security goals you need for your particular device. Not all situations are identical when it comes to making an image secure. Consequently, this section provides some guidance and suggestions for consideration when you want to make your image more secure.
Note
Because the security requirements and risks are different for every type of device, this section cannot provide a complete reference on securing your custom OS. It is strongly recommended that you also consult other sources of information on embedded Linux system hardening and on security.
5.11.1. General Considerations
General considerations exist that help you create more secure images. You should consider the following suggestions to help make your device more secure:
Scan additional code you are adding to the system (e.g. application code) by using static analysis tools. Look for buffer overflows and other potential security problems.
Pay particular attention to the security for any web-based administration interface.
Web interfaces typically need to perform administrative functions and tend to need to run with elevated privileges. Thus, the consequences resulting from the interface's security becoming compromised can be serious. Look for common web vulnerabilities such as cross-site-scripting (XSS), unvalidated inputs, and so forth.
As with system passwords, the default credentials for accessing a web-based interface should not be the same across all devices. This is particularly true if the interface is enabled by default as it can be assumed that many end-users will not change the credentials.
Ensure you can update the software on the device to mitigate vulnerabilities discovered in the future. This consideration especially applies when your device is network-enabled.
Ensure you remove or disable debugging functionality before producing the final image. For information on how to do this, see the "Considerations Specific to the OpenEmbedded Build System" section.
Ensure you have no network services listening that are not needed.
Remove any software from the image that is not needed.
Enable hardware support for secure boot functionality when your device supports this functionality.
5.11.2. Security Flags
The Yocto Project has security flags that you can enable that
help make your build output more secure.
The security flags are in the
meta/conf/distro/include/security_flags.inc
file in your
Source Directory
(e.g. poky).
Note
Depending on the recipe, certain security flags are enabled and disabled by default.
Use the following line in your
local.conf file or in your custom
distribution configuration file to enable the security
compiler and linker flags for your build:
require conf/distro/include/security_flags.inc
5.11.3. Considerations Specific to the OpenEmbedded Build System
You can take some steps that are specific to the OpenEmbedded build system to make your images more secure:
Ensure "debug-tweaks" is not one of your selected
IMAGE_FEATURES. When creating a new project, the default is to provide you with an initiallocal.conffile that enables this feature using theEXTRA_IMAGE_FEATURESvariable with the line:EXTRA_IMAGE_FEATURES = "debug-tweaks"To disable that feature, simply comment out that line in your
local.conffile, or make sureIMAGE_FEATURESdoes not contain "debug-tweaks" before producing your final image. Among other things, leaving this in place sets the root password as blank, which makes logging in for debugging or inspection easy during development but also means anyone can easily log in during production.It is possible to set a root password for the image and also to set passwords for any extra users you might add (e.g. administrative or service type users). When you set up passwords for multiple images or users, you should not duplicate passwords.
To set up passwords, use the
extrausersclass, which is the preferred method. For an example on how to set up both root and user passwords, see the "extrausers.bbclass" section.Note
When adding extra user accounts or setting a root password, be cautious about setting the same password on every device. If you do this, and the password you have set is exposed, then every device is now potentially compromised. If you need this access but want to ensure security, consider setting a different, random password for each device. Typically, you do this as a separate step after you deploy the image onto the device.Consider enabling a Mandatory Access Control (MAC) framework such as SMACK or SELinux and tuning it appropriately for your device's usage. You can find more information in the
meta-selinuxlayer.
5.11.4. Tools for Hardening Your Image
The Yocto Project provides tools for making your image
more secure.
You can find these tools in the
meta-security layer of the
Yocto Project Source Repositories.
5.12. Creating Your Own Distribution
When you build an image using the Yocto Project and do not alter any distribution Metadata, you are creating a Poky distribution. If you wish to gain more control over package alternative selections, compile-time options, and other low-level configurations, you can create your own distribution.
To create your own distribution, the basic steps consist of creating your own distribution layer, creating your own distribution configuration file, and then adding any needed code and Metadata to the layer. The following steps provide some more detail:
Create a layer for your new distro: Create your distribution layer so that you can keep your Metadata and code for the distribution separate. It is strongly recommended that you create and use your own layer for configuration and code. Using your own layer as compared to just placing configurations in a
local.confconfiguration file makes it easier to reproduce the same build configuration when using multiple build machines. See the "Creating a General Layer Using the yocto-layer Script" section for information on how to quickly set up a layer.Create the distribution configuration file: The distribution configuration file needs to be created in the
conf/distrodirectory of your layer. You need to name it using your distribution name (e.g.mydistro.conf).You can split out parts of your configuration file into include files and then "require" them from within your distribution configuration file. Be sure to place the include files in the
conf/distro/includedirectory of your layer. A common example usage of include files would be to separate out the selection of desired version and revisions for individual recipes.Your configuration file needs to set the following required variables:
DISTRO_NAMEDISTRO_VERSIONThese following variables are optional and you typically set them from the distribution configuration file:
DISTRO_FEATURESDISTRO_EXTRA_RDEPENDSDISTRO_EXTRA_RRECOMMENDSTCLIBCTip
If you want to base your distribution configuration file on the very basic configuration from OE-Core, you can useconf/distro/defaultsetup.confas a reference and just include variables that differ as compared todefaultsetup.conf. Alternatively, you can create a distribution configuration file from scratch using thedefaultsetup.conffile or configuration files from other distributions such as Poky or Angstrom as references.Provide miscellaneous variables: Be sure to define any other variables for which you want to create a default or enforce as part of the distribution configuration. You can include nearly any variable from the
local.conffile. The variables you use are not limited to the list in the previous bulleted item.Point to Your distribution configuration file: In your
local.conffile in the Build Directory, set yourDISTROvariable to point to your distribution's configuration file. For example, if your distribution's configuration file is namedmydistro.conf, then you point to it as follows:DISTRO = "mydistro"Add more to the layer if necessary: Use your layer to hold other information needed for the distribution:
Add recipes for installing distro-specific configuration files that are not already installed by another recipe. If you have distro-specific configuration files that are included by an existing recipe, you should add an append file (
.bbappend) for those. For general information and recommendations on how to add recipes to your layer, see the "Creating Your Own Layer" and "Best Practices to Follow When Creating Layers" sections.Add any image recipes that are specific to your distribution.
Add a
psplashappend file for a branded splash screen. For information on append files, see the "Using .bbappend Files" section.Add any other append files to make custom changes that are specific to individual recipes.
5.13. Creating a Custom Template Configuration Directory
If you are producing your own customized version
of the build system for use by other users, you might
want to customize the message shown by the setup script or
you might want to change the template configuration files (i.e.
local.conf and
bblayers.conf) that are created in
a new build directory.
The OpenEmbedded build system uses the environment variable
TEMPLATECONF to locate the directory
from which it gathers configuration information that ultimately
ends up in the
Build Directory's
conf directory.
By default, TEMPLATECONF is set as
follows in the poky repository:
TEMPLATECONF=${TEMPLATECONF:-meta-poky/conf}
This is the directory used by the build system to find templates
from which to build some key configuration files.
If you look at this directory, you will see the
bblayers.conf.sample,
local.conf.sample, and
conf-notes.txt files.
The build system uses these files to form the respective
bblayers.conf file,
local.conf file, and display the list of
BitBake targets when running the setup script.
To override these default configuration files with
configurations you want used within every new
Build Directory, simply set the
TEMPLATECONF variable to your directory.
The TEMPLATECONF variable is set in the
.templateconf file, which is in the
top-level
Source Directory
folder (e.g. poky).
Edit the .templateconf so that it can locate
your directory.
Best practices dictate that you should keep your
template configuration directory in your custom distribution layer.
For example, suppose you have a layer named
meta-mylayer located in your home directory
and you want your template configuration directory named
myconf.
Changing the .templateconf as follows
causes the OpenEmbedded build system to look in your directory
and base its configuration files on the
*.sample configuration files it finds.
The final configuration files (i.e.
local.conf and
bblayers.conf ultimately still end up in
your Build Directory, but they are based on your
*.sample files.
TEMPLATECONF=${TEMPLATECONF:-meta-mylayer/myconf}
Aside from the *.sample configuration files,
the conf-notes.txt also resides in the
default meta-poky/conf directory.
The scripts that set up the build environment
(i.e.
oe-init-build-env
and
oe-init-build-env-memres)
use this file to display BitBake targets as part of the script
output.
Customizing this conf-notes.txt file is a
good way to make sure your list of custom targets appears
as part of the script's output.
Here is the default list of targets displayed as a result of running either of the setup scripts:
You can now run 'bitbake <target>'
Common targets are:
core-image-minimal
core-image-sato
meta-toolchain
meta-ide-support
Changing the listed common targets is as easy as editing your
version of conf-notes.txt in your
custom template configuration directory and making sure you
have TEMPLATECONF set to your directory.
5.14. Building a Tiny System
Very small distributions have some significant advantages such as requiring less on-die or in-package memory (cheaper), better performance through efficient cache usage, lower power requirements due to less memory, faster boot times, and reduced development overhead. Some real-world examples where a very small distribution gives you distinct advantages are digital cameras, medical devices, and small headless systems.
This section presents information that shows you how you can
trim your distribution to even smaller sizes than the
poky-tiny distribution, which is around
5 Mbytes, that can be built out-of-the-box using the Yocto Project.
5.14.1. Overview
The following list presents the overall steps you need to consider and perform to create distributions with smaller root filesystems, achieve faster boot times, maintain your critical functionality, and avoid initial RAM disks:
5.14.2. Goals and Guiding Principles
Before you can reach your destination, you need to know where you are going. Here is an example list that you can use as a guide when creating very small distributions:
Determine how much space you need (e.g. a kernel that is 1 Mbyte or less and a root filesystem that is 3 Mbytes or less).
Find the areas that are currently taking 90% of the space and concentrate on reducing those areas.
Do not create any difficult "hacks" to achieve your goals.
Leverage the device-specific options.
Work in a separate layer so that you keep changes isolated. For information on how to create layers, see the "Understanding and Creating Layers" section.
5.14.3. Understand What Contributes to Your Image Size
It is easiest to have something to start with when creating
your own distribution.
You can use the Yocto Project out-of-the-box to create the
poky-tiny distribution.
Ultimately, you will want to make changes in your own
distribution that are likely modeled after
poky-tiny.
Note
To usepoky-tiny in your build,
set the
DISTRO
variable in your
local.conf file to "poky-tiny"
as described in the
"Creating Your Own Distribution"
section.
Understanding some memory concepts will help you reduce the
system size.
Memory consists of static, dynamic, and temporary memory.
Static memory is the TEXT (code), DATA (initialized data
in the code), and BSS (uninitialized data) sections.
Dynamic memory represents memory that is allocated at runtime:
stacks, hash tables, and so forth.
Temporary memory is recovered after the boot process.
This memory consists of memory used for decompressing
the kernel and for the __init__
functions.
To help you see where you currently are with kernel and root
filesystem sizes, you can use two tools found in the
Source Directory in
the scripts/tiny/ directory:
ksize.py: Reports component sizes for the kernel build objects.dirsize.py: Reports component sizes for the root filesystem.
This next tool and command help you organize configuration fragments and view file dependencies in a human-readable form:
merge_config.sh: Helps you manage configuration files and fragments within the kernel. With this tool, you can merge individual configuration fragments together. The tool allows you to make overrides and warns you of any missing configuration options. The tool is ideal for allowing you to iterate on configurations, create minimal configurations, and create configuration files for different machines without having to duplicate your process.The
merge_config.shscript is part of the Linux Yocto kernel Git repositories (i.e.linux-yocto-3.14,linux-yocto-3.10,linux-yocto-3.8, and so forth) in thescripts/kconfigdirectory.For more information on configuration fragments, see the "Generating Configuration Files" section of the Yocto Project Linux Kernel Development Manual and the "Creating Configuration Fragments" section, which is in this manual.
bitbake -u depexp -g: Using the BitBake command with these options brings up a Dependency Explorer from which you can view file dependencies. Understanding these dependencies allows you to make informed decisions when cutting out various pieces of the kernel and root filesystem.bitbake_target
5.14.4. Trim the Root Filesystem
The root filesystem is made up of packages for booting, libraries, and applications. To change things, you can configure how the packaging happens, which changes the way you build them. You can also modify the filesystem itself or select a different filesystem.
First, find out what is hogging your root filesystem by running the
dirsize.py script from your root directory:
$ cd root-directory-of-image
$ dirsize.py 100000 > dirsize-100k.log
$ cat dirsize-100k.log
You can apply a filter to the script to ignore files under a certain size. The previous example filters out any files below 100 Kbytes. The sizes reported by the tool are uncompressed, and thus will be smaller by a relatively constant factor in a compressed root filesystem. When you examine your log file, you can focus on areas of the root filesystem that take up large amounts of memory.
You need to be sure that what you eliminate does not cripple the functionality you need. One way to see how packages relate to each other is by using the Dependency Explorer UI with the BitBake command:
$ cd image-directory
$ bitbake -u depexp -g image
Use the interface to select potential packages you wish to eliminate and see their dependency relationships.
When deciding how to reduce the size, get rid of packages that
result in minimal impact on the feature set.
For example, you might not need a VGA display.
Or, you might be able to get by with devtmpfs
and mdev instead of
udev.
Use your local.conf file to make changes.
For example, to eliminate udev and
glib, set the following in the
local configuration file:
VIRTUAL-RUNTIME_dev_manager = ""
Finally, you should consider exactly the type of root
filesystem you need to meet your needs while also reducing
its size.
For example, consider cramfs,
squashfs, ubifs,
ext2, or an initramfs
using initramfs.
Be aware that ext3 requires a 1 Mbyte
journal.
If you are okay with running read-only, you do not need this
journal.
Note
After each round of elimination, you need to rebuild your system and then use the tools to see the effects of your reductions.5.14.5. Trim the Kernel
The kernel is built by including policies for hardware-independent aspects. What subsystems do you enable? For what architecture are you building? Which drivers do you build by default?
Note
You can modify the kernel source if you want to help with boot time.
Run the ksize.py script from the top-level
Linux build directory to get an idea of what is making up
the kernel:
$ cd top-level-linux-build-directory
$ ksize.py > ksize.log
$ cat ksize.log
When you examine the log, you will see how much space is
taken up with the built-in .o files for
drivers, networking, core kernel files, filesystem, sound,
and so forth.
The sizes reported by the tool are uncompressed, and thus
will be smaller by a relatively constant factor in a compressed
kernel image.
Look to reduce the areas that are large and taking up around
the "90% rule."
To examine, or drill down, into any particular area, use the
-d option with the script:
$ ksize.py -d > ksize.log
Using this option breaks out the individual file information for each area of the kernel (e.g. drivers, networking, and so forth).
Use your log file to see what you can eliminate from the kernel based on features you can let go. For example, if you are not going to need sound, you do not need any drivers that support sound.
After figuring out what to eliminate, you need to reconfigure
the kernel to reflect those changes during the next build.
You could run menuconfig and make all your
changes at once.
However, that makes it difficult to see the effects of your
individual eliminations and also makes it difficult to replicate
the changes for perhaps another target device.
A better method is to start with no configurations using
allnoconfig, create configuration
fragments for individual changes, and then manage the
fragments into a single configuration file using
merge_config.sh.
The tool makes it easy for you to iterate using the
configuration change and build cycle.
Each time you make configuration changes, you need to rebuild the kernel and check to see what impact your changes had on the overall size.
5.14.6. Remove Package Management Requirements
Packaging requirements add size to the image. One way to reduce the size of the image is to remove all the packaging requirements from the image. This reduction includes both removing the package manager and its unique dependencies as well as removing the package management data itself.
To eliminate all the packaging requirements for an image,
be sure that "package-management" is not part of your
IMAGE_FEATURES
statement for the image.
When you remove this feature, you are removing the package
manager as well as its dependencies from the root filesystem.
5.14.7. Look for Other Ways to Minimize Size
Depending on your particular circumstances, other areas that you can trim likely exist. The key to finding these areas is through tools and methods described here combined with experimentation and iteration. Here are a couple of areas to experiment with:
glibc: In general, follow this process:Remove
glibcfeatures fromDISTRO_FEATURESthat you think you do not need.Build your distribution.
If the build fails due to missing symbols in a package, determine if you can reconfigure the package to not need those features. For example, change the configuration to not support wide character support as is done for
ncurses. Or, if support for those characters is needed, determine whatglibcfeatures provide the support and restore the configuration.Rebuild and repeat the process.
busybox: For BusyBox, use a process similar as described forglibc. A difference is you will need to boot the resulting system to see if you are able to do everything you expect from the running system. You need to be sure to integrate configuration fragments into Busybox because BusyBox handles its own core features and then allows you to add configuration fragments on top.
5.14.8. Iterate on the Process
If you have not reached your goals on system size, you need to iterate on the process. The process is the same. Use the tools and see just what is taking up 90% of the root filesystem and the kernel. Decide what you can eliminate without limiting your device beyond what you need.
Depending on your system, a good place to look might be Busybox, which provides a stripped down version of Unix tools in a single, executable file. You might be able to drop virtual terminal services or perhaps ipv6.
5.15. Building Images for More than One Machine
A common scenario developers face is creating images for several
different machines that use the same software environment.
In this situation, it is tempting to set the
tunings and optimization flags for each build specifically for
the targeted hardware (i.e. "maxing out" the tunings).
Doing so can considerably add to build times and package feed
maintenance collectively for the machines.
For example, selecting tunes that are extremely specific to a
CPU core used in a system might enable some micro optimizations
in GCC for that particular system but would otherwise not gain
you much of a performance difference across the other systems
as compared to using a more general tuning across all the builds
(e.g. setting
DEFAULTTUNE
specifically for each machine's build).
Rather than "max out" each build's tunings, you can take steps that
cause the OpenEmbedded build system to reuse software across the
various machines where it makes sense.
If build speed and package feed maintenance are considerations, you should consider the points in this section that can help you optimize your tunings to best consider build times and package feed maintenance.
Share the Build Directory: If at all possible, share the
TMPDIRacross builds. The Yocto Project supports switching between differentMACHINEvalues in the sameTMPDIR. This practice is well supported and regularly used by developers when building for multiple machines. When you use the sameTMPDIRfor multiple machine builds, the OpenEmbedded build system can reuse the existing native and often cross-recipes for multiple machines. Thus, build time decreases.Note
IfDISTROsettings change or fundamental configuration settings such as the filesystem layout, you need to work with a cleanTMPDIR. SharingTMPDIRunder these circumstances might work but since it is not guaranteed, you should use a cleanTMPDIR.Enable the Appropriate Package Architecture: By default, the OpenEmbedded build system enables three levels of package architectures: "all", "tune" or "package", and "machine". Any given recipe usually selects one of these package architectures (types) for its output. Depending for what a given recipe creates packages, making sure you enable the appropriate package architecture can directly impact the build time.
A recipe that just generates scripts can enable "all" architecture because there are no binaries to build. To specifically enable "all" architecture, be sure your recipe inherits the
allarchclass. This class is useful for "all" architectures because it configures many variables so packages can be used across multiple architectures.If your recipe needs to generate packages that are machine-specific or when one of the build or runtime dependencies is already machine-architecture dependent, which makes your recipe also machine-architecture dependent, make sure your recipe enables the "machine" package architecture through the
MACHINE_ARCHvariable:PACKAGE_ARCH = "${MACHINE_ARCH}"When you do not specifically enable a package architecture through the
PACKAGE_ARCH, The OpenEmbedded build system defaults to theTUNE_PKGARCHsetting:PACKAGE_ARCH = "${TUNE_PKGARCH}"Choose a Generic Tuning File if Possible: Some tunes are more generic and can run on multiple targets (e.g. an
armv5set of packages could run onarmv6andarmv7processors in most cases). Similarly,i486binaries could work oni586and higher processors. You should realize, however, that advances on newer processor versions would not be used.If you select the same tune for several different machines, the OpenEmbedded build system reuses software previously built, thus speeding up the overall build time. Realize that even though a new sysroot for each machine is generated, the software is not recompiled and only one package feed exists.
Manage Granular Level Packaging: Sometimes cases exist where injecting another level of package architecture beyond the three higher levels noted earlier can be useful. For example, consider the
emgdgraphics stack in themeta-intellayer. In this layer, a subset of software exists that is compiled against something different from the rest of the generic packages. You can examine the key code in the Source Repositories "daisy" branch inclasses/emgd-gl.bbclass. For a specific set of packages, the code redefinesPACKAGE_ARCH.PACKAGE_EXTRA_ARCHSis then appended with this extra tune name inmeta-intel-emgd.inc. The result is that when searching for packages, the build system uses a four-level search and the packages in this new level are preferred as compared to the standard tune. The overall result is that the build system reuses most software from the common tune except for specific cases as needed.Use Tools to Debug Issues: Sometimes you can run into situations where software is being rebuilt when you think it should not be. For example, the OpenEmbedded build system might not be using shared state between machines when you think it should be. These types of situations are usually due to references to machine-specific variables such as
MACHINE,SERIAL_CONSOLE,XSERVER,MACHINE_FEATURES, and so forth in code that is supposed to only be tune-specific or when the recipe depends (DEPENDS,RDEPENDS,RRECOMMENDS,RSUGGESTS, and so forth) on some other recipe that already hasPACKAGE_ARCHdefined as "${MACHINE_ARCH}".Note
Patches to fix any issues identified are most welcome as these issues occasionally do occur.For such cases, you can use some tools to help you sort out the situation:
sstate-diff-machines.sh: You can find this tool in thescriptsdirectory of the Source Repositories. See the comments in the script for information on how to use the tool.BitBake's "-S printdiff" Option: Using this option causes BitBake to try to establish the closest signature match it can (e.g. in the shared state cache) and then run
bitbake-diffsigsover the matches to determine the stamps and delta where these two stamp trees diverge.
5.16. Working with Packages
This section describes a few tasks that involve packages:
5.16.1. Excluding Packages from an Image
You might find it necessary to prevent specific packages from being installed into an image. If so, you can use several variables to direct the build system to essentially ignore installing recommended packages or to not install a package at all.
The following list introduces variables you can use to
prevent packages from being installed into your image.
Each of these variables only works with IPK and RPM
package types.
Support for Debian packages does not exist.
Also, you can use these variables from your
local.conf file or attach them to a
specific image recipe by using a recipe name override.
For more detail on the variables, see the descriptions in the
Yocto Project Reference Manual's glossary chapter.
BAD_RECOMMENDATIONS: Use this variable to specify "recommended-only" packages that you do not want installed.NO_RECOMMENDATIONS: Use this variable to prevent all "recommended-only" packages from being installed.PACKAGE_EXCLUDE: Use this variable to prevent specific packages from being installed regardless of whether they are "recommended-only" or not. You need to realize that the build process could fail with an error when you prevent the installation of a package whose presence is required by an installed package.
5.16.2. Incrementing a Package Revision Number
If a committed change results in changing the package output,
then the value of the
PR
variable needs to be increased (or "bumped").
Increasing PR occurs one of two ways:
Automatically using a Package Revision Service (PR Service).
Manually incrementing the
PRvariable.
Given that one of the challenges any build system and its users face is how to maintain a package feed that is compatible with existing package manager applications such as RPM, APT, and OPKG, using an automated system is much preferred over a manual system. In either system, the main requirement is that version numbering increases in a linear fashion and that a number of version components exist that support that linear progression.
The following two sections provide information on the PR Service
and on manual PR bumping.
5.16.2.1. Working With a PR Service
As mentioned, attempting to maintain revision numbers in the Metadata is error prone, inaccurate, and causes problems for people submitting recipes. Conversely, the PR Service automatically generates increasing numbers, particularly the revision field, which removes the human element.
Note
For additional information on using a PR Service, you can see the PR Service wiki page.
The Yocto Project uses variables in order of
decreasing priority to facilitate revision numbering (i.e.
PE,
PV, and
PR
for epoch, version, and revision, respectively).
The values are highly dependent on the policies and
procedures of a given distribution and package feed.
Because the OpenEmbedded build system uses
"signatures",
which are unique to a given build, the build system
knows when to rebuild packages.
All the inputs into a given task are represented by a
signature, which can trigger a rebuild when different.
Thus, the build system itself does not rely on the
PR numbers to trigger a rebuild.
The signatures, however, can be used to generate
PR values.
The PR Service works with both
OEBasic and
OEBasicHash generators.
The value of PR bumps when the
checksum changes and the different generator mechanisms
change signatures under different circumstances.
As implemented, the build system includes values from
the PR Service into the PR field as
an addition using the form ".x" so
r0 becomes r0.1,
r0.2 and so forth.
This scheme allows existing PR values
to be used for whatever reasons, which include manual
PR bumps, should it be necessary.
By default, the PR Service is not enabled or running. Thus, the packages generated are just "self consistent". The build system adds and removes packages and there are no guarantees about upgrade paths but images will be consistent and correct with the latest changes.
The simplest form for a PR Service is for it to exist
for a single host development system that builds the
package feed (building system).
For this scenario, you can enable a local PR Service by
setting
PRSERV_HOST
in your local.conf file in the
Build Directory:
PRSERV_HOST = "localhost:0"
Once the service is started, packages will automatically
get increasing PR values and
BitBake will take care of starting and stopping the server.
If you have a more complex setup where multiple host
development systems work against a common, shared package
feed, you have a single PR Service running and it is
connected to each building system.
For this scenario, you need to start the PR Service using
the bitbake-prserv command:
bitbake-prserv --host ip --port port --start
In addition to hand-starting the service, you need to
update the local.conf file of each
building system as described earlier so each system
points to the server and port.
It is also recommended you use build history, which adds
some sanity checks to package versions, in conjunction with
the server that is running the PR Service.
To enable build history, add the following to each building
system's local.conf file:
# It is recommended to activate "buildhistory" for testing the PR service
INHERIT += "buildhistory"
BUILDHISTORY_COMMIT = "1"
For information on build history, see the "Maintaining Build Output Quality" section in the Yocto Project Reference Manual.
Note
The OpenEmbedded build system does not maintain
PR information as part of the
shared state (sstate) packages.
If you maintain an sstate feed, its expected that either
all your building systems that contribute to the sstate
feed use a shared PR Service, or you do not run a PR
Service on any of your building systems.
Having some systems use a PR Service while others do
not leads to obvious problems.
For more information on shared state, see the "Shared State Cache" section in the Yocto Project Reference Manual.
5.16.2.2. Manually Bumping PR
The alternative to setting up a PR Service is to manually
bump the
PR
variable.
If a committed change results in changing the package
output, then the value of the PR variable needs to be
increased (or "bumped") as part of that commit.
For new recipes you should add the PR
variable and set its initial value equal to "r0", which is
the default.
Even though the default value is "r0", the practice of
adding it to a new recipe makes it harder to forget to bump
the variable when you make changes to the recipe in future.
If you are sharing a common .inc file
with multiple recipes, you can also use the
INC_PR
variable to ensure that the recipes sharing the
.inc file are rebuilt when the
.inc file itself is changed.
The .inc file must set
INC_PR (initially to "r0"), and all
recipes referring to it should set PR
to "${INC_PR}.0" initially, incrementing the last number
when the recipe is changed.
If the .inc file is changed then its
INC_PR should be incremented.
When upgrading the version of a package, assuming the
PV
changes, the PR variable should be
reset to "r0" (or "${INC_PR}.0" if you are using
INC_PR).
Usually, version increases occur only to packages.
However, if for some reason PV changes
but does not increase, you can increase the
PE
variable (Package Epoch).
The PE variable defaults to "0".
Version numbering strives to follow the Debian Version Field Policy Guidelines. These guidelines define how versions are compared and what "increasing" a version means.
5.16.3. Handling Optional Module Packaging
Many pieces of software split functionality into optional modules (or plug-ins) and the plug-ins that are built might depend on configuration options. To avoid having to duplicate the logic that determines what modules are available in your recipe or to avoid having to package each module by hand, the OpenEmbedded build system provides functionality to handle module packaging dynamically.
To handle optional module packaging, you need to do two things:
Ensure the module packaging is actually done.
Ensure that any dependencies on optional modules from other recipes are satisfied by your recipe.
5.16.3.1. Making Sure the Packaging is Done
To ensure the module packaging actually gets done, you use
the do_split_packages function within
the populate_packages Python function
in your recipe.
The do_split_packages function
searches for a pattern of files or directories under a
specified path and creates a package for each one it finds
by appending to the
PACKAGES
variable and setting the appropriate values for
FILES_packagename,
RDEPENDS_packagename,
DESCRIPTION_packagename, and so forth.
Here is an example from the lighttpd
recipe:
python populate_packages_prepend () {
lighttpd_libdir = d.expand('${libdir}')
do_split_packages(d, lighttpd_libdir, '^mod_(.*)\.so$',
'lighttpd-module-%s', 'Lighttpd module for %s',
extra_depends='')
}
The previous example specifies a number of things in the
call to do_split_packages.
A directory within the files installed by your recipe through
do_installin which to search.A regular expression used to match module files in that directory. In the example, note the parentheses () that mark the part of the expression from which the module name should be derived.
A pattern to use for the package names.
A description for each package.
An empty string for
extra_depends, which disables the default dependency on the mainlighttpdpackage. Thus, if a file in${libdir}calledmod_alias.sois found, a package calledlighttpd-module-aliasis created for it and theDESCRIPTIONis set to "Lighttpd module for alias".
Often, packaging modules is as simple as the previous
example.
However, more advanced options exist that you can use
within do_split_packages to modify its
behavior.
And, if you need to, you can add more logic by specifying
a hook function that is called for each package.
It is also perfectly acceptable to call
do_split_packages multiple times if
you have more than one set of modules to package.
For more examples that show how to use
do_split_packages, see the
connman.inc file in the
meta/recipes-connectivity/connman/
directory of the poky
source repository.
You can also find examples in
meta/classes/kernel.bbclass.
Following is a reference that shows
do_split_packages mandatory and
optional arguments:
Mandatory arguments
root
The path in which to search
file_regex
Regular expression to match searched files.
Use parentheses () to mark the part of this
expression that should be used to derive the
module name (to be substituted where %s is
used in other function arguments as noted below)
output_pattern
Pattern to use for the package names. Must
include %s.
description
Description to set for each package. Must
include %s.
Optional arguments
postinst
Postinstall script to use for all packages
(as a string)
recursive
True to perform a recursive search - default
False
hook
A hook function to be called for every match.
The function will be called with the following
arguments (in the order listed):
f
Full path to the file/directory match
pkg
The package name
file_regex
As above
output_pattern
As above
modulename
The module name derived using file_regex
extra_depends
Extra runtime dependencies (RDEPENDS) to be
set for all packages. The default value of None
causes a dependency on the main package
(${PN}) - if you do not want this, pass empty
string '' for this parameter.
aux_files_pattern
Extra item(s) to be added to FILES for each
package. Can be a single string item or a list
of strings for multiple items. Must include %s.
postrm
postrm script to use for all packages (as a
string)
allow_dirs
True to allow directories to be matched -
default False
prepend
If True, prepend created packages to PACKAGES
instead of the default False which appends them
match_path
match file_regex on the whole relative path to
the root rather than just the file name
aux_files_pattern_verbatim
Extra item(s) to be added to FILES for each
package, using the actual derived module name
rather than converting it to something legal
for a package name. Can be a single string item
or a list of strings for multiple items. Must
include %s.
allow_links
True to allow symlinks to be matched - default
False
summary
Summary to set for each package. Must include %s;
defaults to description if not set.
5.16.3.2. Satisfying Dependencies
The second part for handling optional module packaging
is to ensure that any dependencies on optional modules
from other recipes are satisfied by your recipe.
You can be sure these dependencies are satisfied by
using the
PACKAGES_DYNAMIC variable.
Here is an example that continues with the
lighttpd recipe shown earlier:
PACKAGES_DYNAMIC = "lighttpd-module-.*"
The name specified in the regular expression can of
course be anything.
In this example, it is lighttpd-module-
and is specified as the prefix to ensure that any
RDEPENDS
and RRECOMMENDS
on a package name starting with the prefix are satisfied
during build time.
If you are using do_split_packages
as described in the previous section, the value you put in
PACKAGES_DYNAMIC should correspond to
the name pattern specified in the call to
do_split_packages.
5.16.4. Using Runtime Package Management
During a build, BitBake always transforms a recipe into one or
more packages.
For example, BitBake takes the bash recipe
and currently produces the bash-dbg,
bash-staticdev,
bash-dev, bash-doc,
bash-locale, and
bash packages.
Not all generated packages are included in an image.
In several situations, you might need to update, add, remove, or query the packages on a target device at runtime (i.e. without having to generate a new image). Examples of such situations include:
You want to provide in-the-field updates to deployed devices (e.g. security updates).
You want to have a fast turn-around development cycle for one or more applications that run on your device.
You want to temporarily install the "debug" packages of various applications on your device so that debugging can be greatly improved by allowing access to symbols and source debugging.
You want to deploy a more minimal package selection of your device but allow in-the-field updates to add a larger selection for customization.
In all these situations, you have something similar to a more traditional Linux distribution in that in-field devices are able to receive pre-compiled packages from a server for installation or update. Being able to install these packages on a running, in-field device is what is termed "runtime package management".
In order to use runtime package management, you need a host/server machine that serves up the pre-compiled packages plus the required metadata. You also need package manipulation tools on the target. The build machine is a likely candidate to act as the server. However, that machine does not necessarily have to be the package server. The build machine could push its artifacts to another machine that acts as the server (e.g. Internet-facing).
A simple build that targets just one device produces
more than one package database.
In other words, the packages produced by a build are separated
out into a couple of different package groupings based on
criteria such as the target's CPU architecture, the target
board, or the C library used on the target.
For example, a build targeting the qemuarm
device produces the following three package databases:
all, armv5te, and
qemuarm.
If you wanted your qemuarm device to be
aware of all the packages that were available to it,
you would need to point it to each of these databases
individually.
In a similar way, a traditional Linux distribution usually is
configured to be aware of a number of software repositories
from which it retrieves packages.
Using runtime package management is completely optional and not required for a successful build or deployment in any way. But if you want to make use of runtime package management, you need to do a couple things above and beyond the basics. The remainder of this section describes what you need to do.
5.16.4.1. Build Considerations
This section describes build considerations of which you need to be aware in order to provide support for runtime package management.
When BitBake generates packages, it needs to know
what format or formats to use.
In your configuration, you use the
PACKAGE_CLASSES
variable to specify the format:
Open the
local.conffile inside your Build Directory (e.g.~/poky/build/conf/local.conf).Select the desired package format as follows:
PACKAGE_CLASSES ?= “package_packageformat”where
packageformatcan be "ipk", "rpm", and "deb", which are the supported package formats.Note
Because the Yocto Project supports three different package formats, you can set the variable with more than one argument. However, the OpenEmbedded build system only uses the first argument when creating an image or Software Development Kit (SDK).
If you would like your image to start off with a basic
package database containing the packages in your current
build as well as to have the relevant tools available on the
target for runtime package management, you can include
"package-management" in the
IMAGE_FEATURES
variable.
Including "package-management" in this
configuration variable ensures that when the image
is assembled for your target, the image includes
the currently-known package databases as well as
the target-specific tools required for runtime
package management to be performed on the target.
However, this is not strictly necessary.
You could start your image off without any databases
but only include the required on-target package
tool(s).
As an example, you could include "opkg" in your
IMAGE_INSTALL
variable if you are using the IPK package format.
You can then initialize your target's package database(s)
later once your image is up and running.
Whenever you perform any sort of build step that can potentially generate a package or modify an existing package, it is always a good idea to re-generate the package index with:
$ bitbake package-index
Realize that it is not sufficient to simply do the following:
$ bitbake some-package package-index
The reason for this restriction is because BitBake does not
properly schedule the package-index
target fully after any other target has completed.
Thus, be sure to run the package update step separately.
You can use the
PACKAGE_FEED_ARCHS,
PACKAGE_FEED_BASE_PATHS,
and
PACKAGE_FEED_URIS
variables to pre-configure target images to use a package
feed.
If you do not define these variables, then manual steps
as described in the subsequent sections are necessary to
configure the target.
You should set these variables before building the image
in order to produce a correctly configured image.
When your build is complete, your packages reside in the
${TMPDIR}/deploy/
directory.
For example, if
packageformat${TMPDIR}
is tmp and your selected package type
is IPK, then your IPK packages are available in
tmp/deploy/ipk.
5.16.4.2. Host or Server Machine Setup
Although other protocols are possible, a server using HTTP typically serves packages. If you want to use HTTP, then set up and configure a web server such as Apache 2, lighttpd, or SimpleHTTPServer on the machine serving the packages.
To keep things simple, this section describes how to set up a SimpleHTTPServer web server to share package feeds from the developer's machine. Although this server might not be the best for a production environment, the setup is simple and straight forward. Should you want to use a different server more suited for production (e.g. Apache 2, Lighttpd, or Nginx), take the appropriate steps to do so.
From within the build directory where you have built an
image based on your packaging choice (i.e. the
PACKAGE_CLASSES
setting), simply start the server.
The following example assumes a build directory of
~/poky/build/tmp/deploy/rpm and a
PACKAGE_CLASSES setting of
"package_rpm":
$ cd ~/poky/build/tmp/deploy/rpm
$ python -m SimpleHTTPServer
5.16.4.3. Target Setup
Setting up the target differs depending on the package management system. This section provides information for RPM, IPK, and DEB.
5.16.4.3.1. Using RPM
The smart application performs
runtime package management of RPM packages.
You must perform an initial setup for
smart on the target machine
if the
PACKAGE_FEED_ARCHS,
PACKAGE_FEED_BASE_PATHS, and
PACKAGE_FEED_URIS
variables have not been set or the target image was
built before the variables were set.
As an example, assume the target is able to use the
following package databases:
all, i586,
and qemux86 from a server named
my.server.
You must inform smart of the
availability of these databases by issuing the
following commands on the target:
# smart channel --add i585 type=rpm-md baseurl=http://my.server/rpm/i586
# smart channel --add qemux86 type=rpm-md baseurl=http://my.server/rpm/qemux86
# smart channel --add all type=rpm-md baseurl=http://my.server/rpm/all
From the target machine, fetch the repository:
# smart update
After everything is set up, smart
is able to find, install, and upgrade packages from
the specified repository.
5.16.4.3.2. Using IPK
The opkg application performs
runtime package management of IPK packages.
You must perform an initial setup for
opkg on the target machine
if the
PACKAGE_FEED_ARCHS,
PACKAGE_FEED_BASE_PATHS, and
PACKAGE_FEED_URIS
variables have not been set or the target image was
built before the variables were set.
The opkg application uses
configuration files to find available package
databases.
Thus, you need to create a configuration file inside
the /etc/opkg/ direction, which
informs opkg of any repository
you want to use.
As an example, suppose you are serving packages from a
ipk/ directory containing the
i586,
all, and
qemux86 databases through an
HTTP server named my.server.
On the target, create a configuration file
(e.g. my_repo.conf) inside the
/etc/opkg/ directory containing
the following:
src/gz all http://my.server/ipk/all
src/gz i586 http://my.server/ipk/i586
src/gz qemux86 http://my.server/ipk/qemux86
Next, instruct opkg to fetch
the repository information:
# opkg update
The opkg application is now able
to find, install, and upgrade packages from the
specified repository.
5.16.4.3.3. Using DEB
The apt application performs
runtime package management of DEB packages.
This application uses a source list file to find
available package databases.
You must perform an initial setup for
apt on the target machine
if the
PACKAGE_FEED_ARCHS,
PACKAGE_FEED_BASE_PATHS, and
PACKAGE_FEED_URIS
variables have not been set or the target image was
built before the variables were set.
To inform apt of the repository
you want to use, you might create a list file (e.g.
my_repo.list) inside the
/etc/apt/sources.list.d/
directory.
As an example, suppose you are serving packages from a
deb/ directory containing the
i586,
all, and
qemux86 databases through an
HTTP server named my.server.
The list file should contain:
deb http://my.server/deb/all ./
deb http://my.server/deb/i586 ./
deb http://my.server/deb/qemux86 ./
Next, instruct the apt
application to fetch the repository information:
# apt-get update
After this step, apt is able
to find, install, and upgrade packages from the
specified repository.
5.16.5. Testing Packages With ptest
A Package Test (ptest) runs tests against packages built
by the OpenEmbedded build system on the target machine.
A ptest contains at least two items: the actual test, and
a shell script (run-ptest) that starts
the test.
The shell script that starts the test must not contain
the actual test - the script only starts the test.
On the other hand, the test can be anything from a simple
shell script that runs a binary and checks the output to
an elaborate system of test binaries and data files.
The test generates output in the format used by Automake:
result: testname
where the result can be PASS,
FAIL, or SKIP,
and the testname can be any identifying string.
For a list of Yocto Project recipes that are already enabled with ptest, see the Ptest wiki page.
Note
A recipe is "ptest-enabled" if it inherits theptest
class.
5.16.5.1. Adding ptest to Your Build
To add package testing to your build, add the
DISTRO_FEATURES
and EXTRA_IMAGE_FEATURES
variables to your local.conf file,
which is found in the
Build Directory:
DISTRO_FEATURES_append = " ptest"
EXTRA_IMAGE_FEATURES += "ptest-pkgs"
Once your build is complete, the ptest files are installed
into the
/usr/lib/
directory within the image, where
package/ptestpackage
5.16.5.2. Running ptest
The ptest-runner package installs a
shell script that loops through all installed ptest test
suites and runs them in sequence.
Consequently, you might want to add this package to
your image.
5.16.5.3. Getting Your Package Ready
In order to enable a recipe to run installed ptests on target hardware, you need to prepare the recipes that build the packages you want to test. Here is what you have to do for each recipe:
Be sure the recipe inherits the
ptestclass: Include the following line in each recipe:inherit ptestCreate
run-ptest: This script starts your test. Locate the script where you will refer to it usingSRC_URI. Here is an example that starts a test fordbus:#!/bin/sh cd test make -k runtest-TESTSEnsure dependencies are met: If the test adds build or runtime dependencies that normally do not exist for the package (such as requiring "make" to run the test suite), use the
DEPENDSandRDEPENDSvariables in your recipe in order for the package to meet the dependencies. Here is an example where the package has a runtime dependency on "make":RDEPENDS_${PN}-ptest += "make"Add a function to build the test suite: Not many packages support cross-compilation of their test suites. Consequently, you usually need to add a cross-compilation function to the package.
Many packages based on Automake compile and run the test suite by using a single command such as
make check. However, the hostmake checkbuilds and runs on the same computer, while cross-compiling requires that the package is built on the host but executed for the target architecture (though often, as in the case for ptest, the execution occurs on the host). The built version of Automake that ships with the Yocto Project includes a patch that separates building and execution. Consequently, packages that use the unaltered, patched version ofmake checkautomatically cross-compiles.Regardless, you still must add a
do_compile_ptestfunction to build the test suite. Add a function similar to the following to your recipe:do_compile_ptest() { oe_runmake buildtest-TESTS }Ensure special configurations are set: If the package requires special configurations prior to compiling the test code, you must insert a
do_configure_ptestfunction into the recipe.Install the test suite: The
ptestclass automatically copies the filerun-ptestto the target and then runs makeinstall-ptestto run the tests. If this is not enough, you need to create ado_install_ptestfunction and make sure it gets called after the "make install-ptest" completes.
5.17. Working with Source Files
The OpenEmbedded build system works with source files located
through the
SRC_URI
variable.
When you build something using BitBake, a big part of the operation
is locating and downloading all the source tarballs.
For images, downloading all the source for various packages can
take a significant amount of time.
This section presents information for working with source files that can lead to more efficient use of resources and time.
5.17.1. Setting up Effective Mirrors
As mentioned, a good deal that goes into a Yocto Project build is simply downloading all of the source tarballs. Maybe you have been working with another build system (OpenEmbedded or Angstrom) for which you have built up a sizable directory of source tarballs. Or, perhaps someone else has such a directory for which you have read access. If so, you can save time by adding statements to your configuration file so that the build process checks local directories first for existing tarballs before checking the Internet.
Here is an efficient way to set it up in your
local.conf file:
SOURCE_MIRROR_URL ?= "file:///home/you/your-download-dir/"
INHERIT += "own-mirrors"
BB_GENERATE_MIRROR_TARBALLS = "1"
# BB_NO_NETWORK = "1"
In the previous example, the
BB_GENERATE_MIRROR_TARBALLS
variable causes the OpenEmbedded build system to generate
tarballs of the Git repositories and store them in the
DL_DIR
directory.
Due to performance reasons, generating and storing these
tarballs is not the build system's default behavior.
You can also use the
PREMIRRORS
variable.
For an example, see the variable's glossary entry in the
Yocto Project Reference Manual.
5.17.2. Getting Source Files and Suppressing the Build
Another technique you can use to ready yourself for a
successive string of build operations, is to pre-fetch
all the source files without actually starting a build.
This technique lets you work through any download issues
and ultimately gathers all the source files into your
download directory
build/downloads,
which is located with
DL_DIR.
Use the following BitBake command form to fetch all the necessary sources without starting the build:
$ bitbake -c fetchall target
This variation of the BitBake command guarantees that you have all the sources for that BitBake target should you disconnect from the Internet and want to do the build later offline.
5.18. Building Software from an External Source
By default, the OpenEmbedded build system uses the Build Directory when building source code. The build process involves fetching the source files, unpacking them, and then patching them if necessary before the build takes place.
Situations exist where you might want to build software from source
files that are external to and thus outside of the
OpenEmbedded build system.
For example, suppose you have a project that includes a new BSP with
a heavily customized kernel.
And, you want to minimize exposing the build system to the
development team so that they can focus on their project and
maintain everyone's workflow as much as possible.
In this case, you want a kernel source directory on the development
machine where the development occurs.
You want the recipe's
SRC_URI
variable to point to the external directory and use it as is, not
copy it.
To build from software that comes from an external source, all you
need to do is inherit the
externalsrc
class and then set the
EXTERNALSRC
variable to point to your external source code.
Here are the statements to put in your
local.conf file:
INHERIT += "externalsrc"
EXTERNALSRC_pn-myrecipe = "path-to-your-source-tree"
This next example shows how to accomplish the same thing by setting
EXTERNALSRC in the recipe itself or in the
recipe's append file:
EXTERNALSRC = "path"
EXTERNALSRC_BUILD = "path"
Note
In order for these settings to take effect, you must globally or locally inherit theexternalsrc
class.
By default, externalsrc.bbclass builds
the source code in a directory separate from the external source
directory as specified by
EXTERNALSRC.
If you need to have the source built in the same directory in
which it resides, or some other nominated directory, you can set
EXTERNALSRC_BUILD
to point to that directory:
EXTERNALSRC_BUILD_pn-myrecipe = "path-to-your-source-tree"
5.19. Selecting an Initialization Manager
By default, the Yocto Project uses SysVinit as the initialization manager. However, support also exists for systemd, which is a full replacement for init with parallel starting of services, reduced shell overhead and other features that are used by many distributions.
If you want to use SysVinit, you do not have to do anything. But, if you want to use systemd, you must take some steps as described in the following sections.
5.19.1. Using systemd Exclusively
Set the these variables in your distribution configuration file as follows:
DISTRO_FEATURES_append = " systemd"
VIRTUAL-RUNTIME_init_manager = "systemd"
You can also prevent the SysVinit distribution feature from being automatically enabled as follows:
DISTRO_FEATURES_BACKFILL_CONSIDERED = "sysvinit"
Doing so removes any redundant SysVinit scripts.
To remove initscripts from your image altogether, set this variable also:
VIRTUAL-RUNTIME_initscripts = ""
For information on the backfill variable, see
DISTRO_FEATURES_BACKFILL_CONSIDERED.
5.19.2. Using systemd for the Main Image and Using SysVinit for the Rescue Image
Set these variables in your distribution configuration file as follows:
DISTRO_FEATURES_append = " systemd"
VIRTUAL-RUNTIME_init_manager = "systemd"
Doing so causes your main image to use the
packagegroup-core-boot.bb recipe and
systemd.
The rescue/minimal image cannot use this package group.
However, it can install SysVinit
and the appropriate packages will have support for both
systemd and SysVinit.
5.20. Selecting a Device Manager
The Yocto Project provides multiple ways to manage the device
manager (/dev):
Persistent and Pre-Populated
/dev: For this case, the/devdirectory is persistent and the required device nodes are created during the build.Use
devtmpfswith a Device Manager: For this case, the/devdirectory is provided by the kernel as an in-memory file system and is automatically populated by the kernel at runtime. Additional configuration of device nodes is done in user space by a device manager likeudevorbusybox-mdev.
5.20.1. Using Persistent and Pre-Populated/dev
To use the static method for device population, you need to
set the
USE_DEVFS
variable to "0" as follows:
USE_DEVFS = "0"
The content of the resulting /dev
directory is defined in a Device Table file.
The
IMAGE_DEVICE_TABLES
variable defines the Device Table to use and should be set
in the machine or distro configuration file.
Alternatively, you can set this variable in your
local.conf configuration file.
If you do not define the
IMAGE_DEVICE_TABLES variable, the default
device_table-minimal.txt is used:
IMAGE_DEVICE_TABLES = "device_table-mymachine.txt"
The population is handled by the makedevs
utility during image creation:
5.20.2. Using devtmpfs and a Device Manager
To use the dynamic method for device population, you need to
use (or be sure to set) the
USE_DEVFS
variable to "1", which is the default:
USE_DEVFS = "1"
With this setting, the resulting /dev
directory is populated by the kernel using
devtmpfs.
Make sure the corresponding kernel configuration variable
CONFIG_DEVTMPFS is set when building
you build a Linux kernel.
All devices created by devtmpfs will be
owned by root and have permissions
0600.
To have more control over the device nodes, you can use a
device manager like udev or
busybox-mdev.
You choose the device manager by defining the
VIRTUAL-RUNTIME_dev_manager variable
in your machine or distro configuration file.
Alternatively, you can set this variable in your
local.conf configuration file:
VIRTUAL-RUNTIME_dev_manager = "udev"
# Some alternative values
# VIRTUAL-RUNTIME_dev_manager = "busybox-mdev"
# VIRTUAL-RUNTIME_dev_manager = "systemd"
5.21. Using an External SCM
If you're working on a recipe that pulls from an external Source Code Manager (SCM), it is possible to have the OpenEmbedded build system notice new recipe changes added to the SCM and then build the resulting packages that depend on the new recipes by using the latest versions. This only works for SCMs from which it is possible to get a sensible revision number for changes. Currently, you can do this with Apache Subversion (SVN), Git, and Bazaar (BZR) repositories.
To enable this behavior, the
PV
of the recipe needs to reference
SRCPV.
Here is an example:
PV = "1.2.3+git${SRCPV}"
Then, you can add the following to your
local.conf:
SRCREV_pn-PN = "${AUTOREV}"
PN
is the name of the recipe for which you want to enable automatic source
revision updating.
If you do not want to update your local configuration file, you can add the following directly to the recipe to finish enabling the feature:
SRCREV = "${AUTOREV}"
The Yocto Project provides a distribution named
poky-bleeding, whose configuration
file contains the line:
require conf/distro/include/poky-floating-revisions.inc
This line pulls in the listed include file that contains numerous lines of exactly that form:
#SRCREV_pn-opkg-native ?= "${AUTOREV}"
#SRCREV_pn-opkg-sdk ?= "${AUTOREV}"
#SRCREV_pn-opkg ?= "${AUTOREV}"
#SRCREV_pn-opkg-utils-native ?= "${AUTOREV}"
#SRCREV_pn-opkg-utils ?= "${AUTOREV}"
SRCREV_pn-gconf-dbus ?= "${AUTOREV}"
SRCREV_pn-matchbox-common ?= "${AUTOREV}"
SRCREV_pn-matchbox-config-gtk ?= "${AUTOREV}"
SRCREV_pn-matchbox-desktop ?= "${AUTOREV}"
SRCREV_pn-matchbox-keyboard ?= "${AUTOREV}"
SRCREV_pn-matchbox-panel-2 ?= "${AUTOREV}"
SRCREV_pn-matchbox-themes-extra ?= "${AUTOREV}"
SRCREV_pn-matchbox-terminal ?= "${AUTOREV}"
SRCREV_pn-matchbox-wm ?= "${AUTOREV}"
SRCREV_pn-settings-daemon ?= "${AUTOREV}"
SRCREV_pn-screenshot ?= "${AUTOREV}"
.
.
.
These lines allow you to experiment with building a distribution that tracks the latest development source for numerous packages.
Caution
Thepoky-bleeding distribution
is not tested on a regular basis.
Keep this in mind if you use it.
5.22. Creating a Read-Only Root Filesystem
Suppose, for security reasons, you need to disable your target device's root filesystem's write permissions (i.e. you need a read-only root filesystem). Or, perhaps you are running the device's operating system from a read-only storage device. For either case, you can customize your image for that behavior.
Note
Supporting a read-only root filesystem requires that the system and applications do not try to write to the root filesystem. You must configure all parts of the target system to write elsewhere, or to gracefully fail in the event of attempting to write to the root filesystem.5.22.1. Creating the Root Filesystem
To create the read-only root filesystem, simply add the
"read-only-rootfs" feature to your image.
Using either of the following statements in your
image recipe or from within the
local.conf file found in the
Build Directory
causes the build system to create a read-only root filesystem:
IMAGE_FEATURES = "read-only-rootfs"
or
EXTRA_IMAGE_FEATURES += "read-only-rootfs"
For more information on how to use these variables, see the
"Customizing Images Using Custom IMAGE_FEATURES and EXTRA_IMAGE_FEATURES"
section.
For information on the variables, see
IMAGE_FEATURES
and EXTRA_IMAGE_FEATURES.
5.22.2. Post-Installation Scripts
It is very important that you make sure all
post-Installation (pkg_postinst) scripts
for packages that are installed into the image can be run
at the time when the root filesystem is created during the
build on the host system.
These scripts cannot attempt to run during first-boot on the
target device.
With the "read-only-rootfs" feature enabled,
the build system checks during root filesystem creation to make
sure all post-installation scripts succeed.
If any of these scripts still need to be run after the root
filesystem is created, the build immediately fails.
These build-time checks ensure that the build fails
rather than the target device fails later during its
initial boot operation.
Most of the common post-installation scripts generated by the build system for the out-of-the-box Yocto Project are engineered so that they can run during root filesystem creation (e.g. post-installation scripts for caching fonts). However, if you create and add custom scripts, you need to be sure they can be run during this file system creation.
Here are some common problems that prevent post-installation scripts from running during root filesystem creation:
Not using $D in front of absolute paths: The build system defines
$Dwhen the root filesystem is created. Furthermore,$Dis blank when the script is run on the target device. This implies two purposes for$D: ensuring paths are valid in both the host and target environments, and checking to determine which environment is being used as a method for taking appropriate actions.Attempting to run processes that are specific to or dependent on the target architecture: You can work around these attempts by using native tools, which run on the host system, to accomplish the same tasks, or by alternatively running the processes under QEMU, which has the
qemu_run_binaryfunction. For more information, see theqemuclass.
5.22.3. Areas With Write Access
With the "read-only-rootfs" feature enabled,
any attempt by the target to write to the root filesystem at
runtime fails.
Consequently, you must make sure that you configure processes
and applications that attempt these types of writes do so
to directories with write access (e.g.
/tmp or /var/run).
5.23. Performing Automated Runtime Testing
The OpenEmbedded build system makes available a series of automated
tests for images to verify runtime functionality.
You can run these tests on either QEMU or actual target hardware.
Tests are written in Python making use of the
unittest module, and the majority of them
run commands on the target system over SSH.
This section describes how you set up the environment to use these
tests, run available tests, and write and add your own tests.
5.23.1. Enabling Tests
Depending on whether you are planning to run tests using QEMU or on the hardware, you have to take different steps to enable the tests. See the following subsections for information on how to enable both types of tests.
5.23.1.1. Enabling Runtime Tests on QEMU
In order to run tests, you need to do the following:
Set up to avoid interaction with
sudofor networking: To accomplish this, you must do one of the following:Add
NOPASSWDfor your user in/etc/sudoerseither for all commands or just forrunqemu-ifup. You must provide the full path as that can change if you are using multiple clones of the source repository.Note
On some distributions, you also need to comment out "Defaults requiretty" in/etc/sudoers.Manually configure a tap interface for your system.
Run as root the script in
scripts/runqemu-gen-tapdevs, which should generate a list of tap devices. This is the option typically chosen for Autobuilder-type environments.
Set the
DISPLAYvariable: You need to set this variable so that you have an X server available (e.g. startvncserverfor a headless machine).Be sure your host's firewall accepts incoming connections from 192.168.7.0/24: Some of the tests (in particular smart tests) start an HTTP server on a random high number port, which is used to serve files to the target. The smart module serves
${DEPLOY_DIR}/rpmso it can run smart channel commands. That means your host's firewall must accept incoming connections from 192.168.7.0/24, which is the default IP range used for tap devices byrunqemu.Be sure your host has the correct packages installed: Depending your host's distribution, you need to have the following packages installed:
Ubuntu and Debian:
sysstatandiproute2OpenSUSE:
sysstatandiproute2Fedora:
sysstatandiprouteCentOS:
sysstatandiproute
Once you start running the tests, the following happens:
A copy of the root filesystem is written to
${WORKDIR}/testimage.The image is booted under QEMU using the standard
runqemuscript.A default timeout of 500 seconds occurs to allow for the boot process to reach the login prompt. You can change the timeout period by setting
TEST_QEMUBOOT_TIMEOUTin thelocal.conffile.Once the boot process is reached and the login prompt appears, the tests run. The full boot log is written to
${WORKDIR}/testimage/qemu_boot_log.Each test module loads in the order found in
TEST_SUITES. You can find the full output of the commands run over SSH in${WORKDIR}/testimgage/ssh_target_log.If no failures occur, the task running the tests ends successfully. You can find the output from the
unittestin the task log at${WORKDIR}/temp/log.do_testimage.
5.23.1.2. Enabling Runtime Tests on Hardware
The OpenEmbedded build system can run tests on real hardware, and for certain devices it can also deploy the image to be tested onto the device beforehand.
For automated deployment, a "master image" is installed onto the hardware once as part of setup. Then, each time tests are to be run, the following occurs:
The master image is booted into and used to write the image to be tested to a second partition.
The device is then rebooted using an external script that you need to provide.
The device boots into the image to be tested.
When running tests (independent of whether the image has been deployed automatically or not), the device is expected to be connected to a network on a pre-determined IP address. You can either use static IP addresses written into the image, or set the image to use DHCP and have your DHCP server on the test network assign a known IP address based on the MAC address of the device.
In order to run tests on hardware, you need to set
TEST_TARGET to an appropriate value.
For QEMU, you do not have to change anything, the default
value is "QemuTarget".
For running tests on hardware, the following options exist:
"SimpleRemoteTarget": Choose "SimpleRemoteTarget" if you are going to run tests on a target system that is already running the image to be tested and is available on the network. You can use "SimpleRemoteTarget" in conjunction with either real hardware or an image running within a separately started QEMU or any other virtual machine manager.
"GummibootTarget": Choose "GummibootTarget" if your hardware is an EFI-based machine with
gummibootas bootloader andcore-image-testmaster(or something similar) is installed. Also, your hardware under test must be in a DHCP-enabled network that gives it the same IP address for each reboot.If you choose "GummibootTarget", there are additional requirements and considerations. See the "Selecting GummibootTarget" section, which follows, for more information.
"BeagleBoneTarget": Choose "BeagleBoneTarget" if you are deploying images and running tests on the BeagleBone "Black" or original "White" hardware. For information on how to use these tests, see the comments at the top of the BeagleBoneTarget
meta-yocto-bsp/lib/oeqa/controllers/beaglebonetarget.pyfile."EdgeRouterTarget": Choose "EdgeRouterTarget" is you are deploying images and running tests on the Ubiquiti Networks EdgeRouter Lite. For information on how to use these tests, see the comments at the top of the EdgeRouterTarget
meta-yocto-bsp/lib/oeqa/controllers/edgeroutertarget.pyfile."GrubTarget": Choose the "supports deploying images and running tests on any generic PC that boots using GRUB. For information on how to use these tests, see the comments at the top of the GrubTarget
meta-yocto-bsp/lib/oeqa/controllers/grubtarget.pyfile."
your-target": Create your own custom target if you want to run tests when you are deploying images and running tests on a custom machine within your BSP layer. To do this, you need to add a Python unit that defines the target class underlib/oeqa/controllers/within your layer. You must also provide an empty__init__.py. For examples, see files inmeta-yocto-bsp/lib/oeqa/controllers/.
5.23.1.3. Selecting GummibootTarget
If you did not set TEST_TARGET to
"GummibootTarget", then you do not need any information
in this section.
You can skip down to the
"Running Tests"
section.
If you did set TEST_TARGET to
"GummibootTarget", you also need to perform a one-time
setup of your master image by doing the following:
Set
EFI_PROVIDER: Be sure thatEFI_PROVIDERis as follows:EFI_PROVIDER = "gummiboot"Build the master image: Build the
core-image-testmasterimage. Thecore-image-testmasterrecipe is provided as an example for a "master" image and you can customize the image recipe as you would any other recipe.Here are the image recipe requirements:
Inherits
core-imageso that kernel modules are installed.Installs normal linux utilities not busybox ones (e.g.
bash,coreutils,tar,gzip, andkmod).Uses a custom Initial RAM Disk (initramfs) image with a custom installer. A normal image that you can install usually creates a single rootfs partition. This image uses another installer that creates a specific partition layout. Not all Board Support Packages (BSPs) can use an installer. For such cases, you need to manually create the following partition layout on the target:
First partition mounted under
/boot, labeled "boot".The main rootfs partition where this image gets installed, which is mounted under
/.Another partition labeled "testrootfs" where test images get deployed.
Install image: Install the image that you just built on the target system.
The final thing you need to do when setting
TEST_TARGET to "GummibootTarget" is
to set up the test image:
Set up your
local.conffile: Make sure you have the following statements in yourlocal.conffile:IMAGE_FSTYPES += "tar.gz" INHERIT += "testimage" TEST_TARGET = "GummibootTarget" TEST_TARGET_IP = "192.168.2.3"Build your test image: Use BitBake to build the image:
$ bitbake core-image-sato
5.23.1.4. Power Control
For most hardware targets other than SimpleRemoteTarget, you can control power:
You can use
TEST_POWERCONTROL_CMDtogether withTEST_POWERCONTROL_EXTRA_ARGSas a command that runs on the host and does power cycling. The test code passes one argument to that command: off, on or cycle (off then on). Here is an example that could appear in yourlocal.conffile:TEST_POWERCONTROL_CMD = "powercontrol.exp test 10.11.12.1 nuc1"In this example, the expect script does the following:
ssh test@10.11.12.1 "pyctl nuc1arg"It then runs a Python script that controls power for a label called
nuc1.Note
You need to customizeTEST_POWERCONTROL_CMDandTEST_POWERCONTROL_EXTRA_ARGSfor your own setup. The one requirement is that it accepts "on", "off", and "cycle" as the last argument.When no command is defined, it connects to the device over SSH and uses the classic reboot command to reboot the device. Classic reboot is fine as long as the machine actually reboots (i.e. the SSH test has not failed). It is useful for scenarios where you have a simple setup, typically with a single board, and where some manual interaction is okay from time to time.
If you have no hardware to automatically perform power
control but still wish to experiment with automated
hardware testing, you can use the dialog-power-control
script that shows a dialog prompting you to perform the
required power action.
This script requires either KDialog or Zenity to be
installed.
To use this script, set the
TEST_POWERCONTROL_CMD
variable as follows:
TEST_POWERCONTROL_CMD = "${COREBASE}/scripts/contrib/dialog-power-control"
5.23.1.5. Serial Console Connection
For test target classes requiring a serial console
to interact with the bootloader (e.g. BeagleBoneTarget,
EdgeRouterTarget, and GrubTarget), you need to
specify a command to use to connect to the serial console
of the target machine by using the
TEST_SERIALCONTROL_CMD
variable and optionally the
TEST_SERIALCONTROL_EXTRA_ARGS
variable.
These cases could be a serial terminal program if the
machine is connected to a local serial port, or a
telnet or
ssh command connecting to a remote
console server.
Regardless of the case, the command simply needs to
connect to the serial console and forward that connection
to standard input and output as any normal terminal
program does.
For example, to use the picocom terminal program on
serial device /dev/ttyUSB0
at 115200bps, you would set the variable as follows:
TEST_SERIALCONTROL_CMD = "picocom /dev/ttyUSB0 -b 115200"
For local devices where the serial port device disappears
when the device reboots, an additional "serdevtry" wrapper
script is provided.
To use this wrapper, simply prefix the terminal command
with
${COREBASE}/scripts/contrib/serdevtry:
TEST_SERIALCONTROL_CMD = "${COREBASE}/scripts/contrib/serdevtry picocom -b
115200 /dev/ttyUSB0"
5.23.2. Running Tests
You can start the tests automatically or manually:
Automatically running tests: To run the tests automatically after the OpenEmbedded build system successfully creates an image, first set the
TEST_IMAGEvariable to "1" in yourlocal.conffile in the Build Directory:TEST_IMAGE = "1"Next, build your image. If the image successfully builds, the tests will be run:
bitbake core-image-satoManually running tests: To manually run the tests, first globally inherit the
testimageclass by editing yourlocal.conffile:INHERIT += "testimage"Next, use BitBake to run the tests:
bitbake -c testimageimage
All test files reside in
meta/lib/oeqa/runtime in the
Source Directory.
A test name maps directly to a Python module.
Each test module may contain a number of individual tests.
Tests are usually grouped together by the area
tested (e.g tests for systemd reside in
meta/lib/oeqa/runtime/systemd.py).
You can add tests to any layer provided you place them in the
proper area and you extend
BBPATH
in the local.conf file as normal.
Be sure that tests reside in
layer/lib/oeqa/runtime
Note
Be sure that module names do not collide with module names used in the default set of test modules inmeta/lib/oeqa/runtime.
You can change the set of tests run by appending or overriding
TEST_SUITES
variable in local.conf.
Each name in TEST_SUITES represents a
required test for the image.
Test modules named within TEST_SUITES
cannot be skipped even if a test is not suitable for an image
(e.g. running the RPM tests on an image without
rpm).
Appending "auto" to TEST_SUITES causes the
build system to try to run all tests that are suitable for the
image (i.e. each test module may elect to skip itself).
The order you list tests in TEST_SUITES
is important and influences test dependencies.
Consequently, tests that depend on other tests should be added
after the test on which they depend.
For example, since the ssh test
depends on the
ping test, "ssh" needs to come after
"ping" in the list.
The test class provides no re-ordering or dependency handling.
Note
Each module can have multiple classes with multiple test methods. And, Pythonunittest rules apply.
Here are some things to keep in mind when running tests:
The default tests for the image are defined as:
DEFAULT_TEST_SUITES_pn-image= "ping ssh df connman syslog xorg scp vnc date rpm smart dmesg"Add your own test to the list of the by using the following:
TEST_SUITES_append = " mytest"Run a specific list of tests as follows:
TEST_SUITES = "test1 test2 test3"Remember, order is important. Be sure to place a test that is dependent on another test later in the order.
5.23.3. Exporting Tests
You can export tests so that they can run independently of
the build system.
Exporting tests is required if you want to be able to hand
the test execution off to a scheduler.
You can only export tests that are defined in
TEST_SUITES.
If your image is already built, make sure the following are set
in your local.conf file.
Be sure to provide the IP address you need:
INHERIT +="testexport"
TEST_TARGET_IP = "192.168.7.2"
TEST_SERVER_IP = "192.168.7.1"
You can then export the tests with the following:
$ bitbake core-image-sato -c testexport
Exporting the tests places them in the
Build Directory in
tmp/testexport/core-image-sato, which
is controlled by the
TEST_EXPORT_DIR variable.
You can now run the tests outside of the build environment:
$ cd tmp/testexport/core-image-sato
$ ./runexported.py testdata.json
5.23.4. Writing New Tests
As mentioned previously, all new test files need to be in the
proper place for the build system to find them.
New tests for additional functionality outside of the core
should be added to the layer that adds the functionality, in
layer/lib/oeqa/runtimeBBPATH
is extended in the layer's
layer.conf file as normal).
Just remember the following:
Filenames need to map directly to test (module) names.
Do not use module names that collide with existing core tests.
Minimally, an empty
__init__.pyfile must exist in the runtime directory.
To create a new test, start by copying an existing module
(e.g. syslog.py or
gcc.py are good ones to use).
Test modules can use code from
meta/lib/oeqa/utils, which are helper
classes.
Note
Structure shell commands such that you rely on them and they return a single code for success. Be aware that sometimes you will need to parse the output. See thedf.py and
date.py modules for examples.
You will notice that all test classes inherit
oeRuntimeTest, which is found in
meta/lib/oetest.py.
This base class offers some helper attributes, which are
described in the following sections:
5.23.4.1. Class Methods
Class methods are as follows:
hasPackage(pkg): Returns "True" ifpkgis in the installed package list of the image, which is based on the manifest file that is generated during thedo_rootfstask.hasFeature(feature): Returns "True" if the feature is inIMAGE_FEATURESorDISTRO_FEATURES.
5.23.4.2. Class Attributes
Class attributes are as follows:
pscmd: Equals "ps -ef" ifprocpsis installed in the image. Otherwise,pscmdequals "ps" (busybox).tc: The called test context, which gives access to the following attributes:d: The BitBake datastore, which allows you to use stuff such asoeRuntimeTest.tc.d.getVar("VIRTUAL-RUNTIME_init_manager").testslistandtestsrequired: Used internally. The tests do not need these.filesdir: The absolute path tometa/lib/oeqa/runtime/files, which contains helper files for tests meant for copying on the target such as small files written in C for compilation.target: The target controller object used to deploy and start an image on a particular target (e.g. QemuTarget, SimpleRemote, and GummibootTarget). Tests usually use the following:ip: The target's IP address.server_ip: The host's IP address, which is usually used by the "smart" test suite.run(cmd, timeout=None): The single, most used method. This command is a wrapper for:ssh root@host "cmd". The command returns a tuple: (status, output), which are what their names imply - the return code of "cmd" and whatever output it produces. The optional timeout argument represents the number of seconds the test should wait for "cmd" to return. If the argument is "None", the test uses the default instance's timeout period, which is 300 seconds. If the argument is "0", the test runs until the command returns.copy_to(localpath, remotepath):scp localpath root@ip:remotepath.copy_from(remotepath, localpath):scp root@host:remotepath localpath.
5.23.4.3. Instance Attributes
A single instance attribute exists, which is
target.
The target instance attribute is
identical to the class attribute of the same name, which
is described in the previous section.
This attribute exists as both an instance and class
attribute so tests can use
self.target.run(cmd) in instance
methods instead of
oeRuntimeTest.tc.target.run(cmd).
5.23.5. Installing Packages in the DUT Without the Package Manager
When a test requires a package built by BitBake, it is possible
to install that package.
Installing the package does not require a package manager be
installed in the device under test (DUT).
It does, however, require an SSH connection and the target must
be using the sshcontrol class.
Note
This method usesscp to copy files
from the host to the target, which causes permissions and
special attributes to be lost.
A JSON file is used to define the packages needed by a test.
This file must be in the same path as the file used to define
the tests.
Furthermore, the filename must map directly to the test
module name with a .json extension.
The JSON file must include an object with the test name as keys of an object or an array. This object (or array of objects) uses the following data:
"pkg" - A mandatory string that is the name of the package to be installed.
"rm" - An optional boolean, which defaults to "false", that specifies to remove the package after the test.
"extract" - An optional boolean, which defaults to "false", that specifies if the package must be extracted from the package format. When set to "true", the package is not automatically installed into the DUT.
Following is an example JSON file that handles test "foo" installing package "bar" and test "foobar" installing packages "foo" and "bar". Once the test is complete, the packages are removed from the DUT.
{
"foo": {
"pkg": "bar"
},
"foobar": [
{
"pkg": "foo",
"rm": true
},
{
"pkg": "bar",
"rm": true
}
]
}
5.24. Debugging With the GNU Project Debugger (GDB) Remotely
GDB allows you to examine running programs, which in turn helps you to understand and fix problems. It also allows you to perform post-mortem style analysis of program crashes. GDB is available as a package within the Yocto Project and is installed in SDK images by default. See the "Images" chapter in the Yocto Project Reference Manual for a description of these images. You can find information on GDB at http://sourceware.org/gdb/.
Tip
For best results, install debug (-dbg) packages
for the applications you are going to debug.
Doing so makes extra debug symbols available that give you more
meaningful output.
Sometimes, due to memory or disk space constraints, it is not possible to use GDB directly on the remote target to debug applications. These constraints arise because GDB needs to load the debugging information and the binaries of the process being debugged. Additionally, GDB needs to perform many computations to locate information such as function names, variable names and values, stack traces and so forth - even before starting the debugging process. These extra computations place more load on the target system and can alter the characteristics of the program being debugged.
To help get past the previously mentioned constraints, you can use Gdbserver. Gdbserver runs on the remote target and does not load any debugging information from the debugged process. Instead, a GDB instance processes the debugging information that is run on a remote computer - the host GDB. The host GDB then sends control commands to Gdbserver to make it stop or start the debugged program, as well as read or write memory regions of that debugged program. All the debugging information loaded and processed as well as all the heavy debugging is done by the host GDB. Offloading these processes gives the Gdbserver running on the target a chance to remain small and fast.
Note
By default, source files are part of the*-dbg packages in order to enable GDB
to show source lines in its output.
You can save further space on the target by setting the
PACKAGE_DEBUG_SPLIT_STYLE
variable to "debug-without-src" so that these packages do not
include the source files.
Because the host GDB is responsible for loading the debugging information and for doing the necessary processing to make actual debugging happen, you have to make sure the host can access the unstripped binaries complete with their debugging information and also be sure the target is compiled with no optimizations. The host GDB must also have local access to all the libraries used by the debugged program. Because Gdbserver does not need any local debugging information, the binaries on the remote target can remain stripped. However, the binaries must also be compiled without optimization so they match the host's binaries.
To remain consistent with GDB documentation and terminology, the binary being debugged on the remote target machine is referred to as the "inferior" binary. For documentation on GDB see the GDB site.
The remainder of this section describes the steps you need to take to debug using the GNU project debugger.
5.24.1. Set Up the Cross-Development Debugging Environment
Before you can initiate a remote debugging session, you need to be sure you have set up the cross-development environment, toolchain, and sysroot. The Yocto Project Software Development Kit (SDK) Developer's Guide describes this process.
5.24.2. Launch Gdbserver on the Target
Make sure Gdbserver is installed on the target.
If it is not, install the package
gdbserver, which needs the
libthread-db1 package.
Here is an example, that when entered from the host,
connects to the target and launches Gdbserver in order to
"debug" a binary named helloworld:
$ gdbserver localhost:2345 /usr/bin/helloworld
Gdbserver should now be listening on port 2345 for debugging commands coming from a remote GDB process that is running on the host computer. Communication between Gdbserver and the host GDB are done using TCP. To use other communication protocols, please refer to the Gdbserver documentation.
5.24.3. Launch GDB on the Host Computer
Running GDB on the host computer takes a number of stages, which this section describes.
5.24.3.1. Build the Cross-GDB Package
A suitable GDB cross-binary is required that runs on your
host computer but also knows about the the ABI of the
remote target.
You can get this binary from the
Cross-Development Toolchain.
Here is an example where the toolchain has been installed
in the default directory
/opt/poky/2.1.2:
/opt/poky/2.1.2/sysroots/i686-pokysdk-linux/usr/bin/armv7a-vfp-neon-poky-linux-gnueabi/arm-poky-linux-gnueabi-gdb
where arm is the target architecture
and linux-gnueabi is the target ABI.
Alternatively, you can use BitBake to build the
gdb-cross binary.
Here is an example:
$ bitbake gdb-cross
Once the binary is built, you can find it here:
tmp/sysroots/host-arch/usr/bin/target-platform/target-abi-gdb
5.24.3.2. Create the GDB Initialization File and Point to Your Root Filesystem
Aside from the GDB cross-binary, you also need a GDB
initialization file in the same top directory in which
your binary resides.
When you start GDB on your host development system, GDB
finds this initialization file and executes all the
commands within.
For information on the .gdbinit, see
"Debugging with GDB",
which is maintained by
sourceware.org.
You need to add a statement in the
~/.gdbinit file that points to your
root filesystem.
Here is an example that points to the root filesystem for
an ARM-based target device:
set sysroot ~/sysroot_arm
5.24.3.3. Launch the Host GDB
Before launching the host GDB, you need to be sure
you have sourced the cross-debugging environment script,
which if you installed the root filesystem in the default
location is at /opt/poky/2.1.2
and begins with the string "environment-setup".
For more information, see the
Yocto Project Software Development Kit (SDK) Developer's
Guide.
Finally, switch to the directory where the binary resides
and run the cross-gdb binary.
Provide the binary file you are going to debug.
For example, the following command continues with the
example used in the previous section by loading
the helloworld binary as well as the
debugging information:
$ arm-poky-linux-gnuabi-gdb helloworld
The commands in your .gdbinit execute
and the GDB prompt appears.
5.24.4. Connect to the Remote GDB Server
From the target, you need to connect to the remote GDB server that is running on the host. You need to specify the remote host and port. Here is the command continuing with the example:
target remote 192.168.7.2:2345
5.24.5. Use the Debugger
You can now proceed with debugging as normal - as if you were debugging on the local machine. For example, to instruct GDB to break in the "main" function and then continue with execution of the inferior binary use the following commands from within GDB:
(gdb) break main
(gdb) continue
For more information about using GDB, see the project's online documentation at http://sourceware.org/gdb/download/onlinedocs/.
5.25. Debugging Parallel Make Races
A parallel make race occurs when the build
consists of several parts that are run simultaneously and
a situation occurs when the output or result of one
part is not ready for use with a different part of the build that
depends on that output.
Parallel make races are annoying and can sometimes be difficult
to reproduce and fix.
However, some simple tips and tricks exist that can help
you debug and fix them.
This section presents a real-world example of an error encountered
on the Yocto Project autobuilder and the process used to fix it.
Note
If you cannot properly fix amake race
condition, you can work around it by clearing either the
PARALLEL_MAKE
or
PARALLEL_MAKEINST
variables.
5.25.1. The Failure
For this example, assume that you are building an image that depends on the "neard" package. And, during the build, BitBake runs into problems and creates the following output.
Note
This example log file has longer lines artificially broken to make the listing easier to read.
If you examine the output or the log file, you see the
failure during make:
| DEBUG: SITE files ['endian-little', 'bit-32', 'ix86-common', 'common-linux', 'common-glibc', 'i586-linux', 'common']
| DEBUG: Executing shell function do_compile
| NOTE: make -j 16
| make --no-print-directory all-am
| /bin/mkdir -p include/near
| /bin/mkdir -p include/near
| /bin/mkdir -p include/near
| ln -s /home/pokybuild/yocto-autobuilder/yocto-slave/nightly-x86/build/build/tmp/work/i586-poky-linux/neard/
0.14-r0/neard-0.14/include/types.h include/near/types.h
| ln -s /home/pokybuild/yocto-autobuilder/yocto-slave/nightly-x86/build/build/tmp/work/i586-poky-linux/neard/
0.14-r0/neard-0.14/include/log.h include/near/log.h
| ln -s /home/pokybuild/yocto-autobuilder/yocto-slave/nightly-x86/build/build/tmp/work/i586-poky-linux/neard/
0.14-r0/neard-0.14/include/plugin.h include/near/plugin.h
| /bin/mkdir -p include/near
| /bin/mkdir -p include/near
| /bin/mkdir -p include/near
| ln -s /home/pokybuild/yocto-autobuilder/yocto-slave/nightly-x86/build/build/tmp/work/i586-poky-linux/neard/
0.14-r0/neard-0.14/include/tag.h include/near/tag.h
| /bin/mkdir -p include/near
| ln -s /home/pokybuild/yocto-autobuilder/yocto-slave/nightly-x86/build/build/tmp/work/i586-poky-linux/neard/
0.14-r0/neard-0.14/include/adapter.h include/near/adapter.h
| /bin/mkdir -p include/near
| ln -s /home/pokybuild/yocto-autobuilder/yocto-slave/nightly-x86/build/build/tmp/work/i586-poky-linux/neard/
0.14-r0/neard-0.14/include/ndef.h include/near/ndef.h
| ln -s /home/pokybuild/yocto-autobuilder/yocto-slave/nightly-x86/build/build/tmp/work/i586-poky-linux/neard/
0.14-r0/neard-0.14/include/tlv.h include/near/tlv.h
| /bin/mkdir -p include/near
| /bin/mkdir -p include/near
| ln -s /home/pokybuild/yocto-autobuilder/yocto-slave/nightly-x86/build/build/tmp/work/i586-poky-linux/neard/
0.14-r0/neard-0.14/include/setting.h include/near/setting.h
| /bin/mkdir -p include/near
| /bin/mkdir -p include/near
| /bin/mkdir -p include/near
| ln -s /home/pokybuild/yocto-autobuilder/yocto-slave/nightly-x86/build/build/tmp/work/i586-poky-linux/neard/
0.14-r0/neard-0.14/include/device.h include/near/device.h
| ln -s /home/pokybuild/yocto-autobuilder/yocto-slave/nightly-x86/build/build/tmp/work/i586-poky-linux/neard/
0.14-r0/neard-0.14/include/nfc_copy.h include/near/nfc_copy.h
| ln -s /home/pokybuild/yocto-autobuilder/yocto-slave/nightly-x86/build/build/tmp/work/i586-poky-linux/neard/
0.14-r0/neard-0.14/include/snep.h include/near/snep.h
| ln -s /home/pokybuild/yocto-autobuilder/yocto-slave/nightly-x86/build/build/tmp/work/i586-poky-linux/neard/
0.14-r0/neard-0.14/include/version.h include/near/version.h
| ln -s /home/pokybuild/yocto-autobuilder/yocto-slave/nightly-x86/build/build/tmp/work/i586-poky-linux/neard/
0.14-r0/neard-0.14/include/dbus.h include/near/dbus.h
| ./src/genbuiltin nfctype1 nfctype2 nfctype3 nfctype4 p2p > src/builtin.h
| i586-poky-linux-gcc -m32 -march=i586 --sysroot=/home/pokybuild/yocto-autobuilder/yocto-slave/nightly-x86/
build/build/tmp/sysroots/qemux86 -DHAVE_CONFIG_H -I. -I./include -I./src -I./gdbus -I/home/pokybuild/
yocto-autobuilder/yocto-slave/nightly-x86/build/build/tmp/sysroots/qemux86/usr/include/glib-2.0
-I/home/pokybuild/yocto-autobuilder/yocto-slave/nightly-x86/build/build/tmp/sysroots/qemux86/usr/
lib/glib-2.0/include -I/home/pokybuild/yocto-autobuilder/yocto-slave/nightly-x86/build/build/
tmp/sysroots/qemux86/usr/include/dbus-1.0 -I/home/pokybuild/yocto-autobuilder/yocto-slave/
nightly-x86/build/build/tmp/sysroots/qemux86/usr/lib/dbus-1.0/include -I/home/pokybuild/yocto-autobuilder/
yocto-slave/nightly-x86/build/build/tmp/sysroots/qemux86/usr/include/libnl3
-DNEAR_PLUGIN_BUILTIN -DPLUGINDIR=\""/usr/lib/near/plugins"\"
-DCONFIGDIR=\""/etc/neard\"" -O2 -pipe -g -feliminate-unused-debug-types -c
-o tools/snep-send.o tools/snep-send.c
| In file included from tools/snep-send.c:16:0:
| tools/../src/near.h:41:23: fatal error: near/dbus.h: No such file or directory
| #include <near/dbus.h>
| ^
| compilation terminated.
| make[1]: *** [tools/snep-send.o] Error 1
| make[1]: *** Waiting for unfinished jobs....
| make: *** [all] Error 2
| ERROR: oe_runmake failed
5.25.2. Reproducing the Error
Because race conditions are intermittent, they do not manifest themselves every time you do the build. In fact, most times the build will complete without problems even though the potential race condition exists. Thus, once the error surfaces, you need a way to reproduce it.
In this example, compiling the "neard" package is causing the
problem.
So the first thing to do is build "neard" locally.
Before you start the build, set the
PARALLEL_MAKE
variable in your local.conf file to
a high number (e.g. "-j 20").
Using a high value for PARALLEL_MAKE
increases the chances of the race condition showing up:
$ bitbake neard
Once the local build for "neard" completes, start a
devshell build:
$ bitbake neard -c devshell
For information on how to use a
devshell, see the
"Using a Development Shell"
section.
In the devshell, do the following:
$ make clean
$ make tools/snep-send.o
The devshell commands cause the failure
to clearly be visible.
In this case, a missing dependency exists for the "neard"
Makefile target.
Here is some abbreviated, sample output with the
missing dependency clearly visible at the end:
i586-poky-linux-gcc -m32 -march=i586 --sysroot=/home/scott-lenovo/......
.
.
.
tools/snep-send.c
In file included from tools/snep-send.c:16:0:
tools/../src/near.h:41:23: fatal error: near/dbus.h: No such file or directory
#include <near/dbus.h>
^
compilation terminated.
make: *** [tools/snep-send.o] Error 1
$
5.25.3. Creating a Patch for the Fix
Because there is a missing dependency for the Makefile
target, you need to patch the
Makefile.am file, which is generated
from Makefile.in.
You can use Quilt to create the patch:
$ quilt new parallelmake.patch
Patch patches/parallelmake.patch is now on top
$ quilt add Makefile.am
File Makefile.am added to patch patches/parallelmake.patch
For more information on using Quilt, see the "Using Quilt in Your Workflow" section.
At this point you need to make the edits to
Makefile.am to add the missing
dependency.
For our example, you have to add the following line
to the file:
tools/snep-send.$(OBJEXT): include/near/dbus.h
Once you have edited the file, use the
refresh command to create the patch:
$ quilt refresh
Refreshed patch patches/parallelmake.patch
Once the patch file exists, you need to add it back to the
originating recipe folder.
Here is an example assuming a top-level
Source Directory
named poky:
$ cp patches/parallelmake.patch poky/meta/recipes-connectivity/neard/neard
The final thing you need to do to implement the fix in the
build is to update the "neard" recipe (i.e.
neard-0.14.bb) so that the
SRC_URI
statement includes the patch file.
The recipe file is in the folder above the patch.
Here is what the edited SRC_URI
statement would look like:
SRC_URI = "${KERNELORG_MIRROR}/linux/network/nfc/${BPN}-${PV}.tar.xz \
file://neard.in \
file://neard.service.in \
file://parallelmake.patch \
"
With the patch complete and moved to the correct folder and
the SRC_URI statement updated, you can
exit the devshell:
$ exit
5.25.4. Testing the Build
With everything in place, you can get back to trying the build again locally:
$ bitbake neard
This build should succeed.
Now you can open up a devshell again
and repeat the clean and make operations as follows:
$ bitbake neard -c devshell
$ make clean
$ make tools/snep-send.o
The build should work without issue.
As with all solved problems, if they originated upstream, you need to submit the fix for the recipe in OE-Core and upstream so that the problem is taken care of at its source. See the "How to Submit a Change" section for more information.
5.26. Maintaining Open Source License Compliance During Your Product's Lifecycle
One of the concerns for a development organization using open source software is how to maintain compliance with various open source licensing during the lifecycle of the product. While this section does not provide legal advice or comprehensively cover all scenarios, it does present methods that you can use to assist you in meeting the compliance requirements during a software release.
With hundreds of different open source licenses that the Yocto Project tracks, it is difficult to know the requirements of each and every license. However, the requirements of the major FLOSS licenses can begin to be covered by assuming that three main areas of concern exist:
Source code must be provided.
License text for the software must be provided.
Compilation scripts and modifications to the source code must be provided.
There are other requirements beyond the scope of these three and the methods described in this section (e.g. the mechanism through which source code is distributed).
As different organizations have different methods of complying with open source licensing, this section is not meant to imply that there is only one single way to meet your compliance obligations, but rather to describe one method of achieving compliance. The remainder of this section describes methods supported to meet the previously mentioned three requirements. Once you take steps to meet these requirements, and prior to releasing images, sources, and the build system, you should audit all artifacts to ensure completeness.
Note
The Yocto Project generates a license manifest during image creation that is located in${DEPLOY_DIR}/licenses/image_name-datestamp
to assist with any audits.
5.26.1. Providing the Source Code
Compliance activities should begin before you generate the final image. The first thing you should look at is the requirement that tops the list for most compliance groups - providing the source. The Yocto Project has a few ways of meeting this requirement.
One of the easiest ways to meet this requirement is
to provide the entire
DL_DIR
used by the build.
This method, however, has a few issues.
The most obvious is the size of the directory since it includes
all sources used in the build and not just the source used in
the released image.
It will include toolchain source, and other artifacts, which
you would not generally release.
However, the more serious issue for most companies is accidental
release of proprietary software.
The Yocto Project provides an
archiver
class to help avoid some of these concerns.
Before you employ DL_DIR or the
archiver class, you need to decide how you choose to
provide source.
The source archiver class can generate tarballs and SRPMs
and can create them with various levels of compliance in mind.
One way of doing this (but certainly not the only way) is to
release just the source as a tarball.
You can do this by adding the following to the
local.conf file found in the
Build Directory:
INHERIT += "archiver"
ARCHIVER_MODE[src] = "original"
During the creation of your image, the source from all
recipes that deploy packages to the image is placed within
subdirectories of
DEPLOY_DIR/sources based on the
LICENSE
for each recipe.
Releasing the entire directory enables you to comply with
requirements concerning providing the unmodified source.
It is important to note that the size of the directory can
get large.
A way to help mitigate the size issue is to only release tarballs for licenses that require the release of source. Let us assume you are only concerned with GPL code as identified with the following:
$ cd poky/build/tmp/deploy/sources
$ mkdir ~/gpl_source_release
$ for dir in */*GPL*; do cp -r $dir ~/gpl_source_release; done
At this point, you could create a tarball from the
gpl_source_release directory and
provide that to the end user.
This method would be a step toward achieving compliance
with section 3a of GPLv2 and with section 6 of GPLv3.
5.26.2. Providing License Text
One requirement that is often overlooked is inclusion
of license text.
This requirement also needs to be dealt with prior to
generating the final image.
Some licenses require the license text to accompany
the binary.
You can achieve this by adding the following to your
local.conf file:
COPY_LIC_MANIFEST = "1"
COPY_LIC_DIRS = "1"
LICENSE_CREATE_PACKAGE = "1"
Adding these statements to the configuration file ensures that the licenses collected during package generation are included on your image.
Note
Setting all three variables to "1" results in the
image having two copies of the same license file.
One copy resides in
/usr/share/common-licenses and
the other resides in
/usr/share/license.
The reason for this behavior is because
COPY_LIC_DIRS
and
COPY_LIC_MANIFEST
add a copy of the license when the image is built but do not
offer a path for adding licenses for newly installed packages
to an image.
LICENSE_CREATE_PACKAGE
adds a separate package and an upgrade path for adding
licenses to an image.
As the source archiver has already archived the original unmodified source that contains the license files, you would have already met the requirements for inclusion of the license information with source as defined by the GPL and other open source licenses.
5.26.3. Providing Compilation Scripts and Source Code Modifications
At this point, we have addressed all we need to address prior to generating the image. The next two requirements are addressed during the final packaging of the release.
By releasing the version of the OpenEmbedded build system and the layers used during the build, you will be providing both compilation scripts and the source code modifications in one step.
If the deployment team has a BSP layer and a distro layer, and those those layers are used to patch, compile, package, or modify (in any way) any open source software included in your released images, you might be required to to release those layers under section 3 of GPLv2 or section 1 of GPLv3. One way of doing that is with a clean checkout of the version of the Yocto Project and layers used during your build. Here is an example:
# We built using the krogoth branch of the poky repo
$ git clone -b krogoth git://git.yoctoproject.org/poky
$ cd poky
# We built using the release_branch for our layers
$ git clone -b release_branch git://git.mycompany.com/meta-my-bsp-layer
$ git clone -b release_branch git://git.mycompany.com/meta-my-software-layer
# clean up the .git repos
$ find . -name ".git" -type d -exec rm -rf {} \;
One thing a development organization might want to consider
for end-user convenience is to modify
meta-poky/conf/bblayers.conf.sample to
ensure that when the end user utilizes the released build
system to build an image, the development organization's
layers are included in the bblayers.conf
file automatically:
# LAYER_CONF_VERSION is increased each time build/conf/bblayers.conf
# changes incompatibly
LCONF_VERSION = "6"
BBPATH = "${TOPDIR}"
BBFILES ?= ""
BBLAYERS ?= " \
##OEROOT##/meta \
##OEROOT##/meta-poky \
##OEROOT##/meta-yocto-bsp \
##OEROOT##/meta-mylayer \
"
Creating and providing an archive of the Metadata layers (recipes, configuration files, and so forth) enables you to meet your requirements to include the scripts to control compilation as well as any modifications to the original source.
5.27. Using the Error Reporting Tool
The error reporting tool allows you to
submit errors encountered during builds to a central database.
Outside of the build environment, you can use a web interface to
browse errors, view statistics, and query for errors.
The tool works using a client-server system where the client
portion is integrated with the installed Yocto Project
Source Directory
(e.g. poky).
The server receives the information collected and saves it in a
database.
A live instance of the error reporting server exists at http://errors.yoctoproject.org. This server exists so that when you want to get help with build failures, you can submit all of the information on the failure easily and then point to the URL in your bug report or send an email to the mailing list.
Note
If you send error reports to this server, the reports become publicly visible.
5.27.1. Enabling and Using the Tool
By default, the error reporting tool is disabled.
You can enable it by inheriting the
report-error
class by adding the following statement to the end of
your local.conf file in your
Build Directory.
INHERIT += "report-error"
By default, the error reporting feature stores information in
${LOG_DIR}/error-report.
However, you can specify a directory to use by adding the following
to your local.conf file:
ERR_REPORT_DIR = "path"
Enabling error reporting causes the build process to collect the errors and store them in a file as previously described. When the build system encounters an error, it includes a command as part of the console output. You can run the command to send the error file to the server. For example, the following command sends the errors to an upstream server:
$ send-error-report /home/brandusa/project/poky/build/tmp/log/error-report/error_report_201403141617.txt
In the previous example, the errors are sent to a public database available at http://errors.yoctoproject.org, which is used by the entire community. If you specify a particular server, you can send the errors to a different database. Use the following command for more information on available options:
$ send-error-report --help
When sending the error file, you are prompted to review the data being sent as well as to provide a name and optional email address. Once you satisfy these prompts, the command returns a link from the server that corresponds to your entry in the database. For example, here is a typical link:
http://errors.yoctoproject.org/Errors/Details/9522/
Following the link takes you to a web interface where you can browse, query the errors, and view statistics.
5.27.2. Disabling the Tool
To disable the error reporting feature, simply remove or comment
out the following statement from the end of your
local.conf file in your
Build Directory.
INHERIT += "report-error"
5.27.3. Setting Up Your Own Error Reporting Server
If you want to set up your own error reporting server, you can obtain the code from the Git repository at http://git.yoctoproject.org/cgit/cgit.cgi/error-report-web/. Instructions on how to set it up are in the README document.
Chapter 6. Using the Quick EMUlator (QEMU)
Quick EMUlator (QEMU) is an Open Source project the Yocto Project uses as part of its development "tool set". As such, the information in this chapter is limited to the Yocto Project integration of QEMU and not QEMU in general. For official information and documentation on QEMU, see the following references:
QEMU Website: The official website for the QEMU Open Source project.
Documentation: The QEMU user manual.
This chapter provides an overview of the Yocto Project's integration of QEMU, a description of how you use QEMU and its various options, running under a Network File System (NFS) server, and a few tips and tricks you might find helpful when using QEMU.
6.1. Overview
Within the context of the Yocto Project, QEMU is an emulator and virtualization machine that allows you to run a complete image you have built using the Yocto Project as just another task on your build system. QEMU is useful for running and testing images and applications on supported Yocto Project architectures without having actual hardware. Among other things, the Yocto Project uses QEMU to run automated Quality Assurance (QA) tests on final images shipped with each release.
QEMU is made available with the Yocto Project a number of ways. One method is to install a Software Development Kit (SDK). For more information on how to make sure you have QEMU available, see the Yocto Project Software Development Kit (SDK) Developer's Guide.
6.2. Running QEMU
Running QEMU involves having your build environment set up, having the
right artifacts available, and understanding how to use the many
options that are available to you when you start QEMU using the
runqemu command.
6.2.1. Setting Up the Environment
You run QEMU in the same environment from which you run BitBake.
This means you need to source a build environment script (i.e.
oe-init-build-env
or
oe-init-build-env-memres).
6.2.2. Using the runqemu Command
The basic runqemu command syntax is as
follows:
$ runqemu [option ] [...]
Based on what you provide on the command line,
runqemu does a good job of figuring out what
you are trying to do.
For example, by default, QEMU looks for the most recently built
image according to the timestamp when it needs to look for an
image.
Minimally, through the use of options, you must provide either
a machine name, a virtual machine image
(*.vmdk), or a kernel image
(*.bin).
Following is a description of runqemu
options you can provide on the command line:
Tip
If you do provide some "illegal" option combination or perhaps you do not provide enough in the way of options,runqemu provides appropriate error
messaging to help you correct the problem.
QEMUARCH: The QEMU machine architecture, which must be "qemux86", "qemux86_64", "qemuarm", "qemumips", "qemumipsel", “qemumips64", "qemush4", "qemuppc", "qemumicroblaze", or "qemuzynq".VM.vmdkfile. Use this option when you want to boot a.vmdkimage. The image filename you provide must contain one of the following strings: "qemux86-64", "qemux86", "qemuarm", "qemumips64", "qemumips", "qemuppc", or "qemush4".ROOTFS: A root filesystem that has one of the following filetype extensions: "ext2", "ext3", "ext4", "jffs2", "nfs", or "btrfs". If the filename you provide for this option uses “nfs”, it must provide an explicit root filesystem path.KERNEL: A kernel image, which is a.binfile. When you provide a.binfile,runqemudetects it and assumes the file is a kernel image.MACHINE: The architecture of the QEMU machine, which must be one of the following: "qemux86", "qemux86-64", "qemuarm", "qemumips", "qemumipsel", “qemumips64", "qemush4", "qemuppc", "qemumicroblaze", or "qemuzynq". TheMACHINEandQEMUARCHoptions are basically identical. If you do not provide aMACHINEoption,runqemutries to determine it based on other options.ramfs: Indicates you are booting an initial RAM disk (initramfs) image, which means theFSTYPEiscpio.gz.iso: Indicates you are booting an ISO image, which means theFSTYPEis.iso.nographic: Disables the video console, which sets the console to "ttys0".serial: Enables a serial console on/dev/ttyS0.biosdir: Establishes a custom directory for BIOS, VGA BIOS and keymaps.biosfilename: Establishes a custom BIOS name.qemuparams=\": Specifies custom QEMU parameters. Use this option to pass options other than the simple "kvm" and "serial" options.xyz\"bootparams=\": Specifies custom boot parameters for the kernel.xyz\"audio: Enables audio in QEMU. TheMACHINEoption must be either "qemux86" or "qemux86-64" in order for audio to be enabled. Additionally, thesnd_intel8x0orsnd_ens1370driver must be installed in linux guest.slirp: Enables "slirp" networking, which is a different way of networking that does not need root access but also is not as easy to use or comprehensive as the default.kvm: Enables KVM when running "qemux86" or "qemux86-64" QEMU architectures. For KVM to work, all the following conditions must be met:Your
MACHINEmust be either qemux86" or "qemux86-64".Your build host has to have the KVM modules installed, which are
/dev/kvm.The build host
/dev/kvmdirectory has to be both writable and readable.
kvm-vhost: Enables KVM with VHOST support when running "qemux86" or "qemux86-64" QEMU architectures. For KVM with VHOST to work, the following conditions must be met:kvm option conditions must be met.
Your build host has to have virtio net device, which are
/dev/vhost-net.The build host
/dev/vhost-netdirectory has to be either readable or writable and “slirp-enabled”.
publicvnc: Enables a VNC server open to all hosts.
For further understanding regarding option use with
runqemu, consider some examples.
This example starts QEMU with
MACHINE set to "qemux86".
Assuming a standard
Build Directory,
runqemu automatically finds the
bzImage-qemux86.bin image file and
the
core-image-minimal-qemux86-20140707074611.rootfs.ext3
(assuming the current build created a
core-image-minimal image).
Note
When more than one image with the same name exists, QEMU finds and uses the most recently built image according to the timestamp.
$ runqemu qemux86
This example produces the exact same results as the previous example. This command, however, specifically provides the image and root filesystem type.
$ runqemu qemux86 core-image-minimal ext3
This example specifies to boot an initial RAM disk image
and to enable audio in QEMU.
For this case, runqemu set the
internal variable FSTYPE to
"cpio.gz".
Also, for audio to be enabled, an appropriate driver must
be installed (see the previous description for the
audio option for more information).
$ runqemu qemux86 ramfs audio
This example does not provide enough information for
QEMU to launch.
While the command does provide a root filesystem type, it
must also minimally provide a
MACHINE,
KERNEL, or
VM option.
$ runqemu ext3
This example specifies to boot a virtual machine image
(.vmdk file).
From the .vmdk,
runqemu determines the QEMU
architecture (MACHINE) to be
"qemux86" and the root filesystem type to be "vmdk".
$ runqemu /home/scott-lenovo/vm/core-image-minimal-qemux86.vmdk
6.3. Running Under a Network File System (NFS) Server
One method for running QEMU is to run it on an NFS server. This is useful when you need to access the same file system from both the build and the emulated system at the same time. It is also worth noting that the system does not need root privileges to run. It uses a user space NFS server to avoid that. This section describes how to set up for running QEMU using an NFS server and then how you can start and stop the server.
6.3.1. Setting Up to Use NFS
Once you are able to run QEMU in your environment, you can use the
runqemu-extract-sdk script, which is located
in the scripts directory along with
runqemu script.
The runqemu-extract-sdk takes a root
file system tarball and extracts it into a location that you
specify.
Then, when you run runqemu, you can specify
the location that has the file system to pass it to QEMU.
Here is an example that takes a file system and extracts it to
a directory named test-nfs:
runqemu-extract-sdk ./tmp/deploy/images/qemux86/core-image-sato-qemux86.tar.bz2 test-nfs
Once you have extracted the file system, you can run
runqemu normally with the additional
location of the file system.
You can then also make changes to the files within
./test-nfs and see those changes appear in the
image in real time.
Here is an example using the qemux86 image:
runqemu qemux86 ./test-nfs
6.3.2. Starting and Stopping NFS
You can manually start and stop the NFS share using these commands:
start: Starts the NFS share:runqemu-export-rootfs startfile-system-locationstop: Stops the NFS share:runqemu-export-rootfs stopfile-system-locationrestart: Restarts the NFS share:runqemu-export-rootfs restartfile-system-location
6.4. Tips and Tricks
The following list describes things you can do to make running QEMU in the context of the Yocto Project a better experience:
Switching Between Consoles: When booting or running QEMU, you can switch between supported consoles by using Ctrl+Alt+
number. For example, Ctrl+Alt+3 switches you to the serial console as long as that console is enabled. Being able to switch consoles is helpful, for example, if the main QEMU console breaks for some reason.Note
Usually, "2" gets you to the main console and "3" gets you to the serial console.Removing the Splash Screen: You can remove the splash screen when QEMU is booting by using Alt+left. Removing the splash screen allows you to see what is happening in the background.
Disabling the Cursor Grab: The default QEMU integration captures the cursor within the main window. It does this since standard mouse devices only provide relative input and not absolute coordinates. You then have to break out of the grab using the "Ctrl+Alt" key combination. However, the Yocto Project's integration of QEMU enables the wacom USB touch pad driver by default to allow input of absolute coordinates. This default means that the mouse can enter and leave the main window without the grab taking effect leading to a better user experience.
 |
Chapter 7. Introduction
7.1. Introduction
Welcome to the Yocto Project Software Development Kit (SDK) Developer's Guide. This manual provides information that explains how to use both the standard Yocto Project SDK and an extensible SDK to develop applications and images using the Yocto Project. Additionally, the manual also provides information on how to use the popular Eclipse™ IDE as part of your application development workflow within the SDK environment.
Prior to the 2.0 Release of the Yocto Project, application development was primarily accomplished through the use of the Application Development Toolkit (ADT) and the availability of stand-alone cross-development toolchains and other tools. With the 2.1 Release of the Yocto Project, application development has transitioned to within a more traditional SDK and extensible SDK.
A standard SDK consists of the following:
Cross-Development Toolchain: This toolchain contains a compiler, debugger, and various miscellaneous tools.
Libraries, Headers, and Symbols: The libraries, headers, and symbols are specific to the image (i.e. they match the image).
Environment Setup Script: This
*.shfile, once run, sets up the cross-development environment by defining variables and preparing for SDK use.
You can use the standard SDK to independently develop and test code that is destined to run on some target machine.
An extensible SDK consists of everything that the standard SDK has plus tools that allow you to easily add new applications and libraries to an image, modify the source of an existing component, test changes on the target hardware, and easily integrate an application into the OpenEmbedded build system.
SDKs are completely self-contained.
The binaries are linked against their own copy of
libc, which results in no dependencies
on the target system.
To achieve this, the pointer to the dynamic loader is
configured at install time since that path cannot be dynamically
altered.
This is the reason for a wrapper around the
populate_sdk and
populate_sdk_ext archives.
Another feature for the SDKs is that only one set of cross-compiler
toolchain binaries are produced per architecture.
This feature takes advantage of the fact that the target hardware can
be passed to gcc as a set of compiler options.
Those options are set up by the environment script and contained in
variables such as
CC
and
LD.
This reduces the space needed for the tools.
Understand, however, that a sysroot is still needed for every target
since those binaries are target-specific.
The SDK development environment consists of the following:
The self-contained SDK, which is an architecture-specific cross-toolchain and matching sysroots (target and native) all built by the OpenEmbedded build system (e.g. the SDK). The toolchain and sysroots are based on a Metadata configuration and extensions, which allows you to cross-develop on the host machine for the target hardware.
The Quick EMUlator (QEMU), which lets you simulate target hardware. QEMU is not literally part of the SDK. You must build and include this emulator separately. However, QEMU plays an important role in the development process that revolves around use of the SDK.
The Eclipse IDE Yocto Plug-in. This plug-in is available for you if you are an Eclipse user. In the same manner as QEMU, the plug-in is not literally part of the SDK but is rather available for use as part of the development process.
Various user-space tools that greatly enhance your application development experience. These tools are also separate from the actual SDK but can be independently obtained and used in the development process.
7.1.1. The Cross-Development Toolchain
The Cross-Development Toolchain consists of a cross-compiler, cross-linker, and cross-debugger that are used to develop user-space applications for targeted hardware. This toolchain is created by running a toolchain installer script or through a Build Directory that is based on your Metadata configuration or extension for your targeted device. The cross-toolchain works with a matching target sysroot.
7.1.2. Sysroots
The native and target sysroots contain needed headers and libraries for generating binaries that run on the target architecture. The target sysroot is based on the target root filesystem image that is built by the OpenEmbedded build system and uses the same Metadata configuration used to build the cross-toolchain.
7.1.3. The QEMU Emulator
The QEMU emulator allows you to simulate your hardware while running your application or image. QEMU is not part of the SDK but is made available a number of ways:
If you have cloned the
pokyGit repository to create a Source Directory and you have sourced the environment setup script, QEMU is installed and automatically available.If you have downloaded a Yocto Project release and unpacked it to create a Source Directory and you have sourced the environment setup script, QEMU is installed and automatically available.
If you have installed the cross-toolchain tarball and you have sourced the toolchain's setup environment script, QEMU is also installed and automatically available.
7.1.4. Eclipse Yocto Plug-in
The Eclipse IDE is a popular development environment and it fully supports development using the Yocto Project. When you install and configure the Eclipse Yocto Project Plug-in into the Eclipse IDE, you maximize your Yocto Project experience. Installing and configuring the Plug-in results in an environment that has extensions specifically designed to let you more easily develop software. These extensions allow for cross-compilation, deployment, and execution of your output into a QEMU emulation session. You can also perform cross-debugging and profiling. The environment also supports a suite of tools that allows you to perform remote profiling, tracing, collection of power data, collection of latency data, and collection of performance data.
For information about the application development workflow that uses the Eclipse IDE and for a detailed example of how to install and configure the Eclipse Yocto Project Plug-in, see the "Developing Applications Using Eclipse™" section.
7.1.5. User-Space Tools
User-space tools, which are available as part of the SDK development environment, can be helpful. The tools include LatencyTOP, PowerTOP, Perf, SystemTap, and Lttng-ust. These tools are common development tools for the Linux platform.
LatencyTOP: LatencyTOP focuses on latency that causes skips in audio, stutters in your desktop experience, or situations that overload your server even when you have plenty of CPU power left.
PowerTOP: Helps you determine what software is using the most power. You can find out more about PowerTOP at https://01.org/powertop/.
Perf: Performance counters for Linux used to keep track of certain types of hardware and software events. For more information on these types of counters see https://perf.wiki.kernel.org/. For examples on how to setup and use this tool, see the "perf" section in the Yocto Project Profiling and Tracing Manual.
SystemTap: A free software infrastructure that simplifies information gathering about a running Linux system. This information helps you diagnose performance or functional problems. SystemTap is not available as a user-space tool through the Eclipse IDE Yocto Plug-in. See http://sourceware.org/systemtap for more information on SystemTap. For examples on how to setup and use this tool, see the "SystemTap" section in the Yocto Project Profiling and Tracing Manual.
Lttng-ust: A User-space Tracer designed to provide detailed information on user-space activity. See http://lttng.org/ust for more information on Lttng-ust.
7.2. SDK Development Model
Fundamentally, the SDK fits into the development process as follows:
 |
The SDK is installed on any machine and can be used to develop applications, images, and kernels. An SDK can even be used by a QA Engineer or Release Engineer. The fundamental concept is that the machine that has the SDK installed does not have to be associated with the machine that has the Yocto Project installed. A developer can independently compile and test an object on their machine and then, when the object is ready for integration into an image, they can simply make it available to the machine that has the Yocto Project. Once the object is available, the image can be rebuilt using the Yocto Project to produce the modified image.
You just need to follow these general steps:
Install the SDK for your target hardware: For information on how to install the SDK, see the "Installing the SDK" section.
Download the Target Image: The Yocto Project supports several target architectures and has many pre-built kernel images and root filesystem images.
If you are going to develop your application on hardware, go to the
machinesdownload area and choose a target machine area from which to download the kernel image and root filesystem. This download area could have several files in it that support development using actual hardware. For example, the area might contain.hddimgfiles that combine the kernel image with the filesystem, boot loaders, and so forth. Be sure to get the files you need for your particular development process.If you are going to develop your application and then run and test it using the QEMU emulator, go to the
machines/qemudownload area. From this area, go down into the directory for your target architecture (e.g.qemux86_64for an Intel®-based 64-bit architecture). Download kernel, root filesystem, and any other files you need for your process.Note
To use the root filesystem in QEMU, you need to extract it. See the "Extracting the Root Filesystem" section for information on how to extract the root filesystem.Develop and Test your Application: At this point, you have the tools to develop your application. If you need to separately install and use the QEMU emulator, you can go to QEMU Home Page to download and learn about the emulator. See the "Using the Quick EMUlator (QEMU)" chapter in the Yocto Project Development Manual for information on using QEMU within the Yocto Project.
The remainder of this manual describes how to use both the standard SDK and the extensible SDK. Information also exists in appendix form that describes how you can build, install, and modify an SDK.
Chapter 8. Using the Standard SDK
This chapter describes the standard SDK and how to use it. Information covers the pieces of the SDK, how to install it, and presents several task-based procedures common for developing with a standard SDK.
Note
The tasks you can perform using a standard SDK are also applicable when you are using an extensible SDK. For information on the differences when using an extensible SDK as compared to a standard SDK, see the "Using the Extensible SDK" chapter.
8.1. Why use the Standard SDK and What is in It?
The Standard SDK provides a cross-development toolchain and libraries tailored to the contents of a specific image. You would use the Standard SDK if you want a more traditional toolchain experience.
The installed Standard SDK consists of several files and directories. Basically, it contains an SDK environment setup script, some configuration files, and host and target root filesystems to support usage. You can see the directory structure in the "Installed Standard SDK Directory Structure" section.
8.2. Installing the SDK
The first thing you need to do is install the SDK on your host
development machine by running the *.sh
installation script.
You can download a tarball installer, which includes the
pre-built toolchain, the runqemu
script, and support files from the appropriate directory under
http://downloads.yoctoproject.org/releases/yocto/yocto-2.1.2/toolchain/.
Toolchains are available for 32-bit and 64-bit x86 development
systems from the i686 and
x86_64 directories, respectively.
The toolchains the Yocto Project provides are based off the
core-image-sato image and contain
libraries appropriate for developing against that image.
Each type of development system supports five or more target
architectures.
The names of the tarball installer scripts are such that a string representing the host system appears first in the filename and then is immediately followed by a string representing the target architecture.
poky-glibc-host_system-image_type-arch-toolchain-release_version.sh
Where:
host_system is a string representing your development system:
i686 or x86_64.
image_type is the image for which the SDK was built.
arch is a string representing the tuned target architecture:
i586, x86_64, powerpc, mips, armv7a or armv5te
release_version is a string representing the release number of the
Yocto Project:
2.1.2, 2.1.2+snapshot
For example, the following toolchain installer is for a 64-bit
development host system and a i586-tuned target architecture
based off the SDK for core-image-sato and
using the current 2.1.2 snapshot:
poky-glibc-x86_64-core-image-sato-i586-toolchain-2.1.2.sh
The SDK and toolchains are self-contained and by default are installed
into /opt/poky.
However, when you run the SDK installer, you can choose an
installation directory.
Note
You must change the permissions on the toolchain installer script so that it is executable:
$ chmod +x poky-glibc-x86_64-core-image-sato-i586-toolchain-2.1.sh
The following command shows how to run the installer given a
toolchain tarball for a 64-bit x86 development host system and
a 32-bit x86 target architecture.
The example assumes the toolchain installer is located in
~/Downloads/.
Note
If you do not have write permissions for the directory into which you are installing the SDK, the installer notifies you and exits. Be sure you have write permissions in the directory and run the installer again.
$ ./poky-glibc-x86_64-core-image-sato-i586-toolchain-2.1.sh
Poky (Yocto Project Reference Distro) SDK installer version 2.0
===============================================================
Enter target directory for SDK (default: /opt/poky/2.1):
You are about to install the SDK to "/opt/poky/2.1". Proceed[Y/n]? Y
Extracting SDK.......................................................................done
Setting it up...done
SDK has been successfully set up and is ready to be used.
Each time you wish to use the SDK in a new shell session, you need to source the environment setup script e.g.
$ . /opt/poky/2.1/environment-setup-i586-poky-linux
Again, reference the "Installed Standard SDK Directory Structure" section for more details on the resulting directory structure of the installed SDK.
8.3. Running the SDK Environment Setup Script
Once you have the SDK installed, you must run the SDK environment setup script before you can actually use it. This setup script resides in the directory you chose when you installed the SDK. For information on where this setup script can reside, see the "Obtaining the SDK" Appendix.
Before running the script, be sure it is the one that matches the
architecture for which you are developing.
Environment setup scripts begin with the string
"environment-setup" and include as part of their
name the tuned target architecture.
For example, the command to source a setup script for an IA-based
target machine using i586 tuning and located in the default SDK
installation directory is as follows:
$ source /opt/poky/2.1.2/environment-setup-i586-poky-linux
When you run the setup script, many environment variables are defined:
SDKTARGETSYSROOT - The path to the sysroot used for cross-compilation
PKG_CONFIG_PATH - The path to the target pkg-config files
CONFIG_SITE - A GNU autoconf site file preconfigured for the target
CC - The minimal command and arguments to run the C compiler
CXX - The minimal command and arguments to run the C++ compiler
CPP - The minimal command and arguments to run the C preprocessor
AS - The minimal command and arguments to run the assembler
LD - The minimal command and arguments to run the linker
GDB - The minimal command and arguments to run the GNU Debugger
STRIP - The minimal command and arguments to run 'strip', which strips symbols
RANLIB - The minimal command and arguments to run 'ranlib'
OBJCOPY - The minimal command and arguments to run 'objcopy'
OBJDUMP - The minimal command and arguments to run 'objdump'
AR - The minimal command and arguments to run 'ar'
NM - The minimal command and arguments to run 'nm'
TARGET_PREFIX - The toolchain binary prefix for the target tools
CROSS_COMPILE - The toolchain binary prefix for the target tools
CONFIGURE_FLAGS - The minimal arguments for GNU configure
CFLAGS - Suggested C flags
CXXFLAGS - Suggested C++ flags
LDFLAGS - Suggested linker flags when you use CC to link
CPPFLAGS - Suggested preprocessor flags
8.4. Autotools-Based Projects
Once you have a suitable cross-toolchain installed, it is very easy to develop a project outside of the OpenEmbedded build system. This section presents a simple "Helloworld" example that shows how to set up, compile, and run the project.
8.4.1. Creating and Running a Project Based on GNU Autotools
Follow these steps to create a simple Autotools-based project:
Create your directory: Create a clean directory for your project and then make that directory your working location:
$ mkdir $HOME/helloworld $ cd $HOME/helloworldPopulate the directory: Create
hello.c,Makefile.am, andconfigure.acfiles as follows:For
hello.c, include these lines:#include <stdio.h> main() { printf("Hello World!\n"); }For
Makefile.am, include these lines:bin_PROGRAMS = hello hello_SOURCES = hello.cFor
configure.in, include these lines:AC_INIT(hello,0.1) AM_INIT_AUTOMAKE([foreign]) AC_PROG_CC AC_PROG_INSTALL AC_OUTPUT(Makefile)
Source the cross-toolchain environment setup file: Installation of the cross-toolchain creates a cross-toolchain environment setup script in the directory that the SDK was installed. Before you can use the tools to develop your project, you must source this setup script. The script begins with the string "environment-setup" and contains the machine architecture, which is followed by the string "poky-linux". Here is an example that sources a script from the default SDK installation directory that uses the 32-bit Intel x86 Architecture and the Krogoth Yocto Project release:
$ source /opt/poky/2.1.2/environment-setup-i586-poky-linuxGenerate the local aclocal.m4 files and create the configure script: The following GNU Autotools generate the local
aclocal.m4files and create the configure script:$ aclocal $ autoconfGenerate files needed by GNU coding standards: GNU coding standards require certain files in order for the project to be compliant. This command creates those files:
$ touch NEWS README AUTHORS ChangeLogGenerate the configure file: This command generates the
configure:$ automake -aCross-compile the project: This command compiles the project using the cross-compiler. The
CONFIGURE_FLAGSenvironment variable provides the minimal arguments for GNU configure:$ ./configure ${CONFIGURE_FLAGS}Make and install the project: These two commands generate and install the project into the destination directory:
$ make $ make install DESTDIR=./tmpVerify the installation: This command is a simple way to verify the installation of your project. Running the command prints the architecture on which the binary file can run. This architecture should be the same architecture that the installed cross-toolchain supports.
$ file ./tmp/usr/local/bin/helloExecute your project: To execute the project in the shell, simply enter the name. You could also copy the binary to the actual target hardware and run the project there as well:
$ ./helloAs expected, the project displays the "Hello World!" message.
8.4.2. Passing Host Options
For an Autotools-based project, you can use the cross-toolchain by just
passing the appropriate host option to configure.sh.
The host option you use is derived from the name of the environment setup
script found in the directory in which you installed the cross-toolchain.
For example, the host option for an ARM-based target that uses the GNU EABI
is armv5te-poky-linux-gnueabi.
You will notice that the name of the script is
environment-setup-armv5te-poky-linux-gnueabi.
Thus, the following command works to update your project and
rebuild it using the appropriate cross-toolchain tools:
$ ./configure --host=armv5te-poky-linux-gnueabi \
--with-libtool-sysroot=sysroot_dir
Note
If theconfigure script results in problems recognizing the
--with-libtool-sysroot=sysroot-dir option,
regenerate the script to enable the support by doing the following and then
run the script again:
$ libtoolize --automake
$ aclocal -I ${OECORE_NATIVE_SYSROOT}/usr/share/aclocal \
[-I dir_containing_your_project-specific_m4_macros]
$ autoconf
$ autoheader
$ automake -a
8.5. Makefile-Based Projects
For Makefile-based projects, the cross-toolchain environment variables
established by running the cross-toolchain environment setup script
are subject to general make rules.
To illustrate this, consider the following four cross-toolchain environment variables:
CC=i586-poky-linux-gcc -m32 -march=i586 --sysroot=/opt/poky/2.1.2/sysroots/i586-poky-linux
LD=i586-poky-linux-ld --sysroot=/opt/poky/2.1.2/sysroots/i586-poky-linux
CFLAGS=-O2 -pipe -g -feliminate-unused-debug-types
CXXFLAGS=-O2 -pipe -g -feliminate-unused-debug-types
Now, consider the following three cases:
Case 1 - No Variables Set in the
Makefile: Because these variables are not specifically set in theMakefile, the variables retain their values based on the environment.Case 2 - Variables Set in the
Makefile: Specifically setting variables in theMakefileduring the build results in the environment settings of the variables being overwritten.Case 3 - Variables Set when the
Makefileis Executed from the Command Line: Executing theMakefilefrom the command line results in the variables being overwritten with command-line content regardless of what is being set in theMakefile. In this case, environment variables are not considered unless you use the "-e" flag during the build:$ make -efileIf you use this flag, then the environment values of the variables override any variables specifically set in the
Makefile.
Note
For the list of variables set up by the cross-toolchain environment setup script, see the "Running the SDK Environment Setup Script" section.
8.6. Developing Applications Using Eclipse™
If you are familiar with the popular Eclipse IDE, you can use an Eclipse Yocto Plug-in to allow you to develop, deploy, and test your application all from within Eclipse. This section describes general workflow using the SDK and Eclipse and how to configure and set up Eclipse.
8.6.1. Workflow Using Eclipse™
The following figure and supporting list summarize the application development general workflow that employs both the SDK Eclipse.
 |
Prepare the host system for the Yocto Project: See "Supported Linux Distributions" and "Required Packages for the Host Development System" sections both in the Yocto Project Reference Manual for requirements. In particular, be sure your host system has the
xtermpackage installed.Secure the Yocto Project kernel target image: You must have a target kernel image that has been built using the OpenEmbedded build system.
Depending on whether the Yocto Project has a pre-built image that matches your target architecture and where you are going to run the image while you develop your application (QEMU or real hardware), the area from which you get the image differs.
Download the image from
machinesif your target architecture is supported and you are going to develop and test your application on actual hardware.Download the image from
machines/qemuif your target architecture is supported and you are going to develop and test your application using the QEMU emulator.Build your image if you cannot find a pre-built image that matches your target architecture. If your target architecture is similar to a supported architecture, you can modify the kernel image before you build it. See the "Patching the Kernel" section in the Yocto Project Development manual for an example.
For information on pre-built kernel image naming schemes for images that can run on the QEMU emulator, see the Yocto Project Software Development Kit (SDK) Developer's Guide.
Install the SDK: The SDK provides a target-specific cross-development toolchain, the root filesystem, the QEMU emulator, and other tools that can help you develop your application. For information on how to install the SDK, see the "Installing the SDK" section.
Secure the target root filesystem and the Cross-development toolchain: You need to find and download the appropriate root filesystem and the cross-development toolchain.
You can find the tarballs for the root filesystem in the same area used for the kernel image. Depending on the type of image you are running, the root filesystem you need differs. For example, if you are developing an application that runs on an image that supports Sato, you need to get a root filesystem that supports Sato.
You can find the cross-development toolchains at
toolchains. Be sure to get the correct toolchain for your development host and your target architecture. See the "Locating Pre-Built SDK Installers" section for information and the "Installing the SDK" section for installation information.Create and build your application: At this point, you need to have source files for your application. Once you have the files, you can use the Eclipse IDE to import them and build the project. If you are not using Eclipse, you need to use the cross-development tools you have installed to create the image.
Deploy the image with the application: If you are using the Eclipse IDE, you can deploy your image to the hardware or to QEMU through the project's preferences. If you are not using the Eclipse IDE, then you need to deploy the application to the hardware using other methods. Or, if you are using QEMU, you need to use that tool and load your image in for testing. See the "Using the Quick EMUlator (QEMU)" chapter in the Yocto Project Development Manual for information on using QEMU.
Test and debug the application: Once your application is deployed, you need to test it. Within the Eclipse IDE, you can use the debugging environment along with the set of installed user-space tools to debug your application. Of course, the same user-space tools are available separately if you choose not to use the Eclipse IDE.
8.6.2. Working Within Eclipse
The Eclipse IDE is a popular development environment and it fully supports development using the Yocto Project.
Note
This release of the Yocto Project supports both the Luna and Kepler versions of the Eclipse IDE. Thus, the following information provides setup information for both versions.
When you install and configure the Eclipse Yocto Project Plug-in into the Eclipse IDE, you maximize your Yocto Project experience. Installing and configuring the Plug-in results in an environment that has extensions specifically designed to let you more easily develop software. These extensions allow for cross-compilation, deployment, and execution of your output into a QEMU emulation session as well as actual target hardware. You can also perform cross-debugging and profiling. The environment also supports a suite of tools that allows you to perform remote profiling, tracing, collection of power data, collection of latency data, and collection of performance data.
This section describes how to install and configure the Eclipse IDE Yocto Plug-in and how to use it to develop your application.
8.6.2.1. Setting Up the Eclipse IDE
To develop within the Eclipse IDE, you need to do the following:
Install the optimal version of the Eclipse IDE.
Configure the Eclipse IDE.
Install the Eclipse Yocto Plug-in.
Configure the Eclipse Yocto Plug-in.
Note
Do not install Eclipse from your distribution's package repository. Be sure to install Eclipse from the official Eclipse download site as directed in the next section.
8.6.2.1.1. Installing the Eclipse IDE
It is recommended that you have the Luna SR2 (4.4.2) version of the Eclipse IDE installed on your development system. However, if you currently have the Kepler 4.3.2 version installed and you do not want to upgrade the IDE, you can configure Kepler to work with the Yocto Project.
If you do not have the Luna SR2 (4.4.2) Eclipse IDE installed, you can find the tarball at http://www.eclipse.org/downloads. From that site, choose the appropriate download from the "Eclipse IDE for C/C++ Developers". This version contains the Eclipse Platform, the Java Development Tools (JDT), and the Plug-in Development Environment.
Once you have downloaded the tarball, extract it into a
clean directory.
For example, the following commands unpack and install the
downloaded Eclipse IDE tarball into a clean directory
using the default name eclipse:
$ cd ~
$ tar -xzvf ~/Downloads/eclipse-cpp-luna-SR2-linux-gtk-x86_64.tar.gz
8.6.2.1.2. Configuring the Eclipse IDE
This section presents the steps needed to configure the Eclipse IDE.
Before installing and configuring the Eclipse Yocto Plug-in, you need to configure the Eclipse IDE. Follow these general steps:
Start the Eclipse IDE.
Make sure you are in your Workbench and select "Install New Software" from the "Help" pull-down menu.
Select
Luna - http://download.eclipse.org/releases/lunafrom the "Work with:" pull-down menu.Note
For Kepler, selectKepler - http://download.eclipse.org/releases/keplerExpand the box next to "Linux Tools" and select the
Linux Tools LTTng Tracer Control,Linux Tools LTTng Userspace Analysis, andLTTng Kernel Analysisboxes. If these selections do not appear in the list, that means the items are already installed.Note
For Kepler, selectLTTng - Linux Tracing Toolkitbox.Expand the box next to "Mobile and Device Development" and select the following boxes. Again, if any of the following items are not available for selection, that means the items are already installed:
C/C++ Remote Launch (Requires RSE Remote System Explorer)Remote System Explorer End-user RuntimeRemote System Explorer User ActionsTarget Management Terminal (Core SDK)TCF Remote System Explorer add-inTCF Target Explorer
Expand the box next to "Programming Languages" and select the
C/C++ Autotools SupportandC/C++ Development Toolsboxes. For Luna, these items do not appear on the list as they are already installed.Complete the installation and restart the Eclipse IDE.
8.6.2.1.3. Installing or Accessing the Eclipse Yocto Plug-in
You can install the Eclipse Yocto Plug-in into the Eclipse IDE one of two ways: use the Yocto Project's Eclipse Update site to install the pre-built plug-in or build and install the plug-in from the latest source code.
8.6.2.1.3.1. Installing the Pre-built Plug-in from the Yocto Project Eclipse Update Site
To install the Eclipse Yocto Plug-in from the update site, follow these steps:
Start up the Eclipse IDE.
In Eclipse, select "Install New Software" from the "Help" menu.
Click "Add..." in the "Work with:" area.
Enter
http://downloads.yoctoproject.org/releases/eclipse-plugin/2.1.2/lunain the URL field and provide a meaningful name in the "Name" field.Note
If you are using Kepler, usehttp://downloads.yoctoproject.org/releases/eclipse-plugin/2.1.2/keplerin the URL field.Click "OK" to have the entry added to the "Work with:" drop-down list.
Select the entry for the plug-in from the "Work with:" drop-down list.
Check the boxes next to
Yocto Project ADT Plug-in,Yocto Project Bitbake Commander Plug-in, andYocto Project Documentation plug-in.Complete the remaining software installation steps and then restart the Eclipse IDE to finish the installation of the plug-in.
Note
You can click "OK" when prompted about installing software that contains unsigned content.
8.6.2.1.3.2. Installing the Plug-in Using the Latest Source Code
To install the Eclipse Yocto Plug-in from the latest source code, follow these steps:
Be sure your development system is not using OpenJDK to build the plug-in by doing the following:
Use the Oracle JDK. If you don't have that, go to http://www.oracle.com/technetwork/java/javase/downloads/jdk7-downloads-1880260.html and download the latest appropriate Java SE Development Kit tarball for your development system and extract it into your home directory.
In the shell you are going to do your work, export the location of the Oracle Java. The previous step creates a new folder for the extracted software. You need to use the following
exportcommand and provide the specific location:export PATH=~/extracted_jdk_location/bin:$PATH
In the same shell, create a Git repository with:
$ cd ~ $ git clone git://git.yoctoproject.org/eclipse-pokyBe sure to checkout the correct tag. For example, if you are using Luna, do the following:
$ git checkout luna/yocto-2.1.2This puts you in a detached HEAD state, which is fine since you are only going to be building and not developing.
Note
If you are building kepler, checkout thekepler/yocto-2.1.2branch.Change to the
scriptsdirectory within the Git repository:$ cd scriptsSet up the local build environment by running the setup script:
$ ./setup.shWhen the script finishes execution, it prompts you with instructions on how to run the
build.shscript, which is also in thescriptsdirectory of the Git repository created earlier.Run the
build.shscript as directed. Be sure to provide the tag name, documentation branch, and a release name. Here is an example that uses theluna/yocto-2.1.2tag, themasterdocumentation branch, andkrogothfor the release name:$ ECLIPSE_HOME=/home/scottrif/eclipse-poky/scripts/eclipse ./build.sh luna/yocto-2.1.2 master krogoth 2>&1 | tee -a build.logAfter running the script, the file
org.yocto.sdk-release-date-archive.zipis in the current directory.If necessary, start the Eclipse IDE and be sure you are in the Workbench.
Select "Install New Software" from the "Help" pull-down menu.
Click "Add".
Provide anything you want in the "Name" field.
Click "Archive" and browse to the ZIP file you built in step eight. This ZIP file should not be "unzipped", and must be the
*archive.zipfile created by running thebuild.shscript.Click the "OK" button.
Check the boxes that appear in the installation window to install the
Yocto Project ADT Plug-in,Yocto Project Bitbake Commander Plug-in, and theYocto Project Documentation plug-in.Finish the installation by clicking through the appropriate buttons. You can click "OK" when prompted about installing software that contains unsigned content.
Restart the Eclipse IDE if necessary.
At this point you should be able to configure the Eclipse Yocto Plug-in as described in the "Configuring the Eclipse Yocto Plug-in" section.
8.6.2.1.4. Configuring the Eclipse Yocto Plug-in
Configuring the Eclipse Yocto Plug-in involves setting the Cross Compiler options and the Target options. The configurations you choose become the default settings for all projects. You do have opportunities to change them later when you configure the project (see the following section).
To start, you need to do the following from within the Eclipse IDE:
Choose "Preferences" from the "Window" menu to display the Preferences Dialog.
Click "Yocto Project ADT" to display the configuration screen.
8.6.2.1.4.1. Configuring the Cross-Compiler Options
To configure the Cross Compiler Options, you must select the type of toolchain, point to the toolchain, specify the sysroot location, and select the target architecture.
Selecting the Toolchain Type: Choose between
Standalone pre-built toolchainandBuild system derived toolchainfor Cross Compiler Options.Standalone Pre-built Toolchain:Select this mode when you are using a stand-alone cross-toolchain. For example, suppose you are an application developer and do not need to build a target image. Instead, you just want to use an architecture-specific toolchain on an existing kernel and target root filesystem.Build System Derived Toolchain:Select this mode if the cross-toolchain has been installed and built as part of the Build Directory. When you selectBuild system derived toolchain, you are using the toolchain bundled inside the Build Directory.
Point to the Toolchain: If you are using a stand-alone pre-built toolchain, you should be pointing to where it is installed. See the "Installing the SDK" section for information about how the SDK is installed.
If you are using a system-derived toolchain, the path you provide for the
Toolchain Root Locationfield is the Build Directory. See the "Building an SDK Installer" section.Specify the Sysroot Location: This location is where the root filesystem for the target hardware resides.
The location of the sysroot filesystem depends on where you separately extracted and installed the filesystem.
For information on how to install the toolchain and on how to extract and install the sysroot filesystem, see the "Building an SDK Installer" section.
Select the Target Architecture: The target architecture is the type of hardware you are going to use or emulate. Use the pull-down
Target Architecturemenu to make your selection. The pull-down menu should have the supported architectures. If the architecture you need is not listed in the menu, you will need to build the image. See the "Building Images" section of the Yocto Project Quick Start for more information.
8.6.2.1.4.2. Configuring the Target Options
You can choose to emulate hardware using the QEMU emulator, or you can choose to run your image on actual hardware.
QEMU: Select this option if you will be using the QEMU emulator. If you are using the emulator, you also need to locate the kernel and specify any custom options.
If you selected
Build system derived toolchain, the target kernel you built will be located in the Build Directory intmp/deploy/images/directory. If you selectedmachineStandalone pre-built toolchain, the pre-built image you downloaded is located in the directory you specified when you downloaded the image.Most custom options are for advanced QEMU users to further customize their QEMU instance. These options are specified between paired angled brackets. Some options must be specified outside the brackets. In particular, the options
serial,nographic, andkvmmust all be outside the brackets. Use theman qemucommand to get help on all the options and their use. The following is an example:serial ‘<-m 256 -full-screen>’Regardless of the mode, Sysroot is already defined as part of the Cross-Compiler Options configuration in the
Sysroot Location:field.External HW: Select this option if you will be using actual hardware.
Click the "OK" to save your plug-in configurations.
8.6.2.2. Creating the Project
You can create two types of projects: Autotools-based, or Makefile-based. This section describes how to create Autotools-based projects from within the Eclipse IDE. For information on creating Makefile-based projects in a terminal window, see the "Makefile-Based Projects" section.
Note
Do not use special characters in project names (e.g. spaces, underscores, etc.). Doing so can cause configuration to fail.
To create a project based on a Yocto template and then display the source code, follow these steps:
Select "Project" from the "File -> New" menu.
Double click
CC++.Double click
C Projectto create the project.Expand
Yocto Project ADT Autotools Project.Select
Hello World ANSI C Autotools Project. This is an Autotools-based project based on a Yocto template.Put a name in the
Project name:field. Do not use hyphens as part of the name.Click "Next".
Add information in the
AuthorandCopyright noticefields.Be sure the
Licensefield is correct.Click "Finish".
If the "open perspective" prompt appears, click "Yes" so that you in the C/C++ perspective.
The left-hand navigation pane shows your project. You can display your source by double clicking the project's source file.
8.6.2.3. Configuring the Cross-Toolchains
The earlier section, "Configuring the Eclipse Yocto Plug-in", sets up the default project configurations. You can override these settings for a given project by following these steps:
Select "Change Yocto Project Settings" from the "Project" menu. This selection brings up the Yocto Project Settings Dialog and allows you to make changes specific to an individual project.
By default, the Cross Compiler Options and Target Options for a project are inherited from settings you provided using the Preferences Dialog as described earlier in the "Configuring the Eclipse Yocto Plug-in" section. The Yocto Project Settings Dialog allows you to override those default settings for a given project.
Make your configurations for the project and click "OK".
Right-click in the navigation pane and select "Reconfigure Project" from the pop-up menu. This selection reconfigures the project by running
autogen.shin the workspace for your project. The script also runslibtoolize,aclocal,autoconf,autoheader,automake --a, and./configure. Click on the "Console" tab beneath your source code to see the results of reconfiguring your project.
8.6.2.4. Building the Project
To build the project select "Build Project" from the "Project" menu. The console should update and you can note the cross-compiler you are using.
Note
When building "Yocto Project ADT Autotools" projects, the Eclipse IDE might display error messages for Functions/Symbols/Types that cannot be "resolved", even when the related include file is listed at the project navigator and when the project is able to build. For these cases only, it is recommended to add a new linked folder to the appropriate sysroot. Use these steps to add the linked folder:Select the project.
Select "Folder" from the
File > Newmenu.In the "New Folder" Dialog, select "Link to alternate location (linked folder)".
Click "Browse" to navigate to the include folder inside the same sysroot location selected in the Yocto Project configuration preferences.
Click "OK".
Click "Finish" to save the linked folder.
8.6.2.5. Starting QEMU in User-Space NFS Mode
To start the QEMU emulator from within Eclipse, follow these steps:
Note
See the "Using the Quick EMUlator (QEMU)" chapter in the Yocto Project Development Manual for more information on using QEMU.
Expose and select "External Tools" from the "Run" menu. Your image should appear as a selectable menu item.
Select your image from the menu to launch the emulator in a new window.
If needed, enter your host root password in the shell window at the prompt. This sets up a
Tap 0connection needed for running in user-space NFS mode.Wait for QEMU to launch.
Once QEMU launches, you can begin operating within that environment. One useful task at this point would be to determine the IP Address for the user-space NFS by using the
ifconfigcommand.
8.6.2.6. Deploying and Debugging the Application
Once the QEMU emulator is running the image, you can deploy your application using the Eclipse IDE and then use the emulator to perform debugging. Follow these steps to deploy the application.
Note
Currently, Eclipse does not support SSH port forwarding. Consequently, if you need to run or debug a remote application using the host display, you must create a tunneling connection from outside Eclipse and keep that connection alive during your work. For example, in a new terminal, run the following:
ssh -XY user_name@remote_host_ip
After running the command, add the command to be executed
in Eclipse's run configuration before the application
as follows:
export DISPLAY=:10.0
Select "Debug Configurations..." from the "Run" menu.
In the left area, expand
C/C++Remote Application.Locate your project and select it to bring up a new tabbed view in the Debug Configurations Dialog.
Enter the absolute path into which you want to deploy the application. Use the "Remote Absolute File Path for C/C++Application:" field. For example, enter
/usr/bin/.programnameClick on the "Debugger" tab to see the cross-tool debugger you are using.
Click on the "Main" tab.
Create a new connection to the QEMU instance by clicking on "new".
Select
TCF, which means Target Communication Framework.Click "Next".
Clear out the "host name" field and enter the IP Address determined earlier.
Click "Finish" to close the New Connections Dialog.
Use the drop-down menu now in the "Connection" field and pick the IP Address you entered.
Click "Debug" to bring up a login screen and login.
Accept the debug perspective.
8.6.2.7. Running User-Space Tools
As mentioned earlier in the manual, several tools exist that enhance your development experience. These tools are aids in developing and debugging applications and images. You can run these user-space tools from within the Eclipse IDE through the "YoctoProjectTools" menu.
Once you pick a tool, you need to configure it for the remote target. Every tool needs to have the connection configured. You must select an existing TCF-based RSE connection to the remote target. If one does not exist, click "New" to create one.
Here are some specifics about the remote tools:
Lttng2.0 trace import: Selecting this tool transfers the remote target'sLttngtracing data back to the local host machine and uses the Lttng Eclipse plug-in to graphically display the output. For information on how to use Lttng to trace an application, see http://lttng.org/documentation and the "LTTng (Linux Trace Toolkit, next generation)" section, which is in the Yocto Project Profiling and Tracing Manual.Note
Do not useLttng-user space (legacy)tool. This tool no longer has any upstream support.Before you use the
Lttng2.0 trace importtool, you need to setup the Lttng Eclipse plug-in and create a Tracing project. Do the following:Select "Open Perspective" from the "Window" menu and then select "Other..." to bring up a menu of other perspectives. Choose "Tracing".
Click "OK" to change the Eclipse perspective into the Tracing perspective.
Create a new Tracing project by selecting "Project" from the "File -> New" menu.
Choose "Tracing Project" from the "Tracing" menu and click "Next".
Provide a name for your tracing project and click "Finish".
Generate your tracing data on the remote target.
Select "Lttng2.0 trace import" from the "Yocto Project Tools" menu to start the data import process.
Specify your remote connection name.
For the Ust directory path, specify the location of your remote tracing data. Make sure the location ends with
ust(e.g./usr/mysession/ust).Click "OK" to complete the import process. The data is now in the local tracing project you created.
Right click on the data and then use the menu to Select "Generic CTF Trace" from the "Trace Type... -> Common Trace Format" menu to map the tracing type.
Right click the mouse and select "Open" to bring up the Eclipse Lttng Trace Viewer so you view the tracing data.
PowerTOP: Selecting this tool runs PowerTOP on the remote target machine and displays the results in a new view called PowerTOP.The "Time to gather data(sec):" field is the time passed in seconds before data is gathered from the remote target for analysis.
The "show pids in wakeups list:" field corresponds to the
-pargument passed toPowerTOP.LatencyTOP and Perf: LatencyTOP identifies system latency, while Perf monitors the system's performance counter registers. Selecting either of these tools causes an RSE terminal view to appear from which you can run the tools. Both tools refresh the entire screen to display results while they run. For more information on setting up and usingperf, see the "perf" section in the Yocto Project Profiling and Tracing Manual.SystemTap: Systemtap is a tool that lets you create and reuse scripts to examine the activities of a live Linux system. You can easily extract, filter, and summarize data that helps you diagnose complex performance or functional problems. For more information on setting up and usingSystemTap, see the SystemTap Documentation.yocto-bsp: Theyocto-bsptool lets you quickly set up a Board Support Package (BSP) layer. The tool requires a Metadata location, build location, BSP name, BSP output location, and a kernel architecture. For more information on theyocto-bsptool outside of Eclipse, see the "Creating a new BSP Layer Using the yocto-bsp Script" section in the Yocto Project Board Support Package (BSP) Developer's Guide.
Chapter 9. Using the Extensible SDK
- 9.1. Setting Up to Use the Extensible SDK
- 9.2. Using
devtoolin Your SDK Workflow - 9.3. A Closer Look at
devtool add - 9.4. Working With Recipes
- 9.5. Restoring the Target Device to its Original State
- 9.6. Installing Additional Items Into the Extensible SDK
- 9.7. Updating the Extensible SDK
- 9.8. Creating a Derivative SDK With Additional Components
This chapter describes the extensible SDK and how to use it. The extensible SDK makes it easy to add new applications and libraries to an image, modify the source for an existing component, test changes on the target hardware, and ease integration into the rest of the OpenEmbedded build system.
Information in this chapter covers features that are not part of the standard SDK. In other words, the chapter presents information unique to the extensible SDK only. For information on how to use the standard SDK, see the "Using the Standard SDK" chapter.
9.1. Setting Up to Use the Extensible SDK
Getting set up to use the extensible SDK is identical to getting set up to use the standard SDK. You still need to locate and run the installer and then run the environment setup script. See the "Installing the SDK" and the "Running the SDK Environment Setup Script" sections for general information. The following items highlight the only differences between getting set up to use the extensible SDK as compared to the standard SDK:
Default Installation Directory: By default, the extensible SDK installs into the
poky_sdkfolder of your home directory. As with the standard SDK, you can choose to install the extensible SDK in any location when you run the installer. However, unlike the standard SDK, the location you choose needs to be writable for whichever users need to use the SDK, since files will need to be written under that directory during the normal course of operation.Build Tools and Build System: The extensible SDK installer performs additional tasks as compared to the standard SDK installer. The extensible SDK installer extracts build tools specific to the SDK and the installer also prepares the internal build system within the SDK. Here is example output for running the extensible SDK installer:
$ ./poky-glibc-x86_64-core-image-minimal-core2-64-toolchain-ext-2.1+snapshot.sh Poky (Yocto Project Reference Distro) Extensible SDK installer version 2.1+snapshot =================================================================================== Enter target directory for SDK (default: ~/poky_sdk): You are about to install the SDK to "/home/scottrif/poky_sdk". Proceed[Y/n]? Y Extracting SDK......................................................................done Setting it up... Extracting buildtools... Preparing build system... done SDK has been successfully set up and is ready to be used. Each time you wish to use the SDK in a new shell session, you need to source the environment setup script e.g. $ . /home/scottrif/poky_sdk/environment-setup-core2-64-poky-linux
After installing the SDK, you need to run the SDK environment setup script. Here is the output:
$ source environment-setup-core2-64-poky-linux
SDK environment now set up; additionally you may now run devtool to perform development tasks.
Run devtool --help for further details.
Once you run the environment setup script, you have
devtool available.
9.2. Using devtool in Your SDK Workflow
The cornerstone of the extensible SDK is a command-line tool
called devtool.
This tool provides a number of features that help
you build, test and package software within the extensible SDK, and
optionally integrate it into an image built by the OpenEmbedded build
system.
The devtool command line is organized similarly
to
Git in that it has a
number of sub-commands for each function.
You can run devtool --help to see all the
commands.
Two devtool subcommands that provide
entry-points into development are:
devtool add: Assists in adding new software to be built.devtool modify: Sets up an environment to enable you to modify the source of an existing component.
As with the OpenEmbedded build system, "recipes" represent software
packages within devtool.
When you use devtool add, a recipe is
automatically created.
When you use devtool modify, the specified
existing recipe is used in order to determine where to get the source
code and how to patch it.
In both cases, an environment is set up so that when you build the
recipe a source tree that is under your control is used in order to
allow you to make changes to the source as desired.
By default, both new recipes and the source go into a "workspace"
directory under the SDK.
The remainder of this section presents the
devtool add and
devtool modify workflows.
9.2.1. Use devtool add to Add an Application
The devtool add command generates
a new recipe based on existing source code.
This command takes advantage of the
workspace
layer that many devtool commands
use.
The command is flexible enough to allow you to extract source
code into both the workspace or a separate local Git repository
and to use existing code that does not need to be extracted.
Depending on your particular scenario, the arguments and options
you use with devtool add form different
combinations.
The following diagram shows common development flows
you would use with the devtool add
command:

Generating the New Recipe: The top part of the flow shows three scenarios by which you could use
devtool addto generate a recipe based on existing source code.In a shared development environment, it is typical where other developers are responsible for various areas of source code. As a developer, you are probably interested in using that source code as part of your development using the Yocto Project. All you need is access to the code, a recipe, and a controlled area in which to do your work.
Within the diagram, three possible scenarios feed into the
devtool addworkflow:Left: The left scenario represents a common situation where the source code does not exist locally and needs to be extracted. In this situation, you just let it get extracted to the default workspace - you do not want it in some specific location outside of the workspace. Thus, everything you need will be located in the workspace:
$ devtool addrecipe fetchuriWith this command,
devtoolcreates a recipe and an append file in the workspace as well as extracts the upstream source files into a local Git repository also within thesourcesfolder.Middle: The middle scenario also represents a situation where the source code does not exist locally. In this case, the code is again upstream and needs to be extracted to some local area - this time outside of the default workspace. As always, if required
devtoolcreates a Git repository locally during the extraction. Furthermore, the first positional argumentsrctreein this case identifies where thedevtool addcommand will locate the extracted code outside of the workspace:$ devtool addrecipe srctree fetchuriIn summary, the source code is pulled from
fetchuriand extracted into the location defined bysrctreeas a local Git repository.Within workspace,
devtoolcreates both the recipe and an append file for the recipe.Right: The right scenario represents a situation where the source tree (srctree) has been previously prepared outside of the
devtoolworkspace.The following command names the recipe and identifies where the existing source tree is located:
$ devtool addrecipe srctreeThe command examines the source code and creates a recipe for it placing the recipe into the workspace.
Because the extracted source code already exists,
devtooldoes not try to relocate it into the workspace - just the new the recipe is placed in the workspace.Aside from a recipe folder, the command also creates an append folder and places an initial
*.bbappendwithin.
Edit the Recipe: At this point, you can use
devtool edit-recipeto open up the editor as defined by the$EDITORenvironment variable and modify the file:$ devtool edit-reciperecipeFrom within the editor, you can make modifications to the recipe that take affect when you build it later.
Build the Recipe or Rebuild the Image: At this point in the flow, the next step you take depends on what you are going to do with the new code.
If you need to take the build output and eventually move it to the target hardware, you would use
devtool build:$ devtool buildrecipeOn the other hand, if you want an image to contain the recipe's packages for immediate deployment onto a device (e.g. for testing purposes), you can use the
devtool build-imagecommand:$ devtool build-imageimageDeploy the Build Output: When you use the
devtool buildcommand to build out your recipe, you probably want to see if the resulting build output works as expected on target hardware.Note
This step assumes you have a previously built image that is already either running in QEMU or running on actual hardware. Also, it is assumed that for deployment of the image to the target, SSH is installed in the image and if the image is running on real hardware that you have network access to and from your development machine.You can deploy your build output to that target hardware by using the
devtool deploy-targetcommand:$ devtool deploy-targetrecipe targetThe
targetis a live target machine running as an SSH server.You can, of course, also deploy the image you build using the
devtool build-imagecommand to actual hardware. However,devtooldoes not provide a specific command that allows you to do this.Optionally Update the Recipe With Patch Files: Once you are satisfied with the recipe, if you have made any changes to the source tree that you want to have applied by the recipe, you need to generate patches from those changes. You do this before moving the recipe to its final layer and cleaning up the workspace area
devtooluses. This optional step is especially relevant if you are using or adding third-party software.To convert commits created using Git to patch files, use the
devtool update-recipecommand.Note
Any changes you want to turn into patches must be committed to the Git repository in the source tree.$ devtool update-reciperecipeMove the Recipe to its Permanent Layer: Before cleaning up the workspace, you need to move the final recipe to its permanent layer. You must do this before using the
devtool resetcommand if you want to retain the recipe.Reset the Recipe: As a final step, you can restore the state such that standard layers and the upstream source is used to build the recipe rather than data in the workspace. To reset the recipe, use the
devtool resetcommand:$ devtool resetrecipe
9.2.2. Use devtool modify to Modify the Source of an Existing Component
The devtool modify command prepares the
way to work on existing code that already has a recipe in
place.
The command is flexible enough to allow you to extract code,
specify the existing recipe, and keep track of and gather any
patch files from other developers that are
associated with the code.
Depending on your particular scenario, the arguments and options
you use with devtool modify form different
combinations.
The following diagram shows common development flows
you would use with the devtool modify
command:
Preparing to Modify the Code: The top part of the flow shows three scenarios by which you could use
devtool modifyto prepare to work on source files. Each scenario assumes the following:The recipe exists in some layer external to the
devtoolworkspace.The source files exist upstream in an un-extracted state or locally in a previously extracted state.
The typical situation is where another developer has created some layer for use with the Yocto Project and their recipe already resides in that layer. Furthermore, their source code is readily available either upstream or locally.
Left: The left scenario represents a common situation where the source code does not exist locally and needs to be extracted. In this situation, the source is extracted into the default workspace location. The recipe, in this scenario, is in its own layer outside the workspace (i.e.
meta-layername).The following command identifies the recipe and by default extracts the source files:
$ devtool modifyrecipeOnce
devtoollocates the recipe, it uses theSRC_URIvariable to locate the source code and any local patch files from other developers are located.Note
You cannot provide an URL forsrctreewhen using thedevtool modifycommand.With this scenario, however, since no
srctreeargument exists, thedevtool modifycommand by default extracts the source files to a Git structure. Furthermore, the location for the extracted source is the default area within the workspace. The result is that the command sets up both the source code and an append file within the workspace with the recipe remaining in its original location.Middle: The middle scenario represents a situation where the source code also does not exist locally. In this case, the code is again upstream and needs to be extracted to some local area as a Git repository. The recipe, in this scenario, is again in its own layer outside the workspace.
The following command tells
devtoolwhat recipe with which to work and, in this case, identifies a local area for the extracted source files that is outside of the default workspace:$ devtool modifyrecipe srctreeAs with all extractions, the command uses the recipe's
SRC_URIto locate the source files. Once the files are located, the command by default extracts them. Providing thesrctreeargument instructsdevtoolwhere place the extracted source.Within workspace,
devtoolcreates an append file for the recipe. The recipe remains in its original location but the source files are extracted to the location you provided withsrctree.Right: The right scenario represents a situation where the source tree (
srctree) exists as a previously extracted Git structure outside of thedevtoolworkspace. In this example, the recipe also exists elsewhere in its own layer.The following command tells
devtoolthe recipe with which to work, uses the "-n" option to indicate source does not need to be extracted, and usessrctreeto point to the previously extracted source files:$ devtool modify -nrecipe srctreeOnce the command finishes, it creates only an append file for the recipe in the workspace. The recipe and the source code remain in their original locations.
Edit the Source: Once you have used the
devtool modifycommand, you are free to make changes to the source files. You can use any editor you like to make and save your source code modifications.Build the Recipe: Once you have updated the source files, you can build the recipe.
Deploy the Build Output: When you use the
devtool buildcommand to build out your recipe, you probably want to see if the resulting build output works as expected on target hardware.Note
This step assumes you have a previously built image that is already either running in QEMU or running on actual hardware. Also, it is assumed that for deployment of the image to the target, SSH is installed in the image and if the image is running on real hardware that you have network access to and from your development machine.You can deploy your build output to that target hardware by using the
devtool deploy-targetcommand:$ devtool deploy-targetrecipe targetThe
targetis a live target machine running as an SSH server.You can, of course, also deploy the image you build using the
devtool build-imagecommand to actual hardware. However,devtooldoes not provide a specific command that allows you to do this.Optionally Create Patch Files for Your Changes: After you have debugged your changes, you can use
devtool update-recipeto generate patch files for all the commits you have made.Note
Patch files are generated only for changes you have committed.$ devtool update-reciperecipeBy default, the
devtool update-recipecommand creates the patch files in a folder named the same as the recipe beneath the folder in which the recipe resides, and updates the recipe'sSRC_URIstatement to point to the generated patch files.Note
You can use the "--appendLAYERDIR" option to cause the command to create append files in a specific layer rather than the default recipe layer.Restore the Workspace: The
devtool resetrestores the state so that standard layers and upstream sources are used to build the recipe rather than what is in the workspace.$ devtool resetrecipe
9.3. A Closer Look at devtool add
The devtool add command automatically creates a
recipe based on the source tree with which you provide it.
Currently, the command has support for the following:
Autotools (
autoconfandautomake)CMake
Scons
qmakePlain
MakefileOut-of-tree kernel module
Binary package (i.e. "-b" option)
Node.js module through
npmPython modules that use
setuptoolsordistutils
Apart from binary packages, the determination of how a source tree
should be treated is automatic based on the files present within
that source tree.
For example, if a CMakeLists.txt file is found,
then the source tree is assumed to be using
CMake and is treated accordingly.
Note
In most cases, you need to edit the automatically generated recipe in order to make it build properly. Typically, you would go through several edit and build cycles until you can build the recipe. Once the recipe can be built, you could use possible further iterations to test the recipe on the target device.
The remainder of this section covers specifics regarding how parts of the recipe are generated.
9.3.1. Name and Version
If you do not specify a name and version on the command
line, devtool add attempts to determine
the name and version of the software being built from
various metadata within the source tree.
Furthermore, the command sets the name of the created recipe
file accordingly.
If the name or version cannot be determined, the
devtool add command prints an error and
you must re-run the command with both the name and version
or just the name or version specified.
Sometimes the name or version determined from the source tree might be incorrect. For such a case, you must reset the recipe:
$ devtool reset -n recipename
After running the devtool reset command,
you need to run devtool add again and
provide the name or the version.
9.3.2. Dependency Detection and Mapping
The devtool add command attempts to
detect build-time dependencies and map them to other recipes
in the system.
During this mapping, the command fills in the names of those
recipes in the
DEPENDS
value within the recipe.
If a dependency cannot be mapped, then a comment is placed in
the recipe indicating such.
The inability to map a dependency might be caused because the
naming is not recognized or because the dependency simply is
not available.
For cases where the dependency is not available, you must use
the devtool add command to add an
additional recipe to satisfy the dependency and then come
back to the first recipe and add its name to
DEPENDS.
If you need to add runtime dependencies, you can do so by adding the following to your recipe:
RDEPENDS_${PN} += "dependency1 dependency2 ..."
Note
Thedevtool add command often cannot
distinguish between mandatory and optional dependencies.
Consequently, some of the detected dependencies might
in fact be optional.
When in doubt, consult the documentation or the configure
script for the software the recipe is building for further
details.
In some cases, you might find you can substitute the
dependency for an option to disable the associated
functionality passed to the configure script.
9.3.3. License Detection
The devtool add command attempts to
determine if the software you are adding is able to be
distributed under a common open-source license and sets the
LICENSE
value accordingly.
You should double-check this value against the documentation
or source files for the software you are building and update
that LICENSE value if necessary.
The devtool add command also sets the
LIC_FILES_CHKSUM
value to point to all files that appear to be license-related.
However, license statements often appear in comments at the top
of source files or within documentation.
Consequently, you might need to amend the
LIC_FILES_CHKSUM variable to point to one
or more of those comments if present.
Setting LIC_FILES_CHKSUM is particularly
important for third-party software.
The mechanism attempts to ensure correct licensing should you
upgrade the recipe to a newer upstream version in future.
Any change in licensing is detected and you receive an error
prompting you to check the license text again.
If the devtool add command cannot
determine licensing information, the
LICENSE value is set to "CLOSED" and the
LIC_FILES_CHKSUM vaule remains unset.
This behavior allows you to continue with development but is
unlikely to be correct in all cases.
Consequently, you should check the documentation or source
files for the software you are building to determine the actual
license.
9.3.4. Adding Makefile-Only Software
The use of make by itself is very common
in both proprietary and open source software.
Unfortunately, Makefiles are often not written with
cross-compilation in mind.
Thus, devtool add often cannot do very
much to ensure that these Makefiles build correctly.
It is very common, for example, to explicitly call
gcc instead of using the
CC variable.
Usually, in a cross-compilation environment,
gcc is the compiler for the build host
and the cross-compiler is named something similar to
arm-poky-linux-gnueabi-gcc and might
require some arguments (e.g. to point to the associated sysroot
for the target machine).
When writing a recipe for Makefile-only software, keep the following in mind:
You probably need to patch the Makefile to use variables instead of hardcoding tools within the toolchain such as
gccandg++.The environment in which
makeruns is set up with various standard variables for compilation (e.g.CC,CXX, and so forth) in a similar manner to the environment set up by the SDK's environment setup script. One easy way to see these variables is to run thedevtool buildcommand on the recipe and then look inoe-logs/run.do_compile. Towards the top of this file you will see a list of environment variables that are being set. You can take advantage of these variables within the Makefile.If the Makefile sets a default for a variable using "=", that default overrides the value set in the environment, which is usually not desirable. In this situation, you can either patch the Makefile so it sets the default using the "?=" operator, or you can alternatively force the value on the
makecommand line. To force the value on the command line, add the variable setting toEXTRA_OEMAKEwithin the recipe as follows:EXTRA_OEMAKE += "'CC=${CC}' 'CXX=${CXX}'"In the above example, single quotes are used around the variable settings as the values are likely to contain spaces because required default options are passed to the compiler.
Hardcoding paths inside Makefiles is often problematic in a cross-compilation environment. This is particularly true because those hardcoded paths often point to locations on the build host and thus will either be read-only or will introduce contamination into the cross-compilation by virtue of being specific to the build host rather than the target. Patching the Makefile to use prefix variables or other path variables is usually the way to handle this.
Sometimes a Makefile runs target-specific commands such as
ldconfig. For such cases, you might be able to simply apply patches that remove these commands from the Makefile.
9.3.5. Adding Native Tools
Often, you need to build additional tools that run on the
build host system as opposed to the target.
You should indicate this using one of the following methods
when you run devtool add:
Specify the name of the recipe such that it ends with "-native". Specifying the name like this produces a recipe that only builds for the build host.
Specify the "‐‐also-native" option with the
devtool addcommand. Specifying this option creates a recipe file that still builds for the target but also creates a variant with a "-native" suffix that builds for the build host.
Note
If you need to add a tool that is shipped as part of a source tree that builds code for the target, you can typically accomplish this by building the native and target parts separately rather than within the same compilation process. Realize though that with the "‐‐also-native" option, you can add the tool using just one recipe file.
9.3.6. Adding Node.js Modules
You can use the devtool add command in the
following form to add Node.js modules:
$ devtool add "npm://registry.npmjs.org;name=forever;version=0.15.1"
The name and version parameters are mandatory. Lockdown and shrinkwrap files are generated and pointed to by the recipe in order to freeze the version that is fetched for the dependencies according to the first time. This also saves checksums that are verified on future fetches. Together, these behaviors ensure the reproducibility and integrity of the build.
Notes
You must use quotes around the URL. The
devtool adddoes not require the quotes, but the shell considers ";" as a splitter between multiple commands. Thus, without the quotes,devtool adddoes not receive the other parts, which results in several "command not found" errors.In order to support adding Node.js modules, a
nodejsrecipe must be part of your SDK in order to provide Node.js itself.
9.4. Working With Recipes
When building a recipe with devtool build the
typical build progression is as follows:
Fetch the source
Unpack the source
Configure the source
Compiling the source
Install the build output
Package the installed output
For recipes in the workspace, fetching and unpacking is disabled as the source tree has already been prepared and is persistent. Each of these build steps is defined as a function, usually with a "do_" prefix. These functions are typically shell scripts but can instead be written in Python.
If you look at the contents of a recipe, you will see that the
recipe does not include complete instructions for building the
software.
Instead, common functionality is encapsulated in classes inherited
with the inherit directive, leaving the recipe
to describe just the things that are specific to the software to be
built.
A base
class exists that is implicitly inherited by all recipes and provides
the functionality that most typical recipes need.
The remainder of this section presents information useful when working with recipes.
9.4.1. Finding Logs and Work Files
When you are debugging a recipe that you previously created using
devtool add or whose source you are modifying
by using the devtool modify command, after
the first run of devtool build, you will
find some symbolic links created within the source tree:
oe-logs, which points to the directory in
which log files and run scripts for each build step are created
and oe-workdir, which points to the temporary
work area for the recipe.
You can use these links to get more information on what is
happening at each build step.
These locations under oe-workdir are
particularly useful:
image/: Contains all of the files installed at thedo_installstage. Within a recipe, this directory is referred to by the expression${D}.sysroot-destdir/: Contains a subset of files installed withindo_installthat have been put into the shared sysroot. For more information, see the "Sharing Files Between Recipes" section.packages-split/: Contains subdirectories for each package produced by the recipe. For more information, see the "Packaging" section.
9.4.2. Setting Configure Arguments
If the software your recipe is building uses GNU autoconf,
then a fixed set of arguments is passed to it to enable
cross-compilation plus any extras specified by
EXTRA_OECONF
set within the recipe.
If you wish to pass additional options, add them to
EXTRA_OECONF.
Other supported build tools have similar variables
(e.g.
EXTRA_OECMAKE
for CMake,
EXTRA_OESCONS
for Scons, and so forth).
If you need to pass anything on the make
command line, you can use EXTRA_OEMAKE to do
so.
You can use the devtool configure-help command
to help you set the arguments listed in the previous paragraph.
The command determines the exact options being passed, and shows
them to you along with any custom arguments specified through
EXTRA_OECONF.
If applicable, the command also shows you the output of the
configure script's "‐‐help" option as a reference.
9.4.3. Sharing Files Between Recipes
Recipes often need to use files provided by other recipes on the build host. For example, an application linking to a common library needs access to the library itself and its associated headers. The way this access is accomplished within the extensible SDK is through the sysroot. One sysroot exists per "machine" for which the SDK is being built. In practical terms, this means a sysroot exists for the target machine, and a sysroot exists for the build host.
Recipes should never write files directly into the sysroot.
Instead, files should be installed into standard locations
during the
do_install
task within the
${D}
directory.
A subset of these files automatically go into the sysroot.
The reason for this limitation is that almost all files that go
into the sysroot are cataloged in manifests in order to ensure
they can be removed later when a recipe is modified or removed.
Thus, the sysroot is able to remain free from stale files.
9.4.4. Packaging
Packaging is not always particularly relevant within the extensible SDK. However, if you examine how build output gets into the final image on the target device, it is important to understand packaging because the contents of the image are expressed in terms of packages and not recipes.
During the
do_package
task, files installed during the
do_install
task are split into one main package, which is almost always named
the same as the recipe, and several other packages.
This separation is done because not all of those installed files
are always useful in every image.
For example, you probably do not need any of the documentation
installed in a production image.
Consequently, for each recipe the documentation files are separated
into a -doc package.
Recipes that package software that has optional modules or
plugins might do additional package splitting as well.
After building a recipe you can see where files have gone by
looking in the oe-workdir/packages-split
directory, which contains a subdirectory for each package.
Apart from some advanced cases, the
PACKAGES
and
FILES
variables controls splitting.
The PACKAGES variable lists all of the
packages to be produced, while the FILES
variable specifies which files to include in each package,
using an override to specify the package.
For example, FILES_${PN} specifies the files
to go into the main package (i.e. the main package is named the
same as the recipe and
${PN}
evaluates to the recipe name).
The order of the PACKAGES value is significant.
For each installed file, the first package whose
FILES value matches the file is the package
into which the file goes.
Defaults exist for both the PACKAGES and
FILES variables.
Consequently, you might find you do not even need to set these
variables in your recipe unless the software the recipe is
building installs files into non-standard locations.
9.5. Restoring the Target Device to its Original State
If you use the devtool deploy-target
command to write a recipe's build output to the target, and
you are working on an existing component of the system, then you
might find yourself in a situation where you need to restore the
original files that existed prior to running the
devtool deploy-target command.
Because the devtool deploy-target command
backs up any files it overwrites, you can use the
devtool undeploy-target to restore those files
and remove any other files the recipe deployed.
Consider the following example:
$ devtool undeploy-target lighttpd root@192.168.7.2
If you have deployed multiple applications, you can remove them all at once thus restoring the target device back to its original state:
$ devtool undeploy-target -a root@192.168.7.2
Information about files deployed to the target as well as any backed up files are stored on the target itself. This storage of course requires some additional space on the target machine.
Note
Thedevtool deploy-target and
devtool undeploy-target command do not
currently interact with any package management system on the
target device (e.g. RPM or OPKG).
Consequently, you should not intermingle operations
devtool deploy-target and the package
manager operations on the target device.
Doing so could result in a conflicting set of files.
9.6. Installing Additional Items Into the Extensible SDK
The extensible SDK typically only comes with a small number of tools
and libraries out of the box.
If you have a minimal SDK, then it starts mostly empty and is
populated on-demand.
However, sometimes you will need to explicitly install extra items
into the SDK.
If you need these extra items, you can first search for the items
using the devtool search command.
For example, suppose you need to link to libGL but you are not sure
which recipe provides it.
You can use the following command to find out:
$ devtool search libGL
mesa A free implementation of the OpenGL API
Once you know the recipe (i.e. mesa in this
example), you can install it:
$ devtool sdk-install mesa
By default, the devtool sdk-install assumes the
item is available in pre-built form from your SDK provider.
If the item is not available and it is acceptable to build the item
from source, you can add the "-s" option as follows:
$ devtool sdk-install -s mesa
It is important to remember that building the item from source takes
significantly longer than installing the pre-built artifact.
Also, if no recipe exists for the item you want to add to the SDK, you
must instead add it using the devtool add command.
9.7. Updating the Extensible SDK
If you are working with an extensible SDK that gets occasionally updated (e.g. typically when that SDK has been provided to you by another party), then you will need to manually pull down those updates to your installed SDK.
To update your installed SDK, run the following:
$ devtool sdk-update
The previous command assumes your SDK provider has set the default update URL for you. If that URL has not been set, you need to specify it yourself as follows:
$ devtool sdk-update path_to_update_directory
Note
The URL needs to point specifically to a published SDK and not an SDK installer that you would download and install.
9.8. Creating a Derivative SDK With Additional Components
You might need to produce an SDK that contains your own custom libraries for sending to a third party (e.g., if you are a vendor with customers needing to build their own software for the target platform). If that is the case, then you can produce a derivative SDK based on the currently installed SDK fairly easily. Use these steps:
If necessary, install an extensible SDK that you want to use as a base for your derivative SDK.
Source the environment script for the SDK.
Add the extra libraries or other components you want by using the
devtool addcommand.Run the
devtool build-sdkcommand.
The above procedure takes the recipes added to the workspace and constructs a new SDK installer containing those recipes and the resulting binary artifacts. The recipes go into their own separate layer in the constructed derivative SDK, leaving the workspace clean and ready for users to add their own recipes.
Appendix A. Obtaining the SDK
A.1. Locating Pre-Built SDK Installers
You can use existing, pre-built toolchains by locating and running an SDK installer script that ships with the Yocto Project. Using this method, you select and download an architecture-specific toolchain installer and then run the script to hand-install the toolchain.
You can find SDK installers here:
Standard SDK Installers Go to http://downloads.yoctoproject.org/releases/yocto/yocto-2.1.2/toolchain/ and find the folder that matches your host development system (i.e.
i686for 32-bit machines orx86_64for 64-bit machines).Go into that folder and download the toolchain installer whose name includes the appropriate target architecture. The toolchains provided by the Yocto Project are based off of the
core-image-satoimage and contain libraries appropriate for developing against that image. For example, if your host development system is a 64-bit x86 system and you are going to use your cross-toolchain for a 32-bit x86 target, go into thex86_64folder and download the following installer:poky-glibc-x86_64-core-image-sato-i586-toolchain-2.1.2.shExtensible SDK Installers Installers for the extensible SDK are in http://downloads.yoctoproject.org/releases/yocto/yocto-2.1.2/toolchain/.
A.2. Building an SDK Installer
As an alternative to locating and downloading a toolchain installer,
you can build the toolchain installer assuming you have first sourced
the environment setup script.
See the
"Building Images"
section in the Yocto Project Quick Start for steps that show you
how to set up the Yocto Project environment.
In particular, you need to be sure the
MACHINE
variable matches the architecture for which you are building and that
the
SDKMACHINE
variable is correctly set if you are building a toolchain designed to
run on an architecture that differs from your current development host
machine (i.e. the build machine).
To build the toolchain installer for a standard SDK and populate the SDK image, use the following command:
$ bitbake image -c populate_sdk
You can do the same for the extensible SDK using this command:
$ bitbake image -c populate_sdk_ext
These commands result in a toolchain installer that contains the sysroot that matches your target root filesystem.
When the bitbake command completes, the toolchain
installer will be in
tmp/deploy/sdk in the Build Directory.
Note
By default, this toolchain does not build static binaries. If you want to use the toolchain to build these types of libraries, you need to be sure your image has the appropriate static development libraries. Use theIMAGE_INSTALL
variable inside your local.conf file to
install the appropriate library packages.
Following is an example using glibc static
development libraries:
IMAGE_INSTALL_append = " glibc-staticdev"
A.3. Extracting the Root Filesystem
After installing the toolchain, for some use cases you might need to separately extract a root filesystem:
You want to boot the image using NFS.
You want to use the root filesystem as the target sysroot. For example, the Eclipse IDE environment with the Eclipse Yocto Plug-in installed allows you to use QEMU to boot under NFS.
You want to develop your target application using the root filesystem as the target sysroot.
To extract the root filesystem, first source
the cross-development environment setup script to establish
necessary environment variables.
If you built the toolchain in the Build Directory, you will find
the toolchain environment script in the
tmp directory.
If you installed the toolchain by hand, the environment setup
script is located in /opt/poky/2.1.2.
After sourcing the environment script, use the
runqemu-extract-sdk command and provide the
filesystem image.
Following is an example.
The second command sets up the environment.
In this case, the setup script is located in the
/opt/poky/2.1.2 directory.
The third command extracts the root filesystem from a previously
built filesystem that is located in the
~/Downloads directory.
Furthermore, this command extracts the root filesystem into the
qemux86-sato directory:
$ cd ~
$ source /opt/poky/2.1.2/environment-setup-i586-poky-linux
$ runqemu-extract-sdk \
~/Downloads/core-image-sato-sdk-qemux86-2011091411831.rootfs.tar.bz2 \
$HOME/qemux86-sato
You could now point to the target sysroot at
qemux86-sato.
A.4. Installed Standard SDK Directory Structure
The following figure shows the resulting directory structure after
you install the Standard SDK by running the *.sh
SDK installation script:
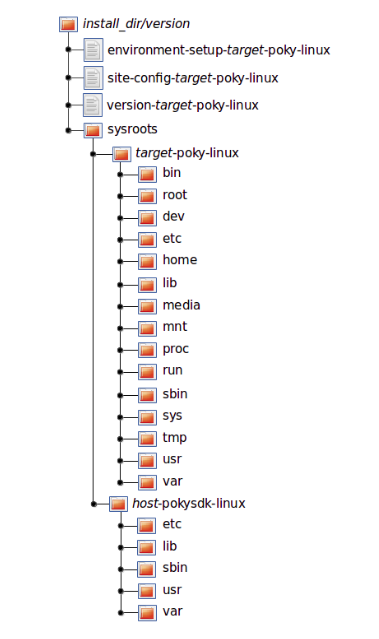
The installed SDK consists of an environment setup script for the SDK,
a configuration file for the target, a version file for the target,
and the root filesystem (sysroots) needed to
develop objects for the target system.
Within the figure, italicized text is used to indicate replaceable
portions of the file or directory name.
For example,
install_dir/version
is the directory where the SDK is installed.
By default, this directory is /opt/poky/.
And, version represents the specific
snapshot of the SDK (e.g. 2.1.2+snapshot).
Furthermore, target represents the target
architecture (e.g. i586) and
host represents the development system's
architecture (e.g. x86_64).
Thus, the complete names of the two directories within the
sysroots could be
i586-poky-linux and
x86_64-pokysdk-linux for the target and host,
respectively.
A.5. Installed Extensible SDK Directory Structure
The following figure shows the resulting directory structure after
you install the Extensible SDK by running the *.sh
SDK installation script:
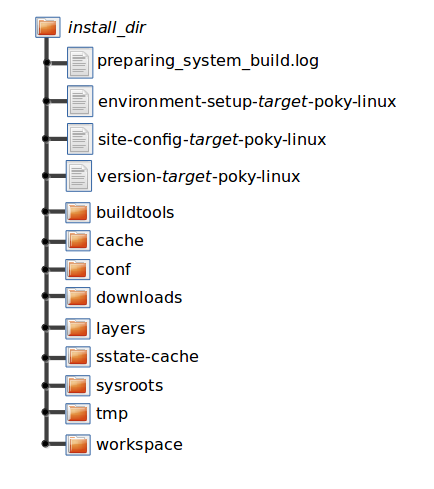
The installed directory structure for the extensible SDK is quite different than the installed structure for the standard SDK. The extensible SDK does not separate host and target parts in the same manner as does the standard SDK. The extensible SDK uses an embedded copy of the OpenEmbedded build system, which has its own sysroots.
Of note in the directory structure are an environment setup script for the SDK, a configuration file for the target, a version file for the target, and a log file for the OpenEmbedded build system preparation script run by the installer.
Within the figure, italicized text is used to indicate replaceable
portions of the file or directory name.
For example,
install_dir is the directory where the SDK
is installed, which is poky_sdk by default.
target represents the target
architecture (e.g. i586) and
host represents the development system's
architecture (e.g. x86_64).
Appendix B. Customizing the SDK
- B.1. Configuring the Extensible SDK
- B.2. Adjusting the Extensible SDK to Suit Your Build System Setup
- B.3. Changing the Appearance of the Extensible SDK
- B.4. Providing Updates After Installing the Extensible SDK
- B.5. Providing Additional Installable Extensible SDK Content
- B.6. Minimizing the Size of the Extensible SDK Installer Download
This appendix presents customizations you can apply to both the standard and extensible SDK. Each subsection identifies the type of SDK to which the section applies.
B.1. Configuring the Extensible SDK
The extensible SDK primarily consists of a pre-configured copy of
the OpenEmbedded build system from which it was produced.
Thus, the SDK's configuration is derived using that build system and
the following filters, which the OpenEmbedded build system applies
against local.conf and
auto.conf if they are present:
Variables whose values start with "/" are excluded since the assumption is that those values are paths that are likely to be specific to the build host.
Variables listed in
SDK_LOCAL_CONF_BLACKLISTare excluded. The default value blacklistsCONF_VERSION,BB_NUMBER_THREADS,PARALLEL_MAKE,PRSERV_HOST, andSSTATE_MIRRORS.Variables listed in
SDK_LOCAL_CONF_WHITELISTare included. Including a variable in the value ofSDK_LOCAL_CONF_WHITELISToverrides either of the above two conditions. The default value is blank.Classes inherited globally with
INHERITthat are listed inSDK_INHERIT_BLACKLISTare disabled. UsingSDK_INHERIT_BLACKLISTto disable these classes is is the typical method to disable classes that are problematic or unnecessary in the SDK context. The default value blacklists thebuildhistoryandiceccclasses.
Additionally, the contents of conf/sdk-extra.conf,
when present, are appended to the end of
conf/local.conf within the produced SDK, without
any filtering.
The sdk-extra.conf file is particularly useful
if you want to set a variable value just for the SDK and not the
OpenEmbedded build system used to create the SDK.
B.2. Adjusting the Extensible SDK to Suit Your Build System Setup
In most cases, the extensible SDK defaults should work. However, some cases exist for which you might consider making adjustments:
If your SDK configuration inherits additional classes using the
INHERITvariable and you do not need or want those classes enabled in the SDK, you can blacklist them by adding them to theSDK_INHERIT_BLACKLISTvariable. The default value ofSDK_INHERIT_BLACKLISTis set using the "?=" operator. Consequently, you will need to either set the complete value using "=" or append the value using "_append".If you have classes or recipes that add additional tasks to the standard build flow (i.e. that execute as part of building the recipe as opposed to needing to be called explicitly), then you need to do one of the following:
Ensure the tasks are shared state tasks (i.e. their output is saved to and can be restored from the shared state cache), or that the tasks are able to be produced quickly from a task that is a shared state task and add the task name to the value of
SDK_RECRDEP_TASKS.Disable the tasks if they are added by a class and you do not need the functionality the class provides in the extensible SDK. To disable the tasks, add the class to
SDK_INHERIT_BLACKLISTas previously described.
Generally, you want to have a shared state mirror set up so users of the SDK can add additional items to the SDK after installation without needing to build the items from source. See the "Providing Additional Installable Extensible SDK Content" section for information.
If you want users of the SDK to be able to easily update the SDK, you need to set the
SDK_UPDATE_URLvariable. For more information, see the "Providing Updates After Installing the Extensible SDK" section.If you have adjusted the list of files and directories that appear in
COREBASE(other than layers that are enabled throughbblayers.conf), then you must list these files inCOREBASE_FILESso that the files are copied into the SDK.If your OpenEmbedded build system setup uses a different environment setup script other than
oe-init-build-envoroe-init-build-env-memres, then you must setOE_INIT_ENV_SCRIPTto point to the environment setup script you use.Note
You must also reflect this change in the value used for theCOREBASE_FILESvariable as previously described.
B.3. Changing the Appearance of the Extensible SDK
You can change the title shown by the SDK installer by setting the
SDK_TITLE
variable.
By default, this title is derived from
DISTRO_NAME
when it is set.
If the DISTRO_NAME variable is not set, the title
is derived from the
DISTRO
variable.
B.4. Providing Updates After Installing the Extensible SDK
When you make changes to your configuration or to the metadata and
if you want those changes to be reflected in installed SDKs, you need
to perform additional steps to make it possible for those that use
the SDK to update their installations with the
devtool sdk-update command:
Arrange to be created a directory that can be shared over HTTP or HTTPS.
Set the
SDK_UPDATE_URLvariable to point to the corresponding HTTP or HTTPS URL. Setting this variable causes any SDK built to default to that URL and thus, the user does not have to pass the URL to thedevtool sdk-updatecommand.Build the extensible SDK normally (i.e., use the
bitbake -c populate_sdk_extimagenamecommand).Publish the SDK using the following command:
$ oe-publish-sdksome_path/sdk-installer.shpath_to_shared/http_directoryYou must repeat this step each time you rebuild the SDK with changes that you want to make available through the update mechanism.
Completing the above steps allows users of the existing SDKs to
simply run devtool sdk-update to retrieve the
latest updates.
See the
"Updating the Extensible SDK"
section for further information.
B.5. Providing Additional Installable Extensible SDK Content
If you want the users of the extensible SDK you are building to be able to add items to the SDK without needing to build the items from source, you need to do a number of things:
Ensure the additional items you want the user to be able to install are actually built. You can ensure these items are built a number of different ways: 1) Build them explicitly, perhaps using one or more "meta" recipes that depend on lists of other recipes to keep things tidy, or 2) Build the "world" target and set
EXCLUDE_FROM_WORLD_pn-recipenamefor the recipes you do not want built. See theEXCLUDE_FROM_WORLDvariable for additional information.Expose the
sstate-cachedirectory produced by the build. Typically, you expose this directory over HTTP or HTTPS.Set the appropriate configuration so that the produced SDK knows how to find the configuration. The variable you need to set is
SSTATE_MIRRORS:SSTATE_MIRRORS = "file://.* http://example.com/some_path/sstate-cache/PATH"You can set the
SSTATE_MIRRORSvariable in two different places:If the mirror value you are setting is appropriate to be set for both the OpenEmbedded build system that is actually building the SDK and the SDK itself (i.e. the mirror is accessible in both places or it will fail quickly on the OpenEmbedded build system side, and its contents will not interfere with the build), then you can set the variable in your
local.confor custom distro configuration file. You can then "whitelist" the variable through to the SDK by adding the following:SDK_LOCAL_CONF_WHITELIST = "SSTATE_MIRRORS"Alternatively, if you just want to set the
SSTATE_MIRRORSvariable's value for the SDK alone, create aconf/sdk-extra.confeither in your Build Directory or within any layer and put yourSSTATE_MIRRORSsetting within that file.Note
This second option is the safest option should you have any doubts as to which method to use when settingSSTATE_MIRRORS.
B.6. Minimizing the Size of the Extensible SDK Installer Download
By default, the extensible SDK bundles the shared state artifacts for
everything needed to reconstruct the image for which the SDK was built.
This bundling can lead to an SDK installer file that is a Gigabyte or
more in size.
If the size of this file causes a problem, you can build an SDK that
has just enough in it to install and provide access to the
devtool command by setting the following in your
configuration:
SDK_EXT_TYPE = "minimal"
Setting
SDK_EXT_TYPE
to "minimal" produces an SDK installer that is around 35 Mbytes in
size, which downloads and installs quickly.
You need to realize, though, that the minimal installer does not
install any libraries or tools out of the box.
These must be installed either "on the fly" or through actions you
perform using devtool or explicitly with the
devtool sdk-install command.
In most cases, when building a minimal SDK you will need to also enable
bringing in the information on a wider range of packages produced by
the system.
This is particularly true so that devtool add
is able to effectively map dependencies it discovers in a source tree
to the appropriate recipes.
Also so that the devtool search command
is able to return useful results.
To facilitate this wider range of information, you would additionally set the following:
SDK_INCLUDE_PKGDATA = "1"
See the
SDK_INCLUDE_PKGDATA
variable for additional information.
Setting the SDK_INCLUDE_PKGDATA variable as
shown causes the "world" target to be built so that information
for all of the recipes included within it are available.
Having these recipes available increases build time significantly and
increases the size of the SDK installer by 30-80 Mbytes depending on
how many recipes are included in your configuration.
You can use
EXCLUDE_FROM_WORLD_pn-recipename
for recipes you want to exclude.
However, it is assumed that you would need to be building the "world"
target if you want to provide additional items to the SDK.
Consequently, building for "world" should not represent undue
overhead in most cases.
Note
If you setSDK_EXT_TYPE to "minimal",
then providing a shared state mirror is mandatory so that items
can be installed as needed.
See the
"Providing Additional Installable Extensible SDK Content"
section for more information.
 |
Chapter 10. Board Support Packages (BSP) - Developer's Guide
A Board Support Package (BSP) is a collection of information that defines how to support a particular hardware device, set of devices, or hardware platform. The BSP includes information about the hardware features present on the device and kernel configuration information along with any additional hardware drivers required. The BSP also lists any additional software components required in addition to a generic Linux software stack for both essential and optional platform features.
This guide presents information about BSP Layers, defines a structure for components so that BSPs follow a commonly understood layout, discusses how to customize a recipe for a BSP, addresses BSP licensing, and provides information that shows you how to create and manage a BSP Layer using two Yocto Project BSP Tools.
10.1. BSP Layers
A BSP consists of a file structure inside a base directory. Collectively, you can think of the base directory, its file structure, and the contents as a BSP Layer. Although not a strict requirement, layers in the Yocto Project use the following well-established naming convention:
meta-bsp_name
The string "meta-" is prepended to the machine or platform name, which is
bsp_name in the above form.
Tip
Because the BSP layer naming convention is well-established, it is advisable to follow it when creating layers. Technically speaking, a BSP layer name does not need to start withmeta-.
However, you might run into situations where obscure
scripts assume this convention.
To help understand the BSP layer concept, consider the BSPs that the
Yocto Project supports and provides with each release.
You can see the layers in the
Yocto Project Source Repositories
through a web interface at
http://git.yoctoproject.org/cgit/cgit.cgi.
If you go to that interface, you will find near the bottom of the list
under "Yocto Metadata Layers" several BSP layers all of which are
supported by the Yocto Project (e.g. meta-raspberrypi and
meta-intel).
Each of these layers is a repository unto itself and clicking on a
layer reveals information that includes two links from which you can choose
to set up a clone of the layer's repository on your local host system.
Here is an example that clones the Raspberry Pi BSP layer:
$ git clone git://git.yoctoproject.org/meta-raspberrypi
In addition to BSP layers near the bottom of that referenced
Yocto Project Source Repository, the
meta-yocto-bsp layer is part of the
shipped poky repository.
The meta-yocto-bsp layer maintains several
BSPs such as the Beaglebone, EdgeRouter, and generic versions of
both 32 and 64-bit IA machines.
For information on the BSP development workflow, see the "Developing a Board Support Package (BSP)" section in the Yocto Project Development Manual. For more information on how to set up a local copy of source files from a Git repository, see the "Getting Set Up" section also in the Yocto Project Development Manual.
The layer's base directory
(meta-)
is the root of the BSP Layer.
This root is what you add to the
bsp_nameBBLAYERS
variable in the conf/bblayers.conf file found in the
Build Directory,
which is established after you run one of the OpenEmbedded build environment
setup scripts (i.e.
oe-init-build-env
and
oe-init-build-env-memres).
Adding the root allows the OpenEmbedded build system to recognize the BSP
definition and from it build an image.
Here is an example:
BBLAYERS ?= " \
/usr/local/src/yocto/meta \
/usr/local/src/yocto/meta-poky \
/usr/local/src/yocto/meta-yocto-bsp \
/usr/local/src/yocto/meta-mylayer \
"
Some BSPs require additional layers on
top of the BSP's root layer in order to be functional.
For these cases, you also need to add those layers to the
BBLAYERS variable in order to build the BSP.
You must also specify in the "Dependencies" section of the BSP's
README file any requirements for additional
layers and, preferably, any
build instructions that might be contained elsewhere
in the README file.
Some layers function as a layer to hold other BSP layers.
An example of this type of layer is the meta-intel layer,
which contains a number of individual BSP sub-layers, as well as a directory
named common/ full of common content across those layers.
Another example is the meta-yocto-bsp layer mentioned
earlier.
For more detailed information on layers, see the "Understanding and Creating Layers" section of the Yocto Project Development Manual.
10.2. Example Filesystem Layout
Defining a common BSP directory structure allows end-users to understand and become familiar with that structure. A common format also encourages standardization of software support of hardware.
The proposed form does have elements that are specific to the OpenEmbedded build system. It is intended that this information can be used by other build systems besides the OpenEmbedded build system and that it will be simple to extract information and convert it to other formats if required. The OpenEmbedded build system, through its standard layers mechanism, can directly accept the format described as a layer. The BSP captures all the hardware-specific details in one place in a standard format, which is useful for any person wishing to use the hardware platform regardless of the build system they are using.
The BSP specification does not include a build system or other tools - it is concerned with the hardware-specific components only. At the end-distribution point, you can ship the BSP combined with a build system and other tools. However, it is important to maintain the distinction that these are separate components that happen to be combined in certain end products.
Before looking at the common form for the file structure inside a BSP Layer, you should be aware that some requirements do exist in order for a BSP to be considered compliant with the Yocto Project. For that list of requirements, see the "Released BSP Requirements" section.
Below is the common form for the file structure inside a BSP Layer. While you can use this basic form for the standard, realize that the actual structures for specific BSPs could differ.
meta-bsp_name/
meta-bsp_name/bsp_license_file
meta-bsp_name/README
meta-bsp_name/README.sources
meta-bsp_name/binary/bootable_images
meta-bsp_name/conf/layer.conf
meta-bsp_name/conf/machine/*.conf
meta-bsp_name/recipes-bsp/*
meta-bsp_name/recipes-core/*
meta-bsp_name/recipes-graphics/*
meta-bsp_name/recipes-kernel/linux/linux-yocto_kernel_rev.bbappend
Below is an example of the Raspberry Pi BSP:
meta-raspberrypi/COPYING.MIT
meta-raspberrypi/README
meta-raspberrypi/classes
meta-raspberrypi/classes/linux-raspberrypi-base.bbclass
meta-raspberrypi/classes/sdcard_image-rpi.bbclass
meta-raspberrypi/conf/
meta-raspberrypi/conf/layer.conf
meta-raspberrypi/conf/machine/
meta-raspberrypi/conf/machine/raspberrypi.conf
meta-raspberrypi/conf/machine/raspberrypi0.conf
meta-raspberrypi/conf/machine/raspberrypi2.conf
meta-raspberrypi/conf/machine/raspberrypi3.conf
meta-raspberrypi/conf/machine/include
meta-raspberrypi/conf/machine/include/rpi-base.inc
meta-raspberrypi/conf/machine/include/rpi-default-providers.inc
meta-raspberrypi/conf/machine/include/rpi-default-settings.inc
meta-raspberrypi/conf/machine/include/rpi-default-versions.inc
meta-raspberrypi/conf/machine/include/rpi-tune-arm1176jzf-s.inc
meta-raspberrypi/files
meta-raspberrypi/files/custom-licenses
meta-raspberrypi/files/custom-licenses/Broadcom
meta-raspberrypi/recipes-bsp
meta-raspberrypi/recipes-bsp/bootfiles
meta-raspberrypi/recipes-bsp/bootfiles/bcm2835-bootfiles.bb
meta-raspberrypi/recipes-bsp/bootfiles/rpi-config_git.bb
meta-raspberrypi/recipes-bsp/common
meta-raspberrypi/recipes-bsp/common/firmware.inc
meta-raspberrypi/recipes-bsp/formfactor_00.bbappend
meta-raspberrypi/recipes-bsp/formfactor/raspberrypi/machconfig
meta-raspberrypi/recipes-bsp/rpi-mkimage_git.bb
meta-raspberrypi/recipes-bsp/rpi-mkimage/License
meta-raspberrypi/recipes-bsp/rpi-mkimage/open-files-relative-to-script.patch
meta-raspberrypi/recipes-bsp/u-boot/u-boot-rpi_git.bb
meta-raspberrypi/recipes-core
meta-raspberrypi/recipes-core/images
meta-raspberrypi/recipes-core/images/rpi-basic-image.bb
meta-raspberrypi/recipes-core/images/rpi-hwup-image.bb
meta-raspberrypi/recipes-core/images/rpi-test-image.bb
meta-raspberrypi/recipes-core/packagegroups
meta-raspberrypi/recipes-core/packagegroups/packagegroup-rpi-test.bb
meta-raspberrypi/recipes-core/psplash
meta-raspberrypi/recipes-core/psplash/files
meta-raspberrypi/recipes-core/psplash/psplash_git.bbappend
meta-raspberrypi/recipes-core/psplash/files/psplash-raspberrypi-img.h
meta-raspberrypi/recipes-devtools
meta-raspberrypi/recipes-devtools/bcm2835
meta-raspberrypi/recipes-devtools/bcm2835/bcm2835_1.46.bb
meta-raspberrypi/recipes-devtools/pi-blaster
meta-raspberrypi/recipes-devtools/pi-blaster/files
meta-raspberrypi/recipes-devtools/pi-blaster/*.patch
meta-raspberrypi/recipes-devtools/pi-blaster/pi-blaster.inc
meta-raspberrypi/recipes-devtools/pi-blaster/pi-blaster_git.bb
meta-raspberrypi/recipes-devtools/python
meta-raspberrypi/recipes-devtools/python/python-rtimu
meta-raspberrypi/recipes-devtools/python/python-rtimu/*.patch
meta-raspberrypi/recipes-devtools/python/python-rtimu_git.bb
meta-raspberrypi/recipes-devtools/python/python-sense-hat_2.1.0.bb
meta-raspberrypi/recipes-devtools/python/rpi-gpio
meta-raspberrypi/recipes-devtools/python/rpi-gpio/*.patch
meta-raspberrypi/recipes-devtools/python/rpi-gpio_0.6.1.bb
meta-raspberrypi/recipes-devtools/python/rpio
meta-raspberrypi/recipes-devtools/python/rpio/*.patch
meta-raspberrypi/recipes-devtools/python/rpio_0.10.0.bb
meta-raspberrypi/recipes-devtools/wiringPi
meta-raspberrypi/recipes-devtools/wiringPi/files
meta-raspberrypi/recipes-devtools/wiringPi/files/*.patch
meta-raspberrypi/recipes-devtools/wiringPi/wiringpi
meta-raspberrypi/recipes-devtools/wiringPi/wiringpi/*.patch
meta-raspberrypi/recipes-devtools/wiringPi/wiringpi_git.bb
meta-raspberrypi/recipes-graphics
meta-raspberrypi/recipes-graphics/eglinfo
meta-raspberrypi/recipes-graphics/eglinfo/eglinfo-fb_%.bbappend
meta-raspberrypi/recipes-graphics/eglinfo/eglinfo-x11_%.bbappend
meta-raspberrypi/recipes-graphics/userland
meta-raspberrypi/recipes-graphics/userland/userland
meta-raspberrypi/recipes-graphics/userland/userland/*.patch
meta-raspberrypi/recipes-graphics/userland/userland_git.bb
meta-raspberrypi/recipes-graphics/vc-graphics
meta-raspberrypi/recipes-graphics/vc-graphics/files
meta-raspberrypi/recipes-graphics/vc-graphics/files/egl.pc
meta-raspberrypi/recipes-graphics/vc-graphics/files/vchiq.sh
meta-raspberrypi/recipes-graphics/vc-graphics/vc-graphics-hardfp.bb
meta-raspberrypi/recipes-graphics/vc-graphics/vc-graphics.bb
meta-raspberrypi/recipes-graphics/vc-graphics/vc-graphics.inc
meta-raspberrypi/recipes-graphics/wayland
meta-raspberrypi/recipes-graphics/wayland/weston_%.bbappend
meta-raspberrypi/recipes-graphics/weston
meta-raspberrypi/recipes-graphics/weston/weston_%.bbappend
meta-raspberrypi/recipes-graphics/xorg-xserver
meta-raspberrypi/recipes-graphics/xorg-xserver/xserver-xf86-config
meta-raspberrypi/recipes-graphics/xorg-xserver/xserver-xf86-config/rpi
meta-raspberrypi/recipes-graphics/xorg-xserver/xserver-xf86-config/rpi/xorg.conf
meta-raspberrypi/recipes-graphics/xorg-xserver/xserver-xf86-config/rpi/xorg.conf.d
meta-raspberrypi/recipes-graphics/xorg-xserver/xserver-xf86-config/rpi/xorg.conf.d/10-evdev.conf
meta-raspberrypi/recipes-graphics/xorg-xserver/xserver-xf86-config/rpi/xorg.conf.d/99-pitft.conf
meta-raspberrypi/recipes-graphics/xorg-xserver/xserver-xf86-config_0.1.bbappend
meta-raspberrypi/recipes-kernel
meta-raspberrypi/recipes-kernel/linux-firmware
meta-raspberrypi/recipes-kernel/linux-firmware/linux-firmware
meta-raspberrypi/recipes-kernel/linux-firmware/linux-firmware/LICENSE.broadcom_brcm80211
meta-raspberrypi/recipes-kernel/linux-firmware/linux-firmware/brcmfmac43430-sdio.bin
meta-raspberrypi/recipes-kernel/linux-firmware/linux-firmware/brcmfmac43430-sdio.txt
meta-raspberrypi/recipes-kernel/linux-firmware/linux-firmware_git.bbappend
meta-raspberrypi/recipes-kernel/linux
meta-raspberrypi/recipes-kernel/linux/linux-raspberrypi-3.14
meta-raspberrypi/recipes-kernel/linux/linux-raspberrypi-3.14/*.patch
meta-raspberrypi/recipes-kernel/linux/linux-raspberrypi-3.18
meta-raspberrypi/recipes-kernel/linux/linux-raspberrypi-3.18/*.patch
meta-raspberrypi/recipes-kernel/linux/linux-raspberrypi-4.1
meta-raspberrypi/recipes-kernel/linux/linux-raspberrypi-4.1/*.patch
meta-raspberrypi/recipes-kernel/linux/linux-raspberrypi.inc
meta-raspberrypi/recipes-kernel/linux/linux-raspberrypi
meta-raspberrypi/recipes-kernel/linux/linux-raspberrypi/defconfig
meta-raspberrypi/recipes-kernel/linux/linux-raspberrypi_3.14.bb
meta-raspberrypi/recipes-kernel/linux/linux-raspberrypi_3.18.bb
meta-raspberrypi/recipes-kernel/linux/linux-raspberrypi_4.1.bb
meta-raspberrypi/recipes-kernel/linux/linux-raspberrypi_4.4.bb
meta-raspberrypi/recipes-kernel/linux/linux.inc
meta-raspberrypi/recipes-multimedia
meta-raspberrypi/recipes-multimedia/gstreamer
meta-raspberrypi/recipes-multimedia/gstreamer/gstreamer1.0-omx
meta-raspberrypi/recipes-multimedia/gstreamer/gstreamer1.0-omx/*.patch
meta-raspberrypi/recipes-multimedia/gstreamer/gstreamer1.0-omx_%.bbappend
meta-raspberrypi/recipes-multimedia/gstreamer/gstreamer1.0-plugins-bad_%.bbappend
meta-raspberrypi/recipes-multimedia/omxplayer
meta-raspberrypi/recipes-multimedia/omxplayer/omxplayer
meta-raspberrypi/recipes-multimedia/omxplayer/omxplayer/*.patch
meta-raspberrypi/recipes-multimedia/omxplayer/omxplayer_git.bb
meta-raspberrypi/scripts
meta-raspberrypi/scripts/lib
meta-raspberrypi/scripts/lib/image
meta-raspberrypi/scripts/lib/image/canned-wks
meta-raspberrypi/scripts/lib/image/canned-wks/sdimage-raspberrypi.wks
The following sections describe each part of the proposed BSP format.
10.2.1. License Files
You can find these files in the BSP Layer at:
meta-bsp_name/bsp_license_file
These optional files satisfy licensing requirements for the BSP.
The type or types of files here can vary depending on the licensing requirements.
For example, in the Raspberry Pi BSP all licensing requirements are handled with the
COPYING.MIT file.
Licensing files can be MIT, BSD, GPLv*, and so forth. These files are recommended for the BSP but are optional and totally up to the BSP developer.
10.2.2. README File
You can find this file in the BSP Layer at:
meta-bsp_name/README
This file provides information on how to boot the live images that are optionally
included in the binary/ directory.
The README file also provides special information needed for
building the image.
At a minimum, the README file must
contain a list of dependencies, such as the names of
any other layers on which the BSP depends and the name of
the BSP maintainer with his or her contact information.
10.2.3. README.sources File
You can find this file in the BSP Layer at:
meta-bsp_name/README.sources
This file provides information on where to locate the BSP
source files used to build the images (if any) that reside in
meta-.
Images in the bsp_name/binarybinary would be images
released with the BSP.
The information in the README.sources
file also helps you find the
Metadata
used to generate the images that ship with the BSP.
Note
If the BSP'sbinary directory is
missing or the directory has no images, an existing
README.sources file is
meaningless.
10.2.4. Pre-built User Binaries
You can find these files in the BSP Layer at:
meta-bsp_name/binary/bootable_images
This optional area contains useful pre-built kernels and user-space filesystem images released with the BSP that are appropriate to the target system. This directory typically contains graphical (e.g. Sato) and minimal live images when the BSP tarball has been created and made available in the Yocto Project website. You can use these kernels and images to get a system running and quickly get started on development tasks.
The exact types of binaries present are highly
hardware-dependent.
The README file should be present in the
BSP Layer and it will explain how to use the images with the
target hardware.
Additionally, the README.sources file
should be present to locate the sources used to build the
images and provide information on the Metadata.
10.2.5. Layer Configuration File
You can find this file in the BSP Layer at:
meta-bsp_name/conf/layer.conf
The conf/layer.conf file identifies the file structure as a
layer, identifies the
contents of the layer, and contains information about how the build
system should use it.
Generally, a standard boilerplate file such as the following works.
In the following example, you would replace "bsp" and
"_bsp" with the actual name
of the BSP (i.e. bsp_name from the example template).
# We have a conf and classes directory, add to BBPATH
BBPATH .= ":${LAYERDIR}"
# We have a recipes directory, add to BBFILES
     BBFILES += "${LAYERDIR}/recipes-*/*/*.bb \
                 ${LAYERDIR}/recipes-*/*/*.bbappend"
BBFILE_COLLECTIONS += "bsp"
BBFILE_PATTERN_bsp = "^${LAYERDIR}/"
BBFILE_PRIORITY_bsp = "6"
LAYERDEPENDS_bsp = "intel"
To illustrate the string substitutions, here are the corresponding statements
from the Raspberry Pi conf/layer.conf file:
# We have a conf and classes directory, append to BBPATH
BBPATH .= ":${LAYERDIR}"
# We have a recipes directory containing .bb and .bbappend files, add to BBFILES
BBFILES += "${LAYERDIR}/recipes*/*/*.bb \
${LAYERDIR}/recipes*/*/*.bbappend"
BBFILE_COLLECTIONS += "raspberrypi"
BBFILE_PATTERN_raspberrypi := "^${LAYERDIR}/"
BBFILE_PRIORITY_raspberrypi = "9"
# Additional license directories.
LICENSE_PATH += "${LAYERDIR}/files/custom-licenses"
This file simply makes BitBake aware of the recipes and configuration directories. The file must exist so that the OpenEmbedded build system can recognize the BSP.
10.2.6. Hardware Configuration Options
You can find these files in the BSP Layer at:
meta-bsp_name/conf/machine/*.conf
The machine files bind together all the information contained elsewhere
in the BSP into a format that the build system can understand.
If the BSP supports multiple machines, multiple machine configuration files
can be present.
These filenames correspond to the values to which users have set the
MACHINE variable.
These files define things such as the kernel package to use
(PREFERRED_PROVIDER
of virtual/kernel), the hardware drivers to
include in different types of images, any special software components
that are needed, any bootloader information, and also any special image
format requirements.
Each BSP Layer requires at least one machine file. However, you can supply more than one file.
This configuration file could also include a hardware "tuning" file that is commonly used to define the package architecture and specify optimization flags, which are carefully chosen to give best performance on a given processor.
Tuning files are found in the meta/conf/machine/include
directory within the
Source Directory.
For example, the ia32-base.inc file resides in the
meta/conf/machine/include directory.
To use an include file, you simply include them in the
machine configuration file.
For example, the Raspberry Pi BSP
raspberrypi3.conf contains the
following statement:
include conf/machine/raspberrypi2.conf
10.2.7. Miscellaneous BSP-Specific Recipe Files
You can find these files in the BSP Layer at:
meta-bsp_name/recipes-bsp/*
This optional directory contains miscellaneous recipe files for
the BSP.
Most notably would be the formfactor files.
For example, in the Raspberry Pi BSP there is the
formfactor_0.0.bbappend file, which is an
append file used to augment the recipe that starts the build.
Furthermore, there are machine-specific settings used during
the build that are defined by the
machconfig file further down in the
directory.
Here is the machconfig
file for the Raspberry Pi BSP:
HAVE_TOUCHSCREEN=0
HAVE_KEYBOARD=1
DISPLAY_CAN_ROTATE=0
DISPLAY_ORIENTATION=0
DISPLAY_DPI=133
Note
If a BSP does not have a formfactor entry, defaults are established according to
the formfactor configuration file that is installed by the main
formfactor recipe
meta/recipes-bsp/formfactor/formfactor_0.0.bb,
which is found in the
Source Directory.
10.2.8. Display Support Files
You can find these files in the BSP Layer at:
meta-bsp_name/recipes-graphics/*
This optional directory contains recipes for the BSP if it has special requirements for graphics support. All files that are needed for the BSP to support a display are kept here.
10.2.9. Linux Kernel Configuration
You can find these files in the BSP Layer at:
meta-bsp_name/recipes-kernel/linux/linux-yocto*.bbappend
These files append your specific changes to the main kernel recipe you are using.
For your BSP, you typically want to use an existing Yocto Project kernel recipe found in the
Source Directory
at meta/recipes-kernel/linux.
You can append your specific changes to the kernel recipe by using a
similarly named append file, which is located in the BSP Layer (e.g.
the meta- directory).
bsp_name/recipes-kernel/linux
Suppose you are using the linux-yocto_4.4.bb recipe to build
the kernel.
In other words, you have selected the kernel in your
bsp_name.conf file by adding these types
of statements:
PREFERRED_PROVIDER_virtual/kernel ?= "linux-yocto"
PREFERRED_VERSION_linux-yocto ?= "4.4%"
Note
When the preferred provider is assumed by default, thePREFERRED_PROVIDER statement does not appear in the
bsp_name.conf file.
You would use the linux-yocto_4.4.bbappend
file to append specific BSP settings to the kernel, thus
configuring the kernel for your particular BSP.
As an example, consider the following append file
used by the BSPs in meta-yocto-bsp:
meta-yocto-bsp/recipes-kernel/linux/linux-yocto_4.4.bbappend
The following listing shows the file.
Be aware that the actual commit ID strings in this
example listing might be different than the actual strings
in the file from the meta-yocto-bsp
layer upstream.
KBRANCH_genericx86 = "standard/base"
KBRANCH_genericx86-64 = "standard/base"
KMACHINE_genericx86 ?= "common-pc"
KMACHINE_genericx86-64 ?= "common-pc-64"
KBRANCH_edgerouter = "standard/edgerouter"
KBRANCH_beaglebone = "standard/beaglebone"
KBRANCH_mpc8315e-rdb = "standard/fsl-mpc8315e-rdb"
SRCREV_machine_genericx86 ?= "ff4c4ef15b51f45b9106d71bf1f62fe7c02e63c2"
SRCREV_machine_genericx86-64 ?= "ff4c4ef15b51f45b9106d71bf1f62fe7c02e63c2"
SRCREV_machine_edgerouter ?= "ff4c4ef15b51f45b9106d71bf1f62fe7c02e63c2"
SRCREV_machine_beaglebone ?= "ff4c4ef15b51f45b9106d71bf1f62fe7c02e63c2"
SRCREV_machine_mpc8315e-rdb ?= "df00877ef9387b38b9601c82db57de2a1b23ce53"
COMPATIBLE_MACHINE_genericx86 = "genericx86"
COMPATIBLE_MACHINE_genericx86-64 = "genericx86-64"
COMPATIBLE_MACHINE_edgerouter = "edgerouter"
COMPATIBLE_MACHINE_beaglebone = "beaglebone"
COMPATIBLE_MACHINE_mpc8315e-rdb = "mpc8315e-rdb"
LINUX_VERSION_genericx86 = "4.4.3"
LINUX_VERSION_genericx86-64 = "4.4.3"
This append file contains statements used to support
several BSPs that ship with the Yocto Project.
The file defines machines using the
COMPATIBLE_MACHINE
variable and uses the
KMACHINE
variable to ensure the machine name used by the OpenEmbedded
build system maps to the machine name used by the Linux Yocto
kernel.
The file also uses the optional
KBRANCH
variable to ensure the build process uses the
appropriate kernel branch.
Although this particular example does not use it, the
KERNEL_FEATURES
variable could be used to enable features specific to
the kernel.
The append file points to specific commits in the
Source Directory
Git repository and the meta Git repository
branches to identify the exact kernel needed to build the
BSP.
One thing missing in this particular BSP, which you will
typically need when developing a BSP, is the kernel configuration
file (.config) for your BSP.
When developing a BSP, you probably have a kernel configuration
file or a set of kernel configuration files that, when taken
together, define the kernel configuration for your BSP.
You can accomplish this definition by putting the configurations
in a file or a set of files inside a directory located at the
same level as your kernel's append file and having the same
name as the kernel's main recipe file.
With all these conditions met, simply reference those files in the
SRC_URI
statement in the append file.
For example, suppose you had some configuration options
in a file called network_configs.cfg.
You can place that file inside a directory named
linux-yocto and then add
a SRC_URI statement such as the
following to the append file.
When the OpenEmbedded build system builds the kernel, the
configuration options are picked up and applied.
SRC_URI += "file://network_configs.cfg"
To group related configurations into multiple files, you
perform a similar procedure.
Here is an example that groups separate configurations
specifically for Ethernet and graphics into their own
files and adds the configurations by using a
SRC_URI statement like the following
in your append file:
SRC_URI += "file://myconfig.cfg \
file://eth.cfg \
file://gfx.cfg"
Another variable you can use in your kernel recipe append
file is the
FILESEXTRAPATHS
variable.
When you use this statement, you are extending the locations
used by the OpenEmbedded system to look for files and
patches as the recipe is processed.
Note
Other methods exist to accomplish grouping and defining configuration options.
For example, if you are working with a local clone of the kernel repository,
you could checkout the kernel's meta branch, make your changes,
and then push the changes to the local bare clone of the kernel.
The result is that you directly add configuration options to the
meta branch for your BSP.
The configuration options will likely end up in that location anyway if the BSP gets
added to the Yocto Project.
In general, however, the Yocto Project maintainers take care of moving the
SRC_URI-specified
configuration options to the kernel's meta branch.
Not only is it easier for BSP developers to not have to worry about putting those
configurations in the branch, but having the maintainers do it allows them to apply
'global' knowledge about the kinds of common configuration options multiple BSPs in
the tree are typically using.
This allows for promotion of common configurations into common features.
10.3. Requirements and Recommendations for Released BSPs
Certain requirements exist for a released BSP to be considered compliant with the Yocto Project. Additionally, recommendations also exist. This section describes the requirements and recommendations for released BSPs.
10.3.1. Released BSP Requirements
Before looking at BSP requirements, you should consider the following:
The requirements here assume the BSP layer is a well-formed, "legal" layer that can be added to the Yocto Project. For guidelines on creating a layer that meets these base requirements, see the "BSP Layers" and the "Understanding and Creating Layers" in the Yocto Project Development Manual.
The requirements in this section apply regardless of how you package a BSP. You should consult the packaging and distribution guidelines for your specific release process. For an example of packaging and distribution requirements, see the "Third Party BSP Release Process" wiki page.
The requirements for the BSP as it is made available to a developer are completely independent of the released form of the BSP. For example, the BSP Metadata can be contained within a Git repository and could have a directory structure completely different from what appears in the officially released BSP layer.
It is not required that specific packages or package modifications exist in the BSP layer, beyond the requirements for general compliance with the Yocto Project. For example, no requirement exists dictating that a specific kernel or kernel version be used in a given BSP.
Following are the requirements for a released BSP that conform to the Yocto Project:
Layer Name: The BSP must have a layer name that follows the Yocto Project standards. For information on BSP layer names, see the "BSP Layers" section.
File System Layout: When possible, use the same directory names in your BSP layer as listed in the
recipes.txtfile. In particular, you should place recipes (.bbfiles) and recipe modifications (.bbappendfiles) intorecipes-*subdirectories by functional area as outlined inrecipes.txt. If you cannot find a category inrecipes.txtto fit a particular recipe, you can make up your ownrecipes-*subdirectory. You can findrecipes.txtin themetadirectory of the Source Directory, or in the OpenEmbedded Core Layer (openembedded-core) found at http://git.openembedded.org/openembedded-core/tree/meta.Within any particular
recipes-*category, the layout should match what is found in the OpenEmbedded Core Git repository (openembedded-core) or the Source Directory (poky). In other words, make sure you place related files in appropriately relatedrecipes-*subdirectories specific to the recipe's function, or within a subdirectory containing a set of closely-related recipes. The recipes themselves should follow the general guidelines for recipes used in the Yocto Project found in the "OpenEmbedded Style Guide".License File: You must include a license file in the
meta-directory. This license covers the BSP Metadata as a whole. You must specify which license to use since there is no default license if one is not specified. See thebsp_nameCOPYING.MITfile for the Raspberry Pi BSP in themeta-raspberrypiBSP layer as an example.README File: You must include a
READMEfile in themeta-directory. See thebsp_nameREADMEfile for the Raspberry Pi BSP in themeta-raspberrypiBSP layer as an example.At a minimum, the
READMEfile should contain the following:A brief description about the hardware the BSP targets.
A list of all the dependencies on which a BSP layer depends. These dependencies are typically a list of required layers needed to build the BSP. However, the dependencies should also contain information regarding any other dependencies the BSP might have.
Any required special licensing information. For example, this information includes information on special variables needed to satisfy a EULA, or instructions on information needed to build or distribute binaries built from the BSP Metadata.
The name and contact information for the BSP layer maintainer. This is the person to whom patches and questions should be sent. For information on how to find the right person, see the "How to Submit a Change" section in the Yocto Project Development Manual.
Instructions on how to build the BSP using the BSP layer.
Instructions on how to boot the BSP build from the BSP layer.
Instructions on how to boot the binary images contained in the
binarydirectory, if present.Information on any known bugs or issues that users should know about when either building or booting the BSP binaries.
README.sources File: You must include a
README.sourcesin themeta-directory. This file specifies exactly where you can find the sources used to generate the binary images contained in thebsp_namebinarydirectory, if present.Layer Configuration File: You must include a
conf/layer.confin themeta-directory. This file identifies thebsp_namemeta-BSP layer as a layer to the build system.bsp_nameMachine Configuration File: You must include one or more
conf/machine/files in thebsp_name.confmeta-directory. These configuration files define machine targets that can be built using the BSP layer. Multiple machine configuration files define variations of machine configurations that are supported by the BSP. If a BSP supports multiple machine variations, you need to adequately describe each variation in the BSPbsp_nameREADMEfile. Do not use multiple machine configuration files to describe disparate hardware. If you do have very different targets, you should create separate BSP layers for each target.Note
It is completely possible for a developer to structure the working repository as a conglomeration of unrelated BSP files, and to possibly generate BSPs targeted for release from that directory using scripts or some other mechanism (e.g.meta-yocto-bsplayer). Such considerations are outside the scope of this document.
10.3.2. Released BSP Recommendations
Following are recommendations for a released BSP that conforms to the Yocto Project:
Bootable Images: BSP releases can contain one or more bootable images. Including bootable images allows users to easily try out the BSP on their own hardware.
In some cases, it might not be convenient to include a bootable image. In this case, you might want to make two versions of the BSP available: one that contains binary images, and one that does not. The version that does not contain bootable images avoids unnecessary download times for users not interested in the images.
If you need to distribute a BSP and include bootable images or build kernel and filesystems meant to allow users to boot the BSP for evaluation purposes, you should put the images and artifacts within a
binary/subdirectory located in themeta-directory.bsp_nameNote
If you do include a bootable image as part of the BSP and the image was built by software covered by the GPL or other open source licenses, it is your responsibility to understand and meet all licensing requirements, which could include distribution of source files.Use a Yocto Linux Kernel: Kernel recipes in the BSP should be based on a Yocto Linux kernel. Basing your recipes on these kernels reduces the costs for maintaining the BSP and increases its scalability. See the
Yocto Linux Kernelcategory in the Source Repositories for these kernels.
10.4. Customizing a Recipe for a BSP
If you plan on customizing a recipe for a particular BSP, you need to do the following:
Create a
.bbappendfile for the modified recipe. For information on using append files, see the "Using .bbappend Files" section in the Yocto Project Development Manual.Ensure your directory structure in the BSP layer that supports your machine is such that it can be found by the build system. See the example later in this section for more information.
Put the append file in a directory whose name matches the machine's name and is located in an appropriate sub-directory inside the BSP layer (i.e.
recipes-bsp,recipes-graphics,recipes-core, and so forth).Place the BSP-specific files in the proper directory inside the BSP layer. How expansive the layer is affects where you must place these files. For example, if your layer supports several different machine types, you need to be sure your layer's directory structure includes hierarchy that separates the files out according to machine. If your layer does not support multiple machines, the layer would not have that additional hierarchy and the files would obviously not be able to reside in a machine-specific directory.
Following is a specific example to help you better understand the process.
Consider an example that customizes a recipe by adding
a BSP-specific configuration file named interfaces to the
init-ifupdown_1.0.bb recipe for machine "xyz" where the
BSP layer also supports several other machines.
Do the following:
Edit the
init-ifupdown_1.0.bbappendfile so that it contains the following:FILESEXTRAPATHS_prepend := "${THISDIR}/files:"The append file needs to be in the
meta-xyz/recipes-core/init-ifupdowndirectory.Create and place the new
interfacesconfiguration file in the BSP's layer here:meta-xyz/recipes-core/init-ifupdown/files/xyz-machine-one/interfacesNote
If themeta-xyzlayer did not support multiple machines, you would place theinterfacesconfiguration file in the layer here:meta-xyz/recipes-core/init-ifupdown/files/interfacesThe
FILESEXTRAPATHSvariable in the append files extends the search path the build system uses to find files during the build. Consequently, for this example you need to have thefilesdirectory in the same location as your append file.
10.5. BSP Licensing Considerations
In some cases, a BSP contains separately licensed Intellectual Property (IP) for a component or components. For these cases, you are required to accept the terms of a commercial or other type of license that requires some kind of explicit End User License Agreement (EULA). Once the license is accepted, the OpenEmbedded build system can then build and include the corresponding component in the final BSP image. If the BSP is available as a pre-built image, you can download the image after agreeing to the license or EULA.
You could find that some separately licensed components that are essential for normal operation of the system might not have an unencumbered (or free) substitute. Without these essential components, the system would be non-functional. Then again, you might find that other licensed components that are simply 'good-to-have' or purely elective do have an unencumbered, free replacement component that you can use rather than agreeing to the separately licensed component. Even for components essential to the system, you might find an unencumbered component that is not identical but will work as a less-capable version of the licensed version in the BSP recipe.
For cases where you can substitute a free component and still maintain the system's functionality, the "Downloads" page from the Yocto Project website's makes available de-featured BSPs that are completely free of any IP encumbrances. For these cases, you can use the substitution directly and without any further licensing requirements. If present, these fully de-featured BSPs are named appropriately different as compared to the names of the respective encumbered BSPs. If available, these substitutions are your simplest and most preferred options. Use of these substitutions of course assumes the resulting functionality meets system requirements.
If however, a non-encumbered version is unavailable or it provides unsuitable functionality or quality, you can use an encumbered version.
A couple different methods exist within the OpenEmbedded build system to satisfy the licensing requirements for an encumbered BSP. The following list describes them in order of preference:
Use the
LICENSE_FLAGSvariable to define the recipes that have commercial or other types of specially-licensed packages: For each of those recipes, you can specify a matching license string in alocal.confvariable namedLICENSE_FLAGS_WHITELIST. Specifying the matching license string signifies that you agree to the license. Thus, the build system can build the corresponding recipe and include the component in the image. See the "Enabling Commercially Licensed Recipes" section in the Yocto Project Reference Manual for details on how to use these variables.If you build as you normally would, without specifying any recipes in the
LICENSE_FLAGS_WHITELIST, the build stops and provides you with the list of recipes that you have tried to include in the image that need entries in theLICENSE_FLAGS_WHITELIST. Once you enter the appropriate license flags into the whitelist, restart the build to continue where it left off. During the build, the prompt will not appear again since you have satisfied the requirement.Once the appropriate license flags are on the white list in the
LICENSE_FLAGS_WHITELISTvariable, you can build the encumbered image with no change at all to the normal build process.Get a pre-built version of the BSP: You can get this type of BSP by visiting the "Downloads" page of the Yocto Project website. You can download BSP tarballs that contain proprietary components after agreeing to the licensing requirements of each of the individually encumbered packages as part of the download process. Obtaining the BSP this way allows you to access an encumbered image immediately after agreeing to the click-through license agreements presented by the website. Note that if you want to build the image yourself using the recipes contained within the BSP tarball, you will still need to create an appropriate
LICENSE_FLAGS_WHITELISTto match the encumbered recipes in the BSP.
Note
Pre-compiled images are bundled with a time-limited kernel that runs for a predetermined amount of time (10 days) before it forces the system to reboot. This limitation is meant to discourage direct redistribution of the image. You must eventually rebuild the image if you want to remove this restriction.10.6. Using the Yocto Project's BSP Tools
The Yocto Project includes a couple of tools that enable
you to create a BSP layer
from scratch and do basic configuration and maintenance
of the kernel without ever looking at a Metadata file.
These tools are yocto-bsp and yocto-kernel,
respectively.
The following sections describe the common location and help features as well
as provide details for the
yocto-bsp and yocto-kernel tools.
10.6.1. Common Features
Designed to have a command interface somewhat like
Git, each
tool is structured as a set of sub-commands under a
top-level command.
The top-level command (yocto-bsp
or yocto-kernel) itself does
nothing but invoke or provide help on the sub-commands
it supports.
Both tools reside in the scripts/ subdirectory
of the Source Directory.
Consequently, to use the scripts, you must source the
environment just as you would when invoking a build:
$ source oe-init-build-env build_dir
The most immediately useful function is to get help on both tools.
The built-in help system makes it easy to drill down at
any time and view the syntax required for any specific command.
Simply enter the name of the command with the help
switch:
$ yocto-bsp help
Usage:
Create a customized Yocto BSP layer.
usage: yocto-bsp [--version] [--help] COMMAND [ARGS]
Current 'yocto-bsp' commands are:
create Create a new Yocto BSP
list List available values for options and BSP properties
See 'yocto-bsp help COMMAND' for more information on a specific command.
Options:
--version show program's version number and exit
-h, --help show this help message and exit
-D, --debug output debug information
Similarly, entering just the name of a sub-command shows the detailed usage for that sub-command:
$ yocto-bsp create
ERROR:root:Wrong number of arguments, exiting
Usage:
Create a new Yocto BSP
usage: yocto-bsp create <bsp-name> <karch> [-o <DIRNAME> | --outdir <DIRNAME>]
[-i <JSON PROPERTY FILE> | --infile <JSON PROPERTY_FILE>]
This command creates a Yocto BSP based on the specified parameters.
The new BSP will be a new Yocto BSP layer contained by default within
the top-level directory specified as 'meta-bsp-name'. The -o option
can be used to place the BSP layer in a directory with a different
name and location.
The value of the 'karch' parameter determines the set of files that
will be generated for the BSP, along with the specific set of
'properties' that will be used to fill out the BSP-specific portions
of the BSP. The possible values for the 'karch' parameter can be
listed via 'yocto-bsp list karch'.
...
For any sub-command, you can use the word "help" option just before the sub-command to get more extensive documentation:
$ yocto-bsp help create
NAME
yocto-bsp create - Create a new Yocto BSP
SYNOPSIS
yocto-bsp create <bsp-name> <karch> [-o <DIRNAME> | --outdir <DIRNAME>]
[-i <JSON PROPERTY FILE> | --infile <JSON PROPERTY_FILE>]
DESCRIPTION
This command creates a Yocto BSP based on the specified
parameters. The new BSP will be a new Yocto BSP layer contained
by default within the top-level directory specified as
'meta-bsp-name'. The -o option can be used to place the BSP layer
in a directory with a different name and location.
...
Now that you know where these two commands reside and how to access information on them, you should find it relatively straightforward to discover the commands necessary to create a BSP and perform basic kernel maintenance on that BSP using the tools.
Note
You can also use theyocto-layer tool to create
a "generic" layer.
For information on this tool, see the
"Creating a General Layer Using the yocto-layer Script"
section in the Yocto Project Development Guide.
The next sections provide a concrete starting point to expand on a few points that might not be immediately obvious or that could use further explanation.
10.6.2. Creating a new BSP Layer Using the yocto-bsp Script
The yocto-bsp script creates a new
BSP layer for any architecture supported
by the Yocto Project, as well as QEMU versions of the same.
The default mode of the script's operation is to prompt you for information needed
to generate the BSP layer.
For the current set of BSPs, the script prompts you for various important parameters such as:
The kernel to use
The branch of that kernel to use (or re-use)
Whether or not to use X, and if so, which drivers to use
Whether to turn on SMP
Whether the BSP has a keyboard
Whether the BSP has a touchscreen
Remaining configurable items associated with the BSP
You use the yocto-bsp create sub-command to create
a new BSP layer.
This command requires you to specify a particular kernel architecture
(karch) on which to base the BSP.
Assuming you have sourced the environment, you can use the
yocto-bsp list karch sub-command to list the
architectures available for BSP creation as follows:
$ yocto-bsp list karch
Architectures available:
powerpc
x86_64
i386
arm
qemu
mips
mips64
The remainder of this section presents an example that uses
myarm as the machine name and qemu
as the machine architecture.
Of the available architectures, qemu is the only architecture
that causes the script to prompt you further for an actual architecture.
In every other way, this architecture is representative of how creating a BSP for
an actual machine would work.
The reason the example uses this architecture is because it is an emulated architecture
and can easily be followed without requiring actual hardware.
As the yocto-bsp create command runs, default values for
the prompts appear in brackets.
Pressing enter without supplying anything on the command line or pressing enter
with an invalid response causes the script to accept the default value.
Once the script completes, the new meta-myarm BSP layer
is created in the current working directory.
This example assumes you have sourced the
oe-init-build-env
setup script.
Following is the complete example:
$ yocto-bsp create myarm qemu
Checking basic git connectivity...
Done.
Which qemu architecture would you like to use? [default: i386]
1) i386 (32-bit)
2) x86_64 (64-bit)
3) ARM (32-bit)
4) PowerPC (32-bit)
5) MIPS (32-bit)
6) MIPS64 (64-bit)
3
Would you like to use the default (4.4) kernel? (y/n) [default: y]
Do you need a new machine branch for this BSP (the alternative is to re-use an existing branch)? [y/n] [default: y]
Getting branches from remote repo git://git.yoctoproject.org/linux-yocto-4.4.git...
Please choose a machine branch to base this BSP on: [default: standard/base]
1) standard/arm-versatile-926ejs
2) standard/base
3) standard/beaglebone
4) standard/edgerouter
5) standard/fsl-mpc8315e-rdb
6) standard/mti-malta32
7) standard/mti-malta64
8) standard/qemuarm64
9) standard/qemuppc
1
Would you like SMP support? (y/n) [default: y]
Does your BSP have a touchscreen? (y/n) [default: n]
Does your BSP have a keyboard? (y/n) [default: y]
New qemu BSP created in meta-myarm
Take a closer look at the example now:
For the QEMU architecture, the script first prompts you for which emulated architecture to use. In the example, we use the ARM architecture.
The script then prompts you for the kernel. The default 4.4 kernel is acceptable. So, the example accepts the default. If you enter 'n', the script prompts you to further enter the kernel you do want to use.
Next, the script asks whether you would like to have a new branch created especially for your BSP in the local Linux Yocto Kernel Git repository . If not, then the script re-uses an existing branch.
In this example, the default (or "yes") is accepted. Thus, a new branch is created for the BSP rather than using a common, shared branch. The new branch is the branch committed to for any patches you might later add. The reason a new branch is the default is that typically new BSPs do require BSP-specific patches. The tool thus assumes that most of time a new branch is required.
Regardless of which choice you make in the previous step, you are now given the opportunity to select a particular machine branch on which to base your new BSP-specific machine branch (or to re-use if you had elected to not create a new branch). Because this example is generating an ARM-based BSP, the example uses
#1at the prompt, which selects the ARM-versatile branch.The remainder of the prompts are routine. Defaults are accepted for each.
By default, the script creates the new BSP Layer in the current working directory of the Source Directory, (i.e.
poky/build).
Once the BSP Layer is created, you must add it to your
bblayers.conf file.
Here is an example:
BBLAYERS = ? " \
/usr/local/src/yocto/meta \
/usr/local/src/yocto/meta-poky \
/usr/local/src/yocto/meta-yocto-bsp \
/usr/local/src/yocto/meta-myarm \
"
Adding the layer to this file allows the build system to build the BSP and
the yocto-kernel tool to be able to find the layer and
other Metadata it needs on which to operate.
10.6.3. Managing Kernel Patches and Config Items with yocto-kernel
Assuming you have created a BSP Layer using
yocto-bsp and you added it to your
BBLAYERS
variable in the bblayers.conf file, you can now use
the yocto-kernel script to add patches and configuration
items to the BSP's kernel.
The yocto-kernel script allows you to add, remove, and list patches
and kernel config settings to a BSP's kernel
.bbappend file.
All you need to do is use the appropriate sub-command.
Recall that the easiest way to see exactly what sub-commands are available
is to use the yocto-kernel built-in help as follows:
$ yocto-kernel --help
Usage:
Modify and list Yocto BSP kernel config items and patches.
usage: yocto-kernel [--version] [--help] COMMAND [ARGS]
Current 'yocto-kernel' commands are:
config list List the modifiable set of bare kernel config options for a BSP
config add Add or modify bare kernel config options for a BSP
config rm Remove bare kernel config options from a BSP
patch list List the patches associated with a BSP
patch add Patch the Yocto kernel for a BSP
patch rm Remove patches from a BSP
feature list List the features used by a BSP
feature add Have a BSP use a feature
feature rm Have a BSP stop using a feature
features list List the features available to BSPs
feature describe Describe a particular feature
feature create Create a new BSP-local feature
feature destroy Remove a BSP-local feature
See 'yocto-kernel help COMMAND' for more information on a specific command.
Options:
--version show program's version number and exit
-h, --help show this help message and exit
-D, --debug output debug information
The yocto-kernel patch add sub-command allows you to add a
patch to a BSP.
The following example adds two patches to the myarm BSP:
$ yocto-kernel patch add myarm ~/test.patch
Added patches:
test.patch
$ yocto-kernel patch add myarm ~/yocto-testmod.patch
Added patches:
yocto-testmod.patch
Note
Although the previous example adds patches one at a time, it is possible to add multiple patches at the same time.
You can verify patches have been added by using the
yocto-kernel patch list sub-command.
Here is an example:
$ yocto-kernel patch list myarm
The current set of machine-specific patches for myarm is:
1) test.patch
2) yocto-testmod.patch
You can also use the yocto-kernel script to
remove a patch using the yocto-kernel patch rm sub-command.
Here is an example:
$ yocto-kernel patch rm myarm
Specify the patches to remove:
1) test.patch
2) yocto-testmod.patch
1
Removed patches:
test.patch
Again, using the yocto-kernel patch list sub-command,
you can verify that the patch was in fact removed:
$ yocto-kernel patch list myarm
The current set of machine-specific patches for myarm is:
1) yocto-testmod.patch
In a completely similar way, you can use the yocto-kernel config add
sub-command to add one or more kernel config item settings to a BSP.
The following commands add a couple of config items to the
myarm BSP:
$ yocto-kernel config add myarm CONFIG_MISC_DEVICES=y
Added item:
CONFIG_MISC_DEVICES=y
$ yocto-kernel config add myarm CONFIG_YOCTO_TESTMOD=y
Added item:
CONFIG_YOCTO_TESTMOD=y
Note
Although the previous example adds config items one at a time, it is possible to add multiple config items at the same time.
You can list the config items now associated with the BSP. Doing so shows you the config items you added as well as others associated with the BSP:
$ yocto-kernel config list myarm
The current set of machine-specific kernel config items for myarm is:
1) CONFIG_MISC_DEVICES=y
2) CONFIG_YOCTO_TESTMOD=y
Finally, you can remove one or more config items using the
yocto-kernel config rm sub-command in a manner
completely analogous to yocto-kernel patch rm.
 |
Chapter 11. Introduction
11.1. Overview
Regardless of how you intend to make use of the Yocto Project, chances are you will work with the Linux kernel. This manual provides background information on the Yocto Linux kernel Metadata, describes common tasks you can perform using the kernel tools, and shows you how to use the kernel Metadata needed to work with the kernel inside the Yocto Project.
Each Yocto Project release has a set of linux-yocto recipes, whose
Git repositories you can view in the Yocto
Source Repositories under
the "Yocto Linux Kernel" heading.
New recipes for the release track the latest upstream developments
and introduce newly-supported platforms.
Previous recipes in the release are refreshed and supported for at
least one additional release.
As they align, these previous releases are updated to include the
latest from the
Long Term Support Initiative
(LTSI) project.
Also included is a linux-yocto development recipe
(linux-yocto-dev.bb) should you want to work
with the very latest in upstream Linux kernel development and
kernel Metadata development.
The Yocto Project also provides a powerful set of kernel tools for managing Linux kernel sources and configuration data. You can use these tools to make a single configuration change, apply multiple patches, or work with your own kernel sources.
In particular, the kernel tools allow you to generate configuration
fragments that specify only what you must, and nothing more.
Configuration fragments only need to contain the highest level
visible CONFIG options as presented by the Linux
kernel menuconfig system.
Contrast this against a complete Linux kernel
.config, which includes all the automatically
selected CONFIG options.
This efficiency reduces your maintenance effort and allows you
to further separate your configuration in ways that make sense for
your project.
A common split separates policy and hardware.
For example, all your kernels might support
the proc and sys filesystems,
but only specific boards require sound, USB, or specific drivers.
Specifying these configurations individually allows you to aggregate
them together as needed, but maintains them in only one place.
Similar logic applies to separating source changes.
If you do not maintain your own kernel sources and need to make only minimal changes to the sources, the released recipes provide a vetted base upon which to layer your changes. Doing so allows you to benefit from the continual kernel integration and testing performed during development of the Yocto Project.
If, instead, you have a very specific Linux kernel source tree and are unable to align with one of the official linux-yocto recipes, an alternative exists by which you can use the Yocto Project Linux kernel tools with your own kernel sources.
11.2. Other Resources
The sections that follow provide instructions for completing specific Linux kernel development tasks. These instructions assume you are comfortable working with BitBake recipes and basic open-source development tools. Understanding these concepts will facilitate the process of working with the kernel recipes. If you find you need some additional background, please be sure to review and understand the following documentation:
Yocto Project Quick Start
The "Modifying Source Code" section in the Yocto Project Development Manual
The "Understanding and Creating Layers" section in the Yocto Project Development Manual
The "Modifying the Kernel" section in the Yocto Project Development Manual.
Finally, while this document focuses on the manual creation of recipes, patches, and configuration files, the Yocto Project Board Support Package (BSP) tools are available to automate this process with existing content and work well to create the initial framework and boilerplate code. For details on these tools, see the "Using the Yocto Project's BSP Tools" section in the Yocto Project Board Support Package (BSP) Developer's Guide.
Chapter 12. Common Tasks
This chapter presents several common tasks you perform when you work with the Yocto Project Linux kernel. These tasks include preparing a layer, modifying an existing recipe, iterative development, working with your own sources, and incorporating out-of-tree modules.
Note
The examples presented in this chapter work with the Yocto Project 1.2.2 Release and forward.
12.1. Creating and Preparing a Layer
If you are going to be modifying kernel recipes, it is recommended
that you create and prepare your own layer in which to do your
work.
Your layer contains its own
BitBake
append files
(.bbappend) and provides a convenient
mechanism to create your own recipe files
(.bb).
For details on how to create and work with layers, see the following
sections in the Yocto Project Development Manual:
"Understanding and Creating Layers" for general information on layers and how to create layers.
"Set Up Your Layer for the Build" for specific instructions on setting up a layer for kernel development.
12.2. Modifying an Existing Recipe
In many cases, you can customize an existing linux-yocto recipe to
meet the needs of your project.
Each release of the Yocto Project provides a few Linux
kernel recipes from which you can choose.
These are located in the
Source Directory
in meta/recipes-kernel/linux.
Modifying an existing recipe can consist of the following:
Creating the append file
Applying patches
Changing the configuration
Before modifying an existing recipe, be sure that you have created a minimal, custom layer from which you can work. See the "Creating and Preparing a Layer" section for some general resources. You can also see the "Set Up Your Layer for the Build" section of the Yocto Project Development Manual for a detailed example.
12.2.1. Creating the Append File
You create this file in your custom layer.
You also name it accordingly based on the linux-yocto recipe
you are using.
For example, if you are modifying the
meta/recipes-kernel/linux/linux-yocto_3.19.bb
recipe, the append file will typically be located as follows
within your custom layer:
your-layer/recipes-kernel/linux/linux-yocto_3.19.bbappend
The append file should initially extend the
FILESPATH
search path by prepending the directory that contains your
files to the
FILESEXTRAPATHS
variable as follows:
FILESEXTRAPATHS_prepend := "${THISDIR}/${PN}:"
The path ${THISDIR}/${PN}
expands to "linux-yocto" in the current directory for this
example.
If you add any new files that modify the kernel recipe and you
have extended FILESPATH as
described above, you must place the files in your layer in the
following area:
your-layer/recipes-kernel/linux/linux-yocto/
Note
If you are working on a new machine Board Support Package (BSP), be sure to refer to the Yocto Project Board Support Package (BSP) Developer's Guide.
12.2.2. Applying Patches
If you have a single patch or a small series of patches
that you want to apply to the Linux kernel source, you
can do so just as you would with any other recipe.
You first copy the patches to the path added to
FILESEXTRAPATHS
in your .bbappend file as described in
the previous section, and then reference them in
SRC_URI
statements.
For example, you can apply a three-patch series by adding the
following lines to your linux-yocto
.bbappend file in your layer:
SRC_URI += "file://0001-first-change.patch"
SRC_URI += "file://0002-second-change.patch"
SRC_URI += "file://0003-third-change.patch"
The next time you run BitBake to build the Linux kernel, BitBake detects the change in the recipe and fetches and applies the patches before building the kernel.
For a detailed example showing how to patch the kernel, see the "Patching the Kernel" section in the Yocto Project Development Manual.
12.2.3. Changing the Configuration
You can make wholesale or incremental changes to the final
.config file used for the eventual
Linux kernel configuration by including a
defconfig file and by specifying
configuration fragments in the
SRC_URI
to be applied to that file.
If you have a complete, working Linux kernel
.config
file you want to use for the configuration, as before, copy
that file to the appropriate ${PN}
directory in your layer's
recipes-kernel/linux directory,
and rename the copied file to "defconfig".
Then, add the following lines to the linux-yocto
.bbappend file in your layer:
     FILESEXTRAPATHS_prepend := "${THISDIR}/${PN}:"
     SRC_URI += "file://defconfig"
The SRC_URI tells the build system how to
search for the file, while the
FILESEXTRAPATHS
extends the
FILESPATH
variable (search directories) to include the
${PN} directory you created to hold the
configuration changes.
Note
The build system applies the configurations from thedefconfig file before applying any
subsequent configuration fragments.
The final kernel configuration is a combination of the
configurations in the defconfig file and
any configuration fragments you provide.
You need to realize that if you have any configuration
fragments, the build system applies these on top of and
after applying the existing defconfig
file configurations.
Generally speaking, the preferred approach is to determine the
incremental change you want to make and add that as a
configuration fragment.
For example, if you want to add support for a basic serial
console, create a file named 8250.cfg in
the ${PN} directory with the following
content (without indentation):
CONFIG_SERIAL_8250=y
CONFIG_SERIAL_8250_CONSOLE=y
CONFIG_SERIAL_8250_PCI=y
CONFIG_SERIAL_8250_NR_UARTS=4
CONFIG_SERIAL_8250_RUNTIME_UARTS=4
CONFIG_SERIAL_CORE=y
CONFIG_SERIAL_CORE_CONSOLE=y
Next, include this configuration fragment and extend the
FILESPATH variable in your
.bbappend file:
FILESEXTRAPATHS_prepend := "${THISDIR}/${PN}:"
SRC_URI += "file://8250.cfg"
The next time you run BitBake to build the Linux kernel, BitBake detects the change in the recipe and fetches and applies the new configuration before building the kernel.
For a detailed example showing how to configure the kernel, see the "Configuring the Kernel" section in the Yocto Project Development Manual.
12.2.4. Using an "In-Tree" defconfig File
It might be desirable to have kernel configuration fragment
support through a defconfig file that
is pulled from the kernel source tree for the configured
machine.
By default, the OpenEmbedded build system looks for
defconfig files in the layer used for
Metadata, which is "out-of-tree", and then configures them
using the following:
SRC_URI += "file://defconfig"
If you do not want to maintain copies of
defconfig files in your layer but would
rather allow users to use the default configuration from the
kernel tree and still be able to add configuration fragments
to the
SRC_URI
through, for example, append files, you can direct the
OpenEmbedded build system to use a
defconfig file that is "in-tree".
To specify an "in-tree" defconfig file,
edit the recipe that builds your kernel so that it has the
following command form:
KBUILD_DEFCONFIG_KMACHINE ?= defconfig_file
You need to append the variable with
KMACHINE
and then supply the path to your "in-tree"
defconfig file.
Aside from modifying your kernel recipe and providing your own
defconfig file, you need to be sure no
files or statements set SRC_URI to use a
defconfig other than your "in-tree"
file (e.g. a kernel's linux-machine.inc
file).
In other words, if the build system detects a statement
that identifies an "out-of-tree"
defconfig file, that statement
will override your
KBUILD_DEFCONFIG variable.
See the
KBUILD_DEFCONFIG
variable description for more information.
12.3. Using an Iterative Development Process
If you do not have existing patches or configuration files, you can iteratively generate them from within the BitBake build environment as described within this section. During an iterative workflow, running a previously completed BitBake task causes BitBake to invalidate the tasks that follow the completed task in the build sequence. Invalidated tasks rebuild the next time you run the build using BitBake.
As you read this section, be sure to substitute the name of your Linux kernel recipe for the term "linux-yocto".
12.3.1. "-dirty" String
If kernel images are being built with "-dirty" on the end of the version string, this simply means that modifications in the source directory have not been committed.
$ git status
You can use the above Git command to report modified, removed, or added files. You should commit those changes to the tree regardless of whether they will be saved, exported, or used. Once you commit the changes, you need to rebuild the kernel.
To force a pickup and commit of all such pending changes, enter the following:
$ git add .
$ git commit -s -a -m "getting rid of -dirty"
Next, rebuild the kernel.
12.3.2. Generating Configuration Files
You can manipulate the .config file
used to build a linux-yocto recipe with the
menuconfig command as follows:
$ bitbake linux-yocto -c menuconfig
This command starts the Linux kernel configuration tool,
which allows you to prepare a new
.config file for the build.
When you exit the tool, be sure to save your changes
at the prompt.
The resulting .config file is
located in the build directory,
${B},
which expands to
${WORKDIR}/linux-${PACKAGE_ARCH}-${LINUX_KERNEL_TYPE}-build.
You can use the entire .config file as the
defconfig file as described in the
"Changing the Configuration" section.
For more information on the .config file,
see the
"Using menuconfig"
section in the Yocto Project Development Manual.
Note
You can determine what a variable expands to by looking at the output of thebitbake -e
command:
$ bitbake -e virtual/kernel
Search the output for the variable in which you are
interested to see exactly how it is expanded and used.
A better method is to create a configuration fragment using the
differences between two configuration files: one previously
created and saved, and one freshly created using the
menuconfig tool.
To create a configuration fragment using this method, follow these steps:
Complete a build at least through the kernel configuration task as follows:
$ bitbake linux-yocto -c kernel_configme -fThis step ensures that you will be creating a
.configfile from a known state. Because situations exist where your build state might become unknown, it is best to run the previous command prior to starting upmenuconfig.Run the
menuconfigcommand:$ bitbake linux-yocto -c menuconfigRun the
diffconfigcommand to prepare a configuration fragment. The resulting filefragment.cfgwill be placed in the${WORKDIR}directory:$ bitbake linux-yocto -c diffconfig
The diffconfig command creates a file that is a
list of Linux kernel CONFIG_ assignments.
See the "Changing the Configuration"
section for information on how to use the output as a
configuration fragment.
Note
You can also use this method to create configuration fragments for a BSP. See the "BSP Descriptions" section for more information.
The kernel tools also provide configuration validation.
You can use these tools to produce warnings for when a
requested configuration does not appear in the final
.config file or when you override a
policy configuration in a hardware configuration fragment.
Here is an example with some sample output of the command
that runs these tools:
$ bitbake linux-yocto -c kernel_configcheck -f
...
NOTE: validating kernel configuration
This BSP sets 3 invalid/obsolete kernel options.
These config options are not offered anywhere within this kernel.
The full list can be found in your kernel src dir at:
meta/cfg/standard/mybsp/invalid.cfg
This BSP sets 21 kernel options that are possibly non-hardware related.
The full list can be found in your kernel src dir at:
meta/cfg/standard/mybsp/specified_non_hdw.cfg
WARNING: There were 2 hardware options requested that do not
have a corresponding value present in the final ".config" file.
This probably means you are not getting the config you wanted.
The full list can be found in your kernel src dir at:
meta/cfg/standard/mybsp/mismatch.cfg
The output describes the various problems that you can
encounter along with where to find the offending configuration
items.
You can use the information in the logs to adjust your
configuration files and then repeat the
kernel_configme and
kernel_configcheck commands until
they produce no warnings.
For more information on how to use the
menuconfig tool, see the
"Using menuconfig"
section in the Yocto Project Development Manual.
12.3.3. Modifying Source Code
You can experiment with source code changes and create a simple patch without leaving the BitBake environment. To get started, be sure to complete a build at least through the kernel configuration task:
$ bitbake linux-yocto -c kernel_configme -f
Taking this step ensures you have the sources prepared
and the configuration completed.
You can find the sources in the build directory within the
source/ directory, which is a symlink
(i.e. ${B}/source).
The source/ directory expands to
${WORKDIR}/linux-${PACKAGE_ARCH}-${LINUX_KERNEL_TYPE}-build/source.
The directory pointed to by the
source/ symlink is also known as
${STAGING_KERNEL_DIR}.
You can edit the sources as you would any other Linux source
tree.
However, keep in mind that you will lose changes if you
trigger the
do_fetch
task for the recipe.
You can avoid triggering this task by not using BitBake to
run the
cleanall,
cleansstate,
or forced
fetch
commands.
Also, do not modify the recipe itself while working
with temporary changes or BitBake might run the
fetch command depending on the
changes to the recipe.
To test your temporary changes, instruct BitBake to run the
compile again.
The -f option forces the command to run
even though BitBake might think it has already done so:
$ bitbake linux-yocto -c compile -f
If the compile fails, you can update the sources and repeat
the compile.
Once compilation is successful, you can inspect and test
the resulting build (i.e. kernel, modules, and so forth) from
the following build directory:
${WORKDIR}/linux-${PACKAGE_ARCH}-${LINUX_KERNEL_TYPE}-build
Alternatively, you can run the deploy
command to place the kernel image in the
tmp/deploy/images directory:
$ bitbake linux-yocto -c deploy
And, of course, you can perform the remaining installation and packaging steps by issuing:
$ bitbake linux-yocto
For rapid iterative development, the edit-compile-repeat loop described in this section is preferable to rebuilding the entire recipe because the installation and packaging tasks are very time consuming.
Once you are satisfied with your source code modifications,
you can make them permanent by generating patches and
applying them to the
SRC_URI
statement as described in the
"Applying Patches"
section.
If you are not familiar with generating patches, refer to the
"Creating the Patch"
section in the Yocto Project Development Manual.
12.4. Working With Your Own Sources
If you cannot work with one of the Linux kernel versions supported by existing linux-yocto recipes, you can still make use of the Yocto Project Linux kernel tooling by working with your own sources. When you use your own sources, you will not be able to leverage the existing kernel Metadata and stabilization work of the linux-yocto sources. However, you will be able to manage your own Metadata in the same format as the linux-yocto sources. Maintaining format compatibility facilitates converging with linux-yocto on a future, mutually-supported kernel version.
To help you use your own sources, the Yocto Project provides a
linux-yocto custom recipe
(linux-yocto-custom.bb) that uses
kernel.org sources
and the Yocto Project Linux kernel tools for managing
kernel Metadata.
You can find this recipe in the
poky Git repository of the
Yocto Project Source Repository
at:
poky/meta-skeleton/recipes-kernel/linux/linux-yocto-custom.bb
Here are some basic steps you can use to work with your own sources:
Copy the
linux-yocto-custom.bbrecipe to your layer and give it a meaningful name. The name should include the version of the Linux kernel you are using (e.g.linux-yocto-myproject_3.19.bb, where "3.19" is the base version of the Linux kernel with which you would be working).In the same directory inside your layer, create a matching directory to store your patches and configuration files (e.g.
linux-yocto-myproject).Make sure you have either a
defconfigfile or configuration fragment files. When you use thelinux-yocto-custom.bbrecipe, you must specify a configuration. If you do not have adefconfigfile, you can run the following:$ make defconfigAfter running the command, copy the resulting
.configto thefilesdirectory as "defconfig" and then add it to theSRC_URIvariable in the recipe.Running the
make defconfigcommand results in the default configuration for your architecture as defined by your kernel. However, no guarantee exists that this configuration is valid for your use case, or that your board will even boot. This is particularly true for non-x86 architectures. To use non-x86defconfigfiles, you need to be more specific and find one that matches your board (i.e. for arm, you look inarch/arm/configsand use the one that is the best starting point for your board).Edit the following variables in your recipe as appropriate for your project:
SRC_URI: TheSRC_URIshould specify a Git repository that uses one of the supported Git fetcher protocols (i.e.file,git,http, and so forth). TheSRC_URIvariable should also specify either adefconfigfile or some configuration fragment files. The skeleton recipe provides an exampleSRC_URIas a syntax reference.LINUX_VERSION: The Linux kernel version you are using (e.g. "3.19").LINUX_VERSION_EXTENSION: The Linux kernelCONFIG_LOCALVERSIONthat is compiled into the resulting kernel and visible through theunamecommand.SRCREV: The commit ID from which you want to build.PR: Treat this variable the same as you would in any other recipe. Increment the variable to indicate to the OpenEmbedded build system that the recipe has changed.PV: The defaultPVassignment is typically adequate. It combines theLINUX_VERSIONwith the Source Control Manager (SCM) revision as derived from theSRCPVvariable. The combined results are a string with the following form:3.19.11+git1+68a635bf8dfb64b02263c1ac80c948647cc76d5f_1+218bd8d2022b9852c60d32f0d770931e3cf343e2While lengthy, the extra verbosity in
PVhelps ensure you are using the exact sources from which you intend to build.COMPATIBLE_MACHINE: A list of the machines supported by your new recipe. This variable in the example recipe is set by default to a regular expression that matches only the empty string, "(^$)". This default setting triggers an explicit build failure. You must change it to match a list of the machines that your new recipe supports. For example, to support theqemux86andqemux86-64machines, use the following form:COMPATIBLE_MACHINE = "qemux86|qemux86-64"
Provide further customizations to your recipe as needed just as you would customize an existing linux-yocto recipe. See the "Modifying an Existing Recipe" section for information.
12.5. Working with Out-of-Tree Modules
This section describes steps to build out-of-tree modules on your target and describes how to incorporate out-of-tree modules in the build.
12.5.1. Building Out-of-Tree Modules on the Target
While the traditional Yocto Project development model would be to include kernel modules as part of the normal build process, you might find it useful to build modules on the target. This could be the case if your target system is capable and powerful enough to handle the necessary compilation. Before deciding to build on your target, however, you should consider the benefits of using a proper cross-development environment from your build host.
If you want to be able to build out-of-tree modules on
the target, there are some steps you need to take
on the target that is running your SDK image.
Briefly, the kernel-dev package
is installed by default on all
*.sdk images and the
kernel-devsrc package is installed
on many of the *.sdk images.
However, you need to create some scripts prior to
attempting to build the out-of-tree modules on the target
that is running that image.
Prior to attempting to build the out-of-tree modules,
you need to be on the target as root and you need to
change to the /usr/src/kernel directory.
Next, make the scripts:
# cd /usr/src/kernel
# make scripts
Because all SDK image recipes include
dev-pkgs, the
kernel-dev packages will be installed
as part of the SDK image and the
kernel-devsrc packages will be installed
as part of applicable SDK images.
The SDK uses the scripts when building out-of-tree
modules.
Once you have switched to that directory and created the
scripts, you should be able to build your out-of-tree modules
on the target.
12.5.2. Incorporating Out-of-Tree Modules
While it is always preferable to work with sources integrated
into the Linux kernel sources, if you need an external kernel
module, the hello-mod.bb recipe is
available as a template from which you can create your
own out-of-tree Linux kernel module recipe.
This template recipe is located in the
poky Git repository of the
Yocto Project Source Repository
at:
poky/meta-skeleton/recipes-kernel/hello-mod/hello-mod_0.1.bb
To get started, copy this recipe to your layer and give it a
meaningful name (e.g. mymodule_1.0.bb).
In the same directory, create a new directory named
files where you can store any source files,
patches, or other files necessary for building
the module that do not come with the sources.
Finally, update the recipe as needed for the module.
Typically, you will need to set the following variables:
Depending on the build system used by the module sources,
you might need to make some adjustments.
For example, a typical module Makefile
looks much like the one provided with the
hello-mod template:
obj-m := hello.o
SRC := $(shell pwd)
all:
$(MAKE) -C $(KERNEL_SRC) M=$(SRC)
modules_install:
$(MAKE) -C $(KERNEL_SRC) M=$(SRC) modules_install
...
The important point to note here is the
KERNEL_SRC
variable.
The
module
class sets this variable and the
KERNEL_PATH
variable to
${
with the necessary Linux kernel build information to build
modules.
If your module STAGING_KERNEL_DIR}Makefile uses a different
variable, you might want to override the
do_compile()
step, or create a patch to
the Makefile to work with the more typical
KERNEL_SRC or
KERNEL_PATH variables.
After you have prepared your recipe, you will likely want to include the module in your images. To do this, see the documentation for the following variables in the Yocto Project Reference Manual and set one of them appropriately for your machine configuration file:
Modules are often not required for boot and can be excluded from certain build configurations. The following allows for the most flexibility:
MACHINE_EXTRA_RRECOMMENDS += "kernel-module-mymodule"
The value is derived by appending the module filename without
the .ko extension to the string
"kernel-module-".
Because the variable is
RRECOMMENDS
and not a
RDEPENDS
variable, the build will not fail if this module is not
available to include in the image.
12.6. Inspecting Changes and Commits
A common question when working with a kernel is: "What changes have been applied to this tree?" Rather than using "grep" across directories to see what has changed, you can use Git to inspect or search the kernel tree. Using Git is an efficient way to see what has changed in the tree.
12.6.1. What Changed in a Kernel?
Following are a few examples that show how to use Git commands to examine changes. These examples are by no means the only way to see changes.
Note
In the following examples, unless you provide a commit range,kernel.org history is blended
with Yocto Project kernel changes.
You can form ranges by using branch names from the
kernel tree as the upper and lower commit markers with
the Git commands.
You can see the branch names through the web interface
to the Yocto Project source repositories at
http://git.yoctoproject.org/cgit.cgi.
To see a full range of the changes, use the
git whatchanged command and specify a
commit range for the branch
(commit..commit).
Here is an example that looks at what has changed in the
emenlow branch of the
linux-yocto-3.19 kernel.
The lower commit range is the commit associated with the
standard/base branch, while
the upper commit range is the commit associated with the
standard/emenlow branch.
$ git whatchanged origin/standard/base..origin/standard/emenlow
To see short, one line summaries of changes use the
git log command:
$ git log --oneline origin/standard/base..origin/standard/emenlow
Use this command to see code differences for the changes:
$ git diff origin/standard/base..origin/standard/emenlow
Use this command to see the commit log messages and the text differences:
$ git show origin/standard/base..origin/standard/emenlow
Use this command to create individual patches for
each change.
Here is an example that that creates patch files for each
commit and places them in your Documents
directory:
$ git format-patch -o $HOME/Documents origin/standard/base..origin/standard/emenlow
12.6.2. Showing a Particular Feature or Branch Change
Tags in the Yocto Project kernel tree divide changes for
significant features or branches.
The git show tag
command shows changes based on a tag.
Here is an example that shows systemtap
changes:
$ git show systemtap
You can use the
git branch --contains tag
command to show the branches that contain a particular feature.
This command shows the branches that contain the
systemtap feature:
$ git branch --contains systemtap
12.7. Adding Recipe-Space Kernel Features
You can add kernel features in the
recipe-space by
using the
KERNEL_FEATURES
variable and by specifying the feature's .scc
file path in the
SRC_URI
statement.
When you add features using this method, the OpenEmbedded build
system checks to be sure the features are present.
If the features are not present, the build stops.
Kernel features are the last elements processed for configuring
and patching the kernel.
Therefore, adding features in this manner is a way
to enforce specific features are present and enabled
without needing to do a full audit of any other layer's additions
to the SRC_URI statement.
You add a kernel feature by providing the feature as part of the
KERNEL_FEATURES variable and by providing the
path to the feature's .scc file, which is
relative to the root of the kernel Metadata.
The OpenEmbedded build system searches all forms of kernel
Metadata on the SRC_URI statement regardless
of whether the Metadata is in the "kernel-cache", system kernel
Metadata, or a recipe-space Metadata.
See the
"Kernel Metadata Location"
section for additional information.
When you specify the feature's .scc file
on the SRC_URI statement, the OpenEmbedded
build system adds the directory of that
.scc file along with all its subdirectories
to the kernel feature search path.
Because subdirectories are searched, you can reference a single
.scc file in the
SRC_URI statement to reference multiple kernel
features.
Consider the following example that adds the "test.scc" feature to the build.
Create a
.sccfile and locate it just as you would any other patch file,.cfgfile, or fetcher item you specify in theSRC_URIstatement.Notes
You must add the directory of the
.sccfile to the fetcher's search path in the same manner as you would add a.patchfile.You can create additional
.sccfiles beneath the directory that contains the file you are adding. All subdirectories are searched during the build as potential feature directories.
Continuing with the example, suppose the "test.scc" feature you are adding has a
test.sccfile in the following directory:my_recipe| +-linux-yocto | +-test.cfg +-test.sccIn this example, the
linux-yoctodirectory has both the featuretest.sccfile and a similarly named configuration fragment filetest.cfg.Add the
.sccfile to the recipe'sSRC_URIstatement:SRC_URI_append = " file://test.scc"The leading space before the path is important as the path is appended to the existing path.
Specify the feature as a kernel feature:
KERNEL_FEATURES_append = " test.scc"The OpenEmbedded build system processes the kernel feature when it builds the kernel.
Note
If other features are contained below "test.scc", then their directories are relative to the directory containing thetest.sccfile.
Chapter 13. Working with Advanced Metadata
13.1. Overview
In addition to supporting configuration fragments and patches, the
Yocto Project kernel tools also support rich
Metadata that you can
use to define complex policies and Board Support Package (BSP) support.
The purpose of the Metadata and the tools that manage it, known as
the kern-tools (kern-tools-native_git.bb), is
to help you manage the complexity of the configuration and sources
used to support multiple BSPs and Linux kernel types.
13.2. Using Kernel Metadata in a Recipe
The kernel sources in the Yocto Project contain kernel Metadata, which
is located in the meta branches of the kernel
source Git repositories.
This Metadata defines Board Support Packages (BSPs) that
correspond to definitions in linux-yocto recipes for the same BSPs.
A BSP consists of an aggregation of kernel policy and enabled
hardware-specific features.
The BSP can be influenced from within the linux-yocto recipe.
Note
Linux kernel source that contains kernel Metadata is said to be "linux-yocto style" kernel source. A Linux kernel recipe that inherits from thelinux-yocto.inc include file is said to be a
"linux-yocto style" recipe.
Every linux-yocto style recipe must define the
KMACHINE
variable.
This variable is typically set to the same value as the
MACHINE
variable, which is used by
BitBake.
However, in some cases, the variable might instead refer to the
underlying platform of the MACHINE.
Multiple BSPs can reuse the same KMACHINE
name if they are built using the same BSP description.
The "ep108-zynqmp" and "qemuzynqmp" BSP combination
in the meta-xilinx
layer is a good example of two BSPs using the same
KMACHINE value (i.e. "zynqmp").
See the BSP Descriptions section
for more information.
Every linux-yocto style recipe must also indicate the Linux kernel
source repository branch used to build the Linux kernel.
The KBRANCH
variable must be set to indicate the branch.
Note
You can use theKBRANCH value to define an
alternate branch typically with a machine override as shown here
from the meta-emenlow layer:
KBRANCH_emenlow-noemgd = "standard/base"
The linux-yocto style recipes can optionally define the following variables:
KERNEL_FEATURES
LINUX_KERNEL_TYPE
LINUX_KERNEL_TYPE defines the kernel type to be
used in assembling the configuration.
If you do not specify a LINUX_KERNEL_TYPE,
it defaults to "standard".
Together with
KMACHINE,
LINUX_KERNEL_TYPE defines the search
arguments used by the kernel tools to find the
appropriate description within the kernel Metadata with which to
build out the sources and configuration.
The linux-yocto recipes define "standard", "tiny", and "preempt-rt"
kernel types.
See the "Kernel Types" section
for more information on kernel types.
During the build, the kern-tools search for the BSP description
file that most closely matches the KMACHINE
and LINUX_KERNEL_TYPE variables passed in from the
recipe.
The tools use the first BSP description it finds that match
both variables.
If the tools cannot find a match, they issue a warning such as
the following:
WARNING: Can't find any BSP hardware or required configuration fragments.
WARNING: Looked at meta/cfg/broken/emenlow-broken/hdw_frags.txt and
meta/cfg/broken/emenlow-broken/required_frags.txt in directory:
meta/cfg/broken/emenlow-broken
In this example, KMACHINE was set to "emenlow-broken"
and LINUX_KERNEL_TYPE was set to "broken".
The tools first search for the KMACHINE and
then for the LINUX_KERNEL_TYPE.
If the tools cannot find a partial match, they will use the
sources from the KBRANCH and any configuration
specified in the
SRC_URI.
You can use the KERNEL_FEATURES variable
to include features (configuration fragments, patches, or both) that
are not already included by the KMACHINE and
LINUX_KERNEL_TYPE variable combination.
For example, to include a feature specified as
"features/netfilter/netfilter.scc",
specify:
KERNEL_FEATURES += "features/netfilter/netfilter.scc"
To include a feature called "cfg/sound.scc" just for the
qemux86 machine, specify:
KERNEL_FEATURES_append_qemux86 = " cfg/sound.scc"
The value of the entries in KERNEL_FEATURES
are dependent on their location within the kernel Metadata itself.
The examples here are taken from the meta
branch of the linux-yocto-3.19 repository.
Within that branch, "features" and "cfg" are subdirectories of the
meta/cfg/kernel-cache directory.
For more information, see the
"Kernel Metadata Syntax" section.
Note
The processing of the these variables has evolved some between the 0.9 and 1.3 releases of the Yocto Project and associated kern-tools sources. The descriptions in this section are accurate for 1.3 and later releases of the Yocto Project.
13.3. Kernel Metadata Location
Kernel Metadata always exists outside of the kernel tree either defined in a kernel recipe (recipe-space) or outside of the recipe. Where you choose to define the Metadata depends on what you want to do and how you intend to work. Regardless of where you define the kernel Metadata, the syntax used applies equally.
If you are unfamiliar with the Linux kernel and only wish to apply a configuration and possibly a couple of patches provided to you by others, the recipe-space method is recommended. This method is also a good approach if you are working with Linux kernel sources you do not control or if you just do not want to maintain a Linux kernel Git repository on your own. For partial information on how you can define kernel Metadata in the recipe-space, see the "Modifying an Existing Recipe" section.
Conversely, if you are actively developing a kernel and are already maintaining a Linux kernel Git repository of your own, you might find it more convenient to work with kernel Metadata kept outside the recipe-space. Working with Metadata in this area can make iterative development of the Linux kernel more efficient outside of the BitBake environment.
13.3.1. Recipe-Space Metadata
When stored in recipe-space, the kernel Metadata files reside in a
directory hierarchy below
FILESEXTRAPATHS.
For a linux-yocto recipe or for a Linux kernel recipe derived
by copying and modifying
oe-core/meta-skeleton/recipes-kernel/linux/linux-yocto-custom.bb
to a recipe in your layer, FILESEXTRAPATHS
is typically set to
${THISDIR}/${PN}.
See the "Modifying an Existing Recipe"
section for more information.
Here is an example that shows a trivial tree of kernel Metadata stored in recipe-space within a BSP layer:
meta-my_bsp_layer/
`-- recipes-kernel
`-- linux
`-- linux-yocto
|-- bsp-standard.scc
|-- bsp.cfg
`-- standard.cfg
When the Metadata is stored in recipe-space, you must take
steps to ensure BitBake has the necessary information to decide
what files to fetch and when they need to be fetched again.
It is only necessary to specify the .scc
files on the
SRC_URI.
BitBake parses them and fetches any files referenced in the
.scc files by the include,
patch, or kconf commands.
Because of this, it is necessary to bump the recipe
PR
value when changing the content of files not explicitly listed
in the SRC_URI.
13.3.2. Metadata Outside the Recipe-Space
When stored outside of the recipe-space, the kernel Metadata
files reside in a separate repository.
The OpenEmbedded build system adds the Metadata to the build as
a "ktype=meta" repository through the
SRC_URI
variable.
As an example, consider the following SRC_URI
statement from the linux-yocto_4.4.bb
kernel recipe:
SRC_URI = "git://git.yoctoproject.org/linux-yocto-4.4.git;name=machine;branch=${KBRANCH}; \
git://git.yoctoproject.org/yocto-kernel-cache;type=kmeta;name=meta;branch=yocto-4.4;destsuffix=${KMETA}"
${KMETA}, in this context, is simply used to
name the directory into which the Git fetcher places the Metadata.
This behavior is no different than any multi-repository
SRC_URI statement used in a recipe.
You can keep kernel Metadata in a "kernel-cache", which is a
directory containing configuration fragments.
As with any Metadata kept outside the recipe-space, you simply
need to use the SRC_URI statement with the
"type=kmeta" attribute.
Doing so makes the kernel Metadata available during the
configuration phase.
If you modify the Metadata, you must not forget to update the
SRCREV
statements in the kernel's recipe.
In particular, you need to update the
SRCREV_meta variable to match the commit in
the KMETA branch you wish to use.
Changing the data in these branches and not updating the
SRCREV statements to match will cause the
build to fetch an older commit.
13.4. Kernel Metadata Syntax
The kernel Metadata consists of three primary types of files:
scc
[1]
description files, configuration fragments, and patches.
The scc files define variables and include or
otherwise reference any of the three file types.
The description files are used to aggregate all types of kernel
Metadata into
what ultimately describes the sources and the configuration required
to build a Linux kernel tailored to a specific machine.
The scc description files are used to define two
fundamental types of kernel Metadata:
Features
Board Support Packages (BSPs)
Features aggregate sources in the form of patches and configuration fragments into a modular reusable unit. You can use features to implement conceptually separate kernel Metadata descriptions such as pure configuration fragments, simple patches, complex features, and kernel types. Kernel types define general kernel features and policy to be reused in the BSPs.
BSPs define hardware-specific features and aggregate them with kernel types to form the final description of what will be assembled and built.
While the kernel Metadata syntax does not enforce any logical separation of configuration fragments, patches, features or kernel types, best practices dictate a logical separation of these types of Metadata. The following Metadata file hierarchy is recommended:
base/
bsp/
cfg/
features/
ktypes/
patches/
The bsp directory contains the
BSP descriptions.
The remaining directories all contain "features".
Separating bsp from the rest of the structure
aids conceptualizing intended usage.
Use these guidelines to help place your scc
description files within the structure:
If your file contains only configuration fragments, place the file in the
cfgdirectory.If your file contains only source-code fixes, place the file in the
patchesdirectory.If your file encapsulates a major feature, often combining sources and configurations, place the file in
featuresdirectory.If your file aggregates non-hardware configuration and patches in order to define a base kernel policy or major kernel type to be reused across multiple BSPs, place the file in
ktypesdirectory.
These distinctions can easily become blurred - especially as
out-of-tree features slowly merge upstream over time.
Also, remember that how the description files are placed is
a purely logical organization and has no impact on the functionality
of the kernel Metadata.
There is no impact because all of cfg,
features, patches, and
ktypes, contain "features" as far as the kernel
tools are concerned.
Paths used in kernel Metadata files are relative to
<base>, which is either
FILESEXTRAPATHS
if you are creating Metadata in
recipe-space,
or meta/cfg/kernel-cache/ if you are creating
Metadata outside of the recipe-space.
13.4.1. Configuration
The simplest unit of kernel Metadata is the configuration-only
feature.
This feature consists of one or more Linux kernel configuration
parameters in a configuration fragment file
(.cfg) and a .scc file
that describes the fragment.
The Symmetric Multi-Processing (SMP) fragment included in the
linux-yocto-3.19 Git repository
consists of the following two files:
cfg/smp.scc:
define KFEATURE_DESCRIPTION "Enable SMP"
define KFEATURE_COMPATIBILITY all
kconf hardware smp.cfg
cfg/smp.cfg:
CONFIG_SMP=y
CONFIG_SCHED_SMT=y
# Increase default NR_CPUS from 8 to 64 so that platform with
# more than 8 processors can be all activated at boot time
CONFIG_NR_CPUS=64
You can find information on configuration fragment files in the "Creating Configuration Fragments" section of the Yocto Project Development Manual and in the "Generating Configuration Files" section earlier in this manual.
KFEATURE_DESCRIPTION
provides a short description of the fragment.
Higher level kernel tools use this description.
The kconf command is used to include the
actual configuration fragment in an .scc
file, and the "hardware" keyword identifies the fragment as
being hardware enabling, as opposed to general policy,
which would use the "non-hardware" keyword.
The distinction is made for the benefit of the configuration
validation tools, which warn you if a hardware fragment
overrides a policy set by a non-hardware fragment.
Note
The description file can include multiplekconf statements, one per fragment.
As described in the "Generating Configuration Files" section, you can use the following BitBake command to audit your configuration:
$ bitbake linux-yocto -c kernel_configcheck -f
13.4.2. Patches
Patch descriptions are very similar to configuration fragment
descriptions, which are described in the previous section.
However, instead of a .cfg file, these
descriptions work with source patches.
A typical patch includes a description file and the patch itself:
patches/mypatch.scc:
patch mypatch.patch
patches/mypatch.patch:
typical-patch
You can create the typical .patch
file using diff -Nurp or
git format-patch.
The description file can include multiple patch statements, one per patch.
13.4.3. Features
Features are complex kernel Metadata types that consist
of configuration fragments (kconf), patches
(patch), and possibly other feature
description files (include).
Here is an example that shows a feature description file:
features/myfeature.scc
define KFEATURE_DESCRIPTION "Enable myfeature"
patch 0001-myfeature-core.patch
patch 0002-myfeature-interface.patch
include cfg/myfeature_dependency.scc
kconf non-hardware myfeature.cfg
This example shows how the patch and
kconf commands are used as well as
how an additional feature description file is included.
Typically, features are less granular than configuration
fragments and are more likely than configuration fragments
and patches to be the types of things you want to specify
in the KERNEL_FEATURES variable of the
Linux kernel recipe.
See the "Using Kernel Metadata in a Recipe"
section earlier in the manual.
13.4.4. Kernel Types
A kernel type defines a high-level kernel policy by
aggregating non-hardware configuration fragments with
patches you want to use when building a Linux kernels of a
specific type.
Syntactically, kernel types are no different than features
as described in the "Features"
section.
The LINUX_KERNEL_TYPE variable in the kernel
recipe selects the kernel type.
See the "Using Kernel Metadata in a Recipe"
section for more information.
As an example, the linux-yocto-3.19
tree defines three kernel types: "standard",
"tiny", and "preempt-rt":
"standard": Includes the generic Linux kernel policy of the Yocto Project linux-yocto kernel recipes. This policy includes, among other things, which file systems, networking options, core kernel features, and debugging and tracing options are supported.
"preempt-rt": Applies the
PREEMPT_RTpatches and the configuration options required to build a real-time Linux kernel. This kernel type inherits from the "standard" kernel type."tiny": Defines a bare minimum configuration meant to serve as a base for very small Linux kernels. The "tiny" kernel type is independent from the "standard" configuration. Although the "tiny" kernel type does not currently include any source changes, it might in the future.
The "standard" kernel type is defined by
standard.scc:
# Include this kernel type fragment to get the standard features and
# configuration values.
# Include all standard features
include standard-nocfg.scc
kconf non-hardware standard.cfg
# individual cfg block section
include cfg/fs/devtmpfs.scc
include cfg/fs/debugfs.scc
include cfg/fs/btrfs.scc
include cfg/fs/ext2.scc
include cfg/fs/ext3.scc
include cfg/fs/ext4.scc
include cfg/net/ipv6.scc
include cfg/net/ip_nf.scc
include cfg/net/ip6_nf.scc
include cfg/net/bridge.scc
As with any .scc file, a
kernel type definition can aggregate other
.scc files with
include commands.
These definitions can also directly pull in
configuration fragments and patches with the
kconf and patch
commands, respectively.
Note
It is not strictly necessary to create a kernel type.scc file.
The Board Support Package (BSP) file can implicitly define
the kernel type using a define
KTYPE myktype
line.
See the "BSP Descriptions"
section for more information.
13.4.5. BSP Descriptions
BSP descriptions combine kernel types with hardware-specific
features.
The hardware-specific portion is typically defined
independently, and then aggregated with each supported kernel
type.
Consider this simple BSP description that supports the
mybsp machine:
mybsp.scc:
define KMACHINE mybsp
define KTYPE standard
define KARCH i386
kconf mybsp.cfg
Every BSP description should define the
KMACHINE,
KTYPE,
and KARCH
variables.
These variables allow the OpenEmbedded build system to identify
the description as meeting the criteria set by the recipe being
built.
This simple example supports the "mybsp" machine for the "standard"
kernel and the "i386" architecture.
Be aware that a hard link between the
KTYPE variable and a kernel type
description file does not exist.
Thus, if you do not have kernel types defined in your kernel
Metadata, you only need to ensure that the kernel recipe's
LINUX_KERNEL_TYPE
variable and the KTYPE variable in the
BSP description file match.
Note
Future versions of the tooling make the specification ofKTYPE in the BSP optional.
If you did want to separate your kernel policy from your hardware configuration, you could do so by specifying a kernel type, such as "standard" and including that description file in the BSP description file. See the "Kernel Types" section for more information.
You might also have multiple hardware configurations that you
aggregate into a single hardware description file that you
could include in the BSP description file, rather than referencing
a single .cfg file.
Consider the following:
mybsp.scc:
define KMACHINE mybsp
define KTYPE standard
define KARCH i386
include standard.scc
include mybsp-hw.scc
In the above example, standard.scc
aggregates all the configuration fragments, patches, and
features that make up your standard kernel policy whereas
mybsp-hw.scc
aggregates all those necessary
to support the hardware available on the
mybsp machine.
For information on how to break a complete
.config file into the various
configuration fragments, see the
"Generating Configuration Files"
section.
Many real-world examples are more complex.
Like any other .scc file, BSP
descriptions can aggregate features.
Consider the Minnow BSP definition from the
linux-yocto-3.19
Git repository:
minnow.scc:
include cfg/x86.scc
include features/eg20t/eg20t.scc
include cfg/dmaengine.scc
include features/power/intel.scc
include cfg/efi.scc
include features/usb/ehci-hcd.scc
include features/usb/ohci-hcd.scc
include features/usb/usb-gadgets.scc
include features/usb/touchscreen-composite.scc
include cfg/timer/hpet.scc
include cfg/timer/rtc.scc
include features/leds/leds.scc
include features/spi/spidev.scc
include features/i2c/i2cdev.scc
# Earlyprintk and port debug requires 8250
kconf hardware cfg/8250.cfg
kconf hardware minnow.cfg
kconf hardware minnow-dev.cfg
The minnow.scc description file includes
a hardware configuration fragment
(minnow.cfg) specific to the Minnow
BSP as well as several more general configuration
fragments and features enabling hardware found on the
machine.
This description file is then included in each of the three
"minnow" description files for the supported kernel types
(i.e. "standard", "preempt-rt", and "tiny").
Consider the "minnow" description for the "standard" kernel
type:
minnow-standard.scc:
define KMACHINE minnow
define KTYPE standard
define KARCH i386
include ktypes/standard
include minnow.scc
# Extra minnow configs above the minimal defined in minnow.scc
include cfg/efi-ext.scc
include features/media/media-all.scc
include features/sound/snd_hda_intel.scc
# The following should really be in standard.scc
# USB live-image support
include cfg/usb-mass-storage.scc
include cfg/boot-live.scc
# Basic profiling
include features/latencytop/latencytop.scc
include features/profiling/profiling.scc
# Requested drivers that don't have an existing scc
kconf hardware minnow-drivers-extra.cfg
The include command midway through the file
includes the minnow.scc description that
defines all hardware enablements for the BSP that is common to all
kernel types.
Using this command significantly reduces duplication.
Now consider the "minnow" description for the "tiny" kernel type:
minnow-tiny.scc:
define KMACHINE minnow
define KTYPE tiny
define KARCH i386
include ktypes/tiny
include minnow.scc
As you might expect, the "tiny" description includes quite a bit less. In fact, it includes only the minimal policy defined by the "tiny" kernel type and the hardware-specific configuration required for booting the machine along with the most basic functionality of the system as defined in the base "minnow" description file.
Notice again the three critical variables:
KMACHINE, KTYPE,
and KARCH.
Of these variables, only the KTYPE has changed.
It is now set to "tiny".
13.5. Organizing Your Source
Many recipes based on the linux-yocto-custom.bb
recipe use Linux kernel sources that have only a single
branch - "master".
This type of repository structure is fine for linear development
supporting a single machine and architecture.
However, if you work with multiple boards and architectures,
a kernel source repository with multiple branches is more
efficient.
For example, suppose you need a series of patches for one board to boot.
Sometimes, these patches are works-in-progress or fundamentally wrong,
yet they are still necessary for specific boards.
In these situations, you most likely do not want to include these
patches in every kernel you build (i.e. have the patches as part of
the lone "master" branch).
It is situations like these that give rise to multiple branches used
within a Linux kernel sources Git repository.
Repository organization strategies exist that maximize source reuse, remove redundancy, and logically order your changes. This section presents strategies for the following cases:
Encapsulating patches in a feature description and only including the patches in the BSP descriptions of the applicable boards.
Creating a machine branch in your kernel source repository and applying the patches on that branch only.
Creating a feature branch in your kernel source repository and merging that branch into your BSP when needed.
The approach you take is entirely up to you and depends on what works best for your development model.
13.5.1. Encapsulating Patches
if you are reusing patches from an external tree and are not working on the patches, you might find the encapsulated feature to be appropriate. Given this scenario, you do not need to create any branches in the source repository. Rather, you just take the static patches you need and encapsulate them within a feature description. Once you have the feature description, you simply include that into the BSP description as described in the "BSP Descriptions" section.
You can find information on how to create patches and BSP descriptions in the "Patches" and "BSP Descriptions" sections.
13.5.2. Machine Branches
When you have multiple machines and architectures to support, or you are actively working on board support, it is more efficient to create branches in the repository based on individual machines. Having machine branches allows common source to remain in the "master" branch with any features specific to a machine stored in the appropriate machine branch. This organization method frees you from continually reintegrating your patches into a feature.
Once you have a new branch, you can set up your kernel Metadata
to use the branch a couple different ways.
In the recipe, you can specify the new branch as the
KBRANCH to use for the board as
follows:
KBRANCH = "mynewbranch"
Another method is to use the branch command
in the BSP description:
mybsp.scc:
define KMACHINE mybsp
define KTYPE standard
define KARCH i386
include standard.scc
branch mynewbranch
include mybsp-hw.scc
If you find yourself with numerous branches, you might consider using a hierarchical branching system similar to what the linux-yocto Linux kernel repositories use:
common/kernel_type/machine
If you had two kernel types, "standard" and "small" for
instance, three machines, and common
as mydir, the branches in your
Git repository might look like this:
mydir/base
mydir/standard/base
mydir/standard/machine_a
mydir/standard/machine_b
mydir/standard/machine_c
mydir/small/base
mydir/small/machine_a
This organization can help clarify the branch relationships.
In this case, mydir/standard/machine_a
includes everything in mydir/base and
mydir/standard/base.
The "standard" and "small" branches add sources specific to those
kernel types that for whatever reason are not appropriate for the
other branches.
Note
The "base" branches are an artifact of the way Git manages its data internally on the filesystem: Git will not allow you to usemydir/standard and
mydir/standard/machine_a because it
would have to create a file and a directory named "standard".
13.5.3. Feature Branches
When you are actively developing new features, it can be more
efficient to work with that feature as a branch, rather than
as a set of patches that have to be regularly updated.
The Yocto Project Linux kernel tools provide for this with
the git merge command.
To merge a feature branch into a BSP, insert the
git merge command after any
branch commands:
mybsp.scc:
define KMACHINE mybsp
define KTYPE standard
define KARCH i386
include standard.scc
branch mynewbranch
git merge myfeature
include mybsp-hw.scc
13.6. SCC Description File Reference
This section provides a brief reference for the commands you can use
within an SCC description file (.scc):
branch [ref]: Creates a new branch relative to the current branch (typically${KTYPE}) using the currently checked-out branch, or "ref" if specified.define: Defines variables, such asKMACHINE,KTYPE,KARCH, andKFEATURE_DESCRIPTION.include SCC_FILE: Includes an SCC file in the current file. The file is parsed as if you had inserted it inline.kconf [hardware|non-hardware] CFG_FILE: Queues a configuration fragment for merging into the final Linux.configfile.git merge GIT_BRANCH: Merges the feature branch into the current branch.patch PATCH_FILE: Applies the patch to the current Git branch.
[1]
scc stands for Series Configuration
Control, but the naming has less significance in the
current implementation of the tooling than it had in the
past.
Consider scc files to be description files.
Appendix C. Advanced Kernel Concepts
C.1. Yocto Project Kernel Development and Maintenance
Kernels available through the Yocto Project, like other kernels, are based off the Linux
kernel releases from http://www.kernel.org.
At the beginning of a major development cycle, the Yocto Project team
chooses its kernel based on factors such as release timing, the anticipated release
timing of final upstream kernel.org versions, and Yocto Project
feature requirements.
Typically, the kernel chosen is in the
final stages of development by the community.
In other words, the kernel is in the release
candidate or "rc" phase and not yet a final release.
But, by being in the final stages of external development, the team knows that the
kernel.org final release will clearly be within the early stages of
the Yocto Project development window.
This balance allows the team to deliver the most up-to-date kernel possible, while still ensuring that the team has a stable official release for the baseline Linux kernel version.
The ultimate source for kernels available through the Yocto Project are released kernels
from kernel.org.
In addition to a foundational kernel from kernel.org, the
kernels available contain a mix of important new mainline
developments, non-mainline developments (when there is no alternative),
Board Support Package (BSP) developments,
and custom features.
These additions result in a commercially released Yocto Project Linux kernel that caters
to specific embedded designer needs for targeted hardware.
Once a kernel is officially released, the Yocto Project team goes into their next development cycle, or upward revision (uprev) cycle, while still continuing maintenance on the released kernel. It is important to note that the most sustainable and stable way to include feature development upstream is through a kernel uprev process. Back-porting hundreds of individual fixes and minor features from various kernel versions is not sustainable and can easily compromise quality.
During the uprev cycle, the Yocto Project team uses an ongoing analysis of
kernel development, BSP support, and release timing to select the best
possible kernel.org version.
The team continually monitors community kernel
development to look for significant features of interest.
The team does consider back-porting large features if they have a significant advantage.
User or community demand can also trigger a back-port or creation of new
functionality in the Yocto Project baseline kernel during the uprev cycle.
Generally speaking, every new kernel both adds features and introduces new bugs. These consequences are the basic properties of upstream kernel development and are managed by the Yocto Project team's kernel strategy. It is the Yocto Project team's policy to not back-port minor features to the released kernel. They only consider back-porting significant technological jumps - and, that is done after a complete gap analysis. The reason for this policy is that back-porting any small to medium sized change from an evolving kernel can easily create mismatches, incompatibilities and very subtle errors.
These policies result in both a stable and a cutting edge kernel that mixes forward ports of existing features and significant and critical new functionality. Forward porting functionality in the kernels available through the Yocto Project kernel can be thought of as a "micro uprev." The many “micro uprevs” produce a kernel version with a mix of important new mainline, non-mainline, BSP developments and feature integrations. This kernel gives insight into new features and allows focused amounts of testing to be done on the kernel, which prevents surprises when selecting the next major uprev. The quality of these cutting edge kernels is evolving and the kernels are used in leading edge feature and BSP development.
C.2. Kernel Architecture
This section describes the architecture of the kernels available through the Yocto Project and provides information on the mechanisms used to achieve that architecture.
C.2.1. Overview
As mentioned earlier, a key goal of the Yocto Project is to present the
developer with
a kernel that has a clear and continuous history that is visible to the user.
The architecture and mechanisms used achieve that goal in a manner similar to the
upstream kernel.org.
You can think of a Yocto Project kernel as consisting of a baseline Linux kernel with added features logically structured on top of the baseline. The features are tagged and organized by way of a branching strategy implemented by the source code manager (SCM) Git. For information on Git as applied to the Yocto Project, see the "Git" section in the Yocto Project Development Manual.
The result is that the user has the ability to see the added features and the commits that make up those features. In addition to being able to see added features, the user can also view the history of what made up the baseline kernel.
The following illustration shows the conceptual Yocto Project kernel.
 |
In the illustration, the "Kernel.org Branch Point" marks the specific spot (or release) from which the Yocto Project kernel is created. From this point "up" in the tree, features and differences are organized and tagged.
The "Yocto Project Baseline Kernel" contains functionality that is common to every kernel type and BSP that is organized further up the tree. Placing these common features in the tree this way means features do not have to be duplicated along individual branches of the structure.
From the Yocto Project Baseline Kernel, branch points represent specific functionality for individual BSPs as well as real-time kernels. The illustration represents this through three BSP-specific branches and a real-time kernel branch. Each branch represents some unique functionality for the BSP or a real-time kernel.
In this example structure, the real-time kernel branch has common features for all real-time kernels and contains more branches for individual BSP-specific real-time kernels. The illustration shows three branches as an example. Each branch points the way to specific, unique features for a respective real-time kernel as they apply to a given BSP.
The resulting tree structure presents a clear path of markers (or branches) to the developer that, for all practical purposes, is the kernel needed for any given set of requirements.
C.2.2. Branching Strategy and Workflow
The Yocto Project team creates kernel branches at points where functionality is no longer shared and thus, needs to be isolated. For example, board-specific incompatibilities would require different functionality and would require a branch to separate the features. Likewise, for specific kernel features, the same branching strategy is used.
This branching strategy results in a tree that has features organized to be specific for particular functionality, single kernel types, or a subset of kernel types. This strategy also results in not having to store the same feature twice internally in the tree. Rather, the kernel team stores the unique differences required to apply the feature onto the kernel type in question.
Note
The Yocto Project team strives to place features in the tree such that they can be shared by all boards and kernel types where possible. However, during development cycles or when large features are merged, the team cannot always follow this practice. In those cases, the team uses isolated branches to merge features.
BSP-specific code additions are handled in a similar manner to kernel-specific additions. Some BSPs only make sense given certain kernel types. So, for these types, the team creates branches off the end of that kernel type for all of the BSPs that are supported on that kernel type. From the perspective of the tools that create the BSP branch, the BSP is really no different than a feature. Consequently, the same branching strategy applies to BSPs as it does to features. So again, rather than store the BSP twice, the team only stores the unique differences for the BSP across the supported multiple kernels.
While this strategy can result in a tree with a significant number of branches, it is
important to realize that from the developer's point of view, there is a linear
path that travels from the baseline kernel.org, through a select
group of features and ends with their BSP-specific commits.
In other words, the divisions of the kernel are transparent and are not relevant
to the developer on a day-to-day basis.
From the developer's perspective, this path is the "master" branch.
The developer does not need to be aware of the existence of any other branches at all.
Of course, there is value in the existence of these branches
in the tree, should a person decide to explore them.
For example, a comparison between two BSPs at either the commit level or at the line-by-line
code diff level is now a trivial operation.
Working with the kernel as a structured tree follows recognized community best practices. In particular, the kernel as shipped with the product, should be considered an "upstream source" and viewed as a series of historical and documented modifications (commits). These modifications represent the development and stabilization done by the Yocto Project kernel development team.
Because commits only change at significant release points in the product life cycle, developers can work on a branch created from the last relevant commit in the shipped Yocto Project kernel. As mentioned previously, the structure is transparent to the developer because the kernel tree is left in this state after cloning and building the kernel.
C.2.3. Source Code Manager - Git
The Source Code Manager (SCM) is Git.
This SCM is the obvious mechanism for meeting the previously mentioned goals.
Not only is it the SCM for kernel.org but,
Git continues to grow in popularity and supports many different work flows,
front-ends and management techniques.
You can find documentation on Git at http://git-scm.com/documentation. You can also get an introduction to Git as it applies to the Yocto Project in the "Git" section in the Yocto Project Development Manual. These referenced sections overview Git and describe a minimal set of commands that allows you to be functional using Git.
Note
You can use as much, or as little, of what Git has to offer to accomplish what you need for your project. You do not have to be a "Git Master" in order to use it with the Yocto Project.
Appendix D. Kernel Maintenance
D.1. Tree Construction
This section describes construction of the Yocto Project kernel source repositories as accomplished by the Yocto Project team to create kernel repositories. These kernel repositories are found under the heading "Yocto Linux Kernel" at http://git.yoctoproject.org/cgit.cgi and can be shipped as part of a Yocto Project release. The team creates these repositories by compiling and executing the set of feature descriptions for every BSP and feature in the product. Those feature descriptions list all necessary patches, configuration, branching, tagging and feature divisions found in a kernel. Thus, the Yocto Project kernel repository (or tree) is built.
The existence of this tree allows you to access and clone a particular Yocto Project kernel repository and use it to build images based on their configurations and features.
You can find the files used to describe all the valid features and BSPs
in the Yocto Project kernel in any clone of the Yocto Project kernel source repository
Git tree.
For example, the following command clones the Yocto Project baseline kernel that
branched off of linux.org version 3.19:
$ git clone git://git.yoctoproject.org/linux-yocto-3.19
For another example of how to set up a local Git repository of the Yocto Project kernel files, see the "Yocto Project Kernel" bulleted item in the Yocto Project Development Manual.
Once you have cloned the kernel Git repository on your local machine, you can
switch to the meta branch within the repository.
Here is an example that assumes the local Git repository for the kernel is in
a top-level directory named linux-yocto-3.19:
$ cd linux-yocto-3.19
$ git checkout -b meta origin/meta
Once you have checked out and switched to the meta branch,
you can see a snapshot of all the kernel configuration and feature descriptions that are
used to build that particular kernel repository.
These descriptions are in the form of .scc files.
You should realize, however, that browsing your local kernel repository for feature descriptions and patches is not an effective way to determine what is in a particular kernel branch. Instead, you should use Git directly to discover the changes in a branch. Using Git is an efficient and flexible way to inspect changes to the kernel.
Note
Ground up reconstruction of the complete kernel tree is an action only taken by the Yocto Project team during an active development cycle. When you create a clone of the kernel Git repository, you are simply making it efficiently available for building and development.
The following steps describe what happens when the Yocto Project Team constructs the Yocto Project kernel source Git repository (or tree) found at http://git.yoctoproject.org/cgit.cgi given the introduction of a new top-level kernel feature or BSP. These are the actions that effectively create the tree that includes the new feature, patch or BSP:
A top-level kernel feature is passed to the kernel build subsystem. Normally, this feature is a BSP for a particular kernel type.
The file that describes the top-level feature is located by searching these system directories:
The in-tree kernel-cache directories, which are located in
meta/cfg/kernel-cacheAreas pointed to by
SRC_URIstatements found in recipes
For a typical build, the target of the search is a feature description in an
.sccfile whose name follows this format:bsp_name-kernel_type.sccOnce located, the feature description is either compiled into a simple script of actions, or into an existing equivalent script that is already part of the shipped kernel.
Extra features are appended to the top-level feature description. These features can come from the
KERNEL_FEATURESvariable in recipes.Each extra feature is located, compiled and appended to the script as described in step three.
The script is executed to produce a series of
meta-*directories. These directories are descriptions of all the branches, tags, patches and configurations that need to be applied to the base Git repository to completely create the source (build) branch for the new BSP or feature.The base repository is cloned, and the actions listed in the
meta-*directories are applied to the tree.The Git repository is left with the desired branch checked out and any required branching, patching and tagging has been performed.
The kernel tree is now ready for developer consumption to be locally cloned, configured, and built into a Yocto Project kernel specific to some target hardware.
Note
The generated meta-* directories add to the kernel
as shipped with the Yocto Project release.
Any add-ons and configuration data are applied to the end of an existing branch.
The full repository generation that is found in the
official Yocto Project kernel repositories at
http://git.yoctoproject.org/cgit.cgi
is the combination of all supported boards and configurations.
The technique the Yocto Project team uses is flexible and allows for seamless blending of an immutable history with additional patches specific to a deployment. Any additions to the kernel become an integrated part of the branches.
D.2. Build Strategy
Once a local Git repository of the Yocto Project kernel exists on a development system, you can consider the compilation phase of kernel development - building a kernel image. Some prerequisites exist that are validated by the build process before compilation starts:
The
SRC_URIpoints to the kernel Git repository.A BSP build branch exists. This branch has the following form:
kernel_type/bsp_name
The OpenEmbedded build system makes sure these conditions exist before attempting compilation. Other means, however, do exist, such as as bootstrapping a BSP.
Before building a kernel, the build process verifies the tree
and configures the kernel by processing all of the
configuration "fragments" specified by feature descriptions in the .scc
files.
As the features are compiled, associated kernel configuration fragments are noted
and recorded in the meta-* series of directories in their compilation order.
The fragments are migrated, pre-processed and passed to the Linux Kernel
Configuration subsystem (lkc) as raw input in the form
of a .config file.
The lkc uses its own internal dependency constraints to do the final
processing of that information and generates the final .config file
that is used during compilation.
Using the board's architecture and other relevant values from the board's template, kernel compilation is started and a kernel image is produced.
The other thing that you notice once you configure a kernel is that
the build process generates a build tree that is separate from your kernel's local Git
source repository tree.
This build tree has a name that uses the following form, where
${MACHINE} is the metadata name of the machine (BSP) and "kernel_type" is one
of the Yocto Project supported kernel types (e.g. "standard"):
linux-${MACHINE}-kernel_type-build
The existing support in the kernel.org tree achieves this
default functionality.
This behavior means that all the generated files for a particular machine or BSP are now in
the build tree directory.
The files include the final .config file, all the .o
files, the .a files, and so forth.
Since each machine or BSP has its own separate
Build Directory
in its own separate branch
of the Git repository, you can easily switch between different builds.
 |
Chapter 14. Yocto Project Profiling and Tracing Manual
14.1. Introduction
Yocto bundles a number of tracing and profiling tools - this 'HOWTO' describes their basic usage and shows by example how to make use of them to examine application and system behavior.
The tools presented are for the most part completely open-ended and have quite good and/or extensive documentation of their own which can be used to solve just about any problem you might come across in Linux. Each section that describes a particular tool has links to that tool's documentation and website.
The purpose of this 'HOWTO' is to present a set of common and generally useful tracing and profiling idioms along with their application (as appropriate) to each tool, in the context of a general-purpose 'drill-down' methodology that can be applied to solving a large number (90%?) of problems. For help with more advanced usages and problems, please see the documentation and/or websites listed for each tool.
The final section of this 'HOWTO' is a collection of real-world examples which we'll be continually adding to as we solve more problems using the tools - feel free to add your own examples to the list!
14.2. General Setup
Most of the tools are available only in 'sdk' images or in images built after adding 'tools-profile' to your local.conf. So, in order to be able to access all of the tools described here, please first build and boot an 'sdk' image e.g.
$ bitbake core-image-sato-sdk
or alternatively by adding 'tools-profile' to the EXTRA_IMAGE_FEATURES line in your local.conf:
EXTRA_IMAGE_FEATURES = "debug-tweaks tools-profile"
If you use the 'tools-profile' method, you don't need to build an sdk image - the tracing and profiling tools will be included in non-sdk images as well e.g.:
$ bitbake core-image-sato
Note
By default, the Yocto build system strips symbols from the binaries it packages, which makes it difficult to use some of the tools.
You can prevent that by setting the
INHIBIT_PACKAGE_STRIP
variable to "1" in your
local.conf when you build the image:
INHIBIT_PACKAGE_STRIP = "1"
The above setting will noticeably increase the size of your image.
If you've already built a stripped image, you can generate debug packages (xxx-dbg) which you can manually install as needed.
To generate debug info for packages, you can add dbg-pkgs to EXTRA_IMAGE_FEATURES in local.conf. For example:
EXTRA_IMAGE_FEATURES = "debug-tweaks tools-profile dbg-pkgs"
Additionally, in order to generate the right type of debuginfo, we also need to add the following to local.conf:
PACKAGE_DEBUG_SPLIT_STYLE = 'debug-file-directory'
Chapter 15. Overall Architecture of the Linux Tracing and Profiling Tools
15.1. Architecture of the Tracing and Profiling Tools
It may seem surprising to see a section covering an 'overall architecture' for what seems to be a random collection of tracing tools that together make up the Linux tracing and profiling space. The fact is, however, that in recent years this seemingly disparate set of tools has started to converge on a 'core' set of underlying mechanisms:
- static tracepoints
- dynamic tracepoints
- kprobes
- uprobes
- the perf_events subsystem
- debugfs
Chapter 16. Basic Usage (with examples) for each of the Yocto Tracing Tools
This chapter presents basic usage examples for each of the tracing tools.
16.1. perf
The 'perf' tool is the profiling and tracing tool that comes bundled with the Linux kernel.
Don't let the fact that it's part of the kernel fool you into thinking that it's only for tracing and profiling the kernel - you can indeed use it to trace and profile just the kernel, but you can also use it to profile specific applications separately (with or without kernel context), and you can also use it to trace and profile the kernel and all applications on the system simultaneously to gain a system-wide view of what's going on.
In many ways, perf aims to be a superset of all the tracing and profiling tools available in Linux today, including all the other tools covered in this HOWTO. The past couple of years have seen perf subsume a lot of the functionality of those other tools and, at the same time, those other tools have removed large portions of their previous functionality and replaced it with calls to the equivalent functionality now implemented by the perf subsystem. Extrapolation suggests that at some point those other tools will simply become completely redundant and go away; until then, we'll cover those other tools in these pages and in many cases show how the same things can be accomplished in perf and the other tools when it seems useful to do so.
The coverage below details some of the most common ways you'll likely want to apply the tool; full documentation can be found either within the tool itself or in the man pages at perf(1).
16.1.1. Setup
For this section, we'll assume you've already performed the basic setup outlined in the General Setup section.
In particular, you'll get the most mileage out of perf if you
profile an image built with the following in your
local.conf file:
INHIBIT_PACKAGE_STRIP = "1"
perf runs on the target system for the most part. You can archive profile data and copy it to the host for analysis, but for the rest of this document we assume you've ssh'ed to the host and will be running the perf commands on the target.
16.1.2. Basic Usage
The perf tool is pretty much self-documenting. To remind yourself of the available commands, simply type 'perf', which will show you basic usage along with the available perf subcommands:
root@crownbay:~# perf
usage: perf [--version] [--help] COMMAND [ARGS]
The most commonly used perf commands are:
annotate Read perf.data (created by perf record) and display annotated code
archive Create archive with object files with build-ids found in perf.data file
bench General framework for benchmark suites
buildid-cache Manage build-id cache.
buildid-list List the buildids in a perf.data file
diff Read two perf.data files and display the differential profile
evlist List the event names in a perf.data file
inject Filter to augment the events stream with additional information
kmem Tool to trace/measure kernel memory(slab) properties
kvm Tool to trace/measure kvm guest os
list List all symbolic event types
lock Analyze lock events
probe Define new dynamic tracepoints
record Run a command and record its profile into perf.data
report Read perf.data (created by perf record) and display the profile
sched Tool to trace/measure scheduler properties (latencies)
script Read perf.data (created by perf record) and display trace output
stat Run a command and gather performance counter statistics
test Runs sanity tests.
timechart Tool to visualize total system behavior during a workload
top System profiling tool.
See 'perf help COMMAND' for more information on a specific command.
16.1.2.1. Using perf to do Basic Profiling
As a simple test case, we'll profile the 'wget' of a fairly large file, which is a minimally interesting case because it has both file and network I/O aspects, and at least in the case of standard Yocto images, it's implemented as part of busybox, so the methods we use to analyze it can be used in a very similar way to the whole host of supported busybox applets in Yocto.
root@crownbay:~# rm linux-2.6.19.2.tar.bz2; \
wget http://downloads.yoctoproject.org/mirror/sources/linux-2.6.19.2.tar.bz2
The quickest and easiest way to get some basic overall data about what's going on for a particular workload is to profile it using 'perf stat'. 'perf stat' basically profiles using a few default counters and displays the summed counts at the end of the run:
root@crownbay:~# perf stat wget http://downloads.yoctoproject.org/mirror/sources/linux-2.6.19.2.tar.bz2
Connecting to downloads.yoctoproject.org (140.211.169.59:80)
linux-2.6.19.2.tar.b 100% |***************************************************| 41727k 0:00:00 ETA
Performance counter stats for 'wget http://downloads.yoctoproject.org/mirror/sources/linux-2.6.19.2.tar.bz2':
4597.223902 task-clock # 0.077 CPUs utilized
23568 context-switches # 0.005 M/sec
68 CPU-migrations # 0.015 K/sec
241 page-faults # 0.052 K/sec
3045817293 cycles # 0.663 GHz
<not supported> stalled-cycles-frontend
<not supported> stalled-cycles-backend
858909167 instructions # 0.28 insns per cycle
165441165 branches # 35.987 M/sec
19550329 branch-misses # 11.82% of all branches
59.836627620 seconds time elapsed
Many times such a simple-minded test doesn't yield much of interest, but sometimes it does (see Real-world Yocto bug (slow loop-mounted write speed)).
Also, note that 'perf stat' isn't restricted to a fixed set of counters - basically any event listed in the output of 'perf list' can be tallied by 'perf stat'. For example, suppose we wanted to see a summary of all the events related to kernel memory allocation/freeing along with cache hits and misses:
root@crownbay:~# perf stat -e kmem:* -e cache-references -e cache-misses wget http://downloads.yoctoproject.org/mirror/sources/linux-2.6.19.2.tar.bz2
Connecting to downloads.yoctoproject.org (140.211.169.59:80)
linux-2.6.19.2.tar.b 100% |***************************************************| 41727k 0:00:00 ETA
Performance counter stats for 'wget http://downloads.yoctoproject.org/mirror/sources/linux-2.6.19.2.tar.bz2':
5566 kmem:kmalloc
125517 kmem:kmem_cache_alloc
0 kmem:kmalloc_node
0 kmem:kmem_cache_alloc_node
34401 kmem:kfree
69920 kmem:kmem_cache_free
133 kmem:mm_page_free
41 kmem:mm_page_free_batched
11502 kmem:mm_page_alloc
11375 kmem:mm_page_alloc_zone_locked
0 kmem:mm_page_pcpu_drain
0 kmem:mm_page_alloc_extfrag
66848602 cache-references
2917740 cache-misses # 4.365 % of all cache refs
44.831023415 seconds time elapsed
So 'perf stat' gives us a nice easy way to get a quick overview of what might be happening for a set of events, but normally we'd need a little more detail in order to understand what's going on in a way that we can act on in a useful way.
To dive down into a next level of detail, we can use 'perf record'/'perf report' which will collect profiling data and present it to use using an interactive text-based UI (or simply as text if we specify --stdio to 'perf report').
As our first attempt at profiling this workload, we'll simply run 'perf record', handing it the workload we want to profile (everything after 'perf record' and any perf options we hand it - here none - will be executed in a new shell). perf collects samples until the process exits and records them in a file named 'perf.data' in the current working directory.
root@crownbay:~# perf record wget http://downloads.yoctoproject.org/mirror/sources/linux-2.6.19.2.tar.bz2
Connecting to downloads.yoctoproject.org (140.211.169.59:80)
linux-2.6.19.2.tar.b 100% |************************************************| 41727k 0:00:00 ETA
[ perf record: Woken up 1 times to write data ]
[ perf record: Captured and wrote 0.176 MB perf.data (~7700 samples) ]
To see the results in a 'text-based UI' (tui), simply run 'perf report', which will read the perf.data file in the current working directory and display the results in an interactive UI:
root@crownbay:~# perf report
 |
The above screenshot displays a 'flat' profile, one entry for each 'bucket' corresponding to the functions that were profiled during the profiling run, ordered from the most popular to the least (perf has options to sort in various orders and keys as well as display entries only above a certain threshold and so on - see the perf documentation for details). Note that this includes both userspace functions (entries containing a [.]) and kernel functions accounted to the process (entries containing a [k]). (perf has command-line modifiers that can be used to restrict the profiling to kernel or userspace, among others).
Notice also that the above report shows an entry for 'busybox', which is the executable that implements 'wget' in Yocto, but that instead of a useful function name in that entry, it displays a not-so-friendly hex value instead. The steps below will show how to fix that problem.
Before we do that, however, let's try running a different profile, one which shows something a little more interesting. The only difference between the new profile and the previous one is that we'll add the -g option, which will record not just the address of a sampled function, but the entire callchain to the sampled function as well:
root@crownbay:~# perf record -g wget http://downloads.yoctoproject.org/mirror/sources/linux-2.6.19.2.tar.bz2
Connecting to downloads.yoctoproject.org (140.211.169.59:80)
linux-2.6.19.2.tar.b 100% |************************************************| 41727k 0:00:00 ETA
[ perf record: Woken up 3 times to write data ]
[ perf record: Captured and wrote 0.652 MB perf.data (~28476 samples) ]
root@crownbay:~# perf report
 |
Using the callgraph view, we can actually see not only which functions took the most time, but we can also see a summary of how those functions were called and learn something about how the program interacts with the kernel in the process.
Notice that each entry in the above screenshot now contains a '+' on the left-hand side. This means that we can expand the entry and drill down into the callchains that feed into that entry. Pressing 'enter' on any one of them will expand the callchain (you can also press 'E' to expand them all at the same time or 'C' to collapse them all).
In the screenshot above, we've toggled the __copy_to_user_ll() entry and several subnodes all the way down. This lets us see which callchains contributed to the profiled __copy_to_user_ll() function which contributed 1.77% to the total profile.
As a bit of background explanation for these callchains, think about what happens at a high level when you run wget to get a file out on the network. Basically what happens is that the data comes into the kernel via the network connection (socket) and is passed to the userspace program 'wget' (which is actually a part of busybox, but that's not important for now), which takes the buffers the kernel passes to it and writes it to a disk file to save it.
The part of this process that we're looking at in the above call stacks is the part where the kernel passes the data it's read from the socket down to wget i.e. a copy-to-user.
Notice also that here there's also a case where the hex value is displayed in the callstack, here in the expanded sys_clock_gettime() function. Later we'll see it resolve to a userspace function call in busybox.
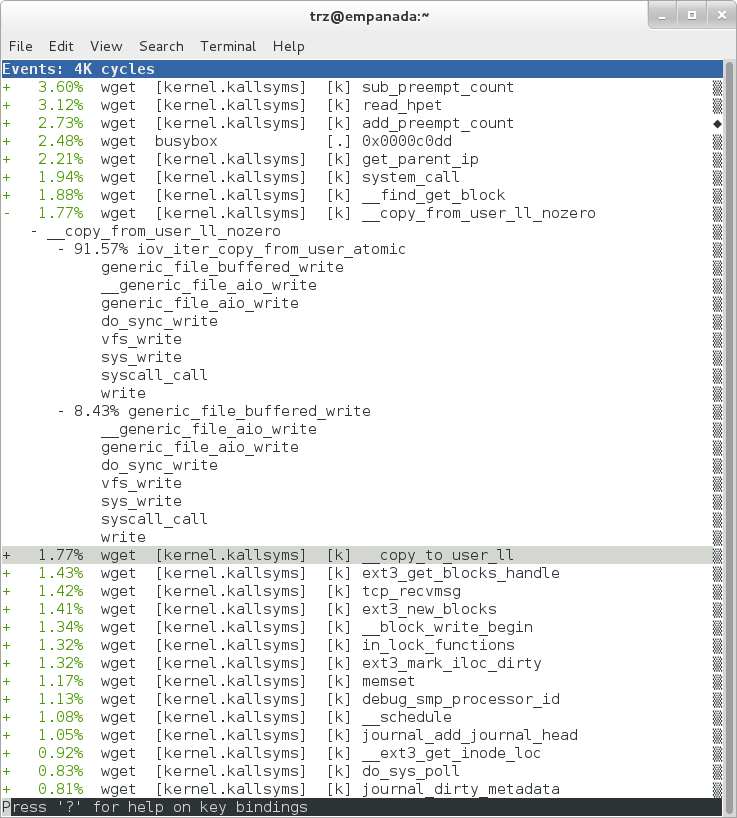 |
The above screenshot shows the other half of the journey for the data - from the wget program's userspace buffers to disk. To get the buffers to disk, the wget program issues a write(2), which does a copy-from-user to the kernel, which then takes care via some circuitous path (probably also present somewhere in the profile data), to get it safely to disk.
Now that we've seen the basic layout of the profile data and the basics of how to extract useful information out of it, let's get back to the task at hand and see if we can get some basic idea about where the time is spent in the program we're profiling, wget. Remember that wget is actually implemented as an applet in busybox, so while the process name is 'wget', the executable we're actually interested in is busybox. So let's expand the first entry containing busybox:
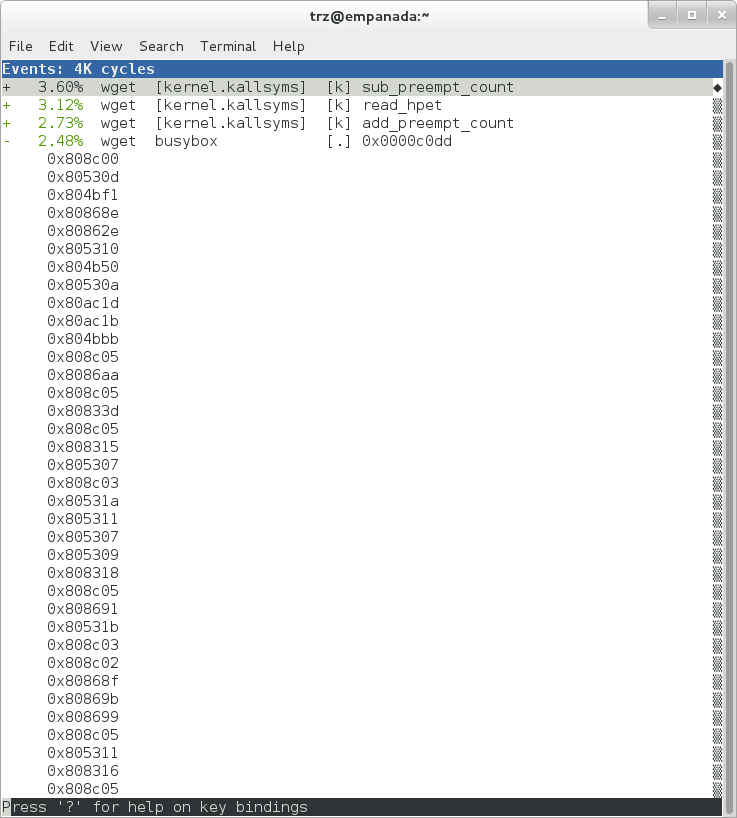 |
Again, before we expanded we saw that the function was labeled with a hex value instead of a symbol as with most of the kernel entries. Expanding the busybox entry doesn't make it any better.
The problem is that perf can't find the symbol information for the busybox binary, which is actually stripped out by the Yocto build system.
One way around that is to put the following in your
local.conf file when you build the image:
INHIBIT_PACKAGE_STRIP = "1"
However, we already have an image with the binaries stripped, so what can we do to get perf to resolve the symbols? Basically we need to install the debuginfo for the busybox package.
To generate the debug info for the packages in the image, we can add dbg-pkgs to EXTRA_IMAGE_FEATURES in local.conf. For example:
EXTRA_IMAGE_FEATURES = "debug-tweaks tools-profile dbg-pkgs"
Additionally, in order to generate the type of debuginfo that perf understands, we also need to add the following to local.conf:
PACKAGE_DEBUG_SPLIT_STYLE = 'debug-file-directory'
Once we've done that, we can install the debuginfo for busybox. The debug packages once built can be found in build/tmp/deploy/rpm/* on the host system. Find the busybox-dbg-...rpm file and copy it to the target. For example:
[trz@empanada core2]$ scp /home/trz/yocto/crownbay-tracing-dbg/build/tmp/deploy/rpm/core2_32/busybox-dbg-1.20.2-r2.core2_32.rpm root@192.168.1.31:
root@192.168.1.31's password:
busybox-dbg-1.20.2-r2.core2_32.rpm 100% 1826KB 1.8MB/s 00:01
Now install the debug rpm on the target:
root@crownbay:~# rpm -i busybox-dbg-1.20.2-r2.core2_32.rpm
Now that the debuginfo is installed, we see that the busybox entries now display their functions symbolically:
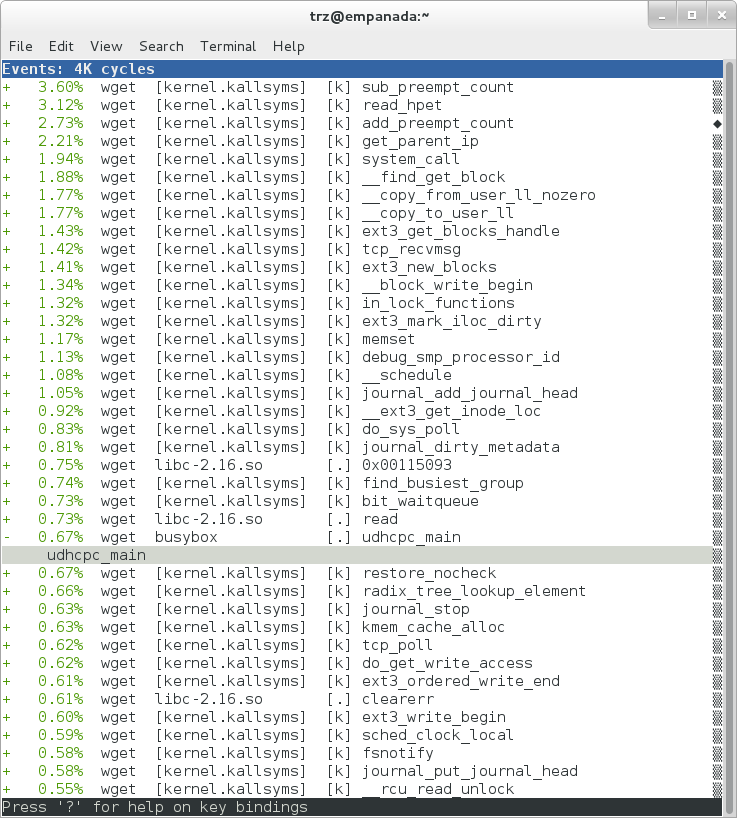 |
If we expand one of the entries and press 'enter' on a leaf node, we're presented with a menu of actions we can take to get more information related to that entry:
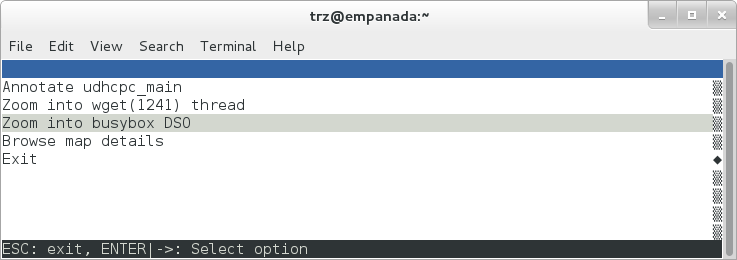 |
One of these actions allows us to show a view that displays a busybox-centric view of the profiled functions (in this case we've also expanded all the nodes using the 'E' key):
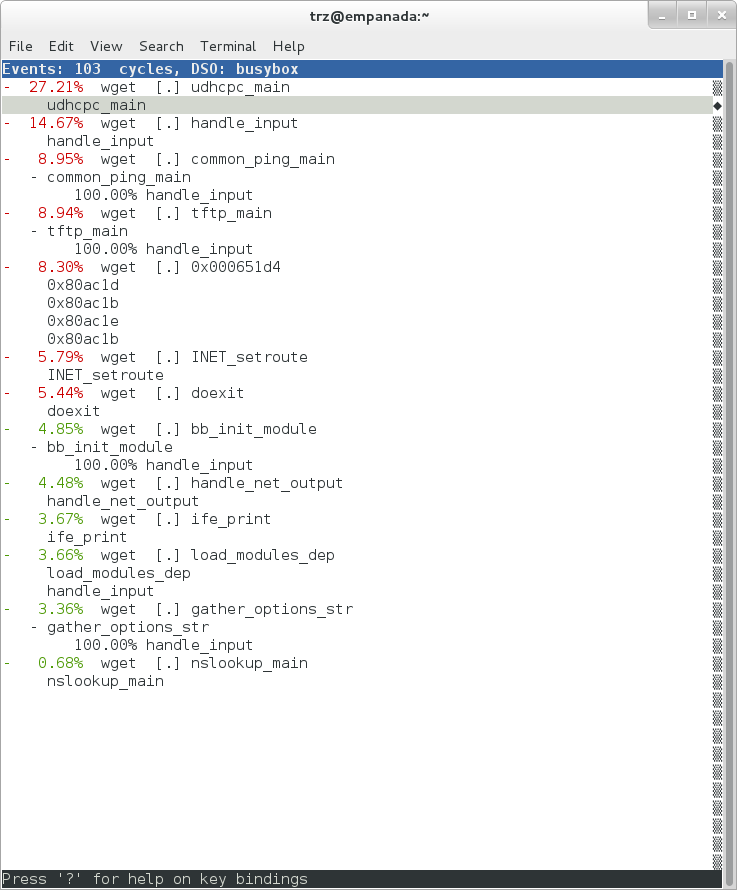 |
Finally, we can see that now that the busybox debuginfo is installed, the previously unresolved symbol in the sys_clock_gettime() entry mentioned previously is now resolved, and shows that the sys_clock_gettime system call that was the source of 6.75% of the copy-to-user overhead was initiated by the handle_input() busybox function:
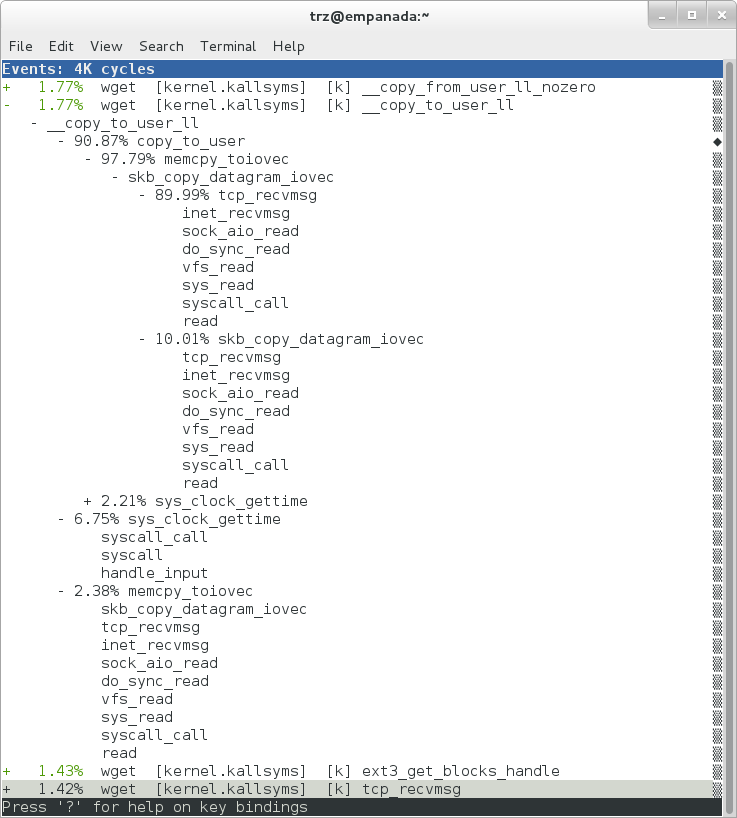 |
At the lowest level of detail, we can dive down to the assembly level and see which instructions caused the most overhead in a function. Pressing 'enter' on the 'udhcpc_main' function, we're again presented with a menu:
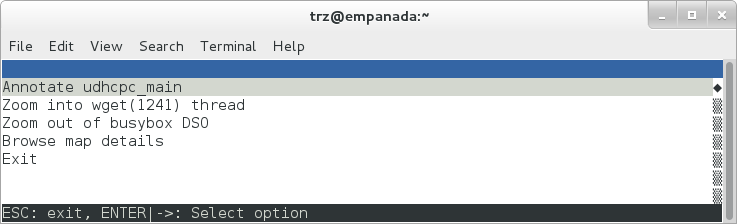 |
Selecting 'Annotate udhcpc_main', we get a detailed listing of percentages by instruction for the udhcpc_main function. From the display, we can see that over 50% of the time spent in this function is taken up by a couple tests and the move of a constant (1) to a register:
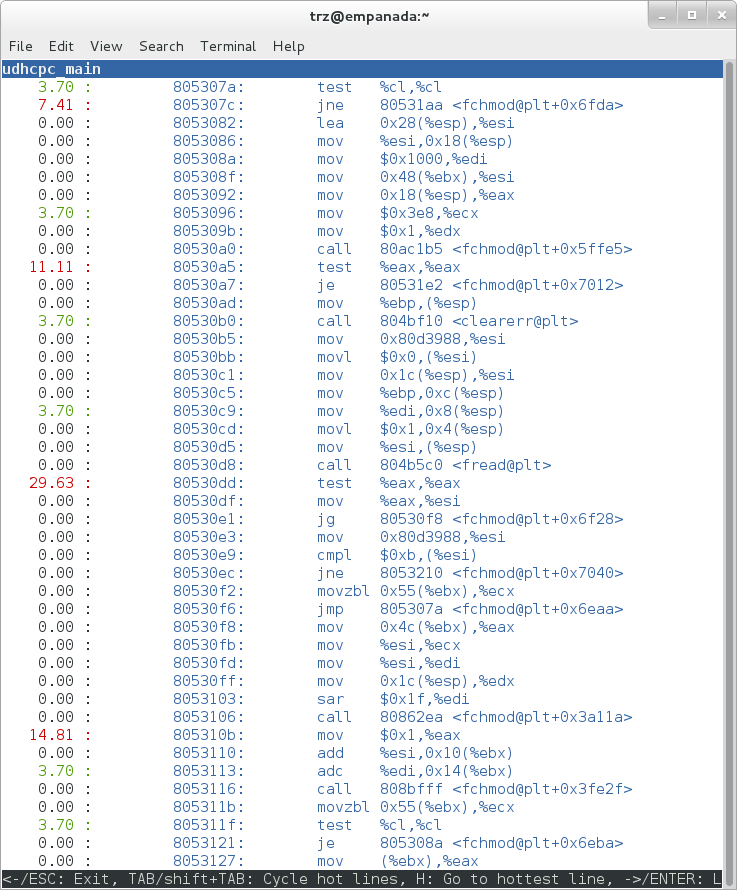 |
As a segue into tracing, let's try another profile using a different counter, something other than the default 'cycles'.
The tracing and profiling infrastructure in Linux has become unified in a way that allows us to use the same tool with a completely different set of counters, not just the standard hardware counters that traditional tools have had to restrict themselves to (of course the traditional tools can also make use of the expanded possibilities now available to them, and in some cases have, as mentioned previously).
We can get a list of the available events that can be used to profile a workload via 'perf list':
root@crownbay:~# perf list
List of pre-defined events (to be used in -e):
cpu-cycles OR cycles [Hardware event]
stalled-cycles-frontend OR idle-cycles-frontend [Hardware event]
stalled-cycles-backend OR idle-cycles-backend [Hardware event]
instructions [Hardware event]
cache-references [Hardware event]
cache-misses [Hardware event]
branch-instructions OR branches [Hardware event]
branch-misses [Hardware event]
bus-cycles [Hardware event]
ref-cycles [Hardware event]
cpu-clock [Software event]
task-clock [Software event]
page-faults OR faults [Software event]
minor-faults [Software event]
major-faults [Software event]
context-switches OR cs [Software event]
cpu-migrations OR migrations [Software event]
alignment-faults [Software event]
emulation-faults [Software event]
L1-dcache-loads [Hardware cache event]
L1-dcache-load-misses [Hardware cache event]
L1-dcache-prefetch-misses [Hardware cache event]
L1-icache-loads [Hardware cache event]
L1-icache-load-misses [Hardware cache event]
.
.
.
rNNN [Raw hardware event descriptor]
cpu/t1=v1[,t2=v2,t3 ...]/modifier [Raw hardware event descriptor]
(see 'perf list --help' on how to encode it)
mem:<addr>[:access] [Hardware breakpoint]
sunrpc:rpc_call_status [Tracepoint event]
sunrpc:rpc_bind_status [Tracepoint event]
sunrpc:rpc_connect_status [Tracepoint event]
sunrpc:rpc_task_begin [Tracepoint event]
skb:kfree_skb [Tracepoint event]
skb:consume_skb [Tracepoint event]
skb:skb_copy_datagram_iovec [Tracepoint event]
net:net_dev_xmit [Tracepoint event]
net:net_dev_queue [Tracepoint event]
net:netif_receive_skb [Tracepoint event]
net:netif_rx [Tracepoint event]
napi:napi_poll [Tracepoint event]
sock:sock_rcvqueue_full [Tracepoint event]
sock:sock_exceed_buf_limit [Tracepoint event]
udp:udp_fail_queue_rcv_skb [Tracepoint event]
hda:hda_send_cmd [Tracepoint event]
hda:hda_get_response [Tracepoint event]
hda:hda_bus_reset [Tracepoint event]
scsi:scsi_dispatch_cmd_start [Tracepoint event]
scsi:scsi_dispatch_cmd_error [Tracepoint event]
scsi:scsi_eh_wakeup [Tracepoint event]
drm:drm_vblank_event [Tracepoint event]
drm:drm_vblank_event_queued [Tracepoint event]
drm:drm_vblank_event_delivered [Tracepoint event]
random:mix_pool_bytes [Tracepoint event]
random:mix_pool_bytes_nolock [Tracepoint event]
random:credit_entropy_bits [Tracepoint event]
gpio:gpio_direction [Tracepoint event]
gpio:gpio_value [Tracepoint event]
block:block_rq_abort [Tracepoint event]
block:block_rq_requeue [Tracepoint event]
block:block_rq_issue [Tracepoint event]
block:block_bio_bounce [Tracepoint event]
block:block_bio_complete [Tracepoint event]
block:block_bio_backmerge [Tracepoint event]
.
.
writeback:writeback_wake_thread [Tracepoint event]
writeback:writeback_wake_forker_thread [Tracepoint event]
writeback:writeback_bdi_register [Tracepoint event]
.
.
writeback:writeback_single_inode_requeue [Tracepoint event]
writeback:writeback_single_inode [Tracepoint event]
kmem:kmalloc [Tracepoint event]
kmem:kmem_cache_alloc [Tracepoint event]
kmem:mm_page_alloc [Tracepoint event]
kmem:mm_page_alloc_zone_locked [Tracepoint event]
kmem:mm_page_pcpu_drain [Tracepoint event]
kmem:mm_page_alloc_extfrag [Tracepoint event]
vmscan:mm_vmscan_kswapd_sleep [Tracepoint event]
vmscan:mm_vmscan_kswapd_wake [Tracepoint event]
vmscan:mm_vmscan_wakeup_kswapd [Tracepoint event]
vmscan:mm_vmscan_direct_reclaim_begin [Tracepoint event]
.
.
module:module_get [Tracepoint event]
module:module_put [Tracepoint event]
module:module_request [Tracepoint event]
sched:sched_kthread_stop [Tracepoint event]
sched:sched_wakeup [Tracepoint event]
sched:sched_wakeup_new [Tracepoint event]
sched:sched_process_fork [Tracepoint event]
sched:sched_process_exec [Tracepoint event]
sched:sched_stat_runtime [Tracepoint event]
rcu:rcu_utilization [Tracepoint event]
workqueue:workqueue_queue_work [Tracepoint event]
workqueue:workqueue_execute_end [Tracepoint event]
signal:signal_generate [Tracepoint event]
signal:signal_deliver [Tracepoint event]
timer:timer_init [Tracepoint event]
timer:timer_start [Tracepoint event]
timer:hrtimer_cancel [Tracepoint event]
timer:itimer_state [Tracepoint event]
timer:itimer_expire [Tracepoint event]
irq:irq_handler_entry [Tracepoint event]
irq:irq_handler_exit [Tracepoint event]
irq:softirq_entry [Tracepoint event]
irq:softirq_exit [Tracepoint event]
irq:softirq_raise [Tracepoint event]
printk:console [Tracepoint event]
task:task_newtask [Tracepoint event]
task:task_rename [Tracepoint event]
syscalls:sys_enter_socketcall [Tracepoint event]
syscalls:sys_exit_socketcall [Tracepoint event]
.
.
.
syscalls:sys_enter_unshare [Tracepoint event]
syscalls:sys_exit_unshare [Tracepoint event]
raw_syscalls:sys_enter [Tracepoint event]
raw_syscalls:sys_exit [Tracepoint event]
Only a subset of these would be of interest to us when looking at this workload, so let's choose the most likely subsystems (identified by the string before the colon in the Tracepoint events) and do a 'perf stat' run using only those wildcarded subsystems:
root@crownbay:~# perf stat -e skb:* -e net:* -e napi:* -e sched:* -e workqueue:* -e irq:* -e syscalls:* wget http://downloads.yoctoproject.org/mirror/sources/linux-2.6.19.2.tar.bz2
Performance counter stats for 'wget http://downloads.yoctoproject.org/mirror/sources/linux-2.6.19.2.tar.bz2':
23323 skb:kfree_skb
0 skb:consume_skb
49897 skb:skb_copy_datagram_iovec
6217 net:net_dev_xmit
6217 net:net_dev_queue
7962 net:netif_receive_skb
2 net:netif_rx
8340 napi:napi_poll
0 sched:sched_kthread_stop
0 sched:sched_kthread_stop_ret
3749 sched:sched_wakeup
0 sched:sched_wakeup_new
0 sched:sched_switch
29 sched:sched_migrate_task
0 sched:sched_process_free
1 sched:sched_process_exit
0 sched:sched_wait_task
0 sched:sched_process_wait
0 sched:sched_process_fork
1 sched:sched_process_exec
0 sched:sched_stat_wait
2106519415641 sched:sched_stat_sleep
0 sched:sched_stat_iowait
147453613 sched:sched_stat_blocked
12903026955 sched:sched_stat_runtime
0 sched:sched_pi_setprio
3574 workqueue:workqueue_queue_work
3574 workqueue:workqueue_activate_work
0 workqueue:workqueue_execute_start
0 workqueue:workqueue_execute_end
16631 irq:irq_handler_entry
16631 irq:irq_handler_exit
28521 irq:softirq_entry
28521 irq:softirq_exit
28728 irq:softirq_raise
1 syscalls:sys_enter_sendmmsg
1 syscalls:sys_exit_sendmmsg
0 syscalls:sys_enter_recvmmsg
0 syscalls:sys_exit_recvmmsg
14 syscalls:sys_enter_socketcall
14 syscalls:sys_exit_socketcall
.
.
.
16965 syscalls:sys_enter_read
16965 syscalls:sys_exit_read
12854 syscalls:sys_enter_write
12854 syscalls:sys_exit_write
.
.
.
58.029710972 seconds time elapsed
Let's pick one of these tracepoints and tell perf to do a profile using it as the sampling event:
root@crownbay:~# perf record -g -e sched:sched_wakeup wget http://downloads.yoctoproject.org/mirror/sources/linux-2.6.19.2.tar.bz2
 |
The screenshot above shows the results of running a profile using sched:sched_switch tracepoint, which shows the relative costs of various paths to sched_wakeup (note that sched_wakeup is the name of the tracepoint - it's actually defined just inside ttwu_do_wakeup(), which accounts for the function name actually displayed in the profile:
/*
* Mark the task runnable and perform wakeup-preemption.
*/
static void
ttwu_do_wakeup(struct rq *rq, struct task_struct *p, int wake_flags)
{
trace_sched_wakeup(p, true);
.
.
.
}
A couple of the more interesting callchains are expanded and displayed above, basically some network receive paths that presumably end up waking up wget (busybox) when network data is ready.
Note that because tracepoints are normally used for tracing, the default sampling period for tracepoints is 1 i.e. for tracepoints perf will sample on every event occurrence (this can be changed using the -c option). This is in contrast to hardware counters such as for example the default 'cycles' hardware counter used for normal profiling, where sampling periods are much higher (in the thousands) because profiling should have as low an overhead as possible and sampling on every cycle would be prohibitively expensive.
16.1.2.2. Using perf to do Basic Tracing
Profiling is a great tool for solving many problems or for getting a high-level view of what's going on with a workload or across the system. It is however by definition an approximation, as suggested by the most prominent word associated with it, 'sampling'. On the one hand, it allows a representative picture of what's going on in the system to be cheaply taken, but on the other hand, that cheapness limits its utility when that data suggests a need to 'dive down' more deeply to discover what's really going on. In such cases, the only way to see what's really going on is to be able to look at (or summarize more intelligently) the individual steps that go into the higher-level behavior exposed by the coarse-grained profiling data.
As a concrete example, we can trace all the events we think might be applicable to our workload:
root@crownbay:~# perf record -g -e skb:* -e net:* -e napi:* -e sched:sched_switch -e sched:sched_wakeup -e irq:*
-e syscalls:sys_enter_read -e syscalls:sys_exit_read -e syscalls:sys_enter_write -e syscalls:sys_exit_write
wget http://downloads.yoctoproject.org/mirror/sources/linux-2.6.19.2.tar.bz2
We can look at the raw trace output using 'perf script' with no arguments:
root@crownbay:~# perf script
perf 1262 [000] 11624.857082: sys_exit_read: 0x0
perf 1262 [000] 11624.857193: sched_wakeup: comm=migration/0 pid=6 prio=0 success=1 target_cpu=000
wget 1262 [001] 11624.858021: softirq_raise: vec=1 [action=TIMER]
wget 1262 [001] 11624.858074: softirq_entry: vec=1 [action=TIMER]
wget 1262 [001] 11624.858081: softirq_exit: vec=1 [action=TIMER]
wget 1262 [001] 11624.858166: sys_enter_read: fd: 0x0003, buf: 0xbf82c940, count: 0x0200
wget 1262 [001] 11624.858177: sys_exit_read: 0x200
wget 1262 [001] 11624.858878: kfree_skb: skbaddr=0xeb248d80 protocol=0 location=0xc15a5308
wget 1262 [001] 11624.858945: kfree_skb: skbaddr=0xeb248000 protocol=0 location=0xc15a5308
wget 1262 [001] 11624.859020: softirq_raise: vec=1 [action=TIMER]
wget 1262 [001] 11624.859076: softirq_entry: vec=1 [action=TIMER]
wget 1262 [001] 11624.859083: softirq_exit: vec=1 [action=TIMER]
wget 1262 [001] 11624.859167: sys_enter_read: fd: 0x0003, buf: 0xb7720000, count: 0x0400
wget 1262 [001] 11624.859192: sys_exit_read: 0x1d7
wget 1262 [001] 11624.859228: sys_enter_read: fd: 0x0003, buf: 0xb7720000, count: 0x0400
wget 1262 [001] 11624.859233: sys_exit_read: 0x0
wget 1262 [001] 11624.859573: sys_enter_read: fd: 0x0003, buf: 0xbf82c580, count: 0x0200
wget 1262 [001] 11624.859584: sys_exit_read: 0x200
wget 1262 [001] 11624.859864: sys_enter_read: fd: 0x0003, buf: 0xb7720000, count: 0x0400
wget 1262 [001] 11624.859888: sys_exit_read: 0x400
wget 1262 [001] 11624.859935: sys_enter_read: fd: 0x0003, buf: 0xb7720000, count: 0x0400
wget 1262 [001] 11624.859944: sys_exit_read: 0x400
This gives us a detailed timestamped sequence of events that occurred within the workload with respect to those events.
In many ways, profiling can be viewed as a subset of tracing - theoretically, if you have a set of trace events that's sufficient to capture all the important aspects of a workload, you can derive any of the results or views that a profiling run can.
Another aspect of traditional profiling is that while powerful in many ways, it's limited by the granularity of the underlying data. Profiling tools offer various ways of sorting and presenting the sample data, which make it much more useful and amenable to user experimentation, but in the end it can't be used in an open-ended way to extract data that just isn't present as a consequence of the fact that conceptually, most of it has been thrown away.
Full-blown detailed tracing data does however offer the opportunity to manipulate and present the information collected during a tracing run in an infinite variety of ways.
Another way to look at it is that there are only so many ways that the 'primitive' counters can be used on their own to generate interesting output; to get anything more complicated than simple counts requires some amount of additional logic, which is typically very specific to the problem at hand. For example, if we wanted to make use of a 'counter' that maps to the value of the time difference between when a process was scheduled to run on a processor and the time it actually ran, we wouldn't expect such a counter to exist on its own, but we could derive one called say 'wakeup_latency' and use it to extract a useful view of that metric from trace data. Likewise, we really can't figure out from standard profiling tools how much data every process on the system reads and writes, along with how many of those reads and writes fail completely. If we have sufficient trace data, however, we could with the right tools easily extract and present that information, but we'd need something other than pre-canned profiling tools to do that.
Luckily, there is a general-purpose way to handle such needs, called 'programming languages'. Making programming languages easily available to apply to such problems given the specific format of data is called a 'programming language binding' for that data and language. Perf supports two programming language bindings, one for Python and one for Perl.
Now that we have the trace data in perf.data, we can use 'perf script -g' to generate a skeleton script with handlers for the read/write entry/exit events we recorded:
root@crownbay:~# perf script -g python
generated Python script: perf-script.py
The skeleton script simply creates a python function for each event type in the perf.data file. The body of each function simply prints the event name along with its parameters. For example:
def net__netif_rx(event_name, context, common_cpu,
common_secs, common_nsecs, common_pid, common_comm,
skbaddr, len, name):
print_header(event_name, common_cpu, common_secs, common_nsecs,
common_pid, common_comm)
print "skbaddr=%u, len=%u, name=%s\n" % (skbaddr, len, name),
We can run that script directly to print all of the events contained in the perf.data file:
root@crownbay:~# perf script -s perf-script.py
in trace_begin
syscalls__sys_exit_read 0 11624.857082795 1262 perf nr=3, ret=0
sched__sched_wakeup 0 11624.857193498 1262 perf comm=migration/0, pid=6, prio=0, success=1, target_cpu=0
irq__softirq_raise 1 11624.858021635 1262 wget vec=TIMER
irq__softirq_entry 1 11624.858074075 1262 wget vec=TIMER
irq__softirq_exit 1 11624.858081389 1262 wget vec=TIMER
syscalls__sys_enter_read 1 11624.858166434 1262 wget nr=3, fd=3, buf=3213019456, count=512
syscalls__sys_exit_read 1 11624.858177924 1262 wget nr=3, ret=512
skb__kfree_skb 1 11624.858878188 1262 wget skbaddr=3945041280, location=3243922184, protocol=0
skb__kfree_skb 1 11624.858945608 1262 wget skbaddr=3945037824, location=3243922184, protocol=0
irq__softirq_raise 1 11624.859020942 1262 wget vec=TIMER
irq__softirq_entry 1 11624.859076935 1262 wget vec=TIMER
irq__softirq_exit 1 11624.859083469 1262 wget vec=TIMER
syscalls__sys_enter_read 1 11624.859167565 1262 wget nr=3, fd=3, buf=3077701632, count=1024
syscalls__sys_exit_read 1 11624.859192533 1262 wget nr=3, ret=471
syscalls__sys_enter_read 1 11624.859228072 1262 wget nr=3, fd=3, buf=3077701632, count=1024
syscalls__sys_exit_read 1 11624.859233707 1262 wget nr=3, ret=0
syscalls__sys_enter_read 1 11624.859573008 1262 wget nr=3, fd=3, buf=3213018496, count=512
syscalls__sys_exit_read 1 11624.859584818 1262 wget nr=3, ret=512
syscalls__sys_enter_read 1 11624.859864562 1262 wget nr=3, fd=3, buf=3077701632, count=1024
syscalls__sys_exit_read 1 11624.859888770 1262 wget nr=3, ret=1024
syscalls__sys_enter_read 1 11624.859935140 1262 wget nr=3, fd=3, buf=3077701632, count=1024
syscalls__sys_exit_read 1 11624.859944032 1262 wget nr=3, ret=1024
That in itself isn't very useful; after all, we can accomplish pretty much the same thing by simply running 'perf script' without arguments in the same directory as the perf.data file.
We can however replace the print statements in the generated function bodies with whatever we want, and thereby make it infinitely more useful.
As a simple example, let's just replace the print statements in the function bodies with a simple function that does nothing but increment a per-event count. When the program is run against a perf.data file, each time a particular event is encountered, a tally is incremented for that event. For example:
def net__netif_rx(event_name, context, common_cpu,
common_secs, common_nsecs, common_pid, common_comm,
skbaddr, len, name):
inc_counts(event_name)
Each event handler function in the generated code is modified to do this. For convenience, we define a common function called inc_counts() that each handler calls; inc_counts() simply tallies a count for each event using the 'counts' hash, which is a specialized hash function that does Perl-like autovivification, a capability that's extremely useful for kinds of multi-level aggregation commonly used in processing traces (see perf's documentation on the Python language binding for details):
counts = autodict()
def inc_counts(event_name):
try:
counts[event_name] += 1
except TypeError:
counts[event_name] = 1
Finally, at the end of the trace processing run, we want to print the result of all the per-event tallies. For that, we use the special 'trace_end()' function:
def trace_end():
for event_name, count in counts.iteritems():
print "%-40s %10s\n" % (event_name, count)
The end result is a summary of all the events recorded in the trace:
skb__skb_copy_datagram_iovec 13148
irq__softirq_entry 4796
irq__irq_handler_exit 3805
irq__softirq_exit 4795
syscalls__sys_enter_write 8990
net__net_dev_xmit 652
skb__kfree_skb 4047
sched__sched_wakeup 1155
irq__irq_handler_entry 3804
irq__softirq_raise 4799
net__net_dev_queue 652
syscalls__sys_enter_read 17599
net__netif_receive_skb 1743
syscalls__sys_exit_read 17598
net__netif_rx 2
napi__napi_poll 1877
syscalls__sys_exit_write 8990
Note that this is pretty much exactly the same information we get from 'perf stat', which goes a little way to support the idea mentioned previously that given the right kind of trace data, higher-level profiling-type summaries can be derived from it.
Documentation on using the 'perf script' python binding.
16.1.2.3. System-Wide Tracing and Profiling
The examples so far have focused on tracing a particular program or workload - in other words, every profiling run has specified the program to profile in the command-line e.g. 'perf record wget ...'.
It's also possible, and more interesting in many cases, to run a system-wide profile or trace while running the workload in a separate shell.
To do system-wide profiling or tracing, you typically use the -a flag to 'perf record'.
To demonstrate this, open up one window and start the profile using the -a flag (press Ctrl-C to stop tracing):
root@crownbay:~# perf record -g -a
^C[ perf record: Woken up 6 times to write data ]
[ perf record: Captured and wrote 1.400 MB perf.data (~61172 samples) ]
In another window, run the wget test:
root@crownbay:~# wget http://downloads.yoctoproject.org/mirror/sources/linux-2.6.19.2.tar.bz2
Connecting to downloads.yoctoproject.org (140.211.169.59:80)
linux-2.6.19.2.tar.b 100% |*******************************| 41727k 0:00:00 ETA
Here we see entries not only for our wget load, but for other processes running on the system as well:
 |
In the snapshot above, we can see callchains that originate in libc, and a callchain from Xorg that demonstrates that we're using a proprietary X driver in userspace (notice the presence of 'PVR' and some other unresolvable symbols in the expanded Xorg callchain).
Note also that we have both kernel and userspace entries in the above snapshot. We can also tell perf to focus on userspace but providing a modifier, in this case 'u', to the 'cycles' hardware counter when we record a profile:
root@crownbay:~# perf record -g -a -e cycles:u
^C[ perf record: Woken up 2 times to write data ]
[ perf record: Captured and wrote 0.376 MB perf.data (~16443 samples) ]
 |
Notice in the screenshot above, we see only userspace entries ([.])
Finally, we can press 'enter' on a leaf node and select the 'Zoom into DSO' menu item to show only entries associated with a specific DSO. In the screenshot below, we've zoomed into the 'libc' DSO which shows all the entries associated with the libc-xxx.so DSO.
 |
We can also use the system-wide -a switch to do system-wide tracing. Here we'll trace a couple of scheduler events:
root@crownbay:~# perf record -a -e sched:sched_switch -e sched:sched_wakeup
^C[ perf record: Woken up 38 times to write data ]
[ perf record: Captured and wrote 9.780 MB perf.data (~427299 samples) ]
We can look at the raw output using 'perf script' with no arguments:
root@crownbay:~# perf script
perf 1383 [001] 6171.460045: sched_wakeup: comm=kworker/1:1 pid=21 prio=120 success=1 target_cpu=001
perf 1383 [001] 6171.460066: sched_switch: prev_comm=perf prev_pid=1383 prev_prio=120 prev_state=R+ ==> next_comm=kworker/1:1 next_pid=21 next_prio=120
kworker/1:1 21 [001] 6171.460093: sched_switch: prev_comm=kworker/1:1 prev_pid=21 prev_prio=120 prev_state=S ==> next_comm=perf next_pid=1383 next_prio=120
swapper 0 [000] 6171.468063: sched_wakeup: comm=kworker/0:3 pid=1209 prio=120 success=1 target_cpu=000
swapper 0 [000] 6171.468107: sched_switch: prev_comm=swapper/0 prev_pid=0 prev_prio=120 prev_state=R ==> next_comm=kworker/0:3 next_pid=1209 next_prio=120
kworker/0:3 1209 [000] 6171.468143: sched_switch: prev_comm=kworker/0:3 prev_pid=1209 prev_prio=120 prev_state=S ==> next_comm=swapper/0 next_pid=0 next_prio=120
perf 1383 [001] 6171.470039: sched_wakeup: comm=kworker/1:1 pid=21 prio=120 success=1 target_cpu=001
perf 1383 [001] 6171.470058: sched_switch: prev_comm=perf prev_pid=1383 prev_prio=120 prev_state=R+ ==> next_comm=kworker/1:1 next_pid=21 next_prio=120
kworker/1:1 21 [001] 6171.470082: sched_switch: prev_comm=kworker/1:1 prev_pid=21 prev_prio=120 prev_state=S ==> next_comm=perf next_pid=1383 next_prio=120
perf 1383 [001] 6171.480035: sched_wakeup: comm=kworker/1:1 pid=21 prio=120 success=1 target_cpu=001
16.1.2.3.1. Filtering
Notice that there are a lot of events that don't really have anything to do with what we're interested in, namely events that schedule 'perf' itself in and out or that wake perf up. We can get rid of those by using the '--filter' option - for each event we specify using -e, we can add a --filter after that to filter out trace events that contain fields with specific values:
root@crownbay:~# perf record -a -e sched:sched_switch --filter 'next_comm != perf && prev_comm != perf' -e sched:sched_wakeup --filter 'comm != perf'
^C[ perf record: Woken up 38 times to write data ]
[ perf record: Captured and wrote 9.688 MB perf.data (~423279 samples) ]
root@crownbay:~# perf script
swapper 0 [000] 7932.162180: sched_switch: prev_comm=swapper/0 prev_pid=0 prev_prio=120 prev_state=R ==> next_comm=kworker/0:3 next_pid=1209 next_prio=120
kworker/0:3 1209 [000] 7932.162236: sched_switch: prev_comm=kworker/0:3 prev_pid=1209 prev_prio=120 prev_state=S ==> next_comm=swapper/0 next_pid=0 next_prio=120
perf 1407 [001] 7932.170048: sched_wakeup: comm=kworker/1:1 pid=21 prio=120 success=1 target_cpu=001
perf 1407 [001] 7932.180044: sched_wakeup: comm=kworker/1:1 pid=21 prio=120 success=1 target_cpu=001
perf 1407 [001] 7932.190038: sched_wakeup: comm=kworker/1:1 pid=21 prio=120 success=1 target_cpu=001
perf 1407 [001] 7932.200044: sched_wakeup: comm=kworker/1:1 pid=21 prio=120 success=1 target_cpu=001
perf 1407 [001] 7932.210044: sched_wakeup: comm=kworker/1:1 pid=21 prio=120 success=1 target_cpu=001
perf 1407 [001] 7932.220044: sched_wakeup: comm=kworker/1:1 pid=21 prio=120 success=1 target_cpu=001
swapper 0 [001] 7932.230111: sched_wakeup: comm=kworker/1:1 pid=21 prio=120 success=1 target_cpu=001
swapper 0 [001] 7932.230146: sched_switch: prev_comm=swapper/1 prev_pid=0 prev_prio=120 prev_state=R ==> next_comm=kworker/1:1 next_pid=21 next_prio=120
kworker/1:1 21 [001] 7932.230205: sched_switch: prev_comm=kworker/1:1 prev_pid=21 prev_prio=120 prev_state=S ==> next_comm=swapper/1 next_pid=0 next_prio=120
swapper 0 [000] 7932.326109: sched_wakeup: comm=kworker/0:3 pid=1209 prio=120 success=1 target_cpu=000
swapper 0 [000] 7932.326171: sched_switch: prev_comm=swapper/0 prev_pid=0 prev_prio=120 prev_state=R ==> next_comm=kworker/0:3 next_pid=1209 next_prio=120
kworker/0:3 1209 [000] 7932.326214: sched_switch: prev_comm=kworker/0:3 prev_pid=1209 prev_prio=120 prev_state=S ==> next_comm=swapper/0 next_pid=0 next_prio=120
In this case, we've filtered out all events that have 'perf' in their 'comm' or 'comm_prev' or 'comm_next' fields. Notice that there are still events recorded for perf, but notice that those events don't have values of 'perf' for the filtered fields. To completely filter out anything from perf will require a bit more work, but for the purpose of demonstrating how to use filters, it's close enough.
16.1.2.4. Using Dynamic Tracepoints
perf isn't restricted to the fixed set of static tracepoints listed by 'perf list'. Users can also add their own 'dynamic' tracepoints anywhere in the kernel. For instance, suppose we want to define our own tracepoint on do_fork(). We can do that using the 'perf probe' perf subcommand:
root@crownbay:~# perf probe do_fork
Added new event:
probe:do_fork (on do_fork)
You can now use it in all perf tools, such as:
perf record -e probe:do_fork -aR sleep 1
Adding a new tracepoint via 'perf probe' results in an event with all the expected files and format in /sys/kernel/debug/tracing/events, just the same as for static tracepoints (as discussed in more detail in the trace events subsystem section:
root@crownbay:/sys/kernel/debug/tracing/events/probe/do_fork# ls -al
drwxr-xr-x 2 root root 0 Oct 28 11:42 .
drwxr-xr-x 3 root root 0 Oct 28 11:42 ..
-rw-r--r-- 1 root root 0 Oct 28 11:42 enable
-rw-r--r-- 1 root root 0 Oct 28 11:42 filter
-r--r--r-- 1 root root 0 Oct 28 11:42 format
-r--r--r-- 1 root root 0 Oct 28 11:42 id
root@crownbay:/sys/kernel/debug/tracing/events/probe/do_fork# cat format
name: do_fork
ID: 944
format:
field:unsigned short common_type; offset:0; size:2; signed:0;
field:unsigned char common_flags; offset:2; size:1; signed:0;
field:unsigned char common_preempt_count; offset:3; size:1; signed:0;
field:int common_pid; offset:4; size:4; signed:1;
field:int common_padding; offset:8; size:4; signed:1;
field:unsigned long __probe_ip; offset:12; size:4; signed:0;
print fmt: "(%lx)", REC->__probe_ip
We can list all dynamic tracepoints currently in existence:
root@crownbay:~# perf probe -l
probe:do_fork (on do_fork)
probe:schedule (on schedule)
Let's record system-wide ('sleep 30' is a trick for recording system-wide but basically do nothing and then wake up after 30 seconds):
root@crownbay:~# perf record -g -a -e probe:do_fork sleep 30
[ perf record: Woken up 1 times to write data ]
[ perf record: Captured and wrote 0.087 MB perf.data (~3812 samples) ]
Using 'perf script' we can see each do_fork event that fired:
root@crownbay:~# perf script
# ========
# captured on: Sun Oct 28 11:55:18 2012
# hostname : crownbay
# os release : 3.4.11-yocto-standard
# perf version : 3.4.11
# arch : i686
# nrcpus online : 2
# nrcpus avail : 2
# cpudesc : Intel(R) Atom(TM) CPU E660 @ 1.30GHz
# cpuid : GenuineIntel,6,38,1
# total memory : 1017184 kB
# cmdline : /usr/bin/perf record -g -a -e probe:do_fork sleep 30
# event : name = probe:do_fork, type = 2, config = 0x3b0, config1 = 0x0, config2 = 0x0, excl_usr = 0, excl_kern
= 0, id = { 5, 6 }
# HEADER_CPU_TOPOLOGY info available, use -I to display
# ========
#
matchbox-deskto 1197 [001] 34211.378318: do_fork: (c1028460)
matchbox-deskto 1295 [001] 34211.380388: do_fork: (c1028460)
pcmanfm 1296 [000] 34211.632350: do_fork: (c1028460)
pcmanfm 1296 [000] 34211.639917: do_fork: (c1028460)
matchbox-deskto 1197 [001] 34217.541603: do_fork: (c1028460)
matchbox-deskto 1299 [001] 34217.543584: do_fork: (c1028460)
gthumb 1300 [001] 34217.697451: do_fork: (c1028460)
gthumb 1300 [001] 34219.085734: do_fork: (c1028460)
gthumb 1300 [000] 34219.121351: do_fork: (c1028460)
gthumb 1300 [001] 34219.264551: do_fork: (c1028460)
pcmanfm 1296 [000] 34219.590380: do_fork: (c1028460)
matchbox-deskto 1197 [001] 34224.955965: do_fork: (c1028460)
matchbox-deskto 1306 [001] 34224.957972: do_fork: (c1028460)
matchbox-termin 1307 [000] 34225.038214: do_fork: (c1028460)
matchbox-termin 1307 [001] 34225.044218: do_fork: (c1028460)
matchbox-termin 1307 [000] 34225.046442: do_fork: (c1028460)
matchbox-deskto 1197 [001] 34237.112138: do_fork: (c1028460)
matchbox-deskto 1311 [001] 34237.114106: do_fork: (c1028460)
gaku 1312 [000] 34237.202388: do_fork: (c1028460)
And using 'perf report' on the same file, we can see the callgraphs from starting a few programs during those 30 seconds:
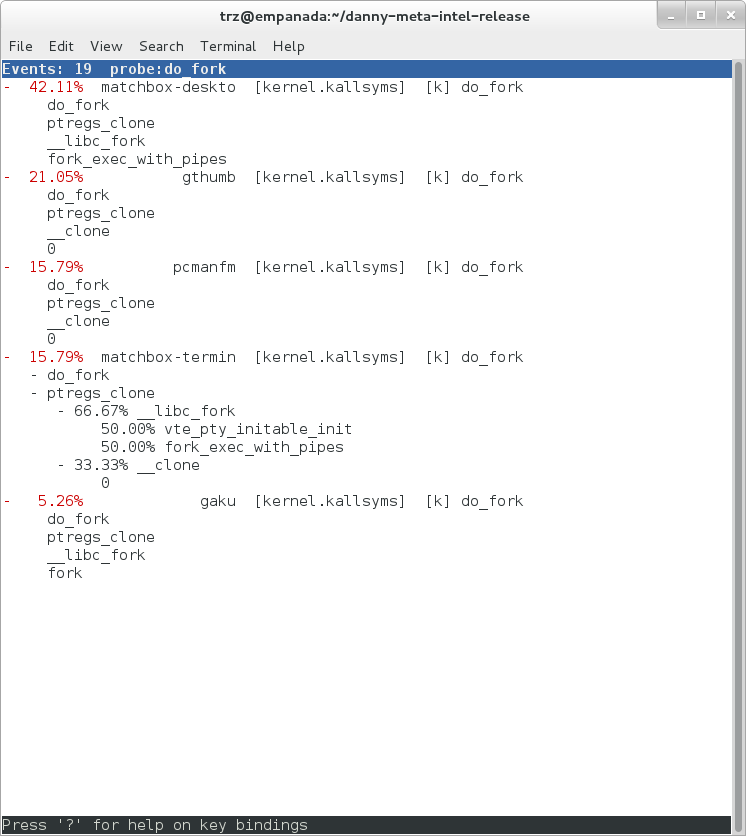 |
16.1.3. Documentation
Online versions of the man pages for the commands discussed in this section can be found here:
The 'perf stat' manpage.
The 'perf probe' manpage.
Documentation on using the 'perf script' python binding.
The top-level perf(1) manpage.
Normally, you should be able to invoke the man pages via perf itself e.g. 'perf help' or 'perf help record'.
However, by default Yocto doesn't install man pages, but perf invokes the man pages for most help functionality. This is a bug and is being addressed by a Yocto bug: Bug 3388 - perf: enable man pages for basic 'help' functionality.
The man pages in text form, along with some other files, such as a set of examples, can be found in the 'perf' directory of the kernel tree:
tools/perf/Documentation
There's also a nice perf tutorial on the perf wiki that goes into more detail than we do here in certain areas: Perf Tutorial
16.2. ftrace
'ftrace' literally refers to the 'ftrace function tracer' but in reality this encompasses a number of related tracers along with the infrastructure that they all make use of.
16.2.1. Setup
For this section, we'll assume you've already performed the basic setup outlined in the General Setup section.
ftrace, trace-cmd, and kernelshark run on the target system, and are ready to go out-of-the-box - no additional setup is necessary. For the rest of this section we assume you've ssh'ed to the host and will be running ftrace on the target. kernelshark is a GUI application and if you use the '-X' option to ssh you can have the kernelshark GUI run on the target but display remotely on the host if you want.
16.2.2. Basic ftrace usage
'ftrace' essentially refers to everything included in the /tracing directory of the mounted debugfs filesystem (Yocto follows the standard convention and mounts it at /sys/kernel/debug). Here's a listing of all the files found in /sys/kernel/debug/tracing on a Yocto system:
root@sugarbay:/sys/kernel/debug/tracing# ls
README kprobe_events trace
available_events kprobe_profile trace_clock
available_filter_functions options trace_marker
available_tracers per_cpu trace_options
buffer_size_kb printk_formats trace_pipe
buffer_total_size_kb saved_cmdlines tracing_cpumask
current_tracer set_event tracing_enabled
dyn_ftrace_total_info set_ftrace_filter tracing_on
enabled_functions set_ftrace_notrace tracing_thresh
events set_ftrace_pid
free_buffer set_graph_function
The files listed above are used for various purposes - some relate directly to the tracers themselves, others are used to set tracing options, and yet others actually contain the tracing output when a tracer is in effect. Some of the functions can be guessed from their names, others need explanation; in any case, we'll cover some of the files we see here below but for an explanation of the others, please see the ftrace documentation.
We'll start by looking at some of the available built-in tracers.
cat'ing the 'available_tracers' file lists the set of available tracers:
root@sugarbay:/sys/kernel/debug/tracing# cat available_tracers
blk function_graph function nop
The 'current_tracer' file contains the tracer currently in effect:
root@sugarbay:/sys/kernel/debug/tracing# cat current_tracer
nop
The above listing of current_tracer shows that the 'nop' tracer is in effect, which is just another way of saying that there's actually no tracer currently in effect.
echo'ing one of the available_tracers into current_tracer makes the specified tracer the current tracer:
root@sugarbay:/sys/kernel/debug/tracing# echo function > current_tracer
root@sugarbay:/sys/kernel/debug/tracing# cat current_tracer
function
The above sets the current tracer to be the 'function tracer'. This tracer traces every function call in the kernel and makes it available as the contents of the 'trace' file. Reading the 'trace' file lists the currently buffered function calls that have been traced by the function tracer:
root@sugarbay:/sys/kernel/debug/tracing# cat trace | less
# tracer: function
#
# entries-in-buffer/entries-written: 310629/766471 #P:8
#
# _-----=> irqs-off
# / _----=> need-resched
# | / _---=> hardirq/softirq
# || / _--=> preempt-depth
# ||| / delay
# TASK-PID CPU# |||| TIMESTAMP FUNCTION
# | | | |||| | |
<idle>-0 [004] d..1 470.867169: ktime_get_real <-intel_idle
<idle>-0 [004] d..1 470.867170: getnstimeofday <-ktime_get_real
<idle>-0 [004] d..1 470.867171: ns_to_timeval <-intel_idle
<idle>-0 [004] d..1 470.867171: ns_to_timespec <-ns_to_timeval
<idle>-0 [004] d..1 470.867172: smp_apic_timer_interrupt <-apic_timer_interrupt
<idle>-0 [004] d..1 470.867172: native_apic_mem_write <-smp_apic_timer_interrupt
<idle>-0 [004] d..1 470.867172: irq_enter <-smp_apic_timer_interrupt
<idle>-0 [004] d..1 470.867172: rcu_irq_enter <-irq_enter
<idle>-0 [004] d..1 470.867173: rcu_idle_exit_common.isra.33 <-rcu_irq_enter
<idle>-0 [004] d..1 470.867173: local_bh_disable <-irq_enter
<idle>-0 [004] d..1 470.867173: add_preempt_count <-local_bh_disable
<idle>-0 [004] d.s1 470.867174: tick_check_idle <-irq_enter
<idle>-0 [004] d.s1 470.867174: tick_check_oneshot_broadcast <-tick_check_idle
<idle>-0 [004] d.s1 470.867174: ktime_get <-tick_check_idle
<idle>-0 [004] d.s1 470.867174: tick_nohz_stop_idle <-tick_check_idle
<idle>-0 [004] d.s1 470.867175: update_ts_time_stats <-tick_nohz_stop_idle
<idle>-0 [004] d.s1 470.867175: nr_iowait_cpu <-update_ts_time_stats
<idle>-0 [004] d.s1 470.867175: tick_do_update_jiffies64 <-tick_check_idle
<idle>-0 [004] d.s1 470.867175: _raw_spin_lock <-tick_do_update_jiffies64
<idle>-0 [004] d.s1 470.867176: add_preempt_count <-_raw_spin_lock
<idle>-0 [004] d.s2 470.867176: do_timer <-tick_do_update_jiffies64
<idle>-0 [004] d.s2 470.867176: _raw_spin_lock <-do_timer
<idle>-0 [004] d.s2 470.867176: add_preempt_count <-_raw_spin_lock
<idle>-0 [004] d.s3 470.867177: ntp_tick_length <-do_timer
<idle>-0 [004] d.s3 470.867177: _raw_spin_lock_irqsave <-ntp_tick_length
.
.
.
Each line in the trace above shows what was happening in the kernel on a given cpu, to the level of detail of function calls. Each entry shows the function called, followed by its caller (after the arrow).
The function tracer gives you an extremely detailed idea of what the kernel was doing at the point in time the trace was taken, and is a great way to learn about how the kernel code works in a dynamic sense.
It is a little more difficult to follow the call chains than it needs to be - luckily there's a variant of the function tracer that displays the callchains explicitly, called the 'function_graph' tracer:
root@sugarbay:/sys/kernel/debug/tracing# echo function_graph > current_tracer
root@sugarbay:/sys/kernel/debug/tracing# cat trace | less
tracer: function_graph
CPU DURATION FUNCTION CALLS
| | | | | | |
7) 0.046 us | pick_next_task_fair();
7) 0.043 us | pick_next_task_stop();
7) 0.042 us | pick_next_task_rt();
7) 0.032 us | pick_next_task_fair();
7) 0.030 us | pick_next_task_idle();
7) | _raw_spin_unlock_irq() {
7) 0.033 us | sub_preempt_count();
7) 0.258 us | }
7) 0.032 us | sub_preempt_count();
7) + 13.341 us | } /* __schedule */
7) 0.095 us | } /* sub_preempt_count */
7) | schedule() {
7) | __schedule() {
7) 0.060 us | add_preempt_count();
7) 0.044 us | rcu_note_context_switch();
7) | _raw_spin_lock_irq() {
7) 0.033 us | add_preempt_count();
7) 0.247 us | }
7) | idle_balance() {
7) | _raw_spin_unlock() {
7) 0.031 us | sub_preempt_count();
7) 0.246 us | }
7) | update_shares() {
7) 0.030 us | __rcu_read_lock();
7) 0.029 us | __rcu_read_unlock();
7) 0.484 us | }
7) 0.030 us | __rcu_read_lock();
7) | load_balance() {
7) | find_busiest_group() {
7) 0.031 us | idle_cpu();
7) 0.029 us | idle_cpu();
7) 0.035 us | idle_cpu();
7) 0.906 us | }
7) 1.141 us | }
7) 0.022 us | msecs_to_jiffies();
7) | load_balance() {
7) | find_busiest_group() {
7) 0.031 us | idle_cpu();
.
.
.
4) 0.062 us | msecs_to_jiffies();
4) 0.062 us | __rcu_read_unlock();
4) | _raw_spin_lock() {
4) 0.073 us | add_preempt_count();
4) 0.562 us | }
4) + 17.452 us | }
4) 0.108 us | put_prev_task_fair();
4) 0.102 us | pick_next_task_fair();
4) 0.084 us | pick_next_task_stop();
4) 0.075 us | pick_next_task_rt();
4) 0.062 us | pick_next_task_fair();
4) 0.066 us | pick_next_task_idle();
------------------------------------------
4) kworker-74 => <idle>-0
------------------------------------------
4) | finish_task_switch() {
4) | _raw_spin_unlock_irq() {
4) 0.100 us | sub_preempt_count();
4) 0.582 us | }
4) 1.105 us | }
4) 0.088 us | sub_preempt_count();
4) ! 100.066 us | }
.
.
.
3) | sys_ioctl() {
3) 0.083 us | fget_light();
3) | security_file_ioctl() {
3) 0.066 us | cap_file_ioctl();
3) 0.562 us | }
3) | do_vfs_ioctl() {
3) | drm_ioctl() {
3) 0.075 us | drm_ut_debug_printk();
3) | i915_gem_pwrite_ioctl() {
3) | i915_mutex_lock_interruptible() {
3) 0.070 us | mutex_lock_interruptible();
3) 0.570 us | }
3) | drm_gem_object_lookup() {
3) | _raw_spin_lock() {
3) 0.080 us | add_preempt_count();
3) 0.620 us | }
3) | _raw_spin_unlock() {
3) 0.085 us | sub_preempt_count();
3) 0.562 us | }
3) 2.149 us | }
3) 0.133 us | i915_gem_object_pin();
3) | i915_gem_object_set_to_gtt_domain() {
3) 0.065 us | i915_gem_object_flush_gpu_write_domain();
3) 0.065 us | i915_gem_object_wait_rendering();
3) 0.062 us | i915_gem_object_flush_cpu_write_domain();
3) 1.612 us | }
3) | i915_gem_object_put_fence() {
3) 0.097 us | i915_gem_object_flush_fence.constprop.36();
3) 0.645 us | }
3) 0.070 us | add_preempt_count();
3) 0.070 us | sub_preempt_count();
3) 0.073 us | i915_gem_object_unpin();
3) 0.068 us | mutex_unlock();
3) 9.924 us | }
3) + 11.236 us | }
3) + 11.770 us | }
3) + 13.784 us | }
3) | sys_ioctl() {
As you can see, the function_graph display is much easier to follow. Also note that in addition to the function calls and associated braces, other events such as scheduler events are displayed in context. In fact, you can freely include any tracepoint available in the trace events subsystem described in the next section by simply enabling those events, and they'll appear in context in the function graph display. Quite a powerful tool for understanding kernel dynamics.
Also notice that there are various annotations on the left hand side of the display. For example if the total time it took for a given function to execute is above a certain threshold, an exclamation point or plus sign appears on the left hand side. Please see the ftrace documentation for details on all these fields.
16.2.3. The 'trace events' Subsystem
One especially important directory contained within the /sys/kernel/debug/tracing directory is the 'events' subdirectory, which contains representations of every tracepoint in the system. Listing out the contents of the 'events' subdirectory, we see mainly another set of subdirectories:
root@sugarbay:/sys/kernel/debug/tracing# cd events
root@sugarbay:/sys/kernel/debug/tracing/events# ls -al
drwxr-xr-x 38 root root 0 Nov 14 23:19 .
drwxr-xr-x 5 root root 0 Nov 14 23:19 ..
drwxr-xr-x 19 root root 0 Nov 14 23:19 block
drwxr-xr-x 32 root root 0 Nov 14 23:19 btrfs
drwxr-xr-x 5 root root 0 Nov 14 23:19 drm
-rw-r--r-- 1 root root 0 Nov 14 23:19 enable
drwxr-xr-x 40 root root 0 Nov 14 23:19 ext3
drwxr-xr-x 79 root root 0 Nov 14 23:19 ext4
drwxr-xr-x 14 root root 0 Nov 14 23:19 ftrace
drwxr-xr-x 8 root root 0 Nov 14 23:19 hda
-r--r--r-- 1 root root 0 Nov 14 23:19 header_event
-r--r--r-- 1 root root 0 Nov 14 23:19 header_page
drwxr-xr-x 25 root root 0 Nov 14 23:19 i915
drwxr-xr-x 7 root root 0 Nov 14 23:19 irq
drwxr-xr-x 12 root root 0 Nov 14 23:19 jbd
drwxr-xr-x 14 root root 0 Nov 14 23:19 jbd2
drwxr-xr-x 14 root root 0 Nov 14 23:19 kmem
drwxr-xr-x 7 root root 0 Nov 14 23:19 module
drwxr-xr-x 3 root root 0 Nov 14 23:19 napi
drwxr-xr-x 6 root root 0 Nov 14 23:19 net
drwxr-xr-x 3 root root 0 Nov 14 23:19 oom
drwxr-xr-x 12 root root 0 Nov 14 23:19 power
drwxr-xr-x 3 root root 0 Nov 14 23:19 printk
drwxr-xr-x 8 root root 0 Nov 14 23:19 random
drwxr-xr-x 4 root root 0 Nov 14 23:19 raw_syscalls
drwxr-xr-x 3 root root 0 Nov 14 23:19 rcu
drwxr-xr-x 6 root root 0 Nov 14 23:19 rpm
drwxr-xr-x 20 root root 0 Nov 14 23:19 sched
drwxr-xr-x 7 root root 0 Nov 14 23:19 scsi
drwxr-xr-x 4 root root 0 Nov 14 23:19 signal
drwxr-xr-x 5 root root 0 Nov 14 23:19 skb
drwxr-xr-x 4 root root 0 Nov 14 23:19 sock
drwxr-xr-x 10 root root 0 Nov 14 23:19 sunrpc
drwxr-xr-x 538 root root 0 Nov 14 23:19 syscalls
drwxr-xr-x 4 root root 0 Nov 14 23:19 task
drwxr-xr-x 14 root root 0 Nov 14 23:19 timer
drwxr-xr-x 3 root root 0 Nov 14 23:19 udp
drwxr-xr-x 21 root root 0 Nov 14 23:19 vmscan
drwxr-xr-x 3 root root 0 Nov 14 23:19 vsyscall
drwxr-xr-x 6 root root 0 Nov 14 23:19 workqueue
drwxr-xr-x 26 root root 0 Nov 14 23:19 writeback
Each one of these subdirectories corresponds to a 'subsystem' and contains yet again more subdirectories, each one of those finally corresponding to a tracepoint. For example, here are the contents of the 'kmem' subsystem:
root@sugarbay:/sys/kernel/debug/tracing/events# cd kmem
root@sugarbay:/sys/kernel/debug/tracing/events/kmem# ls -al
drwxr-xr-x 14 root root 0 Nov 14 23:19 .
drwxr-xr-x 38 root root 0 Nov 14 23:19 ..
-rw-r--r-- 1 root root 0 Nov 14 23:19 enable
-rw-r--r-- 1 root root 0 Nov 14 23:19 filter
drwxr-xr-x 2 root root 0 Nov 14 23:19 kfree
drwxr-xr-x 2 root root 0 Nov 14 23:19 kmalloc
drwxr-xr-x 2 root root 0 Nov 14 23:19 kmalloc_node
drwxr-xr-x 2 root root 0 Nov 14 23:19 kmem_cache_alloc
drwxr-xr-x 2 root root 0 Nov 14 23:19 kmem_cache_alloc_node
drwxr-xr-x 2 root root 0 Nov 14 23:19 kmem_cache_free
drwxr-xr-x 2 root root 0 Nov 14 23:19 mm_page_alloc
drwxr-xr-x 2 root root 0 Nov 14 23:19 mm_page_alloc_extfrag
drwxr-xr-x 2 root root 0 Nov 14 23:19 mm_page_alloc_zone_locked
drwxr-xr-x 2 root root 0 Nov 14 23:19 mm_page_free
drwxr-xr-x 2 root root 0 Nov 14 23:19 mm_page_free_batched
drwxr-xr-x 2 root root 0 Nov 14 23:19 mm_page_pcpu_drain
Let's see what's inside the subdirectory for a specific tracepoint, in this case the one for kmalloc:
root@sugarbay:/sys/kernel/debug/tracing/events/kmem# cd kmalloc
root@sugarbay:/sys/kernel/debug/tracing/events/kmem/kmalloc# ls -al
drwxr-xr-x 2 root root 0 Nov 14 23:19 .
drwxr-xr-x 14 root root 0 Nov 14 23:19 ..
-rw-r--r-- 1 root root 0 Nov 14 23:19 enable
-rw-r--r-- 1 root root 0 Nov 14 23:19 filter
-r--r--r-- 1 root root 0 Nov 14 23:19 format
-r--r--r-- 1 root root 0 Nov 14 23:19 id
The 'format' file for the tracepoint describes the event in memory, which is used by the various tracing tools that now make use of these tracepoint to parse the event and make sense of it, along with a 'print fmt' field that allows tools like ftrace to display the event as text. Here's what the format of the kmalloc event looks like:
root@sugarbay:/sys/kernel/debug/tracing/events/kmem/kmalloc# cat format
name: kmalloc
ID: 313
format:
field:unsigned short common_type; offset:0; size:2; signed:0;
field:unsigned char common_flags; offset:2; size:1; signed:0;
field:unsigned char common_preempt_count; offset:3; size:1; signed:0;
field:int common_pid; offset:4; size:4; signed:1;
field:int common_padding; offset:8; size:4; signed:1;
field:unsigned long call_site; offset:16; size:8; signed:0;
field:const void * ptr; offset:24; size:8; signed:0;
field:size_t bytes_req; offset:32; size:8; signed:0;
field:size_t bytes_alloc; offset:40; size:8; signed:0;
field:gfp_t gfp_flags; offset:48; size:4; signed:0;
print fmt: "call_site=%lx ptr=%p bytes_req=%zu bytes_alloc=%zu gfp_flags=%s", REC->call_site, REC->ptr, REC->bytes_req, REC->bytes_alloc,
(REC->gfp_flags) ? __print_flags(REC->gfp_flags, "|", {(unsigned long)(((( gfp_t)0x10u) | (( gfp_t)0x40u) | (( gfp_t)0x80u) | ((
gfp_t)0x20000u) | (( gfp_t)0x02u) | (( gfp_t)0x08u)) | (( gfp_t)0x4000u) | (( gfp_t)0x10000u) | (( gfp_t)0x1000u) | (( gfp_t)0x200u) | ((
gfp_t)0x400000u)), "GFP_TRANSHUGE"}, {(unsigned long)((( gfp_t)0x10u) | (( gfp_t)0x40u) | (( gfp_t)0x80u) | (( gfp_t)0x20000u) | ((
gfp_t)0x02u) | (( gfp_t)0x08u)), "GFP_HIGHUSER_MOVABLE"}, {(unsigned long)((( gfp_t)0x10u) | (( gfp_t)0x40u) | (( gfp_t)0x80u) | ((
gfp_t)0x20000u) | (( gfp_t)0x02u)), "GFP_HIGHUSER"}, {(unsigned long)((( gfp_t)0x10u) | (( gfp_t)0x40u) | (( gfp_t)0x80u) | ((
gfp_t)0x20000u)), "GFP_USER"}, {(unsigned long)((( gfp_t)0x10u) | (( gfp_t)0x40u) | (( gfp_t)0x80u) | (( gfp_t)0x80000u)), GFP_TEMPORARY"},
{(unsigned long)((( gfp_t)0x10u) | (( gfp_t)0x40u) | (( gfp_t)0x80u)), "GFP_KERNEL"}, {(unsigned long)((( gfp_t)0x10u) | (( gfp_t)0x40u)),
"GFP_NOFS"}, {(unsigned long)((( gfp_t)0x20u)), "GFP_ATOMIC"}, {(unsigned long)((( gfp_t)0x10u)), "GFP_NOIO"}, {(unsigned long)((
gfp_t)0x20u), "GFP_HIGH"}, {(unsigned long)(( gfp_t)0x10u), "GFP_WAIT"}, {(unsigned long)(( gfp_t)0x40u), "GFP_IO"}, {(unsigned long)((
gfp_t)0x100u), "GFP_COLD"}, {(unsigned long)(( gfp_t)0x200u), "GFP_NOWARN"}, {(unsigned long)(( gfp_t)0x400u), "GFP_REPEAT"}, {(unsigned
long)(( gfp_t)0x800u), "GFP_NOFAIL"}, {(unsigned long)(( gfp_t)0x1000u), "GFP_NORETRY"}, {(unsigned long)(( gfp_t)0x4000u), "GFP_COMP"},
{(unsigned long)(( gfp_t)0x8000u), "GFP_ZERO"}, {(unsigned long)(( gfp_t)0x10000u), "GFP_NOMEMALLOC"}, {(unsigned long)(( gfp_t)0x20000u),
"GFP_HARDWALL"}, {(unsigned long)(( gfp_t)0x40000u), "GFP_THISNODE"}, {(unsigned long)(( gfp_t)0x80000u), "GFP_RECLAIMABLE"}, {(unsigned
long)(( gfp_t)0x08u), "GFP_MOVABLE"}, {(unsigned long)(( gfp_t)0), "GFP_NOTRACK"}, {(unsigned long)(( gfp_t)0x400000u), "GFP_NO_KSWAPD"},
{(unsigned long)(( gfp_t)0x800000u), "GFP_OTHER_NODE"} ) : "GFP_NOWAIT"
The 'enable' file in the tracepoint directory is what allows the user (or tools such as trace-cmd) to actually turn the tracepoint on and off. When enabled, the corresponding tracepoint will start appearing in the ftrace 'trace' file described previously. For example, this turns on the kmalloc tracepoint:
root@sugarbay:/sys/kernel/debug/tracing/events/kmem/kmalloc# echo 1 > enable
At the moment, we're not interested in the function tracer or some other tracer that might be in effect, so we first turn it off, but if we do that, we still need to turn tracing on in order to see the events in the output buffer:
root@sugarbay:/sys/kernel/debug/tracing# echo nop > current_tracer
root@sugarbay:/sys/kernel/debug/tracing# echo 1 > tracing_on
Now, if we look at the the 'trace' file, we see nothing but the kmalloc events we just turned on:
root@sugarbay:/sys/kernel/debug/tracing# cat trace | less
# tracer: nop
#
# entries-in-buffer/entries-written: 1897/1897 #P:8
#
# _-----=> irqs-off
# / _----=> need-resched
# | / _---=> hardirq/softirq
# || / _--=> preempt-depth
# ||| / delay
# TASK-PID CPU# |||| TIMESTAMP FUNCTION
# | | | |||| | |
dropbear-1465 [000] ...1 18154.620753: kmalloc: call_site=ffffffff816650d4 ptr=ffff8800729c3000 bytes_req=2048 bytes_alloc=2048 gfp_flags=GFP_KERNEL
<idle>-0 [000] ..s3 18154.621640: kmalloc: call_site=ffffffff81619b36 ptr=ffff88006d555800 bytes_req=512 bytes_alloc=512 gfp_flags=GFP_ATOMIC
<idle>-0 [000] ..s3 18154.621656: kmalloc: call_site=ffffffff81619b36 ptr=ffff88006d555800 bytes_req=512 bytes_alloc=512 gfp_flags=GFP_ATOMIC
matchbox-termin-1361 [001] ...1 18154.755472: kmalloc: call_site=ffffffff81614050 ptr=ffff88006d5f0e00 bytes_req=512 bytes_alloc=512 gfp_flags=GFP_KERNEL|GFP_REPEAT
Xorg-1264 [002] ...1 18154.755581: kmalloc: call_site=ffffffff8141abe8 ptr=ffff8800734f4cc0 bytes_req=168 bytes_alloc=192 gfp_flags=GFP_KERNEL|GFP_NOWARN|GFP_NORETRY
Xorg-1264 [002] ...1 18154.755583: kmalloc: call_site=ffffffff814192a3 ptr=ffff88001f822520 bytes_req=24 bytes_alloc=32 gfp_flags=GFP_KERNEL|GFP_ZERO
Xorg-1264 [002] ...1 18154.755589: kmalloc: call_site=ffffffff81419edb ptr=ffff8800721a2f00 bytes_req=64 bytes_alloc=64 gfp_flags=GFP_KERNEL|GFP_ZERO
matchbox-termin-1361 [001] ...1 18155.354594: kmalloc: call_site=ffffffff81614050 ptr=ffff88006db35400 bytes_req=576 bytes_alloc=1024 gfp_flags=GFP_KERNEL|GFP_REPEAT
Xorg-1264 [002] ...1 18155.354703: kmalloc: call_site=ffffffff8141abe8 ptr=ffff8800734f4cc0 bytes_req=168 bytes_alloc=192 gfp_flags=GFP_KERNEL|GFP_NOWARN|GFP_NORETRY
Xorg-1264 [002] ...1 18155.354705: kmalloc: call_site=ffffffff814192a3 ptr=ffff88001f822520 bytes_req=24 bytes_alloc=32 gfp_flags=GFP_KERNEL|GFP_ZERO
Xorg-1264 [002] ...1 18155.354711: kmalloc: call_site=ffffffff81419edb ptr=ffff8800721a2f00 bytes_req=64 bytes_alloc=64 gfp_flags=GFP_KERNEL|GFP_ZERO
<idle>-0 [000] ..s3 18155.673319: kmalloc: call_site=ffffffff81619b36 ptr=ffff88006d555800 bytes_req=512 bytes_alloc=512 gfp_flags=GFP_ATOMIC
dropbear-1465 [000] ...1 18155.673525: kmalloc: call_site=ffffffff816650d4 ptr=ffff8800729c3000 bytes_req=2048 bytes_alloc=2048 gfp_flags=GFP_KERNEL
<idle>-0 [000] ..s3 18155.674821: kmalloc: call_site=ffffffff81619b36 ptr=ffff88006d554800 bytes_req=512 bytes_alloc=512 gfp_flags=GFP_ATOMIC
<idle>-0 [000] ..s3 18155.793014: kmalloc: call_site=ffffffff81619b36 ptr=ffff88006d554800 bytes_req=512 bytes_alloc=512 gfp_flags=GFP_ATOMIC
dropbear-1465 [000] ...1 18155.793219: kmalloc: call_site=ffffffff816650d4 ptr=ffff8800729c3000 bytes_req=2048 bytes_alloc=2048 gfp_flags=GFP_KERNEL
<idle>-0 [000] ..s3 18155.794147: kmalloc: call_site=ffffffff81619b36 ptr=ffff88006d555800 bytes_req=512 bytes_alloc=512 gfp_flags=GFP_ATOMIC
<idle>-0 [000] ..s3 18155.936705: kmalloc: call_site=ffffffff81619b36 ptr=ffff88006d555800 bytes_req=512 bytes_alloc=512 gfp_flags=GFP_ATOMIC
dropbear-1465 [000] ...1 18155.936910: kmalloc: call_site=ffffffff816650d4 ptr=ffff8800729c3000 bytes_req=2048 bytes_alloc=2048 gfp_flags=GFP_KERNEL
<idle>-0 [000] ..s3 18155.937869: kmalloc: call_site=ffffffff81619b36 ptr=ffff88006d554800 bytes_req=512 bytes_alloc=512 gfp_flags=GFP_ATOMIC
matchbox-termin-1361 [001] ...1 18155.953667: kmalloc: call_site=ffffffff81614050 ptr=ffff88006d5f2000 bytes_req=512 bytes_alloc=512 gfp_flags=GFP_KERNEL|GFP_REPEAT
Xorg-1264 [002] ...1 18155.953775: kmalloc: call_site=ffffffff8141abe8 ptr=ffff8800734f4cc0 bytes_req=168 bytes_alloc=192 gfp_flags=GFP_KERNEL|GFP_NOWARN|GFP_NORETRY
Xorg-1264 [002] ...1 18155.953777: kmalloc: call_site=ffffffff814192a3 ptr=ffff88001f822520 bytes_req=24 bytes_alloc=32 gfp_flags=GFP_KERNEL|GFP_ZERO
Xorg-1264 [002] ...1 18155.953783: kmalloc: call_site=ffffffff81419edb ptr=ffff8800721a2f00 bytes_req=64 bytes_alloc=64 gfp_flags=GFP_KERNEL|GFP_ZERO
<idle>-0 [000] ..s3 18156.176053: kmalloc: call_site=ffffffff81619b36 ptr=ffff88006d554800 bytes_req=512 bytes_alloc=512 gfp_flags=GFP_ATOMIC
dropbear-1465 [000] ...1 18156.176257: kmalloc: call_site=ffffffff816650d4 ptr=ffff8800729c3000 bytes_req=2048 bytes_alloc=2048 gfp_flags=GFP_KERNEL
<idle>-0 [000] ..s3 18156.177717: kmalloc: call_site=ffffffff81619b36 ptr=ffff88006d555800 bytes_req=512 bytes_alloc=512 gfp_flags=GFP_ATOMIC
<idle>-0 [000] ..s3 18156.399229: kmalloc: call_site=ffffffff81619b36 ptr=ffff88006d555800 bytes_req=512 bytes_alloc=512 gfp_flags=GFP_ATOMIC
dropbear-1465 [000] ...1 18156.399434: kmalloc: call_site=ffffffff816650d4 ptr=ffff8800729c3000 bytes_http://rostedt.homelinux.com/kernelshark/req=2048 bytes_alloc=2048 gfp_flags=GFP_KERNEL
<idle>-0 [000] ..s3 18156.400660: kmalloc: call_site=ffffffff81619b36 ptr=ffff88006d554800 bytes_req=512 bytes_alloc=512 gfp_flags=GFP_ATOMIC
matchbox-termin-1361 [001] ...1 18156.552800: kmalloc: call_site=ffffffff81614050 ptr=ffff88006db34800 bytes_req=576 bytes_alloc=1024 gfp_flags=GFP_KERNEL|GFP_REPEAT
To again disable the kmalloc event, we need to send 0 to the enable file:
root@sugarbay:/sys/kernel/debug/tracing/events/kmem/kmalloc# echo 0 > enable
You can enable any number of events or complete subsystems (by using the 'enable' file in the subsystem directory) and get an arbitrarily fine-grained idea of what's going on in the system by enabling as many of the appropriate tracepoints as applicable.
A number of the tools described in this HOWTO do just that, including trace-cmd and kernelshark in the next section.
16.2.4. trace-cmd/kernelshark
trace-cmd is essentially an extensive command-line 'wrapper' interface that hides the details of all the individual files in /sys/kernel/debug/tracing, allowing users to specify specific particular events within the /sys/kernel/debug/tracing/events/ subdirectory and to collect traces and avoid having to deal with those details directly.
As yet another layer on top of that, kernelshark provides a GUI that allows users to start and stop traces and specify sets of events using an intuitive interface, and view the output as both trace events and as a per-CPU graphical display. It directly uses 'trace-cmd' as the plumbing that accomplishes all that underneath the covers (and actually displays the trace-cmd command it uses, as we'll see).
To start a trace using kernelshark, first start kernelshark:
root@sugarbay:~# kernelshark
Then bring up the 'Capture' dialog by choosing from the kernelshark menu:
Capture | Record
That will display the following dialog, which allows you to choose one or more events (or even one or more complete subsystems) to trace:
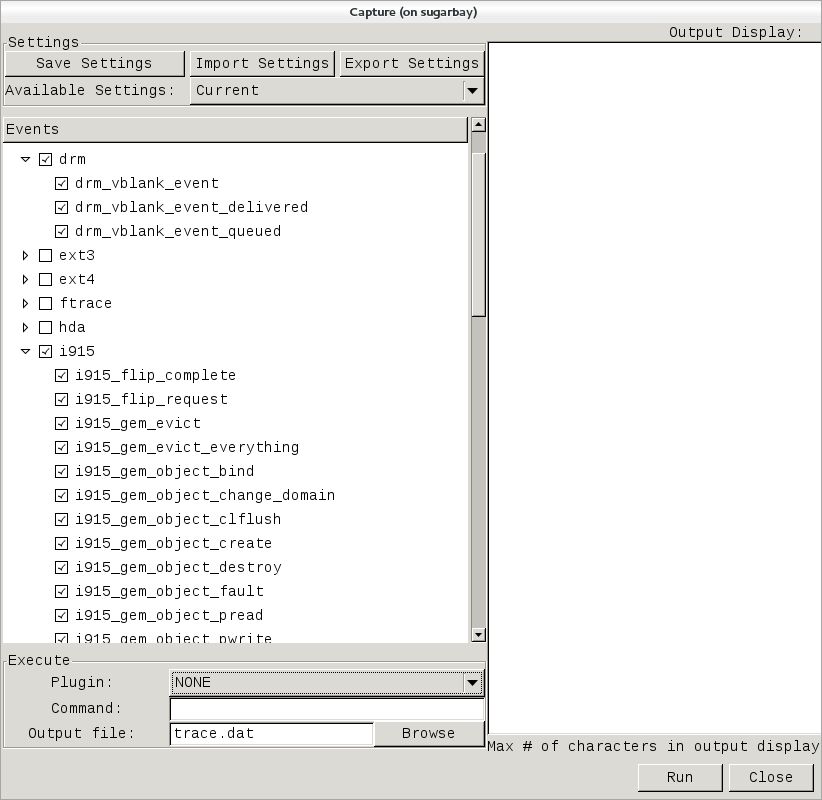 |
Note that these are exactly the same sets of events described in the previous trace events subsystem section, and in fact is where trace-cmd gets them for kernelshark.
In the above screenshot, we've decided to explore the graphics subsystem a bit and so have chosen to trace all the tracepoints contained within the 'i915' and 'drm' subsystems.
After doing that, we can start and stop the trace using the 'Run' and 'Stop' button on the lower right corner of the dialog (the same button will turn into the 'Stop' button after the trace has started):
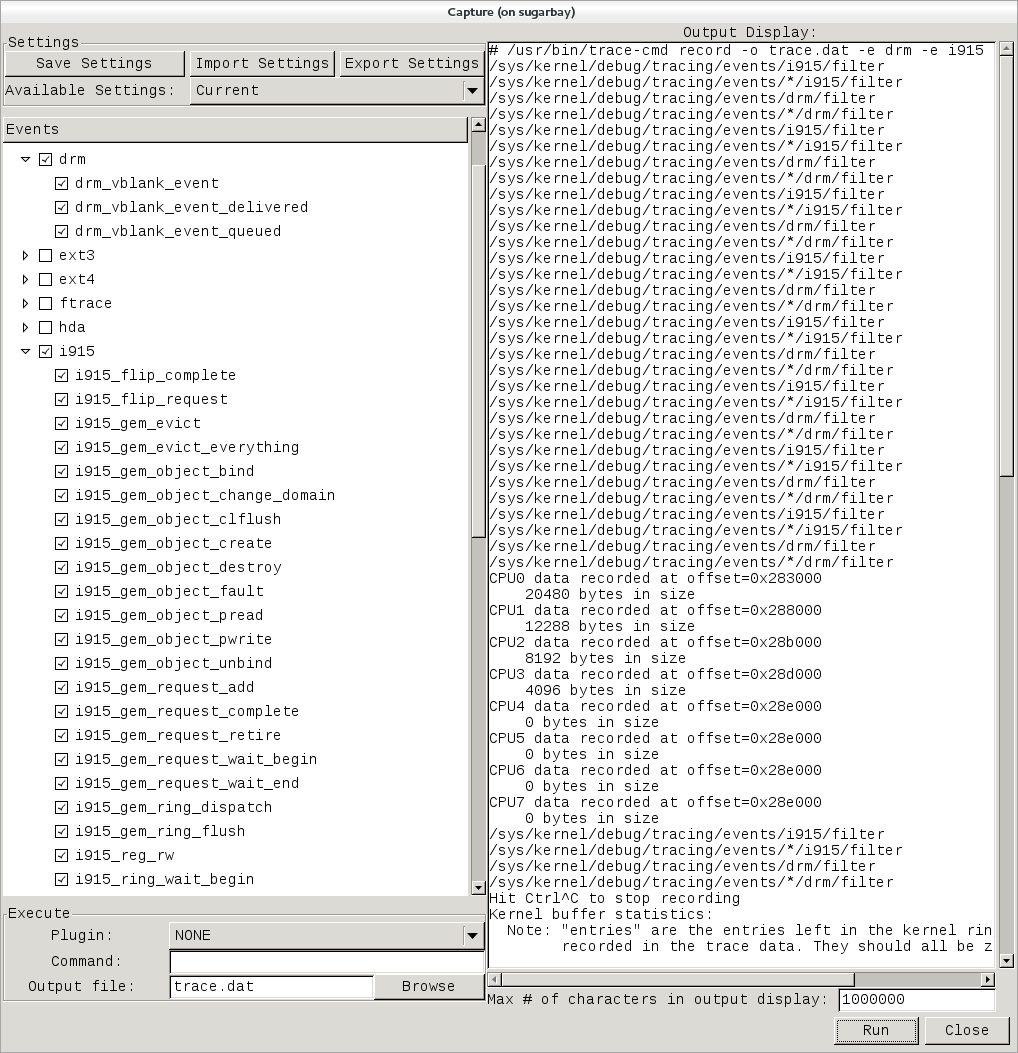 |
Notice that the right-hand pane shows the exact trace-cmd command-line that's used to run the trace, along with the results of the trace-cmd run.
Once the 'Stop' button is pressed, the graphical view magically fills up with a colorful per-cpu display of the trace data, along with the detailed event listing below that:
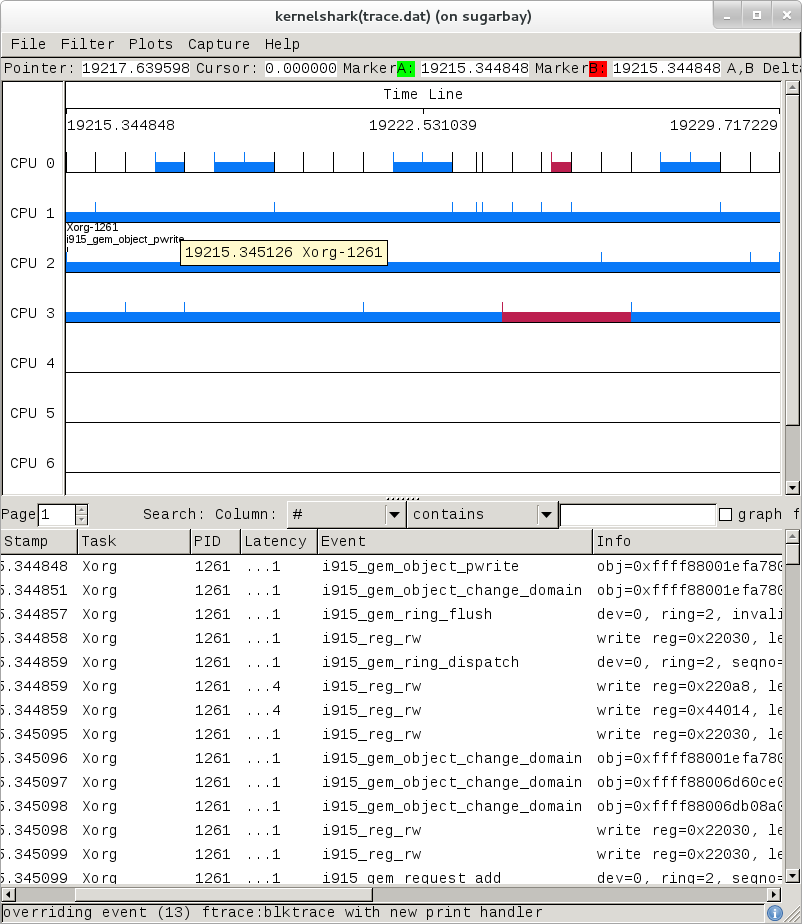 |
Here's another example, this time a display resulting from tracing 'all events':
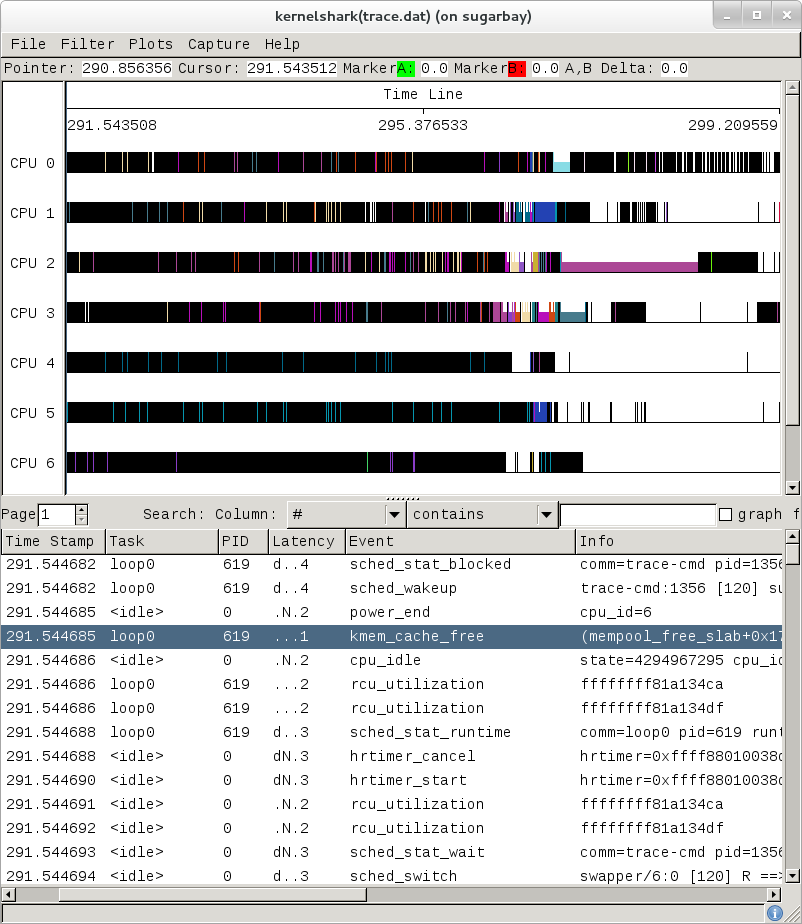 |
The tool is pretty self-explanatory, but for more detailed information on navigating through the data, see the kernelshark website.
16.2.5. Documentation
The documentation for ftrace can be found in the kernel Documentation directory:
Documentation/trace/ftrace.txt
The documentation for the trace event subsystem can also be found in the kernel Documentation directory:
Documentation/trace/events.txt
There is a nice series of articles on using ftrace and trace-cmd at LWN:
There's more detailed documentation kernelshark usage here: KernelShark
An amusing yet useful README (a tracing mini-HOWTO) can be found in /sys/kernel/debug/tracing/README.
16.3. systemtap
SystemTap is a system-wide script-based tracing and profiling tool.
SystemTap scripts are C-like programs that are executed in the kernel to gather/print/aggregate data extracted from the context they end up being invoked under.
For example, this probe from the SystemTap tutorial simply prints a line every time any process on the system open()s a file. For each line, it prints the executable name of the program that opened the file, along with its PID, and the name of the file it opened (or tried to open), which it extracts from the open syscall's argstr.
probe syscall.open
{
printf ("%s(%d) open (%s)\n", execname(), pid(), argstr)
}
probe timer.ms(4000) # after 4 seconds
{
exit ()
}
Normally, to execute this probe, you'd simply install systemtap on the system you want to probe, and directly run the probe on that system e.g. assuming the name of the file containing the above text is trace_open.stp:
# stap trace_open.stp
What systemtap does under the covers to run this probe is 1) parse and convert the probe to an equivalent 'C' form, 2) compile the 'C' form into a kernel module, 3) insert the module into the kernel, which arms it, and 4) collect the data generated by the probe and display it to the user.
In order to accomplish steps 1 and 2, the 'stap' program needs access to the kernel build system that produced the kernel that the probed system is running. In the case of a typical embedded system (the 'target'), the kernel build system unfortunately isn't typically part of the image running on the target. It is normally available on the 'host' system that produced the target image however; in such cases, steps 1 and 2 are executed on the host system, and steps 3 and 4 are executed on the target system, using only the systemtap 'runtime'.
The systemtap support in Yocto assumes that only steps 3 and 4 are run on the target; it is possible to do everything on the target, but this section assumes only the typical embedded use-case.
So basically what you need to do in order to run a systemtap script on the target is to 1) on the host system, compile the probe into a kernel module that makes sense to the target, 2) copy the module onto the target system and 3) insert the module into the target kernel, which arms it, and 4) collect the data generated by the probe and display it to the user.
16.3.1. Setup
Those are a lot of steps and a lot of details, but fortunately Yocto includes a script called 'crosstap' that will take care of those details, allowing you to simply execute a systemtap script on the remote target, with arguments if necessary.
In order to do this from a remote host, however, you need to have access to the build for the image you booted. The 'crosstap' script provides details on how to do this if you run the script on the host without having done a build:
Note
SystemTap, which uses 'crosstap', assumes you can establish an ssh connection to the remote target. Please refer to the crosstap wiki page for details on verifying ssh connections at https://wiki.yoctoproject.org/wiki/Tracing_and_Profiling#systemtap. Also, the ability to ssh into the target system is not enabled by default in *-minimal images.
$ crosstap root@192.168.1.88 trace_open.stp
Error: No target kernel build found.
Did you forget to create a local build of your image?
'crosstap' requires a local sdk build of the target system
(or a build that includes 'tools-profile') in order to build
kernel modules that can probe the target system.
Practically speaking, that means you need to do the following:
- If you're running a pre-built image, download the release
and/or BSP tarballs used to build the image.
- If you're working from git sources, just clone the metadata
and BSP layers needed to build the image you'll be booting.
- Make sure you're properly set up to build a new image (see
the BSP README and/or the widely available basic documentation
that discusses how to build images).
- Build an -sdk version of the image e.g.:
$ bitbake core-image-sato-sdk
OR
- Build a non-sdk image but include the profiling tools:
[ edit local.conf and add 'tools-profile' to the end of
the EXTRA_IMAGE_FEATURES variable ]
$ bitbake core-image-sato
Once you've build the image on the host system, you're ready to
boot it (or the equivalent pre-built image) and use 'crosstap'
to probe it (you need to source the environment as usual first):
$ source oe-init-build-env
$ cd ~/my/systemtap/scripts
$ crosstap root@192.168.1.xxx myscript.stp
So essentially what you need to do is build an SDK image or image with 'tools-profile' as detailed in the "General Setup" section of this manual, and boot the resulting target image.
Note
If you have a build directory containing multiple machines, you need to have the MACHINE you're connecting to selected in local.conf, and the kernel in that machine's build directory must match the kernel on the booted system exactly, or you'll get the above 'crosstap' message when you try to invoke a script.16.3.2. Running a Script on a Target
Once you've done that, you should be able to run a systemtap script on the target:
$ cd /path/to/yocto
$ source oe-init-build-env
### Shell environment set up for builds. ###
     You can now run 'bitbake <target>'

     Common targets are:
         core-image-minimal
         core-image-sato
         meta-toolchain
         meta-ide-support
You can also run generated qemu images with a command like 'runqemu qemux86'
Once you've done that, you can cd to whatever directory contains your scripts and use 'crosstap' to run the script:
$ cd /path/to/my/systemap/script
$ crosstap root@192.168.7.2 trace_open.stp
If you get an error connecting to the target e.g.:
$ crosstap root@192.168.7.2 trace_open.stp
error establishing ssh connection on remote 'root@192.168.7.2'
Try ssh'ing to the target and see what happens:
$ ssh root@192.168.7.2
A lot of the time, connection problems are due specifying a wrong IP address or having a 'host key verification error'.
If everything worked as planned, you should see something like this (enter the password when prompted, or press enter if it's set up to use no password):
$ crosstap root@192.168.7.2 trace_open.stp
root@192.168.7.2's password:
matchbox-termin(1036) open ("/tmp/vte3FS2LW", O_RDWR|O_CREAT|O_EXCL|O_LARGEFILE, 0600)
matchbox-termin(1036) open ("/tmp/vteJMC7LW", O_RDWR|O_CREAT|O_EXCL|O_LARGEFILE, 0600)
16.3.3. Documentation
The SystemTap language reference can be found here: SystemTap Language Reference
Links to other SystemTap documents, tutorials, and examples can be found here: SystemTap documentation page
16.4. Sysprof
Sysprof is a very easy to use system-wide profiler that consists of a single window with three panes and a few buttons which allow you to start, stop, and view the profile from one place.
16.4.1. Setup
For this section, we'll assume you've already performed the basic setup outlined in the General Setup section.
Sysprof is a GUI-based application that runs on the target system. For the rest of this document we assume you've ssh'ed to the host and will be running Sysprof on the target (you can use the '-X' option to ssh and have the Sysprof GUI run on the target but display remotely on the host if you want).
16.4.2. Basic Usage
To start profiling the system, you simply press the 'Start' button. To stop profiling and to start viewing the profile data in one easy step, press the 'Profile' button.
Once you've pressed the profile button, the three panes will fill up with profiling data:
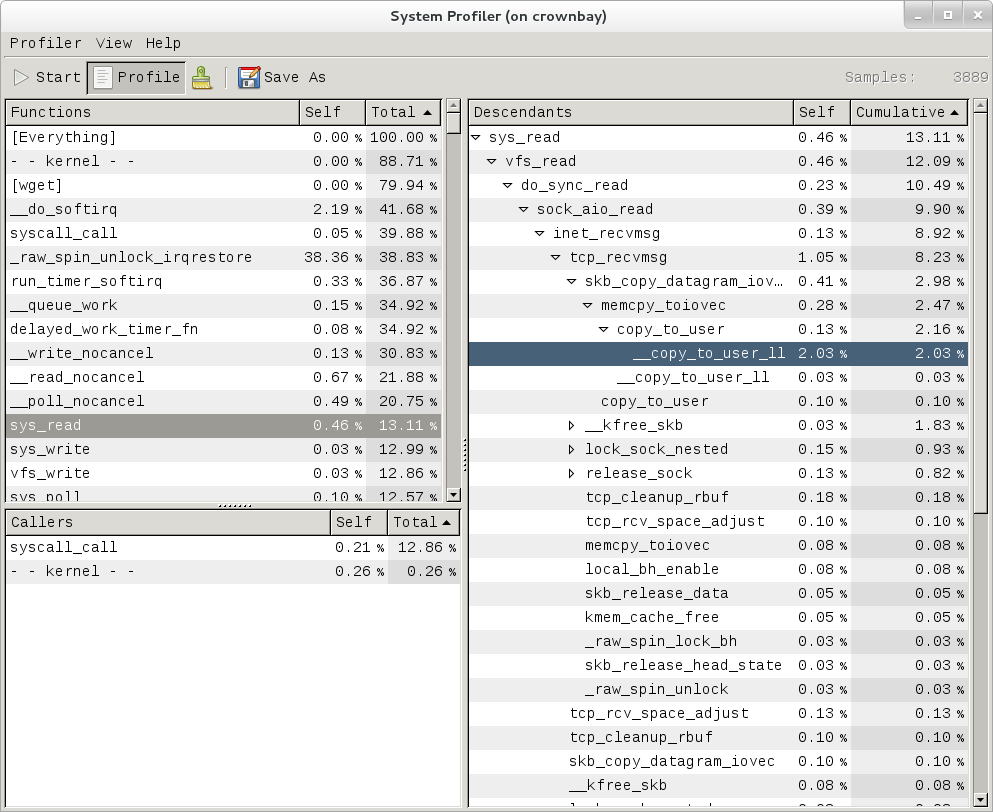 |
The left pane shows a list of functions and processes. Selecting one of those expands that function in the right pane, showing all its callees. Note that this caller-oriented display is essentially the inverse of perf's default callee-oriented callchain display.
In the screenshot above, we're focusing on __copy_to_user_ll() and looking up the callchain we can see that one of the callers of __copy_to_user_ll is sys_read() and the complete callpath between them. Notice that this is essentially a portion of the same information we saw in the perf display shown in the perf section of this page.
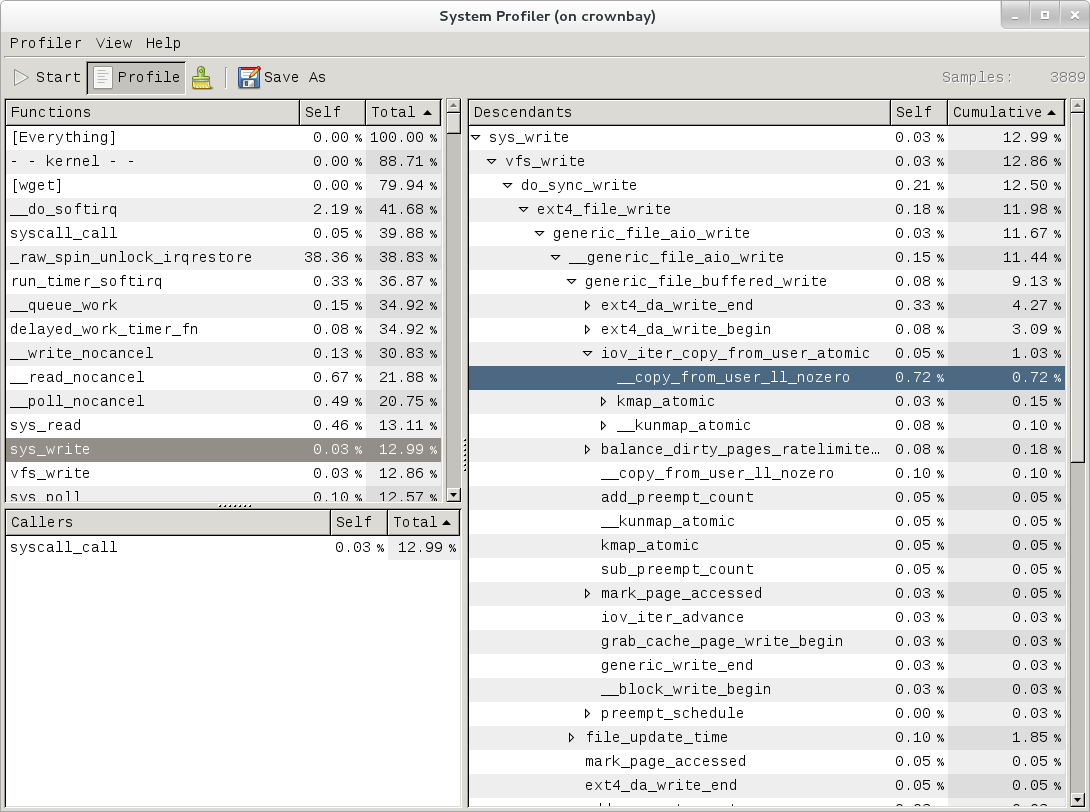 |
Similarly, the above is a snapshot of the Sysprof display of a copy-from-user callchain.
Finally, looking at the third Sysprof pane in the lower left, we can see a list of all the callers of a particular function selected in the top left pane. In this case, the lower pane is showing all the callers of __mark_inode_dirty:
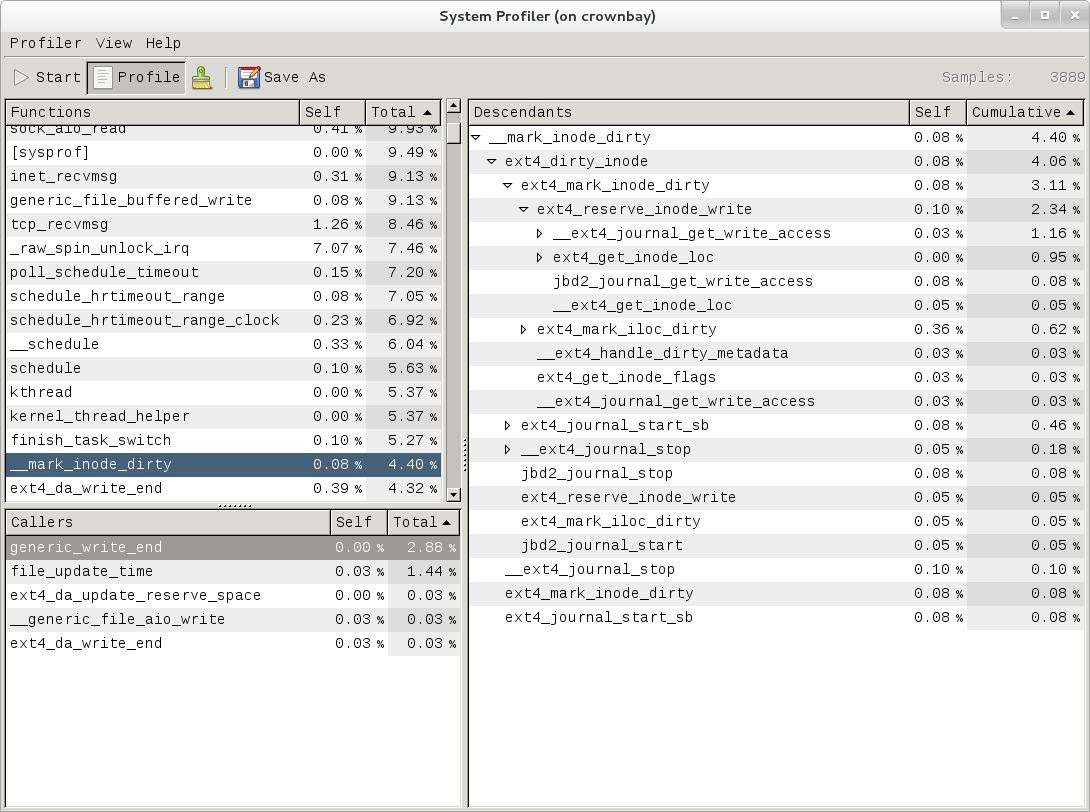 |
Double-clicking on one of those functions will in turn change the focus to the selected function, and so on.
16.4.3. Documentation
There doesn't seem to be any documentation for Sysprof, but maybe that's because it's pretty self-explanatory. The Sysprof website, however, is here: Sysprof, System-wide Performance Profiler for Linux
16.5. LTTng (Linux Trace Toolkit, next generation)
16.5.1. Setup
For this section, we'll assume you've already performed the basic setup outlined in the General Setup section.
LTTng is run on the target system by ssh'ing to it. However, if you want to see the traces graphically, install Eclipse as described in section "Manually copying a trace to the host and viewing it in Eclipse (i.e. using Eclipse without network support)" and follow the directions to manually copy traces to the host and view them in Eclipse (i.e. using Eclipse without network support).
Note
Be sure to download and install/run the 'SR1' or later Juno release of eclipse e.g.: http://www.eclipse.org/downloads/download.php?file=/technology/epp/downloads/release/juno/SR1/eclipse-cpp-juno-SR1-linux-gtk-x86_64.tar.gz16.5.2. Collecting and Viewing Traces
Once you've applied the above commits and built and booted your image (you need to build the core-image-sato-sdk image or use one of the other methods described in the General Setup section), you're ready to start tracing.
16.5.2.1. Collecting and viewing a trace on the target (inside a shell)
First, from the host, ssh to the target:
$ ssh -l root 192.168.1.47
The authenticity of host '192.168.1.47 (192.168.1.47)' can't be established.
RSA key fingerprint is 23:bd:c8:b1:a8:71:52:00:ee:00:4f:64:9e:10:b9:7e.
Are you sure you want to continue connecting (yes/no)? yes
Warning: Permanently added '192.168.1.47' (RSA) to the list of known hosts.
root@192.168.1.47's password:
Once on the target, use these steps to create a trace:
root@crownbay:~# lttng create
Spawning a session daemon
Session auto-20121015-232120 created.
Traces will be written in /home/root/lttng-traces/auto-20121015-232120
Enable the events you want to trace (in this case all kernel events):
root@crownbay:~# lttng enable-event --kernel --all
All kernel events are enabled in channel channel0
Start the trace:
root@crownbay:~# lttng start
Tracing started for session auto-20121015-232120
And then stop the trace after awhile or after running a particular workload that you want to trace:
root@crownbay:~# lttng stop
Tracing stopped for session auto-20121015-232120
You can now view the trace in text form on the target:
root@crownbay:~# lttng view
[23:21:56.989270399] (+?.?????????) sys_geteuid: { 1 }, { }
[23:21:56.989278081] (+0.000007682) exit_syscall: { 1 }, { ret = 0 }
[23:21:56.989286043] (+0.000007962) sys_pipe: { 1 }, { fildes = 0xB77B9E8C }
[23:21:56.989321802] (+0.000035759) exit_syscall: { 1 }, { ret = 0 }
[23:21:56.989329345] (+0.000007543) sys_mmap_pgoff: { 1 }, { addr = 0x0, len = 10485760, prot = 3, flags = 131362, fd = 4294967295, pgoff = 0 }
[23:21:56.989351694] (+0.000022349) exit_syscall: { 1 }, { ret = -1247805440 }
[23:21:56.989432989] (+0.000081295) sys_clone: { 1 }, { clone_flags = 0x411, newsp = 0xB5EFFFE4, parent_tid = 0xFFFFFFFF, child_tid = 0x0 }
[23:21:56.989477129] (+0.000044140) sched_stat_runtime: { 1 }, { comm = "lttng-consumerd", tid = 1193, runtime = 681660, vruntime = 43367983388 }
[23:21:56.989486697] (+0.000009568) sched_migrate_task: { 1 }, { comm = "lttng-consumerd", tid = 1193, prio = 20, orig_cpu = 1, dest_cpu = 1 }
[23:21:56.989508418] (+0.000021721) hrtimer_init: { 1 }, { hrtimer = 3970832076, clockid = 1, mode = 1 }
[23:21:56.989770462] (+0.000262044) hrtimer_cancel: { 1 }, { hrtimer = 3993865440 }
[23:21:56.989771580] (+0.000001118) hrtimer_cancel: { 0 }, { hrtimer = 3993812192 }
[23:21:56.989776957] (+0.000005377) hrtimer_expire_entry: { 1 }, { hrtimer = 3993865440, now = 79815980007057, function = 3238465232 }
[23:21:56.989778145] (+0.000001188) hrtimer_expire_entry: { 0 }, { hrtimer = 3993812192, now = 79815980008174, function = 3238465232 }
[23:21:56.989791695] (+0.000013550) softirq_raise: { 1 }, { vec = 1 }
[23:21:56.989795396] (+0.000003701) softirq_raise: { 0 }, { vec = 1 }
[23:21:56.989800635] (+0.000005239) softirq_raise: { 0 }, { vec = 9 }
[23:21:56.989807130] (+0.000006495) sched_stat_runtime: { 1 }, { comm = "lttng-consumerd", tid = 1193, runtime = 330710, vruntime = 43368314098 }
[23:21:56.989809993] (+0.000002863) sched_stat_runtime: { 0 }, { comm = "lttng-sessiond", tid = 1181, runtime = 1015313, vruntime = 36976733240 }
[23:21:56.989818514] (+0.000008521) hrtimer_expire_exit: { 0 }, { hrtimer = 3993812192 }
[23:21:56.989819631] (+0.000001117) hrtimer_expire_exit: { 1 }, { hrtimer = 3993865440 }
[23:21:56.989821866] (+0.000002235) hrtimer_start: { 0 }, { hrtimer = 3993812192, function = 3238465232, expires = 79815981000000, softexpires = 79815981000000 }
[23:21:56.989822984] (+0.000001118) hrtimer_start: { 1 }, { hrtimer = 3993865440, function = 3238465232, expires = 79815981000000, softexpires = 79815981000000 }
[23:21:56.989832762] (+0.000009778) softirq_entry: { 1 }, { vec = 1 }
[23:21:56.989833879] (+0.000001117) softirq_entry: { 0 }, { vec = 1 }
[23:21:56.989838069] (+0.000004190) timer_cancel: { 1 }, { timer = 3993871956 }
[23:21:56.989839187] (+0.000001118) timer_cancel: { 0 }, { timer = 3993818708 }
[23:21:56.989841492] (+0.000002305) timer_expire_entry: { 1 }, { timer = 3993871956, now = 79515980, function = 3238277552 }
[23:21:56.989842819] (+0.000001327) timer_expire_entry: { 0 }, { timer = 3993818708, now = 79515980, function = 3238277552 }
[23:21:56.989854831] (+0.000012012) sched_stat_runtime: { 1 }, { comm = "lttng-consumerd", tid = 1193, runtime = 49237, vruntime = 43368363335 }
[23:21:56.989855949] (+0.000001118) sched_stat_runtime: { 0 }, { comm = "lttng-sessiond", tid = 1181, runtime = 45121, vruntime = 36976778361 }
[23:21:56.989861257] (+0.000005308) sched_stat_sleep: { 1 }, { comm = "kworker/1:1", tid = 21, delay = 9451318 }
[23:21:56.989862374] (+0.000001117) sched_stat_sleep: { 0 }, { comm = "kworker/0:0", tid = 4, delay = 9958820 }
[23:21:56.989868241] (+0.000005867) sched_wakeup: { 0 }, { comm = "kworker/0:0", tid = 4, prio = 120, success = 1, target_cpu = 0 }
[23:21:56.989869358] (+0.000001117) sched_wakeup: { 1 }, { comm = "kworker/1:1", tid = 21, prio = 120, success = 1, target_cpu = 1 }
[23:21:56.989877460] (+0.000008102) timer_expire_exit: { 1 }, { timer = 3993871956 }
[23:21:56.989878577] (+0.000001117) timer_expire_exit: { 0 }, { timer = 3993818708 }
.
.
.
You can now safely destroy the trace session (note that this doesn't delete the trace - it's still there in ~/lttng-traces):
root@crownbay:~# lttng destroy
Session auto-20121015-232120 destroyed at /home/root
Note that the trace is saved in a directory of the same name as returned by 'lttng create', under the ~/lttng-traces directory (note that you can change this by supplying your own name to 'lttng create'):
root@crownbay:~# ls -al ~/lttng-traces
drwxrwx--- 3 root root 1024 Oct 15 23:21 .
drwxr-xr-x 5 root root 1024 Oct 15 23:57 ..
drwxrwx--- 3 root root 1024 Oct 15 23:21 auto-20121015-232120
16.5.2.2. Collecting and viewing a userspace trace on the target (inside a shell)
For LTTng userspace tracing, you need to have a properly instrumented userspace program. For this example, we'll use the 'hello' test program generated by the lttng-ust build.
The 'hello' test program isn't installed on the rootfs by the lttng-ust build, so we need to copy it over manually. First cd into the build directory that contains the hello executable:
$ cd build/tmp/work/core2_32-poky-linux/lttng-ust/2.0.5-r0/git/tests/hello/.libs
Copy that over to the target machine:
$ scp hello root@192.168.1.20:
You now have the instrumented lttng 'hello world' test program on the target, ready to test.
First, from the host, ssh to the target:
$ ssh -l root 192.168.1.47
The authenticity of host '192.168.1.47 (192.168.1.47)' can't be established.
RSA key fingerprint is 23:bd:c8:b1:a8:71:52:00:ee:00:4f:64:9e:10:b9:7e.
Are you sure you want to continue connecting (yes/no)? yes
Warning: Permanently added '192.168.1.47' (RSA) to the list of known hosts.
root@192.168.1.47's password:
Once on the target, use these steps to create a trace:
root@crownbay:~# lttng create
Session auto-20190303-021943 created.
Traces will be written in /home/root/lttng-traces/auto-20190303-021943
Enable the events you want to trace (in this case all userspace events):
root@crownbay:~# lttng enable-event --userspace --all
All UST events are enabled in channel channel0
Start the trace:
root@crownbay:~# lttng start
Tracing started for session auto-20190303-021943
Run the instrumented hello world program:
root@crownbay:~# ./hello
Hello, World!
Tracing... done.
And then stop the trace after awhile or after running a particular workload that you want to trace:
root@crownbay:~# lttng stop
Tracing stopped for session auto-20190303-021943
You can now view the trace in text form on the target:
root@crownbay:~# lttng view
[02:31:14.906146544] (+?.?????????) hello:1424 ust_tests_hello:tptest: { cpu_id = 1 }, { intfield = 0, intfield2 = 0x0, longfield = 0, netintfield = 0, netintfieldhex = 0x0, arrfield1 = [ [0] = 1, [1] = 2, [2] = 3 ], arrfield2 = "test", _seqfield1_length = 4, seqfield1 = [ [0] = 116, [1] = 101, [2] = 115, [3] = 116 ], _seqfield2_length = 4, seqfield2 = "test", stringfield = "test", floatfield = 2222, doublefield = 2, boolfield = 1 }
[02:31:14.906170360] (+0.000023816) hello:1424 ust_tests_hello:tptest: { cpu_id = 1 }, { intfield = 1, intfield2 = 0x1, longfield = 1, netintfield = 1, netintfieldhex = 0x1, arrfield1 = [ [0] = 1, [1] = 2, [2] = 3 ], arrfield2 = "test", _seqfield1_length = 4, seqfield1 = [ [0] = 116, [1] = 101, [2] = 115, [3] = 116 ], _seqfield2_length = 4, seqfield2 = "test", stringfield = "test", floatfield = 2222, doublefield = 2, boolfield = 1 }
[02:31:14.906183140] (+0.000012780) hello:1424 ust_tests_hello:tptest: { cpu_id = 1 }, { intfield = 2, intfield2 = 0x2, longfield = 2, netintfield = 2, netintfieldhex = 0x2, arrfield1 = [ [0] = 1, [1] = 2, [2] = 3 ], arrfield2 = "test", _seqfield1_length = 4, seqfield1 = [ [0] = 116, [1] = 101, [2] = 115, [3] = 116 ], _seqfield2_length = 4, seqfield2 = "test", stringfield = "test", floatfield = 2222, doublefield = 2, boolfield = 1 }
[02:31:14.906194385] (+0.000011245) hello:1424 ust_tests_hello:tptest: { cpu_id = 1 }, { intfield = 3, intfield2 = 0x3, longfield = 3, netintfield = 3, netintfieldhex = 0x3, arrfield1 = [ [0] = 1, [1] = 2, [2] = 3 ], arrfield2 = "test", _seqfield1_length = 4, seqfield1 = [ [0] = 116, [1] = 101, [2] = 115, [3] = 116 ], _seqfield2_length = 4, seqfield2 = "test", stringfield = "test", floatfield = 2222, doublefield = 2, boolfield = 1 }
.
.
.
You can now safely destroy the trace session (note that this doesn't delete the trace - it's still there in ~/lttng-traces):
root@crownbay:~# lttng destroy
Session auto-20190303-021943 destroyed at /home/root
16.5.2.3. Manually copying a trace to the host and viewing it in Eclipse (i.e. using Eclipse without network support)
If you already have an LTTng trace on a remote target and would like to view it in Eclipse on the host, you can easily copy it from the target to the host and import it into Eclipse to view it using the LTTng Eclipse plug-in already bundled in the Eclipse (Juno SR1 or greater).
Using the trace we created in the previous section, archive it and copy it to your host system:
root@crownbay:~/lttng-traces# tar zcvf auto-20121015-232120.tar.gz auto-20121015-232120
auto-20121015-232120/
auto-20121015-232120/kernel/
auto-20121015-232120/kernel/metadata
auto-20121015-232120/kernel/channel0_1
auto-20121015-232120/kernel/channel0_0
$ scp root@192.168.1.47:lttng-traces/auto-20121015-232120.tar.gz .
root@192.168.1.47's password:
auto-20121015-232120.tar.gz 100% 1566KB 1.5MB/s 00:01
Unarchive it on the host:
$ gunzip -c auto-20121015-232120.tar.gz | tar xvf -
auto-20121015-232120/
auto-20121015-232120/kernel/
auto-20121015-232120/kernel/metadata
auto-20121015-232120/kernel/channel0_1
auto-20121015-232120/kernel/channel0_0
We can now import the trace into Eclipse and view it:
First, start eclipse and open the 'LTTng Kernel' perspective by selecting the following menu item:
Window | Open Perspective | Other...In the dialog box that opens, select 'LTTng Kernel' from the list.
Back at the main menu, select the following menu item:
File | New | Project...In the dialog box that opens, select the 'Tracing | Tracing Project' wizard and press 'Next>'.
Give the project a name and press 'Finish'.
In the 'Project Explorer' pane under the project you created, right click on the 'Traces' item.
Select 'Import..." and in the dialog that's displayed:
Browse the filesystem and find the select the 'kernel' directory containing the trace you copied from the target e.g. auto-20121015-232120/kernel
'Checkmark' the directory in the tree that's displayed for the trace
Below that, select 'Common Trace Format: Kernel Trace' for the 'Trace Type'
Press 'Finish' to close the dialog
Back in the 'Project Explorer' pane, double-click on the 'kernel' item for the trace you just imported under 'Traces'
You should now see your trace data displayed graphically in several different views in Eclipse:
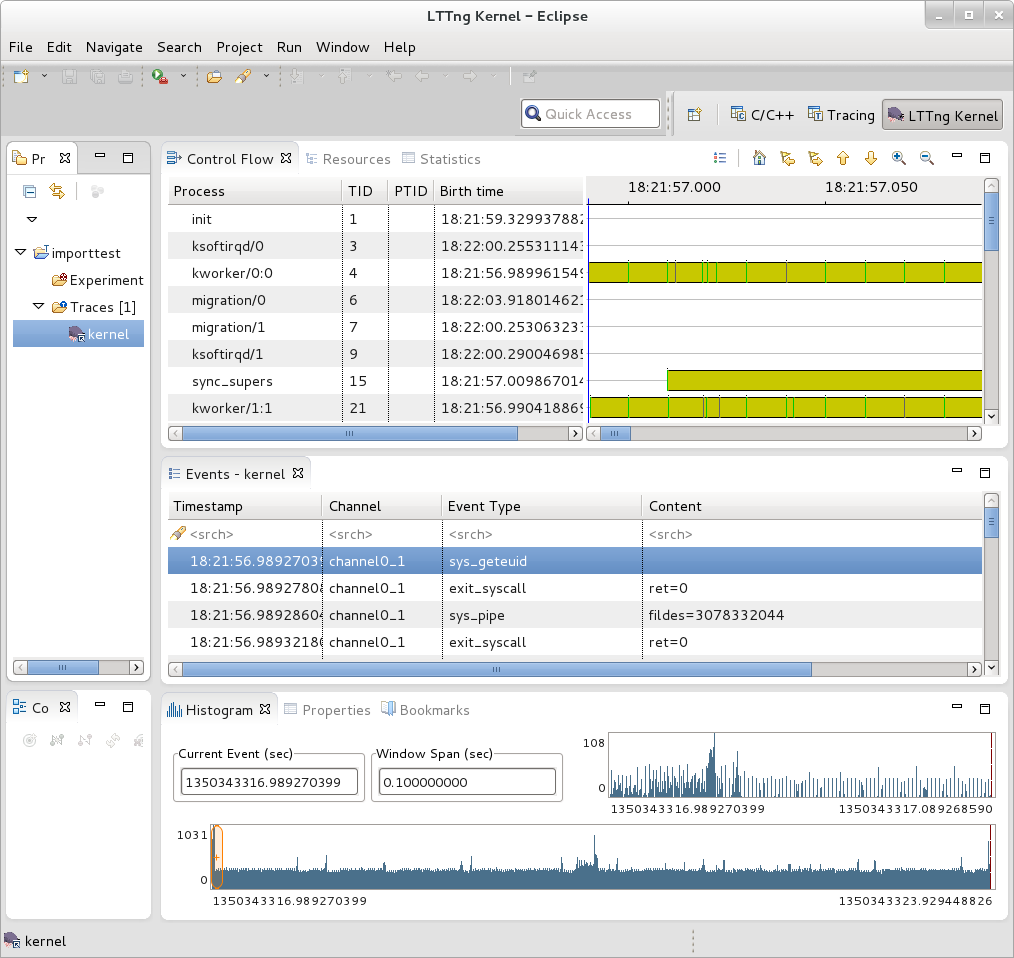 |
You can access extensive help information on how to use the LTTng plug-in to search and analyze captured traces via the Eclipse help system:
Help | Help Contents | LTTng Plug-in User Guide
16.5.2.4. Collecting and viewing a trace in Eclipse
Note
This section on collecting traces remotely doesn't currently work because of Eclipse 'RSE' connectivity problems. Manually tracing on the target, copying the trace files to the host, and viewing the trace in Eclipse on the host as outlined in previous steps does work however - please use the manual steps outlined above to view traces in Eclipse.In order to trace a remote target, you also need to add a 'tracing' group on the target and connect as a user who's part of that group e.g:
# adduser tomz
# groupadd -r tracing
# usermod -a -G tracing tomz
First, start eclipse and open the 'LTTng Kernel' perspective by selecting the following menu item:
Window | Open Perspective | Other...In the dialog box that opens, select 'LTTng Kernel' from the list.
Back at the main menu, select the following menu item:
File | New | Project...In the dialog box that opens, select the 'Tracing | Tracing Project' wizard and press 'Next>'.
Give the project a name and press 'Finish'. That should result in an entry in the 'Project' subwindow.
In the 'Control' subwindow just below it, press 'New Connection'.
Add a new connection, giving it the hostname or IP address of the target system.
Provide the username and password of a qualified user (a member of the 'tracing' group) or root account on the target system.
Provide appropriate answers to whatever else is asked for e.g. 'secure storage password' can be anything you want. If you get an 'RSE Error' it may be due to proxies. It may be possible to get around the problem by changing the following setting:
Window | Preferences | Network ConnectionsSwitch 'Active Provider' to 'Direct'
16.5.3. Documentation
You can find the primary LTTng Documentation on the LTTng Documentation site. The documentation on this site is appropriate for intermediate to advanced software developers who are working in a Linux environment and are interested in efficient software tracing.
For information on LTTng in general, visit the LTTng Project site. You can find a "Getting Started" link on this site that takes you to an LTTng Quick Start.
Finally, you can access extensive help information on how to use the LTTng plug-in to search and analyze captured traces via the Eclipse help system:
Help | Help Contents | LTTng Plug-in User Guide
16.6. blktrace
blktrace is a tool for tracing and reporting low-level disk I/O. blktrace provides the tracing half of the equation; its output can be piped into the blkparse program, which renders the data in a human-readable form and does some basic analysis:
16.6.1. Setup
For this section, we'll assume you've already performed the basic setup outlined in the "General Setup" section.
blktrace is an application that runs on the target system. You can run the entire blktrace and blkparse pipeline on the target, or you can run blktrace in 'listen' mode on the target and have blktrace and blkparse collect and analyze the data on the host (see the "Using blktrace Remotely" section below). For the rest of this section we assume you've ssh'ed to the host and will be running blkrace on the target.
16.6.2. Basic Usage
To record a trace, simply run the 'blktrace' command, giving it the name of the block device you want to trace activity on:
root@crownbay:~# blktrace /dev/sdc
In another shell, execute a workload you want to trace.
root@crownbay:/media/sdc# rm linux-2.6.19.2.tar.bz2; wget http://downloads.yoctoproject.org/mirror/sources/linux-2.6.19.2.tar.bz2; sync
Connecting to downloads.yoctoproject.org (140.211.169.59:80)
linux-2.6.19.2.tar.b 100% |*******************************| 41727k 0:00:00 ETA
Press Ctrl-C in the blktrace shell to stop the trace. It will display how many events were logged, along with the per-cpu file sizes (blktrace records traces in per-cpu kernel buffers and simply dumps them to userspace for blkparse to merge and sort later).
^C=== sdc ===
CPU 0: 7082 events, 332 KiB data
CPU 1: 1578 events, 74 KiB data
Total: 8660 events (dropped 0), 406 KiB data
If you examine the files saved to disk, you see multiple files, one per CPU and with the device name as the first part of the filename:
root@crownbay:~# ls -al
drwxr-xr-x 6 root root 1024 Oct 27 22:39 .
drwxr-sr-x 4 root root 1024 Oct 26 18:24 ..
-rw-r--r-- 1 root root 339938 Oct 27 22:40 sdc.blktrace.0
-rw-r--r-- 1 root root 75753 Oct 27 22:40 sdc.blktrace.1
To view the trace events, simply invoke 'blkparse' in the directory containing the trace files, giving it the device name that forms the first part of the filenames:
root@crownbay:~# blkparse sdc
8,32 1 1 0.000000000 1225 Q WS 3417048 + 8 [jbd2/sdc-8]
8,32 1 2 0.000025213 1225 G WS 3417048 + 8 [jbd2/sdc-8]
8,32 1 3 0.000033384 1225 P N [jbd2/sdc-8]
8,32 1 4 0.000043301 1225 I WS 3417048 + 8 [jbd2/sdc-8]
8,32 1 0 0.000057270 0 m N cfq1225 insert_request
8,32 1 0 0.000064813 0 m N cfq1225 add_to_rr
8,32 1 5 0.000076336 1225 U N [jbd2/sdc-8] 1
8,32 1 0 0.000088559 0 m N cfq workload slice:150
8,32 1 0 0.000097359 0 m N cfq1225 set_active wl_prio:0 wl_type:1
8,32 1 0 0.000104063 0 m N cfq1225 Not idling. st->count:1
8,32 1 0 0.000112584 0 m N cfq1225 fifo= (null)
8,32 1 0 0.000118730 0 m N cfq1225 dispatch_insert
8,32 1 0 0.000127390 0 m N cfq1225 dispatched a request
8,32 1 0 0.000133536 0 m N cfq1225 activate rq, drv=1
8,32 1 6 0.000136889 1225 D WS 3417048 + 8 [jbd2/sdc-8]
8,32 1 7 0.000360381 1225 Q WS 3417056 + 8 [jbd2/sdc-8]
8,32 1 8 0.000377422 1225 G WS 3417056 + 8 [jbd2/sdc-8]
8,32 1 9 0.000388876 1225 P N [jbd2/sdc-8]
8,32 1 10 0.000397886 1225 Q WS 3417064 + 8 [jbd2/sdc-8]
8,32 1 11 0.000404800 1225 M WS 3417064 + 8 [jbd2/sdc-8]
8,32 1 12 0.000412343 1225 Q WS 3417072 + 8 [jbd2/sdc-8]
8,32 1 13 0.000416533 1225 M WS 3417072 + 8 [jbd2/sdc-8]
8,32 1 14 0.000422121 1225 Q WS 3417080 + 8 [jbd2/sdc-8]
8,32 1 15 0.000425194 1225 M WS 3417080 + 8 [jbd2/sdc-8]
8,32 1 16 0.000431968 1225 Q WS 3417088 + 8 [jbd2/sdc-8]
8,32 1 17 0.000435251 1225 M WS 3417088 + 8 [jbd2/sdc-8]
8,32 1 18 0.000440279 1225 Q WS 3417096 + 8 [jbd2/sdc-8]
8,32 1 19 0.000443911 1225 M WS 3417096 + 8 [jbd2/sdc-8]
8,32 1 20 0.000450336 1225 Q WS 3417104 + 8 [jbd2/sdc-8]
8,32 1 21 0.000454038 1225 M WS 3417104 + 8 [jbd2/sdc-8]
8,32 1 22 0.000462070 1225 Q WS 3417112 + 8 [jbd2/sdc-8]
8,32 1 23 0.000465422 1225 M WS 3417112 + 8 [jbd2/sdc-8]
8,32 1 24 0.000474222 1225 I WS 3417056 + 64 [jbd2/sdc-8]
8,32 1 0 0.000483022 0 m N cfq1225 insert_request
8,32 1 25 0.000489727 1225 U N [jbd2/sdc-8] 1
8,32 1 0 0.000498457 0 m N cfq1225 Not idling. st->count:1
8,32 1 0 0.000503765 0 m N cfq1225 dispatch_insert
8,32 1 0 0.000512914 0 m N cfq1225 dispatched a request
8,32 1 0 0.000518851 0 m N cfq1225 activate rq, drv=2
.
.
.
8,32 0 0 58.515006138 0 m N cfq3551 complete rqnoidle 1
8,32 0 2024 58.516603269 3 C WS 3156992 + 16 [0]
8,32 0 0 58.516626736 0 m N cfq3551 complete rqnoidle 1
8,32 0 0 58.516634558 0 m N cfq3551 arm_idle: 8 group_idle: 0
8,32 0 0 58.516636933 0 m N cfq schedule dispatch
8,32 1 0 58.516971613 0 m N cfq3551 slice expired t=0
8,32 1 0 58.516982089 0 m N cfq3551 sl_used=13 disp=6 charge=13 iops=0 sect=80
8,32 1 0 58.516985511 0 m N cfq3551 del_from_rr
8,32 1 0 58.516990819 0 m N cfq3551 put_queue
CPU0 (sdc):
Reads Queued: 0, 0KiB Writes Queued: 331, 26,284KiB
Read Dispatches: 0, 0KiB Write Dispatches: 485, 40,484KiB
Reads Requeued: 0 Writes Requeued: 0
Reads Completed: 0, 0KiB Writes Completed: 511, 41,000KiB
Read Merges: 0, 0KiB Write Merges: 13, 160KiB
Read depth: 0 Write depth: 2
IO unplugs: 23 Timer unplugs: 0
CPU1 (sdc):
Reads Queued: 0, 0KiB Writes Queued: 249, 15,800KiB
Read Dispatches: 0, 0KiB Write Dispatches: 42, 1,600KiB
Reads Requeued: 0 Writes Requeued: 0
Reads Completed: 0, 0KiB Writes Completed: 16, 1,084KiB
Read Merges: 0, 0KiB Write Merges: 40, 276KiB
Read depth: 0 Write depth: 2
IO unplugs: 30 Timer unplugs: 1
Total (sdc):
Reads Queued: 0, 0KiB Writes Queued: 580, 42,084KiB
Read Dispatches: 0, 0KiB Write Dispatches: 527, 42,084KiB
Reads Requeued: 0 Writes Requeued: 0
Reads Completed: 0, 0KiB Writes Completed: 527, 42,084KiB
Read Merges: 0, 0KiB Write Merges: 53, 436KiB
IO unplugs: 53 Timer unplugs: 1
Throughput (R/W): 0KiB/s / 719KiB/s
Events (sdc): 6,592 entries
Skips: 0 forward (0 - 0.0%)
Input file sdc.blktrace.0 added
Input file sdc.blktrace.1 added
The report shows each event that was found in the blktrace data, along with a summary of the overall block I/O traffic during the run. You can look at the blkparse manpage to learn the meaning of each field displayed in the trace listing.
16.6.2.1. Live Mode
blktrace and blkparse are designed from the ground up to be able to operate together in a 'pipe mode' where the stdout of blktrace can be fed directly into the stdin of blkparse:
root@crownbay:~# blktrace /dev/sdc -o - | blkparse -i -
This enables long-lived tracing sessions to run without writing anything to disk, and allows the user to look for certain conditions in the trace data in 'real-time' by viewing the trace output as it scrolls by on the screen or by passing it along to yet another program in the pipeline such as grep which can be used to identify and capture conditions of interest.
There's actually another blktrace command that implements the above pipeline as a single command, so the user doesn't have to bother typing in the above command sequence:
root@crownbay:~# btrace /dev/sdc
16.6.2.2. Using blktrace Remotely
Because blktrace traces block I/O and at the same time normally writes its trace data to a block device, and in general because it's not really a great idea to make the device being traced the same as the device the tracer writes to, blktrace provides a way to trace without perturbing the traced device at all by providing native support for sending all trace data over the network.
To have blktrace operate in this mode, start blktrace on the target system being traced with the -l option, along with the device to trace:
root@crownbay:~# blktrace -l /dev/sdc
server: waiting for connections...
On the host system, use the -h option to connect to the target system, also passing it the device to trace:
$ blktrace -d /dev/sdc -h 192.168.1.43
blktrace: connecting to 192.168.1.43
blktrace: connected!
On the target system, you should see this:
server: connection from 192.168.1.43
In another shell, execute a workload you want to trace.
root@crownbay:/media/sdc# rm linux-2.6.19.2.tar.bz2; wget http://downloads.yoctoproject.org/mirror/sources/linux-2.6.19.2.tar.bz2; sync
Connecting to downloads.yoctoproject.org (140.211.169.59:80)
linux-2.6.19.2.tar.b 100% |*******************************| 41727k 0:00:00 ETA
When it's done, do a Ctrl-C on the host system to stop the trace:
^C=== sdc ===
CPU 0: 7691 events, 361 KiB data
CPU 1: 4109 events, 193 KiB data
Total: 11800 events (dropped 0), 554 KiB data
On the target system, you should also see a trace summary for the trace just ended:
server: end of run for 192.168.1.43:sdc
=== sdc ===
CPU 0: 7691 events, 361 KiB data
CPU 1: 4109 events, 193 KiB data
Total: 11800 events (dropped 0), 554 KiB data
The blktrace instance on the host will save the target output inside a hostname-timestamp directory:
$ ls -al
drwxr-xr-x 10 root root 1024 Oct 28 02:40 .
drwxr-sr-x 4 root root 1024 Oct 26 18:24 ..
drwxr-xr-x 2 root root 1024 Oct 28 02:40 192.168.1.43-2012-10-28-02:40:56
cd into that directory to see the output files:
$ ls -l
-rw-r--r-- 1 root root 369193 Oct 28 02:44 sdc.blktrace.0
-rw-r--r-- 1 root root 197278 Oct 28 02:44 sdc.blktrace.1
And run blkparse on the host system using the device name:
$ blkparse sdc
8,32 1 1 0.000000000 1263 Q RM 6016 + 8 [ls]
8,32 1 0 0.000036038 0 m N cfq1263 alloced
8,32 1 2 0.000039390 1263 G RM 6016 + 8 [ls]
8,32 1 3 0.000049168 1263 I RM 6016 + 8 [ls]
8,32 1 0 0.000056152 0 m N cfq1263 insert_request
8,32 1 0 0.000061600 0 m N cfq1263 add_to_rr
8,32 1 0 0.000075498 0 m N cfq workload slice:300
.
.
.
8,32 0 0 177.266385696 0 m N cfq1267 arm_idle: 8 group_idle: 0
8,32 0 0 177.266388140 0 m N cfq schedule dispatch
8,32 1 0 177.266679239 0 m N cfq1267 slice expired t=0
8,32 1 0 177.266689297 0 m N cfq1267 sl_used=9 disp=6 charge=9 iops=0 sect=56
8,32 1 0 177.266692649 0 m N cfq1267 del_from_rr
8,32 1 0 177.266696560 0 m N cfq1267 put_queue
CPU0 (sdc):
Reads Queued: 0, 0KiB Writes Queued: 270, 21,708KiB
Read Dispatches: 59, 2,628KiB Write Dispatches: 495, 39,964KiB
Reads Requeued: 0 Writes Requeued: 0
Reads Completed: 90, 2,752KiB Writes Completed: 543, 41,596KiB
Read Merges: 0, 0KiB Write Merges: 9, 344KiB
Read depth: 2 Write depth: 2
IO unplugs: 20 Timer unplugs: 1
CPU1 (sdc):
Reads Queued: 688, 2,752KiB Writes Queued: 381, 20,652KiB
Read Dispatches: 31, 124KiB Write Dispatches: 59, 2,396KiB
Reads Requeued: 0 Writes Requeued: 0
Reads Completed: 0, 0KiB Writes Completed: 11, 764KiB
Read Merges: 598, 2,392KiB Write Merges: 88, 448KiB
Read depth: 2 Write depth: 2
IO unplugs: 52 Timer unplugs: 0
Total (sdc):
Reads Queued: 688, 2,752KiB Writes Queued: 651, 42,360KiB
Read Dispatches: 90, 2,752KiB Write Dispatches: 554, 42,360KiB
Reads Requeued: 0 Writes Requeued: 0
Reads Completed: 90, 2,752KiB Writes Completed: 554, 42,360KiB
Read Merges: 598, 2,392KiB Write Merges: 97, 792KiB
IO unplugs: 72 Timer unplugs: 1
Throughput (R/W): 15KiB/s / 238KiB/s
Events (sdc): 9,301 entries
Skips: 0 forward (0 - 0.0%)
You should see the trace events and summary just as you would have if you'd run the same command on the target.
16.6.2.3. Tracing Block I/O via 'ftrace'
It's also possible to trace block I/O using only trace events subsystem, which can be useful for casual tracing if you don't want to bother dealing with the userspace tools.
To enable tracing for a given device, use /sys/block/xxx/trace/enable, where xxx is the device name. This for example enables tracing for /dev/sdc:
root@crownbay:/sys/kernel/debug/tracing# echo 1 > /sys/block/sdc/trace/enable
Once you've selected the device(s) you want to trace, selecting the 'blk' tracer will turn the blk tracer on:
root@crownbay:/sys/kernel/debug/tracing# cat available_tracers
blk function_graph function nop
root@crownbay:/sys/kernel/debug/tracing# echo blk > current_tracer
Execute the workload you're interested in:
root@crownbay:/sys/kernel/debug/tracing# cat /media/sdc/testfile.txt
And look at the output (note here that we're using 'trace_pipe' instead of trace to capture this trace - this allows us to wait around on the pipe for data to appear):
root@crownbay:/sys/kernel/debug/tracing# cat trace_pipe
cat-3587 [001] d..1 3023.276361: 8,32 Q R 1699848 + 8 [cat]
cat-3587 [001] d..1 3023.276410: 8,32 m N cfq3587 alloced
cat-3587 [001] d..1 3023.276415: 8,32 G R 1699848 + 8 [cat]
cat-3587 [001] d..1 3023.276424: 8,32 P N [cat]
cat-3587 [001] d..2 3023.276432: 8,32 I R 1699848 + 8 [cat]
cat-3587 [001] d..1 3023.276439: 8,32 m N cfq3587 insert_request
cat-3587 [001] d..1 3023.276445: 8,32 m N cfq3587 add_to_rr
cat-3587 [001] d..2 3023.276454: 8,32 U N [cat] 1
cat-3587 [001] d..1 3023.276464: 8,32 m N cfq workload slice:150
cat-3587 [001] d..1 3023.276471: 8,32 m N cfq3587 set_active wl_prio:0 wl_type:2
cat-3587 [001] d..1 3023.276478: 8,32 m N cfq3587 fifo= (null)
cat-3587 [001] d..1 3023.276483: 8,32 m N cfq3587 dispatch_insert
cat-3587 [001] d..1 3023.276490: 8,32 m N cfq3587 dispatched a request
cat-3587 [001] d..1 3023.276497: 8,32 m N cfq3587 activate rq, drv=1
cat-3587 [001] d..2 3023.276500: 8,32 D R 1699848 + 8 [cat]
And this turns off tracing for the specified device:
root@crownbay:/sys/kernel/debug/tracing# echo 0 > /sys/block/sdc/trace/enable
16.6.3. Documentation
Online versions of the man pages for the commands discussed in this section can be found here:
The above manpages, along with manpages for the other blktrace utilities (btt, blkiomon, etc) can be found in the /doc directory of the blktrace tools git repo:
$ git clone git://git.kernel.dk/blktrace.git
Chapter 17. Real-World Examples
This chapter contains real-world examples.
17.1. Slow Write Speed on Live Images
In one of our previous releases (denzil), users noticed that booting off of a live image and writing to disk was noticeably slower. This included the boot itself, especially the first one, since first boots tend to do a significant amount of writing due to certain post-install scripts.
The problem (and solution) was discovered by using the Yocto tracing tools, in this case 'perf stat', 'perf script', 'perf record' and 'perf report'.
See all the unvarnished details of how this bug was diagnosed and solved here: Yocto Bug #3049
 |
Chapter 18. Introduction
18.1. Introduction
This manual provides reference information for the current release of the Yocto Project. The Yocto Project is an open-source collaboration project focused on embedded Linux developers. Amongst other things, the Yocto Project uses the OpenEmbedded build system, which is based on the Poky project, to construct complete Linux images. You can find complete introductory and getting started information on the Yocto Project by reading the Yocto Project Quick Start.
For task-based information using the Yocto Project, see the Yocto Project Development Manual and the Yocto Project Linux Kernel Development Manual. For Board Support Package (BSP) structure information, see the Yocto Project Board Support Package (BSP) Developer's Guide. For information on how to use a Software Development Kit, (SDK), see the Yocto Project Software Development Kit (SDK) Developer's Guide. You can find information on tracing and profiling in the Yocto Project Profiling and Tracing Manual. For information on BitBake, which is the task execution tool the OpenEmbedded build system is based on, see the BitBake User Manual. Finally, you can also find lots of Yocto Project information on the Yocto Project website.
18.2. Documentation Overview
This reference manual consists of the following:
Using the Yocto Project: Provides an overview of the components that make up the Yocto Project followed by information about debugng images created in the Yocto Project.
A Closer Look at the Yocto Project Development Environment: Provides a more detailed look at the Yocto Project development environment within the context of development.
Technical Details: Describes fundamental Yocto Project components as well as an explanation behind how the Yocto Project uses shared state (sstate) cache to speed build time.
Migrating to a Newer Yocto Project Release: Describes release-specific information that helps you move from one Yocto Project Release to another.
Directory Structure: Describes the Source Directory created either by unpacking a released Yocto Project tarball on your host development system, or by cloning the upstream Poky Git repository.
Classes: Describes the classes used in the Yocto Project.
Tasks: Describes the tasks defined by the OpenEmbedded build system.
QA Error and Warning Messages: Lists and describes QA warning and error messages.
Images: Describes the standard images that the Yocto Project supports.
Features: Describes mechanisms for creating distribution, machine, and image features during the build process using the OpenEmbedded build system.
Variables Glossary: Presents most variables used by the OpenEmbedded build system, which uses BitBake. Entries describe the function of the variable and how to apply them.
Variable Context: Provides variable locality or context.
FAQ: Provides answers for commonly asked questions in the Yocto Project development environment.
Contributing to the Yocto Project: Provides guidance on how you can contribute back to the Yocto Project.
18.3. System Requirements
For general Yocto Project system requirements, see the "Setting Up to Use the Yocto Project" section in the Yocto Project Quick Start. The remainder of this section provides details on system requirements not covered in the Yocto Project Quick Start.
18.3.1. Supported Linux Distributions
Currently, the Yocto Project is supported on the following distributions:
Note
Yocto Project releases are tested against the stable Linux distributions in the following list. The Yocto Project should work on other distributions but validation is not performed against them.
In particular, the Yocto Project does not support and currently has no plans to support rolling-releases or development distributions due to their constantly changing nature. We welcome patches and bug reports, but keep in mind that our priority is on the supported platforms listed below.
If you encounter problems, please go to Yocto Project Bugzilla and submit a bug. We are interested in hearing about your experience.
Ubuntu 14.04 (LTS)
Ubuntu 14.10
Ubuntu 15.04
Ubuntu 15.10
Fedora release 21
Fedora release 22
CentOS release 6.x
CentOS release 7.x
Debian GNU/Linux 7.x (Wheezy)
Debian GNU/Linux 8.x (Jessie)
openSUSE 13.2
Note
While the Yocto Project Team attempts to ensure all Yocto Project releases are one hundred percent compatible with each officially supported Linux distribution, instances might exist where you encounter a problem while using the Yocto Project on a specific distribution.18.3.2. Required Packages for the Host Development System
The list of packages you need on the host development system can be large when covering all build scenarios using the Yocto Project. This section provides required packages according to Linux distribution and function.
18.3.2.1. Ubuntu and Debian
The following list shows the required packages by function given a supported Ubuntu or Debian Linux distribution:
Note
If your build system has theoss4-dev package installed, you
might experience QEMU build failures due to the package
installing its own custom
/usr/include/linux/soundcard.h on
the Debian system.
If you run into this situation, either of the following
solutions exist:
$ sudo apt-get build-dep qemu
$ sudo apt-get remove oss4-dev
Essentials: Packages needed to build an image on a headless system:
$ sudo apt-get install gawk wget git-core diffstat unzip texinfo gcc-multilib \ build-essential chrpath socatGraphical and Eclipse Plug-In Extras: Packages recommended if the host system has graphics support or if you are going to use the Eclipse IDE:
$ sudo apt-get install libsdl1.2-dev xtermDocumentation: Packages needed if you are going to build out the Yocto Project documentation manuals:
$ sudo apt-get install make xsltproc docbook-utils fop dblatex xmltoSDK Installer Extras: Packages needed if you are going to be using the the standard or extensible SDK:
$ sudo apt-get install autoconf automake libtool libglib2.0-dev libarchive-devOpenEmbedded Self-Test (
oe-selftest): Packages needed if you are going to runoe-selftest:$ sudo apt-get install python-git
18.3.2.2. Fedora Packages
The following list shows the required packages by function given a supported Fedora Linux distribution:
Essentials: Packages needed to build an image for a headless system:
$ sudo dnf install gawk make wget tar bzip2 gzip python unzip perl patch \ diffutils diffstat git cpp gcc gcc-c++ glibc-devel texinfo chrpath \ ccache perl-Data-Dumper perl-Text-ParseWords perl-Thread-Queue perl-bignum socat \ findutils whichGraphical and Eclipse Plug-In Extras: Packages recommended if the host system has graphics support or if you are going to use the Eclipse IDE:
$ sudo dnf install SDL-devel xtermDocumentation: Packages needed if you are going to build out the Yocto Project documentation manuals:
$ sudo dnf install make docbook-style-dsssl docbook-style-xsl \ docbook-dtds docbook-utils fop libxslt dblatex xmlto xsltprocSDK Installer Extras: Packages needed if you are going to be using the standard or extensible SDK:
$ sudo dnf install autoconf automake libtool glib2-devel libarchive-develOpenEmbedded Self-Test (
oe-selftest): Packages needed if you are going to runoe-selftest:$ sudo dnf install GitPython
18.3.2.3. openSUSE Packages
The following list shows the required packages by function given a supported openSUSE Linux distribution:
Essentials: Packages needed to build an image for a headless system:
$ sudo zypper install python gcc gcc-c++ git chrpath make wget python-xml \ diffstat makeinfo python-curses patch socatGraphical and Eclipse Plug-In Extras: Packages recommended if the host system has graphics support or if you are going to use the Eclipse IDE:
$ sudo zypper install libSDL-devel xtermDocumentation: Packages needed if you are going to build out the Yocto Project documentation manuals:
$ sudo zypper install make fop xsltproc dblatex xmltoSDK Installer Extras: Packages needed if you are going to be using the standard or extensible SDK:
$ sudo zypper install autoconf automake libtool glib2-devel libarchive-develOpenEmbedded Self-Test (
oe-selftest): Packages needed if you are going to runoe-selftest:$ sudo zypper install python-GitPython
18.3.2.4. CentOS Packages
The following list shows the required packages by function given a supported CentOS Linux distribution:
Note
For CentOS 6.x, some of the versions of the components provided by the distribution are too old (e.g. Git, Python, and tar). It is recommended that you install the buildtools in order to provide versions that will work with the OpenEmbedded build system. For information on how to install the buildtools tarball, see the "Required Git, Tar, and Python Versions" section.
Essentials: Packages needed to build an image for a headless system:
$ sudo yum install gawk make wget tar bzip2 gzip python unzip perl patch \ diffutils diffstat git cpp gcc gcc-c++ glibc-devel texinfo chrpath socat \ perl-Data-Dumper perl-Text-ParseWords perl-Thread-QueueGraphical and Eclipse Plug-In Extras: Packages recommended if the host system has graphics support or if you are going to use the Eclipse IDE:
$ sudo yum install SDL-devel xtermDocumentation: Packages needed if you are going to build out the Yocto Project documentation manuals:
$ sudo yum install make docbook-style-dsssl docbook-style-xsl \ docbook-dtds docbook-utils fop libxslt dblatex xmlto xsltprocSDK Installer Extras: Packages needed if you are going to be using the standard or extensible SDK:
$ sudo yum install autoconf automake libtool glib2-devel libarchive-develOpenEmbedded Self-Test (
oe-selftest): Packages needed if you are going to runoe-selftest:$ sudo yum install GitPython
18.3.3. Required Git, tar, and Python Versions
In order to use the build system, your host development system must meet the following version requirements for Git, tar, and Python:
Git 1.8.3.1 or greater
tar 1.24 or greater
Python 2.7.3 or greater not including Python 3.x, which is not supported.
If your host development system does not meet all these requirements,
you can resolve this by installing a buildtools
tarball that contains these tools.
You can get the tarball one of two ways: download a pre-built
tarball or use BitBake to build the tarball.
18.3.3.1. Downloading a Pre-Built buildtools Tarball
Downloading and running a pre-built buildtools installer is the easiest of the two methods by which you can get these tools:
Locate and download the
*.shat http://downloads.yoctoproject.org/releases/yocto/yocto-2.1.2/buildtools/.Execute the installation script. Here is an example:
$ sh poky-glibc-x86_64-buildtools-tarball-x86_64-buildtools-nativesdk-standalone-2.1.2.shDuring execution, a prompt appears that allows you to choose the installation directory. For example, you could choose the following:
/home/your-username/buildtoolsSource the tools environment setup script by using a command like the following:
$ source /home/your_username/buildtools/environment-setup-i586-poky-linuxOf course, you need to supply your installation directory and be sure to use the right file (i.e. i585 or x86-64).
After you have sourced the setup script, the tools are added to
PATHand any other environment variables required to run the tools are initialized. The results are working versions versions of Git, tar, Python andchrpath.
18.3.3.2. Building Your Own buildtools Tarball
Building and running your own buildtools installer applies
only when you have a build host that can already run BitBake.
In this case, you use that machine to build the
.sh file and then
take steps to transfer and run it on a
machine that does not meet the minimal Git, tar, and Python
requirements.
Here are the steps to take to build and run your own buildtools installer:
On the machine that is able to run BitBake, be sure you have set up your build environment with the setup script (
oe-init-build-envoroe-init-build-env-memres).Run the BitBake command to build the tarball:
$ bitbake buildtools-tarballNote
TheSDKMACHINEvariable in yourlocal.conffile determines whether you build tools for a 32-bit or 64-bit system.Once the build completes, you can find the
.shfile that installs the tools in thetmp/deploy/sdksubdirectory of the Build Directory. The installer file has the string "buildtools" in the name.Transfer the
.shfile from the build host to the machine that does not meet the Git, tar, or Python requirements.On the machine that does not meet the requirements, run the
.shfile to install the tools. Here is an example:$ sh poky-glibc-x86_64-buildtools-tarball-x86_64-buildtools-nativesdk-standalone-2.1.2.shDuring execution, a prompt appears that allows you to choose the installation directory. For example, you could choose the following:
/home/your_username/buildtoolsSource the tools environment setup script by using a command like the following:
$ source /home/your_username/buildtools/environment-setup-i586-poky-linuxOf course, you need to supply your installation directory and be sure to use the right file (i.e. i585 or x86-64).
After you have sourced the setup script, the tools are added to
PATHand any other environment variables required to run the tools are initialized. The results are working versions versions of Git, tar, Python andchrpath.
18.4. Obtaining the Yocto Project
The Yocto Project development team makes the Yocto Project available through a number of methods:
Source Repositories: Working from a copy of the upstream
pokyrepository is the preferred method for obtaining and using a Yocto Project release. You can view the Yocto Project Source Repositories at http://git.yoctoproject.org/cgit.cgi. In particular, you can find thepokyrepository at http://git.yoctoproject.org/cgit/cgit.cgi/poky/.Releases: Stable, tested releases are available as tarballs through http://downloads.yoctoproject.org/releases/yocto/.
Nightly Builds: These tarball releases are available at http://autobuilder.yoctoproject.org/pub/nightly/. These builds include Yocto Project releases, SDK installation scripts, and experimental builds.
Yocto Project Website: You can find tarball releases of the Yocto Project and supported BSPs at the Yocto Project website. Along with these downloads, you can find lots of other information at this site.
18.5. Development Checkouts
Development using the Yocto Project requires a local Source Directory. You can set up the Source Directory by cloning a copy of the upstream poky Git repository. For information on how to do this, see the "Getting Set Up" section in the Yocto Project Development Manual.
Chapter 19. Using the Yocto Project
This chapter describes common usage for the Yocto Project. The information is introductory in nature as other manuals in the Yocto Project documentation set provide more details on how to use the Yocto Project.
19.1. Running a Build
This section provides a summary of the build process and provides information for less obvious aspects of the build process. For general information on how to build an image using the OpenEmbedded build system, see the "Building Images" section of the Yocto Project Quick Start.
19.1.1. Build Overview
In the development environment you will need to build an image whenever you change hardware support, add or change system libraries, or add or change services that have dependencies.

Building an Image
The first thing you need to do is set up the OpenEmbedded build
environment by sourcing an environment setup script
(i.e.
oe-init-build-env
or
oe-init-build-env-memres).
Here is an example:
$ source oe-init-build-env [build_dir]
The build_dir argument is optional and specifies the directory the
OpenEmbedded build system uses for the build -
the Build Directory.
If you do not specify a Build Directory, it defaults to a directory
named build in your current working directory.
A common practice is to use a different Build Directory for different targets.
For example, ~/build/x86 for a qemux86
target, and ~/build/arm for a qemuarm target.
Once the build environment is set up, you can build a target using:
$ bitbake target
The target is the name of the recipe you want to build.
Common targets are the images in meta/recipes-core/images,
meta/recipes-sato/images, etc. all found in the
Source Directory.
Or, the target can be the name of a recipe for a specific piece of software such as
BusyBox.
For more details about the images the OpenEmbedded build system supports, see the
"Images" chapter.
Note
Building an image without GNU General Public License Version 3 (GPLv3), or similarly licensed, components is supported for only minimal and base images. See the "Images" chapter for more information.19.1.2. Building an Image Using GPL Components
When building an image using GPL components, you need to maintain your original settings and not switch back and forth applying different versions of the GNU General Public License. If you rebuild using different versions of GPL, dependency errors might occur due to some components not being rebuilt.
19.2. Installing and Using the Result
Once an image has been built, it often needs to be installed.
The images and kernels built by the OpenEmbedded build system are placed in the
Build Directory in
tmp/deploy/images.
For information on how to run pre-built images such as qemux86
and qemuarm, see the
Yocto Project Software Development Kit (SDK) Developer's Guide.
For information about how to install these images, see the documentation for your
particular board or machine.
19.3. Debugging Build Failures
The exact method for debugging build failures depends on the nature of the problem and on the system's area from which the bug originates. Standard debugging practices such as comparison against the last known working version with examination of the changes and the re-application of steps to identify the one causing the problem are valid for the Yocto Project just as they are for any other system. Even though it is impossible to detail every possible potential failure, this section provides some general tips to aid in debugging.
A useful feature for debugging is the error reporting tool. Configuring the Yocto Project to use this tool causes the OpenEmbedded build system to produce error reporting commands as part of the console output. You can enter the commands after the build completes to log error information into a common database, that can help you figure out what might be going wrong. For information on how to enable and use this feature, see the "Using the Error Reporting Tool" section in the Yocto Project Development Manual.
For discussions on debugging, see the "Debugging With the GNU Project Debugger (GDB) Remotely" section in the Yocto Project Developer's Manual and the "Working within Eclipse" section in the Yocto Project Software Development Kit (SDK) Developer's Guide.
Note
The remainder of this section presents many examples of thebitbake command.
You can learn about BitBake by reading the
BitBake User Manual.
19.3.1. Task Failures
The log file for shell tasks is available in
${WORKDIR}/temp/log.do_.
For example, the taskname.piddo_compile task for the QEMU minimal image for the x86
machine (qemux86) might be
tmp/work/qemux86-poky-linux/core-image-minimal/1.0-r0/temp/log.do_compile.20830.
To see what
BitBake
runs to generate that log, look at the corresponding
run.do_ file located in the same directory.
taskname.pid
Presently, the output from Python tasks is sent directly to the console.
19.3.2. Running Specific Tasks
Any given package consists of a set of tasks.
The standard BitBake behavior in most cases is:
do_fetch,
do_unpack,
do_patch, do_configure,
do_compile, do_install,
do_package,
do_package_write_*, and
do_build.
The default task is do_build and any tasks
on which it depends build first.
Some tasks, such as do_devshell, are not part
of the default build chain.
If you wish to run a task that is not part of the default build
chain, you can use the -c option in BitBake.
Here is an example:
$ bitbake matchbox-desktop -c devshell
If you wish to rerun a task, use the -f force
option.
For example, the following sequence forces recompilation after
changing files in the work directory.
$ bitbake matchbox-desktop
.
.
make some changes to the source code in the work directory
.
.
$ bitbake matchbox-desktop -c compile -f
$ bitbake matchbox-desktop
This sequence first builds and then recompiles
matchbox-desktop.
The last command reruns all tasks (basically the packaging tasks)
after the compile.
BitBake recognizes that the do_compile
task was rerun and therefore understands that the other tasks
also need to be run again.
You can view a list of tasks in a given package by running the
do_listtasks task as follows:
$ bitbake matchbox-desktop -c listtasks
The results appear as output to the console and are also in the
file ${WORKDIR}/temp/log.do_listtasks.
19.3.3. Dependency Graphs
Sometimes it can be hard to see why BitBake wants to build
other packages before building a given package you have specified.
The bitbake -g command
creates the targetnamepn-buildlist,
pn-depends.dot,
package-depends.dot, and
task-depends.dot files in the current
directory.
These files show what will be built and the package and task
dependencies, which are useful for debugging problems.
You can use the
bitbake -g -u depexp
command to display the results in a more human-readable form.
targetname
19.3.4. General BitBake Problems
You can see debug output from BitBake by using the -D option.
The debug output gives more information about what BitBake
is doing and the reason behind it.
Each -D option you use increases the logging level.
The most common usage is -DDD.
The output from bitbake -DDD -v targetname can reveal why
BitBake chose a certain version of a package or why BitBake
picked a certain provider.
This command could also help you in a situation where you think BitBake did something
unexpected.
19.3.5. Development Host System Issues
Sometimes issues on the host development system can cause your build to fail. Following are known, host-specific problems. Be sure to always consult the Release Notes for a look at all release-related issues.
glibc-initialfails to build: If your development host system has the unpatchedGNU Make 3.82, thedo_installtask fails forglibc-initialduring the build.Typically, every distribution that ships
GNU Make 3.82as the default already has the patched version. However, some distributions, such as Debian, haveGNU Make 3.82as an option, which is unpatched. You will see this error on these types of distributions. Switch toGNU Make 3.81or patch yourmaketo solve the problem.
19.3.6. Building with No Dependencies
To build a specific recipe (.bb file),
you can use the following command form:
$ bitbake -b somepath/somerecipe.bb
This command form does not check for dependencies. Consequently, you should use it only when you know existing dependencies have been met.
Note
You can also specify fragments of the filename. In this case, BitBake checks for a unique match.
19.3.7. Variables
You can use the -e BitBake option to
display the parsing environment for a configuration.
The following displays the general parsing environment:
$ bitbake -e
This next example shows the parsing environment for a specific recipe:
$ bitbake -e recipename
19.3.8. Recipe Logging Mechanisms
Best practices exist while writing recipes that both log build progress and act on build conditions such as warnings and errors. Both Python and Bash language bindings exist for the logging mechanism:
Python: For Python functions, BitBake supports several loglevels:
bb.fatal,bb.error,bb.warn,bb.note,bb.plain, andbb.debug.Bash: For Bash functions, the same set of loglevels exist and are accessed with a similar syntax:
bbfatal,bberror,bbwarn,bbnote,bbplain, andbbdebug.
For guidance on how logging is handled in both Python and Bash recipes, see the
logging.bbclass file in the
meta/classes folder of the
Source Directory.
19.3.8.1. Logging With Python
When creating recipes using Python and inserting code that handles build logs, keep in mind the goal is to have informative logs while keeping the console as "silent" as possible. Also, if you want status messages in the log, use the "debug" loglevel.
Following is an example written in Python.
The code handles logging for a function that determines the
number of tasks needed to be run.
See the
"do_listtasks"
section for additional information:
python do_listtasks() {
bb.debug(2, "Starting to figure out the task list")
if noteworthy_condition:
bb.note("There are 47 tasks to run")
bb.debug(2, "Got to point xyz")
if warning_trigger:
bb.warn("Detected warning_trigger, this might be a problem later.")
if recoverable_error:
bb.error("Hit recoverable_error, you really need to fix this!")
if fatal_error:
bb.fatal("fatal_error detected, unable to print the task list")
bb.plain("The tasks present are abc")
bb.debug(2, "Finished figuring out the tasklist")
}
19.3.8.2. Logging With Bash
When creating recipes using Bash and inserting code that handles build logs, you have the same goals - informative with minimal console output. The syntax you use for recipes written in Bash is similar to that of recipes written in Python described in the previous section.
Following is an example written in Bash.
The code logs the progress of the do_my_function function.
do_my_function() {
bbdebug 2 "Running do_my_function"
if [ exceptional_condition ]; then
bbnote "Hit exceptional_condition"
fi
bbdebug 2 "Got to point xyz"
if [ warning_trigger ]; then
bbwarn "Detected warning_trigger, this might cause a problem later."
fi
if [ recoverable_error ]; then
bberror "Hit recoverable_error, correcting"
fi
if [ fatal_error ]; then
bbfatal "fatal_error detected"
fi
bbdebug 2 "Completed do_my_function"
}
19.3.9. Other Tips
Here are some other tips that you might find useful:
When adding new packages, it is worth watching for undesirable items making their way into compiler command lines. For example, you do not want references to local system files like
/usr/lib/or/usr/include/.If you want to remove the
psplashboot splashscreen, addpsplash=falseto the kernel command line. Doing so preventspsplashfrom loading and thus allows you to see the console. It is also possible to switch out of the splashscreen by switching the virtual console (e.g. Fn+Left or Fn+Right on a Zaurus).
19.4. Maintaining Build Output Quality
Many factors can influence the quality of a build. For example, if you upgrade a recipe to use a new version of an upstream software package or you experiment with some new configuration options, subtle changes can occur that you might not detect until later. Consider the case where your recipe is using a newer version of an upstream package. In this case, a new version of a piece of software might introduce an optional dependency on another library, which is auto-detected. If that library has already been built when the software is building, the software will link to the built library and that library will be pulled into your image along with the new software even if you did not want the library.
The
buildhistory
class exists to help you maintain
the quality of your build output.
You can use the class to highlight unexpected and possibly unwanted
changes in the build output.
When you enable build history, it records information about the contents of
each package and image and then commits that information to a local Git
repository where you can examine the information.
The remainder of this section describes the following:
How you can enable and disable build history
How to understand what the build history contains
How to limit the information used for build history
How to examine the build history from both a command-line and web interface
19.4.1. Enabling and Disabling Build History
Build history is disabled by default.
To enable it, add the following INHERIT
statement and set the
BUILDHISTORY_COMMIT
variable to "1" at the end of your
conf/local.conf file found in the
Build Directory:
INHERIT += "buildhistory"
BUILDHISTORY_COMMIT = "1"
Enabling build history as previously described causes the build process to collect build output information and commit it to a local Git repository.
Note
Enabling build history increases your build times slightly, particularly for images, and increases the amount of disk space used during the build.
You can disable build history by removing the previous statements
from your conf/local.conf file.
19.4.2. Understanding What the Build History Contains
Build history information is kept in
${TOPDIR}/buildhistory
in the Build Directory as defined by the
BUILDHISTORY_DIR
variable.
The following is an example abbreviated listing:
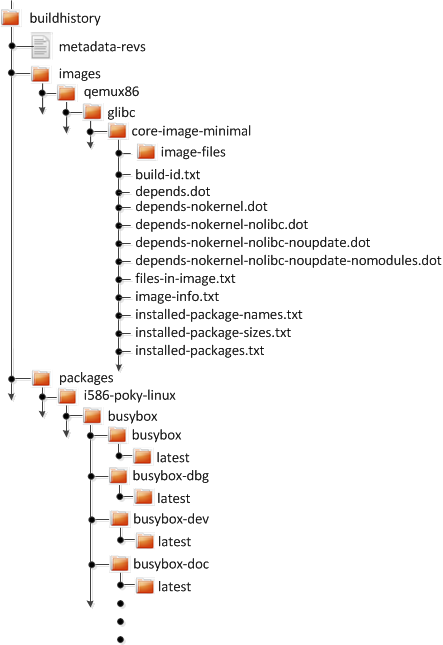 |
At the top level, there is a metadata-revs file
that lists the revisions of the repositories for the layers enabled
when the build was produced.
The rest of the data splits into separate
packages, images and
sdk directories, the contents of which are
described below.
19.4.2.1. Build History Package Information
The history for each package contains a text file that has
name-value pairs with information about the package.
For example, buildhistory/packages/i586-poky-linux/busybox/busybox/latest
contains the following:
PV = 1.22.1
PR = r32
RPROVIDES =
RDEPENDS = glibc (>= 2.20) update-alternatives-opkg
RRECOMMENDS = busybox-syslog busybox-udhcpc update-rc.d
PKGSIZE = 540168
FILES = /usr/bin/* /usr/sbin/* /usr/lib/busybox/* /usr/lib/lib*.so.* \
/etc /com /var /bin/* /sbin/* /lib/*.so.* /lib/udev/rules.d \
/usr/lib/udev/rules.d /usr/share/busybox /usr/lib/busybox/* \
/usr/share/pixmaps /usr/share/applications /usr/share/idl \
/usr/share/omf /usr/share/sounds /usr/lib/bonobo/servers
FILELIST = /bin/busybox /bin/busybox.nosuid /bin/busybox.suid /bin/sh \
/etc/busybox.links.nosuid /etc/busybox.links.suid
Most of these name-value pairs correspond to variables used
to produce the package.
The exceptions are FILELIST, which is the
actual list of files in the package, and
PKGSIZE, which is the total size of files
in the package in bytes.
There is also a file corresponding to the recipe from which the
package came (e.g.
buildhistory/packages/i586-poky-linux/busybox/latest):
PV = 1.22.1
PR = r32
DEPENDS = initscripts kern-tools-native update-rc.d-native \
virtual/i586-poky-linux-compilerlibs virtual/i586-poky-linux-gcc \
virtual/libc virtual/update-alternatives
PACKAGES = busybox-ptest busybox-httpd busybox-udhcpd busybox-udhcpc \
busybox-syslog busybox-mdev busybox-hwclock busybox-dbg \
busybox-staticdev busybox-dev busybox-doc busybox-locale busybox
Finally, for those recipes fetched from a version control
system (e.g., Git), a file exists that lists source revisions
that are specified in the recipe and lists the actual revisions
used during the build.
Listed and actual revisions might differ when
SRCREV
is set to
${AUTOREV}.
Here is an example assuming
buildhistory/packages/qemux86-poky-linux/linux-yocto/latest_srcrev):
# SRCREV_machine = "38cd560d5022ed2dbd1ab0dca9642e47c98a0aa1"
SRCREV_machine = "38cd560d5022ed2dbd1ab0dca9642e47c98a0aa1"
# SRCREV_meta = "a227f20eff056e511d504b2e490f3774ab260d6f"
SRCREV_meta = "a227f20eff056e511d504b2e490f3774ab260d6f"
You can use the buildhistory-collect-srcrevs
command with the -a option to
collect the stored SRCREV values
from build history and report them in a format suitable for
use in global configuration (e.g.,
local.conf or a distro include file) to
override floating AUTOREV values to a
fixed set of revisions.
Here is some example output from this command:
$ buildhistory-collect-srcrevs -a
# i586-poky-linux
SRCREV_pn-glibc = "b8079dd0d360648e4e8de48656c5c38972621072"
SRCREV_pn-glibc-initial = "b8079dd0d360648e4e8de48656c5c38972621072"
SRCREV_pn-opkg-utils = "53274f087565fd45d8452c5367997ba6a682a37a"
SRCREV_pn-kmod = "fd56638aed3fe147015bfa10ed4a5f7491303cb4"
# x86_64-linux
SRCREV_pn-gtk-doc-stub-native = "1dea266593edb766d6d898c79451ef193eb17cfa"
SRCREV_pn-dtc-native = "65cc4d2748a2c2e6f27f1cf39e07a5dbabd80ebf"
SRCREV_pn-update-rc.d-native = "eca680ddf28d024954895f59a241a622dd575c11"
SRCREV_glibc_pn-cross-localedef-native = "b8079dd0d360648e4e8de48656c5c38972621072"
SRCREV_localedef_pn-cross-localedef-native = "c833367348d39dad7ba018990bfdaffaec8e9ed3"
SRCREV_pn-prelink-native = "faa069deec99bf61418d0bab831c83d7c1b797ca"
SRCREV_pn-opkg-utils-native = "53274f087565fd45d8452c5367997ba6a682a37a"
SRCREV_pn-kern-tools-native = "23345b8846fe4bd167efdf1bd8a1224b2ba9a5ff"
SRCREV_pn-kmod-native = "fd56638aed3fe147015bfa10ed4a5f7491303cb4"
# qemux86-poky-linux
SRCREV_machine_pn-linux-yocto = "38cd560d5022ed2dbd1ab0dca9642e47c98a0aa1"
SRCREV_meta_pn-linux-yocto = "a227f20eff056e511d504b2e490f3774ab260d6f"
# all-poky-linux
SRCREV_pn-update-rc.d = "eca680ddf28d024954895f59a241a622dd575c11"
Note
Here are some notes on using thebuildhistory-collect-srcrevs command:
By default, only values where the
SRCREVwas not hardcoded (usually whenAUTOREVwas used) are reported. Use the-aoption to see allSRCREVvalues.The output statements might not have any effect if overrides are applied elsewhere in the build system configuration. Use the
-foption to add theforcevariableoverride to each output line if you need to work around this restriction.The script does apply special handling when building for multiple machines. However, the script does place a comment before each set of values that specifies which triplet to which they belong as shown above (e.g.,
i586-poky-linux).
19.4.2.2. Build History Image Information
The files produced for each image are as follows:
image-files:A directory containing selected files from the root filesystem. The files are defined byBUILDHISTORY_IMAGE_FILES.build-id.txt:Human-readable information about the build configuration and metadata source revisions. This file contains the full build header as printed by BitBake.*.dot:Dependency graphs for the image that are compatible withgraphviz.files-in-image.txt:A list of files in the image with permissions, owner, group, size, and symlink information.image-info.txt:A text file containing name-value pairs with information about the image. See the following listing example for more information.installed-package-names.txt:A list of installed packages by name only.installed-package-sizes.txt:A list of installed packages ordered by size.installed-packages.txt:A list of installed packages with full package filenames.
Note
Installed package information is able to be gathered and produced even if package management is disabled for the final image.
Here is an example of image-info.txt:
DISTRO = poky
DISTRO_VERSION = 1.7
USER_CLASSES = buildstats image-mklibs image-prelink
IMAGE_CLASSES = image_types
IMAGE_FEATURES = debug-tweaks
IMAGE_LINGUAS =
IMAGE_INSTALL = packagegroup-core-boot run-postinsts
BAD_RECOMMENDATIONS =
NO_RECOMMENDATIONS =
PACKAGE_EXCLUDE =
ROOTFS_POSTPROCESS_COMMAND = write_package_manifest; license_create_manifest; \
write_image_manifest ; buildhistory_list_installed_image ; \
buildhistory_get_image_installed ; ssh_allow_empty_password; \
postinst_enable_logging; rootfs_update_timestamp ; ssh_disable_dns_lookup ;
IMAGE_POSTPROCESS_COMMAND = buildhistory_get_imageinfo ;
IMAGESIZE = 6900
Other than IMAGESIZE, which is the
total size of the files in the image in Kbytes, the
name-value pairs are variables that may have influenced the
content of the image.
This information is often useful when you are trying to determine
why a change in the package or file listings has occurred.
19.4.2.3. Using Build History to Gather Image Information Only
As you can see, build history produces image information,
including dependency graphs, so you can see why something
was pulled into the image.
If you are just interested in this information and not
interested in collecting specific package or SDK information,
you can enable writing only image information without
any history by adding the following to your
conf/local.conf file found in the
Build Directory:
INHERIT += "buildhistory"
BUILDHISTORY_COMMIT = "0"
BUILDHISTORY_FEATURES = "image"
Here, you set the
BUILDHISTORY_FEATURES
variable to use the image feature only.
19.4.2.4. Build History SDK Information
Build history collects similar information on the contents
of SDKs
(e.g. bitbake -c populate_sdk imagename)
as compared to information it collects for images.
Furthermore, this information differs depending on whether an
extensible or standard SDK is being produced.
The following list shows the files produced for SDKs:
files-in-sdk.txt:A list of files in the SDK with permissions, owner, group, size, and symlink information. This list includes both the host and target parts of the SDK.sdk-info.txt:A text file containing name-value pairs with information about the SDK. See the following listing example for more information.sstate-task-sizes.txt:A text file containing name-value pairs with information about task group sizes (e.g.do_populate_sysroottasks have a total size). Thesstate-task-sizes.txtfile exists only when an extensible SDK is created.sstate-package-sizes.txt:A text file containing name-value pairs with information for the shared-state packages and sizes in the SDK. Thesstate-package-sizes.txtfile exists only when an extensible SDK is created.sdk-files:A folder that contains copies of the files mentioned inBUILDHISTORY_SDK_FILESif the files are present in the output. Additionally, the default value ofBUILDHISTORY_SDK_FILESis specific to the extensible SDK although you can set it differently if you would like to pull in specific files from the standard SDK.The default files are
conf/local.conf,conf/bblayers.conf,conf/auto.conf,conf/locked-sigs.inc, andconf/devtool.conf. Thus, for an extensible SDK, these files get copied into thesdk-filesdirectory.The following information appears under each of the
hostandtargetdirectories for the portions of the SDK that run on the host and on the target, respectively:Note
The following files for the most part are empty when producing an extensible SDK because this type of SDK is not constructed from packages as is the standard SDK.depends.dot:Dependency graph for the SDK that is compatible withgraphviz.installed-package-names.txt:A list of installed packages by name only.installed-package-sizes.txt:A list of installed packages ordered by size.installed-packages.txt:A list of installed packages with full package filenames.
Here is an example of sdk-info.txt:
DISTRO = poky
DISTRO_VERSION = 1.3+snapshot-20130327
SDK_NAME = poky-glibc-i686-arm
SDK_VERSION = 1.3+snapshot
SDKMACHINE =
SDKIMAGE_FEATURES = dev-pkgs dbg-pkgs
BAD_RECOMMENDATIONS =
SDKSIZE = 352712
Other than SDKSIZE, which is the
total size of the files in the SDK in Kbytes, the
name-value pairs are variables that might have influenced the
content of the SDK.
This information is often useful when you are trying to
determine why a change in the package or file listings
has occurred.
19.4.2.5. Examining Build History Information
You can examine build history output from the command line or from a web interface.
To see any changes that have occurred (assuming you have
BUILDHISTORY_COMMIT = "1"),
you can simply
use any Git command that allows you to view the history of
a repository.
Here is one method:
$ git log -p
You need to realize, however, that this method does show changes that are not significant (e.g. a package's size changing by a few bytes).
A command-line tool called buildhistory-diff
does exist, though, that queries the Git repository and prints just
the differences that might be significant in human-readable form.
Here is an example:
$ ~/poky/poky/scripts/buildhistory-diff . HEAD^
Changes to images/qemux86_64/glibc/core-image-minimal (files-in-image.txt):
/etc/anotherpkg.conf was added
/sbin/anotherpkg was added
* (installed-package-names.txt):
* anotherpkg was added
Changes to images/qemux86_64/glibc/core-image-minimal (installed-package-names.txt):
anotherpkg was added
packages/qemux86_64-poky-linux/v86d: PACKAGES: added "v86d-extras"
* PR changed from "r0" to "r1"
* PV changed from "0.1.10" to "0.1.12"
packages/qemux86_64-poky-linux/v86d/v86d: PKGSIZE changed from 110579 to 144381 (+30%)
* PR changed from "r0" to "r1"
* PV changed from "0.1.10" to "0.1.12"
Note
Thebuildhistory-diff tool requires
the GitPython package.
Be sure to install it using Pip3 as follows:
$ pip3 install GitPython --user
Alternatively, you can install
python3-git using the appropriate
distribution package manager (e.g.
apt-get, dnf, or
zipper).
To see changes to the build history using a web interface, follow
the instruction in the README file here.
http://git.yoctoproject.org/cgit/cgit.cgi/buildhistory-web/.
Here is a sample screenshot of the interface:
 |
19.5. Speeding Up the Build
Build time can be an issue. By default, the build system uses simple controls to try and maximize build efficiency. In general, the default settings for all the following variables result in the most efficient build times when dealing with single socket systems (i.e. a single CPU). If you have multiple CPUs, you might try increasing the default values to gain more speed. See the descriptions in the glossary for each variable for more information:
BB_NUMBER_THREADS: The maximum number of threads BitBake simultaneously executes.BB_NUMBER_PARSE_THREADS: The number of threads BitBake uses during parsing.PARALLEL_MAKE: Extra options passed to themakecommand during thedo_compiletask in order to specify parallel compilation on the local build host.PARALLEL_MAKEINST: Extra options passed to themakecommand during thedo_installtask in order to specify parallel installation on the local build host.
As mentioned, these variables all scale to the number of processor cores available on the build system. For single socket systems, this auto-scaling ensures that the build system fundamentally takes advantage of potential parallel operations during the build based on the build machine's capabilities.
Following are additional factors that can affect build speed:
File system type: The file system type that the build is being performed on can also influence performance. Using
ext4is recommended as compared toext2andext3due toext4improved features such as extents.Disabling the updating of access time using
noatime: Thenoatimemount option prevents the build system from updating file and directory access times.Setting a longer commit: Using the "commit=" mount option increases the interval in seconds between disk cache writes. Changing this interval from the five second default to something longer increases the risk of data loss but decreases the need to write to the disk, thus increasing the build performance.
Choosing the packaging backend: Of the available packaging backends, IPK is the fastest. Additionally, selecting a singular packaging backend also helps.
Using
tmpfsforTMPDIRas a temporary file system: While this can help speed up the build, the benefits are limited due to the compiler using-pipe. The build system goes to some lengths to avoidsync()calls into the file system on the principle that if there was a significant failure, the Build Directory contents could easily be rebuilt.Inheriting the
rm_workclass: Inheriting this class has shown to speed up builds due to significantly lower amounts of data stored in the data cache as well as on disk. Inheriting this class also makes cleanup ofTMPDIRfaster, at the expense of being easily able to dive into the source code. File system maintainers have recommended that the fastest way to clean up large numbers of files is to reformat partitions rather than delete files due to the linear nature of partitions. This, of course, assumes you structure the disk partitions and file systems in a way that this is practical.
Aside from the previous list, you should keep some trade offs in mind that can help you speed up the build:
Remove items from
DISTRO_FEATURESthat you might not need.Exclude debug symbols and other debug information: If you do not need these symbols and other debug information, disabling the
*-dbgpackage generation can speed up the build. You can disable this generation by setting theINHIBIT_PACKAGE_DEBUG_SPLITvariable to "1".Disable static library generation for recipes derived from
autoconforlibtool: Following is an example showing how to disable static libraries and still provide an override to handle exceptions:STATICLIBCONF = "--disable-static" STATICLIBCONF_sqlite3-native = "" EXTRA_OECONF += "${STATICLIBCONF}"Notes
Some recipes need static libraries in order to work correctly (e.g.
pseudo-nativeneedssqlite3-native). Overrides, as in the previous example, account for these kinds of exceptions.Some packages have packaging code that assumes the presence of the static libraries. If so, you might need to exclude them as well.
Chapter 20. A Closer Look at the Yocto Project Development Environment
This chapter takes a more detailed look at the Yocto Project development environment. The following diagram represents the development environment at a high level. The remainder of this chapter expands on the fundamental input, output, process, and Metadata) blocks in the Yocto Project development environment.
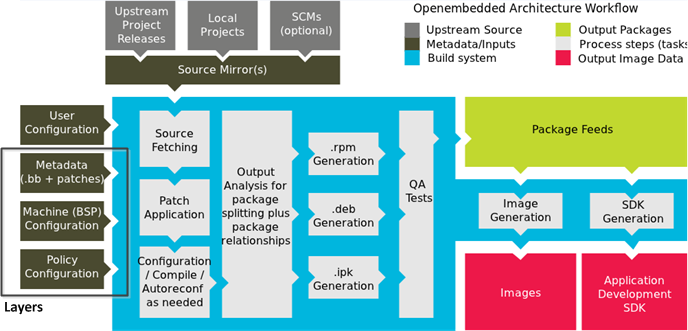 |
The generalized Yocto Project Development Environment consists of several functional areas:
User Configuration: Metadata you can use to control the build process.
Metadata Layers: Various layers that provide software, machine, and distro Metadata.
Source Files: Upstream releases, local projects, and SCMs.
Build System: Processes under the control of BitBake. This block expands on how BitBake fetches source, applies patches, completes compilation, analyzes output for package generation, creates and tests packages, generates images, and generates cross-development tools.
Package Feeds: Directories containing output packages (RPM, DEB or IPK), which are subsequently used in the construction of an image or SDK, produced by the build system. These feeds can also be copied and shared using a web server or other means to facilitate extending or updating existing images on devices at runtime if runtime package management is enabled.
Images: Images produced by the development process.
Application Development SDK: Cross-development tools that are produced along with an image or separately with BitBake.
20.1. User Configuration
User configuration helps define the build. Through user configuration, you can tell BitBake the target architecture for which you are building the image, where to store downloaded source, and other build properties.
The following figure shows an expanded representation of the "User Configuration" box of the general Yocto Project Development Environment figure:
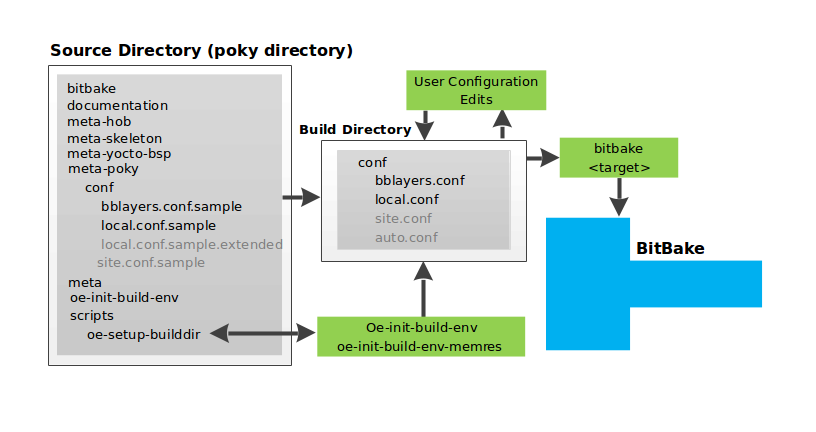
BitBake needs some basic configuration files in order to complete
a build.
These files are *.conf files.
The minimally necessary ones reside as example files in the
Source Directory.
For simplicity, this section refers to the Source Directory as
the "Poky Directory."
When you clone the poky Git repository or you
download and unpack a Yocto Project release, you can set up the
Source Directory to be named anything you want.
For this discussion, the cloned repository uses the default
name poky.
Note
The Poky repository is primarily an aggregation of existing repositories. It is not a canonical upstream source.
The meta-poky layer inside Poky contains
a conf directory that has example
configuration files.
These example files are used as a basis for creating actual
configuration files when you source the build environment
script
(i.e.
oe-init-build-env
or
oe-init-build-env-memres).
Sourcing the build environment script creates a
Build Directory
if one does not already exist.
BitBake uses the Build Directory for all its work during builds.
The Build Directory has a conf directory that
contains default versions of your local.conf
and bblayers.conf configuration files.
These default configuration files are created only if versions
do not already exist in the Build Directory at the time you
source the build environment setup script.
Because the Poky repository is fundamentally an aggregation of
existing repositories, some users might be familiar with running
the oe-init-build-env or
oe-init-build-env-memres script in the context
of separate OpenEmbedded-Core and BitBake repositories rather than a
single Poky repository.
This discussion assumes the script is executed from within a cloned
or unpacked version of Poky.
Depending on where the script is sourced, different sub-scripts
are called to set up the Build Directory (Yocto or OpenEmbedded).
Specifically, the script
scripts/oe-setup-builddir inside the
poky directory sets up the Build Directory and seeds the directory
(if necessary) with configuration files appropriate for the
Yocto Project development environment.
Note
Thescripts/oe-setup-builddir script
uses the $TEMPLATECONF variable to
determine which sample configuration files to locate.
The local.conf file provides many
basic variables that define a build environment.
Here is a list of a few.
To see the default configurations in a local.conf
file created by the build environment script, see the
local.conf.sample in the
meta-poky layer:
Parallelism Options: Controlled by the
BB_NUMBER_THREADS,PARALLEL_MAKE, andBB_NUMBER_PARSE_THREADSvariables.Target Machine Selection: Controlled by the
MACHINEvariable.Download Directory: Controlled by the
DL_DIRvariable.Shared State Directory: Controlled by the
SSTATE_DIRvariable.Build Output: Controlled by the
TMPDIRvariable.
Note
Configurations set in theconf/local.conf
file can also be set in the
conf/site.conf and
conf/auto.conf configuration files.
The bblayers.conf file tells BitBake what
layers you want considered during the build.
By default, the layers listed in this file include layers
minimally needed by the build system.
However, you must manually add any custom layers you have created.
You can find more information on working with the
bblayers.conf file in the
"Enabling Your Layer"
section in the Yocto Project Development Manual.
The files site.conf and
auto.conf are not created by the environment
initialization script.
If you want the site.conf file, you need to
create that yourself.
The auto.conf file is typically created by
an autobuilder:
site.conf: You can use theconf/site.confconfiguration file to configure multiple build directories. For example, suppose you had several build environments and they shared some common features. You can set these default build properties here. A good example is perhaps the packaging format to use through thePACKAGE_CLASSESvariable.One useful scenario for using the
conf/site.conffile is to extend yourBBPATHvariable to include the path to aconf/site.conf. Then, when BitBake looks for Metadata usingBBPATH, it finds theconf/site.conffile and applies your common configurations found in the file. To override configurations in a particular build directory, alter the similar configurations within that build directory'sconf/local.conffile.auto.conf: The file is usually created and written to by an autobuilder. The settings put into the file are typically the same as you would find in theconf/local.confor theconf/site.conffiles.
You can edit all configuration files to further define any particular build environment. This process is represented by the "User Configuration Edits" box in the figure.
When you launch your build with the
bitbake
command, BitBake sorts out the configurations to ultimately
define your build environment.
It is important to understand that the OpenEmbedded build system
reads the configuration files in a specific order:
targetsite.conf, auto.conf,
and local.conf.
And, the build system applies the normal assignment statement
rules.
Because the files are parsed in a specific order, variable
assignments for the same variable could be affected.
For example, if the auto.conf file and
the local.conf set
variable1 to different values, because
the build system parses local.conf after
auto.conf,
variable1 is assigned the value from
the local.conf file.
20.2. Metadata, Machine Configuration, and Policy Configuration
The previous section described the user configurations that define BitBake's global behavior. This section takes a closer look at the layers the build system uses to further control the build. These layers provide Metadata for the software, machine, and policy.
In general, three types of layer input exist:
Policy Configuration: Distribution Layers provide top-level or general policies for the image or SDK being built. For example, this layer would dictate whether BitBake produces RPM or IPK packages.
Machine Configuration: Board Support Package (BSP) layers provide machine configurations. This type of information is specific to a particular target architecture.
Metadata: Software layers contain user-supplied recipe files, patches, and append files.
The following figure shows an expanded representation of the Metadata, Machine Configuration, and Policy Configuration input (layers) boxes of the general Yocto Project Development Environment figure:
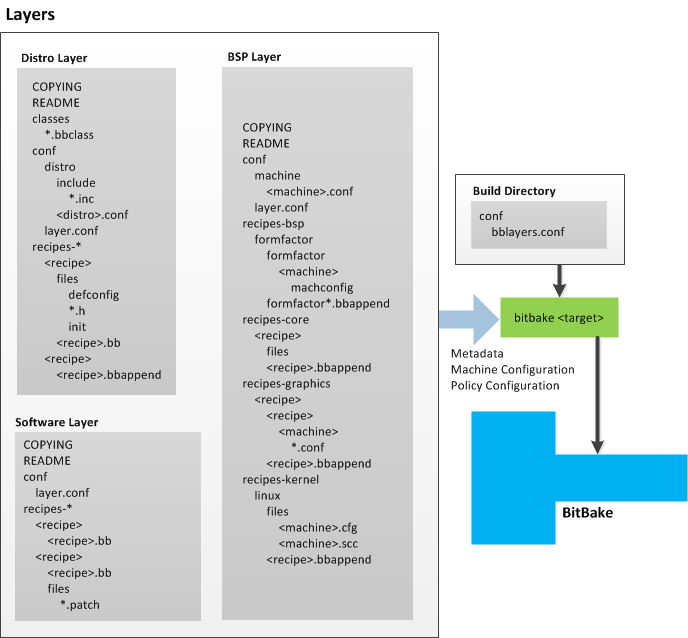 |
In general, all layers have a similar structure.
They all contain a licensing file
(e.g. COPYING) if the layer is to be
distributed, a README file as good practice
and especially if the layer is to be distributed, a
configuration directory, and recipe directories.
The Yocto Project has many layers that can be used. You can see a web-interface listing of them on the Source Repositories page. The layers are shown at the bottom categorized under "Yocto Metadata Layers." These layers are fundamentally a subset of the OpenEmbedded Metadata Index, which lists all layers provided by the OpenEmbedded community.
Note
Layers exist in the Yocto Project Source Repositories that cannot be found in the OpenEmbedded Metadata Index. These layers are either deprecated or experimental in nature.
BitBake uses the conf/bblayers.conf file,
which is part of the user configuration, to find what layers it
should be using as part of the build.
For more information on layers, see the "Understanding and Creating Layers" section in the Yocto Project Development Manual.
20.2.1. Distro Layer
The distribution layer provides policy configurations for your
distribution.
Best practices dictate that you isolate these types of
configurations into their own layer.
Settings you provide in
conf/distro/ override
similar
settings that BitBake finds in your
distro.confconf/local.conf file in the Build
Directory.
The following list provides some explanation and references for what you typically find in the distribution layer:
classes: Class files (
.bbclass) hold common functionality that can be shared among recipes in the distribution. When your recipes inherit a class, they take on the settings and functions for that class. You can read more about class files in the "Classes" section.conf: This area holds configuration files for the layer (
conf/layer.conf), the distribution (conf/distro/), and any distribution-wide include files.distro.confrecipes-*: Recipes and append files that affect common functionality across the distribution. This area could include recipes and append files to add distribution-specific configuration, initialization scripts, custom image recipes, and so forth.
20.2.2. BSP Layer
The BSP Layer provides machine configurations. Everything in this layer is specific to the machine for which you are building the image or the SDK. A common structure or form is defined for BSP layers. You can learn more about this structure in the Yocto Project Board Support Package (BSP) Developer's Guide.
Note
In order for a BSP layer to be considered compliant with the Yocto Project, it must meet some structural requirements.
The BSP Layer's configuration directory contains
configuration files for the machine
(conf/machine/) and,
of course, the layer (machine.confconf/layer.conf).
The remainder of the layer is dedicated to specific recipes
by function: recipes-bsp,
recipes-core,
recipes-graphics, and
recipes-kernel.
Metadata can exist for multiple formfactors, graphics
support systems, and so forth.
Note
While the figure shows severalrecipes-*
directories, not all these directories appear in all
BSP layers.
20.2.3. Software Layer
The software layer provides the Metadata for additional software packages used during the build. This layer does not include Metadata that is specific to the distribution or the machine, which are found in their respective layers.
This layer contains any new recipes that your project needs in the form of recipe files.
20.3. Sources
In order for the OpenEmbedded build system to create an image or any target, it must be able to access source files. The general Yocto Project Development Environment figure represents source files using the "Upstream Project Releases", "Local Projects", and "SCMs (optional)" boxes. The figure represents mirrors, which also play a role in locating source files, with the "Source Mirror(s)" box.
The method by which source files are ultimately organized is a function of the project. For example, for released software, projects tend to use tarballs or other archived files that can capture the state of a release guaranteeing that it is statically represented. On the other hand, for a project that is more dynamic or experimental in nature, a project might keep source files in a repository controlled by a Source Control Manager (SCM) such as Git. Pulling source from a repository allows you to control the point in the repository (the revision) from which you want to build software. Finally, a combination of the two might exist, which would give the consumer a choice when deciding where to get source files.
BitBake uses the
SRC_URI
variable to point to source files regardless of their location.
Each recipe must have a SRC_URI variable
that points to the source.
Another area that plays a significant role in where source files
come from is pointed to by the
DL_DIR
variable.
This area is a cache that can hold previously downloaded source.
You can also instruct the OpenEmbedded build system to create
tarballs from Git repositories, which is not the default behavior,
and store them in the DL_DIR by using the
BB_GENERATE_MIRROR_TARBALLS
variable.
Judicious use of a DL_DIR directory can
save the build system a trip across the Internet when looking
for files.
A good method for using a download directory is to have
DL_DIR point to an area outside of your
Build Directory.
Doing so allows you to safely delete the Build Directory
if needed without fear of removing any downloaded source file.
The remainder of this section provides a deeper look into the source files and the mirrors. Here is a more detailed look at the source file area of the base figure:
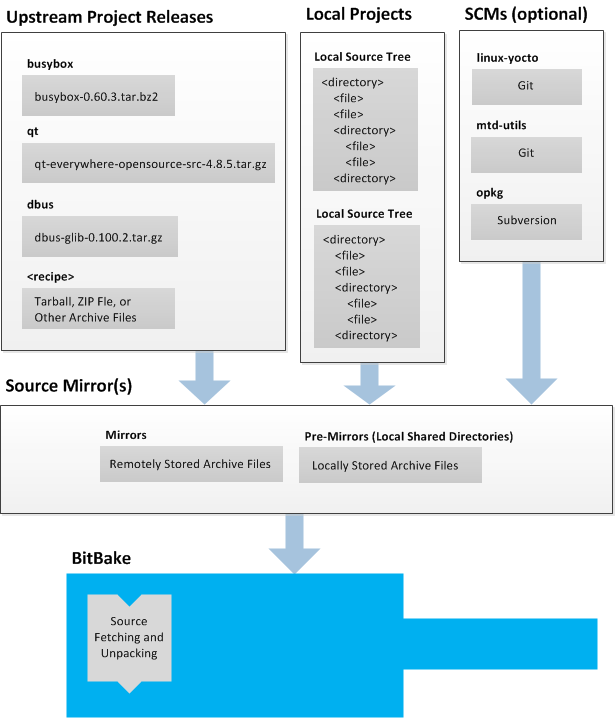 |
20.3.1. Upstream Project Releases
Upstream project releases exist anywhere in the form of an archived file (e.g. tarball or zip file). These files correspond to individual recipes. For example, the figure uses specific releases each for BusyBox, Qt, and Dbus. An archive file can be for any released product that can be built using a recipe.
20.3.2. Local Projects
Local projects are custom bits of software the user provides. These bits reside somewhere local to a project - perhaps a directory into which the user checks in items (e.g. a local directory containing a development source tree used by the group).
The canonical method through which to include a local project
is to use the
externalsrc
class to include that local project.
You use either the local.conf or a
recipe's append file to override or set the
recipe to point to the local directory on your disk to pull
in the whole source tree.
For information on how to use the
externalsrc class, see the
"externalsrc.bbclass"
section.
20.3.3. Source Control Managers (Optional)
Another place the build system can get source files from is
through an SCM such as Git or Subversion.
In this case, a repository is cloned or checked out.
The
do_fetch
task inside BitBake uses
the SRC_URI
variable and the argument's prefix to determine the correct
fetcher module.
Note
For information on how to have the OpenEmbedded build system generate tarballs for Git repositories and place them in theDL_DIR
directory, see the
BB_GENERATE_MIRROR_TARBALLS
variable.
When fetching a repository, BitBake uses the
SRCREV
variable to determine the specific revision from which to
build.
20.3.4. Source Mirror(s)
Two kinds of mirrors exist: pre-mirrors and regular mirrors.
The PREMIRRORS
and
MIRRORS
variables point to these, respectively.
BitBake checks pre-mirrors before looking upstream for any
source files.
Pre-mirrors are appropriate when you have a shared directory
that is not a directory defined by the
DL_DIR
variable.
A Pre-mirror typically points to a shared directory that is
local to your organization.
Regular mirrors can be any site across the Internet that is used as an alternative location for source code should the primary site not be functioning for some reason or another.
20.4. Package Feeds
When the OpenEmbedded build system generates an image or an SDK, it gets the packages from a package feed area located in the Build Directory. The general Yocto Project Development Environment figure shows this package feeds area in the upper-right corner.
This section looks a little closer into the package feeds area used by the build system. Here is a more detailed look at the area:
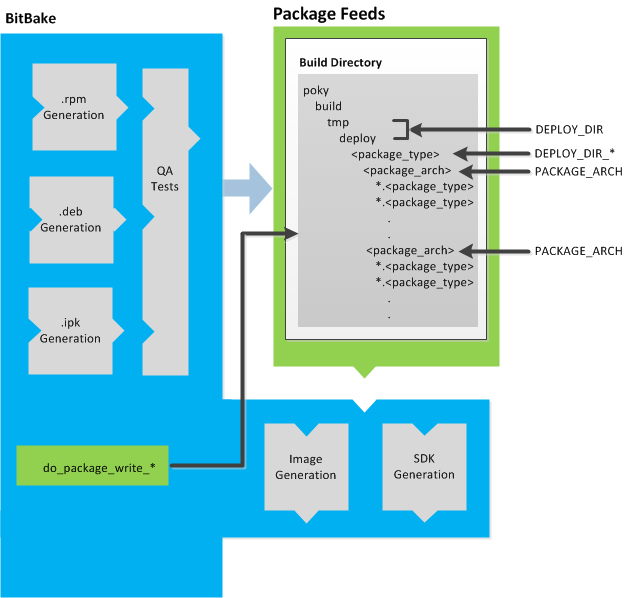 |
Package feeds are an intermediary step in the build process.
The OpenEmbedded build system provides classes to generate
different package types, and you specify which classes to enable
through the
PACKAGE_CLASSES
variable.
Before placing the packages into package feeds,
the build process validates them with generated output quality
assurance checks through the
insane
class.
The package feed area resides in the Build Directory. The directory the build system uses to temporarily store packages is determined by a combination of variables and the particular package manager in use. See the "Package Feeds" box in the illustration and note the information to the right of that area. In particular, the following defines where package files are kept:
DEPLOY_DIR: Defined astmp/deployin the Build Directory.DEPLOY_DIR_*: Depending on the package manager used, the package type sub-folder. Given RPM, IPK, or DEB packaging and tarball creation, theDEPLOY_DIR_RPM,DEPLOY_DIR_IPK,DEPLOY_DIR_DEB, orDEPLOY_DIR_TAR, variables are used, respectively.PACKAGE_ARCH: Defines architecture-specific sub-folders. For example, packages could exist for the i586 or qemux86 architectures.
BitBake uses the do_package_write_* tasks to
generate packages and place them into the package holding area (e.g.
do_package_write_ipk for IPK packages).
See the
"do_package_write_deb",
"do_package_write_ipk",
"do_package_write_rpm",
and
"do_package_write_tar"
sections for additional information.
As an example, consider a scenario where an IPK packaging manager
is being used and package architecture support for both i586
and qemux86 exist.
Packages for the i586 architecture are placed in
build/tmp/deploy/ipk/i586, while packages for
the qemux86 architecture are placed in
build/tmp/deploy/ipk/qemux86.
20.5. BitBake
The OpenEmbedded build system uses BitBake to produce images. You can see from the general Yocto Project Development Environment figure, the BitBake area consists of several functional areas. This section takes a closer look at each of those areas.
Separate documentation exists for the BitBake tool. See the BitBake User Manual for reference material on BitBake.
20.5.1. Source Fetching
The first stages of building a recipe are to fetch and unpack the source code:
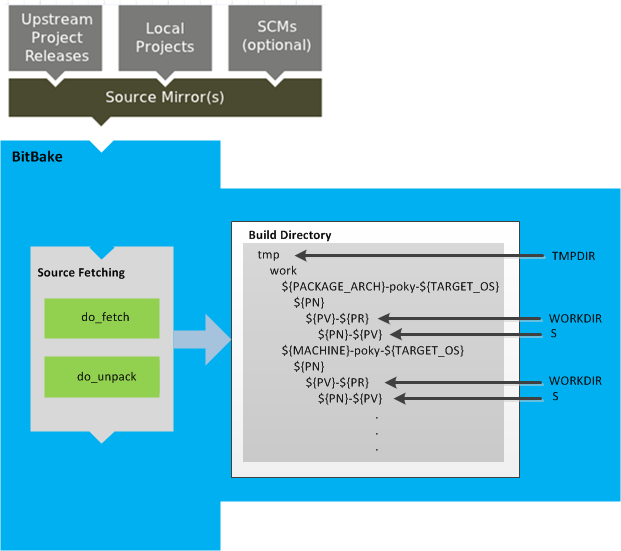 |
The
do_fetch
and
do_unpack
tasks fetch the source files and unpack them into the work
directory.
Note
For every local file (e.g.file://)
that is part of a recipe's
SRC_URI
statement, the OpenEmbedded build system takes a checksum
of the file for the recipe and inserts the checksum into
the signature for the do_fetch.
If any local file has been modified, the
do_fetch task and all tasks that
depend on it are re-executed.
By default, everything is accomplished in the
Build Directory,
which has a defined structure.
For additional general information on the Build Directory,
see the
"build/"
section.
Unpacked source files are pointed to by the
S variable.
Each recipe has an area in the Build Directory where the
unpacked source code resides.
The name of that directory for any given recipe is defined from
several different variables.
You can see the variables that define these directories
by looking at the figure:
TMPDIR- The base directory where the OpenEmbedded build system performs all its work during the build.PACKAGE_ARCH- The architecture of the built package or packages.TARGET_OS- The operating system of the target device.PN- The name of the built package.PV- The version of the recipe used to build the package.PR- The revision of the recipe used to build the package.WORKDIR- The location withinTMPDIRwhere a specific package is built.S- Contains the unpacked source files for a given recipe.
20.5.2. Patching
Once source code is fetched and unpacked, BitBake locates patch files and applies them to the source files:
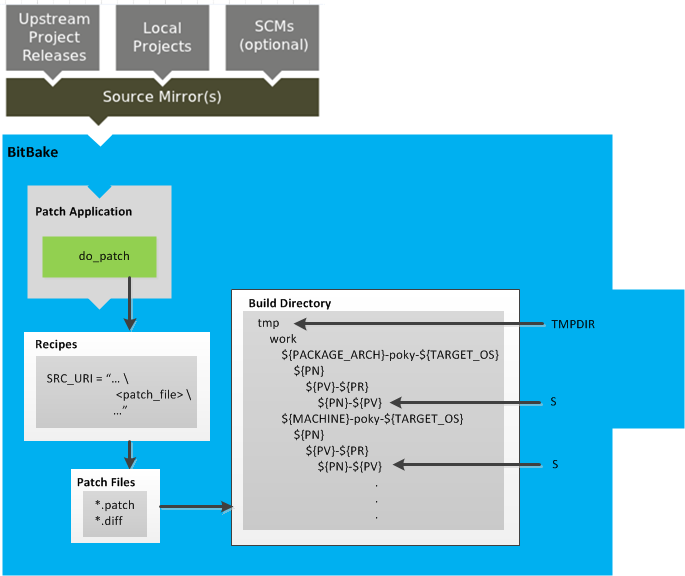 |
The
do_patch
task processes recipes by
using the
SRC_URI
variable to locate applicable patch files, which by default
are *.patch or
*.diff files, or any file if
"apply=yes" is specified for the file in
SRC_URI.
BitBake finds and applies multiple patches for a single recipe
in the order in which it finds the patches.
Patches are applied to the recipe's source files located in the
S directory.
For more information on how the source directories are created, see the "Source Fetching" section.
20.5.3. Configuration and Compilation
After source code is patched, BitBake executes tasks that configure and compile the source code:
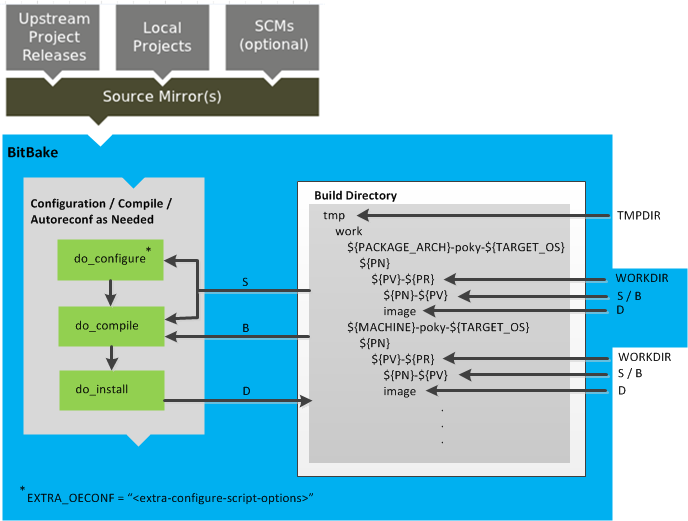 |
This step in the build process consists of three tasks:
do_configure: This task configures the source by enabling and disabling any build-time and configuration options for the software being built. Configurations can come from the recipe itself as well as from an inherited class. Additionally, the software itself might configure itself depending on the target for which it is being built.The configurations handled by the
do_configuretask are specific to source code configuration for the source code being built by the recipe.If you are using the
autotoolsclass, you can add additional configuration options by using theEXTRA_OECONFvariable. For information on how this variable works within that class, see themeta/classes/autotools.bbclassfile.do_compile: Once a configuration task has been satisfied, BitBake compiles the source using thedo_compiletask. Compilation occurs in the directory pointed to by theBvariable. Realize that theBdirectory is, by default, the same as theSdirectory.do_install: Once compilation is done, BitBake executes thedo_installtask. This task copies files from theBdirectory and places them in a holding area pointed to by theDvariable.
20.5.4. Package Splitting
After source code is configured and compiled, the OpenEmbedded build system analyzes the results and splits the output into packages:
 |
The
do_package
and
do_packagedata
tasks combine to analyze
the files found in the
D directory
and split them into subsets based on available packages and
files.
The analyzing process involves the following as well as other
items: splitting out debugging symbols,
looking at shared library dependencies between packages,
and looking at package relationships.
The do_packagedata task creates package
metadata based on the analysis such that the
OpenEmbedded build system can generate the final packages.
Working, staged, and intermediate results of the analysis
and package splitting process use these areas:
PKGD- The destination directory for packages before they are split.PKGDATA_DIR- A shared, global-state directory that holds data generated during the packaging process.PKGDESTWORK- A temporary work area used by thedo_packagetask.PKGDEST- The parent directory for packages after they have been split.
The FILES
variable defines the files that go into each package in
PACKAGES.
If you want details on how this is accomplished, you can
look at the
package
class.
Depending on the type of packages being created (RPM, DEB, or
IPK), the do_package_write_* task
creates the actual packages and places them in the
Package Feed area, which is
${TMPDIR}/deploy.
You can see the
"Package Feeds"
section for more detail on that part of the build process.
Note
Support for creating feeds directly from thedeploy/* directories does not exist.
Creating such feeds usually requires some kind of feed
maintenance mechanism that would upload the new packages
into an official package feed (e.g. the
Ångström distribution).
This functionality is highly distribution-specific
and thus is not provided out of the box.
20.5.5. Image Generation
Once packages are split and stored in the Package Feeds area, the OpenEmbedded build system uses BitBake to generate the root filesystem image:
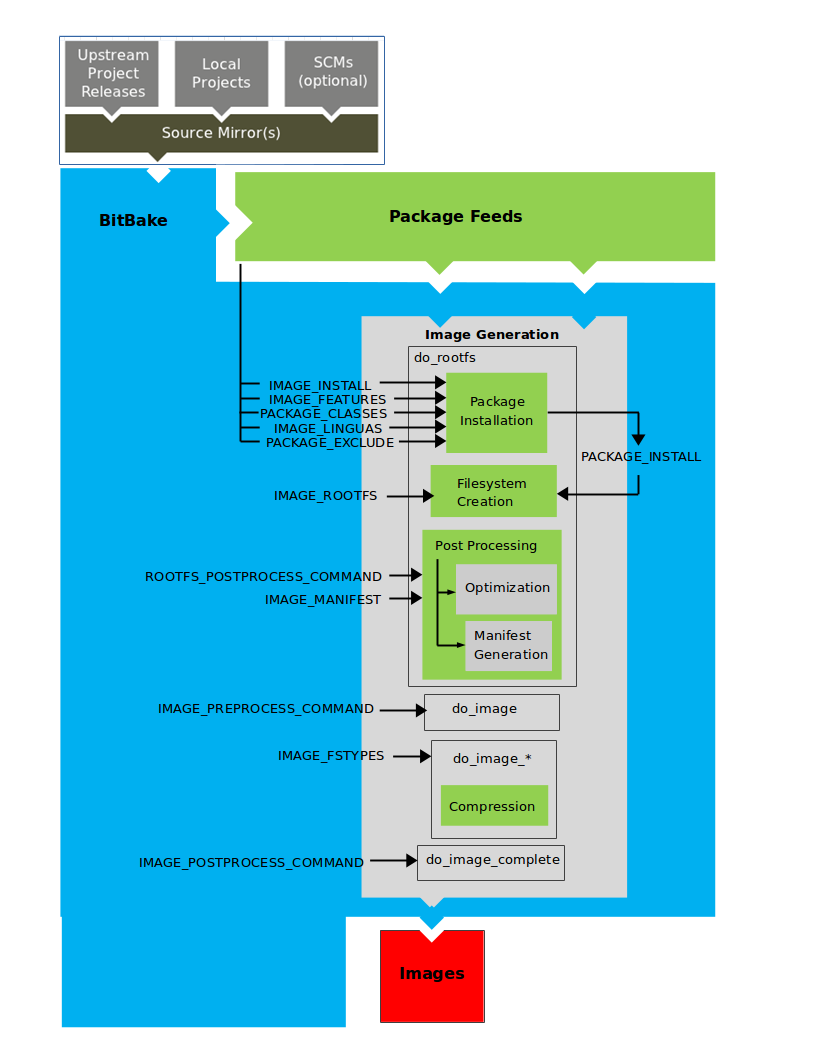 |
The image generation process consists of several stages and
depends on several tasks and variables.
The
do_rootfs
task creates the root filesystem (file and directory structure)
for an image.
This task uses several key variables to help create the list
of packages to actually install:
IMAGE_INSTALL: Lists out the base set of packages to install from the Package Feeds area.PACKAGE_EXCLUDE: Specifies packages that should not be installed.IMAGE_FEATURES: Specifies features to include in the image. Most of these features map to additional packages for installation.PACKAGE_CLASSES: Specifies the package backend to use and consequently helps determine where to locate packages within the Package Feeds area.IMAGE_LINGUAS: Determines the language(s) for which additional language support packages are installed.PACKAGE_INSTALL: The final list of packages passed to the package manager for installation into the image.
With
IMAGE_ROOTFS
pointing to the location of the filesystem under construction and
the PACKAGE_INSTALL variable providing the
final list of packages to install, the root file system is
created.
Package installation is under control of the package manager (e.g. smart/rpm, opkg, or apt/dpkg) regardless of whether or not package management is enabled for the target. At the end of the process, if package management is not enabled for the target, the package manager's data files are deleted from the root filesystem. As part of the final stage of package installation, postinstall scripts that are part of the packages are run. Any scripts that fail to run on the build host are run on the target when the target system is first booted. If you are using a read-only root filesystem, all the post installation scripts must succeed during the package installation phase since the root filesystem is read-only.
The final stages of the do_rootfs task
handle post processing.
Post processing includes creation of a manifest file and
optimizations.
The manifest file (.manifest) resides
in the same directory as the root filesystem image.
This file lists out, line-by-line, the installed packages.
The manifest file is useful for the
testimage
class, for example, to determine whether or not to run
specific tests.
See the
IMAGE_MANIFEST
variable for additional information.
Optimizing processes run across the image include
mklibs, prelink,
and any other post-processing commands as defined by the
ROOTFS_POSTPROCESS_COMMAND
variable.
The mklibs process optimizes the size
of the libraries, while the
prelink process optimizes the dynamic
linking of shared libraries to reduce start up time of
executables.
After the root filesystem is built, processing begins on
the image through the do_image task.
The build system runs any pre-processing commands as defined
by the
IMAGE_PREPROCESS_COMMAND
variable.
This variable specifies a list of functions to call before
the OpenEmbedded build system creates the final image output
files.
The do_image task dynamically creates
other do_image_* tasks as needed, which
include compressing the root filesystem image to reduce the
overall size of the image.
The process turns everything into an image file or a set of
image files.
The formats used for the root filesystem depend on the
IMAGE_FSTYPES
variable.
The final task involved in image creation is the
do_image_complete task.
This task completes the image by applying any image
post processing as defined through the
IMAGE_POSTPROCESS_COMMAND
variable.
The variable specifies a list of functions to call once the
OpenEmbedded build system has created the final image output
files.
Note
The entire image generation process is run under Pseudo. Running under Pseudo ensures that the files in the root filesystem have correct ownership.20.5.6. SDK Generation
The OpenEmbedded build system uses BitBake to generate the
Software Development Kit (SDK) installer script for both the
standard and extensible SDKs:
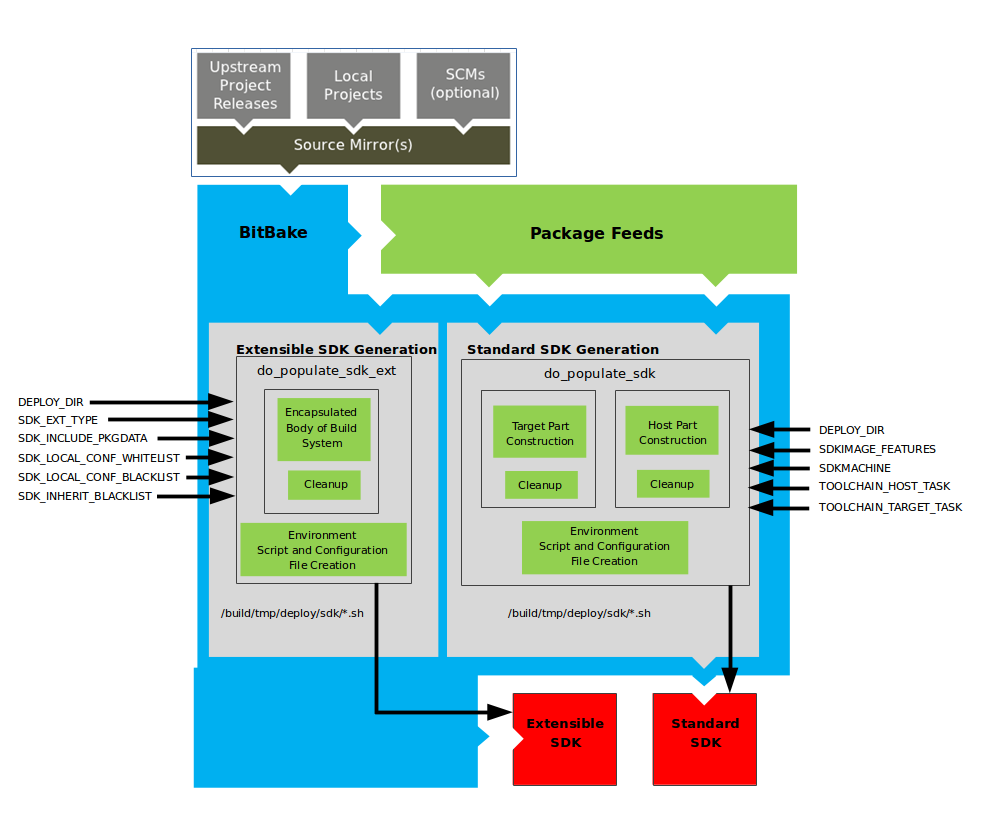
Note
For more information on the cross-development toolchain generation, see the "Cross-Development Toolchain Generation" section. For information on advantages gained when building a cross-development toolchain using thedo_populate_sdk
task, see the
"Building an SDK Installer"
section in the Yocto Project Software Development Kit (SDK)
Developer's Guide.
Like image generation, the SDK script process consists of
several stages and depends on many variables.
The do_populate_sdk and
do_populate_sdk_ext tasks use these
key variables to help create the list of packages to actually
install.
For information on the variables listed in the figure, see the
"Application Development SDK"
section.
The do_populate_sdk task helps create
the standard SDK and handles two parts: a target part and a
host part.
The target part is the part built for the target hardware and
includes libraries and headers.
The host part is the part of the SDK that runs on the
SDKMACHINE.
The do_populate_sdk_ext task helps create
the extensible SDK and handles host and target parts
differently than its counter part does for the standard SDK.
For the extensible SDK, the task encapsulates the build system,
which includes everything needed (host and target) for the SDK.
Regardless of the type of SDK being constructed, the
tasks perform some cleanup after which a cross-development
environment setup script and any needed configuration files
are created.
The final output is the Cross-development
toolchain installation script (.sh file),
which includes the environment setup script.
20.6. Images
The images produced by the OpenEmbedded build system are compressed forms of the root filesystem that are ready to boot on a target device. You can see from the general Yocto Project Development Environment figure that BitBake output, in part, consists of images. This section is going to look more closely at this output:
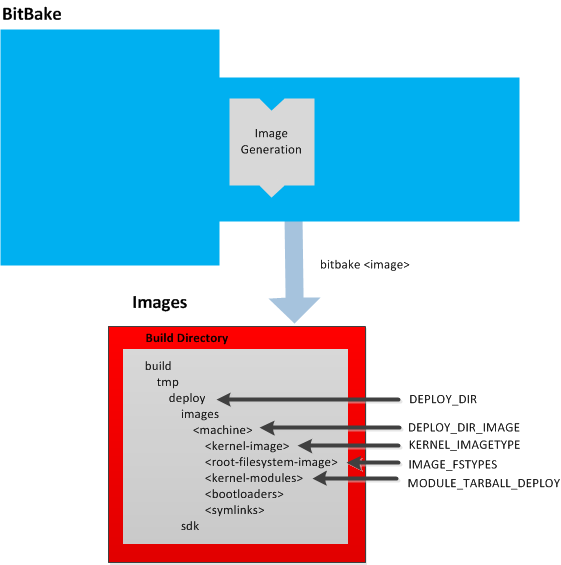 |
For a list of example images that the Yocto Project provides, see the "Images" chapter.
Images are written out to the
Build Directory
inside the tmp/deploy/images/
folder as shown in the figure.
This folder contains any files expected to be loaded on the
target device.
The
machine/DEPLOY_DIR
variable points to the deploy directory,
while the
DEPLOY_DIR_IMAGE
variable points to the appropriate directory containing images for
the current configuration.
kernel-imageKERNEL_IMAGETYPEvariable setting determines the naming scheme for the kernel image file. Depending on that variable, the file could begin with a variety of naming strings. Thedeploy/images/directory can contain multiple image files for the machine.machineroot-filesystem-image*.ext3or*.bz2files). TheIMAGE_FSTYPESvariable setting determines the root filesystem image type. Thedeploy/images/directory can contain multiple root filesystems for the machine.machinekernel-modulesMODULE_TARBALL_DEPLOYvariable to "0". Thedeploy/images/directory can contain multiple kernel module tarballs for the machine.machinebootloadersdeploy/images/directory can contain multiple bootloaders for the machine.machinesymlinksdeploy/images/folder contains a symbolic link that points to the most recently built file for each machine. These links might be useful for external scripts that need to obtain the latest version of each file.machine
20.7. Application Development SDK
In the
general Yocto Project Development Environment figure,
the output labeled "Application Development SDK" represents an
SDK.
The SDK generation process differs depending on whether you build
a standard SDK
(e.g. bitbake -c populate_sdk imagename)
or an extensible SDK
(e.g. bitbake -c populate_sdk_ext imagename).
This section is going to take a closer look at this output:
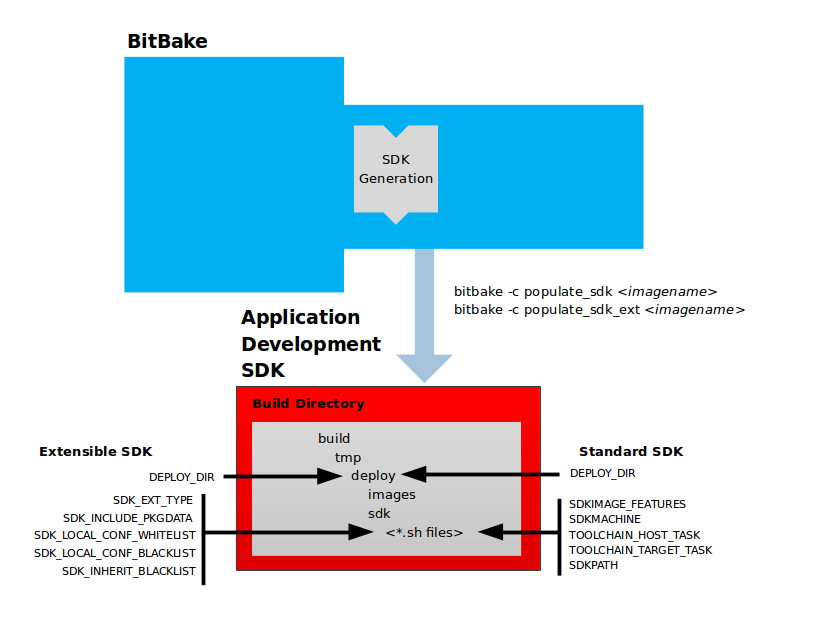 |
The specific form of this output is a self-extracting
SDK installer (*.sh) that, when run,
installs the SDK, which consists of a cross-development
toolchain, a set of libraries and headers, and an SDK
environment setup script.
Running this installer essentially sets up your
cross-development environment.
You can think of the cross-toolchain as the "host"
part because it runs on the SDK machine.
You can think of the libraries and headers as the "target"
part because they are built for the target hardware.
The environment setup script is added so that you can initialize
the environment before using the tools.
Note
The Yocto Project supports several methods by which you can set up this cross-development environment. These methods include downloading pre-built SDK installers or building and installing your own SDK installer.
For background information on cross-development toolchains in the Yocto Project development environment, see the "Cross-Development Toolchain Generation" section. For information on setting up a cross-development environment, see the Yocto Project Software Development Kit (SDK) Developer's Guide.
Once built, the SDK installers are written out to the
deploy/sdk folder inside the
Build Directory
as shown in the figure at the beginning of this section.
Depending on the type of SDK, several variables exist that help
configure these files.
The following list shows the variables associated with a standard
SDK:
DEPLOY_DIR: Points to thedeploydirectory.SDKMACHINE: Specifies the architecture of the machine on which the cross-development tools are run to create packages for the target hardware.SDKIMAGE_FEATURES: Lists the features to include in the "target" part of the SDK.TOOLCHAIN_HOST_TASK: Lists packages that make up the host part of the SDK (i.e. the part that runs on theSDKMACHINE). When you usebitbake -c populate_sdkto create the SDK, a set of default packages apply. This variable allows you to add more packages.imagenameTOOLCHAIN_TARGET_TASK: Lists packages that make up the target part of the SDK (i.e. the part built for the target hardware).SDKPATH: Defines the default SDK installation path offered by the installation script.
This next list, shows the variables associated with an extensible SDK:
DEPLOY_DIR: Points to thedeploydirectory.SDK_EXT_TYPE: Controls whether or not shared state artifacts are copied into the extensible SDK. By default, all required shared state artifacts are copied into the SDK.SDK_INCLUDE_PKGDATA: Specifies whether or not packagedata will be included in the extensible SDK for all recipes in the "world" target.SDK_LOCAL_CONF_WHITELIST: A list of variables allowed through from the build system configuration into the extensible SDK configuration.SDK_LOCAL_CONF_BLACKLIST: A list of variables not allowed through from the build system configuration into the extensible SDK configuration.SDK_INHERIT_BLACKLIST: A list of classes to remove from theINHERITvalue globally within the extensible SDK configuration.
Chapter 21. Technical Details
This chapter provides technical details for various parts of the Yocto Project. Currently, topics include Yocto Project components, cross-toolchain generation, shared state (sstate) cache, x32, Wayland support, and Licenses.
21.1. Yocto Project Components
The BitBake task executor together with various types of configuration files form the OpenEmbedded Core. This section overviews these components by describing their use and how they interact.
BitBake handles the parsing and execution of the data files. The data itself is of various types:
Recipes: Provides details about particular pieces of software.
Class Data: Abstracts common build information (e.g. how to build a Linux kernel).
Configuration Data: Defines machine-specific settings, policy decisions, and so forth. Configuration data acts as the glue to bind everything together.
BitBake knows how to combine multiple data sources together and refers to each data source as a layer. For information on layers, see the "Understanding and Creating Layers" section of the Yocto Project Development Manual.
Following are some brief details on these core components. For additional information on how these components interact during a build, see the "A Closer Look at the Yocto Project Development Environment" Chapter.
21.1.1. BitBake
BitBake is the tool at the heart of the OpenEmbedded build system and is responsible for parsing the Metadata, generating a list of tasks from it, and then executing those tasks.
This section briefly introduces BitBake. If you want more information on BitBake, see the BitBake User Manual.
To see a list of the options BitBake supports, use either of the following commands:
$ bitbake -h
$ bitbake --help
The most common usage for BitBake is bitbake , where
packagenamepackagename is the name of the package you want to build
(referred to as the "target" in this manual).
The target often equates to the first part of a recipe's filename
(e.g. "foo" for a recipe named
foo_1.3.0-r0.bb).
So, to process the matchbox-desktop_1.2.3.bb recipe file, you
might type the following:
$ bitbake matchbox-desktop
Several different versions of matchbox-desktop might exist.
BitBake chooses the one selected by the distribution configuration.
You can get more details about how BitBake chooses between different
target versions and providers in the
"Preferences"
section of the BitBake User Manual.
BitBake also tries to execute any dependent tasks first.
So for example, before building matchbox-desktop, BitBake
would build a cross compiler and glibc if they had not already
been built.
A useful BitBake option to consider is the -k or
--continue option.
This option instructs BitBake to try and continue processing the job
as long as possible even after encountering an error.
When an error occurs, the target that
failed and those that depend on it cannot be remade.
However, when you use this option other dependencies can still be
processed.
21.1.2. Metadata (Recipes)
Files that have the .bb suffix are "recipes"
files.
In general, a recipe contains information about a single piece of
software.
This information includes the location from which to download the
unaltered source, any source patches to be applied to that source
(if needed), which special configuration options to apply,
how to compile the source files, and how to package the compiled
output.
The term "package" is sometimes used to refer to recipes. However,
since the word "package" is used for the packaged output from the OpenEmbedded
build system (i.e. .ipk or .deb files),
this document avoids using the term "package" when referring to recipes.
21.1.3. Classes
Class files (.bbclass) contain information that
is useful to share between
Metadata files.
An example is the
autotools
class, which contains common settings for any application that
Autotools uses.
The "Classes" chapter provides
details about classes and how to use them.
21.1.4. Configuration
The configuration files (.conf) define various configuration variables
that govern the OpenEmbedded build process.
These files fall into several areas that define machine configuration options,
distribution configuration options, compiler tuning options, general common configuration
options, and user configuration options in local.conf, which is found
in the
Build Directory.
21.2. Cross-Development Toolchain Generation
The Yocto Project does most of the work for you when it comes to creating cross-development toolchains. This section provides some technical background on how cross-development toolchains are created and used. For more information on toolchains, you can also see the Yocto Project Software Development Kit (SDK) Developer's Guide.
In the Yocto Project development environment, cross-development toolchains are used to build the image and applications that run on the target hardware. With just a few commands, the OpenEmbedded build system creates these necessary toolchains for you.
The following figure shows a high-level build environment regarding toolchain construction and use.
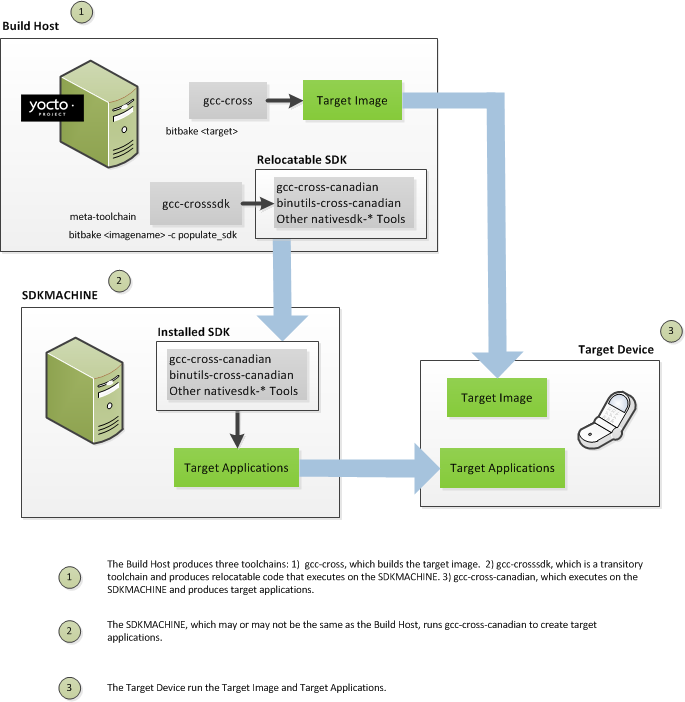 |
Most of the work occurs on the Build Host.
This is the machine used to build images and generally work within the
the Yocto Project environment.
When you run BitBake to create an image, the OpenEmbedded build system
uses the host gcc compiler to bootstrap a
cross-compiler named gcc-cross.
The gcc-cross compiler is what BitBake uses to
compile source files when creating the target image.
You can think of gcc-cross simply as an
automatically generated cross-compiler that is used internally within
BitBake only.
Note
The extensible SDK does not usegcc-cross-canadian since this SDK
ships a copy of the OpenEmbedded build system and the sysroot
within it contains gcc-cross.
The chain of events that occurs when gcc-cross is
bootstrapped is as follows:
gcc -> binutils-cross -> gcc-cross-initial -> linux-libc-headers -> glibc-initial -> glibc -> gcc-cross -> gcc-runtime
gcc: The build host's GNU Compiler Collection (GCC).binutils-cross: The bare minimum binary utilities needed in order to run thegcc-cross-initialphase of the bootstrap operation.gcc-cross-initial: An early stage of the bootstrap process for creating the cross-compiler. This stage builds enough of thegcc-cross, the C library, and other pieces needed to finish building the final cross-compiler in later stages. This tool is a "native" package (i.e. it is designed to run on the build host).linux-libc-headers: Headers needed for the cross-compiler.glibc-initial: An initial version of the Embedded GLIBC needed to bootstrapglibc.gcc-cross: The final stage of the bootstrap process for the cross-compiler. This stage results in the actual cross-compiler that BitBake uses when it builds an image for a targeted device.Note
If you are replacing this cross compiler toolchain with a custom version, you must replacegcc-cross.This tool is also a "native" package (i.e. it is designed to run on the build host).
gcc-runtime: Runtime libraries resulting from the toolchain bootstrapping process. This tool produces a binary that consists of the runtime libraries need for the targeted device.
You can use the OpenEmbedded build system to build an installer for
the relocatable SDK used to develop applications.
When you run the installer, it installs the toolchain, which contains
the development tools (e.g., the
gcc-cross-canadian),
binutils-cross-canadian, and other
nativesdk-* tools,
which are tools native to the SDK (i.e. native to
SDK_ARCH),
you need to cross-compile and test your software.
The figure shows the commands you use to easily build out this
toolchain.
This cross-development toolchain is built to execute on the
SDKMACHINE,
which might or might not be the same
machine as the Build Host.
Note
If your target architecture is supported by the Yocto Project, you can take advantage of pre-built images that ship with the Yocto Project and already contain cross-development toolchain installers.
Here is the bootstrap process for the relocatable toolchain:
gcc -> binutils-crosssdk -> gcc-crosssdk-initial -> linux-libc-headers ->
glibc-initial -> nativesdk-glibc -> gcc-crosssdk -> gcc-cross-canadian
gcc: The build host's GNU Compiler Collection (GCC).binutils-crosssdk: The bare minimum binary utilities needed in order to run thegcc-crosssdk-initialphase of the bootstrap operation.gcc-crosssdk-initial: An early stage of the bootstrap process for creating the cross-compiler. This stage builds enough of thegcc-crosssdkand supporting pieces so that the final stage of the bootstrap process can produce the finished cross-compiler. This tool is a "native" binary that runs on the build host.linux-libc-headers: Headers needed for the cross-compiler.glibc-initial: An initial version of the Embedded GLIBC needed to bootstrapnativesdk-glibc.nativesdk-glibc: The Embedded GLIBC needed to bootstrap thegcc-crosssdk.gcc-crosssdk: The final stage of the bootstrap process for the relocatable cross-compiler. Thegcc-crosssdkis a transitory compiler and never leaves the build host. Its purpose is to help in the bootstrap process to create the eventual relocatablegcc-cross-canadiancompiler, which is relocatable. This tool is also a "native" package (i.e. it is designed to run on the build host).gcc-cross-canadian: The final relocatable cross-compiler. When run on theSDKMACHINE, this tool produces executable code that runs on the target device. Only one cross-canadian compiler is produced per architecture since they can be targeted at different processor optimizations using configurations passed to the compiler through the compile commands. This circumvents the need for multiple compilers and thus reduces the size of the toolchains.
Note
For information on advantages gained when building a cross-development toolchain installer, see the "Building an SDK Installer" section in the Yocto Project Software Development Kit (SDK) Developer's Guide.21.3. Shared State Cache
By design, the OpenEmbedded build system builds everything from scratch unless BitBake can determine that parts do not need to be rebuilt. Fundamentally, building from scratch is attractive as it means all parts are built fresh and there is no possibility of stale data causing problems. When developers hit problems, they typically default back to building from scratch so they know the state of things from the start.
Building an image from scratch is both an advantage and a disadvantage to the process. As mentioned in the previous paragraph, building from scratch ensures that everything is current and starts from a known state. However, building from scratch also takes much longer as it generally means rebuilding things that do not necessarily need to be rebuilt.
The Yocto Project implements shared state code that supports incremental builds. The implementation of the shared state code answers the following questions that were fundamental roadblocks within the OpenEmbedded incremental build support system:
What pieces of the system have changed and what pieces have not changed?
How are changed pieces of software removed and replaced?
How are pre-built components that do not need to be rebuilt from scratch used when they are available?
For the first question, the build system detects changes in the "inputs" to a given task by creating a checksum (or signature) of the task's inputs. If the checksum changes, the system assumes the inputs have changed and the task needs to be rerun. For the second question, the shared state (sstate) code tracks which tasks add which output to the build process. This means the output from a given task can be removed, upgraded or otherwise manipulated. The third question is partly addressed by the solution for the second question assuming the build system can fetch the sstate objects from remote locations and install them if they are deemed to be valid.
Note
The OpenEmbedded build system does not maintainPR information
as part of the shared state packages.
Consequently, considerations exist that affect maintaining shared
state feeds.
For information on how the OpenEmbedded build system
works with packages and can
track incrementing PR information, see the
"Incrementing a Package Revision Number"
section.
The rest of this section goes into detail about the overall incremental build architecture, the checksums (signatures), shared state, and some tips and tricks.
21.3.1. Overall Architecture
When determining what parts of the system need to be built, BitBake
works on a per-task basis rather than a per-recipe basis.
You might wonder why using a per-task basis is preferred over a per-recipe basis.
To help explain, consider having the IPK packaging backend enabled and then switching to DEB.
In this case, the
do_install
and
do_package
task outputs are still valid.
However, with a per-recipe approach, the build would not include the
.deb files.
Consequently, you would have to invalidate the whole build and rerun it.
Rerunning everything is not the best solution.
Also, in this case, the core must be "taught" much about specific tasks.
This methodology does not scale well and does not allow users to easily add new tasks
in layers or as external recipes without touching the packaged-staging core.
21.3.2. Checksums (Signatures)
The shared state code uses a checksum, which is a unique signature of a task's inputs, to determine if a task needs to be run again. Because it is a change in a task's inputs that triggers a rerun, the process needs to detect all the inputs to a given task. For shell tasks, this turns out to be fairly easy because the build process generates a "run" shell script for each task and it is possible to create a checksum that gives you a good idea of when the task's data changes.
To complicate the problem, there are things that should not be
included in the checksum.
First, there is the actual specific build path of a given task -
the WORKDIR.
It does not matter if the work directory changes because it should
not affect the output for target packages.
Also, the build process has the objective of making native
or cross packages relocatable.
Note
Both native and cross packages run on the build host. However, cross packages generate output for the target architecture.
The checksum therefore needs to exclude
WORKDIR.
The simplistic approach for excluding the work directory is to set
WORKDIR to some fixed value and create the
checksum for the "run" script.
Another problem results from the "run" scripts containing functions that might or might not get called. The incremental build solution contains code that figures out dependencies between shell functions. This code is used to prune the "run" scripts down to the minimum set, thereby alleviating this problem and making the "run" scripts much more readable as a bonus.
So far we have solutions for shell scripts. What about Python tasks? The same approach applies even though these tasks are more difficult. The process needs to figure out what variables a Python function accesses and what functions it calls. Again, the incremental build solution contains code that first figures out the variable and function dependencies, and then creates a checksum for the data used as the input to the task.
Like the WORKDIR case, situations exist where dependencies
should be ignored.
For these cases, you can instruct the build process to ignore a dependency
by using a line like the following:
PACKAGE_ARCHS[vardepsexclude] = "MACHINE"
This example ensures that the
PACKAGE_ARCHS
variable does not
depend on the value of
MACHINE,
even if it does reference it.
Equally, there are cases where we need to add dependencies BitBake is not able to find. You can accomplish this by using a line like the following:
PACKAGE_ARCHS[vardeps] = "MACHINE"
This example explicitly adds the MACHINE variable as a
dependency for PACKAGE_ARCHS.
Consider a case with in-line Python, for example, where BitBake is not
able to figure out dependencies.
When running in debug mode (i.e. using -DDD), BitBake
produces output when it discovers something for which it cannot figure out
dependencies.
The Yocto Project team has currently not managed to cover those dependencies
in detail and is aware of the need to fix this situation.
Thus far, this section has limited discussion to the direct inputs into a task. Information based on direct inputs is referred to as the "basehash" in the code. However, there is still the question of a task's indirect inputs - the things that were already built and present in the Build Directory. The checksum (or signature) for a particular task needs to add the hashes of all the tasks on which the particular task depends. Choosing which dependencies to add is a policy decision. However, the effect is to generate a master checksum that combines the basehash and the hashes of the task's dependencies.
At the code level, there are a variety of ways both the basehash and the dependent task hashes can be influenced. Within the BitBake configuration file, we can give BitBake some extra information to help it construct the basehash. The following statement effectively results in a list of global variable dependency excludes - variables never included in any checksum:
BB_HASHBASE_WHITELIST ?= "TMPDIR FILE PATH PWD BB_TASKHASH BBPATH DL_DIR \
SSTATE_DIR THISDIR FILESEXTRAPATHS FILE_DIRNAME HOME LOGNAME SHELL TERM \
USER FILESPATH STAGING_DIR_HOST STAGING_DIR_TARGET COREBASE PRSERV_HOST \
PRSERV_DUMPDIR PRSERV_DUMPFILE PRSERV_LOCKDOWN PARALLEL_MAKE \
CCACHE_DIR EXTERNAL_TOOLCHAIN CCACHE CCACHE_DISABLE LICENSE_PATH SDKPKGSUFFIX"
The previous example excludes
WORKDIR
since that variable is actually constructed as a path within
TMPDIR, which is on
the whitelist.
The rules for deciding which hashes of dependent tasks to include through
dependency chains are more complex and are generally accomplished with a
Python function.
The code in meta/lib/oe/sstatesig.py shows two examples
of this and also illustrates how you can insert your own policy into the system
if so desired.
This file defines the two basic signature generators OE-Core
uses: "OEBasic" and "OEBasicHash".
By default, there is a dummy "noop" signature handler enabled in BitBake.
This means that behavior is unchanged from previous versions.
OE-Core uses the "OEBasicHash" signature handler by default
through this setting in the bitbake.conf file:
BB_SIGNATURE_HANDLER ?= "OEBasicHash"
The "OEBasicHash" BB_SIGNATURE_HANDLER is the same as the
"OEBasic" version but adds the task hash to the stamp files.
This results in any
Metadata
change that changes the task hash, automatically
causing the task to be run again.
This removes the need to bump PR
values, and changes to Metadata automatically ripple across the build.
It is also worth noting that the end result of these signature generators is to make some dependency and hash information available to the build. This information includes:
BB_BASEHASH_task-taskname: The base hashes for each task in the recipe.BB_BASEHASH_filename:taskname: The base hashes for each dependent task.BBHASHDEPS_filename:taskname: The task dependencies for each task.BB_TASKHASH: The hash of the currently running task.
21.3.3. Shared State
Checksums and dependencies, as discussed in the previous section, solve half the problem of supporting a shared state. The other part of the problem is being able to use checksum information during the build and being able to reuse or rebuild specific components.
The
sstate
class is a relatively generic implementation of how to "capture"
a snapshot of a given task.
The idea is that the build process does not care about the source of a task's output.
Output could be freshly built or it could be downloaded and unpacked from
somewhere - the build process does not need to worry about its origin.
There are two types of output, one is just about creating a directory
in WORKDIR.
A good example is the output of either
do_install
or
do_package.
The other type of output occurs when a set of data is merged into a shared directory
tree such as the sysroot.
The Yocto Project team has tried to keep the details of the
implementation hidden in sstate class.
From a user's perspective, adding shared state wrapping to a task
is as simple as this
do_deploy
example taken from the
deploy
class:
DEPLOYDIR = "${WORKDIR}/deploy-${PN}"
SSTATETASKS += "do_deploy"
do_deploy[sstate-inputdirs] = "${DEPLOYDIR}"
do_deploy[sstate-outputdirs] = "${DEPLOY_DIR_IMAGE}"
python do_deploy_setscene () {
sstate_setscene(d)
}
addtask do_deploy_setscene
do_deploy[dirs] = "${DEPLOYDIR} ${B}"
The following list explains the previous example:
Adding "do_deploy" to
SSTATETASKSadds some required sstate-related processing, which is implemented in thesstateclass, to before and after thedo_deploytask.The
do_deploy[sstate-inputdirs] = "${DEPLOYDIR}"declares thatdo_deployplaces its output in${DEPLOYDIR}when run normally (i.e. when not using the sstate cache). This output becomes the input to the shared state cache.The
do_deploy[sstate-outputdirs] = "${DEPLOY_DIR_IMAGE}"line causes the contents of the shared state cache to be copied to${DEPLOY_DIR_IMAGE}.Note
Ifdo_deployis not already in the shared state cache or if its input checksum (signature) has changed from when the output was cached, the task will be run to populate the shared state cache, after which the contents of the shared state cache is copied to${DEPLOY_DIR_IMAGE}. Ifdo_deployis in the shared state cache and its signature indicates that the cached output is still valid (i.e. if no relevant task inputs have changed), then the contents of the shared state cache will be copied directly to${DEPLOY_DIR_IMAGE}by thedo_deploy_setscenetask instead, skipping thedo_deploytask.The following task definition is glue logic needed to make the previous settings effective:
python do_deploy_setscene () { sstate_setscene(d) } addtask do_deploy_setscenesstate_setscene()takes the flags above as input and accelerates thedo_deploytask through the shared state cache if possible. If the task was accelerated,sstate_setscene()returns True. Otherwise, it returns False, and the normaldo_deploytask runs. For more information, see the "setscene" section in the BitBake User Manual.The
do_deploy[dirs] = "${DEPLOYDIR} ${B}"line creates${DEPLOYDIR}and${B}before thedo_deploytask runs. For more information, see the "Variable Flags" section in the BitBake User Manual.Note
In cases wheresstate-inputdirsandsstate-outputdirswould be the same, you can usesstate-plaindirs. For example, to preserve the${PKGD}and${PKGDEST}output from thedo_packagetask, use the following:do_package[sstate-plaindirs] = "${PKGD} ${PKGDEST}"sstate-inputdirsandsstate-outputdirscan also be used with multiple directories. For example, the following declaresPKGDESTWORKandSHLIBWORKas shared state input directories, which populates the shared state cache, andPKGDATA_DIRandSHLIBSDIRas the corresponding shared state output directories:do_package[sstate-inputdirs] = "${PKGDESTWORK} ${SHLIBSWORKDIR}" do_package[sstate-outputdirs] = "${PKGDATA_DIR} ${SHLIBSDIR}"These methods also include the ability to take a lockfile when manipulating shared state directory structures, for cases where file additions or removals are sensitive:
do_package[sstate-lockfile] = "${PACKAGELOCK}"
Behind the scenes, the shared state code works by looking in
SSTATE_DIR and
SSTATE_MIRRORS
for shared state files.
Here is an example:
SSTATE_MIRRORS ?= "\
file://.* http://someserver.tld/share/sstate/PATH;downloadfilename=PATH \n \
file://.* file:///some/local/dir/sstate/PATH"
Note
The shared state directory (SSTATE_DIR) is
organized into two-character subdirectories, where the subdirectory
names are based on the first two characters of the hash.
If the shared state directory structure for a mirror has the
same structure as SSTATE_DIR, you must
specify "PATH" as part of the URI to enable the build system
to map to the appropriate subdirectory.
The shared state package validity can be detected just by looking at the filename since the filename contains the task checksum (or signature) as described earlier in this section. If a valid shared state package is found, the build process downloads it and uses it to accelerate the task.
The build processes use the *_setscene tasks
for the task acceleration phase.
BitBake goes through this phase before the main execution code and tries
to accelerate any tasks for which it can find shared state packages.
If a shared state package for a task is available, the shared state
package is used.
This means the task and any tasks on which it is dependent are not
executed.
As a real world example, the aim is when building an IPK-based image,
only the
do_package_write_ipk
tasks would have their
shared state packages fetched and extracted.
Since the sysroot is not used, it would never get extracted.
This is another reason why a task-based approach is preferred over a
recipe-based approach, which would have to install the output from every task.
21.3.4. Tips and Tricks
The code in the build system that supports incremental builds is not simple code. This section presents some tips and tricks that help you work around issues related to shared state code.
21.3.4.1. Debugging
When things go wrong, debugging needs to be straightforward. Because of this, the Yocto Project includes strong debugging tools:
Whenever a shared state package is written out into the
SSTATE_DIR, a corresponding.siginfofile is also written. This file contains a pickled Python database of all the Metadata that went into creating the hash for a given shared state package. Whenever a stamp is written into the stamp directorySTAMP, a corresponding.sigdatafile is created that contains the same hash data that represented the executed task.You can use BitBake to dump out the signature construction information without executing tasks by using either of the following BitBake command-line options:
‐‐dump-signatures=SIGNATURE_HANDLER-SSIGNATURE_HANDLERNote
Two common values forSIGNATURE_HANDLERare "none" and "printdiff" to only dump the signature or to compare the dumped signature with the cached one, respectively.Using BitBake with either of these options causes BitBake to dump out
.sigdatafiles in the stamp directory for every task it would have executed instead of building the specified target package.There is a
bitbake-diffsigscommand that can process.sigdataand.siginfofiles. If you specify one of these files, BitBake dumps out the dependency information in the file. If you specify two files, BitBake compares the two files and dumps out the differences between the two. This more easily helps answer the question of "What changed between X and Y?"
21.3.4.2. Invalidating Shared State
The OpenEmbedded build system uses checksums and shared state cache to avoid unnecessarily rebuilding tasks. Collectively, this scheme is known as "shared state code."
As with all schemes, this one has some drawbacks.
It is possible that you could make implicit changes to your
code that the checksum calculations do not take into
account.
These implicit changes affect a task's output but do not trigger
the shared state code into rebuilding a recipe.
Consider an example during which a tool changes its output.
Assume that the output of rpmdeps changes.
The result of the change should be that all the
package and
package_write_rpm shared state cache
items become invalid.
However, because the change to the output is
external to the code and therefore implicit,
the associated shared state cache items do not become
invalidated.
In this case, the build process uses the cached items rather
than running the task again.
Obviously, these types of implicit changes can cause problems.
To avoid these problems during the build, you need to understand the effects of any changes you make. Realize that changes you make directly to a function are automatically factored into the checksum calculation. Thus, these explicit changes invalidate the associated area of shared state cache. However, you need to be aware of any implicit changes that are not obvious changes to the code and could affect the output of a given task.
When you identify an implicit change, you can easily take steps
to invalidate the cache and force the tasks to run.
The steps you can take are as simple as changing a function's
comments in the source code.
For example, to invalidate package shared state files, change
the comment statements of
do_package
or the comments of one of the functions it calls.
Even though the change is purely cosmetic, it causes the
checksum to be recalculated and forces the OpenEmbedded build
system to run the task again.
Note
For an example of a commit that makes a cosmetic change to invalidate shared state, see this commit.21.4. x32
x32 is a processor-specific Application Binary Interface (psABI) for x86_64. An ABI defines the calling conventions between functions in a processing environment. The interface determines what registers are used and what the sizes are for various C data types.
Some processing environments prefer using 32-bit applications even when running on Intel 64-bit platforms. Consider the i386 psABI, which is a very old 32-bit ABI for Intel 64-bit platforms. The i386 psABI does not provide efficient use and access of the Intel 64-bit processor resources, leaving the system underutilized. Now consider the x86_64 psABI. This ABI is newer and uses 64-bits for data sizes and program pointers. The extra bits increase the footprint size of the programs, libraries, and also increases the memory and file system size requirements. Executing under the x32 psABI enables user programs to utilize CPU and system resources more efficiently while keeping the memory footprint of the applications low. Extra bits are used for registers but not for addressing mechanisms.
21.4.1. Support
This Yocto Project release supports the final specifications of x32 psABI. Support for x32 psABI exists as follows:
You can create packages and images in x32 psABI format on x86_64 architecture targets.
You can successfully build many recipes with the x32 toolchain.
You can create and boot
core-image-minimalandcore-image-satoimages.
21.4.2. Completing x32
Future Plans for the x32 psABI in the Yocto Project include the following:
Enhance and fix the few remaining recipes so they work with and support x32 toolchains.
Enhance RPM Package Manager (RPM) support for x32 binaries.
Support larger images.
21.4.3. Using x32 Right Now
Follow these steps to use the x32 spABI:
Enable the x32 psABI tuning file for
x86_64machines by editing theconf/local.conflike this:MACHINE = "qemux86-64" DEFAULTTUNE = "x86-64-x32" baselib = "${@d.getVar('BASE_LIB_tune-' + (d.getVar('DEFAULTTUNE', True) \ or 'INVALID'), True) or 'lib'}" #MACHINE = "genericx86" #DEFAULTTUNE = "core2-64-x32"As usual, use BitBake to build an image that supports the x32 psABI. Here is an example:
$ bitbake core-image-satoAs usual, run your image using QEMU:
$ runqemu qemux86-64 core-image-sato
21.5. Wayland
Wayland is a computer display server protocol that provides a method for compositing window managers to communicate directly with applications and video hardware and expects them to communicate with input hardware using other libraries. Using Wayland with supporting targets can result in better control over graphics frame rendering than an application might otherwise achieve.
The Yocto Project provides the Wayland protocol libraries and the reference Weston compositor as part of its release. This section describes what you need to do to implement Wayland and use the compositor when building an image for a supporting target.
21.5.1. Support
The Wayland protocol libraries and the reference Weston compositor
ship as integrated packages in the meta layer
of the
Source Directory.
Specifically, you can find the recipes that build both Wayland
and Weston at meta/recipes-graphics/wayland.
You can build both the Wayland and Weston packages for use only with targets that accept the Mesa 3D and Direct Rendering Infrastructure, which is also known as Mesa DRI. This implies that you cannot build and use the packages if your target uses, for example, the Intel® Embedded Media and Graphics Driver (Intel® EMGD) that overrides Mesa DRI.
Note
Due to lack of EGL support, Weston 1.0.3 will not run directly on the emulated QEMU hardware. However, this version of Weston will run under X emulation without issues.21.5.2. Enabling Wayland in an Image
To enable Wayland, you need to enable it to be built and enable it to be included in the image.
21.5.2.1. Building
To cause Mesa to build the wayland-egl
platform and Weston to build Wayland with Kernel Mode
Setting
(KMS)
support, include the "wayland" flag in the
DISTRO_FEATURES
statement in your local.conf file:
DISTRO_FEATURES_append = " wayland"
Note
If X11 has been enabled elsewhere, Weston will build Wayland with X11 support21.5.2.2. Installing
To install the Wayland feature into an image, you must
include the following
CORE_IMAGE_EXTRA_INSTALL
statement in your local.conf file:
CORE_IMAGE_EXTRA_INSTALL += "wayland weston"
21.5.3. Running Weston
To run Weston inside X11, enabling it as described earlier and building a Sato image is sufficient. If you are running your image under Sato, a Weston Launcher appears in the "Utility" category.
Alternatively, you can run Weston through the command-line interpretor (CLI), which is better suited for development work. To run Weston under the CLI, you need to do the following after your image is built:
Run these commands to export
XDG_RUNTIME_DIR:mkdir -p /tmp/$USER-weston chmod 0700 /tmp/$USER-weston export XDG_RUNTIME_DIR=/tmp/$USER-westonLaunch Weston in the shell:
weston
21.6. Licenses
This section describes the mechanism by which the OpenEmbedded build system tracks changes to licensing text. The section also describes how to enable commercially licensed recipes, which by default are disabled.
For information that can help you maintain compliance with various open source licensing during the lifecycle of the product, see the "Maintaining Open Source License Compliance During Your Project's Lifecycle" section in the Yocto Project Development Manual.
21.6.1. Tracking License Changes
The license of an upstream project might change in the future.
In order to prevent these changes going unnoticed, the
LIC_FILES_CHKSUM
variable tracks changes to the license text. The checksums are validated at the end of the
configure step, and if the checksums do not match, the build will fail.
21.6.1.1. Specifying the LIC_FILES_CHKSUM Variable
The LIC_FILES_CHKSUM
variable contains checksums of the license text in the source code for the recipe.
Following is an example of how to specify LIC_FILES_CHKSUM:
LIC_FILES_CHKSUM = "file://COPYING;md5=xxxx \
file://licfile1.txt;beginline=5;endline=29;md5=yyyy \
file://licfile2.txt;endline=50;md5=zzzz \
..."
The build system uses the
S variable as
the default directory when searching files listed in
LIC_FILES_CHKSUM.
The previous example employs the default directory.
Consider this next example:
LIC_FILES_CHKSUM = "file://src/ls.c;beginline=5;endline=16;\
md5=bb14ed3c4cda583abc85401304b5cd4e"
LIC_FILES_CHKSUM = "file://${WORKDIR}/license.html;md5=5c94767cedb5d6987c902ac850ded2c6"
The first line locates a file in
${S}/src/ls.c.
The second line refers to a file in
WORKDIR.
Note that LIC_FILES_CHKSUM variable is
mandatory for all recipes, unless the
LICENSE variable is set to "CLOSED".
21.6.1.2. Explanation of Syntax
As mentioned in the previous section, the
LIC_FILES_CHKSUM variable lists all the
important files that contain the license text for the source code.
It is possible to specify a checksum for an entire file, or a specific section of a
file (specified by beginning and ending line numbers with the "beginline" and "endline"
parameters, respectively).
The latter is useful for source files with a license notice header,
README documents, and so forth.
If you do not use the "beginline" parameter, then it is assumed that the text begins on the
first line of the file.
Similarly, if you do not use the "endline" parameter, it is assumed that the license text
ends with the last line of the file.
The "md5" parameter stores the md5 checksum of the license text. If the license text changes in any way as compared to this parameter then a mismatch occurs. This mismatch triggers a build failure and notifies the developer. Notification allows the developer to review and address the license text changes. Also note that if a mismatch occurs during the build, the correct md5 checksum is placed in the build log and can be easily copied to the recipe.
There is no limit to how many files you can specify using the
LIC_FILES_CHKSUM variable.
Generally, however, every project requires a few specifications for license tracking.
Many projects have a "COPYING" file that stores the license information for all the source
code files.
This practice allows you to just track the "COPYING" file as long as it is kept up to date.
Tip
If you specify an empty or invalid "md5" parameter, BitBake returns an md5 mis-match error and displays the correct "md5" parameter value during the build. The correct parameter is also captured in the build log.Tip
If the whole file contains only license text, you do not need to use the "beginline" and "endline" parameters.21.6.2. Enabling Commercially Licensed Recipes
By default, the OpenEmbedded build system disables
components that have commercial or other special licensing
requirements.
Such requirements are defined on a
recipe-by-recipe basis through the
LICENSE_FLAGS
variable definition in the affected recipe.
For instance, the
poky/meta/recipes-multimedia/gstreamer/gst-plugins-ugly
recipe contains the following statement:
LICENSE_FLAGS = "commercial"
Here is a slightly more complicated example that contains both an explicit recipe name and version (after variable expansion):
LICENSE_FLAGS = "license_${PN}_${PV}"
In order for a component restricted by a LICENSE_FLAGS
definition to be enabled and included in an image, it
needs to have a matching entry in the global
LICENSE_FLAGS_WHITELIST
variable, which is a variable
typically defined in your local.conf file.
For example, to enable
the poky/meta/recipes-multimedia/gstreamer/gst-plugins-ugly
package, you could add either the string
"commercial_gst-plugins-ugly" or the more general string
"commercial" to LICENSE_FLAGS_WHITELIST.
See the
"License Flag Matching" section
for a full explanation of how LICENSE_FLAGS matching works.
Here is the example:
LICENSE_FLAGS_WHITELIST = "commercial_gst-plugins-ugly"
Likewise, to additionally enable the package built from the recipe containing
LICENSE_FLAGS = "license_${PN}_${PV}", and assuming
that the actual recipe name was emgd_1.10.bb,
the following string would enable that package as well as
the original gst-plugins-ugly package:
LICENSE_FLAGS_WHITELIST = "commercial_gst-plugins-ugly license_emgd_1.10"
As a convenience, you do not need to specify the complete license string in the whitelist for every package. You can use an abbreviated form, which consists of just the first portion or portions of the license string before the initial underscore character or characters. A partial string will match any license that contains the given string as the first portion of its license. For example, the following whitelist string will also match both of the packages previously mentioned as well as any other packages that have licenses starting with "commercial" or "license".
LICENSE_FLAGS_WHITELIST = "commercial license"
21.6.2.1. License Flag Matching
License flag matching allows you to control what recipes the
OpenEmbedded build system includes in the build.
Fundamentally, the build system attempts to match
LICENSE_FLAGS
strings found in recipes against
LICENSE_FLAGS_WHITELIST
strings found in the whitelist.
A match causes the build system to include a recipe in the
build, while failure to find a match causes the build system to
exclude a recipe.
In general, license flag matching is simple. However, understanding some concepts will help you correctly and effectively use matching.
Before a flag
defined by a particular recipe is tested against the
contents of the whitelist, the expanded string
_${PN} is appended to the flag.
This expansion makes each LICENSE_FLAGS
value recipe-specific.
After expansion, the string is then matched against the
whitelist.
Thus, specifying
LICENSE_FLAGS = "commercial"
in recipe "foo", for example, results in the string
"commercial_foo".
And, to create a match, that string must appear in the
whitelist.
Judicious use of the LICENSE_FLAGS
strings and the contents of the
LICENSE_FLAGS_WHITELIST variable
allows you a lot of flexibility for including or excluding
recipes based on licensing.
For example, you can broaden the matching capabilities by
using license flags string subsets in the whitelist.
Note
When using a string subset, be sure to use the part of the expanded string that precedes the appended underscore character (e.g.usethispart_1.3,
usethispart_1.4, and so forth).
For example, simply specifying the string "commercial" in
the whitelist matches any expanded
LICENSE_FLAGS definition that starts with
the string "commercial" such as "commercial_foo" and
"commercial_bar", which are the strings the build system
automatically generates for hypothetical recipes named
"foo" and "bar" assuming those recipes simply specify the
following:
LICENSE_FLAGS = "commercial"
Thus, you can choose to exhaustively enumerate each license flag in the whitelist and allow only specific recipes into the image, or you can use a string subset that causes a broader range of matches to allow a range of recipes into the image.
This scheme works even if the
LICENSE_FLAGS string already
has _${PN} appended.
For example, the build system turns the license flag
"commercial_1.2_foo" into "commercial_1.2_foo_foo" and would
match both the general "commercial" and the specific
"commercial_1.2_foo" strings found in the whitelist, as
expected.
Here are some other scenarios:
You can specify a versioned string in the recipe such as "commercial_foo_1.2" in a "foo" recipe. The build system expands this string to "commercial_foo_1.2_foo". Combine this license flag with a whitelist that has the string "commercial" and you match the flag along with any other flag that starts with the string "commercial".
Under the same circumstances, you can use "commercial_foo" in the whitelist and the build system not only matches "commercial_foo_1.2" but also matches any license flag with the string "commercial_foo", regardless of the version.
You can be very specific and use both the package and version parts in the whitelist (e.g. "commercial_foo_1.2") to specifically match a versioned recipe.
21.6.2.2. Other Variables Related to Commercial Licenses
Other helpful variables related to commercial
license handling exist and are defined in the
poky/meta/conf/distro/include/default-distrovars.inc file:
COMMERCIAL_AUDIO_PLUGINS ?= ""
COMMERCIAL_VIDEO_PLUGINS ?= ""
If you want to enable these components, you can do so by making sure you have
statements similar to the following
in your local.conf configuration file:
COMMERCIAL_AUDIO_PLUGINS = "gst-plugins-ugly-mad \
gst-plugins-ugly-mpegaudioparse"
COMMERCIAL_VIDEO_PLUGINS = "gst-plugins-ugly-mpeg2dec \
gst-plugins-ugly-mpegstream gst-plugins-bad-mpegvideoparse"
LICENSE_FLAGS_WHITELIST = "commercial_gst-plugins-ugly commercial_gst-plugins-bad commercial_qmmp"
Of course, you could also create a matching whitelist
for those components using the more general "commercial"
in the whitelist, but that would also enable all the
other packages with
LICENSE_FLAGS
containing "commercial", which you may or may not want:
LICENSE_FLAGS_WHITELIST = "commercial"
Specifying audio and video plug-ins as part of the
COMMERCIAL_AUDIO_PLUGINS and
COMMERCIAL_VIDEO_PLUGINS statements
(along with the enabling
LICENSE_FLAGS_WHITELIST) includes the
plug-ins or components into built images, thus adding
support for media formats or components.
Chapter 22. Migrating to a Newer Yocto Project Release
- 22.1. General Migration Considerations
- 22.2. Moving to the Yocto Project 1.3 Release
- 22.3. Moving to the Yocto Project 1.4 Release
- 22.4. Moving to the Yocto Project 1.5 Release
- 22.4.1. Host Dependency Changes
- 22.4.2.
atom-pcBoard Support Package (BSP) - 22.4.3. BitBake
- 22.4.4. QA Warnings
- 22.4.5. Directory Layout Changes
- 22.4.6. Shortened Git
SRCREVValues - 22.4.7.
IMAGE_FEATURES - 22.4.8.
/run - 22.4.9. Removal of Package Manager Database Within Image Recipes
- 22.4.10. Images Now Rebuild Only on Changes Instead of Every Time
- 22.4.11. Task Recipes
- 22.4.12. BusyBox
- 22.4.13. Automated Image Testing
- 22.4.14. Build History
- 22.4.15.
udev - 22.4.16. Removed and Renamed Recipes
- 22.4.17. Other Changes
- 22.5. Moving to the Yocto Project 1.6 Release
- 22.5.1.
archiverClass - 22.5.2. Packaging Changes
- 22.5.3. BitBake
- 22.5.4. Changes to Variables
- 22.5.5. Package Test (ptest)
- 22.5.6. Build Changes
- 22.5.7.
qemu-native - 22.5.8.
core-image-basic - 22.5.9. Licensing
- 22.5.10.
CFLAGSOptions - 22.5.11. Custom Image Output Types
- 22.5.12. Tasks
- 22.5.13.
update-alternativeProvider - 22.5.14.
virtclassOverrides - 22.5.15. Removed and Renamed Recipes
- 22.5.16. Removed Classes
- 22.5.17. Reference Board Support Packages (BSPs)
- 22.5.1.
- 22.6. Moving to the Yocto Project 1.7 Release
- 22.6.1. Changes to Setting QEMU
PACKAGECONFIGOptions inlocal.conf - 22.6.2. Minimum Git version
- 22.6.3. Autotools Class Changes
- 22.6.4. Binary Configuration Scripts Disabled
- 22.6.5.
eglibc 2.19Replaced withglibc 2.20 - 22.6.6. Kernel Module Autoloading
- 22.6.7. QA Check Changes
- 22.6.8. Removed Recipes
- 22.6.9. Miscellaneous Changes
- 22.6.1. Changes to Setting QEMU
- 22.7. Moving to the Yocto Project 1.8 Release
- 22.8. Moving to the Yocto Project 2.0 Release
- 22.8.1. GCC 5
- 22.8.2. Gstreamer 0.10 Removed
- 22.8.3. Removed Recipes
- 22.8.4. BitBake datastore improvements
- 22.8.5. Shell Message Function Changes
- 22.8.6. Extra Development/Debug Package Cleanup
- 22.8.7. Recipe Maintenance Tracking Data Moved to OE-Core
- 22.8.8. Automatic Stale Sysroot File Cleanup
- 22.8.9.
linux-yoctoKernel Metadata Repository Now Split from Source - 22.8.10. Additional QA checks
- 22.8.11. Miscellaneous Changes
- 22.9. Moving to the Yocto Project 2.1 Release
- 22.9.1. Variable Expansion in Python Functions
- 22.9.2. Overrides Must Now be Lower-Case
- 22.9.3. Expand Parameter to
getVar()andgetVarFlag()is Now Mandatory - 22.9.4. Makefile Environment Changes
- 22.9.5.
libexecdirReverted to${prefix}/libexec - 22.9.6.
ac_cv_sizeof_off_tis No Longer Cached in Site Files - 22.9.7. Image Generation is Now Split Out from Filesystem Generation
- 22.9.8. Removed Recipes
- 22.9.9. Class Changes
- 22.9.10. Build System User Interface Changes
- 22.9.11. ADT Removed
- 22.9.12. Poky Reference Distribution Changes
- 22.9.13. Packaging Changes
- 22.9.14. Tuning File Changes
- 22.9.15. Supporting GObject Introspection
- 22.9.16. Miscellaneous Changes
This chapter provides information you can use to migrate work to a newer Yocto Project release. You can find the same information in the release notes for a given release.
22.1. General Migration Considerations
Some considerations are not tied to a specific Yocto Project release. This section presents information you should consider when migrating to any new Yocto Project release.
Dealing with Customized Recipes: Issues could arise if you take older recipes that contain customizations and simply copy them forward expecting them to work after you migrate to new Yocto Project metadata. For example, suppose you have a recipe in your layer that is a customized version of a core recipe copied from the earlier release, rather than through the use of an append file. When you migrate to a newer version of Yocto Project, the metadata (e.g. perhaps an include file used by the recipe) could have changed in a way that would break the build. Say, for example, a function is removed from an include file and the customized recipe tries to call that function.
You could "forward-port" all your customizations in your recipe so that everything works for the new release. However, this is not the optimal solution as you would have to repeat this process with each new release if changes occur that give rise to problems.
The better solution (where practical) is to use append files (
*.bbappend) to capture any customizations you want to make to a recipe. Doing so, isolates your changes from the main recipe making them much more manageable. However, sometimes it is not practical to use an append file. A good example of this is when introducing a newer or older version of a recipe in another layer.Updating Append Files: Since append files generally only contain your customizations, they often do not need to be adjusted for new releases. However, if the
.bbappendfile is specific to a particular version of the recipe (i.e. its name does not use the % wildcard) and the version of the recipe to which it is appending has changed, then you will at a minimum need to rename the append file to match the name of the recipe file. A mismatch between an append file and its corresponding recipe file (.bb) will trigger an error during parsing.Depending on the type of customization the append file applies, other incompatibilities might occur when you upgrade. For example, if your append file applies a patch and the recipe to which it is appending is updated to a newer version, the patch might no longer apply. If this is the case and assuming the patch is still needed, you must modify the patch file so that it does apply.
22.2. Moving to the Yocto Project 1.3 Release
This section provides migration information for moving to the Yocto Project 1.3 Release from the prior release.
22.2.1. Local Configuration
Differences include changes for
SSTATE_MIRRORS
and bblayers.conf.
22.2.1.1. SSTATE_MIRRORS
The shared state cache (sstate-cache), as pointed to by
SSTATE_DIR,
by default now has two-character subdirectories to prevent
issues arising from too many files in the same directory.
Also, native sstate-cache packages, which are built to run
on the host system, will go into a subdirectory named using
the distro ID string.
If you copy the newly structured sstate-cache to a mirror
location (either local or remote) and then point to it in
SSTATE_MIRRORS,
you need to append "PATH" to the end of the mirror URL so that
the path used by BitBake before the mirror substitution is
appended to the path used to access the mirror.
Here is an example:
SSTATE_MIRRORS = "file://.* http://someserver.tld/share/sstate/PATH"
22.2.1.2. bblayers.conf
The meta-yocto layer consists of two parts
that correspond to the Poky reference distribution and the
reference hardware Board Support Packages (BSPs), respectively:
meta-yocto and
meta-yocto-bsp.
When running BitBake for the first time after upgrading,
your conf/bblayers.conf file will be
updated to handle this change and you will be asked to
re-run or restart for the changes to take effect.
22.2.2. Recipes
Differences include changes for the following:
Python function whitespace
proto=inSRC_URInativesdkTask recipes
IMAGE_FEATURESRemoved recipes
22.2.2.1. Python Function Whitespace
All Python functions must now use four spaces for indentation.
Previously, an inconsistent mix of spaces and tabs existed,
which made extending these functions using
_append or _prepend
complicated given that Python treats whitespace as
syntactically significant.
If you are defining or extending any Python functions (e.g.
populate_packages, do_unpack,
do_patch and so forth) in custom recipes
or classes, you need to ensure you are using consistent
four-space indentation.
22.2.2.2. proto= in SRC_URI
Any use of proto= in
SRC_URI
needs to be changed to protocol=.
In particular, this applies to the following URIs:
svn://bzr://hg://osc://
Other URIs were already using protocol=.
This change improves consistency.
22.2.2.3. nativesdk
The suffix nativesdk is now implemented
as a prefix, which simplifies a lot of the packaging code for
nativesdk recipes.
All custom nativesdk recipes, which are
relocatable packages that are native to
SDK_ARCH,
and any references need to be updated to use
nativesdk-* instead of
*-nativesdk.
22.2.2.4. Task Recipes
"Task" recipes are now known as "Package groups" and have
been renamed from task-*.bb to
packagegroup-*.bb.
Existing references to the previous task-*
names should work in most cases as there is an automatic
upgrade path for most packages.
However, you should update references in your own recipes and
configurations as they could be removed in future releases.
You should also rename any custom task-*
recipes to packagegroup-*, and change
them to inherit packagegroup instead of
task, as well as taking the opportunity
to remove anything now handled by
packagegroup.bbclass, such as providing
-dev and -dbg
packages, setting
LIC_FILES_CHKSUM,
and so forth.
See the
"packagegroup.bbclass"
section for further details.
22.2.2.5. IMAGE_FEATURES
Image recipes that previously included "apps-console-core"
in IMAGE_FEATURES
should now include "splash" instead to enable the boot-up
splash screen.
Retaining "apps-console-core" will still include the splash
screen but generates a warning.
The "apps-x11-core" and "apps-x11-games"
IMAGE_FEATURES features have been removed.
22.2.2.6. Removed Recipes
The following recipes have been removed. For most of them, it is unlikely that you would have any references to them in your own Metadata. However, you should check your metadata against this list to be sure:
libx11-trim: Replaced bylibx11, which has a negligible size difference with modern Xorg.xserver-xorg-lite: Usexserver-xorg, which has a negligible size difference when DRI and GLX modules are not installed.xserver-kdrive: Effectively unmaintained for many years.mesa-xlib: No longer serves any purpose.galago: Replaced by telepathy.gail: Functionality was integrated into GTK+ 2.13.eggdbus: No longer needed.gcc-*-intermediate: The build has been restructured to avoid the need for this step.libgsmd: Unmaintained for many years. Functionality now provided byofonoinstead.contacts, dates, tasks, eds-tools: Largely unmaintained PIM application suite. It has been moved to
meta-gnomeinmeta-openembedded.
In addition to the previously listed changes, the
meta-demoapps directory has also been removed
because the recipes in it were not being maintained and many
had become obsolete or broken.
Additionally, these recipes were not parsed in the default configuration.
Many of these recipes are already provided in an updated and
maintained form within the OpenEmbedded community layers such as
meta-oe and meta-gnome.
For the remainder, you can now find them in the
meta-extras repository, which is in the
Yocto Project
Source Repositories.
22.2.3. Linux Kernel Naming
The naming scheme for kernel output binaries has been changed to
now include
PE as part of the
filename:
KERNEL_IMAGE_BASE_NAME ?= "${KERNEL_IMAGETYPE}-${PE}-${PV}-${PR}-${MACHINE}-${DATETIME}"
Because the PE variable is not set by default,
these binary files could result with names that include two dash
characters.
Here is an example:
bzImage--3.10.9+git0+cd502a8814_7144bcc4b8-r0-qemux86-64-20130830085431.bin
22.3. Moving to the Yocto Project 1.4 Release
This section provides migration information for moving to the Yocto Project 1.4 Release from the prior release.
22.3.1. BitBake
Differences include the following:
Comment Continuation: If a comment ends with a line continuation (\) character, then the next line must also be a comment. Any instance where this is not the case, now triggers a warning. You must either remove the continuation character, or be sure the next line is a comment.
Package Name Overrides: The runtime package specific variables
RDEPENDS,RRECOMMENDS,RSUGGESTS,RPROVIDES,RCONFLICTS,RREPLACES,FILES,ALLOW_EMPTY, and the pre, post, install, and uninstall script functionspkg_preinst,pkg_postinst,pkg_prerm, andpkg_postrmshould always have a package name override. For example, useRDEPENDS_${PN}for the main package instead ofRDEPENDS. BitBake uses more strict checks when it parses recipes.
22.3.2. Build Behavior
Differences include the following:
Shared State Code: The shared state code has been optimized to avoid running unnecessary tasks. For example, the following no longer populates the target sysroot since that is not necessary:
$ bitbake -c rootfssome-imageInstead, the system just needs to extract the output package contents, re-create the packages, and construct the root filesystem. This change is unlikely to cause any problems unless you have missing declared dependencies.
Scanning Directory Names: When scanning for files in
SRC_URI, the build system now usesFILESOVERRIDESinstead ofOVERRIDESfor the directory names. In general, the values previously inOVERRIDESare now inFILESOVERRIDESas well. However, if you relied upon an additional value you previously added toOVERRIDES, you might now need to add it toFILESOVERRIDESunless you are already adding it through theMACHINEOVERRIDESorDISTROOVERRIDESvariables, as appropriate. For more related changes, see the "Variables" section.
22.3.3. Proxies and Fetching Source
A new oe-git-proxy script has been added to
replace previous methods of handling proxies and fetching source
from Git.
See the meta-yocto/conf/site.conf.sample file
for information on how to use this script.
22.3.4. Custom Interfaces File (netbase change)
If you have created your own custom
etc/network/interfaces file by creating
an append file for the netbase recipe,
you now need to create an append file for the
init-ifupdown recipe instead, which you can
find in the
Source Directory
at meta/recipes-core/init-ifupdown.
For information on how to use append files, see the
"Using .bbappend Files"
in the Yocto Project Development Manual.
22.3.5. Remote Debugging
Support for remote debugging with the Eclipse IDE is now
separated into an image feature
(eclipse-debug) that corresponds to the
packagegroup-core-eclipse-debug package group.
Previously, the debugging feature was included through the
tools-debug image feature, which corresponds
to the packagegroup-core-tools-debug
package group.
22.3.6. Variables
The following variables have changed:
SANITY_TESTED_DISTROS: This variable now uses a distribution ID, which is composed of the host distributor ID followed by the release. Previously,SANITY_TESTED_DISTROSwas composed of the description field. For example, "Ubuntu 12.10" becomes "Ubuntu-12.10". You do not need to worry about this change if you are not specifically setting this variable, or if you are specifically setting it to "".SRC_URI: The${PN},${PF},${P}, andFILE_DIRNAMEdirectories have been dropped from the default value of theFILESPATHvariable, which is used as the search path for finding files referred to inSRC_URI. If you have a recipe that relied upon these directories, which would be unusual, then you will need to add the appropriate paths within the recipe or, alternatively, rearrange the files. The most common locations are still covered by${BP},${BPN}, and "files", which all remain in the default value ofFILESPATH.
22.3.7. Target Package Management with RPM
If runtime package management is enabled and the RPM backend is selected, Smart is now installed for package download, dependency resolution, and upgrades instead of Zypper. For more information on how to use Smart, run the following command on the target:
smart --help
22.3.8. Recipes Moved
The following recipes were moved from their previous locations because they are no longer used by anything in the OpenEmbedded-Core:
clutter-box2d: Now resides in themeta-oelayer.evolution-data-server: Now resides in themeta-gnomelayer.gthumb: Now resides in themeta-gnomelayer.gtkhtml2: Now resides in themeta-oelayer.gupnp: Now resides in themeta-multimedialayer.gypsy: Now resides in themeta-oelayer.libcanberra: Now resides in themeta-gnomelayer.libgdata: Now resides in themeta-gnomelayer.libmusicbrainz: Now resides in themeta-multimedialayer.metacity: Now resides in themeta-gnomelayer.polkit: Now resides in themeta-oelayer.zeroconf: Now resides in themeta-networkinglayer.
22.3.9. Removals and Renames
The following list shows what has been removed or renamed:
evieext: Removed because it has been removed fromxserversince 2008.Gtk+ DirectFB: Removed support because upstream Gtk+ no longer supports it as of version 2.18.
libxfontcache / xfontcacheproto: Removed because they were removed from the Xorg server in 2008.libxp / libxprintapputil / libxprintutil / printproto: Removed because the XPrint server was removed from Xorg in 2008.libxtrap / xtrapproto: Removed because their functionality was broken upstream.linux-yocto 3.0 kernel: Removed with linux-yocto 3.8 kernel being added. The linux-yocto 3.2 and linux-yocto 3.4 kernels remain as part of the release.
lsbsetup: Removed with functionality now provided bylsbtest.matchbox-stroke: Removed because it was never more than a proof-of-concept.matchbox-wm-2 / matchbox-theme-sato-2: Removed because they are not maintained. However,matchbox-wmandmatchbox-theme-satoare still provided.mesa-dri: Renamed tomesa.mesa-xlib: Removed because it was no longer useful.mutter: Removed because nothing ever uses it and the recipe is very old.orinoco-conf: Removed because it has become obsolete.update-modules: Removed because it is no longer used. The kernel modulepostinstallandpostrmscripts can now do the same task without the use of this script.web: Removed because it is not maintained. Superseded byweb-webkit.xf86bigfontproto: Removed because upstream it has been disabled by default since 2007. Nothing usesxf86bigfontproto.xf86rushproto: Removed because its dependency inxserverwas spurious and it was removed in 2005.zypper / libzypp / sat-solver: Removed and been functionally replaced with Smart (python-smartpm) when RPM packaging is used and package management is enabled on the target.
22.4. Moving to the Yocto Project 1.5 Release
This section provides migration information for moving to the Yocto Project 1.5 Release from the prior release.
22.4.1. Host Dependency Changes
The OpenEmbedded build system now has some additional requirements on the host system:
Python 2.7.3+
Tar 1.24+
Git 1.7.8+
Patched version of Make if you are using 3.82. Most distributions that provide Make 3.82 use the patched version.
If the Linux distribution you are using on your build host does not provide packages for these, you can install and use the Buildtools tarball, which provides an SDK-like environment containing them.
For more information on this requirement, see the "Required Git, tar, and Python Versions" section.
22.4.2. atom-pc Board Support Package (BSP)
The atom-pc hardware reference BSP has been
replaced by a genericx86 BSP.
This BSP is not necessarily guaranteed to work on all x86
hardware, but it will run on a wider range of systems than the
atom-pc did.
Note
Additionally, agenericx86-64 BSP has
been added for 64-bit Atom systems.
22.4.3. BitBake
The following changes have been made that relate to BitBake:
BitBake now supports a
_removeoperator. The addition of this operator means you will have to rename any items in recipe space (functions, variables) whose names currently contain_remove_or end with_removeto avoid unexpected behavior.BitBake's global method pool has been removed. This method is not particularly useful and led to clashes between recipes containing functions that had the same name.
The "none" server backend has been removed. The "process" server backend has been serving well as the default for a long time now.
The
bitbake-runtaskscript has been removed.${P}and${PF}are no longer added toPROVIDESby default inbitbake.conf. These version-specificPROVIDESitems were seldom used. Attempting to use them could result in two versions being built simultaneously rather than just one version due to the way BitBake resolves dependencies.
22.4.4. QA Warnings
The following changes have been made to the package QA checks:
If you have customized
ERROR_QAorWARN_QAvalues in your configuration, check that they contain all of the issues that you wish to be reported. Previous Yocto Project versions contained a bug that meant that any item not mentioned inERROR_QAorWARN_QAwould be treated as a warning. Consequently, several important items were not already in the default value ofWARN_QA. All of the possible QA checks are now documented in the "insane.bbclass" section.An additional QA check has been added to check if
/usr/share/info/diris being installed. Your recipe should delete this file withindo_installif "make install" is installing it.If you are using the buildhistory class, the check for the package version going backwards is now controlled using a standard QA check. Thus, if you have customized your
ERROR_QAorWARN_QAvalues and still wish to have this check performed, you should add "version-going-backwards" to your value for one or the other variables depending on how you wish it to be handled. See the documented QA checks in the "insane.bbclass" section.
22.4.5. Directory Layout Changes
The following directory changes exist:
Output SDK installer files are now named to include the image name and tuning architecture through the
SDK_NAMEvariable.Images and related files are now installed into a directory that is specific to the machine, instead of a parent directory containing output files for multiple machines. The
DEPLOY_DIR_IMAGEvariable continues to point to the directory containing images for the currentMACHINEand should be used anywhere there is a need to refer to this directory. Therunqemuscript now uses this variable to find images and kernel binaries and will use BitBake to determine the directory. Alternatively, you can set theDEPLOY_DIR_IMAGEvariable in the external environment.When buildhistory is enabled, its output is now written under the Build Directory rather than
TMPDIR. Doing so makes it easier to deleteTMPDIRand preserve the build history. Additionally, data for produced SDKs is now split byIMAGE_NAME.The
pkgdatadirectory produced as part of the packaging process has been collapsed into a single machine-specific directory. This directory is located undersysrootsand uses a machine-specific name (i.e.tmp/sysroots/).machine/pkgdata
22.4.6. Shortened Git SRCREV Values
BitBake will now shorten revisions from Git repositories from the
normal 40 characters down to 10 characters within
SRCPV
for improved usability in path and file names.
This change should be safe within contexts where these revisions
are used because the chances of spatially close collisions
is very low.
Distant collisions are not a major issue in the way
the values are used.
22.4.7. IMAGE_FEATURES
The following changes have been made that relate to
IMAGE_FEATURES:
The value of
IMAGE_FEATURESis now validated to ensure invalid feature items are not added. Some users mistakenly add package names to this variable instead of usingIMAGE_INSTALLin order to have the package added to the image, which does not work. This change is intended to catch those kinds of situations. ValidIMAGE_FEATURESare drawn fromPACKAGE_GROUPdefinitions,COMPLEMENTARY_GLOBand a new "validitems" varflag onIMAGE_FEATURES. The "validitems" varflag change allows additional features to be added if they are not provided using the previous two mechanisms.The previously deprecated "apps-console-core"
IMAGE_FEATURESitem is no longer supported. Add "splash" toIMAGE_FEATURESif you wish to have the splash screen enabled, since this is all that apps-console-core was doing.
22.4.8. /run
The /run directory from the Filesystem
Hierarchy Standard 3.0 has been introduced.
You can find some of the implications for this change
here.
The change also means that recipes that install files to
/var/run must be changed.
You can find a guide on how to make these changes
here.
22.4.9. Removal of Package Manager Database Within Image Recipes
The image core-image-minimal no longer adds
remove_packaging_data_files to
ROOTFS_POSTPROCESS_COMMAND.
This addition is now handled automatically when "package-management"
is not in
IMAGE_FEATURES.
If you have custom image recipes that make this addition,
you should remove the lines, as they are not needed and might
interfere with correct operation of postinstall scripts.
22.4.10. Images Now Rebuild Only on Changes Instead of Every Time
The
do_rootfs
and other related image
construction tasks are no longer marked as "nostamp".
Consequently, they will only be re-executed when their inputs have
changed.
Previous versions of the OpenEmbedded build system always rebuilt
the image when requested rather when necessary.
22.4.11. Task Recipes
The previously deprecated task.bbclass has
now been dropped.
For recipes that previously inherited from this class, you should
rename them from task-* to
packagegroup-* and inherit packagegroup
instead.
For more information, see the
"packagegroup.bbclass"
section.
22.4.12. BusyBox
By default, we now split BusyBox into two binaries:
one that is suid root for those components that need it, and
another for the rest of the components.
Splitting BusyBox allows for optimization that eliminates the
tinylogin recipe as recommended by upstream.
You can disable this split by setting
BUSYBOX_SPLIT_SUID
to "0".
22.4.13. Automated Image Testing
A new automated image testing framework has been added
through the
testimage.bbclass
class.
This framework replaces the older
imagetest-qemu framework.
You can learn more about performing automated image tests in the "Performing Automated Runtime Testing" section.
22.4.14. Build History
Following are changes to Build History:
Installed package sizes:
installed-package-sizes.txtfor an image now records the size of the files installed by each package instead of the size of each compressed package archive file.The dependency graphs (
depends*.dot) now use the actual package names instead of replacing dashes, dots and plus signs with underscores.The
buildhistory-diffandbuildhistory-collect-srcrevsutilities have improved command-line handling. Use the--helpoption for each utility for more information on the new syntax.
For more information on Build History, see the "Maintaining Build Output Quality" section.
22.4.15. udev
Following are changes to udev:
udevno longer brings inudev-extraconfautomatically throughRRECOMMENDS, since this was originally intended to be optional. If you need the extra rules, then addudev-extraconfto your image.udevno longer brings inpciutils-idsorusbutils-idsthroughRRECOMMENDS. These are not needed byudevitself and removing them saves around 350KB.
22.4.16. Removed and Renamed Recipes
The
linux-yocto3.2 kernel has been removed.libtool-nativesdkhas been renamed tonativesdk-libtool.tinyloginhas been removed. It has been replaced by a suid portion of Busybox. See the "BusyBox" section for more information.external-python-tarballhas been renamed tobuildtools-tarball.web-webkithas been removed. It has been functionally replaced bymidori.imakehas been removed. It is no longer needed by any other recipe.transfig-nativehas been removed. It is no longer needed by any other recipe.anjuta-remote-runhas been removed. Anjuta IDE integration has not been officially supported for several releases.
22.4.17. Other Changes
Following is a list of short entries describing other changes:
run-postinsts: Make this generic.base-files: Remove the unnecessarymedia/xxxdirectories.alsa-state: Provide an emptyasound.confby default.classes/image: EnsureBAD_RECOMMENDATIONSsupports pre-renamed package names.classes/rootfs_rpm: ImplementBAD_RECOMMENDATIONSfor RPM.systemd: Removesystemd_unitdirifsystemdis not inDISTRO_FEATURES.systemd: Removeinit.ddir ifsystemdunit file is present andsysvinitis not a distro feature.libpam: Deny all services for theOTHERentries.image.bbclass: Moveruntime_mapping_renameto avoid conflict withmultilib. SeeYOCTO #4993in Bugzilla for more information.linux-dtb: Use kernel build system to generate thedtbfiles.kern-tools: Switch from guilt to newkgit-s2qtool.
22.5. Moving to the Yocto Project 1.6 Release
This section provides migration information for moving to the Yocto Project 1.6 Release from the prior release.
22.5.1. archiver Class
The
archiver
class has been rewritten and its configuration has been simplified.
For more details on the source archiver, see the
"Maintaining Open Source License Compliance During Your Product's Lifecycle"
section in the Yocto Project Development Manual.
22.5.2. Packaging Changes
The following packaging changes have been made:
The
binutilsrecipe no longer produces abinutils-symlinkspackage.update-alternativesis now used to handle the preferredbinutilsvariant on the target instead.The tc (traffic control) utilities have been split out of the main
iproute2package and put into theiproute2-tcpackage.The
gtk-enginesschemas have been moved to a dedicatedgtk-engines-schemaspackage.The
armv7awith thumb package architecture suffix has changed. The suffix for these packages with the thumb optimization enabled is "t2" as it should be. Use of this suffix was not the case in the 1.5 release. Architecture names will change within package feeds as a result.
22.5.3. BitBake
The following changes have been made to BitBake.
22.5.3.1. Matching Branch Requirement for Git Fetching
When fetching source from a Git repository using
SRC_URI,
BitBake will now validate the
SRCREV
value against the branch.
You can specify the branch using the following form:
SRC_URI = "git://server.name/repository;branch=branchname"
If you do not specify a branch, BitBake looks in the default "master" branch.
Alternatively, if you need to bypass this check (e.g.
if you are fetching a revision corresponding to a tag that
is not on any branch), you can add ";nobranch=1" to
the end of the URL within SRC_URI.
22.5.3.2. Python Definition substitutions
BitBake had some previously deprecated Python definitions
within its bb module removed.
You should use their sub-module counterparts instead:
bb.MalformedUrl: Usebb.fetch.MalformedUrl.bb.encodeurl: Usebb.fetch.encodeurl.bb.decodeurl: Usebb.fetch.decodeurlbb.mkdirhier: Usebb.utils.mkdirhier.bb.movefile: Usebb.utils.movefile.bb.copyfile: Usebb.utils.copyfile.bb.which: Usebb.utils.which.bb.vercmp_string: Usebb.utils.vercmp_string.bb.vercmp: Usebb.utils.vercmp.
22.5.3.3. SVK Fetcher
The SVK fetcher has been removed from BitBake.
22.5.3.4. Console Output Error Redirection
The BitBake console UI will now output errors to
stderr instead of
stdout.
Consequently, if you are piping or redirecting the output of
bitbake to somewhere else, and you wish
to retain the errors, you will need to add
2>&1 (or something similar) to the
end of your bitbake command line.
22.5.3.5. task-taskname Overrides
task-taskname overrides have been
adjusted so that tasks whose names contain underscores have the
underscores replaced by hyphens for the override so that they
now function properly.
For example, the task override for
do_populate_sdk
is task-populate-sdk.
22.5.4. Changes to Variables
The following variables have changed. For information on the OpenEmbedded build system variables, see the "Variables Glossary" Chapter.
22.5.4.1. TMPDIR
TMPDIR
can no longer be on an NFS mount.
NFS does not offer full POSIX locking and inode consistency
and can cause unexpected issues if used to store
TMPDIR.
The check for this occurs on startup.
If TMPDIR is detected on an NFS mount,
an error occurs.
22.5.4.2. PRINC
The PRINC
variable has been deprecated and triggers a warning if
detected during a build.
For
PR
increments on changes, use the PR service instead.
You can find out more about this service in the
"Working With a PR Service"
section in the Yocto Project Development Manual.
22.5.4.3. IMAGE_TYPES
The "sum.jffs2" option for
IMAGE_TYPES
has been replaced by the "jffs2.sum" option, which fits the
processing order.
22.5.4.4. COPY_LIC_MANIFEST
The
COPY_LIC_MANIFEST
variable must
now be set to "1" rather than any value in order to enable
it.
22.5.4.5. COPY_LIC_DIRS
The
COPY_LIC_DIRS
variable must
now be set to "1" rather than any value in order to enable
it.
22.5.4.6. PACKAGE_GROUP
The
PACKAGE_GROUP
variable has been renamed to
FEATURE_PACKAGES
to more accurately reflect its purpose.
You can still use PACKAGE_GROUP but
the OpenEmbedded build system produces a warning message when
it encounters the variable.
22.5.4.7. Preprocess and Post Process Command Variable Behavior
The following variables now expect a semicolon separated list of functions to call and not arbitrary shell commands:
ROOTFS_PREPROCESS_COMMAND
ROOTFS_POSTPROCESS_COMMAND
SDK_POSTPROCESS_COMMAND
POPULATE_SDK_POST_TARGET_COMMAND
POPULATE_SDK_POST_HOST_COMMAND
IMAGE_POSTPROCESS_COMMAND
IMAGE_PREPROCESS_COMMAND
ROOTFS_POSTUNINSTALL_COMMAND
ROOTFS_POSTINSTALL_COMMAND
For migration purposes, you can simply wrap shell commands in a shell function and then call the function. Here is an example:
my_postprocess_function() {
echo "hello" > ${IMAGE_ROOTFS}/hello.txt
}
ROOTFS_POSTPROCESS_COMMAND += "my_postprocess_function; "
22.5.5. Package Test (ptest)
Package Tests (ptest) are built but not installed by default.
For information on using Package Tests, see the
"Setting up and running package test (ptest)"
section in the Yocto Project Development Manual.
For information on the ptest class, see the
"ptest.bbclass"
section.
22.5.6. Build Changes
Separate build and source directories have been enabled
by default for selected recipes where it is known to work
(a whitelist) and for all recipes that inherit the
cmake
class.
In future releases the
autotools
class will enable a separate build directory by default as
well.
Recipes building Autotools-based
software that fails to build with a separate build directory
should be changed to inherit from the
autotools-brokensep
class instead of the autotools or
autotools_stageclasses.
22.5.7. qemu-native
qemu-native now builds without
SDL-based graphical output support by default.
The following additional lines are needed in your
local.conf to enable it:
PACKAGECONFIG_pn-qemu-native = "sdl"
ASSUME_PROVIDED += "libsdl-native"
Note
The defaultlocal.conf
contains these statements.
Consequently, if you are building a headless system and using
a default local.conf file, you will need
comment these two lines out.
22.5.8. core-image-basic
core-image-basic has been renamed to
core-image-full-cmdline.
In addition to core-image-basic being renamed,
packagegroup-core-basic has been renamed to
packagegroup-core-full-cmdline to match.
22.5.9. Licensing
The top-level LICENSE file has been changed
to better describe the license of the various components of
OE-Core.
However, the licensing itself remains unchanged.
Normally, this change would not cause any side-effects.
However, some recipes point to this file within
LIC_FILES_CHKSUM
(as ${COREBASE}/LICENSE) and thus the
accompanying checksum must be changed from
3f40d7994397109285ec7b81fdeb3b58 to
4d92cd373abda3937c2bc47fbc49d690.
A better alternative is to have
LIC_FILES_CHKSUM point to a file
describing the license that is distributed with the source
that the recipe is building, if possible, rather than pointing
to ${COREBASE}/LICENSE.
22.5.10. CFLAGS Options
The "-fpermissive" option has been removed from the default
CFLAGS
value.
You need to take action on individual recipes that fail when
building with this option.
You need to either patch the recipes to fix the issues reported by
the compiler, or you need to add "-fpermissive" to
CFLAGS in the recipes.
22.5.11. Custom Image Output Types
Custom image output types, as selected using
IMAGE_FSTYPES,
must declare their dependencies on other image types (if any) using
a new
IMAGE_TYPEDEP
variable.
22.5.12. Tasks
The do_package_write task has been removed.
The task is no longer needed.
22.5.13. update-alternative Provider
The default update-alternatives provider has
been changed from opkg to
opkg-utils.
This change resolves some troublesome circular dependencies.
The runtime package has also been renamed from
update-alternatives-cworth
to update-alternatives-opkg.
22.5.14. virtclass Overrides
The virtclass overrides are now deprecated.
Use the equivalent class overrides instead (e.g.
virtclass-native becomes
class-native.)
22.5.15. Removed and Renamed Recipes
The following recipes have been removed:
packagegroup-toolset-native- This recipe is largely unused.linux-yocto-3.8- Support for the Linux yocto 3.8 kernel has been dropped. Support for the 3.10 and 3.14 kernels have been added with thelinux-yocto-3.10andlinux-yocto-3.14recipes.ocf-linux- This recipe has been functionally replaced usingcryptodev-linux.genext2fs-genext2fsis no longer used by the build system and is unmaintained upstream.js- This provided an ancient version of Mozilla's javascript engine that is no longer needed.zaurusd- The recipe has been moved to themeta-handheldlayer.eglibc 2.17- Replaced by theeglibc 2.19recipe.gcc 4.7.2- Replaced by the now stablegcc 4.8.2.external-sourcery-toolchain- this recipe is now maintained in themeta-sourcerylayer.linux-libc-headers-yocto 3.4+git- Now using version 3.10 of thelinux-libc-headersby default.meta-toolchain-gmae- This recipe is obsolete.packagegroup-core-sdk-gmae- This recipe is obsolete.packagegroup-core-standalone-gmae-sdk-target- This recipe is obsolete.
22.5.16. Removed Classes
The following classes have become obsolete and have been removed:
module_strippkg_metainfopkg_distributeimage-empty
22.5.17. Reference Board Support Packages (BSPs)
The following reference BSPs changes occurred:
The BeagleBoard (
beagleboard) ARM reference hardware has been replaced by the BeagleBone (beaglebone) hardware.The RouterStation Pro (
routerstationpro) MIPS reference hardware has been replaced by the EdgeRouter Lite (edgerouter) hardware.
The previous reference BSPs for the
beagleboard and
routerstationpro machines are still available
in a new meta-yocto-bsp-old layer in the
Source Repositories
at
http://git.yoctoproject.org/cgit/cgit.cgi/meta-yocto-bsp-old/.
22.6. Moving to the Yocto Project 1.7 Release
This section provides migration information for moving to the Yocto Project 1.7 Release from the prior release.
22.6.1. Changes to Setting QEMU PACKAGECONFIG Options in local.conf
The QEMU recipe now uses a number of
PACKAGECONFIG
options to enable various optional features.
The method used to set defaults for these options means that
existing
local.conf files will need to be be
modified to append to PACKAGECONFIG for
qemu-native and
nativesdk-qemu instead of setting it.
In other words, to enable graphical output for QEMU, you should
now have these lines in local.conf:
PACKAGECONFIG_append_pn-qemu-native = " sdl"
PACKAGECONFIG_append_pn-nativesdk-qemu = " sdl"
22.6.2. Minimum Git version
The minimum
Git version required
on the build host is now 1.7.8 because the
--list option is now required by
BitBake's Git fetcher.
As always, if your host distribution does not provide a version of
Git that meets this requirement, you can use the
buildtools-tarball that does.
See the
"Required Git, tar, and Python Versions"
section for more information.
22.6.3. Autotools Class Changes
The following
autotools
class changes occurred:
A separate build directory is now used by default: The
autotoolsclass has been changed to use a directory for building (B), which is separate from the source directory (S). This is commonly referred to asB != S, or an out-of-tree build.If the software being built is already capable of building in a directory separate from the source, you do not need to do anything. However, if the software is not capable of being built in this manner, you will need to either patch the software so that it can build separately, or you will need to change the recipe to inherit the
autotools-brokensepclass instead of theautotoolsorautotools_stageclasses.The
--foreignoption is no longer passed toautomakewhen runningautoconf: This option tellsautomakethat a particular software package does not follow the GNU standards and therefore should not be expected to distribute certain files such asChangeLog,AUTHORS, and so forth. Because the majority of upstream software packages already tellautomaketo enable foreign mode themselves, the option is mostly superfluous. However, some recipes will need patches for this change. You can easily make the change by patchingconfigure.acso that it passes "foreign" toAM_INIT_AUTOMAKE(). See this commit for an example showing how to make the patch.
22.6.4. Binary Configuration Scripts Disabled
Some of the core recipes that package binary configuration scripts
now disable the scripts due to the
scripts previously requiring error-prone path substitution.
Software that links against these libraries using these scripts
should use the much more robust pkg-config
instead.
The list of recipes changed in this version (and their
configuration scripts) is as follows:
directfb (directfb-config)
freetype (freetype-config)
gpgme (gpgme-config)
libassuan (libassuan-config)
libcroco (croco-6.0-config)
libgcrypt (libgcrypt-config)
libgpg-error (gpg-error-config)
libksba (ksba-config)
libpcap (pcap-config)
libpcre (pcre-config)
libpng (libpng-config, libpng16-config)
libsdl (sdl-config)
libusb-compat (libusb-config)
libxml2 (xml2-config)
libxslt (xslt-config)
ncurses (ncurses-config)
neon (neon-config)
npth (npth-config)
pth (pth-config)
taglib (taglib-config)
Additionally, support for pkg-config has been
added to some recipes in the previous list in the rare cases
where the upstream software package does not already provide
it.
22.6.5. eglibc 2.19 Replaced with glibc 2.20
Because eglibc and
glibc were already fairly close, this
replacement should not require any significant changes to other
software that links to eglibc.
However, there were a number of minor changes in
glibc 2.20 upstream that could require
patching some software (e.g. the removal of the
_BSD_SOURCE feature test macro).
glibc 2.20 requires version 2.6.32 or greater
of the Linux kernel.
Thus, older kernels will no longer be usable in conjunction with it.
For full details on the changes in glibc 2.20,
see the upstream release notes
here.
22.6.6. Kernel Module Autoloading
The
module_autoload_*
variable is now deprecated and a new
KERNEL_MODULE_AUTOLOAD
variable should be used instead.
Also,
module_conf_*
must now be used in conjunction with a new
KERNEL_MODULE_PROBECONF
variable.
The new variables no longer require you to specify the module name
as part of the variable name.
This change not only simplifies usage but also allows the values
of these variables to be appropriately incorporated into task
signatures and thus trigger the appropriate tasks to re-execute
when changed.
You should replace any references to
module_autoload_* with
KERNEL_MODULE_AUTOLOAD, and add any modules
for which module_conf_* is specified to
KERNEL_MODULE_PROBECONF.
For more information, see the
KERNEL_MODULE_AUTOLOAD
and
KERNEL_MODULE_PROBECONF
variables.
22.6.7. QA Check Changes
The following changes have occurred to the QA check process:
Additional QA checks
file-rdepsandbuild-depshave been added in order to verify that file dependencies are satisfied (e.g. package contains a script requiring/bin/bash) and build-time dependencies are declared, respectively. For more information, please see the "QA Error and Warning Messages" chapter.Package QA checks are now performed during a new
do_package_qatask rather than being part of thedo_packagetask. This allows more parallel execution. This change is unlikely to be an issue except for highly customized recipes that disable packaging tasks themselves by marking them asnoexec. For those packages, you will need to disable thedo_package_qatask as well.Files being overwritten during the
do_populate_sysroottask now trigger an error instead of a warning. Recipes should not be overwriting files written to the sysroot by other recipes. If you have these types of recipes, you need to alter them so that they do not overwrite these files.You might now receive this error after changes in configuration or metadata resulting in orphaned files being left in the sysroot. If you do receive this error, the way to resolve the issue is to delete your
TMPDIRor to move it out of the way and then re-start the build. Anything that has been fully built up to that point and does not need rebuilding will be restored from the shared state cache and the rest of the build will be able to proceed as normal.
22.6.8. Removed Recipes
The following recipes have been removed:
x-load: This recipe has been superseded by U-boot SPL for all Cortex-based TI SoCs. For legacy boards, themeta-tilayer, which contains a maintained recipe, should be used instead.ubootchart: This recipe is obsolete. Abootchart2recipe has been added to functionally replace it.linux-yocto 3.4: Support for the linux-yocto 3.4 kernel has been dropped. Support for the 3.10 and 3.14 kernels remains, while support for version 3.17 has been added.eglibchas been removed in favor ofglibc. See the "eglibc 2.19Replaced withglibc 2.20" section for more information.
22.6.9. Miscellaneous Changes
The following miscellaneous change occurred:
The build history feature now writes
build-id.txtinstead ofbuild-id. Additionally,build-id.txtnow contains the full build header as printed by BitBake upon starting the build. You should manually remove old "build-id" files from your existing build history repositories to avoid confusion. For information on the build history feature, see the "Maintaining Build Output Quality" section.
22.7. Moving to the Yocto Project 1.8 Release
This section provides migration information for moving to the Yocto Project 1.8 Release from the prior release.
22.7.1. Removed Recipes
The following recipes have been removed:
owl-video: Functionality replaced bygst-player.gaku: Functionality replaced bygst-player.gnome-desktop: This recipe is now available inmeta-gnomeand is no longer needed.gsettings-desktop-schemas: This recipe is now available inmeta-gnomeand is no longer needed.python-argparse: Theargparsemodule is already provided in the default Python distribution in a package namedpython-argparse. Consequently, the separatepython-argparserecipe is no longer needed.telepathy-python, libtelepathy, telepathy-glib, telepathy-idle, telepathy-mission-control: All these recipes have moved tometa-oeand are consequently no longer needed by any recipes in OpenEmbedded-Core.linux-yocto_3.10andlinux-yocto_3.17: Support for the linux-yocto 3.10 and 3.17 kernels has been dropped. Support for the 3.14 kernel remains, while support for 3.19 kernel has been added.poky-feed-config-opkg: This recipe has become obsolete and is no longer needed. Usedistro-feed-configfrommeta-oeinstead.libav 0.8.x:libav 9.xis now used.sed-native: No longer needed. A working version ofsedis expected to be provided by the host distribution.
22.7.2. BlueZ 4.x / 5.x Selection
Proper built-in support for selecting BlueZ 5.x in preference
to the default of 4.x now exists.
To use BlueZ 5.x, simply add "bluez5" to your
DISTRO_FEATURES
value.
If you had previously added append files
(*.bbappend) to make this selection, you can
now remove them.
Additionally, a
bluetooth
class has been added to make selection of the appropriate bluetooth
support within a recipe a little easier.
If you wish to make use of this class in a recipe, add something
such as the following:
inherit bluetooth
PACKAGECONFIG ??= "${@bb.utils.contains('DISTRO_FEATURES', 'bluetooth', '${BLUEZ}', '', d)}
PACKAGECONFIG[bluez4] = "--enable-bluetooth,--disable-bluetooth,bluez4"
PACKAGECONFIG[bluez5] = "--enable-bluez5,--disable-bluez5,bluez5"
22.7.3. Kernel Build Changes
The kernel build process was changed to place the source
in a common shared work area and to place build artifacts
separately in the source code tree.
In theory, migration paths have been provided for most common
usages in kernel recipes but this might not work in all cases.
In particular, users need to ensure that
${S} (source files) and
${B} (build artifacts) are used
correctly in functions such as
do_configure
and
do_install.
For kernel recipes that do not inherit from
kernel-yocto or include
linux-yocto.inc, you might wish to
refer to the linux.inc file in the
meta-oe layer for the kinds of changes you
need to make.
For reference, here is the
commit
where the linux.inc file in
meta-oe was updated.
Recipes that rely on the kernel source code and do not inherit
the module classes might need to add explicit dependencies on
the do_shared_workdir kernel task, for example:
do_configure[depends] += "virtual/kernel:do_shared_workdir"
22.7.4. SSL 3.0 is Now Disabled in OpenSSL
SSL 3.0 is now disabled when building OpenSSL.
Disabling SSL 3.0 avoids any lingering instances of the POODLE
vulnerability.
If you feel you must re-enable SSL 3.0, then you can add an
append file (*.bbappend) for the
openssl recipe to remove "-no-ssl3"
from
EXTRA_OECONF.
22.7.5. Default Sysroot Poisoning
gcc's default sysroot and include directories
are now "poisoned".
In other words, the sysroot and include directories are being
redirected to a non-existent location in order to catch when
host directories are being used due to the correct options not
being passed.
This poisoning applies both to the cross-compiler used within the
build and to the cross-compiler produced in the SDK.
If this change causes something in the build to fail, it almost certainly means the various compiler flags and commands are not being passed correctly to the underlying piece of software. In such cases, you need to take corrective steps.
22.7.6. Rebuild Improvements
Changes have been made to the
base,
autotools,
and
cmake
classes to clean out generated files when the
do_configure
task needs to be re-executed.
One of the improvements is to attempt to run "make clean" during
the do_configure task if a
Makefile exists.
Some software packages do not provide a working clean target
within their make files.
If you have such recipes, you need to set
CLEANBROKEN
to "1" within the recipe, for example:
CLEANBROKEN = "1"
22.7.7. QA Check and Validation Changes
The following QA Check and Validation Changes have occurred:
Usage of
PRINCpreviously triggered a warning. It now triggers an error. You should remove any remaining usage ofPRINCin any recipe or append file.An additional QA check has been added to detect usage of
${D}inFILESvalues whereDvalues should not be used at all. The same check ensures that$Dis used inpkg_preinst/pkg_postinst/pkg_prerm/pkg_postrmfunctions instead of${D}.Snow needs to be set to a valid value within a recipe. IfSis not set in the recipe, the directory is not automatically created. IfSdoes not point to a directory that exists at the time thedo_unpacktask finishes, a warning will be shown.LICENSEis now validated for correct formatting of multiple licenses. If the format is invalid (e.g. multiple licenses are specified with no operators to specify how the multiple licenses interact), then a warning will be shown.
22.7.8. Miscellaneous Changes
The following miscellaneous changes have occurred:
The
send-error-reportscript now expects a "-s" option to be specified before the server address. This assumes a server address is being specified.The
oe-pkgdata-utilscript now expects a "-p" option to be specified before thepkgdatadirectory, which is now optional. If thepkgdatadirectory is not specified, the script will run BitBake to queryPKGDATA_DIRfrom the build environment.
22.8. Moving to the Yocto Project 2.0 Release
This section provides migration information for moving to the Yocto Project 2.0 Release from the prior release.
22.8.1. GCC 5
The default compiler is now GCC 5.2. This change has required fixes for compilation errors in a number of other recipes.
One important example is a fix for when the Linux kernel freezes at
boot time on ARM when built with GCC 5.
If you are using your own kernel recipe or source tree and
building for ARM, you will likely need to apply this
patch.
The standard linux-yocto kernel source tree
already has a workaround for the same issue.
For further details, see https://gcc.gnu.org/gcc-5/changes.html and the porting guide at https://gcc.gnu.org/gcc-5/porting_to.html.
Alternatively, you can switch back to GCC 4.9 or 4.8 by
setting GCCVERSION in your configuration,
as follows:
GCCVERSION = "4.9%"
22.8.2. Gstreamer 0.10 Removed
Gstreamer 0.10 has been removed in favor of Gstreamer 1.x.
As part of the change, recipes for Gstreamer 0.10 and related
software are now located
in meta-multimedia.
This change results in Qt4 having Phonon and Gstreamer
support in QtWebkit disabled by default.
22.8.3. Removed Recipes
The following recipes have been moved or removed:
bluez4: The recipe is obsolete and has been moved due tobluez5becoming fully integrated. Thebluez4recipe now resides inmeta-oe.gamin: The recipe is obsolete and has been removed.gnome-icon-theme: The recipe's functionally has been replaced byadwaita-icon-theme.Gstreamer 0.10 Recipes: Recipes for Gstreamer 0.10 have been removed in favor of the recipes for Gstreamer 1.x.
insserv: The recipe is obsolete and has been removed.libunique: The recipe is no longer used and has been moved tometa-oe.midori: The recipe's functionally has been replaced byepiphany.python-gst: The recipe is obsolete and has been removed since it only contains bindings for Gstreamer 0.10.qt-mobility: The recipe is obsolete and has been removed since it requiresGstreamer 0.10, which has been replaced.subversion: All 1.6.x versions of this recipe have been removed.webkit-gtk: The older 1.8.3 version of this recipe has been removed in favor ofwebkitgtk.
22.8.4. BitBake datastore improvements
The method by which BitBake's datastore handles overrides has
changed.
Overrides are now applied dynamically and
bb.data.update_data() is now a no-op.
Thus, bb.data.update_data() is no longer
required in order to apply the correct overrides.
In practice, this change is unlikely to require any changes to
Metadata.
However, these minor changes in behavior exist:
All potential overrides are now visible in the variable history as seen when you run the following:
$ bitbake -ed.delVar('VARNAME')andd.setVar('VARNAME', None)result in the variable and all of its overrides being cleared out. Before the change, only the non-overridden values were cleared.
22.8.5. Shell Message Function Changes
The shell versions of the BitBake message functions (i.e.
bbdebug, bbnote,
bbwarn, bbplain,
bberror, and bbfatal)
are now connected through to their BitBake equivalents
bb.debug(), bb.note(),
bb.warn(), bb.plain(),
bb.error(), and
bb.fatal(), respectively.
Thus, those message functions that you would expect to be printed
by the BitBake UI are now actually printed.
In practice, this change means two things:
If you now see messages on the console that you did not previously see as a result of this change, you might need to clean up the calls to
bbwarn,bberror, and so forth. Or, you might want to simply remove the calls.The
bbfatalmessage function now suppresses the full error log in the UI, which means any calls tobbfatalwhere you still wish to see the full error log should be replaced bydieorbbfatal_log.
22.8.6. Extra Development/Debug Package Cleanup
The following recipes have had extra
dev/dbg packages removed:
aclapmdaspellattraugeasbzip2coglcurlelfutilsgcc-targetlibgcclibtoollibxmuopkgpciutilsrpmsysfsutilstiffxz
All of the above recipes now conform to the standard packaging
scheme where a single -dev,
-dbg, and -staticdev
package exists per recipe.
22.8.7. Recipe Maintenance Tracking Data Moved to OE-Core
Maintenance tracking data for recipes that was previously part
of meta-yocto has been moved to OE-Core.
The change includes package_regex.inc and
distro_alias.inc, which are typically enabled
when using the
distrodata
class.
Additionally, the contents of
upstream_tracking.inc has now been split out
to the relevant recipes.
22.8.8. Automatic Stale Sysroot File Cleanup
Stale files from recipes that no longer exist in the current
configuration are now automatically removed from
sysroot as well as removed from
any other place managed by shared state.
This automatic cleanup means that the build system now properly
handles situations such as renaming the build system side of
recipes, removal of layers from
bblayers.conf, and
DISTRO_FEATURES
changes.
Additionally, work directories for old versions of recipes are now pruned. If you wish to disable pruning old work directories, you can set the following variable in your configuration:
SSTATE_PRUNE_OBSOLETEWORKDIR = "0"
22.8.9. linux-yocto Kernel Metadata Repository Now Split from Source
The linux-yocto tree has up to now been a
combined set of kernel changes and configuration (meta) data
carried in a single tree.
While this format is effective at keeping kernel configuration and
source modifications synchronized, it is not always obvious to
developers how to manipulate the Metadata as compared to the
source.
Metadata processing has now been removed from the
kernel-yocto
class and the external Metadata repository
yocto-kernel-cache, which has always been used
to seed the linux-yocto "meta" branch.
This separate linux-yocto cache repository
is now the primary location for this data.
Due to this change, linux-yocto is no longer
able to process combined trees.
Thus, if you need to have your own combined kernel repository,
you must do the split there as well and update your recipes
accordingly.
See the meta/recipes-kernel/linux/linux-yocto_4.1.bb
recipe for an example.
22.8.10. Additional QA checks
The following QA checks have been added:
Added a "host-user-contaminated" check for ownership issues for packaged files outside of
/home. The check looks for files that are incorrectly owned by the user that ran BitBake instead of owned by a valid user in the target system.Added an "invalid-chars" check for invalid (non-UTF8) characters in recipe metadata variable values (i.e.
DESCRIPTION,SUMMARY,LICENSE, andSECTION). Some package managers do not support these characters.Added an "invalid-packageconfig" check for any options specified in
PACKAGECONFIGthat do not match anyPACKAGECONFIGoption defined for the recipe.
22.8.11. Miscellaneous Changes
These additional changes exist:
gtk-update-icon-cachehas been renamed togtk-icon-utils.The
tools-profileIMAGE_FEATURESitem as well as its corresponding packagegroup andpackagegroup-core-tools-profileno longer bring inoprofile. Bringing inoprofilewas originally added to aid compilation on resource-constrained targets. However, this aid has not been widely used and is not likely to be used going forward due to the more powerful target platforms and the existence of better cross-compilation tools.The
IMAGE_FSTYPESvariable's default value now specifiesext4instead ofext3.All support for the
PRINCvariable has been removed.The
packagegroup-core-full-cmdlinepackagegroup no longer brings inlighttpddue to the fact that bringing inlighttpdis not really in line with the packagegroup's purpose, which is to add full versions of command-line tools that by default are provided bybusybox.
22.9. Moving to the Yocto Project 2.1 Release
This section provides migration information for moving to the Yocto Project 2.1 Release from the prior release.
22.9.1. Variable Expansion in Python Functions
Variable expressions, such as
${VARNAME}
no longer expand automatically within Python functions.
Suppressing expansion was done to allow Python functions to
construct shell scripts or other code for situations in which you
do not want such expressions expanded.
For any existing code that relies on these expansions, you need to
change the expansions to expand the value of individual
variables through d.getVar().
To alternatively expand more complex expressions,
use d.expand().
22.9.2. Overrides Must Now be Lower-Case
The convention for overrides has always been for them to be
lower-case characters.
This practice is now a requirement as BitBake's datastore now
assumes lower-case characters in order to give a slight performance
boost during parsing.
In practical terms, this requirement means that anything that ends
up in
OVERRIDES
must now appear in lower-case characters (e.g. values for
MACHINE, TARGET_ARCH,
DISTRO, and also recipe names if
_pn-recipename
overrides are to be effective).
22.9.3. Expand Parameter to getVar() and
getVarFlag() is Now Mandatory
The expand parameter to getVar() and
getVarFlag() previously defaulted to
False if not specified.
Now, however, no default exists so one must be specified.
You must change any getVar() calls that
do not specify the final expand parameter to calls that do specify
the parameter.
You can run the following sed command at the
base of a layer to make this change:
sed -e 's:\(\.getVar([^,()]*\)):\1, False):g' -i `grep -ril getVar *`
sed -e 's:\(\.getVarFlag([^,()]*, [^,()]*\)):\1, False):g' -i `grep -ril getVarFlag *`
Note
The reason for this change is that it prepares the way for changing the default to True in a future Yocto Project release. This future change is a much more sensible default than False. However, the change needs to be made gradually as a sudden change of the default would potentially cause side-effects that would be difficult to detect.
22.9.4. Makefile Environment Changes
EXTRA_OEMAKE
now defaults to "" instead of "-e MAKEFLAGS=".
Setting EXTRA_OEMAKE to "-e MAKEFLAGS=" by
default was a historical accident that has required many classes
(e.g. autotools, module)
and recipes to override this default in order to work with
sensible build systems.
When upgrading to the release, you must edit any recipe that
relies upon this old default by either setting
EXTRA_OEMAKE back to "-e MAKEFLAGS=" or by
explicitly setting any required variable value overrides using
EXTRA_OEMAKE, which is typically only needed
when a Makefile sets a default value for a variable that is
inappropriate for cross-compilation using the "=" operator rather
than the "?=" operator.
22.9.5. libexecdir Reverted to ${prefix}/libexec
The use of ${libdir}/${BPN} as
libexecdir is different as compared to all
other mainstream distributions, which either uses
${prefix}/libexec or
${libdir}.
The use is also contrary to the GNU Coding Standards
(i.e. https://www.gnu.org/prep/standards/html_node/Directory-Variables.html)
that suggest ${prefix}/libexec and also
notes that any package-specific nesting should be done by the
package itself.
Finally, having libexecdir change between
recipes makes it very difficult for different recipes to invoke
binaries that have been installed into
libexecdir.
The Filesystem Hierarchy Standard
(i.e. http://refspecs.linuxfoundation.org/FHS_3.0/fhs/ch04s07.html)
now recognizes the use of ${prefix}/libexec/,
giving distributions the choice between
${prefix}/lib or
${prefix}/libexec without breaking FHS.
22.9.6. ac_cv_sizeof_off_t is No Longer Cached in Site Files
For recipes inheriting the
autotools
class, ac_cv_sizeof_off_t is no longer cached
in the site files for autoconf.
The reason for this change is because the
ac_cv_sizeof_off_t value is not necessarily
static per architecture as was previously assumed.
Rather, the value changes based on whether large file support is
enabled.
For most software that uses autoconf, this
change should not be a problem.
However, if you have a recipe that bypasses the standard
do_configure
task from the autotools class and the software
the recipe is building uses a very old version of
autoconf, the recipe might be incapable of
determining the correct size of off_t during
do_configure.
The best course of action is to patch the software as necessary
to allow the default implementation from the
autotools class to work such that
autoreconf succeeds and produces a working
configure script, and to remove the
overridden do_configure task such that the
default implementation does get used.
22.9.7. Image Generation is Now Split Out from Filesystem Generation
Previously, for image recipes the
do_rootfs
task assembled the filesystem and then from that filesystem
generated images.
With this Yocto Project release, image generation is split into
separate
do_image_*
tasks for clarity both in operation and in the code.
For most cases, this change does not present any problems.
However, if you have made customizations that directly modify the
do_rootfs task or that mention
do_rootfs, you might need to update those
changes.
In particular, if you had added any tasks after
do_rootfs, you should make edits so that
those tasks are after the
do_image_complete
task rather than after do_rootfs
so that the your added tasks
run at the correct time.
A minor part of this restructuring is that the post-processing
definitions and functions have been moved from the
image
class to the
rootfs-postcommands
class.
Functionally, however, they remain unchanged.
22.9.8. Removed Recipes
The following recipes have been removed in the 2.1 release:
gccversion 4.8: Versions 4.9 and 5.3 remain.qt4: All support for Qt 4.x has been moved out to a separatemeta-qt4layer because Qt 4 is no longer supported upstream.x11vnc: Moved to themeta-oelayer.linux-yocto-3.14: No longer supported.linux-yocto-3.19: No longer supported.libjpeg: Replaced by thelibjpeg-turborecipe.pth: Became obsolete.liboil: Recipe is no longer needed and has been moved to themeta-multimedialayer.gtk-theme-torturer: Recipe is no longer needed and has been moved to themeta-gnomelayer.gnome-mime-data: Recipe is no longer needed and has been moved to themeta-gnomelayer.udev: Replaced by theeudevrecipe for compatibility when usingsysvinitwith newer kernels.python-pygtk: Recipe became obsolete.adt-installer: Recipe became obsolete. See the "ADT Removed" section for more information.
22.9.9. Class Changes
The following classes have changed:
autotools_stage: Removed because theautotoolsclass now provides its functionality. Recipes that inherited fromautotools_stageshould now inherit fromautotoolsinstead.boot-directdisk: Merged into theimage-vmclass. Theboot-directdiskclass was rarely directly used. Consequently, this change should not cause any issues.bootimg: Merged into theimage-liveclass. Thebootimgclass was rarely directly used. Consequently, this change should not cause any issues.packageinfo: Removed due to its limited use by the Hob UI, which has itself been removed.
22.9.10. Build System User Interface Changes
The following changes have been made to the build system user interface:
Hob GTK+-based UI: Removed because it is unmaintained and based on the outdated GTK+ 2 library. The Toaster web-based UI is much more capable and is actively maintained. See the "Using the Toaster Web Interface" section in the Yocto Project Toaster User Manual for more information on this interface.
"puccho" BitBake UI: Removed because is unmaintained and no longer useful.
22.9.11. ADT Removed
The Application Development Toolkit (ADT) has been removed because its functionality almost completely overlapped with the standard SDK and the extensible SDK. For information on these SDKs and how to build and use them, see the Yocto Project Software Development Kit (SDK) Developer's Guide.
Note
The Yocto Project Eclipse IDE Plug-in is still supported and is not affected by this change.
22.9.12. Poky Reference Distribution Changes
The following changes have been made for the Poky distribution:
The
meta-yoctolayer has been renamed tometa-pokyto better match its purpose, which is to provide the Poky reference distribution. Themeta-yocto-bsplayer retains its original name since it provides reference machines for the Yocto Project and it is otherwise unrelated to Poky. References tometa-yoctoin yourconf/bblayers.confshould automatically be updated, so you should not need to change anything unless you are relying on this naming elsewhere.The
uninativeclass is now enabled by default in Poky. This class attempts to isolate the build system from the host distribution's C library and makes re-use of native shared state artifacts across different host distributions practical. With this class enabled, a tarball containing a pre-built C library is downloaded at the start of the build.The
uninativeclass is enabled through themeta/conf/distro/include/yocto-uninative.incfile, which for those not using the Poky distribution, can include to easily enable the same functionality.Alternatively, if you wish to build your own
uninativetarball, you can do so by building theuninative-tarballrecipe, making it available to your build machines (e.g. over HTTP/HTTPS) and setting a similar configuration as the one set byyocto-uninative.inc.Static library generation, for most cases, is now disabled by default in the Poky distribution. Disabling this generation saves some build time as well as the size used for build output artifacts.
Disabling this library generation is accomplished through a
meta/conf/distro/include/no-static-libs.inc, which for those not using the Poky distribution can easily include to enable the same functionality.Any recipe that needs to opt-out of having the "--disable-static" option specified on the configure command line either because it is not a supported option for the configure script or because static libraries are needed should set the following variable:
DISABLE_STATIC = ""The separate
poky-tinydistribution now uses the musl C library instead of a heavily pared downglibc. Using musl results in a smaller distribution and facilitates much greater maintainability because musl is designed to have a small footprint.If you have used
poky-tinyand have customized theglibcconfiguration you will need to redo those customizations with musl when upgrading to the new release.
22.9.13. Packaging Changes
The following changes have been made to packaging:
The
runuserandmountpointbinaries, which were previously in the mainutil-linuxpackage, have been split out into theutil-linux-runuserandutil-linux-mountpointpackages, respectively.The
python-elementtreepackage has been merged into thepython-xmlpackage.
22.9.14. Tuning File Changes
The following changes have been made to the tuning files:
The "no-thumb-interwork" tuning feature has been dropped from the ARM tune include files. Because interworking is required for ARM EABI, attempting to disable it through a tuning feature no longer makes sense.
Note
Support for ARM OABI was deprecated in gcc 4.7.The
tune-cortexm*.incandtune-cortexr4.incfiles have been removed because they are poorly tested. Until the OpenEmbedded build system officially gains support for CPUs without an MMU, these tuning files would probably be better maintained in a separate layer if needed.
22.9.15. Supporting GObject Introspection
This release supports generation of GLib Introspective Repository (GIR) files through GObject introspection, which is the standard mechanism for accessing GObject-based software from runtime environments. You can enable, disable, and test the generation of this data. See the "Enabling GObject Introspection Support" section for more information.
22.9.16. Miscellaneous Changes
These additional changes exist:
The minimum Git version has been increased to 1.8.3.1. If your host distribution does not provide a sufficiently recent version, you can install the buildtools, which will provide it. See the "Required Git, tar, and Python Versions" section for more information on the buildtools tarball.
The buggy and incomplete support for the RPM version 4 package manager has been removed. The well-tested and maintained support for RPM version 5 remains.
Previously, the following list of packages were removed if package-management was not in
IMAGE_FEATURES, regardless of any dependencies:update-rc.d base-passwd shadow update-alternatives run-postinstsWith the Yocto Project 2.1 release, these packages are only removed if "read-only-rootfs" is in
IMAGE_FEATURES, since they might still be needed for a read-write image even in the absence of a package manager (e.g. if users need to be added, modified, or removed at runtime).The
devtool modifycommand now defaults to extracting the source since that is most commonly expected. The "-x" or "--extract" options are now no-ops. If you wish to provide your own existing source tree, you will now need to specify either the "-n" or "--no-extract" options when runningdevtool modify.If the formfactor for a machine is either not supplied or does not specify whether a keyboard is attached, then the default is to assume a keyboard is attached rather than assume no keyboard. This change primarily affects the Sato UI.
The
.debugdirectory packaging is now automatic. If your recipe builds software that installs binaries into directories other than the standard ones, you no longer need to take care of settingFILES_${PN}-dbgto pick up the resulting.debugdirectories as these directories are automatically found and added.Inaccurate disk and CPU percentage data has been dropped from
buildstatsoutput. This data has been replaced withgetrusage()data and corrected IO statistics. You will probably need to update any custom code that reads thebuildstatsdata.The
meta/conf/distro/include/package_regex.incis now deprecated. The contents of this file have been moved to individual recipes.Tip
Because this file will likely be removed in a future Yocto Project release, it is suggested that you remove any references to the file that might be in your configuration.The
v86d/uvesafbhas been removed from thegenericx86andgenericx86-64reference machines, which are provided by themeta-yocto-bsplayer. Most modern x86 boards do not rely on this file and it only adds kernel error messages during startup. If you do still need to supportuvesafb, you can simply addv86dto your image.Build sysroot paths are now removed from debug symbol files. Removing these paths means that remote GDB using an unstripped build system sysroot will no longer work (although this was never documented to work). The supported method to accomplish something similar is to set
IMAGE_GEN_DEBUGFSto "1", which will generate a companion debug image containing unstripped binaries and associated debug sources alongside the image.
Chapter 23. Source Directory Structure
- 23.1. Top-Level Core Components
- 23.2. The Build Directory -
build/ - 23.2.1.
build/buildhistory - 23.2.2.
build/conf/local.conf - 23.2.3.
build/conf/bblayers.conf - 23.2.4.
build/conf/sanity_info - 23.2.5.
build/downloads/ - 23.2.6.
build/sstate-cache/ - 23.2.7.
build/tmp/ - 23.2.8.
build/tmp/buildstats/ - 23.2.9.
build/tmp/cache/ - 23.2.10.
build/tmp/deploy/ - 23.2.11.
build/tmp/deploy/deb/ - 23.2.12.
build/tmp/deploy/rpm/ - 23.2.13.
build/tmp/deploy/ipk/ - 23.2.14.
build/tmp/deploy/licenses/ - 23.2.15.
build/tmp/deploy/images/ - 23.2.16.
build/tmp/deploy/sdk/ - 23.2.17.
build/tmp/sstate-control/ - 23.2.18.
build/tmp/sysroots/ - 23.2.19.
build/tmp/stamps/ - 23.2.20.
build/tmp/log/ - 23.2.21.
build/tmp/work/ - 23.2.22.
build/tmp/work-shared/
- 23.2.1.
- 23.3. The Metadata -
meta/ - 23.3.1.
meta/classes/ - 23.3.2.
meta/conf/ - 23.3.3.
meta/conf/machine/ - 23.3.4.
meta/conf/distro/ - 23.3.5.
meta/conf/machine-sdk/ - 23.3.6.
meta/files/ - 23.3.7.
meta/lib/ - 23.3.8.
meta/recipes-bsp/ - 23.3.9.
meta/recipes-connectivity/ - 23.3.10.
meta/recipes-core/ - 23.3.11.
meta/recipes-devtools/ - 23.3.12.
meta/recipes-extended/ - 23.3.13.
meta/recipes-gnome/ - 23.3.14.
meta/recipes-graphics/ - 23.3.15.
meta/recipes-kernel/ - 23.3.16.
meta/recipes-lsb4/ - 23.3.17.
meta/recipes-multimedia/ - 23.3.18.
meta/recipes-rt/ - 23.3.19.
meta/recipes-sato/ - 23.3.20.
meta/recipes-support/ - 23.3.21.
meta/site/ - 23.3.22.
meta/recipes.txt
- 23.3.1.
The Source Directory consists of several components. Understanding them and knowing where they are located is key to using the Yocto Project well. This chapter describes the Source Directory and gives information about the various files and directories.
For information on how to establish a local Source Directory on your development system, see the "Getting Set Up" section in the Yocto Project Development Manual.
Note
The OpenEmbedded build system does not support file or directory names that contain spaces. Be sure that the Source Directory you use does not contain these types of names.23.1. Top-Level Core Components
This section describes the top-level components of the Source Directory.
23.1.1. bitbake/
This directory includes a copy of BitBake for ease of use. The copy usually matches the current stable BitBake release from the BitBake project. BitBake, a Metadata interpreter, reads the Yocto Project Metadata and runs the tasks defined by that data. Failures are usually from the Metadata and not from BitBake itself. Consequently, most users do not need to worry about BitBake.
When you run the bitbake command, the
main BitBake executable, which resides in the
bitbake/bin/ directory, starts.
Sourcing an environment setup script (e.g.
oe-init-build-env
or
oe-init-build-env-memres)
places the scripts and
bitbake/bin directories (in that order) into
the shell's PATH environment variable.
For more information on BitBake, see the BitBake User Manual.
23.1.2. build/
This directory contains user configuration files and the output
generated by the OpenEmbedded build system in its standard configuration where
the source tree is combined with the output.
The Build Directory
is created initially when you source
the OpenEmbedded build environment setup script
(i.e.
oe-init-build-env
or
oe-init-build-env-memres).
It is also possible to place output and configuration
files in a directory separate from the
Source Directory
by providing a directory name when you source
the setup script.
For information on separating output from your local
Source Directory files, see the
"oe-init-build-env
and
"oe-init-build-env-memres"
sections.
23.1.3. documentation/
This directory holds the source for the Yocto Project documentation
as well as templates and tools that allow you to generate PDF and HTML
versions of the manuals.
Each manual is contained in a sub-folder.
For example, the files for this manual reside in
the ref-manual/ directory.
23.1.4. meta/
This directory contains the OpenEmbedded Core metadata.
The directory holds recipes, common classes, and machine
configuration for emulated targets (qemux86,
qemuarm, and so forth.)
23.1.5. meta-poky/
This directory contains the configuration for the Poky reference distribution.
23.1.6. meta-yocto-bsp/
This directory contains the Yocto Project reference hardware Board Support Packages (BSPs). For more information on BSPs, see the Yocto Project Board Support Package (BSP) Developer's Guide.
23.1.7. meta-selftest/
This directory adds additional recipes and append files used by the OpenEmbedded selftests to verify the behavior of the build system.
You do not have to add this layer to your
bblayers.conf file unless you want to run the
selftests.
23.1.8. meta-skeleton/
This directory contains template recipes for BSP and kernel development.
23.1.9. scripts/
This directory contains various integration scripts that implement
extra functionality in the Yocto Project environment (e.g. QEMU scripts).
The oe-init-build-env
and
oe-init-build-env-memres
scripts append this directory to the shell's
PATH environment variable.
The scripts directory has useful scripts that assist in contributing
back to the Yocto Project, such as create-pull-request and
send-pull-request.
23.1.10. oe-init-build-env
This script is one of two scripts that set up the OpenEmbedded build
environment.
For information on the other script, see the
"oe-init-build-env-memres"
section.
Running this script with the source command in
a shell makes changes to PATH and sets other
core BitBake variables based on the current working directory.
You need to run an environment setup script before running BitBake
commands.
The script uses other scripts within the
scripts directory to do the bulk of the work.
When you run this script, your Yocto Project environment is set up, a Build Directory is created, your working directory becomes the Build Directory, and you are presented with a list of common BitBake targets. Here is an example:
$ source oe-init-build-env
### Shell environment set up for builds. ###
You can now run 'bitbake <target>'
Common targets are:
core-image-minimal
core-image-sato
meta-toolchain
meta-ide-support
You can also run generated qemu images with a command like 'runqemu qemux86'
The script gets its default list of common targets from the
conf-notes.txt file, which is found in the
meta-poky directory within the
Source Directory.
Should you have custom distributions, it is very easy to modify
this configuration file to include your targets for your
distribution.
See the
"Creating a Custom Template Configuration Directory"
section in the Yocto Project Development Manual for more
information.
By default, running this script without a
Build Directory
argument creates the build directory
in your current working directory.
If you provide a Build Directory argument when you
source the script, you direct the OpenEmbedded
build system to create a Build Directory of your choice.
For example, the following command creates a Build Directory named
mybuilds that is outside of the
Source Directory:
$ source oe-init-build-env ~/mybuilds
The OpenEmbedded build system uses the template configuration
files, which are found by default in the
meta-poky/conf directory in the
Source Directory.
See the
"Creating a Custom Template Configuration Directory"
section in the Yocto Project Development Manual for more
information.
Note
The OpenEmbedded build system does not support file or directory names that contain spaces. If you attempt to run theoe-init-build-env script
from a Source Directory that contains spaces in either the filenames
or directory names, the script returns an error indicating no such
file or directory.
Be sure to use a Source Directory free of names containing spaces.
23.1.11. oe-init-build-env-memres
This script is one of two scripts that set up the OpenEmbedded
build environment.
Aside from setting up the environment, this script starts a
memory-resident BitBake server.
For information on the other setup script, see the
"oe-init-build-env"
section.
Memory-resident BitBake resides in memory until you specifically remove it using the following BitBake command:
$ bitbake -m
Running this script with the source command in
a shell makes changes to PATH and sets other
core BitBake variables based on the current working directory.
One of these variables is the
BBSERVER
variable, which allows the OpenEmbedded build system to locate
the server that is running BitBake.
You need to run an environment setup script before using BitBake commands. Following is the script syntax:
$ source oe-init-build-env-memres port_number build_dir
Following are some considerations when sourcing this script:
The script uses other scripts within the
scriptsdirectory to do the bulk of the work.If you do not provide a port number with the script, the BitBake server starts at a randomly selected port.
The script's parameters are positionally dependent. Consequently, you cannot run the script and provide a Build Directory name without also providing a port number. In other words, the following syntax is illegal:
$ source oe-initbuild-env-memresbuild_dirNote
The previous restriction might be resolved in the future. See Bug 7555 for more information.
When you run this script, your Yocto Project environment is set up, a Build Directory is created, your working directory becomes the Build Directory, and you are presented with a list of common BitBake targets. Here is an example:
$ source oe-init-build-env-memres
No port specified, using dynamically selected port
### Shell environment set up for builds. ###
You can now run 'bitbake <target>'
Common targets are:
core-image-minimal
core-image-sato
meta-toolchain
meta-ide-support
You can also run generated qemu images with a command like 'runqemu qemux86'
Bitbake server address: 127.0.0.1, server port: 53995
Bitbake server started on demand as needed, use bitbake -m to shut it down
The script gets its default list of common targets from the
conf-notes.txt file, which is found in the
meta-poky directory within the
Source Directory.
Should you have custom distributions, it is very easy to modify
this configuration file to include your targets for your
distribution.
See the
"Creating a Custom Template Configuration Directory"
section in the Yocto Project Development Manual for more
information.
By default, running this script without a
Build Directory
argument creates a build directory named
build.
If you provide a Build Directory argument and port number when you
source the script, the Build Directory is
created using that name.
For example, the following command starts the BitBake server using
port 53995 and creates a Build Directory named
mybuilds that is outside of the
Source Directory:
$ source oe-init-build-env-memres 53995 ~/mybuilds
The oe-init-build-env-memres script starts a
memory resident BitBake server.
This BitBake instance uses the
bitbake-cookerdaemon.log file, which is
located in the Build Directory.
The OpenEmbedded build system uses the template configuration
files, which are found by default in the
meta-poky/conf directory in the
Source Directory.
See the
"Creating a Custom Template Configuration Directory"
section in the Yocto Project Development Manual for more
information.
Note
The OpenEmbedded build system does not support file or directory names that contain spaces. If you attempt to run theoe-init-build-env-memres script
from a Source Directory that contains spaces in either the
filenames or directory names, the script returns an error
indicating no such file or directory.
Be sure to use a Source Directory free of names containing
spaces.
23.1.12. LICENSE, README, and README.hardware
These files are standard top-level files.
23.2. The Build Directory - build/
The OpenEmbedded build system creates the
Build Directory
when you run one of the build environment setup scripts (i.e.
oe-init-build-env
or
oe-init-build-env-memres).
If you do not give the Build Directory a specific name when you run
a setup script, the name defaults to build.
The
TOPDIR variable
points to the Build Directory.
23.2.1. build/buildhistory
The OpenEmbedded build system creates this directory when you enable the build history feature. The directory tracks build information into image, packages, and SDK subdirectories. For information on the build history feature, see the "Maintaining Build Output Quality" section.
23.2.2. build/conf/local.conf
This configuration file contains all the local user configurations
for your build environment.
The local.conf file contains documentation on
the various configuration options.
Any variable set here overrides any variable set elsewhere within
the environment unless that variable is hard-coded within a file
(e.g. by using '=' instead of '?=').
Some variables are hard-coded for various reasons but these
variables are relatively rare.
Edit this file to set the
MACHINE
for which you want to build, which package types you wish to use
(PACKAGE_CLASSES),
and the location from which you want to access downloaded files
(DL_DIR).
If local.conf is not present when you
start the build, the OpenEmbedded build system creates it from
local.conf.sample when
you source the top-level build environment
setup script (i.e.
oe-init-build-env
or
oe-init-build-env-memres).
The source local.conf.sample file used
depends on the $TEMPLATECONF script variable,
which defaults to meta-poky/conf
when you are building from the Yocto Project development
environment and defaults to meta/conf when
you are building from the OpenEmbedded Core environment.
Because the script variable points to the source of the
local.conf.sample file, this implies that
you can configure your build environment from any layer by setting
the variable in the top-level build environment setup script as
follows:
TEMPLATECONF=your_layer/conf
Once the build process gets the sample file, it uses
sed to substitute final
${OEROOT}
values for all ##OEROOT## values.
Note
You can see how theTEMPLATECONF variable
is used by looking at the
scripts/oe-setup-builddir script in the
Source Directory.
You can find the Yocto Project version of the
local.conf.sample file in the
meta-poky/conf directory.
23.2.3. build/conf/bblayers.conf
This configuration file defines
layers,
which are directory trees, traversed (or walked) by BitBake.
The bblayers.conf file uses the
BBLAYERS
variable to list the layers BitBake tries to find.
If bblayers.conf is not present when you
start the build, the OpenEmbedded build system creates it from
bblayers.conf.sample when
you source the top-level build environment
setup script (i.e.
oe-init-build-env
or
oe-init-build-env-memres).
The source bblayers.conf.sample file used
depends on the $TEMPLATECONF script variable,
which defaults to meta-poky/conf
when you are building from the Yocto Project development
environment and defaults to meta/conf when
you are building from the OpenEmbedded Core environment.
Because the script variable points to the source of the
bblayers.conf.sample file, this implies that
you can base your build from any layer by setting the variable in
the top-level build environment setup script as follows:
TEMPLATECONF=your_layer/conf
Once the build process gets the sample file, it uses
sed to substitute final
${OEROOT}
values for all ##OEROOT## values.
Note
You can see how theTEMPLATECONF variable
scripts/oe-setup-builddir script in the
Source Directory.
You can find the Yocto Project version of the
bblayers.conf.sample file in the
meta-poky/conf directory.
23.2.4. build/conf/sanity_info
This file indicates the state of the sanity checks and is created during the build.
23.2.5. build/downloads/
This directory contains downloaded upstream source tarballs.
You can reuse the directory for multiple builds or move
the directory to another location.
You can control the location of this directory through the
DL_DIR variable.
23.2.6. build/sstate-cache/
This directory contains the shared state cache.
You can reuse the directory for multiple builds or move
the directory to another location.
You can control the location of this directory through the
SSTATE_DIR variable.
23.2.7. build/tmp/
The OpenEmbedded build system creates and uses this directory
for all the build system's output.
The
TMPDIR
variable points to this directory.
BitBake creates this directory if it does not exist.
As a last resort, to clean up a build and start it from scratch
(other than the downloads), you can remove everything in the
tmp directory or get rid of the
directory completely.
If you do, you should also completely remove the
build/sstate-cache directory.
23.2.8. build/tmp/buildstats/
This directory stores the build statistics.
23.2.9. build/tmp/cache/
When BitBake parses the metadata, it creates a cache file of the result that can be used when subsequently running commands. BitBake stores these results here on a per-machine basis.
23.2.10. build/tmp/deploy/
This directory contains any "end result" output from the
OpenEmbedded build process.
The DEPLOY_DIR
variable points to this directory.
For more detail on the contents of the deploy
directory, see the
"Images" and
"Application Development SDK"
sections.
23.2.11. build/tmp/deploy/deb/
This directory receives any .deb packages produced by
the build process.
The packages are sorted into feeds for different architecture types.
23.2.12. build/tmp/deploy/rpm/
This directory receives any .rpm packages produced by
the build process.
The packages are sorted into feeds for different architecture types.
23.2.13. build/tmp/deploy/ipk/
This directory receives .ipk packages produced by
the build process.
23.2.14. build/tmp/deploy/licenses/
This directory receives package licensing information.
For example, the directory contains sub-directories for bash,
busybox, and glibc (among others) that in turn
contain appropriate COPYING license files with other licensing information.
For information on licensing, see the
"Maintaining Open Source License Compliance During Your Product's Lifecycle"
section.
23.2.15. build/tmp/deploy/images/
This directory receives complete filesystem images. If you want to flash the resulting image from a build onto a device, look here for the image.
Be careful when deleting files in this directory.
You can safely delete old images from this directory (e.g.
core-image-*).
However, the kernel (*zImage*, *uImage*, etc.),
bootloader and other supplementary files might be deployed here prior to building an
image.
Because these files are not directly produced from the image, if you
delete them they will not be automatically re-created when you build the image again.
If you do accidentally delete files here, you will need to force them to be re-created. In order to do that, you will need to know the target that produced them. For example, these commands rebuild and re-create the kernel files:
$ bitbake -c clean virtual/kernel
$ bitbake virtual/kernel
23.2.16. build/tmp/deploy/sdk/
The OpenEmbedded build system creates this directory to hold toolchain installer scripts, which when executed, install the sysroot that matches your target hardware. You can find out more about these installers in the "Building an SDK Installer" section in the Yocto Project Software Development Kit (SDK) Developer's Guide.
23.2.17. build/tmp/sstate-control/
The OpenEmbedded build system uses this directory for the shared state manifest files. The shared state code uses these files to record the files installed by each sstate task so that the files can be removed when cleaning the recipe or when a newer version is about to be installed. The build system also uses the manifests to detect and produce a warning when files from one task are overwriting those from another.
23.2.18. build/tmp/sysroots/
This directory contains shared header files and libraries as well as other shared data. Packages that need to share output with other packages do so within this directory. The directory is subdivided by architecture so multiple builds can run within the one Build Directory.
23.2.19. build/tmp/stamps/
This directory holds information that BitBake uses for accounting purposes to track what tasks have run and when they have run. The directory is sub-divided by architecture, package name, and version. Following is an example:
stamps/all-poky-linux/distcc-config/1.0-r0.do_build-2fdd....2do
Although the files in the directory are empty of data, BitBake uses the filenames and timestamps for tracking purposes.
23.2.20. build/tmp/log/
This directory contains general logs that are not otherwise placed using the
package's WORKDIR.
Examples of logs are the output from the
do_check_pkg or
do_distro_check tasks.
Running a build does not necessarily mean this directory is created.
23.2.21. build/tmp/work/
This directory contains architecture-specific work sub-directories
for packages built by BitBake.
All tasks execute from the appropriate work directory.
For example, the source for a particular package is unpacked,
patched, configured and compiled all within its own work directory.
Within the work directory, organization is based on the package group
and version for which the source is being compiled
as defined by the
WORKDIR.
It is worth considering the structure of a typical work directory.
As an example, consider linux-yocto-kernel-3.0
on the machine qemux86
built within the Yocto Project.
For this package, a work directory of
tmp/work/qemux86-poky-linux/linux-yocto/3.0+git1+<.....>,
referred to as the
WORKDIR, is created.
Within this directory, the source is unpacked to
linux-qemux86-standard-build and then patched by Quilt.
(See the
"Using Quilt in Your Workflow"
section in the Yocto Project Development Manual for more information.)
Within the linux-qemux86-standard-build directory,
standard Quilt directories linux-3.0/patches
and linux-3.0/.pc are created,
and standard Quilt commands can be used.
There are other directories generated within WORKDIR.
The most important directory is WORKDIR/temp/,
which has log files for each task (log.do_*.pid)
and contains the scripts BitBake runs for each task
(run.do_*.pid).
The WORKDIR/image/ directory is where "make
install" places its output that is then split into sub-packages
within WORKDIR/packages-split/.
23.2.22. build/tmp/work-shared/
For efficiency, the OpenEmbedded build system creates and uses
this directory to hold recipes that share a work directory with
other recipes.
In practice, this is only used for gcc
and its variants (e.g. gcc-cross,
libgcc, gcc-runtime,
and so forth).
23.3. The Metadata - meta/
As mentioned previously, Metadata is the core of the Yocto Project. Metadata has several important subdivisions:
23.3.1. meta/classes/
This directory contains the *.bbclass files.
Class files are used to abstract common code so it can be reused by multiple
packages.
Every package inherits the base.bbclass file.
Examples of other important classes are autotools.bbclass, which
in theory allows any Autotool-enabled package to work with the Yocto Project with minimal effort.
Another example is kernel.bbclass that contains common code and functions
for working with the Linux kernel.
Functions like image generation or packaging also have their specific class files
such as image.bbclass, rootfs_*.bbclass and
package*.bbclass.
For reference information on classes, see the "Classes" chapter.
23.3.2. meta/conf/
This directory contains the core set of configuration files that start from
bitbake.conf and from which all other configuration
files are included.
See the include statements at the end of the
bitbake.conf file and you will note that even
local.conf is loaded from there.
While bitbake.conf sets up the defaults, you can often override
these by using the (local.conf) file, machine file or
the distribution configuration file.
23.3.3. meta/conf/machine/
This directory contains all the machine configuration files.
If you set MACHINE = "qemux86",
the OpenEmbedded build system looks for a qemux86.conf file in this
directory.
The include directory contains various data common to multiple machines.
If you want to add support for a new machine to the Yocto Project, look in this directory.
23.3.4. meta/conf/distro/
The contents of this directory controls any distribution-specific
configurations.
For the Yocto Project, the defaultsetup.conf is the main file here.
This directory includes the versions and the
SRCDATE definitions for applications that are configured here.
An example of an alternative configuration might be poky-bleeding.conf.
Although this file mainly inherits its configuration from Poky.
23.3.5. meta/conf/machine-sdk/
The OpenEmbedded build system searches this directory for
configuration files that correspond to the value of
SDKMACHINE.
By default, 32-bit and 64-bit x86 files ship with the Yocto
Project that support some SDK hosts.
However, it is possible to extend that support to other SDK hosts
by adding additional configuration files in this subdirectory
within another layer.
23.3.6. meta/files/
This directory contains common license files and several text files used by the build system. The text files contain minimal device information and lists of files and directories with known permissions.
23.3.7. meta/lib/
This directory contains OpenEmbedded Python library code used during the build process.
23.3.8. meta/recipes-bsp/
This directory contains anything linking to specific hardware or hardware configuration information such as "u-boot" and "grub".
23.3.9. meta/recipes-connectivity/
This directory contains libraries and applications related to communication with other devices.
23.3.10. meta/recipes-core/
This directory contains what is needed to build a basic working Linux image including commonly used dependencies.
23.3.11. meta/recipes-devtools/
This directory contains tools that are primarily used by the build system. The tools, however, can also be used on targets.
23.3.12. meta/recipes-extended/
This directory contains non-essential applications that add features compared to the alternatives in core. You might need this directory for full tool functionality or for Linux Standard Base (LSB) compliance.
23.3.13. meta/recipes-gnome/
This directory contains all things related to the GTK+ application framework.
23.3.14. meta/recipes-graphics/
This directory contains X and other graphically related system libraries
23.3.15. meta/recipes-kernel/
This directory contains the kernel and generic applications and libraries that have strong kernel dependencies.
23.3.16. meta/recipes-lsb4/
This directory contains recipes specifically added to support the Linux Standard Base (LSB) version 4.x.
23.3.17. meta/recipes-multimedia/
This directory contains codecs and support utilities for audio, images and video.
23.3.18. meta/recipes-rt/
This directory contains package and image recipes for using and testing
the PREEMPT_RT kernel.
23.3.19. meta/recipes-sato/
This directory contains the Sato demo/reference UI/UX and its associated applications and configuration data.
23.3.20. meta/recipes-support/
This directory contains recipes used by other recipes, but that are not directly included in images (i.e. dependencies of other recipes).
23.3.21. meta/site/
This directory contains a list of cached results for various architectures. Because certain "autoconf" test results cannot be determined when cross-compiling due to the tests not able to run on a live system, the information in this directory is passed to "autoconf" for the various architectures.
23.3.22. meta/recipes.txt
This file is a description of the contents of recipes-*.
Chapter 24. Classes
- 24.1.
allarch.bbclass - 24.2.
archiver.bbclass - 24.3.
autotools*.bbclass - 24.4.
base.bbclass - 24.5.
bash-completion.bbclass - 24.6.
bin_package.bbclass - 24.7.
binconfig.bbclass - 24.8.
binconfig-disabled.bbclass - 24.9.
blacklist.bbclass - 24.10.
bluetooth.bbclass - 24.11.
bugzilla.bbclass - 24.12.
buildhistory.bbclass - 24.13.
buildstats.bbclass - 24.14.
buildstats-summary.bbclass - 24.15.
ccache.bbclass - 24.16.
chrpath.bbclass - 24.17.
clutter.bbclass - 24.18.
cmake.bbclass - 24.19.
cml1.bbclass - 24.20.
compress_doc.bbclass - 24.21.
copyleft_compliance.bbclass - 24.22.
copyleft_filter.bbclass - 24.23.
core-image.bbclass - 24.24.
cpan*.bbclass - 24.25.
cross.bbclass - 24.26.
cross-canadian.bbclass - 24.27.
crosssdk.bbclass - 24.28.
debian.bbclass - 24.29.
deploy.bbclass - 24.30.
devshell.bbclass - 24.31.
distro_features_check.bbclass - 24.32.
distrodata.bbclass - 24.33.
distutils*.bbclass - 24.34.
distutils3*.bbclass - 24.35.
externalsrc.bbclass - 24.36.
extrausers.bbclass - 24.37.
fontcache.bbclass - 24.38.
fs-uuid.bbclass - 24.39.
gconf.bbclass - 24.40.
gettext.bbclass - 24.41.
gnome.bbclass - 24.42.
gnomebase.bbclass - 24.43.
gobject-introspection.bbclass - 24.44.
grub-efi.bbclass - 24.45.
gsettings.bbclass - 24.46.
gtk-doc.bbclass - 24.47.
gtk-icon-cache.bbclass - 24.48.
gtk-immodules-cache.bbclass - 24.49.
gummiboot.bbclass - 24.50.
gzipnative.bbclass - 24.51.
icecc.bbclass - 24.52.
image.bbclass - 24.53.
image-buildinfo.bbclass - 24.54.
image_types.bbclass - 24.55.
image_types_uboot.bbclass - 24.56.
image-live.bbclass - 24.57.
image-mklibs.bbclass - 24.58.
image-prelink.bbclass - 24.59.
image-swab.bbclass - 24.60.
image-vm.bbclass - 24.61.
image-vmdk.bbclass - 24.62.
insane.bbclass - 24.63.
insserv.bbclass - 24.64.
kernel.bbclass - 24.65.
kernel-arch.bbclass - 24.66.
kernel-fitimage.bbclass - 24.67.
kernel-grub.bbclass - 24.68.
kernel-module-split.bbclass - 24.69.
kernel-uboot.bbclass - 24.70.
kernel-uimage.bbclass - 24.71.
kernel-yocto.bbclass - 24.72.
kernelsrc.bbclass - 24.73.
lib_package.bbclass - 24.74.
libc*.bbclass - 24.75.
license.bbclass - 24.76.
linux-kernel-base.bbclass - 24.77.
linuxloader.bbclass - 24.78.
logging.bbclass - 24.79.
meta.bbclass - 24.80.
metadata_scm.bbclass - 24.81.
migrate_localcount.bbclass - 24.82.
mime.bbclass - 24.83.
mirrors.bbclass - 24.84.
module.bbclass - 24.85.
module-base.bbclass - 24.86.
multilib*.bbclass - 24.87.
native.bbclass - 24.88.
nativesdk.bbclass - 24.89.
nopackages.bbclass - 24.90.
npm.bbclass - 24.91.
oelint.bbclass - 24.92.
own-mirrors.bbclass - 24.93.
package.bbclass - 24.94.
package_deb.bbclass - 24.95.
package_ipk.bbclass - 24.96.
package_rpm.bbclass - 24.97.
package_tar.bbclass - 24.98.
packagedata.bbclass - 24.99.
packagegroup.bbclass - 24.100.
patch.bbclass - 24.101.
perlnative.bbclass - 24.102.
pixbufcache.bbclass - 24.103.
pkgconfig.bbclass - 24.104.
populate_sdk.bbclass - 24.105.
populate_sdk_*.bbclass - 24.106.
prexport.bbclass - 24.107.
primport.bbclass - 24.108.
prserv.bbclass - 24.109.
ptest.bbclass - 24.110.
ptest-gnome.bbclass - 24.111.
python-dir.bbclass - 24.112.
python3native.bbclass - 24.113.
pythonnative.bbclass - 24.114.
qemu.bbclass - 24.115.
recipe_sanity.bbclass - 24.116.
relocatable.bbclass - 24.117.
remove-libtool.bbclass - 24.118.
report-error.bbclass - 24.119.
rm_work.bbclass - 24.120.
rootfs*.bbclass - 24.121.
sanity.bbclass - 24.122.
scons.bbclass - 24.123.
sdl.bbclass - 24.124.
setuptools.bbclass - 24.125.
setuptools3.bbclass - 24.126.
sign_rpm.bbclass - 24.127.
sip.bbclass - 24.128.
siteconfig.bbclass - 24.129.
siteinfo.bbclass - 24.130.
spdx.bbclass - 24.131.
sstate.bbclass - 24.132.
staging.bbclass - 24.133.
syslinux.bbclass - 24.134.
systemd.bbclass - 24.135.
terminal.bbclass - 24.136.
testimage*.bbclass - 24.137.
testsdk.bbclass - 24.138.
texinfo.bbclass - 24.139.
tinderclient.bbclass - 24.140.
toaster.bbclass - 24.141.
toolchain-scripts.bbclass - 24.142.
typecheck.bbclass - 24.143.
uboot-config.bbclass - 24.144.
uninative.bbclass - 24.145.
update-alternatives.bbclass - 24.146.
update-rc.d.bbclass - 24.147.
useradd*.bbclass - 24.148.
utility-tasks.bbclass - 24.149.
utils.bbclass - 24.150.
vala.bbclass - 24.151.
waf.bbclass
Class files are used to abstract common functionality and share it amongst
multiple recipe (.bb) files.
To use a class file, you simply make sure the recipe inherits the class.
In most cases, when a recipe inherits a class it is enough to enable its
features.
There are cases, however, where in the recipe you might need to set
variables or override some default behavior.
Any Metadata usually
found in a recipe can also be placed in a class file.
Class files are identified by the extension .bbclass
and are usually placed in a classes/ directory beneath
the meta*/ directory found in the
Source Directory.
Class files can also be pointed to by
BUILDDIR
(e.g. build/) in the same way as
.conf files in the conf directory.
Class files are searched for in
BBPATH
using the same method by which .conf files are
searched.
This chapter discusses only the most useful and important classes.
Other classes do exist within the meta/classes
directory in the
Source Directory.
You can reference the .bbclass files directly
for more information.
24.1. allarch.bbclass
The allarch class is inherited
by recipes that do not produce architecture-specific output.
The class disables functionality that is normally needed for recipes
that produce executable binaries (such as building the cross-compiler
and a C library as pre-requisites, and splitting out of debug symbols
during packaging).
Note
Unlike some distro recipes (e.g. Debian), OpenEmbedded recipes
that produce packages that depend on tunings through use of the
RDEPENDS
and
TUNE_PKGARCH
variables, should never be configured for all architectures
using allarch.
This is the case even if the recipes do not produce
architecture-specific output.
Configuring such recipes for all architectures causes the
do_package_write_*
tasks to have different signatures for the machines with different
tunings.
Additionally, unnecessary rebuilds occur every time an
image for a different MACHINE is built
even when the recipe never changes.
By default, all recipes inherit the
base and
package
classes, which enable functionality
needed for recipes that produce executable output.
If your recipe, for example, only produces packages that contain
configuration files, media files, or scripts (e.g. Python and Perl),
then it should inherit the allarch class.
24.2. archiver.bbclass
The archiver class supports releasing
source code and other materials with the binaries.
For more details on the source archiver, see the
"Maintaining Open Source License Compliance During Your Product's Lifecycle"
section in the Yocto Project Development Manual.
You can also see the
ARCHIVER_MODE
variable for information about the variable flags (varflags)
that help control archive creation.
24.3. autotools*.bbclass
The autotools* classes support Autotooled
packages.
The autoconf, automake,
and libtool packages bring standardization.
This class defines a set of tasks (e.g.
configure, compile and
so forth) that
work for all Autotooled packages.
It should usually be enough to define a few standard variables
and then simply inherit autotools.
These classes can also work with software that emulates Autotools.
For more information, see the
"Autotooled Package"
section in the Yocto Project Development Manual.
By default, the autotools* classes
use out-of-tree builds (i.e.
autotools.bbclass).
(B !=
S).
If the software being built by a recipe does not support
using out-of-tree builds, you should have the recipe inherit the
autotools-brokensep class.
The autotools-brokensep class behaves the same
as the autotools class but builds with
B ==
S.
This method is useful when out-of-tree build support is either not
present or is broken.
Note
It is recommended that out-of-tree support be fixed and used if at all possible.
It's useful to have some idea of how the tasks defined by
the autotools* classes work and what they do
behind the scenes.
do_configure- Regenerates the configure script (usingautoreconf) and then launches it with a standard set of arguments used during cross-compilation. You can pass additional parameters toconfigurethrough theEXTRA_OECONFvariable.do_compile- Runsmakewith arguments that specify the compiler and linker. You can pass additional arguments through theEXTRA_OEMAKEvariable.do_install- Runsmake installand passes in${D}asDESTDIR.
24.4. base.bbclass
The base class is special in that every
.bb file implicitly inherits the class.
This class contains definitions for standard basic
tasks such as fetching, unpacking, configuring (empty by default),
compiling (runs any Makefile present), installing
(empty by default) and packaging (empty by default).
These classes are often overridden or extended by other classes
such as the
autotools
class or the
package
class.
The class also contains some commonly used functions such as
oe_runmake.
24.5. bash-completion.bbclass
Sets up packaging and dependencies appropriate for recipes that build software that includes bash-completion data.
24.6. bin_package.bbclass
The bin_package class is a
helper class for recipes that extract the contents of a binary package
(e.g. an RPM) and install those contents rather than building the
binary from source.
The binary package is extracted and new packages in the configured
output package format are created.
Extraction and installation of proprietary binaries is a good example
use for this class.
Note
For RPMs and other packages that do not contain a subdirectory, you should specify an appropriate fetcher parameter to point to the subdirectory. For example, if BitBake is using the Git fetcher (git://), the "subpath" parameter limits
the checkout to a specific subpath of the tree.
Here is an example where ${BP} is used so that
the files are extracted into the subdirectory expected by the
default value of
S:
SRC_URI = "git://example.com/downloads/somepackage.rpm;subpath=${BP}"
See the
"Fetchers"
section in the BitBake User Manual for more information on
supported BitBake Fetchers.
24.7. binconfig.bbclass
The binconfig class helps to correct paths in
shell scripts.
Before pkg-config had become widespread, libraries
shipped shell scripts to give information about the libraries and
include paths needed to build software (usually named
LIBNAME-config).
This class assists any recipe using such scripts.
During staging, the OpenEmbedded build system installs such scripts
into the sysroots/ directory.
Inheriting this class results in all paths in these scripts being
changed to point into the sysroots/ directory so
that all builds that use the script use the correct directories
for the cross compiling layout.
See the
BINCONFIG_GLOB
variable for more information.
24.8. binconfig-disabled.bbclass
An alternative version of the
binconfig
class, which disables binary configuration scripts by making them
return an error in favor of using pkg-config
to query the information.
The scripts to be disabled should be specified using the
BINCONFIG
variable within the recipe inheriting the class.
24.9. blacklist.bbclass
The blacklist class prevents
the OpenEmbedded build system from building specific recipes
(blacklists them).
To use this class, inherit the class globally and set
PNBLACKLIST
for each recipe you wish to blacklist.
Specify the PN
value as a variable flag (varflag) and provide a reason, which is
reported, if the package is requested to be built as the value.
For example, if you want to blacklist a recipe called "exoticware",
you add the following to your local.conf
or distribution configuration:
INHERIT += "blacklist"
PNBLACKLIST[exoticware] = "Not supported by our organization."
24.10. bluetooth.bbclass
The bluetooth class defines a variable that
expands to the recipe (package) providing core
bluetooth support on the platform.
For details on how the class works, see the
meta/classes/bluetooth.bbclass file in the Yocto
Project
Source Directory.
24.11. bugzilla.bbclass
The bugzilla class supports setting up an
instance of Bugzilla in which you can automatically files bug reports
in response to build failures.
For this class to work, you need to enable the XML-RPC interface in
the instance of Bugzilla.
24.12. buildhistory.bbclass
The buildhistory class records a
history of build output metadata, which can be used to detect possible
regressions as well as used for analysis of the build output.
For more information on using Build History, see the
"Maintaining Build Output Quality"
section.
24.13. buildstats.bbclass
The buildstats class records
performance statistics about each task executed during the build
(e.g. elapsed time, CPU usage, and I/O usage).
When you use this class, the output goes into the
BUILDSTATS_BASE
directory, which defaults to ${TMPDIR}/buildstats/.
You can analyze the elapsed time using
scripts/pybootchartgui/pybootchartgui.py, which
produces a cascading chart of the entire build process and can be
useful for highlighting bottlenecks.
Collecting build statistics is enabled by default through the
USER_CLASSES
variable from your local.conf file.
Consequently, you do not have to do anything to enable the class.
However, if you want to disable the class, simply remove "buildstats"
from the USER_CLASSES list.
24.14. buildstats-summary.bbclass
When inherited globally, prints statistics at the end of the build
on sstate re-use.
In order to function, this class requires the
buildstats
class be enabled.
24.15. ccache.bbclass
The ccache class enables the
C/C++ Compiler Cache
for the build.
This class is used to give a minor performance boost during the build.
However, using the class can lead to unexpected side-effects.
Thus, it is recommended that you do not use this class.
See http://ccache.samba.org/ for information on
the C/C++ Compiler Cache.
24.16. chrpath.bbclass
The chrpath class
is a wrapper around the "chrpath" utility, which is used during the
build process for nativesdk,
cross, and
cross-canadian recipes to change
RPATH records within binaries in order to make
them relocatable.
24.17. clutter.bbclass
The clutter class consolidates the
major and minor version naming and other common items used by Clutter
and related recipes.
Note
Unlike some other classes related to specific libraries, recipes building other software that uses Clutter do not need to inherit this class unless they use the same recipe versioning scheme that the Clutter and related recipes do.
24.18. cmake.bbclass
The cmake class allows for
recipes that need to build software using the CMake build system.
You can use the
EXTRA_OECMAKE
variable to specify additional configuration options to be passed on
the cmake command line.
24.19. cml1.bbclass
The cml1 class provides basic support for the
Linux kernel style build configuration system.
24.20. compress_doc.bbclass
Enables compression for man pages and info pages.
This class is intended to be inherited globally.
The default compression mechanism is gz (gzip) but you can
select an alternative mechanism by setting the
DOC_COMPRESS
variable.
24.21. copyleft_compliance.bbclass
The copyleft_compliance class
preserves source code for the purposes of license compliance.
This class is an alternative to the archiver
class and is still used by some users even though it has been
deprecated in favor of the
archiver
class.
24.22. copyleft_filter.bbclass
A class used by the
archiver
and
copyleft_compliance
classes for filtering licenses.
The copyleft_filter class is an internal class
and is not intended to be used directly.
24.23. core-image.bbclass
The core-image class
provides common definitions for the
core-image-* image recipes, such as support for
additional
IMAGE_FEATURES.
24.24. cpan*.bbclass
The cpan* classes support Perl modules.
Recipes for Perl modules are simple. These recipes usually only need to point to the source's archive and then inherit the proper class file. Building is split into two methods depending on which method the module authors used.
Modules that use old
Makefile.PL-based build system requirecpan.bbclassin their recipes.Modules that use
Build.PL-based build system require usingcpan_build.bbclassin their recipes.
Both build methods inherit the cpan-base class
for basic Perl support.
24.25. cross.bbclass
The cross class provides support for the recipes
that build the cross-compilation tools.
24.26. cross-canadian.bbclass
The cross-canadian class
provides support for the recipes that build the Canadian
Cross-compilation tools for SDKs.
See the
"Cross-Development Toolchain Generation"
section for more discussion on these cross-compilation tools.
24.27. crosssdk.bbclass
The crosssdk class
provides support for the recipes that build the cross-compilation
tools used for building SDKs.
See the
"Cross-Development Toolchain Generation"
section for more discussion on these cross-compilation tools.
24.28. debian.bbclass
The debian class renames output packages so that
they follow the Debian naming policy (i.e. glibc
becomes libc6 and glibc-devel
becomes libc6-dev.)
Renaming includes the library name and version as part of the package
name.
If a recipe creates packages for multiple libraries
(shared object files of .so type), use the
LEAD_SONAME
variable in the recipe to specify the library on which to apply the
naming scheme.
24.29. deploy.bbclass
The deploy class handles deploying files
to the
DEPLOY_DIR_IMAGE
directory.
The main function of this class is to allow the deploy step to be
accelerated by shared state.
Recipes that inherit this class should define their own
do_deploy
function to copy the files to be deployed to
DEPLOYDIR,
and use addtask to add the task at the appropriate
place, which is usually after
do_compile
or
do_install.
The class then takes care of staging the files from
DEPLOYDIR to
DEPLOY_DIR_IMAGE.
24.30. devshell.bbclass
The devshell class adds the
do_devshell task.
Distribution policy dictates whether to include this class.
See the
"Using a Development Shell" section
in the Yocto Project Development Manual for more information about
using devshell.
24.31. distro_features_check.bbclass
The distro_features_check class
allows individual recipes to check for required and conflicting
DISTRO_FEATURES.
This class provides support for the
REQUIRED_DISTRO_FEATURES
and
CONFLICT_DISTRO_FEATURES
variables.
If any conditions specified in the recipe using the above variables are
not met, the recipe will be skipped.
24.32. distrodata.bbclass
The distrodata class
provides for automatic checking for upstream recipe updates.
The class creates a comma-separated value (CSV) spreadsheet that
contains information about the recipes.
The information provides the
do_distrodata
and
do_distro_check tasks, which do upstream checking
and also verify if a package is used in multiple major distributions.
The class is not included by default.
To use it, you must set the
INHERIT
variable:
INHERIT+= "distrodata"
The distrodata class also provides the
do_checkpkg
task, which can be used against a simple recipe or against an
image to get all its recipe information.
24.33. distutils*.bbclass
The distutils* classes support recipes for Python
version 2.x extensions, which are simple.
These recipes usually only need to point to the source's archive and
then inherit the proper class.
Building is split into two methods depending on which method the
module authors used.
Extensions that use an Autotools-based build system require Autotools and the classes based on
distutilsin their recipes.Extensions that use build systems based on
distutilsrequire thedistutilsclass in their recipes.Extensions that use build systems based on
setuptoolsrequire thesetuptoolsclass in their recipes.
The distutils-common-base class is required by
some of the distutils* classes to provide common
Python2 support.
The distutils-tools class supports recipes for
additional "distutils" tools.
24.34. distutils3*.bbclass
The distutils3* classes support recipes for Python
version 3.x extensions, which are simple.
These recipes usually only need to point to the source's archive and
then inherit the proper class.
Building is split into three methods depending on which method the
module authors used.
Extensions that use an Autotools-based build system require Autotools and
distutils-based classes in their recipes.Extensions that use
distutils-based build systems require thedistutilsclass in their recipes.Extensions that use build systems based on
setuptools3require thesetuptools3class in their recipes.
The distutils3* classes either inherit their
corresponding distutils* class or replicate them
using a Python3 version instead (e.g.
distutils3-base inherits
distutils-common-base, which is the same as
distutils-base but inherits
python3native instead of
pythonnative).
24.35. externalsrc.bbclass
The externalsrc class supports building software
from source code that is external to the OpenEmbedded build system.
Building software from an external source tree means that the build
system's normal fetch, unpack, and patch process is not used.
By default, the OpenEmbedded build system uses the
S and
B variables to
locate unpacked recipe source code and to build it, respectively.
When your recipe inherits the externalsrc class,
you use the
EXTERNALSRC
and
EXTERNALSRC_BUILD
variables to ultimately define S and
B.
By default, this class expects the source code to support recipe builds
that use the B
variable to point to the directory in which the OpenEmbedded build
system places the generated objects built from the recipes.
By default, the B directory is set to the
following, which is separate from the source directory
(S):
${WORKDIR}/${BPN}/{PV}/
See these variables for more information:
WORKDIR,
BPN, and
PV,
For more information on the
externalsrc class, see the comments in
meta/classes/externalsrc.bbclass in the
Source Directory.
For information on how to use the externalsrc
class, see the
"Building Software from an External Source"
section in the Yocto Project Development Manual.
24.36. extrausers.bbclass
The extrausers class allows
additional user and group configuration to be applied at the image
level.
Inheriting this class either globally or from an image recipe allows
additional user and group operations to be performed using the
EXTRA_USERS_PARAMS
variable.
Note
The user and group operations added using theextrausers class are not tied to a specific
recipe outside of the recipe for the image.
Thus, the operations can be performed across the image as a whole.
Use the
useradd
class to add user and group configuration to a specific recipe.
Here is an example that uses this class in an image recipe:
inherit extrausers
EXTRA_USERS_PARAMS = "\
useradd -p '' tester; \
groupadd developers; \
userdel nobody; \
groupdel -g video; \
groupmod -g 1020 developers; \
usermod -s /bin/sh tester; \
"
Here is an example that adds two users named "tester-jim" and "tester-sue" and assigns passwords:
inherit extrausers
EXTRA_USERS_PARAMS = "\
useradd -P tester01 tester-jim; \
useradd -P tester01 tester-sue; \
"
Finally, here is an example that sets the root password to "1876*18":
inherit extrausers
EXTRA_USERS_PARAMS = "\
usermod -P 1876*18 root; \
"
24.37. fontcache.bbclass
The fontcache class generates the
proper post-install and post-remove (postinst and postrm)
scriptlets for font packages.
These scriptlets call fc-cache (part of
Fontconfig) to add the fonts to the font
information cache.
Since the cache files are architecture-specific,
fc-cache runs using QEMU if the postinst
scriptlets need to be run on the build host during image creation.
If the fonts being installed are in packages other than the main
package, set
FONT_PACKAGES
to specify the packages containing the fonts.
24.38. fs-uuid.bbclass
The fs-uuid class extracts UUID from
${ROOTFS},
which must have been built by the time that this function gets called.
The fs-uuid class only works on
ext file systems and depends on
tune2fs.
24.39. gconf.bbclass
The gconf class provides common
functionality for recipes that need to install GConf schemas.
The schemas will be put into a separate package
(${PN}-gconf)
that is created automatically when this class is inherited.
This package uses the appropriate post-install and post-remove
(postinst/postrm) scriptlets to register and unregister the schemas
in the target image.
24.40. gettext.bbclass
The gettext class provides support for
building software that uses the GNU gettext
internationalization and localization system.
All recipes building software that use
gettext should inherit this class.
24.41. gnome.bbclass
The gnome class supports recipes that
build software from the GNOME stack.
This class inherits the
gnomebase,
gtk-icon-cache,
gconf and
mime classes.
The class also disables GObject introspection where applicable.
24.42. gnomebase.bbclass
The gnomebase class is the base
class for recipes that build software from the GNOME stack.
This class sets
SRC_URI to
download the source from the GNOME mirrors as well as extending
FILES
with the typical GNOME installation paths.
24.43. gobject-introspection.bbclass
Provides support for recipes building software that
supports GObject introspection.
This functionality is only enabled if the
"gobject-introspection-data" feature is in
DISTRO_FEATURES
as well as "qemu-usermode" being in
MACHINE_FEATURES.
Note
This functionality is backfilled by default and, if not applicable, should be disabled throughDISTRO_FEATURES_BACKFILL_CONSIDERED
or
MACHINE_FEATURES_BACKFILL_CONSIDERED,
respectively.
24.44. grub-efi.bbclass
The grub-efi
class provides grub-efi-specific functions for
building bootable images.
This class supports several variables:
INITRD: Indicates list of filesystem images to concatenate and use as an initial RAM disk (initrd) (optional).ROOTFS: Indicates a filesystem image to include as the root filesystem (optional).GRUB_GFXSERIAL: Set this to "1" to have graphics and serial in the boot menu.LABELS: A list of targets for the automatic configuration.APPEND: An override list of append strings for eachLABEL.GRUB_OPTS: Additional options to add to the configuration (optional). Options are delimited using semi-colon characters (;).GRUB_TIMEOUT: Timeout before executing the defaultLABEL(optional).
24.45. gsettings.bbclass
The gsettings class
provides common functionality for recipes that need to install
GSettings (glib) schemas.
The schemas are assumed to be part of the main package.
Appropriate post-install and post-remove (postinst/postrm)
scriptlets are added to register and unregister the schemas in the
target image.
24.46. gtk-doc.bbclass
The gtk-doc class
is a helper class to pull in the appropriate
gtk-doc dependencies and disable
gtk-doc.
24.47. gtk-icon-cache.bbclass
The gtk-icon-cache class
generates the proper post-install and post-remove (postinst/postrm)
scriptlets for packages that use GTK+ and install icons.
These scriptlets call gtk-update-icon-cache to add
the fonts to GTK+'s icon cache.
Since the cache files are architecture-specific,
gtk-update-icon-cache is run using QEMU if the
postinst scriptlets need to be run on the build host during image
creation.
24.48. gtk-immodules-cache.bbclass
The gtk-immodules-cache class
generates the proper post-install and post-remove (postinst/postrm)
scriptlets for packages that install GTK+ input method modules for
virtual keyboards.
These scriptlets call gtk-update-icon-cache to add
the input method modules to the cache.
Since the cache files are architecture-specific,
gtk-update-icon-cache is run using QEMU if the
postinst scriptlets need to be run on the build host during image
creation.
If the input method modules being installed are in packages other than
the main package, set
GTKIMMODULES_PACKAGES
to specify the packages containing the modules.
24.49. gummiboot.bbclass
The gummiboot class provides functions specific
to the gummiboot bootloader for building bootable images.
This is an internal class and is not intended to be
used directly.
Set the
EFI_PROVIDER
variable to "gummiboot" to use this class.
For information on more variables used and supported in this class,
see the
GUMMIBOOT_CFG,
GUMMIBOOT_ENTRIES,
and
GUMMIBOOT_TIMEOUT
variables.
You can also see the Gummiboot documentation for more information.
24.50. gzipnative.bbclass
The gzipnative class enables the use of
different native versions of gzip
and pigz rather than the versions of these tools
from the build host.
24.51. icecc.bbclass
The icecc class supports
Icecream, which
facilitates taking compile jobs and distributing them among remote
machines.
The class stages directories with symlinks from gcc
and g++ to icecc, for both
native and cross compilers.
Depending on each configure or compile, the OpenEmbedded build system
adds the directories at the head of the PATH list
and then sets the ICECC_CXX and
ICEC_CC variables, which are the paths to the
g++ and gcc compilers,
respectively.
For the cross compiler, the class creates a tar.gz
file that contains the Yocto Project toolchain and sets
ICECC_VERSION, which is the version of the
cross-compiler used in the cross-development toolchain, accordingly.
The class handles all three different compile stages
(i.e native ,cross-kernel and target) and creates the necessary
environment tar.gz file to be used by the remote
machines.
The class also supports SDK generation.
If ICECC_PATH
is not set in your local.conf file, then the
class tries to locate the icecc binary
using which.
If
ICECC_ENV_EXEC
is set in your local.conf file, the variable should
point to the icecc-create-env script
provided by the user.
If you do not point to a user-provided script, the build system
uses the default script provided by the recipe
icecc-create-env-native.bb.
Note
This script is a modified version and not the one that comes withicecc.
If you do not want the Icecream distributed compile support to apply
to specific recipes or classes, you can effectively "blacklist" them
by listing the recipes and classes using the
ICECC_USER_PACKAGE_BL
and
ICECC_USER_CLASS_BL,
variables, respectively, in your local.conf file.
Doing so causes the OpenEmbedded build system to handle these
compilations locally.
Additionally, you can list recipes using the
ICECC_USER_PACKAGE_WL
variable in your local.conf file to force
icecc to be enabled for recipes using an empty
PARALLEL_MAKE
variable.
Inheriting the icecc class changes all sstate
signatures.
Consequently, if a development team has a dedicated build system
that populates
STATE_MIRRORS
and they want to reuse sstate from
STATE_MIRRORS, then all developers and the
build system need to either inherit the icecc
class or nobody should.
At the distribution level, you can inherit the
icecc class to be sure that all builders start
with the same sstate signatures.
After inheriting the class, you can then disable the feature by setting
the
ICECC_DISABLED
variable to "1" as follows:
INHERIT_DISTRO_append = " icecc"
ICECC_DISABLED ??= "1"
This practice makes sure everyone is using the same signatures but also
requires individuals that do want to use Icecream to enable the feature
individually as follows in your local.conf file:
ICECC_DISABLED = ""
24.52. image.bbclass
The image class helps support creating images
in different formats.
First, the root filesystem is created from packages using
one of the rootfs*.bbclass
files (depending on the package format used) and then one or more image
files are created.
The
IMAGE_FSTYPESvariable controls the types of images to generate.The
IMAGE_INSTALLvariable controls the list of packages to install into the image.
For information on customizing images, see the "Customizing Images" section in the Yocto Project Development Manual. For information on how images are created, see the "Images" section elsewhere in this manual.
24.53. image-buildinfo.bbclass
The image-buildinfo class writes information
to the target filesystem on /etc/build.
24.54. image_types.bbclass
The image_types class defines all of
the standard image output types that you can enable through the
IMAGE_FSTYPES
variable.
You can use this class as a reference on how to add support for custom
image output types.
By default, this class is enabled through the
IMAGE_CLASSES
variable in
image.bbclass.
If you define your own image types using a custom BitBake class and
then use IMAGE_CLASSES to enable it, the custom
class must either inherit image_types or
image_types must also appear in
IMAGE_CLASSES.
24.55. image_types_uboot.bbclass
The image_types_uboot class
defines additional image types specifically for the U-Boot bootloader.
24.56. image-live.bbclass
The image-live class supports building "live"
images.
Normally, you do not use this class directly.
Instead, you add "live" to
IMAGE_FSTYPES.
For example, if you were building an ISO image, you would add "live"
to IMAGE_FSTYPES, set the
NOISO variable to
"0" and the build system would use the image-live
class to build the ISO image.
24.57. image-mklibs.bbclass
The image-mklibs class
enables the use of the mklibs utility during the
do_rootfs
task, which optimizes the size of
libraries contained in the image.
By default, the class is enabled in the
local.conf.template using the
USER_CLASSES
variable as follows:
USER_CLASSES ?= "buildstats image-mklibs image-prelink"
24.58. image-prelink.bbclass
The image-prelink class
enables the use of the prelink utility during
the
do_rootfs
task, which optimizes the dynamic
linking of shared libraries to reduce executable startup time.
By default, the class is enabled in the
local.conf.template using the
USER_CLASSES
variable as follows:
USER_CLASSES ?= "buildstats image-mklibs image-prelink"
24.59. image-swab.bbclass
The image-swab class enables the
Swabber
tool in order to detect and log accesses to the host system during
the OpenEmbedded build process.
Note
This class is currently unmaintained. Thestrace package needs to be installed
in the build host as a dependency for this tool.
24.60. image-vm.bbclass
The image-vm class supports building VM
images.
24.61. image-vmdk.bbclass
The image-vmdk class supports building VMware
VMDK images.
Normally, you do not use this class directly.
Instead, you add "vmdk" to
IMAGE_FSTYPES.
24.62. insane.bbclass
The insane class adds a step to the package
generation process so that output quality assurance checks are
generated by the OpenEmbedded build system.
A range of checks are performed that check the build's output
for common problems that show up during runtime.
Distribution policy usually dictates whether to include this class.
You can configure the sanity checks so that specific test failures either raise a warning or an error message. Typically, failures for new tests generate a warning. Subsequent failures for the same test would then generate an error message once the metadata is in a known and good condition. See the "QA Error and Warning Messages" Chapter for a list of all the warning and error messages you might encounter using a default configuration.
Use the
WARN_QA and
ERROR_QA
variables to control the behavior of
these checks at the global level (i.e. in your custom distro
configuration).
However, to skip one or more checks in recipes, you should use
INSANE_SKIP.
For example, to skip the check for symbolic link
.so files in the main package of a recipe,
add the following to the recipe.
You need to realize that the package name override, in this example
${PN}, must be used:
INSANE_SKIP_${PN} += "dev-so"
Please keep in mind that the QA checks exist in order to detect real or potential problems in the packaged output. So exercise caution when disabling these checks.
The following list shows the tests you can list with the
WARN_QA and ERROR_QA
variables:
already-stripped:Checks that produced binaries have not already been stripped prior to the build system extracting debug symbols. It is common for upstream software projects to default to stripping debug symbols for output binaries. In order for debugging to work on the target using-dbgpackages, this stripping must be disabled.arch:Checks the Executable and Linkable Format (ELF) type, bit size, and endianness of any binaries to ensure they match the target architecture. This test fails if any binaries do not match the type since there would be an incompatibility. The test could indicate that the wrong compiler or compiler options have been used. Sometimes software, like bootloaders, might need to bypass this check.buildpaths:Checks for paths to locations on the build host inside the output files. Currently, this test triggers too many false positives and thus is not normally enabled.build-deps:Determines if a build-time dependency that is specified throughDEPENDS, explicitRDEPENDS, or task-level dependencies exists to match any runtime dependency. This determination is particularly useful to discover where runtime dependencies are detected and added during packaging. If no explicit dependency has been specified within the metadata, at the packaging stage it is too late to ensure that the dependency is built, and thus you can end up with an error when the package is installed into the image during thedo_rootfstask because the auto-detected dependency was not satisfied. An example of this would be where theupdate-rc.dclass automatically adds a dependency on theinitscripts-functionspackage to packages that install an initscript that refers to/etc/init.d/functions. The recipe should really have an explicitRDEPENDSfor the package in question oninitscripts-functionsso that the OpenEmbedded build system is able to ensure that theinitscriptsrecipe is actually built and thus theinitscripts-functionspackage is made available.compile-host-path:Checks thedo_compilelog for indications that paths to locations on the build host were used. Using such paths might result in host contamination of the build output.debug-deps:Checks that all packages except-dbgpackages do not depend on-dbgpackages, which would cause a packaging bug.debug-files:Checks for.debugdirectories in anything but the-dbgpackage. The debug files should all be in the-dbgpackage. Thus, anything packaged elsewhere is incorrect packaging.dep-cmp:Checks for invalid version comparison statements in runtime dependency relationships between packages (i.e. inRDEPENDS,RRECOMMENDS,RSUGGESTS,RPROVIDES,RREPLACES, andRCONFLICTSvariable values). Any invalid comparisons might trigger failures or undesirable behavior when passed to the package manager.desktop:Runs thedesktop-file-validateprogram against any.desktopfiles to validate their contents against the specification for.desktopfiles.dev-deps:Checks that all packages except-devor-staticdevpackages do not depend on-devpackages, which would be a packaging bug.dev-so:Checks that the.sosymbolic links are in the-devpackage and not in any of the other packages. In general, these symlinks are only useful for development purposes. Thus, the-devpackage is the correct location for them. Some very rare cases do exist for dynamically loaded modules where these symlinks are needed instead in the main package.file-rdeps:Checks that file-level dependencies identified by the OpenEmbedded build system at packaging time are satisfied. For example, a shell script might start with the line#!/bin/bash. This line would translate to a file dependency on/bin/bash. Of the three package managers that the OpenEmbedded build system supports, only RPM directly handles file-level dependencies, resolving them automatically to packages providing the files. However, the lack of that functionality in the other two package managers does not mean the dependencies do not still need resolving. This QA check attempts to ensure that explicitly declaredRDEPENDSexist to handle any file-level dependency detected in packaged files.files-invalid:Checks forFILESvariable values that contain "//", which is invalid.incompatible-license:Report when packages are excluded from being created due to being marked with a license that is inINCOMPATIBLE_LICENSE.install-host-path:Checks thedo_installlog for indications that paths to locations on the build host were used. Using such paths might result in host contamination of the build output.installed-vs-shipped:Reports when files have been installed withindo_installbut have not been included in any package by way of theFILESvariable. Files that do not appear in any package cannot be present in an image later on in the build process. Ideally, all installed files should be packaged or not installed at all. These files can be deleted at the end ofdo_installif the files are not needed in any package.la:Checks.lafiles for anyTMPDIRpaths. Any.lafile containing these paths is incorrect sincelibtooladds the correct sysroot prefix when using the files automatically itself.ldflags:Ensures that the binaries were linked with theLDFLAGSoptions provided by the build system. If this test fails, check that theLDFLAGSvariable is being passed to the linker command.libdir:Checks for libraries being installed into incorrect (possibly hardcoded) installation paths. For example, this test will catch recipes that install/lib/bar.sowhen${base_libdir}is "lib32". Another example is when recipes install/usr/lib64/foo.sowhen${libdir}is "/usr/lib".libexec:Checks if a package contains files in/usr/libexec. This check is not performed if thelibexecdirvariable has been set explicitly to/usr/libexec.packages-list:Checks for the same package being listed multiple times through thePACKAGESvariable value. Installing the package in this manner can cause errors during packaging.perm-config:Reports lines infs-perms.txtthat have an invalid format.perm-line:Reports lines infs-perms.txtthat have an invalid format.perm-link:Reports lines infs-perms.txtthat specify 'link' where the specified target already exists.perms:Currently, this check is unused but reserved.pkgconfig:Checks.pcfiles for anyTMPDIR/WORKDIRpaths. Any.pcfile containing these paths is incorrect sincepkg-configitself adds the correct sysroot prefix when the files are accessed.pkgname:Checks that all packages inPACKAGEShave names that do not contain invalid characters (i.e. characters other than 0-9, a-z, ., +, and -).pkgv-undefined:Checks to see if thePKGVvariable is undefined duringdo_package.pkgvarcheck:Checks through the variablesRDEPENDS,RRECOMMENDS,RSUGGESTS,RCONFLICTS,RPROVIDES,RREPLACES,FILES,ALLOW_EMPTY,pkg_preinst,pkg_postinst,pkg_prermandpkg_postrm, and reports if there are variable sets that are not package-specific. Using these variables without a package suffix is bad practice, and might unnecessarily complicate dependencies of other packages within the same recipe or have other unintended consequences.pn-overrides:Checks that a recipe does not have a name (PN) value that appears inOVERRIDES. If a recipe is named such that itsPNvalue matches something already inOVERRIDES(e.g.PNhappens to be the same asMACHINEorDISTRO), it can have unexpected consequences. For example, assignments such asFILES_${PN} = "xyz"effectively turn intoFILES = "xyz".rpaths:Checks for rpaths in the binaries that contain build system paths such asTMPDIR. If this test fails, bad-rpathoptions are being passed to the linker commands and your binaries have potential security issues.split-strip:Reports that splitting or stripping debug symbols from binaries has failed.staticdev:Checks for static library files (*.a) in non-staticdevpackages.symlink-to-sysroot:Checks for symlinks in packages that point intoTMPDIRon the host. Such symlinks will work on the host, but are clearly invalid when running on the target.textrel:Checks for ELF binaries that contain relocations in their.textsections, which can result in a performance impact at runtime. See the explanation for theELF binarymessage for more information regarding runtime performance issues.unsafe-references-in-binaries:Reports when a binary installed in${base_libdir},${base_bindir}, or${base_sbindir}, depends on another binary installed under${exec_prefix}. This dependency is a concern if you want the system to remain basically operable if/usris mounted separately and is not mounted.Note
Defaults for binaries installed in${base_libdir},${base_bindir}, and${base_sbindir}are/lib,/bin, and/sbin, respectively. The default for a binary installed under${exec_prefix}is/usr.unsafe-references-in-scripts:Reports when a script file installed in${base_libdir},${base_bindir}, or${base_sbindir}, depends on files installed under${exec_prefix}. This dependency is a concern if you want the system to remain basically operable if/usris mounted separately and is not mounted.Note
Defaults for binaries installed in${base_libdir},${base_bindir}, and${base_sbindir}are/lib,/bin, and/sbin, respectively. The default for a binary installed under${exec_prefix}is/usr.useless-rpaths:Checks for dynamic library load paths (rpaths) in the binaries that by default on a standard system are searched by the linker (e.g./liband/usr/lib). While these paths will not cause any breakage, they do waste space and are unnecessary.var-undefined:Reports when variables fundamental to packaging (i.e.WORKDIR,DEPLOY_DIR,D,PN, andPKGD) are undefined duringdo_package.version-going-backwards:If Build History is enabled, reports when a package being written out has a lower version than the previously written package under the same name. If you are placing output packages into a feed and upgrading packages on a target system using that feed, the version of a package going backwards can result in the target system not correctly upgrading to the "new" version of the package.Note
If you are not using runtime package management on your target system, then you do not need to worry about this situation.xorg-driver-abi:Checks that all packages containing Xorg drivers have ABI dependencies. Thexserver-xorgrecipe provides driver ABI names. All drivers should depend on the ABI versions that they have been built against. Driver recipes that includexorg-driver-input.incorxorg-driver-video.incwill automatically get these versions. Consequently, you should only need to explicitly add dependencies to binary driver recipes.
24.63. insserv.bbclass
The insserv class
uses the insserv utility to update the order of
symbolic links in /etc/rc?.d/ within an image
based on dependencies specified by LSB headers in the
init.d scripts themselves.
24.64. kernel.bbclass
The kernel class handles building Linux kernels.
The class contains code to build all kernel trees.
All needed headers are staged into the
STAGING_KERNEL_DIR
directory to allow out-of-tree module builds using
the
module
class.
This means that each built kernel module is packaged separately and inter-module
dependencies are created by parsing the modinfo output.
If all modules are required, then installing the kernel-modules
package installs all packages with modules and various other kernel packages
such as kernel-vmlinux.
Various other classes are used by the kernel
and module classes internally including the
kernel-arch,
module-base,
and
linux-kernel-base
classes.
24.65. kernel-arch.bbclass
The kernel-arch class
sets the ARCH environment variable for Linux
kernel compilation (including modules).
24.66. kernel-fitimage.bbclass
The kernel-fitimage class provides support to
pack zImages.
24.67. kernel-grub.bbclass
The kernel-grub class updates the boot area and
the boot menu with the kernel as the priority boot mechanism while
installing a RPM to update the kernel on a deployed target.
24.68. kernel-module-split.bbclass
The kernel-module-split class
provides common functionality for splitting Linux kernel modules into
separate packages.
24.69. kernel-uboot.bbclass
The kernel-uboot class provides support for
building from vmlinux-style kernel sources.
24.70. kernel-uimage.bbclass
The kernel-uimage class provides support to
pack uImage.
24.71. kernel-yocto.bbclass
The kernel-yocto class
provides common functionality for building from linux-yocto style
kernel source repositories.
24.72. kernelsrc.bbclass
The kernelsrc class sets the Linux kernel
source and version.
24.73. lib_package.bbclass
The lib_package class
supports recipes that build libraries and produce executable
binaries, where those binaries should not be installed by default
along with the library.
Instead, the binaries are added to a separate
${PN}-bin
package to make their installation optional.
24.74. libc*.bbclass
The libc* classes support recipes that build
packages with libc:
The
libc-commonclass provides common support for building withlibc.The
libc-packageclass supports packaging upglibcandeglibc.
24.75. license.bbclass
The license class provides license
manifest creation and license exclusion.
This class is enabled by default using the default value for the
INHERIT_DISTRO
variable.
24.76. linux-kernel-base.bbclass
The linux-kernel-base class
provides common functionality for recipes that build out of the Linux
kernel source tree.
These builds goes beyond the kernel itself.
For example, the Perf recipe also inherits this class.
24.77. linuxloader.bbclass
Provides the function linuxloader(), which gives
the value of the dynamic loader/linker provided on the platform.
This value is used by a number of other classes.
24.78. logging.bbclass
The logging class provides the standard
shell functions used to log messages for various BitBake severity levels
(i.e. bbplain, bbnote,
bbwarn, bberror,
bbfatal, and bbdebug).
This class is enabled by default since it is inherited by
the base class.
24.79. meta.bbclass
The meta class is inherited by recipes
that do not build any output packages themselves, but act as a "meta"
target for building other recipes.
24.80. metadata_scm.bbclass
The metadata_scm class provides functionality for
querying the branch and revision of a Source Code Manager (SCM)
repository.
The base
class uses this class to print the revisions of each layer before
starting every build.
The metadata_scm class is enabled by default
because it is inherited by the base class.
24.81. migrate_localcount.bbclass
The migrate_localcount class verifies a recipe's
localcount data and increments it appropriately.
24.82. mime.bbclass
The mime class generates the proper
post-install and post-remove (postinst/postrm) scriptlets for packages
that install MIME type files.
These scriptlets call update-mime-database to add
the MIME types to the shared database.
24.83. mirrors.bbclass
The mirrors class sets up some standard
MIRRORS entries
for source code mirrors.
These mirrors provide a fall-back path in case the upstream source
specified in
SRC_URI
within recipes is unavailable.
This class is enabled by default since it is inherited by the
base class.
24.84. module.bbclass
The module class provides support for building
out-of-tree Linux kernel modules.
The class inherits the
module-base
and
kernel-module-split
classes, and implements the
do_compile
and
do_install
tasks.
The class provides everything needed to build and package a kernel
module.
For general information on out-of-tree Linux kernel modules, see the "Incorporating Out-of-Tree Modules" section in the Yocto Project Linux Kernel Development Manual.
24.85. module-base.bbclass
The module-base class provides the base
functionality for building Linux kernel modules.
Typically, a recipe that builds software that includes one or
more kernel modules and has its own means of building
the module inherits this class as opposed to inheriting the
module
class.
24.86. multilib*.bbclass
The multilib* classes provide support
for building libraries with different target optimizations or target
architectures and installing them side-by-side in the same image.
For more information on using the Multilib feature, see the "Combining Multiple Versions of Library Files into One Image" section in the Yocto Project Development Manual.
24.87. native.bbclass
The native class provides common
functionality for recipes that wish to build tools to run on the build
host (i.e. tools that use the compiler or other tools from the
build host).
You can create a recipe that builds tools that run natively on the host a couple different ways:
Create a
myrecipe-native.bbthat inherits thenativeclass. If you use this method, you must order the inherit statement in the recipe after all other inherit statements so that thenativeclass is inherited last.Create or modify a target recipe that contains the following:
BBCLASSEXTEND= "native"Inside the recipe, use
_class-nativeand_class-targetoverrides to specify any functionality specific to the respective native or target case.
Although applied differently, the native class is
used with both methods.
The advantage of the second method is that you do not need to have two
separate recipes (assuming you need both) for native and target.
All common parts of the recipe are automatically shared.
24.88. nativesdk.bbclass
The nativesdk class provides common
functionality for recipes that wish to build tools to run as part of
an SDK (i.e. tools that run on
SDKMACHINE).
You can create a recipe that builds tools that run on the SDK machine a couple different ways:
Create a
nativesdk-myrecipe.bbrecipe that inherits thenativesdkclass. If you use this method, you must order the inherit statement in the recipe after all other inherit statements so that thenativesdkclass is inherited last.Create a
nativesdkvariant of any recipe by adding the following:BBCLASSEXTEND= "nativesdk"Inside the recipe, use
_class-nativesdkand_class-targetoverrides to specify any functionality specific to the respective SDK machine or target case.
Although applied differently, the nativesdk class
is used with both methods.
The advantage of the second method is that you do not need to have two
separate recipes (assuming you need both) for the SDK machine and the
target.
All common parts of the recipe are automatically shared.
24.89. nopackages.bbclass
Disables packaging tasks for those recipes and classes where packaging is not needed.
24.90. npm.bbclass
Provides support for building Node.js software fetched using the npm package manager.
Note
Currently, recipes inheriting this class must use thenpm:// fetcher to have dependencies fetched
and packaged automatically.
24.91. oelint.bbclass
The oelint class is an
obsolete lint checking tool that exists in
meta/classes in the
Source Directory.
A number of classes exist that could be generally useful in
OE-Core but are never actually used within OE-Core itself.
The oelint class is one such example.
However, being aware of this class can reduce the proliferation of
different versions of similar classes across multiple layers.
24.92. own-mirrors.bbclass
The own-mirrors class makes it
easier to set up your own
PREMIRRORS
from which to first fetch source before attempting to fetch it from the
upstream specified in
SRC_URI
within each recipe.
To use this class, inherit it globally and specify
SOURCE_MIRROR_URL.
Here is an example:
INHERIT += "own-mirrors"
SOURCE_MIRROR_URL = "http://example.com/my-source-mirror"
You can specify only a single URL in
SOURCE_MIRROR_URL.
24.93. package.bbclass
The package class supports generating
packages from a build's output.
The core generic functionality is in
package.bbclass.
The code specific to particular package types resides in these
package-specific classes:
package_deb,
package_rpm,
package_ipk,
and
package_tar.
Warning
Thepackage_tar class is broken and not
supported.
It is recommended that you do not use this class.
You can control the list of resulting package formats by using the
PACKAGE_CLASSES
variable defined in your conf/local.conf
configuration file, which is located in the
Build Directory.
When defining the variable, you can specify one or more package types.
Since images are generated from packages, a packaging class is
needed to enable image generation.
The first class listed in this variable is used for image generation.
If you take the optional step to set up a repository (package feed) on the development host that can be used by Smart, you can install packages from the feed while you are running the image on the target (i.e. runtime installation of packages). For more information, see the "Using Runtime Package Management" section in the Yocto Project Development Manual.
The package-specific class you choose can affect build-time performance
and has space ramifications.
In general, building a package with IPK takes about thirty percent less
time as compared to using RPM to build the same or similar package.
This comparison takes into account a complete build of the package with
all dependencies previously built.
The reason for this discrepancy is because the RPM package manager
creates and processes more
Metadata than the
IPK package manager.
Consequently, you might consider setting
PACKAGE_CLASSES to "package_ipk" if you are
building smaller systems.
Before making your package manager decision, however, you should consider some further things about using RPM:
RPM starts to provide more abilities than IPK due to the fact that it processes more Metadata. For example, this information includes individual file types, file checksum generation and evaluation on install, sparse file support, conflict detection and resolution for Multilib systems, ACID style upgrade, and repackaging abilities for rollbacks.
For smaller systems, the extra space used for the Berkeley Database and the amount of metadata when using RPM can affect your ability to perform on-device upgrades.
You can find additional information on the effects of the package class at these two Yocto Project mailing list links:
24.94. package_deb.bbclass
The package_deb class
provides support for creating packages that use the Debian
(i.e. .deb) file format.
The class ensures the packages are written out in a
.deb file format to the
${DEPLOY_DIR_DEB}
directory.
This class inherits the
package
class and is enabled through the
PACKAGE_CLASSES
variable in the local.conf file.
24.95. package_ipk.bbclass
The package_ipk class
provides support for creating packages that use the IPK
(i.e. .ipk) file format.
The class ensures the packages are written out in a
.ipk file format to the
${DEPLOY_DIR_IPK}
directory.
This class inherits the
package
class and is enabled through the
PACKAGE_CLASSES
variable in the local.conf file.
24.96. package_rpm.bbclass
The package_rpm class
provides support for creating packages that use the RPM
(i.e. .rpm) file format.
The class ensures the packages are written out in a
.rpm file format to the
${DEPLOY_DIR_RPM}
directory.
This class inherits the
package
class and is enabled through the
PACKAGE_CLASSES
variable in the local.conf file.
24.97. package_tar.bbclass
The package_tar class
provides support for creating tarballs.
The class ensures the packages are written out in a
tarball format to the
${DEPLOY_DIR_TAR}
directory.
This class inherits the
package
class and is enabled through the
PACKAGE_CLASSES
variable in the local.conf file.
Note
You cannot specify thepackage_tar class
first using the PACKAGE_CLASSES variable.
You must use .deb,
.ipk, or .rpm file
formats for your image or SDK.
24.98. packagedata.bbclass
The packagedata class provides
common functionality for reading pkgdata files
found in
PKGDATA_DIR.
These files contain information about each output package produced by
the OpenEmbedded build system.
This class is enabled by default because it is inherited by the
package
class.
24.99. packagegroup.bbclass
The packagegroup class sets default values
appropriate for package group recipes (e.g.
PACKAGES,
PACKAGE_ARCH,
ALLOW_EMPTY,
and so forth).
It is highly recommended that all package group recipes inherit this class.
For information on how to use this class, see the "Customizing Images Using Custom Package Groups" section in the Yocto Project Development Manual.
Previously, this class was called the task class.
24.100. patch.bbclass
The patch class provides all functionality for
applying patches during the
do_patch
task.
This class is enabled by default because it is inherited by the
base
class.
24.101. perlnative.bbclass
When inherited by a recipe, the perlnative class
supports using the native version of Perl built by the build system
rather than using the version provided by the build host.
24.102. pixbufcache.bbclass
The pixbufcache class generates the proper
post-install and post-remove (postinst/postrm) scriptlets for packages
that install pixbuf loaders, which are used with
gdk-pixbuf.
These scriptlets call update_pixbuf_cache
to add the pixbuf loaders to the cache.
Since the cache files are architecture-specific,
update_pixbuf_cache is run using QEMU if the
postinst scriptlets need to be run on the build host during image
creation.
If the pixbuf loaders being installed are in packages other
than the recipe's main package, set
PIXBUF_PACKAGES
to specify the packages containing the loaders.
24.103. pkgconfig.bbclass
The pkgconfig class provides a standard way to get
header and library information by using pkg-config.
This class aims to smooth integration of
pkg-config into libraries that use it.
During staging, BitBake installs pkg-config
data into the sysroots/ directory.
By making use of sysroot functionality within
pkg-config, the pkgconfig
class no longer has to manipulate the files.
24.104. populate_sdk.bbclass
The populate_sdk class provides support for
SDK-only recipes.
For information on advantages gained when building a cross-development
toolchain using the
do_populate_sdk
task, see the
"Building an SDK Installer"
section in the Yocto Project Software Development Kit (SDK) Developer's Guide.
24.105. populate_sdk_*.bbclass
The populate_sdk_* classes support SDK creation
and consist of the following classes:
populate_sdk_base: The base class supporting SDK creation under all package managers (i.e. DEB, RPM, and opkg).populate_sdk_deb: Supports creation of the SDK given the Debian package manager.populate_sdk_rpm: Supports creation of the SDK given the RPM package manager.populate_sdk_ipk: Supports creation of the SDK given the opkg (IPK format) package manager.populate_sdk_ext: Supports extensible SDK creation under all package managers.
The populate_sdk_base class inherits the
appropriate populate_sdk_* (i.e.
deb, rpm, and
ipk) based on
IMAGE_PKGTYPE.
The base class ensures all source and destination directories are
established and then populates the SDK.
After populating the SDK, the populate_sdk_base
class constructs two sysroots:
${SDK_ARCH}-nativesdk,
which contains the cross-compiler and associated tooling, and the
target, which contains a target root filesystem that is configured for
the SDK usage.
These two images reside in
SDK_OUTPUT,
which consists of the following:
${SDK_OUTPUT}/${SDK_ARCH}-nativesdk-pkgs
${SDK_OUTPUT}/${SDKTARGETSYSROOT}/target-pkgs
Finally, the base populate SDK class creates the toolchain environment setup script, the tarball of the SDK, and the installer.
The respective populate_sdk_deb,
populate_sdk_rpm, and
populate_sdk_ipk classes each support the
specific type of SDK.
These classes are inherited by and used with the
populate_sdk_base class.
For more information on the cross-development toolchain
generation, see the
"Cross-Development Toolchain Generation"
section.
For information on advantages gained when building a
cross-development toolchain using the
do_populate_sdk
task, see the
"Building an SDK Installer"
section in the Yocto Project Software Development Kit (SDK) Developer's
Guide.
24.106. prexport.bbclass
The prexport class provides functionality for
exporting
PR values.
Note
This class is not intended to be used directly. Rather, it is enabled when using "bitbake-prserv-tool export".
24.107. primport.bbclass
The primport class provides functionality for
importing
PR values.
Note
This class is not intended to be used directly. Rather, it is enabled when using "bitbake-prserv-tool import".
24.108. prserv.bbclass
The prserv class provides functionality for
using a
PR service
in order to automatically manage the incrementing of the
PR variable for
each recipe.
This class is enabled by default because it is inherited by the
package
class.
However, the OpenEmbedded build system will not enable the
functionality of this class unless
PRSERV_HOST
has been set.
24.109. ptest.bbclass
The ptest class provides functionality for
packaging and installing runtime tests for recipes that build software
that provides these tests.
This class is intended to be inherited by individual recipes.
However, the class' functionality is largely disabled unless "ptest"
appears in
DISTRO_FEATURES.
See the
"Testing Packages With ptest"
section in the Yocto Project Development Manual for more information
on ptest.
24.110. ptest-gnome.bbclass
Enables package tests (ptests) specifically for GNOME packages,
which have tests intended to be executed with
gnome-desktop-testing.
For information on setting up and running ptests, see the "Testing Packages With ptest" section in the Yocto Project Development Manual.
24.111. python-dir.bbclass
The python-dir class provides the base version,
location, and site package location for Python.
24.112. python3native.bbclass
The python3native class supports using the
native version of Python 3 built by the build system rather than
support of the version provided by the build host.
24.113. pythonnative.bbclass
When inherited by a recipe, the pythonnative class
supports using the native version of Python built by the build system
rather than using the version provided by the build host.
24.114. qemu.bbclass
The qemu class provides functionality for recipes
that either need QEMU or test for the existence of QEMU.
Typically, this class is used to run programs for a target system on
the build host using QEMU's application emulation mode.
24.115. recipe_sanity.bbclass
The recipe_sanity class checks for the presence
of any host system recipe prerequisites that might affect the
build (e.g. variables that are set or software that is present).
24.116. relocatable.bbclass
The relocatable class enables relocation of
binaries when they are installed into the sysroot.
This class makes use of the
chrpath
class and is used by both the
cross
and
native
classes.
24.117. remove-libtool.bbclass
The remove-libtool class adds a post function
to the
do_install
task to remove all .la files installed by
libtool.
Removing these files results in them being absent from both the
sysroot and target packages.
If a recipe needs the .la files to be installed,
then the recipe can override the removal by setting
REMOVE_LIBTOOL_LA to "0" as follows:
REMOVE_LIBTOOL_LA = "0"
Note
Theremove-libtool class is not enabled by
default.
24.118. report-error.bbclass
The report-error class supports enabling the
error reporting tool,
which allows you to submit build error information to a central
database.
The class collects debug information for recipe, recipe version, task,
machine, distro, build system, target system, host distro, branch,
commit, and log.
From the information, report files using a JSON format are created and
stored in
${LOG_DIR}/error-report.
24.119. rm_work.bbclass
The rm_work class supports deletion of temporary
workspace, which can ease your hard drive demands during builds.
The OpenEmbedded build system can use a substantial amount of disk
space during the build process.
A portion of this space is the work files under the
${TMPDIR}/work directory for each recipe.
Once the build system generates the packages for a recipe, the work
files for that recipe are no longer needed.
However, by default, the build system preserves these files
for inspection and possible debugging purposes.
If you would rather have these files deleted to save disk space
as the build progresses, you can enable rm_work
by adding the following to your local.conf file,
which is found in the
Build Directory.
INHERIT += "rm_work"
If you are modifying and building source code out of the work directory
for a recipe, enabling rm_work will potentially
result in your changes to the source being lost.
To exclude some recipes from having their work directories deleted by
rm_work, you can add the names of the recipe or
recipes you are working on to the RM_WORK_EXCLUDE
variable, which can also be set in your local.conf
file.
Here is an example:
RM_WORK_EXCLUDE += "busybox glibc"
24.120. rootfs*.bbclass
The rootfs* classes support creating
the root filesystem for an image and consist of the following classes:
The
rootfs-postcommandsclass, which defines filesystem post-processing functions for image recipes.The
rootfs_debclass, which supports creation of root filesystems for images built using.debpackages.The
rootfs_rpmclass, which supports creation of root filesystems for images built using.rpmpackages.The
rootfs_ipkclass, which supports creation of root filesystems for images built using.ipkpackages.The
rootfsdebugfilesclass, which installs additional files found on the build host directly into the root filesystem.
The root filesystem is created from packages using one of the
rootfs*.bbclass files as determined by the
PACKAGE_CLASSES
variable.
For information on how root filesystem images are created, see the "Image Generation" section.
24.121. sanity.bbclass
The sanity class checks to see if prerequisite
software is present on the host system so that users can be notified
of potential problems that might affect their build.
The class also performs basic user configuration checks from
the local.conf configuration file to
prevent common mistakes that cause build failures.
Distribution policy usually determines whether to include this class.
24.122. scons.bbclass
The scons class supports recipes that need to
build software that uses the SCons build system.
You can use the
EXTRA_OESCONS
variable to specify additional configuration options you want to pass
SCons command line.
24.123. sdl.bbclass
The sdl class supports recipes that need to build
software that uses the Simple DirectMedia Layer (SDL) library.
24.124. setuptools.bbclass
The setuptools class supports Python
version 2.x extensions that use build systems based on
setuptools.
If your recipe uses these build systems, the recipe needs to
inherit the setuptools class.
24.125. setuptools3.bbclass
The setuptools3 class supports Python
version 3.x extensions that use build systems based on
setuptools3.
If your recipe uses these build systems, the recipe needs to
inherit the setuptools3 class.
24.126. sign_rpm.bbclass
The sign_rpm class supports generating signed
RPM packages.
24.127. sip.bbclass
The sip class
supports recipes that build or package SIP-based Python bindings.
24.128. siteconfig.bbclass
The siteconfig class
provides functionality for handling site configuration.
The class is used by the
autotools
class to accelerate the
do_configure
task.
24.129. siteinfo.bbclass
The siteinfo class provides information about
the targets that might be needed by other classes or recipes.
As an example, consider Autotools, which can require tests that must
execute on the target hardware.
Since this is not possible in general when cross compiling, site
information is used to provide cached test results so these tests can
be skipped over but still make the correct values available.
The
meta/site directory
contains test results sorted into different categories such as
architecture, endianness, and the libc used.
Site information provides a list of files containing data relevant to
the current build in the
CONFIG_SITE variable
that Autotools automatically picks up.
The class also provides variables like
SITEINFO_ENDIANNESS
and SITEINFO_BITS
that can be used elsewhere in the metadata.
Because the
base class
includes the siteinfo class, it is always active.
24.130. spdx.bbclass
The spdx class integrates real-time license
scanning, generation of SPDX standard output, and verification
of license information during the build.
Note
This class is currently at the prototype stage in the 1.6 release.
24.131. sstate.bbclass
The sstate class provides support for Shared
State (sstate).
By default, the class is enabled through the
INHERIT_DISTRO
variable's default value.
For more information on sstate, see the "Shared State Cache" section.
24.132. staging.bbclass
The staging class provides the
do_populate_sysroot
task, which stages files into the sysroot to make them available to
other recipes at build time.
The class is enabled by default because it is inherited by the
base
class.
24.133. syslinux.bbclass
The syslinux class provides syslinux-specific
functions for building bootable images.
The class supports the following variables:
INITRD: Indicates list of filesystem images to concatenate and use as an initial RAM disk (initrd). This variable is optional.ROOTFS: Indicates a filesystem image to include as the root filesystem. This variable is optional.AUTO_SYSLINUXMENU: Enables creating an automatic menu when set to "1".LABELS: Lists targets for automatic configuration.APPEND: Lists append string overrides for each label.SYSLINUX_OPTS: Lists additional options to add to the syslinux file. Semicolon characters separate multiple options.SYSLINUX_SPLASH: Lists a background for the VGA boot menu when you are using the boot menu.SYSLINUX_DEFAULT_CONSOLE: Set to "console=ttyX" to change kernel boot default console.SYSLINUX_SERIAL: Sets an alternate serial port. Or, turns off serial when the variable is set with an empty string.SYSLINUX_SERIAL_TTY: Sets an alternate "console=tty..." kernel boot argument.
24.134. systemd.bbclass
The systemd class provides support for recipes
that install systemd unit files.
The functionality for this class is disabled unless you have "systemd"
in
DISTRO_FEATURES.
Under this class, the recipe or Makefile (i.e. whatever the recipe is
calling during the
do_install
task) installs unit files into
${D}${systemd_unitdir}/system.
If the unit files being installed go into packages other than the
main package, you need to set
SYSTEMD_PACKAGES
in your recipe to identify the packages in which the files will be
installed.
You should set
SYSTEMD_SERVICE
to the name of the service file.
You should also use a package name override to indicate the package
to which the value applies.
If the value applies to the recipe's main package, use
${PN}.
Here is an example from the connman recipe:
SYSTEMD_SERVICE_${PN} = "connman.service"
Services are set up to start on boot automatically unless
you have set
SYSTEMD_AUTO_ENABLE
to "disable".
For more information on systemd, see the
"Selecting an Initialization Manager"
section in the Yocto Project Development Manual.
24.135. terminal.bbclass
The terminal class provides support for starting
a terminal session.
The
OE_TERMINAL
variable controls which terminal emulator is used for the session.
Other classes use the terminal class anywhere a
separate terminal session needs to be started.
For example, the
patch
class assuming
PATCHRESOLVE
is set to "user", the
cml1
class, and the
devshell
class all use the terminal class.
24.136. testimage*.bbclass
The testimage* classes support running
automated tests against images using QEMU and on actual hardware.
The classes handle loading the tests and starting the image.
To use the classes, you need to perform steps to set up the
environment.
The tests are commands that run on the target system over
ssh.
Each test is written in Python and makes use of the
unittest module.
The testimage.bbclass runs tests on an image
when called using the following:
$ bitbake -c testimage image
The testimage-auto class runs tests on an image
after the image is constructed (i.e.
TEST_IMAGE
must be set to "1").
For information on how to enable, run, and create new tests, see the "Performing Automated Runtime Testing" section in the Yocto Project Development Manual.
24.137. testsdk.bbclass
This class supports running automated tests against
software development kits (SDKs).
The testsdk class runs tests on an SDK when
called using the following:
$ bitbake -c testsdk image
24.138. texinfo.bbclass
This class should be inherited by recipes whose upstream packages
invoke the texinfo utilities at build-time.
Native and cross recipes are made to use the dummy scripts provided
by texinfo-dummy-native, for improved performance.
Target architecture recipes use the genuine
Texinfo utilities.
By default, they use the Texinfo utilities on the host system.
Note
If you want to use the Texinfo recipe shipped with the build system, you can remove "texinfo-native" fromASSUME_PROVIDED
and makeinfo from
SANITY_REQUIRED_UTILITIES.
24.139. tinderclient.bbclass
The tinderclient class submits build results to
an external Tinderbox instance.
Note
This class is currently unmaintained.
24.140. toaster.bbclass
The toaster class collects information about
packages and images and sends them as events that the BitBake
user interface can receive.
The class is enabled when the Toaster user interface is running.
This class is not intended to be used directly.
24.141. toolchain-scripts.bbclass
The toolchain-scripts class provides the scripts
used for setting up the environment for installed SDKs.
24.142. typecheck.bbclass
The typecheck class provides support for
validating the values of variables set at the configuration level
against their defined types.
The OpenEmbedded build system allows you to define the type of a
variable using the "type" varflag.
Here is an example:
IMAGE_FEATURES[type] = "list"
24.143. uboot-config.bbclass
The uboot-config class provides support for
U-Boot configuration for a machine.
Specify the machine in your recipe as follows:
UBOOT_CONFIG ??= <default>
UBOOT_CONFIG[foo] = "config,images"
You can also specify the machine using this method:
UBOOT_MACHINE = "config"
See the
UBOOT_CONFIG
and
UBOOT_MACHINE
variables for additional information.
24.144. uninative.bbclass
Attempts to isolate the build system from the host
distribution's C library in order to make re-use of native shared state
artifacts across different host distributions practical.
With this class enabled, a tarball containing a pre-built C library
is downloaded at the start of the build.
In the Poky reference distribution this is enabled by default
through
meta/conf/distro/include/yocto-uninative.inc.
Other distributions that do not derive from poky can also
"require conf/distro/include/yocto-uninative.inc"
to use this.
Alternatively if you prefer, you can build the uninative-tarball recipe
yourself, publish the resulting tarball (e.g. via HTTP) and set
UNINATIVE_URL and
UNINATIVE_CHECKSUM appropriately.
For an example, see the
meta/conf/distro/include/yocto-uninative.inc.
24.145. update-alternatives.bbclass
The update-alternatives class helps the
alternatives system when multiple sources provide the same command.
This situation occurs when several programs that have the same or
similar function are installed with the same name.
For example, the ar command is available from the
busybox, binutils and
elfutils packages.
The update-alternatives class handles
renaming the binaries so that multiple packages can be installed
without conflicts.
The ar command still works regardless of which
packages are installed or subsequently removed.
The class renames the conflicting binary in each package and symlinks
the highest priority binary during installation or removal of packages.
To use this class, you need to define a number of variables:
These variables list alternative commands needed by a package,
provide pathnames for links, default links for targets, and
so forth.
For details on how to use this class, see the comments in the
update-alternatives.bbclass.
Note
You can use theupdate-alternatives command
directly in your recipes.
However, this class simplifies things in most cases.
24.146. update-rc.d.bbclass
The update-rc.d class uses
update-rc.d to safely install an
initialization script on behalf of the package.
The OpenEmbedded build system takes care of details such as making
sure the script is stopped before a package is removed and started when
the package is installed.
Three variables control this class:
INITSCRIPT_PACKAGES,
INITSCRIPT_NAME and
INITSCRIPT_PARAMS.
See the variable links for details.
24.147. useradd*.bbclass
The useradd* classes support the addition of users
or groups for usage by the package on the target.
For example, if you have packages that contain system services that
should be run under their own user or group, you can use these classes
to enable creation of the user or group.
The meta-skeleton/recipes-skeleton/useradd/useradd-example.bb
recipe in the Source Directory
provides a simple example that shows how to add three
users and groups to two packages.
See the useradd-example.bb recipe for more
information on how to use these classes.
The useradd_base class provides basic
functionality for user or groups settings.
The useradd* classes support the
USERADD_PACKAGES,
USERADD_PARAM,
GROUPADD_PARAM,
and
GROUPMEMS_PARAM
variables.
The useradd-staticids class supports the addition
of users or groups that have static user identification
(uid) and group identification
(gid) values.
The default behavior of the OpenEmbedded build system for assigning
uid and gid values when
packages add users and groups during package install time is to
add them dynamically.
This works fine for programs that do not care what the values of the
resulting users and groups become.
In these cases, the order of the installation determines the final
uid and gid values.
However, if non-deterministic
uid and gid values are a
problem, you can override the default, dynamic application of these
values by setting static values.
When you set static values, the OpenEmbedded build system looks in
BBPATH for
files/passwd and files/group
files for the values.
To use static uid and gid
values, you need to set some variables.
See the
USERADDEXTENSION,
USERADD_UID_TABLES,
USERADD_GID_TABLES,
and
USERADD_ERROR_DYNAMIC
variables.
You can also see the
useradd
class for additional information.
Notes
You do not use theuseradd-staticids
class directly.
You either enable or disable the class by setting the
USERADDEXTENSION variable.
If you enable or disable the class in a configured system,
TMPDIR
might contain incorrect uid and
gid values.
Deleting the TMPDIR directory
will correct this condition.
24.148. utility-tasks.bbclass
The utility-tasks class provides support for
various "utility" type tasks that are applicable to all recipes,
such as
do_clean and
do_listtasks.
This class is enabled by default because it is inherited by
the
base
class.
24.149. utils.bbclass
The utils class provides some useful Python
functions that are typically used in inline Python expressions
(e.g. ${@...}).
One example use is for bb.utils.contains().
This class is enabled by default because it is inherited by the
base
class.
24.150. vala.bbclass
The vala class supports recipes that need to
build software written using the Vala programming language.
24.151. waf.bbclass
The waf class supports recipes that need to build
software that uses the Waf build system.
You can use the
EXTRA_OECONF
variable to specify additional configuration options to be passed on
the Waf command line.
Chapter 25. Tasks
- 25.1. Normal Recipe Build Tasks
- 25.1.1.
do_build - 25.1.2.
do_checkpkg - 25.1.3.
do_compile - 25.1.4.
do_compile_ptest_base - 25.1.5.
do_configure - 25.1.6.
do_configure_ptest_base - 25.1.7.
do_deploy - 25.1.8.
do_distrodata - 25.1.9.
do_fetch - 25.1.10.
do_image - 25.1.11.
do_image_complete - 25.1.12.
do_install - 25.1.13.
do_install_ptest_base - 25.1.14.
do_package - 25.1.15.
do_package_qa - 25.1.16.
do_package_write_deb - 25.1.17.
do_package_write_ipk - 25.1.18.
do_package_write_rpm - 25.1.19.
do_package_write_tar - 25.1.20.
do_packagedata - 25.1.21.
do_patch - 25.1.22.
do_populate_lic - 25.1.23.
do_populate_sdk - 25.1.24.
do_populate_sysroot - 25.1.25.
do_rm_work - 25.1.26.
do_rm_work_all - 25.1.27.
do_unpack
- 25.1.1.
- 25.2. Manually Called Tasks
- 25.3. Image-Related Tasks
- 25.4. Kernel-Related Tasks
- 25.4.1.
do_compile_kernelmodules - 25.4.2.
do_diffconfig - 25.4.3.
do_kernel_checkout - 25.4.4.
do_kernel_configcheck - 25.4.5.
do_kernel_configme - 25.4.6.
do_kernel_link_vmlinux - 25.4.7.
do_kernel_metadata - 25.4.8.
do_menuconfig - 25.4.9.
do_savedefconfig - 25.4.10.
do_shared_workdir - 25.4.11.
do_sizecheck - 25.4.12.
do_strip - 25.4.13.
do_uboot_mkimage - 25.4.14.
do_validate_branches
- 25.4.1.
- 25.5. Miscellaneous Tasks
Tasks are units of execution for BitBake.
Recipes (.bb files) use tasks to complete
configuring, compiling, and packaging software.
This chapter provides a reference of the tasks defined in the
OpenEmbedded build system.
25.1. Normal Recipe Build Tasks
The following sections describe normal tasks associated with building a recipe.
25.1.1. do_build
The default task for all recipes. This task depends on all other normal tasks required to build a recipe.
25.1.2. do_checkpkg
Provides information about the recipe including its upstream version and status. The upstream version and status reveals whether or not a version of the recipe exists upstream and a status of not updated, updated, or unknown.
The checkpkg task is included as part of the
distrodata
class.
To build the checkpkg task, use the
bitbake command with the "-c" option and
task name:
$ bitbake core-image-minimal -c checkpkg
By default, the results are stored in
$LOG_DIR
(e.g. $BUILD_DIR/tmp/log).
25.1.3. do_compile
Compiles the source in the compilation directory, which is pointed
to by the
B variable.
25.1.4. do_compile_ptest_base
Compiles the runtime test suite included in the software being built.
25.1.5. do_configure
Configures the source by enabling and disabling any build-time and configuration options for the software being built.
25.1.6. do_configure_ptest_base
Configures the runtime test suite included in the software being built.
25.1.7. do_deploy
Writes output files that are to be deployed to the deploy
directory, which is defined by the
DEPLOYDIR
variable.
The do_deploy task is a
shared state (sstate) task, which means that the task can
be accelerated through sstate use.
Realize also that if the task is re-executed, any previous output
is removed (i.e. "cleaned").
25.1.8. do_distrodata
Provides information about the recipe.
The distrodata task is included as part of the
distrodata
class.
To build the distrodata task, use the
bitbake command with the "-c" option and
task name:
$ bitbake core-image-minimal -c distrodata
By default, the results are stored in
$LOG_DIR
(e.g. $BUILD_DIR/tmp/log).
25.1.9. do_fetch
Fetches the source code.
This task uses the
SRC_URI
variable and the argument's prefix to determine the correct
fetcher module.
25.1.10. do_image
Starts the image generation process.
The do_image task runs after the
OpenEmbedded build system has run the
do_rootfs
task during which packages are identified for installation into
the image and the root filesystem is created, complete with
post-processing.
The do_image task performs pre-processing
on the image through the
IMAGE_PREPROCESS_COMMAND
and dynamically generates supporting
do_image_* tasks as needed.
For more information on image creation, see the "Image Generation" section.
25.1.11. do_image_complete
Completes the image generation process.
The do_image_complete task runs after the
OpenEmbedded build system has run the
do_image
task during which image pre-processing occurs and through
dynamically generated do_image_* tasks the
image is constructed.
The do_image_complete task performs
post-processing on the image through the
IMAGE_POSTPROCESS_COMMAND.
For more information on image creation, see the "Image Generation" section.
25.1.12. do_install
Copies files from the compilation directory, which is defined by
the
B variable,
to a holding area defined by the
D variable.
25.1.13. do_install_ptest_base
Copies the runtime test suite files from the compilation directory to a holding area.
25.1.14. do_package
Analyzes the content of the holding area and splits it into subsets based on available packages and files.
25.1.15. do_package_qa
Runs QA checks on packaged files.
For more information on these checks, see the
insane
class.
25.1.16. do_package_write_deb
Creates Debian packages (i.e. *.deb files) and
places them in the
${DEPLOY_DIR_DEB}
directory in the package feeds area.
For more information, see the
"Package Feeds"
section.
25.1.17. do_package_write_ipk
Creates IPK packages (i.e. *.ipk files) and
places them in the
${DEPLOY_DIR_IPK}
directory in the package feeds area.
For more information, see the
"Package Feeds"
section.
25.1.18. do_package_write_rpm
Creates RPM packages (i.e. *.rpm files) and
places them in the
${DEPLOY_DIR_RPM}
directory in the package feeds area.
For more information, see the
"Package Feeds"
section.
25.1.19. do_package_write_tar
Creates tarballs and places them in the
${DEPLOY_DIR_TAR}
directory in the package feeds area.
For more information, see the
"Package Feeds"
section.
25.1.20. do_packagedata
Creates package metadata used by the build system to generate the final packages.
25.1.21. do_patch
Locates patch files and applies them to the source code. See the "Patching" section for more information.
25.1.22. do_populate_lic
Writes license information for the recipe that is collected later when the image is constructed.
25.1.23. do_populate_sdk
Creates the file and directory structure for an installable SDK. See the "SDK Generation" section for more information.
25.1.24. do_populate_sysroot
Copies a subset of the files installed by the
do_install
task into the sysroot to make them available to other recipes.
Files that would typically not be needed by other recipes at build
time are skipped.
Skipped files include files installed into
/etc.
For information on what files are copied, see the
staging
class.
The do_populate_sysroot task is a
shared state (sstate) task, which means that the task can
be accelerated through sstate use.
Realize also that if the task is re-executed, any previous output
is removed (i.e. "cleaned").
25.1.25. do_rm_work
Removes work files after the OpenEmbedded build system has
finished with them.
You can learn more by looking at the
"rm_work.bbclass"
section.
25.1.26. do_rm_work_all
Top-level task for removing work files after the build system has finished with them.
25.1.27. do_unpack
Unpacks the source code into a working directory pointed to
by
${WORKDIR}.
The
S variable also
plays a role in where unpacked source files ultimately reside.
For more information on how source files are unpacked, see the
"Source Fetching"
section and the WORKDIR and
S variable descriptions.
25.2. Manually Called Tasks
These tasks are typically manually triggered (e.g. by using the
bitbake -c command-line option):
25.2.3. do_clean
Removes all output files for a target from the
do_unpack
task forward (i.e.
do_unpack,
do_configure,
do_compile,
do_install,
and
do_package).
You can run this task using BitBake as follows:
$ bitbake -c clean recipe
Running this task does not remove the
sstate) cache
files.
Consequently, if no changes have been made and the recipe is
rebuilt after cleaning, output files are simply restored from the
sstate cache.
If you want to remove the sstate cache files for the recipe,
you need to use the
do_cleansstate
task instead (i.e. bitbake -c cleansstate recipe).
25.2.4. do_cleanall
Removes all output files, shared state
(sstate) cache, and
downloaded source files for a target (i.e. the contents of
DL_DIR).
Essentially, the do_cleanall task is
identical to the
do_cleansstate
task with the added removal of downloaded source files.
You can run this task using BitBake as follows:
$ bitbake -c cleanall recipe
Typically, you would not normally use the
cleanall task.
Do so only if you want to start fresh with the
do_fetch
task.
25.2.5. do_cleansstate
Removes all output files and shared state
(sstate)
cache for a target.
Essentially, the do_cleansstate task is
identical to the
do_clean
task with the added removal of shared state
(sstate) cache.
You can run this task using BitBake as follows:
$ bitbake -c cleansstate recipe
When you run the do_cleansstate task,
the OpenEmbedded build system no longer uses any
sstate.
Consequently, building the recipe from scratch is guaranteed.
Note
Thedo_cleansstate task cannot remove
sstate from a remote sstate mirror.
If you need to build a target from scratch using remote
mirrors, use the "-f" option as follows:
$ bitbake -f -c do_cleansstate target
25.2.6. do_devshell
Starts a shell whose environment is set up for
development, debugging, or both.
See the
"Using a Development Shell"
section in the Yocto Project Development Manual for more
information about using devshell.
25.2.7. do_fetchall
Fetches all remote sources required to build a target.
25.2.8. do_listtasks
Lists all defined tasks for a target.
25.2.9. do_package_index
Creates or updates the index in the Package Feeds area.
Note
This task is not triggered with thebitbake -c command-line option as
are the other tasks in this section.
Because this task is specifically for the
package-index recipe,
you run it using
bitbake package-index.
25.3. Image-Related Tasks
The following tasks are applicable to image recipes.
25.3.1. do_bootimg
Creates a bootable live image.
See the
IMAGE_FSTYPES
variable for additional information on live image types.
25.3.2. do_bundle_initramfs
Combines an initial RAM disk (initramfs) image and kernel
together to form a single image.
The
CONFIG_INITRAMFS_SOURCE
variable has some more information about these types of images.
25.3.3. do_rootfs
Creates the root filesystem (file and directory structure) for an image. See the "Image Generation" section for more information on how the root filesystem is created.
25.3.4. do_testimage
Boots an image and performs runtime tests within the image. For information on automatically testing images, see the "Performing Automated Runtime Testing" section in the Yocto Project Development Manual.
25.3.5. do_testimage_auto
Boots an image and performs runtime tests within the image
immediately after it has been built.
This task is enabled when you set
TEST_IMAGE
equal to "1".
For information on automatically testing images, see the "Performing Automated Runtime Testing" section in the Yocto Project Development Manual.
25.4. Kernel-Related Tasks
The following tasks are applicable to kernel recipes.
Some of these tasks (e.g. the
do_menuconfig
task) are also applicable to recipes that use
Linux kernel style configuration such as the BusyBox recipe.
25.4.1. do_compile_kernelmodules
Compiles loadable modules for the Linux kernel.
25.4.2. do_diffconfig
Compares the old and new config files after running the
do_menuconfig
task for the kernel.
25.4.3. do_kernel_checkout
Checks out source/meta branches for a linux-yocto style kernel.
25.4.4. do_kernel_configcheck
Validates the kernel configuration for a linux-yocto style kernel.
25.4.5. do_kernel_configme
Assembles the kernel configuration for a linux-yocto style kernel.
25.4.6. do_kernel_link_vmlinux
Creates a symbolic link in
arch/$arch/boot for vmlinux kernel
images.
25.4.7. do_kernel_metadata
Collects kernel metadata for a
linux-yocto style kernel.
25.4.8. do_menuconfig
Runs make menuconfig for the kernel.
For information on menuconfig, see the
"Using menuconfig"
section in the Yocto Project Development Manual.
25.4.9. do_savedefconfig
Creates a minimal Linux kernel configuration file.
25.4.10. do_shared_workdir
Creates the shared working directory for the kernel.
25.4.11. do_sizecheck
Checks the size of the kernel image against
KERNEL_IMAGE_MAXSIZE
when set.
25.4.12. do_strip
Strips unneeded sections out of the Linux kernel image.
25.4.13. do_uboot_mkimage
Creates a uImage file from the kernel for the U-Boot bootloader.
Chapter 26. QA Error and Warning Messages
26.1. Introduction
When building a recipe, the OpenEmbedded build system performs various QA checks on the output to ensure that common issues are detected and reported. Sometimes when you create a new recipe to build new software, it will build with no problems. When this is not the case, or when you have QA issues building any software, it could take a little time to resolve them.
While it is tempting to ignore a QA message or even to disable QA checks, it is best to try and resolve any reported QA issues. This chapter provides a list of the QA messages and brief explanations of the issues you could encounter so that you can properly resolve problems.
The next section provides a list of all QA error and warning messages based on a default configuration. Each entry provides the message or error form along with an explanation.
Notes
At the end of each message, the name of the associated QA test (as listed in the "
insane.bbclass" section) appears within square brackets.As mentioned, this list of error and warning messages is for QA checks only. The list does not cover all possible build errors or warnings you could encounter.
Because some QA checks are disabled by default, this list does not include all possible QA check errors and warnings.
26.2. Errors and Warnings
<packagename>: <path> is using libexec please relocate to <libexecdir> [libexec]The specified package contains files in
/usr/libexecwhen the distro configuration uses a different path for<libexecdir>By default,<libexecdir>is$prefix/libexec. However, this default can be changed (e.g.${libdir}).
package <packagename> contains bad RPATH <rpath> in file <file> [rpaths]The specified binary produced by the recipe contains dynamic library load paths (rpaths) that contain build system paths such as
TMPDIR, which are incorrect for the target and could potentially be a security issue. Check for bad-rpathoptions being passed to the linker in yourdo_compilelog. Depending on the build system used by the software being built, there might be a configure option to disable rpath usage completely within the build of the software.
<packagename>: <file> contains probably-redundant RPATH <rpath> [useless-rpaths]The specified binary produced by the recipe contains dynamic library load paths (rpaths) that on a standard system are searched by default by the linker (e.g.
/liband/usr/lib). While these paths will not cause any breakage, they do waste space and are unnecessary. Depending on the build system used by the software being built, there might be a configure option to disable rpath usage completely within the build of the software.
<packagename> requires <files>, but no providers in its RDEPENDS [file-rdeps]A file-level dependency has been identified from the specified package on the specified files, but there is no explicit corresponding entry in
RDEPENDS. If particular files are required at runtime thenRDEPENDSshould be declared in the recipe to ensure the packages providing them are built.
<packagename1> rdepends on <packagename2>, but it isn't a build dependency? [build-deps]A runtime dependency exists between the two specified packages, but there is nothing explicit within the recipe to enable the OpenEmbedded build system to ensure that dependency is satisfied. This condition is usually triggered by an
RDEPENDSvalue being added at the packaging stage rather than up front, which is usually automatic based on the contents of the package. In most cases, you should change the recipe to add an explicitRDEPENDSfor the dependency.
non -dev/-dbg/nativesdk- package contains symlink .so: <packagename> path '<path>' [dev-so]Symlink
.sofiles are for development only, and should therefore go into the-devpackage. This situation might occur if you add*.so*rather than*.so.*to a non-dev package. ChangeFILES(and possiblyPACKAGES) such that the specified.sofile goes into an appropriate-devpackage.
<packagename>: found library in wrong location [libdir]The specified file may have been installed into an incorrect (possibly hardcoded) installation path. For example, this test will catch recipes that install
/lib/bar.sowhen${base_libdir}is "lib32". Another example is when recipes install/usr/lib64/foo.sowhen${libdir}is "/usr/lib". False positives occasionally exist. For these cases add "libdir" toINSANE_SKIPfor the package.
non debug package contains .debug directory: <packagename> path <path> [debug-files]The specified package contains a
.debugdirectory, which should not appear in anything but the-dbgpackage. This situation might occur if you add a path which contains a.debugdirectory and do not explicitly add the.debugdirectory to the-dbgpackage. If this is the case, add the.debugdirectory explicitly toFILES_${PN}-dbg. SeeFILESfor additional information onFILES.
Architecture did not match (<machine_arch> to <file_arch>) on <file> [arch]By default, the OpenEmbedded build system checks the Executable and Linkable Format (ELF) type, bit size, and endianness of any binaries to ensure they match the target architecture. This test fails if any binaries do not match the type since there would be an incompatibility. The test could indicate that the wrong compiler or compiler options have been used. Sometimes software, like bootloaders, might need to bypass this check. If the file you receive the error for is firmware that is not intended to be executed within the target operating system or is intended to run on a separate processor within the device, you can add "arch" to
INSANE_SKIPfor the package. Another option is to check thedo_compilelog and verify that the compiler options being used are correct.
Bit size did not match (<machine_bits> to <file_bits>) <recipe> on <file> [arch]By default, the OpenEmbedded build system checks the Executable and Linkable Format (ELF) type, bit size, and endianness of any binaries to ensure they match the target architecture. This test fails if any binaries do not match the type since there would be an incompatibility. The test could indicate that the wrong compiler or compiler options have been used. Sometimes software, like bootloaders, might need to bypass this check. If the file you receive the error for is firmware that is not intended to be executed within the target operating system or is intended to run on a separate processor within the device, you can add "arch" to
INSANE_SKIPfor the package. Another option is to check thedo_compilelog and verify that the compiler options being used are correct.
Endianness did not match (<machine_endianness> to <file_endianness>) on <file> [arch]By default, the OpenEmbedded build system checks the Executable and Linkable Format (ELF) type, bit size, and endianness of any binaries to ensure they match the target architecture. This test fails if any binaries do not match the type since there would be an incompatibility. The test could indicate that the wrong compiler or compiler options have been used. Sometimes software, like bootloaders, might need to bypass this check. If the file you receive the error for is firmware that is not intended to be executed within the target operating system or is intended to run on a separate processor within the device, you can add "arch" to
INSANE_SKIPfor the package. Another option is to check thedo_compilelog and verify that the compiler options being used are correct.
ELF binary '<file>' has relocations in .text [textrel]The specified ELF binary contains relocations in its
.textsections. This situation can result in a performance impact at runtime.Typically, the way to solve this performance issue is to add "-fPIC" or "-fpic" to the compiler command-line options. For example, given software that reads
CFLAGSwhen you build it, you could add the following to your recipe:CFLAGS_append = " -fPIC "For more information on text relocations at runtime, see http://www.akkadia.org/drepper/textrelocs.html.
No GNU_HASH in the elf binary: '<file>' [ldflags]This indicates that binaries produced when building the recipe have not been linked with the
LDFLAGSoptions provided by the build system. Check to be sure that theLDFLAGSvariable is being passed to the linker command. A common workaround for this situation is to pass inLDFLAGSusingTARGET_CC_ARCHwithin the recipe as follows:TARGET_CC_ARCH += "${LDFLAGS}"
Package <packagename> contains Xorg driver (<driver>) but no xorg-abi- dependencies [xorg-driver-abi]The specified package contains an Xorg driver, but does not have a corresponding ABI package dependency. The xserver-xorg recipe provides driver ABI names. All drivers should depend on the ABI versions that they have been built against. Driver recipes that include
xorg-driver-input.incorxorg-driver-video.incwill automatically get these versions. Consequently, you should only need to explicitly add dependencies to binary driver recipes.
The /usr/share/info/dir file is not meant to be shipped in a particular package. [infodir]The
/usr/share/info/dirshould not be packaged. Add the following line to yourdo_installtask or to yourdo_install_appendwithin the recipe as follows:rm ${D}${infodir}/dir
Symlink <path> in <packagename> points to TMPDIR [symlink-to-sysroot]The specified symlink points into
TMPDIRon the host. Such symlinks will work on the host. However, they are clearly invalid when running on the target. You should either correct the symlink to use a relative path or remove the symlink.
<file> failed sanity test (workdir) in path <path> [la]The specified
.lafile containsTMPDIRpaths. Any.lafile containing these paths is incorrect sincelibtooladds the correct sysroot prefix when using the files automatically itself.
<packagename> rdepends on <debug_packagename> [debug-deps]A dependency exists between the specified non-dbg package (i.e. a package whose name does not end in
-dbg) and a package that is adbgpackage. Thedbgpackages contain debug symbols and are brought in using several different methods:Using the
dbg-pkgsIMAGE_FEATURESvalue.Using
IMAGE_INSTALL.As a dependency of another
dbgpackage that was brought in using one of the above methods.
The dependency might have been automatically added because the
dbgpackage erroneously contains files that it should not contain (e.g. a non-symlink.sofile) or it might have been added manually (e.g. by adding toRDEPENDS).
<packagename> rdepends on <dev_packagename> [dev-deps]A dependency exists between the specified non-dev package (a package whose name does not end in
-dev) and a package that is adevpackage. Thedevpackages contain development headers and are usually brought in using several different methods:Using the
dev-pkgsIMAGE_FEATURESvalue.Using
IMAGE_INSTALL.As a dependency of another
devpackage that was brought in using one of the above methods.
The dependency might have been automatically added (because the
devpackage erroneously contains files that it should not have (e.g. a non-symlink.sofile) or it might have been added manually (e.g. by adding toRDEPENDS).
<var>_<packagename> is invalid: <comparison> (<value>) only comparisons <, =, >, <=, and >= are allowed [dep-cmp]If you are adding a versioned dependency relationship to one of the dependency variables (
RDEPENDS,RRECOMMENDS,RSUGGESTS,RPROVIDES,RREPLACES, orRCONFLICTS), you must only use the named comparison operators. Change the versioned dependency values you are adding to match those listed in the message.
<recipename>: The compile log indicates that host include and/or library paths were used. Please check the log '<logfile>' for more information. [compile-host-path]The log for the
do_compiletask indicates that paths on the host were searched for files, which is not appropriate when cross-compiling. Look for "is unsafe for cross-compilation" or "CROSS COMPILE Badness" in the specified log file.
<recipename>: The install log indicates that host include and/or library paths were used. Please check the log '<logfile>' for more information. [install-host-path]The log for the
do_installtask indicates that paths on the host were searched for files, which is not appropriate when cross-compiling. Look for "is unsafe for cross-compilation" or "CROSS COMPILE Badness" in the specified log file.
This autoconf log indicates errors, it looked at host include and/or library paths while determining system capabilities. Rerun configure task after fixing this. The path was '<path>'The log for the
do_configuretask indicates that paths on the host were searched for files, which is not appropriate when cross-compiling. Look for "is unsafe for cross-compilation" or "CROSS COMPILE Badness" in the specified log file.
<packagename> doesn't match the [a-z0-9.+-]+ regex [pkgname]The convention within the OpenEmbedded build system (sometimes enforced by the package manager itself) is to require that package names are all lower case and to allow a restricted set of characters. If your recipe name does not match this, or you add packages to
PACKAGESthat do not conform to the convention, then you will receive this error. Rename your recipe. Or, if you have added a non-conforming package name toPACKAGES, change the package name appropriately.
<recipe>: configure was passed unrecognized options: <options> [unknown-configure-option]The configure script is reporting that the specified options are unrecognized. This situation could be because the options were previously valid but have been removed from the configure script. Or, there was a mistake when the options were added and there is another option that should be used instead. If you are unsure, consult the upstream build documentation, the
./configure --helpoutput, and the upstream change log or release notes. Once you have worked out what the appropriate change is, you can updateEXTRA_OECONFor the individualPACKAGECONFIGoption values accordingly.
Recipe <recipefile> has PN of "<recipename>" which is in OVERRIDES, this can result in unexpected behavior. [pn-overrides]The specified recipe has a name (
PN) value that appears inOVERRIDES. If a recipe is named such that itsPNvalue matches something already inOVERRIDES(e.g.PNhappens to be the same asMACHINEorDISTRO), it can have unexpected consequences. For example, assignments such asFILES_${PN} = "xyz"effectively turn intoFILES = "xyz". Rename your recipe (or ifPNis being set explicitly, change thePNvalue) so that the conflict does not occur. SeeFILESfor additional information.
<recipefile>: Variable <variable> is set as not being package specific, please fix this. [pkgvarcheck]Certain variables (
RDEPENDS,RRECOMMENDS,RSUGGESTS,RCONFLICTS,RPROVIDES,RREPLACES,FILES,pkg_preinst,pkg_postinst,pkg_prerm,pkg_postrm, andALLOW_EMPTY) should always be set specific to a package (i.e. they should be set with a package name override such asRDEPENDS_${PN} = "value"rather thanRDEPENDS = "value"). If you receive this error, correct any assignments to these variables within your recipe.
File '<file>' from <recipename> was already stripped, this will prevent future debugging! [already-stripped]Produced binaries have already been stripped prior to the build system extracting debug symbols. It is common for upstream software projects to default to stripping debug symbols for output binaries. In order for debugging to work on the target using
-dbgpackages, this stripping must be disabled.Depending on the build system used by the software being built, disabling this stripping could be as easy as specifying an additional configure option. If not, disabling stripping might involve patching the build scripts. In the latter case, look for references to "strip" or "STRIP", or the "-s" or "-S" command-line options being specified on the linker command line (possibly through the compiler command line if preceded with "-Wl,").
Note
Disabling stripping here does not mean that the final packaged binaries will be unstripped. Once the OpenEmbedded build system splits out debug symbols to the-dbgpackage, it will then strip the symbols from the binaries.
<packagename> is listed in PACKAGES multiple times, this leads to packaging errors. [packages-list]Package names must appear only once in the
PACKAGESvariable. You might receive this error if you are attempting to add a package toPACKAGESthat is already in the variable's value.
FILES variable for package <packagename> contains '//' which is invalid. Attempting to fix this but you should correct the metadata. [files-invalid]The string "//" is invalid in a Unix path. Correct all occurrences where this string appears in a
FILESvariable so that there is only a single "/".
<recipename>: Files/directories were installed but not shipped [installed-vs-shipped]Files have been installed within the
do_installtask but have not been included in any package by way of theFILESvariable. Files that do not appear in any package cannot be present in an image later on in the build process. You need to do one of the following:Add the files to
FILESfor the package you want them to appear in (e.g.FILES_${PN}for the main package).Delete the files at the end of the
do_installtask if the files are not needed in any package.
<oldpackage>-<oldpkgversion> was registered as shlib provider for <library>, changing it to <newpackage>-<newpkgversion> because it was built laterThis message means that both
<oldpackage>and<newpackage>provide the specified shared library. You can expect this message when a recipe has been renamed. However, if that is not the case, the message might indicate that a private version of a library is being erroneously picked up as the provider for a common library. If that is the case, you should add the library's.sofile name toPRIVATE_LIBSin the recipe that provides the private version of the library.
26.3. Configuring and Disabling QA Checks
You can configure the QA checks globally so that specific check
failures either raise a warning or an error message, using the
WARN_QA and
ERROR_QA
variables, respectively.
You can also disable checks within a particular recipe using
INSANE_SKIP.
For information on how to work with the QA checks, see the
"insane.bbclass"
section.
Tip
Please keep in mind that the QA checks exist in order to detect real or potential problems in the packaged output. So exercise caution when disabling these checks.
Chapter 27. Images
The OpenEmbedded build system provides several example
images to satisfy different needs.
When you issue the bitbake command you provide a “top-level” recipe
that essentially begins the build for the type of image you want.
Note
Building an image without GNU General Public License Version 3 (GPLv3), GNU Lesser General Public License Version 3 (LGPLv3), and the GNU Affero General Public License Version 3 (AGPL-3.0) components is only supported for minimal and base images. Furthermore, if you are going to build an image using non-GPLv3 and similarly licensed components, you must make the following changes in thelocal.conf file before using the BitBake
command to build the minimal or base image:
1. Comment out the EXTRA_IMAGE_FEATURES line
2. Set INCOMPATIBLE_LICENSE = "GPL-3.0 LGPL-3.0 AGPL-3.0"
From within the poky Git repository, you can use
the following command to display the list of directories within the
Source Directory
that containe image recipe files:
$ ls meta*/recipes*/images/*.bb
Following is a list of supported recipes:
build-appliance-image: An example virtual machine that contains all the pieces required to run builds using the build system as well as the build system itself. You can boot and run the image using either the VMware Player or VMware Workstation. For more information on this image, see the Build Appliance page on the Yocto Project website.core-image-base: A console-only image that fully supports the target device hardware.core-image-clutter: An image with support for the Open GL-based toolkit Clutter, which enables development of rich and animated graphical user interfaces.core-image-directfb: An image that usesdirectfbinstead of X11.core-image-full-cmdline: A console-only image with more full-featured Linux system functionality installed.core-image-lsb: An image that conforms to the Linux Standard Base (LSB) specification. This image requires a distribution configuration that enables LSB compliance (e.g.poky-lsb). If you buildcore-image-lsbwithout that configuration, the image will not be LSB-compliant.core-image-lsb-dev: Acore-image-lsbimage that is suitable for development work using the host. The image includes headers and libraries you can use in a host development environment. This image requires a distribution configuration that enables LSB compliance (e.g.poky-lsb). If you buildcore-image-lsb-devwithout that configuration, the image will not be LSB-compliant.core-image-lsb-sdk: Acore-image-lsbthat includes everything in the cross-toolchain but also includes development headers and libraries to form a complete standalone SDK. This image requires a distribution configuration that enables LSB compliance (e.g.poky-lsb). If you buildcore-image-lsb-sdkwithout that configuration, the image will not be LSB-compliant. This image is suitable for development using the target.core-image-minimal: A small image just capable of allowing a device to boot.core-image-minimal-dev: Acore-image-minimalimage suitable for development work using the host. The image includes headers and libraries you can use in a host development environment.core-image-minimal-initramfs: Acore-image-minimalimage that has the Minimal RAM-based Initial Root Filesystem (initramfs) as part of the kernel, which allows the system to find the first “init” program more efficiently. See thePACKAGE_INSTALLvariable for additional information helpful when working with initramfs images.core-image-minimal-mtdutils: Acore-image-minimalimage that has support for the Minimal MTD Utilities, which let the user interact with the MTD subsystem in the kernel to perform operations on flash devices.core-image-rt: Acore-image-minimalimage plus a real-time test suite and tools appropriate for real-time use.core-image-rt-sdk: Acore-image-rtimage that includes everything in the cross-toolchain. The image also includes development headers and libraries to form a complete stand-alone SDK and is suitable for development using the target.core-image-sato: An image with Sato support, a mobile environment and visual style that works well with mobile devices. The image supports X11 with a Sato theme and applications such as a terminal, editor, file manager, media player, and so forth.core-image-sato-dev: Acore-image-satoimage suitable for development using the host. The image includes libraries needed to build applications on the device itself, testing and profiling tools, and debug symbols. This image was formerlycore-image-sdk.core-image-sato-sdk: Acore-image-satoimage that includes everything in the cross-toolchain. The image also includes development headers and libraries to form a complete standalone SDK and is suitable for development using the target.core-image-testmaster: A "master" image designed to be used for automated runtime testing. Provides a "known good" image that is deployed to a separate partition so that you can boot into it and use it to deploy a second image to be tested. You can find more information about runtime testing in the "Performing Automated Runtime Testing" section in the Yocto Project Development Manual.core-image-testmaster-initramfs: A RAM-based Initial Root Filesystem (initramfs) image tailored for use with thecore-image-testmasterimage.core-image-weston: A very basic Wayland image with a terminal. This image provides the Wayland protocol libraries and the reference Weston compositor. For more information, see the "Wayland" section.core-image-x11: A very basic X11 image with a terminal.
Chapter 28. Features
This chapter provides a reference of shipped machine and distro features you can include as part of your image, a reference on image features you can select, and a reference on feature backfilling.
Features provide a mechanism for working out which packages
should be included in the generated images.
Distributions can select which features they want to support through the
DISTRO_FEATURES
variable, which is set or appended to in a distribution's configuration file such as
poky.conf,
poky-tiny.conf,
poky-lsb.conf and so forth.
Machine features are set in the
MACHINE_FEATURES
variable, which is set in the machine configuration file and
specifies the hardware features for a given machine.
These two variables combine to work out which kernel modules, utilities, and other packages to include. A given distribution can support a selected subset of features so some machine features might not be included if the distribution itself does not support them.
One method you can use to determine which recipes are checking to see if a
particular feature is contained or not is to grep through
the Metadata
for the feature.
Here is an example that discovers the recipes whose build is potentially
changed based on a given feature:
$ cd poky
$ git grep 'contains.*MACHINE_FEATURES.*feature'
28.1. Machine Features
The items below are features you can use with
MACHINE_FEATURES.
Features do not have a one-to-one correspondence to packages, and they can
go beyond simply controlling the installation of a package or packages.
Sometimes a feature can influence how certain recipes are built.
For example, a feature might determine whether a particular configure option
is specified within the
do_configure
task for a particular recipe.
This feature list only represents features as shipped with the Yocto Project metadata:
acpi: Hardware has ACPI (x86/x86_64 only)
alsa: Hardware has ALSA audio drivers
apm: Hardware uses APM (or APM emulation)
bluetooth: Hardware has integrated BT
efi: Support for booting through EFI
ext2: Hardware HDD or Microdrive
irda: Hardware has IrDA support
keyboard: Hardware has a keyboard
pcbios: Support for booting through BIOS
pci: Hardware has a PCI bus
pcmcia: Hardware has PCMCIA or CompactFlash sockets
phone: Mobile phone (voice) support
qvga: Machine has a QVGA (320x240) display
rtc: Machine has a Real-Time Clock
screen: Hardware has a screen
serial: Hardware has serial support (usually RS232)
touchscreen: Hardware has a touchscreen
usbgadget: Hardware is USB gadget device capable
usbhost: Hardware is USB Host capable
vfat: FAT file system support
wifi: Hardware has integrated WiFi
28.2. Distro Features
The items below are features you can use with
DISTRO_FEATURES
to enable features across your distribution.
Features do not have a one-to-one correspondence to packages,
and they can go beyond simply controlling the installation of a
package or packages.
In most cases, the presence or absence of a feature translates to
the appropriate option supplied to the configure script during the
do_configure
task for the recipes that optionally
support the feature.
Some distro features are also machine features.
These select features make sense to be controlled both at
the machine and distribution configuration level.
See the
COMBINED_FEATURES
variable for more information.
This list only represents features as shipped with the Yocto Project metadata:
alsa: Include ALSA support (OSS compatibility kernel modules installed if available).
bluetooth: Include bluetooth support (integrated BT only).
bluez5: Include BlueZ Version 5, which provides core Bluetooth layers and protocols support.
Note
The default value for theDISTRO FEATURESvariable includes "bluetooth", which causes bluez5 to be backfilled in for bluetooth support. If you do not want bluez5 backfilled and would rather use bluez4, you need to use theDISTRO_FEATURES_BACKFILL_CONSIDEREDvariable as follows:DISTRO_FEATURES_BACKFILL_CONSIDERED = "bluez5"Setting this variable tells the OpenEmbedded build system that you have considered but ruled out using the bluez5 feature and that bluez4 will be used.cramfs: Include CramFS support.
directfb: Include DirectFB support.
ext2: Include tools for supporting for devices with internal HDD/Microdrive for storing files (instead of Flash only devices).
ipsec: Include IPSec support.
ipv6: Include IPv6 support.
irda: Include IrDA support.
keyboard: Include keyboard support (e.g. keymaps will be loaded during boot).
nfs: Include NFS client support (for mounting NFS exports on device).
opengl: Include the Open Graphics Library, which is a cross-language, multi-platform application programming interface used for rendering two and three-dimensional graphics.
pci: Include PCI bus support.
pcmcia: Include PCMCIA/CompactFlash support.
ppp: Include PPP dialup support.
ptest: Enables building the package tests where supported by individual recipes. For more information on package tests, see the "Testing Packages With ptest" section in the Yocto Project Development Manual.
smbfs: Include SMB networks client support (for mounting Samba/Microsoft Windows shares on device).
systemd: Include support for this
initmanager, which is a full replacement of forinitwith parallel starting of services, reduced shell overhead, and other features. Thisinitmanager is used by many distributions.usbgadget: Include USB Gadget Device support (for USB networking/serial/storage).
usbhost: Include USB Host support (allows to connect external keyboard, mouse, storage, network etc).
wayland: Include the Wayland display server protocol and the library that supports it.
wifi: Include WiFi support (integrated only).
x11: Include the X server and libraries.
28.3. Image Features
The contents of images generated by the OpenEmbedded build system
can be controlled by the
IMAGE_FEATURES
and
EXTRA_IMAGE_FEATURES
variables that you typically configure in your image recipes.
Through these variables, you can add several different
predefined packages such as development utilities or packages with
debug information needed to investigate application problems or
profile applications.
The following image features are available for all images:
allow-empty-password: Allows Dropbear and OpenSSH to accept root logins and logins from accounts having an empty password string.
dbg-pkgs: Installs debug symbol packages for all packages installed in a given image.
debug-tweaks: Makes an image suitable for development (e.g. allows root logins without passwords and enables post-installation logging). See the 'allow-empty-password', 'empty-root-password', and 'post-install-logging' features in this list for additional information.
dev-pkgs: Installs development packages (headers and extra library links) for all packages installed in a given image.
doc-pkgs: Installs documentation packages for all packages installed in a given image.
empty-root-password: Sets the root password to an empty string, which allows logins with a blank password.
package-management: Installs package management tools and preserves the package manager database.
post-install-logging: Enables logging postinstall script runs to the
/var/log/postinstall.logfile on first boot of the image on the target system.ptest-pkgs: Installs ptest packages for all ptest-enabled recipes.
read-only-rootfs: Creates an image whose root filesystem is read-only. See the "Creating a Read-Only Root Filesystem" section in the Yocto Project Development Manual for more information.
splash: Enables showing a splash screen during boot. By default, this screen is provided by
psplash, which does allow customization. If you prefer to use an alternative splash screen package, you can do so by setting theSPLASHvariable to a different package name (or names) within the image recipe or at the distro configuration level.staticdev-pkgs: Installs static development packages, which are static libraries (i.e.
*.afiles), for all packages installed in a given image.
Some image features are available only when you inherit the
core-image
class.
The current list of these valid features is as follows:
eclipse-debug: Provides Eclipse remote debugging support.
hwcodecs: Installs hardware acceleration codecs.
nfs-server: Installs an NFS server.
perf: Installs profiling tools such as
perf,systemtap, andLTTng. For general information on user-space tools, see the Yocto Project Software Development Kit (SDK) Developer's Guide.ssh-server-dropbear: Installs the Dropbear minimal SSH server.
ssh-server-openssh: Installs the OpenSSH SSH server, which is more full-featured than Dropbear. Note that if both the OpenSSH SSH server and the Dropbear minimal SSH server are present in
IMAGE_FEATURES, then OpenSSH will take precedence and Dropbear will not be installed.tools-debug: Installs debugging tools such as
straceandgdb. For information on GDB, see the "Debugging With the GNU Project Debugger (GDB) Remotely" section in the Yocto Project Development Manual. For information on tracing and profiling, see the Yocto Project Profiling and Tracing Manual.tools-sdk: Installs a full SDK that runs on the device.
tools-testapps: Installs device testing tools (e.g. touchscreen debugging).
x11: Installs the X server.
x11-base: Installs the X server with a minimal environment.
x11-sato: Installs the OpenedHand Sato environment.
28.4. Feature Backfilling
Sometimes it is necessary in the OpenEmbedded build system to extend
MACHINE_FEATURES
or DISTRO_FEATURES
to control functionality that was previously enabled and not able
to be disabled.
For these cases, we need to add an
additional feature item to appear in one of these variables,
but we do not want to force developers who have existing values
of the variables in their configuration to add the new feature
in order to retain the same overall level of functionality.
Thus, the OpenEmbedded build system has a mechanism to
automatically "backfill" these added features into existing
distro or machine configurations.
You can see the list of features for which this is done by
finding the
DISTRO_FEATURES_BACKFILL
and MACHINE_FEATURES_BACKFILL
variables in the meta/conf/bitbake.conf file.
Because such features are backfilled by default into all
configurations as described in the previous paragraph, developers
who wish to disable the new features need to be able to selectively
prevent the backfilling from occurring.
They can do this by adding the undesired feature or features to the
DISTRO_FEATURES_BACKFILL_CONSIDERED
or MACHINE_FEATURES_BACKFILL_CONSIDERED
variables for distro features and machine features respectively.
Here are two examples to help illustrate feature backfilling:
The "pulseaudio" distro feature option: Previously, PulseAudio support was enabled within the Qt and GStreamer frameworks. Because of this, the feature is backfilled and thus enabled for all distros through the
DISTRO_FEATURES_BACKFILLvariable in themeta/conf/bitbake.conffile. However, your distro needs to disable the feature. You can disable the feature without affecting other existing distro configurations that need PulseAudio support by adding "pulseaudio" toDISTRO_FEATURES_BACKFILL_CONSIDEREDin your distro's.conffile. Adding the feature to this variable when it also exists in theDISTRO_FEATURES_BACKFILLvariable prevents the build system from adding the feature to your configuration'sDISTRO_FEATURES, effectively disabling the feature for that particular distro.The "rtc" machine feature option: Previously, real time clock (RTC) support was enabled for all target devices. Because of this, the feature is backfilled and thus enabled for all machines through the
MACHINE_FEATURES_BACKFILLvariable in themeta/conf/bitbake.conffile. However, your target device does not have this capability. You can disable RTC support for your device without affecting other machines that need RTC support by adding the feature to your machine'sMACHINE_FEATURES_BACKFILL_CONSIDEREDlist in the machine's.conffile. Adding the feature to this variable when it also exists in theMACHINE_FEATURES_BACKFILLvariable prevents the build system from adding the feature to your configuration'sMACHINE_FEATURES, effectively disabling RTC support for that particular machine.
Chapter 29. Variables Glossary
This chapter lists common variables used in the OpenEmbedded build system and gives an overview of their function and contents.
Glossary
A B C D E F G H I K L M O P R S T U W X
A
- ABIEXTENSION
Extension to the Application Binary Interface (ABI) field of the GNU canonical architecture name (e.g. "eabi").
ABI extensions are set in the machine include files. For example, the
meta/conf/machine/include/arm/arch-arm.incfile sets the following extension:ABIEXTENSION = "eabi"- ALLOW_EMPTY
Specifies if an output package should still be produced if it is empty. By default, BitBake does not produce empty packages. This default behavior can cause issues when there is an
RDEPENDSor some other hard runtime requirement on the existence of the package.Like all package-controlling variables, you must always use them in conjunction with a package name override, as in:
ALLOW_EMPTY_${PN} = "1" ALLOW_EMPTY_${PN}-dev = "1" ALLOW_EMPTY_${PN}-staticdev = "1"- ALTERNATIVE
Lists commands in a package that need an alternative binary naming scheme. Sometimes the same command is provided in multiple packages. When this occurs, the OpenEmbedded build system needs to use the alternatives system to create a different binary naming scheme so the commands can co-exist.
To use the variable, list out the package's commands that also exist as part of another package. For example, if the
busyboxpackage has four commands that also exist as part of another package, you identify them as follows:ALTERNATIVE_busybox = "sh sed test bracket"For more information on the alternatives system, see the "
update-alternatives.bbclass" section.- ALTERNATIVE_LINK_NAME
Used by the alternatives system to map duplicated commands to actual locations. For example, if the
bracketcommand provided by thebusyboxpackage is duplicated through another package, you must use theALTERNATIVE_LINK_NAMEvariable to specify the actual location:ALTERNATIVE_LINK_NAME[bracket] = "/usr/bin/["In this example, the binary for the
bracketcommand (i.e.[) from thebusyboxpackage resides in/usr/bin/.Note
IfALTERNATIVE_LINK_NAMEis not defined, it defaults to${bindir}/.nameFor more information on the alternatives system, see the "
update-alternatives.bbclass" section.- ALTERNATIVE_PRIORITY
Used by the alternatives system to create default priorities for duplicated commands. You can use the variable to create a single default regardless of the command name or package, a default for specific duplicated commands regardless of the package, or a default for specific commands tied to particular packages. Here are the available syntax forms:
ALTERNATIVE_PRIORITY = "priority" ALTERNATIVE_PRIORITY[name] = "priority" ALTERNATIVE_PRIORITY_pkg[name] = "priority"For more information on the alternatives system, see the "
update-alternatives.bbclass" section.- ALTERNATIVE_TARGET
Used by the alternatives system to create default link locations for duplicated commands. You can use the variable to create a single default location for all duplicated commands regardless of the command name or package, a default for specific duplicated commands regardless of the package, or a default for specific commands tied to particular packages. Here are the available syntax forms:
ALTERNATIVE_TARGET = "target" ALTERNATIVE_TARGET[name] = "target" ALTERNATIVE_TARGET_pkg[name] = "target"Note
If
ALTERNATIVE_TARGETis not defined, it inherits the value from theALTERNATIVE_LINK_NAMEvariable.If
ALTERNATIVE_LINK_NAMEandALTERNATIVE_TARGETare the same, the target forALTERNATIVE_TARGEThas ".{BPN}" appended to it.Finally, if the file referenced has not been renamed, the alternatives system will rename it to avoid the need to rename alternative files in the
do_installtask while retaining support for the command if necessary.For more information on the alternatives system, see the "
update-alternatives.bbclass" section.- APPEND
An override list of append strings for each
LABEL.See the
grub-eficlass for more information on how this variable is used.- AR
The minimal command and arguments used to run
ar.- ARCHIVER_MODE
When used with the
archiverclass, determines the type of information used to create a released archive. You can use this variable to create archives of patched source, original source, configured source, and so forth by employing the following variable flags (varflags):ARCHIVER_MODE[src] = "original" # Uses original (unpacked) source # files. ARCHIVER_MODE[src] = "patched" # Uses patched source files. This is # the default. ARCHIVER_MODE[src] = "configured" # Uses configured source files. ARCHIVER_MODE[diff] = "1" # Uses patches between do_unpack and # do_patch. ARCHIVER_MODE[diff-exclude] ?= "filefile..." # Lists files and directories to # exclude from diff. ARCHIVER_MODE[dumpdata] = "1" # Uses environment data. ARCHIVER_MODE[recipe] = "1" # Uses recipe and include files. ARCHIVER_MODE[srpm] = "1" # Uses RPM package files.For information on how the variable works, see the
meta/classes/archiver.bbclassfile in the Source Directory.- AS
The minimal command and arguments used to run the assembler.
- ASSUME_PROVIDED
Lists recipe names (
PNvalues) BitBake does not attempt to build. Instead, BitBake assumes these recipes have already been built.In OpenEmbedded Core,
ASSUME_PROVIDEDmostly specifies native tools that should not be built. An example isgit-native, which when specified, allows for the Git binary from the host to be used rather than buildinggit-native.- ASSUME_SHLIBS
Provides additional
shlibsprovider mapping information, which adds to or overwrites the information provided automatically by the system. Separate multiple entries using spaces.As an example, use the following form to add an
shlibprovider ofshlibnameinpackagenamewith the optionalversion:shlibname:packagename[_version]Here is an example that adds a shared library named
libEGL.so.1as being provided by thelibegl-implementationpackage:ASSUME_SHLIBS = "libEGL.so.1:libegl-implementation"- AUTHOR
The email address used to contact the original author or authors in order to send patches and forward bugs.
- AUTO_LIBNAME_PKGS
When the
debianclass is inherited, which is the default behavior,AUTO_LIBNAME_PKGSspecifies which packages should be checked for libraries and renamed according to Debian library package naming.The default value is "${PACKAGES}", which causes the debian class to act on all packages that are explicitly generated by the recipe.
- AUTO_SYSLINUXMENU
Enables creating an automatic menu for the syslinux bootloader. You must set this variable in your recipe. The
syslinuxclass checks this variable.- AUTOREV
When
SRCREVis set to the value of this variable, it specifies to use the latest source revision in the repository. Here is an example:SRCREV = "${AUTOREV}"If you use the previous statement to retrieve the latest version of software, you need to be sure
PVcontains${SRCPV}. For example, suppose you have a kernel recipe that inherits the kernel class and you use the previous statement. In this example,${SRCPV}does not automatically get intoPV. Consequently, you need to changePVin your recipe so that it does contain${SRCPV}.- AVAILTUNES
The list of defined CPU and Application Binary Interface (ABI) tunings (i.e. "tunes") available for use by the OpenEmbedded build system.
The list simply presents the tunes that are available. Not all tunes may be compatible with a particular machine configuration, or with each other in a Multilib configuration.
To add a tune to the list, be sure to append it with spaces using the "+=" BitBake operator. Do not simply replace the list by using the "=" operator. See the "Basic Syntax" section in the BitBake User Manual for more information.
B
- B
The directory within the Build Directory in which the OpenEmbedded build system places generated objects during a recipe's build process. By default, this directory is the same as the
Sdirectory, which is defined as:S = "${WORKDIR}/${BP}/"You can separate the (
S) directory and the directory pointed to by theBvariable. Most Autotools-based recipes support separating these directories. The build system defaults to using separate directories forgccand some kernel recipes.- BAD_RECOMMENDATIONS
Lists "recommended-only" packages to not install. Recommended-only packages are packages installed only through the
RRECOMMENDSvariable. You can prevent any of these "recommended" packages from being installed by listing them with theBAD_RECOMMENDATIONSvariable:BAD_RECOMMENDATIONS = "package_namepackage_namepackage_name..."You can set this variable globally in your
local.conffile or you can attach it to a specific image recipe by using the recipe name override:BAD_RECOMMENDATIONS_pn-target_image= "package_name"It is important to realize that if you choose to not install packages using this variable and some other packages are dependent on them (i.e. listed in a recipe's
RDEPENDSvariable), the OpenEmbedded build system ignores your request and will install the packages to avoid dependency errors.Support for this variable exists only when using the IPK and RPM packaging backend. Support does not exist for DEB.
See the
NO_RECOMMENDATIONSand thePACKAGE_EXCLUDEvariables for related information.- BASE_LIB
The library directory name for the CPU or Application Binary Interface (ABI) tune. The
BASE_LIBapplies only in the Multilib context. See the "Combining Multiple Versions of Library Files into One Image" section in the Yocto Project Development Manual for information on Multilib.The
BASE_LIBvariable is defined in the machine include files in the Source Directory. If Multilib is not being used, the value defaults to "lib".- BASE_WORKDIR
Points to the base of the work directory for all recipes. The default value is "${TMPDIR}/work".
- BB_ALLOWED_NETWORKS
Specifies a space-delimited list of hosts that the fetcher is allowed to use to obtain the required source code. Following are considerations surrounding this variable:
This host list is only used if
BB_NO_NETWORKis either not set or set to "0".Limited support for wildcard matching against the beginning of host names exists. For example, the following setting matches
git.gnu.org,ftp.gnu.org, andfoo.git.gnu.org.BB_ALLOWED_NETWORKS = "*.gnu.org"Mirrors not in the host list are skipped and logged in debug.
Attempts to access networks not in the host list cause a failure.
Using
BB_ALLOWED_NETWORKSin conjunction withPREMIRRORSis very useful. Adding the host you want to use toPREMIRRORSresults in the source code being fetched from an allowed location and avoids raising an error when a host that is not allowed is in aSRC_URIstatement. This is because the fetcher does not attempt to use the host listed inSRC_URIafter a successful fetch from thePREMIRRORSoccurs.- BB_DANGLINGAPPENDS_WARNONLY
Defines how BitBake handles situations where an append file (
.bbappend) has no corresponding recipe file (.bb). This condition often occurs when layers get out of sync (e.g.oe-corebumps a recipe version and the old recipe no longer exists and the other layer has not been updated to the new version of the recipe yet).The default fatal behavior is safest because it is the sane reaction given something is out of sync. It is important to realize when your changes are no longer being applied.
You can change the default behavior by setting this variable to "1", "yes", or "true" in your
local.conffile, which is located in the Build Directory: Here is an example:BB_DANGLINGAPPENDS_WARNONLY = "1"- BB_DISKMON_DIRS
Monitors disk space and available inodes during the build and allows you to control the build based on these parameters.
Disk space monitoring is disabled by default. To enable monitoring, add the
BB_DISKMON_DIRSvariable to yourconf/local.conffile found in the Build Directory. Use the following form:BB_DISKMON_DIRS = "action,dir,threshold[...]" where:actionis: ABORT: Immediately abort the build when a threshold is broken. STOPTASKS: Stop the build after the currently executing tasks have finished when a threshold is broken. WARN: Issue a warning but continue the build when a threshold is broken. Subsequent warnings are issued as defined by the BB_DISKMON_WARNINTERVAL variable, which must be defined in the conf/local.conf file.diris: Any directory you choose. You can specify one or more directories to monitor by separating the groupings with a space. If two directories are on the same device, only the first directory is monitored.thresholdis: Either the minimum available disk space, the minimum number of free inodes, or both. You must specify at least one. To omit one or the other, simply omit the value. Specify the threshold using G, M, K for Gbytes, Mbytes, and Kbytes, respectively. If you do not specify G, M, or K, Kbytes is assumed by default. Do not use GB, MB, or KB.Here are some examples:
BB_DISKMON_DIRS = "ABORT,${TMPDIR},1G,100K WARN,${SSTATE_DIR},1G,100K" BB_DISKMON_DIRS = "STOPTASKS,${TMPDIR},1G" BB_DISKMON_DIRS = "ABORT,${TMPDIR},,100K"The first example works only if you also provide the
BB_DISKMON_WARNINTERVALvariable in theconf/local.conf. This example causes the build system to immediately abort when either the disk space in${TMPDIR}drops below 1 Gbyte or the available free inodes drops below 100 Kbytes. Because two directories are provided with the variable, the build system also issue a warning when the disk space in the${SSTATE_DIR}directory drops below 1 Gbyte or the number of free inodes drops below 100 Kbytes. Subsequent warnings are issued during intervals as defined by theBB_DISKMON_WARNINTERVALvariable.The second example stops the build after all currently executing tasks complete when the minimum disk space in the
${TMPDIR}directory drops below 1 Gbyte. No disk monitoring occurs for the free inodes in this case.The final example immediately aborts the build when the number of free inodes in the
${TMPDIR}directory drops below 100 Kbytes. No disk space monitoring for the directory itself occurs in this case.- BB_DISKMON_WARNINTERVAL
Defines the disk space and free inode warning intervals. To set these intervals, define the variable in your
conf/local.conffile in the Build Directory.If you are going to use the
BB_DISKMON_WARNINTERVALvariable, you must also use theBB_DISKMON_DIRSvariable and define its action as "WARN". During the build, subsequent warnings are issued each time disk space or number of free inodes further reduces by the respective interval.If you do not provide a
BB_DISKMON_WARNINTERVALvariable and you do useBB_DISKMON_DIRSwith the "WARN" action, the disk monitoring interval defaults to the following:BB_DISKMON_WARNINTERVAL = "50M,5K"When specifying the variable in your configuration file, use the following form:
BB_DISKMON_WARNINTERVAL = "disk_space_interval,disk_inode_interval" where:disk_space_intervalis: An interval of memory expressed in either G, M, or K for Gbytes, Mbytes, or Kbytes, respectively. You cannot use GB, MB, or KB.disk_inode_intervalis: An interval of free inodes expressed in either G, M, or K for Gbytes, Mbytes, or Kbytes, respectively. You cannot use GB, MB, or KB.Here is an example:
BB_DISKMON_DIRS = "WARN,${SSTATE_DIR},1G,100K" BB_DISKMON_WARNINTERVAL = "50M,5K"These variables cause the OpenEmbedded build system to issue subsequent warnings each time the available disk space further reduces by 50 Mbytes or the number of free inodes further reduces by 5 Kbytes in the
${SSTATE_DIR}directory. Subsequent warnings based on the interval occur each time a respective interval is reached beyond the initial warning (i.e. 1 Gbytes and 100 Kbytes).- BB_GENERATE_MIRROR_TARBALLS
Causes tarballs of the Git repositories, including the Git metadata, to be placed in the
DL_DIRdirectory.For performance reasons, creating and placing tarballs of the Git repositories is not the default action by the OpenEmbedded build system.
BB_GENERATE_MIRROR_TARBALLS = "1"Set this variable in your
local.conffile in the Build Directory.- BB_NUMBER_THREADS
The maximum number of tasks BitBake should run in parallel at any one time. The OpenEmbedded build system automatically configures this variable to be equal to the number of cores on the build system. For example, a system with a dual core processor that also uses hyper-threading causes the
BB_NUMBER_THREADSvariable to default to "4".For single socket systems (i.e. one CPU), you should not have to override this variable to gain optimal parallelism during builds. However, if you have very large systems that employ multiple physical CPUs, you might want to make sure the
BB_NUMBER_THREADSvariable is not set higher than "20".For more information on speeding up builds, see the "Speeding Up the Build" section.
- BBCLASSEXTEND
Allows you to extend a recipe so that it builds variants of the software. Common variants for recipes exist such as "natives" like
quilt-native, which is a copy of Quilt built to run on the build system; "crosses" such asgcc-cross, which is a compiler built to run on the build machine but produces binaries that run on the targetMACHINE; "nativesdk", which targets the SDK machine instead ofMACHINE; and "mulitlibs" in the form "multilib:multilib_name".To build a different variant of the recipe with a minimal amount of code, it usually is as simple as adding the following to your recipe:
BBCLASSEXTEND =+ "native nativesdk" BBCLASSEXTEND =+ "multilib:multilib_name"- BBFILE_COLLECTIONS
Lists the names of configured layers. These names are used to find the other
BBFILE_*variables. Typically, each layer will append its name to this variable in itsconf/layer.conffile.- BBFILE_PATTERN
Variable that expands to match files from
BBFILESin a particular layer. This variable is used in theconf/layer.conffile and must be suffixed with the name of the specific layer (e.g.BBFILE_PATTERN_emenlow).- BBFILE_PRIORITY
Assigns the priority for recipe files in each layer.
This variable is useful in situations where the same recipe appears in more than one layer. Setting this variable allows you to prioritize a layer against other layers that contain the same recipe - effectively letting you control the precedence for the multiple layers. The precedence established through this variable stands regardless of a recipe's version (
PVvariable). For example, a layer that has a recipe with a higherPVvalue but for which theBBFILE_PRIORITYis set to have a lower precedence still has a lower precedence.A larger value for the
BBFILE_PRIORITYvariable results in a higher precedence. For example, the value 6 has a higher precedence than the value 5. If not specified, theBBFILE_PRIORITYvariable is set based on layer dependencies (see theLAYERDEPENDSvariable for more information. The default priority, if unspecified for a layer with no dependencies, is the lowest defined priority + 1 (or 1 if no priorities are defined).Tip
You can use the commandbitbake-layers show-layersto list all configured layers along with their priorities.- BBFILES
List of recipe files used by BitBake to build software.
- BBINCLUDELOGS
Variable that controls how BitBake displays logs on build failure.
- BBINCLUDELOGS_LINES
If
BBINCLUDELOGSis set, specifies the maximum number of lines from the task log file to print when reporting a failed task. If you do not setBBINCLUDELOGS_LINES, the entire log is printed.- BBLAYERS
Lists the layers to enable during the build. This variable is defined in the
bblayers.confconfiguration file in the Build Directory. Here is an example:BBLAYERS = " \ /home/scottrif/poky/meta \ /home/scottrif/poky/meta-poky \ /home/scottrif/poky/meta-yocto-bsp \ /home/scottrif/poky/meta-mykernel \ "This example enables four layers, one of which is a custom, user-defined layer named
meta-mykernel.- BBMASK
Prevents BitBake from processing recipes and recipe append files.
You can use the
BBMASKvariable to "hide" these.bband.bbappendfiles. BitBake ignores any recipe or recipe append files that match any of the expressions. It is as if BitBake does not see them at all. Consequently, matching files are not parsed or otherwise used by BitBake.The values you provide are passed to Python's regular expression compiler. The expressions are compared against the full paths to the files. For complete syntax information, see Python's documentation at http://docs.python.org/release/2.3/lib/re-syntax.html.
The following example uses a complete regular expression to tell BitBake to ignore all recipe and recipe append files in the
meta-ti/recipes-misc/directory:BBMASK = "meta-ti/recipes-misc/"If you want to mask out multiple directories or recipes, you can specify multiple regular expression fragments. This next example masks out multiple directories and individual recipes:
BBMASK += "/meta-ti/recipes-misc/ meta-ti/recipes-ti/packagegroup/" BBMASK += "/meta-oe/recipes-support/" BBMASK += "/meta-foo/.*/openldap" BBMASK += "opencv.*\.bbappend" BBMASK += "lzma"Note
When specifying a directory name, use the trailing slash character to ensure you match just that directory name.- BBPATH
Used by BitBake to locate
.bbclassand configuration files. This variable is analogous to thePATHvariable.Note
If you run BitBake from a directory outside of the Build Directory, you must be sure to setBBPATHto point to the Build Directory. Set the variable as you would any environment variable and then run BitBake:$ BBPATH = "build_directory" $ export BBPATH $ bitbaketarget- BBSERVER
Points to the server that runs memory-resident BitBake. This variable is set by the
oe-init-build-env-memressetup script and should not be hand-edited. The variable is only used when you employ memory-resident BitBake. The setup script exports the value as follows:export BBSERVER=localhost:$portFor more information on how the
BBSERVERis used, see theoe-init-build-env-memresscript, which is located in the Source Directory.- BINCONFIG
When inheriting the
binconfig-disabledclass, this variable specifies binary configuration scripts to disable in favor of usingpkg-configto query the information. Thebinconfig-disabledclass will modify the specified scripts to return an error so that calls to them can be easily found and replaced.To add multiple scripts, separate them by spaces. Here is an example from the
libpngrecipe:BINCONFIG = "${bindir}/libpng-config ${bindir}/libpng16-config"- BINCONFIG_GLOB
When inheriting the
binconfigclass, this variable specifies a wildcard for configuration scripts that need editing. The scripts are edited to correct any paths that have been set up during compilation so that they are correct for use when installed into the sysroot and called by the build processes of other recipes.For more information on how this variable works, see
meta/classes/binconfig.bbclassin the Source Directory. You can also find general information on the class in the "binconfig.bbclass" section.- BP
The base recipe name and version but without any special recipe name suffix (i.e.
-native,lib64-, and so forth).BPis comprised of the following:${BPN}-${PV}- BPN
The bare name of the recipe. This variable is a version of the
PNvariable but removes common suffixes such as-nativeand-crossas well as removes common prefixes such as multilib'slib64-andlib32-. The exact list of suffixes removed is specified by theSPECIAL_PKGSUFFIXvariable. The exact list of prefixes removed is specified by theMLPREFIXvariable. Prefixes are removed formultilibandnativesdk-cases.- BUGTRACKER
Specifies a URL for an upstream bug tracking website for a recipe. The OpenEmbedded build system does not use this variable. Rather, the variable is a useful pointer in case a bug in the software being built needs to be manually reported.
- BUILD_ARCH
Specifies the architecture of the build host (e.g.
i686). The OpenEmbedded build system sets the value ofBUILD_ARCHfrom the machine name reported by theunamecommand.- BUILD_CFLAGS
Specifies the flags to pass to the C compiler when building for the build host. When building in the
-nativecontext,CFLAGSis set to the value of this variable by default.- BUILD_CPPFLAGS
Specifies the flags to pass to the C pre-processor (i.e. to both the C and the C++ compilers) when building for the build host. When building in the
-nativecontext,CPPFLAGSis set to the value of this variable by default.- BUILD_CXXFLAGS
Specifies the flags to pass to the C++ compiler when building for the build host. When building in the
-nativecontext,CXXFLAGSis set to the value of this variable by default.- BUILD_LDFLAGS
Specifies the flags to pass to the linker when building for the build host. When building in the
-nativecontext,LDFLAGSis set to the value of this variable by default.- BUILD_OPTIMIZATION
Specifies the optimization flags passed to the C compiler when building for the build host or the SDK. The flags are passed through the
BUILD_CFLAGSandBUILDSDK_CFLAGSdefault values.The default value of the
BUILD_OPTIMIZATIONvariable is "-O2 -pipe".- BUILD_OS
Specifies the operating system in use on the build host (e.g. "linux"). The OpenEmbedded build system sets the value of
BUILD_OSfrom the OS reported by theunamecommand - the first word, converted to lower-case characters.- BUILD_PREFIX
The toolchain binary prefix used for native recipes. The OpenEmbedded build system uses the
BUILD_PREFIXvalue to set theTARGET_PREFIXwhen building fornativerecipes.- BUILD_SYS
Specifies the system, including the architecture and the operating system, to use when building for the build host (i.e. when building
nativerecipes).The OpenEmbedded build system automatically sets this variable based on
BUILD_ARCH,BUILD_VENDOR, andBUILD_OS. You do not need to set theBUILD_SYSvariable yourself.- BUILD_VENDOR
Specifies the vendor name to use when building for the build host. The default value is an empty string ("").
- BUILDDIR
Points to the location of the Build Directory. You can define this directory indirectly through the
oe-init-build-envandoe-init-build-env-memresscripts by passing in a Build Directory path when you run the scripts. If you run the scripts and do not provide a Build Directory path, theBUILDDIRdefaults tobuildin the current directory.- BUILDHISTORY_COMMIT
When inheriting the
buildhistoryclass, this variable specifies whether or not to commit the build history output in a local Git repository. If set to "1", this local repository will be maintained automatically by thebuildhistoryclass and a commit will be created on every build for changes to each top-level subdirectory of the build history output (images, packages, and sdk). If you want to track changes to build history over time, you should set this value to "1".By default, the
buildhistoryclass does not commit the build history output in a local Git repository:BUILDHISTORY_COMMIT ?= "0"- BUILDHISTORY_COMMIT_AUTHOR
When inheriting the
buildhistoryclass, this variable specifies the author to use for each Git commit. In order for theBUILDHISTORY_COMMIT_AUTHORvariable to work, theBUILDHISTORY_COMMITvariable must be set to "1".Git requires that the value you provide for the
BUILDHISTORY_COMMIT_AUTHORvariable takes the form of "name <email@host>". Providing an email address or host that is not valid does not produce an error.By default, the
buildhistoryclass sets the variable as follows:BUILDHISTORY_COMMIT_AUTHOR ?= "buildhistory <buildhistory@${DISTRO}>"- BUILDHISTORY_DIR
When inheriting the
buildhistoryclass, this variable specifies the directory in which build history information is kept. For more information on how the variable works, see thebuildhistory.class.By default, the
buildhistoryclass sets the directory as follows:BUILDHISTORY_DIR ?= "${TOPDIR}/buildhistory"- BUILDHISTORY_FEATURES
When inheriting the
buildhistoryclass, this variable specifies the build history features to be enabled. For more information on how build history works, see the "Maintaining Build Output Quality" section.You can specify three features in the form of a space-separated list:
image: Analysis of the contents of images, which includes the list of installed packages among other things.
package: Analysis of the contents of individual packages.
sdk: Analysis of the contents of the software development kit (SDK).
By default, the
buildhistoryclass enables all three features:BUILDHISTORY_FEATURES ?= "image package sdk"- BUILDHISTORY_IMAGE_FILES
When inheriting the
buildhistoryclass, this variable specifies a list of paths to files copied from the image contents into the build history directory under an "image-files" directory in the directory for the image, so that you can track the contents of each file. The default is to copy/etc/passwdand/etc/group, which allows you to monitor for changes in user and group entries. You can modify the list to include any file. Specifying an invalid path does not produce an error. Consequently, you can include files that might not always be present.By default, the
buildhistoryclass provides paths to the following files:BUILDHISTORY_IMAGE_FILES ?= "/etc/passwd /etc/group"- BUILDHISTORY_PUSH_REPO
When inheriting the
buildhistoryclass, this variable optionally specifies a remote repository to which build history pushes Git changes. In order forBUILDHISTORY_PUSH_REPOto work,BUILDHISTORY_COMMITmust be set to "1".The repository should correspond to a remote address that specifies a repository as understood by Git, or alternatively to a remote name that you have set up manually using
git remotewithin the local repository.By default, the
buildhistoryclass sets the variable as follows:BUILDHISTORY_PUSH_REPO ?= ""- BUILDSDK_CFLAGS
Specifies the flags to pass to the C compiler when building for the SDK. When building in the
nativesdk-context,CFLAGSis set to the value of this variable by default.- BUILDSDK_CPPFLAGS
Specifies the flags to pass to the C pre-processor (i.e. to both the C and the C++ compilers) when building for the SDK. When building in the
nativesdk-context,CPPFLAGSis set to the value of this variable by default.- BUILDSDK_CXXFLAGS
Specifies the flags to pass to the C++ compiler when building for the SDK. When building in the
nativesdk-context,CXXFLAGSis set to the value of this variable by default.- BUILDSDK_LDFLAGS
Specifies the flags to pass to the linker when building for the SDK. When building in the
nativesdk-context,LDFLAGSis set to the value of this variable by default.- BUILDSTATS_BASE
Points to the location of the directory that holds build statistics when you use and enable the
buildstatsclass. TheBUILDSTATS_BASEdirectory defaults to${TMPDIR}/buildstats/.- BUSYBOX_SPLIT_SUID
For the BusyBox recipe, specifies whether to split the output executable file into two parts: one for features that require
setuid root, and one for the remaining features (i.e. those that do not requiresetuid root).The
BUSYBOX_SPLIT_SUIDvariable defaults to "1", which results in a single output executable file. Set the variable to "0" to split the output file.
C
- CACHE
Specifies the directory BitBake uses to store a cache of the Metadata so it does not need to be parsed every time BitBake is started.
- CC
The minimal command and arguments used to run the C compiler.
- CFLAGS
Specifies the flags to pass to the C compiler. This variable is exported to an environment variable and thus made visible to the software being built during the compilation step.
Default initialization for
CFLAGSvaries depending on what is being built:TARGET_CFLAGSwhen building for the targetBUILD_CFLAGSwhen building for the build host (i.e.-native)BUILDSDK_CFLAGSwhen building for an SDK (i.e.nativesdk-)
- CLASSOVERRIDE
An internal variable specifying the special class override that should currently apply (e.g. "class-target", "class-native", and so forth). The classes that use this variable set it to appropriate values.
You do not normally directly interact with this variable. The value for the
CLASSOVERRIDEvariable goes intoOVERRIDESand then can be used as an override. Here is an example where "python-native" is added toDEPENDSonly when building for the-nativecase:DEPENDS_append_class-native = " python-native"- CLEANBROKEN
If set to "1" within a recipe,
CLEANBROKENspecifies that themake cleancommand does not work for the software being built. Consequently, the OpenEmbedded build system will not try to runmake cleanduring thedo_configuretask, which is the default behavior.- COMBINED_FEATURES
Provides a list of hardware features that are enabled in both
MACHINE_FEATURESandDISTRO_FEATURES. This select list of features contains features that make sense to be controlled both at the machine and distribution configuration level. For example, the "bluetooth" feature requires hardware support but should also be optional at the distribution level, in case the hardware supports Bluetooth but you do not ever intend to use it.For more information, see the
MACHINE_FEATURESandDISTRO_FEATURESvariables.- COMMON_LICENSE_DIR
Points to
meta/files/common-licensesin the Source Directory, which is where generic license files reside.- COMPATIBLE_HOST
A regular expression that resolves to one or more hosts (when the recipe is native) or one or more targets (when the recipe is non-native) with which a recipe is compatible. The regular expression is matched against
HOST_SYS. You can use the variable to stop recipes from being built for classes of systems with which the recipes are not compatible. Stopping these builds is particularly useful with kernels. The variable also helps to increase parsing speed since the build system skips parsing recipes not compatible with the current system.- COMPATIBLE_MACHINE
A regular expression that resolves to one or more target machines with which a recipe is compatible. The regular expression is matched against
MACHINEOVERRIDES. You can use the variable to stop recipes from being built for machines with which the recipes are not compatible. Stopping these builds is particularly useful with kernels. The variable also helps to increase parsing speed since the build system skips parsing recipes not compatible with the current machine.- COMPLEMENTARY_GLOB
Defines wildcards to match when installing a list of complementary packages for all the packages explicitly (or implicitly) installed in an image. The resulting list of complementary packages is associated with an item that can be added to
IMAGE_FEATURES. An example usage of this is the "dev-pkgs" item that when added toIMAGE_FEATURESwill install -dev packages (containing headers and other development files) for every package in the image.To add a new feature item pointing to a wildcard, use a variable flag to specify the feature item name and use the value to specify the wildcard. Here is an example:
COMPLEMENTARY_GLOB[dev-pkgs] = '*-dev'- CONF_VERSION
Tracks the version of the local configuration file (i.e.
local.conf). The value forCONF_VERSIONincrements each timebuild/conf/compatibility changes.- CONFFILES
Identifies editable or configurable files that are part of a package. If the Package Management System (PMS) is being used to update packages on the target system, it is possible that configuration files you have changed after the original installation and that you now want to remain unchanged are overwritten. In other words, editable files might exist in the package that you do not want reset as part of the package update process. You can use the
CONFFILESvariable to list the files in the package that you wish to prevent the PMS from overwriting during this update process.To use the
CONFFILESvariable, provide a package name override that identifies the resulting package. Then, provide a space-separated list of files. Here is an example:CONFFILES_${PN} += "${sysconfdir}/file1 \ ${sysconfdir}/file2 ${sysconfdir}/file3"A relationship exists between the
CONFFILESandFILESvariables. The files listed withinCONFFILESmust be a subset of the files listed withinFILES. Because the configuration files you provide withCONFFILESare simply being identified so that the PMS will not overwrite them, it makes sense that the files must already be included as part of the package through theFILESvariable.Note
When specifying paths as part of theCONFFILESvariable, it is good practice to use appropriate path variables. For example,${sysconfdir}rather than/etcor${bindir}rather than/usr/bin. You can find a list of these variables at the top of themeta/conf/bitbake.conffile in the Source Directory.- CONFIG_INITRAMFS_SOURCE
Identifies the initial RAM disk (initramfs) source files. The OpenEmbedded build system receives and uses this kernel Kconfig variable as an environment variable. By default, the variable is set to null ("").
The
CONFIG_INITRAMFS_SOURCEcan be either a single cpio archive with a.cpiosuffix or a space-separated list of directories and files for building the initramfs image. A cpio archive should contain a filesystem archive to be used as an initramfs image. Directories should contain a filesystem layout to be included in the initramfs image. Files should contain entries according to the format described by theusr/gen_init_cpioprogram in the kernel tree.If you specify multiple directories and files, the initramfs image will be the aggregate of all of them.
- CONFIG_SITE
A list of files that contains
autoconftest results relevant to the current build. This variable is used by the Autotools utilities when runningconfigure.- CONFIGURE_FLAGS
The minimal arguments for GNU configure.
- CONFLICT_DISTRO_FEATURES
When inheriting the
distro_features_checkclass, this variable identifies distribution features that would be in conflict should the recipe be built. In other words, if theCONFLICT_DISTRO_FEATURESvariable lists a feature that also appears inDISTRO_FEATURESwithin the current configuration, an error occurs and the build stops.- COPY_LIC_DIRS
If set to "1" along with the
COPY_LIC_MANIFESTvariable, the OpenEmbedded build system copies into the image the license files, which are located in/usr/share/common-licenses, for each package. The license files are placed in directories within the image itself during build time.Note
TheCOPY_LIC_DIRSdoes not offer a path for adding licenses for newly installed packages to an image, which might be most suitable for read-only filesystems that cannot be upgraded. See theLICENSE_CREATE_PACKAGEvariable for additional information. You can also reference the "Providing License Text" section in the Yocto Project Development Manual for information on providing license text.- COPY_LIC_MANIFEST
If set to "1", the OpenEmbedded build system copies the license manifest for the image to
/usr/share/common-licenses/license.manifestwithin the image itself during build time.Note
TheCOPY_LIC_MANIFESTdoes not offer a path for adding licenses for newly installed packages to an image, which might be most suitable for read-only filesystems that cannot be upgraded. See theLICENSE_CREATE_PACKAGEvariable for additional information. You can also reference the "Providing License Text" section in the Yocto Project Development Manual for information on providing license text.- CORE_IMAGE_EXTRA_INSTALL
Specifies the list of packages to be added to the image. You should only set this variable in the
local.confconfiguration file found in the Build Directory.This variable replaces
POKY_EXTRA_INSTALL, which is no longer supported.- COREBASE
Specifies the parent directory of the OpenEmbedded Core Metadata layer (i.e.
meta).It is an important distinction that
COREBASEpoints to the parent of this layer and not the layer itself. Consider an example where you have cloned the Poky Git repository and retained thepokyname for your local copy of the repository. In this case,COREBASEpoints to thepokyfolder because it is the parent directory of thepoky/metalayer.- COREBASE_FILES
Lists files from the
COREBASEdirectory that should be copied other than the layers listed in thebblayers.conffile. TheCOREBASE_FILESvariable exists for the purpose of copying metadata from the OpenEmbedded build system into the extensible SDK.Explicitly listing files in
COREBASEis needed because it typically contains build directories and other files that should not normally be copied into the extensible SDK. Consequently, the value ofCOREBASE_FILESis used in order to only copy the files that are actually needed.- CPP
The minimal command and arguments used to run the C preprocessor.
- CPPFLAGS
Specifies the flags to pass to the C pre-processor (i.e. to both the C and the C++ compilers). This variable is exported to an environment variable and thus made visible to the software being built during the compilation step.
Default initialization for
CPPFLAGSvaries depending on what is being built:TARGET_CPPFLAGSwhen building for the targetBUILD_CPPFLAGSwhen building for the build host (i.e.-native)BUILDSDK_CPPFLAGSwhen building for an SDK (i.e.nativesdk-)
- CROSS_COMPILE
The toolchain binary prefix for the target tools. The
CROSS_COMPILEvariable is the same as theTARGET_PREFIXvariable.Note
The OpenEmbedded build system sets theCROSS_COMPILEvariable only in certain contexts (e.g. when building for kernel and kernel module recipes).- CVSDIR
The directory in which files checked out under the CVS system are stored.
- CXX
The minimal command and arguments used to run the C++ compiler.
- CXXFLAGS
Specifies the flags to pass to the C++ compiler. This variable is exported to an environment variable and thus made visible to the software being built during the compilation step.
Default initialization for
CXXFLAGSvaries depending on what is being built:TARGET_CXXFLAGSwhen building for the targetBUILD_CXXFLAGSwhen building for the build host (i.e.-native)BUILDSDK_CXXFLAGSwhen building for an SDK (i.e.nativesdk-)
D
- D
The destination directory. The location in the Build Directory where components are installed by the
do_installtask. This location defaults to:${WORKDIR}/image- DATE
The date the build was started. Dates appear using the year, month, and day (YMD) format (e.g. "20150209" for February 9th, 2015).
- DATETIME
The date and time on which the current build started. The format is suitable for timestamps.
- DEBIAN_NOAUTONAME
When the
debianclass is inherited, which is the default behavior,DEBIAN_NOAUTONAMEspecifies a particular package should not be renamed according to Debian library package naming. You must use the package name as an override when you set this variable. Here is an example from thefontconfigrecipe:DEBIAN_NOAUTONAME_fontconfig-utils = "1"- DEBIANNAME
When the
debianclass is inherited, which is the default behavior,DEBIANNAMEallows you to override the library name for an individual package. Overriding the library name in these cases is rare. You must use the package name as an override when you set this variable. Here is an example from thedbusrecipe:DEBIANNAME_${PN} = "dbus-1"- DEBUG_BUILD
Specifies to build packages with debugging information. This influences the value of the
SELECTED_OPTIMIZATIONvariable.- DEBUG_OPTIMIZATION
The options to pass in
TARGET_CFLAGSandCFLAGSwhen compiling a system for debugging. This variable defaults to "-O -fno-omit-frame-pointer ${DEBUG_FLAGS} -pipe".- DEFAULT_PREFERENCE
Specifies a weak bias for recipe selection priority.
The most common usage of this is variable is to set it to "-1" within a recipe for a development version of a piece of software. Using the variable in this way causes the stable version of the recipe to build by default in the absence of
PREFERRED_VERSIONbeing used to build the development version.Note
The bias provided byDEFAULT_PREFERENCEis weak and is overridden byBBFILE_PRIORITYif that variable is different between two layers that contain different versions of the same recipe.- DEFAULTTUNE
The default CPU and Application Binary Interface (ABI) tunings (i.e. the "tune") used by the OpenEmbedded build system. The
DEFAULTTUNEhelps defineTUNE_FEATURES.The default tune is either implicitly or explicitly set by the machine (
MACHINE). However, you can override the setting using available tunes as defined withAVAILTUNES.- DEPENDS
Lists a recipe's build-time dependencies (i.e. other recipe files). The system ensures that all the dependencies listed have been built and have their contents in the appropriate sysroots before the recipe's configure task is executed.
Consider this simple example for two recipes named "a" and "b" that produce similarly named packages. In this example, the
DEPENDSstatement appears in the "a" recipe:DEPENDS = "b"Here, the dependency is such that the
do_configuretask for recipe "a" depends on thedo_populate_sysroottask of recipe "b". This means anything that recipe "b" puts into sysroot is available when recipe "a" is configuring itself.For information on runtime dependencies, see the
RDEPENDSvariable.- DEPLOY_DIR
Points to the general area that the OpenEmbedded build system uses to place images, packages, SDKs and other output files that are ready to be used outside of the build system. By default, this directory resides within the Build Directory as
${TMPDIR}/deploy.For more information on the structure of the Build Directory, see "The Build Directory -
build/" section. For more detail on the contents of thedeploydirectory, see the "Images", "Package Feeds", and "Application Development SDK" sections.- DEPLOY_DIR_DEB
Points to the area that the OpenEmbedded build system uses to place Debian packages that are ready to be used outside of the build system. This variable applies only when
PACKAGE_CLASSEScontains "package_deb".The BitBake configuration file initially defines the
DEPLOY_DIR_DEBvariable as a sub-folder ofDEPLOY_DIR:DEPLOY_DIR_DEB = "${DEPLOY_DIR}/deb"The
package_debclass uses theDEPLOY_DIR_DEBvariable to make sure thedo_package_write_debtask writes Debian packages into the appropriate folder. For more information on how packaging works, see the "Package Feeds" section.- DEPLOY_DIR_IMAGE
Points to the area that the OpenEmbedded build system uses to place images and other associated output files that are ready to be deployed onto the target machine. The directory is machine-specific as it contains the
${MACHINE}name. By default, this directory resides within the Build Directory as${DEPLOY_DIR}/images/${MACHINE}/.For more information on the structure of the Build Directory, see "The Build Directory -
build/" section. For more detail on the contents of thedeploydirectory, see the "Images" and "Application Development SDK" sections.- DEPLOY_DIR_IPK
Points to the area that the OpenEmbedded build system uses to place IPK packages that are ready to be used outside of the build system. This variable applies only when
PACKAGE_CLASSEScontains "package_ipk".The BitBake configuration file initially defines this variable as a sub-folder of
DEPLOY_DIR:DEPLOY_DIR_IPK = "${DEPLOY_DIR}/ipk"The
package_ipkclass uses theDEPLOY_DIR_IPKvariable to make sure thedo_package_write_ipktask writes IPK packages into the appropriate folder. For more information on how packaging works, see the "Package Feeds" section.- DEPLOY_DIR_RPM
Points to the area that the OpenEmbedded build system uses to place RPM packages that are ready to be used outside of the build system. This variable applies only when
PACKAGE_CLASSEScontains "package_rpm".The BitBake configuration file initially defines this variable as a sub-folder of
DEPLOY_DIR:DEPLOY_DIR_RPM = "${DEPLOY_DIR}/rpm"The
package_rpmclass uses theDEPLOY_DIR_RPMvariable to make sure thedo_package_write_rpmtask writes RPM packages into the appropriate folder. For more information on how packaging works, see the "Package Feeds" section.- DEPLOY_DIR_TAR
Points to the area that the OpenEmbedded build system uses to place tarballs that are ready to be used outside of the build system. This variable applies only when
PACKAGE_CLASSEScontains "package_tar".The BitBake configuration file initially defines this variable as a sub-folder of
DEPLOY_DIR:DEPLOY_DIR_TAR = "${DEPLOY_DIR}/tar"The
package_tarclass uses theDEPLOY_DIR_TARvariable to make sure thedo_package_write_tartask writes TAR packages into the appropriate folder. For more information on how packaging works, see the "Package Feeds" section.- DEPLOYDIR
When inheriting the
deployclass, theDEPLOYDIRpoints to a temporary work area for deployed files that is set in thedeployclass as follows:DEPLOYDIR = "${WORKDIR}/deploy-${PN}"Recipes inheriting the
deployclass should copy files to be deployed intoDEPLOYDIR, and the class will take care of copying them intoDEPLOY_DIR_IMAGEafterwards.- DESCRIPTION
The package description used by package managers. If not set,
DESCRIPTIONtakes the value of theSUMMARYvariable.- DISK_SIGNATURE
A 32-bit MBR disk signature used by
directdiskimages.By default, the signature is set to an automatically generated random value that allows the OpenEmbedded build system to create a boot loader. You can override the signature in the image recipe by setting
DISK_SIGNATUREto an 8-digit hex string. You might want to overrideDISK_SIGNATUREif you want the disk signature to remain constant between image builds.When using Linux 3.8 or later, you can use
DISK_SIGNATUREto specify the root by UUID to allow the kernel to locate the root device even if the device name changes due to differences in hardware configuration. By default,SYSLINUX_ROOTis set as follows:SYSLINUX_ROOT = "root=/dev/sda2"However, you can change this to locate the root device using the disk signature instead:
SYSLINUX_ROOT = "root=PARTUUID=${DISK_SIGNATURE}-02"As previously mentioned, it is possible to set the
DISK_SIGNATUREvariable in yourlocal.conffile to a fixed value if you do not wantsyslinux.cfgchanging for each build. You might find this useful when you want to upgrade the root filesystem on a device without having to recreate or modify the master boot record.- DISTRO
The short name of the distribution. This variable corresponds to a distribution configuration file whose root name is the same as the variable's argument and whose filename extension is
.conf. For example, the distribution configuration file for the Poky distribution is namedpoky.confand resides in themeta-poky/conf/distrodirectory of the Source Directory.Within that
poky.conffile, theDISTROvariable is set as follows:DISTRO = "poky"Distribution configuration files are located in a
conf/distrodirectory within the Metadata that contains the distribution configuration. The value forDISTROmust not contain spaces, and is typically all lower-case.Note
If theDISTROvariable is blank, a set of default configurations are used, which are specified withinmeta/conf/distro/defaultsetup.confalso in the Source Directory.- DISTRO_CODENAME
Specifies a codename for the distribution being built.
- DISTRO_EXTRA_RDEPENDS
Specifies a list of distro-specific packages to add to all images. This variable takes affect through
packagegroup-baseso the variable only really applies to the more full-featured images that includepackagegroup-base. You can use this variable to keep distro policy out of generic images. As with all other distro variables, you set this variable in the distro.conffile.- DISTRO_EXTRA_RRECOMMENDS
Specifies a list of distro-specific packages to add to all images if the packages exist. The packages might not exist or be empty (e.g. kernel modules). The list of packages are automatically installed but you can remove them.
- DISTRO_FEATURES
The software support you want in your distribution for various features. You define your distribution features in the distribution configuration file.
In most cases, the presence or absence of a feature in
DISTRO_FEATURESis translated to the appropriate option supplied to the configure script during thedo_configuretask for recipes that optionally support the feature. For example, specifying "x11" inDISTRO_FEATURES, causes every piece of software built for the target that can optionally support X11 to have its X11 support enabled.Two more examples are Bluetooth and NFS support. For a more complete list of features that ships with the Yocto Project and that you can provide with this variable, see the "Distro Features" section.
- DISTRO_FEATURES_BACKFILL
Features to be added to
DISTRO_FEATURESif not also present inDISTRO_FEATURES_BACKFILL_CONSIDERED.This variable is set in the
meta/conf/bitbake.conffile. It is not intended to be user-configurable. It is best to just reference the variable to see which distro features are being backfilled for all distro configurations. See the Feature backfilling section for more information.- DISTRO_FEATURES_BACKFILL_CONSIDERED
Features from
DISTRO_FEATURES_BACKFILLthat should not be backfilled (i.e. added toDISTRO_FEATURES) during the build. See the "Feature Backfilling" section for more information.- DISTRO_FEATURES_DEFAULT
A convenience variable that gives you the default list of distro features with the exception of any features specific to the C library (
libc).When creating a custom distribution, you might find it useful to be able to reuse the default
DISTRO_FEATURESoptions without the need to write out the full set. Here is an example that usesDISTRO_FEATURES_DEFAULTfrom a custom distro configuration file:DISTRO_FEATURES ?= "${DISTRO_FEATURES_DEFAULT} ${DISTRO_FEATURES_LIBC} myfeature"- DISTRO_FEATURES_LIBC
A convenience variable that specifies the list of distro features that are specific to the C library (
libc). Typically, these features are prefixed with "libc-" and control which features are enabled at during the build within the C library itself.- DISTRO_NAME
The long name of the distribution.
- DISTRO_VERSION
The version of the distribution.
- DISTROOVERRIDES
This variable lists overrides specific to the current distribution. By default, the variable list includes the value of the
DISTROvariable. You can extend the variable to apply any variable overrides you want as part of the distribution and are not already inOVERRIDESthrough some other means.- DL_DIR
The central download directory used by the build process to store downloads. By default,
DL_DIRgets files suitable for mirroring for everything except Git repositories. If you want tarballs of Git repositories, use theBB_GENERATE_MIRROR_TARBALLSvariable.You can set this directory by defining the
DL_DIRvariable in theconf/local.conffile. This directory is self-maintaining and you should not have to touch it. By default, the directory isdownloadsin the Build Directory.#DL_DIR ?= "${TOPDIR}/downloads"To specify a different download directory, simply remove the comment from the line and provide your directory.
During a first build, the system downloads many different source code tarballs from various upstream projects. Downloading can take a while, particularly if your network connection is slow. Tarballs are all stored in the directory defined by
DL_DIRand the build system looks there first to find source tarballs.Note
When wiping and rebuilding, you can preserve this directory to speed up this part of subsequent builds.You can safely share this directory between multiple builds on the same development machine. For additional information on how the build process gets source files when working behind a firewall or proxy server, see this specific question in the "FAQ" chapter. You can also refer to the "Working Behind a Network Proxy" Wiki page.
- DOC_COMPRESS
When inheriting the
compress_docclass, this variable sets the compression policy used when the OpenEmbedded build system compresses man pages and info pages. By default, the compression method used is gz (gzip). Other policies available are xz and bz2.For information on policies and on how to use this variable, see the comments in the
meta/classes/compress_doc.bbclassfile.
E
- EFI_PROVIDER
When building bootable images (i.e. where
hddimgorvmdkis inIMAGE_FSTYPES), theEFI_PROVIDERvariable specifies the EFI bootloader to use. The default is "grub-efi", but "gummiboot" can be used instead.See the
gummibootclass for more information.- ENABLE_BINARY_LOCALE_GENERATION
Variable that controls which locales for
glibcare generated during the build (useful if the target device has 64Mbytes of RAM or less).- ERR_REPORT_DIR
When used with the
report-errorclass, specifies the path used for storing the debug files created by the error reporting tool, which allows you to submit build errors you encounter to a central database. By default, the value of this variable is${LOG_DIR}/error-report.You can set
ERR_REPORT_DIRto the path you want the error reporting tool to store the debug files as follows in yourlocal.conffile:ERR_REPORT_DIR = "path"- ERROR_QA
Specifies the quality assurance checks whose failures are reported as errors by the OpenEmbedded build system. You set this variable in your distribution configuration file. For a list of the checks you can control with this variable, see the "
insane.bbclass" section.- EXCLUDE_FROM_SHLIBS
Triggers the OpenEmbedded build system's shared libraries resolver to exclude an entire package when scanning for shared libraries.
Note
The shared libraries resolver's functionality results in part from the internal functionpackage_do_shlibs, which is part of thedo_packagetask. You should be aware that the shared libraries resolver might implicitly define some dependencies between packages.The
EXCLUDE_FROM_SHLIBSvariable is similar to thePRIVATE_LIBSvariable, which excludes a package's particular libraries only and not the whole package.Use the
EXCLUDE_FROM_SHLIBSvariable by setting it to "1" for a particular package:EXCLUDE_FROM_SHLIBS = "1"- EXCLUDE_FROM_WORLD
Directs BitBake to exclude a recipe from world builds (i.e.
bitbake world). During world builds, BitBake locates, parses and builds all recipes found in every layer exposed in thebblayers.confconfiguration file.To exclude a recipe from a world build using this variable, set the variable to "1" in the recipe.
Note
Recipes added toEXCLUDE_FROM_WORLDmay still be built during a world build in order to satisfy dependencies of other recipes. Adding a recipe toEXCLUDE_FROM_WORLDonly ensures that the recipe is not explicitly added to the list of build targets in a world build.- EXTENDPE
Used with file and pathnames to create a prefix for a recipe's version based on the recipe's
PEvalue. IfPEis set and greater than zero for a recipe,EXTENDPEbecomes that value (e.g ifPEis equal to "1" thenEXTENDPEbecomes "1_"). If a recipe'sPEis not set (the default) or is equal to zero,EXTENDPEbecomes "".See the
STAMPvariable for an example.- EXTENDPKGV
The full package version specification as it appears on the final packages produced by a recipe. The variable's value is normally used to fix a runtime dependency to the exact same version of another package in the same recipe:
RDEPENDS_${PN}-additional-module = "${PN} (= ${EXTENDPKGV})"The dependency relationships are intended to force the package manager to upgrade these types of packages in lock-step.
- EXTERNAL_KERNEL_TOOLS
When set, the
EXTERNAL_KERNEL_TOOLSvariable indicates that these tools are not in the source tree.When kernel tools are available in the tree, they are preferred over any externally installed tools. Setting the
EXTERNAL_KERNEL_TOOLSvariable tells the OpenEmbedded build system to prefer the installed external tools. See thekernel-yoctoclass inmeta/classesto see how the variable is used.- EXTERNALSRC
When inheriting the
externalsrcclass, this variable points to the source tree, which is outside of the OpenEmbedded build system. When set, this variable sets theSvariable, which is what the OpenEmbedded build system uses to locate unpacked recipe source code.For more information on
externalsrc.bbclass, see the "externalsrc.bbclass" section. You can also find information on how to use this variable in the "Building Software from an External Source" section in the Yocto Project Development Manual.- EXTERNALSRC_BUILD
When inheriting the
externalsrcclass, this variable points to the directory in which the recipe's source code is built, which is outside of the OpenEmbedded build system. When set, this variable sets theBvariable, which is what the OpenEmbedded build system uses to locate the Build Directory.For more information on
externalsrc.bbclass, see the "externalsrc.bbclass" section. You can also find information on how to use this variable in the "Building Software from an External Source" section in the Yocto Project Development Manual.- EXTRA_AUTORECONF
For recipes inheriting the
autotoolsclass, you can useEXTRA_AUTORECONFto specify extra options to pass to theautoreconfcommand that is executed during thedo_configuretask.The default value is "--exclude=autopoint".
- EXTRA_IMAGE_FEATURES
A list of additional features to include in an image. When listing more than one feature, separate them with a space.
Typically, you configure this variable in your
local.conffile, which is found in the Build Directory. Although you can use this variable from within a recipe, best practices dictate that you do not.Note
To enable primary features from within the image recipe, use theIMAGE_FEATURESvariable.Here are some examples of features you can add:
"dbg-pkgs" - Adds -dbg packages for all installed packages including symbol information for debugging and profiling. "debug-tweaks" - Makes an image suitable for debugging. For example, allows root logins without passwords and enables post-installation logging. See the 'allow-empty-password' and 'post-install-logging' features in the "Image Features" section for more information. "dev-pkgs" - Adds -dev packages for all installed packages. This is useful if you want to develop against the libraries in the image. "read-only-rootfs" - Creates an image whose root filesystem is read-only. See the "Creating a Read-Only Root Filesystem" section in the Yocto Project Development Manual for more information "tools-debug" - Adds debugging tools such as gdb and strace. "tools-sdk" - Adds development tools such as gcc, make, pkgconfig and so forth. "tools-testapps" - Adds useful testing tools such as ts_print, aplay, arecord and so forth.For a complete list of image features that ships with the Yocto Project, see the "Image Features" section.
For an example that shows how to customize your image by using this variable, see the "Customizing Images Using Custom
IMAGE_FEATURESandEXTRA_IMAGE_FEATURES" section in the Yocto Project Development Manual.- EXTRA_IMAGECMD
Specifies additional options for the image creation command that has been specified in
IMAGE_CMD. When setting this variable, you should use an override for the associated type. Here is an example:EXTRA_IMAGECMD_ext3 ?= "-i 4096"- EXTRA_IMAGEDEPENDS
A list of recipes to build that do not provide packages for installing into the root filesystem.
Sometimes a recipe is required to build the final image but is not needed in the root filesystem. You can use the
EXTRA_IMAGEDEPENDSvariable to list these recipes and thus specify the dependencies. A typical example is a required bootloader in a machine configuration.- EXTRA_OECMAKE
Additional
cmakeoptions.- EXTRA_OECONF
Additional
configurescript options.- EXTRA_OEMAKE
Additional GNU
makeoptions.Because the
EXTRA_OEMAKEdefaults to "", you need to set the variable to specify any required GNU options.- EXTRA_OESCONS
When inheriting the
sconsclass, this variable specifies additional configuration options you want to pass to thesconscommand line.- EXTRA_USERS_PARAMS
When inheriting the
extrausersclass, this variable provides image level user and group operations. This is a more global method of providing user and group configuration as compared to using theuseraddclass, which ties user and group configurations to a specific recipe.The set list of commands you can configure using the
EXTRA_USERS_PARAMSis shown in theextrausersclass. These commands map to the normal Unix commands of the same names:# EXTRA_USERS_PARAMS = "\ # useradd -p '' tester; \ # groupadd developers; \ # userdel nobody; \ # groupdel -g video; \ # groupmod -g 1020 developers; \ # usermod -s /bin/sh tester; \ # "
F
- FEATURE_PACKAGES
Defines one or more packages to include in an image when a specific item is included in
IMAGE_FEATURES. When setting the value,FEATURE_PACKAGESshould have the name of the feature item as an override. Here is an example:FEATURE_PACKAGES_widget = "package1package2"In this example, if "widget" were added to
IMAGE_FEATURES,package1andpackage2would be included in the image.Note
Packages installed by features defined throughFEATURE_PACKAGESare often package groups. While similarly named, you should not confuse theFEATURE_PACKAGESvariable with package groups, which are discussed elsewhere in the documentation.- FEED_DEPLOYDIR_BASE_URI
Points to the base URL of the server and location within the document-root that provides the metadata and packages required by OPKG to support runtime package management of IPK packages. You set this variable in your
local.conffile.Consider the following example:
FEED_DEPLOYDIR_BASE_URI = "http://192.168.7.1/BOARD-dir"This example assumes you are serving your packages over HTTP and your databases are located in a directory named
BOARD-dir, which is underneath your HTTP server's document-root. In this case, the OpenEmbedded build system generates a set of configuration files for you in your target that work with the feed.- FILES
The list of directories or files that are placed in packages.
To use the
FILESvariable, provide a package name override that identifies the resulting package. Then, provide a space-separated list of files or paths that identify the files you want included as part of the resulting package. Here is an example:FILES_${PN} += "${bindir}/mydir1/ ${bindir}/mydir2/myfile"Note
When specifying paths as part of theFILESvariable, it is good practice to use appropriate path variables. For example, use${sysconfdir}rather than/etc, or${bindir}rather than/usr/bin. You can find a list of these variables at the top of themeta/conf/bitbake.conffile in the Source Directory.If some of the files you provide with the
FILESvariable are editable and you know they should not be overwritten during the package update process by the Package Management System (PMS), you can identify these files so that the PMS will not overwrite them. See theCONFFILESvariable for information on how to identify these files to the PMS.- FILES_SOLIBSDEV
Defines the file specification to match
SOLIBSDEV. In other words,FILES_SOLIBSDEVdefines the full path name of the development symbolic link (symlink) for shared libraries on the target platform.The following statement from the
bitbake.confshows how it is set:FILES_SOLIBSDEV ?= "${base_libdir}/lib*${SOLIBSDEV} ${libdir}/lib*${SOLIBSDEV}"- FILESEXTRAPATHS
Extends the search path the OpenEmbedded build system uses when looking for files and patches as it processes recipes and append files. The default directories BitBake uses when it processes recipes are initially defined by the
FILESPATHvariable. You can extendFILESPATHvariable by usingFILESEXTRAPATHS.Best practices dictate that you accomplish this by using
FILESEXTRAPATHSfrom within a.bbappendfile and that you prepend paths as follows:FILESEXTRAPATHS_prepend := "${THISDIR}/${PN}:"In the above example, the build system first looks for files in a directory that has the same name as the corresponding append file.
Note
When extending
FILESEXTRAPATHS, be sure to use the immediate expansion (:=) operator. Immediate expansion makes sure that BitBake evaluatesTHISDIRat the time the directive is encountered rather than at some later time when expansion might result in a directory that does not contain the files you need.Also, include the trailing separating colon character if you are prepending. The trailing colon character is necessary because you are directing BitBake to extend the path by prepending directories to the search path.
Here is another common use:
FILESEXTRAPATHS_prepend := "${THISDIR}/files:"In this example, the build system extends the
FILESPATHvariable to include a directory namedfilesthat is in the same directory as the corresponding append file.Here is a final example that specifically adds three paths:
FILESEXTRAPATHS_prepend := "path_1:path_2:path_3:"By prepending paths in
.bbappendfiles, you allow multiple append files that reside in different layers but are used for the same recipe to correctly extend the path.- FILESOVERRIDES
A subset of
OVERRIDESused by the OpenEmbedded build system for creatingFILESPATH. You can find more information on how overrides are handled in the BitBake Manual.By default, the
FILESOVERRIDESvariable is defined as:FILESOVERRIDES = "${TRANSLATED_TARGET_ARCH}:${MACHINEOVERRIDES}:${DISTROOVERRIDES}"Note
Do not hand-edit theFILESOVERRIDESvariable. The values match up with expected overrides and are used in an expected manner by the build system.- FILESPATH
The default set of directories the OpenEmbedded build system uses when searching for patches and files. During the build process, BitBake searches each directory in
FILESPATHin the specified order when looking for files and patches specified by eachfile://URI in a recipe.The default value for the
FILESPATHvariable is defined in thebase.bbclassclass found inmeta/classesin the Source Directory:FILESPATH = "${@base_set_filespath(["${FILE_DIRNAME}/${BP}", \ "${FILE_DIRNAME}/${BPN}", "${FILE_DIRNAME}/files"], d)}"Note
Do not hand-edit theFILESPATHvariable. If you want the build system to look in directories other than the defaults, extend theFILESPATHvariable by using theFILESEXTRAPATHSvariable.Be aware that the default
FILESPATHdirectories do not map to directories in custom layers where append files (.bbappend) are used. If you want the build system to find patches or files that reside with your append files, you need to extend theFILESPATHvariable by using theFILESEXTRAPATHSvariable.- FILESYSTEM_PERMS_TABLES
Allows you to define your own file permissions settings table as part of your configuration for the packaging process. For example, suppose you need a consistent set of custom permissions for a set of groups and users across an entire work project. It is best to do this in the packages themselves but this is not always possible.
By default, the OpenEmbedded build system uses the
fs-perms.txt, which is located in themeta/filesfolder in the Source Directory. If you create your own file permissions setting table, you should place it in your layer or the distro's layer.You define the
FILESYSTEM_PERMS_TABLESvariable in theconf/local.conffile, which is found in the Build Directory, to point to your customfs-perms.txt. You can specify more than a single file permissions setting table. The paths you specify to these files must be defined within theBBPATHvariable.For guidance on how to create your own file permissions settings table file, examine the existing
fs-perms.txt.- FONT_EXTRA_RDEPENDS
When inheriting the
fontcacheclass, this variable specifies the runtime dependencies for font packages. By default, theFONT_EXTRA_RDEPENDSis set to "fontconfig-utils".- FONT_PACKAGES
When inheriting the
fontcacheclass, this variable identifies packages containing font files that need to be cached by Fontconfig. By default, thefontcacheclass assumes that fonts are in the recipe's main package (i.e.${PN}). Use this variable if fonts you need are in a package other than that main package.- FULL_OPTIMIZATION
The options to pass in
TARGET_CFLAGSandCFLAGSwhen compiling an optimized system. This variable defaults to "-O2 -pipe ${DEBUG_FLAGS}".
G
- GDB
The minimal command and arguments to run the GNU Debugger.
- GITDIR
The directory in which a local copy of a Git repository is stored when it is cloned.
- GLIBC_GENERATE_LOCALES
Specifies the list of GLIBC locales to generate should you not wish generate all LIBC locals, which can be time consuming.
You can set
GLIBC_GENERATE_LOCALESin yourlocal.conffile. By default, all locales are generated.GLIBC_GENERATE_LOCALES = "en_GB.UTF-8 en_US.UTF-8"- GROUPADD_PARAM
When inheriting the
useraddclass, this variable specifies for a package what parameters should be passed to thegroupaddcommand if you wish to add a group to the system when the package is installed.Here is an example from the
dbusrecipe:GROUPADD_PARAM_${PN} = "-r netdev"For information on the standard Linux shell command
groupadd, see http://linux.die.net/man/8/groupadd.- GROUPMEMS_PARAM
When inheriting the
useraddclass, this variable specifies for a package what parameters should be passed to thegroupmemscommand if you wish to modify the members of a group when the package is installed.For information on the standard Linux shell command
groupmems, see http://linux.die.net/man/8/groupmems.- GRUB_GFXSERIAL
Configures the GNU GRand Unified Bootloader (GRUB) to have graphics and serial in the boot menu. Set this variable to "1" in your
local.confor distribution configuration file to enable graphics and serial in the menu.See the
grub-eficlass for more information on how this variable is used.- GRUB_OPTS
Additional options to add to the GNU GRand Unified Bootloader (GRUB) configuration. Use a semi-colon character (
;) to separate multiple options.The
GRUB_OPTSvariable is optional. See thegrub-eficlass for more information on how this variable is used.- GRUB_TIMEOUT
Specifies the timeout before executing the default
LABELin the GNU GRand Unified Bootloader (GRUB).The
GRUB_TIMEOUTvariable is optional. See thegrub-eficlass for more information on how this variable is used.- GTKIMMODULES_PACKAGES
When inheriting the
gtk-immodules-cacheclass, this variable specifies the packages that contain the GTK+ input method modules being installed when the modules are in packages other than the main package.- GUMMIBOOT_CFG
When
EFI_PROVIDERis set to "gummiboot", theGUMMIBOOT_CFGvariable specifies the configuration file that should be used. By default, thegummibootclass sets theGUMMIBOOT_CFGas follows:GUMMIBOOT_CFG ?= "${S}/loader.conf"For information on Gummiboot, see the Gummiboot documentation.
- GUMMIBOOT_ENTRIES
When
EFI_PROVIDERis set to "gummiboot", theGUMMIBOOT_ENTRIESvariable specifies a list of entry files (*.conf) to be installed containing one boot entry per file. By default, thegummibootclass sets theGUMMIBOOT_ENTRIESas follows:GUMMIBOOT_ENTRIES ?= ""For information on Gummiboot, see the Gummiboot documentation.
- GUMMIBOOT_TIMEOUT
When
EFI_PROVIDERis set to "gummiboot", theGUMMIBOOT_TIMEOUTvariable specifies the boot menu timeout in seconds. By default, thegummibootclass sets theGUMMIBOOT_TIMEOUTas follows:GUMMIBOOT_TIMEOUT ?= "10"For information on Gummiboot, see the Gummiboot documentation.
H
- HOMEPAGE
Website where more information about the software the recipe is building can be found.
- HOST_ARCH
The name of the target architecture, which is normally the same as
TARGET_ARCH. The OpenEmbedded build system supports many architectures. Here is an example list of architectures supported. This list is by no means complete as the architecture is configurable:arm i586 x86_64 powerpc powerpc64 mips mipsel- HOST_CC_ARCH
Specifies architecture-specific compiler flags that are passed to the C compiler.
Default initialization for
HOST_CC_ARCHvaries depending on what is being built:TARGET_CC_ARCHwhen building for the targetBUILD_CC_ARCHwhen building for the build host (i.e.-native)BUILDSDK_CC_ARCHwhen building for an SDK (i.e.nativesdk-)
- HOST_OS
Specifies the name of the target operating system, which is normally the same as the
TARGET_OS. The variable can be set to "linux" forglibc-based systems and to "linux-uclibc" foruclibc. For ARM/EABI targets, there are also "linux-gnueabi" and "linux-uclibc-gnueabi" values possible.- HOST_PREFIX
Specifies the prefix for the cross-compile toolchain.
HOST_PREFIXis normally the same asTARGET_PREFIX.- HOST_SYS
Specifies the system, including the architecture and the operating system, for which the build is occurring in the context of the current recipe.
The OpenEmbedded build system automatically sets this variable based on
HOST_ARCH,HOST_VENDOR, andHOST_OSvariables.Note
You do not need to set the variable yourself.Consider these two examples:
Given a native recipe on a 32-bit x86 machine running Linux, the value is "i686-linux".
Given a recipe being built for a little-endian MIPS target running Linux, the value might be "mipsel-linux".
- HOST_VENDOR
Specifies the name of the vendor.
HOST_VENDORis normally the same asTARGET_VENDOR.
I
- ICECC_DISABLED
Disables or enables the
icecc(Icecream) function. For more information on this function and best practices for using this variable, see the "icecc.bbclass" section.Setting this variable to "1" in your
local.confdisables the function:ICECC_DISABLED ??= "1"To enable the function, set the variable as follows:
ICECC_DISABLED = ""- ICECC_ENV_EXEC
Points to the
icecc-create-envscript that you provide. This variable is used by theiceccclass. You set this variable in yourlocal.conffile.If you do not point to a script that you provide, the OpenEmbedded build system uses the default script provided by the
icecc-create-env.bbrecipe, which is a modified version and not the one that comes withicecc.- ICECC_PARALLEL_MAKE
Extra options passed to the
makecommand during thedo_compiletask that specify parallel compilation. This variable usually takes the form of "-jx", wherexrepresents the maximum number of parallel threadsmakecan run.Note
The options passed affect builds on all enabled machines on the network, which are machines running theiceccddaemon.If your enabled machines support multiple cores, coming up with the maximum number of parallel threads that gives you the best performance could take some experimentation since machine speed, network lag, available memory, and existing machine loads can all affect build time. Consequently, unlike the
PARALLEL_MAKEvariable, there is no rule-of-thumb for settingICECC_PARALLEL_MAKEto achieve optimal performance.If you do not set
ICECC_PARALLEL_MAKE, the build system does not use it (i.e. the system does not detect and assign the number of cores as is done withPARALLEL_MAKE).- ICECC_PATH
The location of the
iceccbinary. You can set this variable in yourlocal.conffile. If yourlocal.conffile does not define this variable, theiceccclass attempts to define it by locatingiceccusingwhich.- ICECC_USER_CLASS_BL
Identifies user classes that you do not want the Icecream distributed compile support to consider. This variable is used by the
iceccclass. You set this variable in yourlocal.conffile.When you list classes using this variable, you are "blacklisting" them from distributed compilation across remote hosts. Any classes you list will be distributed and compiled locally.
- ICECC_USER_PACKAGE_BL
Identifies user recipes that you do not want the Icecream distributed compile support to consider. This variable is used by the
iceccclass. You set this variable in yourlocal.conffile.When you list packages using this variable, you are "blacklisting" them from distributed compilation across remote hosts. Any packages you list will be distributed and compiled locally.
- ICECC_USER_PACKAGE_WL
Identifies user recipes that use an empty
PARALLEL_MAKEvariable that you want to force remote distributed compilation on using the Icecream distributed compile support. This variable is used by theiceccclass. You set this variable in yourlocal.conffile.- IMAGE_BASENAME
The base name of image output files. This variable defaults to the recipe name (
${PN}).- IMAGE_BOOT_FILES
A space-separated list of files installed into the boot partition when preparing an image using the
wictool with thebootimg-partitionsource plugin. By default, the files are installed under the same name as the source files. To change the installed name, separate it from the original name with a semi-colon (;). Source files need to be located inDEPLOY_DIR_IMAGE. Here are two examples:IMAGE_BOOT_FILES = "u-boot.img uImage;kernel" IMAGE_BOOT_FILES = "u-boot.${UBOOT_SUFFIX} ${KERNEL_IMAGETYPE}"Alternatively, source files can be picked up using a glob pattern. In this case, the destination file will have the same name as the base name of the source file path. To install files into a directory within the target location, pass its name after a semi-colon (;). Here are two examples:
IMAGE_BOOT_FILES = "bcm2835-bootfiles/*" IMAGE_BOOT_FILES = "bcm2835-bootfiles/*;boot/"The first example installs all files from
${DEPLOY_DIR_IMAGE}/bcm2835-bootfilesinto the root of the target partition. The second example installs the same files into abootdirectory within the target partition.- IMAGE_CLASSES
A list of classes that all images should inherit. You typically use this variable to specify the list of classes that register the different types of images the OpenEmbedded build system creates.
The default value for
IMAGE_CLASSESisimage_types. You can set this variable in yourlocal.confor in a distribution configuration file.For more information, see
meta/classes/image_types.bbclassin the Source Directory.- IMAGE_CMD
Specifies the command to create the image file for a specific image type, which corresponds to the value set set in
IMAGE_FSTYPES, (e.g.ext3,btrfs, and so forth). When setting this variable, you should use an override for the associated type. Here is an example:IMAGE_CMD_jffs2 = "mkfs.jffs2 --root=${IMAGE_ROOTFS} \ --faketime --output=${DEPLOY_DIR_IMAGE}/${IMAGE_NAME}.rootfs.jffs2 \ ${EXTRA_IMAGECMD}"You typically do not need to set this variable unless you are adding support for a new image type. For more examples on how to set this variable, see the
image_typesclass file, which ismeta/classes/image_types.bbclass.- IMAGE_DEVICE_TABLES
Specifies one or more files that contain custom device tables that are passed to the
makedevscommand as part of creating an image. These files list basic device nodes that should be created under/devwithin the image. IfIMAGE_DEVICE_TABLESis not set,files/device_table-minimal.txtis used, which is located byBBPATH. For details on how you should write device table files, seemeta/files/device_table-minimal.txtas an example.- IMAGE_FEATURES
The primary list of features to include in an image. Typically, you configure this variable in an image recipe. Although you can use this variable from your
local.conffile, which is found in the Build Directory, best practices dictate that you do not.Note
To enable extra features from outside the image recipe, use theEXTRA_IMAGE_FEATURESvariable.For a list of image features that ships with the Yocto Project, see the "Image Features" section.
For an example that shows how to customize your image by using this variable, see the "Customizing Images Using Custom
IMAGE_FEATURESandEXTRA_IMAGE_FEATURES" section in the Yocto Project Development Manual.- IMAGE_FSTYPES
Specifies the formats the OpenEmbedded build system uses during the build when creating the root filesystem. For example, setting
IMAGE_FSTYPESas follows causes the build system to create root filesystems using two formats:.ext3and.tar.bz2:IMAGE_FSTYPES = "ext3 tar.bz2"For the complete list of supported image formats from which you can choose, see
IMAGE_TYPES.Note
If you add "live" toIMAGE_FSTYPESinside an image recipe, be sure that you do so prior to the "inherit image" line of the recipe or the live image will not build.Note
Due to the way this variable is processed, it is not possible to update its contents using_appendor_prepend. To add one or more additional options to this variable the+=operator must be used.- IMAGE_INSTALL
Specifies the packages to install into an image. The
IMAGE_INSTALLvariable is a mechanism for an image recipe and you should use it with care to avoid ordering issues.Note
When working with ancore-image-minimal-initramfsimage, do not use theIMAGE_INSTALLvariable to specify packages for installation. Instead, use thePACKAGE_INSTALLvariable, which allows the initial RAM disk (initramfs) recipe to use a fixed set of packages and not be affected byIMAGE_INSTALL.Image recipes set
IMAGE_INSTALLto specify the packages to install into an image throughimage.bbclass. Additionally, "helper" classes exist, such ascore-image.bbclass, that can takeIMAGE_FEATURESlists and turn these into auto-generated entries inIMAGE_INSTALLin addition to its default contents.Using
IMAGE_INSTALLwith the+=operator from the/conf/local.conffile or from within an image recipe is not recommended as it can cause ordering issues. Sincecore-image.bbclasssetsIMAGE_INSTALLto a default value using the?=operator, using a+=operation againstIMAGE_INSTALLwill result in unexpected behavior when used inconf/local.conf. Furthermore, the same operation from within an image recipe may or may not succeed depending on the specific situation. In both these cases, the behavior is contrary to how most users expect the+=operator to work.When you use this variable, it is best to use it as follows:
IMAGE_INSTALL_append = "package-name"Be sure to include the space between the quotation character and the start of the package name or names.
- IMAGE_LINGUAS
Specifies the list of locales to install into the image during the root filesystem construction process. The OpenEmbedded build system automatically splits locale files, which are used for localization, into separate packages. Setting the
IMAGE_LINGUASvariable ensures that any locale packages that correspond to packages already selected for installation into the image are also installed. Here is an example:IMAGE_LINGUAS = "pt-br de-de"In this example, the build system ensures any Brazilian Portuguese and German locale files that correspond to packages in the image are installed (i.e.
*-locale-pt-brand*-locale-de-deas well as*-locale-ptand*-locale-de, since some software packages only provide locale files by language and not by country-specific language).See the
GLIBC_GENERATE_LOCALESvariable for information on generating GLIBC locales.- IMAGE_MANIFEST
The manifest file for the image. This file lists all the installed packages that make up the image. The file contains package information on a line-per-package basis as follows:
packagenamepackagearchversionThe
imageclass defines the manifest file as follows:IMAGE_MANIFEST = "${DEPLOY_DIR_IMAGE}/${IMAGE_NAME}.rootfs.manifest"The location is derived using the
DEPLOY_DIR_IMAGEandIMAGE_NAMEvariables. You can find information on how the image is created in the "Image Generation" section.- IMAGE_NAME
The name of the output image files minus the extension. This variable is derived using the
IMAGE_BASENAME,MACHINE, andDATETIMEvariables:IMAGE_NAME = "${IMAGE_BASENAME}-${MACHINE}-${DATETIME}"- IMAGE_OVERHEAD_FACTOR
Defines a multiplier that the build system applies to the initial image size for cases when the multiplier times the returned disk usage value for the image is greater than the sum of
IMAGE_ROOTFS_SIZEandIMAGE_ROOTFS_EXTRA_SPACE. The result of the multiplier applied to the initial image size creates free disk space in the image as overhead. By default, the build process uses a multiplier of 1.3 for this variable. This default value results in 30% free disk space added to the image when this method is used to determine the final generated image size. You should be aware that post install scripts and the package management system uses disk space inside this overhead area. Consequently, the multiplier does not produce an image with all the theoretical free disk space. SeeIMAGE_ROOTFS_SIZEfor information on how the build system determines the overall image size.The default 30% free disk space typically gives the image enough room to boot and allows for basic post installs while still leaving a small amount of free disk space. If 30% free space is inadequate, you can increase the default value. For example, the following setting gives you 50% free space added to the image:
IMAGE_OVERHEAD_FACTOR = "1.5"Alternatively, you can ensure a specific amount of free disk space is added to the image by using the
IMAGE_ROOTFS_EXTRA_SPACEvariable.- IMAGE_PKGTYPE
Defines the package type (DEB, RPM, IPK, or TAR) used by the OpenEmbedded build system. The variable is defined appropriately by the
package_deb,package_rpm,package_ipk, orpackage_tarclass.Warning
Thepackage_tarclass is broken and is not supported. It is recommended that you do not use it.The
populate_sdk_*andimageclasses use theIMAGE_PKGTYPEfor packaging up images and SDKs.You should not set the
IMAGE_PKGTYPEmanually. Rather, the variable is set indirectly through the appropriatepackage_*class using thePACKAGE_CLASSESvariable. The OpenEmbedded build system uses the first package type (e.g. DEB, RPM, or IPK) that appears with the variableNote
Files using the.tarformat are never used as a substitute packaging format for DEB, RPM, and IPK formatted files for your image or SDK.- IMAGE_POSTPROCESS_COMMAND
Specifies a list of functions to call once the OpenEmbedded build system has created the final image output files. You can specify functions separated by semicolons:
IMAGE_POSTPROCESS_COMMAND += "function; ... "If you need to pass the root filesystem path to a command within the function, you can use
${IMAGE_ROOTFS}, which points to the directory that becomes the root filesystem image. See theIMAGE_ROOTFSvariable for more information.- IMAGE_PREPROCESS_COMMAND
Specifies a list of functions to call before the OpenEmbedded build system has created the final image output files. You can specify functions separated by semicolons:
IMAGE_PREPROCESS_COMMAND += "function; ... "If you need to pass the root filesystem path to a command within the function, you can use
${IMAGE_ROOTFS}, which points to the directory that becomes the root filesystem image. See theIMAGE_ROOTFSvariable for more information.- IMAGE_ROOTFS
The location of the root filesystem while it is under construction (i.e. during the
do_rootfstask). This variable is not configurable. Do not change it.- IMAGE_ROOTFS_ALIGNMENT
Specifies the alignment for the output image file in Kbytes. If the size of the image is not a multiple of this value, then the size is rounded up to the nearest multiple of the value. The default value is "1". See
IMAGE_ROOTFS_SIZEfor additional information.- IMAGE_ROOTFS_EXTRA_SPACE
Defines additional free disk space created in the image in Kbytes. By default, this variable is set to "0". This free disk space is added to the image after the build system determines the image size as described in
IMAGE_ROOTFS_SIZE.This variable is particularly useful when you want to ensure that a specific amount of free disk space is available on a device after an image is installed and running. For example, to be sure 5 Gbytes of free disk space is available, set the variable as follows:
IMAGE_ROOTFS_EXTRA_SPACE = "5242880"For example, the Yocto Project Build Appliance specifically requests 40 Gbytes of extra space with the line:
IMAGE_ROOTFS_EXTRA_SPACE = "41943040"- IMAGE_ROOTFS_SIZE
Defines the size in Kbytes for the generated image. The OpenEmbedded build system determines the final size for the generated image using an algorithm that takes into account the initial disk space used for the generated image, a requested size for the image, and requested additional free disk space to be added to the image. Programatically, the build system determines the final size of the generated image as follows:
if (image-du * overhead) < rootfs-size: internal-rootfs-size = rootfs-size + xspace else: internal-rootfs-size = (image-du * overhead) + xspace where: image-du = Returned value of the du command on the image. overhead = IMAGE_OVERHEAD_FACTOR rootfs-size = IMAGE_ROOTFS_SIZE internal-rootfs-size = Initial root filesystem size before any modifications. xspace = IMAGE_ROOTFS_EXTRA_SPACESee the
IMAGE_OVERHEAD_FACTORandIMAGE_ROOTFS_EXTRA_SPACEvariables for related information.- IMAGE_TYPEDEP
Specifies a dependency from one image type on another. Here is an example from the
image-liveclass:IMAGE_TYPEDEP_live = "ext3"In the previous example, the variable ensures that when "live" is listed with the
IMAGE_FSTYPESvariable, the OpenEmbedded build system produces anext3image first since one of the components of the live image is anext3formatted partition containing the root filesystem.- IMAGE_TYPES
Specifies the complete list of supported image types by default:
btrfs cpio cpio.gz cpio.lz4 cpio.lzma cpio.xz cramfs elf ext2 ext2.bz2 ext2.gz ext2.lzma ext3 ext3.gz ext4 ext4.gz hdddirect hddimg iso jffs2 jffs2.sum multiubi qcow2 squashfs squashfs-lzo squashfs-xz tar tar.bz2 tar.gz tar.lz4 tar.xz ubi ubifs vdi vmdk wic wic.bz2 wic.gz wic.lzmaFor more information about these types of images, see
meta/classes/image_types*.bbclassin the Source Directory.- INC_PR
Helps define the recipe revision for recipes that share a common
includefile. You can think of this variable as part of the recipe revision as set from within an include file.Suppose, for example, you have a set of recipes that are used across several projects. And, within each of those recipes the revision (its
PRvalue) is set accordingly. In this case, when the revision of those recipes changes, the burden is on you to find all those recipes and be sure that they get changed to reflect the updated version of the recipe. In this scenario, it can get complicated when recipes that are used in many places and provide common functionality are upgraded to a new revision.A more efficient way of dealing with this situation is to set the
INC_PRvariable inside theincludefiles that the recipes share and then expand theINC_PRvariable within the recipes to help define the recipe revision.The following provides an example that shows how to use the
INC_PRvariable given a commonincludefile that defines the variable. Once the variable is defined in theincludefile, you can use the variable to set thePRvalues in each recipe. You will notice that when you set a recipe'sPRyou can provide more granular revisioning by appending values to theINC_PRvariable:recipes-graphics/xorg-font/xorg-font-common.inc:INC_PR = "r2" recipes-graphics/xorg-font/encodings_1.0.4.bb:PR = "${INC_PR}.1" recipes-graphics/xorg-font/font-util_1.3.0.bb:PR = "${INC_PR}.0" recipes-graphics/xorg-font/font-alias_1.0.3.bb:PR = "${INC_PR}.3"The first line of the example establishes the baseline revision to be used for all recipes that use the
includefile. The remaining lines in the example are from individual recipes and show how thePRvalue is set.- INCOMPATIBLE_LICENSE
Specifies a space-separated list of license names (as they would appear in
LICENSE) that should be excluded from the build. Recipes that provide no alternatives to listed incompatible licenses are not built. Packages that are individually licensed with the specified incompatible licenses will be deleted.Note
This functionality is only regularly tested using the following setting:INCOMPATIBLE_LICENSE = "GPL-3.0 LGPL-3.0 AGPL-3.0"Although you can use other settings, you might be required to remove dependencies on or provide alternatives to components that are required to produce a functional system image.- INHERIT
Causes the named class to be inherited at this point during parsing. The variable is only valid in configuration files.
- INHERIT_DISTRO
Lists classes that will be inherited at the distribution level. It is unlikely that you want to edit this variable.
The default value of the variable is set as follows in the
meta/conf/distro/defaultsetup.conffile:INHERIT_DISTRO ?= "debian devshell sstate license"- INHIBIT_DEFAULT_DEPS
Prevents the default dependencies, namely the C compiler and standard C library (libc), from being added to
DEPENDS. This variable is usually used within recipes that do not require any compilation using the C compiler.Set the variable to "1" to prevent the default dependencies from being added.
- INHIBIT_PACKAGE_DEBUG_SPLIT
Prevents the OpenEmbedded build system from splitting out debug information during packaging. By default, the build system splits out debugging information during the
do_packagetask. For more information on how debug information is split out, see thePACKAGE_DEBUG_SPLIT_STYLEvariable.To prevent the build system from splitting out debug information during packaging, set the
INHIBIT_PACKAGE_DEBUG_SPLITvariable as follows:INHIBIT_PACKAGE_DEBUG_SPLIT = "1"- INHIBIT_PACKAGE_STRIP
If set to "1", causes the build to not strip binaries in resulting packages and prevents the
-dbgpackage from containing the source files.By default, the OpenEmbedded build system strips binaries and puts the debugging symbols into
${PN}-dbg. Consequently, you should not setINHIBIT_PACKAGE_STRIPwhen you plan to debug in general.- INITRAMFS_FSTYPES
Defines the format for the output image of an initial RAM disk (initramfs), which is used during boot. Supported formats are the same as those supported by the
IMAGE_FSTYPESvariable.- INITRAMFS_IMAGE
Causes the OpenEmbedded build system to build an additional recipe as a dependency to your root filesystem recipe (e.g.
core-image-sato). The additional recipe is used to create an initial RAM disk (initramfs) that might be needed during the initial boot of the target system to accomplish such things as loading kernel modules prior to mounting the root file system.When you set the variable, specify the name of the initramfs you want created. The following example, which is set in the
local.confconfiguration file, causes a separate recipe to be created that results in an initramfs image namedcore-image-sato-initramfs.bbto be created:INITRAMFS_IMAGE = "core-image-minimal-initramfs"By default, the
kernelclass sets this variable to a null string as follows:INITRAMFS_IMAGE = ""See the
local.conf.sample.extendedfile for additional information. You can also reference thekernel.bbclassfile to see how the variable is used.- INITRAMFS_IMAGE_BUNDLE
Controls whether or not the image recipe specified by
INITRAMFS_IMAGEis run through an extra pass during kernel compilation in order to build a single binary that contains both the kernel image and the initial RAM disk (initramfs). Using an extra compilation pass ensures that when a kernel attempts to use an initramfs, it does not encounter circular dependencies should the initramfs include kernel modules.The combined binary is deposited into the
tmp/deploydirectory, which is part of the Build Directory.Setting the variable to "1" in a configuration file causes the OpenEmbedded build system to make the extra pass during kernel compilation:
INITRAMFS_IMAGE_BUNDLE = "1"By default, the
kernelclass sets this variable to a null string as follows:INITRAMFS_IMAGE_BUNDLE = ""Note
You must set theINITRAMFS_IMAGE_BUNDLEvariable in a configuration file. You cannot set the variable in a recipe file.See the
local.conf.sample.extendedfile for additional information.- INITRD
Indicates list of filesystem images to concatenate and use as an initial RAM disk (
initrd).The
INITRDvariable is an optional variable used with theimage-liveclass.- INITRD_IMAGE
When building a "live" bootable image (i.e. when
IMAGE_FSTYPEScontains "live"),INITRD_IMAGEspecifies the image recipe that should be built to provide the initial RAM disk image. The default value is "core-image-minimal-initramfs".See the
image-liveclass for more information.- INITSCRIPT_NAME
The filename of the initialization script as installed to
${sysconfdir}/init.d.This variable is used in recipes when using
update-rc.d.bbclass. The variable is mandatory.- INITSCRIPT_PACKAGES
A list of the packages that contain initscripts. If multiple packages are specified, you need to append the package name to the other
INITSCRIPT_*as an override.This variable is used in recipes when using
update-rc.d.bbclass. The variable is optional and defaults to thePNvariable.- INITSCRIPT_PARAMS
Specifies the options to pass to
update-rc.d. Here is an example:INITSCRIPT_PARAMS = "start 99 5 2 . stop 20 0 1 6 ."In this example, the script has a runlevel of 99, starts the script in initlevels 2 and 5, and stops the script in levels 0, 1 and 6.
The variable's default value is "defaults", which is set in the
update-rc.dclass.The value in
INITSCRIPT_PARAMSis passed through to theupdate-rc.dcommand. For more information on valid parameters, please see theupdate-rc.dmanual page at http://www.tin.org/bin/man.cgi?section=8&topic=update-rc.d.- INSANE_SKIP
Specifies the QA checks to skip for a specific package within a recipe. For example, to skip the check for symbolic link
.sofiles in the main package of a recipe, add the following to the recipe. The package name override must be used, which in this example is${PN}:INSANE_SKIP_${PN} += "dev-so"See the "
insane.bbclass" section for a list of the valid QA checks you can specify using this variable.- INSTALL_TIMEZONE_FILE
By default, the
tzdatarecipe packages an/etc/timezonefile. Set theINSTALL_TIMEZONE_FILEvariable to "0" at the configuration level to disable this behavior.- IPK_FEED_URIS
When the IPK backend is in use and package management is enabled on the target, you can use this variable to set up
opkgin the target image to point to package feeds on a nominated server. Once the feed is established, you can perform installations or upgrades using the package manager at runtime.
K
- KARCH
Defines the kernel architecture used when assembling the configuration. Architectures supported for this release are:
powerpc i386 x86_64 arm qemu mipsYou define the
KARCHvariable in the BSP Descriptions.- KBRANCH
A regular expression used by the build process to explicitly identify the kernel branch that is validated, patched, and configured during a build. You must set this variable to ensure the exact kernel branch you want is being used by the build process.
Values for this variable are set in the kernel's recipe file and the kernel's append file. For example, if you are using the Yocto Project kernel that is based on the Linux 3.14 kernel, the kernel recipe file is the
meta/recipes-kernel/linux/linux-yocto_3.14.bbfile. Following is an example for a kernel recipe file:KBRANCH ?= "standard/base"This variable is also used from the kernel's append file to identify the kernel branch specific to a particular machine or target hardware. The kernel's append file is located in the BSP layer for a given machine. For example, the kernel append file for the Emenlow BSP is in the
meta-intelGit repository and is namedmeta-emenlow/recipes-kernel/linux/linux-yocto_3.14.bbappend. Here are the related statements from the append file:COMPATIBLE_MACHINE_emenlow-noemgd = "emenlow-noemgd" KMACHINE_emenlow-noemgd = "emenlow" KBRANCH_emenlow-noemgd = "standard/base" KERNEL_FEATURES_append_emenlow-noemgd = " features/drm-gma500/drm-gma500.scc"The
KBRANCHstatement identifies the kernel branch to use when building for the Emenlow BSP.- KBUILD_DEFCONFIG
When used with the
kernel-yoctoclass, specifies an "in-tree" kernel configuration file for use during a kernel build.Typically, when using a
defconfigto configure a kernel during a build, you place the file in your layer in the same manner as you would patch files and configuration fragment files (i.e. "out-of-tree"). However, if you want to use adefconfigfile that is part of the kernel tree (i.e. "in-tree"), you can use theKBUILD_DEFCONFIGvariable to point to thedefconfigfile.To use the variable, set it in the append file for your kernel recipe using the following form:
KBUILD_DEFCONFIG_KMACHINE ?=defconfig_fileHere is an example from a "raspberrypi2"
KMACHINEbuild that uses adefconfigfile named "bcm2709_defconfig":KBUILD_DEFCONFIG_raspberrypi2 = "bcm2709_defconfig"As an alternative, you can use the following within your append file:
KBUILD_DEFCONFIG_pn-linux-yocto ?=defconfig_fileFor more information on how to use the
KBUILD_DEFCONFIGvariable, see the "Using an "In-Tree"defconfigFile" section.- KERNEL_ALT_IMAGETYPE
Specifies an alternate kernel image type for creation in addition to the kernel image type specified using the
KERNEL_IMAGETYPEvariable.- KERNEL_CLASSES
A list of classes defining kernel image types that the
kernelclass should inherit. You typically append this variable to enable extended image types. An example is the "kernel-fitimage", which enables fitImage support and resides inmeta/classes/kernel-fitimage.bbclass. You can register custom kernel image types with thekernelclass using this variable.- KERNEL_DEVICETREE
Specifies the name of the generated Linux kernel device tree (i.e. the
.dtb) file.Note
Legacy support exists for specifying the full path to the device tree. However, providing just the.dtbfile is preferred.In order to use this variable, you must have the include files in your kernel recipe:
require recipes-kernel/linux/linux-dtb.incor
require recipes-kernel/linux/linux-yocto.inc- KERNEL_EXTRA_ARGS
Specifies additional
makecommand-line arguments the OpenEmbedded build system passes on when compiling the kernel.- KERNEL_FEATURES
Includes additional metadata from the Yocto Project kernel Git repository. In the OpenEmbedded build system, the default Board Support Packages (BSPs) Metadata is provided through the
KMACHINEandKBRANCHvariables. You can use theKERNEL_FEATURESvariable to further add metadata for all BSPs.The metadata you add through this variable includes config fragments and features descriptions, which usually includes patches as well as config fragments. You typically override the
KERNEL_FEATURESvariable for a specific machine. In this way, you can provide validated, but optional, sets of kernel configurations and features.For example, the following adds
netfilterto all the Yocto Project kernels and adds sound support to theqemux86machine:# Add netfilter to all linux-yocto kernels KERNEL_FEATURES="features/netfilter/netfilter.scc" # Add sound support to the qemux86 machine KERNEL_FEATURES_append_qemux86=" cfg/sound.scc"- KERNEL_IMAGE_BASE_NAME
The base name of the kernel image. This variable is set in the kernel class as follows:
KERNEL_IMAGE_BASE_NAME ?= "${KERNEL_IMAGETYPE}-${PKGE}-${PKGV}-${PKGR}-${MACHINE}-${DATETIME}"See the
KERNEL_IMAGETYPE,PKGE,PKGV,PKGR,MACHINE, andDATETIMEvariables for additional information.- KERNEL_IMAGE_MAXSIZE
Specifies the maximum size of the kernel image file in kilobytes. If
KERNEL_IMAGE_MAXSIZEis set, the size of the kernel image file is checked against the set value during thedo_sizechecktask. The task fails if the kernel image file is larger than the setting.KERNEL_IMAGE_MAXSIZEis useful for target devices that have a limited amount of space in which the kernel image must be stored.By default, this variable is not set, which means the size of the kernel image is not checked.
- KERNEL_IMAGETYPE
The type of kernel to build for a device, usually set by the machine configuration files and defaults to "zImage". This variable is used when building the kernel and is passed to
makeas the target to build.If you want to build an alternate kernel image type, use the
KERNEL_ALT_IMAGETYPEvariable.- KERNEL_MODULE_AUTOLOAD
Lists kernel modules that need to be auto-loaded during boot.
Note
This variable replaces the deprecatedmodule_autoloadvariable.You can use the
KERNEL_MODULE_AUTOLOADvariable anywhere that it can be recognized by the kernel recipe or by an out-of-tree kernel module recipe (e.g. a machine configuration file, a distribution configuration file, an append file for the recipe, or the recipe itself).Specify it as follows:
KERNEL_MODULE_AUTOLOAD += "module_name1module_name2module_name3"Including
KERNEL_MODULE_AUTOLOADcauses the OpenEmbedded build system to populate the/etc/modules-load.d/modname.conffile with the list of modules to be auto-loaded on boot. The modules appear one-per-line in the file. Here is an example of the most common use case:KERNEL_MODULE_AUTOLOAD += "module_name"For information on how to populate the
modname.conffile withmodprobe.dsyntax lines, see theKERNEL_MODULE_PROBECONFvariable.- KERNEL_MODULE_PROBECONF
Provides a list of modules for which the OpenEmbedded build system expects to find
module_conf_modnamevalues that specify configuration for each of the modules. For information on how to provide those module configurations, see themodule_conf_*variable.- KERNEL_PATH
The location of the kernel sources. This variable is set to the value of the
STAGING_KERNEL_DIRwithin themoduleclass. For information on how this variable is used, see the "Incorporating Out-of-Tree Modules" section.To help maximize compatibility with out-of-tree drivers used to build modules, the OpenEmbedded build system also recognizes and uses the
KERNEL_SRCvariable, which is identical to theKERNEL_PATHvariable. Both variables are common variables used by external Makefiles to point to the kernel source directory.- KERNEL_SRC
The location of the kernel sources. This variable is set to the value of the
STAGING_KERNEL_DIRwithin themoduleclass. For information on how this variable is used, see the "Incorporating Out-of-Tree Modules" section.To help maximize compatibility with out-of-tree drivers used to build modules, the OpenEmbedded build system also recognizes and uses the
KERNEL_PATHvariable, which is identical to theKERNEL_SRCvariable. Both variables are common variables used by external Makefiles to point to the kernel source directory.- KERNEL_VERSION
Specifies the version of the kernel as extracted from
version.horutsrelease.hwithin the kernel sources. Effects of setting this variable do not take affect until the kernel has been configured. Consequently, attempting to refer to this variable in contexts prior to configuration will not work.- KERNELDEPMODDEPEND
Specifies whether the data referenced through
PKGDATA_DIRis needed or not. TheKERNELDEPMODDEPENDdoes not control whether or not that data exists, but simply whether or not it is used. If you do not need to use the data, set theKERNELDEPMODDEPENDvariable in yourinitramfsrecipe. Setting the variable there when the data is not needed avoids a potential dependency loop.- KFEATURE_DESCRIPTION
Provides a short description of a configuration fragment. You use this variable in the
.sccfile that describes a configuration fragment file. Here is the variable used in a file namedsmp.sccto describe SMP being enabled:define KFEATURE_DESCRIPTION "Enable SMP"- KMACHINE
The machine as known by the kernel. Sometimes the machine name used by the kernel does not match the machine name used by the OpenEmbedded build system. For example, the machine name that the OpenEmbedded build system understands as
core2-32-intel-commongoes by a different name in the Linux Yocto kernel. The kernel understands that machine asintel-core2-32. For cases like these, theKMACHINEvariable maps the kernel machine name to the OpenEmbedded build system machine name.These mappings between different names occur in the Yocto Linux Kernel's
metabranch. As an example take a look in thecommon/recipes-kernel/linux/linux-yocto_3.19.bbappendfile:LINUX_VERSION_core2-32-intel-common = "3.19.0" COMPATIBLE_MACHINE_core2-32-intel-common = "${MACHINE}" SRCREV_meta_core2-32-intel-common = "8897ef68b30e7426bc1d39895e71fb155d694974" SRCREV_machine_core2-32-intel-common = "43b9eced9ba8a57add36af07736344dcc383f711" KMACHINE_core2-32-intel-common = "intel-core2-32" KBRANCH_core2-32-intel-common = "standard/base" KERNEL_FEATURES_append_core2-32-intel-common = "${KERNEL_FEATURES_INTEL_COMMON}"The
KMACHINEstatement says that the kernel understands the machine name as "intel-core2-32". However, the OpenEmbedded build system understands the machine as "core2-32-intel-common".- KTYPE
Defines the kernel type to be used in assembling the configuration. The linux-yocto recipes define "standard", "tiny", and "preempt-rt" kernel types. See the "Kernel Types" section in the Yocto Project Linux Kernel Development Manual for more information on kernel types.
You define the
KTYPEvariable in the BSP Descriptions. The value you use must match the value used for theLINUX_KERNEL_TYPEvalue used by the kernel recipe.
L
- LABELS
Provides a list of targets for automatic configuration.
See the
grub-eficlass for more information on how this variable is used.- LAYERDEPENDS
Lists the layers that this recipe depends upon, separated by spaces. Optionally, you can specify a specific layer version for a dependency by adding it to the end of the layer name with a colon, (e.g. "anotherlayer:3" to be compared against
LAYERVERSION_anotherlayerin this case). An error will be produced if any dependency is missing or the version numbers do not match exactly (if specified). This variable is used in theconf/layer.conffile and must be suffixed with the name of the specific layer (e.g.LAYERDEPENDS_mylayer).- LAYERDIR
When used inside the
layer.confconfiguration file, this variable provides the path of the current layer. This variable is not available outside oflayer.confand references are expanded immediately when parsing of the file completes.- LAYERVERSION
Optionally specifies the version of a layer as a single number. You can use this within
LAYERDEPENDSfor another layer in order to depend on a specific version of the layer. This variable is used in theconf/layer.conffile and must be suffixed with the name of the specific layer (e.g.LAYERVERSION_mylayer).- LD
The minimal command and arguments used to run the linker.
- LDFLAGS
Specifies the flags to pass to the linker. This variable is exported to an environment variable and thus made visible to the software being built during the compilation step.
Default initialization for
LDFLAGSvaries depending on what is being built:TARGET_LDFLAGSwhen building for the targetBUILD_LDFLAGSwhen building for the build host (i.e.-native)BUILDSDK_LDFLAGSwhen building for an SDK (i.e.nativesdk-)
- LEAD_SONAME
Specifies the lead (or primary) compiled library file (
.so) that thedebianclass applies its naming policy to given a recipe that packages multiple libraries.This variable works in conjunction with the
debianclass.- LIC_FILES_CHKSUM
Checksums of the license text in the recipe source code.
This variable tracks changes in license text of the source code files. If the license text is changed, it will trigger a build failure, which gives the developer an opportunity to review any license change.
This variable must be defined for all recipes (unless
LICENSEis set to "CLOSED").For more information, see the " Tracking License Changes" section.
- LICENSE
The list of source licenses for the recipe. Follow these rules:
Do not use spaces within individual license names.
Separate license names using | (pipe) when there is a choice between licenses.
Separate license names using & (ampersand) when multiple licenses exist that cover different parts of the source.
You can use spaces between license names.
For standard licenses, use the names of the files in
meta/files/common-licenses/or theSPDXLICENSEMAPflag names defined inmeta/conf/licenses.conf.
Here are some examples:
LICENSE = "LGPLv2.1 | GPLv3" LICENSE = "MPL-1 & LGPLv2.1" LICENSE = "GPLv2+"The first example is from the recipes for Qt, which the user may choose to distribute under either the LGPL version 2.1 or GPL version 3. The second example is from Cairo where two licenses cover different parts of the source code. The final example is from
sysstat, which presents a single license.You can also specify licenses on a per-package basis to handle situations where components of the output have different licenses. For example, a piece of software whose code is licensed under GPLv2 but has accompanying documentation licensed under the GNU Free Documentation License 1.2 could be specified as follows:
LICENSE = "GFDL-1.2 & GPLv2" LICENSE_${PN} = "GPLv2" LICENSE_${PN}-doc = "GFDL-1.2"- LICENSE_CREATE_PACKAGE
Setting
LICENSE_CREATE_PACKAGEto "1" causes the OpenEmbedded build system to create an extra package (i.e.${PN}-lic) for each recipe and to add those packages to theRRECOMMENDS_${PN}.The
${PN}-licpackage installs a directory in/usr/share/licensesnamed${PN}, which is the recipe's base name, and installs files in that directory that contain license and copyright information (i.e. copies of the appropriate license files frommeta/common-licensesthat match the licenses specified in theLICENSEvariable of the recipe metadata and copies of files marked inLIC_FILES_CHKSUMas containing license text).For related information on providing license text, see the
COPY_LIC_DIRSvariable, theCOPY_LIC_MANIFESTvariable, and the "Providing License Text" section in the Yocto Project Development Manual.- LICENSE_FLAGS
Specifies additional flags for a recipe you must whitelist through
LICENSE_FLAGS_WHITELISTin order to allow the recipe to be built. When providing multiple flags, separate them with spaces.This value is independent of
LICENSEand is typically used to mark recipes that might require additional licenses in order to be used in a commercial product. For more information, see the "Enabling Commercially Licensed Recipes" section.- LICENSE_FLAGS_WHITELIST
Lists license flags that when specified in
LICENSE_FLAGSwithin a recipe should not prevent that recipe from being built. This practice is otherwise known as "whitelisting" license flags. For more information, see the Enabling Commercially Licensed Recipes" section.- LICENSE_PATH
Path to additional licenses used during the build. By default, the OpenEmbedded build system uses
COMMON_LICENSE_DIRto define the directory that holds common license text used during the build. TheLICENSE_PATHvariable allows you to extend that location to other areas that have additional licenses:LICENSE_PATH += "path-to-additional-common-licenses"- LINUX_KERNEL_TYPE
Defines the kernel type to be used in assembling the configuration. The linux-yocto recipes define "standard", "tiny", and "preempt-rt" kernel types. See the "Kernel Types" section in the Yocto Project Linux Kernel Development Manual for more information on kernel types.
If you do not specify a
LINUX_KERNEL_TYPE, it defaults to "standard". Together withKMACHINE, theLINUX_KERNEL_TYPEvariable defines the search arguments used by the kernel tools to find the appropriate description within the kernel Metadata with which to build out the sources and configuration.- LINUX_VERSION
The Linux version from
kernel.orgon which the Linux kernel image being built using the OpenEmbedded build system is based. You define this variable in the kernel recipe. For example, thelinux-yocto-3.4.bbkernel recipe found inmeta/recipes-kernel/linuxdefines the variables as follows:LINUX_VERSION ?= "3.4.24"The
LINUX_VERSIONvariable is used to definePVfor the recipe:PV = "${LINUX_VERSION}+git${SRCPV}"- LINUX_VERSION_EXTENSION
A string extension compiled into the version string of the Linux kernel built with the OpenEmbedded build system. You define this variable in the kernel recipe. For example, the linux-yocto kernel recipes all define the variable as follows:
LINUX_VERSION_EXTENSION ?= "-yocto-${LINUX_KERNEL_TYPE}"Defining this variable essentially sets the Linux kernel configuration item
CONFIG_LOCALVERSION, which is visible through theunamecommand. Here is an example that shows the extension assuming it was set as previously shown:$ uname -r 3.7.0-rc8-custom- LOG_DIR
Specifies the directory to which the OpenEmbedded build system writes overall log files. The default directory is
${TMPDIR}/log.For the directory containing logs specific to each task, see the
Tvariable.
M
- MACHINE
Specifies the target device for which the image is built. You define
MACHINEin thelocal.conffile found in the Build Directory. By default,MACHINEis set to "qemux86", which is an x86-based architecture machine to be emulated using QEMU:MACHINE ?= "qemux86"The variable corresponds to a machine configuration file of the same name, through which machine-specific configurations are set. Thus, when
MACHINEis set to "qemux86" there exists the correspondingqemux86.confmachine configuration file, which can be found in the Source Directory inmeta/conf/machine.The list of machines supported by the Yocto Project as shipped include the following:
MACHINE ?= "qemuarm" MACHINE ?= "qemuarm64" MACHINE ?= "qemumips" MACHINE ?= "qemumips64" MACHINE ?= "qemuppc" MACHINE ?= "qemux86" MACHINE ?= "qemux86-64" MACHINE ?= "genericx86" MACHINE ?= "genericx86-64" MACHINE ?= "beaglebone" MACHINE ?= "mpc8315e-rdb" MACHINE ?= "edgerouter"The last five are Yocto Project reference hardware boards, which are provided in the
meta-yocto-bsplayer.Note
Adding additional Board Support Package (BSP) layers to your configuration adds new possible settings forMACHINE.- MACHINE_ARCH
Specifies the name of the machine-specific architecture. This variable is set automatically from
MACHINEorTUNE_PKGARCH. You should not hand-edit theMACHINE_ARCHvariable.- MACHINE_ESSENTIAL_EXTRA_RDEPENDS
A list of required machine-specific packages to install as part of the image being built. The build process depends on these packages being present. Furthermore, because this is a "machine essential" variable, the list of packages are essential for the machine to boot. The impact of this variable affects images based on
packagegroup-core-boot, including thecore-image-minimalimage.This variable is similar to the
MACHINE_ESSENTIAL_EXTRA_RRECOMMENDSvariable with the exception that the image being built has a build dependency on the variable's list of packages. In other words, the image will not build if a file in this list is not found.As an example, suppose the machine for which you are building requires
example-initto be run during boot to initialize the hardware. In this case, you would use the following in the machine's.confconfiguration file:MACHINE_ESSENTIAL_EXTRA_RDEPENDS += "example-init"- MACHINE_ESSENTIAL_EXTRA_RRECOMMENDS
A list of recommended machine-specific packages to install as part of the image being built. The build process does not depend on these packages being present. However, because this is a "machine essential" variable, the list of packages are essential for the machine to boot. The impact of this variable affects images based on
packagegroup-core-boot, including thecore-image-minimalimage.This variable is similar to the
MACHINE_ESSENTIAL_EXTRA_RDEPENDSvariable with the exception that the image being built does not have a build dependency on the variable's list of packages. In other words, the image will still build if a package in this list is not found. Typically, this variable is used to handle essential kernel modules, whose functionality may be selected to be built into the kernel rather than as a module, in which case a package will not be produced.Consider an example where you have a custom kernel where a specific touchscreen driver is required for the machine to be usable. However, the driver can be built as a module or into the kernel depending on the kernel configuration. If the driver is built as a module, you want it to be installed. But, when the driver is built into the kernel, you still want the build to succeed. This variable sets up a "recommends" relationship so that in the latter case, the build will not fail due to the missing package. To accomplish this, assuming the package for the module was called
kernel-module-ab123, you would use the following in the machine's.confconfiguration file:MACHINE_ESSENTIAL_EXTRA_RRECOMMENDS += "kernel-module-ab123"Note
In this example, thekernel-module-ab123recipe needs to explicitly set itsPACKAGESvariable to ensure that BitBake does not use the kernel recipe'sPACKAGES_DYNAMICvariable to satisfy the dependency.Some examples of these machine essentials are flash, screen, keyboard, mouse, or touchscreen drivers (depending on the machine).
- MACHINE_EXTRA_RDEPENDS
A list of machine-specific packages to install as part of the image being built that are not essential for the machine to boot. However, the build process for more fully-featured images depends on the packages being present.
This variable affects all images based on
packagegroup-base, which does not include thecore-image-minimalorcore-image-full-cmdlineimages.The variable is similar to the
MACHINE_EXTRA_RRECOMMENDSvariable with the exception that the image being built has a build dependency on the variable's list of packages. In other words, the image will not build if a file in this list is not found.An example is a machine that has WiFi capability but is not essential for the machine to boot the image. However, if you are building a more fully-featured image, you want to enable the WiFi. The package containing the firmware for the WiFi hardware is always expected to exist, so it is acceptable for the build process to depend upon finding the package. In this case, assuming the package for the firmware was called
wifidriver-firmware, you would use the following in the.conffile for the machine:MACHINE_EXTRA_RDEPENDS += "wifidriver-firmware"- MACHINE_EXTRA_RRECOMMENDS
A list of machine-specific packages to install as part of the image being built that are not essential for booting the machine. The image being built has no build dependency on this list of packages.
This variable affects only images based on
packagegroup-base, which does not include thecore-image-minimalorcore-image-full-cmdlineimages.This variable is similar to the
MACHINE_EXTRA_RDEPENDSvariable with the exception that the image being built does not have a build dependency on the variable's list of packages. In other words, the image will build if a file in this list is not found.An example is a machine that has WiFi capability but is not essential For the machine to boot the image. However, if you are building a more fully-featured image, you want to enable WiFi. In this case, the package containing the WiFi kernel module will not be produced if the WiFi driver is built into the kernel, in which case you still want the build to succeed instead of failing as a result of the package not being found. To accomplish this, assuming the package for the module was called
kernel-module-examplewifi, you would use the following in the.conffile for the machine:MACHINE_EXTRA_RRECOMMENDS += "kernel-module-examplewifi"- MACHINE_FEATURES
Specifies the list of hardware features the
MACHINEis capable of supporting. For related information on enabling features, see theDISTRO_FEATURES,COMBINED_FEATURES, andIMAGE_FEATURESvariables.For a list of hardware features supported by the Yocto Project as shipped, see the "Machine Features" section.
- MACHINE_FEATURES_BACKFILL
Features to be added to
MACHINE_FEATURESif not also present inMACHINE_FEATURES_BACKFILL_CONSIDERED.This variable is set in the
meta/conf/bitbake.conffile. It is not intended to be user-configurable. It is best to just reference the variable to see which machine features are being backfilled for all machine configurations. See the "Feature backfilling" section for more information.- MACHINE_FEATURES_BACKFILL_CONSIDERED
Features from
MACHINE_FEATURES_BACKFILLthat should not be backfilled (i.e. added toMACHINE_FEATURES) during the build. See the "Feature backfilling" section for more information.- MACHINEOVERRIDES
Lists overrides specific to the current machine. By default, this list includes the value of
MACHINE. You can extend the list to apply variable overrides for classes of machines. For example, all QEMU emulated machines (e.g. qemuarm, qemux86, and so forth) include a common file namedmeta/conf/machine/include/qemu.incthat prependsMACHINEOVERRIDESwith the following variable override:MACHINEOVERRIDES =. "qemuall:"Applying an override like
qemuallaffects all QEMU emulated machines elsewhere. Here is an example from theconnman-confrecipe:SRC_URI_append_qemuall = "file://wired.config \ file://wired-setup \ "- MAINTAINER
The email address of the distribution maintainer.
- MIRRORS
Specifies additional paths from which the OpenEmbedded build system gets source code. When the build system searches for source code, it first tries the local download directory. If that location fails, the build system tries locations defined by
PREMIRRORS, the upstream source, and then locations specified byMIRRORSin that order.Assuming your distribution (
DISTRO) is "poky", the default value forMIRRORSis defined in theconf/distro/poky.conffile in themeta-pokyGit repository.- MLPREFIX
Specifies a prefix has been added to
PNto create a special version of a recipe or package, such as a Multilib version. The variable is used in places where the prefix needs to be added to or removed from a the name (e.g. theBPNvariable).MLPREFIXgets set when a prefix has been added toPN.- module_autoload
This variable has been replaced by the
KERNEL_MODULE_AUTOLOADvariable. You should replace all occurrences ofmodule_autoloadwith additions toKERNEL_MODULE_AUTOLOAD, for example:module_autoload_rfcomm = "rfcomm"should now be replaced with:
KERNEL_MODULE_AUTOLOAD += "rfcomm"See the
KERNEL_MODULE_AUTOLOADvariable for more information.- module_conf
Specifies
modprobe.dsyntax lines for inclusion in the/etc/modprobe.d/modname.conffile.You can use this variable anywhere that it can be recognized by the kernel recipe or out-of-tree kernel module recipe (e.g. a machine configuration file, a distribution configuration file, an append file for the recipe, or the recipe itself). If you use this variable, you must also be sure to list the module name in the
KERNEL_MODULE_AUTOLOADvariable.Here is the general syntax:
module_conf_module_name= "modprobe.d-syntax"You must use the kernel module name override.
Run
man modprobe.din the shell to find out more information on the exact syntax you want to provide withmodule_conf.Including
module_confcauses the OpenEmbedded build system to populate the/etc/modprobe.d/modname.conffile withmodprobe.dsyntax lines. Here is an example that adds the optionsarg1andarg2to a module namedmymodule:module_conf_mymodule = "options mymodule arg1=val1 arg2=val2"For information on how to specify kernel modules to auto-load on boot, see the
KERNEL_MODULE_AUTOLOADvariable.- MODULE_IMAGE_BASE_NAME
The base name of the kernel modules tarball. This variable is set in the kernel class as follows:
MODULE_IMAGE_BASE_NAME ?= "modules-${PKGE}-${PKGV}-${PKGR}-${MACHINE}-${DATETIME}"See the
PKGE,PKGV,PKGR,MACHINE, andDATETIMEvariables for additional information.- MODULE_TARBALL_DEPLOY
Controls creation of the
modules-*.tgzfile. Set this variable to "0" to disable creation of this file, which contains all of the kernel modules resulting from a kernel build.- MULTIMACH_TARGET_SYS
Separates files for different machines such that you can build for multiple target machines using the same output directories. See the
STAMPvariable for an example.
N
- NATIVELSBSTRING
A string identifying the host distribution. Strings consist of the host distributor ID followed by the release, as reported by the
lsb_releasetool or as read from/etc/lsb-release. For example, when running a build on Ubuntu 12.10, the value is "Ubuntu-12.10". If this information is unable to be determined, the value resolves to "Unknown".This variable is used by default to isolate native shared state packages for different distributions (e.g. to avoid problems with
glibcversion incompatibilities). Additionally, the variable is checked againstSANITY_TESTED_DISTROSif that variable is set.- NM
The minimal command and arguments to run
nm.- NO_RECOMMENDATIONS
Prevents installation of all "recommended-only" packages. Recommended-only packages are packages installed only through the
RRECOMMENDSvariable). Setting theNO_RECOMMENDATIONSvariable to "1" turns this feature on:NO_RECOMMENDATIONS = "1"You can set this variable globally in your
local.conffile or you can attach it to a specific image recipe by using the recipe name override:NO_RECOMMENDATIONS_pn-target_image= "package_name"It is important to realize that if you choose to not install packages using this variable and some other packages are dependent on them (i.e. listed in a recipe's
RDEPENDSvariable), the OpenEmbedded build system ignores your request and will install the packages to avoid dependency errors.Note
Some recommended packages might be required for certain system functionality, such as kernel modules. It is up to you to add packages with theIMAGE_INSTALLvariable.Support for this variable exists only when using the IPK and RPM packaging backend. Support does not exist for DEB.
See the
BAD_RECOMMENDATIONSand thePACKAGE_EXCLUDEvariables for related information.- NOHDD
Causes the OpenEmbedded build system to skip building the
.hddimgimage. TheNOHDDvariable is used with theimage-liveclass. Set the variable to "1" to prevent the.hddimgimage from being built.- NOISO
Causes the OpenEmbedded build system to skip building the ISO image. The
NOISOvariable is used with theimage-liveclass. Set the variable to "1" to prevent the ISO image from being built. To enable building an ISO image, set the variable to "0".
O
- OBJCOPY
The minimal command and arguments to run
objcopy.- OBJDUMP
The minimal command and arguments to run
objdump.- OE_BINCONFIG_EXTRA_MANGLE
When inheriting the
binconfigclass, this variable specifies additional arguments passed to the "sed" command. The sed command alters any paths in configuration scripts that have been set up during compilation. Inheriting this class results in all paths in these scripts being changed to point into thesysroots/directory so that all builds that use the script will use the correct directories for the cross compiling layout.See the
meta/classes/binconfig.bbclassin the Source Directory for details on how this class applies these additional sed command arguments. For general information on thebinconfig.bbclassclass, see the "Binary Configuration Scripts -binconfig.bbclass" section.- OE_IMPORTS
An internal variable used to tell the OpenEmbedded build system what Python modules to import for every Python function run by the system.
Note
Do not set this variable. It is for internal use only.- OE_INIT_ENV_SCRIPT
The name of the build environment setup script for the purposes of setting up the environment within the extensible SDK. The default value is "oe-init-build-env".
If you use a custom script to set up your build environment, set the
OE_INIT_ENV_SCRIPTvariable to its name.- OE_TERMINAL
Controls how the OpenEmbedded build system spawns interactive terminals on the host development system (e.g. using the BitBake command with the
-c devshellcommand-line option). For more information, see the "Using a Development Shell" section in the Yocto Project Development Manual.You can use the following values for the
OE_TERMINALvariable:auto gnome xfce rxvt screen konsole none- OEROOT
The directory from which the top-level build environment setup script is sourced. The Yocto Project makes two top-level build environment setup scripts available:
oe-init-build-envandoe-init-build-env-memres. When you run one of these scripts, theOEROOTvariable resolves to the directory that contains the script.For additional information on how this variable is used, see the initialization scripts.
- OLDEST_KERNEL
Declares the oldest version of the Linux kernel that the produced binaries must support. This variable is passed into the build of the Embedded GNU C Library (
glibc).The default for this variable comes from the
meta/conf/bitbake.confconfiguration file. You can override this default by setting the variable in a custom distribution configuration file.- OVERRIDES
BitBake uses
OVERRIDESto control what variables are overridden after BitBake parses recipes and configuration files. You can find more information on how overrides are handled in the "Conditional Syntax (Overrides)" section of the BitBake User Manual.
P
- P
The recipe name and version.
Pis comprised of the following:${PN}-${PV}- PACKAGE_ARCH
The architecture of the resulting package or packages.
By default, the value of this variable is set to
TUNE_PKGARCHwhen building for the target,BUILD_ARCHwhen building for the build host and "${SDK_ARCH}-${SDKPKGSUFFIX}" when building for the SDK. However, if your recipe's output packages are built specific to the target machine rather than general for the architecture of the machine, you should setPACKAGE_ARCHto the value ofMACHINE_ARCHin the recipe as follows:PACKAGE_ARCH = "${MACHINE_ARCH}"- PACKAGE_ARCHS
Specifies a list of architectures compatible with the target machine. This variable is set automatically and should not normally be hand-edited. Entries are separated using spaces and listed in order of priority. The default value for
PACKAGE_ARCHSis "all any noarch ${PACKAGE_EXTRA_ARCHS} ${MACHINE_ARCH}".- PACKAGE_BEFORE_PN
Enables easily adding packages to
PACKAGESbefore${PN}so that those added packages can pick up files that would normally be included in the default package.- PACKAGE_CLASSES
This variable, which is set in the
local.confconfiguration file found in theconffolder of the Build Directory, specifies the package manager the OpenEmbedded build system uses when packaging data.You can provide one or more of the following arguments for the variable:
PACKAGE_CLASSES ?= "package_rpm package_deb package_ipk package_tar"Warning
While it is a legal option, thepackage_tarclass is broken and is not supported. It is recommended that you do not use it.The build system uses only the first argument in the list as the package manager when creating your image or SDK. However, packages will be created using any additional packaging classes you specify. For example, if you use the following in your
local.conffile:PACKAGE_CLASSES ?= "package_ipk"The OpenEmbedded build system uses the IPK package manager to create your image or SDK.
For information on packaging and build performance effects as a result of the package manager in use, see the "
package.bbclass" section.- PACKAGE_DEBUG_SPLIT_STYLE
Determines how to split up the binary and debug information when creating
*-dbgpackages to be used with the GNU Project Debugger (GDB).With the
PACKAGE_DEBUG_SPLIT_STYLEvariable, you can control where debug information, which can include or exclude source files, is stored:".debug": Debug symbol files are placed next to the binary in a
.debugdirectory on the target. For example, if a binary is installed into/bin, the corresponding debug symbol files are installed in/bin/.debug. Source files are placed in/usr/src/debug. This is the default behavior."debug-file-directory": Debug symbol files are placed under
/usr/lib/debugon the target, and separated by the path from where the binary is installed. For example, if a binary is installed in/bin, the corresponding debug symbols are installed in/usr/lib/debug/bin. Source files are placed in/usr/src/debug."debug-without-src": The same behavior as ".debug" previously described with the exception that no source files are installed.
You can find out more about debugging using GDB by reading the "Debugging With the GNU Project Debugger (GDB) Remotely" section in the Yocto Project Development Manual.
- PACKAGE_EXCLUDE_COMPLEMENTARY
Prevents specific packages from being installed when you are installing complementary packages.
You might find that you want to prevent installing certain packages when you are installing complementary packages. For example, if you are using
IMAGE_FEATURESto installdev-pkgs, you might not want to install all packages from a particular multilib. If you find yourself in this situation, you can use thePACKAGE_EXCLUDE_COMPLEMENTARYvariable to specify regular expressions to match the packages you want to exclude.- PACKAGE_EXCLUDE
Lists packages that should not be installed into an image. For example:
PACKAGE_EXCLUDE = "package_namepackage_namepackage_name..."You can set this variable globally in your
local.conffile or you can attach it to a specific image recipe by using the recipe name override:PACKAGE_EXCLUDE_pn-target_image= "package_name"If you choose to not install a package using this variable and some other package is dependent on it (i.e. listed in a recipe's
RDEPENDSvariable), the OpenEmbedded build system generates a fatal installation error. Because the build system halts the process with a fatal error, you can use the variable with an iterative development process to remove specific components from a system.Support for this variable exists only when using the IPK and RPM packaging backend. Support does not exist for DEB.
See the
NO_RECOMMENDATIONSand theBAD_RECOMMENDATIONSvariables for related information.- PACKAGE_EXTRA_ARCHS
Specifies the list of architectures compatible with the device CPU. This variable is useful when you build for several different devices that use miscellaneous processors such as XScale and ARM926-EJS.
- PACKAGE_FEED_ARCHS
Specifies the package architectures used as part of the package feed URIs during the build. The
PACKAGE_FEED_ARCHSvariable is appended to the final package feed URI, which is constructed using thePACKAGE_FEED_URISandPACKAGE_FEED_BASE_PATHSvariables.Consider the following example where the
PACKAGE_FEED_URIS,PACKAGE_FEED_BASE_PATHS, andPACKAGE_FEED_ARCHSvariables are defined in yourlocal.conffile:PACKAGE_FEED_URIS = "https://example.com/packagerepos/release \ https://example.com/packagerepos/updates" PACKAGE_FEED_BASE_PATHS = "rpm rpm-dev" PACKAGE_FEED_ARCHS = "all core2-64"Given these settings, the resulting package feeds are as follows:
https://example.com/packagerepos/release/rpm/all https://example.com/packagerepos/release/rpm/core2-64 https://example.com/packagerepos/release/rpm-dev/all https://example.com/packagerepos/release/rpm-dev/core2-64 https://example.com/packagerepos/updates/rpm/all https://example.com/packagerepos/updates/rpm/core2-64 https://example.com/packagerepos/updates/rpm-dev/all https://example.com/packagerepos/updates/rpm-dev/core2-64- PACKAGE_FEED_BASE_PATHS
Specifies the base path used when constructing package feed URIs. The
PACKAGE_FEED_BASE_PATHSvariable makes up the middle portion of a package feed URI used by the OpenEmbedded build system. The base path lies between thePACKAGE_FEED_URISandPACKAGE_FEED_ARCHSvariables.Consider the following example where the
PACKAGE_FEED_URIS,PACKAGE_FEED_BASE_PATHS, andPACKAGE_FEED_ARCHSvariables are defined in yourlocal.conffile:PACKAGE_FEED_URIS = "https://example.com/packagerepos/release \ https://example.com/packagerepos/updates" PACKAGE_FEED_BASE_PATHS = "rpm rpm-dev" PACKAGE_FEED_ARCHS = "all core2-64"Given these settings, the resulting package feeds are as follows:
https://example.com/packagerepos/release/rpm/all https://example.com/packagerepos/release/rpm/core2-64 https://example.com/packagerepos/release/rpm-dev/all https://example.com/packagerepos/release/rpm-dev/core2-64 https://example.com/packagerepos/updates/rpm/all https://example.com/packagerepos/updates/rpm/core2-64 https://example.com/packagerepos/updates/rpm-dev/all https://example.com/packagerepos/updates/rpm-dev/core2-64- PACKAGE_FEED_URIS
Specifies the front portion of the package feed URI used by the OpenEmbedded build system. Each final package feed URI is comprised of
PACKAGE_FEED_URIS,PACKAGE_FEED_BASE_PATHS, andPACKAGE_FEED_ARCHSvariables.Consider the following example where the
PACKAGE_FEED_URIS,PACKAGE_FEED_BASE_PATHS, andPACKAGE_FEED_ARCHSvariables are defined in yourlocal.conffile:PACKAGE_FEED_URIS = "https://example.com/packagerepos/release \ https://example.com/packagerepos/updates" PACKAGE_FEED_BASE_PATHS = "rpm rpm-dev" PACKAGE_FEED_ARCHS = "all core2-64"Given these settings, the resulting package feeds are as follows:
https://example.com/packagerepos/release/rpm/all https://example.com/packagerepos/release/rpm/core2-64 https://example.com/packagerepos/release/rpm-dev/all https://example.com/packagerepos/release/rpm-dev/core2-64 https://example.com/packagerepos/updates/rpm/all https://example.com/packagerepos/updates/rpm/core2-64 https://example.com/packagerepos/updates/rpm-dev/all https://example.com/packagerepos/updates/rpm-dev/core2-64- PACKAGE_GROUP
The
PACKAGE_GROUPvariable has been renamed toFEATURE_PACKAGES. See the variable description forFEATURE_PACKAGESfor information.If if you use the
PACKAGE_GROUPvariable, the OpenEmbedded build system issues a warning message.- PACKAGE_INSTALL
The final list of packages passed to the package manager for installation into the image.
Because the package manager controls actual installation of all packages, the list of packages passed using
PACKAGE_INSTALLis not the final list of packages that are actually installed. This variable is internal to the image construction code. Consequently, in general, you should use theIMAGE_INSTALLvariable to specify packages for installation. The exception to this is when working with thecore-image-minimal-initramfsimage. When working with an initial RAM disk (initramfs) image, use thePACKAGE_INSTALLvariable.- PACKAGE_INSTALL_ATTEMPTONLY
Specifies a list of packages the OpenEmbedded build system attempts to install when creating an image. If a listed package fails to install, the build system does not generate an error. This variable is generally not user-defined.
- PACKAGE_PREPROCESS_FUNCS
Specifies a list of functions run to pre-process the
PKGDdirectory prior to splitting the files out to individual packages.- PACKAGECONFIG
This variable provides a means of enabling or disabling features of a recipe on a per-recipe basis.
PACKAGECONFIGblocks are defined in recipes when you specify features and then arguments that define feature behaviors. Here is the basic block structure:PACKAGECONFIG ??= "f1 f2 f3 ..." PACKAGECONFIG[f1] = "--with-f1,--without-f1,build-deps-f1,rt-deps-f1" PACKAGECONFIG[f2] = "--with-f2,--without-f2,build-deps-f2,rt-deps-f2" PACKAGECONFIG[f3] = "--with-f3,--without-f3,build-deps-f3,rt-deps-f3"The
PACKAGECONFIGvariable itself specifies a space-separated list of the features to enable. Following the features, you can determine the behavior of each feature by providing up to four order-dependent arguments, which are separated by commas. You can omit any argument you like but must retain the separating commas. The order is important and specifies the following:Extra arguments that should be added to the configure script argument list (
EXTRA_OECONF) if the feature is enabled.Extra arguments that should be added to
EXTRA_OECONFif the feature is disabled.Additional build dependencies (
DEPENDS) that should be added if the feature is enabled.Additional runtime dependencies (
RDEPENDS) that should be added if the feature is enabled.
Consider the following
PACKAGECONFIGblock taken from thelibrsvgrecipe. In this example the feature iscroco, which has three arguments that determine the feature's behavior.PACKAGECONFIG ??= "croco" PACKAGECONFIG[croco] = "--with-croco,--without-croco,libcroco"The
--with-crocoandlibcrocoarguments apply only if the feature is enabled. In this case,--with-crocois added to the configure script argument list andlibcrocois added toDEPENDS. On the other hand, if the feature is disabled say through a.bbappendfile in another layer, then the second argument--without-crocois added to the configure script rather than--with-croco.The basic
PACKAGECONFIGstructure previously described holds true regardless of whether you are creating a block or changing a block. When creating a block, use the structure inside your recipe.If you want to change an existing
PACKAGECONFIGblock, you can do so one of two ways:Append file: Create an append file named
recipename.bbappendin your layer and override the value ofPACKAGECONFIG. You can either completely override the variable:PACKAGECONFIG="f4 f5"Or, you can just append the variable:
PACKAGECONFIG_append = " f4"Configuration file: This method is identical to changing the block through an append file except you edit your
local.conformydistro.confPACKAGECONFIG_pn-recipename="f4 f5"Or, you can just amend the variable:
PACKAGECONFIG_append_pn-recipename= " f4"
- PACKAGEGROUP_DISABLE_COMPLEMENTARY
For recipes inheriting the
packagegroupclass, settingPACKAGEGROUP_DISABLE_COMPLEMENTARYto "1" specifies that the normal complementary packages (i.e.-dev,-dbg, and so forth) should not be automatically created by thepackagegrouprecipe, which is the default behavior.- PACKAGES
The list of packages to be created from the recipe. The default value is the following:
${PN}-dbg ${PN}-staticdev ${PN}-dev ${PN}-doc ${PN}-locale ${PACKAGE_BEFORE_PN} ${PN}- PACKAGES_DYNAMIC
A promise that your recipe satisfies runtime dependencies for optional modules that are found in other recipes.
PACKAGES_DYNAMICdoes not actually satisfy the dependencies, it only states that they should be satisfied. For example, if a hard, runtime dependency (RDEPENDS) of another package is satisfied at build time through thePACKAGES_DYNAMICvariable, but a package with the module name is never actually produced, then the other package will be broken. Thus, if you attempt to include that package in an image, you will get a dependency failure from the packaging system during thedo_rootfstask.Typically, if there is a chance that such a situation can occur and the package that is not created is valid without the dependency being satisfied, then you should use
RRECOMMENDS(a soft runtime dependency) instead ofRDEPENDS.For an example of how to use the
PACKAGES_DYNAMICvariable when you are splitting packages, see the "Handling Optional Module Packaging" section in the Yocto Project Development Manual.- PACKAGESPLITFUNCS
Specifies a list of functions run to perform additional splitting of files into individual packages. Recipes can either prepend to this variable or prepend to the
populate_packagesfunction in order to perform additional package splitting. In either case, the function should setPACKAGES,FILES,RDEPENDSand other packaging variables appropriately in order to perform the desired splitting.- PARALLEL_MAKE
Extra options passed to the
makecommand during thedo_compiletask in order to specify parallel compilation on the local build host. This variable is usually in the form "-jx", wherexrepresents the maximum number of parallel threadsmakecan run.By default, the OpenEmbedded build system automatically sets this variable to be equal to the number of cores the build system uses.
Note
If the software being built experiences dependency issues during thedo_compiletask that result in race conditions, you can clear thePARALLEL_MAKEvariable within the recipe as a workaround. For information on addressing race conditions, see the "Debugging Parallel Make Races" section in the Yocto Project Development Manual.For single socket systems (i.e. one CPU), you should not have to override this variable to gain optimal parallelism during builds. However, if you have very large systems that employ multiple physical CPUs, you might want to make sure the
PARALLEL_MAKEvariable is not set higher than "-j 20".For more information on speeding up builds, see the "Speeding Up the Build" section.
- PARALLEL_MAKEINST
Extra options passed to the
make installcommand during thedo_installtask in order to specify parallel installation. This variable defaults to the value ofPARALLEL_MAKE.Note
If the software being built experiences dependency issues during thedo_installtask that result in race conditions, you can clear thePARALLEL_MAKEINSTvariable within the recipe as a workaround. For information on addressing race conditions, see the "Debugging Parallel Make Races" section in the Yocto Project Development Manual.- PATCHRESOLVE
Determines the action to take when a patch fails. You can set this variable to one of two values: "noop" and "user".
The default value of "noop" causes the build to simply fail when the OpenEmbedded build system cannot successfully apply a patch. Setting the value to "user" causes the build system to launch a shell and places you in the right location so that you can manually resolve the conflicts.
Set this variable in your
local.conffile.- PATCHTOOL
Specifies the utility used to apply patches for a recipe during the
do_patchtask. You can specify one of three utilities: "patch", "quilt", or "git". The default utility used is "quilt" except for the quilt-native recipe itself. Because the quilt tool is not available at the time quilt-native is being patched, it uses "patch".If you wish to use an alternative patching tool, set the variable in the recipe using one of the following:
PATCHTOOL = "patch" PATCHTOOL = "quilt" PATCHTOOL = "git"- PE
The epoch of the recipe. By default, this variable is unset. The variable is used to make upgrades possible when the versioning scheme changes in some backwards incompatible way.
- PF
Specifies the recipe or package name and includes all version and revision numbers (i.e.
glibc-2.13-r20+svnr15508/andbash-4.2-r1/). This variable is comprised of the following:${PN}-${EXTENDPE}${PV}-${PR}- PIXBUF_PACKAGES
When inheriting the
pixbufcacheclass, this variable identifies packages that contain the pixbuf loaders used withgdk-pixbuf. By default, thepixbufcacheclass assumes that the loaders are in the recipe's main package (i.e.${PN}). Use this variable if the loaders you need are in a package other than that main package.- PKG
The name of the resulting package created by the OpenEmbedded build system.
Note
When using thePKGvariable, you must use a package name override.For example, when the
debianclass renames the output package, it does so by settingPKG_.packagename- PKG_CONFIG_PATH
The path to
pkg-configfiles for the current build context.pkg-configreads this variable from the environment.- PKGD
Points to the destination directory for files to be packaged before they are split into individual packages. This directory defaults to the following:
${WORKDIR}/packageDo not change this default.
- PKGDATA_DIR
Points to a shared, global-state directory that holds data generated during the packaging process. During the packaging process, the
do_packagedatatask packages data for each recipe and installs it into this temporary, shared area. This directory defaults to the following:${STAGING_DIR_HOST}/pkgdataDo not change this default.
- PKGDEST
Points to the parent directory for files to be packaged after they have been split into individual packages. This directory defaults to the following:
${WORKDIR}/packages-splitUnder this directory, the build system creates directories for each package specified in
PACKAGES. Do not change this default.- PKGDESTWORK
Points to a temporary work area used by the
do_packagetask to write output from thedo_packagedatatask. ThePKGDESTWORKlocation defaults to the following:${WORKDIR}/pkgdataThe
do_packagedatatask then packages the data in the temporary work area and installs it into a shared directory pointed to byPKGDATA_DIR.Do not change this default.
- PKGE
The epoch of the output package built by the OpenEmbedded build system. By default,
PKGEis set toPE.- PKGR
The revision of the output package built by the OpenEmbedded build system. By default,
PKGRis set toPR.- PKGV
The version of the output package built by the OpenEmbedded build system. By default,
PKGVis set toPV.- PN
This variable can have two separate functions depending on the context: a recipe name or a resulting package name.
PNrefers to a recipe name in the context of a file used by the OpenEmbedded build system as input to create a package. The name is normally extracted from the recipe file name. For example, if the recipe is namedexpat_2.0.1.bb, then the default value ofPNwill be "expat".The variable refers to a package name in the context of a file created or produced by the OpenEmbedded build system.
If applicable, the
PNvariable also contains any special suffix or prefix. For example, usingbashto build packages for the native machine,PNisbash-native. Usingbashto build packages for the target and for Multilib,PNwould bebashandlib64-bash, respectively.- PNBLACKLIST
Lists recipes you do not want the OpenEmbedded build system to build. This variable works in conjunction with the
blacklistclass, which the recipe must inherit globally.To prevent a recipe from being built, inherit the class globally and use the variable in your
local.conffile. Here is an example that preventsmyrecipefrom being built:INHERIT += "blacklist" PNBLACKLIST[myrecipe] = "Not supported by our organization."- POPULATE_SDK_POST_HOST_COMMAND
Specifies a list of functions to call once the OpenEmbedded build system has created the host part of the SDK. You can specify functions separated by semicolons:
POPULATE_SDK_POST_HOST_COMMAND += "function; ... "If you need to pass the SDK path to a command within a function, you can use
${SDK_DIR}, which points to the parent directory used by the OpenEmbedded build system when creating SDK output. See theSDK_DIRvariable for more information.- POPULATE_SDK_POST_TARGET_COMMAND
Specifies a list of functions to call once the OpenEmbedded build system has created the target part of the SDK. You can specify functions separated by semicolons:
POPULATE_SDK_POST_TARGET_COMMAND += "function; ... "If you need to pass the SDK path to a command within a function, you can use
${SDK_DIR}, which points to the parent directory used by the OpenEmbedded build system when creating SDK output. See theSDK_DIRvariable for more information.- PR
The revision of the recipe. The default value for this variable is "r0". Subsequent revisions of the recipe conventionally have the values "r1", "r2", and so forth. When
PVincreases,PRis conventionally reset to "r0".Note
The OpenEmbedded build system does not need the aid ofPRto know when to rebuild a recipe. The build system usesSTAMPand the shared state cache mechanisms.The
PRvariable primarily becomes significant when a package manager dynamically installs packages on an already built image. In this case,PR, which is the default value ofPKGR, helps the package manager distinguish which package is the most recent one in cases where many packages have the samePV(i.e.PKGV). A component having many packages with the samePVusually means that the packages all install the same upstream version, but with later (PR) version packages including packaging fixes.Note
PRdoes not need to be increased for changes that do not change the package contents or metadata.Because manually managing
PRcan be cumbersome and error-prone, an automated solution exists. See the "Working With a PR Service" section for more information.- PREFERRED_PROVIDER
If multiple recipes provide an item, this variable determines which recipe should be given preference. You should always suffix the variable with the name of the provided item, and you should set it to the
PNof the recipe to which you want to give precedence. Some examples:PREFERRED_PROVIDER_virtual/kernel ?= "linux-yocto" PREFERRED_PROVIDER_virtual/xserver = "xserver-xf86" PREFERRED_PROVIDER_virtual/libgl ?= "mesa"Note
If you setPREFERRED_PROVIDERfor avirtual/*item, then any recipe thatPROVIDESthat item that is not selected byPREFERRED_PROVIDERis prevented from building, which is usually desirable since this mechanism is designed to select between mutually exclusive alternative providers.- PREFERRED_VERSION
If there are multiple versions of recipes available, this variable determines which recipe should be given preference. You must always suffix the variable with the
PNyou want to select, and you should set thePVaccordingly for precedence. You can use the "%" character as a wildcard to match any number of characters, which can be useful when specifying versions that contain long revision numbers that could potentially change. Here are two examples:PREFERRED_VERSION_python = "2.7.3" PREFERRED_VERSION_linux-yocto = "3.19%"Sometimes the
PREFERRED_VERSIONvariable can be set by configuration files in a way that is hard to change. You can useOVERRIDESto set a machine-specific override. Here is an example:PREFERRED_VERSION_linux-yocto_qemux86 = "3.4%"Although not recommended, worst case, you can also use the "forcevariable" override, which is the strongest override possible. Here is an example:
PREFERRED_VERSION_linux-yocto_forcevariable = "3.4%"- PREMIRRORS
Specifies additional paths from which the OpenEmbedded build system gets source code. When the build system searches for source code, it first tries the local download directory. If that location fails, the build system tries locations defined by
PREMIRRORS, the upstream source, and then locations specified byMIRRORSin that order.Assuming your distribution (
DISTRO) is "poky", the default value forPREMIRRORSis defined in theconf/distro/poky.conffile in themeta-pokyGit repository.Typically, you could add a specific server for the build system to attempt before any others by adding something like the following to the
local.confconfiguration file in the Build Directory:PREMIRRORS_prepend = "\ git://.*/.* http://www.yoctoproject.org/sources/ \n \ ftp://.*/.* http://www.yoctoproject.org/sources/ \n \ http://.*/.* http://www.yoctoproject.org/sources/ \n \ https://.*/.* http://www.yoctoproject.org/sources/ \n"These changes cause the build system to intercept Git, FTP, HTTP, and HTTPS requests and direct them to the
http://sources mirror. You can usefile://URLs to point to local directories or network shares as well.- PRIORITY
Indicates the importance of a package.
PRIORITYis considered to be part of the distribution policy because the importance of any given recipe depends on the purpose for which the distribution is being produced. Thus,PRIORITYis not normally set within recipes.You can set
PRIORITYto "required", "standard", "extra", and "optional", which is the default.- PRIVATE_LIBS
Specifies libraries installed within a recipe that should be ignored by the OpenEmbedded build system's shared library resolver. This variable is typically used when software being built by a recipe has its own private versions of a library normally provided by another recipe. In this case, you would not want the package containing the private libraries to be set as a dependency on other unrelated packages that should instead depend on the package providing the standard version of the library.
Libraries specified in this variable should be specified by their file name. For example, from the Firefox recipe in meta-browser:
PRIVATE_LIBS = "libmozjs.so \ libxpcom.so \ libnspr4.so \ libxul.so \ libmozalloc.so \ libplc4.so \ libplds4.so"- PROVIDES
A list of aliases by which a particular recipe can be known. By default, a recipe's own
PNis implicitly already in itsPROVIDESlist. If a recipe usesPROVIDES, the additional aliases are synonyms for the recipe and can be useful satisfying dependencies of other recipes during the build as specified byDEPENDS.Consider the following example
PROVIDESstatement from a recipe filelibav_0.8.11.bb:PROVIDES += "libpostproc"The
PROVIDESstatement results in the "libav" recipe also being known as "libpostproc".- PRSERV_HOST
The network based
PRservice host and port.The
conf/local.conf.sample.extendedconfiguration file in the Source Directory shows how thePRSERV_HOSTvariable is set:PRSERV_HOST = "localhost:0"You must set the variable if you want to automatically start a local PR service. You can set
PRSERV_HOSTto other values to use a remote PR service.- PTEST_ENABLED
Specifies whether or not Package Test (ptest) functionality is enabled when building a recipe. You should not set this variable directly. Enabling and disabling building Package Tests at build time should be done by adding "ptest" to (or removing it from)
DISTRO_FEATURES.- PV
The version of the recipe. The version is normally extracted from the recipe filename. For example, if the recipe is named
expat_2.0.1.bb, then the default value ofPVwill be "2.0.1".PVis generally not overridden within a recipe unless it is building an unstable (i.e. development) version from a source code repository (e.g. Git or Subversion).- PYTHON_ABI
When used by recipes that inherit the
distutils3,setuptools3,distutils, orsetuptoolsclasses, denotes the Application Binary Interface (ABI) currently in use for Python. By default, the ABI is "m". You do not have to set this variable as the OpenEmbedded build system sets it for you.The OpenEmbedded build system uses the ABI to construct directory names used when installing the Python headers and libraries in sysroot (e.g.
.../python3.3m/...).Recipes that inherit the
distutilsclass during cross-builds also use this variable to locate the headers and libraries of the appropriate Python that the extension is targeting.- PYTHON_PN
When used by recipes that inherit the
distutils3,setuptools3,distutils, orsetuptoolsclasses, specifies the major Python version being built. For Python 2.x,PYTHON_PNwould be "python2". For Python 3.x, the variable would be "python3". You do not have to set this variable as the OpenEmbedded build system automatically sets it for you.The variable allows recipes to use common infrastructure such as the following:
DEPENDS += "${PYTHON_PN}-native"In the previous example, the version of the dependency is
PYTHON_PN.
R
- RANLIB
The minimal command and arguments to run
ranlib.- RCONFLICTS
The list of packages that conflict with packages. Note that packages will not be installed if conflicting packages are not first removed.
Like all package-controlling variables, you must always use them in conjunction with a package name override. Here is an example:
RCONFLICTS_${PN} = "another_conflicting_package_name"BitBake, which the OpenEmbedded build system uses, supports specifying versioned dependencies. Although the syntax varies depending on the packaging format, BitBake hides these differences from you. Here is the general syntax to specify versions with the
RCONFLICTSvariable:RCONFLICTS_${PN} = "package(operatorversion)"For
operator, you can specify the following:= < > <= >=For example, the following sets up a dependency on version 1.2 or greater of the package
foo:RCONFLICTS_${PN} = "foo (>= 1.2)"- RDEPENDS
Lists a package's runtime dependencies (i.e. other packages) that must be installed in order for the built package to run correctly. If a package in this list cannot be found during the build, you will get a build error.
When you use the
RDEPENDSvariable in a recipe, you are essentially stating that the recipe'sdo_buildtask depends on the existence of a specific package. Consider this simple example for two recipes named "a" and "b" that produce similarly named IPK packages. In this example, theRDEPENDSstatement appears in the "a" recipe:RDEPENDS_${PN} = "b"Here, the dependency is such that the
do_buildtask for recipe "a" depends on thedo_package_write_ipktask of recipe "b". This means the package file for "b" must be available when the output for recipe "a" has been completely built. More importantly, package "a" will be marked as depending on package "b" in a manner that is understood by the package manager.The names of the packages you list within
RDEPENDSmust be the names of other packages - they cannot be recipe names. Although package names and recipe names usually match, the important point here is that you are providing package names within theRDEPENDSvariable. For an example of the default list of packages created from a recipe, see thePACKAGESvariable.Because the
RDEPENDSvariable applies to packages being built, you should always use the variable in a form with an attached package name. For example, suppose you are building a development package that depends on theperlpackage. In this case, you would use the followingRDEPENDSstatement:RDEPENDS_${PN}-dev += "perl"In the example, the development package depends on the
perlpackage. Thus, theRDEPENDSvariable has the${PN}-devpackage name as part of the variable.The package name you attach to the
RDEPENDSvariable must appear as it would in thePACKAGESnamespace before any renaming of the output package by classes likedebian.In many cases you do not need to explicitly add runtime dependencies using
RDEPENDSsince some automatic handling occurs:shlibdeps: If a runtime package contains a compiled binary, the build processes the binary in order to determine any shared libraries (.sofiles) to which it is dynamically linked. The build process adds the packages containing these libraries toRDEPENDSwhen creating the runtime package. In addition, if the shared library is versioned, the dependency will have the version appended to it in order to force an upgrade to the appropriate version if needed.pcdeps: If the package ships apkg-configinformation file, the build process uses this file to add items to theRDEPENDSvariable to create the runtime packages.
BitBake, which the OpenEmbedded build system uses, supports specifying versioned dependencies. Although the syntax varies depending on the packaging format, BitBake hides these differences from you. Here is the general syntax to specify versions with the
RDEPENDSvariable:RDEPENDS_${PN} = "package(operatorversion)"For
operator, you can specify the following:= < > <= >=For example, the following sets up a dependency on version 1.2 or greater of the package
foo:RDEPENDS_${PN} = "foo (>= 1.2)"For information on build-time dependencies, see the
DEPENDSvariable.- REQUIRED_DISTRO_FEATURES
When inheriting the
distro_features_checkclass, this variable identifies distribution features that must exist in the current configuration in order for the OpenEmbedded build system to build the recipe. In other words, if theREQUIRED_DISTRO_FEATURESvariable lists a feature that does not appear inDISTRO_FEATURESwithin the current configuration, an error occurs and the build stops.- RM_OLD_IMAGE
Reclaims disk space by removing previously built versions of the same image from the
imagesdirectory pointed to by theDEPLOY_DIRvariable.Set this variable to "1" in your
local.conffile to remove these images.- RM_WORK_EXCLUDE
With
rm_workenabled, this variable specifies a list of recipes whose work directories should not be removed. See the "rm_work.bbclass" section for more details.- ROOT_HOME
Defines the root home directory. By default, this directory is set as follows in the BitBake configuration file:
ROOT_HOME ??= "/home/root"Note
This default value is likely used because some embedded solutions prefer to have a read-only root filesystem and prefer to keep writeable data in one place.You can override the default by setting the variable in any layer or in the
local.conffile. Because the default is set using a "weak" assignment (i.e. "??="), you can use either of the following forms to define your override:ROOT_HOME = "/root" ROOT_HOME ?= "/root"These override examples use
/root, which is probably the most commonly used override.- ROOTFS
Indicates a filesystem image to include as the root filesystem.
The
ROOTFSvariable is an optional variable used with theimage-liveclass.- ROOTFS_POSTINSTALL_COMMAND
Specifies a list of functions to call after the OpenEmbedded build system has installed packages. You can specify functions separated by semicolons:
ROOTFS_POSTINSTALL_COMMAND += "function; ... "If you need to pass the root filesystem path to a command within a function, you can use
${IMAGE_ROOTFS}, which points to the directory that becomes the root filesystem image. See theIMAGE_ROOTFSvariable for more information.- ROOTFS_POSTPROCESS_COMMAND
Specifies a list of functions to call once the OpenEmbedded build system has created the root filesystem. You can specify functions separated by semicolons:
ROOTFS_POSTPROCESS_COMMAND += "function; ... "If you need to pass the root filesystem path to a command within a function, you can use
${IMAGE_ROOTFS}, which points to the directory that becomes the root filesystem image. See theIMAGE_ROOTFSvariable for more information.- ROOTFS_POSTUNINSTALL_COMMAND
Specifies a list of functions to call after the OpenEmbedded build system has removed unnecessary packages. When runtime package management is disabled in the image, several packages are removed including
base-passwd,shadow, andupdate-alternatives. You can specify functions separated by semicolons:ROOTFS_POSTUNINSTALL_COMMAND += "function; ... "If you need to pass the root filesystem path to a command within a function, you can use
${IMAGE_ROOTFS}, which points to the directory that becomes the root filesystem image. See theIMAGE_ROOTFSvariable for more information.- ROOTFS_PREPROCESS_COMMAND
Specifies a list of functions to call before the OpenEmbedded build system has created the root filesystem. You can specify functions separated by semicolons:
ROOTFS_PREPROCESS_COMMAND += "function; ... "If you need to pass the root filesystem path to a command within a function, you can use
${IMAGE_ROOTFS}, which points to the directory that becomes the root filesystem image. See theIMAGE_ROOTFSvariable for more information.- RPROVIDES
A list of package name aliases that a package also provides. These aliases are useful for satisfying runtime dependencies of other packages both during the build and on the target (as specified by
RDEPENDS).Note
A package's own name is implicitly already in itsRPROVIDESlist.As with all package-controlling variables, you must always use the variable in conjunction with a package name override. Here is an example:
RPROVIDES_${PN} = "widget-abi-2"- RRECOMMENDS
A list of packages that extends the usability of a package being built. The package being built does not depend on this list of packages in order to successfully build, but rather uses them for extended usability. To specify runtime dependencies for packages, see the
RDEPENDSvariable.The package manager will automatically install the
RRECOMMENDSlist of packages when installing the built package. However, you can prevent listed packages from being installed by using theBAD_RECOMMENDATIONS,NO_RECOMMENDATIONS, andPACKAGE_EXCLUDEvariables.Packages specified in
RRECOMMENDSneed not actually be produced. However, a recipe must exist that provides each package, either through thePACKAGESorPACKAGES_DYNAMICvariables or theRPROVIDESvariable, or an error will occur during the build. If such a recipe does exist and the package is not produced, the build continues without error.Because the
RRECOMMENDSvariable applies to packages being built, you should always attach an override to the variable to specify the particular package whose usability is being extended. For example, suppose you are building a development package that is extended to support wireless functionality. In this case, you would use the following:RRECOMMENDS_${PN}-dev += "wireless_package_name"In the example, the package name (
${PN}-dev) must appear as it would in thePACKAGESnamespace before any renaming of the output package by classes such asdebian.bbclass.BitBake, which the OpenEmbedded build system uses, supports specifying versioned recommends. Although the syntax varies depending on the packaging format, BitBake hides these differences from you. Here is the general syntax to specify versions with the
RRECOMMENDSvariable:RRECOMMENDS_${PN} = "package(operatorversion)"For
operator, you can specify the following:= < > <= >=For example, the following sets up a recommend on version 1.2 or greater of the package
foo:RRECOMMENDS_${PN} = "foo (>= 1.2)"- RREPLACES
A list of packages replaced by a package. The package manager uses this variable to determine which package should be installed to replace other package(s) during an upgrade. In order to also have the other package(s) removed at the same time, you must add the name of the other package to the
RCONFLICTSvariable.As with all package-controlling variables, you must use this variable in conjunction with a package name override. Here is an example:
RREPLACES_${PN} = "other_package_being_replaced"BitBake, which the OpenEmbedded build system uses, supports specifying versioned replacements. Although the syntax varies depending on the packaging format, BitBake hides these differences from you. Here is the general syntax to specify versions with the
RREPLACESvariable:RREPLACES_${PN} = "package(operatorversion)"For
operator, you can specify the following:= < > <= >=For example, the following sets up a replacement using version 1.2 or greater of the package
foo:RREPLACES_${PN} = "foo (>= 1.2)"- RSUGGESTS
A list of additional packages that you can suggest for installation by the package manager at the time a package is installed. Not all package managers support this functionality.
As with all package-controlling variables, you must always use this variable in conjunction with a package name override. Here is an example:
RSUGGESTS_${PN} = "useful_packageanother_package"
S
- S
The location in the Build Directory where unpacked recipe source code resides. By default, this directory is
${WORKDIR}/${BPN}-${PV}, where${BPN}is the base recipe name and${PV}is the recipe version. If the source tarball extracts the code to a directory named anything other than${BPN}-${PV}, or if the source code if fetched from an SCM such as Git or Subversion, then you must setSin the recipe so that the OpenEmbedded build system knows where to find the unpacked source.As an example, assume a Source Directory top-level folder named
pokyand a default Build Directory atpoky/build. In this case, the work directory the build system uses to keep the unpacked recipe fordbis the following:poky/build/tmp/work/qemux86-poky-linux/db/5.1.19-r3/db-5.1.19The unpacked source code resides in the
db-5.1.19folder.This next example assumes a Git repository. By default, Git repositories are cloned to
${WORKDIR}/gitduringdo_fetch. Since this path is different from the default value ofS, you must set it specifically so the source can be located:SRC_URI = "git://path/to/repo.git" S = "${WORKDIR}/git"- SANITY_REQUIRED_UTILITIES
Specifies a list of command-line utilities that should be checked for during the initial sanity checking process when running BitBake. If any of the utilities are not installed on the build host, then BitBake immediately exits with an error.
- SANITY_TESTED_DISTROS
A list of the host distribution identifiers that the build system has been tested against. Identifiers consist of the host distributor ID followed by the release, as reported by the
lsb_releasetool or as read from/etc/lsb-release. Separate the list items with explicit newline characters (\n). IfSANITY_TESTED_DISTROSis not empty and the current value ofNATIVELSBSTRINGdoes not appear in the list, then the build system reports a warning that indicates the current host distribution has not been tested as a build host.- SDK_ARCH
The target architecture for the SDK. Typically, you do not directly set this variable. Instead, use
SDKMACHINE.- SDK_DEPLOY
The directory set up and used by the
populate_sdk_baseto which the SDK is deployed. Thepopulate_sdk_baseclass definesSDK_DEPLOYas follows:SDK_DEPLOY = "${TMPDIR}/deploy/sdk"- SDK_DIR
The parent directory used by the OpenEmbedded build system when creating SDK output. The
populate_sdk_baseclass defines the variable as follows:SDK_DIR = "${WORKDIR}/sdk"Note
TheSDK_DIRdirectory is a temporary directory as it is part ofWORKDIR. The final output directory isSDK_DEPLOY.- SDK_EXT_TYPE
Controls whether or not shared state artifacts are copied into the extensible SDK. The default value of "full" copies all of the required shared state artifacts into the extensible SDK. The value "minimal" leaves these artifacts out of the SDK.
Note
If you set the variable to "minimal", you need to ensureSSTATE_MIRRORSis set in the SDK's configuration to enable the artifacts to be fetched as needed.- SDK_HOST_MANIFEST
The manifest file for the host part of the SDK. This file lists all the installed packages that make up the host part of SDK. The file contains package information on a line-per-package basis as follows:
packagenamepackagearchversionThe
populate_sdk_baseclass defines the manifest file as follows:SDK_HOST_MANIFEST = "${SDK_DEPLOY}/${TOOLCHAIN_OUTPUTNAME}.host.manifest"The location is derived using the
SDK_DEPLOYandTOOLCHAIN_OUTPUTNAMEvariables.- SDK_INCLUDE_PKGDATA
When set to "1", specifies to include the packagedata for all recipes in the "world" target in the extensible SDK. Including this data allows the
devtool searchcommand to find these recipes in search results, as well as allows thedevtool addcommand to map dependencies more effectively.Note
Enabling theSDK_INCLUDE_PKGDATAvariable significantly increases build time because all of world needs to be built. Enabling the variable also slightly increases the size of the extensible SDK.- SDK_INHERIT_BLACKLIST
A list of classes to remove from the
INHERITvalue globally within the extensible SDK configuration. The default value is "buildhistory icecc".Some classes are not generally applicable within the extensible SDK context and you can use this variable to disable them.
- SDK_LOCAL_CONF_BLACKLIST
A list of variables not allowed through from the build system configuration into the extensible SDK configuration. Usually, these are variables that are specific to the machine on which the build system is running and thus would be potentially problematic within the extensible SDK.
- SDK_LOCAL_CONF_WHITELIST
A list of variables allowed through from the build system configuration into the extensible SDK configuration. This list overrides the variables specified using the
SDK_LOCAL_CONF_BLACKLISTvariable as well as any variables identified by automatic blacklisting due to the "/" character being found at the start of the value, which is usually indicative of being a path and thus might not be valid on the system where the SDK is installed.- SDK_NAME
The base name for SDK output files. The name is derived from the
DISTRO,TCLIBC,SDK_ARCH,IMAGE_BASENAME, andTUNE_PKGARCHvariables:SDK_NAME = "${DISTRO}-${TCLIBC}-${SDK_ARCH}-${IMAGE_BASENAME}-${TUNE_PKGARCH}"- SDK_OS
Specifies the operating system for which the SDK will be built. The default value is the value of
BUILD_OS.- SDK_OUTPUT
The location used by the OpenEmbedded build system when creating SDK output. The
populate_sdk_baseclass defines the variable as follows:SDK_OUTPUT = "${SDK_DIR}/image"Note
TheSDK_OUTPUTdirectory is a temporary directory as it is part ofWORKDIRby way ofSDK_DIR. The final output directory isSDK_DEPLOY.- SDK_PACKAGE_ARCHS
Specifies a list of architectures compatible with the SDK machine. This variable is set automatically and should not normally be hand-edited. Entries are separated using spaces and listed in order of priority. The default value for
SDK_PACKAGE_ARCHSis "all any noarch ${SDK_ARCH}-${SDKPKGSUFFIX}".- SDK_POSTPROCESS_COMMAND
Specifies a list of functions to call once the OpenEmbedded build system has created the SDK. You can specify functions separated by semicolons:
SDK_POSTPROCESS_COMMAND += "function; ... "If you need to pass an SDK path to a command within a function, you can use
${SDK_DIR}, which points to the parent directory used by the OpenEmbedded build system when creating SDK output. See theSDK_DIRvariable for more information.- SDK_PREFIX
The toolchain binary prefix used for
nativesdkrecipes. The OpenEmbedded build system uses theSDK_PREFIXvalue to set theTARGET_PREFIXwhen buildingnativesdkrecipes. The default value is "${SDK_SYS}-".- SDK_RECRDEP_TASKS
A list of shared state tasks added to the extensible SDK. By default, the following tasks are added:
do_populate_lic do_package_qa do_populate_sysroot do_deployDespite the default value of "" for the
SDK_RECRDEP_TASKSvariable, the above four tasks are always added to the SDK. To specify tasks beyond these four, you need to use theSDK_RECRDEP_TASKSvariable (e.g. you are defining additional tasks that are needed in order to buildSDK_TARGETS).- SDK_SYS
Specifies the system, including the architecture and the operating system, for which the SDK will be built.
The OpenEmbedded build system automatically sets this variable based on
SDK_ARCH,SDK_VENDOR, andSDK_OS. You do not need to set theSDK_SYSvariable yourself.- SDK_TARGET_MANIFEST
The manifest file for the target part of the SDK. This file lists all the installed packages that make up the target part of the SDK. The file contains package information on a line-per-package basis as follows:
packagenamepackagearchversionThe
populate_sdk_baseclass defines the manifest file as follows:SDK_TARGET_MANIFEST = "${SDK_DEPLOY}/${TOOLCHAIN_OUTPUTNAME}.target.manifest"The location is derived using the
SDK_DEPLOYandTOOLCHAIN_OUTPUTNAMEvariables.- SDK_TARGETS
A list of targets to install from shared state as part of the standard or extensible SDK installation. The default value is "${PN}" (i.e. the image from which the SDK is built).
The
SDK_TARGETSvariable is an internal variable and typically would not be changed.- SDK_TITLE
Specifies a title to be printed when running the SDK installer. The
SDK_TITLEvariable defaults to "distroSDK" for the standard SDK and "distroExtensible SDK" for the extensible SDK, wheredistrois the first one ofDISTRO_NAMEorDISTROthat is set in your configuration.- SDK_UPDATE_URL
An optional URL for an update server for the extensible SDK. If set, the value is used as the default update server when running
devtool sdk-updatewithin the extensible SDK.- SDK_VENDOR
Specifies the name of the SDK vendor.
- SDK_VERSION
Specifies the version of the SDK. The distribution configuration file (e.g.
/meta-poky/conf/distro/poky.conf) defines theSDK_VERSIONas follows:SDK_VERSION := "${@'${DISTRO_VERSION}'.replace('snapshot-${DATE}','snapshot')}"For additional information, see the
DISTRO_VERSIONandDATEvariables.- SDKIMAGE_FEATURES
Equivalent to
IMAGE_FEATURES. However, this variable applies to the SDK generated from an image using the following command:$ bitbake -c populate_sdkimagename- SDKMACHINE
The machine for which the SDK is built. In other words, the SDK is built such that it runs on the target you specify with the
SDKMACHINEvalue. The value points to a corresponding.conffile underconf/machine-sdk/.You can use "i686" and "x86_64" as possible values for this variable. The variable defaults to "i686" and is set in the local.conf file in the Build Directory.
SDKMACHINE ?= "i686"Note
You cannot set theSDKMACHINEvariable in your distribution configuration file. If you do, the configuration will not take affect.- SDKPATH
Defines the path offered to the user for installation of the SDK that is generated by the OpenEmbedded build system. The path appears as the default location for installing the SDK when you run the SDK's installation script. You can override the offered path when you run the script.
- SDKTARGETSYSROOT
The full path to the sysroot used for cross-compilation within an SDK as it will be when installed into the default
SDKPATH.- SECTION
The section in which packages should be categorized. Package management utilities can make use of this variable.
- SELECTED_OPTIMIZATION
Specifies the optimization flags passed to the C compiler when building for the target. The flags are passed through the default value of the
TARGET_CFLAGSvariable.The
SELECTED_OPTIMIZATIONvariable takes the value ofFULL_OPTIMIZATIONunlessDEBUG_BUILD= "1". If that is the case, the value ofDEBUG_OPTIMIZATIONis used.- SERIAL_CONSOLE
Defines a serial console (TTY) to enable using getty. Provide a value that specifies the baud rate followed by the TTY device name separated by a space. You cannot specify more than one TTY device:
SERIAL_CONSOLE = "115200 ttyS0"- SERIAL_CONSOLES
Defines the serial consoles (TTYs) to enable using getty. Provide a value that specifies the baud rate followed by the TTY device name separated by a semicolon. Use spaces to separate multiple devices:
SERIAL_CONSOLES = "115200;ttyS0 115200;ttyS1"- SERIAL_CONSOLES_CHECK
Similar to
SERIAL_CONSOLESexcept the device is checked for existence before attempting to enable it. This variable is currently only supported with SysVinit (i.e. not with systemd).- SIGGEN_EXCLUDE_SAFE_RECIPE_DEPS
A list of recipe dependencies that should not be used to determine signatures of tasks from one recipe when they depend on tasks from another recipe. For example:
SIGGEN_EXCLUDE_SAFE_RECIPE_DEPS += "intone->mplayer2"In this example,
intonedepends onmplayer2.Use of this variable is one mechanism to remove dependencies that affect task signatures and thus force rebuilds when a recipe changes.
Caution
If you add an inappropriate dependency for a recipe relationship, the software might break during runtime if the interface of the second recipe was changed after the first recipe had been built.- SIGGEN_EXCLUDERECIPES_ABISAFE
A list of recipes that are completely stable and will never change. The ABI for the recipes in the list are presented by output from the tasks run to build the recipe. Use of this variable is one way to remove dependencies from one recipe on another that affect task signatures and thus force rebuilds when the recipe changes.
Caution
If you add an inappropriate variable to this list, the software might break at runtime if the interface of the recipe was changed after the other had been built.- SITEINFO_BITS
Specifies the number of bits for the target system CPU. The value should be either "32" or "64".
- SITEINFO_ENDIANNESS
Specifies the endian byte order of the target system. The value should be either "le" for little-endian or "be" for big-endian.
- SKIP_FILEDEPS
Enables removal of all files from the "Provides" section of an RPM package. Removal of these files is required for packages containing prebuilt binaries and libraries such as
libstdc++andglibc.To enable file removal, set the variable to "1" in your
conf/local.confconfiguration file in your: Build Directory.SKIP_FILEDEPS = "1"- SOC_FAMILY
Groups together machines based upon the same family of SOC (System On Chip). You typically set this variable in a common
.incfile that you include in the configuration files of all the machines.Note
You must includeconf/machine/include/soc-family.incfor this variable to appear inMACHINEOVERRIDES.- SOLIBS
Defines the suffix for shared libraries used on the target platform. By default, this suffix is ".so.*" for all Linux-based systems and is defined in the
meta/conf/bitbake.confconfiguration file.You will see this variable referenced in the default values of
FILES_${PN}.- SOLIBSDEV
Defines the suffix for the development symbolic link (symlink) for shared libraries on the target platform. By default, this suffix is ".so" for Linux-based systems and is defined in the
meta/conf/bitbake.confconfiguration file.You will see this variable referenced in the default values of
FILES_${PN}-dev.- SOURCE_MIRROR_FETCH
When you are fetching files to create a mirror of sources (i.e. creating a source mirror), setting
SOURCE_MIRROR_FETCHto "1" in yourlocal.confconfiguration file ensures the source for all recipes are fetched regardless of whether or not a recipe is compatible with the configuration. A recipe is considered incompatible with the currently configured machine when either or both theCOMPATIBLE_MACHINEvariable andCOMPATIBLE_HOSTvariables specify compatibility with a machine other than that of the current machine or host.Warning
Do not set theSOURCE_MIRROR_FETCHvariable unless you are creating a source mirror. In other words, do not set the variable during a normal build.- SOURCE_MIRROR_URL
Defines your own
PREMIRRORSfrom which to first fetch source before attempting to fetch from the upstream specified inSRC_URI.To use this variable, you must globally inherit the
own-mirrorsclass and then provide the URL to your mirrors. Here is the general syntax:INHERIT += "own-mirrors" SOURCE_MIRROR_URL = "http://example.com/my_source_mirror"Note
You can specify only a single URL inSOURCE_MIRROR_URL.- SPDXLICENSEMAP
Maps commonly used license names to their SPDX counterparts found in
meta/files/common-licenses/. For the defaultSPDXLICENSEMAPmappings, see themeta/conf/licenses.conffile.For additional information, see the
LICENSEvariable.- SPECIAL_PKGSUFFIX
A list of prefixes for
PNused by the OpenEmbedded build system to create variants of recipes or packages. The list specifies the prefixes to strip off during certain circumstances such as the generation of theBPNvariable.- SRC_URI
The list of source files - local or remote. This variable tells the OpenEmbedded build system which bits to pull in for the build and how to pull them in. For example, if the recipe or append file only needs to fetch a tarball from the Internet, the recipe or append file uses a single
SRC_URIentry. On the other hand, if the recipe or append file needs to fetch a tarball, apply two patches, and include a custom file, the recipe or append file would include four instances of the variable.The following list explains the available URI protocols. URI protocols are highly dependent on particular BitBake Fetcher submodules. Depending on the fetcher BitBake uses, various URL parameters are employed. For specifics on the supported Fetchers, see the "Fetchers" section in the BitBake User Manual.
file://- Fetches files, which are usually files shipped with the Metadata, from the local machine. The path is relative to theFILESPATHvariable. Thus, the build system searches, in order, from the following directories, which are assumed to be a subdirectories of the directory in which the recipe file (.bb) or append file (.bbappend) resides:${BPN}- The base recipe name without any special suffix or version numbers.${BP}-${BPN}-${PV}. The base recipe name and version but without any special package name suffix.files - Files within a directory, which is named
filesand is also alongside the recipe or append file.
Note
If you want the build system to pick up files specified through aSRC_URIstatement from your append file, you need to be sure to extend theFILESPATHvariable by also using theFILESEXTRAPATHSvariable from within your append file.bzr://- Fetches files from a Bazaar revision control repository.git://- Fetches files from a Git revision control repository.osc://- Fetches files from an OSC (OpenSUSE Build service) revision control repository.repo://- Fetches files from a repo (Git) repository.ccrc://- Fetches files from a ClearCase repository.http://- Fetches files from the Internet usinghttp.https://- Fetches files from the Internet usinghttps.ftp://- Fetches files from the Internet usingftp.cvs://- Fetches files from a CVS revision control repository.hg://- Fetches files from a Mercurial (hg) revision control repository.p4://- Fetches files from a Perforce (p4) revision control repository.ssh://- Fetches files from a secure shell.svn://- Fetches files from a Subversion (svn) revision control repository.
Standard and recipe-specific options for
SRC_URIexist. Here are standard options:apply- Whether to apply the patch or not. The default action is to apply the patch.striplevel- Which striplevel to use when applying the patch. The default level is 1.patchdir- Specifies the directory in which the patch should be applied. The default is${S}.
Here are options specific to recipes building code from a revision control system:
mindate- Apply the patch only ifSRCDATEis equal to or greater thanmindate.maxdate- Apply the patch only ifSRCDATEis not later thanmindate.minrev- Apply the patch only ifSRCREVis equal to or greater thanminrev.maxrev- Apply the patch only ifSRCREVis not later thanmaxrev.rev- Apply the patch only ifSRCREVis equal torev.notrev- Apply the patch only ifSRCREVis not equal torev.
Here are some additional options worth mentioning:
unpack- Controls whether or not to unpack the file if it is an archive. The default action is to unpack the file.destsuffix- Places the file (or extracts its contents) into the specified subdirectory ofWORKDIRwhen the Git fetcher is used.subdir- Places the file (or extracts its contents) into the specified subdirectory ofWORKDIRwhen the local (file://) fetcher is used.localdir- Places the file (or extracts its contents) into the specified subdirectory ofWORKDIRwhen the CVS fetcher is used.subpath- Limits the checkout to a specific subpath of the tree when using the Git fetcher is used.name- Specifies a name to be used for association withSRC_URIchecksums when you have more than one file specified inSRC_URI.downloadfilename- Specifies the filename used when storing the downloaded file.
- SRC_URI_OVERRIDES_PACKAGE_ARCH
By default, the OpenEmbedded build system automatically detects whether
SRC_URIcontains files that are machine-specific. If so, the build system automatically changesPACKAGE_ARCH. Setting this variable to "0" disables this behavior.- SRCDATE
The date of the source code used to build the package. This variable applies only if the source was fetched from a Source Code Manager (SCM).
- SRCPV
Returns the version string of the current package. This string is used to help define the value of
PV.The
SRCPVvariable is defined in themeta/conf/bitbake.confconfiguration file in the Source Directory as follows:SRCPV = "${@bb.fetch2.get_srcrev(d)}"Recipes that need to define
PVdo so with the help of theSRCPV. For example, theofonorecipe (ofono_git.bb) located inmeta/recipes-connectivityin the Source Directory definesPVas follows:PV = "0.12-git${SRCPV}"- SRCREV
The revision of the source code used to build the package. This variable applies to Subversion, Git, Mercurial and Bazaar only. Note that if you want to build a fixed revision and you want to avoid performing a query on the remote repository every time BitBake parses your recipe, you should specify a
SRCREVthat is a full revision identifier and not just a tag.Note
For information on limitations when inheriting the latest revision of software usingSRCREV, see theAUTOREVvariable description.- SSTATE_DIR
The directory for the shared state cache.
- SSTATE_MIRROR_ALLOW_NETWORK
If set to "1", allows fetches from mirrors that are specified in
SSTATE_MIRRORSto work even when fetching from the network has been disabled by settingBB_NO_NETWORKto "1". Using theSSTATE_MIRROR_ALLOW_NETWORKvariable is useful if you have setSSTATE_MIRRORSto point to an internal server for your shared state cache, but you want to disable any other fetching from the network.- SSTATE_MIRRORS
Configures the OpenEmbedded build system to search other mirror locations for prebuilt cache data objects before building out the data. This variable works like fetcher
MIRRORSandPREMIRRORSand points to the cache locations to check for the shared objects.You can specify a filesystem directory or a remote URL such as HTTP or FTP. The locations you specify need to contain the shared state cache (sstate-cache) results from previous builds. The sstate-cache you point to can also be from builds on other machines.
If a mirror uses the same structure as
SSTATE_DIR, you need to add "PATH" at the end as shown in the examples below. The build system substitutes the correct path within the directory structure.SSTATE_MIRRORS ?= "\ file://.* http://someserver.tld/share/sstate/PATH;downloadfilename=PATH \n \ file://.* file:///some-local-dir/sstate/PATH"- STAGING_BASE_LIBDIR_NATIVE
Specifies the path to the
/libsubdirectory of the sysroot directory for the build host.- STAGING_BASELIBDIR
Specifies the path to the
/libsubdirectory of the sysroot directory for the target for which the current recipe is being built (STAGING_DIR_HOST).- STAGING_BINDIR
Specifies the path to the
/usr/binsubdirectory of the sysroot directory for the target for which the current recipe is being built (STAGING_DIR_HOST).- STAGING_BINDIR_CROSS
Specifies the path to the directory containing binary configuration scripts. These scripts provide configuration information for other software that wants to make use of libraries or include files provided by the software associated with the script.
Note
This style of build configuration has been largely replaced bypkg-config. Consequently, ifpkg-configis supported by the library to which you are linking, it is recommended you usepkg-configinstead of a provided configuration script.- STAGING_BINDIR_NATIVE
Specifies the path to the
/usr/binsubdirectory of the sysroot directory for the build host.- STAGING_DATADIR
Specifies the path to the
/usr/sharesubdirectory of the sysroot directory for the target for which the current recipe is being built (STAGING_DIR_HOST).- STAGING_DATADIR_NATIVE
Specifies the path to the
/usr/sharesubdirectory of the sysroot directory for the build host.- STAGING_DIR
Specifies the path to the top-level sysroots directory (i.e.
${TMPDIR}/sysroots).Note
Recipes should never write files directly under this directory because the OpenEmbedded build system manages the directory automatically. Instead, files should be installed to${D}within your recipe'sdo_installtask and then the OpenEmbedded build system will stage a subset of those files into the sysroot.- STAGING_DIR_HOST
Specifies the path to the primary sysroot directory for which the target is being built. Depending on the type of recipe and the build target, the recipe's value is as follows:
For recipes building for the target machine, the value is "${STAGING_DIR}/${MACHINE}".
For native recipes building for the build host, the value is empty given the assumption that when building for the build host, the build host's own directories should be used.
For native SDK recipes that build for the SDK (
nativesdk), the value is "${STAGING_DIR}/${MULTIMACH_HOST_SYS}".
- STAGING_DIR_NATIVE
Specifies the path to the sysroot directory for the build host.
- STAGING_DIR_TARGET
Specifies the path to the sysroot directory for the target for which the current recipe is being built. In most cases, this path is the
STAGING_DIR_HOST.Some recipes build binaries that can run on the target system but those binaries in turn generate code for another different system (e.g. cross-canadian recipes). Using terminology from GNU, the primary system is referred to as the "HOST" and the secondary, or different, system is referred to as the "TARGET". Thus, the binaries run on the "HOST" system and and generate binaries for the "TARGET" system.
STAGING_DIR_TARGETpoints to the sysroot used for the "TARGET" system.- STAGING_ETCDIR_NATIVE
Specifies the path to the
/etcsubdirectory of the sysroot directory for the build host.- STAGING_EXECPREFIXDIR
Specifies the path to the
/usrsubdirectory of the sysroot directory for the target for which the current recipe is being built (STAGING_DIR_HOST).- STAGING_INCDIR
Specifies the path to the
/usr/includesubdirectory of the sysroot directory for the target for which the current recipe being built (STAGING_DIR_HOST).- STAGING_INCDIR_NATIVE
Specifies the path to the
/usr/includesubdirectory of the sysroot directory for the build host.- STAGING_KERNEL_BUILDDIR
Points to the directory containing the kernel build artifacts. Recipes building software that needs to access kernel build artifacts (e.g.
systemtap-uprobes) can look in the directory specified with theSTAGING_KERNEL_BUILDDIRvariable to find these artifacts after the kernel has been built.- STAGING_KERNEL_DIR
The directory with kernel headers that are required to build out-of-tree modules.
- STAGING_LIBDIR
Specifies the path to the
/usr/libsubdirectory of the sysroot directory for the target for which the current recipe is being built (STAGING_DIR_HOST).- STAGING_LIBDIR_NATIVE
Specifies the path to the
/usr/libsubdirectory of the sysroot directory for the build host.- STAMP
Specifies the base path used to create recipe stamp files. The path to an actual stamp file is constructed by evaluating this string and then appending additional information. Currently, the default assignment for
STAMPas set in themeta/conf/bitbake.conffile is:STAMP = "${STAMPS_DIR}/${MULTIMACH_TARGET_SYS}/${PN}/${EXTENDPE}${PV}-${PR}"See
STAMPS_DIR,MULTIMACH_TARGET_SYS,PN,EXTENDPE,PV, andPRfor related variable information.- STAMPS_DIR
Specifies the base directory in which the OpenEmbedded build system places stamps. The default directory is
${TMPDIR}/stamps.- STRIP
The minimal command and arguments to run
strip, which is used to strip symbols.- SUMMARY
The short (72 characters or less) summary of the binary package for packaging systems such as
opkg,rpmordpkg. By default,SUMMARYis used to define theDESCRIPTIONvariable ifDESCRIPTIONis not set in the recipe.- SVNDIR
The directory in which files checked out of a Subversion system are stored.
- SYSLINUX_DEFAULT_CONSOLE
Specifies the kernel boot default console. If you want to use a console other than the default, set this variable in your recipe as follows where "X" is the console number you want to use:
SYSLINUX_DEFAULT_CONSOLE = "console=ttyX"The
syslinuxclass initially sets this variable to null but then checks for a value later.- SYSLINUX_OPTS
Lists additional options to add to the syslinux file. You need to set this variable in your recipe. If you want to list multiple options, separate the options with a semicolon character (
;).The
syslinuxclass uses this variable to create a set of options.- SYSLINUX_SERIAL
Specifies the alternate serial port or turns it off. To turn off serial, set this variable to an empty string in your recipe. The variable's default value is set in the
syslinuxas follows:SYSLINUX_SERIAL ?= "0 115200"The class checks for and uses the variable as needed.
- SYSLINUX_SPLASH
An
.LSSfile used as the background for the VGA boot menu when you are using the boot menu. You need to set this variable in your recipe.The
syslinuxclass checks for this variable and if found, the OpenEmbedded build system installs the splash screen.- SYSLINUX_SERIAL_TTY
Specifies the alternate console=tty... kernel boot argument. The variable's default value is set in the
syslinuxas follows:SYSLINUX_SERIAL_TTY ?= "console=ttyS0,115200"The class checks for and uses the variable as needed.
- SYSROOT_PREPROCESS_FUNCS
A list of functions to execute after files are staged into the sysroot. These functions are usually used to apply additional processing on the staged files, or to stage additional files.
- SYSTEMD_AUTO_ENABLE
When inheriting the
systemdclass, this variable specifies whether the service you have specified inSYSTEMD_SERVICEshould be started automatically or not. By default, the service is enabled to automatically start at boot time. The default setting is in thesystemdclass as follows:SYSTEMD_AUTO_ENABLE ??= "enable"You can disable the service by setting the variable to "disable".
- SYSTEMD_PACKAGES
When inheriting the
systemdclass, this variable locates the systemd unit files when they are not found in the main recipe's package. By default, theSYSTEMD_PACKAGESvariable is set such that the systemd unit files are assumed to reside in the recipes main package:SYSTEMD_PACKAGES ?= "${PN}"If these unit files are not in this recipe's main package, you need to use
SYSTEMD_PACKAGESto list the package or packages in which the build system can find the systemd unit files.- SYSTEMD_SERVICE
When inheriting the
systemdclass, this variable specifies the systemd service name for a package.When you specify this file in your recipe, use a package name override to indicate the package to which the value applies. Here is an example from the connman recipe:
SYSTEMD_SERVICE_${PN} = "connman.service"- SYSVINIT_ENABLED_GETTYS
When using SysVinit, specifies a space-separated list of the virtual terminals that should be running a getty (allowing login), assuming
USE_VTis not set to "0".The default value for
SYSVINIT_ENABLED_GETTYSis "1" (i.e. only run a getty on the first virtual terminal).
T
- T
This variable points to a directory were BitBake places temporary files, which consist mostly of task logs and scripts, when building a particular recipe. The variable is typically set as follows:
T = "${WORKDIR}/temp"The
WORKDIRis the directory into which BitBake unpacks and builds the recipe. The defaultbitbake.conffile sets this variable.The
Tvariable is not to be confused with theTMPDIRvariable, which points to the root of the directory tree where BitBake places the output of an entire build.- TARGET_ARCH
The target machine's architecture. The OpenEmbedded build system supports many architectures. Here is an example list of architectures supported. This list is by no means complete as the architecture is configurable:
arm i586 x86_64 powerpc powerpc64 mips mipselFor additional information on machine architectures, see the
TUNE_ARCHvariable.- TARGET_AS_ARCH
Specifies architecture-specific assembler flags for the target system.
TARGET_AS_ARCHis initialized fromTUNE_ASARGSby default in the BitBake configuration file (meta/conf/bitbake.conf):TARGET_AS_ARCH = "${TUNE_ASARGS}"- TARGET_CC_ARCH
Specifies architecture-specific C compiler flags for the target system.
TARGET_CC_ARCHis initialized fromTUNE_CCARGSby default.Note
It is a common workaround to appendLDFLAGStoTARGET_CC_ARCHin recipes that build software for the target that would not otherwise respect the exportedLDFLAGSvariable.- TARGET_CC_KERNEL_ARCH
This is a specific kernel compiler flag for a CPU or Application Binary Interface (ABI) tune. The flag is used rarely and only for cases where a userspace
TUNE_CCARGSis not compatible with the kernel compilation. TheTARGET_CC_KERNEL_ARCHvariable allows the kernel (and associated modules) to use a different configuration. See themeta/conf/machine/include/arm/feature-arm-thumb.incfile in the Source Directory for an example.- TARGET_CFLAGS
Specifies the flags to pass to the C compiler when building for the target. When building in the target context,
CFLAGSis set to the value of this variable by default.Additionally, the SDK's environment setup script sets the
CFLAGSvariable in the environment to theTARGET_CFLAGSvalue so that executables built using the SDK also have the flags applied.- TARGET_CPPFLAGS
Specifies the flags to pass to the C pre-processor (i.e. to both the C and the C++ compilers) when building for the target. When building in the target context,
CPPFLAGSis set to the value of this variable by default.Additionally, the SDK's environment setup script sets the
CPPFLAGSvariable in the environment to theTARGET_CPPFLAGSvalue so that executables built using the SDK also have the flags applied.- TARGET_CXXFLAGS
Specifies the flags to pass to the C++ compiler when building for the target. When building in the target context,
CXXFLAGSis set to the value of this variable by default.Additionally, the SDK's environment setup script sets the
CXXFLAGSvariable in the environment to theTARGET_CXXFLAGSvalue so that executables built using the SDK also have the flags applied.- TARGET_FPU
Specifies the method for handling FPU code. For FPU-less targets, which include most ARM CPUs, the variable must be set to "soft". If not, the kernel emulation gets used, which results in a performance penalty.
- TARGET_LD_ARCH
Specifies architecture-specific linker flags for the target system.
TARGET_LD_ARCHis initialized fromTUNE_LDARGSby default in the BitBake configuration file (meta/conf/bitbake.conf):TARGET_LD_ARCH = "${TUNE_LDARGS}"- TARGET_LDFLAGS
Specifies the flags to pass to the linker when building for the target. When building in the target context,
LDFLAGSis set to the value of this variable by default.Additionally, the SDK's environment setup script sets the
LDFLAGSvariable in the environment to theTARGET_LDFLAGSvalue so that executables built using the SDK also have the flags applied.- TARGET_OS
Specifies the target's operating system. The variable can be set to "linux" for
glibc-based systems and to "linux-uclibc" foruclibc. For ARM/EABI targets, there are also "linux-gnueabi" and "linux-uclibc-gnueabi" values possible.- TARGET_PREFIX
Specifies the prefix used for the toolchain binary target tools.
Depending on the type of recipe and the build target,
TARGET_PREFIXis set as follows:For recipes building for the target machine, the value is "${TARGET_SYS}-".
For native recipes, the build system sets the variable to the value of
BUILD_PREFIX.For native SDK recipes (
nativesdk), the build system sets the variable to the value ofSDK_PREFIX.
- TARGET_SYS
Specifies the system, including the architecture and the operating system, for which the build is occurring in the context of the current recipe.
The OpenEmbedded build system automatically sets this variable based on
TARGET_ARCH,TARGET_VENDOR, andTARGET_OSvariables.Note
You do not need to set theTARGET_SYSvariable yourself.Consider these two examples:
Given a native recipe on a 32-bit, x86 machine running Linux, the value is "i686-linux".
Given a recipe being built for a little-endian, MIPS target running Linux, the value might be "mipsel-linux".
- TARGET_VENDOR
Specifies the name of the target vendor.
- TCLIBCAPPEND
Specifies a suffix to be appended onto the
TMPDIRvalue. The suffix identifies thelibcvariant for building. When you are building for multiple variants with the same Build Directory, this mechanism ensures that output for differentlibcvariants is kept separate to avoid potential conflicts.In the
defaultsetup.conffile, the default value ofTCLIBCAPPENDis "-${TCLIBC}". However, distros such as poky, which normally only support onelibcvariant, setTCLIBCAPPENDto "" in their distro configuration file resulting in no suffix being applied.- TCLIBC
Specifies the GNU standard C library (
libc) variant to use during the build process. This variable replacesPOKYLIBC, which is no longer supported.You can select "glibc" or "uclibc".
- TCMODE
Specifies the toolchain selector.
TCMODEcontrols the characteristics of the generated packages and images by telling the OpenEmbedded build system which toolchain profile to use. By default, the OpenEmbedded build system builds its own internal toolchain. The variable's default value is "default", which uses that internal toolchain.Note
IfTCMODEis set to a value other than "default", then it is your responsibility to ensure that the toolchain is compatible with the default toolchain. Using older or newer versions of these components might cause build problems. See the Release Notes for the specific components with which the toolchain must be compatible.The
TCMODEvariable is similar toTCLIBC, which controls the variant of the GNU standard C library (libc) used during the build process:glibcoruclibc.With additional layers, it is possible to use a pre-compiled external toolchain. One example is the Sourcery G++ Toolchain. The support for this toolchain resides in the separate Mentor Graphics®
meta-sourcerylayer at http://github.com/MentorEmbedded/meta-sourcery/.The layer's
READMEfile contains information on how to use the Sourcery G++ Toolchain as an external toolchain. In summary, you must be sure to add the layer to yourbblayers.conffile in front of themetalayer and then set theEXTERNAL_TOOLCHAINvariable in yourlocal.conffile to the location in which you installed the toolchain.The fundamentals used for this example apply to any external toolchain. You can use
meta-sourceryas a template for adding support for other external toolchains.- TEST_EXPORT_DIR
The location the OpenEmbedded build system uses to export tests when the
TEST_EXPORT_ONLYvariable is set to "1".The
TEST_EXPORT_DIRvariable defaults to"${TMPDIR}/testimage/${PN}".- TEST_EXPORT_ONLY
Specifies to export the tests only. Set this variable to "1" if you do not want to run the tests but you want them to be exported in a manner that you to run them outside of the build system.
- TEST_IMAGE
Automatically runs the series of automated tests for images when an image is successfully built.
These tests are written in Python making use of the
unittestmodule, and the majority of them run commands on the target system overssh. You can set this variable to "1" in yourlocal.conffile in the Build Directory to have the OpenEmbedded build system automatically run these tests after an image successfully builds:TEST_IMAGE = "1"For more information on enabling, running, and writing these tests, see the "Performing Automated Runtime Testing" section in the Yocto Project Development Manual and the "
testimage*.bbclass" section.- TEST_LOG_DIR
Holds the SSH log and the boot log for QEMU machines. The
TEST_LOG_DIRvariable defaults to"${WORKDIR}/testimage".Note
Actual test results reside in the task log (log.do_testimage), which is in the${WORKDIR}/temp/directory.- TEST_POWERCONTROL_CMD
For automated hardware testing, specifies the command to use to control the power of the target machine under test. Typically, this command would point to a script that performs the appropriate action (e.g. interacting with a web-enabled power strip). The specified command should expect to receive as the last argument "off", "on" or "cycle" specifying to power off, on, or cycle (power off and then power on) the device, respectively.
- TEST_POWERCONTROL_EXTRA_ARGS
For automated hardware testing, specifies additional arguments to pass through to the command specified in
TEST_POWERCONTROL_CMD. SettingTEST_POWERCONTROL_EXTRA_ARGSis optional. You can use it if you wish, for example, to separate the machine-specific and non-machine-specific parts of the arguments.- TEST_QEMUBOOT_TIMEOUT
The time in seconds allowed for an image to boot before automated runtime tests begin to run against an image. The default timeout period to allow the boot process to reach the login prompt is 500 seconds. You can specify a different value in the
local.conffile.For more information on testing images, see the "Performing Automated Runtime Testing" section in the Yocto Project Development Manual.
- TEST_SERIALCONTROL_CMD
For automated hardware testing, specifies the command to use to connect to the serial console of the target machine under test. This command simply needs to connect to the serial console and forward that connection to standard input and output as any normal terminal program does.
For example, to use the Picocom terminal program on serial device
/dev/ttyUSB0at 115200bps, you would set the variable as follows:TEST_SERIALCONTROL_CMD = "picocom /dev/ttyUSB0 -b 115200"- TEST_SERIALCONTROL_EXTRA_ARGS
For automated hardware testing, specifies additional arguments to pass through to the command specified in
TEST_SERIALCONTROL_CMD. SettingTEST_SERIALCONTROL_EXTRA_ARGSis optional. You can use it if you wish, for example, to separate the machine-specific and non-machine-specific parts of the command.- TEST_SERVER_IP
The IP address of the build machine (host machine). This IP address is usually automatically detected. However, if detection fails, this variable needs to be set to the IP address of the build machine (i.e. where the build is taking place).
Note
TheTEST_SERVER_IPvariable is only used for a small number of tests such as the "smart" test suite, which needs to download packages fromDEPLOY_DIR/rpm.- TEST_TARGET
Specifies the target controller to use when running tests against a test image. The default controller to use is "qemu":
TEST_TARGET = "qemu"A target controller is a class that defines how an image gets deployed on a target and how a target is started. A layer can extend the controllers by adding a module in the layer's
/lib/oeqa/controllersdirectory and by inheriting theBaseTargetclass, which is an abstract class that cannot be used as a value ofTEST_TARGET.You can provide the following arguments with
TEST_TARGET:"qemu" and "QemuTarget": Boots a QEMU image and runs the tests. See the "Enabling Runtime Tests on QEMU" section in the Yocto Project Development Manual for more information.
"simpleremote" and "SimpleRemoteTarget": Runs the tests on target hardware that is already up and running. The hardware can be on the network or it can be a device running an image on QEMU. You must also set
TEST_TARGET_IPwhen you use "simpleremote" or "SimpleRemoteTarget".Note
This argument is defined inmeta/lib/oeqa/targetcontrol.py. The small caps names are kept for compatibility reasons."GummibootTarget": Automatically deploys and runs tests on an EFI-enabled machine that has a master image installed.
Note
This argument is defined inmeta/lib/oeqa/controllers/masterimage.py.
For information on running tests on hardware, see the "Enabling Runtime Tests on Hardware" section in the Yocto Project Development Manual.
- TEST_TARGET_IP
The IP address of your hardware under test. The
TEST_TARGET_IPvariable has no effect whenTEST_TARGETis set to "qemu".When you specify the IP address, you can also include a port. Here is an example:
TEST_TARGET_IP = "192.168.1.4:2201"Specifying a port is useful when SSH is started on a non-standard port or in cases when your hardware under test is behind a firewall or network that is not directly accessible from your host and you need to do port address translation.
- TEST_SUITES
An ordered list of tests (modules) to run against an image when performing automated runtime testing.
The OpenEmbedded build system provides a core set of tests that can be used against images.
Note
Currently, there is only support for running these tests under QEMU.Tests include
ping,ssh,dfamong others. You can add your own tests to the list of tests by appendingTEST_SUITESas follows:TEST_SUITES_append = "mytest"Alternatively, you can provide the "auto" option to have all applicable tests run against the image.
TEST_SUITES_append = " auto"Using this option causes the build system to automatically run tests that are applicable to the image. Tests that are not applicable are skipped.
The order in which tests are run is important. Tests that depend on another test must appear later in the list than the test on which they depend. For example, if you append the list of tests with two tests (
test_Aandtest_B) wheretest_Bis dependent ontest_A, then you must order the tests as follows:TEST_SUITES = " test_A test_B"For more information on testing images, see the "Performing Automated Runtime Testing" section in the Yocto Project Development Manual.
- THISDIR
The directory in which the file BitBake is currently parsing is located. Do not manually set this variable.
- TIME
The time the build was started. Times appear using the hour, minute, and second (HMS) format (e.g. "140159" for one minute and fifty-nine seconds past 1400 hours).
- TMPDIR
This variable is the base directory the OpenEmbedded build system uses for all build output and intermediate files (other than the shared state cache). By default, the
TMPDIRvariable points totmpwithin the Build Directory.If you want to establish this directory in a location other than the default, you can uncomment and edit the following statement in the
conf/local.conffile in the Source Directory:#TMPDIR = "${TOPDIR}/tmp"An example use for this scenario is to set
TMPDIRto a local disk, which does not use NFS, while having the Build Directory use NFS.The filesystem used by
TMPDIRmust have standard filesystem semantics (i.e. mixed-case files are unique, POSIX file locking, and persistent inodes). Due to various issues with NFS and bugs in some implementations, NFS does not meet this minimum requirement. Consequently,TMPDIRcannot be on NFS.- TOOLCHAIN_HOST_TASK
This variable lists packages the OpenEmbedded build system uses when building an SDK, which contains a cross-development environment. The packages specified by this variable are part of the toolchain set that runs on the
SDKMACHINE, and each package should usually have the prefixnativesdk-. For example, consider the following command when building an SDK:$ bitbake -c populate_sdkimagenameIn this case, a default list of packages is set in this variable, but you can add additional packages to the list.
For background information on cross-development toolchains in the Yocto Project development environment, see the "Cross-Development Toolchain Generation" section. For information on setting up a cross-development environment, see the Yocto Project Software Development Kit (SDK) Developer's Guide.
- TOOLCHAIN_OUTPUTNAME
This variable defines the name used for the toolchain output. The
populate_sdk_baseclass sets theTOOLCHAIN_OUTPUTNAMEvariable as follows:TOOLCHAIN_OUTPUTNAME ?= "${SDK_NAME}-toolchain-${SDK_VERSION}"See the
SDK_NAMEandSDK_VERSIONvariables for additional information.- TOOLCHAIN_TARGET_TASK
This variable lists packages the OpenEmbedded build system uses when it creates the target part of an SDK (i.e. the part built for the target hardware), which includes libraries and headers.
For background information on cross-development toolchains in the Yocto Project development environment, see the "Cross-Development Toolchain Generation" section. For information on setting up a cross-development environment, see the Yocto Project Software Development Kit (SDK) Developer's Guide.
- TOPDIR
The top-level Build Directory. BitBake automatically sets this variable when you initialize your build environment using either
oe-init-build-envoroe-init-build-env-memres.- TRANSLATED_TARGET_ARCH
A sanitized version of
TARGET_ARCH. This variable is used where the architecture is needed in a value where underscores are not allowed, for example within package filenames. In this case, dash characters replace any underscore characters used in TARGET_ARCH.Do not edit this variable.
- TUNE_ARCH
The GNU canonical architecture for a specific architecture (i.e.
arm,armeb,mips,mips64, and so forth). BitBake uses this value to setup configuration.TUNE_ARCHdefinitions are specific to a given architecture. The definitions can be a single static definition, or can be dynamically adjusted. You can see details for a given CPU family by looking at the architecture'sREADMEfile. For example, themeta/conf/machine/include/mips/READMEfile in the Source Directory provides information forTUNE_ARCHspecific to themipsarchitecture.TUNE_ARCHis tied closely toTARGET_ARCH, which defines the target machine's architecture. The BitBake configuration file (meta/conf/bitbake.conf) setsTARGET_ARCHas follows:TARGET_ARCH = "${TUNE_ARCH}"The following list, which is by no means complete since architectures are configurable, shows supported machine architectures:
arm i586 x86_64 powerpc powerpc64 mips mipsel- TUNE_ASARGS
Specifies architecture-specific assembler flags for the target system. The set of flags is based on the selected tune features.
TUNE_ASARGSis set using the tune include files, which are typically undermeta/conf/machine/include/and are influenced throughTUNE_FEATURES. For example, themeta/conf/machine/include/x86/arch-x86.incfile defines the flags for the x86 architecture as follows:TUNE_ASARGS += "${@bb.utils.contains("TUNE_FEATURES", "mx32", "-x32", "", d)}"Note
Board Support Packages (BSPs) select the tune. The selected tune, in turn, affects the tune variables themselves (i.e. the tune can supply its own set of flags).- TUNE_CCARGS
Specifies architecture-specific C compiler flags for the target system. The set of flags is based on the selected tune features.
TUNE_CCARGSis set using the tune include files, which are typically undermeta/conf/machine/include/and are influenced throughTUNE_FEATURES.Note
Board Support Packages (BSPs) select the tune. The selected tune, in turn, affects the tune variables themselves (i.e. the tune can supply its own set of flags).- TUNE_LDARGS
Specifies architecture-specific linker flags for the target system. The set of flags is based on the selected tune features.
TUNE_LDARGSis set using the tune include files, which are typically undermeta/conf/machine/include/and are influenced throughTUNE_FEATURES. For example, themeta/conf/machine/include/x86/arch-x86.incfile defines the flags for the x86 architecture as follows:TUNE_LDARGS += "${@bb.utils.contains("TUNE_FEATURES", "mx32", "-m elf32_x86_64", "", d)}"Note
Board Support Packages (BSPs) select the tune. The selected tune, in turn, affects the tune variables themselves (i.e. the tune can supply its own set of flags).- TUNE_FEATURES
Features used to "tune" a compiler for optimal use given a specific processor. The features are defined within the tune files and allow arguments (i.e.
TUNE_*ARGS) to be dynamically generated based on the features.The OpenEmbedded build system verifies the features to be sure they are not conflicting and that they are supported.
The BitBake configuration file (
meta/conf/bitbake.conf) definesTUNE_FEATURESas follows:TUNE_FEATURES ??= "${TUNE_FEATURES_tune-${DEFAULTTUNE}}"See the
DEFAULTTUNEvariable for more information.- TUNE_PKGARCH
The package architecture understood by the packaging system to define the architecture, ABI, and tuning of output packages. The specific tune is defined using the "_tune" override as follows:
TUNE_PKGARCH_tune-tune= "tune"These tune-specific package architectures are defined in the machine include files. Here is an example of the "core2-32" tuning as used in the
meta/conf/machine/include/tune-core2.incfile:TUNE_PKGARCH_tune-core2-32 = "core2-32"- TUNEABI
An underlying Application Binary Interface (ABI) used by a particular tuning in a given toolchain layer. Providers that use prebuilt libraries can use the
TUNEABI,TUNEABI_OVERRIDE, andTUNEABI_WHITELISTvariables to check compatibility of tunings against their selection of libraries.If
TUNEABIis undefined, then every tuning is allowed. See thesanityclass to see how the variable is used.- TUNEABI_OVERRIDE
If set, the OpenEmbedded system ignores the
TUNEABI_WHITELISTvariable. Providers that use prebuilt libraries can use theTUNEABI_OVERRIDE,TUNEABI_WHITELIST, andTUNEABIvariables to check compatibility of a tuning against their selection of libraries.See the
sanityclass to see how the variable is used.- TUNEABI_WHITELIST
A whitelist of permissible
TUNEABIvalues. IfTUNEABI_WHITELISTis not set, all tunes are allowed. Providers that use prebuilt libraries can use theTUNEABI_WHITELIST,TUNEABI_OVERRIDE, andTUNEABIvariables to check compatibility of a tuning against their selection of libraries.See the
sanityclass to see how the variable is used.- TUNECONFLICTS[
feature]¶ Specifies CPU or Application Binary Interface (ABI) tuning features that conflict with
feature.Known tuning conflicts are specified in the machine include files in the Source Directory. Here is an example from the
meta/conf/machine/include/mips/arch-mips.incinclude file that lists the "o32" and "n64" features as conflicting with the "n32" feature:TUNECONFLICTS[n32] = "o32 n64"- TUNEVALID[
feature]¶ Specifies a valid CPU or Application Binary Interface (ABI) tuning feature. The specified feature is stored as a flag. Valid features are specified in the machine include files (e.g.
meta/conf/machine/include/arm/arch-arm.inc). Here is an example from that file:TUNEVALID[bigendian] = "Enable big-endian mode."See the machine include files in the Source Directory for these features.
U
- UBOOT_CONFIG
Configures the
UBOOT_MACHINEand can also defineIMAGE_FSTYPESfor individual cases.Following is an example from the
meta-fsl-armlayer.UBOOT_CONFIG ??= "sd" UBOOT_CONFIG[sd] = "mx6qsabreauto_config,sdcard" UBOOT_CONFIG[eimnor] = "mx6qsabreauto_eimnor_config" UBOOT_CONFIG[nand] = "mx6qsabreauto_nand_config,ubifs" UBOOT_CONFIG[spinor] = "mx6qsabreauto_spinor_config"In this example, "sd" is selected as the configuration of the possible four for the
UBOOT_MACHINE. The "sd" configuration defines "mx6qsabreauto_config" as the value forUBOOT_MACHINE, while the "sdcard" specifies theIMAGE_FSTYPESto use for the U-boot image.For more information on how the
UBOOT_CONFIGis handled, see theuboot-configclass.- UBOOT_ENTRYPOINT
Specifies the entry point for the U-Boot image. During U-Boot image creation, the
UBOOT_ENTRYPOINTvariable is passed as a command-line parameter to theuboot-mkimageutility.- UBOOT_LOADADDRESS
Specifies the load address for the U-Boot image. During U-Boot image creation, the
UBOOT_LOADADDRESSvariable is passed as a command-line parameter to theuboot-mkimageutility.- UBOOT_LOCALVERSION
Appends a string to the name of the local version of the U-Boot image. For example, assuming the version of the U-Boot image built was "2013.10, the full version string reported by U-Boot would be "2013.10-yocto" given the following statement:
UBOOT_LOCALVERSION = "-yocto"- UBOOT_MACHINE
Specifies the value passed on the
makecommand line when building a U-Boot image. The value indicates the target platform configuration. You typically set this variable from the machine configuration file (i.e.conf/machine/).machine_name.confPlease see the "Selection of Processor Architecture and Board Type" section in the U-Boot README for valid values for this variable.
- UBOOT_MAKE_TARGET
Specifies the target called in the
Makefile. The default target is "all".- UBOOT_SUFFIX
Points to the generated U-Boot extension. For example,
u-boot.sbhas a.sbextension.The default U-Boot extension is
.bin- UBOOT_TARGET
Specifies the target used for building U-Boot. The target is passed directly as part of the "make" command (e.g. SPL and AIS). If you do not specifically set this variable, the OpenEmbedded build process passes and uses "all" for the target during the U-Boot building process.
- UNKNOWN_CONFIGURE_WHITELIST
Specifies a list of options that, if reported by the configure script as being invalid, should not generate a warning during the
do_configuretask. Normally, invalid configure options are simply not passed to the configure script (e.g. should be removed fromEXTRA_OECONF). However, common options, for example, exist that are passed to all configure scripts at a class level that might not be valid for some configure scripts. It follows that no benefit exists in seeing a warning about these options. For these cases, the options are added toUNKNOWN_CONFIGURE_WHITELIST.The configure arguments check that uses
UNKNOWN_CONFIGURE_WHITELISTis part of theinsaneclass and is only enabled if the recipe inherits theautotoolsclass.- UPDATERCPN
For recipes inheriting the
update-rc.dclass,UPDATERCPNspecifies the package that contains the initscript that is to be enabled.The default value is "${PN}". Given that almost all recipes that install initscripts package them in the main package for the recipe, you rarely need to set this variable in individual recipes.
- UPSTREAM_CHECK_GITTAGREGEX
When the
distrodataclass is enabled globally, you can perform a per-recipe check for what the latest upstream source code version is by callingbitbake -c checkpkgrecipe. If the recipe source code is provided from Git repositories, the OpenEmbedded build system determines the latest upstream version by picking the latest tag from the list of all repository tags. You can use theUPSTREAM_CHECK_GITTAGREGEXvariable to provide a regular expression to filter only the relevant tags should the default filter not work correctly.UPSTREAM_CHECK_GITTAGREGEX = "git_tag_regex"- UPSTREAM_CHECK_REGEX
When the
distrodataclass is enabled globally, use theUPSTREAM_CHECK_REGEXvariable to specify a different regular expression instead of the default one when the package checking system is parsing the page found usingUPSTREAM_CHECK_URI.UPSTREAM_CHECK_REGEX = "package_regex"- UPSTREAM_CHECK_URI
When the
distrodataclass is enabled globally, you can perform a per-recipe check for what the latest upstream source code version is by callingbitbake -c checkpkgrecipe. If the source code is provided from tarballs, the latest version is determined by fetching the directory listing where the tarball is and attempting to find a later tarball. When this approach does not work, you can useUPSTREAM_CHECK_URIto provide a different URI that contains the link to the latest tarball.UPSTREAM_CHECK_URI = "recipe_url"- USE_DEVFS
Determines if
devtmpfsis used for/devpopulation. The default value used forUSE_DEVFSis "1" when no value is specifically set. Typically, you would setUSE_DEVFSto "0" for a statically populated/devdirectory.See the "Selecting a Device Manager" section in the Yocto Project Development Manual for information on how to use this variable.
- USE_VT
When using SysVinit, determines whether or not to run a getty on any virtual terminals in order to enable logging in through those terminals.
The default value used for
USE_VTis "1" when no default value is specifically set. Typically, you would setUSE_VTto "0" in the machine configuration file for machines that do not have a graphical display attached and therefore do not need virtual terminal functionality.- USER_CLASSES
A list of classes to globally inherit. These classes are used by the OpenEmbedded build system to enable extra features (e.g.
buildstats,image-mklibs, and so forth).The default list is set in your
local.conffile:USER_CLASSES ?= "buildstats image-mklibs image-prelink"For more information, see
meta-poky/conf/local.conf.samplein the Source Directory.- USERADD_ERROR_DYNAMIC
Forces the OpenEmbedded build system to produce an error if the user identification (
uid) and group identification (gid) values are not defined infiles/passwdandfiles/groupfiles.The default behavior for the build system is to dynamically apply
uidandgidvalues. Consequently, theUSERADD_ERROR_DYNAMICvariable is by default not set. If you plan on using statically assignedgidanduidvalues, you should set theUSERADD_ERROR_DYNAMICvariable in yourlocal.conffile as follows:USERADD_ERROR_DYNAMIC = "1"Overriding the default behavior implies you are going to also take steps to set static
uidandgidvalues through use of theUSERADDEXTENSION,USERADD_UID_TABLES, andUSERADD_GID_TABLESvariables.- USERADD_GID_TABLES
Specifies a password file to use for obtaining static group identification (
gid) values when the OpenEmbedded build system adds a group to the system during package installation.When applying static group identification (
gid) values, the OpenEmbedded build system looks inBBPATHfor afiles/groupfile and then applies thoseuidvalues. Set the variable as follows in yourlocal.conffile:USERADD_GID_TABLES = "files/group"Note
Setting theUSERADDEXTENSIONvariable to "useradd-staticids" causes the build system to use staticgidvalues.- USERADD_PACKAGES
When inheriting the
useraddclass, this variable specifies the individual packages within the recipe that require users and/or groups to be added.You must set this variable if the recipe inherits the class. For example, the following enables adding a user for the main package in a recipe:
USERADD_PACKAGES = "${PN}"Note
If follows that if you are going to use theUSERADD_PACKAGESvariable, you need to set one or more of theUSERADD_PARAM,GROUPADD_PARAM, orGROUPMEMS_PARAMvariables.- USERADD_PARAM
When inheriting the
useraddclass, this variable specifies for a package what parameters should be passed to theuseraddcommand if you wish to add a user to the system when the package is installed.Here is an example from the
dbusrecipe:USERADD_PARAM_${PN} = "--system --home ${localstatedir}/lib/dbus \ --no-create-home --shell /bin/false \ --user-group messagebus"For information on the standard Linux shell command
useradd, see http://linux.die.net/man/8/useradd.- USERADD_UID_TABLES
Specifies a password file to use for obtaining static user identification (
uid) values when the OpenEmbedded build system adds a user to the system during package installation.When applying static user identification (
uid) values, the OpenEmbedded build system looks inBBPATHfor afiles/passwdfile and then applies thoseuidvalues. Set the variable as follows in yourlocal.conffile:USERADD_UID_TABLES = "files/passwd"Note
Setting theUSERADDEXTENSIONvariable to "useradd-staticids" causes the build system to use staticuidvalues.- USERADDEXTENSION
When set to "useradd-staticids", causes the OpenEmbedded build system to base all user and group additions on a static
passwdandgroupfiles found inBBPATH.To use static user identification (
uid) and group identification (gid) values, set the variable as follows in yourlocal.conffile:USERADDEXTENSION = "useradd-staticids"Note
Setting this variable to use staticuidandgidvalues causes the OpenEmbedded build system to employ theuseradd-staticidsclass.If you use static
uidandgidinformation, you must also specify thefiles/passwdandfiles/groupfiles by setting theUSERADD_UID_TABLESandUSERADD_GID_TABLESvariables. Additionally, you should also set theUSERADD_ERROR_DYNAMICvariable.
W
- WARN_QA
Specifies the quality assurance checks whose failures are reported as warnings by the OpenEmbedded build system. You set this variable in your distribution configuration file. For a list of the checks you can control with this variable, see the "
insane.bbclass" section.- WORKDIR
The pathname of the work directory in which the OpenEmbedded build system builds a recipe. This directory is located within the
TMPDIRdirectory structure and is specific to the recipe being built and the system for which it is being built.The
WORKDIRdirectory is defined as follows:${TMPDIR}/work/${MULTIMACH_TARGET_SYS}/${PN}/${EXTENDPE}${PV}-${PR}The actual directory depends on several things:
As an example, assume a Source Directory top-level folder name
poky, a default Build Directory atpoky/build, and aqemux86-poky-linuxmachine target system. Furthermore, suppose your recipe is namedfoo_1.3.0-r0.bb. In this case, the work directory the build system uses to build the package would be as follows:poky/build/tmp/work/qemux86-poky-linux/foo/1.3.0-r0
X
- XSERVER
Specifies the packages that should be installed to provide an X server and drivers for the current machine, assuming your image directly includes
packagegroup-core-x11-xserveror, perhaps indirectly, includes "x11-base" inIMAGE_FEATURES.The default value of
XSERVER, if not specified in the machine configuration, is "xserver-xorg xf86-video-fbdev xf86-input-evdev".
Chapter 30. Variable Context
While you can use most variables in almost any context such as
.conf, .bbclass,
.inc, and .bb files,
some variables are often associated with a particular locality or context.
This chapter describes some common associations.
30.1. Configuration
The following subsections provide lists of variables whose context is configuration: distribution, machine, and local.
30.1.1. Distribution (Distro)
This section lists variables whose configuration context is the distribution, or distro.
30.1.3. Local
This section lists variables whose configuration context is the
local configuration through the local.conf
file.
30.2. Recipes
The following subsections provide lists of variables whose context is recipes: required, dependencies, path, and extra build information.
30.2.1. Required
This section lists variables that are required for recipes.
SRC_URI- used in recipes that fetch local or remote files.
30.2.4. Extra Build Information
This section lists variables that define extra build information for recipes.
Chapter 31. FAQ
31.1. | How does Poky differ from OpenEmbedded? |
The term "Poky" refers to the specific reference build system that the Yocto Project provides. Poky is based on OE-Core and BitBake. Thus, the generic term used here for the build system is the "OpenEmbedded build system." Development in the Yocto Project using Poky is closely tied to OpenEmbedded, with changes always being merged to OE-Core or BitBake first before being pulled back into Poky. This practice benefits both projects immediately. | |
31.2. | My development system does not meet the required Git, tar, and Python versions. In particular, I do not have Python 2.7.3 or greater, or I do have Python 3.x, which is specifically not supported by the Yocto Project. Can I still use the Yocto Project? |
You can get the required tools on your host development system a couple different ways (i.e. building a tarball or downloading a tarball). See the "Required Git, tar, and Python Versions" section for steps on how to update your build tools. | |
31.3. | How can you claim Poky / OpenEmbedded-Core is stable? |
There are three areas that help with stability;
| |
31.4. | How do I get support for my board added to the Yocto Project? |
Support for an additional board is added by creating a Board Support Package (BSP) layer for it. For more information on how to create a BSP layer, see the "Understanding and Creating Layers" section in the Yocto Project Development Manual and the Yocto Project Board Support Package (BSP) Developer's Guide. Usually, if the board is not completely exotic, adding support in the Yocto Project is fairly straightforward. | |
31.5. | Are there any products built using the OpenEmbedded build system? |
The software running on the Vernier LabQuest is built using the OpenEmbedded build system. See the Vernier LabQuest website for more information. There are a number of pre-production devices using the OpenEmbedded build system and the Yocto Project team announces them as soon as they are released. | |
31.6. | What does the OpenEmbedded build system produce as output? |
Because you can use the same set of recipes to create output of various formats, the output of an OpenEmbedded build depends on how you start it. Usually, the output is a flashable image ready for the target device. | |
31.7. | How do I add my package to the Yocto Project? |
To add a package, you need to create a BitBake recipe. For information on how to create a BitBake recipe, see the "Writing a New Recipe" in the Yocto Project Development Manual. | |
31.8. | Do I have to reflash my entire board with a new Yocto Project image when recompiling a package? |
The OpenEmbedded build system can build packages in various
formats such as IPK for OPKG, Debian package
( | |
31.9. |
I see the error ' |
You are probably running the build on an NTFS filesystem.
Use | |
31.10. |
I see lots of 404 responses for files on
|
Nothing is wrong. The OpenEmbedded build system checks any configured source mirrors before downloading from the upstream sources. The build system does this searching for both source archives and pre-checked out versions of SCM-managed software. These checks help in large installations because it can reduce load on the SCM servers themselves. The address above is one of the default mirrors configured into the build system. Consequently, if an upstream source disappears, the team can place sources there so builds continue to work. | |
31.11. | I have machine-specific data in a package for one machine only but the package is being marked as machine-specific in all cases, how do I prevent this? |
Set | |
31.12. | I'm behind a firewall and need to use a proxy server. How do I do that? |
Most source fetching by the OpenEmbedded build system is done
by
Following is the applicable code for setting various proxy
types in the
# You can set the default proxies for Wget to use for http, https, and ftp.
# They will override the value in the environment.
#https_proxy = http://proxy.yoyodyne.com:18023/
#http_proxy = http://proxy.yoyodyne.com:18023/
#ftp_proxy = http://proxy.yoyodyne.com:18023/
# If you do not want to use proxy at all, set this to off.
#use_proxy = on
The Yocto Project also includes a
| |
31.13. |
What’s the difference between |
The | |
31.14. | I'm seeing random build failures. Help?! |
If the same build is failing in totally different and random ways, the most likely explanation is:
The OpenEmbedded build system processes a massive amount of data that causes lots of network, disk and CPU activity and is sensitive to even single-bit failures in any of these areas. True random failures have always been traced back to hardware or virtualization issues. | |
31.15. |
When I try to build a native recipe, the build fails with |
If you get an error message that indicates GNU
#error GNU libiconv not in use but included iconv.h is from libiconv
If you find a previously installed file, you should either uninstall it or temporarily rename it and try the build again.
This issue is just a single manifestation of "system
leakage" issues caused when the OpenEmbedded build system
finds and uses previously installed files during a native
build.
This type of issue might not be limited to
| |
31.16. | What do we need to ship for license compliance? |
This is a difficult question and you need to consult your lawyer for the answer for your specific case. It is worth bearing in mind that for GPL compliance, there needs to be enough information shipped to allow someone else to rebuild and produce the same end result you are shipping. This means sharing the source code, any patches applied to it, and also any configuration information about how that package was configured and built. You can find more information on licensing in the "Licensing" and "Maintaining Open Source License Compliance During Your Product's Lifecycle" sections, both of which are in the Yocto Project Development Manual. | |
31.17. | How do I disable the cursor on my touchscreen device? |
You need to create a form factor file as described in the
"Miscellaneous BSP-Specific Recipe Files"
section in the Yocto Project Board Support Packages (BSP)
Developer's Guide.
Set the
HAVE_TOUCHSCREEN=1
| |
31.18. | How do I make sure connected network interfaces are brought up by default? |
The default interfaces file provided by the netbase recipe does not automatically bring up network interfaces. Therefore, you will need to add a BSP-specific netbase that includes an interfaces file. See the "Miscellaneous BSP-Specific Recipe Files" section in the Yocto Project Board Support Packages (BSP) Developer's Guide for information on creating these types of miscellaneous recipe files. For example, add the following files to your layer:
meta-MACHINE/recipes-bsp/netbase/netbase/MACHINE/interfaces
meta-MACHINE/recipes-bsp/netbase/netbase_5.0.bbappend
| |
31.19. | How do I create images with more free space? |
By default, the OpenEmbedded build system creates images that are 1.3 times the size of the populated root filesystem. To affect the image size, you need to set various configurations:
| |
31.20. | Why don't you support directories with spaces in the pathnames? |
The Yocto Project team has tried to do this before but too
many of the tools the OpenEmbedded build system depends on,
such as | |
31.21. | How do I use an external toolchain? |
The toolchain configuration is very flexible and customizable.
It is primarily controlled with the
The default value of
In addition to the toolchain configuration, you also need a
corresponding toolchain recipe file.
This recipe file needs to package up any pre-built objects in
the toolchain such as | |
31.22. | How does the OpenEmbedded build system obtain source code and will it work behind my firewall or proxy server? |
The way the build system obtains source code is highly configurable. You can setup the build system to get source code in most environments if HTTP transport is available.
When the build system searches for source code, it first
tries the local download directory.
If that location fails, Poky tries
Assuming your distribution is "poky", the OpenEmbedded build
system uses the Yocto Project source
As an example, you could add a specific server for the
build system to attempt before any others by adding something
like the following to the
PREMIRRORS_prepend = "\
git://.*/.* http://www.yoctoproject.org/sources/ \n \
ftp://.*/.* http://www.yoctoproject.org/sources/ \n \
http://.*/.* http://www.yoctoproject.org/sources/ \n \
https://.*/.* http://www.yoctoproject.org/sources/ \n"
These changes cause the build system to intercept Git, FTP,
HTTP, and HTTPS requests and direct them to the
Aside from the previous technique, these options also exist:
BB_NO_NETWORK = "1"
This statement tells BitBake to issue an error instead of trying to access the Internet. This technique is useful if you want to ensure code builds only from local sources. Here is another technique:
BB_FETCH_PREMIRRORONLY = "1"
This statement limits the build system to pulling source
from the Here is another technique:
BB_GENERATE_MIRROR_TARBALLS = "1"
This statement tells the build system to generate mirror tarballs. This technique is useful if you want to create a mirror server. If not, however, the technique can simply waste time during the build.
Finally, consider an example where you are behind an
HTTP-only firewall.
You could make the following changes to the
PREMIRRORS_prepend = "\
ftp://.*/.* http://www.yoctoproject.org/sources/ \n \
http://.*/.* http://www.yoctoproject.org/sources/ \n \
https://.*/.* http://www.yoctoproject.org/sources/ \n"
BB_FETCH_PREMIRRORONLY = "1"
These changes would cause the build system to successfully
fetch source over HTTP and any network accesses to anything
other than the
The build system also honors the standard shell environment
variables NoteYou can find more information on the "Working Behind a Network Proxy" Wiki page. | |
31.23. | Can I get rid of build output so I can start over? |
Yes - you can easily do this.
When you use BitBake to build an image, all the build output
goes into the directory created when you run the
build environment setup script (i.e.
Within the Build Directory, is the | |
31.24. |
Why do |
Executables and libraries might need to be used from a directory other than the directory into which they were initially installed. Complicating this situation is the fact that sometimes these executables and libraries are compiled with the expectation of being run from that initial installation target directory. If this is the case, moving them causes problems.
This scenario is a fundamental problem for package maintainers
of mainstream Linux distributions as well as for the
OpenEmbedded build system.
As such, a well-established solution exists.
Makefiles, Autotools configuration scripts, and other build
systems are expected to respect environment variables such as
When the OpenEmbedded build system uses a recipe to build a
target-architecture program (i.e. one that is intended for
inclusion on the image being built), that program eventually
runs from the root file system of that image.
Thus, the build system provides a value of "/usr/bin" for
Meanwhile, NoteDue to these lengthy examples, the paths are artificially broken across lines for readability.
/home/maxtothemax/poky-bootchart2/build/tmp/work/i586-poky-linux/zlib/
1.2.8-r0/sysroot-destdir/usr/bin
/home/maxtothemax/poky-bootchart2/build/tmp/work/x86_64-linux/
zlib-native/1.2.8-r0/sysroot-destdir/home/maxtothemax/poky-bootchart2/
build/tmp/sysroots/x86_64-linux/usr/bin
Even if the paths look unusual, they both are correct -
the first for a target and the second for a native recipe.
These paths are a consequence of the
| |
31.25. |
The files provided by my |
This situation results when a build system does
not recognize the environment variables supplied to it by
BitBake.
The incident that prompted this FAQ entry involved a Makefile
that used an environment variable named
|
Chapter 32. Contributing to the Yocto Project
32.1. Introduction
The Yocto Project team is happy for people to experiment with the Yocto Project. A number of places exist to find help if you run into difficulties or find bugs. To find out how to download source code, see the "Yocto Project Release" section in the Yocto Project Development Manual.
32.2. Tracking Bugs
If you find problems with the Yocto Project, you should report them using the Bugzilla application at http://bugzilla.yoctoproject.org.
32.3. Mailing lists
A number of mailing lists maintained by the Yocto Project exist as well as related OpenEmbedded mailing lists for discussion, patch submission and announcements. To subscribe to one of the following mailing lists, click on the appropriate URL in the following list and follow the instructions:
http://lists.yoctoproject.org/listinfo/yocto - General Yocto Project discussion mailing list.
http://lists.openembedded.org/mailman/listinfo/openembedded-core - Discussion mailing list about OpenEmbedded-Core (the core metadata).
http://lists.openembedded.org/mailman/listinfo/openembedded-devel - Discussion mailing list about OpenEmbedded.
http://lists.openembedded.org/mailman/listinfo/bitbake-devel - Discussion mailing list about the BitBake build tool.
http://lists.yoctoproject.org/listinfo/poky - Discussion mailing list about Poky.
http://lists.yoctoproject.org/listinfo/yocto-announce - Mailing list to receive official Yocto Project release and milestone announcements.
For more Yocto Project-related mailing lists, see the Yocto Project community mailing lists page here.
32.4. Internet Relay Chat (IRC)
Two IRC channels on freenode are available for the Yocto Project and Poky discussions:
#yocto#poky
32.5. Links
Here is a list of resources you will find helpful:
The Yocto Project website: The home site for the Yocto Project.
OpenEmbedded: The upstream, generic, embedded distribution used as the basis for the build system in the Yocto Project. Poky derives from and contributes back to the OpenEmbedded project.
BitBake: The tool used to process metadata.
For more links, see the "Other Information" section in the Yocto Project Development Manual.
32.6. Contributions
The Yocto Project gladly accepts contributions. You can submit changes to the project either by creating and sending pull requests, or by submitting patches through email. For information on how to do both as well as information on how to identify the maintainer for each area of code, see the "How to Submit a Change" section in the Yocto Project Development Manual.
 |
Chapter 33. Introduction
Toaster is a web interface to the Yocto Project's OpenEmbedded build system. The interface enables you to configure and run your builds. Information about builds is collected and stored in a database. You can use Toaster to configure and start builds on multiple remote build servers.
33.1. Toaster Features
Toaster allows you to configure and run builds, and it provides extensive information about the build process.
Configure and Run Builds: You can use the Toaster web interface to configure and start your builds. Builds started using the Toaster web interface are organized into projects. When you create a project, you are asked to select a release, or version of the build system you want to use for the project builds. As shipped, Toaster supports Yocto Project releases 1.8 and beyond. With the Toaster web interface, you can:
Browse layers listed in the various layer sources that are available in your project (e.g. the OpenEmbedded Metadata Index at http://layers.openembedded.org/layerindex/).
Browse images, recipes, and machines provided by those layers.
Import your own layers for building.
Add and remove layers from your configuration.
Set configuration variables.
Select a target or multiple targets to build.
Start your builds.
Toaster also allows you to configure and run your builds from the command line, and switch between the command line and the web interface at any time. Builds started from the command line appear within a special Toaster project called "Command line builds".
Information About the Build Process: Toaster also records extensive information about your builds. Toaster collects data for builds you start from the web interface and from the command line as long as Toaster is running.
Note
You must start Toaster before the build or it will not collect build data.With Toaster you can:
See what was built (recipes and packages) and what packages were installed into your final image.
Browse the directory structure of your image.
See the value of all variables in your build configuration, and which files set each value.
Examine error, warning, and trace messages to aid in debugging.
See information about the BitBake tasks executed and reused during your build, including those that used shared state.
See dependency relationships between recipes, packages, and tasks.
See performance information such as build time, task time, CPU usage, and disk I/O.
33.2. Installation Options
You can set Toaster up to run as a local instance or as a shared hosted service.
When Toaster is set up as a local instance, all the components reside on a single build host. Fundamentally, a local instance of Toaster is suited for a single user developing on a single build host.
 |
Toaster as a hosted service is suited for multiple users developing across several build hosts. When Toaster is set up as a hosted service, its components can be spread across several machines:
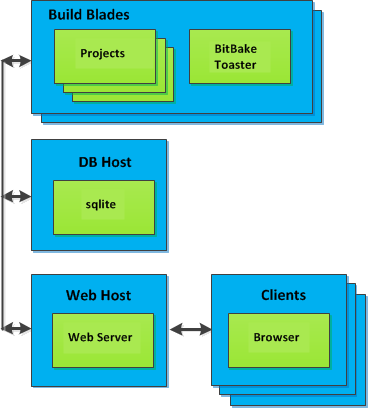 |
Chapter 34. Preparing to Use Toaster
This chapter describes how you need to prepare your system in order to use Toaster.
34.1. Setting Up the Basic System Requirements
Before you can use Toaster, you need to first set up your build system to run the Yocto Project. To do this, follow the instructions in the "The Build Host Packages" and "Yocto Project Release" sections in the Yocto Project Quick Start.
34.2. Establishing Toaster System Dependencies
Toaster requires extra Python dependencies in order to run.
A Toaster requirements file named
toaster-requirements.txt defines the
Python dependencies.
The requirements file is located in the
bitbake directory, which is located in the
root directory of the
Source Directory
(e.g. poky/bitbake/toaster-requirements.txt).
The dependencies appear in a pip,
install-compatible format.
34.2.1. Set Up a Python Virtual Environment
Set up a Python virtual environment that allows you to maintain a dedicated Python executable and its own set of installed modules. Doing so separates the executable from Python and the modules provided by the operating system. This separation avoids any version conflicts.
Note
Creating a virtual environment is not absolutely necessary. However, doing so is highly recommended.
Follow these steps to set up your virtual environment. These steps assume a Ubuntu distribution:
Install
virtualenv: Install the supportedpython-virtualenvpackage from your distribution rather than usingpip.$ sudo apt-get install python-virtualenvCreate and Activate a Virtual Environment:
$ virtualenv venv $ source venv/bin/activate
Note
After setting up a virtual environment in which to run Toaster, you must initialize that virtual environment each time you want to start Toaster. Use the following to initialize the environment just before you start Toaster:
$ source venv/bin/activate
34.2.2. Install Toaster Packages
You need to install the packages that Toaster requires. Use this command:
$ pip install -r bitbake/toaster-requirements.txt
Chapter 35. Setting Up and Using Toaster
35.1. Starting Toaster for Local Development
Once you have set up the Yocto Project and installed the Toaster system dependencies as described in "Preparing to Use Toaster", you are ready to start Toaster.
Navigate to the root of your
Source Directory
(e.g. poky):
$ cd poky
Once in that directory, source the build environment script:
$ source oe-init-build-env
Next, from the build directory (e.g.
poky/build), start Toaster using this
command:
$ source ../bitbake/bin/toaster
You can now run your builds from the command line, or with Toaster as explained in section "Using the Toaster Web Interface".
To access the Toaster web interface, open your favorite browser and enter the following:
http://127.0.0.1:8000
35.2. Setting a Different Port
By default, Toaster starts on port 8000.
You can use the WEBPORT parameter to
set a different port.
For example, the following command sets the port to "8400":
$ source ../bitbake/bin/toaster webport=8400
35.3. The Directory for Cloning Layers
Toaster creates a _toaster_clones
directory inside your Source Directory
(i.e. poky) to clone any layers
needed for your builds.
Alternatively, if you would like all of your Toaster related
files and directories to be in a particular location other than
the default, you can set the TOASTER_DIR
environment variable, which takes precedence over your current
working directory.
Setting this environment variable causes Toaster to create and use
$TOASTER_DIR./_toaster_clones.
35.4. The Build Directory
Toaster creates a build directory within your Source
Directory (e.g. poky) to execute
the builds.
Alternatively, if you would like all of your Toaster related files
and directories to be in a particular location, you can set
the TOASTER_DIR environment variable,
which takes precedence over your current working directory.
Setting this environment variable causes Toaster to use
$TOASTER_DIR/build as the build directory.
35.5. Creating a Django Superuser
Toaster is built on the Django framework. Django provides an administration interface you can use to edit Toaster configuration parameters.
To access the Django administration interface, you must create a superuser by following these steps:
If you used
virtualenv, which is recommended, to set up the Toaster system dependencies, you need be sure the virtual environment is activated. To activate this environment, use the following command:$ source venv/bin/activateFrom the directory containing the Toaster database, which by default is the Build Directory, invoke the
createsuperusercommand frommanage.py:$ cd ~/poky/build $ ../bitbake/lib/toaster/manage.py createsuperuserDjango prompts you for the username, which you need to provide.
Django prompts you for an email address, which is optional.
Django prompts you for a password, which you must provide.
Django prompts you to re-enter your password for verification.
After completing these steps, the following confirmation message appears:
Superuser created successfully.
Creating a superuser allows you to access the Django administration interface through a browser. The URL for this interface is the same as the URL used for the Toaster instance with "/admin" on the end. For example, if you are running Toaster locally, use the following URL:
http://127.0.0.1:8000/admin
You can use the Django administration interface to set Toaster configuration parameters such as the build directory, layer sources, default variable values, and BitBake versions.
35.6. Setting Up a Production Instance of Toaster
You can use a production instance of Toaster to share the Toaster instance with remote users, multiple users, or both. The production instance is also the setup that can handle heavier loads on the web service. Use the instructions in the following sections to set up Toaster to run builds through the Toaster web interface.
35.6.1. Requirements
Be sure you meet the following requirements:
Note
You must comply with all Apache,mod-wsgi, and Mysql requirements.
Have all the build requirements as described in "Setting Up the Basic System Requirements" chapter.
Have an Apache webserver.
Have
mod-wsgifor the Apache webserver.Use the Mysql database server.
If you are using Ubuntu 14.04.3, run the following:
$ sudo apt-get install apache2 libapache2-mod-wsgi mysql-server virtualenv libmysqlclient-devIf you are using Fedora 22 or a RedHat distribution, run the following:
$ sudo dnf install httpd mod_wsgi python-virtualenv gcc mysql-devel
35.6.2. Installation
Perform the following steps to install Toaster:
Checkout a copy of
pokyinto the web server directory. You will be using/var/www/toaster:$ mkdir -p /var/www/toaster $ cd /var/www/toaster/ $ git clone git://git.yoctoproject.org/poky $ git checkout krogothInitialize a virtual environment and install Toaster dependencies. Using a virtual environment keeps the Python packages isolated from your system-provided packages:
$ cd /var/www/toaster/ $ virtualenv venv $ source ./venv/bin/activate $ pip install -r ./poky/bitbake/toaster-requirements.txt $ pip install mysql $ pip install MySQL-pythonNote
Isolating these packages is not required but is recommended. Alternatively, you can use your operating system's package manager to install the packages.Configure Toaster by editing
/var/www/toaster/poky/bitbake/lib/toaster/toastermain/settings.pyas follows:Edit the
DATABASEsettings:DATABASES = { 'default': { 'ENGINE': 'django.db.backends.mysql', 'NAME': 'toaster_data', 'USER': 'toaster', 'PASSWORD': 'yourpasswordhere', 'HOST': 'localhost', 'PORT': '3306', } }Edit the
SECRET_KEY:SECRET_KEY = '
your_secret_key'Edit the
STATIC_ROOT:STATIC_ROOT = '/var/www/toaster/static_files/'
Add the database and user to the
mysqlserver defined earlier:$ mysql -u root -p mysql> CREATE DATABASE toaster_data; mysql> CREATE USER 'toaster'@'localhost' identified by 'yourpasswordhere'; mysql> GRANT all on toaster_data.* to 'toaster'@'localhost'; mysql> quitGet Toaster to create the database schema, default data, and gather the statically-served files:
$ cd /var/www/toaster/poky/ $ ./bitbake/lib/toaster/manage.py syncdb $ ./bitbake/lib/toaster/manage.py migrate $ TOASTER_DIR=`pwd` TOASTER_CONF=./meta-poky/conf/toasterconf.json ./bitbake/lib/toaster/manage.py checksettings $ ./bitbake/lib/toaster/manage.py collectstaticFor the above set of commands, after moving to the
pokydirectory, thesyncdbandmigratecommands ensure the database schema has had changes propagated correctly (i.e. migrations).The next line sets the Toaster root directory
TOASTER_DIRand the location of the Toaster configuration fileTOASTER_CONF, which is relative to the Toaster root directoryTOASTER_DIR. For more information on the Toaster configuration fileTOASTER_CONF, see the JSON Files section of this manual.This line also runs the
checksettingscommand, which configures the location of the Toaster Build directory. The Toaster root directoryTOASTER_DIRdetermines where the Toaster build directory is created on the file system. In the example above,TOASTER_DIRis set as follows:/var/www/toaster/pokyThis setting causes the Toaster build directory to be:
/var/www/toaster/poky/buildFinally, the
collectstaticcommand is a Django framework command that collects all the statically served files into a designated directory to be served up by the Apache web server.Add an Apache configuration file for Toaster to your Apache web server's configuration directory. If you are using Ubuntu or Debian, put the file here:
/etc/apache2/conf-available/toaster.confIf you are using Fedora or RedHat, put it here:
/etc/httpd/conf.d/toaster.confFollowing is a sample Apache configuration for Toaster you can follow:
Alias /static /var/www/toaster/static_files <Directory /var/www/toaster/static_files> Order allow,deny Allow from all Require all granted </Directory> WSGIDaemonProcess toaster_wsgi python-path=/var/www/toaster/poky/bitbake/lib/toaster:/var/www/toaster/venv/lib/python2.7/site-packages WSGIScriptAlias / "/var/www/toaster/poky/bitbake/lib/toaster/toastermain/wsgi.py" <Location /> WSGIProcessGroup toastern_wsgi </Location>If you are using Ubuntu or Debian, you will need to enable the config and module for Apache:
$ sudo a2enmod wsgi $ sudo a2enconf toaster $ chmod +x bitbake/lib/toaster/toastermain/wsgi.pyFinally, restart Apache to make sure all new configuration is loaded. For Ubuntu and Debian use:
$ sudo service apache2 restartFor Fedora and RedHat use:
$ sudo service httpd restartInstall the build runner service. This service needs to be running in order to dispatch builds. Use this command:
/var/www/toaster/poky/bitbake/lib/toaster/manage.py runbuildsHere is an example:
#!/bin/sh # toaster run builds dispatcher cd /var/www/toaster/ source ./venv/bin/activate ./bitbake/lib/toaster/manage.py runbuilds
You can now open up a browser and start using Toaster.
35.7. Using the Toaster Web Interface
The Toaster web interface allows you to do the following:
Browse published layers in the OpenEmbedded Metadata Index that are available for your selected version of the build system.
Import your own layers for building.
Add and remove layers from your configuration.
Set configuration variables.
Select a target or multiple targets to build.
Start your builds.
See what was built (recipes and packages) and what packages were installed into your final image.
Browse the directory structure of your image.
See the value of all variables in your build configuration, and which files set each value.
Examine error, warning and trace messages to aid in debugging.
See information about the BitBake tasks executed and reused during your build, including those that used shared state.
See dependency relationships between recipes, packages and tasks.
See performance information such as build time, task time, CPU usage, and disk I/O.
35.7.1. Toaster Web Interface Videos
Following are several videos that show how to use the Toaster GUI:
Build Configuration: This video overviews and demonstrates build configuration for Toaster.
Build Custom Layers: This video shows you how to build custom layers that are used with Toaster.
Toaster Homepage and Table Controls: This video goes over the Toaster entry page, and provides an overview of the data manipulation capabilities of Toaster, which include search, sorting and filtering by different criteria.
Build Dashboard: This video shows you the build dashboard, a page providing an overview of the information available for a selected build.
Image Information: This video walks through the information Toaster provides about images: packages installed and root file system.
Configuration: This video provides Toaster build configuration information.
Tasks: This video shows the information Toaster provides about the tasks run by the build system.
Recipes and Packages Built: This video shows the information Toaster provides about recipes and packages built.
Performance Data: This video shows the build performance data provided by Toaster.
35.7.2. Additional Information About the Local Yocto Project Release
This section only applies if you have set up Toaster for local development, as explained in the "Starting Toaster for Local Development" section.
When you create a project in Toaster, you will be asked to provide a name and to select a Yocto Project release. One of the release options you will find is called "Local Yocto Project".
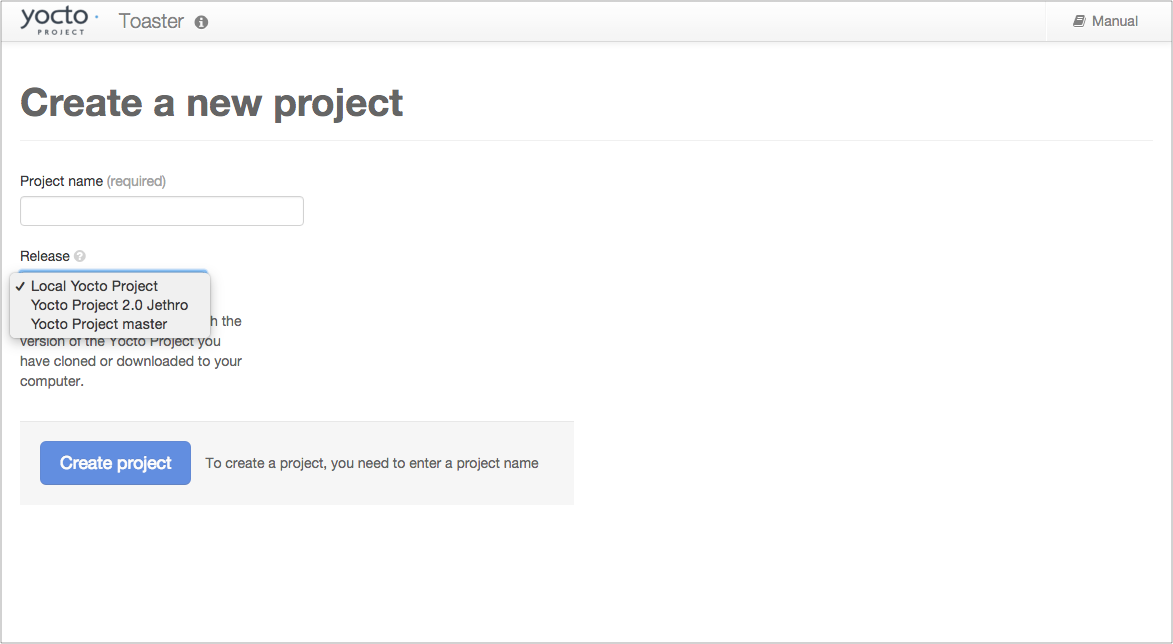 |
When you select the "Local Yocto Project" release, Toaster will run your builds using the local Yocto Project clone you have in your computer: the same clone you are using to run Toaster. Unless you manually update this clone, your builds will always use the same Git revision.
If you select any of the other release options, Toaster will fetch the tip of your selected release from the upstream Yocto Project repository every time you run a build. Fetching this tip effectively means that if your selected release is updated upstream, the Git revision you are using for your builds will change. If you are doing development locally, you might not want this change to happen. In that case, the "Local Yocto Project" release might be the right choice.
However, the "Local Yocto Project" release will not provide you with any compatible layers, other than the three core layers that come with the Yocto Project:
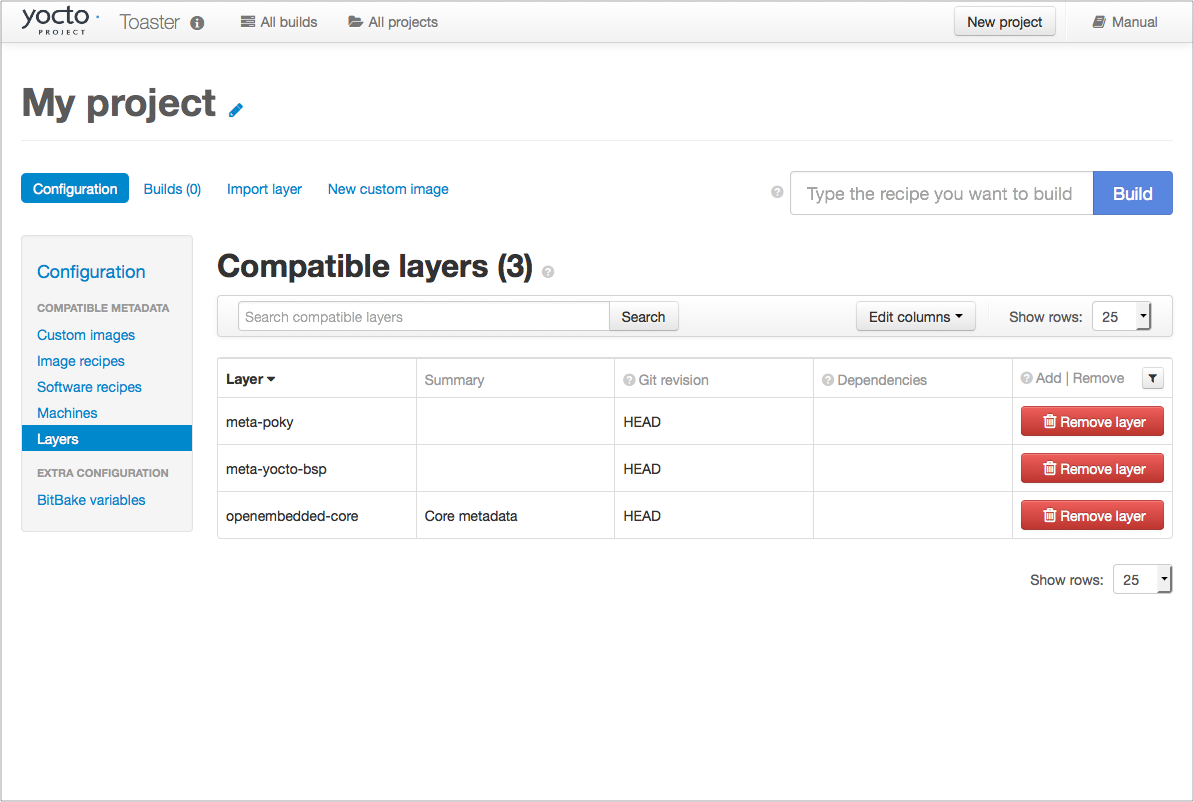 |
If you want to build any other layers, you will need to manually import them into your Toaster project, using the "Import layer" page.
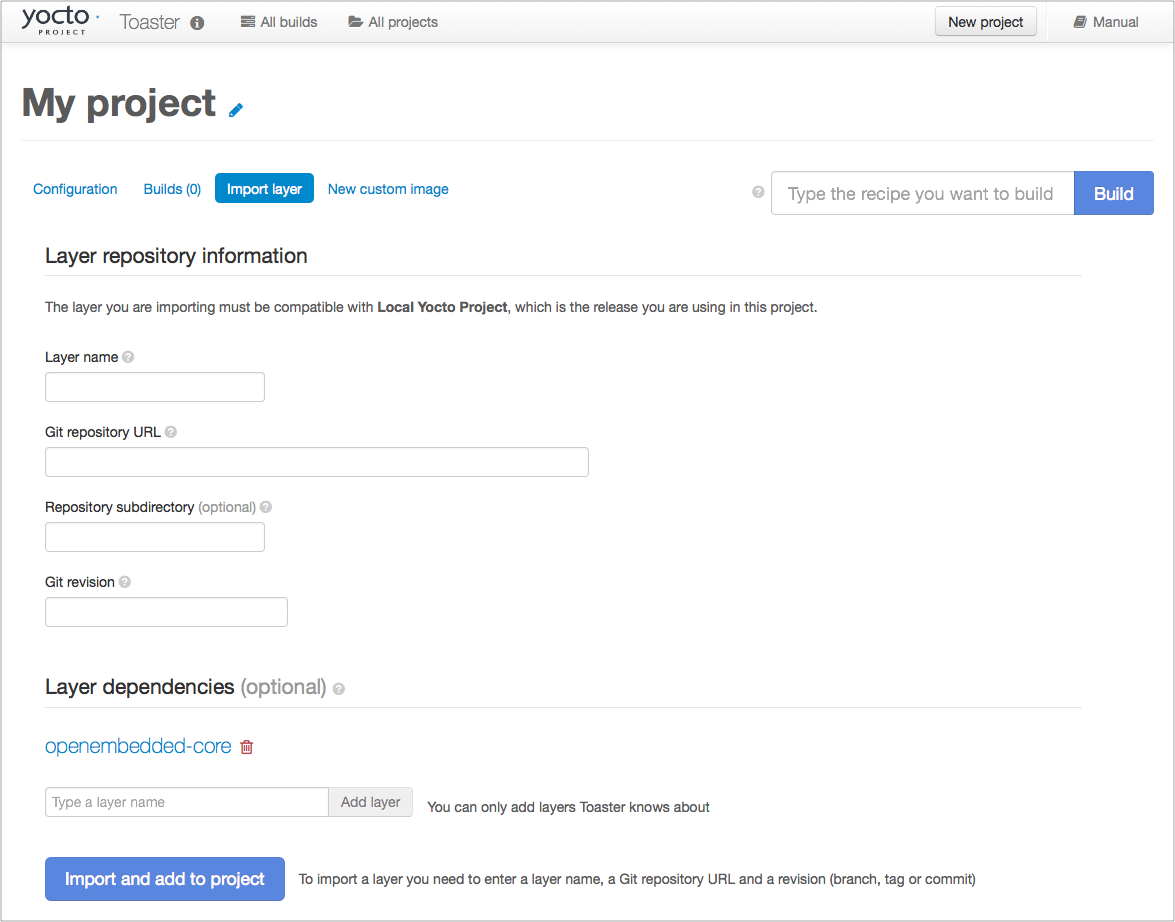 |
35.7.3. Building a Specific Recipe Given Multiple Versions
Occasionally, a layer might provide more than one version of
the same recipe.
For example, the openembedded-core layer
provides two versions of the bash recipe
(i.e. 3.2.48 and 4.3.30-r0) and two versions of the
which recipe (i.e. 2.21 and 2.18).
The following figure shows this exact scenario:
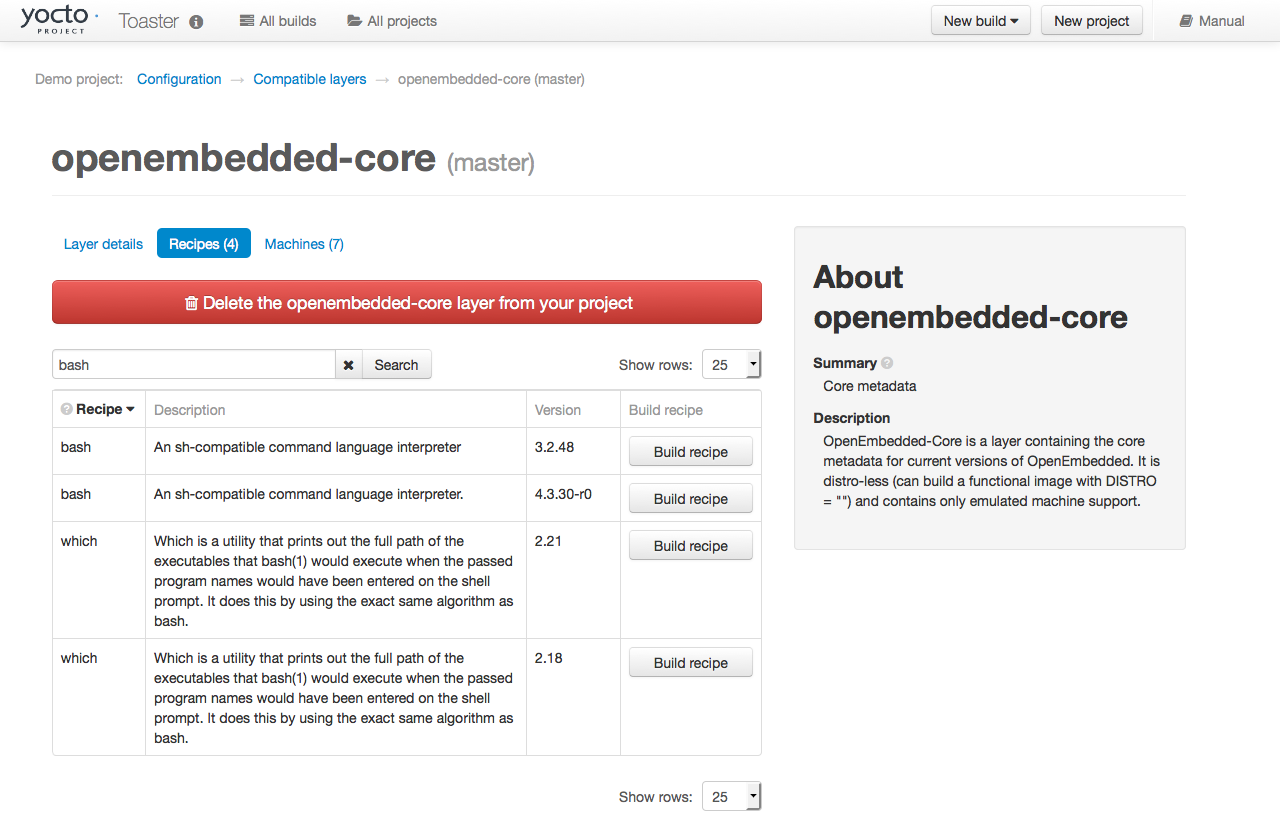 |
By default, the OpenEmbedded build system builds one of the
two recipes.
For the bash case, version 4.3.30-r0 is
built by default.
Unfortunately, Toaster as it exists, is not able to override
the default recipe version.
If you would like to build bash 3.2.48, you need to set the
PREFERRED_VERSION
variable.
You can do so from Toaster, using the "Add variable" form,
which is available in the "BitBake variables" page of the
project configuration section as shown in the following screen:
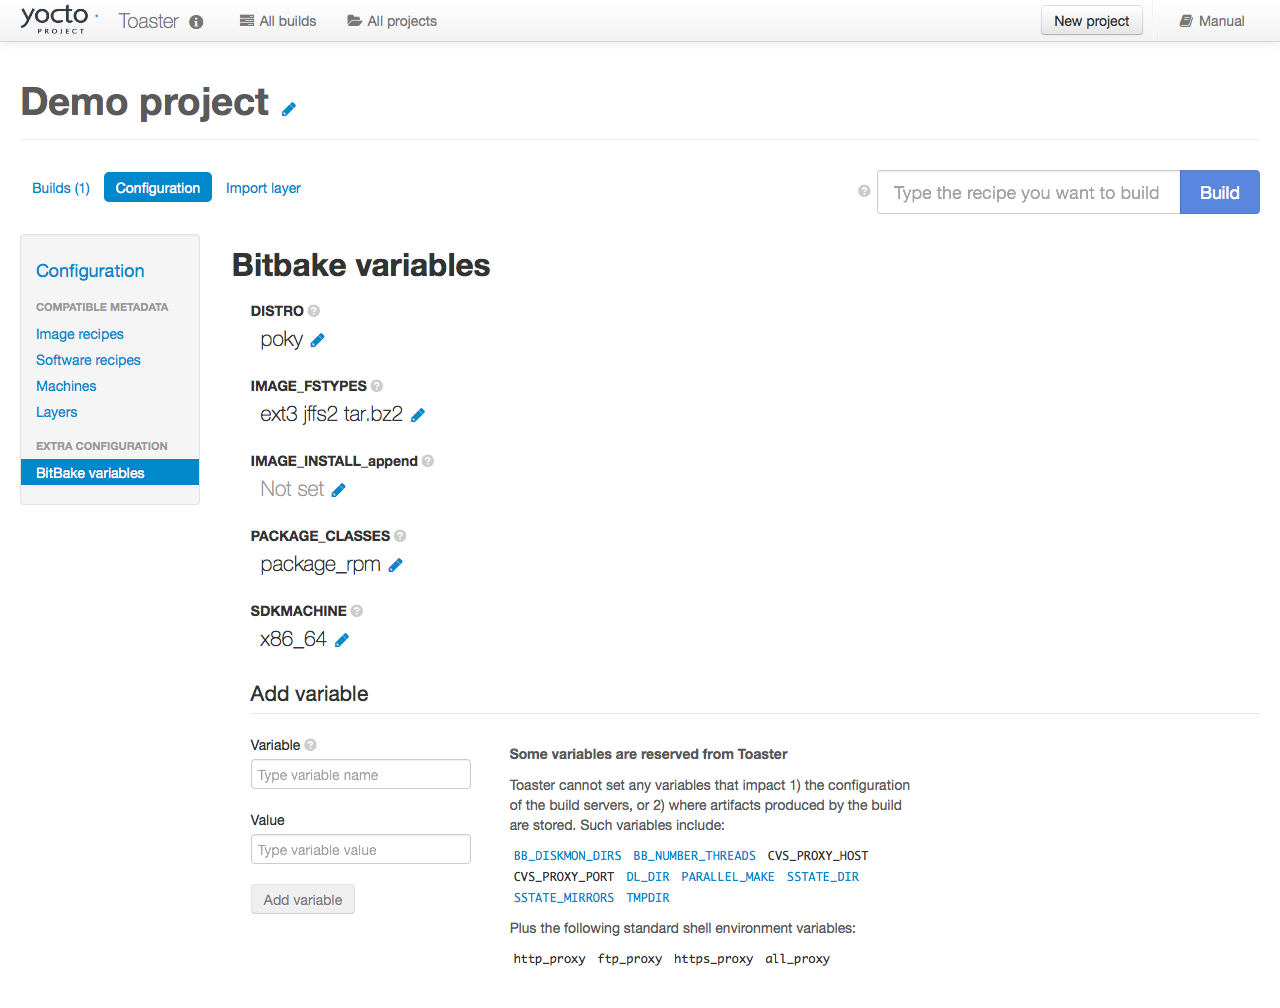 |
To specify bash 3.2.48 as the version to build,
enter "PREFERRED_VERSION_bash" in the "Variable" field, and "3.2.48"
in the "Value" field.
Next, click the "Add variable" button:
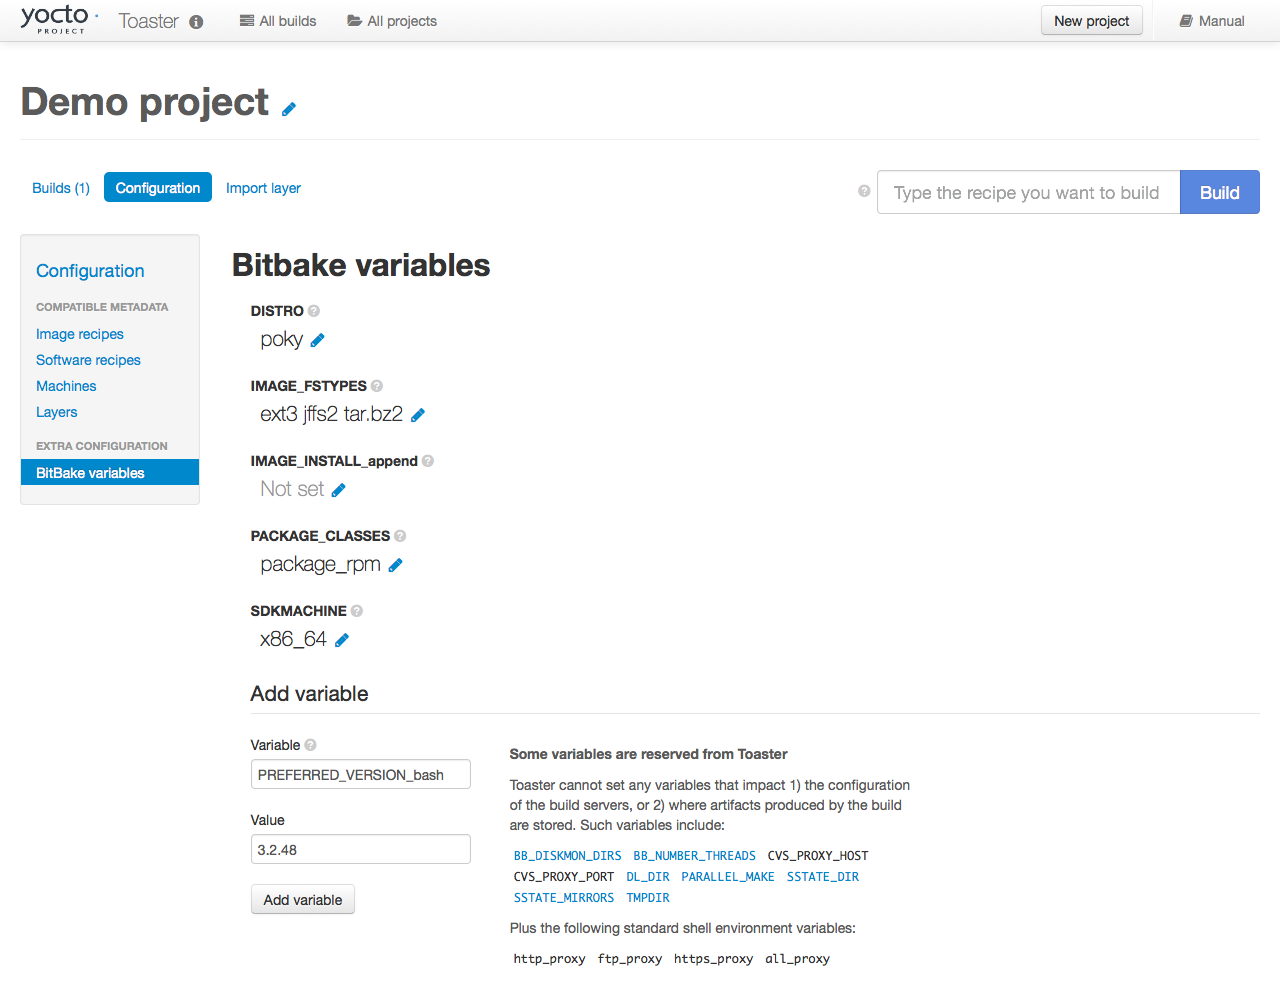 |
After clicking the "Add variable" button, the settings for
PREFERRED_VERSION are added to the bottom
of the BitBake variables list.
With these settings, the OpenEmbedded build system builds the
desired version of the recipe rather than the default version:
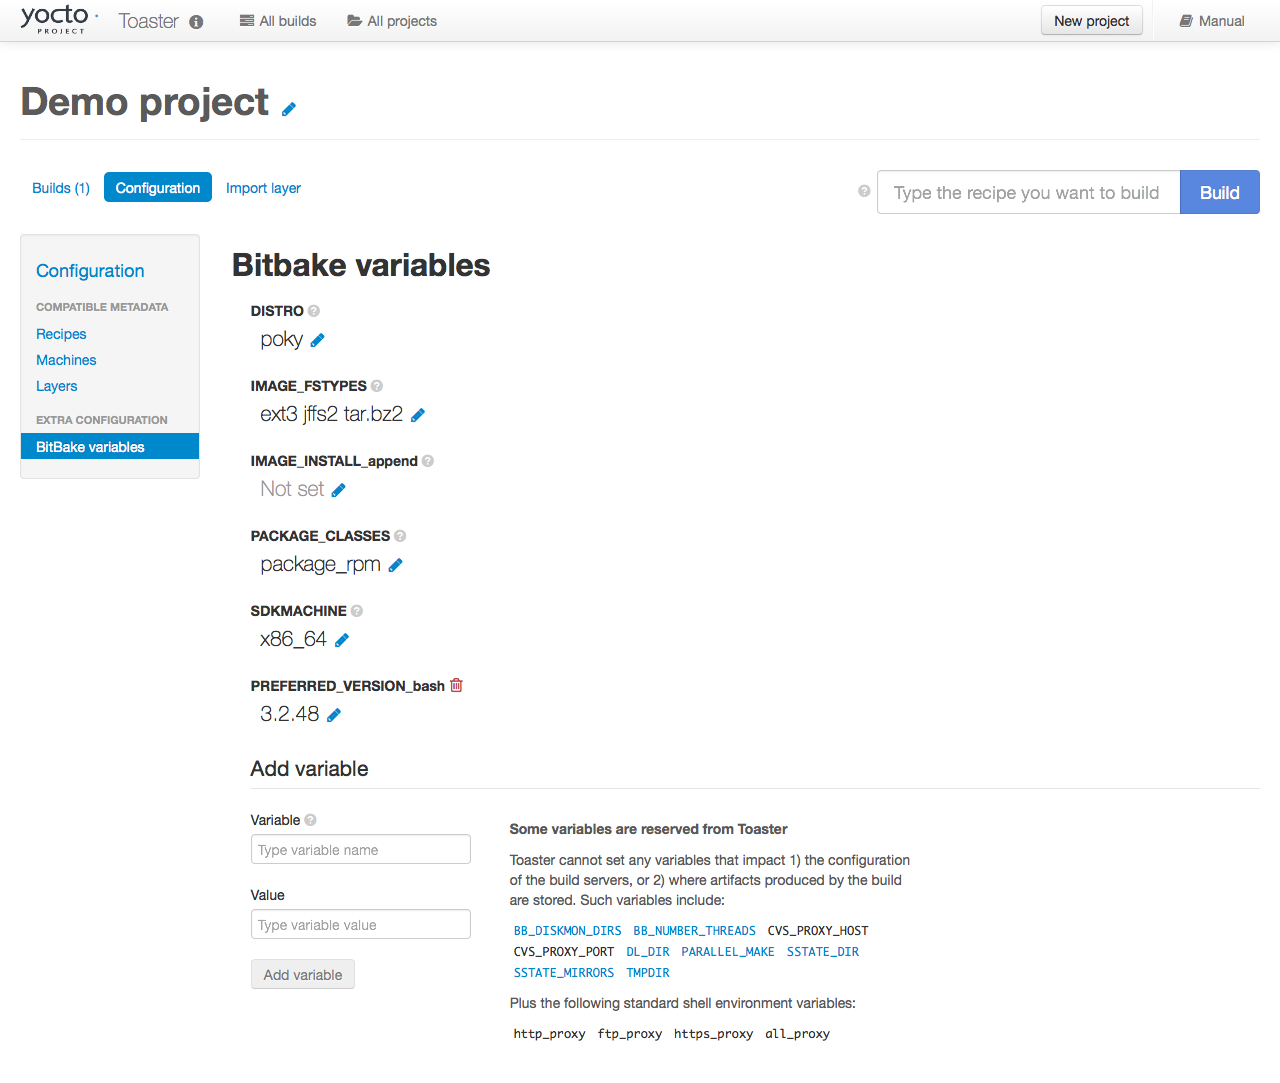 |
Chapter 36. Concepts and Reference
In order to configure and use Toaster, you should understand some
concepts and have some basic command reference material available.
This final chapter provides conceptual information on layer sources,
releases, and JSON configuration files.
Also provided is a quick look at some useful
manage.py commands that are Toaster-specific.
Information on manage.py commands does exist
across the Web and the information in this manual by no means
attempts to provide a command comprehensive reference.
36.1. Layer Source
In general, a "layer source" is a source of information about existing layers. In particular, we are concerned with layers that you can use with the Yocto Project and Toaster. This chapter describes a particular type of layer source called a "layer index."
A layer index is a web application that contains information about a set of custom layers. A good example of an existing layer index is the OpenEmbedded Metadata Index. A public instance of this layer index exists at http://layers.openembedded.org. You can find the code for this layer index's web application at http://git.yoctoproject.org/cgit/cgit.cgi/layerindex-web/.
When you tie a layer source into Toaster, it can query the layer
source through a
REST
API, store the information about the layers in the Toaster
database, and then show the information to users.
Users are then able to view that information and build layers
from Toaster itself without worrying about cloning or editing
the BitBake layers configuration file
bblayers.conf.
Tying a layer source into Toaster is convenient when you have many custom layers that need to be built on a regular basis by a community of developers. In fact, Toaster comes pre-configured with the OpenEmbedded Metadata Index.
Note
You do not have to use a layer source to use Toaster. Tying into a layer source is optional.
36.1.1. Setting Up and Using a Layer Source
To use your own layer source, you need to set up the layer source and then tie it into Toaster. This section describes how to tie into a layer index in a manner similar to the way Toaster ties into the OpenEmbedded Metadata Index.
36.1.1.1. Understanding Your Layers
The obvious first step for using a layer index is to have several custom layers that developers build and access using the Yocto Project on a regular basis. This set of layers needs to exist and you need to be familiar with where they reside. You will need that information when you set up the code for the web application that "hooks" into your set of layers.
For general information on layers, see the "BSP Layers" and "Using the Yocto Project's BSP Tools" sections in the Yocto Project Board Support Package (BSP) Developer's Guide.
36.1.1.2. Configuring Toaster to Hook Into Your Layer Index
If you want Toaster to use your layer index, you must host the web application in a server to which Toaster can connect. You also need to give Toaster the information about your layer index. In other words, you have to configure Toaster to use your layer index. This section describes two methods by which you can configure and use your layer index.
In the previous section, the code for the OpenEmbedded Metadata Index (i.e. http://layers.openembedded.org) was referenced. You can use this code, which is at http://git.yoctoproject.org/cgit/cgit.cgi/layerindex-web/, as a base to create your own layer index.
36.1.1.2.1. Use the Administration Interface
Access the administration interface through a
browser by entering the URL of your Toaster instance and
adding "/admin" to the end of the
URL.
As an example, if you are running Toaster locally, use
the following URL:
http://127.0.0.1:8000/admin
The administration interface has a "Layer sources" section that includes an "Add layer source" button. Click that button and provide the required information. Make sure you select "layerindex" as the layer source type.
36.1.1.2.2. Use the toasterconf.json File
If you do not want to use the Administration
Interface, you can edit the
toasterconf.json
file and reload it to Toaster.
The Toaster startup script in
/bitbake/bin/toaster specifies
the location of a Toaster configuration file
toasterconf.json as the value of
the TOASTER_CONF variable.
This configuration file is used to set up the initial
configuration values within the Toaster database
including the layer sources.
Two versions of the configuration file exist:
The first version of the file is found in the
confdirectory of themeta-pokylayer (i.e.meta-poky/conf/toasterconf.json). This version contains the default Yocto Project configuration for Toaster.The second version of the file is in the
confdirectory of theopenembedded-corelayer (i.e.meta/conf/toasterconf.json). This version contains the default OpenEmbedded configuration for Toaster.
36.1.1.2.3. Edit the Configuration File
Edit the version of the
toasterconf.json file you
used to set up your Toaster instance.
In the file, you will find a section for layer sources
such as the following:
"layersources": [
{
"name": "Local Yocto Project",
"sourcetype": "local",
"apiurl": "../../",
"branches": ["HEAD" ],
"layers": [
{
"name": "openembedded-core",
"local_path": "meta",
"vcs_url": "remote:origin",
"dirpath": "meta"
},
{
"name": "meta-poky",
"local_path": "meta-poky",
"vcs_url": "remote:origin",
"dirpath": "meta-poky"
},
{
"name": "meta-yocto-bsp",
"local_path": "meta-yocto-bsp",
"vcs_url": "remote:origin",
"dirpath": "meta-yocto-bsp"
}
]
},
{
"name": "OpenEmbedded",
"sourcetype": "layerindex",
"apiurl": "http://layers.openembedded.org/layerindex/api/",
"branches": ["master", "jethro" ,"fido"]
},
{
"name": "Imported layers",
"sourcetype": "imported",
"apiurl": "",
"branches": ["master", "jethro","fido", "HEAD"]
}
],
You should add your own layer source to this section by following the same format used for the "OpenEmbedded" layer source shown above.
Give your layer source a name, provide the URL of your layer source API, use the source type "layerindex", and indicate which branches from your layer source you want to make available through Toaster. For example, the OpenEmbedded layer source makes available only its "master", "fido", and "jethro" branches.
The branches must match the branch you set when configuring your releases. For example, if you configure one release in Toaster by setting its branch to "branch-one" and you configure another release in Toaster by setting its branch to "branch-two", the branches in your layer source should be "branch-one" and "branch-two" as well. Doing so creates a connection between the releases and the layer information from your layer source. Thus, when users create a project with a given release, they will see the appropriate layers from your layer source. This connection ensures that only layers that are compatible with the selected project release can be selected for building.
Once you have added this information to the
toasterconf.json file, save your
changes.
In a terminal window, navigate to the directory that
contains the Toaster database, which by default is the
root of the Yocto Project
Source Directory.
Once you are located in that directory, run the
"loadconf" command, which takes as
an argument the full path to the
toasterconf.json file you just edited.
For example, if you cloned the
poky repository and you edited the
meta-poky/conf/toasterconf.json file,
you would type something like the following:
$ bitbake/lib/toaster/manage.py loadconf /home/scottrif/poky/meta-poky/conf/toasterconf.json
After entering this command, you need to update the
Toaster database with the information coming from your
new layer source.
To do that, you should run the
"lsupdates" command from the directory
that contains the Toaster database.
Here is an example:
$ bitbake/lib/toaster/manage.py lsupdates
If Toaster can reach the API URL, you should see a message telling you that Toaster is updating the layer source information.
Once the information has been updated, verify the new layer information is available by using the Toaster web interface. To do that, visit the "All compatible layers" page inside a Toaster project. The layers from your layer source should be listed there.
36.2. Releases
When you create a Toaster project using the web interface, you are asked to choose a "Release." In the context of Toaster, the term "Release" refers to a set of layers and a BitBake version the OpenEmbedded build system uses to build something. As shipped, Toaster is pre-configured with releases that correspond to Yocto Project release branches. However, you can modify, delete, and create new releases according to your needs. This section provides some background information on releases.
36.2.1. Pre-Configured Releases
As shipped, Toaster is configured to use a specific set of releases. Of course, you can always configure Toaster to use any release. For example, you might want your project to build against a specific commit of any of the "out-of-the-box" releases. Or, you might want your project to build against different revisions of OpenEmbedded and BitBake.
As shipped, Toaster is configured to work with the following releases:
Yocto Project 2.0 "Jethro" or OpenEmbedded "Jethro": This release causes your Toaster projects to build against the head of the jethro branch at http://git.yoctoproject.org/cgit/cgit.cgi/poky/log/?h=jethro or http://git.openembedded.org/openembedded-core/commit/?h=jethro.
Yocto Project 1.8 "Fido" or OpenEmbedded "Fido": This release causes your Toaster projects to build against the head of the fido branch at http://git.yoctoproject.org/cgit/cgit.cgi/poky/log/?h=fido or http://git.openembedded.org/openembedded-core/commit/?h=fido.
Yocto Project "Master" or OpenEmbedded "Master": This release causes your Toaster Projects to build against the head of the master branch, which is where active development takes place, at http://git.yoctoproject.org/cgit/cgit.cgi/poky/log/ or http://git.openembedded.org/openembedded-core/log/.
Local Yocto Project or Local OpenEmbedded: This release causes your Toaster Projects to build against the head of the
pokyoropenembedded-coreclone you have local to the machine running Toaster.
36.2.2. What Makes Up a Release?
A release consists of the following:
Name: The name of the release (
name). This release name never appears in the the Toaster web interface. Consequently, a user never sees the release name.Description: The textual description of the release (
description). This description is what users encounter when creating projects with the Toaster web interface. When you configure your release, be sure to use a description that sufficiently describes and is understandable. If Toaster has more than one release configured, the release descriptions appear listed in a drop down menu when a user creates a new project. If Toaster has only one release configured, all projects created using the web interface take that release and the drop down menu does not display in the Toaster web interface.BitBake: The Bitbake version (
bitbake) used to build layers set in the current release. This version is described by a name, a Git URL, a branch in the Git URL, and a directory path in the Git repository. As an example, consider the following snippet from a Toaster JSON configuration file. This BitBake version uses the master branch from the OpenEmbedded repository:"bitbake" : [ { "name": "master", "giturl": "git://git.openembedded.org/bitbake", "branch": "master", "dirpath": "" } ]Here is more detail on each of the items that comprise the BitBake version:
Name: A string (
name) used to refer to the version of BitBake you are using with Toaster. This name is never exposed through Toaster.Git URL: The URL (
giturl) for the BitBake Git repository cloned for Toaster projects.Branch: The Git branch, or revision, (
branch) of the BitBake repository used with Toaster.Directory Path: The sub-directory of the BitBake repository (
dirpath). If the Git URL includes more than one repository, you need to set this directory. If the URL does not include more than a single repository, you can setdirpathto a null string (i.e. "").
Branch: The branch for the layer source (
branch) used with the release. For example, for the OpenEmbedded layer source, the "master", "fido", and "jethro" branches are available.Default Layers: The set of default layers (
defaultlayers) automatically added to the project configuration when a project is created.Layer Source Priorities A specification of layer source priorities (
layersourcepriority). In order for Toaster to work as intended, the "Imported layers" layer source should have the highest priority, which means that layers manually imported by users with the "Import layer" functionality will always be visible and available for selection.Help Text: Help text (
helptext) that explains what the release does when selected. This help text appears below the release drop-down menu when you create a Toaster project. The help text should assist users in making the correct decision regarding the release to use for a given project.
To summarize what comprises a release, consider the following
example from a Toaster JSON file.
The configuration names the release "master" and uses the
"master" branch provided by the layer source of type
"layerindex", which is called "OpenEmbedded", and sets
the openembedded-core layer as the one
to be added by default to any projects created in Toaster.
The BitBake version used would be defined as shown earlier
in the previous list:
"releases": [
{
"name": "master",
"description": "OpenEmbedded master",
"bitbake": "master",
"branch": "master",
"defaultlayers": [ "openembedded-core" ],
"layersourcepriority": { "Imported layers": 99, "Local OpenEmbedded" : 10, "OpenEmbedded" : 0 },
"helptext": "Toaster will run your builds using the tip of the <a href=\"http://git.yoctoproject.org/cgit/cgit.cgi/poky/log/\">Yocto Project master branch</a>, where active development takes place. This is not a stable branch, so your builds might not work as expected."
}
]
36.3. JSON Files
You must configure Toaster before using it. Configuration customizes layer source settings and Toaster defaults for all users and is performed by the person responsible for Toaster Configuration (i.e the Toaster Administrator). The Toaster Administrator performs this configuration through the Django administration interface.
To make it easier to initially start Toaster, you can import a
pre-defined configuration file using the
loadconf
command.
Note
The configuration file is a JSON-formatted text file with specific fields that Toaster recognizes. It is not a data dump from the database, so it cannot be loaded directly in the database.
By convention, the supplied configuration files are named
toasterconf.json.
The Toaster Administrator can customize the file prior to loading
it into Toaster.
The TOASTER_CONF variable in the
Toaster startup script at bitbake/bin/toaster
specifies the location of the toasterconf.json file.
36.3.1. Configuration File Choices
Two versions of the configuration file exist:
The
meta-poky/conf/toasterconf.jsonin theconfdirectory of the Yocto Project'smeta-pokylayer. This version contains the default Yocto Project configuration for Toaster. You are prompted to select this file during the Toaster set up process if you cloned thepokyrepository (i.e.http://git.yoctoproject.org/poky).The
meta/conf/toasterconf.jsonin theconfdirectory of the OpenEmbedded'sopenembedded-corelayer. This version contains the default OpenEmbedded configuration for Toaster. You are prompted to select this file during the Toaster set up process if you had cloned theopenembedded-corerepository (i.e.git://git.openembedded.org/openembedded-core).
36.3.2. File Structure
The toasterconf.json file consists of
easily readable areas: configuration, layer sources, BitBake,
default release, and releases.
36.3.2.1. Configuration Area
This area of the JSON file sets which variables are exposed to users through the Toaster web interface. Users can easily edit these variables.
The variables you set here are displayed in the
"Configuration variables" page in Toaster.
Minimally, you should set the
MACHINE
variable, which appears to users as part of the project
page in Toaster.
Here is the default config area:
"config": {
"MACHINE" : "qemux86",
"DISTRO" : "poky",
"IMAGE_FSTYPES": "ext3 jffs2 tar.bz2",
"IMAGE_INSTALL_append": "",
"PACKAGE_CLASSES": "package_rpm",
},
36.3.2.2. Layer Sources Area
This area of the JSON file defines the layer sources Toaster uses. Toaster reads layer information from layer sources. Three types of layer sources exist that Toaster recognizes: Local, LayerIndex, and Imported.
The Local layer source reads layers from Git clones available on your local drive. Using a local layer source enables you to easily test Toaster.
Note
If you are setting up a hosted version of Toaster, it does not make sense to have a local layer source.
The LayerIndex layer source uses a REST API exposed by instances of the Layer Index application (e.g the public http://layers.openembedded.org/) to read layer data.
The Imported layer source is reserved for layer data manually introduced by the user or Toaster Administrator through the GUI. This layer source lets users import their own layers and build them with Toaster. You should not remove the imported layer source.
Here is the default layersources area:
"layersources": [
{
"name": "Local Yocto Project",
"sourcetype": "local",
"apiurl": "../../",
"branches": ["HEAD" ],
"layers": [
{
"name": "openembedded-core",
"local_path": "meta",
"vcs_url": "remote:origin",
"dirpath": "meta"
},
{
"name": "meta-poky",
"local_path": "meta-poky",
"vcs_url": "remote:origin",
"dirpath": "meta-poky"
},
{
"name": "meta-yocto-bsp",
"local_path": "meta-yocto-bsp",
"vcs_url": "remote:origin",
"dirpath": "meta-yocto-bsp"
}
]
},
{
"name": "OpenEmbedded",
"sourcetype": "layerindex",
"apiurl": "http://layers.openembedded.org/layerindex/api/",
"branches": ["master", "jethro" ,"fido"]
},
{
"name": "Imported layers",
"sourcetype": "imported",
"apiurl": "",
"branches": ["master", "jethro","fido", "HEAD"]
}
],
36.3.2.3. BitBake Area
This area of the JSON file defines the version of BitBake Toaster uses. As shipped, Toaster is configured to recognize four versions of BitBake: master, fido, jethro, and HEAD.
Note
HEAD is a special option that builds whatever is available on disk, without checking out any remote Git repositories.
Here is the default bitbake area:
"bitbake" : [
{
"name": "master",
"giturl": "remote:origin",
"branch": "master",
"dirpath": "bitbake"
},
{
"name": "jethro",
"giturl": "remote:origin",
"branch": "jethro",
"dirpath": "bitbake"
},
{
"name": "fido",
"giturl": "remote:origin",
"branch": "fido",
"dirpath": "bitbake"
},
{
"name": "HEAD",
"giturl": "remote:origin",
"branch": "HEAD",
"dirpath": "bitbake"
}
],
36.3.2.4. Default Area
This area of the JSON file establishes a default release used by Toaster. As shipped, Toaster uses the "master" release.
Here is the statement in the JSON file that establishes the default release:
"defaultrelease": "master",
36.3.2.5. Releases Area
This area of the JSON file defines the versions of the OpenEmbedded build system Toaster recognizes. As shipped, Toaster is configured to work with the four releases described in the "Pre-Configured Releases" section.
Here is the default releases area:
"releases": [
{
"name": "master",
"description": "Yocto Project master",
"bitbake": "master",
"branch": "master",
"defaultlayers": [ "openembedded-core", "meta-poky", "meta-yocto-bsp"],
"layersourcepriority": { "Imported layers": 99, "Local Yocto Project" : 10, "OpenEmbedded" : 0 },
"helptext": "Toaster will run your builds using the tip of the <a href=\"http://git.yoctoproject.org/cgit/cgit.cgi/poky/log/\">Yocto Project master branch</a>, where active development takes place. This is not a stable branch, so your builds might not work as expected."
},
{
"name": "jethro",
"description": "Yocto Project 2.0 Jethro",
"bitbake": "jethro",
"branch": "jethro",
"defaultlayers": [ "openembedded-core", "meta-poky", "meta-yocto-bsp"],
"layersourcepriority": { "Imported layers": 99, "Local Yocto Project" : 10, "OpenEmbedded" : 0 },
"helptext": "Toaster will run your builds with the tip of the <a href=\"http://git.yoctoproject.org/cgit/cgit.cgi/poky/log/?h=jethro\">Yocto Project 2.0 \"Jethro\"</a> branch."
},
{
"name": "fido",
"description": "Yocto Project 1.8 Fido",
"bitbake": "fido",
"branch": "fido",
"defaultlayers": [ "openembedded-core", "meta-poky", "meta-yocto-bsp"],
"layersourcepriority": { "Imported layers": 99, "Local Yocto Project" : 10, "OpenEmbedded" : 0 },
"helptext": "Toaster will run your builds with the tip of the <a href=\"http://git.yoctoproject.org/cgit/cgit.cgi/poky/log/?h=fido\">Yocto Project 1.8 \"Fido\"</a> branch."
},
{
"name": "local",
"description": "Local Yocto Project",
"bitbake": "HEAD",
"branch": "HEAD",
"defaultlayers": [ "openembedded-core", "meta-poky", "meta-yocto-bsp"],
"layersourcepriority": { "Imported layers": 99, "Local Yocto Project" : 10, "OpenEmbedded" : 0 },
"helptext": "Toaster will run your builds with the version of the Yocto Project you have cloned or downloaded to your computer."
}
]
36.4. Useful Commands
In addition to the web user interface and the scripts that start
and stop Toaster, command-line commands exist through the
manage.py management script.
You can find general documentation on
manage.py at the
Django
site.
However, several manage.py commands have been
created that are specific to Toaster and are used to control
configuration and back-end tasks.
You can locate these commands in the
Source Directory
(e.g. poky) at
bitbake/lib/manage.py.
This section documents those commands.
Note
When using manage.py commands given
a default configuration, you must be sure that your
working directory is set to the
Build Directory.
Using manage.py commands from the
Build Directory allows Toaster to find the
toaster.sqlite file, which is located
in the Build Directory.
For non-default database configurations, it is possible
that you can use manage.py commands
from a directory other than the Build directory.
To do so, the
toastermain/settings.py file must be
configured to point to the correct database backend.
36.4.1. buildslist
The buildslist command lists all builds
that Toaster has recorded.
Access the command as follows:
$ bitbake/lib/toaster/manage.py buildslist
The command returns a list, which includes numeric identifications, of the builds that Toaster has recorded in the current database.
You need to run the buildslist command
first to identify existing builds in the database before
using the
builddelete
command.
Here is an example that assumes default repository and build
directory names:
$ cd ~/poky/build
$ python ../bitbake/lib/toaster/manage.py buildslist
If your Toaster database had only one build, the above
buildslist command would return something
like the following:
1: qemux86 poky core-image-minimal
36.4.2. builddelete
The builddelete command deletes data
associated with a build.
Access the command as follows:
$ bitbake/lib/toaster/manage.py builddelete build_id
The command deletes all the build data for the specified
build_id.
This command is useful for removing old and unused data from
the database.
Prior to running the builddelete
command, you need to get the ID associated with builds
by using the
buildslist
command.
36.4.3. perf
The perf command measures Toaster
performance.
Access the command as follows:
$ bitbake/lib/toaster/manage.py perf
The command is a sanity check that returns page loading times in order to identify performance problems.
36.4.4. checksettings
The checksettings command verifies
existing Toaster settings.
Access the command as follows:
$ bitbake/lib/toaster/manage.py checksettings
Toaster uses settings that are based on the
database to configure the building tasks.
The checksettings command verifies that
the database settings are valid in the sense that they have
the minimal information needed to start a build.
In order for the checksettings command
to work, the database must be correctly set up and not have
existing data.
To be sure the database is ready, you can run the following:
$ bitbake/lib/toaster/manage.py syncdb
$ bitbake/lib/toaster/manage.py migrate orm
$ bitbake/lib/toaster/manage.py migrate bldcontrol
After running these commands, you can run the
checksettings command.
36.4.5. loadconf
The loadconf command loads an
existing Toaster configuration file (JSON file).
You must run this on a new database that does not have any
data.
Running this command on an existing database that has data
results in errors.
Access the command as follows:
$ bitbake/lib/toaster/manage.py loadconf filepath
The loadconf command configures a database
based on the supplied existing
toasterconf.json file.
For information on the toasterconf.json,
see the
"JSON Files"
section.
36.4.6. runbuilds
The runbuilds command launches
scheduled builds.
Access the command as follows:
$ bitbake/lib/toaster/manage.py runbuilds
The runbuilds command checks if
scheduled builds exist in the database and then launches them
per schedule.
The command returns after the builds start but before they
complete.
The Toaster Logging Interface records and updates the database
when the builds complete.