Welcome to the Yocto Project Documentation
Yocto Project Quick Build
Welcome!
This short document steps you through the process for a typical image build using the Yocto Project. The document also introduces how to configure a build for specific hardware. You will use Yocto Project to build a reference embedded OS called Poky.
Note
The examples in this paper assume you are using a native Linux system running a supported version of Ubuntu Linux distribution. If the machine you want to use Yocto Project on to build an image (Build Host) is not a native Linux system, you can still perform these steps by using CROss PlatformS (CROPS) and setting up a Poky container. See the Setting Up to Use CROss PlatformS (CROPS) section in the Yocto Project Development Tasks Manual for more information.
You may use version 2 of Windows Subsystem For Linux (WSL 2) to set up a build host using Windows 10 or later, Windows Server 2019 or later. See the Setting Up to Use Windows Subsystem For Linux (WSL 2) section in the Yocto Project Development Tasks Manual for more information.
If you want more conceptual or background information on the Yocto Project, see the Yocto Project Overview and Concepts Manual.
Compatible Linux Distribution
Make sure your Build Host meets the following requirements:
At least 140 Gbytes of free disk space, though much more will help to run multiple builds and increase performance by reusing build artifacts.
At least 32 Gbytes of RAM, though a modern build host with as much RAM and as many CPU cores as possible is strongly recommended to maximize build performance.
Runs a supported Linux distribution (i.e. recent releases of Fedora, openSUSE, CentOS, Debian, or Ubuntu). For a list of Linux distributions that support the Yocto Project, see the Supported Linux Distributions section in the Yocto Project Reference Manual. For detailed information on preparing your build host, see the Preparing the Build Host section in the Yocto Project Development Tasks Manual.
Ensure that the following utilities have these minimum version numbers:
Git 1.8.3.1 or greater
tar 1.28 or greater
Python 3.9.0 or greater
gcc 10.1 or greater
GNU make 4.0 or greater
If your build host does not satisfy all of the above version requirements, you can take steps to prepare the system so that you can still use the Yocto Project. See the Required Git, tar, Python, make and gcc Versions section in the Yocto Project Reference Manual for information.
Build Host Packages
Here are the packages needed to build an image on a headless system with a supported Ubuntu or Debian Linux distribution:
sudo apt-get install build-essential chrpath cpio debianutils diffstat file gawk gcc git iputils-ping libacl1 libcrypt-dev locales python3 python3-git python3-jinja2 python3-pexpect python3-pip python3-subunit socat texinfo unzip wget xz-utils zstd
You also need to ensure you have the en_US.UTF-8 locale enabled:
$ locale --all-locales | grep en_US.utf8
If this is not the case, you can reconfigure the locales package to add it
(requires an interactive shell):
$ sudo dpkg-reconfigure locales
Note
If you are not in an interactive shell,
dpkg-reconfigurewill not work as expected. To add the locale you will need to edit/etc/locale.genfile to add/uncomment theen_US.UTF-8locale. A simple way to do this as root is:$ echo "en_US.UTF-8 UTF-8" >> /etc/locale.gen $ locale-gen
If your build system has the
oss4-devpackage installed, you might experience QEMU build failures due to the package installing its own custom/usr/include/linux/soundcard.hon the Debian system. If you run into this situation, try either of these solutions:$ sudo apt build-dep qemu $ sudo apt remove oss4-dev
Note
For host package requirements on all supported Linux distributions, see the Required Packages for the Build Host section in the Yocto Project Reference Manual.
Use Git to clone bitbake-setup
Once you complete the setup instructions for your machine, you need to
get a copy of the bitbake-setup tool to set up the Poky reference
distribution on your build host. Use the following commands to clone
the bitbake repository.
$ git clone https://git.openembedded.org/bitbake
Setup a build environment with the following command:
$ ./bitbake/bin/bitbake-setup init
By default, this will set up a top directory in the current directory.
If you prefer to set up your builds in a different top directory, for example
$HOME/bitbake-builds, you can set it with the bitbake-setup settings command:
$ ./bitbake/bin/bitbake-setup settings set --global default top-dir-prefix $HOME
Note
Use bitbake-setup settings list to get an overview of the settings.
bitbake-setup init is an interactive program by default and will ask you to make some decisions. Depending on your answers, the output may differ from the examples below.
Choose a configuration (for example,
poky-master):Available Configuration Templates: 1. oe-nodistro-master OpenEmbedded - 'nodistro' basic configuration 2. oe-nodistro-&DISTRO_NAME_NO_CAP OpenEmbedded - 'nodistro' basic configuration, release 6.0 'wrynose' (supported until ...) 3. poky-master Poky - The Yocto Project testing distribution configurations and hardware test platforms 4. poky-&DISTRO_NAME_NO_CAP Poky - The Yocto Project testing distribution configurations and hardware test platforms, release 6.0 'wrynose' (supported until ...) Please select one of the above configurations by its number: 3
Depending on the choice above, new options can be prompted to further specify which configuration to use. For example:
Available bitbake configurations: 1. poky Poky - The Yocto Project testing distribution 2. poky-with-sstate Poky - The Yocto Project testing distribution with internet sstate acceleration. Use with caution as it requires a completely robust local network with sufficient bandwidth. Please select one of the above bitbake configurations by its number: 1
Choose a target MACHINE (for example,
qemux86-64):Target machines: 1. machine/qemux86-64 x86-64 system on QEMU 2. machine/qemuarm64 ARMv8 system on QEMU 3. machine/qemuriscv64 RISC-V system on QEMU 4. machine/genericarm64 Arm64 SystemReady IR/ES platforms 5. machine/genericx86-64 x86_64 (64-bit) PCs and servers Please select one of the above options by its number: 1
Choose a DISTRO (for example,
poky):Target distributions: 1. distro/poky Yocto Project Reference Distro 2. distro/poky-altcfg Poky alternative with systemd as init manager 3. distro/poky-tiny Poky alternative optimized for size Please select one of the above options by its number: 1
Choose a setup directory name:
Enter setup directory name: [poky-master]
Press Enter to leave it to the default value shown in the brackets, or type a custom directory name.
Note
If you prefer to run non-interactively, you can run a command like the following:
$ ./bitbake/bin/bitbake-setup init --non-interactive poky-master poky distro/poky machine/qemux86-64
The init command creates a new Setup in the
top directory. The default name is derived from the selected
configuration above.
For the selected options in the above example, this would be:
poky-master
This will be our example configuration in the following sections.
This directory contains:
The BitBake Build directory, named
build. Later, when the build completes, this directory contains all the files created during the build.This directory also contains a
README, describing the current configuration and showing some instructions.The layers needed to build the Poky reference distribution, in the
layersdirectory.A
configdirectory, representing the current configuration used for this setup.
Note
It is also possible to set up the Poky reference distro manually. For that refer to the Setting Up the Poky Reference Distro Manually section of the Yocto Project Development Tasks Manual.
Building Your Image
Use the following steps to build your image. The build process creates an entire Linux distribution, including the toolchain, from source.
Note
If you are working behind a firewall and your build host is not set up for proxies, you could encounter problems with the build process when fetching source code (e.g. fetcher failures or Git failures).
If you do not know your proxy settings, consult your local network infrastructure resources and get that information. A good starting point could also be to check your web browser settings. Finally, you can find more information on the “Working Behind a Network Proxy” page of the Yocto Project Wiki.
Initialize the Build Environment: Source the
init-build-envenvironment setup script within the BitBake build directory to set up the BitBake build environment on your host:$ source poky-master/build/init-build-env Poky reference distro build
Examine Your Current Configuration: When you set up the build environment, an configuration file named toolcfg.conf becomes available in a
conf/sub-directory of the BitBake build directory. This file is automatically modified by thebitbake-config-buildcommand-line tool. With this tool, list the currently enabled configuration fragments:$ bitbake-config-build list-fragments
For this configuration, the default is to use two Built-in Fragments:
These fragment values correspond to the choices made when running bitbake-setup init.
Note
These set up the environment similar to what was previously in the local configuration file local.conf, which is now largely empty. To set up the build how it was done previously, see the Setting Up the Poky Reference Distro Manually section of the Yocto Project Development Tasks Manual.
The current configuration does not allow the
rootuser to login. As this can be useful for development, you can enable the core/yocto/root-login-with-empty-password fragment:$ bitbake-config-build enable-fragment core/yocto/root-login-with-empty-password
Note
You can significantly speed up your build and guard against fetcher failures by using Shared State Cache mirrors and enabling Hash Equivalence. This way, you can use pre-built artifacts rather than building them. This is relevant only when your network and the server that you use can download these artifacts faster than you would be able to build them.
To use such mirrors, enable the core/yocto/sstate-mirror-cdn fragment:
$ bitbake-config-build enable-fragment core/yocto/sstate-mirror-cdn
The hash equivalence server needs the websockets python module version 9.1 or later. Debian GNU/Linux 12 (Bookworm) and later, Fedora, CentOS Stream 9 and later, and Ubuntu 22.04 (LTS) and later, all have a recent enough package. Other supported distributions need to get the module some other place than their package feed, e.g. via
pip. You can otherwise install a Buildtools tarball by following the instructions in the Required Git, tar, Python, make and gcc Versions section of the Yocto Project Reference Manual.Start the Build: Continue with the following command to build an OS image for the target, which is
core-image-satoin this example:$ bitbake core-image-sato
For information on using the
bitbakecommand, see the BitBake section in the Yocto Project Overview and Concepts Manual, or see The BitBake Command in the BitBake User Manual.Simulate Your Image Using QEMU: Once this particular image is built, you can start QEMU, which is a Quick EMUlator that ships with the Yocto Project:
$ runqemu snapshot
If you want to learn more about running QEMU, see the Using the Quick EMUlator (QEMU) chapter in the Yocto Project Development Tasks Manual.
Exit QEMU: Exit QEMU by either clicking on the shutdown icon or by typing
Ctrl-Cin the QEMU transcript window from which you evoked QEMU.
Customizing Your Build for Specific Hardware
So far, all you have done is quickly built an image suitable for emulation only. This section shows you how to customize your build for specific hardware by adding a hardware layer into the Yocto Project development environment.
In general, layers are repositories that contain related sets of instructions and configurations that tell the Yocto Project what to do. Isolating related metadata into functionally-specific layers facilitates modular development and makes it easier to reuse the layer metadata.
Note
By convention, layer names start with the string “meta-“.
Follow these steps to add a BSP layer:
Find a Layer: Many BSP layers are available. The layer index can be used to find such layers. This example adds the meta-raspberrypi BSP layer.
First, clone the layer next to the other layers:
git clone -b wrynose https://git.yoctoproject.org/meta-raspberrypi ../layers/meta-raspberrypi
Add Your Layer to the Layer Configuration File: Before you can use it, you must add the layer and its dependencies to your
bblayers.conffile, which is found in the Build Directory (conf/) directory.For this, the
bitbake-layers add-layercommand can be used:$ bitbake-layers add-layer ../layers/meta-raspberrypi
You can find more information on adding layers in the Adding a Layer Using the bitbake-layers Script section.
Change the Configuration to Build for a Specific Machine: The MACHINE variable is defined by the machine/ fragment. For this example, the
meta-raspberrypilayer provides the raspberrypi5 machine, so let’s make it the MACHINE used for the build withbitbake-config-build:$ bitbake-config-build enable-fragment machine/raspberrypi5
Note
See the “Examine Your Current Configuration” step earlier for more information on configuring the build.
The
raspberrypi5build depends on non-free firmware (https://github.com/RPi-Distro/firmware-nonfree) that includes the Synaptics license. See the ipcompliance.md document for more information. Add thesynaptics-killswitchvalue to the LICENSE_FLAGS_ACCEPTED variable, in theconf/local.conffile of your build directory:LICENSE_FLAGS_ACCEPTED = "synaptics-killswitch"
Start The Build: The configuration is now set to build for the Raspberry Pi 5. Start the build again:
$ bitbake core-image-sato
Completing these steps has added the meta-raspberrypi layer to your Yocto
Project development environment and configured it to build for the
raspberrypi5 machine.
Note
The previous steps are for demonstration purposes only. If you were
to attempt to build an image for the raspberrypi5 machine, you
should read the README.md file in meta-raspberrypi.
Creating Your Own General Layer
Maybe you have an application or specific set of behaviors you need to
isolate. You can create your own general layer using the
bitbake-layers create-layer command. The tool automates layer
creation by setting up a subdirectory with a layer.conf
configuration file, a recipes-example subdirectory that contains an
example.bb recipe, a licensing file, and a README.
The following commands run the tool to create a layer named
meta-mylayer:
$ bitbake-layers create-layer ../layers/meta-mylayer
NOTE: Starting bitbake server...
Add your new layer with 'bitbake-layers add-layer ../layers/meta-mylayer'
Note
By convention, layers are placed side-by-side.
For more information on layers and how to create them, see the Creating Your Own Layer section in the Yocto Project Development Tasks Manual.
Where To Go Next
Now that you have experienced using the Yocto Project, you might be asking yourself “What now?”. The Yocto Project has many sources of information including the website, wiki pages, and user manuals:
Website: The Yocto Project Website provides background information, the latest builds, breaking news, full development documentation, and access to a rich Yocto Project Development Community into which you can tap.
Video Seminar: The Introduction to the Yocto Project and BitBake, Part 1 and Introduction to the Yocto Project and BitBake, Part 2 videos offer a video seminar introducing you to the most important aspects of developing a custom embedded Linux distribution with the Yocto Project.
Yocto Project Overview and Concepts Manual: The Yocto Project Overview and Concepts Manual is a great place to start to learn about the Yocto Project. This manual introduces you to the Yocto Project and its development environment. The manual also provides conceptual information for various aspects of the Yocto Project.
Yocto Project Wiki: The Yocto Project Wiki provides additional information on where to go next when ramping up with the Yocto Project, release information, project planning, and QA information.
Yocto Project Mailing Lists: Related mailing lists provide a forum for discussion, patch submission and announcements. There are several mailing lists grouped by topic. See the Mailing lists section in the Yocto Project Reference Manual for a complete list of Yocto Project mailing lists.
Comprehensive List of Links and Other Documentation: The Links and Related Documentation section in the Yocto Project Reference Manual provides a comprehensive list of all related links and other user documentation.
Permission is granted to copy, distribute and/or modify this document under the terms of the Creative Commons Attribution-Share Alike 2.0 UK: England & Wales as published by Creative Commons.
To report any inaccuracies or problems with this (or any other Yocto Project)
manual, or to send additions or changes, please send email/patches to the Yocto
Project documentation mailing list at docs@lists.yoctoproject.org or
log into the Libera Chat #yocto channel.
What I wish I’d known about Yocto Project
Note
Before reading further, make sure you’ve taken a look at the Technical Overview page which presents the definitions for many of the terms referenced here. Also, know that some of the information here won’t make sense now, but as you start developing, it is the information you’ll want to keep close at hand. These are best known methods for working with Yocto Project and they are updated regularly.
Using the Yocto Project is fairly easy, until something goes wrong. Without an understanding of how the build process works, you’ll find yourself trying to troubleshoot “a black box”. Here are a few items that new users wished they had known before embarking on their first build with Yocto Project. Feel free to contact us with other suggestions.
Use Git, not the tarball download: If you use Git, the software will be automatically updated with bug updates because of how Git works. If you download the tarball instead, you will need to be responsible for your own updates.
Get to know the layer index: All layers can be found in the layer index. Layers which have applied for Yocto Project Compatible status (structure continuity assurance and testing) can be found in the Yocto Project Compatible Layers page. Generally check the Compatible layer index first, and if you don’t find the necessary layer check the general layer index. The layer index is an original artifact from the Open Embedded Project. As such, that index doesn’t have the curating and testing that the Yocto Project provides on Yocto Project Compatible layer list, but the latter has fewer entries. Know that when you start searching in the layer index that not all layers have the same level of maturity, validation, or usability. Nor do searches prioritize displayed results. There is no easy way to help you through the process of choosing the best layer to suit your needs. Consequently, it is often trial and error, checking the mailing lists, or working with other developers through collaboration rooms that can help you make good choices.
Use existing BSP layers from silicon vendors when possible: Intel, TI, NXP and others have information on what BSP layers to use with their silicon. These layers have names such as “meta-intel” or “meta-ti”. Try not to build layers from scratch. If you do have custom silicon, use one of these layers as a guide or template and familiarize yourself with the Yocto Project Board Support Package Developer’s Guide.
Do not put everything into one layer: Use different layers to logically separate information in your build. As an example, you could have a BSP layer, a GUI layer, a distro configuration, middleware, or an application (e.g. “meta-filesystems”, “meta-python”, “meta-intel”, and so forth). Putting your entire build into one layer limits and complicates future customization and reuse. Isolating information into layers, on the other hand, helps keep simplify future customizations and reuse.
Never modify the core layers (BitBake, OpenEmbedded-Core (OE-Core) and possibly meta-yocto). Never. Ever. When you update to the next release, you’ll lose all of your work. ALL OF IT.**
Don’t be fooled by documentation searching results: Yocto Project documentation is always being updated. Unfortunately, when you use Google to search for Yocto Project concepts or terms, Google consistently searches and retrieves older versions of Yocto Project manuals. For example, searching for a particular topic using Google could result in a “hit” on a Yocto Project manual that is several releases old. To be sure that you are using the most current Yocto Project documentation, use the drop-down menu at the top of any of its page.
Many developers look through the All-in-one ‘Mega’ Manual for a concept or term by doing a search through the whole page. This manual is a concatenation of the core set of Yocto Project manual. Thus, a simple string search using Ctrl-F in this manual produces all the “hits” for a desired term or concept. Once you find the area in which you are interested, you can display the actual manual, if desired. It is also possible to use the search bar in the menu or in the left navigation pane.
Understand the basic concepts of how the build system works: the workflow: Understanding the Yocto Project workflow is important as it can help you both pinpoint where trouble is occurring and how the build is breaking. The workflow breaks down into the following steps:
Fetch – get the source code
Extract – unpack the sources
Patch – apply patches for bug fixes and new capability
Configure – set up your environment specifications
Build – compile and link
Install – copy files to target directories
Package – bundle files for installation
During “fetch”, there may be an inability to find code. During “extract”, there is likely an invalid zip or something similar. In other words, the function of a particular part of the workflow gives you an idea of what might be going wrong.

Know that you can generate a dependency graph and learn how to do it: A dependency graph shows dependencies between recipes, tasks, and targets. You can use the “-g” option with BitBake to generate this graph. When you start a build and the build breaks, you could see packages you have no clue about or have any idea why the build system has included them. The dependency graph can clarify that confusion. You can learn more about dependency graphs and how to generate them in the Generating Dependency Graphs section in the BitBake User Manual.
Here’s how you decode “magic” folder names in tmp/work: The build system fetches, unpacks, preprocesses, and builds. If something goes wrong, the build system reports to you directly the path to a folder where the temporary (build/tmp) files and packages reside resulting from the build. For a detailed example of this process, see the example. Unfortunately this example is on an earlier release of Yocto Project.
When you perform a build, you can use the “-u” BitBake command-line option to specify a user interface viewer into the dependency graph (e.g. knotty, ncurses, or taskexp) that helps you understand the build dependencies better.
You can build more than just images: You can build and run a specific task for a specific package (including devshell) or even a single recipe. When developers first start using the Yocto Project, the instructions found in the Yocto Project Quick Build show how to create an image and then run or flash that image. However, you can actually build just a single recipe. Thus, if some dependency or recipe isn’t working, you can just say “bitbake foo” where “foo” is the name for a specific recipe. As you become more advanced using the Yocto Project, and if builds are failing, it can be useful to make sure the fetch itself works as desired. Here are some valuable links: Using a Development Shell for information on how to build and run a specific task using devshell. Also, the SDK manual shows how to build out a specific recipe.
An ambiguous definition: Package vs Recipe: A recipe contains instructions the build system uses to create packages. Recipes and Packages are the difference between the front end and the result of the build process.
As mentioned, the build system takes the recipe and creates packages from the recipe’s instructions. The resulting packages are related to the one thing the recipe is building but are different parts (packages) of the build (i.e. the main package, the doc package, the debug symbols package, the separate utilities package, and so forth). The build system splits out the packages so that you don’t need to install the packages you don’t want or need, which is advantageous because you are building for small devices when developing for embedded and IoT.
You will want to learn about and know what’s packaged in the root filesystem.
Create your own image recipe: There are a number of ways to create your own image recipe. We suggest you create your own image recipe as opposed to appending an existing recipe. It is trivial and easy to write an image recipe. Again, do not try appending to an existing image recipe. Create your own and do it right from the start.
Finally, here is a list of the basic skills you will need as a systems developer. You must be able to:
deal with corporate proxies
add a package to an image
understand the difference between a recipe and a package
build a package by itself and understand why that’s useful
find out what packages are created by a recipe
find out what files are in a package
find out what files are in an image
add an SSH server to an image (enable transferring of files to target)
know the anatomy of a recipe
know how to create and use layers
find recipes (with the OpenEmbedded Layer index)
understand the difference between MACHINE and DISTRO settings
find and use the right BSP (machine) for your hardware
find examples of DISTRO features and know where to set them
understand the task pipeline and how to execute individual tasks
understand devtool and how it simplifies your workflow
improve build speeds with shared downloads and shared state cache
generate and understand a dependency graph
generate and understand BitBake environment
build an Extensible SDK for applications development
Depending on what you primary interests are with the Yocto Project, you could consider any of the following reading:
Look Through the Yocto Project Development Tasks Manual: This manual contains procedural information grouped to help you get set up, work with layers, customize images, write new recipes, work with libraries, and use QEMU. The information is task-based and spans the breadth of the Yocto Project. See the Yocto Project Development Tasks Manual.
Look Through the Yocto Project Application Development and the Extensible Software Development Kit (eSDK) manual: This manual describes how to use both the standard SDK and the extensible SDK, which are used primarily for application development. The Using the Extensible SDK also provides example workflows that use devtool. See the section Using devtool in Your SDK Workflow for more information.
Learn About Kernel Development: If you want to see how to work with the kernel and understand Yocto Linux kernels, see the Yocto Project Linux Kernel Development Manual. This manual provides information on how to patch the kernel, modify kernel recipes, and configure the kernel.
Learn About Board Support Packages (BSPs): If you want to learn about BSPs, see the Yocto Project Board Support Package Developer’s Guide. This manual also provides an example BSP creation workflow. See the Board Support Packages (BSP) — Developer’s Guide section.
Learn About Toaster: Toaster is a web interface to the Yocto Project’s OpenEmbedded build system. If you are interested in using this type of interface to create images, see the Toaster User Manual.
Discover the VSCode extension: The Yocto Project BitBake extension for the Visual Studio Code IDE provides language features and commands for working with the Yocto Project. If you are interested in using this extension, visit its marketplace page.
Have Available the Yocto Project Reference Manual: Unlike the rest of the Yocto Project manual set, this manual is comprised of material suited for reference rather than procedures. You can get build details, a closer look at how the pieces of the Yocto Project development environment work together, information on various technical details, guidance on migrating to a newer Yocto Project release, reference material on the directory structure, classes, and tasks. The Yocto Project Reference Manual also contains a fairly comprehensive glossary of variables used within the Yocto Project.
Permission is granted to copy, distribute and/or modify this document under the terms of the Creative Commons Attribution-Share Alike 2.0 UK: England & Wales as published by Creative Commons.
To report any inaccuracies or problems with this (or any other Yocto Project)
manual, or to send additions or changes, please send email/patches to the Yocto
Project documentation mailing list at docs@lists.yoctoproject.org or
log into the Libera Chat #yocto channel.
Transitioning to a custom environment for systems development
Note
So you’ve finished the Yocto Project Quick Build and glanced over the document What I wish I’d known about Yocto Project, the latter containing important information learned from other users. You’re well prepared. But now, as you are starting your own project, it isn’t exactly straightforward what to do, and the documentation is daunting. We’ve put together a few hints to get you started.
Make a list of the processor, target board, technologies, and capabilities that will be part of your project. You will be finding layers with recipes and other metadata that support these things, and adding them to your configuration. (See #3)
Set up your board support. Even if you’re using custom hardware, it might be easier to start with an existing target board that uses the same processor or at least the same architecture as your custom hardware. Knowing that the board already has a functioning Board Support Package (BSP) within the project makes it easier for you to get comfortable with project concepts.
Find and acquire the best BSP for your target. Use the Yocto Project Compatible Layers or even the OpenEmbedded Layer Index to find and acquire the best BSP for your target board. The Yocto Project layer index BSPs are regularly validated. The best place to get your first BSP is from your silicon manufacturer or board vendor – they can point you to their most qualified efforts. In general, for Intel silicon use
meta-intel, for Texas Instruments usemeta-ti, and so forth. Choose a BSP that has been tested with the same Yocto Project release that you’ve downloaded. Be aware that some BSPs may not be immediately supported on the very latest release, but they will be eventually.You might want to start with the build specification that Poky provides (which is reference embedded distribution) and then add your newly-chosen layers to that. Here is the information about adding layers.
Based on the layers you’ve chosen, make needed changes in your configuration. For instance, assume you’ve chosen a machine type and added in the corresponding BSP layer. You’ll then need to change the value of the MACHINE variable in your configuration (using the machine/ fragment) to point to that same machine type. There could be other layer-specific settings you need to change as well. Each layer has a
READMEdocument that you can look at for this type of usage information.Add a new layer for any custom recipes and metadata you create. Use the
bitbake-layers create-layercommand. Thebitbake-layerstool also provides a number of other useful layer-related commands. See Creating Your Own Layer section.Create your own layer for the BSP you’re going to use. It is not common that you would need to create an entire BSP from scratch unless you have a really special device. Even if you are using an existing BSP, create your own layer for the BSP. For example, given a 64-bit x86-based machine, copy the conf/intel-corei7-64 definition and give the machine a relevant name (think board name, not product name). Make sure the layer configuration is dependent on the
meta-intellayer (or at least,meta-intelremains in yourbblayers.conffile). Now you can put your custom BSP settings into your layer and you can re-use it for different applications.Write your own recipe to build additional software support that isn’t already available in the form of a recipe. Creating your own recipe is especially important for custom application software that you want to run on your device. Writing new recipes is a process of refinement. Start by getting each step of the build process working beginning with fetching all the way through packaging. Next, run the software on your target and refine further as needed. See Writing a New Recipe in the Yocto Project Development Tasks Manual for more information.
Now you’re ready to create an image recipe. There are a number of ways to do this. However, it is strongly recommended that you have your own image recipe — don’t try appending to existing image recipes. Recipes for images are trivial to create and you usually want to fully customize their contents.
Build your image and refine it. Add what’s missing and fix anything that’s broken using your knowledge of the workflow to identify where issues might be occurring.
Consider creating your own distribution. When you get to a certain level of customization, consider creating your own distribution rather than using the default reference distribution.
Distribution settings define the packaging back-end (e.g. rpm or other) as well as the package feed and possibly the update solution. You would create your own distribution in a new layer inheriting from Poky but overriding what needs to change for your distribution. If you find yourself adding a lot of configuration to your local.conf file aside from paths and other typical local settings, it’s time to consider creating your own distribution.
You can add product specifications that can customize the distribution if needed in other layers. You can also add other functionality specific to the product. But to update the distribution, not individual products, you update the distribution feature through that layer.
Congratulations! You’re well on your way. Welcome to the Yocto Project community.
Permission is granted to copy, distribute and/or modify this document under the terms of the Creative Commons Attribution-Share Alike 2.0 UK: England & Wales as published by Creative Commons.
To report any inaccuracies or problems with this (or any other Yocto Project)
manual, or to send additions or changes, please send email/patches to the Yocto
Project documentation mailing list at docs@lists.yoctoproject.org or
log into the Libera Chat #yocto channel.
Yocto Project Overview and Concepts Manual
1 The Yocto Project Overview and Concepts Manual
1.1 Welcome
Welcome to the Yocto Project Overview and Concepts Manual! This manual introduces the Yocto Project by providing concepts, software overviews, best-known-methods (BKMs), and any other high-level introductory information suitable for a new Yocto Project user.
Here is what you can get from this manual:
Introducing the Yocto Project: This chapter provides an introduction to the Yocto Project. You will learn about features and challenges of the Yocto Project, the layer model, components and tools, development methods, the Poky reference distribution, the OpenEmbedded Build System workflow, and some basic Yocto terms.
The Yocto Project Development Environment: This chapter helps you get started understanding the Yocto Project development environment. You will learn about open source, development hosts, Yocto Project source repositories, workflows using Git and the Yocto Project, a Git primer, and information about licensing.
Yocto Project Concepts : This chapter presents various concepts regarding the Yocto Project. You can find conceptual information about components, development, cross-toolchains, and so forth.
This manual does not give you the following:
Step-by-step Instructions for Development Tasks: Instructional procedures reside in other manuals within the Yocto Project documentation set. For example, the Yocto Project Development Tasks Manual provides examples on how to perform various development tasks. As another example, the Yocto Project Application Development and the Extensible Software Development Kit (eSDK) manual contains detailed instructions on how to install an SDK, which is used to develop applications for target hardware.
Reference Material: This type of material resides in an appropriate reference manual. For example, system variables are documented in the Yocto Project Reference Manual. As another example, the Yocto Project Board Support Package Developer’s Guide contains reference information on BSPs.
Detailed Public Information Not Specific to the Yocto Project: For example, exhaustive information on how to use the Source Control Manager Git is better covered with Internet searches and official Git Documentation than through the Yocto Project documentation.
1.2 Other Information
Because this manual presents information for many different topics, supplemental information is recommended for full comprehension. For additional introductory information on the Yocto Project, see the Yocto Project Website. If you want to build an image with no knowledge of Yocto Project as a way of quickly testing it out, see the Yocto Project Quick Build document. For a comprehensive list of links and other documentation, see the “Links and Related Documentation” section in the Yocto Project Reference Manual.
2 Introducing the Yocto Project
2.1 What is the Yocto Project?
The Yocto Project is an open source collaboration project that helps developers create custom Linux-based systems that are designed for embedded products regardless of the product’s hardware architecture. Yocto Project provides a flexible toolset and a development environment that allows embedded device developers across the world to collaborate through shared technologies, software stacks, configurations, and best practices used to create these tailored Linux images.
Thousands of developers worldwide have discovered that Yocto Project provides advantages in both systems and applications development, archival and management benefits, and customizations used for speed, footprint, and memory utilization. The project is a standard when it comes to delivering embedded software stacks. The project allows software customizations and build interchange for multiple hardware platforms as well as software stacks that can be maintained and scaled.

The remainder of this section overviews advantages and challenges tied to the Yocto Project.
2.1.1 Features
Here are features and advantages of the Yocto Project:
Widely Adopted Across the Industry: Many semiconductor, operating system, software, and service vendors adopt and support the Yocto Project in their products and services. For a look at the Yocto Project community and the companies involved with the Yocto Project, see the “COMMUNITY” and “ABOUT” tabs on the Yocto Project home page.
Architecture Agnostic: Yocto Project supports Intel, ARM, MIPS, AMD, PPC, RISC-V and other architectures. Most Original Design Manufacturers (ODMs), Operating System Vendors (OSVs), and chip vendors create and supply BSPs that support their hardware. If you have custom silicon, you can create a BSP that supports that architecture. See Yocto Project Supported Architectures And Features for details on the level of support for some of these architectures.
Aside from broad architecture support, the Yocto Project fully supports a wide range of devices emulated by the Quick EMUlator (QEMU).
Images and Code Transfer Easily: Yocto Project output can easily move between architectures without moving to new development environments. Additionally, if you have used the Yocto Project to create an image or application and you find yourself not able to support it, commercial Linux vendors listed on https://www.yoctoproject.org/members/ and https://www.yoctoproject.org/about/participants/ could take it and provide ongoing support.
Flexibility: Corporations use the Yocto Project many different ways. One example is to create an internal Linux distribution as a code base the corporation can use across multiple product groups. Through customization and layering, a project group can leverage the base Linux distribution to create a distribution that works for their product needs.
Ideal for Constrained Embedded and IoT devices: Unlike a full Linux distribution, you can use the Yocto Project to create exactly what you need for embedded devices. You only add the feature support or packages that you absolutely need for the device. For devices that have display hardware, you can use available system components such as X11, Wayland, GTK+, Qt, Clutter, and SDL (among others) to create a rich user experience. For devices that do not have a display or where you want to use alternative UI frameworks, you can choose to not build these components.
Comprehensive Toolchain Capabilities: Toolchains for supported architectures satisfy most use cases. However, if your hardware supports features that are not part of a standard toolchain, you can easily customize that toolchain through specification of platform-specific tuning parameters. And, should you need to use a third-party toolchain, mechanisms built into the Yocto Project allow for that.
Mechanism Rules Over Policy: Focusing on mechanism rather than policy ensures that you are free to set policies based on the needs of your design instead of adopting decisions enforced by some system software provider.
Uses a Layer Model: The Yocto Project layer infrastructure groups related functionality into separate bundles. You can incrementally add these grouped functionalities to your project as needed. Using layers to isolate and group functionality reduces project complexity and redundancy, allows you to easily extend the system, make customizations, and keep functionality organized.
Supports Partial Builds: You can build and rebuild individual packages as needed. Yocto Project accomplishes this through its Shared State Cache (sstate) scheme. Being able to build and debug components individually eases project development.
Releases According to a Strict Schedule: Major releases occur on a six-month cycle predictably in October and April. The most recent two releases support point releases to address common vulnerabilities and exposures. This predictability is crucial for projects based on the Yocto Project and allows development teams to plan activities.
Rich Ecosystem of Individuals and Organizations: For open source projects, the value of community is very important. Support forums, expertise, and active developers who continue to push the Yocto Project forward are readily available.
Binary Reproducibility: The Yocto Project allows you to be very specific about dependencies and achieves very high percentages of binary reproducibility (e.g. 99.8% for
core-image-minimal). When distributions are not specific about which packages are pulled in and in what order to support dependencies, other build systems can arbitrarily include packages.License Manifest: The Yocto Project provides a license manifest for review by people who need to track the use of open source licenses (e.g. legal teams).
2.1.2 Challenges
Here are challenges you might encounter when developing using the Yocto Project:
Steep Learning Curve: The Yocto Project has a steep learning curve and has many different ways to accomplish similar tasks. It can be difficult to choose between such ways.
Understanding What Changes You Need to Make For Your Design Requires Some Research: Beyond the simple tutorial stage, understanding what changes need to be made for your particular design can require a significant amount of research and investigation. For information that helps you transition from trying out the Yocto Project to using it for your project, see the “What I wish I’d known about Yocto Project” and “Transitioning to a custom environment for systems development” documents on the Yocto Project website.
Project Workflow Could Be Confusing: The Yocto Project workflow could be confusing if you are used to traditional desktop and server software development. In a desktop development environment, there are mechanisms to easily pull and install new packages, which are typically pre-compiled binaries from servers accessible over the Internet. Using the Yocto Project, you must modify your configuration and rebuild to add additional packages.
Working in a Cross-Build Environment Can Feel Unfamiliar: When developing code to run on a target, compilation, execution, and testing done on the actual target can be faster than running a BitBake build on a development host and then deploying binaries to the target for test. While the Yocto Project does support development tools on the target, the additional step of integrating your changes back into the Yocto Project build environment would be required. Yocto Project supports an intermediate approach that involves making changes on the development system within the BitBake environment and then deploying only the updated packages to the target.
The Yocto Project OpenEmbedded Build System produces packages in standard formats (i.e. RPM, DEB and/or IPK). If you included runtime package management in your image, you can deploy these packages into the running system on the target by using the corresponding utilities on the target such as
rpm/dnf,dpkg/aptoropkg.Initial Build Times Can be Significant: Long initial build times are unfortunately unavoidable due to the large number of packages initially built from scratch for a fully functioning Linux system. Once that initial build is completed, however, the shared-state (sstate) cache mechanism Yocto Project uses keeps the system from rebuilding packages that have not been “touched” since the last build. The sstate mechanism significantly reduces times for successive builds.
2.2 The Yocto Project Layer Model
The Yocto Project’s “Layer Model” is a development model for embedded and IoT Linux creation that distinguishes the Yocto Project from other simple build systems. The Layer Model simultaneously supports collaboration and customization. Layers are repositories that contain related sets of instructions that tell the OpenEmbedded Build System what to do. You can collaborate, share, and reuse layers.
Layers can contain changes to previous instructions or settings at any time. This powerful override capability is what allows you to customize previously supplied collaborative or community layers to suit your product requirements.
You use different layers to logically separate information in your build. As an example, you could have BSP, GUI, distro configuration, middleware, or application layers. Putting your entire build into one layer limits and complicates future customization and reuse. Isolating information into layers, on the other hand, helps simplify future customizations and reuse. You might find it tempting to keep everything in one layer when working on a single project. However, the more modular your Metadata, the easier it is to cope with future changes.
Note
Use Board Support Package (BSP) layers from silicon vendors when possible.
Familiarize yourself with the Yocto Project Compatible Layers or the OpenEmbedded Layer Index. The latter contains more layers but they are less universally validated.
Layers support the inclusion of technologies, hardware components, and software components. The Yocto Project Compatible designation provides a minimum level of standardization that contributes to a strong ecosystem. “YP Compatible” is applied to appropriate products and software components such as BSPs, other OE-compatible layers, and related open-source projects, allowing the producer to use Yocto Project badges and branding assets.
To illustrate how layers are used to keep things modular, consider
machine customizations. These types of customizations typically reside
in a special layer, rather than a general layer, called a BSP Layer.
Furthermore, the machine customizations should be isolated from recipes
and Metadata that support a new GUI environment, for example. This
situation gives you a couple of layers: one for the machine
configurations, and one for the GUI environment. It is important to
understand, however, that the BSP layer can still make machine-specific
additions to recipes within the GUI environment layer without polluting
the GUI layer itself with those machine-specific changes. You can
accomplish this through a recipe that is a BitBake append
(.bbappend) file, which is described later in this section.
Note
For general information on BSP layer structure, see the Yocto Project Board Support Package Developer’s Guide.
The Source Directory
contains both general layers and BSP layers right out of the box. You
can easily identify layers that ship with a Yocto Project release in the
Source Directory by their names. Layers typically have names that begin
with the string meta-.
Note
It is not a requirement that a layer name begin with the prefix
meta-, but it is a commonly accepted standard in the Yocto Project
community.
For example, if you were to examine the tree view
of the openembedded-core repository, you will see several layers: meta,
meta-skeleton, and meta-selftest. Each of these repositories represents a distinct
layer.
For procedures on how to create layers, see the “Understanding and Creating Layers” section in the Yocto Project Development Tasks Manual.
2.3 Components and Tools
The Yocto Project employs a collection of components and tools used by the project itself, by project developers, and by those using the Yocto Project. These components and tools are open source projects and metadata that are separate from the reference distribution (Poky) and the OpenEmbedded Build System. Most of the components and tools are downloaded separately.
This section provides brief overviews of the components and tools associated with the Yocto Project.
2.3.1 Development Tools
Here are tools that help you develop images and applications using the Yocto Project:
CROPS: CROPS is an open source, cross-platform development framework that leverages Docker Containers. CROPS provides an easily managed, extensible environment that allows you to build binaries for a variety of architectures on Windows, Linux and Mac OS X hosts.
devtool: This command-line tool is available as part of the extensible SDK (eSDK) and is its cornerstone. You can use
devtoolto help build, test, and package software within the eSDK. You can use the tool to optionally integrate what you build into an image built by the OpenEmbedded build system.The
devtoolcommand employs a number of sub-commands that allow you to add, modify, and upgrade recipes. As with the OpenEmbedded build system, “recipes” represent software packages withindevtool. When you usedevtool add, a recipe is automatically created. When you usedevtool modify, the specified existing recipe is used in order to determine where to get the source code and how to patch it. In both cases, an environment is set up so that when you build the recipe a source tree that is under your control is used in order to allow you to make changes to the source as desired. By default, both new recipes and the source go into a “workspace” directory under the eSDK. Thedevtool upgradecommand updates an existing recipe so that you can build it for an updated set of source files.You can read about the
devtoolworkflow in the Yocto Project Application Development and Extensible Software Development Kit (eSDK) Manual in the “Using devtool in Your SDK Workflow” section.Extensible Software Development Kit (eSDK): The eSDK provides a cross-development toolchain and libraries tailored to the contents of a specific image. The eSDK makes it easy to add new applications and libraries to an image, modify the source for an existing component, test changes on the target hardware, and integrate into the rest of the OpenEmbedded build system. The eSDK gives you a toolchain experience supplemented with the powerful set of
devtoolcommands tailored for the Yocto Project environment.For information on the eSDK, see the Yocto Project Application Development and the Extensible Software Development Kit (eSDK) Manual.
Toaster: Toaster is a web interface to the Yocto Project OpenEmbedded build system. Toaster allows you to configure, run, and view information about builds. For information on Toaster, see the Toaster User Manual.
VSCode IDE Extension: The Yocto Project BitBake extension for Visual Studio Code provides a rich set of features for working with BitBake recipes. The extension provides syntax highlighting, hover tips, and completion for BitBake files as well as embedded Python and Bash languages. Additional views and commands allow you to efficiently browse, build and edit recipes. It also provides SDK integration for cross-compiling and debugging through
devtool.Learn more about the VSCode Extension on the extension’s frontpage.
2.3.2 Production Tools
Here are tools that help with production related activities using the Yocto Project:
Auto Upgrade Helper: This utility when used in conjunction with the OpenEmbedded Build System (BitBake and OE-Core) automatically generates upgrades for recipes that are based on new versions of the recipes published upstream. See Using the Auto Upgrade Helper (AUH) for how to set it up.
Recipe Reporting System: The Recipe Reporting System tracks recipe versions available for Yocto Project. The main purpose of the system is to help you manage the recipes you maintain and to offer a dynamic overview of the project. The Recipe Reporting System is built on top of the OpenEmbedded Layer Index, which is a website that indexes OpenEmbedded-Core layers.
Patchwork: Patchwork is a fork of a project originally started by OzLabs. The project is a web-based tracking system designed to streamline the process of bringing contributions into a project. The Yocto Project uses Patchwork as an organizational tool to handle patches, which number in the thousands for every release.
AutoBuilder: AutoBuilder is a project that automates build tests and quality assurance (QA). By using the public AutoBuilder, anyone can determine the status of the current development branch of the core repositories (OpenEmbedded-Core (OE-Core) and BitBake).
Note
AutoBuilder is based on buildbot.
A goal of the Yocto Project is to lead the open source industry with a project that automates testing and QA procedures. In doing so, the project encourages a development community that publishes QA and test plans, publicly demonstrates QA and test plans, and encourages development of tools that automate and test and QA procedures for the benefit of the development community.
You can learn more about the AutoBuilder used by the Yocto Project Autobuilder here.
Pseudo: Pseudo is the Yocto Project implementation of fakeroot, which is used to run commands in an environment that seemingly has root privileges.
During a build, it can be necessary to perform operations that require system administrator privileges. For example, file ownership or permissions might need to be defined. Pseudo is a tool that you can either use directly or through the environment variable
LD_PRELOAD. Either method allows these operations to succeed even without system administrator privileges.Thanks to Pseudo, the Yocto Project never needs root privileges to build images for your target system.
You can read more about Pseudo in the “Fakeroot and Pseudo” section.
2.3.3 Open-Embedded Build System Components
Here are components associated with the OpenEmbedded Build System:
BitBake: BitBake is a core component of the Yocto Project and is used by the OpenEmbedded build system to build images. While BitBake is key to the build system, BitBake is maintained separately from the Yocto Project.
BitBake is a generic task execution engine that allows shell and Python tasks to be run efficiently and in parallel while working within complex inter-task dependency constraints. In short, BitBake is a build engine that works through recipes written in a specific format in order to perform sets of tasks.
You can learn more about BitBake in the BitBake User Manual.
OpenEmbedded-Core: OpenEmbedded-Core (OE-Core) is a common layer of metadata (i.e. recipes, classes, and associated files) used by OpenEmbedded-derived systems, which includes the Yocto Project. The Yocto Project and the OpenEmbedded Project both maintain the OpenEmbedded-Core. You can find the OE-Core metadata in the OpenEmbedded Source Repositories.
Historically, the Yocto Project integrated the OE-Core metadata throughout the Yocto Project source repository reference system (Poky). After Yocto Project Version 1.0, the Yocto Project and OpenEmbedded agreed to work together and share a common core set of metadata (OE-Core), which contained much of the functionality previously found in Poky. This collaboration achieved a long-standing OpenEmbedded objective for having a more tightly controlled and quality-assured core. The results also fit well with the Yocto Project objective of achieving a smaller number of fully featured tools as compared to many different ones.
Nowadays, the Poky repository is no longer updated as bitbake-setup became the preferred way of setting up the repositories in order to build the Poky distro.
2.3.4 Packages for Finished Targets
Here are components associated with packages for finished targets:
Matchbox: Matchbox is an Open Source, base environment for the X Window System running on non-desktop, embedded platforms such as handhelds, set-top boxes, kiosks, and anything else for which screen space, input mechanisms, or system resources are limited.
Matchbox consists of a number of interchangeable and optional applications that you can tailor to a specific, non-desktop platform to enhance usability in constrained environments.
You can find the Matchbox source in the Yocto Project Source Repositories.
Opkg: Open PacKaGe management (opkg) is a lightweight package management system based on the itsy package (ipkg) management system. Opkg is written in C and resembles Advanced Package Tool (APT) and Debian Package (dpkg) in operation.
Opkg is intended for use on embedded Linux devices and is used in this capacity in the OpenEmbedded and OpenWrt projects, as well as the Yocto Project.
Note
As best it can, opkg maintains backwards compatibility with ipkg and conforms to a subset of Debian’s policy manual regarding control files.
You can find the opkg source in the Yocto Project Source Repositories.
2.3.5 Archived Components
The Build Appliance is a virtual machine image that enables you to build and boot a custom embedded Linux image with the Yocto Project using a non-Linux development system.
Historically, the Build Appliance was the second of three methods by which you could use the Yocto Project on a system that was not native to Linux.
Hob: Hob, which is now deprecated and is no longer available since the 2.1 release of the Yocto Project provided a rudimentary, GUI-based interface to the Yocto Project. Toaster has fully replaced Hob.
Build Appliance: Post Hob, the Build Appliance became available. It was never recommended that you use the Build Appliance as a day-to-day production development environment with the Yocto Project. Build Appliance was useful as a way to try out development in the Yocto Project environment.
CROPS: The final and best solution available now for developing using the Yocto Project on a system not native to Linux is with CROPS.
2.4 Development Methods
The Yocto Project development environment usually involves a Build Host and target hardware. You use the Build Host to build images and develop applications, while you use the target hardware to execute deployed software.
This section provides an introduction to the choices or development methods you have when setting up your Build Host. Depending on your particular workflow preference and the type of operating system your Build Host runs, you have several choices.
Note
For additional detail about the Yocto Project development environment, see the “The Yocto Project Development Environment” chapter.
Native Linux Host: By far the best option for a Build Host. A system running Linux as its native operating system allows you to develop software by directly using the BitBake tool. You can accomplish all aspects of development from a regular shell in a supported Linux distribution.
For information on how to set up a Build Host on a system running Linux as its native operating system, see the “Setting Up a Native Linux Host” section in the Yocto Project Development Tasks Manual.
CROss PlatformS (CROPS): Typically, you use CROPS, which leverages Docker Containers, to set up a Build Host that is not running Linux (e.g. Microsoft Windows or macOS).
Note
You can, however, use CROPS on a Linux-based system.
CROPS is an open source, cross-platform development framework that provides an easily managed, extensible environment for building binaries targeted for a variety of architectures on Windows, macOS, or Linux hosts. Once the Build Host is set up using CROPS, you can prepare a shell environment to mimic that of a shell being used on a system natively running Linux.
For information on how to set up a Build Host with CROPS, see the “Setting Up to Use CROss PlatformS (CROPS)” section in the Yocto Project Development Tasks Manual.
Windows Subsystem For Linux (WSL 2): You may use Windows Subsystem For Linux version 2 to set up a Build Host using Windows 10 or later, or Windows Server 2019 or later.
The Windows Subsystem For Linux allows Windows to run a real Linux kernel inside of a lightweight virtual machine (VM).
For information on how to set up a Build Host with WSL 2, see the “Setting Up to Use Windows Subsystem For Linux (WSL 2)” section in the Yocto Project Development Tasks Manual.
Toaster: Regardless of what your Build Host is running, you can use Toaster to develop software using the Yocto Project. Toaster is a web interface to the Yocto Project’s OpenEmbedded Build System. The interface allows you to configure and run your builds. Information about builds is collected and stored in a database. You can use Toaster to configure and start builds on multiple remote build servers.
For information about and how to use Toaster, see the Toaster User Manual.
Using the VSCode Extension: You can use the Yocto Project BitBake extension for Visual Studio Code to start your BitBake builds through a graphical user interface.
Learn more about the VSCode Extension on the extension’s marketplace page
2.5 Reference Embedded Distribution (Poky)
“Poky”, which is pronounced Pock-ee, is the name of the Yocto Project’s reference distribution or Reference OS Kit. This reference distribution is represented by a DISTRO configuration file found in meta-poky.
Warning
While Poky is a “complete” distribution specification and is tested and put through QA, you cannot use it as a product “out of the box” in its current form.
Poky has a regular, well established, six-month release cycle detailed in the Yocto Project Releases and the Stable Release Process of the Yocto Project Reference Manual.
2.6 The OpenEmbedded Build System Workflow
The OpenEmbedded Build System uses a “workflow” to accomplish image and SDK generation. The following figure overviews that workflow:
Here is a brief summary of the “workflow”:
Developers specify architecture, policies, patches and configuration details.
The build system fetches and downloads the source code from the specified location. The build system supports standard methods such as tarballs or source code repositories systems such as Git.
Once source code is downloaded, the build system extracts the sources into a local work area where patches are applied and common steps for configuring and compiling the software are run.
The build system then installs the software into a temporary staging area where the binary package format you select (DEB, RPM, or IPK) is used to roll up the software.
Different QA and sanity checks run throughout entire build process.
After the binaries are created, the build system generates a binary package feed that is used to create the final root file image.
The build system generates the file system image and a customized SDK (Software Development Kit) for application development in parallel.
For a very detailed look at this workflow, see the “OpenEmbedded Build System Concepts” section.
2.7 Some Basic Terms
It helps to understand some basic fundamental terms when learning the Yocto Project. Although there is a list of terms in the “Yocto Project Terms” section of the Yocto Project Reference Manual, this section provides the definitions of some terms helpful for getting started:
Configuration Files: Files that hold global definitions of variables, user-defined variables, and hardware configuration information. These files tell the OpenEmbedded Build System what to build and what to put into the image to support a particular platform.
Extensible Software Development Kit (eSDK): A custom SDK for application developers. This eSDK allows developers to incorporate their library and programming changes back into the image to make their code available to other application developers. For information on the eSDK, see the Yocto Project Application Development and the Extensible Software Development Kit (eSDK) manual.
Layer: A collection of related metadata, which could include any of recipes, machine configuration files, distro configuration files and/or class files. Layers allow you to consolidate related metadata to customize your build. Layers also isolate information used when building for multiple architectures. Layers are hierarchical in their ability to override previous specifications. You can include any number of available layers from the Yocto Project and customize the build by adding your own layers after them. You can search the Layer Index for layers used within Yocto Project.
For more detailed information on layers, see the “Understanding and Creating Layers” section in the Yocto Project Development Tasks Manual. For a discussion specifically on BSP Layers, see the “BSP Layers” section in the Yocto Project Board Support Packages (BSP) Developer’s Guide.
Metadata: A key element of the Yocto Project is the Metadata that is used to construct a Linux distribution and is contained in the files that the OpenEmbedded build system parses when building an image. In general, Metadata includes recipes, configuration files, and other information that refers to the build instructions themselves, as well as the data used to control what things get built and the effects of the build. Metadata also includes commands and data used to indicate what versions of software are used, from where they are obtained, and changes or additions to the software itself (patches or auxiliary files) that are used to fix bugs or customize the software for use in a particular situation. OpenEmbedded-Core is an important set of validated metadata.
OpenEmbedded Build System: The terms “BitBake” and “build system” are sometimes used for the OpenEmbedded Build System.
BitBake is a task scheduler and execution engine that parses instructions (i.e. recipes) and configuration data. After a parsing phase, BitBake creates a dependency tree to order the compilation, schedules the compilation of the included code, and finally executes the building of the specified custom Linux image (distribution). BitBake is similar to the
maketool.During a build process, the build system tracks dependencies and performs a native or cross-compilation of each package. As a first step in a cross-build setup, the framework attempts to create a cross-compiler toolchain (i.e. Extensible SDK) suited for the target platform.
OpenEmbedded-Core (OE-Core): OE-Core is metadata comprised of foundation recipes, classes, and associated files that are meant to be common among many different OpenEmbedded-derived systems, including the Yocto Project. OE-Core is a curated subset of an original repository developed by the OpenEmbedded community that has been pared down into a smaller, core set of continuously validated recipes. The result is a tightly controlled and quality-assured core set of recipes.
You can see the Metadata in the
metadirectory of the Yocto Project Source Repositories.Packages: In the context of the Yocto Project, this term refers to a recipe’s packaged output produced by BitBake (i.e. a “baked recipe”). A package is generally the compiled binaries produced from the recipe’s sources. You “bake” something by running it through BitBake.
It is worth noting that the term “package” can, in general, have subtle meanings. For example, the packages referred to in the “Required Packages for the Build Host” section in the Yocto Project Reference Manual are compiled binaries that, when installed, add functionality to your host Linux distribution.
Another point worth noting is that historically within the Yocto Project, recipes were referred to as packages — thus, the existence of several BitBake variables that are seemingly mis-named, (e.g. PR, PV, and PE).
Poky: Poky is a reference embedded distribution and a reference test configuration. Poky provides the following:
A base-level functional distro (DISTRO) used to illustrate how to customize a distribution.
A means by which to test the Yocto Project components (i.e. Poky is used to validate the Yocto Project).
Poky is not a product level distro. Rather, it is a good starting point for customization.
Recipe: The most common form of metadata. A recipe contains a list of settings and tasks (i.e. instructions) for building packages that are then used to build the binary image. A recipe describes where you get source code and which patches to apply. Recipes describe dependencies for libraries or for other recipes as well as configuration and compilation options. Related recipes are consolidated into a layer.
3 The Yocto Project Development Environment
This chapter takes a look at the Yocto Project development environment. The chapter provides Yocto Project Development environment concepts that help you understand how work is accomplished in an open source environment, which is very different as compared to work accomplished in a closed, proprietary environment.
Specifically, this chapter addresses open source philosophy, source repositories, workflows, Git, and licensing.
3.1 Open Source Philosophy
Open source philosophy is characterized by software development directed by peer production and collaboration through an active community of developers. Contrast this to the more standard centralized development models used by commercial software companies where a finite set of developers produces a product for sale using a defined set of procedures that ultimately result in an end product whose architecture and source material are closed to the public.
Open source projects conceptually have differing concurrent agendas, approaches, and production. These facets of the development process can come from anyone in the public (community) who has a stake in the software project. The open source environment contains new copyright, licensing, domain, and consumer issues that differ from the more traditional development environment. In an open source environment, the end product, source material, and documentation are all available to the public at no cost.
A benchmark example of an open source project is the Linux kernel, which was initially conceived and created by Finnish computer science student Linus Torvalds in 1991. Conversely, a good example of a non-open source project is the Windows family of operating systems developed by Microsoft Corporation.
Wikipedia has a good historical description of the Open Source Philosophy. You can also find helpful information on how to participate in the Linux Community here.
3.2 The Development Host
A development host or Build Host is key to using the Yocto Project. Because the goal of the Yocto Project is to develop images or applications that run on embedded hardware, development of those images and applications generally takes place on a system not intended to run the software — the development host.
You need to set up a development host in order to use it with the Yocto Project. Most find that it is best to have a native Linux machine function as the development host. However, it is possible to use a system that does not run Linux as its operating system as your development host. When you have a Mac or Windows-based system, you can set it up as the development host by using CROPS, which leverages Docker Containers. Once you take the steps to set up a CROPS machine, you effectively have access to a shell environment that is similar to what you see when using a Linux-based development host. For the steps needed to set up a system using CROPS, see the “Setting Up to Use CROss PlatformS (CROPS)” section in the Yocto Project Development Tasks Manual.
If your development host is going to be a system that runs a Linux distribution, you must still take steps to prepare the system for use with the Yocto Project. You need to be sure that the Linux distribution on the system is one that supports the Yocto Project. You also need to be sure that the correct set of host packages are installed that allow development using the Yocto Project. For the steps needed to set up a development host that runs Linux, see the “Setting Up a Native Linux Host” section in the Yocto Project Development Tasks Manual.
Once your development host is set up to use the Yocto Project, there are several ways of working in the Yocto Project environment:
Command Lines, BitBake, and Shells: Traditional development in the Yocto Project involves using the OpenEmbedded Build System, which uses BitBake, in a command-line environment from a shell on your development host. You can accomplish this from a host that is a native Linux machine or from a host that has been set up with CROPS. Either way, you create, modify, and build images and applications all within a shell-based environment using components and tools available through your Linux distribution and the Yocto Project.
For a general flow of the build procedures, see the “Building a Simple Image” section in the Yocto Project Development Tasks Manual.
Board Support Package (BSP) Development: Development of BSPs involves using the Yocto Project to create and test layers that allow easy development of images and applications targeted for specific hardware. To development BSPs, you need to take some additional steps beyond what was described in setting up a development host.
The Yocto Project Board Support Package Developer’s Guide provides BSP-related development information. For specifics on development host preparation, see the “Preparing Your Build Host to Work With BSP Layers” section in the Yocto Project Board Support Package (BSP) Developer’s Guide.
Kernel Development: If you are going to be developing kernels using the Yocto Project you likely will be using
devtool. A workflow usingdevtoolmakes kernel development quicker by reducing iteration cycle times.The Yocto Project Linux Kernel Development Manual provides kernel-related development information. For specifics on development host preparation, see the “Preparing the Build Host to Work on the Kernel” section in the Yocto Project Linux Kernel Development Manual.
Using Toaster: The other Yocto Project development method that involves an interface that effectively puts the Yocto Project into the background is Toaster. Toaster provides an interface to the OpenEmbedded build system. The interface enables you to configure and run your builds. Information about builds is collected and stored in a database. You can use Toaster to configure and start builds on multiple remote build servers.
For steps that show you how to set up your development host to use Toaster and on how to use Toaster in general, see the Toaster User Manual.
Using the VSCode Extension: You can use the Yocto Project BitBake extension for Visual Studio Code to start your BitBake builds through a graphical user interface.
Learn more about the VSCode Extension on the extension’s marketplace page.
3.3 Yocto Project Source Repositories
The Yocto Project team maintains complete source repositories for all Yocto Project files at https://git.yoctoproject.org/. This web-based source code browser is organized into categories by function such as IDE Plugins, Matchbox, Poky, Yocto Linux Kernel, and so forth. From the interface, you can click on any particular item in the “Name” column and see the URL at the bottom of the page that you need to clone a Git repository for that particular item. Having a local Git clone of these repositories allows you to make changes, contribute to the history, and ultimately enhance the Yocto Project’s tools, Board Support Packages, and so forth.
For any supported release of Yocto Project, you can also go to the Yocto Project Website and select the “Releases” item from the “Development” menu and get a released tarball of the repositories, any supported BSP tarball, or Yocto Project tools. Unpacking these tarballs gives you a snapshot of the released files.
Note
The recommended method for setting up the Yocto Project is to use Git to create a local copy of the upstream repositories.
Be sure to always work in matching branches for both the selected BSP repository, the OpenEmbedded-Core (OE-Core) and BitBake repositories. For example, if you have checked out the “wrynose” branch of OpenEmbedded-Core (OE-Core) and you are going to use
meta-intel, be sure to check out the “wrynose” branch ofmeta-intel.
In summary, here is where you can get the project files needed for development:
Source Repositories: This area contains BitBake, OpenEmbedded-Core (OE-Core), Yocto documentation and other metadata layers. You can create local copies of Git repositories for each of these areas.

Releases page: The Yocto Project website includes a “Releases” page accessible through the “Development” menu that allows you to download any Yocto Project release, tool, and Board Support Package (BSP) in tarball form. The hyperlinks point to the tarballs under https://downloads.yoctoproject.org/releases/yocto/.
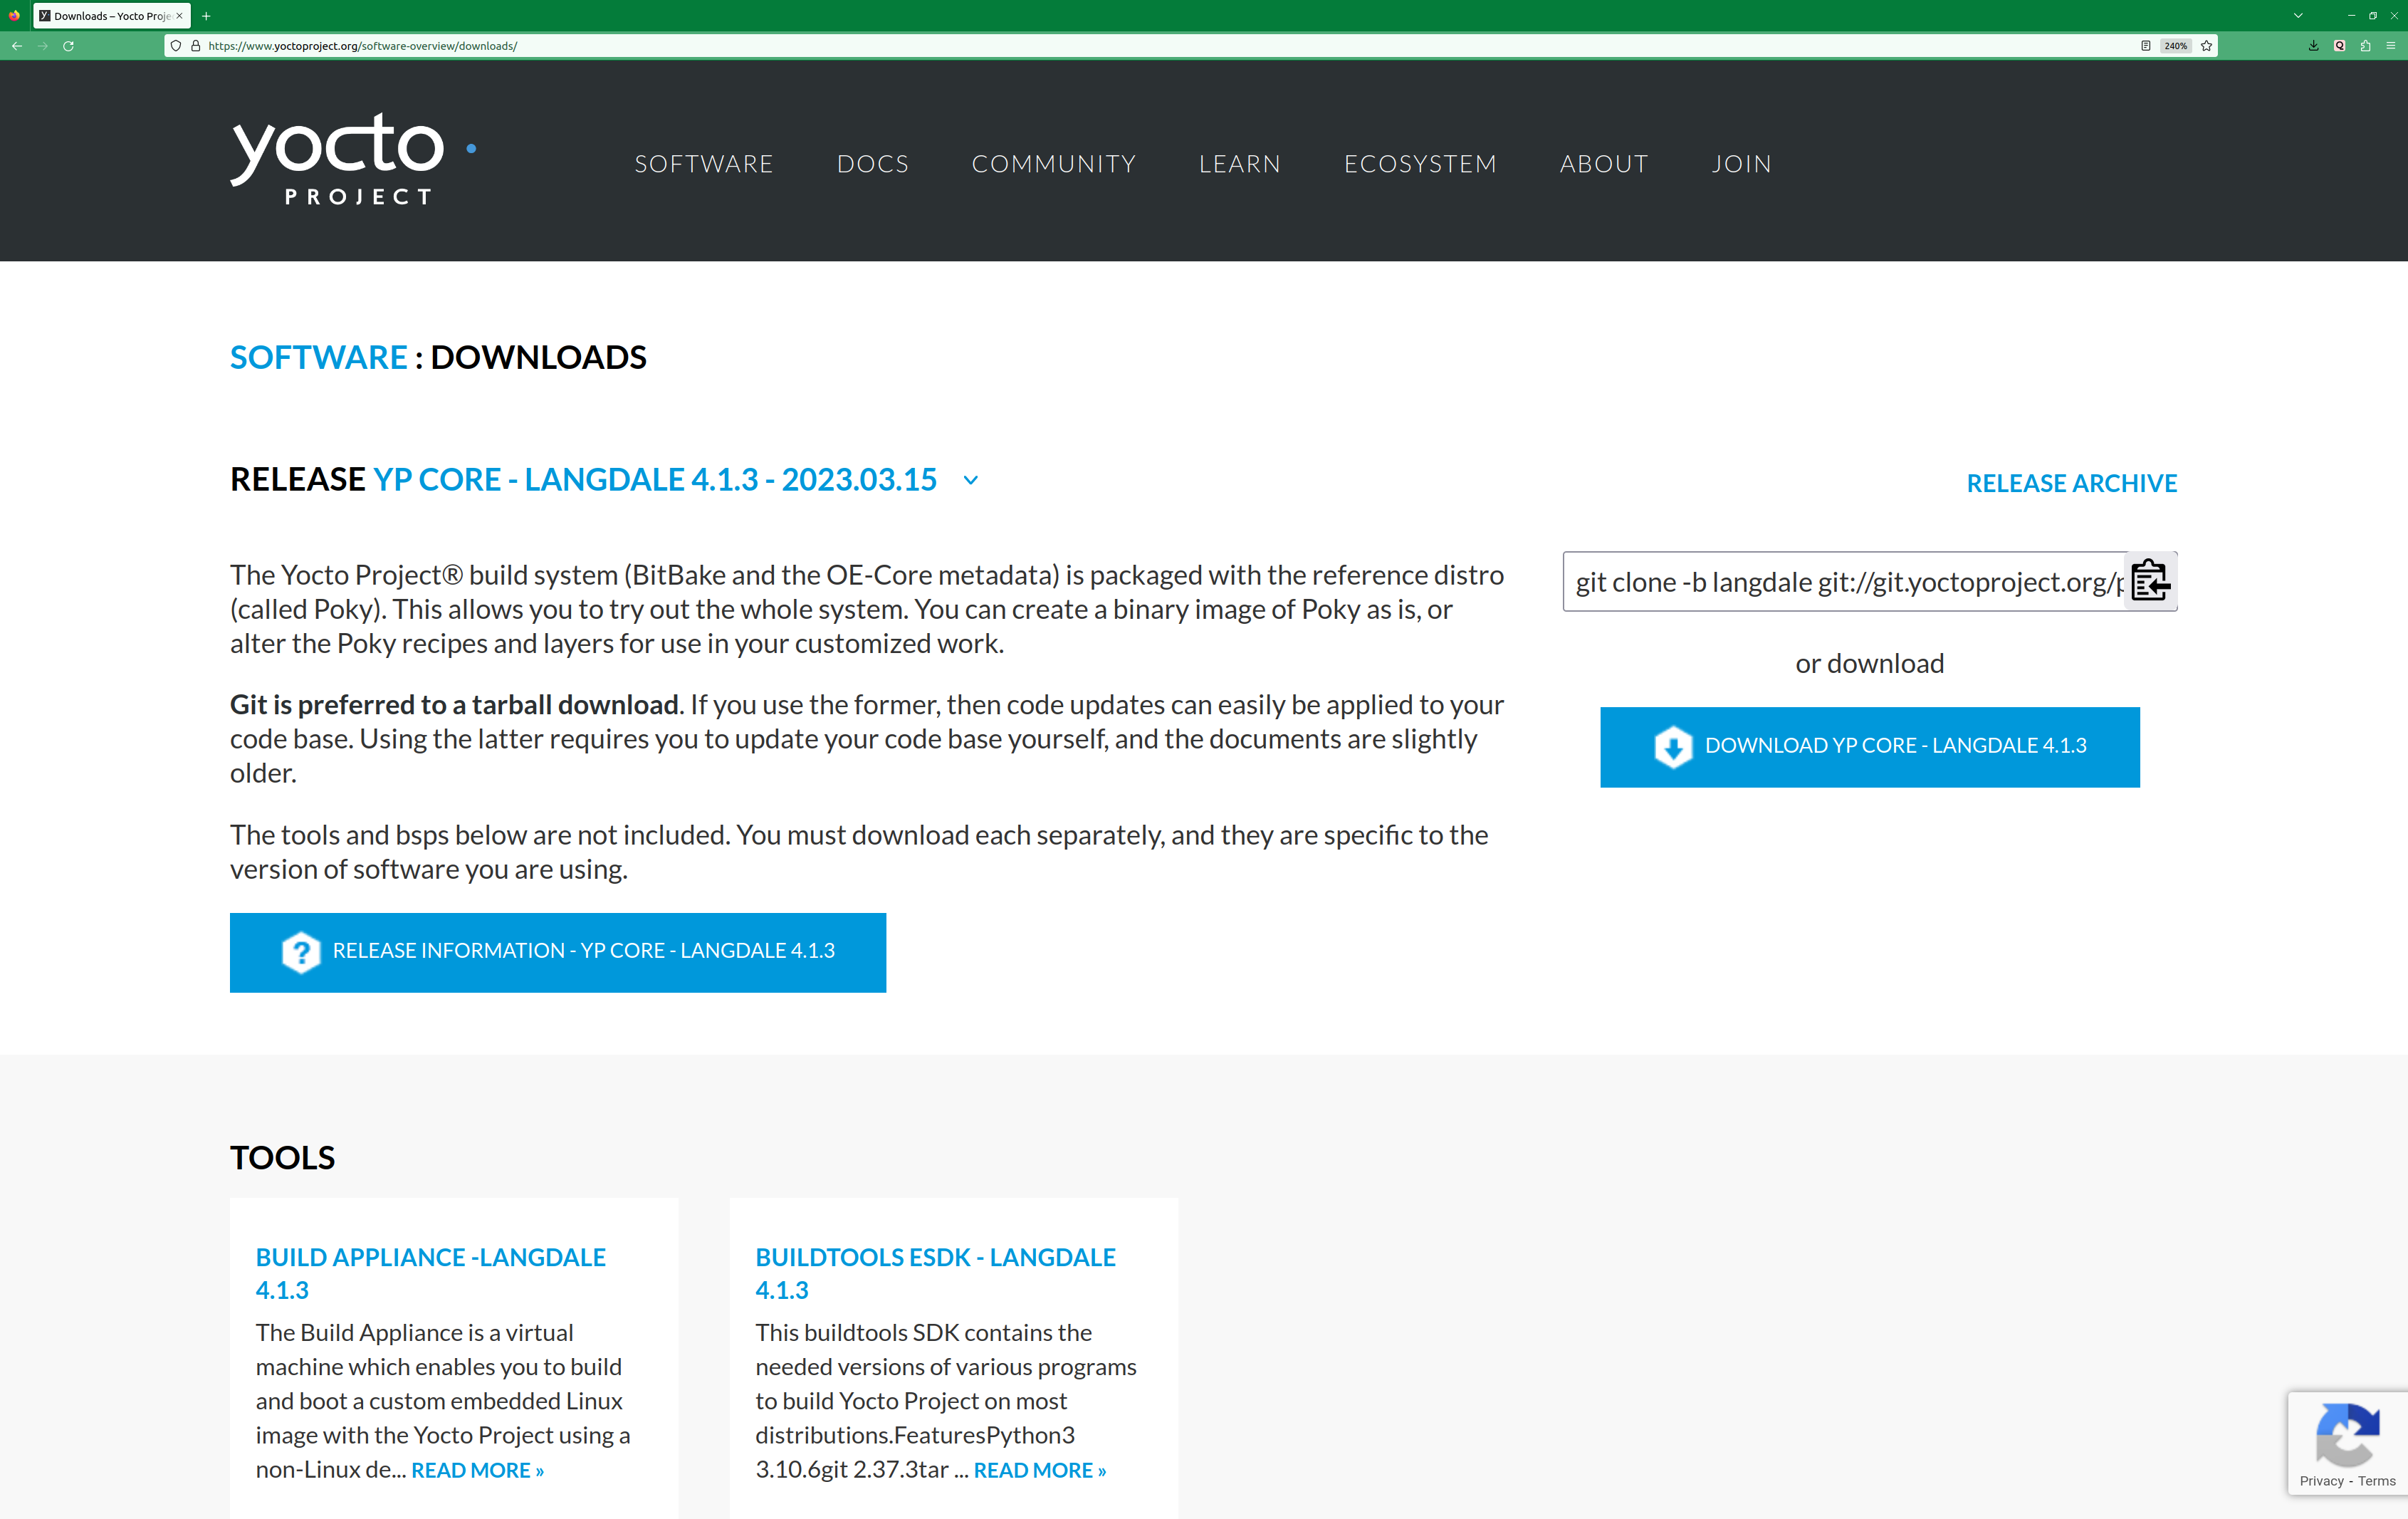
3.4 Git Workflows and the Yocto Project
Developing using the Yocto Project likely requires the use of Git. Git is a free, open source distributed version control system used as part of many collaborative design environments. This section provides workflow concepts using the Yocto Project and Git. In particular, the information covers basic practices that describe roles and actions in a collaborative development environment.
Note
If you are familiar with this type of development environment, you might not want to read this section.
The Yocto Project files are maintained using Git in “branches” whose Git histories track every change and whose structures provide branches for all diverging functionality. Although there is no need to use Git, many open source projects do so.
For the Yocto Project, a key individual called the “maintainer” is responsible for the integrity of the development branch of a given Git repository. The development branch is the “upstream” repository from which final or most recent builds of a project occur. The maintainer is responsible for accepting changes from other developers and for organizing the underlying branch structure to reflect release strategies and so forth.
Note
For information on finding out who is responsible for (maintains) a particular area of code in the Yocto Project, see the “Identify the component” section of the Yocto Project and OpenEmbedded Contributor Guide.
The Yocto Project Git repositories may also have upstream
contribution Git repositories suffixed with -contrib. You can see all the
branches of these repositories using the web interface of the
Source Repositories.
These branches hold changes (commits) to the project that have
been submitted or committed by the Yocto Project development team and by
community members who contribute to the project. The maintainer
determines if the changes are qualified to be moved from the “contrib”
branches into the “master” branch of the Git repository.
Developers (including contributing community members) create and maintain cloned repositories of upstream branches. The cloned repositories are local to their development platforms and are used to develop changes. When a developer is satisfied with a particular feature or change, they “push” the change to the appropriate “contrib” repository.
Developers are responsible for keeping their local repository up-to-date with whatever upstream branch they are working against. They are also responsible for straightening out any conflicts that might arise within files that are being worked on simultaneously by more than one person. All this work is done locally on the development host before anything is pushed to a “contrib” area and examined at the maintainer’s level.
There is a somewhat formal method by which developers commit changes and push them into the “contrib” area and subsequently request that the maintainer include them into an upstream branch. This process is called “submitting a patch” or “submitting a change.” For information on submitting patches and changes, see the “Contributing Changes to a Component” section in the Yocto Project and OpenEmbedded Contributor Guide.
In summary, there is a single point of entry for changes into the development branch of the Git repository, which is controlled by the project’s maintainer. A set of developers independently develop, test, and submit changes to “contrib” areas for the maintainer to examine. The maintainer then chooses which changes are going to become a permanent part of the project.

While each development environment is unique, there are some best practices or methods that help development run smoothly. The following list describes some of these practices. For more information about Git workflows, see the workflow topics in the Git Community Book.
Make Small Changes: It is best to keep the changes you commit small as compared to bundling many disparate changes into a single commit. This practice not only keeps things manageable but also allows the maintainer to more easily include or refuse changes.
Make Complete Changes: It is also good practice to leave the repository in a state that allows you to still successfully build your project. In other words, do not commit half of a feature, then add the other half as a separate, later commit. Each commit should take you from one buildable project state to another buildable state.
Use Branches Liberally: It is very easy to create, use, and delete local branches in your working Git repository on the development host. You can name these branches anything you like. It is helpful to give them names associated with the particular feature or change on which you are working. Once you are done with a feature or change and have merged it into your local development branch, simply discard the temporary branch.
Merge Changes: The
git mergecommand allows you to take the changes from one branch and fold them into another branch. This process is especially helpful when more than a single developer might be working on different parts of the same feature. Merging changes also automatically identifies any collisions or “conflicts” that might happen as a result of the same lines of code being altered by two different developers.Manage Branches: Because branches are easy to use, you should use a system where branches indicate varying levels of code readiness. For example, you can have a “work” branch to develop in, a “test” branch where the code or change is tested, a “stage” branch where changes are ready to be committed, and so forth. As your project develops, you can merge code across the branches to reflect ever-increasing stable states of the development.
Use Push and Pull: The push-pull workflow is based on the concept of developers “pushing” local commits to a remote repository, which is usually a contribution repository. This workflow is also based on developers “pulling” known states of the project down into their local development repositories. The workflow easily allows you to pull changes submitted by other developers from the upstream repository into your work area ensuring that you have the most recent software on which to develop. The Yocto Project has two scripts named
create-pull-requestandsend-pull-requestthat ship with the release to facilitate this workflow. You can find these scripts in thescriptsfolder of OpenEmbedded-Core (OE-Core). For information on how to use these scripts, see the “Using Scripts to Push a Change Upstream and Request a Pull” section in the Yocto Project and OpenEmbedded Contributor Guide.Patch Workflow: This workflow allows you to notify the maintainer through an email that you have a change (or patch) you would like considered for the development branch of the Git repository. To send this type of change, you format the patch and then send the email using the Git commands
git format-patchandgit send-email. For information on how to use these scripts, see the “Contributing Changes to a Component” section in the Yocto Project and OpenEmbedded Contributor Guide.
3.5 Git
The Yocto Project makes extensive use of Git, which is a free, open source distributed version control system. Git supports distributed development, non-linear development, and can handle large projects. It is best that you have some fundamental understanding of how Git tracks projects and how to work with Git if you are going to use the Yocto Project for development. This section provides a quick overview of how Git works and provides you with a summary of some essential Git commands.
Note
For more information on Git, see https://git-scm.com/docs.
If you need to download Git, it is recommended that you add Git to your system through your distribution’s “software store” (e.g. for Ubuntu, use the Ubuntu Software feature). For the Git download page, see https://git-scm.com/download.
3.5.2 Basic Commands
Git has an extensive set of commands that lets you manage changes and perform collaboration over the life of a project. Conveniently though, you can manage with a small set of basic operations and workflows once you understand the basic philosophy behind Git. You do not have to be an expert in Git to be functional. A good place to look for instruction on a minimal set of Git commands is here.
The following list of Git commands briefly describes some basic Git operations as a way to get started. As with any set of commands, this list (in most cases) simply shows the base command and omits the many arguments it supports. See the Git documentation for complete descriptions and strategies on how to use these commands:
git init: Initializes an empty Git repository. You cannot use Git commands unless you have a
.gitrepository.git clone: Creates a local clone of a Git repository that is on equal footing with a fellow developer’s Git repository or an upstream repository.
git add: Locally stages updated file contents to the index that Git uses to track changes. You must stage all files that have changed before you can commit them.
git commit: Creates a local “commit” that documents the changes you made. Only changes that have been staged can be committed. Commits are used for historical purposes, for determining if a maintainer of a project will allow the change, and for ultimately pushing the change from your local Git repository into the project’s upstream repository.
git status: Reports any modified files that possibly need to be staged and gives you a status of where you stand regarding local commits as compared to the upstream repository.
git checkout branch-name: Changes your local working branch and in this form assumes the local branch already exists. This command is analogous to “cd”.
git checkout -b working-branch upstream-branch: Creates and checks out a working branch on your local machine. The local branch tracks the upstream branch. You can use your local branch to isolate your work. It is a good idea to use local branches when adding specific features or changes. Using isolated branches facilitates easy removal of changes if they do not work out.
git branch: Displays the existing local branches associated with your local repository. The branch that you have currently checked out is noted with an asterisk character.
git branch -D branch-name: Deletes an existing local branch. You need to be in a local branch other than the one you are deleting in order to delete branch-name.
git pull --rebase: Retrieves information from an upstream Git repository and places it in your local Git repository. You use this command to make sure you are synchronized with the repository from which you are basing changes (e.g. the “wrynose” branch). The
--rebaseoption ensures that any local commits you have in your branch are preserved at the top of your local branch.git push repo-name local-branch:upstream-branch: Sends all your committed local changes to the upstream Git repository that your local repository is tracking (e.g. a contribution repository). The maintainer of the project draws from these repositories to merge changes (commits) into the appropriate branch of project’s upstream repository.
git merge: Combines or adds changes from one local branch of your repository with another branch. When you create a local Git repository, the default branch may be named “main”. A typical workflow is to create a temporary branch that is based off “main” that you would use for isolated work. You would make your changes in that isolated branch, stage and commit them locally, switch to the “main” branch, and then use the
git mergecommand to apply the changes from your isolated branch into the currently checked out branch (e.g. “main”). After the merge is complete and if you are done with working in that isolated branch, you can safely delete the isolated branch.git cherry-pick commits: Choose and apply specific commits from one branch into another branch. There are times when you might not be able to merge all the changes in one branch with another but need to pick out certain ones.
gitk: Provides a GUI view of the branches and changes in your local Git repository. This command is a good way to graphically see where things have diverged in your local repository.
Note
You need to install the gitk package on your development system to use this command.
git log: Reports a history of your commits to the repository. This report lists all commits regardless of whether you have pushed them upstream or not.
git diff: Displays line-by-line differences between a local working file and the same file as understood by Git. This command is useful to see what you have changed in any given file.
3.6 Licensing
Because open source projects are open to the public, they have different licensing structures in place. License evolution for both Open Source and Free Software has an interesting history. If you are interested in this history, you can find basic information here:
In general, the Yocto Project is broadly licensed under the Massachusetts Institute of Technology (MIT) License. MIT licensing permits the reuse of software within proprietary software as long as the license is distributed with that software. Patches to the Yocto Project follow the upstream licensing scheme. You can find information on the MIT license here.
When you build an image using the Yocto Project, the build process uses
a known list of licenses to ensure compliance. You can find this list in
OpenEmbedded-Core (OE-Core) at meta/files/common-licenses. Once the
build completes, the list of all licenses found and used during that build
are kept in the Build Directory at tmp/deploy/licenses.
If a module requires a license that is not in the base list, the build process generates a warning during the build. These tools make it easier for a developer to be certain of the licenses with which their shipped products must comply. However, even with these tools it is still up to the developer to resolve potential licensing issues.
The base list of licenses used by the build process is a combination of the Software Package Data Exchange (SPDX) list and the Open Source Initiative (OSI) projects. SPDX Group is a working group of the Linux Foundation that maintains a specification for a standard format for communicating the components, licenses, and copyrights associated with a software package. OSI is a corporation dedicated to the Open Source Definition and the effort for reviewing and approving licenses that conform to the Open Source Definition (OSD).
You can find a list of the combined SPDX and OSI licenses that the Yocto Project uses in the meta/files/common-licenses directory in OpenEmbedded-Core (OE-Core).
For information that can help you maintain compliance with various open source licensing during the lifecycle of a product created using the Yocto Project, see the “Maintaining Open Source License Compliance During Your Product’s Lifecycle” section in the Yocto Project Development Tasks Manual.
4 Yocto Project Concepts
This chapter provides explanations for Yocto Project concepts that go beyond the surface of “how-to” information and reference (or look-up) material. Concepts such as components, the OpenEmbedded Build System workflow, cross-development toolchains, shared state cache, and so forth are explained.
Note
Throughout this section, many variables and their meanings are
introduced. If, in the context of a Build Directory,
you want to examine the value of any of these variables, you can
use the bitbake-getvar command, explained in the
“Viewing Variable Values” section.
4.1 Yocto Project Components
The BitBake task executor together with various types of configuration files form the OpenEmbedded-Core (OE-Core). This section overviews these components by describing their use and how they interact.
BitBake handles the parsing and execution of the data files. The data itself is of various types:
Recipes: Provides details about particular pieces of software.
Class Data: Abstracts common build information (e.g. how to build a Linux kernel).
Configuration Data: Defines machine-specific settings, policy decisions, and so forth. Configuration data acts as the glue to bind everything together.
BitBake knows how to combine multiple data sources together and refers to each data source as a layer. For information on layers, see the “Understanding and Creating Layers” section of the Yocto Project Development Tasks Manual.
Here are some brief details on these core components. For additional information on how these components interact during a build, see the “OpenEmbedded Build System Concepts” section.
4.1.1 BitBake
BitBake is the tool at the heart of the OpenEmbedded Build System and is responsible for parsing the Metadata, generating a list of tasks from it, and then executing those tasks.
This section briefly introduces BitBake. If you want more information on BitBake, see the BitBake User Manual.
To see a list of the options BitBake supports, use either of the following commands:
$ bitbake -h
$ bitbake --help
The most common usage for BitBake is bitbake recipename, where
recipename is the name of the recipe you want to build (referred
to as the “target”). The target often equates to the first part of a
recipe’s filename (e.g. “foo” for a recipe file named foo_1.3.0.bb).
So, to process the matchbox-desktop_1.2.3.bb recipe file, you might
type the following:
$ bitbake matchbox-desktop
Several different versions of matchbox-desktop might exist. BitBake chooses
the one selected by the distribution configuration. You can get more details
about how BitBake chooses between different target versions and providers in the
“Preferences” section
of the BitBake User Manual.
BitBake also tries to execute any dependent tasks first. So for example,
before building matchbox-desktop, BitBake would build a cross
compiler and glibc if they had not already been built.
A useful BitBake option to consider is the -k or --continue
option. This option instructs BitBake to try and continue processing the
job as long as possible even after encountering an error. When an error
occurs, the target that failed and those that depend on it cannot be
remade. However, when you use this option other dependencies can still
be processed.
4.1.2 Recipes
Files that have the .bb suffix are “recipes” files. In general, a
recipe contains information about a single piece of software. This
information includes the location from which to download the unaltered
source, any source patches to be applied to that source (if needed),
which special configuration options to apply, how to compile the source
files, and how to package the compiled output.
The term “package” is sometimes used to refer to recipes. However, since
the word “package” is used for the packaged output from the OpenEmbedded
build system (i.e. .ipk, .deb or .rpm files), this document avoids
using the term “package” when referring to recipes.
4.1.3 Classes
Class files (.bbclass) contain information that is useful to share
between recipes files. An example is the autotools* class,
which contains common settings for any application that is built with
the GNU Autotools.
The “Classes” chapter in the Yocto Project
Reference Manual provides details about classes and how to use them.
4.1.4 Configurations
The configuration files (.conf) define various configuration
variables that govern the OpenEmbedded build process. These files fall
into several areas that define machine configuration options,
distribution configuration options, compiler tuning options, general
common configuration options, and user configuration options in
conf/local.conf, which is found in the Build Directory.
4.2 Layers
Layers are repositories that contain related metadata (i.e. sets of instructions) that tell the OpenEmbedded build system how to build a target. The Yocto Project Layer Model facilitates collaboration, sharing, customization, and reuse within the Yocto Project development environment. Layers logically separate information for your project. For example, you can use a layer to hold all the configurations for a particular piece of hardware. Isolating hardware-specific configurations allows you to share other metadata by using a different layer where that metadata might be common across several pieces of hardware.
There are many layers working in the Yocto Project development environment. The Yocto Project Compatible Layer Index and OpenEmbedded Layer Index both contain layers from which you can use or leverage.
By convention, layers in the Yocto Project follow a specific form.
Conforming to a known structure allows BitBake to make assumptions
during builds on where to find types of metadata. You can find
procedures and learn about tools (i.e. bitbake-layers) for creating
layers suitable for the Yocto Project in the
“Understanding and Creating Layers”
section of the Yocto Project Development Tasks Manual.
4.3 OpenEmbedded Build System Concepts
This section takes a more detailed look inside the build process used by the OpenEmbedded Build System, which is the build system specific to the Yocto Project. At the heart of the build system is BitBake, the task executor.
The following diagram represents the high-level workflow of a build. The remainder of this section expands on the fundamental input, output, process, and metadata logical blocks that make up the workflow.
In general, the build’s workflow consists of several functional areas:
User Configuration: metadata you can use to control the build process.
Metadata Layers: Various layers that provide software, machine, and distro metadata.
Source Files: Upstream releases, local projects, and SCMs.
Build System: Processes under the control of BitBake. This block expands on how BitBake fetches source, applies patches, completes compilation, analyzes output for package generation, creates and tests packages, generates images, and generates cross-development tools.
Package Feeds: Directories containing output packages (RPM, DEB or IPK), which are subsequently used in the construction of an image or Software Development Kit (SDK), produced by the build system. These feeds can also be copied and shared using a web server or other means to facilitate extending or updating existing images on devices at runtime if runtime package management is enabled.
Images: Images produced by the workflow.
Application Development SDK: Cross-development tools that are produced along with an image or separately with BitBake.
4.3.1 User Configuration
User configuration helps define the build. Through user configuration, you can tell BitBake the target architecture for which you are building the image, where to store downloaded source, and other build properties.
The following figure shows an expanded representation of the “User Configuration” box of the general workflow figure:

BitBake needs some basic configuration files in order to complete a
build. These files are *.conf files. The minimally necessary ones
reside as example files in the conf subdirectory of the
Build Directory.
When you initialize the build environment, you can specify which directory will be the Source Directory.
Setting up the build environment creates a Build Directory
if one does not already exist. BitBake uses the Build Directory
for all its work during builds. The Build Directory has a conf subdirectory
that contains default versions of your local.conf and bblayers.conf
configuration files. These default configuration files are created only if they do not already exist in the Build
Directory at the time you source the build environment setup script.
Configuration files provide many basic variables that define a build environment. To show a list of possible variables to configure from configuration files, see the local.conf.sample file in OpenEmbedded-Core (OE-Core):
Here is a non-exhaustive list:
Target Machine Selection: Controlled by the MACHINE variable.
Download Directory: Controlled by the DL_DIR variable.
Shared State Directory: Controlled by the SSTATE_DIR variable.
Persistent Data Directory: Controlled by the PERSISTENT_DIR variable.
Build Output: Controlled by the TMPDIR variable.
Distribution Policy: Controlled by the DISTRO variable.
Packaging Format: Controlled by the PACKAGE_CLASSES variable.
SDK Target Architecture: Controlled by the SDKMACHINE variable.
Extra Image Packages: Controlled by the EXTRA_IMAGE_FEATURES variable.
Note
Configurations set in the conf/local.conf file can also be set
in the conf/site.conf and conf/auto.conf configuration files.
The bblayers.conf file tells BitBake what layers you want considered
during the build. By default, the layers listed in this file include
layers minimally needed by the build system. However, you must manually
add any custom layers you have created. You can find more information on
working with the bblayers.conf file in the
“Enabling Your Layer”
section in the Yocto Project Development Tasks Manual.
The files site.conf and auto.conf are not created by the
environment initialization script. If you want the site.conf file,
you need to create it yourself. The auto.conf file is typically
created by an autobuilder:
site.conf: You can use the
conf/site.confconfiguration file to configure multiple build directories. For example, suppose you had several build environments and they shared some common features. You can set these default build properties here. A good example is perhaps the packaging format to use through the PACKAGE_CLASSES variable.auto.conf: The file is usually created and written to by an autobuilder. The settings put into the file are typically the same as you would find in the
conf/local.confor theconf/site.conffiles.
You can edit all configuration files to further define any particular build environment. This process is represented by the “User Configuration Edits” box in the figure.
When you launch your build with the bitbake target command, BitBake
sorts out the configurations to ultimately define your build
environment. It is important to understand that the
OpenEmbedded Build System reads the
configuration files in a specific order: site.conf, auto.conf,
and local.conf. And, the build system applies the normal assignment
statement rules as described in the
“Syntax and Operators” chapter
of the BitBake User Manual. Because the files are parsed in a specific
order, variable assignments for the same variable could be affected. For
example, if the auto.conf file and the local.conf set variable1
to different values, because the build system parses local.conf
after auto.conf, variable1 is assigned the value from the
local.conf file.
4.3.2 Metadata, Machine Configuration, and Policy Configuration
The previous section described the user configurations that define BitBake’s global behavior. This section takes a closer look at the layers the build system uses to further control the build. These layers provide Metadata for the software, machine, and policies.
In general, there are three types of layer input. You can see them below the “User Configuration” box in the general workflow figure:
Metadata (.bb + Patches): Software layers containing user-supplied recipe files, patches, and append files. A good example of a software layer might be the meta-qt5 layer from the OpenEmbedded Layer Index. This layer is for version 5.0 of the popular Qt cross-platform application development framework for desktop, embedded and mobile.
Machine BSP Configuration: Board Support Package (BSP) layers (i.e. “BSP Layer” in the following figure) providing machine-specific configurations. This type of information is specific to a particular target architecture. A good example of a BSP layer from the Reference Embedded Distribution (Poky) is the meta-yocto-bsp layer.
Policy Configuration: Distribution Layers (i.e. “Distro Layer” in the following figure) providing top-level or general policies for the images or SDKs being built for a particular distribution. For example, in the Poky Reference Distribution the distro layer is the meta-poky layer. Within the distro layer is a
conf/distrodirectory that contains distro configuration files (e.g. poky.conf that contain many policy configurations for the Poky distribution.
The following figure shows an expanded representation of these three layers from the general workflow figure:

In general, all layers have a similar structure. They all contain a
licensing file (e.g. COPYING.MIT) if the layer is to be distributed,
a README file as good practice and especially if the layer is to be
distributed, a configuration directory, and recipe directories. You can
learn about the general structure for layers used with the Yocto Project
in the
“Creating Your Own Layer”
section in the
Yocto Project Development Tasks Manual. For a general discussion on
layers and the many layers from which you can draw, see the
“Layers” and
“The Yocto Project Layer Model” sections both
earlier in this manual.
If you explored the previous links, you discovered some areas where many layers that work with the Yocto Project exist. The Source Repositories also shows layers categorized under “Yocto Metadata Layers.”
Note
There are layers in the Yocto Project Source Repositories that cannot be found in the OpenEmbedded Layer Index. Such layers are either deprecated or experimental in nature.
BitBake uses the conf/bblayers.conf file, which is part of the user
configuration, to find what layers it should be using as part of the
build.
4.3.2.1 Distro Layer
A distribution layer provides policy configurations for your
distribution. Best practices dictate that you isolate these types of
configurations into their own layer. Settings you provide in
conf/distro/distro.conf override similar settings that BitBake finds
in your conf/local.conf file in the Build Directory.
The following list provides some explanation and references for what you typically find in a distribution layer (recall that meta-poky is such a layer):
classes, classes-global, classes-recipe: Class files (
.bbclass) hold common functionality that can be shared among recipes in the distribution. When your recipes inherit a class, they take on the settings and functions for that class. You can read more about class files in the “Classes” chapter of the Yocto Reference Manual.conf: This area holds configuration files for the layer (
conf/layer.conf), the distribution (conf/distro/distro.conf), and any distribution-wide include files.recipes-*: Recipes and append files that affect common functionality across the distribution. This area could include recipes and append files to add distribution-specific configuration, initialization scripts, custom image recipes, and so forth. Examples of
recipes-*directories arerecipes-coreandrecipes-extra. Hierarchy and contents within arecipes-*directory can vary. Generally, these directories contain recipe files (*.bb), recipe append files (*.bbappend), directories that are distro-specific for configuration files, and so forth.
4.3.2.2 BSP Layer
A BSP layer provides machine configurations that target specific hardware. Everything in this layer is specific to the machine for which you are building the image or the SDK. A common structure or form is defined for BSP layers. You can learn more about this structure in the Yocto Project Board Support Package Developer’s Guide.
Note
In order for a BSP layer to be considered compliant with the Yocto Project, it must meet some structural requirements.
A BSP layer’s configuration directory contains configuration files for
the machine (conf/machine/machine.conf) and, of course, the layer
(conf/layer.conf).
The remainder of the layer is dedicated to specific recipes by function:
recipes-bsp, recipes-core, recipes-graphics,
recipes-kernel, and so forth. There can be metadata for multiple
formfactors, graphics support systems, and so forth.
Note
While the figure shows several
recipes-*
directories, not all these directories appear in all BSP layers.
4.3.2.3 Software Layer
A software layer provides the Metadata for additional software packages used during the build. This layer does not include Metadata that is specific to the distribution or the machine, which are found in their respective layers.
This layer contains any recipes, append files, and patches that your project needs.
4.3.3 Sources
In order for the OpenEmbedded build system to create an image or any target, it must be able to access source files. The general workflow figure represents source files using the “Upstream Project Releases”, “Local Projects”, and “SCMs (optional)” boxes. The figure represents mirrors, which also play a role in locating source files, with the “Source Materials” box.
The method by which source files are ultimately organized is a function of the project. For example, for released software, projects tend to use tarballs or other archived files that can capture the state of a release guaranteeing that it is statically represented. On the other hand, for a project that is more dynamic or experimental in nature, a project might keep source files in a repository controlled by a Source Control Manager (SCM) such as Git. Pulling source from a repository allows you to control the point in the repository (the revision) from which you want to build software. A combination of the two is also possible.
BitBake uses the SRC_URI variable to point to source files regardless of their location. Each recipe must have a SRC_URI variable that points to the source.
Another area that plays a significant role in where source files come from is pointed to by the DL_DIR variable. This area is a cache that can hold previously downloaded source. You can also instruct the OpenEmbedded build system to create tarballs from Git repositories, which is not the default behavior, and store them in the DL_DIR by using the BB_GENERATE_MIRROR_TARBALLS variable.
Judicious use of a DL_DIR directory can save the build system a trip across the Internet when looking for files. A good method for using a download directory is to have DL_DIR point to an area outside of your Build Directory. Doing so allows you to safely delete the Build Directory if needed without fear of removing any downloaded source file.
The remainder of this section provides a deeper look into the source files and the mirrors. Here is a more detailed look at the source file area of the general workflow figure:

4.3.3.1 Upstream Project Releases
Upstream project releases exist anywhere in the form of an archived file (e.g. tarball or zip file). These files correspond to individual recipes. For example, the figure uses specific releases each for BusyBox, Qt, and Dbus. An archive file can be for any released product that can be built using a recipe.
4.3.3.2 Local Projects
Local projects are custom bits of software the user provides. These bits reside somewhere local to a project — perhaps a directory into which the user checks in items (e.g. a local directory containing a development source tree used by the group).
The canonical method through which to include a local project is to use the
externalsrc class to include that local project. You use
either local.conf or a recipe’s append file to override or set the
recipe to point to the local directory from which to fetch the source.
4.3.3.3 Source Control Managers (Optional)
Another place from which the build system can get source files is with Fetchers employing various Source Control Managers (SCMs) such as Git or Subversion. In such cases, a repository is cloned or checked out. The do_fetch task inside BitBake uses the SRC_URI variable and the argument’s prefix to determine the correct fetcher module.
Note
For information on how to have the OpenEmbedded build system generate tarballs for Git repositories and place them in the DL_DIR directory, see the BB_GENERATE_MIRROR_TARBALLS variable in the Yocto Project Reference Manual.
When fetching a repository, BitBake uses the SRCREV variable to determine the specific revision from which to build.
4.3.3.4 Source Mirror(s)
There are two kinds of mirrors: pre-mirrors and regular mirrors. The PREMIRRORS and MIRRORS variables point to these, respectively. BitBake checks pre-mirrors before looking upstream for any source files. Pre-mirrors are appropriate when you have a shared directory that is not a directory defined by the DL_DIR variable. A Pre-mirror typically points to a shared directory that is local to your organization.
Regular mirrors can be any site across the Internet that is used as an alternative location for source code should the primary site not be functioning for some reason or another.
4.3.4 Package Feeds
When the OpenEmbedded build system generates an image or an SDK, it gets the packages from a package feed area located in the Build Directory. The general workflow figure shows this package feeds area in the upper-right corner.
This section looks a little closer into the package feeds area used by the build system. Here is a more detailed look at the area:

Package feeds are an intermediary step in the build process. The OpenEmbedded build system provides classes to generate different package types, and you specify which classes to enable through the PACKAGE_CLASSES variable. Before placing the packages into package feeds, the build process validates them with generated output quality assurance checks through the insane class.
The package feed area resides in the Build Directory. The directory the build system uses to temporarily store packages is determined by a combination of variables and the particular package manager in use. See the “Package Feeds” box in the illustration and note the information to the right of that area. In particular, the following defines where package files are kept:
DEPLOY_DIR: Defined as
tmp/deployin the Build Directory.DEPLOY_DIR_*: Depending on the package manager used, the package type sub-folder. Given RPM, IPK, or DEB packaging and tarball creation, the DEPLOY_DIR_RPM, DEPLOY_DIR_IPK, or DEPLOY_DIR_DEB variables are used, respectively.PACKAGE_ARCH: Defines architecture-specific sub-folders. For example, packages could be available for the i586 or qemux86 architectures.
BitBake uses the
do_package_write_*
tasks to generate packages and place them into the package holding area
(e.g. do_package_write_ipk for IPK packages). See the
“do_package_write_deb”,
“do_package_write_ipk”,
and
“do_package_write_rpm”
sections in the Yocto Project Reference Manual for additional
information. As an example, consider a scenario where an IPK packaging
manager is being used and there is package architecture support for both
i586 and qemux86. Packages for the i586 architecture are placed in
build/tmp/deploy/ipk/i586, while packages for the qemux86
architecture are placed in build/tmp/deploy/ipk/qemux86.
4.3.5 BitBake Tool
The OpenEmbedded build system uses BitBake to produce images and Software Development Kits (SDKs). You can see from the general workflow figure, the BitBake area consists of several functional areas. This section takes a closer look at each of those areas.
Note
Documentation for the BitBake tool is available separately. See the BitBake User Manual for reference material on BitBake.
4.3.5.1 Source Fetching
The first stages of building a recipe are to fetch and unpack the source code:

The do_fetch and do_unpack tasks fetch the source files and unpack them into the Build Directory.
Note
For every local file (e.g. file://) that is part of a recipe’s
SRC_URI statement, the OpenEmbedded build system takes a
checksum of the file for the recipe and inserts the checksum into
the signature for the do_fetch task. If any local
file has been modified, the do_fetch task and all
tasks that depend on it are re-executed.
By default, everything is accomplished in the Build Directory, which has a defined structure. For additional general information on the Build Directory, see the “build/” section in the Yocto Project Reference Manual.
Each recipe has an area in the Build Directory where the unpacked
source code resides. The UNPACKDIR variable points to this area for a
recipe’s unpacked source code, and has the default sources name. The
preceding figure and the following list describe the Build Directory’s
hierarchy:
TMPDIR: The base directory where the OpenEmbedded build system performs all its work during the build. The default base directory is the
tmpdirectory.PACKAGE_ARCH: The architecture of the built package or packages. Depending on the eventual destination of the package or packages (i.e. machine architecture, Build Host, SDK, or specific machine), PACKAGE_ARCH varies. See the variable’s description for details.
TARGET_OS: The operating system of the target device. A typical value would be “linux” (e.g. “qemux86-poky-linux”).
PN: The name of the recipe used to build the package. This variable can have multiple meanings. However, when used in the context of input files, PN represents the name of the recipe.
WORKDIR: The location where the OpenEmbedded build system builds a recipe (i.e. does the work to create the package).
PV: The version of the recipe used to build the package.
UNPACKDIR: Contains the unpacked source files for a given recipe.
S: Contains the final location of the source code.
The default value for BP is
${BPN}-${PV}where:
Note
In the previous figure, notice that there are two sample hierarchies: one based on package architecture (i.e. PACKAGE_ARCH) and one based on a machine (i.e. MACHINE). The underlying structures are identical. The differentiator being what the OpenEmbedded build system is using as a build target (e.g. general architecture, a build host, an SDK, or a specific machine).
4.3.5.2 Patching
Once source code is fetched and unpacked, BitBake locates patch files and applies them to the source files:

The do_patch task uses a recipe’s SRC_URI statements and the FILESPATH variable to locate applicable patch files.
Default processing for patch files assumes the files have either
*.patch or *.diff file types (or a compressed form of those
file types). You can use SRC_URI parameters
to change the way the build system recognizes patch files. See the
do_patch task for more
information.
BitBake finds and applies multiple patches for a single recipe in the order in which it locates the patches. The FILESPATH variable defines the default set of directories that the build system uses to search for patch files. Once found, patches are applied to the recipe’s source files, which are located in the S directory.
For more information on how the source directories are created, see the “Source Fetching” section. For more information on how to create patches and how the build system processes patches, see the “Patching Code” section in the Yocto Project Development Tasks Manual. You can also see the “Use devtool modify to Modify the Source of an Existing Component” section in the Yocto Project Application Development and the Extensible Software Development Kit (SDK) manual and the “Using Traditional Kernel Development to Patch the Kernel” section in the Yocto Project Linux Kernel Development Manual.
4.3.5.3 Configuration, Compilation, and Staging
After source code is patched, BitBake executes tasks that configure and compile the source code. Once compilation occurs, the files are copied to a holding area (staged) in preparation for packaging:

This step in the build process consists of the following tasks:
do_prepare_recipe_sysroot: This task sets up the two sysroots in the
${WORKDIR}(i.e.recipe-sysrootandrecipe-sysroot-native) so that the subsequent tasks of the recipe (notably do_configure and do_compile) can access the libraries, headers, and similar files built by the recipes on which it depends.recipe-sysroot: contains target libraries, and associated headers and other data needed to cross-build software from its sourcesrecipe-sysroot-native: contains host-native executables with their libraries and other data, so that they can be run directly on the build host when that is required by the build process
do_configure: This task configures the source by enabling and disabling any build-time and configuration options for the software being built. Configurations can come from the recipe itself as well as from an inherited class. Additionally, the software itself might configure itself depending on the target for which it is being built.
The configurations handled by the do_configure task are specific to configurations for the source code being built by the recipe.
If you are using the autotools* class, you can add additional configuration options by using the EXTRA_OECONF or PACKAGECONFIG_CONFARGS variables. For information on how this variable works within that class, see the autotools* class here.
do_compile: Once a configuration task has been satisfied, BitBake compiles the source using the do_compile task. Compilation occurs in the directory pointed to by the B variable. Realize that the B directory is, by default, the same as the S directory.
do_install: After compilation completes, BitBake executes the do_install task. This task copies files from the B directory and places them in a holding area pointed to by the D variable. Packaging occurs later using files from this holding directory.
4.3.5.4 Package Splitting
After source code is configured, compiled, and staged, the build system analyzes the results and splits the output into packages:

The do_package and do_packagedata tasks combine to analyze the files found in the D directory and split them into subsets based on available packages and files. Analysis involves the following as well as other items: splitting out debugging symbols, looking at shared library dependencies between packages, and looking at package relationships.
The do_packagedata task creates package metadata based on the analysis such that the build system can generate the final packages. The do_populate_sysroot task stages (copies) a subset of the files installed by the do_install task into the appropriate sysroot. Working, staged, and intermediate results of the analysis and package splitting process use several areas:
PKGD: The destination directory (i.e.
package) for packages before they are split into individual packages.PKGDESTWORK: A temporary work area (i.e.
pkgdata) used by the do_package task to save package metadata.PKGDEST: The parent directory (i.e.
packages-split) for packages after they have been split.PKGDATA_DIR: A shared, global-state directory that holds packaging metadata generated during the packaging process. The packaging process copies metadata from PKGDESTWORK to the PKGDATA_DIR area where it becomes globally available.
STAGING_DIR_HOST: The path for the sysroot for the system on which a component is built to run (i.e.
recipe-sysroot).STAGING_DIR_NATIVE: The path for the sysroot used when building components for the build host (i.e.
recipe-sysroot-native).STAGING_DIR_TARGET: The path for the sysroot used when a component that is built to execute on a system and it generates code for yet another machine (e.g. cross-canadian recipes).
Packages for a recipe are listed in the PACKAGES variable. The bitbake.conf configuration file defines the following default list of packages:
PACKAGES = "${PN}-src ${PN}-dbg ${PN}-staticdev ${PN}-dev ${PN}-doc ${PN}-locale ${PACKAGE_BEFORE_PN} ${PN}"
Each of these packages contains a default list of files defined with the
FILES variable. For example, the package ${PN}-dev represents files
useful to the development of applications depending on ${PN}. The default
list of files for ${PN}-dev, also defined in bitbake.conf, is defined as follows:
FILES:${PN}-dev = "${includedir} ${FILES_SOLIBSDEV} ${libdir}/*.la \
${libdir}/*.o ${libdir}/pkgconfig ${datadir}/pkgconfig \
${datadir}/aclocal ${base_libdir}/*.o \
${libdir}/${BPN}/*.la ${base_libdir}/*.la \
${libdir}/cmake ${datadir}/cmake"
The paths in this list must be absolute paths from the point of view of the root filesystem on the target, and must not make a reference to the variable D or any WORKDIR related variable. A correct example would be:
${sysconfdir}/foo.conf
Note
The list of files for a package is defined using the override syntax by
separating FILES and the package name by a colon (:).
A given file can only ever be in one package. By iterating from the leftmost to rightmost package in PACKAGES, each file matching one of the patterns defined in the corresponding FILES definition is included in the package.
Note
To find out which package installs a file, the oe-pkgdata-util
command-line utility can be used:
$ oe-pkgdata-util find-path '/etc/fstab'
base-files: /etc/fstab
For more information on the oe-pkgdata-util utility, see the section
Viewing Package Information with oe-pkgdata-util of the Yocto Project Development Tasks Manual.
To add a custom package variant of the ${PN} recipe named
${PN}-extra (name is arbitrary), one can add it to the
PACKAGE_BEFORE_PN variable:
PACKAGE_BEFORE_PN += "${PN}-extra"
Alternatively, a custom package can be added by adding it to the
PACKAGES variable using the prepend operator (=+):
PACKAGES =+ "${PN}-extra"
Depending on the type of packages being created (RPM, DEB, or IPK), the
do_package_write_*
task creates the actual packages and places them in the Package Feed
area, which is ${TMPDIR}/deploy. You can see the
“Package Feeds” section for more detail on
that part of the build process.
Note
Support for creating feeds directly from the deploy/*
directories does not exist. Creating such feeds usually requires some
kind of feed maintenance mechanism that would upload the new packages
into an official package feed (e.g. the Ångström distribution). This
functionality is highly distribution-specific and thus is not
provided out of the box.
4.3.5.5 Image Generation
Once packages are split and stored in the Package Feeds area, the build system uses BitBake to generate the root filesystem image:

The image generation process consists of several stages and depends on several tasks and variables. The do_rootfs task creates the root filesystem (file and directory structure) for an image. This task uses several key variables to help create the list of packages to actually install:
IMAGE_INSTALL: Lists out the base set of packages from which to install from the Package Feeds area.
PACKAGE_EXCLUDE: Specifies packages that should not be installed into the image.
IMAGE_FEATURES: Specifies features to include in the image. Most of these features map to additional packages for installation.
PACKAGE_CLASSES: Specifies the package backend (e.g. RPM, DEB, or IPK) to use and consequently helps determine where to locate packages within the Package Feeds area.
IMAGE_LINGUAS: Determines the language(s) for which additional language support packages are installed.
PACKAGE_INSTALL: The final list of packages passed to the package manager for installation into the image.
With IMAGE_ROOTFS pointing to the location of the filesystem under construction and the PACKAGE_INSTALL variable providing the final list of packages to install, the root file system is created.
Package installation is under control of the package manager (e.g. dnf/rpm, opkg, or apt/dpkg) regardless of whether or not package management is enabled for the target. At the end of the process, if package management is not enabled for the target, the package manager’s data files are deleted from the root filesystem. As part of the final stage of package installation, post installation scripts that are part of the packages are run. Any scripts that fail to run on the build host are run on the target when the target system is first booted. If you are using a read-only root filesystem, all the post installation scripts must succeed on the build host during the package installation phase since the root filesystem on the target is read-only.
The final stages of the do_rootfs task handle post processing. Post processing includes creation of a manifest file and optimizations.
The manifest file (.manifest) resides in the same directory as the root
filesystem image. This file lists out, line-by-line, the installed packages.
The manifest file is useful for the testimage class,
for example, to determine whether or not to run specific tests. See the
IMAGE_MANIFEST variable for additional information.
Optimizing processes that are run across the image include mklibs
and any other post-processing commands as defined by the
ROOTFS_POSTPROCESS_COMMAND
variable. The mklibs process optimizes the size of the libraries.
After the root filesystem is built, processing begins on the image through the do_image task. The build system runs any pre-processing commands as defined by the IMAGE_PREPROCESS_COMMAND variable. This variable specifies a list of functions to call before the build system creates the final image output files.
The build system dynamically creates do_image_* tasks as needed, based on the image types specified in the IMAGE_FSTYPES variable. The process turns everything into an image file or a set of image files and can compress the root filesystem image to reduce the overall size of the image. The formats used for the root filesystem depend on the IMAGE_FSTYPES variable. Compression depends on whether the formats support compression.
As an example, a dynamically created task when creating a particular image type would take the following form:
do_image_type
So, if the type
as specified by the IMAGE_FSTYPES were ext4, the dynamically
generated task would be as follows:
do_image_ext4
The final task involved in image creation is the do_image_complete task. This task completes the image by applying any image post processing as defined through the IMAGE_POSTPROCESS_COMMAND variable. The variable specifies a list of functions to call once the build system has created the final image output files.
Note
The entire image generation process is run under Pseudo. Running under Pseudo ensures that the files in the root filesystem have correct ownership.
4.3.5.6 SDK Generation
The OpenEmbedded build system uses BitBake to generate the Software Development Kit (SDK) installer scripts for both the standard SDK and the extensible SDK (eSDK):

Note
For more information on the cross-development toolchain generation, see the “Cross-Development Toolchain Generation” section. For information on advantages gained when building a cross-development toolchain using the do_populate_sdk task, see the “Building an SDK Installer” section in the Yocto Project Application Development and the Extensible Software Development Kit (eSDK) manual.
Like image generation, the SDK script process consists of several stages and depends on many variables. The do_populate_sdk and do_populate_sdk_ext tasks use these key variables to help create the list of packages to actually install. For information on the variables listed in the figure, see the “Application Development SDK” section.
The do_populate_sdk task helps create the standard SDK and handles two parts: a target part and a host part. The target part is the part built for the target hardware and includes libraries and headers. The host part is the part of the SDK that runs on the SDKMACHINE.
The do_populate_sdk_ext task helps create the extensible SDK and handles host and target parts differently than its counterpart does for the standard SDK. For the extensible SDK, the task encapsulates the build system, which includes everything needed (host and target) for the SDK.
Regardless of the type of SDK being constructed, the tasks perform some
cleanup after which a cross-development environment setup script and any
needed configuration files are created. The final output is the
Cross-development toolchain installation script (.sh file), which
includes the environment setup script.
4.3.5.7 Stamp Files and the Rerunning of Tasks
For each task that completes successfully, BitBake writes a stamp file into the STAMPS_DIR directory. The beginning of the stamp file’s filename is determined by the STAMP variable, and the end of the name consists of the task’s name and current input checksum.
Note
This naming scheme assumes that BB_SIGNATURE_HANDLER is “OEBasicHash”, which is almost always the case in current OpenEmbedded.
To determine if a task needs to be rerun, BitBake checks if a stamp file with a matching input checksum exists for the task. In this case, the task’s output is assumed to exist and still be valid. Otherwise, the task is rerun.
Note
The stamp mechanism is more general than the shared state (sstate) cache mechanism described in the “Setscene Tasks and Shared State” section. BitBake avoids rerunning any task that has a valid stamp file, not just tasks that can be accelerated through the sstate cache.
However, you should realize that stamp files only serve as a marker that some work has been done and that these files do not record task output. The actual task output would usually be somewhere in TMPDIR (e.g. in some recipe’s WORKDIR.) What the sstate cache mechanism adds is a way to cache task output that can then be shared between build machines.
Since STAMPS_DIR is usually a subdirectory of TMPDIR, removing TMPDIR will also remove STAMPS_DIR, which means tasks will properly be rerun to repopulate TMPDIR.
If you want some task to always be considered “out of date”, you can mark it with the nostamp varflag. If some other task depends on such a task, then that task will also always be considered out of date, which might not be what you want.
For details on how to view information about a task’s signature, see the “Viewing Task Variable Dependencies” section in the Yocto Project Development Tasks Manual.
4.3.6 Images
The images produced by the build system are compressed forms of the root filesystem and are ready to boot on a target device. You can see from the general workflow figure that BitBake output, in part, consists of images. This section takes a closer look at this output:

Note
For a list of example images that the Yocto Project provides, see the “Images” chapter in the Yocto Project Reference Manual.
The build process writes images out to the Build Directory inside
the tmp/deploy/images/machine/ folder as shown in the figure. This
folder contains any files expected to be loaded on the target device.
The DEPLOY_DIR variable points to the deploy directory, while the
DEPLOY_DIR_IMAGE variable points to the appropriate directory
containing images for the current configuration.
kernel-image: A kernel binary file. The KERNEL_IMAGETYPE variable determines the naming scheme for the kernel image file. Depending on this variable, the file could begin with a variety of naming strings. The
deploy/images/machine directory can contain multiple image files for the machine.root-filesystem-image: Root filesystems for the target device (e.g.
*.ext3or*.bz2files). The IMAGE_FSTYPES variable determines the root filesystem image type. Thedeploy/images/machine directory can contain multiple root filesystems for the machine.kernel-modules: Tarballs that contain all the modules built for the kernel. Kernel module tarballs exist for legacy purposes and can be suppressed by setting the MODULE_TARBALL_DEPLOY variable to “0”. The
deploy/images/machine directory can contain multiple kernel module tarballs for the machine.bootloaders: If applicable to the target machine, bootloaders supporting the image. The
deploy/images/machine directory can contain multiple bootloaders for the machine.symlinks: The
deploy/images/machine folder contains a symbolic link that points to the most recently built file for each machine. These links might be useful for external scripts that need to obtain the latest version of each file.
4.3.7 Application Development SDK
In the general workflow figure, the
output labeled “Application Development SDK” represents an SDK. The SDK
generation process differs depending on whether you build an extensible
SDK (e.g. bitbake -c populate_sdk_ext imagename) or a standard SDK
(e.g. bitbake -c populate_sdk imagename). This section takes a
closer look at this output:

The specific form of this output is a set of files that includes a
self-extracting SDK installer (*.sh), host and target manifest
files, and files used for SDK testing. When the SDK installer file is
run, it installs the SDK. The SDK consists of a cross-development
toolchain, a set of libraries and headers, and an SDK environment setup
script. Running this installer essentially sets up your
cross-development environment. You can think of the cross-toolchain as
the “host” part because it runs on the SDK machine. You can think of the
libraries and headers as the “target” part because they are built for
the target hardware. The environment setup script is added so that you
can initialize the environment before using the tools.
Note
The Yocto Project supports several methods by which you can set up this cross-development environment. These methods include downloading pre-built SDK installers or building and installing your own SDK installer.
For background information on cross-development toolchains in the Yocto Project development environment, see the “Cross-Development Toolchain Generation” section.
For information on setting up a cross-development environment, see the Yocto Project Application Development and the Extensible Software Development Kit (eSDK) manual.
All the output files for an SDK are written to the deploy/sdk folder
inside the Build Directory as shown in the previous figure. Depending
on the type of SDK, there are several variables to configure these files.
The variables associated with an extensible SDK are:
DEPLOY_DIR: Points to the
deploydirectory.SDK_EXT_TYPE: Controls whether or not shared state artifacts are copied into the extensible SDK. By default, all required shared state artifacts are copied into the SDK.
SDK_INCLUDE_PKGDATA: Specifies whether or not packagedata is included in the extensible SDK for all recipes in the “world” target.
SDK_INCLUDE_TOOLCHAIN: Specifies whether or not the toolchain is included when building the extensible SDK.
ESDK_LOCALCONF_ALLOW: A list of variables allowed through from the build system configuration into the extensible SDK configuration.
ESDK_LOCALCONF_REMOVE: A list of variables not allowed through from the build system configuration into the extensible SDK configuration.
ESDK_CLASS_INHERIT_DISABLE: A list of classes to remove from the INHERIT value globally within the extensible SDK configuration.
This next list, shows the variables associated with a standard SDK:
DEPLOY_DIR: Points to the
deploydirectory.SDKMACHINE: Specifies the architecture of the machine on which the cross-development tools are run to create packages for the target hardware.
SDKIMAGE_FEATURES: Lists the features to include in the “target” part of the SDK.
TOOLCHAIN_HOST_TASK: Lists packages that make up the host part of the SDK (i.e. the part that runs on the SDKMACHINE). When you use
bitbake -c populate_sdk imagenameto create the SDK, a set of default packages apply. This variable allows you to add more packages.TOOLCHAIN_TARGET_TASK: Lists packages that make up the target part of the SDK (i.e. the part built for the target hardware).
SDKPATHINSTALL: Defines the default SDK installation path offered by the installation script.
SDK_HOST_MANIFEST: Lists all the installed packages that make up the host part of the SDK. This variable also plays a minor role for extensible SDK development as well. However, it is mainly used for the standard SDK.
SDK_TARGET_MANIFEST: Lists all the installed packages that make up the target part of the SDK. This variable also plays a minor role for extensible SDK development as well. However, it is mainly used for the standard SDK.
4.4 Cross-Development Toolchain Generation
The Yocto Project does most of the work for you when it comes to creating The Cross-Development Toolchain. This section provides some technical background on how cross-development toolchains are created and used. For more information on toolchains, you can also see the Yocto Project Application Development and the Extensible Software Development Kit (eSDK) manual.
In the Yocto Project development environment, cross-development toolchains are used to build images and applications that run on the target hardware. With just a few commands, the OpenEmbedded build system creates these necessary toolchains for you.
The following figure shows a high-level build environment regarding toolchain construction and use.

Most of the work occurs on the Build Host. This is the machine used to
build images and generally work within the Yocto Project
environment. When you run
BitBake to create an image, the
OpenEmbedded build system uses the host gcc compiler to bootstrap a
cross-compiler named gcc-cross (or clang-cross if Clang is used). This
compiler is what BitBake uses to compile source files when creating the target
image. You can think of it simply as an automatically generated
cross-compiler that is used internally within BitBake only.
The chain of events that occurs when the standard toolchain is bootstrapped:
gcc -> virtual/cross-binutils -> linux-libc-headers -> virtual/cross-cc -> libgcc-initial -> virtual/libc -> libgcc -> virtual/compilerlibs
gcc: The compiler, GNU Compiler Collection (GCC), provided by the Build Host, or by a buildtools tarball.virtual/cross-binutils: The binary utilities needed in order to run thevirtual/cross-ccphase of the bootstrap operation and build the headers for the C library.linux-libc-headers: Headers needed for the cross-compiler and C library build.virtual/cross-cc: The final stage of the bootstrap process for the cross-compiler. This stage results in the actual cross-compiler that BitBake uses when it builds an image for a targeted device.This tool is a “native” tool (i.e. it is designed to run on the build host).
libgcc-initial: An initial version of the GCC support library needed to bootstrapvirtual/libc.virtual/libc: An provider of the C Standard Library (for example, the GNU C Library).libgcc: The final version of the GCC support library which can only be built once there is a C library to link against.virtual/compilerlibs: Runtime libraries resulting from the toolchain bootstrapping process. This tool produces a binary that consists of the runtime libraries need for the targeted device.
You can use the OpenEmbedded build system to build an installer for the
relocatable SDK used to develop applications. When you run the
installer, it installs the toolchain, which contains the development
tools (e.g., gcc-cross-canadian, clang-cross-canadian,
binutils-cross-canadian, and other nativesdk-* tools), which are tools
native to the SDK (i.e. native to SDK_ARCH), you need to cross-compile
and test your software. The figure shows the commands you use to easily build
out this toolchain. This cross-development toolchain is built to execute on the
SDKMACHINE, which might or might not be the same machine as the Build
Host.
Note
If your target architecture is supported by the Yocto Project, you can take advantage of pre-built images that ship with the Yocto Project and already contain cross-development toolchain installers.
Here is the bootstrap process for the relocatable toolchain:
gcc -> virtual/cross-binutils -> linux-libc-headers -> virtual/cross-cc -> libgcc-initial -> virtual/libc -> gcc-cross-canadian/clang-cross-canadian
The chain is the same as the standard toolchain, except for the last item:
gcc-cross-canadian (or clang-cross-canadian) is the final relocatable
cross-compiler. When run on the SDKMACHINE, this tool produces
executable code that runs on the target device. Only one cross-canadian compiler
is produced per architecture since they can be targeted at different processor
optimizations using configurations passed to the compiler through the compile
commands. This circumvents the need for multiple compilers and thus reduces the
size of the toolchains.
Note
The extensible SDK does not use gcc-cross-canadian or clang-cross-canadian
since this SDK ships a copy of the OpenEmbedded build system and the
sysroot within it contains gcc-cross.
Note
To learn how to use Clang for the SDK, see PREFERRED_TOOLCHAIN_SDK.
Note
For information on advantages gained when building a cross-development toolchain installer, see the “Building an SDK Installer” appendix in the Yocto Project Application Development and the Extensible Software Development Kit (eSDK) manual.
4.6 Automatically Added Runtime Dependencies
The OpenEmbedded build system automatically adds common types of runtime
dependencies between packages, which means that you do not need to
explicitly declare the packages using
RDEPENDS. There are three automatic
mechanisms (shlibdeps, pcdeps, and depchains) that
handle shared libraries, package configuration (pkg-config) modules, and
-dev and -dbg packages, respectively. For other types of runtime
dependencies, you must manually declare the dependencies.
shlibdeps: During the do_package task of each recipe, all shared libraries installed by the recipe are located. For each shared library, the package that contains the shared library is registered as providing the shared library. More specifically, the package is registered as providing the soname of the library. The resulting shared-library-to-package mapping is saved globally in PKGDATA_DIR by the do_packagedata task.Simultaneously, all executables and shared libraries installed by the recipe are inspected to see what shared libraries they link against. For each shared library dependency that is found, PKGDATA_DIR is queried to see if some package (likely from a different recipe) contains the shared library. If such a package is found, a runtime dependency is added from the package that depends on the shared library to the package that contains the library.
The automatically added runtime dependency also includes a version restriction. This version restriction specifies that at least the current version of the package that provides the shared library must be used, as if “package (>= version)” had been added to RDEPENDS. This forces an upgrade of the package containing the shared library when installing the package that depends on the library, if needed.
If you want to avoid a package being registered as providing a particular shared library (e.g. because the library is for internal use only), then add the library to PRIVATE_LIBS inside the package’s recipe.
pcdeps: During the do_package task of each recipe, all pkg-config modules (*.pcfiles) installed by the recipe are located. For each module, the package that contains the module is registered as providing the module. The resulting module-to-package mapping is saved globally in PKGDATA_DIR by the do_packagedata task.Simultaneously, all pkg-config modules installed by the recipe are inspected to see what other pkg-config modules they depend on. A module is seen as depending on another module if it contains a “Requires:” line that specifies the other module. For each module dependency, PKGDATA_DIR is queried to see if some package contains the module. If such a package is found, a runtime dependency is added from the package that depends on the module to the package that contains the module.
Note
The pcdeps mechanism most often infers dependencies between -dev packages.
depchains: If a packagefoodepends on a packagebar, thenfoo-devandfoo-dbgare also made to depend onbar-devandbar-dbg, respectively. Taking the-devpackages as an example, thebar-devpackage might provide headers and shared library symlinks needed byfoo-dev, which shows the need for a dependency between the packages.The dependencies added by
depchainsare in the form of RRECOMMENDS.Note
By default,
foo-devalso has an RDEPENDS-style dependency onfoo, because the default value ofRDEPENDS:${PN}-dev(set inbitbake.conf) includes “${PN}”.To ensure that the dependency chain is never broken,
-devand-dbgpackages are always generated by default, even if the packages turn out to be empty. See the ALLOW_EMPTY variable for more information.
The do_package task depends on the do_packagedata
task of each recipe in DEPENDS through use of a
[deptask]
declaration, which guarantees that the required shared-library /
module-to-package mapping information will be available when needed as long as
DEPENDS has been correctly set.
4.7 Fakeroot and Pseudo
Some tasks are easier to implement when allowed to perform certain operations that are normally reserved for the root user (e.g. do_install, do_package_write*, do_rootfs, and do_image_*). For example, the do_install task benefits from being able to set the UID and GID of installed files to arbitrary values.
One approach to allowing tasks to perform root-only operations would be to require BitBake to run as root. However, this method is cumbersome and has security issues. The approach that is actually used is to run tasks that benefit from root privileges in a “fake” root environment. Within this environment, the task and its child processes believe that they are running as the root user, and see an internally consistent view of the filesystem. As long as generating the final output (e.g. a package or an image) does not require root privileges, the fact that some earlier steps ran in a fake root environment does not cause problems.
The capability to run tasks in a fake root environment is known as “fakeroot”, which is derived from the BitBake keyword/variable flag that requests a fake root environment for a task.
In the OpenEmbedded Build System, the program that implements
fakeroot is known as Pseudo. Pseudo
overrides system calls by using the environment variable LD_PRELOAD,
which results in the illusion of running as root. To keep track of
“fake” file ownership and permissions resulting from operations that
require root permissions, Pseudo uses an SQLite 3 database. This
database is stored in
${WORKDIR}/pseudo/files.db
for individual recipes. Storing the database in a file as opposed to in
memory gives persistence between tasks and builds, which is not
accomplished using fakeroot.
Note
If you add your own task that manipulates the same files or
directories as a fakeroot task, then that task also needs to run
under fakeroot. Otherwise, the task cannot run root-only operations,
and cannot see the fake file ownership and permissions set by the
other task. You need to also add a dependency on
virtual/fakeroot-native:do_populate_sysroot, giving the following:
fakeroot do_mytask () {
...
}
do_mytask[depends] += "virtual/fakeroot-native:do_populate_sysroot"
For more information, see the FAKEROOT* variables in the BitBake User Manual. You can also reference the “Why Not Fakeroot?” article for background information on Fakeroot and Pseudo.
4.8 BitBake Tasks Map
To understand how BitBake operates in the build directory and environment we can consider the following recipes and diagram, to have full picture about the tasks that BitBake runs to generate the final package file for the recipe.
We will have two recipes as an example:
libhello: A recipe that provides a shared librarysayhello: A recipe that useslibhellolibrary to do its job
Note
sayhello depends on libhello at compile time as it needs the shared
library to do the dynamic linking process. It also depends on it at runtime
as the shared library loader needs to find the library.
For more details about dependencies check Dependencies.
libhello sources are as follows:
LICENSE: This is the license associated with this libraryMakefile: The file used bymaketo build the libraryhellolib.c: The implementation of the libraryhellolib.h: The C header of the library
sayhello sources are as follows:
LICENSE: This is the license associated with this projectMakefile: The file used bymaketo build the projectsayhello.c: The source file of the project
Before presenting the contents of each file, here are the steps
that we need to follow to accomplish what we want in the first place,
which is integrating sayhello in our root file system:
Create a Git repository for each project with the corresponding files
Create a recipe for each project
Make sure that
sayhellorecipe DEPENDS onlibhelloMake sure that
sayhellorecipe RDEPENDS onlibhelloAdd
sayhelloto IMAGE_INSTALL to integrate it into the root file system
The contents of libhello/Makefile are:
LIB=libhello.so
all: $(LIB)
$(LIB): hellolib.o
$(CC) $< -Wl,-soname,$(LIB).1 -fPIC $(LDFLAGS) -shared -o $(LIB).1.0
%.o: %.c
$(CC) -c $<
clean:
rm -rf *.o *.so*
Note
When creating shared libraries, it is strongly recommended to follow the Linux conventions and guidelines (see this article for some background).
Note
When creating Makefile files, it is strongly recommended to use CC, LDFLAGS
and CFLAGS as BitBake will set them as environment variables according
to your build configuration.
The contents of libhello/hellolib.h are:
#ifndef HELLOLIB_H
#define HELLOLIB_H
void Hello();
#endif
The contents of libhello/hellolib.c are:
#include <stdio.h>
void Hello(){
puts("Hello from a Yocto demo \n");
}
The contents of sayhello/Makefile are:
EXEC=sayhello
LDFLAGS += -lhello
all: $(EXEC)
$(EXEC): sayhello.c
$(CC) $< $(LDFLAGS) $(CFLAGS) -o $(EXEC)
clean:
rm -rf $(EXEC) *.o
The contents of sayhello/sayhello.c are:
#include <hellolib.h>
int main(){
Hello();
return 0;
}
The contents of libhello_0.1.bb are:
SUMMARY = "Hello demo library"
DESCRIPTION = "Hello shared library used in Yocto demo"
# NOTE: Set the License according to the LICENSE file of your project
# and then add LIC_FILES_CHKSUM accordingly
LICENSE = "CLOSED"
# Assuming the branch is main
# Change <username> accordingly
SRC_URI = "git://github.com/<username>/libhello;branch=main;protocol=https"
do_install(){
install -d ${D}${includedir}
install -d ${D}${libdir}
install hellolib.h ${D}${includedir}
oe_soinstall ${PN}.so.${PV} ${D}${libdir}
}
The contents of sayhello_0.1.bb are:
SUMMARY = "SayHello demo"
DESCRIPTION = "SayHello project used in Yocto demo"
# NOTE: Set the License according to the LICENSE file of your project
# and then add LIC_FILES_CHKSUM accordingly
LICENSE = "CLOSED"
# Assuming the branch is main
# Change <username> accordingly
SRC_URI = "git://github.com/<username>/sayhello;branch=main;protocol=https"
DEPENDS += "libhello"
RDEPENDS:${PN} += "libhello"
do_install(){
install -d ${D}${bindir}
install -m 0700 sayhello ${D}${bindir}
}
After placing the recipes in a custom layer we can run bitbake sayhello
to build the recipe.
The following diagram shows the sequences of tasks that BitBake executes to accomplish that.

Permission is granted to copy, distribute and/or modify this document under the terms of the Creative Commons Attribution-Share Alike 2.0 UK: England & Wales as published by Creative Commons.
To report any inaccuracies or problems with this (or any other Yocto Project)
manual, or to send additions or changes, please send email/patches to the Yocto
Project documentation mailing list at docs@lists.yoctoproject.org or
log into the Libera Chat #yocto channel.
Yocto Project and OpenEmbedded Contributor Guide
The Yocto Project and OpenEmbedded are open-source, community-based projects so contributions are very welcome, it is how the code evolves and everyone can effect change. Contributions take different forms, if you have a fix for an issue you’ve run into, a patch is the most appropriate way to contribute it. If you run into an issue but don’t have a solution, opening a defect in Bugzilla or asking questions on the mailing lists might be more appropriate. This guide intends to point you in the right direction to this.
1 Identify the component
The Yocto Project and OpenEmbedded ecosystem is built of layers so the first step is to identify the component where the issue likely lies. For example, if you have a hardware issue, it is likely related to the BSP you are using and the best place to seek advice would be from the BSP provider or layer. If the issue is a build/configuration one and a distro is in use, they would likely be the first place to ask questions. If the issue is a generic one and/or in the core classes or metadata, the core layer or BitBake might be the appropriate component.
Each metadata layer being used should contain a README file and that should
explain where to report issues, where to send changes and how to contact the
maintainers.
If the issue is in the core metadata layer (OpenEmbedded-Core) or in BitBake, issues can be reported in the Yocto Project Bugzilla. The yocto mailing list is a general “catch-all” location where questions can be sent if you can’t work out where something should go.
2 Reporting a Defect Against the Yocto Project and OpenEmbedded
You can use the Yocto Project instance of Bugzilla to submit a defect (bug) against BitBake, OpenEmbedded-Core, against any other Yocto Project component or for tool issues. For additional information on this implementation of Bugzilla see the “Yocto Project Bugzilla” section in the Yocto Project Reference Manual. For more detail on any of the following steps, see the Yocto Project Bugzilla wiki page.
Use the following general steps to submit a bug:
Open the Yocto Project implementation of Bugzilla.
Click “File a Bug” to enter a new bug.
Choose the appropriate “Classification”, “Product”, and “Component” for which the bug was found. Bugs for the Yocto Project fall into one of several classifications, which in turn break down into several products and components. For example, for a bug against the
meta-intellayer, you would choose “Build System, Metadata & Runtime”, “BSPs”, and “bsps-meta-intel”, respectively.Choose the “Version” of the Yocto Project for which you found the bug (e.g. 6.0.2).
Determine and select the “Severity” of the bug. The severity indicates how the bug impacted your work.
Choose the “Hardware” that the bug impacts.
Choose the “Architecture” that the bug impacts.
Choose a “Documentation change” item for the bug. Fixing a bug might or might not affect the Yocto Project documentation. If you are unsure of the impact to the documentation, select “Don’t Know”.
Provide a brief “Summary” of the bug. Try to limit your summary to just a line or two and be sure to capture the essence of the bug.
Provide a detailed “Description” of the bug. You should provide as much detail as you can about the context, behavior, output, and so forth that surrounds the bug. You can even attach supporting files for output from logs by using the “Add an attachment” button.
Click the “Submit Bug” button submit the bug. A new Bugzilla number is assigned to the bug and the defect is logged in the bug tracking system.
Once you file a bug, the bug is processed by the Yocto Project Bug Triage Team and further details concerning the bug are assigned (e.g. priority and owner). You are the “Submitter” of the bug and any further categorization, progress, or comments on the bug result in Bugzilla sending you an automated email concerning the particular change or progress to the bug.
There are no guarantees about if or when a bug might be worked on since an open-source project has no dedicated engineering resources. However, the project does have a good track record of resolving common issues over the medium and long term. We do encourage people to file bugs so issues are at least known about. It helps other users when they find somebody having the same issue as they do, and an issue that is unknown is much less likely to ever be fixed!
3 Recipe Style Guide
3.1 Recipe Naming Conventions
In general, most recipes should follow the naming convention
recipes-category/recipename/recipename_version.bb. Recipes for related
projects may share the same recipe directory. recipename and category
may contain hyphens, but hyphens are not allowed in version.
If the recipe is tracking a Git revision that does not correspond to a released
version of the software, version may be git (e.g. recipename_git.bb)
and the recipe would set PV.
3.2 Version Policy
Our versions follow the form <epoch>:<version>-<revision>
or in BitBake variable terms ${PE}:${PV}-${PR}. We
generally follow the Debian
version policy which defines these terms.
In most cases the version PV will be set automatically from the recipe file name. It is recommended to use released versions of software as these are revisions that upstream are expecting people to use.
Recipe versions should always compare and sort correctly so that upgrades work
as expected. With conventional versions such as 1.4 upgrading to 1.5
this happens naturally, but some versions don’t sort. For example,
1.5 Release Candidate 2 could be written as 1.5rc2 but this sorts after
1.5, so upgrades from feeds won’t happen correctly.
Instead the tilde (~) operator can be used, which sorts before the empty
string so 1.5~rc2 comes before 1.5. There is a historical syntax which
may be found where PV is set as a combination of the prior version
+ the pre-release version, for example PV=1.4+1.5rc2. This is a valid
syntax but the tilde form is preferred.
For version comparisons, the opkg-compare-versions program from
opkg-utils can be useful when attempting to determine how two version
numbers compare to each other. Our definitive version comparison algorithm is
the one within bitbake which aims to match those of the package managers and
Debian policy closely.
When a recipe references a git revision that does not correspond to a released
version of software (e.g. is not a tagged version), the PV variable
should include the sign +, so bitbake automatically includes package
version information during the packaging phase:
PV = "<version>+git"
In this case, <version> should be the most recently released version of the
software from the current source revision (git describe can be useful for
determining this). Whilst not recommended for published layers, this format is
also useful when using AUTOREV to set the recipe to increment source
control revisions automatically, which can be useful during local development.
3.3 Version Number Changes
The PR variable is used to indicate different revisions of a recipe that reference the same upstream source version. It can be used to force a new version of a recipe to be installed onto a device from a package feed. These once had to be set manually but in most cases these can now be set and incremented automatically by a PR Server connected with a package feed.
When PV increases, any existing PR value can and should be removed.
If PV changes in such a way that it does not increase with respect to the previous value, you need to increase PE to ensure package managers will upgrade it correctly. If unset you should set PE to “1” since the default of empty is easily confused with “0” depending on the package manager. PE can only have an integer value.
3.4 Recipe formatting
3.4.1 Variable Formatting
Variable assignment should include a space around each side of the operator, e.g.
FOO = "bar", notFOO="bar".Double quotes should be used on the right-hand side of the assignment, e.g.
FOO = "bar"notFOO = 'bar'Spaces should be used for indenting variables, with 4 spaces per tab
Long variables should be split over multiple lines when possible by using the continuation character (
\)When splitting a long variable over multiple lines, all continuation lines should be indented (with spaces) to align with the start of the quote on the first line:
FOO = "this line is \ long \ "
Instead of:
FOO = "this line is \ long \ "
3.4.2 Python Function formatting
Spaces must be used for indenting Python code, with 4 spaces per tab
3.4.3 Shell Function formatting
The formatting of shell functions should be consistent within layers. Some use tabs, some use spaces.
3.5 Recipe metadata
3.5.1 Required Variables
The following variables should be included in all recipes:
SUMMARY: a one line description of the upstream project
DESCRIPTION: an extended description of the upstream project, possibly with multiple lines. If no reasonable description can be written, this may be omitted as it defaults to SUMMARY.
HOMEPAGE: the URL to the upstream projects homepage.
BUGTRACKER: the URL upstream projects bug tracking website, if applicable.
3.5.2 Recipe Ordering
When a variable is defined in recipes and classes, variables should follow the general order when possible:
inherit ...Build class specific variables such as EXTRA_OECONF
Tasks such as do_configure
There are some cases where ordering is important and these cases would override this default order. Examples include:
PACKAGE_ARCH needing to be set before
inherit packagegroup
Tasks should be ordered based on the order they generally execute. For commonly used tasks this would be:
Custom tasks should be sorted similarly.
Package specific variables are typically grouped together, e.g.:
RDEPENDS:${PN} = “foo”
RDEPENDS:${PN}-libs = “bar”
RRECOMMENDS:${PN} = “one”
RRECOMMENDS:${PN}-libs = “two”
3.5.3 Recipe License Fields
Recipes need to define both the LICENSE and LIC_FILES_CHKSUM variables:
LICENSE: This variable specifies the license for the software. If you do not know the license under which the software you are building is distributed, you should go to the source code and look for that information. Typical files containing this information include
COPYING, LICENSE, andREADMEfiles. You could also find the information near the top of a source file. For example, given a piece of software licensed under the GNU General Public License version 2, you would set LICENSE as follows:LICENSE = "GPL-2.0-only"
The licenses you specify within LICENSE can have any name as long as you do not use spaces, since spaces are used as separators between license names. For standard licenses, use the names of the files in
meta/files/common-licenses/or the SPDXLICENSEMAP flag names defined inmeta/conf/licenses.conf.Note
Setting a LICENSE in a recipe applies to the software to be built by this recipe, not to the recipe file itself. The license of recipes, configuration files and scripts should also be clearly specified, for example via comments or via a license found in the layer that holds these files. These license files are usually found at the root of the layer. Exceptions should be clearly stated in the layer README or LICENSE file.
For example, the OpenEmbedded-Core (OE-Core) layer provides both the GPL-2.0-only and MIT license files, and a “LICENSE” file to explain how these two licenses are attributed to files found in the layer.
LIC_FILES_CHKSUM: The OpenEmbedded build system uses this variable to make sure the license text has not changed. If it has, the build produces an error and it affords you the chance to figure it out and correct the problem.
You need to specify all applicable licensing files for the software. At the end of the configuration step, the build process will compare the checksums of the files to be sure the text has not changed. Any differences result in an error with the message containing the current checksum. For more explanation and examples of how to set the LIC_FILES_CHKSUM variable, see the “Tracking License Changes” section.
To determine the correct checksum string, you can list the appropriate files in the LIC_FILES_CHKSUM variable with incorrect md5 strings, attempt to build the software, and then note the resulting error messages that will report the correct md5 strings. See the “Fetching Code” section for additional information.
Here is an example that assumes the software has a
COPYINGfile:LIC_FILES_CHKSUM = "file://COPYING;md5=xxx"
When you try to build the software, the build system will produce an error and give you the correct string that you can substitute into the recipe file for a subsequent build.
3.5.3.1 License Updates
When you change the LICENSE or LIC_FILES_CHKSUM in the recipe
due to upstream making modifications to the license files, you need to briefly
explain the reason for the change via a License-Update: tag. Often it’s
quite trivial, such as:
License-Update: copyright years refreshed
Less often, the actual licensing terms themselves will have changed. If so, do try to link to upstream making/justifying that decision.
The License-Update: tag is not needed for commits which fix incorrect
license data in our metadata (for an example see OE-Core commit
6c8b76d).
3.5.4 Tips and Guidelines for Writing Recipes
Use BBCLASSEXTEND instead of creating separate recipes such as
-nativeand-nativesdkones, whenever possible. This avoids having to maintain multiple recipe files at the same time.Recipes should have tasks which are idempotent, i.e. that executing a given task multiple times shouldn’t change the end result. The build environment is built upon this assumption and breaking it can cause obscure build failures.
For idempotence when modifying files in tasks, it is usually best to:
copy a file
XtoX.orig(only if it doesn’t exist already)then, copy
X.origback toX,and, finally, modify
X.
This ensures that rerunning the task always produces the same end result and the original file can be preserved to reuse. It also guards against an interrupted build corrupting the file.
3.6 Patch Upstream Status
In order to keep track of patches applied by recipes and ultimately reduce the number of patches that need maintaining, the OpenEmbedded build system requires information about the upstream status of each patch.
In its description, each patch should provide detailed information about the bug that it addresses, such as the URL in a bug tracking system and links to relevant mailing list archives.
Then, you should also add an Upstream-Status: tag containing one of the
following status strings:
PendingNo determination has been made yet, or patch has not yet been submitted to upstream.
Keep in mind that every patch submitted upstream reduces the maintenance burden in OpenEmbedded and Yocto Project in the long run, so this patch status should only be used in exceptional cases if there are genuine obstacles to submitting a patch upstream; the reason for that should be included in the patch.
Submitted [where]Submitted to upstream, waiting for approval. Optionally include where it was submitted, such as the author, mailing list, etc.
Backport [version]Accepted upstream and included in the next release, or backported from newer upstream version, because we are at a fixed version. Include upstream version info (e.g. commit ID or next expected version).
DeniedNot accepted by upstream, include reason in patch.
Inactive-Upstream [lastcommit: when (and/or) lastrelease: when]The upstream is no longer available. This typically means a defunct project where no activity has happened for a long time — measured in years. To make that judgement, it is recommended to look at not only when the last release happened, but also when the last commit happened, and whether newly made bug reports and merge requests since that time receive no reaction. It is also recommended to add to the patch description any relevant links where the inactivity can be clearly seen.
Inappropriate [reason]The patch is not appropriate for upstream, include a brief reason on the same line enclosed with
[]. In the past, there were several different reasons not to submit patches upstream, but we have to consider that every non-upstreamed patch means a maintenance burden for recipe maintainers. Currently, the only reasons to mark patches as inappropriate for upstream submission are:oe specific: the issue is specific to how OpenEmbedded performs builds or sets things up at runtime, and can be resolved only with a patch that is not however relevant or appropriate for general upstream submission.upstream ticket <link>: the issue is not specific to Open-Embedded and should be fixed upstream, but the patch in its current form is not suitable for merging upstream, and the author lacks sufficient expertise to develop a proper patch. Instead the issue is handled via a bug report (include link).
Of course, if another person later takes care of submitting this patch upstream,
the status should be changed to Submitted [where], and an additional
Signed-off-by: line should be added to the patch by the person claiming
responsibility for upstreaming.
3.6.1 Examples
Here’s an example of a patch that has been submitted upstream:
rpm: Adjusted the foo setting in bar
[RPM Ticket #65] -- http://rpm5.org/cvs/tktview?tn=65,5
The foo setting in bar was decreased from X to X-50% in order to
ensure we don't exhaust all system memory with foobar threads.
Upstream-Status: Submitted [rpm5-devel@rpm5.org]
Signed-off-by: Joe Developer <joe.developer@example.com>
A future update can change the value to Backport or Denied as
appropriate.
Another example of a patch that is specific to OpenEmbedded:
Do not treat warnings as errors
There are additional warnings found with musl which are
treated as errors and fails the build, we have more combinations
than upstream supports to handle.
Upstream-Status: Inappropriate [oe specific]
Here’s a patch that has been backported from an upstream commit:
include missing sys/file.h for LOCK_EX
Upstream-Status: Backport [https://github.com/systemd/systemd/commit/ac8db36cbc26694ee94beecc8dca208ec4b5fd45]
3.7 CVE patches
In order to have a better control of vulnerabilities, patches that fix CVEs must
contain a CVE: tag. This tag should list all CVEs fixed by the patch. If more than
one CVE is fixed, separate them using spaces.
3.7.1 CVE Examples
This should be the header of patch that fixes CVE-2015-8370 in GRUB2:
grub2: Fix CVE-2015-8370
[No upstream tracking] -- https://bugzilla.redhat.com/show_bug.cgi?id=1286966
Back to 28; Grub2 Authentication
Two functions suffer from integer underflow fault; the grub_username_get() and grub_password_get()located in
grub-core/normal/auth.c and lib/crypto.c respectively. This can be exploited to obtain a Grub rescue shell.
Upstream-Status: Backport [http://git.savannah.gnu.org/cgit/grub.git/commit/?id=451d80e52d851432e109771bb8febafca7a5f1f2]
CVE: CVE-2015-8370
Signed-off-by: Joe Developer <joe.developer@example.com>
3.8 Patch format
By default, patches created with git format-patch have a Git version signature at the end.
To avoid having a Git signature at the end of generated or updated patches,
you can use Git configuration settings:
git config --global format.signature ""
Note
Patches generated or updated by devtool are created with no signature.
4 Contributing Changes to a Component
Contributions to the Yocto Project and OpenEmbedded are very welcome. Because the system is extremely configurable and flexible, we recognize that developers will want to extend, configure or optimize it for their specific uses.
4.1 Contributing through mailing lists — Why not using web-based workflows?
Both Yocto Project and OpenEmbedded have many key components that are maintained by patches being submitted on mailing lists. We appreciate this approach does look a little old fashioned when other workflows are available through web technology such as GitHub, GitLab and others. Since we are often asked this question, we’ve decided to document the reasons for using mailing lists.
One significant factor is that we value peer review. When a change is proposed to many of the core pieces of the project, it helps to have many eyes of review go over them. Whilst there is ultimately one maintainer who needs to make the final call on accepting or rejecting a patch, the review is made by many eyes and the exact people reviewing it are likely unknown to the maintainer. It is often the surprise reviewer that catches the most interesting issues!
This is in contrast to the “GitHub” style workflow where either just a maintainer makes that review, or review is specifically requested from nominated people. We believe there is significant value added to the codebase by this peer review and that moving away from mailing lists would be to the detriment of our code.
We also need to acknowledge that many of our developers are used to this mailing list workflow and have worked with it for years, with tools and processes built around it. Changing away from this would result in a loss of key people from the project, which would again be to its detriment.
The projects are acutely aware that potential new contributors find the
mailing list approach off-putting and would prefer a web-based GUI.
Since we don’t believe that can work for us, the project is aiming to ensure
patchwork is available to help track
patch status and also looking at how tooling can provide more feedback to users
about patch status. We are looking at improving tools such as patchtest to
test user contributions before they hit the mailing lists and also at better
documenting how to use such workflows since we recognise that whilst this was
common knowledge a decade ago, it might not be as familiar now.
4.2 Preparing Changes for Submission
4.2.1 Set up Git
The first thing to do is to install Git packages. Here is an example on Debian and Ubuntu:
sudo apt install git-core git-email
Then, you need to set a name and e-mail address that Git will use to identify your commits:
git config --global user.name "Ada Lovelace"
git config --global user.email "ada.lovelace@gmail.com"
By default, Git adds a signature line at the end of patches containing the Git version. We suggest to remove it as it doesn’t add useful information.
Remove it with the following command:
git config --global format.signature ""
4.2.2 Clone the Git repository for the component to modify
After identifying the component to modify as described in the “Identify the component” section, clone the corresponding Git repository. Here is an example for OpenEmbedded-Core:
git clone https://git.openembedded.org/openembedded-core
cd openembedded-core
4.2.3 Create a new branch
Then, create a new branch in your local Git repository
for your changes, starting from the reference branch in the upstream
repository (often called master):
$ git checkout <ref-branch>
$ git checkout -b my-changes
If you have completely unrelated sets of changes to submit, you should even create one branch for each set.
4.2.4 Implement and commit changes
In each branch, you should group your changes into small, controlled and isolated ones. Keeping changes small and isolated aids review, makes merging/rebasing easier and keeps the change history clean should anyone need to refer to it in future.
To this purpose, you should create one Git commit per change, corresponding to each of the patches you will eventually submit. See further guidance in the Linux kernel documentation if needed.
For example, when you intend to add multiple new recipes, each recipe should be added in a separate commit. For upgrades to existing recipes, the previous version should usually be deleted as part of the same commit to add the upgraded version.
Stage Your Changes: Stage your changes by using the
git addcommand on each file you modified. If you want to stage all the files you modified, you can even use thegit add -Acommand.Commit Your Changes: This is when you can create separate commits. For each commit to create, use the
git commit -scommand with the files or directories you want to include in the commit:$ git commit -s file1 file2 dir1 dir2 ...
To include all staged files:
$ git commit -sa
The
-soption ofgit commitadds a “Signed-off-by:” line to your commit message. There is the same requirement for contributing to the Linux kernel. Adding such a line signifies that you, the submitter, have agreed to the Developer’s Certificate of Origin 1.1 as follows:Developer's Certificate of Origin 1.1 By making a contribution to this project, I certify that: (a) The contribution was created in whole or in part by me and I have the right to submit it under the open source license indicated in the file; or (b) The contribution is based upon previous work that, to the best of my knowledge, is covered under an appropriate open source license and I have the right under that license to submit that work with modifications, whether created in whole or in part by me, under the same open source license (unless I am permitted to submit under a different license), as indicated in the file; or (c) The contribution was provided directly to me by some other person who certified (a), (b) or (c) and I have not modified it. (d) I understand and agree that this project and the contribution are public and that a record of the contribution (including all personal information I submit with it, including my sign-off) is maintained indefinitely and may be redistributed consistent with this project or the open source license(s) involved.Provide a single-line summary of the change and, if more explanation is needed, provide more detail in the description of the commit. This summary is typically viewable in the “shortlist” of changes. Thus, providing something short and descriptive that gives the reader a summary of the change is useful when viewing a list of many commits. You should prefix this short description with the recipe name (if changing a recipe), or else with the short form path to the file being changed.
Note
To find a suitable prefix for the commit summary, a good idea is to look for prefixes used in previous commits touching the same files or directories:
git log --oneline <paths>
For the commit description, provide detailed information that describes what you changed, why you made the change, and the approach you used. It might also be helpful if you mention how you tested the change. Provide as much detail as you can in the commit description.
Note
If the single line summary is enough to describe a simple change, the commit description can be left empty.
If the change addresses a specific bug or issue that is associated with a bug-tracking ID, include a reference to that ID in the body of the commit message. For example, the Yocto Project uses a specific convention for bug references — any commit that addresses a specific bug should use the following form for the body of the commit message. Be sure to use the actual bug-tracking ID from Bugzilla for bug-id:
single-line summary of change Fixes [YOCTO #bug-id] detailed description of change
If other people participated in this patch, add some tags to the commit description to credit other contributors to the change:
Reported-by: name and email of a person reporting a bug that your commit is trying to fix. This is a good practice to encourage people to go on reporting bugs and let them know that their reports are taken into account.Suggested-by: name and email of a person to credit for the idea of making the change.Tested-by,Reviewed-by: name and email for people having tested your changes or reviewed their code. These fields are usually added by the maintainer accepting a patch, or by yourself if you submitted your patches to early reviewers, or are submitting an unmodified patch again as part of a new iteration of your patch series.Cc: name and email of people you want to send a copy of your changes to. This field will be used bygit send-email.
See more guidance about using such tags in the Linux kernel documentation.
Note
One can amend an existing git commit message to add missing tags for contributors with the
git commit --amendcommand.
4.2.5 Test your changes
For each contributions you make, you should test your changes as well. For this the Yocto Project offers several types of tests. Those tests cover different areas and it depends on your changes which are feasible. For example run:
For changes that affect the build environment:
bitbake-selftest: for changes within BitBake
oe-selftest: to test combinations of BitBake runs
oe-build-perf-test: to test the performance of common build scenariosFor changes in a recipe:
ptest: run package specific tests, if they exist
testimage: build an image, boot it and run testcases on itIf applicable, ensure also the
nativeandnativesdkvariants buildsFor changes relating to the SDK:
testsdk: to build, install and run tests against a SDK
testsdk_ext: to build, install and run tests against an extended SDK
Note that this list just gives suggestions and is not exhaustive. More details can be found here: Yocto Project Tests — Types of Testing Overview.
4.3 Creating Patches
Here is the general procedure on how to create patches to be sent through email:
Describe the Changes in your Branch: If you have more than one commit in your branch, it’s recommended to provide a cover letter describing the series of patches you are about to send.
For this purpose, a good solution is to store the cover letter contents in the branch itself:
git branch --edit-description
This will open a text editor to fill in the description for your changes. This description can be updated when necessary and will be used by Git to create the cover letter together with the patches.
It is recommended to start this description with a title line which will serve a the subject line for the cover letter.
Generate Patches for your Branch: The
git format-patchcommand will generate patch files for each of the commits in your branch. You need to pass the reference branch your branch starts from.If you branch didn’t need a description in the previous step:
$ git format-patch <ref-branch>
If you filled a description for your branch, you will want to generate a cover letter too:
$ git format-patch --cover-letter --cover-from-description=auto <ref-branch>
After the command is run, the current directory contains numbered
.patchfiles for the commits in your branch. If you have a cover letter, it will be in the0000-cover-letter.patch.Note
The
--cover-from-description=autooption makesgit format-patchuse the first paragraph of the branch description as the cover letter title. Another possibility, which is easier to remember, is to pass only the--cover-letteroption, but you will have to edit the subject line manually every time you generate the patches.See the git format-patch manual page for details.
Review each of the Patch Files: This final review of the patches before sending them often allows to view your changes from a different perspective and discover defects such as typos, spacing issues or lines or even files that you didn’t intend to modify. This review should include the cover letter patch too.
If necessary, rework your commits as described in “Taking Patch Review into Account”.
4.4 Validating Patches with Patchtest
patchtest is available in openembedded-core as a tool for making
sure that your patches are well-formatted and contain important info for
maintenance purposes, such as the Signed-off-by presence. Note that no
functional testing of the changes will be performed by patchtest. Currently,
it only supports testing patches for openembedded-core branches. To setup,
perform the following:
pip install -r meta/lib/patchtest/requirements.txt
source oe-init-build-env
bitbake-layers add-layer ../meta-selftest
Once these steps are complete and you have generated your patch files,
you can run patchtest like so:
patchtest --patch <patch_name>
Alternatively, if you want patchtest to iterate over and test
multiple patches stored in a directory, you can use:
patchtest --directory <directory_name>
By default, patchtest uses its own modules’ file paths to determine what
repository and test suite to check patches against. If you wish to test
patches against a repository other than openembedded-core and/or use
a different set of tests, you can use the --repodir and --testdir
flags:
patchtest --patch <patch_name> --repodir <path/to/repo> --testdir <path/to/testdir>
Finally, note that patchtest is designed to test patches in a standalone
way, so if your patches are meant to apply on top of changes made by
previous patches in a series, it is possible that patchtest will report
false failures regarding the “merge on head” test.
Using patchtest in this manner provides a final check for the overall
quality of your changes before they are submitted for review by the
maintainers.
4.5 Sending the Patches via Email
4.5.1 Using Git to Send Patches
To submit patches through email, it is very important that you send them
without any whitespace or HTML formatting that either you or your mailer
introduces. The maintainer that receives your patches needs to be able
to save and apply them directly from your emails, using the git am
command.
Using the git send-email command is the only error-proof way of sending
your patches using email since there is no risk of compromising whitespace
in the body of the message, which can occur when you use your own mail
client. It will also properly include your patches as inline attachments,
which is not easy to do with standard e-mail clients without breaking lines.
If you used your regular e-mail client and shared your patches as regular
attachments, reviewers wouldn’t be able to quote specific sections of your
changes and make comments about them.
4.5.2 Setting up Git to Send Email
The git send-email command can send email by using a local or remote
Mail Transport Agent (MTA) such as msmtp, sendmail, or
through a direct SMTP configuration in your Git ~/.gitconfig file.
Here are the settings for letting git send-email send e-mail through your
regular STMP server, using a Google Mail account as an example:
git config --global sendemail.smtpserver smtp.gmail.com
git config --global sendemail.smtpserverport 587
git config --global sendemail.smtpencryption tls
git config --global sendemail.smtpuser ada.lovelace@gmail.com
git config --global sendemail.smtppass = XXXXXXXX
These settings will appear in the .gitconfig file in your home directory.
If you neither can use a local MTA nor SMTP, make sure you use an email client that does not touch the message (turning spaces in tabs, wrapping lines, etc.). A good mail client to do so is Pine (or Alpine) or Mutt. For more information about suitable clients, see Email clients info for Linux in the Linux kernel sources.
If you use such clients, just include the patch in the body of your email.
4.5.3 Finding a Suitable Mailing List
You should send patches to the appropriate mailing list so that they can be reviewed by the right contributors and merged by the appropriate maintainer. The specific mailing list you need to use depends on the location of the code you are changing.
If people have concerns with any of the patches, they will usually voice their concern over the mailing list. If patches do not receive any negative reviews, the maintainer of the affected layer typically takes them, tests them, and then based on successful testing, merges them.
In general, each component (e.g. layer) should have a README file
that indicates where to send the changes and which process to follow.
If you intend to submit a new recipe that neither fits in OpenEmbedded-Core (OE-Core), nor into meta-openembedded, you should look for a suitable layer in https://layers.openembedded.org. If similar recipes can be expected, you may consider Creating Your Own Layer.
If in doubt, please ask on the yocto general mailing list or on the openembedded-devel mailing list.
4.5.4 Subscribing to the Mailing List
After identifying the right mailing list to use, you will have to subscribe to it if you haven’t done it yet.
If you attempt to send patches to a list you haven’t subscribed to, your email will be returned as undelivered.
However, if you don’t want to be receive all the messages sent to a mailing list, you can set your subscription to “no email”. You will still be a subscriber able to send messages, but you won’t receive any e-mail. If people reply to your message, their e-mail clients will default to including your email address in the conversation anyway.
Anyway, you’ll also be able to access the new messages on mailing list archives, either through a web browser, or for the lists archived on https://lore.kernel.org, through an individual newsgroup feed or a git repository.
4.5.5 Sending Patches via Email
At this stage, you are ready to send your patches via email. Here’s the
typical usage of git send-email:
git send-email --to <mailing-list-address> *.patch
Then, review each subject line and list of recipients carefully, and then allow the command to send each message.
You will see that git send-email will automatically copy the people listed
in any commit tags such as Signed-off-by or Reported-by.
In case you are sending patches for meta-openembedded or any layer other than openembedded-core, please add the appropriate prefix so that it is clear which layer the patch is intended to be applied to:
git format-patch --subject-prefix="meta-oe][PATCH" ...
Note
It is actually possible to send patches without generating them
first. However, make sure you have reviewed your changes carefully
because git send-email will just show you the title lines of
each patch.
Here’s a command you can use if you just have one patch in your branch:
git send-email --to <mailing-list-address> -1
If you have multiple patches and a cover letter, you can send patches for all the commits between the reference branch and the tip of your branch:
git send-email --cover-letter --cover-from-description=auto --to <mailing-list-address> -M <ref-branch>
See the git send-email manual page for details.
4.5.6 Troubleshooting Email Issues
4.5.6.1 Fixing your From identity
We have a frequent issue with contributors whose patches are received through
a From field which doesn’t match the Signed-off-by information. Here is
a typical example for people sending from a domain name with https://en.wikipedia.org/wiki/DMARC:
From: "Linus Torvalds via lists.openembedded.org <linus.torvalds=kernel.org@lists.openembedded.org>"
This From field is used by git am to recreate commits with the right
author name. The following will ensure that your e-mails have an additional
From field at the beginning of the Email body, and therefore that
maintainers accepting your patches don’t have to fix commit author information
manually:
git config --global sendemail.from "linus.torvalds@kernel.org"
The sendemail.from should match your user.email setting,
which appears in the Signed-off-by line of your commits.
4.5.7 Streamlining git send-email usage
If you want to save time and not be forced to remember the right options to use
with git send-email, you can use Git configuration settings.
To set the right mailing list address for a given repository:
git config --local sendemail.to openembedded-devel@lists.openembedded.org
If the mailing list requires a subject prefix for the layer (this only works when the repository only contains one layer):
git config --local format.subjectprefix "meta-something][PATCH"
4.6 Using Scripts to Push a Change Upstream and Request a Pull
For larger patch series it is preferable to send a pull request which not
only includes the patch but also a pointer to a branch that can be pulled
from. This involves making a local branch for your changes, pushing this
branch to an accessible repository and then using the create-pull-request
and send-pull-request scripts from openembedded-core to create and send a
patch series with a link to the branch for review.
Follow this procedure to push a change to an upstream “contrib” Git repository once the steps in “Preparing Changes for Submission” have been followed:
Note
You can find general Git information on how to push a change upstream in the Git Community Book.
Request Push Access to an “Upstream” Contrib Repository: Send an email to
helpdesk@yoctoproject.org:Attach your SSH public key which usually named
id_rsa.pub.. If you don’t have one generate it by runningssh-keygen -t rsa -b 4096 -C "your_email@example.com".List the repositories you’re planning to contribute to.
Include your preferred branch prefix for
-contribrepositories.
Push Your Commits to the “Contrib” Upstream: Push your changes to that repository:
$ git push upstream_remote_repo local_branch_name
For example, suppose you have permissions to push into the upstream
meta-intel-contribrepository and you are working in a local branch named your_name/README. The following command pushes your local commits to themeta-intel-contribupstream repository and puts the commit in a branch named your_name/README:$ git push meta-intel-contrib your_name/README
Determine Who to Notify: Determine the maintainer or the mailing list that you need to notify for the change.
Before submitting any change, you need to be sure who the maintainer is or what mailing list that you need to notify. Use either these methods to find out:
Maintenance File: Examine the
maintainers.incfile, which is located in OpenEmbedded-Core (OE-Core) atmeta/conf/distro/include, to see who is responsible for code.Search by File: Using Git, you can enter the following command to bring up a short list of all commits against a specific file:
git shortlog -- filename
Just provide the name of the file for which you are interested. The information returned is not ordered by history but does include a list of everyone who has committed grouped by name. From the list, you can see who is responsible for the bulk of the changes against the file.
Find the Mailing List to Use: See the “Finding a Suitable Mailing List” section above.
Make a Pull Request: Notify the maintainer or the mailing list that you have pushed a change by making a pull request.
The Yocto Project provides two scripts that conveniently let you generate and send pull requests to the Yocto Project. These scripts are
create-pull-requestandsend-pull-request. You can find these scripts in thescriptsdirectory within OpenEmbedded-Core (OE-Core).Using these scripts correctly formats the requests without introducing any whitespace or HTML formatting. The maintainer that receives your patches either directly or through the mailing list needs to be able to save and apply them directly from your emails. Using these scripts is the preferred method for sending patches.
First, create the pull request. For example, the following command runs the script, specifies the upstream repository in the contrib directory into which you pushed the change, and provides a subject line in the created patch files:
$ ./scripts/create-pull-request -u meta-intel-contrib -s "Updated Manual Section Reference in README"
Running this script forms
*.patchfiles in a folder namedpull-PID in the current directory. One of the patch files is a cover letter.Before running the
send-pull-requestscript, you must edit the cover letter patch to insert information about your change. After editing the cover letter, send the pull request. For example, the following command runs the script and specifies the patch directory and email address. In this example, the email address is a mailing list:$ ./scripts/send-pull-request -p ~/meta-intel/pull-10565 -t meta-intel@lists.yoctoproject.org
You need to follow the prompts as the script is interactive.
Note
For help on using these scripts, simply provide the
-hargument as follows:$ ./scripts/create-pull-request -h $ ./scripts/send-pull-request -h
4.7 Submitting Changes to Stable Release Branches
The process for proposing changes to a Yocto Project stable branch differs from the steps described above. Changes to a stable branch must address identified bugs or CVEs and should be made carefully in order to avoid the risk of introducing new bugs or breaking backwards compatibility. Typically bug fixes must already be accepted into the master branch before they can be backported to a stable branch unless the bug in question does not affect the master branch or the fix on the master branch is unsuitable for backporting.
The list of stable branches along with the status and maintainer for each branch can be obtained from the Releases page.
Note
Changes will not typically be accepted for branches which are marked as End-Of-Life (EOL).
With this in mind, the steps to submit a change for a stable branch are as follows:
Identify the bug or CVE to be fixed: This information should be collected so that it can be included in your submission.
See Checking for Vulnerabilities for details about CVE tracking.
Check if the fix is already present in the master branch: This will result in the most straightforward path into the stable branch for the fix.
If the fix is present in the master branch — submit a backport request by email: You should send an email to the relevant stable branch maintainer and the mailing list with details of the bug or CVE to be fixed, the commit hash on the master branch that fixes the issue and the stable branches which you would like this fix to be backported to.
If the fix is not present in the master branch — submit the fix to the master branch first: This will ensure that the fix passes through the project’s usual patch review and test processes before being accepted. It will also ensure that bugs are not left unresolved in the master branch itself. Once the fix is accepted in the master branch a backport request can be submitted as above.
If the fix is unsuitable for the master branch — submit a patch directly for the stable branch: This method should be considered as a last resort. It is typically necessary when the master branch is using a newer version of the software which includes an upstream fix for the issue or when the issue has been fixed on the master branch in a way that introduces backwards incompatible changes. In this case follow the steps in “Preparing Changes for Submission” and in the following sections but modify the subject header of your patch email to include the name of the stable branch which you are targetting. This can be done using the
--subject-prefixargument togit format-patch, for example to submit a patch to the “whinlatter” branch use:git format-patch --subject-prefix='whinlatter][PATCH' ...
4.8 Taking Patch Review into Account
You may get feedback on your submitted patches from other community members or from the automated patchtest service. If issues are identified in your patches then it is usually necessary to address these before the patches are accepted into the project. In this case you should revise your commits according to the feedback and submit an updated version to the relevant mailing list.
In any case, never fix reported issues by fixing them in new commits on the tip of your branch. Always come up with a new series of commits without the reported issues.
Note
It is a good idea to send a copy to the reviewers who provided feedback
to the previous version of the patch. You can make sure this happens
by adding a CC tag to the commit description:
CC: William Shakespeare <bill@yoctoproject.org>
A single patch can be amended using git commit --amend, and multiple
patches can be easily reworked and reordered through an interactive Git rebase:
git rebase -i <ref-branch>
See this tutorial for practical guidance about using Git interactive rebasing.
You should also modify the [PATCH] tag in the email subject line when
sending the revised patch to mark the new iteration as [PATCH v2],
[PATCH v3], etc as appropriate. This can be done by passing the -v
argument to git format-patch with a version number:
git format-patch -v2 <ref-branch>
After generating updated patches (v2, v3, and so on) via git
format-patch, ideally developers will add a patch version changelog
to each patch that describes what has changed between each revision of
the patch. Add patch version changelogs after the --- marker in the
patch, indicating that this information is part of this patch, but is not
suitable for inclusion in the commit message (i.e. the git history) itself.
Providing a patch version changelog makes it easier for maintainers and
reviewers to succinctly understand what changed in all versions of the
patch, without having to consult alternate sources of information, such as
searching through messages on a mailing list. For example:
<patch title>
<commit message>
<Signed-off-by/other trailers>
---
changes in v4:
- provide a clearer commit message
- fix spelling mistakes
changes in v3:
- replace func() to use other_func() instead
changes in v2:
- this patch was added in v2
---
<diffstat output>
<unified diff>
Lastly please ensure that you also test your revised changes. In particular
please don’t just edit the patch file written out by git format-patch and
resend it.
4.9 Tracking the Status of Patches
The Yocto Project uses a Patchwork instance
to track the status of patches submitted to the various mailing lists and to
support automated patch testing. Each submitted patch is checked for common
mistakes and deviations from the expected patch format and submitters are
notified by patchtest if such mistakes are found. This process helps to
reduce the burden of patch review on maintainers.
Note
This system is imperfect and changes can sometimes get lost in the flow. Asking about the status of a patch or change is reasonable if the change has been idle for a while with no feedback.
If your patches have not had any feedback in a few days, they may have already
been merged. You can run git pull branch to check this. Note that many if
not most layer maintainers do not send out acknowledgement emails when they
accept patches. Alternatively, if there is no response or merge after a few days
the patch may have been missed or the appropriate reviewers may not currently be
around. It is then perfectly fine to reply to it yourself with a reminder asking
for feedback.
Note
Patch reviews for feature and recipe upgrade patches are likely be delayed during a feature freeze because these types of patches aren’t merged during at that time — you may have to wait until after the freeze is lifted.
Maintainers also commonly use -next branches to test submissions prior to
merging patches. Thus, you can get an idea of the status of a patch based on
whether the patch has been merged into one of these branches. The commonly
used testing branches for OpenEmbedded-Core are as follows:
openembedded-core “master-next” branch: This branch is part of the openembedded-core repository and contains proposed changes to the core metadata.
bitbake “master-next” branch: This branch is part of the bitbake repository and contains changes to BitBake.
meta-yocto “master-next” branch: This branch is part of the meta-yocto repository and contains proposed changes to meta-yocto.
Similarly, stable branches maintained by the project may have corresponding
-next branches which collect proposed changes. For example,
wrynose-next and whinlatter-next
branches in both the “openembedded-core” and “meta-yocto” repositories.
Other layers may have similar testing branches but there is no formal requirement or standard for these so please check the documentation for the layers you are contributing to.
4.10 Acceptance of AI Generated Code
The Yocto Project and OpenEmbedded follow the guidance of the Linux Foundation in regards to the use of generative AI tools. See: https://www.linuxfoundation.org/legal/generative-ai.
All of the existing guidelines in this document are expected to be followed, including in the Recipe Style Guide, and contributing the changes with additional requirements to the items in section Implement and commit changes.
All AI Generated Code must be labeled as such in the commit message,
prior to your Signed-off-by line. It is also strongly recommended,
that any patches or code within the commit also have a comment or other
indication that this code was AI generated.
For example, here is a properly formatted commit message:
component: Add the ability to ...
AI-Generated: Uses GitHub Copilot
Signed-off-by: Your Name <your.name@domain>
The Signed-off-by line must be written by you, and not the AI helper.
As a reminder, when contributing a change, your Signed-off-by line is
required and the stipulations in the Developer’s Statement of Origin
1.1 still apply.
Additionally, you must stipulate AI contributions conform to the Linux Foundation policy, specifically:
Contributors should ensure that the terms and conditions of the generative AI tool do not place any contractual restrictions on how the tool’s output can be used that are inconsistent with the project’s open source software license, the project’s intellectual property policies, or the Open Source Definition.
If any pre-existing copyrighted materials (including pre-existing open source code) authored or owned by third parties are included in the AI tool’s output, prior to contributing such output to the project, the Contributor should confirm that they have permission from the third party owners – such as the form of an open source license or public domain declaration that complies with the project’s licensing policies – to use and modify such pre-existing materials and contribute them to the project. Additionally, the contributor should provide notice and attribution of such third party rights, along with information about the applicable license terms, with their contribution.
Permission is granted to copy, distribute and/or modify this document under the terms of the Creative Commons Attribution-Share Alike 2.0 UK: England & Wales as published by Creative Commons.
To report any inaccuracies or problems with this (or any other Yocto Project)
manual, or to send additions or changes, please send email/patches to the Yocto
Project documentation mailing list at docs@lists.yoctoproject.org or
log into the Libera Chat #yocto channel.
Yocto Project Reference Manual
1 System Requirements
Welcome to the Yocto Project Reference Manual. This manual provides reference information for the current release of the Yocto Project, and is most effectively used after you have an understanding of the basics of the Yocto Project. The manual is neither meant to be read as a starting point to the Yocto Project, nor read from start to finish. Rather, use this manual to find variable definitions, class descriptions, and so forth as needed during the course of using the Yocto Project.
For introductory information on the Yocto Project, see the Yocto Project Website and the “The Yocto Project Development Environment” chapter in the Yocto Project Overview and Concepts Manual.
If you want to use the Yocto Project to quickly build an image without having to understand concepts, work through the Yocto Project Quick Build document. You can find “how-to” information in the Yocto Project Development Tasks Manual. You can find Yocto Project overview and conceptual information in the Yocto Project Overview and Concepts Manual.
Note
For more information about the Yocto Project Documentation set, see the Links and Related Documentation section.
1.1 Minimum Free Disk Space
To build an image such as core-image-sato for the qemux86-64 machine,
you need a system with at least 140 Gbytes of free disk space.
However, much more disk space will be necessary to build more complex images,
to run multiple builds and to cache build artifacts, improving build efficiency.
If you have a shortage of disk space, see the “Conserving Disk Space” section of the Development Tasks Manual.
1.2 Minimum System RAM
You will manage to build an image such as core-image-sato for the
qemux86-64 machine with as little as 32 Gbytes of RAM on an old
system with 4 CPU cores, but your builds will be much faster on a system with
as much RAM and as many CPU cores as possible.
1.3 Supported Linux Distributions
Currently, the 6.0.2 release (“Wrynose”) of the Yocto Project is supported on the following distributions:
AlmaLinux 8
AlmaLinux 9
CentOS Stream 9
CentOS Stream 10
Debian 11
Debian 12
Debian 13
Fedora 42
Fedora 43
OpenSUSE Leap 15.6
OpenSUSE Leap 16.0
Rocky Linux 8
Rocky Linux 9
Ubuntu 22.04 (LTS)
Ubuntu 24.04 (LTS)
Ubuntu 25.04
Ubuntu 25.10
Ubuntu 26.04 (LTS)
The following distribution versions are still tested, even though the organizations publishing them no longer make updates publicly available:
Fedora 39
Fedora 40
OpenSUSE Leap 15.5
Ubuntu 25.04
Note that the Yocto Project doesn’t have access to private updates that some of these versions may have. Therefore, our testing has limited value if you have access to such updates. Also, buildtools may have to be used on older releases in order to get current enough tools, such as Python.
Finally, here are the distribution versions which were previously tested on former revisions of “Wrynose”, but no longer are:
This list is currently empty
Note
While the Yocto Project Team attempts to ensure all Yocto Project releases are one hundred percent compatible with each officially supported Linux distribution, you may still encounter problems that happen only with a specific distribution.
Yocto Project releases are tested against the stable Linux distributions in the above list. The Yocto Project should work on other distributions but validation is not performed against them.
In particular, the Yocto Project does not support and currently has no plans to support rolling-releases or development distributions due to their constantly changing nature. We welcome patches and bug reports, but keep in mind that our priority is on the supported platforms listed above.
If your Linux distribution is not in the above list, we recommend to get the buildtools or buildtools-extended tarballs containing the host tools required by your Yocto Project release, typically by running
scripts/install-buildtoolsas explained in the “Required Git, tar, Python, make and gcc Versions” section.You may use Windows Subsystem For Linux v2 to set up a build host using Windows 10 or later, or Windows Server 2019 or later, but validation is not performed against build hosts using WSL 2.
See the Setting Up to Use Windows Subsystem For Linux (WSL 2) section in the Yocto Project Development Tasks Manual for more information.
If you encounter problems, please go to Yocto Project Bugzilla and submit a bug. We are interested in hearing about your experience. For information on how to submit a bug, see the Yocto Project Bugzilla wiki page and the “Reporting a Defect Against the Yocto Project and OpenEmbedded” section in the Yocto Project and OpenEmbedded Contributor Guide.
1.4 Required Packages for the Build Host
The list of packages you need on the host development system can be large when covering all build scenarios using the Yocto Project. This section describes required packages according to Linux distribution and function.
1.4.1 Ubuntu and Debian
Here are the packages needed to build an image on a headless system with a supported Ubuntu or Debian Linux distribution:
sudo apt-get install build-essential chrpath cpio debianutils diffstat file gawk gcc git iputils-ping libacl1 libcrypt-dev locales python3 python3-git python3-jinja2 python3-pexpect python3-pip python3-subunit socat texinfo unzip wget xz-utils zstd
You also need to ensure you have the en_US.UTF-8 locale enabled:
$ locale --all-locales | grep en_US.utf8
If this is not the case, you can reconfigure the locales package to add it
(requires an interactive shell):
$ sudo dpkg-reconfigure locales
Note
If you are not in an interactive shell,
dpkg-reconfigurewill not work as expected. To add the locale you will need to edit/etc/locale.genfile to add/uncomment theen_US.UTF-8locale. A simple way to do this as root is:$ echo "en_US.UTF-8 UTF-8" >> /etc/locale.gen $ locale-gen
If your build system has the
oss4-devpackage installed, you might experience QEMU build failures due to the package installing its own custom/usr/include/linux/soundcard.hon the Debian system. If you run into this situation, try either of these solutions:$ sudo apt build-dep qemu $ sudo apt remove oss4-dev
Additionally, on distributions other than Debian 11 and Ubuntu 22.04 (otherwise see note below), install the following package:
$ sudo apt-get install python3-websockets
Note
On Debian 11 and Ubuntu 22.04, the minimum version for
python3-websockets is not satisfied by the host distribution. This
package is used for fetching pre-built shared state artifacts from upstream Yocto Project
servers (see core/yocto/sstate-mirror-cdn for more
information).
In order to use this feature, you can get the correct version of
python3-websockets by either:
Using a buildtools tarball by following the Required Git, tar, Python, make and gcc Versions section below.
Installing
python3-websocketsusing Pip in a virtual environment, e.g.:$ python3 -m venv --clear ./yocto-docs-venv $ . ./yocto-docs-venv/bin/activate $ pip install websockets
Here are the packages needed to build Project documentation manuals:
sudo apt install git librsvg2-bin locales make python3-saneyaml python3-pip python3-venv
python3 -m venv --clear ./yocto-docs-venv
. ./yocto-docs-venv/bin/activate
python3 -m pip install sphinx sphinx_rtd_theme pyyaml sphinx-copybutton 'sphinxcontrib-svg2pdfconverter>=2.0.0'
In addition to the previous packages, here are the packages needed to build the documentation in PDF format:
sudo apt install fonts-freefont-otf latexmk tex-gyre texlive-fonts-extra texlive-fonts-recommended texlive-lang-all texlive-latex-extra texlive-latex-recommended texlive-xetex
1.4.2 Fedora Packages
Here are the packages needed to build an image on a headless system with a supported Fedora Linux distribution:
sudo dnf install bzip2 ccache chrpath cpio cpp diffstat diffutils file findutils gawk gcc gcc-c++ git glibc-devel glibc-langpack-en gzip hostname libacl make patch perl perl-Data-Dumper perl-File-Compare perl-File-Copy perl-FindBin perl-Text-ParseWords perl-Thread-Queue perl-bignum perl-locale python python3 python3-GitPython python3-jinja2 python3-pexpect python3-pip python3-websockets rpcgen socat tar texinfo unzip wget which xz zstd $([ $(rpm -E %fedora) -ge 42 ] && echo "util-linux-script")
Here are the packages needed to build Project documentation manuals:
sudo dnf install git glibc-locale-source librsvg2-tools make python3-pip which
python3 -m venv --clear ./yocto-docs-venv
. ./yocto-docs-venv/bin/activate
python3 -m pip install sphinx sphinx_rtd_theme pyyaml sphinx-copybutton 'sphinxcontrib-svg2pdfconverter>=2.0.0'
In addition to the previous packages, here are the packages needed to build the documentation in PDF format:
sudo dnf install 'texlive-collection-lang*' latexmk texlive-collection-fontsextra texlive-collection-fontsrecommended texlive-collection-latex texlive-collection-latexextra texlive-collection-latexrecommended texlive-collection-xetex texlive-fncychap texlive-gnu-freefont texlive-tex-gyre texlive-xetex
1.4.3 openSUSE Leap Packages
1.4.3.1 openSUSE Leap 15.6 Packages
Here are the packages needed to build an image on a headless system with a supported openSUSE Leap 15.6 distribution:
sudo zypper install bzip2 chrpath diffstat gcc gcc-c++ git gzip hostname libacl1 make makeinfo patch python python-curses python-xml python3 python3-Jinja2 python3-curses python3-pexpect python3-pip rpcgen socat tar wget which xz zstd
sudo pip3 install GitPython
Additionally, openSUSE Leap 15.6 requires a buildtools tarball to be installed and set up, as this distribution provides a version of Python that is too old for BitBake. Follow the Required Git, tar, Python, make and gcc Versions section below for more information.
Here are the packages needed to build Project documentation manuals:
sudo zypper install git glibc-i18ndata make python3-pip rsvg-convert which
python3 -m venv --clear ./yocto-docs-venv
. ./yocto-docs-venv/bin/activate
python3 -m pip install sphinx sphinx_rtd_theme pyyaml sphinx-copybutton 'sphinxcontrib-svg2pdfconverter>=2.0.0'
In addition to the previous packages, here are the packages needed to build the documentation in PDF format:
sudo zypper install 'texlive-collection-lang*' texlive-collection-fontsextra texlive-collection-fontsrecommended texlive-collection-latex texlive-collection-latexextra texlive-collection-latexrecommended texlive-collection-xetex texlive-fncychap texlive-gnu-freefont texlive-latexmk texlive-tex-gyre texlive-xetex
1.4.3.2 openSUSE Leap 16.0 Packages
Here are the packages needed to build an image on a headless system with a supported openSUSE Leap 16.0 distribution:
sudo zypper install bzip2 chrpath diffstat gcc gcc-c++ git gzip hostname libacl1 make makeinfo patch python3 python3-GitPython python3-Jinja2 python3-curses python3-pexpect python3-pip python3-websockets python3-xml rpcgen socat tar wget which xz zstd
Here are the packages needed to build Project documentation manuals:
sudo zypper install git glibc-i18ndata make python3-pip rsvg-convert which
python3 -m venv --clear ./yocto-docs-venv
. ./yocto-docs-venv/bin/activate
python3 -m pip install sphinx sphinx_rtd_theme pyyaml sphinx-copybutton 'sphinxcontrib-svg2pdfconverter>=2.0.0'
In addition to the previous packages, here are the packages needed to build the documentation in PDF format:
sudo zypper install 'texlive-collection-lang*' texlive-collection-fontsextra texlive-collection-fontsrecommended texlive-collection-latex texlive-collection-latexextra texlive-collection-latexrecommended texlive-collection-xetex texlive-fncychap texlive-gnu-freefont texlive-latexmk texlive-tex-gyre texlive-xetex
1.4.4 AlmaLinux Packages
Here are the packages needed to build an image on a headless system with a supported AlmaLinux distribution:
sudo dnf install -y epel-release
sudo dnf install -y dnf-plugins-core
sudo dnf config-manager --set-enabled crb || sudo dnf config-manager --set-enabled powertools
sudo dnf makecache
sudo dnf install -y bzip2 ccache chrpath cpio cpp diffstat diffutils gawk gcc gcc-c++ git glibc-devel glibc-langpack-en gzip libacl make patch perl perl-Data-Dumper perl-Text-ParseWords perl-Thread-Queue python3 python3-GitPython python3-jinja2 python3-pexpect python3-pip rpcgen socat tar texinfo unzip wget which xz zstd
You will also need to use a buildtools tarball which provides a set of basic host tools with fixed versions. Follow the Required Git, tar, Python, make and gcc Versions section below to learn how to download and install this tarball.
Note
The AlmaLinux 9, CentOS 9 and RockyLinux 9 distributions are affected by a bug described in https://bugzilla.yoctoproject.org/show_bug.cgi?id=16143, which is the reason why a buildtools tarball is required.
Note
Extra Packages for Enterprise Linux (i.e.
epel-release) is a collection of packages from Fedora built on RHEL/CentOS for easy installation of packages not included in enterprise Linux by default. You need to install these packages separately.The
PowerTools/CRBrepo provides additional packages such asrpcgenandtexinfo.The
makecachecommand consumes additional Metadata fromepel-release.
Here are the packages needed to build Project documentation manuals:
sudo dnf install -y git glibc-locale-source librsvg2-tools make python3-pip which
python3 -m venv --clear ./yocto-docs-venv
. ./yocto-docs-venv/bin/activate
python3 -m pip install sphinx sphinx_rtd_theme pyyaml sphinx-copybutton 'sphinxcontrib-svg2pdfconverter>=2.0.0'
In addition to the previous packages, the following TeX Live packages are needed to build the documentation in PDF format and can be installed with the TeX Live package manager:
sudo dnf install -y wget perl
textooldir=${TEXTOOLDIR:-"./docs-build-tex-tools"}
mkdir -p "$textooldir"/tl
wget https://mirror.ctan.org/systems/texlive/tlnet/install-tl-unx.tar.gz -O "$textooldir"/install-tl-unx.tar.gz
tar xzf "$textooldir"/install-tl-unx.tar.gz -C "$textooldir"
"$textooldir"/install-tl-*/install-tl --scheme=small --texdir="${textooldir}"/tl --no-interaction
PATH="$PATH:${textooldir}/tl/bin/x86_64-linux" tlmgr install titlesec varwidth tabulary needspace upquote framed capt-of wrapfig fncychap gnu-freefont ctex latexmk nimbus15
rm -r "$textooldir"/install-tl*
Warning
The Tex Live installation above is only valid for x86_64 hosts.
Before building the documentation PDF, setup the PATH to use the installed
packages (with ${textooldir} pointing to the TeX Live installation from the
previous step):
$ export PATH="${PATH}:${textooldir}/tl/bin/x86_64-linux"
1.4.5 CentOS Stream Packages
Here are the packages needed to build an image on a headless system with a supported CentOS Stream distribution:
sudo dnf install -y epel-release
sudo dnf install -y dnf-plugins-core
sudo dnf config-manager --set-enabled crb || sudo dnf config-manager --set-enabled powertools
sudo dnf makecache
sudo dnf install -y bzip2 ccache chrpath cpio cpp diffstat diffutils gawk gcc gcc-c++ git glibc-devel glibc-langpack-en gzip libacl make patch perl perl-Data-Dumper perl-Text-ParseWords perl-Thread-Queue python3 python3-GitPython python3-jinja2 python3-pexpect python3-pip rpcgen socat tar texinfo unzip wget which xz zstd
You will also need to use a buildtools tarball which provides a set of basic host tools with fixed versions. Follow the Required Git, tar, Python, make and gcc Versions section below to learn how to download and install this tarball.
Note
The AlmaLinux 9, CentOS 9 and RockyLinux 9 distributions are affected by a bug described in https://bugzilla.yoctoproject.org/show_bug.cgi?id=16143, which is the reason why a buildtools tarball is required.
Here are the packages needed to build Project documentation manuals:
sudo dnf install -y git glibc-locale-source librsvg2-tools make python3-pip which
python3 -m venv --clear ./yocto-docs-venv
. ./yocto-docs-venv/bin/activate
python3 -m pip install sphinx sphinx_rtd_theme pyyaml sphinx-copybutton 'sphinxcontrib-svg2pdfconverter>=2.0.0'
In addition to the previous packages, the following TeX Live packages are needed to build the documentation in PDF format and can be installed with the TeX Live package manager:
sudo dnf install -y wget perl
textooldir=${TEXTOOLDIR:-"./docs-build-tex-tools"}
mkdir -p "$textooldir"/tl
wget https://mirror.ctan.org/systems/texlive/tlnet/install-tl-unx.tar.gz -O "$textooldir"/install-tl-unx.tar.gz
tar xzf "$textooldir"/install-tl-unx.tar.gz -C "$textooldir"
"$textooldir"/install-tl-*/install-tl --scheme=small --texdir="${textooldir}"/tl --no-interaction
PATH="$PATH:${textooldir}/tl/bin/x86_64-linux" tlmgr install titlesec varwidth tabulary needspace upquote framed capt-of wrapfig fncychap gnu-freefont ctex latexmk nimbus15
rm -r "$textooldir"/install-tl*
Warning
The Tex Live installation above is only valid for x86_64 hosts.
Before building the documentation PDF, setup the PATH to use the installed
packages (with ${textooldir} pointing to the TeX Live installation from the
previous step):
$ export PATH="${PATH}:${textooldir}/tl/bin/x86_64-linux"
1.4.6 RockyLinux Packages
Here are the packages needed to build an image on a headless system with a supported RockyLinux distribution:
sudo dnf install -y epel-release
sudo dnf install -y dnf-plugins-core
sudo dnf config-manager --set-enabled crb || sudo dnf config-manager --set-enabled powertools
sudo dnf makecache
sudo dnf install -y bzip2 ccache chrpath cpio cpp diffstat diffutils gawk gcc gcc-c++ git glibc-devel glibc-langpack-en gzip libacl make patch perl perl-Data-Dumper perl-Text-ParseWords perl-Thread-Queue python3 python3-GitPython python3-jinja2 python3-pexpect python3-pip rpcgen socat tar texinfo unzip wget which xz zstd
You will also need to use a buildtools tarball which provides a set of basic host tools with fixed versions. Follow the Required Git, tar, Python, make and gcc Versions section below to learn how to download and install this tarball.
Note
The AlmaLinux 9, CentOS 9 and RockyLinux 9 distributions are affected by a bug described in https://bugzilla.yoctoproject.org/show_bug.cgi?id=16143, which is the reason why a buildtools tarball is required.
Note
Extra Packages for Enterprise Linux (i.e.
epel-release) is a collection of packages from Fedora built on RHEL/CentOS for easy installation of packages not included in enterprise Linux by default. You need to install these packages separately.The
PowerTools/CRBrepo provides additional packages such asrpcgenandtexinfo.The
makecachecommand consumes additional Metadata fromepel-release.
Here are the packages needed to build Project documentation manuals:
sudo dnf install -y git glibc-locale-source librsvg2-tools make python3-pip which
python3 -m venv --clear ./yocto-docs-venv
. ./yocto-docs-venv/bin/activate
python3 -m pip install sphinx sphinx_rtd_theme pyyaml sphinx-copybutton 'sphinxcontrib-svg2pdfconverter>=2.0.0'
In addition to the previous packages, the following TeX Live packages are needed to build the documentation in PDF format and can be installed with the TeX Live package manager:
sudo dnf install -y wget perl
textooldir=${TEXTOOLDIR:-"./docs-build-tex-tools"}
mkdir -p "$textooldir"/tl
wget https://mirror.ctan.org/systems/texlive/tlnet/install-tl-unx.tar.gz -O "$textooldir"/install-tl-unx.tar.gz
tar xzf "$textooldir"/install-tl-unx.tar.gz -C "$textooldir"
"$textooldir"/install-tl-*/install-tl --scheme=small --texdir="${textooldir}"/tl --no-interaction
PATH="$PATH:${textooldir}/tl/bin/x86_64-linux" tlmgr install titlesec varwidth tabulary needspace upquote framed capt-of wrapfig fncychap gnu-freefont ctex latexmk nimbus15
rm -r "$textooldir"/install-tl*
Warning
The Tex Live installation above is only valid for x86_64 hosts.
Before building the documentation PDF, setup the PATH to use the installed
packages (with ${textooldir} pointing to the TeX Live installation from the
previous step):
$ export PATH="${PATH}:${textooldir}/tl/bin/x86_64-linux"
1.5 Required Git, tar, Python, make and gcc Versions
In order to use the build system, your host development system must meet the following version requirements for Git, tar, and Python:
Git 1.8.3.1 or greater
tar 1.28 or greater
Python 3.9.0 or greater
GNU make 4.0 or greater
If your host development system does not meet all these requirements, you can resolve this by installing a buildtools tarball that contains these tools. You can either download a pre-built tarball or use BitBake to build one.
In addition, your host development system must meet the following version requirement for gcc:
gcc 10.1 or greater
If your host development system does not meet this requirement, you can
resolve this by installing a buildtools-extended tarball that
contains additional tools, the equivalent of the Debian/Ubuntu build-essential
package.
For systems with a broken make version (e.g. make 4.2.1 without patches) but where the rest of the host tools are usable, you can use the buildtools-make tarball instead.
In the sections that follow, three different methods will be described for installing the buildtools, buildtools-extended or buildtools-make toolset.
1.5.1 Installing a Pre-Built buildtools Tarball with install-buildtools script
The install-buildtools script is the easiest of the three methods by
which you can get these tools. It downloads a pre-built buildtools
installer and automatically installs the tools for you:
Execute the
install-buildtoolsscript. Here is an example:$ cd /path/to/bitbake-builds $ ./layers/openembedded-core/scripts/install-buildtools \ --without-extended-buildtools \ --base-url https://downloads.yoctoproject.org/releases/yocto \ --release yocto-6.0.2 \ --installer-version 6.0.2
During execution, the buildtools tarball will be downloaded, the checksum of the download will be verified, the installer will be run for you, and some basic checks will be run to make sure the installation is functional.
To avoid the need of
sudoprivileges, theinstall-buildtoolsscript will by default tell the installer to install in:/path/to/bitbake-builds/buildtools
If your host development system needs the additional tools provided in the buildtools-extended tarball, you can instead execute the
install-buildtoolsscript with the default parameters:$ cd /path/to/bitbake-builds $ ./layers/openembedded-core/scripts/install-buildtools
Alternatively if your host development system has a broken
makeversion such that you only need a known good version ofmake, you can use the--make-onlyoption:$ cd /path/to/bitbake-builds $ ./layers/openembedded-core/scripts/install-buildtools --make-only
Source the tools environment setup script by using a command like the following:
$ source /path/to/bitbake-builds/buildtools/environment-setup-x86_64-pokysdk-linux
After you have sourced the setup script, the tools are added to
PATHand any other environment variables required to run the tools are initialized. The results are working versions versions of Git, tar, Python andchrpath. And in the case of the buildtools-extended tarball, additional working versions of tools includinggcc,makeand the other tools included inpackagegroup-core-buildessential.
1.5.2 Downloading a Pre-Built buildtools Tarball
If you would prefer not to use the install-buildtools script, you can instead
download and run a pre-built buildtools installer yourself with the following
steps:
Go to https://downloads.yoctoproject.org/releases/yocto/yocto-6.0.2/buildtools/, locate and download the
.shfile corresponding to your host architecture and to buildtools, buildtools-extended or buildtools-make.Execute the installation script. Here is an example for the traditional installer:
$ sh ~/Downloads/x86_64-buildtools-nativesdk-standalone-6.0.2.sh
Here is an example for the extended installer:
$ sh ~/Downloads/x86_64-buildtools-extended-nativesdk-standalone-6.0.2.sh
An example for the make-only installer:
$ sh ~/Downloads/x86_64-buildtools-make-nativesdk-standalone-6.0.2.sh
During execution, a prompt appears that allows you to choose the installation directory. For example, you could choose the following:
/home/your-username/buildtoolsAs instructed by the installer script, you will have to source the tools environment setup script:
$ source /home/your_username/buildtools/environment-setup-x86_64-pokysdk-linux
After you have sourced the setup script, the tools are added to
PATHand any other environment variables required to run the tools are initialized. The results are working versions versions of Git, tar, Python andchrpath. And in the case of the buildtools-extended tarball, additional working versions of tools includinggcc,makeand the other tools included inpackagegroup-core-buildessential.
1.5.3 Building Your Own buildtools Tarball
Building and running your own buildtools installer applies only when you
have a build host that can already run BitBake. In this case, you use
that machine to build the .sh file and then take steps to transfer
and run it on a machine that does not meet the minimal Git, tar, and
Python (or gcc) requirements.
Here are the steps to take to build and run your own buildtools installer:
On the machine that is able to run BitBake, be sure you have set up your build environment with the setup script (oe-init-build-env).
Run the BitBake command to build the tarball:
$ bitbake buildtools-tarball
or to build the extended tarball:
$ bitbake buildtools-extended-tarball
or to build the make-only tarball:
$ bitbake buildtools-make-tarball
Note
The SDKMACHINE variable in your
local.conffile determines whether you build tools for a 32-bit or 64-bit system.Once the build completes, you can find the
.shfile that installs the tools in thetmp/deploy/sdksubdirectory of the Build Directory. The installer file has the string “buildtools” or “buildtools-extended” in the name.Transfer the
.shfile from the build host to the machine that does not meet the Git, tar, or Python (or gcc) requirements.On this machine, run the
.shfile to install the tools. Here is an example for the traditional installer:$ sh ~/Downloads/x86_64-buildtools-nativesdk-standalone-6.0.2.sh
For the extended installer:
$ sh ~/Downloads/x86_64-buildtools-extended-nativesdk-standalone-6.0.2.sh
And for the make-only installer:
$ sh ~/Downloads/x86_64-buildtools-make-nativesdk-standalone-6.0.2.sh
During execution, a prompt appears that allows you to choose the installation directory. For example, you could choose the following:
/home/your_username/buildtoolsSource the tools environment setup script by using a command like the following:
$ source /home/your_username/buildtools/environment-setup-x86_64-poky-linux
After you have sourced the setup script, the tools are added to
PATHand any other environment variables required to run the tools are initialized. The results are working versions versions of Git, tar, Python andchrpath. And in the case of the buildtools-extended tarball, additional working versions of tools includinggcc,makeand the other tools included inpackagegroup-core-buildessential.
2 Yocto Project Supported Architectures And Features
The Yocto Project is putting continuous efforts into testing the changes made to the OpenEmbedded-Core (OE-Core) metadata and core tools. The details on how this test environment functions is described in the Yocto Project Test Environment Manual.
These tests are also run for stable and LTS versions of the Yocto Project. See the Yocto Project Releases and the Stable Release Process section of the Yocto Project Reference Manual for more information on these types of releases.
The infrastructure behind the test environment is the
Yocto Project Autobuilder. The Autobuilder contains a set of Builders that are associated to an
architecture or a feature to test. For example, the qemuarm64 builder
corresponds to testing the ARM 64-bit architecture.
Below is a comprehensive list of target architectures and features that are supported, as well as their level of support. For each architecture or feature, their corresponding builders are also listed.
2.1 Primary Supported
The term “primary” means that dedicated builds for these architectures or features are being run on a daily basis on the Yocto Project Autobuilder and also tested with incoming changes before they merge. These changes are usually on the “-next” Git branches of the OpenEmbedded-Core (OE-Core) repositories.
Below is a list of primary tested features, their maintainer(s) and builder(s):
Feature |
Description |
Maintainer(s) |
Builder(s) |
|---|---|---|---|
ARM architecture testing |
Collective effort |
genericarm64, genericarm64-alt, musl-qemuarm64, qemuarm, qemuarm-alt, qemuarm-oecore, qemuarm-tc, qemuarm64, qemuarm64-alt, qemuarm64-armhost, qemuarm64-ltp, qemuarm64-ptest, qemuarm64-tc, qemuarmv5 |
|
Beaglebone image and SDK build testing |
Collective effort |
beaglebone, beaglebone-alt |
|
reproducibility testing |
Collective effort |
reproducible |
|
Buildtools generation |
Collective effort |
buildtools |
|
meta-agl-core layer testing |
TBD |
meta-agl-core |
|
meta-arm layer testing |
meta-arm mailing list <meta-arm@lists.yoctoproject.org> |
meta-arm |
|
meta-aws layer testing |
TBD |
meta-aws |
|
meta-intel layer testing |
meta-intel mailing list <meta-intel@lists.yoctoproject.org> |
meta-intel |
|
meta-exein layer testing |
TBD |
meta-exein |
|
meta-webosose layer testing |
TBD |
meta-webosose |
|
Multilib feature testing |
Collective effort |
multilib |
|
OpenEmbedded-Core layers selftests |
Collective effort |
oe-selftest-fedora, oe-selftest-debian, oe-selftest-armhost |
|
Package managers |
Package managers (RPM, DEB and IPK formats) testing in the
OpenEmbedded Build System (different from the
|
Collective effort |
pkgman-non-rpm (other builders use RPM by default) |
Patchtest tool selftests |
Collective effort |
patchtest-selftest |
|
RISC-V architecture testing (64-bit) |
Collective effort |
qemuriscv64, qemuriscv64-ptest, qemuriscv64-tc |
|
Systemd init manager testing |
Collective effort |
no-x11, qa-extras2 |
|
Toaster web interface testing |
Collective effort |
toaster |
|
WIC image creation testing |
Collective effort |
wic |
|
X86 architecture testing |
Collective effort |
genericx86, genericx86-64, genericx86-64-alt, genericx86-alt, musl-qemux86, musl-qemux86-64, qemux86, qemux86-64, qemux86-64-alt, qemux86-64-ltp, qemux86-64-ptest, qemux86-64-tc, qemux86-64-x32, qemux86-alt, qemux86-tc, qemux86-world, qemux86-world-alt |
2.2 Secondary Supported
The term “secondary” means that in some cases there is code/feature/support which is desired by people using the project and is in the project’s interests to support, however there isn’t wide enough interest and support to justify testing all incoming changes on it. There are however project member organisations and maintainers willing to run tests and review fixes.
This category may be applicable as support/usage in an area develops and grows, or as support/usage fades but we continue to have tests. It can also apply where resourcing isn’t available for full primary support but there is member/maintainer support for running tests.
We therefore have the following criteria and policies for such items:
It can be clearly isolated and defined by specific configuration.
There is a clear documented group of maintainers agreeing to maintain it.
Those maintainers are active and responsive.
It is being actively and publicly tested (potentially using the Autobuilder by agreement, or otherwise).
Testing would not be part of standard incoming change testing and regressions would not block incoming patches.
The SWAT team would not handle any test builds on the Autobuilder.
Test results can be submitted as part of the release process if desired.
The Yocto Project Technical Steering Committee (TSC) makes decisions on features in this status and Autobuilder testing. Such support would be dropped if the maintainers/testing were inactive.
If you are interested in providing resources for improving testing please contact the Technical Steering Committee (TSC).
Below is a list of secondary tested features, their maintainer(s) and builder(s):
Feature |
Description |
Maintainer(s) |
Builder(s) |
|---|---|---|---|
PowerPC architecture testing (32-bit) |
Peter Marko, Adrian Freihofer |
qemuppc, qemuppc-tc |
|
meta-openembedded layer testing |
Collective effort / openembedded-devel mailing list <openebedded-devel@lists.openembedded.org> |
meta-oe |
|
mingw based SDKs testing |
TBD |
meta-mingw |
|
meta-virtualization layer testing |
meta-virtualization mailing list <meta-virtualization@lists.yoctoproject.org> |
meta-virt |
|
RISC-V architecture testing (32-bit) |
TBD |
qemuriscv32, qemuriscv32, qemuriscv32-tc |
2.3 Untested
“Untested” means that whilst the configurations are present in the project, we don’t currently run the tests on any regular basis and new changes are not tested against them. We may take patches in these areas if they make sense but it is on a best effort only basis.
Feature |
Description |
Maintainer(s) |
Builder(s) |
|---|---|---|---|
MIPS architecture testing |
No maintainers |
qemumips, qemumips64, qemumips-alt, qemumips-tc, qemumips64-tc |
|
PowerPC (32-bit) Systemd |
PowerPC architecture testing (32-bit) with systemd |
No maintainers |
qemuppc-alt |
PowerPC architecture testing (64-bit) |
No maintainers |
qemuppc64, qemuppc64-tc |
3 Yocto Project Terms
Here is a list of terms and definitions users new to the Yocto Project development environment might find helpful. While some of these terms are universal, the list includes them just in case:
- Append Files
Files that append build information to a recipe file. Append files are known as BitBake append files and
.bbappendfiles. The OpenEmbedded build system expects every append file to have a corresponding recipe (.bb) file. Furthermore, the append file and corresponding recipe file must use the same root filename. The filenames can differ only in the file type suffix used (e.g.formfactor_0.0.bbandformfactor_0.0.bbappend).Information in append files extends or overrides the information in the similarly-named recipe file. For an example of an append file in use, see the “Appending Other Layers Metadata With Your Layer” section in the Yocto Project Development Tasks Manual.
When you name an append file, you can use the “
%” wildcard character to allow for matching recipe names. For example, suppose you have an append file named as follows:busybox_1.21.%.bbappend
That append file would match any
busybox_1.21.x.bbversion of the recipe. So, the append file would match any of the following recipe names:busybox_1.21.1.bb busybox_1.21.2.bb busybox_1.21.3.bb busybox_1.21.10.bb busybox_1.21.25.bb
Note
The use of the “%” character is limited in that it only works directly in front of the .bbappend portion of the append file’s name. You cannot use the wildcard character in any other location of the name.
- BitBake
The task executor and scheduler used by the OpenEmbedded build system to build images. For more information on BitBake, see the BitBake User Manual.
- Board Support Package (BSP)
A group of drivers, definitions, and other components that provide support for a specific hardware configuration. For more information on BSPs, see the Yocto Project Board Support Package Developer’s Guide.
- Build Directory
This term refers to the area used by the OpenEmbedded build system for builds. The area is created when you
sourcethe setup environment script that is found in the Source Directory (i.e. oe-init-build-env, orinit-build-envwhen using bitbake-setup). The TOPDIR variable points to the Build Directory.When setting up the build manually (see Setting Up the Poky Reference Distro Manually), you have a lot of flexibility when creating the Build Directory. Here are some examples that show how to create the directory. The examples assume your Source Directory is named
bitbake-builds:Create the Build Directory inside your Source Directory and let the name of the Build Directory default to
build:$ cd bitbake-builds $ source layers/openembedded-core/oe-init-build-env
Or provide a path to the Build Directory when sourcing
oe-init-build-env. Any intermediate folders in the pathname must exist. This next example creates a Build Directory namedYP-6.0.2within the existing directorymybuilds:$ source bitbake-builds/layers/openembedded-core/oe-init-build-env mybuilds/YP-6.0.2
This path can also be an absolute path and be outside of the current working directory:
$ source bitbake-builds/layers/openembedded-core/oe-init-build-env /opt/mybuilds/YP-6.0.2
Note
By default, the Build Directory contains TMPDIR, which is a temporary directory the build system uses for its work. TMPDIR cannot be under NFS. Thus, by default, the Build Directory cannot be under NFS. However, if you need the Build Directory to be under NFS, you can set this up by setting TMPDIR in your build/conf/site.conf file to use a local drive. Doing so effectively separates TMPDIR from TOPDIR, which is the Build Directory.
- Build Host
The system used to build images in a Yocto Project Development environment. The build system is sometimes referred to as the development host.
- buildtools
Build tools in binary form, providing required versions of development tools (such as Git, GCC, Python and make), to run the OpenEmbedded build system on a development host without such minimum versions.
See the “Required Git, tar, Python, make and gcc Versions” paragraph in the Reference Manual for details about downloading or building an archive of such tools.
- buildtools-extended
A set of buildtools binaries extended with additional development tools, such as a required version of the GCC compiler to run the OpenEmbedded build system.
See the “Required Git, tar, Python, make and gcc Versions” paragraph in the Reference Manual for details about downloading or building an archive of such tools.
- buildtools-make
A variant of buildtools, just providing the required version of
maketo run the OpenEmbedded build system.- Built-in Fragment
A built-in fragment is a specific kind of Configuration Fragment that affects the value of a single variable globally. Built-in Fragments do not require a separate configuration file, but like a standard Configuration Fragment, Built-in Fragments can be enabled or disabled using the bitbake-config-build command-line utility.
When declared, a built-in fragment follows the following naming convention:
<fragment>:<variable name>
Where:
<fragment>is the name of the built-in fragment.<variable name>is the name of the variable to be modified by this fragment.
For example:
machine:MACHINE
Will setup the
machineBuilt-in Fragment for modifying the value of the MACHINE variable.Setting the MACHINE variable through this fragment must follow this syntax:
machine/qemux86-64
This sets the value of MACHINE to
qemux86-64.In OpenEmbedded-Core (OE-Core), the list of available Built-in Fragments can be obtained from the OE_FRAGMENTS_BUILTIN variable.
For more details on fragments, see:
The Using Configuration Fragments section of the Yocto Project Reference Manual for a list of fragments the OpenEmbedded Build System supports, and a quick reference guide on how to manage fragments.
The Creating New Configuration Fragments In Your Build section of the Yocto Project Development Tasks Manual for details on how to create new fragments in your build.
- Classes
Files that provide for logic encapsulation and inheritance so that commonly used patterns can be defined once and then easily used in multiple recipes. For reference information on the Yocto Project classes, see the “Classes” chapter. Class files end with the
.bbclassfilename extension.- Configuration File
Files that hold global definitions of variables, user-defined variables, and hardware configuration information. These files tell the OpenEmbedded build system what to build and what to put into the image to support a particular platform.
Configuration files end with a
.conffilename extension. Theconf/local.confconfiguration file in the Build Directory contains user-defined variables that affect every build. Themeta-poky/conf/distro/poky.confconfiguration file defines Yocto “distro” configuration variables used only when building with this policy. Machine configuration files, which are located throughout the Source Directory, define variables for specific hardware and are only used when building for that target (e.g. themachine/beaglebone.confconfiguration file defines variables for the Texas Instruments ARM Cortex-A8 development board). Configuration Fragments such as core/yocto/sstate-mirror-cdn define snippets of configuration that can be enabled from the command-line.- Configuration Fragment
A Configuration Fragment (also called Standard Configuration Fragment) is a configuration file that contains configuration statements such as variable assignments, affecting the build at a global-level when the fragment is enabled. By default, configuration fragments are located in the
conf/fragments/directory of a Layer.Note
Another form of fragment not to be confounded with Standard Configuration Fragments are Built-in Fragments which are used to assign a single variable value globally.
A fragment configuration file must contain a summary (BB_CONF_FRAGMENT_SUMMARY) and a description (BB_CONF_FRAGMENT_DESCRIPTION) explaining the purpose of the fragment.
In OpenEmbedded-Core (OE-Core), the location of fragments and what variables are required in a fragment is specified in bitbake.conf thanks to the addfragments directive and the OE_FRAGMENTS, OE_FRAGMENTS_METADATA_VARS and OE_FRAGMENTS_BUILTIN variables.
Fragments can be listed, enabled and disabled with the bitbake-config-build command-line utility.
For more details on fragments, see:
The Using Configuration Fragments section of the Yocto Project Reference Manual for a list of fragments the OpenEmbedded Build System supports, and a quick reference guide on how to manage fragments.
The Creating New Configuration Fragments In Your Build section of the Yocto Project Development Tasks Manual for details on how to create new fragments in your build.
- Container Layer
A flexible definition that typically refers to a single Git checkout which contains multiple (and typically related) sub-layers which can be included independently in your project’s
bblayers.conffile.In some cases, such as with OpenEmbedded’s meta-openembedded layer, the top level
meta-openembedded/directory is not itself an actual layer, so you would never explicitly include it in abblayers.conffile; rather, you would include any number of its layer subdirectories, such as meta-oe, meta-python and so on.On the other hand, some container layers (such as meta-security) have a top-level directory that is itself an actual layer, as well as a variety of sub-layers, both of which could be included in your
bblayers.conffile.In either case, the phrase “container layer” is simply used to describe a directory structure which contains multiple valid OpenEmbedded layers.
- Cross-Development Toolchain
In general, a cross-development toolchain is a collection of software development tools and utilities that run on one architecture and allow you to develop software for a different, or targeted, architecture. These toolchains contain cross-compilers, linkers, and debuggers that are specific to the target architecture.
The Yocto Project supports two different cross-development toolchains:
A toolchain only used by and within BitBake when building an image for a target architecture.
A relocatable toolchain used outside of BitBake by developers when developing applications that will run on a targeted device.
Creation of these toolchains is simple and automated. For information on toolchain concepts as they apply to the Yocto Project, see the “Cross-Development Toolchain Generation” section in the Yocto Project Overview and Concepts Manual. You can also find more information on using the relocatable toolchain in the Yocto Project Application Development and the Extensible Software Development Kit (eSDK) manual.
- Extensible Software Development Kit (eSDK)
A custom SDK for application developers. This eSDK allows developers to incorporate their library and programming changes back into the image to make their code available to other application developers.
For information on the eSDK, see the Yocto Project Application Development and the Extensible Software Development Kit (eSDK) manual.
- Image
An image is an artifact of the BitBake build process given a collection of recipes and related Metadata. Images are the binary output that run on specific hardware or QEMU and are used for specific use-cases. For a list of the supported image types that the Yocto Project provides, see the “Images” chapter.
- Initramfs
An Initial RAM Filesystem (Initramfs) is an optionally compressed cpio archive which is extracted by the Linux kernel into RAM in a special tmpfs instance, used as the initial root filesystem.
This is a replacement for the legacy init RAM disk (“initrd”) technique, booting on an emulated block device in RAM, but being less efficient because of the overhead of going through a filesystem and having to duplicate accessed file contents in the file cache in RAM, as for any block device.
Note
As far as bootloaders are concerned, Initramfs and “initrd” images are still copied to RAM in the same way. That’s why most most bootloaders refer to Initramfs images as “initrd” or “init RAM disk”.
This kind of mechanism is typically used for two reasons:
For booting the same kernel binary on multiple systems requiring different device drivers. The Initramfs image is then customized for each type of system, to include the specific kernel modules necessary to access the final root filesystem. This technique is used on all GNU / Linux distributions for desktops and servers.
For booting faster. As the root filesystem is extracted into RAM, accessing the first user-space applications is very fast, compared to having to initialize a block device, to access multiple blocks from it, and to go through a filesystem having its own overhead. For example, this allows to display a splashscreen very early, and to later take care of mounting the final root filesystem and loading less time-critical kernel drivers.
This cpio archive can either be loaded to RAM by the bootloader, or be included in the kernel binary.
For information on creating and using an Initramfs, see the “Building an Initial RAM Filesystem (Initramfs) Image” section in the Yocto Project Development Tasks Manual.
- Layer
A collection of related recipes. Layers allow you to consolidate related metadata to customize your build. Layers also isolate information used when building for multiple architectures. Layers are hierarchical in their ability to override previous specifications. You can include any number of available layers from the Yocto Project and customize the build by adding your layers after them. You can search the Layer Index for layers used within Yocto Project.
For introductory information on layers, see the “The Yocto Project Layer Model” section in the Yocto Project Overview and Concepts Manual. For more detailed information on layers, see the “Understanding and Creating Layers” section in the Yocto Project Development Tasks Manual. For a discussion specifically on BSP Layers, see the “BSP Layers” section in the Yocto Project Board Support Packages (BSP) Developer’s Guide.
- LTS
This term means “Long Term Support”, and in the context of the Yocto Project, it corresponds to selected stable releases for which bug and security fixes are provided for at least four years. See the Long Term Support Releases section for details.
- Metadata
A key element of the Yocto Project is the Metadata that is used to construct a Linux distribution and is contained in the files that the OpenEmbedded Build System parses when building an image. In general, Metadata includes recipes, configuration files, and other information that refers to the build instructions themselves, as well as the data used to control what things get built and the effects of the build. Metadata also includes commands and data used to indicate what versions of software are used, from where they are obtained, and changes or additions to the software itself (patches or auxiliary files) that are used to fix bugs or customize the software for use in a particular situation. OpenEmbedded-Core is an important set of validated metadata.
In the context of the kernel (“kernel Metadata”), the term refers to the kernel config fragments and features contained in the yocto-kernel-cache Git repository.
- Mixin
A Mixin layer is a layer which can be created by the community to add a specific feature or support a new version of some package for an LTS release. See the Long Term Support Releases section for details.
- OpenEmbedded Build System
The build system used by the Yocto Project, using Bitbake as the task executor. Throughout the Yocto Project documentation, the OpenEmbedded build system is sometimes referred to simply as “the build system”. If other build systems, such as a host or target build system are referenced, the documentation clearly states the difference.
Note
For some historical information about Poky, see the Poky term.
- OpenEmbedded-Core (OE-Core)
OE-Core is metadata comprised of foundational recipes, classes, and associated files that are meant to be common among many different OpenEmbedded-derived systems, including the Yocto Project. OE-Core is a curated subset of an original repository developed by the OpenEmbedded community that has been pared down into a smaller, core set of continuously validated recipes. The result is a tightly controlled and an quality-assured core set of recipes.
You can browse the source of OpenEmbedded-Core (OE-Core) at openembedded-core.
- Package
In the context of the Yocto Project, this term refers to a recipe’s packaged output produced by BitBake (i.e. a “baked recipe”). A package is generally the compiled binaries produced from the recipe’s sources. You “bake” something by running it through BitBake.
It is worth noting that the term “package” can, in general, have subtle meanings. For example, the packages referred to in the “Required Packages for the Build Host” section are compiled binaries that, when installed, add functionality to your Linux distribution.
Another point worth noting is that historically within the Yocto Project, recipes were referred to as packages — thus, the existence of several BitBake variables that are seemingly mis-named, (e.g. PR, PV, and PE).
- Package Groups
Arbitrary groups of software Recipes. You use package groups to hold recipes that, when built, usually accomplish a single task. For example, a package group could contain the recipes for a company’s proprietary or value-add software. Or, the package group could contain the recipes that enable graphics. A package group is really just another recipe. Because package group files are recipes, they end with the
.bbfilename extension.- Poky
Poky, which is pronounced Pock-ee, is a reference embedded distribution and a reference test configuration. Poky provides the following:
A base-level functional distro used to illustrate how to customize a distribution.
A means by which to test the Yocto Project components (i.e. Poky is used to validate the Yocto Project).
Poky is not a product level distro. Rather, it is a good starting point for customization.
Note
Poky also used to be a repository containing the combination of BitBake, OpenEmbedded-Core (OE-Core), the meta-yocto repository and the Yocto Project documentation – which were combined with the combo-layer tool.
This repository is still hosted at https://git.yoctoproject.org/poky and is still updated for maintained releases that are older than Whinlatter (5.3). Newer releases now use
bitbake-setupto clone and setup the initial OpenEmbedded Build System environment. For more information on how to usebitbake-setup, see the Yocto Project Quick Build document. An alternative can be to setup the above repositories manually, by following the Setting Up the Poky Reference Distro Manually section of the Yocto Project Development Tasks Manual.Note
Poky began as an open-source project initially developed by OpenedHand. OpenedHand developed Poky from the existing OpenEmbedded build system to create a commercially supportable build system for embedded Linux. After Intel Corporation acquired OpenedHand, the poky project became the basis for the Yocto Project’s build system.
- Recipe
A set of instructions for building packages. A recipe describes where you get source code, which patches to apply, how to configure the source, how to compile it and so on. Recipes also describe dependencies for libraries or for other recipes. Recipes represent the logical unit of execution, the software to build, the images to build, and use the
.bbfile extension.- Reference Kit
A working example of a system, which includes a BSP as well as a build host and other components, that can work on specific hardware.
- SBOM
This term means Software Bill of Materials. When you distribute software, it offers a description of all the components you used, their corresponding licenses, their dependencies, the changes that were applied and the known vulnerabilities that were fixed.
This can be used by the recipients of the software to assess their exposure to license compliance and security vulnerability issues.
See the Software Supply Chain article on Wikipedia for more details.
The OpenEmbedded Build System can generate such documentation for your project, in SPDX format, based on all the metadata it used to build the software images. See the “Creating a Software Bill of Materials” section of the Development Tasks manual.
- Source Directory
This term refers to the directory structure created as a result of setting up your environment to build images with the Yocto Project, which can be done in two ways:
Using the
bitbake-setupcommand-line utility (see Setting Up The Environment With bitbake-setup).Or manually setting up the Layers (see Setting Up the Poky Reference Distro Manually).
In either case, the result will be a set of Layers and a Build Directory: this is the Source Directory for your build. The documentation usually denotes this directory with the name “bitbake-builds”.
A typical layout for the Source Directory would be:
bitbake-builds/ ├── build/ └── layers/
Where the
layers/directory corresponds to the directory containing layers for your project, and thebuild/directory corresponds to the Build Directory.We present a Source Directory structure and its components in details in the Source Directory Structure section of the Yocto Project Reference Manual.
Note
The OpenEmbedded build system does not support file or directory names that contain spaces. Be sure that the Source Directory you use does not contain these types of names.
The Source Directory contains BitBake, OpenEmbedded-Core (OE-Core), and other files that all support the Yocto Project.
Consequently, you must have the Source Directory in place on your development system in order to do any development using the Yocto Project.
- SPDX
This term means Software Package Data Exchange, and is used as an open standard for providing a Software Bill of Materials (SBOM). This standard is developed through a Linux Foundation project and is used by the OpenEmbedded Build System to provide an SBOM associated to each software image.
For details, see Wikipedia’s SPDX page and the “Creating a Software Bill of Materials” section of the Development Tasks manual.
- Sysroot
When cross-compiling, the target file system may be differently laid out and contain different things compared to the host system. The concept of a sysroot is directory which looks like the target filesystem and can be used to cross-compile against.
In the context of cross-compiling toolchains, a sysroot typically contains C library and kernel headers, plus the compiled binaries for the C library. A multilib toolchain can contain multiple variants of the C library binaries, each compiled for a target instruction set (such as
armv5,armv7andarmv8), and possibly optimized for a specific CPU core.In the more specific context of the OpenEmbedded build System and of the Yocto Project, each recipe has two sysroots:
A target sysroot contains all the target libraries and headers needed to build the recipe.
A native sysroot contains all the host files and executables needed to build the recipe.
See the SYSROOT_* variables controlling how sysroots are created and stored.
- Task
A per-recipe unit of execution for BitBake (e.g. do_compile, do_fetch, do_patch, and so forth). One of the major benefits of the build system is that, since each recipe will typically spawn the execution of numerous tasks, it is entirely possible that many tasks can execute in parallel, either tasks from separate recipes or independent tasks within the same recipe, potentially up to the parallelism of your build system.
- Toaster
A web interface to the Yocto Project’s OpenEmbedded Build System. The interface enables you to configure and run your builds. Information about builds is collected and stored in a database. For information on Toaster, see the Toaster User Manual.
- Upstream
A reference to source code or repositories that are not local to the development system but located in a remote area that is controlled by the maintainer of the source code. For example, in order for a developer to work on a particular piece of code, they need to first get a copy of it from an “upstream” source.
4 Yocto Project Releases and the Stable Release Process
The Yocto Project release process is predictable and consists of both major and minor (point) releases. This brief chapter provides information on how releases are named, their life cycle, and their stability.
4.1 Major and Minor Release Cadence
The Yocto Project delivers major releases (e.g. 6.0.2) using a six month cadence roughly timed each April and October of the year. Here are examples of some major YP releases with their codenames also shown. See the “Major Release Codenames” section for information on codenames used with major releases.
4.1 (“Langdale”)
4.0 (“Kirkstone”)
3.4 (“Honister”)
While the cadence is never perfect, this timescale facilitates regular releases that have strong QA cycles while not overwhelming users with too many new releases. The cadence is predictable and avoids many major holidays in various geographies.
The Yocto project delivers minor (point) releases on an unscheduled basis and are usually driven by the accumulation of enough significant fixes or enhancements to the associated major release. Some example past point releases are:
4.1.3
4.0.8
3.4.4
The point release indicates a point in the major release branch where a full QA cycle and release process validates the content of the new branch.
Note
Realize that there can be patches merged onto the stable release branches as and when they become available.
4.2 Development Cycle
As explained in the previous Major and Minor Release Cadence section, a new release comes out every six months.
During this six-months period of time, the Yocto Project releases four “Milestone” releases which represent distinct points of time. The milestone releases are tested through the Testing and Quality Assurance process and helps spotting issues before the actual release is out.
The time span between milestone releases can vary, but they are in general evenly spaced out during this six-months period of time.
These milestone releases are tagged with a capital “M” after the future release tag name. For example, the milestone tags “6.0M1”, “6.0M2”, and “6.0M3” are released before the actual “6.0” release.
Note
The fourth milestone (M4) is not actually released and announced, but represents a point of time for the Quality Assurance team to start the Testing and Quality Assurance process before tagging and delivering the final release.
After the third milestone release (M3), the Yocto Project enters Feature Freeze. This means that the maintainers of OpenEmbedded-Core (OE-Core), BitBake and other core repositories stop accepting significant changes on the “master” branch. Changes that may be accepted are minor upgrades to core components and security/bug fixes.
During feature freeze, a new branch is created and maintained separately to test new features and enhancements received from contributors, but these changes will only make it to the master branch after the release is out.
4.3 Major Release Codenames
Each major release receives a codename that identifies the release in the Yocto Project Source Repositories. The concept is that branches of Metadata with the same codename are likely to be compatible and thus work together.
Note
Codenames are associated with major releases because a Yocto Project release number (e.g. 6.0.2) could conflict with a given layer or company versioning scheme. Codenames are unique, interesting, and easily identifiable.
Releases are given a nominal release version as well but the codename is used in repositories for this reason. You can find information on Yocto Project releases and codenames in the Releases page.
Our Release Information detail how to migrate from one release of the Yocto Project to the next.
4.4 Stable Release Process
Once released, the release enters the stable release process at which time a person is assigned as the maintainer for that stable release. This maintainer monitors activity for the release by investigating and handling nominated patches and backport activity. Only fixes and enhancements that have first been applied on the “master” branch (i.e. the current, in-development branch) are considered for backporting to a stable release.
Note
The current Yocto Project policy regarding backporting is to consider bug fixes and security fixes only. Policy dictates that features are not backported to a stable release. This policy means generic recipe version upgrades are unlikely to be accepted for backporting. The exception to this policy occurs when there is a strong reason such as the fix happens to also be the preferred upstream approach.
4.5 Long Term Support Releases
While stable releases are supported for a duration of seven months, some specific ones are now supported for a longer period by the Yocto Project, and are called Long Term Support (LTS) releases.
When significant issues are found, LTS releases allow to publish fixes not only for the current stable release, but also to the LTS releases that are still supported. Older stable releases which have reached their End of Life (EOL) won’t receive such updates.
This started with version 3.1 (“Dunfell”), released in April 2020, which the project initially committed to supporting for two years, but this duration was later extended to four years.
A new LTS release is made every two years and is supported for four years. This offers more stability to project users and leaves more time to upgrade to the following LTS release.
The currently supported LTS releases are:
Version 5.0 (“Scarthgap”), released in April 2024 and supported until April 2028.
Version 4.0 (“Kirkstone”), released in May 2022 and supported until May 2026.
See https://wiki.yoctoproject.org/wiki/Stable_Release_and_LTS for details about the management of stable and LTS releases.
This documentation was built for the Wrynose release.

Note
In some circumstances, a layer can be created by the community in order to add a specific feature or support a new version of some package for an LTS release. This is called a Mixin layer. These are thin and specific purpose layers which can be stacked with an LTS release to “mix” a specific feature into that build. These are created on an as-needed basis and maintained by the people who need them.
Policies on testing these layers depend on how widespread their usage is and determined on a case-by-case basis. You can find some Mixin layers in the meta-lts-mixins repository. While the Yocto Project provides hosting for those repositories, it does not provides testing on them. Other Mixin layers may be released elsewhere by the wider community.
4.6 Testing and Quality Assurance
Part of the Yocto Project development and release process is quality assurance through the execution of test strategies. Test strategies provide the Yocto Project team a way to ensure a release is validated. Additionally, because the test strategies are visible to you as a developer, you can validate your projects. This section overviews the available test infrastructure used in the Yocto Project. For information on how to run available tests on your projects, see the “Performing Automated Runtime Testing” section in the Yocto Project Test Environment Manual.
The QA/testing infrastructure is woven into the project to the point where core developers take some of it for granted. The infrastructure consists of the following pieces:
bitbake-selftest: A standalone command that runs unit tests on key pieces of BitBake and its fetchers.sanity: This automatically included class checks the build environment for missing tools (e.g.
gcc) or common misconfigurations such as MACHINE set incorrectly.insane: This class checks the generated output from builds for sanity. For example, if building for an ARM target, did the build produce ARM binaries. If, for example, the build produced PPC binaries then there is a problem.
testimage: This class performs runtime testing of images after they are built. The tests are usually used with QEMU to boot the images and check the combined runtime result boot operation and functions. However, the test can also use the IP address of a machine to test.
ptest: Runs tests against packages produced during the build for a given piece of software. The test allows the packages to be run within a target image.
oe-selftest: Tests combinations of BitBake invocations. These tests operate outside the OpenEmbedded build system itself. Theoe-selftestcan run all tests by default or can run selected tests or test suites.
Originally, much of this testing was done manually. However, significant effort has been made to automate the tests so that more people can use them and the Yocto Project development team can run them faster and more efficiently.
The Yocto Project’s main Autobuilder publicly tests each Yocto Project release’s code in the openembedded-core, meta-yocto and bitbake repositories. The testing occurs for both the current state of the “master” branch and also for submitted patches. Testing for submitted patches usually occurs in the “master-next” branch in the openembedded-core, meta-yocto and bitbake repository.
Note
You can find all these branches in the Yocto Project Source Repositories.
Testing within these public branches ensures in a publicly visible way that all of the main supposed architectures and recipes in OE-Core successfully build and behave properly.
Various features such as multilib, sub architectures (e.g. x32,
poky-tiny, musl, no-x11 and and so forth),
bitbake-selftest, and oe-selftest are tested as part of the QA
process of a release. Complete testing and validation for a release
takes the Autobuilder workers several hours.
Note
The Autobuilder workers are non-homogeneous, which means regular testing across a variety of Linux distributions occurs. The Autobuilder is limited to only testing QEMU-based setups and not real hardware.
Finally, in addition to the Autobuilder’s tests, the Yocto Project QA team also performs testing on a variety of platforms, which includes actual hardware, to ensure expected results.
5 Source Directory Structure
The Source Directory consists of numerous files, directories and subdirectories; understanding their locations and contents is key to using the Yocto Project effectively. This chapter describes the Source Directory and gives information about those files and directories.
Note
The OpenEmbedded build system does not support file or directory names that contain spaces. Be sure that the Source Directory you use does not contain these types of names.
For the following sections, we assume the core components of the Source Directory are organized as follows:
├── build/
│ └── ...
└── layers/
├── bitbake/
├── meta-yocto/
├── openembedded-core/
└── yocto-docs/
5.1 Top-Level Core Components
This section describes the top-level components of the Source Directory.
5.1.1 bitbake/
This directory includes a copy of BitBake for ease of use. The copy usually matches the current stable BitBake release from the BitBake project. BitBake, a Metadata interpreter, reads the Yocto Project Metadata and runs the tasks defined by that data. Failures are usually caused by errors in your Metadata and not from BitBake itself.
When you run the bitbake command, the main BitBake executable (which
resides in the bitbake/bin/ directory) starts. Sourcing the
environment setup script (i.e. oe-init-build-env) places
the scripts/ and bitbake/bin/ directories (in that order) into
the shell’s PATH environment variable.
For more information on BitBake, see the BitBake User Manual.
5.1.2 build/
This directory contains user configuration files and the output
generated by the OpenEmbedded build system in its standard configuration
where the source tree is combined with the output. The Build Directory
is created initially when you source the OpenEmbedded build environment
setup script (i.e. oe-init-build-env).
It is also possible to place output and configuration files in a
directory separate from the Source Directory by
providing a directory name when you source the setup script. For
information on separating output from your local Source Directory files
(commonly described as an “out of tree” build), see the
“oe-init-build-env” section.
See the “The Build Directory — build/” section for details about the contents of the Build Directory.
5.1.3 layers/yocto-docs/
The Yocto documentation repository is hosted at https://git.yoctoproject.org/yocto-docs.
This directory holds the source for the Yocto Project documentation as
well as templates and tools that allow you to generate PDF and HTML
versions of the manuals. Each manual is contained in its own sub-folder;
for example, the files for this reference manual reside in the
ref-manual/ directory.
This directory is not mandatory for building with BitBake.
5.1.4 layers/openembedded-core/
The OpenEmbedded-Core (OE-Core) repository is hosted at https://git.openembedded.org/openembedded-core.
5.1.4.1 meta/
This directory contains the minimal, underlying OpenEmbedded-Core
(OE-Core) metadata. The directory holds recipes, common classes, and machine
configuration for strictly emulated targets (qemux86, qemuarm,
and so forth.)
5.1.4.2 meta-selftest/
This directory adds additional recipes and append files used by the
OpenEmbedded selftests to verify the behavior of the build system. You
do not have to add this layer to your bblayers.conf file unless you
want to run the selftests.
5.1.4.3 meta-skeleton/
This directory contains template recipes for BSP and kernel development.
5.1.4.4 scripts/
This directory contains various integration scripts that implement extra
functionality in the Yocto Project environment (e.g. QEMU scripts). The
oe-init-build-env script prepends this directory to the
shell’s PATH environment variable.
The scripts directory has useful scripts that assist in contributing
back to the Yocto Project, such as create-pull-request and
send-pull-request.
5.1.4.5 oe-init-build-env
This script sets up the OpenEmbedded build environment. Running this
script with the source command in a shell makes changes to PATH
and sets other core BitBake variables based on the current working
directory. You need to run an environment setup script before running
BitBake commands. The script uses other scripts within the scripts
directory to do the bulk of the work.
When you run this script, your Yocto Project environment is set up, a Build Directory is created, your working directory becomes the Build Directory, and you are presented with some simple suggestions as to what to do next, including a list of some possible targets to build. Here is an example:
$ source oe-init-build-env
### Shell environment set up for builds. ###
You can now run 'bitbake <target>'
Common targets are:
core-image-minimal
core-image-sato
meta-toolchain
meta-ide-support
You can also run generated QEMU images with a command like 'runqemu qemux86-64'
Note
When using bitbake-setup,
this script is indirectly sourced when sourcing the init-build-env
located in the Setup’s build directory. However, compared to
oe-init-build-env, the bitbake-setup init-build-env does not take any
argument, as it is already located in a Build Directory.
See Setting Up The Environment With bitbake-setup for more information.
The default output of the oe-init-build-env script is from the
conf-summary.txt and conf-notes.txt files, which are found in the
meta/conf/templates/default directory of OpenEmbedded-Core
(OE-Core). If you design a custom distribution, you can include your own
versions of these configuration files where you can provide a brief summary and
detailed usage notes, such as a list of the targets defined by your
distribution. See the
“Creating a Custom Template Configuration Directory” section in the Yocto Project Development
Tasks Manual for more information.
By default, running this script without a Build Directory argument
creates the build/ directory in your current working directory. If
you provide a Build Directory argument when you source the script,
you direct the OpenEmbedded build system to create a Build Directory of
your choice. For example, the following command creates a
Build Directory named mybuilds/ that is outside of the
Source Directory:
$ source oe-init-build-env ~/mybuilds
The OpenEmbedded build system uses the template configuration files, which
are found by default in the meta/conf/templates/default directory in
OpenEmbedded-Core (OE-Core). See the
“Creating a Custom Template Configuration Directory”
section in the Yocto Project Development Tasks Manual for more
information.
Note
The OpenEmbedded build system does not support file or directory
names that contain spaces. If you attempt to run the oe-init-build-env
script from a Source Directory that contains spaces in either the
filenames or directory names, the script returns an error indicating
no such file or directory. Be sure to use a Source Directory free of
names containing spaces.
5.1.5 layers/meta-yocto/
The meta-yocto repository is hosted at https://git.yoctoproject.org/meta-yocto.
5.1.5.1 meta-poky/
Dependent on the OpenEmbedded-Core (OE-Core) metadata, this directory adds just enough metadata to define the Poky reference distribution.
Namely, it contains the distro configuration file for Poky:
conf/distro/poky.conf.
5.1.5.2 meta-yocto-bsp/
This directory contains the Yocto Project reference hardware Board Support Packages (BSPs). For more information on BSPs, see the Yocto Project Board Support Package Developer’s Guide.
5.2 The Build Directory — build/
The OpenEmbedded build system creates the Build Directory when you run
the build environment setup script oe-init-build-env. If you do not
give the Build Directory a specific name when you run the setup script,
the name defaults to build/.
For subsequent parsing and processing, the name of the Build directory is available via the TOPDIR variable.
5.2.1 build/buildhistory/
The OpenEmbedded build system creates this directory when you enable build history via the buildhistory class file. The directory organizes build information into image, packages, and SDK subdirectories. For information on the build history feature, see the “Maintaining Build Output Quality” section in the Yocto Project Development Tasks Manual.
5.2.2 build/cache/
This directory contains several internal files used by the OpenEmbedded build system. The path to this directory is defined by the PERSISTENT_DIR variable.
It also contains sanity_info, a text file keeping track of important
build information such as the values of TMPDIR, SSTATE_DIR,
as well as the name and version of the host distribution.
This directory should not be shared between builds.
Note
The default location of the Hash Equivalence
database is this directory (when BB_HASHSERVE is set to auto). If
you need to share the Hash Equivalence
database, don’t share this file and instead refer to the
Setting up a Hash Equivalence Server document of the Yocto Project Development
Tasks Manual to setup a Hash Equivalence server.
5.2.3 build/conf/local.conf
This configuration file contains the local user configurations for the build environment.
You could for example experiment with setting (or adding to) DISTRO_FEATURES or IMAGE_FEATURES, or adjust build configurations for specific recipes by setting the PACKAGECONFIG variables for them. If you would like to publish and share changes made to this file, it is recommended to put them into a distro configuration file, or to create layer configuration fragments from changes made here.
The OpenEmbedded Build System can create the local.conf file from a
local.conf.sample file when you source the top-level build environment
setup script oe-init-build-env.
The source local.conf.sample file used depends on the
TEMPLATECONF script variable, which defaults to
meta/conf/templates/default in OpenEmbedded-Core
(OE-Core).
Because the script variable points to the source of the
local.conf.sample file, this implies that you can configure your
build environment from any layer by setting the variable in the
top-level build environment setup script as follows:
TEMPLATECONF=your_layer/conf/templates/your_template_name
Once the build process gets the sample
file, it uses sed to substitute final
${OEROOT} values for all
##OEROOT## values.
Note
You can see how the TEMPLATECONF variable is used by looking at the
layers/openembedded-core/scripts/oe-setup-builddir script in OpenEmbedded-Core (OE-Core).
5.2.4 build/conf/bblayers.conf
This configuration file defines
layers,
which are directory trees, traversed (or walked) by BitBake. The
bblayers.conf file uses the BBLAYERS
variable to list the layers BitBake tries to find.
The OpenEmbedded build system can create it from a bblayers.conf.sample file
when you source the top-level build environment setup script (i.e.
oe-init-build-env).
As with the build/conf/local.conf file, the source bblayers.conf.sample
file used depends on the TEMPLATECONF script variable, which
defaults to meta/conf/templates/default . Because the script
variable points to the source of the bblayers.conf.sample file, this
implies that you can base your build from any layer by setting the
variable in the top-level build environment setup script as follows:
TEMPLATECONF=your_layer/conf/templates/your_template_name
Once the build process gets the sample file, it uses sed to substitute final
${OEROOT} values for all ##OEROOT## occurrences.
Note
You can see how the TEMPLATECONF variable is defined by the scripts/oe-setup-builddir
script in OpenEmbedded-Core (OE-Core).
5.2.5 build/conf/site.conf
This configuration file contains the site specific configurations for your build environment.
You could for example edit this file to limit the number of threads used by BitBake (BB_NUMBER_THREADS) or set the location from which you want to access downloaded files (DL_DIR).
This file can be shared for multiple build directories. For example,
bitbake-setup
makes the build/conf/site.conf file a symbolic link to a common
site.conf file:
├── poky-master-poky-distro_poky-machine_qemux86-64/
│ └── build/
│ └── conf/
│ └── site.conf -> ../../../site.conf
├── poky-master-poky-with-sstate-distro_poky-machine_qemux86-64/
│ └── build/
│ └── conf/
│ └── site.conf -> ../../../site.conf
└── site.conf
This way, site-specific settings can be shared for multiple build configurations.
Note
For more information on how to use bitbake-setup, see the
Yocto Project Quick Build document.
5.2.6 build/conf/bblock.conf
This configuration file is generated by bblock and
contains the signatures locked by bblock. By default, it does not exist
and will be created upon the first invocation of bblock.
5.2.7 build/conf/toolcfg.conf
This file contains configuration variables that are automatically modified by tools such as bitbake-config-build. This file should not be modified manually.
5.2.8 build/conf/auto.conf
This file is intended for use by continuous integration environments, such as the Yocto Project’s Autobuilder. It should not be created or modified when running local builds.
5.2.9 build/downloads/
This directory contains downloaded upstream source tarballs. You can reuse the directory for multiple builds or move the directory to another location. You can control the location of this directory through the DL_DIR variable.
5.2.10 build/sstate-cache/
This directory contains the shared state cache. You can reuse the directory for multiple builds or move the directory to another location. You can control the location of this directory through the SSTATE_DIR variable.
5.2.11 build/tmp/
The OpenEmbedded build system creates and uses this directory for all the build system’s output. The TMPDIR variable points to this directory.
BitBake creates this directory if it does not exist. As a last resort,
to clean up a build and start it from scratch (other than the
downloads), you can remove everything in the tmp directory or get
rid of the directory completely. If you do, you should also completely
remove the build/sstate-cache directory.
5.2.11.1 build/tmp/buildstats/
This directory stores the build statistics as generated by the buildstats class.
5.2.11.2 build/tmp/cache/
When BitBake parses the metadata (recipes and configuration files), it
caches the results in build/tmp/cache/ to speed up future builds.
The results are stored on a per-machine basis.
During subsequent builds, BitBake checks each recipe (together with, for example, any files included or appended to it) to see if they have been modified. Changes can be detected, for example, through file modification time (mtime) changes and hashing of file contents. If no changes to the file are detected, then the parsed result stored in the cache is reused. If the file has changed, it is reparsed.
5.2.11.3 build/tmp/deploy/
This directory contains any “end result” output from the OpenEmbedded
build process. The DEPLOY_DIR variable points
to this directory. For more detail on the contents of the deploy
directory, see the
“Images” and
“Application Development SDK” sections in the Yocto
Project Overview and Concepts Manual.
5.2.11.3.1 build/tmp/deploy/deb/
This directory receives any .deb packages produced by the build
process. The packages are sorted into feeds for different architecture
types.
5.2.11.3.2 build/tmp/deploy/rpm/
This directory receives any .rpm packages produced by the build
process. The packages are sorted into feeds for different architecture
types.
5.2.11.3.3 build/tmp/deploy/ipk/
This directory receives .ipk packages produced by the build process.
5.2.11.3.4 build/tmp/deploy/licenses/
This directory receives package licensing information. For example, the
directory contains sub-directories for bash, busybox, and
glibc (among others) that in turn contain appropriate COPYING
license files with other licensing information. For information on
licensing, see the
“Maintaining Open Source License Compliance During Your Product’s Lifecycle”
section in the Yocto Project Development Tasks Manual.
5.2.11.3.5 build/tmp/deploy/images/
This directory is populated with the basic output objects of the build (think of them as the “generated artifacts” of the build process), including things like the boot loader image, kernel, root filesystem and more. If you want to flash the resulting image from a build onto a device, look here for the necessary components.
Be careful when deleting files in this directory. You can safely delete
old images from this directory (e.g. core-image-*). However, the
kernel (*zImage*, *uImage*, etc.), bootloader and other
supplementary files might be deployed here prior to building an image.
Because these files are not directly produced from the image, if you
delete them they will not be automatically re-created when you build the
image again.
If you do accidentally delete files here, you will need to force them to be re-created. In order to do that, you will need to know the target that produced them. For example, these commands rebuild and re-create the kernel files:
$ bitbake -c clean virtual/kernel
$ bitbake virtual/kernel
5.2.11.3.6 build/tmp/deploy/sdk/
The OpenEmbedded build system creates this directory to hold toolchain installer scripts which, when executed, install the sysroot that matches your target hardware. You can find out more about these installers in the “Building an SDK Installer” section in the Yocto Project Application Development and the Extensible Software Development Kit (eSDK) manual.
5.2.11.4 build/tmp/hosttools/
The OpenEmbedded build system uses this directory to create symbolic links to some of the host components that are allowed to be called within tasks. These are basic components listed in the Required Packages for the Build Host section. These components are also listed in the HOSTTOOLS variable and are limited to this list to prevent host contamination.
5.2.11.5 build/tmp/pkgdata/
The OpenEmbedded build system uses this directory to store package metadata generated during the do_packagedata task. The files stored in this directory contain information about each output package produced by the OpenEmbedded build system, and are used in different ways by the build system such as “Viewing Package Information with oe-pkgdata-util”.
5.2.11.6 build/tmp/sstate-control/
The OpenEmbedded build system uses this directory for the shared state manifest files. The shared state code uses these files to record the files installed by each sstate task so that the files can be removed when cleaning the recipe or when a newer version is about to be installed. The build system also uses the manifests to detect and produce a warning when files from one task are overwriting those from another.
5.2.11.7 build/tmp/sysroots-components/
This directory is the location of the sysroot contents that the task
do_prepare_recipe_sysroot
links or copies into the recipe-specific sysroot for each recipe listed
in DEPENDS. Population of this directory is
handled through shared state, while the path is specified by the
COMPONENTS_DIR variable. Apart from a few
unusual circumstances, handling of the sysroots-components directory
should be automatic, and recipes should not directly reference
build/tmp/sysroots-components.
5.2.11.8 build/tmp/sysroots/
Previous versions of the OpenEmbedded build system used to create a
global shared sysroot per machine along with a native sysroot. Since
the 2.3 version of the Yocto Project, there are sysroots in
recipe-specific WORKDIR directories. Thus, the
build/tmp/sysroots/ directory is unused.
Note
The build/tmp/sysroots/ directory can still be populated using the
bitbake build-sysroots command and can be used for compatibility in some
cases. However, in general it is not recommended to populate this directory.
Individual recipe-specific sysroots should be used.
5.2.11.9 build/tmp/stamps/
This directory holds information that BitBake uses for accounting purposes to track what tasks have run and when they have run. The directory is sub-divided by architecture, package name, and version. Here is an example:
stamps/all-poky-linux/distcc-config/1.0-r0.do_build-2fdd....2do
Although the files in the directory are empty of data, BitBake uses the filenames and timestamps for tracking purposes.
For information on how BitBake uses stamp files to determine if a task should be rerun, see the “Stamp Files and the Rerunning of Tasks” section in the Yocto Project Overview and Concepts Manual.
5.2.11.10 build/tmp/log/
This directory contains general logs that are not otherwise placed using
the package’s WORKDIR. Examples of logs are the output from the
do_check_pkg or do_distro_check tasks. Running a build does not
necessarily mean this directory is created.
5.2.11.11 build/tmp/work/
This directory contains architecture-specific work sub-directories for packages built by BitBake. All tasks execute from the appropriate work directory. For example, the source for a particular package is unpacked, patched, configured and compiled all within its own work directory. Within the work directory, organization is based on the package group and version for which the source is being compiled as defined by the WORKDIR.
It is worth considering the structure of a typical work directory. As an
example, consider linux-yocto-kernel-3.0 on the machine qemux86
built within the Yocto Project. For this package, a work directory of
tmp/work/qemux86-poky-linux/linux-yocto/3.0+git1+<.....>, referred
to as the WORKDIR, is created. Within this directory, the source is
unpacked to sources/linux-qemux86-standard-build and then patched by Quilt.
(See the “Using Quilt in Your Workflow” section in
the Yocto Project Development Tasks Manual for more information.) Within
the linux-qemux86-standard-build directory, standard Quilt
directories linux-3.0/patches and linux-3.0/.pc are created, and
standard Quilt commands can be used.
There are other directories generated within WORKDIR. The most
important directory is WORKDIR/temp/, which has log files for each
task (log.do_*.pid) and contains the scripts BitBake runs for each
task (run.do_*.pid). The WORKDIR/image/ directory is where “make
install” places its output that is then split into sub-packages within
WORKDIR/packages-split/.
5.2.11.11.1 build/tmp/work/tunearch/recipename/version/
The recipe work directory — ${WORKDIR}.
As described earlier in the
“build/tmp/sysroots/” section,
beginning with the 2.3 release of the Yocto Project, the OpenEmbedded
build system builds each recipe in its own work directory (i.e.
WORKDIR). The path to the work directory is
constructed using the architecture of the given build (e.g.
TUNE_PKGARCH, MACHINE_ARCH, or “allarch”), the recipe
name, and the version of the recipe (i.e.
PE:PV-PR).
Here are key subdirectories within each recipe work directory:
${WORKDIR}/temp: Contains the log files of each task executed for this recipe, the “run” files for each executed task, which contain the code run, and alog.task_orderfile, which lists the order in which tasks were executed.${WORKDIR}/image: Contains the output of the do_install task, which corresponds to the${D}variable in that task.${WORKDIR}/pseudo: Contains the pseudo database and log for any tasks executed under pseudo for the recipe.${WORKDIR}/sysroot-destdir: Contains the output of the do_populate_sysroot task.${WORKDIR}/package: Contains the output of the do_package task before the output is split into individual packages.${WORKDIR}/packages-split: Contains the output of the do_package task after the output has been split into individual packages. There are subdirectories for each individual package created by the recipe.${WORKDIR}/recipe-sysroot: A directory populated with the target dependencies of the recipe. This directory looks like the target filesystem and contains libraries that the recipe might need to link against (e.g. the C library).${WORKDIR}/recipe-sysroot-native: A directory populated with the native dependencies of the recipe. This directory contains the tools the recipe needs to build (e.g. the compiler, Autoconf, libtool, and so forth).${WORKDIR}/build: This subdirectory applies only to recipes that support builds where the source is separate from the build artifacts. The OpenEmbedded build system uses this directory as a separate build directory (i.e.${B}).
5.3 The OpenEmbedded-Core (OE-Core) Metadata — meta/
As mentioned previously, the OpenEmbedded-Core (OE-Core) metadata is the core of the Yocto Project. This metadata has several important subdivisions:
5.3.1 meta/classes*/
These directories contain the *.bbclass files. Class files are used to
abstract common code so it can be reused by multiple packages. Every
package inherits the base file. Examples of other important
classes are autotools*, which in theory allows any
Autotool-enabled package to work with the Yocto Project with minimal
effort. Another example is kernel that contains common code
and functions for working with the Linux kernel. Functions like image
generation or packaging also have their specific class files such as
image, rootfs* and
package*.bbclass.
For reference information on classes, see the “Classes” chapter.
5.3.2 meta/conf/
This directory contains the core set of configuration files that start
from bitbake.conf and from which all other configuration files are
included. See the include statements at the end of the bitbake.conf
file and you will note that even local.conf is loaded from there.
While bitbake.conf sets up the defaults, you can often override
these by using the (local.conf) file, machine file or the
distribution configuration file.
5.3.2.1 meta/conf/machine/
This directory contains all the machine configuration files. If you set
MACHINE = "qemux86", the OpenEmbedded build system looks for a
qemux86.conf file in this directory. The include directory
contains various data common to multiple machines. If you want to add
support for a new machine to the Yocto Project, look in this directory.
5.3.2.2 meta/conf/distro/
The contents of this directory controls any distribution-specific
configurations. For the Yocto Project, the defaultsetup.conf is the
main file here. This directory includes the versions and the SRCDATE
definitions for applications that are configured here. An example of an
alternative configuration might be poky-bleeding.conf. Although this
file mainly inherits its configuration from Poky.
5.3.2.3 meta/conf/machine-sdk/
The OpenEmbedded build system searches this directory for configuration files that correspond to the value of SDKMACHINE. By default, 32-bit and 64-bit x86 files ship with the Yocto Project that support some SDK hosts. However, it is possible to extend that support to other SDK hosts by adding additional configuration files in this subdirectory within another layer.
5.3.3 meta/files/
This directory contains common license files and several text files used by the build system, as well as Wic files that define the layouts of the images produced by the build. The text files contain minimal device information and lists of files and directories with known permissions.
5.3.4 meta/lib/
This directory contains OpenEmbedded Python library code used during the
build process. It is enabled via the addpylib directive in
meta/conf/local.conf. For more information, see
Extending Python Library Code.
5.3.5 meta/recipes-bsp/
This directory contains anything linking to specific hardware or hardware configuration information such as “u-boot” and “grub”.
5.3.6 meta/recipes-connectivity/
This directory contains libraries and applications related to communication with other devices.
5.3.7 meta/recipes-core/
This directory contains what is needed to build a basic working Linux image including commonly used dependencies.
5.3.8 meta/recipes-devtools/
This directory contains tools that are primarily used by the build system. The tools, however, can also be used on targets.
5.3.9 meta/recipes-extended/
This directory contains non-essential applications that add features compared to the alternatives in core. You might need this directory for full tool functionality.
5.3.10 meta/recipes-gnome/
This directory contains all things related to the GTK+ application framework.
5.3.11 meta/recipes-graphics/
This directory contains X and other graphically related system libraries.
5.3.12 meta/recipes-kernel/
This directory contains the kernel and generic applications and libraries that have strong kernel dependencies.
5.3.13 meta/recipes-multimedia/
This directory contains codecs and support utilities for audio, images and video.
5.3.14 meta/recipes-rt/
This directory contains package and image recipes for using and testing
the PREEMPT_RT kernel.
5.3.15 meta/recipes-sato/
This directory contains the Sato demo/reference UI/UX and its associated applications and configuration data.
5.3.16 meta/recipes-support/
This directory contains recipes used by other recipes, but that are not directly included in images (i.e. dependencies of other recipes).
5.3.17 meta/site/
This directory contains a list of cached results for various architectures. Because certain “autoconf” test results cannot be determined when cross-compiling due to the tests not able to run on a live system, the information in this directory is passed to “autoconf” for the various architectures.
5.3.18 meta/recipes.txt
This file is a description of the contents of recipes-*.
6 Classes
Class files are used to abstract common functionality and share it
amongst multiple recipe (.bb) files. To use a class file, you simply
make sure the recipe inherits the class. In most cases, when a recipe
inherits a class it is enough to enable its features. There are cases,
however, where in the recipe you might need to set variables or override
some default behavior. A class can also be inherited globally (in every recipe)
with the INHERIT variable.
Any Metadata usually found in a recipe can also be
placed in a class file. Class files are identified by the extension
.bbclass and are usually placed in one of the following subdirectories
of a layer:
classes-recipe/- classes intended to be inherited by recipes individually
classes-global/- classes intended to be inherited globally
classes/- classes whose usage context is not clearly defined
Class files can also be pointed to by
BUILDDIR (e.g. build/) in the same way as
.conf files in the conf directory. Class files are searched for
in BBPATH using the same method by which .conf
files are searched.
This chapter discusses only the most useful and important classes. Other
classes do exist within the meta/classes* directories of
OpenEmbedded-Core (OE-Core). You can refer to the .bbclass files
directly for more information.
6.1 allarch
The allarch class is inherited by recipes that do not produce architecture-specific output. The class disables functionality that is normally needed for recipes that produce executable binaries (such as building the cross-compiler and a C library as pre-requisites, and splitting out of debug symbols during packaging).
Note
Unlike some distro recipes (e.g. Debian), OpenEmbedded recipes that produce packages that depend on tunings through use of the RDEPENDS and TUNE_PKGARCH variables, should never be configured for all architectures using allarch. This is the case even if the recipes do not produce architecture-specific output.
Configuring such recipes for all architectures causes the do_package_write_* tasks to have different signatures for the machines with different tunings. Additionally, unnecessary rebuilds occur every time an image for a different MACHINE is built even when the recipe never changes.
By default, all recipes inherit the base and package classes, which enable functionality needed for recipes that produce executable output. If your recipe, for example, only produces packages that contain configuration files, media files, or scripts (e.g. Python and Perl), then it should inherit the allarch class.
6.2 archiver
The archiver class supports releasing source code and other materials with the binaries.
For more details on the source archiver, see the “Maintaining Open Source License Compliance During Your Product’s Lifecycle” section in the Yocto Project Development Tasks Manual. You can also see the ARCHIVER_MODE variable for information about the variable flags (varflags) that help control archive creation.
6.3 autotools*
The autotools* classes support packages built with the GNU Autotools.
The autoconf, automake, and libtool packages bring
standardization. This class defines a set of tasks (e.g. configure,
compile and so forth) that work for all Autotooled packages. It
should usually be enough to define a few standard variables and then
simply inherit autotools. These classes can also work with software
that emulates Autotools. For more information, see the
“Building an Autotooled Package” section
in the Yocto Project Development Tasks Manual.
By default, the autotools* classes use out-of-tree builds (i.e.
autotools.bbclass building with B != S).
If the software being built by a recipe does not support using out-of-tree builds, you should have the recipe inherit the autotools-brokensep class. The autotools-brokensep class behaves the same as the autotools* class but builds with B == S. This method is useful when out-of-tree build support is either not present or is broken.
Note
It is recommended that out-of-tree support be fixed and used if at all possible.
It’s useful to have some idea of how the tasks defined by the autotools* classes work and what they do behind the scenes.
do_configure — regenerates the configure script (using
autoreconf) and then launches it with a standard set of arguments used during cross-compilation. You can pass additional parameters toconfigurethrough the EXTRA_OECONF or PACKAGECONFIG_CONFARGS variables.do_compile — runs
makewith arguments that specify the compiler and linker. You can pass additional arguments through the EXTRA_OEMAKE variable.do_install — runs
make installand passes in${D}asDESTDIR.
6.4 barebox
The barebox class manages building the barebox bootloader.
If a file named defconfig is included in the SRC_URI, it will be
copied to .config in the build directory and used as the barebox
configuration.
Instead of providing a defconfig file, you can set BAREBOX_CONFIG
to a defconfig provided by the barebox source tree.
If neither defconfig nor BAREBOX_CONFIG is specified, the class
will raise an error.
The barebox class supports config fragments and internally includes the cml1 class to provide Kconfig support for barebox, enabling tasks such as do_menuconfig and do_diffconfig.
The generated barebox binaries are deployed to
DEPLOY_DIR_IMAGE as well as installed to BAREBOX_INSTALL_PATH
(/boot by default) making them part of the recipe’s base package.
This setup supports both using the barebox binaries as independent artifacts
and installing them into a rootfs.
BAREBOX_BINARY can be used to select a distinct binary to deploy and
install.
If barebox is set as the EFI_PROVIDER, the class will leverage
conf/image-uefi.conf
to define the default installation paths and naming conventions.
The compiled-in barebox environment can be extended by adding environment files
to the BAREBOX_ENV_DIR.
The BAREBOX_FIRMWARE_DIR variable allows you to specify the firmware blob
search directory, enabling loading of additional firmware like TF-A or OP-TEE.
6.5 base
The base class is special in that every .bb file implicitly
inherits the class. This class contains definitions for standard basic
tasks such as fetching, unpacking, configuring (empty by default),
compiling (runs any Makefile present), installing (empty by default)
and packaging (empty by default). These tasks are often overridden or
extended by other classes such as the autotools* class or the
package class.
The class also contains some commonly used functions such as
oe_runmake, which runs make with the arguments specified in
EXTRA_OEMAKE variable as well as the
arguments passed directly to oe_runmake.
6.6 bash-completion
Sets up packaging and dependencies appropriate for recipes that build software that includes bash-completion data.
6.7 bin_package
The bin_package class is a helper class for recipes, that disables the do_configure and do_compile tasks and copies the content of the S directory into the D directory. This is useful for installing binary packages (e.g. RPM packages) by passing the package in the SRC_URI variable and inheriting this class.
For RPMs and other packages that do not contain a subdirectory, you should set
the SRC_URI option subdir to BP so that the contents are
extracted to the directory expected by the default value of S. For
example:
SRC_URI = "https://example.com/downloads/somepackage.rpm;subdir=${BP}"
This class can also be used for tarballs. For example:
SRC_URI = "file://somepackage.tar.xz;subdir=${BP}"
The bin_package class will copy the extracted content of the tarball from S to D.
This class assumes that the content of the package as installed in S
mirrors the expected layout once installed on the target, which is generally the
case for binary packages. For example, an RPM package for a library would
usually contain the usr/lib directory, and should be extracted to
${S}/usr/lib/<library>.so.<version> to be installed in D correctly.
Note
The extraction of the package passed in SRC_URI is not handled by the bin_package class, but rather by the appropriate fetcher depending on the file extension.
6.8 binconfig
The binconfig class helps to correct paths in shell scripts.
Before pkg-config had become widespread, libraries shipped shell
scripts to give information about the libraries and include paths needed
to build software (usually named LIBNAME-config). This class assists
any recipe using such scripts.
During staging, the OpenEmbedded build system installs such scripts into
the sysroots/ directory. Inheriting this class results in all paths
in these scripts being changed to point into the sysroots/ directory
so that all builds that use the script use the correct directories for
the cross compiling layout. See the
BINCONFIG_GLOB variable for more
information.
6.9 binconfig-disabled
An alternative version of the binconfig
class, which disables binary configuration scripts by making them return
an error in favor of using pkg-config to query the information. The
scripts to be disabled should be specified using the BINCONFIG
variable within the recipe inheriting the class.
6.10 buildhistory
The buildhistory class records a history of build output metadata, which can be used to detect possible regressions as well as used for analysis of the build output. For more information on using Build History, see the “Maintaining Build Output Quality” section in the Yocto Project Development Tasks Manual.
6.11 buildstats
The buildstats class records performance statistics about each task executed during the build (e.g. elapsed time, CPU usage, and I/O usage).
When you use this class, the output goes into the
BUILDSTATS_BASE directory, which defaults
to ${TMPDIR}/buildstats/. You can analyze the elapsed time using
scripts/pybootchartgui/pybootchartgui.py, which produces a cascading
chart of the entire build process and can be useful for highlighting
bottlenecks.
Collecting build statistics is enabled by default through the
USER_CLASSES variable from your
local.conf file. Consequently, you do not have to do anything to
enable the class. However, if you want to disable the class, simply
remove “buildstats” from the USER_CLASSES list.
6.12 buildstats-summary
When inherited globally, prints statistics at the end of the build on sstate re-use. In order to function, this class requires the buildstats class be enabled.
6.13 cargo
The cargo class allows to compile Rust language programs using Cargo. Cargo is Rust’s package manager, allowing to fetch package dependencies and build your program.
Using this class makes it very easy to build Rust programs. All you need
is to use the SRC_URI variable to point to a source repository
which can be built by Cargo, typically one that was created by the
cargo new command, containing a Cargo.toml file, a Cargo.lock file and a src
subdirectory.
If you want to build and package tests of the program, inherit the ptest-cargo class instead of cargo.
You will find an example (that show also how to handle possible git source dependencies) in the zvariant_3.12.0.bb recipe. Another example, with only crate dependencies, is the uutils-coreutils recipe, which was generated by the cargo-bitbake tool.
This class inherits the cargo_common class.
6.14 cargo_c
The cargo_c class can be inherited by a recipe to generate
a Rust library that can be called by C/C++ code. The recipe which inherits this
class has to only replace inherit cargo by inherit cargo_c.
See the rust-c-lib-example_git.bb example recipe.
6.15 cargo_common
The cargo_common class is an internal class that is not intended to be used directly.
An exception is the “rust” recipe, to build the Rust compiler and runtime library, which is built by Cargo but cannot use the cargo class. This is why this class was introduced.
6.16 cargo-update-recipe-crates
The cargo-update-recipe-crates class allows
recipe developers to update the list of Cargo crates in SRC_URI
by reading the Cargo.lock file in the source tree.
To do so, create a recipe for your program, for example using devtool, make it inherit the cargo and cargo-update-recipe-crates and run:
bitbake -c update_crates recipe
This creates a recipe-crates.inc file that you can include in your
recipe:
require ${BPN}-crates.inc
That’s also something you can achieve by using the cargo-bitbake tool.
6.17 ccache
The ccache class enables the C/C++ Compiler Cache for the build. This class is used to give a minor performance boost during the build.
See https://ccache.samba.org/ for information on the C/C++ Compiler
Cache, and the ccache.bbclass
file for details about how to enable this mechanism in your configuration
file, how to disable it for specific recipes, and how to share ccache
files between builds.
Recipes (including native ones) can make use of the host’s
ccache binary (via HOSTTOOLS) if the following configuration
statements are provided in a configuration file:
ASSUME_PROVIDED += "ccache-native"
HOSTTOOLS += "ccache"
Recipes can also explicitly disable Ccache support even when the ccache class is enabled, by setting the CCACHE_DISABLE variable to “1”.
Using the ccache class can lead to unexpected side-effects. Using this class is not recommended.
6.18 chrpath
The chrpath class is a wrapper around the “chrpath” utility, which
is used during the build process for nativesdk, cross, and
cross-canadian recipes to change RPATH records within binaries
in order to make them relocatable.
6.19 cmake
The cmake class allows recipes to build software using the
CMake build system. You can use the
EXTRA_OECMAKE variable to specify additional configuration options to
pass to the cmake command line.
By default, the cmake class uses
Ninja instead of GNU make for building, which
offers better build performance. If a recipe is broken with Ninja, then the
recipe can set the OECMAKE_GENERATOR variable to Unix Makefiles to
use GNU make instead.
If you need to install custom CMake toolchain files supplied by the application
being built, you should install them (during do_install) to the
preferred CMake Module directory: ${D}${datadir}/cmake/modules/.
6.20 cmake-qemu
The cmake-qemu class might be used instead of the
cmake class. In addition to the features provided by the
cmake class, the cmake-qemu class passes
the CMAKE_CROSSCOMPILING_EMULATOR setting to cmake. This allows to use
QEMU user-mode emulation for the execution of cross-compiled binaries on the
host machine. For more information about CMAKE_CROSSCOMPILING_EMULATOR
please refer to the related section of the CMake documentation.
Not all platforms are supported by QEMU. This class only works for machines with
qemu-usermode in the Machine Features. Using QEMU user-mode therefore
involves a certain risk, which is also the reason why this feature is not part of
the main cmake class by default.
One use case is the execution of cross-compiled unit tests with CTest on the build
machine. If CMAKE_CROSSCOMPILING_EMULATOR is configured:
cmake --build --target test
works transparently with QEMU user-mode.
If the CMake project is developed with this use case in mind this works very nicely.
This also applies to an IDE configured to use cmake-native for cross-compiling.
6.21 cml1
The cml1 class provides basic support for the Linux kernel style build configuration system. “cml” stands for “Configuration Menu Language”, which originates from the Linux kernel but is also used in other projects such as U-Boot and BusyBox. It could have been called “kconfig” too.
The CML configuration file location (.config) is by default expected to be
in the build directory (B). This can be overridden with the
KCONFIG_CONFIG_ROOTDIR variable.
6.22 compress_doc
Enables compression for manual and info pages. This class is intended to be inherited globally. The default compression mechanism is gz (gzip) but you can select an alternative mechanism by setting the DOC_COMPRESS variable.
6.23 copyleft_compliance
The copyleft_compliance class preserves source code for the purposes of license compliance. This class is an alternative to the archiver class and is still used by some users even though it has been deprecated in favor of the archiver class.
6.24 copyleft_filter
A class used by the archiver and
copyleft_compliance classes
for filtering licenses. The copyleft_filter class is an internal
class and is not intended to be used directly.
6.25 core-image
The core-image class provides common definitions for the
core-image-* image recipes, such as support for additional
IMAGE_FEATURES.
6.26 cpan*
The cpan* classes support Perl modules.
Recipes for Perl modules are simple. These recipes usually only need to point to the source’s archive and then inherit the proper class file. Building is split into two methods depending on which method the module authors used.
Modules that use old
Makefile.PL-based build system requirecpan.bbclassin their recipes.Modules that use
Build.PL-based build system require usingcpan_build.bbclassin their recipes.
Both build methods inherit the cpan-base class for basic Perl support.
6.27 create-spdx
The create-spdx class provides support for automatically creating SPDX SBOM documents based upon image and SDK contents.
This class is meant to be inherited globally from a configuration file:
INHERIT += "create-spdx"
The toplevel SPDX output file is generated in JSON format as a
IMAGE-MACHINE.spdx.json file in tmp/deploy/images/MACHINE/ inside the
Build Directory. There are other related files in the same directory,
as well as in tmp/deploy/spdx.
The exact behaviour of this class, and the amount of output can be controlled
by the SPDX_PRETTY, SPDX_INCLUDE_SOURCES and other variables
starting with with SPDX_.
See the description of these variables and the “Creating a Software Bill of Materials” section in the Yocto Project Development Manual for more details.
6.28 cross
The cross class provides support for the recipes that build the cross-compilation tools.
6.29 cross-canadian
The cross-canadian class provides support for the recipes that build the Canadian Cross-compilation tools for SDKs. See the “Cross-Development Toolchain Generation” section in the Yocto Project Overview and Concepts Manual for more discussion on these cross-compilation tools.
6.30 crosssdk
The crosssdk class provides support for the recipes that build the cross-compilation tools used for building SDKs. See the “Cross-Development Toolchain Generation” section in the Yocto Project Overview and Concepts Manual for more discussion on these cross-compilation tools.
6.31 cython
The cython class can be used by Python recipes that require Cython as part of their build dependencies (DEPENDS).
6.32 debian
The debian class renames output packages so that they follow the
Debian naming policy (i.e. glibc becomes libc6 and
glibc-devel becomes libc6-dev.) Renaming includes the library
name and version as part of the package name.
If a recipe creates packages for multiple libraries (shared object files
of .so type), use the LEAD_SONAME
variable in the recipe to specify the library on which to apply the
naming scheme.
6.33 deploy
The deploy class handles deploying files to the
DEPLOY_DIR_IMAGE directory. The main
function of this class is to allow the deploy step to be accelerated by
shared state. Recipes that inherit this class should define their own
do_deploy function to copy the files to be
deployed to DEPLOYDIR, and use addtask to
add the task at the appropriate place, which is usually after
do_compile or
do_install. The class then takes care of
staging the files from DEPLOYDIR to DEPLOY_DIR_IMAGE.
6.34 devicetree
The devicetree class allows to build a recipe that compiles device tree source files that are not in the kernel tree.
The compilation of out-of-tree device tree sources is the same as the kernel
in-tree device tree compilation process. This includes the ability to include
sources from the kernel such as SoC dtsi files as well as C header files,
such as gpio.h.
The do_compile task will compile two kinds of files:
Regular device tree sources with a
.dtsextension.Device tree overlays, detected from the presence of the
/plugin/;string in the file contents.
This class deploys the generated device tree binaries into
${DEPLOY_DIR_IMAGE}/devicetree/. This is similar to
what the kernel-devicetree class does, with the added
devicetree subdirectory to avoid name clashes. Additionally, the device
trees are populated into the sysroot for access via the sysroot from within
other recipes.
By default, all device tree sources located in DT_FILES_PATH directory
are compiled. To select only particular sources, set DT_FILES to
a space-separated list of files (relative to DT_FILES_PATH). For
convenience, both .dts and .dtb extensions can be used.
An extra padding is appended to non-overlay device trees binaries. This can typically be used as extra space for adding extra properties at boot time. The padding size can be modified by setting DT_PADDING_SIZE to the desired size, in bytes.
See devicetree.bbclass sources for further variables controlling this class.
Here is an excerpt of an example recipes-kernel/linux/devicetree-acme.bb
recipe inheriting this class:
inherit devicetree
COMPATIBLE_MACHINE = "^mymachine$"
SRC_URI:mymachine = "file://mymachine.dts"
6.35 devshell
The devshell class adds the do_devshell task. Distribution policy dictates whether to include this class. See the “Using a Development Shell” section in the Yocto Project Development Tasks Manual for more information about using devshell.
6.36 devupstream
The devupstream class uses BBCLASSEXTEND to add a variant of the recipe that fetches from an alternative URI (e.g. Git) instead of a tarball. Here is an example:
BBCLASSEXTEND = "devupstream:target"
SRC_URI:class-devupstream = "git://git.example.com/example;branch=main"
SRCREV:class-devupstream = "abcd1234"
Adding the above statements to your recipe creates a variant that has
DEFAULT_PREFERENCE set to “-1”.
Consequently, you need to select the variant of the recipe to use it.
Any development-specific adjustments can be done by using the
class-devupstream override. Here is an example:
DEPENDS:append:class-devupstream = " gperf-native"
do_configure:prepend:class-devupstream() {
touch ${S}/README
}
The class currently only supports creating a development variant of the target recipe, not native or nativesdk variants.
The BBCLASSEXTEND syntax (i.e. devupstream:target) provides
support for native and nativesdk variants. Consequently, this
functionality can be added in a future release.
Support for other version control systems such as Subversion is limited
due to BitBake’s automatic fetch dependencies (e.g.
subversion-native).
6.37 externalsrc
The externalsrc class supports building software from source code that is external to the OpenEmbedded build system. Building software from an external source tree means that the build system’s normal fetch, unpack, and patch process is not used.
By default, the OpenEmbedded build system uses the S and B variables to locate unpacked recipe source code and to build it, respectively. When your recipe inherits the externalsrc class, you use the EXTERNALSRC and EXTERNALSRC_BUILD variables to ultimately define S and B.
By default, this class expects the source code to support recipe builds that use the B variable to point to the directory in which the OpenEmbedded build system places the generated objects built from the recipes. By default, the B directory is set to the following, which is separate from the source directory (S):
${WORKDIR}/${BPN}-{PV}/
See these variables for more information: WORKDIR, BPN, and PV,
For more information on the externalsrc class, see the comments in
meta/classes/externalsrc.bbclass in OpenEmbedded-Core (OE-Core).
For information on how to use the externalsrc class, see the
“Building Software from an External Source”
section in the Yocto Project Development Tasks Manual.
6.38 extrausers
The extrausers class allows additional user and group configuration to be applied at the image level. Inheriting this class either globally or from an image recipe allows additional user and group operations to be performed using the EXTRA_USERS_PARAMS variable.
Note
The user and group operations added using the extrausers class are not tied to a specific recipe outside of the recipe for the image. Thus, the operations can be performed across the image as a whole. Use the useradd* class to add user and group configuration to a specific recipe.
Here is an example that uses this class in an image recipe:
inherit extrausers
EXTRA_USERS_PARAMS = "\
useradd -p '' tester; \
groupadd developers; \
userdel nobody; \
groupdel -g video; \
groupmod -g 1020 developers; \
usermod -s /bin/sh tester; \
"
Here is an example that adds two users named “tester-jim” and “tester-sue” and assigns passwords. First on host, create the (escaped) password hash:
printf "%q" $(mkpasswd -m sha256crypt tester01)
The resulting hash is set to a variable and used in useradd command parameters:
inherit extrausers
PASSWD = "\$X\$ABC123\$A-Long-Hash"
EXTRA_USERS_PARAMS = "\
useradd -p '${PASSWD}' tester-jim; \
useradd -p '${PASSWD}' tester-sue; \
"
Finally, here is an example that sets the root password:
inherit extrausers
EXTRA_USERS_PARAMS = "\
usermod -p '${PASSWD}' root; \
"
Note
From a security perspective, hardcoding a default password is not generally a good idea or even legal in some jurisdictions. It is recommended that you do not do this if you are building a production image.
6.39 features_check
The features_check class allows individual recipes to check for required and conflicting DISTRO_FEATURES, MACHINE_FEATURES or COMBINED_FEATURES.
This class provides support for the following variables:
REQUIRED_MACHINE_FEATURESCONFLICT_MACHINE_FEATURESANY_OF_MACHINE_FEATURESREQUIRED_COMBINED_FEATURESCONFLICT_COMBINED_FEATURESANY_OF_COMBINED_FEATURES
If any conditions specified in the recipe using the above variables are not met, the recipe will be skipped, and if the build system attempts to build the recipe then an error will be triggered.
6.40 fontcache
The fontcache class generates the proper post-install and
post-remove (postinst and postrm) scriptlets for font packages. These
scriptlets call fc-cache (part of Fontconfig) to add the fonts
to the font information cache. Since the cache files are
architecture-specific, fc-cache runs using QEMU if the postinst
scriptlets need to be run on the build host during image creation.
If the fonts being installed are in packages other than the main package, set FONT_PACKAGES to specify the packages containing the fonts.
6.41 fs-uuid
The fs-uuid class extracts UUID from
${ROOTFS}, which must have been built
by the time that this function gets called. The fs-uuid class only
works on ext file systems and depends on tune2fs.
6.42 gconf
The gconf class provides common functionality for recipes that need
to install GConf schemas. The schemas will be put into a separate
package (${PN}-gconf) that is created
automatically when this class is inherited. This package uses the
appropriate post-install and post-remove (postinst/postrm) scriptlets to
register and unregister the schemas in the target image.
6.43 gettext
The gettext class provides support for building
software that uses the GNU gettext internationalization and localization
system. All recipes building software that use gettext should inherit this
class.
This class will configure recipes to build translations unless:
the USE_NLS variable is set to
no, orthe INHIBIT_DEFAULT_DEPS variable is set and the recipe inheriting the gettext class does not also inherit the cross-canadian class.
6.44 github-releases
For recipes that fetch release tarballs from github, the github-releases
class sets up a standard way for checking available upstream versions
(to support devtool upgrade and the Automated Upgrade Helper (AUH)).
To use it, add “github-releases” to the inherit line in the recipe,
and if the default value of GITHUB_BASE_URI is not suitable,
then set your own value in the recipe. You should then use ${GITHUB_BASE_URI}
in the value you set for SRC_URI within the recipe.
6.45 gnomebase
The gnomebase class is the base class for recipes that build software from the GNOME stack. This class sets SRC_URI to download the source from the GNOME mirrors as well as extending FILES with the typical GNOME installation paths.
6.46 go
The go class supports building Go programs. The behavior of this class is controlled by the mandatory GO_IMPORT variable, and by the optional GO_INSTALL and GO_INSTALL_FILTEROUT ones.
To build a Go program with the Yocto Project, you can use the go-helloworld_0.1.bb recipe as an example.
6.47 go-mod
The go-mod class allows to use Go modules, and inherits the go class.
See the associated GO_WORKDIR variable.
6.48 go-mod-update-modules
The go-mod-update-modules class can be used in Go recipes and
defines a do_update_modules task that can be run manually to update two
files (“BPN” below corresponds to BPN):
BPN-go-mods.inc: list of Go modules the recipe depends on.BPN-licenses.inc: list of licenses for each Go modules the recipe depends on.
These files can then updated automatically with the do_update_modules task.
6.49 go-vendor
The go-vendor class implements support for offline builds, also known as Go vendoring. In such a scenario, the module dependencias are downloaded during the do_fetch task rather than when modules are imported, thus being coherent with Yocto’s concept of fetching every source beforehand.
The dependencies are unpacked into the modules’ vendor directory, where a
manifest file is generated.
6.50 gobject-introspection
Provides support for recipes building software that supports GObject introspection. This functionality is only enabled if the “gobject-introspection-data” feature is in DISTRO_FEATURES as well as “qemu-usermode” being in MACHINE_FEATURES.
Note
This functionality is enabled by default and, if not applicable, should be disabled through DISTRO_FEATURES_OPTED_OUT or MACHINE_FEATURES_OPTED_OUT, respectively.
6.51 grub-efi
The grub-efi class provides grub-efi-specific functions for
building bootable images.
This class supports several variables:
INITRD: Indicates list of filesystem images to concatenate and use as an initial RAM disk (initrd) (optional). Can be specified for each
LABEL.ROOTFS: Indicates a filesystem image to include as the root filesystem (optional).
GRUB_GFXSERIAL: Set this to “1” to have graphics and serial in the boot menu.
LABELS: A list of targets for the automatic configuration.
APPEND: An override list of append strings for each
LABEL.GRUB_TITLE: A custom title for each
LABEL. If a label does not have a custom title, the label is used as title for the GRUB menu entry.GRUB_OPTS: Additional options to add to the configuration (optional). Options are delimited using semi-colon characters (
;).GRUB_TIMEOUT: Timeout before executing the default
LABEL(optional).
Each LABEL defined in the LABELS variable creates a GRUB boot
entry, and some variables can be defined individually per LABEL. The label
specific override names are defined as grub_LABEL.
For example, for a label factory, the override name would be
grub_factory. A custom GRUB menu entry titled “Factory Install” with the
additional parameter factory=yes can be achieved as follows:
LABELS:append = " factory"
APPEND:grub_factory = "factory=yes"
GRUB_TITLE:grub_factory = "Factory Install"
6.52 gsettings
The gsettings class provides common functionality for recipes that need to install GSettings (glib) schemas. The schemas are assumed to be part of the main package. Appropriate post-install and post-remove (postinst/postrm) scriptlets are added to register and unregister the schemas in the target image.
6.53 gtk-doc
The gtk-doc class is a helper class to pull in the appropriate
gtk-doc dependencies and disable gtk-doc.
6.54 gtk-icon-cache
The gtk-icon-cache class generates the proper post-install and
post-remove (postinst/postrm) scriptlets for packages that use GTK+ and
install icons. These scriptlets call gtk-update-icon-cache to add
the fonts to GTK+’s icon cache. Since the cache files are
architecture-specific, gtk-update-icon-cache is run using QEMU if
the postinst scriptlets need to be run on the build host during image
creation.
6.55 gtk-immodules-cache
The gtk-immodules-cache class generates the proper post-install and
post-remove (postinst/postrm) scriptlets for packages that install GTK+
input method modules for virtual keyboards. These scriptlets call
gtk-update-icon-cache to add the input method modules to the cache.
Since the cache files are architecture-specific,
gtk-update-icon-cache is run using QEMU if the postinst scriptlets
need to be run on the build host during image creation.
If the input method modules being installed are in packages other than the main package, set GTKIMMODULES_PACKAGES to specify the packages containing the modules.
6.56 gzipnative
The gzipnative class enables the use of different native versions of
gzip and pigz rather than the versions of these tools from the
build host.
6.57 image
The image class helps support creating images in different formats.
First, the root filesystem is created from packages using one of the
rootfs*.bbclass files (depending on the package format used) and
then one or more image files are created.
The IMAGE_FSTYPES variable controls the types of images to generate.
The IMAGE_INSTALL variable controls the list of packages to install into the image.
For information on customizing images, see the “Customizing Images” section in the Yocto Project Development Tasks Manual. For information on how images are created, see the “Images” section in the Yocto Project Overview and Concepts Manual.
6.58 image-buildinfo
The image-buildinfo class writes a plain text file containing
build information to the target filesystem at ${sysconfdir}/buildinfo
by default (as specified by IMAGE_BUILDINFO_FILE).
This can be useful for manually determining the origin of any given
image. It writes out two sections:
Build Configuration: a list of variables and their values (specified by IMAGE_BUILDINFO_VARS, which defaults to DISTRO and DISTRO_VERSION)
Layer Revisions: the revisions of all of the layers used in the build.
Additionally, when building an SDK it will write the same contents
to /buildinfo by default (as specified by
SDK_BUILDINFO_FILE).
6.59 image_types
The image_types class defines all of the standard image output types that you can enable through the IMAGE_FSTYPES variable. You can use this class as a reference on how to add support for custom image output types.
By default, the image class automatically
enables the image_types class. The image class uses the
IMGCLASSES variable as follows:
IMGCLASSES = "rootfs_${IMAGE_PKGTYPE} image_types ${IMAGE_CLASSES}"
# Only Linux SDKs support populate_sdk_ext, fall back to populate_sdk_base
# in the non-Linux SDK_OS case, such as mingw32
inherit populate_sdk_base
IMGCLASSES += "${@['', 'populate_sdk_ext']['linux' in d.getVar("SDK_OS")]}"
IMGCLASSES += "${@bb.utils.contains_any('IMAGE_FSTYPES', 'live iso hddimg', 'image-live', '', d)}"
IMGCLASSES += "${@bb.utils.contains('IMAGE_FSTYPES', 'container', 'image-container', '', d)}"
IMGCLASSES += "image_types_wic"
IMGCLASSES += "rootfs-postcommands"
IMGCLASSES += "image-postinst-intercepts"
IMGCLASSES += "overlayfs-etc"
inherit_defer ${IMGCLASSES}
The image_types class also handles conversion and compression of images.
Note
To build a VMware VMDK image, you need to add “wic.vmdk” to IMAGE_FSTYPES. This would also be similar for Virtual Box Virtual Disk Image (“vdi”) and QEMU Copy On Write Version 2 (“qcow2”) images.
6.60 image-container
The image-container class is automatically inherited in
image recipes that have the container image type
in IMAGE_FSTYPES. It provides relevant settings to generate an image
ready for use with an OCI-compliant
container management tool, such as Podman or
Docker.
Note
This class neither builds nor installs container management tools on the target. Those tools are available in the meta-virtualization layer.
You should set the PREFERRED_PROVIDER for the Linux kernel to
linux-dummy in a configuration file:
PREFERRED_PROVIDER_virtual/kernel = "linux-dummy"
Otherwise an error is triggered. If desired, the IMAGE_CONTAINER_NO_DUMMY variable can be set to “1” to avoid triggering this error.
The linux-dummy recipe acts as a Linux kernel recipe but builds nothing. It
is relevant to use as the preferred Linux kernel provider in this case as a
container image does not need to include a Linux kernel. Selecting it as the
preferred provider for the kernel will also decrease build time.
Using this class only deploys an additional tar.bz2 archive to
DEPLOY_DIR_IMAGE. This archive can be used in a container file (a file
typically named Dockerfile or Containerfile). For example, to be used with
Podman or Docker, the
container file could contain
the following instructions:
FROM scratch
ADD ./image-container-qemux86-64.rootfs.tar.bz2 /
ENTRYPOINT /bin/sh
This is suitable to build a container using our generated root filesystem image.
6.61 image-live
This class controls building “live” (i.e. HDDIMG and ISO) images. Live images contain syslinux for legacy booting, as well as the bootloader specified by EFI_PROVIDER if MACHINE_FEATURES contains “efi”.
Normally, you do not use this class directly. Instead, you add “live” to IMAGE_FSTYPES.
6.62 insane
The insane class adds a step to the package generation process so that output quality assurance checks are generated by the OpenEmbedded build system. A range of checks are performed that check the build’s output for common problems that show up during runtime. Distribution policy usually dictates whether to include this class.
You can configure the sanity checks so that specific test failures either raise a warning or an error message. Typically, failures for new tests generate a warning. Subsequent failures for the same test would then generate an error message once the metadata is in a known and good condition. See the “QA Error and Warning Messages” Chapter for a list of all the warning and error messages you might encounter using a default configuration.
Use the WARN_QA and
ERROR_QA variables to control the behavior of
these checks at the global level (i.e. in your custom distro
configuration). However, to skip one or more checks in recipes, you
should use INSANE_SKIP. For example, to skip
the check for symbolic link .so files in the main package of a
recipe, add the following to the recipe. You need to realize that the
package name override, in this example ${PN}, must be used:
INSANE_SKIP:${PN} += "dev-so"
Please keep in mind that the QA checks are meant to detect real or potential problems in the packaged output. So exercise caution when disabling these checks.
The tests you can list with the WARN_QA and ERROR_QA variables are documented in the QA Error and Warning Messages document of the Yocto Project Reference Manual.
6.63 kernel
The kernel class handles building Linux kernels. The class contains code to build all kernel trees. All needed headers are staged into the STAGING_KERNEL_DIR directory to allow out-of-tree module builds using the module class.
If a file named defconfig is listed in SRC_URI, then by default
do_configure copies it as .config in the build directory,
so it is automatically used as the kernel configuration for the build. This
copy is not performed in case .config already exists there: this allows
recipes to produce a configuration by other means in
do_configure:prepend.
Each built kernel module is packaged separately and inter-module
dependencies are created by parsing the modinfo output. If all modules
are required, then installing the kernel-modules package installs all
packages with modules and various other kernel packages such as
kernel-vmlinux.
The kernel class contains logic that allows you to embed an initial RAM filesystem (Initramfs) image when you build the kernel image. For information on how to build an Initramfs, see the “Building an Initial RAM Filesystem (Initramfs) Image” section in the Yocto Project Development Tasks Manual.
Various other classes are used by the kernel and module classes internally including the kernel-arch, module-base, and linux-kernel-base classes.
6.64 kernel-arch
The kernel-arch class sets the ARCH environment variable for
Linux kernel compilation (including modules).
6.65 kernel-devicetree
The kernel-devicetree class, which is inherited by the kernel class, supports device tree generation.
Its behavior is mainly controlled by the following variables:
KERNEL_DEVICETREE_BUNDLE: whether to bundle the kernel and device tree
KERNEL_DTBDEST: directory where to install DTB files
KERNEL_DTBVENDORED: whether to keep vendor subdirectories
KERNEL_DTC_FLAGS: flags for
dtc, the Device Tree CompilerKERNEL_PACKAGE_NAME: base name of the kernel packages
6.66 kernel-fit-image
The kernel-fit-image class provides support to pack a kernel image, device trees, a U-boot script, an Initramfs and additional loadables into a single FIT image. In theory, a FIT image can support any number of kernels, U-boot scripts, Initramfs, and device trees. However, kernel-fit-image currently only supports limited usecases: just one kernel image, an optional U-boot script, an optional Initramfs, and any number of device trees and loadables.
The FIT image is created by a recipe which inherits the
kernel-fit-image class.
One such example is the linux-yocto-fitimage recipe which creates a FIT
image for the Linux Yocto kernel.
Additionally, it is required that KERNEL_CLASSES is set to include
kernel-fit-extra-artifacts.
The kernel-fit-extra-artifacts class exposes the required kernel
artifacts to the DEPLOY_DIR_IMAGE which are used by the
kernel-fit-image class to create the FIT image.
The simplest example for building a FIT image is to add:
KERNEL_CLASSES += "kernel-fit-extra-artifacts"
to the machine configuration file and to execute:
bitbake linux-yocto-fitimage
This results in a fitImage file deployed to the DEPLOY_DIR_IMAGE
directory and a linux-yocto-fitimage package which can be installed.
The same approach works for all variants of the linux-yocto kernel.
For example, if the linux-yocto-rt kernel should be used, add the following
lines to the machine configuration file:
KERNEL_CLASSES += "kernel-fit-extra-artifacts"
PREFERRED_PROVIDER_virtual/kernel = "linux-yocto-rt"
The FIT image, this time including the RT kernel, is built again by calling:
bitbake linux-yocto-fitimage
For other kernels provided by other layers, the same approach would work.
However, it is usually more intuitive to add a custom FIT image recipe next to
the custom kernel recipe.
For example, if a layer provides a linux-vanilla recipe, a
linux-vanilla-fitimage recipe may be added as well.
The linux-vanilla-fitimage recipe can be created as a customized copy of
the linux-yocto-fitimage recipe.
Usually the kernel is built as a dependency of an image. If the FIT image should be used as a replacement for the kernel image which is installed in the root filesystem, then the following variables can be set e.g. in the machine configuration file:
# Create and deploy the vmlinux artifact which gets included into the FIT image
KERNEL_CLASSES += "kernel-fit-extra-artifacts"
# Do not install the kernel image package
RRECOMMENDS:${KERNEL_PACKAGE_NAME}-base = ""
# Install the FIT image package
MACHINE_ESSENTIAL_EXTRA_RDEPENDS += "linux-yocto-fitimage"
# Configure the image.bbclass to depend on the FIT image instead of only
# the kernel to ensure the FIT image is built and deployed with the image
KERNEL_DEPLOY_DEPEND = "linux-yocto-fitimage:do_deploy"
The kernel-fit-image class processes several variables that allow configuration:
The options for the device tree compiler passed to
mkimage -Dwhen creating the FIT image are specified using the UBOOT_MKIMAGE_DTCOPTS variable.Only a single kernel can be added to the FIT image created by kernel-fit-image and it is a mandatory component of the FIT image. The address where the kernel image is to be loaded by U-Boot is specified by UBOOT_LOADADDRESS and the entrypoint by UBOOT_ENTRYPOINT. Setting FIT_ADDRESS_CELLS to “2” is necessary if such addresses are 64 bit ones.
Multiple device trees can be added to the FIT image created by kernel-fit-image and the device tree is optional. The address where the device tree is to be loaded by U-Boot is specified by UBOOT_DTBO_LOADADDRESS for device tree overlays and by UBOOT_DTB_LOADADDRESS for device tree binaries.
Only a single Initramfs can be added to the FIT image created by kernel-fit-image. The Initramfs in FIT is optional. The address where the RAM disk image is to be loaded by U-Boot is specified by UBOOT_RD_LOADADDRESS and the entrypoint by UBOOT_RD_ENTRYPOINT. The Initramfs is added to the FIT image when INITRAMFS_IMAGE is specified.
It’s recommended to add the Initramfs and the kernel image as independent image nodes to the FIT image. Bundling a RAM disk image with the kernel image and including the bundle (INITRAMFS_IMAGE_BUNDLE set to “1”) in the FIT image is possible. However, this approach has the disadvantage that any change to the RAM disk image necessitates rebuilding the kernel image. This process requires the full kernel build directory, which is kind of incompatible with the SSTATE_DIR and, consequently, with SDKs.
Only a single U-Boot boot script can be added to the FIT image created by kernel-fit-image. The boot script is optional. The boot script is specified in the ITS file as a text file containing U-Boot commands. When using a boot script the recipe which inherits the kernel-fit-image class should add the script to SRC_URI and set the FIT_UBOOT_ENV variable to the name of the file like the following:
FIT_UBOOT_ENV = "boot.txt" SRC_URI += "file://${FIT_UBOOT_ENV}"
At run-time, U-boot’s boot command can be configured to load the boot script from the FIT image and source it.
Multiple additional loadables (e.g.: firmwares for auxiliary processors) can be added to the FIT image created by kernel-fit-image. The addition of loadables is optional. The loadables are specified using the FIT_LOADABLES variable; each of them can then be configured through flags on the following variables: FIT_LOADABLE_ARCH, FIT_LOADABLE_COMPRESSION, FIT_LOADABLE_DESCRIPTION, FIT_LOADABLE_ENTRYPOINT, FIT_LOADABLE_FILENAME, FIT_LOADABLE_LOADADDRESS, FIT_LOADABLE_OS and FIT_LOADABLE_TYPE. All loadables specified in this way will be added to all configurations present in the FIT image.
The FIT image generated by the kernel-fit-image class is signed when the variables UBOOT_SIGN_ENABLE, UBOOT_MKIMAGE_DTCOPTS, UBOOT_SIGN_KEYDIR and UBOOT_SIGN_KEYNAME are set appropriately. The default values used for FIT_HASH_ALG and FIT_SIGN_ALG in kernel-fit-image are “sha256” and “rsa2048” respectively. The keys for signing the FIT image can be generated using the kernel-fit-image class when both FIT_GENERATE_KEYS and UBOOT_SIGN_ENABLE are set to “1”.
6.67 kernel-fit-extra-artifacts
The kernel-fit-extra-artifacts class exposes the required kernel artifacts to the DEPLOY_DIR_IMAGE directory. These artifacts are used by the kernel-fit-image class to create a FIT image that can include the kernel, device trees, an optional U-Boot script, and an optional Initramfs.
This class is typically included by adding it to the KERNEL_CLASSES variable in your kernel recipe or machine configuration when building FIT images. It ensures that all necessary files are available for packaging into the FIT image, such as the kernel binary, device tree blobs (DTBs), and other related files.
For example, to enable this class, set:
KERNEL_CLASSES += "kernel-fit-extra-artifacts"
This is required when using the kernel-fit-image class to generate FIT images for your kernel.
6.68 kernel-grub
The kernel-grub class updates the boot area and the boot menu with the kernel as the priority boot mechanism while installing a RPM to update the kernel on a deployed target.
6.69 kernel-module-split
The kernel-module-split class provides common functionality for splitting Linux kernel modules into separate packages.
6.70 kernel-uboot
The kernel-uboot class provides support for building from vmlinux-style kernel sources.
6.71 kernel-uimage
The kernel-uimage class provides support to pack uImage.
6.72 kernel-yocto
The kernel-yocto class provides common functionality for building from linux-yocto style kernel source repositories.
6.73 kernel-yocto-rust
The kernel-yocto-rust class creates the necessary Rust
Linux kernel dependencies and ensures that they are available by running make
rustavailable from the Linux kernel source tree.
6.74 kernelsrc
The kernelsrc class sets the Linux kernel source and version.
6.75 lib_package
The lib_package class supports recipes that build libraries and
produce executable binaries, where those binaries should not be
installed by default along with the library. Instead, the binaries are
added to a separate ${PN}-bin package to
make their installation optional.
6.76 libc*
The libc* classes support recipes that build packages with libc:
The libc-common class provides common support for building with
libc.The libc-package class supports packaging up
glibcandeglibc.
6.77 license
The license class provides license manifest creation and license exclusion. This class is enabled by default using the default value for the INHERIT_DISTRO variable.
6.78 linux-kernel-base
The linux-kernel-base class provides common functionality for recipes that build out of the Linux kernel source tree. These builds goes beyond the kernel itself. For example, the Perf recipe also inherits this class.
6.79 linuxloader
Provides the function linuxloader(), which gives the value of the
dynamic loader/linker provided on the platform. This value is used by a
number of other classes.
6.80 logging
The logging class provides the standard shell functions used to log
messages for various BitBake severity levels (i.e. bbplain,
bbnote, bbwarn, bberror, bbfatal, and bbdebug).
This class is enabled by default since it is inherited by the base class.
6.81 meson
The meson class allows to create recipes that build software
using the Meson build system. You can use the
MESON_BUILDTYPE, MESON_TARGET and EXTRA_OEMESON
variables to specify additional configuration options to be passed using the
meson command line.
6.82 metadata_scm
The metadata_scm class provides functionality for querying the branch and revision of a Source Code Manager (SCM) repository.
The base class uses this class to print the revisions of each layer before starting every build. The metadata_scm class is enabled by default because it is inherited by the base class.
6.83 mime
The mime class generates the proper post-install and post-remove
(postinst/postrm) scriptlets for packages that install MIME type files.
These scriptlets call update-mime-database to add the MIME types to
the shared database.
6.84 mime-xdg
The mime-xdg class generates the proper
post-install and post-remove (postinst/postrm) scriptlets for packages
that install .desktop files containing MimeType entries.
These scriptlets call update-desktop-database to add the MIME types
to the database of MIME types handled by desktop files.
Thanks to this class, when users open a file through a file browser on recently created images, they don’t have to choose the application to open the file from the pool of all known applications, even the ones that cannot open the selected file.
If you have recipes installing their .desktop files as absolute
symbolic links, the detection of such files cannot be done by the current
implementation of this class. In this case, you have to add the corresponding
package names to the MIME_XDG_PACKAGES variable.
6.85 mirrors
The mirrors class sets up some standard MIRRORS entries for source code mirrors. These mirrors provide a fall-back path in case the upstream source specified in SRC_URI within recipes is unavailable.
This class is enabled by default since it is inherited by the base class.
6.86 module
The module class provides support for building out-of-tree Linux kernel modules. The class inherits the module-base and kernel-module-split classes, and implements the do_compile and do_install tasks. The class provides everything needed to build and package a kernel module.
For general information on out-of-tree Linux kernel modules, see the “Incorporating Out-of-Tree Modules” section in the Yocto Project Linux Kernel Development Manual.
6.87 module-base
The module-base class provides the base functionality for building Linux kernel modules. Typically, a recipe that builds software that includes one or more kernel modules and has its own means of building the module inherits this class as opposed to inheriting the module class.
6.88 module-rust
The module-rust class provides support for building out-of-tree Linux kernel modules written in the Rust programming language. The class inherits the module class.
For general information on out-of-tree Linux kernel modules, see the “Incorporating Out-of-Tree Modules” section in the Yocto Project Linux Kernel Development Manual.
6.89 multilib*
The multilib* classes provide support for building libraries with different target optimizations or target architectures and installing them side-by-side in the same image.
For more information on using the Multilib feature, see the “Combining Multiple Versions of Library Files into One Image” section in the Yocto Project Development Tasks Manual.
6.90 native
The native class provides common functionality for recipes that build tools to run on the Build Host (i.e. tools that use the compiler or other tools from the build host).
You can create a recipe that builds tools that run natively on the host a couple different ways:
Create a
myrecipe-native.bbrecipe that inherits the native class. If you use this method, you must order the inherit statement in the recipe after all other inherit statements so that the native class is inherited last.Note
When creating a recipe this way, the recipe name must follow this naming convention:
myrecipe-native.bb
Not using this naming convention can lead to subtle problems caused by existing code that depends on that naming convention.
Or, create a native variant of any target recipe (e.g.
myrecipe.bb) by adding the following to the recipe:BBCLASSEXTEND = "native"
Inside the recipe, use
:class-nativeand:class-targetoverrides to specify any functionality specific to the respective native or target case.
Although applied differently, the native class is used with both methods. The advantage of the second method is that you do not need to have two separate recipes (assuming you need both) for native and target. All common parts of the recipe are automatically shared.
6.91 nativesdk
The nativesdk class provides common functionality for recipes that wish to build tools to run as part of an SDK (i.e. tools that run on SDKMACHINE).
You can create a recipe that builds tools that run on the SDK machine a couple different ways:
Create a
nativesdk-myrecipe.bbrecipe that inherits the nativesdk class. If you use this method, you must order the inherit statement in the recipe after all other inherit statements so that the nativesdk class is inherited last.Note
When creating a recipe, you must follow this naming convention:
nativesdk-myrecipe.bb
Not doing so can lead to subtle problems because there is code that depends on the naming convention.
Or, create a nativesdk variant of any target recipe (e.g.
myrecipe.bb) by adding the following to the recipe:BBCLASSEXTEND = "nativesdk"
Inside the recipe, use
:class-nativesdkand:class-targetoverrides to specify any functionality specific to the respective SDK machine or target case.
Although applied differently, the nativesdk class is used with both methods. The advantage of the second method is that you do not need to have two separate recipes (assuming you need both) for the SDK machine and the target. All common parts of the recipe are automatically shared.
6.92 nopackages
Disables packaging tasks for those recipes and classes where packaging is not needed.
6.93 nospdx
The nospdx allows a recipe to opt out of SPDX generation provided by create-spdx.
6.94 npm
Warning
The NPM fetcher is currently disabled due to security concerns. See 355cd22 for more information.
Provides support for building Node.js software fetched using the node package manager (NPM).
Note
Currently, recipes inheriting this class must use the npm://
fetcher to have dependencies fetched and packaged automatically.
For information on how to create NPM packages, see the “Creating Node Package Manager (NPM) Packages” section in the Yocto Project Development Tasks Manual.
6.95 overlayfs
It’s often desired in Embedded System design to have a read-only root filesystem.
But a lot of different applications might want to have read-write access to
some parts of a filesystem. It can be especially useful when your update mechanism
overwrites the whole root filesystem, but you may want your application data to be preserved
between updates. The overlayfs class provides a way
to achieve that by means of overlayfs and at the same time keeping the base
root filesystem read-only.
To use this class, set a mount point for a partition overlayfs is going to use as upper
layer in your machine configuration. The underlying file system can be anything that
is supported by overlayfs. This has to be done in your machine configuration:
OVERLAYFS_MOUNT_POINT[data] = "/data"
Note
QA checks fail to catch file existence if you redefine this variable in your recipe!
Only the existence of the systemd mount unit file is checked, not its contents.
To get more details on
overlayfs, its internals and supported operations, please refer to the official documentation of the Linux kernel.
The class assumes you have a data.mount systemd unit defined elsewhere in your BSP
(e.g. in systemd-machine-units recipe) and it’s installed into the image.
Then you can specify writable directories on a recipe basis (e.g. in my-application.bb):
OVERLAYFS_WRITABLE_PATHS[data] = "/usr/share/my-custom-application"
To support several mount points you can use a different variable flag. Assuming we
want to have a writable location on the file system, but do not need that the data
survives a reboot, then we could have a mnt-overlay.mount unit for a tmpfs
file system.
In your machine configuration:
OVERLAYFS_MOUNT_POINT[mnt-overlay] = "/mnt/overlay"
and then in your recipe:
OVERLAYFS_WRITABLE_PATHS[mnt-overlay] = "/usr/share/another-application"
On a practical note, your application recipe might require multiple
overlays to be mounted before running to avoid writing to the underlying
file system (which can be forbidden in case of read-only file system)
To achieve that overlayfs provides a systemd
helper service for mounting overlays. This helper service is named
${PN}-overlays.service and can be depended on in your application recipe
(named application in the following example) systemd unit by adding
to the unit the following:
[Unit]
After=application-overlays.service
Requires=application-overlays.service
Note
The class does not support the /etc directory itself, because systemd depends on it.
In order to get /etc in overlayfs, see overlayfs-etc.
6.96 overlayfs-etc
In order to have the /etc directory in overlayfs a special handling at early
boot stage is required. The idea is to supply a custom init script that mounts
/etc before launching the actual init program, because the latter already
requires /etc to be mounted.
Example usage in image recipe:
IMAGE_FEATURES += "overlayfs-etc"
Note
This class must not be inherited directly. Use IMAGE_FEATURES or EXTRA_IMAGE_FEATURES
Your machine configuration should define at least the device, mount point, and file system type
you are going to use for overlayfs:
OVERLAYFS_ETC_MOUNT_POINT = "/data"
OVERLAYFS_ETC_DEVICE = "/dev/mmcblk0p2"
OVERLAYFS_ETC_FSTYPE ?= "ext4"
To control more mount options you should consider setting mount options
(defaults is used by default):
OVERLAYFS_ETC_MOUNT_OPTIONS = "wsync"
The class provides two options for /sbin/init generation:
The default option is to rename the original
/sbin/initto/sbin/init.origand place the generated init under original name, i.e./sbin/init. It has an advantage that you won’t need to change any kernel parameters in order to make it work, but it poses a restriction that package-management can’t be used, because updating the init manager would remove the generated script.If you wish to keep original init as is, you can set:
OVERLAYFS_ETC_USE_ORIG_INIT_NAME = "0"
Then the generated init will be named
/sbin/preinitand you would need to extend your kernel parameters manually in your bootloader configuration.
6.97 own-mirrors
The own-mirrors class makes it easier to set up your own PREMIRRORS from which to first fetch source before attempting to fetch it from the upstream specified in SRC_URI within each recipe.
To use this class, inherit it globally and specify SOURCE_MIRROR_URL. Here is an example:
INHERIT += "own-mirrors"
SOURCE_MIRROR_URL = "http://example.com/my-source-mirror"
You can specify only a single URL in SOURCE_MIRROR_URL.
6.98 package
The package class supports generating packages from a build’s
output. The core generic functionality is in package.bbclass. The
code specific to particular package types resides in these
package-specific classes: package_deb,
package_rpm, package_ipk.
You can control the list of resulting package formats by using the
PACKAGE_CLASSES variable defined in your conf/local.conf
configuration file, which is located in the Build Directory.
When defining the variable, you can specify one or more package types.
Since images are generated from packages, a packaging class is needed
to enable image generation. The first class listed in this variable is
used for image generation.
If you take the optional step to set up a repository (package feed) on the development host that can be used by DNF, you can install packages from the feed while you are running the image on the target (i.e. runtime installation of packages). For more information, see the “Using Runtime Package Management” section in the Yocto Project Development Tasks Manual.
The package-specific class you choose can affect build-time performance and has space ramifications. In general, building a package with IPK takes about thirty percent less time as compared to using RPM to build the same or similar package. This comparison takes into account a complete build of the package with all dependencies previously built. The reason for this discrepancy is because the RPM package manager creates and processes more Metadata than the IPK package manager. Consequently, you might consider setting PACKAGE_CLASSES to “package_ipk” if you are building smaller systems.
Before making your package manager decision, however, you should consider some further things about using RPM:
RPM starts to provide more abilities than IPK due to the fact that it processes more Metadata. For example, this information includes individual file types, file checksum generation and evaluation on install, sparse file support, conflict detection and resolution for Multilib systems, ACID style upgrade, and repackaging abilities for rollbacks.
For smaller systems, the extra space used for the Berkeley Database and the amount of metadata when using RPM can affect your ability to perform on-device upgrades.
You can find additional information on the effects of the package class at this Yocto Project mailing list link: https://lists.yoctoproject.org/g/poky/topic/61292484#msg6286
6.99 package_deb
The package_deb class provides support for creating packages that
use the Debian (i.e. .deb) file format. The class ensures the
packages are written out in a .deb file format to the
${DEPLOY_DIR_DEB} directory.
This class inherits the package class and
is enabled through the PACKAGE_CLASSES
variable in the local.conf file.
6.100 package_ipk
The package_ipk class provides support for creating packages that
use the IPK (i.e. .ipk) file format. The class ensures the packages
are written out in a .ipk file format to the
${DEPLOY_DIR_IPK} directory.
This class inherits the package class and
is enabled through the PACKAGE_CLASSES
variable in the local.conf file.
6.101 package_rpm
The package_rpm class provides support for creating packages that
use the RPM (i.e. .rpm) file format. The class ensures the packages
are written out in a .rpm file format to the
${DEPLOY_DIR_RPM} directory.
This class inherits the package class and
is enabled through the PACKAGE_CLASSES
variable in the local.conf file.
6.102 packagedata
The packagedata class provides common functionality for reading
pkgdata files found in PKGDATA_DIR. These
files contain information about each output package produced by the
OpenEmbedded build system.
This class is enabled by default because it is inherited by the package class.
6.103 packagegroup
The packagegroup class sets default values appropriate for package group recipes (e.g. PACKAGES, PACKAGE_ARCH, ALLOW_EMPTY, and so forth). It is highly recommended that all package group recipes inherit this class.
For information on how to use this class, see the “Customizing Images Using Custom Package Groups” section in the Yocto Project Development Tasks Manual.
Previously, this class was called the task class.
Note
If you’re defining a packagegroup and need to set:
PACKAGE_ARCH = "${MACHINE_ARCH}"
for the packagegroup, you need to do that before the
inherit packagegroup line in the recipe file.
Setting it afterward can break BitBake parsing, result in
an “allarch” architecture mismatch error, or allow
architecture-independent defaults to override your intent.
6.104 patch
The patch class provides all functionality for applying patches during the do_patch task.
This class is enabled by default because it is inherited by the base class.
6.105 perlnative
When inherited by a recipe, the perlnative class supports using the native version of Perl built by the build system rather than using the version provided by the build host.
6.106 pypi
The pypi class sets variables appropriately for recipes that build Python modules from PyPI, the Python Package Index. By default it determines the PyPI package name based upon BPN (stripping the “python-” or “python3-” prefix off if present), however in some cases you may need to set it manually in the recipe by setting PYPI_PACKAGE.
Variables set by the pypi class include SRC_URI, SECTION, HOMEPAGE, UPSTREAM_CHECK_URI, UPSTREAM_CHECK_REGEX and CVE_PRODUCT.
6.107 python_flit_core
The python_flit_core class enables building Python modules which declare
the PEP-517 compliant
flit_core.buildapi build-backend in the [build-system]
section of pyproject.toml (See PEP-518).
Python modules built with flit_core.buildapi are pure Python (no
C or Rust extensions).
Internally this uses the python_pep517 class.
6.108 python_maturin
The python_maturin class provides support for python-maturin, a replacement for setuptools_rust and another “backend” for building Python Wheels.
6.109 python_mesonpy
The python_mesonpy class enables building Python modules which use the meson-python build system.
Internally this uses the python_pep517 class.
6.110 python_pdm
The python_pdm class adds support for building Python packages with the PDM package and dependency manager.
This class adds python3-pdm-backend-native to the recipe’s build-time
dependencies.
Internally this uses the python_pep517 class.
6.111 python_pep517
The python_pep517 class builds and installs a Python wheel binary
archive (see PEP-517).
Recipes wouldn’t inherit this directly, instead typically another class will inherit this and add the relevant native dependencies.
Examples of classes which do this are python_flit_core, python_setuptools_build_meta, and python_poetry_core.
6.112 python_poetry_core
The python_poetry_core class enables building Python modules which use the Poetry Core build system.
Internally this uses the python_pep517 class.
6.113 python_pyo3
The python_pyo3 class helps make sure that Python extensions written in Rust and built with PyO3, properly set up the environment for cross compilation.
This class is internal to the python-setuptools3_rust class and is not meant to be used directly in recipes.
6.114 python-setuptools3_rust
The python-setuptools3_rust class enables building Python extensions implemented in Rust with PyO3, which allows to compile and distribute Python extensions written in Rust as easily as if they were written in C.
This class inherits the setuptools3 and python_pyo3 classes.
6.115 pixbufcache
The pixbufcache class generates the proper post-install and
post-remove (postinst/postrm) scriptlets for packages that install
pixbuf loaders, which are used with gdk-pixbuf. These scriptlets
call update_pixbuf_cache to add the pixbuf loaders to the cache.
Since the cache files are architecture-specific, update_pixbuf_cache
is run using QEMU if the postinst scriptlets need to be run on the build
host during image creation.
If the pixbuf loaders being installed are in packages other than the recipe’s main package, set PIXBUF_PACKAGES to specify the packages containing the loaders.
6.116 pkgconfig
The pkgconfig class provides a standard way to get header and
library information by using pkg-config. This class aims to smooth
integration of pkg-config into libraries that use it.
During staging, BitBake installs pkg-config data into the
sysroots/ directory. By making use of sysroot functionality within
pkg-config, the pkgconfig class no longer has to manipulate the
files.
6.117 populate_sdk
The populate_sdk class provides support for SDK-only recipes. For information on advantages gained when building a cross-development toolchain using the do_populate_sdk task, see the “Building an SDK Installer” section in the Yocto Project Application Development and the Extensible Software Development Kit (eSDK) manual.
6.118 populate_sdk_*
The populate_sdk_* classes support SDK creation and consist of the following classes:
populate_sdk_base: The base class supporting SDK creation under all package managers (i.e. DEB, RPM, and opkg).
populate_sdk_deb: Supports creation of the SDK given the Debian package manager.
populate_sdk_rpm: Supports creation of the SDK given the RPM package manager.
populate_sdk_ipk: Supports creation of the SDK given the opkg (IPK format) package manager.
populate_sdk_ext: Supports extensible SDK creation under all package managers.
The populate_sdk_base class inherits the appropriate
populate_sdk_* (i.e. deb, rpm, and ipk) based on
IMAGE_PKGTYPE.
The base class ensures all source and destination directories are
established and then populates the SDK. After populating the SDK, the
populate_sdk_base class constructs two sysroots:
${SDK_ARCH}-nativesdk, which
contains the cross-compiler and associated tooling, and the target,
which contains a target root filesystem that is configured for the SDK
usage. These two images reside in SDK_OUTPUT,
which consists of the following:
${SDK_OUTPUT}/${SDK_ARCH}-nativesdk-pkgs
${SDK_OUTPUT}/${SDKTARGETSYSROOT}/target-pkgs
Finally, the base populate SDK class creates the toolchain environment setup script, the tarball of the SDK, and the installer.
The respective populate_sdk_deb, populate_sdk_rpm, and populate_sdk_ipk classes each support the specific type of SDK. These classes are inherited by and used with the populate_sdk_base class.
For more information on the cross-development toolchain generation, see the “Cross-Development Toolchain Generation” section in the Yocto Project Overview and Concepts Manual. For information on advantages gained when building a cross-development toolchain using the do_populate_sdk task, see the “Building an SDK Installer” section in the Yocto Project Application Development and the Extensible Software Development Kit (eSDK) manual.
6.119 prexport
The prexport class provides functionality for exporting PR values.
Note
This class is not intended to be used directly. Rather, it is enabled
when using “bitbake-prserv-tool export”.
6.120 primport
The primport class provides functionality for importing PR values.
Note
This class is not intended to be used directly. Rather, it is enabled
when using “bitbake-prserv-tool import”.
6.121 prserv
The prserv class provides functionality for using a PR service in order to automatically manage the incrementing of the PR variable for each recipe.
This class is enabled by default because it is inherited by the package class. However, the OpenEmbedded build system will not enable the functionality of this class unless PRSERV_HOST has been set.
6.122 ptest
The ptest class provides functionality for packaging and installing runtime tests for recipes that build software that provides these tests.
This class is intended to be inherited by individual recipes. However, the class’ functionality is largely disabled unless “ptest” appears in DISTRO_FEATURES. See the “Testing Packages With ptest” section in the Yocto Project Development Tasks Manual for more information on ptest.
6.123 ptest-cargo
The ptest-cargo class is a class which extends the
cargo class and adds compile_ptest_cargo and
install_ptest_cargo steps to respectively build and install
test suites defined in the Cargo.toml file, into a dedicated
-ptest package.
6.124 ptest-gnome
Enables package tests (ptests) specifically for GNOME packages, which
have tests intended to be executed with gnome-desktop-testing.
For information on setting up and running ptests, see the “Testing Packages With ptest” section in the Yocto Project Development Tasks Manual.
6.125 ptest-python-pytest
The ptest-python-pytest class can be inherited in Python-based recipes to automatically configure the ptest class for Python packages leveraging the pytest unit test framework.
Within the recipe, the PTEST_PYTEST_DIR variable specifies the path to
the directory containing the tests that will be installed in D by the
do_install_ptest_base task, as well as a specific run-ptest
script for this task.
6.126 python3-dir
The python3-dir class provides the base version, location, and site package location for Python 3.
6.127 python3native
The python3native class supports using the native version of Python 3 built by the build system rather than support of the version provided by the build host.
6.128 python3targetconfig
The python3targetconfig class supports using the native version of Python
3 built by the build system rather than support of the version provided
by the build host, except that the configuration for the target machine
is accessible (such as correct installation directories). This also adds a
dependency on target python3, so should only be used where appropriate
in order to avoid unnecessarily lengthening builds.
6.129 qemu
The qemu class provides functionality for recipes that either need QEMU or test for the existence of QEMU. Typically, this class is used to run programs for a target system on the build host using QEMU’s application emulation mode.
6.130 recipe_sanity
The recipe_sanity class checks for the presence of any host system recipe prerequisites that might affect the build (e.g. variables that are set or software that is present).
6.131 relative_symlinks
The relative_symlinks class walks the symbolic links in the D directory and replaces links pointing to absolute paths to relative paths. This is occasionally used in some recipes that create wrong symbolic links when their native version is built, and/or would cause breakage in the Shared State Cache.
For example, if the following symbolic link is found in D:
/usr/bin/foo -> /sbin/bar
It is replaced by:
/usr/bin/foo -> ../../sbin/bar
6.132 relocatable
The relocatable class enables relocation of binaries when they are installed into the sysroot.
This class makes use of the chrpath class and is used by both the cross and native classes.
6.133 remove-libtool
The remove-libtool class adds a post function to the
do_install task to remove all .la files
installed by libtool. Removing these files results in them being
absent from both the sysroot and target packages.
If a recipe needs the .la files to be installed, then the recipe can
override the removal by setting REMOVE_LIBTOOL_LA to “0” as follows:
REMOVE_LIBTOOL_LA = "0"
Note
The remove-libtool class is not enabled by default.
6.134 report-error
The report-error class supports enabling the error reporting tool”, which allows you to submit build error information to a central database.
The class collects debug information for recipe, recipe version, task,
machine, distro, build system, target system, host distro, branch,
commit, and log. From the information, report files using a JSON format
are created and stored in
${LOG_DIR}/error-report.
6.135 retain
The retain class can be used to create a tarball of the work directory for a recipe when one of its tasks fails, or any other nominated directories. It is useful in cases where the environment in which builds are run is ephemeral or otherwise inaccessible for examination during debugging.
To enable, add the following to your configuration:
INHERIT += "retain"
The class can be disabled for specific recipes using the RETAIN_ENABLED variable.
6.136 rm_work
The rm_work class supports deletion of temporary workspace, which can ease your hard drive demands during builds.
The OpenEmbedded build system can use a substantial amount of disk space
during the build process. A portion of this space is the work files
under the ${TMPDIR}/work directory for each recipe. Once the build
system generates the packages for a recipe, the work files for that
recipe are no longer needed. However, by default, the build system
preserves these files for inspection and possible debugging purposes. If
you would rather have these files deleted to save disk space as the build
progresses, you can enable rm_work by adding the following to
your local.conf file, which is found in the Build Directory:
INHERIT += "rm_work"
If you are modifying and building source code out of the work directory for a
recipe, enabling rm_work will potentially result in your
changes to the source being lost. To exclude some recipes from having their work
directories deleted by rm_work, you can add the names of the
recipe or recipes you are working on to the RM_WORK_EXCLUDE variable,
which can also be set in your local.conf file. Here is an example:
RM_WORK_EXCLUDE += "busybox glibc"
Finally, if you are using this class for a recipe but want to prevent
BitBake from deleting specific folders or files in that recipe’s
WORKDIR (other than temp), you can preserve those folders or
files with the RM_WORK_EXCLUDE_ITEMS variable as follows:
RM_WORK_EXCLUDE_ITEMS += "items_to_keep"
6.137 rootfs*
The rootfs* classes support creating the root filesystem for an image and consist of the following classes:
The rootfs-postcommands class, which defines filesystem post-processing functions for image recipes.
The rootfs_deb class, which supports creation of root filesystems for images built using
.debpackages.The rootfs_rpm class, which supports creation of root filesystems for images built using
.rpmpackages.The rootfs_ipk class, which supports creation of root filesystems for images built using
.ipkpackages.The rootfsdebugfiles class, which installs additional files found on the build host directly into the root filesystem.
The root filesystem is created from packages using one of the rootfs* files as determined by the PACKAGE_CLASSES variable.
For information on how root filesystem images are created, see the “Image Generation” section in the Yocto Project Overview and Concepts Manual.
6.138 rust
The rust class is an internal class which is just used in the “rust” recipe, to build the Rust compiler and runtime library. Except for this recipe, it is not intended to be used directly.
6.139 rust-common
The rust-common class is an internal class to the cargo_common and rust classes and is not intended to be used directly.
6.140 rust-target-config
The rust-target-config class is an internal class to the cargo_common and rust classes and is not intended to be used directly.
It is used to generate a JSON specification file from the features listed in
TUNE_FEATURES, which is used for cross-compiling. The logic is done in a
do_rust_gen_targets task.
6.141 sanity
The sanity class checks to see if prerequisite software is present
on the host system so that users can be notified of potential problems
that might affect their build. The class also performs basic user
configuration checks from the local.conf configuration file to
prevent common mistakes that cause build failures. Distribution policy
usually determines whether to include this class.
6.142 sbom-cve-check
The sbom-cve-check class uses the sbom-cve-check command-line tool for post-build CVE analysis. It relies on the create-spdx class as SPDX files are the input of this tool.
This class should be enabled through the core/yocto/sbom-cve-check fragment:
$ bitbake-config-build enable-fragment core/yocto/sbom-cve-check
After building an image, sbom-cve-check will generate one or more reports in
the DEPLOY_DIR_IMAGE directory depending on the current value of
SBOM_CVE_CHECK_EXPORT_VARS.
See the variables starting with SBOM_CVE_CHECK_ in the Yocto Project
Reference Manual glossary to learn more on how to
configure the behavior of this class.
6.143 sbom-cve-check-recipe
The sbom-cve-check-recipe class uses the sbom-cve-check command-line tool for post-build CVE analysis of a recipe. It relies on the create-spdx class as SPDX files are the input of this tool.
This class can be inherited in any recipe. Compared to the
ref-classes-sbom-cve-check class, this class only uses the SBOM of the
recipe (after the create_recipe_sbom task is run) to determine which is the
underlying software and do the analysis, meaning that building the recipe itself
isn’t necessary.
To use this class, inherit it in the recipe and run:
$ bitbake <recipe> -c sbom_cve_check_recipe
After running the command, sbom-cve-check will generate one or more reports
in the DEPLOY_DIR_IMAGE directory depending on the current value of
SBOM_CVE_CHECK_EXPORT_VARS.
See the variables starting with SBOM_CVE_CHECK_ in the Yocto Project
Reference Manual glossary to learn more on how to
configure the behavior of this class.
6.144 scons
The scons class supports recipes that need to build software that uses the SCons build system. You can use the EXTRA_OESCONS variable to specify additional configuration options you want to pass SCons command line.
6.145 sdl
The sdl class supports recipes that need to build software that uses the Simple DirectMedia Layer (SDL) library.
6.146 python_setuptools_build_meta
The python_setuptools_build_meta class enables building
Python modules which declare the
PEP-517 compliant
setuptools.build_meta build-backend in the [build-system]
section of pyproject.toml (See PEP-518).
Python modules built with setuptools.build_meta can be pure Python or
include C or Rust extensions).
Internally this uses the python_pep517 class.
6.147 setuptools3
The setuptools3 class supports Python version 3.x extensions
that use build systems based on setuptools (e.g. only have a setup.py
and have not migrated to the official pyproject.toml format). If your recipe
uses these build systems, the recipe needs to inherit the
setuptools3 class.
Note
The setuptools3 class do_compile task now calls
setup.py bdist_wheelto build thewheelbinary archive format (See PEP-427).A consequence of this is that legacy software still using deprecated
distutilsfrom the Python standard library cannot be packaged aswheels. A common solution is the replacefrom distutils.core import setupwithfrom setuptools import setup.Note
The setuptools3 class do_install task now installs the
wheelbinary archive. In current versions ofsetuptoolsthe legacysetup.py installmethod is deprecated. If thesetup.pycannot be used with wheels, for example it creates files outside of the Python module or standard entry points, then setuptools3_legacy should be used.
6.148 setuptools3_legacy
The setuptools3_legacy class supports
Python version 3.x extensions that use build systems based on setuptools
(e.g. only have a setup.py and have not migrated to the official
pyproject.toml format). Unlike setuptools3,
this uses the traditional setup.py build and install commands and
not wheels. This use of setuptools like this is
deprecated
but still relatively common.
6.149 setuptools3-base
The setuptools3-base class provides a reusable base for
other classes that support building Python version 3.x extensions. If you need
functionality that is not provided by the setuptools3 class,
you may want to inherit setuptools3-base. Some recipes do not need the tasks
in the setuptools3 class and inherit this class instead.
6.150 sign_rpm
The sign_rpm class supports generating signed RPM packages.
6.151 siteinfo
The siteinfo class provides information about the targets that might be needed by other classes or recipes.
As an example, consider Autotools, which can require tests that must
execute on the target hardware. Since this is not possible in general
when cross compiling, site information is used to provide cached test
results so these tests can be skipped over but still make the correct
values available. The meta/site directory contains test results
sorted into different categories such as architecture, endianness, and
the libc used. Site information provides a list of files containing
data relevant to the current build in the CONFIG_SITE variable that
Autotools automatically picks up.
The class also provides variables like SITEINFO_ENDIANNESS and SITEINFO_BITS that can be used elsewhere in the metadata.
6.152 sstate
The sstate class provides support for Shared State (sstate). By default, the class is enabled through the INHERIT_DISTRO variable’s default value.
For more information on sstate, see the “Shared State Cache” section in the Yocto Project Overview and Concepts Manual.
6.153 staging
The staging class installs files into individual recipe work directories for sysroots. The class contains the following key tasks:
The do_populate_sysroot task, which is responsible for handing the files that end up in the recipe sysroots.
The do_prepare_recipe_sysroot task (a “partner” task to the
populate_sysroottask), which installs the files into the individual recipe work directories (i.e. WORKDIR).
The code in the staging class is complex and basically works in two stages:
Stage One: The first stage addresses recipes that have files they want to share with other recipes that have dependencies on the originating recipe. Normally these dependencies are installed through the do_install task into
${D}. The do_populate_sysroot task copies a subset of these files into${SYSROOT_DESTDIR}. This subset of files is controlled by the SYSROOT_DIRS, SYSROOT_DIRS_NATIVE, and SYSROOT_DIRS_IGNORE variables.Note
Additionally, a recipe can customize the files further by declaring a processing function in the SYSROOT_PREPROCESS_FUNCS variable.
A shared state (sstate) object is built from these files and the files are placed into a subdirectory of build/tmp/sysroots-components/. The files are scanned for hardcoded paths to the original installation location. If the location is found in text files, the hardcoded locations are replaced by tokens and a list of the files needing such replacements is created. These adjustments are referred to as “FIXMEs”. The list of files that are scanned for paths is controlled by the SSTATE_SCAN_FILES variable.
Stage Two: The second stage addresses recipes that want to use something from another recipe and declare a dependency on that recipe through the DEPENDS variable. The recipe will have a do_prepare_recipe_sysroot task and when this task executes, it creates the
recipe-sysrootandrecipe-sysroot-nativein the recipe work directory (i.e. WORKDIR). The OpenEmbedded build system creates hard links to copies of the relevant files fromsysroots-componentsinto the recipe work directory.Note
If hard links are not possible, the build system uses actual copies.
The build system then addresses any “FIXMEs” to paths as defined from the list created in the first stage.
Finally, any files in
${bindir}within the sysroot that have the prefix “postinst-” are executed.Note
Although such sysroot post installation scripts are not recommended for general use, the files do allow some issues such as user creation and module indexes to be addressed.
Because recipes can have other dependencies outside of DEPENDS (e.g.
do_unpack[depends] += "tar-native:do_populate_sysroot"), the sysroot creation functionextend_recipe_sysrootis also added as a pre-function for those tasks whose dependencies are not through DEPENDS but operate similarly.When installing dependencies into the sysroot, the code traverses the dependency graph and processes dependencies in exactly the same way as the dependencies would or would not be when installed from sstate. This processing means, for example, a native tool would have its native dependencies added but a target library would not have its dependencies traversed or installed. The same sstate dependency code is used so that builds should be identical regardless of whether sstate was used or not. For a closer look, see the
setscene_depvalid()function in the sstate class.The build system is careful to maintain manifests of the files it installs so that any given dependency can be installed as needed. The sstate hash of the installed item is also stored so that if it changes, the build system can reinstall it.
6.154 syslinux
The syslinux class provides syslinux-specific functions for building bootable images.
The class supports the following variables:
INITRD: Indicates list of filesystem images to concatenate and use as an initial RAM disk (initrd). This variable is optional.
ROOTFS: Indicates a filesystem image to include as the root filesystem. This variable is optional.
AUTO_SYSLINUXMENU: Enables creating an automatic menu when set to “1”.
LABELS: Lists targets for automatic configuration.
APPEND: Lists append string overrides for each label.
SYSLINUX_OPTS: Lists additional options to add to the syslinux file. Semicolon characters separate multiple options.
SYSLINUX_SPLASH: Lists a background for the VGA boot menu when you are using the boot menu.
SYSLINUX_DEFAULT_CONSOLE: Set to “console=ttyX” to change kernel boot default console.
SYSLINUX_SERIAL: Sets an alternate serial port. Or, turns off serial when the variable is set with an empty string.
SYSLINUX_SERIAL_TTY: Sets an alternate “console=tty…” kernel boot argument.
6.155 systemd
The systemd class provides support for recipes that install systemd unit files.
The functionality for this class is disabled unless you have “systemd” in DISTRO_FEATURES.
Under this class, the recipe or Makefile (i.e. whatever the recipe is
calling during the do_install task)
installs unit files into
${D}${systemd_unitdir}/system. If the unit
files being installed go into packages other than the main package, you
need to set SYSTEMD_PACKAGES in your
recipe to identify the packages in which the files will be installed.
You should set SYSTEMD_SERVICE to the
name of the service file. You should also use a package name override to
indicate the package to which the value applies. If the value applies to
the recipe’s main package, use ${PN}. Here
is an example from the connman recipe:
SYSTEMD_SERVICE:${PN} = "connman.service"
Services are set up to start on boot automatically unless you have set SYSTEMD_AUTO_ENABLE to “disable”.
For more information on systemd, see the “Selecting an Initialization Manager” section in the Yocto Project Development Tasks Manual.
6.156 systemd-boot
The systemd-boot class provides functions specific to the systemd-boot bootloader for building bootable images. This is an internal class and is not intended to be used directly.
Note
The systemd-boot class is a result from merging the gummiboot class
used in previous Yocto Project releases with the systemd project.
Set the EFI_PROVIDER variable to “systemd-boot” to use this class. Doing so creates a standalone EFI bootloader that is not dependent on systemd.
For information on more variables used and supported in this class, see the SYSTEMD_BOOT_CFG, SYSTEMD_BOOT_ENTRIES, and SYSTEMD_BOOT_TIMEOUT variables.
You can also see the Systemd-boot documentation for more information.
6.157 terminal
The terminal class provides support for starting a terminal session. The OE_TERMINAL variable controls which terminal emulator is used for the session.
Other classes use the terminal class anywhere a separate terminal session needs to be started. For example, the patch class assuming PATCHRESOLVE is set to “user”, the cml1 class, and the devshell class all use the terminal class.
6.158 testexport
Based on the testimage class, the testexport class can be used to export the test environment outside of the OpenEmbedded Build System. This will generate the directory structure to execute the runtime tests using the runexported.py Python script.
For more details on how to use testexport, see the Exporting Tests section in the Yocto Project Test Environment Manual.
6.159 testimage
The testimage class supports running automated tests against images using QEMU and on actual hardware. The classes handle loading the tests and starting the image. To use the classes, you need to perform steps to set up the environment.
To enable this class, add the following to your configuration:
IMAGE_CLASSES += "testimage"
The tests are commands that run on the target system over ssh. Each
test is written in Python and makes use of the unittest module.
The testimage class runs tests on an image when called using the following:
$ bitbake -c testimage image
Alternatively, if you wish to have tests automatically run for each image after it is built, you can set TESTIMAGE_AUTO:
TESTIMAGE_AUTO = "1"
For information on how to enable, run, and create new tests, see the “Performing Automated Runtime Testing” section in the Yocto Project Test Environment Manual.
6.160 testsdk
This class supports running automated tests against software development kits (SDKs). The testsdk class runs tests on an SDK when called using the following:
$ bitbake -c testsdk image
The list of test modules that are run can be controlled with the TESTSDK_SUITES variable.
Note
Best practices include using IMAGE_CLASSES rather than INHERIT to inherit the testsdk class for automated SDK testing.
6.161 texinfo
This class should be inherited by recipes whose upstream packages invoke
the texinfo utilities at build-time. Native and cross recipes are
made to use the dummy scripts provided by texinfo-dummy-native, for
improved performance. Target architecture recipes use the genuine
Texinfo utilities. By default, they use the Texinfo utilities on the
host system.
Note
If you want to use the Texinfo recipe shipped with the build system, you can remove “texinfo-native” from ASSUME_PROVIDED and makeinfo from SANITY_REQUIRED_UTILITIES.
6.162 toaster
The toaster class collects information about packages and images and sends them as events that the BitBake user interface can receive. The class is enabled when the Toaster user interface is running.
This class is not intended to be used directly.
6.163 toolchain-scripts
The toolchain-scripts class provides the scripts used for setting up the environment for installed SDKs.
6.164 toolchain/clang
The toolchain/clang class defines commands for building recipes with Clang/LLVM compiler and utilities.
This class is not meant to be inherited directly. Instead, you should either:
set the PREFERRED_TOOLCHAIN_TARGET, PREFERRED_TOOLCHAIN_NATIVE or PREFERRED_TOOLCHAIN_SDK variables to “clang” from a Configuration File. This will make the base class use the toolchain/clang accordingly. All recipes will be built with the Clang/LLVM toolchain, exception be made for recipes that override the value of TOOLCHAIN or TOOLCHAIN_NATIVE to another value.
set TOOLCHAIN or TOOLCHAIN_NATIVE to “clang” from a recipe when the recipe needs to override the default toolchain set by PREFERRED_TOOLCHAIN_TARGET, PREFERRED_TOOLCHAIN_NATIVE or PREFERRED_TOOLCHAIN_SDK.
6.165 toolchain/clang-native
The toolchain/clang-native class defines commands for building native recipes with Clang/LLVM compiler and utilities independently of the build context.
The toolchain/gcc-native class defines BUILD_CC, BUILD_CXX and other such variables which are rarely used in recipes. Exception be made for target recipes that need to use the compiler from the build host at some point during the build.
This class should not be inherited directly. It is inherited by the base class if TOOLCHAIN_NATIVE is set to “clang”.
6.166 toolchain/gcc
The toolchain/gcc class defines commands for building recipes with GCC/Binutils compiler and utilities.
This class is not meant to be inherited directly. Instead, you should either:
set the PREFERRED_TOOLCHAIN_TARGET, PREFERRED_TOOLCHAIN_NATIVE or PREFERRED_TOOLCHAIN_SDK variables to “gcc” from a Configuration File. This will make the base class use the toolchain/gcc accordingly. All recipes will be built with the GCC/Binutils toolchain, exception be made for recipes that override the value of TOOLCHAIN or TOOLCHAIN_NATIVE to another value.
set TOOLCHAIN or TOOLCHAIN_NATIVE to “gcc” from a recipe when the recipe needs to override the default toolchain set by PREFERRED_TOOLCHAIN_TARGET, PREFERRED_TOOLCHAIN_NATIVE or PREFERRED_TOOLCHAIN_SDK.
6.167 toolchain/gcc-native
The toolchain/gcc-native class defines commands for building native recipes with GCC/Binutils compiler and utilities independently of the build context.
The toolchain/gcc-native class defines BUILD_CC, BUILD_CXX and other such variables which are rarely used in recipes. Exception be made for target recipes that need to use the compiler from the build host at some point during the build.
This class should not be inherited directly. It is inherited by the base class if TOOLCHAIN_NATIVE is set to “gcc”.
6.168 typecheck
The typecheck class provides support for validating the values of variables set at the configuration level against their defined types. The OpenEmbedded build system allows you to define the type of a variable using the “type” varflag. Here is an example:
IMAGE_FEATURES[type] = "list"
6.169 uboot-config
The uboot-config class provides support for configuring one or more U-Boot build configurations.
There are three ways to configure the recipe for your machine:
Using the UBOOT_MACHINE variable (and its companion variable UBOOT_BINARY). For example:
UBOOT_MACHINE = "config" UBOOT_BINARY = "u-boot.bin"
Using UBOOT_CONFIG variables. For example:
UBOOT_CONFIG ??= "foo bar" UBOOT_CONFIG[foo] = "config" UBOOT_CONFIG[bar] = "config2" UBOOT_CONFIG_IMAGE_FSTYPES[bar] = "fstype" UBOOT_CONFIG_BINARY[foo] = "binary" UBOOT_CONFIG_MAKE_OPTS[foo] = "FOO=1" UBOOT_CONFIG_MAKE_OPTS[bar] = "BAR=1" UBOOT_CONFIG_FRAGMENTS[foo] = "foo.fragment"
In this example, all possible configurations are selected (
fooandbar), but it is also possible to build onlyfooorbarby changing the value of UBOOT_CONFIG to include either one or the other. For exmaple:UBOOT_CONFIG = "foo" UBOOT_CONFIG[foo] = "config" UBOOT_CONFIG[bar] = "config2"
Each build configuration is associated to a variable flag definition of UBOOT_CONFIG, and associated changes for each config as defined in the various UBOOT_CONFIG_* variables.
UBOOT_CONFIG[config]: defconfig file selected for this build configuration. These files are found in the source tree’sconfigsfolder of U-Boot.This option is mandatory.
See the documentation of UBOOT_CONFIG for more information.
UBOOT_CONFIG_IMAGE_FSTYPES[config]: image types to append to the IMAGE_FSTYPES variable for image generation for this build configuration.This can allow building an extra image format that uses the binary generated by this build configuration.
This option is not mandatory and can be left unspecified if not needed.
See the documentation of UBOOT_CONFIG_IMAGE_FSTYPES for more information.
UBOOT_CONFIG_BINARY[config]: binary to select as the one to deploy in DEPLOY_DIR_IMAGE. The output of a U-Boot build may be more than one binary, for example:u-boot.bin u-boot-with-spl.bin
Setting the
binaryvalue tou-boot-with-spl.binwill make this binary the one deployed in DEPLOY_DIR_IMAGE. It is renamed to include the build configuration name in the process (fooorbarin the above example).This option defaults to UBOOT_BINARY if not specified.
See the documentation of UBOOT_CONFIG_BINARY for more information.
UBOOT_CONFIG_MAKE_OPTS[config]: additional options passed tomakewhen configuring and compiling U-Boot for this configuration entry. The options in this entry are added before the options in UBOOT_MAKE_OPTS.This option is not mandatory and adds nothing if not specified. If you do not have a make option for a given config, you can simply not set the flag for that config.
See the documentation of UBOOT_CONFIG_MAKE_OPTS for more information.
UBOOT_CONFIG_FRAGMENTS[config]: additional config fragment(s) from the source tree that is used duringdo_configure()to setup the build. The options in this entry are added before the fragments in UBOOT_FRAGMENTS.This option is not mandatory and adds nothing if not specified. If you do not have a fragment a given config, you can simply not set the flag for that config.
See the documentation of UBOOT_CONFIG_FRAGMENTS for more information.
Or, a legacy method using the UBOOT_CONFIG variable by itself. This method is being deprecated, see note below. For example:
UBOOT_CONFIG ??= "foo bar" UBOOT_CONFIG[foo] = "config,images,binary" UBOOT_CONFIG[bar] = "config2,images2,binary2"
In this example, all possible configurations are selected (
fooandbar), but it is also possible to build onlyfooorbarby changing the value of UBOOT_CONFIG to include either one or the other.Each build configuration is associated to a variable flag definition of UBOOT_CONFIG, that can take up to three comma-separated options (
config,images,binary):config: defconfig file selected for this build configuration. These files are found in the source tree’sconfigsfolder of U-Boot.This option is mandatory.
images: image types to append to the IMAGE_FSTYPES variable for image generation for this build configuration.This can allow building an extra image format that uses the binary generated by this build configuration.
This option is not mandatory and can be left empty.
binary: binary to select as the one to deploy in DEPLOY_DIR_IMAGE. The output of a U-Boot build may be more than one binary, for example:u-boot.bin u-boot-with-spl.bin
Setting the
binaryvalue tou-boot-with-spl.binwill make this binary the one deployed in DEPLOY_DIR_IMAGE. It is renamed to include the build configuration name in the process (fooorbarin the above example).This option defaults to UBOOT_BINARY if unset.
Note
The legacy flow has been deprecated. It is recommended to not use this legacy flow as any future extensions to the control knobs will be not added to this methodology. This functionality will be removed after the wrynose LTS release.
Using UBOOT_MACHINE and UBOOT_CONFIG at the same time is not possible.
See the UBOOT_CONFIG and UBOOT_MACHINE variables for additional information.
6.170 uboot-sign
The uboot-sign class provides support for U-Boot verified boot. It is intended to be inherited from U-Boot recipes.
The variables used by this class are:
SPL_MKIMAGE_DTCOPTS: DTC options for U-Boot
mkimagewhen building the FIT image.SPL_SIGN_ENABLE: enable signing the FIT image.
SPL_SIGN_KEYDIR: directory containing the signing keys.
SPL_SIGN_KEYNAME: base filename of the signing keys.
SPL_DTB_BINARY: Name of the SPL device tree binary. Can be set to an empty string to indicate that no SPL should be created and added to the FIT image.
UBOOT_FIT_ADDRESS_CELLS:
#address-cellsvalue for the FIT image.UBOOT_FIT_DESC: description string encoded into the FIT image.
UBOOT_FIT_GENERATE_KEYS: generate the keys if they don’t exist yet.
UBOOT_FIT_HASH_ALG: hash algorithm for the FIT image.
UBOOT_FIT_KEY_GENRSA_ARGS:
openssl genrsaarguments.UBOOT_FIT_KEY_REQ_ARGS:
openssl reqarguments.UBOOT_FIT_SIGN_ALG: signature algorithm for the FIT image.
UBOOT_FIT_SIGN_NUMBITS: size of the private key for FIT image signing.
UBOOT_FIT_KEY_SIGN_PKCS: algorithm for the public key certificate for FIT image signing.
UBOOT_FITIMAGE_ENABLE: enable the generation of a U-Boot FIT image.
UBOOT_MKIMAGE_DTCOPTS: DTC options for U-Boot
mkimagewhen rebuilding the FIT image containing the kernel.UBOOT_FIT_ARM_TRUSTED_FIRMWARE: include the Trusted Firmware-A (TF-A) binary in the U-Boot FIT image.
UBOOT_FIT_ARM_TRUSTED_FIRMWARE_IMAGE: specifies the path to the Trusted Firmware-A (TF-A) binary.
UBOOT_FIT_TEE: include the Trusted Execution Environment (TEE) binary in the U-Boot FIT image.
UBOOT_FIT_TEE_IMAGE: specifies the path to the Trusted Execution Environment (TEE) binary.
UBOOT_FIT_USER_SETTINGS: adds a user-specific snippet to the U-Boot Image Tree Source (ITS). Users can include their custom U-Boot Image Tree Source (ITS) snippet in this variable.
UBOOT_FIT_CONF_FIRMWARE: adds one image to the
firmwareproperty of the configuration node.UBOOT_FIT_CONF_USER_LOADABLES: adds one or more user-defined images to the
loadablesproperty of the configuration node.
See U-Boot’s documentation for details about verified boot and the signature process.
See also the description of kernel-fit-image class, which this class imitates.
6.171 uki
The uki class provides support for Unified Kernel Image
(UKI)
format. UKIs combine kernel, Initramfs, signatures, metadata etc to a
single UEFI firmware compatible binary. The class is intended to be inherited
by rootfs image recipes. The build configuration should also use an
Initramfs, systemd-boot as boot menu provider and have UEFI support
on target hardware. Using systemd as init is recommended. Image builds
should create an ESP partition for UEFI firmware and copy systemd-boot and
UKI files there. Sample configuration for Wic images is provided in
meta/files/wic/efi-uki-bootdisk.wks.in
UKIs are generated using systemd reference implementation ukify.
This class uses a number of variables but tries to find sensible defaults for
them.
The variables used by this class are:
EFI_ARCH: architecture name within EFI standard, set in meta/conf/image-uefi.conf
IMAGE_EFI_BOOT_FILES: files to install to EFI boot partition created by the
bootimg_efiWic pluginINITRAMFS_IMAGE: initramfs recipe name
KERNEL_DEVICETREE: optional devicetree files to embed into UKI
UKI_CMDLINE: kernel command line to use with UKI
UKI_CONFIG_FILE: optional config file for ukify
UKI_FILENAME: output file name for the UKI image
UKI_KERNEL_FILENAME: kernel image file name
UKI_SB_CERT: optional UEFI secureboot certificate matching the private key
UKI_SB_KEY: optional UEFI secureboot private key to sign UKI with
UKI_DEVICETREE: list of device tree blobs to include in the UKI
For examples on how to use this class see oeqa selftest meta/lib/oeqa/selftest/cases/uki.py. Also an oeqa runtime test meta/lib/oeqa/runtime/cases/uki.py is provided which verifies that the target system booted the same UKI binary as was set at buildtime via UKI_FILENAME.
6.172 uninative
The uninative class allows binaries to run on systems with older or newer Glibc versions. This means native recipe Shared State Cache can be shared among different host distributions of different versions, i.e. the Shared State Cache is “universal”.
To allow this to work, the dynamic loader is changed to our own ld.so when binaries are compiled using the
--dynamic-linker option. This means when the binary is executed, it finds
our own ld.so and that loader has a modified search path
which finds a newer Glibc version.
The linking of the binaries is not changed at link time since the headers on the system wouldn’t match the newer Glibc and this causes obtuse failures. Changing the loader is effectively the same as if the system had a Glibc upgrade after the binary was compiled, so it is a mechanism supported by upstream.
One caveat to this approach is that the uninative Glibc binary must be equal to or newer in version to the versions on all the systems using the common Shared State Cache. This is why uninative is regularly changed on the development and stable branches.
Another potential issue is static linking: static libraries created on a system with a new Glibc version may have symbols not present in older versions, which would then fail during linking on older systems. This is one reason we don’t use static linking for our native binaries.
With this class enabled, a tarball containing a pre-built C library is
downloaded at the start of the build. In OpenEmbedded-Core (OE-Core) this is
enabled by default through meta/conf/distro/include/yocto-uninative.inc. Other distributions that do
not derive from Poky can also “require conf/distro/include/yocto-uninative.inc”
to use this. Alternatively if you prefer, you can build the uninative-tarball
recipe yourself, publish the resulting tarball (e.g. via HTTP) and set
UNINATIVE_URL and UNINATIVE_CHECKSUM appropriately. For an
example, see meta/conf/distro/include/yocto-uninative.inc.
The uninative class is also used unconditionally by the
extensible SDK. When building the extensible
SDK, uninative-tarball is built and the resulting tarball is included within
the SDK.
6.173 update-alternatives
The update-alternatives class helps the alternatives system when
multiple sources provide the same command. This situation occurs when
several programs that have the same or similar function are installed
with the same name. For example, the ar command is available from
the busybox, binutils and elfutils packages. The
update-alternatives class handles renaming the binaries so that
multiple packages can be installed without conflicts. The ar command
still works regardless of which packages are installed or subsequently
removed. The class renames the conflicting binary in each package and
symlinks the highest priority binary during installation or removal of
packages.
To use this class, you need to define a number of variables:
These variables list alternative commands needed by a package, provide pathnames for links, default links for targets, and so forth. For details on how to use this class, see the comments in the update-alternatives.bbclass file.
Note
You can use the update-alternatives command directly in your recipes.
However, this class simplifies things in most cases.
6.174 update-rc.d
The update-rc.d class uses update-rc.d to safely install an
initialization script on behalf of the package. The OpenEmbedded build
system takes care of details such as making sure the script is stopped
before a package is removed and started when the package is installed.
Three variables control this class: INITSCRIPT_PACKAGES, INITSCRIPT_NAME and INITSCRIPT_PARAMS. See the variable links for details.
6.175 useradd*
The useradd* classes support the addition of users or groups for usage by the package on the target. For example, if you have packages that contain system services that should be run under their own user or group, you can use these classes to enable creation of the user or group. The meta-skeleton/recipes-skeleton/useradd/useradd-example.bb recipe in OpenEmbedded-Core (OE-Core) provides a simple example that shows how to add three users and groups to two packages.
The useradd_base class provides basic functionality for user or groups settings.
The useradd* classes support the USERADD_PACKAGES, USERADD_PARAM, GROUPADD_PARAM, and GROUPMEMS_PARAM variables.
The useradd-staticids class supports the addition of users or groups
that have static user identification (uid) and group identification
(gid) values.
The default behavior of the OpenEmbedded build system for assigning
uid and gid values when packages add users and groups during
package install time is to add them dynamically. This works fine for
programs that do not care what the values of the resulting users and
groups become. In these cases, the order of the installation determines
the final uid and gid values. However, if non-deterministic
uid and gid values are a problem, you can override the default,
dynamic application of these values by setting static values. When you
set static values, the OpenEmbedded build system looks in
BBPATH for files/passwd and files/group
files for the values.
To use static uid and gid values, you need to set some variables. See
the USERADDEXTENSION, USERADD_UID_TABLES,
USERADD_GID_TABLES, and USERADD_ERROR_DYNAMIC variables.
You can also see the useradd* class for additional
information.
Note
You do not use the useradd-staticids class directly. You either enable
or disable the class by setting the USERADDEXTENSION variable. If you
enable or disable the class in a configured system, TMPDIR might
contain incorrect uid and gid values. Deleting the TMPDIR
directory will correct this condition.
6.176 utility-tasks
The utility-tasks class provides support for various “utility” type tasks that are applicable to all recipes, such as do_clean and do_listtasks.
This class is enabled by default because it is inherited by the base class.
6.177 utils
The utils class provides some useful Python functions that are
typically used in inline Python expressions (e.g. ${@...}). One
example use is for bb.utils.contains().
This class is enabled by default because it is inherited by the base class.
6.178 vala
The vala class supports recipes that need to build software written using the Vala programming language.
6.179 vex
The vex class is used to generate metadata needed by external tools to check for vulnerabilities, for example CVEs.
In order to use this class, inherit the class in the local.conf file and it
will add the generate_vex task for every recipe:
INHERIT += "vex"
If an image is built it will generate a report in DEPLOY_DIR_IMAGE for all the packages used, it will also generate a file for all recipes used in the build.
Example usage:
bitbake -c generate_vex openssl
6.180 waf
The waf class supports recipes that need to build software that uses the Waf build system. You can use the EXTRA_OECONF or PACKAGECONFIG_CONFARGS variables to specify additional configuration options to be passed on the Waf command line.
6.181 yocto-check-layer
The yocto-check-layer class is used by the yocto-check-layer script to ensure that packages from Yocto Project Compatible layers don’t skip required QA checks listed in CHECKLAYER_REQUIRED_TESTS defined by the insane class.
It adds an anonymous python function with extra processing to all recipes,
and globally inheriting this class with INHERIT is not advised. Instead
the yocto-check-layer script should be used as it handles usage of this
class.
For more information on the Yocto Project Compatible layers, see the Making Sure Your Layer is Compatible With Yocto Project section of the Yocto Project Development Manual.
7 Tasks
Tasks are units of execution for BitBake. Recipes (.bb files) use
tasks to complete configuring, compiling, and packaging software. This
chapter provides a reference of the tasks defined in the OpenEmbedded
build system.
7.1 Normal Recipe Build Tasks
The following sections describe normal tasks associated with building a recipe. For more information on tasks and dependencies, see the “Tasks” and “Dependencies” sections in the BitBake User Manual.
7.1.1 do_build
The default task for all recipes. This task depends on all other normal tasks required to build a recipe.
7.1.2 do_compile
Compiles the source code. This task runs with the current working
directory set to ${B}.
The default behavior of this task is to run the oe_runmake function
if a makefile (Makefile, makefile, or GNUmakefile) is found.
If no such file is found, the do_compile task does nothing.
7.1.3 do_compile_ptest_base
Compiles the runtime test suite included in the software being built.
7.1.4 do_configure
Configures the source by enabling and disabling any build-time and
configuration options for the software being built. The task runs with
the current working directory set to ${B}.
The default behavior of this task is to run oe_runmake clean if a
makefile (Makefile, makefile, or GNUmakefile) is found and
CLEANBROKEN is not set to “1”. If no such
file is found or the CLEANBROKEN variable is set to “1”, the
do_configure task does nothing.
7.1.5 do_configure_ptest_base
Configures the runtime test suite included in the software being built.
7.1.6 do_deploy
Writes output files that are to be deployed to
${DEPLOY_DIR_IMAGE}. The
task runs with the current working directory set to
${B}.
Recipes implementing this task should inherit the
deploy class and should write the output
to ${DEPLOYDIR}, which is not to be
confused with ${DEPLOY_DIR}. The deploy class sets up
do_deploy as a shared state (sstate) task that can be accelerated
through sstate use. The sstate mechanism takes care of copying the
output from ${DEPLOYDIR} to ${DEPLOY_DIR_IMAGE}.
Note
Do not write the output directly to ${DEPLOY_DIR_IMAGE}, as this causes
the sstate mechanism to malfunction.
The do_deploy task is not added as a task by default and consequently needs to be added manually. If you want the task to run after do_compile, you can add it by doing the following:
addtask deploy after do_compile
Adding do_deploy after other tasks works the same way.
Note
You do not need to add before do_build to the addtask command
(though it is harmless), because the base class contains the following:
do_build[recrdeptask] += "do_deploy"
See the “Dependencies” section in the BitBake User Manual for more information.
If the do_deploy task re-executes, any previous output is removed (i.e. “cleaned”).
7.1.7 do_fetch
Fetches the source code. This task uses the SRC_URI variable and the argument’s prefix to determine the correct fetcher module.
7.1.8 do_image
Starts the image generation process. The do_image task runs after the OpenEmbedded build system has run the do_rootfs task during which packages are identified for installation into the image and the root filesystem is created, complete with post-processing.
The do_image task performs pre-processing on the image through the IMAGE_PREPROCESS_COMMAND and dynamically generates supporting do_image_* tasks as needed.
For more information on image creation, see the “Image Generation” section in the Yocto Project Overview and Concepts Manual.
7.1.9 do_image_complete
Completes the image generation process. The do_image_complete task runs after the OpenEmbedded build system has run the do_image task during which image pre-processing occurs and through dynamically generated do_image_* tasks the image is constructed.
The do_image_complete task performs post-processing on the image through the IMAGE_POSTPROCESS_COMMAND.
For more information on image creation, see the “Image Generation” section in the Yocto Project Overview and Concepts Manual.
7.1.10 do_install
Copies files that are to be packaged into the holding area
${D}. This task runs with the current
working directory set to ${B}, which is the
compilation directory. The do_install task, as well as other tasks
that either directly or indirectly depend on the installed files (e.g.
do_package, do_package_write_*, and
do_rootfs), run under
fakeroot.
Note
When installing files, be careful not to set the owner and group IDs
of the installed files to unintended values. Some methods of copying
files, notably when using the recursive cp command, can preserve
the UID and/or GID of the original file, which is usually not what
you want. The host-user-contaminated QA check checks for files
that probably have the wrong ownership.
Safe methods for installing files include the following:
The
installutility. This utility is the preferred method.The
cpcommand with the--no-preserve=ownershipoption.The
tarcommand with the--no-same-owneroption. See thebin_package.bbclassfile in themeta/classes-recipesubdirectory of OpenEmbedded-Core (OE-Core) for an example.
7.1.11 do_install_ptest_base
Copies the runtime test suite files from the compilation directory to a holding area.
7.1.12 do_package
Analyzes the content of the holding area
${D} and splits the content into subsets
based on available packages and files. This task makes use of the
PACKAGES and FILES
variables.
The do_package task, in conjunction with the do_packagedata task, also saves some important package metadata. For additional information, see the PKGDESTWORK variable and the “Automatically Added Runtime Dependencies” section in the Yocto Project Overview and Concepts Manual.
7.1.13 do_package_qa
Runs QA checks on packaged files. For more information on these checks, see the QA Error and Warning Messages document.
7.1.14 do_package_write_deb
Creates Debian packages (i.e. *.deb files) and places them in the
${DEPLOY_DIR_DEB} directory in
the package feeds area. For more information, see the
“Package Feeds” section in
the Yocto Project Overview and Concepts Manual.
7.1.15 do_package_write_ipk
Creates IPK packages (i.e. *.ipk files) and places them in the
${DEPLOY_DIR_IPK} directory in
the package feeds area. For more information, see the
“Package Feeds” section in
the Yocto Project Overview and Concepts Manual.
7.1.16 do_package_write_rpm
Creates RPM packages (i.e. *.rpm files) and places them in the
${DEPLOY_DIR_RPM} directory in
the package feeds area. For more information, see the
“Package Feeds” section in
the Yocto Project Overview and Concepts Manual.
7.1.17 do_packagedata
Saves package metadata generated by the do_package task in PKGDATA_DIR to make it available globally.
7.1.18 do_patch
Locates patch files and applies them to the source code.
After fetching and unpacking source files, the build system uses the recipe’s SRC_URI statements to locate and apply patch files to the source code.
Note
The build system uses the FILESPATH variable to determine the default set of directories when searching for patches.
Patch files, by default, are *.patch and *.diff files created
and kept in a subdirectory of the directory holding the recipe file. For
example, consider the
bluez5
recipe from the OpenEmbedded-Core (OE-Core) layer:
meta/recipes-connectivity/bluez5
This recipe has two patch files located here:
meta/recipes-connectivity/bluez5/bluez5
In the bluez5 recipe, the SRC_URI statements point to the source
and patch files needed to build the package.
Note
In the case for the bluez5_5.48.bb recipe, the SRC_URI statements
are from an include file bluez5.inc.
As mentioned earlier, the build system treats files whose file types are
.patch and .diff as patch files. However, you can use the
“apply=yes” parameter with the SRC_URI statement to indicate any
file as a patch file:
SRC_URI = " \
git://path_to_repo/some_package \
file://file;apply=yes \
"
Conversely, if you have a file whose file type is .patch or .diff
and you want to exclude it so that the do_patch task does not apply
it during the patch phase, you can use the “apply=no” parameter with the
SRC_URI statement:
SRC_URI = " \
git://path_to_repo/some_package \
file://file1.patch \
file://file2.patch;apply=no \
"
In the previous example file1.patch would be applied as a patch by default
while file2.patch would not be applied.
You can find out more about the patching process in the “Patching” section in the Yocto Project Overview and Concepts Manual and the “Patching Code” section in the Yocto Project Development Tasks Manual.
7.1.19 do_populate_lic
Writes license information for the recipe that is collected later when the image is constructed.
7.1.20 do_populate_sdk
Creates the file and directory structure for an installable SDK. See the “SDK Generation” section in the Yocto Project Overview and Concepts Manual for more information.
7.1.21 do_populate_sdk_ext
Creates the file and directory structure for an installable extensible SDK (eSDK). See the “SDK Generation” section in the Yocto Project Overview and Concepts Manual for more information.
7.1.22 do_populate_sysroot
Stages (copies) a subset of the files installed by the
do_install task into the appropriate
sysroot. For information on how to access these files from other
recipes, see the STAGING_DIR* variables.
Directories that would typically not be needed by other recipes at build
time (e.g. /etc) are not copied by default.
For information on what directories are copied by default, see the SYSROOT_DIRS* variables. You can change these variables inside your recipe if you need to make additional (or fewer) directories available to other recipes at build time.
The do_populate_sysroot task is a shared state (sstate) task, which means that the task can be accelerated through sstate use. Realize also that if the task is re-executed, any previous output is removed (i.e. “cleaned”).
7.1.23 do_prepare_recipe_sysroot
Installs the files into the individual recipe specific sysroots (i.e.
recipe-sysroot and recipe-sysroot-native under
${WORKDIR} based upon the
dependencies specified by DEPENDS). See the
“staging” class for more information.
7.1.24 do_recipe_qa
Performs QA check on recipes that can operate entirely from recipe metadata and do not need any of the build artefacts or source code.
The list of QA checks that this tasks defines are documented in QA Error and Warning Messages.
7.1.25 do_rm_work
Removes work files after the OpenEmbedded build system has finished with them. You can learn more by looking at the “rm_work” section.
7.1.26 do_unpack
Unpacks the source code into a working directory pointed to by
${UNPACKDIR}.
For more information on how source files are unpacked, see the
“Source Fetching”
section in the Yocto Project Overview and Concepts Manual.
7.2 Manually Called Tasks
These tasks are typically manually triggered (e.g. by using the
bitbake -c command-line option):
7.2.1 do_checkuri
Validates the SRC_URI value.
7.2.2 do_clean
Removes all output files for a target from the do_unpack task forward (i.e. do_unpack, do_configure, do_compile, do_install, and do_package).
You can run this task using BitBake as follows:
$ bitbake -c clean recipe
Running this task does not remove the
sstate cache files.
Consequently, if no changes have been made and the recipe is rebuilt
after cleaning, output files are simply restored from the sstate cache.
If you want to remove the sstate cache files for the recipe, you need to
use the do_cleansstate task instead
(i.e. bitbake -c cleansstate recipe).
7.2.3 do_cleanall
Removes all output files, shared state (sstate) cache, and downloaded source files for a target (i.e. the contents of DL_DIR). Essentially, the do_cleanall task is identical to the do_cleansstate task with the added removal of downloaded source files.
You can run this task using BitBake as follows:
$ bitbake -c cleanall recipe
You should never use the do_cleanall task in a normal scenario. If you want to start fresh with the do_fetch task, use instead:
$ bitbake -f -c fetch recipe
Note
The reason to prefer bitbake -f -c fetch is that the
do_cleanall task would break in some cases, such as:
$ bitbake -c fetch recipe
$ bitbake -c cleanall recipe-native
$ bitbake -c unpack recipe
because after step 1 there is a stamp file for the
do_fetch task of recipe, and it won’t be removed at
step 2 because step 2 uses a different work directory. So the unpack task
at step 3 will try to extract the downloaded archive and fail as it has
been deleted in step 2.
Note that this also applies to BitBake from concurrent processes when a shared download directory (DL_DIR) is setup.
7.2.4 do_cleansstate
Removes all output files and shared state (sstate) cache for a target. Essentially, the do_cleansstate task is identical to the do_clean task with the added removal of shared state (sstate) cache.
You can run this task using BitBake as follows:
$ bitbake -c cleansstate recipe
When you run the do_cleansstate task, the OpenEmbedded build system no longer uses any sstate. Consequently, building the recipe from scratch is guaranteed.
Note
Using do_cleansstate with a shared SSTATE_DIR is not recommended because it could trigger an error during the build of a separate BitBake instance. This is because the builds check sstate “up front” but download the files later, so it if is deleted in the meantime, it will cause an error but not a total failure as it will rebuild it.
The reliable and preferred way to force a new build is to use bitbake
-f instead.
Note
The do_cleansstate task cannot remove sstate from a remote sstate mirror. If you need to build a target from scratch using remote mirrors, use the “-f” option as follows:
$ bitbake -f -c do_cleansstate target
7.2.5 do_pydevshell
Starts a shell in which an interactive Python interpreter allows you to
interact with the BitBake build environment. From within this shell, you
can directly examine and set bits from the data store and execute
functions as if within the BitBake environment. See the “Using a Python Development Shell” section in
the Yocto Project Development Tasks Manual for more information about
using pydevshell.
7.2.6 do_devshell
Starts a shell whose environment is set up for development, debugging,
or both. See the “Using a Development Shell” section in the
Yocto Project Development Tasks Manual for more information about using
devshell.
7.2.7 do_list_image_features
Lists the available features for an image recipe. These features can be set in the IMAGE_FEATURES variable.
7.2.8 do_listtasks
Lists all defined tasks for a target.
7.2.9 do_package_index
Creates or updates the index in the Package Feeds area.
Note
This task is not triggered with the bitbake -c command-line option as
are the other tasks in this section. Because this task is specifically for
the package-index recipe, you run it using bitbake package-index.
8 Using Configuration Fragments
Configuration Fragments define top level build configuration features that can be independently enabled and disabled using standard tooling. Such features are made of one or several build configuration statements that are either contained in a fragment file, or are set indirectly using the Built-in Fragment mechanism.
This document provides a quick reference of the bitbake-config-build tool and lists the Configuration Fragments and Built-in Fragments available in the OpenEmbedded Build System core repositories.
Note
For details on how to define new fragments in your build, see the Creating New Configuration Fragments In Your Build section of the Yocto Project Development Tasks Manual.
8.1 bitbake-config-build Quick Reference
Configuration Fragments are managed with the bitbake-config-build command-line tool, which is available after Initializing the Build Environment.
The bitbake-config-build command-line tool uses sub-commands to manage
fragments, which are detailed in the sections below. For each sub-command, the
--help flag can be passed to get more information on the sub-command.
8.1.1 bitbake-config-build list-fragments
The bitbake-config-build list-fragments command will list the Built-in Fragments and Configuration Fragments that are currently available, and will also print which fragments are enabled or disabled.
8.1.2 bitbake-config-build show-fragment
The bitbake-config-build show-fragment command is used to show the
location and value of a fragment. For example, running bitbake-config-build
show-fragment core/yocto/sstate-mirror-cdn will show the content of the
core/yocto/sstate-mirror-cdn fragment.
8.1.3 bitbake-config-build enable-fragment
The bitbake-config-build enable-fragment command is used to enable a fragment. When a fragment is enabled, the configuration variables of this fragment are parsed by BitBake and their values are available globally in your build.
From the list obtained with the bitbake-config-build list-fragments command, you can determine which fragments can be enabled for your build.
For example, the following command would enable the core/yocto/sstate-mirror-cdn fragment:
bitbake-config-build enable-fragment core/yocto/sstate-mirror-cdn
Note
Multiple fragments can be enabled at once with the same command:
bitbake-config-build enable-fragment <fragment1> <fragment2> ...
Built-in fragments are enabled the same way, and
their values are defined from the command-line directly. For example, the
following command sets the qemuarm64 MACHINE through the
machine/ fragment:
bitbake-config-build enable-fragment machine/qemuarm64
This fragment can be overridden from the command-line by setting it to another value, for example:
bitbake-config-build enable-fragment machine/qemux86-64
In the above example, the new value of MACHINE is now equal to
qemux86-64.
When a fragment is enabled with bitbake-config-build enable-fragment, its name is automatically appended to the OE_FRAGMENTS variable in build/conf/toolcfg.conf.
Note
It is also possible to manually remove or add fragments by modifying the OE_FRAGMENTS variable in a configuration file such as build/conf/local.conf.
8.1.4 bitbake-config-build disable-fragment
Any fragment enabled with the bitbake-config-build enable-fragment command can be disabled with the bitbake-config-build disable-fragment command. The list of enabled fragments can be obtained with bitbake-config-build list-fragments.
For example, the following command disables the core/yocto/sstate-mirror-cdn fragment:
bitbake-config-build disable-fragment core/yocto/sstate-mirror-cdn
Likewise, Built-in Fragments are disabled the
same way. For example, this would disable the machine/qemuarm64 fragment:
bitbake-config-build disable-fragment machine/qemuarm64
Note
Multiple fragments can be disabled at once with the same command:
bitbake-config-build disable-fragment <fragment1> <fragment2>
8.1.5 bitbake-config-build disable-all-fragments
The bitbake-config-build disable-all-fragments command disables all of the currently enabled fragments. The list of enabled fragments can be obtained with bitbake-config-build list-fragments.
This command is run without arguments:
bitbake-config-build disable-all-fragments
8.2 Core Fragments
8.2.1 Core Built-in Fragments
Built-in Fragments are used to assign a single variable globally. The OpenEmbedded Build System defines multiple built-in fragments that are detailed in this section.
8.2.1.1 machine/
The machine/ built-in fragment can be used to assign the value of
the MACHINE variable globally.
8.2.1.2 distro/
The distro/ built-in fragment can be used to assign the value of
the DISTRO variable globally.
8.2.2 Core Configuration Fragments
8.2.2.1 Yocto Project Fragments
This group defines fragments related to the Yocto Project infrastructure in general.
8.2.2.1.1 core/yocto/sstate-mirror-cdn
The core/yocto/sstate-mirror-cdn configuration fragment can be used
to set up BB_HASHSERVE_UPSTREAM and SSTATE_MIRRORS to use
pre-built shared state cache artifacts for standard Yocto build configurations.
This will mean the build will query the Yocto Project mirrors to check for artifacts at the start of builds, which does slow it down initially but it will then speed up the builds by not having to build things if they are present in the cache. It assumes you can download something faster than you can build it which will depend on your network configuration.
8.2.2.1.2 core/yocto/root-login-with-empty-password
The core/yocto/root-login-with-empty-password configuration fragment
can be used to allow to login as the root user to login without a password
on the serial console and over SSH.
8.2.2.1.3 core/yocto/sbom-cve-check
The core/yocto/sbom-cve-check configuration fragment can be used
to set up the build to use the sbom-cve-check class.
This configuration fragment does multiple things:
Adds the create-spdx class to the list of globally inherited classes, as it depends on it.
Sets the source revision (SRCREV) of the input CVE databases to AUTOREV, so these databases are automatically fetched and updated when starting a build.
Includes the VEX statements to the input SPDX document using the SPDX_INCLUDE_VEX variable.
8.2.2.2 Yocto Project Autobuilder Fragments
This group defines fragment used for the Yocto Project Autobuilder. For details, see the Yocto Project Autobuilder Overview section of the Yocto Project Test Environment Manual.
8.2.2.2.1 core/yocto-autobuilder/autobuilder
The core/yocto-autobuilder/autobuilder fragment defines common variables
used in builds started by the Yocto Project Autobuilder.
8.2.2.2.2 core/yocto-autobuilder/autobuilder-resource-constraints
The core/yocto-autobuilder/autobuilder fragment defines variables for
limiting the resources used by the Yocto Project Autobuilder during builds. For
more details on how to limit resources, see the Limiting the Host Resources Usage
section of the Yocto Project Development Tasks Manual.
8.2.2.2.3 core/yocto-autobuilder/multilib-mips64-n32
The core/yocto-autobuilder/multilib-mips64-n32 fragment enables
tri-architecture multilib configurations for MIPS64 machines, which includes mips64-n32, mips64, and
mips32r2.
8.2.2.2.4 core/yocto-autobuilder/multilib-x86-lib32
The core/yocto-autobuilder/multilib-x86-lib32 fragment enables
multilib configurations for supporting 32-bit libraries on 64-bit
X86 builds.
8.2.2.2.5 core/yocto-autobuilder/multilib-x86-lib64
The core/yocto-autobuilder/multilib-x86-lib64 fragment enables
multilib configurations for supporting 64-bit libraries on 32-bit
X86 builds.
9 devtool Quick Reference
The devtool command-line tool provides a number of features that
help you build, test, and package software. This command is available
alongside the bitbake command. Additionally, the devtool command
is a key part of the extensible SDK.
This chapter provides a Quick Reference for the devtool command. For
more information on how to apply the command when using the extensible
SDK, see the “Using the Extensible SDK” chapter in the Yocto
Project Application Development and the Extensible Software Development
Kit (eSDK) manual.
9.1 Getting Help
The devtool command line is organized similarly to Git in that it
has a number of sub-commands for each function. You can run
devtool --help to see all the commands:
$ devtool --help
NOTE: Starting bitbake server...
usage: devtool [--basepath BASEPATH] [--bbpath BBPATH] [-d] [-q] [--color COLOR] [-h] <subcommand> ...
OpenEmbedded development tool
options:
--basepath BASEPATH Base directory of SDK / build directory
--bbpath BBPATH Explicitly specify the BBPATH, rather than getting it from the metadata
-d, --debug Enable debug output
-q, --quiet Print only errors
--color COLOR Colorize output (where COLOR is auto, always, never)
-h, --help show this help message and exit
subcommands:
Beginning work on a recipe:
add Add a new recipe
modify Modify the source for an existing recipe
upgrade Upgrade an existing recipe
Getting information:
status Show workspace status
latest-version Report the latest version of an existing recipe
check-upgrade-status Report upgradability for multiple (or all) recipes
search Search available recipes
Working on a recipe in the workspace:
build Build a recipe
ide-sdk Setup the SDK and configure the IDE
rename Rename a recipe file in the workspace
edit-recipe Edit a recipe file
find-recipe Find a recipe file
configure-help Get help on configure script options
update-recipe Apply changes from external source tree to recipe
reset Remove a recipe from your workspace
finish Finish working on a recipe in your workspace
Testing changes on target:
deploy-target Deploy recipe output files to live target machine
undeploy-target Undeploy recipe output files in live target machine
build-image Build image including workspace recipe packages
Advanced:
create-workspace Set up workspace in an alternative location
import Import exported tar archive into workspace
export Export workspace into a tar archive
extract Extract the source for an existing recipe
sync Synchronize the source tree for an existing recipe
menuconfig Alter build-time configuration for a recipe
Use devtool <subcommand> --help to get help on a specific command
As directed in the general help output, you can
get more syntax on a specific command by providing the command name and
using --help:
$ devtool add --help
NOTE: Starting bitbake server...
usage: devtool add [-h] [--same-dir | --no-same-dir] [--fetch URI] [--npm-dev] [--no-pypi] [--version VERSION] [--no-git] [--srcrev SRCREV | --autorev]
[--srcbranch SRCBRANCH] [--binary] [--also-native] [--src-subdir SUBDIR] [--mirrors] [--provides PROVIDES]
[recipename] [srctree] [fetchuri]
Adds a new recipe to the workspace to build a specified source tree. Can optionally fetch a remote URI and unpack it to create the source tree.
arguments:
recipename Name for new recipe to add (just name - no version, path or extension). If not specified, will attempt to auto-detect it.
srctree Path to external source tree. If not specified, a subdirectory of /media/build1/poky/build/workspace/sources will be used.
fetchuri Fetch the specified URI and extract it to create the source tree
options:
-h, --help show this help message and exit
--same-dir, -s Build in same directory as source
--no-same-dir Force build in a separate build directory
--fetch URI, -f URI Fetch the specified URI and extract it to create the source tree (deprecated - pass as positional argument instead)
--npm-dev For npm, also fetch devDependencies
--no-pypi Do not inherit pypi class
--version VERSION, -V VERSION
Version to use within recipe (PV)
--no-git, -g If fetching source, do not set up source tree as a git repository
--srcrev SRCREV, -S SRCREV
Source revision to fetch if fetching from an SCM such as git (default latest)
--autorev, -a When fetching from a git repository, set SRCREV in the recipe to a floating revision instead of fixed
--srcbranch SRCBRANCH, -B SRCBRANCH
Branch in source repository if fetching from an SCM such as git (default master)
--binary, -b Treat the source tree as something that should be installed verbatim (no compilation, same directory structure). Useful with binary packages e.g. RPMs.
--also-native Also add native variant (i.e. support building recipe for the build host as well as the target machine)
--src-subdir SUBDIR Specify subdirectory within source tree to use
--mirrors Enable PREMIRRORS and MIRRORS for source tree fetching (disable by default).
--provides PROVIDES, -p PROVIDES
Specify an alias for the item provided by the recipe. E.g. virtual/libgl
9.2 The Workspace Layer Structure
devtool uses a “Workspace” layer in which to accomplish builds. This
layer is not specific to any single devtool command but is rather a
common working area used across the tool.
The following figure shows the workspace structure:
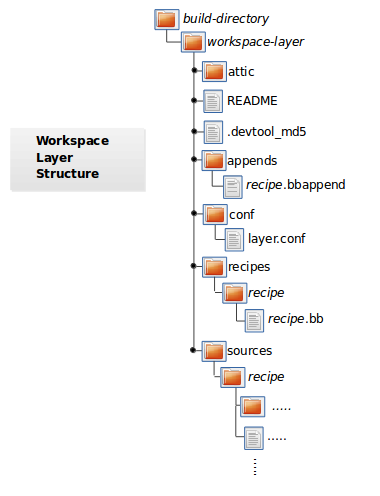
attic - A directory created if devtool believes it must preserve
anything when you run "devtool reset". For example, if you
run "devtool add", make changes to the recipe, and then
run "devtool reset", devtool takes notice that the file has
been changed and moves it into the attic should you still
want the recipe.
README - Provides information on what is in workspace layer and how to
manage it.
.devtool_md5 - A checksum file used by devtool.
appends - A directory that contains *.bbappend files, which point to
external source.
conf - A configuration directory that contains the layer.conf file.
recipes - A directory containing recipes. This directory contains a
folder for each directory added whose name matches that of the
added recipe. devtool places the recipe.bb file
within that sub-directory.
sources - A directory containing a working copy of the source files used
when building the recipe. This is the default directory used
as the location of the source tree when you do not provide a
source tree path. This directory contains a folder for each
set of source files matched to a corresponding recipe.
9.3 Adding a New Recipe to the Workspace Layer
Use the devtool add command to add a new recipe to the workspace
layer. The recipe you add should not exist — devtool creates it for
you. The source files the recipe uses should exist in an external area.
The following example creates and adds a new recipe named jackson to
a workspace layer the tool creates. The source code built by the recipes
resides in /home/user/sources/jackson:
$ devtool add jackson /home/user/sources/jackson
If you add a recipe and the workspace layer does not exist, the command creates the layer and populates it as described in “The Workspace Layer Structure” section.
Running devtool add when the workspace layer exists causes the tool
to add the recipe, append files, and source files into the existing
workspace layer. The .bbappend file is created to point to the
external source tree.
Note
If your recipe has runtime dependencies defined, you must be sure that these packages exist on the target hardware before attempting to run your application. If dependent packages (e.g. libraries) do not exist on the target, your application, when run, will fail to find those functions. For more information, see the “Deploying Your Software on the Target Machine” section.
By default, devtool add uses the latest revision (i.e. master) when
unpacking files from a remote URI. In some cases, you might want to
specify a source revision by branch, tag, or commit hash. You can
specify these options when using the devtool add command:
To specify a source branch, use the
--srcbranchoption:$ devtool add --srcbranch wrynose jackson /home/user/sources/jackson
In the previous example, you are checking out the wrynose branch.
To specify a specific tag or commit hash, use the
--srcrevoption:$ devtool add --srcrev yocto-$DISTRO; jackson /home/user/sources/jackson $ devtool add --srcrev some_commit_hash /home/user/sources/jackson
The previous examples check out the yocto-$DISTRO; tag and the commit associated with the some_commit_hash hash.
Note
If you prefer to use the latest revision every time the recipe is
built, use the options --autorev or -a.
9.4 Extracting the Source for an Existing Recipe
Use the devtool extract command to extract the source for an
existing recipe. When you use this command, you must supply the root
name of the recipe (i.e. no version, paths, or extensions), and you must
supply the directory to which you want the source extracted.
Additional command options let you control the name of a development branch into which you can checkout the source and whether or not to keep a temporary directory, which is useful for debugging.
9.5 Synchronizing a Recipe’s Extracted Source Tree
Use the devtool sync command to synchronize a previously extracted
source tree for an existing recipe. When you use this command, you must
supply the root name of the recipe (i.e. no version, paths, or
extensions), and you must supply the directory to which you want the
source extracted.
Additional command options let you control the name of a development branch into which you can checkout the source and whether or not to keep a temporary directory, which is useful for debugging.
9.6 Modifying an Existing Recipe
Use the devtool modify command to begin modifying the source of an
existing recipe. This command is very similar to the
add command
except that it does not physically create the recipe in the workspace
layer because the recipe already exists in an another layer.
The devtool modify command extracts the source for a recipe, sets it
up as a Git repository if the source had not already been fetched from
Git, checks out a branch for development, and applies any patches from
the recipe as commits on top. You can use the following command to
checkout the source files:
$ devtool modify recipe
Using the above command form, devtool uses the existing recipe’s
SRC_URI statement to locate the upstream source,
extracts the source into the default sources location in the workspace.
The default development branch used is “devtool”.
9.7 Edit an Existing Recipe
Use the devtool edit-recipe command to run the default editor, which
is identified using the EDITOR variable, on the specified recipe.
When you use the devtool edit-recipe command, you must supply the
root name of the recipe (i.e. no version, paths, or extensions). Also,
the recipe file itself must reside in the workspace as a result of the
devtool add or devtool upgrade commands.
9.8 Updating a Recipe
Use the devtool update-recipe command to update your recipe with
patches that reflect changes you make to the source files. For example,
if you know you are going to work on some code, you could first use the
devtool modify command to extract
the code and set up the workspace. After which, you could modify,
compile, and test the code.
When you are satisfied with the results and you have committed your
changes to the Git repository, you can then run the
devtool update-recipe to create the patches and update the recipe:
$ devtool update-recipe recipe
If you run the devtool update-recipe
without committing your changes, the command ignores the changes.
Often, you might want to apply customizations made to your software in
your own layer rather than apply them to the original recipe. If so, you
can use the -a or --append option with the
devtool update-recipe command. These options allow you to specify
the layer into which to write an append file:
$ devtool update-recipe recipe -a base-layer-directory
The *.bbappend file is created at the
appropriate path within the specified layer directory, which may or may
not be in your bblayers.conf file. If an append file already exists,
the command updates it appropriately.
9.9 Checking on the Upgrade Status of a Recipe
Upstream recipes change over time. Consequently, you might find that you need to determine if you can upgrade a recipe to a newer version.
To check on the upgrade status of a recipe, you can use the
devtool latest-version recipe command, which quickly shows the current
version and the latest version available upstream. To get a more global
picture, use the devtool check-upgrade-status command, which takes a
list of recipes as input, or no arguments, in which case it checks all
available recipes. This command will only print the recipes for which
a new upstream version is available. Each such recipe will have its current
version and latest upstream version, as well as the email of the maintainer
and any additional information such as the commit hash or reason for not
being able to upgrade it, displayed in a table.
This upgrade checking mechanism relies on the optional UPSTREAM_CHECK_URI, UPSTREAM_CHECK_REGEX, UPSTREAM_CHECK_GITTAGREGEX, UPSTREAM_CHECK_COMMITS and UPSTREAM_VERSION_UNKNOWN variables in package recipes.
Note
Most of the time, the above variables are unnecessary. They are only required when upstream does something unusual, and default mechanisms cannot find the new upstream versions.
For the
oe-corelayer, recipe maintainers come from the maintainers.inc file.If the recipe is using the Git Fetcher (git://) rather than a tarball, the commit hash points to the commit that matches the recipe’s latest version tag, or in the absence of suitable tags, to the latest commit (when UPSTREAM_CHECK_COMMITS set to
1in the recipe).
As with all devtool commands, you can get help on the individual
command:
$ devtool check-upgrade-status -h
NOTE: Starting bitbake server...
usage: devtool check-upgrade-status [-h] [--all] [recipe [recipe ...]]
Prints a table of recipes together with versions currently provided by recipes, and latest upstream versions, when there is a later version available
arguments:
recipe Name of the recipe to report (omit to report upgrade info for all recipes)
options:
-h, --help show this help message and exit
--all, -a Show all recipes, not just recipes needing upgrade
Unless you provide a specific recipe name on the command line, the command checks all recipes in all configured layers.
Here is a partial example table that reports on all the recipes:
$ devtool check-upgrade-status
...
INFO: bind 9.16.20 9.16.21 Armin Kuster <akuster808@gmail.com>
INFO: inetutils 2.1 2.2 Tom Rini <trini@konsulko.com>
INFO: iproute2 5.13.0 5.14.0 Changhyeok Bae <changhyeok.bae@gmail.com>
INFO: openssl 1.1.1l 3.0.0 Alexander Kanavin <alex.kanavin@gmail.com>
INFO: base-passwd 3.5.29 3.5.51 Anuj Mittal <anuj.mittal@intel.com> cannot be updated due to: Version 3.5.38 requires cdebconf for update-passwd utility
...
Notice the reported reason for not upgrading the base-passwd recipe.
In this example, while a new version is available upstream, you do not
want to use it because the dependency on cdebconf is not easily
satisfied. Maintainers can explicit the reason that is shown by adding
the RECIPE_NO_UPDATE_REASON variable to the corresponding recipe.
See the base-passwd_*.bb
recipe for an example:
RECIPE_NO_UPDATE_REASON = "Version 3.5.38 requires cdebconf for update-passwd utility"
Last but not least, you may set UPSTREAM_VERSION_UNKNOWN to 1
in a recipe when there’s currently no way to determine its latest upstream
version.
9.10 Upgrading a Recipe
As software matures, upstream recipes are upgraded to newer versions. As
a developer, you need to keep your local recipes up-to-date with the
upstream version releases. There are several ways of upgrading recipes.
You can read about them in the “Upgrading Recipes”
section of the Yocto Project Development Tasks Manual. This section
overviews the devtool upgrade command.
Before you upgrade a recipe, you can check on its upgrade status. See the “Checking on the Upgrade Status of a Recipe” section for more information.
The devtool upgrade command upgrades an existing recipe to a more
recent version of the recipe upstream. The command puts the upgraded
recipe file along with any associated files into a “workspace” and, if
necessary, extracts the source tree to a specified location. During the
upgrade, patches associated with the recipe are rebased or added as
needed.
When you use the devtool upgrade command, you must supply the root
name of the recipe (i.e. no version, paths, or extensions), and you must
supply the directory to which you want the source extracted. Additional
command options let you control things such as the version number to
which you want to upgrade (i.e. the PV), the source
revision to which you want to upgrade (i.e. the
SRCREV), whether or not to apply patches, and so
forth.
You can read more on the devtool upgrade workflow in the
“Use devtool upgrade to Create a Version of the Recipe that Supports a Newer Version of the Software”
section in the Yocto Project Application Development and the Extensible
Software Development Kit (eSDK) manual. You can also see an example of
how to use devtool upgrade in the “Using devtool upgrade”
section in the Yocto Project Development Tasks Manual.
9.11 Resetting a Recipe
Use the devtool reset command to remove a recipe and its
configuration (e.g. the corresponding .bbappend file) from the
workspace layer. Realize that this command deletes the recipe and the
append file. The command does not physically move them for you.
Consequently, you must be sure to physically relocate your updated
recipe and the append file outside of the workspace layer before running
the devtool reset command.
If the devtool reset command detects that the recipe or the append
files have been modified, the command preserves the modified files in a
separate “attic” subdirectory under the workspace layer.
Here is an example that resets the workspace directory that contains the
mtr recipe:
$ devtool reset mtr
NOTE: Cleaning sysroot for recipe mtr...
NOTE: Leaving source tree /home/scottrif/bitbake-builds/build/workspace/sources/mtr as-is; if you no longer need it then please delete it manually
$
9.12 Finish Working on a Recipe
Use the devtool finish command to push any committed changes to the
specified recipe in the specified layer and remove it from your workspace.
This is roughly equivalent to the devtool update-recipe command followed by
the devtool reset command. The changes must have been committed to the git
repository created by devtool. Here is an example:
$ devtool finish recipe /path/to/custom/layer
9.13 Building Your Recipe
Use the devtool build command to build your recipe. The
devtool build command is equivalent to the
bitbake -c populate_sysroot command.
When you use the devtool build command, you must supply the root
name of the recipe (i.e. do not provide versions, paths, or extensions).
You can use either the -s or the --disable-parallel-make options to
disable parallel makes during the build. Here is an example:
$ devtool build recipe
9.14 Building Your Image
Use the devtool build-image command to build an image, extending it
to include packages from recipes in the workspace. Using this command is
useful when you want an image that ready for immediate deployment onto a
device for testing. For proper integration into a final image, you need
to edit your custom image recipe appropriately.
When you use the devtool build-image command, you must supply the
name of the image. This command has no command line options:
$ devtool build-image image
9.15 Deploying Your Software on the Target Machine
Use the devtool deploy-target command to deploy the recipe’s build
output to the live target machine:
$ devtool deploy-target recipe target
The target is the address of the target machine, which must be running
an SSH server (i.e. user@hostname[:destdir]).
This command deploys all files installed during the do_install task. Furthermore, you do not need to have package management enabled within the target machine. If you do, the package manager is bypassed.
Note
The deploy-target functionality is for development only. You
should never use it to update an image that will be used in
production.
Some conditions could prevent a deployed application from behaving as expected. When both of the following conditions are met, your application has the potential to not behave correctly when run on the target:
You are deploying a new application to the target and the recipe you used to build the application had correctly defined runtime dependencies.
The target does not physically have the packages on which the application depends installed.
If both of these conditions are met, your application will not behave as
expected. The reason for this misbehavior is because the
devtool deploy-target command does not deploy the packages (e.g.
libraries) on which your new application depends. The assumption is that
the packages are already on the target. Consequently, when a runtime
call is made in the application for a dependent function (e.g. a library
call), the function cannot be found.
Warning
Runtime dependencies can be explicitly listed in the RDEPENDS
variable, but may also be the result of a DEPENDS assignment in your
application’s recipe. This is usually the case when your application depends
on libraries for compilation: these libraries are listed as build-time
dependencies in the DEPENDS variable in your application’s recipe.
However these may also be runtime dependencies if they install shared objects
on which your application will dynamically link to at runtime (e.g. shared
libraries ending with .so).
These runtime dependencies are automatically resolved by the
OpenEmbedded Build System during the packaging phase. Since
devtool ignores packaging dependencies, they will not be installed
automatically with devtool deploy-target.
For more information on how the OpenEmbedded Build System handles packaging, see the Automatically Added Runtime Dependencies section of the Yocto Project Overview and Concepts Manual.
To be sure you have all the dependencies local to the target, you need to be sure that the packages are pre-deployed (installed) on the target before attempting to run your application.
9.16 Removing Your Software from the Target Machine
Use the devtool undeploy-target command to remove deployed build
output from the target machine. For the devtool undeploy-target
command to work, you must have previously used the
“devtool deploy-target”
command:
$ devtool undeploy-target recipe target
The target is the
address of the target machine, which must be running an SSH server (i.e.
user@hostname).
9.17 Creating the Workspace Layer in an Alternative Location
Use the devtool create-workspace command to create a new workspace
layer in your Build Directory. When you create a
new workspace layer, it is populated with the README file and the
conf directory only.
The following example creates a new workspace layer in your current working and by default names the workspace layer “workspace”:
$ devtool create-workspace
You can create a workspace layer anywhere by supplying a pathname with the command. The following command creates a new workspace layer named “new-workspace”:
$ devtool create-workspace /home/scottrif/new-workspace
9.18 Get the Status of the Recipes in Your Workspace
Use the devtool status command to list the recipes currently in your
workspace. Information includes the paths to their respective external
source trees.
The devtool status command has no command-line options:
$ devtool status
Here is sample output after using
devtool add
to create and add the mtr_0.86.bb recipe to the workspace directory:
$ devtool status
mtr:/home/scottrif/bitbake-builds/build/workspace/sources/mtr (/home/scottrif/bitbake-builds/build/workspace/recipes/mtr/mtr_0.86.bb)
$
9.19 Search for Available Target Recipes
Use the devtool search command to search for available target
recipes. The command matches the recipe name, package name, description,
and installed files. The command displays the recipe name as a result of
a match.
When you use the devtool search command, you must supply a keyword.
The command uses the keyword when searching for a match.
Alternatively, the devtool find-recipe command can be used to search for
recipe files instead of recipe names. Likewise, you must supply a keyword.
9.20 Get Information on Recipe Configuration Scripts
Use the devtool configure-help command to get help on the configuration
script options for a given recipe. You must supply the recipe name to the
command. For example, it shows the output of ./configure --help for
autotools-based recipes.
The configure-help command will also display the configuration options
currently in use, including the ones passed through the EXTRA_OECONF
variable.
9.21 Generate an IDE Configuration for a Recipe
The devtool ide-sdk automatically creates an IDE configuration and SDK to
work on a given recipe. Depending on the --mode parameter, different types
of SDKs are generated:
modifiedmode: this creates an SDK and generates an IDE configuration in the workspace directory.sharedmode: this creates a cross-compiling toolchain and the corresponding shared sysroot directories of the supplied recipe(s).
The --target option can be used to specify a username@hostname string
and create a remote debugging configuration for the recipe. Similarly to
devtool deploy-target, it requires an SSH server running on the target.
For further details on the devtool ide-sdk command, see the
“Using the Extensible SDK” chapter in the Yocto Project Application
Development and the Extensible Software Development Kit (eSDK) manual.
10 OpenEmbedded Kickstart (.wks) Reference
10.1 Introduction
This chapter provides a reference on the available kickstart commands. The information lists the commands, their syntax, and meanings. Kickstart commands are based on the Fedora kickstart versions but with modifications to reflect Wic capabilities. You can see the original documentation for those commands at the following link: https://pykickstart.readthedocs.io/en/latest/kickstart-docs.html
10.2 Command: part or partition
Either of these commands creates a partition on the system and uses the following syntax:
part [mntpoint]
partition [mntpoint]
If you do not provide mntpoint, Wic creates a partition but does not mount it.
The mntpoint is where the partition is mounted and must be in one of
the following forms:
/path: For example, “/”, “/usr”, or “/home”swap: The created partition is used as swap space
Specifying a mntpoint causes the partition to automatically be mounted.
Wic achieves this by adding entries to the filesystem table (fstab)
during image generation. In order for Wic to generate a valid fstab, you
must also provide one of the --ondrive, --ondisk, or
--use-uuid partition options as part of the command.
Note
The mount program must understand the PARTUUID syntax you use with
--use-uuid and non-root mountpoint, including swap. The default
configuration of BusyBox in OpenEmbedded supports this, but this may
be disabled in custom configurations.
Here is an example that uses “/” as the mountpoint. The command uses
--ondisk to force the partition onto the sdb disk:
part / --source rootfs --ondisk sdb --fstype=ext3 --label platform --align 1024
Here is a list that describes other supported options you can use with
the part and partition commands:
--size: The minimum partition size. Specify as an integer value optionally followed by one of the units “k” / “K” for kibibyte, “M” for mebibyte and “G” for gibibyte. The default unit if none is given is “M”. You do not need this option if you use--source.--fixed-size: The exact partition size. Specify as an integer value optionally followed by one of the units “k” / “K” for kibibyte, “M” for mebibyte and “G” for gibibyte. The default unit if none is given is “M”. Cannot be specify together with--size. An error occurs when assembling the disk image if the partition data is larger than--fixed-size.--source: This option is a Wic-specific option that names the source of the data that populates the partition. The most common value for this option is “rootfs”, but you can use any value that maps to a valid source plugin. For information on the source plugins, see the “Using the Wic Plugin Interface” section in the Yocto Project Development Tasks Manual.If you use
--source rootfs, Wic creates a partition as large as needed and fills it with the contents of the root filesystem pointed to by the-rcommand-line option or the equivalent root filesystem derived from the-ecommand-line option. The filesystem type used to create the partition is driven by the value of the--fstypeoption specified for the partition. See the entry on--fstypethat follows for more information.If you use
--source plugin-name, Wic creates a partition as large as needed and fills it with the contents of the partition that is generated by the specified plugin name using the data pointed to by the-rcommand-line option or the equivalent root filesystem derived from the-ecommand-line option. Exactly what those contents are and filesystem type used are dependent on the given plugin implementation.If you do not use the
--sourceoption, thewiccommand creates an empty partition. Consequently, you must use the--sizeoption to specify the size of the empty partition.--ondiskor--ondrive: Forces the partition to be created on a particular disk.--fstype: Sets the file system type for the partition. Valid values are:btrfserofsext2ext3ext4squashfsswapvfat
--fsoptions: Specifies a free-form string of options to be used when mounting the filesystem. This string is copied into the/etc/fstabfile of the installed system and should be enclosed in quotes. If not specified, the default string is “defaults”.--label label: Specifies the label to give to the filesystem to be made on the partition. If the given label is already in use by another filesystem, a new label is created for the partition.--active: Marks the partition as active.--align (in KBytes): This option is a Wic-specific option that says to start partitions on boundaries given x KBytes.--offset: This option is a Wic-specific option that says to place a partition at exactly the specified offset. If the partition cannot be placed at the specified offset, the image build will fail. Specify as an integer value optionally followed by one of the units “s” / “S” for 512 byte sector, “k” / “K” for kibibyte, “M” for mebibyte and “G” for gibibyte. The default unit if none is given is “k”.--no-table: This option is a Wic-specific option. Using the option reserves space for the partition and causes it to become populated. However, the partition is not added to the partition table.--exclude-path: This option is a Wic-specific option that excludes the given relative path from the resulting image. This option is only effective with the rootfs source plugin.--extra-filesystem-space: This option is a Wic-specific option that adds extra space after the space filled by the content of the partition. The final size can exceed the size specified by the--sizeoption. The default value is 10M. Specify as an integer value optionally followed by one of the units “k” / “K” for kibibyte, “M” for mebibyte and “G” for gibibyte. The default unit if none is given is “M”.--extra-partition-space: This option is a Wic-specific option that adds extra empty space after the space filled by the filesystem. With--fixed-sizeoption, the extra partition space is removed from the filesystem size. Otherwise (with or without--sizeflag), the extra partition space is added to the final partition size. The default value is 0M. Specify as an integer value optionally followed by one of the units “k” / “K” for kibibyte, “M” for mebibyte and “G” for gibibyte. The default unit if none is given is “M”.--overhead-factor: This option is a Wic-specific option that multiplies the size of the partition by the option’s value. You must supply a value greater than or equal to “1”. The default value is “1.3”.--part-name: This option is a Wic-specific option that specifies a name for GPT partitions.--part-type: This option is a Wic-specific option that specifies the partition type globally unique identifier (GUID) for GPT partitions. You can find the list of partition type GUIDs at https://en.wikipedia.org/wiki/GUID_Partition_Table#Partition_type_GUIDs.--use-uuid: This option is a Wic-specific option that causes Wic to generate a random GUID for the partition. The generated identifier is used in the bootloader configuration to specify the root partition.--uuid: This option is a Wic-specific option that specifies the partition UUID.--fsuuid: This option is a Wic-specific option that specifies the filesystem UUID. You can generate or modify WKS_FILE with this option if a preconfigured filesystem UUID is added to the kernel command line in the bootloader configuration before you run Wic.--system-id: This option is a Wic-specific option that specifies the partition system ID, which is a one byte long, hexadecimal parameter with or without the 0x prefix.--mkfs-extraopts: This option specifies additional options to pass to themkfsutility. Some default options for certain filesystems do not take effect. See Wic’s help on kickstart (i.e.wic help kickstart).
10.3 Command: bootloader
This command specifies how the bootloader should be configured and supports the following options:
Note
Bootloader functionality and boot partitions are implemented by the various source plugins that implement bootloader functionality. The bootloader command essentially provides a means of modifying bootloader configuration.
--append: Specifies kernel parameters. These parameters will be added to the syslinux APPEND orgrubkernel command line.--configfile: Specifies a user-defined configuration file for the bootloader. You can provide a full pathname for the file or a file located in thefiles/wicfolder. This option overrides all other bootloader options.--ptable: Specifies the partition table format. Valid values are:msdosgpt
--timeout: Specifies the number of seconds before the bootloader times out and boots the default option.
10.4 Directive: include
The include directive can be used to include a WKS file into another. The
only argument to this command is the path to the file to include, relative to
the current file. For example:
include common.wks.inc
bootloader --configfile="directdisk-bootloader-config.cfg"
11 QA Error and Warning Messages
11.1 Introduction
When building a recipe, the OpenEmbedded build system performs various QA checks on the output to ensure that common issues are detected and reported. Sometimes when you create a new recipe to build new software, it will build with no problems. When this is not the case, or when you have QA issues building any software, it could take a little time to resolve them.
While it is tempting to ignore a QA message or even to disable QA checks, it is best to try and resolve any reported QA issues. This chapter provides a list of the QA messages and brief explanations of the issues you could encounter so that you can properly resolve problems.
The next section provides a list of all QA error and warning messages based on a default configuration. Each entry provides the message or error form along with an explanation.
Note
At the end of each message, the name of the associated QA test (as listed in the “insane” section) appears within square brackets.
As mentioned, this list of error and warning messages is for QA checks only. The list does not cover all possible build errors or warnings you could encounter.
Because some QA checks are disabled by default, this list does not include all possible QA check errors and warnings.
11.2 Errors and Warnings
11.2.1 already-stripped
File '<file>' from <recipename> was already stripped, this will prevent future debugging! [already-stripped]
Produced binaries have already been stripped prior to the build
system extracting debug symbols. It is common for upstream software
projects to default to stripping debug symbols for output binaries.
In order for debugging to work on the target using -dbg packages,
this stripping must be disabled.
Depending on the build system used by the software being built, disabling this stripping could be as easy as specifying an additional configure option. If not, disabling stripping might involve patching the build scripts. In the latter case, look for references to “strip” or “STRIP”, or the “-s” or “-S” command-line options being specified on the linker command line (possibly through the compiler command line if preceded with “-Wl,”).
Note
Disabling stripping here does not mean that the final packaged
binaries will be unstripped. Once the OpenEmbedded build system
splits out debug symbols to the -dbg package, it will then
strip the symbols from the binaries.
11.2.2 arch
Architecture did not match (<file_arch>, expected <machine_arch>) in <file> [arch]By default, the OpenEmbedded build system checks the Executable and Linkable Format (ELF) type, bit size, and endianness of any binaries to ensure they match the target architecture. This test fails if any binaries do not match the type since there would be an incompatibility. The test could indicate that the wrong compiler or compiler options have been used. Sometimes software, like bootloaders, might need to bypass this check. If the file you receive the error for is firmware that is not intended to be executed within the target operating system or is intended to run on a separate processor within the device, you can add “arch” to INSANE_SKIP for the package. Another option is to check the do_compile log and verify that the compiler options being used are correct.
Bit size did not match (<file_bits>, expected <machine_bits>) in <file> [arch]By default, the OpenEmbedded build system checks the Executable and Linkable Format (ELF) type, bit size, and endianness of any binaries to ensure they match the target architecture. This test fails if any binaries do not match the type since there would be an incompatibility. The test could indicate that the wrong compiler or compiler options have been used. Sometimes software, like bootloaders, might need to bypass this check. If the file you receive the error for is firmware that is not intended to be executed within the target operating system or is intended to run on a separate processor within the device, you can add “arch” to INSANE_SKIP for the package. Another option is to check the do_compile log and verify that the compiler options being used are correct.
Endianness did not match (<file_endianness>, expected <machine_endianness>) in <file> [arch]By default, the OpenEmbedded build system checks the Executable and Linkable Format (ELF) type, bit size, and endianness of any binaries to ensure they match the target architecture. This test fails if any binaries do not match the type since there would be an incompatibility. The test could indicate that the wrong compiler or compiler options have been used. Sometimes software, like bootloaders, might need to bypass this check. If the file you receive the error for is firmware that is not intended to be executed within the target operating system or is intended to run on a separate processor within the device, you can add “arch” to INSANE_SKIP for the package. Another option is to check the do_compile log and verify that the compiler options being used are correct.
11.2.3 build-deps
<packagename1> rdepends on <packagename2>, but it isn't a build dependency? [build-deps]
There is a runtime dependency between the two specified packages, but there is nothing explicit within the recipe to enable the OpenEmbedded build system to ensure that dependency is satisfied. This condition is usually triggered by an RDEPENDS value being added at the packaging stage rather than up front, which is usually automatic based on the contents of the package. In most cases, you should change the recipe to add an explicit RDEPENDS for the dependency.
11.2.4 buildpaths
File <filename> in package <packagename> contains reference to TMPDIR [buildpaths]
This check ensures that build system paths (including TMPDIR) do not appear in output files, which not only leaks build system configuration into the target, but also hinders binary reproducibility as the output will change if the build system configuration changes.
Typically these paths will enter the output through some mechanism in the configuration or compilation of the software being built by the recipe. To resolve this issue you will need to determine how the detected path is entering the output. Sometimes it may require adjusting scripts or code to use a relative path rather than an absolute one, or to pick up the path from runtime configuration or environment variables.
11.2.5 configure-gettext
AM_GNU_GETTEXT used but no inherit gettext [configure-gettext]
If a recipe is building something that uses automake and the automake
files contain an AM_GNU_GETTEXT directive then this check will fail
if there is no inherit gettext statement in the recipe to ensure
that gettext is available during the build. Add inherit gettext to
remove the warning.
11.2.6 configure-unsafe
This autoconf log indicates errors, it looked at host include and/or library paths while determining system capabilities. Rerun configure task after fixing this. [configure-unsafe]
The log for the do_configure task indicates that paths on the host were searched for files, which is not appropriate when cross-compiling. Look for “is unsafe for cross-compilation” or “CROSS COMPILE Badness” in the specified log file.
11.2.7 debug-deps
<packagename> rdepends on <debug_packagename> [debug-deps]
There is a dependency between the specified non-dbg package (i.e. a
package whose name does not end in -dbg) and a package that is a
dbg package. The dbg packages contain debug symbols and are
brought in using several different methods:
Using the
dbg-pkgsIMAGE_FEATURES value.Using IMAGE_INSTALL.
As a dependency of another
dbgpackage that was brought in using one of the above methods.
The dependency might have been automatically added because the
dbg package erroneously contains files that it should not contain
(e.g. a non-symlink .so file) or it might have been added
manually (e.g. by adding to RDEPENDS).
11.2.8 debug-files
non debug package contains .debug directory: <packagename> path <path> [debug-files]
The specified package contains a .debug directory, which should
not appear in anything but the -dbg package. This situation might
occur if you add a path which contains a .debug directory and do
not explicitly add the .debug directory to the -dbg package.
If this is the case, add the .debug directory explicitly to
FILES:${PN}-dbg. See FILES for additional
information on FILES.
11.2.9 dep-cmp
<var>:<packagename> is invalid: <comparison> (<value>) only comparisons <, =, >, <=, and >= are allowed [dep-cmp]
If you are adding a versioned dependency relationship to one of the dependency variables (RDEPENDS, RRECOMMENDS, RSUGGESTS, RPROVIDES, RREPLACES, or RCONFLICTS), you must only use the named comparison operators. Change the versioned dependency values you are adding to match those listed in the message.
11.2.10 dev-deps
<packagename> rdepends on <dev_packagename> [dev-deps]
There is a dependency between the specified non-dev package (a package
whose name does not end in -dev) and a package that is a dev
package. The dev packages contain development headers and are
usually brought in using several different methods:
Using the
dev-pkgsIMAGE_FEATURES value.Using IMAGE_INSTALL.
As a dependency of another
devpackage that was brought in using one of the above methods.
The dependency might have been automatically added (because the
dev package erroneously contains files that it should not have
(e.g. a non-symlink .so file) or it might have been added
manually (e.g. by adding to RDEPENDS).
11.2.11 desktop
"Desktop file issue: ... [desktop]
Runs the desktop-file-validate program against any
.desktop files to validate their contents against the
specification for .desktop files.
11.2.12 dev-so
non -dev/-dbg/nativesdk- package contains symlink .so: <packagename> path '<path>' [dev-so]
Symlink .so files are for development only, and should therefore
go into the -dev package. This situation might occur if you add
*.so* rather than *.so.* to a non-dev package. Change
FILES (and possibly
PACKAGES) such that the specified .so
file goes into an appropriate -dev package.
11.2.13 empty-dirs
<packagename> installs files in <path>, but it is expected to be empty [empty-dirs]
The specified package is installing files into a directory that is
normally expected to be empty (such as /tmp). These files may
be more appropriately installed to a different location, or
perhaps alternatively not installed at all, usually by updating the
do_install task/function.
11.2.14 file-rdeps
<packagename> requires <files>, but no providers in its RDEPENDS [file-rdeps]
A file-level dependency has been identified from the specified package on the specified files, but there is no explicit corresponding entry in RDEPENDS. If particular files are required at runtime then RDEPENDS should be declared in the recipe to ensure the packages providing them are built.
11.2.15 files-invalid
FILES variable for package <packagename> contains '//' which is invalid. Attempting to fix this but you should correct the metadata. [files-invalid]
The string “//” is invalid in a Unix path. Correct all occurrences where this string appears in a FILES variable so that there is only a single “/”.
11.2.16 host-user-contaminated
<package name>: <path> is owned by gid/uid <gid/uid>, which is the same as the user running bitbake. This may be due to host contamination [host-user-contaminated]
Checks that no package produced by the
recipe contains any files outside of /home with a user or group
ID that matches the user running BitBake. A match usually indicates
that the files are being installed with an incorrect UID/GID, since
target IDs are independent from host IDs. For additional information,
see the section describing the
do_install task.
11.2.17 infodir
The /usr/share/info/dir file is not meant to be shipped in a particular package. [infodir]
The /usr/share/info/dir should not be packaged. Add the following
line to your do_install task or to your
do_install:append within the recipe as follows:
rm ${D}${infodir}/dir
11.2.18 installed-vs-shipped
<recipename>: Files/directories were installed but not shipped in any package [installed-vs-shipped]
Files have been installed within the do_install task but have not been included in any package by way of the FILES variable. Files that do not appear in any package cannot be present in an image later on in the build process. You need to do one of the following:
Add the files to FILES for the package you want them to appear in (e.g.
FILES:${PN}for the main package).Delete the files at the end of the do_install task if the files are not needed in any package.
11.2.19 incompatible-license
Excluding <package> from packaging as it has incompatible license(s): <license> [incompatible-license]
Report when packages are excluded from being created due to being marked with a license that is in INCOMPATIBLE_LICENSE.
11.2.20 invalid-chars
<variable> has non <envoding> characters [invalid-chars]
Checks that the recipe metadata variables DESCRIPTION, SUMMARY, LICENSE, and SECTION do not contain non-UTF-8 characters. Some package managers do not support such characters.
11.2.21 invalid-packageconfig
<package>: invalid PACKAGECONFIG(s): <configs> [invalid-packageconfig]
Checks that no undefined features are being added to PACKAGECONFIG. For example, any name “foo” for which the following form does not exist:
PACKAGECONFIG[foo] = "..."
11.2.22 la
<file> failed sanity test (workdir) in path <path> [la]
The specified .la file contains TMPDIR
paths. Any .la file containing these paths is incorrect since
libtool adds the correct sysroot prefix when using the files
automatically itself.
11.2.23 ldflags
File '<file>' in package '<package>' doesn't have GNU_HASH (didn't pass LDFLAGS?) [ldflags]
This indicates that binaries produced when building the recipe have not been linked with the LDFLAGS options provided by the build system. Check to be sure that the LDFLAGS variable is being passed to the linker command. A common workaround for this situation is to pass in LDFLAGS using TARGET_CC_ARCH within the recipe as follows:
TARGET_CC_ARCH += "${LDFLAGS}"
11.2.24 libdir
<packagename>: found library in wrong location [libdir]
The specified file may have been installed into an incorrect
(possibly hardcoded) installation path. For example, this test will
catch recipes that install /lib/bar.so when ${base_libdir} is
“lib32”. Another example is when recipes install
/usr/lib64/foo.so when ${libdir} is “/usr/lib”. False
positives occasionally exist. For these cases add “libdir” to
INSANE_SKIP for the package.
11.2.25 libexec
<packagename>: <path> is using libexec please relocate to <libexecdir> [libexec]
The specified package contains files in /usr/libexec when the
distro configuration uses a different path for <libexecdir> By
default, <libexecdir> is $prefix/libexec. However, this
default can be changed (e.g. ${libdir}).
11.2.26 mime
package contains mime types but does not inherit mime: <packagename> path '<file>' [mime]
The specified package contains mime type files (.xml files in
${datadir}/mime/packages) and yet does not inherit the
mime class which will ensure that these get
properly installed. Either add inherit mime to the recipe or remove the
files at the do_install step if they are not needed.
11.2.27 mime-xdg
package contains desktop file with key 'MimeType' but does not inherit mime-xdg: <packagename> path '<file>' [mime-xdg]
The specified package contains a .desktop file with a ‘MimeType’ key
present, but does not inherit the mime-xdg
class that is required in order for that to be activated. Either add
inherit mime to the recipe or remove the files at the
do_install step if they are not needed.
11.2.28 missing-update-alternatives
<recipename>: recipe defines ALTERNATIVE:<packagename> but doesn't inherit update-alternatives. This might fail during do_rootfs later! [missing-update-alternatives]
This check ensures that if a recipe sets the ALTERNATIVE variable that the
recipe also inherits update-alternatives such
that the alternative will be correctly set up. If you are seeing this message, either
add inherit update-alternatives to your recipe or remove the reference to the variable
if it is not needed.
11.2.29 packages-list
<packagename> is listed in PACKAGES multiple times, this leads to packaging errors. [packages-list]
Package names must appear only once in the PACKAGES variable. You might receive this error if you are attempting to add a package to PACKAGES that is already in the variable’s value.
11.2.30 patch-fuzz
Fuzz detected: <patch output> [patch-fuzz]
This check looks for evidence of “fuzz” when applying patches within the do_patch
task. Patch fuzz is a situation when the patch tool ignores some of the context
lines in order to apply the patch. Consider this example:
Patch to be applied:
--- filename
+++ filename
context line 1
context line 2
context line 3
+newly added line
context line 4
context line 5
context line 6
Original source code:
different context line 1
different context line 2
context line 3
context line 4
different context line 5
different context line 6
Outcome (after applying patch with fuzz):
different context line 1
different context line 2
context line 3
newly added line
context line 4
different context line 5
different context line 6
Chances are, the newly added line was actually added in a completely
wrong location, or it was already in the original source and was added
for the second time. This is especially possible if the context line 3
and 4 are blank or have only generic things in them, such as #endif or }.
Depending on the patched code, it is entirely possible for an incorrectly
patched file to still compile without errors.
How to eliminate patch fuzz warnings
Use the devtool command as explained by the warning. First, unpack the
source into devtool workspace:
devtool modify <recipe>
This will apply all of the patches, and create new commits out of them in the workspace — with the patch context updated.
Then, replace the patches in the recipe layer:
devtool finish --force-patch-refresh <recipe> <layer_path>
The patch updates then need be reviewed (preferably with a side-by-side diff tool) to ensure they are indeed doing the right thing i.e.:
they are applied in the correct location within the file;
they do not introduce duplicate lines, or otherwise do things that are no longer necessary.
To confirm these things, you can also review the patched source code in
devtool’s workspace, typically in <build_dir>/workspace/sources/<recipe>/
Once the review is done, you can create and publish a layer commit with the patch updates that modify the context. Devtool may also refresh other things in the patches, those can be discarded.
11.2.31 patch-status
Missing Upstream-Status in patch <patchfile> Please add according to <url> [patch-status]The
Upstream-Statusvalue is missing in the specified patch file’s header. This value is intended to track whether or not the patch has been sent upstream, whether or not it has been merged, etc.For more information, see the “Patch Upstream Status” section in the Yocto Project and OpenEmbedded Contributor Guide.
Malformed Upstream-Status in patch <patchfile> Please correct according to <url> [patch-status]The
Upstream-Statusvalue in the specified patch file’s header is invalid - it must be a specific format. See the “Missing Upstream-Status” entry above for more information.
11.2.32 pep517-backend
inherits setuptools3 but has pyproject.toml with <build backend>, use the correct class [pep517-backend]
Checks that a recipe inheriting setuptools3 has a PEP517-compliant backend.
11.2.33 perllocalpod
<packagename> contains perllocal.pod (<files>), should not be installed [perllocalpod]
perllocal.pod is an index file of locally installed modules and so shouldn’t be
installed by any distribution packages. The cpan* class
already sets NO_PERLLOCAL to stop this file being generated by most Perl recipes,
but if a recipe is using MakeMaker directly then they might not be doing this
correctly. This check ensures that perllocal.pod is not in any package in order to
avoid multiple packages shipping this file and thus their packages conflicting
if installed together.
11.2.34 perm-config
Fixup Perms: invalid config line <line> [perm-config]
Reports lines in fs-perms.txt that have an invalid format.
11.2.35 perm-line
Fixup perms: <config> invalid line: <line> [perm-line]
Reports lines in fs-perms.txt that have an invalid format.
11.2.36 perm-link
Fixup Perms: Unable to correct directory link, target already exists: <directory> -> <target> [perm-link]
Reports lines in fs-perms.txt that specify ‘link’ where the specified
target already exists.
11.2.37 perms
Currently, this check is unused but reserved.
11.2.38 pkgconfig
<file> failed sanity test (tmpdir) in path <path> [pkgconfig]
The specified .pc file contains
TMPDIR/WORKDIR
paths. Any .pc file containing these paths is incorrect since
pkg-config itself adds the correct sysroot prefix when the files
are accessed.
11.2.39 pkgname
<packagename> doesn't match the [a-z0-9.+-]+ regex [pkgname]
The convention within the OpenEmbedded build system (sometimes enforced by the package manager itself) is to require that package names are all lower case and to allow a restricted set of characters. If your recipe name does not match this, or you add packages to PACKAGES that do not conform to the convention, then you will receive this error. Rename your recipe. Or, if you have added a non-conforming package name to PACKAGES, change the package name appropriately.
11.2.40 pkgvarcheck
<recipefile>: Variable <variable> is set as not being package specific, please fix this. [pkgvarcheck]Certain variables (RDEPENDS, RRECOMMENDS, RSUGGESTS, RCONFLICTS, RPROVIDES, RREPLACES, FILES,
pkg_preinst,pkg_postinst,pkg_prerm,pkg_postrm, and ALLOW_EMPTY) should always be set specific to a package (i.e. they should be set with a package name override such asRDEPENDS:${PN} = "value"rather thanRDEPENDS = "value"). If you receive this error, correct any assignments to these variables within your recipe.recipe uses DEPENDS:${PN}, should use DEPENDS [pkgvarcheck]This check looks for instances of setting
DEPENDS:${PN}which is erroneous (DEPENDS is a recipe-wide variable and thus it is not correct to specify it for a particular package, nor will such an assignment actually work.) Set DEPENDS instead.
11.2.41 pn-overrides
Recipe <recipefile> has PN of "<recipename>" which is in OVERRIDES, this can result in unexpected behavior. [pn-overrides]
The specified recipe has a name (PN) value that
appears in OVERRIDES. If a recipe is named
such that its PN value matches something already in OVERRIDES
(e.g. PN happens to be the same as MACHINE
or DISTRO), it can have unexpected
consequences. For example, assignments such as
FILES:${PN} = "xyz" effectively turn into FILES = "xyz".
Rename your recipe (or if PN is being set explicitly, change the
PN value) so that the conflict does not occur. See
FILES for additional information.
11.2.42 shebang-size
<packagename>: <file> maximum shebang size exceeded, the maximum size is 128. [shebang-size]
This check ensures that the shebang line (#! in the first line) for a script
is not longer than 128 characters, which can cause an error at runtime depending
on the operating system. If you are seeing this message then the specified script
may need to be patched to have a shorter in order to avoid runtime problems.
11.2.43 Shlib provider
<oldpackage>-<oldpkgversion> was registered as shlib provider for <library>, changing it to <newpackage>-<newpkgversion> because it was built later
This message means that both <oldpackage> and <newpackage>
provide the specified shared library. You can expect this message
when a recipe has been renamed. However, if that is not the case, the
message might indicate that a private version of a library is being
erroneously picked up as the provider for a common library. If that
is the case, you should add the library’s .so filename to
PRIVATE_LIBS in the recipe that provides
the private version of the library.
11.2.44 space-around-equal
<filename>:<line number> has a lack of whitespace around the assignment: '<assignment>'
This warning indicated that there is missing spaces around an assignment.
For example, the following assignments would print a warning:
FOO="bar"
FOO= "bar"
FOO ="bar"
These should be replaced by:
FOO = "bar"
11.2.45 src-uri-bad
<recipename>: SRC_URI uses unstable GitHub archives [src-uri-bad]GitHub provides “archive” tarballs, however these can be re-generated on the fly and thus the file’s signature will not necessarily match that in the SRC_URI checksums in future leading to build failures. It is recommended that you use an official release tarball or switch to pulling the corresponding revision in the actual git repository instead.
SRC_URI uses PN not BPN [src-uri-bad]If some part of SRC_URI needs to reference the recipe name, it should do so using ${BPN} rather than ${PN} as the latter will change for different variants of the same recipe e.g. when BBCLASSEXTEND or multilib are being used. This check will fail if a reference to
${PN}is found within the SRC_URI value — change it to${BPN}instead.
11.2.46 staticdev
non -staticdev package contains static .a library: <packagename> path '<path>' [staticdev]
Static .a library files should go into a -staticdev package.
Change FILES (and possibly
PACKAGES) such that the specified .a file
goes into an appropriate -staticdev package.
11.2.47 symlink-to-sysroot
Symlink <path> in <packagename> points to TMPDIR [symlink-to-sysroot]
The specified symlink points into TMPDIR on the host. Such symlinks will work on the host. However, they are clearly invalid when running on the target. You should either correct the symlink to use a relative path or remove the symlink.
11.2.48 Recipe naming
Recipe <recipe> appears native/nativesdk but is not, should inherit native/nativesdk
Checks that the recipe name and recipe class match, so that *-native
recipes inherit native and nativesdk-* recipes
inherit nativesdk.
11.2.49 rpaths
package <packagename> contains bad RPATH <rpath> in file <file> [rpaths]
The specified binary produced by the recipe contains dynamic library
load paths (rpaths) that contain build system paths such as
TMPDIR, which are incorrect for the target and
could potentially be a security issue. Check for bad -rpath
options being passed to the linker in your
do_compile log. Depending on the build
system used by the software being built, there might be a configure
option to disable rpath usage completely within the build of the
software.
11.2.50 textrel
ELF binary '<file>' has relocations in .text [textrel]
The specified ELF binary contains relocations in its .text
sections. This situation can result in a performance impact at
runtime.
Typically, the way to solve this performance issue is to add “-fPIC” or “-fpic” to the compiler command-line options. For example, given software that reads CFLAGS when you build it, you could add the following to your recipe:
CFLAGS:append = " -fPIC "
For more information on text relocations at runtime, see https://www.akkadia.org/drepper/textrelocs.html.
11.2.51 unhandled-features-check
<recipename>: recipe doesn't inherit features_check [unhandled-features-check]
This check ensures that if one of the variables that the
features_check class supports (e.g.
REQUIRED_DISTRO_FEATURES) is used, then the recipe
inherits features_check in order for
the requirement to actually work. If you are seeing this message, either
add inherit features_check to your recipe or remove the reference to
the variable if it is not needed.
11.2.52 unimplemented-ptest
<tool> tests detected [unimplemented-ptest]
This check will detect if the source of the package contains some upstream-provided tests and, if so, that ptests are implemented for this recipe. See the “Testing Packages With ptest” section in the Yocto Project Development Tasks Manual. See also the “ptest” section.
11.2.53 unknown-configure-option
<recipe>: configure was passed unrecognized options: <options> [unknown-configure-option]
The configure script is reporting that the specified options are
unrecognized. This situation could be because the options were
previously valid but have been removed from the configure script. Or,
there was a mistake when the options were added and there is another
option that should be used instead. If you are unsure, consult the
upstream build documentation, the ./configure --help output, and
the upstream change log or release notes. Once you have worked out
what the appropriate change is, you can update
EXTRA_OECONF,
PACKAGECONFIG_CONFARGS, or the
individual PACKAGECONFIG option values
accordingly.
11.2.54 unlisted-pkg-lics
LICENSE:<packagename> includes licenses (<licenses>) that are not listed in LICENSE [unlisted-pkg-lics]
The LICENSE of the recipe should be a superset
of all the licenses of all packages produced by this recipe. In other
words, any license in LICENSE:* should also appear in
LICENSE.
11.2.55 useless-rpaths
<packagename>: <file> contains probably-redundant RPATH <rpath> [useless-rpaths]
The specified binary produced by the recipe contains dynamic library
load paths (rpaths) that on a standard system are searched by default
by the linker (e.g. /lib and /usr/lib). While these paths
will not cause any breakage, they do waste space and are unnecessary.
Depending on the build system used by the software being built, there
might be a configure option to disable rpath usage completely within
the build of the software.
11.2.56 usrmerge
<packagename> package is not obeying usrmerge distro feature. /<path> should be relocated to /usr. [usrmerge]
If usrmerge is in DISTRO_FEATURES, this check will ensure that no package
installs files to root (/bin, /sbin, /lib, /lib64) directories. If you are seeing this
message, it indicates that the do_install step (or perhaps the build process that
do_install is calling into, e.g. make install is using hardcoded paths instead
of the variables set up for this (bindir, sbindir, etc.), and should be
changed so that it does.
11.2.57 version-going-backwards
Package version for package <package> went backwards which would break package feeds (from <version2> to <version1>) [version-going-backwards]
If the buildhistory class is enabled, reports when a package being written out has a lower version than the previously written package under the same name. If you are placing output packages into a feed and upgrading packages on a target system using that feed, the version of a package going backwards can result in the target system not correctly upgrading to the “new” version of the package.
Note
This is only relevant when you are using runtime package management on your target system.
11.2.58 virtual-slash
<variable> is set to <value> but the substring 'virtual/' holds no meaning in this context. It only works for build time dependencies, not runtime ones. It is suggested to use 'VIRTUAL-RUNTIME_' variables instead. [virtual-slash]
virtual/ is a convention intended for use in the build context
(i.e. PROVIDES and DEPENDS) rather than the runtime
context (i.e. RPROVIDES and RDEPENDS). Use
VIRTUAL-RUNTIME variables instead for the latter.
11.2.59 xorg-driver-abi
Package <packagename> contains Xorg driver (<driver>) but no xorg-abi- dependencies [xorg-driver-abi]
The specified package contains an Xorg driver, but does not have a
corresponding ABI package dependency. The xserver-xorg recipe
provides driver ABI names. All drivers should depend on the ABI
versions that they have been built against. Driver recipes that
include xorg-driver-input.inc or xorg-driver-video.inc will
automatically get these versions. Consequently, you should only need
to explicitly add dependencies to binary driver recipes.
11.3 Configuring and Disabling QA Checks
You can configure the QA checks globally so that specific check failures either raise a warning or an error message, using the WARN_QA and ERROR_QA variables, respectively. You can also disable checks within a particular recipe using INSANE_SKIP. For information on how to work with the QA checks, see the “insane” section.
Note
Please keep in mind that the QA checks are meant to detect real or potential problems in the packaged output. So exercise caution when disabling these checks.
12 Images
The OpenEmbedded build system provides several example images to satisfy
different needs. When you issue the bitbake command you provide a
“top-level” recipe that essentially begins the build for the type of
image you want.
Note
Building an image without GNU General Public License Version 3 (GPLv3), GNU Lesser General Public License Version 3 (LGPLv3), and the GNU Affero General Public License Version 3 (AGPL-3.0) components is only tested for core-image-minimal image. Furthermore, if you would like to build an image and verify that it does not include GPLv3 and similarly licensed components, you must make the following changes in the image recipe file before using the BitBake command to build the image:
INCOMPATIBLE_LICENSE = “GPL-3.0* LGPL-3.0*”
Alternatively, you can adjust local.conf file, repeating and adjusting the line
for all images where the license restriction must apply:
INCOMPATIBLE_LICENSE:pn-your-image-name = “GPL-3.0* LGPL-3.0*”
From within the OpenEmbedded-Core (OE-Core) Git repository, you can use the following command to display the list of directories that contain image recipe files:
$ ls meta*/recipes*/images/*.bb
Here is a list of supported recipes:
build-appliance-image: An example virtual machine that contains all the pieces required to run builds using the build system as well as the build system itself. You can boot and run the image using VMware Workstation. For more information on this image, see the Build Appliance page on the Yocto Project website.core-image-base: A console-only image that fully supports the target device hardware.core-image-full-cmdline: A console-only image with more full-featured Linux system functionality installed.core-image-minimal: A small image just capable of allowing a device to boot.core-image-minimal-dev: Acore-image-minimalimage suitable for development work using the host. The image includes headers and libraries you can use in a host development environment.core-image-minimal-initramfs: Acore-image-minimalimage that has the Minimal RAM-based Initial Root Filesystem (Initramfs) as part of the kernel, which allows the system to find the first “init” program more efficiently. See the PACKAGE_INSTALL variable for additional information helpful when working with Initramfs images.core-image-minimal-mtdutils: Acore-image-minimalimage that has support for the Minimal MTD Utilities, which let the user interact with the MTD subsystem in the kernel to perform operations on flash devices.core-image-rt: Acore-image-minimalimage plus a real-time test suite and tools appropriate for real-time use.core-image-rt-sdk: Acore-image-rtimage that includes everything in the cross-toolchain. The image also includes development headers and libraries to form a complete stand-alone SDK and is suitable for development using the target.core-image-sato: An image with Sato support, a mobile environment and visual style that works well with mobile devices. The image supports X11 with a Sato theme and applications such as a terminal, editor, file manager, media player, and so forth.core-image-sato-dev: Acore-image-satoimage suitable for development using the host. The image includes libraries needed to build applications on the device itself, testing and profiling tools, and debug symbols. This image was formerlycore-image-sdk.core-image-sato-sdk: Acore-image-satoimage that includes everything in the cross-toolchain. The image also includes development headers and libraries to form a complete standalone SDK and is suitable for development using the target.core-image-testmaster: A “controller” image designed to be used for automated runtime testing. Provides a “known good” image that is deployed to a separate partition so that you can boot into it and use it to deploy a second image to be tested. You can find more information about runtime testing in the “Performing Automated Runtime Testing” section in the Yocto Project Test Environment Manual.core-image-testmaster-initramfs: A RAM-based Initial Root Filesystem (Initramfs) image tailored for use with thecore-image-testmasterimage.core-image-weston: A very basic Wayland image with a terminal. This image provides the Wayland protocol libraries and the reference Weston compositor. For more information, see the “Using Wayland and Weston” section in the Yocto Project Development Tasks Manual.core-image-x11: A very basic X11 image with a terminal.
13 Features
This chapter provides a reference of shipped machine and distro features you can include as part of your image, a reference on image features you can select, and a reference on Default Features.
Features provide a mechanism for working out which packages should be
included in the generated images. Distributions can select which
features they want to support through the DISTRO_FEATURES variable,
which is set or appended to in a distribution’s configuration file such
as poky.conf, poky-tiny.conf, poky-altcfg.conf and so forth.
Machine features are set in the MACHINE_FEATURES variable, which is
set in the machine configuration file and specifies the hardware
features for a given machine.
These two variables combine to work out which kernel modules, utilities, and other packages to include. A given distribution can support a selected subset of features so some machine features might not be included if the distribution itself does not support them.
One method you can use to determine which recipes are checking to see if
a particular feature is contained or not is to grep through the
Metadata for the feature. Here is an example that
discovers the recipes whose build is potentially changed based on a
given feature:
$ cd openembedded-core
$ git grep 'contains.*MACHINE_FEATURES.*feature'
13.1 Machine Features
The items below are features you can use with MACHINE_FEATURES. Features do not have a one-to-one correspondence to packages, and they can go beyond simply controlling the installation of a package or packages. Sometimes a feature can influence how certain recipes are built. For example, a feature might determine whether a particular configure option is specified within the do_configure task for a particular recipe.
This feature list only represents features as shipped with the Yocto Project metadata:
acpi: Hardware has ACPI (x86/x86_64 only)
alsa: Hardware has ALSA audio drivers
bluetooth: Hardware has integrated BT
coresight: Support for the Coresight Linux Kernel feature on Arm processors. This feature depends on the
opencsdrecipe which is present in the meta-arm layer.efi: Support for booting through EFI
ext2: Hardware HDD or Microdrive
keyboard: Hardware has a keyboard
numa: Hardware has non-uniform memory access
pcbios: Support for booting through BIOS
pci: Hardware has a PCI bus
pcmcia: Hardware has PCMCIA or CompactFlash sockets
phone: Mobile phone (voice) support
qemu-usermode: QEMU can support user-mode emulation for this machine
qvga: Machine has a QVGA (320x240) display
rtc: Machine has a Real-Time Clock
screen: Hardware has a screen
serial: Hardware has serial support (usually RS232)
touchscreen: Hardware has a touchscreen
usbgadget: Hardware is USB gadget device capable
usbhost: Hardware is USB Host capable
vfat: FAT file system support
wifi: Hardware has integrated WiFi
13.2 Distro Features
The items below are features you can use with DISTRO_FEATURES to enable features across your distribution. Features do not have a one-to-one correspondence to packages, and they can go beyond simply controlling the installation of a package or packages. In most cases, the presence or absence of a feature translates to the appropriate option supplied to the configure script during the do_configure task for the recipes that optionally support the feature. Appropriate options must be supplied, and enabling/disabling PACKAGECONFIG for the concerned packages is one way of supplying such options.
Some distro features are also machine features. These select features make sense to be controlled both at the machine and distribution configuration level. See the COMBINED_FEATURES variable for more information.
Note
DISTRO_FEATURES is normally independent of kernel configuration, so if a feature specified in DISTRO_FEATURES also relies on support in the kernel, you will also need to ensure that support is enabled in the kernel configuration.
This list only represents features as shipped with the Yocto Project metadata, as extra layers can define their own:
3g: Include support for cellular data.
acl: Include Access Control List support.
alsa: Include Advanced Linux Sound Architecture support (OSS compatibility kernel modules installed if available).
api-documentation: Enables generation of API documentation during recipe builds. The resulting documentation is added to SDK tarballs when the
bitbake -c populate_sdkcommand is used. See the “Adding API Documentation to the Standard SDK” section in the Yocto Project Application Development and the Extensible Software Development Kit (eSDK) manual.bluetooth: Include bluetooth support (integrated BT only).
cramfs: Include CramFS support.
debuginfod: Include support for getting ELF debugging information through a debuginfod server.
directfb: Include DirectFB support.
ext2: Include tools for supporting devices with internal HDD/Microdrive for storing files (instead of Flash only devices).
gobject-introspection-data: Include data to support GObject Introspection.
ipsec: Include IPSec support.
ipv4: Include IPv4 support.
ipv6: Include IPv6 support.
keyboard: Include keyboard support (e.g. keymaps will be loaded during boot).
minidebuginfo: Add minimal debug symbols (minidebuginfo) to binary files containing, allowing
coredumpctlandgdbto show symbolicated stack traces.multiarch: Enable building applications with multiple architecture support.
ldconfig: Include support for ldconfig and
ld.so.confon the target.lto: Enable Link-Time Optimisation.
nfc: Include support for Near Field Communication.
nfs: Include NFS client support (for mounting NFS exports on device).
nls: Include National Language Support (NLS).
opencl: Include support for the OpenCL (Open Computing Language) framework.
opengl: Include the Open Graphics Library, which is a cross-language, multi-platform application programming interface used for rendering two and three-dimensional graphics.
overlayfs: Include OverlayFS support.
pam: Include Pluggable Authentication Module (PAM) support.
pci: Include PCI bus support.
pni-names: Enable generation of persistent network interface names, i.e. the system tries hard to have the same but unique names for the network interfaces even after a reinstall.
polkit: Include Polkit support.
ppp: Include PPP dialup support.
ptest: Enables building the package tests where supported by individual recipes. For more information on package tests, see the “Testing Packages With ptest” section in the Yocto Project Development Tasks Manual.
pulseaudio: Include support for PulseAudio.
selinux: Include support for Security-Enhanced Linux (SELinux) (requires meta-selinux).
seccomp: Enables building applications with seccomp support, to allow them to strictly restrict the system calls that they are allowed to invoke.
smbfs: Include SMB networks client support (for mounting Samba/Microsoft Windows shares on device).
systemd: Include support for this
initmanager, which is a full replacement of forinitwith parallel starting of services, reduced shell overhead, and other features. Thisinitmanager is used by many distributions.systemd-resolved: Include support and use
systemd-resolvedas the main DNS name resolver inglibcName Service Switch. This is a DNS resolver daemon fromsystemd.usrmerge: Merges the
/bin,/sbin,/lib, and/lib64directories into their respective counterparts in the/usrdirectory to provide better package and application compatibility.vfat: Include FAT filesystem support.
vulkan: Include support for the Vulkan API.
wayland: Include the Wayland display server protocol and the library that supports it.
wifi: Include WiFi support (integrated only).
x11: Include the X server and libraries.
xattr: Include support for extended file attributes.
zeroconf: Include support for zero configuration networking.
13.3 Image Features
The contents of images generated by the OpenEmbedded build system can be controlled by the IMAGE_FEATURES and EXTRA_IMAGE_FEATURES variables that you typically configure in your image recipes. Through these variables, you can add several different predefined packages such as development utilities or packages with debug information needed to investigate application problems or profile applications.
The image features available for all images are:
allow-empty-password: Allows Dropbear and OpenSSH to accept logins from accounts having an empty password string.
allow-root-login: Allows Dropbear and OpenSSH to accept root logins.
dbg-pkgs: Installs debug symbol packages for all packages installed in a given image.
dev-pkgs: Installs development packages (headers and extra library links) for all packages installed in a given image.
doc-pkgs: Installs documentation packages for all packages installed in a given image.
empty-root-password: This feature can be used if you want to allow root login with an empty password. If this feature is not present in IMAGE_FEATURES, a non-empty password is forced in
/etc/passwdand/etc/shadowif such files exist.Note
empty-root-passworddoesn’t set an empty root password by itself. You get an initial empty root password thanks to the base-passwd and shadow recipes, and the presence ofempty-root-passwordjust disables the mechanism which forces an non-empty password for the root user.lic-pkgs: Installs license packages for all packages installed in a given image.
overlayfs-etc: Configures the
/etcdirectory to be inoverlayfs. This allows to store device specific information elsewhere, especially if the root filesystem is configured to be read-only.package-management: Installs package management tools and preserves the package manager database.
post-install-logging: Enables logging postinstall script runs to the
/var/log/postinstall.logfile on first boot of the image on the target system.Note
To make the
/var/logdirectory on the target persistent, remove thefiles/fs-perms-volatile-log.txtvalue from FILESYSTEM_PERMS_TABLES.ptest-pkgs: Installs ptest packages for all ptest-enabled recipes.
read-only-rootfs: Creates an image whose root filesystem is read-only. See the “Creating a Read-Only Root Filesystem” section in the Yocto Project Development Tasks Manual for more information.
read-only-rootfs-delayed-postinsts: when specified in conjunction with
read-only-rootfs, specifies that post-install scripts are still permitted (this assumes that the root filesystem will be made writeable for the first boot; this feature does not do anything to ensure that - it just disables the check for post-install scripts.)serial-autologin-root: when specified in conjunction with
empty-root-passwordwill automatically login as root on the serial console. This of course opens up a security hole if the serial console is potentially accessible to an attacker, so use with caution.splash: Enables showing a splash screen during boot. By default, this screen is provided by
psplash, which does allow customization. If you prefer to use an alternative splash screen package, you can do so by setting the SPLASH variable to a different package name (or names) within the image recipe or at the distro configuration level.stateless-rootfs:: specifies that the image should be created as stateless - when using
systemd,systemctl-nativewill not be run on the image, leaving the image for population at runtime by systemd.staticdev-pkgs: Installs static development packages, which are static libraries (i.e.
*.afiles), for all packages installed in a given image.
Some image features are available only when you inherit the core-image class. The current list of these valid features is as follows:
hwcodecs: Installs hardware acceleration codecs.
nfs-server: Installs an NFS server.
perf: Installs profiling tools such as
perf,systemtap, andLTTng. For general information on user-space tools, see the Yocto Project Application Development and the Extensible Software Development Kit (eSDK) manual.ssh-server-dropbear: Installs the Dropbear minimal SSH server.
Note
As of the 4.1 release, the
ssh-server-dropbearfeature also recommends theopenssh-sftp-serverpackage, which by default will be pulled into the image. This is because recent versions of the OpenSSHscpclient now use the SFTP protocol, and thus require an SFTP server to be present to connect to. However, if you wish to use the Dropbear ssh server without the SFTP server installed, you can either removessh-server-dropbearfromIMAGE_FEATURESand adddropbearto IMAGE_INSTALL instead, or alternatively still use the feature but set BAD_RECOMMENDATIONS as follows:BAD_RECOMMENDATIONS += "openssh-sftp-server"
ssh-server-openssh: Installs the OpenSSH SSH server, which is more full-featured than Dropbear. Note that if both the OpenSSH SSH server and the Dropbear minimal SSH server are present in IMAGE_FEATURES, then OpenSSH will take precedence and Dropbear will not be installed.
tools-debug: Installs debugging tools such as
straceandgdb. For information on GDB, see the “Debugging With the GNU Project Debugger (GDB) Remotely” section in the Yocto Project Development Tasks Manual. For information on tracing and profiling, see the Yocto Project Profiling and Tracing Manual.tools-sdk: Installs a full SDK that runs on the device.
tools-testapps: Installs device testing tools (e.g. touchscreen debugging).
weston: Installs Weston (reference Wayland environment).
x11: Installs the X server.
x11-base: Installs the X server with a minimal environment.
x11-sato: Installs the OpenedHand Sato environment.
13.4 Default Features
Sometimes it is necessary in the OpenEmbedded Build System to add new functionality to MACHINE_FEATURES or DISTRO_FEATURES, but at the same time, allow existing distributions or machine definitions to opt out of such new features, to retain the same overall level of functionality.
To make this possible, the OpenEmbedded build system provides a default list of features through the DISTRO_FEATURES_DEFAULTS and MACHINE_FEATURES_DEFAULTS variables. You can see the default definition of these variable in the meta/conf/distro/include/default-distrovars.inc and meta/conf/bitbake.conf files.
Note
This does not apply to image features (there is no
IMAGE_FEATURES_DEFAULTS definition).
The DISTRO_FEATURES_OPTED_OUT and MACHINE_FEATURES_OPTED_OUT variables can be used to remove a feature provided by one of the DISTRO_FEATURES_DEFAULTS of MACHINE_FEATURES_DEFAULTS variables.
For example, the two following assignments:
DISTRO_FEATURES_DEFAULTS = "a b c"
DISTRO_FEATURES_OPTED_OUT = "b"
Would result in feature a and feature c making it to the final value of
DISTRO_FEATURES, but not feature b. This also applies for
MACHINE_FEATURES_DEFAULTS and MACHINE_FEATURES_OPTED_OUT.
You can also opt out of all default features by setting
DISTRO_FEATURES_OPTED_OUT or MACHINE_FEATURES_OPTED_OUT to
*:
DISTRO_FEATURES_OPTED_OUT = "*"
Tip
You can verify the value of DISTRO_FEATURES or MACHINE_FEATURES with the following commands:
$ bitbake-getvar DISTRO_FEATURES
NOTE: Starting bitbake server...
[...]
DISTRO_FEATURES=" sysvinit acl alsa bluetooth debuginfod ext2 ipv4 ipv6 wifi xattr nfs zero
conf pci 3g nfc x11 vfat seccomp pulseaudio gobject-introspection-data ldconfig opengl ptest mul
tiarch wayland vulkan "
$ bitbake-getvar MACHINE_FEATURES
NOTE: Starting bitbake server...
[...]
MACHINE_FEATURES="alsa bluetooth usbgadget screen vfat rtc qemu-usermode"
14 Variables Glossary
This chapter lists common variables used in the OpenEmbedded build system and gives an overview of their function and contents.
A B C D E F G H I K L M N O P Q R S T U V W X Z
- ABIEXTENSION
Extension to the Application Binary Interface (ABI) field of the GNU canonical architecture name (e.g. “eabi”).
ABI extensions are set in the machine include files. For example, the
meta/conf/machine/include/arm/arch-arm.incfile sets the following extension:ABIEXTENSION = "eabi"
- ALLOW_EMPTY
Specifies whether to produce an output package even if it is empty. By default, BitBake does not produce empty packages. This default behavior can cause issues when there is an RDEPENDS or some other hard runtime requirement on the existence of the package.
Like all package-controlling variables, you must always use them in conjunction with a package name override, as in:
ALLOW_EMPTY:${PN} = "1" ALLOW_EMPTY:${PN}-dev = "1" ALLOW_EMPTY:${PN}-staticdev = "1"- ALTERNATIVE
Lists commands in a package that need an alternative binary naming scheme. Sometimes the same command is provided in multiple packages. When this occurs, the OpenEmbedded build system needs to use the alternatives system to create a different binary naming scheme so the commands can co-exist.
To use the variable, list out the package’s commands that are also provided by another package. For example, if the
busyboxpackage has four such commands, you identify them as follows:ALTERNATIVE:busybox = "sh sed test bracket"
For more information on the alternatives system, see the “update-alternatives” section.
- ALTERNATIVE_LINK_NAME
Used by the alternatives system to map duplicated commands to actual locations. For example, if the
bracketcommand provided by thebusyboxpackage is duplicated through another package, you must use the ALTERNATIVE_LINK_NAME variable to specify the actual location:ALTERNATIVE_LINK_NAME[bracket] = "/usr/bin/["
In this example, the binary for the
bracketcommand (i.e.[) from thebusyboxpackage resides in/usr/bin/.Note
If ALTERNATIVE_LINK_NAME is not defined, it defaults to
${bindir}/name.For more information on the alternatives system, see the “update-alternatives” section.
- ALTERNATIVE_PRIORITY
Used by the alternatives system to create default priorities for duplicated commands. You can use the variable to create a single default regardless of the command name or package, a default for specific duplicated commands regardless of the package, or a default for specific commands tied to particular packages. Here are the available syntax forms:
ALTERNATIVE_PRIORITY = "priority" ALTERNATIVE_PRIORITY[name] = "priority" ALTERNATIVE_PRIORITY_pkg[name] = "priority"
For more information on the alternatives system, see the “update-alternatives” section.
- ALTERNATIVE_TARGET
Used by the alternatives system to create default link locations for duplicated commands. You can use the variable to create a single default location for all duplicated commands regardless of the command name or package, a default for specific duplicated commands regardless of the package, or a default for specific commands tied to particular packages. Here are the available syntax forms:
ALTERNATIVE_TARGET = "target" ALTERNATIVE_TARGET[name] = "target" ALTERNATIVE_TARGET_pkg[name] = "target"
Note
If ALTERNATIVE_TARGET is not defined, it inherits the value from the ALTERNATIVE_LINK_NAME variable.
If ALTERNATIVE_LINK_NAME and ALTERNATIVE_TARGET are the same, the target for ALTERNATIVE_TARGET has “
.{BPN}” appended to it.Finally, if the file referenced has not been renamed, the alternatives system will rename it to avoid the need to rename alternative files in the do_install task while retaining support for the command if necessary.
For more information on the alternatives system, see the “update-alternatives” section.
- ANY_OF_DISTRO_FEATURES
When inheriting the features_check class, this variable identifies a list of distribution features where at least one must be enabled in the current configuration in order for the OpenEmbedded build system to build the recipe. In other words, if none of the features listed in ANY_OF_DISTRO_FEATURES appear in DISTRO_FEATURES within the current configuration, then the recipe will be skipped, and if the build system attempts to build the recipe then an error will be triggered.
- APPEND
An override list of append strings for each target specified with LABELS.
See the grub-efi class for more information on how this variable is used.
- AR
The minimal command and arguments used to run ar.
- ARCHIVER_MODE
When used with the archiver class, determines the type of information used to create a released archive. You can use this variable to create archives of patched source, original source, configured source, and so forth by employing the following variable flags (varflags):
ARCHIVER_MODE[src] = "original" # Uses original (unpacked) source files. ARCHIVER_MODE[src] = "patched" # Uses patched source files. This is the default. ARCHIVER_MODE[src] = "configured" # Uses configured source files. ARCHIVER_MODE[diff] = "1" # Uses patches between do_unpack and do_patch. ARCHIVER_MODE[diff-exclude] ?= "file file ..." # Lists files and directories to exclude from diff. ARCHIVER_MODE[dumpdata] = "1" # Uses environment data. ARCHIVER_MODE[recipe] = "1" # Uses recipe and include files. ARCHIVER_MODE[srpm] = "1" # Uses RPM package files.
For information on how the variable works, see the
meta/classes/archiver.bbclassfile in OpenEmbedded-Core (OE-Core).- AS
Minimal command and arguments needed to run the assembler.
- ASSUME_PROVIDED
Lists recipe names (PN values) BitBake does not attempt to build. Instead, BitBake assumes these recipes have already been built.
In OpenEmbedded-Core, ASSUME_PROVIDED mostly specifies native tools that should not be built. An example is
git-native, which when specified, allows for the Git binary from the host to be used rather than buildinggit-native.- ASSUME_SHLIBS
Provides additional
shlibsprovider mapping information, which adds to or overwrites the information provided automatically by the system. Separate multiple entries using spaces.As an example, use the following form to add an
shlibprovider of shlibname in packagename with the optional version:shlibname:packagename[_version]
Here is an example that adds a shared library named
libEGL.so.1as being provided by thelibegl-implementationpackage:ASSUME_SHLIBS = "libEGL.so.1:libegl-implementation"
- AUTO_LIBNAME_PKGS
When the debian class is inherited, which is the default behavior, AUTO_LIBNAME_PKGS specifies which packages should be checked for libraries and renamed according to Debian library package naming.
The default value is “${PACKAGES}”, which causes the debian class to act on all packages that are explicitly generated by the recipe.
- AUTO_SYSLINUXMENU
Enables creating an automatic menu for the syslinux bootloader. You must set this variable in your recipe. The syslinux class checks this variable.
- AUTOREV
When SRCREV is set to the value of this variable, it specifies to use the latest source revision in the repository. Here is an example:
SRCREV = "${AUTOREV}"
If you use the previous statement to retrieve the latest version of software, you need to make sure PV contains the
+sign so bitbake includes source control information to PKGV when packaging the recipe. For example:PV = "6.10.y+git"
For more information see the “Automatically Incrementing a Package Version Number” section in the Yocto Project Development Tasks Manual.
- AUTOTOOLS_SCRIPT_PATH
When using the autotools* class, the AUTOTOOLS_SCRIPT_PATH variable stores the location of the different scripts used by the Autotools build system. The default value for this variable is S.
- AVAILTUNES
The list of defined CPU and Application Binary Interface (ABI) tunings (i.e. “tunes”) available for use by the OpenEmbedded build system.
The list simply presents the tunes that are available. Not all tunes may be compatible with a particular machine configuration, or with each other in a Multilib configuration.
To add a tune to the list, be sure to append it with spaces using the “+=” BitBake operator. Do not simply replace the list by using the “=” operator. See the “Basic Syntax” section in the BitBake User Manual for more information.
- AZ_SAS
Azure Storage Shared Access Signature, when using the Azure Storage fetcher (az://) This variable can be defined to be used by the fetcher to authenticate and gain access to non-public artifacts:
AZ_SAS = ""se=2021-01-01&sp=r&sv=2018-11-09&sr=c&skoid=<skoid>&sig=<signature>""
For more information see Microsoft’s Azure Storage documentation at https://docs.microsoft.com/en-us/azure/storage/common/storage-sas-overview
- B
The directory within the Build Directory in which the OpenEmbedded build system places generated objects during a recipe’s build process. By default, this directory is the same as the S directory, which is defined as:
S = "${UNPACKDIR}/${BP}"
You can separate the (S) directory and the directory pointed to by the B variable. Most Autotools-based recipes support separating these directories. The build system defaults to using separate directories for
gccand some kernel recipes.- BAD_RECOMMENDATIONS
Lists “recommended-only” packages to not install. Recommended-only packages are packages installed only through the RRECOMMENDS variable. You can prevent any of these “recommended” packages from being installed by listing them with the BAD_RECOMMENDATIONS variable:
BAD_RECOMMENDATIONS = "package_name package_name package_name ..."
You can set this variable globally in your
local.conffile or you can attach it to a specific image recipe by using the recipe name override:BAD_RECOMMENDATIONS:pn-target_image = "package_name"
It is important to realize that if you choose to not install packages using this variable and some other packages are dependent on them (i.e. listed in a recipe’s RDEPENDS variable), the OpenEmbedded build system ignores your request and will install the packages to avoid dependency errors.
This variable is supported for the RPM and IPK packaging backends, but not for DEB.
See the NO_RECOMMENDATIONS and the PACKAGE_EXCLUDE variables for related information.
- BAREBOX_BINARY
When using the barebox class, this variable allows you to specify a particular binary that should be deployed and installed.
The barebox build system can build multiple barebox binaries at once. By default, all built binaries will be deployed and installed under their original name.
Here is an example usage of this variable:
BAREBOX_BINARY = "barebox-boundarydevices-imx6dl-nitrogen6x-1g.img"
- BAREBOX_CONFIG
When using the barebox class, this variable allows you to specify the name of the barebox defconfig to build. The name must be a defconfig file known to the barebox build environment. This variable is mainly useful for generic use cases where a dedicated configuration is not required. The barebox class itself already sets it for some QEMU machines:
BAREBOX_CONFIG:qemuarm = "multi_v7_defconfig" BAREBOX_CONFIG:qemuarm64 = "multi_v8_defconfig" BAREBOX_CONFIG:qemux86-64 = "efi_defconfig"
Except for these, the default value of BAREBOX_CONFIG is empty. For more information on how to provide a barebox configuration, see the barebox class.
- BASE_LIB
The library directory name for the CPU or Application Binary Interface (ABI) tune. The BASE_LIB applies only in the Multilib context. See the “Combining Multiple Versions of Library Files into One Image” section in the Yocto Project Development Tasks Manual for information on Multilib.
The BASE_LIB variable is defined in the machine include files in OpenEmbedded-Core (OE-Core). If Multilib is not being used, the value defaults to “lib”.
- BASE_WORKDIR
Points to the base of the work directory for all recipes. The default value is “${TMPDIR}/work”.
- BB_ALLOWED_NETWORKS
Specifies a space-delimited list of hosts that the fetcher is allowed to use to obtain the required source code. Here are considerations surrounding this variable:
This host list is only used if BB_NO_NETWORK is either not set or set to “0”.
There is limited support for wildcard matching against the beginning of host names. For example, the following setting matches
git.gnu.org,ftp.gnu.org, andfoo.git.gnu.org:BB_ALLOWED_NETWORKS = "*.gnu.org"
Note
The use of the “
*” character only works at the beginning of a host name and it must be isolated from the remainder of the host name. You cannot use the wildcard character in any other location of the name or combined with the front part of the name.For example,
*.foo.baris supported, while*aa.foo.baris not.Mirrors not in the host list are skipped and logged in debug.
Attempts to access networks not in the host list cause a failure.
Using BB_ALLOWED_NETWORKS in conjunction with PREMIRRORS is very useful. Adding the host you want to use to PREMIRRORS results in the source code being fetched from an allowed location and avoids raising an error when a host that is not allowed is in a SRC_URI statement. This is because the fetcher does not attempt to use the host listed in SRC_URI after a successful fetch from the PREMIRRORS occurs.
- BB_BASEHASH_IGNORE_VARS
See BB_BASEHASH_IGNORE_VARS in the BitBake manual.
- BB_CACHEDIR
See BB_CACHEDIR in the BitBake manual.
- BB_CHECK_SSL_CERTS
See BB_CHECK_SSL_CERTS in the BitBake manual.
- BB_CONF_FRAGMENT_DESCRIPTION
The BB_CONF_FRAGMENT_DESCRIPTION variable defines the textual description of a Configuration Fragment. For details on how to use fragments, see the Using Configuration Fragments section of the Yocto Project Reference Manual.
- BB_CONF_FRAGMENT_SUMMARY
The BB_CONF_FRAGMENT_SUMMARY variable defines the one-line textual summary of a Configuration Fragment. For details on how to use fragments, see the Using Configuration Fragments section of the Yocto Project Reference Manual.
- BB_CONSOLELOG
See BB_CONSOLELOG in the BitBake manual.
- BB_CURRENT_MC
See BB_CURRENT_MC in the BitBake manual.
- BB_CURRENTTASK
See BB_CURRENTTASK in the BitBake manual.
- BB_DEFAULT_TASK
See BB_DEFAULT_TASK in the BitBake manual.
- BB_DEFAULT_UMASK
See BB_DEFAULT_UMASK in the BitBake manual.
- BB_DEFER_BBCLASSES
See BB_DEFER_BBCLASSES in the BitBake manual.
- BB_DISKMON_DIRS
Monitors disk space and available inodes during the build and allows you to control the build based on these parameters.
Disk space monitoring is disabled by default. To enable monitoring, add the BB_DISKMON_DIRS variable to your
conf/local.conffile found in the Build Directory. Use the following form:BB_DISKMON_DIRS = "action,dir,threshold [...]" where: action is: ABORT: Immediately stop the build when a threshold is broken. STOPTASKS: Stop the build after the currently executing tasks have finished when a threshold is broken. WARN: Issue a warning but continue the build when a threshold is broken. Subsequent warnings are issued as defined by the BB_DISKMON_WARNINTERVAL variable, which must be defined in the conf/local.conf file. dir is: Any directory you choose. You can specify one or more directories to monitor by separating the groupings with a space. If two directories are on the same device, only the first directory is monitored. threshold is: Either the minimum available disk space, the minimum number of free inodes, or both. You must specify at least one. To omit one or the other, simply omit the value. Specify the threshold using G, M, K for Gbytes, Mbytes, and Kbytes, respectively. If you do not specify G, M, or K, Kbytes is assumed by default. Do not use GB, MB, or KB.Here are some examples:
BB_DISKMON_DIRS = "ABORT,${TMPDIR},1G,100K WARN,${SSTATE_DIR},1G,100K" BB_DISKMON_DIRS = "STOPTASKS,${TMPDIR},1G" BB_DISKMON_DIRS = "ABORT,${TMPDIR},,100K"
The first example works only if you also provide the BB_DISKMON_WARNINTERVAL variable in the
conf/local.conf. This example causes the build system to immediately stop when either the disk space in${TMPDIR}drops below 1 Gbyte or the available free inodes drops below 100 Kbytes. Because two directories are provided with the variable, the build system also issue a warning when the disk space in the${SSTATE_DIR}directory drops below 1 Gbyte or the number of free inodes drops below 100 Kbytes. Subsequent warnings are issued during intervals as defined by the BB_DISKMON_WARNINTERVAL variable.The second example stops the build after all currently executing tasks complete when the minimum disk space in the
${TMPDIR}directory drops below 1 Gbyte. No disk monitoring occurs for the free inodes in this case.The final example immediately stops the build when the number of free inodes in the
${TMPDIR}directory drops below 100 Kbytes. No disk space monitoring for the directory itself occurs in this case.- BB_DISKMON_WARNINTERVAL
Defines the disk space and free inode warning intervals. To set these intervals, define the variable in your
conf/local.conffile in the Build Directory.If you are going to use the BB_DISKMON_WARNINTERVAL variable, you must also use the BB_DISKMON_DIRS variable and define its action as “WARN”. During the build, subsequent warnings are issued each time disk space or number of free inodes further reduces by the respective interval.
If you do not provide a BB_DISKMON_WARNINTERVAL variable and you do use BB_DISKMON_DIRS with the “WARN” action, the disk monitoring interval defaults to the following:
BB_DISKMON_WARNINTERVAL = "50M,5K"
When specifying the variable in your configuration file, use the following form:
BB_DISKMON_WARNINTERVAL = "disk_space_interval,disk_inode_interval" where: disk_space_interval is: An interval of memory expressed in either G, M, or K for Gbytes, Mbytes, or Kbytes, respectively. You cannot use GB, MB, or KB. disk_inode_interval is: An interval of free inodes expressed in either G, M, or K for Gbytes, Mbytes, or Kbytes, respectively. You cannot use GB, MB, or KB.Here is an example:
BB_DISKMON_DIRS = "WARN,${SSTATE_DIR},1G,100K" BB_DISKMON_WARNINTERVAL = "50M,5K"
These variables cause the OpenEmbedded build system to issue subsequent warnings each time the available disk space further reduces by 50 Mbytes or the number of free inodes further reduces by 5 Kbytes in the
${SSTATE_DIR}directory. Subsequent warnings based on the interval occur each time a respective interval is reached beyond the initial warning (i.e. 1 Gbytes and 100 Kbytes).- BB_ENV_PASSTHROUGH
See BB_ENV_PASSTHROUGH in the BitBake manual.
- BB_ENV_PASSTHROUGH_ADDITIONS
See BB_ENV_PASSTHROUGH_ADDITIONS in the BitBake manual.
- BB_FETCH_PREMIRRORONLY
See BB_FETCH_PREMIRRORONLY in the BitBake manual.
- BB_FILENAME
See BB_FILENAME in the BitBake manual.
- BB_GENERATE_MIRROR_TARBALLS
Causes tarballs of the source control repositories (e.g. Git repositories), including metadata, to be placed in the DL_DIR directory.
For performance reasons, creating and placing tarballs of these repositories is not the default action by the OpenEmbedded build system:
BB_GENERATE_MIRROR_TARBALLS = "1"
Set this variable in your
local.conffile in the Build Directory.Once you have the tarballs containing your source files, you can clean up your DL_DIR directory by deleting any Git or other source control work directories.
- BB_GENERATE_SHALLOW_TARBALLS
See BB_GENERATE_SHALLOW_TARBALLS in the BitBake manual.
- BB_GIT_DEFAULT_DESTSUFFIX
See BB_GIT_DEFAULT_DESTSUFFIX in the BitBake manual.
In OpenEmbedded-Core (OE-Core), this variable is set to BP by default in bitbake.conf.
- BB_GIT_SHALLOW
See BB_GIT_SHALLOW in the BitBake manual.
- BB_GIT_SHALLOW_DEPTH
See BB_GIT_SHALLOW_DEPTH in the BitBake manual.
- BB_HASHCHECK_FUNCTION
See BB_HASHCHECK_FUNCTION in the BitBake manual.
- BB_HASHCONFIG_IGNORE_VARS
See BB_HASHCONFIG_IGNORE_VARS in the BitBake manual.
- BB_HASHSERVE
See BB_HASHSERVE in the BitBake manual.
- BB_HASHSERVE_UPSTREAM
See BB_HASHSERVE_UPSTREAM in the BitBake manual.
- BB_INVALIDCONF
See BB_INVALIDCONF in the BitBake manual.
- BB_LOADFACTOR_MAX
The system load threshold above which BitBake will stop running extra tasks.
For more information on how to limit the resources used during builds, see the Limiting the Host Resources Usage section of the Yocto Project Development Tasks Manual.
- BB_LOGCONFIG
See BB_LOGCONFIG in the BitBake manual.
- BB_LOGFMT
See BB_LOGFMT in the BitBake manual.
- BB_MULTI_PROVIDER_ALLOWED
See BB_MULTI_PROVIDER_ALLOWED in the BitBake manual.
- BB_NICE_LEVEL
See BB_NICE_LEVEL in the BitBake manual.
- BB_NO_NETWORK
See BB_NO_NETWORK in the BitBake manual.
- BB_NUMBER_PARSE_THREADS
See BB_NUMBER_PARSE_THREADS in the BitBake manual.
- BB_NUMBER_THREADS
The maximum number of tasks BitBake should run in parallel at any one time. The OpenEmbedded build system automatically configures this variable to be equal to the number of cores on the build system. For example, a system with a dual core processor that also uses hyper-threading causes the BB_NUMBER_THREADS variable to default to “4”.
For single socket systems (i.e. one CPU), you should not have to override this variable to gain optimal parallelism during builds. However, if you have very large systems that employ multiple physical CPUs, you might want to make sure the BB_NUMBER_THREADS variable is not set higher than “20”.
For more information on speeding up builds, see the “Speeding Up a Build” section in the Yocto Project Development Tasks Manual.
On the other hand, if your goal is to limit the amount of system resources consumed by BitBake tasks, setting BB_NUMBER_THREADS to a number lower than the number of CPU threads in your machine won’t be sufficient. That’s because each package will still be built and installed through a number of parallel jobs specified by the PARALLEL_MAKE variable, which is by default the number of CPU threads in your system, and is not impacted by the BB_NUMBER_THREADS value.
So, if you set BB_NUMBER_THREADS to “1” but don’t set PARALLEL_MAKE, most of your system resources will be consumed anyway.
Therefore, if you intend to reduce the load of your build system by setting BB_NUMBER_THREADS to a relatively low value compared to the number of CPU threads on your system, you should also set PARALLEL_MAKE to a similarly low value.
An alternative to using BB_NUMBER_THREADS to keep the usage of build system resources under control is to use the smarter BB_PRESSURE_MAX_CPU, BB_PRESSURE_MAX_IO or BB_PRESSURE_MAX_MEMORY controls. See the Limiting the Host Resources Usage section of the Yocto Project Development Tasks Manual.
- BB_ORIGENV
See BB_ORIGENV in the BitBake manual.
- BB_PRESERVE_ENV
See BB_PRESERVE_ENV in the BitBake manual.
- BB_PRESSURE_MAX_CPU
See BB_PRESSURE_MAX_CPU in the BitBake manual.
For more information on how to limit the resources used during builds, see the Limiting the Host Resources Usage section of the Yocto Project Development Tasks Manual.
- BB_PRESSURE_MAX_IO
See BB_PRESSURE_MAX_IO in the BitBake manual.
For more information on how to limit the resources used during builds, see the Limiting the Host Resources Usage section of the Yocto Project Development Tasks Manual.
- BB_PRESSURE_MAX_MEMORY
See BB_PRESSURE_MAX_MEMORY in the BitBake manual.
For more information on how to limit the resources used during builds, see the Limiting the Host Resources Usage section of the Yocto Project Development Tasks Manual.
- BB_RUNFMT
See BB_RUNFMT in the BitBake manual.
- BB_RUNTASK
See BB_RUNTASK in the BitBake manual.
- BB_SCHEDULER
See BB_SCHEDULER in the BitBake manual.
- BB_SCHEDULERS
See BB_SCHEDULERS in the BitBake manual.
- BB_SERVER_TIMEOUT
Specifies the time (in seconds) after which to unload the BitBake server due to inactivity. Set BB_SERVER_TIMEOUT to determine how long the BitBake server stays resident between invocations.
For example, the following statement in your
local.conffile instructs the server to be unloaded after 20 seconds of inactivity:BB_SERVER_TIMEOUT = "20"
If you want the server to never be unloaded, set BB_SERVER_TIMEOUT to “-1”.
- BB_SETSCENE_DEPVALID
See BB_SETSCENE_DEPVALID in the BitBake manual.
- BB_SIGNATURE_EXCLUDE_FLAGS
See BB_SIGNATURE_EXCLUDE_FLAGS in the BitBake manual.
- BB_SIGNATURE_HANDLER
See BB_SIGNATURE_HANDLER in the BitBake manual.
- BB_SRCREV_POLICY
See BB_SRCREV_POLICY in the BitBake manual.
- BB_STRICT_CHECKSUM
See BB_STRICT_CHECKSUM in the BitBake manual.
- BB_TASK_IONICE_LEVEL
See BB_TASK_IONICE_LEVEL in the BitBake manual.
- BB_TASK_NICE_LEVEL
See BB_TASK_NICE_LEVEL in the BitBake manual.
- BB_TASKHASH
See BB_TASKHASH in the BitBake manual.
- BB_USE_HOME_NPMRC
See BB_USE_HOME_NPMRC in the BitBake manual.
- BB_VERBOSE_LOGS
See BB_VERBOSE_LOGS in the BitBake manual.
- BB_WORKERCONTEXT
See BB_WORKERCONTEXT in the BitBake manual.
- BBCLASSEXTEND
Allows you to extend a recipe so that it builds variants of the software. There are common variants for recipes as “natives” like
quilt-native, which is a copy of Quilt built to run on the build system; “crosses” such asgcc-cross, which is a compiler built to run on the build machine but produces binaries that run on the target MACHINE; “nativesdk”, which targets the SDK machine instead of MACHINE; and “mulitlibs” in the form “multilib:multilib_name”.To build a different variant of the recipe with a minimal amount of code, it usually is as simple as adding the following to your recipe:
BBCLASSEXTEND =+ "native nativesdk" BBCLASSEXTEND =+ "multilib:multilib_name"
Note
Internally, the BBCLASSEXTEND mechanism generates recipe variants by rewriting variable values and applying overrides such as
:class-native. For example, to generate a native version of a recipe, a DEPENDS on “foo” is rewritten to a DEPENDS on “foo-native”.Even when using BBCLASSEXTEND, the recipe is only parsed once. Parsing once adds some limitations. For example, it is not possible to include a different file depending on the variant, since
includestatements are processed when the recipe is parsed.- BBDEBUG
See BBDEBUG in the BitBake manual.
- BBFILE_COLLECTIONS
Lists the names of configured layers. These names are used to find the other
BBFILE_*variables. Typically, each layer will append its name to this variable in itsconf/layer.conffile.- BBFILE_PATTERN
Variable that expands to match files from BBFILES in a particular layer. This variable is used in the
conf/layer.conffile and must be suffixed with the name of the specific layer (e.g.BBFILE_PATTERN_emenlow).- BBFILE_PRIORITY
Assigns the priority for recipe files in each layer.
This variable is useful in situations where the same recipe appears in more than one layer. Setting this variable allows you to prioritize a layer against other layers that contain the same recipe — effectively letting you control the precedence for the multiple layers. The precedence established through this variable stands regardless of a recipe’s version (PV variable). For example, a layer that has a recipe with a higher PV value but for which the BBFILE_PRIORITY is set to have a lower precedence still has a lower precedence.
A larger value for the BBFILE_PRIORITY variable results in a higher precedence. For example, the value 6 has a higher precedence than the value 5. If not specified, the BBFILE_PRIORITY variable is set based on layer dependencies (see the LAYERDEPENDS variable for more information. The default priority, if unspecified for a layer with no dependencies, is the lowest defined priority + 1 (or 1 if no priorities are defined).
Tip
You can use the command
bitbake-layers show-layersto list all configured layers along with their priorities.- BBFILES
A space-separated list of recipe files BitBake uses to build software.
When specifying recipe files, you can pattern match using Python’s glob syntax. For details on the syntax, see the documentation by following the previous link.
- BBFILES_DYNAMIC
Activates content when identified layers are present. This mechanism is commonly referred to as “dynamic layers”. You identify the layers by the collections that the layers define.
Use the BBFILES_DYNAMIC variable to avoid
.bbappendfiles whose corresponding.bbfile is in a layer that attempts to modify other layers through.bbappendbut does not want to introduce a hard dependency on those other layers.Use the following form for BBFILES_DYNAMIC:
collection_name:filename_pattern.The following example identifies two collection names and two filename patterns:
BBFILES_DYNAMIC += " \ clang-layer:${LAYERDIR}/dynamic-layers/meta-clang/*/*/*.bbappend \ core:${LAYERDIR}/dynamic-layers/openembedded-core/meta/*/*/*.bbappend \ "
This next example shows an error message that occurs because invalid entries are found, which cause parsing to fail:
ERROR: BBFILES_DYNAMIC entries must be of the form <collection name>:<filename pattern>, not: /work/my-layer/dynamic-layers/meta-security-isafw/*/*/*.bbappend /work/my-layer/dynamic-layers/openembedded-core/meta/*/*/*.bbappend- BBINCLUDED
See BBINCLUDED in the BitBake manual.
- BBINCLUDELOGS
Variable that controls how BitBake displays logs on build failure.
- BBINCLUDELOGS_LINES
If BBINCLUDELOGS is set, specifies the maximum number of lines from the task log file to print when reporting a failed task. If you do not set BBINCLUDELOGS_LINES, the entire log is printed.
- BBLAYERS
Lists the layers to enable during the build. This variable is defined in the
bblayers.confconfiguration file in the Build Directory. Here is an example:BBLAYERS = " \ /home/scottrif/bitbake-builds/layers/meta \ /home/scottrif/bitbake-builds/layers/meta-poky \ /home/scottrif/bitbake-builds/layers/meta-yocto-bsp \ /home/scottrif/bitbake-builds/layers/meta-mykernel \ "
This example enables four layers, one of which is a custom, user-defined layer named
meta-mykernel.- BBLAYERS_FETCH_DIR
See BBLAYERS_FETCH_DIR in the BitBake manual.
- BBMASK
Prevents BitBake from processing recipes and recipe append files.
You can use the BBMASK variable to “hide” these
.bband.bbappendfiles. BitBake ignores any recipe or recipe append files that match any of the expressions. It is as if BitBake does not see them at all. Consequently, matching files are not parsed or otherwise used by BitBake.The values you provide are passed to Python’s regular expression compiler. Consequently, the syntax follows Python’s Regular Expression (re) syntax. The expressions are compared against the full paths to the files. For complete syntax information, see Python’s documentation at https://docs.python.org/3/library/re.html#regular-expression-syntax.
The following example uses a complete regular expression to tell BitBake to ignore all recipe and recipe append files in the
meta-ti/recipes-misc/directory:BBMASK = "meta-ti/recipes-misc/"
If you want to mask out multiple directories or recipes, you can specify multiple regular expression fragments. This next example masks out multiple directories and individual recipes:
BBMASK += "/meta-ti/recipes-misc/ meta-ti/recipes-ti/packagegroup/" BBMASK += "/meta-oe/recipes-support/" BBMASK += "/meta-foo/.*/openldap" BBMASK += "opencv.*\.bbappend" BBMASK += "lzma"
Note
When specifying a directory name, use the trailing slash character to ensure you match just that directory name.
- BBMULTICONFIG
Specifies each additional separate configuration when you are building targets with multiple configurations. Use this variable in your
conf/local.confconfiguration file. Specify a multiconfigname for each configuration file you are using. For example, the following line specifies three configuration files:BBMULTICONFIG = "configA configB configC"
Each configuration file you use must reside in a
multiconfigsubdirectory of a configuration directory within a layer, or within the Build Directory (e.g.build_directory/conf/multiconfig/configA.conformylayer/conf/multiconfig/configB.conf).For information on how to use BBMULTICONFIG in an environment that supports building targets with multiple configurations, see the “Building Images for Multiple Targets Using Multiple Configurations” section in the Yocto Project Development Tasks Manual.
- BBPATH
See BBPATH in the BitBake manual.
- BBSERVER
If defined in the BitBake environment, BBSERVER points to the BitBake remote server.
Use the following format to export the variable to the BitBake environment:
export BBSERVER=localhost:$port
By default, BBSERVER also appears in BB_BASEHASH_IGNORE_VARS. Consequently, BBSERVER is excluded from checksum and dependency data.
- BBTARGETS
See BBTARGETS in the BitBake manual.
- BINCONFIG
When inheriting the binconfig-disabled class, this variable specifies binary configuration scripts to disable in favor of using
pkg-configto query the information. The binconfig-disabled class will modify the specified scripts to return an error so that calls to them can be easily found and replaced.To add multiple scripts, separate them by spaces. Here is an example from the
libpngrecipe:BINCONFIG = "${bindir}/libpng-config ${bindir}/libpng16-config"
- BINCONFIG_GLOB
When inheriting the binconfig class, this variable specifies a wildcard for configuration scripts that need editing. The scripts are edited to correct any paths that have been set up during compilation so that they are correct for use when installed into the sysroot and called by the build processes of other recipes.
Note
The BINCONFIG_GLOB variable uses shell globbing, which is recognition and expansion of wildcards during pattern matching. Shell globbing is very similar to fnmatch and glob.
For more information on how this variable works, see
meta/classes-recipe/binconfig.bbclassin OpenEmbedded-Core (OE-Core). You can also find general information on the class in the “binconfig” section.- BITBAKE_UI
See BITBAKE_UI in the BitBake manual.
- BP
The base recipe name and version but without any special recipe name suffix (i.e.
-native,lib64-, and so forth). BP is comprised of the following:${BPN}-${PV}- BPN
This variable is a version of the PN variable with common prefixes and suffixes removed, such as
nativesdk-,-cross,-native, and multilib’slib64-andlib32-. The exact lists of prefixes and suffixes removed are specified by the MLPREFIX and SPECIAL_PKGSUFFIX variables, respectively.- BUGTRACKER
Specifies a URL for an upstream bug tracking website for a recipe. The OpenEmbedded build system does not use this variable. Rather, the variable is a useful pointer in case a bug in the software being built needs to be manually reported.
- BUILD_AR
Specifies the architecture-specific archiver for the build host, and its default definition is derived in part from BUILD_PREFIX:
BUILD_AR = "${BUILD_PREFIX}ar"
When building a native recipe, AR is set to the value of this variable by default.
The BUILD_AR variable should not be set manually, and is rarely used in recipes as AR contains the appropriate value depending on the context (native or target recipes). Exception be made for target recipes that need to use the archiver from the build host at some point during the build.
- BUILD_ARCH
Specifies the architecture of the build host (e.g.
i686). The OpenEmbedded build system sets the value of BUILD_ARCH from the machine name reported by theunamecommand.- BUILD_AS
Specifies the architecture-specific assembler for the build host, and its default definition is derived in part from BUILD_PREFIX:
BUILD_AS = "${BUILD_PREFIX}as ${BUILD_AS_ARCH}"
When building a native recipe, AS is set to the value of this variable by default.
The BUILD_AS variable should not be set manually, and is rarely used in recipes as AS contains the appropriate value depending on the context (native or target recipes). Exception be made for target recipes that need to use the assembler from the build host at some point during the build.
- BUILD_AS_ARCH
Specifies the architecture-specific assembler flags for the build host. By default, the value of BUILD_AS_ARCH is empty.
- BUILD_CC
Specifies the architecture-specific C compiler for the build host, and its default definition is derived in part from BUILD_PREFIX and BUILD_CC_ARCH:
BUILD_CC = "${CCACHE}${BUILD_PREFIX}gcc ${BUILD_CC_ARCH}"
When building a native recipe, CC is set to the value of this variable by default.
The BUILD_CC variable should not be set manually, and is rarely used in recipes as CC contains the appropriate value depending on the context (native or target recipes). Exception be made for target recipes that need to use the compiler from the build host at some point during the build.
- BUILD_CC_ARCH
Specifies the architecture-specific C compiler flags for the build host. By default, the value of BUILD_CC_ARCH is empty.
- BUILD_CCLD
Specifies the linker command to be used for the build host when the C compiler is being used as the linker, and its default definition is derived in part from BUILD_PREFIX and BUILD_CC_ARCH:
BUILD_CCLD = "${BUILD_PREFIX}gcc ${BUILD_CC_ARCH}"
When building a native recipe, CCLD is set to the value of this variable by default.
The BUILD_CCLD variable should not be set manually, and is rarely used in recipes as CCLD contains the appropriate value depending on the context (native or target recipes). Exception be made for target recipes that need to use the linker from the build host at some point during the build.
- BUILD_CFLAGS
Specifies the flags to pass to the C compiler when building for the build host. When building a native recipe, CFLAGS is set to the value of this variable by default.
- BUILD_CPP
Specifies the C preprocessor command (to both the C and the C++ compilers) when building for the build host, and its default definition is derived in part from BUILD_PREFIX and BUILD_CC_ARCH:
BUILD_CPP = "${BUILD_PREFIX}gcc ${BUILD_CC_ARCH} -E"
When building a native recipe, CPP is set to the value of this variable by default.
The BUILD_CPP variable should not be set manually, and is rarely used in recipes as CPP contains the appropriate value depending on the context (native or target recipes). Exception be made for target recipes that need to use the preprocessor from the build host at some point during the build.
- BUILD_CPPFLAGS
Specifies the flags to pass to the C preprocessor (i.e. to both the C and the C++ compilers) when building for the build host. When building in the
-nativecontext, CPPFLAGS is set to the value of this variable by default.- BUILD_CXX
Specifies the architecture-specific C++ compiler for the build host, and its default definition is derived in part from BUILD_PREFIX and BUILD_CC_ARCH:
BUILD_CXX = "${CCACHE}${BUILD_PREFIX}g++ ${BUILD_CC_ARCH}"
When building a native recipe, CXX is set to the value of this variable by default.
The BUILD_CXX variable should not be set manually, and is rarely used in recipes as CXX contains the appropriate value depending on the context (native or target recipes). Exception be made for target recipes that need to use the C++ compiler from the build host at some point during the build.
- BUILD_CXXFLAGS
Specifies the flags to pass to the C++ compiler when building for the build host. When building a native recipe, CXXFLAGS is set to the value of this variable by default.
- BUILD_FC
Specifies the Fortran compiler command for the build host, and its default definition is derived in part from BUILD_PREFIX and BUILD_CC_ARCH:
BUILD_FC = "${BUILD_PREFIX}gfortran ${BUILD_CC_ARCH}"
When building a native recipe, FC is set to the value of this variable by default.
The BUILD_FC variable should not be set manually, and is rarely used in recipes as FC contains the appropriate value depending on the context (native or target recipes). Exception be made for target recipes that need to use the Fortran compiler from the build host at some point during the build.
- BUILD_LD
Specifies the linker command for the build host, and its default definition is derived in part from BUILD_PREFIX and BUILD_LD_ARCH:
BUILD_LD = "${BUILD_PREFIX}ld ${BUILD_LD_ARCH}"
When building a native recipe, LD is set to the value of this variable by default.
The BUILD_LD variable should not be set manually, and is rarely used in recipes as LD contains the appropriate value depending on the context (native or target recipes). Exception be made for target recipes that need to use the linker from the build host at some point during the build.
- BUILD_LD_ARCH
Specifies architecture-specific linker flags for the build host. By default, the value of BUILD_LD_ARCH is empty.
- BUILD_LDFLAGS
Specifies the flags to pass to the linker when building for the build host. When building a native recipe, LDFLAGS is set to the value of this variable by default.
- BUILD_NM
Specifies the architecture-specific utility to list symbols from object files for the build host, and its default definition is derived in part from BUILD_PREFIX:
BUILD_NM = "${BUILD_PREFIX}nm"
When building a native recipe, NM is set to the value of this variable by default.
The BUILD_NM variable should not be set manually, and is rarely used in recipes as NM contains the appropriate value depending on the context (native or target recipes). Exception be made for target recipes that need to use the utility from the build host at some point during the build.
- BUILD_OBJCOPY
Specifies the architecture-specific utility to copy object files for the build host, and its default definition is derived in part from BUILD_PREFIX:
BUILD_OBJCOPY = "${BUILD_PREFIX}objcopy"
When building a native recipe, OBJCOPY is set to the value of this variable by default.
The BUILD_OBJCOPY variable should not be set manually, and is rarely used in recipes as OBJCOPY contains the appropriate value depending on the context (native or target recipes). Exception be made for target recipes that need to use the utility from the build host at some point during the build.
- BUILD_OBJDUMP
Specifies the architecture-specific utility to display object files information for the build host, and its default definition is derived in part from BUILD_PREFIX:
BUILD_OBJDUMP = "${BUILD_PREFIX}objdump"
When building a native recipe, OBJDUMP is set to the value of this variable by default.
The BUILD_OBJDUMP variable should not be set manually, and is rarely used in recipes as OBJDUMP contains the appropriate value depending on the context (native or target recipes). Exception be made for target recipes that need to use the utility from the build host at some point during the build.
- BUILD_OPTIMIZATION
Specifies the optimization flags passed to the C compiler when building for the build host or the SDK. The flags are passed through the BUILD_CFLAGS and BUILDSDK_CFLAGS default values.
The default value of the BUILD_OPTIMIZATION variable is “-O2 -pipe”.
- BUILD_OS
Specifies the operating system in use on the build host (e.g. “linux”). The OpenEmbedded build system sets the value of BUILD_OS from the OS reported by the
unamecommand — the first word, converted to lower-case characters.- BUILD_PREFIX
The toolchain binary prefix used for native recipes. The OpenEmbedded build system uses the BUILD_PREFIX value to set the TARGET_PREFIX when building for native recipes.
- BUILD_RANLIB
Specifies the architecture-specific utility to generate indexes for archives for the build host, and its default definition is derived in part from BUILD_PREFIX:
BUILD_RANLIB = "${BUILD_PREFIX}ranlib -D"
When building a native recipe, RANLIB is set to the value of this variable by default.
The BUILD_RANLIB variable should not be set manually, and is rarely used in recipes as RANLIB contains the appropriate value depending on the context (native or target recipes). Exception be made for target recipes that need to use the utility from the build host at some point during the build.
- BUILD_READELF
Specifies the architecture-specific utility to display information about ELF files for the build host, and its default definition is derived in part from BUILD_PREFIX:
BUILD_READELF = "${BUILD_PREFIX}readelf"
When building a native recipe, READELF is set to the value of this variable by default.
The BUILD_READELF variable should not be set manually, and is rarely used in recipes as READELF contains the appropriate value depending on the context (native or target recipes). Exception be made for target recipes that need to use the utility from the build host at some point during the build.
- BUILD_STRIP
Specifies the command to be used to strip debugging symbols from binaries produced for the build host, and its default definition is derived in part from BUILD_PREFIX:
BUILD_STRIP = "${BUILD_PREFIX}strip"
When building a native recipe, STRIP is set to the value of this variable by default.
The BUILD_STRIP variable should not be set manually, and is rarely used in recipes as STRIP contains the appropriate value depending on the context (native or target recipes). Exception be made for target recipes that need to use the utility from the build host at some point during the build.
- BUILD_SYS
Specifies the system, including the architecture and the operating system, to use when building for the build host (i.e. when building native recipes).
The OpenEmbedded build system automatically sets this variable based on BUILD_ARCH, BUILD_VENDOR, and BUILD_OS. You do not need to set the BUILD_SYS variable yourself.
- BUILD_VENDOR
Specifies the vendor name to use when building for the build host. The default value is an empty string (“”).
- BUILDDIR
Points to the location of the Build Directory. You can define this directory indirectly through the oe-init-build-env script by passing in a Build Directory path when you run the script. If you run the script and do not provide a Build Directory path, the BUILDDIR defaults to
buildin the current directory.- BUILDHISTORY_COMMIT
When inheriting the buildhistory class, this variable specifies whether or not to commit the build history output in a local Git repository. If set to “1”, this local repository will be maintained automatically by the buildhistory class and a commit will be created on every build for changes to each top-level subdirectory of the build history output (images, packages, and sdk). If you want to track changes to build history over time, you should set this value to “1”.
By default, the buildhistory class enables committing the buildhistory output in a local Git repository:
BUILDHISTORY_COMMIT ?= "1"
- BUILDHISTORY_COMMIT_AUTHOR
When inheriting the buildhistory class, this variable specifies the author to use for each Git commit. In order for the BUILDHISTORY_COMMIT_AUTHOR variable to work, the BUILDHISTORY_COMMIT variable must be set to “1”.
Git requires that the value you provide for the BUILDHISTORY_COMMIT_AUTHOR variable takes the form of “name email@host”. Providing an email address or host that is not valid does not produce an error.
By default, the buildhistory class sets the variable as follows:
BUILDHISTORY_COMMIT_AUTHOR ?= "buildhistory <buildhistory@${DISTRO}>"- BUILDHISTORY_DIR
When inheriting the buildhistory class, this variable specifies the directory in which build history information is kept. For more information on how the variable works, see the buildhistory class.
By default, the buildhistory class sets the directory as follows:
BUILDHISTORY_DIR ?= "${TOPDIR}/buildhistory"- BUILDHISTORY_FEATURES
When inheriting the buildhistory class, this variable specifies the build history features to be enabled. For more information on how build history works, see the “Maintaining Build Output Quality” section in the Yocto Project Development Tasks Manual.
You can specify these features in the form of a space-separated list:
image: Analysis of the contents of images, which includes the list of installed packages among other things.
package: Analysis of the contents of individual packages.
sdk: Analysis of the contents of the software development kit (SDK).
task: Save output file signatures for shared state (sstate) tasks. This saves one file per task and lists the SHA-256 checksums for each file staged (i.e. the output of the task).
By default, the buildhistory class enables the following features:
BUILDHISTORY_FEATURES ?= "image package sdk"
- BUILDHISTORY_IMAGE_FILES
When inheriting the buildhistory class, this variable specifies a list of paths to files copied from the image contents into the build history directory under an “image-files” directory in the directory for the image, so that you can track the contents of each file. The default is to copy
/etc/passwdand/etc/group, which allows you to monitor for changes in user and group entries. You can modify the list to include any file. Specifying an invalid path does not produce an error. Consequently, you can include files that might not always be present.By default, the buildhistory class provides paths to the following files:
BUILDHISTORY_IMAGE_FILES ?= "/etc/passwd /etc/group"
- BUILDHISTORY_PATH_PREFIX_STRIP
When inheriting the buildhistory class, this variable specifies a common path prefix that should be stripped off the beginning of paths in the task signature list when the
taskfeature is active in BUILDHISTORY_FEATURES. This can be useful when build history is populated from multiple sources that may not all use the same top level directory.By default, the buildhistory class sets the variable as follows:
BUILDHISTORY_PATH_PREFIX_STRIP ?= ""
In this case, no prefixes will be stripped.
- BUILDHISTORY_PUSH_REPO
When inheriting the buildhistory class, this variable optionally specifies a remote repository to which build history pushes Git changes. In order for BUILDHISTORY_PUSH_REPO to work, BUILDHISTORY_COMMIT must be set to “1”.
The repository should correspond to a remote address that specifies a repository as understood by Git, or alternatively to a remote name that you have set up manually using
git remotewithin the local repository.By default, the buildhistory class sets the variable as follows:
BUILDHISTORY_PUSH_REPO ?= ""
- BUILDNAME
See BUILDNAME in the BitBake manual.
- BUILDSDK_CFLAGS
Specifies the flags to pass to the C compiler when building for the SDK. When building in the
nativesdk-context, CFLAGS is set to the value of this variable by default.- BUILDSDK_CPPFLAGS
Specifies the flags to pass to the C pre-processor (i.e. to both the C and the C++ compilers) when building for the SDK. When building in the
nativesdk-context, CPPFLAGS is set to the value of this variable by default.- BUILDSDK_CXXFLAGS
Specifies the flags to pass to the C++ compiler when building for the SDK. When building in the
nativesdk-context, CXXFLAGS is set to the value of this variable by default.- BUILDSDK_LDFLAGS
Specifies the flags to pass to the linker when building for the SDK. When building in the
nativesdk-context, LDFLAGS is set to the value of this variable by default.- BUILDSTATS_BASE
Points to the location of the directory that holds build statistics when you use and enable the buildstats class. The BUILDSTATS_BASE directory defaults to
${TMPDIR}/buildstats/.- BUSYBOX_SPLIT_SUID
For the BusyBox recipe, specifies whether to split the output executable file into two parts: one for features that require
setuid root, and one for the remaining features (i.e. those that do not requiresetuid root).The BUSYBOX_SPLIT_SUID variable defaults to “1”, which results in splitting the output executable file. Set the variable to “0” to get a single output executable file.
- CACHE
Specifies the directory BitBake uses to store a cache of the Metadata so it does not need to be parsed every time BitBake is started.
- CARGO_INSTALL_LIBRARIES
When inheriting the cargo class, the variable CARGO_INSTALL_LIBRARIES can be set to a non-empty value by individual recipes to enable the installation of the libraries the recipe has built in
${B}/target/${CARGO_TARGET_SUBDIR}(files ending with.soor.rlib). By default this variable is not defined and libraries are not installed, to replicate the behavior of thecargo installcommand.- CC
The minimal command and arguments used to run the C compiler.
- CCACHE_DISABLE
When inheriting the ccache class, the CCACHE_DISABLE variable can be set to “1” in a recipe to disable Ccache support. This is useful when the recipe is known to not support it.
- CCACHE_NATIVE_RECIPES_ALLOWED
The CCACHE_NATIVE_RECIPES_ALLOWED variable can be set in a configuration file to a list of native recipes that are allowed to be optimized with the ccache class.
- CCACHE_TOP_DIR
When inheriting the ccache class, the CCACHE_TOP_DIR variable can be set to the location of where Ccache stores its cache files. This directory can be shared between builds.
- CCLD
The minimal command and arguments used to run the linker when the C compiler is being used as the linker.
- CFLAGS
Specifies the flags to pass to the C compiler. This variable is exported to an environment variable and thus made visible to the software being built during the compilation step.
Default initialization for CFLAGS varies depending on what is being built:
TARGET_CFLAGS when building for the target
BUILD_CFLAGS when building for the build host (i.e.
-native)BUILDSDK_CFLAGS when building for an SDK (i.e.
nativesdk-)
- CHECKLAYER_REQUIRED_TESTS
The CHECKLAYER_REQUIRED_TESTS variable lists the QA tests that are required to be enabled to pass the Yocto Project Compatible status for a layer. It is meant to be a read-only variable and any change to the variable may be done with the approval of the Technical Steering Committee (TSC).
For more information on the Yocto Project Compatible status, see the Making Sure Your Layer is Compatible With Yocto Project section of the Yocto Project Development Manual.
- CLASSOVERRIDE
An internal variable specifying the special class override that should currently apply (e.g. “class-target”, “class-native”, and so forth). The classes that use this variable (e.g. native, nativesdk, and so forth) set the variable to appropriate values.
Note
CLASSOVERRIDE gets its default “class-target” value from the
bitbake.conffile.As an example, the following override allows you to install extra files, but only when building for the target:
do_install:append:class-target() { install my-extra-file ${D}${sysconfdir} }Here is an example where
FOOis set to “native” when building for the build host, and to “other” when not building for the build host:FOO:class-native = "native" FOO = "other"
The underlying mechanism behind CLASSOVERRIDE is simply that it is included in the default value of OVERRIDES.
- CLEANBROKEN
If set to “1” within a recipe, CLEANBROKEN specifies that the
make cleancommand does not work for the software being built. Consequently, the OpenEmbedded build system will not try to runmake cleanduring the do_configure task, which is the default behavior.- COMBINED_FEATURES
Provides a list of hardware features that are enabled in both MACHINE_FEATURES and DISTRO_FEATURES. This select list of features contains features that make sense to be controlled both at the machine and distribution configuration level. For example, the “bluetooth” feature requires hardware support but should also be optional at the distribution level, in case the hardware supports Bluetooth but you do not ever intend to use it.
- COMMERCIAL_AUDIO_PLUGINS
This variable is specific to the GStreamer recipes. It allows to build the GStreamer “ugly” and “bad” audio plugins.
See the Other Variables Related to Commercial Licenses section for usage details.
- COMMERCIAL_VIDEO_PLUGINS
This variable is specific to the GStreamer recipes. It allows to build the GStreamer “ugly” and “bad” video plugins.
See the Other Variables Related to Commercial Licenses section for usage details.
- COMMON_LICENSE_DIR
Points to
meta/files/common-licensesin OpenEmbedded-Core (OE-Core), which is where generic license files reside.- COMPATIBLE_HOST
A regular expression that resolves to one or more hosts (when the recipe is native) or one or more targets (when the recipe is non-native) with which a recipe is compatible. The regular expression is matched against HOST_SYS. You can use the variable to stop recipes from being built for classes of systems with which the recipes are not compatible. Stopping these builds is particularly useful with kernels. The variable also helps to increase parsing speed since the build system skips parsing recipes not compatible with the current system.
- COMPATIBLE_MACHINE
A regular expression that resolves to one or more target machines with which a recipe is compatible. The regular expression is matched against MACHINEOVERRIDES. You can use the variable to stop recipes from being built for machines with which the recipes are not compatible. Stopping these builds is particularly useful with kernels. The variable also helps to increase parsing speed since the build system skips parsing recipes not compatible with the current machine.
If one wants to have a recipe only available for some architectures (here
aarch64andmips64), the following can be used:COMPATIBLE_MACHINE = "^$" COMPATIBLE_MACHINE:arch64 = "^(aarch64)$" COMPATIBLE_MACHINE:mips64 = "^(mips64)$"
The first line means “match all machines whose MACHINEOVERRIDES contains the empty string”, which will always be none.
The second is for matching all machines whose MACHINEOVERRIDES contains one override which is exactly
aarch64.The third is for matching all machines whose MACHINEOVERRIDES contains one override which is exactly
mips64.The same could be achieved with:
COMPATIBLE_MACHINE = "^(aarch64|mips64)$"
Note
When COMPATIBLE_MACHINE is set in a native recipe, the recipe is always skipped. All native recipes must be entirely target independent and should not rely on MACHINE.
- COMPLEMENTARY_GLOB
Defines wildcards to match when installing a list of complementary packages for all the packages explicitly (or implicitly) installed in an image.
The COMPLEMENTARY_GLOB variable uses Unix filename pattern matching (fnmatch), which is similar to the Unix style pathname pattern expansion (glob).
The resulting list of complementary packages is associated with an item that can be added to IMAGE_FEATURES. An example usage of this is the “dev-pkgs” item that when added to IMAGE_FEATURES will install -dev packages (containing headers and other development files) for every package in the image.
To add a new feature item pointing to a wildcard, use a variable flag to specify the feature item name and use the value to specify the wildcard. Here is an example:
COMPLEMENTARY_GLOB[dev-pkgs] = '*-dev'
Note
When installing complementary packages, recommends relationships (set via RRECOMMENDS) are always ignored.
- COMPONENTS_DIR
Stores sysroot components provided by each recipe. The OpenEmbedded build system uses COMPONENTS_DIR when constructing recipe-specific sysroots for other recipes.
The default is “
${STAGING_DIR}-components.” (i.e. “${TMPDIR}/sysroots-components”).- CONF_VERSION
Tracks the version of the local configuration file (i.e.
local.conf). The value for CONF_VERSION increments each timebuild/conf/compatibility changes.- CONFFILES
Identifies editable or configurable files that are part of a package. If the Package Management System (PMS) is being used to update packages on the target system, it is possible that configuration files you have changed after the original installation and that you now want to remain unchanged are overwritten. In other words, editable files might exist in the package that you do not want reset as part of the package update process. You can use the CONFFILES variable to list the files in the package that you wish to prevent the PMS from overwriting during this update process.
To use the CONFFILES variable, provide a package name override that identifies the resulting package. Then, provide a space-separated list of files. Here is an example:
CONFFILES:${PN} += "${sysconfdir}/file1 \ ${sysconfdir}/file2 ${sysconfdir}/file3"There is a relationship between the CONFFILES and FILES variables. The files listed within CONFFILES must be a subset of the files listed within FILES. Because the configuration files you provide with CONFFILES are simply being identified so that the PMS will not overwrite them, it makes sense that the files must already be included as part of the package through the FILES variable.
Note
When specifying paths as part of the CONFFILES variable, it is good practice to use appropriate path variables. For example,
${sysconfdir}rather than/etcor${bindir}rather than/usr/bin. You can find a list of these variables at the top of themeta/conf/bitbake.conffile in OpenEmbedded-Core (OE-Core).- CONFIG_INITRAMFS_SOURCE
Identifies the initial RAM filesystem (Initramfs) source files. The OpenEmbedded build system receives and uses this kernel Kconfig variable as an environment variable. By default, the variable is set to null (“”).
The CONFIG_INITRAMFS_SOURCE can be either a single cpio archive with a
.cpiosuffix or a space-separated list of directories and files for building the Initramfs image. A cpio archive should contain a filesystem archive to be used as an Initramfs image. Directories should contain a filesystem layout to be included in the Initramfs image. Files should contain entries according to the format described by theusr/gen_init_cpioprogram in the kernel tree.If you specify multiple directories and files, the Initramfs image will be the aggregate of all of them.
For information on creating an Initramfs, see the “Building an Initial RAM Filesystem (Initramfs) Image” section in the Yocto Project Development Tasks Manual.
- CONFIG_SITE
A list of files that contains
autoconftest results relevant to the current build. This variable is used by the Autotools utilities when runningconfigure.- CONFIGURE_FLAGS
The minimal arguments for GNU configure.
- CONFIGURE_SCRIPT
When using the autotools* class, the CONFIGURE_SCRIPT variable stores the location of the
configurescript for the Autotools build system. The default definition for this variable is:CONFIGURE_SCRIPT ?= "${AUTOTOOLS_SCRIPT_PATH}/configure"Where AUTOTOOLS_SCRIPT_PATH is the location of the of the Autotools build system scripts, which defaults to S.
- CONFLICT_COMBINED_FEATURES
When inheriting the features_check class, this variable identifies combined features (see COMBINED_FEATURES for what this means) that would be in conflict should the recipe be built. In other words, if the CONFLICT_COMBINED_FEATURES variable lists a feature that also appears in COMBINED_FEATURES within the current configuration, then the recipe will be skipped, and if the build system attempts to build the recipe then an error will be triggered.
- CONFLICT_DISTRO_FEATURES
When inheriting the features_check class, this variable identifies distro features that would be in conflict should the recipe be built. In other words, if the CONFLICT_DISTRO_FEATURES variable lists a feature that also appears in DISTRO_FEATURES within the current configuration, then the recipe will be skipped, and if the build system attempts to build the recipe then an error will be triggered.
- CONFLICT_IMAGE_FEATURES
When inheriting the features_check class, this variable identifies image features that would be in conflict should the recipe be built. In other words, if the CONFLICT_IMAGE_FEATURES variable lists a feature that also appears in IMAGE_FEATURES within the current configuration, then the recipe will be skipped, and if the build system attempts to build the recipe then an error will be triggered.
- CONFLICT_MACHINE_FEATURES
When inheriting the features_check class, this variable identifies machine features that would be in conflict should the recipe be built. In other words, if the CONFLICT_MACHINE_FEATURES variable lists a feature that also appears in MACHINE_FEATURES within the current configuration, then the recipe will be skipped, and if the build system attempts to build the recipe then an error will be triggered.
- CONFLICT_TUNE_FEATURES
When inheriting the features_check class, this variable identifies tune features that would be in conflict should the recipe be built. In other words, if the CONFLICT_TUNE_FEATURES variable lists a feature that also appears in TUNE_FEATURES within the current configuration, then the recipe will be skipped, and if the build system attempts to build the recipe then an error will be triggered.
- CONVERSION_CMD
This variable is used for storing image conversion commands. Image conversion can convert an image into different objects like:
Compressed version of the image
Checksums for the image
An example of CONVERSION_CMD from image_types class is:
CONVERSION_CMD:lzo = "lzop -9 ${IMAGE_NAME}${IMAGE_NAME_SUFFIX}.${type}"
- COPY_LIC_DIRS
If set to “1” along with the COPY_LIC_MANIFEST variable, the OpenEmbedded build system copies into the image the license files, which are located in
/usr/share/common-licenses, for each package. The license files are placed in directories within the image itself during build time.Note
The COPY_LIC_DIRS does not offer a path for adding licenses for newly installed packages to an image, which might be most suitable for read-only filesystems that cannot be upgraded. See the LICENSE_CREATE_PACKAGE variable for additional information. You can also reference the “Providing License Text” section in the Yocto Project Development Tasks Manual for information on providing license text.
- COPY_LIC_MANIFEST
If set to “1”, the OpenEmbedded build system copies the license manifest for the image to
/usr/share/common-licenses/license.manifestwithin the image itself during build time.Note
The COPY_LIC_MANIFEST does not offer a path for adding licenses for newly installed packages to an image, which might be most suitable for read-only filesystems that cannot be upgraded. See the LICENSE_CREATE_PACKAGE variable for additional information. You can also reference the “Providing License Text” section in the Yocto Project Development Tasks Manual for information on providing license text.
- COPYLEFT_LICENSE_EXCLUDE
A space-separated list of licenses to exclude from the source archived by the archiver class. In other words, if a license in a recipe’s LICENSE value is in the value of COPYLEFT_LICENSE_EXCLUDE, then its source is not archived by the class.
Note
The COPYLEFT_LICENSE_EXCLUDE variable takes precedence over the COPYLEFT_LICENSE_INCLUDE variable.
The default value, which is “CLOSED Proprietary”, for COPYLEFT_LICENSE_EXCLUDE is set by the copyleft_filter class, which is inherited by the archiver class.
- COPYLEFT_LICENSE_INCLUDE
A space-separated list of licenses to include in the source archived by the archiver class. In other words, if a license in a recipe’s LICENSE value is in the value of COPYLEFT_LICENSE_INCLUDE, then its source is archived by the class.
The default value is set by the copyleft_filter class, which is inherited by the archiver class. The default value includes “GPL*”, “LGPL*”, and “AGPL*”.
- COPYLEFT_PN_EXCLUDE
A list of recipes to exclude in the source archived by the archiver class. The COPYLEFT_PN_EXCLUDE variable overrides the license inclusion and exclusion caused through the COPYLEFT_LICENSE_INCLUDE and COPYLEFT_LICENSE_EXCLUDE variables, respectively.
The default value, which is “” indicating to not explicitly exclude any recipes by name, for COPYLEFT_PN_EXCLUDE is set by the copyleft_filter class, which is inherited by the archiver class.
- COPYLEFT_PN_INCLUDE
A list of recipes to include in the source archived by the archiver class. The COPYLEFT_PN_INCLUDE variable overrides the license inclusion and exclusion caused through the COPYLEFT_LICENSE_INCLUDE and COPYLEFT_LICENSE_EXCLUDE variables, respectively.
The default value, which is “” indicating to not explicitly include any recipes by name, for COPYLEFT_PN_INCLUDE is set by the copyleft_filter class, which is inherited by the archiver class.
- COPYLEFT_RECIPE_TYPES
A space-separated list of recipe types to include in the source archived by the archiver class. Recipe types are
target, native, nativesdk, cross, crosssdk, and cross-canadian.The default value, which is “target*”, for COPYLEFT_RECIPE_TYPES is set by the copyleft_filter class, which is inherited by the archiver class.
- CORE_IMAGE_EXTRA_INSTALL
Specifies the list of packages to be added to the image. You should only set this variable in the
local.confconfiguration file found in the Build Directory.This variable replaces
POKY_EXTRA_INSTALL, which is no longer supported.- COREBASE
Specifies the parent directory of the OpenEmbedded-Core (OE-Core) metadata layer (i.e.
meta).- COREBASE_FILES
Lists files from the COREBASE directory that should be copied other than the layers listed in the
bblayers.conffile. The COREBASE_FILES variable allows to copy metadata from the OpenEmbedded build system into the extensible SDK.Explicitly listing files in COREBASE is needed because it typically contains build directories and other files that should not normally be copied into the extensible SDK. Consequently, the value of COREBASE_FILES is used in order to only copy the files that are actually needed.
- CPP
The minimal command and arguments used to run the C preprocessor.
- CPPFLAGS
Specifies the flags to pass to the C pre-processor (i.e. to both the C and the C++ compilers). This variable is exported to an environment variable and thus made visible to the software being built during the compilation step.
Default initialization for CPPFLAGS varies depending on what is being built:
TARGET_CPPFLAGS when building for the target
BUILD_CPPFLAGS when building for the build host (i.e.
-native)BUILDSDK_CPPFLAGS when building for an SDK (i.e.
nativesdk-)
- CROSS_COMPILE
The toolchain binary prefix for the target tools. The CROSS_COMPILE variable is the same as the TARGET_PREFIX variable.
Note
The OpenEmbedded build system sets the CROSS_COMPILE variable only in certain contexts (e.g. when building for kernel and kernel module recipes).
- CVE_CHECK_IGNORE
This variable is deprecated and should be replaced by CVE_STATUS.
- CVE_CHECK_MANIFEST_JSON
When inheriting the vex class, this variable specifies the path to the CVE manifest in JSON format.
- CVE_CHECK_SKIP_RECIPE
When inheriting the vex class, the variable specifies the list of package names (PN) for which CVEs (Common Vulnerabilities and Exposures) are ignored.
- CVE_CHECK_STATUSMAP
Mapping variable for all possible reasons of CVE_STATUS:
Patched,UnpatchedandIgnored. See meta/conf/cve-check-map.conf for more details:CVE_CHECK_STATUSMAP[cpe-incorrect] = "Ignored"
- CVE_CHECK_VEX_JUSTIFICATION
Mapping variable for CVE_STATUS reasons (for example
not-applicable-platform) to vex justifications. Should be set as follows:CVE_CHECK_VEX_JUSTIFICATION[not-applicable-config] = "vulnerableCodeNotPresent"
- CVE_PRODUCT
In a recipe, defines the name used to match the recipe name against the name in the upstream NIST CVE database.
The default is ${BPN} (except for recipes that inherit the pypi class where it is set based upon PYPI_PACKAGE). If it does not match the name in the NIST CVE database or matches with multiple entries in the database, the default value needs to be changed.
Here is an example from the Berkeley DB recipe:
CVE_PRODUCT = "oracle_berkeley_db berkeley_db"
Sometimes the product name is not specific enough, for example “tar” has been matching CVEs for the GNU
tarpackage and also thenode-tarnode.js extension. To avoid this problem, use the vendor name as a prefix. The syntax for this is:CVE_PRODUCT = "vendor:package"
Since Wrynose (6.0), special characters must not be escaped. For example, the CVE_PRODUCT variable for the
webkitgtkrecipe must no longer be written aswebkitgtk\+but ratherwebkitgtk+.- CVE_STATUS
The CVE ID which is patched or should be ignored. Here is an example from the Python3 recipe:
CVE_STATUS[CVE-2020-15523] = "not-applicable-platform: Issue only applies on Windows"
It has the format “reason: description” and the description is optional. The Reason is mapped to the final CVE state by mapping via CVE_CHECK_STATUSMAP. See Fixing vulnerabilities in recipes for details.
- CVE_STATUS_GROUPS
If there are many CVEs with the same status and reason, they can by simplified by using this variable instead of many similar lines with CVE_STATUS:
CVE_STATUS_GROUPS = "CVE_STATUS_WIN CVE_STATUS_PATCHED" CVE_STATUS_WIN = "CVE-1234-0001 CVE-1234-0002" CVE_STATUS_WIN[status] = "not-applicable-platform: Issue only applies on Windows" CVE_STATUS_PATCHED = "CVE-1234-0003 CVE-1234-0004" CVE_STATUS_PATCHED[status] = "fixed-version: Fixed externally"
- CVE_VERSION
In a recipe, defines the version used to match the recipe version against the version in the NIST CVE database when using the vex or create-spdx class.
The default is ${PV} but if recipes use custom version numbers which do not map to upstream software component release versions and the versions used in the CVE database, then this variable can be used to set the version number for vex or create-spdx. Example:
CVE_VERSION = "2.39"
- CVSDIR
The directory in which files checked out under the CVS system are stored.
- CXX
The minimal command and arguments used to run the C++ compiler.
- CXXFLAGS
Specifies the flags to pass to the C++ compiler. This variable is exported to an environment variable and thus made visible to the software being built during the compilation step.
Default initialization for CXXFLAGS varies depending on what is being built:
TARGET_CXXFLAGS when building for the target
BUILD_CXXFLAGS when building for the build host (i.e.
-native)BUILDSDK_CXXFLAGS when building for an SDK (i.e.
nativesdk-)
- D
The destination directory. The location in the Build Directory where components are installed by the do_install task. This location defaults to:
${WORKDIR}/imageNote
Tasks that read from or write to this directory should run under fakeroot.
- DATE
The date the build was started. Dates appear using the year, month, and day (YMD) format (e.g. “20150209” for February 9th, 2015).
- DATETIME
The date and time on which the current build started. The format is suitable for timestamps.
- DEBIAN_NOAUTONAME
When the debian class is inherited, which is the default behavior, DEBIAN_NOAUTONAME specifies a particular package should not be renamed according to Debian library package naming. You must use the package name as an override when you set this variable. Here is an example from the
fontconfigrecipe:DEBIAN_NOAUTONAME:fontconfig-utils = "1"
- DEBIANNAME
When the debian class is inherited, which is the default behavior, DEBIANNAME allows you to override the library name for an individual package. Overriding the library name in these cases is rare. You must use the package name as an override when you set this variable. Here is an example from the
dbusrecipe:DEBIANNAME:${PN} = "dbus-1"- DEBUG_BUILD
Specifies to build packages with debugging information. This influences the value of the SELECTED_OPTIMIZATION variable.
- DEBUG_OPTIMIZATION
The options to pass in TARGET_CFLAGS and CFLAGS when compiling a system for debugging. This variable defaults to “-O -fno-omit-frame-pointer ${DEBUG_FLAGS} -pipe”.
- DEBUG_PREFIX_MAP
Allows to set C compiler options, such as
-fdebug-prefix-map,-fmacro-prefix-map, and-ffile-prefix-map, which allow to replace build-time paths by install-time ones in the debugging sections of binaries. This makes compiler output files location independent, at the cost of having to pass an extra command to tell the debugger where source files are.This is used by the Yocto Project to guarantee Reproducible Builds even when the source code of a package uses the
__FILE__orassert()macros. See the reproducible-builds.org website for details.This variable is set in the
meta/conf/bitbake.conffile. It is not intended to be user-configurable.- DEFAULT_PREFERENCE
Specifies a weak bias for recipe selection priority.
The most common usage of this is variable is to set it to “-1” within a recipe for a development version of a piece of software. Using the variable in this way causes the stable version of the recipe to build by default in the absence of PREFERRED_VERSION being used to build the development version.
Note
The bias provided by DEFAULT_PREFERENCE is weak and is overridden by BBFILE_PRIORITY if that variable is different between two layers that contain different versions of the same recipe.
- DEFAULT_TIMEZONE
Specifies the time zone set in the image.
This variable causes the
tzdatapackage to configure${sysconfdir}/localtimeaccordingly. Valid values are all files found in/usr/share/zoneinfolikeCETorAsia/Baku.- DEFAULTTUNE
The default CPU and Application Binary Interface (ABI) tunings (i.e. the “tune”) used by the OpenEmbedded build system. The DEFAULTTUNE helps define TUNE_FEATURES.
The default tune is either implicitly or explicitly set by the machine (MACHINE). However, you can override the setting using available tunes as defined with AVAILTUNES.
- DEPENDS
Lists a recipe’s build-time dependencies. These are dependencies on other recipes whose contents (e.g. headers and shared libraries) are needed by the recipe at build time.
As an example, consider a recipe
foothat contains the following assignment:DEPENDS = "bar"
The practical effect of the previous assignment is that all files installed by bar will be available in the appropriate staging sysroot, given by the STAGING_DIR* variables, by the time the do_configure task for
fooruns. This mechanism is implemented by having do_configure depend on the do_populate_sysroot task of each recipe listed in DEPENDS, through a[deptask]declaration in the base class.Note
It seldom is necessary to reference, for example, STAGING_DIR_HOST explicitly. The standard classes and build-related variables are configured to automatically use the appropriate staging sysroots.
As another example, DEPENDS can also be used to add utilities that run on the build machine during the build. For example, a recipe that makes use of a code generator built by the recipe
codegenmight have the following:DEPENDS = "codegen-native"
For more information, see the native class and the EXTRANATIVEPATH variable.
Note
DEPENDS is a list of recipe names. Or, to be more precise, it is a list of PROVIDES names, which usually match recipe names. Putting a package name such as “foo-dev” in DEPENDS does not make sense. Use “foo” instead, as this will put files from all the packages that make up
foo, which includes those fromfoo-dev, into the sysroot.One recipe having another recipe in DEPENDS does not by itself add any runtime dependencies between the packages produced by the two recipes. However, as explained in the “Automatically Added Runtime Dependencies” section in the Yocto Project Overview and Concepts Manual, runtime dependencies will often be added automatically, meaning DEPENDS alone is sufficient for most recipes.
Counterintuitively, DEPENDS is often necessary even for recipes that install precompiled components. For example, if
libfoois a precompiled library that links againstlibbar, then linking againstlibfoorequires bothlibfooandlibbarto be available in the sysroot. Without a DEPENDS from the recipe that installslibfooto the recipe that installslibbar, other recipes might fail to link againstlibfoo.
For information on runtime dependencies, see the RDEPENDS variable. You can also see the “Tasks” and “Dependencies” sections in the BitBake User Manual for additional information on tasks and dependencies.
- DEPLOY_DIR
Points to the general area that the OpenEmbedded build system uses to place images, packages, SDKs, and other output files that are ready to be used outside of the build system. By default, this directory resides within the Build Directory as
${TMPDIR}/deploy.For more information on the structure of the Build Directory, see “The Build Directory — build/” section. For more detail on the contents of the
deploydirectory, see the “Images”, “Package Feeds”, and “Application Development SDK” sections all in the Yocto Project Overview and Concepts Manual.- DEPLOY_DIR_DEB
Points to the area that the OpenEmbedded build system uses to place Debian packages that are ready to be used outside of the build system. This variable applies only when PACKAGE_CLASSES contains “package_deb”.
The BitBake configuration file initially defines the DEPLOY_DIR_DEB variable as a sub-folder of DEPLOY_DIR:
DEPLOY_DIR_DEB = "${DEPLOY_DIR}/deb"
The package_deb class uses the DEPLOY_DIR_DEB variable to make sure the do_package_write_deb task writes Debian packages into the appropriate folder. For more information on how packaging works, see the “Package Feeds” section in the Yocto Project Overview and Concepts Manual.
- DEPLOY_DIR_IMAGE
Points to the area that the OpenEmbedded build system uses to place images and other associated output files that are ready to be deployed onto the target machine. The directory is machine-specific as it contains the
${MACHINE}name. By default, this directory resides within the Build Directory as${DEPLOY_DIR}/images/${MACHINE}/.It must not be used directly in recipes when deploying files. Instead, it’s only useful when a recipe needs to “read” a file already deployed by a dependency. So, it should be filled with the contents of DEPLOYDIR by the deploy class or with the contents of IMGDEPLOYDIR by the image class.
For more information on the structure of the Build Directory, see “The Build Directory — build/” section. For more detail on the contents of the
deploydirectory, see the “Images” and “Application Development SDK” sections both in the Yocto Project Overview and Concepts Manual.- DEPLOY_DIR_IPK
Points to the area that the OpenEmbedded build system uses to place IPK packages that are ready to be used outside of the build system. This variable applies only when PACKAGE_CLASSES contains “package_ipk”.
The BitBake configuration file initially defines this variable as a sub-folder of DEPLOY_DIR:
DEPLOY_DIR_IPK = "${DEPLOY_DIR}/ipk"
The package_ipk class uses the DEPLOY_DIR_IPK variable to make sure the do_package_write_ipk task writes IPK packages into the appropriate folder. For more information on how packaging works, see the “Package Feeds” section in the Yocto Project Overview and Concepts Manual.
- DEPLOY_DIR_RPM
Points to the area that the OpenEmbedded build system uses to place RPM packages that are ready to be used outside of the build system. This variable applies only when PACKAGE_CLASSES contains “package_rpm”.
The BitBake configuration file initially defines this variable as a sub-folder of DEPLOY_DIR:
DEPLOY_DIR_RPM = "${DEPLOY_DIR}/rpm"
The package_rpm class uses the DEPLOY_DIR_RPM variable to make sure the do_package_write_rpm task writes RPM packages into the appropriate folder. For more information on how packaging works, see the “Package Feeds” section in the Yocto Project Overview and Concepts Manual.
- DEPLOYDIR
When inheriting the deploy class, the DEPLOYDIR points to a temporary work area for deployed files that is set in the deploy class as follows:
DEPLOYDIR = "${WORKDIR}/deploy-${PN}"
Recipes inheriting the deploy class should copy files to be deployed into DEPLOYDIR, and the class will take care of copying them into DEPLOY_DIR_IMAGE afterwards.
- DESCRIPTION
The package description used by package managers. If not set, DESCRIPTION takes the value of the SUMMARY variable.
- DEV_PKG_DEPENDENCY
Provides an easy way for recipes to disable or adjust the runtime recommendation (RRECOMMENDS) of the
${PN}-devpackage on the main (${PN}) package.- DISABLE_STATIC
Used in order to disable static linking by default (in order to save space, since static libraries are often unused in embedded systems.) The default value is “ –disable-static”, however it can be set to “” in order to enable static linking if desired. Certain recipes do this individually, and also there is a
meta/conf/distro/include/no-static-libs.incinclude file that disables static linking for a number of recipes. Some software packages or build tools (such as CMake) have explicit support for enabling / disabling static linking, and in those cases DISABLE_STATIC is not used.- DISTRO
The short name of the distribution. For information on the long name of the distribution, see the DISTRO_NAME variable.
The DISTRO variable corresponds to a distribution configuration file whose root name is the same as the variable’s argument and whose filename extension is
.conf. For example, the distribution configuration file for the Poky distribution is namedpoky.confand resides in themeta-poky/conf/distrodirectory of meta-poky.Within that
poky.conffile, the DISTRO variable is set as follows:DISTRO = "poky"
Distribution configuration files are located in a
conf/distrodirectory within the Metadata that contains the distribution configuration. The value for DISTRO must not contain spaces, and is typically all lower-case.Note
If the DISTRO variable is blank, a set of default configurations are used, which are specified within
meta/conf/distro/defaultsetup.confalso in OpenEmbedded-Core (OE-Core).- DISTRO_CODENAME
Specifies a codename for the distribution being built.
- DISTRO_EXTRA_RDEPENDS
Specifies a list of distro-specific packages to add to all images. This variable takes effect through
packagegroup-baseso the variable only really applies to the more full-featured images that includepackagegroup-base. You can use this variable to keep distro policy out of generic images. As with all other distro variables, you set this variable in the distro.conffile.- DISTRO_EXTRA_RRECOMMENDS
Specifies a list of distro-specific packages to add to all images if the packages exist. The packages might not exist or be empty (e.g. kernel modules). The list of packages are automatically installed but you can remove them.
- DISTRO_FEATURES
The software support you want in your distribution for various features. You define your distribution features in the distribution configuration file.
In most cases, the presence or absence of a feature in DISTRO_FEATURES is translated to the appropriate option supplied to the configure script during the do_configure task for recipes that optionally support the feature. For example, specifying “x11” in DISTRO_FEATURES, causes every piece of software built for the target that can optionally support X11 to have its X11 support enabled.
Note
Just enabling DISTRO_FEATURES alone doesn’t enable feature support for packages. Mechanisms such as making PACKAGECONFIG track DISTRO_FEATURES are used to enable/disable package features.
Two more examples are Bluetooth and NFS support. For a more complete list of features that ships with the Yocto Project and that you can provide with this variable, see the “Distro Features” section.
- DISTRO_FEATURES_DEFAULTS
Specifies a space-separated list of default distro features provided by the OpenEmbedded Build System. This list should not be modified directly, but instead DISTRO_FEATURES_OPTED_OUT should be used to prevent default distro features from being enabled.
See Default Features for more information.
- DISTRO_FEATURES_FILTER_NATIVE
Specifies a list of features that if present in the target DISTRO_FEATURES value should be included in DISTRO_FEATURES when building native recipes. This variable is used in addition to the features filtered using the DISTRO_FEATURES_NATIVE variable.
- DISTRO_FEATURES_FILTER_NATIVESDK
Specifies a list of features that if present in the target DISTRO_FEATURES value should be included in DISTRO_FEATURES when building nativesdk recipes. This variable is used in addition to the features filtered using the DISTRO_FEATURES_NATIVESDK variable.
- DISTRO_FEATURES_NATIVE
Specifies a list of features that should be included in DISTRO_FEATURES when building native recipes. This variable is used in addition to the features filtered using the DISTRO_FEATURES_FILTER_NATIVE variable.
- DISTRO_FEATURES_NATIVESDK
Specifies a list of features that should be included in DISTRO_FEATURES when building nativesdk recipes. This variable is used in addition to the features filtered using the DISTRO_FEATURES_FILTER_NATIVESDK variable.
- DISTRO_FEATURES_OPTED_OUT
Specifies a space-separated list of distro features to opt out from when they are provided by the DISTRO_FEATURES_DEFAULTS variable.
You can also opt out of all default features by setting DISTRO_FEATURES_OPTED_OUT to
*:DISTRO_FEATURES_OPTED_OUT = "*"
See Default Features for more information.
- DISTRO_NAME
The long name of the distribution. For information on the short name of the distribution, see the DISTRO variable.
The DISTRO_NAME variable corresponds to a distribution configuration file whose root name is the same as the variable’s argument and whose filename extension is
.conf. For example, the distribution configuration file for the Poky distribution is namedpoky.confand resides in themeta-poky/conf/distrodirectory of meta-poky.Within that
poky.conffile, the DISTRO_NAME variable is set as follows:DISTRO_NAME = "Poky (Yocto Project Reference Distro)"
Distribution configuration files are located in a
conf/distrodirectory within the Metadata that contains the distribution configuration.Note
If the DISTRO_NAME variable is blank, a set of default configurations are used, which are specified within
meta/conf/distro/defaultsetup.confalso in OpenEmbedded-Core (OE-Core).- DISTRO_VERSION
The version of the distribution.
- DISTROOVERRIDES
A colon-separated list of overrides specific to the current distribution. By default, this list includes the value of DISTRO.
You can extend DISTROOVERRIDES to add extra overrides that should apply to the distribution.
The underlying mechanism behind DISTROOVERRIDES is simply that it is included in the default value of OVERRIDES.
Here is an example from meta-poky/conf/distro/poky-tiny.conf:
DISTROOVERRIDES = "poky:poky-tiny"
- DL_DIR
The central download directory used by the build process to store downloads. By default, DL_DIR gets files suitable for mirroring for everything except Git repositories. If you want tarballs of Git repositories, use the BB_GENERATE_MIRROR_TARBALLS variable.
You can set this directory by defining the DL_DIR variable in the
conf/local.conffile. This directory is self-maintaining and you should not have to touch it. By default, the directory isdownloadsin the Build Directory:#DL_DIR ?= "${TOPDIR}/downloads"To specify a different download directory, simply remove the comment from the line and provide your directory.
During a first build, the system downloads many different source code tarballs from various upstream projects. Downloading can take a while, particularly if your network connection is slow. Tarballs are all stored in the directory defined by DL_DIR and the build system looks there first to find source tarballs.
Note
When wiping and rebuilding, you can preserve this directory to speed up this part of subsequent builds.
You can safely share this directory between multiple builds on the same development machine. For additional information on how the build process gets source files when working behind a firewall or proxy server, see this specific question in the “FAQ” chapter. You can also refer to the “Working Behind a Network Proxy” Wiki page.
- DOC_COMPRESS
When inheriting the compress_doc class, this variable sets the compression policy used when the OpenEmbedded build system compresses manual and info pages. By default, the compression method used is gz (gzip). Other policies available are xz and bz2.
For information on policies and on how to use this variable, see the comments in the
meta/classes-recipe/compress_doc.bbclassfile.- DT_FILES
Space-separated list of device tree source files to compile using a recipe that inherits the devicetree class. These are relative to the DT_FILES_PATH.
For convenience, both
.dtsand.dtbextensions can be used.Use an empty string (default) to build all device tree sources within the DT_FILES_PATH directory.
- DT_FILES_PATH
When compiling out-of-tree device tree sources using a recipe that inherits the devicetree class, this variable specifies the path to the directory containing dts files to build.
Defaults to the S directory.
- DT_PADDING_SIZE
When inheriting the devicetree class, this variable specifies the size of padding appended to the device tree blob, used as extra space typically for additional properties during boot.
- EFI_ARCH
The CPU architecture name within EFI standard. Set in meta/conf/image-uefi.conf.
- EFI_PROVIDER
When building bootable images (i.e. where
hddimg,iso, orwic.vmdkis in IMAGE_FSTYPES), the EFI_PROVIDER variable specifies the EFI bootloader to use. The default is “grub-efi”, but “systemd-boot” can be used instead.See the systemd-boot and image-live classes for more information.
- EFI_UKI_DIR
The primary place for the UKI image inside the EFI System Partition.
- EFI_UKI_PATH
The path for the UKI image inside the root filesystem.
- ENABLE_BINARY_LOCALE_GENERATION
Variable that controls which locales for
glibcare generated during the build (useful if the target device has 64Mbytes of RAM or less).- ERR_REPORT_DIR
When used with the report-error class, specifies the path used for storing the debug files created by the error reporting tool, which allows you to submit build errors you encounter to a central database. By default, the value of this variable is
${LOG_DIR}/error-report.You can set ERR_REPORT_DIR to the path you want the error reporting tool to store the debug files as follows in your
local.conffile:ERR_REPORT_DIR = "path"
- ERROR_QA
Specifies the quality assurance checks whose failures are reported as errors by the OpenEmbedded build system. You set this variable in your distribution configuration file. For a list of the checks you can control with this variable, see the “insane” section.
- ESDK_CLASS_INHERIT_DISABLE
A list of classes to remove from the INHERIT value globally within the extensible SDK configuration. The populate-sdk-ext class sets the default value:
ESDK_CLASS_INHERIT_DISABLE ?= "buildhistory"
Some classes are not generally applicable within the extensible SDK context. You can use this variable to disable those classes.
For additional information on how to customize the extensible SDK’s configuration, see the “Configuring the Extensible SDK” section in the Yocto Project Application Development and the Extensible Software Development Kit (eSDK) manual.
- ESDK_LOCALCONF_ALLOW
A list of variables allowed through from the OpenEmbedded build system configuration into the extensible SDK configuration. By default, the list of variables is empty and is set in the populate-sdk-ext class.
This list overrides the variables specified using the ESDK_LOCALCONF_REMOVE variable as well as other variables automatically added due to the “/” character being found at the start of the value, which is usually indicative of being a path and thus might not be valid on the system where the SDK is installed.
For additional information on how to customize the extensible SDK’s configuration, see the “Configuring the Extensible SDK” section in the Yocto Project Application Development and the Extensible Software Development Kit (eSDK) manual.
- ESDK_LOCALCONF_REMOVE
A list of variables not allowed through from the OpenEmbedded build system configuration into the extensible SDK configuration. Usually, these are variables that are specific to the machine on which the build system is running and thus would be potentially problematic within the extensible SDK.
By default, ESDK_LOCALCONF_REMOVE is set in the populate-sdk-ext class and excludes the following variables:
For additional information on how to customize the extensible SDK’s configuration, see the “Configuring the Extensible SDK” section in the Yocto Project Application Development and the Extensible Software Development Kit (eSDK) manual.
- EXCLUDE_FROM_SHLIBS
Triggers the OpenEmbedded build system’s shared libraries resolver to exclude an entire package when scanning for shared libraries.
Note
The shared libraries resolver’s functionality results in part from the internal function
package_do_shlibs, which is part of the do_package task. You should be aware that the shared libraries resolver might implicitly define some dependencies between packages.The EXCLUDE_FROM_SHLIBS variable is similar to the PRIVATE_LIBS variable, which excludes a package’s particular libraries only and not the whole package.
Use the EXCLUDE_FROM_SHLIBS variable by setting it to “1” for a particular package:
EXCLUDE_FROM_SHLIBS = "1"
- EXCLUDE_FROM_WORLD
Directs BitBake to exclude a recipe from world builds (i.e.
bitbake world). During world builds, BitBake locates, parses and builds all recipes found in every layer exposed in thebblayers.confconfiguration file.To exclude a recipe from a world build using this variable, set the variable to “1” in the recipe.
Note
Recipes added to EXCLUDE_FROM_WORLD may still be built during a world build in order to satisfy dependencies of other recipes. Adding a recipe to EXCLUDE_FROM_WORLD only ensures that the recipe is not explicitly added to the list of build targets in a world build.
- EXTENDPE
Used with file and pathnames to create a prefix for a recipe’s version based on the recipe’s PE value. If PE is set and greater than zero for a recipe, EXTENDPE becomes that value (e.g if PE is equal to “1” then EXTENDPE becomes “1”). If a recipe’s PE is not set (the default) or is equal to zero, EXTENDPE becomes “”.
See the STAMP variable for an example.
- EXTENDPKGV
The full package version specification as it appears on the final packages produced by a recipe. The variable’s value is normally used to fix a runtime dependency to the exact same version of another package in the same recipe:
RDEPENDS:${PN}-additional-module = "${PN} (= ${EXTENDPKGV})"The dependency relationships are intended to force the package manager to upgrade these types of packages in lock-step.
- EXTERNAL_KERNEL_DEVICETREE
When inheriting kernel-fit-image and a PREFERRED_PROVIDER for
virtual/dtbset todevicetree, the variable EXTERNAL_KERNEL_DEVICETREE can be used to specify a directory containing one or more compiled device tree or device tree overlays to use.- EXTERNAL_KERNEL_TOOLS
When set, the EXTERNAL_KERNEL_TOOLS variable indicates that these tools are not in the source tree.
When kernel tools are available in the tree, they are preferred over any externally installed tools. Setting the EXTERNAL_KERNEL_TOOLS variable tells the OpenEmbedded build system to prefer the installed external tools. See the kernel-yocto class in
meta/classes-recipeto see how the variable is used.- EXTERNAL_TOOLCHAIN
When you intend to use an external toolchain, this variable allows to specify the directory where this toolchain was installed.
- EXTERNALSRC
When inheriting the externalsrc class, this variable points to the source tree, which is outside of the OpenEmbedded build system. When set, this variable sets the S variable, which is what the OpenEmbedded build system uses to locate unpacked recipe source code.
See the “externalsrc” section for details. You can also find information on how to use this variable in the “Building Software from an External Source” section in the Yocto Project Development Tasks Manual.
- EXTERNALSRC_BUILD
When inheriting the externalsrc class, this variable points to the directory in which the recipe’s source code is built, which is outside of the OpenEmbedded build system. When set, this variable sets the B variable, which is what the OpenEmbedded build system uses to locate the Build Directory.
See the “externalsrc” section for details. You can also find information on how to use this variable in the “Building Software from an External Source” section in the Yocto Project Development Tasks Manual.
- EXTRA_AUTORECONF
For recipes inheriting the autotools* class, you can use EXTRA_AUTORECONF to specify extra options to pass to the
autoreconfcommand that is executed during the do_configure task.The default value is “–exclude=autopoint”.
- EXTRA_IMAGE_FEATURES
A list of additional features to include in an image. When listing more than one feature, separate them with a space.
Typically, you configure this variable in your
local.conffile, which is found in the Build Directory. Although you can use this variable from within a recipe, best practices dictate that you do not.Note
To enable primary features from within the image recipe, use the IMAGE_FEATURES variable.
Here are some examples of features you can add:
“dbg-pkgs” — adds -dbg packages for all installed packages including symbol information for debugging and profiling.
“empty-root-password” — This feature can be used if you want to allow root login with an empty password.
“allow-empty-password” — Allows Dropbear and OpenSSH to accept logins from accounts having an empty password string.
“allow-root-login” — Allows Dropbear and OpenSSH to accept root logins.
“post-install-logging” — Enables logging postinstall script runs to the
/var/log/postinstall.logfile on first boot of the image on the target system.“dev-pkgs” — adds -dev packages for all installed packages. This is useful if you want to develop against the libraries in the image.
“read-only-rootfs” — creates an image whose root filesystem is read-only. See the “Creating a Read-Only Root Filesystem” section in the Yocto Project Development Tasks Manual for more information
“tools-debug” — adds debugging tools such as gdb and strace.
“tools-sdk” — adds development tools such as gcc, make, pkgconfig and so forth.
“tools-testapps” — adds useful testing tools such as ts_print, aplay, arecord and so forth.
For a complete list of image features that ships with the Yocto Project, see the “Image Features” section.
For an example that shows how to customize your image by using this variable, see the “Customizing Images Using Custom IMAGE_FEATURES and EXTRA_IMAGE_FEATURES” section in the Yocto Project Development Tasks Manual.
- EXTRA_IMAGECMD
Specifies additional options for the image creation command that has been specified in IMAGE_CMD. When setting this variable, use an override for the associated image type. Here is an example:
EXTRA_IMAGECMD:ext3 ?= "-i 4096"
- EXTRA_IMAGEDEPENDS
A list of recipes to build that do not provide packages for installing into the root filesystem.
Sometimes a recipe is required to build the final image but is not needed in the root filesystem. You can use the EXTRA_IMAGEDEPENDS variable to list these recipes and thus specify the dependencies. A typical example is a required bootloader in a machine configuration.
Note
To add packages to the root filesystem, see the various RDEPENDS and RRECOMMENDS variables.
- EXTRA_OECMAKE
Additional CMake options. See the cmake class for additional information.
- EXTRA_OECONF
Additional
configurescript options. See PACKAGECONFIG_CONFARGS for additional information on passing configure script options.- EXTRA_OEMAKE
Additional GNU
makeoptions.Because the EXTRA_OEMAKE defaults to “”, you need to set the variable to specify any required GNU options.
PARALLEL_MAKE and PARALLEL_MAKEINST also make use of EXTRA_OEMAKE to pass the required flags.
- EXTRA_OEMESON
Additional Meson options. See the meson class for additional information.
In addition to standard Meson options, such options correspond to Meson build options defined in the
meson_options.txtfile in the sources to build. Here is an example:EXTRA_OEMESON = "-Dpython=disabled -Dvalgrind=disabled"
Note that any custom value for the Meson
--buildtypeoption should be set through the MESON_BUILDTYPE variable.- EXTRA_OESCONS
When inheriting the scons class, this variable specifies additional configuration options you want to pass to the
sconscommand line.- EXTRA_USERS_PARAMS
When inheriting the extrausers class, this variable provides image level user and group operations. This is a more global method of providing user and group configuration as compared to using the useradd* class, which ties user and group configurations to a specific recipe.
The set list of commands you can configure using the EXTRA_USERS_PARAMS is shown in the extrausers class. These commands map to the normal Unix commands of the same names:
# EXTRA_USERS_PARAMS = "\ # useradd -p '' tester; \ # groupadd developers; \ # userdel nobody; \ # groupdel -g video; \ # groupmod -g 1020 developers; \ # usermod -s /bin/sh tester; \ # "
Hardcoded passwords are supported via the
-pparameters foruseraddorusermod, but only hashed.Here is an example that adds two users named “tester-jim” and “tester-sue” and assigns passwords. First on host, create the (escaped) password hash:
printf "%q" $(mkpasswd -m sha256crypt tester01)
The resulting hash is set to a variable and used in
useraddcommand parameters:inherit extrausers PASSWD = "\$X\$ABC123\$A-Long-Hash" EXTRA_USERS_PARAMS = "\ useradd -p '${PASSWD}' tester-jim; \ useradd -p '${PASSWD}' tester-sue; \ "
Finally, here is an example that sets the root password:
inherit extrausers EXTRA_USERS_PARAMS = "\ usermod -p '${PASSWD}' root; \ "
Note
From a security perspective, hardcoding a default password is not generally a good idea or even legal in some jurisdictions. It is recommended that you do not do this if you are building a production image.
Additionally there is a special
passwd-expirecommand that will cause the password for a user to be expired and thus force changing it on first login, for example:EXTRA_USERS_PARAMS += " useradd myuser; passwd-expire myuser;"
Note
At present,
passwd-expiremay only work for remote logins when using OpenSSH and not dropbear as an SSH server.- EXTRANATIVEPATH
A list of subdirectories of
${STAGING_BINDIR_NATIVE}added to the beginning of the environment variablePATH. As an example, the following prepends “${STAGING_BINDIR_NATIVE}/foo:${STAGING_BINDIR_NATIVE}/bar:” toPATH:EXTRANATIVEPATH = "foo bar"
- FAKEROOT
See FAKEROOT in the BitBake manual.
- FAKEROOTBASEENV
See FAKEROOTBASEENV in the BitBake manual.
- FAKEROOTCMD
See FAKEROOTCMD in the BitBake manual.
- FAKEROOTDIRS
See FAKEROOTDIRS in the BitBake manual.
- FAKEROOTENV
See FAKEROOTENV in the BitBake manual.
- FAKEROOTNOENV
See FAKEROOTNOENV in the BitBake manual.
- FC
The minimal command and arguments used to run the Fortran compiler.
- FEATURE_PACKAGES
Defines one or more packages to include in an image when a specific item is included in IMAGE_FEATURES. When setting the value, FEATURE_PACKAGES should have the name of the feature item as an override. Here is an example:
FEATURE_PACKAGES_widget = "package1 package2"
In this example, if “widget” were added to IMAGE_FEATURES, package1 and package2 would be included in the image.
Note
Packages installed by features defined through FEATURE_PACKAGES are often package groups. While similarly named, you should not confuse the FEATURE_PACKAGES variable with package groups, which are discussed elsewhere in the documentation.
- FEED_DEPLOYDIR_BASE_URI
Points to the base URL of the server and location within the document-root that provides the metadata and packages required by OPKG to support runtime package management of IPK packages. You set this variable in your
local.conffile.Consider the following example:
FEED_DEPLOYDIR_BASE_URI = "http://192.168.7.1/BOARD-dir"
This example assumes you are serving your packages over HTTP and your databases are located in a directory named
BOARD-dir, which is underneath your HTTP server’s document-root. In this case, the OpenEmbedded build system generates a set of configuration files for you in your target that work with the feed.- FETCHCMD
See FETCHCMD in the BitBake manual.
- FILE
See FILE in the BitBake manual.
- FILES
The list of files and directories that are placed in a package. The PACKAGES variable lists the packages generated by a recipe.
To use the FILES variable, provide a package name override that identifies the resulting package. Then, provide a space-separated list of files or paths that identify the files you want included as part of the resulting package. Here is an example:
FILES:${PN} += "${bindir}/mydir1 ${bindir}/mydir2/myfile"Note
When specifying files or paths, you can pattern match using Python’s glob syntax. For details on the syntax, see the documentation by following the previous link.
When specifying paths as part of the FILES variable, it is good practice to use appropriate path variables. For example, use
${sysconfdir}rather than/etc, or${bindir}rather than/usr/bin. You can find a list of these variables at the top of themeta/conf/bitbake.conffile in OpenEmbedded-Core (OE-Core). You will also find the default values of the variousFILES:*variables in this file.
If some of the files you provide with the FILES variable are editable and you know they should not be overwritten during the package update process by the Package Management System (PMS), you can identify these files so that the PMS will not overwrite them. See the CONFFILES variable for information on how to identify these files to the PMS.
- FILES_SOLIBSDEV
Defines the file specification to match SOLIBSDEV. In other words, FILES_SOLIBSDEV defines the full path name of the development symbolic link (symlink) for shared libraries on the target platform.
The following statement from the
bitbake.confshows how it is set:FILES_SOLIBSDEV ?= "${base_libdir}/lib*${SOLIBSDEV} ${libdir}/lib*${SOLIBSDEV}"- FILESEXTRAPATHS
A colon-separated list to extend the search path the OpenEmbedded build system uses when looking for files and patches as it processes recipes and append files. The default directories BitBake uses when it processes recipes are initially defined by the FILESPATH variable. You can extend FILESPATH variable by using FILESEXTRAPATHS.
Best practices dictate that you accomplish this by using FILESEXTRAPATHS from within a
.bbappendfile and that you prepend paths as follows:FILESEXTRAPATHS:prepend := "${THISDIR}/${PN}:"
In the above example, the build system first looks for files in a directory that has the same name as the corresponding append file.
Note
When extending FILESEXTRAPATHS, be sure to use the immediate expansion (
:=) operator. Immediate expansion makes sure that BitBake evaluates THISDIR at the time the directive is encountered rather than at some later time when expansion might result in a directory that does not contain the files you need.Also, include the trailing separating colon character if you are prepending. The trailing colon character is necessary because you are directing BitBake to extend the path by prepending directories to the search path.
Here is another common use:
FILESEXTRAPATHS:prepend := "${THISDIR}/files:"
In this example, the build system extends the FILESPATH variable to include a directory named
filesthat is in the same directory as the corresponding append file.This next example specifically adds three paths:
FILESEXTRAPATHS:prepend := "path_1:path_2:path_3:"
A final example shows how you can extend the search path and include a MACHINE-specific override, which is useful in a BSP layer:
FILESEXTRAPATHS:prepend:intel-x86-common := "${THISDIR}/${PN}:"
The previous statement appears in the
linux-yocto-dev.bbappendfile, which is found in the Yocto Project Source Repositories inmeta-intel/common/recipes-kernel/linux. Here, the machine override is a special PACKAGE_ARCH definition for multiplemeta-intelmachines.Note
For a layer that supports a single BSP, the override could just be the value of MACHINE.
By prepending paths in
.bbappendfiles, you allow multiple append files that reside in different layers but are used for the same recipe to correctly extend the path.- FILESOVERRIDES
A colon-separated list to specify a subset of OVERRIDES used by the OpenEmbedded build system for creating FILESPATH. The FILESOVERRIDES variable uses overrides to automatically extend the FILESPATH variable. For an example of how that works, see the FILESPATH variable description. Additionally, you find more information on how overrides are handled in the “Conditional Syntax (Overrides)” section of the BitBake User Manual.
By default, the FILESOVERRIDES variable is defined as:
FILESOVERRIDES = "${TRANSLATED_TARGET_ARCH}:${MACHINEOVERRIDES}:${DISTROOVERRIDES}"
Note
Do not hand-edit the FILESOVERRIDES variable. The values match up with expected overrides and are used in an expected manner by the build system.
- FILESPATH
A colon-separated list specifying the default set of directories the OpenEmbedded build system uses when searching for patches and files.
During the build process, BitBake searches each directory in FILESPATH in the specified order when looking for files and patches specified by each
file://URI in a recipe’s SRC_URI statements.The default value for the FILESPATH variable is defined in the base class found in
meta/classes-globalin OpenEmbedded-Core (OE-Core):FILESPATH = "${@base_set_filespath(["${FILE_DIRNAME}/${BP}", \ "${FILE_DIRNAME}/${BPN}", "${FILE_DIRNAME}/files"], d)}"The FILESPATH variable is automatically extended using the overrides from the FILESOVERRIDES variable.
Note
Do not hand-edit the FILESPATH variable. If you want the build system to look in directories other than the defaults, extend the FILESPATH variable by using the FILESEXTRAPATHS variable.
Be aware that the default FILESPATH directories do not map to directories in custom layers where append files (
.bbappend) are used. If you want the build system to find patches or files that reside with your append files, you need to extend the FILESPATH variable by using the FILESEXTRAPATHS variable.
You can take advantage of this searching behavior in useful ways. For example, consider a case where there is the following directory structure for general and machine-specific configurations:
files/defconfig files/MACHINEA/defconfig files/MACHINEB/defconfig
Also in the example, the SRC_URI statement contains “file://defconfig”. Given this scenario, you can set MACHINE to “MACHINEA” and cause the build system to use files from
files/MACHINEA. Set MACHINE to “MACHINEB” and the build system uses files fromfiles/MACHINEB. Finally, for any machine other than “MACHINEA” and “MACHINEB”, the build system uses files fromfiles/defconfig.You can find out more about the patching process in the “Patching” section in the Yocto Project Overview and Concepts Manual and the “Patching Code” section in the Yocto Project Development Tasks Manual. See the do_patch task as well.
- FILESYSTEM_PERMS_TABLES
Allows you to define your own file permissions settings tables as part of your configuration for the packaging process. For example, suppose you need a consistent set of custom permissions for a set of groups and users across an entire work project. It is best to do this in the packages themselves but this is not always possible.
By default, the OpenEmbedded build system uses the
fs-perms.txt,fs-perms-volatile-log.txtandfs-perms-volatile-tmp.txtwhich are located in themeta/filesfolder in OpenEmbedded-Core (OE-Core). If you create your own permission setting table files, you should place those in your layer.You can override the value of FILESYSTEM_PERMS_TABLES variable in your distribution configuration file to point to your custom permission table files. You can specify one or more file permissions setting tables. The paths that you specify to these files must be defined within the BBPATH variable.
In order to disable the volatile log, which is enabled by default, one can remove the
files/fs-perms-volatile-log.txtvalue fromFILESYSTEM_PERMS_TABLES. Similarly, in order to disable the volatile tmp, one can remove thefiles/fs-perms-volatile-tmp.txtvalue.For guidance on how to define your own file permissions settings tables, examine the existing
fs-perms.txt,fs-perms-volatile-log.txtandfs-perms-volatile-tmp.txtfiles.- FIRMWARE_COMPRESSION
The FIRMWARE_COMPRESSION allows compressing the firmware provided by the
linux-firmwarerecipe. The default value of this variable is an empty string (no compression), and the possible values it can take arexzandzst. This can allow significant disk space savings.For this to work, the Linux Kernel requires the
CONFIG_FW_LOADER_COMPRESS_XZorCONFIG_FW_LOADER_COMPRESS_ZSTDconfiguration options to be set.- FIT_ADDRESS_CELLS
Specifies the value of the
#address-cellsvalue for the description of the FIT image.The default value is set to “1” by the kernel-fit-image class, which corresponds to 32 bit addresses.
For platforms that need to set 64 bit addresses, for example in UBOOT_LOADADDRESS and UBOOT_ENTRYPOINT, you need to set this value to “2”, as two 32 bit values (cells) will be needed to represent such addresses.
Here is an example setting “0x400000000” as a load address:
FIT_ADDRESS_CELLS = "2" UBOOT_LOADADDRESS = "0x04 0x00000000"
- FIT_CONF_DEFAULT_DTB
Specifies the default device tree binary (dtb) file for a FIT image when multiple ones are provided.
This variable is used in the kernel-fit-image class.
- FIT_CONF_MAPPINGS
When inheriting the kernel-fit-image, the FIT_CONF_MAPPINGS variable allows specifying mappings to rename configuration nodes or add extra configuration nodes for existing device tree blobs (DTBs) in FIT images. This provides flexibility when a 1 to 1 mapping between DTB names and configuration node names does not work, such as when the kernel defines a kernel specific name but the bootloader uses a different name. This might be the case when maintaining compatibility with existing boot scripts or bootloader configurations. But there are other use cases as well.
The variable accepts a space-separated list of mapping commands:
dtb-conf:DTB_NAME:NEW_NAMERenames the configuration node for a specific DTB. TheDTB_NAMEis the name of the DTB without its.dtbsuffix.dtb-extra-conf:DTB_NAME:EXTRA_NAMECreates an additional configuration node for an existing DTB. This is useful when you need to provide alternative names for the same hardware configuration to maintain compatibility with existing boot scripts or bootloader configurations or just need an alias configuration name for some other reason.
For example:
FIT_CONF_MAPPINGS = "\ dtb-extra-conf:am335x-bonegreen:bonegreen \ dtb-conf:am335x-boneblack:bbblack"
This generates three configuration nodes from two DTBs:
am335x-bonegreen: the original configuration node for theam335x-bonegreendevice treebonegreen: an extra configuration node for the sameam335x-bonegreenDTBbbblack: a renamed configuration node for theam335x-boneblackDTB
The kernel-fit-image class validates all mappings and ensures they match existing DTBs.
- FIT_CONF_PREFIX
When using the kernel-fit-image, this is the prefix used for creating FIT configuration nodes. Its default value is “conf-“.
- FIT_DESC
Specifies the description string encoded into a FIT image. The default value is set by the kernel-fit-image class as follows:
FIT_DESC ?= "U-Boot fitImage for ${DISTRO_NAME}/${PV}/${MACHINE}"- FIT_GENERATE_KEYS
Decides whether to generate the keys for signing the FIT image if they don’t already exist. The keys are created in UBOOT_SIGN_KEYDIR. The default value is set to “0” by the kernel-fit-image class.
- FIT_HASH_ALG
Specifies the hash algorithm used in creating the FIT Image. This variable is set by default to “sha256” by the kernel-fit-image class.
- FIT_KERNEL_COMP_ALG
The compression algorithm to use for the kernel image inside the FIT Image. At present, the only supported values are “gzip” (default), “lzo” or “none”. If you set this variable to anything other than “none” you may also need to set FIT_KERNEL_COMP_ALG_EXTENSION.
This variable is used in the kernel-uboot class.
- FIT_KERNEL_COMP_ALG_EXTENSION
File extension corresponding to FIT_KERNEL_COMP_ALG. The default value is set “.gz” by the kernel-uboot class. If you set FIT_KERNEL_COMP_ALG to “lzo”, you may want to set this variable to “.lzo”.
- FIT_KERNEL_SIGN_ENABLE
This variable is used by the kernel-fit-image class to enable or disable signing of the FIT image. The default value of FIT_KERNEL_SIGN_ENABLE is the value of UBOOT_SIGN_ENABLE, which means that when U-Boot FIT image signing is enabled, the FIT image will also be signed at build-time and U-Boot will verify the FIT image signature at run-time.
If this variable is set to “1”, the FIT image will be signed using the key specified by FIT_KERNEL_SIGN_KEYNAME from the directory FIT_KERNEL_SIGN_KEYDIR.
If this variable is overridden, the FIT_KERNEL_SIGN_KEYDIR and FIT_KERNEL_SIGN_KEYNAME variables should also be set appropriately.
- FIT_KERNEL_SIGN_KEYDIR
This variable is used by the kernel-fit-image class. The default value of FIT_KERNEL_SIGN_KEYDIR is the value of UBOOT_SIGN_KEYDIR, which means the kernel is signed at build-time with a private key found in UBOOT_SIGN_KEYDIR and U-Boot gets the public key from the same directory injected into its DTB for the on-target verification of the FIT image.
If this variable is overridden, the FIT_KERNEL_SIGN_ENABLE and FIT_KERNEL_SIGN_KEYNAME variables should also be set appropriately.
- FIT_KERNEL_SIGN_KEYNAME
This variable is used by the kernel-fit-image class. The default value of FIT_KERNEL_SIGN_KEYNAME is the value of UBOOT_SIGN_KEYNAME, which means the kernel is signed at build-time with a private key named according to UBOOT_SIGN_KEYNAME and U-Boot gets the public key with the same name injected into its DTB for on-target verification of the FIT image.
If this variable is overridden, the FIT_KERNEL_SIGN_ENABLE and FIT_KERNEL_SIGN_KEYDIR variables should also be set appropriately.
- FIT_KEY_GENRSA_ARGS
Arguments to
openssl genrsafor generating a RSA private key for signing the FIT image. The default value is set to “-F4” by the kernel-fit-image class.- FIT_KEY_REQ_ARGS
Arguments to
openssl reqfor generating a certificate for signing the FIT image. The default value is “-batch -new” by the kernel-fit-image class, “batch” for non interactive mode and “new” for generating new keys.- FIT_KEY_SIGN_PKCS
Format for the public key certificate used for signing the FIT image. The default value is set to “x509” by the kernel-fit-image class.
- FIT_LOADABLE_ARCH
Architecture the loadables defined in FIT_LOADABLES; the value will be used for the
archproperty of the loadable. If no value is defined for a specific loadable, the kernel architecture will be used.This variable cannot be used directly, but only defining flags on it.
Example:
FIT_LOADABLES = "foo" FIT_LOADABLE_ARCH[foo] = "arm"
- FIT_LOADABLE_COMPRESSION
Compression type for the loadables defined in FIT_LOADABLES; the value will be used for the
compressionproperty of the loadable. If no value is defined for a specific loadable, itscompressionproperty will be set tonone.This variable cannot be used directly, but only defining flags on it.
Example:
FIT_LOADABLES = "foo" FIT_LOADABLE_COMPRESSION[foo] = "gzip"
Note
The binary should already be compressed, as no compression is performed by the kernel-fit-image class.
- FIT_LOADABLE_DESCRIPTION
Description for the loadables defined in FIT_LOADABLES; the value will be used for the
descriptionproperty of the loadable. If no value is defined for a specific loadable, its description will be set to the loadable name followed by a space plus the stringloadable.This variable cannot be used directly, but only defining flags on it.
Example:
FIT_LOADABLES = "foo" FIT_LOADABLE_DESCRIPTION[foo] = "Foo firmware binary"
- FIT_LOADABLE_ENTRYPOINT
Entry point for the loadables defined in FIT_LOADABLES; the value will be used for the
entryproperty of the loadable. If no value is defined for a specific loadable, theentryproperty will be omitted.This variable cannot be used directly, but only defining flags on it.
Example:
FIT_LOADABLES = "foo" FIT_LOADABLE_ENTRYPOINT[foo] = "0x80234000"
- FIT_LOADABLE_FILENAME
Filename (or relative path) for the loadables defined in FIT_LOADABLES; this will be used to search for the binary to include and is therefore mandatory for each loadable. Binary files to be included need to be located in DEPLOY_DIR_IMAGE.
This variable cannot be used directly, but only defining flags on it.
Example:
FIT_LOADABLES = "foo" FIT_LOADABLE_FILENAME[foo] = "foo-firmware.bin"
- FIT_LOADABLE_LOADADDRESS
Load address for the loadables defined in FIT_LOADABLES; the value will be used for the
loadproperty of the loadable. This is mandatory for each loadable.This variable cannot be used directly, but only defining flags on it.
Example:
FIT_LOADABLES = "foo" FIT_LOADABLE_LOADADDRESS[foo] = "0x80230000"
- FIT_LOADABLE_OS
Operating system for the loadables defined in FIT_LOADABLES; the value will be used for the
osproperty of the loadable. If no value is defined for a specific loadable, theosproperty will be set tolinux.This variable cannot be used directly, but only defining flags on it.
Example:
FIT_LOADABLES = "foo" FIT_LOADABLE_OS[foo] = "linux"
- FIT_LOADABLE_TYPE
Type for the loadables defined in FIT_LOADABLES; the value will be used for the
typeproperty of the loadable. If no value is defined for a specific loadable, thetypeproperty will be set tofirmware.This variable cannot be used directly, but only defining flags on it.
Example:
FIT_LOADABLES = "foo" FIT_LOADABLE_TYPE[foo] = "firmware"
- FIT_LOADABLES
Space-separated list of loadables to add to a FIT image in addition to regular ones (kernel, initramfs, dtsb etc.). Values specified here will be used as node names inside the FIT image; all of them will be included in all configurations by using the
loadablesproperty.For each loadable specified in this variable, additional parameters can be defined using FIT_LOADABLE_ARCH, FIT_LOADABLE_COMPRESSION, FIT_LOADABLE_DESCRIPTION, FIT_LOADABLE_ENTRYPOINT, FIT_LOADABLE_FILENAME, FIT_LOADABLE_LOADADDRESS, FIT_LOADABLE_OS and FIT_LOADABLE_TYPE.
This variable is used by the kernel-fit-image class and is empty by default.
For example, the following configuration adds as loadables a TF-A BL31 firmware and a (compressed) TEE firmware, to be loaded respectively at 0x204E0000 and 0x96000000:
FIT_LOADABLES = "atf tee" FIT_LOADABLE_FILENAME[atf] = "bl31.bin" FIT_LOADABLE_DESCRIPTION[atf] = "TF-A Firmware" FIT_LOADABLE_TYPE[atf] = "tfa-bl31" FIT_LOADABLE_ARCH[atf] = "arm64" FIT_LOADABLE_OS[atf] = "arm-trusted-firmware" FIT_LOADABLE_LOADADDRESS[atf] = "0x204E0000" FIT_LOADABLE_ENTRYPOINT[atf] = "0x204E0000" FIT_LOADABLE_FILENAME[tee] = "tee.bin.gz" FIT_LOADABLE_COMPRESSION[tee] = "gzip" FIT_LOADABLE_TYPE[tee] = "tee" FIT_LOADABLE_OS[tee] = "tee" FIT_LOADABLE_LOADADDRESS[tee] = "0x96000000"
and will be converted to the following FIT source:
images { atf { description = "TF-A Firmware"; type = "tfa-bl31"; compression = "none"; data = /incbin/("<DEPLOY_DIR_IMAGE>/bl31.bin"); arch = "arm64"; os = "arm-trusted-firmware"; load = <0x204E0000>; entry = <0x204E0000>; }; tee { description = "tee loadable"; type = "tee"; compression = "gzip"; data = /incbin/("<DEPLOY_DIR_IMAGE>/tee.bin.gz"); arch = "arm64"; os = "tee"; load = <0x96000000>; }; }; configurations { default = "<my-board>.dtb"; <my-board>.dtb { description = "1 Linux kernel, FDT blob, loadables"; kernel = "kernel-1"; fdt = "<my-board>.dtb"; loadables = "atf", "tee"; }; };
- FIT_MKIMAGE_EXTRA_OPTS
When inheriting the kernel-fit-image, the FIT_MKIMAGE_EXTRA_OPTS variable allows passing extra options to
mkimageduring FIT image generation, providing flexibility for platforms that require additionalmkimagearguments beyond the defaults.For example:
FIT_MKIMAGE_EXTRA_OPTS = "-B 8 -E"
This results in the
mkimagecommand being invoked as:mkimage -B 8 -E -f fit-image.its fitImage
- FIT_PAD_ALG
Specifies the padding algorithm used in creating the FIT Image. The default value is set to “pkcs-1.5” by the kernel-fit-image class.
- FIT_SIGN_ALG
Specifies the signature algorithm used in creating the FIT Image. This variable is set by default to “rsa2048” by the kernel-fit-image class.
- FIT_SIGN_INDIVIDUAL
If set to “1”, the kernel-fit-image class signs each image node individually, including the kernel, DTB, RAM disk, and any other image types present in the FIT image, in addition to signing the configuration nodes. This can be useful if you need to verify signatures outside of the U-Boot boot process. By default, this variable is set to “0”.
If UBOOT_SIGN_ENABLE is set to “1” and FIT_SIGN_INDIVIDUAL remains at its default value of “0”, only the configuration nodes are signed. Since configuration nodes include hashes of their referenced image nodes, the integrity of the entire FIT image is ensured as long as the image nodes are loaded via the configuration nodes and the hashes of the image nodes are checked. That’s usually the case.
Enabling FIT_SIGN_INDIVIDUAL typically increases complexity for little benefit. There might be exceptions such as image nodes that are not referenced by any configuration node or loaded directly for whatever reason. For most use cases, setting this variable to “0” provides sufficient security.
For further details, refer to the official U-Boot documentation: U-Boot fit signature and more specifically at: U-Boot signed configurations.
Signing only the image nodes is intentionally not implemented by OpenEmbedded-Core (OE-Core), as it is vulnerable to mix-and-match attacks.
- FIT_SIGN_NUMBITS
Size of the private key used in the FIT image, in number of bits. The default value for this variable is set to “2048” by the kernel-fit-image class.
- FIT_UBOOT_ENV
This variable allows to add a U-Boot script as a text file to the FIT image. Such a script can be sourced from the U-Boot shell.
When inheriting the kernel-fit-image class a script file should be included in the SRC_URI of the Linux kernel recipe.
Example:
Add a script
boot.cmdto the Linux kernel recipe:FIT_UBOOT_ENV = "boot.cmd" SRC_URI += "file://${FIT_UBOOT_ENV}"
Use the script file from the U-Boot shell. The name of the script in FIT image is
bootscr-${FIT_UBOOT_ENV}. This example loads the FIT image from a TFTP server:tftp $loadaddr $fit_tftp_path source $loadaddr#bootscr-boot.cmd
More information can be found in the official U-Boot documentation: U-Boot source command
- FONT_EXTRA_RDEPENDS
When inheriting the fontcache class, this variable specifies the runtime dependencies for font packages. By default, the FONT_EXTRA_RDEPENDS is set to “fontconfig-utils”.
- FONT_PACKAGES
When inheriting the fontcache class, this variable identifies packages containing font files that need to be cached by Fontconfig. By default, the fontcache class assumes that fonts are in the recipe’s main package (i.e.
${PN}). Use this variable if fonts you need are in a package other than that main package.- FORCE_RO_REMOVE
Forces the removal of the packages listed in
ROOTFS_RO_UNNEEDEDduring the generation of the root filesystem.Set the variable to “1” to force the removal of these packages.
- FULL_OPTIMIZATION
The options to pass in TARGET_CFLAGS and CFLAGS when compiling an optimized system. This variable defaults to “-O2 -pipe ${DEBUG_FLAGS}”.
- GCCPIE
Enables Position Independent Executables (PIE) within the GNU C Compiler (GCC). Enabling PIE in the GCC makes Return Oriented Programming (ROP) attacks much more difficult to execute.
By default the
security_flags.incfile enables PIE by setting the variable as follows:GCCPIE ?= "--enable-default-pie"
- GCCVERSION
Specifies the default version of the GNU C Compiler (GCC) used for compilation. By default, GCCVERSION is set to “8.x” in the
meta/conf/distro/include/tcmode-default.incinclude file:GCCVERSION ?= "8.%"
You can override this value by setting it in a configuration file such as the
local.conf.- GDB
The minimal command and arguments to run the GNU Debugger.
- GIR_EXTRA_LIBS_PATH
Allows to specify an extra search path for
.sofiles in GLib related recipes using GObject introspection, and which do not compile without this setting. See the “Enabling GObject Introspection Support” section for details.- GITDIR
The directory in which a local copy of a Git repository is stored when it is cloned.
- GITHUB_BASE_URI
When inheriting the github-releases class, specifies the base URL for fetching releases for the github project you wish to fetch sources from. The default value is as follows:
GITHUB_BASE_URI ?= "https://github.com/${BPN}/${BPN}/releases/"- GLIBC_GENERATE_LOCALES
Specifies the list of GLIBC locales to generate should you not wish to generate all LIBC locals, which can be time consuming.
Note
If you specifically remove the locale
en_US.UTF-8, you must set IMAGE_LINGUAS appropriately.You can set GLIBC_GENERATE_LOCALES in your
local.conffile. By default, all locales are generated:GLIBC_GENERATE_LOCALES = "en_GB.UTF-8 en_US.UTF-8"
- GO_IMPORT
When inheriting the go class, this mandatory variable sets the import path for the Go package that will be created for the code to build. If you have a
go.modfile in the source directory, this typically matches the path in themoduleline in this file.Other Go programs importing this package will use this path.
Here is an example setting from the go-helloworld_0.1.bb recipe:
GO_IMPORT = "golang.org/x/example"
- GO_INSTALL
When inheriting the go class, this optional variable specifies which packages in the sources should be compiled and installed in the Go build space by the go install command.
Here is an example setting from the crucible recipe:
GO_INSTALL = "\ ${GO_IMPORT}/cmd/crucible \ ${GO_IMPORT}/cmd/habtool \ "
By default, GO_INSTALL is defined as:
GO_INSTALL ?= "${GO_IMPORT}/..."The
...wildcard means that it will catch all packages found in the sources.See the GO_INSTALL_FILTEROUT variable for filtering out unwanted packages from the ones found from the GO_INSTALL value.
- GO_INSTALL_FILTEROUT
When using the Go “vendor” mechanism to bring in dependencies for a Go package, the default GO_INSTALL setting, which uses the
...wildcard, will include the vendored packages in the build, which produces incorrect results.There are also some Go packages that are structured poorly, so that the
...wildcard results in building example or test code that should not be included in the build, or could fail to build.This optional variable allows for filtering out a subset of the sources. It defaults to excluding everything under the
vendorsubdirectory under package’s main directory. This is the normal location for vendored packages, but it can be overridden by a recipe to filter out other subdirectories if needed.- GO_WORKDIR
When using Go Modules, the current working directory must be the directory containing the
go.modfile, or one of its subdirectories. When thegotool is used, it will automatically look for thego.modfile in the Go working directory or in any parent directory, but not in subdirectories.When using the go-mod class to use Go modules, the optional GO_WORKDIR variable, defaulting to the value of GO_IMPORT, allows to specify a different Go working directory.
- GROUPADD_PARAM
When inheriting the useradd* class, this variable specifies for a package what parameters should be passed to the
groupaddcommand if you wish to add a group to the system when the package is installed.Here is an example from the
dbusrecipe:GROUPADD_PARAM:${PN} = "-r netdev"More than one group can be added by separating each set of different groups’ parameters with a semicolon.
Here is an example adding multiple groups from the
useradd-example.bbfile in themeta-skeletonlayer:GROUPADD_PARAM:${PN} = "-g 880 group1; -g 890 group2"For information on the standard Linux shell command
groupadd, see groupadd(8).- GROUPMEMS_PARAM
When inheriting the useradd* class, this variable specifies for a package what parameters should be passed to the
groupmemscommand if you wish to modify the members of a group when the package is installed.For information on the standard Linux shell command
groupmems, see https://linux.die.net/man/8/groupmems.- GRUB_GFXSERIAL
Configures the GNU GRand Unified Bootloader (GRUB) to have graphics and serial in the boot menu. Set this variable to “1” in your
local.confor distribution configuration file to enable graphics and serial in the menu.See the grub-efi class for more information on how this variable is used.
- GRUB_MKIMAGE_OPTS
This variable controls additional options passed to the
grub-mkimagecommand in the GNU GRand Unified Bootloader (GRUB) recipe during thedo_mkimagetask.- GRUB_OPTS
Additional options to add to the GNU GRand Unified Bootloader (GRUB) configuration. Use a semi-colon character (
;) to separate multiple options.The GRUB_OPTS variable is optional. See the grub-efi class for more information on how this variable is used.
- GRUB_TIMEOUT
Specifies the timeout before executing the default
LABELin the GNU GRand Unified Bootloader (GRUB).The GRUB_TIMEOUT variable is optional. See the grub-efi class for more information on how this variable is used.
- GRUB_TITLE
Specifies custom titles for GRUB labels defined in LABELS. See the grub-efi class for more information on how this variable is used.
- GTKIMMODULES_PACKAGES
When inheriting the gtk-immodules-cache class, this variable specifies the packages that contain the GTK+ input method modules being installed when the modules are in packages other than the main package.
- HGDIR
See HGDIR in the BitBake manual.
- HOMEPAGE
Website where more information about the software the recipe is building can be found.
- HOST_ARCH
The name of the target architecture, which is normally the same as TARGET_ARCH. The OpenEmbedded build system supports many architectures. Here is an example list of architectures supported. This list is by no means complete as the architecture is configurable:
arm
i586
x86_64
powerpc
powerpc64
mips
mipsel
- HOST_AS_ARCH
Specifies architecture-specific assembler flags.
Default initialization for HOST_AS_ARCH varies depending on what is being built:
TARGET_AS_ARCH when building for the target
BUILD_AS_ARCH when building for the build host (i.e.
-native)SDK_AS_ARCH when building for an SDK (i.e.
nativesdk-)
- HOST_CC_ARCH
Specifies architecture-specific compiler flags that are passed to the C compiler.
Default initialization for HOST_CC_ARCH varies depending on what is being built:
TARGET_CC_ARCH when building for the target
BUILD_CC_ARCH when building for the build host (i.e.
-native)SDK_CC_ARCH when building for an SDK (i.e.
nativesdk-)
- HOST_LD_ARCH
Specifies architecture-specific linker flags.
Default initialization for HOST_LD_ARCH varies depending on what is being built:
TARGET_LD_ARCH when building for the target
BUILD_LD_ARCH when building for the build host (i.e.
-native)SDK_LD_ARCH when building for an SDK (i.e.
nativesdk-)
- HOST_OS
Specifies the name of the target operating system, which is normally the same as the TARGET_OS. The variable can be set to “linux” for
glibc-based systems and to “linux-musl” formusl. For ARM/EABI targets, there are also “linux-gnueabi” and “linux-musleabi” values possible.- HOST_PREFIX
Specifies the prefix for the cross-compile toolchain. HOST_PREFIX is normally the same as TARGET_PREFIX.
- HOST_SYS
Specifies the system, including the architecture and the operating system, for which the build is occurring in the context of the current recipe.
The OpenEmbedded build system automatically sets this variable based on HOST_ARCH, HOST_VENDOR, and HOST_OS variables.
Note
You do not need to set the variable yourself.
Consider these two examples:
Given a native recipe on a 32-bit x86 machine running Linux, the value is “i686-linux”.
Given a recipe being built for a little-endian MIPS target running Linux, the value might be “mipsel-linux”.
- HOST_VENDOR
Specifies the name of the vendor. HOST_VENDOR is normally the same as TARGET_VENDOR.
- HOSTTOOLS
A space-separated list (filter) of tools on the build host that should be allowed to be called from within build tasks. Using this filter helps reduce the possibility of host contamination. If a tool specified in the value of HOSTTOOLS is not found on the build host, the OpenEmbedded build system produces an error and the build is not started.
For additional information, see HOSTTOOLS_NONFATAL.
- HOSTTOOLS_NONFATAL
A space-separated list (filter) of tools on the build host that should be allowed to be called from within build tasks. Using this filter helps reduce the possibility of host contamination. Unlike HOSTTOOLS, the OpenEmbedded build system does not produce an error if a tool specified in the value of HOSTTOOLS_NONFATAL is not found on the build host. Thus, you can use HOSTTOOLS_NONFATAL to filter optional host tools.
- IMAGE_BASENAME
The base name of image output files. This variable defaults to the recipe name (
${PN}).- IMAGE_BOOT_FILES
A space-separated list of files installed into the boot partition when preparing an image using the Wic tool with the
bootimg_partitionsource plugin. By default, the files are installed under the same name as the source files. To change the installed name, separate it from the original name with a semi-colon (;). Source files need to be located in DEPLOY_DIR_IMAGE. Here are two examples:IMAGE_BOOT_FILES = "u-boot.img uImage;kernel" IMAGE_BOOT_FILES = "u-boot.${UBOOT_SUFFIX} ${KERNEL_IMAGETYPE}"
Alternatively, source files can be picked up using a glob pattern. In this case, the destination file must have the same name as the base name of the source file path. To install files into a directory within the target location, pass its name after a semi-colon (;). Here are two examples:
IMAGE_BOOT_FILES = "bcm2835-bootfiles/*" IMAGE_BOOT_FILES = "bcm2835-bootfiles/*;boot/"
The first example installs all files from
${DEPLOY_DIR_IMAGE}/bcm2835-bootfilesinto the root of the target partition. The second example installs the same files into abootdirectory within the target partition.You can find information on how to use the Wic tool in the “Creating Partitioned Images Using Wic” section of the Yocto Project Development Tasks Manual. Reference material for Wic is located in the “OpenEmbedded Kickstart (.wks) Reference” chapter.
- IMAGE_BUILDINFO_FILE
When using the image-buildinfo class, specifies the file in the image to write the build information into. The default value is “
${sysconfdir}/buildinfo”.- IMAGE_BUILDINFO_VARS
When using the image-buildinfo class, specifies the list of variables to include in the Build Configuration section of the output file (as a space-separated list). Defaults to “DISTRO DISTRO_VERSION”.
- IMAGE_CLASSES
A list of classes that all images should inherit. This is typically used to enable functionality across all image recipes.
Classes specified in IMAGE_CLASSES must be located in the
classes-recipe/orclasses/subdirectories.- IMAGE_CMD
Specifies the command to create the image file for a specific image type, which corresponds to the value set in IMAGE_FSTYPES, (e.g.
ext3,btrfs, and so forth). When setting this variable, you should use an override for the associated type. Here is an example:IMAGE_CMD:jffs2 = "mkfs.jffs2 --root=${IMAGE_ROOTFS} --faketime \ --output=${IMGDEPLOYDIR}/${IMAGE_NAME}${IMAGE_NAME_SUFFIX}.jffs2 \ ${EXTRA_IMAGECMD}"
You typically do not need to set this variable unless you are adding support for a new image type. For more examples on how to set this variable, see the image_types class file, which is
meta/classes-recipe/image_types.bbclass.- IMAGE_CONTAINER_NO_DUMMY
When an image recipe has the
containerimage type in IMAGE_FSTYPES, it expects the PREFERRED_PROVIDER for the Linux kernel (virtual/kernel) to be set tolinux-dummyfrom a configuration file. Otherwise, an error is triggered.When set to “1”, the IMAGE_CONTAINER_NO_DUMMY variable allows the PREFERRED_PROVIDER variable to be set to another value, thus skipping the check and not triggering the build error. Any other value will keep the check.
This variable should be set from the image recipe using the
containerimage type.See the documentation of the image-container class for more information on why setting the PREFERRED_PROVIDER to
linux-dummyis advised with this class.- IMAGE_DEVICE_TABLES
Specifies one or more files that contain custom device tables that are passed to the
makedevscommand as part of creating an image. These files list basic device nodes that should be created under/devwithin the image. If IMAGE_DEVICE_TABLES is not set,files/device_table-minimal.txtis used, which is located by BBPATH. For details on how you should write device table files, seemeta/files/device_table-minimal.txtas an example.- IMAGE_EFI_BOOT_FILES
A space-separated list of files installed into the boot partition when preparing an image using the Wic tool with the
bootimg_efisource plugin. By default, the files are installed under the same name as the source files. To change the installed name, separate it from the original name with a semi-colon (;). Source files need to be located in DEPLOY_DIR_IMAGE. Here are two examples:IMAGE_EFI_BOOT_FILES = "${KERNEL_IMAGETYPE};bz2" IMAGE_EFI_BOOT_FILES = "${KERNEL_IMAGETYPE} microcode.cpio"
Alternatively, source files can be picked up using a glob pattern. In this case, the destination file must have the same name as the base name of the source file path. To install files into a directory within the target location, pass its name after a semi-colon (;). Here are two examples:
IMAGE_EFI_BOOT_FILES = "boot/loader/*" IMAGE_EFI_BOOT_FILES = "boot/loader/*;boot/"
The first example installs all files from
${DEPLOY_DIR_IMAGE}/boot/loader/into the root of the target partition. The second example installs the same files into abootdirectory within the target partition.You can find information on how to use the Wic tool in the “Creating Partitioned Images Using Wic” section of the Yocto Project Development Tasks Manual. Reference material for Wic is located in the “OpenEmbedded Kickstart (.wks) Reference” chapter.
- IMAGE_EXTRA_PARTITION_FILES
A space-separated list of files installed into the extra partition(s) when preparing an image using the Wic tool with the
extra_partitionsource plugin. By default, the files are installed under the same name as the source files. To change the installed name, separate it from the original name with a semi-colon (;). Source files need to be located in DEPLOY_DIR_IMAGE. Here is an example:IMAGE_EXTRA_PARTITION_FILES = "foobar file.conf;config"
In the above example, the file
foobaris installed with its original namefoobar, while the filefile.confis installed and renamed toconfig.Alternatively, source files can be picked up using a glob pattern. However, hidden files are ignored, and the pattern is non-recursive (subdirectories are ignored). The destination file will have the same name as the base name of the source file path. To install files into a renamed directory within the target location, pass its name after a semi-colon (;). Here are two examples:
IMAGE_EXTRA_PARTITION_FILES = "foo/*" IMAGE_EXTRA_PARTITION_FILES = "foo/*;bar/"
The first line in this example installs all files from
foodirectory into the root of the target partition. The second line in this example installs the same files into abardirectory within the target partition. Thebar/directory is automatically created if it does not exist.You can also specify the target by label, UUID or partition name if multiple extra partitions coexist. Let’s take the following example. This would be the WKS file for the image currently being built:
part --source extra_partition --fstype=ext4 --label foo part --source extra_partition --fstype=ext4 --uuid e7d0824e-cda3-4bed-9f54-9ef5312d105d part --source extra_partition --fstype=ext4 --part-name config
And the following configuration:
IMAGE_EXTRA_PARTITION_FILES_label-foo = "foo/*" IMAGE_EXTRA_PARTITION_FILES_uuid-e7d0824e-cda3-4bed-9f54-9ef5312d105d = "foo/*;bar/" IMAGE_EXTRA_PARTITION_FILES_part-name-config = "config"
Then:
The partition labeled “foo” would get all files from the
foodirectory.The partition whose UUID is “e7d0824e-cda3-4bed-9f54-9ef5312d105d” would get all files from the
foodirectory, installed into abardirectory.The partition named “config” would get the file
config.
You can find information on how to use the Wic tool in the “Creating Partitioned Images Using Wic” section of the Yocto Project Development Tasks Manual. Reference material for Wic is located in the “OpenEmbedded Kickstart (.wks) Reference” chapter.
- IMAGE_FEATURES
The primary list of features to include in an image. Typically, you configure this variable in an image recipe. Although you can use this variable from your
local.conffile, which is found in the Build Directory, best practices dictate that you do not.Note
To enable extra features from outside the image recipe, use the EXTRA_IMAGE_FEATURES variable.
For a list of image features that ships with the Yocto Project, see the “Image Features” section.
For an example that shows how to customize your image by using this variable, see the “Customizing Images Using Custom IMAGE_FEATURES and EXTRA_IMAGE_FEATURES” section in the Yocto Project Development Tasks Manual.
- IMAGE_FSTYPES
Specifies the formats the OpenEmbedded build system uses during the build when creating the root filesystem. For example, setting IMAGE_FSTYPES as follows causes the build system to create root filesystems using two formats:
.ext3and.tar.bz2:IMAGE_FSTYPES = "ext3 tar.bz2"
For the complete list of supported image formats from which you can choose, see IMAGE_TYPES.
Note
If an image recipe uses the “inherit image” line and you are setting IMAGE_FSTYPES inside the recipe, you must set IMAGE_FSTYPES prior to using the “inherit image” line.
Due to the way the OpenEmbedded build system processes this variable, you cannot update its contents by using
:appendor:prepend. You must use the+=operator to add one or more options to the IMAGE_FSTYPES variable.
- IMAGE_FSTYPES_DEBUGFS
The IMAGE_FSTYPES_DEBUGFS holds a list of filesystem image types to generate when the IMAGE_GEN_DEBUGFS variable is set to “1”. The content of this variable is the same as what is supported by the IMAGE_FSTYPES variable.
- IMAGE_GEN_DEBUGFS
When set to “1” in an image recipe, the OpenEmbedded Build System will generate a companion image that contains the debug symbols and source code for the packages installed on the image. The OpenEmbedded Build System does this by adding all the available
-dbgand-srcpackages available in the package feed, which are automatically generated during Package Splitting.- IMAGE_INSTALL
Used by recipes to specify the packages to install into an image through the image class. Use the IMAGE_INSTALL variable with care to avoid ordering issues.
Image recipes set IMAGE_INSTALL to specify the packages to install into an image through image. Additionally, there are “helper” classes such as the core-image class which can take lists used with IMAGE_FEATURES and turn them into auto-generated entries in IMAGE_INSTALL in addition to its default contents.
When you use this variable, it is best to use it as follows:
IMAGE_INSTALL:append = " package-name"
Be sure to include the space between the quotation character and the start of the package name or names.
Note
When working with a core-image-minimal-initramfs image, do not use the IMAGE_INSTALL variable to specify packages for installation. Instead, use the PACKAGE_INSTALL variable, which allows the initial RAM filesystem (Initramfs) recipe to use a fixed set of packages and not be affected by IMAGE_INSTALL. For information on creating an Initramfs, see the “Building an Initial RAM Filesystem (Initramfs) Image” section in the Yocto Project Development Tasks Manual.
Using IMAGE_INSTALL with the += BitBake operator within the
/conf/local.conffile or from within an image recipe is not recommended. Use of this operator in these ways can cause ordering issues. Since core-image sets IMAGE_INSTALL to a default value using the ?= operator, using a+=operation against IMAGE_INSTALL results in unexpected behavior when used withinconf/local.conf. Furthermore, the same operation from within an image recipe may or may not succeed depending on the specific situation. In both these cases, the behavior is contrary to how most users expect the+=operator to work.
- IMAGE_LINGUAS
Specifies the list of locales to install into the image during the root filesystem construction process. The OpenEmbedded build system automatically splits locale files, which are used for localization, into separate packages. Setting the IMAGE_LINGUAS variable ensures that any locale packages that correspond to packages already selected for installation into the image are also installed. Here is an example:
IMAGE_LINGUAS = "pt-br de-de"
In this example, the build system ensures any Brazilian Portuguese and German locale files that correspond to packages in the image are installed (i.e.
*-locale-pt-brand*-locale-de-deas well as*-locale-ptand*-locale-de, since some software packages only provide locale files by language and not by country-specific language).See the GLIBC_GENERATE_LOCALES variable for information on generating GLIBC locales.
- IMAGE_LINK_NAME
The name of the output image symlink (which does not include the version part as IMAGE_NAME does). The default value is derived using the IMAGE_BASENAME and IMAGE_MACHINE_SUFFIX variables:
IMAGE_LINK_NAME ?= "${IMAGE_BASENAME}${IMAGE_MACHINE_SUFFIX}"Note
It is possible to set this to “” to disable symlink creation, however, you also need to set IMAGE_NAME to still have a reasonable value e.g.:
IMAGE_LINK_NAME = "" IMAGE_NAME = "${IMAGE_BASENAME}${IMAGE_MACHINE_SUFFIX}${IMAGE_VERSION_SUFFIX}"
- IMAGE_MACHINE_SUFFIX
Specifies the by default machine-specific suffix for image file names (before the extension). The default value is set as follows:
IMAGE_MACHINE_SUFFIX ??= "-${MACHINE}"The default DEPLOY_DIR_IMAGE already has a MACHINE subdirectory, so you may find it unnecessary to also include this suffix in the name of every image file. If you prefer to remove the suffix you can set this variable to an empty string:
IMAGE_MACHINE_SUFFIX = ""
(Not to be confused with IMAGE_NAME_SUFFIX.)
- IMAGE_MANIFEST
The manifest file for the image. This file lists all the installed packages that make up the image. The file contains package information on a line-per-package basis as follows:
packagename packagearch version
The rootfs-postcommands class defines the manifest file as follows:
IMAGE_MANIFEST = "${IMGDEPLOYDIR}/${IMAGE_NAME}${IMAGE_NAME_SUFFIX}.manifest"
The location is derived using the IMGDEPLOYDIR and IMAGE_NAME variables. You can find information on how the image is created in the “Image Generation” section in the Yocto Project Overview and Concepts Manual.
- IMAGE_NAME
The name of the output image files minus the extension. By default this variable is set using the IMAGE_LINK_NAME, and IMAGE_VERSION_SUFFIX variables:
IMAGE_NAME ?= "${IMAGE_LINK_NAME}${IMAGE_VERSION_SUFFIX}"- IMAGE_NAME_SUFFIX
Suffix used for the image output filename — defaults to
".rootfs"to distinguish the image file from other files created during image building; however if this suffix is redundant or not desired you can clear the value of this variable (set the value to “”). For example, this is typically cleared in Initramfs image recipes.- IMAGE_OUTPUT_MANIFEST
When inheriting the image class directly or through the core-image class, the IMAGE_OUTPUT_MANIFEST points to a manifest
jsonfile that lists what images were created by various image creation tasks (as defined by the IMAGE_FSTYPES variable). It is set in the image class as follows:IMAGE_OUTPUT_MANIFEST = "${IMAGE_OUTPUT_MANIFEST_DIR}/manifest.json"
- IMAGE_OUTPUT_MANIFEST_DIR
When inheriting the image class directly or through the core-image class, the IMAGE_OUTPUT_MANIFEST_DIR points to a directory that stores a manifest
jsonfile that lists what images were created by various image creation tasks (as defined by the IMAGE_FSTYPES variable). It is set in the image class as follows:IMAGE_OUTPUT_MANIFEST_DIR = "${WORKDIR}/deploy-image-output-manifest"
- IMAGE_OVERHEAD_FACTOR
Defines a multiplier that the build system applies to the initial image size for cases when the multiplier times the returned disk usage value for the image is greater than the sum of IMAGE_ROOTFS_SIZE and IMAGE_ROOTFS_EXTRA_SPACE. The result of the multiplier applied to the initial image size creates free disk space in the image as overhead. By default, the build process uses a multiplier of 1.3 for this variable. This default value results in 30% free disk space added to the image when this method is used to determine the final generated image size. You should be aware that post install scripts and the package management system uses disk space inside this overhead area. Consequently, the multiplier does not produce an image with all the theoretical free disk space. See IMAGE_ROOTFS_SIZE for information on how the build system determines the overall image size.
The default 30% free disk space typically gives the image enough room to boot and allows for basic post installs while still leaving a small amount of free disk space. If 30% free space is inadequate, you can increase the default value. For example, the following setting gives you 50% free space added to the image:
IMAGE_OVERHEAD_FACTOR = "1.5"
Alternatively, you can ensure a specific amount of free disk space is added to the image by using the IMAGE_ROOTFS_EXTRA_SPACE variable.
When using Wic tool, beware that a second overhead factor is also applied. This overhead value is defined by the
--overhead-factoroption, which defaults to “1.3” when omitted. See the Command: part or partition chapter in OpenEmbedded Kickstart (.wks) Reference for details.- IMAGE_PKGTYPE
Defines the package type (i.e. DEB, RPM or IPK) used by the OpenEmbedded build system. The variable is defined appropriately by one of the package_deb, package_rpm, or package_ipk classes.
The populate_sdk_* and image classes use the IMAGE_PKGTYPE for packaging images and SDKs.
You should not set the IMAGE_PKGTYPE manually. Rather, the variable is set indirectly through the appropriate package_* class using the PACKAGE_CLASSES variable. The OpenEmbedded build system uses the first package type (e.g. DEB, RPM, or IPK) that appears with the variable
- IMAGE_POSTPROCESS_COMMAND
Specifies a list of functions to call once the OpenEmbedded build system creates the final image output files. You can specify functions separated by spaces:
IMAGE_POSTPROCESS_COMMAND += "function"
If you need to pass the root filesystem path to a command within the function, you can use
${IMAGE_ROOTFS}, which points to the directory that becomes the root filesystem image. See the IMAGE_ROOTFS variable for more information.- IMAGE_PREPROCESS_COMMAND
Specifies a list of functions to call before the OpenEmbedded build system creates the final image output files. You can specify functions separated by spaces:
IMAGE_PREPROCESS_COMMAND += "function"
If you need to pass the root filesystem path to a command within the function, you can use
${IMAGE_ROOTFS}, which points to the directory that becomes the root filesystem image. See the IMAGE_ROOTFS variable for more information.- IMAGE_ROOTFS
The location of the root filesystem while it is under construction (i.e. during the do_rootfs task). This variable is not configurable. Do not change it.
- IMAGE_ROOTFS_ALIGNMENT
Specifies the alignment for the output image file in Kbytes. If the size of the image is not a multiple of this value, then the size is rounded up to the nearest multiple of the value. The default value is “1”. See IMAGE_ROOTFS_SIZE for additional information.
- IMAGE_ROOTFS_EXTRA_SPACE
Defines additional free disk space created in the image in Kbytes. By default, this variable is set to “0”. This free disk space is added to the image after the build system determines the image size as described in IMAGE_ROOTFS_SIZE.
This variable is particularly useful when you want to ensure that a specific amount of free disk space is available on a device after an image is installed and running. For example, to be sure 5 Gbytes of free disk space is available, set the variable as follows:
IMAGE_ROOTFS_EXTRA_SPACE = "5242880"
For example, the Yocto Project Build Appliance specifically requests 40 Gbytes of extra space with the line:
IMAGE_ROOTFS_EXTRA_SPACE = "41943040"
- IMAGE_ROOTFS_MAXSIZE
Defines the maximum allowed size of the generated image in kilobytes. The build will fail if the generated image size exceeds this value.
The generated image size undergoes several calculation steps before being compared to IMAGE_ROOTFS_MAXSIZE. In the first step, the size of the directory pointed to by IMAGE_ROOTFS is calculated. In the second step, the result from the first step is multiplied by IMAGE_OVERHEAD_FACTOR. In the third step, the result from the second step is compared with IMAGE_ROOTFS_SIZE. The larger value of these is added to IMAGE_ROOTFS_EXTRA_SPACE. In the fourth step, the result from the third step is checked for a decimal part. If it has one, it is rounded up to the next integer. If it does not, it is simply converted into an integer. In the fifth step, the IMAGE_ROOTFS_ALIGNMENT is added to the result from the fourth step and “1” is subtracted. In the sixth step, the remainder of the division between the result from the fifth step and IMAGE_ROOTFS_ALIGNMENT is subtracted from the result of the fifth step. In this way, the result from the fourth step is rounded up to the nearest multiple of IMAGE_ROOTFS_ALIGNMENT.
Thus, if the IMAGE_ROOTFS_MAXSIZE is set, is compared with the result of the above calculations and is independent of the final image type. No default value is set for IMAGE_ROOTFS_MAXSIZE.
It’s a good idea to set this variable for images that need to fit on a limited space (e.g. SD card, a fixed-size partition, …).
- IMAGE_ROOTFS_SIZE
Defines the size in Kbytes for the generated image. The OpenEmbedded build system determines the final size for the generated image using an algorithm that takes into account the initial disk space used for the generated image, a requested size for the image, and requested additional free disk space to be added to the image. Programatically, the build system determines the final size of the generated image as follows:
if (image-du * overhead) < rootfs-size: internal-rootfs-size = rootfs-size + xspace else: internal-rootfs-size = (image-du * overhead) + xspace where: image-du = Returned value of the du command on the image. overhead = IMAGE_OVERHEAD_FACTOR rootfs-size = IMAGE_ROOTFS_SIZE internal-rootfs-size = Initial root filesystem size before any modifications. xspace = IMAGE_ROOTFS_EXTRA_SPACE
See the IMAGE_OVERHEAD_FACTOR and IMAGE_ROOTFS_EXTRA_SPACE variables for related information.
- IMAGE_TYPEDEP
Specifies a dependency from one image type on another. Here is an example from the image-live class:
IMAGE_TYPEDEP:live = "ext3"
In the previous example, the variable ensures that when “live” is listed with the IMAGE_FSTYPES variable, the OpenEmbedded build system produces an
ext3image first since one of the components of the live image is anext3formatted partition containing the root filesystem.- IMAGE_TYPES
Specifies the complete list of supported image types by default:
btrfs
container
cpio
cpio.gz
cpio.lz4
cpio.lzma
cpio.xz
cramfs
erofs
erofs-lz4
erofs-lz4hc
ext2
ext2.bz2
ext2.gz
ext2.lzma
ext3
ext3.gz
ext4
ext4.gz
f2fs
hddimg
iso
jffs2
jffs2.sum
multiubi
squashfs
squashfs-lz4
squashfs-lzo
squashfs-xz
tar
tar.bz2
tar.gz
tar.lz4
tar.xz
tar.zst
ubi
ubifs
wic
wic.bz2
wic.gz
wic.lzma
wic.zst
wicenv
For more information about these types of images, see
meta/classes-recipe/image_types*.bbclassin OpenEmbedded-Core (OE-Core).- IMAGE_VERSION_SUFFIX
Version suffix that is part of the default IMAGE_NAME and KERNEL_ARTIFACT_NAME values. Defaults to
"-${DATETIME}", however you could set this to a version string that comes from your external build environment if desired, and this suffix would then be used consistently across the build artifacts.- IMGDEPLOYDIR
When inheriting the image class directly or through the core-image class, the IMGDEPLOYDIR points to a temporary work area for deployed files that is set in the
imageclass as follows:IMGDEPLOYDIR = "${WORKDIR}/deploy-${PN}-image-complete"
Recipes inheriting the image class should copy files to be deployed into IMGDEPLOYDIR, and the class will take care of copying them into DEPLOY_DIR_IMAGE afterwards.
- IMGMANIFESTDIR
When inheriting the image class directly or through the core-image class, the IMGMANIFESTDIR setting points to a temporary area that stores manifest
jsonfiles, that list what images were created by various images creation tasks (as defined by the IMAGE_FSTYPES variable). It is set in the image class as follows:IMGMANIFESTDIR = "${WORKDIR}/image-task-manifest"
- INCOMPATIBLE_LICENSE
Specifies a space-separated list of license names (as they would appear in LICENSE) that should be excluded from the build (if set globally), or from an image (if set locally in an image recipe).
When the variable is set globally, recipes that provide no alternatives to listed incompatible licenses are not built. Packages that are individually licensed with the specified incompatible licenses will be deleted. Most of the time this does not allow a feasible build (because it becomes impossible to satisfy build time dependencies), so the recommended way to implement license restrictions is to set the variable in specific image recipes where the restrictions must apply. That way there are no build time restrictions, but the license check is still performed when the image’s filesystem is assembled from packages.
There is some support for wildcards in this variable’s value, however it is restricted to specific licenses. Currently only these wildcards are allowed and expand as follows:
AGPL-3.0*":AGPL-3.0-only,AGPL-3.0-or-laterGPL-3.0*:GPL-3.0-only,GPL-3.0-or-laterLGPL-3.0*:LGPL-3.0-only,LGPL-3.0-or-later
Note
This functionality is only regularly tested using the following setting:
INCOMPATIBLE_LICENSE = "GPL-3.0* LGPL-3.0* AGPL-3.0*"
Although you can use other settings, you might be required to remove dependencies on (or provide alternatives to) components that are required to produce a functional system image.
- INCOMPATIBLE_LICENSE_EXCEPTIONS
Specifies a space-separated list of package and license pairs that are allowed to be used even if the license is specified in INCOMPATIBLE_LICENSE. The package and license pairs are separated using a colon. Example:
INCOMPATIBLE_LICENSE_EXCEPTIONS = "gdbserver:GPL-3.0-only gdbserver:LGPL-3.0-only"
- INHERIT
Causes the named class or classes to be inherited globally. Anonymous functions in the class or classes are not executed for the base configuration and in each individual recipe. The OpenEmbedded build system ignores changes to INHERIT in individual recipes. Classes inherited using INHERIT must be located in the
classes-global/orclasses/subdirectories.For more information on INHERIT, see the INHERIT Configuration Directive” section in the BitBake User Manual.
- INHERIT_DISTRO
Lists classes that will be inherited at the distribution level. It is unlikely that you want to edit this variable.
Classes specified in INHERIT_DISTRO must be located in the
classes-global/orclasses/subdirectories.The default value of the variable is set as follows in the
meta/conf/distro/defaultsetup.conffile:INHERIT_DISTRO ?= "debian devshell sstate license remove-libtool create-spdx"
- INHIBIT_AUTOTOOLS_DEPS
Prevents the autotools* class from automatically adding its default build-time dependencies.
When a recipe inherits the autotools* class, several native cross tools such as
autoconf-native,automake-native,libtool-native,libtool-crossare added to DEPENDS to support theautotoolsbuild process.To prevent the build system from adding these dependencies automatically, set the INHIBIT_AUTOTOOLS_DEPS variable as follows:
INHIBIT_AUTOTOOLS_DEPS = "1"
By default, the value of INHIBIT_AUTOTOOLS_DEPS is empty. Setting it to “0” does not disable inhibition. Only the empty string will disable inhibition.
- INHIBIT_DEFAULT_DEPS
Prevents the default dependencies, namely the C compiler and standard C library (libc), from being added to DEPENDS. This variable is usually used within recipes that do not require any compilation using the C compiler.
Set the variable to “1” to prevent the default dependencies from being added.
- INHIBIT_DEFAULT_RUST_DEPS
Prevents the rust class from automatically adding its default build-time dependencies.
When a recipe inherits the rust class, several tools such as
rust-nativeand${RUSTLIB_DEP}(only added when cross-compiling) are added to DEPENDS to support therustbuild process.To prevent the build system from adding these dependencies automatically, set the INHIBIT_DEFAULT_RUST_DEPS variable as follows:
INHIBIT_DEFAULT_RUST_DEPS = "1"
By default, the value of INHIBIT_DEFAULT_RUST_DEPS is empty. Setting it to “0” does not disable inhibition. Only the empty string will disable inhibition.
- INHIBIT_PACKAGE_DEBUG_SPLIT
Prevents the OpenEmbedded build system from splitting out debug information during packaging. By default, the build system splits out debugging information during the do_package task. For more information on how debug information is split out, see the PACKAGE_DEBUG_SPLIT_STYLE variable.
To prevent the build system from splitting out debug information during packaging, set the INHIBIT_PACKAGE_DEBUG_SPLIT variable as follows:
INHIBIT_PACKAGE_DEBUG_SPLIT = "1"
- INHIBIT_PACKAGE_STRIP
If set to “1”, causes the build to not strip binaries in resulting packages and prevents the
-dbgpackage from containing the source files.By default, the OpenEmbedded build system strips binaries and puts the debugging symbols into
${PN}-dbg. Consequently, you should not set INHIBIT_PACKAGE_STRIP when you plan to debug in general.- INHIBIT_SYSROOT_STRIP
If set to “1”, causes the build to not strip binaries in the resulting sysroot.
By default, the OpenEmbedded build system strips binaries in the resulting sysroot. When you specifically set the INHIBIT_SYSROOT_STRIP variable to “1” in your recipe, you inhibit this stripping.
If you want to use this variable, include the staging class. This class uses a
sys_strip()function to test for the variable and acts accordingly.Note
Use of the INHIBIT_SYSROOT_STRIP variable occurs in rare and special circumstances. For example, suppose you are building bare-metal firmware by using an external GCC toolchain. Furthermore, even if the toolchain’s binaries are strippable, there are other files needed for the build that are not strippable.
- INHIBIT_UPDATERCD_BBCLASS
Prevents the update-rc.d class from automatically installing and registering SysV init scripts for packages.
When a recipe inherits the update-rc.d class, init scripts are typically installed and registered for the packages listed in INITSCRIPT_PACKAGES. This ensures that the relevant services are started and stopped at the appropriate runlevels using the traditional SysV init system.
To prevent the build system from adding these scripts and configurations automatically, set the INHIBIT_UPDATERCD_BBCLASS variable as follows:
INHIBIT_UPDATERCD_BBCLASS = "1"
By default, the value of INHIBIT_UPDATERCD_BBCLASS is empty. Setting it to “0” does not disable inhibition. Only the empty string will disable inhibition.
- INIT_MANAGER
Specifies the system init manager to use. Available options are:
sysvinitsystemdmdev-busybox
With
sysvinit, the init manager is set to SysVinit, the traditional UNIX init system. This is the default choice in the Poky distribution, together with the Udev device manager (see the “Selecting a Device Manager” section).With
systemd, the init manager becomes systemd, which comes with the udev device manager.With
mdev-busybox, the init manager becomes the much simpler BusyBox init, together with the BusyBox mdev device manager. This is the simplest and lightest solution, and probably the best choice for low-end systems with a rather slow CPU and a limited amount of RAM.More concretely, this is used to include
conf/distro/include/init-manager-${INIT_MANAGER}.incinto the global configuration. You can have a look at the meta/conf/distro/include/init-manager-*.inc files for more information, and also the “Selecting an Initialization Manager” section in the Yocto Project Development Tasks Manual.- INITRAMFS_DEPLOY_DIR_IMAGE
Indicates the deploy directory used by do_bundle_initramfs where the INITRAMFS_IMAGE will be fetched from. This variable is set by default to
${DEPLOY_DIR_IMAGE}in the kernel class and it’s only meant to be changed when building an Initramfs image from a separate multiconfig via INITRAMFS_MULTICONFIG.- INITRAMFS_FSTYPES
Defines the format for the output image of an initial RAM filesystem (Initramfs), which is used during boot. Supported formats are the same as those supported by the IMAGE_FSTYPES variable.
The default value of this variable, which is set in the
meta/conf/bitbake.confconfiguration file in OpenEmbedded-Core (OE-Core), is “cpio.gz”. The Linux kernel’s Initramfs mechanism, as opposed to the initial RAM filesystem initrd mechanism, expects an optionally compressed cpio archive.- INITRAMFS_IMAGE
Specifies the PROVIDES name of an image recipe that is used to build an initial RAM filesystem (Initramfs) image. In other words, the INITRAMFS_IMAGE variable causes an additional recipe to be built as a dependency to whatever root filesystem recipe you might be using (e.g.
core-image-sato). The Initramfs image recipe you provide should set IMAGE_FSTYPES to INITRAMFS_FSTYPES.An Initramfs image provides a temporary root filesystem used for early system initialization (e.g. loading of modules needed to locate and mount the “real” root filesystem).
Note
See the
meta/recipes-core/images/core-image-minimal-initramfs.bbrecipe in OpenEmbedded-Core (OE-Core) for an example Initramfs recipe. To select this sample recipe as the one built to provide the Initramfs image, set INITRAMFS_IMAGE to “core-image-minimal-initramfs”.You can also find more information by referencing the
conf/templates/default/local.conf.sample.extendedconfiguration file in meta-poky, the image class, and the kernel class to see how to use the INITRAMFS_IMAGE variable.If INITRAMFS_IMAGE is empty, which is the default, then no Initramfs image is built.
For more information, you can also see the INITRAMFS_IMAGE_BUNDLE variable, which allows the generated image to be bundled inside the kernel image. Additionally, for information on creating an Initramfs image, see the “Building an Initial RAM Filesystem (Initramfs) Image” section in the Yocto Project Development Tasks Manual.
- INITRAMFS_IMAGE_BUNDLE
Controls whether or not the image recipe specified by INITRAMFS_IMAGE is run through an extra pass (do_bundle_initramfs) during kernel compilation in order to build a single binary that contains both the kernel image and the initial RAM filesystem (Initramfs) image. This makes use of the CONFIG_INITRAMFS_SOURCE kernel feature.
Note
Bundling the Initramfs with the kernel conflates the code in the Initramfs with the GPLv2 licensed Linux kernel binary. Thus only GPLv2 compatible software may be part of a bundled Initramfs.
Note
Using an extra compilation pass to bundle the Initramfs avoids a circular dependency between the kernel recipe and the Initramfs recipe should the Initramfs include kernel modules. Should that be the case, the Initramfs recipe depends on the kernel for the kernel modules, and the kernel depends on the Initramfs recipe since the Initramfs is bundled inside the kernel image.
The combined binary is deposited into the
tmp/deploydirectory, which is part of the Build Directory.Setting the variable to “1” in a configuration file causes the OpenEmbedded build system to generate a kernel image with the Initramfs specified in INITRAMFS_IMAGE bundled within:
INITRAMFS_IMAGE_BUNDLE = "1"
By default, the kernel class sets this variable to a null string as follows:
INITRAMFS_IMAGE_BUNDLE ?= ""
Note
You must set the INITRAMFS_IMAGE_BUNDLE variable in a configuration file. You cannot set the variable in a recipe file.
See the local.conf.sample.extended file for additional information. Also, for information on creating an Initramfs, see the “Building an Initial RAM Filesystem (Initramfs) Image” section in the Yocto Project Development Tasks Manual.
- INITRAMFS_IMAGE_NAME
This value needs to stay in sync with IMAGE_LINK_NAME, but with INITRAMFS_IMAGE instead of IMAGE_BASENAME. The default value is set as follows:
INITRAMFS_IMAGE_NAME ?= “${@[‘${INITRAMFS_IMAGE}${IMAGE_MACHINE_SUFFIX}’, ‘’][d.getVar(‘INITRAMFS_IMAGE’) == ‘’]}”
That is, if INITRAMFS_IMAGE is set, the value of INITRAMFS_IMAGE_NAME will be set based upon INITRAMFS_IMAGE and IMAGE_MACHINE_SUFFIX.
- INITRAMFS_LINK_NAME
The link name of the initial RAM filesystem image. This variable is set in the
meta/classes-recipe/kernel-artifact-names.bbclassfile as follows:INITRAMFS_LINK_NAME ?= "initramfs-${KERNEL_ARTIFACT_LINK_NAME}"The value of the
KERNEL_ARTIFACT_LINK_NAMEvariable, which is set in the same file, has the following value:KERNEL_ARTIFACT_LINK_NAME ?= "${MACHINE}"See the MACHINE variable for additional information.
- INITRAMFS_MAXSIZE
Defines the maximum allowed size of the Initramfs image in Kbytes. The build will fail if the Initramfs image size exceeds this value.
The Initramfs image size undergoes several calculation steps before being compared to INITRAMFS_MAXSIZE. These steps are the same as those used for IMAGE_ROOTFS_MAXSIZE and are described in detail in that entry.
Thus, INITRAMFS_MAXSIZE is compared with the result of the calculations and is independent of the final image type (e.g. compressed). A default value for INITRAMFS_MAXSIZE is set in meta/conf/bitbake.conf.
- INITRAMFS_MULTICONFIG
Defines the multiconfig to create a multiconfig dependency to be used by the kernel class.
This allows the kernel to bundle an INITRAMFS_IMAGE coming from a separate multiconfig, this is meant to be used in addition to INITRAMFS_DEPLOY_DIR_IMAGE.
For more information on how to bundle an Initramfs image from a separate multiconfig see the “Bundling an Initramfs Image From a Separate Multiconfig” section in the Yocto Project Development Tasks Manual.
- INITRAMFS_NAME
The base name of the initial RAM filesystem image. This variable is set in the
meta/classes-recipe/kernel-artifact-names.bbclassfile as follows:INITRAMFS_NAME ?= "initramfs-${KERNEL_ARTIFACT_NAME}"See KERNEL_ARTIFACT_NAME for additional information.
- INITRD
Indicates list of filesystem images to concatenate and use as an initial RAM disk (
initrd).The INITRD variable is an optional variable used with the image-live class.
- INITRD_IMAGE
When building a “live” bootable image (i.e. when IMAGE_FSTYPES contains “live”), INITRD_IMAGE specifies the image recipe that should be built to provide the initial RAM disk image. The default value is “core-image-minimal-initramfs”.
See the image-live class for more information.
- INITSCRIPT_NAME
The filename of the initialization script as installed to
${sysconfdir}/init.d.This variable is used in recipes when using update-rc.d. The variable is mandatory.
- INITSCRIPT_PACKAGES
A list of the packages that contain initscripts. If multiple packages are specified, you need to append the package name to the other
INITSCRIPT_*as an override.This variable is used in recipes when using update-rc.d. The variable is optional and defaults to the PN variable.
- INITSCRIPT_PARAMS
Specifies the options to pass to
update-rc.d. Here is an example:INITSCRIPT_PARAMS = "start 99 5 2 . stop 20 0 1 6 ."
In this example, the script has a runlevel of 99, starts the script in initlevels 2 and 5, and stops the script in levels 0, 1 and 6.
The variable’s default value is “defaults”, which is set in the update-rc.d class.
The value in INITSCRIPT_PARAMS is passed through to the
update-rc.dcommand. For more information on valid parameters, please see the manual page: update-rc.d.- INSANE_SKIP
Specifies the QA checks to skip for a specific package within a recipe. For example, to skip the check for symbolic link
.sofiles in the main package of a recipe, add the following to the recipe. The package name override must be used, which in this example is${PN}:INSANE_SKIP:${PN} += "dev-so"See the “insane” section for a list of the valid QA checks you can specify using this variable.
- INSTALL_TIMEZONE_FILE
By default, the
tzdatarecipe packages an/etc/timezonefile. Set the INSTALL_TIMEZONE_FILE variable to “0” at the configuration level to disable this behavior.- IPK_FEED_URIS
When the IPK backend is in use and package management is enabled on the target, you can use this variable to set up
opkgin the target image to point to package feeds on a nominated server. Once the feed is established, you can perform installations or upgrades using the package manager at runtime.- KARCH
Defines the kernel architecture used when assembling the configuration. Architectures supported for this release are:
powerpc
i386
x86_64
arm
qemu
mips
You define the KARCH variable in the BSP Descriptions.
- KBRANCH
A regular expression used by the build process to explicitly identify the kernel branch that is validated, patched, and configured during a build. You must set this variable to ensure the exact kernel branch you want is being used by the build process.
Values for this variable are set in the kernel’s recipe file and the kernel’s append file. For example, if you are using the
linux-yocto_4.12kernel, the kernel recipe file is themeta/recipes-kernel/linux/linux-yocto_4.12.bbfile. KBRANCH is set as follows in that kernel recipe file:KBRANCH ?= "standard/base"
This variable is also used from the kernel’s append file to identify the kernel branch specific to a particular machine or target hardware. Continuing with the previous kernel example, the kernel’s append file is located in the BSP layer for a given machine. For example, the append file for the Beaglebone and generic versions of both 32 and 64-bit IA machines (
meta-yocto-bsp) is namedmeta-yocto-bsp/recipes-kernel/linux/linux-yocto_6.1.bbappend. Here are the related statements from that append file:KBRANCH:genericx86 = "v6.1/standard/base" KBRANCH:genericx86-64 = "v6.1/standard/base" KBRANCH:beaglebone-yocto = "v6.1/standard/beaglebone"
The KBRANCH statements identify the kernel branch to use when building for each supported BSP.
- KBUILD_DEFCONFIG
When used with the kernel-yocto class, specifies an “in-tree” kernel configuration file for use during a kernel build.
Typically, when using a
defconfigto configure a kernel during a build, you place the file in your layer in the same manner as you would place patch files and configuration fragment files (i.e. “out-of-tree”). However, if you want to use adefconfigfile that is part of the kernel tree (i.e. “in-tree”), you can use the KBUILD_DEFCONFIG variable to point to thedefconfigfile.To use the variable, set it in the append file for your kernel recipe using the following form:
KBUILD_DEFCONFIG:<machine> ?= "defconfig_file"
Here is an example from a “raspberrypi2” MACHINE build that uses a
defconfigfile named “bcm2709_defconfig”:KBUILD_DEFCONFIG:raspberrypi2 = "bcm2709_defconfig"
As an alternative, you can use the following within your append file:
KBUILD_DEFCONFIG:pn-linux-yocto ?= "defconfig_file"
For more information on how to use the KBUILD_DEFCONFIG variable, see the “Using an “In-Tree” defconfig File” section in the Yocto Project Linux Kernel Development Manual.
- KCONF_AUDIT_LEVEL
When inheriting the kernel-yocto class and when the KMETA_AUDIT variable is set to a non-empty string, the KCONF_AUDIT_LEVEL variable specifies whether to report Kernel configuration values that are different from the user-specified value. Its value is a positive integer (default: 1):
0: no reporting is done.
1: report the problems as warnings and trigger an error if KMETA_AUDIT_WERROR is set.
2: if the do_kernel_configme has failed to generate a
.configfile, print the content of themerge_config_build.logfile containing the errors, instead of just providing the path to that file.
For more details see the kernel-yocto class and the symbol_why.py script in yocto-kernel-tools.
- KCONF_BSP_AUDIT_LEVEL
When inheriting the kernel-yocto class and when the KMETA_AUDIT variable is set to a non-empty string, the KCONF_BSP_AUDIT_LEVEL variable can be set to report:
User-specified Kernel configurations that did not make it into the final Kernel configuration.
Configurations defined in multiple input files with differing values.
Its value is a positive integer (default: 0):
0: no reporting is done.
1: reporting of configuration options that did not make it in the final configuration is done and is not limited to the current architecture (
ARCH) in use.2: reporting of configuration options that did not make it in the final configuration is done and is strictly limited to the current architecture (
ARCH) in use.3: report the problems found when this variable equals 2, and also report configurations options defined in multiple input files with differing values.
For value 1, 2 and 3 an error is produced if KMETA_AUDIT_WERROR is set.
For more details see the kernel-yocto class and the symbol_why.py script in yocto-kernel-tools.
- KCONFIG_CONFIG_ROOTDIR
The KCONFIG_CONFIG_ROOTDIR variable allows overriding the default location of the
.configfile for recipes using the cml1 class.- KCONFIG_MODE
When used with the kernel-yocto class, specifies the kernel configuration values to use for options not specified in the provided
defconfigfile. Valid options are:KCONFIG_MODE = "alldefconfig" KCONFIG_MODE = "allnoconfig"
In
alldefconfigmode the options not explicitly specified will be assigned their Kconfig default value. Inallnoconfigmode the options not explicitly specified will be disabled in the kernel config.In case KCONFIG_MODE is not set the
defconfigfile will be handled inallnoconfigmode.A
defconfigfile compatible withallnoconfigmode can be generated by copying the.configfile from a working Linux kernel build, renaming it todefconfigand placing it into the Linux kernel${WORKDIR}through your meta-layer. KCONFIG_MODE does not need to be explicitly set.A
defconfigfile compatible withalldefconfigmode can be generated using the do_savedefconfig task and placed into the Linux kernel${WORKDIR}through your meta-layer. Explicitely set KCONFIG_MODE:KCONFIG_MODE = "alldefconfig"
- KERNEL_ALT_IMAGETYPE
Specifies an alternate kernel image type for creation in addition to the kernel image type specified using the KERNEL_IMAGETYPE and KERNEL_IMAGETYPES variables.
- KERNEL_ARTIFACT_NAME
Specifies the name of all of the build artifacts. You can change the name of the artifacts by changing the KERNEL_ARTIFACT_NAME variable.
The value of KERNEL_ARTIFACT_NAME, which is set in the
meta/classes-recipe/kernel-artifact-names.bbclassfile, has the following default value:KERNEL_ARTIFACT_NAME ?= "${PKGE}-${PKGV}-${PKGR}${IMAGE_MACHINE_SUFFIX}${IMAGE_VERSION_SUFFIX}"See the PKGE, PKGV, PKGR, IMAGE_MACHINE_SUFFIX and IMAGE_VERSION_SUFFIX variables for additional information.
- KERNEL_CLASSES
A list of classes defining kernel image types that the kernel class should inherit. You typically append this variable to enable extended image types. You can register custom kernel image types with the kernel class using this variable.
- KERNEL_CONSOLE
The KERNEL_CONSOLE variable holds the value of the
consoleparameter of the kernel command line and can be used in places such as awksdescription file for Wic images.The default value of this variable is extracted from the first console device and setting in SERIAL_CONSOLES. If nothing is found in SERIAL_CONSOLES, the default value is set to
ttyS0,115200.For more information, see the Kernel command-line documentation.
- KERNEL_DANGLING_FEATURES_WARN_ONLY
When kernel configuration fragments are missing for some KERNEL_FEATURES specified by layers or BSPs, building and configuring the kernel stops with an error.
You can turn these errors into warnings by setting the following in
conf/local.conf:KERNEL_DANGLING_FEATURES_WARN_ONLY = "1"
You will still be warned that runtime issues may occur, but at least the kernel configuration and build process will be allowed to continue.
- KERNEL_DEBUG_TIMESTAMPS
If set to “1”, enables timestamping functionality during building the kernel. The default is “0” to disable this for reproducibility reasons.
- KERNEL_DEPLOY_DEPEND
Provides a means of controlling the dependency of an image recipe on the kernel. The default value is “virtual/kernel:do_deploy”, however for a small initramfs image or other images that do not need the kernel, this can be set to “” in the image recipe.
- KERNEL_DEVICETREE
Specifies the name of the generated Linux kernel device tree (i.e. the
.dtb) file.Note
There is legacy support for specifying the full path to the device tree. However, providing just the
.dtbfile is preferred.In order to use this variable, the kernel-devicetree class must be inherited.
- KERNEL_DEVICETREE_BUNDLE
When set to “1”, this variable allows to bundle the Linux kernel and the Device Tree Binary together in a single file.
This feature is currently only supported on the “arm” (32 bit) architecture.
This variable is set to “0” by default by the kernel-devicetree class.
- KERNEL_DTB_LINK_NAME
The link name of the kernel device tree binary (DTB). This variable is set in the
meta/classes-recipe/kernel-artifact-names.bbclassfile as follows:KERNEL_DTB_LINK_NAME ?= "${KERNEL_ARTIFACT_LINK_NAME}"The value of the
KERNEL_ARTIFACT_LINK_NAMEvariable, which is set in the same file, has the following value:KERNEL_ARTIFACT_LINK_NAME ?= "${MACHINE}"See the MACHINE variable for additional information.
- KERNEL_DTB_NAME
The base name of the kernel device tree binary (DTB). This variable is set in the
meta/classes-recipe/kernel-artifact-names.bbclassfile as follows:KERNEL_DTB_NAME ?= "${KERNEL_ARTIFACT_NAME}"See KERNEL_ARTIFACT_NAME for additional information.
- KERNEL_DTBDEST
This variable, used by the kernel-devicetree class, allows to change the installation directory of the DTB (Device Tree Binary) files.
It is set by default to “${KERNEL_IMAGEDEST}” by the kernel class.
- KERNEL_DTBVENDORED
This variable, used by the kernel-devicetree, allows to ignore vendor subdirectories when installing DTB (Device Tree Binary) files, when it is set to “false”.
To keep vendor subdirectories, set this variable to “true”.
It is set by default to “false” by the kernel class.
- KERNEL_DTC_FLAGS
Specifies the
dtcflags that are passed to the Linux kernel build system when generating the device trees (viaDTC_FLAGSenvironment variable).In order to use this variable, the kernel-devicetree class must be inherited.
- KERNEL_EXTRA_ARGS
Specifies additional
makecommand-line arguments the OpenEmbedded build system passes on when compiling the kernel.- KERNEL_FEATURES
Includes additional kernel metadata. In the OpenEmbedded build system, the default Board Support Packages (BSPs) Metadata is provided through the KMACHINE and KBRANCH variables. You can use the KERNEL_FEATURES variable from within the kernel recipe or kernel append file to further add metadata for all BSPs or specific BSPs.
The metadata you add through this variable includes config fragments and features descriptions, which usually includes patches as well as config fragments. You typically override the KERNEL_FEATURES variable for a specific machine. In this way, you can provide validated, but optional, sets of kernel configurations and features.
For example, the following example from the
linux-yocto-rt_4.12kernel recipe adds “netfilter” and “taskstats” features to all BSPs as well as “virtio” configurations to all QEMU machines. The last two statements add specific configurations to targeted machine types:KERNEL_EXTRA_FEATURES ?= "features/netfilter/netfilter.scc features/taskstats/taskstats.scc" KERNEL_FEATURES:append = " ${KERNEL_EXTRA_FEATURES}" KERNEL_FEATURES:append:qemuall = " cfg/virtio.scc" KERNEL_FEATURES:append:qemux86 = " cfg/sound.scc cfg/paravirt_kvm.scc" KERNEL_FEATURES:append:qemux86-64 = " cfg/sound.scc"- KERNEL_FIT_LINK_NAME
The link name of the kernel flattened image tree (FIT) image. This variable is set in the
meta/classes-recipe/kernel-artifact-names.bbclassfile as follows:KERNEL_FIT_LINK_NAME ?= "${KERNEL_ARTIFACT_LINK_NAME}"The value of the
KERNEL_ARTIFACT_LINK_NAMEvariable, which is set in the same file, has the following value:KERNEL_ARTIFACT_LINK_NAME ?= "${MACHINE}"See the MACHINE variable for additional information.
- KERNEL_FIT_NAME
The base name of the kernel flattened image tree (FIT) image. This variable is set in the
meta/classes-recipe/kernel-artifact-names.bbclassfile as follows:KERNEL_FIT_NAME ?= "${KERNEL_ARTIFACT_NAME}"See KERNEL_ARTIFACT_NAME for additional information.
- KERNEL_IMAGE_LINK_NAME
The link name for the kernel image. This variable is set in the
meta/classes-recipe/kernel-artifact-names.bbclassfile as follows:KERNEL_IMAGE_LINK_NAME ?= "${KERNEL_ARTIFACT_LINK_NAME}"The value of the
KERNEL_ARTIFACT_LINK_NAMEvariable, which is set in the same file, has the following value:KERNEL_ARTIFACT_LINK_NAME ?= "${MACHINE}"See the MACHINE variable for additional information.
- KERNEL_IMAGE_MAXSIZE
Specifies the maximum allowable size of the kernel image file in kibibytes. If this variable is set, the sizes of all of the kernel image files listed in KERNEL_IMAGETYPES are checked against this value during the do_sizecheck task. That task will warn about any of the kernel images that exceed the maximum, and will fail only if all images are too large.
KERNEL_IMAGE_MAXSIZE is useful for target devices that have a limited amount of space in which the kernel image must be stored.
By default, this variable is not set, which means the size of the kernel images are not checked.
- KERNEL_IMAGE_NAME
The base name of the kernel image. This variable is set in the
meta/classes-recipe/kernel-artifact-names.bbclassfile as follows:KERNEL_IMAGE_NAME ?= "${KERNEL_ARTIFACT_NAME}"See KERNEL_ARTIFACT_NAME for additional information.
- KERNEL_IMAGE_STRIP_EXTRA_SECTIONS
If this variable is set, it should contain the sections to be stripped from the
vmlinuximage by the kernel-related do_strip task. As a simple example:KERNEL_IMAGE_STRIP_EXTRA_SECTIONS = ".comment .note.* .debug"
- KERNEL_IMAGETYPE
The type of kernel to build for a device, usually set by the machine configuration files and defaults to “zImage”. This variable is used when building the kernel and is passed to
makeas the target to build.To build additional kernel image types, use KERNEL_IMAGETYPES.
- KERNEL_IMAGETYPES
Lists additional types of kernel images to build for a device in addition to image type specified in KERNEL_IMAGETYPE. Usually set by the machine configuration files.
- KERNEL_LOCALVERSION
This variable allows to append a string to the version of the kernel image. This corresponds to the
CONFIG_LOCALVERSIONkernel configuration parameter.Using this variable is only useful when you are using a kernel recipe inheriting the kernel class, and which doesn’t already set a local version. Therefore, setting this variable has no impact on
linux-yoctokernels.- KERNEL_MODULE_AUTOLOAD
Lists kernel modules that need to be auto-loaded during boot.
Note
This variable replaces the deprecated module_autoload variable.
You can use the KERNEL_MODULE_AUTOLOAD variable anywhere that it can be recognized by the kernel recipe or by an out-of-tree kernel module recipe (e.g. a machine configuration file, a distribution configuration file, an append file for the recipe, or the recipe itself).
Specify it as follows:
KERNEL_MODULE_AUTOLOAD += "module_name1 module_name2 module_name3"
Including KERNEL_MODULE_AUTOLOAD causes the OpenEmbedded build system to populate the
/etc/modules-load.d/modname.conffile with the list of modules to be auto-loaded on boot. The modules appear one-per-line in the file. Here is an example of the most common use case:KERNEL_MODULE_AUTOLOAD += "module_name"
For information on how to populate the
modname.conffile withmodprobe.dsyntax lines, see the KERNEL_MODULE_PROBECONF variable.- KERNEL_MODULE_PROBECONF
Provides a list of modules for which the OpenEmbedded build system expects to find
module_conf_modname values that specify configuration for each of the modules. For information on how to provide those module configurations, see the module_conf_* variable.- KERNEL_PACKAGE_NAME
Specifies the base name of the kernel packages, such as “kernel” in the kernel packages such as “kernel-modules”, “kernel-image” and “kernel-dbg”.
The default value for this variable is set to “kernel” by the kernel class.
- KERNEL_PATH
The location of the kernel sources. This variable is set to the value of the STAGING_KERNEL_DIR within the module class. For information on how this variable is used, see the “Incorporating Out-of-Tree Modules” section in the Yocto Project Linux Kernel Development Manual.
To help maximize compatibility with out-of-tree drivers used to build modules, the OpenEmbedded build system also recognizes and uses the KERNEL_SRC variable, which is identical to the KERNEL_PATH variable. Both variables are common variables used by external Makefiles to point to the kernel source directory.
- KERNEL_SPLIT_MODULES
When inheriting the kernel-module-split class, this variable controls whether kernel modules are split into separate packages or bundled into a single package.
For some use cases, a monolithic kernel module package KERNEL_PACKAGE_NAME that contains all modules built from the kernel sources may be preferred to speed up the installation.
By default, this variable is set to
1, resulting in one package per module. Setting it to any other value will generate a single monolithic package containing all kernel modules.Note
If KERNEL_SPLIT_MODULES is set to 0, it is still possible to install all kernel modules at once by adding
kernel-modules(assuming KERNEL_PACKAGE_NAME iskernel-modules) to IMAGE_INSTALL. The way it works is that a placeholder “kernel-modules” package will be created and will depend on every other individual kernel module packages.- KERNEL_SRC
The location of the kernel sources. This variable is set to the value of the STAGING_KERNEL_DIR within the module class. For information on how this variable is used, see the “Incorporating Out-of-Tree Modules” section in the Yocto Project Linux Kernel Development Manual.
To help maximize compatibility with out-of-tree drivers used to build modules, the OpenEmbedded build system also recognizes and uses the KERNEL_PATH variable, which is identical to the KERNEL_SRC variable. Both variables are common variables used by external Makefiles to point to the kernel source directory.
- KERNEL_STRIP
Allows to specific which
stripcommand to use to strip the kernel binary, typically either GNU binutilsstriporllvm-strip.- KERNEL_VERSION
Specifies the version of the kernel as extracted from
version.horutsrelease.hwithin the kernel sources. Effects of setting this variable do not take effect until the kernel has been configured. Consequently, attempting to refer to this variable in contexts prior to configuration will not work.- KERNELDEPMODDEPEND
Specifies whether the data referenced through PKGDATA_DIR is needed or not. KERNELDEPMODDEPEND does not control whether or not that data exists, but simply whether or not it is used. If you do not need to use the data, set the KERNELDEPMODDEPEND variable in your Initramfs recipe. Setting the variable there when the data is not needed avoids a potential dependency loop.
- KFEATURE_DESCRIPTION
Provides a short description of a configuration fragment. You use this variable in the
.sccfile that describes a configuration fragment file. Here is the variable used in a file namedsmp.sccto describe SMP being enabled:define KFEATURE_DESCRIPTION "Enable SMP"
- KMACHINE
The machine as known by the kernel. Sometimes the machine name used by the kernel does not match the machine name used by the OpenEmbedded build system. For example, the machine name that the OpenEmbedded build system understands as
core2-32-intel-commongoes by a different name in the Linux Yocto kernel. The kernel understands that machine asintel-core2-32. For cases like these, the KMACHINE variable maps the kernel machine name to the OpenEmbedded build system machine name.These mappings between different names occur in the Yocto Linux Kernel’s
metabranch. As an example take a look in thecommon/recipes-kernel/linux/linux-yocto_3.19.bbappendfile:LINUX_VERSION:core2-32-intel-common = "3.19.0" COMPATIBLE_MACHINE:core2-32-intel-common = "${MACHINE}" SRCREV_meta:core2-32-intel-common = "8897ef68b30e7426bc1d39895e71fb155d694974" SRCREV_machine:core2-32-intel-common = "43b9eced9ba8a57add36af07736344dcc383f711" KMACHINE:core2-32-intel-common = "intel-core2-32" KBRANCH:core2-32-intel-common = "standard/base" KERNEL_FEATURES:append:core2-32-intel-common = " ${KERNEL_FEATURES_INTEL_COMMON}"
The KMACHINE statement says that the kernel understands the machine name as “intel-core2-32”. However, the OpenEmbedded build system understands the machine as “core2-32-intel-common”.
- KMETA_AUDIT
When inheriting the kernel-yocto class, the KMETA_AUDIT variable enables or disables auditing of Linux Kernel configuration. The default value for this variable is “yes”, and auditing is enabled. Set this variable to an empty string to disable auditing.
- KMETA_AUDIT_WERROR
When inheriting the kernel-yocto class and when the KMETA_AUDIT and the KMETA_AUDIT_WERROR variables are set to non-empty strings, produce an error if Linux kernel configuration problems were detected, instead of warnings only. For more details on the Linux Kernel configuration auditing feature, see KCONF_AUDIT_LEVEL and KCONF_BSP_AUDIT_LEVEL.
- KMETA_CONFIG_FEATURES
The KMETA_CONFIG_FEATURES variable defines features enabled for the kernel-yocto class. The following list of features are supported:
prefer-modules: prefer a kernel configuration to be set asminstead of the default valueyif the kernel configuration was defined as follows:CONFIG_FOO=y # OVERRIDE:$MODULE_OR_Y
The default value of this variable is an empty string.
- KTYPE
Defines the kernel type to be used in assembling the configuration. The linux-yocto recipes define “standard”, “tiny”, and “preempt-rt” kernel types. See the “Kernel Types” section in the Yocto Project Linux Kernel Development Manual for more information on kernel types.
You define the KTYPE variable in the BSP Descriptions. The value you use must match the value used for the LINUX_KERNEL_TYPE value used by the kernel recipe.
- LABELS
Provides a list of targets for automatic configuration.
See the grub-efi class for more information on how this variable is used.
- LAYERDEPENDS
Lists the layers, separated by spaces, on which this layer depends. Optionally, you can specify a specific layer version for a dependency by adding it to the end of the layer name. Here is an example:
LAYERDEPENDS_mylayer = "anotherlayer (=3)"
In this previous example, version 3 of “anotherlayer” is compared against LAYERVERSION
_anotherlayer.An error is produced if any dependency is missing or the version numbers (if specified) do not match exactly. This variable is used in the
conf/layer.conffile and must be suffixed with the name of the specific layer (e.g.LAYERDEPENDS_mylayer).- LAYERDIR
When used inside the
layer.confconfiguration file, this variable provides the path of the current layer. This variable is not available outside oflayer.confand references are expanded immediately when parsing of the file completes.- LAYERDIR_RE
See LAYERDIR_RE in the BitBake manual.
- LAYERRECOMMENDS
Lists the layers, separated by spaces, recommended for use with this layer.
Optionally, you can specify a specific layer version for a recommendation by adding the version to the end of the layer name. Here is an example:
LAYERRECOMMENDS_mylayer = "anotherlayer (=3)"
In this previous example, version 3 of “anotherlayer” is compared against
LAYERVERSION_anotherlayer.This variable is used in the
conf/layer.conffile and must be suffixed with the name of the specific layer (e.g.LAYERRECOMMENDS_mylayer).- LAYERSERIES_COMPAT
See LAYERSERIES_COMPAT in the BitBake manual.
- LAYERVERSION
Optionally specifies the version of a layer as a single number. You can use this within LAYERDEPENDS for another layer in order to depend on a specific version of the layer. This variable is used in the
conf/layer.conffile and must be suffixed with the name of the specific layer (e.g.LAYERVERSION_mylayer).- LD
The minimal command and arguments used to run the linker.
- LDFLAGS
Specifies the flags to pass to the linker. This variable is exported to an environment variable and thus made visible to the software being built during the compilation step.
Default initialization for LDFLAGS varies depending on what is being built:
TARGET_LDFLAGS when building for the target
BUILD_LDFLAGS when building for the build host (i.e.
-native)BUILDSDK_LDFLAGS when building for an SDK (i.e.
nativesdk-)
- LEAD_SONAME
Specifies the lead (or primary) compiled library file (i.e.
.so) that the debian class applies its naming policy to given a recipe that packages multiple libraries.This variable works in conjunction with the debian class.
- LIC_FILES_CHKSUM
Checksums of the license text in the recipe source code.
This variable tracks changes in license text of the source code files. If the license text is changed, it will trigger a build failure, which gives the developer an opportunity to review any license change.
This variable must be defined for all recipes (unless LICENSE is set to “CLOSED”).
For more information, see the “Tracking License Changes” section in the Yocto Project Development Tasks Manual.
- LICENSE
This is a required field in an OpenEmbedded recipe file, and should contain a list of source licenses for the recipe. Follow these rules:
Do not use spaces within individual license names.
Separate license names using | (pipe) when there is a choice between licenses.
Separate license names using & (ampersand) when there are multiple licenses for different parts of the source.
You can use spaces between license names.
For standard licenses, use the names of the files in
meta/files/common-licenses/or the SPDXLICENSEMAP flag names defined inmeta/conf/licenses.conf.
Here are some examples:
LICENSE = "LGPL-2.1-only | GPL-3.0-only" LICENSE = "MPL-1.0 & LGPL-2.1-only" LICENSE = "GPL-2.0-or-later"
The first example is from the recipes for Qt, which the user may choose to distribute under either the LGPL version 2.1 or GPL version 3. The second example is from Cairo where two licenses cover different parts of the source code. The final example is from
sysstat, which presents a single license.You can also specify licenses on a per-package basis to handle situations where components of the output have different licenses. For example, a piece of software whose code is licensed under GPLv2 but has accompanying documentation licensed under the GNU Free Documentation License 1.2 could be specified as follows:
LICENSE = "GFDL-1.2 & GPL-2.0-only" LICENSE:${PN} = "GPL-2.0.only" LICENSE:${PN}-doc = "GFDL-1.2"Note
A recipe’s LICENSE value must be accompanied by an associated LIC_FILES_CHKSUM value, except in the special case where the LICENSE value is set to “CLOSED”.
- LICENSE_CREATE_PACKAGE
Setting LICENSE_CREATE_PACKAGE to “1” causes the OpenEmbedded build system to create an extra package (i.e.
${PN}-lic) for each recipe and to add those packages to the RRECOMMENDS:${PN}.The
${PN}-licpackage installs a directory in/usr/share/licensesnamed${PN}, which is the recipe’s base name, and installs files in that directory that contain license and copyright information (i.e. copies of the appropriate license files frommeta/common-licensesthat match the licenses specified in the LICENSE variable of the recipe metadata and copies of files marked in LIC_FILES_CHKSUM as containing license text).For related information on providing license text, see the COPY_LIC_DIRS variable, the COPY_LIC_MANIFEST variable, and the “Providing License Text” section in the Yocto Project Development Tasks Manual.
- LICENSE_FLAGS
Specifies additional flags for a recipe you must allow through LICENSE_FLAGS_ACCEPTED in order for the recipe to be built. When providing multiple flags, separate them with spaces.
This value is independent of LICENSE and is typically used to mark recipes that might require additional licenses in order to be used in a commercial product. For more information, see the “Enabling Commercially Licensed Recipes” section in the Yocto Project Development Tasks Manual.
- LICENSE_FLAGS_ACCEPTED
Lists license flags that when specified in LICENSE_FLAGS within a recipe should not prevent that recipe from being built. For more information, see the “Enabling Commercially Licensed Recipes” section in the Yocto Project Development Tasks Manual.
- LICENSE_FLAGS_DETAILS
Adds details about a flag in LICENSE_FLAGS. This way, if such a flag is not accepted through LICENSE_FLAGS_ACCEPTED, the error message will be more informative, containing the specified extra details.
For example, a recipe with an EULA may set:
LICENSE_FLAGS = "FooBar-EULA" LICENSE_FLAGS_DETAILS[FooBar-EULA] = "For further details, see https://example.com/eula."
If
Foobar-EULAisn’t in LICENSE_FLAGS_ACCEPTED, the error message is more useful:Has a restricted license 'FooBar-EULA' which is not listed in your LICENSE_FLAGS_ACCEPTED. For further details, see https://example.com/eula.
- LICENSE_PATH
Path to additional licenses used during the build. By default, the OpenEmbedded build system uses COMMON_LICENSE_DIR to define the directory that holds common license text used during the build. The LICENSE_PATH variable allows you to extend that location to other areas that have additional licenses:
LICENSE_PATH += "path-to-additional-common-licenses"
- LINUX_KERNEL_TYPE
Defines the kernel type to be used in assembling the configuration. The linux-yocto recipes define “standard”, “tiny”, and “preempt-rt” kernel types. See the “Kernel Types” section in the Yocto Project Linux Kernel Development Manual for more information on kernel types.
If you do not specify a LINUX_KERNEL_TYPE, it defaults to “standard”. Together with KMACHINE, the LINUX_KERNEL_TYPE variable defines the search arguments used by the kernel tools to find the appropriate description within the kernel Metadata with which to build out the sources and configuration.
- LINUX_VERSION
The Linux version from
kernel.orgon which the Linux kernel image being built using the OpenEmbedded build system is based. You define this variable in the kernel recipe. For example, thelinux-yocto-3.4.bbkernel recipe found inmeta/recipes-kernel/linuxdefines the variables as follows:LINUX_VERSION ?= "3.4.24"
The LINUX_VERSION variable is used to define PV for the recipe:
PV = "${LINUX_VERSION}+git"
- LINUX_VERSION_EXTENSION
A string extension compiled into the version string of the Linux kernel built with the OpenEmbedded build system. You define this variable in the kernel recipe. For example, the linux-yocto kernel recipes all define the variable as follows:
LINUX_VERSION_EXTENSION ?= "-yocto-${LINUX_KERNEL_TYPE}"Defining this variable essentially sets the Linux kernel configuration item
CONFIG_LOCALVERSION, which is visible through theunamecommand. Here is an example that shows the extension assuming it was set as previously shown:$ uname -r 3.7.0-rc8-custom
- LOCALE_PATHS
The LOCALE_PATHS variable holds a whitespace separated list of paths that are scanned to construct
-localepackages during Package Splitting. The list contains${datadir}/localeby default.- LOCALE_UTF8_IS_DEFAULT
If set, locale names are renamed such that those lacking an explicit encoding (e.g.
en_US) will always be UTF-8, and non-UTF-8 encodings are renamed to, e.g.,en_US.ISO-8859-1. Otherwise, the encoding is specified by Glibc’sSUPPORTEDfile. This is not supported for pre-compiled locales.- LOG_DIR
Specifies the directory to which the OpenEmbedded build system writes overall log files. The default directory is
${TMPDIR}/log.For the directory containing logs specific to each task, see the T variable.
- LTO
The LTO variable defines the flags specific to the
ltodistro feature. The value of this variable is appended to the TARGET_LDFLAGS variable, adding Link-Time Optimisation flags to the linker in-use.- MACHINE
Specifies the target device for which the image is built. You define MACHINE in the
local.conffile found in the Build Directory. By default, MACHINE is set to “qemux86”, which is an x86-based architecture machine to be emulated using QEMU:MACHINE ?= "qemux86"
The variable corresponds to a machine configuration file of the same name, through which machine-specific configurations are set. Thus, when MACHINE is set to “qemux86”, the corresponding
qemux86.confmachine configuration file can be found in OpenEmbedded-Core (OE-Core) inmeta/conf/machine.The list of machines supported by the Yocto Project as shipped include the following:
MACHINE ?= "qemuarm" MACHINE ?= "qemuarm64" MACHINE ?= "qemumips" MACHINE ?= "qemumips64" MACHINE ?= "qemuppc" MACHINE ?= "qemux86" MACHINE ?= "qemux86-64" MACHINE ?= "genericx86" MACHINE ?= "genericx86-64" MACHINE ?= "beaglebone"
The last five are Yocto Project reference hardware boards, which are provided in the
meta-yocto-bsplayer.Note
Adding additional Board Support Package (BSP) layers to your configuration adds new possible settings for MACHINE.
- MACHINE_ARCH
Specifies the name of the machine-specific architecture. This variable is set automatically from MACHINE or TUNE_PKGARCH. You should not hand-edit the MACHINE_ARCH variable.
- MACHINE_ESSENTIAL_EXTRA_RDEPENDS
A list of required machine-specific packages to install as part of the image being built. The build process depends on these packages being present. Furthermore, because this is a “machine-essential” variable, the list of packages are essential for the machine to boot. The impact of this variable affects images based on
packagegroup-core-boot, including thecore-image-minimalimage.This variable is similar to the MACHINE_ESSENTIAL_EXTRA_RRECOMMENDS variable with the exception that the image being built has a build dependency on the variable’s list of packages. In other words, the image will not build if a file in this list is not found.
As an example, suppose the machine for which you are building requires
example-initto be run during boot to initialize the hardware. In this case, you would use the following in the machine’s.confconfiguration file:MACHINE_ESSENTIAL_EXTRA_RDEPENDS += "example-init"
- MACHINE_ESSENTIAL_EXTRA_RRECOMMENDS
A list of recommended machine-specific packages to install as part of the image being built. The build process does not depend on these packages being present. However, because this is a “machine-essential” variable, the list of packages are essential for the machine to boot. The impact of this variable affects images based on
packagegroup-core-boot, including thecore-image-minimalimage.This variable is similar to the MACHINE_ESSENTIAL_EXTRA_RDEPENDS variable with the exception that the image being built does not have a build dependency on the variable’s list of packages. In other words, the image will still build if a package in this list is not found. Typically, this variable is used to handle essential kernel modules, whose functionality may be selected to be built into the kernel rather than as a module, in which case a package will not be produced.
Consider an example where you have a custom kernel where a specific touchscreen driver is required for the machine to be usable. However, the driver can be built as a module or into the kernel depending on the kernel configuration. If the driver is built as a module, you want it to be installed. But, when the driver is built into the kernel, you still want the build to succeed. This variable sets up a “recommends” relationship so that in the latter case, the build will not fail due to the missing package. To accomplish this, assuming the package for the module was called
kernel-module-ab123, you would use the following in the machine’s.confconfiguration file:MACHINE_ESSENTIAL_EXTRA_RRECOMMENDS += "kernel-module-ab123"
Note
In this example, the
kernel-module-ab123recipe needs to explicitly set its PACKAGES variable to ensure that BitBake does not use the kernel recipe’s PACKAGES_DYNAMIC variable to satisfy the dependency.Some examples of these machine essentials are flash, screen, keyboard, mouse, or touchscreen drivers (depending on the machine).
- MACHINE_EXTRA_RDEPENDS
A list of machine-specific packages to install as part of the image being built that are not essential for the machine to boot. However, the build process for more fully-featured images depends on the packages being present.
This variable affects all images based on
packagegroup-base, which does not include thecore-image-minimalorcore-image-full-cmdlineimages.The variable is similar to the MACHINE_EXTRA_RRECOMMENDS variable with the exception that the image being built has a build dependency on the variable’s list of packages. In other words, the image will not build if a file in this list is not found.
An example is a machine that has WiFi capability but is not essential for the machine to boot the image. However, if you are building a more fully-featured image, you want to enable the WiFi. The package containing the firmware for the WiFi hardware is always expected to exist, so it is acceptable for the build process to depend upon finding the package. In this case, assuming the package for the firmware was called
wifidriver-firmware, you would use the following in the.conffile for the machine:MACHINE_EXTRA_RDEPENDS += "wifidriver-firmware"
- MACHINE_EXTRA_RRECOMMENDS
A list of machine-specific packages to install as part of the image being built that are not essential for booting the machine. The image being built has no build dependency on this list of packages.
This variable affects only images based on
packagegroup-base, which does not include thecore-image-minimalorcore-image-full-cmdlineimages.This variable is similar to the MACHINE_EXTRA_RDEPENDS variable with the exception that the image being built does not have a build dependency on the variable’s list of packages. In other words, the image will build if a file in this list is not found.
An example is a machine that has WiFi capability but is not essential For the machine to boot the image. However, if you are building a more fully-featured image, you want to enable WiFi. In this case, the package containing the WiFi kernel module will not be produced if the WiFi driver is built into the kernel, in which case you still want the build to succeed instead of failing as a result of the package not being found. To accomplish this, assuming the package for the module was called
kernel-module-examplewifi, you would use the following in the.conffile for the machine:MACHINE_EXTRA_RRECOMMENDS += "kernel-module-examplewifi"
- MACHINE_FEATURES
Specifies the list of hardware features the MACHINE is capable of supporting. For related information on enabling features, see the DISTRO_FEATURES, COMBINED_FEATURES, and IMAGE_FEATURES variables.
For a list of hardware features supported by the Yocto Project as shipped, see the “Machine Features” section.
- MACHINE_FEATURES_DEFAULTS
Specifies a space-separated list of default machine features provided by the OpenEmbedded Build System. This list should not be modified directly, but instead MACHINE_FEATURES_OPTED_OUT should be used to prevent default machine features from being enabled.
See Default Features for more information.
- MACHINE_FEATURES_OPTED_OUT
Specifies a space-separated list of machine features to opt out from when they are provided by the MACHINE_FEATURES_DEFAULTS variable.
You can also opt out of all default features by setting MACHINE_FEATURES_OPTED_OUT to
*:MACHINE_FEATURES_OPTED_OUT = "*"
See Default Features for more information.
- MACHINEOVERRIDES
A colon-separated list of overrides that apply to the current machine. By default, this list includes the value of MACHINE.
You can extend MACHINEOVERRIDES to add extra overrides that should apply to a machine. For example, all machines emulated in QEMU (e.g.
qemuarm,qemux86, and so forth) include a file namedmeta/conf/machine/include/qemu.incthat prepends the following override to MACHINEOVERRIDES:MACHINEOVERRIDES =. "qemuall:"
This override allows variables to be overridden for all machines emulated in QEMU, like in the following example from the
connman-confrecipe:SRC_URI:append:qemuall = " file://wired.config \ file://wired-setup \ "
The underlying mechanism behind MACHINEOVERRIDES is simply that it is included in the default value of OVERRIDES.
- MAINTAINER
The email address of the distribution maintainer.
- MESON_BUILDTYPE
Value of the Meson
--buildtypeargument used by the meson class. It defaults todebugif DEBUG_BUILD is set to “1”, andplainotherwise.See Meson build options for the values you could set in a recipe. Values such as
plain,debug,debugoptimized,releaseandminsizeallow you to specify the inclusion of debugging symbols and the compiler optimizations (none, performance or size).- MESON_INSTALL_TAGS
A variable for the meson class, allowing to specify install tags (
--tagsargument of themeson installcommand).- MESON_TARGET
A variable for the meson class, allowing to choose a Meson target to build in do_compile. Otherwise, the default targets are built.
- METADATA_BRANCH
The branch currently checked out for the OpenEmbedded-Core layer (path determined by COREBASE).
- METADATA_REVISION
The revision currently checked out for the OpenEmbedded-Core layer (path determined by COREBASE).
- MIME_XDG_PACKAGES
The current implementation of the mime-xdg class cannot detect
.desktopfiles installed through absolute symbolic links. Use this setting to make the class create post-install and post-remove scripts for these packages anyway, to invoke theupdate-destop-databasecommand.- MIRRORS
Specifies additional paths from which the OpenEmbedded build system gets source code. When the build system searches for source code, it first tries the local download directory. If that location fails, the build system tries locations defined by PREMIRRORS, the upstream source, and then locations specified by MIRRORS in that order.
The default value for MIRRORS is defined in the
meta/classes-global/mirrors.bbclassfile in the core metadata layer.See the definition of this variable in the BitBake Manual for more details: MIRRORS.
- MLPREFIX
Specifies a prefix has been added to PN to create a special version of a recipe or package (i.e. a Multilib version). The variable is used in places where the prefix needs to be added to or removed from a name (e.g. the BPN variable). MLPREFIX gets set when a prefix has been added to PN.
Note
The “ML” in MLPREFIX stands for “MultiLib”. This representation is historical and comes from a time when “nativesdk” was a suffix rather than a prefix on the recipe name. When “nativesdk” was turned into a prefix, it made sense to set MLPREFIX for it as well.
To help understand when MLPREFIX might be needed, consider when BBCLASSEXTEND is used to provide a nativesdk version of a recipe in addition to the target version. If that recipe declares build-time dependencies on tasks in other recipes by using DEPENDS, then a dependency on “foo” will automatically get rewritten to a dependency on “nativesdk-foo”. However, dependencies like the following will not get rewritten automatically:
do_foo[depends] += "recipe:do_foo"
If you want such a dependency to also get transformed, you can do the following:
do_foo[depends] += "${MLPREFIX}recipe:do_foo"
- module_autoload
This variable has been replaced by the KERNEL_MODULE_AUTOLOAD variable. You should replace all occurrences of module_autoload with additions to KERNEL_MODULE_AUTOLOAD, for example:
module_autoload_rfcomm = "rfcomm"
should now be replaced with:
KERNEL_MODULE_AUTOLOAD += "rfcomm"
See the KERNEL_MODULE_AUTOLOAD variable for more information.
- module_conf
Specifies modprobe.d(5) syntax lines for inclusion in the
/etc/modprobe.d/modname.conffile.You can use this variable anywhere that it can be recognized by the kernel recipe or out-of-tree kernel module recipe (e.g. a machine configuration file, a distribution configuration file, an append file for the recipe, or the recipe itself). If you use this variable, you must also be sure to list the module name in the KERNEL_MODULE_PROBECONF variable.
Here is the general syntax:
module_conf_module_name = "modprobe.d-syntax"
You must use the kernel module name override.
Run
man modprobe.din the shell to find out more information on the exact syntax you want to provide with module_conf.Including module_conf causes the OpenEmbedded build system to populate the
/etc/modprobe.d/modname.conffile withmodprobe.dsyntax lines. Here is an example that adds the optionsarg1andarg2to a module namedmymodule:module_conf_mymodule = "options mymodule arg1=val1 arg2=val2"
For information on how to specify kernel modules to auto-load on boot, see the KERNEL_MODULE_AUTOLOAD variable.
- MODULE_TARBALL_DEPLOY
Controls creation of the
modules-*.tgzfile. Set this variable to “0” to disable creation of this file, which contains all of the kernel modules resulting from a kernel build.- MODULE_TARBALL_LINK_NAME
The link name of the kernel module tarball. This variable is set in the
meta/classes-recipe/kernel-artifact-names.bbclassfile as follows:MODULE_TARBALL_LINK_NAME ?= "${KERNEL_ARTIFACT_LINK_NAME}"The value of the
KERNEL_ARTIFACT_LINK_NAMEvariable, which is set in the same file, has the following value:KERNEL_ARTIFACT_LINK_NAME ?= "${MACHINE}"See the MACHINE variable for additional information.
- MODULE_TARBALL_NAME
The base name of the kernel module tarball. This variable is set in the
meta/classes-recipe/kernel-artifact-names.bbclassfile as follows:MODULE_TARBALL_NAME ?= "${KERNEL_ARTIFACT_NAME}"See KERNEL_ARTIFACT_NAME for additional information.
- MOUNT_BASE
On non-systemd systems (where
udev-extraconfis being used), specifies the base directory for auto-mounting filesystems. The default value is “/run/media”.- MOUNT_GROUP
On non-systemd systems (where
udev-extraconfis being used), specifies the mount group for auto-mounting filesystems. The default value is “disk”.- MULTIMACH_TARGET_SYS
Uniquely identifies the type of the target system for which packages are being built. This variable allows output for different types of target systems to be put into different subdirectories of the same output directory.
The default value of this variable is:
${PACKAGE_ARCH}${TARGET_VENDOR}-${TARGET_OS}Some classes (e.g. cross-canadian) modify the MULTIMACH_TARGET_SYS value.
See the STAMP variable for an example. See the STAGING_DIR_TARGET variable for more information.
- NATIVELSBSTRING
A string identifying the host distribution. Strings consist of the host distributor ID followed by the release, as reported by the
lsb_releasetool or as read from/etc/lsb-release. For example, when running a build on Ubuntu 12.10, the value is “Ubuntu-12.10”. If this information is unable to be determined, the value resolves to “Unknown”.This variable is used by default to isolate native shared state packages for different distributions (e.g. to avoid problems with
glibcversion incompatibilities). Additionally, the variable is checked against SANITY_TESTED_DISTROS if that variable is set.- NM
The minimal command and arguments to run nm.
- NO_GENERIC_LICENSE
Avoids QA errors when you use a non-common, non-CLOSED license in a recipe. There are packages, such as the linux-firmware package, with many licenses that are not in any way common. Also, new licenses are added occasionally to avoid introducing a lot of common license files, which are only applicable to a specific package. NO_GENERIC_LICENSE is used to allow copying a license that does not exist in common licenses.
The following example shows how to add NO_GENERIC_LICENSE to a recipe:
NO_GENERIC_LICENSE[license_name] = "license_file_in_fetched_source"
Here is an example that uses the
LICENSE.Abilis.txtfile as the license from the fetched source:NO_GENERIC_LICENSE[Firmware-Abilis] = "LICENSE.Abilis.txt"
- NO_RECOMMENDATIONS
Prevents installation of all “recommended-only” packages. Recommended-only packages are packages installed only through the RRECOMMENDS variable). Setting the NO_RECOMMENDATIONS variable to “1” turns this feature on:
NO_RECOMMENDATIONS = "1"
You can set this variable globally in your
local.conffile or you can attach it to a specific image recipe by using the recipe name override:NO_RECOMMENDATIONS:pn-target_image = "1"
It is important to realize that if you choose to not install packages using this variable and some other packages are dependent on them (i.e. listed in a recipe’s RDEPENDS variable), the OpenEmbedded build system ignores your request and will install the packages to avoid dependency errors.
Note
Some recommended packages might be required for certain system functionality, such as kernel modules. It is up to you to add packages with the IMAGE_INSTALL variable.
This variable is supported for all packaging backends.
See the BAD_RECOMMENDATIONS and the PACKAGE_EXCLUDE variables for related information.
- NOAUTOPACKAGEDEBUG
Disables auto package from splitting
.debugfiles. If a recipe requiresFILES:${PN}-dbgto be set manually, the NOAUTOPACKAGEDEBUG can be defined allowing you to define the content of the debug package. For example:NOAUTOPACKAGEDEBUG = "1" FILES:${PN}-dev = "${includedir}/${QT_DIR_NAME}/Qt/*" FILES:${PN}-dbg = "/usr/src/debug/" FILES:${QT_BASE_NAME}-demos-doc = "${docdir}/${QT_DIR_NAME}/qch/qt.qch"- NON_MULTILIB_RECIPES
A list of recipes that should not be built for multilib. OE-Core’s
multilib.conffile defines a reasonable starting point for this list with:NON_MULTILIB_RECIPES = "grub grub-efi make-mod-scripts ovmf u-boot"
- OBJCOPY
The minimal command and arguments to run objcopy.
- OBJDUMP
The minimal command and arguments to run objdump.
- OE_BINCONFIG_EXTRA_MANGLE
When inheriting the binconfig class, this variable specifies additional arguments passed to the “sed” command. The sed command alters any paths in configuration scripts that have been set up during compilation. Inheriting this class results in all paths in these scripts being changed to point into the
sysroots/directory so that all builds that use the script will use the correct directories for the cross compiling layout.See the
meta/classes-recipe/binconfig.bbclassin OpenEmbedded-Core (OE-Core) for details on how this class applies these additional sed command arguments.- OE_FRAGMENTS
The OE_FRAGMENTS variable holds the list of Configuration Fragments currently enabled for the build. For details on how to use fragments, see the Using Configuration Fragments section of the Yocto Project Reference Manual.
- OE_FRAGMENTS_BUILTIN
The OE_FRAGMENTS_BUILTIN variable holds the list of Built-in Fragments available for being set with bitbake-config-build. For details on how to use fragments, see the Using Configuration Fragments section of the Yocto Project Reference Manual.
- OE_FRAGMENTS_METADATA_VARS
The OE_FRAGMENTS_METADATA_VARS variable holds the list of variables that are required to set in a standard Configuration Fragment file. In OpenEmbedded-Core (OE-Core), these variables are BB_CONF_FRAGMENT_SUMMARY and BB_CONF_FRAGMENT_DESCRIPTION.
- OE_FRAGMENTS_PREFIX
The OE_FRAGMENTS_PREFIX variable defines the prefix where BitBake tries to locate Configuration Fragments in layers. For details on how to use fragments, see the Using Configuration Fragments section of the Yocto Project Reference Manual.
- OE_INIT_ENV_SCRIPT
The name of the build environment setup script for the purposes of setting up the environment within the extensible SDK. The default value is “oe-init-build-env”.
If you use a custom script to set up your build environment, set the OE_INIT_ENV_SCRIPT variable to its name.
- OE_SHARED_UMASK
The OE_SHARED_UMASK variable contains the umask definition for shared files (for example files in SSTATE_DIR or DL_DIR).
- OE_TERMINAL
Controls how the OpenEmbedded build system spawns interactive terminals on the host development system (e.g. using the BitBake command with the
-c devshellcommand-line option). For more information, see the “Using a Development Shell” section in the Yocto Project Development Tasks Manual.You can use the following values for the OE_TERMINAL variable:
auto
gnome
xfce
rxvt
screen
konsole
none
- OECMAKE_GENERATOR
A variable for the cmake class, allowing to choose which back-end will be generated by CMake to build an application.
By default, this variable is set to
Ninja, which is faster than GNU make, but if building is broken with Ninja, a recipe can use this variable to use GNU make instead:OECMAKE_GENERATOR = "Unix Makefiles"
- OEQA_REPRODUCIBLE_TEST_LEAF_TARGETS
Set build target(s) for build reproducibility testing but activate shared state build for most dependencies (i.e. the ones explicitly listed in DEPENDS, which may not be all dependencies, c.f. [depends] varflags, PACKAGE_DEPENDS and other implementations). See Reproducible Builds.
- OEQA_REPRODUCIBLE_TEST_PACKAGE
Set the package manager(s) for build reproducibility testing. See reproducible.py and Reproducible Builds.
- OEQA_REPRODUCIBLE_TEST_SSTATE_TARGETS
Set build targets which can be rebuilt using shared state when running build reproducibility tests. See Reproducible Builds.
- OEQA_REPRODUCIBLE_TEST_TARGET
Set build target for build reproducibility testing. By default all available recipes are compiled with “bitbake world”, see also EXCLUDE_FROM_WORLD and Reproducible Builds.
- OEROOT
The directory from which the top-level build environment setup script is sourced. The Yocto Project provides a top-level build environment setup script: oe-init-build-env. When you run this script, the OEROOT variable resolves to the directory that contains the script.
For additional information on how this variable is used, see the initialization script.
- OLDEST_KERNEL
Declares the oldest version of the Linux kernel that the produced binaries must support. This variable is passed into the build of the Embedded GNU C Library (
glibc).The default for this variable comes from the
meta/conf/bitbake.confconfiguration file. You can override this default by setting the variable in a custom distribution configuration file.- OPENSSH_HOST_KEY_DIR
Specifies the directory where OpenSSH host keys are stored. Default is
/etc/ssh.- OPENSSH_HOST_KEY_DIR_READONLY_CONFIG
Specifies the directory where OpenSSH host keys are stored when the device uses a read-only filesystem. Default is
/var/run/ssh.- OPKG_MAKE_INDEX_EXTRA_PARAMS
Specifies extra parameters for the
opkg-make-indexcommand.- OPKGBUILDCMD
The variable OPKGBUILDCMD specifies the command used to build opkg packages when using the package_ipk class. It is defined in package_ipk as:
OPKGBUILDCMD ??= 'opkg-build -Z zstd -a "${ZSTD_DEFAULTS}"'- OVERLAYFS_ETC_DEVICE
When the overlayfs-etc class is inherited, specifies the device to be mounted for the read/write layer of
/etc. There is no default, so you must set this if you wish to enable overlayfs-etc, for example, assuming/dev/mmcblk0p2was the desired device:OVERLAYFS_ETC_DEVICE = "/dev/mmcblk0p2"
- OVERLAYFS_ETC_EXPOSE_LOWER
When the overlayfs-etc class is inherited, if set to “1” then a read-only access to the original
/etccontent will be provided as alower/subdirectory of OVERLAYFS_ETC_MOUNT_POINT. The default value is “0”.- OVERLAYFS_ETC_FSTYPE
When the overlayfs-etc class is inherited, specifies the file system type for the read/write layer of
/etc. There is no default, so you must set this if you wish to enable overlayfs-etc, for example, assuming the file system is ext4:OVERLAYFS_ETC_FSTYPE = "ext4"
- OVERLAYFS_ETC_MOUNT_OPTIONS
When the overlayfs-etc class is inherited, specifies the mount options for the read-write layer. The default value is “defaults”.
- OVERLAYFS_ETC_MOUNT_POINT
When the overlayfs-etc class is inherited, specifies the parent mount path for the filesystem layers. There is no default, so you must set this if you wish to enable overlayfs-etc, for example if the desired path is “/data”:
OVERLAYFS_ETC_MOUNT_POINT = "/data"
- OVERLAYFS_ETC_USE_ORIG_INIT_NAME
When the overlayfs-etc class is inherited, controls how the generated init will be named. For more information, see the overlayfs-etc class documentation. The default value is “1”.
- OVERLAYFS_MOUNT_POINT
When inheriting the overlayfs class, specifies mount point(s) to be used. For example:
OVERLAYFS_MOUNT_POINT[data] = "/data"
The assumes you have a
data.mountsystemd unit defined elsewhere in your BSP (e.g. insystemd-machine-unitsrecipe) and it is installed into the image. For more information see overlayfs.Note
Although the overlayfs class is inherited by individual recipes, OVERLAYFS_MOUNT_POINT should be set in your machine configuration.
- OVERLAYFS_QA_SKIP
When inheriting the overlayfs class, provides the ability to disable QA checks for particular overlayfs mounts. For example:
OVERLAYFS_QA_SKIP[data] = "mount-configured"
Note
Although the overlayfs class is inherited by individual recipes, OVERLAYFS_QA_SKIP should be set in your machine configuration.
- OVERLAYFS_WRITABLE_PATHS
When inheriting the overlayfs class, specifies writable paths used at runtime for the recipe. For example:
OVERLAYFS_WRITABLE_PATHS[data] = "/usr/share/my-custom-application"
- OVERRIDES
A colon-separated list of overrides that currently apply. Overrides are a BitBake mechanism that allows variables to be selectively overridden at the end of parsing. The set of overrides in OVERRIDES represents the “state” during building, which includes the current recipe being built, the machine for which it is being built, and so forth.
As an example, if the string “an-override” appears as an element in the colon-separated list in OVERRIDES, then the following assignment will override
FOOwith the value “overridden” at the end of parsing:FOO:an-override = "overridden"
See the “Conditional Syntax (Overrides)” section in the BitBake User Manual for more information on the overrides mechanism.
The default value of OVERRIDES includes the values of the CLASSOVERRIDE, MACHINEOVERRIDES, and DISTROOVERRIDES variables. Another important override included by default is
pn-${PN}. This override allows variables to be set for a single recipe within configuration (.conf) files. Here is an example:FOO:pn-myrecipe = "myrecipe-specific value"
Note
An easy way to see what overrides apply is to run the command
bitbake-getvar -r myrecipe OVERRIDES. See the “Viewing Variable Values” section in the Yocto Project Development Tasks Manual for more information.- P
The recipe name and version. P is comprised of the following:
${PN}-${PV}- P4DIR
See P4DIR in the BitBake manual.
- PACKAGE_ADD_METADATA
This variable defines additional metadata to add to packages.
You may find you need to inject additional metadata into packages. This variable allows you to do that by setting the injected data as the value. Multiple fields can be added by splitting the content with the literal separator “n”.
The suffixes ‘_IPK’, ‘_DEB’, or ‘_RPM’ can be applied to the variable to do package type specific settings. It can also be made package specific by using the package name as a suffix.
You can find out more about applying this variable in the “Adding custom metadata to packages” section in the Yocto Project Development Tasks Manual.
- PACKAGE_ARCH
The architecture of the resulting package or packages.
By default, the value of this variable is set to TUNE_PKGARCH when building for the target, BUILD_ARCH when building for the build host, and “${SDK_ARCH}-${SDKPKGSUFFIX}” when building for the SDK.
Note
See SDK_ARCH for more information.
However, if your recipe’s output packages are built specific to the target machine rather than generally for the architecture of the machine, you should set PACKAGE_ARCH to the value of MACHINE_ARCH in the recipe as follows:
PACKAGE_ARCH = "${MACHINE_ARCH}"
- PACKAGE_ARCHS
Specifies a list of architectures compatible with the target machine. This variable is set automatically and should not normally be hand-edited. Entries are separated using spaces and listed in order of priority. The default value for PACKAGE_ARCHS is “all any noarch ${PACKAGE_EXTRA_ARCHS} ${MACHINE_ARCH}”.
- PACKAGE_BEFORE_PN
Enables easily adding packages to PACKAGES before
${PN}so that those added packages can pick up files that would normally be included in the default package.- PACKAGE_CLASSES
This variable, which is set in the
local.confconfiguration file found in theconffolder of the Build Directory, specifies the package manager the OpenEmbedded build system uses when packaging data.You can provide one or more of the following arguments for the variable:
PACKAGE_CLASSES ?= "package_rpm package_deb package_ipk"
The build system uses only the first argument in the list as the package manager when creating your image or SDK. However, packages will be created using any additional packaging classes you specify. For example, if you use the following in your
local.conffile:PACKAGE_CLASSES ?= "package_ipk"
The OpenEmbedded build system uses the IPK package manager to create your image or SDK.
For information on packaging and build performance effects as a result of the package manager in use, see the “package” section.
- PACKAGE_DEBUG_SPLIT_STYLE
Determines how to split up and package debug and source information when creating debugging packages to be used with the GNU Project Debugger (GDB). In general, based on the value of this variable, you can combine the source and debug info in a single package, you can break out the source into a separate package that can be installed independently, or you can choose to not have the source packaged at all.
The possible values of PACKAGE_DEBUG_SPLIT_STYLE variable:
“
.debug”: All debugging and source info is placed in a single*-dbgpackage; debug symbol files are placed next to the binary in a.debugdirectory so that, if a binary is installed into/bin, the corresponding debug symbol file is installed in/bin/.debug. Source files are installed in the same*-dbgpackage under/usr/src/debug.“
debug-file-directory”: As above, all debugging and source info is placed in a single*-dbgpackage; debug symbol files are placed entirely under the directory/usr/lib/debugand separated by the path from where the binary is installed, so that if a binary is installed in/bin, the corresponding debug symbols are installed in/usr/lib/debug/bin, and so on. As above, source is installed in the same package under/usr/src/debug.“
debug-with-srcpkg”: Debugging info is placed in the standard*-dbgpackage as with the.debugvalue, while source is placed in a separate*-srcpackage, which can be installed independently. This is the default setting for this variable, as defined in OE-Core’sbitbake.conffile.“
debug-without-src”: The same behavior as with the.debugsetting, but no source is packaged at all.
Note
Much of the above package splitting can be overridden via use of the INHIBIT_PACKAGE_DEBUG_SPLIT variable.
You can find out more about debugging using GDB by reading the “Debugging With the GNU Project Debugger (GDB) Remotely” section in the Yocto Project Development Tasks Manual.
- PACKAGE_EXCLUDE
Lists packages that should not be installed into an image. For example:
PACKAGE_EXCLUDE = "package_name package_name package_name ..."
You can set this variable globally in your
local.conffile or you can attach it to a specific image recipe by using the recipe name override:PACKAGE_EXCLUDE:pn-target_image = "package_name"
If you choose to not install a package using this variable and some other package is dependent on it (i.e. listed in a recipe’s RDEPENDS variable), the OpenEmbedded build system generates a fatal installation error. Because the build system halts the process with a fatal error, you can use the variable with an iterative development process to remove specific components from a system.
This variable is supported for all packaging backends.
See the NO_RECOMMENDATIONS and the BAD_RECOMMENDATIONS variables for related information.
- PACKAGE_EXCLUDE_COMPLEMENTARY
Prevents specific packages from being installed when you are installing complementary packages.
You might find that you want to prevent installing certain packages when you are installing complementary packages. For example, if you are using IMAGE_FEATURES to install
dev-pkgs, you might not want to install all packages from a particular multilib. If you find yourself in this situation, you can use the PACKAGE_EXCLUDE_COMPLEMENTARY variable to specify regular expressions to match the packages you want to exclude.- PACKAGE_EXTRA_ARCHS
Specifies the list of architectures compatible with the device CPU. This variable is useful when you build for several different devices that use miscellaneous processors such as XScale and ARM926-EJS.
- PACKAGE_FEED_ARCHS
Optionally specifies the package architectures used as part of the package feed URIs during the build. When used, the PACKAGE_FEED_ARCHS variable is appended to the final package feed URI, which is constructed using the PACKAGE_FEED_URIS and PACKAGE_FEED_BASE_PATHS variables.
Note
You can use the PACKAGE_FEED_ARCHS variable to allow specific package architectures. If you do not need to allow specific architectures, which is a common case, you can omit this variable. Omitting the variable results in all available architectures for the current machine being included into remote package feeds.
Consider the following example where the PACKAGE_FEED_URIS, PACKAGE_FEED_BASE_PATHS, and PACKAGE_FEED_ARCHS variables are defined in your
local.conffile:PACKAGE_FEED_URIS = "https://example.com/packagerepos/release \ https://example.com/packagerepos/updates" PACKAGE_FEED_BASE_PATHS = "rpm rpm-dev" PACKAGE_FEED_ARCHS = "all core2-64"
Given these settings, the resulting package feeds are as follows:
https://example.com/packagerepos/release/rpm/all https://example.com/packagerepos/release/rpm/core2-64 https://example.com/packagerepos/release/rpm-dev/all https://example.com/packagerepos/release/rpm-dev/core2-64 https://example.com/packagerepos/updates/rpm/all https://example.com/packagerepos/updates/rpm/core2-64 https://example.com/packagerepos/updates/rpm-dev/all https://example.com/packagerepos/updates/rpm-dev/core2-64
- PACKAGE_FEED_BASE_PATHS
Specifies the base path used when constructing package feed URIs. The PACKAGE_FEED_BASE_PATHS variable makes up the middle portion of a package feed URI used by the OpenEmbedded build system. The base path lies between the PACKAGE_FEED_URIS and PACKAGE_FEED_ARCHS variables.
Consider the following example where the PACKAGE_FEED_URIS, PACKAGE_FEED_BASE_PATHS, and PACKAGE_FEED_ARCHS variables are defined in your
local.conffile:PACKAGE_FEED_URIS = "https://example.com/packagerepos/release \ https://example.com/packagerepos/updates" PACKAGE_FEED_BASE_PATHS = "rpm rpm-dev" PACKAGE_FEED_ARCHS = "all core2-64"
Given these settings, the resulting package feeds are as follows:
https://example.com/packagerepos/release/rpm/all https://example.com/packagerepos/release/rpm/core2-64 https://example.com/packagerepos/release/rpm-dev/all https://example.com/packagerepos/release/rpm-dev/core2-64 https://example.com/packagerepos/updates/rpm/all https://example.com/packagerepos/updates/rpm/core2-64 https://example.com/packagerepos/updates/rpm-dev/all https://example.com/packagerepos/updates/rpm-dev/core2-64
- PACKAGE_FEED_URIS
Specifies the front portion of the package feed URI used by the OpenEmbedded build system. Each final package feed URI is comprised of PACKAGE_FEED_URIS, PACKAGE_FEED_BASE_PATHS, and PACKAGE_FEED_ARCHS variables.
Consider the following example where the PACKAGE_FEED_URIS, PACKAGE_FEED_BASE_PATHS, and PACKAGE_FEED_ARCHS variables are defined in your
local.conffile:PACKAGE_FEED_URIS = "https://example.com/packagerepos/release \ https://example.com/packagerepos/updates" PACKAGE_FEED_BASE_PATHS = "rpm rpm-dev" PACKAGE_FEED_ARCHS = "all core2-64"
Given these settings, the resulting package feeds are as follows:
https://example.com/packagerepos/release/rpm/all https://example.com/packagerepos/release/rpm/core2-64 https://example.com/packagerepos/release/rpm-dev/all https://example.com/packagerepos/release/rpm-dev/core2-64 https://example.com/packagerepos/updates/rpm/all https://example.com/packagerepos/updates/rpm/core2-64 https://example.com/packagerepos/updates/rpm-dev/all https://example.com/packagerepos/updates/rpm-dev/core2-64
- PACKAGE_INSTALL
The final list of packages passed to the package manager for installation into the image.
Because the package manager controls actual installation of all packages, the list of packages passed using PACKAGE_INSTALL is not the final list of packages that are actually installed. This variable is internal to the image construction code. Consequently, in general, you should use the IMAGE_INSTALL variable to specify packages for installation. The exception to this is when working with the core-image-minimal-initramfs image. When working with an initial RAM filesystem (Initramfs) image, use the PACKAGE_INSTALL variable. For information on creating an Initramfs, see the “Building an Initial RAM Filesystem (Initramfs) Image” section in the Yocto Project Development Tasks Manual.
- PACKAGE_INSTALL_ATTEMPTONLY
Specifies a list of packages the OpenEmbedded build system attempts to install when creating an image. If a listed package fails to install, the build system does not generate an error. This variable is generally not user-defined.
- PACKAGE_PREPROCESS_FUNCS
Specifies a list of functions run to pre-process the PKGD directory prior to splitting the files out to individual packages.
- PACKAGE_WRITE_DEPS
Specifies a list of dependencies for post-installation and pre-installation scripts on native/cross tools. If your post-installation or pre-installation script can execute at root filesystem creation time rather than on the target but depends on a native tool in order to execute, you need to list the tools in PACKAGE_WRITE_DEPS.
For information on running post-installation scripts, see the “Post-Installation Scripts” section in the Yocto Project Development Tasks Manual.
- PACKAGECONFIG
This variable provides a means of enabling or disabling features of a recipe on a per-recipe basis. PACKAGECONFIG blocks are defined in recipes when you specify features and then arguments that define feature behaviors. Here is the basic block structure (broken over multiple lines for readability):
PACKAGECONFIG ??= "f1 f2 f3 ..." PACKAGECONFIG[f1] = "\ --with-f1, \ --without-f1, \ build-deps-for-f1, \ runtime-deps-for-f1, \ runtime-recommends-for-f1, \ packageconfig-conflicts-for-f1" PACKAGECONFIG[f2] = "\ ... and so on and so on ...The PACKAGECONFIG variable itself specifies a space-separated list of the features to enable. Following the features, you can determine the behavior of each feature by providing up to six order-dependent arguments, which are separated by commas. You can omit any argument you like but must retain the separating commas. The order is important and specifies the following:
Extra arguments that should be added to PACKAGECONFIG_CONFARGS if the feature is enabled.
Extra arguments that should be added to PACKAGECONFIG_CONFARGS if the feature is disabled.
Additional build dependencies (DEPENDS) that should be added if the feature is enabled.
Additional runtime dependencies (RDEPENDS) that should be added if the feature is enabled.
Additional runtime recommendations (RRECOMMENDS) that should be added if the feature is enabled.
Any conflicting (that is, mutually exclusive) PACKAGECONFIG settings for this feature.
Consider the following PACKAGECONFIG block taken from the
librsvgrecipe. In this example the feature isgtk, which has three arguments that determine the feature’s behavior:PACKAGECONFIG[gtk] = "--with-gtk3,--without-gtk3,gtk+3"
The
--with-gtk3andgtk+3arguments apply only if the feature is enabled. In this case,--with-gtk3is added to the configure script argument list andgtk+3is added to DEPENDS. On the other hand, if the feature is disabled say through a.bbappendfile in another layer, then the second argument--without-gtk3is added to the configure script instead.The basic PACKAGECONFIG structure previously described holds true regardless of whether you are creating a block or changing a block. When creating a block, use the structure inside your recipe.
If you want to change an existing PACKAGECONFIG block, you can do so one of two ways:
Append file: Create an append file named
recipename.bbappendin your layer and override the value of PACKAGECONFIG. You can either completely override the variable:PACKAGECONFIG = "f4 f5"
Or, you can just append the variable:
PACKAGECONFIG:append = " f4"
Configuration file: This method is identical to changing the block through an append file except you edit your
local.conformydistro.conffile. As with append files previously described, you can either completely override the variable:PACKAGECONFIG:pn-recipename = "f4 f5"
Or, you can just amend the variable:
PACKAGECONFIG:append:pn-recipename = " f4"
Consider the following example of a cmake recipe with a systemd service in which PACKAGECONFIG is used to transform the systemd service into a feature that can be easily enabled or disabled via PACKAGECONFIG:
example.c example.service CMakeLists.txt
The
CMakeLists.txtfile contains:if(WITH_SYSTEMD) install(FILES ${PROJECT_SOURCE_DIR}/example.service DESTINATION /etc/systemd/systemd) endif(WITH_SYSTEMD)In order to enable the installation of
example.servicewe need to ensure that-DWITH_SYSTEMD=ONis passed to thecmakecommand execution. Recipes that haveCMakeLists.txtgenerally inherit the cmake class, that runscmakewith EXTRA_OECMAKE, which PACKAGECONFIG_CONFARGS will be appended to. Now, knowing that PACKAGECONFIG_CONFARGS is automatically filled with either the first or second element of PACKAGECONFIG flag value, the recipe would be like:inherit cmake PACKAGECONFIG = "systemd" PACKAGECONFIG[systemd] = "-DWITH_SYSTEMD=ON,-DWITH_SYSTEMD=OFF"
A side note to this recipe is to check if
systemdis in fact the used INIT_MANAGER or not:PACKAGECONFIG = "${@'systemd' if d.getVar('INIT_MANAGER') == 'systemd' else ''}"
- PACKAGECONFIG_CONFARGS
A space-separated list of configuration options generated from the PACKAGECONFIG setting.
Classes such as autotools* and cmake use PACKAGECONFIG_CONFARGS to pass PACKAGECONFIG options to
configureandcmake, respectively. If you are using PACKAGECONFIG but not a class that handles the do_configure task, then you need to use PACKAGECONFIG_CONFARGS appropriately.- PACKAGEGROUP_DISABLE_COMPLEMENTARY
For recipes inheriting the packagegroup class, setting PACKAGEGROUP_DISABLE_COMPLEMENTARY to “1” specifies that the normal complementary packages (i.e.
-dev,-dbg, and so forth) should not be automatically created by thepackagegrouprecipe, which is the default behavior.- PACKAGES
The list of packages the recipe creates. The default value is the following:
${PN}-src ${PN}-dbg ${PN}-staticdev ${PN}-dev ${PN}-doc ${PN}-locale ${PACKAGE_BEFORE_PN} ${PN}During packaging, the do_package task goes through PACKAGES and uses the FILES variable corresponding to each package to assign files to the package. If a file matches the FILES variable for more than one package in PACKAGES, it will be assigned to the earliest (leftmost) package.
Packages in the variable’s list that are empty (i.e. where none of the patterns in
FILES:pkg match any files installed by the do_install task) are not generated, unless generation is forced through the ALLOW_EMPTY variable.- PACKAGES_DYNAMIC
A promise that your recipe satisfies runtime dependencies for optional modules that are found in other recipes. PACKAGES_DYNAMIC does not actually satisfy the dependencies, it only states that they should be satisfied. For example, if a hard, runtime dependency (RDEPENDS) of another package is satisfied at build time through the PACKAGES_DYNAMIC variable, but a package with the module name is never actually produced, then the other package will be broken. Thus, if you attempt to include that package in an image, you will get a dependency failure from the packaging system during the do_rootfs task.
Typically, if there is a chance that such a situation can occur and the package that is not created is valid without the dependency being satisfied, then you should use RRECOMMENDS (a soft runtime dependency) instead of RDEPENDS.
For an example of how to use the PACKAGES_DYNAMIC variable when you are splitting packages, see the “Handling Optional Module Packaging” section in the Yocto Project Development Tasks Manual.
- PACKAGESPLITFUNCS
Specifies a list of functions run to perform additional splitting of files into individual packages. Recipes can either prepend to this variable or prepend to the
populate_packagesfunction in order to perform additional package splitting. In either case, the function should set PACKAGES, FILES, RDEPENDS and other packaging variables appropriately in order to perform the desired splitting.- PARALLEL_MAKE
Extra options passed to the build tool command (
make,ninjaor more specific build engines, like the Go language one) during the do_compile task, to specify parallel compilation on the local build host. This variable is usually in the form “-j x”, where x represents the maximum number of parallel threads such engines can run.Note
For software compiled by
make, in order for PARALLEL_MAKE to be effective,makemust be called with${EXTRA_OEMAKE}. An easy way to ensure this is to use theoe_runmakefunction.By default, the OpenEmbedded build system automatically sets this variable to be equal to the number of cores the build system uses.
Note
If the software being built experiences dependency issues during the do_compile task that result in race conditions, you can clear the PARALLEL_MAKE variable within the recipe as a workaround. For information on addressing race conditions, see the “Debugging Parallel Make Races” section in the Yocto Project Development Tasks Manual.
For single socket systems (i.e. one CPU), you should not have to override this variable to gain optimal parallelism during builds. However, if you have very large systems that employ multiple physical CPUs, you might want to make sure the PARALLEL_MAKE variable is not set higher than “-j 20”.
For more information on speeding up builds, see the “Speeding Up a Build” section in the Yocto Project Development Tasks Manual.
For more information on how to limit the resources used during builds, see the Limiting the Host Resources Usage section of the Yocto Project Development Tasks Manual.
- PARALLEL_MAKEINST
Extra options passed to the build tool install command (
make install,ninja installor more specific ones) during the do_install task in order to specify parallel installation. This variable defaults to the value of PARALLEL_MAKE.Note
For software compiled by
make, in order for PARALLEL_MAKEINST to be effective,makemust be called with${EXTRA_OEMAKE}. An easy way to ensure this is to use theoe_runmakefunction.If the software being built experiences dependency issues during the do_install task that result in race conditions, you can clear the PARALLEL_MAKEINST variable within the recipe as a workaround. For information on addressing race conditions, see the “Debugging Parallel Make Races” section in the Yocto Project Development Tasks Manual.
- PATCHRESOLVE
Determines the action to take when a patch fails. You can set this variable to one of two values: “noop” and “user”.
The default value of “noop” causes the build to simply fail when the OpenEmbedded build system cannot successfully apply a patch. Setting the value to “user” causes the build system to launch a shell and places you in the right location so that you can manually resolve the conflicts.
Set this variable in your
local.conffile.- PATCHTOOL
Specifies the utility used to apply patches for a recipe during the do_patch task. You can specify one of three utilities: “patch”, “quilt”, or “git”. The default utility used is “quilt” except for the quilt-native recipe itself. Because the quilt tool is not available at the time quilt-native is being patched, it uses “patch”.
If you wish to use an alternative patching tool, set the variable in the recipe using one of the following:
PATCHTOOL = "patch" PATCHTOOL = "quilt" PATCHTOOL = "git"
- PE
The epoch of the recipe. By default, this variable is unset. The variable is used to make upgrades possible when the versioning scheme changes in some backwards incompatible way.
- PEP517_WHEEL_PATH
When used by recipes that inherit the python_pep517 class, denotes the path to
dist/(short for distribution) where the binary archivewheelis built.- PERSISTENT_DIR
See PERSISTENT_DIR in the BitBake manual.
- PF
Specifies the recipe or package name and includes all version and revision numbers (i.e.
glibc-2.13-r20+svnr15508/andbash-4.2-r1/). This variable is comprised of the following: ${PN}-${EXTENDPE}${PV}-${PR}- PIXBUF_PACKAGES
When inheriting the pixbufcache class, this variable identifies packages that contain the pixbuf loaders used with
gdk-pixbuf. By default, the pixbufcache class assumes that the loaders are in the recipe’s main package (i.e.${PN}). Use this variable if the loaders you need are in a package other than that main package.- PKG
The name of the resulting package created by the OpenEmbedded build system.
Note
When using the PKG variable, you must use a package name override.
For example, when the debian class renames the output package, it does so by setting
PKG:packagename.- PKG_CONFIG_PATH
The path to
pkg-configfiles for the current build context.pkg-configreads this variable from the environment.- PKGD
Points to the destination directory for files to be packaged before they are split into individual packages. This directory defaults to the following:
${WORKDIR}/packageDo not change this default.
- PKGDATA_DIR
Points to a shared, global-state directory that holds data generated during the packaging process. During the packaging process, the do_packagedata task packages data for each recipe and installs it into this shared area. This directory defaults to the following, which you should not change:
${TMPDIR}/pkgdata/${MACHINE}For examples of how this data is used, see the “Automatically Added Runtime Dependencies” section in the Yocto Project Overview and Concepts Manual and the “Viewing Package Information with oe-pkgdata-util” section in the Yocto Project Development Tasks Manual.
- PKGDEST
Points to the parent directory for files to be packaged after they have been split into individual packages. This directory defaults to the following:
${WORKDIR}/packages-splitUnder this directory, the build system creates directories for each package specified in PACKAGES. Do not change this default.
- PKGDESTWORK
Points to a temporary work area where the do_package task saves package metadata. The PKGDESTWORK location defaults to the following:
${WORKDIR}/pkgdataDo not change this default.
The do_packagedata task copies the package metadata from PKGDESTWORK to PKGDATA_DIR to make it available globally.
- PKGE
The epoch of the package(s) built by the recipe. By default, PKGE is set to PE.
- PKGR
The revision of the package(s) built by the recipe. By default, PKGR is set to PR.
- PKGV
The version of the package(s) built by the recipe. By default, PKGV is set to PV.
If PV contains the
+sign, source control information will be included in PKGV later in the packaging phase. For more information, see the Using an External SCM section of the Yocto Project Development Tasks Manual.Warning
Since source control information is included in a late stage by the package class, it cannot be seen from the BitBake environment with
bitbake -eorbitbake-getvar. Instead, after the package is built, the version information can be retrieved withoe-pkgdata-util package-info <package name>. See the Viewing Package Information with oe-pkgdata-util section of the Yocto Project Development Tasks Manual for more information onoe-pkgdata-util.- PN
This variable can have two separate functions depending on the context: a recipe name or a resulting package name.
PN refers to a recipe name in the context of a file used by the OpenEmbedded build system as input to create a package. The name is normally extracted from the recipe file name. For example, if the recipe is named
expat_2.0.1.bb, then the default value of PN will be “expat”.The variable refers to a package name in the context of a file created or produced by the OpenEmbedded build system.
If applicable, the PN variable also contains any special suffix or prefix. For example, using
bashto build packages for the native machine, PN isbash-native. Usingbashto build packages for the target and for Multilib, PN would bebashandlib64-bash, respectively.- POPULATE_SDK_POST_HOST_COMMAND
Specifies a list of functions to call once the OpenEmbedded build system has created the host part of the SDK. You can specify functions separated by spaces:
POPULATE_SDK_POST_HOST_COMMAND += "function"
If you need to pass the SDK path to a command within a function, you can use
${SDK_DIR}, which points to the parent directory used by the OpenEmbedded build system when creating SDK output. See the SDK_DIR variable for more information.- POPULATE_SDK_POST_TARGET_COMMAND
Specifies a list of functions to call once the OpenEmbedded build system has created the target part of the SDK. You can specify functions separated by spaces:
POPULATE_SDK_POST_TARGET_COMMAND += "function"
If you need to pass the SDK path to a command within a function, you can use
${SDK_DIR}, which points to the parent directory used by the OpenEmbedded build system when creating SDK output. See the SDK_DIR variable for more information.- PR
The revision of the recipe. The default value for this variable is “r0”. Subsequent revisions of the recipe conventionally have the values “r1”, “r2”, and so forth. When PV increases, PR is conventionally reset to “r0”.
Note
The OpenEmbedded build system does not need the aid of PR to know when to rebuild a recipe. The build system uses the task input checksums along with the stamp and Shared State Cache mechanisms.
The PR variable primarily becomes significant when a package manager dynamically installs packages on an already built image. In this case, PR, which is the default value of PKGR, helps the package manager distinguish which package is the most recent one in cases where many packages have the same PV (i.e. PKGV). A component having many packages with the same PV usually means that the packages all install the same upstream version, but with later (PR) version packages including packaging fixes.
Note
PR does not need to be increased for changes that do not change the package contents or metadata.
Because manually managing PR can be cumbersome and error-prone, an automated solution exists. See the “Working With a PR Service” section in the Yocto Project Development Tasks Manual for more information.
- PREFERRED_PROVIDER
If multiple recipes provide the same item, this variable determines which recipe is preferred and thus provides the item (i.e. the preferred provider). You should always suffix this variable with the name of the provided item. And, you should define the variable using the preferred recipe’s name (PN). Here is a common example:
PREFERRED_PROVIDER_virtual/kernel ?= "linux-yocto"
In the previous example, multiple recipes are providing “virtual/kernel”. The PREFERRED_PROVIDER variable is set with the name (PN) of the recipe you prefer to provide “virtual/kernel”.
Here are more examples:
PREFERRED_PROVIDER_virtual/xserver = "xserver-xf86" PREFERRED_PROVIDER_virtual/libgl ?= "mesa"
For more information, see the “Using Virtual Providers” section in the Yocto Project Development Tasks Manual.
Note
If you use a
virtual/\*item with PREFERRED_PROVIDER, then any recipe that PROVIDES that item but is not selected (defined) by PREFERRED_PROVIDER is prevented from building, which is usually desirable since this mechanism is designed to select between mutually exclusive alternative providers.- PREFERRED_PROVIDERS
See PREFERRED_PROVIDERS in the BitBake manual.
- PREFERRED_RPROVIDER
The PREFERRED_RPROVIDER variable works like the PREFERRED_PROVIDER variable, but it denotes packages that provide a runtime component. Runtime providers are declared in recipes that set the RPROVIDES variable for a specific package.
For example:
PREFERRED_RPROVIDER_virtual-x-terminal-emulator = "rxvt-unicode"
This statement sets the runtime provider for the X terminal emulator to
rxvt-unicode. Therxvt-unicodepackage is a runtime provider of this component because therxvt-unicoderecipe set the following RPROVIDES definition for therxvt-unicode(${PN}) package:RPROVIDES:${PN} = "virtual-x-terminal-emulator"For more information on virtual providers, see the “Using Virtual Providers” section in the Yocto Project Development Tasks Manual.
- PREFERRED_TOOLCHAIN
The PREFERRED_TOOLCHAIN variable selects the toolchain to use for compiling recipes. This variable is not meant to be overridden globally. Instead, the values of PREFERRED_TOOLCHAIN_TARGET, PREFERRED_TOOLCHAIN_NATIVE and PREFERRED_TOOLCHAIN_SDK should be overridden.
- PREFERRED_TOOLCHAIN_NATIVE
This variable controls the toolchain used for compiling native recipes.
This variable should be set globally from a configuration file.
See PREFERRED_TOOLCHAIN_TARGET for more details on the possible values for this variable.
A recipe that does not support the toolchain specified by PREFERRED_TOOLCHAIN_NATIVE can override it locally with TOOLCHAIN_NATIVE.
- PREFERRED_TOOLCHAIN_SDK
This variable controls the toolchain used for compiling nativesdk recipes.
This variable should be set globally from a configuration file.
See PREFERRED_TOOLCHAIN_TARGET for more details on the possible values for this variable.
- PREFERRED_TOOLCHAIN_TARGET
This variable controls the toolchain used for compiling recipes in the architecture of the target MACHINE.
There are two possible values for this variable at the moment:
PREFERRED_TOOLCHAIN_TARGET will make the base class inherit one of the toolchain classes defined in meta/classes/toolchain. As a consequence, this variable should be set globally from a configuration file.
These classes define commands used for cross-compiling such as CC, CXX, LD and so on.
A recipe that does not support the toolchain specified by PREFERRED_TOOLCHAIN_TARGET can override it locally with TOOLCHAIN.
- PREFERRED_VERSION
If there are multiple versions of a recipe available, this variable determines which version should be given preference. You must always suffix the variable with the PN you want to select (python in the first example below), and you should specify the PV accordingly (3.4.0 in the example).
The PREFERRED_VERSION variable supports limited wildcard use through the “
%” character. You can use the character to match any number of characters, which can be useful when specifying versions that contain long revision numbers that potentially change. Here are two examples:PREFERRED_VERSION_python = "3.4.0" PREFERRED_VERSION_linux-yocto = "5.0%"
Note
The use of the “%” character is limited in that it only works at the end of the string. You cannot use the wildcard character in any other location of the string.
The specified version is matched against PV, which does not necessarily match the version part of the recipe’s filename.
If you want to select a recipe named
foo_git.bbwhich has PV set to1.2.3+git, you can do so by setting`PREFERRED_VERSION_footo1.2.3%(i.e. simply settingPREFERRED_VERSION_footogitwill not work as the name of the recipe isn’t used, but rather its PV definition).Sometimes the PREFERRED_VERSION variable can be set by configuration files in a way that is hard to change. You can use OVERRIDES to set a machine-specific override. Here is an example:
PREFERRED_VERSION_linux-yocto:qemux86 = "5.0%"
Although not recommended, worst case, you can also use the “forcevariable” override, which is the strongest override possible. Here is an example:
PREFERRED_VERSION_linux-yocto:forcevariable = "5.0%"
Note
The
:forcevariableoverride is not handled specially. This override only works because the default value of OVERRIDES includes “forcevariable”.If a recipe with the specified version is not available, a warning message will be shown. See REQUIRED_VERSION if you want this to be an error instead.
- PREMIRRORS
Specifies additional paths from which the OpenEmbedded build system gets source code. When the build system searches for source code, it first tries the local download directory. If that location fails, the build system tries locations defined by PREMIRRORS, the upstream source, and then locations specified by MIRRORS in that order.
The default value for PREMIRRORS is defined in the
meta/classes-global/mirrors.bbclassfile in the core metadata layer.Typically, you could add a specific server for the build system to attempt before any others by adding something like the following to the
local.confconfiguration file in the Build Directory:PREMIRRORS:prepend = "\ git://.*/.* https://downloads.yoctoproject.org/mirror/sources/ \ ftp://.*/.* https://downloads.yoctoproject.org/mirror/sources/ \ http://.*/.* https://downloads.yoctoproject.org/mirror/sources/ \ https://.*/.* https://downloads.yoctoproject.org/mirror/sources/"
These changes cause the build system to intercept Git, FTP, HTTP, and HTTPS requests and direct them to the
http://sources mirror. You can usefile://URLs to point to local directories or network shares as well.See the definition of this variable in the BitBake Manual for more details: PREMIRRORS.
- PRIORITY
Indicates the importance of a package.
PRIORITY is considered to be part of the distribution policy because the importance of any given recipe depends on the purpose for which the distribution is being produced. Thus, PRIORITY is not normally set within recipes.
You can set PRIORITY to “required”, “standard”, “extra”, and “optional”, which is the default.
- PRIVATE_LIBS
Specifies libraries installed within a recipe that should be ignored by the OpenEmbedded build system’s shared library resolver. This variable is typically used when software being built by a recipe has its own private versions of a library normally provided by another recipe. In this case, you would not want the package containing the private libraries to be set as a dependency on other unrelated packages that should instead depend on the package providing the standard version of the library.
Libraries specified in this variable should be specified by their file name. For example, from the Firefox recipe in meta-browser:
PRIVATE_LIBS = "libmozjs.so \ libxpcom.so \ libnspr4.so \ libxul.so \ libmozalloc.so \ libplc4.so \ libplds4.so"
For more information, see the “Automatically Added Runtime Dependencies” section in the Yocto Project Overview and Concepts Manual.
- PROVIDES
A list of aliases by which a particular recipe can be known. By default, a recipe’s own PN is implicitly already in its PROVIDES list and therefore does not need to mention that it provides itself. If a recipe uses PROVIDES, the additional aliases are synonyms for the recipe and can be useful for satisfying dependencies of other recipes during the build as specified by DEPENDS.
Consider the following example PROVIDES statement from the recipe file
eudev_3.2.9.bb:PROVIDES += "udev"
The PROVIDES statement results in the “eudev” recipe also being available as simply “udev”.
Note
A recipe’s own recipe name (PN) is always implicitly prepended to PROVIDES, so while using “+=” in the above example may not be strictly necessary it is recommended to avoid confusion.
In addition to providing recipes under alternate names, the PROVIDES mechanism is also used to implement virtual targets. A virtual target is a name that corresponds to some particular functionality (e.g. a Linux kernel). Recipes that provide the functionality in question list the virtual target in PROVIDES. Recipes that depend on the functionality in question can include the virtual target in DEPENDS to leave the choice of provider open.
Conventionally, virtual targets have names on the form “virtual/function” (e.g. “virtual/kernel”). The slash is simply part of the name and has no syntactical significance.
The PREFERRED_PROVIDER variable is used to select which particular recipe provides a virtual target.
Note
A corresponding mechanism for virtual runtime dependencies (packages) exists. However, the mechanism does not depend on any special functionality beyond ordinary variable assignments. For example, VIRTUAL-RUNTIME_dev_manager refers to the package of the component that manages the
/devdirectory.Setting the “preferred provider” for runtime dependencies is as simple as using the following assignment in a configuration file:
VIRTUAL-RUNTIME_dev_manager = "udev"
- PRSERV_HOST
The network based PR service host and port.
The
conf/templates/default/local.conf.sample.extendedconfiguration file in meta-poky shows how the PRSERV_HOST variable is set:PRSERV_HOST = "localhost:0"
You must set the variable if you want to automatically start a local PR service. You can set PRSERV_HOST to other values to use a remote PR service.
- PRSERV_UPSTREAM
This variable can be used to specify an upstream PR server for the local PR server to connect to, in the form of
host:port.This makes it possible to implement local fixes to an upstream package.
- PSEUDO_IGNORE_PATHS
A comma-separated (without spaces) list of path prefixes that should be ignored by pseudo when monitoring and recording file operations, in order to avoid problems with files being written to outside of the pseudo context and reduce pseudo’s overhead. A path is ignored if it matches any prefix in the list and can include partial directory (or file) names. In case a path prefix is present in both PSEUDO_IGNORE_PATHS and in PSEUDO_INCLUDE_PATHS, PSEUDO_INCLUDE_PATHS takes precedence.
- PSEUDO_INCLUDE_PATHS
A comma-separated (without spaces) list of path prefixes that should be included by pseudo when monitoring and recording file operations, in order to avoid problems with files being written to outside of the pseudo context and reduce pseudo’s overhead. A path is included if it matches any prefix in the list and can include partial directory (or file) names. In case a path prefix is present in both PSEUDO_IGNORE_PATHS and in PSEUDO_INCLUDE_PATHS, PSEUDO_INCLUDE_PATHS takes precedence.
- PTEST_ENABLED
Specifies whether or not Package Test (ptest) functionality is enabled when building a recipe. You should not set this variable directly. Enabling and disabling building Package Tests at build time should be done by adding “ptest” to (or removing it from) DISTRO_FEATURES.
- PTEST_PYTEST_DIR
Within the ptest-python-pytest class, the PTEST_PYTEST_DIR variable represents the path within the source tree of a Python package holding the unit tests to be run with the pytest framework. The default value for this variable is
tests.For more information, see the ptest-python-pytest class documentation.
- PV
The version of the recipe. The version is normally extracted from the recipe filename. For example, if the recipe is named
expat_2.0.1.bb, then the default value of PV will be “2.0.1”. PV is generally not overridden within a recipe unless it is building an unstable (i.e. development) version from a source code repository (e.g. Git or Subversion).- PYPI_PACKAGE
When inheriting the pypi class, specifies the PyPI package name to be built. The default value is set based upon BPN (stripping any “python-” or “python3-” prefix off if present), however for some packages it will need to be set explicitly if that will not match the package name (e.g. where the package name has a prefix, underscores, uppercase letters etc.)
- PYPI_PACKAGE_EXT
When inheriting the pypi class, specifies the file extension to use when fetching a package from PyPI. Default is
tar.gz.- PYPI_SRC_URI
When inheriting the pypi class, specifies the full pythonhosted URI for fetching the package to be built. The default value is constructed based upon PYPI_PACKAGE, PYPI_PACKAGE_EXT, and PV. Most recipes will not need to set this variable unless they are building an unstable (i.e. development) version.
- PYTHON_ABI
When used by recipes that inherit the setuptools3 class, denotes the Application Binary Interface (ABI) currently in use for Python. By default, the ABI is “m”. You do not have to set this variable as the OpenEmbedded build system sets it for you.
The OpenEmbedded build system uses the ABI to construct directory names used when installing the Python headers and libraries in sysroot (e.g.
.../python3.3m/...).- QA_EMPTY_DIRS
Specifies a list of directories that are expected to be empty when packaging; if
empty-dirsappears in ERROR_QA or WARN_QA these will be checked and an error or warning (respectively) will be produced.The default QA_EMPTY_DIRS value is set in insane.bbclass.
- QA_EMPTY_DIRS_RECOMMENDATION
Specifies a recommendation for why a directory must be empty, which will be included in the error message if a specific directory is found to contain files. Must be overridden with the directory path to match on.
If no recommendation is specified for a directory, then the default “but it is expected to be empty” will be used.
An example message shows if files were present in ‘/dev’:
QA_EMPTY_DIRS_RECOMMENDATION:/dev = "but all devices must be created at runtime"
- QB_CMDLINE_IP_SLIRP
If QB_NETWORK_DEVICE adds more than one network interface to QEMU, usually the
ip=Linux kernel command line argument needs to be changed accordingly. The QB_CMDLINE_IP_SLIRP variable allows controlling this value. See the Linux kernel documentation for more details: https://www.kernel.org/doc/Documentation/filesystems/nfs/nfsroot.txt.- QB_CMDLINE_IP_TAP
This variable is similar to the QB_CMDLINE_IP_SLIRP variable.
Use as follows:
QB_CMDLINE_IP_TAP = "ip=192.168.7.@CLIENT@::192.168.7.@GATEWAY@:255.255.255.0::eth0"
Since the tap interface requires static IP configuration,
runqemureplaces the@CLIENT@and@GATEWAY@place holders by the IP and the gateway address of the QEMU guest.- QB_DEFAULT_FSTYPE
The QB_DEFAULT_FSTYPE variable controls the default filesystem type to boot. It is represented as the file extension of one of the root filesystem image extension found in DEPLOY_DIR_IMAGE. For example:
ext4.zst.- QB_DEFAULT_KERNEL
When using
runqemu, the QB_DEFAULT_KERNEL variable controls the default Linux kernel image to boot, found in DEPLOY_DIR_IMAGE. For example:bzImage.- QB_DRIVE_TYPE
When using
runqemu, the QB_DRIVE_TYPE variable specifies the type of drive to emulate when starting the emulated machine. Valid values are:/dev/hd: emulates an IDE drive./dev/mmcblk: emulates an SD Card./dev/sd: emulates an SCSI drive./dev/vd: emulates a VirtIO drive./dev/vdb: emulates a block VirtIO drive.
- QB_GRAPHICS
When using
runqemu, the QB_GRAPHICS variable controls the QEMU video card type to emulate. For example:-vga std.This value is appended to the argument list when running
qemu.- QB_KERNEL_CMDLINE_APPEND
The QB_KERNEL_CMDLINE_APPEND variable controls the options passed to the Linux kernel’s
-appendQEMU options, which controls the Linux kernel command-line.For example:
QB_KERNEL_CMDLINE_APPEND = "console=ttyS0"
- QB_MEM
The QB_MEM variable controls the amount of memory allocated to the emulated machine. Specify as follows:
QB_MEM = "-m 512"
- QB_NETWORK_DEVICE
When using
runqemu, the QB_NETWORK_DEVICE variable controls the network device instantiated by QEMU. This value needs to be compatible with the QB_TAP_OPT variable.Example:
QB_NETWORK_DEVICE = "-device virtio-net-pci,netdev=net0,mac=@MAC@"
runqemureplaces@MAC@with a predefined mac address.- QB_NFSROOTFS_EXTRA_OPT
When using
runqemu, the QB_NFSROOTFS_EXTRA_OPT variable controls extra options to be appended to the NFS rootfs options in the Linux kernel command-line.For example:
QB_NFSROOTFS_EXTRA_OPT = "wsize=4096,rsize=4096"
- QB_OPT_APPEND
When using
runqemu, the QB_OPT_APPEND variable controls general options to append to QEMU when starting.- QB_RNG
When using
runqemu, the QB_RNG variable controls pass-through for host random number generator, it can speedup boot in system mode, where system is experiencing entropy starvation.For example:
QB_RNG = "-object rng-random,filename=/dev/urandom,id=rng0 -device virtio-rng-pci,rng=rng0"
- QB_ROOTFS_EXTRA_OPT
When using
runqemu, the QB_ROOTFS_EXTRA_OPT variable controls extra options to be appended to the rootfs device options.- QB_SERIAL_OPT
When using
runqemu, the QB_SERIAL_OPT variable controls the serial port option.For example:
QB_SERIAL_OPT = "-serial mon:stdio"
- QB_SMP
When using
runqemu, the QB_SMP variable controls amount of CPU cores made availalble inside the QEMU guest, each mapped to a thread on the host.For example:
QB_SMP = "-smp 8".
- QB_TAP_NAMESERVER
When using
runqemu, the QB_TAP_NAMESERVER variable controls the default name server used in the QEMU guest.- QB_TAP_OPT
When using
runqemu, the QB_TAP_OPT variable controls the network option for “tap” mode.For example:
QB_TAP_OPT = "-netdev tap,id=net0,ifname=@TAP@,script=no,downscript=no"
Note that
runqemuwill replace@TAP@with the tap interface in use, such astap0,tap1, etc.- RANLIB
The minimal command and arguments to run ranlib.
- RCONFLICTS
The list of packages that conflict with packages. Note that packages will not be installed if conflicting packages are not first removed.
Like all package-controlling variables, you must always use them in conjunction with a package name override. Here is an example:
RCONFLICTS:${PN} = "another_conflicting_package_name"BitBake, which the OpenEmbedded build system uses, supports specifying versioned dependencies. Although the syntax varies depending on the packaging format, BitBake hides these differences from you. Here is the general syntax to specify versions with the RCONFLICTS variable:
RCONFLICTS:${PN} = "package (operator version)"For
operator, you can specify the following:=
<
>
<=
>=
For example, the following sets up a dependency on version 1.2 or greater of the package
foo:RCONFLICTS:${PN} = "foo (>= 1.2)"- RDEPENDS
Lists runtime dependencies of a package. These dependencies are other packages that must be installed in order for the package to function correctly. As an example, the following assignment declares that the package
fooneeds the packagesbarandbazto be installed:RDEPENDS:foo = "bar baz"
The most common types of package runtime dependencies are automatically detected and added. Therefore, most recipes do not need to set RDEPENDS. For more information, see the “Automatically Added Runtime Dependencies” section in the Yocto Project Overview and Concepts Manual.
The practical effect of the above RDEPENDS assignment is that
barandbazwill be declared as dependencies inside the packagefoowhen it is written out by one of the do_package_write_* tasks. Exactly how this is done depends on which package format is used, which is determined by PACKAGE_CLASSES. When the corresponding package manager installs the package, it will know to also install the packages on which it depends.To ensure that the packages
barandbazget built, the previous RDEPENDS assignment also causes a task dependency to be added. This dependency is from the recipe’s do_build (not to be confused with do_compile) task to the do_package_write_* task of the recipes that buildbarandbaz.The names of the packages you list within RDEPENDS must be the names of other packages — they cannot be recipe names. Although package names and recipe names usually match, the important point here is that you are providing package names within the RDEPENDS variable. For an example of the default list of packages created from a recipe, see the PACKAGES variable.
Because the RDEPENDS variable applies to packages being built, you should always use the variable in a form with an attached package name (remember that a single recipe can build multiple packages). For example, suppose you are building a development package that depends on the
perlpackage. In this case, you would use the following RDEPENDS statement:RDEPENDS:${PN}-dev += "perl"In the example, the development package depends on the
perlpackage. Thus, the RDEPENDS variable has the${PN}-devpackage name as part of the variable.Note
RDEPENDS:${PN}-devincludes${PN}by default. This default is set in the BitBake configuration file (meta/conf/bitbake.conf). Be careful not to accidentally remove${PN}when modifyingRDEPENDS:${PN}-dev. Use the “+=” operator rather than the “=” operator.The package names you use with RDEPENDS must appear as they would in the PACKAGES variable. The PKG variable allows a different name to be used for the final package (e.g. the debian class uses this to rename packages), but this final package name cannot be used with RDEPENDS, which makes sense as RDEPENDS is meant to be independent of the package format used.
BitBake, which the OpenEmbedded build system uses, supports specifying versioned dependencies. Although the syntax varies depending on the packaging format, BitBake hides these differences from you. Here is the general syntax to specify versions with the RDEPENDS variable:
RDEPENDS:${PN} = "package (operator version)"For
operator, you can specify the following:=
<
>
<=
>=
For version, provide the version number.
Note
You can use EXTENDPKGV to provide a full package version specification.
For example, the following sets up a dependency on version 1.2 or greater of the package
foo:RDEPENDS:${PN} = "foo (>= 1.2)"For information on build-time dependencies, see the DEPENDS variable. You can also see the “Tasks” and “Dependencies” sections in the BitBake User Manual for additional information on tasks and dependencies.
- READELF
The minimal command and arguments to run readelf.
- RECIPE_MAINTAINER
This variable defines the name and e-mail address of the maintainer of a recipe. Such information can be used by human users submitted changes, and by automated tools to send notifications, for example about vulnerabilities or source updates.
The variable can be defined in a global distribution maintainers.inc file:
meta/conf/distro/include/maintainers.inc:RECIPE_MAINTAINER:pn-sysvinit = "Ross Burton <ross.burton@arm.com>"
It can also be directly defined in a recipe, for example in the
libgpiodone:RECIPE_MAINTAINER = "Bartosz Golaszewski <brgl@bgdev.pl>"
- RECIPE_NO_UPDATE_REASON
If a recipe should not be replaced by a more recent upstream version, putting the reason why in this variable in a recipe allows
devtool check-upgrade-statuscommand to display it, as explained in the “Checking on the Upgrade Status of a Recipe” section.- RECIPE_SYSROOT
This variable points to the directory populated with all files provided by recipes specified in DEPENDS. As the name indicates, think of this variable as a custom root (
/) for the recipe, that will be used by the compiler in order to find headers and other files needed to complete its job.This variable is used to define STAGING_DIR_HOST or STAGING_DIR_TARGET according to the type of the recipe and the build target.
To better understand this variable, consider the following examples:
For
#include <header.h>,header.hshould be in"${RECIPE_SYSROOT}/usr/include"For
-lexample,libexample.soshould be in"${RECIPE_SYSROOT}/lib"or other library sysroot directories.
The default value is
"${WORKDIR}/recipe-sysroot". Do not modify it.- RECIPE_SYSROOT_NATIVE
This is similar to RECIPE_SYSROOT but files in it are provided by native recipes. This allows a recipe built for the target machine to use native tools.
This variable is used to define STAGING_DIR_NATIVE.
The default value is
"${WORKDIR}/recipe-sysroot-native". Do not modify it.- RECIPE_UPGRADE_EXTRA_TASKS
When upgrading a recipe with
devtool upgrade, the variable RECIPE_UPGRADE_EXTRA_TASKS specifies a space-delimited list of tasks to run after the new sources have been unpacked.For some recipes, after the new source has been unpacked, additional tasks may need to be run during an upgrade. A good example of this is recipes which inherit cargo-update-recipe-crates, where the do_update_crates task needs to be run whenever Cargo.toml/Cargo.lock have changed in the source.
- REPODIR
See REPODIR in the BitBake manual.
- REQUIRED_COMBINED_FEATURES
When inheriting the features_check class, this variable identifies combined features (the intersection of MACHINE_FEATURES and DISTRO_FEATURES) that must exist in the current configuration in order for the OpenEmbedded Build System to build the recipe. In other words, if the REQUIRED_COMBINED_FEATURES variable lists a feature that does not appear in COMBINED_FEATURES within the current configuration, then the recipe will be skipped, and if the build system attempts to build the recipe then an error will be triggered.
- REQUIRED_DISTRO_FEATURES
When inheriting the features_check class, this variable identifies distribution features that must exist in the current configuration in order for the OpenEmbedded build system to build the recipe. In other words, if the REQUIRED_DISTRO_FEATURES variable lists a feature that does not appear in DISTRO_FEATURES within the current configuration, then the recipe will be skipped, and if the build system attempts to build the recipe then an error will be triggered.
- REQUIRED_IMAGE_FEATURES
When inheriting the features_check class, this variable identifies image features that must exist in the current configuration in order for the OpenEmbedded Build System to build the recipe. In other words, if the REQUIRED_IMAGE_FEATURES variable lists a feature that does not appear in IMAGE_FEATURES within the current configuration, then the recipe will be skipped, and if the build system attempts to build the recipe then an error will be triggered.
Compared to other
REQUIRED_*_FEATURESvariables, the REQUIRED_IMAGE_FEATURES varible only targets image recipes, as the IMAGE_FEATURES variable is handled by the core-image class). However, the REQUIRED_IMAGE_FEATURES varible can also be set from a Configuration File, such as a distro configuration file, if the list of required image features should apply to all images using this DISTRO.- REQUIRED_MACHINE_FEATURES
When inheriting the features_check class, this variable identifies MACHINE_FEATURES that must exist in the current configuration in order for the OpenEmbedded Build System to build the recipe. In other words, if the REQUIRED_MACHINE_FEATURES variable lists a feature that does not appear in MACHINE_FEATURES within the current configuration, then the recipe will be skipped, and if the build system attempts to build the recipe then an error will be triggered.
- REQUIRED_TUNE_FEATURES
When inheriting the features_check class, this variable identifies tune features that must exist in the current configuration in order for the OpenEmbedded Build System to build the recipe. In other words, if the REQUIRED_TUNE_FEATURES variable lists a feature that does not appear in TUNE_FEATURES within the current configuration, then the recipe will be skipped, and if the build system attempts to build the recipe then an error will be triggered.
- REQUIRED_VERSION
If there are multiple versions of a recipe available, this variable determines which version should be given preference. REQUIRED_VERSION works in exactly the same manner as PREFERRED_VERSION, except that if the specified version is not available then an error message is shown and the build fails immediately.
If both REQUIRED_VERSION and PREFERRED_VERSION are set for the same recipe, the REQUIRED_VERSION value applies.
- RETAIN_DIRS_ALWAYS
When inheriting the retain class, this variable holds space-separated recipe-specific directories to always save in a tarball whether the recipe build has failed or not.
- RETAIN_DIRS_FAILURE
When inheriting the retain class, this variable holds space-separated recipe-specific directories to save in a tarball on failure of the recipe’s build.
- RETAIN_DIRS_GLOBAL_ALWAYS
When inheriting the retain class, this variable holds space-separated directories that are not specific to a recipe to save in a tarball whether the build has failed or not.
- RETAIN_DIRS_GLOBAL_FAILURE
When inheriting the retain class, this variable holds space-separated directories that are not specific to a recipe to save in a tarball on build failure.
- RETAIN_ENABLED
Disables the creation of a tarball of the work directory done by the retain class. Can be set to specific recipes to disable the class when the class was inherited globally with INHERIT.
- RETAIN_OUTDIR
When inheriting the retain class, this variable specifies the directory where to save the tarball of the work directory. The default directory is
${TMPDIR}/retain.- RETAIN_TARBALL_SUFFIX
When inheriting the retain class, this variable specifies the suffix of the tarball of the work directory. The default suffix is
${DATETIME}.tar.gz.- RM_WORK_EXCLUDE
With rm_work enabled, this variable specifies a list of recipes whose work directories should not be removed. See the “rm_work” section for more details.
- RM_WORK_EXCLUDE_ITEMS
With rm_work enabled, this variable specifies a list of files or folders — relative to the recipe’s WORKDIR — to be preserved. See the “rm_work” section for more details.
- ROOT_HOME
Defines the root home directory. By default, this directory is set as follows in the BitBake configuration file:
ROOT_HOME ??= "/home/root"
Note
This default value is likely used because some embedded solutions prefer to have a read-only root filesystem and prefer to keep writeable data in one place.
When setting
INIT_MANAGER = systemd, the default will be set to:ROOT_HOME ?= "/root"
You can also override the default by setting the variable in your distro configuration or in the
local.conffile.- ROOTFS
Indicates a filesystem image to include as the root filesystem.
The ROOTFS variable is an optional variable used with the image-live class.
- ROOTFS_POSTINSTALL_COMMAND
Specifies a list of functions to call after the OpenEmbedded build system has installed packages. You can specify functions separated by spaces:
ROOTFS_POSTINSTALL_COMMAND += "function"
If you need to pass the root filesystem path to a command within a function, you can use
${IMAGE_ROOTFS}, which points to the directory that becomes the root filesystem image. See the IMAGE_ROOTFS variable for more information.- ROOTFS_POSTPROCESS_COMMAND
Specifies a list of functions to call once the OpenEmbedded build system has created the root filesystem. You can specify functions separated by spaces:
ROOTFS_POSTPROCESS_COMMAND += "function"
If you need to pass the root filesystem path to a command within a function, you can use
${IMAGE_ROOTFS}, which points to the directory that becomes the root filesystem image. See the IMAGE_ROOTFS variable for more information.- ROOTFS_POSTUNINSTALL_COMMAND
Specifies a list of functions to call after the OpenEmbedded build system has removed unnecessary packages. When runtime package management is disabled in the image, several packages are removed including
base-passwd,shadow, andupdate-alternatives. You can specify functions separated by spaces:ROOTFS_POSTUNINSTALL_COMMAND += "function"
If you need to pass the root filesystem path to a command within a function, you can use
${IMAGE_ROOTFS}, which points to the directory that becomes the root filesystem image. See the IMAGE_ROOTFS variable for more information.- ROOTFS_PREPROCESS_COMMAND
Specifies a list of functions to call before the OpenEmbedded build system has created the root filesystem. You can specify functions separated by spaces:
ROOTFS_PREPROCESS_COMMAND += "function"
If you need to pass the root filesystem path to a command within a function, you can use
${IMAGE_ROOTFS}, which points to the directory that becomes the root filesystem image. See the IMAGE_ROOTFS variable for more information.- RPMBUILD_EXTRA_PARAMS
Specifies extra user-defined parameters for the
rpmbuildcommand.- RPROVIDES
A list of package name aliases that a package also provides. These aliases are useful for satisfying runtime dependencies of other packages both during the build and on the target (as specified by RDEPENDS).
Note
A package’s own name is implicitly already in its RPROVIDES list.
As with all package-controlling variables, you must always use the variable in conjunction with a package name override. Here is an example:
RPROVIDES:${PN} = "widget-abi-2"- RRECOMMENDS
A list of packages that extends the usability of a package being built. The package being built does not depend on this list of packages in order to successfully build, but rather uses them for extended usability. To specify runtime dependencies for packages, see the RDEPENDS variable.
The package manager will automatically install the RRECOMMENDS list of packages when installing the built package. However, you can prevent listed packages from being installed by using the BAD_RECOMMENDATIONS, NO_RECOMMENDATIONS, and PACKAGE_EXCLUDE variables.
Packages specified in RRECOMMENDS need not actually be produced. However, there must be a recipe providing each package, either through the PACKAGES or PACKAGES_DYNAMIC variables or the RPROVIDES variable, or an error will occur during the build. If such a recipe does exist and the package is not produced, the build continues without error.
Because the RRECOMMENDS variable applies to packages being built, you should always attach an override to the variable to specify the particular package whose usability is being extended. For example, suppose you are building a development package that is extended to support wireless functionality. In this case, you would use the following:
RRECOMMENDS:${PN}-dev += "wireless_package_name"In the example, the package name (
${PN}-dev) must appear as it would in the PACKAGES namespace before any renaming of the output package by classes such as debian.BitBake, which the OpenEmbedded build system uses, supports specifying versioned recommends. Although the syntax varies depending on the packaging format, BitBake hides these differences from you. Here is the general syntax to specify versions with the RRECOMMENDS variable:
RRECOMMENDS:${PN} = "package (operator version)"For
operator, you can specify the following:=
<
>
<=
>=
For example, the following sets up a recommend on version 1.2 or greater of the package
foo:RRECOMMENDS:${PN} = "foo (>= 1.2)"- RREPLACES
A list of packages replaced by a package. The package manager uses this variable to determine which package should be installed to replace other package(s) during an upgrade. In order to also have the other package(s) removed at the same time, you must add the name of the other package to the RCONFLICTS variable.
As with all package-controlling variables, you must use this variable in conjunction with a package name override. Here is an example:
RREPLACES:${PN} = "other_package_being_replaced"BitBake, which the OpenEmbedded build system uses, supports specifying versioned replacements. Although the syntax varies depending on the packaging format, BitBake hides these differences from you. Here is the general syntax to specify versions with the RREPLACES variable:
RREPLACES:${PN} = "package (operator version)"For
operator, you can specify the following:=
<
>
<=
>=
For example, the following sets up a replacement using version 1.2 or greater of the package
foo:RREPLACES:${PN} = "foo (>= 1.2)"- RSUGGESTS
A list of additional packages that you can suggest for installation by the package manager at the time a package is installed. Not all package managers support this functionality. This feature takes effect only when the package manager is being used to install packages on the target system from a package feed.
As with all package-controlling variables, you must always use this variable in conjunction with a package name override. Here is an example:
RSUGGESTS:${PN} = "useful_package another_package"For more information on package management, see the Using Runtime Package Management section of the Yocto Project Development Tasks Manual.
- RUST_CHANNEL
Specifies which version of Rust to build - “stable”, “beta” or “nightly”. The default value is “stable”. Set this at your own risk, as values other than “stable” are not guaranteed to work at a given time.
- S
The location in the Build Directory where unpacked recipe source code resides. By default, this directory is
${UNPACKDIR}/${BPN}-${PV}, where${BPN}is the base recipe name and${PV}is the recipe version. If the source tarball extracts the code to a directory named anything other than${BPN}-${PV}, or if the source code is fetched from an SCM such as Git or Subversion, then you must set S in the recipe so that the OpenEmbedded build system knows where to find the unpacked source.As an example, assume a Source Directory top-level folder named
bitbake-buildsand a default Build Directory atbitbake-builds/build. In this case, the work directory the build system uses to keep the unpacked recipe fordbis the following:bitbake-builds/build/tmp/work/qemux86-poky-linux/db/5.1.19-r3/sources/db-5.1.19
The unpacked source code resides in the
db-5.1.19folder.- SANITY_REQUIRED_UTILITIES
Specifies a list of command-line utilities that should be checked for during the initial sanity checking process when running BitBake. If any of the utilities are not installed on the build host, then BitBake immediately exits with an error.
- SANITY_TESTED_DISTROS
A list of the host distribution identifiers that the build system has been tested against. Identifiers consist of the host distributor ID followed by the release, as reported by the
lsb_releasetool or as read from/etc/lsb-release. Separate the list items with explicit newline characters (\n). If SANITY_TESTED_DISTROS is not empty and the current value of NATIVELSBSTRING does not appear in the list, then the build system reports a warning that indicates the current host distribution has not been tested as a build host.- SBOM_CVE_CHECK_EXPORT_VARS
When inheriting the sbom-cve-check class, this variable holds the list of variables that declare export files to generate.
Each variable must have a
typeand anextflag set:The
typeflag contains the value that is passed to the--export-typecommand line argument ofsbom-cve-check.The
extflag contains the filename extension (suffix). The output filename is going will be${IMAGE_NAME}${ext}.
For example:
SBOM_CVE_CHECK_EXPORT_VARS = "SBOM_CVE_CHECK_EXPORT_SPDX3" SBOM_CVE_CHECK_EXPORT_SPDX3[type] = "spdx3" SBOM_CVE_CHECK_EXPORT_SPDX3[ext] = ".sbom-cve-check.spdx.json"
- SBOM_CVE_CHECK_EXTRA_ARGS
When inheriting the sbom-cve-check class, this variable can be used to pass extra arguments to the
sbom-cve-checkcommand-line tool.See the documentation of
sbom-cve-checkfor more information.- SBOM_CVE_CHECK_SCAN_SCOPE
When inheriting the sbom-cve-check class, this variable controls whether to scan target and native, just target, or just native recipes.
Valid values are:
- SBOM_CVE_CHECK_SHOW_WARNINGS
When inheriting the sbom-cve-check class, this variable controls whether to show warnings when CVEs with the
Unpatchedstatus are found. Example output:WARNING: core-image-minimal-1.0-r0 do_sbom_cve_check: glibc-2.43+git: Found unpatched CVEs: CVE-2010-4756
Set to “1” to show the warnings, “0” otherwise.
See Checking for Vulnerabilities for more information.
- SDK_ARCH
The target architecture for the SDK. Typically, you do not directly set this variable. Instead, use SDKMACHINE.
- SDK_ARCHIVE_TYPE
Specifies the type of archive to create for the SDK. Valid values:
tar.xz(default)tar.zst7zipzip
Only one archive type can be specified.
- SDK_AS_ARCH
Specifies architecture-specific assembler flags when building nativesdk recipes. By default, the value of SDK_AS_ARCH equals the one of BUILD_AS_ARCH.
- SDK_BUILDINFO_FILE
When using the image-buildinfo class, specifies the file in the SDK to write the build information into. The default value is “
/buildinfo”.- SDK_CC_ARCH
Specifies the architecture-specific C compiler flags when building nativesdk recipes. By default, the value of SDK_CC_ARCH equals the one of BUILD_CC_ARCH.
- SDK_CUSTOM_TEMPLATECONF
When building the extensible SDK, if SDK_CUSTOM_TEMPLATECONF is set to “1” and a
conf/templateconf.cfgfile exists in the Build Directory (TOPDIR) then this will be copied into the SDK.- SDK_DEPLOY
The directory set up and used by the populate_sdk_base class to which the SDK is deployed. The populate_sdk_base class defines SDK_DEPLOY as follows:
SDK_DEPLOY = "${TMPDIR}/deploy/sdk"
- SDK_DIR
The parent directory used by the OpenEmbedded build system when creating SDK output. The populate_sdk_base class defines the variable as follows:
SDK_DIR = "${WORKDIR}/sdk"
Note
The SDK_DIR directory is a temporary directory as it is part of WORKDIR. The final output directory is SDK_DEPLOY.
- SDK_EXT_TYPE
Controls whether or not shared state artifacts are copied into the extensible SDK. The default value of “full” copies all of the required shared state artifacts into the extensible SDK. The value “minimal” leaves these artifacts out of the SDK.
Note
If you set the variable to “minimal”, you need to ensure SSTATE_MIRRORS is set in the SDK’s configuration to enable the artifacts to be fetched as needed.
- SDK_HOST_MANIFEST
The manifest file for the host part of the SDK. This file lists all the installed packages that make up the host part of the SDK. The file contains package information on a line-per-package basis as follows:
packagename packagearch version
The populate_sdk_base class defines the manifest file as follows:
SDK_HOST_MANIFEST = "${SDK_DEPLOY}/${TOOLCHAIN_OUTPUTNAME}.host.manifest"
The location is derived using the SDK_DEPLOY and TOOLCHAIN_OUTPUTNAME variables.
- SDK_INCLUDE_PKGDATA
When set to “1”, specifies to include the packagedata for all recipes in the “world” target in the extensible SDK. Including this data allows the
devtool searchcommand to find these recipes in search results, as well as allows thedevtool addcommand to map dependencies more effectively.Note
Enabling the SDK_INCLUDE_PKGDATA variable significantly increases build time because all of world needs to be built. Enabling the variable also slightly increases the size of the extensible SDK.
- SDK_INCLUDE_TOOLCHAIN
When set to “1”, specifies to include the toolchain in the extensible SDK. Including the toolchain is useful particularly when SDK_EXT_TYPE is set to “minimal” to keep the SDK reasonably small but you still want to provide a usable toolchain. For example, suppose you want to use the toolchain from an IDE or from other tools and you do not want to perform additional steps to install the toolchain.
The SDK_INCLUDE_TOOLCHAIN variable defaults to “0” if SDK_EXT_TYPE is set to “minimal”, and defaults to “1” if SDK_EXT_TYPE is set to “full”.
- SDK_LD_ARCH
Specifies architecture-specific linker flags when building nativesdk recipes. By default, the value of SDK_LD_ARCH equals the one of BUILD_LD_ARCH.
- SDK_NAME
The base name for SDK output files. The default value (as set in
meta-poky/conf/distro/poky.conf) is derived from the DISTRO, TCLIBC, SDKMACHINE, IMAGE_BASENAME, TUNE_PKGARCH, and MACHINE variables:SDK_NAME = "${DISTRO}-${TCLIBC}-${SDKMACHINE}-${IMAGE_BASENAME}-${TUNE_PKGARCH}-${MACHINE}"
- SDK_OS
Specifies the operating system for which the SDK will be built. The default value is the value of BUILD_OS.
- SDK_OUTPUT
The location used by the OpenEmbedded build system when creating SDK output. The populate_sdk_base class defines the variable as follows:
SDK_DIR = "${WORKDIR}/sdk" SDK_OUTPUT = "${SDK_DIR}/image" SDK_DEPLOY = "${DEPLOY_DIR}/sdk"
Note
The SDK_OUTPUT directory is a temporary directory as it is part of WORKDIR by way of SDK_DIR. The final output directory is SDK_DEPLOY.
- SDK_PACKAGE_ARCHS
Specifies a list of architectures compatible with the SDK machine. This variable is set automatically and should not normally be hand-edited. Entries are separated using spaces and listed in order of priority. The default value for SDK_PACKAGE_ARCHS is “all any noarch ${SDK_ARCH}-${SDKPKGSUFFIX}”.
- SDK_POSTPROCESS_COMMAND
Specifies a list of functions to call once the OpenEmbedded build system creates the SDK. You can specify functions separated by spaces:
SDK_POSTPROCESS_COMMAND += “function”
If you need to pass an SDK path to a command within a function, you can use
${SDK_DIR}, which points to the parent directory used by the OpenEmbedded build system when creating SDK output. See the SDK_DIR variable for more information.- SDK_PREFIX
The toolchain binary prefix used for nativesdk recipes. The OpenEmbedded build system uses the SDK_PREFIX value to set the TARGET_PREFIX when building
nativesdkrecipes. The default value is “${SDK_SYS}-“.- SDK_RECRDEP_TASKS
A list of shared state tasks added to the extensible SDK. By default, the following tasks are added:
Despite the default value of “” for the SDK_RECRDEP_TASKS variable, the above four tasks are always added to the SDK. To specify tasks beyond these four, you need to use the SDK_RECRDEP_TASKS variable (e.g. you are defining additional tasks that are needed in order to build SDK_TARGETS).
- SDK_SYS
Specifies the system, including the architecture and the operating system, for which the SDK will be built.
The OpenEmbedded build system automatically sets this variable based on SDK_ARCH, SDK_VENDOR, and SDK_OS. You do not need to set the SDK_SYS variable yourself.
- SDK_TARGET_MANIFEST
The manifest file for the target part of the SDK. This file lists all the installed packages that make up the target part of the SDK. The file contains package information on a line-per-package basis as follows:
packagename packagearch version
The populate_sdk_base class defines the manifest file as follows:
SDK_TARGET_MANIFEST = "${SDK_DEPLOY}/${TOOLCHAIN_OUTPUTNAME}.target.manifest"
The location is derived using the SDK_DEPLOY and TOOLCHAIN_OUTPUTNAME variables.
- SDK_TARGETS
A list of targets to install from shared state as part of the standard or extensible SDK installation. The default value is “${PN}” (i.e. the image from which the SDK is built).
The SDK_TARGETS variable is an internal variable and typically would not be changed.
- SDK_TITLE
The title to be printed when running the SDK installer. By default, this title is based on the DISTRO_NAME or DISTRO variable and is set in the populate_sdk_base class as follows:
SDK_TITLE ??= "${@d.getVar('DISTRO_NAME') or d.getVar('DISTRO')} SDK"For the poky reference distribution, SDK_TITLE is set to “Poky (Yocto Project Reference Distro)”.
For information on how to change this default title, see the “Changing the Extensible SDK Installer Title” section in the Yocto Project Application Development and the Extensible Software Development Kit (eSDK) manual.
- SDK_TOOLCHAIN_LANGS
Specifies programming languages to support in the SDK, as a space-separated list. Currently supported items are
rustandgo.- SDK_UPDATE_URL
An optional URL for an update server for the extensible SDK. If set, the value is used as the default update server when running
devtool sdk-updatewithin the extensible SDK.- SDK_VENDOR
Specifies the name of the SDK vendor.
- SDK_VERSION
Specifies the version of the SDK. The Poky distribution configuration file (
/meta-poky/conf/distro/poky.conf) sets the default SDK_VERSION as follows:SDK_VERSION = "${@d.getVar('DISTRO_VERSION').replace('snapshot-${METADATA_REVISION}', 'snapshot')}"
For additional information, see the DISTRO_VERSION and METADATA_REVISION variables.
- SDK_ZIP_OPTIONS
Specifies extra options to pass to the
zipcommand when zipping the SDK (i.e. when SDK_ARCHIVE_TYPE is set to “zip”). The default value is “-y”.- SDKEXTPATH
The default installation directory for the Extensible SDK. By default, this directory is based on the DISTRO variable and is set in the populate_sdk_base class as follows:
SDKEXTPATH ??= "~/${@d.getVar('DISTRO')}_sdk"For the Poky reference distro, the SDKEXTPATH is set to “poky_sdk”.
For information on how to change this default directory, see the “Changing the Default SDK Installation Directory” section in the Yocto Project Application Development and the Extensible Software Development Kit (eSDK) manual.
- SDKIMAGE_FEATURES
Equivalent to IMAGE_FEATURES. However, this variable applies to the SDK generated from an image using the following command:
$ bitbake -c populate_sdk imagename
- SDKMACHINE
The machine for which the SDK is built. In other words, the SDK is built such that it runs on the target you specify with the SDKMACHINE value. The value points to a corresponding
.conffile underconf/machine-sdk/in the enabled layers, for exampleaarch64,i586,i686,ppc64,ppc64le, andx86_64are available in OpenEmbedded-Core.The variable defaults to BUILD_ARCH so that SDKs are built for the architecture of the build machine.
Note
You cannot set the SDKMACHINE variable in your distribution configuration file. If you do, the configuration will not take effect.
- SDKPATH
Defines the path used to collect the SDK components and build the installer.
- SDKPATHINSTALL
Defines the path offered to the user for installation of the SDK that is generated by the OpenEmbedded build system. The path appears as the default location for installing the SDK when you run the SDK’s installation script. You can override the offered path when you run the script.
- SDKTARGETSYSROOT
The full path to the sysroot used for cross-compilation within an SDK as it will be when installed into the default SDKPATHINSTALL.
- SECTION
The section in which packages should be categorized. Package management utilities can make use of this variable.
- SELECTED_OPTIMIZATION
Specifies the optimization flags passed to the C compiler when building for the target. The flags are passed through the default value of the TARGET_CFLAGS variable.
The SELECTED_OPTIMIZATION variable takes the value of FULL_OPTIMIZATION unless DEBUG_BUILD = “1”, in which case the value of DEBUG_OPTIMIZATION is used.
- SERIAL_CONSOLES
Defines a serial console (TTY) to enable using getty. Provide a value that specifies the baud rate followed by the TTY device name separated by a semicolon. Use spaces to separate multiple devices:
SERIAL_CONSOLES = "115200;ttyS0 115200;ttyS1"
- SETUPTOOLS_BUILD_ARGS
When used by recipes that inherit the setuptools3 class, this variable can be used to specify additional arguments to be passed to
setup.py buildin thesetuptools3_do_compile()task.- SETUPTOOLS_SETUP_PATH
When used by recipes that inherit the setuptools3 class, this variable should be used to specify the directory in which the
setup.pyfile is located if it is not at the root of the source tree (as specified by S). For example, in a recipe where the sources are fetched from a Git repository andsetup.pyis in apython/pythonmodulesubdirectory, you would have this:SETUPTOOLS_SETUP_PATH = "${S}/python/pythonmodule"
- SIGGEN_EXCLUDE_SAFE_RECIPE_DEPS
A list of recipe dependencies that should not be used to determine signatures of tasks from one recipe when they depend on tasks from another recipe. For example:
SIGGEN_EXCLUDE_SAFE_RECIPE_DEPS += "intone->mplayer2"
In the previous example,
intonedepends onmplayer2.You can use the special token
"*"on the left-hand side of the dependency to match all recipes except the one on the right-hand side. Here is an example:SIGGEN_EXCLUDE_SAFE_RECIPE_DEPS += "*->quilt-native"
In the previous example, all recipes except
quilt-nativeignore task signatures from thequilt-nativerecipe when determining their task signatures.Use of this variable is one mechanism to remove dependencies that affect task signatures and thus force rebuilds when a recipe changes.
Note
If you add an inappropriate dependency for a recipe relationship, the software might break during runtime if the interface of the second recipe was changed after the first recipe had been built.
- SIGGEN_EXCLUDERECIPES_ABISAFE
A list of recipes that are completely stable and will never change. The ABI for the recipes in the list are presented by output from the tasks run to build the recipe. Use of this variable is one way to remove dependencies from one recipe on another that affect task signatures and thus force rebuilds when the recipe changes.
Note
If you add an inappropriate variable to this list, the software might break at runtime if the interface of the recipe was changed after the other had been built.
- SIGGEN_LOCKEDSIGS
The list of locked tasks, with the form:
SIGGEN_LOCKEDSIGS += "<package>:<task>:<signature>"
If
<signature>exists for the specified<task>and<package>in the sstate cache, BitBake will use the cached output instead of rebuilding the<task>. If it does not exist, BitBake will build the<task>and the sstate cache will be used next time.Example:
SIGGEN_LOCKEDSIGS += "bc:do_compile:09772aa4532512baf96d433484f27234d4b7c11dd9cda0d6f56fa1b7ce6f25f0"
You can obtain the signature of all the tasks for the recipe
bcusing:bitbake -S none bc
Then you can look at files in
build/tmp/stamps/<arch>/bcand look for files like:<PV>.do_compile.sigdata.09772aa4532512baf96d433484f27234d4b7c11dd9cda0d6f56fa1b7ce6f25f0.Alternatively, you can also use bblock to generate this line for you.
- SIGGEN_LOCKEDSIGS_TASKSIG_CHECK
Specifies the debug level of task signature check. 3 levels are supported:
info: displays a “Note” message to remind the user that a task is locked and the current signature matches the locked one.warn: displays a “Warning” message if a task is locked and the current signature does not match the locked one.error: same as warn but displays an “Error” message and aborts.
- SIGGEN_LOCKEDSIGS_TYPES
Allowed overrides for SIGGEN_LOCKEDSIGS. This is mainly used for architecture specific locks. A common value for SIGGEN_LOCKEDSIGS_TYPES is
${PACKAGE_ARCHS}:SIGGEN_LOCKEDSIGS_TYPES += "${PACKAGE_ARCHS}" SIGGEN_LOCKEDSIGS_core2-64 += "bc:do_compile:09772aa4532512baf96d433484f27234d4b7c11dd9cda0d6f56fa1b7ce6f25f0" SIGGEN_LOCKEDSIGS_cortexa57 += "bc:do_compile:12178eb6d55ef602a8fe638e49862fd247e07b228f0f08967697b655bfe4bb61"
Here, the
do_compiletask frombcwill be locked only forcore2-64andcortexa57but not for other architectures such asmips32r2.- SITEINFO_BITS
Specifies the number of bits for the target system CPU. The value should be either “32” or “64”.
- SITEINFO_ENDIANNESS
Specifies the endian byte order of the target system. The value should be either “le” for little-endian or “be” for big-endian.
- SKIP_FILEDEPS
Enables removal of all files from the “Provides” section of an RPM package. Removal of these files is required for packages containing prebuilt binaries and libraries such as
libstdc++andglibc.To enable file removal, set the variable to “1” in your
conf/local.confconfiguration file in your: Build Directory:SKIP_FILEDEPS = "1"
- SKIP_RECIPE
Used to prevent the OpenEmbedded build system from building a given recipe. Specify the PN value as a variable flag (
varflag) and provide a reason, which will be reported when attempting to build the recipe.To prevent a recipe from being built, use the SKIP_RECIPE variable in your
local.conffile or distribution configuration. Here is an example which preventsmyrecipefrom being built:SKIP_RECIPE[myrecipe] = "Not supported by our organization."
- SOC_FAMILY
A colon-separated list grouping together machines based upon the same family of SoC (System On Chip). You typically set this variable in a common
.incfile that you include in the configuration files of all the machines.Note
You must include
conf/machine/include/soc-family.incfor this variable to appear in MACHINEOVERRIDES.- SOLIBS
Defines the suffix for shared libraries used on the target platform. By default, this suffix is “.so.*” for all Linux-based systems and is defined in the
meta/conf/bitbake.confconfiguration file.You will see this variable referenced in the default values of
FILES:${PN}.- SOLIBSDEV
Defines the suffix for the development symbolic link (symlink) for shared libraries on the target platform. By default, this suffix is “.so” for Linux-based systems and is defined in the
meta/conf/bitbake.confconfiguration file.You will see this variable referenced in the default values of
FILES:${PN}-dev.- SOURCE_DATE_EPOCH
This defines a date expressed in number of seconds since the UNIX EPOCH (01 Jan 1970 00:00:00 UTC), which is used by multiple build systems to force a timestamp in built binaries. Many upstream projects already support this variable.
You will find more details in the official specifications.
A value for each recipe is computed from the sources by meta/lib/oe/reproducible.py.
If a recipe wishes to override the default behavior, it should set its own SOURCE_DATE_EPOCH value:
SOURCE_DATE_EPOCH = "1613559011"
- SOURCE_MIRROR_FETCH
When you are fetching files to create a mirror of sources (i.e. creating a source mirror), setting SOURCE_MIRROR_FETCH to “1” in your
local.confconfiguration file ensures the source for all recipes are fetched regardless of whether or not a recipe is compatible with the configuration. A recipe is considered incompatible with the currently configured machine when either or both the COMPATIBLE_MACHINE variable and COMPATIBLE_HOST variables specify compatibility with a machine other than that of the current machine or host.Note
Do not set the SOURCE_MIRROR_FETCH variable unless you are creating a source mirror. In other words, do not set the variable during a normal build.
- SOURCE_MIRROR_URL
Defines your own PREMIRRORS from which to first fetch source before attempting to fetch from the upstream specified in SRC_URI.
To use this variable, you must globally inherit the own-mirrors class and then provide the URL to your mirrors. Here is the general syntax:
INHERIT += "own-mirrors" SOURCE_MIRROR_URL = "http://example.com/my_source_mirror"
Note
You can specify only a single URL in SOURCE_MIRROR_URL.
Note
If the mirror is protected behind a username and password, the build host needs to be configured so the build system is able to fetch from the mirror.
The recommended way to do that is by setting the following parameters in
$HOME/.netrc($HOMEbeing the build host home directory):machine example.com login <user> password <password>
This file requires permissions set to
400or600to prevent other users from reading the file:chmod 600 "$HOME/.netrc"
Another method to configure the username and password is from the URL in SOURCE_MIRROR_URL directly, with the
userandpswdparameters:SOURCE_MIRROR_URL = "http://example.com/my_source_mirror;user=<user>;pswd=<password>"
- SPDX_BUILD_HOST
The base variable name describing the build host on which the build is running. The value must name a key from
SPDX_IMPORTS, allowing the generated SPDX to reference externally defined host identity data.Requires SPDX_INCLUDE_BITBAKE_PARENT_BUILD to be set to
"1".Warning
Setting this variable will result in non-reproducible SPDX output, because the build host identity may vary across builds.
See also SPDX_INCLUDE_BITBAKE_PARENT_BUILD,
SPDX_IMPORTS, SPDX_INVOKED_BY, and SPDX_ON_BEHALF_OF.- SPDX_CONCLUDED_LICENSE
The SPDX_CONCLUDED_LICENSE variable allows overriding the
hasConcludedLicenseobject to individual SBOM packages. This can be used when the license of a package was determined to be different than the original license string value, after analysis.This variable can be set in two ways:
For the entire recipe:
SPDX_CONCLUDED_LICENSE = "MIT & Apache-2.0"
For an individual package produced by the recipe:
SPDX_CONCLUDED_LICENSE:${PN} = "MIT & Apache-2.0"
- SPDX_CUSTOM_ANNOTATION_VARS
This option allows to associate SPDX annotations to a recipe, using the values of variables in the recipe:
ANNOTATION1 = "First annotation for recipe" ANNOTATION2 = "Second annotation for recipe" SPDX_CUSTOM_ANNOTATION_VARS = "ANNOTATION1 ANNOTATION2"
This will add a new block to the recipe
.sdpx.jsonoutput:"annotations": [ { "annotationDate": "2023-04-18T08:32:12Z", "annotationType": "OTHER", "annotator": "Tool: oe-spdx-creator - 1.0", "comment": "ANNOTATION1=First annotation for recipe" }, { "annotationDate": "2023-04-18T08:32:12Z", "annotationType": "OTHER", "annotator": "Tool: oe-spdx-creator - 1.0", "comment": "ANNOTATION2=Second annotation for recipe" } ],
- SPDX_FILE_EXCLUDE_PATTERNS
A space-separated list of Python regular expressions used to exclude files from the SPDX output when SPDX_INCLUDE_SOURCES is enabled. Files whose paths match any of the patterns, via
re.search(), are filtered out from the generated SBOM.By default this variable is empty, meaning no files are excluded.
Example usage:
SPDX_FILE_EXCLUDE_PATTERNS = "\\.patch$ \\.diff$ /test/ \\.pyc$ \\.o$"
See also SPDX_INCLUDE_SOURCES.
- SPDX_GIT_PURL_MAPPINGS
A space-separated list of
domain:purl_typemappings to configure PURL (Package URLs) generation for Git source downloads.For example, adding
gitlab.example.com:pkg:gitlabto this variable will map repositories hosted on “gitlab.example.com” to thepkg:gitlabPURL type.See also the SPDX_PACKAGE_URLS variable for more information on PURLs.
- SPDX_IMAGE_SUPPLIER
The name of an agent variable prefix describing the organization or person who supplies the image SBOM. When set, the supplier is attached to all root elements of the image SBOM using the
suppliedByproperty.The value of this variable is the base prefix used to look up the agent’s details. The following sub-variables are read using that prefix:
<PREFIX>_name: display name of the supplier (required)<PREFIX>_type: agent type:organization,person,software, oragent(optional, defaults toagent)<PREFIX>_comment: free-text comment (optional)<PREFIX>_id_email: contact e-mail address (optional)
The simplest approach is to use the variable itself as its own prefix, so the sub-variable names follow directly from
SPDX_IMAGE_SUPPLIER.Example (set in the image recipe or in a configuration file):
SPDX_IMAGE_SUPPLIER = "SPDX_IMAGE_SUPPLIER" SPDX_IMAGE_SUPPLIER_name = "Acme Corp" SPDX_IMAGE_SUPPLIER_type = "organization"
Alternatively, you can use any other prefix name, which is useful for sharing an agent definition across multiple supplier variables:
MY_COMPANY_name = "Acme Corp" MY_COMPANY_type = "organization" SPDX_IMAGE_SUPPLIER = "MY_COMPANY" SPDX_SDK_SUPPLIER = "MY_COMPANY"
If not set, no supplier information is added to the image SBOM.
See also SPDX_PACKAGE_SUPPLIER and SPDX_SDK_SUPPLIER.
- SPDX_INCLUDE_BITBAKE_PARENT_BUILD
When set to
"1", the SPDX output will include aBuildobject representing the parent BitBake invocation. This allows consumers of the SBOM to trace which CI/CD job or orchestration system triggered the build.This variable is required for SPDX_INVOKED_BY, SPDX_ON_BEHALF_OF, and SPDX_BUILD_HOST to have any effect.
Warning
Enabling this variable will result in non-reproducible SPDX output, because the build invocation identity changes with every run.
Enable as follows:
SPDX_INCLUDE_BITBAKE_PARENT_BUILD = "1"
See also SPDX_BUILD_HOST, SPDX_INVOKED_BY, and SPDX_ON_BEHALF_OF.
- SPDX_INCLUDE_COMPILED_SOURCES
This option allows the same as SPDX_INCLUDE_SOURCES but including only the sources used to compile the host tools and the target packages. While SPDX_INCLUDE_SOURCES includes all files in the source directory as source file descriptions, SPDX_INCLUDE_COMPILED_SOURCES includes only the sources that are used to produce the binaries delivered as packages. The source files that are not used during compilation are not included in the SBOM. It uses debugsource information generated during
do_packageto filter out source files.This enables an external tool to use the SPDX information to disregard vulnerabilities that are not compiled in the packages.
Enable this option as follows:
SPDX_INCLUDE_COMPILED_SOURCES = "1"
For SPDX 2.2 format (release 4.1 “langdale”), building
core-image-minimalfor theqemux86-64machine, this option reduced the size of thetmp/deploy/spdxdirectory from 2GB to 1.6GB compared to SPDX_INCLUDE_SOURCES, as it includes only compiled objects without original source files.With SPDX 3.0.1 JSON format, enabling this option includes both compiled sources and original source files (same as
SPDX_INCLUDE_SOURCES = "1"), which significantly increases the SBOM size. For example, withcore-image-minimalonqemux86-64, the uncompressed SBOM file can grow from hundreds of megabytes to several gigabytes.- SPDX_INCLUDE_KERNEL_CONFIG
This option allows exporting the Linux kernel configuration (the contents of the
.configfile) into the recipe’s SPDX document as a separatebuild_Buildobject. Each kernel configuration parameter (CONFIG_*) is recorded and linked to the main kernel object using anancestorOfrelationship.Note
This variable only has effect when using the SPDX 3.0 output format (see create-spdx).
Enable this option as follows:
SPDX_INCLUDE_KERNEL_CONFIG = "1"
When enabled, a separate SPDX object is created for the kernel configuration, improving reproducibility, compliance tracking, and auditing of build-time kernel features.
- SPDX_INCLUDE_PACKAGECONFIG
This option allows exporting a recipe’s PACKAGECONFIG features into the recipe’s SPDX document. Each feature is recorded as a
DictionaryEntrywith keyPACKAGECONFIG:<feature>and valueenabledordisabled, depending on whether the feature is active in the current build.Note
This variable only has effect when using the SPDX 3.0 output format (see create-spdx).
Enable this option as follows:
SPDX_INCLUDE_PACKAGECONFIG = "1"
When enabled, the build-time configuration of each recipe is captured in the SPDX document, improving transparency, reproducibility, and security auditing. It allows consumers of the SPDX SBOM to determine which optional features were enabled or disabled in a given build.
- SPDX_INCLUDE_SOURCES
This option allows to add a description of the source files used to build the host tools and the target packages, to the
spdx.jsonfiles intmp/deploy/spdx/MACHINE/recipes/under the Build Directory. As a consequence, thespdx.jsonfiles under theby-namespaceandpackagessubdirectories intmp/deploy/spdx/MACHINEare also modified to include references to such source file descriptions.Enable this option as follows:
SPDX_INCLUDE_SOURCES = "1"
For SPDX 2.2 format (release 4.1 “langdale”), building
core-image-minimalfor theqemux86-64machine, enabling this option multiplied the total size of thetmp/deploy/spdxdirectory by a factor of 3 (+291 MiB for this image), and the size of theIMAGE-MACHINE.spdx.tar.zstintmp/deploy/images/MACHINEby a factor of 130 (+15 MiB for this image), compared to just using the create-spdx class with no option.With SPDX 3.0.1 JSON format, including source files significantly increases the SBOM size (potentially by several gigabytes for typical images).
- SPDX_INCLUDE_VEX
This option controls what VEX information will be present in the output SPDX documents.
It can take three different values:
none: disable all VEX data.current(default): include VEX data for vulnerabilities not already fixed in the upstream source code.all: get all known historical vulnerabilities, including those already fixed upstream (warning: this can be large and slow).
- SPDX_INVOKED_BY
The base variable name describing the agent that invoked the build. Each
Buildobject in the SPDX output is linked to this agent with aninvokedByrelationship. Requires SPDX_INCLUDE_BITBAKE_PARENT_BUILD to be set to"1".The sub-variables follow the same agent prefix convention as SPDX_IMAGE_SUPPLIER:
SPDX_INVOKED_BY_name: display name of the invoking agentSPDX_INVOKED_BY_type: agent type, such assoftwarefor a CI system
Example (CI pipeline invoking the build):
SPDX_INCLUDE_BITBAKE_PARENT_BUILD = "1" SPDX_INVOKED_BY = "SPDX_INVOKED_BY" SPDX_INVOKED_BY_name = "GitLab CI" SPDX_INVOKED_BY_type = "software"
Warning
Setting this variable will likely result in non-reproducible SPDX output, because the invoking agent identity varies across builds.
See also SPDX_INCLUDE_BITBAKE_PARENT_BUILD, SPDX_ON_BEHALF_OF, and SPDX_BUILD_HOST.
- SPDX_LICENSES
Path to the JSON file containing SPDX license identifier mappings. This file maps common license names to official SPDX license identifiers used during SBOM generation.
The default value points to a copy of the license mappings defined by SPDX (https://github.com/spdx/license-list-data) stored in OpenEmbedded-Core (OE-Core).
You can override this variable to use a custom license mapping file if your organization uses different license naming conventions.
- SPDX_MULTILIB_SSTATE_ARCHS
The list of sstate architectures to consider when collecting SPDX dependencies. This includes multilib architectures when multilib is enabled.
The default value is set to the value of
SSTATE_ARCHS.This variable is used internally by the SPDX generation classes to ensure all relevant dependencies are included in the SBOM, regardless of whether multilib is enabled or not.
- SPDX_NAMESPACE_PREFIX
This option could be used in order to change the prefix of
spdxDocumentand the prefix ofdocumentNamespace. It is set by default tohttp://spdx.org/spdxdoc.- SPDX_ON_BEHALF_OF
The base variable name describing the agent on whose behalf the invoking agent (SPDX_INVOKED_BY) is running the build. Requires SPDX_INCLUDE_BITBAKE_PARENT_BUILD to be set to
"1". Has no effect if SPDX_INVOKED_BY is not also set.The sub-variables follow the same agent prefix convention as SPDX_IMAGE_SUPPLIER:
SPDX_ON_BEHALF_OF_name: display name of the commissioning agentSPDX_ON_BEHALF_OF_type: agent type, such asorganization
Example (CI system building on behalf of a customer organization):
SPDX_INCLUDE_BITBAKE_PARENT_BUILD = "1" SPDX_INVOKED_BY = "SPDX_INVOKED_BY" SPDX_INVOKED_BY_name = "GitLab CI" SPDX_INVOKED_BY_type = "software" SPDX_ON_BEHALF_OF = "SPDX_ON_BEHALF_OF" SPDX_ON_BEHALF_OF_name = "Acme Corp" SPDX_ON_BEHALF_OF_type = "organization"
Warning
Setting this variable will likely result in non-reproducible SPDX output, because the agent identity varies across builds.
See also SPDX_INCLUDE_BITBAKE_PARENT_BUILD, SPDX_INVOKED_BY, and SPDX_BUILD_HOST.
- SPDX_PACKAGE_SUPPLIER
The base variable name describing the agent who supplies the artifacts produced by the build. Works identically to SPDX_IMAGE_SUPPLIER but applies to individual packages rather than the image SBOM.
Typically set in a distro configuration file to apply globally to all packages, or in a specific software recipe (or a
.bbappend) to apply only to packages of that recipe. Recipe-level overrides (SPDX_PACKAGE_SUPPLIER:pn-<recipe>) are also supported:SPDX_PACKAGE_SUPPLIER = "SPDX_PACKAGE_SUPPLIER" SPDX_PACKAGE_SUPPLIER_name = "Acme Corp" SPDX_PACKAGE_SUPPLIER_type = "organization"
See also SPDX_IMAGE_SUPPLIER and SPDX_SDK_SUPPLIER.
- SPDX_PACKAGE_URL
Provides a place for the SPDX data creator to record the package URL string (
software_packageUrl), in accordance with the Package URL specification) for a software Package. The default value of this variable is an empty string.- SPDX_PACKAGE_URLS
A space-separated list of Package URLs (“PURLs”) for the software package. The first item in this list will be listed as the
packageUrlproperty of the packages, and all PURLs (including the first one) will be listed as external references. The default value is an auto-generatedpkg:yoctoPURL based on the recipe name, version, and layer name. Override this variable to replace the default, otherwise append or prepend to add additional PURLs.- SPDX_PACKAGE_VERSION
This variable controls the package version as seen in the SPDX 3.0 JSON output (
software_packageVersion). The default value for this variable is PV.- SPDX_PRETTY
This option makes the SPDX output more human-readable, using identation and newlines, instead of the default output in a single line:
SPDX_PRETTY = "1"
The generated SPDX files are approximately 20% bigger, but this option is recommended if you want to inspect the SPDX output files with a text editor.
- SPDX_SDK_SUPPLIER
The base variable name describing the agent who supplies the SDK SBOM. When set, the supplier is attached to all root elements of the SDK SBOM using the
suppliedByproperty.Works identically to SPDX_IMAGE_SUPPLIER but applies to SDK builds. This includes image-based SDKs produced by
bitbake <image> -c populate_sdkas well as toolchain SDKs produced bybitbake meta-toolchain.Typically set in the image recipe or in a configuration file.
If not set, no supplier information is added to the SDK SBOM.
See also SPDX_IMAGE_SUPPLIER and SPDX_PACKAGE_SUPPLIER.
- SPDX_UUID_NAMESPACE
The namespace used for generating UUIDs in SPDX documents. This should be a domain name or unique identifier for your organization to ensure globally unique SPDX IDs across different builds and organizations.
The default value is set to a domain managed by the OpenEmbedded project. You can override this to use your organization’s domain.
- SPDXLICENSEMAP
Maps commonly used license names to their SPDX counterparts found in
meta/files/common-licenses/. For the default SPDXLICENSEMAP mappings, see themeta/conf/licenses.conffile.For additional information, see the LICENSE variable.
- SPECIAL_PKGSUFFIX
A list of prefixes for PN used by the OpenEmbedded build system to create variants of recipes or packages. The list specifies the prefixes to strip off during certain circumstances such as the generation of the BPN variable.
- SPL_BINARY
The file type for the Secondary Program Loader (SPL). Some devices use an SPL from which to boot (e.g. the BeagleBone development board). For such cases, you can declare the file type of the SPL binary in the
u-boot.incinclude file, which is used in the U-Boot recipe.The SPL file type is set to “null” by default in the
u-boot.incfile as follows:# Some versions of u-boot build an SPL (Second Program Loader) image that # should be packaged along with the u-boot binary as well as placed in the # deploy directory. For those versions they can set the following variables # to allow packaging the SPL. SPL_BINARY ?= "" SPL_BINARYNAME ?= "${@os.path.basename(d.getVar("SPL_BINARY"))}" SPL_IMAGE ?= "${SPL_BINARYNAME}-${MACHINE}-${PV}-${PR}" SPL_SYMLINK ?= "${SPL_BINARYNAME}-${MACHINE}"The SPL_BINARY variable helps form various
SPL_*variables used by the OpenEmbedded build system.See the BeagleBone machine configuration example in the “Adding a Layer Using the bitbake-layers Script” section in the Yocto Project Board Support Package Developer’s Guide for additional information.
- SPL_DTB_BINARY
When inheriting the uboot-sign class, the SPL_DTB_BINARY variable contains the name of the SPL binary to be compiled.
- SPL_MKIMAGE_DTCOPTS
Options for the device tree compiler passed to
mkimage -Dfeature while creating a FIT image with the uboot-sign class. If SPL_MKIMAGE_DTCOPTS is not set then the uboot-sign class will not pass the-Doption tomkimage.The default value is set to “” by the uboot-config class.
- SPL_SIGN_ENABLE
Enable signing of the U-Boot FIT image. The default value is “0”. This variable is used by the uboot-sign class.
- SPL_SIGN_KEYDIR
Location of the directory containing the RSA key and certificate used for signing the U-Boot FIT image, used by the uboot-sign class.
- SPL_SIGN_KEYNAME
The name of keys used by the uboot-sign class for signing U-Boot FIT image stored in the SPL_SIGN_KEYDIR directory. If we have for example a
dev.keykey and adev.crtcertificate stored in the SPL_SIGN_KEYDIR directory, you will have to set SPL_SIGN_KEYNAME todev.- SPLASH
This variable, used by the image class, allows to choose splashscreen applications. Set it to the names of packages for such applications to use. This variable is set by default to
psplash.- SPLASH_IMAGES
This variable, used by the
psplashrecipe, allows to customize the default splashscreen image.Specified images in PNG format are converted to
.hfiles by the recipe, and are included in thepsplashbinary, so you won’t find them in the root filesystem.To make such a change, it is recommended to customize the
psplashrecipe in a custom layer. Here is an example structure for anACMEboard:meta-acme/recipes-core/psplash ├── files │ └── logo-acme.png └── psplash_%.bbappend
And here are the contents of the
psplash_%.bbappendfile in this example:SPLASH_IMAGES = "file://logo-acme.png;outsuffix=default" FILESEXTRAPATHS:prepend := "${THISDIR}/files:"
You could even add specific configuration options for
psplash, for example:EXTRA_OECONF += "--disable-startup-msg --enable-img-fullscreen"
For information on append files, see the “Appending Other Layers Metadata With Your Layer” section.
- SRC_URI
See the BitBake manual for the initial description for this variable: SRC_URI.
The following features are added by OpenEmbedded and the Yocto Project.
There are standard and recipe-specific options. Here are standard ones:
apply— whether to apply the patch or not. The default action is to apply the patch.striplevel— which striplevel to use when applying the patch. The default level is 1.patchdir— specifies the directory in which the patch should be applied. The default is${S}.
Here are options specific to recipes building code from a revision control system:
mindate— apply the patch only if SRCDATE is equal to or greater thanmindate.maxdate— apply the patch only if SRCDATE is not later thanmaxdate.minrev— apply the patch only if SRCREV is equal to or greater thanminrev.maxrev— apply the patch only if SRCREV is not later thanmaxrev.rev— apply the patch only if SRCREV is equal torev.notrev— apply the patch only if SRCREV is not equal torev.
Note
If you want the build system to pick up files specified through a SRC_URI statement from your append file, you need to be sure to extend the FILESPATH variable by also using the FILESEXTRAPATHS variable from within your append file.
- SRC_URI_OVERRIDES_PACKAGE_ARCH
By default, the OpenEmbedded build system automatically detects whether SRC_URI contains files that are machine-specific. If so, the build system automatically changes PACKAGE_ARCH. Setting this variable to “0” disables this behavior.
- SRCDATE
The date of the source code used to build the package. This variable applies only if the source was fetched from a Source Code Manager (SCM).
- SRCPV
The variable SRCPV is deprecated. It was previously used to include source control information in PV for bitbake to work correctly but this is no longer a requirement. Source control information will be automatically included by bitbake in the variable PKGV during packaging if the
+sign is present in PV.Note
The SRCPV variable used to be defined in the
meta/conf/bitbake.confconfiguration file in OpenEmbedded-Core (OE-Core) as follows:SRCPV = "${@bb.fetch2.get_srcrev(d)}"
The
get_srcrevfunction can still be used to include source control information in variables manually.- SRCREV
The revision of the source code used to build the package. This variable applies to Subversion, Git, and Mercurial only. Note that if you want to build a fixed revision and you want to avoid performing a query on the remote repository every time BitBake parses your recipe, you should specify a SRCREV that is a full revision identifier (e.g. the full SHA hash in git) and not just a tag.
Note
For information on limitations when inheriting the latest revision of software using SRCREV, see the AUTOREV variable description and the “Automatically Incrementing a Package Version Number” section, which is in the Yocto Project Development Tasks Manual.
- SRCREV_FORMAT
See SRCREV_FORMAT in the BitBake manual.
- SRCTREECOVEREDTASKS
A list of tasks that are typically not relevant (and therefore skipped) when building using the externalsrc class. The default value as set in that class file is the set of tasks that are rarely needed when using external source:
SRCTREECOVEREDTASKS ?= "do_patch do_unpack do_fetch"
The notable exception is when processing external kernel source as defined in the kernel-yocto class file (formatted for aesthetics):
SRCTREECOVEREDTASKS += "\ do_validate_branches \ do_kernel_configcheck \ do_kernel_checkout \ do_fetch \ do_unpack \ do_patch \ "
See the associated EXTERNALSRC and EXTERNALSRC_BUILD variables for more information.
- SSTATE_DIR
The directory for the shared state cache.
- SSTATE_EXCLUDEDEPS_SYSROOT
This variable allows to specify indirect dependencies to exclude from sysroots, for example to avoid the situations when a dependency on any
-nativerecipe will pull in all dependencies of that recipe in the recipe sysroot. This behaviour might not always be wanted, for example when that-nativerecipe depends on build tools that are not relevant for the current recipe.This way, irrelevant dependencies are ignored, which could have prevented the reuse of prebuilt artifacts stored in the Shared State Cache.
SSTATE_EXCLUDEDEPS_SYSROOT is evaluated as two regular expressions of recipe and dependency to ignore. An example is the rule in meta/conf/layer.conf:
# Nothing needs to depend on libc-initial # base-passwd/shadow-sysroot don't need their dependencies SSTATE_EXCLUDEDEPS_SYSROOT += "\ .*->.*-initial.* \ .*(base-passwd|shadow-sysroot)->.* \ "
The
->substring represents the dependency between the two regular expressions.- SSTATE_MIRROR_ALLOW_NETWORK
If set to “1”, allows fetches from mirrors that are specified in SSTATE_MIRRORS to work even when fetching from the network is disabled by setting BB_NO_NETWORK to “1”. Using the SSTATE_MIRROR_ALLOW_NETWORK variable is useful if you have set SSTATE_MIRRORS to point to an internal server for your shared state cache, but you want to disable any other fetching from the network.
- SSTATE_MIRRORS
Configures the OpenEmbedded build system to search other mirror locations for prebuilt cache data objects before building out the data. This variable works like fetcher MIRRORS and PREMIRRORS and points to the cache locations to check for the shared state (sstate) objects.
You can specify a filesystem directory or a remote URL such as HTTP or FTP. The locations you specify need to contain the shared state cache (sstate-cache) results from previous builds. The sstate-cache you point to can also be from builds on other machines.
When pointing to sstate build artifacts on another machine that uses a different GCC version for native builds, you must configure SSTATE_MIRRORS with a regular expression that maps local search paths to server paths. The paths need to take into account NATIVELSBSTRING set by the uninative class. For example, the following maps the local search path
universal-4.9to the server-provided path server_url_sstate_path:SSTATE_MIRRORS ?= "file://universal-4.9/(.*) https://server_url_sstate_path/universal-4.8/\1"
If a mirror uses the same structure as SSTATE_DIR, you need to add “PATH” at the end as shown in the examples below. The build system substitutes the correct path within the directory structure:
SSTATE_MIRRORS ?= "\ file://.* https://someserver.tld/share/sstate/PATH;downloadfilename=PATH \ file://.* file:///some-local-dir/sstate/PATH"Note
If the mirror is protected behind a username and password, the build host needs to be configured so the build system is able to download the sstate cache using authentication.
The recommended way to do that is by setting the following parameters in
$HOME/.netrc($HOMEbeing the build host home directory):machine someserver.tld login <user> password <password>
This file requires permissions set to
400or600to prevent other users from reading the file:chmod 600 "$HOME/.netrc"
Another method to configure the username and password is from the URL in SSTATE_MIRRORS directly, with the
userandpswdparameters:SSTATE_MIRRORS ?= "\ file://.* https://someserver.tld/share/sstate/PATH;user=<user>;pswd=<password>;downloadfilename=PATH \ "The Yocto Project actually shares the cache data objects built by its autobuilder:
SSTATE_MIRRORS ?= "file://.* http://sstate.yoctoproject.org/all/PATH;downloadfilename=PATH"
As such binary artifacts are built for the generic QEMU machines supported by the various Poky releases, they are less likely to be reusable in real projects building binaries optimized for a specific CPU family.
- SSTATE_SCAN_FILES
Controls the list of files the OpenEmbedded build system scans for hardcoded installation paths. The variable uses a space-separated list of filenames (not paths) with standard wildcard characters allowed.
During a build, the OpenEmbedded build system creates a shared state (sstate) object during the first stage of preparing the sysroots. That object is scanned for hardcoded paths for original installation locations. The list of files that are scanned for paths is controlled by the SSTATE_SCAN_FILES variable. Typically, recipes add files they want to be scanned to the value of SSTATE_SCAN_FILES rather than the variable being comprehensively set. The sstate class specifies the default list of files.
For details on the process, see the staging class.
- SSTATE_SIG_KEY
When signing shared state artifacts (when SSTATE_VERIFY_SIG is set to “1”), the SSTATE_SIG_KEY variable is the GPG key identifier used to sign them.
See Shared State Signing in the Yocto Project Security Manual for more information.
- SSTATE_SIG_PASSPHRASE
When signing shared state artifacts (when SSTATE_VERIFY_SIG is set to “1”), the SSTATE_SIG_PASSPHRASE variable is the passphrase used to protect the private key signing the artifacts.
See Shared State Signing in the Yocto Project Security Manual for more information.
- SSTATE_SKIP_CREATION
The SSTATE_SKIP_CREATION variable can be used to skip the creation of shared state tarball files. It makes sense e.g. for image creation tasks as tarring images and keeping them in sstate would consume a lot of disk space.
In general it is not recommended to use this variable as missing sstate artefacts adversely impact the build, particularly for entries in the middle of dependency chains. The case it can make sense is where the size and time costs of the artefact are similar to just running the tasks. This generally only applies to end artefact output like images.
The syntax to disable it for one task is:
SSTATE_SKIP_CREATION:task-image-complete = "1"
The syntax to disable it for the whole recipe is:
SSTATE_SKIP_CREATION = "1"
- SSTATE_VALID_SIGS
When verifying shared state artifacts (when SSTATE_VERIFY_SIG is set to “1”), the SSTATE_VALID_SIGS variable is a space-separated list of GPG key identifiers to use to verify their signature.
It must contain the short form identifier of the key pair. For example, when running the
gpg --list-keyscommand (in bold text below):pub ed25519 2026-04-17 [SC] 4049A47E3AAA99D0250966DC5B97632FA7F4E942 uid [ultimate] Antonin Godard (SState Signing) <antonin.godard@bootlin.com> sub cv25519 2026-04-17 [E]The short form equals the last 16 characters of the identifier. In the above example:
5B97632FA7F4E942.Note
If this variable is empty (the default), any of the GPG key present on the Build Host can be used by the OpenEmbedded Build System to verify the shared state artifacts.
See Shared State Signing in the Yocto Project Security Manual for more information.
- SSTATE_VERIFY_SIG
The SSTATE_VERIFY_SIG variable controls whether to enable or disable the shared state artifacts signing feature.
See Shared State Signing in the Yocto Project Security Manual for more information.
- STAGING_BASE_LIBDIR_NATIVE
Specifies the path to the
/libsubdirectory of the sysroot directory for the build host.- STAGING_BASELIBDIR
Specifies the path to the
/libsubdirectory of the sysroot directory for the target for which the current recipe is being built (STAGING_DIR_HOST).- STAGING_BINDIR
Specifies the path to the
/usr/binsubdirectory of the sysroot directory for the target for which the current recipe is being built (STAGING_DIR_HOST).- STAGING_BINDIR_CROSS
Specifies the path to the directory containing binary configuration scripts. These scripts provide configuration information for other software that wants to make use of libraries or include files provided by the software associated with the script.
Note
This style of build configuration has been largely replaced by
pkg-config. Consequently, ifpkg-configis supported by the library to which you are linking, it is recommended you usepkg-configinstead of a provided configuration script.- STAGING_BINDIR_NATIVE
Specifies the path to the
/usr/binsubdirectory of the sysroot directory for the build host.- STAGING_DATADIR
Specifies the path to the
/usr/sharesubdirectory of the sysroot directory for the target for which the current recipe is being built (STAGING_DIR_HOST).- STAGING_DATADIR_NATIVE
Specifies the path to the
/usr/sharesubdirectory of the sysroot directory for the build host.- STAGING_DIR
Used for constructing directory trees used during staging.
For information on how staging for recipe-specific sysroots occurs, see the do_populate_sysroot task, the “Sharing Files Between Recipes” section in the Yocto Project Development Tasks Manual, the “Configuration, Compilation, and Staging” section in the Yocto Project Overview and Concepts Manual, and the SYSROOT_DIRS variable.
Note
Recipes should never write files directly under the STAGING_DIR directory because the OpenEmbedded build system manages the directory automatically. Instead, files should be installed to
${D}within your recipe’s do_install task and then the OpenEmbedded build system will stage a subset of those files into the sysroot.- STAGING_DIR_HOST
Specifies the path to the recipe’s input sysroot directory, populated with files for the system on which the component is built to run (the system that hosts the component). For most recipes, this sysroot is populated by their do_populate_sysroot task (when sharing files between recipes). Exceptions include native recipes, for which the files from do_populate_sysroot task are instead copied to STAGING_DIR_NATIVE. Depending on the type of recipe and the build target, STAGING_DIR_HOST can have the following values:
For recipes building for the target machine, the value is
"${RECIPE_SYSROOT}", check RECIPE_SYSROOT.For native recipes (building for the build host), the value is empty given the assumption that when building for the build host, the build host’s own directories should be used.
Note
Native recipe files are not installed into host paths such as
/usr. Rather, such files are installed into STAGING_DIR_NATIVE. When compiling native recipes, standard build environment variables such as CPPFLAGS and CFLAGS are set up so that both build host’s paths and STAGING_DIR_NATIVE are searched for libraries and headers using, for example, GCC’s-isystemoption.Thus, the emphasis is that the
STAGING_DIR*variables should be viewed as input variables by tasks such as do_configure, do_compile, and do_install. Having the real system root (the build host’s root) play the role of STAGING_DIR_HOST makes conceptual sense for native recipes, as they make use of the build host’s headers and libraries.
- STAGING_DIR_NATIVE
Specifies the path to the recipe’s input sysroot directory, populated with files provided by native recipes (recipes building components that run on the build host itself).
The default value is
"${RECIPE_SYSROOT_NATIVE}", check RECIPE_SYSROOT_NATIVE.- STAGING_DIR_TARGET
Specifies the path to the sysroot used for the system for which the component generates code. For components that do not generate code, which is the majority, STAGING_DIR_TARGET is set to match STAGING_DIR_HOST.
Some recipes build binaries that can run on the target system but those binaries in turn generate code for another different system (e.g. cross-canadian recipes). Using terminology from GNU, the primary system is referred to as the “HOST” and the secondary, or different, system is referred to as the “TARGET”. Thus, the binaries run on the “HOST” system and generate binaries for the “TARGET” system. The STAGING_DIR_HOST variable points to the sysroot used for the “HOST” system, while STAGING_DIR_TARGET points to the sysroot used for the “TARGET” system.
- STAGING_ETCDIR_NATIVE
Specifies the path to the
/etcsubdirectory of the sysroot directory for the build host.- STAGING_EXECPREFIXDIR
Specifies the path to the
/usrsubdirectory of the sysroot directory for the target for which the current recipe is being built (STAGING_DIR_HOST).- STAGING_INCDIR
Specifies the path to the
/usr/includesubdirectory of the sysroot directory for the target for which the current recipe being built (STAGING_DIR_HOST).- STAGING_INCDIR_NATIVE
Specifies the path to the
/usr/includesubdirectory of the sysroot directory for the build host.- STAGING_KERNEL_BUILDDIR
Points to the directory containing the kernel build artifacts. Recipes building software that needs to access kernel build artifacts (e.g.
systemtap-uprobes) can look in the directory specified with the STAGING_KERNEL_BUILDDIR variable to find these artifacts after the kernel has been built.- STAGING_KERNEL_DIR
The directory with kernel headers that are required to build out-of-tree modules.
- STAGING_LIBDIR
Specifies the path to the
/usr/libsubdirectory of the sysroot directory for the target for which the current recipe is being built (STAGING_DIR_HOST).- STAGING_LIBDIR_NATIVE
Specifies the path to the
/usr/libsubdirectory of the sysroot directory for the build host.- STAMP
Specifies the base path used to create recipe stamp files. The path to an actual stamp file is constructed by evaluating this string and then appending additional information. Currently, the default assignment for STAMP as set in the
meta/conf/bitbake.conffile is:STAMP = "${STAMPS_DIR}/${MULTIMACH_TARGET_SYS}/${PN}/${EXTENDPE}${PV}-${PR}"
For information on how BitBake uses stamp files to determine if a task should be rerun, see the “Stamp Files and the Rerunning of Tasks” section in the Yocto Project Overview and Concepts Manual.
See STAMPS_DIR, MULTIMACH_TARGET_SYS, PN, EXTENDPE, PV, and PR for related variable information.
- STAMPCLEAN
See STAMPCLEAN in the BitBake manual.
- STAMPS_DIR
Specifies the base directory in which the OpenEmbedded build system places stamps. The default directory is
${TMPDIR}/stamps.- STRIP
The minimal command and arguments to run strip, which is used to strip symbols.
- SUMMARY
The short (72 characters or less) summary of the binary package for packaging systems such as
opkg,rpm, ordpkg. By default, SUMMARY is used to define the DESCRIPTION variable if DESCRIPTION is not set in the recipe.- SVNDIR
The directory in which files checked out of a Subversion system are stored.
- SYSLINUX_DEFAULT_CONSOLE
Specifies the kernel boot default console. If you want to use a console other than the default, set this variable in your recipe as follows where “X” is the console number you want to use:
SYSLINUX_DEFAULT_CONSOLE = "console=ttyX"
The syslinux class initially sets this variable to null but then checks for a value later.
- SYSLINUX_OPTS
Lists additional options to add to the syslinux file. You need to set this variable in your recipe. If you want to list multiple options, separate the options with a semicolon character (
;).The syslinux class uses this variable to create a set of options.
- SYSLINUX_SERIAL
Specifies the alternate serial port or turns it off. To turn off serial, set this variable to an empty string in your recipe. The variable’s default value is set in the syslinux class as follows:
SYSLINUX_SERIAL ?= "0 115200"
The class checks for and uses the variable as needed.
- SYSLINUX_SERIAL_TTY
Specifies the alternate console=tty… kernel boot argument. The variable’s default value is set in the syslinux class as follows:
SYSLINUX_SERIAL_TTY ?= "console=ttyS0,115200"
The class checks for and uses the variable as needed.
- SYSLINUX_SPLASH
An
.LSSfile used as the background for the VGA boot menu when you use the boot menu. You need to set this variable in your recipe.The syslinux class checks for this variable and if found, the OpenEmbedded build system installs the splash screen.
- SYSROOT_DESTDIR
Points to the temporary directory under the work directory (default “
${WORKDIR}/sysroot-destdir”) where the files populated into the sysroot are assembled during the do_populate_sysroot task.- SYSROOT_DIRS
Directories that are staged into the sysroot by the do_populate_sysroot task. By default, the following directories are staged:
SYSROOT_DIRS = " \ ${includedir} \ ${libdir} \ ${base_libdir} \ ${nonarch_base_libdir} \ ${datadir} \ /sysroot-only \ "
Consider the following example in which you need to manipulate this variable. Assume you have a recipe
Athat provides a shared library.so.*that is installed into a custom folder other than “${libdir}” or “${base_libdir}”, let’s say “/opt/lib”.Note
This is not a recommended way to deal with shared libraries, but this is just to show the usefulness of setting SYSROOT_DIRS.
When a recipe
BDEPENDS onA, it means what is in SYSROOT_DIRS will be copied from D of the recipeAintoB’s SYSROOT_DESTDIR that is “${WORKDIR}/sysroot-destdir”.Now, since
/opt/libis not in SYSROOT_DIRS, it will never be copied toA’s RECIPE_SYSROOT, which is “${WORKDIR}/recipe-sysroot”. So, the linking process will fail.To fix this, you need to add
/opt/libto SYSROOT_DIRS:SYSROOT_DIRS:append = " /opt/lib"
Note
Even after setting
/opt/libto SYSROOT_DIRS, the linking process will still fail because the linker does not know that location, since TARGET_LDFLAGS doesn’t contain it (if your recipe is for the target). Therefore, so you should add:TARGET_LDFLAGS:append = " -L${RECIPE_SYSROOT}/opt/lib"
- SYSROOT_DIRS_IGNORE
Directories that are not staged into the sysroot by the do_populate_sysroot task. You can use this variable to exclude certain subdirectories of directories listed in SYSROOT_DIRS from staging. By default, the following directories are not staged:
SYSROOT_DIRS_IGNORE = " \ ${mandir} \ ${docdir} \ ${infodir} \ ${datadir}/X11/locale \ ${datadir}/applications \ ${datadir}/bash-completion \ ${datadir}/fonts \ ${datadir}/gtk-doc/html \ ${datadir}/installed-tests \ ${datadir}/locale \ ${datadir}/pixmaps \ ${datadir}/terminfo \ ${libdir}/${BPN}/ptest \ "
- SYSROOT_DIRS_NATIVE
Extra directories staged into the sysroot by the do_populate_sysroot task for
-nativerecipes, in addition to those specified in SYSROOT_DIRS. By default, the following extra directories are staged:SYSROOT_DIRS_NATIVE = " \ ${bindir} \ ${sbindir} \ ${base_bindir} \ ${base_sbindir} \ ${libexecdir} \ ${sysconfdir} \ ${localstatedir} \ "
Note
Programs built by
-nativerecipes run directly from the sysroot (STAGING_DIR_NATIVE), which is why additional directories containing program executables and supporting files need to be staged.- SYSROOT_PREPROCESS_FUNCS
A list of functions to execute after files are staged into the sysroot. These functions are usually used to apply additional processing on the staged files, or to stage additional files.
- SYSTEMD_AUTO_ENABLE
When inheriting the systemd class, this variable specifies whether the specified service in SYSTEMD_SERVICE should start automatically or not. By default, the service is enabled to automatically start at boot time. The default setting is in the systemd class as follows:
SYSTEMD_AUTO_ENABLE ??= "enable"
You can disable the service by setting the variable to “disable”.
- SYSTEMD_BOOT_CFG
When EFI_PROVIDER is set to “systemd-boot”, the SYSTEMD_BOOT_CFG variable specifies the configuration file that should be used. By default, the systemd-boot class sets the SYSTEMD_BOOT_CFG as follows:
SYSTEMD_BOOT_CFG ?= "${S}/loader.conf"For information on Systemd-boot, see the Systemd-boot documentation.
- SYSTEMD_BOOT_ENTRIES
When EFI_PROVIDER is set to “systemd-boot”, the SYSTEMD_BOOT_ENTRIES variable specifies a list of entry files (
*.conf) to install that contain one boot entry per file. By default, the systemd-boot class sets the SYSTEMD_BOOT_ENTRIES as follows:SYSTEMD_BOOT_ENTRIES ?= ""
For information on Systemd-boot, see the Systemd-boot documentation.
- SYSTEMD_BOOT_TIMEOUT
When EFI_PROVIDER is set to “systemd-boot”, the SYSTEMD_BOOT_TIMEOUT variable specifies the boot menu timeout in seconds. By default, the systemd-boot class sets the SYSTEMD_BOOT_TIMEOUT as follows:
SYSTEMD_BOOT_TIMEOUT ?= "10"
For information on Systemd-boot, see the Systemd-boot documentation.
- SYSTEMD_DEFAULT_TARGET
This variable allows to set the default unit that systemd starts at bootup. Usually, this is either
multi-user.targetorgraphical.target. This works by creating adefault.targetsymbolic link to the chosen systemd target file.See systemd’s documentation for details.
For example, this variable is used in the core-image-minimal-xfce.bb recipe:
SYSTEMD_DEFAULT_TARGET = "graphical.target"
- SYSTEMD_PACKAGES
When inheriting the systemd class, this variable locates the systemd unit files when they are not found in the main recipe’s package. By default, the SYSTEMD_PACKAGES variable is set such that the systemd unit files are assumed to reside in the recipes main package:
SYSTEMD_PACKAGES ?= "${PN}"If these unit files are not in this recipe’s main package, you need to use SYSTEMD_PACKAGES to list the package or packages in which the build system can find the systemd unit files.
- SYSTEMD_SERVICE
When inheriting the systemd class, this variable specifies the systemd service name for a package.
Multiple services can be specified, each one separated by a space.
When you specify this file in your recipe, use a package name override to indicate the package to which the value applies. Here is an example from the connman recipe:
SYSTEMD_SERVICE:${PN} = "connman.service"The package overrides that can be specified are directly related to the value of SYSTEMD_PACKAGES. Overrides not included in SYSTEMD_PACKAGES will be silently ignored.
- SYSVINIT_ENABLED_GETTYS
When using SysVinit, specifies a space-separated list of the virtual terminals that should run a getty (allowing login), assuming USE_VT is not set to “0”.
The default value for SYSVINIT_ENABLED_GETTYS is “1” (i.e. only run a getty on the first virtual terminal).
- T
This variable points to a directory were BitBake places temporary files, which consist mostly of task logs and scripts, when building a particular recipe. The variable is typically set as follows:
T = "${WORKDIR}/temp"
The WORKDIR is the directory into which BitBake unpacks and builds the recipe. The default
bitbake.conffile sets this variable.The T variable is not to be confused with the TMPDIR variable, which points to the root of the directory tree where BitBake places the output of an entire build.
- TARGET_ARCH
The target machine’s architecture. The OpenEmbedded build system supports many architectures. Here is an example list of architectures supported. This list is by no means complete as the architecture is configurable:
arm
i586
x86_64
powerpc
powerpc64
mips
mipsel
For additional information on machine architectures, see the TUNE_ARCH variable.
- TARGET_AS_ARCH
Specifies architecture-specific assembler flags for the target system. TARGET_AS_ARCH is initialized from TUNE_ASARGS by default in the BitBake configuration file (
meta/conf/bitbake.conf):TARGET_AS_ARCH = "${TUNE_ASARGS}"
- TARGET_CC_ARCH
Specifies architecture-specific C compiler flags for the target system. TARGET_CC_ARCH is initialized from TUNE_CCARGS by default.
Note
It is a common workaround to append LDFLAGS to TARGET_CC_ARCH in recipes that build software for the target that would not otherwise respect the exported LDFLAGS variable.
- TARGET_CC_KERNEL_ARCH
This is a specific kernel compiler flag for a CPU or Application Binary Interface (ABI) tune. The flag is used rarely and only for cases where a userspace TUNE_CCARGS is not compatible with the kernel compilation. The TARGET_CC_KERNEL_ARCH variable allows the kernel (and associated modules) to use a different configuration. See the
meta/conf/machine/include/arm/feature-arm-thumb.incfile in OpenEmbedded-Core (OE-Core) for an example.- TARGET_CFLAGS
Specifies the flags to pass to the C compiler when building for the target. When building in the target context, CFLAGS is set to the value of this variable by default.
Additionally, the SDK’s environment setup script sets the CFLAGS variable in the environment to the TARGET_CFLAGS value so that executables built using the SDK also have the flags applied.
- TARGET_CPPFLAGS
Specifies the flags to pass to the C pre-processor (i.e. to both the C and the C++ compilers) when building for the target. When building in the target context, CPPFLAGS is set to the value of this variable by default.
Additionally, the SDK’s environment setup script sets the CPPFLAGS variable in the environment to the TARGET_CPPFLAGS value so that executables built using the SDK also have the flags applied.
- TARGET_CXXFLAGS
Specifies the flags to pass to the C++ compiler when building for the target. When building in the target context, CXXFLAGS is set to the value of this variable by default.
Additionally, the SDK’s environment setup script sets the CXXFLAGS variable in the environment to the TARGET_CXXFLAGS value so that executables built using the SDK also have the flags applied.
- TARGET_DBGSRC_DIR
Specifies the target path to debug source files. The default is
/usr/src/debug/${PN}/${PV}.- TARGET_FPU
Specifies the method for handling FPU code. For FPU-less targets, which include most ARM CPUs, the variable must be set to “soft”. If not, the kernel emulation gets used, which results in a performance penalty.
- TARGET_LD_ARCH
Specifies architecture-specific linker flags for the target system. TARGET_LD_ARCH is initialized from TUNE_LDARGS by default in the BitBake configuration file (
meta/conf/bitbake.conf):TARGET_LD_ARCH = "${TUNE_LDARGS}"
- TARGET_LDFLAGS
Specifies the flags to pass to the linker when building for the target. When building in the target context, LDFLAGS is set to the value of this variable by default.
Additionally, the SDK’s environment setup script sets the LDFLAGS variable in the environment to the TARGET_LDFLAGS value so that executables built using the SDK also have the flags applied.
- TARGET_OS
Specifies the target’s operating system. The variable can be set to “linux” for glibc-based systems (GNU C Library) and to “linux-musl” for musl libc. For ARM/EABI targets, the possible values are “linux-gnueabi” and “linux-musleabi”.
- TARGET_PREFIX
Specifies the prefix used for the toolchain binary target tools.
Depending on the type of recipe and the build target, TARGET_PREFIX is set as follows:
For recipes building for the target machine, the value is “${TARGET_SYS}-“.
For native recipes, the build system sets the variable to the value of BUILD_PREFIX.
For native SDK recipes (nativesdk), the build system sets the variable to the value of SDK_PREFIX.
- TARGET_SYS
Specifies the system, including the architecture and the operating system, for which the build is occurring in the context of the current recipe.
The OpenEmbedded build system automatically sets this variable based on TARGET_ARCH, TARGET_VENDOR, and TARGET_OS variables.
Note
You do not need to set the TARGET_SYS variable yourself.
Consider these two examples:
Given a native recipe on a 32-bit, x86 machine running Linux, the value is “i686-linux”.
Given a recipe being built for a little-endian, MIPS target running Linux, the value might be “mipsel-linux”.
- TARGET_VENDOR
Specifies the name of the target vendor.
- TC_CXX_RUNTIME
Specifies the C/C++ STL and runtime variant to use during the build process. Default value is ‘gnu’
You can select “gnu”, “llvm”, or “android”.
- TCLIBC
Specifies the GNU standard C library (
libc) variant to use during the build process.You can select “glibc”, “musl”, “newlib”, or “baremetal”.
- TCMODE
Specifies the toolchain selector. TCMODE controls the characteristics of the generated packages and images by telling the OpenEmbedded build system which toolchain profile to use. By default, the OpenEmbedded build system builds its own internal toolchain. The variable’s default value is “default”, which uses that internal toolchain.
Note
If TCMODE is set to a value other than “default”, then it is your responsibility to ensure that the toolchain is compatible with the default toolchain. Using older or newer versions of these components might cause build problems. See Release Information for your version of the Yocto Project, to find the specific components with which the toolchain must be compatible.
The TCMODE variable is similar to TCLIBC, which controls the variant of the GNU standard C library (
libc) used during the build process:glibcormusl.With additional layers, it is possible to use a pre-compiled external toolchain. One example is the Sourcery G++ Toolchain. The support for this toolchain resides in the separate Mentor Graphics
meta-sourcerylayer at https://github.com/MentorEmbedded/meta-sourcery/.The layer’s
READMEfile contains information on how to use the Sourcery G++ Toolchain as an external toolchain. You will have to add the layer to yourbblayers.conffile and then set the EXTERNAL_TOOLCHAIN variable in yourlocal.conffile to the location of the toolchain.The fundamentals used for this example apply to any external toolchain. You can use
meta-sourceryas a template for adding support for other external toolchains.In addition to toolchain configuration, you will also need a corresponding toolchain recipe file. This recipe file needs to package up any pre-built objects in the toolchain such as
libgcc,libstdcc++, any locales, andlibc.- TEMPLATECONF
Specifies the directory used by the build system to find templates from which to build the
bblayers.confandlocal.conffiles. Use this variable if you wish to customize such files, and the default BitBake targets shown when sourcing theoe-init-build-envscript.For details, see the Creating a Custom Template Configuration Directory section in the Yocto Project Development Tasks manual.
Note
You must set this variable in the external environment in order for it to work.
- TEST_EXPORT_DIR
The location the OpenEmbedded build system uses to export tests when the TEST_EXPORT_ONLY variable is set to “1”.
The TEST_EXPORT_DIR variable defaults to
"${TMPDIR}/testimage/${PN}".- TEST_EXPORT_ONLY
Specifies to export the tests only. Set this variable to “1” if you do not want to run the tests but you want them to be exported in a manner that you to run them outside of the build system.
- TEST_LOG_DIR
Holds the SSH log and the boot log for QEMU machines. The TEST_LOG_DIR variable defaults to
"${WORKDIR}/testimage".Note
Actual test results reside in the task log (
log.do_testimage), which is in the${WORKDIR}/temp/directory.- TEST_POWERCONTROL_CMD
For automated hardware testing, specifies the command to use to control the power of the target machine under test. Typically, this command would point to a script that performs the appropriate action (e.g. interacting with a web-enabled power strip). The specified command should expect to receive as the last argument “off”, “on” or “cycle” specifying to power off, on, or cycle (power off and then power on) the device, respectively.
- TEST_POWERCONTROL_EXTRA_ARGS
For automated hardware testing, specifies additional arguments to pass through to the command specified in TEST_POWERCONTROL_CMD. Setting TEST_POWERCONTROL_EXTRA_ARGS is optional. You can use it if you wish, for example, to separate the machine-specific and non-machine-specific parts of the arguments.
- TEST_QEMUBOOT_TIMEOUT
The time in seconds allowed for an image to boot before automated runtime tests begin to run against an image. The default timeout period to allow the boot process to reach the login prompt is 500 seconds. You can specify a different value in the
local.conffile.For more information on testing images, see the “Performing Automated Runtime Testing” section in the Yocto Project Test Environment Manual.
- TEST_SERIALCONTROL_CMD
For automated hardware testing, specifies the command to use to connect to the serial console of the target machine under test. This command simply needs to connect to the serial console and forward that connection to standard input and output as any normal terminal program does.
For example, to use the Picocom terminal program on serial device
/dev/ttyUSB0at 115200bps, you would set the variable as follows:TEST_SERIALCONTROL_CMD = "picocom /dev/ttyUSB0 -b 115200"
- TEST_SERIALCONTROL_CONNECT_TIMEOUT
For automated hardware testing with the testexport class, the TEST_SERIALCONTROL_CONNECT_TIMEOUT variable specifies the timeout in seconds for the initial connection to the target.
- TEST_SERIALCONTROL_EXTRA_ARGS
For automated hardware testing, specifies additional arguments to pass through to the command specified in TEST_SERIALCONTROL_CMD. Setting TEST_SERIALCONTROL_EXTRA_ARGS is optional. You can use it if you wish, for example, to separate the machine-specific and non-machine-specific parts of the command.
- TEST_SERIALCONTROL_PS1
For automated hardware testing with the testexport class, the TEST_SERIALCONTROL_PS1 variable specifies a regex string representing an empty prompt on the target terminal. For example:
root@target:.*#.- TEST_SERVER_IP
The IP address of the build machine (host machine). This IP address is usually automatically detected. However, if detection fails, this variable needs to be set to the IP address of the build machine (i.e. where the build is taking place).
Note
The TEST_SERVER_IP variable is only used for a small number of tests such as the “dnf” test suite, which needs to download packages from
WORKDIR/oe-rootfs-repo.- TEST_SUITES
An ordered list of tests (modules) to run against an image when performing automated runtime testing.
The OpenEmbedded build system provides a core set of tests that can be used against images.
Note
Currently, there is only support for running these tests under QEMU.
Tests include
ping,ssh,dfamong others. You can add your own tests to the list of tests by appending TEST_SUITES as follows:TEST_SUITES:append = " mytest"
Alternatively, you can provide the “auto” option to have all applicable tests run against the image:
TEST_SUITES:append = " auto"
Using this option causes the build system to automatically run tests that are applicable to the image. Tests that are not applicable are skipped.
The order in which tests are run is important. Tests that depend on another test must appear later in the list than the test on which they depend. For example, if you append the list of tests with two tests (
test_Aandtest_B) wheretest_Bis dependent ontest_A, then you must order the tests as follows:TEST_SUITES = "test_A test_B"
For more information on testing images, see the “Performing Automated Runtime Testing” section in the Yocto Project Test Environment Manual.
- TEST_TARGET
Specifies the target controller to use when running tests against a test image. The default controller to use is “qemu”:
TEST_TARGET = "qemu"
A target controller is a class that defines how an image gets deployed on a target and how a target is started. A layer can extend the controllers by adding a module in the layer’s
/lib/oeqa/controllersdirectory and by inheriting theBaseTargetclass, which is an abstract class that cannot be used as a value of TEST_TARGET.You can provide the following arguments with TEST_TARGET:
“qemu”: Boots a QEMU image and runs the tests. See the “Enabling Runtime Tests on QEMU” section in the Yocto Project Test Environment Manual for more information.
“simpleremote”: Runs the tests on target hardware that is already up and running. The hardware can be on the network or it can be a device running an image on QEMU. You must also set TEST_TARGET_IP when you use “simpleremote”.
Note
This argument is defined in
meta/lib/oeqa/controllers/simpleremote.py.
For information on running tests on hardware, see the “Enabling Runtime Tests on Hardware” section in the Yocto Project Test Environment Manual.
- TEST_TARGET_IP
The IP address of your hardware under test. The TEST_TARGET_IP variable has no effect when TEST_TARGET is set to “qemu”.
When you specify the IP address, you can also include a port. Here is an example:
TEST_TARGET_IP = "192.168.1.4:2201"
Specifying a port is useful when SSH is started on a non-standard port or in cases when your hardware under test is behind a firewall or network that is not directly accessible from your host and you need to do port address translation.
- TESTIMAGE_AUTO
Automatically runs the series of automated tests for images when an image is successfully built. Setting TESTIMAGE_AUTO to “1” causes any image that successfully builds to automatically boot under QEMU. Using the variable also adds in dependencies so that any SDK for which testing is requested is automatically built first.
These tests are written in Python making use of the
unittestmodule, and the majority of them run commands on the target system overssh. You can set this variable to “1” in yourlocal.conffile in the Build Directory to have the OpenEmbedded build system automatically run these tests after an image successfully builds:TESTIMAGE_AUTO = “1”
For more information on enabling, running, and writing these tests, see the “Performing Automated Runtime Testing” section in the Yocto Project Test Environment Manual and the “testimage” section.
- TESTIMAGE_FAILED_QA_ARTIFACTS
When using the testimage class, the variable TESTIMAGE_FAILED_QA_ARTIFACTS lists space-separated paths on the target to retrieve onto the host.
- TESTSDK_SUITES
When using the testsdk class, the TESTSDK_SUITES variable can be used to control the list of test modules to run. The default value for this variable is an empty string and all test modules that can be found are run.
- THISDIR
The directory in which the file BitBake is currently parsing is located. Do not manually set this variable.
- TIME
The time the build was started. Times appear using the hour, minute, and second (HMS) format (e.g. “140159” for one minute and fifty-nine seconds past 1400 hours).
- TMPDIR
This variable is the base directory the OpenEmbedded build system uses for all build output and intermediate files (other than the shared state cache). By default, the TMPDIR variable points to
tmpwithin the Build Directory.If you want to establish this directory in a location other than the default, you can set it to another value in your build/conf/site.conf configuration file:
TMPDIR = "/another/location"
An example use for this scenario is to set TMPDIR to a local disk, which does not use NFS, while having the Build Directory use NFS.
The filesystem used by TMPDIR must have standard filesystem semantics (i.e. mixed-case files are unique, POSIX file locking, and persistent inodes). Due to various issues with NFS and bugs in some implementations, NFS does not meet this minimum requirement. Consequently, TMPDIR cannot be on NFS.
- TOOLCHAIN
The TOOLCHAIN variable can be used to override the toolchain used by a recipe.
The default value for this variable is the value of PREFERRED_TOOLCHAIN. See the description of PREFERRED_TOOLCHAIN to know the list of possible values for TOOLCHAIN.
It is possible to override the value of this variable from a recipe if this recipe is known to support only a specific toolchain. For example, the Pseudo recipe overrides this variable to “gcc”, because Pseudo uses GCC compiler built-ins options that the Clang/LLVM compiler does not provide.
- TOOLCHAIN_HOST_TASK
This variable lists packages the OpenEmbedded build system uses when building an SDK, which contains a cross-development environment. The packages specified by this variable are part of the toolchain set that runs on the SDKMACHINE, and each package should usually have the prefix
nativesdk-. For example, consider the following command when building an SDK:$ bitbake -c populate_sdk imagename
In this case, a default list of packages is set in this variable, but you can add additional packages to the list. See the “Adding Individual Packages to the Standard SDK” section in the Yocto Project Application Development and the Extensible Software Development Kit (eSDK) manual for more information.
For background information on cross-development toolchains in the Yocto Project development environment, see the “The Cross-Development Toolchain” section in the Yocto Project Overview and Concepts Manual. For information on setting up a cross-development environment, see the Yocto Project Application Development and the Extensible Software Development Kit (eSDK) manual.
Note that this variable applies to building an SDK, not an eSDK, in which case the TOOLCHAIN_HOST_TASK_ESDK setting should be used instead.
- TOOLCHAIN_HOST_TASK_ESDK
This variable allows to extend what is installed in the host portion of an eSDK. This is similar to TOOLCHAIN_HOST_TASK applying to SDKs.
- TOOLCHAIN_NATIVE
The TOOLCHAIN_NATIVE variable can be used to override the toolchain used by a native recipe.
The default value for this variable is the value of PREFERRED_TOOLCHAIN (in native contexts). See the description of PREFERRED_TOOLCHAIN to know the list of possible values for TOOLCHAIN_NATIVE.
It is possible to override the value of this variable from a recipe if this recipe is known to support only a specific toolchain.
- TOOLCHAIN_OPTIONS
This variable holds extra options passed to the compiler and the linker for non
-nativerecipes as they have to point to their customsysrootfolder pointed to by RECIPE_SYSROOT:TOOLCHAIN_OPTIONS = " --sysroot=${RECIPE_SYSROOT}"
Native recipes don’t need this variable to be set, as they are built for the host machine with the native compiler.
- TOOLCHAIN_OUTPUTNAME
This variable defines the name used for the toolchain output. The populate_sdk_base class sets the TOOLCHAIN_OUTPUTNAME variable as follows:
TOOLCHAIN_OUTPUTNAME ?= "${SDK_NAME}-toolchain-${SDK_VERSION}"See the SDK_NAME and SDK_VERSION variables for additional information.
- TOOLCHAIN_TARGET_TASK
This variable lists packages the OpenEmbedded build system uses when it creates the target part of an SDK (i.e. the part built for the target hardware), which includes libraries and headers. Use this variable to add individual packages to the part of the SDK that runs on the target. See the “Adding Individual Packages to the Standard SDK” section in the Yocto Project Application Development and the Extensible Software Development Kit (eSDK) manual for more information.
For background information on cross-development toolchains in the Yocto Project development environment, see the “The Cross-Development Toolchain” section in the Yocto Project Overview and Concepts Manual. For information on setting up a cross-development environment, see the Yocto Project Application Development and the Extensible Software Development Kit (eSDK) manual.
- TOPDIR
See TOPDIR in the BitBake manual.
- TRANSLATED_TARGET_ARCH
A sanitized version of TARGET_ARCH. This variable is used where the architecture is needed in a value where underscores are not allowed, for example within package filenames. In this case, dash characters replace any underscore characters used in TARGET_ARCH.
Do not edit this variable.
- TUNE_ARCH
The GNU canonical architecture for a specific architecture (i.e.
arm,armeb,mips,mips64, and so forth). BitBake uses this value to setup configuration.TUNE_ARCH definitions are specific to a given architecture. The definitions can be a single static definition, or can be dynamically adjusted. You can see details for a given CPU family by looking at the architecture’s
READMEfile. For example, themeta/conf/machine/include/mips/READMEfile in OpenEmbedded-Core (OE-Core) provides information for TUNE_ARCH specific to themipsarchitecture.TUNE_ARCH is tied closely to TARGET_ARCH, which defines the target machine’s architecture. The BitBake configuration file (
meta/conf/bitbake.conf) sets TARGET_ARCH as follows:TARGET_ARCH = "${TUNE_ARCH}"
The following list, which is by no means complete since architectures are configurable, shows supported machine architectures:
arm
i586
x86_64
powerpc
powerpc64
mips
mipsel
- TUNE_ASARGS
Specifies architecture-specific assembler flags for the target system. The set of flags is based on the selected tune features. TUNE_ASARGS is set using the tune include files, which are typically under
meta/conf/machine/include/and are influenced through TUNE_FEATURES. For example, themeta/conf/machine/include/x86/arch-x86.incfile defines the flags for the x86 architecture as follows:TUNE_ASARGS += "${@bb.utils.contains("TUNE_FEATURES", "mx32", "-x32", "", d)}"
Note
Board Support Packages (BSPs) select the tune. The selected tune, in turn, affects the tune variables themselves (i.e. the tune can supply its own set of flags).
- TUNE_CCARGS
Specifies architecture-specific C compiler flags for the target system. The set of flags is based on the selected tune features. TUNE_CCARGS is set using the tune include files, which are typically under
meta/conf/machine/include/and are influenced through TUNE_FEATURES.Note
Board Support Packages (BSPs) select the tune. The selected tune, in turn, affects the tune variables themselves (i.e. the tune can supply its own set of flags).
- TUNE_FEATURES
Features used to “tune” a compiler for optimal use given a specific processor. The features are defined within the tune files and allow arguments (i.e.
TUNE_*ARGS) to be dynamically generated based on the features.The OpenEmbedded build system verifies the features to be sure they are not conflicting and that they are supported.
The BitBake configuration file (
meta/conf/bitbake.conf) defines TUNE_FEATURES as follows:TUNE_FEATURES ??= "${TUNE_FEATURES:tune-${DEFAULTTUNE}}"See the DEFAULTTUNE variable for more information.
- TUNE_LDARGS
Specifies architecture-specific linker flags for the target system. The set of flags is based on the selected tune features. TUNE_LDARGS is set using the tune include files, which are typically under
meta/conf/machine/include/and are influenced through TUNE_FEATURES. For example, themeta/conf/machine/include/x86/arch-x86.incfile defines the flags for the x86 architecture as follows:TUNE_LDARGS += "${@bb.utils.contains("TUNE_FEATURES", "mx32", "-m elf32_x86_64", "", d)}"
Note
Board Support Packages (BSPs) select the tune. The selected tune, in turn, affects the tune variables themselves (i.e. the tune can supply its own set of flags).
- TUNE_PKGARCH
The package architecture understood by the packaging system to define the architecture, ABI, and tuning of output packages. The specific tune is defined using the “_tune” override as follows:
TUNE_PKGARCH:tune-tune = "tune"
These tune-specific package architectures are defined in the machine include files. Here is an example of the “core2-32” tuning as used in the
meta/conf/machine/include/x86/tune-core2.incfile:TUNE_PKGARCH:tune-core2-32 = "core2-32"
- TUNECONFLICTS[feature]
Specifies CPU or Application Binary Interface (ABI) tuning features that conflict with feature.
Known tuning conflicts are specified in the machine include files in OpenEmbedded-Core (OE-Core). Here is an example from the
meta/conf/machine/include/mips/arch-mips.incinclude file that lists the “o32” and “n64” features as conflicting with the “n32” feature:TUNECONFLICTS[n32] = "o32 n64"
- TUNEVALID[feature]
Specifies a valid CPU or Application Binary Interface (ABI) tuning feature. The specified feature is stored as a flag. Valid features are specified in the machine include files (e.g.
meta/conf/machine/include/arm/arch-arm.inc). Here is an example from that file:TUNEVALID[bigendian] = "Enable big-endian mode."
See the machine include files in OpenEmbedded-Core (OE-Core) for these features.
- UBOOT_BINARY
Specifies the name of the binary build by U-Boot.
- UBOOT_CONFIG
Configures one or more U-Boot configurations to build. Each configuration must define the UBOOT_MACHINE variable. Additional control variables are: UBOOT_CONFIG_BINARY, UBOOT_CONFIG_FRAGMENTS, UBOOT_CONFIG_IMAGE_FSTYPES, and UBOOT_CONFIG_MAKE_OPTS.
Here is an updated example from the
meta-freescalelayer.UBOOT_CONFIG ??= "sdcard-ifc-secure-boot sdcard-ifc sdcard-qspi lpuart qspi secure-boot nor" UBOOT_CONFIG[nor] = "ls1021atwr_nor_defconfig" UBOOT_CONFIG[sdcard-ifc] = "ls1021atwr_sdcard_ifc_defconfig" UBOOT_CONFIG[sdcard-qspi] = "ls1021atwr_sdcard_qspi_defconfig" UBOOT_CONFIG[lpuart] = "ls1021atwr_nor_lpuart_defconfig" UBOOT_CONFIG[qspi] = "ls1021atwr_qspi_defconfig" UBOOT_CONFIG[secure-boot] = "ls1021atwr_nor_SECURE_BOOT_defconfig" UBOOT_CONFIG[sdcard-ifc-secure-boot] = "ls1021atwr_sdcard_ifc_SECURE_BOOT_defconfig" UBOOT_CONFIG_BINARY[sdcard-ifc] = "u-boot-with-spl-pbl.bin" UBOOT_CONFIG_BINARY[sdcard-qspi] = "u-boot-with-spl-pbl.bin" UBOOT_CONFIG_BINARY[sdcard-ifc-secure-boot] = "u-boot-with-spl-pbl.bin"
In this example, all possible seven configurations are selected. Each configuration specifies “…_defconfig” as UBOOT_MACHINE, and the “sd…” configurations define an individual name for UBOOT_CONFIG_BINARY.
For more information on how the UBOOT_CONFIG variable is handled, see the uboot-config class.
- UBOOT_CONFIG_BINARY
This variable cannot be set to a value in a config, it is a placeholder for configuring the UBOOT_CONFIG flow via flags:
UBOOT_CONFIG_BINARY[foo] = "binary1" UBOOT_CONFIG_BINARY[bar] = "binary2"
It specifies the binary to select as the one to deploy in DEPLOY_DIR_IMAGE. The output of a U-Boot build may be more than one binary, for example:
u-boot.bin u-boot-with-spl.bin
Setting the
binaryvalue tou-boot-with-spl.binwill make this binary the one deployed in DEPLOY_DIR_IMAGE. It is renamed to include the build configuration name in the process (fooorbarin the above example).This option defaults to UBOOT_BINARY if not specified.
For more information on how the UBOOT_CONFIG_BINARY variable is handled, see the uboot-config class.
- UBOOT_CONFIG_FRAGMENTS
This variable cannot be set to a value in a config, it is a placeholder for configuring the UBOOT_CONFIG flow via flags:
UBOOT_CONFIG_FRAGMENTS[foo] = "frag1 frag2" UBOOT_CONFIG_FRAGMENTS[bar] = "frag3"
It specifies a list of fragments from the source tree that should be combined with the defconfig from UBOOT_CONFIG that are used during
do_configure()to configure the build. These fragments are located in same${S}/configs/directory as the defconfig.This option is not required and you only need to specify it for configs that need them.
For more information on how the UBOOT_CONFIG_FRAGMENTS variable is handled, see the uboot-config class.
- UBOOT_CONFIG_IMAGE_FSTYPES
This variable cannot be set to a value in a config, it is a placeholder for configuring the UBOOT_CONFIG flow via flags:
UBOOT_CONFIG_IMAGE_FSTYPES[foo] = "fstype1" UBOOT_CONFIG_IMAGE_FSTYPES[bar] = "fstype2"
Append additional image types to the IMAGE_FSTYPES variable for image generation for this build configuration. This can allow building an extra image format that uses the binary generated by this build configuration.
This option is not required and you only need to specify flag settings for configs that need them.
For more information on how the UBOOT_CONFIG_IMAGE_FSTYPES variable is handled, see the uboot-config class.
- UBOOT_CONFIG_MAKE_OPTS
This variable cannot be set to a value in a config, it is a placeholder for configuring the UBOOT_CONFIG flow via flags:
UBOOT_CONFIG_MAKE_OPTS[foo] = "OPT1=foo OPT2=2" UBOOT_CONFIG_MAKE_OPTS[bar] = "OPT1=bar"
It specifies a list of make command line options that are passed to the
makecommand duringdo_compile().This option is not required and you only need to specify flag settings for configs that need them.
For more information on how the UBOOT_CONFIG_MAKE_OPTS is handled, see the uboot-config class.
- UBOOT_DTB_LOADADDRESS
Specifies the load address for the dtb image used by U-Boot. During FIT image creation, the UBOOT_DTB_LOADADDRESS variable is used in kernel-fit-image class to specify the load address to be used in creating the dtb sections of Image Tree Source for the FIT image.
- UBOOT_DTBO_LOADADDRESS
Specifies the load address for the dtbo image used by U-Boot. During FIT image creation, the UBOOT_DTBO_LOADADDRESS variable is used in kernel-fit-image class to specify the load address to be used in creating the dtbo sections of Image Tree Source for the FIT image.
- UBOOT_ENTRYPOINT
Specifies the entry point for the U-Boot image. During U-Boot image creation, the UBOOT_ENTRYPOINT variable is passed as a command-line parameter to the
uboot-mkimageutility.To pass a 64 bit address for FIT image creation, you will need to set: - The FIT_ADDRESS_CELLS variable for FIT image creation. - The UBOOT_FIT_ADDRESS_CELLS variable for U-Boot FIT image creation.
This variable is used by the kernel-fit-image, kernel-uimage, kernel, uboot-config and uboot-sign classes.
- UBOOT_ENV
This variable allows to add additional environment variables or a script to be installed together with U-Boot. This file, typically
uEnv.txtorboot.cmd, is installed in/bootas well as copied to the DEPLOYDIR directory.For machine configurations needing one of these files a
.bbappendfile should include it in the SRC_URI of the U-Boot recipe.If the variable UBOOT_ENV_SUFFIX is set to
scrthe script is packaged as a uImage (mkimage -T script..) otherwise it gets installed verbatim.Some examples:
Adding a script
boot.cmdas a uImage to/boot:UBOOT_ENV = "boot" UBOOT_ENV_SUFFIX = "scr" SRC_URI += "file://${UBOOT_ENV_SRC}"
Adding a script
uEnv.txtas a plain text file to/boot:UBOOT_ENV = "uEnv" UBOOT_ENV_SUFFIX = "txt" SRC_URI += "file://${UBOOT_ENV_BINARY}"
- UBOOT_ENV_SRC_SUFFIX
If UBOOT_ENV_SUFFIX is set to
scrthis is the suffix of the plain text script file as it is specified in the SRC_URI of the U-Boot recipe. It defaults tocmd.- UBOOT_ENV_SUFFIX
If this variable is set to
scrthe script referred to by UBOOT_ENV gets packaged as a uImage before it gets installed. The default istxtwhich means the script is installed as-is, with no modification.- UBOOT_FIT_ADDRESS_CELLS
Specifies the value of the
#address-cellsvalue for the description of the U-Boot FIT image.The default value is set to “1” by the uboot-sign class, which corresponds to 32 bit addresses.
For platforms that need to set 64 bit addresses in UBOOT_LOADADDRESS and UBOOT_ENTRYPOINT, you need to set this value to “2”, as two 32 bit values (cells) will be needed to represent such addresses.
Here is an example setting “0x400000000” as a load address:
UBOOT_FIT_ADDRESS_CELLS = "2" UBOOT_LOADADDRESS = "0x04 0x00000000"
- UBOOT_FIT_ARM_TRUSTED_FIRMWARE
Trusted Firmware-A (TF-A) is a reference implementation of secure world software for Arm A-Profile architectures (Armv8-A and Armv7-A), including an Exception Level 3 (EL3) Secure Monitor. This variable enables the generation of a U-Boot FIT image with a Trusted Firmware-A (TF-A) binary.
Its default value is “0”, so set it to “1” to enable this functionality:
UBOOT_FIT_ARM_TRUSTED_FIRMWARE = "1"
- UBOOT_FIT_ARM_TRUSTED_FIRMWARE_IMAGE
Specifies the path to the Trusted Firmware-A (TF-A) binary. Its default value is “bl31.bin”:
UBOOT_FIT_ARM_TRUSTED_FIRMWARE_IMAGE ?= "bl31.bin"
If a relative path is provided, the file is expected to be relative to U-Boot’s B directory. An absolute path can be provided too, e.g.:
UBOOT_FIT_ARM_TRUSTED_FIRMWARE_IMAGE ?= "${DEPLOY_DIR_IMAGE}/bl31.bin"If the Trusted Firmware-A (TF-A) binary is built in a separate recipe, you must add the necessary dependency in a U-Boot
.bbappendfile. The recipe name for Trusted Firmware-A (TF-A) binary istrusted-firmware-a, which comes from the meta-arm layer:do_compile[depends] += "trusted-firmware-a:do_deploy"
- UBOOT_FIT_CONF_FIRMWARE
Adds one image to the
firmwareproperty of the configuration node of the U-Boot Image Tree Source (ITS). Sets thefirmwareproperty to select the image to boot first:UBOOT_FIT_CONF_FIRMWARE = "fwa"
If not set, the first entry in “loadables” is used to boot instead.
- UBOOT_FIT_CONF_USER_LOADABLES
Adds one or more user-defined images to the
loadablesproperty of the configuration node of the U-Boot Image Tree Source (ITS). This variable is handled by the local shell in the recipe so appropriate escaping should be done, e.g. escaping quotes.:UBOOT_FIT_CONF_USER_LOADABLES = '\"fwa\", \"fwb\"'
- UBOOT_FIT_DESC
Specifies the description string encoded into a U-Boot fitImage. The default value is set by the uboot-sign class as follows:
UBOOT_FIT_DESC ?= "U-Boot fitImage for ${DISTRO_NAME}/${PV}/${MACHINE}"- UBOOT_FIT_GENERATE_KEYS
Decides whether to generate the keys for signing the U-Boot fitImage if they don’t already exist. The keys are created in SPL_SIGN_KEYDIR. The default value is “0”.
Enable this as follows:
UBOOT_FIT_GENERATE_KEYS = "1"
This variable is used in the uboot-sign class.
- UBOOT_FIT_HASH_ALG
Specifies the hash algorithm used in creating the U-Boot FIT Image. It is set by default to
sha256by the uboot-sign class.- UBOOT_FIT_KEY_GENRSA_ARGS
Arguments to
openssl genrsafor generating a RSA private key for signing the U-Boot FIT image. The default value of this variable is set to “-F4” by the uboot-sign class.- UBOOT_FIT_KEY_REQ_ARGS
Arguments to
openssl reqfor generating a certificate for signing the U-Boot FIT image. The default value is “-batch -new” by the uboot-sign class, “batch” for non interactive mode and “new” for generating new keys.- UBOOT_FIT_KEY_SIGN_PKCS
Format for the public key certificate used for signing the U-Boot FIT image. The default value is set to “x509” by the uboot-sign class.
- UBOOT_FIT_SIGN_ALG
Specifies the signature algorithm used in creating the U-Boot FIT Image. This variable is set by default to “rsa2048” by the uboot-sign class.
- UBOOT_FIT_SIGN_NUMBITS
Size of the private key used in signing the U-Boot FIT image, in number of bits. The default value for this variable is set to “2048” by the uboot-sign class.
- UBOOT_FIT_TEE
A Trusted Execution Environment (TEE) is a secure environment for executing code, ensuring high levels of trust in asset management within the surrounding system. This variable enables the generation of a U-Boot FIT image with a Trusted Execution Environment (TEE) binary.
Its default value is “0”, so set it to “1” to enable this functionality:
UBOOT_FIT_TEE = "1"
- UBOOT_FIT_TEE_IMAGE
Specifies the path to the Trusted Execution Environment (TEE) binary. Its default value is “tee-raw.bin”:
UBOOT_FIT_TEE_IMAGE ?= "tee-raw.bin"
If a relative path is provided, the file is expected to be relative to U-Boot’s B directory. An absolute path can be provided too, e.g.:
UBOOT_FIT_TEE_IMAGE ?= "${DEPLOY_DIR_IMAGE}/tee-raw.bin"If the Trusted Execution Environment (TEE) binary is built in a separate recipe, you must add the necessary dependency in a U-Boot
.bbappendfile. The recipe name for Trusted Execution Environment (TEE) binary isoptee-os, which comes from the meta-arm layer:do_compile[depends] += "optee-os:do_deploy"
- UBOOT_FIT_USER_SETTINGS
Add a user-specific snippet to the U-Boot Image Tree Source (ITS). This variable allows the user to add one or more user-defined
/imagesnode to the U-Boot Image Tree Source (ITS). For more details, please refer to https://fitspec.osfw.foundation/.The original content of the U-Boot Image Tree Source (ITS) is as follows:
images { uboot { description = "U-Boot image"; data = /incbin/("u-boot-nodtb.bin"); type = "standalone"; os = "u-boot"; arch = ""; compression = "none"; load = <0x80000000>; entry = <0x80000000>; }; };
Users can include their custom ITS snippet in this variable, e.g.:
UBOOT_FIT_FWA_ITS = '\ fwa {\n\ description = \"FW A\";\n\ data = /incbin/(\"fwa.bin\");\n\ type = \"firmware\";\n\ arch = \"\";\n\ os = \"\";\n\ load = <0xb2000000>;\n\ entry = <0xb2000000>;\n\ compression = \"none\";\n\ };\n\ ' UBOOT_FIT_USER_SETTINGS = "${UBOOT_FIT_FWA_ITS}"
This variable is handled by the local shell in the recipe so appropriate escaping should be done, e.g. escaping quotes and adding newlines with
\n.The generated content of the U-Boot Image Tree Source (ITS) is as follows:
images { uboot { description = "U-Boot image"; data = /incbin/("u-boot-nodtb.bin"); type = "standalone"; os = "u-boot"; arch = ""; compression = "none"; load = <0x80000000>; entry = <0x80000000>; }; fwa { description = "FW A"; data = /incbin/("fwa.bin"); type = "firmware"; arch = ""; os = ""; load = <0xb2000000>; entry = <0xb2000000>; compression = "none"; }; };
- UBOOT_FITIMAGE_ENABLE
This variable allows to generate a FIT image for U-Boot, which is one of the ways to implement a verified boot process.
Its default value is “0”, so set it to “1” to enable this functionality:
UBOOT_FITIMAGE_ENABLE = "1"
See the uboot-sign class for details.
- UBOOT_FRAGMENTS
The UBOOT_FRAGMENTS variable can be used to pass extra config fragments from the source tree to
makewhen U-Boot is configured. These fragments are located in same${S}/configs/directory as the defconfig.For example:
UBOOT_MACHINE = "am62x_evm_r5_defconfig" UBOOT_FRAGMENTS = "am62x_r5_usbdfu.config"
See the uboot-config class for more information.
- UBOOT_INITIAL_ENV_BINARY
This variable enables the generation of the U-Boot initial environment in binary format.
Its default value is “0”, set it to “1” to enable this functionality:
UBOOT_INITIAL_ENV_BINARY = "1"
If set to “1”, you must also set the size of the environment with UBOOT_INITIAL_ENV_BINARY_SIZE.
This variable is used in the uboot-config class.
The resulting binary can be flashed using WIC or any other flashing method at the environment offset, overriding any existing environment if one is present. Below is an example of a WKS file to flash the binary:
part --source rawcopy --sourceparams="file=u-boot-initial-env-sd.bin" --ondisk sda --no-table --offset 4096k
In this example, the U-Boot initial environment binary u-boot-initial-env-sd.bin is flashed at offset 4096 kibibyte.
- UBOOT_INITIAL_ENV_BINARY_REDUND
If redundant environment support is enabled in U-boot’s configuration, this variable should be set to properly generate the redundant environment in the output U-boot environment binary file.
Its default value is “0”, set it to “1” to enable this functionality:
UBOOT_INITIAL_ENV_BINARY_REDUND = "1"
The UBOOT_INITIAL_ENV_BINARY must also be set to “1” if UBOOT_INITIAL_ENV_BINARY_REDUND is enabled.
This variable is used in the uboot-config class.
- UBOOT_INITIAL_ENV_BINARY_SIZE
This variable sets the binary size (in bytes) of the U-Boot initial environment. Both hexadecimal and decimal values are supported and can be set as follows:
UBOOT_INITIAL_ENV_BINARY_SIZE = "0x4000"
This variable is used in the uboot-config class.
- UBOOT_LOADADDRESS
Specifies the load address for the U-Boot image. During U-Boot image creation, the UBOOT_LOADADDRESS variable is passed as a command-line parameter to the
uboot-mkimageutility.To pass a 64 bit address, you will also need to set:
The FIT_ADDRESS_CELLS variable for FIT image creation.
The UBOOT_FIT_ADDRESS_CELLS variable for U-Boot FIT image creation.
This variable is used by the kernel-fit-image, kernel-uimage, kernel, uboot-config and uboot-sign classes.
- UBOOT_LOCALVERSION
Appends a string to the name of the local version of the U-Boot image. For example, assuming the version of the U-Boot image built was “2013.10”, the full version string reported by U-Boot would be “2013.10-yocto” given the following statement:
UBOOT_LOCALVERSION = "-yocto"
- UBOOT_MACHINE
Specifies the value passed on the
makecommand line when building a U-Boot image. The value indicates the target platform configuration. You typically set this variable from the machine configuration file (i.e.conf/machine/machine_name.conf).Please see the “Selection of Processor Architecture and Board Type” section in the U-Boot README for valid values for this variable.
- UBOOT_MAKE_OPTS
The UBOOT_MAKE_OPTS variable can be used to pass extra options to
makewhen U-Boot is configured and compiled.See the uboot-config class for more information.
- UBOOT_MAKE_TARGET
Specifies the target called in the
Makefile. The default target is “all”.- UBOOT_MKIMAGE
Specifies the name of the mkimage command as used by the kernel-fit-image class to assemble the FIT image. This can be used to substitute an alternative command, wrapper script or function if desired. The default is “uboot-mkimage”.
- UBOOT_MKIMAGE_DTCOPTS
Options for the device tree compiler passed to
mkimage -Dfeature while creating a FIT image with the kernel-fit-image class. If UBOOT_MKIMAGE_DTCOPTS is not set then the kernel-fit-image class will not pass the-Doption tomkimage.This variable is also used by the uboot-sign class.
- UBOOT_MKIMAGE_KERNEL_TYPE
Specifies the type argument for the kernel as passed to
uboot-mkimage. The default value is “kernel”.- UBOOT_MKIMAGE_SIGN
Specifies the name of the mkimage command as used by the kernel-fit-image class to sign the FIT image after it has been assembled (if enabled). This can be used to substitute an alternative command, wrapper script or function if desired. The default is “${UBOOT_MKIMAGE}”.
- UBOOT_MKIMAGE_SIGN_ARGS
Optionally specifies additional arguments for the kernel-fit-image class to pass to the mkimage command when signing the FIT image.
- UBOOT_RD_ENTRYPOINT
Specifies the entrypoint for the RAM disk image. During FIT image creation, the UBOOT_RD_ENTRYPOINT variable is used in kernel-fit-image class to specify the entrypoint to be used in creating the Image Tree Source for the FIT image.
- UBOOT_RD_LOADADDRESS
Specifies the load address for the RAM disk image. During FIT image creation, the UBOOT_RD_LOADADDRESS variable is used in kernel-fit-image class to specify the load address to be used in creating the Image Tree Source for the FIT image.
- UBOOT_SIGN_ENABLE
Enable signing of FIT image. The default value is “0”.
This variable is defined and used by uboot-config class.
Additionally, it serves as the default value for the FIT_KERNEL_SIGN_ENABLE variable, which is used by the kernel-fit-image class.
That means, if UBOOT_SIGN_ENABLE is set to “1”, the kernel-fit-image class will sign the FIT image at build-time using the specified private key, and the uboot-sign class will inject the corresponding public key into U-Boot’s device tree. This makes U-Boot verify the authenticity and integrity of the FIT image at boot time, providing a secure boot workflow that helps prevent unauthorized or tampered images from being loaded.
See https://docs.u-boot.org/en/v2025.10/usage/fit/signature.html for more information on FIT signature verification in U-Boot.
- UBOOT_SIGN_KEYDIR
Location of the directory containing the RSA key and certificate used for signing the FIT image, used by the kernel-fit-image (via the FIT_KERNEL_SIGN_KEYDIR variable) and uboot-sign classes.
- UBOOT_SIGN_KEYNAME
The name of keys used by the kernel-fit-image class (via the FIT_KERNEL_SIGN_KEYNAME variable) for signing U-Boot FIT image stored in the UBOOT_SIGN_KEYDIR directory. If we have for example a
dev.keykey and adev.crtcertificate stored in the UBOOT_SIGN_KEYDIR directory, you will have to set UBOOT_SIGN_KEYNAME todev.- UBOOT_SUFFIX
Points to the generated U-Boot extension. For example,
u-boot.sbhas a.sbextension.The default U-Boot extension is
.bin- UBOOT_TARGET
Specifies the target used for building U-Boot. The target is passed directly as part of the “make” command (e.g. SPL and AIS). If you do not specifically set this variable, the OpenEmbedded build process passes and uses “all” for the target during the U-Boot building process.
- UBOOT_VERSION
When naming the files that are installed and deployed, the package version (PV) and revision (PR) are part of the filename. The UBOOT_VERSION variable contains this information, but can be overridden if desired.
- UKI_CMDLINE
When inheriting the uki class, the kernel command line to use when booting the Unified Kernel Image (UKI). Defaults to
rootwait root=LABEL=root console=${KERNEL_CONSOLE}.- UKI_CONFIG_FILE
When inheriting the uki class, an optional config file for the ukify command.
- UKI_DEVICETREE
When inheriting the uki class, the UKI_DEVICETREE variable holds the list of device tree blobs to include in the Unified Kernel Image (UKI).
- UKI_FILENAME
When inheriting the uki class, the output file name for the generated Unified Kernel Image (UKI). Defaults to
uki.efi.- UKI_KERNEL_FILENAME
When inheriting the uki class, the kernel image file name to use as input. Defaults to KERNEL_IMAGETYPE.
- UKI_SB_CERT
When inheriting the uki class, optional UEFI secureboot certificate matching the private key in UKI_SB_KEY.
- UKI_SB_KEY
When inheriting the uki class, optional UEFI secureboot private key to sign the Unified Kernel Image (UKI).
- UKIFY_CMD
When inheriting the uki class, ukify command to build Unified Kernel Image (UKI). Defaults to
ukify build.- UNINATIVE_CHECKSUM
When inheriting the uninative class, the UNINATIVE_CHECKSUM variable flags contain the checksums of the uninative tarball as specified by the UNINATIVE_URL variable. There should be one checksum per tarballs published at UNINATIVE_URL, which match architectures. For example:
UNINATIVE_CHECKSUM[aarch64] ?= "812045d826b7fda88944055e8526b95a5a9440bfef608d5b53fd52faab49bf85" UNINATIVE_CHECKSUM[i686] ?= "5cc28efd0c15a75de4bcb147c6cce65f1c1c9d442173a220f08427f40a3ffa09" UNINATIVE_CHECKSUM[x86_64] ?= "4c03d1ed2b7b4e823aca4a1a23d8f2e322f1770fc10e859adcede5777aff4f3a"
- UNINATIVE_URL
When inheriting the uninative class, the UNINATIVE_URL variable contains the URL where the uninative tarballs are published.
- UNKNOWN_CONFIGURE_OPT_IGNORE
Specifies a list of options that, if reported by the configure script as being invalid, should not generate a warning during the do_configure task. Normally, invalid configure options are simply not passed to the configure script (e.g. should be removed from EXTRA_OECONF or PACKAGECONFIG_CONFARGS). However, there are common options that are passed to all configure scripts at a class level, but might not be valid for some configure scripts. Therefore warnings about these options are useless. For these cases, the options are added to UNKNOWN_CONFIGURE_OPT_IGNORE.
The configure arguments check that uses UNKNOWN_CONFIGURE_OPT_IGNORE is part of the insane class and is only enabled if the recipe inherits the autotools* class.
- UNPACKDIR
This variable, used by the base class, specifies where fetched sources should be unpacked by the do_unpack task.
- UPDATERCPN
For recipes inheriting the update-rc.d class, UPDATERCPN specifies the package that contains the initscript that is enabled.
The default value is “${PN}”. Given that almost all recipes that install initscripts package them in the main package for the recipe, you rarely need to set this variable in individual recipes.
- UPSTREAM_CHECK_COMMITS
You can perform a per-recipe check for what the latest upstream source code version is by calling
devtool latest-version recipe. If the recipe source code is provided from Git repositories, but releases are not identified by Git tags, set UPSTREAM_CHECK_COMMITS to1in the recipe, and the OpenEmbedded build system will compare the latest commit with the one currently specified by the recipe (SRCREV):UPSTREAM_CHECK_COMMITS = "1"
- UPSTREAM_CHECK_GITTAGREGEX
You can perform a per-recipe check for what the latest upstream source code version is by calling
devtool latest-version recipe. If the recipe source code is provided from Git repositories, the OpenEmbedded build system determines the latest upstream version by picking the latest tag from the list of all repository tags.You can use the UPSTREAM_CHECK_GITTAGREGEX variable to provide a regular expression to filter only the relevant tags should the default filter not work correctly:
UPSTREAM_CHECK_GITTAGREGEX = "git_tag_regex"
- UPSTREAM_CHECK_REGEX
Use the UPSTREAM_CHECK_REGEX variable to specify a different regular expression instead of the default one when the package checking system is parsing the page found using UPSTREAM_CHECK_URI:
UPSTREAM_CHECK_REGEX = "package_regex"
- UPSTREAM_CHECK_URI
You can perform a per-recipe check for what the latest upstream source code version is by calling
devtool latest-version recipe. If the source code is provided from tarballs, the latest version is determined by fetching the directory listing where the tarball is and attempting to find a later tarball. When this approach does not work, you can use UPSTREAM_CHECK_URI to provide a different URI that contains the link to the latest tarball:UPSTREAM_CHECK_URI = "recipe_url"
- UPSTREAM_VERSION_UNKNOWN
You can perform a per-recipe check for what the latest upstream source code version is by calling
devtool latest-version recipe. If no combination of the UPSTREAM_CHECK_URI, UPSTREAM_CHECK_REGEX, UPSTREAM_CHECK_GITTAGREGEX and UPSTREAM_CHECK_COMMITS variables in the recipe allows to determine what the latest upstream version is, you can set UPSTREAM_VERSION_UNKNOWN to1in the recipe to acknowledge that the check cannot be performed:UPSTREAM_VERSION_UNKNOWN = "1"
- USE_DEVFS
Determines if
devtmpfsis used for/devpopulation. The default value used for USE_DEVFS is “1” when no value is specifically set. Typically, you would set USE_DEVFS to “0” for a statically populated/devdirectory.See the “Selecting a Device Manager” section in the Yocto Project Development Tasks Manual for information on how to use this variable.
- USE_NLS
Determine if language translations should be built for recipes that can build them. This variable can be equal to:
yes: translations are enabled.no: translation are disabled.
Recipes can use the value of this variable to enable language translations in their build. Classes such as gettext use the value of this variable to enable Gettext support.
- USE_VT
When using SysVinit, determines whether or not to run a getty on any virtual terminals in order to enable logging in through those terminals.
The default value used for USE_VT is “1” when no default value is specifically set. Typically, you would set USE_VT to “0” in the machine configuration file for machines that do not have a graphical display attached and therefore do not need virtual terminal functionality.
- USER_CLASSES
A list of classes to globally inherit. These classes are used by the OpenEmbedded build system to enable extra features.
Classes inherited using USER_CLASSES must be located in the
classes-global/orclasses/subdirectories.The default list is set in your
local.conffile:USER_CLASSES ?= "buildstats"
For more information, see
conf/templates/default/local.conf.samplein meta-poky.- USERADD_DEPENDS
Specifies a list of recipes that create users / groups (via USERADD_PARAM / GROUPADD_PARAM) which a recipe depends upon. This ensures that those users / groups are available when building a recipe.
- USERADD_ERROR_DYNAMIC
If set to
error, forces the OpenEmbedded build system to produce an error if the user identification (uid) and group identification (gid) values are not defined in any of the files listed in USERADD_UID_TABLES and USERADD_GID_TABLES. If set towarn, a warning will be issued instead.The default behavior for the build system is to dynamically apply
uidandgidvalues. Consequently, the USERADD_ERROR_DYNAMIC variable is by default not set. If you plan on using statically assignedgidanduidvalues, you should set the USERADD_ERROR_DYNAMIC variable in yourlocal.conffile as follows:USERADD_ERROR_DYNAMIC = "error"
Overriding the default behavior implies you are going to also take steps to set static
uidandgidvalues through use of the USERADDEXTENSION, USERADD_UID_TABLES, and USERADD_GID_TABLES variables.Note
There is a difference in behavior between setting USERADD_ERROR_DYNAMIC to
errorand setting it towarn. When it is set towarn, the build system will report a warning for every undefineduidandgidin any recipe. But when it is set toerror, it will only report errors for recipes that are actually built. This saves you from having to add static IDs for recipes that you know will never be built.- USERADD_GID_TABLES
Specifies a password file to use for obtaining static group identification (
gid) values when the OpenEmbedded build system adds a group to the system during package installation.When applying static group identification (
gid) values, the OpenEmbedded build system looks in BBPATH for afiles/groupfile and then applies thoseuidvalues. Set the variable as follows in yourlocal.conffile:USERADD_GID_TABLES = "files/group"
Note
Setting the USERADDEXTENSION variable to “useradd-staticids” causes the build system to use static
gidvalues.- USERADD_PACKAGES
When inheriting the useradd* class, this variable specifies the individual packages within the recipe that require users and/or groups to be added.
You must set this variable if the recipe inherits the class. For example, the following enables adding a user for the main package in a recipe:
USERADD_PACKAGES = "${PN}"
Note
It follows that if you are going to use the USERADD_PACKAGES variable, you need to set one or more of the USERADD_PARAM, GROUPADD_PARAM, or GROUPMEMS_PARAM variables.
- USERADD_PARAM
When inheriting the useradd* class, this variable specifies for a package what parameters should pass to the
useraddcommand if you add a user to the system when the package is installed.Here is an example from the
dbusrecipe:USERADD_PARAM:${PN} = "--system --home ${localstatedir}/lib/dbus \ --no-create-home --shell /bin/false \ --user-group messagebus"For information on the standard Linux shell command
useradd, see useradd(8).- USERADD_UID_TABLES
Specifies a password file to use for obtaining static user identification (
uid) values when the OpenEmbedded build system adds a user to the system during package installation.When applying static user identification (
uid) values, the OpenEmbedded build system looks in BBPATH for afiles/passwdfile and then applies thoseuidvalues. Set the variable as follows in yourlocal.conffile:USERADD_UID_TABLES = "files/passwd"
Note
Setting the USERADDEXTENSION variable to “useradd-staticids” causes the build system to use static
uidvalues.- USERADDEXTENSION
When set to “useradd-staticids”, causes the OpenEmbedded build system to base all user and group additions on a static
passwdandgroupfiles found in BBPATH.To use static user identification (
uid) and group identification (gid) values, set the variable as follows in yourlocal.conffile: USERADDEXTENSION = “useradd-staticids”Note
Setting this variable to use static
uidandgidvalues causes the OpenEmbedded build system to employ the useradd* class.If you use static
uidandgidinformation, you must also specify thefiles/passwdandfiles/groupfiles by setting the USERADD_UID_TABLES and USERADD_GID_TABLES variables. Additionally, you should also set the USERADD_ERROR_DYNAMIC variable.- VIRTUAL-RUNTIME
VIRTUAL-RUNTIME is a commonly used prefix for defining virtual packages for runtime usage, typically for use in RDEPENDS or in image definitions.
An example is
VIRTUAL-RUNTIME_base-utilsthat makes it possible to either use BusyBox based utilities:VIRTUAL-RUNTIME_base-utils = "busybox"
or their full featured implementations from GNU Coreutils and other projects:
VIRTUAL-RUNTIME_base-utils = "packagegroup-core-base-utils"
Here are two examples using this virtual runtime package. The first one is in initramfs-framework_1.0.bb:
RDEPENDS:${PN} += "${VIRTUAL-RUNTIME_base-utils}"The second example is in the core-image-initramfs-boot image definition:
PACKAGE_INSTALL = "${INITRAMFS_SCRIPTS} ${VIRTUAL-RUNTIME_base-utils} base-passwd"
- WARN_QA
Specifies the quality assurance checks whose failures are reported as warnings by the OpenEmbedded build system. You set this variable in your distribution configuration file. For a list of the checks you can control with this variable, see the “insane” section.
- WATCHDOG_RUNTIME_SEC
For the
systemdrecipe, this controls the value of theRuntimeWatchdogSecoption in/etc/systemd/system.conf. The default value is an empty string.- WATCHDOG_TIMEOUT
Specifies the timeout in seconds used by the
watchdog-configrecipe and also bysystemdduring reboot. The default is 60 seconds.- WESTON_USER
The WESTON_USER variable defines the username for the Weston user.
- WESTON_USER_HOME
The WESTON_USER variable defines the path to the home directory for the Weston user.
- WIC_CREATE_EXTRA_ARGS
If the IMAGE_FSTYPES variable contains “wic”, the build will generate a Wic image automatically when BitBake builds an image recipe. As part of this process BitBake will invoke the “wic create” command. The WIC_CREATE_EXTRA_ARGS variable is placed at the end of this command which allows the user to supply additional arguments.
One such useful purpose for this mechanism is to add the
-D(or--debug) argument to the “wic create” command. This increases the amount of debugging information written out to the Wic log during the Wic creation process.- WIC_SECTOR_SIZE
Warning
This variable is deprecated in favor of the
--sector-sizewic command-line argument. See WIC_SECTOR_SIZE should be replaced by --sector-size for more information.The variable WIC_SECTOR_SIZE controls the sector size of Wic images. In the background, this controls the value of the
PARTED_SECTOR_SIZEenvironment variable passed to thepartedcommand-line utility, used to generated the images. The default value is512.For more information on how to create Wic images, see the “Creating Partitioned Images Using Wic” section in the Yocto Project Development Tasks Manual.
- WIRELESS_DAEMON
For
connmanandpackagegroup-base, specifies the wireless daemon to use. The default is “wpa-supplicant” (note that the value uses a dash and not an underscore).- WKS_FILE
Specifies the location of the Wic kickstart file that is used by the OpenEmbedded build system to create a partitioned image (
image.wic). For information on how to create a partitioned image, see the “Creating Partitioned Images Using Wic” section in the Yocto Project Development Tasks Manual. For details on the kickstart file format, see the “OpenEmbedded Kickstart (.wks) Reference” Chapter.- WKS_FILE_DEPENDS
When placed in the recipe that builds your image, this variable lists build-time dependencies. The WKS_FILE_DEPENDS variable is only applicable when Wic images are active (i.e. when IMAGE_FSTYPES contains entries related to Wic). If your recipe does not create Wic images, the variable has no effect.
The WKS_FILE_DEPENDS variable is similar to the DEPENDS variable. When you use the variable in your recipe that builds the Wic image, dependencies you list in the WKS_FILE_DEPENDS variable are added to the DEPENDS variable.
With the WKS_FILE_DEPENDS variable, you have the possibility to specify a list of additional dependencies (e.g. native tools, bootloaders, and so forth), that are required to build Wic images. Here is an example:
WKS_FILE_DEPENDS = "some-native-tool"
In the previous example, some-native-tool would be replaced with an actual native tool on which the build would depend.
- WKS_FILES
Specifies a list of candidate Wic kickstart files to be used by the OpenEmbedded build system to create a partitioned image. Only the first one that is found, from left to right, will be used.
This is only useful when there are multiple
.wksfiles that can be used to produce an image. A typical case is when multiple layers are used for different hardware platforms, each supplying a different.wksfile. In this case, you specify all possible ones through WKS_FILES.If only one
.wksfile is used, set WKS_FILE instead.- WORKDIR
The pathname of the work directory in which the OpenEmbedded build system builds a recipe. This directory is located within the TMPDIR directory structure and is specific to the recipe being built and the system for which it is being built.
The WORKDIR directory is defined as follows:
${TMPDIR}/work/${MULTIMACH_TARGET_SYS}/${PN}/${EXTENDPE}${PV}-${PR}The actual directory depends on several things:
TMPDIR: The top-level build output directory
MULTIMACH_TARGET_SYS: The target system identifier
PN: The recipe name
EXTENDPE: The epoch — if PE is not specified, which is usually the case for most recipes, then EXTENDPE is blank.
PV: The recipe version
PR: The recipe revision
As an example, assume a Source Directory top-level folder name
bitbake-builds, a default Build Directory atbitbake-builds/build, and aqemux86-poky-linuxmachine target system. Furthermore, suppose your recipe is namedfoo_1.3.0-r0.bb. In this case, the work directory the build system uses to build the package would be as follows:bitbake-builds/build/tmp/work/qemux86-poky-linux/foo/1.3.0-r0
- XSERVER
Specifies the packages that should be installed to provide an X server and drivers for the current machine, assuming your image directly includes
packagegroup-core-x11-xserveror, perhaps indirectly, includes “x11-base” in IMAGE_FEATURES.The default value of XSERVER, if not specified in the machine configuration, is “xserver-xorg xf86-video-fbdev xf86-input-evdev”.
- XZ_MEMLIMIT
Specifies the maximum memory the xz compression should use as a percentage of system memory. If unconstrained the xz compressor can use large amounts of memory and become problematic with parallelism elsewhere in the build. “50%” has been found to be a good value.
- XZ_THREADS
Specifies the number of parallel threads that should be used when using xz compression.
By default this scales with core count, but is never set less than 2 to ensure that multi-threaded mode is always used so that the output file contents are deterministic. Builds will work with a value of 1 but the output will differ compared to the output from the compression generated when more than one thread is used.
On systems where many tasks run in parallel, setting a limit to this can be helpful in controlling system resource usage.
- ZSTD_COMPRESSION_LEVEL
Specifies the compression level to be used with ZStandard compression (from
1to19, set to3by default, following upstream choice). Higher levels produce smaller files, but take longer to complete.- ZSTD_THREADS
Specifies the number of parallel threads that should be used when using ZStandard compression.
By default this scales with core count, but is never set less than 2 to ensure that multi-threaded mode is always used so that the output file contents are deterministic. Builds will work with a value of 1 but the output will differ compared to the output from the compression generated when more than one thread is used.
On systems where many tasks run in parallel, setting a limit to this can be helpful in controlling system resource usage.
15 Variable Context
While you can use most variables in almost any context such as
.conf, .bbclass, .inc, and .bb files, some variables are
often associated with a particular locality or context. This chapter
describes some common associations.
15.1 Configuration
The following subsections provide lists of variables whose context is configuration: distribution, machine, and local.
15.1.1 Distribution (Distro)
This section lists variables whose configuration context is the distribution, or distro.
15.1.2 Machine
This section lists variables whose configuration context is the machine.
15.1.3 Local
This section lists variables whose configuration context is the local
configuration through the local.conf file.
15.2 Recipes
The following subsections provide lists of variables whose context is recipes: required, dependencies, path, and extra build information.
15.2.1 Required
This section lists variables that are required for recipes.
SRC_URI — used in recipes that fetch local or remote files.
15.2.2 Dependencies
This section lists variables that define recipe dependencies.
15.2.3 Paths
This section lists variables that define recipe paths.
15.2.4 Extra Build Information
This section lists variables that define extra build information for recipes.
16 FAQ
16.1 General questions
16.1.1 How does Poky differ from OpenEmbedded?
The term Poky refers to the reference distribution that the Yocto Project provides, and a reference test configuration.
The Poky distribution is built using the OpenEmbedded Build System and BitBake. The metadata involved to build the Poky reference distribution is:
OpenEmbedded-Core (OE-Core), which is hosted at https://git.openembedded.org/openembedded-core.
meta-poky, which defines the
pokydistro configuration file (DISTRO).
Note
Poky also used to be a repository containing the combination of BitBake, OpenEmbedded-Core (OE-Core), the meta-yocto repository and the Yocto Project documentation – which were combined with the combo-layer tool.
This repository is still hosted at https://git.yoctoproject.org/poky and is still
updated for maintained releases that are older than Whinlatter (5.3).
Newer releases now use bitbake-setup to clone and setup the initial
OpenEmbedded Build System environment. For more information on
how to use bitbake-setup, see the Yocto Project Quick Build
document. An alternative can be to setup the above repositories
manually, by following the Setting Up the Poky Reference Distro Manually
section of the Yocto Project Development Tasks Manual.
16.1.2 How can you claim Poky / OpenEmbedded-Core is stable?
There are three areas that help with stability;
The Yocto Project team keeps OpenEmbedded-Core (OE-Core) small and focused, containing around a thousand recipes as opposed to the thousands available in other OpenEmbedded community layers. Keeping it small makes it easy to test and maintain.
The Yocto Project team runs manual and automated tests using a small, fixed set of reference hardware as well as emulated targets.
The Yocto Project uses an autobuilder, which provides continuous build and integration tests.
16.1.3 Are there any products built using the OpenEmbedded build system?
See Products that use the Yocto Project in the Yocto Project Wiki. Don’t hesitate to contribute to this page if you know other such products.
16.1.4 Why isn’t systemd the default init system for OpenEmbedded-Core/Yocto Project or in Poky?
systemd is a desktop Linux init system with a specific focus that is not entirely aligned with a customisable “embedded” build system/environment.
It understandably mandates certain layouts and configurations which may or may not align with what the objectives and direction OpenEmbedded-Core (OE-Core) or Yocto Project want to take. It doesn’t support all of our targets. For example musl support in systemd is problematic.
If it were our default, we would have to align with all their choices and this doesn’t make sense. It is therefore a configuration option and available to anyone where the design goals align. But we are clear it is not the only way to handle init.
Our automated testing includes it through the poky-altcfg DISTRO and
we don’t really need it to be the default: it is tested, it works, and people
can choose to use it.
16.2 Building environment
16.2.1 Missing dependencies on the development system?
If your development system does not meet the required Git, tar, and Python versions, you can get the required tools on your host development system in different ways (i.e. building a tarball or downloading a tarball). See the “Required Git, tar, Python, make and gcc Versions” section for steps on how to update your build tools.
16.2.2 How does OpenEmbedded fetch source code? Will it work through a firewall or proxy server?
The way the build system obtains source code is highly configurable. You can setup the build system to get source code in most environments if HTTP transport is available.
When the build system searches for source code, it first tries the local download directory (DL_DIR). If that location fails, the OpenEmbedded Build System tries PREMIRRORS, the upstream source (specified in SRC_URI), and then MIRRORS in that order.
Assuming your distribution is “poky”, the OpenEmbedded build system uses the Yocto Project source PREMIRRORS by default for SCM-based sources, upstreams for normal tarballs, and then falls back to a number of other mirrors including the Yocto Project source mirror if those fail.
As an example, you could add a specific server for the build system to
attempt before any others by adding something like the following to the
local.conf configuration file:
PREMIRRORS:prepend = "\
git://.*/.* https://downloads.yoctoproject.org/mirror/sources/ \
ftp://.*/.* https://downloads.yoctoproject.org/mirror/sources/ \
http://.*/.* https://downloads.yoctoproject.org/mirror/sources/ \
https://.*/.* https://downloads.yoctoproject.org/mirror/sources/"
These changes cause the build system to intercept Git, FTP, HTTP, and
HTTPS requests and direct them to the http:// sources mirror. You
can use file:// URLs to point to local directories or network shares
as well.
Another option is to set:
BB_NO_NETWORK = "1"
This statement tells BitBake to issue an error instead of trying to access the Internet. This technique is useful if you want to ensure code builds only from local sources.
Here is another technique:
BB_FETCH_PREMIRRORONLY = "1"
This statement limits the build system to pulling source from the PREMIRRORS only. Again, this technique is useful for reproducing builds.
Here is yet another technique:
BB_GENERATE_MIRROR_TARBALLS = "1"
This statement tells the build system to generate mirror tarballs. This technique is useful if you want to create a mirror server. If not, however, the technique can simply waste time during the build.
Finally, consider an example where you are behind an HTTP-only firewall.
You could make the following changes to the local.conf configuration
file as long as the PREMIRRORS server is current:
PREMIRRORS:prepend = "\
git://.*/.* https://downloads.yoctoproject.org/mirror/sources/ \
ftp://.*/.* https://downloads.yoctoproject.org/mirror/sources/ \
http://.*/.* https://downloads.yoctoproject.org/mirror/sources/ \
https://.*/.* https://downloads.yoctoproject.org/mirror/sources/"
BB_FETCH_PREMIRRORONLY = "1"
These changes would cause the build system to successfully fetch source over HTTP and any network accesses to anything other than the PREMIRRORS would fail.
Most source fetching by the OpenEmbedded build system is done by
wget and you therefore need to specify the proxy settings in a
.wgetrc file, which can be in your home directory if you are a
single user or can be in /usr/local/etc/wgetrc as a global user
file.
Here is the applicable code for setting various proxy types in the
.wgetrc file. By default, these settings are disabled with comments.
To use them, remove the comments:
# You can set the default proxies for Wget to use for http, https, and ftp.
# They will override the value in the environment.
#https_proxy = http://proxy.yoyodyne.com:18023/
#http_proxy = http://proxy.yoyodyne.com:18023/
#ftp_proxy = http://proxy.yoyodyne.com:18023/
# If you do not want to use proxy at all, set this to off.
#use_proxy = on
The build system also accepts http_proxy, ftp_proxy, https_proxy,
and all_proxy set as to standard shell environment variables to redirect
requests through proxy servers.
The Yocto Project also includes a meta/conf/templates/default/site.conf.sample file that shows how to configure a Git proxy server if needed.
Note
You can find more information on the “Working Behind a Network Proxy” Wiki page.
16.3 Using the OpenEmbedded Build system
16.3.1 How do I use an external toolchain?
See the “Optionally Using an External Toolchain” section in the Development Task manual.
16.3.2 Why do I get chmod permission issues?
If you see the error
chmod: XXXXX new permissions are r-xrwxrwx, not r-xr-xr-x,
you are probably running the build on an NTFS filesystem. Instead,
run the build system on a partition with a modern Linux filesystem such as
ext4, btrfs or xfs.
16.3.3 I see many 404 errors trying to download sources. Is anything wrong?
Nothing is wrong. The OpenEmbedded build system checks any configured source mirrors before downloading from the upstream sources. The build system does this searching for both source archives and pre-checked out versions of SCM-managed software. These checks help in large installations because it can reduce load on the SCM servers themselves. This can also allow builds to continue to work if an upstream source disappears.
16.3.4 Why do I get random build failures?
If the same build is failing in totally different and random ways, the most likely explanation is:
The hardware you are running the build on has some problem.
You are running the build under virtualization, in which case the virtualization probably has bugs.
The OpenEmbedded build system processes a massive amount of data that causes lots of network, disk and CPU activity and is sensitive to even single-bit failures in any of these areas. True random failures have always been traced back to hardware or virtualization issues.
16.3.5 Why does the build fail with iconv.h problems?
When you try to build a native recipe, you may get an error message that
indicates that GNU libiconv is not in use but iconv.h has been
included from libiconv:
#error GNU libiconv not in use but included iconv.h is from libiconv
When this happens, you need to check whether you have a previously
installed version of the header file in /usr/local/include/.
If that’s the case, you should either uninstall it or temporarily rename
it and try the build again.
This issue is just a single manifestation of “system leakage” issues
caused when the OpenEmbedded build system finds and uses previously
installed files during a native build. This type of issue might not be
limited to iconv.h. Make sure that leakage cannot occur from
/usr/local/include and /opt locations.
16.3.6 Why don’t other recipes find the files provided by my *-native recipe?
Files provided by your native recipe could be missing from the native sysroot, your recipe could also be installing to the wrong place, or you could be getting permission errors during the do_install task in your recipe.
This situation happens when the build system used by a package does not
recognize the environment variables supplied to it by BitBake. The
incident that prompted this FAQ entry involved a Makefile that used an
environment variable named BINDIR instead of the more standard
variable bindir. The makefile’s hardcoded default value of
“/usr/bin” worked most of the time, but not for the recipe’s -native
variant. For another example, permission errors might be caused by a
Makefile that ignores DESTDIR or uses a different name for that
environment variable. Check the build system of the package to see if
these kinds of issues exist.
16.3.7 Can I get rid of build output so I can start over?
Yes — you can easily do this. When you use BitBake to build an
image, all the build output goes into the directory created when you run
the build environment setup script (i.e. oe-init-build-env).
By default, this Build Directory is named build but can be named
anything you want.
Within the Build Directory, is the tmp directory. To remove all the
build output yet preserve any source code or downloaded files from
previous builds, simply remove the tmp directory.
16.3.8 Why isn’t there a way to append bbclass files like bbappend for recipes?
The Yocto Project has consciously chosen not to implement such functionality. Class code is designed to be shared and reused, and exposes some level of configuration to its users. We want to encourage people to share these changes so we can build the best classes.
If the append functionality was available for classes, our evidence and
experience suggest that people would create their custom changes in their
layer instead of sharing and discussing the issues and/or limitations they
encountered. This would lead to bizarre class interactions when new layers are
included. We therefore consciously choose to have a natural pressure to share
class code improvements or fixes.
There are also technical considerations like which recipes a class append would apply to and how that would fit within the layer model. These are complications we think we can live without!
16.3.9 How do I integrate a third-party vulnerability scanning tool?
The OpenEmbedded Build System produces SPDX files that contain the Software Bill Of Materials (SBOM) for any recipe that is built. For this it uses the create-spdx class. This class also creates a final SPDX document for an image recipe, found in the deployment directory (DEPLOY_DIR_IMAGE). See the Creating a Software Bill of Materials section of the Yocto Project Development Tasks Manual for more information of SBOMs generated by the OpenEmbedded Build System.
Some third-party vulnerability scanning tools have existing integration with the SPDX documents generated by the OpenEmbedded Build System. One example is Blackduck, which offers the bd_scan_yocto_via_sbom utility to scan the vulnerabilities using the SPDX document as input.
These third-party tools have the responsibility of providing support for integrating with the Yocto Project SBOMs.
Also see the Checking for Vulnerabilities section of the Yocto Project Development Tasks Manual for more information on dealing with vulnerabilities.
16.4 Customizing generated images
16.4.1 What does the OpenEmbedded build system produce as output?
Because you can use the same set of recipes to create output of various formats, the output of an OpenEmbedded build depends on how you start it. Usually, the output is a flashable image ready for the target device.
16.4.2 How do I make the Yocto Project support my board?
Support for an additional board is added by creating a Board Support Package (BSP) layer for it. For more information on how to create a BSP layer, see the “Understanding and Creating Layers” section in the Yocto Project Development Tasks Manual and the Yocto Project Board Support Package Developer’s Guide.
Usually, if the board is not completely exotic, adding support in the Yocto Project is fairly straightforward.
16.4.3 How do I make the Yocto Project support my package?
To add a package, you need to create a BitBake recipe. For information on how to create a BitBake recipe, see the “Writing a New Recipe” section in the Yocto Project Development Tasks Manual.
16.4.4 What do I need to ship for license compliance?
This is a difficult question and you need to consult your lawyer for the answer for your specific case. It is worth bearing in mind that for GPL compliance, there needs to be enough information shipped to allow someone else to rebuild and produce the same end result you are shipping. This means sharing the source code, any patches applied to it, and also any configuration information about how that package was configured and built.
You can find more information on licensing in the “Licensing” section in the Yocto Project Overview and Concepts Manual and also in the “Maintaining Open Source License Compliance During Your Product’s Lifecycle” section in the Yocto Project Development Tasks Manual.
16.4.5 Do I have to make a full reflash after recompiling one package?
The OpenEmbedded build system can build packages in various
formats such as IPK for OPKG, Debian package (.deb), or RPM. You can
then upgrade only the modified packages using the package tools on the device,
much like on a desktop distribution such as Ubuntu or Fedora. However,
package management on the target is entirely optional.
16.4.6 How to prevent my package from being marked as machine specific?
If you have machine-specific data in a package for one machine only
but the package is being marked as machine-specific in all cases,
you can set SRC_URI_OVERRIDES_PACKAGE_ARCH = “0” in the .bb file.
However, but make sure the package is manually marked as machine-specific for the
case that needs it. The code that handles SRC_URI_OVERRIDES_PACKAGE_ARCH
is in the meta/classes-global/base.bbclass file.
16.4.7 What’s the difference between target and target-native?
The *-native targets are designed to run on the system being
used for the build. These are usually tools that are needed to assist
the build in some way such as quilt-native, which is used to apply
patches. The non-native version is the one that runs on the target
device.
16.4.8 Why do ${bindir} and ${libdir} have strange values for -native recipes?
Executables and libraries might need to be used from a directory other than the directory into which they were initially installed. Complicating this situation is the fact that sometimes these executables and libraries are compiled with the expectation of being run from that initial installation target directory. If this is the case, moving them causes problems.
This scenario is a fundamental problem for package maintainers of
mainstream Linux distributions as well as for the OpenEmbedded build
system. As such, a well-established solution exists. Makefiles,
Autotools configuration scripts, and other build systems are expected to
respect environment variables such as bindir, libdir, and
sysconfdir that indicate where executables, libraries, and data
reside when a program is actually run. They are also expected to respect
a DESTDIR environment variable, which is prepended to all the other
variables when the build system actually installs the files. It is
understood that the program does not actually run from within
DESTDIR.
When the OpenEmbedded build system uses a recipe to build a
target-architecture program (i.e. one that is intended for inclusion on
the image being built), that program eventually runs from the root file
system of that image. Thus, the build system provides a value of
“/usr/bin” for bindir, a value of “/usr/lib” for libdir, and so
forth.
Meanwhile, DESTDIR is a path within the Build Directory.
However, when the recipe builds a native program (i.e. one that is
intended to run on the build machine), that program is never installed
directly to the build machine’s root file system. Consequently, the build
system uses paths within the Build Directory for DESTDIR, bindir
and related variables. To better understand this, consider the following
two paths (artificially broken across lines for readability) where the
first is relatively normal and the second is not:
/home/maxtothemax/poky-bootchart2/build/tmp/work/i586-poky-linux/zlib/
1.2.8-r0/sysroot-destdir/usr/bin
/home/maxtothemax/poky-bootchart2/build/tmp/work/x86_64-linux/
zlib-native/1.2.8-r0/sysroot-destdir/home/maxtothemax/poky-bootchart2/
build/tmp/sysroots/x86_64-linux/usr/bin
Even if the paths look unusual, they both are correct — the first for
a target and the second for a native recipe. These paths are a consequence
of the DESTDIR mechanism and while they appear strange, they are correct
and in practice very effective.
16.4.9 How do I create images with more free space?
By default, the OpenEmbedded build system creates images that are 1.3 times the size of the populated root filesystem. To affect the image size, you need to set various configurations:
Image Size: The OpenEmbedded build system uses the IMAGE_ROOTFS_SIZE variable to define the size of the image in Kbytes. The build system determines the size by taking into account the initial root filesystem size before any modifications such as requested size for the image and any requested additional free disk space to be added to the image.
Overhead: Use the IMAGE_OVERHEAD_FACTOR variable to define the multiplier that the build system applies to the initial image size, which is 1.3 by default.
Additional Free Space: Use the IMAGE_ROOTFS_EXTRA_SPACE variable to add additional free space to the image. The build system adds this space to the image after it determines its IMAGE_ROOTFS_SIZE.
16.4.10 Why aren’t spaces in path names supported?
The Yocto Project team has tried to do this before but too many
of the tools the OpenEmbedded build system depends on, such as
autoconf, break when they find spaces in pathnames. Until that
situation changes, the team will not support spaces in pathnames.
16.4.11 I’m adding a binary in a recipe. Why is it different in the image?
The first most obvious change is the system stripping debug symbols from it. Setting INHIBIT_PACKAGE_STRIP to stop debug symbols being stripped and/or INHIBIT_PACKAGE_DEBUG_SPLIT to stop debug symbols being split into a separate file will ensure the binary is unchanged.
16.5 Issues on the running system
16.5.1 How do I disable the cursor on my touchscreen device?
You need to create a form factor file as described in the
“Miscellaneous BSP-Specific Recipe Files” section in
the Yocto Project Board Support Packages (BSP) Developer’s Guide. Set
the HAVE_TOUCHSCREEN variable equal to one as follows:
HAVE_TOUCHSCREEN=1
16.5.2 How to always bring up connected network interfaces?
The default interfaces file provided by the netbase recipe does not automatically bring up network interfaces. Therefore, you will need to add a BSP-specific netbase that includes an interfaces file. See the “Miscellaneous BSP-Specific Recipe Files” section in the Yocto Project Board Support Packages (BSP) Developer’s Guide for information on creating these types of miscellaneous recipe files.
For example, add the following files to your layer:
meta-MACHINE/recipes-bsp/netbase/netbase/MACHINE/interfaces
meta-MACHINE/recipes-bsp/netbase/netbase_5.0.bbappend
17 Contributions and Additional Information
17.1 Introduction
The Yocto Project team is happy for people to experiment with the Yocto Project. There is a number of places where you can find help if you run into difficulties or find bugs. This presents information about contributing and participating in the Yocto Project.
17.2 Contributions
The Yocto Project gladly accepts contributions. You can submit changes to the project either by creating and sending pull requests, or by submitting patches through email. For information on how to do both as well as information on how to identify the maintainer for each area of code, see the Yocto Project and OpenEmbedded Contributor Guide.
17.3 Yocto Project Bugzilla
The Yocto Project uses its own implementation of Bugzilla to track defects (bugs). Implementations of Bugzilla work well for group development because they track bugs and code changes, can be used to communicate changes and problems with developers, can be used to submit and review patches, and can be used to manage quality assurance.
Sometimes it is helpful to submit, investigate, or track a bug against the Yocto Project itself (e.g. when discovering an issue with some component of the build system that acts contrary to the documentation or your expectations).
For a general procedure and guidelines on how to use Bugzilla to submit a bug against the Yocto Project, see the following:
The “Reporting a Defect Against the Yocto Project and OpenEmbedded” section in the Yocto Project and OpenEmbedded Contributor Guide.
The Yocto Project Bugzilla wiki page
For information on Bugzilla in general, see https://www.bugzilla.org/about/.
17.4 Mailing lists
There are multiple mailing lists maintained by the Yocto Project as well as related OpenEmbedded mailing lists for discussion, patch submission and announcements. To subscribe to one of the following mailing lists, click on the appropriate URL in the following list and follow the instructions:
https://lists.yoctoproject.org/g/yocto — general Yocto Project discussion mailing list.
https://lists.yoctoproject.org/g/yocto-patches — patch contribution mailing list for Yocto Project-related layers which do not have their own mailing list.
https://lists.openembedded.org/g/openembedded-core — discussion mailing list about OpenEmbedded-Core (the core metadata).
https://lists.openembedded.org/g/openembedded-devel — discussion mailing list about OpenEmbedded.
https://lists.openembedded.org/g/bitbake-devel — discussion mailing list about the BitBake build tool.
https://lists.yoctoproject.org/g/poky — discussion mailing list about Poky.
https://lists.yoctoproject.org/g/yocto-announce — mailing list to receive official Yocto Project release and milestone announcements.
https://lists.yoctoproject.org/g/docs — discussion mailing list about the Yocto Project documentation.
See also the description of all mailing lists.
17.5 Internet Relay Chat (IRC)
Two IRC channels on Libera Chat are available for the Yocto Project and OpenEmbedded discussions:
#yocto#oe
Permission is granted to copy, distribute and/or modify this document under the terms of the Creative Commons Attribution-Share Alike 2.0 UK: England & Wales as published by Creative Commons.
To report any inaccuracies or problems with this (or any other Yocto Project)
manual, or to send additions or changes, please send email/patches to the Yocto
Project documentation mailing list at docs@lists.yoctoproject.org or
log into the Libera Chat #yocto channel.
Yocto Project Board Support Package Developer’s Guide
1 Board Support Packages (BSP) — Developer’s Guide
A Board Support Package (BSP) is a collection of information that defines how to support a particular hardware device, set of devices, or hardware platform. The BSP includes information about the hardware features present on the device, any essential bootloader, kernel and device tree configuration, along with any additional hardware drivers required. The BSP also lists any additional software components required in addition to a generic Linux software stack for both essential and optional platform features.
This guide presents information about BSP layers, defines a structure for components so that BSPs follow a commonly understood layout, discusses how to customize a recipe for a BSP, addresses BSP licensing, and provides information that shows you how to create a BSP Layer using the bitbake-layers tool.
1.1 BSP Layers
A BSP consists of a file structure inside a base directory. Collectively, you can think of the base directory, its file structure, and the contents as a BSP layer. Although not a strict requirement, BSP layers in the Yocto Project use the following well-established naming convention:
meta-bsp_root_name
The string “meta-” is prepended to the machine or platform name, which is “bsp_root_name” in the above form.
Note
Because the BSP layer naming convention is well-established, it is
advisable to follow it when creating layers. Technically speaking, a
BSP layer name does not need to start with meta-.
However, various scripts and tools in the Yocto Project development
environment assume this convention.
To help understand the BSP layer concept, consider the BSPs that the Yocto Project supports and provides with each release. You can see the layers in the Yocto Project Source Repositories through a web interface at https://git.yoctoproject.org/. If you go to that interface, you will find a list of repositories under “Yocto Metadata Layers”.
Note
Layers that are no longer actively supported as part of the Yocto Project appear under the heading “Yocto Metadata Layer Archive.”
Each repository is a BSP layer supported by the Yocto Project (e.g.
meta-raspberrypi and meta-intel). Each of these layers is a
repository unto itself and clicking on the layer name displays two URLs
from which you can clone the layer’s repository to your local system.
Here is an example that clones the Raspberry Pi BSP layer:
$ git clone git://git.yoctoproject.org/meta-raspberrypi
In addition to BSP layers, the meta-yocto-bsp layer is part of
meta-yocto. The meta-yocto-bsp layer maintains
several “reference” BSPs including the ARM-based Beaglebone and generic
versions of both 32-bit and 64-bit IA machines.
For information on typical BSP development workflow, see the Developing a Board Support Package (BSP) section. For more information on how to set up a local copy of source files from a Git repository, see the Setting Up the Poky Reference Distro Manually section in the Yocto Project Development Tasks Manual.
The BSP layer’s base directory (meta-bsp_root_name) is the root
directory of that Layer. This directory is what you add to the
BBLAYERS variable in the
conf/bblayers.conf file found in your
Build Directory, which is
established after you run the OpenEmbedded build environment setup
script (i.e. oe-init-build-env).
Adding the root directory allows the OpenEmbedded Build System
to recognize the BSP
layer and from it build an image. Here is an example:
BBLAYERS ?= " \
/usr/local/src/yocto/meta \
/usr/local/src/yocto/meta-poky \
/usr/local/src/yocto/meta-yocto-bsp \
/usr/local/src/yocto/meta-mylayer \
"
Note
Ordering and BBFILE_PRIORITY for the layers listed in BBLAYERS matter. For example, if multiple layers define a machine configuration, the OpenEmbedded build system uses the last layer searched given similar layer priorities. The build system works from the top-down through the layers listed in BBLAYERS.
Some BSPs require or depend on additional layers beyond the BSP’s root
layer in order to be functional. In this case, you need to specify these
layers in the README “Dependencies” section of the BSP’s root layer.
Additionally, if any build instructions exist for the BSP, you must add
them to the “Dependencies” section.
Some layers function as a layer to hold other BSP layers. These layers
are known as “container layers”. An example of
this type of layer is OpenEmbedded’s meta-openembedded
layer. The meta-openembedded layer contains many meta-* layers.
In cases like this, you need to include the names of the actual layers
you want to work with, such as:
BBLAYERS ?= " \
/usr/local/src/yocto/meta \
/usr/local/src/yocto/meta-poky \
/usr/local/src/yocto/meta-yocto-bsp \
/usr/local/src/yocto/meta-mylayer \
.../meta-openembedded/meta-oe \
.../meta-openembedded/meta-perl \
.../meta-openembedded/meta-networking \
"
and so on.
For more information on layers, see the “Understanding and Creating Layers” section of the Yocto Project Development Tasks Manual.
1.2 Preparing Your Build Host to Work With BSP Layers
This section describes how to get your build host ready to work with BSP layers. Once you have the host set up, you can create the layer as described in the “Creating a new BSP Layer Using the bitbake-layers Script” section.
Note
For structural information on BSPs, see the Example Filesystem Layout section.
Set Up the Build Environment: Be sure you are set up to use BitBake in a shell. See the “Preparing the Build Host” section in the Yocto Project Development Tasks Manual for information on how to get a build host ready that is either a native Linux machine or a machine that uses CROPS.
Prepare the Source Repositories:
There are two ways of setting up the Poky reference distro:
Using the
bitbake-setupcommand-line utility from BitBake. Follow:Manually cloning the required repositories. Follow:
Determine the BSP Layer You Want: The Yocto Project supports many BSPs, which are maintained in their own layers or in layers designed to contain several BSPs. The Layer Index can help finding BSP layers to use.
Optionally Clone the meta-intel BSP Layer: If your hardware is based on current Intel CPUs and devices, you can leverage this BSP layer. For details on the
meta-intelBSP layer, see the layer’s README file.Navigate to Your Source Directory: Typically, you set up the
meta-intelGit repository next to the other layers in your build.Clone the Layer:
$ git clone git://git.yoctoproject.org/meta-intel.git Cloning into 'meta-intel'... remote: Counting objects: 15585, done. remote: Compressing objects: 100% (5056/5056), done. remote: Total 15585 (delta 9123), reused 15329 (delta 8867) Receiving objects: 100% (15585/15585), 4.51 MiB | 3.19 MiB/s, done. Resolving deltas: 100% (9123/9123), done. Checking connectivity... done.
Check Out the Proper Branch: The branch you check out for
meta-intelmust match the same branch you are using for the Yocto Project release (e.g.wrynose):$ cd meta-intel $ git checkout -b wrynose remotes/origin/wrynose Branch wrynose set up to track remote branch wrynose from origin. Switched to a new branch 'wrynose'
Note
To see the available branch names in a cloned repository, use the
git branch -acommand.
Optionally Set Up an Alternative BSP Layer: If your hardware can be more closely leveraged to an existing BSP not within the
meta-intelBSP layer, you can clone that BSP layer.The process is identical to the process used for the
meta-intellayer except for the layer’s name. For example, if you determine that your hardware most closely matches themeta-raspberrypi, clone that layer:$ git clone git://git.yoctoproject.org/meta-raspberrypi Cloning into 'meta-raspberrypi'... remote: Counting objects: 4743, done. remote: Compressing objects: 100% (2185/2185), done. remote: Total 4743 (delta 2447), reused 4496 (delta 2258) Receiving objects: 100% (4743/4743), 1.18 MiB | 0 bytes/s, done. Resolving deltas: 100% (2447/2447), done. Checking connectivity... done.
Initialize the Build Environment: While in the Source Directory, run the oe-init-build-env environment setup script located in OpenEmbedded-Core (OE-Core) to define the OpenEmbedded build environment on your build host.
$ source layers/openembedded-core/oe-init-build-env
Among other things, the script creates the Build Directory, which is “build”. After the script runs, your current working directory is set to the Build Directory.
Note
Alternatively, you can source the
init-build-envfile provided by bitbake-setup
1.3 Example Filesystem Layout
Defining a common BSP directory structure allows end-users to understand and become familiar with that standard. A common format also encourages standardization of software support for hardware.
The proposed form described in this section does have elements that are specific to the OpenEmbedded build system. It is intended that developers can use this structure with other build systems besides the OpenEmbedded build system. It is also intended that it will be simple to extract information and convert it to other formats if required. The OpenEmbedded build system, through its standard layers mechanism, can directly accept the format described as a layer. The BSP layer captures all the hardware-specific details in one place using a standard format, which is useful for any person wishing to use the hardware platform regardless of the build system they are using.
The BSP specification does not include a build system or other tools - the specification is concerned with the hardware-specific components only. At the end-distribution point, you can ship the BSP layer combined with a build system and other tools. Realize that it is important to maintain the distinction that the BSP layer, a build system, and tools are separate components that could be combined in certain end products.
Before looking at the recommended form for the directory structure inside a BSP layer, you should be aware that there are some requirements in order for a BSP layer to be considered compliant with the Yocto Project. For that list of requirements, see the “Released BSP Requirements” section.
Below is the typical directory structure for a BSP layer. While this basic form represents the standard, realize that the actual layout for individual BSPs could differ.
meta-bsp_root_name/
meta-bsp_root_name/bsp_license_file
meta-bsp_root_name/README
meta-bsp_root_name/README.sources
meta-bsp_root_name/binary/bootable_images
meta-bsp_root_name/conf/layer.conf
meta-bsp_root_name/conf/machine/*.conf
meta-bsp_root_name/recipes-bsp/*
meta-bsp_root_name/recipes-core/*
meta-bsp_root_name/recipes-graphics/*
meta-bsp_root_name/recipes-kernel/linux/linux-yocto_kernel_rev.bbappend
Below is an example of the Raspberry Pi BSP layer that is available from the Source Repositories:
meta-raspberrypi/COPYING.MIT
meta-raspberrypi/README.md
meta-raspberrypi/classes
meta-raspberrypi/classes/sdcard_image-rpi.bbclass
meta-raspberrypi/conf/
meta-raspberrypi/conf/layer.conf
meta-raspberrypi/conf/machine/
meta-raspberrypi/conf/machine/raspberrypi-cm.conf
meta-raspberrypi/conf/machine/raspberrypi-cm3.conf
meta-raspberrypi/conf/machine/raspberrypi.conf
meta-raspberrypi/conf/machine/raspberrypi0-wifi.conf
meta-raspberrypi/conf/machine/raspberrypi0.conf
meta-raspberrypi/conf/machine/raspberrypi2.conf
meta-raspberrypi/conf/machine/raspberrypi3-64.conf
meta-raspberrypi/conf/machine/raspberrypi3.conf
meta-raspberrypi/conf/machine/include
meta-raspberrypi/conf/machine/include/rpi-base.inc
meta-raspberrypi/conf/machine/include/rpi-default-providers.inc
meta-raspberrypi/conf/machine/include/rpi-default-settings.inc
meta-raspberrypi/conf/machine/include/rpi-default-versions.inc
meta-raspberrypi/conf/machine/include/tune-arm1176jzf-s.inc
meta-raspberrypi/docs
meta-raspberrypi/docs/Makefile
meta-raspberrypi/docs/conf.py
meta-raspberrypi/docs/contributing.md
meta-raspberrypi/docs/extra-apps.md
meta-raspberrypi/docs/extra-build-config.md
meta-raspberrypi/docs/index.rst
meta-raspberrypi/docs/layer-contents.md
meta-raspberrypi/docs/readme.md
meta-raspberrypi/files
meta-raspberrypi/files/custom-licenses
meta-raspberrypi/files/custom-licenses/Broadcom
meta-raspberrypi/recipes-bsp
meta-raspberrypi/recipes-bsp/bootfiles
meta-raspberrypi/recipes-bsp/bootfiles/bcm2835-bootfiles.bb
meta-raspberrypi/recipes-bsp/bootfiles/rpi-config_git.bb
meta-raspberrypi/recipes-bsp/common
meta-raspberrypi/recipes-bsp/common/firmware.inc
meta-raspberrypi/recipes-bsp/formfactor
meta-raspberrypi/recipes-bsp/formfactor/formfactor
meta-raspberrypi/recipes-bsp/formfactor/formfactor/raspberrypi
meta-raspberrypi/recipes-bsp/formfactor/formfactor/raspberrypi/machconfig
meta-raspberrypi/recipes-bsp/formfactor/formfactor_%.bbappend
meta-raspberrypi/recipes-bsp/rpi-u-boot-src
meta-raspberrypi/recipes-bsp/rpi-u-boot-src/files
meta-raspberrypi/recipes-bsp/rpi-u-boot-src/files/boot.cmd.in
meta-raspberrypi/recipes-bsp/rpi-u-boot-src/rpi-u-boot-scr.bb
meta-raspberrypi/recipes-bsp/u-boot
meta-raspberrypi/recipes-bsp/u-boot/u-boot
meta-raspberrypi/recipes-bsp/u-boot/u-boot/*.patch
meta-raspberrypi/recipes-bsp/u-boot/u-boot_%.bbappend
meta-raspberrypi/recipes-connectivity
meta-raspberrypi/recipes-connectivity/bluez5
meta-raspberrypi/recipes-connectivity/bluez5/bluez5
meta-raspberrypi/recipes-connectivity/bluez5/bluez5/*.patch
meta-raspberrypi/recipes-connectivity/bluez5/bluez5/BCM43430A1.hcd
meta-raspberrypi/recipes-connectivity/bluez5/bluez5brcm43438.service
meta-raspberrypi/recipes-connectivity/bluez5/bluez5_%.bbappend
meta-raspberrypi/recipes-core
meta-raspberrypi/recipes-core/images
meta-raspberrypi/recipes-core/images/rpi-basic-image.bb
meta-raspberrypi/recipes-core/images/rpi-hwup-image.bb
meta-raspberrypi/recipes-core/images/rpi-test-image.bb
meta-raspberrypi/recipes-core/packagegroups
meta-raspberrypi/recipes-core/packagegroups/packagegroup-rpi-test.bb
meta-raspberrypi/recipes-core/psplash
meta-raspberrypi/recipes-core/psplash/files
meta-raspberrypi/recipes-core/psplash/files/psplash-raspberrypi-img.h
meta-raspberrypi/recipes-core/psplash/psplash_git.bbappend
meta-raspberrypi/recipes-core/udev
meta-raspberrypi/recipes-core/udev/udev-rules-rpi
meta-raspberrypi/recipes-core/udev/udev-rules-rpi/99-com.rules
meta-raspberrypi/recipes-core/udev/udev-rules-rpi.bb
meta-raspberrypi/recipes-devtools
meta-raspberrypi/recipes-devtools/bcm2835
meta-raspberrypi/recipes-devtools/bcm2835/bcm2835_1.52.bb
meta-raspberrypi/recipes-devtools/pi-blaster
meta-raspberrypi/recipes-devtools/pi-blaster/files
meta-raspberrypi/recipes-devtools/pi-blaster/files/*.patch
meta-raspberrypi/recipes-devtools/pi-blaster/pi-blaster_git.bb
meta-raspberrypi/recipes-devtools/python
meta-raspberrypi/recipes-devtools/python/python-rtimu
meta-raspberrypi/recipes-devtools/python/python-rtimu/*.patch
meta-raspberrypi/recipes-devtools/python/python-rtimu_git.bb
meta-raspberrypi/recipes-devtools/python/python-sense-hat_2.2.0.bb
meta-raspberrypi/recipes-devtools/python/rpi-gpio
meta-raspberrypi/recipes-devtools/python/rpi-gpio/*.patch
meta-raspberrypi/recipes-devtools/python/rpi-gpio_0.6.3.bb
meta-raspberrypi/recipes-devtools/python/rpio
meta-raspberrypi/recipes-devtools/python/rpio/*.patch
meta-raspberrypi/recipes-devtools/python/rpio_0.10.0.bb
meta-raspberrypi/recipes-devtools/wiringPi
meta-raspberrypi/recipes-devtools/wiringPi/files
meta-raspberrypi/recipes-devtools/wiringPi/files/*.patch
meta-raspberrypi/recipes-devtools/wiringPi/wiringpi_git.bb
meta-raspberrypi/recipes-graphics
meta-raspberrypi/recipes-graphics/eglinfo
meta-raspberrypi/recipes-graphics/eglinfo/eglinfo-fb_%.bbappend
meta-raspberrypi/recipes-graphics/eglinfo/eglinfo-x11_%.bbappend
meta-raspberrypi/recipes-graphics/mesa
meta-raspberrypi/recipes-graphics/mesa/mesa-gl_%.bbappend
meta-raspberrypi/recipes-graphics/mesa/mesa_%.bbappend
meta-raspberrypi/recipes-graphics/userland
meta-raspberrypi/recipes-graphics/userland/userland
meta-raspberrypi/recipes-graphics/userland/userland/*.patch
meta-raspberrypi/recipes-graphics/userland/userland_git.bb
meta-raspberrypi/recipes-graphics/vc-graphics
meta-raspberrypi/recipes-graphics/vc-graphics/files
meta-raspberrypi/recipes-graphics/vc-graphics/files/egl.pc
meta-raspberrypi/recipes-graphics/vc-graphics/files/vchiq.sh
meta-raspberrypi/recipes-graphics/vc-graphics/vc-graphics-hardfp.bb
meta-raspberrypi/recipes-graphics/vc-graphics/vc-graphics.bb
meta-raspberrypi/recipes-graphics/vc-graphics/vc-graphics.inc
meta-raspberrypi/recipes-graphics/wayland
meta-raspberrypi/recipes-graphics/wayland/weston_%.bbappend
meta-raspberrypi/recipes-graphics/xorg-xserver
meta-raspberrypi/recipes-graphics/xorg-xserver/xserver-xf86-config
meta-raspberrypi/recipes-graphics/xorg-xserver/xserver-xf86-config/rpi
meta-raspberrypi/recipes-graphics/xorg-xserver/xserver-xf86-config/rpi/xorg.conf
meta-raspberrypi/recipes-graphics/xorg-xserver/xserver-xf86-config/rpi/xorg.conf.d
meta-raspberrypi/recipes-graphics/xorg-xserver/xserver-xf86-config/rpi/xorg.conf.d/10-evdev.conf
meta-raspberrypi/recipes-graphics/xorg-xserver/xserver-xf86-config/rpi/xorg.conf.d/98-pitft.conf
meta-raspberrypi/recipes-graphics/xorg-xserver/xserver-xf86-config/rpi/xorg.conf.d/99-calibration.conf
meta-raspberrypi/recipes-graphics/xorg-xserver/xserver-xf86-config_0.1.bbappend
meta-raspberrypi/recipes-graphics/xorg-xserver/xserver-xorg_%.bbappend
meta-raspberrypi/recipes-kernel
meta-raspberrypi/recipes-kernel/linux-firmware
meta-raspberrypi/recipes-kernel/linux-firmware/files
meta-raspberrypi/recipes-kernel/linux-firmware/files/brcmfmac43430-sdio.bin
meta-raspberrypi/recipes-kernel/linux-firmware/files/brcfmac43430-sdio.txt
meta-raspberrypi/recipes-kernel/linux-firmware/linux-firmware_%.bbappend
meta-raspberrypi/recipes-kernel/linux
meta-raspberrypi/recipes-kernel/linux/linux-raspberrypi-dev.bb
meta-raspberrypi/recipes-kernel/linux/linux-raspberrypi.inc
meta-raspberrypi/recipes-kernel/linux/linux-raspberrypi_4.14.bb
meta-raspberrypi/recipes-kernel/linux/linux-raspberrypi_4.9.bb
meta-raspberrypi/recipes-multimedia
meta-raspberrypi/recipes-multimedia/gstreamer
meta-raspberrypi/recipes-multimedia/gstreamer/gstreamer1.0-omx
meta-raspberrypi/recipes-multimedia/gstreamer/gstreamer1.0-omx/*.patch
meta-raspberrypi/recipes-multimedia/gstreamer/gstreamer1.0-omx_%.bbappend
meta-raspberrypi/recipes-multimedia/gstreamer/gstreamer1.0-plugins-bad_%.bbappend
meta-raspberrypi/recipes-multimedia/gstreamer/gstreamer1.0-omx-1.12
meta-raspberrypi/recipes-multimedia/gstreamer/gstreamer1.0-omx-1.12/*.patch
meta-raspberrypi/recipes-multimedia/omxplayer
meta-raspberrypi/recipes-multimedia/omxplayer/omxplayer
meta-raspberrypi/recipes-multimedia/omxplayer/omxplayer/*.patch
meta-raspberrypi/recipes-multimedia/omxplayer/omxplayer_git.bb
meta-raspberrypi/recipes-multimedia/x264
meta-raspberrypi/recipes-multimedia/x264/x264_git.bbappend
meta-raspberrypi/wic
meta-raspberrypi/wic/sdimage-raspberrypi.wks
The following sections describe each part of the proposed BSP format.
1.3.1 License Files
You can find these files in the BSP Layer at:
meta-bsp_root_name/bsp_license_file
These optional files satisfy licensing requirements for the BSP. The
type or types of files here can vary depending on the licensing
requirements. For example, in the Raspberry Pi BSP, all licensing
requirements are handled with the COPYING.MIT file.
Licensing files can be MIT, BSD, GPLv*, and so forth. These files are recommended for the BSP but are optional and totally up to the BSP developer. For information on how to maintain license compliance, see the “Maintaining Open Source License Compliance During Your Product’s Lifecycle” section in the Yocto Project Development Tasks Manual.
1.3.2 README File
You can find this file in the BSP Layer at:
meta-bsp_root_name/README
This file provides information on how to boot the live images that are
optionally included in the binary/ directory. The README file
also provides information needed for building the image.
At a minimum, the README file must contain a list of dependencies,
such as the names of any other layers on which the BSP depends and the
name of the BSP maintainer with his or her contact information.
1.3.3 README.sources File
You can find this file in the BSP Layer at:
meta-bsp_root_name/README.sources
This file provides information on where to locate the BSP source files
used to build the images (if any) that reside in
meta-bsp_root_name/binary. Images in the binary would be images
released with the BSP. The information in the README.sources file
also helps you find the Metadata
used to generate the images that ship with the BSP.
Note
If the BSP’s binary directory is missing or the directory has no images, an
existing README.sources file is meaningless and usually does not exist.
1.3.4 Pre-built User Binaries
You can find these files in the BSP Layer at:
meta-bsp_root_name/binary/bootable_images
This optional area contains useful pre-built kernels and user-space filesystem images released with the BSP that are appropriate to the target system. This directory typically contains graphical (e.g. Sato) and minimal live images when the BSP tarball has been created and made available in the Yocto Project website. You can use these kernels and images to get a system running and quickly get started on development tasks.
The exact types of binaries present are highly hardware-dependent. The README file should be present in the BSP Layer and it explains how to use the images with the target hardware. Additionally, the README.sources file should be present to locate the sources used to build the images and provide information on the Metadata.
1.3.5 Layer Configuration File
You can find this file in the BSP Layer at:
meta-bsp_root_name/conf/layer.conf
The conf/layer.conf file identifies the file structure as a layer,
identifies the contents of the layer, and contains information about how
the build system should use it. Generally, a standard boilerplate file
such as the following works. In the following example, you would replace
“bsp” with the actual name of the BSP (i.e. “bsp_root_name” from the example
template).
# We have a conf and classes directory, add to BBPATH
BBPATH .= ":${LAYERDIR}"
# We have a recipes directory containing .bb and .bbappend files, add to BBFILES
BBFILES += "${LAYERDIR}/recipes-*/*/*.bb \
${LAYERDIR}/recipes-*/*/*.bbappend"
BBFILE_COLLECTIONS += "bsp"
BBFILE_PATTERN_bsp = "^${LAYERDIR}/"
BBFILE_PRIORITY_bsp = "6"
LAYERDEPENDS_bsp = "intel"
To illustrate the string substitutions, here are the corresponding
statements from the Raspberry Pi conf/layer.conf file:
# We have a conf and classes directory, append to BBPATH
BBPATH .= ":${LAYERDIR}"
# We have a recipes directory containing .bb and .bbappend files, add to BBFILES
BBFILES += "${LAYERDIR}/recipes*/*/*.bb \
${LAYERDIR}/recipes*/*/*.bbappend"
BBFILE_COLLECTIONS += "raspberrypi"
BBFILE_PATTERN_raspberrypi := "^${LAYERDIR}/"
BBFILE_PRIORITY_raspberrypi = "9"
# Additional license directories.
LICENSE_PATH += "${LAYERDIR}/files/custom-licenses"
.
.
.
This file simply makes BitBake aware of the recipes and configuration directories. The file must exist so that the OpenEmbedded build system can recognize the BSP.
1.3.6 Hardware Configuration Options
You can find these files in the BSP Layer at:
meta-bsp_root_name/conf/machine/*.conf
The machine files bind together all the information contained elsewhere in the BSP into a format that the build system can understand. Each BSP Layer requires at least one machine file. If the BSP supports multiple machines, multiple machine configuration files can exist. These filenames correspond to the values to which users have set the MACHINE variable.
These files define things such as the kernel package to use (PREFERRED_PROVIDER of virtual/kernel), the hardware drivers to include in different types of images, any special software components that are needed, any bootloader information, and also any special image format requirements.
This configuration file could also include a hardware “tuning” file that is commonly used to define the package architecture and specify optimization flags, which are carefully chosen to give best performance on a given processor.
Tuning files are found in the meta/conf/machine/include directory
within OpenEmbedded-Core (OE-Core).
For example, many tune-* files (e.g. tune-arm1136jf-s.inc,
tune-1586-nlp.inc, and so forth) reside in the
meta/conf/machine/include directory.
To use an include file, you simply include them in the machine
configuration file. For example, the Raspberry Pi BSP
raspberrypi3.conf contains the following statement:
include conf/machine/include/rpi-base.inc
1.3.7 Miscellaneous BSP-Specific Recipe Files
You can find these files in the BSP Layer at:
meta-bsp_root_name/recipes-bsp/*
This optional directory contains miscellaneous recipe files for the BSP.
Most notably would be the formfactor files. For example, in the
Raspberry Pi BSP, there is the formfactor_%.bbappend file, which
is an append file used to augment the recipe that starts the build.
Furthermore, there are machine-specific settings used during the build
that are defined by the machconfig file further down in the
directory. Here is the machconfig file for the Raspberry Pi BSP:
HAVE_TOUCHSCREEN=0
HAVE_KEYBOARD=1
DISPLAY_CAN_ROTATE=0
DISPLAY_ORIENTATION=0
DISPLAY_DPI=133
Note
If a BSP does not have a formfactor entry, defaults are established
according to the formfactor configuration file that is installed by
the main formfactor recipe
meta/recipes-bsp/formfactor/formfactor_0.0.bb, which is found in
OpenEmbedded-Core (OE-Core).
1.3.8 Display Support Files
You can find these files in the BSP Layer at:
meta-bsp_root_name/recipes-graphics/*
This optional directory contains recipes for the BSP if it has special requirements for graphics support. All files that are needed for the BSP to support a display are kept here.
1.3.9 Linux Kernel Configuration
You can find these files in the BSP Layer at:
meta-bsp_root_name/recipes-kernel/linux/linux*.bbappend
meta-bsp_root_name/recipes-kernel/linux/*.bb
Append files (*.bbappend) modify the main kernel recipe being used
to build the image. The *.bb files would be a developer-supplied
kernel recipe. This area of the BSP hierarchy can contain both these
types of files although, in practice, it is likely that you would have
one or the other.
For your BSP, you typically want to use an existing Yocto Project kernel
recipe found in OpenEmbedded-Core (OE-Core)
at
meta/recipes-kernel/linux. You can append machine-specific changes
to the kernel recipe by using a similarly named append file, which is
located in the BSP Layer for your target device (e.g. the
meta-bsp_root_name/recipes-kernel/linux directory).
Suppose you are using the linux-yocto_6.12.bb recipe to build the
kernel. In other words, you have selected the kernel in your
"bsp_root_name".conf file by adding
PREFERRED_PROVIDER and PREFERRED_VERSION
statements as follows:
PREFERRED_PROVIDER_virtual/kernel ?= "linux-yocto"
PREFERRED_VERSION_linux-yocto ?= "6.12%"
Note
When the preferred provider is assumed by default, the PREFERRED_PROVIDER
statement does not appear in the "bsp_root_name".conf file.
You would use the linux-yocto_6.12.bbappend file to append specific
BSP settings to the kernel, thus configuring the kernel for your
particular BSP.
You can find more information on what your append file should contain in the “Creating the Append File” section in the Yocto Project Linux Kernel Development Manual.
An alternate scenario is when you create your own kernel recipe for the
BSP. A good example of this is the Raspberry Pi BSP. If you examine the
recipes-kernel/linux directory in that layer you see the following
Raspberry Pi-specific recipes and associated files:
files/
linux-raspberrypi_6.12.bb
linux-raspberrypi_6.1.bb
linux-raspberrypi_6.6.bb
linux-raspberrypi-dev.bb
linux-raspberrypi.inc
linux-raspberrypi-v7_6.12.bb
linux-raspberrypi-v7_6.1.bb
linux-raspberrypi-v7_6.6.bb
linux-raspberrypi-v7.inc
1.4 Developing a Board Support Package (BSP)
This section describes the high-level procedure you can follow to create
a BSP. Although not required for BSP creation, the meta-intel
repository, which contains many BSPs supported by the Yocto Project, is
part of the example.
For an example that shows how to create a new layer using the tools, see the “Creating a new BSP Layer Using the bitbake-layers Script” section.
The following illustration and list summarize the BSP creation general workflow.
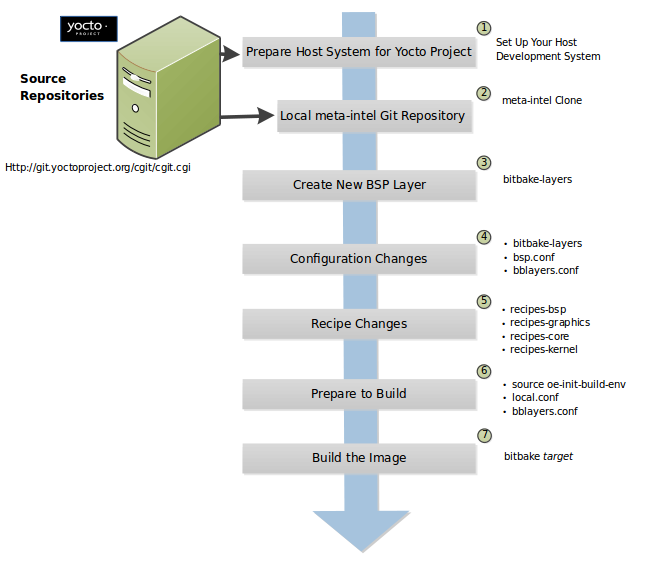
Set up Your Host Development System to Support Development Using the Yocto Project: See the “Preparing the Build Host” section in the Yocto Project Development Tasks Manual for options on how to get a system ready to use the Yocto Project.
Establish the meta-intel Repository on Your System: Having local copies of these supported BSP layers on your system gives you access to layers you might be able to leverage when creating your BSP. For information on how to get these files, see the “Preparing Your Build Host to Work With BSP Layers” section.
Create Your Own BSP Layer Using the bitbake-layers Script: Layers are ideal for isolating and storing work for a given piece of hardware. A layer is really just a location or area in which you place the recipes and configurations for your BSP. In fact, a BSP is, in itself, a special type of layer. The simplest way to create a new BSP layer that is compliant with the Yocto Project is to use the
bitbake-layersscript. For information about that script, see the “Creating a new BSP Layer Using the bitbake-layers Script” section.Another example that illustrates a layer is an application. Suppose you are creating an application that has library or other dependencies in order for it to compile and run. The layer, in this case, would be where all the recipes that define those dependencies are kept. The key point for a layer is that it is an isolated area that contains all the relevant information for the project that the OpenEmbedded build system knows about. For more information on layers, see the “The Yocto Project Layer Model” section in the Yocto Project Overview and Concepts Manual. You can also reference the “Understanding and Creating Layers” section in the Yocto Project Development Tasks Manual. For more information on BSP layers, see the “BSP Layers” section.
Note
There are four hardware reference BSPs in the Yocto Project release, located in the meta-yocto-bsp BSP layer:
Texas Instruments Beaglebone (
beaglebone-yocto)Two generic IA platforms (
genericx86andgenericx86-64)A generic ARM 64 platform (
genericarm64)
When you set up a layer for a new BSP, you should follow a standard layout. This layout is described in the “Example Filesystem Layout” section. In the standard layout, notice the suggested structure for recipes and configuration information. You can see the standard layout for a BSP by examining any supported BSP found in the meta-intel layer.
Make Configuration Changes to Your New BSP Layer: The standard BSP layer structure organizes the files you need to edit in
confand severalrecipes-*directories within the BSP layer. Configuration changes identify where your new layer is on the local system and identifies the kernel you are going to use. When you run thebitbake-layersscript, you are able to interactively configure many things for the BSP (e.g. keyboard, touchscreen, and so forth).Make Recipe Changes to Your New BSP Layer: Recipe changes include altering recipes (
*.bbfiles), removing recipes you do not use, and adding new recipes or append files (.bbappend) that support your hardware.Prepare for the Build: Once you have made all the changes to your BSP layer, there remains a few things you need to do for the OpenEmbedded build system in order for it to create your image. You need to get the build environment ready by sourcing an environment setup script (i.e.
oe-init-build-env) and you need to be sure two key configuration files are configured appropriately: theconf/local.confand theconf/bblayers.conffile. You must make the OpenEmbedded build system aware of your new layer. See the “Enabling Your Layer” section in the Yocto Project Development Tasks Manual for information on how to let the build system know about your new layer.Build the Image: The OpenEmbedded build system uses the BitBake tool to build images based on the type of image you want to create. You can find more information about BitBake in the BitBake User Manual.
The build process supports several types of images to satisfy different needs. See the “Images” chapter in the Yocto Project Reference Manual for information on supported images.
1.5 Requirements and Recommendations for Released BSPs
This section describes requirements and recommendations for a released BSP to be considered compliant with the Yocto Project.
1.5.1 Released BSP Requirements
Before looking at BSP requirements, you should consider the following:
The requirements here assume the BSP layer is a well-formed, “legal” layer that can be added to the Yocto Project. For guidelines on creating a layer that meets these base requirements, see the “BSP Layers” section in this manual and the “Understanding and Creating Layers” section in the Yocto Project Development Tasks Manual.
The requirements in this section apply regardless of how you package a BSP. You should consult the packaging and distribution guidelines for your specific release process. For an example of packaging and distribution requirements, see the “Third Party BSP Release Process” wiki page.
The requirements for the BSP as it is made available to a developer are completely independent of the released form of the BSP. For example, the BSP Metadata can be contained within a Git repository and could have a directory structure completely different from what appears in the officially released BSP layer.
It is not required that specific packages or package modifications exist in the BSP layer, beyond the requirements for general compliance with the Yocto Project. For example, there is no requirement dictating that a specific kernel or kernel version be used in a given BSP.
The requirements for a released BSP that conform to the Yocto Project are:
Layer Name: The BSP must have a layer name that follows the Yocto Project standards. For information on BSP layer names, see the “BSP Layers” section.
File System Layout: When possible, use the same directory names in your BSP layer as listed in the
recipes.txtfile, which is found in meta directory of OpenEmbedded-Core (OE-Core).You should place recipes (
*.bbfiles) and recipe modifications (*.bbappendfiles) intorecipes-*subdirectories by functional area as outlined inrecipes.txt. If you cannot find a category inrecipes.txtto fit a particular recipe, you can make up your ownrecipes-*subdirectory.Within any particular
recipes-*category, the layout should match what is found in the OpenEmbedded-Core (OE-Core) Git repository. In other words, make sure you place related files in appropriately-relatedrecipes-*subdirectories specific to the recipe’s function, or within a subdirectory containing a set of closely-related recipes. The recipes themselves should follow the general guidelines for recipes found in the “Recipe Style Guide” in the Yocto Project and OpenEmbedded Contributor Guide.License File: You must include a license file in the
meta-bsp_root_namedirectory. This license covers the BSP Metadata as a whole. You must specify which license to use since no default license exists. See the COPYING.MIT file for the Raspberry Pi BSP in themeta-raspberrypiBSP layer as an example.README File: You must include a
READMEfile in themeta-bsp_root_namedirectory. See the README.md file for the Raspberry Pi BSP in themeta-raspberrypiBSP layer as an example.At a minimum, the
READMEfile should contain the following:A brief description of the target hardware.
A list of all the dependencies of the BSP. These dependencies are typically a list of required layers needed to build the BSP. However, the dependencies should also contain information regarding any other dependencies the BSP might have.
Any required special licensing information. For example, this information includes information on special variables needed to satisfy a EULA, or instructions on information needed to build or distribute binaries built from the BSP Metadata.
The name and contact information for the BSP layer maintainer. This is the person to whom patches and questions should be sent. For information on how to find the right person, see the Contributing Changes to a Component section in the Yocto Project and OpenEmbedded Contributor Guide.
Instructions on how to build the BSP using the BSP layer.
Instructions on how to boot the BSP build from the BSP layer.
Instructions on how to boot the binary images contained in the
binarydirectory, if present.Information on any known bugs or issues that users should know about when either building or booting the BSP binaries.
README.sources File: If your BSP contains binary images in the
binarydirectory, you must include aREADME.sourcesfile in themeta-bsp_root_namedirectory. This file specifies exactly where you can find the sources used to generate the binary images.Layer Configuration File: You must include a
conf/layer.conffile in themeta-bsp_root_namedirectory. This file identifies themeta-bsp_root_nameBSP layer as a layer to the build system.Machine Configuration File: You must include one or more
conf/machine/bsp_root_name.conffiles in themeta-bsp_root_namedirectory. These configuration files define machine targets that can be built using the BSP layer. Multiple machine configuration files define variations of machine configurations that the BSP supports. If a BSP supports multiple machine variations, you need to adequately describe each variation in the BSPREADMEfile. Do not use multiple machine configuration files to describe disparate hardware. If you do have very different targets, you should create separate BSP layers for each target.Note
It is completely possible for a developer to structure the working repository as a conglomeration of unrelated BSP files, and to possibly generate BSPs targeted for release from that directory using scripts or some other mechanism (e.g.
meta-yocto-bsplayer). Such considerations are outside the scope of this document.
1.5.2 Released BSP Recommendations
Here are recommendations for released BSPs that conform to the Yocto Project:
Bootable Images: Released BSPs can contain one or more bootable images. Including bootable images allows users to easily try out the BSP using their own hardware.
In some cases, it might not be convenient to include a bootable image. If so, you might want to make two versions of the BSP available: one that contains binary images, and one that does not. The version that does not contain bootable images avoids unnecessary download times for users not interested in the images.
If you need to distribute a BSP and include bootable images or build kernel and filesystems meant to allow users to boot the BSP for evaluation purposes, you should put the images and artifacts within a
binary/subdirectory located in themeta-bsp_root_namedirectory.Note
If you do include a bootable image as part of the BSP and the image was built by software covered by the GPL or other open source licenses, it is your responsibility to understand and meet all licensing requirements, which could include distribution of source files.
Use a Yocto Linux Kernel: Kernel recipes in the BSP should be based on a Yocto Linux kernel. Basing your recipes on these kernels reduces the costs for maintaining the BSP and increases its scalability. See the
Yocto Linux Kernelcategory in the Source Repositories for these kernels.
1.6 Customizing a Recipe for a BSP
If you plan on customizing a recipe for a particular BSP, you need to do the following:
Create a
*.bbappendfile for the modified recipe. For information on using append files, see the “Appending Other Layers Metadata With Your Layer” section in the Yocto Project Development Tasks Manual.Ensure your directory structure in the BSP layer that supports your machine is such that the OpenEmbedded build system can find it. See the example later in this section for more information.
Put the append file in a directory whose name matches the machine’s name and is located in an appropriate sub-directory inside the BSP layer (i.e.
recipes-bsp,recipes-graphics,recipes-core, and so forth).Place the BSP-specific files in the proper directory inside the BSP layer. How expansive the layer is affects where you must place these files. For example, if your layer supports several different machine types, you need to be sure your layer’s directory structure includes hierarchy that separates the files according to machine. If your layer does not support multiple machines, the layer would not have that additional hierarchy and the files would obviously not be able to reside in a machine-specific directory.
Here is a specific example to help you better understand the
process. This example customizes a recipe by adding a
BSP-specific configuration file named interfaces to the
init-ifupdown_1.0.bb recipe for machine “xyz” where the BSP layer
also supports several other machines:
Edit the
init-ifupdown_1.0.bbappendfile so that it contains the following:FILESEXTRAPATHS:prepend := "${THISDIR}/files:"
The append file needs to be in the
meta-xyz/recipes-core/init-ifupdowndirectory.Create and place the new
interfacesconfiguration file in the BSP’s layer here:meta-xyz/recipes-core/init-ifupdown/files/xyz-machine-one/interfaces
Note
If the
meta-xyzlayer did not support multiple machines, you would place the interfaces configuration file in the layer here:meta-xyz/recipes-core/init-ifupdown/files/interfaces
The FILESEXTRAPATHS variable in the append files extends the search path the build system uses to find files during the build. Consequently, for this example you need to have the
filesdirectory in the same location as your append file.
1.7 BSP Licensing Considerations
In some cases, a BSP contains separately-licensed Intellectual Property (IP) for a component or components. For these cases, you are required to accept the terms of a commercial or other type of license that requires some kind of explicit End User License Agreement (EULA). Once you accept the license, the OpenEmbedded build system can then build and include the corresponding component in the final BSP image. If the BSP is available as a pre-built image, you can download the image after agreeing to the license or EULA.
You could find that some separately-licensed components that are essential for normal operation of the system might not have an unencumbered (or free) substitute. Without these essential components, the system would be non-functional. Then again, you might find that other licensed components that are simply ‘good-to-have’ or purely elective do have an unencumbered, free replacement component that you can use rather than agreeing to the separately-licensed component. Even for components essential to the system, you might find an unencumbered component that is not identical but will work as a less-capable version of the licensed version in the BSP recipe.
For cases where you can substitute a free component and still maintain the system’s functionality, the “DOWNLOADS” selection from the “SOFTWARE” tab on the Yocto Project Website makes available de-featured BSPs that are completely free of any IP encumbrances. For these cases, you can use the substitution directly and without any further licensing requirements. If present, these fully de-featured BSPs are named appropriately different as compared to the names of their respective encumbered BSPs. If available, these substitutions are your simplest and most preferred options. Obviously, use of these substitutions assumes the resulting functionality meets system requirements.
Note
If however, a non-encumbered version is unavailable or it provides unsuitable functionality or quality, you can use an encumbered version.
There are two different methods within the OpenEmbedded build system to satisfy the licensing requirements for an encumbered BSP. The following list describes them in order of preference:
Use the LICENSE_FLAGS Variable to Define the Recipes that Have Commercial or Other Types of Specially-Licensed Packages: For each of those recipes, you can specify a matching license string in a
local.confvariable named LICENSE_FLAGS_ACCEPTED. Specifying the matching license string signifies that you agree to the license. Thus, the build system can build the corresponding recipe and include the component in the image. See the “Enabling Commercially Licensed Recipes” section in the Yocto Project Development Tasks Manual for details on how to use these variables.If you build as you normally would, without specifying any recipes in the LICENSE_FLAGS_ACCEPTED variable, the build stops and provides you with the list of recipes that you have tried to include in the image that need entries in the LICENSE_FLAGS_ACCEPTED variable. Once you enter the appropriate license flags into it, restart the build to continue where it left off. During the build, the prompt will not appear again since you have satisfied the requirement.
Once the appropriate license flags are on the white list in the LICENSE_FLAGS_ACCEPTED variable, you can build the encumbered image with no change at all to the normal build process.
Get a Pre-Built Version of the BSP: You can get this type of BSP by selecting the “DOWNLOADS” item from the “SOFTWARE” tab on the Yocto Project website. You can download BSP tarballs that contain proprietary components after agreeing to the licensing requirements of each of the individually encumbered packages as part of the download process. Obtaining the BSP this way allows you to access an encumbered image immediately after agreeing to the click-through license agreements presented by the website. If you want to build the image yourself using the recipes contained within the BSP tarball, you will still need to create an appropriate LICENSE_FLAGS_ACCEPTED to match the encumbered recipes in the BSP.
Note
Pre-compiled images are bundled with a time-limited kernel that runs for a predetermined amount of time (10 days) before it forces the system to reboot. This limitation is meant to discourage direct redistribution of the image. You must eventually rebuild the image if you want to remove this restriction.
1.8 Creating a new BSP Layer Using the bitbake-layers Script
The bitbake-layers create-layer script automates creating a BSP
layer. What makes a layer a “BSP layer” is the presence of at least one
machine configuration file. Additionally, a BSP layer usually has a
kernel recipe or an append file that leverages off an existing kernel
recipe. The primary requirement, however, is the machine configuration.
Use these steps to create a BSP layer:
Create a General Layer: Use the
bitbake-layersscript with thecreate-layersubcommand to create a new general layer. For instructions on how to create a general layer using thebitbake-layersscript, see the “Creating Your Own Layer” section in the Yocto Project Development Tasks Manual.Create a Layer Configuration File: Every layer needs a layer configuration file. This configuration file establishes locations for the layer’s recipes, priorities for the layer, and so forth. You can find examples of
layer.conffiles in the Yocto Project Source Repositories. To get examples of what you need in your configuration file, locate a layer (e.g. “meta-ti”) and examine the local.conf file.Create a Machine Configuration File: Create a
conf/machine/bsp_root_name.conffile. See meta-yocto-bsp/conf/machine for samplebsp_root_name.conffiles. There are other samples such as meta-ti and meta-freescale from other vendors that have more specific machine and tuning examples.Create a Kernel Recipe: Create a kernel recipe in
recipes-kernel/linuxby either using a kernel append file or a new custom kernel recipe file (e.g.linux-yocto_6.12.bb). The BSP layers mentioned in the previous step also contain different kernel examples. See the “Modifying an Existing Recipe” section in the Yocto Project Linux Kernel Development Manual for information on how to create a custom kernel.
The remainder of this section provides a description of the Yocto Project reference BSP for Beaglebone, which resides in the meta-yocto-bsp layer.
1.8.1 BSP Layer Configuration Example
The layer’s conf directory contains the layer.conf configuration
file. In this example, the conf/layer.conf file is the following:
# We have a conf and classes directory, add to BBPATH
BBPATH .= ":${LAYERDIR}"
# We have a recipes directory containing .bb and .bbappend files, add to BBFILES
BBFILES += "${LAYERDIR}/recipes-*/*/*.bb \
${LAYERDIR}/recipes-*/*/*.bbappend"
BBFILE_COLLECTIONS += "yoctobsp"
BBFILE_PATTERN_yoctobsp = "^${LAYERDIR}/"
BBFILE_PRIORITY_yoctobsp = "5"
LAYERVERSION_yoctobsp = "4"
LAYERSERIES_COMPAT_yoctobsp = "wrynose"
The variables used in this file configure the layer. A good way to learn about layer configuration files is to examine various files for BSP from the Source Repositories.
For a detailed description of this particular layer configuration file, see “step 3” in the discussion that describes how to create layers in the Yocto Project Development Tasks Manual.
1.8.2 BSP Machine Configuration Example
As mentioned earlier in this section, the existence of at least one machine configuration file is what makes a layer a BSP layer as compared to a general or kernel layer.
As an actual example, consider the relevant content from the
/meta-yocto/tree/meta-yocto-bsp/conf/ directory of the
meta-yocto-bsp BSP layer:
$ tree -F conf
conf/
├── layer.conf
└── machine/
├── beaglebone-yocto.conf
├── genericarm64.conf
├── genericx86-64.conf
├── genericx86.conf
└── include/
└── genericx86-common.inc
showing four machine configuration files along with a lower-level tuning configuration file.
The variables used to configure the machine define machine-specific properties; for example, machine-dependent packages, machine tunings, the type of kernel to build, and U-Boot configurations.
The following list provides some explanation for the statements found in the example reference machine configuration file for the BeagleBone development board. Realize that much more can be defined as part of a machine’s configuration file. In general, you can learn about related variables that this example does not have by locating the variables in the “Variables Glossary” in the Yocto Project Reference Manual.
PREFERRED_PROVIDER_virtual/xserver: The recipe that provides “virtual/xserver” when more than one provider is found. In this case, the recipe that provides “virtual/xserver” is “xserver-xorg”, available in
meta/recipes-graphics/xorg-xserverin OpenEmbedded-Core (OE-Core).MACHINE_EXTRA_RRECOMMENDS: A list of machine-dependent packages not essential for booting the image. Thus, the build does not fail if the packages do not exist. However, the packages are required for a fully-featured image.
Tip
There are many
MACHINE*variables that help you configure a particular piece of hardware.EXTRA_IMAGEDEPENDS: Recipes to build that do not provide packages for installing into the root filesystem but building the image depends on the recipes. Sometimes a recipe is required to build the final image but is not needed in the root filesystem. In this case, the U-Boot recipe must be built for the image.
At the end of the file, we also use this setting to implement
runqemusupport on the host machine.DEFAULTTUNE: Machines use tunings to optimize machine, CPU, and application performance. These features — collectively known as “tuning features” — are set in the OpenEmbedded-Core (OE-Core) layer. In this example, the default tuning file is tune-cortexa8.
Note
The include statement that pulls in the
conf/machine/include/arm/tune-cortexa8.incfile provides many tuning possibilities.IMAGE_FSTYPES: The formats the OpenEmbedded build system uses during the build when creating the root filesystem. In this example, four types of images are supported.
EXTRA_IMAGECMD: Specifies additional options for image creation commands. In this example, the “-lnp “ option is used when creating the JFFS2 image.
WKS_FILE: The location of the Wic kickstart file used by the OpenEmbedded build system to create a partitioned image.
do_image_wic[depends]: A task that is constructed during the build. In this example, the task depends on specific tools in order to create the sysroot when building a Wic image.SERIAL_CONSOLES: Defines one or more serial consoles (TTYs) to enable using getty.
PREFERRED_PROVIDER_virtual/kernel: Specifies the recipe that provides “virtual/kernel” when more than one provider is found. In this case, the recipe that provides “virtual/kernel” is “linux-yocto”, which exists in the layer’s
recipes-kernel/linuxdirectory.PREFERRED_VERSION_linux-yocto: Defines the version of the recipe used to build the kernel, which is “6.18%” in this case.
KERNEL_IMAGETYPE: The type of kernel to build for the device. In this case, the OpenEmbedded build system creates a “zImage” image type.
KERNEL_DEVICETREE: The names of the generated Linux kernel device trees (i.e. the
*.dtb) files. All the device trees for the various BeagleBone devices are included.KERNEL_EXTRA_ARGS: Additional
makecommand-line arguments the OpenEmbedded build system passes on when compiling the kernel. In this example,LOADADDR=${UBOOT_ENTRYPOINT}is passed as a command-line argument.SPL_BINARY: Defines the Secondary Program Loader (SPL) binary type. In this case, the SPL binary is set to “MLO”, which stands for Multimedia card LOader.
The BeagleBone development board requires an SPL to boot and that SPL file type must be MLO. Consequently, the machine configuration needs to define SPL_BINARY as
MLO.Note
For more information on how the SPL variables are used, see the u-boot.inc include file.
UBOOT_*: Defines various U-Boot configurations needed to build a U-Boot image. In this example, a U-Boot image is required to boot the BeagleBone device. See the following variables for more information:
UBOOT_SUFFIX: Points to the generated U-Boot extension.
UBOOT_MACHINE: Specifies the value passed on the make command line when building a U-Boot image.
MACHINE_FEATURES: Specifies the list of hardware features the BeagleBone device is capable of supporting. In this case, the device supports “usbgadget usbhost vfat alsa”.
IMAGE_BOOT_FILES: Files installed into the device’s boot partition when preparing the image using the Wic tool with the
bootimg_partitionorbootimg_efisource plugin.
1.8.3 BSP Kernel Recipe Example
The kernel recipe used to build the kernel image for the BeagleBone device was established in the machine configuration:
PREFERRED_PROVIDER_virtual/kernel ?= "linux-yocto"
PREFERRED_VERSION_linux-yocto ?= "6.18%"
The meta-yocto-bsp/recipes-kernel/linux directory in the layer contains
metadata used to build the kernel. In this case, a kernel append file
(i.e. linux-yocto_6.18.bbappend) is used to override an established
kernel recipe (i.e. linux-yocto_6.18.bb), which is located in
https://git.openembedded.org/openembedded-core/tree/meta/recipes-kernel/linux.
The contents of the append file are:
COMPATIBLE_MACHINE:genericarm64 = "genericarm64"
COMPATIBLE_MACHINE:beaglebone-yocto = "beaglebone-yocto"
COMPATIBLE_MACHINE:genericx86 = "genericx86"
COMPATIBLE_MACHINE:genericx86-64 = "genericx86-64"
KMACHINE:beaglebone-yocto ?= "beaglebone"
KMACHINE:genericx86 ?= "common-pc"
KMACHINE:genericx86-64 ?= "common-pc-64"
KBRANCH:genericarm64 ?= "v6.18/standard/genericarm64"
SRCREV_machine:genericarm64 ?= "5cd75b0b5da06045acdd0c66e50656ab82cb880f"
This particular append file works for all the machines that are
part of the meta-yocto-bsp layer. The relevant statements are
appended with the “beaglebone-yocto” string. The OpenEmbedded build
system uses these statements to override similar statements in the
kernel recipe:
KBRANCH: Identifies the kernel branch that is validated, patched, and configured during the build.
KMACHINE: Identifies the machine name as known by the kernel, which is sometimes a different name than what is known by the OpenEmbedded build system.
SRCREV: Identifies the revision of the source code used to build the image.
COMPATIBLE_MACHINE: A regular expression that resolves to one or more target machines with which the recipe is compatible.
LINUX_VERSION: The Linux version from kernel.org used by the OpenEmbedded build system to build the kernel image.
Permission is granted to copy, distribute and/or modify this document under the terms of the Creative Commons Attribution-Share Alike 2.0 UK: England & Wales as published by Creative Commons.
To report any inaccuracies or problems with this (or any other Yocto Project)
manual, or to send additions or changes, please send email/patches to the Yocto
Project documentation mailing list at docs@lists.yoctoproject.org or
log into the Libera Chat #yocto channel.
Yocto Project Development Tasks Manual
1 The Yocto Project Development Tasks Manual
1.1 Welcome
Welcome to the Yocto Project Development Tasks Manual. This manual provides relevant procedures necessary for developing in the Yocto Project environment (i.e. developing embedded Linux images and user-space applications that run on targeted devices). This manual groups related procedures into higher-level sections. Procedures can consist of high-level steps or low-level steps depending on the topic.
This manual provides the following:
Procedures that help you get going with the Yocto Project; for example, procedures that show you how to set up a build host and work with the Yocto Project source repositories.
Procedures that show you how to submit changes to the Yocto Project. Changes can be improvements, new features, or bug fixes.
Procedures related to “everyday” tasks you perform while developing images and applications using the Yocto Project, such as creating a new layer, customizing an image, writing a new recipe, and so forth.
This manual does not provide the following:
Redundant step-by-step instructions: For example, the Yocto Project Application Development and the Extensible Software Development Kit (eSDK) manual contains detailed instructions on how to install an SDK, which is used to develop applications for target hardware.
Reference or conceptual material: This type of material resides in an appropriate reference manual. As an example, system variables are documented in the Yocto Project Reference Manual.
Detailed public information not specific to the Yocto Project: For example, exhaustive information on how to use the Git version control system is better covered with Internet searches and official Git documentation than through the Yocto Project documentation.
1.2 Other Information
Because this manual presents information for many different topics, supplemental information is recommended for full comprehension. For introductory information on the Yocto Project, see the Yocto Project Website. If you want to build an image with no knowledge of Yocto Project as a way of quickly testing it out, see the Yocto Project Quick Build document.
For a comprehensive list of links and other documentation, see the “Links and Related Documentation” section in the Yocto Project Reference Manual.
2 Setting Up to Use the Yocto Project
This chapter provides guidance on how to prepare to use the Yocto Project. You can learn about creating a team environment to develop using the Yocto Project, how to set up a build host, how to locate Yocto Project source repositories, and how to create local Git repositories.
2.1 Creating a Team Development Environment
It might not be immediately clear how you can use the Yocto Project in a team development environment, or how to scale it for a large team of developers. You can adapt the Yocto Project to many different use cases and scenarios; however, this flexibility could cause difficulties if you are trying to create a working setup that scales effectively.
To help you understand how to set up this type of environment, this section presents a procedure that gives you information that can help you get the results you want. The procedure is high-level and presents some of the project’s most successful experiences, practices, solutions, and available technologies that have proved to work well in the past; however, keep in mind, the procedure here is simply a starting point. You can build off these steps and customize the procedure to fit any particular working environment and set of practices.
Determine Who is Going to be Developing: You first need to understand who is going to be doing anything related to the Yocto Project and determine their roles. Making this determination is essential to completing subsequent steps, which are to get your equipment together and set up your development environment’s hardware topology.
Possible roles are:
Application Developer: This type of developer does application level work on top of an existing software stack.
Core System Developer: This type of developer works on the contents of the operating system image itself.
Build Engineer: This type of developer manages Autobuilders and releases. Depending on the specifics of the environment, not all situations might need a Build Engineer.
Test Engineer: This type of developer creates and manages automated tests that are used to ensure all application and core system development meets desired quality standards.
Gather the Hardware: Based on the size and make-up of the team, get the hardware together. Ideally, any development, build, or test engineer uses a system that runs a supported Linux distribution. These systems, in general, should be high performance (e.g. dual, six-core Xeons with 24 Gbytes of RAM and plenty of disk space). You can help ensure efficiency by having any machines used for testing or that run Autobuilders be as high performance as possible.
Note
Given sufficient processing power, you might also consider building Yocto Project development containers to be run under Docker, which is described later.
Understand the Hardware Topology of the Environment: Once you understand the hardware involved and the make-up of the team, you can understand the hardware topology of the development environment. You can get a visual idea of the machines and their roles across the development environment.
Use Git as Your Source Control Manager (SCM): Keeping your Metadata (i.e. recipes, configuration files, classes, and so forth) and any software you are developing under the control of an SCM system that is compatible with the OpenEmbedded build system is advisable. Of all of the SCMs supported by BitBake, the Yocto Project team strongly recommends using Git. Git is a distributed system that is easy to back up, allows you to work remotely, and then connects back to the infrastructure.
Note
For information about BitBake, see the BitBake User Manual.
It is relatively easy to set up Git services and create infrastructure like https://git.yoctoproject.org/, which is based on server software called Gitolite with cgit being used to generate the web interface that lets you view the repositories.
gitoliteidentifies users using SSH keys and allows branch-based access controls to repositories that you can control as little or as much as necessary.Set up the Application Development Machines: As mentioned earlier, application developers are creating applications on top of existing software stacks. Here are some best practices for setting up machines used for application development:
Use a pre-built toolchain that contains the software stack itself. Then, develop the application code on top of the stack. This method works well for small numbers of relatively isolated applications.
Keep your cross-development toolchains updated. You can do this through provisioning either as new toolchain downloads or as updates through a package update mechanism to provide updates to an existing toolchain. The exact mechanics of how and when to do this depend on local policy.
Use multiple toolchains installed locally into different locations to allow development across versions.
Set up the Core Development Machines: As mentioned earlier, core developers work on the contents of the operating system itself. Here are some best practices for setting up machines used for developing images:
Have the OpenEmbedded Build System available on the developer workstations so developers can run their own builds and directly rebuild the software stack.
Keep the core system unchanged as much as possible and do your work in layers on top of the core system. Doing so gives you a greater level of portability when upgrading to new versions of the core system or Board Support Packages (BSPs).
Share layers amongst the developers of a particular project and contain the policy configuration that defines the project.
Set up an Autobuilder: Autobuilders are often the core of the development environment. It is here that changes from individual developers are brought together and centrally tested. Based on this automated build and test environment, subsequent decisions about releases can be made. Autobuilders also allow for “continuous integration” style testing of software components and regression identification and tracking.
See “Yocto Project Autobuilder” for more information and links to buildbot. The Yocto Project team has found this implementation works well in this role. A public example of this is the Yocto Project Autobuilders, which the Yocto Project team uses to test the overall health of the project.
The features of this system are:
Highlights when commits break the build.
Populates an sstate cache from which developers can pull rather than requiring local builds.
Allows commit hook triggers, which trigger builds when commits are made.
Allows triggering of automated image booting and testing under the Quick EMUlator (QEMU).
Supports incremental build testing and from-scratch builds.
Shares output that allows developer testing and historical regression investigation.
Creates output that can be used for releases.
Allows scheduling of builds so that resources can be used efficiently.
Set up Test Machines: Use a small number of shared, high performance systems for testing purposes. Developers can use these systems for wider, more extensive testing while they continue to develop locally using their primary development system.
Document Policies and Change Flow: The Yocto Project uses a hierarchical structure and a pull model. There are scripts to create and send pull requests (i.e.
create-pull-requestandsend-pull-request). This model is in line with other open source projects where maintainers are responsible for specific areas of the project and a single maintainer handles the final “top-of-tree” merges.Note
You can also use a more collective push model. The
gitolitesoftware supports both the push and pull models quite easily.As with any development environment, it is important to document the policy used as well as any main project guidelines so they are understood by everyone. It is also a good idea to have well-structured commit messages, which are usually a part of a project’s guidelines. Good commit messages are essential when looking back in time and trying to understand why changes were made.
If you discover that changes are needed to the core layer of the project, it is worth sharing those with the community as soon as possible. Chances are if you have discovered the need for changes, someone else in the community needs them also.
Development Environment Summary: Aside from the previous steps, here are best practices within the Yocto Project development environment:
Use Git as the source control system.
Maintain your Metadata in layers that make sense for your situation. See the “The Yocto Project Layer Model” section in the Yocto Project Overview and Concepts Manual and the “Understanding and Creating Layers” section for more information on layers.
Separate the project’s Metadata and code by using separate Git repositories. See the “Yocto Project Source Repositories” section in the Yocto Project Overview and Concepts Manual for information on these repositories. See the “Setting Up the Poky Reference Distro Manually” section for information on how to set up local Git repositories for related upstream Yocto Project Git repositories.
Set up the directory for the shared state cache (SSTATE_DIR) where it makes sense. For example, set up the sstate cache on a system used by developers in the same organization and share the same source directories on their machines.
Set up a local Hash Equivalence server.
See the Hash Equivalence section of the Yocto Project Overview and Concepts Manual for more details on the hash equivalence feature.
See the Setting up a Hash Equivalence Server section of the Yocto Project Development Tasks Manual for details on how to set up a Hash Equivalence server.
Set up an Autobuilder and have it populate the sstate cache and source directories.
The Yocto Project community encourages you to send patches to the project to fix bugs or add features. If you do submit patches, follow the project commit guidelines for writing good commit messages. See the “Contributing Changes to a Component” section in the Yocto Project and OpenEmbedded Contributor Guide.
Send changes to the core sooner than later as others are likely to run into the same issues. For some guidance on mailing lists to use, see the lists in the “Finding a Suitable Mailing List” section. For a description of the available mailing lists, see the “Mailing lists” section in the Yocto Project Reference Manual.
2.2 Preparing the Build Host
This section provides procedures to set up a system to be used as your Build Host for development using the Yocto Project. Your build host can be a native Linux machine (recommended), it can be a machine (Linux, Mac, or Windows) that uses CROPS, which leverages Docker Containers or it can be a Windows machine capable of running version 2 of Windows Subsystem For Linux (WSL 2).
Note
The Yocto Project is not compatible with version 1 of Windows Subsystem for Linux. It is compatible but neither officially supported nor validated with WSL 2. If you still decide to use WSL please upgrade to WSL 2.
Once your build host is set up to use the Yocto Project, further steps are necessary depending on what you want to accomplish. See the following references for information on how to prepare for Board Support Package (BSP) development and kernel development:
BSP Development: See the “Preparing Your Build Host to Work With BSP Layers” section in the Yocto Project Board Support Package (BSP) Developer’s Guide.
Kernel Development: See the “Preparing the Build Host to Work on the Kernel” section in the Yocto Project Linux Kernel Development Manual.
2.2.1 Setting Up a Native Linux Host
Follow these steps to prepare a native Linux machine as your Yocto Project Build Host:
Use a Supported Linux Distribution: You should have a reasonably current Linux-based host system. You will have the best results with a recent release of Fedora, openSUSE, Debian, Ubuntu, RHEL or CentOS as these releases are frequently tested against the Yocto Project and officially supported. For a list of the distributions under validation and their status, see the “Supported Linux Distributions” section in the Yocto Project Reference Manual and the wiki page at Distribution Support.
Have Enough Free Memory: Your system should have at least 50 Gbytes of free disk space for building images.
Meet Minimal Version Requirements: The OpenEmbedded build system should be able to run on any modern distribution that has the following versions for Git, tar, Python, gcc and make.
Git 1.8.3.1 or greater
tar 1.28 or greater
Python 3.9.0 or greater.
gcc 10.1 or greater.
GNU make 4.0 or greater
If your build host does not satisfy all of these listed version requirements, you can take steps to prepare the system so that you can still use the Yocto Project. See the “Required Git, tar, Python, make and gcc Versions” section in the Yocto Project Reference Manual for information.
Install Development Host Packages: Required development host packages vary depending on your build host and what you want to do with the Yocto Project. Collectively, the number of required packages is large if you want to be able to cover all cases.
For lists of required packages for all scenarios, see the “Required Packages for the Build Host” section in the Yocto Project Reference Manual.
Once you have completed the previous steps, you are ready to continue using a given development path on your native Linux machine. If you are going to use BitBake, see the “Preparing the Poky Reference Distro” section. If you are going to use the Extensible SDK, see the “Using the Extensible SDK” Chapter in the Yocto Project Application Development and the Extensible Software Development Kit (eSDK) manual. If you want to work on the kernel, see the Yocto Project Linux Kernel Development Manual. If you are going to use Toaster, see the “Setting Up and Using Toaster” section in the Toaster User Manual. If you are a VSCode user, you can configure the Yocto Project BitBake extension accordingly.
2.2.2 Setting Up to Use CROss PlatformS (CROPS)
With CROPS, which leverages Docker Containers, you can create a Yocto Project development environment that is operating system agnostic. You can set up a container in which you can develop using the Yocto Project on a Windows, Mac, or Linux machine.
Follow these general steps to prepare a Windows, Mac, or Linux machine as your Yocto Project build host:
Determine What Your Build Host Needs: Docker is a software container platform that you need to install on the build host. Depending on your build host, you might have to install different software to support Docker containers. Go to the Docker installation page and read about the platform requirements in “Supported Platforms” your build host needs to run containers.
Choose What To Install: Depending on whether or not your build host meets system requirements, you need to install “Docker CE Stable” or the “Docker Toolbox”. Most situations call for Docker CE. However, if you have a build host that does not meet requirements (e.g. Pre-Windows 10 or Windows 10 “Home” version), you must install Docker Toolbox instead.
Go to the Install Site for Your Platform: Click the link for the Docker edition associated with your build host’s native software. For example, if your build host is running Microsoft Windows Version 10 and you want the Docker CE Stable edition, click that link under “Supported Platforms”.
Install the Software: Once you have understood all the pre-requisites, you can download and install the appropriate software. Follow the instructions for your specific machine and the type of the software you need to install:
Install Docker Desktop on Windows for Windows build hosts that meet requirements.
Install Docker Desktop on MacOs for Mac build hosts that meet requirements.
Install Docker Engine on CentOS for Linux build hosts running the CentOS distribution.
Install Docker Engine on Debian for Linux build hosts running the Debian distribution.
Install Docker Engine for Fedora for Linux build hosts running the Fedora distribution.
Install Docker Engine for Ubuntu for Linux build hosts running the Ubuntu distribution.
Optionally Orient Yourself With Docker: If you are unfamiliar with Docker and the container concept, you can learn more here - https://docs.docker.com/get-started/.
Launch Docker or Docker Toolbox: You should be able to launch Docker or the Docker Toolbox and have a terminal shell on your development host.
Set Up the Containers to Use the Yocto Project: Go to https://github.com/crops/docker-win-mac-docs/wiki and follow the directions for your particular build host (i.e. Linux, Mac, or Windows).
Once you complete the setup instructions for your machine, you have the Poky, Extensible SDK, and Toaster containers available. You can click those links from the page and learn more about using each of those containers.
Once you have a container set up, everything is in place to develop just as if you were running on a native Linux machine. If you are going to use the Poky container, see the “Preparing the Poky Reference Distro” section. If you are going to use the Extensible SDK container, see the “Using the Extensible SDK” Chapter in the Yocto Project Application Development and the Extensible Software Development Kit (eSDK) manual. If you are going to use the Toaster container, see the “Setting Up and Using Toaster” section in the Toaster User Manual. If you are a VSCode user, you can configure the Yocto Project BitBake extension accordingly.
2.2.3 Setting Up to Use Windows Subsystem For Linux (WSL 2)
With Windows Subsystem for Linux (WSL 2), you can create a Yocto Project development environment that allows you to build on Windows. You can set up a Linux distribution inside Windows in which you can develop using the Yocto Project.
Follow these general steps to prepare a Windows machine using WSL 2 as your Yocto Project build host:
Make sure your Windows machine is capable of running WSL 2:
While all Windows 11 and Windows Server 2022 builds support WSL 2, the first versions of Windows 10 and Windows Server 2019 didn’t. Check the minimum build numbers for Windows 10 and for Windows Server 2019.
To check which build version you are running, you may open a command prompt on Windows and execute the command “ver”:
C:\Users\myuser> ver Microsoft Windows [Version 10.0.19041.153]
Install the Linux distribution of your choice inside WSL 2: Once you know your version of Windows supports WSL 2, you can install the distribution of your choice from the Microsoft Store. Open the Microsoft Store and search for Linux. While there are several Linux distributions available, the assumption is that your pick will be one of the distributions supported by the Yocto Project as stated on the instructions for using a native Linux host. After making your selection, simply click “Get” to download and install the distribution.
Check which Linux distribution WSL 2 is using: Open a Windows PowerShell and run:
C:\WINDOWS\system32> wsl -l -v NAME STATE VERSION *Ubuntu Running 2
Note that WSL 2 supports running as many different Linux distributions as you want to install.
Optionally Get Familiar with WSL: You can learn more on https://docs.microsoft.com/en-us/windows/wsl/wsl2-about.
Launch your WSL Distibution: From the Windows start menu simply launch your WSL distribution just like any other application.
Optimize your WSL 2 storage often: Due to the way storage is handled on WSL 2, the storage space used by the underlying Linux distribution is not reflected immediately, and since BitBake heavily uses storage, after several builds, you may be unaware you are running out of space. As WSL 2 uses a VHDX file for storage, this issue can be easily avoided by regularly optimizing this file in a manual way:
Find the location of your VHDX file:
First you need to find the distro app package directory, to achieve this open a Windows Powershell as Administrator and run:
C:\WINDOWS\system32> Get-AppxPackage -Name "*Ubuntu*" | Select PackageFamilyName PackageFamilyName ----------------- CanonicalGroupLimited.UbuntuonWindows_79abcdefgh
You should now replace the PackageFamilyName and your user on the following path to find your VHDX file:
ls C:\Users\myuser\AppData\Local\Packages\CanonicalGroupLimited.UbuntuonWindows_79abcdefgh\LocalState\ Mode LastWriteTime Length Name -a---- 3/14/2020 9:52 PM 57418973184 ext4.vhdx
Your VHDX file path is:
C:\Users\myuser\AppData\Local\Packages\CanonicalGroupLimited.UbuntuonWindows_79abcdefgh\LocalState\ext4.vhdx
2a. Optimize your VHDX file using Windows Powershell:
To use the
optimize-vhdcmdlet below, first install the Hyper-V option on Windows. Then, open a Windows Powershell as Administrator to optimize your VHDX file, shutting down WSL first:C:\WINDOWS\system32> wsl --shutdown C:\WINDOWS\system32> optimize-vhd -Path C:\Users\myuser\AppData\Local\Packages\CanonicalGroupLimited.UbuntuonWindows_79abcdefgh\LocalState\ext4.vhdx -Mode full
A progress bar should be shown while optimizing the VHDX file, and storage should now be reflected correctly on the Windows Explorer.
2b. Optimize your VHDX file using DiskPart:
The
optimize-vhdcmdlet noted in step 2a above is provided by Hyper-V. Not all SKUs of Windows can install Hyper-V. As an alternative, use the DiskPart tool. To start, open a Windows command prompt as Administrator to optimize your VHDX file, shutting down WSL first:C:\WINDOWS\system32> wsl --shutdown C:\WINDOWS\system32> diskpart DISKPART> select vdisk file="<path_to_VHDX_file>" DISKPART> attach vdisk readonly DISKPART> compact vdisk DISKPART> detach DISKPART> exit
Note
The current implementation of WSL 2 does not have out-of-the-box
access to external devices such as those connected through a USB
port, but it automatically mounts your C: drive on /mnt/c/
(and others), which you can use to share deploy artifacts to be later
flashed on hardware through Windows, but your Build Directory
should not reside inside this mountpoint.
Once you have WSL 2 set up, everything is in place to develop just as if you were running on a native Linux machine. If you are going to use the Extensible SDK container, see the “Using the Extensible SDK” Chapter in the Yocto Project Application Development and the Extensible Software Development Kit (eSDK) manual. If you are going to use the Toaster container, see the “Setting Up and Using Toaster” section in the Toaster User Manual. If you are a VSCode user, you can configure the Yocto Project BitBake extension accordingly.
2.2.4 Preparing the Poky Reference Distro
Now that the Build Host has been prepared to build images, the next step can be to build the Poky reference distro. There are two ways of setting up the Poky reference distro:
Using the
bitbake-setupcommand-line utility from BitBake. Follow:Manually cloning the required repositories. Follow:
Note
The Poky distro is a reference distro. It can be used to try the Yocto Project but should not be used in a production environment. Instead, it is recommended to create your own distro, see the Creating Your Own Distribution section of the Yocto Project Development Tasks Manual.
2.2.5 Initializing the Build Environment
Initializing the build environment is a common task, as it needs to be done for each new instance of the shell where the Poky reference distro was set up:
If
bitbake-setupwas used to set up the Poky reference distro, you need to source theinit-build-envfile of the Setup directory that was created after the bitbake-setup init command execution:$ source <setup-dir>/build/init-build-env
If the Poky distro was set up using manual clones of the layers, you need to source the
oe-init-build-envscript present in the OpenEmbedded-Core (OE-Core) layer:$ source openembedded-core/oe-init-build-env
This will set up your current shell and change the current working directory to the Build Directory.
2.2.6 Where To Go From Here
Configure your build: follow User Configuration.
3 Understanding and Creating Layers
The OpenEmbedded build system supports organizing Metadata into multiple layers. Layers allow you to isolate different types of customizations from each other. For introductory information on the Yocto Project Layer Model, see the “The Yocto Project Layer Model” section in the Yocto Project Overview and Concepts Manual.
3.1 Creating Your Own Layer
Follow these general steps to create your layer without using tools:
Check Existing Layers: Before creating a new layer, you should be sure someone has not already created a layer containing the Metadata you need. You can see the OpenEmbedded Metadata Index for a list of layers from the OpenEmbedded community that can be used in the Yocto Project. You could find a layer that is identical or close to what you need.
Note
For information on BSP layers, see the “BSP Layers” section in the Yocto Project Board Specific (BSP) Developer’s Guide.
Create a new Layer: Create the directory for your layer. The
bitbake-layersscript with thecreate-layersubcommand simplifies creating a new general layer. Place it next to the other layers in your Source Directory.In its simplest form, you can use the following command to create a layer named “your_layer_name” in the current directory:
$ bitbake-layers create-layer your_layer_name
While not strictly required, prepend the name of the directory with the string “meta-”. For example:
meta-mylayer meta-GUI_xyz meta-mymachine
With rare exceptions, a layer’s name follows this form:
meta-root_name
Following this layer naming convention can save you trouble later when tools, components, or variables “assume” your layer name begins with “meta-”. A notable example is in configuration files as shown in the following step where layer names without the “meta-” string are appended to several variables used in the configuration.
As an example, the following command creates a layer named
meta-scottrifin your home directory:$ bitbake-layers create-layer meta-scottrif NOTE: Starting bitbake server... Add your new layer with 'bitbake-layers add-layer meta-scottrif'
In order to use a layer with the OpenEmbedded Build System, you need to add the layer to your
bblayers.confconfiguration file, as hinted by the previous command. See the “Adding a Layer Using the bitbake-layers Script” section for more information.By default, the
bitbake-layers create-layercommand creates a layer with the following:A
conf/layer.confconfiguration file with default definitions.Here is an explanation of the typical content of the layer configuration file:
BBPATH: Adds the layer’s root directory to BitBake’s search path. Through the use of the BBPATH variable, BitBake locates class files (
.bbclass), configuration files, and files that are included withincludeandrequirestatements. For these cases, BitBake uses the first file that matches the name found in BBPATH. This is similar to the way thePATHvariable is used for binaries. It is recommended, therefore, that you use unique class and configuration filenames in your custom layer.See the Locating Include Files section of the BitBake User Manual for more details on how files are included with BitBake.
BBFILES: Defines the location for all recipes in the layer.
BBFILE_COLLECTIONS: Establishes the current layer through a unique identifier that is used throughout the OpenEmbedded Build System to refer to the layer. In this example, the identifier “yoctobsp” is the representation for the container layer named “meta-yocto-bsp”.
This name is used by other layers when specifying the layer dependencies via the LAYERDEPENDS variable.
BBFILE_PATTERN: Expands immediately during parsing to provide the directory of the layer.
BBFILE_PRIORITY: Establishes a priority to use for recipes in the layer when the OpenEmbedded Build System finds recipes of the same name in different layers.
LAYERVERSION: Establishes a version number for the layer. You can use this version number to specify this exact version of the layer as a dependency when using the LAYERDEPENDS variable.
LAYERDEPENDS: Lists all layers on which this layer depends (if any). It uses the layer names specified by the BBFILE_COLLECTIONS variable.
LAYERSERIES_COMPAT: Lists the Yocto Project release codenames (in lowercase) this layer is compatible with. For example: “wrynose”.
This variable is a good way to indicate if a particular layer is current.
A
recipes-examplesubdirectory that itself contains a subdirectory namedexample, which contains anexample.bbrecipe file.A
COPYING.MIT, which is the license statement for the layer. The script assumes you want to use the MIT license, which is typical for most layers, for the contents of the layer itself.A
READMEfile, which is a file describing the contents of your new layer.
If you want to set the priority of the layer to other than the default value of “6”, you can either use the
--priorityoption or you can edit the BBFILE_PRIORITY value in theconf/layer.confafter the script creates it. Furthermore, if you want to give the example recipe file some name other than the default, you can use the--example-recipe-nameoption.The easiest way to see how the
bitbake-layers create-layercommand works is to experiment with the script. You can also read the usage information by runningbitbake-layers create-layer --help.Add Content: Depending on the type of layer, add the content. If the layer adds support for a machine, add the machine configuration in a
conf/machine/file within the layer. If the layer adds distro policy, add the distro configuration in aconf/distro/file within the layer. If the layer introduces new recipes, put the recipes you need inrecipes-*subdirectories within the layer.Note
For an explanation of layer hierarchy that is compliant with the Yocto Project, see the “Example Filesystem Layout” section in the Yocto Project Board Support Package (BSP) Developer’s Guide.
Optionally Test for Compatibility: If you want permission to use the Yocto Project Compatibility logo with your layer or application that uses your layer, perform the steps to apply for compatibility. See the “Making Sure Your Layer is Compatible With Yocto Project” section for more information.
3.2 Following Best Practices When Creating Layers
To create layers that are easier to maintain and that will not impact builds for other machines, you should consider the information in the following list:
Avoid “Overlaying” Entire Recipes from Other Layers in Your Configuration: In other words, do not copy an entire recipe into your layer and then modify it. Rather, use an append file (
.bbappend) to override only those parts of the original recipe you need to modify.Avoid Duplicating Include Files: Use append files (
.bbappend) for each recipe that uses an include file. Or, if you are introducing a new recipe that requires the included file, use the path relative to the original layer directory to refer to the file. For example, userequire recipes-core/package/file.incinstead ofrequirefile.inc. If you’re finding you have to overlay the include file, it could indicate a deficiency in the include file in the layer to which it originally belongs. If this is the case, you should try to address that deficiency instead of overlaying the include file. For example, you could address this by getting the maintainer of the include file to add a variable or variables to make it easy to override the parts needing to be overridden.Structure Your Layers: Proper use of overrides within append files and placement of machine-specific files within your layer can ensure that a build is not using the wrong Metadata and negatively impacting a build for a different machine. Here are some examples:
Modify Variables to Support a Different Machine: Suppose you have a layer named
meta-onethat adds support for building machine “one”. To do so, you use an append file namedbase-files.bbappendand create a dependency on “foo” by altering the DEPENDS variable:DEPENDS = "foo"
The dependency is created during any build that includes the layer
meta-one. However, you might not want this dependency for all machines. For example, suppose you are building for machine “two” but yourbblayers.conffile has themeta-onelayer included. During the build, thebase-filesfor machine “two” will also have the dependency onfoo.To make sure your changes apply only when building machine “one”, use a machine override with the DEPENDS statement:
DEPENDS:one = "foo"
You should follow the same strategy when using
:appendand:prependoperations:DEPENDS:append:one = " foo" DEPENDS:prepend:one = "foo "
As an actual example, here’s a snippet from the generic kernel include file
linux-yocto.inc, wherein the kernel compile and link options are adjusted in the case of a subset of the supported architectures:DEPENDS:append:aarch64 = " libgcc" KERNEL_CC:append:aarch64 = " ${TOOLCHAIN_OPTIONS}" KERNEL_LD:append:aarch64 = " ${TOOLCHAIN_OPTIONS}" DEPENDS:append:nios2 = " libgcc" KERNEL_CC:append:nios2 = " ${TOOLCHAIN_OPTIONS}" KERNEL_LD:append:nios2 = " ${TOOLCHAIN_OPTIONS}" DEPENDS:append:arc = " libgcc" KERNEL_CC:append:arc = " ${TOOLCHAIN_OPTIONS}" KERNEL_LD:append:arc = " ${TOOLCHAIN_OPTIONS}" KERNEL_FEATURES:append:qemuall=" features/debug/printk.scc"
Place Machine-Specific Files in Machine-Specific Locations: When you have a base recipe, such as
base-files.bb, that contains a SRC_URI statement to a file, you can use an append file to cause the build to use your own version of the file. For example, an append file in your layer atmeta-one/recipes-core/base-files/base-files.bbappendcould extend FILESPATH using FILESEXTRAPATHS as follows:FILESEXTRAPATHS:prepend := "${THISDIR}/${BPN}:"
The build for machine “one” will pick up your machine-specific file as long as you have the file in
meta-one/recipes-core/base-files/base-files/. However, if you are building for a different machine and thebblayers.conffile includes themeta-onelayer and the location of your machine-specific file is the first location where that file is found according to FILESPATH, builds for all machines will also use that machine-specific file.You can make sure that a machine-specific file is used for a particular machine by putting the file in a subdirectory specific to the machine. For example, rather than placing the file in
meta-one/recipes-core/base-files/base-files/as shown above, put it inmeta-one/recipes-core/base-files/base-files/one/. Not only does this make sure the file is used only when building for machine “one”, but the build process locates the file more quickly.In summary, you need to place all files referenced from SRC_URI in a machine-specific subdirectory within the layer in order to restrict those files to machine-specific builds.
Perform Steps to Apply for Yocto Project Compatibility: If you want permission to use the Yocto Project Compatibility logo with your layer or application that uses your layer, perform the steps to apply for compatibility. See the “Making Sure Your Layer is Compatible With Yocto Project” section for more information.
Follow the Layer Naming Convention: Store custom layers in a Git repository that use the
meta-layer_nameformat.Group Your Layers Locally: Clone your repository alongside other layers in your Source Directory.
3.3 Making Sure Your Layer is Compatible With Yocto Project
When you create a layer used with the Yocto Project, it is advantageous to make sure that the layer interacts well with existing Yocto Project layers (i.e. the layer is compatible with the Yocto Project). Ensuring compatibility makes the layer easy to be consumed by others in the Yocto Project community and could allow you permission to use the Yocto Project Compatible Logo.
Note
Only Yocto Project member organizations are permitted to use the Yocto Project Compatible Logo. The logo is not available for general use. For information on how to become a Yocto Project member organization, see the Yocto Project Website.
The Yocto Project Compatibility Program consists of a layer application process that requests permission to use the Yocto Project Compatibility Logo for your layer and application. The process consists of two parts:
Successfully passing a script (
yocto-check-layer) that, when run against your layer, tests it against constraints based on experiences of how layers have worked in the real world and where pitfalls have been found. Getting a “PASS” result from the script is required for successful compatibility registration.Completion of an application acceptance form, which you can find at https://www.yoctoproject.org/compatible-registration/.
To be granted permission to use the logo, you need to satisfy the following:
Be able to check the box indicating that you got a “PASS” when running the script against your layer.
Answer “Yes” to the questions on the form or have an acceptable explanation for any questions answered “No”.
Be a Yocto Project Member Organization.
The remainder of this section presents information on the registration
form and on the yocto-check-layer script.
3.3.1 Yocto Project Compatible Program Application
Use the form to apply for your layer’s approval. Upon successful application, you can use the Yocto Project Compatibility Logo with your layer and the application that uses your layer.
To access the form, use this link: https://www.yoctoproject.org/compatible-registration. Follow the instructions on the form to complete your application.
The application consists of the following sections:
Contact Information: Provide your contact information as the fields require. Along with your information, provide the released versions of the Yocto Project for which your layer is compatible.
Acceptance Criteria: Provide “Yes” or “No” answers for each of the items in the checklist. There is space at the bottom of the form for any explanations for items for which you answered “No”.
Recommendations: Provide answers for the questions regarding Linux kernel use and build success.
3.3.2 yocto-check-layer Script
The yocto-check-layer script provides you a way to assess how
compatible your layer is with the Yocto Project. You should run this
script prior to using the form to apply for compatibility as described
in the previous section. You need to achieve a “PASS” result in order to
have your application form successfully processed.
The script divides tests into three areas: COMMON, BSP, and DISTRO. For example, given a distribution layer (DISTRO), the layer must pass both the COMMON and DISTRO related tests. Furthermore, if your layer is a BSP layer, the layer must pass the COMMON and BSP set of tests.
To execute the script, enter the following commands from your build directory:
$ source oe-init-build-env
$ yocto-check-layer your_layer_directory
Be sure to provide the actual directory for your layer as part of the command.
You should pass the dependencies of your layer using the --dependency
argument:
$ source oe-init-build-env
$ yocto-check-layer --dependency <layer1_directory> <layer2_directory> ... -- your_layer_directory
For BSP layers, the --machines
argument should be passed as part of the command:
$ source oe-init-build-env
$ yocto-check-layer --machines <machine1> <machine2> ... -- your_layer_directory
These machines are the ones present in your BSP layer, in the conf/machine/
directory.
Entering the command causes the script to determine the type of layer and then to execute a set of specific tests against the layer.
The following list overviews the test:
common.test_readme: Tests if aREADMEfile exists in the layer and the file is not empty.common.test_security: Tests that the layer has aSECURITY.md(or similar) file, either in the layer itself or at the top of the containing git repository.common.test_parse: Tests to make sure that BitBake can parse the files without error (i.e.bitbake -p).common.test_show_environment: Tests that the global or per-recipe environment is in order without errors (i.e.bitbake -e).common.test_world: Verifies thatbitbake worldworks.common.test_world_inherit_class: Verifies thatbitbake worldworks when the yocto-check-layer class is inherited.common.test_patches_upstream_status: Verifies that all the patch files included in the layer contain a Patch Upstream Status.common.test_signatures: Tests to be sure that BSP and DISTRO layers do not come with recipes that change signatures.common.test_layerseries_compat: Verifies layer compatibility is set properly.bsp.test_bsp_defines_machines: Tests if a BSP layer has machine configurations.bsp.test_bsp_no_set_machine: Tests to ensure a BSP layer does not set the machine when the layer is added.bsp.test_machine_world: Verifies thatbitbake worldworks regardless of which machine is selected.bsp.test_machine_signatures: Verifies that building for a particular machine affects only the signature of tasks specific to that machine.distro.test_distro_defines_distros: Tests if a DISTRO layer has distro configurations.distro.test_distro_no_set_distros: Tests to ensure a DISTRO layer does not set the distribution when the layer is added.
For a complete list of tests, see the scripts/lib/checklayer/cases directory in OpenEmbedded-Core (OE-Core).
3.4 Enabling Your Layer
Before the OpenEmbedded build system can use your new layer, you need to
enable it. To enable your layer, simply add your layer’s path to the
BBLAYERS variable in your conf/bblayers.conf file, which is
found in the Build Directory. The following example shows how to
enable your new meta-mylayer layer (note how your new layer exists
outside of the official poky repository which you would have checked
out earlier):
# POKY_BBLAYERS_CONF_VERSION is increased each time build/conf/bblayers.conf
# changes incompatibly
POKY_BBLAYERS_CONF_VERSION = "2"
BBPATH = "${TOPDIR}"
BBFILES ?= ""
BBLAYERS ?= " \
/home/user/poky/meta \
/home/user/poky/meta-poky \
/home/user/poky/meta-yocto-bsp \
/home/user/mystuff/meta-mylayer \
"
BitBake parses each conf/layer.conf file from the top down as
specified in the BBLAYERS variable within the conf/bblayers.conf
file. During the processing of each conf/layer.conf file, BitBake
adds the recipes, classes and configurations contained within the
particular layer to the source directory.
3.5 Appending Other Layers Metadata With Your Layer
A recipe that appends Metadata to another recipe is called a BitBake
append file. A BitBake append file uses the .bbappend file type
suffix, while the corresponding recipe to which Metadata is being
appended uses the .bb file type suffix.
You can use a .bbappend file in your layer to make additions or
changes to the content of another layer’s recipe without having to copy
the other layer’s recipe into your layer. Your .bbappend file
resides in your layer, while the main .bb recipe file to which you
are appending Metadata resides in a different layer.
Being able to append information to an existing recipe not only avoids duplication, but also automatically applies recipe changes from a different layer into your layer. If you were copying recipes, you would have to manually merge changes as they occur.
When you create an append file, you must use the same root name as the
corresponding recipe file. For example, the append file
someapp_3.1.bbappend must apply to someapp_3.1.bb. This
means the original recipe and append filenames are version
number-specific. If the corresponding recipe is renamed to update to a
newer version, you must also rename and possibly update the
corresponding .bbappend as well.
During the build process, BitBake displays an error on startup if it detects a
.bbappend file that does not have a corresponding recipe with a matching
name. To handle these errors, the best practice is to rename the .bbappend
to match the original recipe version. This also gives you the opportunity to see
if the .bbappend is still relevant for the new version of the recipe.
Another method is to use the character % in the .bbappend filename. For
example, to append information to every 6.* minor versions of the recipe
someapp, the someapp_6.%.bbappend file can be created. This way, an
error will only be triggered if the someapp recipe has a major version
update.
Finally, another method to deal with these errors is to use the variable
BBMASK, especially in cases where modifying the .bbappend is not
possible.
3.5.1 Overlaying a File Using Your Layer
As an example, consider the main formfactor recipe and a corresponding
formfactor append file both from OpenEmbedded-Core (OE-Core).
Here is the main
formfactor recipe, which is named formfactor_0.0.bb and located in
the “meta” layer at meta/recipes-bsp/formfactor:
SUMMARY = "Device formfactor information"
DESCRIPTION = "A formfactor configuration file provides information about the \
target hardware for which the image is being built and information that the \
build system cannot obtain from other sources such as the kernel."
SECTION = "base"
LICENSE = "MIT"
LIC_FILES_CHKSUM = "file://${COREBASE}/meta/COPYING.MIT;md5=3da9cfbcb788c80a0384361b4de20420"
SRC_URI = "file://config file://machconfig"
S = "${UNPACKDIR}"
PACKAGE_ARCH = "${MACHINE_ARCH}"
INHIBIT_DEFAULT_DEPS = "1"
do_install() {
# Install file only if it has contents
install -d ${D}${sysconfdir}/formfactor/
install -m 0644 ${S}/config ${D}${sysconfdir}/formfactor/
if [ -s "${S}/machconfig" ]; then
install -m 0644 ${S}/machconfig ${D}${sysconfdir}/formfactor/
fi
}
In the main recipe, note the SRC_URI variable, which tells the OpenEmbedded build system where to find files during the build.
Here is the append file, which is named formfactor_0.0.bbappend
and is from the Raspberry Pi BSP Layer named meta-raspberrypi. The
file is in the layer at recipes-bsp/formfactor:
FILESEXTRAPATHS:prepend := "${THISDIR}/${PN}:"
By default, the build system uses the
FILESPATH variable to
locate files. This append file extends the locations by setting the
FILESEXTRAPATHS
variable. Setting this variable in the .bbappend file is the most
reliable and recommended method for adding directories to the search
path used by the build system to find files.
The statement in this example extends the directories to include
${THISDIR}/${PN},
which resolves to a directory named formfactor in the same directory
in which the append file resides (i.e.
meta-raspberrypi/recipes-bsp/formfactor. This implies that you must
have the supporting directory structure set up that will contain any
files or patches you will be including from the layer.
Using the immediate expansion assignment operator := is important
because of the reference to THISDIR. The trailing colon character is
important as it ensures that items in the list remain colon-separated.
Note
BitBake automatically defines the THISDIR variable. You should never set this variable yourself. Using “:prepend” as part of the FILESEXTRAPATHS ensures your path will be searched prior to other paths in the final list.
Also, not all append files add extra files. Many append files simply
allow to add build options (e.g. systemd). For these cases, your
append file would not even use the FILESEXTRAPATHS statement.
The end result of this .bbappend file is that on a Raspberry Pi, where
rpi will exist in the list of OVERRIDES, the file
meta-raspberrypi/recipes-bsp/formfactor/formfactor/rpi/machconfig will be
used during do_fetch and the test for a non-zero file size in
do_install will return true, and the file will be installed.
3.5.2 Installing Additional Files Using Your Layer
As another example, consider the main xserver-xf86-config recipe and a
corresponding xserver-xf86-config append file both from
OpenEmbedded-Core (OE-Core). Here is the main xserver-xf86-config recipe, which is named
xserver-xf86-config_0.1.bb and located in the “meta” layer at
meta/recipes-graphics/xorg-xserver:
SUMMARY = "X.Org X server configuration file"
HOMEPAGE = "http://www.x.org"
SECTION = "x11/base"
LICENSE = "MIT"
LIC_FILES_CHKSUM = "file://${COREBASE}/meta/COPYING.MIT;md5=3da9cfbcb788c80a0384361b4de20420"
SRC_URI = "file://xorg.conf"
S = "${UNPACKDIR}"
CONFFILES:${PN} = "${sysconfdir}/X11/xorg.conf"
PACKAGE_ARCH = "${MACHINE_ARCH}"
ALLOW_EMPTY:${PN} = "1"
do_install () {
if test -s ${UNPACKDIR}/xorg.conf; then
install -d ${D}/${sysconfdir}/X11
install -m 0644 ${UNPACKDIR}/xorg.conf ${D}/${sysconfdir}/X11/
fi
}
Here is the append file, which is named xserver-xf86-config_%.bbappend
and is from the Raspberry Pi BSP Layer named meta-raspberrypi. The
file is in the layer at recipes-graphics/xorg-xserver:
FILESEXTRAPATHS:prepend := "${THISDIR}/${PN}:"
SRC_URI:append:rpi = " \
file://xorg.conf.d/98-pitft.conf \
file://xorg.conf.d/99-calibration.conf \
"
do_install:append:rpi () {
PITFT = "${@bb.utils.contains("MACHINE_FEATURES", "pitft", "1", "0", d)}"
if [ "${PITFT}" = "1" ]; then
install -d ${D}/${sysconfdir}/X11/xorg.conf.d/
install -m 0644 ${UNPACKDIR}/xorg.conf.d/98-pitft.conf ${D}/${sysconfdir}/X11/xorg.conf.d/
install -m 0644 ${UNPACKDIR}/xorg.conf.d/99-calibration.conf ${D}/${sysconfdir}/X11/xorg.conf.d/
fi
}
FILES:${PN}:append:rpi = " ${sysconfdir}/X11/xorg.conf.d/*"
Building off of the previous example, we once again are setting the
FILESEXTRAPATHS variable. In this case we are also using
SRC_URI to list additional source files to use when rpi is found in
the list of OVERRIDES. The do_install task will then perform a
check for an additional MACHINE_FEATURES that if set will cause these
additional files to be installed. These additional files are listed in
FILES so that they will be packaged.
3.6 Prioritizing Your Layer
Each layer is assigned a priority value. Priority values control which
layer takes precedence if there are recipe files with the same name in
multiple layers. For these cases, the recipe file from the layer with a
higher priority number takes precedence. Priority values also affect the
order in which multiple .bbappend files for the same recipe are
applied. You can either specify the priority manually, or allow the
build system to calculate it based on the layer’s dependencies.
To specify the layer’s priority manually, use the BBFILE_PRIORITY variable and append the layer’s root name:
BBFILE_PRIORITY_mylayer = "1"
Note
It is possible for a recipe with a lower version number PV in a layer that has a higher priority to take precedence.
Also, the layer priority does not currently affect the precedence
order of .conf or .bbclass files. Future versions of BitBake
might address this.
3.6.1 Providing Global-level Configurations With Your Layer
When creating a layer, you may need to define configurations that should take
effect globally in your build environment when the layer is part of the build.
The layer.conf file is a configuration file that affects the build
system globally, so it is a candidate for this use-case.
Warning
Providing unconditional global level configuration from the layer.conf
file is not a good practice, and should be avoided. For this reason, the
section Conditionally Provide Global-level Configurations With Your Layer below shows how the layer.conf
file can be used to provide configurations only if a certain condition is
met.
For example, if your layer provides a Linux kernel recipe named
linux-custom, you may want to make PREFERRED_PROVIDER_virtual/kernel point to linux-custom:
PREFERRED_PROVIDER_virtual/kernel = "linux-custom"
This can be defined in the layer.conf file. If your layer is at the last
position in the BBLAYERS list, it will take precedence over previous
PREFERRED_PROVIDER_virtual/kernel assignments (unless one is set from a
configuration file that is parsed later, such as machine or distro
configuration files).
3.6.1.1 Conditionally Provide Global-level Configurations With Your Layer
In some cases, your layer may provide global configurations only if some
features it provides are enabled. Since the layer.conf file is parsed at an
earlier stage in the parsing process, the DISTRO_FEATURES and
MACHINE_FEATURES variables are not yet available to layer.conf, and
declaring conditional assignments based on these variables is not possible. The
following technique shows a way to bypass this limitation by using the
USER_CLASSES variable and a conditional require command.
In the following steps, let’s assume our layer is named meta-mylayer and
that this layer defines a custom distro feature
named mylayer-kernel. We will set the PREFERRED_PROVIDER variable
for the kernel only if our feature mylayer-kernel is part of the
DISTRO_FEATURES:
Create an include file in the directory
meta-mylayer/conf/distro/include/, for example a file namedmylayer-kernel-provider.incthat sets the kernel provider tolinux-custom:PREFERRED_PROVIDER_virtual/kernel = "linux-custom"
Provide a path to this include file in your
layer.conf:META_MYLAYER_KERNEL_PROVIDER_PATH = "${LAYERDIR}/conf/distro/include/mylayer-kernel-provider.inc"
Create a new class in
meta-mylayer/classes-global/, for example a classmeta-mylayer-cfg.bbclass. Make it conditionally require the filemylayer-kernel-provider.incdefined above, using the variableMETA_MYLAYER_KERNEL_PROVIDER_PATHdefined inlayer.conf:require ${@bb.utils.contains('DISTRO_FEATURES', 'mylayer-kernel', '${META_MYLAYER_KERNEL_PROVIDER_PATH}', '', d)}For details on the
bb.utils.containsfunction, see its definition in lib/bb/utils.py.Note
The
requirecommand is designed to not fail if the functionbb.utils.containsreturns an empty string.Back to your
layer.conffile, add the classmeta-mylayer-cfgclass to the USER_CLASSES variable:USER_CLASSES:append = " meta-mylayer-cfg"
This will add the class
meta-mylayer-cfgto the list of classes to globally inherit. Since therequirecommand is conditional inmeta-mylayer-cfg.bbclass, even though inherited the class will have no effect unless the featuremylayer-kernelis enabled through DISTRO_FEATURES.
This technique can also be used for Machine features by following the same steps. Though not mandatory, it is
recommended to put include files for DISTRO_FEATURES in your layer’s
conf/distro/include and the ones for MACHINE_FEATURES in your
layer’s conf/machine/include.
3.7 Managing Layers
You can use the BitBake layer management tool bitbake-layers to
provide a view into the structure of recipes across a multi-layer
project. Being able to generate output that reports on configured layers
with their paths and priorities and on .bbappend files and their
applicable recipes can help to reveal potential problems.
For help on the BitBake layer management tool, use the following command:
$ bitbake-layers --help
The following list describes the available commands:
help:Displays general help or help on a specified command.show-layers:Shows the current configured layers.show-overlayed:Lists overlayed recipes. A recipe is overlayed when a recipe with the same name exists in another layer that has a higher layer priority.show-recipes:Lists available recipes and the layers that provide them.show-appends:Lists.bbappendfiles and the recipe files to which they apply.show-cross-depends:Lists dependency relationships between recipes that cross layer boundaries.add-layer:Adds a layer tobblayers.conf.remove-layer:Removes a layer frombblayers.confflatten:Flattens the layer configuration into a separate output directory. Flattening your layer configuration builds a “flattened” directory that contains the contents of all layers, with any overlayed recipes removed and any.bbappendfiles appended to the corresponding recipes. You might have to perform some manual cleanup of the flattened layer as follows:Non-recipe files (such as patches) are overwritten. The flatten command shows a warning for these files.
Anything beyond the normal layer setup has been added to the
layer.conffile. Only the lowest priority layer’slayer.confis used.Overridden and appended items from
.bbappendfiles need to be cleaned up. The contents of each.bbappendend up in the flattened recipe. However, if there are appended or changed variable values, you need to tidy these up yourself. Consider the following example. Here, thebitbake-layerscommand adds the line#### bbappended ...so that you know where the following lines originate:... DESCRIPTION = "A useful utility" ... EXTRA_OECONF = "--enable-something" ... #### bbappended from meta-anotherlayer #### DESCRIPTION = "Customized utility" EXTRA_OECONF += "--enable-somethingelse"
Ideally, you would tidy up these utilities as follows:
... DESCRIPTION = "Customized utility" ... EXTRA_OECONF = "--enable-something --enable-somethingelse" ...
layerindex-fetch: Fetches a layer from a layer index, along with its dependent layers, and adds the layers to theconf/bblayers.conffile.layerindex-show-depends: Finds layer dependencies from the layer index.save-build-conf: Saves the currently active build configuration (conf/local.conf,conf/bblayers.conf) as a template into a layer. This template can later be used for setting up builds via TEMPLATECONF. For information about saving and using configuration templates, see “Creating a Custom Template Configuration Directory”.create-layer: Creates a basic layer.create-layers-setup: Writes out a configuration file and/or a script that can replicate the directory structure and revisions of the layers in a current build. For more information, see “Saving and restoring the layers setup”.show-machines: Lists the machines available in the currently configured layers.
3.8 Adding a Layer Using the bitbake-layers Script
Once you create your general layer, you must add it to your
bblayers.conf file. Adding the layer to this configuration file
makes the OpenEmbedded build system aware of your layer so that it can
search it for metadata.
Add your layer by using the bitbake-layers add-layer command:
$ bitbake-layers add-layer your_layer_name
Here is an example that adds a
layer named meta-scottrif to the configuration file. Following the
command that adds the layer is another bitbake-layers command that
shows the layers that are in your bblayers.conf file:
$ bitbake-layers add-layer meta-scottrif
NOTE: Starting bitbake server...
Parsing recipes: 100% |##########################################################| Time: 0:00:49
Parsing of 1441 .bb files complete (0 cached, 1441 parsed). 2055 targets, 56 skipped, 0 masked, 0 errors.
$ bitbake-layers show-layers
NOTE: Starting bitbake server...
layer path priority
==============================================================================================
meta /home/scottrif/bitbake-builds/layers/openembedded-core/meta 5
meta-poky /home/scottrif/bitbake-builds/layers/meta-yocto/meta-poky 5
meta-yocto-bsp /home/scottrif/bitbake-builds/layers/meta-yocto/meta-yocto-bsp 5
workspace /home/scottrif/bitbake-builds/build/workspace 99
meta-scottrif /home/scottrif/bitbake-builds/build/meta-scottrif 6
Adding the layer to this file enables the build system to locate the layer during the build.
Note
During a build, the OpenEmbedded build system looks in the layers from the top of the list down to the bottom in that order.
3.9 Saving and restoring the layers setup
Once you have a working build with the correct set of layers, it is beneficial to capture the layer setup — what they are, which repositories they come from and which SCM revisions they’re at — into a configuration file, so that this setup can be easily replicated later, perhaps on a different machine. Here’s how to do this:
$ bitbake-layers create-layers-setup /srv/work/alex/meta-alex/
NOTE: Starting bitbake server...
NOTE: Created /srv/work/alex/meta-alex/setup-layers.json
NOTE: Created /srv/work/alex/meta-alex/setup-layers
The tool needs a single argument which tells where to place the output, consisting
of a json formatted layer configuration, and a setup-layers script that can use that configuration
to restore the layers in a different location, or on a different host machine. The argument
can point to a custom layer (which is then deemed a “bootstrap” layer that needs to be
checked out first), or into a completely independent location.
The replication of the layers is performed by running the setup-layers script provided
above:
Clone the bootstrap layer or some other repository to obtain the json config and the setup script that can use it.
Run the script directly with no options:
alex@Zen2:/srv/work/alex/my-build$ meta-alex/setup-layers Note: not checking out source meta-alex, use --force-bootstraplayer-checkout to override. Setting up source meta-intel, revision 15.0-hardknott-3.3-310-g0a96edae, branch master Running 'git init -q /srv/work/alex/my-build/meta-intel' Running 'git remote remove origin > /dev/null 2>&1; git remote add origin git://git.yoctoproject.org/meta-intel' in /srv/work/alex/my-build/meta-intel Running 'git fetch -q origin || true' in /srv/work/alex/my-build/meta-intel Running 'git checkout -q 0a96edae609a3f48befac36af82cf1eed6786b4a' in /srv/work/alex/my-build/meta-intel Setting up source poky, revision 4.1_M1-372-g55483d28f2, branch akanavin/setup-layers Running 'git init -q /srv/work/alex/my-build/poky' Running 'git remote remove origin > /dev/null 2>&1; git remote add origin git://git.yoctoproject.org/poky' in /srv/work/alex/my-build/poky Running 'git fetch -q origin || true' in /srv/work/alex/my-build/poky Running 'git remote remove poky-contrib > /dev/null 2>&1; git remote add poky-contrib ssh://git@push.yoctoproject.org/poky-contrib' in /srv/work/alex/my-build/poky Running 'git fetch -q poky-contrib || true' in /srv/work/alex/my-build/poky Running 'git checkout -q 11db0390b02acac1324e0f827beb0e2e3d0d1d63' in /srv/work/alex/my-build/poky
Note
This will work to update an existing checkout as well.
Note
The script is self-sufficient and requires only python3 and git on the build machine.
Note
Both the create-layers-setup and the setup-layers provided several additional options
that customize their behavior - you are welcome to study them via --help command line parameter.
4 Customizing Images
You can customize images to satisfy particular requirements. This section describes several methods and provides guidelines for each.
4.1 Customizing Images Using local.conf
Probably the easiest way to customize an image is to add a package by
way of the local.conf configuration file. Because it is limited to
local use, this method generally only allows you to add packages and is
not as flexible as creating your own customized image. When you add
packages using local variables this way, you need to realize that these
variable changes are in effect for every build and consequently affect
all images, which might not be what you require.
To add a package to your image using the local configuration file, use
the IMAGE_INSTALL variable with the :append operator:
IMAGE_INSTALL:append = " strace"
Use of the syntax is important; specifically, the leading space
after the opening quote and before the package name, which is
strace in this example. This space is required since the :append
operator does not add the space.
Furthermore, you must use :append instead of the += operator if
you want to avoid ordering issues. The reason for this is because doing
so unconditionally appends to the variable and avoids ordering problems
due to the variable being set in image recipes and .bbclass files
with operators like ?=. Using :append ensures the operation
takes effect.
As shown in its simplest use, IMAGE_INSTALL:append affects all
images. It is possible to extend the syntax so that the variable applies
to a specific image only. Here is an example:
IMAGE_INSTALL:append:pn-core-image-minimal = " strace"
This example adds strace to the core-image-minimal image only.
You can add packages using a similar approach through the
CORE_IMAGE_EXTRA_INSTALL variable. If you use this variable, only
core-image-* images are affected.
4.2 Customizing Images Using Custom IMAGE_FEATURES and EXTRA_IMAGE_FEATURES
Another method for customizing your image is to enable or disable
high-level image features by using the
IMAGE_FEATURES and
EXTRA_IMAGE_FEATURES
variables. Although the functions for both variables are nearly
equivalent, best practices dictate using IMAGE_FEATURES from within
a recipe and using EXTRA_IMAGE_FEATURES from within your
local.conf file, which is found in the Build Directory.
To understand how these features work, the best reference is
meta/classes-recipe/image.bbclass.
This class lists out the available
IMAGE_FEATURES of which most map to package groups while some, such
as read-only-rootfs, resolve as general configuration settings.
In summary, the file looks at the contents of the IMAGE_FEATURES
variable and then maps or configures the feature accordingly. Based on
this information, the build system automatically adds the appropriate
packages or configurations to the
IMAGE_INSTALL variable.
Effectively, you are enabling extra features by extending the class or
creating a custom class for use with specialized image .bb files.
Use the EXTRA_IMAGE_FEATURES variable from within your local
configuration file. Using a separate area from which to enable features
with this variable helps you avoid overwriting the features in the image
recipe that are enabled with IMAGE_FEATURES. The value of
EXTRA_IMAGE_FEATURES is added to IMAGE_FEATURES within
meta/conf/bitbake.conf.
To illustrate how you can use these variables to modify your image, consider an
example that selects the SSH server. The Yocto Project ships with two SSH
servers you can use with your images: Dropbear and OpenSSH. Dropbear is a
minimal SSH server appropriate for resource-constrained environments, while
OpenSSH is a well-known standard SSH server implementation. By default, the
core-image-sato image is configured to use Dropbear. The
core-image-full-cmdline image includes OpenSSH. The core-image-minimal
image does not contain an SSH server.
You can customize your image and change these defaults. Edit the
IMAGE_FEATURES variable in your recipe or use the
EXTRA_IMAGE_FEATURES in your local.conf file so that it
configures the image you are working with to include
ssh-server-dropbear or ssh-server-openssh.
Note
See the “Image Features” section in the Yocto Project Reference Manual for a complete list of image features that ship with the Yocto Project.
4.3 Customizing Images Using Custom .bb Files
You can also customize an image by creating a custom recipe that defines additional software as part of the image. The following example shows the form for the two lines you need:
IMAGE_INSTALL = "packagegroup-core-x11-base package1 package2"
inherit core-image
Defining the software using a custom recipe gives you total control over
the contents of the image. It is important to use the correct names of
packages in the IMAGE_INSTALL variable. You must use the
OpenEmbedded notation and not the Debian notation for the names (e.g.
glibc-dev instead of libc6-dev).
The other method for creating a custom image is to base it on an
existing image. For example, if you want to create an image based on
core-image-sato but add the additional package strace to the
image, copy the meta/recipes-sato/images/core-image-sato.bb to a new
.bb and add the following line to the end of the copy:
IMAGE_INSTALL += "strace"
4.4 Customizing Images Using Custom Package Groups
For complex custom images, the best approach for customizing an image is
to create a custom package group recipe that is used to build the image
or images. A good example of a package group recipe is
meta/recipes-core/packagegroups/packagegroup-base.bb.
If you examine that recipe, you see that the PACKAGES variable lists
the package group packages to produce. The inherit packagegroup
statement sets appropriate default values and automatically adds
-dev, -dbg, and -ptest complementary packages for each
package specified in the PACKAGES statement.
Note
The inherit packagegroup line should be located near the top of the
recipe, certainly before the PACKAGES statement.
For each package you specify in PACKAGES, you can use RDEPENDS
and RRECOMMENDS entries to provide a list of packages the parent
task package should contain. You can see examples of these further down
in the packagegroup-base.bb recipe.
Here is a short, fabricated example showing the same basic pieces for a
hypothetical packagegroup defined in packagegroup-custom.bb, where
the variable PN is the standard way to abbreviate the reference to
the full packagegroup name packagegroup-custom:
DESCRIPTION = "My Custom Package Groups"
inherit packagegroup
PACKAGES = "\
${PN}-apps \
${PN}-tools \
"
RDEPENDS:${PN}-apps = "\
dropbear \
portmap \
psplash"
RDEPENDS:${PN}-tools = "\
oprofile \
oprofileui-server \
lttng-tools"
RRECOMMENDS:${PN}-tools = "\
kernel-module-oprofile"
In the previous example, two package group packages are created with
their dependencies and their recommended package dependencies listed:
packagegroup-custom-apps, and packagegroup-custom-tools. To
build an image using these package group packages, you need to add
packagegroup-custom-apps and/or packagegroup-custom-tools to
IMAGE_INSTALL. For other forms of image dependencies see the other
areas of this section.
4.5 Customizing an Image Hostname
By default, the configured hostname (i.e. /etc/hostname) in an image
is the same as the machine name. For example, if
MACHINE equals “qemux86”, the
configured hostname written to /etc/hostname is “qemux86”.
You can customize this name by altering the value of the “hostname”
variable in the base-files recipe using either an append file or a
configuration file. Use the following in an append file:
hostname = "myhostname"
Use the following in a configuration file:
hostname:pn-base-files = "myhostname"
Changing the default value of the variable “hostname” can be useful in certain situations. For example, suppose you need to do extensive testing on an image and you would like to easily identify the image under test from existing images with typical default hostnames. In this situation, you could change the default hostname to “testme”, which results in all the images using the name “testme”. Once testing is complete and you do not need to rebuild the image for test any longer, you can easily reset the default hostname.
Another point of interest is that if you unset the variable, the image will have no default hostname in the filesystem. Here is an example that unsets the variable in a configuration file:
hostname:pn-base-files = ""
Having no default hostname in the filesystem is suitable for environments that use dynamic hostnames such as virtual machines.
5 Writing a New Recipe
Recipes (.bb files) are fundamental components in the Yocto Project
environment. Each software component built by the OpenEmbedded build
system requires a recipe to define the component. This section describes
how to create, write, and test a new recipe.
Note
For information on variables that are useful for recipes and for information about recipe naming issues, see the “Recipes” section of the Yocto Project Reference Manual.
5.1 Overview
The following figure shows the basic process for creating a new recipe. The remainder of the section provides details for the steps.
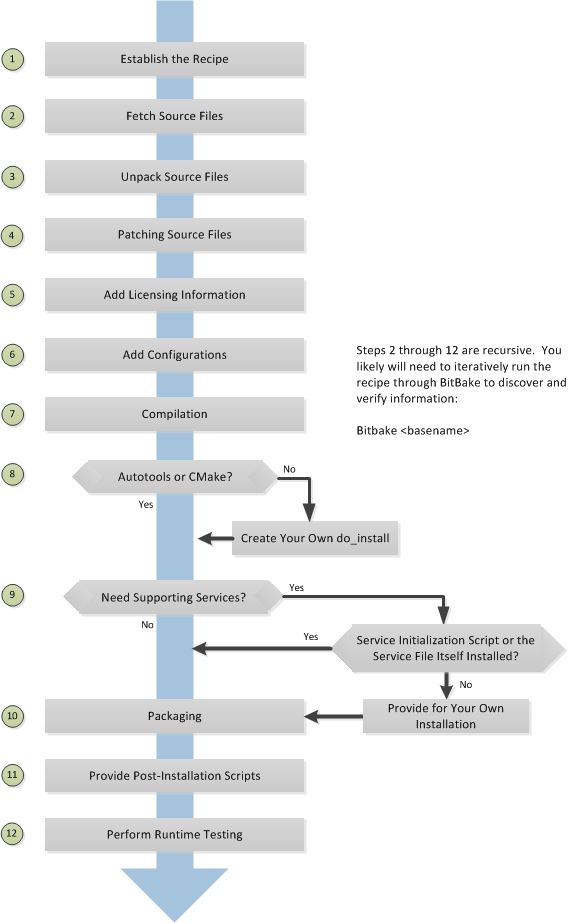
5.2 Locate or Automatically Create a Base Recipe
You can always write a recipe from scratch. However, there are three choices that can help you quickly get started with a new recipe:
devtool add: A command that assists in creating a recipe and an environment conducive to development.recipetool create: A command provided by the Yocto Project that automates creation of a base recipe based on the source files.Existing Recipes: Location and modification of an existing recipe that is similar in function to the recipe you need.
Note
For information on recipe syntax, see the “Recipe Syntax” section.
5.2.1 Creating the Base Recipe Using devtool add
The devtool add command uses the same logic for auto-creating the
recipe as recipetool create, which is listed below. Additionally,
however, devtool add sets up an environment that makes it easy for
you to patch the source and to make changes to the recipe as is often
necessary when adding a recipe to build a new piece of software to be
included in a build.
You can find a complete description of the devtool add command in
the “A Closer Look at devtool add” section
in the Yocto Project Application Development and the Extensible Software
Development Kit (eSDK) manual.
5.2.2 Creating the Base Recipe Using recipetool create
recipetool create automates creation of a base recipe given a set of
source code files. As long as you can extract or point to the source
files, the tool will construct a recipe and automatically configure all
pre-build information into the recipe. For example, suppose you have an
application that builds using Autotools. Creating the base recipe using
recipetool results in a recipe that has the pre-build dependencies,
license requirements, and checksums configured.
To run the tool, you just need to be in your Build Directory and have sourced the build environment setup script (i.e. oe-init-build-env). To get help on the tool, use the following command:
$ recipetool -h
NOTE: Starting bitbake server...
usage: recipetool [-d] [-q] [--color COLOR] [-h] <subcommand> ...
OpenEmbedded recipe tool
options:
-d, --debug Enable debug output
-q, --quiet Print only errors
--color COLOR Colorize output (where COLOR is auto, always, never)
-h, --help show this help message and exit
subcommands:
newappend Create a bbappend for the specified target in the specified layer
create Create a new recipe
setvar Set a variable within a recipe
appendfile Create/update a bbappend to replace a target file
appendsrcfiles Create/update a bbappend to add or replace source files
appendsrcfile Create/update a bbappend to add or replace a source file
edit Edit the recipe and appends for the specified target. This obeys $VISUAL if set,
otherwise $EDITOR, otherwise vi.
Use recipetool <subcommand> --help to get help on a specific command
Running recipetool create -o OUTFILE creates the base recipe and
locates it properly in the layer that contains your source files.
Here are some syntax examples:
Use this syntax to generate a recipe based on source. Once generated, the recipe resides in the existing source code layer:
recipetool create -o OUTFILE sourceUse this syntax to generate a recipe using code that you extract from source. The extracted code is placed in its own layer defined by EXTERNALSRC:
recipetool create -o OUTFILE -x EXTERNALSRC sourceUse this syntax to generate a recipe based on source. The options direct
recipetoolto generate debugging information. Once generated, the recipe resides in the existing source code layer:recipetool create -d -o OUTFILE source
5.2.3 Locating and Using a Similar Recipe
Before writing a recipe from scratch, it is often useful to discover whether someone else has already written one that meets (or comes close to meeting) your needs. The Yocto Project and OpenEmbedded communities maintain many recipes that might be candidates for what you are doing. You can find a good central index of these recipes in the OpenEmbedded Layer Index.
Working from an existing recipe or a skeleton recipe is the best way to get started. Here are some points on both methods:
Locate and modify a recipe that is close to what you want to do: This method works when you are familiar with the current recipe space. The method does not work so well for those new to the Yocto Project or writing recipes.
Some risks associated with this method are using a recipe that has areas totally unrelated to what you are trying to accomplish with your recipe, not recognizing areas of the recipe that you might have to add from scratch, and so forth. All these risks stem from unfamiliarity with the existing recipe space.
Use and modify the following skeleton recipe: If for some reason you do not want to use
recipetooland you cannot find an existing recipe that is close to meeting your needs, you can use the following structure to provide the fundamental areas of a new recipe:DESCRIPTION = "" HOMEPAGE = "" LICENSE = "" SECTION = "" DEPENDS = "" LIC_FILES_CHKSUM = "" SRC_URI = ""
5.3 Storing and Naming the Recipe
Once you have your base recipe, you should put it in your own layer and name it appropriately. Locating it correctly ensures that the OpenEmbedded build system can find it when you use BitBake to process the recipe.
Storing Your Recipe: The OpenEmbedded build system locates your recipe through the layer’s
conf/layer.conffile and the BBFILES variable. This variable sets up a path from which the build system can locate recipes. Here is the typical use:BBFILES += "${LAYERDIR}/recipes-*/*/*.bb \ ${LAYERDIR}/recipes-*/*/*.bbappend"
Consequently, you need to be sure you locate your new recipe inside your layer such that it can be found.
You can find more information on how layers are structured in the “Understanding and Creating Layers” section.
Naming Your Recipe: When you name your recipe, you need to follow this naming convention:
basename_version.bb
Use lower-cased characters and do not include the reserved suffixes
-native,-cross,-initial, or-devcasually (i.e. do not use them as part of your recipe name unless the string applies). Here are some examples (which includes the use of the string “git” as a special case of a version identifier):cups_2.4.12.bb gawk_5.3.2.bb psplash_git.bb
5.4 Running a Build on the Recipe
Creating a new recipe is usually an iterative process that requires using BitBake to process the recipe multiple times in order to progressively discover and add information to the recipe file.
Assuming you have sourced the build environment setup script (i.e.
oe-init-build-env) and you are in the Build Directory, use
BitBake to process your recipe. All you need to provide is the
basename of the recipe as described in the previous section:
$ bitbake basename
During the build, the OpenEmbedded build system creates a temporary work
directory for each recipe
(${WORKDIR})
where it keeps extracted source files, log files, intermediate
compilation and packaging files, and so forth.
The path to the per-recipe temporary work directory depends on the
context in which it is being built. The quickest way to find this path
is to use the bitbake-getvar utility:
$ bitbake-getvar -r basename WORKDIR
As an example, assume a Source Directory
top-level folder named bitbake-builds, a default Build Directory at
bitbake-builds/build, a cortexa57 PACKAGE_ARCH, poky
DISTRO and linux as TARGET_OS.
Furthermore, suppose your recipe is named foo_1.3.0.bb. In this
case, the work directory the build system uses to build the package
would be as follows:
bitbake-builds/build/tmp/work/cortexa57-poky-linux/foo/1.3.0
Note
This covers the case when the PACKAGE_ARCH variable is set to its default value, TUNE_PKGARCH. This variable is sometimes set to MACHINE_ARCH. See the documentation of the PACKAGE_ARCH variable for more information.
Inside this directory you can find sub-directories such as image,
packages-split, and temp. After the build, you can examine these
to determine how well the build went.
Note
You can find log files for each task in the recipe’s temp
directory (e.g. bitbake-builds/build/tmp/work/cortexa57-poky-linux/foo/1.3.0/temp).
Log files are named log.taskname (e.g. log.do_configure,
log.do_fetch, and log.do_compile).
You can find more information about the build process in “The Yocto Project Development Environment” chapter of the Yocto Project Overview and Concepts Manual.
5.5 Fetching Code
The first thing your recipe must do is specify how to fetch the source files. Fetching is controlled mainly through the SRC_URI variable. Your recipe must have a SRC_URI variable that points to where the source is located. For a graphical representation of source locations, see the “Sources” section in the Yocto Project Overview and Concepts Manual.
The do_fetch task uses the prefix of each entry in the SRC_URI variable value to determine which fetcher to use to get your source files. It is the SRC_URI variable that triggers the fetcher. The do_patch task uses the variable after source is fetched to apply patches. The OpenEmbedded build system uses FILESOVERRIDES for scanning directory locations for local files in SRC_URI.
The SRC_URI variable in your recipe must define each unique location
for your source files. It is good practice to not hard-code version
numbers in a URL used in SRC_URI. Rather than hard-code these
values, use ${PV},
which causes the fetch process to use the version specified in the
recipe filename. Specifying the version in this manner means that
upgrading the recipe to a future version is as simple as renaming the
recipe to match the new version.
Here is a simple example from the strace recipe where the source comes from a single tarball. Notice the use of the PV variable:
SRC_URI = "${GITHUB_BASE_URI}/download/v${PV}/strace-${PV}.tar.xz \
Files mentioned in SRC_URI whose names end in a typical archive
extension (e.g. .tar, .tar.gz, .tar.bz2, .zip, and so
forth), are automatically extracted during the
do_unpack task. For
another example that specifies these types of files, see the
“Building an Autotooled Package” section.
Another way of specifying source is from an SCM. For Git repositories,
you must specify SRCREV and you should specify PV to include
a + sign in its definition. Here is an example from the recipe
l3afpad_git.bb:
SRC_URI = "git://github.com/stevenhoneyman/l3afpad.git;branch=master;protocol=https"
PV = "0.8.18.1.11+git"
SRCREV = "3cdccdc9505643e50f8208171d9eee5de11a42ff"
If your SRC_URI statement includes URLs pointing to individual files
fetched from a remote server other than a version control system,
BitBake attempts to verify the files against checksums defined in your
recipe to ensure they have not been tampered with or otherwise modified
since the recipe was written. Multiple checksums are supported:
SRC_URI[md5sum], SRC_URI[sha1sum], SRC_URI[sha256sum].
SRC_URI[sha384sum] and SRC_URI[sha512sum], but only
SRC_URI[sha256sum] is commonly used.
Note
SRC_URI[md5sum] used to also be commonly used, but it is deprecated
and should be replaced by SRC_URI[sha256sum] when updating existing
recipes.
If your SRC_URI variable points to more than a single URL (excluding
SCM URLs), you need to provide the sha256 checksum for each URL. For these
cases, you provide a name for each URL as part of the SRC_URI and then
reference that name in the subsequent checksum statements. Here is an example
combining lines from the files git.inc and git_2.24.1.bb:
SRC_URI = "${KERNELORG_MIRROR}/software/scm/git/git-${PV}.tar.gz;name=tarball \
${KERNELORG_MIRROR}/software/scm/git/git-manpages-${PV}.tar.gz;name=manpages"
SRC_URI[tarball.sha256sum] = "ad5334956301c86841eb1e5b1bb20884a6bad89a10a6762c958220c7cf64da02"
SRC_URI[manpages.sha256sum] = "9a7ae3a093bea39770eb96ca3e5b40bff7af0b9f6123f089d7821d0e5b8e1230"
The proper value for the sha256 checksum might be available together
with other signatures on the download page for the upstream source (e.g.
md5, sha1, sha256, GPG, and so forth). Because the
OpenEmbedded build system typically only deals with sha256sum,
you should verify all the signatures you find by hand.
If no SRC_URI checksums are specified when you attempt to build the recipe, or you provide an incorrect checksum, the build will produce an error for each missing or incorrect checksum. As part of the error message, the build system provides the checksum string corresponding to the fetched file. Once you have the correct checksums, you can copy and paste them into your recipe and then run the build again to continue.
Note
As mentioned, if the upstream source provides signatures for verifying the downloaded source code, you should verify those manually before setting the checksum values in the recipe and continuing with the build.
This final example is a bit more complicated and is from the rxvt-unicode recipe. The example’s SRC_URI statement identifies multiple files as the source files for the recipe: a tarball, a patch file, a desktop file, and an icon:
SRC_URI = "http://dist.schmorp.de/rxvt-unicode/Attic/rxvt-unicode-${PV}.tar.bz2 \
file://xwc.patch \
file://rxvt.desktop \
file://rxvt.png"
When you specify local files using the file:// URI protocol, the
build system fetches files from the local machine. The path is relative
to the FILESPATH variable
and searches specific directories in a certain order:
${BP},
${BPN}, and
files. The directories are assumed to be subdirectories of the
directory in which the recipe or append file resides. For another
example that specifies these types of files, see the
“building a single .c file package” section.
The previous example also specifies a patch file. Patch files are files
whose names usually end in .patch or .diff but can end with
compressed suffixes such as diff.gz and patch.bz2, for example.
The build system automatically applies patches as described in the
“Patching Code” section.
5.5.1 Fetching Code Through Firewalls
Some users are behind firewalls and need to fetch code through a proxy. See the “FAQ” chapter for advice.
5.5.2 Limiting the Number of Parallel Connections
Some users are behind firewalls or use servers where the number of parallel
connections is limited. In such cases, you can limit the number of fetch
tasks being run in parallel by adding the following to your local.conf
file:
do_fetch[number_threads] = "4"
5.6 Unpacking Code
During the build, the
do_unpack task unpacks
the source with ${S}
pointing to where it is unpacked.
By default, the value of ${S} is already set to where the
OpenEmbedded Build System will unpack the source code, by using the
value of UNPACKDIR and BP.
You typically don’t need to set S explicitly. If processing your recipe
using BitBake successfully unpacks the source files, you can verify that the
directory pointed to by ${S} is the root of your source code.
Note
It used to be that when fetching with Git, recipes should explicitly set
S to ${WORKDIR}/git: this is no longer the case. See
S = ${WORKDIR}/git and S = ${UNPACKDIR}/git should be removed for more information.
5.7 Patching Code
Sometimes it is necessary to patch code after it has been fetched. Any
files mentioned in SRC_URI whose names end in .patch or
.diff or compressed versions of these suffixes (e.g. diff.gz,
patch.bz2, etc.) are treated as patches. The
do_patch task
automatically applies these patches.
The build system should be able to apply patches with the “-p1” option (i.e. one directory level in the path will be stripped off). If your patch needs to have more directory levels stripped off, specify the number of levels using the “striplevel” option in the SRC_URI entry for the patch. Alternatively, if your patch needs to be applied in a specific subdirectory that is not specified in the patch file, use the “patchdir” option in the entry.
As with all local files referenced in
SRC_URI using file://,
you should place patch files in a directory next to the recipe either
named the same as the base name of the recipe
(BP and
BPN) or “files”.
5.8 Licensing
Your recipe needs to define variables related to the license under which the software is distributed. See the Recipe License Fields section in the Contributor Guide for details.
5.9 Dependencies
Most software packages have a short list of other packages that they require, which are called dependencies. These dependencies fall into two main categories: build-time dependencies, which are required when the software is built; and runtime dependencies, which are required to be installed on the target in order for the software to run.
Within a recipe, you specify build-time dependencies using the DEPENDS variable. Although there are nuances, items specified in DEPENDS should be names of other recipes. It is important that you specify all build-time dependencies explicitly.
Another consideration is that configure scripts might automatically check for optional dependencies and enable corresponding functionality if those dependencies are found. If you wish to make a recipe that is more generally useful (e.g. publish the recipe in a layer for others to use), instead of hard-disabling the functionality, you can use the PACKAGECONFIG variable to allow functionality and the corresponding dependencies to be enabled and disabled easily by other users of the recipe.
Similar to build-time dependencies, you specify runtime dependencies
through a variable -
RDEPENDS, which is
package-specific. All variables that are package-specific need to have
the name of the package added to the end as an override. Since the main
package for a recipe has the same name as the recipe, and the recipe’s
name can be found through the
${PN} variable, then
you specify the dependencies for the main package by setting
RDEPENDS:${PN}. If the package were named ${PN}-tools, then you
would set RDEPENDS:${PN}-tools, and so forth.
Some runtime dependencies will be set automatically at packaging time. These dependencies include any shared library dependencies (i.e. if a package “example” contains “libexample” and another package “mypackage” contains a binary that links to “libexample” then the OpenEmbedded build system will automatically add a runtime dependency to “mypackage” on “example”). See the “Automatically Added Runtime Dependencies” section in the Yocto Project Overview and Concepts Manual for further details.
5.10 Configuring the Recipe
Most software provides some means of setting build-time configuration options before compilation. Typically, setting these options is accomplished by running a configure script with options, or by modifying a build configuration file.
Note
As of Yocto Project Release 1.7, some of the core recipes that
package binary configuration scripts now disable the scripts due to
the scripts previously requiring error-prone path substitution. The
OpenEmbedded build system uses pkg-config now, which is much more
robust. You can find a list of the *-config scripts that are disabled
in the “Binary Configuration Scripts Disabled” section
in the Yocto Project Reference Manual.
A major part of build-time configuration is about checking for build-time dependencies and possibly enabling optional functionality as a result. You need to specify any build-time dependencies for the software you are building in your recipe’s DEPENDS value, in terms of other recipes that satisfy those dependencies. You can often find build-time or runtime dependencies described in the software’s documentation.
The following list provides configuration items of note based on how your software is built:
Autotools: If your source files have a
configure.acfile, then your software is built using Autotools. If this is the case, you just need to modify the configuration.When using Autotools, your recipe needs to inherit the autotools* class and it does not have to contain a do_configure task. However, you might still want to make some adjustments. For example, you can set EXTRA_OECONF or PACKAGECONFIG_CONFARGS to pass any needed configure options that are specific to the recipe.
CMake: If your source files have a
CMakeLists.txtfile, then your software is built using CMake. If this is the case, you just need to modify the configuration.When you use CMake, your recipe needs to inherit the cmake class and it does not have to contain a do_configure task. You can make some adjustments by setting EXTRA_OECMAKE to pass any needed configure options that are specific to the recipe.
Note
If you need to install one or more custom CMake toolchain files that are supplied by the application you are building, install the files to
${D}${datadir}/cmake/Modulesduring do_install.Other: If your source files do not have a
configure.acorCMakeLists.txtfile, then your software is built using some method other than Autotools or CMake. If this is the case, you normally need to provide a do_configure task in your recipe unless, of course, there is nothing to configure.Even if your software is not being built by Autotools or CMake, you still might not need to deal with any configuration issues. You need to determine if configuration is even a required step. You might need to modify a Makefile or some configuration file used for the build to specify necessary build options. Or, perhaps you might need to run a provided, custom configure script with the appropriate options.
For the case involving a custom configure script, you would run
./configure --helpand look for the options you need to set.
Once configuration succeeds, it is always good practice to look at the
log.do_configure file to ensure that the appropriate options have
been enabled and no additional build-time dependencies need to be added
to DEPENDS. For example, if the configure script reports that it
found something not mentioned in DEPENDS, or that it did not find
something that it needed for some desired optional functionality, then
you would need to add those to DEPENDS. Looking at the log might
also reveal items being checked for, enabled, or both that you do not
want, or items not being found that are in DEPENDS, in which case
you would need to look at passing extra options to the configure script
as needed. For reference information on configure options specific to
the software you are building, you can consult the output of the
./configure --help command within ${S} or consult the software’s
upstream documentation.
5.11 Using Headers to Interface with Devices
If your recipe builds an application that needs to communicate with some
device or needs an API into a custom kernel, you will need to provide
appropriate header files. Under no circumstances should you ever modify
the existing
meta/recipes-kernel/linux-libc-headers/linux-libc-headers.inc file.
These headers are used to build libc and must not be compromised
with custom or machine-specific header information. If you customize
libc through modified headers all other applications that use
libc thus become affected.
Note
Never copy and customize the libc header file (i.e.
meta/recipes-kernel/linux-libc-headers/linux-libc-headers.inc).
The correct way to interface to a device or custom kernel is to use a separate package that provides the additional headers for the driver or other unique interfaces. When doing so, your application also becomes responsible for creating a dependency on that specific provider.
Consider the following:
Never modify
linux-libc-headers.inc. Consider that file to be part of thelibcsystem, and not something you use to access the kernel directly. You should accesslibcthrough specificlibccalls.Applications that must talk directly to devices should either provide necessary headers themselves, or establish a dependency on a special headers package that is specific to that driver.
For example, suppose you want to modify an existing header that adds I/O control or network support. If the modifications are used by a small number programs, providing a unique version of a header is easy and has little impact. When doing so, bear in mind the guidelines in the previous list.
Note
If for some reason your changes need to modify the behavior of the libc,
and subsequently all other applications on the system, use a .bbappend
to modify the linux-kernel-headers.inc file. However, take care to not
make the changes machine specific.
Consider a case where your kernel is older and you need an older
libc ABI. The headers installed by your recipe should still be a
standard mainline kernel, not your own custom one.
When you use custom kernel headers you need to get them from STAGING_KERNEL_DIR, which is the directory with kernel headers that are required to build out-of-tree modules. Your recipe will also need the following:
do_configure[depends] += "virtual/kernel:do_shared_workdir"
5.12 Compilation
During a build, the do_compile task happens after source is fetched, unpacked, and configured. If the recipe passes through do_compile successfully, nothing needs to be done.
However, if the compile step fails, you need to diagnose the failure. Here are some common issues that cause failures.
Note
For cases where improper paths are detected for configuration files
or for when libraries/headers cannot be found, be sure you are using
the more robust pkg-config. See the note in section
“Configuring the Recipe” for additional information.
Parallel build failures: These failures manifest themselves as intermittent errors, or errors reporting that a file or directory that should be created by some other part of the build process could not be found. This type of failure can occur even if, upon inspection, the file or directory does exist after the build has failed, because that part of the build process happened in the wrong order.
To fix the problem, you need to either satisfy the missing dependency in the Makefile or whatever script produced the Makefile, or (as a workaround) set PARALLEL_MAKE to an empty string:
PARALLEL_MAKE = ""
For information on parallel Makefile issues, see the “Debugging Parallel Make Races” section.
Improper host path usage: This failure applies to recipes building for the target or “nativesdk” only. The failure occurs when the compilation process uses improper headers, libraries, or other files from the host system when cross-compiling for the target.
To fix the problem, examine the
log.do_compilefile to identify the host paths being used (e.g./usr/include,/usr/lib, and so forth) and then either add configure options, apply a patch, or do both.Failure to find required libraries/headers: If a build-time dependency is missing because it has not been declared in DEPENDS, or because the dependency exists but the path used by the build process to find the file is incorrect and the configure step did not detect it, the compilation process could fail. For either of these failures, the compilation process notes that files could not be found. In these cases, you need to go back and add additional options to the configure script as well as possibly add additional build-time dependencies to DEPENDS.
Occasionally, it is necessary to apply a patch to the source to ensure the correct paths are used. If you need to specify paths to find files staged into the sysroot from other recipes, use the variables that the OpenEmbedded build system provides (e.g. STAGING_BINDIR, STAGING_INCDIR, STAGING_DATADIR, and so forth).
5.13 Installing
During do_install, the task copies the built files along with their
hierarchy to locations that would mirror their locations on the target
device. The installation process copies files from the
${S},
${B}, and
${UNPACKDIR}
directories to the ${D}
directory to create the structure as it should appear on the target
system.
How your software is built affects what you must do to be sure your software is installed correctly. The following list describes what you must do for installation depending on the type of build system used by the software being built:
Autotools and CMake: If the software your recipe is building uses Autotools or CMake, the OpenEmbedded build system understands how to install the software. Consequently, you do not have to have a do_install task as part of your recipe. You just need to make sure the install portion of the build completes with no issues. However, if you wish to install additional files not already being installed by
make install, you should do this using ado_install:appendfunction using the install command as described in the “Manual” bulleted item later in this list.Other (using
make install): You need to define a do_install function in your recipe. The function should calloe_runmake installand will likely need to pass in the destination directory as well. How you pass that path is dependent on how theMakefilebeing run is written (e.g.DESTDIR=${D},PREFIX=${D},INSTALLROOT=${D}, and so forth).For an example recipe using
make install, see the “Building a Makefile-Based Package” section.Manual: You need to define a do_install function in your recipe. The function must first use
install -dto create the directories under${D}. Once the directories exist, your function can useinstallto manually install the built software into the directories.You can find more information on
installat https://www.gnu.org/software/coreutils/manual/html_node/install-invocation.html.
For the scenarios that do not use Autotools or CMake, you need to track
the installation and diagnose and fix any issues until everything
installs correctly. You need to look in the default location of
${D}, which is ${WORKDIR}/image, to be sure your files have been
installed correctly.
Note
During the installation process, you might need to modify some of the installed files to suit the target layout. For example, you might need to replace hard-coded paths in an initscript with values of variables provided by the build system, such as replacing
/usr/bin/with${bindir}. If you do perform such modifications during do_install, be sure to modify the destination file after copying rather than before copying. Modifying after copying ensures that the build system can re-execute do_install if needed.oe_runmake install, which can be run directly or can be run indirectly by the autotools* and cmake classes, runsmake installin parallel. Sometimes, a Makefile can have missing dependencies between targets that can result in race conditions. If you experience intermittent failures during do_install, you might be able to work around them by disabling parallel Makefile installs by adding the following to the recipe:PARALLEL_MAKEINST = ""
See PARALLEL_MAKEINST for additional information.
If you need to install one or more custom CMake toolchain files that are supplied by the application you are building, install the files to
${D}${datadir}/cmake/Modulesduring do_install.
5.14 Enabling System Services
If you want to install a service, which is a process that usually starts on boot and runs in the background, then you must include some additional definitions in your recipe.
If you are adding services and the service initialization script or the
service file itself is not installed, you must provide for that
installation in your recipe using a do_install:append function. If
your recipe already has a do_install function, update the function
near its end rather than adding an additional do_install:append
function.
When you create the installation for your services, you need to
accomplish what is normally done by make install. In other words,
make sure your installation arranges the output similar to how it is
arranged on the target system.
The OpenEmbedded build system provides support for starting services two different ways:
SysVinit: SysVinit is a system and service manager that manages the init system used to control the very basic functions of your system. The init program is the first program started by the Linux kernel when the system boots. Init then controls the startup, running and shutdown of all other programs.
To enable a service using SysVinit, your recipe needs to inherit the update-rc.d class. The class helps facilitate safely installing the package on the target.
You will need to set the INITSCRIPT_PACKAGES, INITSCRIPT_NAME, and INITSCRIPT_PARAMS variables within your recipe.
systemd: System Management Daemon (systemd) was designed to replace SysVinit and to provide enhanced management of services. For more information on systemd, see the systemd homepage at https://systemd.io/.
To enable a service using systemd, your recipe needs to inherit the systemd class. See the
systemd.bbclassfile located in OpenEmbedded-Core (OE-Core) section for more information.
5.15 Packaging
Successful packaging is a combination of automated processes performed by the OpenEmbedded build system and some specific steps you need to take. The following list describes the process:
Splitting Files: The do_package task splits the files produced by the recipe into logical components. Even software that produces a single binary might still have debug symbols, documentation, and other logical components that should be split out. The do_package task ensures that files are split up and packaged correctly.
Running QA Checks: The insane class adds a step to the package generation process so that output quality assurance checks are generated by the OpenEmbedded build system. This step performs a range of checks to be sure the build’s output is free of common problems that show up during runtime. For information on these checks, see the insane class and the “QA Error and Warning Messages” chapter in the Yocto Project Reference Manual.
Hand-Checking Your Packages: After you build your software, you need to be sure your packages are correct. Examine the
${WORKDIR}/packages-splitdirectory and make sure files are where you expect them to be. If you discover problems, you can set PACKAGES, FILES,do_install(:append), and so forth as needed.Splitting an Application into Multiple Packages: If you need to split an application into several packages, see the “Splitting an Application into Multiple Packages” section for an example.
Installing a Post-Installation Script: For an example showing how to install a post-installation script, see the “Post-Installation Scripts” section.
Marking Package Architecture: Depending on what your recipe is building and how it is configured, it might be important to mark the packages produced as being specific to a particular machine, or to mark them as not being specific to a particular machine or architecture at all.
By default, packages apply to any machine with the same architecture as the target machine. When a recipe produces packages that are machine-specific (e.g. the MACHINE value is passed into the configure script or a patch is applied only for a particular machine), you should mark them as such by adding the following to the recipe:
PACKAGE_ARCH = "${MACHINE_ARCH}"
On the other hand, if the recipe produces packages that do not contain anything specific to the target machine or architecture at all (e.g. recipes that simply package script files or configuration files), you should use the allarch class to do this for you by adding this to your recipe:
inherit allarch
Ensuring that the package architecture is correct is not critical while you are doing the first few builds of your recipe. However, it is important in order to ensure that your recipe rebuilds (or does not rebuild) appropriately in response to changes in configuration, and to ensure that you get the appropriate packages installed on the target machine, particularly if you run separate builds for more than one target machine.
5.17 Using Virtual Providers
Prior to a build, if you know that several different recipes provide the
same functionality, you can use a virtual provider (i.e. virtual/*)
as a placeholder for the actual provider. The actual provider is
determined at build-time.
A common scenario where a virtual provider is used would be for the kernel
recipe. Suppose you have three kernel recipes whose PN values map to
kernel-big, kernel-mid, and kernel-small. Furthermore, each of
these recipes in some way uses a PROVIDES statement that essentially
identifies itself as being able to provide virtual/kernel. Here is one way
through the kernel class:
PROVIDES += "virtual/kernel"
Any recipe that inherits the kernel class is
going to utilize a PROVIDES statement that identifies that recipe as
being able to provide the virtual/kernel item.
Now comes the time to actually build an image and you need a kernel
recipe, but which one? You can configure your build to call out the
kernel recipe you want by using the PREFERRED_PROVIDER variable. As
an example, consider the x86-base.inc include file, which is a
machine (i.e. MACHINE) configuration file. This include file is the
reason all x86-based machines use the linux-yocto kernel. Here is the
relevant line from that include file:
PREFERRED_PROVIDER_virtual/kernel ??= "linux-yocto"
When you use a virtual provider, you do not have to “hard code” a recipe
name as a build dependency. You can use the
DEPENDS variable to state the
build is dependent on virtual/kernel for example:
DEPENDS = "virtual/kernel"
During the build, the OpenEmbedded build system picks
the correct recipe needed for the virtual/kernel dependency based on
the PREFERRED_PROVIDER variable. If you want to use the small kernel
mentioned at the beginning of this section, configure your build as
follows:
PREFERRED_PROVIDER_virtual/kernel ??= "kernel-small"
Note
Any recipe that PROVIDES a virtual/* item that is ultimately not
selected through PREFERRED_PROVIDER does not get built. Preventing these
recipes from building is usually the desired behavior since this mechanism’s
purpose is to select between mutually exclusive alternative providers.
The following lists specific examples of virtual providers:
virtual/kernel: Provides the name of the kernel recipe to use when building a kernel image.virtual/bootloader: Provides the name of the bootloader to use when building an image.virtual/libgbm: Providesgbm.pc.virtual/egl: Providesegl.pcand possiblywayland-egl.pc.virtual/libgl: Providesgl.pc(i.e. libGL).virtual/libgles1: Providesglesv1_cm.pc(i.e. libGLESv1_CM).virtual/libgles2: Providesglesv2.pc(i.e. libGLESv2).
5.18 Properly Versioning Pre-Release Recipes
Sometimes the name of a recipe can lead to versioning problems when the
recipe is upgraded to a final release. For example, consider the
irssi_0.8.16-rc1.bb recipe file in the list of example recipes in
the “Storing and Naming the Recipe” section.
This recipe is at a release candidate stage (i.e. “rc1”). When the recipe is
released, the recipe filename becomes irssi_0.8.16.bb. The version
change from 0.8.16-rc1 to 0.8.16 is seen as a decrease by the
build system and package managers, so the resulting packages will not
correctly trigger an upgrade.
In order to ensure the versions compare properly, the recommended
convention is to use a tilde (~) character as follows:
PV = 0.8.16~rc1
This way 0.8.16~rc1 sorts before 0.8.16. See the
“Version Policy” section in the
Yocto Project and OpenEmbedded Contributor Guide for more details about
versioning code corresponding to a pre-release or to a specific Git commit.
5.19 Post-Installation Scripts
Post-installation scripts run immediately after installing a package on
the target or during image creation when a package is included in an
image. To add a post-installation script to a package, add a
pkg_postinst:PACKAGENAME() function to the recipe file
(.bb) and replace PACKAGENAME with the name of the package you want
to attach to the postinst script. To apply the post-installation
script to the main package for the recipe, which is usually what is
required, specify
${PN} in place of
PACKAGENAME.
A post-installation function has the following structure:
pkg_postinst:PACKAGENAME() {
# Commands to carry out
}
The script defined in the post-installation function is called when the root filesystem is created. If the script succeeds, the package is marked as installed.
Note
Any RPM post-installation script that runs on the target should return a 0 exit code. RPM does not allow non-zero exit codes for these scripts, and the RPM package manager will cause the package to fail installation on the target.
Sometimes it is necessary for the execution of a post-installation
script to be delayed until the first boot. For example, the script might
need to be executed on the device itself. To delay script execution
until boot time, you must explicitly mark post installs to defer to the
target. You can use pkg_postinst_ontarget() or call
postinst_intercept delay_to_first_boot from pkg_postinst(). Any
failure of a pkg_postinst() script (including exit 1) triggers an
error during the
do_rootfs task.
If you have recipes that use pkg_postinst function and they require
the use of non-standard native tools that have dependencies during
root filesystem construction, you need to use the
PACKAGE_WRITE_DEPS
variable in your recipe to list these tools. If you do not use this
variable, the tools might be missing and execution of the
post-installation script is deferred until first boot. Deferring the
script to the first boot is undesirable and impossible for read-only
root filesystems.
Note
There is equivalent support for pre-install, pre-uninstall, and post-uninstall
scripts by way of pkg_preinst, pkg_prerm, and pkg_postrm,
respectively. These scrips work in exactly the same way as does
pkg_postinst with the exception that they run at different times. Also,
because of when they run, they are not applicable to being run at image
creation time like pkg_postinst.
5.20 Testing
The final step for completing your recipe is to be sure that the software you built runs correctly. To accomplish runtime testing, add the build’s output packages to your image and test them on the target.
For information on how to customize your image by adding specific packages, see “Customizing Images” section.
5.21 Examples
To help summarize how to write a recipe, this section provides some recipe examples given various scenarios:
5.21.1 Building a Single .c File Package
Building an application from a single file that is stored locally (e.g. under
files) requires a recipe that has the file listed in the SRC_URI
variable. Additionally, you need to manually write the do_compile
and do_install tasks. The S variable defines the
directory containing the source code, which is set to UNPACKDIR in this
case — the directory BitBake uses for the build:
SUMMARY = "Simple helloworld application"
SECTION = "examples"
LICENSE = "MIT"
LIC_FILES_CHKSUM = "file://${COMMON_LICENSE_DIR}/MIT;md5=0835ade698e0bcf8506ecda2f7b4f302"
SRC_URI = "file://helloworld.c"
S = "${UNPACKDIR}"
do_compile() {
${CC} ${LDFLAGS} helloworld.c -o helloworld
}
do_install() {
install -d ${D}${bindir}
install -m 0755 helloworld ${D}${bindir}
}
By default, the helloworld, helloworld-dbg, and helloworld-dev packages
are built. For information on how to customize the packaging process, see the
“Splitting an Application into Multiple Packages”
section.
5.21.2 Building a Makefile-Based Package
Applications built with GNU make require a recipe that has the source archive
listed in SRC_URI. You do not need to add a do_compile
step since by default BitBake starts the make command to compile the
application. If you need additional make options, you should store them in
the EXTRA_OEMAKE or PACKAGECONFIG_CONFARGS variables. BitBake
passes these options into the GNU make invocation. Note that a
do_install task is still required. Otherwise, BitBake runs an
empty do_install task by default.
Some applications might require extra parameters to be passed to the compiler. For example, the application might need an additional header path. You can accomplish this by adding to the CFLAGS variable. The following example shows this:
CFLAGS:prepend = "-I ${S}/include "
In the following example, lz4 is a makefile-based package:
SUMMARY = "Extremely Fast Compression algorithm"
DESCRIPTION = "LZ4 is a very fast lossless compression algorithm, providing compression speed at 400 MB/s per core, scalable with multi-cores CPU. It also features an extremely fast decoder, with speed in multiple GB/s per core, typically reaching RAM speed limits on multi-core systems."
HOMEPAGE = "https://github.com/lz4/lz4"
LICENSE = "BSD-2-Clause | GPL-2.0-only"
LIC_FILES_CHKSUM = "file://lib/LICENSE;md5=ebc2ea4814a64de7708f1571904b32cc \
file://programs/COPYING;md5=b234ee4d69f5fce4486a80fdaf4a4263 \
file://LICENSE;md5=d57c0d21cb917fb4e0af2454aa48b956 \
"
PE = "1"
SRCREV = "d44371841a2f1728a3f36839fd4b7e872d0927d3"
SRC_URI = "git://github.com/lz4/lz4.git;branch=release;protocol=https \
file://CVE-2021-3520.patch \
"
UPSTREAM_CHECK_GITTAGREGEX = "v(?P<pver>.*)"
CVE_STATUS[CVE-2014-4715] = "fixed-version: Fixed in r118, which is larger than the current version"
EXTRA_OEMAKE = "PREFIX=${prefix} CC='${CC}' CFLAGS='${CFLAGS}' DESTDIR=${D} LIBDIR=${libdir} INCLUDEDIR=${includedir} BUILD_STATIC=no"
do_install() {
oe_runmake install
}
BBCLASSEXTEND = "native nativesdk"
5.21.3 Building an Autotooled Package
Applications built with the Autotools such as autoconf and automake
require a recipe that has a source archive listed in SRC_URI and also
inherit the autotools* class, which contains the definitions
of all the steps needed to build an Autotool-based application. The result of
the build is automatically packaged. And, if the application uses NLS for
localization, packages with local information are generated (one package per
language). Here is one example: (hello_2.3.bb):
SUMMARY = "GNU Helloworld application"
SECTION = "examples"
LICENSE = "GPL-2.0-or-later"
LIC_FILES_CHKSUM = "file://COPYING;md5=751419260aa954499f7abaabaa882bbe"
SRC_URI = "${GNU_MIRROR}/hello/hello-${PV}.tar.gz"
inherit autotools gettext
The variable LIC_FILES_CHKSUM is used to track source license changes as described in the “Tracking License Changes” section in the Yocto Project Overview and Concepts Manual. You can quickly create Autotool-based recipes in a manner similar to the previous example.
5.21.4 Building a Meson Package
Applications built with the Meson build system just need a recipe that has sources described in SRC_URI and inherits the meson class.
The ipcalc recipe is a simple example of an application without dependencies:
SUMMARY = "Tool to assist in network address calculations for IPv4 and IPv6."
HOMEPAGE = "https://gitlab.com/ipcalc/ipcalc"
SECTION = "net"
LICENSE = "GPL-2.0-only"
LIC_FILES_CHKSUM = "file://COPYING;md5=b234ee4d69f5fce4486a80fdaf4a4263"
SRC_URI = "git://gitlab.com/ipcalc/ipcalc.git;protocol=https;branch=master"
SRCREV = "4c4261a47f355946ee74013d4f5d0494487cc2d6"
inherit meson
Applications with dependencies are likely to inherit the
pkgconfig class, as pkg-config is the default method
used by Meson to find dependencies and compile applications against them.
5.21.5 Splitting an Application into Multiple Packages
You can use the variables PACKAGES and FILES to split an application into multiple packages.
Here is an example that uses the libxpm recipe. By default,
this recipe generates a single package that contains the library along
with a few binaries. You can modify the recipe to split the binaries
into separate packages:
require xorg-lib-common.inc
SUMMARY = "Xpm: X Pixmap extension library"
LICENSE = "MIT"
LIC_FILES_CHKSUM = "file://COPYING;md5=51f4270b012ecd4ab1a164f5f4ed6cf7"
DEPENDS += "libxext libsm libxt"
PE = "1"
XORG_PN = "libXpm"
PACKAGES =+ "sxpm cxpm"
FILES:cxpm = "${bindir}/cxpm"
FILES:sxpm = "${bindir}/sxpm"
In the previous example, we want to ship the sxpm and cxpm
binaries in separate packages. Since bindir would be packaged into
the main PN package by default, we prepend the PACKAGES variable
so additional package names are added to the start of list. This results
in the extra FILES:* variables then containing information that
define which files and directories go into which packages. Files
included by earlier packages are skipped by latter packages. Thus, the
main PN package does not include the above listed files.
5.21.6 Packaging Externally Produced Binaries
Sometimes, you need to add pre-compiled binaries to an image. For example, suppose that there are binaries for proprietary code, created by a particular division of a company. Your part of the company needs to use those binaries as part of an image that you are building using the OpenEmbedded build system. Since you only have the binaries and not the source code, you cannot use a typical recipe that expects to fetch the source specified in SRC_URI and then compile it.
One method is to package the binaries and then install them as part of the image. Generally, it is not a good idea to package binaries since, among other things, it can hinder the ability to reproduce builds and could lead to compatibility problems with ABI in the future. However, sometimes you have no choice.
The easiest solution is to create a recipe that uses the
bin_package class and to be sure that you are using default
locations for build artifacts. In most cases, the
bin_package class handles “skipping” the configure and
compile steps as well as sets things up to grab packages from the appropriate
area. In particular, this class sets noexec on both the
do_configure and do_compile tasks, sets
FILES:${PN} to “/” so that it picks up all files, and sets up a
do_install task, which effectively copies all files from ${S}
to ${D}. The bin_package class works well when the files
extracted into ${S} are already laid out in the way they should be laid out
on the target. For more information on these variables, see the FILES,
PN, S, and D variables in the Yocto Project Reference
Manual’s variable glossary.
Note
Using DEPENDS is a good idea even for components distributed in binary form, and is often necessary for shared libraries. For a shared library, listing the library dependencies in DEPENDS makes sure that the libraries are available in the staging sysroot when other recipes link against the library, which might be necessary for successful linking.
Using DEPENDS also allows runtime dependencies between packages to be added automatically. See the “Automatically Added Runtime Dependencies” section in the Yocto Project Overview and Concepts Manual for more information.
If you cannot use the bin_package class, you need to be sure you are doing the following:
Create a recipe where the do_configure and do_compile tasks do nothing: It is usually sufficient to just not define these tasks in the recipe, because the default implementations do nothing unless a Makefile is found in
${S}.If
${S}might contain a Makefile, or if you inherit some class that replaces do_configure and do_compile with custom versions, then you can use the[noexec]flag to turn the tasks into no-ops, as follows:do_configure[noexec] = "1" do_compile[noexec] = "1"
Unlike Deleting a Task, using the flag preserves the dependency chain from the do_fetch, do_unpack, and do_patch tasks to the do_install task.
Make sure your do_install task installs the binaries appropriately.
Ensure that you set up FILES (usually
FILES:${PN}) to point to the files you have installed, which of course depends on where you have installed them and whether those files are in different locations than the defaults.
As a basic example of a bin_package-style recipe, consider this snippet from the wireless-regdb recipe file, which fetches a single tarball of binary content and manually installs with no need for any configuration or compilation:
SRC_URI = "https://www.kernel.org/pub/software/network/${BPN}/${BP}.tar.xz"
SRC_URI[sha256sum] = "57f8e7721cf5a880c13ae0c202edbb21092a060d45f9e9c59bcd2a8272bfa456"
inherit bin_package allarch
do_install() {
install -d -m0755 ${D}${nonarch_libdir}/crda
install -d -m0755 ${D}${sysconfdir}/wireless-regdb/pubkeys
install -m 0644 regulatory.bin ${D}${nonarch_libdir}/crda/regulatory.bin
install -m 0644 wens.key.pub.pem ${D}${sysconfdir}/wireless-regdb/pubkeys/wens.key.pub.pem
install -m 0644 -D regulatory.db ${D}${nonarch_base_libdir}/firmware/regulatory.db
install -m 0644 regulatory.db.p7s ${D}${nonarch_base_libdir}/firmware/regulatory.db.p7s
}
5.22 Following Recipe Style Guidelines
When writing recipes, it is good to conform to existing style guidelines. See the “Recipe Style Guide” in the Yocto Project and OpenEmbedded Contributor Guide for reference.
It is common for existing recipes to deviate a bit from this style.
However, aiming for at least a consistent style is a good idea. Some
practices, such as omitting spaces around = operators in assignments
or ordering recipe components in an erratic way, are widely seen as poor
style.
5.23 Recipe Syntax
Understanding recipe file syntax is important for writing recipes. The following list overviews the basic items that make up a BitBake recipe file. For more complete BitBake syntax descriptions, see the “Syntax and Operators” chapter of the BitBake User Manual.
Variable Assignments and Manipulations: Variable assignments allow a value to be assigned to a variable. The assignment can be static text or might include the contents of other variables. In addition to the assignment, appending and prepending operations are also supported.
The following example shows some of the ways you can use variables in recipes:
S = "${UNPACKDIR}/postfix-${PV}" CFLAGS += "-DNO_ASM" CFLAGS:append = " --enable-important-feature"
Functions: Functions provide a series of actions to be performed. You usually use functions to override the default implementation of a task function or to complement a default function (i.e. append or prepend to an existing function). Standard functions use
shshell syntax, although access to OpenEmbedded variables and internal methods are also available.Here is an example function from the
sedrecipe:do_install () { autotools_do_install install -d ${D}${base_bindir} if [ ! ${D}${bindir} -ef ${D}${base_bindir} ]; then mv ${D}${bindir}/sed ${D}${base_bindir}/sed rmdir ${D}${bindir}/ fi }It is also possible to implement new functions that are called between existing tasks as long as the new functions are not replacing or complementing the default functions. You can implement functions in Python instead of shell. Both of these options are not seen in the majority of recipes.
Keywords: BitBake recipes use only a few keywords. You use keywords to include common functions (
inherit), load parts of a recipe from other files (includeandrequire) and export variables to the environment (export).The following example shows the use of some of these keywords:
export POSTCONF = "${STAGING_BINDIR}/postconf" inherit autoconf require otherfile.inc
Comments (#): Any lines that begin with the hash character (
#) are treated as comment lines and are ignored:# This is a comment
This next list summarizes the most important and most commonly used parts of the recipe syntax. For more information on these parts of the syntax, you can reference the “Syntax and Operators” chapter in the BitBake User Manual.
Line Continuation (\): Use the backward slash (
\) character to split a statement over multiple lines. Place the slash character at the end of the line that is to be continued on the next line:VAR = "A really long \ line"
Note
You cannot have any characters including spaces or tabs after the slash character.
Using Variables (${VARNAME}): Use the
${VARNAME}syntax to access the contents of a variable:SRC_URI = "${SOURCEFORGE_MIRROR}/libpng/zlib-${PV}.tar.gz"
Note
It is important to understand that the value of a variable expressed in this form does not get substituted automatically. The expansion of these expressions happens on-demand later (e.g. usually when a function that makes reference to the variable executes). This behavior ensures that the values are most appropriate for the context in which they are finally used. On the rare occasion that you do need the variable expression to be expanded immediately, you can use the := operator instead of = when you make the assignment, but this is not generally needed.
Quote All Assignments (“value”): Use double quotes around values in all variable assignments (e.g.
"value"). Here is an example:VAR1 = "${OTHERVAR}" VAR2 = "The version is ${PV}"
Conditional Assignment (?=): Conditional assignment is used to assign a value to a variable, but only when the variable is currently unset. Use the question mark followed by the equal sign (
?=) to make a “soft” assignment used for conditional assignment. Typically, “soft” assignments are used in thelocal.conffile for variables that are allowed to come through from the external environment.Here is an example where
VAR1is set to “New value” if it is currently empty. However, ifVAR1has already been set, it remains unchanged:VAR1 ?= "New value"
In this next example,
VAR1is left with the value “Original value”:VAR1 = "Original value" VAR1 ?= "New value"
Appending (+=): Use the plus character followed by the equals sign (
+=) to append values to existing variables.Note
This operator adds a space between the existing content of the variable and the new content.
Here is an example:
SRC_URI += "file://fix-makefile.patch"
Prepending (=+): Use the equals sign followed by the plus character (
=+) to prepend values to existing variables.Note
This operator adds a space between the new content and the existing content of the variable.
Here is an example:
VAR =+ "Starts"
Appending (:append): Use the
:appendoperator to append values to existing variables. This operator does not add any additional space. Also, the operator is applied after all the+=, and=+operators have been applied and after all=assignments have occurred. This means that if:appendis used in a recipe, it can only be overridden by another layer using the special:removeoperator, which in turn will prevent further layers from adding it back.The following example shows the space being explicitly added to the start to ensure the appended value is not merged with the existing value:
CFLAGS:append = " --enable-important-feature"
You can also use the
:appendoperator with overrides, which results in the actions only being performed for the specified target or machine:CFLAGS:append:sh4 = " --enable-important-sh4-specific-feature"
Prepending (:prepend): Use the
:prependoperator to prepend values to existing variables. This operator does not add any additional space. Also, the operator is applied after all the+=, and=+operators have been applied and after all=assignments have occurred.The following example shows the space being explicitly added to the end to ensure the prepended value is not merged with the existing value:
CFLAGS:prepend = "-I${S}/myincludes "
You can also use the
:prependoperator with overrides, which results in the actions only being performed for the specified target or machine:CFLAGS:prepend:sh4 = "-I${S}/myincludes "
Overrides: You can use overrides to set a value conditionally, typically based on how the recipe is being built. For example, to set the KBRANCH variable’s value to “standard/base” for any target MACHINE, except for qemuarm where it should be set to “standard/arm-versatile-926ejs”, you would do the following:
KBRANCH = "standard/base" KBRANCH:qemuarm = "standard/arm-versatile-926ejs"
Overrides are also used to separate alternate values of a variable in other situations. For example, when setting variables such as FILES and RDEPENDS that are specific to individual packages produced by a recipe, you should always use an override that specifies the name of the package.
Indentation: Use spaces for indentation rather than tabs. For shell functions, both currently work. However, it is a policy decision of the Yocto Project to use tabs in shell functions. Realize that some layers have a policy to use spaces for all indentation.
Using Python for Complex Operations: For more advanced processing, it is possible to use Python code during variable assignments (e.g. search and replacement on a variable).
You indicate Python code using the
${@python_code}syntax for the variable assignment:SRC_URI = "ftp://ftp.info-zip.org/pub/infozip/src/zip${@d.getVar('PV',1).replace('.', '')}.tgz
Shell Function Syntax: Write shell functions as if you were writing a shell script when you describe a list of actions to take. You should ensure that your script works with a generic
shand that it does not require anybashor other shell-specific functionality. The same considerations apply to various system utilities (e.g.sed,grep,awk, and so forth) that you might wish to use. If in doubt, you should check with multiple implementations — including those from BusyBox.
6 Adding a New Machine
Adding a new machine to the Yocto Project is a straightforward process. This section describes how to add machines that are similar to those that the Yocto Project already supports.
Note
Although well within the capabilities of the Yocto Project, adding a
totally new architecture might require changes to gcc/glibc
and to the site information, which is beyond the scope of this
manual.
For a complete example that shows how to add a new machine, see the “Creating a new BSP Layer Using the bitbake-layers Script” section in the Yocto Project Board Support Package (BSP) Developer’s Guide.
6.1 Adding the Machine Configuration File
To add a new machine, you need to add a new machine configuration file
to the layer’s conf/machine directory. This configuration file
provides details about the device you are adding.
The OpenEmbedded build system uses the root name of the machine
configuration file to reference the new machine. For example, given a
machine configuration file named crownbay.conf, the build system
recognizes the machine as “crownbay”.
The most important variables you must set in your machine configuration file or include from a lower-level configuration file are as follows:
TARGET_ARCH (e.g. “arm”)
PREFERRED_PROVIDER_virtual/kernelMACHINE_FEATURES (e.g. “screen wifi”)
You might also need these variables:
SERIAL_CONSOLES (e.g. “115200;ttyS0 115200;ttyS1”)
KERNEL_IMAGETYPE (e.g. “zImage”)
IMAGE_FSTYPES (e.g. “tar.gz jffs2”)
You can find full details on these variables in the reference section.
You can leverage existing machine .conf files from
meta-yocto-bsp/conf/machine/.
6.2 Adding a Kernel for the Machine
The OpenEmbedded build system needs to be able to build a kernel for the
machine. You need to either create a new kernel recipe for this machine,
or extend an existing kernel recipe. You can find several kernel recipe
examples in the Source Directory at meta/recipes-kernel/linux that
you can use as references.
If you are creating a new kernel recipe, normal recipe-writing rules
apply for setting up a SRC_URI. Thus, you need to specify any
necessary patches and set S to point at the source code. You need to
create a do_configure task that configures the unpacked kernel with
a defconfig file. You can do this by using a make defconfig
command or, more commonly, by copying in a suitable defconfig file
and then running make oldconfig. By making use of inherit kernel
and potentially some of the linux-*.inc files, most other
functionality is centralized and the defaults of the class normally work
well.
If you are extending an existing kernel recipe, it is usually a matter
of adding a suitable defconfig file. The file needs to be added into
a location similar to defconfig files used for other machines in a
given kernel recipe. A possible way to do this is by listing the file in
the SRC_URI and adding the machine to the expression in
COMPATIBLE_MACHINE:
COMPATIBLE_MACHINE = '(qemux86|qemumips)'
For more information on defconfig files, see the
“Changing the Configuration”
section in the Yocto Project Linux Kernel Development Manual.
6.3 Adding a Formfactor Configuration File
A formfactor configuration file provides information about the target hardware for which the image is being built and information that the build system cannot obtain from other sources such as the kernel. Some examples of information contained in a formfactor configuration file include framebuffer orientation, whether or not the system has a keyboard, the positioning of the keyboard in relation to the screen, and the screen resolution.
The build system uses reasonable defaults in most cases. However, if
customization is necessary, you need to create a machconfig file in
the meta/recipes-bsp/formfactor/files directory. This directory
contains directories for specific machines such as qemuarm and
qemux86. For information about the settings available and the
defaults, see the meta/recipes-bsp/formfactor/files/config file
found in the same area.
Here is an example for “qemuarm” machine:
HAVE_TOUCHSCREEN=1
HAVE_KEYBOARD=1
DISPLAY_CAN_ROTATE=0
DISPLAY_ORIENTATION=0
#DISPLAY_WIDTH_PIXELS=640
#DISPLAY_HEIGHT_PIXELS=480
#DISPLAY_BPP=16
DISPLAY_DPI=150
DISPLAY_SUBPIXEL_ORDER=vrgb
7 Upgrading Recipes
Over time, upstream developers publish new versions for software built by layer recipes. It is recommended to keep recipes up-to-date with upstream version releases.
While there are several methods to upgrade a recipe, you might
consider checking on the upgrade status of a recipe first. You can do so
using the devtool check-upgrade-status command. See the
“Checking on the Upgrade Status of a Recipe”
section in the Yocto Project Reference Manual for more information.
The remainder of this section describes three ways you can upgrade a
recipe. You can use the Automated Upgrade Helper (AUH) to set up
automatic version upgrades. Alternatively, you can use
devtool upgrade to set up semi-automatic version upgrades. Finally,
you can manually upgrade a recipe by editing the recipe itself.
7.1 Using the Auto Upgrade Helper (AUH)
The AUH utility works in conjunction with the OpenEmbedded build system in order to automatically generate upgrades for recipes based on new versions being published upstream. Use AUH when you want to create a service that performs the upgrades automatically and optionally sends you an email with the results.
AUH allows you to update several recipes with a single use. You can also optionally perform build and integration tests using images with the results saved to your hard drive and emails of results optionally sent to recipe maintainers. Finally, AUH creates Git commits with appropriate commit messages in the layer’s tree for the changes made to recipes.
Note
In some conditions, you should not use AUH to upgrade recipes
and should instead use either devtool upgrade or upgrade your
recipes manually:
When AUH cannot complete the upgrade sequence. This situation usually results because custom patches carried by the recipe cannot be automatically rebased to the new version. In this case,
devtool upgradeallows you to manually resolve conflicts.When for any reason you want fuller control over the upgrade process. For example, when you want special arrangements for testing.
The following steps describe how to set up the AUH utility:
Be Sure the Development Host is Set Up: You need to be sure that your development host is set up to use the Yocto Project. For information on how to set up your host, see the “Preparing the Build Host” section.
Make Sure Git is Configured: The AUH utility requires Git to be configured because AUH uses Git to save upgrades. Thus, you must have Git user and email configured. The following command shows your configurations:
$ git config --list
If you do not have the user and email configured, you can use the following commands to do so:
$ git config --global user.name some_name $ git config --global user.email username@domain.com
Clone the AUH Repository: To use AUH, you must clone the repository onto your development host. The following command uses Git to create a local copy of the repository on your system:
$ git clone git://git.yoctoproject.org/auto-upgrade-helper Cloning into 'auto-upgrade-helper'... remote: Counting objects: 768, done. remote: Compressing objects: 100% (300/300), done. remote: Total 768 (delta 499), reused 703 (delta 434) Receiving objects: 100% (768/768), 191.47 KiB | 98.00 KiB/s, done. Resolving deltas: 100% (499/499), done. Checking connectivity... done.
AUH is not part of the OpenEmbedded-Core (OE-Core) or Poky repositories.
Create a Dedicated Build Directory: Create a new Setup with
bitbake-setupor manually run the oe-init-build-env script to create a fresh Build Directory that you use exclusively for running the AUH utility:$ source layers/openembedded-core/oe-init-build-env your_AUH_build_directory
Re-using an existing Build Directory and its configurations is not recommended as existing settings could cause AUH to fail or behave undesirably.
Make Configurations in Your Local Configuration File: Several settings are needed in the
local.conffile in the build directory you just created for AUH. Make these following configurations:If you want to enable Build History, which is optional, you need the following lines in the
conf/local.conffile:INHERIT =+ "buildhistory" BUILDHISTORY_COMMIT = "1"
With this configuration and a successful upgrade, a build history “diff” file appears in the
upgrade-helper/work/recipe/buildhistory-diff.txtfile found in your Build Directory.If you want to enable testing through the testimage class, which is optional, you need to have the following set in your
conf/local.conffile:IMAGE_CLASSES += "testimage"
Note
If your distro does not enable by default ptest, which Poky does, you need the following in your
local.conffile:DISTRO_FEATURES:append = " ptest"
Optionally Start a vncserver: If you are running in a server without an X11 session, you need to start a vncserver:
$ vncserver :1 $ export DISPLAY=:1
Create and Edit an AUH Configuration File: You need to have the
upgrade-helper/upgrade-helper.confconfiguration file in your Build Directory. You can find a sample configuration file in the AUH source repository.Read through the sample file and make configurations as needed. For example, if you enabled build history in your
local.confas described earlier, you must enable it inupgrade-helper.conf.Also, if you are using the default
maintainers.incfile supplied in OpenEmbedded-Core (OE-Core) and you do not set a “maintainers_whitelist” or “global_maintainer_override” in theupgrade-helper.confconfiguration, and you specify “-e all” on the AUH command-line, the utility automatically sends out emails to all the default maintainers. Please avoid this.
This next set of examples describes how to use the AUH:
Upgrading a Specific Recipe: To upgrade a specific recipe, use the following form:
$ upgrade-helper.py recipe_name
For example, this command upgrades the
xmodmaprecipe:$ upgrade-helper.py xmodmap
Upgrading a Specific Recipe to a Particular Version: To upgrade a specific recipe to a particular version, use the following form:
$ upgrade-helper.py recipe_name -t version
For example, this command upgrades the
xmodmaprecipe to version 1.2.3:$ upgrade-helper.py xmodmap -t 1.2.3
Upgrading all Recipes to the Latest Versions and Suppressing Email Notifications: To upgrade all recipes to their most recent versions and suppress the email notifications, use the following command:
$ upgrade-helper.py all
Upgrading all Recipes to the Latest Versions and Send Email Notifications: To upgrade all recipes to their most recent versions and send email messages to maintainers for each attempted recipe as well as a status email, use the following command:
$ upgrade-helper.py -e all
Once you have run the AUH utility, you can find the results in the AUH Build Directory:
${BUILDDIR}/upgrade-helper/timestamp
The AUH utility also creates recipe update commits from successful upgrade attempts in the layer tree.
You can easily set up to run the AUH utility on a regular basis by using a cron job. See the weeklyjob.sh file distributed with the utility for an example.
7.2 Using devtool upgrade
As mentioned earlier, an alternative method for upgrading recipes to
newer versions is to use
devtool upgrade.
You can read about devtool upgrade in general in the
“Use devtool upgrade to Create a Version of the Recipe that Supports a Newer Version of the Software”
section in the Yocto Project Application Development and the Extensible
Software Development Kit (eSDK) Manual.
To see all the command-line options available with devtool upgrade,
use the following help command:
$ devtool upgrade -h
If you want to find out what version a recipe is currently at upstream without any attempt to upgrade your local version of the recipe, you can use the following command:
$ devtool latest-version recipe_name
As mentioned in the previous section describing AUH, devtool upgrade
works in a less-automated manner than AUH. Specifically,
devtool upgrade only works on a single recipe that you name on the
command line, cannot perform build and integration testing using images,
and does not automatically generate commits for changes in the source
tree. Despite all these “limitations”, devtool upgrade updates the
recipe file to the new upstream version and attempts to rebase custom
patches contained by the recipe as needed.
Note
AUH uses much of devtool upgrade behind the scenes making AUH somewhat
of a “wrapper” application for devtool upgrade.
A typical scenario involves having used Git to clone an upstream
repository that you use during build operations. Because you have built the
recipe in the past, the layer is likely added to your
configuration already. If for some reason, the layer is not added, you
could add it easily using the
“bitbake-layers”
script. For example, suppose you use the nano.bb recipe from the
meta-oe layer in the meta-openembedded repository. For this
example, assume that the layer has been cloned into following area:
/home/scottrif/bitbake-builds/layers/meta-openembedded
The following command from your Build Directory adds the layer to
your build configuration (i.e. ${BUILDDIR}/conf/bblayers.conf):
$ bitbake-layers add-layer /home/scottrif/bitbake-builds/layers/meta-openembedded/meta-oe
NOTE: Starting bitbake server...
Parsing recipes: 100% |##########################################| Time: 0:00:55
Parsing of 1431 .bb files complete (0 cached, 1431 parsed). 2040 targets, 56 skipped, 0 masked, 0 errors.
Removing 12 recipes from the x86_64 sysroot: 100% |##############| Time: 0:00:00
Removing 1 recipes from the x86_64_i586 sysroot: 100% |##########| Time: 0:00:00
Removing 5 recipes from the i586 sysroot: 100% |#################| Time: 0:00:00
Removing 5 recipes from the qemux86 sysroot: 100% |##############| Time: 0:00:00
For this example, assume that the nano.bb recipe that
is upstream has a 2.9.3 version number. However, the version in the
local repository is 2.7.4. The following command from your build
directory automatically upgrades the recipe for you:
$ devtool upgrade nano -V 2.9.3
NOTE: Starting bitbake server...
NOTE: Creating workspace layer in /home/scottrif/bitbake-builds/build/workspace
Parsing recipes: 100% |##########################################| Time: 0:00:46
Parsing of 1431 .bb files complete (0 cached, 1431 parsed). 2040 targets, 56 skipped, 0 masked, 0 errors.
NOTE: Extracting current version source...
NOTE: Resolving any missing task queue dependencies
.
.
.
NOTE: Executing SetScene Tasks
NOTE: Executing RunQueue Tasks
NOTE: Tasks Summary: Attempted 74 tasks of which 72 didn't need to be rerun and all succeeded.
Adding changed files: 100% |#####################################| Time: 0:00:00
NOTE: Upgraded source extracted to /home/scottrif/bitbake-builds/build/workspace/sources/nano
NOTE: New recipe is /home/scottrif/bitbake-builds/build/workspace/recipes/nano/nano_2.9.3.bb
Note
Using the -V option is not necessary. Omitting the version number causes
devtool upgrade to upgrade the recipe to the most recent version.
Continuing with this example, you can use devtool build to build the
newly upgraded recipe:
$ devtool build nano
NOTE: Starting bitbake server...
Loading cache: 100% |################################################################################################| Time: 0:00:01
Loaded 2040 entries from dependency cache.
Parsing recipes: 100% |##############################################################################################| Time: 0:00:00
Parsing of 1432 .bb files complete (1431 cached, 1 parsed). 2041 targets, 56 skipped, 0 masked, 0 errors.
NOTE: Resolving any missing task queue dependencies
.
.
.
NOTE: Executing SetScene Tasks
NOTE: Executing RunQueue Tasks
NOTE: nano: compiling from external source tree /home/scottrif/bitbake-builds/build/workspace/sources/nano
NOTE: Tasks Summary: Attempted 520 tasks of which 304 didn't need to be rerun and all succeeded.
Within the devtool upgrade workflow, you can
deploy and test your rebuilt software. For this example,
however, running devtool finish cleans up the workspace once the
source in your workspace is clean. This usually means using Git to stage
and submit commits for the changes generated by the upgrade process.
Once the tree is clean, you can clean things up in this example with the
following command from the ${BUILDDIR}/workspace/sources/nano
directory:
$ devtool finish nano meta-oe
NOTE: Starting bitbake server...
Loading cache: 100% |################################################################################################| Time: 0:00:00
Loaded 2040 entries from dependency cache.
Parsing recipes: 100% |##############################################################################################| Time: 0:00:01
Parsing of 1432 .bb files complete (1431 cached, 1 parsed). 2041 targets, 56 skipped, 0 masked, 0 errors.
NOTE: Adding new patch 0001-nano.bb-Stuff-I-changed-when-upgrading-nano.bb.patch
NOTE: Updating recipe nano_2.9.3.bb
NOTE: Removing file /home/scottrif/bitbake-builds/layers/meta-openembedded/meta-oe/recipes-support/nano/nano_2.7.4.bb
NOTE: Moving recipe file to /home/scottrif/bitbake-builds/layers/meta-openembedded/meta-oe/recipes-support/nano
NOTE: Leaving source tree /home/scottrif/bitbake-builds/build/workspace/sources/nano as-is; if you no longer need it then please delete it manually
Using the devtool finish command cleans up the workspace and creates a patch
file based on your commits. The tool puts all patch files back into the
source directory in a sub-directory named nano in this case.
7.3 Manually Upgrading a Recipe
If for some reason you choose not to upgrade recipes using Using the Auto Upgrade Helper (AUH) or by Using devtool upgrade, you can manually edit the recipe files to upgrade the versions.
Note
Manually updating multiple recipes scales poorly and involves many
steps. The recommendation to upgrade recipe versions is through AUH
or devtool upgrade, both of which automate some steps and provide
guidance for others needed for the manual process.
To manually upgrade recipe versions, follow these general steps:
Change the Version: Rename the recipe such that the version (i.e. the PV part of the recipe name) changes appropriately. If the version is not part of the recipe name, change the value as it is set for PV within the recipe itself.
Update SRCREV if Needed: If the source code your recipe builds is fetched from Git or some other version control system, update SRCREV to point to the commit hash that matches the new version.
Build the Software: Try to build the recipe using BitBake. Typical build failures include the following:
License statements were updated for the new version. For this case, you need to review any changes to the license and update the values of LICENSE and LIC_FILES_CHKSUM as needed.
Note
License changes are often inconsequential. For example, the license text’s copyright year might have changed.
Custom patches carried by the older version of the recipe might fail to apply to the new version. For these cases, you need to review the failures. Patches might not be necessary for the new version of the software if the upgraded version has fixed those issues. If a patch is necessary and failing, you need to rebase it into the new version.
Optionally Attempt to Build for Several Architectures: Once you successfully build the new software for a given architecture, you could test the build for other architectures by changing the MACHINE variable and rebuilding the software. This optional step is especially important if the recipe is to be released publicly.
Check the Upstream Change Log or Release Notes: Checking both these reveals if there are new features that could break backwards-compatibility. If so, you need to take steps to mitigate or eliminate that situation.
Optionally Create a Bootable Image and Test: If you want, you can test the new software by booting it onto actual hardware.
Create a Commit with the Change in the Layer Repository: After all builds work and any testing is successful, you can create commits for any changes in the layer holding your upgraded recipe.
8 Finding Temporary Source Code
You might find it helpful during development to modify the temporary source code used by recipes to build packages. For example, suppose you are developing a patch and you need to experiment a bit to figure out your solution. After you have initially built the package, you can iteratively tweak the source code, which is located in the Build Directory, and then you can force a re-compile and quickly test your altered code. Once you settle on a solution, you can then preserve your changes in the form of patches.
During a build, the unpacked temporary source code used by recipes to
build packages is available in the Build Directory as defined by the
S variable. Below is the default value for the S variable as
defined in the meta/conf/bitbake.conf configuration file in
OpenEmbedded-Core (OE-Core):
S = "${UNPACKDIR}/${BP}"
You should be aware that many recipes override the S variable when the default isn’t accurate.
Note
The BP represents the base recipe name, which consists of the name and version:
BP = "${BPN}-${PV}"
This matches the location that the git fetcher unpacks to, and usually matches unpacked content of release tarballs (e.g. they contain a single directory which matches value of ${BP} exactly).
The path to the unpack directory for the recipe (UNPACKDIR) is defined as follows:
${WORKDIR}/sources
In turn, the path to the work directory for the recipe (WORKDIR) is defined as follows:
${BASE_WORKDIR}/${MULTIMACH_TARGET_SYS}/${PN}/${PV}
The actual directory depends on several things:
BASE_WORKDIR: The top-level build output directory.
MULTIMACH_TARGET_SYS: The target system identifier.
PN: The recipe name.
PV: The recipe version.
As an example, assume a Source Directory top-level folder named
project, a default Build Directory at project/build, and a
qemux86-poky-linux machine target system. Furthermore, suppose your
recipe is named foo_1.3.0.bb. In this case, the work directory the
build system uses to build the package would be as follows:
project/build/tmp/work/qemux86-poky-linux/foo/1.3.0
9 Creating New Configuration Fragments In Your Build
Configuration Fragments define top level build configuration features that can be independently enabled and disabled using standard tooling. Such features are made of one or several build configuration statements that are either contained in a fragment file, or are set indirectly using the Built-in Fragment mechanism.
This section will describe how to create new fragments for your builds.
There are two kinds of configuration fragments:
Standard Configuration Fragments which a stored in a file. These fragments include a summary and a description, following by configuration statements.
Built-in Fragments which can be used to assign a value to a single variable and do not require a separate definition file. They are especially useful when a list of possible values is very long (or infinite).
9.1 Creating A Standard Configuration Fragment
By default, all configuration fragments are located within the
conf/fragments directory of a layer. This location is defined by the
OE_FRAGMENTS_PREFIX variable which, in turn, is used as a parameter in an
addfragments directive in bitbake.conf.
You can create one or more configuration fragment files in your
layer in this directory. Let’s take the following example, where
custom-fragment.conf is our custom fragment file:
meta-custom
├── conf
│ ├── fragments
│ │ └── custom-fragment.conf
│ └── layer.conf
...
For our custom-fragment.conf file, the following variables must be set
for our fragment to be considered a valid fragment by the OpenEmbedded
Build System:
BB_CONF_FRAGMENT_SUMMARY: a one-line summary of this fragment.
BB_CONF_FRAGMENT_DESCRIPTION: a description of this fragment.
Note
The BB_CONF_FRAGMENT_SUMMARY and BB_CONF_FRAGMENT_DESCRIPTION variables are also passed as parameters in an addfragments directive in bitbake.conf.
After creating these variables, our custom fragment should look like the following:
BB_CONF_FRAGMENT_SUMMARY = "This fragment sets a limit of 4 bitbake threads and 4 parsing threads"
BB_CONF_FRAGMENT_DESCRIPTION = "This fragment is useful to constrain resource consumption when the Yocto default \
is causing an overload of host machine's memory and CPU resources."
For now, our fragment does not have any additional configuration statement. Let’s add the following assignments to our fragment:
BB_NUMBER_THREADS = "4"
BB_NUMBER_PARSE_THREADS = "4"
This means that our fragment can be enabled to set a limit on the number of threads BitBake will use with the BB_NUMBER_THREADS and BB_NUMBER_PARSE_THREADS variables.
For now, our fragment exists and is listed by the bitbake-config-build list-fragments command, but is not enabled. To enable this fragment, use the bitbake-config-build enable-fragment command:
bitbake-config-build enable-fragment meta-custom/custom-fragment
Note
The meta-custom prefix in the above command depends on the name of your
layer. This name is defined by the BBFILE_COLLECTIONS variable in
the conf/layer.conf file of your layer.
Standard Configuration fragments can be organized in a more complex way. For example, it’s possible to create sub-directories to organize your fragments:
meta-custom
├── conf
│ ├── fragments
│ │ ├── networking
│ │ │ └── mirrors.conf
│ │ └── resources
│ │ └── numberthreads.conf
│ └── layer.conf
...
In the above example, the meta-custom/networking/mirrors and
meta-custom/resources/numberthreads fragments will be available in your
build.
9.2 Creating A Built-in Fragment
Within the OpenEmbedded Build System, Built-in Fragments are defined with the OE_FRAGMENTS_BUILTIN variable, which is passed as a parameter in an addfragments directive in bitbake.conf.
Adding new Built-in Fragments can be done by appending the OE_FRAGMENTS_BUILTIN variable from your layer configuration file:
OE_FRAGMENTS_BUILTIN:append = " custom-builtin-fragment:CUSTOM_VARIABLE"
Warning
Make sure to use the :append override in the above assignment, as using
+= can lead to unexpected behavior.
Warning
Due to the way BitBake parses files, it is not possible to modify
OE_FRAGMENTS_BUILTIN from any kind of configuration file.
Setting it from the layer configuration file (conf/layer.conf) is
the retained solution to create new built-in fragments.
You can then use the bitbake-config-build enable-fragment command to
set a value to the CUSTOM_VARIABLE variable:
bitbake-config-build enable-fragment custom-builtin-fragment/somevalue
10 Setting Up the Poky Reference Distro Manually
While the default way to set up the Poky reference distro is to use
bitbake-setup, it is also possible to manually set up the environment. This
document guides through this setup step-by-step.
Note
This document will produce a setup similar to what is described in
Yocto Project Quick Build, which shows how to set up Poky
with bitbake-setup.
10.1 Obtaining The Source Repositories
You can obtain the source repositories required to build the Poky reference distro in two ways described below: cloning the repositories with Git, or downloading the released archives.
10.1.1 Use Git to Clone The Layers
Go to the Releases page, and choose a release
(such as yocto-6.0.2), corresponding to either the latest stable
release or a Long Term Support release.
Once you complete the setup instructions for your machine (see the
System Requirements section of the Yocto Project Reference
Manual), create a Source Directory: the base directory for your project.
Throughout the documentation, we will use bitbake-builds as the name of the
Source Directory. Here’s how to create it:
$ mkdir bitbake-builds
$ cd bitbake-builds
You need to get a copy of the different layers needed to set up the Poky reference distribution on your build host. Use the following commands:
$ mkdir layers/
$ git clone -b yocto-6.0.2 https://git.openembedded.org/bitbake ./layers/bitbake
$ git clone -b yocto-6.0.2 https://git.openembedded.org/openembedded-core ./layers/openembedded-core
$ git clone -b yocto-6.0.2 https://git.yoctoproject.org/meta-yocto ./layers/meta-yocto
10.1.2 Using the Source Archives
The Yocto Project also provides source archives of its releases, which are available at https://downloads.yoctoproject.org/releases/yocto/. Then, choose the subdirectory containing the release you wish to use, for example yocto-6.0.2.
You will find there source archives of OpenEmbedded-Core (OE-Core), BitBake, and meta-yocto.
Note
The recommended method for accessing Yocto Project components is to use Git to clone the upstream repository and work from within the locally cloned repositories.
10.2 Building Your Image
Use the following steps to build your image. The build process creates an entire Linux distribution, including the toolchain, from source.
Note
If you are working behind a firewall and your build host is not set up for proxies, you could encounter problems with the build process when fetching source code (e.g. fetcher failures or Git failures).
If you do not know your proxy settings, consult your local network infrastructure resources and get that information. A good starting point could also be to check your web browser settings. Finally, you can find more information on the “Working Behind a Network Proxy” page of the Yocto Project Wiki.
Initialize the Build Environment: From your current working directory, set up a build environment with the following command:
$ source ./layers/openembedded-core/oe-init-build-env
Among other things, the script creates the Build Directory, which is
buildin this case and is located in the Source Directory. After the script runs, your current working directory is set to the Build Directory. Later, when the build completes, the Build Directory contains all the files created during the build.Examine Your Local Configuration File: When you set up the build environment, a local configuration file named
local.confbecomes available in aconfsub-directory of the Build Directory. For this example, the defaults are set to build for aqemux86-64target, which is suitable for emulation. The package manager used is set to the RPM package manager.Tip
You can significantly speed up your build and guard against fetcher failures by using Shared State Cache mirrors and enabling Hash Equivalence. This way, you can use pre-built artifacts rather than building them. This is relevant only when your network and the server that you use can download these artifacts faster than you would be able to build them.
To use such mirrors, uncomment the below lines in your
conf/local.conffile in the Build Directory:BB_HASHSERVE_UPSTREAM = "wss://hashserv.yoctoproject.org/ws" SSTATE_MIRRORS ?= "file://.* http://sstate.yoctoproject.org/all/PATH;downloadfilename=PATH" BB_HASHSERVE = "auto" BB_SIGNATURE_HANDLER = "OEEquivHash"
The hash equivalence server needs the websockets python module version 9.1 or later. Debian GNU/Linux 12 (Bookworm) and later, Fedora, CentOS Stream 9 and later, and Ubuntu 22.04 (LTS) and later, all have a recent enough package. Other supported distributions need to get the module some other place than their package feed, e.g. via
pip. You can otherwise install a Buildtools tarball by following the instructions in the Required Git, tar, Python, make and gcc Versions section of the Yocto Project Reference Manual.Start the Build: Continue with the following command to build an OS image for the target, which is
core-image-satoin this example:$ bitbake core-image-sato
For information on using the
bitbakecommand, see the BitBake section in the Yocto Project Overview and Concepts Manual, or see The BitBake Command in the BitBake User Manual.Simulate Your Image Using QEMU: Once this particular image is built, you can start QEMU, which is a Quick EMUlator that ships with the Yocto Project:
$ runqemu qemux86-64
If you want to learn more about running QEMU, see the Using the Quick EMUlator (QEMU) chapter in the Yocto Project Development Tasks Manual.
Exit QEMU: Exit QEMU by either clicking on the shutdown icon or by typing
Ctrl-Cin the QEMU transcript window from which you evoked QEMU.
11 Using Quilt in Your Workflow
Quilt is a powerful tool that allows you to capture source code changes without having a clean source tree. This section outlines the typical workflow you can use to modify source code, test changes, and then preserve the changes in the form of a patch all using Quilt.
Note
With regard to preserving changes to source files, if you clean a recipe or have rm_work enabled, the devtool workflow as described in the Yocto Project Application Development and the Extensible Software Development Kit (eSDK) manual is a safer development flow than the flow that uses Quilt.
Follow these general steps:
Find the Source Code: Temporary source code used by the OpenEmbedded build system is kept in the Build Directory. See the “Finding Temporary Source Code” section to learn how to locate the directory that has the temporary source code for a particular package.
Change Your Working Directory: You need to be in the directory that has the temporary source code. That directory is defined by the S variable.
Create a New Patch: Before modifying source code, you need to create a new patch. To create a new patch file, use
quilt newas below:$ quilt new my_changes.patch
Notify Quilt and Add Files: After creating the patch, you need to notify Quilt about the files you plan to edit. You notify Quilt by adding the files to the patch you just created:
$ quilt add file1.c file2.c file3.c
Edit the Files: Make your changes in the source code to the files you added to the patch.
Test Your Changes: Once you have modified the source code, the easiest way to test your changes is by calling the do_compile task as shown in the following example:
$ bitbake -c compile -f package
The
-for--forceoption forces the specified task to execute. If you find problems with your code, you can just keep editing and re-testing iteratively until things work as expected.Note
All the modifications you make to the temporary source code disappear once you run the do_clean or do_cleanall tasks using BitBake (i.e.
bitbake -c clean packageandbitbake -c cleanall package). Modifications will also disappear if you use the rm_work feature as described in the “Conserving Disk Space During Builds” section.Generate the Patch: Once your changes work as expected, you need to use Quilt to generate the final patch that contains all your modifications:
$ quilt refresh
At this point, the
my_changes.patchfile has all your edits made to thefile1.c,file2.c, andfile3.cfiles.You can find the resulting patch file in the
patches/subdirectory of the source (S) directory.Copy the Patch File: For simplicity, copy the patch file into a directory named
files, which you can create in the same directory that holds the recipe (.bb) file or the append (.bbappend) file. Placing the patch here guarantees that the OpenEmbedded build system will find the patch. Next, add the patch into the SRC_URI of the recipe. Here is an example:SRC_URI += "file://my_changes.patch"
12 Using a Development Shell
When debugging certain commands or even when just editing packages,
devshell can be a useful tool. When you invoke devshell, all
tasks up to and including
do_patch are run for the
specified target. Then, a new terminal is opened and you are placed in
${S}, the source
directory. In the new terminal, all the OpenEmbedded build-related
environment variables are still defined so you can use commands such as
configure and make. The commands execute just as if the
OpenEmbedded build system were executing them. Consequently, working
this way can be helpful when debugging a build or preparing software to
be used with the OpenEmbedded build system.
Here is an example that uses devshell on a target named
matchbox-desktop:
$ bitbake matchbox-desktop -c devshell
This command spawns a terminal with a shell prompt within the OpenEmbedded build environment. The OE_TERMINAL variable controls what type of shell is opened.
For spawned terminals, the following occurs:
The
PATHvariable includes the cross-toolchain.The
pkgconfigvariables find the correct.pcfiles.The
configurecommand finds the Yocto Project site files as well as any other necessary files.
Within this environment, you can run configure or compile commands as if they were being run by the OpenEmbedded build system itself. As noted earlier, the working directory also automatically changes to the Source Directory (S).
To manually run a specific task using devshell, run the
corresponding run.* script in the
${WORKDIR}/temp
directory (e.g., run.do_configure.pid). If a task’s script does
not exist, which would be the case if the task was skipped by way of the
sstate cache, you can create the task by first running it outside of the
devshell:
$ bitbake -c task
Note
Execution of a task’s
run.*script and BitBake’s execution of a task are identical. In other words, running the script re-runs the task just as it would be run using thebitbake -ccommand.Any
run.*file that does not have a.pidextension is a symbolic link (symlink) to the most recent version of that file.
Remember, that the devshell is a mechanism that allows you to get
into the BitBake task execution environment. And as such, all commands
must be called just as BitBake would call them. That means you need to
provide the appropriate options for cross-compilation and so forth as
applicable.
When you are finished using devshell, exit the shell or close the
terminal window.
Note
It is worth remembering that when using
devshellyou need to use the full compiler name such asarm-poky-linux-gnueabi-gccinstead of just usinggcc. The same applies to other applications such asbinutils,libtooland so forth. BitBake sets up environment variables such as CC to assist applications, such asmaketo find the correct tools.It is also worth noting that
devshellstill works over X11 forwarding and similar situations.
13 Using a Python Development Shell
Similar to working within a development shell as described in the
previous section, you can also spawn and work within an interactive
Python development shell. When debugging certain commands or even when
just editing packages, pydevshell can be a useful tool. When you
invoke the pydevshell task, all tasks up to and including
do_patch are run for the
specified target. Then a new terminal is opened. Additionally, key
Python objects and code are available in the same way they are to
BitBake tasks, in particular, the data store ‘d’. So, commands such as
the following are useful when exploring the data store and running
functions:
pydevshell> d.getVar("STAGING_DIR")
'/media/build1/bitbake-builds/build/tmp/sysroots'
pydevshell> d.getVar("STAGING_DIR", False)
'${TMPDIR}/sysroots'
pydevshell> d.setVar("FOO", "bar")
pydevshell> d.getVar("FOO")
'bar'
pydevshell> d.delVar("FOO")
pydevshell> d.getVar("FOO")
pydevshell> bb.build.exec_func("do_unpack", d)
pydevshell>
See the “Functions You Can Call From Within Python” section in the BitBake User Manual for details about available functions.
The commands execute just as if the OpenEmbedded build system were executing them. Consequently, working this way can be helpful when debugging a build or preparing software to be used with the OpenEmbedded build system.
Here is an example that uses pydevshell on a target named
matchbox-desktop:
$ bitbake matchbox-desktop -c pydevshell
This command spawns a terminal and places you in an interactive Python interpreter within the OpenEmbedded build environment. The OE_TERMINAL variable controls what type of shell is opened.
When you are finished using pydevshell, you can exit the shell
either by using Ctrl+d or closing the terminal window.
14 Building
This section describes various build procedures, such as the steps needed for a simple build, building a target for multiple configurations, generating an image for more than one machine, and so forth.
14.1 Building a Simple Image
In the development environment, you need to build an image whenever you change hardware support, add or change system libraries, or add or change services that have dependencies. There are several methods that allow you to build an image within the Yocto Project. This section presents the basic steps you need to build a simple image using BitBake from a build host running Linux.
Note
For information on how to build an image using Toaster, see the Toaster User Manual.
For information on how to use
devtoolto build images, see the “Using devtool in Your SDK Workflow” section in the Yocto Project Application Development and the Extensible Software Development Kit (eSDK) manual.For a quick example on how to build an image using the OpenEmbedded build system, see the Yocto Project Quick Build document.
You can also use the Yocto Project BitBake extension for Visual Studio Code to build images.
The build process creates an entire Linux distribution from source and
places it in your Build Directory under tmp/deploy/images. For
detailed information on the build process using BitBake, see the
“Images” section in the Yocto Project Overview
and Concepts Manual.
The following figure and list overviews the build process:

Set up Your Host Development System to Support Development Using the Yocto Project: See the “Setting Up to Use the Yocto Project” section for options on how to get a build host ready to use the Yocto Project.
Make Sure Your Configuration is Correct: Use bitbake-config-build to define the MACHINE or DISTRO, and open your build/conf/site.conf file to set site-specific settings.
Build the Image: Build the image using the
bitbakecommand:$ bitbake target
Note
For information on BitBake, see the BitBake User Manual.
The target is the name of the recipe you want to build. Common targets are the images in
meta/recipes-core/images,meta/recipes-sato/images, and so forth all found in OpenEmbedded-Core (OE-Core). Alternatively, the target can be the name of a recipe for a specific piece of software such as BusyBox. For more details about the images the OpenEmbedded build system supports, see the “Images” chapter in the Yocto Project Reference Manual.As an example, the following command builds the
core-image-minimalimage:$ bitbake core-image-minimal
Once an image has been built, it often needs to be installed. The images and kernels built by the OpenEmbedded build system are placed in the Build Directory in
tmp/deploy/images. For information on how to run pre-built images such asqemux86andqemuarm, see the Yocto Project Application Development and the Extensible Software Development Kit (eSDK) manual. For information about how to install these images, see the documentation for your particular board or machine.
14.2 Building Images for Multiple Targets Using Multiple Configurations
See the Building Images for Multiple Targets With Multiconfig section of the Yocto Project Development Tasks Manual.
14.3 Building an Initial RAM Filesystem (Initramfs) Image
An initial RAM filesystem (Initramfs) image provides a temporary root filesystem used for early system initialization, typically providing tools and loading modules needed to locate and mount the final root filesystem.
Follow these steps to create an Initramfs image:
Create the Initramfs Image Recipe: You can reference the
core-image-minimal-initramfs.bbrecipe found in themeta/recipes-coredirectory in OpenEmbedded-Core (OE-Core) as an example from which to work. Thecore-image-minimal-initramfsrecipe is based on the initramfs-framework recipe described below.Decide if You Need to Bundle the Initramfs Image Into the Kernel Image: If you want the Initramfs image that is built to be bundled in with the kernel image, set the INITRAMFS_IMAGE_BUNDLE variable to
"1"in yourlocal.confconfiguration file and set the INITRAMFS_IMAGE variable in the recipe that builds the kernel image.Setting the INITRAMFS_IMAGE_BUNDLE flag causes the Initramfs image to be unpacked into the
${B}/usr/directory. The unpacked Initramfs image is then passed to the kernel’sMakefileusing the CONFIG_INITRAMFS_SOURCE variable, allowing the Initramfs image to be built into the kernel normally.Optionally Add Items to the Initramfs Image Through the Initramfs Image Recipe: If you add items to the Initramfs image by way of its recipe, you should use PACKAGE_INSTALL rather than IMAGE_INSTALL. PACKAGE_INSTALL gives more direct control of what is added to the image as compared to the defaults you might not necessarily want that are set by the image or core-image classes.
Build the Kernel Image and the Initramfs Image: Build your kernel image using BitBake. Because the Initramfs image recipe is a dependency of the kernel image, the Initramfs image is built as well and bundled with the kernel image if you used the INITRAMFS_IMAGE_BUNDLE variable described earlier.
14.3.1 Customizing an Initramfs using initramfs-framework
The core-image-minimal-initramfs.bb recipe found in
meta/recipes-core/images uses the
initramfs-framework_1.0.bb
recipe as its base component. The goal of the initramfs-framework recipe is
to provide the building blocks to build a customized Initramfs.
The initramfs-framework recipe relies on shell initialization scripts
defined in meta/recipes-core/initrdscripts/initramfs-framework. Since some of
these scripts do not apply for all use cases, the initramfs-framework recipe
defines different packages:
initramfs-framework-base: this package installs the basic components of an Initramfs, such as theinitscript or the/dev/consolecharacter special file. As this package is a runtime dependency of all modules listed below, it is automatically pulled in when one of the modules is installed in the image.initramfs-module-exec: support for execution of applications.initramfs-module-mdev: support for mdev.initramfs-module-udev: support for Udev.initramfs-module-e2fs: support for ext4/ext3/ext2 filesystems.initramfs-module-nfsrootfs: support for locating and mounting the root partition via NFS.initramfs-module-rootfs: support for locating and mounting the root partition.initramfs-module-debug: dynamic debug support.initramfs-module-lvm: LVM rootfs support.initramfs-module-overlayroot: support for mounting a read-write overlay on top of a read-only root filesystem.
In addition to the packages defined by the initramfs-framework recipe
itself, the following packages are defined by the recipes present in
meta/recipes-core/initrdscripts:
initramfs-module-install: module to create and install a partition layout on a selected block device.initramfs-module-install-efi: module to create and install an EFI partition layout on a selected block device.initramfs-module-setup-live: module to start a shell in the Initramfs ifroot=/dev/ram0in passed in the Kernel command-line or theroot=parameter was not passed.
To customize the Initramfs, you can add or remove packages listed
earlier from the PACKAGE_INSTALL variable with a bbappend on the
core-image-minimal-initramfs recipe, or create a custom recipe for the
Initramfs taking core-image-minimal-initramfs as example.
Custom scripts can be added to the Initramfs by writing your own
recipes. The recipes are conventionally named initramfs-module-<module name>
where <module name> is the name of the module. The recipe should set its
RDEPENDS package-specific variables to include
initramfs-framework-base and the other packages on which the module depends
at runtime.
The recipe must install shell initialization scripts in ${D}/init.d and must follow the <number>-<script name> naming scheme where:
<number>is a two-digit number that affects the execution order of the script compared to others. For example, the script80-setup-livewould be executed after01-udevbecause 80 is greater than 01.This number being two-digits is important here as the scripts are executed alphabetically. For example, the script
10-scriptwould be executed before the script8-script, because1is inferior to8. Therefore, the script should be named08-script.<script name>is the script name which you can choose freely.If two script use the same
<number>, they are sorted alphabetically based on<script name>.
14.3.2 Bundling an Initramfs Image From a Separate Multiconfig
There may be a case where we want to build an Initramfs image which does not
inherit the same distro policy as our main image, for example, we may want
our main image to use TCLIBC = "glibc", but to use TCLIBC = "musl" in our Initramfs
image to keep a smaller footprint. However, by performing the steps mentioned
above the Initramfs image will inherit TCLIBC = "glibc" without allowing us
to override it.
To achieve this, you need to perform some additional steps:
Create a multiconfig for your Initramfs image: You can perform the steps on “Building Images for Multiple Targets Using Multiple Configurations” to create a separate multiconfig. For the sake of simplicity let’s assume such multiconfig is called:
initramfscfg.confand contains the variables:TMPDIR = "${TOPDIR}/tmp-initramfscfg" TCLIBC = "musl"
Set additional Initramfs variables on your main configuration: Additionally, on your main configuration (
local.conf) you need to set the variables:INITRAMFS_MULTICONFIG = "initramfscfg" INITRAMFS_DEPLOY_DIR_IMAGE = "${TOPDIR}/tmp-initramfscfg/deploy/images/${MACHINE}"
The variables INITRAMFS_MULTICONFIG and INITRAMFS_DEPLOY_DIR_IMAGE are used to create a multiconfig dependency from the kernel to the INITRAMFS_IMAGE to be built coming from the
initramfscfgmulticonfig, and to let the buildsystem know where the INITRAMFS_IMAGE will be located.Building a system with such configuration will build the kernel using the main configuration but the do_bundle_initramfs task will grab the selected INITRAMFS_IMAGE from INITRAMFS_DEPLOY_DIR_IMAGE instead, resulting in a musl based Initramfs image bundled in the kernel but a glibc based main image.
The same is applicable to avoid inheriting DISTRO_FEATURES on INITRAMFS_IMAGE or to build a different DISTRO for it such as
poky-tiny.
14.4 Building a Tiny System
Very small distributions have some significant advantages such as requiring less on-die or in-package memory (cheaper), better performance through efficient cache usage, lower power requirements due to less memory, faster boot times, and reduced development overhead. Some real-world examples where a very small distribution gives you distinct advantages are digital cameras, medical devices, and small headless systems.
This section presents information that shows you how you can trim your
distribution to even smaller sizes than the poky-tiny distribution,
which is around 5 Mbytes, that can be built out-of-the-box using the
Yocto Project.
14.4.1 Tiny System Overview
The following list presents the overall steps you need to consider and perform to create distributions with smaller root filesystems, achieve faster boot times, maintain your critical functionality, and avoid initial RAM disks:
14.4.2 Goals and Guiding Principles
Before you can reach your destination, you need to know where you are going. Here is an example list that you can use as a guide when creating very small distributions:
Determine how much space you need (e.g. a kernel that is 1 Mbyte or less and a root filesystem that is 3 Mbytes or less).
Find the areas that are currently taking 90% of the space and concentrate on reducing those areas.
Do not create any difficult “hacks” to achieve your goals.
Leverage the device-specific options.
Work in a separate layer so that you keep changes isolated. For information on how to create layers, see the “Understanding and Creating Layers” section.
14.4.3 Understand What Contributes to Your Image Size
It is easiest to have something to start with when creating your own
distribution. You can use the Yocto Project out-of-the-box to create the
poky-tiny distribution. Ultimately, you will want to make changes in
your own distribution that are likely modeled after poky-tiny.
Note
To use poky-tiny in your build, set the DISTRO variable in your
local.conf file to “poky-tiny” as described in the
“Creating Your Own Distribution”
section.
Understanding some memory concepts will help you reduce the system size.
Memory consists of static, dynamic, and temporary memory. Static memory
is the TEXT (code), DATA (initialized data in the code), and BSS
(uninitialized data) sections. Dynamic memory represents memory that is
allocated at runtime: stacks, hash tables, and so forth. Temporary
memory is recovered after the boot process. This memory consists of
memory used for decompressing the kernel and for the __init__
functions.
To help you see where you currently are with kernel and root filesystem
sizes, you can use two tools found in OpenEmbedded-Core (OE-Core)
in the scripts/tiny/ directory:
ksize.py: Reports component sizes for the kernel build objects.dirsize.py: Reports component sizes for the root filesystem.
This next tool and command help you organize configuration fragments and view file dependencies in a human-readable form:
merge_config.sh: Helps you manage configuration files and fragments within the kernel. With this tool, you can merge individual configuration fragments together. The tool allows you to make overrides and warns you of any missing configuration options. The tool is ideal for allowing you to iterate on configurations, create minimal configurations, and create configuration files for different machines without having to duplicate your process.The
merge_config.shscript is part of the Linux Yocto kernel Git repositories (i.e.linux-yocto-3.14,linux-yocto-3.10,linux-yocto-3.8, and so forth) in thescripts/kconfigdirectory.For more information on configuration fragments, see the “Creating Configuration Fragments” section in the Yocto Project Linux Kernel Development Manual.
bitbake -u taskexp -g bitbake_target: Using the BitBake command with these options brings up a Dependency Explorer from which you can view file dependencies. Understanding these dependencies allows you to make informed decisions when cutting out various pieces of the kernel and root filesystem.
14.4.4 Trim the Root Filesystem
The root filesystem is made up of packages for booting, libraries, and applications. To change things, you can configure how the packaging happens, which changes the way you build them. You can also modify the filesystem itself or select a different filesystem.
First, find out what is hogging your root filesystem by running the
dirsize.py script from your root directory:
$ cd root-directory-of-image
$ dirsize.py 100000 > dirsize-100k.log
$ cat dirsize-100k.log
You can apply a filter to the script to ignore files under a certain size. The previous example filters out any files below 100 Kbytes. The sizes reported by the tool are uncompressed, and thus will be smaller by a relatively constant factor in a compressed root filesystem. When you examine your log file, you can focus on areas of the root filesystem that take up large amounts of memory.
You need to be sure that what you eliminate does not cripple the functionality you need. One way to see how packages relate to each other is by using the Dependency Explorer UI with the BitBake command:
$ cd image-directory
$ bitbake -u taskexp -g image
Use the interface to select potential packages you wish to eliminate and see their dependency relationships.
When deciding how to reduce the size, get rid of packages that result in
minimal impact on the feature set. For example, you might not need a VGA
display. Or, you might be able to get by with devtmpfs and mdev
instead of udev.
Use your local.conf file to make changes. For example, to eliminate
udev and glib, set the following in the local configuration
file:
VIRTUAL-RUNTIME_dev_manager = ""
Finally, you should consider exactly the type of root filesystem you
need to meet your needs while also reducing its size. For example,
consider cramfs, squashfs, ubifs, ext2, or an
Initramfs using initramfs. Be aware that ext3 requires a 1
Mbyte journal. If you are okay with running read-only, you do not need
this journal.
Note
After each round of elimination, you need to rebuild your system and then use the tools to see the effects of your reductions.
14.4.5 Trim the Kernel
The kernel is built by including policies for hardware-independent aspects. What subsystems do you enable? For what architecture are you building? Which drivers do you build by default?
Note
You can modify the kernel source if you want to help with boot time.
Run the ksize.py script from the top-level Linux build directory to
get an idea of what is making up the kernel:
$ cd top-level-linux-build-directory
$ ksize.py > ksize.log
$ cat ksize.log
When you examine the log, you will see how much space is taken up with
the built-in .o files for drivers, networking, core kernel files,
filesystem, sound, and so forth. The sizes reported by the tool are
uncompressed, and thus will be smaller by a relatively constant factor
in a compressed kernel image. Look to reduce the areas that are large
and taking up around the “90% rule.”
To examine, or drill down, into any particular area, use the -d
option with the script:
$ ksize.py -d > ksize.log
Using this option breaks out the individual file information for each area of the kernel (e.g. drivers, networking, and so forth).
Use your log file to see what you can eliminate from the kernel based on features you can let go. For example, if you are not going to need sound, you do not need any drivers that support sound.
After figuring out what to eliminate, you need to reconfigure the kernel
to reflect those changes during the next build. You could run
menuconfig and make all your changes at once. However, that makes it
difficult to see the effects of your individual eliminations and also
makes it difficult to replicate the changes for perhaps another target
device. A better method is to start with no configurations using
allnoconfig, create configuration fragments for individual changes,
and then manage the fragments into a single configuration file using
merge_config.sh. The tool makes it easy for you to iterate using the
configuration change and build cycle.
Each time you make configuration changes, you need to rebuild the kernel and check to see what impact your changes had on the overall size.
14.4.6 Remove Package Management Requirements
Packaging requirements add size to the image. One way to reduce the size of the image is to remove all the packaging requirements from the image. This reduction includes both removing the package manager and its unique dependencies as well as removing the package management data itself.
To eliminate all the packaging requirements for an image, be sure that “package-management” is not part of your IMAGE_FEATURES statement for the image. When you remove this feature, you are removing the package manager as well as its dependencies from the root filesystem.
14.4.7 Look for Other Ways to Minimize Size
Depending on your particular circumstances, other areas that you can trim likely exist. The key to finding these areas is through tools and methods described here combined with experimentation and iteration. Here are a couple of areas to experiment with:
glibc: In general, follow this process:Remove
glibcfeatures from DISTRO_FEATURES that you think you do not need.Build your distribution.
If the build fails due to missing symbols in a package, determine if you can reconfigure the package to not need those features. For example, change the configuration to not support wide character support as is done for
ncurses. Or, if support for those characters is needed, determine whatglibcfeatures provide the support and restore the configuration.
Rebuild and repeat the process.
busybox: For BusyBox, use a process similar as described forglibc. A difference is you will need to boot the resulting system to see if you are able to do everything you expect from the running system. You need to be sure to integrate configuration fragments into Busybox because BusyBox handles its own core features and then allows you to add configuration fragments on top.
14.4.8 Iterate on the Process
If you have not reached your goals on system size, you need to iterate on the process. The process is the same. Use the tools and see just what is taking up 90% of the root filesystem and the kernel. Decide what you can eliminate without limiting your device beyond what you need.
Depending on your system, a good place to look might be Busybox, which provides a stripped down version of Unix tools in a single, executable file. You might be able to drop virtual terminal services or perhaps ipv6.
14.5 Building Images for More than One Machine
A common scenario developers face is creating images for several different machines that use the same software environment. In this situation, it is tempting to set the tunings and optimization flags for each build specifically for the targeted hardware (i.e. “maxing out” the tunings). Doing so can considerably add to build times and package feed maintenance collectively for the machines. For example, selecting tunes that are extremely specific to a CPU core used in a system might enable some micro optimizations in GCC for that particular system but would otherwise not gain you much of a performance difference across the other systems as compared to using a more general tuning across all the builds (e.g. setting DEFAULTTUNE specifically for each machine’s build). Rather than “max out” each build’s tunings, you can take steps that cause the OpenEmbedded build system to reuse software across the various machines where it makes sense.
If build speed and package feed maintenance are considerations, you should consider the points in this section that can help you optimize your tunings to best consider build times and package feed maintenance.
Share the Build Directory : If at all possible, share the TMPDIR across builds. The Yocto Project supports switching between different MACHINE values in the same TMPDIR. This practice is well supported and regularly used by developers when building for multiple machines. When you use the same TMPDIR for multiple machine builds, the OpenEmbedded build system can reuse the existing native and often cross-recipes for multiple machines. Thus, build time decreases.
Enable the Appropriate Package Architecture: By default, the OpenEmbedded build system enables three levels of package architectures: “all”, “tune” or “package”, and “machine”. Any given recipe usually selects one of these package architectures (types) for its output. Depending for what a given recipe creates packages, making sure you enable the appropriate package architecture can directly impact the build time.
A recipe that just generates scripts can enable “all” architecture because there are no binaries to build. To specifically enable “all” architecture, be sure your recipe inherits the allarch class. This class is useful for “all” architectures because it configures many variables so packages can be used across multiple architectures.
If your recipe needs to generate packages that are machine-specific or when one of the build or runtime dependencies is already machine-architecture dependent, which makes your recipe also machine-architecture dependent, make sure your recipe enables the “machine” package architecture through the MACHINE_ARCH variable:
PACKAGE_ARCH = "${MACHINE_ARCH}"
When you do not specifically enable a package architecture through the PACKAGE_ARCH, The OpenEmbedded build system defaults to the TUNE_PKGARCH setting:
PACKAGE_ARCH = "${TUNE_PKGARCH}"
Choose a Generic Tuning File if Possible: Some tunes are more generic and can run on multiple targets (e.g. an
armv5set of packages could run onarmv6andarmv7processors in most cases). Similarly,i486binaries could work oni586and higher processors. You should realize, however, that advances on newer processor versions would not be used.If you select the same tune for several different machines, the OpenEmbedded build system reuses software previously built, thus speeding up the overall build time. Realize that even though a new sysroot for each machine is generated, the software is not recompiled and only one package feed exists.
Manage Granular Level Packaging: Sometimes there are cases where injecting another level of package architecture beyond the three higher levels noted earlier can be useful. For example, consider how NXP (formerly Freescale) allows for the easy reuse of binary packages in their layer meta-freescale. In this example, the fsl-dynamic-packagearch class shares GPU packages for i.MX53 boards because all boards share the AMD GPU. The i.MX6-based boards can do the same because all boards share the Vivante GPU. This class inspects the BitBake datastore to identify if the package provides or depends on one of the sub-architecture values. If so, the class sets the PACKAGE_ARCH value based on the
MACHINE_SUBARCHvalue. If the package does not provide or depend on one of the sub-architecture values but it matches a value in the machine-specific filter, it sets MACHINE_ARCH. This behavior reduces the number of packages built and saves build time by reusing binaries.Use Tools to Debug Issues: Sometimes you can run into situations where software is being rebuilt when you think it should not be. For example, the OpenEmbedded build system might not be using shared state between machines when you think it should be. These types of situations are usually due to references to machine-specific variables such as MACHINE, SERIAL_CONSOLES, XSERVER, MACHINE_FEATURES, and so forth in code that is supposed to only be tune-specific or when the recipe depends (DEPENDS, RDEPENDS, RRECOMMENDS, RSUGGESTS, and so forth) on some other recipe that already has PACKAGE_ARCH defined as “${MACHINE_ARCH}”.
Note
Patches to fix any issues identified are most welcome as these issues occasionally do occur.
For such cases, you can use some tools to help you sort out the situation:
state-diff-machines.sh``*:* You can find this tool in the ``scriptsdirectory of the Source Repositories. See the comments in the script for information on how to use the tool.BitBake’s “-S printdiff” Option: Using this option causes BitBake to try to establish the most recent signature match (e.g. in the shared state cache) and then compare matched signatures to determine the stamps and delta where these two stamp trees diverge.
14.6 Building Software from an External Source
By default, the OpenEmbedded build system uses the Build Directory when building source code. The build process involves fetching the source files, unpacking them, and then patching them if necessary before the build takes place.
There are situations where you might want to build software from source files that are external to and thus outside of the OpenEmbedded build system. For example, suppose you have a project that includes a new BSP with a heavily customized kernel. And, you want to minimize exposing the build system to the development team so that they can focus on their project and maintain everyone’s workflow as much as possible. In this case, you want a kernel source directory on the development machine where the development occurs. You want the recipe’s SRC_URI variable to point to the external directory and use it as is, not copy it.
To build from software that comes from an external source, all you need to do
is inherit the externalsrc class and then set
the EXTERNALSRC variable to point to your external source code. Here
are the statements to put in your local.conf file:
INHERIT += "externalsrc"
EXTERNALSRC:pn-myrecipe = "path-to-your-source-tree"
This next example shows how to accomplish the same thing by setting EXTERNALSRC in the recipe itself or in the recipe’s append file:
EXTERNALSRC = "path"
EXTERNALSRC_BUILD = "path"
Note
In order for these settings to take effect, you must globally or locally inherit the externalsrc class.
By default, externalsrc builds the source code in a directory separate from the external source directory as specified by EXTERNALSRC. If you need to have the source built in the same directory in which it resides, or some other nominated directory, you can set EXTERNALSRC_BUILD to point to that directory:
EXTERNALSRC_BUILD:pn-myrecipe = "path-to-your-source-tree"
Note
The values of EXTERNALSRC and EXTERNALSRC_BUILD must be absolute paths.
14.7 Replicating a Build Offline
It can be useful to take a “snapshot” of upstream sources used in a build and then use that “snapshot” later to replicate the build offline. To do so, you need to first prepare and populate your downloads directory with your “snapshot” of files. Once your downloads directory is ready, you can use it at any time and from any machine to replicate your build.
Follow these steps to populate your Downloads directory:
Create a Clean Downloads Directory: Start with an empty downloads directory (DL_DIR). You start with an empty downloads directory by either removing the files in the existing directory or by setting DL_DIR to point to either an empty location or one that does not yet exist.
Generate Tarballs of the Source Git Repositories: Edit your
local.confconfiguration file as follows:DL_DIR = "/home/your-download-dir/" BB_GENERATE_MIRROR_TARBALLS = "1"
During the fetch process in the next step, BitBake gathers the source files and creates tarballs in the directory pointed to by DL_DIR. See the BB_GENERATE_MIRROR_TARBALLS variable for more information.
Populate Your Downloads Directory Without Building: Use BitBake to fetch your sources but inhibit the build:
$ bitbake target --runall=fetch
The downloads directory (i.e.
${DL_DIR}) now has a “snapshot” of the source files in the form of tarballs, which can be used for the build.Optionally Remove Any Git or other SCM Subdirectories From the Downloads Directory: If you want, you can clean up your downloads directory by removing any Git or other Source Control Management (SCM) subdirectories such as
${DL_DIR}/git2/*. The tarballs already contain these subdirectories.
Once your downloads directory has everything it needs regarding source files, you can create your “own-mirror” and build your target. Understand that you can use the files to build the target offline from any machine and at any time.
Follow these steps to build your target using the files in the downloads directory:
Using Local Files Only: Inside your
local.conffile, add the SOURCE_MIRROR_URL variable, inherit the own-mirrors class, and add the BB_NO_NETWORK variable to yourlocal.conf:SOURCE_MIRROR_URL ?= "file:///home/your-download-dir/" INHERIT += "own-mirrors" BB_NO_NETWORK = "1"
The SOURCE_MIRROR_URL and own-mirrors class set up the system to use the downloads directory as your “own mirror”. Using the BB_NO_NETWORK variable makes sure that BitBake’s fetching process in step 3 stays local, which means files from your “own-mirror” are used.
Start With a Clean Build: You can start with a clean build by removing the
${TMPDIR}directory or using a new Build Directory.Build Your Target: Use BitBake to build your target:
$ bitbake target
The build completes using the known local “snapshot” of source files from your mirror. The resulting tarballs for your “snapshot” of source files are in the downloads directory.
Note
The offline build does not work if recipes attempt to find the latest version of software by setting SRCREV to
${AUTOREV}:SRCREV = "${AUTOREV}"
When a recipe sets SRCREV to
${AUTOREV}, the build system accesses the network in an attempt to determine the latest version of software from the SCM. Typically, recipes that use AUTOREV are custom or modified recipes. Recipes that reside in public repositories usually do not use AUTOREV.If you do have recipes that use AUTOREV, you can take steps to still use the recipes in an offline build. Do the following:
Use a configuration generated by enabling build history.
Use the
buildhistory-collect-srcrevscommand to collect the stored SRCREV values from the build’s history. For more information on collecting these values, see the “Build History Package Information” section.Once you have the correct source revisions, you can modify those recipes to set SRCREV to specific versions of the software.
15 Building Images for Multiple Targets With Multiconfig
You can use a single bitbake command to build multiple images or
packages for different targets where each image or package requires a
different configuration (multiple configuration builds). The builds, in
this scenario, are sometimes referred to as “multiconfigs”, and this
section uses that term throughout.
This section describes how to set up for multiple configuration builds and how to account for cross-build dependencies between the multiconfigs.
15.1 Setting Up and Running a Multiple Configuration Build
To accomplish a multiple configuration build, you must define each
target’s configuration separately using a parallel configuration file in
the Build Directory or configuration directory within a layer, and you
must follow a required file hierarchy. Additionally, you must enable the
multiple configuration builds in your local.conf file.
Follow these steps to set up and execute multiple configuration builds:
Create Separate Configuration Files: You need to create a single Configuration File for each build target (each multiconfig). The configuration definitions are implementation dependent but often each configuration file will define the MACHINE and the temporary directory (TMPDIR) BitBake uses for the build.
Note
Whether the same temporary directory (TMPDIR) can be shared will depend on what is similar and what is different between the configurations. Multiple MACHINE targets can share the same TMPDIR as long as the rest of the configuration is the same, multiple DISTRO settings would need separate TMPDIR directories.
For example, consider a scenario with two different multiconfigs for the same MACHINE: “qemux86” built for two distributions such as “poky” and “poky-lsb”. In this case, you would need to use two different TMPDIR.
In the general case, using separate TMPDIR for the different multiconfigs is strongly recommended.
The location for these multiconfig configuration files is specific. They must reside in the current Build Directory in a sub-directory of
confnamedmulticonfigor within a Layer’sconfdirectory under a directory namedmulticonfig. Here is an example that defines two configuration files for the “x86” and “arm” multiconfigs: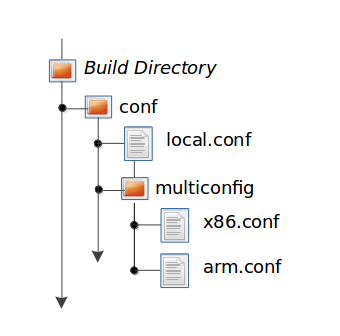
The usual BBPATH search path is used to locate multiconfig files in a similar way to other configuration files.
Here is an example showing the minimal statements needed in a configuration file named
qemux86.conffor aqemux86target whose temporary build directory istmp-qemux86:MACHINE = "qemux86" TMPDIR .= "-${BB_CURRENT_MC}"
BitBake will expand the BB_CURRENT_MC variable to the value of the current multiconfig in use. We append this value to TMPDIR so that any change on the definition of TMPDIR will automatically affect the value of TMPDIR for each multiconfig.
Add the BitBake Multi-configuration Variable to the Local Configuration File: Use the BBMULTICONFIG variable in your
conf/local.confconfiguration file to specify each multiconfig. Continuing with the example from the previous figure, the BBMULTICONFIG variable needs to enable two multiconfigs: “x86” and “arm” by specifying each configuration file:BBMULTICONFIG = "x86 arm"
Note
A “default” configuration already exists by definition. This configuration is named: “” (i.e. empty string) and is defined by the variables coming from your
local.conffile. Consequently, the previous example actually adds two additional configurations to your build: “arm” and “x86” along with “”.Launch BitBake: Use the following BitBake command form to launch the multiple configuration build:
$ bitbake [mc:multiconfigname:]target [[[mc:multiconfigname:]target] ... ]
For the example in this section, the following command applies:
$ bitbake mc:x86:core-image-minimal mc:arm:core-image-sato mc::core-image-base
The previous BitBake command builds several components:
A
core-image-minimalimage that is configured through thex86.confconfiguration fileA
core-image-satoimage that is configured through thearm.confconfiguration fileA
core-image-basethat is configured through yourlocal.confconfiguration file
Note
Support for multiple configuration builds in the Yocto Project 6.0.2 (Wrynose) Release does not include Shared State (sstate) optimizations. Consequently, if a build uses the same object twice in, for example, two different TMPDIR directories, the build either loads from an existing sstate cache for that build at the start or builds the object fresh.
15.2 Enabling Multiple Configuration Build Dependencies
Sometimes dependencies can exist between targets (multiconfigs) in a
multiple configuration build. For example, suppose that in order to
build a core-image-sato image for an “x86” multiconfig, the root
filesystem of an “arm” multiconfig must exist. This dependency is
essentially that the
do_image task in the
core-image-sato recipe depends on the completion of the
do_rootfs task of the
core-image-minimal recipe.
To enable dependencies in a multiple configuration build, you must declare the dependencies in the recipe using the following statement form:
task_or_package[mcdepends] = "mc:from_multiconfig:to_multiconfig:recipe_name:task_on_which_to_depend"
To better show how to use this statement, consider the example scenario
from the first paragraph of this section. The following statement needs
to be added to the recipe that builds the core-image-sato image:
do_image[mcdepends] = "mc:x86:arm:core-image-minimal:do_rootfs"
In this example, the from_multiconfig is “x86”. The to_multiconfig is “arm”. The
task on which the do_image task in the recipe depends is the
do_rootfs task from the core-image-minimal recipe associated
with the “arm” multiconfig.
Once you set up this dependency, you can build the “x86” multiconfig using a BitBake command as follows:
$ bitbake mc:x86:core-image-sato
This command executes all the tasks needed to create the
core-image-sato image for the “x86” multiconfig. Because of the
dependency, BitBake also executes through the do_rootfs task for the
“arm” multiconfig build.
Having a recipe depend on the root filesystem of another build might not
seem that useful. Consider this change to the statement in the
core-image-sato recipe:
do_image[mcdepends] = "mc:x86:arm:core-image-minimal:do_image"
In this case, BitBake must
create the core-image-minimal image for the “arm” build since the
“x86” build depends on it.
Because “x86” and “arm” are enabled for multiple configuration builds and have separate configuration files, BitBake places the artifacts for each build in the respective temporary build directories (i.e. TMPDIR).
15.3 Suggested best practices
TMPDIR (other than the default set in bitbake.conf) is only set in
local.confby the user. This means that we should not manipulate TMPDIR in any way within the Machine or Distro configuration file.A multiconfig should specify a TMPDIR, and should specify it by appending the multiconfig name with BB_CURRENT_MC.
Recipes that are used to transfer the output from a multiconfig build to another should use
do_task[mcdepends]to trigger the build of the component, and then transfer the item to the current configuration in do_install and do_deploy, assuming the value of the deployed item based on TMPDIR.The do_install and do_deploy tasks should look like this:
do_install() { install -m 0644 ${TMPDIR}-<multiconfig>/tmp/deploy/images/<machine>/somefile ${D}/some/path } do_deploy() { install -m 0644 ${TMPDIR}-<multiconfig>/tmp/deploy/images/<machine>/somefile ${DEPLOYDIR}/somefile }In the example above:
<multiconfig>is the multiconfig name as set by the multiconfig configuration file (see the Setting Up and Running a Multiple Configuration Build section above).<machine>must be the MACHINE for whichsomefilewas built and deployed. This value may differ from the current MACHINE if the multiconfig configuration file overrides it.
Firmware recipes can set the INHIBIT_DEFAULT_DEPS variable to
1if they don’t rely on default dependencies such as the standard C library.
15.4 Common use case: building baremetal firmware alongside a Linux build
A common use case for multiconfig is to use the default configuration as the regular Linux build, while one or more multiconfigs can be used to build special components, such as baremetal firmware. It would also apply to a scenario where a microcontroller, for example, is companion to a main processor where Linux is running. This section details how one can achieve these kinds of scenarios with a multiconfig build.
15.4.1 Adding a multiconfig configuration file and recipe for a baremetal firmware
As described in Setting Up and Running a Multiple Configuration Build, each multiconfig will require a separate Configuration File. In addition, we will define a separate TMPDIR for our baremetal firmware build configuration.
For example, we will define a new conf/multiconfig/baremetal-firmware.conf
as follows:
TMPDIR .= "-${BB_CURRENT_MC}"
TCLIBC = "newlib"
The baremetal-firmware.conf file configures a separate TMPDIR for
holding binaries compiled with the newlib
toolchain (see TCLIBC).
Note
Here, the default MACHINE is not overridden by the multiconfig configuration file. As a consequence, the architecture of the built baremetal binaries will be the same. In other cases, where the firmware runs on a completely different architecture, the MACHINE must be overridden.
We then create a recipe my-firmware.bb that defines how the baremetal
firmware is built. The recipe should contain enough information for the
OpenEmbedded build system to properly compile the firmware with our
toolchain. The building tasks may vary depending on the nature of the firmware.
However, the recipe should define a deploy task that deploys
the output into the DEPLOYDIR directory. We will consider in the
following that the file is named my-firmware.elf.
15.4.2 Building the firmware
The firmware can be built with BitBake with the following command:
$ bitbake mc:baremetal-firmware:my-firmware
However, we would prefer for my-firmware to be automatically built when
triggering a normal Linux build.
Using a mcdepend, a recipe belonging to the Linux build can trigger the
build of my-firmware. For example, let’s consider that our Linux build needs
to assemble a “special” firmware that uses the output of our my-firmware
recipe - let’s call it my-parent-firmware.bb. Then, we should specify this
dependency in my-parent-firmware.bb with:
do_compile[mcdepends] = "mc::baremetal-firmware:my-firmware:do_deploy"
The above will ensure that when the do_compile task of
my-parent-firmware is triggered, the do_deploy task of
my-firmware will already have run successfully.
15.4.3 Using the output of my-firmware
After my-firmware recipe has deployed my-firmware.elf, we need to use
the output in some way. We can make a series of assumptions, based on the
default Yocto Project variables in order to get the binary for packaging.
First, we can set the following in my-parent-firmware.bb:
FIRMWARE_FILE ??= "${TMPDIR}-baremetal-firmware/deploy/images/<machine>/my-firmware.elf"
FIRMWARE_FILE[vardepsexclude] += "TMPDIR"
The first assignment stores the value of the path to the firmware built and
deployed by the my-firmware.bb recipe. The second assignment excludes the
TMPDIR variable from being part of FIRMWARE_FILE’s dependencies —
meaning that changing the value of TMPDIR (for example, changing the
host on which the firmware is built) will not invalidate the shared state
cache.
Additionally, <machine> should be replaced by the MACHINE for which
we are building in the baremetal-firmware context.
We can then add a do_install task to my-parent-firmware:
do_install() {
install -Dm 0644 ${FIRMWARE_FILE} ${D}/lib/firmware/my-firmware.elf
}
Doing the above will allow the firmware binary to be transferred and packaged into the Linux context and rootfs.
16 Speeding Up a Build
Build time can be an issue. By default, the build system uses simple controls to try and maximize build efficiency. In general, the default settings for all the following variables result in the most efficient build times when dealing with single socket systems (i.e. a single CPU). If you have multiple CPUs, you might try increasing the default values to gain more speed. See the descriptions in the glossary for each variable for more information:
BB_NUMBER_THREADS: The maximum number of threads BitBake simultaneously executes.
BB_NUMBER_PARSE_THREADS: The number of threads BitBake uses during parsing.
PARALLEL_MAKE: Extra options passed to the
makecommand during the do_compile task in order to specify parallel compilation on the local build host.PARALLEL_MAKEINST: Extra options passed to the
makecommand during the do_install task in order to specify parallel installation on the local build host.
As mentioned, these variables all scale to the number of processor cores available on the build system. For single socket systems, this auto-scaling ensures that the build system fundamentally takes advantage of potential parallel operations during the build based on the build machine’s capabilities.
Additional factors that can affect build speed are:
File system type: The file system type that the build is being performed on can also influence performance. Using
ext4is recommended as compared toext2andext3due toext4improved features such as extents.Disabling the updating of access time using
noatime: Thenoatimemount option prevents the build system from updating file and directory access times.Setting a longer commit: Using the “commit=” mount option increases the interval in seconds between disk cache writes. Changing this interval from the five second default to something longer increases the risk of data loss but decreases the need to write to the disk, thus increasing the build performance.
Choosing the packaging backend: Of the available packaging backends, IPK is the fastest. Additionally, selecting a singular packaging backend also helps.
Using
tmpfsfor TMPDIR as a temporary file system: While this can help speed up the build, the benefits are limited due to the compiler using-pipe. The build system goes to some lengths to avoidsync()calls into the file system on the principle that if there was a significant failure, the Build Directory contents could easily be rebuilt.Inheriting the rm_work class: Inheriting this class has shown to speed up builds due to significantly lower amounts of data stored in the data cache as well as on disk. Inheriting this class also makes cleanup of TMPDIR faster, at the expense of being easily able to dive into the source code. File system maintainers have recommended that the fastest way to clean up large numbers of files is to reformat partitions rather than delete files due to the linear nature of partitions. This, of course, assumes you structure the disk partitions and file systems in a way that this is practical.
Aside from the previous list, you should keep some trade offs in mind that can help you speed up the build:
Remove items from DISTRO_FEATURES that you might not need.
Exclude debug symbols and other debug information: If you do not need these symbols and other debug information, disabling the
*-dbgpackage generation can speed up the build. You can disable this generation by setting the INHIBIT_PACKAGE_DEBUG_SPLIT variable to “1”.Disable static library generation for recipes derived from
autoconforlibtool: Here is an example showing how to disable static libraries and still provide an override to handle exceptions:STATICLIBCONF = "--disable-static" STATICLIBCONF:sqlite3-native = "" EXTRA_OECONF += "${STATICLIBCONF}"
Note
Some recipes need static libraries in order to work correctly (e.g.
pseudo-nativeneedssqlite3-native). Overrides, as in the previous example, account for these kinds of exceptions.Some packages have packaging code that assumes the presence of the static libraries. If so, you might need to exclude them as well.
17 Limiting the Host Resources Usage
While you sometimes need to speed up a build, you may also need to limit the resources used by the OpenEmbedded Build System, especially on shared infrastructures where multiple users start heavy-load builds, or when building on low-power machines.
This document aims at giving the different configuration variables available to limit the resources used by the build system. These variables should be set from a configuration file and thus take effect over the entire build environment. For each variable, also see the variable description in the glossary for more details.
-
This sets a hard limit on the number of threads BitBake can run at the same time. Lowering this value will set a limit to the number of BitBake threads, but will not prevent a single task from starting more compilation threads (see PARALLEL_MAKE).
-
Like BB_NUMBER_THREADS, but this variable sets a limit on the number of threads during the parsing of the environment (before executing tasks).
-
This variable should be set in the form of
-jN, whereNis a positive integer. This integer controls the number of threads used when startingmake. Note that this variable is not limited to the usage ofmake, but extends to the compilation (do_compile task) commands defined by the meson, cmake and such classes.If you want to have a different limit from the rest of the build for a recipe, it is also possible to achieve with the following line added to your
local.confconfiguration file:PARALLEL_MAKE:pn-linux-yocto = "-j4"
The above example will limit the number of threads used by
makefor thelinux-yoctorecipe to 4. -
Like PARALLEL_MAKE, but this variable controls the number of threads used during the do_install task.
The default value of PARALLEL_MAKEINST is the value of PARALLEL_MAKE.
Note
While most of the variables in this document help to limit the CPU load, it
is also possible that the host system runs out of physical RAM when running
builds. This can trigger the out-of-memory killer and stop the related
processes abruptly. This can create strange looking failures in the output
log of the tasks in question. The out-of-memory killer only logs in the
kernel dmesg logs, so it is advised to monitor it closely with the dmesg
command when encountering unexpected failures during builds.
In these situations, lowering the value of PARALLEL_MAKE and BB_NUMBER_THREADS is recommended.
BB_PRESSURE_MAX_CPU, BB_PRESSURE_MAX_IO and BB_PRESSURE_MAX_MEMORY:
These variables control the limit of pressure (PSI as defined by https://docs.kernel.org/accounting/psi.html) on the system, and will limit the number of BitBake threads dynamically depending on the current pressure of the system. This also means that your host must support the PSI kernel feature (otherwise see BB_LOADFACTOR_MAX below).
These variables take a positive integer between 1 (extremely low limit) and 1000000 (value unlikely ever reached). Setting an extremely low value, such as 2, is not desirable as it will result in BitBake limiting the number of threads to 1 most of the time.
To determine a reasonable value to set for your host, follow the steps below:
In a Bash shell, start the following script, which will provide an estimate of the current pressure on your host:
pressure="0" while true; do prev_pressure="$pressure" pressure=$(head -1 /proc/pressure/cpu | cut -d' ' -f5 | cut -d'=' -f2) echo $(( $pressure - $prev_pressure )) sleep 1 done
Note
Change
/proc/pressure/cputo/proc/pressure/ioor/proc/pressure/memoryto change the pressure type to monitor.This script can be stopped by pressing Control + C.
Then, start a heavy-load build, for example:
bitbake virtual/kernel -c compile -f
You can stop the build at anytime with Control + C.
Monitor the values printed on the console. These should indicate how the pressure evolves during the build. You can take a value below the maximum printed value as a starting point.
After setting initial values, you can monitor when the pressure exceeds of the limit set by the above variables by running BitBake with the
--verboseand--log-domainsflag:$ bitbake virtual/kernel -c compile -f --verbose --log-domains BitBake.RunQueue.PSI
In parallel, you can monitor the pressure information by tracking the output log file:
$ tail -F tmp/log/cooker/<machine>/console-latest.log | grep "Pressure status changed" NOTE: Pressure status changed to CPU: False, IO: None, Mem: None (CPU: 1105.9/2.0, IO: 0.0/2.0, Mem: 0.0/2.0) - using 1/64 bitbake threads ...
Take a look at the value between parenthesis:
CPU: 1105.9/2.0, IO: 0.0/2.0, Mem: 0.0/2.0. They correspond to the current pressure value for the CPU, IO and memory respectively. If BitBake prints these messages a lot, it is likely that your pressure limit is too low, and thus can be raised to a higher value.-
This variable will limit the number of threads BitBake will start by monitoring the current CPU load of the host system. BitBake will print the following when the limit set by BB_LOADFACTOR_MAX is reached:
Load average limiting set to True as load average: 0.7188262939453125 - using 37/64 bitbake threads
This variable has no effect when any of BB_PRESSURE_MAX_CPU, BB_PRESSURE_MAX_IO or BB_PRESSURE_MAX_MEMORY is set, as it was designed for systems that do not have pressure information available.
18 Working With Libraries
Libraries are an integral part of your system. This section describes some common practices you might find helpful when working with libraries to build your system:
How to use the Multilib feature to combine multiple versions of library files into a single image
How to install multiple versions of the same library in parallel on the same system
18.1 Including Static Library Files
If you are building a library and the library offers static linking, you
can control which static library files (*.a files) get included in
the built library.
The PACKAGES and
FILES:* variables in the
meta/conf/bitbake.conf configuration file define how files installed
by the do_install task are packaged. By default, the PACKAGES
variable includes ${PN}-staticdev, which represents all static
library files.
Note
Some previously released versions of the Yocto Project defined the
static library files through ${PN}-dev.
Here is a small part of the BitBake configuration file, where you can see how the static library files are defined:
PACKAGES = "${PN}-src ${PN}-dbg ${PN}-staticdev ${PN}-dev ${PN}-doc ${PN}-locale ${PACKAGE_BEFORE_PN} ${PN}"
FILES:${PN}-staticdev = "${libdir}/*.a ${base_libdir}/*.a ${libdir}/${BPN}/*.a"
SECTION:${PN}-staticdev = "devel"
RDEPENDS:${PN}-staticdev = "${PN}-dev (= ${EXTENDPKGV})"
18.2 Combining Multiple Versions of Library Files into One Image
The build system offers the ability to build libraries with different target optimizations or architecture formats and combine these together into one system image. You can link different binaries in the image against the different libraries as needed for specific use cases. This feature is called “Multilib”.
An example would be where you have most of a system compiled in 32-bit mode using 32-bit libraries, but you have something large, like a database engine, that needs to be a 64-bit application and uses 64-bit libraries. Multilib allows you to get the best of both 32-bit and 64-bit libraries.
While the Multilib feature is most commonly used for 32 and 64-bit differences, the approach the build system uses facilitates different target optimizations. You could compile some binaries to use one set of libraries and other binaries to use a different set of libraries. The libraries could differ in architecture, compiler options, or other optimizations.
There are several examples in the meta-skeleton layer found in
OpenEmbedded-Core (OE-Core):
conf/multilib-example.conf configuration file.
conf/multilib-example2.conf configuration file.
recipes-multilib/images/core-image-multilib-example.bb recipe
18.2.1 Preparing to Use Multilib
User-specific requirements drive the Multilib feature. Consequently, there is no one “out-of-the-box” configuration that would meet your needs.
In order to enable Multilib, you first need to ensure your recipe is
extended to support multiple libraries. Many standard recipes are
already extended and support multiple libraries. You can check in the
meta/conf/multilib.conf configuration file in
OpenEmbedded-Core (OE-Core) to see how this is
done using the
BBCLASSEXTEND variable.
Eventually, all recipes will be covered and this list will not be
needed.
For the most part, the Multilib
class extension works automatically to
extend the package name from ${PN} to ${MLPREFIX}${PN}, where
MLPREFIX is the particular multilib (e.g. “lib32-” or “lib64-“).
Standard variables such as
DEPENDS,
RDEPENDS,
RPROVIDES,
RRECOMMENDS,
PACKAGES, and
PACKAGES_DYNAMIC are
automatically extended by the system. If you are extending any manual
code in the recipe, you can use the ${MLPREFIX} variable to ensure
those names are extended correctly.
18.2.2 Using Multilib
After you have set up the recipes, you need to define the actual
combination of multiple libraries you want to build. You accomplish this
through your local.conf configuration file in the
Build Directory. An example configuration would be as follows:
MACHINE = "qemux86-64"
require conf/multilib.conf
MULTILIBS = "multilib:lib32"
DEFAULTTUNE:virtclass-multilib-lib32 = "x86"
IMAGE_INSTALL:append = " lib32-glib-2.0"
This example enables an additional library named
lib32 alongside the normal target packages. When combining these
“lib32” alternatives, the example uses “x86” for tuning. For information
on this particular tuning, see
meta/conf/machine/include/ia32/arch-ia32.inc.
The example then includes lib32-glib-2.0 in all the images, which
illustrates one method of including a multiple library dependency. You
can use a normal image build to include this dependency, for example:
$ bitbake core-image-sato
You can also build Multilib packages specifically with a command like this:
$ bitbake lib32-glib-2.0
18.2.3 Additional Implementation Details
There are generic implementation details as well as details that are specific to package management systems. Here are implementation details that exist regardless of the package management system:
The typical convention used for the class extension code as used by Multilib assumes that all package names specified in PACKAGES that contain
${PN}have${PN}at the start of the name. When that convention is not followed and${PN}appears at the middle or the end of a name, problems occur.The TARGET_VENDOR value under Multilib will be extended to “-vendormlmultilib” (e.g. “-pokymllib32” for a “lib32” Multilib with Poky). The reason for this slightly unwieldy contraction is that any “-” characters in the vendor string presently break Autoconf’s
config.sub, and other separators are problematic for different reasons.
Here are the implementation details for the RPM Package Management System:
A unique architecture is defined for the Multilib packages, along with creating a unique deploy folder under
tmp/deploy/rpmin the Build Directory. For example, considerlib32in aqemux86-64image. The possible architectures in the system are “all”, “qemux86_64”, “lib32:qemux86_64”, and “lib32:x86”.The
${MLPREFIX}variable is stripped from${PN}during RPM packaging. The naming for a normal RPM package and a Multilib RPM package in aqemux86-64system resolves to something similar tobash-4.1-r2.x86_64.rpmandbash-4.1.r2.lib32_x86.rpm, respectively.When installing a Multilib image, the RPM backend first installs the base image and then installs the Multilib libraries.
The build system relies on RPM to resolve the identical files in the two (or more) Multilib packages.
Here are the implementation details for the IPK Package Management System:
The
${MLPREFIX}is not stripped from${PN}during IPK packaging. The naming for a normal RPM package and a Multilib IPK package in aqemux86-64system resolves to something likebash_4.1-r2.x86_64.ipkandlib32-bash_4.1-rw:x86.ipk, respectively.The IPK deploy folder is not modified with
${MLPREFIX}because packages with and without the Multilib feature can exist in the same folder due to the${PN}differences.IPK defines a sanity check for Multilib installation using certain rules for file comparison, overridden, etc.
18.3 Installing Multiple Versions of the Same Library
There might be situations where you need to install and use multiple versions of the same library on the same system at the same time. This almost always happens when a library API changes and you have multiple pieces of software that depend on the separate versions of the library. To accommodate these situations, you can install multiple versions of the same library in parallel on the same system.
The process is straightforward as long as the libraries use proper
versioning. With properly versioned libraries, all you need to do to
individually specify the libraries is create separate, appropriately
named recipes where the PN part of
the name includes a portion that differentiates each library version
(e.g. the major part of the version number). Thus, instead of having a
single recipe that loads one version of a library (e.g. clutter),
you provide multiple recipes that result in different versions of the
libraries you want. As an example, the following two recipes would allow
the two separate versions of the clutter library to co-exist on the
same system:
clutter-1.6_1.6.20.bb
clutter-1.8_1.8.4.bb
Additionally, if
you have other recipes that depend on a given library, you need to use
the DEPENDS variable to
create the dependency. Continuing with the same example, if you want to
have a recipe depend on the 1.8 version of the clutter library, use
the following in your recipe:
DEPENDS = "clutter-1.8"
19 Working with Pre-Built Libraries
19.1 Introduction
Some library vendors do not release source code for their software but do release pre-built binaries. When shared libraries are built, they should be versioned (see this article for some background), but sometimes this is not done.
To summarize, a versioned library must meet two conditions:
The filename must have the version appended, for example:
libfoo.so.1.2.3.The library must have the ELF tag
SONAMEset to the major version of the library, for example:libfoo.so.1. You can check this by runningreadelf -d filename | grep SONAME.
This section shows how to deal with both versioned and unversioned pre-built libraries.
19.2 Versioned Libraries
In this example we work with pre-built libraries for the FT4222H USB I/O chip. Libraries are built for several target architecture variants and packaged in an archive as follows:
├── build-arm-hisiv300
│ └── libft4222.so.1.4.4.44
├── build-arm-v5-sf
│ └── libft4222.so.1.4.4.44
├── build-arm-v6-hf
│ └── libft4222.so.1.4.4.44
├── build-arm-v7-hf
│ └── libft4222.so.1.4.4.44
├── build-arm-v8
│ └── libft4222.so.1.4.4.44
├── build-i386
│ └── libft4222.so.1.4.4.44
├── build-i486
│ └── libft4222.so.1.4.4.44
├── build-mips-eglibc-hf
│ └── libft4222.so.1.4.4.44
├── build-pentium
│ └── libft4222.so.1.4.4.44
├── build-x86_64
│ └── libft4222.so.1.4.4.44
├── examples
│ ├── get-version.c
│ ├── i2cm.c
│ ├── spim.c
│ └── spis.c
├── ftd2xx.h
├── install4222.sh
├── libft4222.h
├── ReadMe.txt
└── WinTypes.h
To write a recipe to use such a library in your system:
The vendor will probably have a proprietary licence, so set LICENSE_FLAGS in your recipe.
The vendor provides a tarball containing libraries so set SRC_URI appropriately.
Set COMPATIBLE_HOST so that the recipe cannot be used with an unsupported architecture. In the following example, we only support the 32 and 64 bit variants of the
x86architecture.As the vendor provides versioned libraries, we can use
oe_soinstallfrom utils to install the shared library and create symbolic links. If the vendor does not do this, we need to follow the non-versioned library guidelines in the next section.As the vendor likely used LDFLAGS different from those in your Yocto Project build, disable the corresponding checks by adding
ldflagsto INSANE_SKIP.The vendor will typically ship release builds without debugging symbols. Avoid errors by preventing the packaging task from stripping out the symbols and adding them to a separate debug package. This is done by setting the
INHIBIT_flags shown below.
The complete recipe would look like this:
SUMMARY = "FTDI FT4222H Library"
SECTION = "libs"
LICENSE_FLAGS = "ftdi"
LICENSE = "CLOSED"
COMPATIBLE_HOST = "(i.86|x86_64).*-linux"
# Sources available in a .tgz file in .zip archive
# at https://ftdichip.com/wp-content/uploads/2021/01/libft4222-linux-1.4.4.44.zip
# Found on https://ftdichip.com/software-examples/ft4222h-software-examples/
# Since dealing with this particular type of archive is out of topic here,
# we use a local link.
SRC_URI = "file://libft4222-linux-${PV}.tgz"
S = "${UNPACKDIR}"
ARCH_DIR:x86-64 = "build-x86_64"
ARCH_DIR:i586 = "build-i386"
ARCH_DIR:i686 = "build-i386"
INSANE_SKIP:${PN} = "ldflags"
INHIBIT_PACKAGE_STRIP = "1"
INHIBIT_SYSROOT_STRIP = "1"
INHIBIT_PACKAGE_DEBUG_SPLIT = "1"
do_install () {
install -m 0755 -d ${D}${libdir}
oe_soinstall ${S}/${ARCH_DIR}/libft4222.so.${PV} ${D}${libdir}
install -d ${D}${includedir}
install -m 0755 ${S}/*.h ${D}${includedir}
}
If the precompiled binaries are not statically linked and have dependencies on other libraries, then by adding those libraries to DEPENDS, the linking can be examined and the appropriate RDEPENDS automatically added.
19.3 Non-Versioned Libraries
19.3.1 Some Background
Libraries in Linux systems are generally versioned so that it is possible
to have multiple versions of the same library installed, which eases upgrades
and support for older software. For example, suppose that in a versioned
library, an actual library is called libfoo.so.1.2, a symbolic link named
libfoo.so.1 points to libfoo.so.1.2, and a symbolic link named
libfoo.so points to libfoo.so.1.2. Given these conditions, when you
link a binary against a library, you typically provide the unversioned file
name (i.e. -lfoo to the linker). However, the linker follows the symbolic
link and actually links against the versioned filename. The unversioned symbolic
link is only used at development time. Consequently, the library is packaged
along with the headers in the development package ${PN}-dev along with the
actual library and versioned symbolic links in ${PN}. Because versioned
libraries are far more common than unversioned libraries, the default packaging
rules assume versioned libraries.
19.3.2 Yocto Library Packaging Overview
It follows that packaging an unversioned library requires a bit of work in the
recipe. By default, libfoo.so gets packaged into ${PN}-dev, which
triggers a QA warning that a non-symlink library is in a -dev package,
and binaries in the same recipe link to the library in ${PN}-dev,
which triggers more QA warnings. To solve this problem, you need to package the
unversioned library into ${PN} where it belongs. The abridged
default FILES variables in bitbake.conf are:
SOLIBS = ".so.*"
SOLIBSDEV = ".so"
FILES:${PN} = "... ${libdir}/lib*${SOLIBS} ... ${base_libdir}/*${SOLIBS} ..."
FILES_SOLIBSDEV ?= "${base_libdir}/lib*${SOLIBSDEV} ${libdir}/lib*${SOLIBSDEV}"
FILES:${PN}-dev = "... ${FILES_SOLIBSDEV} ..."
SOLIBS defines a pattern that matches real shared object libraries.
SOLIBSDEV matches the development form (unversioned symlink). These two
variables are then used in FILES:${PN} and FILES:${PN}-dev, which puts
the real libraries into ${PN} and the unversioned symbolic link into ${PN}-dev.
To package unversioned libraries, you need to modify the variables in the recipe
as follows:
SOLIBS = ".so"
FILES_SOLIBSDEV = ""
The modifications cause the .so file to be the real library
and unset FILES_SOLIBSDEV so that no libraries get packaged into
${PN}-dev. The changes are required because unless PACKAGES is changed,
${PN}-dev collects files before ${PN}. ${PN}-dev must not collect any of
the files you want in ${PN}.
Finally, loadable modules, essentially unversioned libraries that are linked
at runtime using dlopen() instead of at build time, should generally be
installed in a private directory. However, if they are installed in ${libdir},
then the modules can be treated as unversioned libraries.
19.3.3 Example
The example below installs an unversioned x86-64 pre-built library named
libfoo.so. The COMPATIBLE_HOST variable limits recipes to the
x86-64 architecture while the INSANE_SKIP, INHIBIT_PACKAGE_STRIP
and INHIBIT_SYSROOT_STRIP variables are all set as in the above
versioned library example. The “magic” is setting the SOLIBS and
FILES_SOLIBSDEV variables as explained above:
SUMMARY = "libfoo sample recipe"
SECTION = "libs"
LICENSE = "CLOSED"
SRC_URI = "file://libfoo.so"
COMPATIBLE_HOST = "x86_64.*-linux"
INSANE_SKIP:${PN} = "ldflags"
INHIBIT_PACKAGE_STRIP = "1"
INHIBIT_SYSROOT_STRIP = "1"
SOLIBS = ".so"
FILES_SOLIBSDEV = ""
do_install () {
install -d ${D}${libdir}
install -m 0755 ${UNPACKDIR}/libfoo.so ${D}${libdir}
}
20 Using the devtool command-line tool
The devtool command-line tool provides a number of features that
help you build, test, and package software. This command is available
alongside the bitbake command. Additionally, the devtool command
is a key part of the Extensible Software Development Kit (eSDK).
20.1 Use devtool add to Add an Application
The devtool add command generates a new recipe based on existing
source code. This command takes advantage of the
The Workspace Layer Structure
layer that many devtool commands use. The command is flexible enough
to allow you to extract source code into both the workspace or a
separate local Git repository and to use existing code that does not
need to be extracted.
Depending on your particular scenario, the arguments and options you use
with devtool add form different combinations. The following diagram
shows common development flows you would use with the devtool add
command:

Generating the New Recipe: The top part of the flow shows three scenarios by which you could use
devtool addto generate a recipe based on existing source code.In a shared development environment, it is typical for other developers to be responsible for various areas of source code. As a developer, you are probably interested in using that source code as part of your development within the Yocto Project. All you need is access to the code, a recipe, and a controlled area in which to do your work.
Within the diagram, three possible scenarios feed into the
devtool addworkflow:Left: The left scenario in the figure represents a common situation where the source code does not exist locally and needs to be extracted. In this situation, the source code is extracted to the default workspace — you do not want the files in some specific location outside of the workspace. Thus, everything you need will be located in the workspace:
$ devtool add recipe fetchuri
With this command,
devtoolextracts the upstream source files into a local Git repository within thesourcesfolder. The command then creates a recipe named recipe and a corresponding append file in the workspace. If you do not provide recipe, the command makes an attempt to determine the recipe name.Middle: The middle scenario in the figure also represents a situation where the source code does not exist locally. In this case, the code is again upstream and needs to be extracted to some local area — this time outside of the default workspace.
Note
If required,
devtoolalways creates a Git repository locally during the extraction.Furthermore, the first positional argument
srctreein this case identifies where thedevtool addcommand will locate the extracted code outside of the workspace. You need to specify an empty directory:$ devtool add recipe srctree fetchuri
In summary, the source code is pulled from fetchuri and extracted into the location defined by
srctreeas a local Git repository.Within workspace,
devtoolcreates a recipe named recipe along with an associated append file.Right: The right scenario in the figure represents a situation where the
srctreehas been previously prepared outside of thedevtoolworkspace.The following command provides a new recipe name and identifies the existing source tree location:
$ devtool add recipe srctree
The command examines the source code and creates a recipe named recipe for the code and places the recipe into the workspace.
Because the extracted source code already exists,
devtooldoes not try to relocate the source code into the workspace — only the new recipe is placed in the workspace.Aside from a recipe folder, the command also creates an associated append folder and places an initial
*.bbappendfile within.
Edit the Recipe: You can use
devtool edit-recipeto open up the editor as defined by the$EDITORenvironment variable and modify the file:$ devtool edit-recipe recipe
From within the editor, you can make modifications to the recipe that take effect when you build it later.
Build the Recipe or Rebuild the Image: The next step you take depends on what you are going to do with the new code.
If you need to eventually move the build output to the target hardware, use the following
devtoolcommand:$ devtool build recipe
On the other hand, if you want an image to contain the recipe’s packages from the workspace for immediate deployment onto a device (e.g. for testing purposes), you can use the
devtool build-imagecommand:$ devtool build-image image
Deploy the Build Output: When you use the
devtool buildcommand to build out your recipe, you probably want to see if the resulting build output works as expected on the target hardware.Note
This step assumes you have a previously built image that is already either running in QEMU or is running on actual hardware. Also, it is assumed that for deployment of the image to the target, SSH is installed in the image and, if the image is running on real hardware, you have network access to and from your development machine.
You can deploy your build output to that target hardware by using the
devtool deploy-targetcommand:$ devtool deploy-target recipe target
The target is a live target machine running as an SSH server.
You can, of course, also deploy the image you build to actual hardware by using the
devtool build-imagecommand. However,devtooldoes not provide a specific command that allows you to deploy the image to actual hardware.Finish Your Work With the Recipe: The
devtool finishcommand creates any patches corresponding to commits in the local Git repository, moves the new recipe to a more permanent layer, and then resets the recipe so that the recipe is built normally rather than from the workspace:$ devtool finish recipe layer
Note
Any changes you want to turn into patches must be committed to the Git repository in the source tree.
As mentioned, the
devtool finishcommand moves the final recipe to its permanent layer.As a final process of the
devtool finishcommand, the state of the standard layers and the upstream source is restored so that you can build the recipe from those areas rather than the workspace.Note
You can use the
devtool resetcommand to put things back should you decide you do not want to proceed with your work. If you do use this command, realize that the source tree is preserved.
20.2 Use devtool modify to Modify the Source of an Existing Component
The devtool modify command prepares the way to work on existing code
that already has a local recipe in place that is used to build the
software. The command is flexible enough to allow you to extract code
from an upstream source, specify the existing recipe, and keep track of
and gather any patch files from other developers that are associated
with the code.
Depending on your particular scenario, the arguments and options you use
with devtool modify form different combinations. The following
diagram shows common development flows for the devtool modify
command:
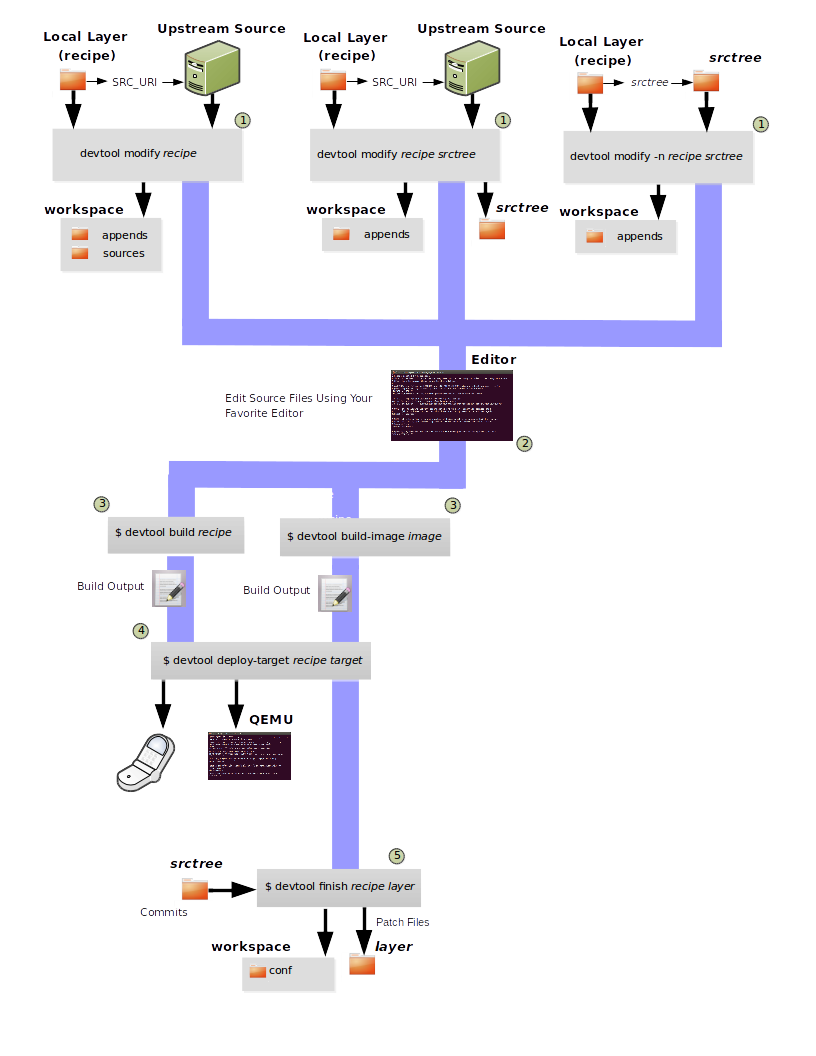
Preparing to Modify the Code: The top part of the flow shows three scenarios by which you could use
devtool modifyto prepare to work on source files. Each scenario assumes the following:The recipe exists locally in a layer external to the
devtoolworkspace.The source files exist either upstream in an un-extracted state or locally in a previously extracted state.
The typical situation is where another developer has created a layer for use with the Yocto Project and their recipe already resides in that layer. Furthermore, their source code is readily available either upstream or locally.
Left: The left scenario in the figure represents a common situation where the source code does not exist locally and it needs to be extracted from an upstream source. In this situation, the source is extracted into the default
devtoolworkspace location. The recipe, in this scenario, is in its own layer outside the workspace (i.e.meta-layername).The following command identifies the recipe and, by default, extracts the source files:
$ devtool modify recipe
Once
devtoollocates the recipe,devtooluses the recipe’s SRC_URI statements to locate the source code and any local patch files from other developers.With this scenario, there is no
srctreeargument. Consequently, the default behavior of thedevtool modifycommand is to extract the source files pointed to by the SRC_URI statements into a local Git structure. Furthermore, the location for the extracted source is the default area within thedevtoolworkspace. The result is that the command sets up both the source code and an append file within the workspace while the recipe remains in its original location.Additionally, if you have any non-patch local files (i.e. files referred to with
file://entries in SRC_URI statement excluding*.patch/or*.diff), these files are copied to anoe-local-filesfolder under the newly created source tree. Copying the files here gives you a convenient area from which you can modify the files. Any changes or additions you make to those files are incorporated into the build the next time you build the software just as are other changes you might have made to the source.Middle: The middle scenario in the figure represents a situation where the source code also does not exist locally. In this case, the code is again upstream and needs to be extracted to some local area as a Git repository. The recipe, in this scenario, is again local and in its own layer outside the workspace.
The following command tells
devtoolthe recipe with which to work and, in this case, identifies a local area for the extracted source files that exists outside of the defaultdevtoolworkspace:$ devtool modify recipe srctree
Note
You cannot provide a URL for
srctreeusing thedevtoolcommand.As with all extractions, the command uses the recipe’s SRC_URI statements to locate the source files and any associated patch files. Non-patch files are copied to an
oe-local-filesfolder under the newly created source tree.Once the files are located, the command by default extracts them into
srctree.Within workspace,
devtoolcreates an append file for the recipe. The recipe remains in its original location but the source files are extracted to the location you provide withsrctree.Right: The right scenario in the figure represents a situation where the source tree (
srctree) already exists locally as a previously extracted Git structure outside of thedevtoolworkspace. In this example, the recipe also exists elsewhere locally in its own layer.The following command tells
devtoolthe recipe with which to work, uses the “-n” option to indicate source does not need to be extracted, and usessrctreeto point to the previously extracted source files:$ devtool modify -n recipe srctree
If an
oe-local-filessubdirectory happens to exist and it contains non-patch files, the files are used. However, if the subdirectory does not exist and you run thedevtool finishcommand, any non-patch files that might exist next to the recipe are removed because it appears todevtoolthat you have deleted those files.Once the
devtool modifycommand finishes, it creates only an append file for the recipe in thedevtoolworkspace. The recipe and the source code remain in their original locations.
Edit the Source: Once you have used the
devtool modifycommand, you are free to make changes to the source files. You can use any editor you like to make and save your source code modifications.Build the Recipe or Rebuild the Image: The next step you take depends on what you are going to do with the new code.
If you need to eventually move the build output to the target hardware, use the following
devtoolcommand:$ devtool build recipe
On the other hand, if you want an image to contain the recipe’s packages from the workspace for immediate deployment onto a device (e.g. for testing purposes), you can use the
devtool build-imagecommand:$ devtool build-image image
Deploy the Build Output: When you use the
devtool buildcommand to build out your recipe, you probably want to see if the resulting build output works as expected on target hardware.Note
This step assumes you have a previously built image that is already either running in QEMU or running on actual hardware. Also, it is assumed that for deployment of the image to the target, SSH is installed in the image and if the image is running on real hardware that you have network access to and from your development machine.
You can deploy your build output to that target hardware by using the
devtool deploy-targetcommand:$ devtool deploy-target recipe target
The target is a live target machine running as an SSH server.
You can, of course, use other methods to deploy the image you built using the
devtool build-imagecommand to actual hardware.devtooldoes not provide a specific command to deploy the image to actual hardware.Finish Your Work With the Recipe: The
devtool finishcommand creates any patches corresponding to commits in the local Git repository, updates the recipe to point to them (or creates a.bbappendfile to do so, depending on the specified destination layer), and then resets the recipe so that the recipe is built normally rather than from the workspace:$ devtool finish recipe layer
Note
Any changes you want to turn into patches must be staged and committed within the local Git repository before you use the
devtool finishcommand.Because there is no need to move the recipe,
devtool finisheither updates the original recipe in the original layer or the command creates a.bbappendfile in a different layer as provided by layer. Any work you did in theoe-local-filesdirectory is preserved in the original files next to the recipe during thedevtool finishcommand.As a final process of the
devtool finishcommand, the state of the standard layers and the upstream source is restored so that you can build the recipe from those areas rather than from the workspace.Note
You can use the
devtool resetcommand to put things back should you decide you do not want to proceed with your work. If you do use this command, realize that the source tree is preserved.
20.3 devtool ide-sdk configures IDEs and bootstraps SDKs
The devtool ide-sdk command can provide an IDE configuration for IDEs when
working on the source code of one or more recipes.
Depending on the programming language, and the build system used by the recipe,
the tools required for cross-development and remote debugging are different.
For example:
A C/C++ project usually uses CMake or Meson.
A Python project uses setuptools or one of its successors.
A Rust project uses Cargo.
Also, the IDE plugins needed for the integration of a build system with the
IDE and the corresponding settings are usually specific to these build-systems.
To hide all these details from the user, devtool ide-sdk does two things:
It generates any kind of SDK needed for cross-development and remote debugging of the specified recipes.
It generates the configuration for the IDE (and the IDE plugins) for using the cross-toolchain and remote debugging tools provided by the SDK directly from the IDE.
For supported build systems the configurations generated by devtool ide-sdk
combine the advantages of the devtool modify based workflow
(see Using devtool in Your SDK Workflow) with the advantages of the simple Environment Setup
script based workflow (see Running the Extensible SDK Environment Setup Script) provided by Yocto’s
SDK or eSDK:
The source code of the recipe is in the workspace created by
devtool modifyordevtool add. Usingdevtool build,devtool build-image,devtool deploy-targetorbitbakeis possible. Alsodevtool ide-sdkcan be used to update the SDK and the IDE configuration at any time.devtool ide-sdkaims to support multiple programming languages and multiple IDEs natively. “Natively” means that the IDE is configured to call the build tool (e.g.cmakeormeson) directly. This has several advantages. First of all, it is usually much faster to call for examplecmakethandevtool build. It also allows to benefit from the very good integration that IDEs like VSCode offer for tools like CMake or GDB.However, supporting many programming languages and multiple IDEs is quite an elaborate and constantly evolving thing. Support for IDEs is therefore implemented as plugins. Plugins can also be provided by optional layers.
So much about the introduction to the default mode of devtool sdk-ide which
is called the “modified” mode because it uses the workspace created by
devtool modify and the per recipe Sysroots of BitBake.
For some recipes and use cases, this default behavior of devtool ide-sdk
with full devtool and bitbake integration might not be suitable.
To offer full feature parity with the SDK and the eSDK, devtool ide-sdk has
a second mode called “shared” mode.
If devtool ide-sdk is called with the --mode=shared option, it
bootstraps an SDK directly from the BitBake environment, which offers the same
Environment Setup script as described in Running the Extensible SDK Environment Setup Script.
In addition to the (e)SDK installer-based setup, the IDE gets configured
to use the shared Sysroots and the tools from the SDK.
devtool ide-sdk --mode=shared is basically a wrapper for the setup of the
extensible SDK as described in Setting up the Extensible SDK environment directly in a Yocto build.
The use of devtool ide-sdk is an alternative to using one of the SDK
installers.
devtool ide-sdk allows the creation of SDKs that offer all the
functionality of the SDK and the eSDK installers. Compared to the installers,
however, the SDK created with devtool ide-sdk is much more flexible.
For example, it is very easy to change the MACHINE in the
local.conf file, update the layer meta data and then regenerate the SDK.
Let’s take a look at an example of how to use devtool ide-sdk in each of
the two modes:
Modified mode:
In order to use the
devtool ide-sdk, a few settings are needed. As a starting example, the following lines of code can be added to thelocal.conffile:# Build the companion debug file system IMAGE_GEN_DEBUGFS = "1" # Optimize build time: with devtool ide-sdk the dbg tar is not needed IMAGE_FSTYPES_DEBUGFS = "" # Without copying the binaries into roofs-dbg, GDB does not find all source files. IMAGE_CLASSES += "image-combined-dbg" # SSH is mandatory, no password simplifies the usage EXTRA_IMAGE_FEATURES += "\ ssh-server-openssh \ allow-empty-password \ allow-root-login \ empty-root-password \ " # Remote debugging needs gdbserver on the target device IMAGE_INSTALL:append = " gdbserver" # Add the recipes which should be modified to the image # Otherwise some dependencies might be missing. IMAGE_INSTALL:append = " my-recipe"
Assuming the BitBake environment is set up correctly and a workspace has been created for the recipe using
devtool modify my-recipeor probably even better by usingdevtool modify my-recipe --debug-build, the following command can create the SDK and the configuration for VSCode in the recipe workspace:$ devtool ide-sdk my-recipe core-image-minimal --target root@192.168.7.2
The command requires an image recipe (
core-image-minimalfor this example) that is used to create the SDK. This firmware image should also be installed on the target device. It is possible to pass multiple package recipes:$ devtool ide-sdk my-recipe-1 my-recipe-2 core-image-minimal --target root@192.168.7.2
devtool ide-sdktries to create an IDE configuration for all package recipes.What this command does exactly depends on the recipe, more precisely on the build tool used by the recipe. The basic idea is to configure the IDE so that it calls the build tool exactly as
bitbakedoes.For example, a CMake preset is created for a recipe that inherits cmake. In the case of VSCode, CMake presets are supported by the CMake Tools plugin. This is an example of how the build configuration used by
bitbakeis exported to an IDE configuration that gives exactly the same build results.Support for remote debugging with seamless integration into the IDE is important for a cross-SDK.
devtool ide-sdkautomatically generates the necessary helper scripts for deploying the compiled artifacts to the target device as well as the necessary configuration for the debugger and the IDE.Note
To ensure that the debug symbols on the build machine match the binaries running on the target device, it is essential that the image built by
devtool ide-sdkis running on the target device.The default IDE is VSCode. Some hints about using VSCode:
VSCode can be used to work on the BitBake recipes or the application source code. Usually there is one instance of VSCode running in the folder where the BitBake recipes are. This instance has the Yocto Project BitBake plugin running.
Warning
Some VSCode plugins (Python, BitBake and others) need a reasonable configuration to work as expected. Otherwise, some plugins try to index the build directory of BitBake, which keeps your system quite busy until an out of memory exception stops this nonsense. Other plugins, such as the BitBake plugin, do not behave as expected.
To work around such issues, the
oe-init-build-envscript creates an initial.vscode/settings.jsonfile ifcodecan be found and the.vscodefolder does not yet exist. It is best to runoe-init-build-envonce before starting VSCode. An alternative approach is to use a build folder outside the layers, e.g.oe-init-build-env ../build.The BitBake plugin also offers to create devtool workspaces and run
devtool ide-sdkwith a few mouse clicks. Of course, issuing commands in the terminal works as well.To work on the source code of a recipe another instance of VSCode is started in the recipe’s workspace. Example:
code build/workspace/sources/my-recipe
This instance of VSCode uses plugins that are useful for the development of the application.
devtool ide-sdkgenerates the necessaryextensions.json,settings.json,tasks.jsonandlaunch.jsonconfiguration files for all the involved plugins.When the source code folder present in the workspace folder is opened in VSCode for the first time, a pop-up message recommends installing the required plugins. After accepting the installation of the plugins, working with the source code or some debugging tasks should work as usual with VSCode.
Starting the VSCode instances in the recipe workspace folders can also be done by a mouse click on the recipe workspaces in the first VSCode instance.
To work with CMake press
Ctrl + Shift + p, typecmake. This will show some possible commands like selecting a CMake preset, compiling or running CTest.For recipes inheriting cmake-qemu rather than cmake, executing cross-compiled unit tests on the host can be supported transparently with QEMU user-mode.
To work with Meson press
Ctrl + Shift + p, typemeson. This will show some possible commands like compiling or executing the unit tests.A note on running cross-compiled unit tests on the host: Meson enables support for QEMU user mode by default. It is expected that the execution of the unit tests from the IDE will work without any additional steps, given that the code is suitable for the execution on the host machine.
For the deployment to the target device, just press
Ctrl + Shift + p, typetask. Selectinstall && deploy-target.For remote debugging, switch to the debugging view by pressing the “play” button with the
bug iconon the left side. This will provide a green play button with a drop-down list where a debug configuration can be selected. After selecting one of the generated configurations, press the “play” button.Starting a remote debugging session automatically initiates the deployment to the target device. If this is not desired, the
"dependsOn": ["install && deploy-target...]parameter of the tasks with"label": "gdbserver start...can be removed from thetasks.jsonfile.VSCode supports GDB with many different setups and configurations for many different use cases. However, most of these setups have some limitations when it comes to cross-development, support only a few target architectures or require a high performance target device. Therefore
devtool ide-sdksupports the classic, generic setup with GDB on the development host and gdbserver on the target device.Roughly summarized, this means:
The binaries are copied via SSH to the remote target device by a script referred by
tasks.json.gdbserver is started on the remote target device via SSH by a script referred by
tasks.json.Changing the parameters that are passed to the debugging executable requires modifying the generated script. The script is located at
oe-scripts/gdbserver_*. Defining the parameters in theargsfield in thelaunch.jsonfile does not work.VSCode connects to gdbserver as documented in Remote debugging or debugging with a local debugger server.
Additionally
--ide=noneis supported. With thenoneIDE parameter, some generic configuration files likegdbinitfiles and some helper scripts starting gdbserver remotely on the target device as well as the GDB client on the host are generated.Here is a usage example for the
cmake-examplerecipe from themeta-selftestlayer which inherits cmake-qemu:# Create the SDK devtool modify cmake-example --debug-build devtool ide-sdk cmake-example core-image-minimal -c --ide=none # Install the firmware on a target device or start QEMU runqemu # From exploring the workspace of cmake-example cd build/workspace/sources/cmake-example # Find cmake-native and save the path into a variable # Note: using just cmake instead of $CMAKE_NATIVE would work in many cases CMAKE_NATIVE="$(jq -r '.configurePresets[0] | "\(.cmakeExecutable)"' CMakeUserPresets.json)" # List available CMake presets "$CMAKE_NATIVE" --list-presets Available configure presets: "cmake-example-cortexa57" - cmake-example: cortexa57 # Re-compile the already compiled sources "$CMAKE_NATIVE" --build --preset cmake-example-cortexa57 ninja: no work to do. # Do a clean re-build "$CMAKE_NATIVE" --build --preset cmake-example-cortexa57 --target clean [1/1] Cleaning all built files... Cleaning... 8 files. "$CMAKE_NATIVE" --build --preset cmake-example-cortexa57 --target all [7/7] Linking CXX executable cmake-example # Run the cross-compiled unit tests with QEMU user-mode "$CMAKE_NATIVE" --build --preset cmake-example-cortexa57 --target test [0/1] Running tests... Test project .../build/tmp/work/cortexa57-poky-linux/cmake-example/1.0/cmake-example-1.0 Start 1: test-cmake-example 1/1 Test #1: test-cmake-example ............... Passed 0.03 sec 100% tests passed, 0 tests failed out of 1 Total Test time (real) = 0.03 sec # Using CTest directly is possible as well CTEST_NATIVE="$(dirname "$CMAKE_NATIVE")/ctest" # List available CMake presets "$CTEST_NATIVE" --list-presets Available test presets: "cmake-example-cortexa57" - cmake-example: cortexa57 # Run the cross-compiled unit tests with QEMU user-mode "$CTEST_NATIVE" --preset "cmake-example-cortexa57" Test project ...build/tmp/work/cortexa57-poky-linux/cmake-example/1.0/cmake-example-1.0 Start 1: test-cmake-example 1/1 Test #1: test-cmake-example ............... Passed 0.03 sec 100% tests passed, 0 tests failed out of 1 Total Test time (real) = 0.03 sec # Deploying the new build to the target device (default is QEUM at 192.168.7.2) oe-scripts/install_and_deploy_cmake-example-cortexa57 # Start a remote debugging session with gdbserver on the target and GDB on the host oe-scripts/gdbserver_1234_usr-bin-cmake-example_m oe-scripts/gdb_1234_usr-bin-cmake-example break main run step stepi continue quit # Stop gdbserver on the target device oe-scripts/gdbserver_1234_usr-bin-cmake-example_m stop
Shared sysroots mode
Creating an SDK with shared Sysroots that contains all the dependencies needed to work with
my-recipeis possible with the following example command:$ devtool ide-sdk --mode=shared my-recipe
For VSCode the cross-toolchain is exposed as a CMake kit. CMake kits are defined in
~/.local/share/CMakeTools/cmake-tools-kits.json. The following example shows how the cross-toolchain can be selected in VSCode. First of all we need a folder containing a CMake project. For this example, let’s create a CMake project and start VSCode:mkdir kit-test echo "project(foo VERSION 1.0)" > kit-test/CMakeLists.txt code kit-test
If there is a CMake project in the workspace, cross-compilation is supported:
Press
Ctrl + Shift + P, typeCMake: Scan for KitsPress
Ctrl + Shift + P, typeCMake: Select a Kit
Finally most of the features provided by CMake and the IDE should be available.
Other IDEs than VSCode are supported as well. However,
devtool ide-sdk --mode=shared --ide=none my-recipeis currently just a simple wrapper for the setup of the extensible SDK, as described in Setting up the Extensible SDK environment directly in a Yocto build.
20.4 Use devtool upgrade to Create a Version of the Recipe that Supports a Newer Version of the Software
The devtool upgrade command upgrades an existing recipe to that of a
more up-to-date version found upstream. Throughout the life of software,
recipes continually undergo version upgrades by their upstream
publishers. You can use the devtool upgrade workflow to make sure
your recipes you are using for builds are up-to-date with their upstream
counterparts.
Note
Several methods exist by which you can upgrade recipes —
devtool upgrade happens to be one. You can read about all the methods by
which you can upgrade recipes in the
Upgrading Recipes section of the Yocto
Project Development Tasks Manual.
The devtool upgrade command is flexible enough to allow you to specify
source code revision and versioning schemes, extract code into or out of the
devtool The Workspace Layer Structure, and work with any
source file forms that the
Fetchers support.
The following diagram shows the common development flow used with the
devtool upgrade command:
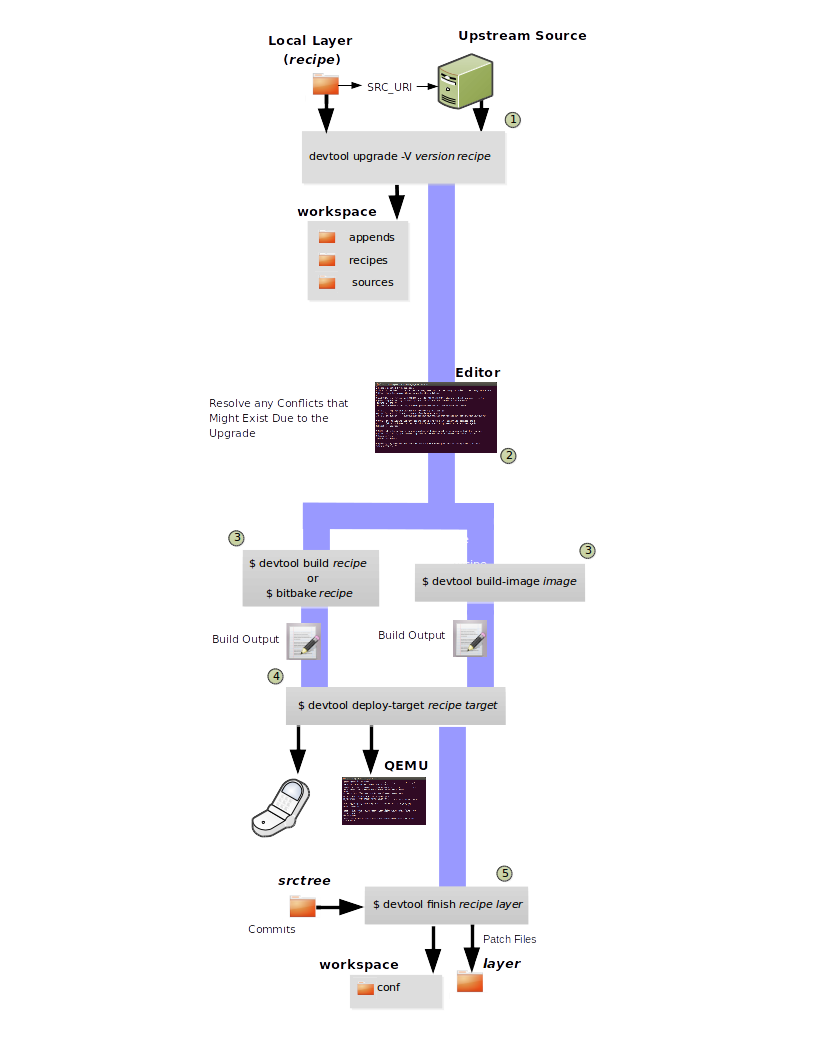
Initiate the Upgrade: The top part of the flow shows the typical scenario by which you use the
devtool upgradecommand. The following conditions exist:The recipe exists in a local layer external to the
devtoolworkspace.The source files for the new release exist in the same location pointed to by SRC_URI in the recipe (e.g. a tarball with the new version number in the name, or as a different revision in the upstream Git repository).
A common situation is where third-party software has undergone a revision so that it has been upgraded. The recipe you have access to is likely in your own layer. Thus, you need to upgrade the recipe to use the newer version of the software:
$ devtool upgrade -V version recipe
By default, the
devtool upgradecommand extracts source code into thesourcesdirectory in the The Workspace Layer Structure. If you want the code extracted to any other location, you need to provide thesrctreepositional argument with the command as follows:$ devtool upgrade -V version recipe srctree
Note
In this example, the “-V” option specifies the new version. If you don’t use “-V”, the command upgrades the recipe to the latest version.
If the source files pointed to by the SRC_URI statement in the recipe are in a Git repository, you must provide the “-S” option and specify a revision for the software.
Once
devtoollocates the recipe, it uses the SRC_URI variable to locate the source code and any local patch files from other developers. The result is that the command sets up the source code, the new version of the recipe, and an append file all within the workspace.Additionally, if you have any non-patch local files (i.e. files referred to with
file://entries in SRC_URI statement excluding*.patch/or*.diff), these files are copied to anoe-local-filesfolder under the newly created source tree. Copying the files here gives you a convenient area from which you can modify the files. Any changes or additions you make to those files are incorporated into the build the next time you build the software just as are other changes you might have made to the source.Resolve any Conflicts created by the Upgrade: Conflicts could happen after upgrading the software to a new version. Conflicts occur if your recipe specifies some patch files in SRC_URI that conflict with changes made in the new version of the software. For such cases, you need to resolve the conflicts by editing the source and following the normal
git rebaseconflict resolution process.Before moving onto the next step, be sure to resolve any such conflicts created through use of a newer or different version of the software.
Build the Recipe or Rebuild the Image: The next step you take depends on what you are going to do with the new code.
If you need to eventually move the build output to the target hardware, use the following
devtoolcommand:$ devtool build recipe
On the other hand, if you want an image to contain the recipe’s packages from the workspace for immediate deployment onto a device (e.g. for testing purposes), you can use the
devtool build-imagecommand:$ devtool build-image image
Deploy the Build Output: When you use the
devtool buildcommand orbitbaketo build your recipe, you probably want to see if the resulting build output works as expected on target hardware.Note
This step assumes you have a previously built image that is already either running in QEMU or running on actual hardware. Also, it is assumed that for deployment of the image to the target, SSH is installed in the image and if the image is running on real hardware that you have network access to and from your development machine.
You can deploy your build output to that target hardware by using the
devtool deploy-targetcommand:$ devtool deploy-target recipe target
The target is a live target machine running as an SSH server.
You can, of course, also deploy the image you build using the
devtool build-imagecommand to actual hardware. However,devtooldoes not provide a specific command that allows you to do this.Finish Your Work With the Recipe: The
devtool finishcommand creates any patches corresponding to commits in the local Git repository, moves the new recipe to a more permanent layer, and then resets the recipe so that the recipe is built normally rather than from the workspace.Any work you did in the
oe-local-filesdirectory is preserved in the original files next to the recipe during thedevtool finishcommand.If you specify a destination layer that is the same as the original source, then the old version of the recipe and associated files are removed prior to adding the new version:
$ devtool finish recipe layer
Note
Any changes you want to turn into patches must be committed to the Git repository in the source tree.
As a final process of the
devtool finishcommand, the state of the standard layers and the upstream source is restored so that you can build the recipe from those areas rather than the workspace.Note
You can use the
devtool resetcommand to put things back should you decide you do not want to proceed with your work. If you do use this command, realize that the source tree is preserved.
20.5 A Closer Look at devtool add
The devtool add command automatically creates a recipe based on the
source tree you provide with the command. Currently, the command has
support for the following:
Autotools (
autoconfandautomake)CMake
Scons
qmakePlain
MakefileOut-of-tree kernel module
Binary package (i.e. “-b” option)
Node.js module
Python modules that use
setuptoolsordistutils
Apart from binary packages, the determination of how a source tree
should be treated is automatic based on the files present within that
source tree. For example, if a CMakeLists.txt file is found, then
the source tree is assumed to be using CMake and is treated accordingly.
Note
In most cases, you need to edit the automatically generated recipe in order to make it build properly. Typically, you would go through several edit and build cycles until the recipe successfully builds. Once the recipe builds, you could use possible further iterations to test the recipe on the target device.
The remainder of this section covers specifics regarding how parts of the recipe are generated.
20.5.1 Name and Version
If you do not specify a name and version on the command line,
devtool add uses various metadata within the source tree in an
attempt to determine the name and version of the software being built.
Based on what the tool determines, devtool sets the name of the
created recipe file accordingly.
If devtool cannot determine the name and version, the command prints
an error. For such cases, you must re-run the command and provide the
name and version, just the name, or just the version as part of the
command line.
Sometimes the name or version determined from the source tree might be incorrect. For such a case, you must reset the recipe:
$ devtool reset -n recipename
After running the devtool reset command, you need to
run devtool add again and provide the name or the version.
20.5.2 Dependency Detection and Mapping
The devtool add command attempts to detect build-time dependencies and map
them to other recipes in the system. During this mapping, the command fills in
the names of those recipes as part of the DEPENDS variable within the
recipe. If a dependency cannot be mapped, devtool places a comment
in the recipe indicating such. The inability to map a dependency can
result from naming not being recognized or because the dependency simply
is not available. For cases where the dependency is not available, you
must use the devtool add command to add an additional recipe that
satisfies the dependency. Once you add that recipe, you need to update
the DEPENDS variable in the original recipe to include the new
recipe.
If you need to add runtime dependencies, you can do so by adding the following to your recipe:
RDEPENDS:${PN} += "dependency1 dependency2 ..."
Note
The devtool add command often cannot distinguish between mandatory and
optional dependencies. Consequently, some of the detected dependencies might
in fact be optional. When in doubt, consult the documentation or the
configure script for the software the recipe is building for further
details. In some cases, you might find you can substitute the
dependency with an option that disables the associated functionality
passed to the configure script.
20.5.3 License Detection
The devtool add command attempts to determine if the software you are
adding is able to be distributed under a common, open-source license. If
so, the command sets the LICENSE value accordingly.
You should double-check the value added by the command against the
documentation or source files for the software you are building and, if
necessary, update that LICENSE value.
The devtool add command also sets the LIC_FILES_CHKSUM
value to point to all files that appear to be license-related. Realize
that license statements often appear in comments at the top of source
files or within the documentation. In such cases, the command does not
recognize those license statements. Consequently, you might need to
amend the LIC_FILES_CHKSUM variable to point to one or more of those
comments if present. Setting LIC_FILES_CHKSUM is particularly
important for third-party software. The mechanism attempts to ensure
correct licensing should you upgrade the recipe to a newer upstream
version in future. Any change in licensing is detected and you receive
an error prompting you to check the license text again.
If the devtool add command cannot determine licensing information,
devtool sets the LICENSE value to “CLOSED” and leaves the
LIC_FILES_CHKSUM value unset. This behavior allows you to continue
with development even though the settings are unlikely to be correct in
all cases. You should check the documentation or source files for the
software you are building to determine the actual license.
20.5.4 Adding Makefile-Only Software
The use of Make by itself is very common in both proprietary and
open-source software. Unfortunately, Makefiles are often not written
with cross-compilation in mind. Thus, devtool add often cannot do
very much to ensure that these Makefiles build correctly. It is very
common, for example, to explicitly call gcc instead of using the
CC variable. Usually, in a
cross-compilation environment, gcc is the compiler for the build
host and the cross-compiler is named something similar to
arm-poky-linux-gnueabi-gcc and might require arguments (e.g. to
point to the associated sysroot for the target machine).
When writing a recipe for Makefile-only software, keep the following in mind:
You probably need to patch the Makefile to use variables instead of hardcoding tools within the toolchain such as
gccandg++.The environment in which Make runs is set up with various standard variables for compilation (e.g. CC, CXX, and so forth) in a similar manner to the environment set up by an SDK’s environment setup script. One easy way to see these variables is to run the
devtool buildcommand on the recipe and then look inoe-logs/run.do_compile. Towards the top of this file, there is a list of environment variables that are set. You can take advantage of these variables within the Makefile.If the Makefile sets a default for a variable using “=”, that default overrides the value set in the environment, which is usually not desirable. For this case, you can either patch the Makefile so it sets the default using the “?=” operator, or you can alternatively force the value on the
makecommand line. To force the value on the command line, add the variable setting to EXTRA_OEMAKE or PACKAGECONFIG_CONFARGS within the recipe. Here is an example using EXTRA_OEMAKE:EXTRA_OEMAKE += "'CC=${CC}' 'CXX=${CXX}'"
In the above example, single quotes are used around the variable settings as the values are likely to contain spaces because required default options are passed to the compiler.
Hardcoding paths inside Makefiles is often problematic in a cross-compilation environment. This is particularly true because those hardcoded paths often point to locations on the build host and thus will either be read-only or will introduce contamination into the cross-compilation because they are specific to the build host rather than the target. Patching the Makefile to use prefix variables or other path variables is usually the way to handle this situation.
Sometimes a Makefile runs target-specific commands such as
ldconfig. For such cases, you might be able to apply patches that remove these commands from the Makefile.
20.5.5 Adding Native Tools
Often, you need to build additional tools that run on the Build Host
as opposed to the target. You should indicate this requirement by using one of
the following methods when you run devtool add:
Specify the name of the recipe such that it ends with “-native”. Specifying the name like this produces a recipe that only builds for the build host.
Specify the “–also-native” option with the
devtool addcommand. Specifying this option creates a recipe file that still builds for the target but also creates a variant with a “-native” suffix that builds for the build host.
Note
If you need to add a tool that is shipped as part of a source tree that builds code for the target, you can typically accomplish this by building the native and target parts separately rather than within the same compilation process. Realize though that with the “–also-native” option, you can add the tool using just one recipe file.
20.5.6 Adding Node.js Modules
Warning
The NPM fetcher is currently disabled due to security concerns. See 355cd22 for more information.
You can use the devtool add command two different ways to add
Node.js modules: through npm or from a repository or local source.
Use the following form to add Node.js modules through npm:
$ devtool add "npm://registry.npmjs.org;name=forever;version=0.15.1"
The name and version parameters are mandatory. Lockdown and shrinkwrap files are generated and pointed to by the recipe in order to freeze the version that is fetched for the dependencies according to the first time. This also saves checksums that are verified on future fetches. Together, these behaviors ensure the reproducibility and integrity of the build.
Note
You must use quotes around the URL.
devtool adddoes not require the quotes, but the shell considers “;” as a splitter between multiple commands. Thus, without the quotes,devtool adddoes not receive the other parts, which results in several “command not found” errors.
As mentioned earlier, you can also add Node.js modules directly from a
repository or local source tree. To add modules this way, use
devtool add in the following form:
$ devtool add https://github.com/diversario/node-ssdp
In this example, devtool fetches the specified Git repository, detects the
code as Node.js code, fetches dependencies using npm, and sets
SRC_URI accordingly.
20.6 Working With Recipes
When building a recipe using the devtool build command, the typical
build progresses as follows:
Fetch the source
Unpack the source
Configure the source
Compile the source
Install the build output
Package the installed output
For recipes in the workspace, fetching and unpacking is disabled as the source tree has already been prepared and is persistent. Each of these build steps is defined as a function (task), usually with a “do_” prefix (e.g. do_fetch, do_unpack, and so forth). These functions are typically shell scripts but can instead be written in Python.
If you look at the contents of a recipe, you will see that the recipe
does not include complete instructions for building the software.
Instead, common functionality is encapsulated in classes inherited with
the inherit directive. This technique leaves the recipe to describe
just the things that are specific to the software being built. There is
a base class that is implicitly inherited by all recipes
and provides the functionality that most recipes typically need.
The remainder of this section presents information useful when working with recipes.
20.6.1 Finding Logs and Work Files
After the first run of the devtool build command, recipes that were
previously created using the devtool add command or whose sources
were modified using the devtool modify command contain symbolic
links created within the source tree:
oe-logs: This link points to the directory in which log files and run scripts for each build step are created.oe-workdir: This link points to the temporary work area for the recipe. The following locations underoe-workdirare particularly useful:image/: Contains all of the files installed during the do_install stage. Within a recipe, this directory is referred to by the expression${D}.sysroot-destdir/: Contains a subset of files installed within do_install that have been put into the shared sysroot. For more information, see the “Sharing Files Between Recipes” section.packages-split/: Contains subdirectories for each package produced by the recipe. For more information, see the “Packaging” section.
You can use these links to get more information on what is happening at each build step.
20.6.2 Setting Configure Arguments
If the software your recipe is building uses GNU autoconf, then a fixed
set of arguments is passed to it to enable cross-compilation plus any
extras specified by EXTRA_OECONF or PACKAGECONFIG_CONFARGS
set within the recipe. If you wish to pass additional options, add them
to EXTRA_OECONF or PACKAGECONFIG_CONFARGS. Other supported build
tools have similar variables (e.g. EXTRA_OECMAKE for CMake,
EXTRA_OESCONS for Scons, and so forth). If you need to pass anything on
the make command line, you can use EXTRA_OEMAKE or the
PACKAGECONFIG_CONFARGS variables to do so.
You can use the devtool configure-help command to help you set the
arguments listed in the previous paragraph. The command determines the
exact options being passed, and shows them to you along with any custom
arguments specified through EXTRA_OECONF or
PACKAGECONFIG_CONFARGS. If applicable, the command also shows you
the output of the configure script’s “–help” option as a
reference.
20.6.4 Packaging
If you examine how build output gets into the final image on the target device, it is important to understand packaging because the contents of the image are expressed in terms of packages and not recipes.
During the do_package task, files installed during the
do_install task are split into one main package, which is almost
always named the same as the recipe, and into several other packages. This
separation exists because not all of those installed files are useful in every
image. For example, you probably do not need any of the documentation installed
in a production image. Consequently, for each recipe the documentation
files are separated into a -doc package. Recipes that package
software containing optional modules or plugins might undergo additional
package splitting as well.
After building a recipe, you can see where files have gone by looking in
the oe-workdir/packages-split directory, which contains a
subdirectory for each package. Apart from some advanced cases, the
PACKAGES and FILES variables controls
splitting. The PACKAGES variable lists all of the packages to be
produced, while the FILES variable specifies which files to include
in each package by using an override to specify the package. For
example, FILES:${PN} specifies the files to go into the main package
(i.e. the main package has the same name as the recipe and
${PN} evaluates to the
recipe name). The order of the PACKAGES value is significant. For
each installed file, the first package whose FILES value matches the
file is the package into which the file goes. Both the PACKAGES and
FILES variables have default values. Consequently, you might find
you do not even need to set these variables in your recipe unless the
software the recipe is building installs files into non-standard
locations.
20.7 Restoring the Target Device to its Original State
If you use the devtool deploy-target command to write a recipe’s
build output to the target, and you are working on an existing component
of the system, then you might find yourself in a situation where you
need to restore the original files that existed prior to running the
devtool deploy-target command. Because the devtool deploy-target
command backs up any files it overwrites, you can use the
devtool undeploy-target command to restore those files and remove
any other files the recipe deployed. Consider the following example:
$ devtool undeploy-target lighttpd root@192.168.7.2
If you have deployed multiple applications, you can remove them all using the “-a” option thus restoring the target device to its original state:
$ devtool undeploy-target -a root@192.168.7.2
Information about files deployed to the target as well as any backed up files are stored on the target itself. This storage, of course, requires some additional space on the target machine.
Note
The devtool deploy-target and devtool undeploy-target commands do
not currently interact with any package management system on the target
device (e.g. RPM or OPKG). Consequently, you should not intermingle
devtool deploy-target and package manager operations on the target
device. Doing so could result in a conflicting set of files.
21 Using x32 psABI
x32 processor-specific Application Binary Interface (x32 psABI) is a native 32-bit processor-specific ABI for Intel 64 (x86-64) architectures. An ABI defines the calling conventions between functions in a processing environment. The interface determines what registers are used and what the sizes are for various C data types.
Some processing environments prefer using 32-bit applications even when running on Intel 64-bit platforms. Consider the i386 psABI, which is a very old 32-bit ABI for Intel 64-bit platforms. The i386 psABI does not provide efficient use and access of the Intel 64-bit processor resources, leaving the system underutilized. Now consider the x86_64 psABI. This ABI is newer and uses 64-bits for data sizes and program pointers. The extra bits increase the footprint size of the programs, libraries, and also increases the memory and file system size requirements. Executing under the x32 psABI enables user programs to utilize CPU and system resources more efficiently while keeping the memory footprint of the applications low. Extra bits are used for registers but not for addressing mechanisms.
The Yocto Project supports the final specifications of x32 psABI as follows:
You can create packages and images in x32 psABI format on x86_64 architecture targets.
You can successfully build recipes with the x32 toolchain.
You can create and boot
core-image-minimalandcore-image-satoimages.There is RPM Package Manager (RPM) support for x32 binaries.
There is support for large images.
To use the x32 psABI, you need to edit your conf/local.conf
configuration file as follows:
MACHINE = "qemux86-64"
DEFAULTTUNE = "x86-64-x32"
baselib = "${@d.getVar('BASE_LIB:tune-' + (d.getVar('DEFAULTTUNE') \
or 'INVALID')) or 'lib'}"
Once you have set up your configuration file, use BitBake to build an image that supports the x32 psABI. Here is an example:
$ bitbake core-image-sato
22 Enabling GObject Introspection Support
GObject introspection is the standard mechanism for accessing GObject-based software from runtime environments. GObject is a feature of the GLib library that provides an object framework for the GNOME desktop and related software. GObject Introspection adds information to GObject that allows objects created within it to be represented across different programming languages. If you want to construct GStreamer pipelines using Python, or control UPnP infrastructure using Javascript and GUPnP, GObject introspection is the only way to do it.
This section describes the Yocto Project support for generating and
packaging GObject introspection data. GObject introspection data is a
description of the API provided by libraries built on top of the GLib
framework, and, in particular, that framework’s GObject mechanism.
GObject Introspection Repository (GIR) files go to -dev packages,
typelib files go to main packages as they are packaged together with
libraries that are introspected.
The data is generated when building such a library, by linking the library with a small executable binary that asks the library to describe itself, and then executing the binary and processing its output.
Generating this data in a cross-compilation environment is difficult because the library is produced for the target architecture, but its code needs to be executed on the build host. This problem is solved with the OpenEmbedded build system by running the code through QEMU, which allows precisely that. Unfortunately, QEMU does not always work perfectly as mentioned in the “Known Issues” section.
22.1 Enabling the Generation of Introspection Data
Enabling the generation of introspection data (GIR files) in your library package involves the following:
Inherit the gobject-introspection class.
Make sure introspection is not disabled anywhere in the recipe or from anything the recipe includes. Also, make sure that “gobject-introspection-data” is not in DISTRO_FEATURES_OPTED_OUT and that “qemu-usermode” is not in MACHINE_FEATURES_OPTED_OUT. In either of these conditions, nothing will happen.
Try to build the recipe. If you encounter build errors that look like something is unable to find
.solibraries, check where these libraries are located in the source tree and add the following to the recipe:GIR_EXTRA_LIBS_PATH = "${B}/something/.libs"
Note
See recipes in the
oe-corerepository that use that GIR_EXTRA_LIBS_PATH variable as an example.Look for any other errors, which probably mean that introspection support in a package is not entirely standard, and thus breaks down in a cross-compilation environment. For such cases, custom-made fixes are needed. A good place to ask and receive help in these cases is the Yocto Project mailing lists.
Note
Using a library that no longer builds against the latest Yocto Project release and prints introspection related errors is a good candidate for the previous procedure.
22.2 Disabling the Generation of Introspection Data
You might find that you do not want to generate introspection data. Or, perhaps QEMU does not work on your build host and target architecture combination. If so, you can use either of the following methods to disable GIR file generations:
Add the following to your distro configuration:
DISTRO_FEATURES_OPTED_OUT = "gobject-introspection-data"
Adding this statement disables generating introspection data using QEMU but will still enable building introspection tools and libraries (i.e. building them does not require the use of QEMU).
Add the following to your machine configuration:
MACHINE_FEATURES_OPTED_OUT = "qemu-usermode"
Adding this statement disables the use of QEMU when building packages for your machine. Currently, this feature is used only by introspection recipes and has the same effect as the previously described option.
Note
Future releases of the Yocto Project might have other features affected by this option.
If you disable introspection data, you can still obtain it through other means such as copying the data from a suitable sysroot, or by generating it on the target hardware. The OpenEmbedded build system does not currently provide specific support for these techniques.
22.3 Testing that Introspection Works in an Image
Use the following procedure to test if generating introspection data is working in an image:
Make sure that “gobject-introspection-data” is not in DISTRO_FEATURES_OPTED_OUT and that “qemu-usermode” is not in MACHINE_FEATURES_OPTED_OUT.
Build
core-image-sato.Launch a Terminal and then start Python in the terminal.
Enter the following in the terminal:
>>> from gi.repository import GLib >>> GLib.get_host_name()
For something a little more advanced, enter the following see: https://python-gtk-3-tutorial.readthedocs.io/en/latest/introduction.html
22.4 Known Issues
Here are know issues in GObject Introspection Support:
qemu-ppc64immediately crashes. Consequently, you cannot build introspection data on that architecture.x32 is not supported by QEMU. Consequently, introspection data is disabled.
musl causes transient GLib binaries to crash on assertion failures. Consequently, generating introspection data is disabled.
Because QEMU is not able to run the binaries correctly, introspection is disabled for some specific packages under specific architectures (e.g.
gcr,libsecret, andwebkit).QEMU usermode might not work properly when running 64-bit binaries under 32-bit host machines. In particular, “qemumips64” is known to not work under i686.
23 Optionally Using an External Toolchain
You might want to use an external toolchain as part of your development. If this is the case, the fundamental steps you need to accomplish are as follows:
Understand where the installed toolchain resides. For cases where you need to build the external toolchain, you would need to take separate steps to build and install the toolchain.
Make sure you add the layer that contains the toolchain to your
bblayers.conffile through the BBLAYERS variable.Set the EXTERNAL_TOOLCHAIN variable in your
local.conffile to the location in which you installed the toolchain.
The toolchain configuration is very flexible and customizable. It
is primarily controlled with the TCMODE variable. This variable
controls which tcmode-*.inc file to include from the
meta/conf/distro/include directory within OpenEmbedded-Core (OE-Core).
The default value of TCMODE is “default”, which tells the
OpenEmbedded build system to use its internally built toolchain (i.e.
tcmode-default.inc). However, other patterns are accepted. In
particular, “external-*” refers to external toolchains. One example is
the Mentor Graphics Sourcery G++ Toolchain. Support for this toolchain resides
in the separate meta-sourcery layer at
https://github.com/MentorEmbedded/meta-sourcery/.
See its README file for details about how to use this layer.
Another example of external toolchain layer is meta-arm-toolchain supporting GNU toolchains released by ARM.
You can find further information by reading about the TCMODE variable in the Yocto Project Reference Manual’s variable glossary.
24 Creating Partitioned Images Using Wic
Creating an image for a particular hardware target using the OpenEmbedded build system does not necessarily mean you can boot that image as is on your device. Physical devices accept and boot images in various ways depending on the specifics of the device. Usually, information about the hardware can tell you what image format the device requires. Should your device require multiple partitions on an SD card, flash, or an HDD, you can use the OpenEmbedded Image Creator, Wic, to create the properly partitioned image.
The wic command generates partitioned images from existing
OpenEmbedded build artifacts. Image generation is driven by partitioning
commands contained in an OpenEmbedded kickstart file (.wks)
specified either directly on the command line or as one of a selection
of canned kickstart files as shown with the wic list images command
in the
“Generate an Image using an Existing Kickstart File”
section. When you apply the command to a given set of build artifacts, the
result is an image or set of images that can be directly written onto media and
used on a particular system.
Note
For a kickstart file reference, see the “OpenEmbedded Kickstart (.wks) Reference” Chapter in the Yocto Project Reference Manual.
The wic command and the infrastructure it is based on is by
definition incomplete. The purpose of the command is to allow the
generation of customized images, and as such, was designed to be
completely extensible through a plugin interface. See the
“Using the Wic Plugin Interface” section
for information on these plugins.
This section provides some background information on Wic, describes what you need to have in place to run the tool, provides instruction on how to use the Wic utility, provides information on using the Wic plugins interface, and provides several examples that show how to use Wic.
24.1 Background
This section provides some background on the Wic utility. While none of this information is required to use Wic, you might find it interesting.
The name “Wic” is derived from OpenEmbedded Image Creator (oeic). The “oe” diphthong in “oeic” was promoted to the letter “w”, because “oeic” is both difficult to remember and to pronounce.
Wic is loosely based on the Meego Image Creator (
mic) framework. The Wic implementation has been heavily modified to make direct use of OpenEmbedded build artifacts instead of package installation and configuration, which are already incorporated within the OpenEmbedded artifacts.Wic is a completely independent standalone utility that initially provides easier-to-use and more flexible replacements for an existing functionality in OE-Core’s image-live class. The difference between Wic and those examples is that with Wic the functionality of those scripts is implemented by a general-purpose partitioning language, which is based on Redhat kickstart syntax.
24.2 Requirements
In order to use the Wic utility with the OpenEmbedded Build system, your system needs to meet the following requirements:
You environment and Build Directory must be ready, as if you were going to run
bitbakecommands. See Initializing the Build Environment for more details.Make the
wiccommand-line tool available in your shell:Run the following command first:
$ bitbake wic-native -c addto_recipe_sysroot
Check if you can use the
wicutility usingoe-run-native:$ oe-run-native wic-native wic --help
Define a local alias for the above command:
$ alias wic="oe-run-native wic-native wic"
This will make it possible to use
wicfrom the OpenEmbedded Build System transparently below.
You need to have the build artifacts already available, which typically means that you must have already created an image using the OpenEmbedded build system (e.g.
core-image-minimal). While it might seem redundant to generate an image in order to create an image using Wic, the current version of Wic requires the artifacts in the form generated by the OpenEmbedded build system.Include “wic” as part of the IMAGE_FSTYPES variable (from a configuration file or in the image recipe).
Include the name of the wic kickstart file as part of the WKS_FILE variable. If multiple candidate files can be provided by different layers, specify all the possible names through the WKS_FILES variable instead.
These assignments are typically made in a machine configuration file.
24.3 Getting Help
You can get general help for the wic command by entering the wic
command by itself or by entering the command with a help argument as
follows:
$ wic -h
$ wic --help
$ wic help
Currently, Wic supports seven commands: cp, create, help,
list, ls, rm, and write. You can get help for all these
commands except “help” by using the following form:
$ wic help command
For example, the following command returns help for the write
command:
$ wic help write
Wic supports help for three topics: overview, plugins, and
kickstart. You can get help for any topic using the following form:
$ wic help topic
For example, the following returns overview help for Wic:
$ wic help overview
There is one additional level of help for Wic. You can get help on
individual images through the list command. You can use the list
command to return the available Wic images as follows:
$ wic list images
genericx86 Create an EFI disk image for genericx86*
beaglebone-yocto Create SD card image for Beaglebone
qemuriscv Create qcow2 image for RISC-V QEMU machines
mkefidisk Create an EFI disk image
qemuloongarch Create qcow2 image for LoongArch QEMU machines
directdisk-multi-rootfs Create multi rootfs image using rootfs plugin
directdisk Create a 'pcbios' direct disk image
efi-bootdisk
mkhybridiso Create a hybrid ISO image
directdisk-gpt Create a 'pcbios' direct disk image
systemd-bootdisk Create an EFI disk image with systemd-boot
sdimage-bootpart Create SD card image with a boot partition
qemux86-directdisk Create a qemu machine 'pcbios' direct disk image
directdisk-bootloader-config Create a 'pcbios' direct disk image with custom bootloader config
Once you know the list of available
Wic images, you can use help with the command to get help on a
particular image. For example, the following command returns help on the
“beaglebone-yocto” image:
$ wic list beaglebone-yocto help
Creates a partitioned SD card image for Beaglebone.
Boot files are located in the first vfat partition.
24.4 Operational Modes
You can use Wic in two different modes, depending on how much control you need for specifying the OpenEmbedded build artifacts that are used for creating the image: Raw and Cooked:
Raw Mode: You explicitly specify build artifacts through Wic command-line arguments.
Cooked Mode: The current MACHINE setting and image name are used to automatically locate and provide the build artifacts. You just supply a kickstart file and the name of the image from which to use artifacts.
Regardless of the mode you use, you need to have the build artifacts ready and available.
24.4.1 Raw Mode
Running Wic in raw mode allows you to specify all the partitions through
the wic command line. The primary use for raw mode is if you have
built your kernel outside of the Yocto Project Build Directory.
In other words, you can point to arbitrary kernel, root filesystem locations,
and so forth. Contrast this behavior with cooked mode where Wic looks in the
Build Directory (e.g. tmp/deploy/images/machine).
The general form of the wic command in raw mode is:
$ wic create wks_file options ...
Where:
wks_file:
An OpenEmbedded kickstart file. You can provide
your own custom file or use a file from a set of
existing files as described by further options.
optional arguments:
-h, --help show this help message and exit
-o OUTDIR, --outdir OUTDIR
name of directory to create image in
-e IMAGE_NAME, --image-name IMAGE_NAME
name of the image to use the artifacts from e.g. core-
image-sato
-r ROOTFS_DIR, --rootfs-dir ROOTFS_DIR
path to the /rootfs dir to use as the .wks rootfs
source
-b BOOTIMG_DIR, --bootimg-dir BOOTIMG_DIR
path to the dir containing the boot artifacts (e.g.
/EFI or /syslinux dirs) to use as the .wks bootimg
source
-k KERNEL_DIR, --kernel-dir KERNEL_DIR
path to the dir containing the kernel to use in the
.wks bootimg
-n NATIVE_SYSROOT, --native-sysroot NATIVE_SYSROOT
path to the native sysroot containing the tools to use
to build the image
-s, --skip-build-check
skip the build check
-f, --build-rootfs build rootfs
-c {gzip,bzip2,xz}, --compress-with {gzip,bzip2,xz}
compress image with specified compressor
-m, --bmap generate .bmap
--no-fstab-update Do not change fstab file.
-v VARS_DIR, --vars VARS_DIR
directory with <image>.env files that store bitbake
variables
-D, --debug output debug information
Note
You do not need root privileges to run Wic. In fact, you should not run as root when using the utility.
24.4.2 Cooked Mode
Running Wic in cooked mode leverages off artifacts in the
Build Directory. In other words, you do not have to specify kernel or
root filesystem locations as part of the command. All you need to provide is
a kickstart file and the name of the image from which to use artifacts
by using the “-e” option. Wic looks in the Build Directory (e.g.
tmp/deploy/images/machine) for artifacts.
The general form of the wic command using Cooked Mode is as follows:
$ wic create wks_file -e IMAGE_NAME
Where:
wks_file:
An OpenEmbedded kickstart file. You can provide
your own custom file or use a file from a set of
existing files provided with the Yocto Project
release.
required argument:
-e IMAGE_NAME, --image-name IMAGE_NAME
name of the image to use the artifacts from e.g. core-
image-sato
24.5 Using an Existing Kickstart File
If you do not want to create your own kickstart file, you can use an existing file provided by the Wic installation. As shipped, kickstart files can be found in the Yocto Project Source Repositories in the following two locations:
meta-yocto/meta-yocto-bsp/files/wic
openembedded-core/files/wic
Use the following command to list the available kickstart files:
$ wic list images
genericx86 Create an EFI disk image for genericx86*
beaglebone-yocto Create SD card image for Beaglebone
qemuriscv Create qcow2 image for RISC-V QEMU machines
mkefidisk Create an EFI disk image
qemuloongarch Create qcow2 image for LoongArch QEMU machines
directdisk-multi-rootfs Create multi rootfs image using rootfs plugin
directdisk Create a 'pcbios' direct disk image
efi-bootdisk
mkhybridiso Create a hybrid ISO image
directdisk-gpt Create a 'pcbios' direct disk image
systemd-bootdisk Create an EFI disk image with systemd-boot
sdimage-bootpart Create SD card image with a boot partition
qemux86-directdisk Create a qemu machine 'pcbios' direct disk image
directdisk-bootloader-config Create a 'pcbios' direct disk image with custom bootloader config
When you use an existing file, you
do not have to use the .wks extension. Here is an example in Raw
Mode that uses the directdisk file:
$ wic create directdisk -r rootfs_dir -b bootimg_dir \
-k kernel_dir -n native_sysroot
Here are the actual partition language commands used in the
genericx86.wks file to generate an image:
# short-description: Create an EFI disk image for genericx86*
# long-description: Creates a partitioned EFI disk image for genericx86* machines
part /boot --source bootimg_efi --sourceparams="loader=grub-efi" --ondisk sda --label msdos --active --align 1024
part / --source rootfs --ondisk sda --fstype=ext4 --label platform --align 1024 --use-uuid
part swap --ondisk sda --size 44 --label swap1 --fstype=swap
bootloader --ptable gpt --timeout=5 --append="rootfstype=ext4 console=ttyS0,115200 console=tty0"
24.6 Using the Wic Plugin Interface
You can extend and specialize Wic functionality by using Wic plugins. This section explains the Wic plugin interface.
Note
Wic plugins consist of “source” and “imager” plugins. Imager plugins are beyond the scope of this section.
Source plugins provide a mechanism to customize partition content during
the Wic image generation process. You can use source plugins to map
values that you specify using --source commands in kickstart files
(i.e. *.wks) to a plugin implementation used to populate a given
partition.
Note
If you use plugins that have build-time dependencies (e.g. native tools, bootloaders, and so forth) when building a Wic image, you need to specify those dependencies using the WKS_FILE_DEPENDS variable.
Source plugins are subclasses defined in plugin files. As shipped, the Yocto Project provides several plugin files. You can see the source plugin files that ship with the Yocto Project here. Each of these plugin files contains source plugins that are designed to populate a specific Wic image partition.
Source plugins are subclasses of the SourcePlugin class, which is
defined in the openembedded-core/scripts/lib/wic/pluginbase.py file. For example,
the BootimgEFIPlugin source plugin found in the bootimg_efi.py
file is a subclass of the SourcePlugin class, which is found in the
pluginbase.py file.
You can also implement source plugins in a layer outside of the Source
Repositories (external layer). To do so, be sure that your plugin files
are located in a directory whose path is
scripts/lib/wic/plugins/source/ within your external layer. When the
plugin files are located there, the source plugins they contain are made
available to Wic.
When the Wic implementation needs to invoke a partition-specific
implementation, it looks for the plugin with the same name as the
--source parameter used in the kickstart file given to that
partition. For example, if the partition is set up using the following
command in a kickstart file:
part /boot --source bootimg_pcbios --ondisk sda --label boot --active --align 1024
The methods defined as class
members of the matching source plugin (i.e. bootimg_pcbios) in the
bootimg_pcbios.py plugin file are used.
To be more concrete, here is the corresponding plugin definition from
the bootimg_pcbios.py file for the previous command along with an
example method called by the Wic implementation when it needs to prepare
a partition using an implementation-specific function:
.
.
.
class BootimgPcbiosPlugin(SourcePlugin):
"""
Create MBR boot partition and install syslinux on it.
"""
name = 'bootimg_pcbios'
.
.
.
@classmethod
def do_prepare_partition(cls, part, source_params, creator, cr_workdir,
oe_builddir, bootimg_dir, kernel_dir,
rootfs_dir, native_sysroot):
"""
Called to do the actual content population for a partition i.e. it
'prepares' the partition to be incorporated into the image.
In this case, prepare content for legacy bios boot partition.
"""
.
.
.
If a
subclass (plugin) itself does not implement a particular function, Wic
locates and uses the default version in the superclass. It is for this
reason that all source plugins are derived from the SourcePlugin
class.
The SourcePlugin class defined in the pluginbase.py file defines
a set of methods that source plugins can implement or override. Any
plugins (subclass of SourcePlugin) that do not implement a
particular method inherit the implementation of the method from the
SourcePlugin class. For more information, see the SourcePlugin
class in the pluginbase.py file for details:
The following list describes the methods implemented in the
SourcePlugin class:
do_prepare_partition(): Called to populate a partition with actual content. In other words, the method prepares the final partition image that is incorporated into the disk image.do_configure_partition(): Called beforedo_prepare_partition()to create custom configuration files for a partition (e.g. syslinux or grub configuration files).do_install_disk(): Called after all partitions have been prepared and assembled into a disk image. This method provides a hook to allow finalization of a disk image (e.g. writing an MBR).do_stage_partition(): Special content-staging hook called beforedo_prepare_partition(). This method is normally empty.Typically, a partition just uses the passed-in parameters (e.g. the unmodified value of
bootimg_dir). However, in some cases, things might need to be more tailored. As an example, certain files might additionally need to be taken frombootimg_dir + /boot. This hook allows those files to be staged in a customized fashion.Note
get_bitbake_var()allows you to access non-standard variables that you might want to use for this behavior.
You can extend the source plugin mechanism. To add more hooks, create
more source plugin methods within SourcePlugin and the corresponding
derived subclasses. The code that calls the plugin methods uses the
plugin.get_source_plugin_methods() function to find the method or
methods needed by the call. Retrieval of those methods is accomplished
by filling up a dict with keys that contain the method names of
interest. On success, these will be filled in with the actual methods.
See the Wic implementation for examples and details.
24.7 Wic Examples
This section provides several examples that show how to use the Wic
utility. All the examples assume the list of requirements in the
“Requirements” section have been met. The
examples assume the previously generated image is
core-image-minimal.
24.7.1 Generate an Image using an Existing Kickstart File
This example runs in Cooked Mode and uses the mkefidisk kickstart
file:
$ wic create mkefidisk -e core-image-minimal
INFO: Building wic-tools...
.
.
.
INFO: The new image(s) can be found here:
./mkefidisk-201804191017-sda.direct
The following build artifacts were used to create the image(s):
ROOTFS_DIR: /home/stephano/yocto/build/tmp-glibc/work/qemux86-oe-linux/core-image-minimal/1.0-r0/rootfs
BOOTIMG_DIR: /home/stephano/yocto/build/tmp-glibc/work/qemux86-oe-linux/core-image-minimal/1.0-r0/recipe-sysroot/usr/share
KERNEL_DIR: /home/stephano/yocto/build/tmp-glibc/deploy/images/qemux86
NATIVE_SYSROOT: /home/stephano/yocto/build/tmp-glibc/work/i586-oe-linux/wic-tools/1.0-r0/recipe-sysroot-native
INFO: The image(s) were created using OE kickstart file:
/home/stephano/yocto/openembedded-core/files/wic/mkefidisk.wks
The previous example shows the easiest way to create an image by running
in cooked mode and supplying a kickstart file and the “-e” option to
point to the existing build artifacts. Your local.conf file needs to
have the MACHINE variable set
to the machine you are using, which is “qemux86” in this example.
Once the image builds, the output provides image location, artifact use, and kickstart file information.
Note
You should always verify the details provided in the output to make sure that the image was indeed created exactly as expected.
Continuing with the example, you can now write the image from the
Build Directory onto a USB stick, or whatever media for which you
built your image, and boot from the media. You can write the image by using
bmaptool or dd:
$ oe-run-native bmaptool-native bmaptool copy mkefidisk-201804191017-sda.direct /dev/sdX
or :
$ sudo dd if=mkefidisk-201804191017-sda.direct of=/dev/sdX
Note
For more information on how to use the bmaptool
to flash a device with an image, see the
“Flashing Images Using bmaptool”
section.
24.7.2 Using a Modified Kickstart File
Because partitioned image creation is driven by the kickstart file, it
is easy to affect image creation by changing the parameters in the file.
This next example demonstrates that through modification of the
directdisk-gpt kickstart file.
As mentioned earlier, you can use the command wic list images to
show the list of existing kickstart files. The directory in which the
directdisk-gpt.wks file resides is
files/wic, which is located in
OpenEmbedded-Core (OE-Core).
Because available files reside in this directory, you can create and add
your own custom files to the directory. Subsequent use of the
wic list images command would then include your kickstart files.
In this example, the existing directdisk-gpt file already does most
of what is needed. However, for the hardware in this example, the image
will need to boot from sdb instead of sda, which is what the
directdisk-gpt kickstart file uses.
The example begins by making a copy of the directdisk-gpt.wks file
in the files/wic directory and then by changing
the lines that specify the target disk from which to boot:
$ cp /home/stephano/yocto/openembedded-core/files/wic/directdisk-gpt.wks \
/home/stephano/yocto/openembedded-core/files/wic/directdisksdb-gpt.wks
Next, the example modifies the directdisksdb-gpt.wks file and
changes all instances of “--ondisk sda” to “--ondisk sdb”. The
example changes the following two lines and leaves the remaining lines
untouched:
part /boot --source bootimg_pcbios --ondisk sdb --label boot --active --align 1024
part / --source rootfs --ondisk sdb --fstype=ext4 --label platform --align 1024 --use-uuid
Once the lines are changed, the
example generates the directdisksdb-gpt image. The command points
the process at the core-image-minimal artifacts for the Next Unit of
Computing (nuc) MACHINE the
local.conf:
$ wic create directdisksdb-gpt -e core-image-minimal
INFO: Building wic-tools...
.
.
.
Initialising tasks: 100% |#######################################| Time: 0:00:01
NOTE: Executing SetScene Tasks
NOTE: Executing RunQueue Tasks
NOTE: Tasks Summary: Attempted 1161 tasks of which 1157 didn't need to be rerun and all succeeded.
INFO: Creating image(s)...
INFO: The new image(s) can be found here:
./directdisksdb-gpt-201710090938-sdb.direct
The following build artifacts were used to create the image(s):
ROOTFS_DIR: /home/stephano/yocto/build/tmp-glibc/work/qemux86-oe-linux/core-image-minimal/1.0-r0/rootfs
BOOTIMG_DIR: /home/stephano/yocto/build/tmp-glibc/work/qemux86-oe-linux/core-image-minimal/1.0-r0/recipe-sysroot/usr/share
KERNEL_DIR: /home/stephano/yocto/build/tmp-glibc/deploy/images/qemux86
NATIVE_SYSROOT: /home/stephano/yocto/build/tmp-glibc/work/i586-oe-linux/wic-tools/1.0-r0/recipe-sysroot-native
INFO: The image(s) were created using OE kickstart file:
/home/stephano/yocto/openembedded-core/files/wic/directdisksdb-gpt.wks
Continuing with the example, you can now directly dd the image to a
USB stick, or whatever media for which you built your image, and boot
the resulting media:
$ sudo dd if=directdisksdb-gpt-201710090938-sdb.direct of=/dev/sdb
140966+0 records in
140966+0 records out
72174592 bytes (72 MB, 69 MiB) copied, 78.0282 s, 925 kB/s
$ sudo eject /dev/sdb
24.7.3 Using a Modified Kickstart File and Running in Raw Mode
This next example manually specifies each build artifact (runs in Raw
Mode) and uses a modified kickstart file. The example also uses the
-o option to cause Wic to create the output somewhere other than the
default output directory, which is the current directory:
$ wic create test.wks -o /home/stephano/testwic \
--rootfs-dir /home/stephano/yocto/build/tmp/work/qemux86-poky-linux/core-image-minimal/1.0-r0/rootfs \
--bootimg-dir /home/stephano/yocto/build/tmp/work/qemux86-poky-linux/core-image-minimal/1.0-r0/recipe-sysroot/usr/share \
--kernel-dir /home/stephano/yocto/build/tmp/deploy/images/qemux86 \
--native-sysroot /home/stephano/yocto/build/tmp/work/i586-poky-linux/wic-tools/1.0-r0/recipe-sysroot-native
INFO: Creating image(s)...
INFO: The new image(s) can be found here:
/home/stephano/testwic/test-201710091445-sdb.direct
The following build artifacts were used to create the image(s):
ROOTFS_DIR: /home/stephano/yocto/build/tmp-glibc/work/qemux86-oe-linux/core-image-minimal/1.0-r0/rootfs
BOOTIMG_DIR: /home/stephano/yocto/build/tmp-glibc/work/qemux86-oe-linux/core-image-minimal/1.0-r0/recipe-sysroot/usr/share
KERNEL_DIR: /home/stephano/yocto/build/tmp-glibc/deploy/images/qemux86
NATIVE_SYSROOT: /home/stephano/yocto/build/tmp-glibc/work/i586-oe-linux/wic-tools/1.0-r0/recipe-sysroot-native
INFO: The image(s) were created using OE kickstart file:
test.wks
For this example,
MACHINE did not have to be
specified in the local.conf file since the artifact is manually
specified.
24.7.4 Using Wic to Manipulate an Image
Wic image manipulation allows you to shorten turnaround time during image development. For example, you can use Wic to delete the kernel partition of a Wic image and then insert a newly built kernel. This saves you time from having to rebuild the entire image each time you modify the kernel.
Note
In order to use Wic to manipulate a Wic image as in this example,
your development machine must have the mtools package installed.
The following example examines the contents of the Wic image, deletes the existing kernel, and then inserts a new kernel:
List the Partitions: Use the
wic lscommand to list all the partitions in the Wic image:$ wic ls tmp/deploy/images/qemux86/core-image-minimal-qemux86.wic Num Start End Size Fstype 1 1048576 25041919 23993344 fat16 2 25165824 72157183 46991360 ext4
The previous output shows two partitions in the
core-image-minimal-qemux86.wicimage.Examine a Particular Partition: Use the
wic lscommand again but in a different form to examine a particular partition.Note
You can get command usage on any Wic command using the following form:
$ wic help command
For example, the following command shows you the various ways to use the
wic lscommand:$ wic help ls
The following command shows what is in partition one:
$ wic ls tmp/deploy/images/qemux86/core-image-minimal-qemux86.wic:1 Volume in drive : is boot Volume Serial Number is E894-1809 Directory for ::/ libcom32 c32 186500 2017-10-09 16:06 libutil c32 24148 2017-10-09 16:06 syslinux cfg 220 2017-10-09 16:06 vesamenu c32 27104 2017-10-09 16:06 vmlinuz 6904608 2017-10-09 16:06 5 files 7 142 580 bytes 16 582 656 bytes free
The previous output shows five files, with the
vmlinuzbeing the kernel.Note
If you see the following error, you need to update or create a
~/.mtoolsrcfile and be sure to have the line “mtools_skip_check=1” in the file. Then, run the Wic command again:ERROR: _exec_cmd: /usr/bin/mdir -i /tmp/wic-parttfokuwra ::/ returned '1' instead of 0 output: Total number of sectors (47824) not a multiple of sectors per track (32)! Add mtools_skip_check=1 to your .mtoolsrc file to skip this test
Remove the Old Kernel: Use the
wic rmcommand to remove thevmlinuzfile (kernel):$ wic rm tmp/deploy/images/qemux86/core-image-minimal-qemux86.wic:1/vmlinuz
Add In the New Kernel: Use the
wic cpcommand to add the updated kernel to the Wic image. Depending on how you built your kernel, it could be in different places. If you useddevtooland an SDK to build your kernel, it resides in thetmp/workdirectory of the extensible SDK. If you usedmaketo build the kernel, the kernel will be in theworkspace/sourcesarea.The following example assumes
devtoolwas used to build the kernel:$ wic cp poky_sdk/tmp/work/qemux86-poky-linux/linux-yocto/4.12.12+git999-r0/linux-yocto-4.12.12+git999/arch/x86/boot/bzImage \ build/tmp/deploy/images/qemux86/core-image-minimal-qemux86.wic:1/vmlinuz
Once the new kernel is added back into the image, you can use the
ddcommand or bmaptool commands to flash your wic image onto an SD card or USB stick and test your target.Note
Using
bmaptoolis generally 10 to 20 times faster than usingdd.
25 Flashing Images Using bmaptool
A fast and easy way to flash an image to a bootable device is to use bmaptool, which is integrated into the OpenEmbedded build system. bmaptool is a generic tool that creates a file’s block map (bmap) and then uses that map to copy the file. As compared to traditional tools such as dd or cp, bmaptool can copy (or flash) large files like raw system image files much faster.
Note
If you are using Ubuntu or Debian distributions, you can install the
bmaptoolpackage using the following command and then use the tool without specifyingPATHeven from the root account:$ sudo apt install bmaptool
If you are unable to install the
bmaptoolpackage, you will need to build bmaptool before using it. Use the following command:$ bitbake bmaptool-native -caddto_recipe_sysroot
Following, is an example that shows how to flash a Wic image. Realize that while this example uses a Wic image, you can use bmaptool to flash any type of image. Use these steps to flash an image using bmaptool:
Update your local.conf File: You need to have the following set in your
local.conffile before building your image:IMAGE_FSTYPES += "wic wic.bmap"
Get Your Image: Either have your image ready (pre-built with the IMAGE_FSTYPES setting previously mentioned) or take the step to build the image:
$ bitbake image
Flash the Device: Flash the device with the image by using bmaptool depending on your particular setup. The following commands assume the image resides in the Build Directory’s
deploy/images/area:If you installed the package for bmaptool, you can directly run:
$ sudo bmaptool copy build-directory/tmp/deploy/images/machine/image.wic /dev/sdX
Otherwise, if you built bmaptool with BitBake, run:
$ sudo chmod a+w /dev/sdX # get write access to the media, needed only once after booting $ oe-run-native bmaptool-native bmaptool copy build-directory/tmp/deploy/images/machine/image.wic /dev/sdX
For help on the bmaptool command, use the following command:
$ bmaptool --help
Note
Earlier releases of Ubuntu and Debian had a package named
bmap-tools; you can still install by this name as this
is simply a transitional package which exists solely to
ensure backward compatibility and smooth upgrades from
older installations.
26 Creating Your Own Distribution
When you build an image using the Yocto Project and follow the default setup showcased in Setting Up to Use the Yocto Project, you are using the Poky reference distribution.
Poky is explicitly a reference distribution for testing and development purposes. It enables most hardware and software features so that they can be tested, but this also means that from a security point of view the attack surface is very large. Additionally, at some point it is likely that you will want to gain more control over package alternative selections, compile-time options, and other low-level configurations. For both of these reasons, if you are using the Yocto Project for production use then you are strongly encouraged to create your own distribution.
To create your own distribution, the basic steps consist of creating your own distribution layer, creating your own distribution configuration file, and then adding any needed code and Metadata to the layer. The following steps provide some more detail:
Create a layer for your new distro: Create your distribution layer so that you can keep your Metadata and code for the distribution separate. It is strongly recommended that you create and use your own layer for configuration and code. Using your own layer as compared to just placing configurations in a
local.confconfiguration file makes it easier to reproduce the same build configuration when using multiple build machines. See the “Creating Your Own Layer” section for information on how to quickly set up a layer.Create the distribution configuration file: The distribution configuration file needs to be created in the
conf/distrodirectory of your layer. You need to name it using your distribution name (e.g.mydistro.conf).Note
The DISTRO variable in your
local.conffile determines the name of your distribution.You can split out parts of your configuration file into include files and then “require” them from within your distribution configuration file. Be sure to place the include files in the
conf/distro/includedirectory of your layer. A common example usage of include files would be to separate out the selection of desired version and revisions for individual recipes.Your configuration file needs to set the following required variables:
These following variables are optional and you typically set them from the distribution configuration file:
Tip
If you want to base your distribution configuration file on the very basic configuration from OE-Core, you can use
conf/distro/defaultsetup.confas a reference and just include variables that differ as compared todefaultsetup.conf. Alternatively, you can create a distribution configuration file from scratch using thedefaultsetup.conffile or configuration files from another distribution such as Poky as a reference.Provide miscellaneous variables: Be sure to define any other variables for which you want to create a default or enforce as part of the distribution configuration. You can include nearly any variable from the
local.conffile. The variables you use are not limited to the list in the previous bulleted item.Point to Your distribution configuration file: In your
local.conffile in the Build Directory, set your DISTRO variable to point to your distribution’s configuration file. For example, if your distribution’s configuration file is namedmydistro.conf, then you point to it as follows:DISTRO = "mydistro"
Add more to the layer if necessary: Use your layer to hold other information needed for the distribution:
Add recipes for installing distro-specific configuration files that are not already installed by another recipe. If you have distro-specific configuration files that are included by an existing recipe, you should add an append file (
.bbappend) for those. For general information and recommendations on how to add recipes to your layer, see the “Creating Your Own Layer” and “Following Best Practices When Creating Layers” sections.Add any image recipes that are specific to your distribution.
Add a
psplashappend file for a branded splash screen, using the SPLASH_IMAGES variable.Add any other append files to make custom changes that are specific to individual recipes.
For information on append files, see the “Appending Other Layers Metadata With Your Layer” section.
26.1 Copying and modifying the Poky distribution
Instead of creating a custom distribution from scratch as per above, you may
wish to start your custom distribution configuration by copying the Poky
distribution provided within the meta-poky layer and then modifying it.
This is fine, however if you do this you should keep the following in mind:
Every reference to Poky needs to be updated in your copy so that it will still apply. This includes override usage within files (e.g.
:poky) and in directory names. This is a good opportunity to evaluate each one of these customizations to see if they are needed for your use case.Unless you also intend to use them, the
poky-tiny,poky-altcfgandpoky-bleedingvariants and any references to them can be removed.More generally, the Poky distribution configuration enables a lot more than you likely need for your production use case. You should evaluate every configuration choice made in your copy to determine if it is needed.
27 Creating a Custom Template Configuration Directory
If you are producing your own customized version of the build system for
use by other users, you might want to provide a custom build configuration
that includes all the necessary settings and layers (i.e. local.conf and
bblayers.conf that are created in a new Build Directory) and a custom
message that is shown when setting up the build. This can be done by
creating one or more template configuration directories in your
custom distribution layer.
This can be done by using bitbake-layers save-build-conf:
$ bitbake-layers save-build-conf ../../meta-alex/ test-1
NOTE: Starting bitbake server...
NOTE: Configuration template placed into /srv/bitbake-builds/layers/meta-alex/conf/templates/test-1
Please review the files in there, and particularly provide a configuration description in /srv/bitbake-builds/meta-alex/conf/templates/test-1/conf-notes.txt
You can try out the configuration with
TEMPLATECONF=/srv/bitbake-builds/layers/meta-alex/conf/templates/test-1 . /srv/bitbake-builds/layers/openembedded-core/oe-init-build-env build-try-test-1
The above command takes the config files from the currently active Build Directory under conf,
replaces site-specific paths in bblayers.conf with ##OECORE##-relative paths, and copies
the config files into a specified layer under a specified template name.
To use those saved templates as a starting point for a build, users should point to one of them with TEMPLATECONF environment variable:
TEMPLATECONF=/srv/bitbake-builds/layers/meta-alex/conf/templates/test-1 . /srv/bitbake-builds/layers/openembedded-core/oe-init-build-env build-try-test-1
The OpenEmbedded build system uses the environment variable
TEMPLATECONF to locate the directory from which it gathers
configuration information that ultimately ends up in the
Build Directory conf directory.
If TEMPLATECONF is not set, the default value is obtained
from .templateconf file that is read from the same directory as
oe-init-build-env script. For the Poky reference distribution this
would be:
TEMPLATECONF=${TEMPLATECONF:-meta/conf/templates/default}
If you look at a configuration template directory, you will
see the bblayers.conf.sample, local.conf.sample, conf-summary.txt and
conf-notes.txt files. The build system uses these files to form the
respective bblayers.conf file, local.conf file, and show
users usage information about the build they’re setting up
when running the oe-init-build-env setup script. These can be
edited further if needed to improve or change the build configurations
available to the users, and provide useful summaries and detailed usage notes.
28 Conserving Disk Space
28.1 Conserving Disk Space During Builds
To help conserve disk space during builds, you can add the following
statement to your project’s local.conf configuration file found in
the Build Directory:
INHERIT += "rm_work"
Adding this statement deletes the work directory used for building a recipe once the recipe is built. For more information on “rm_work”, see the rm_work class in the Yocto Project Reference Manual.
When you inherit this class and build a core-image-sato image for a
qemux86-64 machine from an Ubuntu 22.04 x86-64 system, you end up with a
final disk usage of 22 Gbytes instead of 140 Gbytes. However,
40 Gbytes of initial free disk space are still needed to
create temporary files before they can be deleted.
29 Working with Packages
This section describes a few tasks that involve packages:
(disabled) Creating Node Package Manager (NPM) Packages
29.1 Excluding Packages from an Image
You might find it necessary to prevent specific packages from being installed into an image. If so, you can use several variables to direct the build system to essentially ignore installing recommended packages or to not install a package at all.
The following list introduces variables you can use to prevent packages
from being installed into your image. Each of these variables only works
with IPK and RPM package types, not for Debian packages.
Also, you can use these variables from your local.conf file
or attach them to a specific image recipe by using a recipe name
override. For more detail on the variables, see the descriptions in the
Yocto Project Reference Manual’s glossary chapter.
BAD_RECOMMENDATIONS: Use this variable to specify “recommended-only” packages that you do not want installed.
NO_RECOMMENDATIONS: Use this variable to prevent all “recommended-only” packages from being installed.
PACKAGE_EXCLUDE: Use this variable to prevent specific packages from being installed regardless of whether they are “recommended-only” or not. You need to realize that the build process could fail with an error when you prevent the installation of a package whose presence is required by an installed package.
29.2 Incrementing a Package Version
This section provides some background on how binary package versioning is accomplished and presents some of the services, variables, and terminology involved.
In order to understand binary package versioning, you need to consider the following:
Binary Package: The binary package that is eventually built and installed into an image.
Binary Package Version: The binary package version is composed of two components — a version and a revision.
Note
Technically, a third component, the “epoch” (i.e. PE) is involved but this discussion for the most part ignores PE.
The version and revision are taken from the PV and PR variables, respectively.
PV: The recipe version. PV represents the version of the software being packaged. Do not confuse PV with the binary package version.
PR: The recipe revision.
PR Service: A network-based service that helps automate keeping package feeds compatible with existing package manager applications such as RPM, APT, and OPKG.
Whenever the binary package content changes, the binary package version must change. Changing the binary package version is accomplished by changing or “bumping” the PR and/or PV values. Increasing these values occurs one of two ways:
Automatically using a Package Revision Service (PR Service).
Given a primary challenge of any build system and its users is how to maintain a package feed that is compatible with existing package manager applications such as RPM, APT, and OPKG, using an automated system is much preferred over a manual system. In either system, the main requirement is that binary package version numbering increases in a linear fashion and that there is a number of version components that support that linear progression. For information on how to ensure package revisioning remains linear, see the “Automatically Incrementing a Package Version Number” section.
The following three sections provide related information on the PR Service, the manual method for “bumping” PR and/or PV, and on how to ensure binary package revisioning remains linear.
29.2.1 Working With a PR Service
As mentioned, attempting to maintain revision numbers in the Metadata is error prone, inaccurate, and causes problems for people submitting recipes. Conversely, the PR Service automatically generates increasing numbers, particularly the revision field, which removes the human element.
Note
For additional information on using a PR Service, you can see the PR Service wiki page.
The Yocto Project uses variables in order of decreasing priority to facilitate revision numbering (i.e. PE, PV, and PR for epoch, version, and revision, respectively). The values are highly dependent on the policies and procedures of a given distribution and package feed.
Because the OpenEmbedded build system uses “signatures”, which are unique to a given build, the build system knows when to rebuild packages. All the inputs into a given task are represented by a signature, which can trigger a rebuild when different. Thus, the build system itself does not rely on the PR, PV, and PE numbers to trigger a rebuild. The signatures, however, can be used to generate these values.
The PR Service works with both OEBasic and OEBasicHash
generators. The value of PR bumps when the checksum changes and the
different generator mechanisms change signatures under different
circumstances.
As implemented, the build system includes values from the PR Service
into the PR field as an addition using the form “.x” so r0
becomes r0.1, r0.2 and so forth. This scheme allows existing
PR values to be used for whatever reasons, which include manual
PR bumps, should it be necessary.
By default, the PR Service is not enabled or running. Thus, the packages generated are just “self consistent”. The build system adds and removes packages and there are no guarantees about upgrade paths but images will be consistent and correct with the latest changes.
The simplest form for a PR Service is for a single host development system
that builds the package feed (building system). For this scenario, you can
enable a local PR Service by setting PRSERV_HOST in your
local.conf file in the Build Directory:
PRSERV_HOST = "localhost:0"
Once the service is started, packages will automatically get increasing PR values and BitBake takes care of starting and stopping the server.
If you have a more complex setup where multiple host development systems
work against a common, shared package feed, you have a single PR Service
running and it is connected to each building system. For this scenario,
you need to start the PR Service using the bitbake-prserv command:
bitbake-prserv --host ip --port port --start
In addition to
hand-starting the service, you need to update the local.conf file of
each building system as described earlier so each system points to the
server and port.
It is also recommended you use build history, which adds some sanity
checks to binary package versions, in conjunction with the server that
is running the PR Service. To enable build history, add the following to
each building system’s local.conf file:
# It is recommended to activate "buildhistory" for testing the PR service
INHERIT += "buildhistory"
BUILDHISTORY_COMMIT = "1"
For information on build history, see the “Maintaining Build Output Quality” section.
Note
The OpenEmbedded build system does not maintain PR information as part of the shared state (sstate) packages. If you maintain an sstate feed, it’s expected that either all your building systems that contribute to the sstate feed use a shared PR service, or you do not run a PR service on any of your building systems.
That’s because if you had multiple machines sharing a PR service but not their sstate feed, you could end up with “diverging” hashes for the same output artefacts. When presented to the share PR service, each would be considered as new and would increase the revision number, causing many unnecessary package upgrades.
For more information on shared state, see the “Shared State Cache” section in the Yocto Project Overview and Concepts Manual.
29.2.2 Manually Bumping PR
The alternative to setting up a PR Service is to manually “bump” the PR variable.
If a committed change results in changing the package output, then the value of the PR variable needs to be increased (or “bumped”) as part of that commit. For new recipes you should add the PR variable and set its initial value equal to “r0”, which is the default. Even though the default value is “r0”, the practice of adding it to a new recipe makes it harder to forget to bump the variable when you make changes to the recipe in future.
Usually, version increases occur only to binary packages. However, if for some reason PV changes but does not increase, you can increase the PE variable (Package Epoch). The PE variable defaults to “0”.
Binary package version numbering strives to follow the Debian Version Field Policy Guidelines. These guidelines define how versions are compared and what “increasing” a version means.
29.2.3 Automatically Incrementing a Package Version Number
When fetching a repository, BitBake uses the SRCREV variable to determine the specific source code revision from which to build. You set the SRCREV variable to AUTOREV to cause the OpenEmbedded build system to automatically use the latest revision of the software:
SRCREV = "${AUTOREV}"
Furthermore, you need to include a + sign in PV in order to
automatically update the version whenever the revision of the source
code changes. Here is an example:
PV = "1.0+git"
The OpenEmbedded build system will automatically add the source control information to the end of the variable PKGV, in this format:
AUTOINC+source_code_revision
The build system replaces the AUTOINC
with a number. The number used depends on the state of the PR Service:
If PR Service is enabled, the build system increments the number, which is similar to the behavior of PR. This behavior results in linearly increasing package versions, which is desirable. Here is an example:
hello-world-git_1.0+git0+b6558dd387-r0.0_armv7a-neon.ipk hello-world-git_1.0+git1+dd2f5c3565-r0.1_armv7a-neon.ipk
Two numbers got incremented here:
gitXchanged fromgit0togit1. This is because there was a change in the source code (SRCREV).r0.Xchanged fromr0.0tor0.1. This is because the hash of the do_package task changed.The reason for this change can be many. To understand why the hash of the do_package task changed, you can run the following command:
$ bitbake-diffsigs -t hello-world package
If PR Service is not enabled, the build system replaces the
AUTOINCplaceholder with zero (i.e. “0”). This results in changing the package version since the source revision is included. However, package versions are not increased linearly. Here is an example:hello-world-git_1.0+git0+b6558dd387-r0_armv7a-neon.ipk hello-world-git_1.0+git0+dd2f5c3565-r0_armv7a-neon.ipk
In summary, the OpenEmbedded build system does not track the history of
binary package versions for this purpose. AUTOINC, in this case, is
comparable to PR. If PR server is not enabled, AUTOINC in the
package version is simply replaced by “0”. If PR server is enabled, the
build system keeps track of the package versions and bumps the number
when the package revision changes.
29.3 Handling Optional Module Packaging
Many pieces of software split functionality into optional modules (or plugins) and the plugins that are built might depend on configuration options. To avoid having to duplicate the logic that determines what modules are available in your recipe or to avoid having to package each module by hand, the OpenEmbedded build system provides functionality to handle module packaging dynamically.
To handle optional module packaging, you need to do two things:
Ensure the module packaging is actually done.
Ensure that any dependencies on optional modules from other recipes are satisfied by your recipe.
29.3.1 Making Sure the Packaging is Done
To ensure the module packaging actually gets done, you use the
do_split_packages function within the populate_packages Python
function in your recipe. The do_split_packages function searches for
a pattern of files or directories under a specified path and creates a
package for each one it finds by appending to the
PACKAGES variable and
setting the appropriate values for FILES:packagename,
RDEPENDS:packagename, DESCRIPTION:packagename, and so forth.
Here is an example from the lighttpd recipe:
python populate_packages:prepend () {
lighttpd_libdir = d.expand('${libdir}')
do_split_packages(d, lighttpd_libdir, '^mod_(.*).so$',
'lighttpd-module-%s', 'Lighttpd module for %s',
extra_depends='')
}
The previous example specifies a number of things in the call to
do_split_packages.
A directory within the files installed by your recipe through do_install in which to search.
A regular expression used to match module files in that directory. In the example, note the parentheses () that mark the part of the expression from which the module name should be derived.
A pattern to use for the package names.
A description for each package.
An empty string for
extra_depends, which disables the default dependency on the mainlighttpdpackage. Thus, if a file in${libdir}calledmod_alias.sois found, a package calledlighttpd-module-aliasis created for it and the DESCRIPTION is set to “Lighttpd module for alias”.
Often, packaging modules is as simple as the previous example. However,
there are more advanced options that you can use within
do_split_packages to modify its behavior. And, if you need to, you
can add more logic by specifying a hook function that is called for each
package. It is also perfectly acceptable to call do_split_packages
multiple times if you have more than one set of modules to package.
For more examples that show how to use do_split_packages, see the
connman.inc file in the meta/recipes-connectivity/connman/
directory of OpenEmbedded-Core (OE-Core). You can
also find examples in meta/classes-recipe/kernel.bbclass.
Here is a reference that shows do_split_packages mandatory and
optional arguments:
Mandatory arguments
root
The path in which to search
file_regex
Regular expression to match searched files.
Use parentheses () to mark the part of this
expression that should be used to derive the
module name (to be substituted where %s is
used in other function arguments as noted below)
output_pattern
Pattern to use for the package names. Must
include %s.
description
Description to set for each package. Must
include %s.
Optional arguments
postinst
Postinstall script to use for all packages
(as a string)
recursive
True to perform a recursive search --- default
False
hook
A hook function to be called for every match.
The function will be called with the following
arguments (in the order listed):
f
Full path to the file/directory match
pkg
The package name
file_regex
As above
output_pattern
As above
modulename
The module name derived using file_regex
extra_depends
Extra runtime dependencies (RDEPENDS) to be
set for all packages. The default value of None
causes a dependency on the main package
(${PN}) --- if you do not want this, pass empty
string '' for this parameter.
aux_files_pattern
Extra item(s) to be added to FILES for each
package. Can be a single string item or a list
of strings for multiple items. Must include %s.
postrm
postrm script to use for all packages (as a
string)
allow_dirs
True to allow directories to be matched -
default False
prepend
If True, prepend created packages to PACKAGES
instead of the default False which appends them
match_path
match file_regex on the whole relative path to
the root rather than just the filename
aux_files_pattern_verbatim
Extra item(s) to be added to FILES for each
package, using the actual derived module name
rather than converting it to something legal
for a package name. Can be a single string item
or a list of strings for multiple items. Must
include %s.
allow_links
True to allow symlinks to be matched --- default
False
summary
Summary to set for each package. Must include %s;
defaults to description if not set.
29.3.2 Satisfying Dependencies
The second part for handling optional module packaging is to ensure that
any dependencies on optional modules from other recipes are satisfied by
your recipe. You can be sure these dependencies are satisfied by using
the PACKAGES_DYNAMIC
variable. Here is an example that continues with the lighttpd recipe
shown earlier:
PACKAGES_DYNAMIC = "lighttpd-module-.*"
The name
specified in the regular expression can of course be anything. In this
example, it is lighttpd-module- and is specified as the prefix to
ensure that any RDEPENDS and
RRECOMMENDS on a package
name starting with the prefix are satisfied during build time. If you
are using do_split_packages as described in the previous section,
the value you put in PACKAGES_DYNAMIC should correspond to the name
pattern specified in the call to do_split_packages.
29.4 Using Runtime Package Management
During a build, BitBake always transforms a recipe into one or more
packages. For example, BitBake takes the bash recipe and produces a
number of packages (e.g. bash, bash-bashbug,
bash-completion, bash-completion-dbg, bash-completion-dev,
bash-completion-extra, bash-dbg, and so forth). Not all
generated packages are included in an image.
In several situations, you might need to update, add, remove, or query the packages on a target device at runtime (i.e. without having to generate a new image). Examples of such situations include:
You want to provide in-the-field updates to deployed devices (e.g. security updates).
You want to have a fast turn-around development cycle for one or more applications that run on your device.
You want to temporarily install the “debug” packages of various applications on your device so that debugging can be greatly improved by allowing access to symbols and source debugging.
You want to deploy a more minimal package selection of your device but allow in-the-field updates to add a larger selection for customization.
In all these situations, you have something similar to a more traditional Linux distribution in that in-field devices are able to receive pre-compiled packages from a server for installation or update. Being able to install these packages on a running, in-field device is what is termed “runtime package management”.
In order to use runtime package management, you need a host or server machine that serves up the pre-compiled packages plus the required metadata. You also need package manipulation tools on the target. The build machine is a likely candidate to act as the server. However, that machine does not necessarily have to be the package server. The build machine could push its artifacts to another machine that acts as the server (e.g. Internet-facing). In fact, doing so is advantageous for a production environment as getting the packages away from the development system’s Build Directory prevents accidental overwrites.
A simple build that targets just one device produces more than one
package database. In other words, the packages produced by a build are
separated out into a couple of different package groupings based on
criteria such as the target’s CPU architecture, the target board, or the
C library used on the target. For example, a build targeting the
qemux86 device produces the following three package databases:
noarch, i586, and qemux86. If you wanted your qemux86
device to be aware of all the packages that were available to it, you
would need to point it to each of these databases individually. In a
similar way, a traditional Linux distribution usually is configured to
be aware of a number of software repositories from which it retrieves
packages.
Using runtime package management is completely optional and not required for a successful build or deployment in any way. But if you want to make use of runtime package management, you need to do a couple things above and beyond the basics. The remainder of this section describes what you need to do.
29.4.1 Build Considerations
This section describes build considerations of which you need to be aware in order to provide support for runtime package management.
When BitBake generates packages, it needs to know what format or formats to use. In your configuration, you use the PACKAGE_CLASSES variable to specify the format:
Open the
local.conffile inside your Build Directory (e.g.bitbake-builds/build/conf/local.conf).Select the desired package format as follows:
PACKAGE_CLASSES ?= "package_packageformat"
where packageformat can be “ipk”, “rpm”, or “deb” which are the supported package formats.
Note
Because the Yocto Project supports three different package formats, you can set the variable with more than one argument. However, the OpenEmbedded build system only uses the first argument when creating an image or Software Development Kit (SDK).
If you would like your image to start off with a basic package database containing the packages in your current build as well as to have the relevant tools available on the target for runtime package management, you can include “package-management” in the IMAGE_FEATURES variable. Including “package-management” in this configuration variable ensures that when the image is assembled for your target, the image includes the currently-known package databases as well as the target-specific tools required for runtime package management to be performed on the target. However, this is not strictly necessary. You could start your image off without any databases but only include the required on-target package tool(s). As an example, you could include “opkg” in your IMAGE_INSTALL variable if you are using the IPK package format. You can then initialize your target’s package database(s) later once your image is up and running.
Whenever you perform any sort of build step that can potentially generate a package or modify existing package, it is always a good idea to re-generate the package index after the build by using the following command:
$ bitbake package-index
It might be tempting to build the package and the package index at the same time with a command such as the following:
$ bitbake some-package package-index
Do not do this as BitBake does not schedule the package index for after the completion of the package you are building. Consequently, you cannot be sure of the package index including information for the package you just built. Thus, be sure to run the package update step separately after building any packages.
You can use the PACKAGE_FEED_ARCHS, PACKAGE_FEED_BASE_PATHS, and PACKAGE_FEED_URIS variables to pre-configure target images to use a package feed. If you do not define these variables, then manual steps as described in the subsequent sections are necessary to configure the target. You should set these variables before building the image in order to produce a correctly configured image.
Note
Your image will need enough free storage space to run package upgrades, especially if many of them need to be downloaded at the same time. You should make sure images are created with enough free space by setting the IMAGE_ROOTFS_EXTRA_SPACE variable.
When your build is complete, your packages reside in the
${TMPDIR}/deploy/packageformat directory. For example, if
${TMPDIR} is
tmp and your selected package type is RPM, then your RPM packages
are available in tmp/deploy/rpm.
29.4.2 Host or Server Machine Setup
Although other protocols are possible, a server using HTTP typically serves packages. If you want to use HTTP, then set up and configure a web server such as Apache 2, lighttpd, or Python web server on the machine serving the packages.
To keep things simple, this section describes how to set up a Python web server to share package feeds from the developer’s machine. Although this server might not be the best for a production environment, the setup is simple and straight forward. Should you want to use a different server more suited for production (e.g. Apache 2, Lighttpd, or Nginx), take the appropriate steps to do so.
From within the Build Directory where you have built an image based on
your packaging choice (i.e. the PACKAGE_CLASSES setting), simply start
the server. The following example assumes a Build Directory of bitbake-builds/build
and a PACKAGE_CLASSES setting of “package_rpm”:
$ cd bitbake-builds/build/tmp/deploy/rpm
$ python3 -m http.server
29.4.3 Target Setup
Setting up the target differs depending on the package management system. This section provides information for RPM, IPK, and DEB.
29.4.3.1 Using RPM
The Dandified Packaging (DNF) performs
runtime package management of RPM packages. In order to use DNF for
runtime package management, you must perform an initial setup on the
target machine for cases where the PACKAGE_FEED_* variables were not
set as part of the image that is running on the target. This means if
you built your image and did not use these variables as part of the
build and your image is now running on the target, you need to perform
the steps in this section if you want to use runtime package management.
Note
For information on the PACKAGE_FEED_* variables, see
PACKAGE_FEED_ARCHS, PACKAGE_FEED_BASE_PATHS, and
PACKAGE_FEED_URIS in the Yocto Project Reference Manual variables
glossary.
On the target, you must inform DNF that package databases are available.
You do this by creating a file named
/etc/yum.repos.d/oe-packages.repo and defining the oe-packages.
As an example, assume the target is able to use the following package
databases: all, i586, and qemux86 from a server named
my.server. The specifics for setting up the web server are up to
you. The critical requirement is that the URIs in the target repository
configuration point to the correct remote location for the feeds.
Note
For development purposes, you can point the web server to the build
system’s deploy directory. However, for production use, it is better to
copy the package directories to a location outside of the build area and use
that location. Doing so avoids situations where the build system
overwrites or changes the deploy directory.
When telling DNF where to look for the package databases, you must declare individual locations per architecture or a single location used for all architectures. You cannot do both:
Create an Explicit List of Architectures: Define individual base URLs to identify where each package database is located:
[oe-packages] baseurl=http://my.server/rpm/i586 http://my.server/rpm/qemux86 http://my.server/rpm/all
This example informs DNF about individual package databases for all three architectures.
Create a Single (Full) Package Index: Define a single base URL that identifies where a full package database is located:
[oe-packages] baseurl=http://my.server/rpm
This example informs DNF about a single package database that contains all the package index information for all supported architectures.
Once you have informed DNF where to find the package databases, you need to fetch them:
# dnf makecache
DNF is now able to find, install, and upgrade packages from the specified repository or repositories.
Note
See the DNF documentation for additional information.
29.4.3.2 Using IPK
The opkg application performs runtime package management of IPK
packages. You must perform an initial setup for opkg on the target
machine if the
PACKAGE_FEED_ARCHS,
PACKAGE_FEED_BASE_PATHS,
and
PACKAGE_FEED_URIS
variables have not been set or the target image was built before the
variables were set.
The opkg application uses configuration files to find available
package databases. Thus, you need to create a configuration file inside
the /etc/opkg/ directory, which informs opkg of any repository
you want to use.
As an example, suppose you are serving packages from a ipk/
directory containing the i586, all, and qemux86 databases
through an HTTP server named my.server. On the target, create a
configuration file (e.g. my_repo.conf) inside the /etc/opkg/
directory containing the following:
src/gz all http://my.server/ipk/all
src/gz i586 http://my.server/ipk/i586
src/gz qemux86 http://my.server/ipk/qemux86
Next, instruct opkg to fetch the
repository information:
# opkg update
The opkg application is now able to find, install, and upgrade packages
from the specified repository.
29.4.3.3 Using DEB
The apt application performs runtime package management of DEB
packages. This application uses a source list file to find available
package databases. You must perform an initial setup for apt on the
target machine if the
PACKAGE_FEED_ARCHS,
PACKAGE_FEED_BASE_PATHS,
and
PACKAGE_FEED_URIS
variables have not been set or the target image was built before the
variables were set.
To inform apt of the repository you want to use, you might create a
list file (e.g. my_repo.list) inside the
/etc/apt/sources.list.d/ directory. As an example, suppose you are
serving packages from a deb/ directory containing the i586,
all, and qemux86 databases through an HTTP server named
my.server. The list file should contain:
deb http://my.server/deb/all ./
deb http://my.server/deb/i586 ./
deb http://my.server/deb/qemux86 ./
Next, instruct the apt application
to fetch the repository information:
$ sudo apt update
After this step,
apt is able to find, install, and upgrade packages from the
specified repository.
29.5 Generating and Using Signed Packages
In order to add security to RPM packages used during a build, you can take steps to securely sign them. Once a signature is verified, the OpenEmbedded build system can use the package in the build. If security fails for a signed package, the build system stops the build.
This section describes how to sign RPM packages during a build and how to use signed package feeds (repositories) when doing a build.
29.5.1 Signing RPM Packages
To enable signing RPM packages, you must modify the rpm
recipe configuration to include support for OpenPGP signing.
That may be done either in a .bbappend for the rpm recipe:
PACKAGECONFIG:append = " sequoia"
or in a Configuration File:
PACKAGECONFIG:append:pn-rpm-native = " sequoia"
PACKAGECONFIG:append:pn-rpm = " sequoia"
You must also set up the following settings in a Configuration File:
# Inherit sign_rpm.bbclass to enable signing functionality
INHERIT += " sign_rpm"
# Define the GPG key that will be used for signing.
RPM_GPG_NAME = "key_name"
# Provide passphrase for the key
RPM_GPG_PASSPHRASE = "passphrase"
Note
Be sure to supply appropriate values for both key_name and passphrase.
Aside from the RPM_GPG_NAME and RPM_GPG_PASSPHRASE variables in
the previous example, two optional variables related to signing are available:
GPG_BIN: Specifies a
gpgbinary/wrapper that is executed when the package is signed.GPG_PATH: Specifies the
gpghome directory used when the package is signed.
29.5.2 Processing Package Feeds
In addition to being able to sign RPM packages, you can also enable signed package feeds for IPK and RPM packages.
The steps you need to take to enable signed package feed use are similar
to the steps used to sign RPM packages. You must define the following in
your local.config or distro.config file:
INHERIT += "sign_package_feed"
PACKAGE_FEED_GPG_NAME = "key_name"
PACKAGE_FEED_GPG_PASSPHRASE_FILE = "path_to_file_containing_passphrase"
For signed package feeds, the passphrase must be specified in a separate file,
which is pointed to by the PACKAGE_FEED_GPG_PASSPHRASE_FILE
variable. Regarding security, keeping a plain text passphrase out of the
configuration is more secure.
Aside from the PACKAGE_FEED_GPG_NAME and
PACKAGE_FEED_GPG_PASSPHRASE_FILE variables, three optional variables
related to signed package feeds are available:
GPG_BIN Specifies a
gpgbinary/wrapper that is executed when the package is signed.GPG_PATH: Specifies the
gpghome directory used when the package is signed.PACKAGE_FEED_GPG_SIGNATURE_TYPE: Specifies the type of
gpgsignature. This variable applies only to RPM and IPK package feeds. Allowable values for thePACKAGE_FEED_GPG_SIGNATURE_TYPEare “ASC”, which is the default and specifies ascii armored, and “BIN”, which specifies binary.
29.6 Testing Packages With ptest
See the Testing Packages With ptest section of the Yocto Project Test Environment Manual.
29.7 Creating Node Package Manager (NPM) Packages
Warning
The NPM fetcher is currently disabled due to security concerns. See 355cd22 for more information.
This section is left there if it is re-enabled in the future, but is currently obsolete.
NPM is a package manager for the JavaScript programming language. The Yocto Project supports the NPM fetcher. You can use this fetcher in combination with devtool to create recipes that produce NPM packages.
There are two workflows that allow you to create NPM packages using
devtool: the NPM registry modules method and the NPM project code
method.
Note
While it is possible to create NPM recipes manually, using
devtool is far simpler.
Additionally, some requirements and caveats exist.
29.7.1 Requirements and Caveats
You need to be aware of the following before using devtool to create
NPM packages:
Of the two methods that you can use
devtoolto create NPM packages, the registry approach is slightly simpler. However, you might consider the project approach because you do not have to publish your module in the NPM registry, which is NPM’s public registry.Be familiar with devtool.
The NPM host tools need the native
nodejs-npmpackage, which is part of the OpenEmbedded environment. You need to get the package by cloning the meta-openembedded repository. Be sure to add the path to your local copy to yourbblayers.conffile.devtoolcannot detect native libraries in module dependencies. Consequently, you must manually add packages to your recipe.While deploying NPM packages,
devtoolcannot determine which dependent packages are missing on the target (e.g. the node runtimenodejs). Consequently, you need to find out what files are missing and be sure they are on the target.Although you might not need NPM to run your node package, it is useful to have NPM on your target. The NPM package name is
nodejs-npm.
29.7.2 Using the Registry Modules Method
This section presents an example that uses the cute-files module,
which is a file browser web application.
Note
You must know the cute-files module version.
The first thing you need to do is use devtool and the NPM fetcher to
create the recipe:
$ devtool add "npm://registry.npmjs.org;package=cute-files;version=1.0.2"
The
devtool add command runs recipetool create and uses the same
fetch URI to download each dependency and capture license details where
possible. The result is a generated recipe.
After running for quite a long time, in particular building the
nodejs-native package, the command should end as follows:
INFO: Recipe /home/.../build/workspace/recipes/cute-files/cute-files_1.0.2.bb has been automatically created; further editing may be required to make it fully functional
The recipe file is fairly simple and contains every license that
recipetool finds and includes the licenses in the recipe’s
LIC_FILES_CHKSUM
variables. You need to examine the variables and look for those with
“unknown” in the LICENSE
field. You need to track down the license information for “unknown”
modules and manually add the information to the recipe.
recipetool creates a “shrinkwrap” file for your recipe. Shrinkwrap
files capture the version of all dependent modules. Many packages do not
provide shrinkwrap files but recipetool will create a shrinkwrap file as it
runs.
Note
A package is created for each sub-module. This policy is the only practical way to have the licenses for all of the dependencies represented in the license manifest of the image.
The devtool edit-recipe command lets you take a look at the recipe:
$ devtool edit-recipe cute-files
# Recipe created by recipetool
# This is the basis of a recipe and may need further editing in order to be fully functional.
# (Feel free to remove these comments when editing.)
SUMMARY = "Turn any folder on your computer into a cute file browser, available on the local network."
# WARNING: the following LICENSE and LIC_FILES_CHKSUM values are best guesses - it is
# your responsibility to verify that the values are complete and correct.
#
# NOTE: multiple licenses have been detected; they have been separated with &
# in the LICENSE value for now since it is a reasonable assumption that all
# of the licenses apply. If instead there is a choice between the multiple
# licenses then you should change the value to separate the licenses with |
# instead of &. If there is any doubt, check the accompanying documentation
# to determine which situation is applicable.
SUMMARY = "Turn any folder on your computer into a cute file browser, available on the local network."
LICENSE = "BSD-3-Clause & ISC & MIT"
LIC_FILES_CHKSUM = "file://LICENSE;md5=71d98c0a1db42956787b1909c74a86ca \
file://node_modules/accepts/LICENSE;md5=bf1f9ad1e2e1d507aef4883fff7103de \
file://node_modules/array-flatten/LICENSE;md5=44088ba57cb871a58add36ce51b8de08 \
...
file://node_modules/cookie-signature/Readme.md;md5=57ae8b42de3dd0c1f22d5f4cf191e15a"
SRC_URI = " \
npm://registry.npmjs.org/;package=cute-files;version=${PV} \
npmsw://${THISDIR}/${BPN}/npm-shrinkwrap.json \
"
S = "${UNPACKDIR}/npm"
inherit npm
LICENSE:${PN} = "MIT"
LICENSE:${PN}-accepts = "MIT"
LICENSE:${PN}-array-flatten = "MIT"
...
LICENSE:${PN}-vary = "MIT"
Three key points in the previous example are:
SRC_URI uses the NPM scheme so that the NPM fetcher is used.
recipetoolcollects all the license information. If a sub-module’s license is unavailable, the sub-module’s name appears in the comments.The
inherit npmstatement causes the npm class to package up all the modules.
You can run the following command to build the cute-files package:
$ devtool build cute-files
Remember that nodejs must be installed on
the target before your package.
Assuming 192.168.7.2 for the target’s IP address, use the following command to deploy your package:
$ devtool deploy-target -s cute-files root@192.168.7.2
Once the package is installed on the target, you can test the application to show the contents of any directory:
$ cd /usr/lib/node_modules/cute-files
$ cute-files
On a browser,
go to http://192.168.7.2:3000 and you see the following:
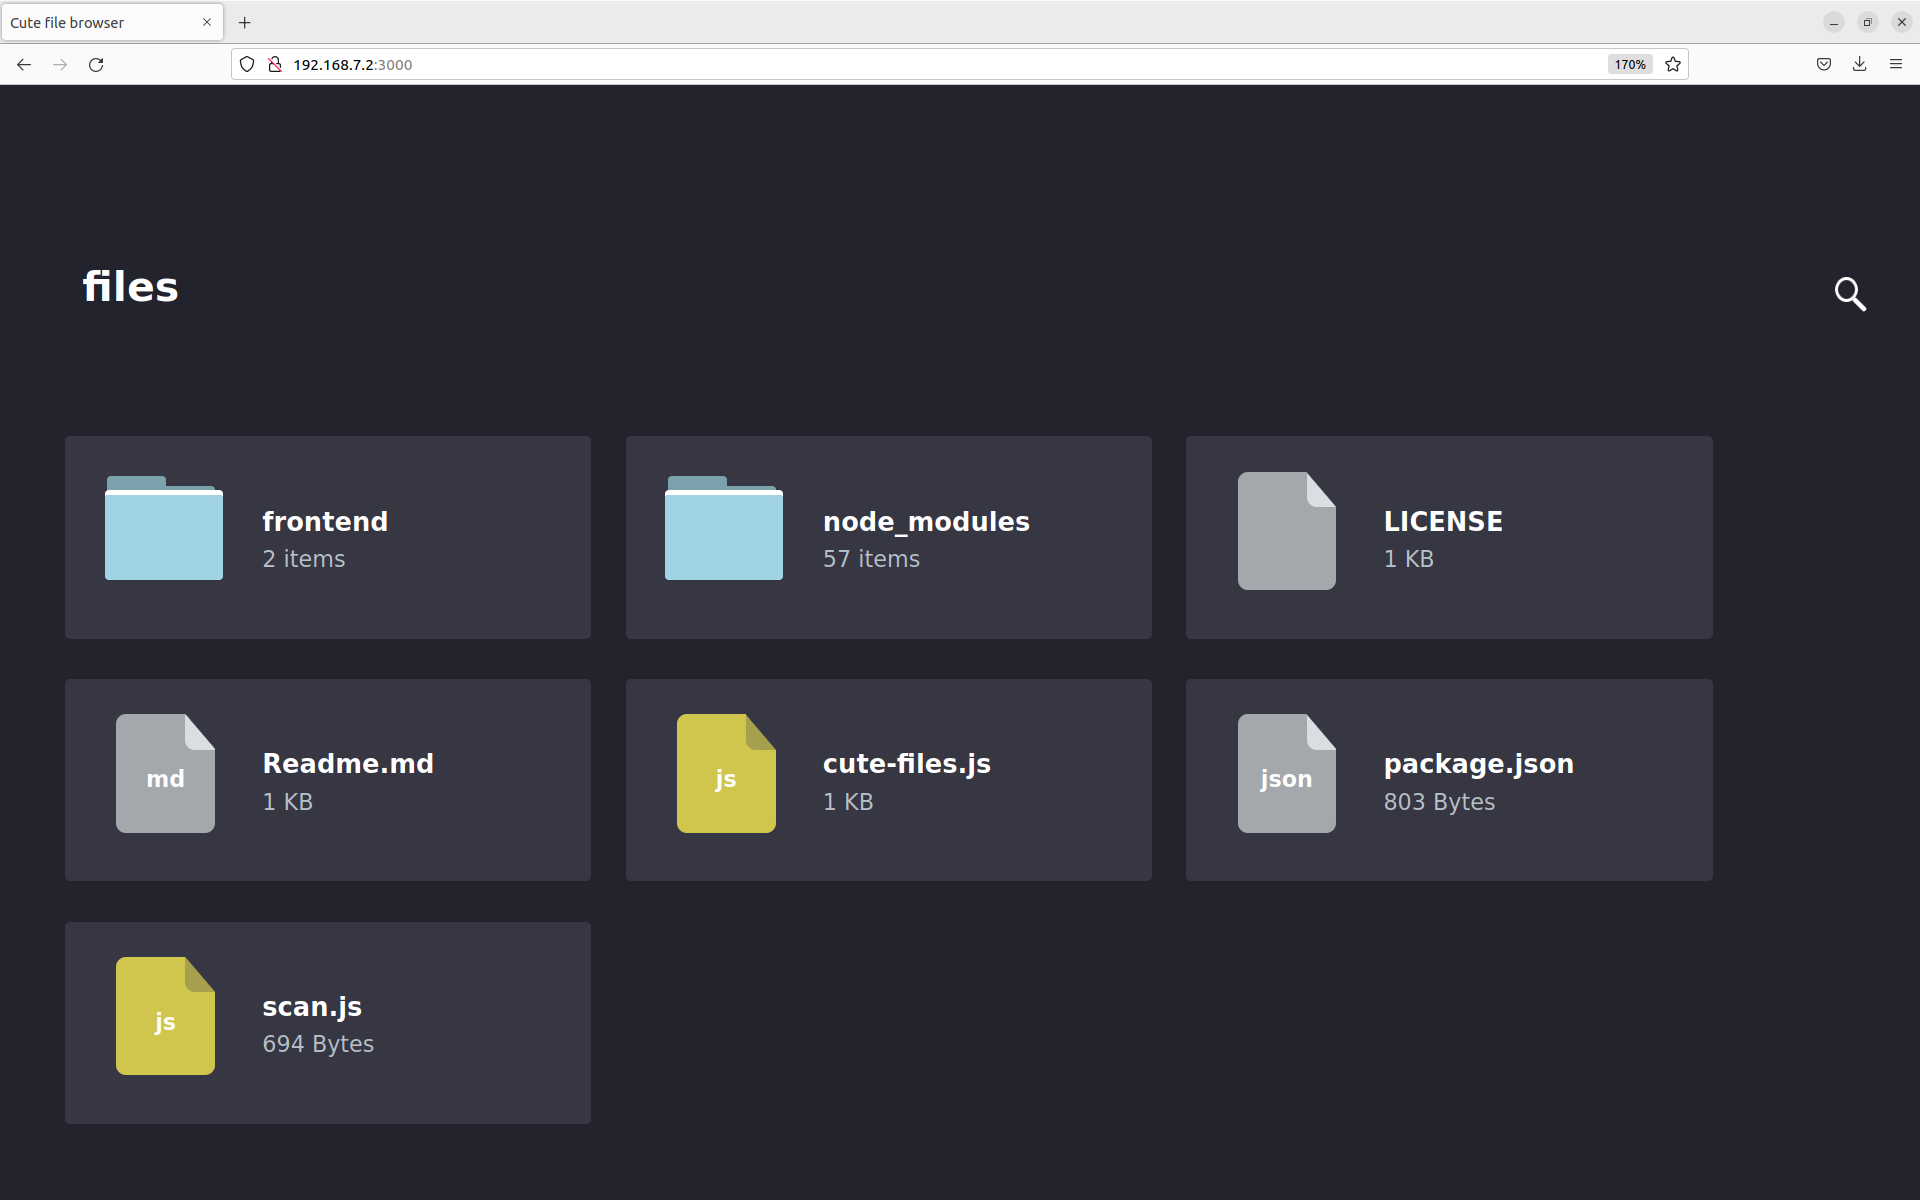
You can find the recipe in workspace/recipes/cute-files. You can use
the recipe in any layer you choose.
29.7.3 Using the NPM Projects Code Method
Although it is useful to package modules already in the NPM registry,
adding node.js projects under development is a more common developer
use case.
This section covers the NPM projects code method, which is very similar
to the “registry” approach described in the previous section. In the NPM
projects method, you provide devtool with an URL that points to the
source files.
Replicating the same example, (i.e. cute-files) use the following
command:
$ devtool add https://github.com/martinaglv/cute-files.git
The recipe this command generates is very similar to the recipe created in the previous section. However, the SRC_URI looks like the following:
SRC_URI = " \
git://github.com/martinaglv/cute-files.git;protocol=https;branch=master \
npmsw://${THISDIR}/${BPN}/npm-shrinkwrap.json \
"
In this example, the main module is taken from the Git repository and dependencies are taken from the NPM registry. Other than those differences, the recipe is basically the same between the two methods. You can build and deploy the package exactly as described in the previous section that uses the registry modules method.
29.8 Adding custom metadata to packages
The variable PACKAGE_ADD_METADATA can be used to add additional metadata to packages. This is reflected in the package control/spec file. To take the ipk format for example, the CONTROL file stored inside would contain the additional metadata as additional lines.
The variable can be used in multiple ways, including using suffixes to set it for a specific package type and/or package. Note that the order of precedence is the same as this list:
PACKAGE_ADD_METADATA_<PKGTYPE>:<PN>PACKAGE_ADD_METADATA_<PKGTYPE>PACKAGE_ADD_METADATA:<PN>
<PKGTYPE> is a parameter and expected to be a distinct name of specific package type:
IPK for .ipk packages
DEB for .deb packages
RPM for .rpm packages
<PN> is a parameter and expected to be a package name.
The variable can contain multiple [one-line] metadata fields separated
by the literal sequence ‘\n’. The separator can be redefined using the
variable flag separator.
Here is an example that adds two custom fields for ipk packages:
PACKAGE_ADD_METADATA_IPK = "Vendor: CustomIpk\nGroup:Applications/Spreadsheets"
30 Efficiently Fetching Source Files During a Build
The OpenEmbedded build system works with source files located through the SRC_URI variable. When you build something using BitBake, a big part of the operation is locating and downloading all of the source code. For images, downloading all the source for various packages can take a significant amount of time.
This section shows you how you can use mirrors to speed up fetching source files and how you can pre-fetch files all of which leads to more efficient use of resources and time.
30.1 Setting up Effective Mirrors
A good deal that goes into a Yocto Project build is simply downloading source code. Maybe you have been working with another build system for which you have built up a sizable directory of source tarballs. Or, perhaps someone else has such a directory for which you have read access. If so, you can save time by adding statements to your configuration file so that the build process checks local directories first for existing tarballs before checking the Internet.
Here is an efficient way to set it up in your local.conf file:
SOURCE_MIRROR_URL ?= "file:///home/you/your-download-dir/"
INHERIT += "own-mirrors"
BB_GENERATE_MIRROR_TARBALLS = "1"
# BB_NO_NETWORK = "1"
In the previous example, the BB_GENERATE_MIRROR_TARBALLS variable causes the OpenEmbedded build system to generate tarballs of the Git repositories and store them in the DL_DIR directory. Due to performance reasons, generating and storing these tarballs is not the build system’s default behavior.
You can also use the PREMIRRORS variable. For an example, see the variable’s glossary entry in the Yocto Project Reference Manual.
30.2 Getting Source Files and Suppressing the Build
Another technique you can use to ready yourself for a successive string of build operations, is to pre-fetch all the source files without actually starting a build. This technique lets you work through any download issues and ultimately gathers all the source files into your download directory build/downloads/, which is located with DL_DIR.
Use the following BitBake command form to fetch all the necessary sources without starting the build:
$ bitbake target --runall=fetch
This variation of the BitBake command guarantees that you have all the sources for that BitBake target should you disconnect from the Internet and want to do the build later offline.
31 Selecting an Initialization Manager
By default, the Poky distro uses SysVinit as the initialization manager. There is also support for BusyBox init, a simpler implementation, as well as support for systemd, which is a full replacement for init with parallel starting of services, reduced shell overhead, increased security and resource limits for services, and other features that are used by many distributions.
Within the system, SysVinit and BusyBox init treat system components as
services. These services are maintained as shell scripts stored in the
/etc/init.d/ directory.
SysVinit is more elaborate than BusyBox init and organizes services in
different run levels. This organization is maintained by putting links
to the services in the /etc/rcN.d/ directories, where N/ is one
of the following options: “S”, “0”, “1”, “2”, “3”, “4”, “5”, or “6”.
Note
Each runlevel has a dependency on the previous runlevel. This dependency allows the services to work properly.
Both SysVinit and BusyBox init are configured through the /etc/inittab
file, with a very similar syntax, though of course BusyBox init features
are more limited.
In comparison, systemd treats components as units. Using units is a
broader concept as compared to using a service. A unit includes several
different types of entities. Service is one of the types of entities.
The runlevel concept in SysVinit corresponds to the concept of a target
in systemd, where target is also a type of supported unit.
In systems with SysVinit or BusyBox init, services load sequentially (i.e. one by one) during init and parallelization is not supported. With systemd, services start in parallel. This method can have an impact on the startup performance of a given service, though systemd will also provide more services by default, therefore increasing the total system boot time. systemd also substantially increases system size because of its multiple components and the extra dependencies it pulls.
By contrast, BusyBox init is the simplest and the lightest solution and also comes with BusyBox mdev as device manager, a lighter replacement to udev, which SysVinit and systemd both use.
The “Selecting a Device Manager” chapter has more details about device managers.
31.1 Using SysVinit with udev
SysVinit with the udev device manager corresponds to the default setting in Poky. This corresponds to setting:
INIT_MANAGER = "sysvinit"
31.2 Using BusyBox init with BusyBox mdev
BusyBox init with BusyBox mdev is the simplest and lightest solution for small root filesystems. All you need is BusyBox, which most systems have anyway:
INIT_MANAGER = "mdev-busybox"
31.3 Using systemd
The last option is to use systemd together with the udev device manager. This is the most powerful and versatile solution, especially for more complex systems:
INIT_MANAGER = "systemd"
This will enable systemd and remove sysvinit components from the image. See meta/conf/distro/include/init-manager-systemd.inc for exact details on what this does.
31.3.1 Controling systemd from the target command line
Here is a quick reference for controling systemd from the command line on the
target. Instead of opening and sometimes modifying files, most interaction
happens through the systemctl and journalctl commands:
systemctl status: show the status of all servicessystemctl status <service>: show the status of one servicesystemctl [start|stop] <service>: start or stop a servicesystemctl [enable|disable] <service>: enable or disable a service at boot timesystemctl list-units: list all available unitsjournalctl -a: show all logs for all servicesjournalctl -f: show only the last log entries, and keep printing updates as they arrivejournalctl -u: show only logs from a particular service
31.3.2 Using systemd-journald without a traditional syslog daemon
Counter-intuitively, systemd-journald is not a syslog runtime or provider,
and the proper way to use systemd-journald as your sole logging mechanism is to
effectively disable syslog entirely by setting these variables in your distribution
configuration file:
VIRTUAL-RUNTIME_syslog = ""
VIRTUAL-RUNTIME_base-utils-syslog = ""
Doing so will prevent rsyslog / busybox-syslog from being pulled in by
default, leaving only systemd-journald.
31.3.3 Summary
The Yocto Project supports three different initialization managers, offering increasing levels of complexity and functionality:
BusyBox init |
SysVinit |
systemd |
|
|---|---|---|---|
Size |
Small |
Small |
Big [1] |
Complexity |
Small |
Medium |
High |
Support for boot profiles |
No |
Yes (“runlevels”) |
Yes (“targets”) |
Services defined as |
Shell scripts |
Shell scripts |
Description files |
Starting services in parallel |
No |
No |
Yes |
Setting service resource limits |
No |
No |
Yes |
Support service isolation |
No |
No |
Yes |
Integrated logging |
No |
No |
Yes |
32 Selecting a Device Manager
The Yocto Project provides multiple ways to manage the device manager
(/dev):
Persistent and Pre-Populated
/dev: For this case, the/devdirectory is persistent and the required device nodes are created during the build.Use
devtmpfswith a Device Manager: For this case, the/devdirectory is provided by the kernel as an in-memory file system and is automatically populated by the kernel at runtime. Additional configuration of device nodes is done in user space by a device manager likeudevorbusybox-mdev.
32.1 Using Persistent and Pre-Populated /dev
To use the static method for device population, you need to set the USE_DEVFS variable to “0” as follows:
USE_DEVFS = "0"
The content of the resulting /dev directory is defined in a Device
Table file. The
IMAGE_DEVICE_TABLES
variable defines the Device Table to use and should be set in the
machine or distro configuration file. Alternatively, you can set this
variable in your local.conf configuration file.
If you do not define the IMAGE_DEVICE_TABLES variable, the default
device_table-minimal.txt is used:
IMAGE_DEVICE_TABLES = "device_table-mymachine.txt"
The population is handled by the makedevs utility during image
creation:
32.2 Using devtmpfs and a Device Manager
To use the dynamic method for device population, you need to use (or be sure to set) the USE_DEVFS variable to “1”, which is the default:
USE_DEVFS = "1"
With this
setting, the resulting /dev directory is populated by the kernel
using devtmpfs. Make sure the corresponding kernel configuration
variable CONFIG_DEVTMPFS is set when building you build a Linux
kernel.
All devices created by devtmpfs will be owned by root and have
permissions 0600.
To have more control over the device nodes, you can use a device manager like
udev or busybox-mdev. You choose the device manager by defining the
VIRTUAL-RUNTIME_dev_manager variable in your machine
or distro configuration file. Alternatively, you can set this variable in
your local.conf configuration file:
VIRTUAL-RUNTIME_dev_manager = "udev"
# Some alternative values
# VIRTUAL-RUNTIME_dev_manager = "busybox-mdev"
# VIRTUAL-RUNTIME_dev_manager = "systemd"
33 Using an External SCM
If you’re working on a recipe that pulls from an external Source Code Manager (SCM), it is possible to have the OpenEmbedded build system notice new recipe changes added to the SCM and then build the resulting packages that depend on the new recipes by using the latest versions. This only works for SCMs from which it is possible to get a sensible revision number for changes. Currently, you can do this with Apache Subversion (SVN) and Git.
To enable this behavior, the PV of
the recipe needs to include a + sign in its assignment.
Here is an example:
PV = "1.2.3+git"
Bitbake later includes the source control information in PKGV during the packaging phase.
Then, you can add the following to your
local.conf:
SRCREV:pn-PN = "${AUTOREV}"
PN is the name of the recipe for which you want to enable automatic source revision updating.
If you do not want to update your local configuration file, you can add the following directly to the recipe to finish enabling the feature:
SRCREV = "${AUTOREV}"
The Yocto Project provides a distribution named poky-bleeding, whose
configuration file contains the line:
require conf/distro/include/poky-floating-revisions.inc
This line pulls in the listed include file that defines the set of AUTOREV-enabled recipes:
INHERIT += "poky-bleeding"
POKY_AUTOREV_RECIPES = "\
libmatchbox \
opkg-utils \
matchbox-config-gtk \
matchbox-desktop \
matchbox-keyboard \
matchbox-panel-2 \
matchbox-terminal \
matchbox-theme-sato \
matchbox-wm \
pseudo \
puzzles \
sato-icon-theme \
sato-screenshot \
settings-daemon \
"
This allows you to experiment with building a distribution that tracks the latest development source for numerous packages.
Note
The poky-bleeding distribution is not tested on a regular basis. Keep
this in mind if you use it.
34 Maintaining Build Output Quality
Many factors can influence the quality of a build. For example, if you upgrade a recipe to use a new version of an upstream software package or you experiment with some new configuration options, subtle changes can occur that you might not detect until later. Consider the case where your recipe is using a newer version of an upstream package. In this case, a new version of a piece of software might introduce an optional dependency on another library, which is auto-detected. If that library has already been built when the software is building, the software will link to the built library and that library will be pulled into your image along with the new software even if you did not want the library.
The buildhistory class helps you maintain the quality of your build output. You can use the class to highlight unexpected and possibly unwanted changes in the build output. When you enable build history, it records information about the contents of each package and image and then commits that information to a local Git repository where you can examine the information.
The remainder of this section describes the following:
34.1 Enabling and Disabling Build History
Build history is disabled by default. To enable it, add the following
INHERIT statement and set the BUILDHISTORY_COMMIT variable to
“1” at the end of your conf/local.conf file found in the
Build Directory:
INHERIT += "buildhistory"
BUILDHISTORY_COMMIT = "1"
Enabling build history as previously described causes the OpenEmbedded build system to collect build output information and commit it as a single commit to a local Git repository.
Note
Enabling build history increases your build times slightly, particularly for images, and increases the amount of disk space used during the build.
You can disable build history by removing the previous statements from
your conf/local.conf file.
34.2 Understanding What the Build History Contains
Build history information is kept in ${TOPDIR}/buildhistory
in the Build Directory as defined by the BUILDHISTORY_DIR
variable. Here is an example abbreviated listing:
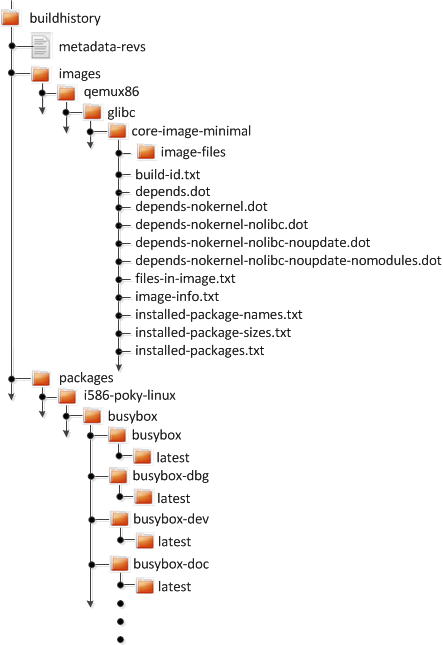
At the top level, there is a metadata-revs file that lists the
revisions of the repositories for the enabled layers when the build was
produced. The rest of the data splits into separate packages,
images and sdk directories, the contents of which are described
as follows.
34.2.1 Build History Package Information
The history for each package contains a text file that has name-value
pairs with information about the package. For example,
buildhistory/packages/i586-poky-linux/busybox/busybox/latest
contains the following:
PV = 1.22.1
PR = r32
RPROVIDES =
RDEPENDS = glibc (>= 2.20) update-alternatives-opkg
RRECOMMENDS = busybox-syslog busybox-udhcpc update-rc.d
PKGSIZE = 540168
FILES = /usr/bin/* /usr/sbin/* /usr/lib/busybox/* /usr/lib/lib*.so.* \
/etc /com /var /bin/* /sbin/* /lib/*.so.* /lib/udev/rules.d \
/usr/lib/udev/rules.d /usr/share/busybox /usr/lib/busybox/* \
/usr/share/pixmaps /usr/share/applications /usr/share/idl \
/usr/share/omf /usr/share/sounds /usr/lib/bonobo/servers
FILELIST = /bin/busybox /bin/busybox.nosuid /bin/busybox.suid /bin/sh \
/etc/busybox.links.nosuid /etc/busybox.links.suid
Most of these
name-value pairs correspond to variables used to produce the package.
The exceptions are FILELIST, which is the actual list of files in
the package, and PKGSIZE, which is the total size of files in the
package in bytes.
There is also a file that corresponds to the recipe from which the package
came (e.g. buildhistory/packages/i586-poky-linux/busybox/latest):
PV = 1.22.1
PR = r32
DEPENDS = initscripts kern-tools-native update-rc.d-native \
virtual/i586-poky-linux-compilerlibs virtual/i586-poky-linux-gcc \
virtual/libc virtual/update-alternatives
PACKAGES = busybox-ptest busybox-httpd busybox-udhcpd busybox-udhcpc \
busybox-syslog busybox-mdev busybox-hwclock busybox-dbg \
busybox-staticdev busybox-dev busybox-doc busybox-locale busybox
Finally, for those recipes fetched from a version control system (e.g.,
Git), there is a file that lists source revisions that are specified in
the recipe and the actual revisions used during the build. Listed
and actual revisions might differ when
SRCREV is set to
${AUTOREV}. Here is an
example assuming
buildhistory/packages/qemux86-poky-linux/linux-yocto/latest_srcrev):
# SRCREV_machine = "38cd560d5022ed2dbd1ab0dca9642e47c98a0aa1"
SRCREV_machine = "38cd560d5022ed2dbd1ab0dca9642e47c98a0aa1"
# SRCREV_meta = "a227f20eff056e511d504b2e490f3774ab260d6f"
SRCREV_meta ="a227f20eff056e511d504b2e490f3774ab260d6f"
You can use the
buildhistory-collect-srcrevs command with the -a option to
collect the stored SRCREV values from build history and report them
in a format suitable for use in global configuration (e.g.,
local.conf or a distro include file) to override floating
AUTOREV values to a fixed set of revisions. Here is some example
output from this command:
$ buildhistory-collect-srcrevs -a
# all-poky-linux
SRCREV:pn-ca-certificates = "07de54fdcc5806bde549e1edf60738c6bccf50e8"
SRCREV:pn-update-rc.d = "8636cf478d426b568c1be11dbd9346f67e03adac"
# core2-64-poky-linux
SRCREV:pn-binutils = "87d4632d36323091e731eb07b8aa65f90293da66"
SRCREV:pn-btrfs-tools = "8ad326b2f28c044cb6ed9016d7c3285e23b673c8"
SRCREV_bzip2-tests:pn-bzip2 = "f9061c030a25de5b6829e1abf373057309c734c0"
SRCREV:pn-e2fsprogs = "02540dedd3ddc52c6ae8aaa8a95ce75c3f8be1c0"
SRCREV:pn-file = "504206e53a89fd6eed71aeaf878aa3512418eab1"
SRCREV_glibc:pn-glibc = "24962427071fa532c3c48c918e9d64d719cc8a6c"
SRCREV:pn-gnome-desktop-testing = "e346cd4ed2e2102c9b195b614f3c642d23f5f6e7"
SRCREV:pn-init-system-helpers = "dbd9197569c0935029acd5c9b02b84c68fd937ee"
SRCREV:pn-kmod = "b6ecfc916a17eab8f93be5b09f4e4f845aabd3d1"
SRCREV:pn-libnsl2 = "82245c0c58add79a8e34ab0917358217a70e5100"
SRCREV:pn-libseccomp = "57357d2741a3b3d3e8425889a6b79a130e0fa2f3"
SRCREV:pn-libxcrypt = "50cf2b6dd4fdf04309445f2eec8de7051d953abf"
SRCREV:pn-ncurses = "51d0fd9cc3edb975f04224f29f777f8f448e8ced"
SRCREV:pn-procps = "19a508ea121c0c4ac6d0224575a036de745eaaf8"
SRCREV:pn-psmisc = "5fab6b7ab385080f1db725d6803136ec1841a15f"
SRCREV:pn-ptest-runner = "bcb82804daa8f725b6add259dcef2067e61a75aa"
SRCREV:pn-shared-mime-info = "18e558fa1c8b90b86757ade09a4ba4d6a6cf8f70"
SRCREV:pn-zstd = "e47e674cd09583ff0503f0f6defd6d23d8b718d3"
# qemux86_64-poky-linux
SRCREV_machine:pn-linux-yocto = "20301aeb1a64164b72bc72af58802b315e025c9c"
SRCREV_meta:pn-linux-yocto = "2d38a472b21ae343707c8bd64ac68a9eaca066a0"
# x86_64-linux
SRCREV:pn-binutils-cross-x86_64 = "87d4632d36323091e731eb07b8aa65f90293da66"
SRCREV_glibc:pn-cross-localedef-native = "24962427071fa532c3c48c918e9d64d719cc8a6c"
SRCREV_localedef:pn-cross-localedef-native = "794da69788cbf9bf57b59a852f9f11307663fa87"
SRCREV:pn-debianutils-native = "de14223e5bffe15e374a441302c528ffc1cbed57"
SRCREV:pn-libmodulemd-native = "ee80309bc766d781a144e6879419b29f444d94eb"
SRCREV:pn-virglrenderer-native = "363915595e05fb252e70d6514be2f0c0b5ca312b"
SRCREV:pn-zstd-native = "e47e674cd09583ff0503f0f6defd6d23d8b718d3"
Note
Here are some notes on using the buildhistory-collect-srcrevs command:
By default, only values where the SRCREV was not hardcoded (usually when AUTOREV is used) are reported. Use the
-aoption to see all SRCREV values.The output statements might not have any effect if overrides are applied elsewhere in the build system configuration. Use the
-foption to add theforcevariableoverride to each output line if you need to work around this restriction.The script does apply special handling when building for multiple machines. However, the script does place a comment before each set of values that specifies which triplet to which they belong as previously shown (e.g.,
i586-poky-linux).
34.2.2 Build History Image Information
The files produced for each image are as follows:
image-files:A directory containing selected files from the root filesystem. The files are defined by BUILDHISTORY_IMAGE_FILES.build-id.txt:Human-readable information about the build configuration and metadata source revisions. This file contains the full build header as printed by BitBake.*.dot:Dependency graphs for the image that are compatible withgraphviz.files-in-image.txt:A list of files in the image with permissions, owner, group, size, and symlink information.image-info.txt:A text file containing name-value pairs with information about the image. See the following listing example for more information.installed-package-names.txt:A list of installed packages by name only.installed-package-sizes.txt:A list of installed packages ordered by size.installed-packages.txt:A list of installed packages with full package filenames.
Note
Installed package information is able to be gathered and produced even if package management is disabled for the final image.
Here is an example of image-info.txt:
DISTRO = poky
DISTRO_VERSION = 3.4+snapshot-a0245d7be08f3d24ea1875e9f8872aa6bbff93be
USER_CLASSES = buildstats
IMAGE_CLASSES = qemuboot qemuboot license_image
IMAGE_FEATURES = allow-empty-password empty-root-password allow-root-login post-install-logging
IMAGE_LINGUAS =
IMAGE_INSTALL = packagegroup-core-boot speex speexdsp
BAD_RECOMMENDATIONS =
NO_RECOMMENDATIONS =
PACKAGE_EXCLUDE =
ROOTFS_POSTPROCESS_COMMAND = ssh_allow_empty_password ssh_allow_root_login postinst_enable_logging rootfs_update_timestamp write_image_test_data empty_var_volatile sort_passwd rootfs_reproducible
IMAGE_POSTPROCESS_COMMAND = buildhistory_get_imageinfo
IMAGESIZE = 9265
Other than IMAGESIZE,
which is the total size of the files in the image in Kbytes, the
name-value pairs are variables that may have influenced the content of
the image. This information is often useful when you are trying to
determine why a change in the package or file listings has occurred.
34.2.3 Using Build History to Gather Image Information Only
As you can see, build history produces image information, including
dependency graphs, so you can see why something was pulled into the
image. If you are just interested in this information and not interested
in collecting specific package or SDK information, you can enable
writing only image information without any history by adding the
following to your conf/local.conf file found in the
Build Directory:
INHERIT += "buildhistory"
BUILDHISTORY_COMMIT = "0"
BUILDHISTORY_FEATURES = "image"
Here, you set the BUILDHISTORY_FEATURES variable to use the image feature only.
34.2.4 Build History SDK Information
Build history collects similar information on the contents of SDKs (e.g.
bitbake -c populate_sdk imagename) as compared to information it
collects for images. Furthermore, this information differs depending on
whether an extensible or standard SDK is being produced.
The following list shows the files produced for SDKs:
files-in-sdk.txt:A list of files in the SDK with permissions, owner, group, size, and symlink information. This list includes both the host and target parts of the SDK.sdk-info.txt:A text file containing name-value pairs with information about the SDK. See the following listing example for more information.sstate-task-sizes.txt:A text file containing name-value pairs with information about task group sizes (e.g. do_populate_sysroot tasks have a total size). Thesstate-task-sizes.txtfile exists only when an extensible SDK is created.sstate-package-sizes.txt:A text file containing name-value pairs with information for the shared-state packages and sizes in the SDK. Thesstate-package-sizes.txtfile exists only when an extensible SDK is created.sdk-files:A folder that contains copies of the files mentioned inBUILDHISTORY_SDK_FILESif the files are present in the output. Additionally, the default value ofBUILDHISTORY_SDK_FILESis specific to the extensible SDK although you can set it differently if you would like to pull in specific files from the standard SDK.The default files are
conf/local.conf,conf/bblayers.conf,conf/auto.conf,conf/locked-sigs.inc, andconf/devtool.conf. Thus, for an extensible SDK, these files get copied into thesdk-filesdirectory.The following information appears under each of the
hostandtargetdirectories for the portions of the SDK that run on the host and on the target, respectively:Note
The following files for the most part are empty when producing an extensible SDK because this type of SDK is not constructed from packages as is the standard SDK.
depends.dot:Dependency graph for the SDK that is compatible withgraphviz.installed-package-names.txt:A list of installed packages by name only.installed-package-sizes.txt:A list of installed packages ordered by size.installed-packages.txt:A list of installed packages with full package filenames.
Here is an example of sdk-info.txt:
DISTRO = poky
DISTRO_VERSION = 1.3+snapshot-20130327
SDK_NAME = poky-glibc-i686-arm
SDK_VERSION = 1.3+snapshot
SDKMACHINE =
SDKIMAGE_FEATURES = dev-pkgs dbg-pkgs
BAD_RECOMMENDATIONS =
SDKSIZE = 352712
Other than SDKSIZE, which is
the total size of the files in the SDK in Kbytes, the name-value pairs
are variables that might have influenced the content of the SDK. This
information is often useful when you are trying to determine why a
change in the package or file listings has occurred.
34.2.5 Examining Build History Information
You can examine build history output from the command line or from a web interface.
To see any changes that have occurred (assuming you have BUILDHISTORY_COMMIT = “1”), you can simply use any Git command that allows you to view the history of a repository. Here is one method:
$ git log -p
You need to realize, however, that this method does show changes that are not significant (e.g. a package’s size changing by a few bytes).
There is a command-line tool called buildhistory-diff, though,
that queries the Git repository and prints just the differences that
might be significant in human-readable form. Here is an example:
$ bitbake-builds/layers/openembedded-core/scripts/buildhistory-diff . HEAD^
Changes to images/qemux86_64/glibc/core-image-minimal (files-in-image.txt):
/etc/anotherpkg.conf was added
/sbin/anotherpkg was added
* (installed-package-names.txt):
* anotherpkg was added
Changes to images/qemux86_64/glibc/core-image-minimal (installed-package-names.txt):
anotherpkg was added
packages/qemux86_64-poky-linux/v86d: PACKAGES: added "v86d-extras"
* PR changed from "r0" to "r1"
* PV changed from "0.1.10" to "0.1.12"
packages/qemux86_64-poky-linux/v86d/v86d: PKGSIZE changed from 110579 to 144381 (+30%)
* PR changed from "r0" to "r1"
* PV changed from "0.1.10" to "0.1.12"
Note
The buildhistory-diff tool requires the GitPython
package. Be sure to install it using Pip3 as follows:
$ pip3 install GitPython --user
Alternatively, you can install python3-git using the appropriate
distribution package manager (e.g. apt, dnf, or zipper).
To see changes to the build history using a web interface, follow the
instruction in the README file
here.
Here is a sample screenshot of the interface:
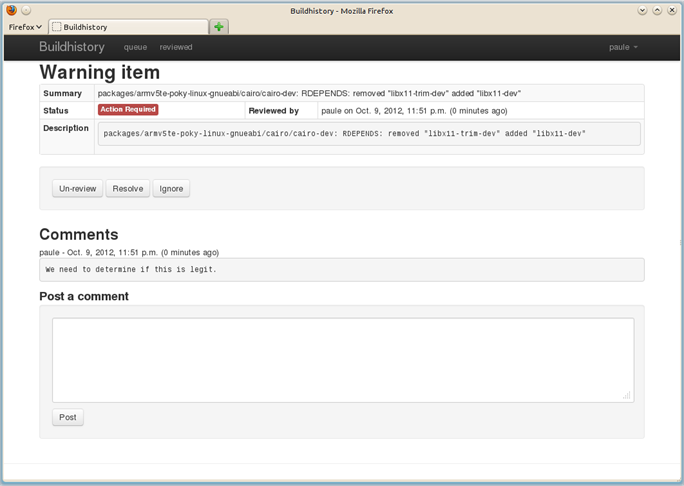
35 Debugging Tools and Techniques
The exact method for debugging build failures depends on the nature of the problem and on the system’s area from which the bug originates. Standard debugging practices such as comparison against the last known working version with examination of the changes and the re-application of steps to identify the one causing the problem are valid for the Yocto Project just as they are for any other system. Even though it is impossible to detail every possible potential failure, this section provides some general tips to aid in debugging given a variety of situations.
Note
A useful feature for debugging is the error reporting tool. Configuring the Yocto Project to use this tool causes the OpenEmbedded build system to produce error reporting commands as part of the console output. You can enter the commands after the build completes to log error information into a common database, that can help you figure out what might be going wrong. For information on how to enable and use this feature, see the “Using the Error Reporting Tool” section.
The following list shows the debugging topics in the remainder of this section:
“Viewing Logs from Failed Tasks” describes how to find and view logs from tasks that failed during the build process.
“Viewing Variable Values” describes how to use the BitBake
-eoption to examine variable values after a recipe has been parsed.“Viewing Package Information with oe-pkgdata-util” describes how to use the
oe-pkgdata-utilutility to query PKGDATA_DIR and display package-related information for built packages.“Viewing Dependencies Between Recipes and Tasks” describes how to use the BitBake
-goption to display recipe dependency information used during the build.“Viewing Task Variable Dependencies” describes how to use the
bitbake-dumpsigcommand in conjunction with key subdirectories in the Build Directory to determine variable dependencies.“Running Specific Tasks” describes how to use several BitBake options (e.g.
-c,-C, and-f) to run specific tasks in the build chain. It can be useful to run tasks “out-of-order” when trying isolate build issues.“General BitBake Problems” describes how to use BitBake’s
-Ddebug output option to reveal more about what BitBake is doing during the build.“Building with No Dependencies” describes how to use the BitBake
-boption to build a recipe while ignoring dependencies.“Recipe Logging Mechanisms” describes how to use the many recipe logging functions to produce debugging output and report errors and warnings.
“Debugging Parallel Make Races” describes how to debug situations where the build consists of several parts that are run simultaneously and when the output or result of one part is not ready for use with a different part of the build that depends on that output.
“Debugging With the GNU Project Debugger (GDB) Remotely” describes how to use GDB to allow you to examine running programs, which can help you fix problems.
“Debugging with the GNU Project Debugger (GDB) on the Target” describes how to use GDB directly on target hardware for debugging.
“Other Debugging Tips” describes miscellaneous debugging tips that can be useful.
35.1 Viewing Logs from Failed Tasks
You can find the log for a task in the file
${WORKDIR}/temp/log.do_taskname.
For example, the log for the
do_compile task of the
QEMU minimal image for the x86 machine (qemux86) might be in
tmp/work/qemux86-poky-linux/core-image-minimal/1.0-r0/temp/log.do_compile.
To see the commands BitBake ran
to generate a log, look at the corresponding run.do_taskname file
in the same directory.
log.do_taskname and run.do_taskname are actually symbolic
links to log.do_taskname.pid and
log.run_taskname.pid, where pid is the PID the task had
when it ran. The symlinks always point to the files corresponding to the
most recent run.
35.2 Viewing Variable Values
Sometimes you need to know the value of a variable as a result of BitBake’s parsing step. This could be because some unexpected behavior occurred in your project. Perhaps an attempt to modify a variable did not work out as expected.
BitBake’s bitbake-getvar command is used to display variable values after
parsing. The following command displays the variable value for OVERRIDES
after the configuration files (i.e. local.conf, bblayers.conf,
bitbake.conf and so forth) have been parsed:
$ bitbake-getvar OVERRIDES
The following command displays the value of PV after a specific recipe has been parsed:
$ bitbake-getvar -r recipename PV
Note
Each recipe has its own private set of variables (datastore). Internally, after parsing the configuration, a copy of the resulting datastore is made prior to parsing each recipe. This copying implies that variables set in one recipe will not be visible to other recipes.
Likewise, each task within a recipe gets a private datastore based on the recipe datastore, which means that variables set within one task will not be visible to other tasks.
In the output of bitbake-getvar, the line containing the value of the
variable is preceded by a description of how the variable got its value,
including temporary values that were later overridden. This description also
includes variable flags (varflags) set on the variable. The output can be very
helpful during debugging.
Variables that are exported to the environment are preceded by
export in the output of bitbake-getvar. See the following example:
export CC="i586-poky-linux-gcc -m32 -march=i586 --sysroot=/home/ulf/poky/build/tmp/sysroots/qemux86"
Shell functions and tasks can also be inspected with the same mechanism:
$ bitbake-getvar -r recipename do_install
For Python functions and tasks, bitbake -e recipename can be used instead.
Moreover, the output of the bitbake -e and bitbake -e recipe commands
includes the following information:
The output starts with a tree listing all configuration files and classes included globally, recursively listing the files they include or inherit in turn. Much of the behavior of the OpenEmbedded build system (including the behavior of the Normal Recipe Build Tasks) is implemented in the base class and the classes it inherits, rather than being built into BitBake itself.
After the variable values, all functions appear in the output. For shell functions, variables referenced within the function body are expanded. If a function has been modified using overrides or using override-style operators like
:appendand:prepend, then the final assembled function body appears in the output.
35.3 Viewing Package Information with oe-pkgdata-util
You can use the oe-pkgdata-util command-line utility to query
PKGDATA_DIR and display
various package-related information. When you use the utility, you must
use it to view information on packages that have already been built.
Here are a few of the available oe-pkgdata-util subcommands.
Note
You can use the standard * and ? globbing wildcards as part of package names and paths.
oe-pkgdata-util list-pkgs [pattern]: Lists all packages that have been built, optionally limiting the match to packages that match pattern.oe-pkgdata-util list-pkg-files package ...: Lists the files and directories contained in the given packages.Note
A different way to view the contents of a package is to look at the
${WORKDIR}/packages-splitdirectory of the recipe that generates the package. This directory is created by the do_package task and has one subdirectory for each package the recipe generates, which contains the files stored in that package.If you want to inspect the
${WORKDIR}/packages-splitdirectory, make sure that rm_work is not enabled when you build the recipe.oe-pkgdata-util find-path path ...: Lists the names of the packages that contain the given paths. For example, the following tells us that/usr/share/man/man1/make.1is contained in themake-docpackage:$ oe-pkgdata-util find-path /usr/share/man/man1/make.1 make-doc: /usr/share/man/man1/make.1
oe-pkgdata-util lookup-recipe package ...: Lists the name of the recipes that produce the given packages.
For more information on the oe-pkgdata-util command, use the help
facility:
$ oe-pkgdata-util --help
$ oe-pkgdata-util subcommand --help
35.4 Viewing Dependencies Between Recipes and Tasks
Sometimes it can be hard to see why BitBake wants to build other recipes before the one you have specified. Dependency information can help you understand why a recipe is built.
To generate dependency information for a recipe, run the following command:
$ bitbake -g recipename
This command writes the following files in the current directory:
pn-buildlist: A list of recipes/targets involved in building recipename. “Involved” here means that at least one task from the recipe needs to run when building recipename from scratch. Targets that are in ASSUME_PROVIDED are not listed.task-depends.dot: A graph showing dependencies between tasks.
The graphs are in DOT
format and can be converted to images (e.g. using the dot tool from
Graphviz).
Note
DOT files use a plain text format. The graphs generated using the
bitbake -gcommand are often so large as to be difficult to read without special pruning (e.g. with BitBake’s-Ioption) and processing. Despite the form and size of the graphs, the corresponding.dotfiles can still be possible to read and provide useful information.As an example, the
task-depends.dotfile contains lines such as the following:"libxslt.do_configure" -> "libxml2.do_populate_sysroot"
The above example line reveals that the do_configure task in
libxsltdepends on the do_populate_sysroot task inlibxml2, which is a normal DEPENDS dependency between the two recipes.For an example of how
.dotfiles can be processed, see thescripts/contrib/graph-toolPython script, which finds and displays paths between graph nodes.
You can use a different method to view dependency information by using either:
$ bitbake -g -u taskexp recipename
or:
$ bitbake -g -u taskexp_ncurses recipename
The -u taskdep option GUI window from which you can view build-time and
runtime dependencies for the recipes involved in building recipename. The
-u taskexp_ncurses option uses ncurses instead of GTK to render the UI.
35.5 Viewing Task Variable Dependencies
As mentioned in the
“Checksums (Signatures)”
section of the BitBake User Manual, BitBake tries to automatically determine
what variables a task depends on so that it can rerun the task if any values of
the variables change. This determination is usually reliable. However, if you
do things like construct variable names at runtime, then you might have to
manually declare dependencies on those variables using vardeps as described
in the “Variable Flags”
section of the BitBake User Manual.
If you are unsure whether a variable dependency is being picked up automatically for a given task, you can list the variable dependencies BitBake has determined by doing the following:
Build the recipe containing the task:
$ bitbake recipename
Inside the STAMPS_DIR directory, find the signature data (
sigdata) file that corresponds to the task. Thesigdatafiles contain a pickled Python database of all the metadata that went into creating the input checksum for the task. As an example, for the do_fetch task of thedbrecipe, thesigdatafile might be found in the following location:${BUILDDIR}/tmp/stamps/i586-poky-linux/db/6.0.30-r1.do_fetch.sigdata.7c048c18222b16ff0bcee2000ef648b1For tasks that are accelerated through the shared state (sstate) cache, an additional
siginfofile is written into SSTATE_DIR along with the cached task output. Thesiginfofiles contain exactly the same information assigdatafiles.Run
bitbake-dumpsigon thesigdataorsiginfofile. Here is an example:$ bitbake-dumpsig ${BUILDDIR}/tmp/stamps/i586-poky-linux/db/6.0.30-r1.do_fetch.sigdata.7c048c18222b16ff0bcee2000ef648b1In the output of the above command, you will find a line like the following, which lists all the (inferred) variable dependencies for the task. This list also includes indirect dependencies from variables depending on other variables, recursively:
Task dependencies: ['PV', 'SRCREV', 'SRC_URI', 'SRC_URI[sha256sum]', 'base_do_fetch']
Note
Functions (e.g.
base_do_fetch) also count as variable dependencies. These functions in turn depend on the variables they reference.The output of
bitbake-dumpsigalso includes the value each variable had, a list of dependencies for each variable, and BB_BASEHASH_IGNORE_VARS information.
35.6 Debugging signature construction and unexpected task executions
There is a bitbake-diffsigs command for comparing two
siginfo or sigdata files. This command can be helpful when
trying to figure out what changed between two versions of a task. If you
call bitbake-diffsigs with just one file, the command behaves like
bitbake-dumpsig.
You can also use BitBake to dump out the signature construction information without executing tasks by using either of the following BitBake command-line options:
‐‐dump-signatures=SIGNATURE_HANDLER
-S SIGNATURE_HANDLER
Note
Two common values for SIGNATURE_HANDLER are “none” and “printdiff”, which dump only the signature or compare the dumped signature with the most recent one, respectively. “printdiff” will try to establish the most recent signature match (e.g. in the sstate cache) and then compare the matched signatures to determine the stamps and delta where these two stamp trees diverge. This can be used to determine why tasks need to be re-run in situations where that is not expected.
Using BitBake with either of these options causes BitBake to dump out
sigdata files in the stamps directory for every task it would
have executed instead of building the specified target package.
35.9 Running Specific Tasks
Any given recipe consists of a set of tasks. The standard BitBake
behavior in most cases is: do_fetch, do_unpack, do_patch,
do_configure, do_compile, do_install, do_package,
do_package_write_*, and do_build. The default task is
do_build and any tasks on which it depends build first. Some tasks,
such as do_devshell, are not part of the default build chain. If you
wish to run a task that is not part of the default build chain, you can
use the -c option in BitBake. Here is an example:
$ bitbake matchbox-desktop -c devshell
The -c option respects task dependencies, which means that all other
tasks (including tasks from other recipes) that the specified task
depends on will be run before the task. Even when you manually specify a
task to run with -c, BitBake will only run the task if it considers
it “out of date”. See the
“Stamp Files and the Rerunning of Tasks”
section in the Yocto Project Overview and Concepts Manual for how
BitBake determines whether a task is “out of date”.
If you want to force an up-to-date task to be rerun (e.g. because you
made manual modifications to the recipe’s
WORKDIR that you want to try
out), then you can use the -f option.
Note
The reason -f is never required when running the
do_devshell task is because the
[nostamp]
variable flag is already set for the task.
The following example shows one way you can use the -f option:
$ bitbake matchbox-desktop
.
.
make some changes to the source code in the work directory
.
.
$ bitbake matchbox-desktop -c compile -f
$ bitbake matchbox-desktop
This sequence first builds and then recompiles matchbox-desktop. The
last command reruns all tasks (basically the packaging tasks) after the
compile. BitBake recognizes that the do_compile task was rerun and
therefore understands that the other tasks also need to be run again.
Another, shorter way to rerun a task and all
Normal Recipe Build Tasks
that depend on it is to use the -C option.
Note
This option is upper-cased and is separate from the -c
option, which is lower-cased.
Using this option invalidates the given task and then runs the do_build task, which is the default task if no task is given, and the tasks on which it depends. You could replace the final two commands in the previous example with the following single command:
$ bitbake matchbox-desktop -C compile
Internally, the -f and -C options work by tainting (modifying)
the input checksum of the specified task. This tainting indirectly
causes the task and its dependent tasks to be rerun through the normal
task dependency mechanisms.
Note
BitBake explicitly keeps track of which tasks have been tainted in this fashion, and will print warnings such as the following for builds involving such tasks:
WARNING: /home/ulf/openembedded-core/meta/recipes-sato/matchbox-desktop/matchbox-desktop_2.1.bb.do_compile is tainted from a forced run
The purpose of the warning is to let you know that the work directory and build output might not be in the clean state they would be in for a “normal” build, depending on what actions you took. To get rid of such warnings, you can remove the work directory and rebuild the recipe, as follows:
$ bitbake matchbox-desktop -c clean
$ bitbake matchbox-desktop
You can view a list of tasks in a given package by running the do_listtasks task as follows:
$ bitbake matchbox-desktop -c listtasks
The results appear as output to the console and are also in
the file ${WORKDIR}/temp/log.do_listtasks.
35.10 General BitBake Problems
You can see debug output from BitBake by using the -D option. The
debug output gives more information about what BitBake is doing and the
reason behind it. Each -D option you use increases the logging
level. The most common usage is -DDD.
The output from bitbake -DDD -v targetname can reveal why BitBake
chose a certain version of a package or why BitBake picked a certain
provider. This command could also help you in a situation where you
think BitBake did something unexpected.
35.11 Building with No Dependencies
To build a specific recipe (.bb file), you can use the following
command form:
$ bitbake -b somepath/somerecipe.bb
This command form does not check for dependencies. Consequently, you should use it only when you know existing dependencies have been met.
Note
You can also specify fragments of the filename. In this case, BitBake checks for a unique match.
35.12 Recipe Logging Mechanisms
The Yocto Project provides several logging functions for producing
debugging output and reporting errors and warnings. For Python
functions, the following logging functions are available. All of these functions
log to ${T}/log.do_task, and can also log to standard output
(stdout) with the right settings:
bb.plain(msg): Writes msg as is to the log while also logging to stdout.bb.note(msg): Writes “NOTE: msg” to the log. Also logs to stdout if BitBake is called with “-v”.bb.debug(level, msg): Writes “DEBUG: msg” to the log. Also logs to stdout if the log level is greater than or equal to level. See the “Usage and syntax” option in the BitBake User Manual for more information.bb.warn(msg): Writes “WARNING: msg” to the log while also logging to stdout.bb.error(msg): Writes “ERROR: msg” to the log while also logging to standard out (stdout).Note
Calling this function does not cause the task to fail.
bb.fatal(msg): This logging function is similar tobb.error(msg)but also causes the calling task to fail.Note
bb.fatal()raises an exception, which means you do not need to put a “return” statement after the function.
The same logging functions are also available in shell functions, under
the names bbplain, bbnote, bbdebug, bbwarn, bberror,
and bbfatal. The logging class
implements these functions. See that class in the meta/classes
folder of OpenEmbedded-Core (OE-Core) for information.
35.12.1 Logging With Python
When creating recipes using Python and inserting code that handles build logs, keep in mind the goal is to have informative logs while keeping the console as “silent” as possible. Also, if you want status messages in the log, use the “debug” loglevel.
Here is an example written in Python. The code handles logging for a function that determines the number of tasks needed to be run. See the “do_listtasks” section for additional information:
python do_listtasks() {
bb.debug(2, "Starting to figure out the task list")
if noteworthy_condition:
bb.note("There are 47 tasks to run")
bb.debug(2, "Got to point xyz")
if warning_trigger:
bb.warn("Detected warning_trigger, this might be a problem later.")
if recoverable_error:
bb.error("Hit recoverable_error, you really need to fix this!")
if fatal_error:
bb.fatal("fatal_error detected, unable to print the task list")
bb.plain("The tasks present are abc")
bb.debug(2, "Finished figuring out the tasklist")
}
35.12.2 Logging With Bash
When creating recipes using Bash and inserting code that handles build logs, you have the same goals — informative with minimal console output. The syntax you use for recipes written in Bash is similar to that of recipes written in Python described in the previous section.
Here is an example written in Bash. The code logs the progress of
the do_my_function function:
do_my_function() {
bbdebug 2 "Running do_my_function"
if [ exceptional_condition ]; then
bbnote "Hit exceptional_condition"
fi
bbdebug 2 "Got to point xyz"
if [ warning_trigger ]; then
bbwarn "Detected warning_trigger, this might cause a problem later."
fi
if [ recoverable_error ]; then
bberror "Hit recoverable_error, correcting"
fi
if [ fatal_error ]; then
bbfatal "fatal_error detected"
fi
bbdebug 2 "Completed do_my_function"
}
35.13 Debugging Parallel Make Races
A parallel make race occurs when the build consists of several parts
that are run simultaneously and a situation occurs when the output or
result of one part is not ready for use with a different part of the
build that depends on that output. Parallel make races are annoying and
can sometimes be difficult to reproduce and fix. However, there are some simple
tips and tricks that can help you debug and fix them. This section
presents a real-world example of an error encountered on the Yocto
Project autobuilder and the process used to fix it.
Note
If you cannot properly fix a make race condition, you can work around it
by clearing either the PARALLEL_MAKE or PARALLEL_MAKEINST
variables.
35.13.1 The Failure
For this example, assume that you are building an image that depends on the “neard” package. And, during the build, BitBake runs into problems and creates the following output.
Note
This example log file has longer lines artificially broken to make the listing easier to read.
If you examine the output or the log file, you see the failure during
make:
| DEBUG: SITE files ['endian-little', 'bit-32', 'ix86-common', 'common-linux', 'common-glibc', 'i586-linux', 'common']
| DEBUG: Executing shell function do_compile
| NOTE: make -j 16
| make --no-print-directory all-am
| /bin/mkdir -p include/near
| /bin/mkdir -p include/near
| /bin/mkdir -p include/near
| ln -s /home/pokybuild/yocto-autobuilder/nightly-x86/build/build/tmp/work/i586-poky-linux/neard/
0.14-r0/neard-0.14/include/types.h include/near/types.h
| ln -s /home/pokybuild/yocto-autobuilder/nightly-x86/build/build/tmp/work/i586-poky-linux/neard/
0.14-r0/neard-0.14/include/log.h include/near/log.h
| ln -s /home/pokybuild/yocto-autobuilder/nightly-x86/build/build/tmp/work/i586-poky-linux/neard/
0.14-r0/neard-0.14/include/plugin.h include/near/plugin.h
| /bin/mkdir -p include/near
| /bin/mkdir -p include/near
| /bin/mkdir -p include/near
| ln -s /home/pokybuild/yocto-autobuilder/nightly-x86/build/build/tmp/work/i586-poky-linux/neard/
0.14-r0/neard-0.14/include/tag.h include/near/tag.h
| /bin/mkdir -p include/near
| ln -s /home/pokybuild/yocto-autobuilder/nightly-x86/build/build/tmp/work/i586-poky-linux/neard/
0.14-r0/neard-0.14/include/adapter.h include/near/adapter.h
| /bin/mkdir -p include/near
| ln -s /home/pokybuild/yocto-autobuilder/nightly-x86/build/build/tmp/work/i586-poky-linux/neard/
0.14-r0/neard-0.14/include/ndef.h include/near/ndef.h
| ln -s /home/pokybuild/yocto-autobuilder/nightly-x86/build/build/tmp/work/i586-poky-linux/neard/
0.14-r0/neard-0.14/include/tlv.h include/near/tlv.h
| /bin/mkdir -p include/near
| /bin/mkdir -p include/near
| ln -s /home/pokybuild/yocto-autobuilder/nightly-x86/build/build/tmp/work/i586-poky-linux/neard/
0.14-r0/neard-0.14/include/setting.h include/near/setting.h
| /bin/mkdir -p include/near
| /bin/mkdir -p include/near
| /bin/mkdir -p include/near
| ln -s /home/pokybuild/yocto-autobuilder/nightly-x86/build/build/tmp/work/i586-poky-linux/neard/
0.14-r0/neard-0.14/include/device.h include/near/device.h
| ln -s /home/pokybuild/yocto-autobuilder/nightly-x86/build/build/tmp/work/i586-poky-linux/neard/
0.14-r0/neard-0.14/include/nfc_copy.h include/near/nfc_copy.h
| ln -s /home/pokybuild/yocto-autobuilder/nightly-x86/build/build/tmp/work/i586-poky-linux/neard/
0.14-r0/neard-0.14/include/snep.h include/near/snep.h
| ln -s /home/pokybuild/yocto-autobuilder/nightly-x86/build/build/tmp/work/i586-poky-linux/neard/
0.14-r0/neard-0.14/include/version.h include/near/version.h
| ln -s /home/pokybuild/yocto-autobuilder/nightly-x86/build/build/tmp/work/i586-poky-linux/neard/
0.14-r0/neard-0.14/include/dbus.h include/near/dbus.h
| ./src/genbuiltin nfctype1 nfctype2 nfctype3 nfctype4 p2p > src/builtin.h
| i586-poky-linux-gcc -m32 -march=i586 --sysroot=/home/pokybuild/yocto-autobuilder/nightly-x86/
build/build/tmp/sysroots/qemux86 -DHAVE_CONFIG_H -I. -I./include -I./src -I./gdbus -I/home/pokybuild/
yocto-autobuilder/nightly-x86/build/build/tmp/sysroots/qemux86/usr/include/glib-2.0
-I/home/pokybuild/yocto-autobuilder/nightly-x86/build/build/tmp/sysroots/qemux86/usr/
lib/glib-2.0/include -I/home/pokybuild/yocto-autobuilder/nightly-x86/build/build/
tmp/sysroots/qemux86/usr/include/dbus-1.0 -I/home/pokybuild/yocto-autobuilder/
nightly-x86/build/build/tmp/sysroots/qemux86/usr/lib/dbus-1.0/include -I/home/pokybuild/yocto-autobuilder/
nightly-x86/build/build/tmp/sysroots/qemux86/usr/include/libnl3
-DNEAR_PLUGIN_BUILTIN -DPLUGINDIR=\""/usr/lib/near/plugins"\"
-DCONFIGDIR=\""/etc/neard\"" -O2 -pipe -g -feliminate-unused-debug-types -c
-o tools/snep-send.o tools/snep-send.c
| In file included from tools/snep-send.c:16:0:
| tools/../src/near.h:41:23: fatal error: near/dbus.h: No such file or directory
| #include <near/dbus.h>
| ^
| compilation terminated.
| make[1]: *** [tools/snep-send.o] Error 1
| make[1]: *** Waiting for unfinished jobs....
| make: *** [all] Error 2
| ERROR: oe_runmake failed
35.13.2 Reproducing the Error
Because race conditions are intermittent, they do not manifest themselves every time you do the build. In fact, most times the build will complete without problems even though the potential race condition exists. Thus, once the error surfaces, you need a way to reproduce it.
In this example, compiling the “neard” package is causing the problem.
So the first thing to do is build “neard” locally. Before you start the
build, set the
PARALLEL_MAKE variable
in your local.conf file to a high number (e.g. “-j 20”). Using a
high value for PARALLEL_MAKE increases the chances of the race
condition showing up:
$ bitbake neard
Once the local build for “neard” completes, start a devshell build:
$ bitbake neard -c devshell
For information on how to use a devshell, see the
“Using a Development Shell” section.
In the devshell, do the following:
$ make clean
$ make tools/snep-send.o
The devshell commands cause the failure to clearly
be visible. In this case, there is a missing dependency for the neard
Makefile target. Here is some abbreviated, sample output with the
missing dependency clearly visible at the end:
i586-poky-linux-gcc -m32 -march=i586 --sysroot=/home/scott-lenovo/......
.
.
.
tools/snep-send.c
In file included from tools/snep-send.c:16:0:
tools/../src/near.h:41:23: fatal error: near/dbus.h: No such file or directory
#include <near/dbus.h>
^
compilation terminated.
make: *** [tools/snep-send.o] Error 1
$
35.13.3 Creating a Patch for the Fix
Because there is a missing dependency for the Makefile target, you need
to patch the Makefile.am file, which is generated from
Makefile.in. You can use Quilt to create the patch:
$ quilt new parallelmake.patch
Patch patches/parallelmake.patch is now on top
$ quilt add Makefile.am
File Makefile.am added to patch patches/parallelmake.patch
For more information on using Quilt, see the “Using Quilt in Your Workflow” section.
At this point you need to make the edits to Makefile.am to add the
missing dependency. For our example, you have to add the following line
to the file:
tools/snep-send.$(OBJEXT): include/near/dbus.h
Once you have edited the file, use the refresh command to create the
patch:
$ quilt refresh
Refreshed patch patches/parallelmake.patch
Once the patch file is created, you need to add it back to the originating
recipe folder. Here is an example assuming OpenEmbedded-Core (OE-Core)
is named openembedded-core:
$ cp patches/parallelmake.patch openembedded-core/meta/recipes-connectivity/neard/neard
The final thing you need to do to implement the fix in the build is to
update the “neard” recipe (i.e. neard-0.14.bb) so that the
SRC_URI statement includes
the patch file. The recipe file is in the folder above the patch. Here
is what the edited SRC_URI statement would look like:
SRC_URI = "${KERNELORG_MIRROR}/linux/network/nfc/${BPN}-${PV}.tar.xz \
file://neard.in \
file://neard.service.in \
file://parallelmake.patch \
"
With the patch complete and moved to the correct folder and the
SRC_URI statement updated, you can exit the devshell:
$ exit
35.13.4 Testing the Build
With everything in place, you can get back to trying the build again locally:
$ bitbake neard
This build should succeed.
Now you can open up a devshell again and repeat the clean and make
operations as follows:
$ bitbake neard -c devshell
$ make clean
$ make tools/snep-send.o
The build should work without issue.
As with all solved problems, if they originated upstream, you need to submit the fix for the recipe in OE-Core and upstream so that the problem is taken care of at its source. See the “Contributing Changes to a Component” section for more information.
35.14 Debugging With the GNU Project Debugger (GDB) Remotely
GDB allows you to examine running programs, which in turn helps you to understand and fix problems. It also allows you to perform post-mortem style analysis of program crashes. GDB is available as a package within the Yocto Project and is installed in SDK images by default. See the “Images” chapter in the Yocto Project Reference Manual for a description of these images. You can find information on GDB at https://sourceware.org/gdb/.
Note
For best results, install debug (-dbg) packages for the applications you
are going to debug. Doing so makes extra debug symbols available that give
you more meaningful output.
Sometimes, due to memory or disk space constraints, it is not possible to use GDB directly on the remote target to debug applications. These constraints arise because GDB needs to load the debugging information and the binaries of the process being debugged. Additionally, GDB needs to perform many computations to locate information such as function names, variable names and values, stack traces and so forth — even before starting the debugging process. These extra computations place more load on the target system and can alter the characteristics of the program being debugged.
To help get past the previously mentioned constraints, there are two methods you can use: running a debuginfod server and using gdbserver.
35.14.1 Using the debuginfod server method
debuginfod from elfutils is a way to distribute debuginfo files.
Running a debuginfod server makes debug symbols readily available,
which means you don’t need to download debugging information
and the binaries of the process being debugged. You can just fetch
debug symbols from the server.
To run a debuginfod server, you need to do the following:
Ensure that
debuginfodis present in DISTRO_FEATURES (it already is in OpenEmbedded-Core (OE-Core) defaults and Poky reference distribution).If not, set in your distro config file or in
local.conf:DISTRO_FEATURES:append = " debuginfod"
This distro feature enables the server and client library in
elfutils, and enablesdebuginfodsupport in clients (at the moment,gdbandbinutils).Run the following commands to launch the
debuginfodserver on the host:$ oe-debuginfod
To use
debuginfodon the target, you need to know the ip:port wheredebuginfodis listening on the host (port defaults to 8002), and export that into the shell environment, for example inqemu:root@qemux86-64:~# export DEBUGINFOD_URLS="http://192.168.7.1:8002/"
Then debug info fetching should simply work when running the target
gdb,readelforobjdump, for example:root@qemux86-64:~# gdb /bin/cat ... Reading symbols from /bin/cat... Downloading separate debug info for /bin/cat... Reading symbols from /home/root/.cache/debuginfod_client/923dc4780cfbc545850c616bffa884b6b5eaf322/debuginfo...
It’s also possible to use
debuginfod-findto just query the server:root@qemux86-64:~# debuginfod-find debuginfo /bin/ls /home/root/.cache/debuginfod_client/356edc585f7f82d46f94fcb87a86a3fe2d2e60bd/debuginfo
35.14.2 Using the gdbserver method
gdbserver, which runs on the remote target and does not load any debugging information from the debugged process. Instead, a GDB instance processes the debugging information that is run on a remote computer - the host GDB. The host GDB then sends control commands to gdbserver to make it stop or start the debugged program, as well as read or write memory regions of that debugged program. All the debugging information loaded and processed as well as all the heavy debugging is done by the host GDB. Offloading these processes gives the gdbserver running on the target a chance to remain small and fast.
Because the host GDB is responsible for loading the debugging information and for doing the necessary processing to make actual debugging happen, you have to make sure the host can access the unstripped binaries complete with their debugging information and also be sure the target is compiled with no optimizations. The host GDB must also have local access to all the libraries used by the debugged program. Because gdbserver does not need any local debugging information, the binaries on the remote target can remain stripped. However, the binaries must also be compiled without optimization so they match the host’s binaries.
To remain consistent with GDB documentation and terminology, the binary being debugged on the remote target machine is referred to as the “inferior” binary. For documentation on GDB see the GDB site.
The following steps show you how to debug using the GNU project debugger.
Configure your build system to construct the companion debug filesystem:
In your
local.conffile, set the following:IMAGE_GEN_DEBUGFS = "1" IMAGE_FSTYPES_DEBUGFS = "tar.bz2"
These options cause the OpenEmbedded build system to generate a special companion filesystem fragment, which contains the matching source and debug symbols to your deployable filesystem. The build system does this by looking at what is in the deployed filesystem, and pulling the corresponding
-dbgpackages.The companion debug filesystem is not a complete filesystem, but only contains the debug fragments. This filesystem must be combined with the full filesystem for debugging. Subsequent steps in this procedure show how to combine the partial filesystem with the full filesystem.
Configure the system to include gdbserver in the target filesystem:
Make the following addition in your
local.conffile:EXTRA_IMAGE_FEATURES:append = " tools-debug"
The change makes sure the
gdbserverpackage is included.Build the environment:
Use the following command to construct the image and the companion Debug Filesystem:
$ bitbake image
Build the cross GDB component and make it available for debugging. Build the SDK that matches the image. Building the SDK is best for a production build that can be used later for debugging, especially during long term maintenance:
$ bitbake -c populate_sdk image
Alternatively, you can build the minimal toolchain components that match the target. Doing so creates a smaller than typical SDK and only contains a minimal set of components with which to build simple test applications, as well as run the debugger:
$ bitbake meta-toolchain
A final method is to build Gdb itself within the build system:
$ bitbake gdb-cross-<architecture>
Doing so produces a temporary copy of
cross-gdbyou can use for debugging during development. While this is the quickest approach, the two previous methods in this step are better when considering long-term maintenance strategies.Note
If you run
bitbake gdb-cross, the OpenEmbedded build system suggests the actual image (e.g.gdb-cross-i586). The suggestion is usually the actual name you want to use.Set up the
debugfs:Run the following commands to set up the
debugfs:$ mkdir debugfs $ cd debugfs $ tar xvfj build-dir/tmp/deploy/images/machine/image.rootfs.tar.bz2 $ tar xvfj build-dir/tmp/deploy/images/machine/image-dbg.rootfs.tar.bz2
Set up GDB:
Install the SDK (if you built one) and then source the correct environment file. Sourcing the environment file puts the SDK in your
PATHenvironment variable and sets$GDBto the SDK’s debugger.If you are using the build system, Gdb is located in build-dir
/tmp/sysroots/host/usr/bin/architecture/architecture-gdbBoot the target:
For information on how to run QEMU, see the QEMU Documentation.
Note
Be sure to verify that your host can access the target via TCP.
Debug a program:
Debugging a program involves running gdbserver on the target and then running Gdb on the host. The example in this step debugs
gzip:root@qemux86:~# gdbserver localhost:1234 /bin/gzip —help
For additional gdbserver options, see the GDB Server Documentation.
After running gdbserver on the target, you need to run Gdb on the host and configure it and connect to the target. Use these commands:
$ cd directory-holding-the-debugfs-directory $ arch-gdb (gdb) set sysroot debugfs (gdb) set substitute-path /usr/src/debug debugfs/usr/src/debug (gdb) target remote IP-of-target:1234
At this point, everything should automatically load (i.e. matching binaries, symbols and headers).
Note
The Gdb
setcommands in the previous example can be placed into the users~/.gdbinitfile. Upon starting, Gdb automatically runs whatever commands are in that file.Deploying without a full image rebuild:
In many cases, during development you want a quick method to deploy a new binary to the target and debug it, without waiting for a full image build.
One approach to solving this situation is to just build the component you want to debug. Once you have built the component, copy the executable directly to both the target and the host
debugfs.If the binary is processed through the debug splitting in OpenEmbedded, you should also copy the debug items (i.e.
.debugcontents and corresponding/usr/src/debugfiles) from the work directory. Here is an example:$ bitbake bash $ bitbake -c devshell bash $ cd .. $ scp packages-split/bash/bin/bash target:/bin/bash $ cp -a packages-split/bash-dbg/\* path/debugfs
35.15 Debugging with the GNU Project Debugger (GDB) on the Target
The previous section addressed using GDB remotely for debugging purposes, which is the most usual case due to the inherent hardware limitations on many embedded devices. However, debugging in the target hardware itself is also possible with more powerful devices. This section describes what you need to do in order to support using GDB to debug on the target hardware.
To support this kind of debugging, you need do the following:
Ensure that GDB is on the target. You can do this by making the following addition to your
local.conffile:EXTRA_IMAGE_FEATURES:append = " tools-debug"
Ensure that debug symbols are present. You can do so by adding the corresponding
-dbgpackage to IMAGE_INSTALL:IMAGE_INSTALL:append = " packagename-dbg"
Alternatively, you can add the following to
local.confto include all the debug symbols:EXTRA_IMAGE_FEATURES:append = " dbg-pkgs"
Note
To improve the debug information accuracy, you can reduce the level
of optimization used by the compiler. For example, when adding the
following line to your local.conf file, you will reduce optimization
from FULL_OPTIMIZATION of “-O2” to DEBUG_OPTIMIZATION
of “-O -fno-omit-frame-pointer”:
DEBUG_BUILD = "1"
Consider that this will reduce the application’s performance and is recommended only for debugging purposes.
35.16 Enabling Minidebuginfo
Enabling the DISTRO_FEATURES minidebuginfo adds a compressed ELF section .gnu_debugdata
to all binary files, containing only function names, and thus increasing the size of the
binaries only by 5 to 10%. For comparison, full debug symbols can be 10 times as big as
a stripped binary, and it is thus not always possible to deploy full debug symbols.
Minidebuginfo data allows, on the one side, to retrieve a call-stack using
GDB (command backtrace) without deploying full debug symbols to the target. It also
allows to retrieve a symbolicated call-stack when using systemd-coredump to manage
coredumps (commands coredumpctl list and coredumpctl info).
This feature was created by Fedora, see https://fedoraproject.org/wiki/Features/MiniDebugInfo for more details.
35.17 Other Debugging Tips
Here are some other tips that you might find useful:
When adding new packages, it is worth watching for undesirable items making their way into compiler command lines. For example, you do not want references to local system files like
/usr/lib/or/usr/include/.If you want to remove the
psplashboot splashscreen, addpsplash=falseto the kernel command line. Doing so preventspsplashfrom loading and thus allows you to see the console. It is also possible to switch out of the splashscreen by switching the virtual console (e.g. Fn+Left or Fn+Right on a Zaurus).Removing TMPDIR (usually
tmp/, within the Build Directory) can often fix temporary build issues. Removing TMPDIR is usually a relatively cheap operation, because task output will be cached in SSTATE_DIR (usuallysstate-cache/, which is also in the Build Directory).Note
Removing TMPDIR might be a workaround rather than a fix. Consequently, trying to determine the underlying cause of an issue before removing the directory is a good idea.
Understanding how a feature is used in practice within existing recipes can be very helpful. It is recommended that you configure some method that allows you to quickly search through files.
Using GNU Grep, you can use the following shell function to recursively search through common recipe-related files, skipping binary files,
.gitdirectories, and the Build Directory (assuming its name starts with “build”):g() { grep -Ir \ --exclude-dir=.git \ --exclude-dir='build*' \ --include='*.bb*' \ --include='*.inc*' \ --include='*.conf*' \ --include='*.py*' \ "$@" }
Here are some usage examples:
$ g FOO # Search recursively for "FOO" $ g -i foo # Search recursively for "foo", ignoring case $ g -w FOO # Search recursively for "FOO" as a word, ignoring e.g. "FOOBAR"
If figuring out how some feature works requires a lot of searching, it might indicate that the documentation should be extended or improved. In such cases, consider filing a documentation bug using the Yocto Project implementation of Bugzilla. For information on how to submit a bug against the Yocto Project, see the Yocto Project Bugzilla wiki page and the “Reporting a Defect Against the Yocto Project and OpenEmbedded” section.
Note
The manuals might not be the right place to document variables that are purely internal and have a limited scope (e.g. internal variables used to implement a single
.bbclassfile).
36 Working With Licenses
As mentioned in the “Licensing” section in the Yocto Project Overview and Concepts Manual, open source projects are open to the public and they consequently have different licensing structures in place. This section describes the mechanism by which the OpenEmbedded Build System tracks changes to licensing text and covers how to maintain open source license compliance during your project’s lifecycle. The section also describes how to enable commercially licensed recipes, which by default are disabled.
36.1 Tracking License Changes
The license of an upstream project might change in the future. In order to prevent these changes going unnoticed, the LIC_FILES_CHKSUM variable tracks changes to the license text. The checksums are validated at the end of the configure step, and if the checksums do not match, the build will fail.
36.1.1 Specifying the LIC_FILES_CHKSUM Variable
The LIC_FILES_CHKSUM variable contains checksums of the license text in the source code for the recipe. Here is an example of how to specify LIC_FILES_CHKSUM:
LIC_FILES_CHKSUM = "file://COPYING;md5=xxxx \
file://licfile1.txt;beginline=5;endline=29;md5=yyyy \
file://licfile2.txt;endline=50;md5=zzzz \
..."
Note
When using “beginline” and “endline”, realize that line numbering begins with one and not zero. Also, the included lines are inclusive (i.e. lines five through and including 29 in the previous example for
licfile1.txt).When a license check fails, the selected license text is included as part of the QA message. Using this output, you can determine the exact start and finish for the needed license text.
The build system uses the S variable as the default directory when searching files listed in LIC_FILES_CHKSUM. The previous example employs the default directory.
Consider this next example:
LIC_FILES_CHKSUM = "file://src/ls.c;beginline=5;endline=16;\
md5=bb14ed3c4cda583abc85401304b5cd4e"
LIC_FILES_CHKSUM = "file://${UNPACKDIR}/license.html;md5=5c94767cedb5d6987c902ac850ded2c6"
The first line locates a file in ${S}/src/ls.c and isolates lines
five through 16 as license text. The second line refers to a file in
UNPACKDIR.
Note that LIC_FILES_CHKSUM variable is mandatory for all recipes, unless the LICENSE variable is set to “CLOSED”.
36.1.2 Explanation of Syntax
As mentioned in the previous section, the LIC_FILES_CHKSUM variable lists all the important files that contain the license text for the source code. It is possible to specify a checksum for an entire file, or a specific section of a file (specified by beginning and ending line numbers with the “beginline” and “endline” parameters, respectively). The latter is useful for source files with a license notice header, README documents, and so forth. If you do not use the “beginline” parameter, then it is assumed that the text begins on the first line of the file. Similarly, if you do not use the “endline” parameter, it is assumed that the license text ends with the last line of the file.
The “md5” parameter stores the md5 checksum of the license text. If the license text changes in any way as compared to this parameter then a mismatch occurs. This mismatch triggers a build failure and notifies the developer. Notification allows the developer to review and address the license text changes. Also note that if a mismatch occurs during the build, the correct md5 checksum is placed in the build log and can be easily copied to the recipe.
There is no limit to how many files you can specify using the LIC_FILES_CHKSUM variable. Generally, however, every project requires a few specifications for license tracking. Many projects have a “COPYING” file that stores the license information for all the source code files. This practice allows you to just track the “COPYING” file as long as it is kept up to date.
Note
If you specify an empty or invalid “md5” parameter, BitBake returns an md5 mis-match error and displays the correct “md5” parameter value during the build. The correct parameter is also captured in the build log.
If the whole file contains only license text, you do not need to use the “beginline” and “endline” parameters.
36.2 Enabling Commercially Licensed Recipes
By default, the OpenEmbedded build system disables components that have
commercial or other special licensing requirements. Such requirements
are defined on a recipe-by-recipe basis through the
LICENSE_FLAGS variable
definition in the affected recipe. For instance, the
meta/recipes-multimedia/gstreamer/gstreamer1.0-plugins-ugly recipe of
OpenEmbedded-Core (OE-Core) contains the following statement:
LICENSE_FLAGS = "commercial"
Here is a slightly more complicated example that contains both an explicit recipe name and version (after variable expansion):
LICENSE_FLAGS = "license_${PN}_${PV}"
It is possible to give more details about a specific license using flags on the LICENSE_FLAGS_DETAILS variable:
LICENSE_FLAGS_DETAILS[my-eula-license] = "For further details, see https://example.com/eula."
If set, this will be displayed to the user if the license hasn’t been accepted.
In order for a component restricted by a
LICENSE_FLAGS definition to be enabled and included in an image, it
needs to have a matching entry in the global
LICENSE_FLAGS_ACCEPTED
variable, which is a variable typically defined in your local.conf
file. For example, to enable the
meta/recipes-multimedia/gstreamer/gstreamer1.0-plugins-ugly package of
OpenEmbedded-Core (OE-Core), you
could add either the string “commercial_gst-plugins-ugly” or the more
general string “commercial” to LICENSE_FLAGS_ACCEPTED. See the
“License Flag Matching” section for a full
explanation of how LICENSE_FLAGS matching works. Here is the
example:
LICENSE_FLAGS_ACCEPTED = "commercial_gst-plugins-ugly"
Likewise, to additionally enable the package built from the recipe
containing LICENSE_FLAGS = "license_${PN}_${PV}", and assuming that
the actual recipe name was emgd_1.10.bb, the following string would
enable that package as well as the original gst-plugins-ugly
package:
LICENSE_FLAGS_ACCEPTED = "commercial_gst-plugins-ugly license_emgd_1.10"
As a convenience, you do not need to specify the complete license string for every package. You can use an abbreviated form, which consists of just the first portion or portions of the license string before the initial underscore character or characters. A partial string will match any license that contains the given string as the first portion of its license. For example, the following value will also match both of the packages previously mentioned as well as any other packages that have licenses starting with “commercial” or “license”:
LICENSE_FLAGS_ACCEPTED = "commercial license"
36.2.1 License Flag Matching
License flag matching allows you to control what recipes the OpenEmbedded build system includes in the build. Fundamentally, the build system attempts to match LICENSE_FLAGS strings found in recipes against strings found in LICENSE_FLAGS_ACCEPTED. A match causes the build system to include a recipe in the build, while failure to find a match causes the build system to exclude a recipe.
In general, license flag matching is simple. However, understanding some concepts will help you correctly and effectively use matching.
Before a flag defined by a particular recipe is tested against the
entries of LICENSE_FLAGS_ACCEPTED, the expanded
string _${PN} is appended to the flag. This expansion makes each
LICENSE_FLAGS value recipe-specific. After expansion, the
string is then matched against the entries. Thus, specifying
LICENSE_FLAGS = "commercial" in recipe “foo”, for example, results
in the string "commercial_foo". And, to create a match, that string
must appear among the entries of LICENSE_FLAGS_ACCEPTED.
Judicious use of the LICENSE_FLAGS strings and the contents of the LICENSE_FLAGS_ACCEPTED variable allows you a lot of flexibility for including or excluding recipes based on licensing. For example, you can broaden the matching capabilities by using license flags string subsets in LICENSE_FLAGS_ACCEPTED.
Note
When using a string subset, be sure to use the part of the expanded
string that precedes the appended underscore character (e.g.
usethispart_1.3, usethispart_1.4, and so forth).
For example, simply specifying the string “commercial” in the LICENSE_FLAGS_ACCEPTED variable matches any expanded LICENSE_FLAGS definition that starts with the string “commercial” such as “commercial_foo” and “commercial_bar”, which are the strings the build system automatically generates for hypothetical recipes named “foo” and “bar” assuming those recipes simply specify the following:
LICENSE_FLAGS = "commercial"
Thus, you can choose to exhaustively enumerate each license flag in the list and allow only specific recipes into the image, or you can use a string subset that causes a broader range of matches to allow a range of recipes into the image.
This scheme works even if the LICENSE_FLAGS string already has
_${PN} appended. For example, the build system turns the license
flag “commercial_1.2_foo” into “commercial_1.2_foo_foo” and would match
both the general “commercial” and the specific “commercial_1.2_foo”
strings found in the LICENSE_FLAGS_ACCEPTED variable, as expected.
Here are some other scenarios:
You can specify a versioned string in the recipe such as “commercial_foo_1.2” in a “foo” recipe. The build system expands this string to “commercial_foo_1.2_foo”. Combine this license flag with a LICENSE_FLAGS_ACCEPTED variable that has the string “commercial” and you match the flag along with any other flag that starts with the string “commercial”.
Under the same circumstances, you can add “commercial_foo” in the LICENSE_FLAGS_ACCEPTED variable and the build system not only matches “commercial_foo_1.2” but also matches any license flag with the string “commercial_foo”, regardless of the version.
You can be very specific and use both the package and version parts in the LICENSE_FLAGS_ACCEPTED list (e.g. “commercial_foo_1.2”) to specifically match a versioned recipe.
36.3 Maintaining Open Source License Compliance During Your Product’s Lifecycle
One of the concerns for a development organization using open source software is how to maintain compliance with various open source licensing during the lifecycle of the product. While this section does not provide legal advice or comprehensively cover all scenarios, it does present methods that you can use to assist you in meeting the compliance requirements during a software release.
With hundreds of different open source licenses that the Yocto Project tracks, it is difficult to know the requirements of each and every license. However, the requirements of the major FLOSS licenses can begin to be covered by assuming that there are three main areas of concern:
Source code must be provided.
License text for the software must be provided.
Compilation scripts and modifications to the source code must be provided.
There are other requirements beyond the scope of these three and the methods described in this section (e.g. the mechanism through which source code is distributed).
As different organizations have different ways of releasing software, there can be multiple ways of meeting license obligations. At least, we describe here two methods for achieving compliance:
The first method is to use OpenEmbedded’s ability to provide the source code, provide a list of licenses, as well as compilation scripts and source code modifications.
The remainder of this section describes supported methods to meet the previously mentioned three requirements.
The second method is to generate a Software Bill of Materials (SBoM), as described in the “Creating a Software Bill of Materials” section. Not only do you generate SPDX output which can be used meet license compliance requirements (except for sharing the build system and layers sources for the time being), but this output also includes component version and patch information which can be used for vulnerability assessment.
Whatever method you choose, prior to releasing images, sources, and the build system, you should audit all artifacts to ensure completeness.
Note
The Yocto Project generates a license manifest during image creation
that is located in
${DEPLOY_DIR}/licenses/${SSTATE_PKGARCH}/<image-name>-<machine>.rootfs-<datestamp>/
to assist with any audits.
36.3.1 Providing the Source Code
Compliance activities should begin before you generate the final image. The first thing you should look at is the requirement that tops the list for most compliance groups — providing the source. The Yocto Project has a few ways of meeting this requirement.
One of the easiest ways to meet this requirement is to provide the entire DL_DIR used by the build. This method, however, has a few issues. The most obvious is the size of the directory since it includes all sources used in the build and not just the source used in the released image. It will include toolchain source, and other artifacts, which you would not generally release. However, the more serious issue for most companies is accidental release of proprietary software. The Yocto Project provides an archiver class to help avoid some of these concerns.
Before you employ DL_DIR or the archiver class, you need to decide how you choose to provide source. The source archiver class can generate tarballs and SRPMs and can create them with various levels of compliance in mind.
One way of doing this (but certainly not the only way) is to release
just the source as a tarball. You can do this by adding the following to
the local.conf file found in the Build Directory:
INHERIT += "archiver"
ARCHIVER_MODE[src] = "original"
During the creation of your
image, the source from all recipes that deploy packages to the image is
placed within subdirectories of DEPLOY_DIR/sources based on the
LICENSE for each recipe.
Releasing the entire directory enables you to comply with requirements
concerning providing the unmodified source. It is important to note that
the size of the directory can get large.
A way to help mitigate the size issue is to only release tarballs for licenses that require the release of source. Let us assume you are only concerned with GPL code as identified by running the following script:
# Script to archive a subset of packages matching specific license(s)
# Source and license files are copied into sub folders of package folder
# Must be run from build folder
#!/bin/bash
src_release_dir="source-release"
mkdir -p $src_release_dir
for a in tmp/deploy/sources/*; do
for d in $a/*; do
# Get package name from path
p=`basename $d`
p=${p%-*}
p=${p%-*}
# Only archive GPL packages (update *GPL* regex for your license check)
numfiles=`ls tmp/deploy/licenses/$p/*GPL* 2> /dev/null | wc -l`
if [ $numfiles -ge 1 ]; then
echo Archiving $p
mkdir -p $src_release_dir/$p/source
cp $d/* $src_release_dir/$p/source 2> /dev/null
mkdir -p $src_release_dir/$p/license
cp tmp/deploy/licenses/$p/* $src_release_dir/$p/license 2> /dev/null
fi
done
done
At this point, you
could create a tarball from the gpl_source_release directory and
provide that to the end user. This method would be a step toward
achieving compliance with section 3a of GPLv2 and with section 6 of
GPLv3.
36.3.2 Providing License Text
One requirement that is often overlooked is inclusion of license text.
This requirement also needs to be dealt with prior to generating the
final image. Some licenses require the license text to accompany the
binary. You can achieve this by adding the following to your
local.conf file:
COPY_LIC_MANIFEST = "1"
COPY_LIC_DIRS = "1"
LICENSE_CREATE_PACKAGE = "1"
Adding these statements to the configuration file ensures that the licenses collected during package generation are included on your image.
Note
Setting all three variables to “1” results in the image having two
copies of the same license file. One copy resides in
/usr/share/common-licenses and the other resides in
/usr/share/license.
The reason for this behavior is because COPY_LIC_DIRS and COPY_LIC_MANIFEST add a copy of the license when the image is built but do not offer a path for adding licenses for newly installed packages to an image. LICENSE_CREATE_PACKAGE adds a separate package and an upgrade path for adding licenses to an image.
As the source archiver class has already archived the original unmodified source that contains the license files, you would have already met the requirements for inclusion of the license information with source as defined by the GPL and other open source licenses.
36.3.3 Providing Compilation Scripts and Source Code Modifications
At this point, we have addressed all we need prior to generating the image. The next two requirements are addressed during the final packaging of the release.
By releasing the version of the OpenEmbedded build system and the layers used during the build, you will be providing both compilation scripts and the source code modifications in one step.
If the deployment team has a BSP Layer and a distro layer, and those layers are used to patch, compile, package, or modify (in any way) any open source software included in your released images, you might be required to release those layers under section 3 of GPLv2 or section 1 of GPLv3. One way of doing that is with a clean checkout of the version of the Yocto Project and layers used during your build. Archiving a Git repository can be done with the git-archive command.
One thing a development organization might want to consider for end-user
convenience is to provide its own version of the
meta/conf/templates/default/bblayers.conf.sample file to ensure that when
the end user utilizes the released build system to build an image, the
development organization’s layers are included in the bblayers.conf file
automatically:
# POKY_BBLAYERS_CONF_VERSION is increased each time build/conf/bblayers.conf
# changes incompatibly
POKY_BBLAYERS_CONF_VERSION = "2"
BBPATH = "${TOPDIR}"
BBFILES ?= ""
BBLAYERS ?= " \
##OEROOT##/meta \
##OEROOT##/../meta-yocto/meta-poky \
##OEROOT##/../meta-yocto/meta-yocto-bsp \
##OEROOT##/../meta-mylayer \
"
Creating and providing an archive of the Metadata layers (recipes, configuration files, and so forth) enables you to meet your requirements to include the scripts to control compilation as well as any modifications to the original source.
36.3.4 Compliance Limitations with Executables Built from Static Libraries
When package A is added to an image via the RDEPENDS or RRECOMMENDS
mechanisms as well as explicitly included in the image recipe with
IMAGE_INSTALL, and depends on a static linked library recipe B
(DEPENDS += "B"), package B will neither appear in the generated license
manifest nor in the generated source tarballs. This occurs as the
license and archiver classes assume that
only packages included via RDEPENDS or RRECOMMENDS
end up in the image.
As a result, potential obligations regarding license compliance for package B may not be met.
The Yocto Project doesn’t enable static libraries by default, in part because of this issue. Before a solution to this limitation is found, you need to keep in mind that if your root filesystem is built from static libraries, you will need to manually ensure that your deliveries are compliant with the licenses of these libraries.
36.4 Copying Non Standard Licenses
Some packages, such as the linux-firmware package, have many licenses that are not in any way common. You can avoid adding a lot of these types of common license files, which are only applicable to a specific package, by using the NO_GENERIC_LICENSE variable. Using this variable also avoids QA errors when you use a non-common, non-CLOSED license in a recipe.
Here is an example that uses the LICENSE.Abilis.txt file as
the license from the fetched source:
NO_GENERIC_LICENSE[Firmware-Abilis] = "LICENSE.Abilis.txt"
37 Creating a Software Bill of Materials
Once you are able to build an image for your project, once the licenses for each software component are all identified (see “Working With Licenses”) and once vulnerability fixes are applied (see “Checking for Vulnerabilities”), the OpenEmbedded build system can generate a description of all the components you used, their licenses, their dependencies, their sources, the changes that were applied to them and the known vulnerabilities that were fixed.
This description is generated in the form of a Software Bill of Materials (SBOM), using the SPDX standard.
When you release software, this is the most standard way to provide information about the Software Supply Chain of your software image and SDK. The SBOM tooling is often used to ensure open source license compliance by providing the license texts used in the product which legal departments and end users can read in standardized format.
SBOM information is also critical to performing vulnerability exposure assessments, as all the components used in the Software Supply Chain are listed.
The OpenEmbedded build system generates such information by default (by inheriting the create-spdx class in INHERIT_DISTRO).
If needed, it can be disabled from a configuration file:
INHERIT_DISTRO:remove = "create-spdx"
There are two ways to generate SBOM metadata:
By building an image, you will then get the SPDX output in JSON format as an
IMAGE-MACHINE.spdx.jsonfile intmp/deploy/images/MACHINE/inside the Build Directory.By generating the SBOM document using the recipe metadata only:
$ bitbake <recipe> -c create_recipe_sbom
Note that recipe SBOM is also included in the image SBOM document (for the recipes involved in the build of the image only).
The create-spdx class offers options to include more information in the output SPDX data:
Make the json files more human readable by setting (SPDX_PRETTY).
Add a description of the source files used to generate host tools and target packages (SPDX_INCLUDE_SOURCES)
Add a description of the compiled source files used to generate host tools and target packages (SPDX_INCLUDE_COMPILED_SOURCES)
Export the Linux kernel configuration (
CONFIG_*parameters) into the SPDX document (SPDX_INCLUDE_KERNEL_CONFIG).Export the recipe’s
PACKAGECONFIGfeatures (enabled/disabled) into the SPDX document (SPDX_INCLUDE_PACKAGECONFIG).Exclude specific files from the SPDX output using Python regular expressions (SPDX_FILE_EXCLUDE_PATTERNS).
Attach supplier information to the image SBOM, SDK SBOM, or individual packages (SPDX_IMAGE_SUPPLIER, SPDX_SDK_SUPPLIER, SPDX_PACKAGE_SUPPLIER).
Enrich source downloads with ecosystem-specific Package URLs (PURLs), using the cargo_common, go-mod, pypi, npm, and cpan* classes to automatically populate PURL identifiers for the corresponding language ecosystems.
Record which agent invoked the build and on whose behalf it ran, enabling CI/CD traceability in the SBOM (SPDX_INCLUDE_BITBAKE_PARENT_BUILD, SPDX_INVOKED_BY, SPDX_ON_BEHALF_OF).
See also the SPDX_CUSTOM_ANNOTATION_VARS variable which allows to associate custom notes to a recipe. See the tools page on the SPDX project website for a list of tools to consume and transform the SPDX data generated by the OpenEmbedded build system.
See the definition of the variables starting with SPDX_ in the
Yocto Project Reference Manual glossary for more
information.
See also Joshua Watt’s presentations Automated SBoM generation with OpenEmbedded and the Yocto Project at FOSDEM 2023 and SPDX in the Yocto Project at FOSDEM 2024.
38 Using the Error Reporting Tool
The error reporting tool allows you to submit errors encountered during builds to a central database. Outside of the build environment, you can use a web interface to browse errors, view statistics, and query for errors. The tool works using a client-server system where the client portion is integrated in OpenEmbedded-Core (OE-Core). The server receives the information collected and saves it in a database.
There is a live instance of the error reporting server at https://errors.yoctoproject.org. When you want to get help with build failures, you can submit all of the information on the failure easily and then point to the URL in your bug report or send an email to the mailing list.
Note
If you send error reports to this server, the reports become publicly visible.
38.1 Enabling and Using the Tool
By default, the error reporting tool is disabled. You can enable it by
inheriting the report-error class by adding the
following statement to the end of your local.conf file in your
Build Directory:
INHERIT += "report-error"
By default, the error reporting feature stores information in
${LOG_DIR}/error-report.
However, you can specify a directory to use by adding the following to
your local.conf file:
ERR_REPORT_DIR = "path"
Enabling error reporting causes the build process to collect the errors and store them in a file as previously described. When the build system encounters an error, it includes a command as part of the console output. You can run the command to send the error file to the server. For example, the following command sends the errors to an upstream server:
$ send-error-report /home/brandusa/project/poky/build/tmp/log/error-report/error_report_201403141617.txt
In the previous example, the errors are sent to a public database available at https://errors.yoctoproject.org, which is used by the entire community. If you specify a particular server, you can send the errors to a different database. Use the following command for more information on available options:
$ send-error-report --help
When sending the error file, you are prompted to review the data being sent as well as to provide a name and optional email address. Once you satisfy these prompts, the command returns a link from the server that corresponds to your entry in the database. For example, here is a typical link: https://errors.yoctoproject.org/Errors/Details/9522/
Following the link takes you to a web interface where you can browse, query the errors, and view statistics.
38.2 Disabling the Tool
To disable the error reporting feature, simply remove or comment out the
following statement from the end of your local.conf file in your
Build Directory:
INHERIT += "report-error"
38.3 Setting Up Your Own Error Reporting Server
If you want to set up your own error reporting server, you can obtain the code from the Git repository at https://git.yoctoproject.org/error-report-web/. Instructions on how to set it up are in the README document.
39 Using Wayland and Weston
Wayland is a computer display server protocol that provides a method for compositing window managers to communicate directly with applications and video hardware and expects them to communicate with input hardware using other libraries. Using Wayland with supporting targets can result in better control over graphics frame rendering than an application might otherwise achieve.
The Yocto Project provides the Wayland protocol libraries and the
reference Weston
compositor as part of its release. You can find the integrated packages
in the meta layer of OpenEmbedded-Core (OE-Core).
Specifically, you
can find the recipes that build both Wayland and Weston at
meta/recipes-graphics/wayland.
You can build both the Wayland and Weston packages for use only with targets that accept the Mesa 3D and Direct Rendering Infrastructure, which is also known as Mesa DRI. This implies that you cannot build and use the packages if your target uses, for example, the Intel Embedded Media and Graphics Driver (Intel EMGD) that overrides Mesa DRI.
Note
Due to lack of EGL support, Weston 1.0.3 will not run directly on the emulated QEMU hardware. However, this version of Weston will run under X emulation without issues.
This section describes what you need to do to implement Wayland and use the Weston compositor when building an image for a supporting target.
39.1 Enabling Wayland in an Image
To enable Wayland, you need to enable it to be built and enable it to be included (installed) in the image.
39.1.1 Building Wayland
To cause Mesa to build the wayland-egl platform and Weston to build
Wayland with Kernel Mode Setting
(KMS)
support, include the “wayland” flag in the
DISTRO_FEATURES
statement in your local.conf file:
DISTRO_FEATURES:append = " wayland"
Note
If X11 has been enabled elsewhere, Weston will build Wayland with X11 support
39.1.2 Installing Wayland and Weston
To install the Wayland feature into an image, you must include the
following
CORE_IMAGE_EXTRA_INSTALL
statement in your local.conf file:
CORE_IMAGE_EXTRA_INSTALL += "wayland weston"
39.2 Running Weston
To run Weston inside X11, enabling it as described earlier and building a Sato image is sufficient. If you are running your image under Sato, a Weston Launcher appears in the “Utility” category.
Alternatively, you can run Weston through the command-line interpretor (CLI), which is better suited for development work. To run Weston under the CLI, you need to do the following after your image is built:
Run these commands to export
XDG_RUNTIME_DIR:mkdir -p /tmp/$USER-weston chmod 0700 /tmp/$USER-weston export XDG_RUNTIME_DIR=/tmp/$USER-weston
Launch Weston in the shell:
weston
40 Using the Quick EMUlator (QEMU)
The Yocto Project uses an implementation of the Quick EMUlator (QEMU) Open Source project as part of the Yocto Project development “tool set”. This chapter provides both procedures that show you how to use the Quick EMUlator (QEMU) and other QEMU information helpful for development purposes.
40.1 Overview
Within the context of the Yocto Project, QEMU is an emulator and virtualization machine that allows you to run a complete image you have built using the Yocto Project as just another task on your build system. QEMU is useful for running and testing images and applications on supported Yocto Project architectures without having actual hardware. Among other things, the Yocto Project uses QEMU to run automated Quality Assurance (QA) tests on final images shipped with each release.
Note
This implementation is not the same as QEMU in general.
This section provides a brief reference for the Yocto Project implementation of QEMU.
For official information and documentation on QEMU in general, see the following references:
QEMU Website: The official website for the QEMU Open Source project.
Documentation: The QEMU user manual.
40.2 Running QEMU
To use QEMU, you need to have QEMU installed and initialized as well as have the proper artifacts (i.e. image files and root filesystems) available. Follow these general steps to run QEMU:
Install QEMU: QEMU is made available with the Yocto Project a number of ways. One method is to install a Software Development Kit (SDK). See “The QEMU Emulator” section in the Yocto Project Application Development and the Extensible Software Development Kit (eSDK) manual for information on how to install QEMU.
Setting Up the Environment: How you set up the QEMU environment depends on how you installed QEMU:
If you followed Setting Up to Use the Yocto Project, either use
bitbake-setupor source the environment setup script manually:$ cd bitbake-builds $ source layers/openembedded-core/oe-init-build-env
If you installed a cross-toolchain, you can run the script that initializes the toolchain. For example, the following commands run the initialization script from the default
poky_sdkdirectory:. poky_sdk/environment-setup-core2-64-poky-linux
Ensure the Artifacts are in Place: You need to be sure you have a pre-built kernel that will boot in QEMU. You also need the target root filesystem for your target machine’s architecture:
If you have previously built an image for QEMU (e.g.
qemux86,qemuarm, and so forth), then the artifacts are in place in your Build Directory.If you have not built an image, you can go to the machines/qemu area and download a pre-built image that matches your architecture and can be run on QEMU.
See the “Extracting the Root Filesystem” section in the Yocto Project Application Development and the Extensible Software Development Kit (eSDK) manual for information on how to extract a root filesystem.
Run QEMU: The basic
runqemucommand syntax is as follows:$ runqemu [option ] [...]
Based on what you provide on the command line,
runqemudoes a good job of figuring out what you are trying to do. For example, by default, QEMU looks for the most recently built image according to the timestamp when it needs to look for an image. Minimally, through the use of options, you must provide either a machine name, a virtual machine image (*wic.vmdk), or a kernel image (*.bin).Here are some additional examples to help illustrate further QEMU:
This example starts QEMU with MACHINE set to “qemux86-64”. Assuming a standard Build Directory,
runqemuautomatically finds thebzImage-qemux86-64.binimage file and thecore-image-minimal-qemux86-64-20200218002850.rootfs.ext4(assuming the current build created acore-image-minimalimage):$ runqemu qemux86-64
Note
When more than one image with the same name exists, QEMU finds and uses the most recently built image according to the timestamp.
This example produces the exact same results as the previous example. This command, however, specifically provides the image and root filesystem type:
$ runqemu qemux86-64 core-image-minimal ext4
This example starts QEMU in a temporary root filesystem (“snapshot”) with no graphical environment (“nographic”), meaning QEMU is started in the current shell:
$ runqemu qemux86-64 snapshot nographic
Running in “snapshot” mode means that changes in root filesystem will not remain after quitting QEMU.
This example specifies to boot an Initramfs image and to enable audio in QEMU. For this case,
runqemusets the internal variableFSTYPEtocpio.gz. Also, for audio to be enabled, an appropriate driver must be installed (see theaudiooption in runqemu Command-Line Options for more information):$ runqemu qemux86-64 ramfs audio
This example does not provide enough information for QEMU to launch. While the command does provide a root filesystem type, it must also minimally provide a MACHINE, KERNEL, or VM option:
$ runqemu ext4
This example specifies to boot a virtual machine image (
.wic.vmdkfile). From the.wic.vmdk,runqemudetermines the QEMU architecture (MACHINE) to be “qemux86-64” and the root filesystem type to be “vmdk”:$ runqemu /home/scott-lenovo/vm/core-image-minimal-qemux86-64.wic.vmdk
40.3 Switching Between Consoles
When booting or running QEMU, you can switch between supported consoles by using Ctrl+Alt+number. For example, Ctrl+Alt+3 switches you to the serial console as long as that console is enabled. Being able to switch consoles is helpful, for example, if the main QEMU console breaks for some reason.
Note
Usually, “2” gets you to the main console and “3” gets you to the serial console.
40.4 Removing the Splash Screen
You can remove the splash screen when QEMU is booting by using Alt+left. Removing the splash screen allows you to see what is happening in the background.
40.5 Disabling the Cursor Grab
The default QEMU integration captures the cursor within the main window. It does this since standard mouse devices only provide relative input and not absolute coordinates. You then have to break out of the grab using the “Ctrl+Alt” key combination. However, the Yocto Project’s integration of QEMU enables the wacom USB touch pad driver by default to allow input of absolute coordinates. This default means that the mouse can enter and leave the main window without the grab taking effect leading to a better user experience.
40.6 Running Under a Network File System (NFS) Server
One method for running QEMU is to run it on an NFS server. This is useful when you need to access the same file system from both the build and the emulated system at the same time. It is also worth noting that the system does not need root privileges to run. It uses a user space NFS server to avoid that. Follow these steps to set up for running QEMU using an NFS server.
Extract a Root Filesystem: Once you are able to run QEMU in your environment, you can use the
runqemu-extract-sdkscript, which is located in thescriptsdirectory along with therunqemuscript.The
runqemu-extract-sdktakes a root filesystem tarball and extracts it into a location that you specify. Here is an example that takes a file system and extracts it to a directory namedtest-nfs:runqemu-extract-sdk ./tmp/deploy/images/qemux86-64/core-image-sato-qemux86-64.tar.bz2 test-nfs
Start QEMU: Once you have extracted the file system, you can run
runqemunormally with the additional location of the file system. You can then also make changes to the files within./test-nfsand see those changes appear in the image in real time. Here is an example using theqemux86image:runqemu qemux86-64 ./test-nfs
Note
Should you need to start, stop, or restart the NFS share, you can use the following commands:
To start the NFS share:
runqemu-export-rootfs start file-system-location
To stop the NFS share:
runqemu-export-rootfs stop file-system-location
To restart the NFS share:
runqemu-export-rootfs restart file-system-location
40.7 QEMU CPU Compatibility Under KVM
By default, the QEMU build compiles for and targets 64-bit and x86 Intel Core2 Duo processors and 32-bit x86 Intel Pentium II processors. QEMU builds for and targets these CPU types because they display a broad range of CPU feature compatibility with many commonly used CPUs.
Despite this broad range of compatibility, the CPUs could support a
feature that your host CPU does not support. Although this situation is
not a problem when QEMU uses software emulation of the feature, it can
be a problem when QEMU is running with KVM enabled. Specifically,
software compiled with a certain CPU feature crashes when run on a CPU
under KVM that does not support that feature. To work around this
problem, you can override QEMU’s runtime CPU setting by changing the
QB_CPU_KVM variable in qemuboot.conf in the Build Directory
deploy/image directory. This setting specifies a -cpu option passed
into QEMU in the runqemu script. Running qemu -cpu help returns a
list of available supported CPU types.
40.8 QEMU Performance
Using QEMU to emulate your hardware can result in speed issues depending
on the target and host architecture mix. For example, using the
qemux86 image in the emulator on an Intel-based 32-bit (x86) host
machine is fast because the target and host architectures match. On the
other hand, using the qemuarm image on the same Intel-based host can
be slower. But, you still achieve faithful emulation of ARM-specific
issues.
To speed things up, the QEMU images support using distcc to call a
cross-compiler outside the emulated system. If you used runqemu to
start QEMU, and the distccd application is present on the host
system, any BitBake cross-compiling toolchain available from the build
system is automatically used from within QEMU simply by calling
distcc. You can accomplish this by defining the cross-compiler
variable (e.g. export CC="distcc"). Alternatively, if you are using
a suitable SDK image or the appropriate stand-alone toolchain is
present, the toolchain is also automatically used.
Note
There are several mechanisms to connect to the system running on the QEMU emulator:
QEMU provides a framebuffer interface that makes standard consoles available.
Generally, headless embedded devices have a serial port. If so, you can configure the operating system of the running image to use that port to run a console. The connection uses standard IP networking.
SSH servers are available in some QEMU images. The
core-image-satoQEMU image has a Dropbear secure shell (SSH) server that runs with the root password disabled. Thecore-image-full-cmdlineQEMU image has OpenSSH instead of Dropbear. Including these SSH servers allow you to use standardsshandscpcommands. Thecore-image-minimalQEMU image, however, contains no SSH server.You can use a provided, user-space NFS server to boot the QEMU session using a local copy of the root filesystem on the host. In order to make this connection, you must extract a root filesystem tarball by using the
runqemu-extract-sdkcommand. After running the command, you must then point therunqemuscript to the extracted directory instead of a root filesystem image file. See the “Running Under a Network File System (NFS) Server” section for more information.
40.9 QEMU Command-Line Syntax
The basic runqemu command syntax is as follows:
$ runqemu [option ] [...]
Based on what you provide on the command line, runqemu does a
good job of figuring out what you are trying to do. For example, by
default, QEMU looks for the most recently built image according to the
timestamp when it needs to look for an image. Minimally, through the use
of options, you must provide either a machine name, a virtual machine
image (*wic.vmdk), or a kernel image (*.bin).
Here is the command-line help output for the runqemu command:
$ runqemu --help
Usage: you can run this script with any valid combination
of the following environment variables (in any order):
KERNEL - the kernel image file to use
ROOTFS - the rootfs image file or nfsroot directory to use
MACHINE - the machine name (optional, autodetected from KERNEL filename if unspecified)
Simplified QEMU command-line options can be passed with:
nographic - disable video console
serial - enable a serial console on /dev/ttyS0
slirp - enable user networking, no root privileges required
kvm - enable KVM when running x86/x86_64 (VT-capable CPU required)
kvm-vhost - enable KVM with vhost when running x86/x86_64 (VT-capable CPU required)
publicvnc - enable a VNC server open to all hosts
audio - enable audio
[*/]ovmf* - OVMF firmware file or base name for booting with UEFI
tcpserial=<port> - specify tcp serial port number
biosdir=<dir> - specify custom bios dir
biosfilename=<filename> - specify bios filename
qemuparams=<xyz> - specify custom parameters to QEMU
bootparams=<xyz> - specify custom kernel parameters during boot
help, -h, --help: print this text
Examples:
runqemu
runqemu qemuarm
runqemu tmp/deploy/images/qemuarm
runqemu tmp/deploy/images/qemux86/<qemuboot.conf>
runqemu qemux86-64 core-image-sato ext4
runqemu qemux86-64 wic-image-minimal wic
runqemu path/to/bzImage-qemux86.bin path/to/nfsrootdir/ serial
runqemu qemux86 iso/hddimg/wic.vmdk/wic.qcow2/wic.vdi/ramfs/cpio.gz...
runqemu qemux86 qemuparams="-m 256"
runqemu qemux86 bootparams="psplash=false"
runqemu path/to/<image>-<machine>.wic
runqemu path/to/<image>-<machine>.wic.vmdk
40.10 runqemu Command-Line Options
Here is a description of runqemu options you can provide on the
command line:
Note
If you do provide some “illegal” option combination or perhaps you do
not provide enough in the way of options, runqemu
provides appropriate error messaging to help you correct the problem.
QEMUARCH: The QEMU machine architecture, which must be “qemuarm”, “qemuarm64”, “qemumips”, “qemumips64”, “qemuppc”, “qemux86”, or “qemux86-64”.
VM: The virtual machine image, which must be a
.wic.vmdkfile. Use this option when you want to boot a.wic.vmdkimage.ROOTFS: A root filesystem that has one of the following filetype extensions: “ext2”, “ext3”, “ext4”, “jffs2”, “nfs”, or “btrfs”. If the filename you provide for this option uses “nfs”, it must provide an explicit root filesystem path.
KERNEL: A kernel image, which is a
.binfile. When you provide a.binfile,runqemudetects it and assumes the file is a kernel image.MACHINE: The architecture of the QEMU machine, which must be one of the following: “qemux86”, “qemux86-64”, “qemuarm”, “qemuarm64”, “qemumips”, “qemumips64”, or “qemuppc”. The MACHINE and QEMUARCH options are basically identical. If you do not provide a MACHINE option,
runqemutries to determine it based on other options.ramfs: Indicates you are booting an Initramfs image, which means theFSTYPEiscpio.gz.iso: Indicates you are booting an ISO image, which means theFSTYPEis.iso.nographic: Disables the video console, which sets the console to “ttys0”. This option is useful when you have logged into a server and you do not want to disable forwarding from the X Window System (X11) to your workstation or laptop.serial: Enables a serial console on/dev/ttyS0.biosdir: Establishes a custom directory for BIOS, VGA BIOS and keymaps.biosfilename: Establishes a custom BIOS name.qemuparams=\"xyz\": Specifies custom QEMU parameters. Use this option to pass options other than the simple “kvm” and “serial” options.bootparams=\"xyz\": Specifies custom boot parameters for the kernel.audio: Enables audio in QEMU. The MACHINE option must be either “qemux86” or “qemux86-64” in order for audio to be enabled. Additionally, thesnd_intel8x0orsnd_ens1370driver must be installed in linux guest.slirp: Enables “slirp” networking, which is a different way of networking that does not need root access but also is not as easy to use or comprehensive as the default.Using
slirpby default will forward the guest machine’s 22 and 23 TCP ports to host machine’s 2222 and 2323 ports (or the next free ports). Specific forwarding rules can be configured by settingQB_SLIRP_OPTas environment variable or inqemuboot.confin the Build Directorydeploy/imagedirectory. Examples:QB_SLIRP_OPT = "-netdev user,id=net0,hostfwd=tcp::8080-:80" QB_SLIRP_OPT = "-netdev user,id=net0,hostfwd=tcp::8080-:80,hostfwd=tcp::2222-:22"
The first example forwards TCP port 80 from the emulated system to port 8080 (or the next free port) on the host system, allowing access to an http server running in QEMU from
http://<host ip>:8080/.The second example does the same, but also forwards TCP port 22 on the guest system to 2222 (or the next free port) on the host system, allowing ssh access to the emulated system using
ssh -P 2222 <user>@<host ip>.Keep in mind that proper configuration of firewall software is required.
kvm: Enables KVM when running “qemux86” or “qemux86-64” QEMU architectures. For KVM to work, all the following conditions must be met:Your MACHINE must be either qemux86” or “qemux86-64”.
Your build host has to have the KVM modules installed, which are
/dev/kvm.The build host
/dev/kvmdirectory has to be both writable and readable.
kvm-vhost: Enables KVM with VHOST support when running “qemux86” or “qemux86-64” QEMU architectures. For KVM with VHOST to work, the following conditions must be met:kvmoption conditions defined above must be met.Your build host has to have virtio net device, which are
/dev/vhost-net.The build host
/dev/vhost-netdirectory has to be either readable or writable and “slirp-enabled”.
publicvnc: Enables a VNC server open to all hosts.
41 Locking and Unlocking Recipes Using bblock
By design, the OpenEmbedded build system builds everything from scratch unless BitBake determines that specific tasks do not require rebuilding. At startup, it computes a signature for all tasks, based on the task’s input. Then, it compares these signatures with the ones from the sstate cache (if they exist). Any changes cause the task to rerun.
During development, changes might trigger BitBake to rebuild certain
recipes, even when we know they do not require rebuilding at that stage.
For example, modifying a recipe can lead to rebuilding its native
counterpart, which might prove unnecessary. Editing the python3 recipe,
for instance, can prompt BitBake to rebuild python3-native along with any
recipes that depend on it.
To prevent this, use bblock to lock specific tasks or recipes to
specific signatures, forcing BitBake to use the sstate cache for them.
Warning
Use bblock only during the development phase.
Forcing BitBake to use the sstate cache, regardless of input changes, means the recipe metadata no longer directly reflect the output. Use this feature with caution. If you do not understand why signatures change, see the section on understanding what changed.
41.1 Locking tasks and recipes
To lock a recipe, use:
$ bblock recipe
You can also use a space-separated list of recipes to lock multiple recipes:
$ bblock recipe1 recipe2
Locking a recipe means locking all tasks of the recipe. If you need to lock only particular tasks, use the -t option with a comma-separated list of tasks:
$ bblock -t task1,task2 recipe
41.2 Unlocking tasks and recipes
To unlock a recipe, use the -r option:
$ bblock -r recipe
You can also use a space-separated list of recipes to unlock multiple recipes:
$ bblock -r recipe1 recipe2
Unlocking a recipe means unlocking all tasks of the recipe. If you need to
unlock only particular tasks use the -t option with a comma-separated
list of tasks:
$ bblock -r -t task1,task2 recipe
To unlock all recipes, do not specify any recipe:
$ bblock -r
41.3 Configuration file
bblock will dump the signatures in the build/conf/bblock.conf file,
included by default in meta/conf/bitbake.conf.
To dump the file, use the -d option:
$ bblock -d
41.4 Locking mechanism
bblock computes the signature(s) of the task(s) and sets the 3 following
variables: SIGGEN_LOCKEDSIGS, SIGGEN_LOCKEDSIGS_TYPES
and SIGGEN_LOCKEDSIGS_TASKSIG_CHECK.
In particular, bblock sets:
SIGGEN_LOCKEDSIGS_TASKSIG_CHECK = "info"
SIGGEN_LOCKEDSIGS_TYPES += "${PACKAGE_ARCHS}"
SIGGEN_LOCKEDSIGS_<package_arch> += "<recipe>:<task>:<signature>"
This produces architecture specific locks and reminds user that some tasks have locked signatures.
41.5 Example
When working on the python3 recipe, we can lock python3-native with
the following:
$ bblock python3-native
$ bblock -d
# Generated by bblock
SIGGEN_LOCKEDSIGS_TASKSIG_CHECK = "info"
SIGGEN_LOCKEDSIGS_TYPES += "${PACKAGE_ARCHS}"
SIGGEN_LOCKEDSIGS_x86_64 += "python3-native:do_patch:865859c27e603ba42025b7bb766c3cd4c0f477e4962cfd39128c0619d695fce7"
SIGGEN_LOCKEDSIGS_x86_64 += "python3-native:do_populate_sysroot:f8fa5d3194cef638416000252b959e86d0a19f6b7898e1f56b643c588cdd8605"
SIGGEN_LOCKEDSIGS_x86_64 += "python3-native:do_prepare_recipe_sysroot:fe295ac505d9d1143313424b201c6f3f2a0a90da40a13a905b86b874705f226a"
SIGGEN_LOCKEDSIGS_x86_64 += "python3-native:do_fetch:1b6e4728fee631bc7a8a7006855c5b8182a8224579e32e3d0a2db77c26459f25"
SIGGEN_LOCKEDSIGS_x86_64 += "python3-native:do_unpack:2ad74d6f865ef75c35c0e6bbe3f9a90923a6b2c62c18a3ddef514ea31fbc588f"
SIGGEN_LOCKEDSIGS_x86_64 += "python3-native:do_deploy_source_date_epoch:15f89b8483c1ad7507480f337619bb98c26e231227785eb3543db163593e7b42"
SIGGEN_LOCKEDSIGS_x86_64 += "python3-native:do_configure:7960c13d23270fdb12b3a7c426ce1da0d2f5c7cf5e5d3f5bdce5fa330eb7d482"
SIGGEN_LOCKEDSIGS_x86_64 += "python3-native:do_compile:012e1d4a63f1a78fc2143bd90d704dbcf5865c5257d6272aa7540ec1cd3063d9"
SIGGEN_LOCKEDSIGS_x86_64 += "python3-native:do_install:d3401cc2afa4c996beb154beaad3e45fa0272b9c56fb86e9db14ec3544c68f9d"
SIGGEN_LOCKEDSIGS_x86_64 += "python3-native:do_build:fa88bb7afb9046c0417c24a3fa98a058653805a8b00eda2c2d7fea68fc42f882"
SIGGEN_LOCKEDSIGS_x86_64 += "python3-native:do_collect_spdx_deps:cc9c53ba7c495567e9a38ec4801830c425c0d1f895aa2fc66930a2edd510d9b4"
SIGGEN_LOCKEDSIGS_x86_64 += "python3-native:do_create_spdx:766a1d09368438b7b5a1a8e2a8f823b2b731db44b57e67d8b3196de91966f9c5"
SIGGEN_LOCKEDSIGS_x86_64 += "python3-native:do_create_package_spdx:46f80faeab25575e9977ba3bf14c819489c3d489432ae5145255635108c21020"
SIGGEN_LOCKEDSIGS_x86_64 += "python3-native:do_recipe_qa:cb960cdb074e7944e894958db58f3dc2a0436ecf87c247feb3e095e214fec0e4"
SIGGEN_LOCKEDSIGS_x86_64 += "python3-native:do_populate_lic:15657441621ee83f15c2e650e7edbb036870b56f55e72e046c6142da3c5783fd"
SIGGEN_LOCKEDSIGS_x86_64 += "python3-native:do_create_manifest:24f0abbec221d27bbb2909b6e846288b12cab419f1faf9f5006ed80423d37e28"
SIGGEN_LOCKEDSIGS_x86_64 += "python3-native:do_addto_recipe_sysroot:bcb6a1905f113128de3f88d702b706befd6a786267c045ee82532759a7c214d7"
42 Setting up a Hash Equivalence Server
A Hash Equivalence server can help reduce build times by using the mechanism described in the Hash Equivalence section of the Yocto Project Overview and Concepts Manual.
This document will guide you through the steps required to set up the reference Hash Equivalence server provided by the bitbake-hashserv script in BitBake.
This guide will explain how to set up a local Hash Equivalence server and does not explain how to set up the surrounding infrastructure to secure this server.
42.1 Hash Equivalence Server Setup
From this point onwards, the commands displayed below are assumed to be run from the BitBake repository, which can be found here.
To start a basic Hash Equivalence server, one could simply run:
./bin/bitbake-hashserv
This will take all of the default options of the script, which are already sufficient to start a local server.
Run ./bin/bitbake-hashserv --help to see what options the script can take.
Some of the important ones are:
--databasecontrols the location of the hash server database (default:./hashserver.db).--bindcontrols the bind address of the server (default:unix://./hashserver.sock).You can specify three types of addresses:
unix://PATH: will bind to a Unix socket atPATH.wss://ADDRESS:PORT: will bind to a Websocket atADDRESS:PORT.ADDRESS:PORT: will bind to a raw TCP socket atADDRESS:PORT.
--logcan be used to control the logging level of the server (e.g.INFOwill print information about clients connection to the server).--upstreamcan be used to specify an upstream server to pull hashes from. This has no default value, meaning no upstream server is used.--db-usernameand--db-passwordcan be used to control the access to the database.--read-onlywill disable hash reports from clients.
These variables can also be set from the environment from where it is being run.
Run ./bin/bitbake-hashserv --help to get the variable names that you can
export.
Warning
The shared Hash Equivalence server needs to be maintained together with the Shared State cache. Otherwise, the server could report Shared State hashes that only exist on specific clients.
We therefore recommend that one Hash Equivalence server be set up to
correspond with a given Shared State cache, and to start this server
in read-only mode (--read-only option), so that it doesn’t store
equivalences for Shared State caches that are local to clients.
If there is no pre-existing Shared State Cache, the server should allow
hashes to be reported (no --read-only option) to create the initial
Hash Equivalence database.
42.2 Yocto Project Build Setup
To use the server started in the previous section, set the following variables in a configuration file:
BB_HASHSERVE = "<bind address>"
BB_SIGNATURE_HANDLER = "OEEquivHash"
The <bind address> value should be replaced to point to the server started
in the previous section.
See the documentation of BB_SIGNATURE_HANDLER for more details on this variable.
You can optionally specify an upstream server with BB_HASHSERVE_UPSTREAM variable. For example:
BB_HASHSERVE_UPSTREAM = "wss://hashserv.yoctoproject.org/ws"
This will make the local server pull hashes from the upstream server. The BB_HASHSERVE_UPSTREAM only works when a server is running (BB_HASHSERVE is set).
To output debugging information on what is happening with Hash Equivalence when builds are started, you can configure BitBake logging as follows from a configuration file:
BB_LOGCONFIG = "hashequiv.json"
With hashequiv.json containing the following content:
{
"version": 1,
"loggers": {
"BitBake.SigGen.HashEquiv": {
"level": "VERBOSE",
"handlers": ["BitBake.verbconsole"]
},
"BitBake.RunQueue.HashEquiv": {
"level": "VERBOSE",
"handlers": ["BitBake.verbconsole"]
}
}
}
This will make Hash Equivalence related changes be printed on the console, such as:
NOTE: Task <recipe.bb>:do_<task> unihash changed to dc0da29c62a2d78d8d853fbb9c173778fe7d6fa4a68c67494b17afffe8ca1894
Permission is granted to copy, distribute and/or modify this document under the terms of the Creative Commons Attribution-Share Alike 2.0 UK: England & Wales as published by Creative Commons.
To report any inaccuracies or problems with this (or any other Yocto Project)
manual, or to send additions or changes, please send email/patches to the Yocto
Project documentation mailing list at docs@lists.yoctoproject.org or
log into the Libera Chat #yocto channel.
Yocto Project Linux Kernel Development Manual
1 Introduction
1.1 Overview
Regardless of how you intend to make use of the Yocto Project, chances are you will work with the Linux kernel. This manual describes how to set up your build host to support kernel development, introduces the kernel development process, provides background information on the Yocto Linux kernel Metadata, describes common tasks you can perform using the kernel tools, shows you how to use the kernel Metadata needed to work with the kernel inside the Yocto Project, and provides insight into how the Yocto Project team develops and maintains Yocto Linux kernel Git repositories and Metadata.
Each Yocto Project release has a set of Yocto Linux kernel recipes, whose Git repositories you can view in the Yocto Source Repositories under the “Yocto Linux Kernel” heading. New recipes for the release track the latest Linux kernel upstream developments from https://www.kernel.org and introduce newly-supported platforms. Previous recipes in the release are refreshed and supported for at least one additional Yocto Project release.
Also included is a Yocto Linux kernel development recipe
(linux-yocto-dev.bb) should you want to work with the very latest in
upstream Yocto Linux kernel development and kernel Metadata development.
Note
For more on Yocto Linux kernels, see the “Yocto Project Kernel Development and Maintenance” section.
The Yocto Project also provides a powerful set of kernel tools for managing Yocto Linux kernel sources and configuration data. You can use these tools to make a single configuration change, apply multiple patches, or work with your own kernel sources.
In particular, the kernel tools allow you to generate configuration
fragments that specify only what you must, and nothing more.
Configuration fragments only need to contain the highest level visible
CONFIG options as presented by the Yocto Linux kernel menuconfig
system. Contrast this against a complete Yocto Linux kernel .config
file, which includes all the automatically selected CONFIG options.
This efficiency reduces your maintenance effort and allows you to
further separate your configuration in ways that make sense for your
project. A common split separates policy and hardware. For example, all
your kernels might support the proc and sys filesystems, but
only specific boards require sound, USB, or specific drivers. Specifying
these configurations individually allows you to aggregate them together
as needed, but maintains them in only one place. Similar logic applies
to separating source changes.
If you do not maintain your own kernel sources and need to make only minimal changes to the sources, the released recipes provide a vetted base upon which to layer your changes. Doing so allows you to benefit from the continual kernel integration and testing performed during development of the Yocto Project.
If, instead, you have a very specific Linux kernel source tree and are unable to align with one of the official Yocto Linux kernel recipes, you have a way to use the Yocto Project Linux kernel tools with your own kernel sources.
The remainder of this manual provides instructions for completing specific Linux kernel development tasks. These instructions assume you are comfortable working with BitBake recipes and basic open-source development tools. Understanding these concepts will facilitate the process of working with the kernel recipes. If you find you need some additional background, please be sure to review and understand the following documentation:
Yocto Project Quick Build document.
devtool workflow as described in the Yocto Project Application Development and the Extensible Software Development Kit (eSDK) manual.
The “Understanding and Creating Layers” section in the Yocto Project Development Tasks Manual.
The “Kernel Modification Workflow” section.
1.2 Kernel Modification Workflow
Kernel modification involves changing the Yocto Project kernel, which
could involve changing configuration options as well as adding new
kernel recipes. Configuration changes can be added in the form of
configuration fragments, while recipe modification comes through the
kernel’s recipes-kernel area in a kernel layer you create.
This section presents a high-level overview of the Yocto Project kernel modification workflow. The illustration and accompanying list provide general information and references for further information.
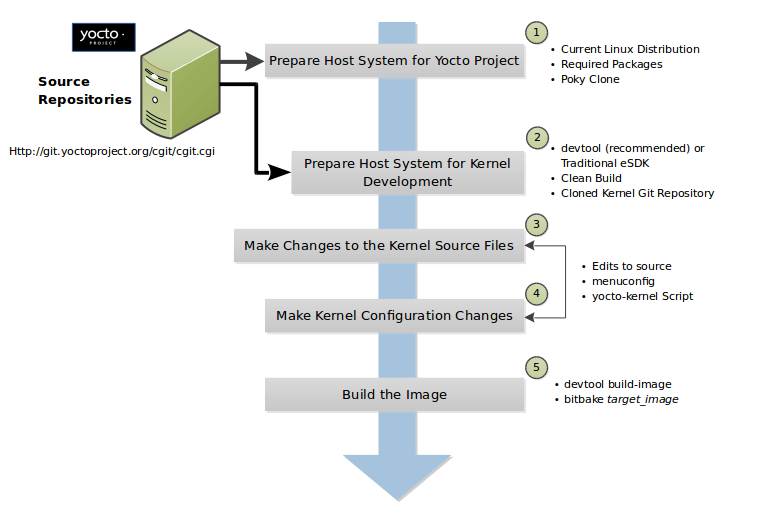
Set up Your Host Development System to Support Development Using the Yocto Project: See the “Setting Up to Use the Yocto Project” section in the Yocto Project Development Tasks Manual for options on how to get a build host ready to use the Yocto Project.
Set Up Your Host Development System for Kernel Development: It is recommended that you use
devtoolfor kernel development. Alternatively, you can use traditional kernel development methods with the Yocto Project. Either way, there are steps you need to take to get the development environment ready.Using
devtoolrequires that you have a clean build of the image. For more information, see the “Getting Ready to Develop Using devtool” section.Using traditional kernel development requires that you have the kernel source available in an isolated local Git repository. For more information, see the “Getting Ready for Traditional Kernel Development” section.
Make Changes to the Kernel Source Code if applicable: Modifying the kernel does not always mean directly changing source files. However, if you have to do this, you make the changes to the files in the Yocto’s Build Directory if you are using
devtool. For more information, see the “Using devtool to Patch the Kernel” section.If you are using traditional kernel development, you edit the source files in the kernel’s local Git repository. For more information, see the “Using Traditional Kernel Development to Patch the Kernel” section.
Make Kernel Configuration Changes if Applicable: If your situation calls for changing the kernel’s configuration, you can use menuconfig, which allows you to interactively develop and test the configuration changes you are making to the kernel. Saving changes you make with
menuconfigupdates the kernel’s.configfile.Note
Try to resist the temptation to directly edit an existing
.configfile, which is found in the Build Directory among the source code used for the build. Doing so, can produce unexpected results when the OpenEmbedded build system regenerates the configuration file.Once you are satisfied with the configuration changes made using
menuconfigand you have saved them, you can directly compare the resulting.configfile against an existing original and gather those changes into a configuration fragment file to be referenced from within the kernel’s.bbappendfile.Additionally, if you are working in a BSP layer and need to modify the BSP’s kernel’s configuration, you can use
menuconfig.Rebuild the Kernel Image With Your Changes: Rebuilding the kernel image applies your changes. Depending on your target hardware, you can verify your changes on actual hardware or perhaps QEMU.
The remainder of this developer’s guide covers common tasks typically used during kernel development, advanced Metadata usage, and Yocto Linux kernel maintenance concepts.
2 Common Tasks
This chapter presents several common tasks you perform when you work with the Yocto Project Linux kernel. These tasks include preparing your host development system for kernel development, preparing a layer, modifying an existing recipe, patching the kernel, configuring the kernel, iterative development, working with your own sources, and incorporating out-of-tree modules.
Note
The examples presented in this chapter work with the Yocto Project 2.4 Release and forward.
2.1 Preparing the Build Host to Work on the Kernel
Before you can do any kernel development, you need to be sure your build host is set up to use the Yocto Project. For information on how to get set up, see the “Setting Up to Use the Yocto Project” section in the Yocto Project Development Tasks Manual.
Note
Be sure you check out the appropriate development branch or you create your local branch by checking out a specific tag to get the desired version of Yocto Project.
Kernel development is best accomplished using devtool and not through traditional kernel workflow methods. The remainder of this section provides information for both scenarios.
2.1.1 Getting Ready to Develop Using devtool
Follow these steps to prepare to update the kernel image using
devtool. Completing this procedure leaves you with a clean kernel
image and ready to make modifications as described in the
“Using devtool to Patch the Kernel”
section:
Initialize the Build Environment: Follow the Setting Up to Use the Yocto Project section of the Yocto Project Development Tasks Manual in order to have a ready-to-use shell that can execute
devtool.Prepare Your local.conf File: By default, the MACHINE variable is set to “qemux86-64”, which is fine if you are building for the QEMU emulator in 64-bit mode. However, if you are not, you need to set the MACHINE variable appropriately in your
conf/local.conffile found in the Build Directory (i.e.bitbake-builds/buildin this example).Also, since you are preparing to work on the kernel image, you need to set the MACHINE_ESSENTIAL_EXTRA_RRECOMMENDS variable to include kernel modules.
In this example we wish to build for qemux86 so we must set the MACHINE variable to “qemux86” and also add the “kernel-modules”. As described we do this by appending to
conf/local.conf:MACHINE = "qemux86" MACHINE_ESSENTIAL_EXTRA_RRECOMMENDS += "kernel-modules"
Create a Layer for Patches: You need to create a layer to hold patches created for the kernel image. You can use the
bitbake-layers create-layercommand as follows:$ cd bitbake-builds/build $ bitbake-layers create-layer ../layers/meta-mylayer NOTE: Starting bitbake server... Add your new layer with 'bitbake-layers add-layer ../layers/meta-mylayer' $
Note
For background information on working with common and BSP layers, see the “Understanding and Creating Layers” section in the Yocto Project Development Tasks Manual and the “BSP Layers” section in the Yocto Project Board Support (BSP) Developer’s Guide, respectively. For information on how to use the
bitbake-layers create-layercommand to quickly set up a layer, see the “Creating Your Own Layer” section in the Yocto Project Development Tasks Manual.Inform the BitBake Build Environment About Your Layer: As directed when you created your layer, you need to add the layer to the BBLAYERS variable in the
bblayers.conffile as follows:$ cd bitbake-builds/build $ bitbake-layers add-layer ../../meta-mylayer NOTE: Starting bitbake server... $
Build the Clean Image: The final step in preparing to work on the kernel is to build an initial image using
bitbake:$ bitbake core-image-minimal Parsing recipes: 100% |##########################################| Time: 0:00:05 Parsing of 830 .bb files complete (0 cached, 830 parsed). 1299 targets, 47 skipped, 0 masked, 0 errors. WARNING: No packages to add, building image core-image-minimal unmodified Loading cache: 100% |############################################| Time: 0:00:00 Loaded 1299 entries from dependency cache. NOTE: Resolving any missing task queue dependencies Initializing tasks: 100% |#######################################| Time: 0:00:07 Checking sstate mirror object availability: 100% |###############| Time: 0:00:00 NOTE: Executing SetScene Tasks NOTE: Executing RunQueue Tasks NOTE: Tasks Summary: Attempted 2866 tasks of which 2604 didn't need to be rerun and all succeeded.
If you were building for actual hardware and not for emulation, you could flash the image to a USB stick on
/dev/sddand boot your device. For an example that uses a Minnowboard, see the TipsAndTricks/KernelDevelopmentWithEsdk Wiki page.
At this point you have set up to start making modifications to the kernel. For a continued example, see the “Using devtool to Patch the Kernel” section.
2.1.2 Getting Ready for Traditional Kernel Development
Getting ready for traditional kernel development using the Yocto Project involves many of the same steps as described in the previous section. However, you need to establish a local copy of the kernel source since you will be editing these files.
Follow these steps to prepare to update the kernel image using traditional kernel development flow with the Yocto Project. Completing this procedure leaves you ready to make modifications to the kernel source as described in the “Using Traditional Kernel Development to Patch the Kernel” section:
Initialize the BitBake Environment: Follow the steps in the Setting Up to Use the Yocto Project section of the Yocto Project Development Tasks Manual.
Prepare Your local.conf File: By default, the MACHINE variable is set to “qemux86-64”, which is fine if you are building for the QEMU emulator in 64-bit mode. However, if you are not, you need to set the MACHINE variable appropriately in your
conf/local.conffile found in the Build Directory (i.e.bitbake-builds/buildin this example).Also, since you are preparing to work on the kernel image, you need to set the MACHINE_ESSENTIAL_EXTRA_RRECOMMENDS variable to include kernel modules.
In this example we wish to build for qemux86 so we must set the MACHINE variable to “qemux86” and also add the “kernel-modules”. As described we do this by appending to
conf/local.conf:MACHINE = "qemux86" MACHINE_ESSENTIAL_EXTRA_RRECOMMENDS += "kernel-modules"
Create a Layer for Patches: You need to create a layer to hold patches created for the kernel image. You can use the
bitbake-layers create-layercommand as follows:$ cd bitbake-builds/build $ bitbake-layers create-layer ../../meta-mylayer NOTE: Starting bitbake server... Add your new layer with 'bitbake-layers add-layer ../../meta-mylayer'
Note
For background information on working with common and BSP layers, see the “Understanding and Creating Layers” section in the Yocto Project Development Tasks Manual and the “BSP Layers” section in the Yocto Project Board Support (BSP) Developer’s Guide, respectively. For information on how to use the
bitbake-layers create-layercommand to quickly set up a layer, see the “Creating Your Own Layer” section in the Yocto Project Development Tasks Manual.Inform the BitBake Build Environment About Your Layer: As directed when you created your layer, you need to add the layer to the BBLAYERS variable in the
bblayers.conffile as follows:$ cd bitbake-builds/build $ bitbake-layers add-layer ../../meta-mylayer NOTE: Starting bitbake server ... $
Create a Local Copy of the Kernel Git Repository: You can find Git repositories of supported Yocto Project kernels organized under “Yocto Linux Kernel” in the Yocto Project Source Repositories at https://git.yoctoproject.org/.
For simplicity, it is recommended that you create your copy of the kernel Git repository outside of the Source Directory. Also, be sure you are in the
standard/basebranch.The following commands show how to create a local copy of the
linux-yocto-4.12kernel and be in thestandard/basebranch:$ cd ~ $ git clone git://git.yoctoproject.org/linux-yocto-4.12 --branch standard/base Cloning into 'linux-yocto-4.12'... remote: Counting objects: 6097195, done. remote: Compressing objects: 100% (901026/901026), done. remote: Total 6097195 (delta 5152604), reused 6096847 (delta 5152256) Receiving objects: 100% (6097195/6097195), 1.24 GiB | 7.81 MiB/s, done. Resolving deltas: 100% (5152604/5152604), done. Checking connectivity... done. Checking out files: 100% (59846/59846), done.
Note
The
linux-yocto-4.12kernel can be used with the Yocto Project 2.4 release and forward. You cannot use thelinux-yocto-4.12kernel with releases prior to Yocto Project 2.4.Create a Local Copy of the Kernel Cache Git Repository: For simplicity, it is recommended that you create your copy of the kernel cache Git repository outside of the Source Directory. Also, for this example, be sure you are in the
yocto-4.12branch.The following commands show how to create a local copy of the
yocto-kernel-cacheand switch to theyocto-4.12branch:$ cd ~ $ git clone git://git.yoctoproject.org/yocto-kernel-cache --branch yocto-4.12 Cloning into 'yocto-kernel-cache'... remote: Counting objects: 22639, done. remote: Compressing objects: 100% (9761/9761), done. remote: Total 22639 (delta 12400), reused 22586 (delta 12347) Receiving objects: 100% (22639/22639), 22.34 MiB | 6.27 MiB/s, done. Resolving deltas: 100% (12400/12400), done. Checking connectivity... done.
At this point, you are ready to start making modifications to the kernel using traditional kernel development steps. For a continued example, see the “Using Traditional Kernel Development to Patch the Kernel” section.
2.2 Creating and Preparing a Layer
If you are going to be modifying kernel recipes, it is recommended that
you create and prepare your own layer in which to do your work. Your
layer contains its own BitBake
append files (.bbappend) and provides a convenient mechanism to
create your own recipe files (.bb) as well as store and use kernel
patch files. For background information on working with layers, see the
“Understanding and Creating Layers”
section in the Yocto Project Development Tasks Manual.
Note
The Yocto Project comes with many tools that simplify tasks you need
to perform. One such tool is the bitbake-layers create-layer
command, which simplifies creating a new layer. See the
“Creating Your Own Layer”
section in the Yocto Project Development Tasks Manual for
information on how to use this script to quick set up a new layer.
To better understand the layer you create for kernel development, the
following section describes how to create a layer without the aid of
tools. These steps assume creation of a layer named mylayer in your
home directory:
Create Structure: Create the layer’s structure:
$ mkdir -p meta-mylayer/conf meta-mylayer/recipes-kernel/linux/linux-yocto
The
confdirectory holds your configuration files, while therecipes-kerneldirectory holds your append file and eventual patch files.Create the Layer Configuration File: Move to the
meta-mylayer/confdirectory and create thelayer.conffile as follows:# We have a conf and classes directory, add to BBPATH BBPATH .= ":${LAYERDIR}" # We have recipes-* directories, add to BBFILES BBFILES += "${LAYERDIR}/recipes-*/*/*.bb \ ${LAYERDIR}/recipes-*/*/*.bbappend" BBFILE_COLLECTIONS += "mylayer" BBFILE_PATTERN_mylayer = "^${LAYERDIR}/" BBFILE_PRIORITY_mylayer = "5"
Notice
mylayeras part of the last three statements.Create the Kernel Recipe Append File: Move to the
meta-mylayer/recipes-kernel/linuxdirectory and create the kernel’s append file. This example uses thelinux-yocto-4.12kernel. Thus, the name of the append file islinux-yocto_4.12.bbappend:FILESEXTRAPATHS:prepend := "${THISDIR}/${PN}:" SRC_URI += "file://patch-file-one.patch" SRC_URI += "file://patch-file-two.patch" SRC_URI += "file://patch-file-three.patch"
The FILESEXTRAPATHS and SRC_URI statements enable the OpenEmbedded build system to find patch files. For more information on using append files, see the “Appending Other Layers Metadata With Your Layer” section in the Yocto Project Development Tasks Manual.
2.3 Modifying an Existing Recipe
In many cases, you can customize an existing linux-yocto recipe to meet
the needs of your project. Each release of the Yocto Project provides a
few Linux kernel recipes from which you can choose. These are located in
OpenEmbedded-Core (OE-Core) in meta/recipes-kernel/linux.
Modifying an existing recipe can consist of the following:
Before modifying an existing recipe, be sure that you have created a minimal, custom layer from which you can work. See the “Creating and Preparing a Layer” section for information.
2.3.1 Creating the Append File
You create this file in your custom layer. You also name it accordingly
based on the linux-yocto recipe you are using. For example, if you are
modifying the meta/recipes-kernel/linux/linux-yocto_6.1.bb recipe,
the append file will typically be located as follows within your custom
layer:
your-layer/recipes-kernel/linux/linux-yocto_6.1.bbappend
The append file should initially extend the FILESPATH search path by prepending the directory that contains your files to the FILESEXTRAPATHS variable as follows:
FILESEXTRAPATHS:prepend := "${THISDIR}/${PN}:"
The path ${THISDIR}/${PN}
expands to “linux-yocto” in the current directory for this example. If
you add any new files that modify the kernel recipe and you have
extended FILESPATH as described above, you must place the files in
your layer in the following area:
your-layer/recipes-kernel/linux/linux-yocto/
Note
If you are working on a new machine Board Support Package (BSP), be sure to refer to the Yocto Project Board Support Package Developer’s Guide.
As an example, consider the following append file used by the BSPs in
meta-yocto-bsp:
meta-yocto-bsp/recipes-kernel/linux/linux-yocto_6.1.bbappend
Here are the contents of this file. Be aware that the actual commit ID
strings in this example listing might be different than the actual
strings in the file from the meta-yocto-bsp layer upstream:
KBRANCH:genericx86 = "v6.1/standard/base"
KBRANCH:genericx86-64 = "v6.1/standard/base"
KBRANCH:beaglebone-yocto = "v6.1/standard/beaglebone"
KMACHINE:genericx86 ?= "common-pc"
KMACHINE:genericx86-64 ?= "common-pc-64"
KMACHINE:beaglebone-yocto ?= "beaglebone"
SRCREV_machine:genericx86 ?= "6ec439b4b456ce929c4c07fe457b5d6a4b468e86"
SRCREV_machine:genericx86-64 ?= "6ec439b4b456ce929c4c07fe457b5d6a4b468e86"
SRCREV_machine:beaglebone-yocto ?= "423e1996694b61fbfc8ec3bf062fc6461d64fde1"
COMPATIBLE_MACHINE:genericx86 = "genericx86"
COMPATIBLE_MACHINE:genericx86-64 = "genericx86-64"
COMPATIBLE_MACHINE:beaglebone-yocto = "beaglebone-yocto"
LINUX_VERSION:genericx86 = "6.1.30"
LINUX_VERSION:genericx86-64 = "6.1.30"
LINUX_VERSION:beaglebone-yocto = "6.1.20"
This append file contains statements used to support several BSPs that ship with the Yocto Project. The file defines machines using the COMPATIBLE_MACHINE variable and uses the KMACHINE variable to ensure the machine name used by the OpenEmbedded build system maps to the machine name used by the Linux Yocto kernel. The file also uses the optional KBRANCH variable to ensure the build process uses the appropriate kernel branch.
Although this particular example does not use it, the KERNEL_FEATURES variable could be used to enable features specific to the kernel. The append file points to specific commits in the OpenEmbedded-Core (OE-Core) Git repository branches to identify the exact kernel needed to build the BSP.
One thing missing in this particular BSP, which you will typically need
when developing a BSP, is the kernel configuration file (.config)
for your BSP. When developing a BSP, you probably have a kernel
configuration file or a set of kernel configuration files that, when
taken together, define the kernel configuration for your BSP. You can
accomplish this definition by putting the configurations in a file or a
set of files inside a directory located at the same level as your
kernel’s append file and having the same name as the kernel’s main
recipe file. With all these conditions met, simply reference those files
in the SRC_URI statement in
the append file.
For example, suppose you had some configuration options in a file called
network_configs.cfg. You can place that file inside a directory
named linux-yocto and then add a SRC_URI statement such as the
following to the append file. When the OpenEmbedded build system builds
the kernel, the configuration options are picked up and applied:
SRC_URI += "file://network_configs.cfg"
To group related configurations into multiple files, you perform a similar procedure. Here is an example that groups separate configurations specifically for Ethernet and graphics into their own files and adds the configurations by using a SRC_URI statement like the following in your append file:
SRC_URI += "file://myconfig.cfg \
file://eth.cfg \
file://gfx.cfg"
Another variable you can use in your kernel recipe append file is the FILESEXTRAPATHS variable. When you use this statement, you are extending the locations used by the OpenEmbedded system to look for files and patches as the recipe is processed.
Note
There are other ways of grouping and defining configuration
options. For example, if you are working with a local clone of the
kernel repository, you could checkout the kernel’s meta branch,
make your changes, and then push the changes to the local bare clone
of the kernel. The result is that you directly add configuration
options to the meta branch for your BSP. The configuration
options will likely end up in that location anyway if the BSP gets
added to the Yocto Project.
In general, however, the Yocto Project maintainers take care of
moving the SRC_URI-specified configuration options to the
kernel’s meta branch. Not only is it easier for BSP developers
not to have to put those configurations in the branch,
but having the maintainers do it allows them to apply ‘global’
knowledge about the kinds of common configuration options multiple
BSPs in the tree are typically using. This allows for promotion of
common configurations into common features.
2.3.2 Applying Patches
If you have a single patch or a small series of patches that you want to
apply to the Linux kernel source, you can do so just as you would with
any other recipe. You first copy the patches to the path added to
FILESEXTRAPATHS in
your .bbappend file as described in the previous section, and then
reference them in SRC_URI
statements.
For example, you can apply a three-patch series by adding the following
lines to your linux-yocto .bbappend file in your layer:
SRC_URI += "file://0001-first-change.patch"
SRC_URI += "file://0002-second-change.patch"
SRC_URI += "file://0003-third-change.patch"
The next time you run BitBake to build the Linux kernel, BitBake detects the change in the recipe and fetches and applies the patches before building the kernel.
For a detailed example showing how to patch the kernel using
devtool, see the
“Using devtool to Patch the Kernel”
and
“Using Traditional Kernel Development to Patch the Kernel”
sections.
2.3.3 Changing the Configuration
You can make wholesale or incremental changes to the final .config
file used for the eventual Linux kernel configuration by including a
defconfig file and by specifying configuration fragments in the
SRC_URI to be applied to that
file.
If you have a complete, working Linux kernel .config file you want
to use for the configuration, as before, copy that file to the
appropriate ${PN} directory in your layer’s recipes-kernel/linux
directory, and rename the copied file to “defconfig”. Then, add the
following lines to the linux-yocto .bbappend file in your layer:
FILESEXTRAPATHS:prepend := "${THISDIR}/${PN}:"
SRC_URI += "file://defconfig"
The SRC_URI tells the build system how to search
for the file, while the
FILESEXTRAPATHS
extends the FILESPATH
variable (search directories) to include the ${PN} directory you
created to hold the configuration changes.
You can also use a regular defconfig file, as generated by the
do_savedefconfig
task instead of a complete .config file. This only specifies the
non-default configuration values. You need to additionally set
KCONFIG_MODE
in the linux-yocto .bbappend file in your layer:
KCONFIG_MODE = "alldefconfig"
Note
The build system applies the configurations from the defconfig
file before applying any subsequent configuration fragments. The
final kernel configuration is a combination of the configurations in
the defconfig file and any configuration fragments you provide. You need
to realize that if you have any configuration fragments, the build system
applies these on top of and after applying the existing defconfig file
configurations.
Generally speaking, the preferred approach is to determine the
incremental change you want to make and add that as a configuration
fragment. For example, if you want to add support for a basic serial
console, create a file named 8250.cfg in the ${PN} directory
with the following content (without indentation):
CONFIG_SERIAL_8250=y
CONFIG_SERIAL_8250_CONSOLE=y
CONFIG_SERIAL_8250_PCI=y
CONFIG_SERIAL_8250_NR_UARTS=4
CONFIG_SERIAL_8250_RUNTIME_UARTS=4
CONFIG_SERIAL_CORE=y
CONFIG_SERIAL_CORE_CONSOLE=y
Next, include this
configuration fragment and extend the FILESPATH variable in your
.bbappend file:
FILESEXTRAPATHS:prepend := "${THISDIR}/${PN}:"
SRC_URI += "file://8250.cfg"
The next time you run BitBake to build the Linux kernel, BitBake detects the change in the recipe and fetches and applies the new configuration before building the kernel.
For a detailed example showing how to configure the kernel, see the “Configuring the Kernel” section.
2.3.4 Using an “In-Tree” defconfig File
It might be desirable to have kernel configuration fragment support
through a defconfig file that is pulled from the kernel source tree
for the configured machine. By default, the OpenEmbedded build system
looks for defconfig files in the layer used for Metadata, which is
“out-of-tree”, and then configures them using the following:
SRC_URI += "file://defconfig"
If you do not want to maintain copies of
defconfig files in your layer but would rather allow users to use
the default configuration from the kernel tree and still be able to add
configuration fragments to the
SRC_URI through, for example,
append files, you can direct the OpenEmbedded build system to use a
defconfig file that is “in-tree”.
To specify an “in-tree” defconfig file, use the following statement
form:
KBUILD_DEFCONFIG:<machine> ?= "defconfig_file"
Here is an example that assigns the KBUILD_DEFCONFIG variable utilizing
an override for the “raspberrypi2” MACHINE and provides the path to the
“in-tree” defconfig file to be used for a Raspberry Pi 2, which is based on
the Broadcom 2708/2709 chipset:
KBUILD_DEFCONFIG:raspberrypi2 ?= "bcm2709_defconfig"
If the build system detects a statement that identifies an “out-of-tree”
defconfig file, your KBUILD_DEFCONFIG variable will take precedence
over it.
See the KBUILD_DEFCONFIG variable description for more information.
2.4 Using devtool to Patch the Kernel
The steps in this procedure show you how you can patch the kernel using
devtool.
Note
Before attempting this procedure, be sure you have performed the steps to get ready for updating the kernel as described in the “Getting Ready to Develop Using devtool” section.
Patching the kernel involves changing or adding configurations to an existing kernel, changing or adding recipes to the kernel that are needed to support specific hardware features, or even altering the source code itself.
This example creates a simple patch by adding some QEMU emulator console
output at boot time through printk statements in the kernel’s
calibrate.c source code file. Applying the patch and booting the
modified image causes the added messages to appear on the emulator’s
console. The example is a continuation of the setup procedure found in
the “Getting Ready to Develop Using devtool” Section.
Check Out the Kernel Source Files: First you must use
devtoolto checkout the kernel source code in its workspace.Note
See this step in the “Getting Ready to Develop Using devtool” section for more information.
Use the following
devtoolcommand to check out the code:$ devtool modify linux-yocto
Note
During the checkout operation, there is a bug that could cause errors such as the following:
ERROR: Taskhash mismatch 2c793438c2d9f8c3681fd5f7bc819efa versus be3a89ce7c47178880ba7bf6293d7404 for /path/to/esdk/layers/openembedded-core/meta/recipes-kernel/linux/linux-yocto_4.10.bb.do_unpackYou can safely ignore these messages. The source code is correctly checked out.
Edit the Source Files Follow these steps to make some simple changes to the source files:
Change the working directory: In the previous step, the output noted where you can find the source files (e.g.
build/workspace/sources/linux-yocto). Change to where the kernel source code is before making your edits to thecalibrate.cfile:$ cd build/workspace/sources/linux-yocto
Edit the source file: Edit the
init/calibrate.cfile to have the following changes:void calibrate_delay(void) { unsigned long lpj; static bool printed; int this_cpu = smp_processor_id(); printk("*************************************\n"); printk("* *\n"); printk("* HELLO YOCTO KERNEL *\n"); printk("* *\n"); printk("*************************************\n"); if (per_cpu(cpu_loops_per_jiffy, this_cpu)) { . . .
Build the Updated Kernel Source: To build the updated kernel source, use
devtool:$ devtool build linux-yocto
Create the Image With the New Kernel: Use the
devtool build-imagecommand to create a new image that has the new kernel:$ cd ~ $ devtool build-image core-image-minimal
Note
If the image you originally created resulted in a Wic file, you can use an alternate method to create the new image with the updated kernel. For an example, see the steps in the TipsAndTricks/KernelDevelopmentWithEsdk Wiki Page.
Test the New Image: For this example, you can run the new image using QEMU to verify your changes:
Boot the image: Boot the modified image in the QEMU emulator using this command:
$ runqemu qemux86
Verify the changes: Log into the machine using
rootwith no password and then use the following shell command to scroll through the console’s boot output.# dmesg | less
You should see the results of your
printkstatements as part of the output when you scroll down the console window.
Stage and commit your changes: Change your working directory to where you modified the
calibrate.cfile and use these Git commands to stage and commit your changes:$ cd build/workspace/sources/linux-yocto $ git status $ git add init/calibrate.c $ git commit -m "calibrate: Add printk example"
Export the Patches and Create an Append File: To export your commits as patches and create a
.bbappendfile, use the following command. This example uses the previously established layer namedmeta-mylayer:$ devtool finish linux-yocto ~/meta-mylayer
Note
See Step 3 of the “Getting Ready to Develop Using devtool” section for information on setting up this layer.
Once the command finishes, the patches and the
.bbappendfile are located in the~/meta-mylayer/recipes-kernel/linuxdirectory.Build the Image With Your Modified Kernel: You can now build an image that includes your kernel patches. Execute the following command from your Build Directory in the terminal set up to run BitBake:
$ cd bitbake-builds/build $ bitbake core-image-minimal
2.5 Using Traditional Kernel Development to Patch the Kernel
The steps in this procedure show you how you can patch the kernel using
traditional kernel development (i.e. not using devtool
as described in the
“Using devtool to Patch the Kernel”
section).
Note
Before attempting this procedure, be sure you have performed the steps to get ready for updating the kernel as described in the “Getting Ready for Traditional Kernel Development” section.
Patching the kernel involves changing or adding configurations to an existing kernel, changing or adding recipes to the kernel that are needed to support specific hardware features, or even altering the source code itself.
The example in this section creates a simple patch by adding some QEMU
emulator console output at boot time through printk statements in
the kernel’s calibrate.c source code file. Applying the patch and
booting the modified image causes the added messages to appear on the
emulator’s console. The example is a continuation of the setup procedure
found in the
“Getting Ready for Traditional Kernel Development”
Section.
Edit the Source Files Prior to this step, you should have used Git to create a local copy of the repository for your kernel. Assuming you created the repository as directed in the “Getting Ready for Traditional Kernel Development” section, use the following commands to edit the
calibrate.cfile:Change the working directory: You need to locate the source files in the local copy of the kernel Git repository. Change to where the kernel source code is before making your edits to the
calibrate.cfile:$ cd ~/linux-yocto-4.12/init
Edit the source file: Edit the
calibrate.cfile to have the following changes:void calibrate_delay(void) { unsigned long lpj; static bool printed; int this_cpu = smp_processor_id(); printk("*************************************\n"); printk("* *\n"); printk("* HELLO YOCTO KERNEL *\n"); printk("* *\n"); printk("*************************************\n"); if (per_cpu(cpu_loops_per_jiffy, this_cpu)) { . . .
Stage and Commit Your Changes: Use standard Git commands to stage and commit the changes you just made:
$ git add calibrate.c $ git commit -m "calibrate.c - Added some printk statements"
If you do not stage and commit your changes, the OpenEmbedded Build System will not pick up the changes.
Update Your local.conf File to Point to Your Source Files: In addition to your
local.conffile specifying to use “kernel-modules” and the “qemux86” machine, it must also point to the updated kernel source files. Add SRC_URI and SRCREV statements similar to the following to yourlocal.conf:$ cd bitbake-builds/build/conf
Add the following to the
local.conf:SRC_URI:pn-linux-yocto = "git:///path-to/linux-yocto-4.12;protocol=file;name=machine;branch=standard/base; \ git:///path-to/yocto-kernel-cache;protocol=file;type=kmeta;name=meta;branch=yocto-4.12;destsuffix=${KMETA}" SRCREV_meta:qemux86 = "${AUTOREV}" SRCREV_machine:qemux86 = "${AUTOREV}"
Note
Be sure to replace path-to with the pathname to your local Git repositories. Also, you must be sure to specify the correct branch and machine types. For this example, the branch is
standard/baseand the machine isqemux86.Build the Image: With the source modified, your changes staged and committed, and the
local.conffile pointing to the kernel files, you can now use BitBake to build the image:$ cd bitbake-builds/build $ bitbake core-image-minimal
Boot the image: Boot the modified image in the QEMU emulator using this command. When prompted to login to the QEMU console, use “root” with no password:
$ cd bitbake-builds/build $ runqemu qemux86
Look for Your Changes: As QEMU booted, you might have seen your changes rapidly scroll by. If not, use these commands to see your changes:
# dmesg | less
You should see the results of your
printkstatements as part of the output when you scroll down the console window.Generate the Patch File: Once you are sure that your patch works correctly, you can generate a
*.patchfile in the kernel source repository:$ cd ~/linux-yocto-4.12/init $ git format-patch -1 0001-calibrate.c-Added-some-printk-statements.patch
Move the Patch File to Your Layer: In order for subsequent builds to pick up patches, you need to move the patch file you created in the previous step to your layer
meta-mylayer. For this example, the layer created earlier is located in your home directory asmeta-mylayer. When the layer was created using theyocto-createscript, no additional hierarchy was created to support patches. Before moving the patch file, you need to add additional structure to your layer using the following commands:$ cd ~/meta-mylayer $ mkdir -p recipes-kernel recipes-kernel/linux/linux-yocto
Once you have created this hierarchy in your layer, you can move the patch file using the following command:
$ mv ~/linux-yocto-4.12/init/0001-calibrate.c-Added-some-printk-statements.patch ~/meta-mylayer/recipes-kernel/linux/linux-yocto
Create the Append File: Finally, you need to create the
linux-yocto_4.12.bbappendfile and insert statements that allow the OpenEmbedded build system to find the patch. The append file needs to be in your layer’srecipes-kernel/linuxdirectory and it must be namedlinux-yocto_4.12.bbappendand have the following contents:FILESEXTRAPATHS:prepend := "${THISDIR}/${PN}:" SRC_URI += "file://0001-calibrate.c-Added-some-printk-statements.patch"
The FILESEXTRAPATHS and SRC_URI statements enable the OpenEmbedded build system to find the patch file.
For more information on append files and patches, see the “Creating the Append File” and “Applying Patches” sections. You can also see the “Appending Other Layers Metadata With Your Layer” section in the Yocto Project Development Tasks Manual.
Note
To build
core-image-minimalagain and see the effects of your patch, you can essentially eliminate the temporary source files saved inbitbake-builds/build/tmp/work/...and residual effects of the build by entering the following sequence of commands:$ cd bitbake-builds/build $ bitbake -c cleanall linux-yocto $ bitbake core-image-minimal -c cleanall $ bitbake core-image-minimal $ runqemu qemux86
2.6 Configuring the Kernel
Configuring the Yocto Project kernel consists of making sure the
.config file has all the right information in it for the image you
are building. You can use the menuconfig tool and configuration
fragments to make sure your .config file is just how you need it.
You can also save known configurations in a defconfig file that the
build system can use for kernel configuration.
This section describes how to use menuconfig, create and use
configuration fragments, and how to interactively modify your
.config file to create the leanest kernel configuration file
possible.
For more information on kernel configuration, see the “Changing the Configuration” section.
2.6.2 Creating a defconfig File
A defconfig file in the context of the Yocto Project is often a
.config file that is copied from a build or a defconfig taken
from the kernel tree and moved into recipe space. You can use a
defconfig file to retain a known set of kernel configurations from
which the OpenEmbedded build system can draw to create the final
.config file.
Note
Out-of-the-box, the Yocto Project never ships a defconfig or .config
file. The OpenEmbedded build system creates the final .config file used
to configure the kernel.
To create a defconfig, start with a complete, working Linux kernel
.config file. Copy that file to the appropriate
${PN} directory in
your layer’s recipes-kernel/linux directory, and rename the copied
file to “defconfig” (e.g.
~/meta-mylayer/recipes-kernel/linux/linux-yocto/defconfig). Then,
add the following lines to the linux-yocto .bbappend file in your
layer:
FILESEXTRAPATHS:prepend := "${THISDIR}/${PN}:"
SRC_URI += "file://defconfig"
The SRC_URI tells the build system how to search for the file, while the
FILESEXTRAPATHS extends the FILESPATH
variable (search directories) to include the ${PN} directory you
created to hold the configuration changes.
Note
The build system applies the configurations from the defconfig
file before applying any subsequent configuration fragments. The
final kernel configuration is a combination of the configurations in
the defconfig file and any configuration fragments you provide. You need
to realize that if you have any configuration fragments, the build system
applies these on top of and after applying the existing defconfig file
configurations.
For more information on configuring the kernel, see the “Changing the Configuration” section.
2.6.3 Creating Configuration Fragments
Configuration fragments are simply kernel options that appear in a file
placed where the OpenEmbedded build system can find and apply them. The
build system applies configuration fragments after applying
configurations from a defconfig file. Thus, the final kernel
configuration is a combination of the configurations in the
defconfig file and then any configuration fragments you provide. The
build system applies fragments on top of and after applying the existing
defconfig file configurations.
Syntactically, the configuration statement is identical to what would
appear in the .config file, which is in the Build Directory.
Note
For more information about where the .config file is located, see the
example in the
“Using menuconfig”
section.
It is simple to create a configuration fragment. One method is to use
shell commands. For example, issuing the following from the shell
creates a configuration fragment file named my_changes.cfg that enables
multi-processor support within the kernel and disables the FPGA
Configuration Framework:
$ echo "CONFIG_SMP=y" >> my_changes.cfg
$ echo "# CONFIG_FPGA is not set" >> my_changes.cfg
Note
All configuration fragment files must use the .cfg extension in order
for the OpenEmbedded build system to recognize them as a configuration
fragment.
Another method is to create a configuration fragment using the
differences between two configuration files: one previously created and
saved, and one freshly created using the menuconfig tool.
To create a configuration fragment using this method, follow these steps:
Complete a Build Through Kernel Configuration: Complete a build at least through the kernel configuration task as follows:
$ bitbake linux-yocto -c kernel_configme -f
This step ensures that you create a
.configfile from a known state. Because there are situations where your build state might become unknown, it is best to run this task prior to startingmenuconfig.Launch menuconfig: Run the
menuconfigcommand:$ bitbake linux-yocto -c menuconfig
Create the Configuration Fragment: Run the
diffconfigcommand to prepare a configuration fragment. The resulting filefragment.cfgis placed in the${WORKDIR}directory:$ bitbake linux-yocto -c diffconfig
The diffconfig command creates a file that is a list of Linux kernel
CONFIG_ assignments. See the
“Changing the Configuration” section for additional
information on how to use the output as a configuration fragment.
Note
You can also use this method to create configuration fragments for a BSP. See the “BSP Descriptions” section for more information.
Where do you put your configuration fragment files? You can place these
files in an area pointed to by
SRC_URI as directed by your
bblayers.conf file, which is located in your layer. The OpenEmbedded
build system picks up the configuration and adds it to the kernel’s
configuration. For example, suppose you had a set of configuration
options in a file called myconfig.cfg. If you put that file inside a
directory named linux-yocto that resides in the same directory as
the kernel’s append file within your layer and then add the following
statements to the kernel’s append file, those configuration options will
be picked up and applied when the kernel is built:
FILESEXTRAPATHS:prepend := "${THISDIR}/${PN}:"
SRC_URI += "file://myconfig.cfg"
As mentioned earlier, you can group related configurations into multiple files and name them all in the SRC_URI statement as well. For example, you could group separate configurations specifically for Ethernet and graphics into their own files and add those by using a SRC_URI statement like the following in your append file:
SRC_URI += "file://myconfig.cfg \
file://eth.cfg \
file://gfx.cfg"
2.6.4 Validating Configuration
You can use the do_kernel_configcheck task to provide configuration validation:
$ bitbake linux-yocto -c kernel_configcheck -f
Running this task produces warnings for when a
requested configuration does not appear in the final .config file or
when you override a policy configuration in a hardware configuration
fragment.
In order to run this task, you must have an existing .config file.
See the “Using menuconfig” section for
information on how to create a configuration file.
Here is sample output from the do_kernel_configcheck task:
Loading cache: 100% |########################################################| Time: 0:00:00
Loaded 1275 entries from dependency cache.
NOTE: Resolving any missing task queue dependencies
Build Configuration:
.
.
.
NOTE: Executing SetScene Tasks
NOTE: Executing RunQueue Tasks
WARNING: linux-yocto-4.12.12+gitAUTOINC+eda4d18ce4_16de014967-r0 do_kernel_configcheck:
[kernel config]: specified values did not make it into the kernel's final configuration:
---------- CONFIG_X86_TSC -----------------
Config: CONFIG_X86_TSC
From: /home/scottrif/bitbake-builds/build/tmp/work-shared/qemux86/kernel-source/.kernel-meta/configs/standard/bsp/common-pc/common-pc-cpu.cfg
Requested value: CONFIG_X86_TSC=y
Actual value:
---------- CONFIG_X86_BIGSMP -----------------
Config: CONFIG_X86_BIGSMP
From: /home/scottrif/bitbake-builds/build/tmp/work-shared/qemux86/kernel-source/.kernel-meta/configs/standard/cfg/smp.cfg
/home/scottrif/bitbake-builds/build/tmp/work-shared/qemux86/kernel-source/.kernel-meta/configs/standard/defconfig
Requested value: # CONFIG_X86_BIGSMP is not set
Actual value:
---------- CONFIG_NR_CPUS -----------------
Config: CONFIG_NR_CPUS
From: /home/scottrif/bitbake-builds/build/tmp/work-shared/qemux86/kernel-source/.kernel-meta/configs/standard/cfg/smp.cfg
/home/scottrif/bitbake-builds/build/tmp/work-shared/qemux86/kernel-source/.kernel-meta/configs/standard/bsp/common-pc/common-pc.cfg
/home/scottrif/bitbake-builds/build/tmp/work-shared/qemux86/kernel-source/.kernel-meta/configs/standard/defconfig
Requested value: CONFIG_NR_CPUS=8
Actual value: CONFIG_NR_CPUS=1
---------- CONFIG_SCHED_SMT -----------------
Config: CONFIG_SCHED_SMT
From: /home/scottrif/bitbake-builds/build/tmp/work-shared/qemux86/kernel-source/.kernel-meta/configs/standard/cfg/smp.cfg
/home/scottrif/bitbake-builds/build/tmp/work-shared/qemux86/kernel-source/.kernel-meta/configs/standard/defconfig
Requested value: CONFIG_SCHED_SMT=y
Actual value:
NOTE: Tasks Summary: Attempted 288 tasks of which 285 didn't need to be rerun and all succeeded.
Summary: There were 3 WARNING messages shown.
Note
The previous output example has artificial line breaks to make it more readable.
The output describes the various problems that you can encounter along with where to find the offending configuration items. You can use the information in the logs to adjust your configuration files and then repeat the do_kernel_configme and do_kernel_configcheck tasks until they produce no warnings.
For more information on how to use the menuconfig tool, see the
Using menuconfig section.
2.6.5 Fine-Tuning the Kernel Configuration File
You can make sure the .config file is as lean or efficient as
possible by reading the output of the kernel configuration fragment
audit, noting any issues, making changes to correct the issues, and then
repeating.
As part of the kernel build process, the do_kernel_configcheck task
runs. This task validates the kernel configuration by checking the final
.config file against the input files. During the check, the task
produces warning messages for the following issues:
Requested options that did not make it into the final
.configfile.Configuration items that appear twice in the same configuration fragment.
Configuration items tagged as “required” that were overridden.
A board overrides a non-board specific option.
Listed options not valid for the kernel being processed. In other words, the option does not appear anywhere.
Note
The do_kernel_configcheck task can also optionally report if an option is overridden during processing.
For each output warning, a message points to the file that contains a list of the options and a pointer to the configuration fragment that defines them. Collectively, the files are the key to streamlining the configuration.
To streamline the configuration, do the following:
Use a Working Configuration: Start with a full configuration that you know works. Be sure the configuration builds and boots successfully. Use this configuration file as your baseline.
Run Configure and Check Tasks: Separately run the do_kernel_configme and do_kernel_configcheck tasks:
$ bitbake linux-yocto -c kernel_configme -f $ bitbake linux-yocto -c kernel_configcheck -f
Process the Results: Take the resulting list of files from the do_kernel_configcheck task warnings and do the following:
Drop values that are redefined in the fragment but do not change the final
.configfile.Analyze and potentially drop values from the
.configfile that override required configurations.Analyze and potentially remove non-board specific options.
Remove repeated and invalid options.
Re-Run Configure and Check Tasks: After you have worked through the output of the kernel configuration audit, you can re-run the do_kernel_configme and do_kernel_configcheck tasks to see the results of your changes. If you have more issues, you can deal with them as described in the previous step.
Iteratively working through steps two through four eventually yields a
minimal, streamlined configuration file. Once you have the best
.config, you can build the Linux Yocto kernel.
2.7 Expanding Variables
Sometimes it is helpful to determine what a variable expands to during a
build. You can examine the value of a variable by running the bitbake-getvar
command:
$ bitbake-getvar -r virtual/kernel VARIABLE
The output of the command explains exactly how the variable is expanded and used by the OpenEmbedded Build System.
2.8 Working with a “Dirty” Kernel Version String
If you build a kernel image and the version string has a “+” or a “-dirty” at the end, it means there are uncommitted modifications in the kernel’s source directory. Follow these steps to clean up the version string:
Discover the Uncommitted Changes: Go to the kernel’s locally cloned Git repository (source directory) and use the following Git command to list the files that have been changed, added, or removed:
$ git status
Commit the Changes: You should commit those changes to the kernel source tree regardless of whether or not you will save, export, or use the changes:
$ git add $ git commit -s -a -m "getting rid of -dirty"
Rebuild the Kernel Image: Once you commit the changes, rebuild the kernel.
Depending on your particular kernel development workflow, the commands you use to rebuild the kernel might differ. For information on building the kernel image when using
devtool, see the “Using devtool to Patch the Kernel” section. For information on building the kernel image when using BitBake, see the “Using Traditional Kernel Development to Patch the Kernel” section.
2.9 Working With Your Own Sources
If you cannot work with one of the Linux kernel versions supported by existing linux-yocto recipes, you can still make use of the Yocto Project Linux kernel tooling by working with your own sources. When you use your own sources, you will not be able to leverage the existing kernel Metadata and stabilization work of the linux-yocto sources. However, you will be able to manage your own Metadata in the same format as the linux-yocto sources. Maintaining format compatibility facilitates converging with linux-yocto on a future, mutually-supported kernel version.
To help you use your own sources, the Yocto Project provides a
linux-yocto custom recipe
that uses kernel.org sources and the Yocto Project Linux kernel tools for
managing kernel Metadata.
Here are some basic steps you can use to work with your own sources:
Create a Copy of the Kernel Recipe: Copy the
linux-yocto-custom.bbrecipe to your layer and give it a meaningful name. The name should include the version of the Yocto Linux kernel you are using (e.g.linux-yocto-myproject_4.12.bb, where “4.12” is the base version of the Linux kernel with which you would be working).Create a Directory for Your Patches: In the same directory inside your layer, create a matching directory to store your patches and configuration files (e.g.
linux-yocto-myproject).Ensure You Have Configurations: Make sure you have either a
defconfigfile or configuration fragment files in your layer. When you use thelinux-yocto-custom.bbrecipe, you must specify a configuration. If you do not have adefconfigfile, you can run the following:$ make defconfig
After running the command, copy the resulting
.configfile to thefilesdirectory in your layer as “defconfig” and then add it to the SRC_URI variable in the recipe.Running the
make defconfigcommand results in the default configuration for your architecture as defined by your kernel. However, there is no guarantee that this configuration is valid for your use case, or that your board will even boot. This is particularly true for non-x86 architectures.To use non-x86
defconfigfiles, you need to be more specific and find one that matches your board (i.e. for arm, you look inarch/arm/configsand use the one that is the best starting point for your board).Edit the Recipe: Edit the following variables in your recipe as appropriate for your project:
SRC_URI: The SRC_URI should specify a Git repository that uses one of the supported Git fetcher protocols (i.e.
file,git,http, and so forth). The SRC_URI variable should also specify either adefconfigfile or some configuration fragment files. The skeleton recipe provides an example SRC_URI as a syntax reference.LINUX_VERSION: The Linux kernel version you are using (e.g. “4.12”).
LINUX_VERSION_EXTENSION: The Linux kernel
CONFIG_LOCALVERSIONthat is compiled into the resulting kernel and visible through theunamecommand.SRCREV: The commit ID from which you want to build.
PR: Treat this variable the same as you would in any other recipe. Increment the variable to indicate to the OpenEmbedded build system that the recipe has changed.
PV: The default PV assignment is typically adequate. It combines the value of LINUX_VERSION and the value
+gitwhich adds source control information to PKGV later during the packaging phase.COMPATIBLE_MACHINE: A list of the machines supported by your new recipe. This variable in the example recipe is set by default to a regular expression that matches only the empty string, “(^$)”. This default setting triggers an explicit build failure. You must change it to match a list of the machines that your new recipe supports. For example, to support the
qemux86andqemux86-64machines, use the following form:COMPATIBLE_MACHINE = "qemux86|qemux86-64"
Customize Your Recipe as Needed: Provide further customizations to your recipe as needed just as you would customize an existing linux-yocto recipe. See the “Modifying an Existing Recipe” section for information.
2.10 Working with Out-of-Tree Modules
This section describes steps to build out-of-tree modules on your target and describes how to incorporate out-of-tree modules in the build.
2.10.1 Building Out-of-Tree Modules on the Target
While the traditional Yocto Project development model would be to include kernel modules as part of the normal build process, you might find it useful to build modules on the target. This could be the case if your target system is capable and powerful enough to handle the necessary compilation. Before deciding to build on your target, however, you should consider the benefits of using a proper cross-development environment from your build host.
If you want to be able to build out-of-tree modules on the target, there
are some steps you need to take on the target that is running your SDK
image. Briefly, the kernel-dev package is installed by default on
all *.sdk images and the kernel-devsrc package is installed on
many of the *.sdk images. However, you need to create some scripts
prior to attempting to build the out-of-tree modules on the target that
is running that image.
Prior to attempting to build the out-of-tree modules, you need to be on
the target as root and you need to change to the /usr/src/kernel
directory. Next, make the scripts:
# cd /usr/src/kernel
# make scripts
Because all SDK image recipes include dev-pkgs, the
kernel-dev packages will be installed as part of the SDK image and
the kernel-devsrc packages will be installed as part of applicable
SDK images. The SDK uses the scripts when building out-of-tree modules.
Once you have switched to that directory and created the scripts, you
should be able to build your out-of-tree modules on the target.
2.10.2 Incorporating Out-of-Tree Modules
While it is always preferable to work with sources integrated into the Linux kernel sources, if you need an external kernel module, the hello-mod recipe is available as a template from which you can create your own out-of-tree Linux kernel module recipe.
To get started, copy this recipe to your layer and give it a meaningful
name (e.g. mymodule_1.0.bb). In the same directory, create a new
directory named files where you can store any source files, patches,
or other files necessary for building the module that do not come with
the sources. Finally, update the recipe as needed for the module.
Typically, you will need to set the following variables:
Depending on the build system used by the module sources, you might need
to make some adjustments. For example, a typical module Makefile
looks much like the one provided with the hello-mod template:
obj-m := hello.o
SRC := $(shell pwd)
all:
$(MAKE) -C $(KERNEL_SRC) M=$(SRC)
modules_install:
$(MAKE) -C $(KERNEL_SRC) M=$(SRC) modules_install
...
The important point to note here is the KERNEL_SRC variable. The
module class sets this variable and the KERNEL_PATH
variable to ${STAGING_KERNEL_DIR} with the necessary Linux kernel build
information to build modules. If your module Makefile uses a different
variable, you might want to override the do_compile step, or
create a patch to the Makefile to work with the more typical
KERNEL_SRC or KERNEL_PATH variables.
After you have prepared your recipe, you will likely want to include the module in your images. To do this, see the documentation for the following variables in the Yocto Project Reference Manual and set one of them appropriately for your machine configuration file:
Modules are often not required for boot and can be excluded from certain build configurations. The following allows for the most flexibility:
MACHINE_EXTRA_RRECOMMENDS += "kernel-module-mymodule"
The value is
derived by appending the module filename without the .ko extension
to the string “kernel-module-“.
Because the variable is RRECOMMENDS and not a RDEPENDS variable, the build will not fail if this module is not available to include in the image.
2.11 Inspecting Changes and Commits
A common question when working with a kernel is: “What changes have been applied to this tree?” Rather than using “grep” across directories to see what has changed, you can use Git to inspect or search the kernel tree. Using Git is an efficient way to see what has changed in the tree.
2.11.1 What Changed in a Kernel?
Here are a few examples that show how to use Git commands to examine changes. These examples are by no means the only way to see changes.
Note
In the following examples, unless you provide a commit range, kernel.org
history is blended with Yocto Project kernel changes. You can form
ranges by using branch names from the kernel tree as the upper and
lower commit markers with the Git commands. You can see the branch
names through the web interface to the Yocto Project source
repositories at https://git.yoctoproject.org/.
To see a full range of the changes, use the git whatchanged command
and specify a commit range for the branch (commit..commit).
Here is an example that looks at what has changed in the emenlow
branch of the linux-yocto-3.19 kernel. The lower commit range is the
commit associated with the standard/base branch, while the upper
commit range is the commit associated with the standard/emenlow
branch:
$ git whatchanged origin/standard/base..origin/standard/emenlow
To see short, one line summaries of changes use the git log command:
$ git log --oneline origin/standard/base..origin/standard/emenlow
Use this command to see code differences for the changes:
$ git diff origin/standard/base..origin/standard/emenlow
Use this command to see the commit log messages and the text differences:
$ git show origin/standard/base..origin/standard/emenlow
Use this command to create individual patches for each change. Here is
an example that creates patch files for each commit and places them
in your Documents directory:
$ git format-patch -o $HOME/Documents origin/standard/base..origin/standard/emenlow
2.11.2 Showing a Particular Feature or Branch Change
Tags in the Yocto Project kernel tree divide changes for significant
features or branches. The git show tag command shows changes based
on a tag. Here is an example that shows systemtap changes:
$ git show systemtap
You can use the git branch --contains tag command to
show the branches that contain a particular feature. This command shows
the branches that contain the systemtap feature:
$ git branch --contains systemtap
2.12 Adding Recipe-Space Kernel Features
You can add kernel features in the
recipe-space
by using the KERNEL_FEATURES
variable and by specifying the feature’s .scc file path in the
SRC_URI statement. When you
add features using this method, the OpenEmbedded build system checks to
be sure the features are present. If the features are not present, the
build stops. Kernel features are the last elements processed for
configuring and patching the kernel. Therefore, adding features in this
manner is a way to enforce specific features are present and enabled
without needing to do a full audit of any other layer’s additions to the
SRC_URI statement.
You add a kernel feature by providing the feature as part of the
KERNEL_FEATURES variable and by providing the path to the feature’s
.scc file, which is relative to the root of the kernel Metadata. The
OpenEmbedded build system searches all forms of kernel Metadata on the
SRC_URI statement regardless of whether the Metadata is in the
“kernel-cache”, system kernel Metadata, or a recipe-space Metadata (i.e.
part of the kernel recipe). See the
“Kernel Metadata Location” section for
additional information.
When you specify the feature’s .scc file on the SRC_URI
statement, the OpenEmbedded build system adds the directory of that
.scc file along with all its subdirectories to the kernel feature
search path. Because subdirectories are searched, you can reference a
single .scc file in the SRC_URI statement to reference multiple
kernel features.
Consider the following example that adds the “test.scc” feature to the build.
Create the Feature File: Create a
.sccfile and locate it just as you would any other patch file,.cfgfile, or fetcher item you specify in the SRC_URI statement.Note
You must add the directory of the
.sccfile to the fetcher’s search path in the same manner as you would add a.patchfile.You can create additional
.sccfiles beneath the directory that contains the file you are adding. All subdirectories are searched during the build as potential feature directories.
Continuing with the example, suppose the “test.scc” feature you are adding has a
test.sccfile in the following directory:my_recipe | +-linux-yocto | +-test.cfg +-test.scc
In this example, the
linux-yoctodirectory has both the featuretest.sccfile and a similarly named configuration fragment filetest.cfg.Add the Feature File to SRC_URI: Add the
.sccfile to the recipe’s SRC_URI statement:SRC_URI += "file://test.scc"
The leading space before the path is important as the path is appended to the existing path.
Specify the Feature as a Kernel Feature: Use the KERNEL_FEATURES statement to specify the feature as a kernel feature:
KERNEL_FEATURES += "test.scc"
The OpenEmbedded build system processes the kernel feature when it builds the kernel.
Note
If other features are contained below “test.scc”, then their directories are relative to the directory containing the
test.sccfile.
3 Working with Advanced Metadata (yocto-kernel-cache)
3.1 Overview
In addition to supporting configuration fragments and patches, the Yocto Project kernel tools also support rich Metadata that you can use to define complex policies and Board Support Package (BSP) support. The purpose of the Metadata and the tools that manage it is to help you manage the complexity of the configuration and sources used to support multiple BSPs and Linux kernel types.
Kernel Metadata exists in many places. One area in the
Yocto Project Source Repositories
is the yocto-kernel-cache Git repository. You can find this repository
grouped under the “Yocto Linux Kernel” heading in the
Yocto Project Source Repositories.
Kernel development tools (“kern-tools”) are also available in the Yocto Project
Source Repositories under the “Yocto Linux Kernel” heading in the
yocto-kernel-tools Git repository. The recipe that builds these
tools is recipes-kernel/kern-tools/kern-tools-native_git.bb in
OpenEmbedded-Core (OE-Core).
3.2 Using Kernel Metadata in a Recipe
As mentioned in the introduction, the Yocto Project contains kernel
Metadata, which is located in the yocto-kernel-cache Git repository.
This Metadata defines Board Support Packages (BSPs) that correspond to
definitions in linux-yocto recipes for corresponding BSPs. A BSP
consists of an aggregation of kernel policy and enabled
hardware-specific features. The BSP can be influenced from within the
linux-yocto recipe.
Note
A Linux kernel recipe that contains kernel Metadata (e.g. inherits
from the linux-yocto.inc file) is said to be a “linux-yocto style” recipe.
Every linux-yocto style recipe must define the KMACHINE variable. This variable is typically set to the same value as the MACHINE variable, which is used by BitBake. However, in some cases, the variable might instead refer to the underlying platform of the MACHINE.
Multiple BSPs can reuse the same KMACHINE name if they are built using the same BSP description. Multiple Corei7-based BSPs could share the same “intel-corei7-64” value for KMACHINE. It is important to realize that KMACHINE is just for kernel mapping, while MACHINE is the machine type within a BSP Layer. Even with this distinction, however, these two variables can hold the same value. See the “BSP Descriptions” section for more information.
Every linux-yocto style recipe must also indicate the Linux kernel source repository branch used to build the Linux kernel. The KBRANCH variable must be set to indicate the branch.
Note
You can use the KBRANCH value to define an alternate branch typically
with a machine override as shown here from the meta-yocto-bsp layer:
KBRANCH:beaglebone-yocto = "standard/beaglebone"
The linux-yocto style recipes can optionally define the following variables:
LINUX_KERNEL_TYPE defines the kernel type to be used in assembling the configuration. If you do not specify a LINUX_KERNEL_TYPE, it defaults to “standard”. Together with KMACHINE, LINUX_KERNEL_TYPE defines the search arguments used by the kernel tools to find the appropriate description within the kernel Metadata with which to build out the sources and configuration. The linux-yocto recipes define “standard”, “tiny”, and “preempt-rt” kernel types. See the “Kernel Types” section for more information on kernel types.
During the build, the kern-tools search for the BSP description file that most closely matches the KMACHINE and LINUX_KERNEL_TYPE variables passed in from the recipe. The tools use the first BSP description they find that matches both variables. If the tools cannot find a match, they issue a warning.
The tools first search for the KMACHINE and then for the LINUX_KERNEL_TYPE. If the tools cannot find a partial match, they will use the sources from the KBRANCH and any configuration specified in the SRC_URI.
You can use the KERNEL_FEATURES variable to include features (configuration fragments, patches, or both) that are not already included by the KMACHINE and LINUX_KERNEL_TYPE variable combination. For example, to include a feature specified as “features/netfilter/netfilter.scc”, specify:
KERNEL_FEATURES += "features/netfilter/netfilter.scc"
To include a
feature called “cfg/sound.scc” just for the qemux86 machine,
specify:
KERNEL_FEATURES:append:qemux86 = " cfg/sound.scc"
The value of
the entries in KERNEL_FEATURES are dependent on their location
within the kernel Metadata itself. The examples here are taken from the
yocto-kernel-cache repository. Each branch of this repository
contains “features” and “cfg” subdirectories at the top-level. For more
information, see the “Kernel Metadata Syntax”
section.
3.3 Kernel Metadata Syntax
The kernel Metadata consists of three primary types of files: scc
[1] description files, configuration fragments, and patches. The
scc files define variables and include or otherwise reference any of
the three file types. The description files are used to aggregate all
types of kernel Metadata into what ultimately describes the sources and
the configuration required to build a Linux kernel tailored to a
specific machine.
The scc description files are used to define two fundamental types
of kernel Metadata:
Features
Board Support Packages (BSPs)
Features aggregate sources in the form of patches and configuration fragments into a modular reusable unit. You can use features to implement conceptually separate kernel Metadata descriptions such as pure configuration fragments, simple patches, complex features, and kernel types. Kernel Types define general kernel features and policy to be reused in the BSPs.
BSPs define hardware-specific features and aggregate them with kernel types to form the final description of what will be assembled and built.
While the kernel Metadata syntax does not enforce any logical separation of configuration fragments, patches, features or kernel types, best practices dictate a logical separation of these types of Metadata. The following Metadata file hierarchy is recommended:
base/
bsp/
cfg/
features/
ktypes/
patches/
The bsp directory contains the BSP Descriptions.
The remaining directories all contain “features”. Separating bsp from the
rest of the structure aids conceptualizing intended usage.
Use these guidelines to help place your scc description files within
the structure:
If your file contains only configuration fragments, place the file in the
cfgdirectory.If your file contains only source-code fixes, place the file in the
patchesdirectory.If your file encapsulates a major feature, often combining sources and configurations, place the file in
featuresdirectory.If your file aggregates non-hardware configuration and patches in order to define a base kernel policy or major kernel type to be reused across multiple BSPs, place the file in
ktypesdirectory.
These distinctions can easily become blurred — especially as out-of-tree
features slowly merge upstream over time. Also, remember that how the
description files are placed is a purely logical organization and has no
impact on the functionality of the kernel Metadata. There is no impact
because all of cfg, features, patches, and ktypes,
contain “features” as far as the kernel tools are concerned.
Paths used in kernel Metadata files are relative to base, which is either FILESEXTRAPATHS if you are creating Metadata in recipe-space, or the top level of yocto-kernel-cache if you are creating Metadata Outside the Recipe-Space.
3.3.1 Configuration
The simplest unit of kernel Metadata is the configuration-only feature.
This feature consists of one or more Linux kernel configuration
parameters in a configuration fragment file (.cfg) and a .scc
file that describes the fragment.
As an example, consider the Symmetric Multi-Processing (SMP) fragment
used with the linux-yocto-4.12 kernel as defined outside of the
recipe space (i.e. yocto-kernel-cache). This Metadata consists of
two files: smp.scc and smp.cfg. You can find these files in the
cfg directory of the yocto-4.12 branch in the
yocto-kernel-cache Git repository:
cfg/smp.scc:
define KFEATURE_DESCRIPTION "Enable SMP for 32 bit builds"
define KFEATURE_COMPATIBILITY all
kconf hardware smp.cfg
cfg/smp.cfg:
CONFIG_SMP=y
CONFIG_SCHED_SMT=y
# Increase default NR_CPUS from 8 to 64 so that platform with
# more than 8 processors can be all activated at boot time
CONFIG_NR_CPUS=64
# The following is needed when setting NR_CPUS to something
# greater than 8 on x86 architectures, it should be automatically
# disregarded by Kconfig when using a different arch
CONFIG_X86_BIGSMP=y
You can find general information on configuration fragment files in the “Creating Configuration Fragments” section.
Within the smp.scc file, the
KFEATURE_DESCRIPTION
statement provides a short description of the fragment. Higher level
kernel tools use this description.
Also within the smp.scc file, the kconf command includes the
actual configuration fragment in an .scc file, and the “hardware”
keyword identifies the fragment as being hardware enabling, as opposed
to general policy, which would use the “non-hardware” keyword. The
distinction is made for the benefit of the configuration validation
tools, which warn you if a hardware fragment overrides a policy set by a
non-hardware fragment.
Note
The description file can include multiple kconf statements, one per
fragment.
As described in the “Validating Configuration” section, you can use the following BitBake command to audit your configuration:
$ bitbake linux-yocto -c kernel_configcheck -f
3.3.2 Patches
Patch descriptions are very similar to configuration fragment
descriptions, which are described in the previous section. However,
instead of a .cfg file, these descriptions work with source patches
(i.e. .patch files).
A typical patch includes a description file and the patch itself. As an
example, consider the build patches used with the linux-yocto-4.12
kernel as defined outside of the recipe space (i.e.
yocto-kernel-cache). This Metadata consists of several files:
build.scc and a set of *.patch files. You can find these files
in the patches/build directory of the yocto-4.12 branch in the
yocto-kernel-cache Git repository.
The following listings show the build.scc file and part of the
modpost-mask-trivial-warnings.patch file:
patches/build/build.scc:
patch arm-serialize-build-targets.patch
patch powerpc-serialize-image-targets.patch
patch kbuild-exclude-meta-directory-from-distclean-processi.patch
# applied by kgit
# patch kbuild-add-meta-files-to-the-ignore-li.patch
patch modpost-mask-trivial-warnings.patch
patch menuconfig-check-lxdiaglog.sh-Allow-specification-of.patch
patches/build/modpost-mask-trivial-warnings.patch:
From bd48931bc142bdd104668f3a062a1f22600aae61 Mon Sep 17 00:00:00 2001
From: Paul Gortmaker <paul.gortmaker@windriver.com>
Date: Sun, 25 Jan 2009 17:58:09 -0500
Subject: [PATCH] modpost: mask trivial warnings
Newer HOSTCC will complain about various stdio fcns because
.
.
.
char *dump_write = NULL, *files_source = NULL;
int opt;
--
2.10.1
generated by cgit v0.10.2 at 2017-09-28 15:23:23 (GMT)
The description file can
include multiple patch statements where each statement handles a single
patch. In the example build.scc file, there are five patch statements
for the five patches in the directory.
You can create a typical .patch file using diff -Nurp or
git format-patch commands. For information on how to create patches,
see the “Using devtool to Patch the Kernel”
and “Using Traditional Kernel Development to Patch the Kernel”
sections.
3.3.3 Features
Features are complex kernel Metadata types that consist of configuration fragments, patches, and possibly other feature description files. As an example, consider the following generic listing:
features/myfeature.scc
define KFEATURE_DESCRIPTION "Enable myfeature"
patch 0001-myfeature-core.patch
patch 0002-myfeature-interface.patch
include cfg/myfeature_dependency.scc
kconf non-hardware myfeature.cfg
This example shows how the patch and kconf commands are used as well
as how an additional feature description file is included with the
include command.
Typically, features are less granular than configuration fragments and are more likely than configuration fragments and patches to be the types of things you want to specify in the KERNEL_FEATURES variable of the Linux kernel recipe. See the “Using Kernel Metadata in a Recipe” section earlier in the manual.
3.3.4 Kernel Types
A kernel type defines a high-level kernel policy by aggregating non-hardware
configuration fragments with patches you want to use when building a Linux
kernel of a specific type (e.g. a real-time kernel). Syntactically, kernel
types are no different than features as described in the
“Features” section. The LINUX_KERNEL_TYPE
variable in the kernel recipe selects the kernel type. For example, in the
linux-yocto_4.12.bb kernel recipe found in meta/recipes-kernel/linux, a
require
directive includes the meta/recipes-kernel/linux/linux-yocto.inc file,
which has the following statement that defines the default kernel type:
LINUX_KERNEL_TYPE ??= "standard"
Another example would be the real-time kernel (i.e.
linux-yocto-rt_4.12.bb). This kernel recipe directly sets the kernel
type as follows:
LINUX_KERNEL_TYPE = "preempt-rt"
Note
You can find kernel recipes in the meta/recipes-kernel/linux directory
of the Yocto Project Source Repositories. See the
“Using Kernel Metadata in a Recipe”
section for more information.
Three kernel types (“standard”, “tiny”, and “preempt-rt”) are supported for Linux Yocto kernels:
“standard”: Includes the generic Linux kernel policy of the Yocto Project linux-yocto kernel recipes. This policy includes, among other things, which file systems, networking options, core kernel features, and debugging and tracing options are supported.
“preempt-rt”: Applies the
PREEMPT_RTpatches and the configuration options required to build a real-time Linux kernel. This kernel type inherits from the “standard” kernel type.“tiny”: Defines a bare minimum configuration meant to serve as a base for very small Linux kernels. The “tiny” kernel type is independent from the “standard” configuration. Although the “tiny” kernel type does not currently include any source changes, it might in the future.
For any given kernel type, the Metadata is defined by the .scc (e.g.
standard.scc). Here is a partial listing for the standard.scc
file, which is found in the ktypes/standard directory of the
yocto-kernel-cache Git repository:
# Include this kernel type fragment to get the standard features and
# configuration values.
# Note: if only the features are desired, but not the configuration
# then this should be included as:
# include ktypes/standard/standard.scc nocfg
# if no chained configuration is desired, include it as:
# include ktypes/standard/standard.scc nocfg inherit
include ktypes/base/base.scc
branch standard
kconf non-hardware standard.cfg
include features/kgdb/kgdb.scc
.
.
.
include cfg/net/ip6_nf.scc
include cfg/net/bridge.scc
include cfg/systemd.scc
include features/rfkill/rfkill.scc
As with any .scc file, a kernel type definition can aggregate other
.scc files with include commands. These definitions can also
directly pull in configuration fragments and patches with the kconf
and patch commands, respectively.
Note
It is not strictly necessary to create a kernel type .scc
file. The Board Support Package (BSP) file can implicitly define the
kernel type using a define KTYPE myktype line. See the
“BSP Descriptions” section for more
information.
3.3.5 BSP Descriptions
BSP descriptions (i.e. *.scc files) combine kernel types with
hardware-specific features. The hardware-specific Metadata is typically
defined independently in the BSP layer, and then aggregated with each
supported kernel type.
Note
For BSPs supported by the Yocto Project, the BSP description files
are located in the bsp directory of the yocto-kernel-cache
repository organized under the “Yocto Linux Kernel” heading in the
Yocto Project Source Repositories.
This section overviews the BSP description structure, the aggregation concepts, and presents a detailed example using a BSP supported by the Yocto Project (i.e. BeagleBone Board). For complete information on BSP layer file hierarchy, see the Yocto Project Board Support Package Developer’s Guide.
3.3.5.1 Description Overview
For simplicity, consider the following root BSP layer description files for the BeagleBone board. These files employ both a structure and naming convention for consistency. The naming convention for the file is as follows:
bsp_root_name-kernel_type.scc
Here are some example root layer BSP filenames for the BeagleBone Board BSP, which is supported by the Yocto Project:
beaglebone-standard.scc
beaglebone-preempt-rt.scc
Each file uses the root name (i.e “beaglebone”) BSP name followed by the kernel type.
Examine the beaglebone-standard.scc file:
define KMACHINE beaglebone
define KTYPE standard
define KARCH arm
include ktypes/standard/standard.scc
branch beaglebone
include beaglebone.scc
# default policy for standard kernels
include features/latencytop/latencytop.scc
include features/profiling/profiling.scc
Every top-level BSP description file should define the KMACHINE, KTYPE, and KARCH variables. These variables allow the OpenEmbedded build system to identify the description as meeting the criteria set by the recipe being built. This example supports the “beaglebone” machine for the “standard” kernel and the “arm” architecture.
Be aware that there is no hard link between the KTYPE variable and a kernel type description file. Thus, if you do not have the kernel type defined in your kernel Metadata as it is here, you only need to ensure that the LINUX_KERNEL_TYPE variable in the kernel recipe and the KTYPE variable in the BSP description file match.
To separate your kernel policy from your hardware configuration, you
include a kernel type (ktype), such as “standard”. In the previous
example, this is done using the following:
include ktypes/standard/standard.scc
This file aggregates all the configuration fragments, patches, and features that make up your standard kernel policy. See the “Kernel Types” section for more information.
To aggregate common configurations and features specific to the kernel for mybsp, use the following:
include mybsp.scc
You can see that in the BeagleBone example with the following:
include beaglebone.scc
For information on how to break a complete .config file into the various
configuration fragments, see the “Creating Configuration Fragments” section.
Finally, if you have any configurations specific to the hardware that
are not in a *.scc file, you can include them as follows:
kconf hardware mybsp-extra.cfg
The BeagleBone example does not include these
types of configurations. However, the Malta 32-bit board does
(“mti-malta32”). Here is the mti-malta32-le-standard.scc file:
define KMACHINE mti-malta32-le
define KMACHINE qemumipsel
define KTYPE standard
define KARCH mips
include ktypes/standard/standard.scc
branch mti-malta32
include mti-malta32.scc
kconf hardware mti-malta32-le.cfg
3.3.5.2 Example
Many real-world examples are more complex. Like any other .scc file,
BSP descriptions can aggregate features. Consider the Minnow BSP
definition given the linux-yocto-4.4 branch of the
yocto-kernel-cache (i.e. yocto-kernel-cache/bsp/minnow/minnow.scc):
include cfg/x86.scc
include features/eg20t/eg20t.scc
include cfg/dmaengine.scc
include features/power/intel.scc
include cfg/efi.scc
include features/usb/ehci-hcd.scc
include features/usb/ohci-hcd.scc
include features/usb/usb-gadgets.scc
include features/usb/touchscreen-composite.scc
include cfg/timer/hpet.scc
include features/leds/leds.scc
include features/spi/spidev.scc
include features/i2c/i2cdev.scc
include features/mei/mei-txe.scc
# Earlyprintk and port debug requires 8250
kconf hardware cfg/8250.cfg
kconf hardware minnow.cfg
kconf hardware minnow-dev.cfg
Note
Although the Minnow Board BSP is unused, the Metadata remains and is being used here just as an example.
The minnow.scc description file includes a hardware configuration
fragment (minnow.cfg) specific to the Minnow BSP as well as several
more general configuration fragments and features enabling hardware
found on the machine. This minnow.scc description file is then
included in each of the three “minnow” description files for the
supported kernel types (i.e. “standard”, “preempt-rt”, and “tiny”).
Consider the “minnow” description for the “standard” kernel type (i.e.
minnow-standard.scc):
define KMACHINE minnow
define KTYPE standard
define KARCH i386
include ktypes/standard
include minnow.scc
# Extra minnow configs above the minimal defined in minnow.scc
include cfg/efi-ext.scc
include features/media/media-all.scc
include features/sound/snd_hda_intel.scc
# The following should really be in standard.scc
# USB live-image support
include cfg/usb-mass-storage.scc
include cfg/boot-live.scc
# Basic profiling
include features/latencytop/latencytop.scc
include features/profiling/profiling.scc
# Requested drivers that don't have an existing scc
kconf hardware minnow-drivers-extra.cfg
The include command midway through the file includes the minnow.scc description
that defines all enabled hardware for the BSP that is common to all
kernel types. Using this command significantly reduces duplication.
Now consider the “minnow” description for the “tiny” kernel type (i.e.
minnow-tiny.scc):
define KMACHINE minnow
define KTYPE tiny
define KARCH i386
include ktypes/tiny
include minnow.scc
As you might expect, the “tiny” description includes quite a bit less. In fact, it includes only the minimal policy defined by the “tiny” kernel type and the hardware-specific configuration required for booting the machine along with the most basic functionality of the system as defined in the base “minnow” description file.
Notice again the three critical variables: KMACHINE, KTYPE, and KARCH. Of these variables, only KTYPE has changed to specify the “tiny” kernel type.
3.4 Kernel Metadata Location
Kernel Metadata always exists outside of the kernel tree either defined in a kernel recipe (recipe-space) or outside of the recipe. Where you choose to define the Metadata depends on what you want to do and how you intend to work. Regardless of where you define the kernel Metadata, the syntax used applies equally.
If you are unfamiliar with the Linux kernel and only wish to apply a configuration and possibly a couple of patches provided to you by others, the recipe-space method is recommended. This method is also a good approach if you are working with Linux kernel sources you do not control or if you just do not want to maintain a Linux kernel Git repository on your own. For partial information on how you can define kernel Metadata in the recipe-space, see the “Modifying an Existing Recipe” section.
Conversely, if you are actively developing a kernel and are already maintaining a Linux kernel Git repository of your own, you might find it more convenient to work with kernel Metadata kept outside the recipe-space. Working with Metadata in this area can make iterative development of the Linux kernel more efficient outside of the BitBake environment.
3.4.1 Recipe-Space Metadata
When stored in recipe-space, the kernel Metadata files reside in a
directory hierarchy below FILESEXTRAPATHS. For
a linux-yocto recipe or for a Linux kernel recipe derived by copying
meta-skeleton/recipes-kernel/linux/linux-yocto-custom.bb
into your layer and modifying it, FILESEXTRAPATHS is typically set to
${THISDIR}/${PN}.
See the “Modifying an Existing Recipe”
section for more information.
Here is an example that shows a trivial tree of kernel Metadata stored in recipe-space within a BSP layer:
meta-my_bsp_layer/
`-- recipes-kernel
`-- linux
`-- linux-yocto
|-- bsp-standard.scc
|-- bsp.cfg
`-- standard.cfg
When the Metadata is stored in recipe-space, you must take steps to
ensure BitBake has the necessary information to decide what files to
fetch and when they need to be fetched again. It is only necessary to
specify the .scc files on the
SRC_URI. BitBake parses them
and fetches any files referenced in the .scc files by the
include, patch, or kconf commands. Because of this, it is
necessary to bump the recipe PR
value when changing the content of files not explicitly listed in the
SRC_URI.
If the BSP description is in recipe space, you cannot simply list the
*.scc in the SRC_URI statement. You need to use the following
form from your kernel append file:
SRC_URI:append:myplatform = " \
file://myplatform;type=kmeta;destsuffix=myplatform \
"
3.4.2 Metadata Outside the Recipe-Space
When stored outside of the recipe-space, the kernel Metadata files
reside in a separate repository. The OpenEmbedded build system adds the
Metadata to the build as a “type=kmeta” repository through the
SRC_URI variable. As an
example, consider the following SRC_URI statement from the
linux-yocto_5.15.bb kernel recipe:
SRC_URI = "git://git.yoctoproject.org/linux-yocto.git;name=machine;branch=${KBRANCH};protocol=https \
git://git.yoctoproject.org/yocto-kernel-cache;type=kmeta;name=meta;branch=yocto-5.15;destsuffix=${KMETA};protocol=https"
${KMETA}, in this context, is simply used to name the directory into
which the Git fetcher places the Metadata. This behavior is no different
than any multi-repository SRC_URI statement used in a recipe (e.g.
see the previous section).
You can keep kernel Metadata in a “kernel-cache”, which is a directory containing configuration fragments. As with any Metadata kept outside the recipe-space, you simply need to use the SRC_URI statement with the “type=kmeta” attribute. Doing so makes the kernel Metadata available during the configuration phase.
If you modify the Metadata, you must not forget to update the SRCREV
statements in the kernel’s recipe. In particular, you need to update the
SRCREV_meta variable to match the commit in the KMETA branch you
wish to use. Changing the data in these branches and not updating the
SRCREV statements to match will cause the build to fetch an older
commit.
3.5 Organizing Your Source
Many recipes based on the linux-yocto-custom.bb recipe use Linux
kernel sources that have only a single branch. This type of
repository structure is fine for linear development supporting a single
machine and architecture. However, if you work with multiple boards and
architectures, a kernel source repository with multiple branches is more
efficient. For example, suppose you need a series of patches for one
board to boot. Sometimes, these patches are works-in-progress or
fundamentally wrong, yet they are still necessary for specific boards.
In these situations, you most likely do not want to include these
patches in every kernel you build (i.e. have the patches as part of the
default branch). It is situations like these that give rise to
multiple branches used within a Linux kernel sources Git repository.
Here are repository organization strategies maximizing source reuse, removing redundancy, and logically ordering your changes. This section presents strategies for the following cases:
Encapsulating patches in a feature description and only including the patches in the BSP descriptions of the applicable boards.
Creating a machine branch in your kernel source repository and applying the patches on that branch only.
Creating a feature branch in your kernel source repository and merging that branch into your BSP when needed.
The approach you take is entirely up to you and depends on what works best for your development model.
3.5.1 Encapsulating Patches
If you are reusing patches from an external tree and are not working on the patches, you might find the encapsulated feature to be appropriate. Given this scenario, you do not need to create any branches in the source repository. Rather, you just take the static patches you need and encapsulate them within a feature description. Once you have the feature description, you simply include that into the BSP description as described in the “BSP Descriptions” section.
You can find information on how to create patches and BSP descriptions in the “Patches” and “BSP Descriptions” sections.
3.5.2 Machine Branches
When you have multiple machines and architectures to support, or you are actively working on board support, it is more efficient to create branches in the repository based on individual machines. Having machine branches allows common source to remain in the development branch with any features specific to a machine stored in the appropriate machine branch. This organization method frees you from continually reintegrating your patches into a feature.
Once you have a new branch, you can set up your kernel Metadata to use the branch a couple different ways. In the recipe, you can specify the new branch as the KBRANCH to use for the board as follows:
KBRANCH = "mynewbranch"
Another method is to use the branch command in the BSP
description:
mybsp.scc:
define KMACHINE mybsp
define KTYPE standard
define KARCH i386
include standard.scc
branch mynewbranch
include mybsp-hw.scc
If you find yourself with numerous branches, you might consider using a hierarchical branching system similar to what the Yocto Linux Kernel Git repositories use:
common/kernel_type/machine
If you had two kernel types, “standard” and “small” for instance, three
machines, and common as mydir, the branches in your Git repository
might look like this:
mydir/base
mydir/standard/base
mydir/standard/machine_a
mydir/standard/machine_b
mydir/standard/machine_c
mydir/small/base
mydir/small/machine_a
This organization can help clarify the branch relationships. In this
case, mydir/standard/machine_a includes everything in mydir/base
and mydir/standard/base. The “standard” and “small” branches add
sources specific to those kernel types that for whatever reason are not
appropriate for the other branches.
Note
The “base” branches are an artifact of the way Git manages its data
internally on the filesystem: Git will not allow you to use
mydir/standard and mydir/standard/machine_a because it would have to
create a file and a directory named “standard”.
3.5.3 Feature Branches
When you are actively developing new features, it can be more efficient
to work with that feature as a branch, rather than as a set of patches
that have to be regularly updated. The Yocto Project Linux kernel tools
provide for this with the git merge command.
To merge a feature branch into a BSP, insert the git merge command
after any branch commands:
mybsp.scc:
define KMACHINE mybsp
define KTYPE standard
define KARCH i386
include standard.scc
branch mynewbranch
git merge myfeature
include mybsp-hw.scc
3.6 SCC Description File Reference
This section provides a brief reference for the commands you can use
within an SCC description file (.scc):
branch [ref]: Creates a new branch relative to the current branch (typically${KTYPE}) using the currently checked-out branch, or “ref” if specified.define: Defines variables, such as KMACHINE, KTYPE, KARCH, and KFEATURE_DESCRIPTION.include SCC_FILE: Includes an SCC file in the current file. The file is parsed as if you had inserted it inline.kconf [hardware|non-hardware] CFG_FILE: Queues a configuration fragment for merging into the final Linux.configfile.git merge GIT_BRANCH: Merges the feature branch into the current branch.patch PATCH_FILE: Applies the patch to the current Git branch.
4 Advanced Kernel Concepts
4.1 Yocto Project Kernel Development and Maintenance
Kernels available through the Yocto Project (Yocto Linux kernels), like
other kernels, are based off the Linux kernel releases from
https://www.kernel.org. At the beginning of a major Linux kernel
development cycle, the Yocto Project team chooses a Linux kernel based
on factors such as release timing, the anticipated release timing of
final upstream kernel.org versions, and Yocto Project feature
requirements. Typically, the Linux kernel chosen is in the final stages
of development by the Linux community. In other words, the Linux kernel
is in the release candidate or “rc” phase and has yet to reach final
release. But, by being in the final stages of external development, the
team knows that the kernel.org final release will clearly be within
the early stages of the Yocto Project development window.
This balance allows the Yocto Project team to deliver the most up-to-date Yocto Linux kernel possible, while still ensuring that the team has a stable official release for the baseline Linux kernel version.
As implied earlier, the ultimate source for Yocto Linux kernels are
released kernels from kernel.org. In addition to a foundational
kernel from kernel.org, the available Yocto Linux kernels contain a
mix of important new mainline developments, non-mainline developments
(when no alternative exists), Board Support Package (BSP) developments,
and custom features. These additions result in a commercially released
Yocto Project Linux kernel that caters to specific embedded designer
needs for targeted hardware.
You can find a web interface to the Yocto Linux kernels in the Yocto Project Source Repositories at https://git.yoctoproject.org/. If you look at the interface, you will see to the left a grouping of Git repositories titled “Yocto Linux Kernel”. Within this group, you will find several Linux Yocto kernels developed and included with Yocto Project releases:
linux-yocto-4.1: The stable Yocto Project kernel to use with the Yocto Project Release 2.0. This kernel is based on the Linux 4.1 released kernel.
linux-yocto-4.4: The stable Yocto Project kernel to use with the Yocto Project Release 2.1. This kernel is based on the Linux 4.4 released kernel.
linux-yocto-4.6: A temporary kernel that is not tied to any Yocto Project release.
linux-yocto-4.8: The stable yocto Project kernel to use with the Yocto Project Release 2.2.
linux-yocto-4.9: The stable Yocto Project kernel to use with the Yocto Project Release 2.3. This kernel is based on the Linux 4.9 released kernel.
linux-yocto-4.10: The default stable Yocto Project kernel to use with the Yocto Project Release 2.3. This kernel is based on the Linux 4.10 released kernel.
linux-yocto-4.12: The default stable Yocto Project kernel to use with the Yocto Project Release 2.4. This kernel is based on the Linux 4.12 released kernel.
yocto-kernel-cache: The
linux-yocto-cachecontains patches and configurations for the linux-yocto kernel tree. This repository is useful when working on the linux-yocto kernel. For more information on this “Advanced Kernel Metadata”, see the “Working with Advanced Metadata (yocto-kernel-cache)” Chapter.linux-yocto-dev: A development kernel based on the latest upstream release candidate available.
Once a Yocto Linux kernel is officially released, the Yocto Project team goes into their next development cycle, or upward revision (uprev) cycle, while still continuing maintenance on the released kernel. It is important to note that the most sustainable and stable way to include feature development upstream is through a kernel uprev process. Back-porting hundreds of individual fixes and minor features from various kernel versions is not sustainable and can easily compromise quality.
During the uprev cycle, the Yocto Project team uses an ongoing analysis
of Linux kernel development, BSP support, and release timing to select
the best possible kernel.org Linux kernel version on which to base
subsequent Yocto Linux kernel development. The team continually monitors
Linux community kernel development to look for significant features of
interest. The team does consider back-porting large features if they
have a significant advantage. User or community demand can also trigger
a back-port or creation of new functionality in the Yocto Project
baseline kernel during the uprev cycle.
Generally speaking, every new Linux kernel both adds features and introduces new bugs. These consequences are the basic properties of upstream Linux kernel development and are managed by the Yocto Project team’s Yocto Linux kernel development strategy. It is the Yocto Project team’s policy to not back-port minor features to the released Yocto Linux kernel. They only consider back-porting significant technological jumps — and, that is done after a complete gap analysis. The reason for this policy is that back-porting any small to medium sized change from an evolving Linux kernel can easily create mismatches, incompatibilities and very subtle errors.
The policies described in this section result in both a stable and a cutting edge Yocto Linux kernel that mixes forward ports of existing Linux kernel features and significant and critical new functionality. Forward porting Linux kernel functionality into the Yocto Linux kernels available through the Yocto Project can be thought of as a “micro uprev”. The many “micro uprevs” produce a Yocto Linux kernel version with a mix of important new mainline, non-mainline, BSP developments and feature integrations. This Yocto Linux kernel gives insight into new features and allows focused amounts of testing to be done on the kernel, which prevents surprises when selecting the next major uprev. The quality of these cutting edge Yocto Linux kernels is evolving and the kernels are used in leading edge feature and BSP development.
4.2 Yocto Linux Kernel Architecture and Branching Strategies
As mentioned earlier, a key goal of the Yocto Project is to present the
developer with a kernel that has a clear and continuous history that is
visible to the user. The architecture and mechanisms, in particular the
branching strategies, used achieve that goal in a manner similar to
upstream Linux kernel development in kernel.org.
You can think of a Yocto Linux kernel as consisting of a baseline Linux kernel with added features logically structured on top of the baseline. The features are tagged and organized by way of a branching strategy implemented by the Yocto Project team using the Source Code Manager (SCM) Git.
Note
Git is the obvious SCM for meeting the Yocto Linux kernel organizational and structural goals described in this section. Not only is Git the SCM for Linux kernel development in
kernel.orgbut, Git continues to grow in popularity and supports many different work flows, front-ends and management techniques.You can find documentation on Git at https://git-scm.com/doc. You can also get an introduction to Git as it applies to the Yocto Project in the “Git” section in the Yocto Project Overview and Concepts Manual. The latter reference provides an overview of Git and presents a minimal set of Git commands that allows you to be functional using Git. You can use as much, or as little, of what Git has to offer to accomplish what you need for your project. You do not have to be a “Git Expert” in order to use it with the Yocto Project.
Using Git’s tagging and branching features, the Yocto Project team creates kernel branches at points where functionality is no longer shared and thus, needs to be isolated. For example, board-specific incompatibilities would require different functionality and would require a branch to separate the features. Likewise, for specific kernel features, the same branching strategy is used.
This “tree-like” architecture results in a structure that has features organized to be specific for particular functionality, single kernel types, or a subset of kernel types. Thus, the user has the ability to see the added features and the commits that make up those features. In addition to being able to see added features, the user can also view the history of what made up the baseline Linux kernel.
Another consequence of this strategy results in not having to store the same feature twice internally in the tree. Rather, the kernel team stores the unique differences required to apply the feature onto the kernel type in question.
Note
The Yocto Project team strives to place features in the tree such that features can be shared by all boards and kernel types where possible. However, during development cycles or when large features are merged, the team cannot always follow this practice. In those cases, the team uses isolated branches to merge features.
BSP-specific code additions are handled in a similar manner to kernel-specific additions. Some BSPs only make sense given certain kernel types. So, for these types, the team creates branches off the end of that kernel type for all of the BSPs that are supported on that kernel type. From the perspective of the tools that create the BSP branch, the BSP is really no different than a feature. Consequently, the same branching strategy applies to BSPs as it does to kernel features. So again, rather than store the BSP twice, the team only stores the unique differences for the BSP across the supported multiple kernels.
While this strategy can result in a tree with a significant number of
branches, it is important to realize that from the developer’s point of
view, there is a linear path that travels from the baseline
kernel.org, through a select group of features and ends with their
BSP-specific commits. In other words, the divisions of the kernel are
transparent and are not relevant to the developer on a day-to-day basis.
From the developer’s perspective, this path is the development branch.
The developer does not need to be aware of the existence of
any other branches at all. Of course, it can make sense to have these
branches in the tree, should a person decide to explore them. For
example, a comparison between two BSPs at either the commit level or at
the line-by-line code diff level is now a trivial operation.
The following illustration shows the conceptual Yocto Linux kernel.
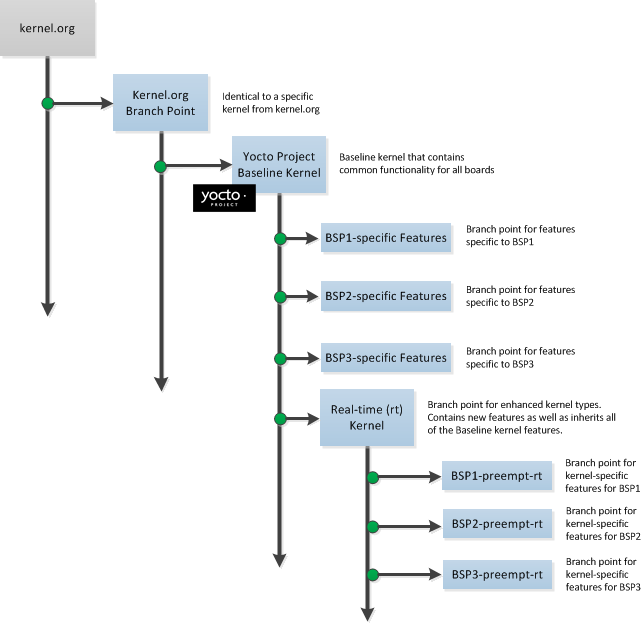
In the illustration, the “Kernel.org Branch Point” marks the specific spot (or Linux kernel release) from which the Yocto Linux kernel is created. From this point forward in the tree, features and differences are organized and tagged.
The “Yocto Project Baseline Kernel” contains functionality that is common to every kernel type and BSP that is organized further along in the tree. Placing these common features in the tree this way means features do not have to be duplicated along individual branches of the tree structure.
From the “Yocto Project Baseline Kernel”, branch points represent specific functionality for individual Board Support Packages (BSPs) as well as real-time kernels. The illustration represents this through three BSP-specific branches and a real-time kernel branch. Each branch represents some unique functionality for the BSP or for a real-time Yocto Linux kernel.
In this example structure, the “Real-time (rt) Kernel” branch has common features for all real-time Yocto Linux kernels and contains more branches for individual BSP-specific real-time kernels. The illustration shows three branches as an example. Each branch points the way to specific, unique features for a respective real-time kernel as they apply to a given BSP.
The resulting tree structure presents a clear path of markers (or branches) to the developer that, for all practical purposes, is the Yocto Linux kernel needed for any given set of requirements.
Note
Keep in mind the figure does not take into account all the supported Yocto Linux kernels, but rather shows a single generic kernel just for conceptual purposes. Also keep in mind that this structure represents the Yocto Project Source Repositories that are either pulled from during the build or established on the host development system prior to the build by either cloning a particular kernel’s Git repository or by downloading and unpacking a tarball.
Working with the kernel as a structured tree follows recognized community best practices. In particular, the kernel as shipped with the product, should be considered an “upstream source” and viewed as a series of historical and documented modifications (commits). These modifications represent the development and stabilization done by the Yocto Project kernel development team.
Because commits only change at significant release points in the product life cycle, developers can work on a branch created from the last relevant commit in the shipped Yocto Project Linux kernel. As mentioned previously, the structure is transparent to the developer because the kernel tree is left in this state after cloning and building the kernel.
4.3 Kernel Build File Hierarchy
Upstream storage of all the available kernel source code is one thing, while representing and using the code on your host development system is another. Conceptually, you can think of the kernel source repositories as all the source files necessary for all the supported Yocto Linux kernels. As a developer, you are just interested in the source files for the kernel on which you are working. And, furthermore, you need them available on your host system.
Kernel source code is available on your host system several different ways:
Files Accessed While using devtool:
devtool, which is available with the Yocto Project, is the preferred method by which to modify the kernel. See the “Kernel Modification Workflow” section.Cloned Repository: If you are working in the kernel all the time, you probably would want to set up your own local Git repository of the Yocto Linux kernel tree. For information on how to clone a Yocto Linux kernel Git repository, see the “Preparing the Build Host to Work on the Kernel” section.
Temporary Source Files from a Build: If you just need to make some patches to the kernel using a traditional BitBake workflow (i.e. not using the
devtool), you can access temporary kernel source files that were extracted and used during a kernel build.
The temporary kernel source files resulting from a build using BitBake have a particular hierarchy. When you build the kernel on your development system, all files needed for the build are taken from the source repositories pointed to by the SRC_URI variable and gathered in a temporary work area where they are subsequently used to create the unique kernel. Thus, in a sense, the process constructs a local source tree specific to your kernel from which to generate the new kernel image.
The following figure shows the temporary file structure created on your host system when you build the kernel using BitBake. This Build Directory contains all the source files used during the build.

Again, for additional information on the Yocto Project kernel’s architecture and its branching strategy, see the “Yocto Linux Kernel Architecture and Branching Strategies” section. You can also reference the “Using devtool to Patch the Kernel” and “Using Traditional Kernel Development to Patch the Kernel” sections for detailed example that modifies the kernel.
4.4 Determining Hardware and Non-Hardware Features for the Kernel Configuration Audit Phase
This section describes part of the kernel configuration audit phase that
most developers can ignore. For general information on kernel
configuration including menuconfig, defconfig files, and
configuration fragments, see the
“Configuring the Kernel” section.
During this part of the audit phase, the contents of the final
.config file are compared against the fragments specified by the
system. These fragments can be system fragments, distro fragments, or
user-specified configuration elements. Regardless of their origin, the
OpenEmbedded build system warns the user if a specific option is not
included in the final kernel configuration.
By default, in order to not overwhelm the user with configuration warnings, the system only reports missing “hardware” options as they could result in a boot failure or indicate that important hardware is not available.
To determine whether or not a given option is “hardware” or
“non-hardware”, the kernel Metadata in yocto-kernel-cache contains
files that classify individual or groups of options as either hardware
or non-hardware. To better show this, consider a situation where the
yocto-kernel-cache contains the following files:
yocto-kernel-cache/features/drm-psb/hardware.cfg
yocto-kernel-cache/features/kgdb/hardware.cfg
yocto-kernel-cache/ktypes/base/hardware.cfg
yocto-kernel-cache/bsp/mti-malta32/hardware.cfg
yocto-kernel-cache/bsp/qemu-ppc32/hardware.cfg
yocto-kernel-cache/bsp/qemuarma9/hardware.cfg
yocto-kernel-cache/bsp/mti-malta64/hardware.cfg
yocto-kernel-cache/bsp/arm-versatile-926ejs/hardware.cfg
yocto-kernel-cache/bsp/common-pc/hardware.cfg
yocto-kernel-cache/bsp/common-pc-64/hardware.cfg
yocto-kernel-cache/features/rfkill/non-hardware.cfg
yocto-kernel-cache/ktypes/base/non-hardware.cfg
yocto-kernel-cache/features/aufs/non-hardware.kcf
yocto-kernel-cache/features/ocf/non-hardware.kcf
yocto-kernel-cache/ktypes/base/non-hardware.kcf
yocto-kernel-cache/ktypes/base/hardware.kcf
yocto-kernel-cache/bsp/qemu-ppc32/hardware.kcf
Here are explanations for the various files:
hardware.kcf: Specifies a list of kernel Kconfig files that contain hardware options only.non-hardware.kcf: Specifies a list of kernel Kconfig files that contain non-hardware options only.hardware.cfg: Specifies a list of kernelCONFIG_options that are hardware, regardless of whether or not they are within a Kconfig file specified by a hardware or non-hardware Kconfig file (i.e.hardware.kcfornon-hardware.kcf).non-hardware.cfg: Specifies a list of kernelCONFIG_options that are not hardware, regardless of whether or not they are within a Kconfig file specified by a hardware or non-hardware Kconfig file (i.e.hardware.kcfornon-hardware.kcf).
Here is a specific example using the
kernel-cache/bsp/mti-malta32/hardware.cfg:
CONFIG_SERIAL_8250
CONFIG_SERIAL_8250_CONSOLE
CONFIG_SERIAL_8250_NR_UARTS
CONFIG_SERIAL_8250_PCI
CONFIG_SERIAL_CORE
CONFIG_SERIAL_CORE_CONSOLE
CONFIG_VGA_ARB
The kernel configuration audit automatically detects
these files (hence the names must be exactly the ones discussed here),
and uses them as inputs when generating warnings about the final
.config file.
A user-specified kernel Metadata repository, or recipe space feature,
can use these same files to classify options that are found within its
.cfg files as hardware or non-hardware, to prevent the OpenEmbedded
build system from producing an error or warning when an option is not in
the final .config file.
5 Kernel Maintenance
5.1 Tree Construction
This section describes construction of the Yocto Project kernel source
repositories as accomplished by the Yocto Project team to create Yocto
Linux kernel repositories. These kernel repositories are found under the
heading “Yocto Linux Kernel” at https://git.yoctoproject.org/ and
are shipped as part of a Yocto Project release. The team creates these
repositories by compiling and executing the set of feature descriptions
for every BSP and feature in the product. Those feature descriptions
list all necessary patches, configurations, branches, tags, and feature
divisions found in a Yocto Linux kernel. Thus, the Yocto Project Linux
kernel repository (or tree) and accompanying Metadata in the
yocto-kernel-cache are built.
The existence of these repositories allow you to access and clone a particular Yocto Project Linux kernel repository and use it to build images based on their configurations and features.
You can find the files used to describe all the valid features and BSPs
in the Yocto Project Linux kernel in any clone of the Yocto Project
Linux kernel source repository and yocto-kernel-cache Git trees. For
example, the following commands clone the Yocto Project baseline Linux
kernel that branches off linux.org version 4.12 and the
yocto-kernel-cache, which contains stores of kernel Metadata:
$ git clone git://git.yoctoproject.org/linux-yocto-4.12
$ git clone git://git.yoctoproject.org/linux-kernel-cache
For more information on how to set up a local Git repository of the Yocto Project Linux kernel files, see the “Preparing the Build Host to Work on the Kernel” section.
Once you have cloned the kernel Git repository and the cache of Metadata on your local machine, you can discover the branches that are available in the repository using the following Git command:
$ git branch -a
Checking out a branch allows you to work with a particular Yocto Linux
kernel. For example, the following commands check out the
“standard/beagleboard” branch of the Yocto Linux kernel repository and
the “yocto-4.12” branch of the yocto-kernel-cache repository:
$ cd ~/linux-yocto-4.12
$ git checkout -b my-kernel-4.12 remotes/origin/standard/beagleboard
$ cd ~/linux-kernel-cache
$ git checkout -b my-4.12-metadata remotes/origin/yocto-4.12
Note
Branches in the yocto-kernel-cache repository correspond to Yocto Linux
kernel versions (e.g. “yocto-4.12”, “yocto-4.10”, “yocto-4.9”, and so forth).
Once you have checked out and switched to appropriate branches, you can see a snapshot of all the kernel source files used to build that particular Yocto Linux kernel for a particular board.
To see the features and configurations for a particular Yocto Linux
kernel, you need to examine the yocto-kernel-cache Git repository.
As mentioned, branches in the yocto-kernel-cache repository
correspond to Yocto Linux kernel versions (e.g. yocto-4.12).
Branches contain descriptions in the form of .scc and .cfg
files.
You should realize, however, that browsing your local
yocto-kernel-cache repository for feature descriptions and patches
is not an effective way to determine what is in a particular kernel
branch. Instead, you should use Git directly to discover the changes in
a branch. Using Git is an efficient and flexible way to inspect changes
to the kernel.
Note
Ground up reconstruction of the complete kernel tree is an action only taken by the Yocto Project team during an active development cycle. When you create a clone of the kernel Git repository, you are simply making it efficiently available for building and development.
The following steps describe what happens when the Yocto Project Team constructs the Yocto Project kernel source Git repository (or tree) found at https://git.yoctoproject.org/ given the introduction of a new top-level kernel feature or BSP. The following actions effectively provide the Metadata and create the tree that includes the new feature, patch, or BSP:
Pass Feature to the OpenEmbedded Build System: A top-level kernel feature is passed to the kernel build subsystem. Normally, this feature is a BSP for a particular kernel type.
Locate Feature: The file that describes the top-level feature is located by searching these system directories:
The in-tree kernel-cache directories, which are located in the yocto-kernel-cache repository organized under the “Yocto Linux Kernel” heading in the Yocto Project Source Repositories.
Areas pointed to by SRC_URI statements found in kernel recipes.
For a typical build, the target of the search is a feature description in an
.sccfile whose name follows this format (e.g.beaglebone-standard.sccandbeaglebone-preempt-rt.scc):bsp_root_name-kernel_type.scc
Expand Feature: Once located, the feature description is either expanded into a simple script of actions, or into an existing equivalent script that is already part of the shipped kernel.
Append Extra Features: Extra features are appended to the top-level feature description. These features can come from the KERNEL_FEATURES variable in recipes.
Locate, Expand, and Append Each Feature: Each extra feature is located, expanded and appended to the script as described in step three.
Execute the Script: The script is executed to produce files
.sccand.cfgfiles in appropriate directories of theyocto-kernel-cacherepository. These files are descriptions of all the branches, tags, patches and configurations that need to be applied to the base Git repository to completely create the source (build) branch for the new BSP or feature.Clone Base Repository: The base repository is cloned, and the actions listed in the
yocto-kernel-cachedirectories are applied to the tree.Perform Cleanup: The Git repositories are left with the desired branches checked out and any required branching, patching and tagging has been performed.
The kernel tree and cache are ready for developer consumption to be locally cloned, configured, and built into a Yocto Project kernel specific to some target hardware.
Note
The generated
yocto-kernel-cacherepository adds to the kernel as shipped with the Yocto Project release. Any add-ons and configuration data are applied to the end of an existing branch. The full repository generation that is found in the official Yocto Project kernel repositories at https://git.yoctoproject.org/ is the combination of all supported boards and configurations.The technique the Yocto Project team uses is flexible and allows for seamless blending of an immutable history with additional patches specific to a deployment. Any additions to the kernel become an integrated part of the branches.
The full kernel tree that you see on https://git.yoctoproject.org/ is generated through repeating the above steps for all valid BSPs. The end result is a branched, clean history tree that makes up the kernel for a given release. You can see the script (
kgit-scc) responsible for this in the yocto-kernel-tools repository.The steps used to construct the full kernel tree are the same steps that BitBake uses when it builds a kernel image.
5.2 Build Strategy
Once you have cloned a Yocto Linux kernel repository and the cache
repository (yocto-kernel-cache) onto your development system, you
can consider the compilation phase of kernel development, which is
building a kernel image. Some prerequisites are validated by
the build process before compilation starts:
The SRC_URI points to the kernel Git repository.
A BSP build branch with Metadata exists in the
yocto-kernel-cacherepository. The branch is based on the Yocto Linux kernel version and has configurations and features grouped under theyocto-kernel-cache/bspdirectory. For example, features and configurations for the BeagleBone Board assuming alinux-yocto_4.12kernel reside in the following area of theyocto-kernel-cacherepository: yocto-kernel-cache/bsp/beagleboneNote
In the previous example, the “yocto-4.12” branch is checked out in the
yocto-kernel-cacherepository.
The OpenEmbedded build system makes sure these conditions are satisfied before attempting compilation. Other means, however, do exist, such as bootstrapping a BSP.
Before building a kernel, the build process verifies the tree and
configures the kernel by processing all of the configuration “fragments”
specified by feature descriptions in the .scc files. As the features
are compiled, associated kernel configuration fragments are noted and
recorded in the series of directories in their compilation order. The
fragments are migrated, pre-processed and passed to the Linux Kernel
Configuration subsystem (lkc) as raw input in the form of a
.config file. The lkc uses its own internal dependency
constraints to do the final processing of that information and generates
the final .config file that is used during compilation.
Using the board’s architecture and other relevant values from the board’s template, kernel compilation is started and a kernel image is produced.
The other thing that you notice once you configure a kernel is that the
build process generates a build tree that is separate from your kernel’s
local Git source repository tree. This build tree has a name that uses
the following form, where ${MACHINE} is the metadata name of the
machine (BSP) and “kernel_type” is one of the Yocto Project supported
kernel types (e.g. “standard”):
linux-${MACHINE}-kernel_type-build
The existing support in the kernel.org tree achieves this default
functionality.
This behavior means that all the generated files for a particular
machine or BSP are now in the build tree directory. The files include
the final .config file, all the .o files, the .a files, and
so forth. Since each machine or BSP has its own separate
Build Directory in its own separate branch of the Git repository,
you can easily switch between different builds.
6 Kernel Development FAQ
6.1 Common Questions and Solutions
Here are some solutions for common questions.
6.1.1 How do I use my own Linux kernel .config file?
Refer to the “Changing the Configuration” section for information.
6.1.2 How do I create configuration fragments?
A: Refer to the “Creating Configuration Fragments” section for information.
6.1.3 How do I use my own Linux kernel sources?
Refer to the “Working With Your Own Sources” section for information.
6.1.4 How do I install/not-install the kernel image on the root filesystem?
The kernel image (e.g. vmlinuz) is provided by the
kernel-image package. Image recipes depend on kernel-base. To
specify whether or not the kernel image is installed in the generated
root filesystem, override RRECOMMENDS:${KERNEL_PACKAGE_NAME}-base to include or not
include “kernel-image”. See the
“Appending Other Layers Metadata With Your Layer”
section in the
Yocto Project Development Tasks Manual for information on how to use an
append file to override metadata.
6.1.5 How do I install a specific kernel module?
Linux kernel modules are packaged individually. To ensure a specific kernel module is included in an image, include it in the appropriate machine RRECOMMENDS variable. These other variables are useful for installing specific modules: - MACHINE_ESSENTIAL_EXTRA_RDEPENDS - MACHINE_ESSENTIAL_EXTRA_RRECOMMENDS - MACHINE_EXTRA_RDEPENDS - MACHINE_EXTRA_RRECOMMENDS
For example, set the following in the qemux86.conf file to include
the ab123 kernel modules with images built for the qemux86
machine:
MACHINE_EXTRA_RRECOMMENDS += "kernel-module-ab123"
For more information, see the “Incorporating Out-of-Tree Modules” section.
6.1.6 How do I change the Linux kernel command line?
The Linux kernel command line is typically specified in the machine config using the APPEND variable. For example, you can add some helpful debug information doing the following:
APPEND += "printk.time=y initcall_debug debug"
Permission is granted to copy, distribute and/or modify this document under the terms of the Creative Commons Attribution-Share Alike 2.0 UK: England & Wales as published by Creative Commons.
To report any inaccuracies or problems with this (or any other Yocto Project)
manual, or to send additions or changes, please send email/patches to the Yocto
Project documentation mailing list at docs@lists.yoctoproject.org or
log into the Libera Chat #yocto channel.
Yocto Project Security Manual
1 Introduction
Welcome to the Yocto Project Security Manual. This manual provides relevant procedures for dealing with security-related tasks supported in the Yocto Project environment. This manual groups related procedures into higher-level sections. Procedures can consist of high-level steps or low-level steps depending on the topic.
This manual provides the following:
Procedures that help you secure an image using features supported by the Yocto Project; for example, making a root filesystem read-only.
Procedures related to processes outside of the target images; for example, how to deal with vulnerabilities.
This manual does not provide the following:
Procedures for security features implemented outside of OpenEmbedded-Core (OE-Core).
Documentation for the security mechanisms themselves, which can often be found in the documentation of the feature itself. This manual focuses on how to integrate those security mechanisms within the Yocto Project.
2 Making Images More Secure
When securing your image is of concern, there are steps, tools, and variables that you can consider to help you reach the security goals you need for your particular device. Not all situations are identical when it comes to making an image secure. Consequently, this section provides some guidance and suggestions for consideration when you want to make your image more secure.
Note
Because the security requirements and risks are different for every type of device, this section cannot provide a complete reference on securing your custom OS. It is strongly recommended that you also consult other sources of information on embedded Linux system hardening and on security.
2.1 General Considerations
There are general considerations that help you create more secure images. You should consider the following suggestions to make your device more secure:
Scan additional code you are adding to the system (e.g. application code) by using static analysis tools. Look for buffer overflows and other potential security problems.
Pay particular attention to the security for any web-based administration interface.
Web interfaces typically need to perform administrative functions and tend to need to run with elevated privileges. Thus, the consequences resulting from the interface’s security becoming compromised can be serious. Look for common web vulnerabilities such as cross-site-scripting (XSS), unvalidated inputs, and so forth.
As with system passwords, the default credentials for accessing a web-based interface should not be the same across all devices. This is particularly true if the interface is enabled by default as it can be assumed that many end-users will not change the credentials.
Ensure you can update the software on the device to mitigate vulnerabilities discovered in the future. This consideration especially applies when your device is network-enabled.
Regularly scan and apply fixes for CVE security issues affecting all software components in the product, see “Checking for Vulnerabilities”.
Regularly update your version of BitBake and your layers (e.g. OpenEmbedded-Core (OE-Core), meta-yocto, …), e.g. to apply updates and security fixes from stable and LTS branches.
Ensure you remove or disable debugging functionality before producing the final image. For information on how to do this, see the “Considerations Specific to the OpenEmbedded Build System” section.
Ensure you have no network services listening that are not needed.
Remove any software from the image that is not needed.
Enable hardware support for secure boot functionality when your device supports this functionality.
2.2 Security Flags
The Yocto Project has security flags that you can enable that help make
your build output more secure. The security flags are in the
meta/conf/distro/include/security_flags.inc file in your
OpenEmbedded-Core (OE-Core).
Note
Depending on the recipe, certain security flags are enabled and disabled by default.
Use the following line in your local.conf file or in your custom
distribution configuration file to enable the security compiler and
linker flags for your build:
require conf/distro/include/security_flags.inc
2.3 Considerations Specific to the OpenEmbedded Build System
You can take some steps that are specific to the OpenEmbedded build system to make your images more secure:
Ensure that “allow-empty-password”, “allow-root-login”, or “empty-root-password” are not one of your selected IMAGE_FEATURES. When creating a new project, the default is to provide you with an initial
local.conffile that enables these features using the EXTRA_IMAGE_FEATURES variable with the line:EXTRA_IMAGE_FEATURES = "allow-empty-password empty-root-password allow-root-login"
To disable these features, simply comment out that line in your
local.conffile, or make sure IMAGE_FEATURES does not contain any of these features before producing your final image. Among other things, leaving this in place sets the root password as blank, which makes logging in for debugging or inspection easy during development but also means anyone can easily log in during production.It is possible to set a root password for the image and also to set passwords for any extra users you might add (e.g. administrative or service type users). When you set up passwords for multiple images or users, you should not duplicate passwords.
To set up passwords, use the extrausers class, which is the preferred method. For an example on how to set up both root and user passwords, see the “extrausers” section.
Note
When adding extra user accounts or setting a root password, be cautious about setting the same password on every device. If you do this, and the password you have set is exposed, then every device is now potentially compromised. If you need this access but want to ensure security, consider setting a different, random password for each device. Typically, you do this as a separate step after you deploy the image onto the device.
Consider enabling a Mandatory Access Control (MAC) framework such as SMACK or SELinux and tuning it appropriately for your device’s usage. You can find more information in the meta-selinux layer.
2.4 Tools for Hardening Your Image
The Yocto Project provides tools for making your image more secure. You
can find these tools in the meta-security layer of the
Yocto Project Source Repositories.
3 Checking for Vulnerabilities
3.1 Vulnerabilities in OpenEmbedded-Core (OE-Core)
The Yocto Project has an infrastructure to track and address unfixed known security vulnerabilities, as tracked by the public Common Vulnerabilities and Exposures (CVE) database.
The Yocto Project maintains a list of known vulnerabilities for packages in OpenEmbedded-Core (OE-Core), tracking the evolution of the number of unpatched CVEs and the status of patches. Such information is available for the current development version and for each supported release.
Security is a process, not a product, and thus at any time, a number of security issues may be impacting OpenEmbedded-Core (OE-Core). It is up to the maintainers, users, contributors and anyone interested in the issues to investigate and possibly fix them by updating software components to newer versions or by applying patches to address them. It is recommended to work with OpenEmbedded-Core (OE-Core) upstream maintainers and submit patches to fix them, see “Contributing Changes to a Component” for details.
3.2 Vulnerability check at build time
To enable a check for CVE security vulnerabilities in the specific image or target you are building, run the following command from your Build Directory:
$ bitbake-config-build enable-fragment core/yocto/sbom-cve-check
Or add the following statement to a configuration file:
OE_FRAGMENTS += "core/yocto/sbom-cve-check"
This will enable the sbom-cve-check class and set the recommended settings to use it.
The CVE database contains some old incomplete entries which have been deemed not to impact OpenEmbedded-Core (OE-Core). These CVE entries can be excluded from the check by adding the following statement:
include conf/distro/include/cve-extra-exclusions.inc
With the core/yocto/sbom-cve-check fragment enabled, the
BitBake build of an image will try to map each compiled software
component recipe name and version information to the CVE database and generate
reports in the deployment directory (DEPLOY_DIR_IMAGE), one of which
being: tmp/deploy/images/<machine>/<image-name>-<machine>.rootfs.sbom-cve-check.yocto.json,
a report containing:
Metadata about the software component like names and versions
Metadata about the CVE issue such as description and NVD link
For each software component, a list of CVEs which are possibly impacting this version
Status of each CVE:
Patched,UnpatchedorIgnored
Note
Another report named <image-name>-<machine>.rootfs.sbom-cve-check.spdx.json
is also generated: this is the enriched SPDX file of the image
containing the same information contained in the previous point, and a lot
more metadata information on the packages included in the image. For more
information on SPDX, see the Creating a Software Bill of Materials section of the
Yocto Project Development Tasks Manual.
Each item in the "package" list corresponds to a package installed on the
built image. Each of these packages contain a number of CVE entries under the
"issue" sub-list. These CVE can have the following statuses:
Patchedmeans that a patch file to address the security issue has been applied.Unpatchedmeans that no patches to address the issue have been applied and that the issue needs to be investigated.Ignoredmeans that after analysis, it has been deemed to ignore the issue as it for example affects the software component on a different operating system platform.
For example, the report for the glibc package looks like this (simplified):
{
"version": "1",
"package": [
{
"name": "glibc",
"layer": "core",
"version": "2.43+git",
"products": [
{
"product": "glibc",
"cvesInRecord": "Yes"
}
],
"issue": [
{
"id": "CVE-2010-4756",
"status": "Unpatched",
"link": "https://nvd.nist.gov/vuln/detail/CVE-2010-4756",
"summary": "The glob implementation in the GNU C Library (aka glibc or libc6) allows remote authenticated users to cause a denial of service (CPU and memory consumption) via crafted glob expressions that do not match any pathnames, as demonstrated by glob expressions in STAT commands to an FTP daemon, a different vulnerability than CVE-2010-2632.",
"scorev2": "4.0",
"scorev3": "0.0",
"scorev4": "0.0",
"modified": "2025-11-03T22:15:41.000",
"vector": "NETWORK",
"vectorString": "AV:N/AC:L/Au:S/C:N/I:N/A:P",
"detail": "no-version-ranges",
"description": "Check package version"
},
{
"id": "CVE-2018-6551",
"status": "Patched",
"link": "https://nvd.nist.gov/vuln/detail/CVE-2018-6551",
"summary": "The malloc implementation in the GNU C Library (aka glibc or libc6), from version 2.24 to 2.26 on powerpc, and only in version 2.26 on i386, did not properly handle malloc calls with arguments close to SIZE_MAX and could return a pointer to a heap region that is smaller than requested, eventually leading to heap corruption.",
"scorev2": "7.5",
"scorev3": "9.8",
"scorev4": "0.0",
"modified": "2024-11-21T04:10:53.000",
"vector": "NETWORK",
"vectorString": "CVSS:3.0/AV:N/AC:L/PR:N/UI:N/S:U/C:H/I:H/A:H",
"detail": "version-not-in-range"
},
{
"id": "CVE-2019-1010022",
"status": "Ignored",
"link": "https://nvd.nist.gov/vuln/detail/CVE-2019-1010022",
"summary": "GNU Libc current is affected by: Mitigation bypass. The impact is: Attacker may bypass stack guard protection. The component is: nptl. The attack vector is: Exploit stack buffer overflow vulnerability and use this bypass vulnerability to bypass stack guard. NOTE: Upstream comments indicate \"this is being treated as a non-security bug and no real threat.",
"scorev2": "7.5",
"scorev3": "9.8",
"scorev4": "0.0",
"modified": "2024-11-21T04:17:55.000",
"vector": "NETWORK",
"vectorString": "CVSS:3.0/AV:N/AC:L/PR:N/UI:N/S:U/C:H/I:H/A:H",
"description": "Upstream glibc maintainers dispute there is any issue and have no plans to address it further. this is being treated as a non-security bug and no real threat."
}
],
"cpes": ["cpe:2.3:*:*:glibc:2.43:*:*:*:*:*:*:*"]
}
]
}
At build time the sbom-cve-check class will also throw warnings about
Unpatched CVEs (when SBOM_CVE_CHECK_SHOW_WARNINGS is set to “1”):
WARNING: core-image-minimal-1.0-r0 do_sbom_cve_check: glibc-2.43+git: Found unpatched CVEs: CVE-2010-4756
3.3 Fixing CVE product name and version mappings
By default, sbom-cve-check uses the recipe name BPN as CVE product name when querying the CVE database. If this mapping contains false positives, e.g. some reported CVEs are not for the software component in question, or false negatives like some CVEs are not found to impact the recipe when they should, then the problems can be in the recipe name to CVE product mapping. These mapping issues can be fixed by setting the CVE_PRODUCT variable inside the recipe. This defines the name of the software component in the upstream NIST CVE database.
The variable supports using vendor and product names like this:
CVE_PRODUCT = "flex_project:flex westes:flex"
In this example we have two possible vendors names, flex_project and westes,
with the product name flex. With this setting the flex recipe only maps to this specific
product and not products from other vendors with same name flex.
Similarly, when the recipe version PV is not compatible with software versions used by the upstream software component releases and the CVE database, these can be fixed using the CVE_VERSION variable.
Note that if the CVE entries in the NVD database contain bugs or have missing or incomplete information, it is recommended to fix the information there directly instead of working around the issues possibly for a long time in OpenEmbedded-Core (OE-Core) side recipes. Feedback to NVD about CVE entries can be provided through the NVD contact form.
3.4 Fixing vulnerabilities in recipes
Suppose a CVE security issue impacts a software component. In that case, it can be fixed by updating to a newer version, by applying a patch, or by marking it as patched via CVE_STATUS variable flag. For OpenEmbedded-Core (OE-Core) master branches, updating to a more recent software component release with fixes is the best option, but patches can be applied if releases are not yet available.
For stable branches, we want to avoid API (Application Programming Interface) or ABI (Application Binary Interface) breakages. When submitting an update, a minor version update of a component is preferred if the version is backward-compatible. Many software components have backward-compatible stable versions, with a notable example of the Linux kernel. However, if the new version does or likely might introduce incompatibilities, extracting and backporting patches is preferred.
Here is an example of fixing CVE security issues with patch files, an example from the ffmpeg recipe for dunfell:
SRC_URI = "https://www.ffmpeg.org/releases/${BP}.tar.xz \
file://mips64_cpu_detection.patch \
file://CVE-2020-12284.patch \
file://0001-libavutil-include-assembly-with-full-path-from-sourc.patch \
file://CVE-2021-3566.patch \
file://CVE-2021-38291.patch \
file://CVE-2022-1475.patch \
file://CVE-2022-3109.patch \
file://CVE-2022-3341.patch \
file://CVE-2022-48434.patch \
"
The recipe has both generic and security-related fixes. The CVE patch files are named according to the CVE they fix.
When preparing the patch file, take the original patch from the upstream repository. Do not use patches from different distributions, except if it is the only available source.
Modify the patch adding OE-related metadata. We will follow the example of the
CVE-2022-3341.patch.
The original commit message is:
From 9cf652cef49d74afe3d454f27d49eb1a1394951e Mon Sep 17 00:00:00 2001
From: Jiasheng Jiang <jiasheng@iscas.ac.cn>
Date: Wed, 23 Feb 2022 10:31:59 +0800
Subject: [PATCH] avformat/nutdec: Add check for avformat_new_stream
Check for failure of avformat_new_stream() and propagate
the error code.
Signed-off-by: Michael Niedermayer <michael@niedermayer.cc>
---
libavformat/nutdec.c | 16 ++++++++++++----
1 file changed, 12 insertions(+), 4 deletions(-)
For the correct operations of sbom-cve-check, it requires the CVE
identification in a CVE: tag of the patch file commit message using
the format:
CVE: CVE-2022-3341
It is also required to add the Upstream-Status: tag with a link
to the original patch and sign-off by people working on the backport.
If there are any modifications to the original patch, note them in
the Comments: tag.
With the additional information, the header of the patch file in OE-core becomes:
From 9cf652cef49d74afe3d454f27d49eb1a1394951e Mon Sep 17 00:00:00 2001
From: Jiasheng Jiang <jiasheng@iscas.ac.cn>
Date: Wed, 23 Feb 2022 10:31:59 +0800
Subject: [PATCH] avformat/nutdec: Add check for avformat_new_stream
Check for failure of avformat_new_stream() and propagate
the error code.
Signed-off-by: Michael Niedermayer <michael@niedermayer.cc>
CVE: CVE-2022-3341
Upstream-Status: Backport [https://github.com/FFmpeg/FFmpeg/commit/9cf652cef49d74afe3d454f27d49eb1a1394951e]
Comments: Refreshed Hunk
Signed-off-by: Narpat Mali <narpat.mali@windriver.com>
Signed-off-by: Bhabu Bindu <bhabu.bindu@kpit.com>
---
libavformat/nutdec.c | 16 ++++++++++++----
1 file changed, 12 insertions(+), 4 deletions(-)
A good practice is to include the CVE identifier in the patch file name, the patch file commit message and optionally in the recipe commit message.
sbom-cve-check will then capture this information and change the CVE
status to Patched in the generated reports.
If analysis shows that the CVE issue does not impact the recipe due to configuration, platform,
version or other reasons, the CVE can be marked as Ignored by using
the CVE_STATUS variable flag with appropriate reason which is mapped to Ignored.
The entry should have the format like:
CVE_STATUS[CVE-2016-10642] = "cpe-incorrect: This is specific to the npm package that installs cmake, so isn't relevant to OpenEmbedded"
As mentioned previously, if data in the CVE database is wrong, it is recommended to fix those issues in the CVE database (NVD in the case of OpenEmbedded-Core (OE-Core)) directly.
Note that if there are many CVEs with the same status and reason, those can be shared by using the CVE_STATUS_GROUPS variable.
When analyzing CVEs, it is recommended to:
study the latest information in CVE database.
check how upstream developers of the software component addressed the issue, e.g. what patch was applied, which upstream release contains the fix.
check what other Linux distributions like Debian did to analyze and address the issue.
follow security notices from other Linux distributions.
follow public open source security mailing lists for discussions and advance notifications of CVE bugs and software releases with fixes.
3.5 Implementation details
As sbom-cve-check is an external tool, its implementation is detailed on the official documentation: https://sbom-cve-check.readthedocs.io/en/latest/index.html
3.6 Linux kernel vulnerabilities
Since the Linux kernel became a CVE Numbering Authority (CNA), the number of associated CVEs has increased dramatically. Security teams must address these CVEs to meet regulatory and customer requirements. Automation on identifying issues helps to reduce their workload.
OpenEmbedded-Core (OE-Core) has two scripts that help to characterize and filter CVEs affecting the Linux kernel:
openembedded-core/meta/recipes-kernel/linux/generate-cve-exclusions.pyopenembedded-core/scripts/contrib/improve_kernel_cve_report.py
3.6.1 generate-cve-exclusions.py
When updating a kernel recipe, a helper script needs to be run manually to update the CVE_STATUS for the kernel recipe. The script can be used for custom kernels.
First we need to get an updated version of the CVE information from the CVE Project. Run it as follows:
$ git clone https://github.com/CVEProject/cvelistV5 ~/cvelistV5
Or if you have already cloned it, you need to pull the latest data:
$ git -C ~/cvelistV5 pull
Then, generate the CVE_STATUS information for the desired version of the kernel:
$ ./generate-cve-exclusions.py ~/cvelistV5 <version> > cve-exclusion_<kernel_version>.inc
Example:
$ git clone https://github.com/CVEProject/cvelistV5 ~/cvelistV5
$ cd openembedded-core/meta/recipes-kernel/linux/
$ ./generate-cve-exclusions.py ~/cvelistV5 6.12.27 > ~/meta-custom/recipes-kernel/linux/cve-exclusion_6.12.inc
Don’t forget to update your kernel recipe with:
include cve-exclusion_6.12.inc
Then the CVE information will automatically be added in the
cve-check or vex report.
3.6.2 improve_kernel_cve_report.py
The openembedded-core/scripts/contrib/improve_kernel_cve_report.py script
leverages CVE kernel metadata and the SPDX_INCLUDE_COMPILED_SOURCES
variable to update an output .sbom-cve-check.yocto.json report file (see
section Vulnerability check at build time
for details on these report files). It reduces CVE false positives by 70%-80%
and provide detailed responses for all kernel-related CVEs by analyzing the
files used to build the kernel. The script is decoupled from the build and
can be run outside of the BitBake environment.
The script uses the output from the vex as input, together with CVE information from the Linux kernel CNA to enrich the report file with updated CVE information.
The file name can be specified as argument. Optionally, it can also use the list of compiled files from the kernel SPDX to ignore CVEs that are not affected because the files are not compiled.
For this, BitBake uses the debug information to extract the sources used to build a binary. Therefore, it needs to be configured in the kernel to extract the kernel compiled files.
If you are using the linux-yocto recipe, enable it by adding the following
in a configuration file or in a .bbappend:
KERNEL_EXTRA_FEATURES:append = " features/debug/debug-kernel.scc"
Or by editing your kernel configuration to include DWARF4 debug information.
See the Changing the Configuration section of the Yocto Project Linux Kernel Development Manual for more information.
For the following example, we will consider that the kernel recipe used is
linux-yocto. Instructions also apply to other kernel recipes named
differently.
The sources for the kernel are stored under
tmp/pkgdata/<MACHINE>/debugsources/linux-yocto-debugsources.json.zstd. In
order to include the information into the SPDX file to filter out
source files that are not used to compile the kernel, add the following in a
configuration file:
SPDX_INCLUDE_COMPILED_SOURCES:pn-linux-yocto = "1"
Finally, store either the recipe-linux-yocto.spdx.json or the
linux-yocto-debugsources.json.zstd outside the build directory.
The SPDX file is under
tmp/deploy/spdx/<spdx_version>/<MACHINE>/recipes/recipe-linux-yocto.spdx.json
Once you have the input data, first you need to clone or fetch the latest CVE information from https://git.kernel.org:
$ git clone https://git.kernel.org/pub/scm/linux/security/vulns.git ~/vulns
Or if already checked out:
$ git -C ~/vulns pull
Finally, run the script by using one of the examples below. The most exact are the first two examples, using the old cve-summary.json.
Example using
--old-cve-reportas input:$ python3 openembedded-core/scripts/contrib/improve_kernel_cve_report.py \ --spdx tmp/deploy/spdx/3.0.1/qemux86_64/recipes/recipe-linux-yocto.spdx.json \ --datadir ~/vulns \ --old-cve-report build/tmp/deploy/images/<machine>/<image-name>-<machine>.rootfs.sbom-cve-check.yocto.json
Example using
--debug-sourcesfile instead of SPDX kernel file:$ python3 openembedded-core/scripts/contrib/improve_kernel_cve_report.py \ --debug-sources tmp/pkgdata/qemux86_64/debugsources/linux-yocto-debugsources.json.zstd \ --datadir ~/vulns \ --old-cve-report build/tmp/deploy/images/<machine>/<image-name>-<machine>.rootfs.sbom-cve-check.yocto.json
Example using the
--kernel-version:$ python3 openembedded-core/scripts/contrib/improve_kernel_cve_report.py \ --spdx tmp/deploy/spdx/3.0.1/qemux86_64/recipes/recipe-linux-yocto.spdx.json \ --kernel-version 6.12.27 \ --datadir ~/vulns
Example output for a CVE for which the status was changed to “Ignored” because the source files associated to the CVE were not compiled:
{
"id": "CVE-2025-38384",
"status": "Ignored",
"detail": "not-applicable-config",
"summary": "In the Linux kernel, the following vulnerability has been resolved (...)",
"description": "Source code not compiled by config. {'drivers/mtd/nand/spi/core.c'}"
}
Example of output for a CVE not in range:
{
"id": "CVE-2025-40017",
"status": "Patched",
"detail": "fixed-version",
"summary": "In the Linux kernel, the following vulnerability has been resolved (...)",
"description": "only affects 6.15 onwards"
}
Example of output for a CVE that is vulnerable:
{
"id": "CVE-2024-58093",
"status": "Unpatched",
"detail": "version-in-range",
"summary": "In the Linux kernel, the following vulnerability has been resolved (...)",
"description": "Needs backporting (fixed from 6.15)"
}
Example of output for a CVE rejected by the Linux CNA:
{
"id": "CVE-2025-38380",
"status": "Ignored",
"detail": "rejected",
"summary": "In the Linux kernel, the following vulnerability has been resolved (...)",
"description": "Rejected by CNA"
}
4 Creating a Read-Only Root Filesystem
Suppose, for security reasons, you need to disable your target device’s root filesystem’s write permissions (i.e. you need a read-only root filesystem). Or, perhaps you are running the device’s operating system from a read-only storage device. For either case, you can customize your image for that behavior.
Note
Supporting a read-only root filesystem requires that the system and applications do not try to write to the root filesystem. You must configure all parts of the target system to write elsewhere, or to gracefully fail in the event of attempting to write to the root filesystem.
4.1 Creating the Root Filesystem
To create the read-only root filesystem, simply add the “read-only-rootfs” feature to your image, normally in one of two ways. The first way is to add the “read-only-rootfs” image feature in the image’s recipe file via the IMAGE_FEATURES variable:
IMAGE_FEATURES += "read-only-rootfs"
As an alternative, you can add the same feature
from within your Build Directory’s local.conf file with the
associated EXTRA_IMAGE_FEATURES variable, as in:
EXTRA_IMAGE_FEATURES = "read-only-rootfs"
For more information on how to use these variables, see the “Customizing Images Using Custom IMAGE_FEATURES and EXTRA_IMAGE_FEATURES” section. For information on the variables, see IMAGE_FEATURES and EXTRA_IMAGE_FEATURES.
4.2 Post-Installation Scripts and Read-Only Root Filesystem
It is very important that you make sure all post-Installation
(pkg_postinst) scripts for packages that are installed into the
image can be run at the time when the root filesystem is created during
the build on the host system. These scripts cannot attempt to run during
the first boot on the target device. With the “read-only-rootfs” feature
enabled, the build system makes sure that all post-installation scripts
succeed at file system creation time. If any of these scripts
still need to be run after the root filesystem is created, the build
immediately fails. These build-time checks ensure that the build fails
rather than the target device fails later during its initial boot
operation.
Most of the common post-installation scripts generated by the build system for the out-of-the-box Yocto Project are engineered so that they can run during root filesystem creation (e.g. post-installation scripts for caching fonts). However, if you create and add custom scripts, you need to be sure they can be run during this file system creation.
Here are some common problems that prevent post-installation scripts from running during root filesystem creation:
Not using $D in front of absolute paths: The build system defines
$D when the root filesystem is created. Furthermore,$Dis blank when the script is run on the target device. This implies two purposes for$D: ensuring paths are valid in both the host and target environments, and checking to determine which environment is being used as a method for taking appropriate actions.Attempting to run processes that are specific to or dependent on the target architecture: You can work around these attempts by using native tools, which run on the host system, to accomplish the same tasks, or by alternatively running the processes under QEMU, which has the
qemu_run_binaryfunction. For more information, see the qemu class.
4.3 Areas With Write Access
With the “read-only-rootfs” feature enabled, any attempt by the target
to write to the root filesystem at runtime fails. Consequently, you must
make sure that you configure processes and applications that attempt
these types of writes do so to directories with write access (e.g.
/tmp or /var/run).
Permission is granted to copy, distribute and/or modify this document under the terms of the Creative Commons Attribution-Share Alike 2.0 UK: England & Wales as published by Creative Commons.
To report any inaccuracies or problems with this (or any other Yocto Project)
manual, or to send additions or changes, please send email/patches to the Yocto
Project documentation mailing list at docs@lists.yoctoproject.org or
log into the Libera Chat #yocto channel.
Yocto Project Profiling and Tracing Manual
1 Yocto Project Profiling and Tracing Manual
1.1 Introduction
Yocto Project bundles a number of tracing and profiling tools — this manual describes their basic usage and shows by example how to make use of them to analyze application and system behavior.
The tools presented are, for the most part, completely open-ended and have quite good and/or extensive documentation of their own which can be used to solve just about any problem you might come across in Linux. Each section that describes a particular tool has links to that tool’s documentation and website.
The purpose of this manual is to present a set of common and generally useful tracing and profiling idioms along with their application (as appropriate) to each tool, in the context of a general-purpose ‘drill-down’ methodology that can be applied to solving a large number of problems. For help with more advanced usages and problems, refer to the documentation and/or websites provided for each tool.
The final section of this manual is a collection of real-world examples which we’ll be continually updating as we solve more problems using the tools — feel free to suggest additions to what you read here.
1.2 General Setup
Most of the tools are available only in sdk images or in images built
after adding tools-profile to your local.conf file. So, in order to be able
to access all of the tools described here, you can build and boot
an sdk image, perhaps one of:
$ bitbake core-image-sato-sdk
$ bitbake core-image-weston-sdk
$ bitbake core-image-rt-sdk
Alternatively, you can add tools-profile to the EXTRA_IMAGE_FEATURES line in
your local.conf file:
EXTRA_IMAGE_FEATURES:append = " tools-profile"
If you use the tools-profile method, you don’t need to build an sdk image —
the tracing and profiling tools will be included in non-sdk images as well e.g.:
$ bitbake core-image-sato
Note
By default, the Yocto build system strips symbols from the binaries it packages, which makes it difficult to use some of the tools.
You can prevent that by setting the
INHIBIT_PACKAGE_STRIP
variable to “1” in your local.conf when you build the image:
INHIBIT_PACKAGE_STRIP = "1"
The above setting will noticeably increase the size of your image.
If you’ve already built a stripped image, you can generate debug packages (xxx-dbg) which you can manually install as needed.
To generate debug info for packages, you can add dbg-pkgs to
EXTRA_IMAGE_FEATURES in local.conf. For example:
EXTRA_IMAGE_FEATURES:append = " dbg-pkgs"
Additionally, in order to generate the right type of debug info, we also need to
set PACKAGE_DEBUG_SPLIT_STYLE in the local.conf file:
PACKAGE_DEBUG_SPLIT_STYLE = 'debug-file-directory'
2 Overall Architecture of the Linux Tracing and Profiling Tools
2.1 Architecture of the Tracing and Profiling Tools
It may seem surprising to see a section covering an ‘overall architecture’ for what seems to be a random collection of tracing tools that together make up the Linux tracing and profiling space. The fact is, however, that in recent years this seemingly disparate set of tools has started to converge on a ‘core’ set of underlying mechanisms:
static tracepoints
dynamic tracepoints
kprobes
uprobes
the perf_events subsystem
debugfs
3 Basic Usage (with examples) for each of the Yocto Tracing Tools
This chapter presents basic usage examples for each of the tracing tools.
3.1 perf
The perf tool is the profiling and tracing tool that comes bundled with the Linux kernel.
Don’t let the fact that it’s part of the kernel fool you into thinking that it’s only for tracing and profiling the kernel — you can indeed use it to trace and profile just the kernel, but you can also use it to profile specific applications separately (with or without kernel context), and you can also use it to trace and profile the kernel and all applications on the system simultaneously to gain a system-wide view of what’s going on.
In many ways, perf aims to be a superset of all the tracing and profiling tools available in Linux today, including all the other tools covered in this How-to. The past couple of years have seen perf subsume a lot of the functionality of those other tools and, at the same time, those other tools have removed large portions of their previous functionality and replaced it with calls to the equivalent functionality now implemented by the perf subsystem. Extrapolation suggests that at some point those other tools will become completely redundant and go away; until then, we’ll cover those other tools in these pages and in many cases show how the same things can be accomplished in perf and the other tools when it seems useful to do so.
The coverage below details some of the most common ways you’ll likely want to apply the tool; full documentation can be found either within the tool itself or in the manual pages at perf(1).
3.1.1 perf Setup
For this section, we’ll assume you’ve already performed the basic setup outlined in the “General Setup” section.
In particular, you’ll get the most mileage out of perf if you profile an
image built with the following in your local.conf file:
INHIBIT_PACKAGE_STRIP = "1"
perf runs on the target system for the most part. You can archive profile data and copy it to the host for analysis, but for the rest of this document we assume you’re connected to the host through SSH and will be running the perf commands on the target.
3.1.2 Basic perf Usage
The perf tool is pretty much self-documenting. To remind yourself of the
available commands, just type perf, which will show you basic usage
along with the available perf subcommands:
root@crownbay:~# perf
usage: perf [--version] [--help] COMMAND [ARGS]
The most commonly used perf commands are:
annotate Read perf.data (created by perf record) and display annotated code
archive Create archive with object files with build-ids found in perf.data file
bench General framework for benchmark suites
buildid-cache Manage build-id cache.
buildid-list List the buildids in a perf.data file
diff Read two perf.data files and display the differential profile
evlist List the event names in a perf.data file
inject Filter to augment the events stream with additional information
kmem Tool to trace/measure kernel memory(slab) properties
kvm Tool to trace/measure kvm guest os
list List all symbolic event types
lock Analyze lock events
probe Define new dynamic tracepoints
record Run a command and record its profile into perf.data
report Read perf.data (created by perf record) and display the profile
sched Tool to trace/measure scheduler properties (latencies)
script Read perf.data (created by perf record) and display trace output
stat Run a command and gather performance counter statistics
test Runs sanity tests.
timechart Tool to visualize total system behavior during a workload
top System profiling tool.
See 'perf help COMMAND' for more information on a specific command.
3.1.2.1 Using perf to do Basic Profiling
As a simple test case, we’ll profile the wget of a fairly large file,
which is a minimally interesting case because it has both file and
network I/O aspects, and at least in the case of standard Yocto images,
it’s implemented as part of BusyBox, so the methods we use to analyze it
can be used in a similar way to the whole host of supported BusyBox
applets in Yocto:
root@crownbay:~# rm linux-2.6.19.2.tar.bz2; \
wget https://downloads.yoctoproject.org/mirror/sources/linux-2.6.19.2.tar.bz2
The quickest and easiest way to get some basic overall data about what’s
going on for a particular workload is to profile it using perf stat.
This command basically profiles using a few default counters and displays
the summed counts at the end of the run:
root@crownbay:~# perf stat wget https://downloads.yoctoproject.org/mirror/sources/linux-2.6.19.2.tar.bz2
Connecting to downloads.yoctoproject.org (140.211.169.59:80)
linux-2.6.19.2.tar.b 100% |***************************************************| 41727k 0:00:00 ETA
Performance counter stats for 'wget https://downloads.yoctoproject.org/mirror/sources/linux-2.6.19.2.tar.bz2':
4597.223902 task-clock # 0.077 CPUs utilized
23568 context-switches # 0.005 M/sec
68 CPU-migrations # 0.015 K/sec
241 page-faults # 0.052 K/sec
3045817293 cycles # 0.663 GHz
<not supported> stalled-cycles-frontend
<not supported> stalled-cycles-backend
858909167 instructions # 0.28 insns per cycle
165441165 branches # 35.987 M/sec
19550329 branch-misses # 11.82% of all branches
59.836627620 seconds time elapsed
Such a simple-minded test doesn’t always yield much of interest, but sometimes it does (see the Slow write speed on live images with denzil bug report).
Also, note that perf stat isn’t restricted to a fixed set of counters
— basically any event listed in the output of perf list can be tallied
by perf stat. For example, suppose we wanted to see a summary of all
the events related to kernel memory allocation/freeing along with cache
hits and misses:
root@crownbay:~# perf stat -e kmem:* -e cache-references -e cache-misses wget https://downloads.yoctoproject.org/mirror/sources/linux-2.6.19.2.tar.bz2
Connecting to downloads.yoctoproject.org (140.211.169.59:80)
linux-2.6.19.2.tar.b 100% |***************************************************| 41727k 0:00:00 ETA
Performance counter stats for 'wget https://downloads.yoctoproject.org/mirror/sources/linux-2.6.19.2.tar.bz2':
5566 kmem:kmalloc
125517 kmem:kmem_cache_alloc
0 kmem:kmalloc_node
0 kmem:kmem_cache_alloc_node
34401 kmem:kfree
69920 kmem:kmem_cache_free
133 kmem:mm_page_free
41 kmem:mm_page_free_batched
11502 kmem:mm_page_alloc
11375 kmem:mm_page_alloc_zone_locked
0 kmem:mm_page_pcpu_drain
0 kmem:mm_page_alloc_extfrag
66848602 cache-references
2917740 cache-misses # 4.365 % of all cache refs
44.831023415 seconds time elapsed
As you can see, perf stat gives us a nice easy
way to get a quick overview of what might be happening for a set of
events, but normally we’d need a little more detail in order to
understand what’s going on in a way that we can act on in a useful way.
To dive down into a next level of detail, we can use perf record /
perf report which will collect profiling data and present it to use using an
interactive text-based UI (or just as text if we specify --stdio to
perf report).
As our first attempt at profiling this workload, we’ll just run perf
record, handing it the workload we want to profile (everything after
perf record and any perf options we hand it — here none, will be
executed in a new shell). perf collects samples until the process exits
and records them in a file named perf.data in the current working
directory:
root@crownbay:~# perf record wget https://downloads.yoctoproject.org/mirror/sources/linux-2.6.19.2.tar.bz2
Connecting to downloads.yoctoproject.org (140.211.169.59:80)
linux-2.6.19.2.tar.b 100% |************************************************| 41727k 0:00:00 ETA
[ perf record: Woken up 1 times to write data ]
[ perf record: Captured and wrote 0.176 MB perf.data (~7700 samples) ]
To see the results in a
“text-based UI” (tui), just run perf report, which will read the
perf.data file in the current working directory and display the results
in an interactive UI:
root@crownbay:~# perf report
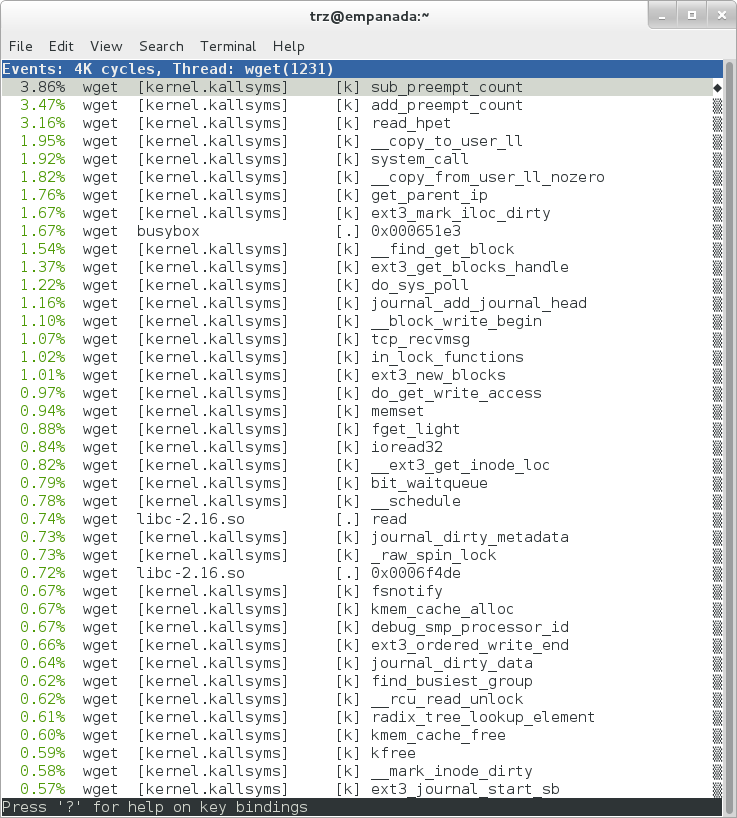
The above screenshot displays a “flat” profile, one entry for each
“bucket” corresponding to the functions that were profiled during the
profiling run, ordered from the most popular to the least (perf has
options to sort in various orders and keys as well as display entries
only above a certain threshold and so on — see the perf documentation
for details). Note that this includes both user space functions (entries
containing a [.]) and kernel functions accounted to the process (entries
containing a [k]). perf has command-line modifiers that can be used to
restrict the profiling to kernel or user space, among others.
Notice also that the above report shows an entry for busybox, which is
the executable that implements wget in Yocto, but that instead of a
useful function name in that entry, it displays a not-so-friendly hex
value instead. The steps below will show how to fix that problem.
Before we do that, however, let’s try running a different profile, one
which shows something a little more interesting. The only difference
between the new profile and the previous one is that we’ll add the -g
option, which will record not just the address of a sampled function,
but the entire call chain to the sampled function as well:
root@crownbay:~# perf record -g wget https://downloads.yoctoproject.org/mirror/sources/linux-2.6.19.2.tar.bz2
Connecting to downloads.yoctoproject.org (140.211.169.59:80)
linux-2.6.19.2.tar.b 100% |************************************************| 41727k 0:00:00 ETA
[ perf record: Woken up 3 times to write data ]
[ perf record: Captured and wrote 0.652 MB perf.data (~28476 samples) ]
root@crownbay:~# perf report

Using the call graph view, we can actually see not only which functions took the most time, but we can also see a summary of how those functions were called and learn something about how the program interacts with the kernel in the process.
Notice that each entry in the above screenshot now contains a + on the
left side. This means that we can expand the entry and drill down
into the call chains that feed into that entry. Pressing Enter on any
one of them will expand the call chain (you can also press E to expand
them all at the same time or C to collapse them all).
In the screenshot above, we’ve toggled the __copy_to_user_ll() entry
and several subnodes all the way down. This lets us see which call chains
contributed to the profiled __copy_to_user_ll() function which
contributed 1.77% to the total profile.
As a bit of background explanation for these call chains, think about
what happens at a high level when you run wget to get a file out on the
network. Basically what happens is that the data comes into the kernel
via the network connection (socket) and is passed to the user space
program wget (which is actually a part of BusyBox, but that’s not
important for now), which takes the buffers the kernel passes to it and
writes it to a disk file to save it.
The part of this process that we’re looking at in the above call stacks
is the part where the kernel passes the data it has read from the socket
down to wget i.e. a copy-to-user.
Notice also that here there’s also a case where the hex value is
displayed in the call stack, here in the expanded sys_clock_gettime()
function. Later we’ll see it resolve to a user space function call in
BusyBox.
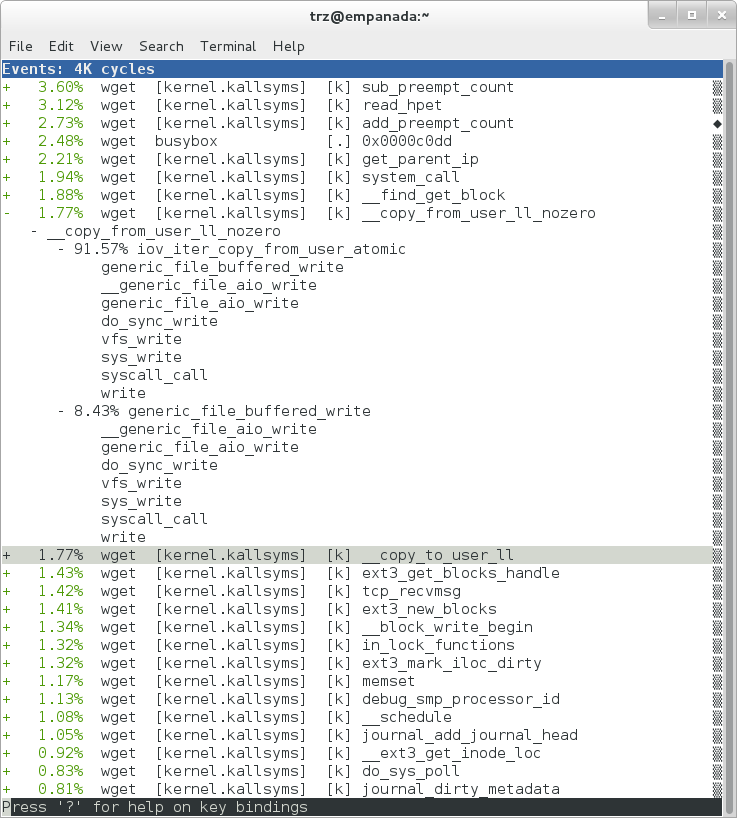
The above screenshot shows the other half of the journey for the data —
from the wget program’s user space buffers to disk. To get the buffers to
disk, the wget program issues a write(2), which does a copy-from-user to
the kernel, which then takes care via some circuitous path (probably
also present somewhere in the profile data), to get it safely to disk.
Now that we’ve seen the basic layout of the profile data and the basics
of how to extract useful information out of it, let’s get back to the
task at hand and see if we can get some basic idea about where the time
is spent in the program we’re profiling, wget. Remember that wget is
actually implemented as an applet in BusyBox, so while the process name
is wget, the executable we’re actually interested in is busybox.
Therefore, let’s expand the first entry containing BusyBox:
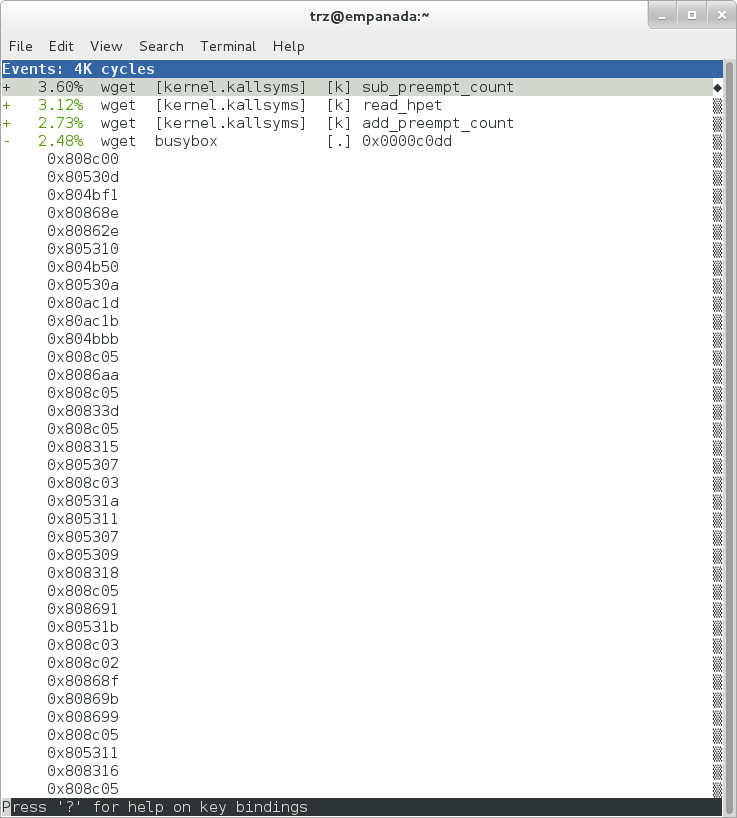
Again, before we expanded we saw that the function was labeled with a hex value instead of a symbol as with most of the kernel entries. Expanding the BusyBox entry doesn’t make it any better.
The problem is that perf can’t find the symbol information for the
busybox binary, which is actually stripped out by the Yocto build
system.
One way around that is to put the following in your local.conf file
when you build the image:
INHIBIT_PACKAGE_STRIP = "1"
However, we already have an image with the binaries stripped, so what can we do to get perf to resolve the symbols? Basically we need to install the debugging information for the BusyBox package.
To generate the debug info for the packages in the image, we can add
dbg-pkgs to EXTRA_IMAGE_FEATURES in local.conf. For example:
EXTRA_IMAGE_FEATURES:append = " dbg-pkgs"
Additionally, in order to generate the type of debugging information that perf
understands, we also need to set PACKAGE_DEBUG_SPLIT_STYLE
in the local.conf file:
PACKAGE_DEBUG_SPLIT_STYLE = 'debug-file-directory'
Once we’ve done that, we can install the debugging information for BusyBox. The
debug packages once built can be found in build/tmp/deploy/rpm/*
on the host system. Find the busybox-dbg-...rpm file and copy it
to the target. For example:
[trz@empanada core2]$ scp /home/trz/yocto/crownbay-tracing-dbg/build/tmp/deploy/rpm/core2_32/busybox-dbg-1.20.2-r2.core2_32.rpm root@192.168.1.31:
busybox-dbg-1.20.2-r2.core2_32.rpm 100% 1826KB 1.8MB/s 00:01
Now install the debug RPM on the target:
root@crownbay:~# rpm -i busybox-dbg-1.20.2-r2.core2_32.rpm
Now that the debugging information is installed, we see that the BusyBox entries now display their functions symbolically:
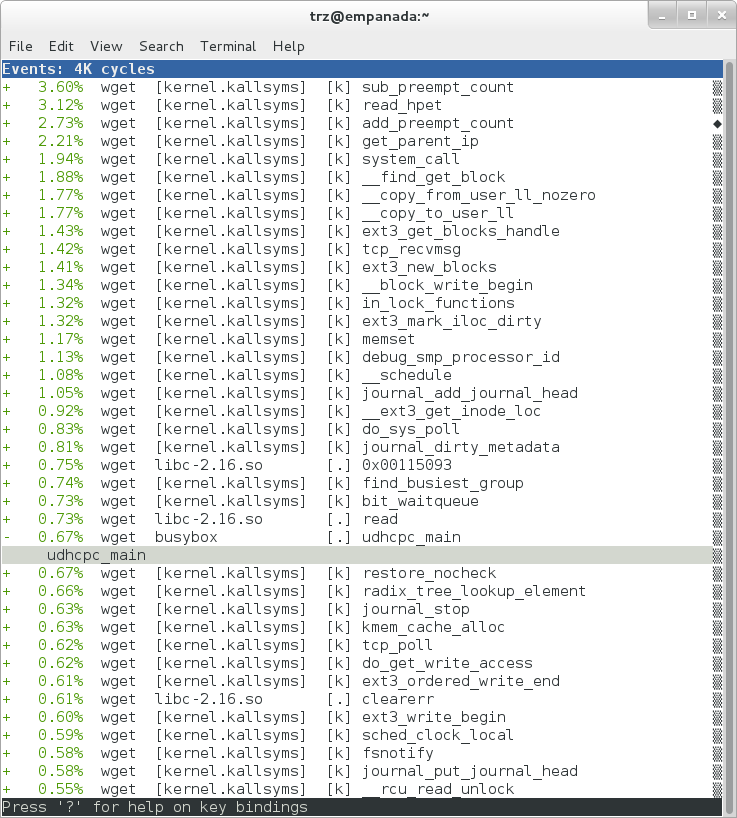
If we expand one of the entries and press Enter on a leaf node, we’re
presented with a menu of actions we can take to get more information
related to that entry:
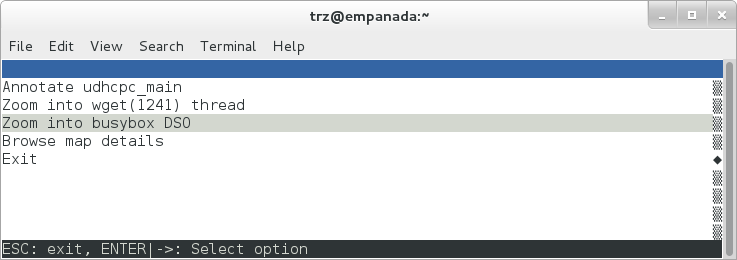
One of these actions allows us to show a view that displays a
busybox-centric view of the profiled functions (in this case we’ve also
expanded all the nodes using the E key):
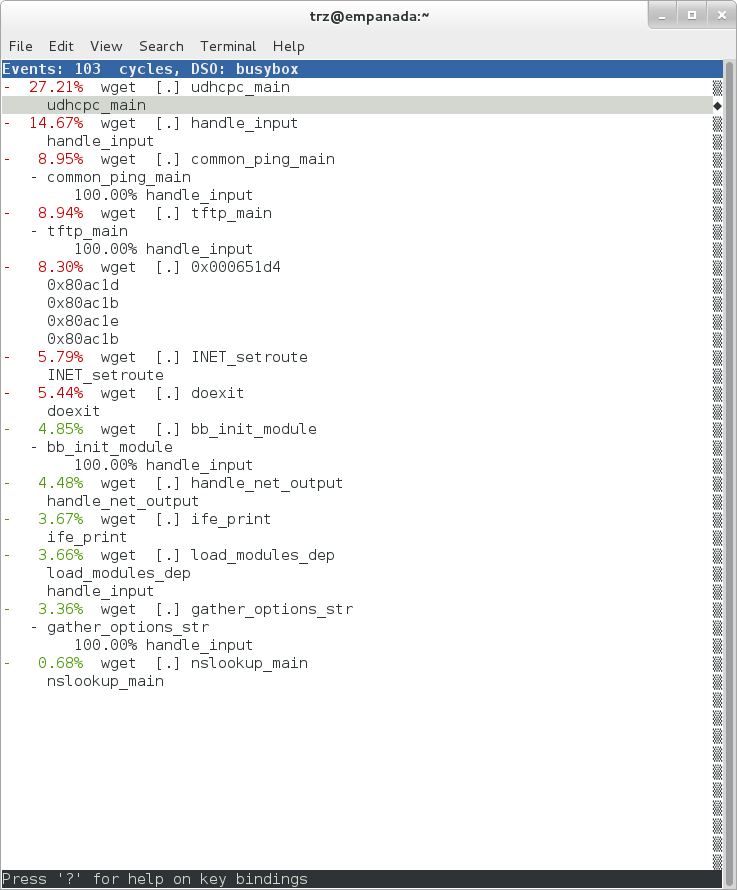
Finally, we can see that now that the BusyBox debugging information is installed,
the previously unresolved symbol in the sys_clock_gettime() entry
mentioned previously is now resolved, and shows that the
sys_clock_gettime system call that was the source of 6.75% of the
copy-to-user overhead was initiated by the handle_input() BusyBox
function:

At the lowest level of detail, we can dive down to the assembly level
and see which instructions caused the most overhead in a function.
Pressing Enter on the udhcpc_main function, we’re again presented
with a menu:
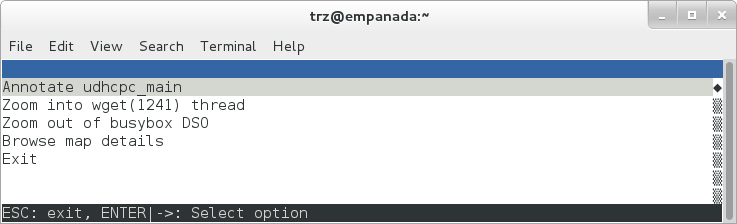
Selecting Annotate udhcpc_main, we get a detailed listing of
percentages by instruction for the udhcpc_main function. From the
display, we can see that over 50% of the time spent in this function is
taken up by a couple tests and the move of a constant (1) to a register:
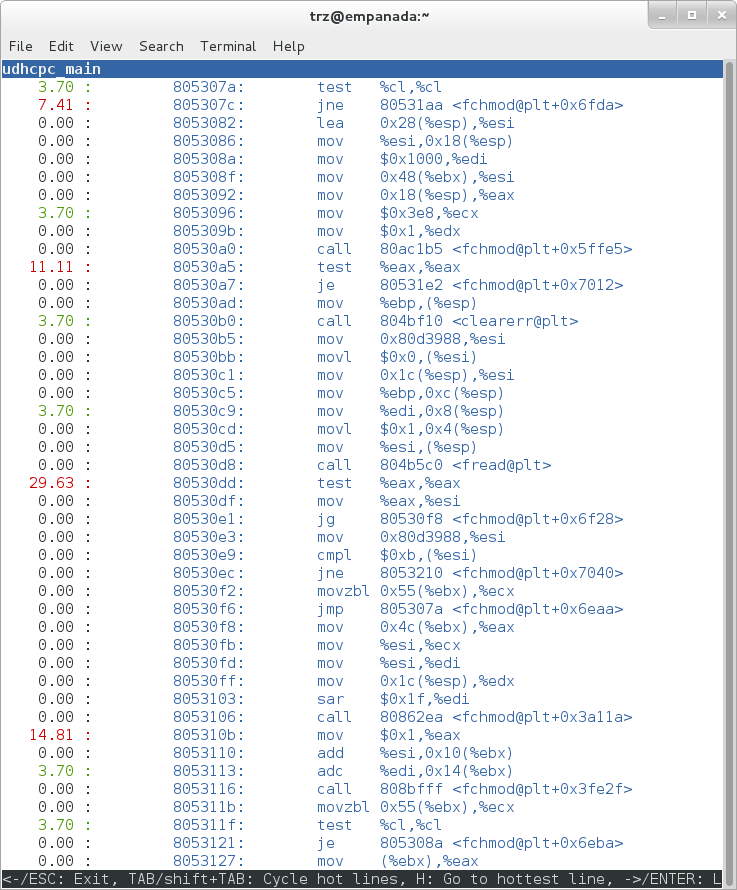
As a segue into tracing, let’s try another profile using a different
counter, something other than the default cycles.
The tracing and profiling infrastructure in Linux has become unified in a way that allows us to use the same tool with a completely different set of counters, not just the standard hardware counters that traditional tools have had to restrict themselves to (the traditional tools can now actually make use of the expanded possibilities now available to them, and in some cases have, as mentioned previously).
We can get a list of the available events that can be used to profile a
workload via perf list:
root@crownbay:~# perf list
List of pre-defined events (to be used in -e):
cpu-cycles OR cycles [Hardware event]
stalled-cycles-frontend OR idle-cycles-frontend [Hardware event]
stalled-cycles-backend OR idle-cycles-backend [Hardware event]
instructions [Hardware event]
cache-references [Hardware event]
cache-misses [Hardware event]
branch-instructions OR branches [Hardware event]
branch-misses [Hardware event]
bus-cycles [Hardware event]
ref-cycles [Hardware event]
cpu-clock [Software event]
task-clock [Software event]
page-faults OR faults [Software event]
minor-faults [Software event]
major-faults [Software event]
context-switches OR cs [Software event]
cpu-migrations OR migrations [Software event]
alignment-faults [Software event]
emulation-faults [Software event]
L1-dcache-loads [Hardware cache event]
L1-dcache-load-misses [Hardware cache event]
L1-dcache-prefetch-misses [Hardware cache event]
L1-icache-loads [Hardware cache event]
L1-icache-load-misses [Hardware cache event]
.
.
.
rNNN [Raw hardware event descriptor]
cpu/t1=v1[,t2=v2,t3 ...]/modifier [Raw hardware event descriptor]
(see 'perf list --help' on how to encode it)
mem:<addr>[:access] [Hardware breakpoint]
sunrpc:rpc_call_status [Tracepoint event]
sunrpc:rpc_bind_status [Tracepoint event]
sunrpc:rpc_connect_status [Tracepoint event]
sunrpc:rpc_task_begin [Tracepoint event]
skb:kfree_skb [Tracepoint event]
skb:consume_skb [Tracepoint event]
skb:skb_copy_datagram_iovec [Tracepoint event]
net:net_dev_xmit [Tracepoint event]
net:net_dev_queue [Tracepoint event]
net:netif_receive_skb [Tracepoint event]
net:netif_rx [Tracepoint event]
napi:napi_poll [Tracepoint event]
sock:sock_rcvqueue_full [Tracepoint event]
sock:sock_exceed_buf_limit [Tracepoint event]
udp:udp_fail_queue_rcv_skb [Tracepoint event]
hda:hda_send_cmd [Tracepoint event]
hda:hda_get_response [Tracepoint event]
hda:hda_bus_reset [Tracepoint event]
scsi:scsi_dispatch_cmd_start [Tracepoint event]
scsi:scsi_dispatch_cmd_error [Tracepoint event]
scsi:scsi_eh_wakeup [Tracepoint event]
drm:drm_vblank_event [Tracepoint event]
drm:drm_vblank_event_queued [Tracepoint event]
drm:drm_vblank_event_delivered [Tracepoint event]
random:mix_pool_bytes [Tracepoint event]
random:mix_pool_bytes_nolock [Tracepoint event]
random:credit_entropy_bits [Tracepoint event]
gpio:gpio_direction [Tracepoint event]
gpio:gpio_value [Tracepoint event]
block:block_rq_abort [Tracepoint event]
block:block_rq_requeue [Tracepoint event]
block:block_rq_issue [Tracepoint event]
block:block_bio_bounce [Tracepoint event]
block:block_bio_complete [Tracepoint event]
block:block_bio_backmerge [Tracepoint event]
.
.
writeback:writeback_wake_thread [Tracepoint event]
writeback:writeback_wake_forker_thread [Tracepoint event]
writeback:writeback_bdi_register [Tracepoint event]
.
.
writeback:writeback_single_inode_requeue [Tracepoint event]
writeback:writeback_single_inode [Tracepoint event]
kmem:kmalloc [Tracepoint event]
kmem:kmem_cache_alloc [Tracepoint event]
kmem:mm_page_alloc [Tracepoint event]
kmem:mm_page_alloc_zone_locked [Tracepoint event]
kmem:mm_page_pcpu_drain [Tracepoint event]
kmem:mm_page_alloc_extfrag [Tracepoint event]
vmscan:mm_vmscan_kswapd_sleep [Tracepoint event]
vmscan:mm_vmscan_kswapd_wake [Tracepoint event]
vmscan:mm_vmscan_wakeup_kswapd [Tracepoint event]
vmscan:mm_vmscan_direct_reclaim_begin [Tracepoint event]
.
.
module:module_get [Tracepoint event]
module:module_put [Tracepoint event]
module:module_request [Tracepoint event]
sched:sched_kthread_stop [Tracepoint event]
sched:sched_wakeup [Tracepoint event]
sched:sched_wakeup_new [Tracepoint event]
sched:sched_process_fork [Tracepoint event]
sched:sched_process_exec [Tracepoint event]
sched:sched_stat_runtime [Tracepoint event]
rcu:rcu_utilization [Tracepoint event]
workqueue:workqueue_queue_work [Tracepoint event]
workqueue:workqueue_execute_end [Tracepoint event]
signal:signal_generate [Tracepoint event]
signal:signal_deliver [Tracepoint event]
timer:timer_init [Tracepoint event]
timer:timer_start [Tracepoint event]
timer:hrtimer_cancel [Tracepoint event]
timer:itimer_state [Tracepoint event]
timer:itimer_expire [Tracepoint event]
irq:irq_handler_entry [Tracepoint event]
irq:irq_handler_exit [Tracepoint event]
irq:softirq_entry [Tracepoint event]
irq:softirq_exit [Tracepoint event]
irq:softirq_raise [Tracepoint event]
printk:console [Tracepoint event]
task:task_newtask [Tracepoint event]
task:task_rename [Tracepoint event]
syscalls:sys_enter_socketcall [Tracepoint event]
syscalls:sys_exit_socketcall [Tracepoint event]
.
.
.
syscalls:sys_enter_unshare [Tracepoint event]
syscalls:sys_exit_unshare [Tracepoint event]
raw_syscalls:sys_enter [Tracepoint event]
raw_syscalls:sys_exit [Tracepoint event]
Only a subset of these would be of interest to us when looking at this
workload, so let’s choose the most likely subsystems (identified by the
string before the colon in the Tracepoint events) and do a perf stat
run using only those subsystem wildcards:
root@crownbay:~# perf stat -e skb:* -e net:* -e napi:* -e sched:* -e workqueue:* -e irq:* -e syscalls:* wget https://downloads.yoctoproject.org/mirror/sources/linux-2.6.19.2.tar.bz2
Performance counter stats for 'wget https://downloads.yoctoproject.org/mirror/sources/linux-2.6.19.2.tar.bz2':
23323 skb:kfree_skb
0 skb:consume_skb
49897 skb:skb_copy_datagram_iovec
6217 net:net_dev_xmit
6217 net:net_dev_queue
7962 net:netif_receive_skb
2 net:netif_rx
8340 napi:napi_poll
0 sched:sched_kthread_stop
0 sched:sched_kthread_stop_ret
3749 sched:sched_wakeup
0 sched:sched_wakeup_new
0 sched:sched_switch
29 sched:sched_migrate_task
0 sched:sched_process_free
1 sched:sched_process_exit
0 sched:sched_wait_task
0 sched:sched_process_wait
0 sched:sched_process_fork
1 sched:sched_process_exec
0 sched:sched_stat_wait
2106519415641 sched:sched_stat_sleep
0 sched:sched_stat_iowait
147453613 sched:sched_stat_blocked
12903026955 sched:sched_stat_runtime
0 sched:sched_pi_setprio
3574 workqueue:workqueue_queue_work
3574 workqueue:workqueue_activate_work
0 workqueue:workqueue_execute_start
0 workqueue:workqueue_execute_end
16631 irq:irq_handler_entry
16631 irq:irq_handler_exit
28521 irq:softirq_entry
28521 irq:softirq_exit
28728 irq:softirq_raise
1 syscalls:sys_enter_sendmmsg
1 syscalls:sys_exit_sendmmsg
0 syscalls:sys_enter_recvmmsg
0 syscalls:sys_exit_recvmmsg
14 syscalls:sys_enter_socketcall
14 syscalls:sys_exit_socketcall
.
.
.
16965 syscalls:sys_enter_read
16965 syscalls:sys_exit_read
12854 syscalls:sys_enter_write
12854 syscalls:sys_exit_write
.
.
.
58.029710972 seconds time elapsed
Let’s pick one of these tracepoints and tell perf to do a profile using it as the sampling event:
root@crownbay:~# perf record -g -e sched:sched_wakeup wget https://downloads.yoctoproject.org/mirror/sources/linux-2.6.19.2.tar.bz2
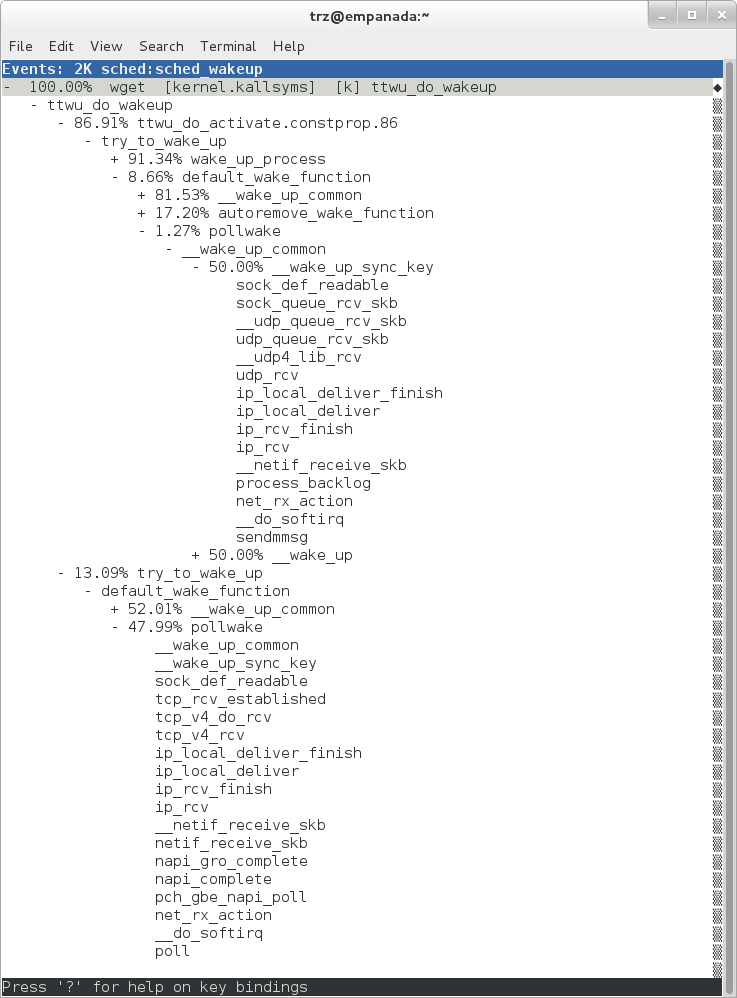
The screenshot above shows the results of running a profile using
sched:sched_switch tracepoint, which shows the relative costs of various
paths to sched_wakeup (note that sched_wakeup is the name of the
tracepoint — it’s actually defined just inside ttwu_do_wakeup(), which
accounts for the function name actually displayed in the profile:
/*
* Mark the task runnable and perform wakeup-preemption.
*/
static void
ttwu_do_wakeup(struct rq *rq, struct task_struct *p, int wake_flags)
{
trace_sched_wakeup(p, true);
.
.
.
}
A couple of the more interesting call chains are expanded and displayed above, basically some network receive paths that presumably end up waking up wget (BusyBox) when network data is ready.
Note that because tracepoints are normally used for tracing, the default
sampling period for tracepoints is 1 i.e. for tracepoints perf will
sample on every event occurrence (this can be changed using the -c
option). This is in contrast to hardware counters such as for example
the default cycles hardware counter used for normal profiling, where
sampling periods are much higher (in the thousands) because profiling
should have as low an overhead as possible and sampling on every cycle
would be prohibitively expensive.
3.1.2.2 Using perf to do Basic Tracing
Profiling is a great tool for solving many problems or for getting a
high-level view of what’s going on with a workload or across the system.
It is however by definition an approximation, as suggested by the most
prominent word associated with it, sampling. On the one hand, it
allows a representative picture of what’s going on in the system to be
cheaply taken, but alternatively, that cheapness limits its utility
when that data suggests a need to “dive down” more deeply to discover
what’s really going on. In such cases, the only way to see what’s really
going on is to be able to look at (or summarize more intelligently) the
individual steps that go into the higher-level behavior exposed by the
coarse-grained profiling data.
As a concrete example, we can trace all the events we think might be applicable to our workload:
root@crownbay:~# perf record -g -e skb:* -e net:* -e napi:* -e sched:sched_switch -e sched:sched_wakeup -e irq:*
-e syscalls:sys_enter_read -e syscalls:sys_exit_read -e syscalls:sys_enter_write -e syscalls:sys_exit_write
wget https://downloads.yoctoproject.org/mirror/sources/linux-2.6.19.2.tar.bz2
We can look at the raw trace output using perf script with no
arguments:
root@crownbay:~# perf script
perf 1262 [000] 11624.857082: sys_exit_read: 0x0
perf 1262 [000] 11624.857193: sched_wakeup: comm=migration/0 pid=6 prio=0 success=1 target_cpu=000
wget 1262 [001] 11624.858021: softirq_raise: vec=1 [action=TIMER]
wget 1262 [001] 11624.858074: softirq_entry: vec=1 [action=TIMER]
wget 1262 [001] 11624.858081: softirq_exit: vec=1 [action=TIMER]
wget 1262 [001] 11624.858166: sys_enter_read: fd: 0x0003, buf: 0xbf82c940, count: 0x0200
wget 1262 [001] 11624.858177: sys_exit_read: 0x200
wget 1262 [001] 11624.858878: kfree_skb: skbaddr=0xeb248d80 protocol=0 location=0xc15a5308
wget 1262 [001] 11624.858945: kfree_skb: skbaddr=0xeb248000 protocol=0 location=0xc15a5308
wget 1262 [001] 11624.859020: softirq_raise: vec=1 [action=TIMER]
wget 1262 [001] 11624.859076: softirq_entry: vec=1 [action=TIMER]
wget 1262 [001] 11624.859083: softirq_exit: vec=1 [action=TIMER]
wget 1262 [001] 11624.859167: sys_enter_read: fd: 0x0003, buf: 0xb7720000, count: 0x0400
wget 1262 [001] 11624.859192: sys_exit_read: 0x1d7
wget 1262 [001] 11624.859228: sys_enter_read: fd: 0x0003, buf: 0xb7720000, count: 0x0400
wget 1262 [001] 11624.859233: sys_exit_read: 0x0
wget 1262 [001] 11624.859573: sys_enter_read: fd: 0x0003, buf: 0xbf82c580, count: 0x0200
wget 1262 [001] 11624.859584: sys_exit_read: 0x200
wget 1262 [001] 11624.859864: sys_enter_read: fd: 0x0003, buf: 0xb7720000, count: 0x0400
wget 1262 [001] 11624.859888: sys_exit_read: 0x400
wget 1262 [001] 11624.859935: sys_enter_read: fd: 0x0003, buf: 0xb7720000, count: 0x0400
wget 1262 [001] 11624.859944: sys_exit_read: 0x400
This gives us a detailed timestamped sequence of events that occurred within the workload with respect to those events.
In many ways, profiling can be viewed as a subset of tracing — theoretically, if you have a set of trace events that’s sufficient to capture all the important aspects of a workload, you can derive any of the results or views that a profiling run can.
Another aspect of traditional profiling is that while powerful in many ways, it’s limited by the granularity of the underlying data. Profiling tools offer various ways of sorting and presenting the sample data, which make it much more useful and amenable to user experimentation, but in the end it can’t be used in an open-ended way to extract data that just isn’t present as a consequence of the fact that conceptually, most of it has been thrown away.
Full-blown detailed tracing data does however offer the opportunity to manipulate and present the information collected during a tracing run in an infinite variety of ways.
Another way to look at it is that there are only so many ways that the
‘primitive’ counters can be used on their own to generate interesting
output; to get anything more complicated than simple counts requires
some amount of additional logic, which is typically specific to the
problem at hand. For example, if we wanted to make use of a ‘counter’
that maps to the value of the time difference between when a process was
scheduled to run on a processor and the time it actually ran, we
wouldn’t expect such a counter to exist on its own, but we could derive
one called say wakeup_latency and use it to extract a useful view of
that metric from trace data. Likewise, we really can’t figure out from
standard profiling tools how much data every process on the system reads
and writes, along with how many of those reads and writes fail
completely. If we have sufficient trace data, however, we could with the
right tools easily extract and present that information, but we’d need
something other than ready-made profiling tools to do that.
Luckily, there is a general-purpose way to handle such needs, called “programming languages”. Making programming languages easily available to apply to such problems given the specific format of data is called a ‘programming language binding’ for that data and language. perf supports two programming language bindings, one for Python and one for Perl.
Now that we have the trace data in perf.data, we can use perf script
-g to generate a skeleton script with handlers for the read / write
entry / exit events we recorded:
root@crownbay:~# perf script -g python
generated Python script: perf-script.py
The skeleton script just creates a Python function for each event type in the
perf.data file. The body of each function just prints the event name along
with its parameters. For example:
def net__netif_rx(event_name, context, common_cpu,
common_secs, common_nsecs, common_pid, common_comm,
skbaddr, len, name):
print_header(event_name, common_cpu, common_secs, common_nsecs,
common_pid, common_comm)
print "skbaddr=%u, len=%u, name=%s\n" % (skbaddr, len, name),
We can run that script directly to print all of the events contained in the
perf.data file:
root@crownbay:~# perf script -s perf-script.py
in trace_begin
syscalls__sys_exit_read 0 11624.857082795 1262 perf nr=3, ret=0
sched__sched_wakeup 0 11624.857193498 1262 perf comm=migration/0, pid=6, prio=0, success=1, target_cpu=0
irq__softirq_raise 1 11624.858021635 1262 wget vec=TIMER
irq__softirq_entry 1 11624.858074075 1262 wget vec=TIMER
irq__softirq_exit 1 11624.858081389 1262 wget vec=TIMER
syscalls__sys_enter_read 1 11624.858166434 1262 wget nr=3, fd=3, buf=3213019456, count=512
syscalls__sys_exit_read 1 11624.858177924 1262 wget nr=3, ret=512
skb__kfree_skb 1 11624.858878188 1262 wget skbaddr=3945041280, location=3243922184, protocol=0
skb__kfree_skb 1 11624.858945608 1262 wget skbaddr=3945037824, location=3243922184, protocol=0
irq__softirq_raise 1 11624.859020942 1262 wget vec=TIMER
irq__softirq_entry 1 11624.859076935 1262 wget vec=TIMER
irq__softirq_exit 1 11624.859083469 1262 wget vec=TIMER
syscalls__sys_enter_read 1 11624.859167565 1262 wget nr=3, fd=3, buf=3077701632, count=1024
syscalls__sys_exit_read 1 11624.859192533 1262 wget nr=3, ret=471
syscalls__sys_enter_read 1 11624.859228072 1262 wget nr=3, fd=3, buf=3077701632, count=1024
syscalls__sys_exit_read 1 11624.859233707 1262 wget nr=3, ret=0
syscalls__sys_enter_read 1 11624.859573008 1262 wget nr=3, fd=3, buf=3213018496, count=512
syscalls__sys_exit_read 1 11624.859584818 1262 wget nr=3, ret=512
syscalls__sys_enter_read 1 11624.859864562 1262 wget nr=3, fd=3, buf=3077701632, count=1024
syscalls__sys_exit_read 1 11624.859888770 1262 wget nr=3, ret=1024
syscalls__sys_enter_read 1 11624.859935140 1262 wget nr=3, fd=3, buf=3077701632, count=1024
syscalls__sys_exit_read 1 11624.859944032 1262 wget nr=3, ret=1024
That in itself isn’t very useful; after all, we can accomplish pretty much the
same thing by just running perf script without arguments in the same
directory as the perf.data file.
We can however replace the print statements in the generated function bodies with whatever we want, and thereby make it infinitely more useful.
As a simple example, let’s just replace the print statements in the function bodies with a simple function that does nothing but increment a per-event count. When the program is run against a perf.data file, each time a particular event is encountered, a tally is incremented for that event. For example:
def net__netif_rx(event_name, context, common_cpu,
common_secs, common_nsecs, common_pid, common_comm,
skbaddr, len, name):
inc_counts(event_name)
Each event handler function in the generated code
is modified to do this. For convenience, we define a common function
called inc_counts() that each handler calls; inc_counts() just tallies
a count for each event using the counts hash, which is a specialized
hash function that does Perl-like autovivification, a capability that’s
extremely useful for kinds of multi-level aggregation commonly used in
processing traces (see perf’s documentation on the Python language
binding for details):
counts = autodict()
def inc_counts(event_name):
try:
counts[event_name] += 1
except TypeError:
counts[event_name] = 1
Finally, at the end of the trace processing run, we want to print the
result of all the per-event tallies. For that, we use the special
trace_end() function:
def trace_end():
for event_name, count in counts.iteritems():
print "%-40s %10s\n" % (event_name, count)
The end result is a summary of all the events recorded in the trace:
skb__skb_copy_datagram_iovec 13148
irq__softirq_entry 4796
irq__irq_handler_exit 3805
irq__softirq_exit 4795
syscalls__sys_enter_write 8990
net__net_dev_xmit 652
skb__kfree_skb 4047
sched__sched_wakeup 1155
irq__irq_handler_entry 3804
irq__softirq_raise 4799
net__net_dev_queue 652
syscalls__sys_enter_read 17599
net__netif_receive_skb 1743
syscalls__sys_exit_read 17598
net__netif_rx 2
napi__napi_poll 1877
syscalls__sys_exit_write 8990
Note that this is
pretty much exactly the same information we get from perf stat, which
goes a little way to support the idea mentioned previously that given
the right kind of trace data, higher-level profiling-type summaries can
be derived from it.
Documentation on using the 'perf script' Python binding.
3.1.2.3 System-Wide Tracing and Profiling
The examples so far have focused on tracing a particular program or
workload — that is, every profiling run has specified the program
to profile in the command-line e.g. perf record wget ....
It’s also possible, and more interesting in many cases, to run a system-wide profile or trace while running the workload in a separate shell.
To do system-wide profiling or tracing, you typically use the -a flag to
perf record.
To demonstrate this, open up one window and start the profile using the
-a flag (press Ctrl-C to stop tracing):
root@crownbay:~# perf record -g -a
^C[ perf record: Woken up 6 times to write data ]
[ perf record: Captured and wrote 1.400 MB perf.data (~61172 samples) ]
In another window, run the wget test:
root@crownbay:~# wget https://downloads.yoctoproject.org/mirror/sources/linux-2.6.19.2.tar.bz2
Connecting to downloads.yoctoproject.org (140.211.169.59:80)
linux-2.6.19.2.tar.b 100% \|*******************************\| 41727k 0:00:00 ETA
Here we see entries not only for our wget load, but for
other processes running on the system as well:
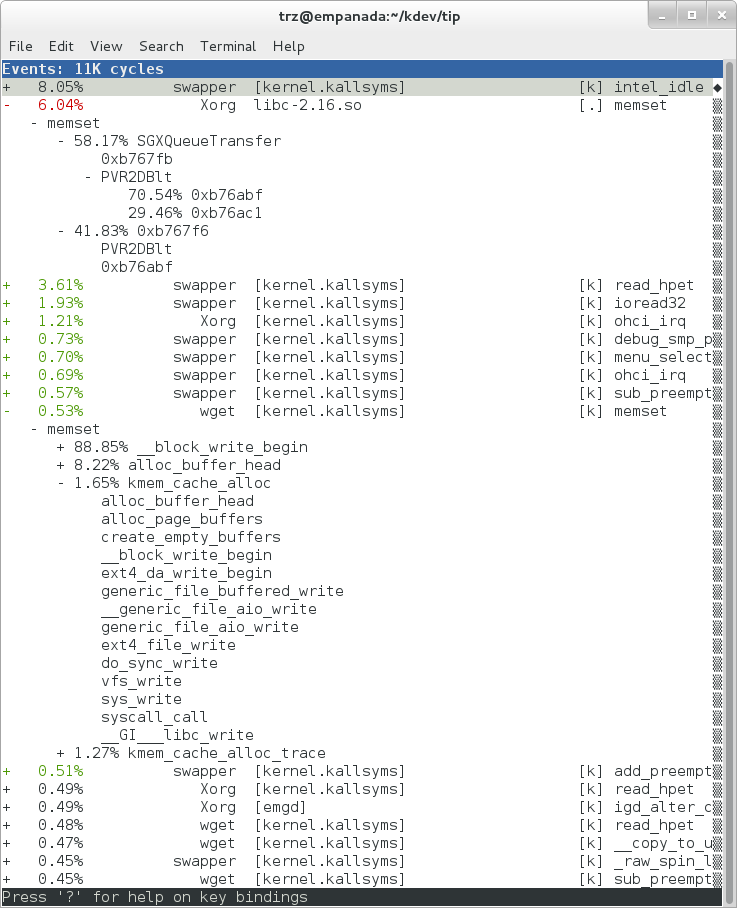
In the snapshot above, we can see call chains that originate in libc, and
a call chain from Xorg that demonstrates that we’re using a proprietary X
driver in user space (notice the presence of PVR and some other
unresolvable symbols in the expanded Xorg call chain).
Note also that we have both kernel and user space entries in the above
snapshot. We can also tell perf to focus on user space but providing a
modifier, in this case u, to the cycles hardware counter when we
record a profile:
root@crownbay:~# perf record -g -a -e cycles:u
^C[ perf record: Woken up 2 times to write data ]
[ perf record: Captured and wrote 0.376 MB perf.data (~16443 samples) ]
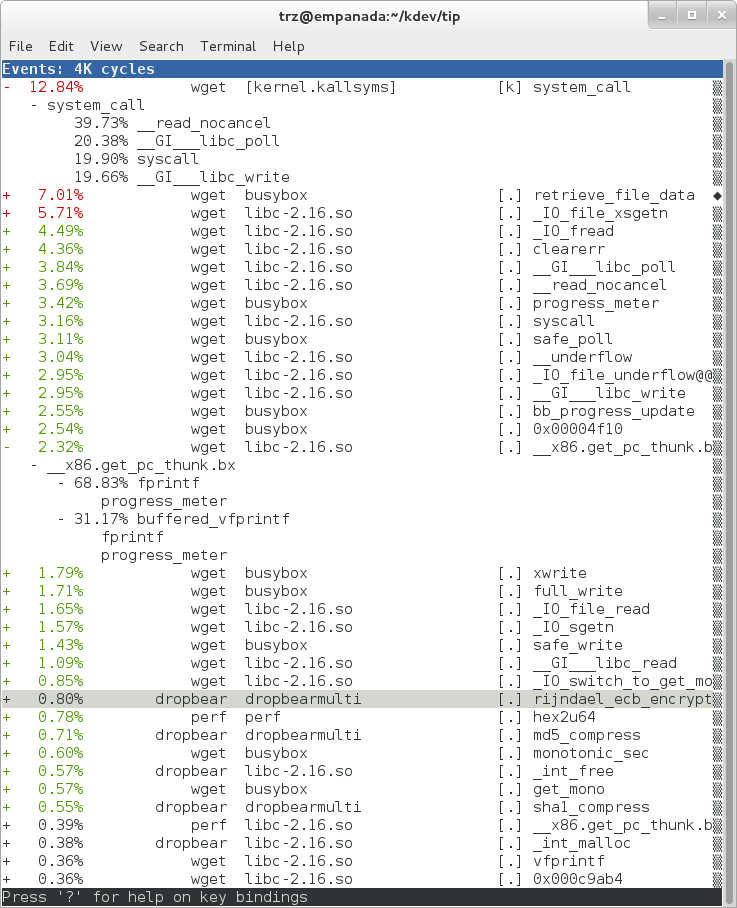
Notice in the screenshot above, we see only user space entries ([.])
Finally, we can press Enter on a leaf node and select the Zoom into
DSO menu item to show only entries associated with a specific DSO. In
the screenshot below, we’ve zoomed into the libc DSO which shows all
the entries associated with the libc-xxx.so DSO.
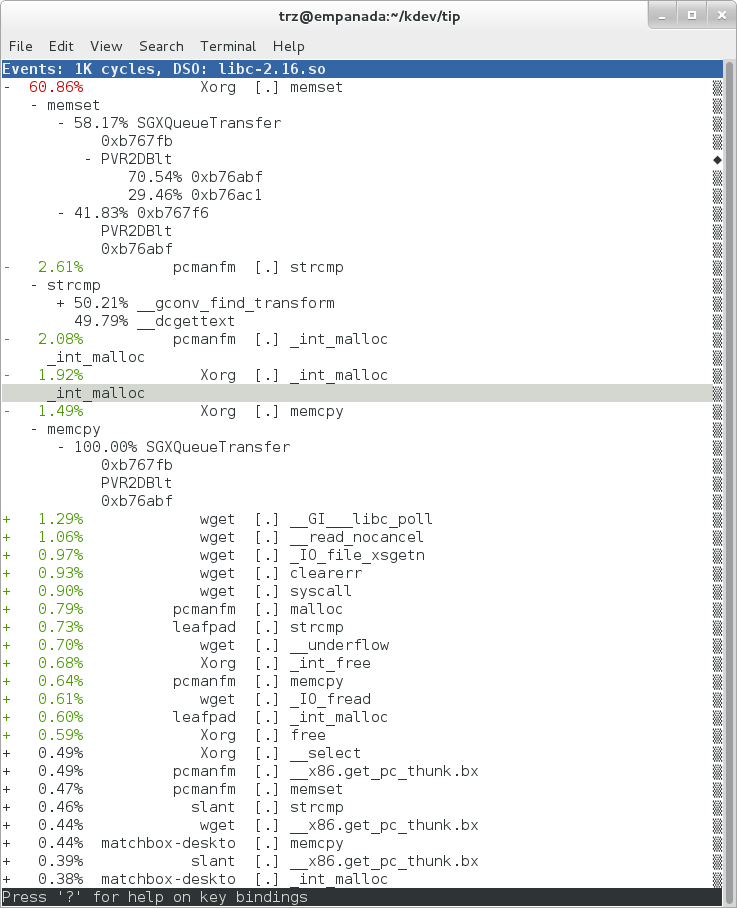
We can also use the system-wide -a switch to do system-wide tracing.
Here we’ll trace a couple of scheduler events:
root@crownbay:~# perf record -a -e sched:sched_switch -e sched:sched_wakeup
^C[ perf record: Woken up 38 times to write data ]
[ perf record: Captured and wrote 9.780 MB perf.data (~427299 samples) ]
We can look at the raw output using perf script with no arguments:
root@crownbay:~# perf script
perf 1383 [001] 6171.460045: sched_wakeup: comm=kworker/1:1 pid=21 prio=120 success=1 target_cpu=001
perf 1383 [001] 6171.460066: sched_switch: prev_comm=perf prev_pid=1383 prev_prio=120 prev_state=R+ ==> next_comm=kworker/1:1 next_pid=21 next_prio=120
kworker/1:1 21 [001] 6171.460093: sched_switch: prev_comm=kworker/1:1 prev_pid=21 prev_prio=120 prev_state=S ==> next_comm=perf next_pid=1383 next_prio=120
swapper 0 [000] 6171.468063: sched_wakeup: comm=kworker/0:3 pid=1209 prio=120 success=1 target_cpu=000
swapper 0 [000] 6171.468107: sched_switch: prev_comm=swapper/0 prev_pid=0 prev_prio=120 prev_state=R ==> next_comm=kworker/0:3 next_pid=1209 next_prio=120
kworker/0:3 1209 [000] 6171.468143: sched_switch: prev_comm=kworker/0:3 prev_pid=1209 prev_prio=120 prev_state=S ==> next_comm=swapper/0 next_pid=0 next_prio=120
perf 1383 [001] 6171.470039: sched_wakeup: comm=kworker/1:1 pid=21 prio=120 success=1 target_cpu=001
perf 1383 [001] 6171.470058: sched_switch: prev_comm=perf prev_pid=1383 prev_prio=120 prev_state=R+ ==> next_comm=kworker/1:1 next_pid=21 next_prio=120
kworker/1:1 21 [001] 6171.470082: sched_switch: prev_comm=kworker/1:1 prev_pid=21 prev_prio=120 prev_state=S ==> next_comm=perf next_pid=1383 next_prio=120
perf 1383 [001] 6171.480035: sched_wakeup: comm=kworker/1:1 pid=21 prio=120 success=1 target_cpu=001
3.1.2.3.1 Filtering
Notice that there are many events that don’t really have anything to
do with what we’re interested in, namely events that schedule perf
itself in and out or that wake perf up. We can get rid of those by using
the --filter option — for each event we specify using -e, we can add a
--filter after that to filter out trace events that contain fields with
specific values:
root@crownbay:~# perf record -a -e sched:sched_switch --filter 'next_comm != perf && prev_comm != perf' -e sched:sched_wakeup --filter 'comm != perf'
^C[ perf record: Woken up 38 times to write data ]
[ perf record: Captured and wrote 9.688 MB perf.data (~423279 samples) ]
root@crownbay:~# perf script
swapper 0 [000] 7932.162180: sched_switch: prev_comm=swapper/0 prev_pid=0 prev_prio=120 prev_state=R ==> next_comm=kworker/0:3 next_pid=1209 next_prio=120
kworker/0:3 1209 [000] 7932.162236: sched_switch: prev_comm=kworker/0:3 prev_pid=1209 prev_prio=120 prev_state=S ==> next_comm=swapper/0 next_pid=0 next_prio=120
perf 1407 [001] 7932.170048: sched_wakeup: comm=kworker/1:1 pid=21 prio=120 success=1 target_cpu=001
perf 1407 [001] 7932.180044: sched_wakeup: comm=kworker/1:1 pid=21 prio=120 success=1 target_cpu=001
perf 1407 [001] 7932.190038: sched_wakeup: comm=kworker/1:1 pid=21 prio=120 success=1 target_cpu=001
perf 1407 [001] 7932.200044: sched_wakeup: comm=kworker/1:1 pid=21 prio=120 success=1 target_cpu=001
perf 1407 [001] 7932.210044: sched_wakeup: comm=kworker/1:1 pid=21 prio=120 success=1 target_cpu=001
perf 1407 [001] 7932.220044: sched_wakeup: comm=kworker/1:1 pid=21 prio=120 success=1 target_cpu=001
swapper 0 [001] 7932.230111: sched_wakeup: comm=kworker/1:1 pid=21 prio=120 success=1 target_cpu=001
swapper 0 [001] 7932.230146: sched_switch: prev_comm=swapper/1 prev_pid=0 prev_prio=120 prev_state=R ==> next_comm=kworker/1:1 next_pid=21 next_prio=120
kworker/1:1 21 [001] 7932.230205: sched_switch: prev_comm=kworker/1:1 prev_pid=21 prev_prio=120 prev_state=S ==> next_comm=swapper/1 next_pid=0 next_prio=120
swapper 0 [000] 7932.326109: sched_wakeup: comm=kworker/0:3 pid=1209 prio=120 success=1 target_cpu=000
swapper 0 [000] 7932.326171: sched_switch: prev_comm=swapper/0 prev_pid=0 prev_prio=120 prev_state=R ==> next_comm=kworker/0:3 next_pid=1209 next_prio=120
kworker/0:3 1209 [000] 7932.326214: sched_switch: prev_comm=kworker/0:3 prev_pid=1209 prev_prio=120 prev_state=S ==> next_comm=swapper/0 next_pid=0 next_prio=120
In this case, we’ve filtered out all events that have
perf in their comm, comm_prev or comm_next fields. Notice that
there are still events recorded for perf, but notice that those events
don’t have values of perf for the filtered fields. To completely
filter out anything from perf will require a bit more work, but for the
purpose of demonstrating how to use filters, it’s close enough.
3.1.2.4 Using Dynamic Tracepoints
perf isn’t restricted to the fixed set of static tracepoints listed by
perf list. Users can also add their own “dynamic” tracepoints anywhere
in the kernel. For example, suppose we want to define our own
tracepoint on do_fork(). We can do that using the perf probe perf
subcommand:
root@crownbay:~# perf probe do_fork
Added new event:
probe:do_fork (on do_fork)
You can now use it in all perf tools, such as:
perf record -e probe:do_fork -aR sleep 1
Adding a new tracepoint via
perf probe results in an event with all the expected files and format
in /sys/kernel/debug/tracing/events, just the same as for static
tracepoints (as discussed in more detail in the trace events subsystem
section:
root@crownbay:/sys/kernel/debug/tracing/events/probe/do_fork# ls -al
drwxr-xr-x 2 root root 0 Oct 28 11:42 .
drwxr-xr-x 3 root root 0 Oct 28 11:42 ..
-rw-r--r-- 1 root root 0 Oct 28 11:42 enable
-rw-r--r-- 1 root root 0 Oct 28 11:42 filter
-r--r--r-- 1 root root 0 Oct 28 11:42 format
-r--r--r-- 1 root root 0 Oct 28 11:42 id
root@crownbay:/sys/kernel/debug/tracing/events/probe/do_fork# cat format
name: do_fork
ID: 944
format:
field:unsigned short common_type; offset:0; size:2; signed:0;
field:unsigned char common_flags; offset:2; size:1; signed:0;
field:unsigned char common_preempt_count; offset:3; size:1; signed:0;
field:int common_pid; offset:4; size:4; signed:1;
field:int common_padding; offset:8; size:4; signed:1;
field:unsigned long __probe_ip; offset:12; size:4; signed:0;
print fmt: "(%lx)", REC->__probe_ip
We can list all dynamic tracepoints currently in existence:
root@crownbay:~# perf probe -l
probe:do_fork (on do_fork)
probe:schedule (on schedule)
Let’s record system-wide (sleep 30 is a
trick for recording system-wide but basically do nothing and then wake
up after 30 seconds):
root@crownbay:~# perf record -g -a -e probe:do_fork sleep 30
[ perf record: Woken up 1 times to write data ]
[ perf record: Captured and wrote 0.087 MB perf.data (~3812 samples) ]
Using perf script we can see each do_fork event that fired:
root@crownbay:~# perf script
# ========
# captured on: Sun Oct 28 11:55:18 2012
# hostname : crownbay
# os release : 3.4.11-yocto-standard
# perf version : 3.4.11
# arch : i686
# nrcpus online : 2
# nrcpus avail : 2
# cpudesc : Intel(R) Atom(TM) CPU E660 @ 1.30GHz
# cpuid : GenuineIntel,6,38,1
# total memory : 1017184 kB
# cmdline : /usr/bin/perf record -g -a -e probe:do_fork sleep 30
# event : name = probe:do_fork, type = 2, config = 0x3b0, config1 = 0x0, config2 = 0x0, excl_usr = 0, excl_kern
= 0, id = { 5, 6 }
# HEADER_CPU_TOPOLOGY info available, use -I to display
# ========
#
matchbox-deskto 1197 [001] 34211.378318: do_fork: (c1028460)
matchbox-deskto 1295 [001] 34211.380388: do_fork: (c1028460)
pcmanfm 1296 [000] 34211.632350: do_fork: (c1028460)
pcmanfm 1296 [000] 34211.639917: do_fork: (c1028460)
matchbox-deskto 1197 [001] 34217.541603: do_fork: (c1028460)
matchbox-deskto 1299 [001] 34217.543584: do_fork: (c1028460)
gthumb 1300 [001] 34217.697451: do_fork: (c1028460)
gthumb 1300 [001] 34219.085734: do_fork: (c1028460)
gthumb 1300 [000] 34219.121351: do_fork: (c1028460)
gthumb 1300 [001] 34219.264551: do_fork: (c1028460)
pcmanfm 1296 [000] 34219.590380: do_fork: (c1028460)
matchbox-deskto 1197 [001] 34224.955965: do_fork: (c1028460)
matchbox-deskto 1306 [001] 34224.957972: do_fork: (c1028460)
matchbox-termin 1307 [000] 34225.038214: do_fork: (c1028460)
matchbox-termin 1307 [001] 34225.044218: do_fork: (c1028460)
matchbox-termin 1307 [000] 34225.046442: do_fork: (c1028460)
matchbox-deskto 1197 [001] 34237.112138: do_fork: (c1028460)
matchbox-deskto 1311 [001] 34237.114106: do_fork: (c1028460)
gaku 1312 [000] 34237.202388: do_fork: (c1028460)
And using perf report on the same file, we can see the
call graphs from starting a few programs during those 30 seconds:
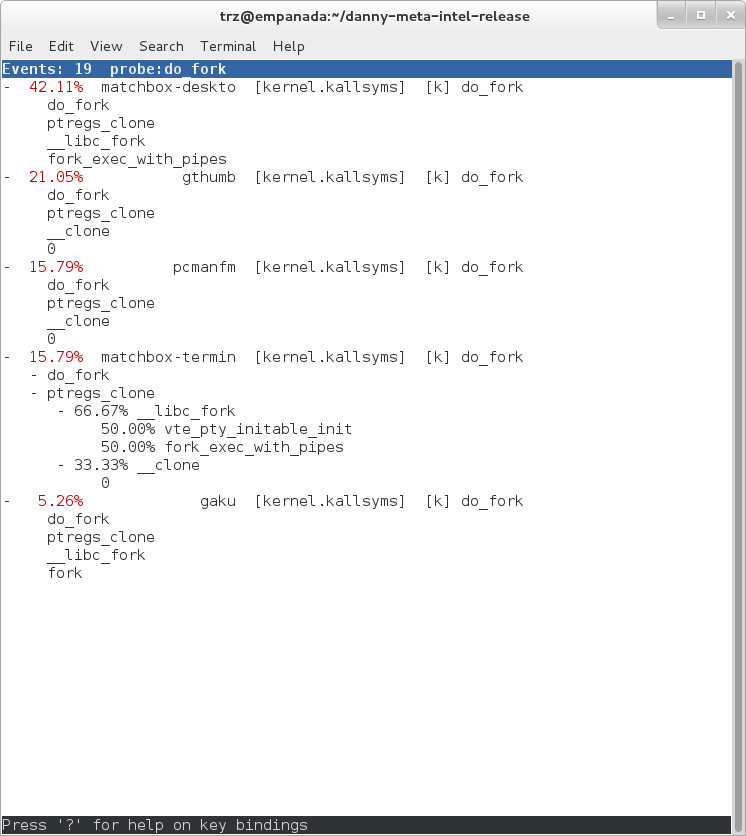
3.1.3 perf Documentation
Online versions of the manual pages for the commands discussed in this section can be found here:
Documentation on using the 'perf script' Python binding.
The top-level perf(1) manual page.
Normally, you should be able to open the manual pages via perf itself
e.g. perf help or perf help record.
To have the perf manual pages installed on your target, modify your configuration as follows:
IMAGE_INSTALL:append = " perf perf-doc"
DISTRO_FEATURES:append = " api-documentation"
The manual pages in text form, along with some other files, such as a set
of examples, can also be found in the perf directory of the kernel tree:
tools/perf/Documentation
There’s also a nice perf tutorial on the perf wiki that goes into more detail than we do here in certain areas: perf Tutorial
3.2 ftrace
“ftrace” literally refers to the “ftrace function tracer” but in reality this encompasses several related tracers along with the infrastructure that they all make use of.
3.2.1 ftrace Setup
For this section, we’ll assume you’ve already performed the basic setup outlined in the “General Setup” section.
ftrace, trace-cmd, and KernelShark run on the target system, and are
ready to go out-of-the-box — no additional setup is necessary. For the
rest of this section we assume you’re connected to the host through SSH and
will be running ftrace on the target. KernelShark is a GUI application and if
you use the -X option to ssh you can have the KernelShark GUI run on
the target but display remotely on the host if you want.
3.2.2 Basic ftrace usage
“ftrace” essentially refers to everything included in the /tracing
directory of the mounted debugfs filesystem (Yocto follows the standard
convention and mounts it at /sys/kernel/debug). All the files found in
/sys/kernel/debug/tracing on a Yocto system are:
root@sugarbay:/sys/kernel/debug/tracing# ls
README kprobe_events trace
available_events kprobe_profile trace_clock
available_filter_functions options trace_marker
available_tracers per_cpu trace_options
buffer_size_kb printk_formats trace_pipe
buffer_total_size_kb saved_cmdlines tracing_cpumask
current_tracer set_event tracing_enabled
dyn_ftrace_total_info set_ftrace_filter tracing_on
enabled_functions set_ftrace_notrace tracing_thresh
events set_ftrace_pid
free_buffer set_graph_function
The files listed above are used for various purposes — some relate directly to the tracers themselves, others are used to set tracing options, and yet others actually contain the tracing output when a tracer is in effect. Some of the functions can be guessed from their names, others need explanation; in any case, we’ll cover some of the files we see here below but for an explanation of the others, please see the ftrace documentation.
We’ll start by looking at some of the available built-in tracers.
The available_tracers file lists the set of available tracers:
root@sugarbay:/sys/kernel/debug/tracing# cat available_tracers
blk function_graph function nop
The current_tracer file contains the tracer currently in effect:
root@sugarbay:/sys/kernel/debug/tracing# cat current_tracer
nop
The above listing of current_tracer shows that the
nop tracer is in effect, which is just another way of saying that
there’s actually no tracer currently in effect.
Writing one of the available tracers into current_tracer makes the
specified tracer the current tracer:
root@sugarbay:/sys/kernel/debug/tracing# echo function > current_tracer
root@sugarbay:/sys/kernel/debug/tracing# cat current_tracer
function
The above sets the current tracer to be the function tracer. This tracer
traces every function call in the kernel and makes it available as the
contents of the trace file. Reading the trace file lists the
currently buffered function calls that have been traced by the function
tracer:
root@sugarbay:/sys/kernel/debug/tracing# cat trace | less
# tracer: function
#
# entries-in-buffer/entries-written: 310629/766471 #P:8
#
# _-----=> irqs-off
# / _----=> need-resched
# | / _---=> hardirq/softirq
# || / _--=> preempt-depth
# ||| / delay
# TASK-PID CPU# |||| TIMESTAMP FUNCTION
# | | | |||| | |
<idle>-0 [004] d..1 470.867169: ktime_get_real <-intel_idle
<idle>-0 [004] d..1 470.867170: getnstimeofday <-ktime_get_real
<idle>-0 [004] d..1 470.867171: ns_to_timeval <-intel_idle
<idle>-0 [004] d..1 470.867171: ns_to_timespec <-ns_to_timeval
<idle>-0 [004] d..1 470.867172: smp_apic_timer_interrupt <-apic_timer_interrupt
<idle>-0 [004] d..1 470.867172: native_apic_mem_write <-smp_apic_timer_interrupt
<idle>-0 [004] d..1 470.867172: irq_enter <-smp_apic_timer_interrupt
<idle>-0 [004] d..1 470.867172: rcu_irq_enter <-irq_enter
<idle>-0 [004] d..1 470.867173: rcu_idle_exit_common.isra.33 <-rcu_irq_enter
<idle>-0 [004] d..1 470.867173: local_bh_disable <-irq_enter
<idle>-0 [004] d..1 470.867173: add_preempt_count <-local_bh_disable
<idle>-0 [004] d.s1 470.867174: tick_check_idle <-irq_enter
<idle>-0 [004] d.s1 470.867174: tick_check_oneshot_broadcast <-tick_check_idle
<idle>-0 [004] d.s1 470.867174: ktime_get <-tick_check_idle
<idle>-0 [004] d.s1 470.867174: tick_nohz_stop_idle <-tick_check_idle
<idle>-0 [004] d.s1 470.867175: update_ts_time_stats <-tick_nohz_stop_idle
<idle>-0 [004] d.s1 470.867175: nr_iowait_cpu <-update_ts_time_stats
<idle>-0 [004] d.s1 470.867175: tick_do_update_jiffies64 <-tick_check_idle
<idle>-0 [004] d.s1 470.867175: _raw_spin_lock <-tick_do_update_jiffies64
<idle>-0 [004] d.s1 470.867176: add_preempt_count <-_raw_spin_lock
<idle>-0 [004] d.s2 470.867176: do_timer <-tick_do_update_jiffies64
<idle>-0 [004] d.s2 470.867176: _raw_spin_lock <-do_timer
<idle>-0 [004] d.s2 470.867176: add_preempt_count <-_raw_spin_lock
<idle>-0 [004] d.s3 470.867177: ntp_tick_length <-do_timer
<idle>-0 [004] d.s3 470.867177: _raw_spin_lock_irqsave <-ntp_tick_length
.
.
.
Each line in the trace above shows what was happening in the kernel on a given CPU, to the level of detail of function calls. Each entry shows the function called, followed by its caller (after the arrow).
The function tracer gives you an extremely detailed idea of what the kernel was doing at the point in time the trace was taken, and is a great way to learn about how the kernel code works in a dynamic sense.
It is a little more difficult to follow the call chains than it needs to
be — luckily there’s a variant of the function tracer that displays the
call chains explicitly, called the function_graph tracer:
root@sugarbay:/sys/kernel/debug/tracing# echo function_graph > current_tracer
root@sugarbay:/sys/kernel/debug/tracing# cat trace | less
tracer: function_graph
CPU DURATION FUNCTION CALLS
| | | | | | |
7) 0.046 us | pick_next_task_fair();
7) 0.043 us | pick_next_task_stop();
7) 0.042 us | pick_next_task_rt();
7) 0.032 us | pick_next_task_fair();
7) 0.030 us | pick_next_task_idle();
7) | _raw_spin_unlock_irq() {
7) 0.033 us | sub_preempt_count();
7) 0.258 us | }
7) 0.032 us | sub_preempt_count();
7) + 13.341 us | } /* __schedule */
7) 0.095 us | } /* sub_preempt_count */
7) | schedule() {
7) | __schedule() {
7) 0.060 us | add_preempt_count();
7) 0.044 us | rcu_note_context_switch();
7) | _raw_spin_lock_irq() {
7) 0.033 us | add_preempt_count();
7) 0.247 us | }
7) | idle_balance() {
7) | _raw_spin_unlock() {
7) 0.031 us | sub_preempt_count();
7) 0.246 us | }
7) | update_shares() {
7) 0.030 us | __rcu_read_lock();
7) 0.029 us | __rcu_read_unlock();
7) 0.484 us | }
7) 0.030 us | __rcu_read_lock();
7) | load_balance() {
7) | find_busiest_group() {
7) 0.031 us | idle_cpu();
7) 0.029 us | idle_cpu();
7) 0.035 us | idle_cpu();
7) 0.906 us | }
7) 1.141 us | }
7) 0.022 us | msecs_to_jiffies();
7) | load_balance() {
7) | find_busiest_group() {
7) 0.031 us | idle_cpu();
.
.
.
4) 0.062 us | msecs_to_jiffies();
4) 0.062 us | __rcu_read_unlock();
4) | _raw_spin_lock() {
4) 0.073 us | add_preempt_count();
4) 0.562 us | }
4) + 17.452 us | }
4) 0.108 us | put_prev_task_fair();
4) 0.102 us | pick_next_task_fair();
4) 0.084 us | pick_next_task_stop();
4) 0.075 us | pick_next_task_rt();
4) 0.062 us | pick_next_task_fair();
4) 0.066 us | pick_next_task_idle();
------------------------------------------
4) kworker-74 => <idle>-0
------------------------------------------
4) | finish_task_switch() {
4) | _raw_spin_unlock_irq() {
4) 0.100 us | sub_preempt_count();
4) 0.582 us | }
4) 1.105 us | }
4) 0.088 us | sub_preempt_count();
4) ! 100.066 us | }
.
.
.
3) | sys_ioctl() {
3) 0.083 us | fget_light();
3) | security_file_ioctl() {
3) 0.066 us | cap_file_ioctl();
3) 0.562 us | }
3) | do_vfs_ioctl() {
3) | drm_ioctl() {
3) 0.075 us | drm_ut_debug_printk();
3) | i915_gem_pwrite_ioctl() {
3) | i915_mutex_lock_interruptible() {
3) 0.070 us | mutex_lock_interruptible();
3) 0.570 us | }
3) | drm_gem_object_lookup() {
3) | _raw_spin_lock() {
3) 0.080 us | add_preempt_count();
3) 0.620 us | }
3) | _raw_spin_unlock() {
3) 0.085 us | sub_preempt_count();
3) 0.562 us | }
3) 2.149 us | }
3) 0.133 us | i915_gem_object_pin();
3) | i915_gem_object_set_to_gtt_domain() {
3) 0.065 us | i915_gem_object_flush_gpu_write_domain();
3) 0.065 us | i915_gem_object_wait_rendering();
3) 0.062 us | i915_gem_object_flush_cpu_write_domain();
3) 1.612 us | }
3) | i915_gem_object_put_fence() {
3) 0.097 us | i915_gem_object_flush_fence.constprop.36();
3) 0.645 us | }
3) 0.070 us | add_preempt_count();
3) 0.070 us | sub_preempt_count();
3) 0.073 us | i915_gem_object_unpin();
3) 0.068 us | mutex_unlock();
3) 9.924 us | }
3) + 11.236 us | }
3) + 11.770 us | }
3) + 13.784 us | }
3) | sys_ioctl() {
As you can see, the function_graph display is much easier
to follow. Also note that in addition to the function calls and
associated braces, other events such as scheduler events are displayed
in context. In fact, you can freely include any tracepoint available in
the trace events subsystem described in the next section by just
enabling those events, and they’ll appear in context in the function
graph display. Quite a powerful tool for understanding kernel dynamics.
Also notice that there are various annotations on the left hand side of the display. For example if the total time it took for a given function to execute is above a certain threshold, an exclamation point or plus sign appears on the left hand side. Please see the ftrace documentation for details on all these fields.
3.2.3 The ‘trace events’ Subsystem
One especially important directory contained within the
/sys/kernel/debug/tracing directory is the events subdirectory, which
contains representations of every tracepoint in the system. Listing out
the contents of the events subdirectory, we see mainly another set of
subdirectories:
root@sugarbay:/sys/kernel/debug/tracing# cd events
root@sugarbay:/sys/kernel/debug/tracing/events# ls -al
drwxr-xr-x 38 root root 0 Nov 14 23:19 .
drwxr-xr-x 5 root root 0 Nov 14 23:19 ..
drwxr-xr-x 19 root root 0 Nov 14 23:19 block
drwxr-xr-x 32 root root 0 Nov 14 23:19 btrfs
drwxr-xr-x 5 root root 0 Nov 14 23:19 drm
-rw-r--r-- 1 root root 0 Nov 14 23:19 enable
drwxr-xr-x 40 root root 0 Nov 14 23:19 ext3
drwxr-xr-x 79 root root 0 Nov 14 23:19 ext4
drwxr-xr-x 14 root root 0 Nov 14 23:19 ftrace
drwxr-xr-x 8 root root 0 Nov 14 23:19 hda
-r--r--r-- 1 root root 0 Nov 14 23:19 header_event
-r--r--r-- 1 root root 0 Nov 14 23:19 header_page
drwxr-xr-x 25 root root 0 Nov 14 23:19 i915
drwxr-xr-x 7 root root 0 Nov 14 23:19 irq
drwxr-xr-x 12 root root 0 Nov 14 23:19 jbd
drwxr-xr-x 14 root root 0 Nov 14 23:19 jbd2
drwxr-xr-x 14 root root 0 Nov 14 23:19 kmem
drwxr-xr-x 7 root root 0 Nov 14 23:19 module
drwxr-xr-x 3 root root 0 Nov 14 23:19 napi
drwxr-xr-x 6 root root 0 Nov 14 23:19 net
drwxr-xr-x 3 root root 0 Nov 14 23:19 oom
drwxr-xr-x 12 root root 0 Nov 14 23:19 power
drwxr-xr-x 3 root root 0 Nov 14 23:19 printk
drwxr-xr-x 8 root root 0 Nov 14 23:19 random
drwxr-xr-x 4 root root 0 Nov 14 23:19 raw_syscalls
drwxr-xr-x 3 root root 0 Nov 14 23:19 rcu
drwxr-xr-x 6 root root 0 Nov 14 23:19 rpm
drwxr-xr-x 20 root root 0 Nov 14 23:19 sched
drwxr-xr-x 7 root root 0 Nov 14 23:19 scsi
drwxr-xr-x 4 root root 0 Nov 14 23:19 signal
drwxr-xr-x 5 root root 0 Nov 14 23:19 skb
drwxr-xr-x 4 root root 0 Nov 14 23:19 sock
drwxr-xr-x 10 root root 0 Nov 14 23:19 sunrpc
drwxr-xr-x 538 root root 0 Nov 14 23:19 syscalls
drwxr-xr-x 4 root root 0 Nov 14 23:19 task
drwxr-xr-x 14 root root 0 Nov 14 23:19 timer
drwxr-xr-x 3 root root 0 Nov 14 23:19 udp
drwxr-xr-x 21 root root 0 Nov 14 23:19 vmscan
drwxr-xr-x 3 root root 0 Nov 14 23:19 vsyscall
drwxr-xr-x 6 root root 0 Nov 14 23:19 workqueue
drwxr-xr-x 26 root root 0 Nov 14 23:19 writeback
Each one of these subdirectories
corresponds to a “subsystem” and contains yet again more subdirectories,
each one of those finally corresponding to a tracepoint. For example,
here are the contents of the kmem subsystem:
root@sugarbay:/sys/kernel/debug/tracing/events# cd kmem
root@sugarbay:/sys/kernel/debug/tracing/events/kmem# ls -al
drwxr-xr-x 14 root root 0 Nov 14 23:19 .
drwxr-xr-x 38 root root 0 Nov 14 23:19 ..
-rw-r--r-- 1 root root 0 Nov 14 23:19 enable
-rw-r--r-- 1 root root 0 Nov 14 23:19 filter
drwxr-xr-x 2 root root 0 Nov 14 23:19 kfree
drwxr-xr-x 2 root root 0 Nov 14 23:19 kmalloc
drwxr-xr-x 2 root root 0 Nov 14 23:19 kmalloc_node
drwxr-xr-x 2 root root 0 Nov 14 23:19 kmem_cache_alloc
drwxr-xr-x 2 root root 0 Nov 14 23:19 kmem_cache_alloc_node
drwxr-xr-x 2 root root 0 Nov 14 23:19 kmem_cache_free
drwxr-xr-x 2 root root 0 Nov 14 23:19 mm_page_alloc
drwxr-xr-x 2 root root 0 Nov 14 23:19 mm_page_alloc_extfrag
drwxr-xr-x 2 root root 0 Nov 14 23:19 mm_page_alloc_zone_locked
drwxr-xr-x 2 root root 0 Nov 14 23:19 mm_page_free
drwxr-xr-x 2 root root 0 Nov 14 23:19 mm_page_free_batched
drwxr-xr-x 2 root root 0 Nov 14 23:19 mm_page_pcpu_drain
Let’s see what’s inside the subdirectory for a
specific tracepoint, in this case the one for kmalloc:
root@sugarbay:/sys/kernel/debug/tracing/events/kmem# cd kmalloc
root@sugarbay:/sys/kernel/debug/tracing/events/kmem/kmalloc# ls -al
drwxr-xr-x 2 root root 0 Nov 14 23:19 .
drwxr-xr-x 14 root root 0 Nov 14 23:19 ..
-rw-r--r-- 1 root root 0 Nov 14 23:19 enable
-rw-r--r-- 1 root root 0 Nov 14 23:19 filter
-r--r--r-- 1 root root 0 Nov 14 23:19 format
-r--r--r-- 1 root root 0 Nov 14 23:19 id
The format file for the
tracepoint describes the event in memory, which is used by the various
tracing tools that now make use of these tracepoint to parse the event
and make sense of it, along with a print fmt field that allows tools
like ftrace to display the event as text. The format of the
kmalloc event looks like:
root@sugarbay:/sys/kernel/debug/tracing/events/kmem/kmalloc# cat format
name: kmalloc
ID: 313
format:
field:unsigned short common_type; offset:0; size:2; signed:0;
field:unsigned char common_flags; offset:2; size:1; signed:0;
field:unsigned char common_preempt_count; offset:3; size:1; signed:0;
field:int common_pid; offset:4; size:4; signed:1;
field:int common_padding; offset:8; size:4; signed:1;
field:unsigned long call_site; offset:16; size:8; signed:0;
field:const void * ptr; offset:24; size:8; signed:0;
field:size_t bytes_req; offset:32; size:8; signed:0;
field:size_t bytes_alloc; offset:40; size:8; signed:0;
field:gfp_t gfp_flags; offset:48; size:4; signed:0;
print fmt: "call_site=%lx ptr=%p bytes_req=%zu bytes_alloc=%zu gfp_flags=%s", REC->call_site, REC->ptr, REC->bytes_req, REC->bytes_alloc,
(REC->gfp_flags) ? __print_flags(REC->gfp_flags, "|", {(unsigned long)(((( gfp_t)0x10u) | (( gfp_t)0x40u) | (( gfp_t)0x80u) | ((
gfp_t)0x20000u) | (( gfp_t)0x02u) | (( gfp_t)0x08u)) | (( gfp_t)0x4000u) | (( gfp_t)0x10000u) | (( gfp_t)0x1000u) | (( gfp_t)0x200u) | ((
gfp_t)0x400000u)), "GFP_TRANSHUGE"}, {(unsigned long)((( gfp_t)0x10u) | (( gfp_t)0x40u) | (( gfp_t)0x80u) | (( gfp_t)0x20000u) | ((
gfp_t)0x02u) | (( gfp_t)0x08u)), "GFP_HIGHUSER_MOVABLE"}, {(unsigned long)((( gfp_t)0x10u) | (( gfp_t)0x40u) | (( gfp_t)0x80u) | ((
gfp_t)0x20000u) | (( gfp_t)0x02u)), "GFP_HIGHUSER"}, {(unsigned long)((( gfp_t)0x10u) | (( gfp_t)0x40u) | (( gfp_t)0x80u) | ((
gfp_t)0x20000u)), "GFP_USER"}, {(unsigned long)((( gfp_t)0x10u) | (( gfp_t)0x40u) | (( gfp_t)0x80u) | (( gfp_t)0x80000u)), GFP_TEMPORARY"},
{(unsigned long)((( gfp_t)0x10u) | (( gfp_t)0x40u) | (( gfp_t)0x80u)), "GFP_KERNEL"}, {(unsigned long)((( gfp_t)0x10u) | (( gfp_t)0x40u)),
"GFP_NOFS"}, {(unsigned long)((( gfp_t)0x20u)), "GFP_ATOMIC"}, {(unsigned long)((( gfp_t)0x10u)), "GFP_NOIO"}, {(unsigned long)((
gfp_t)0x20u), "GFP_HIGH"}, {(unsigned long)(( gfp_t)0x10u), "GFP_WAIT"}, {(unsigned long)(( gfp_t)0x40u), "GFP_IO"}, {(unsigned long)((
gfp_t)0x100u), "GFP_COLD"}, {(unsigned long)(( gfp_t)0x200u), "GFP_NOWARN"}, {(unsigned long)(( gfp_t)0x400u), "GFP_REPEAT"}, {(unsigned
long)(( gfp_t)0x800u), "GFP_NOFAIL"}, {(unsigned long)(( gfp_t)0x1000u), "GFP_NORETRY"}, {(unsigned long)(( gfp_t)0x4000u), "GFP_COMP"},
{(unsigned long)(( gfp_t)0x8000u), "GFP_ZERO"}, {(unsigned long)(( gfp_t)0x10000u), "GFP_NOMEMALLOC"}, {(unsigned long)(( gfp_t)0x20000u),
"GFP_HARDWALL"}, {(unsigned long)(( gfp_t)0x40000u), "GFP_THISNODE"}, {(unsigned long)(( gfp_t)0x80000u), "GFP_RECLAIMABLE"}, {(unsigned
long)(( gfp_t)0x08u), "GFP_MOVABLE"}, {(unsigned long)(( gfp_t)0), "GFP_NOTRACK"}, {(unsigned long)(( gfp_t)0x400000u), "GFP_NO_KSWAPD"},
{(unsigned long)(( gfp_t)0x800000u), "GFP_OTHER_NODE"} ) : "GFP_NOWAIT"
The enable file
in the tracepoint directory is what allows the user (or tools such as
trace-cmd) to actually turn the tracepoint on and off. When enabled, the
corresponding tracepoint will start appearing in the ftrace trace file
described previously. For example, this turns on the kmalloc tracepoint:
root@sugarbay:/sys/kernel/debug/tracing/events/kmem/kmalloc# echo 1 > enable
At the moment, we’re not interested in the function tracer or some other tracer that might be in effect, so we first turn it off, but if we do that, we still need to turn tracing on in order to see the events in the output buffer:
root@sugarbay:/sys/kernel/debug/tracing# echo nop > current_tracer
root@sugarbay:/sys/kernel/debug/tracing# echo 1 > tracing_on
Now, if we look at the trace file, we see nothing
but the kmalloc events we just turned on:
root@sugarbay:/sys/kernel/debug/tracing# cat trace | less
# tracer: nop
#
# entries-in-buffer/entries-written: 1897/1897 #P:8
#
# _-----=> irqs-off
# / _----=> need-resched
# | / _---=> hardirq/softirq
# || / _--=> preempt-depth
# ||| / delay
# TASK-PID CPU# |||| TIMESTAMP FUNCTION
# | | | |||| | |
dropbear-1465 [000] ...1 18154.620753: kmalloc: call_site=ffffffff816650d4 ptr=ffff8800729c3000 bytes_req=2048 bytes_alloc=2048 gfp_flags=GFP_KERNEL
<idle>-0 [000] ..s3 18154.621640: kmalloc: call_site=ffffffff81619b36 ptr=ffff88006d555800 bytes_req=512 bytes_alloc=512 gfp_flags=GFP_ATOMIC
<idle>-0 [000] ..s3 18154.621656: kmalloc: call_site=ffffffff81619b36 ptr=ffff88006d555800 bytes_req=512 bytes_alloc=512 gfp_flags=GFP_ATOMIC
matchbox-termin-1361 [001] ...1 18154.755472: kmalloc: call_site=ffffffff81614050 ptr=ffff88006d5f0e00 bytes_req=512 bytes_alloc=512 gfp_flags=GFP_KERNEL|GFP_REPEAT
Xorg-1264 [002] ...1 18154.755581: kmalloc: call_site=ffffffff8141abe8 ptr=ffff8800734f4cc0 bytes_req=168 bytes_alloc=192 gfp_flags=GFP_KERNEL|GFP_NOWARN|GFP_NORETRY
Xorg-1264 [002] ...1 18154.755583: kmalloc: call_site=ffffffff814192a3 ptr=ffff88001f822520 bytes_req=24 bytes_alloc=32 gfp_flags=GFP_KERNEL|GFP_ZERO
Xorg-1264 [002] ...1 18154.755589: kmalloc: call_site=ffffffff81419edb ptr=ffff8800721a2f00 bytes_req=64 bytes_alloc=64 gfp_flags=GFP_KERNEL|GFP_ZERO
matchbox-termin-1361 [001] ...1 18155.354594: kmalloc: call_site=ffffffff81614050 ptr=ffff88006db35400 bytes_req=576 bytes_alloc=1024 gfp_flags=GFP_KERNEL|GFP_REPEAT
Xorg-1264 [002] ...1 18155.354703: kmalloc: call_site=ffffffff8141abe8 ptr=ffff8800734f4cc0 bytes_req=168 bytes_alloc=192 gfp_flags=GFP_KERNEL|GFP_NOWARN|GFP_NORETRY
Xorg-1264 [002] ...1 18155.354705: kmalloc: call_site=ffffffff814192a3 ptr=ffff88001f822520 bytes_req=24 bytes_alloc=32 gfp_flags=GFP_KERNEL|GFP_ZERO
Xorg-1264 [002] ...1 18155.354711: kmalloc: call_site=ffffffff81419edb ptr=ffff8800721a2f00 bytes_req=64 bytes_alloc=64 gfp_flags=GFP_KERNEL|GFP_ZERO
<idle>-0 [000] ..s3 18155.673319: kmalloc: call_site=ffffffff81619b36 ptr=ffff88006d555800 bytes_req=512 bytes_alloc=512 gfp_flags=GFP_ATOMIC
dropbear-1465 [000] ...1 18155.673525: kmalloc: call_site=ffffffff816650d4 ptr=ffff8800729c3000 bytes_req=2048 bytes_alloc=2048 gfp_flags=GFP_KERNEL
<idle>-0 [000] ..s3 18155.674821: kmalloc: call_site=ffffffff81619b36 ptr=ffff88006d554800 bytes_req=512 bytes_alloc=512 gfp_flags=GFP_ATOMIC
<idle>-0 [000] ..s3 18155.793014: kmalloc: call_site=ffffffff81619b36 ptr=ffff88006d554800 bytes_req=512 bytes_alloc=512 gfp_flags=GFP_ATOMIC
dropbear-1465 [000] ...1 18155.793219: kmalloc: call_site=ffffffff816650d4 ptr=ffff8800729c3000 bytes_req=2048 bytes_alloc=2048 gfp_flags=GFP_KERNEL
<idle>-0 [000] ..s3 18155.794147: kmalloc: call_site=ffffffff81619b36 ptr=ffff88006d555800 bytes_req=512 bytes_alloc=512 gfp_flags=GFP_ATOMIC
<idle>-0 [000] ..s3 18155.936705: kmalloc: call_site=ffffffff81619b36 ptr=ffff88006d555800 bytes_req=512 bytes_alloc=512 gfp_flags=GFP_ATOMIC
dropbear-1465 [000] ...1 18155.936910: kmalloc: call_site=ffffffff816650d4 ptr=ffff8800729c3000 bytes_req=2048 bytes_alloc=2048 gfp_flags=GFP_KERNEL
<idle>-0 [000] ..s3 18155.937869: kmalloc: call_site=ffffffff81619b36 ptr=ffff88006d554800 bytes_req=512 bytes_alloc=512 gfp_flags=GFP_ATOMIC
matchbox-termin-1361 [001] ...1 18155.953667: kmalloc: call_site=ffffffff81614050 ptr=ffff88006d5f2000 bytes_req=512 bytes_alloc=512 gfp_flags=GFP_KERNEL|GFP_REPEAT
Xorg-1264 [002] ...1 18155.953775: kmalloc: call_site=ffffffff8141abe8 ptr=ffff8800734f4cc0 bytes_req=168 bytes_alloc=192 gfp_flags=GFP_KERNEL|GFP_NOWARN|GFP_NORETRY
Xorg-1264 [002] ...1 18155.953777: kmalloc: call_site=ffffffff814192a3 ptr=ffff88001f822520 bytes_req=24 bytes_alloc=32 gfp_flags=GFP_KERNEL|GFP_ZERO
Xorg-1264 [002] ...1 18155.953783: kmalloc: call_site=ffffffff81419edb ptr=ffff8800721a2f00 bytes_req=64 bytes_alloc=64 gfp_flags=GFP_KERNEL|GFP_ZERO
<idle>-0 [000] ..s3 18156.176053: kmalloc: call_site=ffffffff81619b36 ptr=ffff88006d554800 bytes_req=512 bytes_alloc=512 gfp_flags=GFP_ATOMIC
dropbear-1465 [000] ...1 18156.176257: kmalloc: call_site=ffffffff816650d4 ptr=ffff8800729c3000 bytes_req=2048 bytes_alloc=2048 gfp_flags=GFP_KERNEL
<idle>-0 [000] ..s3 18156.177717: kmalloc: call_site=ffffffff81619b36 ptr=ffff88006d555800 bytes_req=512 bytes_alloc=512 gfp_flags=GFP_ATOMIC
<idle>-0 [000] ..s3 18156.399229: kmalloc: call_site=ffffffff81619b36 ptr=ffff88006d555800 bytes_req=512 bytes_alloc=512 gfp_flags=GFP_ATOMIC
dropbear-1465 [000] ...1 18156.399434: kmalloc: call_site=ffffffff816650d4 ptr=ffff8800729c3000 bytes_http://rostedt.homelinux.com/kernelshark/req=2048 bytes_alloc=2048 gfp_flags=GFP_KERNEL
<idle>-0 [000] ..s3 18156.400660: kmalloc: call_site=ffffffff81619b36 ptr=ffff88006d554800 bytes_req=512 bytes_alloc=512 gfp_flags=GFP_ATOMIC
matchbox-termin-1361 [001] ...1 18156.552800: kmalloc: call_site=ffffffff81614050 ptr=ffff88006db34800 bytes_req=576 bytes_alloc=1024 gfp_flags=GFP_KERNEL|GFP_REPEAT
To again disable the kmalloc event, we need to send 0 to the enable file:
root@sugarbay:/sys/kernel/debug/tracing/events/kmem/kmalloc# echo 0 > enable
You can enable any number of events or complete subsystems (by
using the enable file in the subsystem directory) and get an
arbitrarily fine-grained idea of what’s going on in the system by
enabling as many of the appropriate tracepoints as applicable.
Several tools described in this How-to do just that, including
trace-cmd and KernelShark in the next section.
3.2.4 trace-cmd / KernelShark
trace-cmd is essentially an extensive command-line “wrapper” interface
that hides the details of all the individual files in
/sys/kernel/debug/tracing, allowing users to specify specific particular
events within the /sys/kernel/debug/tracing/events/ subdirectory and to
collect traces and avoid having to deal with those details directly.
As yet another layer on top of that, KernelShark provides a GUI that allows users to start and stop traces and specify sets of events using an intuitive interface, and view the output as both trace events and as a per-CPU graphical display. It directly uses trace-cmd as the plumbing that accomplishes all that underneath the covers (and actually displays the trace-cmd command it uses, as we’ll see).
To start a trace using KernelShark, first start this tool:
root@sugarbay:~# kernelshark
Then open up the Capture dialog by choosing from the KernelShark menu:
Capture | Record
That will display the following dialog, which allows you to choose one or more events (or even entire subsystems) to trace:
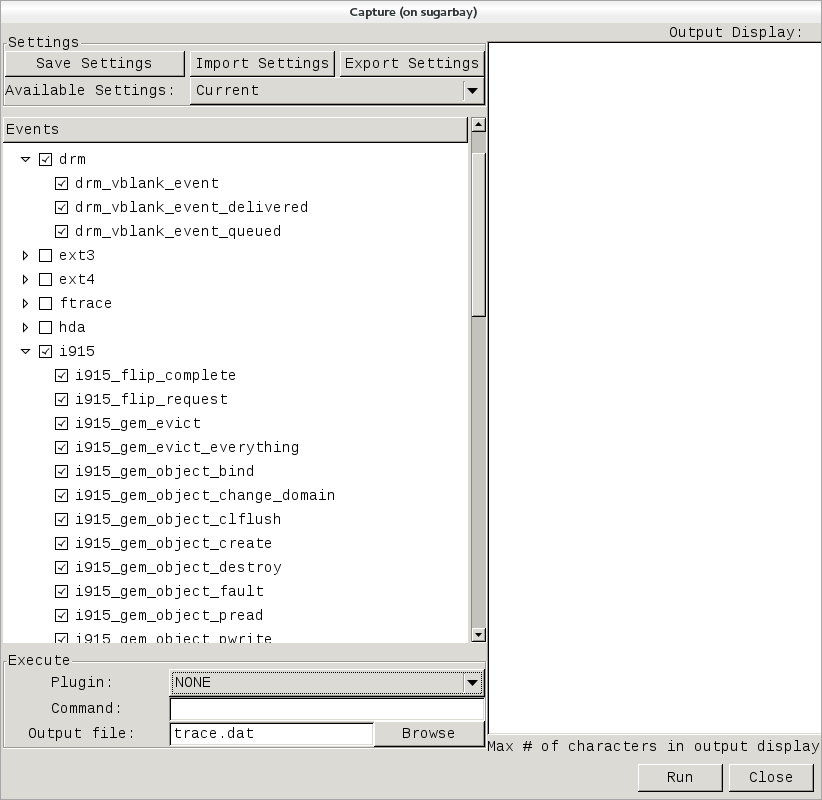
Note that these are exactly the same sets of events described in the previous trace events subsystem section, and in fact is where trace-cmd gets them for KernelShark.
In the above screenshot, we’ve decided to explore the graphics subsystem
a bit and so have chosen to trace all the tracepoints contained within
the i915 and drm subsystems.
After doing that, we can start and stop the trace using the Run and
Stop button on the lower right corner of the dialog (the same button
will turn into the ‘Stop’ button after the trace has started):
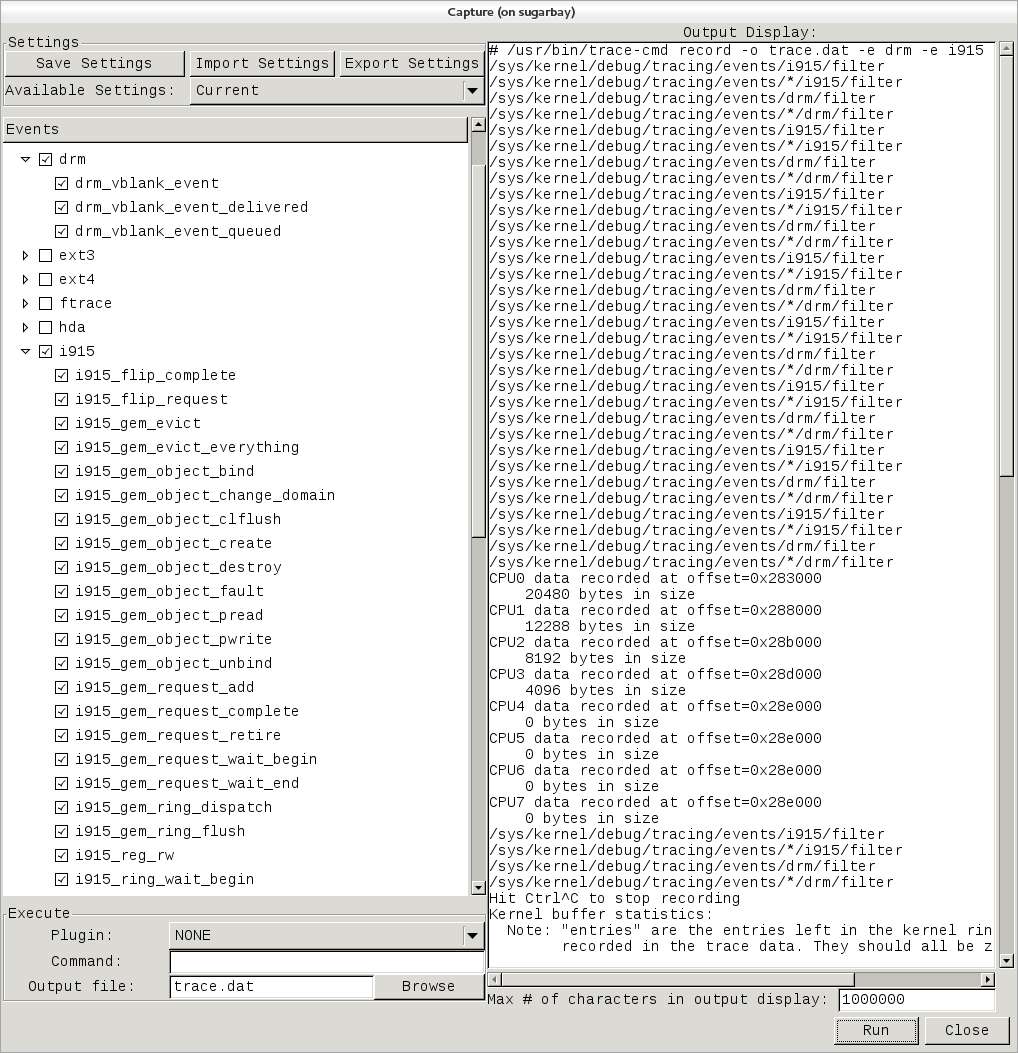
Notice that the right pane shows the exact trace-cmd command-line that’s used to run the trace, along with the results of the trace-cmd run.
Once the Stop button is pressed, the graphical view magically fills up
with a colorful per-CPU display of the trace data, along with the
detailed event listing below that:
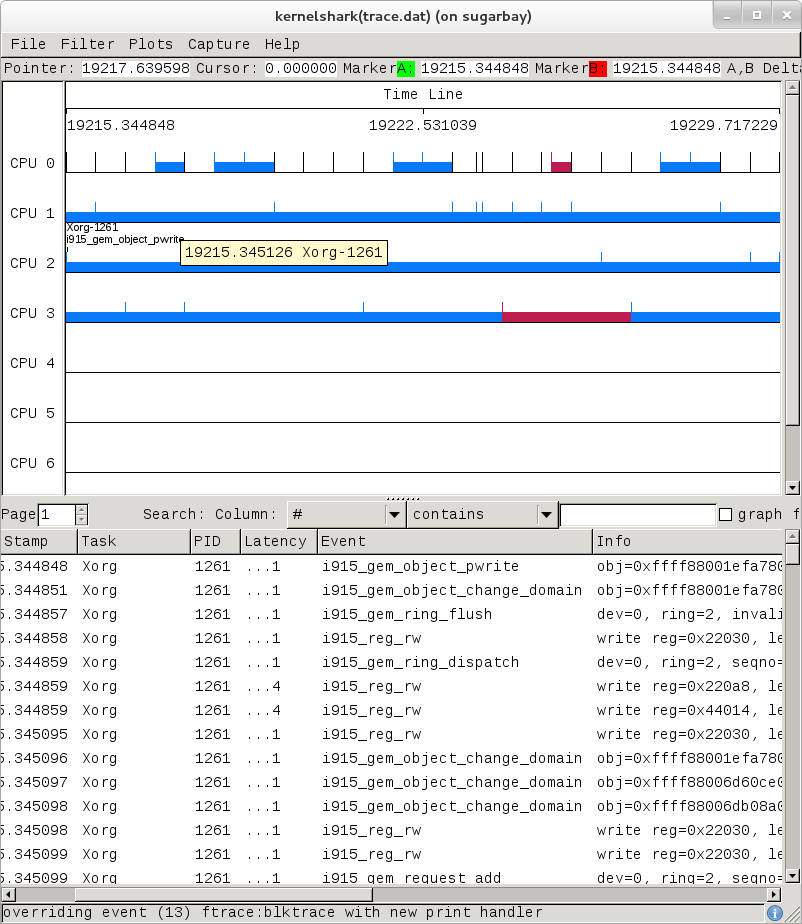
Here’s another example, this time a display resulting from tracing all
events:
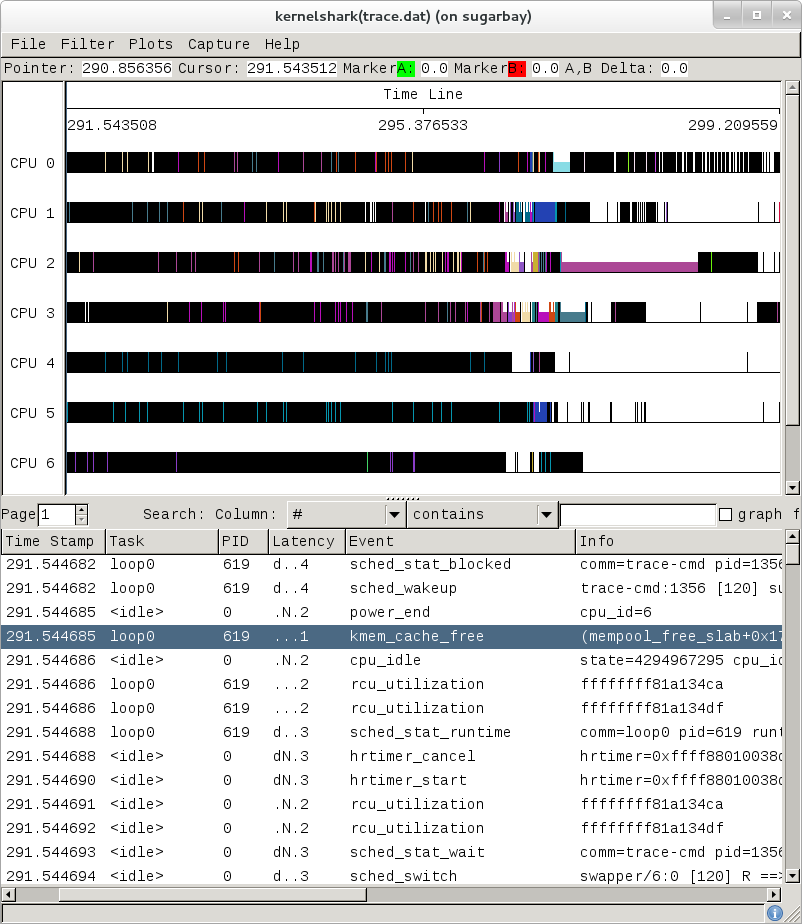
The tool is pretty self-explanatory, but for more detailed information on navigating through the data, see the KernelShark website.
3.2.5 ftrace Documentation
The documentation for ftrace can be found in the kernel Documentation directory:
Documentation/trace/ftrace.txt
The documentation for the trace event subsystem can also be found in the kernel Documentation directory:
Documentation/trace/events.txt
A nice series of articles on using ftrace and trace-cmd are available at LWN:
See also KernelShark’s documentation for further usage details.
An amusing yet useful README (a tracing mini-How-to) can be found in
/sys/kernel/debug/tracing/README.
3.3 SystemTap
SystemTap is a system-wide script-based tracing and profiling tool.
SystemTap scripts are C-like programs that are executed in the kernel to gather / print / aggregate data extracted from the context they end up being called under.
For example, this probe from the SystemTap
tutorial just prints a
line every time any process on the system runs open() on a file. For each line,
it prints the executable name of the program that opened the file, along
with its PID, and the name of the file it opened (or tried to open), which it
extracts from the argument string (argstr) of the open system call.
probe syscall.open
{
printf ("%s(%d) open (%s)\n", execname(), pid(), argstr)
}
probe timer.ms(4000) # after 4 seconds
{
exit ()
}
Normally, to execute this
probe, you’d just install SystemTap on the system you want to probe,
and directly run the probe on that system e.g. assuming the name of the
file containing the above text is trace_open.stp:
# stap trace_open.stp
What SystemTap does under the covers to run this probe is 1) parse and convert the probe to an equivalent “C” form, 2) compile the “C” form into a kernel module, 3) insert the module into the kernel, which arms it, and 4) collect the data generated by the probe and display it to the user.
In order to accomplish steps 1 and 2, the stap program needs access to
the kernel build system that produced the kernel that the probed system
is running. In the case of a typical embedded system (the “target”), the
kernel build system unfortunately isn’t typically part of the image
running on the target. It is normally available on the “host” system
that produced the target image however; in such cases, steps 1 and 2 are
executed on the host system, and steps 3 and 4 are executed on the
target system, using only the SystemTap “runtime”.
The SystemTap support in Yocto assumes that only steps 3 and 4 are run on the target; it is possible to do everything on the target, but this section assumes only the typical embedded use-case.
Therefore, what you need to do in order to run a SystemTap script on the target is to 1) on the host system, compile the probe into a kernel module that makes sense to the target, 2) copy the module onto the target system and 3) insert the module into the target kernel, which arms it, and 4) collect the data generated by the probe and display it to the user.
3.3.1 SystemTap Setup
Those are many steps and details, but fortunately Yocto
includes a script called crosstap that will take care of those
details, allowing you to just execute a SystemTap script on the remote
target, with arguments if necessary.
In order to do this from a remote host, however, you need to have access
to the build for the image you booted. The crosstap script provides
details on how to do this if you run the script on the host without
having done a build:
$ crosstap root@192.168.1.88 trace_open.stp
Error: No target kernel build found.
Did you forget to create a local build of your image?
‘crosstap’ requires a local SDK build of the target system (or a build that includes ‘tools-profile’) in order to build kernel modules that can probe the target system.
Practically speaking, that means you need to do the following:
If you’re running a pre-built image, download the release and/or BSP tarballs used to build the image.
If you’re working from git sources, just clone the metadata and BSP layers needed to build the image you’ll be booting.
Make sure you’re properly set up to build a new image (see the BSP README and/or the widely available basic documentation that discusses how to build images).
Build an
-sdkversion of the image e.g.:$ bitbake core-image-sato-sdk
Or build a non-SDK image but include the profiling tools (edit
local.confand addtools-profileto the end of EXTRA_IMAGE_FEATURES variable):$ bitbake core-image-sato
Once you’ve build the image on the host system, you’re ready to boot it (or the equivalent pre-built image) and use
crosstapto probe it (you need to source the environment as usual first):$ source oe-init-build-env $ cd ~/my/systemtap/scripts $ crosstap root@192.168.1.xxx myscript.stp
Note
SystemTap, which uses crosstap, assumes you can establish an SSH
connection to the remote target. Please refer to the crosstap wiki
page for details on verifying SSH connections. Also, the ability to SSH
into the target system is not enabled by default in *-minimal images.
Therefore, what you need to do is build an SDK image or image with
tools-profile as detailed in the “General Setup”
section of this manual, and boot the resulting target image.
Note
If you have a Build Directory containing multiple machines, you need
to have the MACHINE you’re connecting to selected in local.conf, and
the kernel in that machine’s Build Directory must match the kernel on
the booted system exactly, or you’ll get the above crosstap message
when you try to call a script.
3.3.2 Running a Script on a Target
Once you’ve done that, you should be able to run a SystemTap script on the target:
$ cd /path/to/yocto
$ source oe-init-build-env
### Shell environment set up for builds. ###
You can now run 'bitbake <target>'
Common targets are:
core-image-minimal
core-image-sato
meta-toolchain
meta-ide-support
You can also run generated QEMU images with a command like 'runqemu qemux86-64'
Once you’ve done that, you can cd to whatever
directory contains your scripts and use crosstap to run the script:
$ cd /path/to/my/systemap/script
$ crosstap root@192.168.7.2 trace_open.stp
If you get an error connecting to the target e.g.:
$ crosstap root@192.168.7.2 trace_open.stp
error establishing ssh connection on remote 'root@192.168.7.2'
Try connecting to the target through SSH and see what happens:
$ ssh root@192.168.7.2
Connection problems are often due specifying a wrong IP address or having a host key
verification error.
If everything worked as planned, you should see something like this (enter the password when prompted, or press enter if it’s set up to use no password):
$ crosstap root@192.168.7.2 trace_open.stp
root@192.168.7.2's password:
matchbox-termin(1036) open ("/tmp/vte3FS2LW", O_RDWR|O_CREAT|O_EXCL|O_LARGEFILE, 0600)
matchbox-termin(1036) open ("/tmp/vteJMC7LW", O_RDWR|O_CREAT|O_EXCL|O_LARGEFILE, 0600)
3.3.3 SystemTap Documentation
The SystemTap language reference can be found here: SystemTap Language Reference
Links to other SystemTap documents, tutorials, and examples can be found here: SystemTap documentation page
3.4 Sysprof
Sysprof is an easy to use system-wide profiler that consists of a single window with three panes and a few buttons which allow you to start, stop, and view the profile from one place.
3.4.1 Sysprof Setup
For this section, we’ll assume you’ve already performed the basic setup outlined in the “General Setup” section.
Sysprof is a GUI-based application that runs on the target system. For the rest
of this document we assume you’re connected to the host through SSH and will be
running Sysprof on the target (you can use the -X option to ssh and
have the Sysprof GUI run on the target but display remotely on the host
if you want).
3.4.2 Basic Sysprof Usage
To start profiling the system, you just press the Start button. To
stop profiling and to start viewing the profile data in one easy step,
press the Profile button.
Once you’ve pressed the profile button, the three panes will fill up with profiling data:
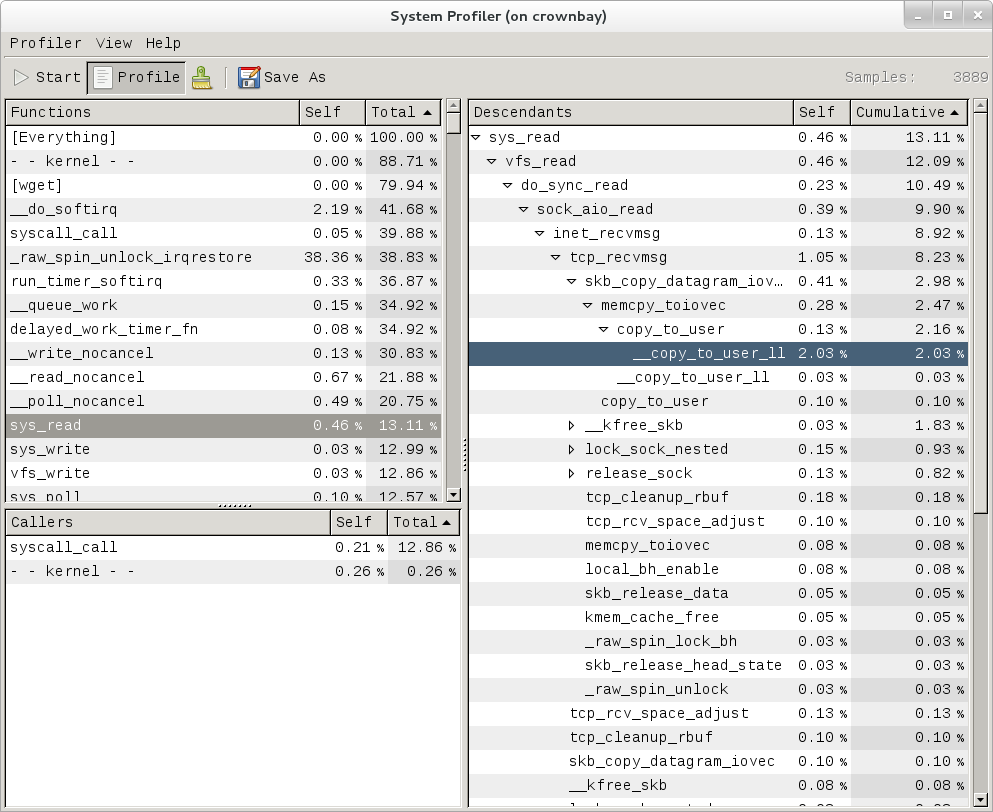
The left pane shows a list of functions and processes. Selecting one of those expands that function in the right pane, showing all its callees. Note that this caller-oriented display is essentially the inverse of perf’s default callee-oriented call chain display.
In the screenshot above, we’re focusing on __copy_to_user_ll() and
looking up the call chain we can see that one of the callers of
__copy_to_user_ll is sys_read() and the complete call path between them.
Notice that this is essentially a portion of the same information we saw
in the perf display shown in the perf section of this page.
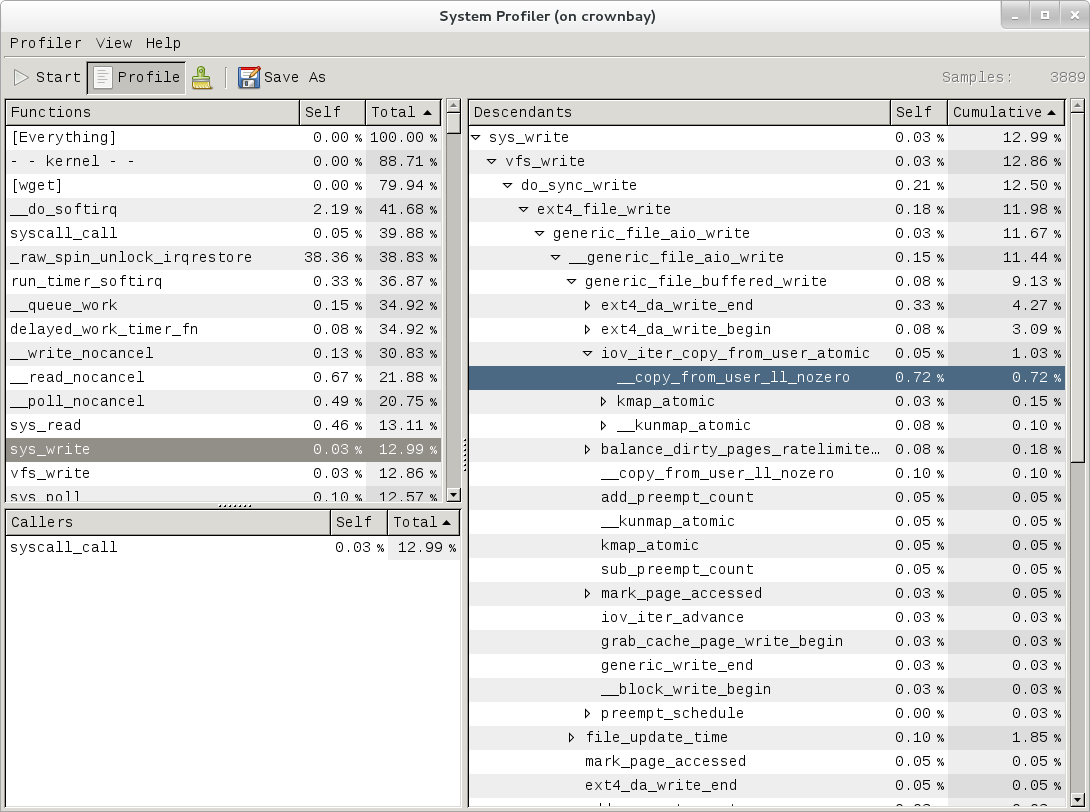
Similarly, the above is a snapshot of the Sysprof display of a
copy-from-user call chain.
Finally, looking at the third Sysprof pane in the lower left, we can see
a list of all the callers of a particular function selected in the top
left pane. In this case, the lower pane is showing all the callers of
__mark_inode_dirty:
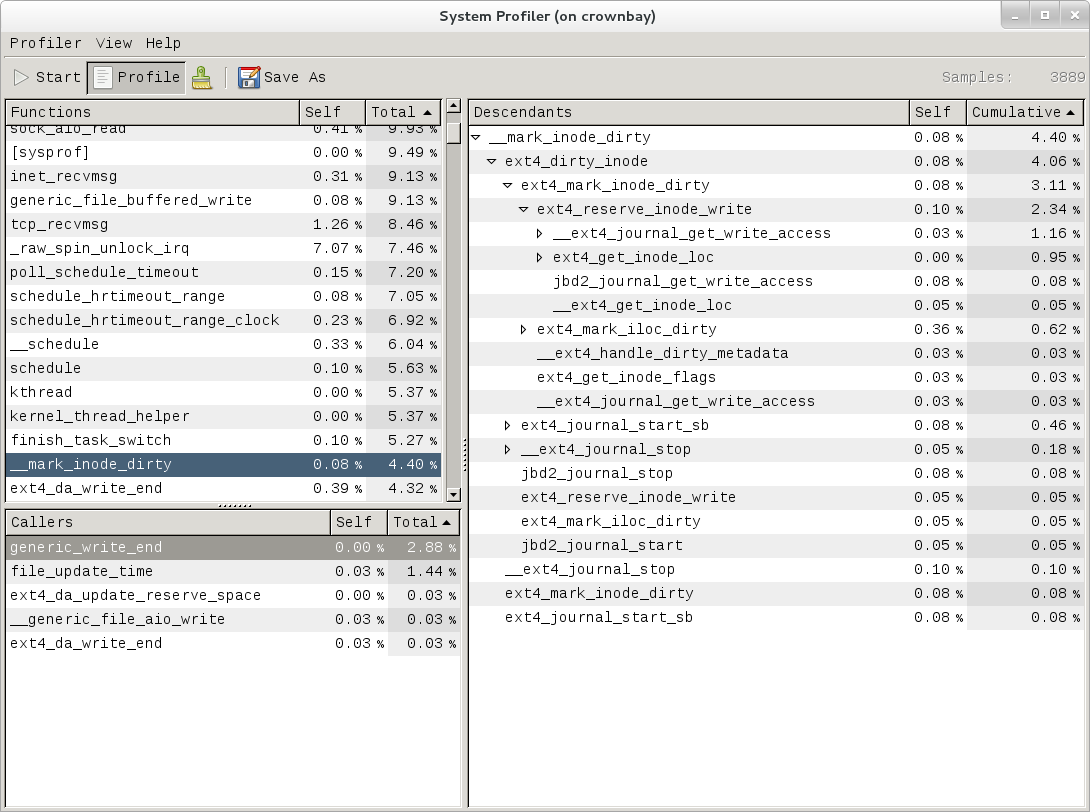
Double-clicking on one of those functions will in turn change the focus to the selected function, and so on.
3.4.3 Sysprof Documentation
There doesn’t seem to be any documentation for Sysprof, but maybe that’s because it’s pretty self-explanatory. The Sysprof website, however, is here: Sysprof, System-wide Performance Profiler for Linux
3.5 LTTng (Linux Trace Toolkit, next generation)
3.5.1 LTTng Setup
For this section, we’ll assume you’ve already performed the basic setup outlined in the “General Setup” section. LTTng is run on the target system by connecting to it through SSH.
3.5.2 Collecting and Viewing Traces
Once you’ve applied the above commits and built and booted your image
(you need to build the core-image-sato-sdk image or use one of the other
methods described in the “General Setup” section), you’re ready to start
tracing.
3.5.2.1 Collecting and viewing a trace on the target (inside a shell)
First, from the host, connect to the target through SSH:
$ ssh -l root 192.168.1.47
The authenticity of host '192.168.1.47 (192.168.1.47)' can't be established.
RSA key fingerprint is 23:bd:c8:b1:a8:71:52:00:ee:00:4f:64:9e:10:b9:7e.
Are you sure you want to continue connecting (yes/no)? yes
Warning: Permanently added '192.168.1.47' (RSA) to the list of known hosts.
root@192.168.1.47's password:
Once on the target, use these steps to create a trace:
root@crownbay:~# lttng create
Spawning a session daemon
Session auto-20121015-232120 created.
Traces will be written in /home/root/lttng-traces/auto-20121015-232120
Enable the events you want to trace (in this case all kernel events):
root@crownbay:~# lttng enable-event --kernel --all
All kernel events are enabled in channel channel0
Start the trace:
root@crownbay:~# lttng start
Tracing started for session auto-20121015-232120
And then stop the trace after awhile or after running a particular workload that you want to trace:
root@crownbay:~# lttng stop
Tracing stopped for session auto-20121015-232120
You can now view the trace in text form on the target:
root@crownbay:~# lttng view
[23:21:56.989270399] (+?.?????????) sys_geteuid: { 1 }, { }
[23:21:56.989278081] (+0.000007682) exit_syscall: { 1 }, { ret = 0 }
[23:21:56.989286043] (+0.000007962) sys_pipe: { 1 }, { fildes = 0xB77B9E8C }
[23:21:56.989321802] (+0.000035759) exit_syscall: { 1 }, { ret = 0 }
[23:21:56.989329345] (+0.000007543) sys_mmap_pgoff: { 1 }, { addr = 0x0, len = 10485760, prot = 3, flags = 131362, fd = 4294967295, pgoff = 0 }
[23:21:56.989351694] (+0.000022349) exit_syscall: { 1 }, { ret = -1247805440 }
[23:21:56.989432989] (+0.000081295) sys_clone: { 1 }, { clone_flags = 0x411, newsp = 0xB5EFFFE4, parent_tid = 0xFFFFFFFF, child_tid = 0x0 }
[23:21:56.989477129] (+0.000044140) sched_stat_runtime: { 1 }, { comm = "lttng-consumerd", tid = 1193, runtime = 681660, vruntime = 43367983388 }
[23:21:56.989486697] (+0.000009568) sched_migrate_task: { 1 }, { comm = "lttng-consumerd", tid = 1193, prio = 20, orig_cpu = 1, dest_cpu = 1 }
[23:21:56.989508418] (+0.000021721) hrtimer_init: { 1 }, { hrtimer = 3970832076, clockid = 1, mode = 1 }
[23:21:56.989770462] (+0.000262044) hrtimer_cancel: { 1 }, { hrtimer = 3993865440 }
[23:21:56.989771580] (+0.000001118) hrtimer_cancel: { 0 }, { hrtimer = 3993812192 }
[23:21:56.989776957] (+0.000005377) hrtimer_expire_entry: { 1 }, { hrtimer = 3993865440, now = 79815980007057, function = 3238465232 }
[23:21:56.989778145] (+0.000001188) hrtimer_expire_entry: { 0 }, { hrtimer = 3993812192, now = 79815980008174, function = 3238465232 }
[23:21:56.989791695] (+0.000013550) softirq_raise: { 1 }, { vec = 1 }
[23:21:56.989795396] (+0.000003701) softirq_raise: { 0 }, { vec = 1 }
[23:21:56.989800635] (+0.000005239) softirq_raise: { 0 }, { vec = 9 }
[23:21:56.989807130] (+0.000006495) sched_stat_runtime: { 1 }, { comm = "lttng-consumerd", tid = 1193, runtime = 330710, vruntime = 43368314098 }
[23:21:56.989809993] (+0.000002863) sched_stat_runtime: { 0 }, { comm = "lttng-sessiond", tid = 1181, runtime = 1015313, vruntime = 36976733240 }
[23:21:56.989818514] (+0.000008521) hrtimer_expire_exit: { 0 }, { hrtimer = 3993812192 }
[23:21:56.989819631] (+0.000001117) hrtimer_expire_exit: { 1 }, { hrtimer = 3993865440 }
[23:21:56.989821866] (+0.000002235) hrtimer_start: { 0 }, { hrtimer = 3993812192, function = 3238465232, expires = 79815981000000, softexpires = 79815981000000 }
[23:21:56.989822984] (+0.000001118) hrtimer_start: { 1 }, { hrtimer = 3993865440, function = 3238465232, expires = 79815981000000, softexpires = 79815981000000 }
[23:21:56.989832762] (+0.000009778) softirq_entry: { 1 }, { vec = 1 }
[23:21:56.989833879] (+0.000001117) softirq_entry: { 0 }, { vec = 1 }
[23:21:56.989838069] (+0.000004190) timer_cancel: { 1 }, { timer = 3993871956 }
[23:21:56.989839187] (+0.000001118) timer_cancel: { 0 }, { timer = 3993818708 }
[23:21:56.989841492] (+0.000002305) timer_expire_entry: { 1 }, { timer = 3993871956, now = 79515980, function = 3238277552 }
[23:21:56.989842819] (+0.000001327) timer_expire_entry: { 0 }, { timer = 3993818708, now = 79515980, function = 3238277552 }
[23:21:56.989854831] (+0.000012012) sched_stat_runtime: { 1 }, { comm = "lttng-consumerd", tid = 1193, runtime = 49237, vruntime = 43368363335 }
[23:21:56.989855949] (+0.000001118) sched_stat_runtime: { 0 }, { comm = "lttng-sessiond", tid = 1181, runtime = 45121, vruntime = 36976778361 }
[23:21:56.989861257] (+0.000005308) sched_stat_sleep: { 1 }, { comm = "kworker/1:1", tid = 21, delay = 9451318 }
[23:21:56.989862374] (+0.000001117) sched_stat_sleep: { 0 }, { comm = "kworker/0:0", tid = 4, delay = 9958820 }
[23:21:56.989868241] (+0.000005867) sched_wakeup: { 0 }, { comm = "kworker/0:0", tid = 4, prio = 120, success = 1, target_cpu = 0 }
[23:21:56.989869358] (+0.000001117) sched_wakeup: { 1 }, { comm = "kworker/1:1", tid = 21, prio = 120, success = 1, target_cpu = 1 }
[23:21:56.989877460] (+0.000008102) timer_expire_exit: { 1 }, { timer = 3993871956 }
[23:21:56.989878577] (+0.000001117) timer_expire_exit: { 0 }, { timer = 3993818708 }
.
.
.
You can now safely destroy the trace
session (note that this doesn’t delete the trace — it’s still there in
~/lttng-traces):
root@crownbay:~# lttng destroy
Session auto-20121015-232120 destroyed at /home/root
Note that the trace is saved in a directory of the same name as returned by
lttng create, under the ~/lttng-traces directory (note that you can change this by
supplying your own name to lttng create):
root@crownbay:~# ls -al ~/lttng-traces
drwxrwx--- 3 root root 1024 Oct 15 23:21 .
drwxr-xr-x 5 root root 1024 Oct 15 23:57 ..
drwxrwx--- 3 root root 1024 Oct 15 23:21 auto-20121015-232120
3.5.2.2 Collecting and viewing a user space trace on the target (inside a shell)
For LTTng user space tracing, you need to have a properly instrumented
user space program. For this example, we’ll use the hello test program
generated by the lttng-ust build.
The hello test program isn’t installed on the root filesystem by the lttng-ust
build, so we need to copy it over manually. First cd into the build
directory that contains the hello executable:
$ cd build/tmp/work/core2_32-poky-linux/lttng-ust/2.0.5-r0/git/tests/hello/.libs
Copy that over to the target machine:
$ scp hello root@192.168.1.20:
You now have the instrumented LTTng “hello world” test program on the target, ready to test.
First, from the host, connect to the target through SSH:
$ ssh -l root 192.168.1.47
The authenticity of host '192.168.1.47 (192.168.1.47)' can't be established.
RSA key fingerprint is 23:bd:c8:b1:a8:71:52:00:ee:00:4f:64:9e:10:b9:7e.
Are you sure you want to continue connecting (yes/no)? yes
Warning: Permanently added '192.168.1.47' (RSA) to the list of known hosts.
root@192.168.1.47's password:
Once on the target, use these steps to create a trace:
root@crownbay:~# lttng create
Session auto-20190303-021943 created.
Traces will be written in /home/root/lttng-traces/auto-20190303-021943
Enable the events you want to trace (in this case all user space events):
root@crownbay:~# lttng enable-event --userspace --all
All UST events are enabled in channel channel0
Start the trace:
root@crownbay:~# lttng start
Tracing started for session auto-20190303-021943
Run the instrumented “hello world” program:
root@crownbay:~# ./hello
Hello, World!
Tracing... done.
And then stop the trace after awhile or after running a particular workload that you want to trace:
root@crownbay:~# lttng stop
Tracing stopped for session auto-20190303-021943
You can now view the trace in text form on the target:
root@crownbay:~# lttng view
[02:31:14.906146544] (+?.?????????) hello:1424 ust_tests_hello:tptest: { cpu_id = 1 }, { intfield = 0, intfield2 = 0x0, longfield = 0, netintfield = 0, netintfieldhex = 0x0, arrfield1 = [ [0] = 1, [1] = 2, [2] = 3 ], arrfield2 = "test", _seqfield1_length = 4, seqfield1 = [ [0] = 116, [1] = 101, [2] = 115, [3] = 116 ], _seqfield2_length = 4, seqfield2 = "test", stringfield = "test", floatfield = 2222, doublefield = 2, boolfield = 1 }
[02:31:14.906170360] (+0.000023816) hello:1424 ust_tests_hello:tptest: { cpu_id = 1 }, { intfield = 1, intfield2 = 0x1, longfield = 1, netintfield = 1, netintfieldhex = 0x1, arrfield1 = [ [0] = 1, [1] = 2, [2] = 3 ], arrfield2 = "test", _seqfield1_length = 4, seqfield1 = [ [0] = 116, [1] = 101, [2] = 115, [3] = 116 ], _seqfield2_length = 4, seqfield2 = "test", stringfield = "test", floatfield = 2222, doublefield = 2, boolfield = 1 }
[02:31:14.906183140] (+0.000012780) hello:1424 ust_tests_hello:tptest: { cpu_id = 1 }, { intfield = 2, intfield2 = 0x2, longfield = 2, netintfield = 2, netintfieldhex = 0x2, arrfield1 = [ [0] = 1, [1] = 2, [2] = 3 ], arrfield2 = "test", _seqfield1_length = 4, seqfield1 = [ [0] = 116, [1] = 101, [2] = 115, [3] = 116 ], _seqfield2_length = 4, seqfield2 = "test", stringfield = "test", floatfield = 2222, doublefield = 2, boolfield = 1 }
[02:31:14.906194385] (+0.000011245) hello:1424 ust_tests_hello:tptest: { cpu_id = 1 }, { intfield = 3, intfield2 = 0x3, longfield = 3, netintfield = 3, netintfieldhex = 0x3, arrfield1 = [ [0] = 1, [1] = 2, [2] = 3 ], arrfield2 = "test", _seqfield1_length = 4, seqfield1 = [ [0] = 116, [1] = 101, [2] = 115, [3] = 116 ], _seqfield2_length = 4, seqfield2 = "test", stringfield = "test", floatfield = 2222, doublefield = 2, boolfield = 1 }
.
.
.
You can now safely destroy the trace session (note that this doesn’t delete the
trace — it’s still there in ~/lttng-traces):
root@crownbay:~# lttng destroy
Session auto-20190303-021943 destroyed at /home/root
3.5.3 LTTng Documentation
You can find the primary LTTng Documentation on the LTTng Documentation site. The documentation on this site is appropriate for intermediate to advanced software developers who are working in a Linux environment and are interested in efficient software tracing.
For information on LTTng in general, visit the LTTng Project site. You can find a “Getting Started” link on this site that takes you to an LTTng Quick Start.
3.6 blktrace
blktrace is a tool for tracing and reporting low-level disk I/O. blktrace provides the tracing half of the equation; its output can be piped into the blkparse program, which renders the data in a human-readable form and does some basic analysis:
3.6.1 blktrace Setup
For this section, we’ll assume you’ve already performed the basic setup outlined in the “General Setup” section.
blktrace is an application that runs on the target system. You can run the entire blktrace and blkparse pipeline on the target, or you can run blktrace in ‘listen’ mode on the target and have blktrace and blkparse collect and analyze the data on the host (see the “Using blktrace Remotely” section below). For the rest of this section we assume you’ve to the host through SSH and will be running blktrace on the target.
3.6.2 Basic blktrace Usage
To record a trace, just run the blktrace command, giving it the name
of the block device you want to trace activity on:
root@crownbay:~# blktrace /dev/sdc
In another shell, execute a workload you want to trace:
root@crownbay:/media/sdc# rm linux-2.6.19.2.tar.bz2; wget https://downloads.yoctoproject.org/mirror/sources/linux-2.6.19.2.tar.bz2; sync
Connecting to downloads.yoctoproject.org (140.211.169.59:80)
linux-2.6.19.2.tar.b 100% \|*******************************\| 41727k 0:00:00 ETA
Press Ctrl-C in the blktrace shell to stop the trace. It
will display how many events were logged, along with the per-cpu file
sizes (blktrace records traces in per-cpu kernel buffers and just
dumps them to user space for blkparse to merge and sort later):
^C=== sdc ===
CPU 0: 7082 events, 332 KiB data
CPU 1: 1578 events, 74 KiB data
Total: 8660 events (dropped 0), 406 KiB data
If you examine the files saved to disk, you see multiple files, one per CPU and with the device name as the first part of the filename:
root@crownbay:~# ls -al
drwxr-xr-x 6 root root 1024 Oct 27 22:39 .
drwxr-sr-x 4 root root 1024 Oct 26 18:24 ..
-rw-r--r-- 1 root root 339938 Oct 27 22:40 sdc.blktrace.0
-rw-r--r-- 1 root root 75753 Oct 27 22:40 sdc.blktrace.1
To view the trace events, just call blkparse in the directory
containing the trace files, giving it the device name that forms the
first part of the filenames:
root@crownbay:~# blkparse sdc
8,32 1 1 0.000000000 1225 Q WS 3417048 + 8 [jbd2/sdc-8]
8,32 1 2 0.000025213 1225 G WS 3417048 + 8 [jbd2/sdc-8]
8,32 1 3 0.000033384 1225 P N [jbd2/sdc-8]
8,32 1 4 0.000043301 1225 I WS 3417048 + 8 [jbd2/sdc-8]
8,32 1 0 0.000057270 0 m N cfq1225 insert_request
8,32 1 0 0.000064813 0 m N cfq1225 add_to_rr
8,32 1 5 0.000076336 1225 U N [jbd2/sdc-8] 1
8,32 1 0 0.000088559 0 m N cfq workload slice:150
8,32 1 0 0.000097359 0 m N cfq1225 set_active wl_prio:0 wl_type:1
8,32 1 0 0.000104063 0 m N cfq1225 Not idling. st->count:1
8,32 1 0 0.000112584 0 m N cfq1225 fifo= (null)
8,32 1 0 0.000118730 0 m N cfq1225 dispatch_insert
8,32 1 0 0.000127390 0 m N cfq1225 dispatched a request
8,32 1 0 0.000133536 0 m N cfq1225 activate rq, drv=1
8,32 1 6 0.000136889 1225 D WS 3417048 + 8 [jbd2/sdc-8]
8,32 1 7 0.000360381 1225 Q WS 3417056 + 8 [jbd2/sdc-8]
8,32 1 8 0.000377422 1225 G WS 3417056 + 8 [jbd2/sdc-8]
8,32 1 9 0.000388876 1225 P N [jbd2/sdc-8]
8,32 1 10 0.000397886 1225 Q WS 3417064 + 8 [jbd2/sdc-8]
8,32 1 11 0.000404800 1225 M WS 3417064 + 8 [jbd2/sdc-8]
8,32 1 12 0.000412343 1225 Q WS 3417072 + 8 [jbd2/sdc-8]
8,32 1 13 0.000416533 1225 M WS 3417072 + 8 [jbd2/sdc-8]
8,32 1 14 0.000422121 1225 Q WS 3417080 + 8 [jbd2/sdc-8]
8,32 1 15 0.000425194 1225 M WS 3417080 + 8 [jbd2/sdc-8]
8,32 1 16 0.000431968 1225 Q WS 3417088 + 8 [jbd2/sdc-8]
8,32 1 17 0.000435251 1225 M WS 3417088 + 8 [jbd2/sdc-8]
8,32 1 18 0.000440279 1225 Q WS 3417096 + 8 [jbd2/sdc-8]
8,32 1 19 0.000443911 1225 M WS 3417096 + 8 [jbd2/sdc-8]
8,32 1 20 0.000450336 1225 Q WS 3417104 + 8 [jbd2/sdc-8]
8,32 1 21 0.000454038 1225 M WS 3417104 + 8 [jbd2/sdc-8]
8,32 1 22 0.000462070 1225 Q WS 3417112 + 8 [jbd2/sdc-8]
8,32 1 23 0.000465422 1225 M WS 3417112 + 8 [jbd2/sdc-8]
8,32 1 24 0.000474222 1225 I WS 3417056 + 64 [jbd2/sdc-8]
8,32 1 0 0.000483022 0 m N cfq1225 insert_request
8,32 1 25 0.000489727 1225 U N [jbd2/sdc-8] 1
8,32 1 0 0.000498457 0 m N cfq1225 Not idling. st->count:1
8,32 1 0 0.000503765 0 m N cfq1225 dispatch_insert
8,32 1 0 0.000512914 0 m N cfq1225 dispatched a request
8,32 1 0 0.000518851 0 m N cfq1225 activate rq, drv=2
.
.
.
8,32 0 0 58.515006138 0 m N cfq3551 complete rqnoidle 1
8,32 0 2024 58.516603269 3 C WS 3156992 + 16 [0]
8,32 0 0 58.516626736 0 m N cfq3551 complete rqnoidle 1
8,32 0 0 58.516634558 0 m N cfq3551 arm_idle: 8 group_idle: 0
8,32 0 0 58.516636933 0 m N cfq schedule dispatch
8,32 1 0 58.516971613 0 m N cfq3551 slice expired t=0
8,32 1 0 58.516982089 0 m N cfq3551 sl_used=13 disp=6 charge=13 iops=0 sect=80
8,32 1 0 58.516985511 0 m N cfq3551 del_from_rr
8,32 1 0 58.516990819 0 m N cfq3551 put_queue
CPU0 (sdc):
Reads Queued: 0, 0KiB Writes Queued: 331, 26,284KiB
Read Dispatches: 0, 0KiB Write Dispatches: 485, 40,484KiB
Reads Requeued: 0 Writes Requeued: 0
Reads Completed: 0, 0KiB Writes Completed: 511, 41,000KiB
Read Merges: 0, 0KiB Write Merges: 13, 160KiB
Read depth: 0 Write depth: 2
IO unplugs: 23 Timer unplugs: 0
CPU1 (sdc):
Reads Queued: 0, 0KiB Writes Queued: 249, 15,800KiB
Read Dispatches: 0, 0KiB Write Dispatches: 42, 1,600KiB
Reads Requeued: 0 Writes Requeued: 0
Reads Completed: 0, 0KiB Writes Completed: 16, 1,084KiB
Read Merges: 0, 0KiB Write Merges: 40, 276KiB
Read depth: 0 Write depth: 2
IO unplugs: 30 Timer unplugs: 1
Total (sdc):
Reads Queued: 0, 0KiB Writes Queued: 580, 42,084KiB
Read Dispatches: 0, 0KiB Write Dispatches: 527, 42,084KiB
Reads Requeued: 0 Writes Requeued: 0
Reads Completed: 0, 0KiB Writes Completed: 527, 42,084KiB
Read Merges: 0, 0KiB Write Merges: 53, 436KiB
IO unplugs: 53 Timer unplugs: 1
Throughput (R/W): 0KiB/s / 719KiB/s
Events (sdc): 6,592 entries
Skips: 0 forward (0 - 0.0%)
Input file sdc.blktrace.0 added
Input file sdc.blktrace.1 added
The report shows each event that was found in the blktrace data, along with a summary of the overall block I/O traffic during the run. You can look at the blkparse(1) manual page to learn the meaning of each field displayed in the trace listing.
3.6.2.1 Live Mode
blktrace and blkparse are designed from the ground up to be able to operate together in a “pipe mode” where the standard output of blktrace can be fed directly into the standard input of blkparse:
root@crownbay:~# blktrace /dev/sdc -o - | blkparse -i -
This enables long-lived tracing sessions to run without writing anything to disk, and allows the user to look for certain conditions in the trace data in ‘real-time’ by viewing the trace output as it scrolls by on the screen or by passing it along to yet another program in the pipeline such as grep which can be used to identify and capture conditions of interest.
There’s actually another blktrace command that implements the above pipeline as a single command, so the user doesn’t have to bother typing in the above command sequence:
root@crownbay:~# btrace /dev/sdc
3.6.2.2 Using blktrace Remotely
Because blktrace traces block I/O and at the same time normally writes its trace data to a block device, and in general because it’s not really a great idea to make the device being traced the same as the device the tracer writes to, blktrace provides a way to trace without perturbing the traced device at all by providing native support for sending all trace data over the network.
To have blktrace operate in this mode, start blktrace in server mode on the host system, which is going to store the captured data:
$ blktrace -l
server: waiting for connections...
On the target system that is going to be traced, start blktrace in client mode with the -h option to connect to the host system, also passing it the device to trace:
root@crownbay:~# blktrace -d /dev/sdc -h 192.168.1.43
blktrace: connecting to 192.168.1.43
blktrace: connected!
On the host system, you should see this:
server: connection from 192.168.1.43
In another shell, execute a workload you want to trace:
root@crownbay:/media/sdc# rm linux-2.6.19.2.tar.bz2; wget https://downloads.yoctoproject.org/mirror/sources/linux-2.6.19.2.tar.bz2; sync
Connecting to downloads.yoctoproject.org (140.211.169.59:80)
linux-2.6.19.2.tar.b 100% \|*******************************\| 41727k 0:00:00 ETA
When it’s done, do a Ctrl-C on the target system to stop the
trace:
^C=== sdc ===
CPU 0: 7691 events, 361 KiB data
CPU 1: 4109 events, 193 KiB data
Total: 11800 events (dropped 0), 554 KiB data
On the host system, you should also see a trace summary for the trace just ended:
server: end of run for 192.168.1.43:sdc
=== sdc ===
CPU 0: 7691 events, 361 KiB data
CPU 1: 4109 events, 193 KiB data
Total: 11800 events (dropped 0), 554 KiB data
The blktrace instance on the host will
save the target output inside a <hostname>-<timestamp> directory:
$ ls -al
drwxr-xr-x 10 root root 1024 Oct 28 02:40 .
drwxr-sr-x 4 root root 1024 Oct 26 18:24 ..
drwxr-xr-x 2 root root 1024 Oct 28 02:40 192.168.1.43-2012-10-28-02:40:56
cd into that directory to see the output files:
$ ls -l
-rw-r--r-- 1 root root 369193 Oct 28 02:44 sdc.blktrace.0
-rw-r--r-- 1 root root 197278 Oct 28 02:44 sdc.blktrace.1
And run blkparse on the host system using the device name:
$ blkparse sdc
8,32 1 1 0.000000000 1263 Q RM 6016 + 8 [ls]
8,32 1 0 0.000036038 0 m N cfq1263 alloced
8,32 1 2 0.000039390 1263 G RM 6016 + 8 [ls]
8,32 1 3 0.000049168 1263 I RM 6016 + 8 [ls]
8,32 1 0 0.000056152 0 m N cfq1263 insert_request
8,32 1 0 0.000061600 0 m N cfq1263 add_to_rr
8,32 1 0 0.000075498 0 m N cfq workload slice:300
.
.
.
8,32 0 0 177.266385696 0 m N cfq1267 arm_idle: 8 group_idle: 0
8,32 0 0 177.266388140 0 m N cfq schedule dispatch
8,32 1 0 177.266679239 0 m N cfq1267 slice expired t=0
8,32 1 0 177.266689297 0 m N cfq1267 sl_used=9 disp=6 charge=9 iops=0 sect=56
8,32 1 0 177.266692649 0 m N cfq1267 del_from_rr
8,32 1 0 177.266696560 0 m N cfq1267 put_queue
CPU0 (sdc):
Reads Queued: 0, 0KiB Writes Queued: 270, 21,708KiB
Read Dispatches: 59, 2,628KiB Write Dispatches: 495, 39,964KiB
Reads Requeued: 0 Writes Requeued: 0
Reads Completed: 90, 2,752KiB Writes Completed: 543, 41,596KiB
Read Merges: 0, 0KiB Write Merges: 9, 344KiB
Read depth: 2 Write depth: 2
IO unplugs: 20 Timer unplugs: 1
CPU1 (sdc):
Reads Queued: 688, 2,752KiB Writes Queued: 381, 20,652KiB
Read Dispatches: 31, 124KiB Write Dispatches: 59, 2,396KiB
Reads Requeued: 0 Writes Requeued: 0
Reads Completed: 0, 0KiB Writes Completed: 11, 764KiB
Read Merges: 598, 2,392KiB Write Merges: 88, 448KiB
Read depth: 2 Write depth: 2
IO unplugs: 52 Timer unplugs: 0
Total (sdc):
Reads Queued: 688, 2,752KiB Writes Queued: 651, 42,360KiB
Read Dispatches: 90, 2,752KiB Write Dispatches: 554, 42,360KiB
Reads Requeued: 0 Writes Requeued: 0
Reads Completed: 90, 2,752KiB Writes Completed: 554, 42,360KiB
Read Merges: 598, 2,392KiB Write Merges: 97, 792KiB
IO unplugs: 72 Timer unplugs: 1
Throughput (R/W): 15KiB/s / 238KiB/s
Events (sdc): 9,301 entries
Skips: 0 forward (0 - 0.0%)
You should see the trace events and summary just as you would have if you’d run the same command on the target.
3.6.2.3 Tracing Block I/O via ‘ftrace’
It’s also possible to trace block I/O using only The ‘trace events’ Subsystem, which can be useful for casual tracing if you don’t want to bother dealing with the user space tools.
To enable tracing for a given device, use /sys/block/xxx/trace/enable,
where xxx is the device name. This for example enables tracing for
/dev/sdc:
root@crownbay:/sys/kernel/debug/tracing# echo 1 > /sys/block/sdc/trace/enable
Once you’ve selected the device(s) you want
to trace, selecting the blk tracer will turn the blk tracer on:
root@crownbay:/sys/kernel/debug/tracing# cat available_tracers
blk function_graph function nop
root@crownbay:/sys/kernel/debug/tracing# echo blk > current_tracer
Execute the workload you’re interested in:
root@crownbay:/sys/kernel/debug/tracing# cat /media/sdc/testfile.txt
And look at the output (note here that we’re using trace_pipe instead of
trace to capture this trace — this allows us to wait around on the pipe
for data to appear):
root@crownbay:/sys/kernel/debug/tracing# cat trace_pipe
cat-3587 [001] d..1 3023.276361: 8,32 Q R 1699848 + 8 [cat]
cat-3587 [001] d..1 3023.276410: 8,32 m N cfq3587 alloced
cat-3587 [001] d..1 3023.276415: 8,32 G R 1699848 + 8 [cat]
cat-3587 [001] d..1 3023.276424: 8,32 P N [cat]
cat-3587 [001] d..2 3023.276432: 8,32 I R 1699848 + 8 [cat]
cat-3587 [001] d..1 3023.276439: 8,32 m N cfq3587 insert_request
cat-3587 [001] d..1 3023.276445: 8,32 m N cfq3587 add_to_rr
cat-3587 [001] d..2 3023.276454: 8,32 U N [cat] 1
cat-3587 [001] d..1 3023.276464: 8,32 m N cfq workload slice:150
cat-3587 [001] d..1 3023.276471: 8,32 m N cfq3587 set_active wl_prio:0 wl_type:2
cat-3587 [001] d..1 3023.276478: 8,32 m N cfq3587 fifo= (null)
cat-3587 [001] d..1 3023.276483: 8,32 m N cfq3587 dispatch_insert
cat-3587 [001] d..1 3023.276490: 8,32 m N cfq3587 dispatched a request
cat-3587 [001] d..1 3023.276497: 8,32 m N cfq3587 activate rq, drv=1
cat-3587 [001] d..2 3023.276500: 8,32 D R 1699848 + 8 [cat]
And this turns off tracing for the specified device:
root@crownbay:/sys/kernel/debug/tracing# echo 0 > /sys/block/sdc/trace/enable
3.6.3 blktrace Documentation
Online versions of the manual pages for the commands discussed in this section can be found here:
The above manual pages, along with manuals for the other blktrace utilities
(btt, blkiomon, etc) can be found in the /doc directory of the blktrace
tools git repository:
$ git clone https://git.kernel.org/pub/scm/linux/kernel/git/axboe/blktrace.git
4 Real-World Examples
This chapter contains real-world examples.
4.1 Slow Write Speed on Live Images
In one of our previous releases (denzil), users noticed that booting off of a live image and writing to disk was noticeably slower. This included the boot itself, especially the first one, since first boots tend to do a significant amount of writing due to certain post-install scripts.
The problem (and solution) was discovered by using the Yocto tracing tools, in this case ‘perf stat’, ‘perf script’, ‘perf record’ and ‘perf report’.
See all the unvarnished details of how this bug was diagnosed and solved here: Yocto Bug #3049
Permission is granted to copy, distribute and/or modify this document under the terms of the Creative Commons Attribution-Share Alike 2.0 UK: England & Wales as published by Creative Commons.
To report any inaccuracies or problems with this (or any other Yocto Project)
manual, or to send additions or changes, please send email/patches to the Yocto
Project documentation mailing list at docs@lists.yoctoproject.org or
log into the Libera Chat #yocto channel.
Yocto Project Application Development and the Extensible Software Development Kit (eSDK)
1 Introduction
1.1 eSDK Introduction
Welcome to the Yocto Project Application Development and the Extensible Software Development Kit (eSDK) manual. This manual explains how to use both the Yocto Project extensible and standard SDKs to develop applications and images.
All SDKs consist of the following:
Cross-Development Toolchain: This toolchain contains a compiler, debugger, and various associated tools.
Libraries, Headers, and Symbols: The libraries, headers, and symbols are specific to the image (i.e. they match the image against which the SDK was built).
Environment Setup Script: This
*.shfile, once sourced, sets up the cross-development environment by defining variables and preparing for SDK use.
Additionally, an extensible SDK has tools that allow you to easily add new applications and libraries to an image, modify the source of an existing component, test changes on the target hardware, and easily integrate an application into the OpenEmbedded Build System.
You can use an SDK to independently develop and test code that is
destined to run on some target machine. SDKs are completely
self-contained. The binaries are linked against their own copy of
libc, which results in no dependencies on the target system. To
achieve this, the pointer to the dynamic loader is configured at install
time since that path cannot be dynamically altered. This is the reason
for a wrapper around the populate_sdk and populate_sdk_ext
archives.
Another feature of the SDKs is that only one set of cross-compiler
toolchain binaries are produced for any given architecture. This feature
takes advantage of the fact that the target hardware can be passed to
gcc as a set of compiler options. Those options are set up by the
environment script and contained in variables such as
CC and
LD. This reduces the space needed
for the tools. Understand, however, that every target still needs its own
sysroot because those binaries are target-specific.
The SDK development environment consists of the following:
The self-contained SDK, which is an architecture-specific cross-toolchain and matching sysroots (target and native) all built by the OpenEmbedded build system (e.g. the SDK). The toolchain and sysroots are based on a Metadata configuration and extensions, which allows you to cross-develop on the host machine for the target hardware. Additionally, the extensible SDK contains the
devtoolfunctionality.The Quick EMUlator (QEMU), which lets you simulate target hardware. QEMU is not literally part of the SDK. You must build and include this emulator separately. However, QEMU plays an important role in the development process that revolves around use of the SDK.
In summary, the extensible and standard SDK share many features. However, the extensible SDK has powerful development tools to help you more quickly develop applications. Here is a table that summarizes the primary differences between the standard and extensible SDK types when considering which to build:
Feature |
Standard SDK |
Extensible SDK |
|---|---|---|
Toolchain |
Yes |
Yes [1] |
Debugger |
Yes |
Yes [1] |
Size |
100+ MBytes |
1+ GBytes (or 300+ MBytes for minimal w/toolchain) |
|
No |
Yes |
Build Images |
No |
Yes |
Updateable |
No |
Yes |
Managed Sysroot [2] |
No |
Yes |
Installed Packages |
No [3] |
Yes [4] |
Construction |
Packages |
Shared State |
1.1.1 The Cross-Development Toolchain
The Cross-Development Toolchain consists
of a cross-compiler, cross-linker, and cross-debugger that are used to
develop user-space applications for targeted hardware; in addition,
the extensible SDK comes with built-in devtool
functionality. This toolchain is created by running a SDK installer
script or through a Build Directory that is based on
your metadata configuration or extension for your targeted device. The
cross-toolchain works with a matching target sysroot.
1.1.2 Sysroots
The native and target sysroots contain needed headers and libraries for generating binaries that run on the target architecture. The target sysroot is based on the target root filesystem image that is built by the OpenEmbedded build system and uses the same metadata configuration used to build the cross-toolchain.
1.1.3 The QEMU Emulator
The QEMU emulator allows you to simulate your hardware while running your application or image. QEMU is not part of the SDK but is automatically installed and available if you have done any one of the following:
Setup your Build Host as described in the Setting Up to Use the Yocto Project section of the Yocto Project Development Tasks Manual.
installed the cross-toolchain tarball and sourced the toolchain’s setup environment script.
1.2 SDK Development Model
Fundamentally, the SDK fits into the development process as follows:

The SDK is installed on any machine and can be used to develop applications, images, and kernels. An SDK can even be used by a QA Engineer or Release Engineer. The fundamental concept is that the machine that has the SDK installed does not have to be associated with the machine that has the Yocto Project installed. A developer can independently compile and test an object on their machine and then, when the object is ready for integration into an image, they can simply make it available to the machine that has the Yocto Project. Once the object is available, the image can be rebuilt using the Yocto Project to produce the modified image.
You just need to follow these general steps:
Install the SDK for your target hardware: For information on how to install the SDK, see the “Installing the SDK” section.
Download or Build the Target Image: The Yocto Project supports several target architectures and has many pre-built kernel images and root filesystem images.
If you are going to develop your application on hardware, go to the machines download area and choose a target machine area from which to download the kernel image and root filesystem. This download area could have several files in it that support development using actual hardware. For example, the area might contain
.hddimgfiles that combine the kernel image with the filesystem, boot loaders, and so forth. Be sure to get the files you need for your particular development process.If you are going to develop your application and then run and test it using the QEMU emulator, go to the machines/qemu download area. From this area, go down into the directory for your target architecture (e.g.
qemux86_64for an Intel-based 64-bit architecture). Download the kernel, root filesystem, and any other files you need for your process.Note
To use the root filesystem in QEMU, you need to extract it. See the “Extracting the Root Filesystem” section for information on how to do this extraction.
Develop and Test your Application: At this point, you have the tools to develop your application. If you need to separately install and use the QEMU emulator, you can go to QEMU Home Page to download and learn about the emulator. See the “Using the Quick EMUlator (QEMU)” chapter in the Yocto Project Development Tasks Manual for information on using QEMU within the Yocto Project.
The remainder of this manual describes how to use the extensible and standard SDKs. There is also information in appendix form describing how you can build, install, and modify an SDK.
2 Using the Extensible SDK
This chapter describes the extensible SDK and how to install it.
Information covers the pieces of the SDK, how to install it, and
presents a look at using the devtool functionality. The extensible
SDK makes it easy to add new applications and libraries to an image,
modify the source for an existing component, test changes on the target
hardware, and ease integration into the rest of the
OpenEmbedded Build System.
Note
For a side-by-side comparison of main features supported for an extensible SDK as compared to a standard SDK, see the Introduction section.
In addition to the functionality available through devtool, you can
alternatively make use of the toolchain directly, for example from
Makefile and Autotools. See the
“Using the SDK Toolchain Directly” chapter
for more information.
2.1 Why use the Extensible SDK and What is in It?
The extensible SDK provides a cross-development toolchain and libraries
tailored to the contents of a specific image. You would use the
Extensible SDK if you want a toolchain experience supplemented with the
powerful set of devtool commands tailored for the Yocto Project
environment.
The installed extensible SDK consists of several files and directories.
Basically, it contains an SDK environment setup script, some
configuration files, an internal build system, and the devtool
functionality.
2.2 Installing the Extensible SDK
2.2.1 Two ways to install the Extensible SDK
Extensible SDK can be installed in two different ways, and both have their own pros and cons:
Setting up the Extensible SDK environment directly in a Yocto build. This avoids having to produce, test, distribute and maintain separate SDK installer archives, which can get very large. There is only one environment for the regular Yocto build and the SDK and less code paths where things can go not according to plan. It’s easier to update the SDK: it simply means updating the Yocto layers with git fetch or layer management tooling. The SDK extensibility is better than in the second option: just run
bitbakeagain to add more things to the sysroot, or add layers if even more things are required.Setting up the Extensible SDK from a standalone installer. This has the benefit of having a single, self-contained archive that includes all the needed binary artifacts. So nothing needs to be rebuilt, and there is no need to provide a well-functioning binary artefact cache over the network for developers with underpowered laptops.
2.2.2 Setting up the Extensible SDK environment directly in a Yocto build
Set up all the needed layers and a Yocto Build Directory, e.g. a regular Yocto build where
bitbakecan be executed.Run:
$ bitbake meta-ide-support
$ bitbake -c populate_sysroot gtk+3
# or any other target or native item that the application developer would need
$ bitbake build-sysroots -c build_native_sysroot && bitbake build-sysroots -c build_target_sysroot
2.2.3 Setting up the Extensible SDK from a standalone installer
The first thing you need to do is install the SDK on your Build
Host by running the *.sh installation script.
You can download a tarball installer, which includes the pre-built
toolchain, the runqemu script, the internal build system,
devtool, and support files from the appropriate
toolchain directory within the Index of
Releases. Toolchains are available for several 32-bit and 64-bit
architectures with the x86_64 directories, respectively. The
toolchains the Yocto Project provides are based off the
core-image-sato and core-image-minimal images and contain
libraries appropriate for developing against that image.
The names of the tarball installer scripts are such that a string representing the host system appears first in the filename and then is immediately followed by a string representing the target architecture. An extensible SDK has the string “-ext” as part of the name. Following is the general form:
poky-glibc-host_system-image_type-arch-toolchain-ext-release_version.sh
Where:
host_system is a string representing your development system:
i686orx86_64.image_type is the image for which the SDK was built:
core-image-satoorcore-image-minimal.arch is a string representing the tuned target architecture:
aarch64,armv5e,core2-64,i586,mips32r2,mips64,ppc7400, orcortexa8hf-neon.release_version is a string representing the release number of the Yocto Project:
6.0.2,6.0.2+snapshot.
For example, the following SDK installer is for a 64-bit
development host system and a i586-tuned target architecture based off
the SDK for core-image-sato and using the current 6.0.2 snapshot:
poky-glibc-x86_64-core-image-sato-i586-toolchain-ext-6.0.2.sh
Note
As an alternative to downloading an SDK, you can build the SDK installer. For information on building the installer, see the Building an SDK Installer section.
The SDK and toolchains are self-contained and by default are installed
into the poky_sdk folder in your home directory. You can choose to
install the extensible SDK in any location when you run the installer.
However, because files need to be written under that directory during
the normal course of operation, the location you choose for installation
must be writable for whichever users need to use the SDK.
The following command shows how to run the installer given a toolchain
tarball for a 64-bit x86 development host system and a 64-bit x86 target
architecture. The example assumes the SDK installer is located in
~/Downloads/ and has execution rights:
$ ./Downloads/poky-glibc-x86_64-core-image-minimal-core2-64-toolchain-ext-2.5.sh
Poky (Yocto Project Reference Distro) Extensible SDK installer version 2.5
==========================================================================
Enter target directory for SDK (default: poky_sdk):
You are about to install the SDK to "/home/scottrif/poky_sdk". Proceed [Y/n]? Y
Extracting SDK..............done
Setting it up...
Extracting buildtools...
Preparing build system...
Parsing recipes: 100% |##################################################################| Time: 0:00:52
Initialising tasks: 100% |###############################################################| Time: 0:00:00
Checking sstate mirror object availability: 100% |#######################################| Time: 0:00:00
Loading cache: 100% |####################################################################| Time: 0:00:00
Initialising tasks: 100% |###############################################################| Time: 0:00:00
done
SDK has been successfully set up and is ready to be used.
Each time you wish to use the SDK in a new shell session, you need to source the environment setup script e.g.
$ . /home/scottrif/poky_sdk/environment-setup-core2-64-poky-linux
Note
If you do not have write permissions for the directory into which you are installing the SDK, the installer notifies you and exits. For that case, set up the proper permissions in the directory and run the installer again.
2.3 Running the Extensible SDK Environment Setup Script
Once you have the SDK installed, you must run the SDK environment setup script before you can actually use the SDK.
When using an SDK directly in a Yocto build, you will find the script in
tmp/deploy/images/qemux86-64/ in your Build Directory.
When using a standalone SDK installer, this setup script resides in
the directory you chose when you installed the SDK, which is either the
default poky_sdk directory or the directory you chose during
installation.
Before running the script, be sure it is the one that matches the
architecture for which you are developing. Environment setup scripts
begin with the string “environment-setup” and include as part of
their name the tuned target architecture. As an example, the following
commands set the working directory to where the SDK was installed and
then source the environment setup script. In this example, the setup
script is for an IA-based target machine using i586 tuning:
$ cd /home/scottrif/poky_sdk
$ source environment-setup-core2-64-poky-linux
SDK environment now set up; additionally you may now run devtool to perform development tasks.
Run devtool --help for further details.
When using the environment script directly in a Yocto build, it can be run similarly:
$ source tmp/deploy/images/qemux86-64/environment-setup-core2-64-poky-linux
Running the setup script defines many environment variables needed in order to
use the SDK (e.g. PATH, CC, LD, and so forth). If you want
to see all the environment variables the script exports, examine the
installation file itself.
2.4 Using devtool in Your SDK Workflow
The cornerstone of the extensible SDK is a command-line tool called
devtool. This tool provides a number of features that help you
build, test and package software within the extensible SDK, and
optionally integrate it into an image built by the OpenEmbedded build
system.
Note
The use of devtool is not limited to the extensible SDK. You can use
devtool to help you easily develop any project whose build output must be
part of an image built using the build system.
The devtool command line is organized similarly to
Git in that it has a number of
sub-commands for each function. You can run devtool --help to see
all the commands.
Note
See the “devtool Quick Reference” section in the Yocto Project Reference Manual.
devtool subcommands provide entry-points into development:
devtool add: Assists in adding new software to be built.
devtool modify: Sets up an environment to enable you to modify the source of an existing component.
devtool ide-sdk: Generates a configuration for an IDE.
devtool upgrade: Updates an existing recipe so that you can build it for an updated set of source files.
As with the build system, “recipes” represent software packages within
devtool. When you use devtool add, a recipe is automatically
created. When you use devtool modify, the specified existing recipe
is used in order to determine where to get the source code and how to
patch it. In both cases, an environment is set up so that when you build
the recipe a source tree that is under your control is used in order to
allow you to make changes to the source as desired. By default, new
recipes and the source go into a “workspace” directory under the SDK.
To learn how to use devtool to add, modify, upgrade recipes and more, see
the Using the devtool command-line tool
section of the Yocto Project Development Tasks Manual.
2.5 Installing Additional Items Into the Extensible SDK
Out of the box the extensible SDK typically only comes with a small
number of tools and libraries. A minimal SDK starts mostly empty and is
populated on-demand. Sometimes you must explicitly install extra items
into the SDK. If you need these extra items, you can first search for
the items using the devtool search command. For example, suppose you
need to link to libGL but you are not sure which recipe provides libGL.
You can use the following command to find out:
$ devtool search libGL mesa
A free implementation of the OpenGL API
Once you know the recipe
(i.e. mesa in this example), you can install it.
2.5.1 When using the extensible SDK directly in a Yocto build
In this scenario, the Yocto build tooling, e.g. bitbake
is directly accessible to build additional items, and it
can simply be executed directly:
$ bitbake curl-native
# Add newly built native items to native sysroot
$ bitbake build-sysroots -c build_native_sysroot
$ bitbake mesa
# Add newly built target items to target sysroot
$ bitbake build-sysroots -c build_target_sysroot
2.5.2 When using a standalone installer for the Extensible SDK
$ devtool sdk-install mesa
By default, the devtool sdk-install command assumes
the item is available in pre-built form from your SDK provider. If the
item is not available and it is acceptable to build the item from
source, you can add the “-s” option as follows:
$ devtool sdk-install -s mesa
It is important to remember that building the item from source
takes significantly longer than installing the pre-built artifact. Also,
if there is no recipe for the item you want to add to the SDK, you must
instead add the item using the devtool add command.
2.6 Applying Updates to an Installed Extensible SDK
If you are working with an installed extensible SDK that gets occasionally updated (e.g. a third-party SDK), then you will need to manually “pull down” the updates into the installed SDK.
To update your installed SDK, use devtool as follows:
$ devtool sdk-update
The previous command assumes your SDK provider has set the default update URL for you through the SDK_UPDATE_URL variable as described in the “Providing Updates to the Extensible SDK After Installation” section. If the SDK provider has not set that default URL, you need to specify it yourself in the command as follows:
$ devtool sdk-update path_to_update_directory
Note
The URL needs to point specifically to a published SDK and not to an SDK installer that you would download and install.
2.7 Creating a Derivative SDK With Additional Components
You might need to produce an SDK that contains your own custom libraries. A good example would be if you were a vendor with customers that use your SDK to build their own platform-specific software and those customers need an SDK that has custom libraries. In such a case, you can produce a derivative SDK based on the currently installed SDK fairly easily by following these steps:
If necessary, install an extensible SDK that you want to use as a base for your derivative SDK.
Source the environment script for the SDK.
Add the extra libraries or other components you want by using the
devtool addcommand.Run the
devtool build-sdkcommand.
The previous steps take the recipes added to the workspace and construct a new SDK installer that contains those recipes and the resulting binary artifacts. The recipes go into their own separate layer in the constructed derivative SDK, which leaves the workspace clean and ready for users to add their own recipes.
3 Using the Standard SDK
This chapter describes the standard SDK and how to install it. Information includes unique installation and setup aspects for the standard SDK.
Note
For a side-by-side comparison of main features supported for a standard SDK as compared to an extensible SDK, see the “Introduction” section.
You can use a standard SDK to work on Makefile and Autotools-based projects. See the “Using the SDK Toolchain Directly” chapter for more information.
3.1 Why use the Standard SDK and What is in It?
The Standard SDK provides a cross-development toolchain and libraries
tailored to the contents of a specific image. You would use the Standard
SDK if you want a more traditional toolchain experience as compared to
the extensible SDK, which provides an internal build system and the
devtool functionality.
The installed Standard SDK consists of several files and directories. Basically, it contains an SDK environment setup script, some configuration files, and host and target root filesystems to support usage. You can see the directory structure in the “Installed Standard SDK Directory Structure” section.
3.2 Installing the SDK
The first thing you need to do is install the SDK on your Build
Host by running the *.sh installation script.
You can download a tarball installer, which includes the pre-built
toolchain, the runqemu script, and support files from the
appropriate toolchain directory within
the Index of Releases. Toolchains are available for several 32-bit and
64-bit architectures with the x86_64 directories, respectively. The
toolchains the Yocto Project provides are based off the
core-image-sato and core-image-minimal images and contain
libraries appropriate for developing against the corresponding image.
The names of the tarball installer scripts are such that a string representing the host system appears first in the filename and then is immediately followed by a string representing the target architecture:
poky-glibc-host_system-image_type-arch-toolchain-release_version.sh
Where:
host_system is a string representing your development system:
i686orx86_64.image_type is the image for which the SDK was built:
core-image-minimalorcore-image-sato.arch is a string representing the tuned target architecture:
aarch64,armv5e,core2-64,i586,mips32r2,mips64,ppc7400, orcortexa8hf-neon.release_version is a string representing the release number of the Yocto Project:
6.0.2,6.0.2+snapshot.
For example, the following SDK installer is for a 64-bit
development host system and a i586-tuned target architecture based off
the SDK for core-image-sato and the 6.0.2 release:
poky-glibc-x86_64-core-image-sato-i586-toolchain-6.0.2.sh
Note
As an alternative to downloading an SDK, you can build the SDK installer. For information on building the installer, see the “Building an SDK Installer” section.
The SDK and toolchains are self-contained and by default are installed
into the poky_sdk folder in your home directory. You can choose to
install the extensible SDK in any location when you run the installer.
However, because files need to be written under that directory during
the normal course of operation, the location you choose for installation
must be writable for whichever users need to use the SDK.
The following command shows how to run the installer given a toolchain
tarball for a 64-bit x86 development host system and a 64-bit x86 target
architecture. The example assumes the SDK installer is located in
~/Downloads/ and has execution rights:
$ ./Downloads/poky-glibc-x86_64-core-image-sato-i586-toolchain-6.0.2.sh
Poky (Yocto Project Reference Distro) SDK installer version 6.0.2
===============================================================
Enter target directory for SDK (default: /opt/poky/6.0.2):
You are about to install the SDK to "/opt/poky/6.0.2". Proceed [Y/n]? Y
Extracting SDK........................................ ..............................done
Setting it up...done
SDK has been successfully set up and is ready to be used.
Each time you wish to use the SDK in a new shell session, you need to source the environment setup script e.g.
$ . /opt/poky/6.0.2/environment-setup-i586-poky-linux
Note
If you do not have write permissions for the directory into which you are installing the SDK, the installer notifies you and exits. For that case, set up the proper permissions in the directory and run the installer again.
Again, reference the “Installed Standard SDK Directory Structure” section for more details on the resulting directory structure of the installed SDK.
3.3 Running the SDK Environment Setup Script
Once you have the SDK installed, you must run the SDK environment setup
script before you can actually use the SDK. This setup script resides in
the directory you chose when you installed the SDK, which is either the
default /opt/poky/6.0.2 directory or the directory you chose during
installation.
Before running the script, be sure it is the one that matches the
architecture for which you are developing. Environment setup scripts
begin with the string “environment-setup” and include as part of
their name the tuned target architecture. As an example, the following
commands set the working directory to where the SDK was installed and
then source the environment setup script. In this example, the setup
script is for an IA-based target machine using i586 tuning:
$ source /opt/poky/6.0.2/environment-setup-i586-poky-linux
When you run the setup script, the same environment variables are defined as are when you run the setup script for an extensible SDK. See the “Installed Extensible SDK Directory Structure” section for more information.
4 Using the SDK Toolchain Directly
You can use the SDK toolchain directly with Makefile and Autotools-based projects.
4.1 Autotools-Based Projects
Once you have a suitable The Cross-Development Toolchain installed, it is very easy to develop a project using the GNU Autotools-based workflow, which is outside of the OpenEmbedded Build System.
The following figure presents a simple Autotools workflow.
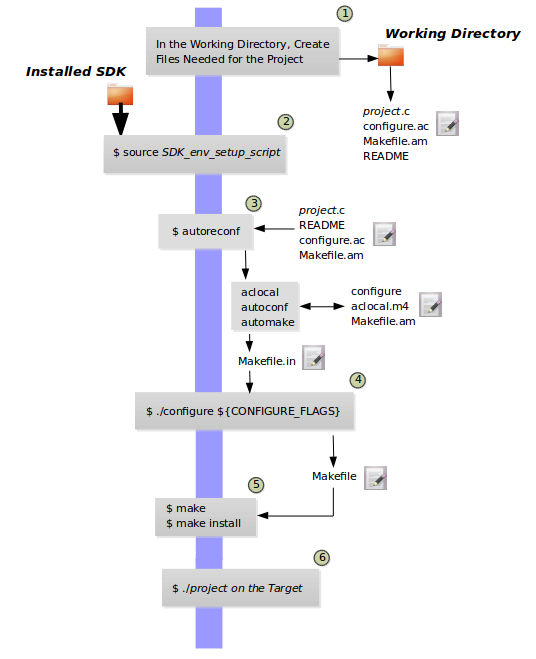
Follow these steps to create a simple Autotools-based “Hello World” project:
Note
For more information on the GNU Autotools workflow, see the same example on the GNOME Developer site.
Create a Working Directory and Populate It: Create a clean directory for your project and then make that directory your working location:
$ mkdir $HOME/helloworld $ cd $HOME/helloworld
After setting up the directory, populate it with files needed for the flow. You need a project source file, a file to help with configuration, and a file to help create the Makefile, and a README file:
hello.c,configure.ac,Makefile.am, andREADME, respectively.Use the following command to create an empty README file, which is required by GNU Coding Standards:
$ touch README
Create the remaining three files as follows:
hello.c:#include <stdio.h> int main() { printf("Hello World!\n"); return 0; }
configure.ac:AC_INIT(hello,0.1) AM_INIT_AUTOMAKE([foreign]) AC_PROG_CC AC_CONFIG_FILES(Makefile) AC_OUTPUT
Makefile.am:bin_PROGRAMS = hello hello_SOURCES = hello.c
Source the Cross-Toolchain Environment Setup File: As described earlier in the manual, installing the cross-toolchain creates a cross-toolchain environment setup script in the directory that the SDK was installed. Before you can use the tools to develop your project, you must source this setup script. The script begins with the string “environment-setup” and contains the machine architecture, which is followed by the string “poky-linux”. For this example, the command sources a script from the default SDK installation directory that uses the 32-bit Intel x86 Architecture and the 6.0.2 Yocto Project release:
$ source /opt/poky/6.0.2/environment-setup-i586-poky-linux
Another example is sourcing the environment setup directly in a Yocto build:
$ source tmp/deploy/images/qemux86-64/environment-setup-core2-64-poky-linux
Create the configure Script: Use the
autoreconfcommand to generate theconfigurescript:$ autoreconfThe
autoreconftool takes care of running the other Autotools such asaclocal,autoconf, andautomake.Note
If you get errors from
configure.ac, whichautoreconfruns, that indicate missing files, you can use the “-i” option, which ensures missing auxiliary files are copied to the build host.Cross-Compile the Project: This command compiles the project using the cross-compiler. The CONFIGURE_FLAGS environment variable provides the minimal arguments for GNU configure:
$ ./configure ${CONFIGURE_FLAGS}
For an Autotools-based project, you can use the cross-toolchain by just passing the appropriate host option to
configure.sh. The host option you use is derived from the name of the environment setup script found in the directory in which you installed the cross-toolchain. For example, the host option for an ARM-based target that uses the GNU EABI isarmv5te-poky-linux-gnueabi. You will notice that the name of the script isenvironment-setup-armv5te-poky-linux-gnueabi. Thus, the following command works to update your project and rebuild it using the appropriate cross-toolchain tools:$ ./configure --host=armv5te-poky-linux-gnueabi --with-libtool-sysroot=sysroot_dir
Make and Install the Project: These two commands generate and install the project into the destination directory:
$ make $ make install DESTDIR=./tmp
Note
To learn about environment variables established when you run the cross-toolchain environment setup script and how they are used or overridden by the Makefile, see the Makefile-Based Projects section.
This next command is a simple way to verify the installation of your project. Running the command prints the architecture on which the binary file can run. This architecture should be the same architecture that the installed cross-toolchain supports:
$ file ./tmp/usr/local/bin/hello
Execute Your Project: To execute the project, you would need to run it on your target hardware. If your target hardware happens to be your build host, you could run the project as follows:
$ ./tmp/usr/local/bin/helloAs expected, the project displays the “Hello World!” message.
4.2 Makefile-Based Projects
Simple Makefile-based projects use and interact with the cross-toolchain
environment variables established when you run the cross-toolchain
environment setup script. The environment variables are subject to
general make rules.
This section presents a simple Makefile development flow and provides an example that lets you see how you can use cross-toolchain environment variables and Makefile variables during development.
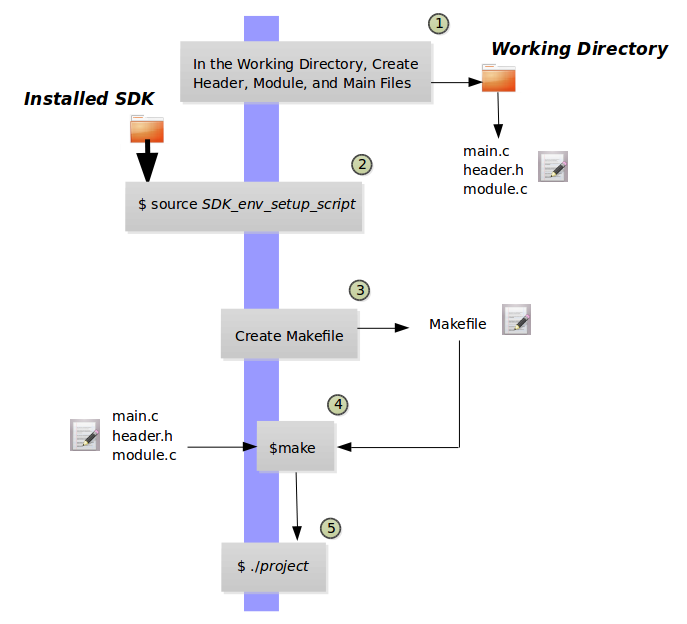
The main point of this section is to explain the following three cases regarding variable behavior:
Case 1 — No Variables Set in the Makefile Map to Equivalent Environment Variables Set in the SDK Setup Script: Because matching variables are not specifically set in the
Makefile, the variables retain their values based on the environment setup script.Case 2 — Variables Are Set in the Makefile that Map to Equivalent Environment Variables from the SDK Setup Script: Specifically setting matching variables in the
Makefileduring the build results in the environment settings of the variables being overwritten. In this case, the variables you set in theMakefileare used.Case 3 — Variables Are Set Using the Command Line that Map to Equivalent Environment Variables from the SDK Setup Script: Executing the
Makefilefrom the command line results in the environment variables being overwritten. In this case, the command-line content is used.
Note
Regardless of how you set your variables, if you use the “-e” option
with make, the variables from the SDK setup script take precedence:
$ make -e target
The remainder of this section presents a simple Makefile example that demonstrates these variable behaviors.
In a new shell environment variables are not established for the SDK until you run the setup script. For example, the following commands show a null value for the compiler variable (i.e. CC):
$ echo ${CC}
$
Running the
SDK setup script for a 64-bit build host and an i586-tuned target
architecture for a core-image-sato image using the current 6.0.2
Yocto Project release and then echoing that variable shows the value
established through the script:
$ source /opt/poky/6.0.2/environment-setup-i586-poky-linux
$ echo ${CC}
i586-poky-linux-gcc -m32 -march=i586 --sysroot=/opt/poky/6.0.2/sysroots/i586-poky-linux
To illustrate variable use, work through this simple “Hello World!” example:
Create a Working Directory and Populate It: Create a clean directory for your project and then make that directory your working location:
$ mkdir $HOME/helloworld $ cd $HOME/helloworld
After setting up the directory, populate it with files needed for the flow. You need a
main.cfile from which you call your function, amodule.hfile to contain headers, and amodule.cthat defines your function.Create the three files as follows:
main.c:#include "module.h" void sample_func(); int main() { sample_func(); return 0; }
module.h:#include <stdio.h> void sample_func();
module.c:#include "module.h" void sample_func() { printf("Hello World!"); printf("\n"); }
Source the Cross-Toolchain Environment Setup File: As described earlier in the manual, installing the cross-toolchain creates a cross-toolchain environment setup script in the directory that the SDK was installed. Before you can use the tools to develop your project, you must source this setup script. The script begins with the string “environment-setup” and contains the machine architecture, which is followed by the string “poky-linux”. For this example, the command sources a script from the default SDK installation directory that uses the 32-bit Intel x86 Architecture and the Wrynose Yocto Project release:
$ source /opt/poky/6.0.2/environment-setup-i586-poky-linux
Another example is sourcing the environment setup directly in a Yocto build:
$ source tmp/deploy/images/qemux86-64/environment-setup-core2-64-poky-linux
Create the Makefile: For this example, the Makefile contains two lines that can be used to set the CC variable. One line is identical to the value that is set when you run the SDK environment setup script, and the other line sets CC to “gcc”, the default GNU compiler on the build host:
# CC=i586-poky-linux-gcc -m32 -march=i586 --sysroot=/opt/poky/2.5/sysroots/i586-poky-linux # CC="gcc" all: main.o module.o ${CC} main.o module.o -o target_bin main.o: main.c module.h ${CC} -I . -c main.c module.o: module.c module.h ${CC} -I . -c module.c clean: rm -rf *.o rm target_bin
Make the Project: Use the
makecommand to create the binary output file. Because variables are commented out in the Makefile, the value used for CC is the value set when the SDK environment setup file was run:$ make i586-poky-linux-gcc -m32 -march=i586 --sysroot=/opt/poky/2.5/sysroots/i586-poky-linux -I . -c main.c i586-poky-linux-gcc -m32 -march=i586 --sysroot=/opt/poky/2.5/sysroots/i586-poky-linux -I . -c module.c i586-poky-linux-gcc -m32 -march=i586 --sysroot=/opt/poky/2.5/sysroots/i586-poky-linux main.o module.o -o target_bin
From the results of the previous command, you can see that the compiler used was the compiler established through the CC variable defined in the setup script.
You can override the CC environment variable with the same variable as set from the Makefile by uncommenting the line in the Makefile and running
makeagain:$ make clean rm -rf *.o rm target_bin # # Edit the Makefile by uncommenting the line that sets CC to "gcc" # $ make gcc -I . -c main.c gcc -I . -c module.c gcc main.o module.o -o target_bin
As shown in the previous example, the cross-toolchain compiler is not used. Rather, the default compiler is used.
This next case shows how to override a variable by providing the variable as part of the command line. Go into the Makefile and re-insert the comment character so that running
makeuses the established SDK compiler. However, when you runmake, use a command-line argument to set CC to “gcc”:$ make clean rm -rf *.o rm target_bin # # Edit the Makefile to comment out the line setting CC to "gcc" # $ make i586-poky-linux-gcc -m32 -march=i586 --sysroot=/opt/poky/2.5/sysroots/i586-poky-linux -I . -c main.c i586-poky-linux-gcc -m32 -march=i586 --sysroot=/opt/poky/2.5/sysroots/i586-poky-linux -I . -c module.c i586-poky-linux-gcc -m32 -march=i586 --sysroot=/opt/poky/2.5/sysroots/i586-poky-linux main.o module.o -o target_bin $ make clean rm -rf *.o rm target_bin $ make CC="gcc" gcc -I . -c main.c gcc -I . -c module.c gcc main.o module.o -o target_bin
In the previous case, the command-line argument overrides the SDK environment variable.
In this last case, edit Makefile again to use the “gcc” compiler but then use the “-e” option on the
makecommand line:$ make clean rm -rf *.o rm target_bin # # Edit the Makefile to use "gcc" # $ make gcc -I . -c main.c gcc -I . -c module.c gcc main.o module.o -o target_bin $ make clean rm -rf *.o rm target_bin $ make -e i586-poky-linux-gcc -m32 -march=i586 --sysroot=/opt/poky/2.5/sysroots/i586-poky-linux -I . -c main.c i586-poky-linux-gcc -m32 -march=i586 --sysroot=/opt/poky/2.5/sysroots/i586-poky-linux -I . -c module.c i586-poky-linux-gcc -m32 -march=i586 --sysroot=/opt/poky/2.5/sysroots/i586-poky-linux main.o module.o -o target_bin
In the previous case, the “-e” option forces
maketo use the SDK environment variables regardless of the values in the Makefile.Execute Your Project: To execute the project (i.e.
target_bin), use the following command:$ ./target_bin Hello World!
Note
If you used the cross-toolchain compiler to build target_bin and your build host differs in architecture from that of the target machine, you need to run your project on the target device.
As expected, the project displays the “Hello World!” message.
5 Obtaining the SDK
5.1 Working with the SDK components directly in a Yocto build
Please refer to section “Setting up the Extensible SDK environment directly in a Yocto build”
Note that to use this feature effectively either a powerful build machine, or a well-functioning sstate cache infrastructure is required: otherwise significant time could be spent waiting for components to be built by BitBake from source code.
5.2 Working with standalone SDK Installers
5.2.1 Locating Pre-Built SDK Installers
You can use existing, pre-built toolchains by locating and running an SDK installer script that ships with the Yocto Project. Using this method, you select and download an architecture-specific SDK installer and then run the script to hand-install the toolchain.
Follow these steps to locate and hand-install the toolchain:
Go to the Installers Directory: Go to https://downloads.yoctoproject.org/releases/yocto/yocto-6.0.2/toolchain/
Open the Folder for Your Build Host: Open the folder that matches your Build Host (i.e.
i686for 32-bit machines orx86_64for 64-bit machines).Locate and Download the SDK Installer: You need to find and download the installer appropriate for your build host, target hardware, and image type.
The installer files (
*.sh) follow this naming convention:poky-glibc-host_system-core-image-type-arch-toolchain[-ext]-release.sh
With:
host_system: string representing your development system:
i686orx86_64type: string representing the image:
satoorminimalarch: string representing the target architecture such as
cortexa57-qemuarm64release: version of the Yocto Project.
Note
The standard SDK installer does not have the
-extstring as part of the filename.The toolchains provided by the Yocto Project are based off of the
core-image-satoandcore-image-minimalimages and contain libraries appropriate for developing against those images.For example, if your build host is a 64-bit x86 system and you need an extended SDK for a 64-bit core2 QEMU target, go into the
x86_64folder and download the following installer:poky-glibc-x86_64-core-image-sato-core2-64-qemux86-64-toolchain-6.0.2.sh
Run the Installer: Be sure you have execution privileges and run the installer. Here is an example from the
Downloadsdirectory:$ ~/Downloads/poky-glibc-x86_64-core-image-sato-core2-64-qemux86-64-toolchain-6.0.2.shDuring execution of the script, you choose the root location for the toolchain. See the “Installed Standard SDK Directory Structure” section and the “Installed Extensible SDK Directory Structure” section for more information.
5.2.2 Building an SDK Installer
As an alternative to locating and downloading an SDK installer, you can build the SDK installer. Follow these steps:
Set Up the Build Environment: Be sure you are set up to use BitBake in a shell. See the “Setting Up to Use the Yocto Project” section in the Yocto Project Development Tasks Manual for information on how to get a build host ready that is either a native Linux machine or a machine that uses CROPS.
Make Sure You Are Building an Installer for the Correct Machine: Check to be sure that your MACHINE variable in the
local.conffile in your Build Directory matches the architecture for which you are building.Make Sure Your SDK Machine is Correctly Set: If you are building a toolchain designed to run on an architecture that differs from your current development host machine (i.e. the build host), be sure that the SDKMACHINE variable in the
local.conffile in your Build Directory is correctly set.Note
If you are building an SDK installer for the Extensible SDK, the SDKMACHINE value must be set for the architecture of the machine you are using to build the installer. If SDKMACHINE is not set appropriately, the build fails and provides an error message similar to the following:
The extensible SDK can currently only be built for the same architecture as the machine being built on - SDK_ARCH is set to i686 (likely via setting SDKMACHINE) which is different from the architecture of the build machine (x86_64). Unable to continue.
Build the SDK Installer: To build the SDK installer for a standard SDK and populate the SDK image, use the following command form. Be sure to replace
imagewith an image (e.g. “core-image-sato”):$ bitbake image -c populate_sdk
You can do the same for the extensible SDK using this command form:
$ bitbake image -c populate_sdk_ext
These commands produce an SDK installer that contains the sysroot that matches your target root filesystem.
When the
bitbakecommand completes, the SDK installer will be intmp/deploy/sdkin the Build Directory.Note
By default, the previous BitBake command does not build static binaries. If you want to use the toolchain to build these types of libraries, you need to be sure your SDK has the appropriate static development libraries. Use the TOOLCHAIN_TARGET_TASK variable inside your
local.conffile before building the SDK installer. Doing so ensures that the eventual SDK installation process installs the appropriate library packages as part of the SDK. Here is an example usinglibcstatic development libraries: TOOLCHAIN_TARGET_TASK:append = ” libc-staticdev”
Run the Installer: You can now run the SDK installer from
tmp/deploy/sdkin the Build Directory. Here is an example:$ cd bitbake-builds/build/tmp/deploy/sdk $ ./poky-glibc-x86_64-core-image-sato-core2-64-toolchain-ext-6.0.2.sh
During execution of the script, you choose the root location for the toolchain. See the “Installed Standard SDK Directory Structure” section and the “Installed Extensible SDK Directory Structure” section for more information.
5.3 Extracting the Root Filesystem
After installing the toolchain, for some use cases you might need to separately extract a root filesystem:
You want to boot the image using NFS.
You want to use the root filesystem as the target sysroot.
You want to develop your target application using the root filesystem as the target sysroot.
Follow these steps to extract the root filesystem:
Locate and Download the Tarball for the Pre-Built Root Filesystem Image File: You need to find and download the root filesystem image file that is appropriate for your target system. These files are kept in machine-specific folders in the Index of Releases in the “machines” directory.
The machine-specific folders of the “machines” directory contain tarballs (
*.tar.bz2) for supported machines. These directories also contain flattened root filesystem image files (*.ext4), which you can use with QEMU directly.The pre-built root filesystem image files follow this naming convention:
core-image-profile-machine.tar.bz2
With:
profile: filesystem image’s profile, such as
minimal,minimal-devorsato. For information on these types of image profiles, see the “Images” chapter in the Yocto Project Reference Manual.machine: same string as the name of the parent download directory.
The root filesystems provided by the Yocto Project are based off of the
core-image-satoandcore-image-minimalimages.For example, if you plan on using a BeagleBone device as your target hardware and your image is a
core-image-sato-sdkimage, you can download the following file:core-image-sato-sdk-beaglebone-yocto.tar.bz2
Initialize the Cross-Development Environment: You must
sourcethe cross-development environment setup script to establish necessary environment variables.This script is located in the top-level directory in which you installed the toolchain (e.g.
poky_sdk).Here is an example based on the toolchain installed in the “Locating Pre-Built SDK Installers” section:
$ source poky_sdk/environment-setup-core2-64-poky-linux
Extract the Root Filesystem: Use the
runqemu-extract-sdkcommand and provide the root filesystem image.Here is an example command that extracts the root filesystem from a previously built root filesystem image that was downloaded from the Index of Releases. This command extracts the root filesystem into the
core2-64-satodirectory:$ runqemu-extract-sdk ~/Downloads/core-image-sato-sdk-beaglebone-yocto.tar.bz2 ~/beaglebone-sato
You could now point to the target sysroot at
beaglebone-sato.
5.4 Installed Standard SDK Directory Structure
After you install the Standard SDK by running the *.sh SDK installation
script, the following directory structure should be observed:
install_dir/version/ ├── buildinfo ├── environment-setup-target-poky-linux ├── site-config-target-poky-linux ├── sysroots/ │ ├── target-poky-linux/ │ │ ├── bin/ │ │ ├── boot/ │ │ ├── etc/ │ │ ├── home/ │ │ ├── lib/ │ │ ├── media/ │ │ ├── mnt/ │ │ ├── proc/ │ │ ├── run/ │ │ ├── sbin/ │ │ ├── sys/ │ │ ├── tmp/ │ │ ├── usr/ │ │ └── var/ │ └── host-pokysdk-linux/ │ ├── bin/ │ ├── environment-setup.d/ │ ├── etc/ │ ├── lib/ │ ├── sbin/ │ ├── usr/ │ └── var/ └── version-target-poky-linux
The installed SDK consists of an environment setup script for the SDK, a
configuration file for the target, a version file for the target, and
the root filesystem (sysroots) needed to develop objects for the
target system.
In the layout above, italicized text is used to indicate replaceable
portions of the file or directory name. For example, install_dir/version
is the directory where the SDK is installed. By default, install_dir
is /opt/poky/. And, version represents the specific snapshot of the
SDK (e.g. 6.0.2). Furthermore, target represents the target architecture
(e.g. i586) and host represents the development system’s
architecture (e.g. x86_64). Thus, the complete names of the two
directories within the sysroots could be i586-poky-linux and
x86_64-pokysdk-linux for the target and host, respectively.
5.5 Installed Extensible SDK Directory Structure
After you install the Extensible SDK by running the *.sh SDK installation
script, the following directory structure should be observed:
install_dir/ ├── bitbake-cookerdaemon.log ├── buildinfo ├── buildtools/ ├── cache/ ├── conf/ ├── .devtoolbase ├── downloads/ ├── environment-setup-target-poky-linux ├── layers/ ├── oe-time-dd-test.dat ├── preparing_system_build.log ├── site-config-target-poky-linux ├── sstate-cache/ ├── sysroots/ ├── tmp/ ├── version-target-poky-linux └── workspace/
The installed directory structure for the extensible SDK is quite different than the installed structure for the standard SDK. The extensible SDK does not separate host and target parts in the same manner as does the standard SDK. The extensible SDK uses an embedded copy of the OpenEmbedded build system, which has its own sysroots.
Of note in the directory structure are an environment setup script for the SDK, a configuration file for the target, a version file for the target, and log files for the OpenEmbedded build system preparation script run by the installer and BitBake.
In the layout above, italicized text is used to indicate replaceable
portions of the file or directory name. For example, install_dir is the
directory where the SDK is installed, which is by default poky_sdk in your
home directory and target represents the target architecture (e.g. i586).
6 Customizing the Extensible SDK standalone installer
This appendix describes customizations you can apply to the extensible SDK when using in the standalone installer version.
Note
It is also possible to use the Extensible SDK functionality directly in a Yocto build, avoiding separate installer artefacts. Please refer to “Installing the Extensible SDK”
6.1 Configuring the Extensible SDK
The extensible SDK primarily consists of a pre-configured copy of the
OpenEmbedded build system from which it was produced. Thus, the SDK’s
configuration is derived using that build system and the filters shown
in the following list. When these filters are present, the OpenEmbedded
build system applies them against local.conf and auto.conf:
Variables whose values start with “/” are excluded since the assumption is that those values are paths that are likely to be specific to the Build Host.
Variables listed in ESDK_LOCALCONF_REMOVE are excluded. These variables are not allowed through from the OpenEmbedded build system configuration into the extensible SDK configuration. Typically, these variables are specific to the machine on which the build system is running and could be problematic as part of the extensible SDK configuration.
For a list of the variables excluded by default, see the ESDK_LOCALCONF_REMOVE in the glossary of the Yocto Project Reference Manual.
Variables listed in ESDK_LOCALCONF_ALLOW are included. Including a variable in the value of ESDK_LOCALCONF_ALLOW overrides either of the previous two filters. The default value is blank.
Classes inherited globally with INHERIT that are listed in ESDK_CLASS_INHERIT_DISABLE are disabled. Using ESDK_CLASS_INHERIT_DISABLE to disable these classes is the typical method to disable classes that are problematic or unnecessary in the SDK context. The default value disables the buildhistory class.
Additionally, the contents of conf/sdk-extra.conf, when present, are
appended to the end of conf/local.conf within the produced SDK,
without any filtering. The sdk-extra.conf file is particularly
useful if you want to set a variable value just for the SDK and not the
OpenEmbedded build system used to create the SDK.
6.2 Adjusting the Extensible SDK to Suit Your Build Host’s Setup
In most cases, the extensible SDK defaults should work with your Build Host’s setup. However, there are cases when you might consider making adjustments:
If your SDK configuration inherits additional classes using the INHERIT variable and you do not need or want those classes enabled in the SDK, you can disable them by adding them to the ESDK_CLASS_INHERIT_DISABLE variable as described in the previous section.
Note
The default value of ESDK_CLASS_INHERIT_DISABLE is set using the “?=” operator. Consequently, you will need to either define the entire list by using the “=” operator, or you will need to append a value using either “:append” or the “+=” operator. You can learn more about these operators in the “Basic Syntax” section of the BitBake User Manual.
If you have classes or recipes that add additional tasks to the standard build flow (i.e. the tasks execute as the recipe builds as opposed to being called explicitly), then you need to do one of the following:
After ensuring the tasks are shared state tasks (i.e. the output of the task is saved to and can be restored from the shared state cache) or ensuring the tasks are able to be produced quickly from a task that is a shared state task, add the task name to the value of SDK_RECRDEP_TASKS.
Disable the tasks if they are added by a class and you do not need the functionality the class provides in the extensible SDK. To disable the tasks, add the class to the ESDK_CLASS_INHERIT_DISABLE variable as described in the previous section.
Generally, you want to have a shared state mirror set up so users of the SDK can add additional items to the SDK after installation without needing to build the items from source. See the “Providing Additional Installable Extensible SDK Content” section for information.
If you want users of the SDK to be able to easily update the SDK, you need to set the SDK_UPDATE_URL variable. For more information, see the “Providing Updates to the Extensible SDK After Installation” section.
If you have adjusted the list of files and directories that appear in COREBASE (other than layers that are enabled through
bblayers.conf), then you must list these files in COREBASE_FILES so that the files are copied into the SDK.If your OpenEmbedded build system setup uses a different environment setup script other than oe-init-build-env, then you must set OE_INIT_ENV_SCRIPT to point to the environment setup script you use.
Note
You must also reflect this change in the value used for the COREBASE_FILES variable as previously described.
6.3 Changing the Extensible SDK Installer Title
You can change the displayed title for the SDK installer by setting the SDK_TITLE variable and then rebuilding the SDK installer. For information on how to build an SDK installer, see the “Building an SDK Installer” section.
By default, this title is derived from DISTRO_NAME when it is set. If the DISTRO_NAME variable is not set, the title is derived from the DISTRO variable.
The populate_sdk_base class defines the default value of the SDK_TITLE variable as follows:
SDK_TITLE ??= "${@d.getVar('DISTRO_NAME') or d.getVar('DISTRO')} SDK"
While there are several ways of changing this variable, an efficient method is
to set the variable in your distribution’s configuration file. Doing so
creates an SDK installer title that applies across your distribution. As
an example, assume you have your own layer for your distribution named
“meta-mydistro” and you are using the same type of file hierarchy as
does the default “poky” distribution. If so, you could update the
SDK_TITLE variable in the
~/meta-mydistro/conf/distro/mydistro.conf file using the following
form:
SDK_TITLE = "your_title"
6.4 Providing Updates to the Extensible SDK After Installation
When you make changes to your configuration or to the metadata and if
you want those changes to be reflected in installed SDKs, you need to
perform additional steps. These steps make it possible for anyone using
the installed SDKs to update the installed SDKs by using the
devtool sdk-update command:
Create a directory that can be shared over HTTP or HTTPS. You can do this by setting up a web server such as an Apache HTTP Server or Nginx server in the cloud to host the directory. This directory must contain the published SDK.
Set the SDK_UPDATE_URL variable to point to the corresponding HTTP or HTTPS URL. Setting this variable causes any SDK built to default to that URL and thus, the user does not have to pass the URL to the
devtool sdk-updatecommand as described in the “Applying Updates to an Installed Extensible SDK” section.Build the extensible SDK normally (i.e., use the
bitbake -c populate_sdk_extimagename command).Publish the SDK using the following command:
$ oe-publish-sdk some_path/sdk-installer.sh path_to_shared_http_directory
You must repeat this step each time you rebuild the SDK with changes that you want to make available through the update mechanism.
Completing the above steps allows users of the existing installed SDKs
to simply run devtool sdk-update to retrieve and apply the latest
updates. See the
“Applying Updates to an Installed Extensible SDK”
section for further information.
6.5 Changing the Default SDK Installation Directory
When you build the installer for the Extensible SDK, the default installation directory for the SDK is based on the DISTRO and SDKEXTPATH variables from within the populate_sdk_base class as follows:
SDKEXTPATH ??= "~/${@d.getVar('DISTRO')}_sdk"
You can change this default installation directory by specifically setting the SDKEXTPATH variable.
While there are several ways of setting this variable,
the method that makes the most sense is to set the variable in your
distribution’s configuration file. Doing so creates an SDK installer
default directory that applies across your distribution. As an example,
assume you have your own layer for your distribution named
“meta-mydistro” and you are using the same type of file hierarchy as
does the default “poky” distribution. If so, you could update the
SDKEXTPATH variable in the
~/meta-mydistro/conf/distro/mydistro.conf file using the following
form:
SDKEXTPATH = "some_path_for_your_installed_sdk"
After building your installer, running it prompts the user for acceptance of the some_path_for_your_installed_sdk directory as the default location to install the Extensible SDK.
6.6 Providing Additional Installable Extensible SDK Content
If you want the users of an extensible SDK you build to be able to add items to the SDK without requiring the users to build the items from source, you need to do a number of things:
Ensure the additional items you want the user to be able to install are already built:
Build the items explicitly. You could use one or more “meta” recipes that depend on lists of other recipes.
Build the “world” target and set
EXCLUDE_FROM_WORLD:pn-recipename for the recipes you do not want built. See the EXCLUDE_FROM_WORLD variable for additional information.
Expose the
sstate-cachedirectory produced by the build. Typically, you expose this directory by making it available through an Apache HTTP Server or Nginx server.Set the appropriate configuration so that the produced SDK knows how to find the configuration. The variable you need to set is SSTATE_MIRRORS:
SSTATE_MIRRORS = "file://.* https://example.com/some_path/sstate-cache/PATH"
You can set the SSTATE_MIRRORS variable in two different places:
If the mirror value you are setting is appropriate to be set for both the OpenEmbedded build system that is actually building the SDK and the SDK itself (i.e. the mirror is accessible in both places or it will fail quickly on the OpenEmbedded build system side, and its contents will not interfere with the build), then you can set the variable in your
local.confor custom distro configuration file. You can then pass the variable to the SDK by adding the following:ESDK_LOCALCONF_ALLOW = "SSTATE_MIRRORS"
Alternatively, if you just want to set the SSTATE_MIRRORS variable’s value for the SDK alone, create a
conf/sdk-extra.conffile either in your Build Directory or within any layer and put your SSTATE_MIRRORS setting within that file.Note
This second option is the safest option should you have any doubts as to which method to use when setting SSTATE_MIRRORS
6.7 Minimizing the Size of the Extensible SDK Installer Download
By default, the extensible SDK bundles the shared state artifacts for
everything needed to reconstruct the image for which the SDK was built.
This bundling can lead to an SDK installer file that is a Gigabyte or
more in size. If the size of this file causes a problem, you can build
an SDK that has just enough in it to install and provide access to the
devtool command by setting the following in your configuration:
SDK_EXT_TYPE = "minimal"
Setting
SDK_EXT_TYPE to
“minimal” produces an SDK installer that is around 35 Mbytes in size,
which downloads and installs quickly. You need to realize, though, that
the minimal installer does not install any libraries or tools out of the
box. These libraries and tools must be installed either “on the fly” or
through actions you perform using devtool or explicitly with the
devtool sdk-install command.
In most cases, when building a minimal SDK you need to also enable
bringing in the information on a wider range of packages produced by the
system. Requiring this wider range of information is particularly true
so that devtool add is able to effectively map dependencies it
discovers in a source tree to the appropriate recipes. Additionally, the
information enables the devtool search command to return useful
results.
To facilitate this wider range of information, you would need to set the following:
SDK_INCLUDE_PKGDATA = "1"
See the SDK_INCLUDE_PKGDATA variable for additional information.
Setting the SDK_INCLUDE_PKGDATA variable as shown causes the “world” target to be built so that information for all of the recipes included within it are available. Having these recipes available increases build time significantly and increases the size of the SDK installer by 30-80 Mbytes depending on how many recipes are included in your configuration.
You can use EXCLUDE_FROM_WORLD:pn-recipename for recipes you want
to exclude. However, it is assumed that you would need to be building
the “world” target if you want to provide additional items to the SDK.
Consequently, building for “world” should not represent undue overhead
in most cases.
Note
If you set SDK_EXT_TYPE to “minimal”, then providing a shared state mirror is mandatory so that items can be installed as needed. See the Providing Additional Installable Extensible SDK Content section for more information.
You can explicitly control whether or not to include the toolchain when you build an SDK by setting the SDK_INCLUDE_TOOLCHAIN variable to “1”. In particular, it is useful to include the toolchain when you have set SDK_EXT_TYPE to “minimal”, which by default, excludes the toolchain. Also, it is helpful if you are building a small SDK for use with an IDE or some other tool where you do not want to take extra steps to install a toolchain.
7 Customizing the Standard SDK
This appendix presents customizations you can apply to the standard SDK.
7.1 Adding Individual Packages to the Standard SDK
When you build a standard SDK using the bitbake -c populate_sdk, a
default set of packages is included in the resulting SDK. The
TOOLCHAIN_HOST_TASK
and
TOOLCHAIN_TARGET_TASK
variables control the set of packages adding to the SDK.
If you want to add individual packages to the toolchain that runs on the host, simply add those packages to the TOOLCHAIN_HOST_TASK variable. Similarly, if you want to add packages to the default set that is part of the toolchain that runs on the target, add the packages to the TOOLCHAIN_TARGET_TASK variable.
7.2 Adding API Documentation to the Standard SDK
You can include API documentation as well as any other documentation provided by recipes with the standard SDK by adding “api-documentation” to the DISTRO_FEATURES variable: DISTRO_FEATURES:append = “ api-documentation” Setting this variable as shown here causes the OpenEmbedded build system to build the documentation and then include it in the standard SDK.
Permission is granted to copy, distribute and/or modify this document under the terms of the Creative Commons Attribution-Share Alike 2.0 UK: England & Wales as published by Creative Commons.
To report any inaccuracies or problems with this (or any other Yocto Project)
manual, or to send additions or changes, please send email/patches to the Yocto
Project documentation mailing list at docs@lists.yoctoproject.org or
log into the Libera Chat #yocto channel.
Toaster User Manual
1 Introduction
Toaster is a web interface to the Yocto Project’s OpenEmbedded Build System. The interface enables you to configure and run your builds. Information about builds is collected and stored in a database. You can use Toaster to configure and start builds on multiple remote build servers.
1.1 Toaster Features
Toaster allows you to configure and run builds, and it provides extensive information about the build process.
Configure and Run Builds: You can use the Toaster web interface to configure and start your builds. Builds started using the Toaster web interface are organized into projects. When you create a project, you are asked to select a release, or version of the build system you want to use for the project builds. As shipped, Toaster supports Yocto Project releases 1.8 and beyond. With the Toaster web interface, you can:
Browse layers listed in the various layer sources that are available in your project (e.g. the OpenEmbedded Layer Index at https://layers.openembedded.org/).
Browse images, recipes, and machines provided by those layers.
Import your own layers for building.
Add and remove layers from your configuration.
Set configuration variables.
Select a target or multiple targets to build.
Start your builds.
Toaster also allows you to configure and run your builds from the command line, and switch between the command line and the web interface at any time. Builds started from the command line appear within a special Toaster project called “Command line builds”.
Information About the Build Process: Toaster also records extensive information about your builds. Toaster collects data for builds you start from the web interface and from the command line as long as Toaster is running.
Note
You must start Toaster before the build or it will not collect build data.
With Toaster you can:
See what was built (recipes and packages) and what packages were installed into your final image.
Browse the directory structure of your image.
See the value of all variables in your build configuration, and which files set each value.
Examine error, warning, and trace messages to aid in debugging.
See information about the BitBake tasks executed and reused during your build, including those that used shared state.
See dependency relationships between recipes, packages, and tasks.
See performance information such as build time, task time, CPU usage, and disk I/O.
For an overview of Toaster, see this introduction video.
1.2 Installation Options
You can set Toaster up to run as a local instance or as a shared hosted service.
When Toaster is set up as a local instance, all the components reside on a single build host. Fundamentally, a local instance of Toaster is suited for a single user developing on a single build host.
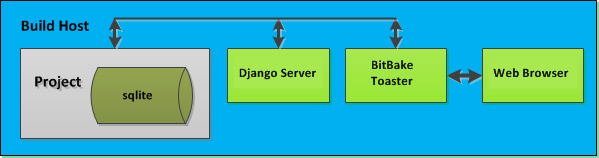
Toaster as a hosted service is suited for multiple users developing across several build hosts. When Toaster is set up as a hosted service, its components can be spread across several machines:
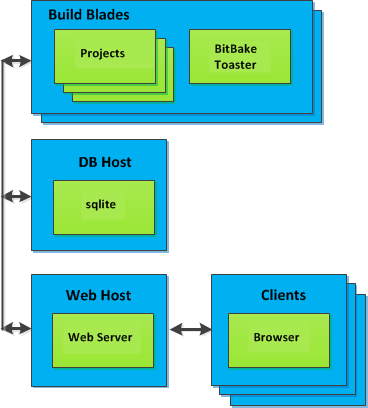
2 Preparing to Use Toaster
This chapter describes how you need to prepare your system in order to use Toaster.
2.1 Setting Up the Basic System Requirements
Before you can use Toaster, you need to first set up your build system to run the Yocto Project. To do this, follow the instructions in the “Preparing the Build Host” section of the Yocto Project Development Tasks Manual. For Ubuntu/Debian, you might also need to do an additional install of pip3.
$ sudo apt install python3-pip
2.2 Establishing Toaster System Dependencies
Toaster requires extra Python dependencies in order to run. A Toaster
requirements file named toaster-requirements.txt defines the Python
dependencies. The requirements file is located in the bitbake
directory, which is located in the root directory of the
Source Directory (e.g.
poky/bitbake/toaster-requirements.txt). The dependencies appear in a
pip, install-compatible format.
2.2.1 Install Toaster Packages
You need to install the packages that Toaster requires. Use this command:
$ pip3 install --user -r bitbake/toaster-requirements.txt
The previous command installs the necessary Toaster modules into a local
Python 3 cache in your $HOME directory. The caches is actually
located in $HOME/.local. To see what packages have been installed
into your $HOME directory, do the following:
$ pip3 list installed --local
If you need to remove something, the following works:
$ pip3 uninstall PackageNameToUninstall
3 Setting Up and Using Toaster
3.1 Starting Toaster for Local Development
Once you have set up the Yocto Project and installed the Toaster system dependencies as described in the “Preparing to Use Toaster” chapter, you are ready to start Toaster.
Navigate to the root of your
Source Directory (e.g. poky):
$ cd poky
Once in that directory, source the build environment script:
$ source oe-init-build-env
Next, from the Build Directory (e.g. poky/build), start Toaster
using this command:
$ source toaster start
You can now run your builds from the command line, or with Toaster as explained in section “Using the Toaster Web Interface”.
To access the Toaster web interface, open your favorite browser and enter the following:
http://127.0.0.1:8000
3.2 Setting a Different Port
By default, Toaster starts on port 8000. You can use the WEBPORT
parameter to set a different port. For example, the following command
sets the port to “8400”:
$ source toaster start webport=8400
3.3 Setting Up Toaster Without a Web Server
You can start a Toaster environment without starting its web server. This is useful for the following:
Capturing a command-line build’s statistics into the Toaster database for examination later.
Capturing a command-line build’s statistics when the Toaster server is already running.
Having one instance of the Toaster web server track and capture multiple command-line builds, where each build is started in its own “noweb” Toaster environment.
The following commands show how to start a Toaster environment without starting its web server, perform BitBake operations, and then shut down the Toaster environment. Once the build is complete, you can close the Toaster environment. Before closing the environment, however, you should allow a few minutes to ensure the complete transfer of its BitBake build statistics to the Toaster database. If you have a separate Toaster web server instance running, you can watch this command-line build’s progress and examine the results as soon as they are posted:
$ source toaster start noweb
$ bitbake target
$ source toaster stop
3.4 Setting Up Toaster Without a Build Server
You can start a Toaster environment with the “New Projects” feature disabled. Doing so is useful for the following:
Sharing your build results over the web server while blocking others from starting builds on your host.
Allowing only local command-line builds to be captured into the Toaster database.
Use the following command to set up Toaster without a build server:
$ source toaster start nobuild webport=port
3.5 Setting up External Access
By default, Toaster binds to the loop back address (i.e. localhost),
which does not allow access from external hosts. To allow external
access, use the WEBPORT parameter to open an address that connects
to the network, specifically the IP address that your NIC uses to
connect to the network. You can also bind to all IP addresses the
computer supports by using the shortcut “0.0.0.0:port”.
The following example binds to all IP addresses on the host:
$ source toaster start webport=0.0.0.0:8400
This example binds to a specific IP address on the host’s NIC:
$ source toaster start webport=192.168.1.1:8400
3.6 The Directory for Cloning Layers
Toaster creates a _toaster_clones directory inside your Source
Directory (i.e. poky) to clone any layers needed for your builds.
Alternatively, if you would like all of your Toaster related files and
directories to be in a particular location other than the default, you
can set the TOASTER_DIR environment variable, which takes precedence
over your current working directory. Setting this environment variable
causes Toaster to create and use $TOASTER_DIR./_toaster_clones.
3.7 The Build Directory
Toaster creates a Build Directory within your Source Directory (e.g.
poky) to execute the builds.
Alternatively, if you would like all of your Toaster related files and
directories to be in a particular location, you can set the
TOASTER_DIR environment variable, which takes precedence over your
current working directory. Setting this environment variable causes
Toaster to use $TOASTER_DIR/build as the Build Directory.
3.8 Creating a Django Superuser
Toaster is built on the Django framework. Django provides an administration interface you can use to edit Toaster configuration parameters.
To access the Django administration interface, you must create a superuser by following these steps:
If you used
pip3, which is recommended, to set up the Toaster system dependencies, you need be sure the local user path is in yourPATHlist. To append the pip3 local user path, use the following command:$ export PATH=$PATH:$HOME/.local/bin
From the directory containing the Toaster database, which by default is the Build Directory, invoke the
createsuperusercommand frommanage.py:$ cd poky/build $ ../bitbake/lib/toaster/manage.py createsuperuser
Django prompts you for the username, which you need to provide.
Django prompts you for an email address, which is optional.
Django prompts you for a password, which you must provide.
Django prompts you to re-enter your password for verification.
After completing these steps, the following confirmation message appears:
Superuser created successfully.
Creating a superuser allows you to access the Django administration interface through a browser. The URL for this interface is the same as the URL used for the Toaster instance with “/admin” on the end. For example, if you are running Toaster locally, use the following URL:
http://127.0.0.1:8000/admin
You can use the Django administration interface to set Toaster configuration parameters such as the Build Directory, layer sources, default variable values, and BitBake versions.
3.9 Setting Up a Production Instance of Toaster
You can use a production instance of Toaster to share the Toaster instance with remote users, multiple users, or both. The production instance is also the setup that can handle heavier loads on the web service. Use the instructions in the following sections to set up Toaster to run builds through the Toaster web interface.
3.9.1 Requirements
Be sure you meet the following requirements:
Note
You must comply with all Apache, mod-wsgi, and Mysql requirements.
Have all the build requirements as described in the “Preparing to Use Toaster” chapter.
Have an Apache webserver.
Have
mod-wsgifor the Apache webserver.Use the Mysql database server.
If you are using Ubuntu, run the following:
$ sudo apt install apache2 libapache2-mod-wsgi-py3 mysql-server python3-pip libmysqlclient-dev
If you are using Fedora or a RedHat distribution, run the following:
$ sudo dnf install httpd python3-mod_wsgi python3-pip mariadb-server mariadb-devel python3-devel
If you are using openSUSE, run the following:
$ sudo zypper install apache2 apache2-mod_wsgi-python3 python3-pip mariadb mariadb-client python3-devel
3.9.2 Installation
Perform the following steps to install Toaster:
Create toaster user and set its home directory to
/var/www/toaster:$ sudo /usr/sbin/useradd toaster -md /var/www/toaster -s /bin/false $ sudo su - toaster -s /bin/bash
Checkout a copy of
pokyinto the web server directory. You will be using/var/www/toaster:$ git clone git://git.yoctoproject.org/poky $ git checkout wrynose
Install Toaster dependencies using the
--userflag which keeps the Python packages isolated from your system-provided packages:$ cd /var/www/toaster/ $ pip3 install --user -r ./poky/bitbake/toaster-requirements.txt $ pip3 install --user mysqlclient
Note
Isolating these packages is not required but is recommended. Alternatively, you can use your operating system’s package manager to install the packages.
Configure Toaster by editing
/var/www/toaster/poky/bitbake/lib/toaster/toastermain/settings.pyas follows:Edit the DATABASES settings:
DATABASES = { 'default': { 'ENGINE': 'django.db.backends.mysql', 'NAME': 'toaster_data', 'USER': 'toaster', 'PASSWORD': 'yourpasswordhere', 'HOST': 'localhost', 'PORT': '3306', } }
Edit the SECRET_KEY:
SECRET_KEY = 'your_secret_key'
Edit the STATIC_ROOT:
STATIC_ROOT = '/var/www/toaster/static_files/'
Add the database and user to the
mysqlserver defined earlier:$ mysql -u root -p mysql> CREATE DATABASE toaster_data; mysql> CREATE USER 'toaster'@'localhost' identified by 'yourpasswordhere'; mysql> GRANT all on toaster_data.\* to 'toaster'@'localhost'; mysql> quit
Get Toaster to create the database schema, default data, and gather the statically-served files:
$ cd /var/www/toaster/poky/ $ ./bitbake/lib/toaster/manage.py migrate $ TOASTER_DIR=`pwd\` TEMPLATECONF='poky' \ ./bitbake/lib/toaster/manage.py checksettings $ ./bitbake/lib/toaster/manage.py collectstatic
In the previous example, from the
pokydirectory, themigratecommand ensures the database schema changes have propagated correctly (i.e. migrations). The next line sets the Toaster root directoryTOASTER_DIRand the location of the Toaster configuration fileTOASTER_CONF, which is relative toTOASTER_DIR. The TEMPLATECONF value reflects the contents ofpoky/.templateconf, and by default, should include the string “poky”. For more information on the Toaster configuration file, see the “Configuring Toaster” section.This line also runs the
checksettingscommand, which configures the location of the Toaster Build Directory. The Toaster root directoryTOASTER_DIRdetermines where the Toaster build directory is created on the file system. In the example above,TOASTER_DIRis set as follows:/var/www/toaster/poky
This setting causes the Toaster Build Directory to be:
/var/www/toaster/poky/build
Finally, the
collectstaticcommand is a Django framework command that collects all the statically served files into a designated directory to be served up by the Apache web server as defined bySTATIC_ROOT.Test and/or use the Mysql integration with Toaster’s Django web server. At this point, you can start up the normal Toaster Django web server with the Toaster database in Mysql. You can use this web server to confirm that the database migration and data population from the Layer Index is complete.
To start the default Toaster Django web server with the Toaster database now in Mysql, use the standard start commands:
$ source oe-init-build-env $ source toaster start
Additionally, if Django is sufficient for your requirements, you can use it for your release system and migrate later to Apache as your requirements change.
Add an Apache configuration file for Toaster to your Apache web server’s configuration directory. If you are using Ubuntu or Debian, put the file here:
/etc/apache2/conf-available/toaster.conf
If you are using Fedora or RedHat, put it here:
/etc/httpd/conf.d/toaster.conf
If you are using openSUSE, put it here:
/etc/apache2/conf.d/toaster.conf
Here is a sample Apache configuration for Toaster you can follow:
Alias /static /var/www/toaster/static_files <Directory /var/www/toaster/static_files> <IfModule mod_access_compat.c> Order allow,deny Allow from all </IfModule> <IfModule !mod_access_compat.c> Require all granted </IfModule> </Directory> <Directory /var/www/toaster/poky/bitbake/lib/toaster/toastermain> <Files "wsgi.py"> Require all granted </Files> </Directory> WSGIDaemonProcess toaster_wsgi python-path=/var/www/toaster/poky/bitbake/lib/toaster:/var/www/toaster/.local/lib/python3.4/site-packages WSGIScriptAlias / "/var/www/toaster/poky/bitbake/lib/toaster/toastermain/wsgi.py" <Location /> WSGIProcessGroup toaster_wsgi </Location>
If you are using Ubuntu or Debian, you will need to enable the config and module for Apache:
$ sudo a2enmod wsgi $ sudo a2enconf toaster $ chmod +x bitbake/lib/toaster/toastermain/wsgi.py
Finally, restart Apache to make sure all new configuration is loaded. For Ubuntu, Debian, and openSUSE use:
$ sudo service apache2 restart
For Fedora and RedHat use:
$ sudo service httpd restart
Prepare the systemd service to run Toaster builds. Here is a sample configuration file for the service:
[Unit] Description=Toaster runbuilds [Service] Type=forking User=toaster ExecStart=/usr/bin/screen -d -m -S runbuilds /var/www/toaster/poky/bitbake/lib/toaster/runbuilds-service.sh start ExecStop=/usr/bin/screen -S runbuilds -X quit WorkingDirectory=/var/www/toaster/poky [Install] WantedBy=multi-user.target
Prepare the
runbuilds-service.shscript that you need to place in the/var/www/toaster/poky/bitbake/lib/toaster/directory by setting up executable permissions:#!/bin/bash #export http_proxy=http://proxy.host.com:8080 #export https_proxy=http://proxy.host.com:8080 #export GIT_PROXY_COMMAND=$HOME/bin/gitproxy cd poky/ source ./oe-init-build-env build source ../bitbake/bin/toaster $1 noweb [ "$1" == 'start' ] && /bin/bash
Run the service:
$ sudo service runbuilds start
Since the service is running in a detached screen session, you can attach to it using this command:
$ sudo su - toaster $ screen -rS runbuilds
You can detach from the service again using “Ctrl-a” followed by “d” key combination.
You can now open up a browser and start using Toaster.
3.10 Using the Toaster Web Interface
The Toaster web interface allows you to do the following:
Browse published layers in the OpenEmbedded Layer Index that are available for your selected version of the build system.
Import your own layers for building.
Add and remove layers from your configuration.
Set configuration variables.
Select a target or multiple targets to build.
Start your builds.
See what was built (recipes and packages) and what packages were installed into your final image.
Browse the directory structure of your image.
See the value of all variables in your build configuration, and which files set each value.
Examine error, warning and trace messages to aid in debugging.
See information about the BitBake tasks executed and reused during your build, including those that used shared state.
See dependency relationships between recipes, packages and tasks.
See performance information such as build time, task time, CPU usage, and disk I/O.
3.10.1 Toaster Web Interface Videos
Here are several videos that show how to use the Toaster GUI:
Build Configuration: This video overviews and demonstrates build configuration for Toaster.
Build Custom Layers: This video shows you how to build custom layers that are used with Toaster.
Toaster Homepage and Table Controls: This video goes over the Toaster entry page, and provides an overview of the data manipulation capabilities of Toaster, which include search, sorting and filtering by different criteria.
Build Dashboard: This video shows you the build dashboard, a page providing an overview of the information available for a selected build.
Image Information: This video walks through the information Toaster provides about images: packages installed and root file system.
Configuration: This video provides Toaster build configuration information.
Tasks: This video shows the information Toaster provides about the tasks run by the build system.
Recipes and Packages Built: This video shows the information Toaster provides about recipes and packages built.
Performance Data: This video shows the build performance data provided by Toaster.
3.10.2 Additional Information About the Local Yocto Project Release
This section only applies if you have set up Toaster for local development, as explained in the “Starting Toaster for Local Development” section.
When you create a project in Toaster, you will be asked to provide a name and to select a Yocto Project release. One of the release options you will find is called “Local Yocto Project”.
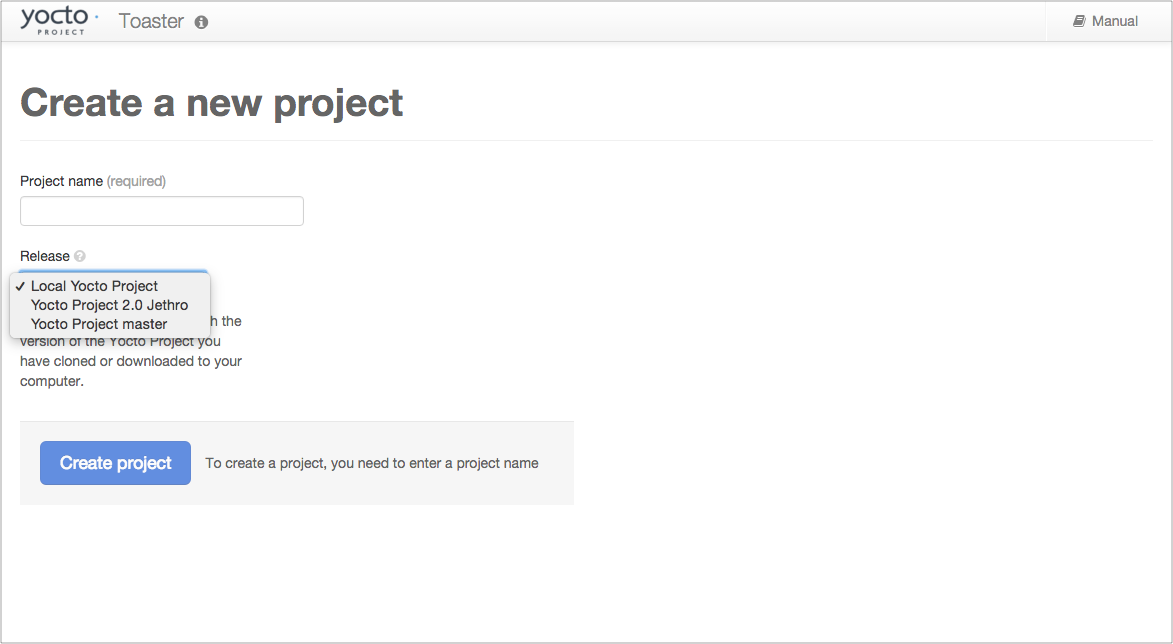
When you select the “Local Yocto Project” release, Toaster will run your builds using the local Yocto Project clone you have in your computer: the same clone you are using to run Toaster. Unless you manually update this clone, your builds will always use the same Git revision.
If you select any of the other release options, Toaster will fetch the tip of your selected release from the upstream Yocto Project repository every time you run a build. Fetching this tip effectively means that if your selected release is updated upstream, the Git revision you are using for your builds will change. If you are doing development locally, you might not want this change to happen. In that case, the “Local Yocto Project” release might be the right choice.
However, the “Local Yocto Project” release will not provide you with any compatible layers, other than the three core layers that come with the Yocto Project:
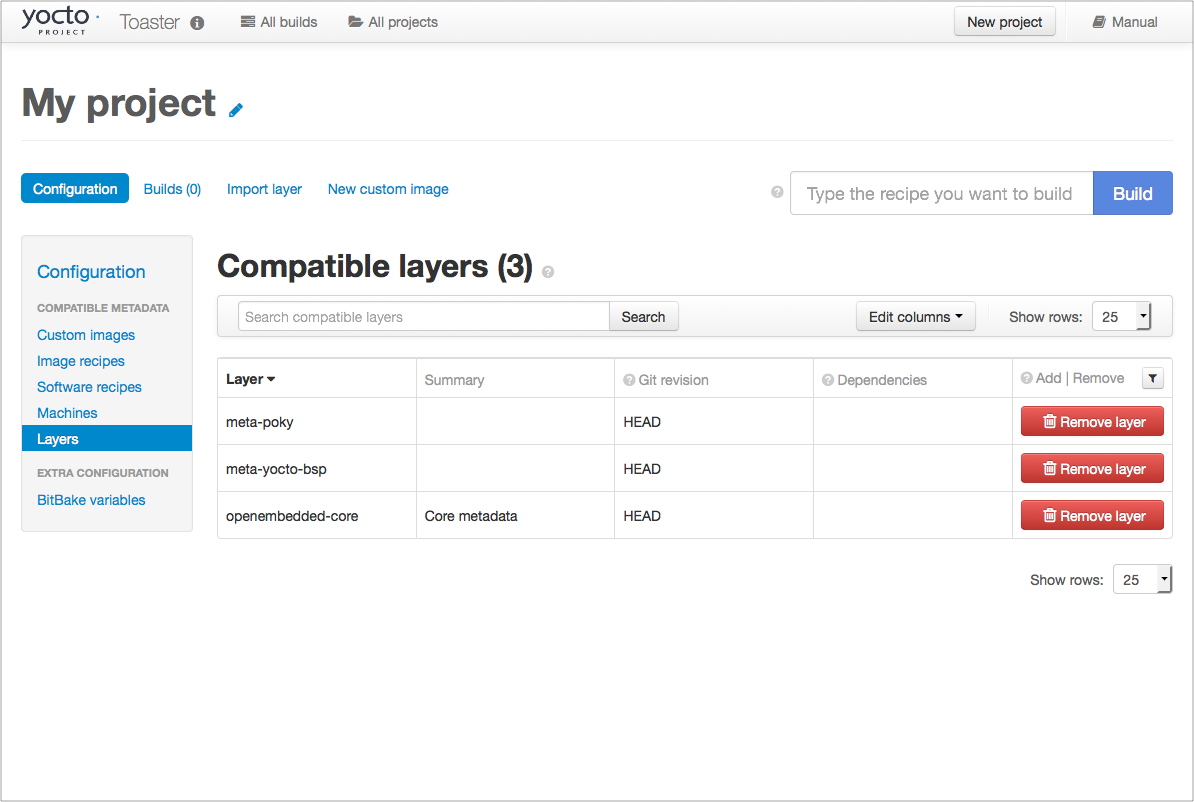
If you want to build any other layers, you will need to manually import them into your Toaster project, using the “Import layer” page.

3.10.3 Building a Specific Recipe Given Multiple Versions
Occasionally, a layer might provide more than one version of the same
recipe. For example, the openembedded-core layer provides two
versions of the bash recipe (i.e. 3.2.48 and 4.3.30-r0) and two
versions of the which recipe (i.e. 2.21 and 2.18). The following
figure shows this exact scenario:
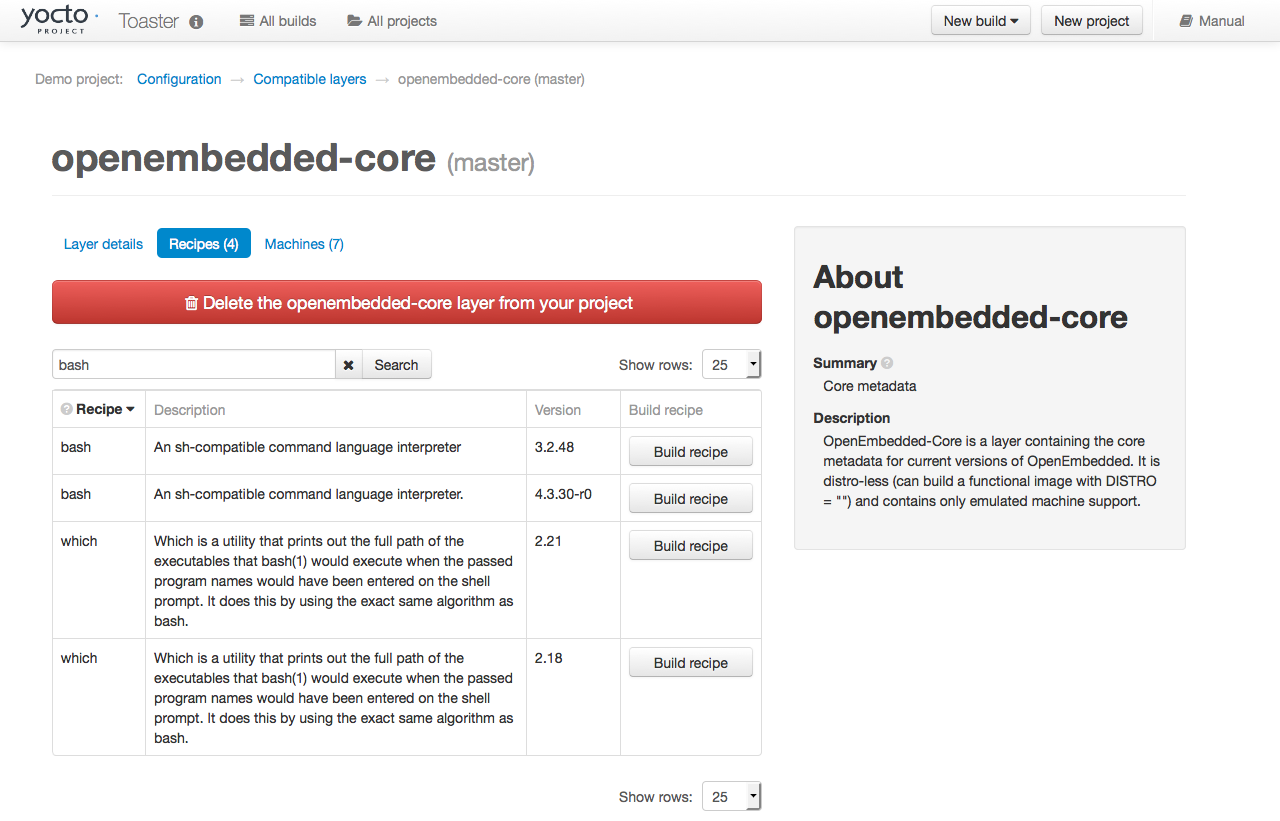
By default, the OpenEmbedded build system builds one of the two recipes.
For the bash case, version 4.3.30-r0 is built by default.
Unfortunately, Toaster as it exists, is not able to override the default
recipe version. If you would like to build bash 3.2.48, you need to set
the
PREFERRED_VERSION
variable. You can do so from Toaster, using the “Add variable” form,
which is available in the “BitBake variables” page of the project
configuration section as shown in the following screen:
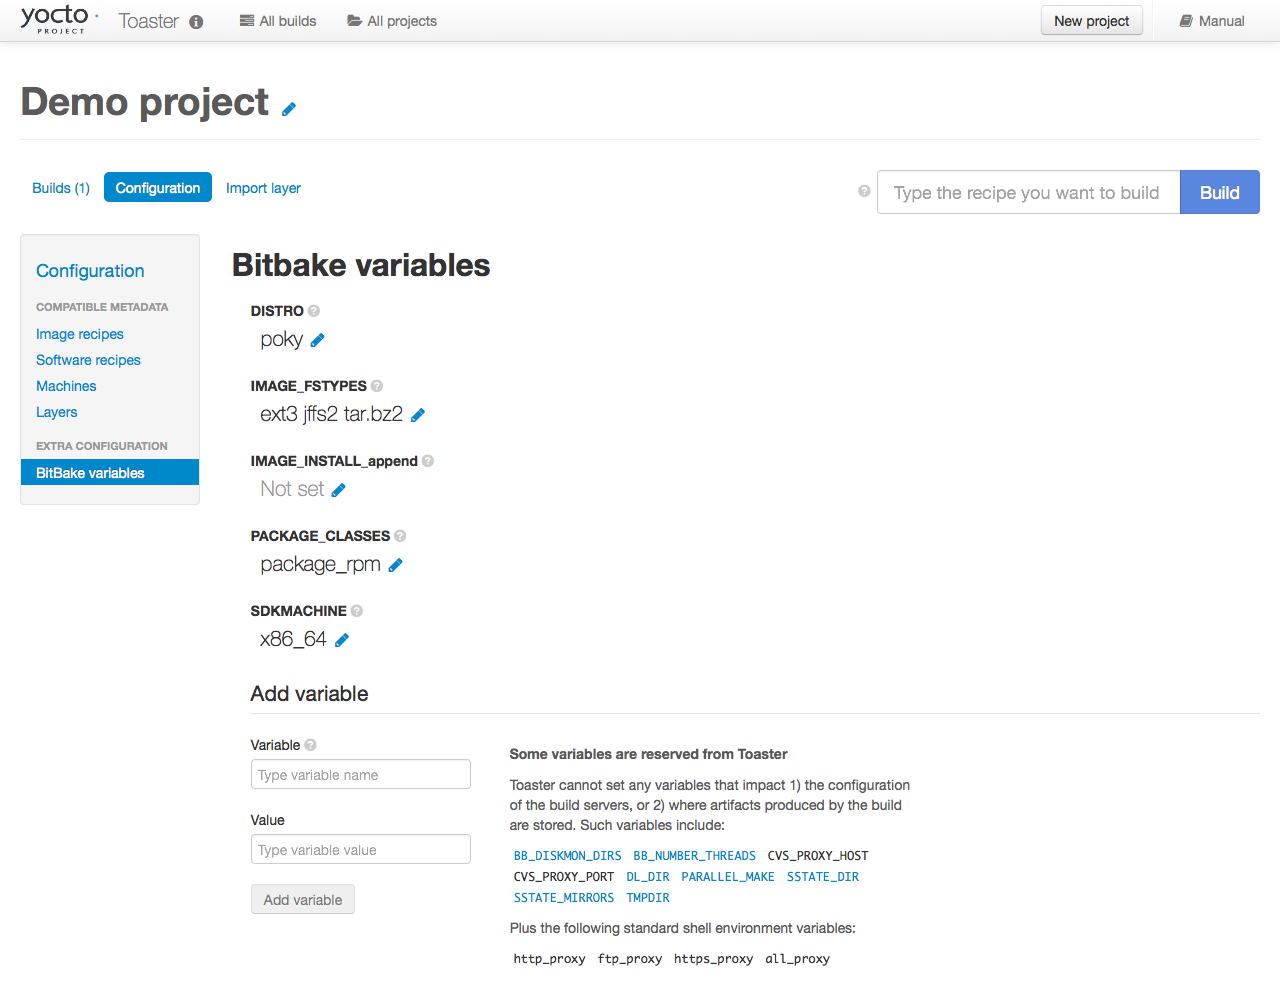
To specify bash 3.2.48 as the version to build, enter
“PREFERRED_VERSION_bash” in the “Variable” field, and “3.2.48” in the
“Value” field. Next, click the “Add variable” button:
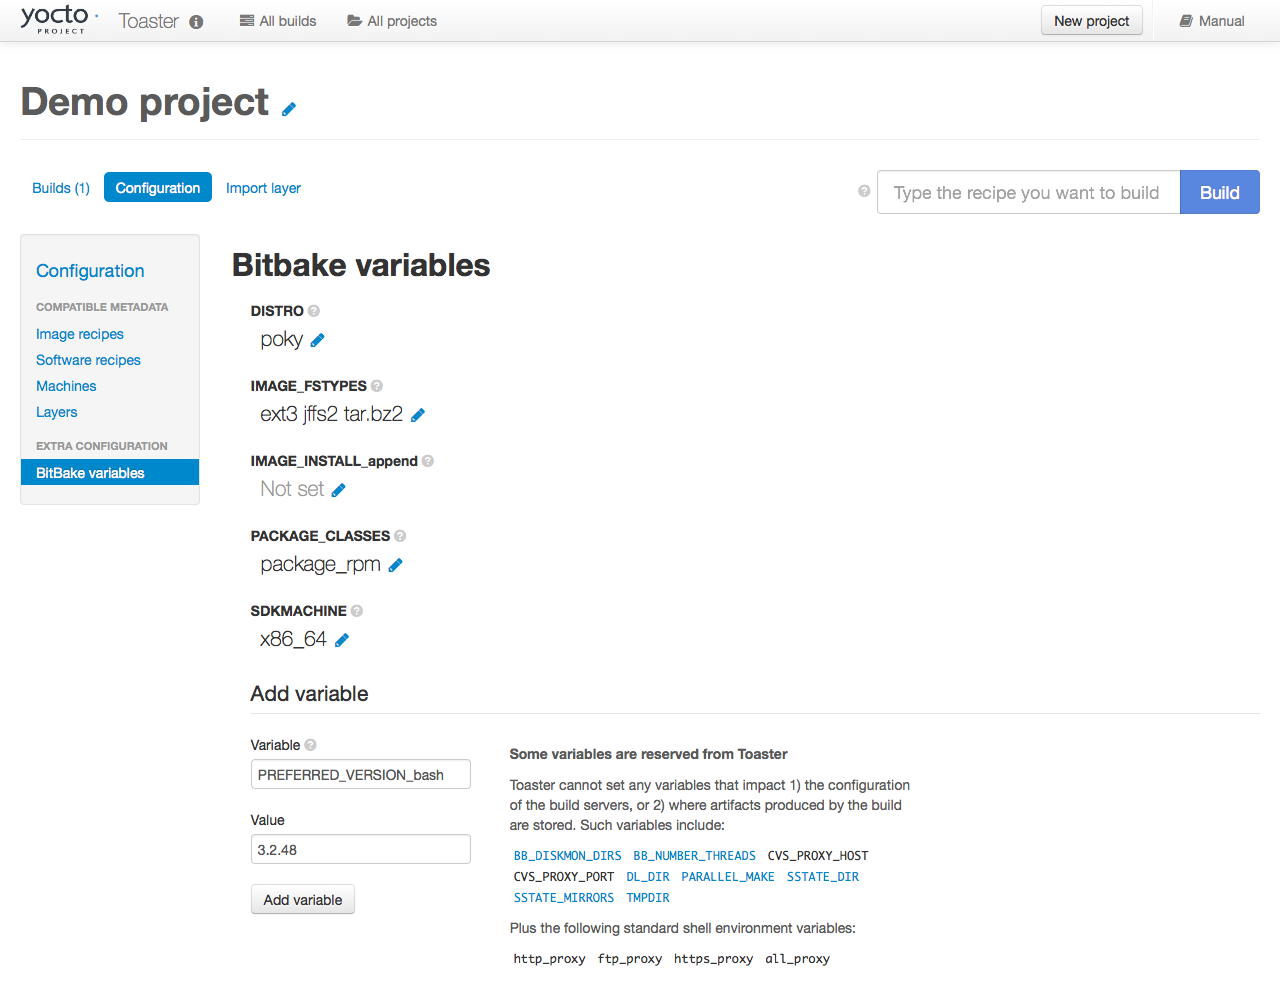
After clicking the “Add variable” button, the settings for PREFERRED_VERSION are added to the bottom of the BitBake variables list. With these settings, the OpenEmbedded build system builds the desired version of the recipe rather than the default version:
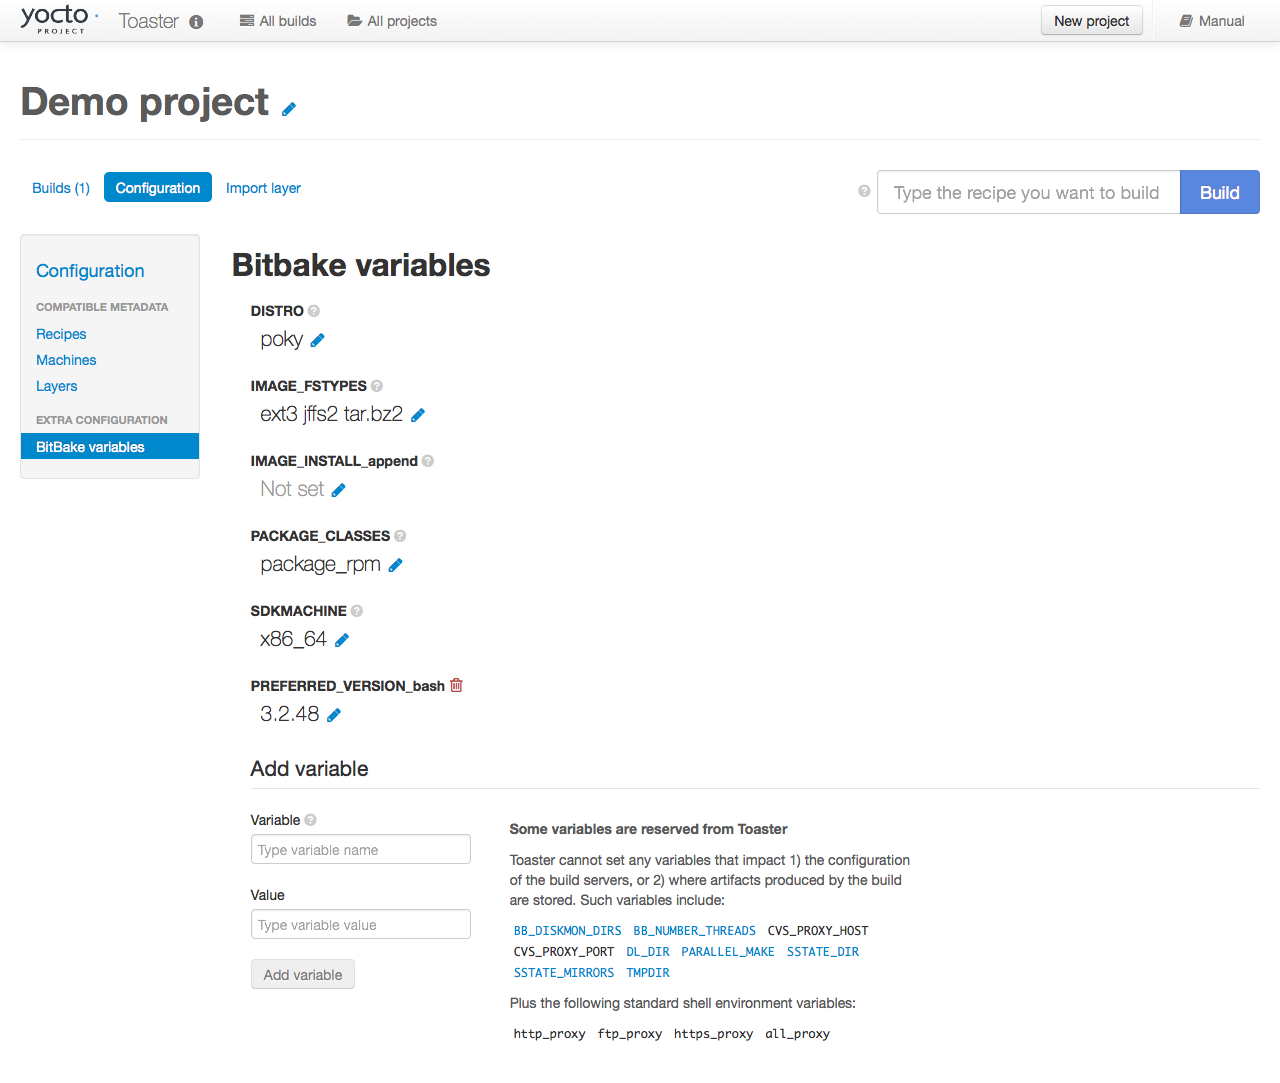
4 Concepts and Reference
In order to configure and use Toaster, you should understand some
concepts and have some basic command reference material available. This
final chapter provides conceptual information on layer sources,
releases, and JSON configuration files. Also provided is a quick look at
some useful manage.py commands that are Toaster-specific.
Information on manage.py commands is available across the Web and
this manual by no means attempts to provide a command
comprehensive reference.
4.1 Layer Source
In general, a “layer source” is a source of information about existing layers. In particular, we are concerned with layers that you can use with the Yocto Project and Toaster. This chapter describes a particular type of layer source called a “layer index.”
A layer index is a web application that contains information about a set of custom layers. A good example of an existing layer index is the OpenEmbedded Layer Index. A public instance of this layer index exists at https://layers.openembedded.org/. You can find the code for this layer index’s web application at https://git.yoctoproject.org/layerindex-web/.
When you tie a layer source into Toaster, it can query the layer source
through a REST
API, store the information about the layers in the Toaster database, and
then show the information to users. Users are then able to view that
information and build layers from Toaster itself without having to
clone or edit the BitBake layers configuration file bblayers.conf.
Tying a layer source into Toaster is convenient when you have many custom layers that need to be built on a regular basis by a community of developers. In fact, Toaster comes pre-configured with the OpenEmbedded Metadata Index.
Note
You do not have to use a layer source to use Toaster. Tying into a layer source is optional.
4.1.1 Setting Up and Using a Layer Source
To use your own layer source, you need to set up the layer source and then tie it into Toaster. This section describes how to tie into a layer index in a manner similar to the way Toaster ties into the OpenEmbedded Metadata Index.
4.1.1.1 Understanding Your Layers
The obvious first step for using a layer index is to have several custom layers that developers build and access using the Yocto Project on a regular basis. This set of layers needs to exist and you need to be familiar with where they reside. You will need that information when you set up the code for the web application that “hooks” into your set of layers.
For general information on layers, see the “The Yocto Project Layer Model” section in the Yocto Project Overview and Concepts Manual. For information on how to create layers, see the “Understanding and Creating Layers” section in the Yocto Project Development Tasks Manual.
4.1.1.2 Configuring Toaster to Hook Into Your Layer Index
If you want Toaster to use your layer index, you must host the web application in a server to which Toaster can connect. You also need to give Toaster the information about your layer index. In other words, you have to configure Toaster to use your layer index. This section describes two methods by which you can configure and use your layer index.
In the previous section, the code for the OpenEmbedded Metadata Index (i.e. https://layers.openembedded.org/) was referenced. You can use this code, which is at https://git.yoctoproject.org/layerindex-web/, as a base to create your own layer index.
4.1.1.2.1 Use the Administration Interface
Access the administration interface through a browser by entering the
URL of your Toaster instance and adding “/admin” to the end of the
URL. As an example, if you are running Toaster locally, use the
following URL:
http://127.0.0.1:8000/admin
The administration interface has a “Layer sources” section that includes an “Add layer source” button. Click that button and provide the required information. Make sure you select “layerindex” as the layer source type.
4.1.1.2.2 Use the Fixture Feature
The Django fixture feature overrides the default layer server when you
use it to specify a custom URL. To use the fixture feature, create (or
edit) the file bitbake/lib/toaster.orm/fixtures/custom.xml, and then
set the following Toaster setting to your custom URL:
<?xml version="1.0" ?>
<django-objects version="1.0">
<object model="orm.toastersetting" pk="100">
<field name="name" type="CharField">CUSTOM_LAYERINDEX_SERVER</field>
<field name="value" type="CharField">https://layers.my_organization.org/layerindex/branch/master/layers/</field>
</object>
<django-objects>
When you start Toaster for the first time, or
if you delete the file toaster.sqlite and restart, the database will
populate cleanly from this layer index server.
Once the information has been updated, verify the new layer information is available by using the Toaster web interface. To do that, visit the “All compatible layers” page inside a Toaster project. The layers from your layer source should be listed there.
If you change the information in your layer index server, refresh the Toaster database by running the following command:
$ bitbake/lib/toaster/manage.py lsupdates
If Toaster can reach the API URL, you should see a message telling you that Toaster is updating the layer source information.
4.2 Releases
When you create a Toaster project using the web interface, you are asked to choose a “Release.” In the context of Toaster, the term “Release” refers to a set of layers and a BitBake version the OpenEmbedded build system uses to build something. As shipped, Toaster is pre-configured with releases that correspond to Yocto Project release branches. However, you can modify, delete, and create new releases according to your needs. This section provides some background information on releases.
4.2.1 Pre-Configured Releases
As shipped, Toaster is configured to use a specific set of releases. Of course, you can always configure Toaster to use any release. For example, you might want your project to build against a specific commit of any of the “out-of-the-box” releases. Or, you might want your project to build against different revisions of OpenEmbedded and BitBake.
As shipped, Toaster is configured to work with the following releases:
Yocto Project 6.0.2 “Wrynose” or OpenEmbedded “Wrynose”: This release causes your Toaster projects to build against the head of the wrynose branch at https://git.yoctoproject.org/poky/log/?h=wrynose or https://git.openembedded.org/openembedded-core/commit/?h=wrynose.
Yocto Project “Master” or OpenEmbedded “Master”: This release causes your Toaster Projects to build against the head of the master branch, which is where active development takes place, at https://git.yoctoproject.org/poky/log/ or https://git.openembedded.org/openembedded-core/log/.
Local Yocto Project or Local OpenEmbedded: This release causes your Toaster Projects to build against the head of the
pokyoropenembedded-coreclone you have local to the machine running Toaster.
4.3 Configuring Toaster
In order to use Toaster, you must configure the database with the default content. The following subsections describe various aspects of Toaster configuration.
4.3.1 Configuring the Workflow
The bldcontrol/management/commands/checksettings.py file controls
workflow configuration. Here is the process to
initially populate this database.
The default project settings are set from
orm/fixtures/settings.xml.The default project distro and layers are added from
orm/fixtures/poky.xmlif poky is installed. If poky is not installed, they are added fromorm/fixtures/oe-core.xml.If the
orm/fixtures/custom.xmlfile exists, then its values are added.The layer index is then scanned and added to the database.
Once these steps complete, Toaster is set up and ready to use.
4.3.2 Customizing Pre-Set Data
The pre-set data for Toaster is easily customizable. You can create the
orm/fixtures/custom.xml file to customize the values that go into
the database. Customization is additive, and can either extend or
completely replace the existing values.
You use the orm/fixtures/custom.xml file to change the default
project settings for the machine, distro, file images, and layers. When
creating a new project, you can use the file to define the offered
alternate project release selections. For example, you can add one or
more additional selections that present custom layer sets or distros,
and any other local or proprietary content.
Additionally, you can completely disable the content from the
oe-core.xml and poky.xml files by defining the section shown
below in the settings.xml file. For example, this option is
particularly useful if your custom configuration defines fewer releases
or layers than the default fixture files.
The following example sets “name” to “CUSTOM_XML_ONLY” and its value to “True”.
<object model="orm.toastersetting" pk="99">
<field type="CharField" name="name">CUSTOM_XML_ONLY</field>
<field type="CharField" name="value">True</field>
</object>
4.3.3 Understanding Fixture File Format
Here is an overview of the file format used by the
oe-core.xml, poky.xml, and custom.xml files.
The following subsections describe each of the sections in the fixture
files, and outline an example section of the XML code. you can use to
help understand this information and create a local custom.xml file.
4.3.3.1 Defining the Default Distro and Other Values
This section defines the default distro value for new projects. By default, it reserves the first Toaster Setting record “1”. The following demonstrates how to set the project default value for DISTRO:
<!-- Set the project default value for DISTRO -->
<object model="orm.toastersetting" pk="1">
<field type="CharField" name="name">DEFCONF_DISTRO</field>
<field type="CharField" name="value">poky</field>
</object>
You can override
other default project values by adding additional Toaster Setting
sections such as any of the settings coming from the settings.xml
file. Also, you can add custom values that are included in the BitBake
environment. The “pk” values must be unique. By convention, values that
set default project values have a “DEFCONF” prefix.
4.3.3.2 Defining BitBake Version
The following defines which version of BitBake is used for the following release selection:
<!-- Bitbake versions which correspond to the metadata release -->
<object model="orm.bitbakeversion" pk="1">
<field type="CharField" name="name">wrynose</field>
<field type="CharField" name="giturl">git://git.yoctoproject.org/poky</field>
<field type="CharField" name="branch">wrynose</field>
<field type="CharField" name="dirpath">bitbake</field>
</object>
4.3.3.3 Defining Release
The following defines the releases when you create a new project:
<!-- Releases available -->
<object model="orm.release" pk="1">
<field type="CharField" name="name">wrynose</field>
<field type="CharField" name="description">Yocto Project 6.0.2 "Wrynose"</field>
<field rel="ManyToOneRel" to="orm.bitbakeversion" name="bitbake_version">1</field>
<field type="CharField" name="branch_name">wrynose</field>
<field type="TextField" name="helptext">Toaster will run your builds using the tip of the <a href="https://git.yoctoproject.org/cgit/cgit.cgi/poky/log/?h=wrynose">Yocto Project Wrynose branch</a>.</field>
</object>
The “pk” value must match the above respective BitBake version record.
4.3.3.4 Defining the Release Default Layer Names
The following defines the default layers for each release:
<!-- Default project layers for each release -->
<object model="orm.releasedefaultlayer" pk="1">
<field rel="ManyToOneRel" to="orm.release" name="release">1</field>
<field type="CharField" name="layer_name">openembedded-core</field>
</object>
The ‘pk’ values in the example above should start at “1” and increment uniquely. You can use the same layer name in multiple releases.
4.3.3.5 Defining Layer Definitions
Layer definitions are the most complex. The following defines each of
the layers, and then defines the exact layer version of the layer used
for each respective release. You must have one orm.layer entry for
each layer. Then, with each entry you need a set of
orm.layer_version entries that connects the layer with each release
that includes the layer. In general all releases include the layer.
<object model="orm.layer" pk="1">
<field type="CharField" name="name">openembedded-core</field>
<field type="CharField" name="layer_index_url"></field>
<field type="CharField" name="vcs_url">git://git.yoctoproject.org/poky</field>
<field type="CharField" name="vcs_web_url">https://git.yoctoproject.org/cgit/cgit.cgi/poky</field>
<field type="CharField" name="vcs_web_tree_base_url">https://git.yoctoproject.org/cgit/cgit.cgi/poky/tree/%path%?h=%branch%</field>
<field type="CharField" name="vcs_web_file_base_url">https://git.yoctoproject.org/cgit/cgit.cgi/poky/tree/%path%?h=%branch%</field>
</object>
<object model="orm.layer_version" pk="1">
<field rel="ManyToOneRel" to="orm.layer" name="layer">1</field>
<field type="IntegerField" name="layer_source">0</field>
<field rel="ManyToOneRel" to="orm.release" name="release">1</field>
<field type="CharField" name="branch">wrynose</field>
<field type="CharField" name="dirpath">meta</field>
</object> <object model="orm.layer_version" pk="2">
<field rel="ManyToOneRel" to="orm.layer" name="layer">1</field>
<field type="IntegerField" name="layer_source">0</field>
<field rel="ManyToOneRel" to="orm.release" name="release">2</field>
<field type="CharField" name="branch">HEAD</field>
<field type="CharField" name="commit">HEAD</field>
<field type="CharField" name="dirpath">meta</field>
</object>
<object model="orm.layer_version" pk="3">
<field rel="ManyToOneRel" to="orm.layer" name="layer">1</field>
<field type="IntegerField" name="layer_source">0</field>
<field rel="ManyToOneRel" to="orm.release" name="release">3</field>
<field type="CharField" name="branch">master</field>
<field type="CharField" name="dirpath">meta</field>
</object>
The layer “pk” values above must be unique, and typically start at “1”. The layer version “pk” values must also be unique across all layers, and typically start at “1”.
4.4 Remote Toaster Monitoring
Toaster has an API that allows remote management applications to directly query the state of the Toaster server and its builds in a machine-to-machine manner. This API uses the REST interface and the transfer of JSON files. For example, you might monitor a build inside a container through well supported known HTTP ports in order to easily access a Toaster server inside the container. In this example, when you use this direct JSON API, you avoid having web page parsing against the display the user sees.
4.4.1 Checking Health
Before you use remote Toaster monitoring, you should do a health check. To do this, ping the Toaster server using the following call to see if it is still alive:
http://host:port/health
Be sure to provide values for host and port. If the server is alive, you will get the response HTML:
<!DOCTYPE html>
<html lang="en">
<head><title>Toaster Health</title></head>
<body>Ok</body>
</html>
4.4.2 Determining Status of Builds in Progress
Sometimes it is useful to determine the status of a build in progress. To get the status of pending builds, use the following call:
http://host:port/toastergui/api/building
Be sure to provide values for host and port. The output is a JSON file that itemizes all builds in progress. This file includes the time in seconds since each respective build started as well as the progress of the cloning, parsing, and task execution. Here is sample output for a build in progress:
{"count": 1,
"building": [
{"machine": "beaglebone",
"seconds": "463.869",
"task": "927:2384",
"distro": "poky",
"clone": "1:1",
"id": 2,
"start": "2017-09-22T09:31:44.887Z",
"name": "20170922093200",
"parse": "818:818",
"project": "my_rocko",
"target": "core-image-minimal"
}]
}
The JSON data for this query is returned in a single line. In the previous example the line has been artificially split for readability.
4.4.3 Checking Status of Builds Completed
Once a build is completed, you get the status when you use the following call:
http://host:port/toastergui/api/builds
Be sure to provide values for host and port. The output is a JSON file that itemizes all complete builds, and includes build summary information. Here is sample output for a completed build:
{"count": 1,
"builds": [
{"distro": "poky",
"errors": 0,
"machine": "beaglebone",
"project": "my_rocko",
"stop": "2017-09-22T09:26:36.017Z",
"target": "quilt-native",
"seconds": "78.193",
"outcome": "Succeeded",
"id": 1,
"start": "2017-09-22T09:25:17.824Z",
"warnings": 1,
"name": "20170922092618"
}]
}
The JSON data for this query is returned in a single line. In the previous example the line has been artificially split for readability.
4.4.4 Determining Status of a Specific Build
Sometimes it is useful to determine the status of a specific build. To get the status of a specific build, use the following call:
http://host:port/toastergui/api/build/ID
Be sure to provide values for host, port, and ID. You can find the value for ID from the Builds Completed query. See the “Checking Status of Builds Completed” section for more information.
The output is a JSON file that itemizes the specific build and includes build summary information. Here is sample output for a specific build:
{"build":
{"distro": "poky",
"errors": 0,
"machine": "beaglebone",
"project": "my_rocko",
"stop": "2017-09-22T09:26:36.017Z",
"target": "quilt-native",
"seconds": "78.193",
"outcome": "Succeeded",
"id": 1,
"start": "2017-09-22T09:25:17.824Z",
"warnings": 1,
"name": "20170922092618",
"cooker_log": "/opt/user/poky/build-toaster-2/tmp/log/cooker/beaglebone/build_20170922_022607.991.log"
}
}
The JSON data for this query is returned in a single line. In the previous example the line has been artificially split for readability.
4.5 Useful Commands
In addition to the web user interface and the scripts that start and
stop Toaster, command-line commands are available through the manage.py
management script. You can find general documentation on manage.py
at the
Django
site. However, several manage.py commands have been created that are
specific to Toaster and are used to control configuration and back-end
tasks. You can locate these commands in the
Source Directory (e.g. poky) at
bitbake/lib/manage.py. This section documents those commands.
Note
When using
manage.pycommands given a default configuration, you must be sure that your working directory is set to the Build Directory. Usingmanage.pycommands from the Build Directory allows Toaster to find thetoaster.sqlitefile, which is located in the Build Directory.For non-default database configurations, it is possible that you can use
manage.pycommands from a directory other than the Build Directory. To do so, thetoastermain/settings.pyfile must be configured to point to the correct database backend.
4.5.1 buildslist
The buildslist command lists all builds that Toaster has recorded.
Access the command as follows:
$ bitbake/lib/toaster/manage.py buildslist
The command returns a list, which includes numeric identifications, of the builds that Toaster has recorded in the current database.
You need to run the buildslist command first to identify existing
builds in the database before using the
builddelete command. Here is an
example that assumes default repository and Build Directory names:
$ cd poky/build
$ python ../bitbake/lib/toaster/manage.py buildslist
If your Toaster database had only one build, the above buildslist command would return something like the following:
1: qemux86 poky core-image-minimal
4.5.2 builddelete
The builddelete command deletes data associated with a build. Access
the command as follows:
$ bitbake/lib/toaster/manage.py builddelete build_id
The command deletes all the build data for the specified build_id. This command is useful for removing old and unused data from the database.
Prior to running the builddelete command, you need to get the ID
associated with builds by using the
buildslist command.
4.5.3 perf
The perf command measures Toaster performance. Access the command as
follows:
$ bitbake/lib/toaster/manage.py perf
The command is a sanity check that returns page loading times in order to identify performance problems.
4.5.4 checksettings
The checksettings command verifies existing Toaster settings. Access
the command as follows:
$ bitbake/lib/toaster/manage.py checksettings
Toaster uses settings that are based on the database to configure the
building tasks. The checksettings command verifies that the database
settings are valid in the sense that they have the minimal information
needed to start a build.
In order for the checksettings command to work, the database must be
correctly set up and not have existing data. To be sure the database is
ready, you can run the following:
$ bitbake/lib/toaster/manage.py syncdb
$ bitbake/lib/toaster/manage.py migrate orm
$ bitbake/lib/toaster/manage.py migrate bldcontrol
After running these commands, you can run the checksettings command.
4.5.5 runbuilds
The runbuilds command launches scheduled builds. Access the command
as follows:
$ bitbake/lib/toaster/manage.py runbuilds
The runbuilds command checks if scheduled builds exist in the database
and then launches them per schedule. The command returns after the builds
start but before they complete. The Toaster Logging Interface records and
updates the database when the builds complete.
Permission is granted to copy, distribute and/or modify this document under the terms of the Creative Commons Attribution-Share Alike 2.0 UK: England & Wales as published by Creative Commons.
To report any inaccuracies or problems with this (or any other Yocto Project)
manual, or to send additions or changes, please send email/patches to the Yocto
Project documentation mailing list at docs@lists.yoctoproject.org or
log into the Libera Chat #yocto channel.
Yocto Project Test Environment Manual
1 The Yocto Project Test Environment Manual
1.1 Welcome
Welcome to the Yocto Project Test Environment Manual! This manual is a work in progress. The manual contains information about the testing environment used by the Yocto Project to make sure each major and minor release works as intended. All the project’s testing infrastructure and processes are publicly visible and available so that the community can see what testing is being performed, how it’s being done and the current status of the tests and the project at any given time. It is intended that other organizations can leverage off the process and testing environment used by the Yocto Project to create their own automated, production test environment, building upon the foundations from the project core.
This manual is a work-in-progress and is being initially loaded with information from the README files and notes from key engineers:
yocto-autobuilder2: This README.md is the main README which details how to set up the Yocto Project Autobuilder. The
yocto-autobuilder2repository represents the Yocto Project’s console UI plugin to Buildbot and the configuration necessary to configure Buildbot to perform the testing the project requires.yocto-autobuilder-helper: This README and repository contains Yocto Project Autobuilder Helper scripts and configuration. The
yocto-autobuilder-helperrepository contains the “glue” logic that defines which tests to run and how to run them. As a result, it can be used by any Continuous Improvement (CI) system to run builds, support getting the correct code revisions, configure builds and layers, run builds, and collect results. The code is independent of any CI system, which means the code can work Buildbot, Jenkins, or others. This repository has a branch per release of the project defining the tests to run on a per release basis.
1.2 Yocto Project Autobuilder Overview
The Yocto Project Autobuilder collectively refers to the software, tools, scripts, and procedures used by the Yocto Project to test released software across supported hardware in an automated and regular fashion. Basically, during the development of a Yocto Project release, the Autobuilder tests if things work. The Autobuilder builds all test targets and runs all the tests.
The Yocto Project uses standard upstream Buildbot to drive its integration and testing. Buildbot has a plug-in interface that the Yocto Project customizes using code from the yocto-autobuilder2 repository, adding its own console UI plugin. The resulting UI plug-in allows you to visualize builds in a way suited to the project’s needs.
A helper layer provides configuration and job management through
scripts found in the yocto-autobuilder-helper repository. The
helper layer contains the bulk of the build configuration
information and is release-specific, which makes it highly customizable
on a per-project basis. The layer is CI system-agnostic and contains a
number of Helper scripts that can generate build configurations from
simple JSON files.
Note
The project uses Buildbot for historical reasons but also because many of the project developers have knowledge of Python. It is possible to use the outer layers from another Continuous Integration (CI) system such as Jenkins instead of Buildbot.
The following figure shows the Yocto Project Autobuilder stack with a topology that includes a controller and a cluster of workers:
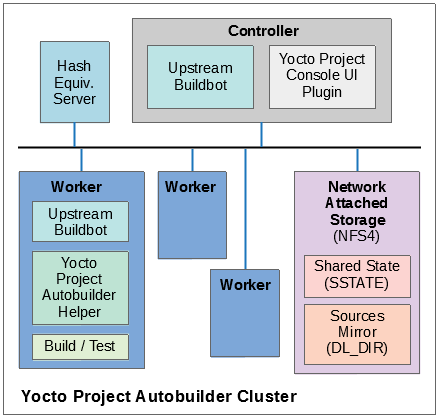
1.3 Yocto Project Tests — Types of Testing Overview
The Autobuilder tests different elements of the project by using the following types of tests:
Build Testing: Tests whether specific configurations build by varying MACHINE, DISTRO, other configuration options, and the specific target images being built (or
world). This is used to trigger builds of all the different test configurations on the Autobuilder. Builds usually cover many different targets for different architectures, machines, and distributions, as well as different configurations, such as different init systems. The Autobuilder tests literally hundreds of configurations and targets.Sanity Checks During the Build Process: Tests initiated through the insane class. These checks ensure the output of the builds are correct. For example, does the ELF architecture in the generated binaries match the target system? ARM binaries would not work in a MIPS system!
Build Performance Testing: Tests whether or not commonly used steps during builds work efficiently and avoid regressions. Tests to time commonly used usage scenarios are run through
oe-build-perf-test. These tests are run on isolated machines so that the time measurements of the tests are accurate and no other processes interfere with the timing results. The project currently tests performance on two different distributions, Fedora and Ubuntu, to ensure we have no single point of failure and can ensure the different distros work effectively.eSDK Testing: Image tests initiated through the following command:
$ bitbake image -c testsdkext
The tests use the testsdk class and the
do_testsdkexttask.Feature Testing: Various scenario-based tests are run through the OpenEmbedded Self test (oe-selftest). We test oe-selftest on each of the main distributions we support.
Image Testing: Image tests initiated through the following command:
$ bitbake image -c testimage
The tests use the testimage class and the do_testimage task. See the Performing Automated Runtime Testing section of the Yocto Project Test Environment Manual for more information.
Layer Testing: The Autobuilder has the possibility to test whether specific layers work with the test of the system. The layers tested may be selected by members of the project. Some key community layers are also tested periodically.
Package Testing: A Package Test (ptest) runs tests against packages built by the OpenEmbedded build system on the target machine. See the Testing Packages With ptest section in the Yocto Project Development Tasks Manual and the “Ptest” Wiki page for more information on Ptest.
SDK Testing: Image tests initiated through the following command:
$ bitbake image -c testsdk
The tests use the testsdk class and the
do_testsdktask.Unit Testing: Unit tests on various components of the system run through bitbake-selftest and oe-selftest.
Automatic Upgrade Helper: This target tests whether new versions of software are available and whether we can automatically upgrade to those new versions. If so, this target emails the maintainers with a patch to let them know this is possible.
1.4 How Tests Map to Areas of Code
Tests map into the codebase as follows:
bitbake-selftest:
These tests are self-contained and test BitBake as well as its APIs, which include the fetchers. The tests are located in
bitbake/lib/*/tests.Some of these tests run the
bitbakecommand, sobitbake/binmust be added to thePATHbefore runningbitbake-selftest. From within the BitBake repository, run the following:$ export PATH=$PWD/bin:$PATH
After that, you can run the selftest script:
$ bitbake-selftest
The default output is quiet and just prints a summary of what was run. To see more information, there is a verbose option:
$ bitbake-selftest -v
To skip tests that access the Internet, use the
BB_SKIP_NETTESTSvariable when runningbitbake-selftestas follows:$ BB_SKIP_NETTESTS=yes bitbake-selftest
Use this option when you wish to skip tests that access the network, which are mostly necessary to test the fetcher modules. To specify individual test modules to run, append the test module name to the
bitbake-selftestcommand. For example, to specify the tests forbb.tests.data.DataExpansions, run:$ bitbake-selftest bb.tests.data.DataExpansions
You can also specify individual tests by defining the full name and module plus the class path of the test, for example:
$ bitbake-selftest bb.tests.data.DataExpansions.test_one_var
The tests are based on Python unittest.
oe-selftest:
These tests use OE to test the workflows, which include testing specific features, behaviors of tasks, and API unit tests.
The tests can take advantage of parallelism through the
-joption, which can specify a number of threads to spread the tests across. Note that all tests from a given class of tests will run in the same thread. To parallelize large numbers of tests you can split the class into multiple units.The tests are based on Python unittest.
The code for the tests resides in
meta/lib/oeqa/selftest/cases/.To run all the tests, enter the following command:
$ oe-selftest -a
To run a specific test, use the following command form where
testnameis the name of the specific test:$ oe-selftest -r <testname>
For example, the following command would run the
tinfoilgetVarAPI test:$ oe-selftest -r tinfoil.TinfoilTests.test_getvar
It is also possible to run a set of tests. For example the following command will run all of the
tinfoiltests:$ oe-selftest -r tinfoil
testimage:
These tests build an image, boot it, and run tests against the image’s content.
The code for these tests resides in
meta/lib/oeqa/runtime/cases/.You need to set the IMAGE_CLASSES variable as follows:
IMAGE_CLASSES += "testimage"
Run the tests using the following command form:
$ bitbake image -c testimage
testsdk:
These tests build an SDK, install it, and then run tests against that SDK.
The code for these tests resides in
meta/lib/oeqa/sdk/cases/.Run the test using the following command form:
$ bitbake image -c testsdk
testsdk_ext:
These tests build an extended SDK (eSDK), install that eSDK, and run tests against the eSDK.
The code for these tests resides in
meta/lib/oeqa/sdkext/cases/.To run the tests, use the following command form:
$ bitbake image -c testsdkext
oe-build-perf-test:
These tests run through commonly used usage scenarios and measure the performance times.
The code for these tests resides in
meta/lib/oeqa/buildperf.To run the tests, use the following command form:
$ oe-build-perf-test <options>
The command takes a number of options, such as where to place the test results. The Autobuilder Helper Scripts include the
build-perf-test-wrapperscript with examples of how to use the oe-build-perf-test from the command line.Use the
oe-git-archivecommand to store test results into a Git repository.Use the
oe-build-perf-reportcommand to generate text reports and HTML reports with graphs of the performance data. See html and txt examples.The tests are contained in
meta/lib/oeqa/buildperf/test_basic.py.
1.5 Test Examples
This section provides example tests for each of the tests listed in the How Tests Map to Areas of Code section.
oe-selftesttestcases reside in themeta/lib/oeqa/selftest/casesdirectory.bitbake-selftesttestcases reside in thebitbake/lib/bb/tests/directory.
1.5.1 bitbake-selftest
A simple test example from bitbake/lib/bb/tests/data.py is:
class DataExpansions(unittest.TestCase):
def setUp(self):
self.d = bb.data.init()
self.d["foo"] = "value_of_foo"
self.d["bar"] = "value_of_bar"
self.d["value_of_foo"] = "value_of_'value_of_foo'"
def test_one_var(self):
val = self.d.expand("${foo}")
self.assertEqual(str(val), "value_of_foo")
In this example, a DataExpansions class of tests is created, derived from
standard Python unittest.
The class has a common setUp function which is shared by all the tests in
the class. A simple test is then added to test that when a variable is
expanded, the correct value is found.
BitBake selftests are straightforward Python unittest. Refer to the Python unittest documentation for additional information on writing such tests.
1.5.2 oe-selftest
These tests are more complex due to the setup required behind the scenes for full builds. Rather than directly using Python unittest, the code wraps most of the standard objects. The tests can be simple, such as testing a command from within the OE build environment using the following example:
class BitbakeLayers(OESelftestTestCase):
def test_bitbakelayers_showcrossdepends(self):
result = runCmd('bitbake-layers show-cross-depends')
self.assertTrue('aspell' in result.output, msg = "No dependencies were shown. bitbake-layers show-cross-depends output: %s"% result.output)
This example, taken from meta/lib/oeqa/selftest/cases/bblayers.py,
creates a testcase from the OESelftestTestCase class, derived
from unittest.TestCase, which runs the bitbake-layers command
and checks the output to ensure it contains something we know should be
here.
The oeqa.utils.commands module contains Helpers which can assist
with common tasks, including:
Obtaining the value of a bitbake variable: Use
oeqa.utils.commands.get_bb_var()or useoeqa.utils.commands.get_bb_vars()for more than one variableRunning a bitbake invocation for a build: Use
oeqa.utils.commands.bitbake()Running a command: Use
oeqa.utils.commands.runCmd()
There is also a oeqa.utils.commands.runqemu() function for launching
the runqemu command for testing things within a running, virtualized
image.
You can run these tests in parallel. Parallelism works per test class,
so tests within a given test class should always run in the same build,
while tests in different classes or modules may be split into different
builds. There is no data store available for these tests since the tests
launch the bitbake command and exist outside of its context. As a
result, common BitBake library functions (bb.\*) are also unavailable.
1.5.3 testimage
These tests are run once an image is up and running, either on target
hardware or under QEMU. As a result, they are assumed to be running in a
target image environment, as opposed to in a host build environment. A
simple example from meta/lib/oeqa/runtime/cases/python.py contains
the following:
class PythonTest(OERuntimeTestCase):
@OETestDepends(['ssh.SSHTest.test_ssh'])
@OEHasPackage(['python3-core'])
def test_python3(self):
cmd = "python3 -c \\"import codecs; print(codecs.encode('Uryyb, jbeyq', 'rot13'))\""
status, output = self.target.run(cmd)
msg = 'Exit status was not 0. Output: %s' % output
self.assertEqual(status, 0, msg=msg)
In this example, the OERuntimeTestCase class wraps
unittest.TestCase. Within the test, self.target represents the
target system, where commands can be run using the run()
method.
To ensure certain tests or package dependencies are met, you can use the
OETestDepends and OEHasPackage decorators. For example, the test
in this example would only make sense if python3-core is installed in
the image.
1.5.4 testsdk_ext
These tests are run against built extensible SDKs (eSDKs). The tests can
assume that the eSDK environment has already been set up. An example from
meta/lib/oeqa/sdk/cases/devtool.py contains the following:
class DevtoolTest(OESDKExtTestCase):
@classmethod def setUpClass(cls):
myapp_src = os.path.join(cls.tc.esdk_files_dir, "myapp")
cls.myapp_dst = os.path.join(cls.tc.sdk_dir, "myapp")
shutil.copytree(myapp_src, cls.myapp_dst)
subprocess.check_output(['git', 'init', '.'], cwd=cls.myapp_dst)
subprocess.check_output(['git', 'add', '.'], cwd=cls.myapp_dst)
subprocess.check_output(['git', 'commit', '-m', "'test commit'"], cwd=cls.myapp_dst)
@classmethod
def tearDownClass(cls):
shutil.rmtree(cls.myapp_dst)
def _test_devtool_build(self, directory):
self._run('devtool add myapp %s' % directory)
try:
self._run('devtool build myapp')
finally:
self._run('devtool reset myapp')
def test_devtool_build_make(self):
self._test_devtool_build(self.myapp_dst)
In this example, the devtool
command is tested to see whether a sample application can be built with
the devtool build command within the eSDK.
1.5.5 testsdk
These tests are run against built SDKs. The tests can assume that an SDK
has already been extracted and its environment file has been sourced. A
simple example from meta/lib/oeqa/sdk/cases/python.py contains the
following:
class Python3Test(OESDKTestCase):
def setUp(self):
if not (self.tc.hasHostPackage("nativesdk-python3-core") or
self.tc.hasHostPackage("python3-core-native")):
raise unittest.SkipTest("No python3 package in the SDK")
def test_python3(self):
cmd = "python3 -c \\"import codecs; print(codecs.encode('Uryyb, jbeyq', 'rot13'))\""
output = self._run(cmd)
self.assertEqual(output, "Hello, world\n")
In this example, if nativesdk-python3-core has been installed into the SDK,
the code runs the python3 interpreter with a basic command to check it is
working correctly. The test would only run if Python3 is installed in the SDK.
1.5.6 oe-build-perf-test
The performance tests usually measure how long operations take and the
resource utilization as that happens. An example from
meta/lib/oeqa/buildperf/test_basic.py contains the following:
class Test3(BuildPerfTestCase):
def test3(self):
"""Bitbake parsing (bitbake -p)"""
# Drop all caches and parse
self.rm_cache()
oe.path.remove(os.path.join(self.bb_vars['TMPDIR'], 'cache'), True)
self.measure_cmd_resources(['bitbake', '-p'], 'parse_1',
'bitbake -p (no caches)')
# Drop tmp/cache
oe.path.remove(os.path.join(self.bb_vars['TMPDIR'], 'cache'), True)
self.measure_cmd_resources(['bitbake', '-p'], 'parse_2',
'bitbake -p (no tmp/cache)')
# Parse with fully cached data
self.measure_cmd_resources(['bitbake', '-p'], 'parse_3',
'bitbake -p (cached)')
This example shows how three specific parsing timings are measured, with and without various caches, to show how BitBake’s parsing performance trends over time.
1.6 Considerations When Writing Tests
When writing good tests, there are several things to keep in mind. Since things running on the Autobuilder are accessed concurrently by multiple workers, consider the following:
Running “cleanall” is not permitted.
This can delete files from DL_DIR which would potentially break other builds running in parallel. If this is required, DL_DIR must be set to an isolated directory.
Running “cleansstate” is not permitted.
This can delete files from SSTATE_DIR which would potentially break
other builds running in parallel. If this is required, SSTATE_DIR must
be set to an isolated directory. Alternatively, you can use the -f
option with the bitbake command to “taint” tasks by changing the
sstate checksums to ensure sstate cache items will not be reused.
Tests should not change the metadata.
This is particularly true for oe-selftests since these can run in parallel and changing metadata leads to changing checksums, which confuses BitBake while running in parallel. If this is necessary, copy layers to a temporary location and modify them. Some tests need to change metadata, such as the devtool tests. To protect the metadata from changes, set up temporary copies of that data first.
2 Project Testing and Release Process
2.1 Day to Day Development
This section details how the project tests changes, through automation on the Autobuilder or with the assistance of QA teams, through to making releases.
The project aims to test changes against our test matrix before those
changes are merged into the master branch. As such, changes are queued
up in batches either in the master-next branch in the main trees, or
in user trees such as ross/mut in poky-contrib (Ross Burton
helps review and test patches and this is his testing tree).
We have two broad categories of test builds, including “full” and “quick”. On the Autobuilder, these can be seen as “a-quick” and “a-full”, simply for ease of sorting in the UI. Use our Autobuilder console view to see where we manage most test-related items.
Builds are triggered manually when the test branches are ready. The
builds are monitored by the SWAT team. For additional information, see
https://wiki.yoctoproject.org/wiki/Yocto_Build_Failure_Swat_Team.
If successful, the changes would usually be merged to the master
branch. If not successful, someone would respond to the changes on the
mailing list explaining that there was a failure in testing. The choice
of quick or full would depend on the type of changes and the speed with
which the result was required.
The Autobuilder does build the master branch once daily for several
reasons, in particular, to ensure the current master branch does
build, but also to keep (yocto-testresults),
(buildhistory), and
our sstate up to date. On the weekend, there is a master-next build
instead to ensure the test results are updated for the less frequently
run targets.
Performance builds (buildperf-\* targets in the console) are triggered
separately every six hours and automatically push their results to the
buildstats repository.
The “quick” targets have been selected to be the ones which catch the
most failures or give the most valuable data. We run “fast” ptests in
this case for example but not the ones which take a long time. The quick
target doesn’t include \*-lsb builds for all architectures, some world
builds and doesn’t trigger performance tests or ltp testing. The full
build includes all these things and is slower but more comprehensive.
2.2 Release Builds
The project typically has two major releases a year with a six month cadence in April and October. Between these there would be a number of milestone releases (usually four) with the final one being stabilization only along with point releases of our stable branches.
The build and release process for these project releases is similar to that in Day to Day Development, in that the a-full target of the Autobuilder is used but in addition the form is configured to generate and publish artifacts and the milestone number, version, release candidate number and other information is entered. The box to “generate an email to QA” is also checked.
When the build completes, an email is sent out using the send-qa-email
script in the yocto-autobuilder-helper
repository to the list of people configured for that release. Release builds
are placed into a directory in https://valkyrie.yocto.io/pub/releases on the
Autobuilder which is included in the email. The process from here is
more manual and control is effectively passed to release engineering.
The next steps include:
QA teams respond to the email saying which tests they plan to run and when the results will be available.
QA teams run their tests and share their results in the yocto-testresults-contrib repository, along with a summary of their findings.
Release engineering prepare the release as per their process.
Test results from the QA teams are included into the release in separate directories and also uploaded to the yocto-testresults repository alongside the other test results for the given revision.
The QA report in the final release is regenerated using resulttool to include the new test results and the test summaries from the teams (as headers to the generated report).
The release is checked against the release checklist and release readiness criteria.
A final decision on whether to release is made by the YP TSC who have final oversight on release readiness.
3 Testing Packages With ptest
A Package Test (ptest) runs tests against packages built by the
OpenEmbedded build system on the target machine. A ptest contains at
least two items: the actual test, and a shell script (run-ptest)
that starts the test. The shell script that starts the test must not
contain the actual test — the script only starts the test. On the other
hand, the test can be anything from a simple shell script that runs a
binary and checks the output to an elaborate system of test binaries and
data files.
The test generates output in the format used by Automake:
result: testname
where the result can be PASS, FAIL, or SKIP, and
the testname can be any identifying string.
For a list of Yocto Project recipes that are already enabled with ptest, see the Ptest wiki page.
Note
A recipe is “ptest-enabled” if it inherits the ptest class.
3.1 Adding ptest to Your Build
To add package testing to your build, add the DISTRO_FEATURES and
EXTRA_IMAGE_FEATURES variables to your local.conf file, which
is found in the Build Directory:
DISTRO_FEATURES:append = " ptest"
EXTRA_IMAGE_FEATURES += "ptest-pkgs"
Once your build is complete, the ptest files are installed into the
/usr/lib/package/ptest directory within the image, where package
is the name of the package.
3.2 Running ptest
The ptest-runner package installs a shell script that loops through
all installed ptest test suites and runs them in sequence.
During the execution ptest-runner keeps count of total and failed
ptests. At end the execution summary is written to the console.
If any of the run-ptest fails, ptest-runner returns ‘1’.
Consequently, you might want to add ptest-runner to your image.
3.3 Getting Your Package Ready
In order to enable a recipe to run installed ptests on target hardware,
you need to prepare the recipes that build the packages you want to
test. Here is what you have to do for each recipe:
Be sure the recipe inherits the ptest class: Include the following line in each recipe:
inherit ptest
Note
Classes for common frameworks already exist in OpenEmbedded-Core (OE-Core), such as:
Inheriting these classes with the
inheritkeyword in your recipe will make the next steps automatic.Create run-ptest: This script starts your test. Locate the script where you will refer to it using SRC_URI. Be sure
run-ptestexits with 0 to mark it as successfully executed otherwise will be marked as fail. Here is an example that starts a test fordbus:#!/bin/sh cd test make -k runtest-TESTS
Return an appropriate exit code: The
run-ptestscript must return 0 on success, 1 on failure. This is needed byptest-runnerto keep track of the successful and failed tests.Make sure the test prints at least one test result: The execution of the
run-ptestscript must result in at least one test result output on the console, with the following format:result: testname
Where
resultcan be one ofPASS,SKIP, orFAIL.testnamecan be any name.There can be as many test results as desired.
This information is read by the testimage class and logparser module.
Ensure dependencies are met: If the test adds build or runtime dependencies that normally do not exist for the package (such as requiring “make” to run the test suite), use the DEPENDS and RDEPENDS variables in your recipe in order for the package to meet the dependencies. Here is an example where the package has a runtime dependency on “make”:
RDEPENDS:${PN}-ptest += "make"Add a function to build the test suite: Not many packages support cross-compilation of their test suites. Consequently, you usually need to add a cross-compilation function to the package.
Many packages based on Automake compile and run the test suite by using a single command such as
make check. However, the hostmake checkbuilds and runs on the same computer, while cross-compiling requires that the package is built on the host but executed for the target architecture (though often, as in the case for ptest, the execution occurs on the host). The built version of Automake that ships with the Yocto Project includes a patch that separates building and execution. Consequently, packages that use the unaltered, patched version ofmake checkautomatically cross-compiles.Regardless, you still must add a
do_compile_ptestfunction to build the test suite. Add a function similar to the following to your recipe:do_compile_ptest() { oe_runmake buildtest-TESTS }
Ensure special configurations are set: If the package requires special configurations prior to compiling the test code, you must insert a
do_configure_ptestfunction into the recipe.Install the test suite: The ptest class automatically copies the file
run-ptestto the target and then runs makeinstall-ptestto run the tests. If this is not enough, you need to create ado_install_ptestfunction and make sure it gets called after the “make install-ptest” completes.
4 Performing Automated Runtime Testing
The OpenEmbedded build system makes available a series of automated
tests for images to verify runtime functionality. You can run these
tests on either QEMU or actual target hardware. Tests are written in
Python making use of the unittest module, and the majority of them
run commands on the target system over SSH. This section describes how
you set up the environment to use these tests, run available tests, and
write and add your own tests.
For information on the test and QA infrastructure available within the Yocto Project, see the “Testing and Quality Assurance” section in the Yocto Project Reference Manual.
4.1 Enabling Tests
Depending on whether you are planning to run tests using QEMU or on the hardware, you have to take different steps to enable the tests. See the following subsections for information on how to enable both types of tests.
4.1.1 Enabling Runtime Tests on QEMU
In order to run tests, you need to do the following:
Set up to avoid interaction with sudo for networking: To accomplish this, you must do one of the following:
Add
NOPASSWDfor your user in/etc/sudoerseither for all commands or just forrunqemu-ifup. You must provide the full path as that can change if you are using multiple clones of the source repository.Note
On some distributions, you also need to comment out “Defaults requiretty” in
/etc/sudoers.Manually configure a tap interface for your system.
Run as root the script in
scripts/runqemu-gen-tapdevs, which should generate a list of tap devices. This is the option typically chosen for Autobuilder-type environments.Note
Be sure to use an absolute path when calling this script with sudo.
Ensure that your host has the package
iptablesinstalled.The package recipe
qemu-helper-nativeis required to run this script. Build the package using the following command:$ bitbake qemu-helper-native
Set the DISPLAY variable: You need to set this variable so that you have an X server available (e.g. start
vncserverfor a headless machine).Be sure your host’s firewall accepts incoming connections from 192.168.7.0/24: Some of the tests (in particular DNF tests) start an HTTP server on a random high number port, which is used to serve files to the target. The DNF module serves
${WORKDIR}/oe-rootfs-reposo it can run DNF channel commands. That means your host’s firewall must accept incoming connections from 192.168.7.0/24, which is the default IP range used for tap devices byrunqemu.Be sure your host has the correct packages installed: Depending your host’s distribution, you need to have the following packages installed:
Ubuntu and Debian:
sysstatandiproute2openSUSE:
sysstatandiproute2Fedora:
sysstatandiprouteCentOS:
sysstatandiproute
Once you start running the tests, the following happens:
A copy of the root filesystem is written to
${WORKDIR}/testimage.The image is booted under QEMU using the standard
runqemuscript.A default timeout of 500 seconds occurs to allow for the boot process to reach the login prompt. You can change the timeout period by setting TEST_QEMUBOOT_TIMEOUT in the
local.conffile.Once the boot process is reached and the login prompt appears, the tests run. The full boot log is written to
${WORKDIR}/testimage/qemu_boot_log.Each test module loads in the order found in TEST_SUITES. You can find the full output of the commands run over SSH in
${WORKDIR}/testimgage/ssh_target_log.If no failures occur, the task running the tests ends successfully. You can find the output from the
unittestin the task log at${WORKDIR}/temp/log.do_testimage.
4.1.2 Enabling Runtime Tests on Hardware
The OpenEmbedded build system can run tests on real hardware, and for certain devices it can also deploy the image to be tested onto the device beforehand.
For automated deployment, a “controller image” is installed onto the hardware once as part of setup. Then, each time tests are to be run, the following occurs:
The controller image is booted into and used to write the image to be tested to a second partition.
The device is then rebooted using an external script that you need to provide.
The device boots into the image to be tested.
When running tests (independent of whether the image has been deployed automatically or not), the device is expected to be connected to a network on a pre-determined IP address. You can either use static IP addresses written into the image, or set the image to use DHCP and have your DHCP server on the test network assign a known IP address based on the MAC address of the device.
In order to run tests on hardware, you need to set TEST_TARGET to an appropriate value. For QEMU, you do not have to change anything, the default value is “qemu”. For running tests on hardware, the following options are available:
“simpleremote”: Choose “simpleremote” if you are going to run tests on a target system that is already running the image to be tested and is available on the network. You can use “simpleremote” in conjunction with either real hardware or an image running within a separately started QEMU or any other virtual machine manager.
“SystemdbootTarget”: Choose “SystemdbootTarget” if your hardware is an EFI-based machine with
systemd-bootas bootloader andcore-image-testmaster(or something similar) is installed. Also, your hardware under test must be in a DHCP-enabled network that gives it the same IP address for each reboot.If you choose “SystemdbootTarget”, there are additional requirements and considerations. See the “Selecting SystemdbootTarget” section, which follows, for more information.
“BeagleBoneTarget”: Choose “BeagleBoneTarget” if you are deploying images and running tests on the BeagleBone “Black” or original “White” hardware. For information on how to use these tests, see the comments at the top of the BeagleBoneTarget
meta-yocto-bsp/lib/oeqa/controllers/beaglebonetarget.pyfile.“GrubTarget”: Choose “GrubTarget” if you are deploying images and running tests on any generic PC that boots using GRUB. For information on how to use these tests, see the comments at the top of the GrubTarget
meta-yocto-bsp/lib/oeqa/controllers/grubtarget.pyfile.“your-target”: Create your own custom target if you want to run tests when you are deploying images and running tests on a custom machine within your BSP layer. To do this, you need to add a Python unit that defines the target class under
lib/oeqa/controllers/within your layer. You must also provide an empty__init__.py. For examples, see files inmeta-yocto-bsp/lib/oeqa/controllers/.
4.1.3 Selecting SystemdbootTarget
If you did not set TEST_TARGET to “SystemdbootTarget”, then you do not need any information in this section. You can skip down to the “Running Tests” section.
If you did set TEST_TARGET to “SystemdbootTarget”, you also need to perform a one-time setup of your controller image by doing the following:
Set EFI_PROVIDER: Be sure that EFI_PROVIDER is as follows:
EFI_PROVIDER = "systemd-boot"
Build the controller image: Build the
core-image-testmasterimage. Thecore-image-testmasterrecipe is provided as an example for a “controller” image and you can customize the image recipe as you would any other recipe.Image recipe requirements are:
Inherits
core-imageso that kernel modules are installed.Installs normal linux utilities not BusyBox ones (e.g.
bash,coreutils,tar,gzip, andkmod).Uses a custom Initramfs image with a custom installer. A normal image that you can install usually creates a single root filesystem partition. This image uses another installer that creates a specific partition layout. Not all Board Support Packages (BSPs) can use an installer. For such cases, you need to manually create the following partition layout on the target:
First partition mounted under
/boot, labeled “boot”.The main root filesystem partition where this image gets installed, which is mounted under
/.Another partition labeled “testrootfs” where test images get deployed.
Install image: Install the image that you just built on the target system.
The final thing you need to do when setting TEST_TARGET to “SystemdbootTarget” is to set up the test image:
Set up your local.conf file: Make sure you have the following statements in your
local.conffile:IMAGE_FSTYPES += "tar.gz" IMAGE_CLASSES += "testimage" TEST_TARGET = "SystemdbootTarget" TEST_TARGET_IP = "192.168.2.3"
Build your test image: Use BitBake to build the image:
$ bitbake core-image-sato
4.1.4 Power Control
For most hardware targets other than “simpleremote”, you can control power:
You can use TEST_POWERCONTROL_CMD together with TEST_POWERCONTROL_EXTRA_ARGS as a command that runs on the host and does power cycling. The test code passes one argument to that command: off, on or cycle (off then on). Here is an example that could appear in your
local.conffile:TEST_POWERCONTROL_CMD = "powercontrol.exp test 10.11.12.1 nuc1"
In this example, the expect script does the following:
ssh test@10.11.12.1 "pyctl nuc1 arg"
It then runs a Python script that controls power for a label called
nuc1.Note
You need to customize TEST_POWERCONTROL_CMD and TEST_POWERCONTROL_EXTRA_ARGS for your own setup. The one requirement is that it accepts “on”, “off”, and “cycle” as the last argument.
When no command is defined, it connects to the device over SSH and uses the classic reboot command to reboot the device. Classic reboot is fine as long as the machine actually reboots (i.e. the SSH test has not failed). It is useful for scenarios where you have a simple setup, typically with a single board, and where some manual interaction is okay from time to time.
If you have no hardware to automatically perform power control but still
wish to experiment with automated hardware testing, you can use the
dialog-power-control script that shows a dialog prompting you to perform
the required power action. This script requires either KDialog or Zenity
to be installed. To use this script, set the
TEST_POWERCONTROL_CMD
variable as follows:
TEST_POWERCONTROL_CMD = "${COREBASE}/scripts/contrib/dialog-power-control"
4.1.5 Serial Console Connection
For test target classes requiring a serial console to interact with the bootloader (e.g. BeagleBoneTarget and GrubTarget), you need to specify a command to use to connect to the serial console of the target machine by using the TEST_SERIALCONTROL_CMD variable and optionally the TEST_SERIALCONTROL_EXTRA_ARGS variable.
These cases could be a serial terminal program if the machine is
connected to a local serial port, or a telnet or ssh command
connecting to a remote console server. Regardless of the case, the
command simply needs to connect to the serial console and forward that
connection to standard input and output as any normal terminal program
does. For example, to use the picocom terminal program on serial device
/dev/ttyUSB0 at 115200bps, you would set the variable as follows:
TEST_SERIALCONTROL_CMD = "picocom /dev/ttyUSB0 -b 115200"
For local
devices where the serial port device disappears when the device reboots,
an additional “serdevtry” wrapper script is provided. To use this
wrapper, simply prefix the terminal command with
${COREBASE}/scripts/contrib/serdevtry:
TEST_SERIALCONTROL_CMD = "${COREBASE}/scripts/contrib/serdevtry picocom -b 115200 /dev/ttyUSB0"
4.2 Running Tests
You can start the tests automatically or manually:
Automatically running tests: To run the tests automatically after the OpenEmbedded build system successfully creates an image, first set the TESTIMAGE_AUTO variable to “1” in your
local.conffile in the Build Directory:TESTIMAGE_AUTO = "1"
Next, build your image. If the image successfully builds, the tests run:
bitbake core-image-sato
Manually running tests: To manually run the tests, first globally inherit the testimage class by editing your
local.conffile:IMAGE_CLASSES += "testimage"
Next, use BitBake to run the tests:
bitbake -c testimage image
All test files reside in meta/lib/oeqa/runtime/cases in
OpenEmbedded-Core (OE-Core). A test name maps
directly to a Python module. Each test module may contain a number of
individual tests. Tests are usually grouped together by the area tested
(e.g tests for systemd reside in meta/lib/oeqa/runtime/cases/systemd.py).
You can add tests to any layer provided you place them in the proper
area and you extend BBPATH in
the local.conf file as normal. Be sure that tests reside in
layer/lib/oeqa/runtime/cases.
Note
Be sure that module names do not collide with module names used in
the default set of test modules in meta/lib/oeqa/runtime/cases.
You can change the set of tests run by appending or overriding
TEST_SUITES variable in
local.conf. Each name in TEST_SUITES represents a required test
for the image. Test modules named within TEST_SUITES cannot be
skipped even if a test is not suitable for an image (e.g. running the
RPM tests on an image without rpm). Appending “auto” to
TEST_SUITES causes the build system to try to run all tests that are
suitable for the image (i.e. each test module may elect to skip itself).
The order you list tests in TEST_SUITES is important and influences
test dependencies. Consequently, tests that depend on other tests should
be added after the test on which they depend. For example, since the
ssh test depends on the ping test, “ssh” needs to come after
“ping” in the list. The test class provides no re-ordering or dependency
handling.
Note
Each module can have multiple classes with multiple test methods.
And, Python unittest rules apply.
Here are some things to keep in mind when running tests:
The default tests for the image are defined as:
DEFAULT_TEST_SUITES:pn-image = "ping ssh df connman syslog xorg scp vnc date rpm dnf dmesg"
Add your own test to the list of the by using the following:
TEST_SUITES:append = " mytest"
Run a specific list of tests as follows:
TEST_SUITES = "test1 test2 test3"
Remember, order is important. Be sure to place a test that is dependent on another test later in the order.
4.3 Exporting Tests
You can export tests so that they can run independently of the build system. Exporting tests is required if you want to be able to hand the test execution off to a scheduler. You can only export tests that are defined in TEST_SUITES.
If your image is already built, make sure the following are set in your
local.conf file:
IMAGE_CLASSES += "testexport"
TEST_TARGET_IP = "IP-address-for-the-test-target"
TEST_SERVER_IP = "IP-address-for-the-test-server"
You can then export the tests with the following BitBake command form:
$ bitbake image -c testexport
Exporting the tests places them in the Build Directory in
tmp/testimage/image, which is controlled by the TEST_EXPORT_DIR
variable.
You can now run the tests outside of the build environment:
$ cd tmp/testimage/image
$ ./oe-test runtime
Note
You might need to run the image under QEMU or deploy it to your hardware before you can run the tests.
Here is a complete example that shows IP addresses and uses the
core-image-sato image:
IMAGE_CLASSES += "testexport"
TEST_TARGET_IP = "192.168.7.2"
TEST_SERVER_IP = "192.168.7.1"
Use BitBake to export the tests:
$ bitbake core-image-sato -c testexport
Run the tests outside of the build environment using the following:
$ cd tmp/testimage/core-image-sato
$ ./oe-test runtime
4.4 Writing New Tests
As mentioned previously, all new test files need to be in the proper
place for the build system to find them. New tests for additional
functionality outside of the core should be added to the layer that adds
the functionality, in layer/lib/oeqa/runtime/cases (as long as
BBPATH is extended in the
layer’s layer.conf file as normal). Just remember the following:
Filenames need to map directly to test (module) names.
Do not use module names that collide with existing core tests.
Minimally, an empty
__init__.pyfile must be present in the runtime directory.
To create a new test, start by copying an existing module (e.g.
oe_syslog.py or gcc.py are good ones to use). Test modules can use
code from meta/lib/oeqa/utils, which are helper classes.
Note
Structure shell commands such that you rely on them and they return a
single code for success. Be aware that sometimes you will need to
parse the output. See the df.py and date.py modules for examples.
You will notice that all test classes inherit oeRuntimeTest, which
is found in meta/lib/oetest.py. This base class offers some helper
attributes, which are described in the following sections:
4.4.1 Class Methods
Class methods are as follows:
hasPackage(pkg): Returns “True” if
pkgis in the installed package list of the image, which is based on the manifest file that is generated during the do_rootfs task.hasFeature(feature): Returns “True” if the feature is in IMAGE_FEATURES or DISTRO_FEATURES.
4.4.2 Class Attributes
Class attributes are as follows:
pscmd: Equals “ps -ef” if
procpsis installed in the image. Otherwise,pscmdequals “ps” (busybox).tc: The called test context, which gives access to the following attributes:
d: The BitBake datastore, which allows you to use stuff such as
oeRuntimeTest.tc.d.getVar("VIRTUAL-RUNTIME_init_manager").testslist and testsrequired: Used internally. The tests do not need these.
filesdir: The absolute path to
meta/lib/oeqa/runtime/files, which contains helper files for tests meant for copying on the target such as small files written in C for compilation.target: The target controller object used to deploy and start an image on a particular target (e.g. Qemu, SimpleRemote, and SystemdbootTarget). Tests usually use the following:
ip: The target’s IP address.
server_ip: The host’s IP address, which is usually used by the DNF test suite.
run(cmd, timeout=None): The single, most used method. This command is a wrapper for:
ssh root@host "cmd". The command returns a tuple: (status, output), which are what their names imply - the return code of “cmd” and whatever output it produces. The optional timeout argument represents the number of seconds the test should wait for “cmd” to return. If the argument is “None”, the test uses the default instance’s timeout period, which is 300 seconds. If the argument is “0”, the test runs until the command returns.copy_to(localpath, remotepath):
scp localpath root@ip:remotepath.copy_from(remotepath, localpath):
scp root@host:remotepath localpath.
4.4.3 Instance Attributes
There is a single instance attribute, which is target. The target
instance attribute is identical to the class attribute of the same name,
which is described in the previous section. This attribute exists as
both an instance and class attribute so tests can use
self.target.run(cmd) in instance methods instead of
oeRuntimeTest.tc.target.run(cmd).
4.5 Installing Packages in the DUT Without the Package Manager
When a test requires a package built by BitBake, it is possible to
install that package. Installing the package does not require a package
manager be installed in the device under test (DUT). It does, however,
require an SSH connection and the target must be using the
sshcontrol class.
Note
This method uses scp to copy files from the host to the target, which
causes permissions and special attributes to be lost.
A JSON file is used to define the packages needed by a test. This file
must be in the same path as the file used to define the tests.
Furthermore, the filename must map directly to the test module name with
a .json extension.
The JSON file must include an object with the test name as keys of an object or an array. This object (or array of objects) uses the following data:
“pkg” — a mandatory string that is the name of the package to be installed.
“rm” — an optional boolean, which defaults to “false”, that specifies to remove the package after the test.
“extract” — an optional boolean, which defaults to “false”, that specifies if the package must be extracted from the package format. When set to “true”, the package is not automatically installed into the DUT.
Here is an example JSON file that handles test “foo” installing package “bar” and test “foobar” installing packages “foo” and “bar”. Once the test is complete, the packages are removed from the DUT:
{
"foo": {
"pkg": "bar"
},
"foobar": [
{
"pkg": "foo",
"rm": true
},
{
"pkg": "bar",
"rm": true
}
]
}
5 Understanding the Yocto Project Autobuilder
5.1 Execution Flow within the Autobuilder
The “a-full” and “a-quick” targets are the usual entry points into the Autobuilder and it makes sense to follow the process through the system starting there. This is best visualized from the Autobuilder Console view.
Each item along the top of that view represents some “target build” and
these targets are all run in parallel. The ‘full’ build will trigger the
majority of them, the “quick” build will trigger some subset of them.
The Autobuilder effectively runs whichever configuration is defined for
each of those targets on a separate buildbot worker. To understand the
configuration, you need to look at the entry on config.json file
within the yocto-autobuilder-helper
repository. The targets are defined in the overrides section, a quick
example could be qemux86-64 which looks like:
"qemux86-64" : {
"MACHINE" : "qemux86-64",
"TEMPLATE" : "arch-qemu",
"step1" : {
"extravars" : [
"IMAGE_FSTYPES:append = ' wic wic.bmap'"
]
}
},
And to expand that, you need the arch-qemu entry from
the templates section, which looks like:
"arch-qemu" : {
"BUILDINFO" : true,
"BUILDHISTORY" : true,
"step1" : {
"BBTARGETS" : "core-image-sato core-image-sato-dev core-image-sato-sdk core-image-minimal core-image-minimal-dev core-image-sato:do_populate_sdk",
"SANITYTARGETS" : "core-image-minimal:do_testimage core-image-sato:do_testimage core-image-sato-sdk:do_testimage core-image-sato:do_testsdk"
},
"step2" : {
"SDKMACHINE" : "x86_64",
"BBTARGETS" : "core-image-sato:do_populate_sdk core-image-minimal:do_populate_sdk_ext core-image-sato:do_populate_sdk_ext",
"SANITYTARGETS" : "core-image-sato:do_testsdk core-image-minimal:do_testsdkext core-image-sato:do_testsdkext"
},
"step3" : {
"BUILDHISTORY" : false,
"EXTRACMDS" : ["${SCRIPTSDIR}/checkvnc; DISPLAY=:1 oe-selftest ${HELPERSTMACHTARGS} -j 15"],
"ADDLAYER" : ["${BUILDDIR}/../meta-selftest"]
}
},
Combining these two entries you can see that qemux86-64 is a three step
build where bitbake BBTARGETS would be run, then bitbake SANITYTARGETS
for each step; all for MACHINE="qemux86-64" but with differing
SDKMACHINE settings. In step 1, an extra variable is added to the
auto.conf file to enable wic image generation.
While not every detail of this is covered here, you can see how the template mechanism allows quite complex configurations to be built up yet allows duplication and repetition to be kept to a minimum.
The different build targets are designed to allow for parallelization, so different machines are usually built in parallel, operations using the same machine and metadata are built sequentially, with the aim of trying to optimize build efficiency as much as possible.
The config.json file is processed by the scripts in the Helper
repository in the scripts directory. The following section details
how this works.
5.2 Autobuilder Target Execution Overview
For each given target in a build, the Autobuilder executes several
steps. These are configured in yocto-autobuilder2/builders.py and
roughly consist of:
Run clobberdir.
This cleans out any previous build. Old builds are left around to allow easier debugging of failed builds. For additional information, see clobberdir.
Obtain yocto-autobuilder-helper
This step clones the yocto-autobuilder-helper git repository. This is necessary to avoid the requirement to maintain all the release or project-specific code within Buildbot. The branch chosen matches the release being built so we can support older releases and still make changes in newer ones.
Write layerinfo.json
This transfers data in the Buildbot UI when the build was configured to the Helper.
Call scripts/shared-repo-unpack
This is a call into the Helper scripts to set up a checkout of all the pieces this build might need. It might clone the BitBake repository, the OpenEmbedded-Core (OE-Core) repository as well as additional layers. It will use the data from the
layerinfo.jsonfile to help understand the configuration. It will also use a local cache of repositories to speed up the clone checkouts. For additional information, see Autobuilder Clone Cache.This step has two possible modes of operation. If the build is part of a parent build, it’s possible that all the repositories needed may already be available, ready in a pre-prepared directory. An “a-quick” or “a-full” build would prepare this before starting the other sub-target builds. This is done for two reasons:
the upstream may change during a build, for example, from a forced push and this ensures we have matching content for the whole build
if 15 Workers all tried to pull the same data from the same repos, we can hit resource limits on upstream servers as they can think they are under some kind of network attack
This pre-prepared directory is shared among the Workers over NFS. If the build is an individual build and there is no “shared” directory available, it would clone from the cache and the upstreams as necessary. This is considered the fallback mode.
Call scripts/run-config
This is another call into the Helper scripts where it’s expected that the main functionality of this target will be executed.
5.3 Autobuilder Technology
The Autobuilder has Yocto Project-specific functionality to allow builds to operate with increased efficiency and speed.
5.3.1 clobberdir
When deleting files, the Autobuilder uses clobberdir, which is a
special script that moves files to a special location, rather than
deleting them. Files in this location are deleted by an rm command,
which is run under ionice -c 3. For example, the deletion only
happens when there is idle IO capacity on the Worker. The Autobuilder
Worker Janitor runs this deletion. See Autobuilder Worker Janitor.
5.3.2 Autobuilder Clone Cache
Cloning repositories from scratch each time they are required was slow on the Autobuilder. We therefore have a stash of commonly used repositories pre-cloned on the Workers. Data is fetched from these during clones first, then “topped up” with later revisions from any upstream when necessary. The cache is maintained by the Autobuilder Worker Janitor. See Autobuilder Worker Janitor.
5.3.3 Autobuilder Worker Janitor
This is a process running on each Worker that performs two basic operations, including background file deletion at IO idle (see “Run clobberdir” in Autobuilder Target Execution Overview) and maintenance of a cache of cloned repositories to improve the speed the system can checkout repositories.
5.3.7 Resulttool
All of the different tests run as part of the build generate output into
testresults.json files. This allows us to determine which tests ran
in a given build and their status. Additional information, such as
failure logs or the time taken to run the tests, may also be included.
Resulttool is part of OpenEmbedded-Core and is used to manipulate these JSON results files. It has the ability to merge files together, display reports of the test results and compare different result files.
For details, see https://wiki.yoctoproject.org/wiki/Resulttool.
5.4 run-config Target Execution
The scripts/run-config execution is where most of the work within
the Autobuilder happens. It runs through a number of steps; the first
are general setup steps that are run once and include:
Set up any buildtools tarball if configured.
Call
buildhistory-initif buildhistory is configured.
For each step that is configured in config.json, it will perform the
following:
Add any layers that are specified using the
bitbake-layers add-layercommand (logging as stepXa)Call the
scripts/setup-configscript to generate the necessaryauto.confconfiguration file for the buildRun the
bitbake BBTARGETScommand (logging as stepXb)Run the
bitbake SANITYTARGETScommand (logging as stepXc)Run the
EXTRACMDScommand, which are run within the BitBake build environment (logging as stepXd)Run the
EXTRAPLAINCMDScommand(s), which are run outside the BitBake build environment (logging as stepXd)Remove any layers added in step 1 using the
bitbake-layers remove-layercommand (logging as stepXa)
Once the execution steps above complete, run-config executes a set
of post-build steps, including:
Call
scripts/publish-artifactsto collect any output which is to be saved from the build.Call
scripts/collect-resultsto collect any test results to be saved from the build.Call
scripts/upload-error-reportsto send any error reports generated to the remote server.Cleanup the Build Directory using clobberdir if the build was successful, else rename it to “build-renamed” for potential future debugging.
5.5 Deploying Yocto Autobuilder
The most up to date information about how to setup and deploy your own Autobuilder can be found in README.md in the yocto-autobuilder2 repository.
We hope that people can use the yocto-autobuilder2
code directly but it is inevitable that users will end up needing to heavily
customize the yocto-autobuilder-helper
repository, particularly the config.json file as they will want to define
their own test matrix.
The Autobuilder supports two customization options:
variable substitution
overlaying configuration files
The standard config.json minimally attempts to allow substitution of
the paths. The Helper script repository includes a
local-example.json file to show how you could override these from a
separate configuration file. Pass the following into the environment of
the Autobuilder:
$ ABHELPER_JSON="config.json local-example.json"
As another example, you could also pass the following into the environment:
$ ABHELPER_JSON="config.json /some/location/local.json"
One issue users often run into is validation of the config.json files. A
tip for minimizing issues from invalid JSON files is to use a Git
pre-commit-hook.sh script to verify the JSON file before committing
it. Create a symbolic link as follows:
$ ln -s ../../scripts/pre-commit-hook.sh .git/hooks/pre-commit
6 Reproducible Builds
6.1 How we define it
The Yocto Project defines reproducibility as where a given input build configuration will give the same binary output regardless of when it is built (now or in 5 years time), regardless of the path on the filesystem the build is run in, and regardless of the distro and tools on the underlying host system the build is running on.
6.2 Why it matters
The project aligns with the Reproducible Builds project, which shares information about why reproducibility matters. The primary focus of the project is the ability to detect security issues being introduced. However, from a Yocto Project perspective, it is also hugely important that our builds are deterministic. When you build a given input set of metadata, we expect you to get consistent output. This has always been a key focus but, since release 3.1 (“dunfell”), it is now true down to the binary level including timestamps.
For example, at some point in the future life of a product, you find that you need to rebuild to add a security fix. If this happens, only the components that have been modified should change at the binary level. This would lead to much easier and clearer bounds on where validation is needed.
This also gives an additional benefit to the project builds themselves, our Hash Equivalence for Shared State object reuse works much more effectively when the binary output remains the same.
Note
We strongly advise you to make sure your project builds reproducibly before finalizing your production images. It would be too late if you only address this issue when the first updates are required.
6.3 How we implement it
There are many different aspects to build reproducibility, but some particular things we do within the build system to ensure reproducibility include:
Adding mappings to the compiler options to ensure debug filepaths are mapped to consistent target compatible paths. This is done through the DEBUG_PREFIX_MAP variable which sets the
-fmacro-prefix-mapand-fdebug-prefix-mapcompiler options correctly to map to target paths.Being explicit about recipe dependencies and their configuration (no floating configure options or host dependencies creeping in). In particular this means making sure PACKAGECONFIG coverage covers configure options which may otherwise try and auto-detect host dependencies.
Using recipe specific sysroots to isolate recipes so they only see their dependencies. These are visible as
recipe-sysrootandrecipe-sysroot-nativedirectories within the WORKDIR of a given recipe and are populated only with the dependencies a recipe has.Build images from a reduced package set: only packages from recipes the image depends upon.
Filtering the tools available from the host’s
PATHto only a specific set of tools, set using the HOSTTOOLS variable.
6.4 Can we prove the project is reproducible?
Yes, we can prove it and we regularly test this on the Autobuilder. At the time of writing (release 3.3, “hardknott”), OpenEmbedded-Core (OE-Core) is 100% reproducible for all its recipes (i.e. world builds) apart from the Go language and Ruby documentation packages. Unfortunately, the current implementation of the Go language has fundamental reproducibility problems as it always depends upon the paths it is built in.
Note
Only BitBake and OpenEmbedded-Core (OE-Core) guarantee complete
reproducibility. The moment you add another layer, this warranty is voided,
because of additional configuration files, bbappend files, overridden
classes, etc.
To run our automated selftest, as we use in our CI on the Autobuilder, you can run:
oe-selftest -r reproducible.ReproducibleTests.test_reproducible_builds
This defaults to including a world build so, if other layers are added, it
would also run the tests for recipes in the additional layers. Different build
targets can be defined using the OEQA_REPRODUCIBLE_TEST_TARGET variable
in local.conf. For example, running reproducibility tests for only the
python3-numpy recipe can be done by setting:
OEQA_REPRODUCIBLE_TEST_TARGET = "python3-numpy"
in local.conf before running the oe-selftest command shown above.
Reproducibility builds the target list twice. The first build will be run using Shared State if available, the second build explicitly disables Shared State except for recipes defined in the OEQA_REPRODUCIBLE_TEST_SSTATE_TARGETS variable, and builds on the specific host the build is running on. This means we can test reproducibility builds between different host distributions over time on the Autobuilder.
If OEQA_DEBUGGING_SAVED_OUTPUT is set, any differing packages will be saved
here. The test is also able to run the diffoscope command on the output to
generate HTML files showing the differences between the packages, to aid
debugging. On the Autobuilder, these appear under
https://valkyrie.yocto.io/pub/repro-fail/ in the form oe-reproducible +
<date> + <random ID>, e.g. oe-reproducible-20200202-1lm8o1th.
The project’s current reproducibility status can be seen at https://www.yoctoproject.org/reproducible-build-results/
You can also check the reproducibility status on the Autobuilder: https://autobuilder.yoctoproject.org/valkyrie/#/builders/reproducible.
6.5 How can I test my layer or recipes?
6.5.1 With world build
Once again, you can run a world test using the
oe-selftest
command provided above. This functionality is implemented
in meta/lib/oeqa/selftest/cases/reproducible.py.
6.5.2 Subclassing the test
You could subclass the test and change targets to a different target.
You may also change sstate_targets which would allow you to “pre-cache” some
set of recipes before the test, meaning they are excluded from reproducibility
testing. As a practical example, you could set sstate_targets to
core-image-sato, then setting targets to core-image-sato-sdk would
run reproducibility tests only on the targets belonging only to core-image-sato-sdk.
6.5.3 Using OEQA_REPRODUCIBLE_TEST_* variables
If you want to test the reproducibility of a set of recipes, you can define OEQA_REPRODUCIBLE_TEST_LEAF_TARGETS, in your local.conf:
OEQA_REPRODUCIBLE_TEST_LEAF_TARGETS = "my-recipe"
This will test the reproducibility of my-recipe but will use the
Shared State for most its
dependencies (i.e. the ones explicitly listed in DEPENDS, which may not be all
dependencies, c.f. [depends] varflags, PACKAGE_DEPENDS and other
implementations).
You can have finer control on the test with:
OEQA_REPRODUCIBLE_TEST_TARGET: lists recipes to be built,
OEQA_REPRODUCIBLE_TEST_SSTATE_TARGETS: lists recipes that will be built using Shared State.
7 Yocto Project Compatible
7.1 Introduction
After the introduction of layers to OpenEmbedded, it quickly became clear that while some layers were popular and worked well, others developed a reputation for being “problematic”. Those were layers which didn’t interoperate well with others and tended to assume they controlled all the aspects of the final output. This usually isn’t intentional but happens because such layers are often created by developers with a particular focus (e.g. a company’s BSP) whilst the end users have a different one (e.g. integrating that BSP into a product).
As a result of noticing such patterns and friction between layers, the project
developed the “Yocto Project Compatible” badge program, allowing layers
following the best known practises to be marked as being widely compatible
with other ones. This takes the form of a set of “yes/no” binary answer
questions where layers can declare if they meet the appropriate criteria.
In the second version of the program, a script was added to make validation
easier and clearer, the script is called yocto-check-layer and is
available in OpenEmbedded-Core (OE-Core).
See Making Sure Your Layer is Compatible With Yocto Project for details.
7.2 Benefits
The Yocto Project Layer Model is powerful and flexible: it gives users the ultimate power to change pretty much any aspect of the system but as with most things, power comes with responsibility. The Yocto Project would like to see people able to mix and match BSPs with distro configs or software stacks and be able to merge successfully. Over time, the project identified characteristics in layers that allow them to operate well together. “anti-patterns” were also found, preventing layers from working well together.
The intent of the compatibility program is simple: if the layer passes the compatibility tests, it is considered “well behaved” and should operate and cooperate well with other compatible layers.
The benefits of compatibility can be seen from multiple different user and member perspectives. From a hardware perspective (a BSP Layer), compatibility means the hardware can be used in many different products and use cases without impacting the software stacks being run with it. For a company developing a product, compatibility gives you a specification / standard you can require in a contract and then know it will have certain desired characteristics for interoperability. It also puts constraints on how invasive the code bases are into the rest of the system, meaning that multiple different separate hardware support layers can coexist (e.g. for multiple product lines from different hardware manufacturers). This can also make it easier for one or more parties to upgrade those system components for security purposes during the lifecycle of a product.
7.3 Validating a layer
The badges are available to members of the Yocto Project (as member benefit) and to open source projects run on a non-commercial basis. However, anyone can answer the questions and run the script.
The project encourages all layer maintainers to review the questions and the output from the script against their layer, as the way some layers are constructed often has unintended consequences. The questions and the script are designed to highlight known issues which are often easy to solve. This makes layers easier to use and therefore more popular.
It is intended that over time, the tests will evolve as new best known practices are identified, and as new interoperability issues are found, unnecessarily restricting layer interoperability. If anyone becomes aware of either type, please let the project know through the technical calls, the mailing lists or through the Technical Steering Committee (TSC). The TSC is responsible for the technical criteria used by the program.
Layers are divided into three types:
“BSP” or “hardware support” layers contain support for particular pieces of hardware. This includes kernel and boot loader configuration, and any recipes for firmware or kernel modules needed for the hardware. Such layers usually correspond to a MACHINE setting.
“distro” layers defined as layers providing configuration options and settings such as the choice of init system, compiler and optimisation options, and configuration and choices of software components. This would usually correspond to a DISTRO setting.
“software” layers are usually recipes. A layer might target a particular graphical UI or software stack component.
Here are key best practices the program tries to encourage:
A layer should clearly show who maintains it, and who change submissions and bug reports should be sent to.
Where multiple types of functionality are present, the layer should be internally divided into sublayers to separate these components. That’s because some users may only need one of them and separability is a key best practice.
Adding a layer to a build should not modify that build, unless the user changes a configuration setting to activate the layer, by selecting a MACHINE, a DISTRO or a DISTRO_FEATURES setting.
Layers should be documenting where they don’t support normal “core” functionality such as where debug symbols are disabled or missing, where development headers and on-target library usage may not work or where functionality like the SDK/eSDK would not be expected to work.
The project does test the compatibility status of the core project layers on its Autobuilder.
The official form to submit compatibility requests with is at https://www.yoctoproject.org/ecosystem/branding/compatible-registration/. Applicants can display the badge they get when their application is successful.
Permission is granted to copy, distribute and/or modify this document under the terms of the Creative Commons Attribution-Share Alike 2.0 UK: England & Wales as published by Creative Commons.
To report any inaccuracies or problems with this (or any other Yocto Project)
manual, or to send additions or changes, please send email/patches to the Yocto
Project documentation mailing list at docs@lists.yoctoproject.org or
log into the Libera Chat #yocto channel.
BitBake Documentation
BitBake was originally a part of the OpenEmbedded project. It was inspired by the Portage package management system used by the Gentoo Linux distribution. In 2004, the OpenEmbedded project was split the project into two distinct pieces:
BitBake, a generic task executor
OpenEmbedded, a metadata set utilized by BitBake
Today, BitBake is the primary build tool of OpenEmbedded based projects, such as the Yocto Project.
The BitBake documentation can be found here.
Yocto Project Security Reference
1 Security team
The Yocto Project/OpenEmbedded security team coordinates the work on security subjects in the project. All general discussion takes place publicly. The Security Team only uses confidential communication tools to deal with private vulnerability reports before they are released.
1.1 Security team appointment
The Yocto Project Security Team consists of at least three members. When new members are needed, the Yocto Project Technical Steering Committee (YP TSC) asks for nominations by public channels including a nomination deadline. Self-nominations are possible. When the limit time is reached, the YP TSC posts the list of candidates for the comments of project participants and developers. Comments may be sent publicly or privately to the YP and OE TSCs. The candidates are approved by both YP TSC and OpenEmbedded Technical Steering Committee (OE TSC) and the final list of the team members is announced publicly. The aim is to have people representing technical leadership, security knowledge and infrastructure present with enough people to provide backup/coverage but keep the notification list small enough to minimize information risk and maintain trust.
YP Security Team members may resign at any time.
1.2 Security Team Operations
The work of the Security Team might require high confidentiality. Team members are individuals selected by merit and do not represent the companies they work for. They do not share information about confidential issues outside of the team and do not hint about ongoing embargoes.
Team members can bring in domain experts as needed. Those people should be added to individual issues only and adhere to the same standards as the YP Security Team.
The YP security team organizes its meetings and communication as needed.
When the YP Security team receives a report about a potential security vulnerability, they quickly analyze and notify the reporter of the result. They might also request more information.
If the issue is confirmed and affects the code maintained by the YP, they confidentially notify maintainers of that code and work with them to prepare a fix.
If the issue is confirmed and affects an upstream project, the YP security team notifies the project. Usually, the upstream project analyzes the problem again. If they deem it a real security problem in their software, they develop and release a fix following their security policy. They may want to include the original reporter in the loop. There is also sometimes some coordination for handling patches, backporting patches etc, or just understanding the problem or what caused it.
The security policy of the upstream project might include a notification to Linux distributions or other important downstream projects in advance to discuss coordinated disclosure. These mailing lists are normally non-public.
When the upstream project releases a version with the fix, they are responsible for contacting an appropriate CVE Numbering Authority (CNA), such as Mitre, to get a CVE number assigned and the CVE record published.
When the fix is publicly available, the YP security team member or the package maintainer sends patches against the YP code base, following usual procedures, including public code review.
1.2.1 If an upstream project does not respond quickly
If an upstream project does not fix the problem in a reasonable time, the Yocto’s Security Team will contact other interested parties (usually other distributions) in the community and together try to solve the vulnerability as quickly as possible.
The Yocto Project Security team adheres to the 90 days disclosure policy by default. An increase of the embargo time is possible when necessary.
1.2.2 Handling multi-project embargoes
In rare cases, a severe security issue affects multiple projects. This might be numerous projects having a similar issue because of design, coding pattern, or reuse of the same code (an example of this situation is CVE-2023-44487 where multiple web servers share a design weakness). It might also be a high-profile issue in a commonly used library (like OpenSSL). In such cases, the project, learning first about the issue, might decide to notify other affected projects confidentially so that they come up with a synchronized fix. It might also be the affected project informing major distributions to roll out the update simultaneously.
Such notifications happen over confidential, non-public means. Typically, the project initiating this “embargo” directly notifies a selected number of people from each project, including a subset of the security team. When Yocto Project is a part of such a notified group, developers prepare fixes on separate infrastructure and test it. They might also include additional developers and domain experts who can help with the fix and eventual regressions. When the embargo is lifted, they send a patch to the relevant public list, and the usual review process starts.
1.3 Security Team Members
For secure communications, please send your messages encrypted using the GPG keys. Remember, message headers are not encrypted so do not include sensitive information in the subject line.
Ross Burton: <ross [at] burtonini [dot] com> Public key
Michael Halstead: <mhalstead [at] linuxfoundation [dot] org> Public key or Public key
Richard Purdie: <richard.purdie [at] linuxfoundation [dot] org> Public key
Marta Rybczynska: <marta DOT rybczynska [at] ygreky [dot] com> Public key
Paul Barker <paul [at] pbarker [dot] dev> Public key
2 Reporting Vulnerabilities
The Yocto Project and OpenEmbedded are open-source, community-based projects used in numerous products. They assemble multiple other open-source projects, and need to handle security issues and practices both internal (in the code maintained by both projects), and external (maintained by other projects and organizations).
This manual assembles security-related information concerning the whole ecosystem. It includes information on reporting a potential security issue, the operation of the YP Security team and how to contribute in the related code. It is written to be useful for both security researchers and YP developers.
2.1 How to report a potential security vulnerability?
If you would like to report a public issue (for example, one with a released CVE number), please report it using the Security Bugzilla.
If you are dealing with a not-yet-released issue, or an urgent one, please send a message to security AT yoctoproject DOT org, including as many details as possible: the layer or software module affected, the recipe and its version, and any example code, if available. This mailing list is monitored by the Yocto Project Security team.
For each layer, you might also look for specific instructions (if any) for
reporting potential security issues in the specific SECURITY.md file at the
root of the repository. Instructions on how and where submit a patch are
usually available in README.md. If this is your first patch to the
Yocto Project/OpenEmbedded, you might want to have a look into the
Contributor’s Manual section
“Preparing Changes for Submission”.
2.1.1 Branches maintained with security fixes
See the Release process documentation for details regarding the policies and maintenance of stable branches.
The Releases page contains a list of all releases of the Yocto Project, grouped into current and previous releases. Previous releases are no longer actively maintained with security patches, but well-tested patches may still be accepted for them for significant issues.
2.1.3 What you should do if you find a security vulnerability
If you find a security flaw: a crash, an information leakage, or anything that can have a security impact if exploited in any Open Source software built or used by the Yocto Project, please report this to the Yocto Project Security Team. If you prefer to contact the upstream project directly, please send a copy to the security team at the Yocto Project as well. If you believe this is highly sensitive information, please report the vulnerability in a secure way, i.e. encrypt the email and send it to the private list. This ensures that the exploit is not leaked and exploited before a response/fix has been generated.
Permission is granted to copy, distribute and/or modify this document under the terms of the Creative Commons Attribution-Share Alike 2.0 UK: England & Wales as published by Creative Commons.
To report any inaccuracies or problems with this (or any other Yocto Project)
manual, or to send additions or changes, please send email/patches to the Yocto
Project documentation mailing list at docs@lists.yoctoproject.org or
log into the Libera Chat #yocto channel.
Release Information
Each document in this chapter provides release notes and information about how to move to one release of the Yocto Project from the previous one.
Introduction
This guide provides a list of the backwards-incompatible changes you might need to adapt to in your existing Yocto Project configuration when upgrading to a new release.
If you are upgrading over multiple releases, you will need to follow the sections from the version following the one you were previously using up to the new version you are upgrading to.
General Migration Considerations
Some considerations are not tied to a specific Yocto Project release. This section presents information you should consider when migrating to any new Yocto Project release.
Dealing with Customized Recipes:
Issues could arise if you take older recipes that contain customizations and simply copy them forward expecting them to work after you migrate to new Yocto Project metadata. For example, suppose you have a recipe in your layer that is a customized version of a core recipe copied from the earlier release, rather than through the use of an append file. When you migrate to a newer version of Yocto Project, the metadata (e.g. perhaps an include file used by the recipe) could have changed in a way that would break the build. Say, for example, a function is removed from an include file and the customized recipe tries to call that function.
You could “forward-port” all your customizations in your recipe so that everything works for the new release. However, this is not the optimal solution as you would have to repeat this process with each new release if changes occur that give rise to problems.
The better solution (where practical) is to use append files (
*.bbappend) to capture any customizations you want to make to a recipe. Doing so isolates your changes from the main recipe, making them much more manageable. However, sometimes it is not practical to use an append file. A good example of this is when introducing a newer or older version of a recipe in another layer.Updating Append Files:
Since append (
.bbappend) files generally only contain your customizations, they often do not need to be adjusted for new releases. However, if the append file is specific to a particular version of the recipe (i.e. its name does not use the % wildcard) and the version of the recipe to which it is appending has changed, then you will at a minimum need to rename the append file to match the name of the recipe file. A mismatch between an append file and its corresponding recipe file (.bb) will trigger an error during parsing.Depending on the type of customization the append file applies, other incompatibilities might occur when you upgrade. For example, if your append file applies a patch and the recipe to which it is appending is updated to a newer version, the patch might no longer apply. If this is the case and assuming the patch is still needed, you must modify the patch file so that it does apply.
Tip
You can list all append files used in your configuration by running:
bitbake-layers show-appends
Checking Image / SDK Changes:
The buildhistory class can be used if you wish to check the impact of changes to images / SDKs across the migration (e.g. added/removed packages, added/removed files, size changes etc.). To do this, follow these steps:
Enable buildhistory before the migration
Run a pre-migration build
Capture the buildhistory output (as specified by BUILDHISTORY_DIR) and ensure it is preserved for subsequent builds. How you would do this depends on how you are running your builds - if you are doing this all on one workstation in the same Build Directory you may not need to do anything other than not deleting the buildhistory output directory. For builds in a pipeline it may be more complicated.
Set a tag in the buildhistory output (which is a git repository) before migration, to make the commit from the pre-migration build easy to find as you may end up running multiple builds during the migration.
Perform the migration
Run a build
Check the output changes between the previously set tag and HEAD in the buildhistory output using
git difforbuildhistory-diff.
For more information on using buildhistory, see Maintaining Build Output Quality.
Release 6.0 (wrynose)
Release notes for 6.0 (wrynose)
This document lists new features and enhancements for the Yocto Project 6.0 Release (codename “wrynose”). For a list of breaking changes and migration guides, see the Migration notes for 6.0 (wrynose) section.
The 6.0 (wrynose) release is the new LTS release after 5.0 (scarthgap). If you are migrating from the 5.0 version, be sure to read the previous migration guides:
See also the list of new features and enhancements of the previous releases:
New Features / Enhancements in 6.0
Linux kernel 6.18, gcc 15.2, glibc 2.43, LLVM 22.1.2, and over 300 other recipe upgrades
Minimum Python version required on the host: 3.9.
Kernel-related changes:
kernel-fit-image: Support arbitrary loadables (2535427)
kernel-yocto: Allow enabling Rust in the kernel by adding
rustto the KERNEL_FEATURES (for Linux kernel recipes inheriting this class) (6719ed4)Disable ccache support when Linux kernel Rust support is enabled (d80d006)
New core recipes:
libconfig: Import recipe from https://git.openembedded.org/meta-openembedded/, needed by one of the Mesa recipes (1a0196a)python3-sphinxcontrib-svg2pdfconverter: Used for the generation of the Yocto Project documentation (f3f0019)python3-pyzstd: Import from meta-python, needed by theukifytool of systemd v258 (88a2713)python3-uv-build: This recipe adds theuvPython build backend, required bypython3-cryptography(0880cd2)blueprint-compiler: Add the recipe as it became a dependency of theepiphanyrecipe after its upgrade to 49.2 (4212392)python3-sbom-cve-check: New recipe for building and using sbom-cve-check, a lightweight SBOM CVE analysis tool (0fdacec)python3-shacl2code,python3-hatch-build-scripts,python3-spdx-python-model: Added as dependencies ofpython3-sbom-cve-check(4862221, 41591af, a83eaca)libfyaml: Added as a dependency ofappstream(b8b7b58)meta-world-recipe-sbom: Building this recipe will produce SBOM documents for each recipe present in the build environment, using the create-spdx class. This is different from the image SBOM which can also be generated using the create-spdx class after building an image. See Creating a Software Bill of Materials for more information (d999ac4)python3-kirk: The Kirk application is a fork ofrunltp-ngand became the official LTP tests executor (c33fd4e)wic: This recipe builds the WIC command-line tool. This used to be part of OpenEmbedded-Core (OE-Core) but is now externally managed (25ca1cb, b9e2a2f)
New core classes:
kernel-yocto-rust: Adds the required dependencies to build the Rust components of the Linux kernel (6c90097)
module-rust: Support for building out-of-tree Rust kernel modules. An example recipe using this class can be found in meta-skeleton/recipes-kernel/rust-out-of-tree-module (76fd22f, 76fd22f)
sbom-cve-check: Class for post-build CVE analysis of an image, which uses the sbom-cve-check tool internally (8ef22ad)
sbom-cve-check-recipe: Class for post-build CVE analysis of recipes (using the recipe SBOM, meaning building the software provided by the recipe is not needed), which uses the sbom-cve-check tool internally. This also obsoletes the
cve-checkclass. (e2518b1, 00de455)
New variables:
The OPENSSH_HOST_KEY_DIR variable can be used to specify the directory where OpenSSH host keys are stored. The default value is
/etc/ssh(addd80d)The OPENSSH_HOST_KEY_DIR_READONLY_CONFIG variable can be used to specify the directory where OpenSSH host keys are stored when the device uses a read-only filesystem. The default value is
/var/run/ssh(addd80d)The SPDX_INCLUDE_KERNEL_CONFIG can be set to “1” to export the Linux kernel configuration (
CONFIG_*parameters) into the SPDX document when using the create-spdx class (228a968)The SPDX_INCLUDE_PACKAGECONFIG variable can be set to “1” to export a recipe’s PACKAGECONFIG features (enabled/disabled) into the SPDX document when using the create-spdx class (228a968)
The SPDX_PACKAGE_URL allows specifying a space-separated list of Package URLs (purls) for the software Package when using the create-spdx class (874b2d3)
The SPDX_GIT_PURL_MAPPINGS variable allows mapping domain names to PURLs (Package URLs) in SPDX documents (9f1825e)
The SPDX_CONCLUDED_LICENSE allows specifying the
hasConcludedLicenseobject of individual SBOM packages when using the create-spdx class (bb21c6a)The FIT_MKIMAGE_EXTRA_OPTS variable allows passing extra options to the
mkimagecommand when creating a FIT image with the kernel-fit-image class (d925d67)The FIT_CONF_MAPPINGS variable allows mapping extra configurations to existing ones or rename an existing configuration in FIT images created with the kernel-fit-image class (e30f809)
The UBOOT_CONFIG_FRAGMENTS and UBOOT_FRAGMENTS allow supplying additional configuration fragments to the existing U-Boot configuration. See the definition of the variables for more information, and the documentation of the uboot-config class (9e96d3d)
The IMAGE_EXTRA_PARTITION_FILES allows specifying extra files from the deploy directory (DEPLOY_DIR_IMAGE) to install in a WIC partition created with the
extra_partitionplugin (e152607)The FIT_LOADABLES, FIT_LOADABLE_FILENAME, FIT_LOADABLE_TYPE, FIT_LOADABLE_ARCH, FIT_LOADABLE_OS and FIT_LOADABLE_LOADADDRESS variables can be used to specify arbitrary
loadablesin a FIT image (2535427)
Global configuration changes:
Changes in DISTRO_FEATURES default values and how DISTRO_FEATURES and MACHINE_FEATURES are provided, see Migration notes for 6.0 (wrynose) for more information.
base-passwd: Add aclockgroup as systemd version v258 introduces this group to enable applications like linuxptp to open clocks without root privileges (aad8493)bitbake.conf:remove DEBUG_PREFIX_MAP from TARGET_LDFLAGS (1797741)
The default definition of TARGET_LDFLAGS used to contain the value of DEBUG_PREFIX_MAP, to fix binary reproducibility issues. This was no longer needed after the originating GCC bug was fixed (1797741)
Switch BB_SIGNATURE_HANDLER to
OEEquivHashand BB_HASHSERVE toautoby default (5596ea1, 4a38840)
The uninative class is now enabled by default. This allows reuse of native sstate built on one distro on another (722897f)
The no-static-libs.inc file, disabling most static libraries in various recipes, is now included by default in the default distro setup (appearing as the
nodistroDISTRO) (03fc931)The security_flags.inc file, adding various security related flags to the default compiler and linker, is now included by default in the default distro setup (appearing as
nodistroDISTRO) (4c2d64c)The yocto-space-optimize.inc file, adding various space optimization tweaks, is now included by default in the default distro setup (appearing as
nodistroDISTRO) (175fcf9)
QEMU /
runqemuchanges:qemuboot`: Make the tap interface nameserver configurable through QB_TAP_NAMESERVER (0e8c258)qemu: Disable thelibkeyutilsfeature (30cc9f5)runqemu-extract-sdk: Support thetar.zstformat (650bb45)qemurunner: Improveqmpmodule detection (a7386d0)runqemu: Support.tar.zst,.tar,xz,.tarrootfs archive types (3a6172f)runqemu: Allow VNC to be used as a fallback when there is noDISPLAYset (df9e9f3)
Documentation changes:
The documentation build now fetches the list of active and inactive versions of the documentation from the remote releases.json file. This also applies to the BitBake documentation.
Go changes:
Rust changes:
Enable dynamic linking with llvm. This allows dynamically linking to
libLLVM.soinstead of linking statically (74ba238)Install Rust library sources for
make rustavailablesupport (2912ca3)Enable dynamic LLVM linking by default (d0671c3)
Enable fully static linking when TCLIBC is set to
musl(75409c6)
Wic Image Creator changes:
wic/engine: Fix copying directories into wic image withext*partitions (1ed38af)Re-implement sector-size support (b50d6de)
The Wic tool is now maintained in a separate project, no longer part of OpenEmbedded-Core (OE-Core): https://git.yoctoproject.org/wic/
A new
wicenvtype can be added to IMAGE_FSTYPES to place the.envfile generate by Wic in the deployment directory (DEPLOY_DIR_IMAGE) (e4d4970)
Testing-related changes:
ptest support was added for the following recipes:
selftests: Use SHA256 keys for RPM tests (692919b)oeqa: Open JSON files to parse in a context manager (e96baf5)resulttool: Add ptest support to the JUnit output format (2abe2d7)do_testimage: Print last lines of kernel log on test fail (fea3c44)
reproducible: Use the jQuery CDN instead ofjquery-native(d3ee549)selftest: Test installation of recipes with complex packaging (6f3aab6)Add
test_sdk_runqemuto test the execution ofrunqemufrom an SDK (7fbb281)Add tests for Rust support in the Linux kernel (01ea2b2, 10dff9f)
Replace
runltpwithkirk, as it became the new official LTP test executor (c1e5ed4)WIC related tests were updated after wic was moved to its own repository and is externally managed (b9e2a2f)
Utility script changes:classes
bitbake-config-build: It is now possible to disable all fragments starting with a prefix by issuingbitbake-config-build disable-fragment <prefix>/(573695d)recipetool: Support PEP639-variant of license key in Pythonpyproject.tomlfiles (9d1a7bb)create-pull-request: Keep commit hash to be pulled in cover email (c78f5ae)yocto-check-layer: Add messages intest_readmeassertions (9fe883c)improve_kernel_cve_report:oe-pkgdata-util: improve thelookup-pkgerror message for RPROVIDES packages (46ff3a8)
BitBake changes:
bitbake-layers:Add a
--show-variantsoption to theshow-recipessubcommand to display BBCLASSEXTEND variants (353d5e9)Fix the branch detection method of
layerindex-fetch(af9dd01)
bitbake-setup:Implement symlinking local sources into builds with the
--use-local-sourceoption of theinitsubcommand (ed5a3a0)Correct several scenarios in layer updates (aa15cc7)
Source in the
git-remotesection can now be specified more simply with theuriproperty, instead of theremotesproperty (7941a5d). For example:"bitbake": { "git-remote": { "uri": "https://git.openembedded.org/bitbake", "branch": "master", "rev": "master" } }
Use the internal registry if run from a Git checkout, from a remote BitBake repository otherwise (675e907)
Fragments passed in the
oe-fragments-one-ofproperty can now contain descriptions (29f2cee)Improve the readability of choices during the bitbake-setup init command (d970063)
Enable coloring of the diff outputs when using the bitbake-setup status or bitbake-setup update commands
The bitbake-setup update now behaves in a non-destructive way: local commits and modifications to layers are taken into account, and the tool will either stop or warn the user that the update is possible or not (2ee3a19)
Share Shared State by default between builds, by adding a definition for SSTATE_DIR and BB_HASHSERVE_DB_DIR in the
site.conffile created by bitbake-setup init (a70c336)Generate config files for VSCode by default, unless
--no-init-vscodeis passed to bitbake-setup init (92fd721)
The
unpack()function (the one containing the logic of the do_unpack task), can now take anupdateargument to allow updating a Git repository in-place rather than deleting it and re-creating it. An alias function namedunpack_update()was created for this unpack mode. See The Non-Destructive Update (unpack_update) for more information (e7d5e15)cooker: Use BB_HASHSERVE_DB_DIR as hash server database location. If unset, the existing behavior is preserved (b339d05)bitbake-getvar: Show close matches when no providers are found (1f8fa7c)The
GIT_CONFIG_GLOBALenvironment variable will now be taken into account by the Git fetcher, to allow passing a different set of Git configuration options when fetching Git repositories (4c37844)When using the
subpathparameter with the Git fetcher in an SRC_URI, properly make theHEADpoint to the value specified in SRCREV.
Clang/LLVM related changes:
SPDX-related changes:
Output SBOM documents now include recipe metadata (d999ac4)
spdx30_tasks: Fix SPDX_CUSTOM_ANNOTATION_VARS implementation (52ab3b6)kernel: Add a task to export the kernel configuration to SPDX (228a968)
Add support for exporting the PACKAGECONFIG to SPDX (7ec61ac)
Add suport for package URLs (PURLs) through SPDX_PACKAGE_URL (874b2d3)
Support only SPDX 3 and removed SPDX 2.2 support. (12abd05)
The create-spdx class used to include VEX statements in the SPDX documents tied to each packages. This is no longer the case, as these statements are now found in the SPDX documents for recipes directly. This was done to decrease the duplication of these statements for packages that were generated by the same recipe.
The output SPDX document for an image recipe will still include the VEX statements, as the SPDX document for the image also include the recipe SPDX metadata.
The inclusion of VEX statements in SPDX documents can be controlled with the SPDX_INCLUDE_VEX variable (d999ac4)
devtoolchanges:Patchtest-related changes:
insane / sanity classes related changes:
Reject TMPDIR containing redundant slashes to avoid errors in executions of do_populate_sysroot (3e72ebe)
sanity: Warn when the Shared State cache directory (SSTATE_DIR) is outside of the build directory (BUILDDIR), but the Hash Equivalence database is inside it (491de0d)
Security changes:
A new document was added to the Yocto Project documentation: Yocto Project Security Reference. It is intended to document how to report vulnerabilities to the Yocto Project security team.
sbom-cve-check-related changes:
Escape special characters in CPE 2.3 strings (9dd9c00)
New PACKAGECONFIG options for individual recipes:
curl:schannelgstreamer1.0-plugins-bad:fdkaacgstreamer1.0-plugins-good:qt6libinput:lua,libwacom,mtdevlibrepo:sequoiamesa:expat,zlibopenssl:legacyopkg:acl,xattrorc:hotdocpython3:freethreading(experimental, see c569901)python3-cryptography:legacy-opensslsystemd:osc-contextsystemtap:readline
systemd related changes:
Package
ukifyseparately, with thesystemd-ukifypackage name (e924274)
U-Boot related changes:
uboot-config: Add support for generating the U-Boot initial environment in binary format using UBOOT_INITIAL_ENV_BINARY (cf11b14)
A new way of specifying multiple U-Boot configurations has been added (cd9e730). See U-Boot configuration flow changes (ref-classes-uboot-config)
Miscellaneous changes:
curl: EnsureCURL_CA_BUNDLEfrom host environment is respected (545e43a)weston: Add PipeWire as runtime dependency whenpipewireis part of PACKAGECONFIG (9f52867)uki: Use basename of device trees available via KERNEL_DEVICETREE (27a7fbb)
rpcbind: Set the owner of/run/rpcbindtorpc(80e4289)udev-extraconf: Splitautomountandautonetinto seperate packages (udev-extraconf-automountandudev-extraconf-autonet) (08662d7)e2fsprogs: Fix a bug for files larger than 2GB (683a1e7)mesa: Add support for thevirtio,gfxstream,hasvkVulkan drivers (8e7ffdc, 3b56f14)mesa: Drop VDPAU remnants in the recipe after upstream support was removed (3b05f58)cross: Propagate dependencies to
outhash, improving hash equivalence (267b651)run-postinsts: Propagate exit status to therun-postinsts.servicesystemd service (7f74d88)freetype: Use meson instead of autotools* (7395e4f)wpa-supplicant:overlayfs: Remove helper unit (623c20f)kea: Replacekeactrlwith kea daemons (kea-dhcp*) in initscripts (7f9d929), and removekeactrlfrom the recipe (08c3877)initramfs-framework:perl: Providepod2man(in the recipe’s PROVIDES definition). This is used by many other recipes to produce man pages. This allows existing recipes to explicitly depend onpod2man-nativeto produce man pages (1d1e55d)build-sysroots: Add sysroot tasks to default build and remove warning (e73f150)Licenses and manifests are now deployed in the SDK when setting COPY_LIC_DIRS and/or COPY_LIC_MANIFEST, for both host and target sysroots (f757ae4)
openssl: Disable TLS 1.0/1.1 by default (d5501e7)python3-cryptography: Disablelegacy-opensslfeature by default (1acd199)openssl: Add support for config snippet includes. This can be done by installing extra configuration files in${sysconfdir}/ssl/openssl.cnf.d/(34bafcf)busybox:Enable SELinux support if DISTRO_FEATURES contains
selinux(c544f12)Do not build SUID binary without an applet (1406f95)
coreutils:killanduptimeare no longer provided by the recipe (cedeb95)license_image.bbclass: Report all packages with incompatible license (when using INCOMPATIBLE_LICENSE) (57fe3e4)python3: Package all of the compression module intopython3-compression(5f34680)gobject-introspection: Disable cache for the scanner during the do_compile task (GI_SCANNER_DISABLE_CACHE=1), to fix an intermittent build failure (2b55dd1)archiver: Don’t try to preserve all attributes when copying files (6e83136)
useradd*: allow inheriting the class with only USERADD_DEPENDS set, when a recipe only depends on users/groups created by another (09a901b)
vim: disable GTK+3 UI by default (a07763f)
Known Issues in 6.0
Referencing an unset variable in DISTRO_FEATURES causes DISTRO_FEATURES_NATIVE and DISTRO_FEATURES_NATIVESDK to be set incorrectly. The leads to confusing errors, such as:
Nothing PROVIDES 'libseccomp-native'Required build target 'glibc' has no buildable providers.
To resolve these errors, ensure that all variables referenced in DISTRO_FEATURES are set. Variables may be set to an empty string if not needed.
A fix for this issue is in progress and should be included in Yocto Project 6.0.1. See Yocto bug 16275 for further details.
Recipe License changes in 6.0
The following changes have been made to the LICENSE values set by recipes:
Recipe(s) |
Previous value |
New value |
|---|---|---|
|
|
|
|
|
|
|
|
|
|
|
|
|
|
|
|
|
|
|
|
|
Security Fixes in 6.0
The following CVEs have been fixed:
Recipe Upgrades in 6.0
The following recipes have been upgraded:
Recipe |
Previous version(s) |
New version(s) |
|---|---|---|
|
20250807 |
20251212 |
|
48.0 |
49.0 |
|
1.2.14 |
1.2.15.3 |
|
1.2.14 |
1.2.15 |
|
1.2.14 |
1.2.15.3 |
|
1.2.14 |
1.2.15.2 |
|
1.0.6 |
1.1.2 |
|
0.60.8.1 |
0.60.8.2 |
|
2.56.4 |
2.60.0 |
|
2.72 |
2.73 |
|
2025.09.3 |
2026.04.0 |
|
2025.09.3 |
2026.04.0 |
|
3.6.7 |
3.6.8 |
|
2.16.0 |
2.17.0 |
|
9.20.15 |
9.20.22 |
|
2.45.1+git |
2.46 |
|
2.45.1+git |
2.46 |
|
2.45.1+git |
2.46 |
|
2.45.1+git |
2.46 |
|
2.45.1+git |
2.46 |
|
5.84 |
5.86 |
|
1.89.0 |
1.90.0 |
|
1.89.0 |
1.90.0 |
|
6.16 |
6.19.1 |
|
1.90.0 |
1.94.1 |
|
0.10.16+cargo-0.91.0 |
0.10.21+cargo-0.95.0 |
|
4.12.3 |
4.13.2 |
|
21.1.7 |
22.1.3 |
|
4.1.2 |
4.3.1 |
|
4.1.2 |
4.3.1 |
|
21.1.7 |
22.1.3 |
|
21.1.7 |
22.1.3 |
|
1.45 |
2.0 |
|
9.7 |
9.10 |
|
1.2.1 |
1.2.3 |
|
2.42+git |
2.43+git |
|
1.14 (135cbff90af2…) |
1.14 (08644db02d43…) |
|
1.14 (135cbff90af2…) |
1.14 (08644db02d43…) |
|
1.14 (135cbff90af2…) |
1.14 (08644db02d43…) |
|
2.4.15 |
2.4.16 |
|
8.17.0 |
8.19.0 |
|
10.2.4 |
10.3.0 |
|
306 |
314 |
|
3.6 |
3.7 |
|
4.23.0 |
4.24.0 |
|
7.5.2 |
7.5.4 |
|
1.22.21 |
1.23.7 |
|
2025.88 |
2025.89 |
|
1.47.3 |
1.47.4 |
|
1.22.2 |
1.22.5 |
|
0.193 |
0.194 |
|
0.80 |
0.83 |
|
2.8.14 |
2.8.15 |
|
48.5 |
49.7 |
|
1.8.10 |
1.9.1 |
|
6.15 |
6.19 |
|
2.7.4 |
2.7.5 |
|
8.0.2 |
8.2.4 |
|
8.0 |
8.0.1 |
|
5.46 |
5.47 |
|
11.2.0 |
12.1.0 |
|
1.0.5 |
1.0.6 |
|
2.13.3 |
2.14.3 |
|
5.3.2 |
5.4.0 |
|
16.3 |
17.1 |
|
16.3 |
17.1 |
|
16.3 |
17.1 |
|
2.42.12 |
2.44.5 |
|
0.26 |
1.0 |
|
0.26 |
1.0 |
|
2025.4 |
2026.1 |
|
2.51.0 |
2.53.0 |
|
2.2.0 |
2.3.1 |
|
2.86.4 |
2.88.0 |
|
2.86.4 |
2.88.0 |
|
2.42+git |
2.43+git |
|
2.42+git |
2.43+git |
|
2.42+git |
2.43+git |
|
2.42+git |
2.43+git |
|
2.42+git |
2.43+git |
|
1.4.328.1 |
1.4.341.0 |
|
0+git (81b24e01531e…) |
0+git (9d19a7870add…) |
|
4.0.2 |
4.0.4 |
|
2.5.11 |
2.5.17 |
|
3.8.10 |
3.8.12 |
|
1.25.9 |
1.26.2 |
|
1.25.9 |
1.26.2 |
|
1.25.9 |
1.26.2 |
|
1.25.9 |
1.26.2 |
|
1.25.9 |
1.26.2 |
|
0.1 (8b405629c4a5…) |
0.1 (7f05d217867b…) |
|
1.25.9 |
1.26.2 |
|
1.84.0 |
1.86.0 |
|
1.23.0 |
1.24.0 |
|
2.12 |
2.14 |
|
2.12 |
2.14 |
|
48.0 |
50.0 |
|
1.26.7 |
1.28.2 |
|
1.26.7 |
1.28.2 |
|
1.26.7 |
1.28.2 |
|
1.26.7 |
1.28.2 |
|
1.26.7 |
1.28.2 |
|
1.26.7 |
1.28.2 |
|
1.26.7 |
1.28.2 |
|
1.26.7 |
1.28.2 |
|
1.26.7 |
1.28.2 |
|
1.26.7 |
1.28.2 |
|
1.34.0 |
1.35.1 |
|
4.18.6 |
4.22.1 |
|
11.4.5 |
12.3.2 |
|
0.399 |
0.405 |
|
2.9 |
2.10 |
|
77-1 |
78.3 |
|
0.8.44 |
0.8.45 |
|
2.1 |
2.3 |
|
2.6 |
2.7 |
|
6.16.0 |
6.19.0 |
|
1.8.11 |
1.8.13 |
|
4.18.0 |
4.20.1 |
|
2.8.0 |
2.9.0 |
|
3.0.1 |
3.0.3 |
|
0.3+git (f589e1df2325…) |
0.3+git (a4a362d9f4f0…) |
|
2.0.31 |
2.0.32 |
|
0.0.1+git (2c1f2646c5e5…) |
0.0.1+git (f60e50e887d3…) |
|
679 |
692 |
|
1.7.6 |
1.8.4 |
|
3.8.6 |
3.8.7 |
|
7.8.4 |
7.10.0 |
|
2.76 |
2.77 |
|
0.8.5 |
0.9.1 |
|
0.8.5 |
0.9.1 |
|
21.1.7 |
22.1.3 |
|
0.1.22 |
0.1.24 |
|
21.1.7 |
22.1.3 |
|
0.2.0 |
0.3.0 |
|
0.74.0 |
0.75.0 |
|
2.4.125 |
2.4.131 |
|
20250104-3.1 |
20251016-3.1 |
|
1.13.5 |
1.13.6 |
|
0.6.25 |
0.6.26 |
|
1.1.8 |
1.1.9 |
|
1.11.2 |
1.12.1 |
|
1.9.1 |
1.9.2 |
|
4.5.0+git |
4.6.0+git |
|
1.56 |
1.59 |
|
1.29.1 |
1.30.2 |
|
3.1.2 |
3.1.3 |
|
1.6.7 |
1.6.8 |
|
3.11.0 |
3.12.0 |
|
0.8.6 |
0.8.8 |
|
1.7.1 |
1.7.2 |
|
0.18.1 |
0.19 |
|
10.46 |
10.47 |
|
0.5.10 |
0.5.12 |
|
2.61.0 |
2.61.3 |
|
0.7.35 |
0.7.36 |
|
1.90.0 |
1.94.1 |
|
4.20.0 |
4.21.0 |
|
0.017 |
0.018 |
|
1.3.6 |
1.3.7 |
|
1.8.4 |
1.9.0 |
|
0.3.6 |
0.3.7 |
|
1.3 |
1.4.2 |
|
0.15.3 |
0.15.6 |
|
1.51.0 |
1.52.1 |
|
2.22.0 |
2.23.0 |
|
2.22.0 |
2.23.0 |
|
2.22.0 |
2.23.0 |
|
1.8.12 |
1.8.13 |
|
1.8.4 |
1.8.12 |
|
0.4.6 |
0.4.7 |
|
4.4.38 |
4.5.2 |
|
4.4.38 |
4.5.2 |
|
1.1.6 |
1.1.7 |
|
1.3.6 |
1.3.7 |
|
1.1.5 |
1.1.6 |
|
1.11.0 |
1.13.1 |
|
1.1.3 |
1.2.0 |
|
2.14.6 |
2.15.2 |
|
1.2.1 |
1.3.1 |
|
3.5.17 |
3.5.18 |
|
1.5.4 |
1.5.5 |
|
1.1.43 |
1.1.45 |
|
1.0.14 |
1.0.15 |
|
1.1.6 |
1.1.7 |
|
1.4.81 |
1.4.82 |
|
20251111 |
20260410 |
|
6.17 |
6.18 |
|
6.12.69+git, 6.16.11+git |
6.18.24+git |
|
6.18+git |
7.0+git |
|
6.12.69+git, 6.16.11+git |
6.18.24+git |
|
6.12.69+git, 6.16.11+git |
6.18.24+git |
|
21.1.7 |
22.1.3 |
|
21.1.7 |
22.1.3 |
|
21.1.7 |
22.1.3 |
|
21.1.7 |
22.1.3 |
|
4.99.5 |
4.99.6 |
|
20250930 |
20260130 |
|
2.14.3 |
2.14.4 |
|
2.14.0 |
2.14.1 |
|
5.4.8 |
5.5.0 |
|
1.15 |
1.16 |
|
1.4.20 |
1.4.21 |
|
1.4.20 |
1.4.21 |
|
1.7.7 |
1.7.8 |
|
6.15 |
6.17 |
|
4.4 |
4.6 |
|
25.2.8 |
26.0.5 |
|
25.2.8 |
26.0.5 |
|
1.9.1 |
1.10.2 |
|
1.33.2 |
1.33.4 |
|
1.8.31 |
1.8.32 |
|
2.3.0 |
2.3.1 |
|
1.2.5+git |
1.2.6+git |
|
2.16.03 |
3.01 |
|
6.5 |
6.6 |
|
4.5.0+git |
4.6.0+git |
|
2.8.4 |
2.8.7 |
|
1.66.0 |
1.68.1 |
|
1.13.1 |
1.13.2 |
|
2.18 |
2.19 |
|
21.1.7 |
22.1.3 |
|
1.7 |
1.8.1 |
|
10.2p1 |
10.3p1 |
|
0.8.0 |
0.9.0 |
|
0.4.41 |
0.4.42 |
|
edk2-stable202508 |
edk2-stable202511 |
|
0.25.5 |
0.26.2 |
|
5.40.2 |
5.42.0 |
|
1.6.2 |
1.6.4 |
|
1.8.6+git |
1.8.11+git |
|
1.8.6+git |
1.8.11+git |
|
4.0.5 |
4.0.6 |
|
1.9.3+git |
1.9.5 |
|
0.0+git (a7c7826bce5c…) |
0.0+git (ecb576fb2a0a…) |
|
3.13.12 |
3.14.4 |
|
25.3.0 |
25.4.0 |
|
2.17.0 |
2.18.0 |
|
4.3.0 |
5.0.0 |
|
0.21.0 |
0.22.9 |
|
1.3.0 |
1.4.0 |
|
2025.04.17 |
2025.10.20 |
|
2025.8.3 |
2026.2.25 |
|
1.17.1 |
2.0.0 |
|
5.2.0 |
6.0.0.post1 |
|
8.2.2 |
8.3.1 |
|
45.0.7 |
46.0.5 |
|
45.0.7 |
46.0.5 |
|
3.1.3 |
3.2.4 |
|
0.37.0 |
0.38.1 |
|
0.22 |
0.22.4 |
|
2025.8 |
2025.12 |
|
1.27.0 |
1.29.0 |
|
6.142.2 |
6.151.9 |
|
1.4.1 |
2.0.0 |
|
2.1.0 |
2.3.0 |
|
4.25.1 |
4.26.0 |
|
3.9 |
3.10.2 |
|
3.0.2 |
3.0.3 |
|
1.9.4 |
1.12.4 |
|
0.18.0 |
0.19.0 |
|
2.3.4 |
2.4.3 |
|
25.0 |
26.0 |
|
0.12.1 |
1.0.4 |
|
7.0.1 |
7.0.3 |
|
2.25.9 |
2.26.6 |
|
2.4.5 |
2.4.7 |
|
0.3.5 |
0.3.7 |
|
25.2 |
26.0.1 |
|
2.1.3 |
2.3.1 |
|
7.0.0 |
7.2.2 |
|
0.6.1 |
0.6.2 |
|
1.28.0 |
1.29.0 |
|
2.22 |
3.0 |
|
3.52.3 |
3.56.1 |
|
25.1.0 |
26.0.0 |
|
3.2.4 |
3.3.2 |
|
0.9.1 |
0.11.0 |
|
8.4.2 |
9.0.2 |
|
0.14.2 |
0.15.0 |
|
2025.2 |
2026.1 |
|
6.0.2 |
6.0.3 |
|
7.1.4 |
7.6.0 |
|
0.27.1 |
0.30.0 |
|
0.18.15 |
0.19.1 |
|
4.9.1 |
4.10.1 |
|
80.9.0 |
82.0.1 |
|
8.3.1 |
9.2.2 |
|
8.2.1 |
9.1.0 |
|
3.0.2 |
3.1.0 |
|
2.7.2 |
2.8.7 |
|
2025.9.11.17 |
2026.1.14.14 |
|
0.3 |
0.4 |
|
5.0.0 |
6.0.1 |
|
2.5.0 |
2.6.3 |
|
0.2.13 |
0.6.0 |
|
24.11.1 |
25.10.0 |
|
15.0.1 |
16.0 |
|
0.46.1 |
0.46.3 |
|
0.15.1 |
1.0.4 |
|
1.37.1 |
1.38.0 |
|
10.0.6 |
10.2.0 |
|
10.0.6 |
10.2.0 |
|
10.0.6 |
10.2.0 |
|
4.10 |
4.11 |
|
4.3 |
4.4 |
|
2.58 |
2.61.1 |
|
1.93 |
1.94 |
|
1.1.0 |
1.1.1 |
|
1.9.0 |
1.10.1 |
|
git (ae1df75b1155…) |
git (f3f5fa454345…) |
|
2.9 |
2.10 |
|
3.4.5 |
4.0.2 |
|
1.90.0 |
1.94.1 |
|
1.90.0 |
1.94.1 |
|
2.1 |
2.2 |
|
1.11.3 |
1.11.4 |
|
0.9.1 |
0.9.3 |
|
2025.3 |
2026.1 |
|
4.18.0 |
4.19.4 |
|
1.8.0.3 |
1.8.1.1 |
|
1.4.328.1 |
1.4.341.0 |
|
21.1.1 |
22.1.1 |
|
1.4.328.1 |
1.4.341.0 |
|
3.48.0 |
3.51.3 |
|
4.7.2 |
4.7.5 |
|
6.16 |
6.19 |
|
0.19.04 |
0.20.01 |
|
4.3.1 |
4.4.1 |
|
12.7.8 |
12.7.9 |
|
257.8 |
259.5 |
|
257.8 |
259.5 |
|
257.8 |
259.5 |
|
257.8 |
259.5 |
|
5.3 |
5.4 |
|
5.3 |
5.4 |
|
2.1.1 |
2.2.1 |
|
9.0.2 |
9.0.3 |
|
7.2 |
7.3 |
|
2.38.0 |
2.41.0 |
|
2025.10 |
2026.01 |
|
2025.10 |
2026.01 |
|
018 |
019 |
|
4.0.6 |
4.0.9 |
|
2.41.1 |
2.41.3 |
|
2.41.1 |
2.41.3 |
|
3.25.1 |
3.26.0 |
|
9.1.1683 |
9.2.0340 |
|
9.1.1683 |
9.2.0340 |
|
1.1.1 |
1.2.0 |
|
0.82.1 |
0.82.2 |
|
1.4.328.1 |
1.4.341.0 |
|
1.4.328.1 |
1.4.341.0 |
|
git (d27205d14d01…) |
git (fa2cf45adde0…) |
|
1.4.328.1 |
1.4.341.0 |
|
1.4.328.1 |
1.4.341.0 |
|
1.4.328.1 |
1.4.341.0 |
|
1.4.328.1 |
1.4.341.0 |
|
1.45 |
1.47 |
|
1.2.0 |
1.3.0 |
|
2.50.4 |
2.50.6 |
|
14.0.2 |
15.0.0 |
|
1.16.0 |
1.16.1 |
|
r3039+git (31e19f92f00c…) |
r3039+git (0480cb05fa18…) |
|
1.1.4 |
1.1.5 |
|
0.1.5 |
0.1.6 |
|
1.3.0 |
1.3.1 |
|
1.4.7 |
1.5.0 |
|
2.45 |
2.47 |
|
2024.1 |
2025.1 |
|
21.1.18 |
21.1.21 |
|
24.1.8 |
24.1.9 |
|
5.8.1 |
5.8.2 |
|
1.3.1 |
1.3.2 |
Contributors to 6.0
Thanks to the following people who contributed to this release:
Adam Blank
Adam Duskett
Adarsh Jagadish Kamini
Aditya Kurdunkar
Adrian Freihofer
Ahmad Fatoum
Alejandro Hernandez Samaniego
Aleksandar Nikolic
Alexander Kanavin
Alexander Sverdlin
Alex Bradbury
Alex Kiernan
Amaury Couderc
Andrej Kozemcak
Anibal Limon
Ankur Tyagi
Antonin Godard
Ashish Kumar Mishra
Ashish Sharma
BELHADJ SALEM Talel
Benjamin Robin
Bruce Ashfield
Changqing Li
Chen Qi
Clement Faure
Colin Pinnell McAllister
Corentin Guillevic
Daiane Angolini
Daniel Dragomir
Daniel Turull
Dan McGregor
Deepesh Varatharajan
Dmitry Baryshkov
Dragomir, Daniel
El Mehdi YOUNES
Enrico Jörns
Ernst Persson
Etienne Cordonnier
Fabio Berton
Fabio Estevam
Favazza, Samuele
Florian Schmaus
Francesco Valla
Franz Schnyder
Germann, Bastian
Guðni Már Gilbert
Gyorgy Sarvari
Haiqing Bai
Harish Sadineni
Hemanth Kumar M D
Het Patel
Hiago De Franco
Himanshu Jadon
hongxu
Hongxu Jia
Jaeyoon Jung
Jan Luebbe
Jan Vermaete
Jason Schonberg
Javier Tia
Jiaying Song
Jinfeng Wang
João Marcos Costa
Jörg Sommer
Jose Quaresma
Joshua Watt
Kai Kang
Kamel Bouhara
Kavinaya S
Ken Kurematsu
Khai Dang
Khalifa Rouis
Khem Raj
Koen Kooi
Kory Maincent
Kristiyan Chakarov
Krupal Ka Patel
Lee Chee Yang
Leon Anavi
Le Qi
Liu Yiding
Livin Sunny
Liyin Zhang
Logan Gallois
Louis Rannou
Lucas Stach
Luka Krstic
Mahesh Angadi
Mark Hatle
Mark-Pk Tsai
Markus Volk
mark.yang
Martin Jansa
Martin Schwan
Mathieu Dubois-Briand
Matt Madison
Maxin B. John
Maxin John
Max Krummenacher
Miaoqing Pan
Michael Arndt
Michael Halstead
Michael Opdenacker
Michal Sieron
Mikko Rapeli
Ming Liu
Mingli Yu
Miroslav Cernak
Mohammad Rafi Shaik
Mohammad Rahimi
Moritz Haase
Naftaly RALAMBOARIVONY
Naman Jain
Nikhil R
Niko Mauno
Nora Schiffer
Osama Abdelkader
Patrick Vogelaar
Patrick Wicki
Paul Barker
Pavel Löbl
Peter Bergin
Peter de Ridder
Peter Kjellerstedt
Peter Marko
Peter Tatrai
Philip Lorenz
Pierre-Loup GOSSE
Piotr Buliński
Pratik Farkase
Quentin Schulz
Randolph Sapp
Randy MacLeod
Ricardo Salveti
Ricardo Simoes
Ricardo Ungerer
Richard Purdie
Robert Joslyn
Robert P. J. Day
Robert Yang
Rob Woolley
Ross Burton
Rouven Rastetter
Ryan Eatmon
Sam Povilus
Samuli Piippo
Sandeep Gundlupet Raju
Scott Murray
Shaik Moin
Shotaro Uchida
Stefano Babic
Stefano Tondo
Sunil Dora
sven.kalmbach
Swami
Telukula Jeevan Kumar Sahu
Theo GAIGE
Thomas Perrot
Tim Orling
Tom Geelen
Trevor Gamblin
Trevor Woerner
Ulrich Ölmann
Uwe Kleine-König
Veeresh Kadasani
Victor Kamensky
Vijay Anusuri
Viswanath Kraleti
Vivek Puar
Vyacheslav Yurkov
Wang Mingyu
Weisser, Pascal
Xiangyu Chen
Yanis BINARD
Yann Dirson
Yannic Moog
Yash Gupta
Yash Shinde
Yasir Al-Latifi
Yiding Liu
Yi Zhao
Yoann Congal
Yongxin Liu
Zhangfei Gao
Zhang Peng
Zk47T
Zoltán Böszörményi
Repositories / Downloads for Yocto-6.0
yocto-docs
Repository Location: https://git.yoctoproject.org/yocto-docs
Branch: wrynose
Tag: yocto-6.0
Git Revision: eb74fdfd9e5e579a65e8872d1a73b51e77b14f63
Release Artefact: yocto-docs-eb74fdfd9e5e579a65e8872d1a73b51e77b14f63
sha: 50d7391b4b4d169649a5628a8f367443eb03fb78faa813b9c20d5214e49ce782
Download Locations:
openembedded-core
Repository Location: https://git.openembedded.org/openembedded-core
Branch: wrynose
Tag: yocto-6.0
Git Revision: 42fa856a00ac16b2a7a83d7ecfa60a5be192b16c
Release Artefact: oecore-42fa856a00ac16b2a7a83d7ecfa60a5be192b16c
sha: 14abd19071d1b31737f5d3946182f21825e0a7121468054bbaa68f207b018fb6
Download Locations:
meta-yocto
Repository Location: https://git.yoctoproject.org/meta-yocto
Branch: wrynose
Tag: yocto-6.0
Git Revision: 904846ae078ee20de073040ebb77c86e19250f56
Release Artefact: meta-yocto-904846ae078ee20de073040ebb77c86e19250f56
sha: d3470939772339d2d70a2bbdd4e01563357c376fdb496d5515a1f96bce4e2ea2
Download Locations:
meta-mingw
Repository Location: https://git.yoctoproject.org/meta-mingw
Branch: wrynose
Tag: yocto-6.0
Git Revision: a4ba674d6a0a17e4c0bc4c11bbb9d0ea9de2b315
Release Artefact: meta-mingw-a4ba674d6a0a17e4c0bc4c11bbb9d0ea9de2b315
sha: cea731150cd3caedd90ca6a82bf050a00c3705cea166d24a6077d07b1b7b2404
Download Locations:
bitbake
Repository Location: https://git.openembedded.org/bitbake
Branch: 2.18
Tag: yocto-6.0
Git Revision: 33581c84f3a85008239acbd940501a35de48dc91
Release Artefact: bitbake-33581c84f3a85008239acbd940501a35de48dc91
sha: 8a0b0243b50b6e004f3350824628f69ee66be0d3a28bc25f3d96b35406015ba7
Download Locations:
Migration notes for 6.0 (wrynose)
This section provides migration information for moving to the Yocto Project 6.0 Release (codename “wrynose”) from the prior release. For a list of new features and enhancements, see the Release notes for 6.0 (wrynose) section.
The 6.0 (wrynose) release is the new LTS release after 5.0 (scarthgap). If you are migrating from the 5.0 version, be sure to read the previous migration guides:
See also the list of new features and enhancements of the previous releases:
Supported kernel versions
The OLDEST_KERNEL setting is 5.15 in this release, meaning that out the box, older kernels are not supported. See 4.3 migration notes for details.
Supported distributions
Compared to the previous releases, running BitBake is supported on new GNU/Linux distributions:
Fedora 43
openSUSE Leap 16.0
Ubuntu 26.04 (LTS)
On the other hand, some earlier distributions are no longer supported:
Fedora 39
Fedora 40
Fedora 41
openSUSE Leap 15.5
BitBake fetcher removals
The following BitBake fetchers have been disabled or removed:
Default INIT_MANAGER definition changed to systemd
The default definition of INIT_MANAGER in the defaultsetup.conf file was changed
from none to systemd.
This means that users of the default distro setup (appearing as the nodistro
DISTRO) will be using systemd as the default init
manager.
This does not change the default init manager of the Poky distribution, which remains SysVinit.
Reverting to SysVinit can be done by specifying the INIT_MANAGER in your own DISTRO configuration file:
INIT_MANAGER = "sysvinit"
See commit 0b4061c for more information.
Changes in how default DISTRO_FEATURES and MACHINE_FEATURES are provided
The way default DISTRO_FEATURES and MACHINE_FEATURES are provided by the OpenEmbedded Build System has changed.
The DISTRO_FEATURES_BACKFILL, DISTRO_FEATURES_BACKFILL_CONSIDERED,
DISTRO_FEATURES_DEFAULT, MACHINE_FEATURES_BACKFILL and
MACHINE_FEATURES_BACKFILL_CONSIDERED variables are now obsolete.
Instead, these are replaced by the DISTRO_FEATURES_DEFAULTS, DISTRO_FEATURES_OPTED_OUT, MACHINE_FEATURES_DEFAULTS and MACHINE_FEATURES_OPTED_OUT variables.
Users are advised to migrate to these variables the following way:
For DISTRO_FEATURES:
If you have previously assigned DISTRO_FEATURES without using
DISTRO_FEATURES_DEFAULT, you will now get the default features added automatically (from DISTRO_FEATURES_DEFAULTS). You will need to review these and add any features you do not want to use to DISTRO_FEATURES_OPTED_OUT.DISTRO_FEATURES_DEFAULTis now unused, the new variable name is slightly different (DISTRO_FEATURES_DEFAULTS) to ensure that it is not accidentally used if a layer hasn’t been modified to adapt to the new naming.If you previously set
DISTRO_FEATURES_BACKFILL_CONSIDERED, use the new DISTRO_FEATURES_OPTED_OUT variable instead.If you previously modified
DISTRO_FEATURES_BACKFILL, remove these assignments and follow the above instructions.
For MACHINE_FEATURES:
MACHINE_FEATURES will now get the default features added automatically (from MACHINE_FEATURES_DEFAULTS). You will need to review these and add any features you do not want to use to MACHINE_FEATURES_OPTED_OUT.
If you previously set
MACHINE_FEATURES_BACKFILL_CONSIDERED, use the new MACHINE_FEATURES_OPTED_OUT variable instead.If you previously modified
MACHINE_FEATURES_BACKFILL, remove these assignments and follow the above instructions.
Changes to the list of DISTRO_FEATURES enabled by default
The following DISTRO_FEATURES are now enabled by default in meta/conf/bitbake.conf:
multiarch: Enable building applications with multiple architecture support.opengl: Include the Open Graphics Library, which is a cross-language multi-platform application programming interface used for rendering two and three-dimensional graphics.ptest: Enable building the package tests where supported by individual recipes. To add the built ptest packages to the image, addptest-pkgsto IMAGE_FEATURES in your image recipe.vulkan: Include support for the Vulkan API.wayland: Include the Wayland display server protocol and the library that supports it.
See commit 2e1e7c8 for more information.
Default configuration templates removed from meta-poky
The configuration templates located in meta-poky/conf/templates/default have
been removed as they are now provided in a single location:
OpenEmbedded-Core (OE-Core) meta/conf/templates/default.
See commit ac300ba for more information on the differences between the two sets of default templates.
native and cross classes DEBUG_BUILD change
Previously, setting DEBUG_BUILD to “1” globally would prevent the OpenEmbedded Build System from stripping target, native and cross binaries. This was changed so that only target binaries are stripped when this variable is set.
This change can be reverted by setting the two following lines in a configuration file:
INHIBIT_SYSROOT_STRIP:class-cross = "${@oe.utils.vartrue('DEBUG_BUILD', '1', '', d)}"
INHIBIT_SYSROOT_STRIP:class-native = "${@oe.utils.vartrue('DEBUG_BUILD', '1', '', d)}"
See commit 3c29afe for more information.
U-Boot configuration flow changes (uboot-config)
Declaring multiple U-Boot configurations used to be entirely defined by one UBOOT_CONFIG variable flag per configuration, e.g.:
UBOOT_CONFIG ??= "foo bar"
UBOOT_CONFIG[foo] = "config,images,binary"
UBOOT_CONFIG[bar] = "config2,images2,binary2"
This has now been split into more variable flags, e.g.:
UBOOT_CONFIG ??= "foo bar"
UBOOT_CONFIG[foo] = "config"
UBOOT_CONFIG[bar] = "config2"
UBOOT_CONFIG_IMAGE_FSTYPES[bar] = "fstype"
UBOOT_CONFIG_BINARY[foo] = "binary"
UBOOT_CONFIG_MAKE_OPTS[foo] = "FOO=1"
UBOOT_CONFIG_MAKE_OPTS[bar] = "BAR=1"
UBOOT_CONFIG_FRAGMENTS[foo] = "foo.fragment"
See the documentation of the uboot-config for full details.
While the previous legacy approach is still supported, it will be removed in for the next release. Users are advised to migrate to the new approach.
See commit cd9e730 for more information.
Note
Single configuration builds have not changed and are still declared using the following statements:
UBOOT_MACHINE = "config"
UBOOT_BINARY = "u-boot.bin"
vex output JSON document extension change
Image recipes that inherit the vex class have an extra JSON
document generated which was previously ending with the .json suffix. For
example, a build for the core-image-minimal image recipe with this class
inherited would have resulted in a file named:
core-image-minimal-qemuarm64.rootfs.json
The suffix of this file is now .vex.json. Taking the above example, the same
file is now named:
core-image-minimal-qemuarm64.rootfs.vex.json
Support for SPDX 2.2 removed
Support for generating SPDX 2.2 document through the create-spdx-2.2 class
was removed:
Removes SPDX 2.2 support in favor of SPDX 3 support being the only
option. The SPDX 3 data is far superior to SPDX 2.2 and thus more useful
for SBoM uses cases.
See commit 12abd05 for more information.
Users are advised to transition to SDPX 3.0, which is provided by the create-spdx class.
cve-check class removed
The cve-check class was removed and replaced by the
sbom-cve-check class. Quoting the commit removing the class
(00de455):
It's been long known that the cve-check class in oe-core is not that
usable in the real world, for more details see "Future of CVE scanning
in Yocto"[1]. This mail proposed an alternative direction that included
a CVE scanning tool that can be ran both during the build and afterwards,
so that periodic scans of a previously build image is possible.
Last year, Bootlin wrote sbom-cve-check[2] and I compared this to my
proposal in "Comparing cve-check with sbom-cve-check"[3], concluding
that this is likely the missing piece.
Support for sbom-cve-check has been merged into oe-core, and the
cve-check class is now obsolete. So that we don't have to maintain it for
the four-year lifecycle of the Wrynose release, delete it.
This patch also deletes the database fetcher recipes, and the test cases
that were specific to cve-check. Note that the oe.cve_check library
still exists as this is used by the SPDX classes.
[1] https://lore.kernel.org/openembedded-core/7D6E419E-A7AE-4324-966C-3552C586E452@arm.com/
[2] https://github.com/bootlin/sbom-cve-check
[3] https://lore.kernel.org/openembedded-core/2CD10DD9-FB2A-4B10-B98A-85918EB6B4B7@arm.com/
Users currently using the cve-check class are advised to switch to
sbom-cve-check:
The following assignment:
INHERIT += "cve-check"
Should be removed and replaced by:
OE_FRAGMENTS += "core/yocto/sbom-cve-check"
This will enable the sbom-cve-check class along with the recommended settings.
This will deploy two files to the deployment directory (DEPLOY_DIR_IMAGE) after building an image:
A file ending with
.sbom-cve-check.yocto.json: this is the output JSON report in the same format as the one deployed by thecve-checkclass.A file ending with
.sbom-cve-check.spdx.json: this is an output SPDX report annotated with vulnerable CVEs.
The
cve-checkclass output summary file (deployed in the DEPLOY_DIR_IMAGE) ending with.cve.txtis no longer deployed by default but can be brought back by adding the following statement to a configuration file:SBOM_CVE_CHECK_EXPORT_VARS:append = " SBOM_CVE_CHECK_EXPORT_SUMMARY"
This will deploy a new file ending with
.cve.txt, which uses the same format as the summary previously deployed by thecve-checkclass.See the documentation of SBOM_CVE_CHECK_EXPORT_VARS for more details.
The
CVE_CHECK_SHOW_WARNINGSvariable, which was used to control whether thecve-checkwould print warning when unpatched CVEs were found, is now removed and replaced by the SBOM_CVE_CHECK_SHOW_WARNINGS variable, which does the same.
See the Checking for Vulnerabilities section of the Yocto Project Security Manual for more information.
CVE_PRODUCT character escaping change
The CVE_PRODUCT variable, which specifies a name used to match the recipe name against the name in the upstream NIST CVE database, used to require special characters to be escaped.
This is no longer, the case. For example, the CVE_PRODUCT variable for
the webkitgtk recipe must no longer be written as webkitgtk\+ but
webkitgtk+.
Users are advised to review their CVE_PRODUCT assignments and remove any special character escaping.
WIC_SECTOR_SIZE should be replaced by --sector-size
The WIC_SECTOR_SIZE variable was previously used to define the sector
size of the partitions generated by the WIC tool. The
wic command-line tool now supports a --sector-size argument that
replaces this variable.
While this variable can still be used in recipes, a warning is now printed on the console when used:
DEPRECATED: WIC_SECTOR_SIZE is deprecated, use the --sector-size command-line argument instead.
Using the --sector-size command-line argument can be done through the
WIC_CREATE_EXTRA_ARGS variable.
For example, a previous assignment to WIC_SECTOR_SIZE:
WIC_SECTOR_SIZE = "4096"
Should be replaced by:
WIC_CREATE_EXTRA_ARGS += "--sector-size 4096"
See commit b50d6de for more information.
WIC kickstart files to be moved under files/wic
WIC kickstart files (WKS
files) should be moved to the files/wic/ directory of the layer containing
them.
If not done, the build will fail with errors indicating how to move these files, for example:
wic/wks files at ../meta-custom/wic need to be moved to files/wic within the layer to be found/used
wic/wks files at ../meta-custom/scripts/lib/wic/canned-wks need to be moved to files/wic within the layer to be found/used
For example, here is the content of the OpenEmbedded-Core (OE-Core) “meta” layer as of writing:
meta/files/wic
├── common.wks.inc
├── directdisk-bootloader-config.cfg
├── directdisk-bootloader-config.wks
├── directdisk-gpt.wks
├── directdisk-multi-rootfs.wks
├── directdisk.wks
├── efi-bootdisk.wks.in
├── efi-uki-bootdisk.wks.in
├── mkefidisk.wks
├── mkhybridiso.wks
├── qemuloongarch.wks
├── qemuriscv.wks
├── qemux86-directdisk.wks
├── sdimage-bootpart.wks
└── systemd-bootdisk.wks
This change does not affect WIC plugins, which should remain in scripts/lib/wic/plugins/source/.
Support for SysVinit compatibility in systemd was dropped
Support for the SysVinit compatibility in systemd was dropped.
This is due to recent announcements in systemd which is planning to drop support for the SysVinit compatibility.
This means that the systemd and sysvinit distro features cannot be used together anymore.
Users are advised to switch to one init manager or the other entirely.
See commit d9ec9e2 for more information.
Removed recipes
The following recipes have been removed in this release:
jquery: The last users of this recipe were the reproducible tests, but have been reworked to use the jQuery CDN instead with d3ee549 (See aae793a)systemd-compat-units: Dropped as a consequence of removing SysVinit support in systemd (d9ec9e2)gstreamer1.0-vaapi: removed as it was already provided by thevaPACKAGECONFIG item ofgstreamer1.0-plugins-bad. (9e2d2a5)pkgconfig: replaced by thepkgconfrecipe (e32bf38)python3-pyzstd: there were no users of this in OpenEmbedded-Core (OE-Core) and Python 3.14 now has built-in support for zstd (55061de)cve-update-db-native,cve-update-nvd2-native: removed with thecve-checkclass removal as it was the only user of these recipes. (00de455)python3-roman-numerals-py: renamed topython3-roman-numerals(faff756)
Removed PACKAGECONFIG options
Removed classes
The following classes have been removed in this release:
oelint: remove as most of the checks done by this class are done in other areas of code now, making this class obsolete.
Miscellaneous changes
meson: drop
meson_do_qa_configureas it was non-functional (0514b45)Drop VSCode setup support from the
oe-init-build-envscript. Users are advised to use bitbake-setup instead (4e781c6)
Release notes for Yocto-6.0.1 (Wrynose)
Security Fixes in Yocto-6.0.1
avahi: Fix CVE-2026-34933
base-files: Ignore CVE-2018-6557
bind: Ignore CVE-2017-3139
busybox: fix CVE-2024-58251 and CVE-2026-29004
cargo: Ignore CVE-2023-40030
cve-extra-exclusions: Ignore CVE-2019-2708
ffmpeg: Ignore CVE-2022-2566, CVE-2025-9951, CVE-2025-59729 and CVE-2025-59730
git: Ignore CVE-2024-32002, CVE-2024-50349, CVE-2024-52006, CVE-2025-48385 and CVE-2025-48386
glibc: Fix CVE-2026-4046
gnutls: Ignore CVE-2026-1584
harfbuzz: Ignore CVE-2024-56732
inetutils: Fix CVE-2026-32772
libarchive: Ignore CVE-2026-4426 and CVE-2026-5745
libsoup: Fix CVE-2026-2708 and CVE-2026-5119
libsoup: Ignore CVE-2026-2369 and CVE-2026-2436
libssh2: Fix CVE-2026-7598
libva: Ignore CVE-2023-39929
ovmf: Ignore CVE-2024-38796, CVE-2024-38797, CVE-2024-38798, CVE-2024-38805, CVE-2025-2295, CVE-2025-2296 and CVE-2025-3770
p11-kit: Ignore CVE-2026-2100
python3-requests: Ignore CVE-2024-35195 and CVE-2024-47081
python3-setuptools: Ignore CVE-2024-6345
rsync: Ignore CVE-2024-12084
ruby: Ignore CVE-2025-0306
sed: Fix CVE-2026-5958
sudo: Fix CVE-2026-35535
tiff: Fix CVE-2026-4775
Fixes in Yocto-6.0.1
bitbake
README: Add “2.18” subject-prefix to git-send-email suggestion
b4-config: add send-prefixes for 2.18/wrynose
fetch/git: Fix leaking of temporary directory
fetch/git: Improve temporary directory handling
fetch/wget: in upstream version checks, match versioned directories exactly
fetch2/crate: use CDN endpoint for version checking if possible
fetch2/crate: use CDN for fetching crates
meta-yocto
poky.conf: Bump version for 6.0.1 release
openembedded-core
README: Add wrynose subject-prefix to git-send-email suggestion
apr-util: Add CVE_PRODUCT to support product name
apr: Add CVE_PRODUCT to support product name
b4-config: add send-prefixes for wrynose
bluez5: add patches to fix 8.56 cli & gatt issues
build-appliance-image: Update to wrynose head revisions
build-appliance-image: fix branches for wrynose revisions
cargo: set CVE_PRODUCT
ccache: upgrade to 4.13.3
classes/base: add explicit bzip2-native dependency for unpacking .bz2
coreutils: set CVE_PRODUCT
default-distrovars.inc: add missing spaces in append overrides
devtool: Disable gpg signing when setting up source tree repos
dhcpcd: upgrade to 10.3.1
efivar: Backport patch to fix -march issue for ppc64le
features-check.bbclass: add reference to required TUNE_FEATURES
glibc: Fix recipe bug that disabled stack protector
glibc: stable 2.43 branch updates
groff: upgrade to 1.24.1
gsettings-desktop-schemas: upgrade to 50.1
gtk4: upgrade to 4.22.2
gtk+3: upgrade to 3.24.52
hwdata: upgrade to 0.406
mirrors: remove inactive sources.openembedded.org URLs
oe-pkgdata-util: fix empty runtime-rprovides directory handling
oe-pkgdata-util: fix runtime-rprovides handling in lookup_pkg error path
package.py: fix kernel module file pre-filter and document strip asymmetry
perf: add PACKAGECONFIG for llvm
pseudo: Upgrade to 1.9.7
python3-requests: Increase chardet upper limit
python3-sbom-cve-check: Update to version 1.3.1
qemu: fix iotlb_to_section() for different AddressSpace
rust: fix codegen test failure on big-endian targets
sbom-cve-check-update-cvelist-native: Update source revision
sbom-cve-check-update-nvd-native: Update source revision
sbom-cve-check: set PV from upstream tags and ensure version checks are correct
scripts/makefile-getvar: quote MAKEFILE variable
sed: upgrade to 4.10
shadow-native: Change upstream status of disable_syslog.patch
shadow: set CVE_PRODUCT
sudo: set CVE_PRODUCT
tzdata/tzcode-native: upgrade to2026b
utils: Handle unexpanded variables in DISTRO_FEATURES
wireless-regdb: upgrade to 2026.03.18
yocto-docs
“Transitioning …” doc: Various pedantic cleanups
Quick Build guide: Various pedantic cleanups
What I Wish I’d KNown: Various pedantic cleanups
YP Quick Build: delete extraneous periods in list
YP Quick Build: use “set up” as a verb
conf.py: add a :yocto_bug: role
contributor-guide: fix type “maintainance” to “maintenance”
dev-manual: “–runonly” should be “–runall”
docs-wide: drop documentation for cve-check and variables
index.rst: update “Software Overview” to “Technical Overview”
migration-guide: add release notes for 4.0.35 5.3.4
migration-guide: migration-6.0: fix typos in cve-check removal
migration-guides/migration-6.0.rst: add migration notes on cve-check removal
migration-guides/migration-6.0.rst: document the CVE_PRODUCT behavior change
migration-guides/migration-6.0.rst: mention python3-roman-numerals-py rename
migration-guides/release-notes-6.0.rst: add contributors, CVE fixes, downloads, known issue, license, recipe version changes
migration-guides: fix https:// prefix missing in anonymous reference
migration-guides: migration-6.0: fix grammar and missing word
migration-guides: migration-6.0: reword meta-poky templates removal
migration-guides: release-notes-6.0: fix typo in documentation changes
overview-manual/concepts.rst: fix do_prepare_recipe_sysroot task description
overview-manual: fix “checkout” versus “check out”
ref-manual/system-requirements.rst: add CentOS 10 as a supported distro
ref-manual/variables.rst: document the SBOM_CVE_CHECK_SHOW_WARNINGS variable
ref-manual/variables: IMAGE_TYPES: add new wicenv type
ref-manual/variables: document the ‘dynamic layer’ concept
ref-manual: classes: add missing “task” after create_recipe_sbom
ref-manual: classes: fix https:// prefix missing in anonymous reference
ref-manual: fix “include to” grammar for UKI_DEVICETREE
ref-manual: fragments: fix style inconsistencies
ref-manual: replace “naive” with “simple”
ref-manual: variables: add hyphen to “space separated” and “auto generated”
security-manual/vulnerabilities.rst: refresh the document after cve-check removal
security-manual/vulnerabilities.rst: require Upstream-Status, not recommend
tools/build-docs-container: add CentOS 10 support
tools/build-docs-container: add missing leap 16.0 in help message
yp-intro.rst: add link to “buildbot”
yp-intro.rst: delete really old references
Known Issues in Yocto-6.0.1
N/A
Contributors to Yocto-6.0.1
Thanks to the following people who contributed to this release:
Alexander Kanavin
Andrew Geissler
Ankur Tyagi
Antonin Godard
Benjamin Robin (Schneider Electric)
Chen Qi
Daniel McGregor
Dawid Bijak
Dmitry Sakhonchik
Himanshu Jadon
Ivan Nestlerode
Jinwang Li
Johan Anderholm
João Marcos Costa
Lee Chee Yang
Leonardo Costa
Li Wang
Minwoo Choi
Moritz Haase
Paul Barker
Peter Marko
Peter Tatrai
Quan Sun
Quentin Schulz
Richard Purdie
Robert P. J. Day
Ross Burton
Sam Kent
Thomas Perrot
Vijay Anusuri
Wang Mingyu
Yoann Congal
Repositories / Downloads for Yocto-6.0.1
yocto-docs
Repository Location: https://git.yoctoproject.org/yocto-docs
Branch: wrynose
Tag: yocto-6.0.1
Git Revision: 7ac955621b36a221126cd40f12c41fa98c213a24
Release Artefact: yocto-docs-7ac955621b36a221126cd40f12c41fa98c213a24
sha: 32e25828d25662db5e92829ae6a471291e27d950b5c273458fae211a776e4131
Download Locations:
openembedded-core
Repository Location: https://git.openembedded.org/openembedded-core
Branch: wrynose
Tag: yocto-6.0.1
Git Revision: 06dd66e6220e5ce4ed4b9af4d8231ae5f0a8ce80
Release Artefact: oecore-06dd66e6220e5ce4ed4b9af4d8231ae5f0a8ce80
sha: 26de701c73d43ab8904bc57b162385901f9a1114807b3e28b665437d4ba23624
Download Locations:
meta-yocto
Repository Location: https://git.yoctoproject.org/meta-yocto
Branch: wrynose
Tag: yocto-6.0.1
Git Revision: 8251bdad5fda780a000fb41e6eda82eadf0fa39e
Release Artefact: meta-yocto-8251bdad5fda780a000fb41e6eda82eadf0fa39e
sha: ac9125ddd150febba0da9ae4fb7e222dde1d6e8f2ad3aaae1c0c2a4c1f738f36
Download Locations:
bitbake
Repository Location: https://git.openembedded.org/bitbake
Branch: 2.18
Tag: yocto-6.0.1
Git Revision: 22021758e66737bcf68dfd2b74adc6a0cb1d42d9
Release Artefact: bitbake-22021758e66737bcf68dfd2b74adc6a0cb1d42d9
sha: ce9c213f9b8c5fb677b0a64ac883386a4d578fdb66881dcc9f1cd8bc4e79e7f6
Download Locations:
Release 5.3 (whinlatter)
Release 5.3 (whinlatter)
Migration notes for 5.3 (whinlatter)
This section provides migration information for moving to the Yocto Project 5.3 Release (codename “whinlatter”) from the prior release.
The Poky repository master branch is no longer updated
The master branch of the Poky repository is no longer being updated. This does not mean that the Poky distribution is deprecated, but that the way to clone the base layers and setup the environment for building Poky has changed.
You can either:
Switch to individual clones of bitbake, openembedded-core, meta-yocto and yocto-docs by following the Setting Up the Poky Reference Distro Manually section of the Yocto Project Development Tasks Manual.
Use the new
bitbake-setuptool by following the Yocto Project Quick Build document.See the Setting Up The Environment With bitbake-setup of the BitBake User Manual for reference documentation on
bitbake-setup.
Releases older than Whinlatter will still have their branch on the Poky repository updated until they reach end-of-life.
Some further information on the background of this change can be found in: https://lists.openembedded.org/g/openembedded-architecture/message/2179
WORKDIR changes
S = ${WORKDIR}/something no longer supported
If a recipe has S set to be ${WORKDIR}/something,
this is no longer supported, and an error will be issued. The recipe should be
changed to:
S = "${UNPACKDIR}/something"
S = ${WORKDIR}/git and S = ${UNPACKDIR}/git should be removed
The Git fetcher now unpacks into the BB_GIT_DEFAULT_DESTSUFFIX directory
rather than the git/ directory under UNPACKDIR.
BB_GIT_DEFAULT_DESTSUFFIX is set in OpenEmbedded-Core
(OE-Core)’s bitbake.conf to BP.
This location matches the default value of S set by bitbake.conf, so S setting in recipes can and should be removed.
Note that when S is set to a subdirectory of the git checkout, then it should be instead adjusted according to the previous point:
S = "${UNPACKDIR}/${BP}/something"
Note that “git” as the source checkout location can be hardcoded in other places in recipes; when it’s in SRC_URI, replace with BB_GIT_DEFAULT_DESTSUFFIX, otherwise replace with BP.
How to make those adjustments without tedious manual editing
The following sed command can be used to remove S = “${WORKDIR}/git across a whole layer:
sed -i "/^S = \"\${WORKDIR}\/git\"/d" `find . -name '*.bb' -o -name '*.inc' -o -name '*.bbclass'`
Then, the following command can tweak the remaining S assignments to refer to UNPACKDIR instead of WORKDIR:
sed -i "s/^S = \"\${WORKDIR}\//S = \"\${UNPACKDIR}\//g" `find . -name '*.bb' -o -name '*.inc' -o -name '*.bbclass'`
The first change can introduce a lot of consecutive empty lines, so those can be removed with:
sed -i -z -E 's/([ \t\f\v\r]*\n){3,}/\n\n/g' `find . -name '*.bb' -o -name '*.inc'`
BitBake Git fetcher tag parameter
The tag= parameter of the Git fetcher (git://) was updated. The tag
commit SHA will be compared against the value supplied by the SRCREV
variable or the rev= parameter in the URI in SRC_URI. This is
strongly recommended to add to the URIs when using the Git fetcher for
repositories using tag releases.
Space around equal assignment
A new warning is now printed when there are no whitespaces around an =
assignment in recipes:
<filename>:<line number> has a lack of whitespace around the assignment: '<assignment>'
For example, the following assignments would print a warning:
FOO="bar"
FOO= "bar"
FOO ="bar"
These should be replaced by:
FOO = "bar"
Wic plugins containing dashes should be renamed
After a Python upgrade, Wic plugins containing dashes (-) for their filenames are no
longer supported. One must rename the plugin file and convert the dashes to
underscores (_).
It is also recommended to update any WKS file to convert dashes to underscores.
For example, the bootimg-partition.py plugin was renamed to
bootimg_partition.py. This means that any WKS file using this plugin must
change each --source bootimg-partition to --source bootimg_partition.
However, the current WIC code automatically converts dashes to underscore for
any --source call, so existing WKS files will not break if they use upstream
plugins from OpenEmbedded-Core (OE-Core).
fitImage no longer supported for KERNEL_IMAGETYPE
The fitImage type for KERNEL_IMAGETYPE is no longer supported. The
logic for creating a FIT image was moved out of the kernel
class. Instead, one should create a new recipe to build this FIT image, as
described in the Removed Classes section of the Migration notes for 5.3 (whinlatter).
systemd Predictable Interface Names no longer MAC policy by default
The systemd recipe
used to forcibly set the “mac” policy by default when the pni-names
distro feature is enabled.
This is no longer the case as this was not following upstream changes. Now when
the pni-names distro feature is enabled, the
default policy from systemd is selected (from
https://github.com/systemd/systemd/blob/v257.8/network/99-default.link).
To set back the “mac” policy in systemd (version 257.8 at the time of writing
this note), you should set the NamePolicy and AlternativeNamesPolicy as
detailed in systemd.link(5).
Removal of unlicensed Linux kernel firmware
By default, the linux-firmware recipe now excludes firmware that do not
provide any license information. The recipe holds an internal list of firmware
to exclude via a variable named REMOVE_UNLICENSED, this variable may be
overridden if unlicensed firmware is needed. See the recipe for a complete
overview of the removed firmware.
*FLAGS variables behavior change for native and nativesdk classes
The CPPFLAGS, CFLAGS, CXXFLAGS and LDFLAGS variables used to have hard assignments in the native and nativesdk classes, respectively:
CPPFLAGS = "${BUILD_CPPFLAGS}"
CFLAGS = "${BUILD_CFLAGS}"
CXXFLAGS = "${BUILD_CXXFLAGS}"
LDFLAGS = "${BUILD_LDFLAGS}"
and:
CPPFLAGS = "${BUILDSDK_CPPFLAGS}"
CFLAGS = "${BUILDSDK_CFLAGS}"
CXXFLAGS = "${BUILDSDK_CXXFLAGS}"
LDFLAGS = "${BUILDSDK_LDFLAGS}"
This caused races when recipes tried to append to any of these variables using
the += operator, so recipes could use :append instead if they wanted the
change to apply to the target, native and
nativesdk contexts.
Recipes can now safely use the += operator to achieve this.
What this change also means is that previous assignments using the +=
operator, which only used to apply to the target context, now apply to all
three: target, native and nativesdk
contexts.
Recipes that unknowingly relied on this behavior should change these assignments
to use TARGET_ variables instead, for example:
CFLAGS += "something"
to:
TARGET_CFLAGS += "something"
See https://git.openembedded.org/openembedded-core/commit/?id=a157b2f9d93428ca21265cc860a3b58b3698b3aa.
Supported kernel versions
The OLDEST_KERNEL setting is 5.15 in this release, meaning that out the box, older kernels are not supported. See 4.3 migration notes for details.
Supported distributions
Compared to the previous releases, running BitBake is supported on new GNU/Linux distributions:
Debian 13 (Trixie)
Fedora 42
Ubuntu 25.04
Ubuntu 25.10
Removed variables
The following variables have been removed:
BUILDHISTORY_RESET: Setting this to non-empty used to remove the old content of the buildhistory as part of the current BitBake invocation and replace it with information about what was built during the build. This was partly broken and hard to maintain.GPE_MIRROR: this variable used to contain the “http://gpe.linuxtogo.org/download/source” URL, but was not used by any recipe in OE-Core.
Removed recipes
The following recipes have been removed in this release:
libsoup-2.4: The last user in OpenEmbedded-Core (OE-Core) wasgst-examples, which has been upgraded with itslibsoup-2.4dependency dropped. The recipe has been moved tometa-oe.glibc-y2038-tests: removed as the recipe only provides tests which are now provided byglibc-testsuite.python3-ndg-httpsclient: The last dependency in core on this recipe was removed in May 2024 with dfa482f1998 (“python3-requests: cleanup RDEPENDS”), and there is no other user of this variable.xf86-input-mouse: The project has stopped supporting Linux.xf86-input-vmmouse: It has a runtime dependency onxf86-input-mouse, which stopped supporting Linux.babeltrace: Removed in favour ofbabeltrace2.cwautomacros: A long-obsolete set of custom autotools* macros, not used by any other recipe.rust-llvm: removed after the Rust and LLVM recipes were reworked to depend on thellvmrecipe instead.
Removed PACKAGECONFIG entries
dropbear:enable-x11-forwarding(renamed tox11)libxml2:ipv6squashfs-tools:reproduciblemesa:kmsro,osmesa,xasystemd:dbus
Removed classes
The following classes have been removed in this release:
kernel-fitimage.bbclass: the class has been replaced by the kernel-fit-image class. The new implementation resolves the long-standing bug 12912.If you are using the kernel FIT image support, you will need to:
Make sure to include
kernel-fit-extra-artifactsin your KERNEL_CLASSES variable to ensure the required files are exposed to the DEPLOY_DIR_IMAGE directory:KERNEL_CLASSES += "kernel-fit-extra-artifacts"
Use the specific FIT image recipe rather than the base kernel recipe. For example, instead of:
bitbake linux-yocto
the FIT image is now build by:
bitbake linux-yocto-fitimage
For custom kernel recipes, creating a corresponding custom FIT image recipe is usually a good approach.
If a FIT image is used as a replacement for the kernel image in the root filesystem, add the following configuration to your machine configuration file:
# Create and deploy the vmlinux artifact which gets included into the FIT image KERNEL_CLASSES += "kernel-fit-extra-artifacts" # Do not install the kernel image package RRECOMMENDS:${KERNEL_PACKAGE_NAME}-base = "" # Install the FIT image package MACHINE_ESSENTIAL_EXTRA_RDEPENDS += "linux-yocto-fitimage" # Configure the image.bbclass to depend on the FIT image instead of only # the kernel to ensure the FIT image is built and deployed with the image KERNEL_DEPLOY_DEPEND = "linux-yocto-fitimage:do_deploy"
See the kernel-fit-image section for more information.
icecc.bbclass: Reports show that this class has been broken since Yocto Mickledore which suggests there are limited numbers of users. It doesn’t have any automated testing and it would be hard to setup and maintain a testing environment for it. The original users/maintainers aren’t using it now.
Miscellaneous changes
xserver-xorg: remove sub-package${PN}-xwayland, asxwaylandis now its own recipe.gdk-pixbuf: drop theGDK_PIXBUF_LOADERSvariable, which was part of the recipe’s PACKAGECONFIG. Instead the PACKAGECONFIG can be modified directly to achieve the same result.Remove the
meta/conf/distro/include/distro_alias.incinclude file, which associated a recipe name to one or more Distribution package name. This file is not used and maintained anymore.Remove the
nghttp2-proxypackage from thenghttp2recipe as thenghttp2-proxypackage became empty after an upgrade that makes it a library recipe only (due to EXTRA_OEMAKE containing-DENABLE_APP=OFFby default in the recipe).Remove the
util-linux-fcntl-lockpackage (in theutil-linuxrecipe) asutil-linuxnow supports the--fcntlflag for theflockcommand.Recipes currently using the
fcntl-lockcommand should replace these byflock --fcntl.bareboxhas been updated from v2025.02.0 to v2025.09.0. Refer to the upstream migration guides for migration advice.
Release notes for 5.3 (whinlatter)
This release does have significant changes which people need to be aware of. See the migration guide for more information.
New Features / Enhancements in 5.3
Linux kernel 6.16, gcc 15, glibc 2.42, LLVM 21.1.1, and over 300 other recipe upgrades.
Minimum Python version required on the host: 3.9.
Host requirements changes:
The minimum disk space requirement is now 140Gbytes (previously 90Gbytes).
The minimum RAM requirement is now 32Gbytes (previously 8Gbytes).
These changes are mainly due to recent additions of the LLVM and other resource heavy recipes. For guidance on how to limit the resources used by the OpenEmbedded Build System, see the Limiting the Host Resources Usage guide.
BitBake changes:
A new
bitbake-setuptool can be used to clone the initial layers and setup the environment. See the Yocto Project Quick Build section for instructions on how to build an image that uses the Poky distribution with this new tool.See the reference documentation of
bitbake-setupat Setting Up The Environment With bitbake-setup.codeparser: Add function decorators forvardepsAdds
bb.parse.vardepsandbb.parse.excludevardepsfunction decorators that can be used to explicitly add or exclude variables from a Python function parsed by BitBake.Move
vardepexcludeflag entries alongside functions for maintainability.Fetcher:
Check for
git-lfsexistence before using it.Add support for
.debsfiles containing uncompressed data tarballs.az: Add sanity check to check that AZ_SAS starts with?to mark the start of the query parameters.git:Add the tag to shallow clone tarball name.
Verify if local clones contains a tag, when the
tag=parameter is used in SRC_URI.
knotty:Pass failed task logs through the log infrastructure (use
bb.plain()instead ofprint()).Improve refresh rate of the footer progress bar.
Add support for automatically promoting class inherits to deferred inherits by listing them in the BB_DEFER_BBCLASSES variable.
“Built-in” fragments support is now added to the addfragments directive. This is the fourth parameter to this directive, and should be the name of the variable that contains definitions of built-in fragments. Refer to the documentation of addfragments to learn how to define new built-in fragments.
Listing these built-in fragments can be done with bitbake-config-build list-fragments, which could list:
Available built-in fragments: machine/... Sets MACHINE = ... distro/... Sets DISTRO = ...
In the above example, this means that the MACHINE of DISTRO can be overridden with:
OE_FRAGMENTS += "machine/qemuarm64 distro/poky-bleeding"
This would set MACHINE to
qemuarm64and the DISTRO topoky-bleeding.The
tag-parameter in URLs can now be specified alongside therev=parameter and SRCREV variable, and will ensure that the specified tag matches the specified revision.It is strongly encouraged to include the
tag=parameter to the SRC_URI definition when possible.tinfoil: add await_fordecorator to wrap a function that makes an asynchronous tinfoil call wait for event to say that the call has been successful, or an error has occurred.New
bb.utils.to_filemode()helper function which is a helper to take a variable’s content containing a filemode and convert it to the proper Python representation of the number.cooker: Use a shared counter for processing parser jobs. This allows the parser processes to run independently of needing to be feed by the parent process, and load balances them much better.cooker/process/utils: Add a-P(--profile) option to BitBake to specify what to profile. Can be “main”, “idle” or “parsing”. Split the reports in separate files.A “filtering” functionality was added and allows modifying the value of a variable before its value is returned by BitBake. The
setVarFilterAPI can be used for applying the filters, but it is not recommended for general use. It was added for internal use in the OpenEmbedded Build System in the native class. The list of filters that are allowed are derived from a select list of functions that must be added using afilter_procdecorator.tests/parse: Add tests forinclude,requireandinclude_all.
Toolchain changes:
The Clang/LLVM toolchain can now be used as part of the build.
The PREFERRED_TOOLCHAIN_TARGET, PREFERRED_TOOLCHAIN_NATIVE and PREFERRED_TOOLCHAIN_SDK variables can be used to customize the selected toolchain globally.
There are two supported toolchains: “gcc” and “clang”. See the documentation of PREFERRED_TOOLCHAIN_TARGET for more details.
The toolchain is also customizable on a per-recipe basis, using the TOOLCHAIN and TOOLCHAIN_NATIVE variables.
Warning
The TOOLCHAIN should not be set globally. For overriding the toolchain globally, use PREFERRED_TOOLCHAIN_TARGET, PREFERRED_TOOLCHAIN_NATIVE and PREFERRED_TOOLCHAIN_SDK.
Multiple recipes were pinned to use the GCC/Binutils toolchain as they do not support being built with Clang/LLVM yet. In these recipes the TOOLCHAIN variable is set to “gcc”.
Global configuration changes:
bitbake.conf/pseudo: Switch from exclusion list to inclusion list by swapping PSEUDO_IGNORE_PATHS for PSEUDO_INCLUDE_PATHS which should be easier and more explicit to maintain.bitbake.conf: Droplz4from HOSTTOOLS, as it is not required anymore, and thelz4-nativepackage is used instead.-
Add a fragment for the CDN sstate-cache mirror.
Add a
show-fragmentssub-command to the bitbake-config-build utility, to show the content of fragments from command-line.
default-distrovars: set an empty default for LICENSE_PATH.The default definition of UNPACKDIR is no longer
sources-unpackbutsources.The default value for IMAGE_FSTYPES (defined in bitbake.conf) is now
tar.zst(previouslytar.gz).Remove the
meta/conf/distro/include/distro_alias.incinclude file, which associated a recipe name to one or more Distribution package name. This file is not used and maintained anymore.A new configuration file build/conf/toolcfg.conf is now used by bitbake-config-build to manage Configuration Fragments.
bitbake.conf: add TMPDIR to theGIT_CEILING_DIRECTORIESGit variable. This avoids Git trying to find a repository higher than TMPDIR in recipes that use the build/tmp/work-shared/ directory for storing their sources. This fixes reproducibility issues.Changes to the
genericarm64machine configuration:Increase the Initramfs maximum size.
Install extra Linux firmware packages to fix Linux kernel warnings.
New variables:
The
VIRTUAL-RUNTIME_dbusvariable, to allow changing the runtime implementation of D-Bus. See VIRTUAL-RUNTIME.The
VIRTUAL-RUNTIME_libsdl2variable, to allow changing the runtime implementation of libsdl2. See VIRTUAL-RUNTIME.The SPDX_PACKAGE_URL variable can be used in recipes to set the output
software_packageUrlfield in their associated SPDX 3.0 output (default value: empty string).The KMETA_CONFIG_FEATURES variable can be used to control kernel-yocto configuration features. For now only
prefer-modulesis supported for this variable.The TESTSDK_SUITES variable can be used to control the list of tests run for the testsdk class.
The UBOOT_FIT_CONF_FIRMWARE can be used to specify a
firmwareentry in the configuration node of a FIT image.The SPDX_INCLUDE_COMPILED_SOURCES option allows the same as SPDX_INCLUDE_SOURCES but including only the sources used to compile the host tools and the target packages.
The UBOOT_VERSION variable holds the package version (PV) and revision (PR) which are part of the installed and deployed filenames. Users can now override UBOOT_VERSION to changes the output filenames.
The UBOOT_MAKE_OPTS variable specifies extra options passed to
makewhen building U-boot. Extra options can also be passed as the fourth argument of the UBOOT_CONFIG variable. See the documentation of uboot-config class for more details.The WESTON_USER and WESTON_USER_HOME variables can be used to define the username and home directory for the Weston user.
New core tasks:
The do_list_image_features can be used to list the available IMAGE_FEATURES for an image recipe.
Kernel-related changes:
Support for the 6.17 kernel exists but 6.16 is the default selected one in the Poky distro.
linux/generate-cve-exclusions: use data from CVEProject instead of the archived https://linuxkernelcves.com.kernel-yocto: allow annotated options to be modified. For example if the following kernel configuration is set:CONFIG_INET_TUNNEL=y # OVERRIDE:$MODULE_OR_Y
And if the KMETA_CONFIG_FEATURES variable contains
prefer-modules,CONFIG_INET_TUNNELwill be set tominstead ofy.kernel-devsrc: Replace the extraSystem.mapfile with symbolic link.kernel-module-split: Allow for external configuration files being assigned to the correct kernel module package.When built for the RISC-V architecture, ensure that the minimum required features set by TUNE_FEATURES are set using the features_check class.
linux-yocto: when built for RISC-V, enable features in KERNEL_FEATURES based on features listed in TUNE_FEATURES.perf: Enablecoresightif enabled in MACHINE_FEATURES.
New core recipes:
python3-pdm,python3-pdm-backendandpython3-pdm-build-locked, which are dependencies ofpython3-webcolors.python3-pdmitself depends onpython3-pdm-build-lockedbindgen-cli: a tool to generate Rust bindings.python3-colorama: Cross-platform colored terminal text, needed bypytestas a dependency.libglvnd: imported from meta-oe which provides a vendor neutral approach to handling OpenGL / OpenGL ES / EGL / GLX libraries.python3-sphinx-argparse: A sphinx extension that automatically documentsargparsecommands and options. It is part ofbuildtools-docs-tarballfor later use in the Yocto Project documentation.python3-sphinx-copybutton: A sphinx extension that adds a copy button to code blocks in Sphinx. It is part ofbuildtools-docs-tarballfor later use in the Yocto Project documentation.python3-coherent-licensed: License management tooling for Coherent System and skeleton projects. It became a new dependency ofpython3-zipp.gn: a commonly used build tool to generate ninja files.LLVM/Clang related recipes:
clang: LLVM based C/C++ compiler.compiler-rt: LLVM based C/C++ compiler Runtime.libclc: Implementation of the library requirements of the OpenCL C programming language.libcxx: new implementation of the C++ standard library, targeting C++11 and abovellvm-tblgen-native: LLVM TableGen binaries for the build host, often used to build LLVM projects.lld: the LLVM Linker.lldb: LLDB debugger for LLVM projects.llvm-project-source: canonical git mirror of the LLVM subversion repository.llvm: The LLVM Compiler Infrastructure.openmp: LLVM OpenMP compiler Runtime.
kernel-signing-keys-native: this recipe is used in the kernel-fit-image class to generate a pair of RSA public/private key. It replaces thedo_generate_rsa_keysof the kernel-fit-image class.
New DISTRO_FEATURES:
glvnd, which enables OpenGL Vendor Neutral Dispatch Library support when using recipes such asmesa.opencl: support for the OpenCL (Open Computing Language) framework.
New core classes:
The new kernel-fit-image class replaces the previous
kernel-fitimageclass. It has been rewritten and improved to fix bug 12912. See the Removed Classes section of the Migration notes for 5.3 (whinlatter) for more details on how to switch to this new class.The new go-mod-update-modules class can be used to maintain Go recipes that use a
BPN-go-mods.incandBPN-licenses.incand update these files automatically.The new python_pdm class supports building Python recipes with the PDM package and dependency manager.
Architecture-specific changes:
Rework the RISC-V TUNE_FEATURES to make them based of the RISC-V ISA (Instruction Set Architecture) implementation.
This implements the following base ISAs:
rv32i,rv64irv32e,rv64i
The following ABIs:
ilp32,ilp32e,ilp32f,ilp32dlp64,lp64e,lp64f,lp64d
The following ISA extension are also implemented:
M: Integer Multiplication and Division Extension
A: Atomic Memory Extension
F: Single-Precision Floating-Point Extension
D: Double-Precision Floating-Point Extension
C: Compressed Extension
B: Bit Manipulation Extension (implies Zba, Zbb, Zbs)
V: Vector Operations Extension
Zicsr: Control and Status Register Access Extension
Zifencei: Instruction-Fetch Fence Extension
Zba: Address bit manipulation extension
Zbb: Basic bit manipulation extension
Zbc: Carry-less multiplication extension
Zbs: Single-bit manipulation extension
Zicbom: Cache-block management extension
The existing processors tunes are preserved:
riscv64(rv64gc)riscv32(rv32gc)riscv64nf(rv64imac_zicsr_zifencei)riscv32nf(rv32imac_zicsr_zifencei)riscv64nc(rv64imafd_zicsr_zifencei)
See meta/conf/machine/include/riscv/README for more information.
Add support for new Arm64 instruction sets, which are represented as files to be included in MACHINE configuration in OpenEmbedded-Core (OE-Core). The new configuration files are:
arch-mips.inc: Use-EB/-ELfor denoting Endianness.Enable
riscv32as supported arch formuslsystems.Powerpc: Use
-maltivecin compiler flags ifaltivecis in TUNE_FEATURES.arm: add anocryptofeature to TUNE_FEATURES to complement thecryptofeature to explicitly disable cryptographic extensions via GCC flags.This lead to the creation of two new tunes:
tune-cortexa72-nocryptotune-cortexa53-nocrypto
QEMU /
runqemuchanges:Refactor qemu functions into library functions (in lib/oe/qemu.py).
The
qemux86-64MACHINE now defaults to thex86-64-v3micro-architecture level.The previous default was Core 2 era processors. This change means that the toolchain is configured to build for that level, and QEMU is configured to emulate it.
The v3 level adds support for AVX/AVX2/BMI/BMI2/F16C and other newer instructions which are seeing increasing usage in modern software and add performance benefits. Please see X86-64 Microarchitecture levels for definition of the levels and lists of Intel/AMD CPUs where support for the instructions was first added.
Note that if QEMU system emulation is used on an x86 build machine with KVM enabled, then the build machine’s CPU must also be recent enough to support these instructions natively.
runqemu:The script can now run compressed images with snapshot mode. For example, with IMAGE_FSTYPES containing
ext4.zst, you can run:runqemu snapshot ext4.zst <image-recipe>
Add support for the
erofsfilesystem.The BitBake environment is now a requirement, and the script cannot run without a successful call to
bitbake -e.The script will also raise an error with the
bitbakecommand is not found.
Documentation changes:
Add documentation on Configuration Fragments:
Part of BitBake internals are now documented at https://docs.yoctoproject.org/bitbake/bitbake-user-manual/bitbake-user-manual-library-functions.html.
A new Limiting the Host Resources Usage guide was created to help users limit the resources used by the OpenEmbedded Build System.
A new Setting up a Hash Equivalence Server guide was created to help users setting up a Hash Equivalence server.
The QA checks defined in the OpenEmbedded Build System were gathered in QA Error and Warning Messages.
A new Setting Up the Poky Reference Distro Manually document was added to instruct how to setup the Poky reference distribution manually, after the master branch of the Poky repository has stopped being updated.
Core library changes:
Add license_finder.py, which was extracted from
recipetoolto be shared for multiple users. Improve its functionalities.
Go changes:
go-mod-update-modules: Update license finding to use the new
find_licenses_uplibrary function.
Rust changes:
The rust-llvm recipe has been removed, and the rust recipe now uses the same llvm recipe as clang.
Add the
has-thread-localoption to the rust-target-config class.
Wic Image Creator changes:
After a Python upgrade, WIC plugins containing dashes (
-) for their filenames are no longer supported. One must convert the dashed to underscores (_) and update users of the plugins accordingly.See the Wic plugins containing dashes should be renamed section of the Yocto Project 5.3 Migration Guide for more information.
wic: do not ignore IMAGE_ROOTFS_SIZE if the Rootfs is modified.Several improvements in WIC selftests.
bootimg_efi.py: fail build if no binaries are installed.Add new options to the
wicls,cp,rm, andwritecommands:--image-name: name of the image to use the artifacts from.--vars: directory with<image>.envfiles that store BitBake variables. This directory is usually found in STAGING_DIR.
Add the Wic-specific option
--extra-partition-spaceto add extra empty space after the space filled by the filesystem in the partition.The Wic-specific option
--extra-spacehas a new alias--extra-filesystem-space.bootimg_pcbios: move Syslinux install into separate functions, to make it easier to add new bootloaders.The Grub bootloader can now be installed with this Wic plugin.
Add the Wic plugin
extra_partitionto install files from the DEPLOY_DIR_IMAGE directory into an extra non-rootfs partition. See the IMAGE_EXTRA_PARTITION_FILES variable for more information.The
--diskidoption was added to allow passing a MS-DOS or GPT-formatted disk IDs for a partition (for example:deadbeef-cafe-babe-f00d-cec2ea4eface).
SDK-related changes:
Include additional information about Meson setting in the SDK environment setup script (host system, CPU family, etc.).
Add Go to SDK_TOOLCHAIN_LANGS, except for the following architecture on which this is not supported:
RISC-V 32 bits (
rv32)PowerPC
Image-based SDKs can now include Zsh completions by adding the
zsh-completion-pkgsfeature to the IMAGE_FEATURES variable in the image recipe.The SDK build is now part of the buildhistory difference analysis (
buildhistory-diffcommand).
Testing-related changes:
bitbake/tests/fetch: Add tests forgitsmwith git-lfs.bitbake/lib/bb/tests/fetch: add a test case to ensure Git shallow fetch works for tag containing slashes.testexport: capture all tests and data from all layers (instead of the OpenEmbedded-Core (OE-Core) layer only).
OEQA:
SDK:
Add a test to sanity check that the generated SDK manifest was parsed correctly and isn’t empty.
Add a test to verify the manifests are generated correctly.
Add helpers to check for and install packages.
Add check that meson has detected the target correctly.
Simplify test specification and discovery:
Introduce the
TESTSDK_CASE_DIRSvariable to specify test directory types, replacing the need to modify thedefault_casesclass member.Discover tests from configured layers using a common discovery pattern (
<LAYER_DIR>/lib/oeqa/<dirname>/cases) where<dirname>is specified inTESTSDK_CASE_DIRS.The “buildtools” directories were renamed to follow the common discovery pattern (
<LAYER_DIR>/lib/oeqa/<dirname>/cases) for consistency across all SDK configurations.
selftest/reproducible: Limit memory used bydiffoscopeto avoid triggering OOM kills.Add tests for the devicetree class.
Tests for the kernel-fit-image class have been reworked and improved.
data.py: addskipIfNotBuildArchdecorator, to skip tests if BUILD_ARCH is not in present in the specified tuple.selftest: add new test for toolchain switching.utils/command: add a fast-pathget_bb_var()that usesbitbake-getvarinstead ofbitbake -ewhen there is notpostconfigargument passed.core/case: add file exists assertion test case.context.py: use TEST_SUITES if set.runqemu: add new test for booting compressed images.General improvements of the parallelization of tests, namely fixing some tests that could spawn an unlimited number of threads leading to OOM kills.
A new SDK test is now running for Go after
gowas added to SDK_TOOLCHAIN_LANGS.Commands sent over SSH (using the
OESSHTargetclass) will now error when an SSH failure occurs. It is possible to ignore these errors by passingignore_ssh_failswhen executing a command.
Utility script changes:
sstate-cache-management: add a--dry-runargumentyocto-check-layer:Expect success for
test_patches_upstream_status. This means that patch files must include anUpstream-Statusto pass with this script.Show the DISTRO used when running the script.
yocto-check-layer class:
Refactor to be extended easily.
Add a
check_network_flagtest that checks that no tasks other than do_fetch can access the network.
send-error-report:Respect URL scheme in server name if it exists.
Drop
--no-sslas the server URL specifies it withhttp://orhttps://.
buildstats.py:Extend disk stats support for NVMe and flexible token count.
Add tracking of network I/O per interface.
buildstats-diff: find last two Buildstats files if none are specified.pybootchartgui:visualize
/proc/net/devnetwork stats in graphs.account for network statistics when calculating extents.
Packaging changes:
Export
debugsourcesin PKGDESTWORK as JSON. The source information used during packaging can be use from other tasks to have more detailed information on the files used during the compilation and improve SPDX accuracy.When using the
ipkandrpmpackage managers, give out more possible reasons about unmatched packages.For example:
E: Package 'catch2' has no installation candidate catch2 is a recipe. Its generated packages are: ['catch2-src', 'catch2-dbg', 'catch2-staticdev', 'catch2-dev', 'catch2-doc'] Either specify a generated package or set ALLOW_EMPTY:${PN} = "1" in catch2 recipepackage.py: replace all files unconditionally when copying debug sources (passing-uto thecpiocommand incopydebugsources()). This improves reproducibility.
LLVM related changes:
Like
gcc-source, the LLVM project sources are part ofwork-sharedunder TMPDIR. The project codebase is large and sharing it offers performance improvements.
SPDX-related changes:
spdx30: Providesoftware_packageUrlfieldspdx30_tasks: Change recipe license to “declared” (instead of “concluded”)create-spdx-2.2: support to override the version of a package in SPDX 2 through SPDX_PACKAGE_VERSION.
devtoolandrecipetoolchanges:Use
lib/oe/license_finderto extract the license from source code.Calculate source paths relative to UNPACKDIR.
Allow
recipe createhandlers to specify bitbake tasks to run.Go recipes are now generated with help of the new go-mod-update-modules class.
Add a new improve_kernel_cve_report.py script in
scripts/contribfor post-processing of kernel CVE data.Handle workspaces for multiconfig.
Fix upgrade for recipes with Git submodules.
Patchtest-related changes:
Security changes:
openssl: add FIPS support. This can be enabled through thefipsPACKAGECONFIG.The default Poky template configuration (local.conf.sample) does not define the
allow-empty-password,empty-root-password, andallow-root-loginin EXTRA_IMAGE_FEATURES anymore.
Toaster changes:
Adapt it for bitbake-setup.
Remove hard dependency on the Poky repository, as its master branch is no longer updated.
cve-checkclass changes:cve-update-db-native: FKIE: use Secondary metric if there is no Primary metric.
New PACKAGECONFIG options for individual recipes:
ppp:l2tp,pptpdropbear:x11(renamed fromenable-x11-forwarding)gdb:source-highlightgstreamer1.0-plugins-bad:analyticsmtd-utils:ubihealthd-serviceopenssl:fipsqemu:sdl-image,pixmanwget:pcre2mesa:asahi,amd,svga,teflon,nouveau,xmlconfigdbus:traditional-activation,message-buscmake:debuggerlibcxx:unwind-crosstiff:lercfreetype:brotligawk:pma-if-64bitx264:ffmpeg,opencl
Systemd related changes:
Enable getty generator by default by adding
serial-getty-generatorto PACKAGECONFIG.Now uses the USE_NLS variable to enable or disable building translations.
Fix deduplicated templates and instance lines in preset files when listing both template and instances in SYSTEMD_SERVICE.
Stop enabling non-standard MAC policy when using the ‘pni-names’ feature (part of DISTRO_FEATURES). Instead, follow what is provided by upstream systemd.
Install
systemd-sysv-installwhen using thesystemd-systemctl-nativerecipe.
sanity class changes:
insane: Move test for invalid PACKAGECONFIG to do_recipe_qa.
Add
unimplemented-ptestdetection for cargo-based tests, allowing to detect when a cargo package has available tests that could be enable with Ptest.Add a test for recipe naming/class mismatches.
Add a sanity test for “bad” gcc installs on Ubuntu 24.04. The host should install
libstdc++-14-devinstead oflibgcc-14-devto avoid build issues when building native with Clang.Drop the
var-undefinedQA check as it was not relevant for the variables it was checking, as those are mandatory by default.
U-boot related changes:
uboot-sign: Add support for setting firmware property in FIT configuration with UBOOT_FIT_CONF_FIRMWARE.
uboot-sign: Add support for signing U-Boot FIT image without an SPL. The SPL_DTB_BINARY variable can be set to an empty string to indicate that no SPL is present.
When built for the RISC-V architecture, read the TUNE_FEATURES variable to automatically set U-boot configuration options (for example
CONFIG_RISCV_ISA_F).Improve the way build directories are split when having multiple configurations listed in UBOOT_CONFIG. This fixes an issue where two or more of these configurations were using the same directory for building (because these were using the same defconfig file).
Miscellaneous changes:
dropbear: Thedropbearkey.servicecan now take extra arguments for key generation, through/etc/default/dropbear.initscripts: addlog_success_msg/log_failure_msg/log_warning_msgfunctions for logging in initscripts.connman:Mark
iptablesandnftablesfeature of PACKAGECONFIG mutually incompatible.Set
dns-backendautomatically tosystemd-resolvedwhensystemd-resolvedis part of DISTRO_FEATURES.
uninative: show errors if installing fails.meson: Allow user to override setup command options by exportingMESON_SETUP_OPTSin a recipe.cmake: Enhance to emit a native toolchain CMake file. This is part of improvements allowing to use
clangin an SDK.Fix the runtime version of several recipes (they now return the effective version instead of a default string like “Unknown”).
module: add
KBUILD_EXTRA_SYMBOLSto the install command.rpm-sequoia: add Ptest support.libunwind: disable installation of tests directory with--disable-tests, which can be installed with thelibunwind-ptestpackage instead.boost: addprocesslibrary to the list of built libraries.base-files: addnsswitch-resolved.conf, only installed ifsystemdandsystemd-resolvedis part of DISTRO_FEATURES.nfs-utils: don’t use signals to shut down the NFS server in the associated initscript, instead userpc.nfsd 0.readline: enable HOME, END, INSERT, and DELETE key bindings ininputrc.Switch to a new sstate-cache CDN (http://sstate.yoctoproject.org).
sstate: Apply a proper umask when fetching from SSTATE_MIRRORS.
kernel-devsrc: make package version consistent with kernel source (by inheriting kernelsrc).externalsrc: Always ask Git for location of
.gitdirectory (may be different from the default${S}/.git).features_check: Add support for REQUIRED_TUNE_FEATURES.
openssh: limit read access tosshd_configfile (set its filemode to0600).barebox-toolsnow installs therk-usb-loaderutility.The setuptools3_legacy class now supports the pep517-backend QA check.
The ccache class now supports using Ccache for native recipes when the local build configuration contains:
ASSUME_PROVIDED += "ccache-native" HOSTTOOLS += "ccache"
python_pep517: use
pyproject-buildinstead of calling the module withnativepython3.dbus-glib: include the binding tools separately into the${PN}-toolspackage.dbus: use the systemd class to handle the unit files of D-Bus.dpkg: add ptest support.shared-mime-info: Now uses the USE_NLS variable to enable building translations.p11-kit: Now uses the USE_NLS variable to enable building translations.babeltrace2: Enable Python pluginsinitramfs-framework: mount a temporary filesystem on/runand move it to the root filesystem directory before callingswitch_root.python3: PassPLATFORM_TRIPLETexplicitly when cross compiling to make the build deterministic instead of letting Python detect the platform triplet (${HOST_ARCH}-${HOST_OS}).pulseaudio: Add theaudiogroup explicitly ifpulseaudio-serveris used.oe/license_finder: Addfind_licenses_upfunction to find licenses upwards until reaching a predefined top directory (as an argument).mesa:Build Mesa’s Asahi tools when
asahiis part of the recipe’s PACKAGECONFIG variable.The
mesarecipe now declares two new PROVIDES for Vulkan and OpenCL ICD. These virtual provider are respectively namedvirtual-opencl-icdandvirtual-vulkan-icd.
mesa-demos: split info tools to a separate packagemesa-demos-info.vte: skip gobject-introspection with Clang on Arm, as it caused build failures.shadow: Increase the maximum group name length from 24 to 32 (default value provided by upstream recipe, was previously hardcoded to 24).udev-extraconf: Speed up themount.shscript by passing the block device of interest toblkidwhen getting partition label names.piglit: enable OpenCL support ifopenclis part of the DISTRO features.
Known Issues in 5.3
N/A
Recipe License changes in 5.3
The following changes have been made to the LICENSE values set by recipes:
Recipe |
Previous value |
New value |
|---|---|---|
|
|
|
|
|
|
|
|
|
|
|
|
|
|
|
|
|
|
|
|
|
|
|
|
Security Fixes in 5.3
The following CVEs have been fixed:
Recipe Upgrades in 5.3
The following recipes have been upgraded:
Recipe |
Previous version(s) |
New version(s) |
|---|---|---|
|
20240827 |
20250807 |
|
1.2.13 |
1.2.14 |
|
1.2.11 |
1.2.14 |
|
1.2.13 |
1.2.14 |
|
1.2.13 |
1.2.14 |
|
1.0.4 |
1.0.6 |
|
1.7.5 |
1.7.6 |
|
2.6.1 |
3.0.3 |
|
2.56.0 |
2.56.4 |
|
2.72e |
2.72 |
|
1.17 |
1.18.1 |
|
2.1.0 |
2.1.2 |
|
2025.02.0 |
2025.11.0 |
|
2025.02.0 |
2025.11.0 |
|
3.6.6 |
3.6.7 |
|
5.2.37 |
5.3 |
|
1.08.1 |
1.08.2 |
|
9.20.11 |
9.20.15 |
|
2.44 |
2.45 |
|
2.44 |
2.45 |
|
2.44 |
2.45 |
|
2.44 |
2.45 |
|
2.44 |
2.45 |
|
1.3.0+git |
1.3.0 |
|
5.79 |
5.85 |
|
3.8.0+git |
3.9.0+git |
|
1.87.0 |
1.89.0 |
|
1.87.0 |
1.89.0 |
|
6.13 |
6.17 |
|
15.0.0 (316baad50b45…) |
15.0.0 |
|
20241223 |
20250419 |
|
1.84.1 |
1.90.0 |
|
0.10.5+cargo-0.83.0 |
0.10.16+cargo-0.91.0 |
|
4.11 |
4.12.1 |
|
3.31.6 |
4.2.0 |
|
3.31.6 |
4.2.0 |
|
1.43 |
1.45 |
|
9.6 |
9.7 |
|
1.2.0 |
1.2.1 |
|
2.41+git |
2.42+git |
|
2.4.11 |
2.4.14 |
|
8.12.1 |
8.17.0 |
|
5.21 |
5.23.2 |
|
5.1 |
5.2 |
|
10.2.2 |
10.2.4 |
|
289 |
306 |
|
1.67 |
1.68 |
|
3.11 |
3.12 |
|
4.22.0 |
4.24.0 |
|
7.5.2 |
7.5.3 |
|
1.22.11 |
1.22.21 |
|
2024.86 |
2025.88 |
|
1.47.1 |
1.47.3 |
|
1.21 |
1.22.2 |
|
0.192 |
0.194 |
|
0.74 |
0.80 |
|
2.8.2 |
2.8.12 |
|
48.3 |
48.5 |
|
1.8.5 |
1.8.10 |
|
6.11 |
6.15 |
|
2.7.2 |
2.7.3 |
|
8.0.2 |
8.1.0 |
|
7.1.2 |
8.0 |
|
1.4.3 |
1.5.0 |
|
11.1.4 |
12.1.0 |
|
2.15.0 |
2.17.1 |
|
5.3.1 |
5.3.2 |
|
14.3.0 |
15.2.0 |
|
14.3.0 |
15.2.0 |
|
14.3.0 |
15.2.0 |
|
14.3.0 |
15.2.0 |
|
14.3.0 |
15.2.0 |
|
14.3.0 |
15.2.0 |
|
14.3.0 |
15.2.0 |
|
4.3.1 |
4.4.0.1 |
|
16.2 |
16.3 |
|
16.2 |
16.3 |
|
16.2 |
16.3 |
|
1.24 |
1.26 |
|
0.23.1 |
0.26 |
|
0.23.1 |
0.26 |
|
10.05.1 |
10.06.0 |
|
2025.3 |
2025.5 |
|
2.49.1 |
2.51.2 |
|
2.84.4 |
2.86.1 |
|
2.84.4 |
2.86.1 |
|
2.80.0 |
2.80.1 |
|
2.41+git |
2.42+git |
|
2.41+git |
2.42+git |
|
2.41+git |
2.42+git |
|
2.41+git |
2.42+git |
|
2.41+git |
2.42+git |
|
1.4.309.0 |
1.4.328.1 |
|
20240823+git |
20250709+git |
|
4.0.0 |
4.0.2 |
|
2.5.5 |
2.5.11 |
|
1.24.6 |
1.25.4 |
|
1.24.6 |
1.25.4 |
|
1.24.6 |
1.25.4 |
|
1.24.6 |
1.25.4 |
|
1.24.6 |
1.25.4 |
|
0.1 (d7b0ac127859…) |
0.1 (8b405629c4a5…) |
|
1.24.6 |
1.25.4 |
|
3.1 |
3.3 |
|
1.24.2 |
2.0.1 |
|
3.11 |
3.12 |
|
48.0 |
49.1 |
|
1.24.13 |
1.26.7 |
|
1.18.6 |
1.26.7 |
|
1.24.13 |
1.26.7 |
|
1.24.13 |
1.26.7 |
|
1.24.13 |
1.26.7 |
|
1.24.13 |
1.26.7 |
|
1.24.13 |
1.26.7 |
|
1.24.13 |
1.26.7 |
|
1.24.13 |
1.26.7 |
|
1.24.13 |
1.26.7 |
|
1.24.13 |
1.26.7 |
|
3.24.43 |
3.24.51 |
|
4.18.1 |
4.18.6 |
|
1.13 |
1.14 |
|
10.4.0 |
11.5.1 |
|
0.393 |
0.399 |
|
2.8 |
2.9 |
|
76-1 |
77-1 |
|
1.30 |
2.1 |
|
1.68 |
1.69 |
|
6.13.0 |
6.17.0 |
|
20240905 |
20250605 |
|
4.17.0 |
4.18.0 |
|
6.9 |
6.17 |
|
1.10.6 |
1.10.8 |
|
2.7.1 |
2.8.0 |
|
2.6.3 |
3.0.1 |
|
0.3+git (c8c1f17867d0…) |
0.3+git (f589e1df2325…) |
|
2.0.30 |
2.0.31 |
|
34.1 |
34.2 |
|
0.0.1+git (311eaaaa473d…) |
0.0.1+git (f60e50e887d3…) |
|
668 |
685 |
|
1.7.0 |
1.7.6 |
|
3.7.9 |
3.8.3 |
|
7.8.2 |
7.8.4 |
|
0+git (18e28496adee…) |
0+git (f2bac7711bec…) |
|
2.75 |
2.77 |
|
3.1.0 |
3.2.0 |
|
0.1.21 |
0.1.23 |
|
0.73.4 |
0.75.0 |
|
2.4.124 |
2.4.128 |
|
20250104-3.1 |
20251016-3.1 |
|
1.13.3 |
1.13.5 |
|
3.4.7 |
3.5.2 |
|
14.3.0 |
15.2.0 |
|
14.3.0 |
15.2.0 |
|
1.11.0 |
1.11.2 |
|
14.3.0 |
15.2.0 |
|
1.9.0 |
1.9.1 |
|
4.4.0+git |
4.5.0+git |
|
1.51 |
1.56 |
|
1.27.1 |
1.29.1 |
|
3.6.2 |
3.6.3 |
|
3.0.1 |
3.1.2 |
|
1.0.1 |
1.0.2 |
|
2.15.0 |
2.15.2 |
|
0.8.4 |
0.8.6 |
|
3.2 |
3.4 |
|
1.3.5 |
1.3.6 |
|
1.6.47 |
1.6.50 |
|
0.5.9 |
0.5.10 |
|
1.19.0 |
1.20.0 |
|
2.59.2 |
2.61.0 |
|
2.32.2 |
2.32.10 |
|
0.21.6 |
0.21.7 |
|
4.9.0 |
4.9.1 |
|
0.7.31 |
0.7.35 |
|
1.84.1 |
1.90.0 |
|
1.1.1 |
1.2.0 |
|
1.2 |
1.3.2 |
|
1.3 |
1.4.1 |
|
1.6.2 |
1.8.3 |
|
0.15.1 |
0.15.3 |
|
1.0.27 |
1.0.29 |
|
1.50.0 |
1.51.0 |
|
1.5.0 |
1.6.0 |
|
1.16.2 |
1.16.3 |
|
6.0.1 |
6.0.2 |
|
2.3.8 |
2.3.9 |
|
1.8.1 |
1.11.0 |
|
2.13.8 |
2.14.6 |
|
0.3.22 |
0.3.23 |
|
1.2.2 |
1.2.3 |
|
1.2.4 |
1.2.5 |
|
1.4.77 |
1.4.81 |
|
20250311 |
20251111 |
|
6.12 |
6.17 |
|
6.12.47+git |
6.12.55+git, 6.16.11+git, 6.17.6+git |
|
6.14+git |
6.18+git |
|
6.12.47+git |
6.12.55+git, 6.16.11+git, 6.17.6+git |
|
6.12.47+git |
6.12.55+git, 6.16.11+git, 6.17.6+git |
|
20.1.0 |
21.1.6 |
|
4.99.4 |
4.99.5 |
|
20250130 |
20250930 |
|
2.13.17 |
2.14.3 |
|
2.13.14 |
2.14.0 |
|
2.13.8 |
2.14.0 |
|
5.4.7 |
5.4.8 |
|
1.4.19 |
1.4.20 |
|
1.4.19 |
1.4.20 |
|
2.13.0 |
2.13.1 |
|
6.13 |
6.15 |
|
4.3 |
4.4 |
|
24.0.7 |
25.2.5 |
|
24.0.7 |
25.2.5 |
|
1.7.0 |
1.9.1 |
|
0.1+git |
1.0 |
|
20240407 |
20250613 |
|
4.2.1 |
4.2.2 |
|
1.32.10 |
1.33.2 |
|
1.8.28 |
1.8.31 |
|
1.2.5+git (c47ad25ea3b4…) |
1.2.5+git (0ccaf0572e9c…) |
|
3.10.1 |
3.10.2 |
|
4.4.0+git |
4.5.0+git |
|
2.8.2 |
2.8.4 |
|
1.65.0 |
1.68.0 |
|
1.12.1 |
1.13.1 |
|
2.15 |
2.18 |
|
1.6 |
1.7 |
|
9.9p2 |
10.2p1 |
|
3.4.2 |
3.5.4 |
|
0.7.0 |
0.9.0 |
|
edk2-stable202411 |
edk2-stable202508 |
|
1.56.2 |
1.57.0 |
|
2.7.6 |
2.8 |
|
0.18.0 |
0.18.0+git |
|
3.13.0 |
3.14.0 |
|
1.0+gitr (fc8179d31904…) |
1.0+gitr (a0a27e528f64…) |
|
1.3.1 |
1.3.2 |
|
0.44.2 |
0.46.4 |
|
2.4.3 |
2.5.1 |
|
1.9.0+git |
1.9.2+git |
|
0.1+git (1f64c654129f…) |
0.1+git (53ae74a36bf1…) |
|
0.0+git (7da464122232…) |
0.0+git (a7c7826bce5c…) |
|
3.13.4 |
3.13.9 |
|
0.20.0 |
0.21.0 |
|
4.0 |
5.0 |
|
1.2.2 |
1.3.0 |
|
2022.6.26 |
2025.04.17 |
|
2025.1.31 |
2025.8.3 |
|
8.1.8 |
8.2.2 |
|
44.0.2 |
45.0.7 |
|
44.0.2 |
45.0.7 |
|
3.0.12 |
3.1.3 |
|
0.33.0 |
0.37.0 |
|
0.21.2 |
0.22 |
|
2025.2 |
2025.8 |
|
3.11.0 |
3.12.0 |
|
24.1.0 |
25.1.0 |
|
0.4.0 |
0.5.0 |
|
6.129.2 |
6.142.2 |
|
3.10 |
3.11 |
|
2.0.0 |
2.1.0 |
|
4.23.0 |
4.25.1 |
|
2024.10.1 |
2025.9.1 |
|
30.4.1 |
30.4.4 |
|
5.3.1 |
6.0.2 |
|
1.3.9 |
1.3.10 |
|
3.7 |
3.9 |
|
1.8.3 |
1.9.4 |
|
0.17.1 |
0.18.0 |
|
2.2.3 |
2.3.4 |
|
24.2 |
25.0 |
|
6.1.0 |
7.0.1 |
|
25.0.1 |
25.2 |
|
1.5.0 |
1.6.0 |
|
2.1.1 |
2.1.3 |
|
1.27.0 |
1.28.0 |
|
3.22.0 |
3.23.0 |
|
3.22.0 |
3.23.0 |
|
2.19.1 |
2.19.2 |
|
3.52.2 |
3.54.5 |
|
25.0.0 |
25.1.0 |
|
3.2.1 |
3.2.4 |
|
8.3.5 |
8.4.2 |
|
0.14.1 |
0.14.2 |
|
2025.1 |
2025.2 |
|
7.1.3 |
7.1.4 |
|
0.36.2 |
0.37.0 |
|
2.32.4 |
2.32.5 |
|
0.22.3 |
0.27.1 |
|
0.18.10 |
0.18.15 |
|
4.9.0 |
4.9.1 |
|
76.0.0 |
80.9.0 |
|
1.11.0 |
1.12.0 |
|
8.2.0 |
8.3.1 |
|
2.0.0 |
2.0.2 |
|
2.2.0 |
3.0.1 |
|
2025.3.13.13 |
2025.9.11.17 |
|
4.12.2 |
4.15.0 |
|
0.2 |
0.3 |
|
4.0.3 |
5.0.0 |
|
2.3.0 |
2.5.0 |
|
24.8.0 |
24.11.1 |
|
0.45.1 |
0.46.1 |
|
0.14.2 |
0.15.1 |
|
1.36.0 |
1.37.1 |
|
3.21.0 |
3.23.0 |
|
9.2.0 |
10.0.6 |
|
9.2.0 |
10.0.6 |
|
9.2.0 |
10.0.6 |
|
0.68 |
0.69 |
|
0.68 |
0.69 |
|
4.09 |
4.10 |
|
4.1 |
4.3 |
|
8.2.13 |
8.3 |
|
2.52 |
2.58 |
|
1.92 |
1.94 |
|
1.2.7 |
1.2.8 |
|
4.20.0 |
4.20.1 |
|
1.7.0 |
1.9.0 |
|
git (032b418a6db8…) |
git (ae1df75b1155…) |
|
2.8 |
2.9 |
|
3.4.4 |
3.4.5 |
|
1.84.1 |
1.90.0 |
|
1.84.1 |
1.90.0 |
|
2.0 |
2.1 |
|
1.11.3 |
1.11.4 |
|
5.0.0 |
5.0.1 |
|
2024.3 |
2025.3 |
|
4.17.3 |
4.18.0 |
|
1.4.309.0 |
1.4.328.1 |
|
1.4.309.0 |
1.4.328.1 |
|
4.6.1 |
4.7.4 |
|
6.12 |
6.17 |
|
0.18.11 |
0.19.04 |
|
1.9.17p1 |
1.9.17p2 |
|
4.3.0 |
4.3.1 |
|
2.7.1 |
2.7.2 |
|
12.7.7 |
12.7.8 |
|
257.6 |
257.8 |
|
257.6 |
257.8 |
|
257.6 |
257.8 |
|
257.6 |
257.8 |
|
5.2 |
5.3 |
|
5.2 |
5.3 |
|
2.0.2 |
2.1.1 |
|
1.8.0+git |
1.9.0 |
|
9.0.1 |
9.0.2 |
|
8.6.16 |
8.6.17 |
|
4.7.0 |
4.7.1 |
|
2.37.0 |
2.38.0 |
|
2025.01 |
2025.10 |
|
2025.01 |
2025.10 |
|
0.10.0 |
0.11.0 |
|
018 |
019 |
|
2.40.4 |
2.41.1 |
|
2.40.4 |
2.41.1 |
|
3.24.0 |
3.25.1 |
|
9.1.1652 |
9.1.1683 |
|
9.1.1652 |
9.1.1683 |
|
1.1.0 |
1.1.1 |
|
0.78.2 |
0.82.1 |
|
1.4.309.0 |
1.4.328.1 |
|
1.4.309.0 |
1.4.328.1 |
|
git (8547ce1022a1…) |
git (d27205d14d01…) |
|
1.4.309.0 |
1.4.328.1 |
|
1.4.309.0 |
1.4.328.1 |
|
1.4.309.0 |
1.4.328.1 |
|
1.4.309.0 |
1.4.328.1 |
|
1.23.1 |
1.24.0 |
|
1.41 |
1.45 |
|
2.48.2 |
2.50.0 |
|
14.0.1 |
14.0.2 |
|
2.21 |
2.23 |
|
2025.02.20 |
2025.10.07 |
|
1.3.4 |
1.4.0 |
|
0.7.5+git |
0.8.0 |
|
2.44 |
2.45 |
|
24.1.6 |
24.1.8 |
|
5.6.4 |
5.8.1 |
Contributors to 5.3
Thanks to the following people who contributed to this release:
Adam Blank
Adam Nilsson
Adrian Freihofer
Ahmad Fatoum
Alejandro Hernandez Samaniego
Aleksandar Nikolic
Alexander Kanavin
Alex Kiernan
Alon Bar-Lev
Alper Ak
Andreas Stergiopoulos
Andrej Valek
Anibal Limon
Ankur Tyagi
Anna-Lena Marx
Antonin Godard
Anuj Mittal
Archana Polampalli
Barne Carstensen
Benjamin Missey
Benjamin Szőke
Bo Sun
Bruce Ashfield
Carlos Sánchez de La Lama
Changqing Li
Chen Qi
Chris Laplante
Christian Lindeberg
Christos Gavros
Daisuke Yamane
Daniel McGregor
Daniel Turull
Daniel Wagenknecht
Dan McGregor
Dario Binacchi
David Reyna
Deepak Rathore
Deepesh Varatharajan
denisova-ok
Denys Dmytriyenko
Diego de los Santos
Diego Sueiro
Divya Chellam
Dixit Parmar
Dmitry Baryshkov
Enrico Jörns
Enrico Scholz
Erick Shepherd
Erik Lindsten
Etienne Cordonnier
Fabio Estevam
Falk Bauer
Gregor Herburger
Guðni Már Gilbert
Gyorgy Sarvari
Haixiao Yan
Harish Sadineni
Hiago De Franco
hongxu
Hongxu Jia
Ines KCHELFI
Isaac True
Jaeyoon Jung
Jamin Lin
Jan Vermaete
Jason M. Bills
Jason Schonberg
Jayasurya Maganuru
Jeroen Hofstee
Jiaying Song
Jimmy Ho
Jinfeng Wang
João Henrique Ferreira de Freitas
Joao Marcos Costa
João Marcos Costa
Johannes Schneider
Jonathan Schnitzler
Jon Mason
Jörg Sommer
Jose Quaresma
Joshua Watt
Julian Haller
Kai Kang
Kavinaya S
Keerthivasan Raghavan
Khang D Nguyen
Khem Raj
Koch, Stefan
Koen Kooi
Kyungjik Min
Lamine REHAHLIA
Lee Chee Yang
leimaohui
Lei Maohui
Leon Anavi
Leonard Anderweit
Libo Chen
Liu Yiding
Li Wang
Louis Rannou
Luca Fancellu
Madhu Marri
Manuel Leonhardt
Marco Cavallini
Mark Asselstine
Mark Hatle
Markus Kurz
Markus Volk
Martin Jansa
Martin Siegumfeldt
Mathieu Dubois-Briand
Michael Halstead
Michael Jeanson
Michael Opdenacker
Michael Tretter
Michal Sieron
Mike Crowe
Mike Looijmans
Mikko Rapeli
Ming Liu
Mingli Yu
Moritz Haase
NeilBrown
Nguyen Dat Tho
Nikhil R
Niko Mauno
Ola x Nilsson
Olga Denisova
Osama Abdelkader
Osose Itua
Ovidiu Panait
Patrick Vogelaar
Patrick Williams
Patryk Seregiet
Paul Barker
Paul Gortmaker
Pedro Ferreira
Per x Johansson
Peter Kjellerstedt
Peter Marko
Peter Tatrai
Petr Vorel
Philip Lorenz
Philippe-Alexandre Mathieu
Pierre-Loup GOSSE
Poonam Jadhav
Praveen Kumar
Priyal Doshi
Quentin Schulz
rajmohan r
Randolph Sapp
Randy MacLeod
Raphael Schlarb
Rasmus Villemoes
Ricardo Salveti
Ricardo Simoes
Richard Grünert
Richard Purdie
Robbin Van Damme
Robert P. J. Day
Robert Tiemann
Robert Yang
Rogerio Guerra Borin
Ross Burton
Ryan Eatmon
Samuli Piippo
Sandeep Gundlupet Raju
Saravanan
Siddharth Doshi
Simone Weiß
Soumya Sambu
Stefan Eichenberger
Stefan Koch
Steffen Greber
Steve Sakoman
Talel BELHAJ SALEM
Thomas Perrot
Thune Tran
Tim Orling
Tobias Pistora
Tom Hochstein
Trevor Gamblin
Trevor Woerner
Tudor Ambarus
Uwe Kleine-König
Veeresh Kadasani
Victor Kamensky
Vijay Anusuri
Vincent Davis Jr
Vishwas Udupa
Vivek Puar
Vyacheslav Yurkov
Walter Werner SCHNEIDER
Wang Mingyu
Weisser, Pascal.ext
Yannic Moog
Yash Shinde
Yi Zhao
Yoann Congal
Yogesh Tyagi
Yogita Urade
Zhang Peng
Zoltan Boszormenyi
Zoltán Böszörményi
Repositories / Downloads for Yocto-5.3
yocto-docs
Repository Location: https://git.yoctoproject.org/yocto-docs
Branch: whinlatter
Tag: yocto-5.3
Git Revision: 79cd33b06e87c04e4f873a5afd9d53714bc5047f
Release Artefact: yocto-docs-79cd33b06e87c04e4f873a5afd9d53714bc5047f
sha: f2a353847243370d6924ea83542b055ee8098c51d4875b6a9b2cee79b98c0f29
Download Locations:
openembedded-core
Repository Location: https://git.openembedded.org/openembedded-core
Branch: whinlatter
Tag: yocto-5.3
Git Revision: 8519978592483bb096ed5192fff7af6c887b799e
Release Artefact: oecore-8519978592483bb096ed5192fff7af6c887b799e
sha: 3b23d8a56a2f6e3872ec01272a76e3551ac1eab001f81c9abc680ce415aa888d
Download Locations:
meta-yocto
Repository Location: https://git.yoctoproject.org/meta-yocto
Branch: whinlatter
Tag: yocto-5.3
Git Revision: d02d3faaf4d6075ea03e9eb47654ec7639f929a0
Release Artefact: meta-yocto-d02d3faaf4d6075ea03e9eb47654ec7639f929a0
sha: e2a69bf93466cd010fd14e4f1b2bb5f45da165b00eb1fbf7987541d7a9378d47
Download Locations:
meta-mingw
Repository Location: https://git.yoctoproject.org/meta-mingw
Branch: whinlatter
Tag: yocto-5.3
Git Revision: :yocto_git:` </meta-mingw/commit/?id=00323de97e397d4f6734ef2191806616989f5e10>`
Release Artefact: meta-mingw-00323de97e397d4f6734ef2191806616989f5e10
sha: c9a70539b12c0642596fde6a2766d4a6a8fec8b2a366453fb6473363127a1c77
Download Locations:
bitbake
Repository Location: https://git.openembedded.org/bitbake
Branch: 2.16
Tag: yocto-5.3
Git Revision: 720df1a53452983c1c832f624490e255cf389204
Release Artefact: bitbake-720df1a53452983c1c832f624490e255cf389204
sha: 08a5d8914b59e904a805fbf0e76058dfeddd49f4a022298a3c1485b98233db24
Download Locations:
Release notes for Yocto-5.3.1 (Whinlatter)
Users of Alma 9, Rocky 9 and Centos Stream 9 rolling releases have seen obtuse failures in the execution of tar in various tasks after recent host distro updates. These newer versions of tar contain a CVE fix which uses a new glibc call/syscall (openat2). The fix is to update to a newer pseudo version which handles this syscall. This is not included in this stable release but we aim to include it in the next one.
Security Fixes in Yocto-5.3.1
binutils: Fix CVE-2025-11494, CVE-2025-11839 and CVE-2025-11840
cups: Fix CVE-2025-58436 and CVE-2025-61915
dropbear: Fix CVE-2019-6111
glib-2.0: Fix CVE-2025-13601, CVE-2025-14087 and CVE-2025-14512
gnutls: Fix CVE-2025-9820
go: Fix CVE-2025-61727 and CVE-2025-61729
libarchive: Fix CVE-2025-60753
libpcap: Fix CVE-2025-11961 and CVE-2025-11964
libpng: Fix CVE-2025-64505, CVE-2025-64506, CVE-2025-64720, CVE-2025-65018 and CVE-2025-66293
linux-yocto/6.12: Ignore CVE-2023-7324, CVE-2024-57995, CVE-2025-21833, CVE-2025-22105, CVE-2025-22107, CVE-2025-22121, CVE-2025-23129, CVE-2025-23130, CVE-2025-37803, CVE-2025-37860, CVE-2025-38643, CVE-2025-38678, CVE-2025-39678, CVE-2025-39981, CVE-2025-40014, CVE-2025-40026, CVE-2025-40027, CVE-2025-40028, CVE-2025-40029, CVE-2025-40030, CVE-2025-40031, CVE-2025-40032, CVE-2025-40033, CVE-2025-40034, CVE-2025-40035, CVE-2025-40036, CVE-2025-40037, CVE-2025-40038, CVE-2025-40039, CVE-2025-40040, CVE-2025-40041, CVE-2025-40042, CVE-2025-40043, CVE-2025-40044, CVE-2025-40045, CVE-2025-40046, CVE-2025-40047, CVE-2025-40048, CVE-2025-40049, CVE-2025-40050, CVE-2025-40051, CVE-2025-40052, CVE-2025-40053, CVE-2025-40055, CVE-2025-40056, CVE-2025-40057, CVE-2025-40058, CVE-2025-40059, CVE-2025-40060, CVE-2025-40061, CVE-2025-40062, CVE-2025-40063, CVE-2025-40066, CVE-2025-40067, CVE-2025-40068, CVE-2025-40069, CVE-2025-40070, CVE-2025-40071, CVE-2025-40072, CVE-2025-40073, CVE-2025-40076, CVE-2025-40077, CVE-2025-40078, CVE-2025-40079, CVE-2025-40080, CVE-2025-40081, CVE-2025-40082, CVE-2025-40083, CVE-2025-40084, CVE-2025-40085, CVE-2025-40087, CVE-2025-40088, CVE-2025-40089, CVE-2025-40090, CVE-2025-40091, CVE-2025-40092, CVE-2025-40093, CVE-2025-40094, CVE-2025-40095, CVE-2025-40096, CVE-2025-40097, CVE-2025-40099, CVE-2025-40100, CVE-2025-40101, CVE-2025-40103, CVE-2025-40104, CVE-2025-40105, CVE-2025-40106, CVE-2025-40107, CVE-2025-40108, CVE-2025-40109, CVE-2025-40110, CVE-2025-40111, CVE-2025-40112, CVE-2025-40115, CVE-2025-40116, CVE-2025-40117, CVE-2025-40118, CVE-2025-40119, CVE-2025-40120, CVE-2025-40121, CVE-2025-40122, CVE-2025-40123, CVE-2025-40124, CVE-2025-40125, CVE-2025-40126, CVE-2025-40127, CVE-2025-40129, CVE-2025-40131, CVE-2025-40132, CVE-2025-40133, CVE-2025-40134, CVE-2025-40137, CVE-2025-40138, CVE-2025-40140, CVE-2025-40141, CVE-2025-40142, CVE-2025-40143, CVE-2025-40144, CVE-2025-40145, CVE-2025-40148, CVE-2025-40151, CVE-2025-40152, CVE-2025-40153, CVE-2025-40154, CVE-2025-40155, CVE-2025-40156, CVE-2025-40157, CVE-2025-40159, CVE-2025-40160, CVE-2025-40161, CVE-2025-40162, CVE-2025-40163, CVE-2025-40165, CVE-2025-40166, CVE-2025-40167, CVE-2025-40169, CVE-2025-40171, CVE-2025-40172, CVE-2025-40173, CVE-2025-40174, CVE-2025-40175, CVE-2025-40176, CVE-2025-40177, CVE-2025-40178, CVE-2025-40179, CVE-2025-40180, CVE-2025-40181, CVE-2025-40182, CVE-2025-40183, CVE-2025-40184, CVE-2025-40185, CVE-2025-40186, CVE-2025-40187, CVE-2025-40188, CVE-2025-40189, CVE-2025-40190, CVE-2025-40191, CVE-2025-40192, CVE-2025-40193, CVE-2025-40194, CVE-2025-40195, CVE-2025-40196, CVE-2025-40197, CVE-2025-40198, CVE-2025-40199, CVE-2025-40200, CVE-2025-40201, CVE-2025-40202, CVE-2025-40203, CVE-2025-40204, CVE-2025-40205, CVE-2025-40206, CVE-2025-40207, CVE-2025-40208, CVE-2025-40209, CVE-2025-40211, CVE-2025-40212 and CVE-2025-40213
python3-urllib3: Fix CVE-2025-66418
python3: Fix CVE-2025-6075 and CVE-2025-12084
sqlite3: Fix CVE-2025-3277, CVE-2025-6965 and CVE-2025-29087
Fixes in Yocto-5.3.1
bitbake
bin: Hide os.fork() deprecation warning in all bitbake scripts
bitbake-layers: Also hide os.fork() deprecation warning
meta-yocto
poky.conf: bump version for 5.3.1
openembedded-core
build-appliance-image: Update to whinlatter head revisions
ccache: upgrade to 4.12.2
cross.bbclass: Propagate dependencies to outhash
cups: upgrade to 2.4.15
curl: Use host CA bundle by default for native(sdk) builds
cve-update: Avoid NFS caching issues
e2fsprogs: misc/create_inode.c: Fix for file larger than 2GB
ell: upgrade to 0.80
enchant2: upgrade to 2.8.14
glib-2.0: Upgrade to 2.86.1
glib-2.0: upgrade to 2.86.3
go: upgrade to 1.25.5
gst-devtools: upgrade to 1.26.7
gst-examples: upgrade to 1.26.7
gstreamer1.0: upgrade to 1.26.7
gstreamer1.0-libav: upgrade to 1.26.7
gstreamer1.0-plugins-bad: upgrade to 1.26.7
gstreamer1.0-plugins-base: upgrade to 1.26.7
gstreamer1.0-plugins-good: upgrade to 1.26.7
gstreamer1.0-plugins-ugly: upgrade to 1.26.7
gstreamer1.0-python: upgrade to 1.26.7
gstreamer1.0-rtsp-server: upgrade to 1.26.7
gstreamer1.0-vaapi: upgrade to 1.26.7
libarchive: upgrade to 3.8.3
libarchive: upgrade to 3.8.4
libpcap: upgrade to 1.10.6
libpng: upgrade to 1.6.52
libssh2: fix regression in KEX method validation (GH-1553)
libxmlb: upgrade to 0.3.24
linux-yocto/6.12: update to v6.12.60
llvm/clang: Upgrade to 21.1.7
mesa: upgrade to 25.2.8
python3: upgrade to 3.13.11
spdx30_tasks: Fix SPDX_CUSTOM_ANNOTATION_VARS implementation
xserver-nodm-init: avoid race condition related to udev
yocto-docs
Add the sphinx-copybutton extension
Fix bitbake version mapping for whinlatter
Makefile: fix rsvg-convert –format capitalization
brief-yoctoprojectqs/index.rst: fix improper code-block indentation
brief-yoctoprojectqs/index.rst: switch shell block to to console/text blocks
brief-yoctoprojectqs/index.rst: update available bitbake-setup configurations
brief-yoctoprojectqs: specify what “recent Ubuntu Linux distribution” is
dev-manual/limiting-resources.rst: update how to track pressure info
make sure Quick Build section and System Requirements are in sync
migration-guide: update 5.3 release notes download section
migration-guides/release-notes-5.3.rst: add contributors
migration-guides/release-notes-5.3.rst: add fixed cve
migration-guides/release-notes-5.3.rst: add license updates
migration-guides/release-notes-5.3.rst: add recipe upgrades
migration-guides/release-notes-5.3.rst: latest changes from master
overview-manual/concepts.rst: update the cross-development toolchain section
poky.yaml.in: add DISTRO_RELEASE_SERIES
ref-manual/classes.rst: document the image-container class
ref-manual/faq.rst: add Q&A on third-party vuln scanning tools
ref-manual/system-requirements.rst: add RockyLinux install instructions
ref-manual/system-requirements.rst: fix AlmaLinux PDF build
ref-manual/tasks.rst: document the do_list_image_features task
ref-manual/variables.rst: document WESTON_USER/WESTON_USER_HOME variables
ref-manual: Document SPDX 3.0.1 variables
set_versions.py: add wrynose as devbranch
tools/build-docs-container: add CentOS Stream 9 support
tools/build-docs-container: move container files in their own directory
tools: add gen-cve-release-notes
tools: ubuntu_docs: remove duplicate python3-saneyaml
Known Issues in Yocto-5.3.1
N/A
Contributors to Yocto-5.3.1
Thanks to the following people who contributed to this release:
Alexander Kanavin
Ankur Tyagi
Antonin Godard
Bruce Ashfield
Chen Qi
Deepesh Varatharajan
Dmitry Baryshkov
Gyorgy Sarvari
Jayasurya Maganuru
Jörg Sommer
Lee Chee Yang
Martin Jansa
Mathieu Dubois-Briand
Moritz Haase
Paul Barker
Peter Marko
Quentin Schulz
Robert Yang
Stefano Tondo
Vijay Anusuri
Wang Mingyu
Yash Shinde
Yoann Congal
Zhang Peng
Repositories / Downloads for Yocto-5.3.1
yocto-docs
Repository Location: https://git.yoctoproject.org/yocto-docs
Branch: whinlatter
Tag: yocto-5.3.1
Git Revision: 102a33294e63a5581c413555040f790161fc80ff
Release Artefact: yocto-docs-102a33294e63a5581c413555040f790161fc80ff
sha: 377b828c5dbf82b8a918360a52ff7b4122d37fd8d13d0451738edd57a1924083
Download Locations:
openembedded-core
Repository Location: https://git.openembedded.org/openembedded-core
Branch: whinlatter
Tag: yocto-5.3.1
Git Revision: dd10706cfafb5574b7cf316fca2300d166ef71b0
Release Artefact: oecore-dd10706cfafb5574b7cf316fca2300d166ef71b0
sha: b3182231a4a10f57215289b0f42ebe658ee9b1ed0b0bfe414d846a778ff7c598
Download Locations:
meta-yocto
Repository Location: https://git.yoctoproject.org/meta-yocto
Branch: whinlatter
Tag: yocto-5.3.1
Git Revision: 6973ca663aaa9c3ab517ee960ab7985a5bf54c07
Release Artefact: meta-yocto-6973ca663aaa9c3ab517ee960ab7985a5bf54c07
sha: 0e126b092e74bb217416d9603002b20db8e552b45b23d634cdae955fd089dfe2
Download Locations:
meta-mingw
Repository Location: https://git.yoctoproject.org/meta-mingw
Branch: whinlatter
Tag: yocto-5.3.1
Git Revision: 00323de97e397d4f6734ef2191806616989f5e10
Release Artefact: meta-mingw-00323de97e397d4f6734ef2191806616989f5e10
sha: c9a70539b12c0642596fde6a2766d4a6a8fec8b2a366453fb6473363127a1c77
Download Locations:
bitbake
Repository Location: https://git.openembedded.org/bitbake
Branch: 2.16
Tag: yocto-5.3.1
Git Revision: 663021740bc086bd959a8457ad9ddb6da52a8278
Release Artefact: bitbake-663021740bc086bd959a8457ad9ddb6da52a8278
sha: a290072317e5c533fafd18608e61c9ebe9acf24d2ce46b43ba99df42c77e7073
Download Locations:
Release notes for Yocto-5.3.2 (Whinlatter)
Security Fixes in Yocto-5.3.2
avahi: Fix CVE-2025-68276, CVE-2025-68468, CVE-2025-68471 and CVE-2026-24401
curl: Fix CVE-2025-13034, CVE-2025-14017, CVE-2025-14524, CVE-2025-14819, CVE-2025-15079 and CVE-2025-15224
dropbear: Fix CVE-2025-14282
expat: Fix CVE-2026-24515 and CVE-2026-25210
ffmpeg: Ignore CVE-2023-51791, CVE-2023-51793, CVE-2023-51794, CVE-2023-51795, CVE-2023-51796, CVE-2023-51797, CVE-2023-51798, CVE-2025-22921, CVE-2025-25468 and CVE-2025-25469
glib-2.0: Fix CVE-2026-0988
glibc: Fix CVE-2025-15281, CVE-2026-0861 and CVE-2026-0915
gnupg: Fix CVE-2025-68973
go: Fix CVE-2025-61730, CVE-2025-61731, CVE-2025-61728, CVE-2025-61726, CVE-2025-61732, CVE-2025-68119 and CVE-2025-68121
grub: Fix CVE-2025-54770, CVE-2025-61661, CVE-2025-61662, CVE-2025-61663 and CVE-2025-61664
inetutils: Fix CVE-2026-24061
libarchive: Fix CVE-2025-60753
libpng: Fix CVE-2026-22695 and CVE-2026-22801
libsndfile1: Fix CVE-2025-56226
libtasn1: Fix CVE-2025-13151
libxml2: Fix CVE-2026-0989, CVE-2026-0990 and CVE-2026-0992
linux-yocto/6.12: Ignore CVE-2021-47620, CVE-2022-48853, CVE-2022-48950, CVE-2022-50583, CVE-2022-50614, CVE-2022-50615, CVE-2022-50616, CVE-2022-50617, CVE-2022-50618, CVE-2022-50619, CVE-2022-50620, CVE-2022-50621, CVE-2022-50622, CVE-2022-50623, CVE-2022-50624, CVE-2022-50625, CVE-2022-50626, CVE-2022-50627, CVE-2022-50628, CVE-2022-50629, CVE-2022-50630, CVE-2022-50631, CVE-2022-50632, CVE-2022-50633, CVE-2022-50634, CVE-2022-50635, CVE-2022-50636, CVE-2022-50637, CVE-2022-50638, CVE-2022-50639, CVE-2022-50640, CVE-2022-50641, CVE-2022-50642, CVE-2022-50643, CVE-2022-50644, CVE-2022-50645, CVE-2022-50646, CVE-2022-50647, CVE-2022-50648, CVE-2022-50649, CVE-2022-50650, CVE-2022-50651, CVE-2022-50652, CVE-2022-50653, CVE-2022-50654, CVE-2022-50655, CVE-2022-50656, CVE-2022-50657, CVE-2022-50658, CVE-2022-50659, CVE-2022-50660, CVE-2022-50661, CVE-2022-50662, CVE-2022-50663, CVE-2022-50664, CVE-2022-50665, CVE-2022-50666, CVE-2022-50667, CVE-2022-50668, CVE-2022-50669, CVE-2022-50670, CVE-2022-50671, CVE-2022-50672, CVE-2022-50673, CVE-2022-50674, CVE-2022-50675, CVE-2022-50676, CVE-2022-50677, CVE-2022-50678, CVE-2022-50679, CVE-2022-50697, CVE-2022-50698, CVE-2022-50699, CVE-2022-50700, CVE-2022-50701, CVE-2022-50702, CVE-2022-50703, CVE-2022-50704, CVE-2022-50705, CVE-2022-50706, CVE-2022-50707, CVE-2022-50708, CVE-2022-50709, CVE-2022-50710, CVE-2022-50711, CVE-2022-50712, CVE-2022-50713, CVE-2022-50714, CVE-2022-50715, CVE-2022-50716, CVE-2022-50717, CVE-2022-50718, CVE-2022-50719, CVE-2022-50720, CVE-2022-50721, CVE-2022-50722, CVE-2022-50723, CVE-2022-50724, CVE-2022-50725, CVE-2022-50726, CVE-2022-50727, CVE-2022-50728, CVE-2022-50729, CVE-2022-50730, CVE-2022-50731, CVE-2022-50732, CVE-2022-50733, CVE-2022-50734, CVE-2022-50735, CVE-2022-50736, CVE-2022-50737, CVE-2022-50738, CVE-2022-50739, CVE-2022-50740, CVE-2022-50741, CVE-2022-50742, CVE-2022-50743, CVE-2022-50744, CVE-2022-50745, CVE-2022-50746, CVE-2022-50747, CVE-2022-50748, CVE-2022-50749, CVE-2022-50750, CVE-2022-50751, CVE-2022-50752, CVE-2022-50753, CVE-2022-50754, CVE-2022-50755, CVE-2022-50756, CVE-2022-50757, CVE-2022-50758, CVE-2022-50759, CVE-2022-50760, CVE-2022-50761, CVE-2022-50762, CVE-2022-50763, CVE-2022-50764, CVE-2022-50765, CVE-2022-50766, CVE-2022-50767, CVE-2022-50768, CVE-2022-50769, CVE-2022-50770, CVE-2022-50771, CVE-2022-50772, CVE-2022-50773, CVE-2022-50774, CVE-2022-50775, CVE-2022-50776, CVE-2022-50777, CVE-2022-50778, CVE-2022-50779, CVE-2022-50780, CVE-2022-50781, CVE-2022-50782, CVE-2022-50783, CVE-2022-50784, CVE-2022-50785, CVE-2022-50786, CVE-2022-50809, CVE-2022-50810, CVE-2022-50811, CVE-2022-50812, CVE-2022-50813, CVE-2022-50814, CVE-2022-50815, CVE-2022-50816, CVE-2022-50817, CVE-2022-50818, CVE-2022-50819, CVE-2022-50820, CVE-2022-50821, CVE-2022-50822, CVE-2022-50823, CVE-2022-50824, CVE-2022-50825, CVE-2022-50826, CVE-2022-50827, CVE-2022-50828, CVE-2022-50829, CVE-2022-50830, CVE-2022-50832, CVE-2022-50833, CVE-2022-50834, CVE-2022-50835, CVE-2022-50836, CVE-2022-50837, CVE-2022-50838, CVE-2022-50839, CVE-2022-50840, CVE-2022-50841, CVE-2022-50842, CVE-2022-50843, CVE-2022-50844, CVE-2022-50845, CVE-2022-50846, CVE-2022-50847, CVE-2022-50848, CVE-2022-50849, CVE-2022-50850, CVE-2022-50851, CVE-2022-50852, CVE-2022-50853, CVE-2022-50854, CVE-2022-50855, CVE-2022-50856, CVE-2022-50857, CVE-2022-50858, CVE-2022-50859, CVE-2022-50860, CVE-2022-50861, CVE-2022-50862, CVE-2022-50863, CVE-2022-50864, CVE-2022-50865, CVE-2022-50866, CVE-2022-50867, CVE-2022-50868, CVE-2022-50869, CVE-2022-50870, CVE-2022-50871, CVE-2022-50872, CVE-2022-50873, CVE-2022-50874, CVE-2022-50875, CVE-2022-50876, CVE-2022-50877, CVE-2022-50878, CVE-2022-50879, CVE-2022-50880, CVE-2022-50881, CVE-2022-50882, CVE-2022-50883, CVE-2022-50884, CVE-2022-50885, CVE-2022-50886, CVE-2022-50887, CVE-2022-50888, CVE-2022-50889, CVE-2023-53339, CVE-2023-53742, CVE-2023-53743, CVE-2023-53744, CVE-2023-53745, CVE-2023-53746, CVE-2023-53747, CVE-2023-53748, CVE-2023-53750, CVE-2023-53751, CVE-2023-53752, CVE-2023-53753, CVE-2023-53754, CVE-2023-53755, CVE-2023-53756, CVE-2023-53757, CVE-2023-53758, CVE-2023-53759, CVE-2023-53760, CVE-2023-53761, CVE-2023-53762, CVE-2023-53763, CVE-2023-53764, CVE-2023-53765, CVE-2023-53766, CVE-2023-53767, CVE-2023-53768, CVE-2023-53769, CVE-2023-53777, CVE-2023-53778, CVE-2023-53780, CVE-2023-53781, CVE-2023-53782, CVE-2023-53783, CVE-2023-53784, CVE-2023-53785, CVE-2023-53786, CVE-2023-53787, CVE-2023-53788, CVE-2023-53789, CVE-2023-53790, CVE-2023-53791, CVE-2023-53792, CVE-2023-53793, CVE-2023-53794, CVE-2023-53795, CVE-2023-53796, CVE-2023-53797, CVE-2023-53798, CVE-2023-53799, CVE-2023-53800, CVE-2023-53801, CVE-2023-53802, CVE-2023-53803, CVE-2023-53804, CVE-2023-53806, CVE-2023-53807, CVE-2023-53808, CVE-2023-53809, CVE-2023-53810, CVE-2023-53811, CVE-2023-53812, CVE-2023-53813, CVE-2023-53814, CVE-2023-53815, CVE-2023-53816, CVE-2023-53817, CVE-2023-53818, CVE-2023-53819, CVE-2023-53820, CVE-2023-53821, CVE-2023-53822, CVE-2023-53823, CVE-2023-53824, CVE-2023-53825, CVE-2023-53826, CVE-2023-53827, CVE-2023-53828, CVE-2023-53829, CVE-2023-53830, CVE-2023-53831, CVE-2023-53832, CVE-2023-53833, CVE-2023-53834, CVE-2023-53836, CVE-2023-53837, CVE-2023-53838, CVE-2023-53839, CVE-2023-53840, CVE-2023-53841, CVE-2023-53842, CVE-2023-53843, CVE-2023-53844, CVE-2023-53845, CVE-2023-53846, CVE-2023-53847, CVE-2023-53848, CVE-2023-53849, CVE-2023-53850, CVE-2023-53851, CVE-2023-53852, CVE-2023-53853, CVE-2023-53854, CVE-2023-53855, CVE-2023-53856, CVE-2023-53857, CVE-2023-53858, CVE-2023-53859, CVE-2023-53860, CVE-2023-53861, CVE-2023-53862, CVE-2023-53863, CVE-2023-53864, CVE-2023-53865, CVE-2023-53866, CVE-2023-53867, CVE-2023-53986, CVE-2023-53987, CVE-2023-53988, CVE-2023-53989, CVE-2023-53990, CVE-2023-53991, CVE-2023-53992, CVE-2023-53993, CVE-2023-53994, CVE-2023-53995, CVE-2023-53996, CVE-2023-53997, CVE-2023-53998, CVE-2023-53999, CVE-2023-54000, CVE-2023-54001, CVE-2023-54002, CVE-2023-54003, CVE-2023-54004, CVE-2023-54005, CVE-2023-54006, CVE-2023-54007, CVE-2023-54008, CVE-2023-54009, CVE-2023-54010, CVE-2023-54011, CVE-2023-54012, CVE-2023-54013, CVE-2023-54014, CVE-2023-54015, CVE-2023-54016, CVE-2023-54017, CVE-2023-54018, CVE-2023-54019, CVE-2023-54020, CVE-2023-54021, CVE-2023-54022, CVE-2023-54023, CVE-2023-54024, CVE-2023-54025, CVE-2023-54026, CVE-2023-54027, CVE-2023-54028, CVE-2023-54030, CVE-2023-54031, CVE-2023-54032, CVE-2023-54033, CVE-2023-54034, CVE-2023-54035, CVE-2023-54036, CVE-2023-54037, CVE-2023-54038, CVE-2023-54039, CVE-2023-54040, CVE-2023-54041, CVE-2023-54042, CVE-2023-54043, CVE-2023-54044, CVE-2023-54045, CVE-2023-54046, CVE-2023-54047, CVE-2023-54048, CVE-2023-54049, CVE-2023-54050, CVE-2023-54051, CVE-2023-54052, CVE-2023-54053, CVE-2023-54055, CVE-2023-54056, CVE-2023-54057, CVE-2023-54058, CVE-2023-54059, CVE-2023-54060, CVE-2023-54062, CVE-2023-54063, CVE-2023-54064, CVE-2023-54065, CVE-2023-54066, CVE-2023-54067, CVE-2023-54068, CVE-2023-54069, CVE-2023-54070, CVE-2023-54071, CVE-2023-54072, CVE-2023-54073, CVE-2023-54074, CVE-2023-54075, CVE-2023-54076, CVE-2023-54077, CVE-2023-54078, CVE-2023-54079, CVE-2023-54080, CVE-2023-54081, CVE-2023-54083, CVE-2023-54084, CVE-2023-54085, CVE-2023-54086, CVE-2023-54087, CVE-2023-54088, CVE-2023-54089, CVE-2023-54090, CVE-2023-54091, CVE-2023-54092, CVE-2023-54093, CVE-2023-54094, CVE-2023-54095, CVE-2023-54096, CVE-2023-54097, CVE-2023-54098, CVE-2023-54099, CVE-2023-54100, CVE-2023-54101, CVE-2023-54102, CVE-2023-54104, CVE-2023-54105, CVE-2023-54106, CVE-2023-54107, CVE-2023-54108, CVE-2023-54109, CVE-2023-54110, CVE-2023-54111, CVE-2023-54112, CVE-2023-54113, CVE-2023-54114, CVE-2023-54115, CVE-2023-54116, CVE-2023-54117, CVE-2023-54118, CVE-2023-54119, CVE-2023-54120, CVE-2023-54121, CVE-2023-54122, CVE-2023-54123, CVE-2023-54124, CVE-2023-54125, CVE-2023-54126, CVE-2023-54127, CVE-2023-54128, CVE-2023-54129, CVE-2023-54130, CVE-2023-54131, CVE-2023-54132, CVE-2023-54133, CVE-2023-54134, CVE-2023-54135, CVE-2023-54136, CVE-2023-54137, CVE-2023-54138, CVE-2023-54139, CVE-2023-54140, CVE-2023-54141, CVE-2023-54142, CVE-2023-54143, CVE-2023-54144, CVE-2023-54145, CVE-2023-54146, CVE-2023-54147, CVE-2023-54148, CVE-2023-54149, CVE-2023-54150, CVE-2023-54151, CVE-2023-54152, CVE-2023-54153, CVE-2023-54154, CVE-2023-54155, CVE-2023-54156, CVE-2023-54157, CVE-2023-54158, CVE-2023-54159, CVE-2023-54160, CVE-2023-54162, CVE-2023-54164, CVE-2023-54165, CVE-2023-54166, CVE-2023-54167, CVE-2023-54168, CVE-2023-54169, CVE-2023-54170, CVE-2023-54171, CVE-2023-54172, CVE-2023-54173, CVE-2023-54174, CVE-2023-54175, CVE-2023-54176, CVE-2023-54177, CVE-2023-54178, CVE-2023-54179, CVE-2023-54180, CVE-2023-54181, CVE-2023-54182, CVE-2023-54183, CVE-2023-54184, CVE-2023-54185, CVE-2023-54186, CVE-2023-54187, CVE-2023-54188, CVE-2023-54189, CVE-2023-54190, CVE-2023-54191, CVE-2023-54192, CVE-2023-54193, CVE-2023-54194, CVE-2023-54195, CVE-2023-54196, CVE-2023-54197, CVE-2023-54198, CVE-2023-54199, CVE-2023-54200, CVE-2023-54201, CVE-2023-54202, CVE-2023-54203, CVE-2023-54204, CVE-2023-54205, CVE-2023-54206, CVE-2023-54207, CVE-2023-54208, CVE-2023-54209, CVE-2023-54210, CVE-2023-54211, CVE-2023-54213, CVE-2023-54214, CVE-2023-54215, CVE-2023-54216, CVE-2023-54217, CVE-2023-54218, CVE-2023-54219, CVE-2023-54220, CVE-2023-54221, CVE-2023-54222, CVE-2023-54223, CVE-2023-54224, CVE-2023-54225, CVE-2023-54226, CVE-2023-54227, CVE-2023-54228, CVE-2023-54229, CVE-2023-54230, CVE-2023-54231, CVE-2023-54232, CVE-2023-54233, CVE-2023-54234, CVE-2023-54235, CVE-2023-54236, CVE-2023-54237, CVE-2023-54238, CVE-2023-54239, CVE-2023-54240, CVE-2023-54241, CVE-2023-54242, CVE-2023-54243, CVE-2023-54244, CVE-2023-54245, CVE-2023-54246, CVE-2023-54247, CVE-2023-54248, CVE-2023-54249, CVE-2023-54250, CVE-2023-54251, CVE-2023-54252, CVE-2023-54253, CVE-2023-54254, CVE-2023-54255, CVE-2023-54257, CVE-2023-54258, CVE-2023-54259, CVE-2023-54260, CVE-2023-54261, CVE-2023-54262, CVE-2023-54263, CVE-2023-54264, CVE-2023-54265, CVE-2023-54266, CVE-2023-54267, CVE-2023-54268, CVE-2023-54269, CVE-2023-54270, CVE-2023-54271, CVE-2023-54272, CVE-2023-54273, CVE-2023-54274, CVE-2023-54275, CVE-2023-54276, CVE-2023-54277, CVE-2023-54278, CVE-2023-54279, CVE-2023-54280, CVE-2023-54281, CVE-2023-54282, CVE-2023-54283, CVE-2023-54284, CVE-2023-54285, CVE-2023-54286, CVE-2023-54287, CVE-2023-54288, CVE-2023-54289, CVE-2023-54291, CVE-2023-54292, CVE-2023-54293, CVE-2023-54294, CVE-2023-54295, CVE-2023-54296, CVE-2023-54297, CVE-2023-54298, CVE-2023-54299, CVE-2023-54300, CVE-2023-54301, CVE-2023-54302, CVE-2023-54303, CVE-2023-54304, CVE-2023-54305, CVE-2023-54306, CVE-2023-54307, CVE-2023-54308, CVE-2023-54309, CVE-2023-54310, CVE-2023-54311, CVE-2023-54312, CVE-2023-54313, CVE-2023-54314, CVE-2023-54315, CVE-2023-54316, CVE-2023-54317, CVE-2023-54318, CVE-2023-54319, CVE-2023-54320, CVE-2023-54321, CVE-2023-54322, CVE-2023-54323, CVE-2023-54324, CVE-2023-54325, CVE-2023-54326, CVE-2024-47683, CVE-2025-37884, CVE-2025-39745, CVE-2025-39822, CVE-2025-39905, CVE-2025-40210, CVE-2025-40214, CVE-2025-40216, CVE-2025-40218, CVE-2025-40219, CVE-2025-40220, CVE-2025-40221, CVE-2025-40222, CVE-2025-40223, CVE-2025-40224, CVE-2025-40225, CVE-2025-40226, CVE-2025-40227, CVE-2025-40228, CVE-2025-40229, CVE-2025-40230, CVE-2025-40231, CVE-2025-40232, CVE-2025-40233, CVE-2025-40234, CVE-2025-40235, CVE-2025-40236, CVE-2025-40237, CVE-2025-40238, CVE-2025-40239, CVE-2025-40240, CVE-2025-40241, CVE-2025-40242, CVE-2025-40243, CVE-2025-40244, CVE-2025-40245, CVE-2025-40246, CVE-2025-40248, CVE-2025-40249, CVE-2025-40250, CVE-2025-40251, CVE-2025-40252, CVE-2025-40253, CVE-2025-40254, CVE-2025-40255, CVE-2025-40256, CVE-2025-40257, CVE-2025-40258, CVE-2025-40259, CVE-2025-40260, CVE-2025-40261, CVE-2025-40262, CVE-2025-40263, CVE-2025-40264, CVE-2025-40265, CVE-2025-40266, CVE-2025-40267, CVE-2025-40268, CVE-2025-40269, CVE-2025-40270, CVE-2025-40271, CVE-2025-40272, CVE-2025-40273, CVE-2025-40274, CVE-2025-40275, CVE-2025-40277, CVE-2025-40278, CVE-2025-40279, CVE-2025-40280, CVE-2025-40281, CVE-2025-40282, CVE-2025-40283, CVE-2025-40284, CVE-2025-40285, CVE-2025-40286, CVE-2025-40287, CVE-2025-40288, CVE-2025-40289, CVE-2025-40290, CVE-2025-40291, CVE-2025-40292, CVE-2025-40293, CVE-2025-40294, CVE-2025-40295, CVE-2025-40296, CVE-2025-40297, CVE-2025-40298, CVE-2025-40299, CVE-2025-40301, CVE-2025-40302, CVE-2025-40303, CVE-2025-40304, CVE-2025-40305, CVE-2025-40306, CVE-2025-40307, CVE-2025-40308, CVE-2025-40309, CVE-2025-40310, CVE-2025-40311, CVE-2025-40312, CVE-2025-40313, CVE-2025-40314, CVE-2025-40315, CVE-2025-40316, CVE-2025-40317, CVE-2025-40318, CVE-2025-40319, CVE-2025-40320, CVE-2025-40321, CVE-2025-40322, CVE-2025-40323, CVE-2025-40324, CVE-2025-40326, CVE-2025-40327, CVE-2025-40328, CVE-2025-40329, CVE-2025-40330, CVE-2025-40331, CVE-2025-40332, CVE-2025-40333, CVE-2025-40334, CVE-2025-40335, CVE-2025-40336, CVE-2025-40337, CVE-2025-40339, CVE-2025-40340, CVE-2025-40341, CVE-2025-40342, CVE-2025-40343, CVE-2025-40344, CVE-2025-40346, CVE-2025-40347, CVE-2025-40348, CVE-2025-40349, CVE-2025-40350, CVE-2025-40351, CVE-2025-40352, CVE-2025-40353, CVE-2025-40354, CVE-2025-40356, CVE-2025-40357, CVE-2025-40358, CVE-2025-40359, CVE-2025-40360, CVE-2025-40362, CVE-2025-40363, CVE-2025-68167, CVE-2025-68168, CVE-2025-68169, CVE-2025-68170, CVE-2025-68171, CVE-2025-68172, CVE-2025-68173, CVE-2025-68176, CVE-2025-68177, CVE-2025-68178, CVE-2025-68179, CVE-2025-68180, CVE-2025-68181, CVE-2025-68182, CVE-2025-68183, CVE-2025-68184, CVE-2025-68185, CVE-2025-68186, CVE-2025-68187, CVE-2025-68188, CVE-2025-68189, CVE-2025-68190, CVE-2025-68191, CVE-2025-68192, CVE-2025-68194, CVE-2025-68196, CVE-2025-68197, CVE-2025-68198, CVE-2025-68199, CVE-2025-68200, CVE-2025-68201, CVE-2025-68202, CVE-2025-68204, CVE-2025-68205, CVE-2025-68207, CVE-2025-68208, CVE-2025-68210, CVE-2025-68211, CVE-2025-68212, CVE-2025-68213, CVE-2025-68214, CVE-2025-68215, CVE-2025-68216, CVE-2025-68217, CVE-2025-68218, CVE-2025-68219, CVE-2025-68220, CVE-2025-68221, CVE-2025-68222, CVE-2025-68223, CVE-2025-68225, CVE-2025-68226, CVE-2025-68227, CVE-2025-68228, CVE-2025-68229, CVE-2025-68230, CVE-2025-68231, CVE-2025-68232, CVE-2025-68233, CVE-2025-68234, CVE-2025-68235, CVE-2025-68237, CVE-2025-68238, CVE-2025-68240, CVE-2025-68241, CVE-2025-68242, CVE-2025-68243, CVE-2025-68244, CVE-2025-68245, CVE-2025-68246, CVE-2025-68247, CVE-2025-68248, CVE-2025-68249, CVE-2025-68250, CVE-2025-68252, CVE-2025-68253, CVE-2025-68260, CVE-2025-68262, CVE-2025-68281, CVE-2025-68294, CVE-2025-68299, CVE-2025-68309, CVE-2025-68310, CVE-2025-68311, CVE-2025-68312, CVE-2025-68313, CVE-2025-68314, CVE-2025-68315, CVE-2025-68316, CVE-2025-68317, CVE-2025-68320, CVE-2025-68321, CVE-2025-68322, CVE-2025-68323, CVE-2025-68326, CVE-2025-68350, CVE-2025-68355, CVE-2025-68370, CVE-2025-68373, CVE-2025-68375, CVE-2025-68377, CVE-2025-68726, CVE-2025-68731, CVE-2025-68734, CVE-2025-68737, CVE-2025-68738, CVE-2025-68739, CVE-2025-68743, CVE-2025-68750, CVE-2025-68752, CVE-2025-68754, CVE-2025-68760, CVE-2025-68761, CVE-2025-68762, CVE-2025-68779, CVE-2025-68790, CVE-2025-68791, CVE-2025-68793, CVE-2025-68805, CVE-2025-68807, CVE-2025-68812, CVE-2025-71070, CVE-2025-71090, CVE-2025-71092, CVE-2025-71103, CVE-2025-71106, CVE-2025-71110, CVE-2025-71115, CVE-2025-71124, CVE-2025-71128, CVE-2025-71139, CVE-2025-71142, CVE-2025-71155, CVE-2025-71158, CVE-2025-71159, CVE-2025-71181, CVE-2025-71187, CVE-2026-22983, CVE-2026-22987, CVE-2026-22995, CVE-2026-23008, CVE-2026-23009, CVE-2026-23012, CVE-2026-23014, CVE-2026-23015, CVE-2026-23016, CVE-2026-23018, CVE-2026-23022, CVE-2026-23024, CVE-2026-23027, CVE-2026-23028, CVE-2026-23029, CVE-2026-23034, CVE-2026-23036, CVE-2026-23039, CVE-2026-23040, CVE-2026-23041, CVE-2026-23042, CVE-2026-23043, CVE-2026-23044, CVE-2026-23045, CVE-2026-23046, CVE-2026-23048, CVE-2026-23051, CVE-2026-23052, CVE-2026-23067, CVE-2026-23077, CVE-2026-23079, CVE-2026-23081, CVE-2026-23092, CVE-2026-23100, CVE-2026-23106 and CVE-2026-23109
linux-yocto/6.12: Fix CVE-2024-58096, CVE-2024-58097, CVE-2025-22111, CVE-2025-38234, CVE-2025-38248, CVE-2025-38591, CVE-2025-39872, CVE-2025-40075, CVE-2025-40149, CVE-2025-40164, CVE-2025-40170, CVE-2025-40215, CVE-2025-40276, CVE-2025-40325, CVE-2025-40345, CVE-2025-68206, CVE-2025-68254, CVE-2025-68255, CVE-2025-68256, CVE-2025-68257, CVE-2025-68258, CVE-2025-68259, CVE-2025-68261, CVE-2025-68263, CVE-2025-68264, CVE-2025-68265, CVE-2025-68266, CVE-2025-68282, CVE-2025-68283, CVE-2025-68284, CVE-2025-68285, CVE-2025-68286, CVE-2025-68287, CVE-2025-68288, CVE-2025-68289, CVE-2025-68290, CVE-2025-68291, CVE-2025-68292, CVE-2025-68293, CVE-2025-68295, CVE-2025-68296, CVE-2025-68297, CVE-2025-68298, CVE-2025-68300, CVE-2025-68301, CVE-2025-68302, CVE-2025-68303, CVE-2025-68305, CVE-2025-68306, CVE-2025-68307, CVE-2025-68308, CVE-2025-68324, CVE-2025-68325, CVE-2025-68327, CVE-2025-68328, CVE-2025-68329, CVE-2025-68330, CVE-2025-68331, CVE-2025-68332, CVE-2025-68333, CVE-2025-68335, CVE-2025-68336, CVE-2025-68337, CVE-2025-68338, CVE-2025-68339, CVE-2025-68340, CVE-2025-68341, CVE-2025-68342, CVE-2025-68343, CVE-2025-68344, CVE-2025-68345, CVE-2025-68346, CVE-2025-68347, CVE-2025-68348, CVE-2025-68349, CVE-2025-68351, CVE-2025-68352, CVE-2025-68354, CVE-2025-68356, CVE-2025-68357, CVE-2025-68358, CVE-2025-68361, CVE-2025-68362, CVE-2025-68363, CVE-2025-68364, CVE-2025-68365, CVE-2025-68366, CVE-2025-68367, CVE-2025-68369, CVE-2025-68371, CVE-2025-68372, CVE-2025-68374, CVE-2025-68378, CVE-2025-68379, CVE-2025-68380, CVE-2025-68724, CVE-2025-68725, CVE-2025-68727, CVE-2025-68728, CVE-2025-68732, CVE-2025-68733, CVE-2025-68740, CVE-2025-68741, CVE-2025-68742, CVE-2025-68744, CVE-2025-68746, CVE-2025-68747, CVE-2025-68748, CVE-2025-68749, CVE-2025-68753, CVE-2025-68756, CVE-2025-68757, CVE-2025-68758, CVE-2025-68759, CVE-2025-68763, CVE-2025-68764, CVE-2025-68765, CVE-2025-68766, CVE-2025-68767, CVE-2025-68769, CVE-2025-68770, CVE-2025-68771, CVE-2025-68772, CVE-2025-68773, CVE-2025-68774, CVE-2025-68775, CVE-2025-68776, CVE-2025-68777, CVE-2025-68778, CVE-2025-68780, CVE-2025-68781, CVE-2025-68782, CVE-2025-68783, CVE-2025-68784, CVE-2025-68785, CVE-2025-68786, CVE-2025-68787, CVE-2025-68788, CVE-2025-68789, CVE-2025-68792, CVE-2025-68794, CVE-2025-68795, CVE-2025-68796, CVE-2025-68797, CVE-2025-68798, CVE-2025-68799, CVE-2025-68800, CVE-2025-68801, CVE-2025-68802, CVE-2025-68803, CVE-2025-68804, CVE-2025-68806, CVE-2025-68808, CVE-2025-68809, CVE-2025-68810, CVE-2025-68811, CVE-2025-68813, CVE-2025-68814, CVE-2025-68815, CVE-2025-68816, CVE-2025-68817, CVE-2025-68818, CVE-2025-68819, CVE-2025-68820, CVE-2025-68821, CVE-2025-68822, CVE-2025-71064, CVE-2025-71065, CVE-2025-71066, CVE-2025-71067, CVE-2025-71068, CVE-2025-71069, CVE-2025-71071, CVE-2025-71072, CVE-2025-71073, CVE-2025-71075, CVE-2025-71076, CVE-2025-71077, CVE-2025-71078, CVE-2025-71079, CVE-2025-71080, CVE-2025-71081, CVE-2025-71082, CVE-2025-71083, CVE-2025-71084, CVE-2025-71085, CVE-2025-71086, CVE-2025-71087, CVE-2025-71088, CVE-2025-71089, CVE-2025-71091, CVE-2025-71093, CVE-2025-71094, CVE-2025-71095, CVE-2025-71096, CVE-2025-71097, CVE-2025-71098, CVE-2025-71099, CVE-2025-71100, CVE-2025-71101, CVE-2025-71102, CVE-2025-71104, CVE-2025-71105, CVE-2025-71107, CVE-2025-71108, CVE-2025-71109, CVE-2025-71111, CVE-2025-71112, CVE-2025-71113, CVE-2025-71114, CVE-2025-71116, CVE-2025-71118, CVE-2025-71119, CVE-2025-71120, CVE-2025-71121, CVE-2025-71122, CVE-2025-71123, CVE-2025-71125, CVE-2025-71126, CVE-2025-71127, CVE-2025-71129, CVE-2025-71130, CVE-2025-71131, CVE-2025-71132, CVE-2025-71133, CVE-2025-71134, CVE-2025-71135, CVE-2025-71136, CVE-2025-71137, CVE-2025-71138, CVE-2025-71140, CVE-2025-71143, CVE-2025-71144, CVE-2025-71146, CVE-2025-71147, CVE-2025-71148, CVE-2025-71149, CVE-2025-71150, CVE-2025-71151, CVE-2025-71153, CVE-2025-71154, CVE-2025-71156, CVE-2025-71157, CVE-2025-71160, CVE-2025-71162, CVE-2025-71163, CVE-2025-71180, CVE-2025-71182, CVE-2025-71183, CVE-2025-71184, CVE-2025-71185, CVE-2025-71186, CVE-2025-71188, CVE-2025-71189, CVE-2025-71190, CVE-2025-71191, CVE-2025-71192, CVE-2025-71193, CVE-2025-71194, CVE-2025-71195, CVE-2025-71196, CVE-2025-71197, CVE-2025-71198, CVE-2025-71199, CVE-2026-22976, CVE-2026-22977, CVE-2026-22978, CVE-2026-22979, CVE-2026-22980, CVE-2026-22982, CVE-2026-22984, CVE-2026-22988, CVE-2026-22989, CVE-2026-22990, CVE-2026-22991, CVE-2026-22992, CVE-2026-22994, CVE-2026-22996, CVE-2026-22997, CVE-2026-22998, CVE-2026-22999, CVE-2026-23000, CVE-2026-23001, CVE-2026-23002, CVE-2026-23003, CVE-2026-23005, CVE-2026-23006, CVE-2026-23010, CVE-2026-23011, CVE-2026-23013, CVE-2026-23019, CVE-2026-23020, CVE-2026-23021, CVE-2026-23023, CVE-2026-23025, CVE-2026-23026, CVE-2026-23030, CVE-2026-23031, CVE-2026-23032, CVE-2026-23033, CVE-2026-23035, CVE-2026-23037, CVE-2026-23038, CVE-2026-23047, CVE-2026-23049, CVE-2026-23050, CVE-2026-23053, CVE-2026-23054, CVE-2026-23055, CVE-2026-23056, CVE-2026-23057, CVE-2026-23058, CVE-2026-23059, CVE-2026-23060, CVE-2026-23061, CVE-2026-23062, CVE-2026-23063, CVE-2026-23064, CVE-2026-23065, CVE-2026-23068, CVE-2026-23069, CVE-2026-23071, CVE-2026-23072, CVE-2026-23073, CVE-2026-23074, CVE-2026-23075, CVE-2026-23076, CVE-2026-23078, CVE-2026-23080, CVE-2026-23082, CVE-2026-23083, CVE-2026-23084, CVE-2026-23085, CVE-2026-23086, CVE-2026-23087, CVE-2026-23088, CVE-2026-23089, CVE-2026-23090, CVE-2026-23091, CVE-2026-23093, CVE-2026-23094, CVE-2026-23095, CVE-2026-23096, CVE-2026-23097, CVE-2026-23098, CVE-2026-23099, CVE-2026-23101, CVE-2026-23103, CVE-2026-23105, CVE-2026-23107, CVE-2026-23108 and CVE-2026-23110
openssl: Fix CVE-2025-11187, CVE-2025-15467, CVE-2025-15468, CVE-2025-15469, CVE-2025-66199, CVE-2025-68160, CVE-2025-69418, CVE-2025-69419, CVE-2025-69420, CVE-2025-69421, CVE-2026-22795 and CVE-2026-22796
python3-urllib3: Fix CVE-2026-21441
util-linux: Fix CVE-2025-14104
vim: ignore CVE-2025-66476
webkitgtk: Fix CVE-2025-43343
zlib: ignore CVE-2026-22184
Fixes in Yocto-5.3.2
bitbake
bitbake-setup: ensure paths with timestamps in them are unique
meta-yocto
poky.conf: Bump version for 5.3.2 release
openembedded-core
build-appliance-image: Update to whinlatter head revisions
devtool: deploy: Reset PATH after strip_execs
devtool: deploy: Run pseudo with correct PATH
docbook-xml-dtd4: fix the fetching failure
dpkg: Fix ADMINDIR
expat: upgrade to 2.7.4
ffmpeg: add a (possible) build race fix
ffmpeg: fix a build race, hopefully for real this time
glibc: stable 2.42 branch updates (912d89a766…)
go: upgrade to 1.25.7
libarchive: upgrade to 3.8.5
libpng: upgrade to 1.6.54
libtheora: set CVE_PRODUCT
linux-yocto/6.12: update to v6.12.69
mobile-broadband-provider-info: upgrade to 20251101
oeqa/gitarchive: Fix git push URL parameter
oeqa/gitarchive: Push tag before copying log files
oeqa/selftest/wic: test recursive dir copy on ext partitions
openssl: upgrade to 3.5.5
pseudo: Update to 1.9.3+git9ab513512d… (include an openat2 fix)
scripts/install-buildtools: Update to 5.3.1
scripts/oe-git-archive: Ensure new push parameter is specified
selftest: devtool: Set PATH when running pseudo
webkitgtk: upgrade to 2.50.4
webkitgtk: workaround compile failure for large debug symbols
wic/engine: fix copying directories into wic image with ext* partition
yocto-docs
Add a new “Security” section
Add a security manual
Move security related manuals to the security manual
README: remove obsolete poky repo references
README: replace obsolete substitution variables
Remove diagrams directory
brief-yoctoprojectqs/index.rst: remove extra word from text
bsp-guide/bsp.rst: remove obsolete poky repo references
contributor-guide/identify-component.rst: remove obsolete poky repo references
contributor-guide/recipe-style-guide.rst: explain difference between layer and recipe license(s)
contributor-guide/submit-changes.rst: remove obsolete poky repo references
dev-manual/build-quality.rst: remove obsolete poky repo references
dev-manual/building.rst: remove obsolete poky repo references
dev-manual/custom-distribution.rst: remove obsolete poky repo references
dev-manual/custom-template-configuration-directory.rst: remove obsolete poky repo references
dev-manual/debugging.rst: remove obsolete poky repo references
dev-manual/error-reporting-tool.rst: remove obsolete poky repo references
dev-manual/external-toolchain.rst: remove obsolete poky repo references
dev-manual/init-manager.rst: remove obsolete poky repo references
dev-manual/layers.rst: re-organize the document
dev-manual/layers.rst: remove obsolete poky repo references
dev-manual/libraries.rst: remove obsolete poky repo references
dev-manual/licenses.rst: instruct to use git-archive instead of removing .git
dev-manual/licenses.rst: remove obsolete poky repo references
dev-manual/new-recipe.rst: remove obsolete poky repo references
dev-manual/packages.rst: fix example recipe version
dev-manual/packages.rst: pr server: fix and explain why r0.X increments on SRCREV change
dev-manual/packages.rst: remove obsolete poky repo references
dev-manual/packages.rst: rename r0.0 to r0 when PR server is not enabled
dev-manual/poky-manual-setup.rst: mention the Source Directory
dev-manual/poky-manual-setup.rst: remove obsolete poky repo references
dev-manual/python-development-shell.rst: remove obsolete poky repo references
dev-manual/qemu.rst: remove obsolete poky repo references
dev-manual/qemu: add an example for the snapshot+nographic mode
dev-manual/securing-images.rst: remove obsolete poky repo references
dev-manual/start.rst: remove obsolete poky repo references
dev-manual/temporary-source-code.rst: remove obsolete poky repo references
dev-manual/upgrading-recipes.rst: move meta-openembedded to bitbake-builds/layers
dev-manual/upgrading-recipes.rst: remove obsolete poky repo references
dev-manual/vulnerabilities.rst: remove obsolete poky repo references
dev-manual/wayland.rst: remove obsolete poky repo references
dev-manual/wic.rst: remove obsolete poky repo references
kernel-dev/advanced.rst: remove obsolete poky repo references
kernel-dev/common.rst: remove obsolete poky repo references
migration-guides/migration-1.4.rst: remove obsolete poky repo references
migration-guides/migration-5.3.rst: add note on *FLAGS behavior change
migration-guides: add release notes for 4.0.32, 5.0.14, 5.0.15 and 5.3.1
overview-manual/concepts.rst: remove obsolete poky repo references
overview-manual/development-environment.rst: remove obsolete poky repo references
overview-manual/yp-intro.rst: fix SDK type in bullet list
overview-manual/yp-intro.rst: remove obsolete poky repo references
overview-manual: convert YP-flow-diagram.png to SVG
ref-manual/classes.rst: remove obsolete poky repo references
ref-manual/devtool-reference.rst: remove obsolete poky repo references
ref-manual/faq.rst: remove obsolete poky repo references
ref-manual/features.rst: remove obsolete poky repo references
ref-manual/images.rst: remove obsolete poky repo references
ref-manual/release-process.rst: add a “Development Cycle” section
ref-manual/release-process.rst: remove obsolete poky repo references
ref-manual/release-process.rst: remove repeated “in the”
ref-manual/structure.rst: remove obsolete poky repo references
ref-manual/system-requirements.rst: fix wrong path to install-buildtools
ref-manual/system-requirements.rst: remove obsolete poky repo references
ref-manual/tasks.rst: remove obsolete poky repo references
ref-manual/terms.rst: refresh the Build Directory definition
ref-manual/terms.rst: refresh the OpenEmbedded build system definition
ref-manual/terms.rst: refresh the OpenEmbedded-Core definition
ref-manual/terms.rst: simplify the Source Directory definition
ref-manual/variables.rst: document the CCACHE_TOP_DIR variable
ref-manual/variables.rst: remove obsolete poky repo references
ref-manual/yocto-project-supported-features.rst: remove obsolete poky repo reference
sdk-manual/appendix-obtain.rst: remove obsolete poky repo references
sdk-manual/intro.rst: remove obsolete poky repo references
sdk-manual: appending-customizing: use none lexer for BitBake code blocks
sdk-manual: appendix-obtain: fix default path for eSDK installer script
sdk-manual: appendix-obtain: replace directory structure PNG with a parsed-literal block
sdk-manual: appendix-obtain: replace eSDK directory structure PNG with a parsed-literal block
sdk-manual: appendix-obtain: use parsed-literal block for naming convention of the installer scripts
sdk-manual: delete sdk-title PNG
sdk-manual: fix improper indent of general form of tarball installer scripts
sdk-manual: fix incorrect highlight language for console code-blocks
sdk-manual: fix incorrect highlight language for text code-blocks
sdk-manual: replace sdk-environment PNG with SVG
sdk-manual: using: fix SDK filename example
sdk-manual: working-projects: properly highlight code code-blocks
security-manual/securing-images.rst: remove old links
test-manual/ptest.rst: detail the exit code and output requirements
test-manual/reproducible-builds.rst: remove obsolete poky repo references
test-manual/runtime-testing.rst: remove obsolete poky repo references
test-manual/understand-autobuilder.rst: remove obsolete poky repo references
transitioning-to-a-custom-environment.rst: remove obsolete poky repo references
tree-wide: figures: remove title PNGs
what-i-wish-id-known.rst: remove obsolete poky repo references
Known Issues in Yocto-5.3.2
N/A
Contributors to Yocto-5.3.2
Thanks to the following people who contributed to this release:
Adarsh Jagadish Kamini
Aleksandar Nikolic
Alexander Kanavin
Amaury Couderc
Ankur Tyagi
Antonin Godard
Bruce Ashfield
Dragomir, Daniel
Hongxu Jia
Hugo SIMELIERE
Jiaying Song
Ken Kurematsu
Khai Dang
Lee Chee Yang
Mark Hatle
Mathieu Dubois-Briand
Mohammad Rahimi
Paul Barker
Peter Marko
Quentin Schulz
Richard Purdie
Repositories / Downloads for Yocto-5.3.2
yocto-docs
Repository Location: https://git.yoctoproject.org/yocto-docs
Branch: whinlatter
Tag: yocto-5.3.2
Git Revision: 9c363d270ab45f3443391fb7275817db69d8a5d4
Release Artefact: yocto-docs-9c363d270ab45f3443391fb7275817db69d8a5d4
sha: ca6638b5ab0cfc60c2f6e43db765fe0e87242c733e07ed6da55d01228067cf1f
Download Locations:
openembedded-core
Repository Location: https://git.openembedded.org/openembedded-core
Branch: whinlatter
Tag: yocto-5.3.2
Git Revision: 21314665e198c1abe458d0bad5c4d14d4c3ad856
Release Artefact: oecore-21314665e198c1abe458d0bad5c4d14d4c3ad856
sha: 9ccfb0e279ccd1c683de2ed04db2f2b3acb81d9d50b7cbc0484fd2c1bc379a1e
Download Locations:
meta-yocto
Repository Location: https://git.yoctoproject.org/meta-yocto
Branch: whinlatter
Tag: yocto-5.3.2
Git Revision: 691ff0fbeab54eceb26d90140d7a8f672532235b
Release Artefact: meta-yocto-691ff0fbeab54eceb26d90140d7a8f672532235b
sha: 3ef0e1c99820e15eeda97c16579173f7818ea84964bc73a1859827d836be6405
Download Locations:
meta-qcom
Repository Location: https://git.yoctoproject.org/meta-qcom
Branch: whinlatter
Tag: yocto-5.3.2
Git Revision: 49bc2113adb0b86d463c311d32d4fb1007fe4845
Release Artefact: meta-qcom-49bc2113adb0b86d463c311d32d4fb1007fe4845
sha: ccd82e54bfe30786cd0792175cb9b6b74c98d613ff42832036bcaa6e96582683
Download Locations:
meta-mingw
Repository Location: https://git.yoctoproject.org/meta-mingw
Branch: whinlatter
Tag: yocto-5.3.2
Git Revision: 00323de97e397d4f6734ef2191806616989f5e10
Release Artefact: meta-mingw-00323de97e397d4f6734ef2191806616989f5e10
sha: c9a70539b12c0642596fde6a2766d4a6a8fec8b2a366453fb6473363127a1c77
Download Locations:
bitbake
Repository Location: https://git.openembedded.org/bitbake
Branch: 2.16
Tag: yocto-5.3.2
Git Revision: 7af7e04f3adc8ba144d9e2e6b37ed4ddb3b59df0
Release Artefact: bitbake-7af7e04f3adc8ba144d9e2e6b37ed4ddb3b59df0
sha: 06dd68908a5ffafae46ff7616e93a80f8b73c016f541e9517cf63b05f52f15c7
Download Locations:
Release notes for Yocto-5.3.3 (Whinlatter)
Security Fixes in Yocto-5.3.3
alsa-lib: patch CVE-2026-25068
busybox: Fix CVE-2025-60876
ffmpeg: Ignore CVE-2025-12343
freetype: Fix CVE-2026-23865
gdk-pixbuf: Fix CVE-2025-6199
glib-2.0: Fix CVE-2026-1484, CVE-2026-1485 and CVE-2026-1489
gnutls: Fix CVE-2025-14831
go: Fix CVE-2026-25679, CVE-2026-27137, CVE-2026-27138, CVE-2026-27139 and CVE-2026-27142
harfbuzz: Fix CVE-2026-22693
inetutils: Fix CVE-2026-28372
libpam: Ignore CVE-2024-10041
libpng: Fix CVE-2026-25646
linux-yocto: Ignore CVE-2022-38096, CVE-2023-6535, CVE-2023-39176, CVE-2023-39179 and CVE-2023-39180
python3-pip: Fix CVE-2026-1703
python3-urllib3: Fix CVE-2025-66471
zlib: Fix CVE-2026-27171
Fixes in Yocto-5.3.3
meta-yocto
poky.conf: Bump version for 5.3.3 release
openembedded-core
README: Add whinlatter subject-prefix to git-send-email suggestion
avahi: Remove a reference to the rejected CVE-2021-36217
b4-config: add send-prefixes for whinlatter
build-appliance-image: Update to whinlatter head revisions
classes/buildhistory: Do not sign buildhistory commits
create-pull-request: Keep commit hash to be pulled in cover email
glib-2.0: upgrade to 2.86.4
gnutls: fix postinst script for ${PN}-fips for multilibs
gnutls: use libtool to install test binaries
go: upgrade to 1.25.8
libpng: upgrade to 1.6.55
linux-yocto: apply cve-exclusions also to rt and tiny recipe variants
lsb.py: strip ‘ from os-release file
lz4: Remove a reference to the rejected CVE-2025-62813
pseudo: Update to include a fix for systems with kernel <5.6
python3: skip flaky test_default_timeout test
scripts/install-buildtools: Update to 5.3.2
wic/engine: error on old host debugfs for standalone directory copy
wireless-regdb: upgrade to 2026.02.04
yocto-docs
Makefile: pass -silent to latexmk
dev-manual: delete references to “tar” package format
overview-manual/concepts: list other possible class directories
overview-manual: escape wildcard in inline markup
qemu.rst: parsing of the code-block was not done
ref-manual/classes.rst: fix broken links to U-Boot documentation
tools/host_packages_scripts/tlmgr_docs_pdf.sh: install perl
what-i-wish-id-known.rst: replace figure by the new SVG
Known Issues in Yocto-5.3.3
N/A
Contributors to Yocto-5.3.3
Thanks to the following people who contributed to this release:
Adarsh Jagadish Kamini
Ankur Tyagi
Antonin Godard
Benjamin Robin (Schneider Electric)
Daniel Dragomir
Fabio Berton
Hugo SIMELIERE
Jan Vermaete
Kristiyan Chakarov
Liu Yiding
Livin Sunny
Martin Jansa
Michael Opdenacker
Paul Barker
Peter Marko
Quentin Schulz
Richard Purdie
Robert P. J. Day
Ross Burton
Shaik Moin
Vijay Anusuri
Yoann Congal
Repositories / Downloads for Yocto-5.3.3
yocto-docs
Repository Location: https://git.yoctoproject.org/yocto-docs
Branch: whinlatter
Tag: yocto-5.3.3
Git Revision: 82bd1a71e6e6a707d0009725969976cf2256af36
Release Artefact: yocto-docs-82bd1a71e6e6a707d0009725969976cf2256af36
sha: fcf7020e34198f3b89077f9649cec579f4d23228f7f0a3a28a21c6b5b3649857
Download Locations:
openembedded-core
Repository Location: https://git.openembedded.org/openembedded-core
Branch: whinlatter
Tag: yocto-5.3.3
Git Revision: ab57471acad7ce2a037480dc7b301104620f1ebf
Release Artefact: oecore-ab57471acad7ce2a037480dc7b301104620f1ebf
sha: 63ed486722e186d517e333c204def0a7bf578ca78bdeb2ad982625c49e7ee833
Download Locations:
meta-yocto
Repository Location: https://git.yoctoproject.org/meta-yocto
Branch: whinlatter
Tag: yocto-5.3.3
Git Revision: 9b98ec5e6cfb6c9dc74d3c2e6304eeb274f7c487
Release Artefact: meta-yocto-9b98ec5e6cfb6c9dc74d3c2e6304eeb274f7c487
sha: fcb81c6835036c4157b16dfc9f6d8c5a7dd0ed7ac72f59be238e99b486b1f8fa
Download Locations:
meta-mingw
Repository Location: https://git.yoctoproject.org/meta-mingw
Branch: whinlatter
Tag: yocto-5.3.3
Git Revision: 00323de97e397d4f6734ef2191806616989f5e10
Release Artefact: meta-mingw-00323de97e397d4f6734ef2191806616989f5e10
sha: c9a70539b12c0642596fde6a2766d4a6a8fec8b2a366453fb6473363127a1c77
Download Locations:
bitbake
Repository Location: https://git.openembedded.org/bitbake
Branch: 2.16
Tag: yocto-5.3.3
Git Revision: 7af7e04f3adc8ba144d9e2e6b37ed4ddb3b59df0
Release Artefact: bitbake-7af7e04f3adc8ba144d9e2e6b37ed4ddb3b59df0
sha: 06dd68908a5ffafae46ff7616e93a80f8b73c016f541e9517cf63b05f52f15c7
Download Locations:
Release notes for Yocto-5.3.4 (Whinlatter)
Security Fixes in Yocto-5.3.4
binutils: Fix CVE-2025-69644, CVE-2025-69647, CVE-2025-69648, CVE-2025-69649 and CVE-2025-69652
binutils: Ignore CVE-2025-69650 and CVE-2025-69651
curl: Fix CVE-2026-1965, CVE-2026-3783, CVE-2026-3784 and CVE-2026-3805
expat: Fix CVE-2026-32776, CVE-2026-32777 and CVE-2026-32778
glibc: Fix CVE-2026-4437 and CVE-2026-4438
go: Fix CVE-2026-27140, CVE-2026-27143, CVE-2026-27144, CVE-2026-32280, CVE-2026-32281, CVE-2026-32282, CVE-2026-32283, CVE-2026-32288 and CVE-2026-32289
inetutils: Fix CVE-2026-32746
libpng: Fix CVE-2026-33416 and CVE-2026-33636
libsoup: fix CVE-2025-32049 and CVE-2026-1539
nfs-utils: Fix CVE-2025-12801
openssl: Fix CVE-2026-2673, CVE-2026-28387, CVE-2026-28388, CVE-2026-28389, CVE-2026-28390, CVE-2026-31789 and CVE-2026-31790
python3-pyopenssl: Fix CVE-2026-27448 and CVE-2026-27459
python3: Fix CVE-2025-15282
sqlite3: Fix CVE-2025-70873
vim: Fix CVE-2026-25749, CVE-2026-26269, CVE-2026-28418, CVE-2026-28419 and CVE-2026-33412
Fixes in Yocto-5.3.4
bitbake
runqueue.py: make sure we use bb multiprocessing
tests/fetch: Avoid using git protocol in tests
meta-yocto
poky.conf: Bump version for 5.3.4 release
poky: Fix CentOS Stream 9 distro name
openembedded-core
archiver: Don’t try to preserve all attributes when copying files
barebox/barebox-tools: upgrade to 2025.09.3
binutils: Fix build with GLIBC 2.43 on the host
binutils: Upgrade to 2.45.1 release
build-appliance-image: switch SRC_URI to https protocol
build-appliance-image: Update to whinlatter head revisions
ca-certificates: upgrade to 20260223
ccache: upgrade to 4.12.3
dtc: backport fix for build with glibc-2.43
gcc: backport a fix for building with gcc-16
gettext: backport gnulib changes to fix build with glibc-2.43 on host
glibc: stable 2.42 branch updates (a56a2943d2c…)
go: upgrade to 1.25.9
libarchive: upgrade to 3.8.6
libpng: upgrade to 1.6.56
libsoup: upgrade to 3.6.6
libxcrypt: avoid discarded-qualifiers build failure with glibc 2.43
libxcrypt: Fix build wrt C23 support
libxcrypt: Use configure knob to disable warnings as errors
libxmlb: upgrade to 0.3.25
license.py: Drop visit_Str from SeenVisitor in selftest
m4: backport 3 gnulib changes to fix build with glibc-2.43 on host
meta/files/layers.example.json: switch to https clone URIs
oe-setup-build: TEMPLATECONF were not applied correctly
oeqa/sdk: Default to https git protocol for YP/OE repos
oeqa/selftest/devtool: add vulkan feature check for test needing it
oeqa/selftest/git-submodule-test: Default to https git protocol for YP/OE repos
oeqa/selftest: add wayland feature check for tests needing it
openssl: upgrade to 3.5.6
ovmf: backport a fix for build with gcc-16
pseudo: Add fix for glibc 2.43
ptest-runner: Upgrade to 2.5.1
ptest-runner: Use git tag in SRC_URI
python3-pip: drop unused Windows distlib launcher templates
python3-setuptools: drop Windows launcher executables on non-mingw builds
python3: Fix test under ptest-runner 2.5.1
python3: upgrade to 3.13.12
recipetool: Recognise https://git. as git urls
report-error.bbclass: replace ‘codecs.open()’ with ‘open()’
scripts/install-buildtools: Update to 5.3.3
scripts: Default to https git protocol for YP/OE repos
selftest/gdbserver: replace shutil.unpack_archive with tarfile extract
selftest/minidebuginfo: extract files from tar archive using tarfile module
selftest/scripts: Update old git protocol references
spirv-tools: backport a fix for building with gcc-16
systemd: backport fix to build with glibc-2.43 on host
tzdata/tzcode-native: upgrade to 2026a
util-linux: backport fix to build with glibc-2.43 on host
virglrenderer: Fix build with glibc 2.43+
yocto-uninative: Update to 5.1 for glibc 2.43
yocto-docs
contributor-guide/submit-changes.rst: Added missing word
dev-manual/new-recipe.rst: rework Unpacking Code section
migration-guide: add release notes for 4.0.33 4.0.34 5.0.16 5.0.17 5.3.2 5.3.3
sphinx-static/theme_overrides.css: switch to a fixed width documentation
Known Issues in Yocto-5.3.4
N/A
Contributors to Yocto-5.3.4
Thanks to the following people who contributed to this release:
Adarsh Jagadish Kamini
Alexander Kanavin
Andrej Kozemcak
Anil Dongare
Ankur Tyagi
Antonin Godard
Changqing Li
Deepak Rathore
Hemanth Kumar M D
Hitendra Prajapati
Jinfeng Wang
Khem Raj
Krupal Ka Patel
Lee Chee Yang
Logan Gallois
Martin Jansa
Michael Halstead
Paul Barker
Peter Marko
Richard Purdie
Sunil Dora
Trevor Gamblin
Vijay Anusuri
Wang Mingyu
Yanis BINARD
Yoann Congal
Zoltán Böszörményi
Repositories / Downloads for Yocto-5.3.4
yocto-docs
Repository Location: https://git.yoctoproject.org/yocto-docs
Branch: whinlatter
Tag: yocto-5.3.4
Git Revision: 10818445a22c524de0934901547cf676256c2b9d
Release Artefact: yocto-docs-10818445a22c524de0934901547cf676256c2b9d
sha: f9e0b155730ba23b83febd40b6e5d6e22c624d083cccb569cfff4a83ef3fde43
Download Locations:
openembedded-core
Repository Location: https://git.openembedded.org/openembedded-core
Branch: whinlatter
Tag: yocto-5.3.4
Git Revision: 8751ec83421192fc0f8495fb95798f9eb7be77a0
Release Artefact: oecore-8751ec83421192fc0f8495fb95798f9eb7be77a0
sha: d587dc39a046a1a48f4cd33f5e9dd79b7d0948d71a9151fcf5542641893be229
Download Locations:
meta-yocto
Repository Location: https://git.yoctoproject.org/meta-yocto
Branch: whinlatter
Tag: yocto-5.3.4
Git Revision: 3f2e6b6fadfa542f0fe3738375a2f9fcbd4c1f6e
Release Artefact: meta-yocto-3f2e6b6fadfa542f0fe3738375a2f9fcbd4c1f6e
sha: b942dc726a631b52284d4fe62dda4b97d880fea758a7090a8590cca964865e30
Download Locations:
meta-mingw
Repository Location: https://git.yoctoproject.org/meta-mingw
Branch: whinlatter
Tag: yocto-5.3.4
Git Revision: 00323de97e397d4f6734ef2191806616989f5e10
Release Artefact: meta-mingw-00323de97e397d4f6734ef2191806616989f5e10
sha: c9a70539b12c0642596fde6a2766d4a6a8fec8b2a366453fb6473363127a1c77
Download Locations:
bitbake
Repository Location: https://git.openembedded.org/bitbake
Branch: 2.16
Tag: yocto-5.3.4
Git Revision: 713fbbdb9ecc195ceb2216a2345e0d79dbee2135
Release Artefact: bitbake-713fbbdb9ecc195ceb2216a2345e0d79dbee2135
sha: 1d0f14e8bc71a39de4207aeeb329cb1d2541089c07e954131bf37a3d1b66b823
Download Locations:
Release 5.2 (walnascar)
Release 5.2 (walnascar)
Migration notes for 5.2 (walnascar)
This section provides migration information for moving to the Yocto Project 5.2 Release (codename “walnascar”) from the prior release.
debug-tweaks removed from IMAGE_FEATURES
The debug-tweaks image feature is now removed because it was too vague about
what it achieved: an image on which the root user can login without a
password.
To achieve the same result, the features previously added by debug-tweaks
should be manually added to the IMAGE_FEATURES variable. These are:
allow-empty-passwordallow-root-loginempty-root-passwordpost-install-logging
Such a statement would be:
IMAGE_FEATURES += "allow-empty-password allow-root-login empty-root-password post-install-logging"
See the list of available image features in the Image Features section of the Yocto Project Reference Manual.
Supported kernel versions
The OLDEST_KERNEL setting is 5.15 in this release, meaning that out the box, older kernels are not supported. See 4.3 migration notes for details.
Supported distributions
Compared to the previous releases, running BitBake is supported on new GNU/Linux distributions:
Fedora 41
CentOS Stream 9
On the other hand, some earlier distributions are no longer supported:
CentOS Stream 8
Fedora 38
OpenSUSE Leap 15.4
Ubuntu 20.04
Rust language changes
Recipes inheriting the cargo do not install libraries by default anymore. This behavior can be controlled by the CARGO_INSTALL_LIBRARIES variable.
systemd changes
Support for
split-usrandunmerged-usrare now removed after Systemd was updated to version 255. This option allowed installing Systemd in a system where directories such as/lib,/sbinor/binare not merged into/usr.As a consequence, the
systemdrecipe no longer contains theusrmergePACKAGECONFIG option as it is now implied by default.systemd.bbclass: If asystemdservice file had referred to other service files by starting them via Also, the other service files were automatically added to the FILES variable of the same package. Example:a.service contains:
[Install] Also=b.service
If
a.serviceis packaged in packageA,b.servicewas automatically packaged into packageAas well. This happened even ifb.servicewas explicitly added to packageBusing FILES and SYSTEMD_SERVICE variables. This prevented such services from being packaged into different packages. Therefore, this automatic behavior has been removed for service files (but not for socket files). Now all service files must be explicitly added to FILES.Add
create-log-dirsback to the configuration options. To enable persistent logging a user can now set the “Storage” option ofjournald.confto “persistent”. The/var/log/journaldirectory is now used for logging instead of/run/log.If
pni-namesis not in the DISTRO_FEATURES, the Predictable Network Interface names systemd feature will now be disabled. Previously the feature was still enabled even ifpni-nameswas not part of DISTRO_FEATURES. Make sure to add the feature to DISTRO_FEATURES if you want to keep this systemd behavior.
Multiconfig changes
The value of BB_CURRENT_MC was changed from default to an empty string
for the default multiconfig configuration to avoid needing to map the values
within BitBake. This was already not happening in some cases so this fixes
some obscure bugs.
Any logic based on BB_CURRENT_MC equalling to default by default should
be changed to be equal to an empty string.
Virtual toolchain provider changes
Support was added for virtual providers on a per-recipe basis for specific
key toolchain providers listed in BB_VIRTUAL_RECIPE_PROVIDERS. As part of
that support, the cross providers were simplified to remove the triplet
prefix (TARGET_PREFIX, SDK_PREFIX and HOST_PREFIX) and
generalise the naming. Here are examples of how references to these variables
can be changed to use the new cross syntax:
virtual/${HOST_PREFIX}binutils -> virtual/cross-binutils
virtual/${TARGET_PREFIX}binutils -> virtual/cross-binutils
virtual/${HOST_PREFIX}gcc -> virtual/cross-cc
virtual/${TARGET_PREFIX}gcc -> virtual/cross-cc
virtual/${SDK_PREFIX}gcc -> virtual/nativesdk-cross-cc
virtual/${HOST_PREFIX}compilerlibs -> virtual/compilerlibs
virtual/${TARGET_PREFIX}compilerlibs -> virtual/compilerlibs
virtual/nativesdk-${SDK_PREFIX}compilerlibs -> virtual/nativesdk-compilerlibs
virtual/${TARGET_PREFIX}g++ -> virtual/cross-c++
A PREFERRED_PROVIDER assignment can be transformed as follows:
PREFERRED_PROVIDER_virtual/${TARGET_PREFIX}binutils -> PREFERRED_PROVIDER_virtual/cross-binutils
PREFERRED_PROVIDER_virtual/${SDK_PREFIX}binutils -> PREFERRED_PROVIDER_virtual/cross-binutils:class-nativesdk
PREFERRED_PROVIDER_virtual/${SDK_PREFIX}g++ -> PREFERRED_PROVIDER_virtual/nativesdk-cross-c++
The above examples should cover most cases, but there might be situations where replacing is not as straightforward. For more examples, see the commit “classes/recipes: Switch virtual/XXX-gcc to virtual/cross-cc (and c++/binutils)” in OpenEmbedded-Core (OE-Core).
autotools* changes
Changes to how
aclocalis invoked means thatACLOCALDIRandACLOCALEXTRAPATHare no longer used.Directories containing m4 files are no longer found automatically and passed to
autoreconf. If a recipe fails to configure because it cannot find m4 macros, then usually the solution is to setEXTRA_AUTORECONF += "-I path/to/m4"in the recipe.The autotools* class now requires any recipe that inherits the class to have a
configurescript. The configuration script location is stored in the CONFIGURE_SCRIPT variable. The do_configure task will fail if the script is missing.
UBOOT_ENTRYPOINT changes
The UBOOT_ENTRYPOINT variable should now be defined with a leading
0x to its value. For example, consider the following assignment:
UBOOT_ENTRYPOINT ?= "20008000"
This should now be replaced by:
UBOOT_ENTRYPOINT ?= "0x20008000"
Git fetcher: support for multiple revisions per URL removed
The support for having multiple Git revisions per URL in SRC_URI was removed from BitBake, which means the following syntax is not supported anymore:
SRC_URI = "git://some.host/somepath;bareclone=1;branch=branchX,branchY;name=nameX,nameY"
SRCREV_nameX = "xxxxxxxxxxxxxxxxxxxx"
SRCREV_nameY = "yyyyyyyyyyyyyyyyyyyy"
This was rarely used in the core repositories because it would only ever make
sense for bare clones (the bareclone=1 SRC_URI option) where recipes
take care of the Git checkout. This removal simplifies the code logic in several
places.
If one of your recipes is using this mechanism, you can split the code source fetching into two separate entries:
SRC_URI = "git://some.host/somepath;bareclone=1;branch=branchX;name=nameX \
git://some.host/somepath;bareclone=1;branch=branchY;name=nameY"
SRCREV_nameX = "xxxxxxxxxxxxxxxxxxxx"
SRCREV_nameY = "yyyyyyyyyyyyyyyyyyyy"
Git fetcher: Branch parameter now required in SRC_URI
The branch parameter is now required when specifying a Git repository in
SRC_URI, for example:
SRC_URI = "git://some.host/somepath;branch=branchX"
A missing branch parameter used to produce a warning, and will now produce
an error.
Recipe changes
The
libnss-mdnsrecipe is now renamed toavahi-libnss-mdnsto avoid a conflict with meta-networking.ptest support for the
valgrindrecipe was removed, due to regressions occurring after updating Glibc to 2.41.
Removed variables
The following variables have been removed:
PACKAGE_SNAP_LIB_SYMLINKS: related to an unmaintained and obsolete “micro” distro.SETUPTOOLS_INSTALL_ARGS: obsolete and unused variable.BB_DANGLINGAPPENDS_WARNONLY: support for only warning the user when a.bbappendfile doesn’t apply to the original recipe has been dropped. See the Appending Other Layers Metadata With Your Layer section of the Yocto Project Development Tasks Manual for alternatives to this variable.
Removed recipes
The following recipes have been removed in this release:
liburi-perl: moved to meta-perl.python3-isodate: moved to meta-python.python3-iniparse: removed as there are no consumers of this recipe in openembedded-core or meta-openembedded.blktool: It was created in 2004 as an alternative to hdparm and never updated since (while hdparm remains active).cargo-c-native: converted to a target recipe and renamed tocargo-c.libnss-mdns: renamed toavahi-libnss-mdns
Removed classes
The following classes have been removed in this release:
migrate_localcount.bbclass: obsolete class for which code was already removed in 2012.
Removed features
The
ld-is-golddistro feature was removed from the DISTRO_FEATURES.
Miscellaneous changes
ZSTD_COMPRESSION_LEVEL is now a plain integer number instead of a dash-prefixed command-line option (e.g. it should be set to
3rather than-3).Until now, the variable UBOOT_ENV was processed both by the U-Boot recipe and by the
kernel-fitimage.bbclass. However, adding a U-Boot script to the kernel FIT image is a different and independent thing, which also requires an independent variable. Therefore, the UBOOT_ENV is no longer handled by thekernel-fitimage.bbclass. There is a new variable FIT_UBOOT_ENV which should be used for adding a U-Boot script to a FIT image.The
devtool ide-sdkutility has been removed from the eSDK (but remains available in the BitBake environment).
Release notes for 5.2 (walnascar)
New Features / Enhancements in 5.2
Linux kernel 6.12, gcc 14.2, glibc 2.41, LLVM 19.1.7, and over 300 other recipe upgrades.
Minimum Python version required on the host: 3.9.
New variables:
linux-firmware: Add the FIRMWARE_COMPRESSION variable which allows compression the firmwares provided by thelinux-firmwarerecipe. Possible values arexzandzst.Reproducibility: Add the OEQA_REPRODUCIBLE_TEST_LEAF_TARGETS variable which enables a reproducibility test on recipes using Shared State for the dependencies. See Reproducible Builds.
systemd: Add WATCHDOG_RUNTIME_SEC: for controlling theRuntimeWatchdogSecoption in/etc/systemd/system.conf.FIT_UBOOT_ENV to allow including a u-boot script as a text in a fit image. See the
kernel-fitimagefor more information.meson: MESON_INSTALL_TAGS to allow passing install tags (
--tags) to themeson installcommand during the do_install task.cve-check:NVD_DB_VERSIONto allow choosing the CVE feed when using thecve-checkclass.The BB_USE_HOME_NPMRC controls whether or not BitBake uses the user’s
.npmrcfile within their home directory within the npm fetcher. This can be used for authentication of private NPM registries, among other uses.The GRUB_MKIMAGE_OPTS can be used to control the flags to the
grub-mkimagecommand in the context of the GRUB recipe (grub-efi).The SPDX_PACKAGE_VERSION variable controls the package version as seen in the SPDX 3.0 JSON output (
software_packageVersion).
Kernel-related changes:
cml1: in do_diffconfig, do not override
.configwith.config.orig. This applies to other recipes using the class cml1.linux-firmware: add following new firmware packages:qcom-qcm6490-audioqcom-qcm6490-computeqcom-adreno-a663qcom-qcm6490-adrenoqcom-sa8775p-adrenoqcom-qcm6490-ipaqcom-x1e80100-audioqcom-qcs615-adrenoqcom-aic100qcom-qdu100qca-qca2066qca-qca61x4-serialqca-qca61x4-usbqca-qca6390qca-qca6698qca-wcn3950qca-wcn3988qca-wcn399xqca-wcn6750qca-wcn7850qcom-2-licenseqcom-aic100qcom-qcm6490-wifiqcom-qdu100qcom-sa8775p-audioqcom-sa8775p-computeqcom-sa8775p-generalpurposeqcom-x1e80100-lenovo-t14s-g6-adrenoqcom-x1e80100-lenovo-t14s-g6-audioqcom-x1e80100-lenovo-t14s-g6-computeqcom-adreno-a623qcom-qcs8300-adrenoqca-qca2066qcom-adreno-a2xx
linux-firmware: splitamgpu,ath10k,ath11kandath12kin separate packages.The kernel-yocto classes now supports in-tree configuration fragments. These can be added with the KERNEL_FEATURES variable.
Kernel configuration audit can now be disabled by setting KMETA_AUDIT to 1.
The
kern-toolsrecipe is now able to recognize files ending with.configfor kernel-yocto-based Kernel recipes.Support the LZMA compression algorithm in the kernel-uboot class. This can be done by setting the variable FIT_KERNEL_COMP_ALG to
lzma.kernel-yocto: Reproducibility for commits created by the kernel-yocto class was improved.
kernel-arch: add-fmacro-prefix-mapinKERNEL_CCto fix a reproducibility issue.
New core recipes:
python3-pefile: required for the uki class.Add initial support for the Barebox bootloader, along with associated OEQA test cases. This adds the
bareboxand thebarebox-toolsrecipes.Import
makedumpfilefrom meta-openembedded, as thekexec-toolsrecipe RDEPENDS on it.The
tcl-8recipe was added back to support the build ofexpect.Add the
libdisplay-inforecipe, an EDID and DisplayID library, required for Weston 14.0.1 and newer.The
hwdatarecipe was imported from meta-openembedded, a recipe for hardware identification and configuration data, needed bylibdisplay-info.The
cve-update-db-nativewas restored from kirkstone and can be used to update the CVE National Vulnerability Database (NVD). Add support for the FKIE-CAD (https://github.com/fkie-cad/nvd-json-data-feeds) CVE source for it.The
rpm-sequoia-crypto-policyto ship a crypto policy file for therpm-sequoiarecipe.The
libsassandsasscfor the C/C++ port of the Sass CSS pre-compiler, required by thelibadwaitarecipe.python3-roman-numerals-py: module providing utilities for working with well-formed Roman numerals.python3-sphinxrelies on this recipe.The
fastfloatrecipe, a header-only library for fast number parsing. This will be a dependency for thevterecipe in later versions.The
avahi-libnss-mdnswas renamed fromlibnss-mdns.The
cargo-cwas renamed fromcargo-c-native.The
tcl8recipe was added to support the failing build ofexpect. Thetclrecipe (version 9) remains the main recipe for this component.The
scdocrecipe is imported from https://layers.openembedded.org/layerindex/branch/master/layer/meta-wayland to support the generation of the man-pages ofkdoc.
New core classes:
New uki class for building Unified Kernel Images (UKI). Associated OEQA tests were also added for this class.
New cython class for python recipes that require Cython for their compilation. Existing recipes depending on Cython now inherit this class. This class also strips potential build paths in the compilation output for reproducibility.
New ptest-python-pytest class to automatically configure ptest for Python packages using the pytest unit test framework.
Architecture-specific changes:
tune-cortexa32: set tune feature toarmv8a.Add the
loongarch64architecture for thegrub2andllvmrecipes. It was also added to build withmuslas the toolchain.
QEMU /
runqemuchanges:qemu/machine: change theQEMU_EXTRAOPTIONS_${TUNE_PKGARCH}syntax in QEMU machine definitions toQEMU_EXTRAOPTIONS:tune-${TUNE_PKGARCH}to follow the same patterns as other QEMU-related variables.
Documentation changes:
Use
rsvgas a replacement ofinkscapeto convert svg files in the documentation.The
cverole was replaced bycve_nistto avoid a conflict with more recent version of Sphinx.New documentation on the multiconfig feature: Building Images for Multiple Targets With Multiconfig.
New documentation on
bblock: Locking and Unlocking Recipes Using bblock.
Go changes:
The go-mod class now sets an internal variable
GO_MOD_CACHE_DIRto enable the use of the Go module fetchers for downloading and unpacking module dependencies to the module cache.Make the do_compile task run before do_populate_lic in the go-mod class so license files are found by do_populate_lic after the
go installcommand is run in do_compile.
Rust changes:
rust-target-config: Update the data layout for the x86-64 target, as it was different in Rust from LLVM, which produced a data layout error.The PACKAGECONFIG_CONFARGS value if now passed to the
cargo buildcommand, which means that Rust recipes can now properly define their PACKAGECONFIG configuration.
Wic Image Creator changes:
Allow the
--exclude-pathoption to exclude symlinks.Add the variable WIC_SECTOR_SIZE to control the sector size of Wic images.
bootimg-efi: Support “+” symbol in filenames passed in IMAGE_EFI_BOOT_FILES.
SDK-related changes:
Add support for ZST-compression through SDK_ARCHIVE_TYPE, by setting its value to
tar.zst.The
debug-tweaksfeatures were removed from-sdkimages (core-image-*-sdk.bb).Enable
ipv6,acl, andxattrin DISTRO_FEATURES_NATIVESDK.Toolchain SDKs (
meta-toolchain) now properly supports theusrmergefeature (part of DISTRO_FEATURES).The
pipefailshell option is now added to the SDK installer script.
Testing-related changes:
oeqa/postactions: Fix archive retrieval from target.oeqa/selftest/gcc: Fix kex exchange identification error.oeqa/utils/qemurunner: support ignoring vt100 escape sequences.oeqa: support passing custom boot patterns to runqemu.oeqa/selftest/cases: add basic U-boot and Barebox tests.oeqa/selftest/rust: skip on all MIPS platforms.Lots of changes and improvements to the Toaster OEQA tests.
oeqa/selftest: add a test for bitbake “-e” and “-getvar” difference.oeqa/selftest: Fix failure when configuration containsBBLAYERS:appendoeqa/ssh: improve performance and log sizes when handling large files.oeqa/poisoning: fix and improve gcc include poisoning tests.
Utility script changes:
The
patchreview.pyscript now uses thecheck_upstream_statusfromoe.qato get patch statuses.resulttool:Allow store to filter to specific revisions (
--revisionflag).Use single space indentation in JSON output, to save disk space.
Add
--logfile-archiveoption to store and archive log files separately.Handle LTP raw logs as well as Ptest.
yocto-check-layer:Check for the presence of a
SECURITY.mdfile in layers and make it mandatory.The yocto-check-layer class now uses CHECKLAYER_REQUIRED_TESTS to get the list of QA checks to verify when running the
yocto-check-layerscript.
New
oe-image-files-spdxscript utility directory underscripts/contribto that processes the SPDX 3.0.1 output from a build and lists all the files on the root file system with their checksums.install-buildtools:Add the
--downloads-directoryargument to the script to allow specifying the location of the artifact download directory.The download URL are now stored next to the download artifacts for traceability.
New
clean-hashserver-databaseunderscripts/that can be used to clean the hashserver database based on the files available in the sstate directory (see Hash Equivalence for more information).
BitBake changes:
Add a new concept of configuration fragment, which allows providing configuration snippets contained in layers in a structured and controlled way. For more information, see the addfragments Directive section of the BitBake User Manual.
Add a new
include_alldirective, which can be used to include multiple files present in the same location in different layers.Fetcher related changes (
fetch2):Do not preserve ownership when unpacking.
switch from Sqlite
persist_datato a standard cache file for checksums, and droppersist_data.add support for GitHub codespaces by adding the
GITHUB_TOKENto the list of variables exported duringgitinvocations.set User-Agent to ‘bitbake/version’ instead of a “fake mozilla” user agent.
wget: handle HTTP 308 Permanent Redirect.wget: increase timeout to 100s from 30s to match CDN worst response time.Add support for fast initial shallow fetch. The fetcher will prefer an initial shallow clone, but will re-utilize an existing bare clone if there is one. If the remote server does not allow shallow fetches, the fetcher falls back to a bare clone. This improves the data transfer size on the initial fetch of a repository, eliminates the need to use an HTTPS tarball SRC_URI to reduce data transfer, and allows SSH-based authentication when using non-public repos, so additional HTTPS tokens may not be required.
compress: uselz4instead oflz4c, aslz4cas been considered deprecated since 2018.server/process: decrease idle/main loop frequency, as it is idle and main loops have socket select calls to know when to execute.bitbake-worker:improve bytearray truncation performance when large amounts of data are being transferred from the cooker to the worker.
cooker: increase the default pipe size from 64KB to 512KB for better efficiency when transferring large amounts of data.
bitbake-getvar: catchNoProviderexception to improve error readability when a recipe is not found with--recipe.bb/build: add a functionbb.build.listtasks()to list the tasks in a datastore.Remove custom exception backtrace formatting, and replace occurrences of
bb.exception.format_exception()bytraceback.format_exception().runqueue: various performance optimizations including:Fix performance of multiconfigs with large overlap.
Optimise
setsceneloop processing by starting where it was left off in the previous execution.
knottynow hints the user if MACHINE was not set in thelocal.conffile.utils: add Go mod h1 checksum support, specific to Go modules. Use withgoh1.The parser now catches empty variable name assignments such as:
+= "value"
The previous code would have assigned
valueto the variable named+.hashserv: Add thegc-mark-streamcommand for batch hash marking.
Packaging changes:
systemd: extract dependencies from.note.dlopenELF segments, to better detect dynamically linked libraries at runtime.package_rpm: use ZSTD’s default compression level from the variable ZSTD_COMPRESSION_LEVEL.package_rpm: restrict RPM packaging to 4 threads to improve the compression speed.sign_rpm:rpmneeds thesequoiaPACKAGECONFIG config set to be able to generate signed packages.
LLVM related changes:
Set
LLVM_HOST_TRIPLEfor cross-compilation, which is recommended when cross-compiling Llvm.
SPDX-related changes:
SPDX 3.0:
Find local sources when searching for debug sources.
Map
gitsmURIs togit.Link license and build by alias instead of SPDX ID.
Fix SPDX tasks not running when code changes (use of
file-checksums).
devtoolchanges:Remove the “S = WORKDIR” workaround as now S cannot be equal to WORKDIR.
The already broken
--debug-build-configoption ofdevtool ide-sdkhas been replaced by a new--debug-buildoption ofdevtool modify. The newdevtool ide-sdkworkflow is:devtool modify my-recipe --debug-buildfollowed bydevtool ide-sdk my-recipe my-image.create-spdx: support line numbers for NO_GENERIC_LICENSE license types.spdx30: Adds a “contains” relationship that relates the root file system package to the files contained in it. If a package provides a file with a matching hash and path, it will be linked, otherwise a new File element will be created.The output of devtool upgrade-status is now sorted by recipe name.
Patchtest-related changes:
Refactor pattern definitions in a
patternsmodule.Refactor and improve the
mboxmodule.Split out result messages.
Add a check for user name tags in patches (for example “fix added by @username”).
insane class related changes:
Only parse ELF if they are files and not symlinks.
Check for
RUNPATHin addition toRPATHin binaries.Ensure insane tasks of dependencies run in builds when expected.
Security changes:
The
PIEgcc flag is now passed for the powerpc architecture after a bugfix in gcc (https://gcc.gnu.org/bugzilla/show_bug.cgi?id=81170).openssh: be more restrictive on private key file permissions by setting them from the do_install task.
cve-checkchanges:Update the DL_DIR database location name (
${DL_DIR}/CVE_CHECK2).Add the field “modified” to the JSON report (from “NVD-modified”).
Add support for CVSS v4.0.
Fix malformed cve status description with
:characters.Restore the
CVE_CHECK_SHOW_WARNINGSvariable and functionality. It currently prints warning message for every unpatched CVE thecve-checkclass finds.Users can control the NVD database source using the
NVD_DB_VERSIONvariable with possible valuesNVD1,NVD2, orFKIE.The default feed for CVEs is now
FKIEinstead ofNVD2(seeNVD_DB_VERSIONfor more information).
New PACKAGECONFIG options for individual recipes:
perf:zstdppp:pam,openssllibpciaccess:zlibgdk-pixbuf:gif,otherslibpam:selinuxlibsecret:pamrpm:sequoiasystemd:apparmor,fido,mountfsd,nsresourcedovmf:debugwebkitgtk:assertionsiproute2:iptablesman-db:col
Systemd related changes:
systemd:set better sane time at startup by creating the
clock-epochfile in${libdir}if theset-time-epochPACKAGECONFIG config is set.really disable Predictable Network Interface names if the
pni-namesfeature is not part of DISTRO_FEATURES. Previously it was only really disabled for QEMU machines.split
networkdinto its own package namedsystemd-networkd.
systemd-bootchart: now supports the 32-bit riscv architecture.systemd-boot: now supports the riscv architecture.systemd-serialgetty:the recipe no longer sets a default value for SERIAL_CONSOLES, and uses the one set in
bitbake.conf.the recipe no longer ships a copy of the
serial-getty@.serviceas it is provided by systemd directly.Don’t set a default SERIAL_CONSOLES value in the
systemd-serialgettyrecipe and take the global value that should already be set.Replace custom unit files by existing unit files provided in the systemd source code.
User unit supports was improved. All the user units are now enabled by default.
The custom implementation of
systemctlin OpenEmbedded-Core (OE-Core) was removed to use the upstream one. Thissystemctlbinary is now compiled and used for systemd-related operations.
sanity class changes:
Add a sanity check to validate that the C++ toolchain is functional on the host.
Add a sanity check to check that the C++ compiler on the host supports C++20.
Add a sanity check to verify that TOPDIR does not contain non-ASCII characters, as it may lead to unexpected build errors.
Miscellaneous changes:
bluez: fix mesh build when building with musl.python3-pip: thepipexecutable is now left and not deleted, and can be used instead ofpip3andpip2.tarimage types are now more reproducible as the IMAGE_CMD fortarnow stripsatimeandctimefrom the archive content.SOLIBSDEV and SOLIBS are now defined for the mingw32 architecture (
.dll).rootfs-postcommands: make
opkgstatus reproducible.The default KERNEL_CONSOLE value is no longer
ttyS0but the first entry from the SERIAL_CONSOLES variable.virglrenderer: add a patch to fix-int-conversionbuild issue.ffmpeg: disable asm optimizations for the x86 architecture as PIC is required and x86 ASM code is not PIC.udev-extraconf: fix thenetwork.shscript that did not configure hotplugged interfaces.classes-global/license: move several functions and logic to library code in meta/lib/oe/license.py.The recipe
caironow disables the featuressymbol-lookup,spectre, andtestsby default.The recipe
glib-2.0now disables the featuresysprofby default.The recipe
gstreamer1.0-libavnow disables the featuredocby default.rxvt-unicode: changevirtual/x-terminal-emulatorfrom PROVIDES to RPROVIDES asvirtual-x-terminal-emulator. Also make this recipe depend on thex11distro features with REQUIRED_DISTRO_FEATURES.rxvt-unicode.inc: disable theterminfoinstallation by settingTICto:in EXTRA_OECONF, to avoid host contamination.matchbox-terminal: addx-terminal-emulatoras RPROVIDES and set ALTERNATIVE for the recipe.default-providers.conf: setrxvt-unicodeas the defaultvirtual-x-terminal-emulatorruntime provider with PREFERRED_RPROVIDER.cve-update-nvd2-native: updating the database will now result in an error if BB_NO_NETWORK is enabled andCVE_DB_UPDATE_INTERVALis not set to-1. Users can control the NVD database source using theNVD_DB_VERSIONvariable with possible valuesNVD1,NVD2, orFKIE.systemtap: add--with-extra-version="oe"configure option to improve the reproducibility of the recipe.python3: packagetkinter’s shared objects separately in thepython3-tkinterpackage.init-manager: set the variableVIRTUAL-RUNTIME_dev_managertoudevby default in meta/conf/distro/include/init-manager-none.inc and meta/conf/distro/include/init-manager-sysvinit.inc, instead of meta/recipes-core/packagegroups/packagegroup-core-boot.bb only.Likewise, the same is done for
VIRTUAL-RUNTIME_keymapswithkeymapsas its default value.seatd: Create aseatgroup and package the systemd serviceseatd.servicewith correct permissions.That way, the
westonuser inweston-init.bbwas added to theseatgroup to be able to properly establish connection between the Weston and theseatdsocket.webkitgtk:Fix build on 32bit arches with 64bit
time_tonly.Disable JIT on RISCV64.
report-error: Add PN to error report files.
initrdscripts: add UBI support for mounting a liveubifsrootfs.uboot-extlinux-config.bbclass: add support for device tree overlays.glibc: addld.so.confto CONFFILES.udev-extraconf: Allow FAT mount group to be specified with MOUNT_GROUP.New
bbverbnotelog utility which can be used to print on the console (equivalent to thebb.verbnotePython implementation).grub-efi: Add GRUB_TITLE variable to set custom GRUB titles.
gawk: Enable high precision arithmetic support by default (mpfrenabled by default in PACKAGECONFIG).licenses: Map the licenseSGIv1toSGI-OpenGL, asSGIv1is not an SPDX license identifier.Configuration files for the b4 command-line tool was added to the different Yocto Project and OpenEmbedded repositories.
kernel-fitimage: handle multiconfig dependency when INITRAMFS_MULTICONFIG is set.psplash: when using thesystemdfeature from DISTRO_FEATURES, start thepsplashservice when the/dev/fb0framebuffer is detected with Udev.gdb: is now compiled with xz support by default (--with-lzma).busybox: drop net-tools from the defaultdefconfig, since these tools (ifconfig, etc.) have been deprecated since 2009.perfis built withzstdin PACKAGECONFIG by default.boost: addcharconvto built libraries by default.mirrors: rationalise Debian mirrors to point at the canonical server (deb.debian.org) instead of country specific ones. This server is backed by a CDN to properly balance the server load.lib: sbom30: Add action statement for affected VEX statements with “Mitigation action unknown”, as these are not tracked by the existing code.
Known Issues in 5.2
The
cve-checkclass is based on the National Vulnerability Database (NVD). Since the beginning of 2024, the maintainers of this database have stopped annotating CVEs with the affected CPEs. This prevents thecve-checkclass to properly report CVEs as CPEs are used to match Yocto recipes with CVEs affecting them. As a result, the current CVE reports may look good but the reality is that some vulnerabilities are just not reported.During that time, users may look up the ‘CVE database <https://www.cve.org/>’__ for entries concerning software they use, or follow release notes of such projects closely.
Please note, that the
cve-checktool has always been a helper tool, and users are advised to always review the final result. Results of an automatic scan may not take into account configuration options, compiler options and other factors.
Recipe License changes in 5.2
The following changes have been made to the LICENSE values set by recipes:
Recipe |
Previous value |
New value |
|---|---|---|
|
|
|
|
|
|
|
|
|
|
|
|
|
|
|
|
|
|
|
|
|
|
|
|
|
|
|
|
|
|
|
|
|
|
|
|
|
|
|
|
|
|
|
|
|
|
|
|
Security Fixes in 5.2
The following CVEs have been fixed:
Recipe Upgrades in 5.2
Recipe |
Previous version |
New version |
|---|---|---|
|
46.2 |
48.0 |
|
1.2.12 |
1.2.13 |
|
1.2.12 |
1.2.13 |
|
1.2.12 |
1.2.13 |
|
1.0.3 |
1.0.4 |
|
2.52.0 |
2.56.0 |
|
2023.02.20 |
2024.10.16 |
|
2.0.6 |
2.1.0 |
|
3.6.4 |
3.6.6 |
|
5.2.32 |
5.2.37 |
|
2.14.0 |
2.16.0 |
|
1.07.1 |
1.08.1 |
|
9.20.1 |
9.20.6 |
|
2.43.1 |
2.44 |
|
2.43.1 |
2.44 |
|
2.43.1 |
2.44 |
|
2.43.1 |
2.44 |
|
2.43.1 |
2.44 |
|
5.78 |
5.79 |
|
1.86.0 |
1.87.0 |
|
1.86.0 |
1.87.0 |
|
6.10.1 |
6.13 |
|
15.0.0 (6a5ba188b79e…) |
15.0.0 (2fe7f46e1779…) |
|
1.36.1 |
1.37.0 |
|
1.36.1 |
1.37.0 |
|
20240203 |
20241223 |
|
1.18.2 |
1.18.4 |
|
1.79.0 |
1.84.1 |
|
4.10.2 |
4.11 |
|
0.16 |
0.18 |
|
3.30.2 |
3.31.6 |
|
3.30.2 |
3.31.6 |
|
1.42 |
1.43 |
|
9.5 |
9.6 |
|
2.10.2 |
2.10.3 |
|
1.1.4 |
1.2.0 |
|
2.40+git |
2.41+git |
|
2.4.10 |
2.4.11 |
|
8.9.1 |
8.12.1 |
|
1.14.10 |
1.16.2 |
|
0.112 |
0.114 |
|
5.20 |
5.21 |
|
5.0 |
5.1 |
|
0.27 |
0.28 |
|
10.0.10 |
10.2.2 |
|
277 |
289 |
|
1.66 |
1.67 |
|
3.10 |
3.11 |
|
4.21.1 |
4.22.0 |
|
2024.85 |
2024.86 |
|
1.7.0 |
1.7.2 |
|
1.20.2 |
1.21 |
|
39+39+git |
39 |
|
0.191 |
0.192 |
|
0.68 |
0.74 |
|
46.3 |
48.0 |
|
1.8.1 |
1.8.5 |
|
6.10 |
6.11 |
|
2.6.4 |
2.7.0 |
|
7.0.2 |
7.1.1 |
|
5.45 |
5.46 |
|
11.0.2 |
11.1.4 |
|
1.0.15 |
1.0.16 |
|
5.3.0 |
5.3.1 |
|
4.3.0 |
4.3.1 |
|
15.1 |
16.2 |
|
15.1 |
16.2 |
|
15.1 |
16.2 |
|
0.22.5 |
0.23.1 |
|
0.22.5 |
0.23.1 |
|
10.04.0 |
10.05.0 |
|
2024.1 |
2025.3 |
|
2.46.1 |
2.49.0 |
|
.0 2.80.4 |
2.84.0 |
|
.0-initial 2.80.4 |
2.84.0 |
|
2.40+git |
2.41+git |
|
2.40+git |
2.41+git |
|
2.40+git |
2.41+git |
|
2.40+git |
2.41+git |
|
2.40+git |
2.41+git |
|
2.40+git |
2.41+git |
|
1.3.290.0 |
1.4.309.0 |
|
3.0.18 |
4.0.0 |
|
2.5.0 |
2.5.5 |
|
3.8.6 |
3.8.9 |
|
1.22.12 |
1.24.1 |
|
1.22.12 |
1.24.1 |
|
1.22.12 |
1.24.1 |
|
1.22.12 |
1.24.1 |
|
1.22.12 |
1.24.1 |
|
0.1 (39e772fc2670…) |
0.1 (d7b0ac127859…) |
|
1.22.12 |
1.24.1 |
|
1.80.1 |
1.84.0 |
|
1.23.2 |
1.24.2 |
|
46.1 |
48.0 |
|
1.24.10 |
1.24.12 |
|
1.24.10 |
1.24.12 |
|
1.24.10 |
1.24.12 |
|
1.24.10 |
1.24.12 |
|
1.24.10 |
1.24.12 |
|
1.24.10 |
1.24.12 |
|
1.24.10 |
1.24.12 |
|
1.24.10 |
1.24.12 |
|
1.24.10 |
1.24.12 |
|
1.24.10 |
1.24.12 |
|
4.14.5 |
4.18.1 |
|
9.0.0 |
10.4.0 |
|
2.7 |
2.8 |
|
4.3 |
4.4 |
|
75-1 |
76-1 |
|
0.8.43 |
0.8.44 |
|
1.28 |
1.30 |
|
2.5 |
2.6 |
|
1.66 |
1.68 |
|
6.10.0 |
6.13.0 |
|
1.8.10 |
1.8.11 |
|
20240117 |
20240905 |
|
4.16.0 |
4.17.0 |
|
0.17 |
0.18 |
|
1.8.0 |
1.10.6 |
|
2.6.4 |
2.7.1 |
|
0.3+git (7160ebe8b865…) |
0.3+git (bfca22a52ec5…) |
|
2.0.29 |
2.0.30 |
|
33 |
34.1 |
|
0.0.1+git (b2f97f53e01e…) |
0.0.1+git (311eaaaa473d…) |
|
661 |
668 |
|
1.5.3 |
1.7.0 |
|
3.7.4 |
3.7.8 |
|
3.0.1 |
3.0.2 |
|
2.70 |
2.75 |
|
0.73.3 |
0.73.4 |
|
2.4.123 |
2.4.124 |
|
20240808-3.1 |
20250104-3.1 |
|
0.6.24 |
0.6.25 |
|
3.4.6 |
3.4.7 |
|
1.8.1 |
1.9.0 |
|
1.50 |
1.51 |
|
3.0.18 |
3.0.20 |
|
1.1.1 |
1.1.2 |
|
2.3.7 |
2.3.8 |
|
1.26.1 |
1.27.1 |
|
3.5.0 |
3.6.2 |
|
1.12 |
1.13 |
|
3.10.0 |
3.11.0 |
|
0.8.3 |
0.8.4 |
|
1.6.1 |
1.7.0 |
|
10.44 |
10.45 |
|
1.5.7 |
1.5.8 |
|
1.6.43 |
1.6.47 |
|
0.7.1 |
0.9.1 |
|
0.5.8 |
0.5.9 |
|
1.18.1 |
1.19.0 |
|
2.58.2 |
2.59.2 |
|
2.30.7 |
2.32.2 |
|
2.5.5 |
2.6.0 |
|
0.21.4 |
0.21.6 |
|
4.8.0 |
4.9.0 |
|
1.2.4 |
1.2.6 |
|
0.7.30 |
0.7.31 |
|
3.6.0 |
3.6.4 |
|
1.11.0 |
1.11.1 |
|
1.79.0 |
1.84.1 |
|
0.033 |
0.038 |
|
1.3.5 |
1.3.6 |
|
2.5.2 |
2.5.4 |
|
2.5.2 |
2.5.4 |
|
2.5.2 |
2.5.4 |
|
1.8.3 |
1.8.4 |
|
0.31 |
0.32 |
|
0.3.5 |
0.3.6 |
|
1.2 |
1.3 |
|
0.14.1 |
0.15.1 |
|
1.48.0 |
1.50.0 |
|
1.4.0 |
1.5.0 |
|
1.16.0 |
1.16.2 |
|
1.8.10 |
1.8.12 |
|
1.0.11 |
1.0.12 |
|
4.4.36 |
4.4.38 |
|
4.4.36 |
4.4.38 |
|
1.2.2 |
1.2.3 |
|
0.1.2 |
0.1.3 |
|
1.8.1 |
1.8.2 |
|
1.7.0 |
1.8.1 |
|
0.3.19 |
0.3.22 |
|
0.9.11 |
0.9.12 |
|
1.3.2 |
1.3.3 |
|
1.1.42 |
1.1.43 |
|
1.3.0 |
1.3.1 |
|
1.0.12 |
1.0.13 |
|
1.1.5 |
1.1.6 |
|
1.4.76 |
1.4.77 |
|
20240909 |
20250311 |
|
6.10 |
6.12 |
|
6.6.75+git, 6.10.14+git |
6.12.19+git |
|
6.11+git |
6.14+git |
|
6.6.75+git, 6.10.14+git |
6.12.19+git |
|
6.6.75+git, 6.10.14+git |
6.12.19+git |
|
18.1.8 |
20.1.0 |
|
2.1.1 |
2.1.2 |
|
4.99.3 |
4.99.4 |
|
20240524 |
20250130 |
|
2.13.14 |
2.13.17 |
|
1.24.1 |
1.25 |
|
1.14 |
1.15 |
|
2.12.1 |
2.13.0 |
|
6.9.1 |
6.13 |
|
4.8.32 |
4.8.33 |
|
8.5.0 |
9.0.0 |
|
1.5.1 |
1.7.0 |
|
2.9 |
2.10 |
|
0.1+git (123fd8b2ac39…) |
0.1+git (2aef4cd9a84d…) |
|
1.32.7 |
1.32.10 |
|
1.8.26 |
1.8.28 |
|
2.2.0 |
2.3.0 |
|
4.0.44 |
4.0.48 |
|
1.2.5+git (dd1e63c3638d…) |
1.2.5+git (c47ad25ea3b4…) |
|
2.5.2 |
2.5.4 |
|
6.4 |
6.5 |
|
3.10 |
3.10.1 |
|
2.6.4 |
2.8.2 |
|
1.63.0 |
1.65.0 |
|
1.7 |
1.8 |
|
2.0.18 |
2.0.19 |
|
2.10 |
2.15 |
|
1.5.1 |
1.6 |
|
9.8p1 |
9.9p2 |
|
3.3.1 |
3.4.1 |
|
0.4.40 |
0.4.41 |
|
edk2-stable202402 |
edk2-stable202411 |
|
1.54.0 |
1.56.2 |
|
1.0+gitr (c11c9374c144…) |
1.0+gitr (fc8179d31904…) |
|
0.42.2 |
0.44.2 |
|
2.3.0 |
2.4.3 |
|
2.5.0 |
2.5.2 |
|
4.0.4 |
4.0.5 |
|
0.1+git (ecc191375669…) |
0.1+git (1f64c654129f…) |
|
2.4.5+git |
2.4.5.1 |
|
0.0+git (1c1899ee1c4e…) |
0.0+git (7da464122232…) |
|
3.12.9 |
3.13.2 |
|
24.2.0 |
25.3.0 |
|
2.16.0 |
2.17.0 |
|
4.2.0 |
4.3.0 |
|
0.18.5 |
0.20.0 |
|
1.2.1 |
1.2.2 |
|
2024.8.30 |
2025.1.31 |
|
1.17.0 |
1.17.1 |
|
8.1.7 |
8.1.8 |
|
42.0.8 |
44.0.2 |
|
42.0.8 |
44.0.2 |
|
3.0.11 |
3.0.12 |
|
1.3.2 |
1.4.0 |
|
0.32.1 |
0.33.0 |
|
1.7.0 |
1.7.2 |
|
2024.5 |
2025.2 |
|
3.9.0 |
3.11.0 |
|
4.0.11 |
4.0.12 |
|
1.25.0 |
1.27.0 |
|
6.111.2 |
6.129.2 |
|
3.8 |
3.10 |
|
3.1.4 |
3.1.6 |
|
2023.12.1 |
2024.10.1 |
|
30.3.1 |
30.4.1 |
|
5.3.0 |
5.3.1 |
|
1.3.5 |
1.3.9 |
|
3.6 |
3.7 |
|
2.1.5 |
3.0.2 |
|
1.7.1 |
1.8.3 |
|
0.16.0 |
0.17.1 |
|
10.4.0 |
10.6.0 |
|
1.26.4 |
2.2.3 |
|
24.1 |
24.2 |
|
24.2 |
25.0.1 |
|
1.9.0 |
2.1.1 |
|
6.0.0 |
7.0.0 |
|
0.6.0 |
0.6.1 |
|
1.26.1 |
1.27.0 |
|
3.20.0 |
3.22.0 |
|
3.20.0 |
3.22.0 |
|
0.31 |
0.32 |
|
2.18.0 |
2.19.1 |
|
3.48.2 |
3.52.2 |
|
24.2.1 |
25.0.0 |
|
3.1.4 |
3.2.1 |
|
1.0.0 |
1.2.0 |
|
0.8.0 |
0.9.1 |
|
8.3.2 |
8.3.5 |
|
0.13.1 |
0.14.1 |
|
2024.1 |
2025.1 |
|
7.0.0 |
7.1.3 |
|
0.35.1 |
0.36.2 |
|
0.20.0 |
0.22.3 |
|
0.18.6 |
0.18.10 |
|
4.8.0 |
4.9.0 |
|
72.1.0 |
76.0.0 |
|
1.10.1 |
1.11.0 |
|
8.1.0 |
8.2.0 |
|
1.16.0 |
1.17.0 |
|
0.8.2 |
0.8.3 |
|
8.0.2 |
8.2.1 |
|
2.0.0 |
3.0.2 |
|
2024.7.2 |
2025.3.13.13 |
|
2.0.7 |
2.1.0 |
|
2.2.2 |
2.3.0 |
|
13.0.1 |
15.0.1 |
|
0.44.0 |
0.45.1 |
|
0.13.0 |
0.14.2 |
|
1.35.1 |
1.36.0 |
|
3.20.1 |
3.21.0 |
|
9.0.2 |
9.2.0 |
|
9.0.2 |
9.2.0 |
|
9.0.2 |
9.2.0 |
|
3.1 |
4.1 |
|
2.46 |
2.52 |
|
4.19.1.1 |
4.20.0 |
|
3.3.0 |
3.4.1 |
|
2.7 |
2.8 |
|
3.3.4 |
3.4.2 |
|
1.79.0 |
1.84.1 |
|
1.79.0 |
1.84.1 |
|
1.79.0 |
1.84.1 |
|
4.9.1 |
5.0.0 |
|
0.8.0 |
0.9.1 |
|
2024.1 |
2024.3 |
|
4.16.0 |
4.17.3 |
|
1.8.0.0 |
1.8.0.3 |
|
1.3.290.0 |
1.4.309.0 |
|
1.3.290.0 |
1.4.309.0 |
|
3.46.1 |
3.48.0 |
|
6.10 |
6.12 |
|
0.18.02 |
0.18.11 |
|
1.14.3 |
1.14.5 |
|
1.9.15p5 |
1.9.16p2 |
|
4.2.1 |
4.3.0 |
|
2.6.1 |
2.7.1 |
|
12.7.6 |
12.7.7 |
|
256.5 |
257.4 |
|
256.5 |
257.4 |
|
256.5 |
257.4 |
|
1.0 |
257.4 |
|
5.1 |
5.2 |
|
5.1 |
5.2 |
|
3.04 |
3.14 |
|
8.6.14 |
9.0.1 |
|
7.1 |
7.2 |
|
4.6.0 |
4.7.0 |
|
2.34.0 |
2.37.0 |
|
2024.07 |
2025.01 |
|
2024.07 |
2025.01 |
|
017 |
018 |
|
4.0.5 |
4.0.6 |
|
2.40.2 |
2.40.4 |
|
2.40.2 |
2.40.4 |
|
1.20.1 |
1.20.2 |
|
0.56.17 |
0.56.18 |
|
3.23.0 |
3.24.0 |
|
9.1.1043 |
9.1.1198 |
|
9.1.1043 |
9.1.1198 |
|
1.0.1 |
1.1.0 |
|
0.76.3 |
0.78.2 |
|
1.3.290.0 |
1.4.309.0 |
|
1.3.290.0 |
1.4.309.0 |
|
git (fdce530c0295…) |
git (8547ce1022a1…) |
|
1.3.290.0 |
1.4.309.0 |
|
1.3.290.0 |
1.4.309.0 |
|
1.3.290.0 |
1.4.309.0 |
|
1.3.290.0 |
1.4.309.0 |
|
1.37 |
1.41 |
|
2.44.3 |
2.48.0 |
|
13.0.3 |
14.0.1 |
|
1.24.5 |
1.25.0 |
|
2024.10.07 |
2025.02.20 |
|
1.14.2 |
1.16.0 |
|
1.1.3 |
1.1.4 |
|
0.1.4 |
0.1.5 |
|
2.10.6 |
2.11.0 |
|
1.4.0 |
1.5.0 |
|
1.9.2 |
1.10.0 |
|
0.5.0 |
0.5.1 |
|
1.0.9 |
1.0.10 |
|
1.4.2 |
1.4.4 |
|
2.42 |
2.44 |
|
1.2.7 |
1.2.8 |
|
1.5.2 |
1.5.3 |
|
1.5.0 |
1.6.0 |
|
0.8.2 |
0.8.3 |
|
5.6.2 |
5.6.4 |
|
1.5.6 |
1.5. 7 |
Contributors to 5.2
Thanks to the following people who contributed to this release:
Aditya Tayade
Adrian Freihofer
Alban Bedel
Aleksandar Nikolic
Alessio Cascone
Alexander Hirsch
Alexander Kanavin
Alexander Sverdlin
Alexander van Gessel
Alexander Yurkov
Alexandre Marques
Alexis Cellier
Alex Kiernan
Andrej Valek
Angelo Ribeiro
Antonin Godard
Archana Polampalli
Artur Kowalski
Awais Belal
Balaji Pothunoori
Bartosz Golaszewski
Bastian Germann
Bastian Krause
Bastien JAUNY
BELHADJ SALEM Talel
Benjamin Bara
Benjamin Grossschartner
Benjamin Szőke
Bin Lan
Bruce Ashfield
Changhyeok Bae
Changqing Li
Chen Qi
Chris Laplante
Christian Lindeberg
Christian Taedcke
Christos Gavros
Claus Stovgaard
Clayton Casciato
Colin McAllister
Daniel Ammann
Daniel McGregor
Dan McGregor
Deepesh Varatharajan
Deepthi Hemraj
Denis OSTERLAND-HEIM
Denys Dmytriyenko
Derek Straka
Divya Chellam
Dmitry Baryshkov
Enrico Jörns
Enrico Scholz
Eric Meyers
Esben Haabendal
Etienne Cordonnier
Fabio Berton
Fabio Estevam
Gaël PORTAY
Georgi, Tom
Guðni Már Gilbert
Guénaël Muller
Harish Sadineni
Haseeb Ashraf
Hiago De Franco
Hongxu Jia
Igor Opaniuk
Jagadeesh Krishnanjanappa
Jamin Lin
Jason Schonberg
Jean-Pierre Geslin
Jermain Horsman
Jesse Riemens
Jiaying Song
Jinfeng Wang
João Henrique Ferreira de Freitas
Joerg Schmidt
Jonas Gorski
Jon Mason
Jörg Sommer
Jose Quaresma
Joshua Watt
Julien Stephan
Justin Bronder
Kai Kang
Katariina Lounento
Katawann
Kevin Hao
Khem Raj
Koen Kooi
Lee Chee Yang
Lei Maohui
Lei YU
Leon Anavi
Louis Rannou
Maik Otto
Makarios Christakis
Marc Ferland
Marco Felsch
Marek Vasut
Mark Hatle
Markus Volk
Marta Rybczynska
Martin Jansa
Mathieu Dubois-Briand
Matthias Schiffer
Maxin John
Michael Estner
Michael Halstead
Michael Nazzareno Trimarchi
Michael Opdenacker
Michelle Lin
Mikko Rapeli
Ming Liu
Moritz Haase
Nick Owens
Nicolas Dechesne
Nikolai Merinov
Niko Mauno
Ninette Adhikari
Ola x Nilsson
Oleksandr Hnatiuk
Oliver Kästner
Omri Sarig
Pascal Eberhard
Patrik Nordvall
Paul Barker
Pavel Zhukov
Pedro Ferreira
Peter Bergin
Peter Delevoryas
Peter Kjellerstedt
Peter Marko
Peter Tatrai
Philip Lorenz
Priyal Doshi
Purushottam Choudhary
Quentin Schulz
Ralph Siemsen
Randy MacLeod
Ranjitsinh Rathod
Rasmus Villemoes
Regis Dargent
Ricardo Salveti
Richard Purdie
Robert Yang
Rohini Sangam
Roland Hieber
Ross Burton
Ryan Eatmon
Savvas Etairidis
Sean Nyekjaer
Sebastian Zenker
Sergei Zhmylev
Shunsuke Tokumoto
Sid-Ali
Simon A. Eugster
Simone Weiß
Slawomir Stepien
Sofiane HAMAM
Stefan Gloor
Stefan Herbrechtsmeier
Stefan Koch
Stefan Mueller-Klieser
Steve Sakoman
Sunil Dora
Sven Kalmbach
Talel BELHAJSALEM
Thomas Perrot
Thomas Roos
Tim Orling
Tom Hochstein
Trevor Gamblin
Ulrich Ölmann
Valeria Petrov
Victor J. Hansen
Victor Kamensky
Vijay Anusuri
Vince Chang
Vivek Puar
Vyacheslav Yurkov
Walter Schweizer
Wang Mingyu
Weisser, Pascal
Xiangyu Chen
Xiaotian Wu
Yash Shinde
Yi Zhao
Yoann Congal
Yogita Urade
Zoltán Böszörményi
Repositories / Downloads for Yocto-5.2
poky
Repository Location: https://git.yoctoproject.org/poky
Branch: walnascar
Tag: yocto-5.2
Git Revision: 9b96fdbb0cab02f4a6180e812b02bc9d4c41b1a5
Release Artefact: poky-9b96fdbb0cab02f4a6180e812b02bc9d4c41b1a5
sha: 2d3c0e216c7fa71a364986be6754549e2059d37581aad0a53f0f95c33fb1eefe
Download Locations: https://downloads.yoctoproject.org/releases/yocto/yocto-5.2/poky-9b96fdbb0cab02f4a6180e812b02bc9d4c41b1a5.tar.bz2 https://mirrors.kernel.org/yocto/yocto/yocto-5.2/poky-9b96fdbb0cab02f4a6180e812b02bc9d4c41b1a5.tar.bz2
openembedded-core
Repository Location: https://git.openembedded.org/openembedded-core
Branch: walnascar
Tag: yocto-5.2
Git Revision: 6ec2c52b938302b894f119f701ffcf0a847eee85
Release Artefact: oecore-6ec2c52b938302b894f119f701ffcf0a847eee85
sha: 00453354efdd9c977d559f7c0047691bb974170ce313ac9a1e6cb94108d6c648
Download Locations: https://downloads.yoctoproject.org/releases/yocto/yocto-5.2/oecore-6ec2c52b938302b894f119f701ffcf0a847eee85.tar.bz2 https://mirrors.kernel.org/yocto/yocto/yocto-5.2/oecore-6ec2c52b938302b894f119f701ffcf0a847eee85.tar.bz2
meta-mingw
Repository Location: https://git.yoctoproject.org/meta-mingw
Branch: walnascar
Tag: yocto-5.2
Git Revision: edce693e1b8fabd84651aa6c0888aafbcf238577
Release Artefact: meta-mingw-edce693e1b8fabd84651aa6c0888aafbcf238577
sha: 6cfed41b54f83da91a6cf201ec1c2cd4ac284f642b1268c8fa89d2335ea2bce1
Download Locations: https://downloads.yoctoproject.org/releases/yocto/yocto-5.2/meta-mingw-edce693e1b8fabd84651aa6c0888aafbcf238577.tar.bz2 https://mirrors.kernel.org/yocto/yocto/yocto-5.2/meta-mingw-edce693e1b8fabd84651aa6c0888aafbcf238577.tar.bz2
bitbake
Repository Location: https://git.openembedded.org/bitbake
Branch: 2.12
Tag: yocto-5.2
Git Revision: 5b4e20377eea8d428edf1aeb2187c18f82ca6757
Release Artefact: bitbake-5b4e20377eea8d428edf1aeb2187c18f82ca6757
sha: 48cff22c1e61f47adce474b636ca865e7e0b62293fc5c8829d09e7f1ac5252af
Download Locations: https://downloads.yoctoproject.org/releases/yocto/yocto-5.2/bitbake-5b4e20377eea8d428edf1aeb2187c18f82ca6757.tar.bz2 https://mirrors.kernel.org/yocto/yocto/yocto-5.2/bitbake-5b4e20377eea8d428edf1aeb2187c18f82ca6757.tar.bz2
yocto-docs
Repository Location: https://git.yoctoproject.org/yocto-docs
Branch: walnascar
Tag: yocto-5.2
Git Revision: b8d9cf79d299b2e553e6bc962527d835206022ec
Release notes for Yocto-5.2.1 (Walnascar)
Security Fixes in Yocto-5.2.1
connman :Fix CVE-2025-32366 and CVE-2025-32743
ffmpeg: Fix CVE-2025-22921
go: Fix CVE-2025-22871 and CVE-2025-22873
iputils: Fix CVE-2025-47268
libsoup-2.4: Fix CVE-2024-52532 and CVE-2025-32911
libxml2: Fix CVE-2025-32414 and CVE-2025-32415
openssh: Fix CVE-2025-32728
perl: Fix CVE-2024-56406
qemu: Ignore CVE-2023-1386
ruby: Fix CVE-2025-27219, CVE-2025-27220 and CVE-2025-27221
webkitgtk: Fix CVE-2024-54551, CVE-2025-24208, CVE-2025-24209, CVE-2025-24213, CVE-2025-24216, CVE-2025-24264 and CVE-2025-30427
Fixes in Yocto-5.2.1
binutils: stable 2.44 branch updates
bluez5: add missing tools to noinst-tools package
build-appliance-image: Update to walnascar head revision
buildtools-tarball: Make buildtools respects host CA certificates
buildtools-tarball: add envvars into BB_ENV_PASSTHROUGH_ADDITIONS
buildtools-tarball: move setting of envvars to respective envfile
cdrtools-native: fix booting EFI ISO live failed
contributor-guide/submit-changes: encourage patch version changelogs
gcc: Fix LDRD register overlap in register-indexed mode
glibc-y2038-tests: remove glibc-y2038-tests_2.41.bb recipe
glibc: Add single-threaded fast path to rand()
glibc: stable 2.41 branch update
go: upgrade to 1.24.3
gobject-introspection: Fix wrong PN used in MULTILIB_SCRIPTS
icu: set ac_cv_path_install to ensure install tool reproducibility
initscripts: add function log_success_msg/log_failure_msg/log_warning_msg
insane.bbclass: Move test for invalid PACKAGECONFIGs to do_recipe_qa
insane.bbclass: Report all invalid PACKAGECONFIGs for a recipe at once
libxml2: upgrade to 2.13.8
makedumpfile: upgrade to 1.7.7
migration-guides: add release notes for 4.0.26 and 5.0.9
module.bbclass: add KBUILD_EXTRA_SYMBOLS to install
patch.py: set commituser and commitemail for addNote
perl: upgrade to 5.40.2
perlcross: upgrade to 1.6.2
poky.conf: bump version for 5.2.1
ref-manual/release-process: update releases.svg
ref-manual/variables.rst: document WIC_CREATE_EXTRA_ARGS
ref-manual/variables.rst: update ROOT_HOME documentation
ref-manual: classes: uki: Fix git links
ref-manual: kernel-fitimage.bbclass does not use SPL_SIGN_KEYNAME
ruby: upgrade to 3.4.3
sbom.rst: how to disable SPDX generation
scripts/install-buildtools: Update to 5.2
sphinx-lint: various fixes
syslinux: improve isohybrid to process extra sector count for ISO 9660 image
test-manual/intro: remove Buildbot version used
tzdata/tzcode-native: upgrade to 2025b
webkitgtk: Use WTF_CPU_UNKNOWN when building for riscv64
webkitgtk: upgrade to 2.48.1
Known Issues in Yocto-5.2.1
N/A
Contributors to Yocto-5.2.1
Adrian Freihofer
Aleksandar Nikolic
Alon Bar-Lev
Antonin Godard
Archana Polampalli
Changqing Li
Deepesh Varatharajan
Divya Chellam
Enrico Jörns
Guðni Már Gilbert
Haixiao Yan
Hongxu Jia
Jiaying Song
Khem Raj
Lee Chee Yang
Leonard Anderweit
Madhu Marri
Mikko Rapeli
Peter Kjellerstedt
Peter Marko
Praveen Kumar
Priyal Doshi
Steve Sakoman
Trevor Woerner
Yi Zhao
Yogita Urade
rajmohan r
Repositories / Downloads for Yocto-5.2.1
poky
Repository Location: https://git.yoctoproject.org/poky
Branch: walnascar
Tag: yocto-5.2.1
Git Revision: fd9b605507a20d850a9991316cd190c1d20dc4a6
Release Artefact: poky-fd9b605507a20d850a9991316cd190c1d20dc4a6
sha: 0234a96fc28e60e0acaae2a03118ecde76810c47e8bb259f4950492bd75fc050
Download Locations: https://downloads.yoctoproject.org/releases/yocto/yocto-5.2.1/poky-fd9b605507a20d850a9991316cd190c1d20dc4a6.tar.bz2 https://mirrors.kernel.org/yocto/yocto/yocto-5.2.1/poky-fd9b605507a20d850a9991316cd190c1d20dc4a6.tar.bz2
openembedded-core
Repository Location: https://git.openembedded.org/openembedded-core
Branch: walnascar
Tag: yocto-5.2.1
Git Revision: 17affdaa600896282e07fb4d64cb23195673baa1
Release Artefact: oecore-17affdaa600896282e07fb4d64cb23195673baa1
sha: b6c3c15004fcd1efbaa26c9695202806402730dde8e41552a70140cff67c97c9
Download Locations: https://downloads.yoctoproject.org/releases/yocto/yocto-5.2.1/oecore-17affdaa600896282e07fb4d64cb23195673baa1.tar.bz2 https://mirrors.kernel.org/yocto/yocto/yocto-5.2.1/oecore-17affdaa600896282e07fb4d64cb23195673baa1.tar.bz2
meta-mingw
Repository Location: https://git.yoctoproject.org/meta-mingw
Branch: walnascar
Tag: yocto-5.2.1
Git Revision: edce693e1b8fabd84651aa6c0888aafbcf238577
Release Artefact: meta-mingw-edce693e1b8fabd84651aa6c0888aafbcf238577
sha: 6cfed41b54f83da91a6cf201ec1c2cd4ac284f642b1268c8fa89d2335ea2bce1
Download Locations: https://downloads.yoctoproject.org/releases/yocto/yocto-5.2.1/meta-mingw-edce693e1b8fabd84651aa6c0888aafbcf238577.tar.bz2 https://mirrors.kernel.org/yocto/yocto/yocto-5.2.1/meta-mingw-edce693e1b8fabd84651aa6c0888aafbcf238577.tar.bz2
bitbake
Repository Location: https://git.openembedded.org/bitbake
Branch: 2.12
Tag: yocto-5.2.1
Git Revision: 5b4e20377eea8d428edf1aeb2187c18f82ca6757
Release Artefact: bitbake-5b4e20377eea8d428edf1aeb2187c18f82ca6757
sha: 48cff22c1e61f47adce474b636ca865e7e0b62293fc5c8829d09e7f1ac5252af
Download Locations: https://downloads.yoctoproject.org/releases/yocto/yocto-5.2.1/bitbake-5b4e20377eea8d428edf1aeb2187c18f82ca6757.tar.bz2 https://mirrors.kernel.org/yocto/yocto/yocto-5.2.1/bitbake-5b4e20377eea8d428edf1aeb2187c18f82ca6757.tar.bz2
yocto-docs
Repository Location: https://git.yoctoproject.org/yocto-docs
Branch: walnascar
Tag: yocto-5.2.1
Git Revision: 6b7019c13054bf11fb16657a3fac85831352cea9
Release notes for Yocto-5.2.2 (Walnascar)
Security Fixes in Yocto-5.2.2
bind: Fix CVE-2025-40775
binutils: Fix CVE-2025-1153, CVE-2025-1178, CVE-2025-1180, CVE-2025-1181, CVE-2025-1182, CVE-2025-3198 and CVE-2025-5244
binutils: Ignore CVE-2025-1153 (fixed in current version)
epiphany: Fix CVE-2025-3839
go: Fix CVE-2025-0913, CVE-2025-4673 and CVE-2025-22874
go: Ignore CVE-2024-3566
kea: Fix CVE-2025-32801, CVE-2025-32802 and CVE-2025-32803
libarchive: Fix CVE-2025-5914
libsoup-2.4: Fix CVE-2024-52530, CVE-2024-52531, CVE-2025-2784, CVE-2025-4476, CVE-2025-4948, CVE-2025-4969, CVE-2025-32050, CVE-2025-32052, CVE-2025-32053, CVE-2025-32906, CVE-2025-32907, CVE-2025-32909, CVE-2025-32910, CVE-2025-32912, CVE-2025-32913, CVE-2025-32914, CVE-2025-46420 and CVE-2025-46421
libsoup: Fix CVE-2025-4476, CVE-2025-4948, CVE-2025-4969, CVE-2025-32907, CVE-2025-32908 and CVE-2025-32914
linux-yocto: Fix CVE-2023-3079, CVE-2023-52904, CVE-2023-52979, CVE-2025-22102, CVE-2025-37800, CVE-2025-37801, CVE-2025-37802, CVE-2025-37805, CVE-2025-37821, CVE-2025-37838, CVE-2025-37890, CVE-2025-37891, CVE-2025-37894, CVE-2025-37895, CVE-2025-37897, CVE-2025-37899, CVE-2025-37900, CVE-2025-37901, CVE-2025-37903, CVE-2025-37905, CVE-2025-37907, CVE-2025-37908, CVE-2025-37909, CVE-2025-37910, CVE-2025-37911, CVE-2025-37912, CVE-2025-37913, CVE-2025-37914, CVE-2025-37915, CVE-2025-37916, CVE-2025-37917, CVE-2025-37918, CVE-2025-37919, CVE-2025-37920, CVE-2025-37921, CVE-2025-37922, CVE-2025-37923, CVE-2025-37924, CVE-2025-37926, CVE-2025-37927, CVE-2025-37928, CVE-2025-37929, CVE-2025-37930, CVE-2025-37931, CVE-2025-37932, CVE-2025-37933, CVE-2025-37934, CVE-2025-37935, CVE-2025-37936, CVE-2025-37946, CVE-2025-37947, CVE-2025-37948, CVE-2025-37949, CVE-2025-37951, CVE-2025-37952, CVE-2025-37953, CVE-2025-37954, CVE-2025-37955, CVE-2025-37956, CVE-2025-37957, CVE-2025-37958, CVE-2025-37959, CVE-2025-37960, CVE-2025-37961, CVE-2025-37962, CVE-2025-37963, CVE-2025-37964, CVE-2025-37965, CVE-2025-37967, CVE-2025-37968, CVE-2025-37969, CVE-2025-37970, CVE-2025-37971, CVE-2025-37972, CVE-2025-37973, CVE-2025-37974, CVE-2025-37990, CVE-2025-37991, CVE-2025-37992, CVE-2025-37993, CVE-2025-37994, CVE-2025-37995, CVE-2025-37997, CVE-2025-37998 and CVE-2025-37999
linux-yocto: Ignore CVE-2023-3079 and CVE-2025-37996
net-tools: Fix CVE-2025-46836
ofono: Fix CVE-2024-7537
python3-setuptools: Fix CVE-2025-47273
python3-urllib3: Fix CVE-2025-50181 and CVE-2025-50182
sqlite3: Fix CVE-2025-3277 and CVE-2025-29088
sqlite3: mark CVE-2025-29087 as patched
systemd: Fix CVE-2025-4598
xz: Fix CVE-2025-31115
Fixes in Yocto-5.2.2
bind: upgrade to 9.20.9
bitbake: toaster/tests/buildtest: Switch to new CDN
brief-yoctoprojectqs/index.rst: replace removed macro
brief-yoctoprojectqs/ref-manual: Switch to new CDN
bsp guide: update kernel version example to 6.12
bsp-guide: update all of section 1.8.2 to reflect current beaglebone conf file
bsp-guide: update lonely “4.12” kernel reference to “6.12”
build-appliance-image: Update to walnascar head revision
cmake: Correctly handle cost data of tests with arbitrary chars in name
conf.py: tweak SearchEnglish to be hyphen-friendly
cve-exclusion_6.12.inc: Update using current cvelistV5
cve-exclusions: correct cve status for 5 entries
docs: Clean up explanation of minimum required version numbers
docs: README: specify how to contribute instead of pointing at another file
docs: conf.py: silence SyntaxWarning on js_splitter_code
docs: sphinx-lint: superfluous backtick in front of role
docs: sphinx-lint: unbalanced inline literal markup
epiphany: upgrade to 48.3
gcc: Upgrade to GCC 14.3
gcc: fix incorrect preprocessor line numbers in large files
genericarm64.conf: increase INITRAMFS_MAXSIZE
ghostscript: upgrade to 10.05.1
glibc: stable 2.41 branch updates
go: upgrade to 1.24.4
kea: upgrade to 2.6.3
libarchive: upgrade to 3.7.9
libmatchbox: upgrade to 1.14
libsoup: upgrade to 3.6.5
linux-yocto/6.12: bsp/genericarm64: modular configuration updates
linux-yocto/6.12: libbpf: silence maybe-uninitialized warning from clang
linux-yocto/6.12: update to v6.12.31
linux-yoto/6.12: bsp/arm: fix CONFIG_CRYPTO_LIB_CHACHA
linux/cve-exclusion: Execute the script after changing to the new data source
linux/cve-exclusion: correct fixed-version calculation
linux/cve-exclusion: do not shift first_affected
linux/cve-exclusion: update exclusions after script fixes
linux/cve-exclusion: update with latest cvelistV5
linux/generate-cve-exclusions: show the name and version of the data source
linux/generate-cve-exclusions: use data from CVEProject
linux: cve-exclusions: Amend terminology
linux: cve-exclusions: Fix false negatives
local.conf.sample: Switch to new CDN
migration-guides: add release notes for 4.0.27, 5.0.10, 5.2.1
nfs-utils: don’t use signals to shut down nfs server.
oeqa/sstatetests: Fix NATIVELSBSTRING handling
oeqa/sstatetests: Improve/fix sstate creation tests
overview-manual: small number of pedantic cleanups
package_rpm.bbclass: Remove empty build directory
poky.conf: bump version for 5.2.2
python3-pygobject: RDEPENDS on gobject-introspection
python3-requests: upgrade to 2.32.4
python3: backport the full fix for importlib scanning invalid distributions
python3: drop old nis module dependencies
python3: remove obsolete deletion of non-deterministic .pyc files
python3: upgrade to 3.13.4
ref-manual/variables.rst: document IMAGE_ROOTFS_MAXSIZE INHIBIT_DEFAULT_RUST_DEPS INHIBIT_UPDATERCD_BBCLASS INITRAMFS_MAXSIZE KERNEL_SPLIT_MODULES SSTATE_SKIP_CREATION
ref-manual: clarify KCONFIG_MODE default behaviour
ref-manual: classes: nativesdk: move note to appropriate section
ref-manual: classes: reword to clarify that native/nativesdk options are exclusive
scripts/install-buildtools: Update to 5.2.1
sstate: apply proper umask when fetching from SSTATE_MIRROR
sstatetests: Switch to new CDN
systemd.bbclass: generate preset for templates
systemd: upgrade to 257.6
tcf-agent: correct the SRC_URI
testimage: get real os-release file
tune-cortexr52: Remove aarch64 for ARM Cortex-R52
util-linux: fix agetty segfault issue
xwayland: Add missing libtirpc dependency
Known Issues in Yocto-5.2.2
N/A
Contributors to Yocto-5.2.2
Aleksandar Nikolic
Alper Ak
Antonin Godard
Archana Polampalli
Bruce Ashfield
Carlos Sánchez de La Lama
Changqing Li
Christos Gavros
Colin Pinnell McAllister
Daniel Turull
Deepesh Varatharajan
Dixit Parmar
Enrico Jörns
Etienne Cordonnier
Guocai He
Guðni Már Gilbert
Gyorgy Sarvari
Harish Sadineni
Jiaying Song
Lee Chee Yang
Mathieu Dubois-Briand
Mikko Rapeli
Moritz Haase
NeilBrown
Niko Mauno
Patrick Williams
Peter Marko
Praveen Kumar
Quentin Schulz
Randy MacLeod
Rasmus Villemoes
Richard Purdie
Robert P. J. Day
Robert Yang
Ross Burton
Sandeep Gundlupet Raju
Steve Sakoman
Trevor Gamblin
Trevor Woerner
Wang Mingyu
Yash Shinde
Yi Zhao
Yogita Urade
Yongxin Liu
Repositories / Downloads for Yocto-5.2.2
poky
Repository Location: https://git.yoctoproject.org/poky
Branch: walnascar
Tag: yocto-5.2.2
Git Revision: 41038342a471b4a8884548568ad147a1704253a3
Release Artefact: poky-41038342a471b4a8884548568ad147a1704253a3
sha: 4b1e9c80949e5c5ab5ffeb4fa3dadb43b74b813fc9d132caabf1fc8c38bd8f5e
Download Locations: https://downloads.yoctoproject.org/releases/yocto/yocto-5.2.2/poky-41038342a471b4a8884548568ad147a1704253a3.tar.bz2 https://mirrors.kernel.org/yocto/yocto/yocto-5.2.2/poky-41038342a471b4a8884548568ad147a1704253a3.tar.bz2
openembedded-core
Repository Location: https://git.openembedded.org/openembedded-core
Branch: walnascar
Tag: yocto-5.2.2
Git Revision: c855be07828c9cff3aa7ddfa04eb0c4df28658e4
Release Artefact: oecore-c855be07828c9cff3aa7ddfa04eb0c4df28658e4
sha: c510b69b984be7ad8045236a3dde9bc4f5833bc9f3045dc04d6442a9453165f4
Download Locations: https://downloads.yoctoproject.org/releases/yocto/yocto-5.2.2/oecore-c855be07828c9cff3aa7ddfa04eb0c4df28658e4.tar.bz2 https://mirrors.kernel.org/yocto/yocto/yocto-5.2.2/oecore-c855be07828c9cff3aa7ddfa04eb0c4df28658e4.tar.bz2
meta-mingw
Repository Location: https://git.yoctoproject.org/meta-mingw
Branch: walnascar
Tag: yocto-5.2.2
Git Revision: edce693e1b8fabd84651aa6c0888aafbcf238577
Release Artefact: meta-mingw-edce693e1b8fabd84651aa6c0888aafbcf238577
sha: 6cfed41b54f83da91a6cf201ec1c2cd4ac284f642b1268c8fa89d2335ea2bce1
Download Locations: https://downloads.yoctoproject.org/releases/yocto/yocto-5.2.2/meta-mingw-edce693e1b8fabd84651aa6c0888aafbcf238577.tar.bz2 https://mirrors.kernel.org/yocto/yocto/yocto-5.2.2/meta-mingw-edce693e1b8fabd84651aa6c0888aafbcf238577.tar.bz2
bitbake
Repository Location: https://git.openembedded.org/bitbake
Branch: 2.12
Tag: yocto-5.2.2
Git Revision: 74c28e14a9b5e2ff908a03f93c189efa6f56b0ca
Release Artefact: bitbake-74c28e14a9b5e2ff908a03f93c189efa6f56b0ca
sha: 1d417990d922289152af6274d461d7809d06c290d57e5373fd46bb0112e6b812
Download Locations: https://downloads.yoctoproject.org/releases/yocto/yocto-5.2.2/bitbake-74c28e14a9b5e2ff908a03f93c189efa6f56b0ca.tar.bz2 https://mirrors.kernel.org/yocto/yocto/yocto-5.2.2/bitbake-74c28e14a9b5e2ff908a03f93c189efa6f56b0ca.tar.bz2
meta-yocto
Repository Location: https://git.yoctoproject.org/meta-yocto
Branch: walnascar
Tag: yocto-5.2.2
Git Revision: 5754fb5efb54cf06f96012a88619baba0995b0fc
yocto-docs
Repository Location: https://git.yoctoproject.org/yocto-docs
Branch: walnascar
Tag: yocto-5.2.2
Git Revision: 85f8e5c799ef38c6dcca615d7cc6baff325df259
Release notes for Yocto-5.2.3 (Walnascar)
Security Fixes in Yocto-5.2.3
avahi: Fix CVE-2024-52615 and CVE-2024-52616
bind: Fix:cve_nist:2025-40777
binutils: Fix CVE-2025-5245, CVE-2025-7545 and CVE-2025-7546
busybox: Fix CVE-2023-39810
coreutils: Fix CVE-2025-5278
curl: Ignore CVE-2025-4947 and CVE-2025-5025
dpkg: Fix CVE-2025-6297
dropbear: Fix CVE-2025-47203
gdk-pixbuf: Fix CVE-2025-7345
git: Fix CVE-2025-27613, CVE-2025-27614, CVE-2025-46334, CVE-2025-46835, CVE-2025-48384, CVE-2025-48385 and CVE-2025-48386
gnutls: Fix CVE-2025-6395, CVE-2025-32988, CVE-2025-32989 and CVE-2025-32990
go: Fix CVE-2025-4674
icu: Fix CVE-2025-5222
iputils: Fix CVE-2025-48964
libarchive: Fix CVE-2025-5915
libpam: Fix CVE-2024-10963
libsoup-2.4: Fix CVE-2025-4945
libsoup: Fix CVE-2025-4945, CVE-2025-6021, CVE-2025-6170, CVE-2025-49794, CVE-2025-49795 and CVE-2025-49796
linux-yocto/6.12: Ignore CVE-2021-47342, CVE-2022-49934, CVE-2022-49935, CVE-2022-49936, CVE-2022-49937, CVE-2022-49938, CVE-2022-49939, CVE-2022-49940, CVE-2022-49942, CVE-2022-49943, CVE-2022-49944, CVE-2022-49945, CVE-2022-49946, CVE-2022-49947, CVE-2022-49948, CVE-2022-49949, CVE-2022-49950, CVE-2022-49951, CVE-2022-49952, CVE-2022-49953, CVE-2022-49954, CVE-2022-49955, CVE-2022-49956, CVE-2022-49957, CVE-2022-49958, CVE-2022-49959, CVE-2022-49960, CVE-2022-49961, CVE-2022-49962, CVE-2022-49963, CVE-2022-49964, CVE-2022-49965, CVE-2022-49966, CVE-2022-49967, CVE-2022-49968, CVE-2022-49969, CVE-2022-49970, CVE-2022-49971, CVE-2022-49972, CVE-2022-49973, CVE-2022-49974, CVE-2022-49975, CVE-2022-49976, CVE-2022-49977, CVE-2022-49978, CVE-2022-49979, CVE-2022-49980, CVE-2022-49981, CVE-2022-49982, CVE-2022-49983, CVE-2022-49984, CVE-2022-49985, CVE-2022-49986, CVE-2022-49987, CVE-2022-49989, CVE-2022-49990, CVE-2022-49991, CVE-2022-49992, CVE-2022-49993, CVE-2022-49994, CVE-2022-49995, CVE-2022-49996, CVE-2022-49997, CVE-2022-49998, CVE-2022-49999, CVE-2022-50000, CVE-2022-50001, CVE-2022-50002, CVE-2022-50003, CVE-2022-50004, CVE-2022-50005, CVE-2022-50006, CVE-2022-50007, CVE-2022-50008, CVE-2022-50009, CVE-2022-50010, CVE-2022-50011, CVE-2022-50012, CVE-2022-50013, CVE-2022-50014, CVE-2022-50015, CVE-2022-50016, CVE-2022-50017, CVE-2022-50019, CVE-2022-50020, CVE-2022-50021, CVE-2022-50022, CVE-2022-50023, CVE-2022-50024, CVE-2022-50025, CVE-2022-50026, CVE-2022-50027, CVE-2022-50028, CVE-2022-50029, CVE-2022-50030, CVE-2022-50031, CVE-2022-50032, CVE-2022-50033, CVE-2022-50034, CVE-2022-50035, CVE-2022-50036, CVE-2022-50037, CVE-2022-50038, CVE-2022-50039, CVE-2022-50040, CVE-2022-50041, CVE-2022-50042, CVE-2022-50043, CVE-2022-50044, CVE-2022-50045, CVE-2022-50046, CVE-2022-50047, CVE-2022-50048, CVE-2022-50049, CVE-2022-50050, CVE-2022-50051, CVE-2022-50052, CVE-2022-50053, CVE-2022-50054, CVE-2022-50055, CVE-2022-50056, CVE-2022-50057, CVE-2022-50058, CVE-2022-50059, CVE-2022-50060, CVE-2022-50061, CVE-2022-50062, CVE-2022-50063, CVE-2022-50064, CVE-2022-50065, CVE-2022-50066, CVE-2022-50067, CVE-2022-50068, CVE-2022-50069, CVE-2022-50070, CVE-2022-50071, CVE-2022-50072, CVE-2022-50073, CVE-2022-50074, CVE-2022-50075, CVE-2022-50076, CVE-2022-50077, CVE-2022-50078, CVE-2022-50079, CVE-2022-50080, CVE-2022-50082, CVE-2022-50083, CVE-2022-50084, CVE-2022-50085, CVE-2022-50086, CVE-2022-50087, CVE-2022-50088, CVE-2022-50089, CVE-2022-50090, CVE-2022-50091, CVE-2022-50092, CVE-2022-50093, CVE-2022-50094, CVE-2022-50095, CVE-2022-50096, CVE-2022-50097, CVE-2022-50098, CVE-2022-50099, CVE-2022-50100, CVE-2022-50101, CVE-2022-50102, CVE-2022-50103, CVE-2022-50104, CVE-2022-50105, CVE-2022-50106, CVE-2022-50107, CVE-2022-50108, CVE-2022-50109, CVE-2022-50110, CVE-2022-50111, CVE-2022-50112, CVE-2022-50113, CVE-2022-50114, CVE-2022-50115, CVE-2022-50116, CVE-2022-50117, CVE-2022-50118, CVE-2022-50119, CVE-2022-50120, CVE-2022-50121, CVE-2022-50122, CVE-2022-50123, CVE-2022-50124, CVE-2022-50125, CVE-2022-50126, CVE-2022-50127, CVE-2022-50129, CVE-2022-50130, CVE-2022-50131, CVE-2022-50132, CVE-2022-50133, CVE-2022-50134, CVE-2022-50135, CVE-2022-50136, CVE-2022-50137, CVE-2022-50138, CVE-2022-50139, CVE-2022-50140, CVE-2022-50141, CVE-2022-50142, CVE-2022-50143, CVE-2022-50144, CVE-2022-50145, CVE-2022-50146, CVE-2022-50147, CVE-2022-50148, CVE-2022-50149, CVE-2022-50151, CVE-2022-50152, CVE-2022-50153, CVE-2022-50154, CVE-2022-50155, CVE-2022-50156, CVE-2022-50157, CVE-2022-50158, CVE-2022-50159, CVE-2022-50160, CVE-2022-50161, CVE-2022-50162, CVE-2022-50163, CVE-2022-50164, CVE-2022-50165, CVE-2022-50166, CVE-2022-50167, CVE-2022-50168, CVE-2022-50169, CVE-2022-50170, CVE-2022-50171, CVE-2022-50172, CVE-2022-50173, CVE-2022-50174, CVE-2022-50175, CVE-2022-50176, CVE-2022-50177, CVE-2022-50178, CVE-2022-50179, CVE-2022-50181, CVE-2022-50182, CVE-2022-50183, CVE-2022-50184, CVE-2022-50185, CVE-2022-50186, CVE-2022-50187, CVE-2022-50188, CVE-2022-50189, CVE-2022-50190, CVE-2022-50191, CVE-2022-50192, CVE-2022-50193, CVE-2022-50194, CVE-2022-50195, CVE-2022-50196, CVE-2022-50197, CVE-2022-50198, CVE-2022-50199, CVE-2022-50200, CVE-2022-50201, CVE-2022-50202, CVE-2022-50203, CVE-2022-50204, CVE-2022-50205, CVE-2022-50206, CVE-2022-50207, CVE-2022-50208, CVE-2022-50209, CVE-2022-50210, CVE-2022-50211, CVE-2022-50212, CVE-2022-50213, CVE-2022-50214, CVE-2022-50215, CVE-2022-50217, CVE-2022-50218, CVE-2022-50219, CVE-2022-50220, CVE-2022-50221, CVE-2022-50222, CVE-2022-50223, CVE-2022-50224, CVE-2022-50225, CVE-2022-50226, CVE-2022-50227, CVE-2022-50228, CVE-2022-50229, CVE-2022-50231, CVE-2024-26710, CVE-2024-57976 and CVE-2024-58091
linux-yocto/6.12: (cont.) Ignore CVE-2025-21817, CVE-2025-22101, CVE-2025-22112, CVE-2025-22119, CVE-2025-22122, CVE-2025-22123, CVE-2025-22128, CVE-2025-23137, CVE-2025-23155, CVE-2025-37842, CVE-2025-37855, CVE-2025-38000, CVE-2025-38001, CVE-2025-38002, CVE-2025-38003, CVE-2025-38004, CVE-2025-38005, CVE-2025-38006, CVE-2025-38007, CVE-2025-38008, CVE-2025-38009, CVE-2025-38010, CVE-2025-38011, CVE-2025-38012, CVE-2025-38013, CVE-2025-38014, CVE-2025-38015, CVE-2025-38016, CVE-2025-38017, CVE-2025-38018, CVE-2025-38019, CVE-2025-38020, CVE-2025-38021, CVE-2025-38022, CVE-2025-38023, CVE-2025-38024, CVE-2025-38025, CVE-2025-38027, CVE-2025-38028, CVE-2025-38031, CVE-2025-38032, CVE-2025-38033, CVE-2025-38034, CVE-2025-38035, CVE-2025-38037, CVE-2025-38038, CVE-2025-38039, CVE-2025-38040, CVE-2025-38043, CVE-2025-38044, CVE-2025-38045, CVE-2025-38047, CVE-2025-38048, CVE-2025-38050, CVE-2025-38051, CVE-2025-38052, CVE-2025-38053, CVE-2025-38054, CVE-2025-38055, CVE-2025-38056, CVE-2025-38057, CVE-2025-38058, CVE-2025-38059, CVE-2025-38060, CVE-2025-38061, CVE-2025-38062, CVE-2025-38063, CVE-2025-38065, CVE-2025-38066, CVE-2025-38068, CVE-2025-38069, CVE-2025-38070, CVE-2025-38071, CVE-2025-38072, CVE-2025-38073, CVE-2025-38074, CVE-2025-38075, CVE-2025-38076, CVE-2025-38077, CVE-2025-38078, CVE-2025-38079, CVE-2025-38080, CVE-2025-38081, CVE-2025-38082, CVE-2025-38083, CVE-2025-38084, CVE-2025-38085, CVE-2025-38086, CVE-2025-38087, CVE-2025-38088, CVE-2025-38089, CVE-2025-38090, CVE-2025-38091, CVE-2025-38092, CVE-2025-38093, CVE-2025-38094, CVE-2025-38095, CVE-2025-38096, CVE-2025-38097, CVE-2025-38098, CVE-2025-38099, CVE-2025-38100, CVE-2025-38101, CVE-2025-38102, CVE-2025-38103, CVE-2025-38106, CVE-2025-38107, CVE-2025-38108, CVE-2025-38109, CVE-2025-38110, CVE-2025-38111, CVE-2025-38112, CVE-2025-38113, CVE-2025-38114, CVE-2025-38115, CVE-2025-38116, CVE-2025-38117, CVE-2025-38118, CVE-2025-38119, CVE-2025-38120, CVE-2025-38121, CVE-2025-38122, CVE-2025-38123, CVE-2025-38124, CVE-2025-38125, CVE-2025-38126, CVE-2025-38127, CVE-2025-38128, CVE-2025-38129, CVE-2025-38130, CVE-2025-38131, CVE-2025-38133, CVE-2025-38134, CVE-2025-38135, CVE-2025-38136, CVE-2025-38138, CVE-2025-38139, CVE-2025-38141, CVE-2025-38142, CVE-2025-38143, CVE-2025-38144, CVE-2025-38145, CVE-2025-38146, CVE-2025-38147, CVE-2025-38148, CVE-2025-38149, CVE-2025-38150, CVE-2025-38151, CVE-2025-38153, CVE-2025-38154, CVE-2025-38155, CVE-2025-38156, CVE-2025-38157, CVE-2025-38158, CVE-2025-38159, CVE-2025-38160, CVE-2025-38161, CVE-2025-38162, CVE-2025-38163, CVE-2025-38164, CVE-2025-38165, CVE-2025-38166, CVE-2025-38167, CVE-2025-38168, CVE-2025-38169, CVE-2025-38170, CVE-2025-38171, CVE-2025-38172, CVE-2025-38173, CVE-2025-38174, CVE-2025-38175, CVE-2025-38176, CVE-2025-38177, CVE-2025-38178, CVE-2025-38179, CVE-2025-38180, CVE-2025-38181, CVE-2025-38182, CVE-2025-38183, CVE-2025-38184, CVE-2025-38185, CVE-2025-38186, CVE-2025-38188, CVE-2025-38189, CVE-2025-38190, CVE-2025-38191, CVE-2025-38192, CVE-2025-38193, CVE-2025-38194, CVE-2025-38195, CVE-2025-38196, CVE-2025-38197, CVE-2025-38198, CVE-2025-38200, CVE-2025-38201, CVE-2025-38202, CVE-2025-38208, CVE-2025-38209, CVE-2025-38210, CVE-2025-38211, CVE-2025-38212, CVE-2025-38213, CVE-2025-38214, CVE-2025-38215, CVE-2025-38216, CVE-2025-38217, CVE-2025-38218, CVE-2025-38219, CVE-2025-38220, CVE-2025-38221, CVE-2025-38222, CVE-2025-38223, CVE-2025-38224, CVE-2025-38225, CVE-2025-38226, CVE-2025-38227, CVE-2025-38228, CVE-2025-38229, CVE-2025-38230, CVE-2025-38231, CVE-2025-38232, CVE-2025-38233, CVE-2025-38235, CVE-2025-38236, CVE-2025-38238, CVE-2025-38239, CVE-2025-38241, CVE-2025-38242, CVE-2025-38243, CVE-2025-38244, CVE-2025-38245, CVE-2025-38246, CVE-2025-38247, CVE-2025-38249, CVE-2025-38250, CVE-2025-38251, CVE-2025-38252, CVE-2025-38253, CVE-2025-38254, CVE-2025-38255, CVE-2025-38256, CVE-2025-38257, CVE-2025-38258, CVE-2025-38259, CVE-2025-38260, CVE-2025-38262, CVE-2025-38263, CVE-2025-38264, CVE-2025-38265, CVE-2025-38266, CVE-2025-38267, CVE-2025-38268, CVE-2025-38269, CVE-2025-38270, CVE-2025-38271, CVE-2025-38273, CVE-2025-38274, CVE-2025-38275, CVE-2025-38276, CVE-2025-38277, CVE-2025-38278, CVE-2025-38279, CVE-2025-38280, CVE-2025-38281, CVE-2025-38282, CVE-2025-38283, CVE-2025-38285, CVE-2025-38286, CVE-2025-38287, CVE-2025-38288, CVE-2025-38289, CVE-2025-38290, CVE-2025-38291, CVE-2025-38292, CVE-2025-38293, CVE-2025-38294, CVE-2025-38295, CVE-2025-38296, CVE-2025-38297, CVE-2025-38298, CVE-2025-38299, CVE-2025-38300, CVE-2025-38301, CVE-2025-38302, CVE-2025-38303, CVE-2025-38304, CVE-2025-38305, CVE-2025-38307, CVE-2025-38308, CVE-2025-38309, CVE-2025-38310, CVE-2025-38312, CVE-2025-38313, CVE-2025-38314, CVE-2025-38315, CVE-2025-38316, CVE-2025-38317, CVE-2025-38318, CVE-2025-38319, CVE-2025-38320, CVE-2025-38321, CVE-2025-38322, CVE-2025-38323, CVE-2025-38324, CVE-2025-38325, CVE-2025-38326, CVE-2025-38327, CVE-2025-38328, CVE-2025-38329, CVE-2025-38330, CVE-2025-38331, CVE-2025-38332, CVE-2025-38333, CVE-2025-38334, CVE-2025-38336, CVE-2025-38337, CVE-2025-38338, CVE-2025-38339, CVE-2025-38340, CVE-2025-38341, CVE-2025-38342, CVE-2025-38343, CVE-2025-38344, CVE-2025-38345, CVE-2025-38346, CVE-2025-38347 and CVE-2025-38348
ncurses: Fix CVE-2025-6141
python3: Fix CVE-2025-8194
sqlite3: Fix CVE-2025-6965
sudo: Fix CVE-2025-32462 and CVE-2025-32463
webkitgtk: Fix CVE-2025-24223, CVE-2025-31204, CVE-2025-31205, CVE-2025-31206, CVE-2025-31215 and CVE-2025-31257
xserver-xorg: Fix CVE-2025-49175, CVE-2025-49176, CVE-2025-49177, CVE-2025-49178, CVE-2025-49179 and CVE-2025-49180
Fixes in Yocto-5.2.3
bind: upgrade to 9.20.11
binutils: stable 2.44 branch updates
bitbake: test/fetch: Switch u-boot based test to use our own mirror
bitbake: utils: Optimise signal/sigmask performance
build-appliance-image: Update to walnascar head revision
ca-certificates: correct the SRC_URI
conf.py: improve SearchEnglish to handle terms with dots
dev-manual/start.rst: added missing command in Optimize your VHDX file using DiskPart
dev-manual/start.rst: mention that PERSISTENT_DIR should be shared too
dev-manual/start.rst: remove basic setup for hash equivalence
dev-manual/start.rst: remove shared PERSISTENT_DIR mentions
docs/variables.rst: remove references to obsolete tar packaging
git: upgrade to 2.49.1
glibc: stable 2.41 branch updates
gnutls: upgrade to 3.8.10
go: upgrade to 1.24.5
kea: set correct permissions for /var/run/kea
libpam: upgrade to 1.7.1
linux-yocto/6.12: riscv tune fragments
linux-yocto/6.12: riscv: Enable TUNE_FEATURES based KERNEL_FEATURES
linux-yocto/6.12: update to v6.12.38
linux-yocto/6.12: yaffs2: silence warnings
ltp: Skip semctl08 when __USE_TIME64_REDIRECTS is defined
ltp: backport patch to fix compilation error for Skylake -march=x86-64-v3
migration-guides: add release notes for 4.0.28, 5.0.11, 5.2.2
mingetty: fix do_package warning
mtools: upgrade to 4.0.49
openssl: upgrade to 3.4.2
orc: set CVE_PRODUCT
overview-manual/concepts.rst: fix sayhello hardcoded bindir
overview-manual/concepts.rst: mention PERSISTENT_DIR for user configuration
overview-manual/yp-intro.rst: fix broken link to article
poky.conf: bump version for 5.2.3
poky.yaml.in: increase minimum RAM from 8 to 32
python3: update CVE product
ref-manual/classes.rst: document the testexport class
ref-manual/classes.rst: drop obsolete QA errors
ref-manual/classes.rst: insane: drop cve_status_not_in_db
ref-manual/structure.rst: remove shared PERSISTENT_DIR mentions
ref-manual/structure.rst: update with info on PERSISTENT_DIR
ref-manual/system-requirements.rst: update supported distributions
ref-manual/variables.rst: document SPL_DTB_BINARY
ref-manual/variables.rst: document the FIT_CONF_PREFIX variable
ruby-ptest: some ptest fixes
ruby: upgrade to 3.4.4
rust: Fix malformed hunk header in rustix patch
scripts/install-buildtools: Update to 5.2.2
sudo: upgrade to 1.9.17p1
test-manual/understand-autobuilder.rst: mention hashequiv server
webkitgtk: Fix build break on non-arm/non-x86 systems
webkitgtk: Use gcc to compile for arm target
webkitgtk: upgrade to 2.48.2
xserver-xorg: upgrade to 21.1.18
Known Issues in Yocto-5.2.3
N/A
Contributors to Yocto-5.2.3
Aleksandar Nikolic
Antonin Godard
Archana Polampalli
Bruce Ashfield
Changqing Li
Chen Qi
Deepesh Varatharajan
Divya Chellam
Enrico Jörns
Erik Lindsten
Gyorgy Sarvari
Hongxu Jia
Jiaying Song
Jinfeng Wang
Khem Raj
Lee Chee Yang
Marco Cavallini
Mark Hatle
Peter Marko
Praveen Kumar
Richard Purdie
Robert P. J. Day
Steve Sakoman
Vijay Anusuri
Wang Mingyu
Yash Shinde
Yi Zhao
Yogesh Tyagi
Yogita Urade
Zhang Peng
Repositories / Downloads for Yocto-5.2.3
poky
Repository Location: https://git.yoctoproject.org/poky
Branch: walnascar
Tag: yocto-5.2.3
Git Revision: db04028d9070f05c3b5dee728473fb234bd24f05
Release Artefact: poky-db04028d9070f05c3b5dee728473fb234bd24f05
sha: 32e1d457d5de0041ee423727b5690fbde58c485a42b8ed81ecebb7bb2d8c58cc
Download Locations: https://downloads.yoctoproject.org/releases/yocto/yocto-5.2.3/poky-db04028d9070f05c3b5dee728473fb234bd24f05.tar.bz2 https://mirrors.kernel.org/yocto/yocto/yocto-5.2.3/poky-db04028d9070f05c3b5dee728473fb234bd24f05.tar.bz2
openembedded-core
Repository Location: https://git.openembedded.org/openembedded-core
Branch: walnascar
Tag: yocto-5.2.3
Git Revision: 347cb0861dde58613541ce692778f907943a60ea
Release Artefact: oecore-347cb0861dde58613541ce692778f907943a60ea
sha: 88cbb79f7bc2de9d931cfa1092463005189972d4584cdae1562621df79f09fbd
Download Locations: https://downloads.yoctoproject.org/releases/yocto/yocto-5.2.3/oecore-347cb0861dde58613541ce692778f907943a60ea.tar.bz2 https://mirrors.kernel.org/yocto/yocto/yocto-5.2.3/oecore-347cb0861dde58613541ce692778f907943a60ea.tar.bz2
meta-mingw
Repository Location: https://git.yoctoproject.org/meta-mingw
Branch: walnascar
Tag: yocto-5.2.3
Git Revision: edce693e1b8fabd84651aa6c0888aafbcf238577
Release Artefact: meta-mingw-edce693e1b8fabd84651aa6c0888aafbcf238577
sha: 6cfed41b54f83da91a6cf201ec1c2cd4ac284f642b1268c8fa89d2335ea2bce1
Download Locations: https://downloads.yoctoproject.org/releases/yocto/yocto-5.2.3/meta-mingw-edce693e1b8fabd84651aa6c0888aafbcf238577.tar.bz2 https://mirrors.kernel.org/yocto/yocto/yocto-5.2.3/meta-mingw-edce693e1b8fabd84651aa6c0888aafbcf238577.tar.bz2
bitbake
Repository Location: https://git.openembedded.org/bitbake
Branch: 2.12
Tag: yocto-5.2.3
Git Revision: 710f98844ae30416bdf6a01b655df398b49574ec
Release Artefact: bitbake-710f98844ae30416bdf6a01b655df398b49574ec
sha: e30aa4739e3104634184b1dd7d5502f0994a725daec15929c4adf1164aa1296d
Download Locations: https://downloads.yoctoproject.org/releases/yocto/yocto-5.2.3/bitbake-710f98844ae30416bdf6a01b655df398b49574ec.tar.bz2 https://mirrors.kernel.org/yocto/yocto/yocto-5.2.3/bitbake-710f98844ae30416bdf6a01b655df398b49574ec.tar.bz2
meta-yocto
Repository Location: https://git.yoctoproject.org/meta-yocto
Branch: walnascar
Tag: yocto-5.2.3
Git Revision: ce011415ab4e583a4545cd91aceff4190225f31d
yocto-docs
Repository Location: https://git.yoctoproject.org/yocto-docs
Branch: walnascar
Tag: yocto-5.2.3
Git Revision: e664a70adb5bc19041b3b5f553fb90dcddff99d0
Release notes for Yocto-5.2.4 (Walnascar)
Security Fixes in Yocto-5.2.4
binutils: Fix CVE-2025-8225
binutils: Ignore CVE-2025-8224
cups: Fix CVE-2025-58060 and CVE-2025-58364
curl: Fix CVE-2025-9086 and CVE-2025-10148
elfutils: Fix CVE-2025-1352, CVE-2025-1365, CVE-2025-1371, CVE-2025-1372, CVE-2025-1376 and CVE-2025-1377
expat: Fix CVE-2025-59375
ffmpeg: Fix CVE-2025-7700
glib-2.0: Fix CVE-2025-4056, CVE-2025-6052 and CVE-2025-7039
gnutls: Ignore CVE-2025-32989 and CVE-2025-32990
grub2: Fix CVE-2024-56738
grub2: Ignore CVE-2024-2312
gstreamer1.0: Ignore CVE-2025-2759, CVE-2025-3887, CVE-2025-47183, CVE-2025-47219, CVE-2025-47806, CVE-2025-47807 and CVE-2025-47808
libarchive: Fix CVE-2025-5916, CVE-2025-5917 and CVE-2025-5918
libpre2: Fix CVE-2025-58050
linux-yocto/6.12: Ignore CVE-2022-50233, CVE-2023-3865, CVE-2023-3866, CVE-2023-3867, CVE-2023-4130, CVE-2023-4515, CVE-2023-32246, CVE-2023-32249, CVE-2024-58238, CVE-2024-58239, CVE-2024-58240, CVE-2025-21884, CVE-2025-22103, CVE-2025-22113, CVE-2025-22115, CVE-2025-22124, CVE-2025-22125, CVE-2025-23133, CVE-2025-37925, CVE-2025-37984, CVE-2025-38067, CVE-2025-38104, CVE-2025-38272, CVE-2025-38306, CVE-2025-38335, CVE-2025-38349, CVE-2025-38350, CVE-2025-38351, CVE-2025-38352, CVE-2025-38353, CVE-2025-38354, CVE-2025-38355, CVE-2025-38356, CVE-2025-38357, CVE-2025-38358, CVE-2025-38360, CVE-2025-38361, CVE-2025-38362, CVE-2025-38363, CVE-2025-38364, CVE-2025-38365, CVE-2025-38366, CVE-2025-38367, CVE-2025-38368, CVE-2025-38369, CVE-2025-38370, CVE-2025-38371, CVE-2025-38372, CVE-2025-38373, CVE-2025-38374, CVE-2025-38375, CVE-2025-38376, CVE-2025-38377, CVE-2025-38378, CVE-2025-38379, CVE-2025-38380, CVE-2025-38381, CVE-2025-38382, CVE-2025-38383, CVE-2025-38384, CVE-2025-38385, CVE-2025-38386, CVE-2025-38387, CVE-2025-38388, CVE-2025-38389, CVE-2025-38390, CVE-2025-38391, CVE-2025-38392, CVE-2025-38393, CVE-2025-38394, CVE-2025-38395, CVE-2025-38396, CVE-2025-38397, CVE-2025-38398, CVE-2025-38399, CVE-2025-38400, CVE-2025-38401, CVE-2025-38402, CVE-2025-38403, CVE-2025-38404, CVE-2025-38405, CVE-2025-38406, CVE-2025-38407, CVE-2025-38408, CVE-2025-38409, CVE-2025-38410, CVE-2025-38411, CVE-2025-38412, CVE-2025-38413, CVE-2025-38414, CVE-2025-38415, CVE-2025-38416, CVE-2025-38417, CVE-2025-38418, CVE-2025-38419, CVE-2025-38420, CVE-2025-38421, CVE-2025-38422, CVE-2025-38423, CVE-2025-38424, CVE-2025-38425, CVE-2025-38427, CVE-2025-38428, CVE-2025-38429, CVE-2025-38430, CVE-2025-38431, CVE-2025-38432, CVE-2025-38433, CVE-2025-38434, CVE-2025-38435, CVE-2025-38436, CVE-2025-38437, CVE-2025-38438, CVE-2025-38439, CVE-2025-38440, CVE-2025-38441, CVE-2025-38442, CVE-2025-38443, CVE-2025-38444, CVE-2025-38445, CVE-2025-38446, CVE-2025-38447, CVE-2025-38448, CVE-2025-38449, CVE-2025-38450, CVE-2025-38451, CVE-2025-38452, CVE-2025-38453, CVE-2025-38454, CVE-2025-38455, CVE-2025-38456, CVE-2025-38457, CVE-2025-38458, CVE-2025-38459, CVE-2025-38460, CVE-2025-38461, CVE-2025-38462, CVE-2025-38463, CVE-2025-38464, CVE-2025-38465, CVE-2025-38466, CVE-2025-38467, CVE-2025-38468, CVE-2025-38469, CVE-2025-38470, CVE-2025-38471, CVE-2025-38472, CVE-2025-38473, CVE-2025-38474, CVE-2025-38475, CVE-2025-38476, CVE-2025-38477, CVE-2025-38478, CVE-2025-38480, CVE-2025-38481, CVE-2025-38482, CVE-2025-38483, CVE-2025-38484, CVE-2025-38485, CVE-2025-38486, CVE-2025-38487, CVE-2025-38488, CVE-2025-38489, CVE-2025-38490, CVE-2025-38491, CVE-2025-38492, CVE-2025-38493, CVE-2025-38494, CVE-2025-38495, CVE-2025-38496, CVE-2025-38497, CVE-2025-38498, CVE-2025-38499, CVE-2025-38500, CVE-2025-38501, CVE-2025-38502, CVE-2025-38503, CVE-2025-38504, CVE-2025-38505, CVE-2025-38506, CVE-2025-38507, CVE-2025-38508, CVE-2025-38509, CVE-2025-38510, CVE-2025-38511, CVE-2025-38512, CVE-2025-38513, CVE-2025-38514, CVE-2025-38515, CVE-2025-38516, CVE-2025-38517, CVE-2025-38518, CVE-2025-38519, CVE-2025-38520, CVE-2025-38521, CVE-2025-38522, CVE-2025-38523, CVE-2025-38524, CVE-2025-38525, CVE-2025-38526, CVE-2025-38527, CVE-2025-38528, CVE-2025-38529, CVE-2025-38530, CVE-2025-38531, CVE-2025-38532, CVE-2025-38533, CVE-2025-38534, CVE-2025-38535, CVE-2025-38536, CVE-2025-38537, CVE-2025-38538, CVE-2025-38539, CVE-2025-38540, CVE-2025-38541, CVE-2025-38542, CVE-2025-38543, CVE-2025-38544, CVE-2025-38545, CVE-2025-38546, CVE-2025-38547, CVE-2025-38548, CVE-2025-38549, CVE-2025-38550, CVE-2025-38551, CVE-2025-38552, CVE-2025-38553, CVE-2025-38554, CVE-2025-38555, CVE-2025-38556, CVE-2025-38557, CVE-2025-38558, CVE-2025-38559, CVE-2025-38560, CVE-2025-38561, CVE-2025-38562, CVE-2025-38563, CVE-2025-38564, CVE-2025-38565, CVE-2025-38566, CVE-2025-38567, CVE-2025-38568, CVE-2025-38569, CVE-2025-38570, CVE-2025-38571, CVE-2025-38572, CVE-2025-38573, CVE-2025-38574, CVE-2025-38576, CVE-2025-38577, CVE-2025-38578, CVE-2025-38579, CVE-2025-38580, CVE-2025-38581, CVE-2025-38582, CVE-2025-38583, CVE-2025-38585, CVE-2025-38586, CVE-2025-38587, CVE-2025-38588, CVE-2025-38589, CVE-2025-38590, CVE-2025-38592, CVE-2025-38593, CVE-2025-38594, CVE-2025-38595, CVE-2025-38596, CVE-2025-38598 and CVE-2025-38599
linux-yocto/6.12: Ignore CVE-2025-38600, CVE-2025-38601, CVE-2025-38602, CVE-2025-38603, CVE-2025-38604, CVE-2025-38606, CVE-2025-38607, CVE-2025-38608, CVE-2025-38609, CVE-2025-38610, CVE-2025-38611, CVE-2025-38612, CVE-2025-38613, CVE-2025-38614, CVE-2025-38615, CVE-2025-38616, CVE-2025-38617, CVE-2025-38618, CVE-2025-38619, CVE-2025-38620, CVE-2025-38622, CVE-2025-38623, CVE-2025-38624, CVE-2025-38625, CVE-2025-38626, CVE-2025-38628, CVE-2025-38629, CVE-2025-38630, CVE-2025-38631, CVE-2025-38632, CVE-2025-38633, CVE-2025-38634, CVE-2025-38635, CVE-2025-38638, CVE-2025-38639, CVE-2025-38640, CVE-2025-38641, CVE-2025-38642, CVE-2025-38644, CVE-2025-38645, CVE-2025-38646, CVE-2025-38647, CVE-2025-38648, CVE-2025-38649, CVE-2025-38650, CVE-2025-38651, CVE-2025-38652, CVE-2025-38653, CVE-2025-38654, CVE-2025-38655, CVE-2025-38657, CVE-2025-38658, CVE-2025-38659, CVE-2025-38660, CVE-2025-38661, CVE-2025-38662, CVE-2025-38663, CVE-2025-38664, CVE-2025-38665, CVE-2025-38666, CVE-2025-38667, CVE-2025-38668, CVE-2025-38669, CVE-2025-38670, CVE-2025-38671, CVE-2025-38672, CVE-2025-38673, CVE-2025-38674, CVE-2025-38675, CVE-2025-38676, CVE-2025-38677, CVE-2025-38679, CVE-2025-38680, CVE-2025-38681, CVE-2025-38682, CVE-2025-38683, CVE-2025-38684, CVE-2025-38685, CVE-2025-38686, CVE-2025-38687, CVE-2025-38688, CVE-2025-38689, CVE-2025-38690, CVE-2025-38691, CVE-2025-38692, CVE-2025-38693, CVE-2025-38694, CVE-2025-38695, CVE-2025-38696, CVE-2025-38697, CVE-2025-38698, CVE-2025-38699, CVE-2025-38700, CVE-2025-38701, CVE-2025-38702, CVE-2025-38703, CVE-2025-38704, CVE-2025-38705, CVE-2025-38706, CVE-2025-38707, CVE-2025-38708, CVE-2025-38709, CVE-2025-38710, CVE-2025-38711, CVE-2025-38712, CVE-2025-38713, CVE-2025-38714, CVE-2025-38715, CVE-2025-38716, CVE-2025-38717, CVE-2025-38718, CVE-2025-38719, CVE-2025-38720, CVE-2025-38721, CVE-2025-38722, CVE-2025-38723, CVE-2025-38724, CVE-2025-38725, CVE-2025-38726, CVE-2025-38727, CVE-2025-38728, CVE-2025-38729, CVE-2025-38730, CVE-2025-38731, CVE-2025-38732, CVE-2025-38733, CVE-2025-38734, CVE-2025-38735, CVE-2025-38736, CVE-2025-38737, CVE-2025-39673, CVE-2025-39674, CVE-2025-39675, CVE-2025-39676, CVE-2025-39679, CVE-2025-39680, CVE-2025-39681, CVE-2025-39682, CVE-2025-39683, CVE-2025-39684, CVE-2025-39685, CVE-2025-39686, CVE-2025-39687, CVE-2025-39689, CVE-2025-39690, CVE-2025-39691, CVE-2025-39692, CVE-2025-39693, CVE-2025-39694, CVE-2025-39695, CVE-2025-39696, CVE-2025-39697, CVE-2025-39698, CVE-2025-39699, CVE-2025-39700, CVE-2025-39701, CVE-2025-39702, CVE-2025-39703, CVE-2025-39704, CVE-2025-39705, CVE-2025-39706, CVE-2025-39707, CVE-2025-39708, CVE-2025-39709, CVE-2025-39710, CVE-2025-39711, CVE-2025-39712, CVE-2025-39713, CVE-2025-39714, CVE-2025-39715, CVE-2025-39716, CVE-2025-39717, CVE-2025-39718, CVE-2025-39719, CVE-2025-39720, CVE-2025-39721, CVE-2025-39722, CVE-2025-39723, CVE-2025-39724, CVE-2025-39725, CVE-2025-39726, CVE-2025-39727, CVE-2025-39729, CVE-2025-39730, CVE-2025-39731, CVE-2025-39732, CVE-2025-39733, CVE-2025-39734, CVE-2025-39736, CVE-2025-39737, CVE-2025-39738, CVE-2025-39739, CVE-2025-39740, CVE-2025-39741, CVE-2025-39742, CVE-2025-39743, CVE-2025-39744, CVE-2025-39746, CVE-2025-39747, CVE-2025-39748, CVE-2025-39749, CVE-2025-39750, CVE-2025-39751, CVE-2025-39752, CVE-2025-39753, CVE-2025-39754, CVE-2025-39756, CVE-2025-39757, CVE-2025-39758, CVE-2025-39759, CVE-2025-39760, CVE-2025-39761, CVE-2025-39763, CVE-2025-39765, CVE-2025-39766, CVE-2025-39767, CVE-2025-39768, CVE-2025-39769, CVE-2025-39770, CVE-2025-39771, CVE-2025-39772, CVE-2025-39773, CVE-2025-39774, CVE-2025-39775, CVE-2025-39776, CVE-2025-39777, CVE-2025-39779, CVE-2025-39780, CVE-2025-39781, CVE-2025-39782, CVE-2025-39783, CVE-2025-39784, CVE-2025-39785, CVE-2025-39786, CVE-2025-39787, CVE-2025-39788, CVE-2025-39790, CVE-2025-39791, CVE-2025-39792, CVE-2025-39793, CVE-2025-39794, CVE-2025-39795, CVE-2025-39796, CVE-2025-39797, CVE-2025-39798 and CVE-2025-39799
libxslt: Fix CVE-2025-7424
pulseaudio: Ignore CVE-2024-11586
tiff: Fix CVE-2024-13978, CVE-2025-8176, CVE-2025-8177, CVE-2025-8534, CVE-2025-8961 and CVE-2025-9165
tiff: Ignore CVE-2025-8851
vim: Fix CVE-2025-53905, CVE-2025-53906, CVE-2025-55157 and CVE-2025-55158
Fixes in Yocto-5.2.4
bash: use -std=gnu17 also for native CFLAGS
binutils: Fix gprofng broken symbolic link with gp-*
bitbake: Use a “fork” multiprocessing context
bitbake: bitbake: Bump version to 2.12.1
bitbake: tests/fetch: Update tests after bitbake tag removal
build-appliance-image: Update to walnascar head revision
buildtools-tarball: fix unbound variable issues under ‘set -u’
cve-update-db-native: Fix fetcher for CVEs missing nodes
default-distrovars.inc: Fix CONNECTIVITY_CHECK_URIS redirect issue
dev-manual/security-subjects.rst: update mailing lists
expat: upgrade to 2.7.2
ffmpeg: upgrade to 7.1.2
glib-2.0: update to 2.84.4
go: upgrade 1.24.6
gst-devtools: upgrade 1.24.13
gstreamer1.0-libav: upgrade 1.24.13
gstreamer1.0-plugins-bad: upgrade 1.24.13
gstreamer1.0-plugins-base: upgrade 1.24.13
gstreamer1.0-plugins-good: upgrade 1.24.13
gstreamer1.0-plugins-ugly: upgrade 1.24.13
gstreamer1.0-python: upgrade 1.24.13
gstreamer1.0-rtsp-server: upgrade 1.24.13
gstreamer1.0-vaapi: upgrade 1.24.13
gstreamer1.0: upgrade 1.24.13
lib/oe/utils: use multiprocessing from bb
libpcre2: upgrade 10.46
license.py: avoid deprecated ast.Str
linux-yocto/6.12: Revert “linux-yocto/6.12: riscv: Enable TUNE_FEATURES based KERNEL_FEATURES”
linux-yocto/6.12: update to 6.12.47
migration-guides: add release notes for 4.0.29, 5.0.12 and 5.2.3
pkgconfig: fix build with gcc-15
poky.conf: bump version for 5.2.4
pulseaudio: Add audio group explicitly
python3-setuptools: restore build_scripts.executable support
ref-manual/variables.rst: expand IMAGE_OVERHEAD_FACTOR glossary entry
rpm: correct tool path in macros for no usrmerge
rpm: keep leading ‘/’ from sed operation
runqemu: fix special characters bug
rust-target-config: Add has-thread-local option
sanity.conf: Update minimum bitbake version to 2.12.1
sdk: The main in the C example should return an int
systemd-systemctl-native: Install systemd-sysv-install
systemd-systemctl-native: Use += instead of :append
systemd.bbclass: Make systemd_postinst run as intended
vim: upgrade 9.1.1652
vulnerabilities: update nvdcve file name
yocto-uninative: Update to 4.9 for glibc 2.42 and GCC 15.1
Known Issues in Yocto-5.2.4
N/A
Contributors to Yocto-5.2.4
Antonin Godard
Archana Polampalli
Bruce Ashfield
Deepak Rathore
Haixiao Yan
Harish Sadineni
Hongxu Jia
Jan Vermaete
Joao Marcos Costa
Joshua Watt
Kyungjik Min
Lee Chee Yang
Libo Chen
Markus Kurz
Markus Volk
Martin Jansa
Mathieu Dubois-Briand
Michael Halstead
Patryk Seregiet
Per x Johansson
Peter Kjellerstedt
Peter Marko
Praveen Kumar
Ross Burton
Siddharth Doshi
Soumya Sambu
Steve Sakoman
Yi Zhao
Yogita Urade
Repositories / Downloads for Yocto-5.2.4
poky
Repository Location: https://git.yoctoproject.org/poky
Branch: walnascar
Tag: yocto-5.2.4
Git Revision: d0b46a6624ec9c61c47270745dd0b2d5abbe6ac1
Release Artefact: poky-d0b46a6624ec9c61c47270745dd0b2d5abbe6ac1
sha: b5fa58650f7069c1c001f48aa8eeb12ab78b5f50a414de46df1a196fdc3be8cb
Download Locations: https://downloads.yoctoproject.org/releases/yocto/yocto-5.2.4/poky-d0b46a6624ec9c61c47270745dd0b2d5abbe6ac1.tar.bz2 https://mirrors.kernel.org/yocto/yocto/yocto-5.2.4/poky-d0b46a6624ec9c61c47270745dd0b2d5abbe6ac1.tar.bz2
openembedded-core
Repository Location: https://git.openembedded.org/openembedded-core
Branch: walnascar
Tag: yocto-5.2.4
Git Revision: ff1c54df4e7b15df2e2c9fced59d9ad3e92ed565
Release Artefact: oecore-ff1c54df4e7b15df2e2c9fced59d9ad3e92ed565
sha: a348eb7c759cc02c1415d2b506903ac1d5530708c9b47550a4ae8c8d86c75728
Download Locations: https://downloads.yoctoproject.org/releases/yocto/yocto-5.2.4/oecore-ff1c54df4e7b15df2e2c9fced59d9ad3e92ed565.tar.bz2 https://mirrors.kernel.org/yocto/yocto/yocto-5.2.4/oecore-ff1c54df4e7b15df2e2c9fced59d9ad3e92ed565.tar.bz2
meta-mingw
Repository Location: https://git.yoctoproject.org/meta-mingw
Branch: walnascar
Tag: yocto-5.2.4
Git Revision: edce693e1b8fabd84651aa6c0888aafbcf238577
Release Artefact: meta-mingw-edce693e1b8fabd84651aa6c0888aafbcf238577
sha: 6cfed41b54f83da91a6cf201ec1c2cd4ac284f642b1268c8fa89d2335ea2bce1
Download Locations: https://downloads.yoctoproject.org/releases/yocto/yocto-5.2.4/meta-mingw-edce693e1b8fabd84651aa6c0888aafbcf238577.tar.bz2 https://mirrors.kernel.org/yocto/yocto/yocto-5.2.4/meta-mingw-edce693e1b8fabd84651aa6c0888aafbcf238577.tar.bz2
bitbake
Repository Location: https://git.openembedded.org/bitbake
Branch: 2.12
Tag: yocto-5.2.4
Git Revision: ac097300921590ed6a814f2c3fa08a59f4ded92d
Release Artefact: bitbake-ac097300921590ed6a814f2c3fa08a59f4ded92d
sha: ad8afd956f5378691172317c95bdd1c098d6144a7269975d7d3230707305e88a
Download Locations: https://downloads.yoctoproject.org/releases/yocto/yocto-5.2.4/bitbake-ac097300921590ed6a814f2c3fa08a59f4ded92d.tar.bz2 https://mirrors.kernel.org/yocto/yocto/yocto-5.2.4/bitbake-ac097300921590ed6a814f2c3fa08a59f4ded92d.tar.bz2
meta-yocto
Repository Location: https://git.yoctoproject.org/meta-yocto
Branch: walnascar
Tag: yocto-5.2.4
Git Revision: 0993c45a1f78f302fd40c78a2a1f709daa7a0ae0
yocto-docs
Repository Location: https://git.yoctoproject.org/yocto-docs
Branch: walnascar
Tag: yocto-5.2.4
Git Revision: 29330751c8a2b82b4bd80659d2a0a8bac51afca5
Release 5.1 (styhead)
Release 5.1 (styhead)
Migration notes for 5.1 (styhead)
This section provides migration information for moving to the Yocto Project 5.1 Release (codename “styhead”) from the prior release.
WORKDIR changes
S = ${WORKDIR} no longer supported
If a recipe has S set to be WORKDIR, this is no longer supported, and an error will be issued. The recipe should be changed to:
S = "${UNPACKDIR}"
Any WORKDIR references where files from SRC_URI are referenced should be changed to S. These are commonly in do_configure, do_compile, do_install and LIC_FILES_CHKSUM.
WORKDIR references in recipes
WORKDIR references in other recipes need auditing. If they reference
files from SRC_URI, they likely need changing to UNPACKDIR.
These are commonly in do_compile and do_install
for things like service or configuration files. One unusual case is
${WORKDIR}/${BP} which should probably be set to ${S}.
References to ../ in LIC_FILES_CHKSUM or elsewhere may need changing
to UNPACKDIR. References to WORKDIR in sed commands are
usually left as they are.
General notes
Files from do_unpack now unpack to WORKDIR/sources-unpack/
rather than WORKDIR/.
If S is set to a subdirectory under WORKDIR and that
subdirectory exists in sources-unpack after do_unpack runs,
it is moved to WORKDIR. This means that S = "${WORKDIR}/${BP}",
S = "${WORKDIR}/git" and also deeper paths continue to work as expected
without changes. We cannot use symlinks to do this as it breaks autotools
based recipes. Keeping all sources under sources-unpack wasn’t considered
as it meant more invasive recipes changes. The key objective was separating the
do_unpack task output from WORKDIR.
Previously, S was always created but after the recent changes it is no
longer the case. This means the check in do_unpack_qa triggers where
S is not created by a recipe while it didn’t happen before. This can
require to add an S definition to a recipe that only uses
file:// SRC_URI entries. To be consistent, the following pattern is
recommended:
S = "${UNPACKDIR}"
Building C files from UNPACKDIR without setting S to point at it does not work as the debug prefix mapping doesn’t handle that.
devtool and recipetool have been updated to handle this and their
support for S = WORKDIR and oe-local-files has been removed.
Supported kernel versions
The OLDEST_KERNEL setting is still “5.15” in this release, meaning that out the box, older kernels are not supported. See 4.3 migration notes for details.
Supported distributions
Compared to the previous releases, running BitBake is supported on new GNU/Linux distributions:
Ubuntu 24.10
Fedora 40
OpenSUSE Leap 15.5
OpenSUSE Leap 15.6
On the other hand, some earlier distributions are no longer supported:
Ubuntu 23.04
Go language changes
After dropping the custom do_unpack from the go class, go recipes should now add
destsuffix=${GO_SRCURI_DESTSUFFIX}to their SRC_URI to extract them in the appropriate path. An example would be:SRC_URI = "git://go.googlesource.com/example;branch=master;protocol=https;destsuffix=${GO_SRCURI_DESTSUFFIX}"
Go modules are no longer compiled with
--linkmode=external.
systemd changes
New PACKAGECONFIG value
bpf-frameworkused to pre-compile eBPFs that are required for the systemd.resource-control featuresRestrictFileSystemsandRestrictNetworkInterfaces.
Recipe changes
gobject-introspection: thegiscannerutility is now shipped as a separate package ingobject-introspection-tools.perfno longer useslibnewtfor compiling its TUI.openssl: do not build the test suite unless ptests are enabled.
Removed variables
The following variables have been removed:
TCLIBCAPPENDis now removed as sharing TMPDIR for multiple libc providers has been supported for years.VOLATILE_LOG_DIR: FILESYSTEM_PERMS_TABLES is now used instead. By default, FILESYSTEM_PERMS_TABLES now contains the valuefiles/fs-perms-volatile-log.txt, which means that volatile log is enabled. Users can disable the volatile log by removing the valuefiles/fs-perms-volatile-log.txtfrom FILESYSTEM_PERMS_TABLES.VOLATILE_TMP_DIR: FILESYSTEM_PERMS_TABLES is now used instead. By default, FILESYSTEM_PERMS_TABLES now contains the valuefiles/fs-perms-volatile-tmp.txt, which means that volatile tmp is enabled. Users can disable the volatile tmp by removing the valuefiles/fs-perms-volatile-tmp.txtfrom FILESYSTEM_PERMS_TABLES.
Removed recipes
The following recipes have been removed in this release:
liba52: superseded byffmpeglibomxil: recipe removed as its only consumer, the gstreamer omx plugin,was removed and has not been developed for several years
libnewt: moved to meta-oempeg2dec: inactive for 10 years and superseded byffmpegpytest-runner: moved to meta-pythonpython3-importlib-metadata: moved to meta-pythonpython3-pathlib2: moved to meta-pythonpython3-py: moved to meta-pythonpython3-rfc3986-validator: moved to meta-pythonpython3-toml: moved to meta-pythonpython3-tomli: moved to meta-pythonusbinit: recipe was poorly named as it is a gadget Ethernet driver. Gadget Ethernet is of questionable use now and usbinit isn’t referenced/used anywhere within OE-Core.
Removed classes
The following classes have been removed in this release:
siteconfig: removed as it was only used byncursesandzliband adding minimal added-value for a considerable amount of added runtime.
Miscellaneous changes
oe-selftest now only rewrites environment variable paths that absolutely point to builddir (i.e
X=$BUILDDIR/conf/is still rewritten to point to the oe-selftestconf/directory but notY=$BUILDDIR/../bitbake/which still point to thebitbake/directory)For example (taken from autobuilder environment): BB_LOGCONFIG is set as:
BB_LOGCONFIG="${BUILDDIR}/../bitbake/contrib/autobuilderlog.json". Note the relative path starting from the build directory to outside of it. This path is not changed by oe-selftest anymore.Environment variables containing relative paths from tested build directory to outside of the original build directory may need to be updated as they won’t be changed by oe-selftest.
Several sanity checks from the insane class, such as
buildpaths, have been promoted to errors instead of warnings.The
license-incompatibleERROR_QA sanity check was renamed tolicense-exception.
Release notes for 5.1 (styhead)
New Features / Enhancements in 5.1
Linux kernel 6.10, gcc 14.2, glibc 2.40, LLVM 18.1.18, and over 300 other recipe upgrades.
New variables:
CVE_CHECK_MANIFEST_JSON_SUFFIX: suffix for the CVE JSON manifest file.PRSERV_UPSTREAM: Upstream PR service (
host:port) for the local PR server to connect to.RECIPE_UPGRADE_EXTRA_TASKS: space-delimited list of tasks to run after the new sources have been unpacked in the
scripts/lib/devtool/upgrade.pyupgrade() method.
Kernel-related changes:
The default kernel is the current stable (6.10), and there is also support for the latest long-term release (6.6).
New core recipes:
fmt: an open-source formatting library for C++ (imported from meta-oe).
xcb-util-errors: gives human readable names to error codes and event codes
QEMU /
runqemuchanges:runqemu:
QB_DRIVE_TYPEnow support for sd card (/dev/mmcblk)Trigger
write_qemuboot_conftask on changes of kernel image realpath (KERNEL_IMAGE_NAME).
Go changes:
New Go module fetcher (
gomod://) for downloading module dependencies to the module cache from a module proxy.New Go module fetcher (
gomodgit://) for downloading module dependencies to the module cache directly from a git repository.The old 1.4 Go bootstrap written in C has been dropped. The default Go bootstrap provider is now
go-binary-nativeonly.
Rust changes:
Cargo dependencies specified as git repositories now also have their git submodules checked out.
Rust is now built with its default set of tools instead of just
rust-demangler.
wic Image Creator changes:
Add the
truncateutility in HOSTTOOLS, needed by some wic commands.The
get_boot_filesfunction is no longer part of thebootimg-partitionplugin and is part of the commonbootfiles.pylibrary.
SDK-related changes:
Included
nativesdk-python3-pipin buildtools by default.nativesdk now have do_package_qa run when calling do_populate_sdk.
A new 7zip archive type can be used to create the SDK by setting SDK_ARCHIVE_TYPE to
7zip.The toolchain-scripts class now exports the target endianness and wordsize in environment variables
OECORE_TARGET_BITSandOECORE_TARGET_ENDIAN.
Testing-related changes:
oeqa/selftest: Only rewrite envvars paths that absolutely point to BUILDDIR.
oeqa/manual: remove obsolete CROPS and Eclipse manually testing scripts
Enable ptests for
python3-cffi,python3-idna,python3-libarchive-c,python3-mako,python3-packaging,python3-uritoolsandpython3-rpds-py.Running tests on target with testimage can now be done over a serial connection.
Artifact collection when using the testimage class is now optional and allowed by making TESTIMAGE_FAILED_QA_ARTIFACTS empty.
Artifacts from
oeqapost-actions are now retrieved as whole archives instead of individual copies. The archive is left uncompressed on the host.A test for the
minidebuginfofeature of DISTRO_FEATURES is now part of the test suite.A test for building a kernel module was added to the SDK test suite.
oeqa/selftest: run test serially if neither the
testtoolsorsubunitPython modules have been found.Artifact collection and test result collection are now separated and artifact collection can be controlled with the
OEQA_ARTEFACT_DIRvariable.
Utility script changes:
New
cve-json-to-textscript that converts thecve-checkresult from the JSON format to the TEXT format ascve-checkremoved text format.New
makefile-getvarscript to extract value from a Makefile.New
pull-spdx-licensesscript to pull SPDX license data, update license list JSON data and update license directory.Several improvements in
oe-build-perf-reportreport.oe-debuginfod: add parameter “-d” to store debuginfod files in project sub-directory.resulttool: support test report generation in JUnit XML format.Remove
install-buildtools“test installation” step harmless error messages.bitbake-layers: add a new subcommandshow-machinesto list the machines available in the currently configured layers.
BitBake changes:
Fetcher for Rust crates: added a check for latest upstream version.
syncrpcnow requires a minimum version of the websockets module depend on Python version.Improve
bitbake-hashclientstress statistics reporting.bitbake-hashservaddedreuseportparameter to enable SO_REUSEPORT, allowing multiple servers to bind to the same port for load balancingImprove cloning speed with BB_GIT_SHALLOW and BB_GENERATE_MIRROR_TARBALLS.
BitBake UI now includes log paths for failed task.
fetcher2: support for wget and wget2.fetcher2: support npm package name with ‘@’ character.fetcher2: remote name forgit://is noworiginby default.Codeparser now support shell substitution in quotes, for example:
var1="$(cmd1 ...)"
Function code of pylib functions are now taken into account when computing taskhashes.
Fix
_test_devtool_add_git_urltestHashserv: add a batch stream API that reduces the round trip latency on the server.
The prserv class now uses a shared sqlite3 database to allow multiple processes to access the database.
The Python codeparser now skips the checksumming of external Python modules imported with
from module import something.Enable batching of
unihashqueries to reduce the effect of latency when making multiple queries to the server.Parser: improve cache invalidation reliability by using the mtime’s nanoseconds, inode number and size of files.
When using the syntax
addtask do_XXX before YYY after ZZZ, bitbake now ensures thatYYYandZZZare prefixed withdo_, to avoid unexpected failures.
devtoolchanges:Fix
_test_devtool_add_git_urltestupdate-recipe,finish: fix error when calling on another layer and having a localfile.devtool check-upgrade-statusnow groups recipes when they need to be upgraded together.
Packaging changes:
When processing
pkgconfig’spcfiles, also process “Requires.private” in addition to “Requires”. This fixes a broken dependency list for IPKs and avoids installing unecessary recommended additional packages (and save disk usage).Package management: make the extraction of IPK packages not depend on
zstcompression, as it can be changed with OPKGBUILDCMD.Remove support for
DIRFILESof package_rpm as it is rpm-specific and untested.Bump
abi_versionandpackageversions after recentpkgconfigchanges.
Security changes:
The
busyboxdefault configuration now disables internal TLS code to use theopensslbackend instead, for a more secure initial set of settings.Limit ssh host keys pre-generation to qemu machines by default, for security purposes.
LLVM related changes:
Enable
libllvmin PACKAGECONFIG for native builds.Fetch release tarballs instead of git checkouts to reduce disk usage.
cve-checkchanges:The class
cve-checknow uses a local copy of the NVD database during builds.New statuses can be reported by
cve-check:fix-file-included: when a fix file has been included (set automatically)version-not-in-range: version number NOT in the vulnerable range (set automatically)version-in-range: version number IS in the vulnerable range (set automatically)unknown: impossible to conclude if the vulnerability is present or not
The TEXT output format was removed to favor the JSON format which offers more features.
Allow overriding the default “policies” from
meta/conf/cve-check-map.confby including it before distro include files inmeta/conf/bitbake.conf.
SPDX-related changes:
Update the SPDX license set too version 3.24.0, and produce SPDX output in version 3.0 by default, instead of 2.2.
New
create-spdx-3.0class to generate SPDX 3.0 output (used by generic class create-spdx). Newcreate-spdx-image-3.0class that is used when generating images andcreate-spdx-sdk-3.0for SDK based recipes.New nospdx class that allows recipes to opt out of generating SPDX.
Specify the SPDX image purposes for
tar,cpioandwicimages.The create-spdx class now reports for multilib* classes.
Miscellaneous changes:
Fix reproducibility for
spirv-toolsAllow selection of host key types used by openssh.
New glibc task
do_symlistto list exported symbols.initramfs-frameworksupport for force reboot in the case of fatal error.The insane class now checks for
patch-statusandpep517-backendby default.New
yocto-space-optimizeinclude file to allow turning off debug compiler options for a small set of recipes to reduce build on disk footprint and package/sstate sizes.Image creation tasks inheriting from the image class now produce a
manifest.jsonfile listing the images created. The output manifest path is defined by the IMAGE_OUTPUT_MANIFEST variable.New vex class generates the minimum information that is necessary for VEX generation by an external CVE checking tool.
New retain class creates a tarball of the work directory for a recipe when one of its tasks fails, or any other nominated directories.
New
localpkgfeedclass in meta-selftest to create a subset of the package feed that just contain the packages depended on by this recipe.New PACKAGECONFIG options for individual recipes:
appstream: qt6cronie: inotifygstreamer1.0-plugins-bad: gtk3libsdl2: libsampleratemesa: tegraopenssh: hostkey-rsa hostkey-ecdsa hostkey-ed25519pciutils: kmod zlibpiglit: waylandpulseaudio: oss-outputpython3: staticlibpythonpython3-jsonschema: format-nongpl (previously “nongpl”)systemd: bpf-frameworkutil-linux: libmount-mountfd-support
Stop referring WORKDIR for S and B and trigger insane errors when S or B are equal to WORKDIR.
picolibccan now be used with TCLIBC to build withpicolibcas the C library.opensshnow usessd_notifypatch from upstream instead of custom one, which does not depend on libsystemd and is standalone.cmakenow uses the${COREBASE}/scripts/gitwrapper instead of the host’s, which is required during do_install to call git while disabling fakeroot, and avoid “dubious ownership” git errors.Default compiler option changes:
BUILD_CFLAGS now includes the -pipe option by default.
Remove the
eliminate-unused-debug-typesoption from the default compiler options since it is now included by default.
uninativeupdated to 4.6 for glibc 2.40Mark recipe
meta-ide-supportas machine specific with PACKAGE_ARCH.sstate: Drop intercept functions support which was only used by now removed
siteconfigclass.sstate: Drop support for
SSTATEPOSTINSTFUNCvariable now thatpostfuncis available.openssl: strip the test suite after building, reducing the build tree of 50% after installation.
u-boot: Refactor some of the do_configure tasks into new functions, making it easier to modify using a bbappend.
The
muslrecipe now shows an error if used with multilib* enabled (musldoes not support multilib).The
gitrecipe is now configured with default configuration pointing to/etc/gitconfigfor native recipes.The
apt-nativerecipe, used to compiledpkgand handledebpackages, was modified to avoid files being overriden by other packages when they share common files. Instead, prompt an error.The do_savedefconfig was moved from the u-boot and kernel recipes to the cml1 class, so that more kbuild-based recipes can use it.
The sanity class now checks if user namespaces are enabled on the host as they are required for network isolation.
The recipe
os-releaseis now part of SIGGEN_EXCLUDERECIPES_ABISAFE and does not trigger a rebuild on a change for dependent tasks.In
kernel-fitimage, the existence of EXTERNAL_KERNEL_DEVICETREE is checked more thoroughly to avoid false positives.rootfs: ensure
run-postinstsis not uninstalled when the read-only-rootfs-delayed-postinsts and read-only-rootfs IMAGE_FEATURES are enabled.Gcc can now use
libc++as its runtime.The variable
CMDLINE_CONSOLEwas removed from the kernel class, as it wasn’t used anywhere.python3: make-coredepend on-compressionas it needs to import thezipfilemodule.The classes native and nativesdk do not override the
*FLAGSvariables anymore, allowing users to use the+=syntax in recipes.The
multilib_scriptclass (part of multilib*) now expands theMULTILIB_SCRIPTSvariable before splitting the scripts, fixing some issues seen when PACKAGECONFIG would conditionally modify it.
Known Issues in 5.1
oeqa/runtime: thebeaglebone-yoctotarget fails theparselogsruntime test due to unexpected kernel error messages in the log (see bug 15624 on Bugzilla).
Recipe License changes in 5.1
The following corrections have been made to the LICENSE values set by recipes:
ccache:GPL-3.0-or-latertoGPL-3.0-or-later & MIT & BSL-1.0 & ISCafter adding third-party licenses.dejagnu: update toGPL-3.0-only.gcr: update toLGPL-2.0-only.glibc: update toGPL-2.0-only & LGPL-2.1-or-later.gpgme: update for different packages.iw: update toISC.json-glib:LGPL-2.1-onlytoLGPL-2.1-or-laterafter update to 1.10.0.libgcrypt:GPL-2.0-or-later & LGPL-2.1-or-latertoGPL-2.0-or-later & LGPL-2.1-or-later & BSD-3-Clause. Add BSD-3-Clause for poly1305-amd64-avx512.S.linux-firmware: set package LICENSE for following firmware packages: -cc33xx-ath10k-wcn3990-qcom-adreno-g750-qcom-x1e80100-adreno-wfx-qcom-vpu-qcom-sm8550-audio-tplg-qcom-sm8650-audio-tplg-linaro-license-mali-csffw-arch108lz4:BSD-2-Clause | GPL-2.0-onlytoBSD-2-Clause | GPL-2.0-or-laterafter update to 1.10.0.ppp: add licenseRSA-MD.python3-docutils:PSF-2.0 & BSD-2-Clause & GPL-3.0-onlytoCC0-1.0 & ZPL-2.1 & BSD-2-Clause & GPL-3.0-only. Add CC0 after update to 0.21.2.tiff: update tolibtiff.unzip: update toInfo-ZIP.util-linux: AddGPL-2.0-onlyafter update to 2.40.1 (GPL-2.0changed toGPL-2.0-onlyin README.licensing).xz:PDremoved and0BSDadded after update to 5.6.2.xz: addPDfor xz, xz-dev and xz-doc package.zip: update toInfo-ZIP.
Security Fixes in 5.1
apr: CVE-2023-49582busybox: CVE-2021-42380, CVE-2023-42363, CVE-2023-42364, CVE-2023-42365, CVE-2023-42366cups: CVE-2024-35235curl: CVE-2024-6197, CVE-2024-6874, CVE-2024-7264expat: CVE-2024-45490, CVE-2024-45491, CVE-2024-45492.gcc: CVE-2023-4039gdk-pixbuf: CVE-2022-48622ghostscript: CVE-2024-33869, CVE-2023-52722, CVE-2024-33870, CVE-2024-33871, CVE-2024-29510git: CVE-2024-32002, CVE-2024-32004, CVE-2024-32020, CVE-2024-32021, CVE-2024-32465glibc: CVE-2024-2961, CVE-2024-33599, CVE-2024-33600, CVE-2024-33601, CVE-2024-33602go: CVE-2024-24790gtk+3: CVE-2024-6655linux-yocto/6.10: CVE-2020-16119linux-yocto/6.6: CVE-2020-16119llvm: CVE-2024-0151ncurses: CVE-2023-50495, CVE-2023-45918openssh: CVE-2024-6387openssl: CVE-2024-4603, CVE-2024-4741python3: CVE-2024-7592, CVE-2024-8088, CVE-2024-6232tiff: CVE-2024-7006vim: CVE-2024-41957, CVE-2024-41965, CVE-2024-43374, CVE-2024-43790, CVE-2024-43802wget: CVE-2024-38428wpa-supplicant: CVE-2024-5290, CVE-2023-52160xserver-xorg: CVE-2024-31080, CVE-2024-31081, CVE-2024-31082, CVE-2024-31083
Recipe Upgrades in 5.1
acpica20240322 -> 20240827adwaita-icon-theme45.0 -> 46.2alsa-lib1.2.11 -> 1.2.12alsa-plugins1.2.7.1 -> 1.2.12alsa-ucm-conf1.2.11 -> 1.2.12alsa-utils1.2.11 -> 1.2.12asciidoc10.2.0 -> 10.2.1at-spi2-core2.50.1 -> 2.52.0attr2.5.1 -> 2.5.2automake1.16.5 -> 1.17base-passwd3.6.3 -> 3.6.4bash5.2.21 -> 5.2.32bash-completion2.12.0 -> 2.14.0bind9.18.28 -> 9.20.1binutils2.42 -> 2.43.1binutils-cross2.42 -> 2.43.1binutils-cross-canadian2.42 -> 2.43.1binutils-crosssdk2.42 -> 2.43.1bluez55.72 -> 5.78boost1.84.0 -> 1.86.0boost-build-native1.84.0 -> 1.86.0btrfs-tools6.7.1 -> 6.10.1build-appliance-image15.0.0 (bf88a67b4523…) -> 15.0.0 (7cc8bf7af794…)ca-certificates20211016 -> 20240203cairo1.18.0 -> 1.18.2cargo1.75.0 -> 1.79.0cargo-c-native0.9.30+cargo-0.77.0 -> 0.10.3+cargo-0.81.0ccache4.9.1 -> 4.10.2cmake3.28.3 -> 3.30.2cmake-native3.28.3 -> 3.30.2connman1.42 -> 1.43coreutils9.4 -> 9.5cracklib2.9.11 -> 2.10.2createrepo-c1.0.4 -> 1.1.4cross-localedef-native2.39+git -> 2.40+gitcryptodev-linux1.13+gitX -> 1.14cryptodev-module1.13+gitX -> 1.14cryptodev-tests1.13+gitX -> 1.14curl8.7.1 -> 8.9.1debianutils5.16 -> 5.20dhcpcd10.0.6 -> 10.0.10diffoscope259 -> 277dmidecode3.5 -> 3.6dnf4.19.0 -> 4.21.1dpkg1.22.0 -> 1.22.11dropbear2022.83 -> 2024.85e2fsprogs1.47.0 -> 1.47.1ell0.64 -> 0.68enchant22.6.7 -> 2.8.2encodings1.0.7 -> 1.1.0epiphany46.0 -> 46.3erofs-utils1.7.1 -> 1.8.1ethtool6.7 -> 6.10ffmpeg6.1.1 -> 7.0.2findutils4.9.0 -> 4.10.0freetype2.13.2 -> 2.13.3fribidi1.0.14 -> 1.0.15gcc13.3.0 -> 14.2.0gcc-cross13.3.0 -> 14.2.0gcc-cross-canadian13.3.0 -> 14.2.0gcc-crosssdk13.3.0 -> 14.2.0gcc-runtime13.3.0 -> 14.2.0gcc-sanitizers13.3.0 -> 14.2.0gcc-source13.3.0 -> 14.2.0gcr4.2.1 -> 4.3.0gdb14.2 -> 15.1gdb-cross14.2 -> 15.1gdb-cross-canadian14.2 -> 15.1gdbm1.23 -> 1.24gi-docgen2023.3 -> 2024.1git2.44.1 -> 2.46.0glib-2.02.78.6 -> 2.82.1glib-networking2.78.1 -> 2.80.0glibc2.39+git -> 2.40+gitglibc-locale2.39+git -> 2.40+gitglibc-mtrace2.39+git -> 2.40+gitglibc-scripts2.39+git -> 2.40+gitglibc-testsuite2.39+git -> 2.40+gitglibc-y2038-tests2.39+git -> 2.40+gitglslang1.3.275.0 -> 1.3.290.0gnu-config20240101+git -> 20240823+gitgnu-efi3.0.17 -> 3.0.18gnupg2.4.4 -> 2.5.0gnutls3.8.4 -> 3.8.6go-helloworld0.1 (d9923f6970e9…) -> 0.1 (39e772fc2670…)gobject-introspection1.78.1 -> 1.80.1gptfdisk1.0.9 -> 1.0.10gsettings-desktop-schemas46.0 -> 47.1gst-devtools1.22.12 -> 1.24.6gstreamer1.01.22.12 -> 1.24.6gstreamer1.0-libav1.22.12 -> 1.24.6gstreamer1.0-plugins-bad1.22.12 -> 1.24.6gstreamer1.0-plugins-base1.22.12 -> 1.24.6gstreamer1.0-plugins-good1.22.12 -> 1.24.6gstreamer1.0-plugins-ugly1.22.12 -> 1.24.6gstreamer1.0-python1.22.12 -> 1.24.6gstreamer1.0-rtsp-server1.22.12 -> 1.24.6gstreamer1.0-vaapi1.22.12 -> 1.24.6gtk+33.24.41 -> 3.24.43gtk-doc1.33.2 -> 1.34.0gtk44.14.1 -> 4.16.0harfbuzz8.3.0 -> 9.0.0hicolor-icon-theme0.17 -> 0.18hwlatdetect2.6 -> 2.7icu74-2 -> 75-1ifupdown0.8.41 -> 0.8.43iproute26.7.0 -> 6.10.0iputils20240117 -> 20240905iw6.7 -> 6.9json-glib1.8.0 -> 1.10.0kea2.4.1 -> 2.6.1kexec-tools2.0.28 -> 2.0.29kmod31 -> 33kmscube0.0.1+git (6ab022fdfcfe…) -> 0.0.1+git (467e86c5cbeb…)less643 -> 661libadwaita1.5.2 -> 1.6.0libassuan2.5.6 -> 3.0.1libbsd0.12.1 -> 0.12.2libcap2.69 -> 2.70libcomps0.1.20 -> 0.1.21libdnf0.73.2 -> 0.73.3libdrm2.4.120 -> 2.4.123libedit20230828-3.1 -> 20240808-3.1libevdev1.13.1 -> 1.13.2libfontenc1.1.7 -> 1.1.8libgcc13.3.0 -> 14.2.0libgcc-initial13.3.0 -> 14.2.0libgcrypt1.10.3 -> 1.11.0libgfortran13.3.0 -> 14.2.0libgit21.7.2 -> 1.8.1libgpg-error1.48 -> 1.50libical3.0.17 -> 3.0.18libinput1.25.0 -> 1.26.1libjitterentropy3.4.1 -> 3.5.0libksba1.6.6 -> 1.6.7libnl3.9.0 -> 3.10.0libpam1.5.3 -> 1.6.1libpcap1.10.4 -> 1.10.5libpciaccess0.18 -> 0.18.1libpcre210.43 -> 10.44libpng1.6.42 -> 1.6.43libportal0.7.1 -> 0.8.1libproxy0.5.4 -> 0.5.8librepo1.17.0 -> 1.18.1librsvg2.57.1 -> 2.58.2libsdl22.30.1 -> 2.30.7libslirp4.7.0 -> 4.8.0libsolv0.7.28 -> 0.7.30libsoup3.4.4 -> 3.6.0libstd-rs1.75.0 -> 1.79.0libtirpc1.3.4 -> 1.3.5libtool2.4.7 -> 2.5.2libtool-cross2.4.7 -> 2.5.2libtool-native2.4.7 -> 2.5.2libtraceevent1.7.3 -> 1.8.3liburcu0.14.0 -> 0.14.1liburi-perl5.27 -> 5.28libva2.20.0 -> 2.22.0libva-initial2.20.0 -> 2.22.0libva-utils2.20.1 -> 2.22.0libwebp1.3.2 -> 1.4.0libwpe1.14.2 -> 1.16.0libx111.8.9 -> 1.8.10libxcb1.16 -> 1.17.0libxdmcp1.1.4 -> 1.1.5libxfont22.0.6 -> 2.0.7libxkbcommon1.6.0 -> 1.7.0libxml22.12.8 -> 2.13.3libxmlb0.3.15 -> 0.3.19libxmu1.1.4 -> 1.2.1libxslt1.1.39 -> 1.1.42libxtst1.2.4 -> 1.2.5lighttpd1.4.74 -> 1.4.76linux-firmware20240312 -> 20240909linux-libc-headers6.6 -> 6.10linux-yocto6.6.35+git -> 6.6.50+git, 6.10.8+gitlinux-yocto-dev6.9+git -> 6.11+gitlinux-yocto-rt6.6.35+git -> 6.6.50+git, 6.10.8+gitlinux-yocto-tiny6.6.35+git -> 6.6.50+git, 6.10.8+gitllvm18.1.6 -> 18.1.8logrotate3.21.0 -> 3.22.0ltp20240129 -> 20240524lttng-modules2.13.12 -> 2.13.14lttng-tools2.13.13 -> 2.13.14lua5.4.6 -> 5.4.7lz41.9.4 -> 1.10.0lzip1.24 -> 1.24.1man-db2.12.0 -> 2.12.1man-pages6.06 -> 6.9.1mc4.8.31 -> 4.8.32mdadm4.2 -> 4.3meson1.3.1 -> 1.5.1mkfontscale1.2.2 -> 1.2.3mmc-utils0.1+git (b5ca140312d2…) -> 0.1+git (123fd8b2ac39…)mpg1231.32.6 -> 1.32.7msmtp1.8.25 -> 1.8.26mtd-utils2.1.6 -> 2.2.0mtdev1.1.6 -> 1.1.7mtools4.0.43 -> 4.0.44musl1.2.4+git -> 1.2.5+gitnativesdk-libtool2.4.7 -> 2.5.2ncurses6.4 -> 6.5nettle3.9.1 -> 3.10nfs-utils2.6.4 -> 2.7.1nghttp21.61.0 -> 1.63.0ninja1.11.1 -> 1.12.1npth1.6 -> 1.7ofono2.4 -> 2.10opensbi1.4 -> 1.5.1openssh9.6p1 -> 9.8p1openssl3.2.3 -> 3.3.1opkg0.6.3 -> 0.7.0opkg-utils0.6.3 -> 0.7.0ovmfedk2-stable202402 -> edk2-stable202408p11-kit0.25.3 -> 0.25.5pango1.52.1 -> 1.54.0pciutils3.11.1 -> 3.13.0perl5.38.2 -> 5.40.0perlcross1.5.2 -> 1.6piglit1.0+gitr (22eaf6a91cfd…) -> 1.0+gitr (c11c9374c144…)pinentry1.2.1 -> 1.3.1pkgconf2.1.1 -> 2.3.0psmisc23.6 -> 23.7ptest-runner2.4.4+git -> 2.4.5+gitpuzzles0.0+git (80aac3104096…) -> 0.0+git (1c1899ee1c4e…)python3-alabaster0.7.16 -> 1.0.0python3-attrs23.2.0 -> 24.2.0python3-babel2.14.0 -> 2.16.0python3-bcrypt4.1.2 -> 4.2.0python3-beartype0.17.2 -> 0.18.5python3-build1.1.1 -> 1.2.1python3-certifi2024.2.2 -> 2024.8.30python3-cffi1.16.0 -> 1.17.0python3-cryptography42.0.5 -> 42.0.8python3-cryptography-vectors42.0.5 -> 42.0.8python3-cython3.0.8 -> 3.0.11python3-dbusmock0.31.1 -> 0.32.1python3-docutils0.20.1 -> 0.21.2python3-dtschema2024.2 -> 2024.5python3-git3.1.42 -> 3.1.43python3-hatchling1.21.1 -> 1.25.0python3-hypothesis6.98.15 -> 6.111.2python3-idna3.7 -> 3.8python3-jsonpointer2.4 -> 3.0.0python3-jsonschema4.21.1 -> 4.23.0python3-libarchive-c5.0 -> 5.1python3-license-expression30.2.0 -> 30.3.1python3-lxml5.0.0 -> 5.3.0python3-mako1.3.2 -> 1.3.5python3-markdown3.5.2 -> 3.6python3-maturin1.4.0 -> 1.7.1python3-meson-python0.15.0 -> 0.16.0python3-more-itertools10.2.0 -> 10.4.0python3-packaging23.2 -> 24.1python3-pbr6.0.0 -> 6.1.0python3-pip24.0 -> 24.2python3-pluggy1.4.0 -> 1.5.0python3-psutil5.9.8 -> 6.0.0python3-pyasn10.5.1 -> 0.6.0python3-pycairo1.26.0 -> 1.26.1python3-pycparser2.21 -> 2.22python3-pyelftools0.30 -> 0.31python3-pygments2.17.2 -> 2.18.0python3-pygobject3.46.0 -> 3.48.2python3-pyopenssl24.0.0 -> 24.2.1python3-pyparsing3.1.1 -> 3.1.4python3-pyproject-metadata0.7.1 -> 0.8.0python3-pytest8.0.2 -> 8.3.2python3-pytest-subtests0.11.0 -> 0.13.1python3-pyyaml6.0.1 -> 6.0.2python3-referencing0.33.0 -> 0.35.1python3-requests2.31.0 -> 2.32.3python3-rpds-py0.18.0 -> 0.20.0python3-scons4.6.0 -> 4.8.0python3-setuptools69.1.1 -> 72.1.0python3-setuptools-rust1.9.0 -> 1.10.1python3-setuptools-scm8.0.4 -> 8.1.0python3-sphinx7.2.6 -> 8.0.2python3-sphinxcontrib-applehelp1.0.8 -> 2.0.0python3-sphinxcontrib-devhelp1.0.6 -> 2.0.0python3-sphinxcontrib-htmlhelp2.0.5 -> 2.1.0python3-sphinxcontrib-qthelp1.0.7 -> 2.0.0python3-sphinxcontrib-serializinghtml1.1.10 -> 2.0.0python3-testtools2.7.1 -> 2.7.2python3-trove-classifiers2024.2.23 -> 2024.7.2python3-typing-extensions4.10.0 -> 4.12.2python3-uritools4.0.2 -> 4.0.3python3-urllib32.2.1 -> 2.2.2python3-webcolors1.13 -> 24.8.0python3-websockets12.0 -> 13.0.1python3-wheel0.42.0 -> 0.44.0python3-zipp3.17.0 -> 3.20.1qemu8.2.3 -> 9.0.2qemu-native8.2.3 -> 9.0.2qemu-system-native8.2.3 -> 9.0.2quilt0.67 -> 0.68quilt-native0.67 -> 0.68readline8.2 -> 8.2.13repo2.42 -> 2.46rng-tools6.16 -> 6.17rpcbind1.2.6 -> 1.2.7rsync3.2.7 -> 3.3.0rt-tests2.6 -> 2.7ruby3.2.2 -> 3.3.4rust1.75.0 -> 1.79.0rust-cross-canadian1.75.0 -> 1.79.0rust-llvm1.75.0 -> 1.79.0shaderc2023.8 -> 2024.1shadow4.14.2 -> 4.16.0spirv-headers1.3.275.0 -> 1.3.290.0spirv-tools1.3.275.0 -> 1.3.290.0sqlite33.45.1 -> 3.46.1strace6.7 -> 6.10stress-ng0.17.05 -> 0.18.02sysklogd2.5.2 -> 2.6.1sysstat12.7.5 -> 12.7.6systemd255.4 -> 256.5systemd-boot255.4 -> 256.5systemd-boot-native255.4 -> 256.5systemtap5.0 -> 5.1systemtap-native5.0 -> 5.1taglib2.0.1 -> 2.0.2tcl8.6.13 -> 8.6.14texinfo7.0.3 -> 7.1ttyrun2.31.0 -> 2.34.0u-boot2024.01 -> 2024.07u-boot-tools2024.01 -> 2024.07util-linux2.39.3 -> 2.40.2util-linux-libuuid2.39.3 -> 2.40.2util-macros1.20.0 -> 1.20.1vala0.56.15 -> 0.56.17valgrind3.22.0 -> 3.23.0vte0.74.2 -> 0.76.3vulkan-headers1.3.275.0 -> 1.3.290.0vulkan-loader1.3.275.0 -> 1.3.290.0vulkan-samplesgit (2307c3eb5608…) -> git (fdce530c0295…)vulkan-tools1.3.275.0 -> 1.3.290.0vulkan-utility-libraries1.3.275.0 -> 1.3.290.0vulkan-validation-layers1.3.275.0 -> 1.3.290.0vulkan-volk1.3.275.0 -> 1.3.290.0waffle1.7.2 -> 1.8.1wayland1.22.0 -> 1.23.1wayland-protocols1.33 -> 1.37webkitgtk2.44.1 -> 2.44.3weston13.0.1 -> 13.0.3wget1.21.4 -> 1.24.5wpa-supplicant2.10 -> 2.11x264r3039+git (baee400fa9ce…) -> r3039+git (31e19f92f00c…)xauth1.1.2 -> 1.1.3xcb-proto1.16.0 -> 1.17.0xev1.2.5 -> 1.2.6xkeyboard-config2.41 -> 2.42xmlto0.0.28+0.0.29+git -> 0.0.29xorgproto2023.2 -> 2024.1xwayland23.2.5 -> 24.1.2xz5.4.6 -> 5.6.2zstd1.5.5 -> 1.5.6
Contributors to 5.1
Thanks to the following people who contributed to this release:
Adithya Balakumar
Adriaan Schmidt
Adrian Freihofer
Alban Bedel
Alejandro Hernandez Samaniego
Aleksandar Nikolic
Alessandro Pecugi
Alexander Kanavin
Alexander Sverdlin
Alexandre Belloni
Alexandre Truong
Alexis Lothoré
Andrew Fernandes
Andrew Oppelt
Andrey Zhizhikin
Anton Almqvist
Antonin Godard
Anuj Mittal
Archana Polampalli
Bartosz Golaszewski
Benjamin Bara
Benjamin Szőke
Bruce Ashfield
Carlos Alberto Lopez Perez
Changhyeok Bae
Changqing Li
Chen Qi
Chris Laplante
Chris Spencer
Christian Bräuner Sørensen
Christian Lindeberg
Christian Taedcke
Clara Kowalsky
Clément Péron
Colin McAllister
Corentin Lévy
Daniel Klauer
Daniel Semkowicz
Daniil Batalov
Dan McGregor
Deepesh Varatharajan
Deepthi Hemraj
Denys Dmytriyenko
Divya Chellam
Dmitry Baryshkov
Emil Kronborg
Enguerrand de Ribaucourt
Enrico Jörns
Esben Haabendal
Etienne Cordonnier
Fabio Estevam
Felix Nilsson
Florian Amstutz
Gassner, Tobias.ext
Gauthier HADERER
Guðni Már Gilbert
Harish Sadineni
Heiko Thole
Het Patel
Hongxu Jia
Igor Opaniuk
Intaek Hwang
Iskander Amara
Jaeyoon Jung
Jan Vermaete
Jasper Orschulko
Joe Slater
Johannes Schneider
John Ripple
Jonas Gorski
Jonas Munsin
Jonathan GUILLOT
Jon Mason
Jookia
Jordan Crouse
Jörg Sommer
Jose Quaresma
Joshua Watt
Julien Stephan
Kai Kang
Kari Sivonen
Khem Raj
Kirill Yatsenko
Konrad Weihmann
Lee Chee Yang
Lei Maohui
Leon Anavi
Leonard Göhrs
Louis Rannou
Marc Ferland
Marcus Folkesson
Marek Vasut
Mark Hatle
Markus Volk
Marlon Rodriguez Garcia
Marta Rybczynska
Martin Hundebøll
Martin Jansa
Matthew Bullock
Matthias Pritschet
Maxin B. John
Michael Glembotzki
Michael Haener
Michael Halstead
Michael Opdenacker
Michal Sieron
Mikko Rapeli
Mingli Yu
Naveen Saini
Niko Mauno
Ninette Adhikari
Noe Galea
Ola x Nilsson
Oleksandr Hnatiuk
Otavio Salvador
Patrick Wicki
Paul Barker
Paul Eggleton
Paul Gerber
Pedro Ferreira
Peter Kjellerstedt
Peter Marko
Philip Lorenz
Poonam Jadhav
Primoz Fiser
Quentin Schulz
Ralph Siemsen
Rasmus Villemoes
Ricardo Simoes
Richard Purdie
Robert Joslyn
Robert Kovacsics
Robert Yang
Ross Burton
Rudolf J Streif
Ryan Eatmon
Sabeeh Khan
Sakib Sajal
Samantha Jalabert
Siddharth Doshi
simit.ghane
Simone Weiß
Soumya Sambu
Sreejith Ravi
Stefan Mueller-Klieser
Sundeep KOKKONDA
Sven Schwermer
Teresa Remmet
Theodore A. Roth
Thomas Perrot
Tim Orling
Tom Hochstein
Trevor Gamblin
Troels Dalsgaard Hoffmeyer
Tronje Krabbe
Ulrich Ölmann
Victor Kamensky
Vijay Anusuri
Vincent Kriek
Vivek Puar
Wadim Egorov
Wang Mingyu
Weisser, Pascal.ext
Willy Tu
Xiangyu Chen
Yang-Mark Zhang
Yash Shinde
Yi Zhao
Yoann Congal
Yogita Urade
Yuri D’Elia
Zahir Hussain
Zev Weiss
Zoltan Boszormenyi
Repositories / Downloads for Yocto-5.1
poky
Repository Location: https://git.yoctoproject.org/poky
Branch: styhead
Tag: yocto-5.1
Git Revision: 8f01ae5c7cba251ed25c80f0141a950ebc8a5f73
Release Artefact: poky-8f01ae5c7cba251ed25c80f0141a950ebc8a5f73
sha: 91f5b2bc8a2be153ac2c358aa8ad71737b4f91e83d2c3ed1aac4f5f087991769
Download Locations: http://downloads.yoctoproject.org/releases/yocto/yocto-5.1/poky-8f01ae5c7cba251ed25c80f0141a950ebc8a5f73.tar.bz2 http://mirrors.kernel.org/yocto/yocto/yocto-5.1/poky-8f01ae5c7cba251ed25c80f0141a950ebc8a5f73.tar.bz2
openembedded-core
Repository Location: https://git.openembedded.org/openembedded-core
Branch: styhead
Tag: yocto-5.1
Git Revision: 161c5b311f1aeb8f254dca96331b31d5b67fc92d
Release Artefact: oecore-161c5b311f1aeb8f254dca96331b31d5b67fc92d
sha: 7b8ea61a3b811556f40b0912ee22b3ef37bccead1d65fb7e1c35a47aff4ca718
Download Locations: http://downloads.yoctoproject.org/releases/yocto/yocto-5.1/oecore-161c5b311f1aeb8f254dca96331b31d5b67fc92d.tar.bz2 http://mirrors.kernel.org/yocto/yocto/yocto-5.1/oecore-161c5b311f1aeb8f254dca96331b31d5b67fc92d.tar.bz2
meta-mingw
Repository Location: https://git.yoctoproject.org/meta-mingw
Branch: styhead
Tag: yocto-5.1
Git Revision: 4ac6cbfdce1f85294bd54bcd8b074f7ef32c378f
Release Artefact: meta-mingw-4ac6cbfdce1f85294bd54bcd8b074f7ef32c378f
sha: 7759361e141654cc84aad486ad36a9ddaf7ee47feebe2cc6dca3175f1922b7c4
Download Locations: http://downloads.yoctoproject.org/releases/yocto/yocto-5.1/meta-mingw-4ac6cbfdce1f85294bd54bcd8b074f7ef32c378f.tar.bz2 http://mirrors.kernel.org/yocto/yocto/yocto-5.1/meta-mingw-4ac6cbfdce1f85294bd54bcd8b074f7ef32c378f.tar.bz2
bitbake
Repository Location: https://git.openembedded.org/bitbake
Branch: 2.10
Tag: yocto-5.1
Git Revision: d3c84198771b7f79aa84dc73061d8ca071fe18f3
Release Artefact: bitbake-d3c84198771b7f79aa84dc73061d8ca071fe18f3
sha: 4b64120f26878a661d1aaf0b0bb5009a21614e2db0649c728cc9d4c16b1050b6
Download Locations: http://downloads.yoctoproject.org/releases/yocto/yocto-5.1/bitbake-d3c84198771b7f79aa84dc73061d8ca071fe18f3.tar.bz2 http://mirrors.kernel.org/yocto/yocto/yocto-5.1/bitbake-d3c84198771b7f79aa84dc73061d8ca071fe18f3.tar.bz2
yocto-docs
Repository Location: https://git.yoctoproject.org/yocto-docs
Branch: styhead
Tag: yocto-5.1
Git Revision: c32b55b3403dcfd76a4694ff407d4b513e14c8f4
Release notes for Yocto-5.1.1 (Styhead)
Security Fixes in Yocto-5.1.1
go: Fix CVE-2024-34155, CVE-2024-34156 and CVE-2024-34158
linux-yocto/6.6: Fix CVE-2023-52917, CVE-2024-46735, CVE-2024-46737, CVE-2024-46738, CVE-2024-46739, CVE-2024-46740, CVE-2024-46741, CVE-2024-46742, CVE-2024-46743, CVE-2024-46744, CVE-2024-46746, CVE-2024-46747, CVE-2024-46749, CVE-2024-46750, CVE-2024-46755, CVE-2024-46756, CVE-2024-46757, CVE-2024-46758, CVE-2024-46759, CVE-2024-46760, CVE-2024-46761, CVE-2024-46762, CVE-2024-46763, CVE-2024-46765, CVE-2024-46768, CVE-2024-46770, CVE-2024-46771, CVE-2024-46773, CVE-2024-46776, CVE-2024-46777, CVE-2024-46780, CVE-2024-46781, CVE-2024-46782, CVE-2024-46783, CVE-2024-46784, CVE-2024-46785, CVE-2024-46786, CVE-2024-46787, CVE-2024-46788, CVE-2024-46791, CVE-2024-46794, CVE-2024-46795, CVE-2024-46796, CVE-2024-46797, CVE-2024-46798, CVE-2024-46800, CVE-2024-46822, CVE-2024-46825, CVE-2024-46826, CVE-2024-46827, CVE-2024-46828, CVE-2024-46829, CVE-2024-46830, CVE-2024-46831, CVE-2024-46832, CVE-2024-46835, CVE-2024-46836, CVE-2024-46838, CVE-2024-46840, CVE-2024-46843, CVE-2024-46844, CVE-2024-46845, CVE-2024-46846, CVE-2024-46847, CVE-2024-46848, CVE-2024-46849, CVE-2024-46852, CVE-2024-46853, CVE-2024-46854, CVE-2024-46855, CVE-2024-46857, CVE-2024-46858, CVE-2024-46859, CVE-2024-46860, CVE-2024-46861, CVE-2024-46863, CVE-2024-46864, CVE-2024-47663, CVE-2024-47664, CVE-2024-47665, CVE-2024-47666, CVE-2024-47667, CVE-2024-47668, CVE-2024-47669, CVE-2024-47670, CVE-2024-47671, CVE-2024-47672, CVE-2024-47673, CVE-2024-47674, CVE-2024-47675, CVE-2024-47678, CVE-2024-47679, CVE-2024-47681, CVE-2024-47682, CVE-2024-47683, CVE-2024-47684, CVE-2024-47685, CVE-2024-47686, CVE-2024-47688, CVE-2024-47689, CVE-2024-47690, CVE-2024-47691, CVE-2024-47692, CVE-2024-47693, CVE-2024-47695, CVE-2024-47696, CVE-2024-47697, CVE-2024-47698, CVE-2024-47699, CVE-2024-47700, CVE-2024-47701, CVE-2024-47705, CVE-2024-47706, CVE-2024-47707, CVE-2024-47710, CVE-2024-47712, CVE-2024-47713, CVE-2024-47714, CVE-2024-47715, CVE-2024-47716, CVE-2024-47718, CVE-2024-47719, CVE-2024-47720, CVE-2024-47723, CVE-2024-47727, CVE-2024-47728, CVE-2024-47730, CVE-2024-47731, CVE-2024-47734, CVE-2024-47735, CVE-2024-47737, CVE-2024-47738, CVE-2024-47739, CVE-2024-47741, CVE-2024-47742, CVE-2024-47743, CVE-2024-47744, CVE-2024-47745, CVE-2024-47747, CVE-2024-47748, CVE-2024-47749, CVE-2024-47750, CVE-2024-47751, CVE-2024-47752, CVE-2024-47753, CVE-2024-47754, CVE-2024-47757, CVE-2024-49850, CVE-2024-49851, CVE-2024-49852, CVE-2024-49853, CVE-2024-49854, CVE-2024-49855, CVE-2024-49856, CVE-2024-49858, CVE-2024-49859, CVE-2024-49860, CVE-2024-49861 and CVE-2024-49862
linux-yocto/6.10: Fix CVE-2023-52917, CVE-2024-46714, CVE-2024-46719, CVE-2024-46720, CVE-2024-46721, CVE-2024-46722, CVE-2024-46723, CVE-2024-46724, CVE-2024-46725, CVE-2024-46726, CVE-2024-46727, CVE-2024-46728, CVE-2024-46730, CVE-2024-46731, CVE-2024-46732, CVE-2024-46735, CVE-2024-46737, CVE-2024-46738, CVE-2024-46739, CVE-2024-46740, CVE-2024-46741, CVE-2024-46742, CVE-2024-46743, CVE-2024-46744, CVE-2024-46746, CVE-2024-46747, CVE-2024-46749, CVE-2024-46750, CVE-2024-46751, CVE-2024-46755, CVE-2024-46756, CVE-2024-46757, CVE-2024-46758, CVE-2024-46759, CVE-2024-46760, CVE-2024-46761, CVE-2024-46762, CVE-2024-46763, CVE-2024-46765, CVE-2024-46766, CVE-2024-46768, CVE-2024-46769, CVE-2024-46770, CVE-2024-46771, CVE-2024-46772, CVE-2024-46773, CVE-2024-46774, CVE-2024-46775, CVE-2024-46776, CVE-2024-46777, CVE-2024-46778, CVE-2024-46779, CVE-2024-46780, CVE-2024-46781, CVE-2024-46782, CVE-2024-46783, CVE-2024-46784, CVE-2024-46785, CVE-2024-46786, CVE-2024-46787, CVE-2024-46788, CVE-2024-46789, CVE-2024-46790, CVE-2024-46791, CVE-2024-46792, CVE-2024-46793, CVE-2024-46794, CVE-2024-46795, CVE-2024-46796, CVE-2024-46797, CVE-2024-46798, CVE-2024-46799, CVE-2024-46800, CVE-2024-46801, CVE-2024-46802, CVE-2024-46803, CVE-2024-46804, CVE-2024-46805, CVE-2024-46806, CVE-2024-46807, CVE-2024-46808, CVE-2024-46809, CVE-2024-46810, CVE-2024-46811, CVE-2024-46812, CVE-2024-46813, CVE-2024-46814, CVE-2024-46815, CVE-2024-46816, CVE-2024-46817, CVE-2024-46818, CVE-2024-46819, CVE-2024-46820, CVE-2024-46821, CVE-2024-46822, CVE-2024-46823, CVE-2024-46824, CVE-2024-46825, CVE-2024-46826, CVE-2024-46827, CVE-2024-46828, CVE-2024-46829, CVE-2024-46830, CVE-2024-46831, CVE-2024-46832, CVE-2024-46833, CVE-2024-46834, CVE-2024-46835, CVE-2024-46836, CVE-2024-46837, CVE-2024-46838, CVE-2024-46840, CVE-2024-46841, CVE-2024-46842, CVE-2024-46843, CVE-2024-46844, CVE-2024-46845, CVE-2024-46846, CVE-2024-46847, CVE-2024-46848, CVE-2024-46849, CVE-2024-46850, CVE-2024-46851, CVE-2024-46852, CVE-2024-46853, CVE-2024-46854, CVE-2024-46855, CVE-2024-46856, CVE-2024-46857, CVE-2024-46858, CVE-2024-46859, CVE-2024-46860, CVE-2024-46861, CVE-2024-46862, CVE-2024-46863, CVE-2024-46864, CVE-2024-46866, CVE-2024-46867, CVE-2024-46868, CVE-2024-46869, CVE-2024-46870, CVE-2024-46871, CVE-2024-47658, CVE-2024-47659, CVE-2024-47660, CVE-2024-47661, CVE-2024-47662, CVE-2024-47663, CVE-2024-47664, CVE-2024-47665, CVE-2024-47666, CVE-2024-47667, CVE-2024-47668, CVE-2024-47669, CVE-2024-47670, CVE-2024-47671, CVE-2024-47672, CVE-2024-47673, CVE-2024-47674, CVE-2024-47675, CVE-2024-47676, CVE-2024-47677, CVE-2024-47678, CVE-2024-47679, CVE-2024-47680, CVE-2024-47681, CVE-2024-47682, CVE-2024-47683, CVE-2024-47684, CVE-2024-47685, CVE-2024-47686, CVE-2024-47687, CVE-2024-47688, CVE-2024-47689, CVE-2024-47690, CVE-2024-47691, CVE-2024-47692, CVE-2024-47693, CVE-2024-47695, CVE-2024-47696, CVE-2024-47697, CVE-2024-47698, CVE-2024-47699, CVE-2024-47700, CVE-2024-47701, CVE-2024-47702, CVE-2024-47703, CVE-2024-47704, CVE-2024-47705, CVE-2024-47706, CVE-2024-47707, CVE-2024-47710, CVE-2024-47712, CVE-2024-47713, CVE-2024-47714, CVE-2024-47715, CVE-2024-47716, CVE-2024-47717, CVE-2024-47718, CVE-2024-47719, CVE-2024-47720, CVE-2024-47721, CVE-2024-47723, CVE-2024-47724, CVE-2024-47727, CVE-2024-47728, CVE-2024-47730, CVE-2024-47731, CVE-2024-47732, CVE-2024-47733, CVE-2024-47734, CVE-2024-47735, CVE-2024-47736, CVE-2024-47737, CVE-2024-47738, CVE-2024-47739, CVE-2024-47741, CVE-2024-47742, CVE-2024-47743, CVE-2024-47744, CVE-2024-47745, CVE-2024-47746, CVE-2024-47747, CVE-2024-47748, CVE-2024-47749, CVE-2024-47750, CVE-2024-47751, CVE-2024-47752, CVE-2024-47753, CVE-2024-47754, CVE-2024-47757, CVE-2024-49850, CVE-2024-49851, CVE-2024-49852, CVE-2024-49853, CVE-2024-49854, CVE-2024-49855, CVE-2024-49856, CVE-2024-49858, CVE-2024-49859, CVE-2024-49860, CVE-2024-49861, CVE-2024-49862, CVE-2024-49863, CVE-2024-49864, CVE-2024-49866, CVE-2024-49867, CVE-2024-49868, CVE-2024-49870, CVE-2024-49871, CVE-2024-49874 and CVE-2024-49875
orc: Fix CVE-2024-40897 (follow-up fix)
vim: Fix CVE-2024-45306 and CVE-2024-47814
wpa-supplicant: Ignore CVE-2024-5290
xserver-xorg: Fix CVE-2024-9632
xwayland: Fix CVE-2024-9632
Fixes in Yocto-5.1.1
binutils: Add missing perl modules to RDEPENDS for nativsdk variant
binutils: Fix binutils mingw packaging
bitbake.conf: Mark VOLATILE_LOG_DIR & VOLATILE_TMP_DIR as obsolete
bitbake: Remove custom exception backtrace formatting
bitbake: bitbake: doc/user-manual: Update the BB_HASHSERVE_UPSTREAM
bitbake: fetch2/git: Use quote from shlex, not pipes
bitbake: fetch2: don’t try to preserve all attributes when unpacking files
bitbake: fetch2: use persist_data context managers
bitbake: fetch/wget: Increase timeout to 100s from 30s
bitbake: gitsm: Add call_process_submodules() to remove duplicated code
bitbake: gitsm: Remove downloads/tmpdir when failed
bitbake: persist_data: close connection in SQLTable __exit__
bitbake: tests/fetch: Update GoModTest and GoModGitTest
bitbake: tests/fetch: Use our own mirror of mobile-broadband-provider to decouple from gnome gitlab
bitbake: tests/fetch: Use our own mirror of sysprof to decouple from gnome gitlab
bluez: Fix mesh builds on musl
build-appliance-image: Update to styhead head revision
cml1.bbclass: do_diffconfig: Don’t override .config with .config.orig
contributor-guide: Remove duplicated words
cve-check: add field “modified” to JSON report
cve-check: add support for cvss v4.0
cve-check: do not skip cve status description after :
cve-check: fix malformed cve status description with : characters
dev-manual: add bblock documentation
dev-manual: bblock: use warning block instead of attention
dev-manual: document how to provide confs from layer.conf
documentation: features: describe distribution feature pni-name
documentation; features: remove duplicate word in distribution feature ext2
documentation: Makefile: add SPHINXLINTDOCS to specify subset to sphinx-lint
documentation: Makefile: add support for xelatex
documentation: Makefile: publish pdf and epub versions too
documentation: Makefile: remove inkscape, replace by rsvg-convert
documentation: README: add instruction to run Vale on a subset
documentation: Replace VOLATILE_LOG_DIR with FILESYSTEM_PERMS_TABLES
documentation: Replace VOLATILE_TMP_DIR with FILESYSTEM_PERMS_TABLES
documentation: add a download page for epub and pdf
documentation: conf.py: add a bitbake_git extlink
documentation: conf.py: rename :cve: role to :cve_nist:
documentation: sphinx-static/switchers.js.in: do not refer to URL_ROOT anymore
documentation: styles: vocabularies: Yocto: add sstate
e2fsprogs: removed ‘sed -u’ option
efi-bootdisk.wks: Increase overhead-factor to avoid test failures
ffmpeg: Add “libswresample libavcodec” to CVE_PRODUCT
ffmpeg: Disable asm optimizations on x86
ffmpeg: fix packaging examples
ffmpeg: nasm is x86 only, so only DEPEND if x86
ffmpeg: no need for textrel INSANE_SKIP
gcc-source: Fix racing on building gcc-source-14.2.0 and lib32-gcc-source-14.2.0
gcc: add a backport patch to fix an issue with tzdata 2024b
git: upgrade to 2.46.1
glib-2.0: fix glib-2.0 ptest failure when upgrading tzdata2024b
glibc: Fix missing randomness in __gen_tempname
glibc: stable 2.40 branch updates
go: upgrade to 1.22.8
groff: fix rare build race in hdtbl
icu: update patch Upstream-Status
image.bbclass: Drop support for ImageQAFailed exceptions in image_qa
json-c: avoid ptest failure caused by valgrind
kexec-tools: update COMPATIBLE_HOST because of makedumpfile
kmscube: Upgrade to latest revision (b2f97f53e0..)
lib/oe/package-manager: skip processing installed-pkgs with empty globs
libevdev: upgrade to 1.13.3
libgfortran: fix buildpath QA issue
libpam: use libdir in conditional
linux-yocto/6.6: update to v6.6.54
linux-yocto/6.10: bsp/genericarm64: disable ARM64_SME
linux-yocto/6.10: cfg: gpio: allow to re-enable the deprecated GPIO sysfs interface
linux-yocto/6.10: genericarm64.cfg: enable CONFIG_DMA_CMA
linux-yocto/6.10: update to v6.10.14
linux-yocto: Enable l2tp drivers when ptest featuee is on
lsb-release: fix Distro Codename shell escaping
migration-guides/release-notes-4.0: update BB_HASHSERVE_UPSTREAM for new infrastructure
migration-guides/release-notes-5.0: NO_OUTPUT -> NO_COLOR
migration-guides/release-notes-5.1: add beaglebone-yocto parselogs test oeqa failure
migration-guides/release-notes-5.1: document added python3-libarchive-c ptest
migration-guides/release-notes-5.1: document fixed _test_devtool_add_git_url test
migration-guides/release-notes-5.1: document oeqa/selftest envvars change
migration-guides/release-notes-5.1: document spirv-tools reproducibility
migration-guides/release-notes-5.1: fix spdx bullet point
migration-guides/release-notes-5.1: update for several section
migration-guides/release-notes-5.1: update release note for styhead
migration-guides: 5.1: fix titles
migration-guides: add release notes for 4.0.21 and 4.0.22
oeqa/postactions: Fix archive retrieval from target
oeqa/runtime/ssh: Fix incorrect timeout fix
oeqa/runtime/ssh: Rework ssh timeout
oeqa/selftest/gcc: Fix kex exchange identification error
oeqa/selftest: Update the BB_HASHSERVE_UPSTREAM
openssl: Fix SDK environment script to avoid unbound variable
orc: upgrade to 0.4.40
overview-manual: concepts: add details on package splitting
ovmf-native: remove .pyc files from install
package_rpm: Check if file exists before open()
package_rpm: restrict rpm to 4 threads
package_rpm: use zstd’s default compression level
poky.conf: bump version for 5.1.1
pseudo: Fix envp bug and add posix_spawn wrapper
python3-maturin: sort external libs in wheel files
python3-setuptools: Add “python:setuptools” to CVE_PRODUCT
qemu: Fix build on musl/riscv64
qemurunner: Clean up serial_lock handling
ref-manual: add missing CVE_CHECK manifest variables
ref-manual: add missing EXTERNAL_KERNEL_DEVICETREE variable
ref-manual: add missing OPKGBUILDCMD variable
ref-manual: add missing TESTIMAGE_FAILED_QA_ARTIFACTS
ref-manual: add missing image manifest variables
ref-manual: add missing nospdx class
ref-manual: add missing variable PRSERV_UPSTREAM
ref-manual: add mission pep517-backend sanity check
ref-manual: add new RECIPE_UPGRADE_EXTRA_TASKS variable
ref-manual: add new retain class and variables
ref-manual: add new vex class
ref-manual: devtool-reference: document missing commands
ref-manual: devtool-reference: refresh example outputs
ref-manual: drop TCLIBCAPPEND variable
ref-manual: drop siteconfig class
ref-manual: faq: add q&a on class appends
ref-manual: fix ordering of insane checks list
ref-manual: merge patch-status-* to patch-status
ref-manual: release-process: add a reference to the doc’s release
ref-manual: release-process: refresh the current LTS releases
ref-manual: release-process: update releases.svg
ref-manual: release-process: update releases.svg with month after “Current”
ref-manual: structure.rst: document missing tmp/ dirs
ref-manual: variables: add SIGGEN_LOCKEDSIGS* variables
rootfs-postcommands.bbclass: make opkg status reproducible
scripts/install-buildtools: Update to 5.1
selftest/sstatetests: run CDN mirror check only once
shadow: use update-alternatives to handle groups.1
strace: download release tarballs from GitHub
systemd: fix broken links for sysvinit-compatible commands
tcl: skip io-13.6 test case
toolchain-shar-extract.sh: exit when post-relocate-setup.sh fails
tune-cortexa32: set tune feature as armv8a
tzdata/tzcode-native: upgrade to 2024b
uboot-sign: fix concat_dtb arguments
udev-extraconf: fix network.sh script did not configure hotplugged interfaces
util-linux: Add findmnt to the bash completion RDEPENDS
vim: Upgrade to 9.1.0764
virglrenderer: Add patch to fix -int-conversion build issue
weston: Add missing runtime dependency on freerdp
weston: backport patch to allow neatvnc < v0.9.0
wireless-regdb: upgrade to 2024.10.07
xserver-xorg: upgrade to 21.1.14
xwayland: upgrade to 24.1.4
Known Issues in Yocto-5.1.1
N/A
Contributors to Yocto-5.1.1
Aditya Tayade
Alban Bedel
Aleksandar Nikolic
Alexander Kanavin
Antonin Godard
Bruce Ashfield
Chen Qi
Chris Laplante
Christian Lindeberg
Claus Stovgaard
Clayton Casciato
Daniel McGregor
Deepthi Hemraj
Harish Sadineni
Hiago De Franco
Hongxu Jia
Jagadeesh Krishnanjanappa
Jinfeng Wang
Jonas Gorski
Jose Quaresma
Joshua Watt
Julien Stephan
Jörg Sommer
Kai Kang
Katawann
Khem Raj
Lee Chee Yang
Markus Volk
Martin Jansa
Mathieu Dubois-Briand
Michael Opdenacker
Mikko Rapeli
Niko Mauno
Ola x Nilsson
Pavel Zhukov
Peter Kjellerstedt
Peter Marko
Purushottam Choudhary
Regis Dargent
Richard Purdie
Robert Yang
Rohini Sangam
Ross Burton
Sergei Zhmylev
Shunsuke Tokumoto
Steve Sakoman
Talel BELHAJSALEM
Tom Hochstein
Vijay Anusuri
Wang Mingyu
Yi Zhao
Yoann Congal
Zahir Hussain
Repositories / Downloads for Yocto-5.1.1
poky
Repository Location: https://git.yoctoproject.org/poky
Branch: styhead
Tag: yocto-5.1.1
Git Revision: 7e081bd98fdc5435e850d1df79a5e0f1e30293d0
Release Artefact: poky-7e081bd98fdc5435e850d1df79a5e0f1e30293d0
sha: 1ae688856bcd4aa2d1a14c2659217143cc2050151a8c194b99e6b472b0a99710
Download Locations: https://downloads.yoctoproject.org/releases/yocto/yocto-5.1.1/poky-7e081bd98fdc5435e850d1df79a5e0f1e30293d0.tar.bz2 https://mirrors.kernel.org/yocto/yocto/yocto-5.1.1/poky-7e081bd98fdc5435e850d1df79a5e0f1e30293d0.tar.bz2
openembedded-core
Repository Location: https://git.openembedded.org/openembedded-core
Branch: styhead
Tag: yocto-5.1.1
Git Revision: b511d0146a2e8f316f4aecc90c853215674013ea
Release Artefact: oecore-b511d0146a2e8f316f4aecc90c853215674013ea
sha: 71eb36bf898b3eb5a7a79c2f1c057755405740e82b21a57ac540cebc1337e151
Download Locations: https://downloads.yoctoproject.org/releases/yocto/yocto-5.1.1/oecore-b511d0146a2e8f316f4aecc90c853215674013ea.tar.bz2 https://mirrors.kernel.org/yocto/yocto/yocto-5.1.1/oecore-b511d0146a2e8f316f4aecc90c853215674013ea.tar.bz2
meta-mingw
Repository Location: https://git.yoctoproject.org/meta-mingw
Branch: styhead
Tag: yocto-5.1.1
Git Revision: 77fe18d4f8ec34501045c5d92ce7e13b1bd129e9
Release Artefact: meta-mingw-77fe18d4f8ec34501045c5d92ce7e13b1bd129e9
sha: 4c7f8100a3675d9863e51825def3df5b263ffc81cd57bae26eedbc156d771534
Download Locations: https://downloads.yoctoproject.org/releases/yocto/yocto-5.1.1/meta-mingw-77fe18d4f8ec34501045c5d92ce7e13b1bd129e9.tar.bz2 https://mirrors.kernel.org/yocto/yocto/yocto-5.1.1/meta-mingw-77fe18d4f8ec34501045c5d92ce7e13b1bd129e9.tar.bz2
bitbake
Repository Location: https://git.openembedded.org/bitbake/
Branch: 2.10
Tag: yocto-5.1.1
Git Revision: 9602a684568910fd333ffce907fa020ad3661c26
Release Artefact: bitbake-9602a684568910fd333ffce907fa020ad3661c26
sha: 8f5304b7a71cf7ad5dc8e5ee8bbfc041780bd402712f314d2c3c8be79c89a526
Download Locations: https://downloads.yoctoproject.org/releases/yocto/yocto-5.1.1/bitbake-9602a684568910fd333ffce907fa020ad3661c26.tar.bz2 https://mirrors.kernel.org/yocto/yocto/yocto-5.1.1/bitbake-9602a684568910fd333ffce907fa020ad3661c26.tar.bz2
yocto-docs
Repository Location: https://git.yoctoproject.org/yocto-docs
Branch: styhead
Tag: yocto-5.1.1
Git Revision: 8288c8cae7fe7303e89d8ed286de91fc26ce6cc3
Release notes for Yocto-5.1.2 (Styhead)
Security Fixes in Yocto-5.1.2
binutils: Fix CVE-2024-53589
curl: Fix CVE-2024-9681
ghostscript: Fix CVE-2024-46951, CVE-2024-46952, CVE-2024-46953, CVE-2024-46954, CVE-2024-46955 and CVE-2024-46956
gstreamer1.0: Fix CVE-2024-47606
gstreamer1.0-plugins-base: Fix CVE-2024-47538, CVE-2024-47541, CVE-2024-47542, CVE-2024-47600, CVE-2024-47607, CVE-2024-47615 and CVE-2024-47835
gstreamer1.0-plugins-good: Fix CVE-2024-47537, CVE-2024-47539, CVE-2024-47540, CVE-2024-47543, CVE-2024-47544, CVE-2024-47545, CVE-2024-47546, CVE-2024-47596, CVE-2024-47597, CVE-2024-47598, CVE-2024-47599, CVE-2024-47601, CVE-2024-47602, CVE-2024-47603, CVE-2024-47606, CVE-2024-47613, CVE-2024-47774, CVE-2024-47775, CVE-2024-47776, CVE-2024-47777, CVE-2024-47778 and CVE-2024-47834
gstreamer1.0-rtsp-server: Fix CVE-2024-44331
libarchive: Fix CVE-2024-48957 and CVE-2024-48958
libexpat: Fix CVE-2024-50602
libsndfile1: Fix CVE-2024-50612
linux-yocto/6.6: Fix CVE-2024-27059, CVE-2024-47704, CVE-2024-49863, CVE-2024-49864, CVE-2024-49866, CVE-2024-49867, CVE-2024-49868, CVE-2024-49870, CVE-2024-49871, CVE-2024-49874, CVE-2024-49875, CVE-2024-49877, CVE-2024-49878, CVE-2024-49879, CVE-2024-49881, CVE-2024-49882, CVE-2024-49883, CVE-2024-49884, CVE-2024-49886, CVE-2024-49889, CVE-2024-49890, CVE-2024-49892, CVE-2024-49894, CVE-2024-49895, CVE-2024-49896, CVE-2024-49900, CVE-2024-49901, CVE-2024-49902, CVE-2024-49903, CVE-2024-49905, CVE-2024-49907, CVE-2024-49912, CVE-2024-49913, CVE-2024-49924, CVE-2024-49925, CVE-2024-49927, CVE-2024-49929, CVE-2024-49930, CVE-2024-49931, CVE-2024-49933, CVE-2024-49935, CVE-2024-49936, CVE-2024-49937, CVE-2024-49938, CVE-2024-49939, CVE-2024-49944, CVE-2024-49946, CVE-2024-49947, CVE-2024-49948, CVE-2024-49949, CVE-2024-49950, CVE-2024-49951, CVE-2024-49952, CVE-2024-49953, CVE-2024-49954, CVE-2024-49955, CVE-2024-49957, CVE-2024-49958, CVE-2024-49959, CVE-2024-49960, CVE-2024-49961, CVE-2024-49962, CVE-2024-49963, CVE-2024-49965, CVE-2024-49966, CVE-2024-49969, CVE-2024-49973, CVE-2024-49975, CVE-2024-49976, CVE-2024-49977, CVE-2024-49978, CVE-2024-49980, CVE-2024-49981, CVE-2024-49982, CVE-2024-49983, CVE-2024-49985, CVE-2024-49986, CVE-2024-49987, CVE-2024-49988, CVE-2024-49989, CVE-2024-49991, CVE-2024-49992, CVE-2024-49995, CVE-2024-49996, CVE-2024-49997, CVE-2024-50000, CVE-2024-50001, CVE-2024-50002, CVE-2024-50003, CVE-2024-50005, CVE-2024-50006, CVE-2024-50007, CVE-2024-50008, CVE-2024-50012, CVE-2024-50013, CVE-2024-50015, CVE-2024-50016, CVE-2024-50019, CVE-2024-50022, CVE-2024-50023, CVE-2024-50024, CVE-2024-50026, CVE-2024-50029, CVE-2024-50031, CVE-2024-50032, CVE-2024-50033, CVE-2024-50035, CVE-2024-50036, CVE-2024-50038, CVE-2024-50039, CVE-2024-50040, CVE-2024-50041, CVE-2024-50044, CVE-2024-50045, CVE-2024-50046, CVE-2024-50047, CVE-2024-50048, CVE-2024-50049, CVE-2024-50055, CVE-2024-50057, CVE-2024-50058, CVE-2024-50059, CVE-2024-50060, CVE-2024-50061, CVE-2024-50062, CVE-2024-50063, CVE-2024-50064, CVE-2024-50065, CVE-2024-50066, CVE-2024-50069, CVE-2024-50070, CVE-2024-50072, CVE-2024-50073, CVE-2024-50074, CVE-2024-50075, CVE-2024-50076, CVE-2024-50077, CVE-2024-50078, CVE-2024-50080, CVE-2024-50082, CVE-2024-50083, CVE-2024-50084, CVE-2024-50085, CVE-2024-50086, CVE-2024-50087, CVE-2024-50088, CVE-2024-50093, CVE-2024-50095, CVE-2024-50096, CVE-2024-50098, CVE-2024-50099, CVE-2024-50101, CVE-2024-50103, CVE-2024-50108, CVE-2024-50110, CVE-2024-50111, CVE-2024-50112, CVE-2024-50115, CVE-2024-50116, CVE-2024-50117, CVE-2024-50120, CVE-2024-50121, CVE-2024-50124, CVE-2024-50125, CVE-2024-50126, CVE-2024-50127, CVE-2024-50128, CVE-2024-50130, CVE-2024-50131, CVE-2024-50133, CVE-2024-50134, CVE-2024-50135, CVE-2024-50136, CVE-2024-50139, CVE-2024-50140, CVE-2024-50141, CVE-2024-50142, CVE-2024-50143, CVE-2024-50145, CVE-2024-50147, CVE-2024-50148, CVE-2024-50150, CVE-2024-50151, CVE-2024-50152, CVE-2024-50153, CVE-2024-50154, CVE-2024-50155, CVE-2024-50156, CVE-2024-50158, CVE-2024-50159, CVE-2024-50160, CVE-2024-50162, CVE-2024-50163, CVE-2024-50164, CVE-2024-50166, CVE-2024-50167, CVE-2024-50168, CVE-2024-50169, CVE-2024-50170, CVE-2024-50171, CVE-2024-50172, CVE-2024-50175, CVE-2024-50176, CVE-2024-50179, CVE-2024-50180, CVE-2024-50181, CVE-2024-50182, CVE-2024-50183, CVE-2024-50184, CVE-2024-50185, CVE-2024-50186, CVE-2024-50187, CVE-2024-50188, CVE-2024-50189, CVE-2024-50191, CVE-2024-50192, CVE-2024-50193, CVE-2024-50194, CVE-2024-50195, CVE-2024-50196, CVE-2024-50198, CVE-2024-50201, CVE-2024-50202, CVE-2024-50205, CVE-2024-50208, CVE-2024-50209, CVE-2024-50211, CVE-2024-50215, CVE-2024-50222, CVE-2024-50223, CVE-2024-50224, CVE-2024-50226, CVE-2024-50229, CVE-2024-50230, CVE-2024-50231, CVE-2024-50232, CVE-2024-50233, CVE-2024-50234, CVE-2024-50235, CVE-2024-50236, CVE-2024-50237, CVE-2024-50239, CVE-2024-50240, CVE-2024-50242, CVE-2024-50243, CVE-2024-50244, CVE-2024-50245, CVE-2024-50246, CVE-2024-50247, CVE-2024-50248, CVE-2024-50249, CVE-2024-50250, CVE-2024-50251, CVE-2024-50252, CVE-2024-50255, CVE-2024-50256, CVE-2024-50257, CVE-2024-50258, CVE-2024-50259, CVE-2024-50261, CVE-2024-50262, CVE-2024-50264, CVE-2024-50265, CVE-2024-50267, CVE-2024-50268, CVE-2024-50269, CVE-2024-50271, CVE-2024-50272, CVE-2024-50273, CVE-2024-50275, CVE-2024-50276, CVE-2024-50278, CVE-2024-50279, CVE-2024-50282, CVE-2024-50283, CVE-2024-50284, CVE-2024-50285, CVE-2024-50286, CVE-2024-50287, CVE-2024-50292, CVE-2024-50296, CVE-2024-50298, CVE-2024-50299, CVE-2024-50300, CVE-2024-50301, CVE-2024-50302, CVE-2024-53042, CVE-2024-53043, CVE-2024-53046, CVE-2024-53047, CVE-2024-53052, CVE-2024-53055, CVE-2024-53057, CVE-2024-53058, CVE-2024-53059, CVE-2024-53060, CVE-2024-53061, CVE-2024-53063, CVE-2024-53066, CVE-2024-53068, CVE-2024-53072, CVE-2024-53076, CVE-2024-53079, CVE-2024-53081, CVE-2024-53082, CVE-2024-53083, CVE-2024-53088, CVE-2024-53091, CVE-2024-53093, CVE-2024-53094, CVE-2024-53096, CVE-2024-53099, CVE-2024-53100, CVE-2024-53101, CVE-2024-53103, CVE-2024-53108, CVE-2024-53109, CVE-2024-53110, CVE-2024-53112, CVE-2024-53113, CVE-2024-53119, CVE-2024-53120, CVE-2024-53121, CVE-2024-53122, CVE-2024-53123, CVE-2024-53126, CVE-2024-53127, CVE-2024-53129, CVE-2024-53130, CVE-2024-53131, CVE-2024-53134, CVE-2024-53135, CVE-2024-53138, CVE-2024-53139, CVE-2024-53140, CVE-2024-53141, CVE-2024-53142, CVE-2024-53145, CVE-2024-53146, CVE-2024-53150, CVE-2024-53151, CVE-2024-53154, CVE-2024-53155, CVE-2024-53156, CVE-2024-53157, CVE-2024-53165, CVE-2024-53166, CVE-2024-53171, CVE-2024-53173, CVE-2024-53180, CVE-2024-53188, CVE-2024-53200, CVE-2024-53202, CVE-2024-53208, CVE-2024-53210, CVE-2024-53213, CVE-2024-53226, CVE-2024-53227, CVE-2024-53230, CVE-2024-53231, CVE-2024-53237, CVE-2024-54683, CVE-2024-55916, CVE-2024-56369, CVE-2024-56538, CVE-2024-56551, CVE-2024-56567, CVE-2024-56572, CVE-2024-56574, CVE-2024-56577, CVE-2024-56578, CVE-2024-56579, CVE-2024-56581, CVE-2024-56593, CVE-2024-56595, CVE-2024-56596, CVE-2024-56598, CVE-2024-56600, CVE-2024-56601, CVE-2024-56602, CVE-2024-56603, CVE-2024-56604, CVE-2024-56605, CVE-2024-56606, CVE-2024-56611, CVE-2024-56613, CVE-2024-56614, CVE-2024-56615, CVE-2024-56617, CVE-2024-56622, CVE-2024-56623, CVE-2024-56626, CVE-2024-56627, CVE-2024-56629, CVE-2024-56631, CVE-2024-56634, CVE-2024-56640, CVE-2024-56642, CVE-2024-56643, CVE-2024-56648, CVE-2024-56649, CVE-2024-56650, CVE-2024-56651, CVE-2024-56653, CVE-2024-56654, CVE-2024-56657, CVE-2024-56658, CVE-2024-56659, CVE-2024-56660, CVE-2024-56662, CVE-2024-56663, CVE-2024-56664, CVE-2024-56667, CVE-2024-56670, CVE-2024-56672, CVE-2024-56675, CVE-2024-56688, CVE-2024-56689, CVE-2024-56692, CVE-2024-56694, CVE-2024-56704, CVE-2024-56708, CVE-2024-56710, CVE-2024-56715, CVE-2024-56716, CVE-2024-56717, CVE-2024-56718, CVE-2024-56720, CVE-2024-56722, CVE-2024-56723, CVE-2024-56724, CVE-2024-56725, CVE-2024-56726, CVE-2024-56727, CVE-2024-56728, CVE-2024-56729, CVE-2024-56739, CVE-2024-56741, CVE-2024-56744, CVE-2024-56745, CVE-2024-56746, CVE-2024-56747, CVE-2024-56748, CVE-2024-56751, CVE-2024-56752, CVE-2024-56754, CVE-2024-56755, CVE-2024-56756, CVE-2024-56760, CVE-2024-56763, CVE-2024-56765, CVE-2024-56767, CVE-2024-56769, CVE-2024-56770, CVE-2024-56774, CVE-2024-56776, CVE-2024-56777, CVE-2024-56778, CVE-2024-56779, CVE-2024-56780, CVE-2024-56781, CVE-2024-56783, CVE-2024-56785, CVE-2024-56786, CVE-2024-56787 and CVE-2024-57807
qemu: Fix CVE-2024-6505
rust: Ignore CVE-2024-43402
Fixes in Yocto-5.1.2
binutils: stable 2.43.1 branch update
bitbake: runqueue: Fix performance of multiconfigs with large overlap
bitbake: runqueue: Fix scenetask processing performance issue
bitbake: runqueue: Optimise setscene loop processing
build-appliance-image: Update to styhead head revision
builder: set CVE_PRODUCT
buildtools-docs-tarball: Add rsvg so we can handle svg files in docs
connman: Fix restart script
contributor-guide: submit-changes.rst: suggest to remove the git signature
cve-update-nvd2-native: Handle BB_NO_NETWORK and missing db
cve-update-nvd2-native: Tweak to work better with NFS DL_DIR
dev-manual: bmaptool.rst: correct command for bmaptool-native
dev-manual: bmaptool.rst: simplify and fix instructions
dev-manual: fix styling of references to bmaptool
do_package/sstate/sstatesig: Change timestamp clamping to hash output only
docs: Gather dependencies in poky.yaml.in
docs: Update the documentation for SRCPV
docs: standards.md: add a section on admonitions
docs: update current releases
expat: upgrade to 2.6.4
gcc: Fix c++: tweak for Wrange-loop-construct
ghostscript: upgrade 10.04.0
glibc: stable 2.40 branch updates.
groff: Fix race issues for parallel build
gstreamer1.0-libav: explicitly disable documentation
gstreamer1.0: run ptests in parallel
gstreamer1.0: upgrade to 1.24.10
linux-yocto/6.6: bsp/genericarm64: disable ARM64_SME
linux-yocto/6.6: genericarm64.cfg: enable CONFIG_DMA_CMA
linux-yocto/6.6: update to v6.6.69
lttng-modules: fix sched_stat_runtime changed in Linux 6.6.66
migration-guides: add release notes for 4.0.23, 5.0.4, 5.0.5 and 5.1.1
oeqa/ssh: Improve performance and log sizes
oeqa/utils/gitarchive: Return tag name and improve exclude handling
poky.conf: add new tested distros
poky.conf: bump version for 5.1.2
poky.yaml.in: add missing locales dependency
poky.yaml.in: replace inkscape dependency by librsvg2-bin
populate_sdk_ext: write_local_conf add shutil import
python3-poetry-core: drop python3-six from RDEPENDS
python3: upgrade to 3.12.8
ref-manual: SSTATE_MIRRORS/SOURCE_MIRROR_URL: add instructions for mirror authentication
ref-manual: classes: fix bin_package description
ref-manual: devtool-reference: add warning note on deploy-target and shared objects
ref-manual: merge two separate descriptions of RECIPE_UPGRADE_EXTRA_TASKS
ref-manual: move runtime-testing section to the test-manual
ref-manual: packages: move ptest section to the test-manual
ref-manual: qa-checks: remove patch-status-core/patch-status-noncore
ref-manual: use standardized method accross both ubuntu and debian for locale install
reproducible-builds.rst: show how to build a single package
resulttool: Add –logfile-archive option to store mode
resulttool: Allow store to filter to specific revisions
resulttool: Clean up repoducible build logs
resulttool: Fix passthrough of –all files in store mode
resulttool: Handle ltp rawlogs as well as ptest
resulttool: Improve repo layout for oeselftest results
resulttool: Trim the precision of duration information
resulttool: Use single space indentation in json output
rxvt-unicode.inc: disable the terminfo installation by setting TIC to :
selftest/reproducible: Clean up pathnames
selftest/reproducible: Drop rawlogs
shadow: use update-alternatives to handle su.1 and nologin.8
system-requirements.rst: add dependencies for pdf builds
system-requirements: add fedora 39 to supported distros
system-requirements: update list of supported distros
systemd-boot: drop intltool-native from DEPENDS
systemd: drop intltool-native from DEPENDS
Known Issues in Yocto-5.1.2
N/A
Contributors to Yocto-5.1.2
Thanks to the following people who contributed to this release:
Alexander Kanavin
Antonin Godard
Bruce Ashfield
Changqing Li
Deepthi Hemraj
Guénaël Muller
Guðni Már Gilbert
Hitendra Prajapati
Lee Chee Yang
Mark Hatle
Michael Nazzareno Trimarchi
Michael Opdenacker
Peter Marko
Richard Purdie
Robert Yang
Ross Burton
Sid-Ali
Steve Sakoman
Sunil Dora
Trevor Gamblin
Wang Mingyu
Xiangyu Chen
Yash Shinde
Repositories / Downloads for Yocto-5.1.2
poky
Repository Location: https://git.yoctoproject.org/poky
Branch: styhead
Tag: yocto-5.1.2
Git Revision: ff9ca74e170480578fcdb1f7bcd897f0e69e46a5
Release Artefact: poky-ff9ca74e170480578fcdb1f7bcd897f0e69e46a5
sha: 3c8d5504ebc988a6427e31d3a9e84e74f16f84b7e9b0884f77be6bd6231b7fef
Download Locations: https://downloads.yoctoproject.org/releases/yocto/yocto-5.1.2/poky-ff9ca74e170480578fcdb1f7bcd897f0e69e46a5.tar.bz2 https://mirrors.kernel.org/yocto/yocto/yocto-5.1.2/poky-ff9ca74e170480578fcdb1f7bcd897f0e69e46a5.tar.bz2
openembedded-core
Repository Location: https://git.openembedded.org/openembedded-core
Branch: styhead
Tag: yocto-5.1.2
Git Revision: 62dfe689246d648f9970a5476716e486b1a33765
Release Artefact: oecore-62dfe689246d648f9970a5476716e486b1a33765
sha: 8118c0260e673dbf9f3d7cd0a6d8364fc337f3e8ff75f0c449be88d2157e78fb
Download Locations: https://downloads.yoctoproject.org/releases/yocto/yocto-5.1.2/oecore-62dfe689246d648f9970a5476716e486b1a33765.tar.bz2 https://mirrors.kernel.org/yocto/yocto/yocto-5.1.2/oecore-62dfe689246d648f9970a5476716e486b1a33765.tar.bz2
meta-mingw
Repository Location: https://git.yoctoproject.org/meta-mingw
Branch: styhead
Tag: yocto-5.1.2
Git Revision: 77fe18d4f8ec34501045c5d92ce7e13b1bd129e9
Release Artefact: meta-mingw-77fe18d4f8ec34501045c5d92ce7e13b1bd129e9
sha: 4c7f8100a3675d9863e51825def3df5b263ffc81cd57bae26eedbc156d771534
Download Locations: https://downloads.yoctoproject.org/releases/yocto/yocto-5.1.2/meta-mingw-77fe18d4f8ec34501045c5d92ce7e13b1bd129e9.tar.bz2 https://mirrors.kernel.org/yocto/yocto/yocto-5.1.2/meta-mingw-77fe18d4f8ec34501045c5d92ce7e13b1bd129e9.tar.bz2
bitbake
Repository Location: https://git.openembedded.org/bitbake
Branch: 2.10
Tag: yocto-5.1.2
Git Revision: 1452e74cc4ddfaadc6537a049877a66cec253c8d
Release Artefact: bitbake-1452e74cc4ddfaadc6537a049877a66cec253c8d
sha: 26538d0b8ab907d962623707697bfc6826615239a724b1805e0c3acbd74fdcaa
Download Locations: https://downloads.yoctoproject.org/releases/yocto/yocto-5.1.2/bitbake-1452e74cc4ddfaadc6537a049877a66cec253c8d.tar.bz2 https://mirrors.kernel.org/yocto/yocto/yocto-5.1.2/bitbake-1452e74cc4ddfaadc6537a049877a66cec253c8d.tar.bz2
yocto-docs
Repository Location: https://git.yoctoproject.org/yocto-docs
Branch: styhead
Tag: yocto-5.1.2
Git Revision: 8ac3e2eb1dd4149b24af03666813dc6d94df466d
Release notes for Yocto-5.1.3 (Styhead)
Security Fixes in Yocto-5.1.3
go: Fix CVE-2024-45336, CVE-2024-45341 and CVE-2025-22866
linux-yocto/6.6: Fix CVE-2024-36476, CVE-2024-53179, CVE-2024-56582, CVE-2024-56703, CVE-2024-57801, CVE-2024-57802, CVE-2024-57841, CVE-2024-57882, CVE-2024-57887, CVE-2024-57890, CVE-2024-57892, CVE-2024-57895, CVE-2024-57896, CVE-2024-57900, CVE-2024-57901, CVE-2024-57902, CVE-2024-57906, CVE-2024-57907, CVE-2024-57908, CVE-2024-57910, CVE-2024-57911, CVE-2024-57912, CVE-2024-57913, CVE-2024-57916, CVE-2024-57922, CVE-2024-57925, CVE-2024-57926, CVE-2024-57933, CVE-2024-57938, CVE-2024-57939, CVE-2024-57940, CVE-2024-57949, CVE-2024-57951, CVE-2025-21631, CVE-2025-21636, CVE-2025-21637, CVE-2025-21638, CVE-2025-21639, CVE-2025-21640, CVE-2025-21642, CVE-2025-21652, CVE-2025-21658, CVE-2025-21665, CVE-2025-21666, CVE-2025-21667, CVE-2025-21669, CVE-2025-21670, CVE-2025-21671, CVE-2025-21673, CVE-2025-21674, CVE-2025-21675, CVE-2025-21676, CVE-2025-21680, CVE-2025-21681, CVE-2025-21683, CVE-2025-21684, CVE-2025-21687, CVE-2025-21689, CVE-2025-21690, CVE-2025-21692, CVE-2025-21694, CVE-2025-21697 and CVE-2025-21699
pyhton3: Fix CVE-2024-12254, CVE-2025-0938 and 3 other vulnerabilities (gh-80222, gh-119511 and gh-126108).
socat: Fix CVE-2024-54661
vim: Fix CVE-2025-22134 and CVE-2025-24014
Fixes in Yocto-5.1.3
bitbake: bblayers/query: Fix using “removeprefix” string method
bitbake: cooker: Make cooker ‘skiplist’ per-multiconfig/mc
bitbake: tests/fetch: Fix git shallow test failure with git >= 2.48
boost: fix do_fetch error
build-appliance-image: Update to styhead head revision
classes/nativesdk: also override TUNE_PKGARCH
classes/qemu: use tune to select QEMU_EXTRAOPTIONS, not package architecture
cmake: apply parallel build settings to ptest tasks
contributor-guide/submit-changes: add policy on AI generated code
cve-check: fix cvesInRecord
cve-check: restore
CVE_CHECK_SHOW_WARNINGSfunctionalitydev-manual/building: document the initramfs-framework recipe
devtool: ide-sdk recommend DEBUG_BUILD
devtool: ide-sdk remove the plugin from eSDK installer
devtool: ide-sdk sort cmake preset
devtool: modify support debug-builds
docs: Add favicon for the documentation html
docs: Fix typo in standards.md
docs: Update autobuilder URLs to valkyrie
enchant2: correct SRC_URI and other uris
go: upgrade to 1.22.12
libnsl2: set CVE_PRODUCT
libxml-parser-perl: correct SRC_URI
linux-yocto/6.6: update to v6.6.75
linux: Modify kernel configuration to fix runqlat issue
lrzsz: update SRC_URI to avoid redirect
migration-guides: add release notes for 4.0.24, 5.0.6, 5.0.7 and 5.1.2
oe-selftest: devtool ide-sdk use modify debug-build
oeqa/gitarchive: Fix syntax warning
poky.conf: bump version for 5.1.3
python3: upgrade 3.12.9
ref-manual/faq: add q&a on systemd as default
resulttool/store: Fix permissions of logarchive
rust-target-config: Fix TARGET_C_INT_WIDTH with correct size
scripts/install-buildtools: Update to 5.1.2
sdk-manual: extensible.rst: devtool ide-sdk improve
sdk-manual: extensible.rst: update devtool ide-sdk
systemd: set CVE_PRODUCT
test-manual/ptest: link to common framework ptest classes
test-manual/reproducible-builds: fix reproducible links
vim: Upgrade 9.1.1043
Known Issues in Yocto-5.1.3
N/A
Contributors to Yocto-5.1.3
Adrian Freihofer
Aleksandar Nikolic
Alexander Kanavin
Antonin Godard
Bruce Ashfield
Chris Laplante
Divya Chellam
Harish Sadineni
Jiaying Song
Joerg Schmidt
Lee Chee Yang
Mikko Rapeli
Peter Marko
Richard Purdie
Ross Burton
Simon A. Eugster
Steve Sakoman
Repositories / Downloads for Yocto-5.1.3
poky
Repository Location: https://git.yoctoproject.org/poky
Branch: styhead
Tag: yocto-5.1.3
Git Revision: 11a8dec6e29ac0b2fd942c0fc00dd7fc30658841
Release Artefact: poky-11a8dec6e29ac0b2fd942c0fc00dd7fc30658841
sha: 9ebcacaab53058fd97b06134e06b5883df3c7ddb25dae43a2f3809c4f65d24b5
Download Locations: https://downloads.yoctoproject.org/releases/yocto/yocto-5.1.3/poky-11a8dec6e29ac0b2fd942c0fc00dd7fc30658841.tar.bz2 https://mirrors.kernel.org/yocto/yocto/yocto-5.1.3/poky-11a8dec6e29ac0b2fd942c0fc00dd7fc30658841.tar.bz2
openembedded-core
Repository Location: https://git.openembedded.org/openembedded-core
Branch: styhead
Tag: yocto-5.1.3
Git Revision: 35ffa0ed523ba95f069dff5b7df3f819ef031015
Release Artefact: oecore-35ffa0ed523ba95f069dff5b7df3f819ef031015
sha: 67efedf0afa9ac9e4664f02923a4c5c2429f2f1be697e39f9cbffb9e3f2d9d2c
Download Locations: https://downloads.yoctoproject.org/releases/yocto/yocto-5.1.3/oecore-35ffa0ed523ba95f069dff5b7df3f819ef031015.tar.bz2 https://mirrors.kernel.org/yocto/yocto/yocto-5.1.3/oecore-35ffa0ed523ba95f069dff5b7df3f819ef031015.tar.bz2
meta-mingw
Repository Location: https://git.yoctoproject.org/meta-mingw
Branch: styhead
Tag: yocto-5.1.3
Git Revision: 77fe18d4f8ec34501045c5d92ce7e13b1bd129e9
Release Artefact: meta-mingw-77fe18d4f8ec34501045c5d92ce7e13b1bd129e9
sha: 4c7f8100a3675d9863e51825def3df5b263ffc81cd57bae26eedbc156d771534
Download Locations: https://downloads.yoctoproject.org/releases/yocto/yocto-5.1.3/meta-mingw-77fe18d4f8ec34501045c5d92ce7e13b1bd129e9.tar.bz2 https://mirrors.kernel.org/yocto/yocto/yocto-5.1.3/meta-mingw-77fe18d4f8ec34501045c5d92ce7e13b1bd129e9.tar.bz2
bitbake
Repository Location: https://git.openembedded.org/bitbake
Branch: 2.10
Tag: yocto-5.1.3
Git Revision: 58e5c70a0572ff5994dc181694e05cd5d3ddaf66
Release Artefact: bitbake-58e5c70a0572ff5994dc181694e05cd5d3ddaf66
sha: 8b1d8aa3de6ca8c520f1b528e342e06de0cff918a11d77862c499185a9ba8fec
Download Locations: https://downloads.yoctoproject.org/releases/yocto/yocto-5.1.3/bitbake-58e5c70a0572ff5994dc181694e05cd5d3ddaf66.tar.bz2 https://mirrors.kernel.org/yocto/yocto/yocto-5.1.3/bitbake-58e5c70a0572ff5994dc181694e05cd5d3ddaf66.tar.bz2
yocto-docs
Repository Location: https://git.yoctoproject.org/yocto-docs
Branch: styhead
Tag: yocto-5.1.3
Git Revision: fd9c744d6e73a5719e61a3c0063b1602ca386e91
Release notes for Yocto-5.1.4 (Styhead)
Security Fixes in Yocto-5.1.4
binutils: Fix CVE-2025-0840
grub: Fix CVE-2024-45774, CVE-2024-45775, CVE-2024-45776, CVE-2024-45777, CVE-2024-45778, CVE-2024-45779, CVE-2024-45780, CVE-2024-45781, CVE-2024-45782, CVE-2024-45783, CVE-2024-56737, CVE-2025-0622, CVE-2025-0624, CVE-2025-0677, CVE-2025-0678, CVE-2025-0684, CVE-2025-0685, CVE-2025-0686, CVE-2025-0689, CVE-2025-0690, CVE-2025-1118 and CVE-2025-1125
libtasn1: fix CVE-2024-12133
libxml2: fix CVE-2024-56171, CVE-2025-24928 and CVE-2025-27113
openssh: Fix CVE-2025-26465 and CVE-2025-26466
puzzles: Ignore CVE-2024-13769, CVE-2024-13770 and CVE-2025-0837
subversion: Ignore CVE-2024-45720
xserver-xorg: Fix CVE-2025-26594, CVE-2025-26595, CVE-2025-26596, CVE-2025-26597, CVE-2025-26598, CVE-2025-26599, CVE-2025-26600 and CVE-2025-26601
xwayland: Fix CVE-2025-26594, CVE-2025-26595, CVE-2025-26596, CVE-2025-26597, CVE-2025-26598, CVE-2025-26599, CVE-2025-26600 and CVE-2025-26601
Fixes in Yocto-5.1.4
bitbake: event/utils: Avoid deadlock from lock_timeout() and recursive events
bitbake: utils: Add signal blocking for lock_timeout
bitbake: utils: Print information about lock issue before exiting
bitbake: utils: Tweak lock_timeout logic
build-appliance-image: Update to styhead head revision
docs: Remove all mention of core-image-lsb
grub: backport strlcpy function
grub: drop obsolete CVE statuses
icu: Adjust ICU_DATA_DIR path on big endian targets
libtasn1: upgrade to 4.20.0
libxml2: upgrade to 2.13.6
migration-guides: add release notes for 4.0.25 and 5.1.3
poky.conf: bump version for 5.1.4
ref-manual: Add missing variable IMAGE_ROOTFS_MAXSIZE
ref-manual: don’t refer to poky-lsb
ref-manual: remove OE_IMPORTS
tzcode-native: Fix compiler setting from 2023d version
tzdata/tzcode-native: upgrade to 2025a
vulnerabilities/classes: remove references to cve-check text format
xserver-xf86-config: add a configuration fragment to disable screen blanking
xserver-xf86-config: remove obsolete configuration files
xserver-xorg: upgrade to 21.1.16
xwayland: upgrade to 21.1.6
Known Issues in Yocto-5.1.4
NA
Contributors to Yocto-5.1.4
Thanks to the following people who contributed to this release:
Alessio Cascone
Lee Chee Yang
Makarios Christakis
Marta Rybczynska
Peter Marko
Priyal Doshi
Richard Purdie
Ross Burton
Steve Sakoman
Vijay Anusuri
Wang Mingyu
Weisser, Pascal
Repositories / Downloads for Yocto-5.1.4
poky
Repository Location: https://git.yoctoproject.org/poky
Branch: styhead
Tag: yocto-5.1.4
Git Revision: 70dc28ac287bf35541270cae1d99130a0f6b7b5f
Release Artefact: poky-70dc28ac287bf35541270cae1d99130a0f6b7b5f
sha: 63f1d3d47a28bd9b41c89db6e1f2657c04233a00d10210795e766c0bc265d766
Download Locations: https://downloads.yoctoproject.org/releases/yocto/yocto-5.1.4/poky-70dc28ac287bf35541270cae1d99130a0f6b7b5f.tar.bz2 https://mirrors.kernel.org/yocto/yocto/yocto-5.1.4/poky-70dc28ac287bf35541270cae1d99130a0f6b7b5f.tar.bz2
openembedded-core
Repository Location: https://git.openembedded.org/openembedded-core
Branch: styhead
Tag: yocto-5.1.4
Git Revision: 2d94f4b8a852dc761f89e5106347e239382df5fb
Release Artefact: oecore-2d94f4b8a852dc761f89e5106347e239382df5fb
sha: 344ac23f814c049d69b06cee42c43b7b422506ce84397406caef09becb2555bf
Download Locations: https://downloads.yoctoproject.org/releases/yocto/yocto-5.1.4/oecore-2d94f4b8a852dc761f89e5106347e239382df5fb.tar.bz2 https://mirrors.kernel.org/yocto/yocto/yocto-5.1.4/oecore-2d94f4b8a852dc761f89e5106347e239382df5fb.tar.bz2
meta-mingw
Repository Location: https://git.yoctoproject.org/meta-mingw
Branch: styhead
Tag: yocto-5.1.4
Git Revision: 77fe18d4f8ec34501045c5d92ce7e13b1bd129e9
Release Artefact: meta-mingw-77fe18d4f8ec34501045c5d92ce7e13b1bd129e9
sha: 4c7f8100a3675d9863e51825def3df5b263ffc81cd57bae26eedbc156d771534
Download Locations: https://downloads.yoctoproject.org/releases/yocto/yocto-5.1.4/meta-mingw-77fe18d4f8ec34501045c5d92ce7e13b1bd129e9.tar.bz2 https://mirrors.kernel.org/yocto/yocto/yocto-5.1.4/meta-mingw-77fe18d4f8ec34501045c5d92ce7e13b1bd129e9.tar.bz2
bitbake
Repository Location: https://git.openembedded.org/bitbake
Branch: 2.10
Tag: yocto-5.1.4
Git Revision: 82b9f42126983579da03bdbb4e3ebf07346118a7
Release Artefact: bitbake-82b9f42126983579da03bdbb4e3ebf07346118a7
sha: 209d62c5262f2287af60e7fe2343c29ab25b5088de4da71de89016e75900285a
Download Locations: https://downloads.yoctoproject.org/releases/yocto/yocto-5.1.4/bitbake-82b9f42126983579da03bdbb4e3ebf07346118a7.tar.bz2 https://mirrors.kernel.org/yocto/yocto/yocto-5.1.4/bitbake-82b9f42126983579da03bdbb4e3ebf07346118a7.tar.bz2
yocto-docs
Repository Location: https://git.yoctoproject.org/yocto-docs
Branch: styhead
Tag: yocto-5.1.4
Git Revision: f0324b8f14881227336f84325cdebd0518e17796
Release 5.0 (scarthgap)
Release 5.0 LTS (scarthgap)
Migration notes for 5.0 (scarthgap)
This section provides migration information for moving to the Yocto Project 5.0 Release (codename “scarthgap”) from the prior release.
To migrate from an earlier LTS release, you also need to check all the previous migration notes from your release to this new one:
Supported kernel versions
The OLDEST_KERNEL setting is still “5.15” in this release, meaning that out the box, older kernels are not supported. See 4.3 migration notes for details.
Supported distributions
Compared to the previous releases, running BitBake is supported on new GNU/Linux distributions:
Rocky 9
On the other hand, some earlier distributions are no longer supported:
Fedora 37
Ubuntu 22.10
OpenSUSE Leap 15.3
Go language changes
The linkmode flag was dropped from GO_LDFLAGS for nativesdk and
cross-canadian. Also, dynamic linking was disabled for the whole set of
(previously) supported architectures in the goarch class.
systemd changes
Systemd’s nss-resolve plugin is now supported and can be added via the
nss-resolve PACKAGECONFIG option , which is from now on required
(along with resolved) by the systemd-resolved feature. Related to that
(i.e., Systemd’s network name resolution), an option to use stub-resolv.conf
was added as well.
Recipe changes
Runtime testing of ptest now fails if no test results are returned by any given ptest.
Deprecated variables
CVE_CHECK_IGNOREshould be replaced with CVE_STATUS
Removed variables
The following variables have been removed:
DEPLOY_DIR_TAR: no longer needed since the package_tar class was removed in 4.2.PYTHON_PN: Python 2 has previously been removed, leaving Python 3 as the sole major version. Therefore, this abstraction to differentiate both versions is no longer needed.oldincludedirUSE_L10N: previously deprecated, and now removed.CVE_SOCKET_TIMEOUTSERIAL_CONSOLES_CHECK- use SERIAL_CONSOLES instead as all consoles specified in the latter are checked for their existence before agettyis started.
Removed recipes
The following recipes have been removed in this release:
libcroco: deprecated and archived by the Gnome Project.liberror-perl: unmaintained and no longer needed - moved to meta-perl.linux-yocto: version 6.1 (version 6.6 provided instead).systemtap-uprobes: obsolete.zvariant: fails to build with newer Rust.
Removed classes
No classes have been removed in this release.
QEMU changes
In tune-core2, the cpu models n270 and core2duo are no longer
passed to QEMU, since its documentation recommends not using them with -cpu
option. Therefore, from now on, Nehalem model is used instead.
ipk packaging changes
ipk packaging (using opkg) now uses zstd compression instead of xz
for better compression and performance. This does mean that .ipk packages
built using the 5.0 release requires Opkg built with zstd enabled — naturally
this is the case in 5.0, but at least by default these packages will not be
usable on older systems where Opkg does not have zstd enabled at build time.
Additionally, the internal dependency solver in Opkg is now deprecated — it
is still available in this release but will trigger a warning if selected.
The default has been the external libsolv solver for some time, but if you
have explicitly removed that from PACKAGECONFIG for Opkg to
select the internal solver, you should plan to switch to libsolv in the
near future (by including libsolv your custom PACKAGECONFIG value
for Opkg, or reverting to the default value).
motd message when using DISTRO = "poky"
The default poky DISTRO is explicitly a reference distribution
for testing and development purposes. It enables most hardware and software
features so that they can be tested, but this also means that
from a security point of view the attack surface is very large.
We encourage anyone using the Yocto Project for production use to create
their own distribution and not use Poky. To encourage this behaviour
further, in 5.0 a warning has been added to /etc/motd when Poky is used
so that the developer will see it when they log in. If you are creating your
own distribution this message will not show up.
For information on how to create your own distribution, see “Creating Your Own Distribution”.
Miscellaneous changes
bitbake-whatchangedscript was removed as it was broken and unmaintained.scripts/sstate-cache-management.shhas been replaced byscripts/sstate-cache-management.py, a more performant Python-based version.The
bmap-toolsrecipe has been renamed tobmaptool.gpgmehas had Python binding support disabled since upstream does not support Python 3.12 yet. This will be fixed in future once it is fixed upstream.)A warning will now be shown if the
virtual/prefix is used in runtime contexts (RDEPENDS / RPROVIDES) — See virtual-slash for details.recipetoolnow prefixes the names of recipes created for Python modules withpython3-.The
cve-checkclass no longer produces a warning for remote patches — it only logs a note and does not try to fetch the patch in order to scan it for issues or CVE numbers. However, CVE number references in remote patch file names will now be picked up.The values of PE and PR have been dropped from
-f{file,macro,debug}-prefix-map, in order to avoid unnecessary churn in debugging symbol paths when the version is bumped. This is unlikely to cause issues, but if you are paying attention to the debugging source path (e.g. in recipes that need to manipulate these files during packaging) then you will notice the difference. A new TARGET_DBGSRC_DIR variable is provided to make this easier.ccacheno longer supports FORTRAN.
Release notes for 5.0 (scarthgap)
New Features / Enhancements in 5.0
Linux kernel 6.6, gcc 13.2, glibc 2.39, LLVM 18.1, and over 300 other recipe upgrades
New variables:
CVE_DB_INCR_UPDATE_AGE_THRES: Configure the maximum age of the internal CVE database for incremental update (instead of a full redownload).RPMBUILD_EXTRA_PARAMS: support extra user-defined fields without crashing the RPM package creation.
OPKG_MAKE_INDEX_EXTRA_PARAMS: support extra parameters for
opkg-make-index.EFI_UKI_PATH, EFI_UKI_DIR: define the location of UKI image in the EFI System partition.
TARGET_DBGSRC_DIR: specifies the target path to debug source files
USERADD_DEPENDS: provides a way to declare dependencies on the users and/or groups created by other recipes, resolving a long-standing build ordering issue
Architecture-specific enhancements:
genericarm64: a new MACHINE to represent a 64-bit General Arm SystemReady platform.Add Power8 tune to PowerPC architecture.
arch-armv9: remove CRC and SVE tunes, since FEAT_CRC32 is now mandatory and SVE/SVE2 are enabled by default in GCC’s-march=armv9-a.arm/armv*: add all of the additional Arm tunes in GCC 13.2.0
Kernel-related enhancements:
The default kernel is the current LTS (6.6).
Add support for
genericarm64.
New core recipes:
bmaptool: a tool for creating block maps for files and flashing images, being now under the Yocto Project umbrella.
core-image-initramfs-boot: a minimal initramfs image, containing justudevandinit, designed to find the main root filesystem and pivot to it.lzlib: a data compression library that provides LZMA compression and decompression functions.
lzop: a compression utility based on the LZO library, that was brought back after a (now reverted) removal.
python3-jsonschema-specifications: support files for JSON Schema Specifications (meta-schemas and vocabularies), added as a new dependency of
python3-jsonschema.python3-maturin: a project that allows building and publishing Rust crates as Python packages.
python3-meson-python: a Python build backend that enables the Meson build-system for Python packages.
python3-pyproject-metadata: a class to handle PEP 621 metadata, and a dependency for
python3-meson-python.python3-referencing: another dependency of
python3-jsonschema, it provides an implementation of JSON reference resolution.python3-rpds-py: Python bindings to the Rust rpds crate, and a runtime dependency for
python3-referencing.python3-sphinxcontrib-jquery: a Sphinx extension to include jQuery on newer Sphinx releases. Recent versions of
python3-sphinx-rtd-themedepend on it.python3-websockets: a library for building WebSocket servers and clients in Python.
python3-yamllint: a linter for YAML files. In U-Boot, the
binmantool uses this linter to verify the configurations at compile time.systemd-boot-native: a UEFI boot manager, this time built as native to provide theukifytool.utfcpp: a C++ library to handle UTF-8 encoded strings. It was added as a dependency for
taglibafter its upgrade to v2.0.vulkan-utility-libraries: a set of libraries to share code across various Vulkan repositories.
vulkan-volk: a meta-loader for Vulkan, needed to support building the latest
vulkan-tools.
QEMU /
runqemuenhancements:QEMU has been upgraded to version 8.2.1
qemuboot: support predictable network interface names.runqemu: match “.rootfs.” in addition to “-image-” for the root filesystem.cmake-qemu: a new class allowing to execute cross-compiled binaries using QEMU user-mode emulation.
Rust improvements:
Rust has been upgraded to version 1.75
The Rust profiler (i.e., PGO - Profile-Guided Optimization) options were enabled back.
The Rust
oe-selftestwere enabled, except formips32whose tests are skipped.rust-cross-canadian: addedriscv64to cross-canadian hosts.
wic Image Creator enhancements:
Allow the imager’s output file extension to match the imager’s name, instead of hardcoding it to
direct(i.e., the default imager)For GPT-based disks, add reproducible Disk GUID generation
Allow generating reproducible ext4 images
Add feature to fill a specific range of a partition with zeros
bootimg-efi: addinstall-kernel-into-boot-dirparameter to configure kernel installation point(s) (i.e., rootfs and/or boot partition)rawcopy: add support for zstd decompression
SDK-related improvements:
nativesdk: let MACHINE_FEATURES be set bymachine-sdkconfiguration files.nativesdk: prevent MACHINE_FEATURES and DISTRO_FEATURES from being backfilled.Support for
riscv64as an SDK host architectureExtend recipes to
nativesdk:acpica,libpcap,python3-setuptools-rust
Testing:
Move patchtest to the core (as
scripts/patchtest, test cases undermeta/lib/patchtest/tests) and make a number of improvements to enable it to validate patches submitted on the mailing list again. Additionally, make it work with the original upstream version of Patchwork.Add an optional
unimplemented-ptestQA warning to detect upstream packages with tests, that do not use ptest.testimage: retrieve the ptests directory, especially for the logs, upon ptest failure.oeqa,oe-selftest: add test cases for Maturin (SDK and runtime).Proof-of-concept of screenshot-based runtime UI test (
meta/lib/oeqa/runtime/cases/login.py)Enable ptests for
python3-attrs,python3-pyyaml,xz
Utility script changes:
oe-init-build-envcan generate a initial configuration (.vscode) for VSCode and its “Yocto Project BitBake” extension.The
sstate-cache-managementscript has been rewritten in python for better performance and maintainabilitybitbake-layers: added an option to update the reference of repositories in layer setup
BitBake improvements:
New
inherit_deferstatement which works as inherit does, except that it is only evaluated at the end of parsing — recommended where a conditional expression is used, e.g.:inherit_defer ${@bb.utils.contains('PACKAGECONFIG', 'python', 'python3targetconfig', '', d)}This allows conditional expressions to be evaluated ‘late’ meaning changes to the variable after the line is parsed will take effect - with inherit this is not the case.
Add support for BB_LOADFACTOR_MAX, so Bitbake can stop running extra tasks if the system load is too high, especially in distributions where
/proc/pressureis disabled.taskexp_ncurses: add ncurses version oftaskexp, the dependency explorer originally implemented with GTK.Improve
runqueueperformance by adding a cache mechanism inbuild_taskdepdata.bitbake.conf: addruntimedirto represent the path to the runtime state directory (i.e.,/run).Allow to disable colored text output through the
NO_COLORenvironment variable.git-make-shallowscript: add support for Git’ssafe.bareRepository=explicitconfiguration setting.Hash equivalence gained a number of scalability improvements including:
Support for a wide range of database backends through SQLAlchemy
Support for hash equivalence server and client to communicate over websockets
Support for per-user permissions in the hashserver, and on the client side specifying credentials via the environment or
.netrcAdd garbage collection to remove unused unihashes from the database.
devtool improvements:
Introduce a new
ide-sdkplugin to generate a configuration to use the eSDK through an IDE.Add
--no-pypioption for Python projects that are not hosted on PyPI.Add support for Git submodules.
ide:vscode: generate files from recipe sysroots and debug the root filesystem in read-only mode to avoid confusion.modify: add support for multiple sources in SRC_URI.Support plugins within plugins.
recipetool improvements:
appendsrcfile(s): add a mode to update the recipe itself.appendsrcfile(s): add--dry-runmode.create: add handler to create Go recipes.create: improve identification of licenses.create: add support for modern Python PEP-517 build systems including hatchling, maturin, meson-python.create: add PyPi support.create: prefix created Python recipes withpython3-.
Packaging changes:
package_rpm: the RPM package compressor’s mode can now be overriden.ipk packaging (using
opkg) now useszstdcompression instead ofxzfor better compression and performance.
Security improvements:
Improve incremental CVE database download from NVD. Rejected CVEs are removed, configuration is kept up-to-date. The age threshold for incremental update can be configured with
CVE_DB_INCR_UPDATE_AGE_THRESvariable.
Toaster Web UI improvements:
Numerous bugfixes, and additional input validation
Add pytest support and add/update test cases
Prominent documentation updates:
Documentation for using the new
devtool ide-sdkcommand and features. See Using devtool in Your SDK Workflow for details.New “Variable Context” section in the BitBake User Manual.
New
make stylecheckcommand to run Vale, to perform text style checks and comply with text writing standards in the industry.New
make sphinx-lintcommand to run sphinx-lint. After customization, this will allow us to enforce Sphinx syntax style choices.
Miscellaneous changes:
Systemd’s following PACKAGECONFIG options were added:
cryptsetup-plugins,no-ntp-fallback, andp11kit.New PACKAGECONFIG options added to
libarchive,libinput,libunwind,mesa,mesa-gl,openssh,perf,python3-pyyaml,qemu,rpm,shadow,strace,syslinux,systemd,vte,webkitgtk,xserver-xorg.systemd-bootcan, from now on, be compiled asnative, thus providingukifytool to build UKI images.systemd: split bash completion for
udevadmin a newudev-bash-completionpackage.The go-vendor class was added to support offline builds (i.e., vendoring). It can also handle modules from the same repository, taking into account their versions.
Disable strace support of bluetooth by default.
opensshnow has a systemd service:sshd.service.The python_mesonpy class was added (moved in from
meta-python) to support Python package builds using the meson-python PEP-517 build backend.Support for unpacking
.7zarchives in SRC_URI usingp7zip.Add minimal VS Code configuration to avoid VS Code’s indexer from choking on build directories.
Known Issues in 5.0
gpgmehas had Python binding support disabled since upstream does not yet support Python 3.12.
Recipe License changes in 5.0
The following corrections have been made to the LICENSE values set by recipes:
elfutils: split license for libraries & backend and utilities.ghostscript: correct LICENSE toAGPL-3.0-or-later.kbd: update license for consolefont and keymaps.libsystemd: set its own LICENSE value (LGPL-2.1-or-later) to add more granularity.libtest-warnings-perl: update LICENSEArtistic-1.0toArtistic-1.0-Perl.linux-firmware: set package LICENSE appropriately forcarl9170,rockchipandpowerpr.newlib: add licenseApache-2.0-with-LLVM-exception.python3-poetry-core: add licenseBSD-3-Clauseforfastjsonschema.systemd: make the scope ofLGPLmore accurate (LGPL-2.1->LGPL-2.1-or-later).util-linux: addGPL-1.0-or-laterlicense for fdisk andMITlicense forflock.zstd: set to dual-licensedBSD-3-ClauseorGPL-2.0-only.
Security Fixes in 5.0
avahi: CVE-2023-1981, CVE-2023-38469, CVE-2023-38470, CVE-2023-38471, CVE-2023-38469, CVE-2023-38470, CVE-2023-38471, CVE-2023-38472, CVE-2023-38473
bind: CVE-2023-4408, CVE-2023-5517, CVE-2023-5679, CVE-2023-50387
bluez5: CVE-2023-45866
coreutils: CVE-2024-0684
cups: CVE-2023-4504
curl: CVE-2023-46218
expat: CVE-2024-28757
gcc: CVE-2023-4039
glibc: CVE-2023-5156, CVE-2023-0687
gnutls: CVE-2024-0553, CVE-2024-0567, CVE-2024-28834, CVE-2024-28835
go: CVE-2023-45288
grub: CVE-2023-4692, CVE-2023-4693
grub2: CVE-2023-4001 (ignored), CVE-2024-1048 (ignored)
libgit2: CVE-2024-24575, CVE-2024-24577
libsndfile1: CVE-2022-33065
libssh2: CVE-2023-48795
libuv: CVE-2024-24806
libxml2: CVE-2023-45322 (ignored)
linux-yocto/6.6: CVE-2020-16119
openssh: CVE-2023-48795, CVE-2023-51384, CVE-2023-51385
openssl: CVE-2023-5363, CVE-2023-5678, CVE-2023-6129, CVE-2023-6237, CVE-2024-0727, CVE-2024-2511
perl: CVE-2023-47100
pixman: CVE-2023-37769 (ignored)
python3-cryptography{-vectors}: CVE-2023-49083, CVE-2024-26130
python3-urllib3: CVE-2023-45803
shadow: CVE-2023-4641
sudo: CVE-2023-42456
tiff: CVE-2023-6228, CVE-2023-6277, CVE-2023-52355, CVE-2023-52356
vim: CVE-2023-46246, CVE-2023-48231, CVE-2023-48232, CVE-2023-48233, CVE-2023-48234, CVE-2023-48235, CVE-2023-48236, CVE-2023-48237, CVE-2024-22667
wpa-supplicant: CVE-2023-52160
xserver-xorg: CVE-2023-5574, CVE-2023-6816, CVE-2024-0229, CVE-2024-0408, CVE-2024-0409, CVE-2024-21885, CVE-2024-21886
xwayland: CVE-2023-5367, CVE-2024-0408, CVE-2024-0409, CVE-2023-6816, CVE-2024-0229, CVE-2024-21885, CVE-2024-21886
zlib: CVE-2023-45853 (ignored), CVE-2023-6992 (ignored)
Recipe Upgrades in 5.0
acl 2.3.1 -> 2.3.2
acpica 20230628 -> 20240322
alsa-lib 1.2.10 -> 1.2.11
alsa-tools 1.2.5 -> 1.2.11
alsa-ucm-conf 1.2.10 -> 1.2.11
alsa-utils 1.2.10 -> 1.2.11
appstream 0.16.3 -> 1.0.2
autoconf 2.72c -> 2.72e
bash 5.2.15 -> 5.2.21
bash-completion 2.11 -> 2.12.0
binutils 2.41 -> 2.42
bluez5 5.69 -> 5.72
boost 1.83.0 -> 1.84.0
boost-build-native 1.83.0 -> 1.84.0
btrfs-tools 6.5.1 -> 6.7.1
cairo 1.16.0 -> 1.18.0
cargo 1.70.0 -> 1.75.0
cargo-c-native 0.9.18 -> 0.9.30+cargo-0.77.0
ccache 4.8.3 -> 4.9.1
cmake 3.27.7 -> 3.28.3
cmake-native 3.27.7 -> 3.28.3
createrepo-c 1.0.0 -> 1.0.4
cronie 1.6.1 -> 1.7.1
cross-localedef-native 2.38+git -> 2.39+git
cups 2.4.6 -> 2.4.7
curl 8.4.0 -> 8.7.1
dbus-wait 0.1+git (6cc6077a36fe…) -> 0.1+git (64bc7c8fae61…)
debianutils 5.13 -> 5.16
desktop-file-utils 0.26 -> 0.27
dhcpcd 10.0.2 -> 10.0.6
diffoscope 249 -> 259
diffstat 1.65 -> 1.66
dnf 4.17.0 -> 4.19.0
dos2unix 7.5.1 -> 7.5.2
ed 1.19 -> 1.20.1
efivar 38+39+git -> 39+39+git
elfutils 0.189 -> 0.191
ell 0.60 -> 0.63
enchant2 2.6.2 -> 2.6.7
epiphany 44.6 -> 46.0
erofs-utils 1.6 -> 1.7.1
ethtool 6.5 -> 6.7
eudev 3.2.12 -> 3.2.14
expat 2.5.0 -> 2.6.2
ffmpeg 6.0 -> 6.1.1
fontconfig 2.14.2 -> 2.15.0
gawk 5.2.2 -> 5.3.0
gcr 4.1.0 -> 4.2.0
gdb 13.2 -> 14.2
gettext 0.22 -> 0.22.5
gettext-minimal-native 0.22 -> 0.22.5
gi-docgen 2023.1 -> 2023.3
git 2.42.0 -> 2.44.0
glib-2.0 2.78.3 -> 2.78.4
glib-networking 2.76.1 -> 2.78.1
glibc 2.38+git -> 2.39+git
glibc-locale 2.38 -> 2.39+git
glibc-mtrace 2.38 -> 2.39+git
glibc-scripts 2.38 -> 2.39+git
glibc-testsuite 2.38+git -> 2.39+git
glibc-y2038-tests 2.38+git -> 2.39+git
glslang 1.3.261.1 -> 1.3.275.0
gnu-config 20230216+git -> 20240101+git
gnupg 2.4.3 -> 2.4.4
gnutls 3.8.3 -> 3.8.4
go 1.20.12 -> 1.22.2
go-binary-native 1.20.12 -> 1.22.2
go-native 1.20.12 -> 1.22.2
go-runtime 1.20.12 -> 1.22.2
gpgme 1.22.0 -> 1.23.2
grub 2.06 -> 2.12
grub-efi 2.06 -> 2.12
gsettings-desktop-schemas 44.0 -> 46.0
gst-devtools 1.22.9 -> 1.22.11
gstreamer1.0 1.22.9 -> 1.22.11
gstreamer1.0-libav 1.22.9 -> 1.22.11
gstreamer1.0-omx 1.22.9 -> 1.22.11
gstreamer1.0-plugins-bad 1.22.9 -> 1.22.11
gstreamer1.0-plugins-base 1.22.9 -> 1.22.11
gstreamer1.0-plugins-good 1.22.9 -> 1.22.11
gstreamer1.0-plugins-ugly 1.22.9 -> 1.22.11
gstreamer1.0-python 1.22.9 -> 1.22.11
gstreamer1.0-rtsp-server 1.22.9 -> 1.22.11
gstreamer1.0-vaapi 1.22.9 -> 1.22.11
gtk+3 3.24.38 -> 3.24.41
gtk4 4.12.3 -> 4.14.1
harfbuzz 8.2.2 -> 8.3.0
hwlatdetect 2.5 -> 2.6
icu 73-2 -> 74-1
inetutils 2.4 -> 2.5
init-system-helpers 1.65.2 -> 1.66
iproute2 6.5.0 -> 6.7.0
iptables 1.8.9 -> 1.8.10
iputils 20221126 -> 20240117
iso-codes 4.15.0 -> 4.16.0
iw 5.19 -> 6.7
json-glib 1.6.6 -> 1.8.0
kbd 2.6.3 -> 2.6.4
kexec-tools 2.0.27 -> 2.0.28
kmod 30 -> 31
kmscube git -> 0.0.1+git
libadwaita 1.4.2 -> 1.5.0
libbsd 0.11.7 -> 0.12.1
libcap-ng 0.8.3 -> 0.8.4
libcap-ng-python 0.8.3 -> 0.8.4
libcomps 0.1.19 -> 0.1.20
libdnf 0.71.0 -> 0.73.0
libdrm 2.4.116 -> 2.4.120
libffi 3.4.4 -> 3.4.6
libgit2 1.7.1 -> 1.7.2
libgloss 4.3.0+git -> 4.4.0+git
libgpg-error 1.47 -> 1.48
libhandy 1.8.2 -> 1.8.3
libical 3.0.16 -> 3.0.17
libidn2 2.3.4 -> 2.3.7
libinput 1.24.0 -> 1.25.0
libksba 1.6.4 -> 1.6.6
libmicrohttpd 0.9.77 -> 1.0.1
libnl 3.8.0 -> 3.9.0
libnotify 0.8.2 -> 0.8.3
libpciaccess 0.17 -> 0.18
libpcre2 10.42 -> 10.43
libpng 1.6.40 -> 1.6.42
libproxy 0.5.3 -> 0.5.4
libpsl 0.21.2 -> 0.21.5
librepo 1.16.0 -> 1.17.0
librsvg 2.56.3 -> 2.57.1
libsdl2 2.28.4 -> 2.30.0
libseccomp 2.5.4 -> 2.5.5
libsecret 0.21.1 -> 0.21.4
libsolv 0.7.26 -> 0.7.28
libsoup 3.4.2 -> 3.4.4
libstd-rs 1.70.0 -> 1.75.0
libtest-warnings-perl 0.031 -> 0.033
libtirpc 1.3.3 -> 1.3.4
libubootenv 0.3.4 -> 0.3.5
libunistring 1.1 -> 1.2
liburi-perl 5.21 -> 5.27
libusb1 1.0.26 -> 1.0.27
libuv 1.46.0 -> 1.48.0
libva 2.19.0 -> 2.20.0
libva-initial 2.19.0 -> 2.20.0
libwpe 1.14.1 -> 1.14.2
libxext 1.3.5 -> 1.3.6
libxkbcommon 1.5.0 -> 1.6.0
libxkbfile 1.1.2 -> 1.1.3
libxml-parser-perl 2.46 -> 2.47
libxml2 2.11.7 -> 2.12.5
libxmlb 0.3.14 -> 0.3.15
libxrandr 1.5.3 -> 1.5.4
libxvmc 1.0.13 -> 1.0.14
lighttpd 1.4.71 -> 1.4.74
linux-firmware 20240220 -> 20240312
linux-libc-headers 6.5 -> 6.6
linux-yocto 6.1.78+git, 6.5.13+git -> 6.6.23+git
linux-yocto-dev 6.6+git -> 6.9+git
linux-yocto-rt 6.1.78+git, 6.5.13+git -> 6.6.23+git
linux-yocto-tiny 6.1.78+git, 6.5.13+git -> 6.6.23+git
llvm 17.0.3 -> 18.1.3
lsof 4.98.0 -> 4.99.3
ltp 20230516 -> 20240129
lttng-modules 2.13.10 -> 2.13.12
lttng-ust 2.13.6 -> 2.13.7
lzip 1.23 -> 1.24
makedepend 1.0.8 -> 1.0.9
man-db 2.11.2 -> 2.12.0
man-pages 6.05.01 -> 6.06
mc 4.8.30 -> 4.8.31
mesa 23.2.1 -> 24.0.2
mesa-gl 23.2.1 -> 24.0.2
meson 1.2.2 -> 1.3.1
minicom 2.8 -> 2.9
mmc-utils 0.1+git (613495ecaca9…) -> 0.1+git (b5ca140312d2…)
mpg123 1.31.3 -> 1.32.5
newlib 4.3.0+git -> 4.4.0+git
nghttp2 1.57.0 -> 1.61.0
numactl 2.0.16 -> 2.0.18
ofono 2.1 -> 2.4
opensbi 1.2 -> 1.4
openssh 9.5p1 -> 9.6p1
openssl 3.1.5 -> 3.2.1
opkg 0.6.2 -> 0.6.3
opkg-utils 0.6.2 -> 0.6.3
orc 0.4.34 -> 0.4.38
ovmf edk2-stable202308 -> edk2-stable202402
p11-kit 0.25.0 -> 0.25.3
pango 1.51.0 -> 1.52.0
pciutils 3.10.0 -> 3.11.1
piglit 1.0+gitr (71c21b1157c4…) -> 1.0+gitr (22eaf6a91cfd…)
pkgconf 2.0.3 -> 2.1.1
psplash 0.1+git (44afb7506d43…) -> 0.1+git (ecc191375669…)
ptest-runner 2.4.2+git -> 2.4.3+git
pulseaudio 16.1 -> 17.0
puzzles 0.0+git (2d9e414ee316…) -> 0.0+git (80aac3104096…)
python3 3.11.5 -> 3.12.3
python3-alabaster 0.7.13 -> 0.7.16
python3-attrs 23.1.0 -> 23.2.0
python3-babel 2.12.1 -> 2.14.0
python3-bcrypt 4.0.1 -> 4.1.2
python3-beartype 0.15.0 -> 0.17.2
python3-build 1.0.3 -> 1.1.1
python3-certifi 2023.7.22 -> 2024.2.2
python3-cffi 1.15.1 -> 1.16.0
python3-cryptography 41.0.4 -> 42.0.5
python3-cryptography-vectors 41.0.4 -> 42.0.5
python3-cython 0.29.36 -> 3.0.8
python3-dbusmock 0.29.1 -> 0.31.1
python3-dtschema 2023.7 -> 2024.2
python3-git 3.1.36 -> 3.1.42
python3-gitdb 4.0.10 -> 4.0.11
python3-hatch-fancy-pypi-readme 23.1.0 -> 24.1.0
python3-hatch-vcs 0.3.0 -> 0.4.0
python3-hatchling 1.18.0 -> 1.21.1
python3-hypothesis 6.86.2 -> 6.98.15
python3-idna 3.4 -> 3.6
python3-importlib-metadata 6.8.0 -> 7.0.1
python3-iso8601 2.0.0 -> 2.1.0
python3-jsonschema 4.17.3 -> 4.21.1
python3-license-expression 30.1.1 -> 30.2.0
python3-lxml 4.9.3 -> 5.0.0
python3-mako 1.2.4 -> 1.3.2
python3-markdown 3.4.4 -> 3.5.2
python3-markupsafe 2.1.3 -> 2.1.5
python3-more-itertools 10.1.0 -> 10.2.0
python3-numpy 1.26.0 -> 1.26.4
python3-packaging 23.1 -> 23.2
python3-pathspec 0.11.2 -> 0.12.1
python3-pbr 5.11.1 -> 6.0.0
python3-pip 23.2.1 -> 24.0
python3-pluggy 1.3.0 -> 1.4.0
python3-poetry-core 1.7.0 -> 1.9.0
python3-psutil 5.9.5 -> 5.9.8
python3-pyasn1 0.5.0 -> 0.5.1
python3-pycairo 1.24.0 -> 1.26.0
python3-pycryptodome 3.19.0 -> 3.20.0
python3-pycryptodomex 3.19.0 -> 3.20.0
python3-pygments 2.16.1 -> 2.17.2
python3-pyopenssl 23.2.0 -> 24.0.0
python3-pyrsistent 0.19.3 -> 0.20.0
python3-pytest 7.4.2 -> 8.0.2
python3-pytest-runner 6.0.0 -> 6.0.1
python3-pytz 2023.3 -> 2024.1
python3-ruamel-yaml 0.17.32 -> 0.18.6
python3-scons 4.5.2 -> 4.6.0
python3-setuptools 68.2.2 -> 69.1.1
python3-setuptools-rust 1.7.0 -> 1.9.0
python3-setuptools-scm 7.1.0 -> 8.0.4
python3-spdx-tools 0.8.1 -> 0.8.2
python3-sphinx-rtd-theme 1.3.0 -> 2.0.0
python3-sphinxcontrib-applehelp 1.0.4 -> 1.0.8
python3-sphinxcontrib-devhelp 1.0.2 -> 1.0.6
python3-sphinxcontrib-htmlhelp 2.0.1 -> 2.0.5
python3-sphinxcontrib-qthelp 1.0.3 -> 1.0.7
python3-sphinxcontrib-serializinghtml 1.1.5 -> 1.1.10
python3-subunit 1.4.2 -> 1.4.4
python3-testtools 2.6.0 -> 2.7.1
python3-trove-classifiers 2023.9.19 -> 2024.2.23
python3-typing-extensions 4.8.0 -> 4.10.0
python3-unittest-automake-output 0.1 -> 0.2
python3-urllib3 2.0.7 -> 2.2.1
python3-wcwidth 0.2.6 -> 0.2.13
python3-wheel 0.41.2 -> 0.42.0
qemu 8.1.4 -> 8.2.1
qemu-native 8.1.4 -> 8.2.1
qemu-system-native 8.1.4 -> 8.2.1
repo 2.36.1 -> 2.42
resolvconf 1.91 -> 1.92
rpm 4.18.1 -> 4.19.1
rt-tests 2.5 -> 2.6
rust 1.70.0 -> 1.75.0
rust-cross-canadian 1.70.0 -> 1.75.0
rust-llvm 1.70.0 -> 1.75.0
shaderc 2023.6 -> 2023.8
shadow 4.13 -> 4.14.2
shared-mime-info 2.2 -> 2.4
socat 1.7.4.4 -> 1.8.0.0
spirv-headers 1.3.261.1 -> 1.3.275.0
spirv-tools 1.3.261.1 -> 1.3.275.0
sqlite3 3.43.2 -> 3.45.1
strace 6.5 -> 6.7
stress-ng 0.16.05 -> 0.17.05
subversion 1.14.2 -> 1.14.3
swig 4.1.1 -> 4.2.1
sysstat 12.7.4 -> 12.7.5
systemd 254.4 -> 255.4
systemd-boot 254.4 -> 255.4
systemd-bootchart 234 -> 235
systemtap 4.9 -> 5.0
systemtap-native 4.9 -> 5.0
taglib 1.13.1 -> 2.0
ttyrun 2.29.0 -> 2.31.0
u-boot 2023.10 -> 2024.01
u-boot-tools 2023.10 -> 2024.01
update-rc.d 0.8 (8636cf478d42…) -> 0.8 (b8f950105010…)
usbutils 015 -> 017
util-linux 2.39.2 -> 2.39.3
util-linux-libuuid 2.39.2 -> 2.39.3
vala 0.56.13 -> 0.56.15
valgrind 3.21.0 -> 3.22.0
vim 9.0.2190 -> 9.1.0114
vim-tiny 9.0.2190 -> 9.1.0114
virglrenderer 0.10.4 -> 1.0.1
vte 0.72.2 -> 0.74.2
vulkan-headers 1.3.261.1 -> 1.3.275.0
vulkan-loader 1.3.261.1 -> 1.3.275.0
vulkan-tools 1.3.261.1 -> 1.3.275.0
vulkan-validation-layers 1.3.261.1 -> 1.3.275.0
wayland-protocols 1.32 -> 1.33
webkitgtk 2.40.5 -> 2.44.0
weston 12.0.2 -> 13.0.0
xkbcomp 1.4.6 -> 1.4.7
xkeyboard-config 2.39 -> 2.41
xprop 1.2.6 -> 1.2.7
xwayland 23.2.4 -> 23.2.5
xz 5.4.4 -> 5.4.6
zlib 1.3 -> 1.3.1
Contributors to 5.0
Thanks to the following people who contributed to this release:
Adam Johnston
Adithya Balakumar
Adrian Freihofer
Alassane Yattara
Alejandro Hernandez Samaniego
Aleksey Smirnov
Alexander Kanavin
Alexander Lussier-Cullen
Alexander Sverdlin
Alexandre Belloni
Alexandre Truong
Alex Bennée
Alexis Lothoré
Alex Kiernan
Alex Stewart
André Draszik
Anibal Limon
Anuj Mittal
Archana Polampalli
Arne Schwerdt
Bartosz Golaszewski
Baruch Siach
Bastian Krause
BELHADJ SALEM Talel
BELOUARGA Mohamed
Bruce Ashfield
Changhyeok Bae
Changqing Li
Charlie Johnston
Chen Qi
Chi Xu
Chris Laplante
Christian Taedcke
Christoph Vogtländer
Claus Stovgaard
Clay Chang
Clément Péron
Colin McAllister
Corentin Guillevic
Daniel Ammann
david d zuhn
David Reyna
Deepthi Hemraj
Denys Dmytriyenko
Derek Erdmann
Desone Burns
Dhairya Nagodra
Dmitry Baryshkov
Eero Aaltonen
Eilís ‘pidge’ Ní Fhlannagáin
Emil Kronborg
Enguerrand de Ribaucourt
Enrico Jörns
Enrico Scholz
Etienne Cordonnier
Fabien Mahot
Fabio Estevam
Fahad Arslan
Felix Moessbauer
Florian Wickert
Geoff Parker
Glenn Strauss
Harish Sadineni
Hongxu Jia
Ilya A. Kriveshko
Jamin Lin
Jan Vermaete
Jason Andryuk
Javier Tia
Jeremy A. Puhlman
Jérémy Rosen
Jermain Horsman
Jiang Kai
Joakim Tjernlund
Joao Marcos Costa
Joe Slater
Johan Bezem
Johannes Schneider
Jonathan GUILLOT
Jon Mason
Jörg Sommer
Jose Quaresma
Joshua Watt
Julien Stephan
Justin Bronder
Kai Kang
Kareem Zarka
Kevin Hao
Khem Raj
Konrad Weihmann
Lee Chee Yang
Lei Maohui
lixiaoyong
Logan Gunthorpe
Luca Ceresoli
luca fancellu
Lucas Stach
Ludovic Jozeau
Lukas Funke
Maanya Goenka
Malte Schmidt
Marcel Ziswiler
Marco Felsch
Marcus Folkesson
Marek Vasut
Mark Asselstine
Mark Hatle
Markus Fuchs
Markus Volk
Marlon Rodriguez Garcia
Marta Rybczynska
Martin Hundebøll
Martin Jansa
Massimiliano Minella
Maxin B. John
Max Krummenacher
Meenali Gupta
Michael Halstead
Michael Opdenacker
Michal Sieron
Mikko Rapeli
Ming Liu
Mingli Yu
Munehisa Kamata
Nick Owens
Niko Mauno
Ola x Nilsson
Oleh Matiusha
Patrick Williams
Paul Barker
Paul Eggleton
Paul Gortmaker
Pavel Zhukov
Peter A. Bigot
Peter Kjellerstedt
Peter Marko
Petr Vorel
Philip Balister
Philip Lorenz
Philippe Rivest
Piotr Łobacz
Priyal Doshi
Quentin Schulz
Ragesh Nair
Randolph Sapp
Randy MacLeod
Rasmus Villemoes
Renat Khalikov
Richard Haar
Richard Purdie
Robert Berger
Robert Joslyn
Robert P. J. Day
Robert Yang
Rodrigo M. Duarte
Ross Burton
Rouven Czerwinski
Ryan Eatmon
Sam Van Den Berge
Saul Wold
Sava Jakovljev
Sean Nyekjaer
Sergei Zhmylev
Shinji Matsunaga
Shubham Kulkarni
Simone Weiß
Siong W.LIM
Soumya Sambu
Sourav Kumar Pramanik
Stefan Herbrechtsmeier
Stéphane Veyret
Steve Sakoman
Sundeep KOKKONDA
Thomas Perrot
Thomas Wolber
Timon Bergelt
Tim Orling
Timotheus Giuliani
Tobias Hagelborn
Tom Hochstein
Tom Rini
Toni Lammi
Trevor Gamblin
Trevor Woerner
Ulrich Ölmann
Valek Andrej
venkata pyla
Victor Kamensky
Vijay Anusuri
Vikas Katariya
Vincent Davis Jr
Viswanath Kraleti
Vyacheslav Yurkov
Wang Mingyu
William A. Kennington III
William Hauser
William Lyu
Xiangyu Chen
Xiaotian Wu
Yang Xu
Yannick Rodriguez
Yash Shinde
Yi Zhao
Yoann Congal
Yogesh Tyagi
Yogita Urade
Zahir Hussain
Zang Ruochen
Zoltan Boszormenyi
Repositories / Downloads for Yocto-5.0
poky
Repository Location: https://git.yoctoproject.org/poky
Branch: scarthgap
Tag: yocto-5.0
Git Revision: fb91a49387cfb0c8d48303bb3354325ba2a05587
Release Artefact: poky-fb91a49387cfb0c8d48303bb3354325ba2a05587
sha: 8a0dff4b677b9414ab814ed35d1880196123732ea16ab2fafa388bcc509b32ab
Download Locations: http://downloads.yoctoproject.org/releases/yocto/yocto-5.0/poky-fb91a49387cfb0c8d48303bb3354325ba2a05587.tar.bz2 http://mirrors.kernel.org/yocto/yocto/yocto-5.0/poky-fb91a49387cfb0c8d48303bb3354325ba2a05587.tar.bz2
openembedded-core
Repository Location: https://git.openembedded.org/openembedded-core
Branch: scarthgap
Tag: yocto-5.0
Git Revision: b65b4e5a8e4473d8ca43835ba17bc8bd4bdca277
Release Artefact: oecore-b65b4e5a8e4473d8ca43835ba17bc8bd4bdca277
sha: c7fd05d1a00c70acba2540e60dce01a1bdc4701ebff9a808784960240c69261d
Download Locations: http://downloads.yoctoproject.org/releases/yocto/yocto-5.0/oecore-b65b4e5a8e4473d8ca43835ba17bc8bd4bdca277.tar.bz2 http://mirrors.kernel.org/yocto/yocto/yocto-5.0/oecore-b65b4e5a8e4473d8ca43835ba17bc8bd4bdca277.tar.bz2
meta-mingw
Repository Location: https://git.yoctoproject.org/meta-mingw
Branch: scarthgap
Tag: yocto-5.0
Git Revision: acbba477893ef87388effc4679b7f40ee49fc852
Release Artefact: meta-mingw-acbba477893ef87388effc4679b7f40ee49fc852
sha: 3b7c2f475dad5130bace652b150367f587d44b391218b1364a8bbc430b48c54c
Download Locations: http://downloads.yoctoproject.org/releases/yocto/yocto-5.0/meta-mingw-acbba477893ef87388effc4679b7f40ee49fc852.tar.bz2 http://mirrors.kernel.org/yocto/yocto/yocto-5.0/meta-mingw-acbba477893ef87388effc4679b7f40ee49fc852.tar.bz2
bitbake
Repository Location: https://git.openembedded.org/bitbake
Branch: 2.8
Tag: yocto-5.0
Git Revision: c86466d51e8ff14e57a734c1eec5bb651fdc73ef
Release Artefact: bitbake-c86466d51e8ff14e57a734c1eec5bb651fdc73ef
sha: 45c91294c1fa5a0044f1bb72a9bb69456bb458747114115af85c7664bf672d48
Download Locations: http://downloads.yoctoproject.org/releases/yocto/yocto-5.0/bitbake-c86466d51e8ff14e57a734c1eec5bb651fdc73ef.tar.bz2 http://mirrors.kernel.org/yocto/yocto/yocto-5.0/bitbake-c86466d51e8ff14e57a734c1eec5bb651fdc73ef.tar.bz2
yocto-docs
Repository Location: https://git.yoctoproject.org/yocto-docs
Branch: scarthgap
Tag: yocto-5.0
Git Revision: 0cdc0afd3332459d30cfc8f4c2e62bdcc23f5ed5
Release notes for Yocto-5.0.1 (Scarthgap)
Security Fixes in Yocto-5.0.1
N/A
Fixes in Yocto-5.0.1
babeltrace2: upgrade 2.0.5 -> 2.0.6
bind: upgrade 9.18.24 -> 9.18.25
bitbake: cooker: Use hash client to ping upstream server
build-appliance-image: Update to scarthgap head revision (b9b47b1a392b…)
docs: add support for scarthgap 5.0 release
docs: brief-yoctoprojectqs: explicit version dependency on websockets python module
docs: brief-yoctoprojectqs: Update to the correct hash equivalence server address
documentation/poky.yaml.in: drop mesa/sdl from essential host packages
ell: upgrade 0.63 -> 0.64
gcr: upgrade 4.2.0 -> 4.2.1
icu: update 74-1 -> 74-2
libdnf: upgrade 0.73.0 -> 0.73.1
libsdl2: upgrade 2.30.0 -> 2.30.1
libx11: upgrade 1.8.7 -> 1.8.9
libxcursor: upgrade 1.2.1 -> 1.2.2
libxml2: upgrade 2.12.5 -> 2.12.6
local.conf.sample: Fix hashequivalence server address
lttng-tools: upgrade 2.13.11 -> 2.13.13
manuals: standards.md: add standard for project names
mesa: upgrade 24.0.2 -> 24.0.3
migration-notes: add release notes for 4.0.18
mpg123: upgrade 1.32.5 -> 1.32.6
pango: upgrade 1.52.0 -> 1.52.1
poky.conf: bump version for 5.0.1
python3: skip test_concurrent_futures/test_shutdown
ref-manual: update releases.svg
ref-manual: variables: add USERADD_DEPENDS
release-notes-5.0: update Repositories / Downloads section
release-notes-5.0: update recipes changes
release-notes-5.0: update new features
rootfs-postcommands.bbclass: Only set DROPBEAR_RSAKEY_DIR once
rpm: update 4.19.1 -> 4.19.1.1
scripts/oe-setup-build: write a build environment initialization one-liner into the build directory
sstate.bbclass: Add _SSTATE_EXCLUDEDEPS_SYSROOT to vardepsexclude
systemd: sed ROOT_HOME only if sysusers PACKAGECONFIG is set
Known Issues in Yocto-5.0.1
N/A
Contributors to Yocto-5.0.1
Alexander Kanavin
Christian Bräuner Sørensen
Joshua Watt
Lee Chee Yang
Mark Hatle
Michael Glembotzki
Michael Halstead
Michael Opdenacker
Paul Eggleton
Quentin Schulz
Richard Purdie
Steve Sakoman
Trevor Gamblin
Wang Mingyu
Repositories / Downloads for Yocto-5.0.1
poky
Repository Location: https://git.yoctoproject.org/poky
Branch: scarthgap
Tag: yocto-5.0.1
Git Revision: 4b07a5316ed4b858863dfdb7cab63859d46d1810
Release Artefact: poky-4b07a5316ed4b858863dfdb7cab63859d46d1810
sha: 51d0c84da7dbcc8db04a674da39cfc73ea78aac22ee646ede5b6229937d4666a
Download Locations: http://downloads.yoctoproject.org/releases/yocto/yocto-5.0.1/poky-4b07a5316ed4b858863dfdb7cab63859d46d1810.tar.bz2 http://mirrors.kernel.org/yocto/yocto/yocto-5.0.1/poky-4b07a5316ed4b858863dfdb7cab63859d46d1810.tar.bz2
openembedded-core
Repository Location: https://git.openembedded.org/openembedded-core
Branch: scarthgap
Tag: yocto-5.0.1
Git Revision: 294a7dbe44f6b7c8d3a1de8c2cc182af37c4f916
Release Artefact: oecore-294a7dbe44f6b7c8d3a1de8c2cc182af37c4f916
sha: e9be51a3b1fe8a1f420483b912caf91bc429dcca303d462381876a643b73045e
Download Locations: http://downloads.yoctoproject.org/releases/yocto/yocto-5.0.1/oecore-294a7dbe44f6b7c8d3a1de8c2cc182af37c4f916.tar.bz2 http://mirrors.kernel.org/yocto/yocto/yocto-5.0.1/oecore-294a7dbe44f6b7c8d3a1de8c2cc182af37c4f916.tar.bz2
meta-mingw
Repository Location: https://git.yoctoproject.org/meta-mingw
Branch: scarthgap
Tag: yocto-5.0.1
Git Revision: acbba477893ef87388effc4679b7f40ee49fc852
Release Artefact: meta-mingw-acbba477893ef87388effc4679b7f40ee49fc852
sha: 3b7c2f475dad5130bace652b150367f587d44b391218b1364a8bbc430b48c54c
Download Locations: http://downloads.yoctoproject.org/releases/yocto/yocto-5.0.1/meta-mingw-acbba477893ef87388effc4679b7f40ee49fc852.tar.bz2 http://mirrors.kernel.org/yocto/yocto/yocto-5.0.1/meta-mingw-acbba477893ef87388effc4679b7f40ee49fc852.tar.bz2
bitbake
Repository Location: https://git.openembedded.org/bitbake
Branch: 2.8
Tag: yocto-5.0.1
Git Revision: 8f90d10f9efc9a32e13f6bd031992aece79fe7cc
Release Artefact: bitbake-8f90d10f9efc9a32e13f6bd031992aece79fe7cc
sha: 519f02d5de7fbfac411532161d521123814dd9cc7d6b55488b5e7a547c1a6977
Download Locations: http://downloads.yoctoproject.org/releases/yocto/yocto-5.0.1/bitbake-8f90d10f9efc9a32e13f6bd031992aece79fe7cc.tar.bz2 http://mirrors.kernel.org/yocto/yocto/yocto-5.0.1/bitbake-8f90d10f9efc9a32e13f6bd031992aece79fe7cc.tar.bz2
yocto-docs
Repository Location: https://git.yoctoproject.org/yocto-docs
Branch: scarthgap
Tag: yocto-5.0.1
Git Revision: 875dfe69e93bf8fee3b8c07818a6ac059f228a13
Release notes for Yocto-5.0.2 (Scarthgap)
Security Fixes in Yocto-5.0.2
cups: Fix CVE-2024-35235
gcc: Fix CVE-2024-0151
gdk-pixbuf: Fix CVE-2022-48622
ghostscript: fix CVE-2024-29510, CVE-2024-33869, CVE-2024-33870 and CVE-2024-33871
git: Fix CVE-2024-32002, CVE-2024-32004, CVE-2024-32020, CVE-2024-32021 and CVE-2024-32465
glib-2.0: Fix CVE-2024-34397
glibc: Fix CVE-2024-2961, CVE-2024-33599, CVE-2024-33600, CVE-2024-33601 and CVE-2024-33602
ncurses: Fix CVE-2023-45918 and CVE-2023-50495
openssl: Fix CVE-2024-4603 and CVE-2024-4741
util-linux: Fix CVE-2024-28085
xserver-xorg: Fix CVE-2024-31080, CVE-2024-31081, CVE-2024-31082 and CVE-2024-31083
Fixes in Yocto-5.0.2
appstream: Upgrade to 1.0.3
apr: submit 0001-Add-option-to-disable-timed-dependant-tests.patch upstream
base-files: profile: fix error sh: 1: unknown operand
bash: Fix file-substitution error-handling bug
bash: mark build-tests.patch as Inappropriate
binutils: Fix aarch64 disassembly abort
bitbake: bb: Use namedtuple for Task data
bitbake: cooker: Handle ImportError for websockets
bitbake: fetch2/gcp: Add missing runfetchcmd import
bitbake: fetch2/wget: Canonicalize DL_DIR paths for wget2 compatibility
bitbake: fetch2/wget: Fix failure path for files that are empty or don’t exist
bitbake: hashserv: client: Add batch stream API
bitbake: parse: Improve/fix cache invalidation via mtime
bitbake: runqueue: Add timing warnings around slow loops
bitbake: runqueue: Allow rehash loop to exit in case of interrupts
bitbake: runqueue: Improve rehash get_unihash parallelism
bitbake: runqueue: Process unihashes in parallel at init
bitbake: siggen/runqueue: Report which dependencies affect the taskhash
bitbake: siggen: Enable batching of unihash queries
bitbake: tests/fetch: Tweak test to match upstream repo url change
bitbake: tests/fetch: Tweak to work on Fedora40
build-appliance-image: Update to scarthgap head revision
busybox: update CVE-2022-28391 patches upstream status
cdrtools-native: Fix build with GCC 14
classes: image_types: apply EXTRA_IMAGECMD:squashfs* in oe_mksquashfs()
classes: image_types: quote variable assignment needed by dash
consolekit: Disable incompatible-pointer-types warning as error
cracklib: Modify patch to compile with GCC 14
cronie: Upgrade to 1.7.2
cups: Upgrade to 2.4.9
db: ignore implicit-int and implicit-function-declaration issues fatal with gcc-14
devtool: modify: Catch git submodule error for go code
devtool: standard: update-recipe/finish: fix update localfile in another layer
devtool: sync: Fix Execution error
expect: ignore various issues now fatal with gcc-14
expect: mark patches as Inactive-Upstream
gawk: fix readline detection
gcc : Upgrade to v13.3
gcc-runtime: libgomp fix for gcc 14 warnings with mandb selftest
gdk-pixbuf: Upgrade to 2.42.12
git: set –with-gitconfig=/etc/gitconfig for -native builds
git: Upgrade to 2.44.1
glib-2.0: Upgrade to 2.78.6
glibc: Update to latest on stable 2.39 branch (273a835fe7…)
glibc: correct LICENSE to “GPL-2.0-only & LGPL-2.1-or-later”
go: Drop the linkmode completely
goarch: Revert “disable dynamic linking globally”
gstreamer1.0-plugins-good: Include qttools-native during the build with qt5 PACKAGECONFIG
gtk4: Disable int-conversion warning as error
icu: add upstream submission links for fix-install-manx.patch
ipk: Fix clean up of extracted IPK payload
iproute2: Fix build with GCC-14
iproute2: drop obsolete patch
iputils: splitting the ping6 as a package
kea: Remove -fvisibility-inlines-hidden from C++ flags
kea: remove unnecessary reproducibility patch
kernel.bbclass: check, if directory exists before removing empty module directory
kexec-tools: Fix build with GCC-14 on musl
lib/oe/package-manager: allow including self in create_packages_dir
lib/package_manager/ipk: Do not hardcode payload compression algorithm
libarchive: Upgrade to 3.7.4
libcgroup: fix build on non-systemd systems
libgloss: Do not apply non-existent patch
libinput: fix building with debug-gui option
libtraceevent: submit meson.patch upstream
libunwind: ignore various issues now fatal with gcc-14
libusb1: Set CVE_PRODUCT
llvm: Switch to using release tarballs
llvm: Upgrade to 18.1.5
lrzsz connman-gnome libfm: ignore various issues fatal with gcc-14
ltp: Fix build with GCC-14
ltp: add iputils-ping6 to RDEPENDS
lttng-ust: Upgrade to 2.13.8
mesa: Upgrade to 24.0.5
oeqa/postactions: Do not use -l option with df
oeqa/sdk/assimp: Upgrade and fix for gcc 14
oeqa/sdkext/devtool: replace use of librdfa
oeqa/selftest/debuginfod: use localpkgfeed to speed server startup
oeqa/selftest/devtool: Revert fix test_devtool_add_git_style2”
oeqa/selftest/devtool: add test for modifying recipes using go.bbclass
oeqa/selftest/devtool: add test for updating local files into another layer
oeqa/selftest/devtool: fix _test_devtool_add_git_url
oeqa: selftest: context: run tests serially if testtools/subunit modules are not found
openssl: Upgrade to 3.2.2
p11-kit: ignore various issues fatal with gcc-14 (for 32bit MACHINEs)
patchtest: test_metadata: fix invalid escape sequences
poky.conf: bump version for 5.0.2
ppp: Add RSA-MD in LICENSE
procps: fix build with new glibc but old kernel headers
ptest-runner: Bump to 2.4.4 (95f528c)
recipetool: Handle several go-import tags in go resolver
recipetool: Handle unclean response in go resolver
run-postinsts.service: Removed –no-reload to fix reload warning when users execute systemctl in the first boot.
selftest/classes: add localpkgfeed class
serf: mark patch as inappropriate for upstream submission
taglib: Upgrade to 2.0.1
ttyrun: define CVE_PRODUCT
uboot-sign: fix loop in do_uboot_assemble_fitimage
update-rc.d: add +git to PV
webkitgtk: Upgrade to 2.44.1
xinput-calibrator: mark upstream as inactive in a patch
xserver-xorg: Upgrade to 21.1.12
yocto-uninative: Update to 4.5 for gcc 14
zip: Fix build with gcc-14
Known Issues in Yocto-5.0.2
N/A
Contributors to Yocto-5.0.2
Adriaan Schmidt
Alexander Kanavin
Alexandre Truong
Anton Almqvist
Archana Polampalli
Changqing Li
Deepthi Hemraj
Felix Nilsson
Heiko Thole
Jose Quaresma
Joshua Watt
Julien Stephan
Kai Kang
Khem Raj
Lei Maohui
Marc Ferland
Marek Vasut
Mark Hatle
Martin Hundebøll
Martin Jansa
Maxin B. John
Michael Halstead
Mingli Yu
Ola x Nilsson
Peter Marko
Philip Lorenz
Poonam Jadhav
Ralph Siemsen
Rasmus Villemoes
Ricardo Simoes
Richard Purdie
Robert Joslyn
Ross Burton
Rudolf J Streif
Siddharth Doshi
Soumya Sambu
Steve Sakoman
Sven Schwermer
Trevor Gamblin
Vincent Kriek
Wang Mingyu
Xiangyu Chen
Yogita Urade
Zev Weiss
Zoltan Boszormenyi
Repositories / Downloads for Yocto-5.0.2
poky
Repository Location: https://git.yoctoproject.org/poky
Branch: scarthgap
Tag: yocto-5.0.2
Git Revision: f7def85be9f99dcb4ba488bead201f670304379b
Release Artefact: poky-f7def85be9f99dcb4ba488bead201f670304379b
sha: 0610a3175846d87f8a853020e8d517c94fe5e8b3fd4e40cd2d0ddbc22e75db4c
Download Locations: http://downloads.yoctoproject.org/releases/yocto/yocto-5.0.2/poky-f7def85be9f99dcb4ba488bead201f670304379b.tar.bz2 http://mirrors.kernel.org/yocto/yocto/yocto-5.0.2/poky-f7def85be9f99dcb4ba488bead201f670304379b.tar.bz2
openembedded-core
Repository Location: https://git.openembedded.org/openembedded-core
Branch: scarthgap
Tag: yocto-5.0.2
Git Revision: 803cc32e72b4fc2fc28d92090e61f5dd288a10cb
Release Artefact: oecore-803cc32e72b4fc2fc28d92090e61f5dd288a10cb
sha: b63f1214438e540ec15f1ec7f49615f31584c93e9cff10833273eefc710a7862
Download Locations: http://downloads.yoctoproject.org/releases/yocto/yocto-5.0.2/oecore-803cc32e72b4fc2fc28d92090e61f5dd288a10cb.tar.bz2 http://mirrors.kernel.org/yocto/yocto/yocto-5.0.2/oecore-803cc32e72b4fc2fc28d92090e61f5dd288a10cb.tar.bz2
meta-mingw
Repository Location: https://git.yoctoproject.org/meta-mingw
Branch: scarthgap
Tag: yocto-5.0.2
Git Revision: acbba477893ef87388effc4679b7f40ee49fc852
Release Artefact: meta-mingw-acbba477893ef87388effc4679b7f40ee49fc852
sha: 3b7c2f475dad5130bace652b150367f587d44b391218b1364a8bbc430b48c54c
Download Locations: http://downloads.yoctoproject.org/releases/yocto/yocto-5.0.2/meta-mingw-acbba477893ef87388effc4679b7f40ee49fc852.tar.bz2 http://mirrors.kernel.org/yocto/yocto/yocto-5.0.2/meta-mingw-acbba477893ef87388effc4679b7f40ee49fc852.tar.bz2
bitbake
Repository Location: https://git.openembedded.org/bitbake
Branch: 2.8
Tag: yocto-5.0.2
Git Revision: 8714a02e13477a9d97858b3642e05f28247454b5
Release Artefact: bitbake-8714a02e13477a9d97858b3642e05f28247454b5
sha: f22b56447e321c308353196da1d6dd76af5e9957e7e654c75dfd707f58091fd1
Download Locations: http://downloads.yoctoproject.org/releases/yocto/yocto-5.0.2/bitbake-8714a02e13477a9d97858b3642e05f28247454b5.tar.bz2 http://mirrors.kernel.org/yocto/yocto/yocto-5.0.2/bitbake-8714a02e13477a9d97858b3642e05f28247454b5.tar.bz2
yocto-docs
Repository Location: https://git.yoctoproject.org/yocto-docs
Branch: scarthgap
Tag: yocto-5.0.2
Git Revision: 875dfe69e93bf8fee3b8c07818a6ac059f228a13
Release notes for Yocto-5.0.3 (Scarthgap)
Security Fixes in Yocto-5.0.3
bind: Fix CVE-2024-0760, CVE-2024-1737, CVE-2024-1975 and CVE-2024-4076
busybox: Fix CVE-2023-42366, CVE-2023-42364, CVE-2023-42365, CVE-2021-42380 and CVE-2023-42363
cpio: Ignore CVE-2023-7216
curl: Fix CVE-2024-6197
ffmpeg: Fix CVE-2023-49502, CVE-2024-31578 and CVE-2024-31582
ghostscript: Fix CVE-2023-52722
go: Fix CVE-2024-24790
gstreamer1.0-plugins-base: Fix CVE-2024-4453
less: Fix CVE-2024-32487
libxml2: Fix CVE-2024-34459
libyaml: Ignore CVE-2024-35328
linux-yocto/6.6: Fix CVE-2024-23307, CVE-2024-24861, CVE-2024-26642, CVE-2024-26643, CVE-2024-26654, CVE-2024-26656 and CVE-2023-47233
linux-yocto/6.6: Ignore CVE-2019-25160, CVE-2019-25162, CVE-2020-36775, CVE-2020-36776, CVE-2020-36777, CVE-2020-36778, CVE-2020-36779, CVE-2020-36780, CVE-2020-36781, CVE-2020-36782, CVE-2020-36783, CVE-2020-36784, CVE-2020-36785, CVE-2020-36786, CVE-2020-36787, CVE-2021-46904, CVE-2021-46905, CVE-2021-46906, CVE-2021-46908, CVE-2021-46909, CVE-2021-46910, CVE-2021-46911, CVE-2021-46912, CVE-2021-46913, CVE-2021-46914, CVE-2021-46915, CVE-2021-46916, CVE-2021-46917, CVE-2021-46918, CVE-2021-46919, CVE-2021-46920, CVE-2021-46921, CVE-2021-46922, CVE-2021-46923, CVE-2021-46924, CVE-2021-46925, CVE-2021-46926, CVE-2021-46927, CVE-2021-46928, CVE-2021-46929, CVE-2021-46930, CVE-2021-46931, CVE-2021-46932, CVE-2021-46933, CVE-2021-46934, CVE-2021-46935, CVE-2021-46936, CVE-2021-46937, CVE-2021-46938, CVE-2021-46939, CVE-2021-46940, CVE-2021-46941, CVE-2021-46942, CVE-2021-46943, CVE-2021-46944, CVE-2021-46945, CVE-2021-46947, CVE-2021-46948, CVE-2021-46949, CVE-2021-46950, CVE-2021-46951, CVE-2021-46952, CVE-2021-46953, CVE-2021-46954, CVE-2021-46955, CVE-2021-46956, CVE-2021-46957, CVE-2021-46958, CVE-2021-46959, CVE-2021-46960, CVE-2021-46961, CVE-2021-46962, CVE-2021-46963, CVE-2021-46964, CVE-2021-46965, CVE-2021-46966, CVE-2021-46967, CVE-2021-46968, CVE-2021-46969, CVE-2021-46970, CVE-2021-46971, CVE-2021-46972, CVE-2021-46973, CVE-2021-46974, CVE-2021-46976, CVE-2021-46977, CVE-2021-46978, CVE-2021-46979, CVE-2021-46980, CVE-2021-46981, CVE-2021-46982, CVE-2021-46983, CVE-2021-46984, CVE-2021-46985, CVE-2021-46986, CVE-2021-46987, CVE-2021-46988, CVE-2021-46989, CVE-2021-46990, CVE-2021-46991, CVE-2021-46992, CVE-2021-46993, CVE-2021-46994, CVE-2021-46995, CVE-2021-46996, CVE-2021-46997, CVE-2021-46998, CVE-2021-46999, CVE-2021-47000, CVE-2021-47001, CVE-2021-47002, CVE-2021-47003, CVE-2021-47004, CVE-2021-47005, CVE-2021-47006, CVE-2021-47007, CVE-2021-47008, CVE-2021-47009, CVE-2021-47010, CVE-2021-47011, CVE-2021-47012, CVE-2021-47013, CVE-2021-47014, CVE-2021-47015, CVE-2021-47016, CVE-2021-47017, CVE-2021-47018, CVE-2021-47019, CVE-2021-47020, CVE-2021-47021, CVE-2021-47022, CVE-2021-47023, CVE-2021-47024, CVE-2021-47025, CVE-2021-47026, CVE-2021-47027, CVE-2021-47028, CVE-2021-47029, CVE-2021-47030, CVE-2021-47031, CVE-2021-47032, CVE-2021-47033, CVE-2021-47034, CVE-2021-47035, CVE-2021-47036, CVE-2021-47037, CVE-2021-47038, CVE-2021-47039, CVE-2021-47040, CVE-2021-47041, CVE-2021-47042, CVE-2021-47043, CVE-2021-47044, CVE-2021-47045, CVE-2021-47046, CVE-2021-47047, CVE-2021-47048, CVE-2021-47049, CVE-2021-47050, CVE-2021-47051, CVE-2021-47052, CVE-2021-47053, CVE-2021-47054, CVE-2021-47055, CVE-2021-47056, CVE-2021-47057, CVE-2021-47058, CVE-2021-47059, CVE-2021-47060, CVE-2021-47061, CVE-2021-47062, CVE-2021-47063, CVE-2021-47064, CVE-2021-47065, CVE-2021-47066, CVE-2021-47067, CVE-2021-47068, CVE-2021-47069, CVE-2021-47070, CVE-2021-47071, CVE-2021-47072, CVE-2021-47073, CVE-2021-47074, CVE-2021-47075, CVE-2021-47076, CVE-2021-47077, CVE-2021-47078, CVE-2021-47079, CVE-2021-47080, CVE-2021-47081, CVE-2021-47082, CVE-2021-47083, CVE-2021-47086, CVE-2021-47087, CVE-2021-47088, CVE-2021-47089, CVE-2021-47090, CVE-2021-47091, CVE-2021-47092, CVE-2021-47093, CVE-2021-47094, CVE-2021-47095, CVE-2021-47096, CVE-2021-47097, CVE-2021-47098, CVE-2021-47099, CVE-2021-47100, CVE-2021-47101, CVE-2021-47102, CVE-2021-47103, CVE-2021-47104, CVE-2021-47105, CVE-2021-47106, CVE-2021-47107, CVE-2021-47108, CVE-2021-47109, CVE-2021-47110, CVE-2021-47111, CVE-2021-47112, CVE-2021-47113, CVE-2021-47114, CVE-2021-47116, CVE-2021-47117, CVE-2021-47118, CVE-2021-47119, CVE-2021-47120, CVE-2021-47121, CVE-2021-47122, CVE-2021-47123, CVE-2021-47124, CVE-2021-47125, CVE-2021-47126, CVE-2021-47127, CVE-2021-47128, CVE-2021-47129, CVE-2021-47130, CVE-2021-47131, CVE-2021-47132, CVE-2021-47133, CVE-2021-47134, CVE-2021-47135, CVE-2021-47136, CVE-2021-47137, CVE-2021-47138, CVE-2021-47139, CVE-2021-47140, CVE-2021-47141, CVE-2021-47142, CVE-2021-47143, CVE-2021-47144, CVE-2021-47145, CVE-2021-47146, CVE-2021-47147, CVE-2021-47148, CVE-2021-47149, CVE-2021-47150, CVE-2021-47151, CVE-2021-47152, CVE-2021-47153, CVE-2021-47158, CVE-2021-47159, CVE-2021-47160, CVE-2021-47161, CVE-2021-47162, CVE-2021-47163, CVE-2021-47164, CVE-2021-47165, CVE-2021-47166, CVE-2021-47167, CVE-2021-47168, CVE-2021-47169, CVE-2021-47170, CVE-2021-47171, CVE-2021-47172, CVE-2021-47173, CVE-2021-47174, CVE-2021-47175, CVE-2021-47176, CVE-2021-47177, CVE-2021-47178, CVE-2021-47179, CVE-2021-47180, CVE-2022-48626, CVE-2022-48627, CVE-2022-48628, CVE-2022-48629 and CVE-2022-48630
linux-yocto/6.6 (cont.): Ignore CVE-2023-6270, CVE-2023-6356, CVE-2023-6536, CVE-2023-7042, CVE-2023-28746, CVE-2023-52465, CVE-2023-52467, CVE-2023-52468, CVE-2023-52469, CVE-2023-52470, CVE-2023-52471, CVE-2023-52472, CVE-2023-52473, CVE-2023-52474, CVE-2023-52475, CVE-2023-52476, CVE-2023-52477, CVE-2023-52478, CVE-2023-52479, CVE-2023-52480, CVE-2023-52481, CVE-2023-52482, CVE-2023-52483, CVE-2023-52484, CVE-2023-52486, CVE-2023-52487, CVE-2023-52488, CVE-2023-52489, CVE-2023-52490, CVE-2023-52491, CVE-2023-52492, CVE-2023-52493, CVE-2023-52494, CVE-2023-52495, CVE-2023-52497, CVE-2023-52498, CVE-2023-52499, CVE-2023-52500, CVE-2023-52501, CVE-2023-52502, CVE-2023-52503, CVE-2023-52504, CVE-2023-52505, CVE-2023-52506, CVE-2023-52507, CVE-2023-52508, CVE-2023-52509, CVE-2023-52510, CVE-2023-52511, CVE-2023-52512, CVE-2023-52513, CVE-2023-52515, CVE-2023-52516, CVE-2023-52517, CVE-2023-52518, CVE-2023-52519, CVE-2023-52520, CVE-2023-52522, CVE-2023-52523, CVE-2023-52524, CVE-2023-52525, CVE-2023-52526, CVE-2023-52527, CVE-2023-52528, CVE-2023-52529, CVE-2023-52530, CVE-2023-52531, CVE-2023-52532, CVE-2023-52559, CVE-2023-52560, CVE-2023-52561, CVE-2023-52562, CVE-2023-52563, CVE-2023-52564, CVE-2023-52565, CVE-2023-52566, CVE-2023-52567, CVE-2023-52568, CVE-2023-52569, CVE-2023-52570, CVE-2023-52571, CVE-2023-52572, CVE-2023-52573, CVE-2023-52574, CVE-2023-52575, CVE-2023-52576, CVE-2023-52577, CVE-2023-52578, CVE-2023-52580, CVE-2023-52581, CVE-2023-52582, CVE-2023-52583, CVE-2023-52584, CVE-2023-52587, CVE-2023-52588, CVE-2023-52589, CVE-2023-52591, CVE-2023-52593, CVE-2023-52594, CVE-2023-52595, CVE-2023-52596, CVE-2023-52597, CVE-2023-52598, CVE-2023-52599, CVE-2023-52600, CVE-2023-52601, CVE-2023-52602, CVE-2023-52603, CVE-2023-52604, CVE-2023-52606, CVE-2023-52607, CVE-2023-52608, CVE-2023-52609, CVE-2023-52610, CVE-2023-52611, CVE-2023-52612, CVE-2023-52613, CVE-2023-52614, CVE-2023-52615, CVE-2023-52616, CVE-2023-52617, CVE-2023-52618, CVE-2023-52619, CVE-2023-52620, CVE-2023-52621, CVE-2023-52622, CVE-2023-52623, CVE-2023-52626, CVE-2023-52627, CVE-2023-52628, CVE-2023-52629, CVE-2023-52630, CVE-2023-52631, CVE-2023-52632, CVE-2023-52633, CVE-2023-52635, CVE-2023-52636, CVE-2023-52637, CVE-2023-52638, CVE-2023-52639, CVE-2023-52640, CVE-2023-52641, CVE-2024-0841, CVE-2024-22099, CVE-2024-23196, CVE-2024-26600, CVE-2024-26601, CVE-2024-26602, CVE-2024-26603, CVE-2024-26604, CVE-2024-26605, CVE-2024-26606, CVE-2024-26607, CVE-2024-26608, CVE-2024-26610, CVE-2024-26611, CVE-2024-26612, CVE-2024-26614, CVE-2024-26615, CVE-2024-26616, CVE-2024-26617, CVE-2024-26618, CVE-2024-26619, CVE-2024-26620, CVE-2024-26621, CVE-2024-26622, CVE-2024-26623, CVE-2024-26625, CVE-2024-26626, CVE-2024-26627, CVE-2024-26629, CVE-2024-26630, CVE-2024-26631, CVE-2024-26632, CVE-2024-26633, CVE-2024-26634, CVE-2024-26635, CVE-2024-26636, CVE-2024-26637, CVE-2024-26638, CVE-2024-26639, CVE-2024-26640, CVE-2024-26641, CVE-2024-26644, CVE-2024-26645, CVE-2024-26646, CVE-2024-26647, CVE-2024-26648, CVE-2024-26649, CVE-2024-26650, CVE-2024-26651, CVE-2024-26652, CVE-2024-26653, CVE-2024-26657, CVE-2024-26659, CVE-2024-26660, CVE-2024-26661, CVE-2024-26662, CVE-2024-26663, CVE-2024-26664, CVE-2024-26665, CVE-2024-26666, CVE-2024-26667, CVE-2024-26668, CVE-2024-26669, CVE-2024-26670, CVE-2024-26671, CVE-2024-26673, CVE-2024-26674, CVE-2024-26675, CVE-2024-26676, CVE-2024-26677, CVE-2024-26678, CVE-2024-26679, CVE-2024-26680, CVE-2024-26681, CVE-2024-26682, CVE-2024-26683, CVE-2024-26684, CVE-2024-26685, CVE-2024-26687, CVE-2024-26688, CVE-2024-26689, CVE-2024-26690, CVE-2024-26691, CVE-2024-26692, CVE-2024-26693, CVE-2024-26694, CVE-2024-26695, CVE-2024-26696, CVE-2024-26697, CVE-2024-26698, CVE-2024-26700, CVE-2024-26702, CVE-2024-26703, CVE-2024-26704, CVE-2024-26705, CVE-2024-26706, CVE-2024-26707, CVE-2024-26708, CVE-2024-26709, CVE-2024-26710, CVE-2024-26711, CVE-2024-26712, CVE-2024-26713, CVE-2024-26714, CVE-2024-26715, CVE-2024-26716, CVE-2024-26717, CVE-2024-26718, CVE-2024-26719, CVE-2024-26720, CVE-2024-26721, CVE-2024-26722, CVE-2024-26723, CVE-2024-26724, CVE-2024-26725, CVE-2024-26726, CVE-2024-26727, CVE-2024-26728, CVE-2024-26729, CVE-2024-26730, CVE-2024-26731, CVE-2024-26732, CVE-2024-26733, CVE-2024-26734, CVE-2024-26735, CVE-2024-26736, CVE-2024-26737, CVE-2024-26738, CVE-2024-26739, CVE-2024-26740, CVE-2024-26741, CVE-2024-26742, CVE-2024-26743, CVE-2024-26744, CVE-2024-26745, CVE-2024-26746, CVE-2024-26747, CVE-2024-26748, CVE-2024-26749, CVE-2024-26750, CVE-2024-26751, CVE-2024-26752, CVE-2024-26753, CVE-2024-26754, CVE-2024-26755, CVE-2024-26759, CVE-2024-26760, CVE-2024-26761, CVE-2024-26762, CVE-2024-26763, CVE-2024-26764, CVE-2024-26765, CVE-2024-26766, CVE-2024-26767, CVE-2024-26768, CVE-2024-26769, CVE-2024-26770, CVE-2024-26771, CVE-2024-26772, CVE-2024-26773, CVE-2024-26774, CVE-2024-26775, CVE-2024-26776, CVE-2024-26777, CVE-2024-26778, CVE-2024-26779, CVE-2024-26780, CVE-2024-26781, CVE-2024-26782, CVE-2024-26783, CVE-2024-26786, CVE-2024-26787, CVE-2024-26788, CVE-2024-26789, CVE-2024-26790, CVE-2024-26791, CVE-2024-26792, CVE-2024-26793, CVE-2024-26794, CVE-2024-26795, CVE-2024-26796, CVE-2024-26798, CVE-2024-26799, CVE-2024-26800, CVE-2024-26801, CVE-2024-26802, CVE-2024-26803, CVE-2024-26804, CVE-2024-26805, CVE-2024-26807, CVE-2024-26808 and CVE-2024-26809
llvm: Fix CVE-2024-0151
ofono: Fix CVE-2023-2794
openssh: Fix CVE-2024-6387 and CVE-2024-39894
openssl: Fix CVE-2024-5535
pam: Fix CVE-2024-22365
python3-idna: Fix CVE-2024-3651
qemu: Fix CVE-2023-6683, CVE-2024-3446, CVE-2024-3447, CVE-2024-3567, CVE-2024-26327 and CVE-2024-26328
ruby: Fix CVE-2023-36617 and CVE-2024-27281
vte: Fix CVE-2024-37535
wget: Fix for CVE-2024-38428
Fixes in Yocto-5.0.3
apt-native: don’t let dpkg overwrite files by default
archiver.bbclass: Fix work-shared checking for kernel recipes
automake: mark new_rt_path_for_test-driver.patch as Inappropriate
bash: fix configure checks that fail with GCC 14.1
bind: upgrade to 9.18.28
binutils: stable 2.42 branch updates
bitbake: codeparser/data: Ensure module function contents changing is accounted for
bitbake: codeparser: Skip non-local functions for module dependencies
build-appliance-image: Update to scarthgap head revision
cargo: remove True option to getVar calls
classes/create-spdx-2.2: Fix SPDX Namespace Prefix
classes/kernel: No symlink in postinst without KERNEL_IMAGETYPE_SYMLINK
cmake-qemu.bbclass: fix if criterion
create-spdx-3.0/populate_sdk_base: Add SDK_CLASSES inherit mechanism to fix tarball SPDX manifests
create-spdx-‘*’: Support multilibs via SPDX_MULTILIB_SSTATE_ARCHS
curl: correct the PACKAGECONFIG for native/nativesdk
curl: locale-base-en-us isn’t glibc-specific
curl: skip FTP tests in run-ptest
cve-check: Introduce CVE_CHECK_MANIFEST_JSON_SUFFIX
cve-exclusion: Drop the version comparision/warning
devtool: ide-sdk: correct help typo
dnf: Fix missing leading whitespace with ‘:append’
dpkg: mark patches adding custom non-debian architectures as inappropriate for upstream
ed: upgrade to 1.20.2
expect: fix configure with GCC 14
ffmpeg: backport patch to fix errors with GCC 14
ffmpeg: backport patches to use new Vulkan AV1 codec API
flac: fix buildpaths warnings
fribidi: upgrade to 1.0.14
gawk: Remove References to /usr/local/bin/gawk
gawk: update patch status
gettext: fix a parallel build issue
ghostscript: upgrade to 10.03.1
glib-networking: submit eagain.patch upstream
glibc: cleanup old cve status
glibc: stable 2.39 branch updates
glslang: mark 0001-generate-glslang-pkg-config.patch as Inappropriate
go: drop the old 1.4 bootstrap C version
go: upgrade to 1.22.5
gpgme: move gpgme-tool to own sub-package
grub,grub-efi: Remove -mfpmath=sse on x86
grub: mark grub-module-explicitly-keeps-symbole-.module_license.patch as a workaround
gstreamer1.0: skip another known flaky test
gstreamer: upgrade to 1.22.12
insane.bbclass: fix HOST_ variable names
insane.bbclass: remove leftover variables and comment
insane.bbclass: remove skipping of cross-compiled packages
insane: handle dangling symlinks in the libdir QA check
iptables: fix memory corruption when parsing nft rules
iptables: fix save/restore symlinks with libnftnl PACKAGECONFIG enabled
iptables: submit 0001-configure-Add-option-to-enable-disable-libnfnetlink.patch upstream
kexec-tools: submit 0003-kexec-ARM-Fix-add_buffer_phys_virt-align-issue.patch upstream
layer.conf: Add os-release to SIGGEN_EXCLUDERECIPES_ABISAFE
libacpi: mark patches as inactive-upstream
libadwaita: upgrade to 1.5.1
libcap-ng-python: upgrade to 0.8.5
libcap-ng: upgrade to 0.8.5
libmnl: explicitly disable doxygen
libnl: change HOMEPAGE
libpam: fix runtime error in pam_pwhistory moudle
libpng: update SRC_URI
libportal: fix rare build race
libstd-rs: set CVE_PRODUCT to rust
libxcrypt: correct the check for a working libucontext.h
libxml2: upgrade to 2.12.8
linux-yocto-custom: Fix comment override syntax
linux-yocto/6.6: cfg: drop obselete options
linux-yocto/6.6: cfg: introduce Intel NPU fragment
linux-yocto/6.6: fix AMD boot trace
linux-yocto/6.6: fix kselftest failures
linux-yocto/6.6: intel configuration changes
linux-yocto/6.6: nft: enable veth
linux-yocto/6.6: update to v6.6.35
linux-yocto: Enable team net driver
linuxloader: add -armhf on arm only for TARGET_FPU ‘hard’
llvm: upgrade to 18.1.6
maintainers.inc: update self e-mail address
maintainers: Drop go-native as recipe removed
mesa: Fix missing leading whitespace with ‘:append’
mesa: remove obsolete 0001-meson.build-check-for-all-linux-host_os-combinations.patch
mesa: upgrade to 24.0.7
meson: don’t use deprecated pkgconfig variable
migration-guides: add release notes for 4.0.19
migration-guides: add release notes for 5.0.2
migration-notes: add release notes for 5.0.1
mmc-utils: fix URL
mobile-broadband-provider-info: upgrade to 20240407
multilib.bbclass: replace deprecated e.data with d
multilib.conf: remove appending to PKG_CONFIG_PATH
nasm: upgrade to 2.16.03
ncurses: switch to new mirror
oeqa/runtime/scp: requires openssh-sftp-server
oeqa/runtime: fix race-condition in minidebuginfo test
oeqa/runtime: fix regression in minidebuginfo test
oeqa/runtime: make minidebuginfo test work with coreutils
oeqa/sdk/case: Ensure DL_DIR is populated with artefacts if used
oeqa/sdk/case: Skip SDK test cases when TCLIBC is newlib
oeqa/selftest/devtool: Fix for usrmerge in DISTRO_FEATURES
oeqa/selftest/recipetool: Fix for usrmerge in DISTRO_FEATURES
openssh: drop rejected patch fixed in 8.6p1 release
openssh: systemd notification was implemented upstream
openssh: systemd sd-notify patch was rejected upstream
orc: upgrade to 0.4.39
package.py: Fix static debuginfo split
package.py: Fix static library processing
pcmanfm: Disable incompatible-pointer-types warning as error
perl: submit the rest of determinism.patch upstream
pixman: fixing inline failure with -Og
poky.conf: bump version for 5.0.3
populate_sdk_ext.bbclass: Fix undefined variable error
pseudo: Fix to work with glibc 2.40
pseudo: Update to include open symlink handling bugfix
pseudo: Update to pull in python 3.12+ fix
python3-attrs: drop python3-ctypes from RDEPENDS
python3-bcrypt: drop python3-six from RDEPENDS
python3-idna: upgrade to 3.7
python3-jinja2: upgrade to 3.1.4
python3-pyopenssl: drop python3-six from RDEPENDS
python3-requests: cleanup RDEPENDS
python3-setuptools: drop python3-2to3 from RDEPENDS
python3: Treat UID/GID overflow as failure
python3: skip test_concurrent_futures/test_deadlock
python3: skip test_multiprocessing/test_active_children test
python3: submit deterministic_imports.patch upstream as a ticket
python3: upgrade to 3.12.4
qemu: upgrade to 8.2.3
rng-tools: ignore incompatible-pointer-types errors for now
rt-tests: rt_bmark.py: fix TypeError
rust-cross-canadian: set CVE_PRODUCT to rust
rust: Add new varaible RUST_ENABLE_EXTRA_TOOLS
sanity: Check if tar is gnutar
sdk: Fix path length limit to match reserved size
selftest-hardlink: Add additional test cases
selftest/cases/runtime_test: Exclude centos-9 from virgl tests
selftest: add Upstream-Status to .patch files
settings-daemon: submit addsoundkeys.patch upstream and update to a revision that has it
systemd.bbclass: Clarify error message
tcp-wrappers: mark all patches as inactive-upstream
tzdata: Add tzdata.zi to tzdata-core package
vorbis: mark patch as Inactive-Upstream
vulkan-samples: fix do_compile error when -Og enabled
watchdog: Set watchdog_module in default config
webkitgtk: fix do_compile errors on beaglebone-yocto
webkitgtk: fix do_configure error on beaglebone-yocto
weston: upgrade to 13.0.1
wic/partition.py: Set hash_seed for empty ext partition
wic: bootimg-efi: fix error handling
wic: engine.py: use raw string for escape sequence
wireless-regdb: upgrade to 2024.05.08
xserver-xorg: upgrade to 21.1.13
xz: Update LICENSE variable for xz packages
Known Issues in Yocto-5.0.3
N/A
Contributors to Yocto-5.0.3
Adithya Balakumar
Aleksandar Nikolic
Alexander Kanavin
Antonin Godard
Archana Polampalli
Ashish Sharma
Benjamin Szőke
Bruce Ashfield
Changqing Li
Chen Qi
Christian Taedcke
Deepthi Hemraj
Denys Dmytriyenko
Dmitry Baryshkov
Emil Kronborg
Enrico Jörns
Etienne Cordonnier
Guðni Már Gilbert
Hitendra Prajapati
Jonas Gorski
Jookia
Jose Quaresma
Joshua Watt
Jörg Sommer
Kai Kang
Khem Raj
Kirill Yatsenko
Lee Chee Yang
Mark Hatle
Markus Volk
Martin Jansa
Michael Opdenacker
Mingli Yu
Niko Mauno
Patrick Wicki
Peter Marko
Quentin Schulz
Ranjitsinh Rathod
Richard Purdie
Robert Kovacsics
Ross Burton
Siddharth Doshi
Simone Weiß
Soumya Sambu
Steve Sakoman
Sundeep KOKKONDA
Trevor Gamblin
Vijay Anusuri
Wadim Egorov
Wang Mingyu
Xiangyu Chen
Yi Zhao
Yogita Urade
Zahir Hussain
Repositories / Downloads for Yocto-5.0.3
poky
Repository Location: https://git.yoctoproject.org/poky
Branch: scarthgap
Tag: yocto-5.0.3
Git Revision: 0b37512fb4b231cc106768e2a7328431009b3b70
Release Artefact: poky-0b37512fb4b231cc106768e2a7328431009b3b70
sha: b37fe0b2f6a685ee94b4af55f896cbf52ba69023e10eb21d3e54798ca21ace79
Download Locations: http://downloads.yoctoproject.org/releases/yocto/yocto-5.0.3/poky-0b37512fb4b231cc106768e2a7328431009b3b70.tar.bz2 http://mirrors.kernel.org/yocto/yocto/yocto-5.0.3/poky-0b37512fb4b231cc106768e2a7328431009b3b70.tar.bz2
openembedded-core
Repository Location: https://git.openembedded.org/openembedded-core
Branch: scarthgap
Tag: yocto-5.0.3
Git Revision: 236ac1b43308df722a78d3aa20aef065dfae5b2b
Release Artefact: oecore-236ac1b43308df722a78d3aa20aef065dfae5b2b
sha: 44b89feba9563c2281c8c2f45037dd7c312fb20e8b7d9289b25f0ea0fe1fc2c4
Download Locations: http://downloads.yoctoproject.org/releases/yocto/yocto-5.0.3/oecore-236ac1b43308df722a78d3aa20aef065dfae5b2b.tar.bz2 http://mirrors.kernel.org/yocto/yocto/yocto-5.0.3/oecore-236ac1b43308df722a78d3aa20aef065dfae5b2b.tar.bz2
meta-mingw
Repository Location: https://git.yoctoproject.org/meta-mingw
Branch: scarthgap
Tag: yocto-5.0.3
Git Revision: acbba477893ef87388effc4679b7f40ee49fc852
Release Artefact: meta-mingw-acbba477893ef87388effc4679b7f40ee49fc852
sha: 3b7c2f475dad5130bace652b150367f587d44b391218b1364a8bbc430b48c54c
Download Locations: http://downloads.yoctoproject.org/releases/yocto/yocto-5.0.3/meta-mingw-acbba477893ef87388effc4679b7f40ee49fc852.tar.bz2 http://mirrors.kernel.org/yocto/yocto/yocto-5.0.3/meta-mingw-acbba477893ef87388effc4679b7f40ee49fc852.tar.bz2
bitbake
Repository Location: https://git.openembedded.org/bitbake
Branch: 2.8
Tag: yocto-5.0.3
Git Revision: 11d83170922a2c6b9db1f6e8c23e533526984b2c
Release Artefact: bitbake-11d83170922a2c6b9db1f6e8c23e533526984b2c
sha: 9643433748d7ed80d6334124390271929566b3bc076dad0f6e6be1ec6d753b8d
Download Locations: http://downloads.yoctoproject.org/releases/yocto/yocto-5.0.3/bitbake-11d83170922a2c6b9db1f6e8c23e533526984b2c.tar.bz2 http://mirrors.kernel.org/yocto/yocto/yocto-5.0.3/bitbake-11d83170922a2c6b9db1f6e8c23e533526984b2c.tar.bz2
yocto-docs
Repository Location: https://git.yoctoproject.org/yocto-docs
Branch: scarthgap
Tag: yocto-5.0.3
Git Revision: TBD
Release notes for Yocto-5.0.4 (Scarthgap)
Security Fixes in Yocto-5.0.4
apr: Fix CVE-2023-49582
curl: Ignore CVE-2024-32928
curl: Fix CVE-2024-7264
expat: Fix CVE-2024-45490, CVE-2024-45491 and CVE-2024-45492
ffmpeg: Fix CVE-2023-50008 and CVE-2024-32230
libpcap: Fix CVE-2023-7256 and CVE-2024-8006
libyaml: Ignore CVE-2024-35325 and CVE-2024-35326
openssl: Fix CVE-2024-5535 and CVE-2024-6119
python3-certifi: Fix CVE-2024-39689
python3-setuptools: Fix CVE-2024-6345
python3: Fix CVE-2024-6232, CVE-2024-7592, CVE-2024-8088 and CVE-2024-27034
qemu: Fix CVE-2024-4467 and CVE-2024-7409
ruby: Fix CVE-2024-27282
tiff: Fix CVE-2024-7006
vim: Fix CVE-2024-41957, CVE-2024-41965, CVE-2024-43374, CVE-2024-43790 and CVE-2024-43802
Fixes in Yocto-5.0.4
apr: drop 0007-explicitly-link-libapr-against-phtread-to-make-gold-.patch
apr: upgrade to 1.7.5
bind: Fix build with the httpstats package config enabled
bitbake: data_smart: Improve performance for VariableHistory
bluez5: remove redundant patch for MAX_INPUT
build-appliance-image: Update to scarthgap head revision
buildhistory: Fix intermittent package file list creation
buildhistory: Restoring files from preserve list
buildhistory: Simplify intercept call sites and drop SSTATEPOSTINSTFUNC usage
busybox: Fix cut with “-s” flag
create-sdpx-2.2.bbclass: Switch from exists to isfile checking debugsrc
cups: upgrade to 2.4.10
dejagnu: Fix LICENSE (change to GPL-3.0-only)
doc: features: describe distribution feature pni-name
doc: features: remove duplicate word in distribution feature ext2
expat: upgrade to 2.6.3
expect-native: fix do_compile failure with gcc-14
gcc: Fix spurious ‘/’ in GLIBC_DYNAMIC_LINKER on microblaze
gcr: Fix LICENSE (change to LGPL-2.0-only)
glibc: fix fortran header file conflict for arm
go: upgrade to 1.22.6
gstreamer1.0: disable flaky baseparser tests
image_types.bbclass: Use –force also with lz4,lzop
initramfs-framework: fix typos
iw: Fix LICENSE (change to ISC)
libadwaita: upgrade to 1.5.2
libcap-ng: update SRC_URI
libdnf: upgrade to 0.73.2
libedit: Make docs generation deterministic
libgfortran.inc: fix nativesdk-libgfortran dependencies
librsvg: don’t try to run target code at build time
linux-firmware: add a package for ath12k firmware
llvm: Enable libllvm for native build
maintainers.inc: add maintainer for python(-setuptools, -smmap, -subunit, -testtools)
mc: fix source URL
migration-guide: add release notes for 4.0.20 and 5.0.3
oeqa/postactions: fix exception handling
oeqa/runtime/ssh: In case of failure, show exit code and handle -15 (SIGTERM)
oeqa/runtime/ssh: add retry logic and sleeps to allow for slower systems
oeqa/runtime/ssh: check for all errors at the end
oeqa/runtime/ssh: increase the number of attempts
oeqa/selftest/reproducibile: Explicitly list virtual targets
oeqa/utils/postactions: transfer whole archive over ssh instead of doing individual copies
openssh: add backported header file include
openssl: upgrade to 3.2.3
os-release: Fix VERSION_CODENAME in case it is empty
poky.conf: bump version for 5.0.4
populate_sdk_ext.bclass: make sure OECORE_NATIVE_SYSROOT is exported.
python3-maturin: Fix cross compilation issue for armv7l, mips64, ppc
python3-pycryptodome(x): use python_setuptools_build_meta build class
python3: upgrade to 3.12.6
python3: skip readline limited history tests
qemu: backport patches to fix riscv64 build failure
qemuboot: Trigger write_qemuboot_conf task on changes of kernel image realpath
ref-manual: fix typo and move SYSROOT_DIRS example
ruby: Make docs generation deterministic
systemd: Mitigate /var/log type mismatch issue
systemd: Mitigate /var/tmp type mismatch issue
tiff: Fix LICENSE (change to libtiff)
u-boot.inc: Refactor do_* steps into functions that can be overridden
udev-extraconf: Add collect flag to mount
unzip: Fix LICENSE (change to Info-ZIP)
util-linux: Add PACKAGECONFIG option (libmount-mountfd-support) to mitigate rootfs remount error
vim: upgrade to 9.1.0698
weston-init: fix weston not starting when xwayland is enabled
wireless-regdb: upgrade to 2024.07.04
wpa-supplicant: upgrade to 2.11
xserver-xorg: mark CVE-2023-5574 as unpatched when xvfb enabled
yocto-uninative: Update to 4.6 for glibc 2.40
zip: Fix LICENSE (change to Info-ZIP)
Known Issues in Yocto-5.0.4
N/A
Contributors to Yocto-5.0.4
Alban Bedel
Alexander Kanavin
Alexis Lothoré
Archana Polampalli
Ashish Sharma
Bartosz Golaszewski
Benjamin Szőke
Changqing Li
Chen Qi
Colin McAllister
Daniel Semkowicz
Dmitry Baryshkov
Gauthier HADERER
Guðni Már Gilbert
Jon Mason
Jose Quaresma
Jörg Sommer
Kai Kang
Khem Raj
Lee Chee Yang
Mark Hatle
Martin Jansa
Matthias Pritschet
Michael Halstead
Mingli Yu
Niko Mauno
Pedro Ferreira
Peter Marko
Quentin Schulz
Richard Purdie
Robert Yang
Ross Burton
Ryan Eatmon
Siddharth Doshi
Simone Weiß
Soumya Sambu
Steve Sakoman
Trevor Gamblin
Ulrich Ölmann
Vijay Anusuri
Wang Mingyu
Weisser, Pascal.ext
Yogita Urade
Repositories / Downloads for Yocto-5.0.4
poky
Repository Location: https://git.yoctoproject.org/poky
Branch: scarthgap
Tag: yocto-5.0.4
Git Revision: 2034fc38eb4e63984d9bd6b260aa1bf95ce562e4
Release Artefact: poky-2034fc38eb4e63984d9bd6b260aa1bf95ce562e4
sha: 697ed099793d6c86d5ffe590e96f99689bd28dcb2d4451dc4585496fa4a20400
Download Locations: http://downloads.yoctoproject.org/releases/yocto/yocto-5.0.4/poky-2034fc38eb4e63984d9bd6b260aa1bf95ce562e4.tar.bz2 http://mirrors.kernel.org/yocto/yocto/yocto-5.0.4/poky-2034fc38eb4e63984d9bd6b260aa1bf95ce562e4.tar.bz2
openembedded-core
Repository Location: https://git.openembedded.org/openembedded-core
Branch: scarthgap
Tag: yocto-5.0.4
Git Revision: f888dd911529a828820799a7a1b75dfd3a44847c
Release Artefact: oecore-f888dd911529a828820799a7a1b75dfd3a44847c
sha: 93cb4c3c8e0f77edab20814d155847dc3452c6b083e3dd9c7a801e80a7e4d228
Download Locations: http://downloads.yoctoproject.org/releases/yocto/yocto-5.0.4/oecore-f888dd911529a828820799a7a1b75dfd3a44847c.tar.bz2 http://mirrors.kernel.org/yocto/yocto/yocto-5.0.4/oecore-f888dd911529a828820799a7a1b75dfd3a44847c.tar.bz2
meta-mingw
Repository Location: https://git.yoctoproject.org/meta-mingw
Branch: scarthgap
Tag: yocto-5.0.4
Git Revision: acbba477893ef87388effc4679b7f40ee49fc852
Release Artefact: meta-mingw-acbba477893ef87388effc4679b7f40ee49fc852
sha: 3b7c2f475dad5130bace652b150367f587d44b391218b1364a8bbc430b48c54c
Download Locations: http://downloads.yoctoproject.org/releases/yocto/yocto-5.0.4/meta-mingw-acbba477893ef87388effc4679b7f40ee49fc852.tar.bz2 http://mirrors.kernel.org/yocto/yocto/yocto-5.0.4/meta-mingw-acbba477893ef87388effc4679b7f40ee49fc852.tar.bz2
bitbake
Repository Location: https://git.openembedded.org/bitbake
Branch: 2.8
Tag: yocto-5.0.4
Git Revision: d251668d9a7a8dd25bd8767efb30d6d9ff8b1ad3
Release Artefact: bitbake-d251668d9a7a8dd25bd8767efb30d6d9ff8b1ad3
sha: d873f4d3a471d26680dc39200d8f3851a6863f15daa9bed978ba31b930f9a1c1
Download Locations: http://downloads.yoctoproject.org/releases/yocto/yocto-5.0.4/bitbake-d251668d9a7a8dd25bd8767efb30d6d9ff8b1ad3.tar.bz2 http://mirrors.kernel.org/yocto/yocto/yocto-5.0.4/bitbake-d251668d9a7a8dd25bd8767efb30d6d9ff8b1ad3.tar.bz2
yocto-docs
Repository Location: https://git.yoctoproject.org/yocto-docs
Branch: scarthgap
Tag: yocto-5.0.4
Git Revision: d71081dd14a9d75ace4d1c62472374f37b4a888d
Release notes for Yocto-5.0.5 (Scarthgap)
Security Fixes in Yocto-5.0.5
cups: Fix CVE-2024-47175curl: Fix CVE-2024-8096gnupg: Ignore CVE-2022-3219 (wont-fix)libarchive: Fix CVE-2024-48957 and CVE-2024-48958openssh: Ignore CVE-2023-51767 (wont-fix)openssl: Fix CVE-2024-9143ruby: Fix CVE-2024-41123 and CVE-2024-41496rust-llvm: Fix CVE-2024-0151rust,libstd-rs: Ignore CVE-2024-43402wpa-supplicant: Patch SAE H2E and incomplete downgrade protection for group negotiationwpa-supplicant: Fix CVE-2024-3596wpa-supplicant: Ignore CVE-2024-5290
Fixes in Yocto-5.0.5
binutils: stable 2.42 branch updates
bitbake.conf: Add truncate to HOSTTOOLS
bitbake: asyncrpc: Use client timeout for websocket open timeout
bitbake: bitbake: doc/user-manual: Update the BB_HASHSERVE_UPSTREAM
bitbake: gitsm: Add call_process_submodules() to remove duplicated code
bitbake: gitsm: Remove downloads/tmpdir when failed
bitbake: tests/fetch: Use our own mirror of mobile-broadband-provider to decouple from gnome gitlab
bitbake: tests/fetch: Use our own mirror of sysprof to decouple from gnome gitlab
build-appliance-image: Update to scarthgap head revision
cryptodev: upgrade to 1.14
cve-check: add support for cvss v4.0
cve_check: Use a local copy of the database during builds
dev-manual: add bblock documentation
documentation: conf.py: rename :cve: role to :cve_nist:
documentation: README: add instruction to run Vale on a subset
documentation: Makefile: add SPHINXLINTDOCS to specify subset to sphinx-lint
e2fsprogs: removed ‘sed -u’ option
ffmpeg: Add “libswresample libavcodec” to CVE_PRODUCT
glibc: stable 2.39 branch updates.
go: upgrade to 1.22.8
icu: update patch Upstream-Status
image.bbclass: Drop support for ImageQAFailed exceptions in image_qa
image_qa: fix error handling
install-buildtools: fix “test installation” step
install-buildtools: remove md5 checksum validation
install-buildtools: update base-url, release and installer version
kernel-devsrc: remove 64 bit vdso cmd files
kernel-fitimage: fix external dtb check
kernel-fitimage: fix intentation
lib/oe/package-manager: skip processing installed-pkgs with empty globs
liba52: fix do_fetch error
libpcre2: Update base uri PhilipHazel -> PCRE2Project
libsdl2: Fix non-deterministic configure option for libsamplerate
license: Fix directory layout issues
linux-firmware: upgrade to 20240909
linux-yocto/6.6: fix genericarm64 config warning
linux-yocto/6.6: upgrade to v6.6.54
lsb-release: fix Distro Codename shell escaping
makedevs: Fix issue when rootdir of / is given
makedevs: Fix matching uid/gid
meta-ide-support: Mark recipe as MACHINE-specific
meta-world-pkgdata: Inherit nopackages
migration-guide: add release notes for 4.0.21, 4.0.22 and 5.0.4
migration-guide: release-notes-4.0: update BB_HASHSERVE_UPSTREAM for new infrastructure
migration-guide: release-notes-5.0.rst: update NO_OUTPUT -> NO_COLOR
orc: upgrade to 0.4.40
overview-manual: concepts: add details on package splitting
poky.conf: bump version for 5.0.5
populate_sdk_base: inherit nopackages
ptest-runner: upgrade to 2.4.5
pulseaudio: correct freedesktop.org -> www.freedesktop.org SRC_URI
desktop-file-utils: correct freedesktop.org -> www.freedesktop.org SRC_URI
python3-lxml: upgrade to v5.0.2
python3-setuptools: Add “python:setuptools” to CVE_PRODUCT
recipes-bsp: usbutils: Fix usb-devices command using busybox
ref-manual: add missing CVE_CHECK manifest variables
ref-manual: add missing EXTERNAL_KERNEL_DEVICETREE variable
ref-manual: add missing OPKGBUILDCMD variable
ref-manual: add missing TESTIMAGE_FAILED_QA_ARTIFACTS
ref-manual: devtool-reference: document missing commands
ref-manual: devtool-reference: refresh example outputs
ref-manual: faq: add q&a on class appends
ref-manual: introduce
CVE_CHECK_REPORT_PATCHEDvariableref-manual: merge patch-status-* to patch-status
ref-manual: release-process: add a reference to the doc’s release
ref-manual: release-process: refresh the current LTS releases
ref-manual: release-process: update releases.svg
ref-manual: release-process: update releases.svg with month after “Current”
ref-manual: structure.rst: document missing tmp/ dirs
ref-manual: variables: add SIGGEN_LOCKEDSIGS* variables
rootfs-postcommands.bbclass: make opkg status reproducible
rpm: fix expansion of %_libdir in macros
ruby: upgrade to 3.3.5
runqemu: Fix detection of -serial parameter
runqemu: keep generating tap devices
scripts/install-buildtools: Update to 5.0.3
sqlite3: upgrade to 3.45.3
styles: vocabularies: Yocto: add sstate
systemtap: fix systemtap-native build error on Fedora 40
sysvinit: take release tarballs from github
testexport: fallback for empty IMAGE_LINK_NAME
testimage: fallback for empty IMAGE_LINK_NAME
uboot-sign: fix counters in do_uboot_assemble_fitimage
vim: upgrade to 9.1.0764
virglrenderer: Add patch to fix -int-conversion build issue
webkitgtk: upgrade to 2.44.3
weston: backport patch to allow neatvnc < v0.9.0
wpa-supplicant: Patch security advisory 2024-2
xserver-xorg: upgrade to 21.1.14
Known Issues in Yocto-5.0.5
oeqa/runtime: thebeaglebone-yoctotarget fails the parselogs runtime test due to unexpected kernel error messages in the log (see bug 15624 on Bugzilla).
Contributors to Yocto-5.0.5
Aditya Tayade
Adrian Freihofer
Aleksandar Nikolic
Alexander Kanavin
Antonin Godard
Anuj Mittal
Bruce Ashfield
Claus Stovgaard
Deepesh Varatharajan
Deepthi Hemraj
Hiago De Franco
Hitendra Prajapati
Jaeyoon Jung
Jiaying Song
Jonas Gorski
Jose Quaresma
Joshua Watt
Julien Stephan
Jörg Sommer
Khem Raj
Konrad Weihmann
Lee Chee Yang
Louis Rannou
Macpaul Lin
Martin Jansa
Paul Barker
Paul Gerber
Peter Kjellerstedt
Peter Marko
Purushottam Choudhary
Richard Purdie
Robert Yang
Rohini Sangam
Ross Burton
Sergei Zhmylev
Shunsuke Tokumoto
Steve Sakoman
Teresa Remmet
Victor Kamensky
Vijay Anusuri
Wang Mingyu
Yi Zhao
Yogita Urade
Zahir Hussain
Repositories / Downloads for Yocto-5.0.5
poky
Repository Location: https://git.yoctoproject.org/poky
Branch: scarthgap
Tag: yocto-5.0.5
Git Revision: dce4163d42f7036ea216b52b9135968d51bec4c1
Release Artefact: poky-dce4163d42f7036ea216b52b9135968d51bec4c1
sha: ad35a965a284490a962f6854ace536b8795f96514e14bf5c79f91f6d76ac25d3
Download Locations: https://downloads.yoctoproject.org/releases/yocto/yocto-5.0.5/poky-dce4163d42f7036ea216b52b9135968d51bec4c1.tar.bz2 https://mirrors.kernel.org/yocto/yocto/yocto-5.0.5/poky-dce4163d42f7036ea216b52b9135968d51bec4c1.tar.bz2
openembedded-core
Repository Location: https://git.openembedded.org/openembedded-core
Branch: scarthgap
Tag: yocto-5.0.5
Git Revision: a051a066da2874b95680d0353dfa18c1d56b2670
Release Artefact: oecore-a051a066da2874b95680d0353dfa18c1d56b2670
sha: 16d252aade00161ade2692f41b2da3effeb1f41816a66db843bb1c5495125e93
Download Locations: https://downloads.yoctoproject.org/releases/yocto/yocto-5.0.5/oecore-a051a066da2874b95680d0353dfa18c1d56b2670.tar.bz2 https://mirrors.kernel.org/yocto/yocto/yocto-5.0.5/oecore-a051a066da2874b95680d0353dfa18c1d56b2670.tar.bz2
meta-mingw
Repository Location: https://git.yoctoproject.org/meta-mingw
Branch: scarthgap
Tag: yocto-5.0.5
Git Revision: acbba477893ef87388effc4679b7f40ee49fc852
Release Artefact: meta-mingw-acbba477893ef87388effc4679b7f40ee49fc852
sha: 3b7c2f475dad5130bace652b150367f587d44b391218b1364a8bbc430b48c54c
Download Locations: https://downloads.yoctoproject.org/releases/yocto/yocto-5.0.5/meta-mingw-acbba477893ef87388effc4679b7f40ee49fc852.tar.bz2 https://mirrors.kernel.org/yocto/yocto/yocto-5.0.5/meta-mingw-acbba477893ef87388effc4679b7f40ee49fc852.tar.bz2
bitbake
Repository Location: https://git.openembedded.org/bitbake/
Branch: 2.8
Tag: yocto-5.0.5
Git Revision: 377eba2361850adfb8ce7e761ef9c76be287f88c
Release Artefact: bitbake-377eba2361850adfb8ce7e761ef9c76be287f88c
sha: 4a5a35098eec719bbb879706d50e552a2b709295db4055c8050ae7dda1eb2994
Download Locations: https://downloads.yoctoproject.org/releases/yocto/yocto-5.0.5/bitbake-377eba2361850adfb8ce7e761ef9c76be287f88c.tar.bz2 https://mirrors.kernel.org/yocto/yocto/yocto-5.0.5/bitbake-377eba2361850adfb8ce7e761ef9c76be287f88c.tar.bz2
yocto-docs
Repository Location: https://git.yoctoproject.org/yocto-docs
Branch: scarthgap
Tag: yocto-5.0.5
Git Revision: e882cb3e5816d081eb05cb83488f286cca70e0c6
Release notes for Yocto-5.0.6 (Scarthgap)
Security Fixes in Yocto-5.0.6
acpica: Fix CVE-2024-24856
curl: Fix CVE-2024-9681
dropbear: Fix CVE-2023-48795
expat: Fix CVE-2024-50602
ffmpeg: Fix CVE-2023-49501, CVE-2023-49528, CVE-2023-50007, CVE-2024-7055 and CVE-2024-28661
glib-2.0: Fix CVE-2024-52533
ghostscript: Fix CVE-2024-46951, CVE-2024-46952, CVE-2024-46953, CVE-2024-46954, CVE-2024-46955 and CVE-2024-46956
gstreamer1.0: Ignore CVE-2024-0444
libpam: Fix CVE-2024-10041
libsndfile: Fix CVE-2024-50612
libsoup: Fix CVE-2024-52530, CVE-2024-52531 and CVE-2024-52532
ovmf: Fix CVE-2024-1298 and CVE-2024-38796
python3-zipp: Fix CVE-2024-5569
qemu: Fix CVE-2024-4693, CVE-2024-6505 and CVE-2024-7730
qemu: Ignore CVE-2024-6505
Fixes in Yocto-5.0.6
binutils: Add missing perl modules to RDEPENDS for nativesdk variant
binutils: stable 2.42 branch update
bitbake: Remove custom exception backtrace formatting
bitbake: fetch2/git: Use quote from shlex, not pipes
bitbake: fetch2: use persist_data context managers
bitbake: fetch/wget: Increase timeout to 100s from 30s
bitbake: persist_data: close connection in SQLTable __exit__
bitbake: runqueue: Fix performance of multiconfigs with large overlap
bitbake: runqueue: Fix scenetask processing performance issue
bitbake: runqueue: Optimise setscene loop processing
build-appliance-image: Update to scarthgap head revision
builder: set CVE_PRODUCT
cmake: Fix sporadic issues when determining compiler internals
cml1: do_diffconfig: Don’t override .config with .config.orig
contributor-guide: Remove duplicated words
dev-manual: bblock: use warning block instead of attention
dev-manual: document how to provide confs from layer.conf
do_package/sstate/sstatesig: Change timestamp clamping to hash output only
doc: Makefile: add support for xelatex
doc: Makefile: publish pdf and epub versions too
doc: Makefile: remove inkscape, replace by rsvg-convert
doc: add a download page for epub and pdf
doc: conf.py: add a bitbake_git extlink
doc: standards.md: add a section on admonitions
doc: sphinx-static: switchers.js.in: do not refer to URL_ROOT anymore
dropbear: backport fix for concurrent channel open/close
enchant2: fix do_fetch error
expat: upgrade to 2.6.4
gcc: backport patch to fix an issue with tzdata 2024b
ghostscript: upgrade to 10.04.0
glibc: stable 2.39 branch updates
groff: fix rare build race in hdtbl
libgcrypt: Fix building error with ‘-O2’ in sysroot path
libpam: drop cracklib from DEPENDS
libxml-parser-perl: fix do_fetch error
llvm: reduce size of -dbg package
lttng-ust: backport patch to fix cmake-multiple-shared-libraries build error
migration-guides: add release notes for 4.0.23 and 5.0.5
ninja: fix build with python 3.13
oeqa/runtime/ssh: Fix incorrect timeout fix
oeqa/runtime/ssh: Rework ssh timeout
oeqa/utils/gitarchive: Return tag name and improve exclude handling
package_rpm: Check if file exists before open()
package_rpm: restrict rpm to 4 threads
package_rpm: use zstd’s default compression level
poky.conf: bump version for 5.0.6
pseudo: Fix envp bug and add posix_spawn wrapper
python3-poetry-core: drop python3-six from RDEPENDS
python3-requests: upgrade to 2.32.2
python3-urllib3: upgrade to 2.2.2
qemu: upgrade to 8.2.7
qemurunner: Clean up serial_lock handling
ref-manual: classes: fix bin_package description
resulttool: Add –logfile-archive option to store mode
resulttool: Allow store to filter to specific revisions
resulttool: Clean up repoducible build logs
resulttool: Fix passthrough of –all files in store mode
resulttool: Handle ltp rawlogs as well as ptest
resulttool: Improve repo layout for oeselftest results
resulttool: Trim the precision of duration information
resulttool: Use single space indentation in json output
rootfs: Ensure run-postinsts is not uninstalled for read-only-rootfs-delayed-postinsts
rxvt-unicode.inc: disable the terminfo installation by setting TIC to :
sanity: check for working user namespaces
scripts/install-buildtools: Update to 5.0.5
selftest/reproducible: Clean up pathnames
selftest/reproducible: Drop rawlogs
shared-mime-info: drop itstool-native from DEPENDS
strace: download release tarballs from GitHub
systemd-boot: drop intltool-native from DEPENDS
systemd: drop intltool-native from DEPENDS
systemd: upgrade to 255.13
sysvinit: backport patch for fixing one issue of pidof
tcl: skip io-13.6 test case
toolchain-shar-extract.sh: exit when post-relocate-setup.sh fails
tune-cortexa32: set tune feature as armv8a
tzcode-native: upgrade to 2024b
tzdata: upgrade to 2024b
uboot-sign: fix concat_dtb arguments
udev-extraconf: fix network.sh script did not configure hotplugged interfaces
webkitgtk: fix erroneous use of unsuported DEBUG_LEVELFLAG variable
wireless-regdb: upgrade to 2024.10.07
Known Issues in Yocto-5.0.6
N/A
Contributors to Yocto-5.0.6
Thanks to the following people who contributed to this release:
Aleksandar Nikolic
Alexander Kanavin
Antonin Godard
Archana Polampalli
Bin Lan
Changqing Li
Chen Qi
Chris Laplante
Clayton Casciato
Deepthi Hemraj
Divya Chellam
Florian Kreutzer
Gassner, Tobias.ext
Guðni Már Gilbert
Harish Sadineni
Hitendra Prajapati
Hongxu Jia
Jagadeesh Krishnanjanappa
Jiaying Song
Jinfeng Wang
Joshua Watt
Lee Chee Yang
Markus Volk
Michael Opdenacker
Pavel Zhukov
Peter Marko
Philip Lorenz
Randy MacLeod
Regis Dargent
Richard Purdie
Robert Yang
Ross Burton
Soumya Sambu
Steve Sakoman
Talel BELHAJSALEM
Trevor Gamblin
Vijay Anusuri
Wang Mingyu
Yogita Urade
Repositories / Downloads for Yocto-5.0.6
poky
Repository Location: https://git.yoctoproject.org/poky
Branch: scarthgap
Tag: yocto-5.0.6
Git Revision: 2541a8171f91812a4b16e7dc4da0d77d2318a256
Release Artefact: poky-2541a8171f91812a4b16e7dc4da0d77d2318a256
sha: b77157596ae75d163387a08a317397a57ab8fa6cf4725f28e344fae3f69cca4d
Download Locations: https://downloads.yoctoproject.org/releases/yocto/yocto-5.0.6/poky-2541a8171f91812a4b16e7dc4da0d77d2318a256.tar.bz2 https://mirrors.kernel.org/yocto/yocto/yocto-5.0.6/poky-2541a8171f91812a4b16e7dc4da0d77d2318a256.tar.bz2
openembedded-core
Repository Location: https://git.openembedded.org/openembedded-core
Branch: scarthgap
Tag: yocto-5.0.6
Git Revision: 336eec6808710f260a5336ca8ca98139a80ccb14
Release Artefact: oecore-336eec6808710f260a5336ca8ca98139a80ccb14
sha: 38c4fa7e7e88c28361c012dd5baabe373e2ec3c8aba6194146768b146192cceb
Download Locations: https://downloads.yoctoproject.org/releases/yocto/yocto-5.0.6/oecore-336eec6808710f260a5336ca8ca98139a80ccb14.tar.bz2 https://mirrors.kernel.org/yocto/yocto/yocto-5.0.6/oecore-336eec6808710f260a5336ca8ca98139a80ccb14.tar.bz2
meta-mingw
Repository Location: https://git.yoctoproject.org/meta-mingw
Branch: scarthgap
Tag: yocto-5.0.6
Git Revision: acbba477893ef87388effc4679b7f40ee49fc852
Release Artefact: meta-mingw-acbba477893ef87388effc4679b7f40ee49fc852
sha: 3b7c2f475dad5130bace652b150367f587d44b391218b1364a8bbc430b48c54c
Download Locations: https://downloads.yoctoproject.org/releases/yocto/yocto-5.0.6/meta-mingw-acbba477893ef87388effc4679b7f40ee49fc852.tar.bz2 https://mirrors.kernel.org/yocto/yocto/yocto-5.0.6/meta-mingw-acbba477893ef87388effc4679b7f40ee49fc852.tar.bz2
bitbake
Repository Location: https://git.openembedded.org/bitbake
Branch: 2.8
Tag: yocto-5.0.6
Git Revision: f40a3a477d5241b697bf2fb030dd804c1ff5839f
Release Artefact: bitbake-f40a3a477d5241b697bf2fb030dd804c1ff5839f
sha: dbfc056c7408a5547f624799621ab1261a05685112e0922a88007723b1edbc87
Download Locations: https://downloads.yoctoproject.org/releases/yocto/yocto-5.0.6/bitbake-f40a3a477d5241b697bf2fb030dd804c1ff5839f.tar.bz2 https://mirrors.kernel.org/yocto/yocto/yocto-5.0.6/bitbake-f40a3a477d5241b697bf2fb030dd804c1ff5839f.tar.bz2
yocto-docs
Repository Location: https://git.yoctoproject.org/yocto-docs
Branch: scarthgap
Tag: yocto-5.0.6
Git Revision: TBD
Release notes for Yocto-5.0.7 (Scarthgap)
Security Fixes in Yocto-5.0.7
avahi: Fix CVE-2024-52616
binutils: Fix CVE-2024-53589
ffmpeg: Fix CVE-2024-35366, CVE-2024-35367 and CVE-2024-35368
gstreamer1.0-plugins-base: Fix CVE-2024-47538, CVE-2024-47541, CVE-2024-47542, CVE-2024-47600, CVE-2024-47607, CVE-2024-47615 and CVE-2024-47835
gstreamer1.0-plugins-good: Fix CVE-2024-47537, CVE-2024-47539, CVE-2024-47540, CVE-2024-47543, CVE-2024-47544, CVE-2024-47545, CVE-2024-47546, CVE-2024-47596, CVE-2024-47597, CVE-2024-47598, CVE-2024-47599, CVE-2024-47601, CVE-2024-47602, CVE-2024-47603, CVE-2024-47606, CVE-2024-47613, CVE-2024-47774, CVE-2024-47775, CVE-2024-47776, CVE-2024-47777, CVE-2024-47778 and CVE-2024-47834
gstreamer1.0: Ignore CVE-2024-47537, CVE-2024-47539, CVE-2024-47540, CVE-2024-47543, CVE-2024-47544, CVE-2024-47545, CVE-2024-47538, CVE-2024-47541, CVE-2024-47542, CVE-2024-47600, CVE-2024-47607, CVE-2024-47615, CVE-2024-47835, CVE-2024-47546, CVE-2024-47596, CVE-2024-47597, CVE-2024-47598, CVE-2024-47599, CVE-2024-47601, CVE-2024-47602, CVE-2024-47603, CVE-2024-47613, CVE-2024-47774, CVE-2024-47775, CVE-2024-47776, CVE-2024-47777, CVE-2024-47778 and CVE-2024-47834
libarchive: Fix CVE-2024-20696
libxml2: Fix CVE-2024-40896
linux-yocto/6.6: Fix CVE-2024-27059, CVE-2024-43098, CVE-2024-45828, CVE-2024-47141, CVE-2024-47143, CVE-2024-47704, CVE-2024-47809, CVE-2024-48873, CVE-2024-48875, CVE-2024-48881, CVE-2024-49863, CVE-2024-49864, CVE-2024-49866, CVE-2024-49867, CVE-2024-49868, CVE-2024-49870, CVE-2024-49871, CVE-2024-49874, CVE-2024-49875, CVE-2024-49877, CVE-2024-49878, CVE-2024-49879, CVE-2024-49881, CVE-2024-49882, CVE-2024-49883, CVE-2024-49884, CVE-2024-49886, CVE-2024-49889, CVE-2024-49890, CVE-2024-49892, CVE-2024-49894, CVE-2024-49895, CVE-2024-49896, CVE-2024-49900, CVE-2024-49901, CVE-2024-49902, CVE-2024-49903, CVE-2024-49905, CVE-2024-49907, CVE-2024-49912, CVE-2024-49913, CVE-2024-49924, CVE-2024-49925, CVE-2024-49927, CVE-2024-49929, CVE-2024-49930, CVE-2024-49931, CVE-2024-49933, CVE-2024-49935, CVE-2024-49936, CVE-2024-49937, CVE-2024-49938, CVE-2024-49939, CVE-2024-49944, CVE-2024-49946, CVE-2024-49947, CVE-2024-49948, CVE-2024-49949, CVE-2024-49950, CVE-2024-49951, CVE-2024-49952, CVE-2024-49953, CVE-2024-49954, CVE-2024-49955, CVE-2024-49957, CVE-2024-49958, CVE-2024-49959, CVE-2024-49960, CVE-2024-49961, CVE-2024-49962, CVE-2024-49963, CVE-2024-49965, CVE-2024-49966, CVE-2024-49969, CVE-2024-49973, CVE-2024-49975, CVE-2024-49976, CVE-2024-49977, CVE-2024-49978, CVE-2024-49980, CVE-2024-49981, CVE-2024-49982, CVE-2024-49983, CVE-2024-49985, CVE-2024-49986, CVE-2024-49987, CVE-2024-49988, CVE-2024-49989, CVE-2024-49991, CVE-2024-49992, CVE-2024-49995, CVE-2024-49996, CVE-2024-49997, CVE-2024-50000, CVE-2024-50001, CVE-2024-50002, CVE-2024-50003, CVE-2024-50005, CVE-2024-50006, CVE-2024-50007, CVE-2024-50008, CVE-2024-50012, CVE-2024-50013, CVE-2024-50015, CVE-2024-50016, CVE-2024-50019, CVE-2024-50022, CVE-2024-50023, CVE-2024-50024, CVE-2024-50026, CVE-2024-50029, CVE-2024-50031, CVE-2024-50032, CVE-2024-50033, CVE-2024-50035, CVE-2024-50036, CVE-2024-50038, CVE-2024-50039, CVE-2024-50040, CVE-2024-50041, CVE-2024-50044, CVE-2024-50045, CVE-2024-50046, CVE-2024-50047, CVE-2024-50048, CVE-2024-50049, CVE-2024-50051, CVE-2024-50055, CVE-2024-50057, CVE-2024-50058, CVE-2024-50059, CVE-2024-50060, CVE-2024-50061, CVE-2024-50062, CVE-2024-50063, CVE-2024-50064, CVE-2024-50065, CVE-2024-50066, CVE-2024-50069, CVE-2024-50070, CVE-2024-50072, CVE-2024-50073, CVE-2024-50074, CVE-2024-50075, CVE-2024-50076, CVE-2024-50077, CVE-2024-50078, CVE-2024-50080, CVE-2024-50082, CVE-2024-50083, CVE-2024-50084, CVE-2024-50085, CVE-2024-50086, CVE-2024-50087, CVE-2024-50088, CVE-2024-50093, CVE-2024-50095, CVE-2024-50096, CVE-2024-50098, CVE-2024-50099, CVE-2024-50101, CVE-2024-50103, CVE-2024-50108, CVE-2024-50110, CVE-2024-50111, CVE-2024-50112, CVE-2024-50115, CVE-2024-50116, CVE-2024-50117, CVE-2024-50120, CVE-2024-50121, CVE-2024-50124, CVE-2024-50125, CVE-2024-50126, CVE-2024-50127, CVE-2024-50128, CVE-2024-50130, CVE-2024-50131, CVE-2024-50133, CVE-2024-50134, CVE-2024-50135, CVE-2024-50136, CVE-2024-50139, CVE-2024-50140, CVE-2024-50141, CVE-2024-50142, CVE-2024-50143, CVE-2024-50145, CVE-2024-50147, CVE-2024-50148, CVE-2024-50150, CVE-2024-50151, CVE-2024-50152, CVE-2024-50153, CVE-2024-50154, CVE-2024-50155, CVE-2024-50156, CVE-2024-50158, CVE-2024-50159, CVE-2024-50160, CVE-2024-50162, CVE-2024-50163, CVE-2024-50164, CVE-2024-50166, CVE-2024-50167, CVE-2024-50168, CVE-2024-50169, CVE-2024-50170, CVE-2024-50171, CVE-2024-50172, CVE-2024-50175, CVE-2024-50176, CVE-2024-50179, CVE-2024-50180, CVE-2024-50181, CVE-2024-50182, CVE-2024-50183, CVE-2024-50184, CVE-2024-50185, CVE-2024-50186, CVE-2024-50187, CVE-2024-50188, CVE-2024-50189, CVE-2024-50191, CVE-2024-50192, CVE-2024-50193, CVE-2024-50194, CVE-2024-50195, CVE-2024-50196, CVE-2024-50198, CVE-2024-50201, CVE-2024-50202, CVE-2024-50205, CVE-2024-50208, CVE-2024-50209, CVE-2024-50211, CVE-2024-50215, CVE-2024-50222, CVE-2024-50223, CVE-2024-50224, CVE-2024-50226, CVE-2024-50229, CVE-2024-50230, CVE-2024-50231, CVE-2024-50232, CVE-2024-50233, CVE-2024-50234, CVE-2024-50235, CVE-2024-50236, CVE-2024-50237, CVE-2024-50239, CVE-2024-50240, CVE-2024-50242, CVE-2024-50243, CVE-2024-50244, CVE-2024-50245, CVE-2024-50246, CVE-2024-50247, CVE-2024-50248, CVE-2024-50249, CVE-2024-50250, CVE-2024-50251, CVE-2024-50252, CVE-2024-50255, CVE-2024-50256, CVE-2024-50257, CVE-2024-50258, CVE-2024-50259, CVE-2024-50261, CVE-2024-50262, CVE-2024-50264, CVE-2024-50265, CVE-2024-50267, CVE-2024-50268, CVE-2024-50269, CVE-2024-50271, CVE-2024-50272, CVE-2024-50273, CVE-2024-50275, CVE-2024-50276, CVE-2024-50278, CVE-2024-50279, CVE-2024-50282, CVE-2024-50283, CVE-2024-50284, CVE-2024-50285, CVE-2024-50286, CVE-2024-50287, CVE-2024-50292, CVE-2024-50296, CVE-2024-50298, CVE-2024-50299, CVE-2024-50300, CVE-2024-50301, CVE-2024-50302, CVE-2024-53042, CVE-2024-53043, CVE-2024-53046, CVE-2024-53047, CVE-2024-53052, CVE-2024-53055, CVE-2024-53057, CVE-2024-53058, CVE-2024-53059, CVE-2024-53060, CVE-2024-53061, CVE-2024-53063, CVE-2024-53066, CVE-2024-53068, CVE-2024-53072, CVE-2024-53076, CVE-2024-53079, CVE-2024-53081, CVE-2024-53082, CVE-2024-53083, CVE-2024-53088, CVE-2024-53091, CVE-2024-53093, CVE-2024-53094, CVE-2024-53096, CVE-2024-53099, CVE-2024-53100, CVE-2024-53101, CVE-2024-53103, CVE-2024-53108, CVE-2024-53109, CVE-2024-53110, CVE-2024-53112, CVE-2024-53113, CVE-2024-53119, CVE-2024-53120, CVE-2024-53121, CVE-2024-53122, CVE-2024-53123, CVE-2024-53126, CVE-2024-53127, CVE-2024-53129, CVE-2024-53130, CVE-2024-53131, CVE-2024-53134, CVE-2024-53135, CVE-2024-53138, CVE-2024-53139, CVE-2024-53140, CVE-2024-53141, CVE-2024-53142, CVE-2024-53145, CVE-2024-53146, CVE-2024-53150, CVE-2024-53151, CVE-2024-53154, CVE-2024-53155, CVE-2024-53156, CVE-2024-53157, CVE-2024-53161, CVE-2024-53165, CVE-2024-53166, CVE-2024-53168, CVE-2024-53171, CVE-2024-53173, CVE-2024-53175, CVE-2024-53180, CVE-2024-53188, CVE-2024-53191, CVE-2024-53200, CVE-2024-53202, CVE-2024-53208, CVE-2024-53210, CVE-2024-53213, CVE-2024-53215, CVE-2024-53217, CVE-2024-53224, CVE-2024-53226, CVE-2024-53227, CVE-2024-53230, CVE-2024-53231, CVE-2024-53237, CVE-2024-53239, CVE-2024-54683, CVE-2024-55916, CVE-2024-56369, CVE-2024-56538, CVE-2024-56551, CVE-2024-56567, CVE-2024-56568, CVE-2024-56569, CVE-2024-56572, CVE-2024-56574, CVE-2024-56575, CVE-2024-56577, CVE-2024-56578, CVE-2024-56579, CVE-2024-56581, CVE-2024-56587, CVE-2024-56593, CVE-2024-56595, CVE-2024-56596, CVE-2024-56598, CVE-2024-56600, CVE-2024-56601, CVE-2024-56602, CVE-2024-56603, CVE-2024-56604, CVE-2024-56605, CVE-2024-56606, CVE-2024-56611, CVE-2024-56613, CVE-2024-56614, CVE-2024-56615, CVE-2024-56617, CVE-2024-56622, CVE-2024-56623, CVE-2024-56626, CVE-2024-56627, CVE-2024-56629, CVE-2024-56631, CVE-2024-56634, CVE-2024-56635, CVE-2024-56640, CVE-2024-56642, CVE-2024-56643, CVE-2024-56648, CVE-2024-56649, CVE-2024-56650, CVE-2024-56651, CVE-2024-56653, CVE-2024-56654, CVE-2024-56657, CVE-2024-56658, CVE-2024-56659, CVE-2024-56660, CVE-2024-56662, CVE-2024-56663, CVE-2024-56664, CVE-2024-56667, CVE-2024-56670, CVE-2024-56672, CVE-2024-56675, CVE-2024-56687, CVE-2024-56688, CVE-2024-56689, CVE-2024-56692, CVE-2024-56694, CVE-2024-56698, CVE-2024-56704, CVE-2024-56708, CVE-2024-56710, CVE-2024-56715, CVE-2024-56716, CVE-2024-56717, CVE-2024-56718, CVE-2024-56720, CVE-2024-56722, CVE-2024-56723, CVE-2024-56724, CVE-2024-56725, CVE-2024-56726, CVE-2024-56727, CVE-2024-56728, CVE-2024-56729, CVE-2024-56739, CVE-2024-56741, CVE-2024-56744, CVE-2024-56745, CVE-2024-56746, CVE-2024-56747, CVE-2024-56748, CVE-2024-56751, CVE-2024-56752, CVE-2024-56754, CVE-2024-56755, CVE-2024-56756, CVE-2024-56760, CVE-2024-56763, CVE-2024-56765, CVE-2024-56767, CVE-2024-56769, CVE-2024-56770, CVE-2024-56774, CVE-2024-56776, CVE-2024-56777, CVE-2024-56778, CVE-2024-56779, CVE-2024-56780, CVE-2024-56781, CVE-2024-56783, CVE-2024-56785, CVE-2024-56786, CVE-2024-56787, CVE-2024-57798, CVE-2024-57807 and CVE-2024-57874
ofono: Fix CVE-2023-4232, CVE-2023-4235, CVE-2024-7539, CVE-2024-7540, CVE-2024-7541, CVE-2024-7542, CVE-2024-7543, CVE-2024-7544, CVE-2024-7545, CVE-2024-7546 and CVE-2024-7547
rsync: Fix CVE-2024-12084, CVE-2024-12085, CVE-2024-12086, CVE-2024-12087, CVE-2024-12088 and CVE-2024-12747
socat: Fix CVE-2024-54661
subversion: Fix CVE-2024-46901
wget: Fix CVE-2024-10524
Fixes in Yocto-5.0.7
bitbake: cooker: Make cooker ‘skiplist’ per-multiconfig/mc
bitbake: tests/fetch: Fix git shallow test failure with git >= 2.48
bitbake: ui/knotty: print log paths for failed tasks in summary
bitbake: ui/knotty: respect NO_COLOR & check for tty; rename print_hyperlink => format_hyperlink
bluez5: Revert “bluez5: remove configuration files from install task”
bluez5: backport patch to fix address type when loading keys
boost: fix do_fetch error
build-appliance-image: Update to scarthgap head revision
classes/nativesdk: also override TUNE_PKGARCH
classes/qemu: use tune to select QEMU_EXTRAOPTIONS, not package architecture
contributor-guide/submit-changes.rst: suggest to remove the git signature
cve-update-nvd2-native: Handle BB_NO_NETWORK and missing db
cve-update-nvd2-native: Tweak to work better with NFS DL_DIR
dev-manual/bmaptool.rst: correct command for bmaptool-native
dev-manual/bmaptool.rst: simplify and fix instructions
dev-manual: fix styling of references to bmaptool
docs: Gather dependencies in poky.yaml.in
docs: Update autobuilder URLs to valkyrie
docs: Update the documentation for SRCPV
gcc: Fix c++: tweak for Wrange-loop-construct
groff: Fix race issues for parallel build
libgfortran: fix buildpath QA issue
libxml2: Upgrade to 2.12.9
linux-yocto/6.6: bsp/genericarm64: disable ARM64_SME
linux-yocto/6.6: genericarm64.cfg: enable CONFIG_DMA_CMA
linux-yocto/6.6: update to v6.6.69
lttng-modules: fix sched_stat_runtime changed in Linux 6.6.66
migration-guides: add release notes for 5.0.6
oeqa/ssh: allow to retrieve raw, unformatted ouput
ovmf-native: remove .pyc files from install
poky.conf: add new tested distros
poky.conf: bump version for 5.0.7
poky.yaml.in: add missing locales dependency
poky.yaml.in: replace inkscape dependency by librsvg2-bin
populate_sdk_ext: write_local_conf add shutil import
pulseaudio: fix webrtc audio depdency
python3-requests: upgrade to 2.32.3
python3: Drop empty patch
python3: add dependency on -compression to -core
python3: upgrade to 3.12.7
ref-manual: move runtime-testing section to the test-manual
ref-manual: use standardized method accross both ubuntu and debian for locale install
ref-manual: SSTATE_MIRRORS/SOURCE_MIRROR_URL: add instructions for mirror authentication
reproducible-builds.rst: show how to build a single package
rust-target-config: Fix TARGET_C_INT_WIDTH with correct size
rust: Revert “rust: Add new varaible RUST_ENABLE_EXTRA_TOOLS”
rust: add reproducibility patch to eliminate host leakage
rust: build the default set of tools
rust: correctly link rust-snapshot into build/stage0
rust: use rust-snapshot binaries only in rust-native
sanity.bbclass: skip check_userns for non-local uid
scripts/install-buildtools: Update to 5.0.6
system-requirements.rst: add dependencies for pdf builds
system-requirements: add fedora 39 to supported distros
system-requirements: update list of supported distros
systemd: enable create-log-dirs
test-manual/reproducible-builds: fix reproducible links
Known Issues in Yocto-5.0.7
N/A
Contributors to Yocto-5.0.7
Thanks to the following people who contributed to this release:
Aleksandar Nikolic
Alexander Kanavin
Alexis Lothoré
Antonin Godard
Archana Polampalli
Bruce Ashfield
Catalin Popescu
Changqing Li
Chen Qi
Chris Laplante
Divya Chellam
Esben Haabendal
Guénaël Muller
Guðni Már Gilbert
Harish Sadineni
Hiago De Franco
Hitendra Prajapati
Jiaying Song
Khem Raj
Lee Chee Yang
Mark Hatle
Michael Opdenacker
Mikko Rapeli
Peter Marko
Richard Purdie
Robert Yang
Ross Burton
Soumya Sambu
Steve Sakoman
Sunil Dora
Trevor Gamblin
Xiangyu Chen
Yash Shinde
Zhang Peng
Zahir Hussain
Repositories / Downloads for Yocto-5.0.7
poky
Repository Location: https://git.yoctoproject.org/poky
Branch: scarthgap
Tag: yocto-5.0.7
Git Revision: 7dad83c7e5e9637c0ff5d5712409611fd4a14946
Release Artefact: poky-7dad83c7e5e9637c0ff5d5712409611fd4a14946
sha: ae688031b19b88582bb4a76d0525e3704b981ad1d21eb38a0873cd01dd9a4652
Download Locations: https://downloads.yoctoproject.org/releases/yocto/yocto-5.0.7/poky-7dad83c7e5e9637c0ff5d5712409611fd4a14946.tar.bz2 https://mirrors.kernel.org/yocto/yocto/yocto-5.0.7/poky-7dad83c7e5e9637c0ff5d5712409611fd4a14946.tar.bz2
openembedded-core
Repository Location: https://git.openembedded.org/openembedded-core
Branch: scarthgap
Tag: yocto-5.0.7
Git Revision: 62cb12967391db709315820d48853ffa4c6b4740
Release Artefact: oecore-62cb12967391db709315820d48853ffa4c6b4740
sha: bc45429df1805445b678f1b0ed6ce017edfac38c7226dce92ce393b3ef311f95
Download Locations: https://downloads.yoctoproject.org/releases/yocto/yocto-5.0.7/oecore-62cb12967391db709315820d48853ffa4c6b4740.tar.bz2 https://mirrors.kernel.org/yocto/yocto/yocto-5.0.7/oecore-62cb12967391db709315820d48853ffa4c6b4740.tar.bz2
meta-mingw
Repository Location: https://git.yoctoproject.org/meta-mingw
Branch: scarthgap
Tag: yocto-5.0.7
Git Revision: acbba477893ef87388effc4679b7f40ee49fc852
Release Artefact: meta-mingw-acbba477893ef87388effc4679b7f40ee49fc852
sha: 3b7c2f475dad5130bace652b150367f587d44b391218b1364a8bbc430b48c54c
Download Locations: https://downloads.yoctoproject.org/releases/yocto/yocto-5.0.7/meta-mingw-acbba477893ef87388effc4679b7f40ee49fc852.tar.bz2 https://mirrors.kernel.org/yocto/yocto/yocto-5.0.7/meta-mingw-acbba477893ef87388effc4679b7f40ee49fc852.tar.bz2
bitbake
Repository Location: https://git.openembedded.org/bitbake
Branch: 2.8
Tag: yocto-5.0.7
Git Revision: aa0e540fc31a1c26839efd2c7785a751ce24ebfb
Release Artefact: bitbake-aa0e540fc31a1c26839efd2c7785a751ce24ebfb
sha: 169b68ed7d5e55015b1c35a82d35efaa25c87cba4722c85e66514a15d31e1d28
Download Locations: https://downloads.yoctoproject.org/releases/yocto/yocto-5.0.7/bitbake-aa0e540fc31a1c26839efd2c7785a751ce24ebfb.tar.bz2 https://mirrors.kernel.org/yocto/yocto/yocto-5.0.7/bitbake-aa0e540fc31a1c26839efd2c7785a751ce24ebfb.tar.bz2
yocto-docs
Repository Location: https://git.yoctoproject.org/yocto-docs
Branch: scarthgap
Tag: yocto-5.0.7
Git Revision: bb9e018adcc10c642f87d0b95432783b5eb8057b
Release notes for Yocto-5.0.8 (Scarthgap)
Security Fixes in Yocto-5.0.8
binutils: Fix CVE-2025-0840
curl: Ignore CVE-2025-0725
elfutils: Fix CVE-2025-1352, CVE-2025-1365 and CVE-2025-1372
ffmpeg: Fix CVE-2024-35365, CVE-2024-35369, CVE-2024-36613, CVE-2024-36616, CVE-2024-36617, CVE-2024-36618, CVE-2024-36619, CVE-2025-0518, CVE-2025-22919, CVE-2025-22921 and CVE-2025-25473
glibc: Fix CVE-2025-0395
gnutls: Fix CVE-2024-12243
go: Fix CVE-2024-45336, CVE-2024-45341 and CVE-2025-22866
gstreamer1.0-rtsp-server: Fix CVE-2024-44331
libcap: Fix CVE-2025-1390
libtasn1: Fix CVE-2024-12133
libxml2: Fix CVE-2024-56171 and CVE-2025-24928
linux-yocto/6.6: Fix CVE-2024-36476, CVE-2024-53179, CVE-2024-56582, CVE-2024-56703, CVE-2024-57801, CVE-2024-57802, CVE-2024-57841, CVE-2024-57882, CVE-2024-57887, CVE-2024-57890, CVE-2024-57892, CVE-2024-57895, CVE-2024-57896, CVE-2024-57900, CVE-2024-57901, CVE-2024-57902, CVE-2024-57906, CVE-2024-57907, CVE-2024-57908, CVE-2024-57910, CVE-2024-57911, CVE-2024-57912, CVE-2024-57913, CVE-2024-57916, CVE-2024-57922, CVE-2024-57925, CVE-2024-57926, CVE-2024-57933, CVE-2024-57938, CVE-2024-57939, CVE-2024-57940, CVE-2024-57949, CVE-2024-57951, CVE-2025-21631, CVE-2025-21636, CVE-2025-21637, CVE-2025-21638, CVE-2025-21639, CVE-2025-21640, CVE-2025-21642, CVE-2025-21652, CVE-2025-21658, CVE-2025-21665, CVE-2025-21666, CVE-2025-21667, CVE-2025-21669, CVE-2025-21670, CVE-2025-21671, CVE-2025-21673, CVE-2025-21674, CVE-2025-21675, CVE-2025-21676, CVE-2025-21680, CVE-2025-21681, CVE-2025-21683, CVE-2025-21684, CVE-2025-21687, CVE-2025-21689, CVE-2025-21690, CVE-2025-21692, CVE-2025-21694, CVE-2025-21697 and CVE-2025-21699
openssh: Fix CVE-2025-26466
openssl: Fix CVE-2024-9143, CVE-2024-12797 and CVE-2024-13176
pyhton3: Fix CVE-2024-12254 and CVE-2025-0938
subversion: Ignore CVE-2024-45720
u-boot: Fix CVE-2024-57254, CVE-2024-57255, CVE-2024-57256, CVE-2024-57257, CVE-2024-57258 and CVE-2024-57259
vim: Fix CVE-2025-22134 and CVE-2025-24014
xwayland: Fix CVE-2024-9632, CVE-2025-26594, CVE-2025-26595, CVE-2025-26596, CVE-2025-26597, CVE-2025-26598, CVE-2025-26599, CVE-2025-26600 and CVE-2025-26601
Fixes in Yocto-5.0.8
base-files: Drop /bin/sh dependency
bind: upgrade to 9.18.33
binutils: File name too long causing failure to open temporary head file in dlltool
binutils: stable 2.42 branch update
bitbake: bblayers/query: Fix using “removeprefix” string method
bitbake: bitbake-diffsigs: fix handling when finding only a single sigfile
bitbake: data_smart.py: clear expand_cache in _setvar_update_overridevars
bitbake: data_smart.py: remove unnecessary ? from __expand_var_regexp__
bitbake: data_smart.py: simple clean up
build-appliance-image: Update to scarthgap head revision
ccache.conf: Add include_file_ctime to sloppiness
cmake: apply parallel build settings to ptest tasks
contributor-guide/submit-changes: add policy on AI generated code
dev-manual/building: document the initramfs-framework recipe
devtool: ide-sdk recommend DEBUG_BUILD
devtool: ide-sdk remove the plugin from eSDK installer
devtool: ide-sdk sort cmake preset
devtool: modify support debug-builds
docs: Add favicon for the documentation html
docs: Fix typo in standards.md
docs: Remove all mention of core-image-lsb
docs: vulnerabilities/classes: remove references to cve-check text format
files: Amend overlayfs unit descriptions with path information
files: overlayfs-create-dirs: Improve mount unit dependency
glibc: stable 2.39 branch updates
gnupg: upgrade to 2.4.5
go: upgrade 1.22.12
icu: remove host references in nativesdk to fix reproducibility
libtasn1: upgrade to 4.20.0
libxml2: upgrade to 2.12.10
linux-yocto/6.6: upgrade to v6.6.75
meta: Enable ‘-o pipefail’ for the SDK installer
migration-guides: add release notes for 4.0.24, 4.0.25 and 5.0.7
oe-selftest: devtool ide-sdk use modify debug-build
oeqa/sdk/context: fix for gtk3 test failure during do_testsdk
oeqa/selftest/rust: skip on all MIPS platforms
openssl: upgrade to 3.2.4
pkg-config-native: pick additional search paths from $EXTRA_NATIVE_PKGCONFIG_PATH
poky.conf: add ubuntu2404 to SANITY_TESTED_DISTROS
poky.conf: bump version for 5.0.8
ppp: Revert lock path to /var/lock
python3-setuptools-scm: respect GIT_CEILING_DIRECTORIES
python3: upgrade to 3.12.9
qemu: Do not define sched_attr with glibc >= 2.41
ref-manual/faq: add q&a on systemd as default
ref-manual: Add missing variable IMAGE_ROOTFS_MAXSIZE
ref-manual: don’t refer to poky-lsb
ref-manual: remove OE_IMPORTS
rust-common.bbclass: soft assignment for RUSTLIB path
rust: fix for rust multilib sdk configuration
rust: remove redundant cargo config file
scripts/install-buildtools: Update to 5.0.7
sdk-manual: extensible.rst: devtool ide-sdk improve
sdk-manual: extensible.rst: update devtool ide-sdk
selftest/rust: correctly form the PATH environment variable
systemd: add libpcre2 as RRECOMMENDS if pcre2 is enabled
systemd: upgrade to 255.17
test-manual/ptest: link to common framework ptest classes
tzcode-native: Fix compiler setting from 2023d version
tzdata/tzcode-native: upgrade to 2025a
u-boot: kernel-fitimage: Fix dependency loop if UBOOT_SIGN_ENABLE and UBOOT_ENV enabled
u-boot: kernel-fitimage: Restore FIT_SIGN_INDIVIDUAL=”1” behavior
uboot-config: fix devtool modify with kernel-fitimage
vim: upgrade to 9.1.1043
Known Issues in Yocto-5.0.8
N/A
Contributors to Yocto-5.0.8
Thanks to the following people who contributed to this release:
Adrian Freihofer
Aleksandar Nikolic
Alessio Cascone
Alexander Kanavin
Alexis Cellier
Antonin Godard
Archana Polampalli
Bruce Ashfield
Chen Qi
Deepesh Varatharajan
Divya Chellam
Enrico Jörns
Esben Haabendal
Etienne Cordonnier
Fabio Berton
Guðni Már Gilbert
Harish Sadineni
Hitendra Prajapati
Hongxu Jia
Jiaying Song
Joerg Schmidt
Johannes Schneider
Khem Raj
Lee Chee Yang
Marek Vasut
Marta Rybczynska
Moritz Haase
Oleksandr Hnatiuk
Pedro Ferreira
Peter Marko
Poonam Jadhav
Priyal Doshi
Ross Burton
Simon A. Eugster
Steve Sakoman
Vijay Anusuri
Wang Mingyu
Weisser, Pascal
Repositories / Downloads for Yocto-5.0.8
poky
Repository Location: https://git.yoctoproject.org/poky
Branch: scarthgap
Tag: yocto-5.0.8
Git Revision: dc4827b3660bc1a03a2bc3b0672615b50e9137ff
Release Artefact: poky-dc4827b3660bc1a03a2bc3b0672615b50e9137ff
sha: ace7264e16e18ed02ef0ad2935fa10b5fad2c4de38b2356f4192b38ef2184504
Download Locations: https://downloads.yoctoproject.org/releases/yocto/yocto-5.0.8/poky-dc4827b3660bc1a03a2bc3b0672615b50e9137ff.tar.bz2 https://mirrors.kernel.org/yocto/yocto/yocto-5.0.8/poky-dc4827b3660bc1a03a2bc3b0672615b50e9137ff.tar.bz2
openembedded-core
Repository Location: https://git.openembedded.org/openembedded-core
Branch: scarthgap
Tag: yocto-5.0.8
Git Revision: cd2b6080a4c0f2ed2c9939ec0b87763aef595048
Release Artefact: oecore-cd2b6080a4c0f2ed2c9939ec0b87763aef595048
sha: 14c7cd5c62a96ceb9c2141164ea0f087fdbaed99ca3e9a722977a3f12d6381f6
Download Locations: https://downloads.yoctoproject.org/releases/yocto/yocto-5.0.8/oecore-cd2b6080a4c0f2ed2c9939ec0b87763aef595048.tar.bz2 https://mirrors.kernel.org/yocto/yocto/yocto-5.0.8/oecore-cd2b6080a4c0f2ed2c9939ec0b87763aef595048.tar.bz2
meta-mingw
Repository Location: https://git.yoctoproject.org/meta-mingw
Branch: scarthgap
Tag: yocto-5.0.8
Git Revision: bd9fef71ec005be3c3a6d7f8b99d8116daf70c4f
Release Artefact: meta-mingw-bd9fef71ec005be3c3a6d7f8b99d8116daf70c4f
sha: ab073def6487f237ac125d239b3739bf02415270959546b6b287778664f0ae65
Download Locations: https://downloads.yoctoproject.org/releases/yocto/yocto-5.0.8/meta-mingw-bd9fef71ec005be3c3a6d7f8b99d8116daf70c4f.tar.bz2 https://mirrors.kernel.org/yocto/yocto/yocto-5.0.8/meta-mingw-bd9fef71ec005be3c3a6d7f8b99d8116daf70c4f.tar.bz2
bitbake
Repository Location: https://git.openembedded.org/bitbake
Branch: 2.8
Tag: yocto-5.0.8
Git Revision: 7375d32e8c1af20c51abec4eb3b072b4ca58b239
Release Artefact: bitbake-7375d32e8c1af20c51abec4eb3b072b4ca58b239
sha: 13dffbc162c5b6e2c95fa72936a430b9a542d52d81d502a5d0afc592fbf4a16b
Download Locations: https://downloads.yoctoproject.org/releases/yocto/yocto-5.0.8/bitbake-7375d32e8c1af20c51abec4eb3b072b4ca58b239.tar.bz2 https://mirrors.kernel.org/yocto/yocto/yocto-5.0.8/bitbake-7375d32e8c1af20c51abec4eb3b072b4ca58b239.tar.bz2
yocto-docs
Repository Location: https://git.yoctoproject.org/yocto-docs
Branch: scarthgap
Tag: yocto-5.0.8
Git Revision: 7d3cce5b962ca9f73b29affceb7ebc6710627739
Release notes for Yocto-5.0.9 (Scarthgap)
Security Fixes in Yocto-5.0.9
binutils: Fix CVE-2024-57360, CVE-2025-1176, CVE-2025-1178 and CVE-2025-1181
expat: Fix CVE-2024-8176
freetype: Fix CVE-2025-27363
ghostscript: Fix CVE-2025-27830, CVE-2025-27831, CVE-2025-27832, CVE-2025-27833, CVE-2025-27833, CVE-2025-27834, CVE-2025-27835 and CVE-2025-27836
go: fix CVE-2025-22870 and CVE-2025-22871
grub: Fix CVE-2024-45781, CVE-2024-45774, CVE-2024-45775, CVE-2024-45776, CVE-2024-45777, CVE-2024-45778, CVE-2024-45779, CVE-2024-45780, CVE-2024-45782, CVE-2024-45783, CVE-2024-56737, CVE-2025-0622, CVE-2025-0624, CVE-2025-0677, CVE-2025-0678, CVE-2025-0684, CVE-2025-0685, CVE-2025-0686, CVE-2025-0689, CVE-2025-0690, CVE-2025-1118 and CVE-2025-1125
libarchive: Fix CVE-2024-20696, CVE-2024-48957, CVE-2024-48958, CVE-2025-1632 and CVE-2025-25724
libxslt: Fix CVE-2024-24855 and CVE-2024-55549
linux-yocto/6.6: Fix CVE-2024-54458, CVE-2024-57834, CVE-2024-57973, CVE-2024-57978, CVE-2024-57979, CVE-2024-57980, CVE-2024-57981, CVE-2024-57984, CVE-2024-57996, CVE-2024-57997, CVE-2024-58002, CVE-2024-58005, CVE-2024-58007, CVE-2024-58010, CVE-2024-58011, CVE-2024-58013, CVE-2024-58017, CVE-2024-58020, CVE-2024-58034, CVE-2024-58052, CVE-2024-58055, CVE-2024-58058, CVE-2024-58063, CVE-2024-58068, CVE-2024-58069, CVE-2024-58070, CVE-2024-58071, CVE-2024-58076, CVE-2024-58080, CVE-2024-58083, CVE-2024-58088, CVE-2025-21700, CVE-2025-21703, CVE-2025-21707, CVE-2025-21711, CVE-2025-21715, CVE-2025-21716, CVE-2025-21718, CVE-2025-21726, CVE-2025-21727, CVE-2025-21731, CVE-2025-21735, CVE-2025-21736, CVE-2025-21741, CVE-2025-21742, CVE-2025-21743, CVE-2025-21744, CVE-2025-21745, CVE-2025-21748, CVE-2025-21749, CVE-2025-21753, CVE-2025-21756, CVE-2025-21759, CVE-2025-21760, CVE-2025-21761, CVE-2025-21762, CVE-2025-21763, CVE-2025-21764, CVE-2025-21773, CVE-2025-21775, CVE-2025-21776, CVE-2025-21779, CVE-2025-21780, CVE-2025-21782, CVE-2025-21783, CVE-2025-21785, CVE-2025-21787, CVE-2025-21789, CVE-2025-21790, CVE-2025-21791, CVE-2025-21792, CVE-2025-21793, CVE-2025-21796, CVE-2025-21811, CVE-2025-21812, CVE-2025-21814, CVE-2025-21820, CVE-2025-21844, CVE-2025-21846, CVE-2025-21847, CVE-2025-21848, CVE-2025-21853, CVE-2025-21854, CVE-2025-21855, CVE-2025-21856, CVE-2025-21857, CVE-2025-21858, CVE-2025-21859, CVE-2025-21862, CVE-2025-21863, CVE-2025-21864, CVE-2025-21865, CVE-2025-21866, CVE-2025-21867, CVE-2025-21887, CVE-2025-21891, CVE-2025-21898, CVE-2025-21904, CVE-2025-21905, CVE-2025-21908, CVE-2025-21912, CVE-2025-21915, CVE-2025-21917, CVE-2025-21918, CVE-2025-21919, CVE-2025-21920, CVE-2025-21922, CVE-2025-21928, CVE-2025-21934, CVE-2025-21936, CVE-2025-21937, CVE-2025-21941, CVE-2025-21943, CVE-2025-21945, CVE-2025-21947, CVE-2025-21948, CVE-2025-21951, CVE-2025-21957, CVE-2025-21959, CVE-2025-21962, CVE-2025-21963, CVE-2025-21964, CVE-2025-21966, CVE-2025-21967, CVE-2025-21968, CVE-2025-21969, CVE-2025-21979, CVE-2025-21980, CVE-2025-21981, CVE-2025-21991 and CVE-2025-21993
mpg123: Fix CVE-2024-10573
ofono: Fix CVE-2024-7537
openssh: Fix CVE-2025-26465
puzzles: Ignore CVE-2024-13769, CVE-2024-13770 and CVE-2025-0837
qemu: Ignore CVE-2023-1386
ruby: Fix CVE-2025-27219 and CVE-2025-27220
rust-cross-canadian: Ignore CVE-2024-43402
vim: Fix CVE-2025-1215, CVE-2025-26603, CVE-2025-27423 and CVE-2025-29768
xserver-xorg: Fix CVE-2025-26594, CVE-2025-26595, CVE-2025-26596, CVE-2025-26597, CVE-2025-26598, CVE-2025-26599, CVE-2025-26600 and CVE-2025-26601
xz: Fix CVE-2025-31115
Fixes in Yocto-5.0.9
babeltrace2: extend to nativesdk
babeltrace: extend to nativesdk
bitbake: event/utils: Avoid deadlock from lock_timeout() and recursive events
bitbake: utils: Add signal blocking for lock_timeout
bitbake: utils: Print information about lock issue before exiting
bitbake: utils: Tweak lock_timeout logic
build-appliance-image: Update to scarthgap head revision
cve-check.bbclass: Mitigate symlink related error
cve-update-nvd2-native: add workaround for json5 style list
cve-update-nvd2-native: handle missing vulnStatus
gcc: remove paths to sysroot from configargs.h and checksum-options for gcc-cross-canadian
gcc: unify cleanup of include-fixed, apply to cross-canadian
ghostscript: upgrade to 10.05.0
grub: backport strlcpy function
grub: drop obsolete CVE statuses
icu: Adjust ICU_DATA_DIR path on big endian targets
kernel-arch: add macro-prefix-map in KERNEL_CC
libarchive: upgrade to 3.7.9
libxslt: upgrade to 1.1.43
linux-yocto/6.6: update to v6.6.84
mc: set ac_cv_path_ZIP to avoid buildpaths QA issues
mpg123: upgrade to 1.32.10
nativesdk-libtool: sanitize the script, remove buildpaths
openssl: rewrite ptest installation
overview-manual/concepts: remove PR from the build dir list
patch.py: set commituser and commitemail for addNote
poky.conf: bump version for 5.0.9
vim: Upgrade to 9.1.1198
xserver-xf86-config: add a configuration fragment to disable screen blanking
xserver-xf86-config: remove obsolete configuration files
xserver-xorg: upgrade to 21.1.16
xz: upgrade to 5.4.7
yocto-uninative: Update to 4.7 for glibc 2.41
Known Issues in Yocto-5.0.9
N/A
Contributors to Yocto-5.0.9
Thanks to the following people who contributed to this release:
Antonin Godard
Archana Polampalli
Ashish Sharma
Bruce Ashfield
Changqing Li
Denys Dmytriyenko
Divya Chellam
Hitendra Prajapati
Madhu Marri
Makarios Christakis
Martin Jansa
Michael Halstead
Niko Mauno
Oleksandr Hnatiuk
Peter Marko
Richard Purdie
Ross Burton
Sana Kazi
Stefan Mueller-Klieser
Steve Sakoman
Vijay Anusuri
Virendra Thakur
Vishwas Udupa
Wang Mingyu
Zhang Peng
Repositories / Downloads for Yocto-5.0.9
poky
Repository Location: https://git.yoctoproject.org/poky
Branch: scarthgap
Tag: yocto-5.0.9
Git Revision: bab0f9f62af9af580744948dd3240f648a99879a
Release Artefact: poky-bab0f9f62af9af580744948dd3240f648a99879a
sha: ee6811d9fb6c4913e19d6e3569f1edc8ccd793779b237520596506446a6b4531
Download Locations: https://downloads.yoctoproject.org/releases/yocto/yocto-5.0.9/poky-bab0f9f62af9af580744948dd3240f648a99879a.tar.bz2 https://mirrors.kernel.org/yocto/yocto/yocto-5.0.9/poky-bab0f9f62af9af580744948dd3240f648a99879a.tar.bz2
openembedded-core
Repository Location: https://git.openembedded.org/openembedded-core
Branch: scarthgap
Tag: yocto-5.0.9
Git Revision: 04038ecd1edd6592b826665a2b787387bb7074fa
Release Artefact: oecore-04038ecd1edd6592b826665a2b787387bb7074fa
sha: 6e201a4b486dfbdfcb7e96d83b962a205ec4764db6ad0e34bd623db18910eddb
Download Locations: https://downloads.yoctoproject.org/releases/yocto/yocto-5.0.9/oecore-04038ecd1edd6592b826665a2b787387bb7074fa.tar.bz2 https://mirrors.kernel.org/yocto/yocto/yocto-5.0.9/oecore-04038ecd1edd6592b826665a2b787387bb7074fa.tar.bz2
meta-mingw
Repository Location: https://git.yoctoproject.org/meta-mingw
Branch: scarthgap
Tag: yocto-5.0.9
Git Revision: bd9fef71ec005be3c3a6d7f8b99d8116daf70c4f
Release Artefact: meta-mingw-bd9fef71ec005be3c3a6d7f8b99d8116daf70c4f
sha: ab073def6487f237ac125d239b3739bf02415270959546b6b287778664f0ae65
Download Locations: https://downloads.yoctoproject.org/releases/yocto/yocto-5.0.9/meta-mingw-bd9fef71ec005be3c3a6d7f8b99d8116daf70c4f.tar.bz2 https://mirrors.kernel.org/yocto/yocto/yocto-5.0.9/meta-mingw-bd9fef71ec005be3c3a6d7f8b99d8116daf70c4f.tar.bz2
bitbake
Repository Location: https://git.openembedded.org/bitbake
Branch: 2.8
Tag: yocto-5.0.9
Git Revision: 696c2c1ef095f8b11c7d2eff36fae50f58c62e5e
Release Artefact: bitbake-696c2c1ef095f8b11c7d2eff36fae50f58c62e5e
sha: fc83f879cd6dd14b9b7eba0161fec23ecc191fed0fb00556ba729dceef6c145f
Download Locations: https://downloads.yoctoproject.org/releases/yocto/yocto-5.0.9/bitbake-696c2c1ef095f8b11c7d2eff36fae50f58c62e5e.tar.bz2 https://mirrors.kernel.org/yocto/yocto/yocto-5.0.9/bitbake-696c2c1ef095f8b11c7d2eff36fae50f58c62e5e.tar.bz2
yocto-docs
Repository Location: https://git.yoctoproject.org/yocto-docs
Branch: scarthgap
Tag: yocto-5.0.9
Git Revision: 56db4fd81f6235428bef9e46a61c11ca0ba89733
Release notes for Yocto-5.0.10 (Scarthgap)
Security Fixes in Yocto-5.0.10
binutils: Fix CVE-2025-1153, CVE-2025-1179, CVE-2025-1180 and CVE-2025-1182
connman: Fix CVE-2025-32366 and CVE-2025-32743
curl: Fix CVE-2024-11053 and CVE-2025-0167
elfutils: Fix CVE-2025-1371
ffmpeg: Fix CVE-2024-7055, CVE-2024-32230, CVE-2024-35366, CVE-2024-36613, CVE-2024-36616, CVE-2024-36617 and CVE-2024-36619
git: Fix CVE-2024-50349 and CVE-2024-52006
glib-2.0: fix CVE-2025-3360 and CVE-2025-4373
iputils: Fix CVE-2025-47268
libpam: Fix CVE-2024-10041
libsoup-2.4: Fix CVE-2024-52530, CVE-2024-52531, CVE-2024-52532, CVE-2025-32906, CVE-2025-32909, CVE-2025-32910, CVE-2025-32911, CVE-2025-32912, CVE-2025-32913, CVE-2025-32914 and CVE-2025-46420
libsoup: Fix CVE-2025-4476, CVE-2025-32906, CVE-2025-32909, CVE-2025-32910, CVE-2025-32911, CVE-2025-32912, CVE-2025-32913, CVE-2025-32914 and CVE-2025-46420
libxml2: Fix CVE-2025-32414 and CVE-2025-32415
openssh: Fix CVE-2025-32728
perl: Fix CVE-2024-56406
ppp: Fix CVE-2024-58250
python3-jinja2: Fix CVE-2024-56201, CVE-2024-56326 and CVE-2025-27516
ruby: Fix CVE-2025-27221
sqlite3: Fix CVE-2025-3277, CVE-2025-29087 and CVE-2025-29088
Fixes in Yocto-5.0.10
binutils: stable 2.42 branch updates
bluez5: add missing tools to noinst-tools package
bluez5: backport a patch to fix btmgmt -i
bluez5: make media control a PACKAGECONFIG option
build-appliance-image: Update to scarthgap head revision
buildtools-tarball: Make buildtools respects host CA certificates
buildtools-tarball: add envvars into BB_ENV_PASSTHROUGH_ADDITIONS
buildtools-tarball: move setting of envvars to respective envfile
contributor-guide/submit-changes: encourage patch version changelogs
cve-check.bbclass: Fix symlink handling also for text files
cve-update-nvd2-native: Revert “cve-update-nvd2-native: Tweak to work better with NFS DL_DIR”
dev-manual/sbom.rst: fix wrong build outputs
docs: Fix dead links that use the DISTRO macro
docs: conf.py: tweak SearchEnglish to be hyphen-friendly
docs:conf.py: define a manpage url
ffmpeg: upgrade to 6.1.2
git: upgrade to 2.44.3
glibc-y2038-tests: remove glibc-y2038-tests_2.39.bb recipe
glibc: Add single-threaded fast path to rand()
glibc: stable 2.39 branch updates
initscripts: add function log_success_msg/log_failure_msg/log_warning_msg
libatomic-ops: Update GITHUB_BASE_URI
manuals: remove repeated word
migration-guides: add release notes for 4.0.26, 5.0.8, 5.0.9
module.bbclass: add KBUILD_EXTRA_SYMBOLS to install
perl: upgrade to 5.38.4
perlcross: upgrade to 1.6.2
poky.conf: bump version for 5.0.10
poky.yaml: introduce DISTRO_LATEST_TAG
python3-jinja2: upgrade to 3.1.6
ref-manual/release-process: update releases.svg
ref-manual/variables.rst: HOST_CC_ARCH: fix wrong SDK reference
ref-manual/variables.rst: WATCHDOG_TIMEOUT: fix recipe name
ref-manual/variables.rst: add manpage links for toolchain variables
ref-manual/variables.rst: add missing documentation for BUILD_* variables
ref-manual/variables.rst: document HOST_*_ARCH variables
ref-manual/variables.rst: document INHIBIT_DEFAULT_RUST_DEPS
ref-manual/variables.rst: document INHIBIT_UPDATERCD_BBCLASS
ref-manual/variables.rst: document SSTATE_SKIP_CREATION
ref-manual/variables.rst: document WIC_CREATE_EXTRA_ARGS
ref-manual/variables.rst: document autotools class related variables
ref-manual/variables.rst: document missing SDK_*_ARCH variables
ref-manual/variables.rst: document the IMAGE_ROOTFS_MAXSIZE variable
ref-manual/variables.rst: document the INITRAMFS_MAXSIZE variable
ref-manual/variables.rst: improve the PKGV documentation
ref-manual/variables.rst: update ROOT_HOME documentation
ref-manual: kernel-fitimage.bbclass does not use SPL_SIGN_KEYNAME
scripts/install-buildtools: Update to 5.0.9
sphinx-lint: missing space after literal
sphinx-lint: trailing whitespace
sphinx-lint: unbalanced inline literal markup
systemd: Password agents shouldn’t be optional
systemd: upgrade to 255.18
test-manual/intro: remove Buildbot version used
tzdata/tzcode-native: upgrade 2025a -> 2025b
u-boot: ensure keys are generated before assembling U-Boot FIT image
util-linux: Add fix to isolate test fstab entries using CUSTOM_FSTAB
wic: bootimg-efi: Support + symbol in filenames
Known Issues in Yocto-5.0.10
There is an issue where the target libsoup-2.4 build may fail if apachectl is present on the build host. The issue only affects test binaries which aren’t actually used. The issue can be fixed by disabling the tests or updating to more recent changes on the scarthgap branch which fix this.
Contributors to Yocto-5.0.10
Thanks to the following people who contributed to this release:
Adrian Freihofer
Aleksandar Nikolic
Alexander Kanavin
Alon Bar-Lev
Alper Ak
Andrew Kreimer
Antonin Godard
Archana Polampalli
Ashish Sharma
Changqing Li
Christos Gavros
Deepesh Varatharajan
Divya Chellam
Divyanshu Rathore
Enrico Jörns
Etienne Cordonnier
Guðni Már Gilbert
Haixiao Yan
Harish Sadineni
Igor Opaniuk
Jeroen Hofstee
Lee Chee Yang
Nguyen Dat Tho
Niko Mauno
Peter Marko
Praveen Kumar
Priyal Doshi
Rogerio Guerra Borin
Shubham Kulkarni
Soumya Sambu
Steve Sakoman
Sunil Dora
Trevor Woerner
Vijay Anusuri
Virendra Thakur
Vyacheslav Yurkov
Yi Zhao
Yogita Urade
rajmohan r
Repositories / Downloads for Yocto-5.0.10
poky
Repository Location: https://git.yoctoproject.org/poky
Branch: scarthgap
Tag: yocto-5.0.10
Git Revision: ac257900c33754957b2696529682029d997a8f28
Release Artefact: poky-ac257900c33754957b2696529682029d997a8f28
sha: ddca7e54b331e78214bea65b346320d4fbcddf4b51103bfbbd9fc3960f32cdc7
Download Locations: https://downloads.yoctoproject.org/releases/yocto/yocto-5.0.10/poky-ac257900c33754957b2696529682029d997a8f28.tar.bz2 https://mirrors.kernel.org/yocto/yocto/yocto-5.0.10/poky-ac257900c33754957b2696529682029d997a8f28.tar.bz2
openembedded-core
Repository Location: https://git.openembedded.org/openembedded-core
Branch: scarthgap
Tag: yocto-5.0.10
Git Revision: d5342ffc570d47a723b18297d75bd2f63c2088db
Release Artefact: oecore-d5342ffc570d47a723b18297d75bd2f63c2088db
sha: daa62094f2327f4b3fbcc485e8964d1b86a4722f58fb37e0d8e8e9885094a262
Download Locations: https://downloads.yoctoproject.org/releases/yocto/yocto-5.0.10/oecore-d5342ffc570d47a723b18297d75bd2f63c2088db.tar.bz2 https://mirrors.kernel.org/yocto/yocto/yocto-5.0.10/oecore-d5342ffc570d47a723b18297d75bd2f63c2088db.tar.bz2
meta-mingw
Repository Location: https://git.yoctoproject.org/meta-mingw
Branch: scarthgap
Tag: yocto-5.0.10
Git Revision: bd9fef71ec005be3c3a6d7f8b99d8116daf70c4f
Release Artefact: meta-mingw-bd9fef71ec005be3c3a6d7f8b99d8116daf70c4f
sha: ab073def6487f237ac125d239b3739bf02415270959546b6b287778664f0ae65
Download Locations: https://downloads.yoctoproject.org/releases/yocto/yocto-5.0.10/meta-mingw-bd9fef71ec005be3c3a6d7f8b99d8116daf70c4f.tar.bz2 https://mirrors.kernel.org/yocto/yocto/yocto-5.0.10/meta-mingw-bd9fef71ec005be3c3a6d7f8b99d8116daf70c4f.tar.bz2
bitbake
Repository Location: https://git.openembedded.org/bitbake
Branch: 2.8
Tag: yocto-5.0.10
Git Revision: 696c2c1ef095f8b11c7d2eff36fae50f58c62e5e
Release Artefact: bitbake-696c2c1ef095f8b11c7d2eff36fae50f58c62e5e
sha: fc83f879cd6dd14b9b7eba0161fec23ecc191fed0fb00556ba729dceef6c145f
Download Locations: https://downloads.yoctoproject.org/releases/yocto/yocto-5.0.10/bitbake-696c2c1ef095f8b11c7d2eff36fae50f58c62e5e.tar.bz2 https://mirrors.kernel.org/yocto/yocto/yocto-5.0.10/bitbake-696c2c1ef095f8b11c7d2eff36fae50f58c62e5e.tar.bz2
yocto-docs
Repository Location: https://git.yoctoproject.org/yocto-docs
Branch: scarthgap
Tag: yocto-5.0.10
Git Revision: 3996388e337377bedc113d072a51fe9d68dd40c6
Release notes for Yocto-5.0.11 (Scarthgap)
Security Fixes in Yocto-5.0.11
binutils: Fix CVE-2025-5244 and CVE-2025-5245
busybox: Fix CVE-2022-48174
coreutils: Fix CVE-2025-5278
curl: Ignore CVE-2025-5025 if PACKAGECONFIG set with openssl
ffmpeg: Fix CVE-2025-1373
glibc: fix CVE-2025-4802 and CVE-2025-5702
gnupg: Fix CVE-2025-30258
go: Fix CVE-2025-4673
go: Ignore CVE-2024-3566
icu: Fix CVE-2025-5222
kea: Fix CVE-2025-32801, CVE-2025-32802 and CVE-2025-32803
libarchive: fix CVE-2025-5914, CVE-2025-5915, CVE-2025-5916, CVE-2025-5917 and CVE-2025-5918
libsoup-2.4: Fix CVE-2025-2784, CVE-2025-4476, CVE-2025-4945, CVE-2025-4948, CVE-2025-4969, CVE-2025-32050, CVE-2025-32052, CVE-2025-32053, CVE-2025-32907 and CVE-2025-46421
libsoup-3.4: Fix CVE-2025-2784, CVE-2025-4945, CVE-2025-4948, CVE-2025-4969, CVE-2025-32050, CVE-2025-32051, CVE-2025-32052, CVE-2025-32053, CVE-2025-32907, CVE-2025-32908 and CVE-2025-46421
libxml2: Fix CVE-2025-6021
linux-yocto-6.6: Fix CVE-2025-21995, CVE-2025-21996, CVE-2025-21997, CVE-2025-21999, CVE-2025-22001, CVE-2025-22003, CVE-2025-22004, CVE-2025-22005, CVE-2025-22007, CVE-2025-22009, CVE-2025-22010, CVE-2025-22014, CVE-2025-22018, CVE-2025-22020, CVE-2025-22027, CVE-2025-22033, CVE-2025-22035, CVE-2025-22038, CVE-2025-22040, CVE-2025-22041, CVE-2025-22054, CVE-2025-22056, CVE-2025-22063, CVE-2025-22066, CVE-2025-22080, CVE-2025-22081, CVE-2025-22088, CVE-2025-22097, CVE-2025-23136, CVE-2025-37785, CVE-2025-37800, CVE-2025-37801, CVE-2025-37803, CVE-2025-37805, CVE-2025-37838, CVE-2025-37893, CVE-2025-38152, CVE-2025-39728 and CVE-2025-39735
net-tools: Fix CVE-2025-46836
python3-setuptools: Fix CVE-2025-47273
python3-requests: fix CVE-2024-47081
python3-urllib3: Fix CVE-2025-50181
python3: Fix CVE 2024-12718 CVE 2025-4138 CVE 2025-4330 CVE 2025-4435 CVE-2025-4516 CVE 2025-4517
screen: fix CVE-2025-46802, CVE-2025-46804 and CVE-2025-46805
sudo: Fix CVE-2025-32462
xwayland: Fix CVE-2025-49175, CVE-2025-49176, CVE-2025-49177, CVE-2025-49178, CVE-2025-49179 and CVE-2025-49180
Fixes in Yocto-5.0.11
bitbake: ast: Change deferred inherits to happen per recipe
bitbake: fetch2: Avoid deprecation warning
bitbake: gcp.py: remove slow calls to gsutil stat
bitbake: toaster/tests/buildtest: Switch to new CDN
brief-yoctoprojectqs/ref-manual: Switch to new CDN
bsp-guide: update kernel version example to 6.12
bsp-guide: update all of section 1.8.2 to reflect current beaglebone conf file
bsp-guide: update lonely “4.12” kernel reference to “6.12”
build-appliance-image: Update to scarthgap head revision
cmake: Correctly handle cost data of tests with arbitrary chars in name
conf.py: improve SearchEnglish to handle terms with dots
docs: Clean up explanation of minimum required version numbers
docs: README: specify how to contribute instead of pointing at another file
docs: conf.py: silence SyntaxWarning on js_splitter_code
gcc: Upgrade to GCC 13.4
ghostscript: upgrade to 10.05.1
glibc: stable 2.39 branch updates (06a70769fd…)
gnupg: update to 2.4.8
gtk+: add missing libdrm dependency
kea: upgrade to 2.4.2
libpng: Add ptest
libsoup-2.4: fix do_compile failure
linux-yocto/6.6: fix beaglebone ethernet
linux-yocto/6.6: update to v6.6.96
local.conf.sample: Switch to new CDN
ltp: backport patch to fix compilation error for x86_64
migration-guides: add release notes for 4.0.27, 4.0.28, 5.0.10
minicom: correct the SRC_URI
nfs-utils: don’t use signals to shut down nfs server.
overview-manual/concepts.rst: fix sayhello hardcoded bindir
overview-manual: small number of pedantic cleanups
package: export debugsources in PKGDESTWORK as json
poky.conf: bump version for 5.0.11
python3-requests: upgrade to 2.32.4
python3: upgrade to 3.12.11
ref-manual: clarify KCONFIG_MODE default behaviour
ref-manual: classes: nativesdk: move note to appropriate section
ref-manual: classes: reword to clarify that native/nativesdk options are exclusive
ref-manual: document KERNEL_SPLIT_MODULES variable
scripts/install-buildtools: Update to 5.0.10
spdx: add option to include only compiled sources
sstatetests: Switch to new CDN
systemd: Rename systemd_v255.21 to systemd_255.21
systemd: upgrade to 255.21
tcf-agent: correct the SRC_URI
testimage: get real os-release file
tune-cortexr52: Remove aarch64 for ARM Cortex-R52
uboot: Allow for customizing installed/deployed file names
Known Issues in Yocto-5.0.11
N/A
Contributors to Yocto-5.0.11
Thanks to the following people who contributed to this release: - Aleksandar Nikolic - Andrew Fernandes - Antonin Godard - Archana Polampalli - Ashish Sharma - Bruce Ashfield - Carlos Sánchez de La Lama - Changqing Li - Chen Qi - Colin Pinnell McAllister - Daniel Turull - Deepesh Varatharajan - Divya Chellam - Dixit Parmar - Enrico Jörns - Etienne Cordonnier - Guocai He - Guðni Már Gilbert - Hitendra Prajapati - Jiaying Song - Lee Chee Yang - Moritz Haase - NeilBrown - Peter Marko - Poonam Jadhav - Praveen Kumar - Preeti Sachan - Quentin Schulz - Richard Purdie - Robert P. J. Day - Roland Kovacs - Ryan Eatmon - Sandeep Gundlupet Raju - Savvas Etairidis - Steve Sakoman - Victor Giraud - Vijay Anusuri - Virendra Thakur - Wang Mingyu - Yogita Urade
Repositories / Downloads for Yocto-5.0.11
poky
Repository Location: https://git.yoctoproject.org/poky
Branch: scarthgap
Tag: yocto-5.0.11
Git Revision: ae2d52758fc2fcb0ed996aa234430464ebf4b310
Release Artefact: poky-ae2d52758fc2fcb0ed996aa234430464ebf4b310
sha: 48dec434dd51e5c9c626abdccc334da300fa2b4975137d526f5df6703e5a930e
Download Locations: https://downloads.yoctoproject.org/releases/yocto/yocto-5.0.11/poky-ae2d52758fc2fcb0ed996aa234430464ebf4b310.tar.bz2 https://mirrors.kernel.org/yocto/yocto/yocto-5.0.11/poky-ae2d52758fc2fcb0ed996aa234430464ebf4b310.tar.bz2
openembedded-core
Repository Location: https://git.openembedded.org/openembedded-core
Branch: scarthgap
Tag: yocto-5.0.11
Git Revision: 7a59dc5ee6edd9596e87c2fbcd1f2594c06b3d1b
Release Artefact: oecore-7a59dc5ee6edd9596e87c2fbcd1f2594c06b3d1b
sha: fb50992a28298915fe195e327628d6d5872fd2dbc74189c2d840178cd860bb2e
Download Locations: https://downloads.yoctoproject.org/releases/yocto/yocto-5.0.11/oecore-7a59dc5ee6edd9596e87c2fbcd1f2594c06b3d1b.tar.bz2 https://mirrors.kernel.org/yocto/yocto/yocto-5.0.11/oecore-7a59dc5ee6edd9596e87c2fbcd1f2594c06b3d1b.tar.bz2
meta-mingw
Repository Location: https://git.yoctoproject.org/meta-mingw
Branch: scarthgap
Tag: yocto-5.0.11
Git Revision: bd9fef71ec005be3c3a6d7f8b99d8116daf70c4f
Release Artefact: meta-mingw-bd9fef71ec005be3c3a6d7f8b99d8116daf70c4f
sha: ab073def6487f237ac125d239b3739bf02415270959546b6b287778664f0ae65
Download Locations: https://downloads.yoctoproject.org/releases/yocto/yocto-5.0.11/meta-mingw-bd9fef71ec005be3c3a6d7f8b99d8116daf70c4f.tar.bz2 https://mirrors.kernel.org/yocto/yocto/yocto-5.0.11/meta-mingw-bd9fef71ec005be3c3a6d7f8b99d8116daf70c4f.tar.bz2
bitbake
Repository Location: https://git.openembedded.org/bitbake
Branch: 2.8
Tag: yocto-5.0.11
Git Revision: 139f61fe9eec221745184a14b3618d2dfa650b91
Release Artefact: bitbake-139f61fe9eec221745184a14b3618d2dfa650b91
sha: 86669d4220c50d35c0703f151571954ad9c6285cc91a870afbb878d2e555d2ca
Download Locations: https://downloads.yoctoproject.org/releases/yocto/yocto-5.0.11/bitbake-139f61fe9eec221745184a14b3618d2dfa650b91.tar.bz2 https://mirrors.kernel.org/yocto/yocto/yocto-5.0.11/bitbake-139f61fe9eec221745184a14b3618d2dfa650b91.tar.bz2
meta-yocto
Repository Location: https://git.yoctoproject.org/meta-yocto
Branch: scarthgap
Tag: yocto-5.0.11
Git Revision: 50e5c0d85d3775ac1294bdcd7f11deaa382c9d08
yocto-docs
Repository Location: https://git.yoctoproject.org/yocto-docs
Branch: scarthgap
Tag: yocto-5.0.11
Git Revision: 3f88cb85cca8f9128cfaab36882c4563457b03d9
Release notes for Yocto-5.0.12 (Scarthgap)
Security Fixes in Yocto-5.0.12
avahi: Fix CVE-2024-52615
binutils: Fix CVE-2025-7545 and CVE-2025-7546
busybox: Fix CVE-2023-39810
dropbear: Fix CVE-2025-47203
gdk-pixbuf: Fix CVE-2025-7345
git: Fix CVE-2025-27613, CVE-2025-27614, CVE-2025-46334, CVE-2025-46835, CVE-2025-48384, CVE-2025-48385 and CVE-2025-48386
glib-2.0: Ignore CVE-2025-4056
glibc: Fix CVE-2025-8058
gnutls: Fix CVE-2025-6395, CVE-2025-32988, CVE-2025-32989 and CVE-2025-32990
go: Ignore CVE-2025-0913
gstreamer1.0-plugins-base: Fix CVE-2025-47806 and CVE-2025-47808
gstreamer1.0-plugins-good: Fix CVE-2025-47183 and CVE-2025-47219
iputils: Fix CVE-2025-48964
libpam: Fix CVE-2025-6020
libxml2: Fix CVE-2025-6170, CVE-2025-49794, CVE-2025-49795 and CVE-2025-49796
libxml2: Ignore CVE-2025-8732
ncurses: Fix CVE-2025-6141
openssl: Fix CVE-2024-41996 and CVE-2025-27587
python3: Fix CVE-2025-8194
sqlite3: Fix CVE-2025-6965
sudo: Fix CVE-2025-32463
xserver-xorg: Fix CVE-2022-49737, CVE-2025-49175, CVE-2025-49176, CVE-2025-49177, CVE-2025-49178, CVE-2025-49179, CVE-2025-49180 and CVE-2025-49176
xz: Ignore CVE-2024-47611
Fixes in Yocto-5.0.12
bash: Stick to C17 std
bash: use -std=gnu17 also for native CFLAGS
binutils: stable 2.42 branch updates
bitbake: bitbake: runqueue: Verify mcdepends are valid
bitbake: test/fetch: Switch u-boot based test to use our own mirror
bitbake: utils: Optimise signal/sigmask performance
build-appliance-image: Update to scarthgap head revision
cairo: fix build with gcc-15 on host
cmake: Add PACKAGECONFIG option for debugger support
cve-check: Add missing call to exit_if_errors
dev-manual/start.rst: added missing command in Optimize your VHDX file using DiskPart
e2fsprogs: Fix build failure with gcc 15
git: Upgrade to 2.44.4
glibc: stable 2.39 branch updates
gnutls: patch read buffer overrun in the “pre_shared_key” extension
gnutls: patch reject zero-length version in certificate request
go-helloworld: fix license
kea: set correct permissions for /var/run/kea
linux-libc-headers: Fix invalid conversion in cn_proc.h
migration-guides: add release notes for 5.0.11
mtools: upgrade to 4.0.49
oe-debuginfod: add option for data storage
orc: set CVE_PRODUCT
overview-manual/yp-intro.rst: fix broken link to article
parted: Fix build with GCC 15
poky.conf: bump version for 5.0.12
python3: update CVE product
ref-manual/classes.rst: document the testexport class
ref-manual/system-requirements.rst: update supported distributions
ref-manual/variables.rst: document SPL_DTB_BINARY FIT_CONF_PREFIX variable
scripts/install-buildtools: Update to 5.0.11
sudo: upgrade to 1.9.17p1
timedated: wait for jobs before SetNTP response
variables.rst: remove references to obsolete tar packaging
xserver-xorg: upgrade to 21.1.18
Known Issues in Yocto-5.0.12
N/A
Contributors to Yocto-5.0.12
Thanks to the following people who contributed to this release: - Aleksandar Nikolic - Alexander Kanavin - Antonin Godard - Archana Polampalli - Daniel Turull - Deepesh Varatharajan - Erik Lindsten - Fabio Berton - Hitendra Prajapati - Jinfeng Wang - Joe Slater - Khem Raj - Lee Chee Yang - Marco Cavallini - Mark Hatle - Martin Jansa - Michal Seben - Nikhil R - Peter Marko - Philip Lorenz - Praveen Kumar - Quentin Schulz - Richard Purdie - Robert P. J. Day - Roland Kovacs - Steve Sakoman - Vijay Anusuri - Wang Mingyu - Yash Shinde - Yi Zhao - Zhang Peng
Repositories / Downloads for Yocto-5.0.12
poky
Repository Location: https://git.yoctoproject.org/poky
Branch: scarthgap
Tag: yocto-5.0.12
Git Revision: ec220ae083dba35c279192b2249ad03fe238446e
Release Artefact: poky-ec220ae083dba35c279192b2249ad03fe238446e
sha: a5f8c2ad491c59d0bdfb85f46a136b0ee66cfdd4359ab1ab9dac2430d0a52c17
Download Locations: https://downloads.yoctoproject.org/releases/yocto/yocto-5.0.12/poky-ec220ae083dba35c279192b2249ad03fe238446e.tar.bz2 https://mirrors.kernel.org/yocto/yocto/yocto-5.0.12/poky-ec220ae083dba35c279192b2249ad03fe238446e.tar.bz2
openembedded-core
Repository Location: https://git.openembedded.org/openembedded-core
Branch: scarthgap
Tag: yocto-5.0.12
Git Revision: 93c7489d843a0e46fe4fc685b356d0ae885300d7
Release Artefact: oecore-93c7489d843a0e46fe4fc685b356d0ae885300d7
sha: 49695592179cd777eee337d922aae354dad4ab503628f0344b1b53329900c4d9
Download Locations: https://downloads.yoctoproject.org/releases/yocto/yocto-5.0.12/oecore-93c7489d843a0e46fe4fc685b356d0ae885300d7.tar.bz2 https://mirrors.kernel.org/yocto/yocto/yocto-5.0.12/oecore-93c7489d843a0e46fe4fc685b356d0ae885300d7.tar.bz2
meta-mingw
Repository Location: https://git.yoctoproject.org/meta-mingw
Branch: scarthgap
Tag: yocto-5.0.12
Git Revision: bd9fef71ec005be3c3a6d7f8b99d8116daf70c4f
Release Artefact: meta-mingw-bd9fef71ec005be3c3a6d7f8b99d8116daf70c4f
sha: ab073def6487f237ac125d239b3739bf02415270959546b6b287778664f0ae65
Download Locations: https://downloads.yoctoproject.org/releases/yocto/yocto-5.0.12/meta-mingw-bd9fef71ec005be3c3a6d7f8b99d8116daf70c4f.tar.bz2 https://mirrors.kernel.org/yocto/yocto/yocto-5.0.12/meta-mingw-bd9fef71ec005be3c3a6d7f8b99d8116daf70c4f.tar.bz2
bitbake
Repository Location: https://git.openembedded.org/bitbake
Branch: 2.8
Tag: yocto-5.0.12
Git Revision: 982645110a19ebb94d519926a4e14c8a2a205cfd
Release Artefact: bitbake-982645110a19ebb94d519926a4e14c8a2a205cfd
sha: f8d777d322b8f05372d7ce75c67df2db2b7de3f64d5b7769b8051c507161245d
Download Locations: https://downloads.yoctoproject.org/releases/yocto/yocto-5.0.12/bitbake-982645110a19ebb94d519926a4e14c8a2a205cfd.tar.bz2 https://mirrors.kernel.org/yocto/yocto/yocto-5.0.12/bitbake-982645110a19ebb94d519926a4e14c8a2a205cfd.tar.bz2
meta-yocto
Repository Location: https://git.yoctoproject.org/meta-yocto
Branch: scarthgap
Tag: yocto-5.0.12
Git Revision: 82602cda1a89644d1acbe230a81c93e3fb5031c8
yocto-docs
Repository Location: https://git.yoctoproject.org/yocto-docs
Branch: scarthgap
Tag: yocto-5.0.12
Git Revision: dd665216fa578a1f2f268790d708c6a5d2912ecf
Release notes for Yocto-5.0.13 (Scarthgap)
Security Fixes in Yocto-5.0.13
busybox: Fix CVE-2025-46394
cups: Fix CVE-2025-58060 and CVE-2025-58364
curl: Fix CVE-2025-9086
dpkg: Fix CVE-2025-6297
expat: follow-up Fix CVE-2024-8176
ffmpeg: Fix CVE-2025-1594
ffmpeg: Ignore CVE-2023-49502, CVE-2023-50007, CVE-2023-50008, CVE-2023-50009, CVE-2023-50010, CVE-2024-31578, CVE-2024-31582 and CVE-2024-31585
ghostscript: Fix CVE-2025-59798, CVE-2025-59799 and CVE-2025-59800
glib-2.0: Fix CVE-2025-6052 and CVE-2025-7039
go-binary-native: Ignore CVE-2025-0913
go: Fix CVE-2025-4674, CVE-2025-47906 and CVE-2025-47907
grub2: Fix CVE-2024-56738
grub2: Ignore CVE-2024-2312
gstreamer1.0-plugins-bad: Fix CVE-2025-3887
gstreamer1.0-plugins-base: Fix CVE-2025-47807
gstreamer1.0-plugins-base: Ignore CVE-2025-47806 and CVE-2025-47808
gstreamer1.0-plugins-good: Ignore CVE-2025-47183 and CVE-2025-47219
gstreamer1.0: Ignore CVE-2025-2759
libpam: Fix CVE-2024-10963
libxslt: Fix CVE-2025-7424
openssl: Fix CVE-2025-9230, CVE-2025-9231 and CVE-2025-9232
pulseaudio: Ignore CVE-2024-11586
qemu: Ignore CVE-2024-7730
tiff: Fix CVE-2025-9900
tiff: Ignore CVE-2024-13978, CVE-2025-8176, CVE-2025-8177, CVE-2025-8534 and CVE-2025-8851
vim: Fix CVE-2025-9389
wpa-supplicant: Fix CVE-2022-37660
Fixes in Yocto-5.0.13
binutils: fix build with gcc-15
bitbake: Use a “fork” multiprocessing context
bitbake: bitbake: Bump version to 2.8.1
build-appliance-image: Update to scarthgap head revision
buildtools-tarball: fix unbound variable issues under ‘set -u’
cmake: fix build with gcc-15 on host
conf/bitbake.conf: use gnu mirror instead of main server
contributor-guide: submit-changes: align CC tag description
contributor-guide: submit-changes: clarify example with Yocto bug ID
contributor-guide: submit-changes: fix improper bold string
contributor-guide: submit-changes: make “Crediting contributors” part of “Commit your changes”
contributor-guide: submit-changes: make the Cc tag follow kernel guidelines
contributor-guide: submit-changes: number instruction list in commit your changes
contributor-guide: submit-changes: reword commit message instructions
cpio: Pin to use C17 std
cups: upgrade to 2.4.11
curl: update CVE_STATUS for CVE-2025-5025
dbus-glib: fix build with gcc-15
default-distrovars.inc: Fix CONNECTIVITY_CHECK_URIS redirect issue
dev-manual/building.rst: add note about externalsrc variables absolute paths
dev-manual/security-subjects.rst: update mailing lists
elfutils: fix build with gcc-15
examples: genl: fix wrong attribute size
expect: Fix build with GCC 15
expect: Revert “expect-native: fix do_compile failure with gcc-14”
expect: cleanup do_install
expect: don’t run aclocal in do_configure
expect: fix native build with GCC 15
expect: update code for Tcl channel implementation
ffmpeg: upgrade to 6.1.3
gdbm: Use C11 standard
git: fix build with gcc-15 on host
gmp: Fix build with GCC15/C23
gmp: Fix build with older gcc versions
kernel-dev/common.rst: fix the in-tree defconfig description
lib/oe/utils: use multiprocessing from bb
libarchive: patch regression of patch for CVE-2025-5918
libgpg-error: fix build with gcc-15
libtirpc: Fix build with gcc-15/C23
license.py: avoid deprecated ast.Str
llvm: fix build with gcc-15
llvm: update to 18.1.8
m4: Stick to C17 standard
migration-guides: add release notes for 4.0.29 5.0.12
ncurses: Pin to C17 standard
oeqa/sdk/cases/buildcpio.py: use gnu mirror instead of main server
openssl: upgrade to 3.2.6
p11-kit: backport fix for handle USE_NLS from master
pkgconfig: fix build with gcc-15
poky.conf: bump version for 5.0.13
pulseaudio: Add audio group explicitly
ref-manual/structure: document the auto.conf file
ref-manual/variables.rst: expand IMAGE_OVERHEAD_FACTOR glossary entry
ref-manual/variables.rst: fix the description of KBUILD_DEFCONFIG STAGING_DIR
rpm: keep leading “/” from sed operation
ruby-ptest: some ptest fixes
runqemu: fix special characters bug
rust-llvm: fix build with gcc-15
sanity.conf: Update minimum bitbake version to 2.8.1
scripts/install-buildtools: Update to 5.0.12
sdk: The main in the C example should return an int
selftest/cases/meta_ide.py: use use gnu mirror instead of main server
shared-mime-info: Handle USE_NLS
sudo: remove devtool FIXME comment
systemd: backport fix for handle USE_NLS from master
systemtap: Fix task_work_cancel build
test-manual/yocto-project-compatible.rst: fix a typo
test-manual: update runtime-testing Exporting Tests section
unifdef: Don’t use C23 constexpr keyword
unzip: Fix build with GCC-15
util-linux: use ${B} instead of ${WORKDIR}/build, to fix building under devtool
vim: upgrade to 9.1.1683
yocto-uninative: Update to 4.9 for glibc 2.42 GCC 15.1
Known Issues in Yocto-5.0.13
N/A
Contributors to Yocto-5.0.13
Thanks to the following people who contributed to this release: - Adam Blank - Adrian Freihofer - Aleksandar Nikolic - Antonin Godard - Archana Polampalli - AshishKumar Mishra - Barne Carstensen - Chris Laplante - Deepak Rathore - Divya Chellam - Gyorgy Sarvari - Haixiao Yan - Hitendra Prajapati - Hongxu Jia - Jan Vermaete - Jiaying Song - Jinfeng Wang - Joao Marcos Costa - Joshua Watt - Khem Raj - Kyungjik Min - Lee Chee Yang - Libo Chen - Martin Jansa - Michael Halstead - Nitin Wankhade - Peter Marko - Philip Lorenz - Praveen Kumar - Quentin Schulz - Ross Burton - Stanislav Vovk - Steve Sakoman - Talel BELHAJ SALEM - Vijay Anusuri - Vrushti Dabhi - Yogita Urade
Repositories / Downloads for Yocto-5.0.13
yocto-docs
Repository Location: https://git.yoctoproject.org/yocto-docs
Branch: scarthgap
Tag: yocto-5.0.13
Git Revision: 6f086fd3d9dbbb0c80f6c3e89b8df4fed422e79a
Release Artefact: yocto-docs-6f086fd3d9dbbb0c80f6c3e89b8df4fed422e79a
sha: 454601d8b6034268212f74ca689ed360b08f7a4c7de5df726aa3706586ca4351
Download Locations: https://downloads.yoctoproject.org/releases/yocto/yocto-5.0.13/yocto-docs-6f086fd3d9dbbb0c80f6c3e89b8df4fed422e79a.tar.bz2 https://mirrors.kernel.org/yocto/yocto/yocto-5.0.13/yocto-docs-6f086fd3d9dbbb0c80f6c3e89b8df4fed422e79a.tar.bz2
poky
Repository Location: https://git.yoctoproject.org/poky
Branch: scarthgap
Tag: yocto-5.0.13
Git Revision: f16cffd030d21d12dd57bb95cfc310bda41f8a1f
Release Artefact: poky-f16cffd030d21d12dd57bb95cfc310bda41f8a1f
sha: 1367e43907f5ffa725f3afb019cd7ca07de21f13e5e73a1f5d1808989ae6ed2a
Download Locations: https://downloads.yoctoproject.org/releases/yocto/yocto-5.0.13/poky-f16cffd030d21d12dd57bb95cfc310bda41f8a1f.tar.bz2 https://mirrors.kernel.org/yocto/yocto/yocto-5.0.13/poky-f16cffd030d21d12dd57bb95cfc310bda41f8a1f.tar.bz2
openembedded-core
Repository Location: https://git.openembedded.org/openembedded-core
Branch: scarthgap
Tag: yocto-5.0.13
Git Revision: 7af6b75221d5703ba5bf43c7cd9f1e7a2e0ed20b
Release Artefact: oecore-7af6b75221d5703ba5bf43c7cd9f1e7a2e0ed20b
sha: 4dcf636ec4a7b38b47a24e9cb3345b385bc126bb19620bf6af773bf292fef6b2
Download Locations: https://downloads.yoctoproject.org/releases/yocto/yocto-5.0.13/oecore-7af6b75221d5703ba5bf43c7cd9f1e7a2e0ed20b.tar.bz2 https://mirrors.kernel.org/yocto/yocto/yocto-5.0.13/oecore-7af6b75221d5703ba5bf43c7cd9f1e7a2e0ed20b.tar.bz2
meta-yocto
Repository Location: https://git.yoctoproject.org/meta-yocto
Branch: scarthgap
Tag: yocto-5.0.13
Git Revision: 3ff7ca786732390cd56ae92ff4a43aba46a1bf2e
Release Artefact: meta-yocto-3ff7ca786732390cd56ae92ff4a43aba46a1bf2e
sha: 8efbaeab49dc3e1c4b67ff8d5801df1b05204c2255d18cff9a6857769ae33b23
Download Locations: https://downloads.yoctoproject.org/releases/yocto/yocto-5.0.13/meta-yocto-3ff7ca786732390cd56ae92ff4a43aba46a1bf2e.tar.bz2 https://mirrors.kernel.org/yocto/yocto/yocto-5.0.13/meta-yocto-3ff7ca786732390cd56ae92ff4a43aba46a1bf2e.tar.bz2
meta-mingw
Repository Location: https://git.yoctoproject.org/meta-mingw
Branch: scarthgap
Tag: yocto-5.0.13
Git Revision: bd9fef71ec005be3c3a6d7f8b99d8116daf70c4f
Release Artefact: meta-mingw-bd9fef71ec005be3c3a6d7f8b99d8116daf70c4f
sha: ab073def6487f237ac125d239b3739bf02415270959546b6b287778664f0ae65
Download Locations: https://downloads.yoctoproject.org/releases/yocto/yocto-5.0.13/meta-mingw-bd9fef71ec005be3c3a6d7f8b99d8116daf70c4f.tar.bz2 https://mirrors.kernel.org/yocto/yocto/yocto-5.0.13/meta-mingw-bd9fef71ec005be3c3a6d7f8b99d8116daf70c4f.tar.bz2
bitbake
Repository Location: https://git.openembedded.org/bitbake
Branch: 2.8
Tag: yocto-5.0.13
Git Revision: 1c9ec1ffde75809de34c10d3ec2b40d84d258cb4
Release Artefact: bitbake-1c9ec1ffde75809de34c10d3ec2b40d84d258cb4
sha: 98bf54fa3abe237b73a93b1e33842a429209371fca6e409c258a441987879d16
Download Locations: https://downloads.yoctoproject.org/releases/yocto/yocto-5.0.13/bitbake-1c9ec1ffde75809de34c10d3ec2b40d84d258cb4.tar.bz2 https://mirrors.kernel.org/yocto/yocto/yocto-5.0.13/bitbake-1c9ec1ffde75809de34c10d3ec2b40d84d258cb4.tar.bz2
Release notes for Yocto-5.0.14 (Scarthgap)
Security Fixes in Yocto-5.0.14
bind: Fix CVE-2025-8677, CVE-2025-40778 and CVE-2025-40780
binutils: Fix CVE-2025-8225, CVE-2025-11081, CVE-2025-11082, CVE-2025-11083, CVE-2025-11412, CVE-2025-11413 and CVE-2025-11414
cmake: fix CVE-2025-9301
curl: Ignore CVE-2025-10966
elfutils: Fix CVE-2025-1376 and CVE-2025-1377
expat: Fix CVE-2025-59375
glib-networking: Fix CVE-2025-60018 and CVE-2025-60019
gnupg: Ignore CVE-2025-30258
go: Fix CVE-2025-47912, CVE-2025-58185, CVE-2025-58187, CVE-2025-58188, CVE-2025-58189, CVE-2025-61723 and CVE-2025-61724
libpam: Ignore CVE-2025-6018
lz4: Fix CVE-2025-62813
openssh: Fix CVE-2025-61984 and CVE-2025-61985
python3: Fix CVE-2025-59375
python3-xmltodict: Fix CVE-2025-9375
qemu: Fix CVE-2024-8354
tiff: Ignore CVE-2025-8961
u-boot: Fix CVE-2024-42040
wpa-supplicant: Fix CVE-2025-24912
Fixes in Yocto-5.0.14
bind: upgrade to 9.18.41
bitbake: bb/fetch2/__init__.py: remove a DeprecationWarning in uri_replace()
bitbake: fetch2/wget: Keep query parameters in URL during checkstatus
build-appliance-image: Update to scarthgap head revision
ca-certificates: Add comment for provenance of SRCREV
ca-certificates: fix on-target postinstall script
ca-certificates: get sources from debian tarballs
ca-certificates: submit sysroot patch upstream, drop default-sysroot.patch
ca-certificates: upgrade to 20250419
classes/create-spdx-2.2: align DEPLOY_DIR_SPDX with SPDX_VERSION layout
classes/create-spdx-2.2: Handle empty packages
classes-global/license: Move functions to library code
classes-global/staging: Exclude do_create_spdx from automatic sysroot extension
classes-recipe/baremetal-image: Add image file manifest
classes-recipe/image: Add image file manifest
curl: only set CA bundle in target build
dev-manual, test-manual: Update autobuilder output links
flex: fix build with gcc-15 on host
glibc: stable 2.39 branch updates
gstreamer1.0-plugins-bad: fix buffer allocation fail for v4l2codecs
icu: Backport patch to fix build issues with long paths (>512 chars)
iptables: remove /etc/ethertypes
lib/license: Move package license skip to library
lib: oe: license: Add missing import
lib: oeqa: spdx: Add tests for extra options
linux-yocto/6.6: update to v6.6.111
meta: backport SPDX 3.0 fixes and tasks from upstream version Walnascar
migration-guides: add release notes for 4.0.30
oe-build-perf-report: relax metadata matching rules
oe-core: Remove empty file
oeqa/runtime/ping: don’t bother trying to ping localhost
oeqa/selftest: Add SPDX 3.0 include source case for work-share
oeqa/selftest/devtool: Update after upstream repo changes
oeqa: spdx: Add tar test for SPDX 2.2
overview-manual/yp-intro.rst: update on-target packaging info
perf: add arm64 source files for unistd_64.h
poky.conf: bump version for 5.0.14
python3: upgrade to 3.12.12
ref-manual/classes.rst: document the relative_symlinks class
ref-manual/classes.rst: extend the uninative class documentation
ref-manual/classes.rst: gettext: extend the documentation of the class
ref-manual/variables.rst: document CCACHE_DISABLE CHECKSUM UNINATIVE_URL REQUIRED_COMBINED_FEATURES REQUIRED_IMAGE_FEATURES REQUIRED_MACHINE_FEATURES USE_NLS variable
ref-manual/variables.rst: fix LAYERDEPENDS description
selftest: spdx: Add SPDX 3.0 test cases
selftest/spdx: Fix for SPDX_VERSION addition
spdx 3.0: Rework how SPDX aliases are linked
spdx30_tasks: adapt CVE handling to new cve-check API
spdx30_tasks: fix FetchData attribute in add_download_files
util-linux: fix pointer usage in hwclock param handling
vulnerabilities: update nvdcve file name
webkitgtk: upgrade to 2.44.4
wireless-regdb: upgrade to 2025.10.07
xf86-video-intel: correct SRC_URI as freedesktop anongit is down
Known Issues in Yocto-5.0.14
N/A
Contributors to Yocto-5.0.14
Thanks to the following people who contributed to this release: - Alexander Kanavin - Anders Heimer - Ankur Tyagi - Antonin Godard - Archana Polampalli - Bastian Krause - Bin Lan - Bruce Ashfield - Carlos Alberto Lopez Perez - Daniel Semkowicz - David Nyström - Deepesh Varatharajan - Gyorgy Sarvari - Hongxu Jia - Joshua Watt - João Marcos Costa - Kamel Bouhara (Schneider Electric) - Lee Chee Yang - Martin Jansa - Matthias Schiffer - Michael Haener - Paul Barker - Peter Marko - Philippe-Alexandre Mathieu - Praveen Kumar - Rajeshkumar Ramasamy - Rasmus Villemoes - Richard Purdie - Robert P. J. Day - Saravanan - Soumya Sambu - Steve Sakoman - Theodore A. Roth - Wang Mingyu - Yannic Moog - Yash Shinde - Yogita Urade
Repositories / Downloads for Yocto-5.0.14
yocto-docs
Repository Location: https://git.yoctoproject.org/yocto-docs
Branch: scarthgap
Tag: yocto-5.0.14
Git Revision: a8687e4bb2e822670b6ad110613a12fa02943d3d
Release Artefact: yocto-docs-a8687e4bb2e822670b6ad110613a12fa02943d3d
sha: 72a51b6049a59f773720d9b0aa94f090222a41aeb22d65c5f4211c78418fb6fa
Download Locations: https://downloads.yoctoproject.org/releases/yocto/yocto-5.0.14/yocto-docs-a8687e4bb2e822670b6ad110613a12fa02943d3d.tar.bz2 https://mirrors.kernel.org/yocto/yocto/yocto-5.0.14/yocto-docs-a8687e4bb2e822670b6ad110613a12fa02943d3d.tar.bz2
poky
Repository Location: https://git.yoctoproject.org/poky
Branch: scarthgap
Tag: yocto-5.0.14
Git Revision: 7e8674996b0164b07e56bc066d0fba790e627061
Release Artefact: poky-7e8674996b0164b07e56bc066d0fba790e627061
sha: 071e189ebccfad99d4d79ea9021475296fa642611828249f0963b019f842a021
Download Locations: https://downloads.yoctoproject.org/releases/yocto/yocto-5.0.14/poky-7e8674996b0164b07e56bc066d0fba790e627061.tar.bz2 https://mirrors.kernel.org/yocto/yocto/yocto-5.0.14/poky-7e8674996b0164b07e56bc066d0fba790e627061.tar.bz2
openembedded-core
Repository Location: https://git.openembedded.org/openembedded-core
Branch: scarthgap
Tag: yocto-5.0.14
Git Revision: 471adaa5f77fa3b974eab60a2ded48e360042828
Release Artefact: oecore-471adaa5f77fa3b974eab60a2ded48e360042828
sha: 4dfad047a68aea2293845cdb4a86911bb3b1b0444a63f51b4e5a2448018d6a5e
Download Locations: https://downloads.yoctoproject.org/releases/yocto/yocto-5.0.14/oecore-471adaa5f77fa3b974eab60a2ded48e360042828.tar.bz2 https://mirrors.kernel.org/yocto/yocto/yocto-5.0.14/oecore-471adaa5f77fa3b974eab60a2ded48e360042828.tar.bz2
meta-yocto
Repository Location: https://git.yoctoproject.org/meta-yocto
Branch: scarthgap
Tag: yocto-5.0.14
Git Revision: bf6aea52c4009e08f26565c33ce432eec7cfb090
Release Artefact: meta-yocto-bf6aea52c4009e08f26565c33ce432eec7cfb090
sha: 92c9da1027efaf945d80bcd44984d5f8e7606c7ded485b57c0c8f47c9fa1302d
Download Locations: https://downloads.yoctoproject.org/releases/yocto/yocto-5.0.14/meta-yocto-bf6aea52c4009e08f26565c33ce432eec7cfb090.tar.bz2 https://mirrors.kernel.org/yocto/yocto/yocto-5.0.14/meta-yocto-bf6aea52c4009e08f26565c33ce432eec7cfb090.tar.bz2
meta-mingw
Repository Location: https://git.yoctoproject.org/meta-mingw
Branch: scarthgap
Tag: yocto-5.0.14
Git Revision: bd9fef71ec005be3c3a6d7f8b99d8116daf70c4f
Release Artefact: meta-mingw-bd9fef71ec005be3c3a6d7f8b99d8116daf70c4f
sha: ab073def6487f237ac125d239b3739bf02415270959546b6b287778664f0ae65
Download Locations: https://downloads.yoctoproject.org/releases/yocto/yocto-5.0.14/meta-mingw-bd9fef71ec005be3c3a6d7f8b99d8116daf70c4f.tar.bz2 https://mirrors.kernel.org/yocto/yocto/yocto-5.0.14/meta-mingw-bd9fef71ec005be3c3a6d7f8b99d8116daf70c4f.tar.bz2
bitbake
Repository Location: https://git.openembedded.org/bitbake
Branch: 2.8
Tag: yocto-5.0.14
Git Revision: 8dcf084522b9c66a6639b5f117f554fde9b6b45a
Release Artefact: bitbake-8dcf084522b9c66a6639b5f117f554fde9b6b45a
sha: 766eda21f2a914276d2723b1d8248be11507f954aef8fc5bb1767f3cb65688dd
Download Locations: https://downloads.yoctoproject.org/releases/yocto/yocto-5.0.14/bitbake-8dcf084522b9c66a6639b5f117f554fde9b6b45a.tar.bz2 https://mirrors.kernel.org/yocto/yocto/yocto-5.0.14/bitbake-8dcf084522b9c66a6639b5f117f554fde9b6b45a.tar.bz2
Release notes for Yocto-5.0.15 (Scarthgap)
Users of Alma 9, Rocky 9 and Centos Stream 9 rolling releases have seen obtuse failures in the execution of tar in various tasks after recent host distro updates. These newer versions of tar contain a CVE fix which uses a new glibc call/syscall (openat2). The fix is to update to a newer pseudo version which handles this syscall. This is not included in this stable release but we aim to include it in the next one.
Security Fixes in Yocto-5.0.15
binutils: Fix CVE-2025-11494, CVE-2025-11839 and CVE-2025-11840
cmake-native: Fix CVE-2025-9301
cups: Fix CVE-2025-58436 and CVE-2025-61915
gnutls: Fix CVE-2025-9820
go: Fix CVE-2025-61727 and CVE-2025-61729
go: Update CVE-2025-58187 patches
grub: Fix CVE-2025-54770, CVE-2025-61661, CVE-2025-61662, CVE-2025-61663 and CVE-2025-61664
libarchive: Fix CVE-2025-60753
libarchive: Fix 2 security issue (https://github.com/libarchive/libarchive/pull/2753 and https://github.com/libarchive/libarchive/pull/2768)
libmicrohttpd: Ignore CVE-2025-59777 and CVE-2025-62689
libpng: Fix CVE-2025-64505, CVE-2025-64506, CVE-2025-64720, CVE-2025-65018 and CVE-2025-66293
libsoup: Fix CVE-2025-12105
libssh2: Fix CVE-2023-48795
libxml2: Fix CVE-2025-7425
libxslt: Fix CVE-2025-11731
musl: Fix CVE-2025-26519
python3-urllib3: Fix CVE-2025-66418 and CVE-2025-66471
python3: Fix CVE-2025-6075
qemu: Fix CVE-2025-12464
rsync: Fix CVE-2025-10158
ruby: Fix CVE-2025-24294, CVE-2025-25186 and CVE-2025-61594
sqlite3: Fix CVE-2025-7709
xserver-xorg: Fix CVE-2025-62229, CVE-2025-62230 and CVE-2025-62231
xwayland: Fix CVE-2025-62229, CVE-2025-62230 and CVE-2025-62231
Fixes and Feature Changes in Yocto-5.0.15
build-appliance-image: Update to scarthgap head revision
classes/create-spdx-2.2: Define SPDX_VERSION to 2.2
cml1.bbclass: use consistent make flags for menuconfig
cross.bbclass: Propagate dependencies to outhash
curl: Ensure ‘CURL_CA_BUNDLE’ from host env is indeed respected
curl: Use host CA bundle by default for native(sdk) builds
cve-check: extract extending CVE_STATUS to library function
dev-manual/layers.rst: document “bitbake-layers show-machines”
dev-manual/new-recipe.rst: replace ‘bitbake -e’ with ‘bitbake-getvar’
dev-manual/new-recipe.rst: typo, “whith” -> “which”
dev-manual/new-recipe.rst: update “recipetool -h” output
dev-manual/sbom.rst: reflect that create-spdx is enabled by default
dev-manual: debugging: use bitbake-getvar in Viewing Variable Values section
documentation: link to the Releases page on yoctoproject.org instead of wiki
glslang: fix compiling with gcc15
go: add sdk test
go: extend runtime test
go: remove duplicate arch map in sdk test
goarch.bbclass: do not leak TUNE_FEATURES into crosssdk task signatures
kernel-dev: add disable config example
kernel-dev: common: migrate bitbake -e to bitbake-getvar
kernel.bbclass: Add task to export kernel configuration to SPDX
libssh2: fix regression in KEX method validation (GH-1553)
libssh2: upgrade to 1.11.1
migration-guides: add release notes for 4.0.31 and 5.0.13
oe/sdk: fix empty SDK manifests
oeqa/sdk/buildepoxy: skip test in eSDK
oeqa/selftest: oe-selftest: Add SPDX tests for kernel config and PACKAGECONFIG
oeqa: drop unnecessary dependency from go runtime tests
oeqa: fix package detection in go sdk tests
overview-manual: migrate to SVG + fix typo
poky.conf: bump version for 5.0.15
ref-manual: variables: migrate the OVERRIDES note to bitbake-getvar
ruby: Upgrade to 3.3.10
rust-target-config: fix nativesdk-libstd-rs build with baremetal
scripts/install-buildtools: Update to 5.0.14
spdx30: Provide software_packageUrl field in SPDX 3.0 SBOM
spdx30: fix cve status for patch files in VEX
spdx30: provide all CVE_STATUS, not only Patched status
spdx30_tasks: Add support for exporting PACKAGECONFIG to SPDX
spdx: Revert “spdx: Update for bitbake changes”
spdx: extend CVE_STATUS variables
testsdk: allow user to specify which tests to run
vex.bbclass: add a new class
vex: fix rootfs manifest
xserver-xorg: remove redundant patch
Known Issues in Yocto-5.0.15
N/A
Contributors to Yocto-5.0.15
Thanks to the following people who contributed to this release:
Adarsh Jagadish Kamini
Aleksandar Nikolic
Alexander Kanavin
Benjamin Robin (Schneider Electric)
Changqing Li
Daniel Turull
Deepak Rathore
Deepesh Varatharajan
Enrico Jörns
Gyorgy Sarvari
Hitendra Prajapati
Hongxu Jia
Hugo SIMELIERE
Jiaying Song
Kai Kang
Kamel Bouhara (Schneider Electric)
Lee Chee Yang
Martin Jansa
Mingli Yu
Moritz Haase
Osama Abdelkader
Ovidiu Panait
Peter Marko
Praveen Kumar
Quentin Schulz
Robert P. J. Day
Ross Burton
Steve Sakoman
Vijay Anusuri
Walter Werner SCHNEIDER
Yash Shinde
Yogita Urade
Repositories / Downloads for Yocto-5.0.15
yocto-docs
Repository Location: https://git.yoctoproject.org/yocto-docs
Branch: scarthgap
Tag: yocto-5.0.15
Git Revision: b0f5cc276639916df197435780b3e94accd4af41
Release Artefact: yocto-docs-b0f5cc276639916df197435780b3e94accd4af41
sha: 28ebedfa6471e4ed7583aca0925cd31f4429af3d27ffc0a7e250f7b75404edd7
Download Locations:
poky
Repository Location: https://git.yoctoproject.org/poky
Branch: scarthgap
Tag: yocto-5.0.15
Git Revision: 72983ac391008ebceb45edc7a8f0f6d5f4fe715c
Release Artefact: poky-72983ac391008ebceb45edc7a8f0f6d5f4fe715c
sha: d5336d1ef1dd48b88cb92748c669360901004d458b7786ddc1918da12fef4edd
Download Locations:
openembedded-core
Repository Location: https://git.openembedded.org/openembedded-core
Branch: scarthgap
Tag: yocto-5.0.15
Git Revision: 6988157ad983978ffd6b12bcefedd4deaffdbbd1
Release Artefact: oecore-6988157ad983978ffd6b12bcefedd4deaffdbbd1
sha: 98a691ce87f9aba57007e91b56bbe0af6d6c8f62aacb68820026478ff8e1f819
Download Locations:
meta-yocto
Repository Location: https://git.yoctoproject.org/meta-yocto
Branch: scarthgap
Tag: yocto-5.0.15
Git Revision: 9bb6e6e8b016a0c9dfe290369a6ed91ef4020535
Release Artefact: meta-yocto-9bb6e6e8b016a0c9dfe290369a6ed91ef4020535
sha: 01778c43673ef11ec5d0fb76bd7c600031f5fc9bcfd9bfa586d5fb6b6babff95
Download Locations:
meta-mingw
Repository Location: https://git.yoctoproject.org/meta-mingw
Branch: scarthgap
Tag: yocto-5.0.15
Git Revision: bd9fef71ec005be3c3a6d7f8b99d8116daf70c4f
Release Artefact: meta-mingw-bd9fef71ec005be3c3a6d7f8b99d8116daf70c4f
sha: ab073def6487f237ac125d239b3739bf02415270959546b6b287778664f0ae65
Download Locations:
bitbake
Repository Location: https://git.openembedded.org/bitbake
Branch: 2.8
Tag: yocto-5.0.15
Git Revision: 8dcf084522b9c66a6639b5f117f554fde9b6b45a
Release Artefact: bitbake-8dcf084522b9c66a6639b5f117f554fde9b6b45a
sha: 766eda21f2a914276d2723b1d8248be11507f954aef8fc5bb1767f3cb65688dd
Download Locations:
Release notes for Yocto-5.0.16 (Scarthgap)
This release breaks support for Ubuntu 20.04 as a compatible host. The Ubuntu 20.04 Linux kernel headers are not recent enough to support the latest pseudo fixes.
Ubuntu 20.04 is End-of-Life since 31 May 2025. Impacted users are encouraged to upgrade to an actively supported host distribution. See System Requirements for more information on compatible hosts.
Alternatively, a fix has been merged to scarthgap branch and can be applied on top of this release:
Security Fixes in Yocto-5.0.16
curl: Fix CVE-2025-10148, CVE-2025-14017, CVE-2025-14524, CVE-2025-14819, CVE-2025-15079 and CVE-2025-15224
dropbear: Fix CVE-2019-6111
expat: Fix CVE-2026-24515 and CVE-2026-25210
ffmpeg: Ignore CVE-2025-25469
glib-2.0: Fix CVE-2025-13601, CVE-2025-14087, CVE-2025-14512 and CVE-2026-0988
glibc: FIx CVE-2025-15281, CVE-2026-0861 and CVE-2026-0915
inetutils: Fix CVE-2026-24061
libarchive: Fix CVE-2025-60753 (follow-up fix)
libpcap: Fix CVE-2025-11961 and CVE-2025-11964
libpng: Fix CVE-2026-22695 and CVE-2026-22801
libtasn1: Fix CVE-2025-13151
libxml2: Fix CVE-2026-0989, CVE-2026-0990 and CVE-2026-0992
python-urllib3: Fix for CVE-2026-21441
python3: Fix CVE-2025-12084, CVE-2025-13836 and CVE-2025-13837
qemu: Ignore CVE-2025-54566 and CVE-2025-54567
util-linux: Fix CVE-2025-14104
zlib: Ignore CVE-2026-22184
Fixes in Yocto-5.0.16
bitbake: knotty: Make sure getTerminalColumns() returns two integers
bitbake: knotty: fix TIOCGWINSZ call for Python 3.14 and later
build-appliance-image: Update to scarthgap head revision
contributor-guide/recipe-style-guide.rst: explain difference between layer and recipe license(s)
contributor-guide/submit-changes.rst: remove mention of Upstream-Status
cups: allow unknown directives in conf files
dev-manual/packages.rst: fix example recipe version
dev-manual/packages.rst: pr server: fix and explain why r0.X increments on SRCREV change
dev-manual/packages.rst: rename r0.0 to r0 when PR server is not enabled
dev-manual/temporary-source-code.rst: fix definition of WORKDIR
docbook-xml-dtd4: fix the fetching failure
docs: Add a new “Security” section
docs: Makefile: fix rsvg-convert –format capitalization
ffmpeg: upgrade to 6.1.4
glibc: stable 2.39 branch updates
improve_kernel_cve_report: add script for postprocesing of kernel CVE data
libtheora: set CVE_PRODUCT
lighttpd: Fix trailing slash on files in mod_dirlisting
meta/classes: fix missing vardeps for CVE status variables
migration-guides: add release notes for 4.0.32, 5.0.14 and 5.0.15
overview-manual/yp-intro.rst: change removed ECOSYSTEM to ABOUT
overview-manual/yp-intro.rst: fix SDK type in bullet list
overview-manual/yp-intro.rst: link to YP members and participants
overview-manual: convert YP-flow-diagram.png to SVG
pseudo: Add hard sstate dependencies for pseudo-native
pseudo: Update to 1.9.3 release
ref-manual/classes.rst: document the image-container class
ref-manual/release-process.rst: add a “Development Cycle” section
ref-manual/svg/releases.svg: mark styhead and walnascar EOL
ref-manual/svg/releases.svg: mark whinlatter as current release
ref-manual/variables.rst: document the CCACHE_TOP_DIR variable
sdk-manual: appending-customizing: use none lexer for BitBake code blocks
sdk-manual: appendix-obtain: fix default path for eSDK installer script
sdk-manual: appendix-obtain: replace directory structure PNG with a parsed-literal block
sdk-manual: appendix-obtain: replace eSDK directory structure PNG with a parsed-literal block
sdk-manual: appendix-obtain: use parsed-literal block for naming convention of the installer scripts
sdk-manual: delete sdk-title PNG
sdk-manual: fix improper indent of general form of tarball installer scripts
sdk-manual: fix incorrect highlight language for console code-blocks
sdk-manual: fix incorrect highlight language for text code-blocks
sdk-manual: replace sdk-environment PNG with SVG
sdk-manual: using: fix SDK filename example
sdk-manual: working-projects: properly highlight code code-blocks
test-manual/ptest.rst: detail the exit code and output requirements
zlib: Add CVE_PRODUCT to exclude false positives
zlib: cleanup obsolete CVE_STATUS[CVE-2023-45853]
Known Issues in Yocto-5.0.16
The poky DISTRO_VERSION was incorrectly left at 5.0.15. This is a minor issue, if a workaround is needed please cherry-pick:
Contributors to Yocto-5.0.16
Thanks to the following people who contributed to this release:
Adarsh Jagadish Kamini
Amaury Couderc
Ankur Tyagi
Antonin Godard
Benjamin Robin (Schneider Electric)
Daniel Turull
Enrico Scholz
Fred Bacon
Het Patel
Hitendra Prajapati
Hugo SIMELIERE
Ken Kurematsu
Khai Dang
Lee Chee Yang
Paul Barker
Peter Marko
Quentin Schulz
Richard Purdie
Robert Yang
Vijay Anusuri
Yoann Congal
Zoltan Boszormenyi
Repositories / Downloads for Yocto-5.0.16
yocto-docs
Repository Location: https://git.yoctoproject.org/yocto-docs
Branch: scarthgap
Tag: yocto-5.0.16
Git Revision: 369f3307368eaea605983e80047377fd19ebd6bf
Release Artefact: yocto-docs-369f3307368eaea605983e80047377fd19ebd6bf
sha: e8ea8e2d5da2bfad868178d6fb37093c4f9ff06553f68970f0f730d6fb5cbd26
Download Locations:
poky
Repository Location: https://git.yoctoproject.org/poky
Branch: scarthgap
Tag: yocto-5.0.16
Git Revision: 1d54d1c4736a114e1cecbe85a0306e3814d5ce70
Release Artefact: poky-1d54d1c4736a114e1cecbe85a0306e3814d5ce70
sha: efb75697fa7a8e35a3f46abcfa706400f56ae1d1b5e360b48d6ffa81f6a675e8
Download Locations:
openembedded-core
Repository Location: https://git.openembedded.org/openembedded-core
Branch: scarthgap
Tag: yocto-5.0.16
Git Revision: a1f4ae4e569bc0e36c27c1e4651e502e54d63b28
Release Artefact: oecore-a1f4ae4e569bc0e36c27c1e4651e502e54d63b28
sha: 10eefd2296206e5cbaf138de7dbd0dbe7bfc413618e924a123cd3f7f9a8418e0
Download Locations:
meta-yocto
Repository Location: https://git.yoctoproject.org/meta-yocto
Branch: scarthgap
Tag: yocto-5.0.16
Git Revision: 9bb6e6e8b016a0c9dfe290369a6ed91ef4020535
Release Artefact: meta-yocto-9bb6e6e8b016a0c9dfe290369a6ed91ef4020535
sha: d9cfd2192d12ebc55553bc421f3ab00d1f49c5f5c4c70e48923da695d19e8e2a
Download Locations:
meta-mingw
Repository Location: https://git.yoctoproject.org/meta-mingw
Branch: scarthgap
Tag: yocto-5.0.16
Git Revision: bd9fef71ec005be3c3a6d7f8b99d8116daf70c4f
Release Artefact: meta-mingw-bd9fef71ec005be3c3a6d7f8b99d8116daf70c4f
sha: ab073def6487f237ac125d239b3739bf02415270959546b6b287778664f0ae65
Download Locations:
bitbake
Repository Location: https://git.openembedded.org/bitbake
Branch: 2.8
Tag: yocto-5.0.16
Git Revision: 10118785e4a670bce4980e1044c0888a8b6e84af
Release Artefact: bitbake-10118785e4a670bce4980e1044c0888a8b6e84af
sha: 601a16210d7dc9b7a7306240d3e7013b3f950db8953fdd972151d715e050cc39
Download Locations:
Release notes for Yocto-5.0.17 (Scarthgap)
Openssl 3.2 has reached EOL. Some projects would like to use LTS version due to criticality and exposure of this component, so upgrade to 3.5 branch.
Security Fixes in Yocto-5.0.17
alsa-lib: Fix CVE-2026-25068
avahi: Fix CVE-2025-68276, CVE-2025-68468, CVE-2025-68471 and CVE-2026-24401
bind: Fix CVE-2025-13878
busybox: Fix CVE-2025-60876
ffmpeg: ignore CVE-2025-1594, CVE-2025-10256, CVE-2025-12343 and CVE-2025-25468
freetype: Fix CVE-2026-23865
gdk-pixbuf: Fix CVE-2025-6199
glib-2.0: Fix CVE-2026-1484, CVE-2026-1485 and CVE-2026-1489
gnupg: Fix CVE-2025-68973
gnutls: Fix CVE-2025-14831
go 1.22.12: Fix CVE-2025-61726, CVE-2025-61728, CVE-2025-61730, CVE-2025-61731, CVE-2025-61732, CVE-2025-68119 and CVE-2025-68121
harfbuzz: Fix CVE-2026-22693
inetutils: Fix CVE-2026-28372 and CVE-2026-32746
libpng: Fix CVE-2026-25646
libsndfile1: Fix CVE-2025-56226
libtheora: Ignore CVE-2024-56431
linux-yocto/6.6: Fix CVE-2025-38593, CVE-2025-38643, CVE-2025-38678, CVE-2025-40039, CVE-2025-40040, CVE-2025-40149, CVE-2025-40164, CVE-2025-40251, CVE-2025-68211, CVE-2025-68214, CVE-2025-68223, CVE-2025-68340, CVE-2025-68365, CVE-2025-68725, CVE-2025-68817, CVE-2025-71068, CVE-2025-71071, CVE-2025-71075, CVE-2025-71077, CVE-2025-71078, CVE-2025-71079, CVE-2025-71081, CVE-2025-71082, CVE-2025-71083, CVE-2025-71084, CVE-2025-71085, CVE-2025-71086, CVE-2025-71087, CVE-2025-71088, CVE-2025-71089, CVE-2025-71091, CVE-2025-71093, CVE-2025-71094, CVE-2025-71095, CVE-2025-71096, CVE-2025-71097, CVE-2025-71098, CVE-2025-71101, CVE-2025-71102, CVE-2025-71104, CVE-2025-71105, CVE-2025-71107, CVE-2025-71108, CVE-2025-71111, CVE-2025-71112, CVE-2025-71113, CVE-2025-71114, CVE-2025-71116, CVE-2025-71118, CVE-2025-71119, CVE-2025-71120, CVE-2025-71121, CVE-2025-71122, CVE-2025-71125, CVE-2025-71126, CVE-2025-71127, CVE-2025-71129, CVE-2025-71130, CVE-2025-71131, CVE-2025-71132, CVE-2025-71133, CVE-2025-71136, CVE-2025-71137, CVE-2025-71138, CVE-2025-71141, CVE-2025-71143, CVE-2025-71147, CVE-2025-71148, CVE-2025-71149, CVE-2025-71150, CVE-2025-71151, CVE-2025-71153, CVE-2025-71154, CVE-2025-71160, CVE-2025-71162, CVE-2025-71163, CVE-2025-71180, CVE-2025-71182, CVE-2025-71183, CVE-2025-71185, CVE-2025-71186, CVE-2025-71188, CVE-2025-71189, CVE-2025-71190, CVE-2025-71191, CVE-2025-71200, CVE-2026-22976, CVE-2026-22977, CVE-2026-22978, CVE-2026-22979, CVE-2026-22980, CVE-2026-22982, CVE-2026-22984, CVE-2026-22990, CVE-2026-22991, CVE-2026-22992, CVE-2026-22994, CVE-2026-22997, CVE-2026-22998, CVE-2026-22999, CVE-2026-23001, CVE-2026-23003, CVE-2026-23005, CVE-2026-23006, CVE-2026-23010, CVE-2026-23011, CVE-2026-23019, CVE-2026-23020, CVE-2026-23021, CVE-2026-23025, CVE-2026-23026, CVE-2026-23060, CVE-2026-23061, CVE-2026-23062, CVE-2026-23063, CVE-2026-23064, CVE-2026-23068, CVE-2026-23069, CVE-2026-23071, CVE-2026-23073, CVE-2026-23074, CVE-2026-23075, CVE-2026-23076, CVE-2026-23078, CVE-2026-23080, CVE-2026-23083, CVE-2026-23084, CVE-2026-23085, CVE-2026-23086, CVE-2026-23087, CVE-2026-23088, CVE-2026-23089, CVE-2026-23090, CVE-2026-23091, CVE-2026-23093, CVE-2026-23094, CVE-2026-23095, CVE-2026-23096, CVE-2026-23097, CVE-2026-23098, CVE-2026-23099, CVE-2026-23101, CVE-2026-23102, CVE-2026-23103, CVE-2026-23105, CVE-2026-23107, CVE-2026-23108, CVE-2026-23110, CVE-2026-23113, CVE-2026-23116, CVE-2026-23119, CVE-2026-23120, CVE-2026-23121, CVE-2026-23123, CVE-2026-23124, CVE-2026-23125, CVE-2026-23126, CVE-2026-23128, CVE-2026-23131, CVE-2026-23133, CVE-2026-23135, CVE-2026-23136, CVE-2026-23139, CVE-2026-23140, CVE-2026-23141, CVE-2026-23142, CVE-2026-23144, CVE-2026-23146, CVE-2026-23150, CVE-2026-23156, CVE-2026-23160, CVE-2026-23163, CVE-2026-23164, CVE-2026-23167, CVE-2026-23168, CVE-2026-23170, CVE-2026-23172, CVE-2026-23173 and CVE-2026-23212
openssl: fix CVE-2025-15468 and CVE-2025-69419
python3-cryptography: Fix CVE-2026-26007
python3-pip: Fix CVE-2026-1703
python3-pyopenssl: Fix CVE-2026-27448 and CVE-2026-27459
tiff: ignore CVE-2025-61144 and CVE-2025-61145
vim: ignore CVE-2025-66476
zlib: Fix CVE-2026-27171
Fixes in Yocto-5.0.17
README: Add scarthgap subject-prefix to git-send-email suggestion
bind: upgrade to 9.18.44
bitbake: COW: Fix hardcoded magic numbers and work with python 3.13
bitbake: fetch2: Fix LFS object checkout in submodules
bitbake: fetch2: Fix incorrect lfs parametrization for submodules
bitbake: fetch2: don’t try to preserve all attributes when unpacking files
bitbake: gitsm: Add clean function
build-appliance-image: Update to scarthgap head revision
classes/buildhistory: Do not sign buildhistory commits
create-pull-request: Keep commit hash to be pulled in cover email
dev-manual: delete references to “tar” package format
docs: Makefile: pass -silent to latexmk
go-vendor: Fix absolute paths issue
improve_kernel_cve_report: add option to read debugsources.zstd
improve_kernel_cve_report: do not override backported-patch
improve_kernel_cve_report: do not use custom version
linux-yocto/6.6: upgrade to v6.6.123
lsb.py: strip ‘ from os-release file
migration-guides: add release notes for 5.0.16
mobile-broadband-provider-info: upgrade to 20251101
oe-setup-build: Fix typo
oeqa/selftest/wic: test recursive dir copy on ext partitions
openssl: upgrade to 3.5.5
overview-manual/concepts: list other possible class directories
overview-manual: escape wildcard in inline markup
poky.conf: Bump version for 5.0.17 release
poky.conf: add Centos Stream 9, fedora-41, rocky-8 to SANITY_TESTED_DISTROS
pseudo: Update to include a fix for systems with kernel <5.6
python3-pip: drop unused Windows distlib launcher templates
python3-setuptools: drop Windows launcher executables on non-mingw builds
ref-manual/classes.rst: fix broken links to U-Boot documentation
ref-manual/system-requirements.rst: update supported, end-of-life and untested distros
scripts/install-buildtools: Update to 5.0.15
spdx30_tasks: Exclude ‘doc’ when exporting PACKAGECONFIG to SPDX
spdx: add option to include only compiled sources
systemd-systemctl: Fix instance name parsing with escapes or periods
tzdata,tzcode-native: upgrade to 2025c
u-boot: move CVE Fixes out of the common .inc file
uboot-config: Fix devtool modify
weston: fix a touch-calibrator issue
what-i-wish-id-known.rst: replace figure by the new SVG
wic/engine: error on old host debugfs for standalone directory copy
wic/engine: fix copying directories into wic image with ext* partition
wireless-regdb: upgrade to 2026.02.04
Known Issues in Yocto-5.0.17
N/A
Contributors to Yocto-5.0.17
Aleksandar Nikolic
Amaury Couderc
Ankur Tyagi
Antonin Godard
Benjamin Robin (Schneider Electric)
Bruce Ashfield
Daniel Dragomir
Daniel Turull
Deepak Rathore
Dragomir, Daniel
Eduardo Ferreira
Fabio Berton
Hitendra Prajapati
Hugo SIMELIERE
João Marcos Costa (Schneider Electric)
Kristiyan Chakarov
Krupal Ka Patel
Lee Chee Yang
Livin Sunny
Martin Jansa
Michael Opdenacker
Ming Liu
Nguyen Dat Tho
Paul Barker
Peter Marko
Philip Lorenz
Quentin Schulz
Richard Purdie
Robert P. J. Day
Robert Yang
Ross Burton
Ryan Eatmon
Shaik Moin
Tom Hochstein
Trent Piepho
Vijay Anusuri
Yoann Congal
Repositories / Downloads for Yocto-5.0.17
yocto-docs
Repository Location: https://git.yoctoproject.org/yocto-docs
Branch: scarthgap
Tag: yocto-5.0.17
Git Revision: aa7226705451e6c1ef964d49963bbed29b267c27
Release Artefact: yocto-docs-aa7226705451e6c1ef964d49963bbed29b267c27
sha: d429833609637657f213611317dfadbd70293fff2f9e22753d1f71ef8515a6c0
Download Locations:
poky
Repository Location: https://git.yoctoproject.org/poky
Branch: scarthgap
Tag: yocto-5.0.17
Git Revision: 1e8099846661571ede077f533eb1b6c86818ddce
Release Artefact: poky-1e8099846661571ede077f533eb1b6c86818ddce
sha: b56890576f593cc881ea8e467562d842cfca248099ce653d28ca14d250f6219e
Download Locations:
openembedded-core
Repository Location: https://git.openembedded.org/openembedded-core
Branch: scarthgap
Tag: yocto-5.0.17
Git Revision: 52380df998b3a8fe6a091f8547434a3231320a8e
Release Artefact: oecore-52380df998b3a8fe6a091f8547434a3231320a8e
sha: a948d75acf76a392d170129ce6eb6f5fe45082d95b4fd28045aac58b8373cb26
Download Locations:
meta-yocto
Repository Location: https://git.yoctoproject.org/meta-yocto
Branch: scarthgap
Tag: yocto-5.0.17
Git Revision: c7c38663a1cafb1fa8593c0b246811e51d3bbe20
Release Artefact: meta-yocto-c7c38663a1cafb1fa8593c0b246811e51d3bbe20
sha: 5a2a9360249e639694cc2a75985e3907085512b3eb236e8491cb07f1e0cb0f19
Download Locations:
meta-mingw
Repository Location: https://git.yoctoproject.org/meta-mingw
Branch: scarthgap
Tag: yocto-5.0.17
Git Revision: bd9fef71ec005be3c3a6d7f8b99d8116daf70c4f
Release Artefact: meta-mingw-bd9fef71ec005be3c3a6d7f8b99d8116daf70c4f
sha: ab073def6487f237ac125d239b3739bf02415270959546b6b287778664f0ae65
Download Locations:
bitbake
Repository Location: https://git.openembedded.org/bitbake
Branch: 2.8
Tag: yocto-5.0.17
Git Revision: d3b4c352dd33fca90cd31649eda054b884478739
Release Artefact: bitbake-d3b4c352dd33fca90cd31649eda054b884478739
sha: 1021fc412780e21b25ccb045b66368ebe3fc4e785a65066ac0cafb9bdd5492fa
Download Locations:
Release notes for Yocto-5.0.18 (Scarthgap)
Security Fixes in Yocto-5.0.18
The large number of CVE updates for the linux-yocto recipe is linked to two backport
commits on OpenEmbedded-Core (OE-Core). See
66a13f9 and
4bdf534 for more details on these
changes.
avahi: Fix CVE-2026-34933
binutils: Fix CVE-2025-69647 and CVE-2025-69648
binutils: Ignore CVE-2025-69650 and CVE-2025-69651
busybox: Fix CVE-2026-26157 and CVE-2026-26158
coreutils: set CVE_PRODUCT
curl: Fix CVE-2026-1965, CVE-2026-3783 and CVE-2026-3784
expat: Fix CVE-2026-32776, CVE-2026-32777 and CVE-2026-32778
gdk-pixbuf: Fix CVE-2026-5201
gi-docgen: Fix CVE-2025-11687
gnupg: Fix CVE-2026-24882
inetutils: Fix CVE-2026-32772
libarchive: Fix CVE-2026-4111 and CVE-2026-4426
libpng: Fix CVE-2026-33636
libsoup: Fix CVE-2025-14523 and CVE-2025-32049
libxml2: Fix CVE-2026-1757
linux-yocto/6.6: Fix CVE-2025-40005, CVE-2025-40082, CVE-2025-68358, CVE-2025-68823, CVE-2025-71204, CVE-2025-71220, CVE-2025-71222, CVE-2025-71223, CVE-2025-71229, CVE-2025-71232, CVE-2025-71233, CVE-2025-71235, CVE-2025-71236, CVE-2025-71237, CVE-2025-71238, CVE-2025-71268, CVE-2025-71270, CVE-2026-23100, CVE-2026-23111, CVE-2026-23112, CVE-2026-23169, CVE-2026-23187, CVE-2026-23190, CVE-2026-23193, CVE-2026-23198, CVE-2026-23200, CVE-2026-23202, CVE-2026-23204, CVE-2026-23205, CVE-2026-23206, CVE-2026-23209, CVE-2026-23216, CVE-2026-23220, CVE-2026-23221, CVE-2026-23222, CVE-2026-23228, CVE-2026-23229, CVE-2026-23230, CVE-2026-23233, CVE-2026-23234, CVE-2026-23235, CVE-2026-23236, CVE-2026-23237, CVE-2026-23238, CVE-2026-23256, CVE-2026-23257, CVE-2026-23261, CVE-2026-23262 and CVE-2026-31687
linux-yocto/6.6: Ignore CVE-2020-36788, CVE-2020-36789, CVE-2020-36790, CVE-2020-36791, CVE-2021-4439, CVE-2021-4440, CVE-2021-4441, CVE-2021-4442, CVE-2021-4453, CVE-2021-4454, CVE-2021-4460, CVE-2021-47181, CVE-2021-47182, CVE-2021-47183, CVE-2021-47184, CVE-2021-47185, CVE-2021-47186, CVE-2021-47187, CVE-2021-47188, CVE-2021-47189, CVE-2021-47190, CVE-2021-47191, CVE-2021-47192, CVE-2021-47193, CVE-2021-47194, CVE-2021-47195, CVE-2021-47196, CVE-2021-47197, CVE-2021-47198, CVE-2021-47199, CVE-2021-47200, CVE-2021-47201, CVE-2021-47202, CVE-2021-47203, CVE-2021-47204, CVE-2021-47205, CVE-2021-47206, CVE-2021-47207, CVE-2021-47209, CVE-2021-47210, CVE-2021-47211, CVE-2021-47212, CVE-2021-47214, CVE-2021-47215, CVE-2021-47216, CVE-2021-47217, CVE-2021-47218, CVE-2021-47219, CVE-2021-47221, CVE-2021-47222, CVE-2021-47223, CVE-2021-47224, CVE-2021-47225, CVE-2021-47226, CVE-2021-47227, CVE-2021-47228, CVE-2021-47229, CVE-2021-47230, CVE-2021-47231, CVE-2021-47232, CVE-2021-47233, CVE-2021-47234, CVE-2021-47235, CVE-2021-47236, CVE-2021-47237, CVE-2021-47238, CVE-2021-47239, CVE-2021-47240, CVE-2021-47241, CVE-2021-47242, CVE-2021-47243, CVE-2021-47244, CVE-2021-47245, CVE-2021-47246, CVE-2021-47247, CVE-2021-47248, CVE-2021-47249, CVE-2021-47250, CVE-2021-47251, CVE-2021-47252, CVE-2021-47253, CVE-2021-47254, CVE-2021-47255, CVE-2021-47256, CVE-2021-47257, CVE-2021-47258, CVE-2021-47259, CVE-2021-47260, CVE-2021-47261, CVE-2021-47262, CVE-2021-47263, CVE-2021-47264, CVE-2021-47265, CVE-2021-47266, CVE-2021-47267, CVE-2021-47268, CVE-2021-47269, CVE-2021-47270, CVE-2021-47271, CVE-2021-47272, CVE-2021-47273, CVE-2021-47274, CVE-2021-47275, CVE-2021-47276, CVE-2021-47277, CVE-2021-47278, CVE-2021-47279, CVE-2021-47280, CVE-2021-47281, CVE-2021-47282, CVE-2021-47283, CVE-2021-47284, CVE-2021-47286, CVE-2021-47287, CVE-2021-47288, CVE-2021-47289, CVE-2021-47290, CVE-2021-47291, CVE-2021-47292, CVE-2021-47293, CVE-2021-47294, CVE-2021-47295, CVE-2021-47296, CVE-2021-47297, CVE-2021-47298, CVE-2021-47299, CVE-2021-47300, CVE-2021-47301, CVE-2021-47302, CVE-2021-47303, CVE-2021-47304, CVE-2021-47305, CVE-2021-47306, CVE-2021-47307, CVE-2021-47308, CVE-2021-47309, CVE-2021-47310, CVE-2021-47311, CVE-2021-47312, CVE-2021-47313, CVE-2021-47314, CVE-2021-47315, CVE-2021-47316, CVE-2021-47317, CVE-2021-47318, CVE-2021-47319, CVE-2021-47320, CVE-2021-47321, CVE-2021-47322, CVE-2021-47323, CVE-2021-47324, CVE-2021-47325, CVE-2021-47327, CVE-2021-47328, CVE-2021-47329, CVE-2021-47330, CVE-2021-47331, CVE-2021-47332, CVE-2021-47333, CVE-2021-47334, CVE-2021-47335, CVE-2021-47336, CVE-2021-47337, CVE-2021-47338, CVE-2021-47339, CVE-2021-47340, CVE-2021-47341, CVE-2021-47342, CVE-2021-47343, CVE-2021-47344, CVE-2021-47345, CVE-2021-47346, CVE-2021-47347, CVE-2021-47348, CVE-2021-47349, CVE-2021-47350, CVE-2021-47351, CVE-2021-47352, CVE-2021-47353, CVE-2021-47354, CVE-2021-47355, CVE-2021-47356, CVE-2021-47357, CVE-2021-47358, CVE-2021-47359, CVE-2021-47360, CVE-2021-47361, CVE-2021-47362, CVE-2021-47363, CVE-2021-47364, CVE-2021-47365, CVE-2021-47366, CVE-2021-47367, CVE-2021-47368, CVE-2021-47369, CVE-2021-47370, CVE-2021-47371, CVE-2021-47372, CVE-2021-47373, CVE-2021-47374, CVE-2021-47375, CVE-2021-47376, CVE-2021-47378, CVE-2021-47379, CVE-2021-47380, CVE-2021-47381, CVE-2021-47382, CVE-2021-47383, CVE-2021-47384, CVE-2021-47385, CVE-2021-47386, CVE-2021-47387, CVE-2021-47388, CVE-2021-47389, CVE-2021-47390, CVE-2021-47391, CVE-2021-47392, CVE-2021-47393, CVE-2021-47394, CVE-2021-47395, CVE-2021-47396, CVE-2021-47397, CVE-2021-47398, CVE-2021-47399, CVE-2021-47400, CVE-2021-47401, CVE-2021-47402, CVE-2021-47403, CVE-2021-47404, CVE-2021-47405, CVE-2021-47406, CVE-2021-47407, CVE-2021-47408, CVE-2021-47409, CVE-2021-47410, CVE-2021-47412, CVE-2021-47413, CVE-2021-47414, CVE-2021-47415, CVE-2021-47416, CVE-2021-47417, CVE-2021-47418, CVE-2021-47419, CVE-2021-47420, CVE-2021-47421, CVE-2021-47422, CVE-2021-47423, CVE-2021-47424, CVE-2021-47425, CVE-2021-47426, CVE-2021-47427, CVE-2021-47428, CVE-2021-47429, CVE-2021-47430, CVE-2021-47431, CVE-2021-47432, CVE-2021-47433, CVE-2021-47434, CVE-2021-47435, CVE-2021-47436, CVE-2021-47437, CVE-2021-47438, CVE-2021-47439, CVE-2021-47440, CVE-2021-47441, CVE-2021-47442, CVE-2021-47443, CVE-2021-47444, CVE-2021-47445, CVE-2021-47446, CVE-2021-47447, CVE-2021-47448, CVE-2021-47449, CVE-2021-47450, CVE-2021-47451, CVE-2021-47452, CVE-2021-47453, CVE-2021-47454, CVE-2021-47455, CVE-2021-47456, CVE-2021-47457, CVE-2021-47458, CVE-2021-47459, CVE-2021-47460, CVE-2021-47461, CVE-2021-47462, CVE-2021-47463, CVE-2021-47464, CVE-2021-47465, CVE-2021-47466, CVE-2021-47467, CVE-2021-47468, CVE-2021-47470, CVE-2021-47471, CVE-2021-47473, CVE-2021-47474, CVE-2021-47475, CVE-2021-47476, CVE-2021-47477, CVE-2021-47478, CVE-2021-47479, CVE-2021-47480, CVE-2021-47481, CVE-2021-47482, CVE-2021-47483, CVE-2021-47484, CVE-2021-47485, CVE-2021-47486, CVE-2021-47489, CVE-2021-47490, CVE-2021-47491, CVE-2021-47492, CVE-2021-47493, CVE-2021-47494, CVE-2021-47495, CVE-2021-47496, CVE-2021-47497, CVE-2021-47498, CVE-2021-47499, CVE-2021-47500, CVE-2021-47501, CVE-2021-47502, CVE-2021-47503, CVE-2021-47504, CVE-2021-47505, CVE-2021-47506, CVE-2021-47507, CVE-2021-47508, CVE-2021-47509, CVE-2021-47510, CVE-2021-47511, CVE-2021-47512, CVE-2021-47513, CVE-2021-47514, CVE-2021-47515, CVE-2021-47516, CVE-2021-47517, CVE-2021-47518, CVE-2021-47519, CVE-2021-47520, CVE-2021-47521, CVE-2021-47522, CVE-2021-47523, CVE-2021-47524, CVE-2021-47525, CVE-2021-47526, CVE-2021-47527, CVE-2021-47528, CVE-2021-47529, CVE-2021-47530, CVE-2021-47531, CVE-2021-47532, CVE-2021-47533, CVE-2021-47534, CVE-2021-47535, CVE-2021-47536, CVE-2021-47537, CVE-2021-47538, CVE-2021-47539, CVE-2021-47540, CVE-2021-47541, CVE-2021-47542, CVE-2021-47544, CVE-2021-47546, CVE-2021-47547, CVE-2021-47548, CVE-2021-47549, CVE-2021-47550, CVE-2021-47551, CVE-2021-47552, CVE-2021-47553, CVE-2021-47554, CVE-2021-47555, CVE-2021-47556, CVE-2021-47557, CVE-2021-47558, CVE-2021-47559, CVE-2021-47560, CVE-2021-47561, CVE-2021-47562, CVE-2021-47563, CVE-2021-47564, CVE-2021-47565, CVE-2021-47566, CVE-2021-47567, CVE-2021-47568, CVE-2021-47569, CVE-2021-47570, CVE-2021-47571, CVE-2021-47572, CVE-2021-47576, CVE-2021-47577, CVE-2021-47578, CVE-2021-47579, CVE-2021-47580, CVE-2021-47582, CVE-2021-47583, CVE-2021-47584, CVE-2021-47585, CVE-2021-47586, CVE-2021-47587, CVE-2021-47588, CVE-2021-47589, CVE-2021-47590, CVE-2021-47591, CVE-2021-47592, CVE-2021-47593, CVE-2021-47594, CVE-2021-47595, CVE-2021-47596, CVE-2021-47597, CVE-2021-47598, CVE-2021-47599, CVE-2021-47600, CVE-2021-47601, CVE-2021-47602, CVE-2021-47603, CVE-2021-47604, CVE-2021-47605, CVE-2021-47606, CVE-2021-47607, CVE-2021-47608, CVE-2021-47609, CVE-2021-47610, CVE-2021-47611, CVE-2021-47612, CVE-2021-47613, CVE-2021-47614, CVE-2021-47616, CVE-2021-47617, CVE-2021-47618, CVE-2021-47619, CVE-2021-47620, CVE-2021-47622, CVE-2021-47623, CVE-2021-47624, CVE-2021-47631, CVE-2021-47632, CVE-2021-47633, CVE-2021-47634, CVE-2021-47635, CVE-2021-47636, CVE-2021-47637, CVE-2021-47638, CVE-2021-47639, CVE-2021-47640, CVE-2021-47641, CVE-2021-47642, CVE-2021-47643, CVE-2021-47644, CVE-2021-47645, CVE-2021-47646, CVE-2021-47647, CVE-2021-47648, CVE-2021-47649, CVE-2021-47650, CVE-2021-47651, CVE-2021-47652, CVE-2021-47653, CVE-2021-47654, CVE-2021-47655, CVE-2021-47656, CVE-2021-47657, CVE-2021-47658, CVE-2021-47659, CVE-2021-47660, CVE-2021-47668, CVE-2021-47669, CVE-2021-47670, CVE-2021-47671, CVE-2022-21546, CVE-2022-48631, CVE-2022-48632, CVE-2022-48633, CVE-2022-48634, CVE-2022-48635, CVE-2022-48636, CVE-2022-48637, CVE-2022-48638, CVE-2022-48639, CVE-2022-48640, CVE-2022-48641, CVE-2022-48642, CVE-2022-48643, CVE-2022-48644, CVE-2022-48645, CVE-2022-48646, CVE-2022-48647, CVE-2022-48648, CVE-2022-48649, CVE-2022-48650, CVE-2022-48651, CVE-2022-48652, CVE-2022-48653, CVE-2022-48654, CVE-2022-48655, CVE-2022-48656, CVE-2022-48657, CVE-2022-48658, CVE-2022-48659, CVE-2022-48660, CVE-2022-48661, CVE-2022-48662, CVE-2022-48663, CVE-2022-48664, CVE-2022-48665, CVE-2022-48666, CVE-2022-48667, CVE-2022-48668, CVE-2022-48669, CVE-2022-48670, CVE-2022-48671, CVE-2022-48672, CVE-2022-48673, CVE-2022-48674, CVE-2022-48675, CVE-2022-48686, CVE-2022-48687, CVE-2022-48688, CVE-2022-48689, CVE-2022-48690, CVE-2022-48691, CVE-2022-48692, CVE-2022-48693, CVE-2022-48694, CVE-2022-48695, CVE-2022-48696, CVE-2022-48697, CVE-2022-48698, CVE-2022-48699, CVE-2022-48701, CVE-2022-48702 and CVE-2022-48703
linux-yocto/6.6: (Cont.) Ignore CVE-2022-48704, CVE-2022-48705, CVE-2022-48706, CVE-2022-48707, CVE-2022-48708, CVE-2022-48709, CVE-2022-48710, CVE-2022-48711, CVE-2022-48712, CVE-2022-48713, CVE-2022-48714, CVE-2022-48715, CVE-2022-48716, CVE-2022-48717, CVE-2022-48718, CVE-2022-48719, CVE-2022-48720, CVE-2022-48721, CVE-2022-48722, CVE-2022-48723, CVE-2022-48724, CVE-2022-48725, CVE-2022-48726, CVE-2022-48727, CVE-2022-48728, CVE-2022-48729, CVE-2022-48730, CVE-2022-48731, CVE-2022-48732, CVE-2022-48733, CVE-2022-48734, CVE-2022-48735, CVE-2022-48738, CVE-2022-48739, CVE-2022-48740, CVE-2022-48741, CVE-2022-48742, CVE-2022-48743, CVE-2022-48744, CVE-2022-48745, CVE-2022-48746, CVE-2022-48747, CVE-2022-48748, CVE-2022-48749, CVE-2022-48750, CVE-2022-48751, CVE-2022-48752, CVE-2022-48753, CVE-2022-48754, CVE-2022-48755, CVE-2022-48756, CVE-2022-48757, CVE-2022-48758, CVE-2022-48759, CVE-2022-48760, CVE-2022-48761, CVE-2022-48762, CVE-2022-48763, CVE-2022-48764, CVE-2022-48765, CVE-2022-48766, CVE-2022-48767, CVE-2022-48768, CVE-2022-48769, CVE-2022-48770, CVE-2022-48771, CVE-2022-48772, CVE-2022-48773, CVE-2022-48774, CVE-2022-48775, CVE-2022-48776, CVE-2022-48777, CVE-2022-48778, CVE-2022-48779, CVE-2022-48780, CVE-2022-48781, CVE-2022-48782, CVE-2022-48783, CVE-2022-48784, CVE-2022-48785, CVE-2022-48786, CVE-2022-48787, CVE-2022-48788, CVE-2022-48789, CVE-2022-48790, CVE-2022-48791, CVE-2022-48792, CVE-2022-48793, CVE-2022-48794, CVE-2022-48795, CVE-2022-48796, CVE-2022-48797, CVE-2022-48798, CVE-2022-48799, CVE-2022-48800, CVE-2022-48801, CVE-2022-48802, CVE-2022-48803, CVE-2022-48804, CVE-2022-48805, CVE-2022-48806, CVE-2022-48807, CVE-2022-48808, CVE-2022-48809, CVE-2022-48810, CVE-2022-48811, CVE-2022-48812, CVE-2022-48813, CVE-2022-48814, CVE-2022-48815, CVE-2022-48816, CVE-2022-48817, CVE-2022-48818, CVE-2022-48819, CVE-2022-48820, CVE-2022-48821, CVE-2022-48822, CVE-2022-48823, CVE-2022-48824, CVE-2022-48825, CVE-2022-48826, CVE-2022-48827, CVE-2022-48828, CVE-2022-48829, CVE-2022-48830, CVE-2022-48831, CVE-2022-48832, CVE-2022-48833, CVE-2022-48834, CVE-2022-48835, CVE-2022-48836, CVE-2022-48837, CVE-2022-48838, CVE-2022-48839, CVE-2022-48840, CVE-2022-48841, CVE-2022-48842, CVE-2022-48844, CVE-2022-48845, CVE-2022-48846, CVE-2022-48847, CVE-2022-48848, CVE-2022-48849, CVE-2022-48850, CVE-2022-48851, CVE-2022-48852, CVE-2022-48853, CVE-2022-48854, CVE-2022-48855, CVE-2022-48856, CVE-2022-48857, CVE-2022-48858, CVE-2022-48859, CVE-2022-48860, CVE-2022-48861, CVE-2022-48862, CVE-2022-48863, CVE-2022-48864, CVE-2022-48865, CVE-2022-48866, CVE-2022-48867, CVE-2022-48868, CVE-2022-48869, CVE-2022-48870, CVE-2022-48871, CVE-2022-48872, CVE-2022-48873, CVE-2022-48874, CVE-2022-48875, CVE-2022-48876, CVE-2022-48877, CVE-2022-48878, CVE-2022-48879, CVE-2022-48880, CVE-2022-48881, CVE-2022-48882, CVE-2022-48883, CVE-2022-48884, CVE-2022-48885, CVE-2022-48886, CVE-2022-48887, CVE-2022-48888, CVE-2022-48889, CVE-2022-48890, CVE-2022-48891, CVE-2022-48892, CVE-2022-48893, CVE-2022-48894, CVE-2022-48895, CVE-2022-48896, CVE-2022-48897, CVE-2022-48898, CVE-2022-48899, CVE-2022-48901, CVE-2022-48902, CVE-2022-48903, CVE-2022-48904, CVE-2022-48905, CVE-2022-48906, CVE-2022-48907, CVE-2022-48908, CVE-2022-48909, CVE-2022-48910, CVE-2022-48911, CVE-2022-48912, CVE-2022-48913, CVE-2022-48914, CVE-2022-48915, CVE-2022-48916, CVE-2022-48918, CVE-2022-48919, CVE-2022-48920, CVE-2022-48921, CVE-2022-48922, CVE-2022-48923, CVE-2022-48924, CVE-2022-48925, CVE-2022-48926, CVE-2022-48927, CVE-2022-48928, CVE-2022-48929, CVE-2022-48930, CVE-2022-48931, CVE-2022-48932, CVE-2022-48933, CVE-2022-48934, CVE-2022-48935, CVE-2022-48937, CVE-2022-48938, CVE-2022-48939, CVE-2022-48940, CVE-2022-48941, CVE-2022-48942, CVE-2022-48943, CVE-2022-48944, CVE-2022-48945, CVE-2022-48946, CVE-2022-48947, CVE-2022-48948, CVE-2022-48949, CVE-2022-48950, CVE-2022-48951, CVE-2022-48952, CVE-2022-48953, CVE-2022-48954, CVE-2022-48955, CVE-2022-48956, CVE-2022-48957, CVE-2022-48958, CVE-2022-48959, CVE-2022-48960, CVE-2022-48961, CVE-2022-48962, CVE-2022-48963, CVE-2022-48964, CVE-2022-48965, CVE-2022-48966, CVE-2022-48967, CVE-2022-48968, CVE-2022-48969, CVE-2022-48970, CVE-2022-48971, CVE-2022-48972, CVE-2022-48973, CVE-2022-48974, CVE-2022-48975, CVE-2022-48976, CVE-2022-48977, CVE-2022-48978, CVE-2022-48979, CVE-2022-48980, CVE-2022-48981, CVE-2022-48982, CVE-2022-48983, CVE-2022-48984, CVE-2022-48985, CVE-2022-48986, CVE-2022-48987, CVE-2022-48988, CVE-2022-48989, CVE-2022-48990, CVE-2022-48991, CVE-2022-48992, CVE-2022-48994, CVE-2022-48995, CVE-2022-48996, CVE-2022-48997, CVE-2022-48998, CVE-2022-48999, CVE-2022-49000, CVE-2022-49001, CVE-2022-49002, CVE-2022-49003, CVE-2022-49004, CVE-2022-49005, CVE-2022-49006, CVE-2022-49007, CVE-2022-49008, CVE-2022-49009, CVE-2022-49010, CVE-2022-49011, CVE-2022-49012, CVE-2022-49013, CVE-2022-49014, CVE-2022-49015, CVE-2022-49016, CVE-2022-49017, CVE-2022-49018, CVE-2022-49019, CVE-2022-49020, CVE-2022-49021, CVE-2022-49022, CVE-2022-49023, CVE-2022-49024, CVE-2022-49025, CVE-2022-49026, CVE-2022-49027, CVE-2022-49028, CVE-2022-49029, CVE-2022-49030, CVE-2022-49031, CVE-2022-49032, CVE-2022-49033, CVE-2022-49034, CVE-2022-49035, CVE-2022-49044, CVE-2022-49046, CVE-2022-49047, CVE-2022-49048, CVE-2022-49049, CVE-2022-49050, CVE-2022-49051, CVE-2022-49052, CVE-2022-49053, CVE-2022-49054, CVE-2022-49055, CVE-2022-49057, CVE-2022-49058, CVE-2022-49059, CVE-2022-49060, CVE-2022-49061, CVE-2022-49062, CVE-2022-49063, CVE-2022-49064, CVE-2022-49065, CVE-2022-49066, CVE-2022-49067, CVE-2022-49068, CVE-2022-49069, CVE-2022-49070, CVE-2022-49071, CVE-2022-49072, CVE-2022-49073, CVE-2022-49074, CVE-2022-49075, CVE-2022-49076, CVE-2022-49077, CVE-2022-49078, CVE-2022-49079, CVE-2022-49080, CVE-2022-49081, CVE-2022-49082, CVE-2022-49083, CVE-2022-49084, CVE-2022-49085, CVE-2022-49086, CVE-2022-49087, CVE-2022-49088, CVE-2022-49089, CVE-2022-49090, CVE-2022-49091, CVE-2022-49092, CVE-2022-49093, CVE-2022-49094, CVE-2022-49095, CVE-2022-49096, CVE-2022-49097, CVE-2022-49098, CVE-2022-49099, CVE-2022-49100, CVE-2022-49102, CVE-2022-49103, CVE-2022-49104, CVE-2022-49105, CVE-2022-49106, CVE-2022-49107, CVE-2022-49108, CVE-2022-49109, CVE-2022-49110, CVE-2022-49111, CVE-2022-49112, CVE-2022-49113, CVE-2022-49114, CVE-2022-49115, CVE-2022-49116, CVE-2022-49117, CVE-2022-49118, CVE-2022-49119, CVE-2022-49120, CVE-2022-49121, CVE-2022-49122, CVE-2022-49123, CVE-2022-49124, CVE-2022-49125, CVE-2022-49126, CVE-2022-49127, CVE-2022-49128, CVE-2022-49129, CVE-2022-49130, CVE-2022-49131, CVE-2022-49132, CVE-2022-49133, CVE-2022-49134, CVE-2022-49135, CVE-2022-49136, CVE-2022-49137, CVE-2022-49138, CVE-2022-49139, CVE-2022-49141, CVE-2022-49142, CVE-2022-49144, CVE-2022-49145, CVE-2022-49146, CVE-2022-49147, CVE-2022-49148, CVE-2022-49149, CVE-2022-49150, CVE-2022-49151, CVE-2022-49152, CVE-2022-49153, CVE-2022-49154, CVE-2022-49155, CVE-2022-49156, CVE-2022-49157, CVE-2022-49158, CVE-2022-49159, CVE-2022-49160, CVE-2022-49161, CVE-2022-49162, CVE-2022-49163, CVE-2022-49164, CVE-2022-49165, CVE-2022-49166, CVE-2022-49167, CVE-2022-49168, CVE-2022-49169, CVE-2022-49170, CVE-2022-49171, CVE-2022-49172, CVE-2022-49173, CVE-2022-49174, CVE-2022-49175, CVE-2022-49176, CVE-2022-49177, CVE-2022-49178, CVE-2022-49179, CVE-2022-49180, CVE-2022-49182, CVE-2022-49183, CVE-2022-49184, CVE-2022-49185, CVE-2022-49186, CVE-2022-49187, CVE-2022-49188, CVE-2022-49189, CVE-2022-49190, CVE-2022-49191, CVE-2022-49192, CVE-2022-49193, CVE-2022-49194, CVE-2022-49195, CVE-2022-49196, CVE-2022-49197, CVE-2022-49198, CVE-2022-49199, CVE-2022-49200, CVE-2022-49201, CVE-2022-49202, CVE-2022-49203, CVE-2022-49204, CVE-2022-49205, CVE-2022-49206, CVE-2022-49207, CVE-2022-49208, CVE-2022-49209, CVE-2022-49210, CVE-2022-49211, CVE-2022-49212, CVE-2022-49213, CVE-2022-49214, CVE-2022-49215, CVE-2022-49216, CVE-2022-49217, CVE-2022-49218, CVE-2022-49219, CVE-2022-49220, CVE-2022-49221, CVE-2022-49222, CVE-2022-49223, CVE-2022-49224, CVE-2022-49225, CVE-2022-49226, CVE-2022-49227, CVE-2022-49228, CVE-2022-49229, CVE-2022-49230, CVE-2022-49231, CVE-2022-49232, CVE-2022-49233, CVE-2022-49234, CVE-2022-49235, CVE-2022-49236, CVE-2022-49237, CVE-2022-49238, CVE-2022-49239, CVE-2022-49240, CVE-2022-49241, CVE-2022-49242, CVE-2022-49243, CVE-2022-49244, CVE-2022-49245, CVE-2022-49246, CVE-2022-49247, CVE-2022-49248, CVE-2022-49249, CVE-2022-49250, CVE-2022-49251, CVE-2022-49252, CVE-2022-49253, CVE-2022-49254, CVE-2022-49255, CVE-2022-49256 and CVE-2022-49257
linux-yocto/6.6: (Cont.) Ignore CVE-2022-49258, CVE-2022-49259, CVE-2022-49260, CVE-2022-49261, CVE-2022-49262, CVE-2022-49263, CVE-2022-49264, CVE-2022-49265, CVE-2022-49266, CVE-2022-49268, CVE-2022-49269, CVE-2022-49270, CVE-2022-49271, CVE-2022-49272, CVE-2022-49273, CVE-2022-49274, CVE-2022-49275, CVE-2022-49276, CVE-2022-49277, CVE-2022-49278, CVE-2022-49279, CVE-2022-49280, CVE-2022-49281, CVE-2022-49282, CVE-2022-49283, CVE-2022-49284, CVE-2022-49285, CVE-2022-49286, CVE-2022-49287, CVE-2022-49288, CVE-2022-49289, CVE-2022-49290, CVE-2022-49291, CVE-2022-49292, CVE-2022-49293, CVE-2022-49294, CVE-2022-49295, CVE-2022-49296, CVE-2022-49297, CVE-2022-49298, CVE-2022-49300, CVE-2022-49301, CVE-2022-49302, CVE-2022-49303, CVE-2022-49304, CVE-2022-49305, CVE-2022-49306, CVE-2022-49307, CVE-2022-49308, CVE-2022-49309, CVE-2022-49310, CVE-2022-49311, CVE-2022-49312, CVE-2022-49313, CVE-2022-49314, CVE-2022-49315, CVE-2022-49316, CVE-2022-49317, CVE-2022-49318, CVE-2022-49319, CVE-2022-49320, CVE-2022-49321, CVE-2022-49322, CVE-2022-49323, CVE-2022-49324, CVE-2022-49325, CVE-2022-49326, CVE-2022-49327, CVE-2022-49328, CVE-2022-49329, CVE-2022-49330, CVE-2022-49331, CVE-2022-49332, CVE-2022-49333, CVE-2022-49334, CVE-2022-49335, CVE-2022-49336, CVE-2022-49337, CVE-2022-49338, CVE-2022-49339, CVE-2022-49340, CVE-2022-49341, CVE-2022-49342, CVE-2022-49343, CVE-2022-49344, CVE-2022-49345, CVE-2022-49346, CVE-2022-49347, CVE-2022-49348, CVE-2022-49349, CVE-2022-49350, CVE-2022-49351, CVE-2022-49352, CVE-2022-49353, CVE-2022-49354, CVE-2022-49356, CVE-2022-49357, CVE-2022-49358, CVE-2022-49359, CVE-2022-49360, CVE-2022-49361, CVE-2022-49362, CVE-2022-49363, CVE-2022-49364, CVE-2022-49365, CVE-2022-49366, CVE-2022-49367, CVE-2022-49368, CVE-2022-49369, CVE-2022-49370, CVE-2022-49371, CVE-2022-49372, CVE-2022-49373, CVE-2022-49374, CVE-2022-49375, CVE-2022-49376, CVE-2022-49377, CVE-2022-49378, CVE-2022-49379, CVE-2022-49380, CVE-2022-49381, CVE-2022-49382, CVE-2022-49383, CVE-2022-49384, CVE-2022-49385, CVE-2022-49386, CVE-2022-49387, CVE-2022-49388, CVE-2022-49389, CVE-2022-49390, CVE-2022-49391, CVE-2022-49392, CVE-2022-49393, CVE-2022-49394, CVE-2022-49395, CVE-2022-49396, CVE-2022-49397, CVE-2022-49398, CVE-2022-49399, CVE-2022-49400, CVE-2022-49401, CVE-2022-49402, CVE-2022-49403, CVE-2022-49404, CVE-2022-49405, CVE-2022-49406, CVE-2022-49407, CVE-2022-49408, CVE-2022-49409, CVE-2022-49410, CVE-2022-49411, CVE-2022-49412, CVE-2022-49413, CVE-2022-49414, CVE-2022-49415, CVE-2022-49416, CVE-2022-49417, CVE-2022-49418, CVE-2022-49419, CVE-2022-49420, CVE-2022-49421, CVE-2022-49422, CVE-2022-49423, CVE-2022-49424, CVE-2022-49425, CVE-2022-49426, CVE-2022-49427, CVE-2022-49428, CVE-2022-49429, CVE-2022-49430, CVE-2022-49431, CVE-2022-49432, CVE-2022-49433, CVE-2022-49434, CVE-2022-49435, CVE-2022-49436, CVE-2022-49437, CVE-2022-49438, CVE-2022-49439, CVE-2022-49440, CVE-2022-49441, CVE-2022-49442, CVE-2022-49443, CVE-2022-49444, CVE-2022-49445, CVE-2022-49446, CVE-2022-49447, CVE-2022-49448, CVE-2022-49449, CVE-2022-49450, CVE-2022-49451, CVE-2022-49452, CVE-2022-49453, CVE-2022-49454, CVE-2022-49455, CVE-2022-49456, CVE-2022-49457, CVE-2022-49458, CVE-2022-49459, CVE-2022-49460, CVE-2022-49461, CVE-2022-49462, CVE-2022-49463, CVE-2022-49464, CVE-2022-49465, CVE-2022-49466, CVE-2022-49467, CVE-2022-49468, CVE-2022-49469, CVE-2022-49470, CVE-2022-49471, CVE-2022-49472, CVE-2022-49473, CVE-2022-49474, CVE-2022-49475, CVE-2022-49476, CVE-2022-49477, CVE-2022-49478, CVE-2022-49479, CVE-2022-49480, CVE-2022-49481, CVE-2022-49482, CVE-2022-49483, CVE-2022-49484, CVE-2022-49485, CVE-2022-49486, CVE-2022-49487, CVE-2022-49488, CVE-2022-49489, CVE-2022-49490, CVE-2022-49491, CVE-2022-49492, CVE-2022-49493, CVE-2022-49494, CVE-2022-49495, CVE-2022-49496, CVE-2022-49497, CVE-2022-49498, CVE-2022-49499, CVE-2022-49500, CVE-2022-49501, CVE-2022-49502, CVE-2022-49503, CVE-2022-49504, CVE-2022-49505, CVE-2022-49506, CVE-2022-49507, CVE-2022-49508, CVE-2022-49509, CVE-2022-49510, CVE-2022-49511, CVE-2022-49512, CVE-2022-49513, CVE-2022-49514, CVE-2022-49515, CVE-2022-49516, CVE-2022-49517, CVE-2022-49518, CVE-2022-49519, CVE-2022-49520, CVE-2022-49521, CVE-2022-49522, CVE-2022-49523, CVE-2022-49524, CVE-2022-49525, CVE-2022-49526, CVE-2022-49527, CVE-2022-49528, CVE-2022-49529, CVE-2022-49530, CVE-2022-49531, CVE-2022-49532, CVE-2022-49533, CVE-2022-49534, CVE-2022-49535, CVE-2022-49536, CVE-2022-49537, CVE-2022-49538, CVE-2022-49539, CVE-2022-49540, CVE-2022-49541, CVE-2022-49542, CVE-2022-49543, CVE-2022-49544, CVE-2022-49545, CVE-2022-49546, CVE-2022-49547, CVE-2022-49548, CVE-2022-49549, CVE-2022-49550, CVE-2022-49551, CVE-2022-49552, CVE-2022-49553, CVE-2022-49554, CVE-2022-49555, CVE-2022-49556, CVE-2022-49557, CVE-2022-49558, CVE-2022-49559, CVE-2022-49560, CVE-2022-49561, CVE-2022-49562, CVE-2022-49563, CVE-2022-49564, CVE-2022-49565, CVE-2022-49566, CVE-2022-49567, CVE-2022-49568, CVE-2022-49569, CVE-2022-49570, CVE-2022-49571, CVE-2022-49572, CVE-2022-49573, CVE-2022-49574, CVE-2022-49575, CVE-2022-49576, CVE-2022-49577, CVE-2022-49578, CVE-2022-49579, CVE-2022-49580, CVE-2022-49581, CVE-2022-49582, CVE-2022-49583, CVE-2022-49584, CVE-2022-49585, CVE-2022-49586, CVE-2022-49587, CVE-2022-49588, CVE-2022-49589, CVE-2022-49590, CVE-2022-49591, CVE-2022-49592, CVE-2022-49593, CVE-2022-49594, CVE-2022-49595, CVE-2022-49596, CVE-2022-49597, CVE-2022-49598, CVE-2022-49599, CVE-2022-49600, CVE-2022-49601, CVE-2022-49602, CVE-2022-49603, CVE-2022-49604, CVE-2022-49605, CVE-2022-49606, CVE-2022-49607, CVE-2022-49608, CVE-2022-49609, CVE-2022-49610, CVE-2022-49611, CVE-2022-49612, CVE-2022-49613, CVE-2022-49615, CVE-2022-49616, CVE-2022-49617, CVE-2022-49618, CVE-2022-49619, CVE-2022-49620, CVE-2022-49621, CVE-2022-49622, CVE-2022-49623, CVE-2022-49624, CVE-2022-49625, CVE-2022-49626, CVE-2022-49627, CVE-2022-49628, CVE-2022-49629, CVE-2022-49630, CVE-2022-49631, CVE-2022-49632, CVE-2022-49633, CVE-2022-49634, CVE-2022-49635, CVE-2022-49636, CVE-2022-49637, CVE-2022-49638, CVE-2022-49639, CVE-2022-49640, CVE-2022-49641, CVE-2022-49642, CVE-2022-49643, CVE-2022-49644, CVE-2022-49645, CVE-2022-49646, CVE-2022-49647, CVE-2022-49648, CVE-2022-49649, CVE-2022-49650, CVE-2022-49651, CVE-2022-49652, CVE-2022-49653, CVE-2022-49654, CVE-2022-49655, CVE-2022-49656, CVE-2022-49657, CVE-2022-49658, CVE-2022-49659, CVE-2022-49661, CVE-2022-49662, CVE-2022-49663, CVE-2022-49664, CVE-2022-49665, CVE-2022-49666, CVE-2022-49667, CVE-2022-49668, CVE-2022-49669, CVE-2022-49670, CVE-2022-49671, CVE-2022-49672, CVE-2022-49673, CVE-2022-49674, CVE-2022-49675, CVE-2022-49676, CVE-2022-49677, CVE-2022-49678, CVE-2022-49679, CVE-2022-49680, CVE-2022-49681, CVE-2022-49682, CVE-2022-49683, CVE-2022-49684, CVE-2022-49685, CVE-2022-49686, CVE-2022-49687, CVE-2022-49688, CVE-2022-49691, CVE-2022-49692, CVE-2022-49693, CVE-2022-49694, CVE-2022-49695, CVE-2022-49696, CVE-2022-49697, CVE-2022-49698, CVE-2022-49699, CVE-2022-49700, CVE-2022-49701, CVE-2022-49702, CVE-2022-49703, CVE-2022-49704, CVE-2022-49705, CVE-2022-49706, CVE-2022-49707, CVE-2022-49708, CVE-2022-49709, CVE-2022-49710, CVE-2022-49711, CVE-2022-49712, CVE-2022-49713, CVE-2022-49714, CVE-2022-49715, CVE-2022-49716, CVE-2022-49717, CVE-2022-49718, CVE-2022-49719, CVE-2022-49720, CVE-2022-49721, CVE-2022-49722, CVE-2022-49723, CVE-2022-49724, CVE-2022-49725, CVE-2022-49726, CVE-2022-49727, CVE-2022-49728, CVE-2022-49729, CVE-2022-49731, CVE-2022-49732, CVE-2022-49733, CVE-2022-49738, CVE-2022-49739, CVE-2022-49740, CVE-2022-49741, CVE-2022-49742, CVE-2022-49743, CVE-2022-49744, CVE-2022-49745, CVE-2022-49746, CVE-2022-49747, CVE-2022-49748, CVE-2022-49749, CVE-2022-49750, CVE-2022-49751, CVE-2022-49752, CVE-2022-49753, CVE-2022-49754, CVE-2022-49755, CVE-2022-49756, CVE-2022-49757, CVE-2022-49758, CVE-2022-49759, CVE-2022-49760, CVE-2022-49761, CVE-2022-49762, CVE-2022-49763, CVE-2022-49764, CVE-2022-49765, CVE-2022-49766, CVE-2022-49767, CVE-2022-49768, CVE-2022-49769, CVE-2022-49770, CVE-2022-49771, CVE-2022-49772, CVE-2022-49773, CVE-2022-49774, CVE-2022-49775, CVE-2022-49776, CVE-2022-49777, CVE-2022-49778, CVE-2022-49779, CVE-2022-49780, CVE-2022-49781, CVE-2022-49782, CVE-2022-49783, CVE-2022-49784, CVE-2022-49785, CVE-2022-49786, CVE-2022-49787, CVE-2022-49788, CVE-2022-49789, CVE-2022-49790, CVE-2022-49791, CVE-2022-49792, CVE-2022-49793, CVE-2022-49794, CVE-2022-49795, CVE-2022-49796, CVE-2022-49797, CVE-2022-49798, CVE-2022-49799, CVE-2022-49800, CVE-2022-49801 and CVE-2022-49802
linux-yocto/6.6: (Cont.) Ignore CVE-2022-49803, CVE-2022-49804, CVE-2022-49805, CVE-2022-49806, CVE-2022-49807, CVE-2022-49808, CVE-2022-49809, CVE-2022-49810, CVE-2022-49811, CVE-2022-49812, CVE-2022-49813, CVE-2022-49814, CVE-2022-49815, CVE-2022-49817, CVE-2022-49818, CVE-2022-49819, CVE-2022-49820, CVE-2022-49821, CVE-2022-49822, CVE-2022-49823, CVE-2022-49824, CVE-2022-49825, CVE-2022-49826, CVE-2022-49827, CVE-2022-49828, CVE-2022-49829, CVE-2022-49830, CVE-2022-49831, CVE-2022-49832, CVE-2022-49833, CVE-2022-49834, CVE-2022-49835, CVE-2022-49836, CVE-2022-49837, CVE-2022-49838, CVE-2022-49839, CVE-2022-49840, CVE-2022-49841, CVE-2022-49842, CVE-2022-49844, CVE-2022-49845, CVE-2022-49846, CVE-2022-49847, CVE-2022-49848, CVE-2022-49849, CVE-2022-49850, CVE-2022-49851, CVE-2022-49852, CVE-2022-49853, CVE-2022-49854, CVE-2022-49855, CVE-2022-49857, CVE-2022-49858, CVE-2022-49859, CVE-2022-49860, CVE-2022-49861, CVE-2022-49862, CVE-2022-49863, CVE-2022-49864, CVE-2022-49865, CVE-2022-49866, CVE-2022-49867, CVE-2022-49868, CVE-2022-49869, CVE-2022-49870, CVE-2022-49871, CVE-2022-49872, CVE-2022-49873, CVE-2022-49874, CVE-2022-49875, CVE-2022-49876, CVE-2022-49877, CVE-2022-49878, CVE-2022-49879, CVE-2022-49880, CVE-2022-49881, CVE-2022-49882, CVE-2022-49883, CVE-2022-49884, CVE-2022-49885, CVE-2022-49886, CVE-2022-49887, CVE-2022-49888, CVE-2022-49889, CVE-2022-49890, CVE-2022-49891, CVE-2022-49892, CVE-2022-49893, CVE-2022-49894, CVE-2022-49895, CVE-2022-49896, CVE-2022-49898, CVE-2022-49899, CVE-2022-49900, CVE-2022-49901, CVE-2022-49902, CVE-2022-49903, CVE-2022-49904, CVE-2022-49905, CVE-2022-49906, CVE-2022-49907, CVE-2022-49908, CVE-2022-49910, CVE-2022-49911, CVE-2022-49912, CVE-2022-49913, CVE-2022-49914, CVE-2022-49915, CVE-2022-49916, CVE-2022-49917, CVE-2022-49918, CVE-2022-49919, CVE-2022-49920, CVE-2022-49921, CVE-2022-49922, CVE-2022-49923, CVE-2022-49924, CVE-2022-49925, CVE-2022-49926, CVE-2022-49927, CVE-2022-49928, CVE-2022-49929, CVE-2022-49930, CVE-2022-49931, CVE-2022-49932, CVE-2022-49934, CVE-2022-49935, CVE-2022-49936, CVE-2022-49937, CVE-2022-49938, CVE-2022-49939, CVE-2022-49940, CVE-2022-49942, CVE-2022-49943, CVE-2022-49944, CVE-2022-49945, CVE-2022-49946, CVE-2022-49947, CVE-2022-49948, CVE-2022-49949, CVE-2022-49950, CVE-2022-49951, CVE-2022-49952, CVE-2022-49953, CVE-2022-49954, CVE-2022-49955, CVE-2022-49956, CVE-2022-49957, CVE-2022-49958, CVE-2022-49959, CVE-2022-49960, CVE-2022-49961, CVE-2022-49962, CVE-2022-49963, CVE-2022-49964, CVE-2022-49965, CVE-2022-49966, CVE-2022-49967, CVE-2022-49968, CVE-2022-49969, CVE-2022-49970, CVE-2022-49971, CVE-2022-49972, CVE-2022-49973, CVE-2022-49974, CVE-2022-49975, CVE-2022-49976, CVE-2022-49977, CVE-2022-49978, CVE-2022-49979, CVE-2022-49980, CVE-2022-49981, CVE-2022-49982, CVE-2022-49983, CVE-2022-49984, CVE-2022-49985, CVE-2022-49986, CVE-2022-49987, CVE-2022-49989, CVE-2022-49990, CVE-2022-49991, CVE-2022-49992, CVE-2022-49993, CVE-2022-49994, CVE-2022-49995, CVE-2022-49996, CVE-2022-49997, CVE-2022-49998, CVE-2022-49999, CVE-2022-50000, CVE-2022-50001, CVE-2022-50002, CVE-2022-50003, CVE-2022-50004, CVE-2022-50005, CVE-2022-50006, CVE-2022-50007, CVE-2022-50008, CVE-2022-50009, CVE-2022-50010, CVE-2022-50011, CVE-2022-50012, CVE-2022-50013, CVE-2022-50014, CVE-2022-50015, CVE-2022-50016, CVE-2022-50017, CVE-2022-50019, CVE-2022-50020, CVE-2022-50021, CVE-2022-50022, CVE-2022-50023, CVE-2022-50024, CVE-2022-50025, CVE-2022-50026, CVE-2022-50027, CVE-2022-50028, CVE-2022-50029, CVE-2022-50030, CVE-2022-50032, CVE-2022-50033, CVE-2022-50034, CVE-2022-50035, CVE-2022-50036, CVE-2022-50037, CVE-2022-50038, CVE-2022-50039, CVE-2022-50040, CVE-2022-50041, CVE-2022-50042, CVE-2022-50043, CVE-2022-50044, CVE-2022-50045, CVE-2022-50046, CVE-2022-50047, CVE-2022-50048, CVE-2022-50049, CVE-2022-50050, CVE-2022-50051, CVE-2022-50052, CVE-2022-50053, CVE-2022-50054, CVE-2022-50055, CVE-2022-50056, CVE-2022-50057, CVE-2022-50058, CVE-2022-50059, CVE-2022-50060, CVE-2022-50061, CVE-2022-50062, CVE-2022-50063, CVE-2022-50064, CVE-2022-50065, CVE-2022-50066, CVE-2022-50067, CVE-2022-50068, CVE-2022-50069, CVE-2022-50070, CVE-2022-50071, CVE-2022-50072, CVE-2022-50073, CVE-2022-50074, CVE-2022-50075, CVE-2022-50076, CVE-2022-50077, CVE-2022-50078, CVE-2022-50079, CVE-2022-50080, CVE-2022-50082, CVE-2022-50084, CVE-2022-50085, CVE-2022-50086, CVE-2022-50087, CVE-2022-50088, CVE-2022-50089, CVE-2022-50090, CVE-2022-50091, CVE-2022-50092, CVE-2022-50093, CVE-2022-50094, CVE-2022-50095, CVE-2022-50096, CVE-2022-50097, CVE-2022-50098, CVE-2022-50099, CVE-2022-50100, CVE-2022-50101, CVE-2022-50102, CVE-2022-50103, CVE-2022-50104, CVE-2022-50105, CVE-2022-50106, CVE-2022-50107, CVE-2022-50108, CVE-2022-50109, CVE-2022-50110, CVE-2022-50111, CVE-2022-50112, CVE-2022-50113, CVE-2022-50114, CVE-2022-50115, CVE-2022-50116, CVE-2022-50117, CVE-2022-50118, CVE-2022-50119, CVE-2022-50120, CVE-2022-50121, CVE-2022-50122, CVE-2022-50123, CVE-2022-50124, CVE-2022-50125, CVE-2022-50126, CVE-2022-50127, CVE-2022-50129, CVE-2022-50130, CVE-2022-50131, CVE-2022-50132, CVE-2022-50133, CVE-2022-50134, CVE-2022-50135, CVE-2022-50136, CVE-2022-50137, CVE-2022-50138, CVE-2022-50139, CVE-2022-50140, CVE-2022-50141, CVE-2022-50142, CVE-2022-50143, CVE-2022-50144, CVE-2022-50145, CVE-2022-50146, CVE-2022-50147, CVE-2022-50148, CVE-2022-50149, CVE-2022-50151, CVE-2022-50152, CVE-2022-50153, CVE-2022-50154, CVE-2022-50155, CVE-2022-50156, CVE-2022-50157, CVE-2022-50158, CVE-2022-50159, CVE-2022-50160, CVE-2022-50161, CVE-2022-50162, CVE-2022-50163, CVE-2022-50164, CVE-2022-50165, CVE-2022-50166, CVE-2022-50167, CVE-2022-50168, CVE-2022-50169, CVE-2022-50170, CVE-2022-50171, CVE-2022-50172, CVE-2022-50173, CVE-2022-50174, CVE-2022-50175, CVE-2022-50176, CVE-2022-50177, CVE-2022-50178, CVE-2022-50179, CVE-2022-50181, CVE-2022-50182, CVE-2022-50183, CVE-2022-50184, CVE-2022-50185, CVE-2022-50186, CVE-2022-50187, CVE-2022-50188, CVE-2022-50189, CVE-2022-50190, CVE-2022-50191, CVE-2022-50192, CVE-2022-50193, CVE-2022-50194, CVE-2022-50195, CVE-2022-50196, CVE-2022-50197, CVE-2022-50198, CVE-2022-50199, CVE-2022-50200, CVE-2022-50201, CVE-2022-50202, CVE-2022-50203, CVE-2022-50204, CVE-2022-50205, CVE-2022-50206, CVE-2022-50207, CVE-2022-50208, CVE-2022-50209, CVE-2022-50210, CVE-2022-50211, CVE-2022-50212, CVE-2022-50213, CVE-2022-50214, CVE-2022-50215, CVE-2022-50217, CVE-2022-50218, CVE-2022-50219, CVE-2022-50220, CVE-2022-50221, CVE-2022-50222, CVE-2022-50223, CVE-2022-50224, CVE-2022-50225, CVE-2022-50226, CVE-2022-50227, CVE-2022-50228, CVE-2022-50229, CVE-2022-50230, CVE-2022-50231, CVE-2022-50232, CVE-2022-50233, CVE-2022-50234, CVE-2022-50235, CVE-2022-50236, CVE-2022-50239, CVE-2022-50240, CVE-2022-50241, CVE-2022-50242, CVE-2022-50243, CVE-2022-50244, CVE-2022-50245, CVE-2022-50246, CVE-2022-50247, CVE-2022-50248, CVE-2022-50249, CVE-2022-50250, CVE-2022-50251, CVE-2022-50252, CVE-2022-50253, CVE-2022-50254, CVE-2022-50255, CVE-2022-50256, CVE-2022-50257, CVE-2022-50258, CVE-2022-50259, CVE-2022-50260, CVE-2022-50261, CVE-2022-50262, CVE-2022-50263, CVE-2022-50264, CVE-2022-50265, CVE-2022-50266, CVE-2022-50267, CVE-2022-50268, CVE-2022-50269, CVE-2022-50270, CVE-2022-50271, CVE-2022-50272, CVE-2022-50273, CVE-2022-50274, CVE-2022-50275, CVE-2022-50276, CVE-2022-50277, CVE-2022-50278, CVE-2022-50279, CVE-2022-50280, CVE-2022-50281, CVE-2022-50282, CVE-2022-50283, CVE-2022-50284, CVE-2022-50285, CVE-2022-50286, CVE-2022-50287, CVE-2022-50288, CVE-2022-50289, CVE-2022-50291, CVE-2022-50292, CVE-2022-50293, CVE-2022-50294, CVE-2022-50295, CVE-2022-50296, CVE-2022-50297, CVE-2022-50298, CVE-2022-50299, CVE-2022-50300, CVE-2022-50301, CVE-2022-50302, CVE-2022-50303, CVE-2022-50304, CVE-2022-50305, CVE-2022-50306, CVE-2022-50307, CVE-2022-50308, CVE-2022-50309, CVE-2022-50310, CVE-2022-50311, CVE-2022-50312, CVE-2022-50313, CVE-2022-50314, CVE-2022-50315, CVE-2022-50316, CVE-2022-50317, CVE-2022-50318, CVE-2022-50319, CVE-2022-50320, CVE-2022-50321, CVE-2022-50322, CVE-2022-50323, CVE-2022-50324, CVE-2022-50325, CVE-2022-50326, CVE-2022-50327, CVE-2022-50328, CVE-2022-50329, CVE-2022-50330, CVE-2022-50331, CVE-2022-50332, CVE-2022-50333, CVE-2022-50334, CVE-2022-50335, CVE-2022-50336, CVE-2022-50337, CVE-2022-50339, CVE-2022-50340, CVE-2022-50341, CVE-2022-50342, CVE-2022-50343, CVE-2022-50344, CVE-2022-50346, CVE-2022-50347, CVE-2022-50348, CVE-2022-50349, CVE-2022-50350, CVE-2022-50351, CVE-2022-50352, CVE-2022-50353, CVE-2022-50354, CVE-2022-50355 and CVE-2022-50356
linux-yocto/6.6: (Cont.) Ignore CVE-2022-50357, CVE-2022-50358, CVE-2022-50359, CVE-2022-50360, CVE-2022-50361, CVE-2022-50362, CVE-2022-50363, CVE-2022-50364, CVE-2022-50365, CVE-2022-50366, CVE-2022-50367, CVE-2022-50368, CVE-2022-50369, CVE-2022-50370, CVE-2022-50371, CVE-2022-50372, CVE-2022-50373, CVE-2022-50374, CVE-2022-50375, CVE-2022-50376, CVE-2022-50378, CVE-2022-50379, CVE-2022-50380, CVE-2022-50381, CVE-2022-50382, CVE-2022-50383, CVE-2022-50384, CVE-2022-50385, CVE-2022-50386, CVE-2022-50387, CVE-2022-50388, CVE-2022-50389, CVE-2022-50390, CVE-2022-50391, CVE-2022-50392, CVE-2022-50393, CVE-2022-50394, CVE-2022-50395, CVE-2022-50396, CVE-2022-50398, CVE-2022-50399, CVE-2022-50400, CVE-2022-50401, CVE-2022-50402, CVE-2022-50404, CVE-2022-50405, CVE-2022-50406, CVE-2022-50407, CVE-2022-50408, CVE-2022-50409, CVE-2022-50410, CVE-2022-50411, CVE-2022-50412, CVE-2022-50413, CVE-2022-50414, CVE-2022-50415, CVE-2022-50416, CVE-2022-50417, CVE-2022-50418, CVE-2022-50419, CVE-2022-50420, CVE-2022-50421, CVE-2022-50422, CVE-2022-50423, CVE-2022-50424, CVE-2022-50425, CVE-2022-50426, CVE-2022-50427, CVE-2022-50428, CVE-2022-50429, CVE-2022-50430, CVE-2022-50431, CVE-2022-50432, CVE-2022-50433, CVE-2022-50434, CVE-2022-50435, CVE-2022-50436, CVE-2022-50437, CVE-2022-50438, CVE-2022-50439, CVE-2022-50440, CVE-2022-50441, CVE-2022-50442, CVE-2022-50443, CVE-2022-50444, CVE-2022-50445, CVE-2022-50446, CVE-2022-50447, CVE-2022-50448, CVE-2022-50449, CVE-2022-50451, CVE-2022-50452, CVE-2022-50453, CVE-2022-50454, CVE-2022-50456, CVE-2022-50457, CVE-2022-50458, CVE-2022-50459, CVE-2022-50460, CVE-2022-50461, CVE-2022-50462, CVE-2022-50463, CVE-2022-50464, CVE-2022-50465, CVE-2022-50466, CVE-2022-50467, CVE-2022-50468, CVE-2022-50469, CVE-2022-50470, CVE-2022-50471, CVE-2022-50472, CVE-2022-50473, CVE-2022-50474, CVE-2022-50475, CVE-2022-50476, CVE-2022-50477, CVE-2022-50478, CVE-2022-50479, CVE-2022-50480, CVE-2022-50481, CVE-2022-50482, CVE-2022-50483, CVE-2022-50484, CVE-2022-50485, CVE-2022-50486, CVE-2022-50488, CVE-2022-50489, CVE-2022-50490, CVE-2022-50491, CVE-2022-50492, CVE-2022-50493, CVE-2022-50494, CVE-2022-50496, CVE-2022-50497, CVE-2022-50498, CVE-2022-50499, CVE-2022-50500, CVE-2022-50501, CVE-2022-50503, CVE-2022-50504, CVE-2022-50505, CVE-2022-50506, CVE-2022-50507, CVE-2022-50508, CVE-2022-50509, CVE-2022-50510, CVE-2022-50511, CVE-2022-50512, CVE-2022-50513, CVE-2022-50514, CVE-2022-50515, CVE-2022-50516, CVE-2022-50517, CVE-2022-50518, CVE-2022-50519, CVE-2022-50520, CVE-2022-50521, CVE-2022-50522, CVE-2022-50523, CVE-2022-50524, CVE-2022-50525, CVE-2022-50526, CVE-2022-50527, CVE-2022-50528, CVE-2022-50529, CVE-2022-50530, CVE-2022-50531, CVE-2022-50532, CVE-2022-50533, CVE-2022-50534, CVE-2022-50535, CVE-2022-50536, CVE-2022-50537, CVE-2022-50538, CVE-2022-50539, CVE-2022-50540, CVE-2022-50541, CVE-2022-50542, CVE-2022-50543, CVE-2022-50544, CVE-2022-50545, CVE-2022-50546, CVE-2022-50547, CVE-2022-50548, CVE-2022-50549, CVE-2022-50550, CVE-2022-50551, CVE-2022-50552, CVE-2022-50553, CVE-2022-50554, CVE-2022-50555, CVE-2022-50556, CVE-2022-50557, CVE-2022-50558, CVE-2022-50559, CVE-2022-50560, CVE-2022-50561, CVE-2022-50562, CVE-2022-50563, CVE-2022-50564, CVE-2022-50565, CVE-2022-50566, CVE-2022-50567, CVE-2022-50568, CVE-2022-50569, CVE-2022-50570, CVE-2022-50571, CVE-2022-50572, CVE-2022-50573, CVE-2022-50574, CVE-2022-50575, CVE-2022-50576, CVE-2022-50577, CVE-2022-50578, CVE-2022-50579, CVE-2022-50580, CVE-2022-50581, CVE-2022-50582, CVE-2022-50583, CVE-2022-50614, CVE-2022-50615, CVE-2022-50616, CVE-2022-50617, CVE-2022-50618, CVE-2022-50619, CVE-2022-50620, CVE-2022-50621, CVE-2022-50622, CVE-2022-50623, CVE-2022-50624, CVE-2022-50625, CVE-2022-50626, CVE-2022-50627, CVE-2022-50628, CVE-2022-50629, CVE-2022-50630, CVE-2022-50631, CVE-2022-50632, CVE-2022-50633, CVE-2022-50634, CVE-2022-50635, CVE-2022-50636, CVE-2022-50637, CVE-2022-50638, CVE-2022-50639, CVE-2022-50640, CVE-2022-50641, CVE-2022-50642, CVE-2022-50643, CVE-2022-50644, CVE-2022-50645, CVE-2022-50646, CVE-2022-50647, CVE-2022-50648, CVE-2022-50649, CVE-2022-50650, CVE-2022-50651, CVE-2022-50652, CVE-2022-50653, CVE-2022-50654, CVE-2022-50655, CVE-2022-50656, CVE-2022-50657, CVE-2022-50658, CVE-2022-50659, CVE-2022-50660, CVE-2022-50661, CVE-2022-50662, CVE-2022-50663, CVE-2022-50664, CVE-2022-50665, CVE-2022-50666, CVE-2022-50667, CVE-2022-50668, CVE-2022-50669, CVE-2022-50670, CVE-2022-50671, CVE-2022-50672, CVE-2022-50673, CVE-2022-50674, CVE-2022-50675, CVE-2022-50676, CVE-2022-50677, CVE-2022-50678, CVE-2022-50679, CVE-2022-50697, CVE-2022-50698, CVE-2022-50699, CVE-2022-50700, CVE-2022-50701, CVE-2022-50702, CVE-2022-50703, CVE-2022-50704, CVE-2022-50705, CVE-2022-50706, CVE-2022-50707, CVE-2022-50708, CVE-2022-50709, CVE-2022-50710, CVE-2022-50711, CVE-2022-50712, CVE-2022-50713, CVE-2022-50714, CVE-2022-50715, CVE-2022-50716, CVE-2022-50717, CVE-2022-50718, CVE-2022-50719, CVE-2022-50720, CVE-2022-50721, CVE-2022-50722, CVE-2022-50723, CVE-2022-50724, CVE-2022-50725, CVE-2022-50726, CVE-2022-50727, CVE-2022-50728, CVE-2022-50729, CVE-2022-50730, CVE-2022-50731, CVE-2022-50732, CVE-2022-50733, CVE-2022-50734, CVE-2022-50735, CVE-2022-50736, CVE-2022-50737, CVE-2022-50738, CVE-2022-50739, CVE-2022-50740, CVE-2022-50741, CVE-2022-50742, CVE-2022-50743, CVE-2022-50744, CVE-2022-50745, CVE-2022-50746, CVE-2022-50747, CVE-2022-50748, CVE-2022-50749, CVE-2022-50750, CVE-2022-50751, CVE-2022-50752, CVE-2022-50753, CVE-2022-50754, CVE-2022-50755, CVE-2022-50756, CVE-2022-50757, CVE-2022-50758, CVE-2022-50759, CVE-2022-50760, CVE-2022-50761, CVE-2022-50762, CVE-2022-50763, CVE-2022-50764, CVE-2022-50765, CVE-2022-50766, CVE-2022-50767, CVE-2022-50768, CVE-2022-50769, CVE-2022-50770, CVE-2022-50771, CVE-2022-50772, CVE-2022-50773, CVE-2022-50774, CVE-2022-50775, CVE-2022-50776, CVE-2022-50777, CVE-2022-50778, CVE-2022-50779, CVE-2022-50780, CVE-2022-50781, CVE-2022-50782, CVE-2022-50783, CVE-2022-50784, CVE-2022-50785, CVE-2022-50786, CVE-2022-50809, CVE-2022-50810, CVE-2022-50811, CVE-2022-50812, CVE-2022-50813, CVE-2022-50814, CVE-2022-50815, CVE-2022-50816, CVE-2022-50817, CVE-2022-50818, CVE-2022-50819, CVE-2022-50820, CVE-2022-50821, CVE-2022-50822, CVE-2022-50823, CVE-2022-50824, CVE-2022-50825, CVE-2022-50826, CVE-2022-50827, CVE-2022-50828, CVE-2022-50829, CVE-2022-50830, CVE-2022-50832, CVE-2022-50833, CVE-2022-50834, CVE-2022-50835, CVE-2022-50836, CVE-2022-50837, CVE-2022-50838, CVE-2022-50839, CVE-2022-50840, CVE-2022-50841, CVE-2022-50842, CVE-2022-50843, CVE-2022-50844, CVE-2022-50845, CVE-2022-50846, CVE-2022-50847, CVE-2022-50848, CVE-2022-50849, CVE-2022-50850, CVE-2022-50851, CVE-2022-50852, CVE-2022-50853, CVE-2022-50854, CVE-2022-50855, CVE-2022-50856, CVE-2022-50857, CVE-2022-50858, CVE-2022-50859, CVE-2022-50860, CVE-2022-50861, CVE-2022-50862, CVE-2022-50863, CVE-2022-50864, CVE-2022-50865, CVE-2022-50866, CVE-2022-50867, CVE-2022-50868, CVE-2022-50869, CVE-2022-50870, CVE-2022-50871, CVE-2022-50872, CVE-2022-50873, CVE-2022-50874, CVE-2022-50875, CVE-2022-50876, CVE-2022-50877, CVE-2022-50878, CVE-2022-50879, CVE-2022-50880, CVE-2022-50881, CVE-2022-50882, CVE-2022-50883, CVE-2022-50884, CVE-2022-50885, CVE-2022-50886, CVE-2022-50887, CVE-2022-50888, CVE-2022-50889, CVE-2023-4130, CVE-2023-4515, CVE-2023-7324, CVE-2023-32246, CVE-2023-32249, CVE-2023-52585, CVE-2023-52634, CVE-2023-52642, CVE-2023-52643, CVE-2023-52644, CVE-2023-52645, CVE-2023-52646, CVE-2023-52647, CVE-2023-52648, CVE-2023-52649, CVE-2023-52650, CVE-2023-52652, CVE-2023-52653, CVE-2023-52654, CVE-2023-52655, CVE-2023-52656, CVE-2023-52657, CVE-2023-52658, CVE-2023-52659, CVE-2023-52660, CVE-2023-52661, CVE-2023-52662, CVE-2023-52663, CVE-2023-52664, CVE-2023-52667, CVE-2023-52668, CVE-2023-52669, CVE-2023-52670, CVE-2023-52671, CVE-2023-52672, CVE-2023-52673, CVE-2023-52674, CVE-2023-52675, CVE-2023-52676, CVE-2023-52677, CVE-2023-52678, CVE-2023-52679, CVE-2023-52680, CVE-2023-52681, CVE-2023-52682, CVE-2023-52683, CVE-2023-52684, CVE-2023-52686, CVE-2023-52687, CVE-2023-52688, CVE-2023-52689, CVE-2023-52690, CVE-2023-52691, CVE-2023-52692, CVE-2023-52693, CVE-2023-52694, CVE-2023-52695, CVE-2023-52696, CVE-2023-52697, CVE-2023-52698, CVE-2023-52699, CVE-2023-52700, CVE-2023-52701, CVE-2023-52702, CVE-2023-52703, CVE-2023-52704, CVE-2023-52705, CVE-2023-52706, CVE-2023-52707, CVE-2023-52708, CVE-2023-52730, CVE-2023-52731, CVE-2023-52732, CVE-2023-52735, CVE-2023-52736, CVE-2023-52737, CVE-2023-52738 and CVE-2023-52739
linux-yocto/6.6: (Cont.) Ignore CVE-2023-52740, CVE-2023-52741, CVE-2023-52742, CVE-2023-52743, CVE-2023-52744, CVE-2023-52745, CVE-2023-52746, CVE-2023-52747, CVE-2023-52748, CVE-2023-52749, CVE-2023-52750, CVE-2023-52751, CVE-2023-52752, CVE-2023-52753, CVE-2023-52754, CVE-2023-52755, CVE-2023-52757, CVE-2023-52760, CVE-2023-52761, CVE-2023-52762, CVE-2023-52763, CVE-2023-52764, CVE-2023-52765, CVE-2023-52766, CVE-2023-52767, CVE-2023-52768, CVE-2023-52769, CVE-2023-52770, CVE-2023-52771, CVE-2023-52772, CVE-2023-52773, CVE-2023-52774, CVE-2023-52775, CVE-2023-52776, CVE-2023-52777, CVE-2023-52778, CVE-2023-52779, CVE-2023-52780, CVE-2023-52781, CVE-2023-52782, CVE-2023-52783, CVE-2023-52784, CVE-2023-52785, CVE-2023-52786, CVE-2023-52787, CVE-2023-52788, CVE-2023-52789, CVE-2023-52790, CVE-2023-52791, CVE-2023-52792, CVE-2023-52794, CVE-2023-52795, CVE-2023-52796, CVE-2023-52797, CVE-2023-52798, CVE-2023-52799, CVE-2023-52800, CVE-2023-52801, CVE-2023-52803, CVE-2023-52804, CVE-2023-52805, CVE-2023-52806, CVE-2023-52807, CVE-2023-52808, CVE-2023-52809, CVE-2023-52810, CVE-2023-52811, CVE-2023-52812, CVE-2023-52813, CVE-2023-52814, CVE-2023-52815, CVE-2023-52816, CVE-2023-52817, CVE-2023-52818, CVE-2023-52819, CVE-2023-52821, CVE-2023-52825, CVE-2023-52826, CVE-2023-52827, CVE-2023-52828, CVE-2023-52829, CVE-2023-52831, CVE-2023-52832, CVE-2023-52833, CVE-2023-52834, CVE-2023-52835, CVE-2023-52836, CVE-2023-52837, CVE-2023-52838, CVE-2023-52839, CVE-2023-52840, CVE-2023-52841, CVE-2023-52842, CVE-2023-52843, CVE-2023-52844, CVE-2023-52845, CVE-2023-52846, CVE-2023-52847, CVE-2023-52848, CVE-2023-52849, CVE-2023-52850, CVE-2023-52851, CVE-2023-52852, CVE-2023-52853, CVE-2023-52854, CVE-2023-52855, CVE-2023-52856, CVE-2023-52857, CVE-2023-52858, CVE-2023-52859, CVE-2023-52860, CVE-2023-52861, CVE-2023-52862, CVE-2023-52863, CVE-2023-52864, CVE-2023-52865, CVE-2023-52866, CVE-2023-52867, CVE-2023-52868, CVE-2023-52869, CVE-2023-52870, CVE-2023-52871, CVE-2023-52872, CVE-2023-52873, CVE-2023-52874, CVE-2023-52875, CVE-2023-52876, CVE-2023-52877, CVE-2023-52878, CVE-2023-52879, CVE-2023-52880, CVE-2023-52881, CVE-2023-52882, CVE-2023-52883, CVE-2023-52884, CVE-2023-52885, CVE-2023-52886, CVE-2023-52887, CVE-2023-52888, CVE-2023-52889, CVE-2023-52893, CVE-2023-52894, CVE-2023-52895, CVE-2023-52896, CVE-2023-52897, CVE-2023-52898, CVE-2023-52899, CVE-2023-52900, CVE-2023-52901, CVE-2023-52902, CVE-2023-52903, CVE-2023-52904, CVE-2023-52905, CVE-2023-52906, CVE-2023-52907, CVE-2023-52908, CVE-2023-52909, CVE-2023-52910, CVE-2023-52911, CVE-2023-52912, CVE-2023-52913, CVE-2023-52914, CVE-2023-52915, CVE-2023-52916, CVE-2023-52918, CVE-2023-52919, CVE-2023-52920, CVE-2023-52921, CVE-2023-52922, CVE-2023-52923, CVE-2023-52924, CVE-2023-52925, CVE-2023-52926, CVE-2023-52927, CVE-2023-52928, CVE-2023-52929, CVE-2023-52930, CVE-2023-52931, CVE-2023-52932, CVE-2023-52933, CVE-2023-52934, CVE-2023-52935, CVE-2023-52936, CVE-2023-52937, CVE-2023-52938, CVE-2023-52939, CVE-2023-52940, CVE-2023-52941, CVE-2023-52942, CVE-2023-52973, CVE-2023-52974, CVE-2023-52975, CVE-2023-52976, CVE-2023-52977, CVE-2023-52978, CVE-2023-52980, CVE-2023-52981, CVE-2023-52982, CVE-2023-52983, CVE-2023-52984, CVE-2023-52985, CVE-2023-52986, CVE-2023-52987, CVE-2023-52988, CVE-2023-52989, CVE-2023-52991, CVE-2023-52992, CVE-2023-52993, CVE-2023-52994, CVE-2023-52995, CVE-2023-52996, CVE-2023-52997, CVE-2023-52998, CVE-2023-52999, CVE-2023-53000, CVE-2023-53002, CVE-2023-53003, CVE-2023-53004, CVE-2023-53005, CVE-2023-53006, CVE-2023-53007, CVE-2023-53008, CVE-2023-53009, CVE-2023-53010, CVE-2023-53011, CVE-2023-53013, CVE-2023-53014, CVE-2023-53015, CVE-2023-53016, CVE-2023-53017, CVE-2023-53018, CVE-2023-53019, CVE-2023-53020, CVE-2023-53021, CVE-2023-53022, CVE-2023-53023, CVE-2023-53024, CVE-2023-53026, CVE-2023-53028, CVE-2023-53029, CVE-2023-53030, CVE-2023-53031, CVE-2023-53032, CVE-2023-53033, CVE-2023-53034, CVE-2023-53035, CVE-2023-53036, CVE-2023-53037, CVE-2023-53038, CVE-2023-53039, CVE-2023-53040, CVE-2023-53041, CVE-2023-53042, CVE-2023-53043, CVE-2023-53044, CVE-2023-53045, CVE-2023-53046, CVE-2023-53047, CVE-2023-53048, CVE-2023-53049, CVE-2023-53050, CVE-2023-53051, CVE-2023-53052, CVE-2023-53053, CVE-2023-53054, CVE-2023-53055, CVE-2023-53056, CVE-2023-53057, CVE-2023-53058, CVE-2023-53059, CVE-2023-53060, CVE-2023-53061, CVE-2023-53062, CVE-2023-53064, CVE-2023-53065, CVE-2023-53066, CVE-2023-53067, CVE-2023-53068, CVE-2023-53069, CVE-2023-53070, CVE-2023-53071, CVE-2023-53072, CVE-2023-53073, CVE-2023-53074, CVE-2023-53075, CVE-2023-53077, CVE-2023-53078, CVE-2023-53079, CVE-2023-53080, CVE-2023-53081, CVE-2023-53082, CVE-2023-53083, CVE-2023-53084, CVE-2023-53085, CVE-2023-53086, CVE-2023-53087, CVE-2023-53088, CVE-2023-53089, CVE-2023-53090, CVE-2023-53091, CVE-2023-53092, CVE-2023-53093, CVE-2023-53094, CVE-2023-53095, CVE-2023-53096, CVE-2023-53097, CVE-2023-53098, CVE-2023-53099, CVE-2023-53100, CVE-2023-53101, CVE-2023-53102, CVE-2023-53103, CVE-2023-53105, CVE-2023-53106, CVE-2023-53107, CVE-2023-53108, CVE-2023-53109, CVE-2023-53110, CVE-2023-53111, CVE-2023-53112, CVE-2023-53113, CVE-2023-53114, CVE-2023-53115, CVE-2023-53116, CVE-2023-53117, CVE-2023-53118, CVE-2023-53119, CVE-2023-53120, CVE-2023-53121, CVE-2023-53123, CVE-2023-53124, CVE-2023-53125, CVE-2023-53126, CVE-2023-53127, CVE-2023-53128, CVE-2023-53131, CVE-2023-53132, CVE-2023-53133, CVE-2023-53134, CVE-2023-53135, CVE-2023-53136, CVE-2023-53138, CVE-2023-53139, CVE-2023-53140, CVE-2023-53141, CVE-2023-53142, CVE-2023-53143, CVE-2023-53144, CVE-2023-53145, CVE-2023-53146, CVE-2023-53147, CVE-2023-53148, CVE-2023-53149, CVE-2023-53150, CVE-2023-53151, CVE-2023-53152, CVE-2023-53153, CVE-2023-53163, CVE-2023-53164, CVE-2023-53165, CVE-2023-53166, CVE-2023-53167, CVE-2023-53168, CVE-2023-53169, CVE-2023-53170, CVE-2023-53171, CVE-2023-53172, CVE-2023-53173, CVE-2023-53174, CVE-2023-53175, CVE-2023-53176, CVE-2023-53177, CVE-2023-53178, CVE-2023-53179, CVE-2023-53180, CVE-2023-53181, CVE-2023-53182, CVE-2023-53184, CVE-2023-53185, CVE-2023-53186, CVE-2023-53188, CVE-2023-53189, CVE-2023-53190, CVE-2023-53191, CVE-2023-53192, CVE-2023-53193, CVE-2023-53194, CVE-2023-53195, CVE-2023-53196, CVE-2023-53197, CVE-2023-53198, CVE-2023-53199, CVE-2023-53200, CVE-2023-53201, CVE-2023-53202, CVE-2023-53203, CVE-2023-53204, CVE-2023-53205, CVE-2023-53206, CVE-2023-53207, CVE-2023-53208, CVE-2023-53209, CVE-2023-53210, CVE-2023-53211, CVE-2023-53213, CVE-2023-53214, CVE-2023-53215, CVE-2023-53216, CVE-2023-53217, CVE-2023-53218, CVE-2023-53219, CVE-2023-53220, CVE-2023-53221, CVE-2023-53222, CVE-2023-53223, CVE-2023-53224, CVE-2023-53225, CVE-2023-53226, CVE-2023-53228, CVE-2023-53229, CVE-2023-53230, CVE-2023-53231, CVE-2023-53232, CVE-2023-53233, CVE-2023-53234, CVE-2023-53235, CVE-2023-53236, CVE-2023-53237, CVE-2023-53238, CVE-2023-53239, CVE-2023-53240, CVE-2023-53241, CVE-2023-53242, CVE-2023-53243, CVE-2023-53244, CVE-2023-53245, CVE-2023-53246, CVE-2023-53247, CVE-2023-53248, CVE-2023-53249, CVE-2023-53250, CVE-2023-53251, CVE-2023-53252, CVE-2023-53253, CVE-2023-53254, CVE-2023-53255, CVE-2023-53256, CVE-2023-53257, CVE-2023-53258, CVE-2023-53259, CVE-2023-53260, CVE-2023-53261, CVE-2023-53262, CVE-2023-53263, CVE-2023-53264, CVE-2023-53265, CVE-2023-53266, CVE-2023-53267, CVE-2023-53268, CVE-2023-53269, CVE-2023-53270, CVE-2023-53271, CVE-2023-53272, CVE-2023-53273, CVE-2023-53274, CVE-2023-53275, CVE-2023-53276, CVE-2023-53277, CVE-2023-53278, CVE-2023-53279, CVE-2023-53280, CVE-2023-53281, CVE-2023-53282, CVE-2023-53284, CVE-2023-53285, CVE-2023-53286, CVE-2023-53287, CVE-2023-53288, CVE-2023-53289, CVE-2023-53290, CVE-2023-53291, CVE-2023-53292, CVE-2023-53294, CVE-2023-53295, CVE-2023-53296, CVE-2023-53297, CVE-2023-53298, CVE-2023-53299, CVE-2023-53300, CVE-2023-53301, CVE-2023-53302, CVE-2023-53303, CVE-2023-53304, CVE-2023-53305, CVE-2023-53306, CVE-2023-53307, CVE-2023-53308, CVE-2023-53309, CVE-2023-53310, CVE-2023-53311, CVE-2023-53312, CVE-2023-53313, CVE-2023-53314, CVE-2023-53315, CVE-2023-53316, CVE-2023-53317, CVE-2023-53318, CVE-2023-53319, CVE-2023-53320, CVE-2023-53321, CVE-2023-53322, CVE-2023-53323, CVE-2023-53324, CVE-2023-53325, CVE-2023-53326, CVE-2023-53327, CVE-2023-53328, CVE-2023-53329, CVE-2023-53330, CVE-2023-53331, CVE-2023-53332, CVE-2023-53333, CVE-2023-53334, CVE-2023-53335, CVE-2023-53336, CVE-2023-53337, CVE-2023-53338, CVE-2023-53339, CVE-2023-53340, CVE-2023-53341, CVE-2023-53342, CVE-2023-53343 and CVE-2023-53344
linux-yocto/6.6: (Cont.) Ignore CVE-2023-53345, CVE-2023-53346, CVE-2023-53347, CVE-2023-53348, CVE-2023-53349, CVE-2023-53350, CVE-2023-53351, CVE-2023-53352, CVE-2023-53353, CVE-2023-53354, CVE-2023-53355, CVE-2023-53356, CVE-2023-53357, CVE-2023-53358, CVE-2023-53359, CVE-2023-53360, CVE-2023-53361, CVE-2023-53362, CVE-2023-53363, CVE-2023-53364, CVE-2023-53365, CVE-2023-53366, CVE-2023-53367, CVE-2023-53368, CVE-2023-53369, CVE-2023-53370, CVE-2023-53371, CVE-2023-53372, CVE-2023-53373, CVE-2023-53374, CVE-2023-53375, CVE-2023-53376, CVE-2023-53377, CVE-2023-53378, CVE-2023-53379, CVE-2023-53380, CVE-2023-53381, CVE-2023-53382, CVE-2023-53383, CVE-2023-53384, CVE-2023-53385, CVE-2023-53386, CVE-2023-53387, CVE-2023-53388, CVE-2023-53389, CVE-2023-53390, CVE-2023-53391, CVE-2023-53392, CVE-2023-53393, CVE-2023-53394, CVE-2023-53395, CVE-2023-53396, CVE-2023-53397, CVE-2023-53398, CVE-2023-53399, CVE-2023-53400, CVE-2023-53401, CVE-2023-53402, CVE-2023-53403, CVE-2023-53404, CVE-2023-53405, CVE-2023-53406, CVE-2023-53407, CVE-2023-53408, CVE-2023-53409, CVE-2023-53410, CVE-2023-53411, CVE-2023-53412, CVE-2023-53413, CVE-2023-53414, CVE-2023-53415, CVE-2023-53416, CVE-2023-53417, CVE-2023-53418, CVE-2023-53419, CVE-2023-53420, CVE-2023-53421, CVE-2023-53422, CVE-2023-53423, CVE-2023-53424, CVE-2023-53425, CVE-2023-53426, CVE-2023-53427, CVE-2023-53428, CVE-2023-53429, CVE-2023-53430, CVE-2023-53431, CVE-2023-53432, CVE-2023-53433, CVE-2023-53434, CVE-2023-53435, CVE-2023-53436, CVE-2023-53437, CVE-2023-53438, CVE-2023-53439, CVE-2023-53440, CVE-2023-53441, CVE-2023-53442, CVE-2023-53443, CVE-2023-53444, CVE-2023-53445, CVE-2023-53446, CVE-2023-53447, CVE-2023-53448, CVE-2023-53449, CVE-2023-53450, CVE-2023-53451, CVE-2023-53452, CVE-2023-53453, CVE-2023-53454, CVE-2023-53455, CVE-2023-53456, CVE-2023-53457, CVE-2023-53458, CVE-2023-53459, CVE-2023-53460, CVE-2023-53461, CVE-2023-53462, CVE-2023-53463, CVE-2023-53464, CVE-2023-53465, CVE-2023-53466, CVE-2023-53467, CVE-2023-53468, CVE-2023-53470, CVE-2023-53471, CVE-2023-53472, CVE-2023-53473, CVE-2023-53474, CVE-2023-53475, CVE-2023-53476, CVE-2023-53477, CVE-2023-53478, CVE-2023-53479, CVE-2023-53480, CVE-2023-53481, CVE-2023-53482, CVE-2023-53483, CVE-2023-53484, CVE-2023-53485, CVE-2023-53486, CVE-2023-53487, CVE-2023-53488, CVE-2023-53489, CVE-2023-53490, CVE-2023-53491, CVE-2023-53492, CVE-2023-53493, CVE-2023-53494, CVE-2023-53495, CVE-2023-53496, CVE-2023-53497, CVE-2023-53498, CVE-2023-53499, CVE-2023-53500, CVE-2023-53501, CVE-2023-53503, CVE-2023-53504, CVE-2023-53505, CVE-2023-53506, CVE-2023-53507, CVE-2023-53508, CVE-2023-53509, CVE-2023-53510, CVE-2023-53511, CVE-2023-53512, CVE-2023-53513, CVE-2023-53514, CVE-2023-53515, CVE-2023-53516, CVE-2023-53517, CVE-2023-53518, CVE-2023-53519, CVE-2023-53520, CVE-2023-53521, CVE-2023-53522, CVE-2023-53523, CVE-2023-53524, CVE-2023-53525, CVE-2023-53526, CVE-2023-53527, CVE-2023-53528, CVE-2023-53529, CVE-2023-53530, CVE-2023-53531, CVE-2023-53532, CVE-2023-53533, CVE-2023-53534, CVE-2023-53535, CVE-2023-53536, CVE-2023-53537, CVE-2023-53538, CVE-2023-53539, CVE-2023-53540, CVE-2023-53541, CVE-2023-53542, CVE-2023-53543, CVE-2023-53544, CVE-2023-53545, CVE-2023-53546, CVE-2023-53547, CVE-2023-53548, CVE-2023-53549, CVE-2023-53550, CVE-2023-53551, CVE-2023-53552, CVE-2023-53553, CVE-2023-53554, CVE-2023-53555, CVE-2023-53556, CVE-2023-53557, CVE-2023-53558, CVE-2023-53559, CVE-2023-53560, CVE-2023-53561, CVE-2023-53562, CVE-2023-53563, CVE-2023-53564, CVE-2023-53565, CVE-2023-53566, CVE-2023-53567, CVE-2023-53568, CVE-2023-53569, CVE-2023-53570, CVE-2023-53571, CVE-2023-53572, CVE-2023-53573, CVE-2023-53574, CVE-2023-53575, CVE-2023-53576, CVE-2023-53577, CVE-2023-53578, CVE-2023-53579, CVE-2023-53580, CVE-2023-53581, CVE-2023-53582, CVE-2023-53583, CVE-2023-53584, CVE-2023-53585, CVE-2023-53586, CVE-2023-53587, CVE-2023-53588, CVE-2023-53589, CVE-2023-53590, CVE-2023-53591, CVE-2023-53592, CVE-2023-53593, CVE-2023-53594, CVE-2023-53595, CVE-2023-53596, CVE-2023-53597, CVE-2023-53598, CVE-2023-53599, CVE-2023-53600, CVE-2023-53601, CVE-2023-53602, CVE-2023-53603, CVE-2023-53604, CVE-2023-53605, CVE-2023-53606, CVE-2023-53607, CVE-2023-53608, CVE-2023-53609, CVE-2023-53610, CVE-2023-53611, CVE-2023-53612, CVE-2023-53613, CVE-2023-53614, CVE-2023-53615, CVE-2023-53616, CVE-2023-53617, CVE-2023-53618, CVE-2023-53619, CVE-2023-53620, CVE-2023-53621, CVE-2023-53622, CVE-2023-53623, CVE-2023-53624, CVE-2023-53625, CVE-2023-53626, CVE-2023-53627, CVE-2023-53628, CVE-2023-53629, CVE-2023-53630, CVE-2023-53631, CVE-2023-53632, CVE-2023-53633, CVE-2023-53634, CVE-2023-53635, CVE-2023-53636, CVE-2023-53637, CVE-2023-53638, CVE-2023-53639, CVE-2023-53640, CVE-2023-53641, CVE-2023-53642, CVE-2023-53643, CVE-2023-53644, CVE-2023-53645, CVE-2023-53646, CVE-2023-53647, CVE-2023-53648, CVE-2023-53649, CVE-2023-53650, CVE-2023-53651, CVE-2023-53652, CVE-2023-53653, CVE-2023-53654, CVE-2023-53655, CVE-2023-53656, CVE-2023-53657, CVE-2023-53658, CVE-2023-53659, CVE-2023-53660, CVE-2023-53661, CVE-2023-53662, CVE-2023-53663, CVE-2023-53664, CVE-2023-53665, CVE-2023-53666, CVE-2023-53667, CVE-2023-53668, CVE-2023-53669, CVE-2023-53670, CVE-2023-53671, CVE-2023-53672, CVE-2023-53673, CVE-2023-53674, CVE-2023-53675, CVE-2023-53676, CVE-2023-53677, CVE-2023-53678, CVE-2023-53679, CVE-2023-53680, CVE-2023-53681, CVE-2023-53682, CVE-2023-53683, CVE-2023-53684, CVE-2023-53685, CVE-2023-53686, CVE-2023-53687, CVE-2023-53692, CVE-2023-53693, CVE-2023-53694, CVE-2023-53695, CVE-2023-53696, CVE-2023-53697, CVE-2023-53698, CVE-2023-53699, CVE-2023-53700, CVE-2023-53702, CVE-2023-53703, CVE-2023-53704, CVE-2023-53705, CVE-2023-53706, CVE-2023-53707, CVE-2023-53708, CVE-2023-53709, CVE-2023-53710, CVE-2023-53711, CVE-2023-53712, CVE-2023-53713, CVE-2023-53714, CVE-2023-53715, CVE-2023-53716, CVE-2023-53717, CVE-2023-53718, CVE-2023-53719, CVE-2023-53720, CVE-2023-53721, CVE-2023-53722, CVE-2023-53723, CVE-2023-53724, CVE-2023-53725, CVE-2023-53726, CVE-2023-53727, CVE-2023-53728, CVE-2023-53729, CVE-2023-53730, CVE-2023-53731, CVE-2023-53732, CVE-2023-53733, CVE-2023-53742, CVE-2023-53743, CVE-2023-53744, CVE-2023-53745, CVE-2023-53746, CVE-2023-53747, CVE-2023-53748, CVE-2023-53750, CVE-2023-53751, CVE-2023-53752, CVE-2023-53753, CVE-2023-53754, CVE-2023-53755, CVE-2023-53756, CVE-2023-53757, CVE-2023-53758, CVE-2023-53759, CVE-2023-53760, CVE-2023-53761, CVE-2023-53762, CVE-2023-53763, CVE-2023-53764, CVE-2023-53765, CVE-2023-53766, CVE-2023-53767, CVE-2023-53768, CVE-2023-53769, CVE-2023-53777, CVE-2023-53778, CVE-2023-53780, CVE-2023-53781, CVE-2023-53782, CVE-2023-53783, CVE-2023-53784, CVE-2023-53785, CVE-2023-53786, CVE-2023-53787, CVE-2023-53788, CVE-2023-53789, CVE-2023-53790, CVE-2023-53791, CVE-2023-53792, CVE-2023-53793, CVE-2023-53794, CVE-2023-53795, CVE-2023-53796, CVE-2023-53797, CVE-2023-53798, CVE-2023-53799, CVE-2023-53800, CVE-2023-53801, CVE-2023-53802, CVE-2023-53803, CVE-2023-53804, CVE-2023-53806, CVE-2023-53807, CVE-2023-53808, CVE-2023-53809, CVE-2023-53810, CVE-2023-53811, CVE-2023-53812, CVE-2023-53813, CVE-2023-53814, CVE-2023-53815, CVE-2023-53816, CVE-2023-53817, CVE-2023-53818, CVE-2023-53819, CVE-2023-53820, CVE-2023-53821, CVE-2023-53822, CVE-2023-53823, CVE-2023-53824, CVE-2023-53825, CVE-2023-53826, CVE-2023-53827, CVE-2023-53828, CVE-2023-53829, CVE-2023-53830, CVE-2023-53831, CVE-2023-53832, CVE-2023-53833, CVE-2023-53834, CVE-2023-53836, CVE-2023-53837, CVE-2023-53838, CVE-2023-53839, CVE-2023-53840, CVE-2023-53841, CVE-2023-53842, CVE-2023-53843, CVE-2023-53844, CVE-2023-53845, CVE-2023-53846, CVE-2023-53847, CVE-2023-53848, CVE-2023-53849, CVE-2023-53850, CVE-2023-53851, CVE-2023-53852, CVE-2023-53853, CVE-2023-53854, CVE-2023-53855, CVE-2023-53856, CVE-2023-53857, CVE-2023-53858, CVE-2023-53859, CVE-2023-53860, CVE-2023-53861, CVE-2023-53862, CVE-2023-53863, CVE-2023-53864, CVE-2023-53865, CVE-2023-53866, CVE-2023-53867, CVE-2023-53986, CVE-2023-53987, CVE-2023-53988, CVE-2023-53989, CVE-2023-53990, CVE-2023-53991, CVE-2023-53992, CVE-2023-53993, CVE-2023-53994, CVE-2023-53995, CVE-2023-53996, CVE-2023-53997, CVE-2023-53998, CVE-2023-53999, CVE-2023-54000, CVE-2023-54001, CVE-2023-54002, CVE-2023-54003, CVE-2023-54004, CVE-2023-54005, CVE-2023-54006, CVE-2023-54007, CVE-2023-54008, CVE-2023-54009, CVE-2023-54010, CVE-2023-54011, CVE-2023-54012, CVE-2023-54013, CVE-2023-54014, CVE-2023-54015, CVE-2023-54016, CVE-2023-54017, CVE-2023-54018, CVE-2023-54019, CVE-2023-54020 and CVE-2023-54021
linux-yocto/6.6: (Cont.) Ignore CVE-2023-54022, CVE-2023-54023, CVE-2023-54024, CVE-2023-54025, CVE-2023-54026, CVE-2023-54027, CVE-2023-54028, CVE-2023-54030, CVE-2023-54031, CVE-2023-54032, CVE-2023-54033, CVE-2023-54034, CVE-2023-54035, CVE-2023-54036, CVE-2023-54037, CVE-2023-54038, CVE-2023-54039, CVE-2023-54040, CVE-2023-54041, CVE-2023-54042, CVE-2023-54043, CVE-2023-54044, CVE-2023-54045, CVE-2023-54046, CVE-2023-54047, CVE-2023-54048, CVE-2023-54049, CVE-2023-54050, CVE-2023-54051, CVE-2023-54052, CVE-2023-54053, CVE-2023-54055, CVE-2023-54056, CVE-2023-54057, CVE-2023-54058, CVE-2023-54059, CVE-2023-54060, CVE-2023-54062, CVE-2023-54063, CVE-2023-54064, CVE-2023-54065, CVE-2023-54066, CVE-2023-54067, CVE-2023-54068, CVE-2023-54069, CVE-2023-54070, CVE-2023-54071, CVE-2023-54072, CVE-2023-54073, CVE-2023-54074, CVE-2023-54075, CVE-2023-54076, CVE-2023-54077, CVE-2023-54078, CVE-2023-54079, CVE-2023-54080, CVE-2023-54081, CVE-2023-54083, CVE-2023-54084, CVE-2023-54085, CVE-2023-54086, CVE-2023-54087, CVE-2023-54088, CVE-2023-54089, CVE-2023-54090, CVE-2023-54091, CVE-2023-54092, CVE-2023-54093, CVE-2023-54094, CVE-2023-54095, CVE-2023-54096, CVE-2023-54097, CVE-2023-54098, CVE-2023-54099, CVE-2023-54100, CVE-2023-54101, CVE-2023-54102, CVE-2023-54104, CVE-2023-54105, CVE-2023-54106, CVE-2023-54107, CVE-2023-54108, CVE-2023-54109, CVE-2023-54110, CVE-2023-54111, CVE-2023-54112, CVE-2023-54113, CVE-2023-54114, CVE-2023-54115, CVE-2023-54116, CVE-2023-54117, CVE-2023-54118, CVE-2023-54119, CVE-2023-54120, CVE-2023-54121, CVE-2023-54122, CVE-2023-54123, CVE-2023-54124, CVE-2023-54125, CVE-2023-54126, CVE-2023-54127, CVE-2023-54128, CVE-2023-54129, CVE-2023-54130, CVE-2023-54131, CVE-2023-54132, CVE-2023-54133, CVE-2023-54134, CVE-2023-54135, CVE-2023-54136, CVE-2023-54137, CVE-2023-54138, CVE-2023-54139, CVE-2023-54140, CVE-2023-54141, CVE-2023-54142, CVE-2023-54143, CVE-2023-54144, CVE-2023-54145, CVE-2023-54146, CVE-2023-54147, CVE-2023-54148, CVE-2023-54149, CVE-2023-54150, CVE-2023-54151, CVE-2023-54152, CVE-2023-54153, CVE-2023-54154, CVE-2023-54155, CVE-2023-54156, CVE-2023-54157, CVE-2023-54158, CVE-2023-54159, CVE-2023-54160, CVE-2023-54162, CVE-2023-54164, CVE-2023-54165, CVE-2023-54166, CVE-2023-54167, CVE-2023-54168, CVE-2023-54169, CVE-2023-54170, CVE-2023-54171, CVE-2023-54172, CVE-2023-54173, CVE-2023-54174, CVE-2023-54175, CVE-2023-54176, CVE-2023-54177, CVE-2023-54178, CVE-2023-54179, CVE-2023-54180, CVE-2023-54181, CVE-2023-54182, CVE-2023-54183, CVE-2023-54184, CVE-2023-54185, CVE-2023-54186, CVE-2023-54187, CVE-2023-54188, CVE-2023-54189, CVE-2023-54190, CVE-2023-54191, CVE-2023-54192, CVE-2023-54193, CVE-2023-54194, CVE-2023-54195, CVE-2023-54196, CVE-2023-54197, CVE-2023-54198, CVE-2023-54199, CVE-2023-54200, CVE-2023-54201, CVE-2023-54202, CVE-2023-54203, CVE-2023-54204, CVE-2023-54205, CVE-2023-54206, CVE-2023-54207, CVE-2023-54208, CVE-2023-54209, CVE-2023-54210, CVE-2023-54211, CVE-2023-54213, CVE-2023-54214, CVE-2023-54215, CVE-2023-54216, CVE-2023-54217, CVE-2023-54218, CVE-2023-54219, CVE-2023-54220, CVE-2023-54221, CVE-2023-54222, CVE-2023-54223, CVE-2023-54224, CVE-2023-54225, CVE-2023-54226, CVE-2023-54227, CVE-2023-54228, CVE-2023-54229, CVE-2023-54230, CVE-2023-54231, CVE-2023-54232, CVE-2023-54233, CVE-2023-54234, CVE-2023-54235, CVE-2023-54236, CVE-2023-54237, CVE-2023-54238, CVE-2023-54239, CVE-2023-54240, CVE-2023-54241, CVE-2023-54242, CVE-2023-54243, CVE-2023-54244, CVE-2023-54245, CVE-2023-54246, CVE-2023-54247, CVE-2023-54248, CVE-2023-54249, CVE-2023-54250, CVE-2023-54251, CVE-2023-54252, CVE-2023-54253, CVE-2023-54254, CVE-2023-54255, CVE-2023-54257, CVE-2023-54258, CVE-2023-54259, CVE-2023-54260, CVE-2023-54261, CVE-2023-54262, CVE-2023-54263, CVE-2023-54264, CVE-2023-54265, CVE-2023-54266, CVE-2023-54267, CVE-2023-54268, CVE-2023-54269, CVE-2023-54270, CVE-2023-54271, CVE-2023-54272, CVE-2023-54273, CVE-2023-54274, CVE-2023-54275, CVE-2023-54276, CVE-2023-54277, CVE-2023-54278, CVE-2023-54279, CVE-2023-54280, CVE-2023-54281, CVE-2023-54282, CVE-2023-54283, CVE-2023-54284, CVE-2023-54285, CVE-2023-54286, CVE-2023-54287, CVE-2023-54288, CVE-2023-54289, CVE-2023-54291, CVE-2023-54292, CVE-2023-54293, CVE-2023-54294, CVE-2023-54295, CVE-2023-54296, CVE-2023-54297, CVE-2023-54298, CVE-2023-54299, CVE-2023-54300, CVE-2023-54301, CVE-2023-54302, CVE-2023-54303, CVE-2023-54304, CVE-2023-54305, CVE-2023-54306, CVE-2023-54307, CVE-2023-54308, CVE-2023-54309, CVE-2023-54310, CVE-2023-54311, CVE-2023-54312, CVE-2023-54313, CVE-2023-54314, CVE-2023-54315, CVE-2023-54316, CVE-2023-54317, CVE-2023-54318, CVE-2023-54319, CVE-2023-54320, CVE-2023-54321, CVE-2023-54322, CVE-2023-54323, CVE-2023-54324, CVE-2023-54325, CVE-2023-54326, CVE-2024-26596, CVE-2024-26655, CVE-2024-26658, CVE-2024-26686, CVE-2024-26699, CVE-2024-26784, CVE-2024-26785, CVE-2024-26797, CVE-2024-26806, CVE-2024-26810, CVE-2024-26811, CVE-2024-26812, CVE-2024-26813, CVE-2024-26814, CVE-2024-26815, CVE-2024-26816, CVE-2024-26817, CVE-2024-26818, CVE-2024-26820, CVE-2024-26822, CVE-2024-26823, CVE-2024-26824, CVE-2024-26825, CVE-2024-26826, CVE-2024-26828, CVE-2024-26829, CVE-2024-26830, CVE-2024-26831, CVE-2024-26832, CVE-2024-26833, CVE-2024-26834, CVE-2024-26835, CVE-2024-26836, CVE-2024-26837, CVE-2024-26838, CVE-2024-26839, CVE-2024-26840, CVE-2024-26841, CVE-2024-26842, CVE-2024-26843, CVE-2024-26844, CVE-2024-26845, CVE-2024-26846, CVE-2024-26847, CVE-2024-26849, CVE-2024-26850, CVE-2024-26851, CVE-2024-26852, CVE-2024-26853, CVE-2024-26854, CVE-2024-26855, CVE-2024-26856, CVE-2024-26857, CVE-2024-26858, CVE-2024-26859, CVE-2024-26860, CVE-2024-26861, CVE-2024-26862, CVE-2024-26863, CVE-2024-26864, CVE-2024-26865, CVE-2024-26866, CVE-2024-26867, CVE-2024-26868, CVE-2024-26869, CVE-2024-26870, CVE-2024-26871, CVE-2024-26872, CVE-2024-26873, CVE-2024-26874, CVE-2024-26875, CVE-2024-26876, CVE-2024-26877, CVE-2024-26878, CVE-2024-26879, CVE-2024-26880, CVE-2024-26881, CVE-2024-26882, CVE-2024-26883, CVE-2024-26884, CVE-2024-26885, CVE-2024-26886, CVE-2024-26887, CVE-2024-26888, CVE-2024-26889, CVE-2024-26890, CVE-2024-26891, CVE-2024-26892, CVE-2024-26893, CVE-2024-26894, CVE-2024-26895, CVE-2024-26896, CVE-2024-26897, CVE-2024-26898, CVE-2024-26899, CVE-2024-26900, CVE-2024-26901, CVE-2024-26902, CVE-2024-26903, CVE-2024-26906, CVE-2024-26907, CVE-2024-26909, CVE-2024-26910, CVE-2024-26911, CVE-2024-26912, CVE-2024-26915, CVE-2024-26916, CVE-2024-26917, CVE-2024-26918, CVE-2024-26919, CVE-2024-26920, CVE-2024-26921, CVE-2024-26922, CVE-2024-26923, CVE-2024-26924, CVE-2024-26925, CVE-2024-26926, CVE-2024-26927, CVE-2024-26928, CVE-2024-26930, CVE-2024-26931, CVE-2024-26932, CVE-2024-26933, CVE-2024-26934, CVE-2024-26935, CVE-2024-26936, CVE-2024-26937, CVE-2024-26938, CVE-2024-26939, CVE-2024-26940, CVE-2024-26941, CVE-2024-26942, CVE-2024-26943, CVE-2024-26945, CVE-2024-26946, CVE-2024-26947, CVE-2024-26949, CVE-2024-26950, CVE-2024-26951, CVE-2024-26952, CVE-2024-26953, CVE-2024-26954, CVE-2024-26955, CVE-2024-26956, CVE-2024-26957, CVE-2024-26958, CVE-2024-26959, CVE-2024-26960, CVE-2024-26961, CVE-2024-26962, CVE-2024-26963, CVE-2024-26964, CVE-2024-26965, CVE-2024-26966, CVE-2024-26967, CVE-2024-26968, CVE-2024-26969, CVE-2024-26970, CVE-2024-26971, CVE-2024-26973, CVE-2024-26974, CVE-2024-26975, CVE-2024-26976, CVE-2024-26977, CVE-2024-26978, CVE-2024-26980, CVE-2024-26981, CVE-2024-26982, CVE-2024-26983, CVE-2024-26984, CVE-2024-26985, CVE-2024-26986, CVE-2024-26987, CVE-2024-26988, CVE-2024-26989, CVE-2024-26990, CVE-2024-26991, CVE-2024-26992, CVE-2024-26993, CVE-2024-26994, CVE-2024-26995, CVE-2024-26996, CVE-2024-26997, CVE-2024-26998, CVE-2024-26999, CVE-2024-27000, CVE-2024-27001, CVE-2024-27002, CVE-2024-27003, CVE-2024-27004, CVE-2024-27005, CVE-2024-27006, CVE-2024-27007, CVE-2024-27008, CVE-2024-27009, CVE-2024-27011, CVE-2024-27013, CVE-2024-27014, CVE-2024-27015, CVE-2024-27016, CVE-2024-27017, CVE-2024-27018, CVE-2024-27019, CVE-2024-27020, CVE-2024-27021, CVE-2024-27023, CVE-2024-27024, CVE-2024-27025, CVE-2024-27026, CVE-2024-27027, CVE-2024-27028, CVE-2024-27029, CVE-2024-27030, CVE-2024-27031, CVE-2024-27032, CVE-2024-27033, CVE-2024-27034, CVE-2024-27035, CVE-2024-27036, CVE-2024-27037, CVE-2024-27038, CVE-2024-27039, CVE-2024-27040, CVE-2024-27041, CVE-2024-27043, CVE-2024-27044, CVE-2024-27045, CVE-2024-27046, CVE-2024-27047, CVE-2024-27048, CVE-2024-27049, CVE-2024-27050, CVE-2024-27051, CVE-2024-27052, CVE-2024-27053, CVE-2024-27054, CVE-2024-27056 and CVE-2024-27057
linux-yocto/6.6: (Cont.) Ignore CVE-2024-27058, CVE-2024-27059, CVE-2024-27060, CVE-2024-27061, CVE-2024-27062, CVE-2024-27063, CVE-2024-27064, CVE-2024-27065, CVE-2024-27066, CVE-2024-27067, CVE-2024-27068, CVE-2024-27069, CVE-2024-27070, CVE-2024-27071, CVE-2024-27072, CVE-2024-27073, CVE-2024-27074, CVE-2024-27075, CVE-2024-27076, CVE-2024-27077, CVE-2024-27078, CVE-2024-27080, CVE-2024-27388, CVE-2024-27389, CVE-2024-27390, CVE-2024-27391, CVE-2024-27392, CVE-2024-27393, CVE-2024-27394, CVE-2024-27395, CVE-2024-27396, CVE-2024-27397, CVE-2024-27398, CVE-2024-27399, CVE-2024-27400, CVE-2024-27401, CVE-2024-27402, CVE-2024-27403, CVE-2024-27404, CVE-2024-27405, CVE-2024-27406, CVE-2024-27407, CVE-2024-27408, CVE-2024-27409, CVE-2024-27410, CVE-2024-27411, CVE-2024-27412, CVE-2024-27413, CVE-2024-27414, CVE-2024-27415, CVE-2024-27416, CVE-2024-27417, CVE-2024-27418, CVE-2024-27419, CVE-2024-27431, CVE-2024-27432, CVE-2024-27433, CVE-2024-27434, CVE-2024-27435, CVE-2024-27436, CVE-2024-27437, CVE-2024-31076, CVE-2024-32936, CVE-2024-33619, CVE-2024-33621, CVE-2024-33847, CVE-2024-34027, CVE-2024-34030, CVE-2024-34777, CVE-2024-35247, CVE-2024-35784, CVE-2024-35785, CVE-2024-35786, CVE-2024-35787, CVE-2024-35789, CVE-2024-35790, CVE-2024-35791, CVE-2024-35792, CVE-2024-35793, CVE-2024-35795, CVE-2024-35796, CVE-2024-35797, CVE-2024-35798, CVE-2024-35799, CVE-2024-35800, CVE-2024-35801, CVE-2024-35803, CVE-2024-35804, CVE-2024-35805, CVE-2024-35806, CVE-2024-35807, CVE-2024-35809, CVE-2024-35810, CVE-2024-35811, CVE-2024-35813, CVE-2024-35814, CVE-2024-35815, CVE-2024-35816, CVE-2024-35817, CVE-2024-35818, CVE-2024-35819, CVE-2024-35821, CVE-2024-35822, CVE-2024-35823, CVE-2024-35824, CVE-2024-35825, CVE-2024-35826, CVE-2024-35827, CVE-2024-35828, CVE-2024-35829, CVE-2024-35830, CVE-2024-35831, CVE-2024-35832, CVE-2024-35833, CVE-2024-35834, CVE-2024-35835, CVE-2024-35836, CVE-2024-35837, CVE-2024-35838, CVE-2024-35839, CVE-2024-35840, CVE-2024-35841, CVE-2024-35842, CVE-2024-35844, CVE-2024-35845, CVE-2024-35846, CVE-2024-35847, CVE-2024-35848, CVE-2024-35849, CVE-2024-35850, CVE-2024-35851, CVE-2024-35852, CVE-2024-35853, CVE-2024-35854, CVE-2024-35855, CVE-2024-35856, CVE-2024-35857, CVE-2024-35858, CVE-2024-35859, CVE-2024-35860, CVE-2024-35861, CVE-2024-35862, CVE-2024-35863, CVE-2024-35864, CVE-2024-35865, CVE-2024-35866, CVE-2024-35867, CVE-2024-35868, CVE-2024-35869, CVE-2024-35870, CVE-2024-35871, CVE-2024-35872, CVE-2024-35873, CVE-2024-35874, CVE-2024-35875, CVE-2024-35877, CVE-2024-35878, CVE-2024-35879, CVE-2024-35880, CVE-2024-35882, CVE-2024-35883, CVE-2024-35884, CVE-2024-35885, CVE-2024-35886, CVE-2024-35887, CVE-2024-35888, CVE-2024-35889, CVE-2024-35890, CVE-2024-35891, CVE-2024-35892, CVE-2024-35893, CVE-2024-35894, CVE-2024-35895, CVE-2024-35896, CVE-2024-35897, CVE-2024-35898, CVE-2024-35899, CVE-2024-35900, CVE-2024-35901, CVE-2024-35902, CVE-2024-35903, CVE-2024-35904, CVE-2024-35905, CVE-2024-35907, CVE-2024-35908, CVE-2024-35909, CVE-2024-35910, CVE-2024-35911, CVE-2024-35912, CVE-2024-35913, CVE-2024-35914, CVE-2024-35915, CVE-2024-35916, CVE-2024-35917, CVE-2024-35919, CVE-2024-35920, CVE-2024-35921, CVE-2024-35922, CVE-2024-35924, CVE-2024-35925, CVE-2024-35926, CVE-2024-35927, CVE-2024-35929, CVE-2024-35930, CVE-2024-35932, CVE-2024-35933, CVE-2024-35934, CVE-2024-35935, CVE-2024-35936, CVE-2024-35937, CVE-2024-35938, CVE-2024-35939, CVE-2024-35940, CVE-2024-35942, CVE-2024-35943, CVE-2024-35944, CVE-2024-35945, CVE-2024-35946, CVE-2024-35947, CVE-2024-35948, CVE-2024-35949, CVE-2024-35950, CVE-2024-35951, CVE-2024-35952, CVE-2024-35953, CVE-2024-35954, CVE-2024-35955, CVE-2024-35956, CVE-2024-35957, CVE-2024-35958, CVE-2024-35959, CVE-2024-35960, CVE-2024-35961, CVE-2024-35962, CVE-2024-35963, CVE-2024-35964, CVE-2024-35965, CVE-2024-35966, CVE-2024-35967, CVE-2024-35968, CVE-2024-35969, CVE-2024-35970, CVE-2024-35971, CVE-2024-35972, CVE-2024-35973, CVE-2024-35974, CVE-2024-35975, CVE-2024-35976, CVE-2024-35977, CVE-2024-35978, CVE-2024-35979, CVE-2024-35980, CVE-2024-35981, CVE-2024-35982, CVE-2024-35983, CVE-2024-35984, CVE-2024-35985, CVE-2024-35986, CVE-2024-35987, CVE-2024-35988, CVE-2024-35989, CVE-2024-35990, CVE-2024-35991, CVE-2024-35992, CVE-2024-35993, CVE-2024-35994, CVE-2024-35995, CVE-2024-35996, CVE-2024-35997, CVE-2024-35998, CVE-2024-35999, CVE-2024-36000, CVE-2024-36001, CVE-2024-36002, CVE-2024-36003, CVE-2024-36004, CVE-2024-36005, CVE-2024-36006, CVE-2024-36007, CVE-2024-36008, CVE-2024-36009, CVE-2024-36010, CVE-2024-36011, CVE-2024-36012, CVE-2024-36013, CVE-2024-36014, CVE-2024-36015, CVE-2024-36016, CVE-2024-36017, CVE-2024-36018, CVE-2024-36019, CVE-2024-36020, CVE-2024-36021, CVE-2024-36023, CVE-2024-36025, CVE-2024-36026, CVE-2024-36027, CVE-2024-36028, CVE-2024-36029, CVE-2024-36030, CVE-2024-36031, CVE-2024-36032, CVE-2024-36033, CVE-2024-36244, CVE-2024-36270, CVE-2024-36281, CVE-2024-36286, CVE-2024-36288, CVE-2024-36476, CVE-2024-36477, CVE-2024-36478, CVE-2024-36479, CVE-2024-36481, CVE-2024-36484, CVE-2024-36489, CVE-2024-36880, CVE-2024-36881, CVE-2024-36882, CVE-2024-36883, CVE-2024-36884, CVE-2024-36886, CVE-2024-36887, CVE-2024-36888, CVE-2024-36889, CVE-2024-36890, CVE-2024-36891, CVE-2024-36892, CVE-2024-36893, CVE-2024-36894, CVE-2024-36895, CVE-2024-36896, CVE-2024-36897, CVE-2024-36898, CVE-2024-36899, CVE-2024-36900, CVE-2024-36901, CVE-2024-36902, CVE-2024-36903, CVE-2024-36904, CVE-2024-36905, CVE-2024-36906, CVE-2024-36908, CVE-2024-36909, CVE-2024-36910, CVE-2024-36911, CVE-2024-36912, CVE-2024-36913, CVE-2024-36914, CVE-2024-36915, CVE-2024-36916, CVE-2024-36917, CVE-2024-36918, CVE-2024-36919, CVE-2024-36920, CVE-2024-36921, CVE-2024-36922, CVE-2024-36924, CVE-2024-36925, CVE-2024-36926, CVE-2024-36927, CVE-2024-36928, CVE-2024-36929, CVE-2024-36930, CVE-2024-36931, CVE-2024-36932, CVE-2024-36933, CVE-2024-36934, CVE-2024-36935, CVE-2024-36936, CVE-2024-36937, CVE-2024-36938, CVE-2024-36939, CVE-2024-36940, CVE-2024-36941, CVE-2024-36943, CVE-2024-36944, CVE-2024-36945, CVE-2024-36946, CVE-2024-36947, CVE-2024-36948, CVE-2024-36949, CVE-2024-36950, CVE-2024-36951, CVE-2024-36952, CVE-2024-36953, CVE-2024-36954, CVE-2024-36955, CVE-2024-36956, CVE-2024-36957, CVE-2024-36958, CVE-2024-36959, CVE-2024-36960, CVE-2024-36961, CVE-2024-36962, CVE-2024-36963, CVE-2024-36964, CVE-2024-36965, CVE-2024-36966, CVE-2024-36967, CVE-2024-36968, CVE-2024-36969, CVE-2024-36970, CVE-2024-36971, CVE-2024-36972, CVE-2024-36973, CVE-2024-36974, CVE-2024-36975, CVE-2024-36976, CVE-2024-36977, CVE-2024-36978, CVE-2024-36979, CVE-2024-37021, CVE-2024-37026, CVE-2024-37078, CVE-2024-37354, CVE-2024-37356, CVE-2024-38306, CVE-2024-38381, CVE-2024-38384, CVE-2024-38385, CVE-2024-38388, CVE-2024-38390, CVE-2024-38538, CVE-2024-38539, CVE-2024-38540, CVE-2024-38541, CVE-2024-38542, CVE-2024-38543, CVE-2024-38544, CVE-2024-38545, CVE-2024-38546, CVE-2024-38547, CVE-2024-38548, CVE-2024-38549, CVE-2024-38550, CVE-2024-38551, CVE-2024-38552, CVE-2024-38553, CVE-2024-38554, CVE-2024-38555, CVE-2024-38556, CVE-2024-38557, CVE-2024-38558, CVE-2024-38559, CVE-2024-38560, CVE-2024-38561, CVE-2024-38562, CVE-2024-38563, CVE-2024-38564, CVE-2024-38565, CVE-2024-38566, CVE-2024-38567, CVE-2024-38568, CVE-2024-38569, CVE-2024-38570, CVE-2024-38571, CVE-2024-38572, CVE-2024-38573, CVE-2024-38574, CVE-2024-38575, CVE-2024-38576, CVE-2024-38577, CVE-2024-38578, CVE-2024-38579, CVE-2024-38580, CVE-2024-38581, CVE-2024-38582, CVE-2024-38583, CVE-2024-38584, CVE-2024-38585, CVE-2024-38586, CVE-2024-38587, CVE-2024-38588, CVE-2024-38589, CVE-2024-38590, CVE-2024-38591, CVE-2024-38592, CVE-2024-38593, CVE-2024-38594, CVE-2024-38595, CVE-2024-38596, CVE-2024-38597, CVE-2024-38598, CVE-2024-38599, CVE-2024-38600, CVE-2024-38601, CVE-2024-38602, CVE-2024-38603, CVE-2024-38604, CVE-2024-38605, CVE-2024-38606, CVE-2024-38607, CVE-2024-38609, CVE-2024-38610, CVE-2024-38611, CVE-2024-38612, CVE-2024-38613, CVE-2024-38614, CVE-2024-38615, CVE-2024-38616, CVE-2024-38617, CVE-2024-38618, CVE-2024-38619, CVE-2024-38620, CVE-2024-38621, CVE-2024-38622, CVE-2024-38623, CVE-2024-38624, CVE-2024-38625, CVE-2024-38626, CVE-2024-38627, CVE-2024-38628, CVE-2024-38629, CVE-2024-38630, CVE-2024-38631, CVE-2024-38632, CVE-2024-38633, CVE-2024-38634, CVE-2024-38635, CVE-2024-38636, CVE-2024-38637, CVE-2024-38659, CVE-2024-38661, CVE-2024-38662, CVE-2024-38663, CVE-2024-38664, CVE-2024-38667, CVE-2024-38780, CVE-2024-39276, CVE-2024-39277, CVE-2024-39282, CVE-2024-39291 and CVE-2024-39292
linux-yocto/6.6: (Cont.) Ignore CVE-2024-39293, CVE-2024-39296, CVE-2024-39298, CVE-2024-39301, CVE-2024-39371, CVE-2024-39461, CVE-2024-39462, CVE-2024-39463, CVE-2024-39464, CVE-2024-39465, CVE-2024-39466, CVE-2024-39467, CVE-2024-39468, CVE-2024-39469, CVE-2024-39470, CVE-2024-39471, CVE-2024-39472, CVE-2024-39473, CVE-2024-39474, CVE-2024-39475, CVE-2024-39476, CVE-2024-39477, CVE-2024-39479, CVE-2024-39480, CVE-2024-39481, CVE-2024-39482, CVE-2024-39483, CVE-2024-39484, CVE-2024-39485, CVE-2024-39486, CVE-2024-39487, CVE-2024-39488, CVE-2024-39489, CVE-2024-39490, CVE-2024-39491, CVE-2024-39492, CVE-2024-39493, CVE-2024-39494, CVE-2024-39495, CVE-2024-39496, CVE-2024-39497, CVE-2024-39498, CVE-2024-39499, CVE-2024-39500, CVE-2024-39502, CVE-2024-39503, CVE-2024-39504, CVE-2024-39505, CVE-2024-39506, CVE-2024-39507, CVE-2024-39508, CVE-2024-39509, CVE-2024-39510, CVE-2024-40899, CVE-2024-40900, CVE-2024-40901, CVE-2024-40902, CVE-2024-40903, CVE-2024-40904, CVE-2024-40905, CVE-2024-40906, CVE-2024-40907, CVE-2024-40908, CVE-2024-40909, CVE-2024-40910, CVE-2024-40911, CVE-2024-40912, CVE-2024-40913, CVE-2024-40914, CVE-2024-40915, CVE-2024-40916, CVE-2024-40917, CVE-2024-40918, CVE-2024-40919, CVE-2024-40920, CVE-2024-40921, CVE-2024-40922, CVE-2024-40923, CVE-2024-40924, CVE-2024-40925, CVE-2024-40926, CVE-2024-40927, CVE-2024-40928, CVE-2024-40929, CVE-2024-40930, CVE-2024-40931, CVE-2024-40932, CVE-2024-40933, CVE-2024-40934, CVE-2024-40935, CVE-2024-40936, CVE-2024-40937, CVE-2024-40938, CVE-2024-40939, CVE-2024-40940, CVE-2024-40941, CVE-2024-40942, CVE-2024-40943, CVE-2024-40944, CVE-2024-40945, CVE-2024-40947, CVE-2024-40948, CVE-2024-40949, CVE-2024-40950, CVE-2024-40951, CVE-2024-40952, CVE-2024-40953, CVE-2024-40954, CVE-2024-40955, CVE-2024-40956, CVE-2024-40957, CVE-2024-40958, CVE-2024-40959, CVE-2024-40960, CVE-2024-40961, CVE-2024-40962, CVE-2024-40963, CVE-2024-40964, CVE-2024-40965, CVE-2024-40966, CVE-2024-40967, CVE-2024-40968, CVE-2024-40969, CVE-2024-40970, CVE-2024-40971, CVE-2024-40972, CVE-2024-40973, CVE-2024-40974, CVE-2024-40975, CVE-2024-40976, CVE-2024-40977, CVE-2024-40978, CVE-2024-40980, CVE-2024-40981, CVE-2024-40983, CVE-2024-40984, CVE-2024-40985, CVE-2024-40986, CVE-2024-40987, CVE-2024-40988, CVE-2024-40989, CVE-2024-40990, CVE-2024-40991, CVE-2024-40992, CVE-2024-40993, CVE-2024-40994, CVE-2024-40995, CVE-2024-40996, CVE-2024-40997, CVE-2024-40998, CVE-2024-41000, CVE-2024-41001, CVE-2024-41002, CVE-2024-41003, CVE-2024-41004, CVE-2024-41005, CVE-2024-41006, CVE-2024-41007, CVE-2024-41009, CVE-2024-41010, CVE-2024-41011, CVE-2024-41012, CVE-2024-41013, CVE-2024-41014, CVE-2024-41015, CVE-2024-41016, CVE-2024-41017, CVE-2024-41018, CVE-2024-41019, CVE-2024-41020, CVE-2024-41021, CVE-2024-41022, CVE-2024-41025, CVE-2024-41026, CVE-2024-41027, CVE-2024-41028, CVE-2024-41029, CVE-2024-41030, CVE-2024-41031, CVE-2024-41032, CVE-2024-41033, CVE-2024-41034, CVE-2024-41035, CVE-2024-41036, CVE-2024-41037, CVE-2024-41038, CVE-2024-41039, CVE-2024-41040, CVE-2024-41041, CVE-2024-41042, CVE-2024-41043, CVE-2024-41044, CVE-2024-41046, CVE-2024-41047, CVE-2024-41048, CVE-2024-41049, CVE-2024-41050, CVE-2024-41051, CVE-2024-41052, CVE-2024-41053, CVE-2024-41054, CVE-2024-41055, CVE-2024-41056, CVE-2024-41057, CVE-2024-41058, CVE-2024-41059, CVE-2024-41060, CVE-2024-41061, CVE-2024-41062, CVE-2024-41063, CVE-2024-41064, CVE-2024-41065, CVE-2024-41066, CVE-2024-41067, CVE-2024-41068, CVE-2024-41069, CVE-2024-41070, CVE-2024-41072, CVE-2024-41073, CVE-2024-41074, CVE-2024-41075, CVE-2024-41076, CVE-2024-41077, CVE-2024-41078, CVE-2024-41079, CVE-2024-41080, CVE-2024-41081, CVE-2024-41083, CVE-2024-41084, CVE-2024-41086, CVE-2024-41087, CVE-2024-41088, CVE-2024-41089, CVE-2024-41090, CVE-2024-41091, CVE-2024-41092, CVE-2024-41093, CVE-2024-41094, CVE-2024-41095, CVE-2024-41096, CVE-2024-41097, CVE-2024-41098, CVE-2024-41149, CVE-2024-41935, CVE-2024-42063, CVE-2024-42064, CVE-2024-42065, CVE-2024-42066, CVE-2024-42069, CVE-2024-42070, CVE-2024-42071, CVE-2024-42072, CVE-2024-42073, CVE-2024-42074, CVE-2024-42075, CVE-2024-42076, CVE-2024-42077, CVE-2024-42078, CVE-2024-42079, CVE-2024-42080, CVE-2024-42081, CVE-2024-42082, CVE-2024-42083, CVE-2024-42084, CVE-2024-42085, CVE-2024-42086, CVE-2024-42087, CVE-2024-42088, CVE-2024-42089, CVE-2024-42090, CVE-2024-42091, CVE-2024-42092, CVE-2024-42093, CVE-2024-42094, CVE-2024-42095, CVE-2024-42096, CVE-2024-42097, CVE-2024-42098, CVE-2024-42099, CVE-2024-42100, CVE-2024-42101, CVE-2024-42102, CVE-2024-42103, CVE-2024-42104, CVE-2024-42105, CVE-2024-42106, CVE-2024-42108, CVE-2024-42109, CVE-2024-42110, CVE-2024-42111, CVE-2024-42112, CVE-2024-42113, CVE-2024-42114, CVE-2024-42115, CVE-2024-42117, CVE-2024-42119, CVE-2024-42120, CVE-2024-42121, CVE-2024-42122, CVE-2024-42124, CVE-2024-42125, CVE-2024-42126, CVE-2024-42127, CVE-2024-42128, CVE-2024-42129, CVE-2024-42131, CVE-2024-42132, CVE-2024-42133, CVE-2024-42134, CVE-2024-42135, CVE-2024-42136, CVE-2024-42137, CVE-2024-42138, CVE-2024-42140, CVE-2024-42141, CVE-2024-42142, CVE-2024-42144, CVE-2024-42145, CVE-2024-42146, CVE-2024-42147, CVE-2024-42148, CVE-2024-42149, CVE-2024-42150, CVE-2024-42151, CVE-2024-42152, CVE-2024-42153, CVE-2024-42154, CVE-2024-42156, CVE-2024-42157, CVE-2024-42159, CVE-2024-42160, CVE-2024-42161, CVE-2024-42223, CVE-2024-42224, CVE-2024-42225, CVE-2024-42227, CVE-2024-42228, CVE-2024-42229, CVE-2024-42230, CVE-2024-42231, CVE-2024-42232, CVE-2024-42233, CVE-2024-42234, CVE-2024-42235, CVE-2024-42236, CVE-2024-42237, CVE-2024-42238, CVE-2024-42239, CVE-2024-42240, CVE-2024-42241, CVE-2024-42242, CVE-2024-42243, CVE-2024-42244, CVE-2024-42245, CVE-2024-42246, CVE-2024-42247, CVE-2024-42248, CVE-2024-42249, CVE-2024-42250, CVE-2024-42251, CVE-2024-42252, CVE-2024-42253, CVE-2024-42254, CVE-2024-42255, CVE-2024-42256, CVE-2024-42257, CVE-2024-42259, CVE-2024-42260, CVE-2024-42261, CVE-2024-42262, CVE-2024-42263, CVE-2024-42264, CVE-2024-42265, CVE-2024-42266, CVE-2024-42267, CVE-2024-42268, CVE-2024-42269, CVE-2024-42270, CVE-2024-42271, CVE-2024-42272, CVE-2024-42273, CVE-2024-42274, CVE-2024-42275, CVE-2024-42276, CVE-2024-42277, CVE-2024-42278, CVE-2024-42279, CVE-2024-42280, CVE-2024-42281, CVE-2024-42282, CVE-2024-42283, CVE-2024-42284, CVE-2024-42285, CVE-2024-42286, CVE-2024-42287, CVE-2024-42288, CVE-2024-42289, CVE-2024-42290, CVE-2024-42291, CVE-2024-42292, CVE-2024-42293, CVE-2024-42294, CVE-2024-42295, CVE-2024-42296, CVE-2024-42297, CVE-2024-42298, CVE-2024-42299, CVE-2024-42300, CVE-2024-42301, CVE-2024-42302, CVE-2024-42303, CVE-2024-42304, CVE-2024-42305, CVE-2024-42306, CVE-2024-42307, CVE-2024-42309, CVE-2024-42310, CVE-2024-42311, CVE-2024-42312, CVE-2024-42313, CVE-2024-42314, CVE-2024-42315, CVE-2024-42316, CVE-2024-42318, CVE-2024-42319, CVE-2024-42320, CVE-2024-42321, CVE-2024-42322, CVE-2024-43098, CVE-2024-43815, CVE-2024-43816, CVE-2024-43817, CVE-2024-43818, CVE-2024-43820, CVE-2024-43821, CVE-2024-43822, CVE-2024-43823, CVE-2024-43825, CVE-2024-43827, CVE-2024-43828, CVE-2024-43829, CVE-2024-43830, CVE-2024-43831, CVE-2024-43832, CVE-2024-43833, CVE-2024-43834, CVE-2024-43835, CVE-2024-43836, CVE-2024-43837, CVE-2024-43838, CVE-2024-43839, CVE-2024-43840, CVE-2024-43841, CVE-2024-43842, CVE-2024-43843, CVE-2024-43844, CVE-2024-43845, CVE-2024-43846, CVE-2024-43847, CVE-2024-43848, CVE-2024-43849, CVE-2024-43850, CVE-2024-43851, CVE-2024-43852, CVE-2024-43853, CVE-2024-43854, CVE-2024-43855, CVE-2024-43856, CVE-2024-43857, CVE-2024-43858, CVE-2024-43859, CVE-2024-43860, CVE-2024-43861, CVE-2024-43862, CVE-2024-43863, CVE-2024-43864, CVE-2024-43865, CVE-2024-43866, CVE-2024-43867, CVE-2024-43868, CVE-2024-43869, CVE-2024-43870, CVE-2024-43871, CVE-2024-43873, CVE-2024-43874, CVE-2024-43875, CVE-2024-43876, CVE-2024-43877, CVE-2024-43878, CVE-2024-43879, CVE-2024-43880, CVE-2024-43881, CVE-2024-43882, CVE-2024-43883, CVE-2024-43884, CVE-2024-43886, CVE-2024-43887, CVE-2024-43888, CVE-2024-43889, CVE-2024-43890, CVE-2024-43891, CVE-2024-43892, CVE-2024-43893, CVE-2024-43894, CVE-2024-43896, CVE-2024-43897, CVE-2024-43899, CVE-2024-43900, CVE-2024-43902, CVE-2024-43904, CVE-2024-43905, CVE-2024-43906, CVE-2024-43907, CVE-2024-43908, CVE-2024-43909, CVE-2024-43910, CVE-2024-43911, CVE-2024-43912, CVE-2024-43913, CVE-2024-43914, CVE-2024-44931, CVE-2024-44932, CVE-2024-44933, CVE-2024-44934, CVE-2024-44935, CVE-2024-44936, CVE-2024-44937, CVE-2024-44938, CVE-2024-44939, CVE-2024-44940, CVE-2024-44941, CVE-2024-44942 and CVE-2024-44943
linux-yocto/6.6: (Cont.) Ignore CVE-2024-44944, CVE-2024-44945, CVE-2024-44946, CVE-2024-44947, CVE-2024-44948, CVE-2024-44949, CVE-2024-44950, CVE-2024-44951, CVE-2024-44953, CVE-2024-44954, CVE-2024-44956, CVE-2024-44957, CVE-2024-44958, CVE-2024-44959, CVE-2024-44960, CVE-2024-44961, CVE-2024-44962, CVE-2024-44963, CVE-2024-44964, CVE-2024-44965, CVE-2024-44966, CVE-2024-44967, CVE-2024-44968, CVE-2024-44969, CVE-2024-44970, CVE-2024-44971, CVE-2024-44973, CVE-2024-44974, CVE-2024-44975, CVE-2024-44976, CVE-2024-44977, CVE-2024-44978, CVE-2024-44979, CVE-2024-44980, CVE-2024-44981, CVE-2024-44982, CVE-2024-44983, CVE-2024-44984, CVE-2024-44985, CVE-2024-44986, CVE-2024-44987, CVE-2024-44988, CVE-2024-44989, CVE-2024-44990, CVE-2024-44991, CVE-2024-44992, CVE-2024-44993, CVE-2024-44994, CVE-2024-44995, CVE-2024-44996, CVE-2024-44997, CVE-2024-44998, CVE-2024-44999, CVE-2024-45000, CVE-2024-45001, CVE-2024-45002, CVE-2024-45003, CVE-2024-45004, CVE-2024-45005, CVE-2024-45006, CVE-2024-45007, CVE-2024-45008, CVE-2024-45009, CVE-2024-45010, CVE-2024-45011, CVE-2024-45012, CVE-2024-45013, CVE-2024-45014, CVE-2024-45015, CVE-2024-45016, CVE-2024-45017, CVE-2024-45018, CVE-2024-45019, CVE-2024-45020, CVE-2024-45021, CVE-2024-45022, CVE-2024-45023, CVE-2024-45024, CVE-2024-45025, CVE-2024-45026, CVE-2024-45027, CVE-2024-45028, CVE-2024-45029, CVE-2024-45030, CVE-2024-45828, CVE-2024-46672, CVE-2024-46673, CVE-2024-46674, CVE-2024-46675, CVE-2024-46676, CVE-2024-46677, CVE-2024-46678, CVE-2024-46679, CVE-2024-46680, CVE-2024-46682, CVE-2024-46683, CVE-2024-46684, CVE-2024-46685, CVE-2024-46686, CVE-2024-46687, CVE-2024-46688, CVE-2024-46689, CVE-2024-46690, CVE-2024-46692, CVE-2024-46693, CVE-2024-46694, CVE-2024-46695, CVE-2024-46696, CVE-2024-46697, CVE-2024-46699, CVE-2024-46702, CVE-2024-46703, CVE-2024-46704, CVE-2024-46705, CVE-2024-46706, CVE-2024-46707, CVE-2024-46708, CVE-2024-46709, CVE-2024-46710, CVE-2024-46711, CVE-2024-46712, CVE-2024-46713, CVE-2024-46714, CVE-2024-46715, CVE-2024-46716, CVE-2024-46717, CVE-2024-46718, CVE-2024-46719, CVE-2024-46720, CVE-2024-46721, CVE-2024-46722, CVE-2024-46723, CVE-2024-46724, CVE-2024-46725, CVE-2024-46726, CVE-2024-46728, CVE-2024-46731, CVE-2024-46732, CVE-2024-46733, CVE-2024-46734, CVE-2024-46735, CVE-2024-46736, CVE-2024-46737, CVE-2024-46738, CVE-2024-46739, CVE-2024-46740, CVE-2024-46741, CVE-2024-46742, CVE-2024-46743, CVE-2024-46744, CVE-2024-46745, CVE-2024-46746, CVE-2024-46747, CVE-2024-46748, CVE-2024-46749, CVE-2024-46750, CVE-2024-46751, CVE-2024-46752, CVE-2024-46753, CVE-2024-46755, CVE-2024-46759, CVE-2024-46760, CVE-2024-46761, CVE-2024-46762, CVE-2024-46763, CVE-2024-46764, CVE-2024-46765, CVE-2024-46766, CVE-2024-46767, CVE-2024-46768, CVE-2024-46769, CVE-2024-46770, CVE-2024-46771, CVE-2024-46772, CVE-2024-46773, CVE-2024-46774, CVE-2024-46776, CVE-2024-46777, CVE-2024-46778, CVE-2024-46779, CVE-2024-46780, CVE-2024-46781, CVE-2024-46782, CVE-2024-46783, CVE-2024-46784, CVE-2024-46785, CVE-2024-46786, CVE-2024-46787, CVE-2024-46788, CVE-2024-46789, CVE-2024-46790, CVE-2024-46791, CVE-2024-46792, CVE-2024-46793, CVE-2024-46794, CVE-2024-46795, CVE-2024-46796, CVE-2024-46797, CVE-2024-46798, CVE-2024-46799, CVE-2024-46800, CVE-2024-46801, CVE-2024-46802, CVE-2024-46803, CVE-2024-46804, CVE-2024-46805, CVE-2024-46806, CVE-2024-46807, CVE-2024-46809, CVE-2024-46810, CVE-2024-46811, CVE-2024-46812, CVE-2024-46813, CVE-2024-46814, CVE-2024-46815, CVE-2024-46816, CVE-2024-46817, CVE-2024-46818, CVE-2024-46819, CVE-2024-46820, CVE-2024-46821, CVE-2024-46822, CVE-2024-46823, CVE-2024-46824, CVE-2024-46825, CVE-2024-46826, CVE-2024-46827, CVE-2024-46828, CVE-2024-46829, CVE-2024-46830, CVE-2024-46831, CVE-2024-46832, CVE-2024-46833, CVE-2024-46835, CVE-2024-46836, CVE-2024-46837, CVE-2024-46838, CVE-2024-46840, CVE-2024-46841, CVE-2024-46843, CVE-2024-46844, CVE-2024-46845, CVE-2024-46846, CVE-2024-46847, CVE-2024-46848, CVE-2024-46849, CVE-2024-46850, CVE-2024-46851, CVE-2024-46852, CVE-2024-46853, CVE-2024-46854, CVE-2024-46855, CVE-2024-46856, CVE-2024-46857, CVE-2024-46858, CVE-2024-46859, CVE-2024-46860, CVE-2024-46861, CVE-2024-46862, CVE-2024-46863, CVE-2024-46864, CVE-2024-46865, CVE-2024-46866, CVE-2024-46867, CVE-2024-46868, CVE-2024-46869, CVE-2024-46871, CVE-2024-46896, CVE-2024-47141, CVE-2024-47143, CVE-2024-47408, CVE-2024-47658, CVE-2024-47659, CVE-2024-47660, CVE-2024-47663, CVE-2024-47664, CVE-2024-47665, CVE-2024-47666, CVE-2024-47667, CVE-2024-47668, CVE-2024-47669, CVE-2024-47670, CVE-2024-47671, CVE-2024-47673, CVE-2024-47674, CVE-2024-47675, CVE-2024-47676, CVE-2024-47677, CVE-2024-47678, CVE-2024-47679, CVE-2024-47680, CVE-2024-47681, CVE-2024-47682, CVE-2024-47683, CVE-2024-47684, CVE-2024-47685, CVE-2024-47686, CVE-2024-47687, CVE-2024-47688, CVE-2024-47689, CVE-2024-47690, CVE-2024-47691, CVE-2024-47692, CVE-2024-47693, CVE-2024-47694, CVE-2024-47695, CVE-2024-47696, CVE-2024-47697, CVE-2024-47698, CVE-2024-47699, CVE-2024-47700, CVE-2024-47701, CVE-2024-47704, CVE-2024-47705, CVE-2024-47706, CVE-2024-47707, CVE-2024-47708, CVE-2024-47709, CVE-2024-47710, CVE-2024-47711, CVE-2024-47712, CVE-2024-47713, CVE-2024-47714, CVE-2024-47715, CVE-2024-47716, CVE-2024-47717, CVE-2024-47718, CVE-2024-47719, CVE-2024-47720, CVE-2024-47721, CVE-2024-47723, CVE-2024-47724, CVE-2024-47726, CVE-2024-47727, CVE-2024-47728, CVE-2024-47729, CVE-2024-47730, CVE-2024-47731, CVE-2024-47732, CVE-2024-47733, CVE-2024-47734, CVE-2024-47735, CVE-2024-47736, CVE-2024-47737, CVE-2024-47738, CVE-2024-47739, CVE-2024-47740, CVE-2024-47741, CVE-2024-47742, CVE-2024-47743, CVE-2024-47744, CVE-2024-47745, CVE-2024-47746, CVE-2024-47747, CVE-2024-47748, CVE-2024-47749, CVE-2024-47750, CVE-2024-47751, CVE-2024-47752, CVE-2024-47753, CVE-2024-47754, CVE-2024-47756, CVE-2024-47757, CVE-2024-47809, CVE-2024-48873, CVE-2024-48875, CVE-2024-48876, CVE-2024-48881, CVE-2024-49568, CVE-2024-49569, CVE-2024-49570, CVE-2024-49571, CVE-2024-49573, CVE-2024-49850, CVE-2024-49851, CVE-2024-49852, CVE-2024-49853, CVE-2024-49855, CVE-2024-49856, CVE-2024-49857, CVE-2024-49858, CVE-2024-49859, CVE-2024-49860, CVE-2024-49861, CVE-2024-49862, CVE-2024-49863, CVE-2024-49864, CVE-2024-49865, CVE-2024-49866, CVE-2024-49867, CVE-2024-49868, CVE-2024-49869, CVE-2024-49870, CVE-2024-49871, CVE-2024-49872, CVE-2024-49873, CVE-2024-49874, CVE-2024-49875, CVE-2024-49876, CVE-2024-49877, CVE-2024-49878, CVE-2024-49879, CVE-2024-49880, CVE-2024-49881, CVE-2024-49882, CVE-2024-49883, CVE-2024-49884, CVE-2024-49886, CVE-2024-49887, CVE-2024-49889, CVE-2024-49890, CVE-2024-49891, CVE-2024-49892, CVE-2024-49894, CVE-2024-49895, CVE-2024-49896, CVE-2024-49897, CVE-2024-49898, CVE-2024-49899, CVE-2024-49900, CVE-2024-49901, CVE-2024-49902, CVE-2024-49903, CVE-2024-49904, CVE-2024-49905, CVE-2024-49906, CVE-2024-49907, CVE-2024-49909, CVE-2024-49911, CVE-2024-49912, CVE-2024-49913, CVE-2024-49914, CVE-2024-49915, CVE-2024-49917, CVE-2024-49919, CVE-2024-49923, CVE-2024-49924, CVE-2024-49925, CVE-2024-49926, CVE-2024-49927, CVE-2024-49928, CVE-2024-49929, CVE-2024-49930, CVE-2024-49931, CVE-2024-49932, CVE-2024-49933, CVE-2024-49934, CVE-2024-49935, CVE-2024-49936, CVE-2024-49937, CVE-2024-49938, CVE-2024-49939, CVE-2024-49941, CVE-2024-49942, CVE-2024-49943, CVE-2024-49944, CVE-2024-49946, CVE-2024-49947, CVE-2024-49948, CVE-2024-49949, CVE-2024-49950, CVE-2024-49951, CVE-2024-49952, CVE-2024-49953, CVE-2024-49954, CVE-2024-49955, CVE-2024-49956, CVE-2024-49957, CVE-2024-49958, CVE-2024-49959, CVE-2024-49960, CVE-2024-49961, CVE-2024-49962, CVE-2024-49963, CVE-2024-49964, CVE-2024-49965, CVE-2024-49966, CVE-2024-49968, CVE-2024-49969, CVE-2024-49971, CVE-2024-49972, CVE-2024-49973, CVE-2024-49974, CVE-2024-49975, CVE-2024-49976, CVE-2024-49977, CVE-2024-49978, CVE-2024-49979, CVE-2024-49980, CVE-2024-49981, CVE-2024-49982, CVE-2024-49983, CVE-2024-49984, CVE-2024-49985, CVE-2024-49986, CVE-2024-49987, CVE-2024-49988, CVE-2024-49989, CVE-2024-49990, CVE-2024-49991, CVE-2024-49992, CVE-2024-49994, CVE-2024-49996, CVE-2024-49997, CVE-2024-49998, CVE-2024-49999, CVE-2024-50000, CVE-2024-50001, CVE-2024-50002, CVE-2024-50003, CVE-2024-50004, CVE-2024-50005, CVE-2024-50006, CVE-2024-50007, CVE-2024-50008, CVE-2024-50009, CVE-2024-50010, CVE-2024-50011, CVE-2024-50012, CVE-2024-50013, CVE-2024-50014, CVE-2024-50015, CVE-2024-50017, CVE-2024-50019, CVE-2024-50020, CVE-2024-50021, CVE-2024-50022, CVE-2024-50023, CVE-2024-50024, CVE-2024-50025, CVE-2024-50026, CVE-2024-50027 and CVE-2024-50029
linux-yocto/6.6: (Cont.) Ignore CVE-2024-50030, CVE-2024-50031, CVE-2024-50033, CVE-2024-50034, CVE-2024-50035, CVE-2024-50036, CVE-2024-50037, CVE-2024-50038, CVE-2024-50039, CVE-2024-50040, CVE-2024-50041, CVE-2024-50042, CVE-2024-50043, CVE-2024-50044, CVE-2024-50045, CVE-2024-50046, CVE-2024-50047, CVE-2024-50048, CVE-2024-50049, CVE-2024-50051, CVE-2024-50055, CVE-2024-50056, CVE-2024-50057, CVE-2024-50058, CVE-2024-50059, CVE-2024-50060, CVE-2024-50061, CVE-2024-50062, CVE-2024-50063, CVE-2024-50064, CVE-2024-50065, CVE-2024-50066, CVE-2024-50067, CVE-2024-50068, CVE-2024-50069, CVE-2024-50070, CVE-2024-50071, CVE-2024-50072, CVE-2024-50073, CVE-2024-50074, CVE-2024-50075, CVE-2024-50076, CVE-2024-50077, CVE-2024-50078, CVE-2024-50079, CVE-2024-50080, CVE-2024-50081, CVE-2024-50082, CVE-2024-50083, CVE-2024-50084, CVE-2024-50085, CVE-2024-50086, CVE-2024-50087, CVE-2024-50088, CVE-2024-50090, CVE-2024-50091, CVE-2024-50092, CVE-2024-50093, CVE-2024-50094, CVE-2024-50095, CVE-2024-50096, CVE-2024-50097, CVE-2024-50098, CVE-2024-50099, CVE-2024-50100, CVE-2024-50101, CVE-2024-50103, CVE-2024-50104, CVE-2024-50105, CVE-2024-50106, CVE-2024-50107, CVE-2024-50108, CVE-2024-50109, CVE-2024-50110, CVE-2024-50111, CVE-2024-50112, CVE-2024-50113, CVE-2024-50114, CVE-2024-50115, CVE-2024-50116, CVE-2024-50117, CVE-2024-50118, CVE-2024-50119, CVE-2024-50120, CVE-2024-50121, CVE-2024-50122, CVE-2024-50123, CVE-2024-50124, CVE-2024-50125, CVE-2024-50126, CVE-2024-50127, CVE-2024-50128, CVE-2024-50129, CVE-2024-50130, CVE-2024-50131, CVE-2024-50132, CVE-2024-50133, CVE-2024-50134, CVE-2024-50135, CVE-2024-50136, CVE-2024-50137, CVE-2024-50138, CVE-2024-50139, CVE-2024-50140, CVE-2024-50141, CVE-2024-50142, CVE-2024-50143, CVE-2024-50144, CVE-2024-50145, CVE-2024-50146, CVE-2024-50147, CVE-2024-50148, CVE-2024-50149, CVE-2024-50150, CVE-2024-50151, CVE-2024-50152, CVE-2024-50153, CVE-2024-50154, CVE-2024-50155, CVE-2024-50156, CVE-2024-50157, CVE-2024-50158, CVE-2024-50159, CVE-2024-50160, CVE-2024-50161, CVE-2024-50162, CVE-2024-50163, CVE-2024-50164, CVE-2024-50165, CVE-2024-50166, CVE-2024-50167, CVE-2024-50168, CVE-2024-50169, CVE-2024-50170, CVE-2024-50171, CVE-2024-50172, CVE-2024-50173, CVE-2024-50174, CVE-2024-50175, CVE-2024-50176, CVE-2024-50177, CVE-2024-50178, CVE-2024-50179, CVE-2024-50180, CVE-2024-50182, CVE-2024-50183, CVE-2024-50184, CVE-2024-50185, CVE-2024-50186, CVE-2024-50187, CVE-2024-50188, CVE-2024-50189, CVE-2024-50190, CVE-2024-50191, CVE-2024-50192, CVE-2024-50193, CVE-2024-50194, CVE-2024-50195, CVE-2024-50196, CVE-2024-50197, CVE-2024-50198, CVE-2024-50199, CVE-2024-50200, CVE-2024-50201, CVE-2024-50202, CVE-2024-50203, CVE-2024-50204, CVE-2024-50205, CVE-2024-50206, CVE-2024-50207, CVE-2024-50208, CVE-2024-50209, CVE-2024-50210, CVE-2024-50211, CVE-2024-50212, CVE-2024-50213, CVE-2024-50214, CVE-2024-50215, CVE-2024-50216, CVE-2024-50218, CVE-2024-50220, CVE-2024-50221, CVE-2024-50222, CVE-2024-50223, CVE-2024-50224, CVE-2024-50226, CVE-2024-50227, CVE-2024-50229, CVE-2024-50230, CVE-2024-50231, CVE-2024-50232, CVE-2024-50233, CVE-2024-50234, CVE-2024-50235, CVE-2024-50236, CVE-2024-50237, CVE-2024-50238, CVE-2024-50239, CVE-2024-50240, CVE-2024-50241, CVE-2024-50242, CVE-2024-50243, CVE-2024-50244, CVE-2024-50245, CVE-2024-50246, CVE-2024-50247, CVE-2024-50248, CVE-2024-50249, CVE-2024-50250, CVE-2024-50251, CVE-2024-50252, CVE-2024-50253, CVE-2024-50254, CVE-2024-50255, CVE-2024-50256, CVE-2024-50257, CVE-2024-50258, CVE-2024-50259, CVE-2024-50260, CVE-2024-50261, CVE-2024-50262, CVE-2024-50263, CVE-2024-50264, CVE-2024-50265, CVE-2024-50266, CVE-2024-50267, CVE-2024-50268, CVE-2024-50269, CVE-2024-50270, CVE-2024-50271, CVE-2024-50272, CVE-2024-50273, CVE-2024-50274, CVE-2024-50275, CVE-2024-50276, CVE-2024-50277, CVE-2024-50278, CVE-2024-50279, CVE-2024-50280, CVE-2024-50281, CVE-2024-50282, CVE-2024-50283, CVE-2024-50284, CVE-2024-50285, CVE-2024-50286, CVE-2024-50287, CVE-2024-50288, CVE-2024-50290, CVE-2024-50291, CVE-2024-50292, CVE-2024-50293, CVE-2024-50294, CVE-2024-50295, CVE-2024-50296, CVE-2024-50297, CVE-2024-50298, CVE-2024-50299, CVE-2024-50300, CVE-2024-50301, CVE-2024-50302, CVE-2024-50303, CVE-2024-50304, CVE-2024-51729, CVE-2024-52319, CVE-2024-52332, CVE-2024-52557, CVE-2024-52559, CVE-2024-53042, CVE-2024-53043, CVE-2024-53044, CVE-2024-53045, CVE-2024-53046, CVE-2024-53047, CVE-2024-53048, CVE-2024-53049, CVE-2024-53050, CVE-2024-53052, CVE-2024-53053, CVE-2024-53055, CVE-2024-53057, CVE-2024-53058, CVE-2024-53059, CVE-2024-53060, CVE-2024-53061, CVE-2024-53062, CVE-2024-53063, CVE-2024-53064, CVE-2024-53065, CVE-2024-53066, CVE-2024-53067, CVE-2024-53068, CVE-2024-53069, CVE-2024-53070, CVE-2024-53071, CVE-2024-53072, CVE-2024-53073, CVE-2024-53074, CVE-2024-53075, CVE-2024-53076, CVE-2024-53077, CVE-2024-53078, CVE-2024-53079, CVE-2024-53080, CVE-2024-53081, CVE-2024-53082, CVE-2024-53083, CVE-2024-53084, CVE-2024-53085, CVE-2024-53086, CVE-2024-53087, CVE-2024-53088, CVE-2024-53091, CVE-2024-53092, CVE-2024-53093, CVE-2024-53094, CVE-2024-53095, CVE-2024-53096, CVE-2024-53097, CVE-2024-53098, CVE-2024-53099, CVE-2024-53100, CVE-2024-53101, CVE-2024-53103, CVE-2024-53104, CVE-2024-53105, CVE-2024-53106, CVE-2024-53107, CVE-2024-53108, CVE-2024-53109, CVE-2024-53110, CVE-2024-53111, CVE-2024-53112, CVE-2024-53113, CVE-2024-53115, CVE-2024-53116, CVE-2024-53117, CVE-2024-53118, CVE-2024-53119, CVE-2024-53120, CVE-2024-53121, CVE-2024-53122, CVE-2024-53123, CVE-2024-53124, CVE-2024-53125, CVE-2024-53126, CVE-2024-53127, CVE-2024-53128, CVE-2024-53129, CVE-2024-53130, CVE-2024-53131, CVE-2024-53132, CVE-2024-53133, CVE-2024-53134, CVE-2024-53135, CVE-2024-53136, CVE-2024-53137, CVE-2024-53138, CVE-2024-53139, CVE-2024-53140, CVE-2024-53141, CVE-2024-53142, CVE-2024-53143, CVE-2024-53144, CVE-2024-53145, CVE-2024-53146, CVE-2024-53148, CVE-2024-53149, CVE-2024-53150, CVE-2024-53151, CVE-2024-53152, CVE-2024-53153, CVE-2024-53154, CVE-2024-53155, CVE-2024-53156, CVE-2024-53157, CVE-2024-53158, CVE-2024-53160, CVE-2024-53161, CVE-2024-53162, CVE-2024-53163, CVE-2024-53164, CVE-2024-53165, CVE-2024-53166, CVE-2024-53167, CVE-2024-53168, CVE-2024-53169, CVE-2024-53170, CVE-2024-53171, CVE-2024-53172, CVE-2024-53173, CVE-2024-53174, CVE-2024-53175, CVE-2024-53176, CVE-2024-53177, CVE-2024-53178, CVE-2024-53179, CVE-2024-53180, CVE-2024-53181, CVE-2024-53182, CVE-2024-53183, CVE-2024-53184, CVE-2024-53185, CVE-2024-53186, CVE-2024-53188, CVE-2024-53189, CVE-2024-53190, CVE-2024-53191, CVE-2024-53192, CVE-2024-53193, CVE-2024-53194, CVE-2024-53195, CVE-2024-53196, CVE-2024-53197, CVE-2024-53198, CVE-2024-53199, CVE-2024-53200, CVE-2024-53201, CVE-2024-53202, CVE-2024-53203, CVE-2024-53204, CVE-2024-53205, CVE-2024-53206, CVE-2024-53207, CVE-2024-53208, CVE-2024-53209, CVE-2024-53210, CVE-2024-53211, CVE-2024-53212, CVE-2024-53213, CVE-2024-53214, CVE-2024-53215, CVE-2024-53216, CVE-2024-53217, CVE-2024-53218, CVE-2024-53220, CVE-2024-53221, CVE-2024-53222, CVE-2024-53223, CVE-2024-53224, CVE-2024-53225, CVE-2024-53226, CVE-2024-53227, CVE-2024-53228, CVE-2024-53229, CVE-2024-53230, CVE-2024-53231, CVE-2024-53232, CVE-2024-53233, CVE-2024-53234, CVE-2024-53235, CVE-2024-53236, CVE-2024-53237, CVE-2024-53238, CVE-2024-53239, CVE-2024-53240, CVE-2024-53241, CVE-2024-53680, CVE-2024-53681, CVE-2024-53682, CVE-2024-53685, CVE-2024-53687, CVE-2024-53690, CVE-2024-54031, CVE-2024-54191, CVE-2024-54193, CVE-2024-54455, CVE-2024-54456, CVE-2024-54458, CVE-2024-54460, CVE-2024-54683, CVE-2024-55639, CVE-2024-55641, CVE-2024-55642, CVE-2024-55881, CVE-2024-55916, CVE-2024-56368, CVE-2024-56369, CVE-2024-56372, CVE-2024-56531, CVE-2024-56532, CVE-2024-56533, CVE-2024-56534, CVE-2024-56535, CVE-2024-56536, CVE-2024-56537, CVE-2024-56538, CVE-2024-56539, CVE-2024-56540, CVE-2024-56541, CVE-2024-56542, CVE-2024-56543, CVE-2024-56545, CVE-2024-56546, CVE-2024-56547, CVE-2024-56548, CVE-2024-56549, CVE-2024-56550, CVE-2024-56551, CVE-2024-56552, CVE-2024-56553, CVE-2024-56554, CVE-2024-56555, CVE-2024-56556, CVE-2024-56557, CVE-2024-56558, CVE-2024-56559, CVE-2024-56560, CVE-2024-56561, CVE-2024-56562, CVE-2024-56563, CVE-2024-56564, CVE-2024-56565, CVE-2024-56566, CVE-2024-56567, CVE-2024-56568, CVE-2024-56569, CVE-2024-56570, CVE-2024-56572, CVE-2024-56573, CVE-2024-56574, CVE-2024-56575, CVE-2024-56576, CVE-2024-56577, CVE-2024-56578, CVE-2024-56579, CVE-2024-56580, CVE-2024-56581, CVE-2024-56582, CVE-2024-56583, CVE-2024-56584, CVE-2024-56585, CVE-2024-56586 and CVE-2024-56587
linux-yocto/6.6: (Cont.) Ignore CVE-2024-56588, CVE-2024-56589, CVE-2024-56590, CVE-2024-56592, CVE-2024-56593, CVE-2024-56594, CVE-2024-56595, CVE-2024-56596, CVE-2024-56597, CVE-2024-56598, CVE-2024-56599, CVE-2024-56600, CVE-2024-56601, CVE-2024-56602, CVE-2024-56603, CVE-2024-56604, CVE-2024-56605, CVE-2024-56606, CVE-2024-56607, CVE-2024-56608, CVE-2024-56609, CVE-2024-56610, CVE-2024-56611, CVE-2024-56612, CVE-2024-56613, CVE-2024-56614, CVE-2024-56615, CVE-2024-56616, CVE-2024-56617, CVE-2024-56618, CVE-2024-56619, CVE-2024-56620, CVE-2024-56621, CVE-2024-56622, CVE-2024-56623, CVE-2024-56624, CVE-2024-56625, CVE-2024-56626, CVE-2024-56627, CVE-2024-56628, CVE-2024-56629, CVE-2024-56630, CVE-2024-56631, CVE-2024-56632, CVE-2024-56633, CVE-2024-56634, CVE-2024-56635, CVE-2024-56636, CVE-2024-56637, CVE-2024-56638, CVE-2024-56639, CVE-2024-56640, CVE-2024-56641, CVE-2024-56642, CVE-2024-56643, CVE-2024-56644, CVE-2024-56645, CVE-2024-56646, CVE-2024-56648, CVE-2024-56649, CVE-2024-56650, CVE-2024-56651, CVE-2024-56652, CVE-2024-56653, CVE-2024-56654, CVE-2024-56655, CVE-2024-56656, CVE-2024-56657, CVE-2024-56658, CVE-2024-56659, CVE-2024-56660, CVE-2024-56661, CVE-2024-56662, CVE-2024-56663, CVE-2024-56664, CVE-2024-56665, CVE-2024-56666, CVE-2024-56667, CVE-2024-56668, CVE-2024-56669, CVE-2024-56670, CVE-2024-56671, CVE-2024-56672, CVE-2024-56673, CVE-2024-56674, CVE-2024-56675, CVE-2024-56676, CVE-2024-56677, CVE-2024-56678, CVE-2024-56679, CVE-2024-56680, CVE-2024-56681, CVE-2024-56682, CVE-2024-56683, CVE-2024-56684, CVE-2024-56685, CVE-2024-56687, CVE-2024-56688, CVE-2024-56689, CVE-2024-56690, CVE-2024-56691, CVE-2024-56692, CVE-2024-56693, CVE-2024-56694, CVE-2024-56695, CVE-2024-56696, CVE-2024-56697, CVE-2024-56698, CVE-2024-56699, CVE-2024-56700, CVE-2024-56701, CVE-2024-56703, CVE-2024-56704, CVE-2024-56705, CVE-2024-56706, CVE-2024-56707, CVE-2024-56708, CVE-2024-56709, CVE-2024-56710, CVE-2024-56711, CVE-2024-56713, CVE-2024-56714, CVE-2024-56715, CVE-2024-56716, CVE-2024-56717, CVE-2024-56718, CVE-2024-56719, CVE-2024-56720, CVE-2024-56721, CVE-2024-56722, CVE-2024-56723, CVE-2024-56724, CVE-2024-56725, CVE-2024-56726, CVE-2024-56727, CVE-2024-56728, CVE-2024-56729, CVE-2024-56730, CVE-2024-56739, CVE-2024-56740, CVE-2024-56743, CVE-2024-56744, CVE-2024-56745, CVE-2024-56746, CVE-2024-56747, CVE-2024-56748, CVE-2024-56749, CVE-2024-56750, CVE-2024-56751, CVE-2024-56752, CVE-2024-56753, CVE-2024-56754, CVE-2024-56755, CVE-2024-56756, CVE-2024-56757, CVE-2024-56758, CVE-2024-56759, CVE-2024-56760, CVE-2024-56761, CVE-2024-56763, CVE-2024-56764, CVE-2024-56765, CVE-2024-56766, CVE-2024-56767, CVE-2024-56768, CVE-2024-56769, CVE-2024-56770, CVE-2024-56771, CVE-2024-56772, CVE-2024-56773, CVE-2024-56774, CVE-2024-56776, CVE-2024-56777, CVE-2024-56778, CVE-2024-56779, CVE-2024-56780, CVE-2024-56782, CVE-2024-56783, CVE-2024-56784, CVE-2024-56785, CVE-2024-56787, CVE-2024-56788, CVE-2024-57791, CVE-2024-57792, CVE-2024-57793, CVE-2024-57795, CVE-2024-57798, CVE-2024-57799, CVE-2024-57800, CVE-2024-57801, CVE-2024-57802, CVE-2024-57805, CVE-2024-57806, CVE-2024-57807, CVE-2024-57834, CVE-2024-57838, CVE-2024-57839, CVE-2024-57841, CVE-2024-57843, CVE-2024-57844, CVE-2024-57849, CVE-2024-57850, CVE-2024-57852, CVE-2024-57874, CVE-2024-57875, CVE-2024-57876, CVE-2024-57877, CVE-2024-57878, CVE-2024-57879, CVE-2024-57880, CVE-2024-57881, CVE-2024-57882, CVE-2024-57883, CVE-2024-57884, CVE-2024-57885, CVE-2024-57886, CVE-2024-57887, CVE-2024-57888, CVE-2024-57889, CVE-2024-57890, CVE-2024-57891, CVE-2024-57892, CVE-2024-57893, CVE-2024-57895, CVE-2024-57896, CVE-2024-57897, CVE-2024-57898, CVE-2024-57899, CVE-2024-57900, CVE-2024-57901, CVE-2024-57902, CVE-2024-57903, CVE-2024-57904, CVE-2024-57905, CVE-2024-57906, CVE-2024-57907, CVE-2024-57908, CVE-2024-57909, CVE-2024-57910, CVE-2024-57911, CVE-2024-57912, CVE-2024-57913, CVE-2024-57914, CVE-2024-57916, CVE-2024-57917, CVE-2024-57918, CVE-2024-57919, CVE-2024-57921, CVE-2024-57922, CVE-2024-57923, CVE-2024-57924, CVE-2024-57925, CVE-2024-57926, CVE-2024-57927, CVE-2024-57928, CVE-2024-57929, CVE-2024-57930, CVE-2024-57931, CVE-2024-57932, CVE-2024-57933, CVE-2024-57934, CVE-2024-57935, CVE-2024-57936, CVE-2024-57938, CVE-2024-57939, CVE-2024-57940, CVE-2024-57941, CVE-2024-57942, CVE-2024-57943, CVE-2024-57944, CVE-2024-57945, CVE-2024-57946, CVE-2024-57947, CVE-2024-57948, CVE-2024-57949, CVE-2024-57950, CVE-2024-57951, CVE-2024-57952, CVE-2024-57953, CVE-2024-57973, CVE-2024-57977, CVE-2024-57978, CVE-2024-57979, CVE-2024-57980, CVE-2024-57981, CVE-2024-57982, CVE-2024-57983, CVE-2024-57984, CVE-2024-57985, CVE-2024-57986, CVE-2024-57987, CVE-2024-57988, CVE-2024-57989, CVE-2024-57990, CVE-2024-57991, CVE-2024-57992, CVE-2024-57993, CVE-2024-57994, CVE-2024-57995, CVE-2024-57996, CVE-2024-57997, CVE-2024-57998, CVE-2024-58000, CVE-2024-58001, CVE-2024-58002, CVE-2024-58003, CVE-2024-58004, CVE-2024-58005, CVE-2024-58007, CVE-2024-58008, CVE-2024-58009, CVE-2024-58010, CVE-2024-58011, CVE-2024-58013, CVE-2024-58014, CVE-2024-58016, CVE-2024-58017, CVE-2024-58018, CVE-2024-58019, CVE-2024-58020, CVE-2024-58021, CVE-2024-58022, CVE-2024-58034, CVE-2024-58042, CVE-2024-58051, CVE-2024-58052, CVE-2024-58053, CVE-2024-58054, CVE-2024-58055, CVE-2024-58056, CVE-2024-58057, CVE-2024-58058, CVE-2024-58059, CVE-2024-58060, CVE-2024-58061, CVE-2024-58062, CVE-2024-58063, CVE-2024-58064, CVE-2024-58065, CVE-2024-58066, CVE-2024-58067, CVE-2024-58068, CVE-2024-58069, CVE-2024-58070, CVE-2024-58071, CVE-2024-58072, CVE-2024-58073, CVE-2024-58074, CVE-2024-58075, CVE-2024-58076, CVE-2024-58077, CVE-2024-58078, CVE-2024-58079, CVE-2024-58080, CVE-2024-58081, CVE-2024-58082, CVE-2024-58083, CVE-2024-58084, CVE-2024-58085, CVE-2024-58086, CVE-2024-58087, CVE-2024-58088, CVE-2024-58090, CVE-2024-58091, CVE-2024-58092, CVE-2024-58096, CVE-2024-58097, CVE-2024-58098, CVE-2024-58099, CVE-2024-58100, CVE-2024-58237, CVE-2024-58238, CVE-2024-58239, CVE-2024-58240, CVE-2024-58241, CVE-2025-21629, CVE-2025-21631, CVE-2025-21632, CVE-2025-21636, CVE-2025-21637, CVE-2025-21638, CVE-2025-21639, CVE-2025-21640, CVE-2025-21641, CVE-2025-21642, CVE-2025-21643, CVE-2025-21644, CVE-2025-21645, CVE-2025-21646, CVE-2025-21647, CVE-2025-21648, CVE-2025-21652, CVE-2025-21653, CVE-2025-21654, CVE-2025-21655, CVE-2025-21656, CVE-2025-21657, CVE-2025-21658, CVE-2025-21659, CVE-2025-21660, CVE-2025-21661, CVE-2025-21662, CVE-2025-21663, CVE-2025-21664, CVE-2025-21665, CVE-2025-21666, CVE-2025-21667, CVE-2025-21668, CVE-2025-21669, CVE-2025-21670, CVE-2025-21671, CVE-2025-21672, CVE-2025-21673, CVE-2025-21674, CVE-2025-21675, CVE-2025-21676, CVE-2025-21677, CVE-2025-21678, CVE-2025-21679, CVE-2025-21680, CVE-2025-21681, CVE-2025-21683, CVE-2025-21684, CVE-2025-21685, CVE-2025-21687, CVE-2025-21688, CVE-2025-21689, CVE-2025-21690, CVE-2025-21691, CVE-2025-21692, CVE-2025-21694, CVE-2025-21695, CVE-2025-21697, CVE-2025-21699, CVE-2025-21700, CVE-2025-21701, CVE-2025-21702, CVE-2025-21703, CVE-2025-21704, CVE-2025-21705, CVE-2025-21706, CVE-2025-21707, CVE-2025-21708, CVE-2025-21709, CVE-2025-21710, CVE-2025-21711, CVE-2025-21712, CVE-2025-21713, CVE-2025-21715, CVE-2025-21716, CVE-2025-21717, CVE-2025-21718, CVE-2025-21719, CVE-2025-21720, CVE-2025-21721, CVE-2025-21724, CVE-2025-21725, CVE-2025-21726, CVE-2025-21727, CVE-2025-21728, CVE-2025-21730, CVE-2025-21731, CVE-2025-21733, CVE-2025-21734, CVE-2025-21735, CVE-2025-21736, CVE-2025-21737, CVE-2025-21738, CVE-2025-21741, CVE-2025-21742, CVE-2025-21743, CVE-2025-21744, CVE-2025-21745, CVE-2025-21746, CVE-2025-21747, CVE-2025-21748, CVE-2025-21749, CVE-2025-21750, CVE-2025-21751, CVE-2025-21752, CVE-2025-21753, CVE-2025-21754, CVE-2025-21756, CVE-2025-21758, CVE-2025-21759, CVE-2025-21760, CVE-2025-21761, CVE-2025-21762, CVE-2025-21763, CVE-2025-21764, CVE-2025-21765, CVE-2025-21766, CVE-2025-21767, CVE-2025-21769, CVE-2025-21770, CVE-2025-21771, CVE-2025-21772, CVE-2025-21773, CVE-2025-21774, CVE-2025-21775, CVE-2025-21776, CVE-2025-21777, CVE-2025-21778, CVE-2025-21779, CVE-2025-21780, CVE-2025-21781, CVE-2025-21782, CVE-2025-21783, CVE-2025-21784, CVE-2025-21785, CVE-2025-21786, CVE-2025-21787, CVE-2025-21788, CVE-2025-21789, CVE-2025-21790, CVE-2025-21791, CVE-2025-21792, CVE-2025-21793, CVE-2025-21794, CVE-2025-21795, CVE-2025-21796, CVE-2025-21797, CVE-2025-21798, CVE-2025-21799, CVE-2025-21800, CVE-2025-21802, CVE-2025-21803, CVE-2025-21804, CVE-2025-21805, CVE-2025-21806, CVE-2025-21807, CVE-2025-21808 and CVE-2025-21809
linux-yocto/6.6: (Cont.) Ignore CVE-2025-21810, CVE-2025-21811, CVE-2025-21812, CVE-2025-21813, CVE-2025-21814, CVE-2025-21815, CVE-2025-21816, CVE-2025-21817, CVE-2025-21819, CVE-2025-21820, CVE-2025-21821, CVE-2025-21822, CVE-2025-21823, CVE-2025-21824, CVE-2025-21826, CVE-2025-21827, CVE-2025-21828, CVE-2025-21829, CVE-2025-21830, CVE-2025-21831, CVE-2025-21832, CVE-2025-21833, CVE-2025-21834, CVE-2025-21835, CVE-2025-21836, CVE-2025-21838, CVE-2025-21839, CVE-2025-21840, CVE-2025-21841, CVE-2025-21842, CVE-2025-21843, CVE-2025-21844, CVE-2025-21845, CVE-2025-21846, CVE-2025-21847, CVE-2025-21848, CVE-2025-21849, CVE-2025-21850, CVE-2025-21851, CVE-2025-21852, CVE-2025-21853, CVE-2025-21854, CVE-2025-21855, CVE-2025-21856, CVE-2025-21857, CVE-2025-21858, CVE-2025-21859, CVE-2025-21860, CVE-2025-21861, CVE-2025-21862, CVE-2025-21863, CVE-2025-21864, CVE-2025-21865, CVE-2025-21866, CVE-2025-21867, CVE-2025-21868, CVE-2025-21869, CVE-2025-21871, CVE-2025-21872, CVE-2025-21873, CVE-2025-21874, CVE-2025-21875, CVE-2025-21876, CVE-2025-21877, CVE-2025-21878, CVE-2025-21879, CVE-2025-21880, CVE-2025-21881, CVE-2025-21882, CVE-2025-21883, CVE-2025-21884, CVE-2025-21886, CVE-2025-21887, CVE-2025-21889, CVE-2025-21890, CVE-2025-21891, CVE-2025-21893, CVE-2025-21894, CVE-2025-21895, CVE-2025-21896, CVE-2025-21897, CVE-2025-21898, CVE-2025-21899, CVE-2025-21900, CVE-2025-21901, CVE-2025-21902, CVE-2025-21903, CVE-2025-21904, CVE-2025-21905, CVE-2025-21906, CVE-2025-21908, CVE-2025-21909, CVE-2025-21910, CVE-2025-21911, CVE-2025-21912, CVE-2025-21913, CVE-2025-21914, CVE-2025-21915, CVE-2025-21916, CVE-2025-21917, CVE-2025-21918, CVE-2025-21919, CVE-2025-21920, CVE-2025-21921, CVE-2025-21922, CVE-2025-21923, CVE-2025-21924, CVE-2025-21925, CVE-2025-21926, CVE-2025-21928, CVE-2025-21929, CVE-2025-21930, CVE-2025-21931, CVE-2025-21932, CVE-2025-21933, CVE-2025-21934, CVE-2025-21935, CVE-2025-21936, CVE-2025-21937, CVE-2025-21938, CVE-2025-21939, CVE-2025-21940, CVE-2025-21941, CVE-2025-21942, CVE-2025-21943, CVE-2025-21944, CVE-2025-21945, CVE-2025-21946, CVE-2025-21947, CVE-2025-21948, CVE-2025-21950, CVE-2025-21951, CVE-2025-21952, CVE-2025-21953, CVE-2025-21954, CVE-2025-21955, CVE-2025-21956, CVE-2025-21957, CVE-2025-21958, CVE-2025-21959, CVE-2025-21960, CVE-2025-21962, CVE-2025-21963, CVE-2025-21964, CVE-2025-21965, CVE-2025-21966, CVE-2025-21967, CVE-2025-21968, CVE-2025-21969, CVE-2025-21970, CVE-2025-21971, CVE-2025-21973, CVE-2025-21974, CVE-2025-21975, CVE-2025-21977, CVE-2025-21978, CVE-2025-21979, CVE-2025-21980, CVE-2025-21981, CVE-2025-21982, CVE-2025-21983, CVE-2025-21984, CVE-2025-21986, CVE-2025-21987, CVE-2025-21988, CVE-2025-21989, CVE-2025-21990, CVE-2025-21991, CVE-2025-21992, CVE-2025-21993, CVE-2025-21994, CVE-2025-21995, CVE-2025-21996, CVE-2025-21997, CVE-2025-21998, CVE-2025-21999, CVE-2025-22000, CVE-2025-22001, CVE-2025-22002, CVE-2025-22003, CVE-2025-22004, CVE-2025-22005, CVE-2025-22006, CVE-2025-22007, CVE-2025-22008, CVE-2025-22009, CVE-2025-22010, CVE-2025-22011, CVE-2025-22012, CVE-2025-22013, CVE-2025-22014, CVE-2025-22015, CVE-2025-22016, CVE-2025-22017, CVE-2025-22018, CVE-2025-22019, CVE-2025-22020, CVE-2025-22021, CVE-2025-22022, CVE-2025-22023, CVE-2025-22024, CVE-2025-22025, CVE-2025-22027, CVE-2025-22028, CVE-2025-22030, CVE-2025-22031, CVE-2025-22032, CVE-2025-22033, CVE-2025-22034, CVE-2025-22035, CVE-2025-22036, CVE-2025-22037, CVE-2025-22038, CVE-2025-22040, CVE-2025-22041, CVE-2025-22042, CVE-2025-22043, CVE-2025-22044, CVE-2025-22045, CVE-2025-22046, CVE-2025-22047, CVE-2025-22048, CVE-2025-22049, CVE-2025-22050, CVE-2025-22051, CVE-2025-22052, CVE-2025-22053, CVE-2025-22054, CVE-2025-22055, CVE-2025-22056, CVE-2025-22057, CVE-2025-22058, CVE-2025-22059, CVE-2025-22060, CVE-2025-22061, CVE-2025-22062, CVE-2025-22063, CVE-2025-22064, CVE-2025-22065, CVE-2025-22066, CVE-2025-22067, CVE-2025-22068, CVE-2025-22069, CVE-2025-22071, CVE-2025-22072, CVE-2025-22073, CVE-2025-22074, CVE-2025-22075, CVE-2025-22076, CVE-2025-22077, CVE-2025-22078, CVE-2025-22079, CVE-2025-22080, CVE-2025-22081, CVE-2025-22082, CVE-2025-22083, CVE-2025-22084, CVE-2025-22085, CVE-2025-22086, CVE-2025-22087, CVE-2025-22088, CVE-2025-22089, CVE-2025-22090, CVE-2025-22091, CVE-2025-22092, CVE-2025-22093, CVE-2025-22094, CVE-2025-22095, CVE-2025-22096, CVE-2025-22097, CVE-2025-22098, CVE-2025-22099, CVE-2025-22100, CVE-2025-22102, CVE-2025-22103, CVE-2025-22105, CVE-2025-22106, CVE-2025-22107, CVE-2025-22110, CVE-2025-22111, CVE-2025-22112, CVE-2025-22114, CVE-2025-22116, CVE-2025-22117, CVE-2025-22118, CVE-2025-22119, CVE-2025-22120, CVE-2025-22121, CVE-2025-22122, CVE-2025-22123, CVE-2025-22124, CVE-2025-22126, CVE-2025-22128, CVE-2025-23129, CVE-2025-23134, CVE-2025-23136, CVE-2025-23137, CVE-2025-23138, CVE-2025-23140, CVE-2025-23141, CVE-2025-23142, CVE-2025-23143, CVE-2025-23144, CVE-2025-23145, CVE-2025-23146, CVE-2025-23147, CVE-2025-23148, CVE-2025-23149, CVE-2025-23150, CVE-2025-23151, CVE-2025-23152, CVE-2025-23153, CVE-2025-23154, CVE-2025-23155, CVE-2025-23156, CVE-2025-23157, CVE-2025-23158, CVE-2025-23159, CVE-2025-23160, CVE-2025-23161, CVE-2025-23162, CVE-2025-23163, CVE-2025-37738, CVE-2025-37739, CVE-2025-37740, CVE-2025-37741, CVE-2025-37742, CVE-2025-37744, CVE-2025-37745, CVE-2025-37746, CVE-2025-37747, CVE-2025-37748, CVE-2025-37749, CVE-2025-37750, CVE-2025-37751, CVE-2025-37752, CVE-2025-37754, CVE-2025-37755, CVE-2025-37756, CVE-2025-37757, CVE-2025-37758, CVE-2025-37760, CVE-2025-37761, CVE-2025-37762, CVE-2025-37763, CVE-2025-37764, CVE-2025-37765, CVE-2025-37766, CVE-2025-37767, CVE-2025-37768, CVE-2025-37769, CVE-2025-37770, CVE-2025-37771, CVE-2025-37772, CVE-2025-37773, CVE-2025-37774, CVE-2025-37775, CVE-2025-37776, CVE-2025-37777, CVE-2025-37778, CVE-2025-37779, CVE-2025-37780, CVE-2025-37781, CVE-2025-37783, CVE-2025-37784, CVE-2025-37785, CVE-2025-37786, CVE-2025-37787, CVE-2025-37788, CVE-2025-37789, CVE-2025-37790, CVE-2025-37791, CVE-2025-37792, CVE-2025-37793, CVE-2025-37794, CVE-2025-37796, CVE-2025-37797, CVE-2025-37798, CVE-2025-37799, CVE-2025-37800, CVE-2025-37801, CVE-2025-37803, CVE-2025-37805, CVE-2025-37808, CVE-2025-37809, CVE-2025-37810, CVE-2025-37811, CVE-2025-37812, CVE-2025-37813, CVE-2025-37814, CVE-2025-37815, CVE-2025-37816, CVE-2025-37817, CVE-2025-37818, CVE-2025-37819, CVE-2025-37820, CVE-2025-37821, CVE-2025-37822, CVE-2025-37823, CVE-2025-37824, CVE-2025-37825, CVE-2025-37827, CVE-2025-37828, CVE-2025-37829, CVE-2025-37830, CVE-2025-37831, CVE-2025-37836, CVE-2025-37837, CVE-2025-37838, CVE-2025-37839, CVE-2025-37840, CVE-2025-37841, CVE-2025-37842, CVE-2025-37843, CVE-2025-37844, CVE-2025-37845, CVE-2025-37846, CVE-2025-37847, CVE-2025-37848, CVE-2025-37849, CVE-2025-37850, CVE-2025-37851, CVE-2025-37852, CVE-2025-37853, CVE-2025-37854, CVE-2025-37855, CVE-2025-37857, CVE-2025-37858, CVE-2025-37859, CVE-2025-37862, CVE-2025-37863, CVE-2025-37864, CVE-2025-37865, CVE-2025-37866, CVE-2025-37867, CVE-2025-37868, CVE-2025-37869, CVE-2025-37871, CVE-2025-37872, CVE-2025-37873, CVE-2025-37874, CVE-2025-37875, CVE-2025-37876, CVE-2025-37877, CVE-2025-37878, CVE-2025-37879, CVE-2025-37881, CVE-2025-37882, CVE-2025-37883, CVE-2025-37884, CVE-2025-37885, CVE-2025-37886, CVE-2025-37887, CVE-2025-37888, CVE-2025-37889, CVE-2025-37890, CVE-2025-37891, CVE-2025-37892, CVE-2025-37893, CVE-2025-37894, CVE-2025-37895, CVE-2025-37896, CVE-2025-37897, CVE-2025-37898, CVE-2025-37899, CVE-2025-37900, CVE-2025-37901, CVE-2025-37903, CVE-2025-37904, CVE-2025-37905, CVE-2025-37906, CVE-2025-37908, CVE-2025-37909, CVE-2025-37910, CVE-2025-37911, CVE-2025-37912, CVE-2025-37913, CVE-2025-37914, CVE-2025-37915, CVE-2025-37916, CVE-2025-37917, CVE-2025-37918, CVE-2025-37919, CVE-2025-37920, CVE-2025-37921, CVE-2025-37922, CVE-2025-37923, CVE-2025-37924, CVE-2025-37925, CVE-2025-37926, CVE-2025-37927, CVE-2025-37928, CVE-2025-37929, CVE-2025-37930, CVE-2025-37931, CVE-2025-37932, CVE-2025-37933, CVE-2025-37934, CVE-2025-37935, CVE-2025-37936, CVE-2025-37937, CVE-2025-37938, CVE-2025-37939, CVE-2025-37940, CVE-2025-37941, CVE-2025-37943, CVE-2025-37944, CVE-2025-37945, CVE-2025-37946, CVE-2025-37947, CVE-2025-37948, CVE-2025-37949, CVE-2025-37950, CVE-2025-37951, CVE-2025-37952, CVE-2025-37953, CVE-2025-37954, CVE-2025-37955, CVE-2025-37956, CVE-2025-37957, CVE-2025-37958, CVE-2025-37959, CVE-2025-37960, CVE-2025-37961, CVE-2025-37962, CVE-2025-37963, CVE-2025-37964, CVE-2025-37965, CVE-2025-37966, CVE-2025-37967, CVE-2025-37968, CVE-2025-37969 and CVE-2025-37970
linux-yocto/6.6: (Cont.) Ignore CVE-2025-37971, CVE-2025-37972, CVE-2025-37973, CVE-2025-37974, CVE-2025-37975, CVE-2025-37978, CVE-2025-37979, CVE-2025-37980, CVE-2025-37981, CVE-2025-37982, CVE-2025-37983, CVE-2025-37984, CVE-2025-37985, CVE-2025-37986, CVE-2025-37987, CVE-2025-37988, CVE-2025-37989, CVE-2025-37990, CVE-2025-37991, CVE-2025-37992, CVE-2025-37993, CVE-2025-37994, CVE-2025-37995, CVE-2025-37996, CVE-2025-37997, CVE-2025-37998, CVE-2025-37999, CVE-2025-38000, CVE-2025-38001, CVE-2025-38002, CVE-2025-38003, CVE-2025-38004, CVE-2025-38005, CVE-2025-38006, CVE-2025-38007, CVE-2025-38008, CVE-2025-38009, CVE-2025-38010, CVE-2025-38011, CVE-2025-38012, CVE-2025-38013, CVE-2025-38014, CVE-2025-38015, CVE-2025-38016, CVE-2025-38017, CVE-2025-38018, CVE-2025-38019, CVE-2025-38020, CVE-2025-38021, CVE-2025-38022, CVE-2025-38023, CVE-2025-38024, CVE-2025-38025, CVE-2025-38027, CVE-2025-38028, CVE-2025-38031, CVE-2025-38032, CVE-2025-38033, CVE-2025-38034, CVE-2025-38035, CVE-2025-38036, CVE-2025-38037, CVE-2025-38039, CVE-2025-38040, CVE-2025-38043, CVE-2025-38044, CVE-2025-38045, CVE-2025-38047, CVE-2025-38048, CVE-2025-38049, CVE-2025-38050, CVE-2025-38051, CVE-2025-38052, CVE-2025-38053, CVE-2025-38054, CVE-2025-38055, CVE-2025-38056, CVE-2025-38057, CVE-2025-38058, CVE-2025-38059, CVE-2025-38060, CVE-2025-38061, CVE-2025-38062, CVE-2025-38063, CVE-2025-38065, CVE-2025-38066, CVE-2025-38067, CVE-2025-38068, CVE-2025-38070, CVE-2025-38071, CVE-2025-38072, CVE-2025-38074, CVE-2025-38075, CVE-2025-38076, CVE-2025-38077, CVE-2025-38078, CVE-2025-38079, CVE-2025-38080, CVE-2025-38081, CVE-2025-38082, CVE-2025-38083, CVE-2025-38084, CVE-2025-38085, CVE-2025-38086, CVE-2025-38087, CVE-2025-38088, CVE-2025-38089, CVE-2025-38090, CVE-2025-38091, CVE-2025-38092, CVE-2025-38093, CVE-2025-38094, CVE-2025-38095, CVE-2025-38097, CVE-2025-38098, CVE-2025-38099, CVE-2025-38100, CVE-2025-38101, CVE-2025-38102, CVE-2025-38103, CVE-2025-38104, CVE-2025-38105, CVE-2025-38106, CVE-2025-38107, CVE-2025-38108, CVE-2025-38109, CVE-2025-38110, CVE-2025-38111, CVE-2025-38112, CVE-2025-38113, CVE-2025-38114, CVE-2025-38115, CVE-2025-38116, CVE-2025-38117, CVE-2025-38118, CVE-2025-38119, CVE-2025-38120, CVE-2025-38121, CVE-2025-38122, CVE-2025-38123, CVE-2025-38124, CVE-2025-38125, CVE-2025-38126, CVE-2025-38127, CVE-2025-38128, CVE-2025-38129, CVE-2025-38130, CVE-2025-38131, CVE-2025-38133, CVE-2025-38134, CVE-2025-38135, CVE-2025-38136, CVE-2025-38137, CVE-2025-38138, CVE-2025-38139, CVE-2025-38141, CVE-2025-38142, CVE-2025-38143, CVE-2025-38144, CVE-2025-38145, CVE-2025-38146, CVE-2025-38147, CVE-2025-38148, CVE-2025-38149, CVE-2025-38150, CVE-2025-38151, CVE-2025-38152, CVE-2025-38153, CVE-2025-38154, CVE-2025-38155, CVE-2025-38156, CVE-2025-38157, CVE-2025-38158, CVE-2025-38159, CVE-2025-38160, CVE-2025-38161, CVE-2025-38163, CVE-2025-38165, CVE-2025-38166, CVE-2025-38167, CVE-2025-38168, CVE-2025-38169, CVE-2025-38170, CVE-2025-38171, CVE-2025-38172, CVE-2025-38173, CVE-2025-38174, CVE-2025-38175, CVE-2025-38176, CVE-2025-38177, CVE-2025-38179, CVE-2025-38180, CVE-2025-38181, CVE-2025-38182, CVE-2025-38183, CVE-2025-38184, CVE-2025-38185, CVE-2025-38186, CVE-2025-38187, CVE-2025-38188, CVE-2025-38189, CVE-2025-38190, CVE-2025-38191, CVE-2025-38192, CVE-2025-38193, CVE-2025-38194, CVE-2025-38195, CVE-2025-38196, CVE-2025-38197, CVE-2025-38198, CVE-2025-38200, CVE-2025-38202, CVE-2025-38205, CVE-2025-38208, CVE-2025-38209, CVE-2025-38210, CVE-2025-38211, CVE-2025-38212, CVE-2025-38214, CVE-2025-38215, CVE-2025-38216, CVE-2025-38217, CVE-2025-38218, CVE-2025-38219, CVE-2025-38220, CVE-2025-38221, CVE-2025-38222, CVE-2025-38223, CVE-2025-38224, CVE-2025-38225, CVE-2025-38226, CVE-2025-38227, CVE-2025-38228, CVE-2025-38229, CVE-2025-38230, CVE-2025-38231, CVE-2025-38232, CVE-2025-38233, CVE-2025-38235, CVE-2025-38236, CVE-2025-38238, CVE-2025-38239, CVE-2025-38240, CVE-2025-38241, CVE-2025-38242, CVE-2025-38243, CVE-2025-38244, CVE-2025-38245, CVE-2025-38246, CVE-2025-38247, CVE-2025-38248, CVE-2025-38249, CVE-2025-38250, CVE-2025-38251, CVE-2025-38252, CVE-2025-38253, CVE-2025-38254, CVE-2025-38255, CVE-2025-38256, CVE-2025-38257, CVE-2025-38258, CVE-2025-38259, CVE-2025-38260, CVE-2025-38262, CVE-2025-38263, CVE-2025-38265, CVE-2025-38266, CVE-2025-38267, CVE-2025-38268, CVE-2025-38269, CVE-2025-38270, CVE-2025-38271, CVE-2025-38273, CVE-2025-38274, CVE-2025-38275, CVE-2025-38276, CVE-2025-38277, CVE-2025-38278, CVE-2025-38280, CVE-2025-38281, CVE-2025-38282, CVE-2025-38283, CVE-2025-38284, CVE-2025-38285, CVE-2025-38286, CVE-2025-38287, CVE-2025-38288, CVE-2025-38289, CVE-2025-38290, CVE-2025-38291, CVE-2025-38293, CVE-2025-38294, CVE-2025-38295, CVE-2025-38296, CVE-2025-38297, CVE-2025-38298, CVE-2025-38299, CVE-2025-38300, CVE-2025-38301, CVE-2025-38302, CVE-2025-38304, CVE-2025-38305, CVE-2025-38306, CVE-2025-38307, CVE-2025-38308, CVE-2025-38309, CVE-2025-38310, CVE-2025-38312, CVE-2025-38313, CVE-2025-38314, CVE-2025-38315, CVE-2025-38316, CVE-2025-38317, CVE-2025-38318, CVE-2025-38319, CVE-2025-38320, CVE-2025-38321, CVE-2025-38322, CVE-2025-38323, CVE-2025-38324, CVE-2025-38325, CVE-2025-38326, CVE-2025-38327, CVE-2025-38328, CVE-2025-38329, CVE-2025-38330, CVE-2025-38331, CVE-2025-38332, CVE-2025-38334, CVE-2025-38335, CVE-2025-38336, CVE-2025-38337, CVE-2025-38338, CVE-2025-38339, CVE-2025-38340, CVE-2025-38341, CVE-2025-38342, CVE-2025-38343, CVE-2025-38344, CVE-2025-38345, CVE-2025-38346, CVE-2025-38347, CVE-2025-38348, CVE-2025-38349, CVE-2025-38350, CVE-2025-38351, CVE-2025-38352, CVE-2025-38353, CVE-2025-38354, CVE-2025-38355, CVE-2025-38356, CVE-2025-38357, CVE-2025-38358, CVE-2025-38360, CVE-2025-38361, CVE-2025-38362, CVE-2025-38363, CVE-2025-38364, CVE-2025-38365, CVE-2025-38366, CVE-2025-38367, CVE-2025-38368, CVE-2025-38369, CVE-2025-38370, CVE-2025-38371, CVE-2025-38372, CVE-2025-38373, CVE-2025-38374, CVE-2025-38375, CVE-2025-38376, CVE-2025-38377, CVE-2025-38378, CVE-2025-38379, CVE-2025-38381, CVE-2025-38382, CVE-2025-38383, CVE-2025-38384, CVE-2025-38385, CVE-2025-38386, CVE-2025-38387, CVE-2025-38388, CVE-2025-38389, CVE-2025-38390, CVE-2025-38391, CVE-2025-38392, CVE-2025-38393, CVE-2025-38394, CVE-2025-38395, CVE-2025-38396, CVE-2025-38397, CVE-2025-38398, CVE-2025-38399, CVE-2025-38400, CVE-2025-38401, CVE-2025-38402, CVE-2025-38403, CVE-2025-38404, CVE-2025-38405, CVE-2025-38406, CVE-2025-38407, CVE-2025-38408, CVE-2025-38409, CVE-2025-38410, CVE-2025-38411, CVE-2025-38412, CVE-2025-38413, CVE-2025-38415, CVE-2025-38416, CVE-2025-38417, CVE-2025-38418, CVE-2025-38419, CVE-2025-38420, CVE-2025-38421, CVE-2025-38422, CVE-2025-38423, CVE-2025-38424, CVE-2025-38425, CVE-2025-38427, CVE-2025-38428, CVE-2025-38429, CVE-2025-38430, CVE-2025-38431, CVE-2025-38432, CVE-2025-38433, CVE-2025-38434, CVE-2025-38435, CVE-2025-38436, CVE-2025-38437, CVE-2025-38439, CVE-2025-38440, CVE-2025-38441, CVE-2025-38442, CVE-2025-38443, CVE-2025-38444, CVE-2025-38445, CVE-2025-38446, CVE-2025-38447, CVE-2025-38448, CVE-2025-38449, CVE-2025-38450, CVE-2025-38451, CVE-2025-38452, CVE-2025-38453, CVE-2025-38454, CVE-2025-38455, CVE-2025-38456, CVE-2025-38457, CVE-2025-38458, CVE-2025-38459, CVE-2025-38460, CVE-2025-38461, CVE-2025-38462, CVE-2025-38463, CVE-2025-38464, CVE-2025-38465, CVE-2025-38466, CVE-2025-38467, CVE-2025-38468, CVE-2025-38469, CVE-2025-38470, CVE-2025-38471, CVE-2025-38472, CVE-2025-38473, CVE-2025-38474, CVE-2025-38475, CVE-2025-38476, CVE-2025-38477, CVE-2025-38478, CVE-2025-38479, CVE-2025-38480, CVE-2025-38481, CVE-2025-38482, CVE-2025-38483, CVE-2025-38484, CVE-2025-38485, CVE-2025-38486, CVE-2025-38487, CVE-2025-38488, CVE-2025-38489, CVE-2025-38490, CVE-2025-38491, CVE-2025-38492, CVE-2025-38493, CVE-2025-38494, CVE-2025-38495, CVE-2025-38496, CVE-2025-38497, CVE-2025-38498, CVE-2025-38499, CVE-2025-38500, CVE-2025-38501, CVE-2025-38502, CVE-2025-38503, CVE-2025-38504, CVE-2025-38505, CVE-2025-38506, CVE-2025-38508, CVE-2025-38509, CVE-2025-38510, CVE-2025-38511, CVE-2025-38512, CVE-2025-38513, CVE-2025-38514, CVE-2025-38515, CVE-2025-38516, CVE-2025-38517, CVE-2025-38518, CVE-2025-38519, CVE-2025-38520, CVE-2025-38521, CVE-2025-38522, CVE-2025-38523, CVE-2025-38524, CVE-2025-38525, CVE-2025-38526, CVE-2025-38527, CVE-2025-38528, CVE-2025-38529, CVE-2025-38530, CVE-2025-38532, CVE-2025-38533, CVE-2025-38534, CVE-2025-38535, CVE-2025-38536, CVE-2025-38537, CVE-2025-38538, CVE-2025-38539, CVE-2025-38540, CVE-2025-38541, CVE-2025-38542, CVE-2025-38543, CVE-2025-38544 and CVE-2025-38545
linux-yocto/6.6: (Cont.) Ignore CVE-2025-38546, CVE-2025-38547, CVE-2025-38548, CVE-2025-38549, CVE-2025-38550, CVE-2025-38551, CVE-2025-38552, CVE-2025-38553, CVE-2025-38554, CVE-2025-38555, CVE-2025-38556, CVE-2025-38557, CVE-2025-38558, CVE-2025-38559, CVE-2025-38560, CVE-2025-38561, CVE-2025-38562, CVE-2025-38563, CVE-2025-38564, CVE-2025-38565, CVE-2025-38566, CVE-2025-38567, CVE-2025-38568, CVE-2025-38569, CVE-2025-38570, CVE-2025-38571, CVE-2025-38572, CVE-2025-38573, CVE-2025-38574, CVE-2025-38575, CVE-2025-38576, CVE-2025-38577, CVE-2025-38578, CVE-2025-38579, CVE-2025-38580, CVE-2025-38581, CVE-2025-38582, CVE-2025-38583, CVE-2025-38586, CVE-2025-38587, CVE-2025-38588, CVE-2025-38589, CVE-2025-38590, CVE-2025-38592, CVE-2025-38593, CVE-2025-38594, CVE-2025-38596, CVE-2025-38598, CVE-2025-38599, CVE-2025-38600, CVE-2025-38601, CVE-2025-38602, CVE-2025-38604, CVE-2025-38606, CVE-2025-38607, CVE-2025-38608, CVE-2025-38609, CVE-2025-38610, CVE-2025-38612, CVE-2025-38613, CVE-2025-38614, CVE-2025-38615, CVE-2025-38616, CVE-2025-38617, CVE-2025-38618, CVE-2025-38619, CVE-2025-38620, CVE-2025-38621, CVE-2025-38622, CVE-2025-38623, CVE-2025-38624, CVE-2025-38625, CVE-2025-38626, CVE-2025-38627, CVE-2025-38628, CVE-2025-38629, CVE-2025-38630, CVE-2025-38631, CVE-2025-38632, CVE-2025-38633, CVE-2025-38634, CVE-2025-38635, CVE-2025-38637, CVE-2025-38638, CVE-2025-38639, CVE-2025-38640, CVE-2025-38641, CVE-2025-38642, CVE-2025-38643, CVE-2025-38644, CVE-2025-38645, CVE-2025-38646, CVE-2025-38647, CVE-2025-38648, CVE-2025-38649, CVE-2025-38650, CVE-2025-38651, CVE-2025-38652, CVE-2025-38653, CVE-2025-38654, CVE-2025-38655, CVE-2025-38657, CVE-2025-38658, CVE-2025-38659, CVE-2025-38661, CVE-2025-38662, CVE-2025-38663, CVE-2025-38664, CVE-2025-38665, CVE-2025-38666, CVE-2025-38667, CVE-2025-38668, CVE-2025-38669, CVE-2025-38670, CVE-2025-38671, CVE-2025-38672, CVE-2025-38673, CVE-2025-38674, CVE-2025-38675, CVE-2025-38676, CVE-2025-38677, CVE-2025-38678, CVE-2025-38679, CVE-2025-38680, CVE-2025-38681, CVE-2025-38682, CVE-2025-38683, CVE-2025-38684, CVE-2025-38685, CVE-2025-38686, CVE-2025-38687, CVE-2025-38688, CVE-2025-38689, CVE-2025-38690, CVE-2025-38691, CVE-2025-38692, CVE-2025-38693, CVE-2025-38694, CVE-2025-38695, CVE-2025-38696, CVE-2025-38697, CVE-2025-38698, CVE-2025-38699, CVE-2025-38700, CVE-2025-38701, CVE-2025-38702, CVE-2025-38703, CVE-2025-38706, CVE-2025-38707, CVE-2025-38708, CVE-2025-38709, CVE-2025-38711, CVE-2025-38712, CVE-2025-38713, CVE-2025-38714, CVE-2025-38715, CVE-2025-38716, CVE-2025-38718, CVE-2025-38719, CVE-2025-38720, CVE-2025-38721, CVE-2025-38723, CVE-2025-38724, CVE-2025-38725, CVE-2025-38726, CVE-2025-38727, CVE-2025-38728, CVE-2025-38729, CVE-2025-38730, CVE-2025-38731, CVE-2025-38732, CVE-2025-38733, CVE-2025-38734, CVE-2025-38735, CVE-2025-38736, CVE-2025-38737, CVE-2025-39673, CVE-2025-39674, CVE-2025-39675, CVE-2025-39676, CVE-2025-39678, CVE-2025-39679, CVE-2025-39680, CVE-2025-39681, CVE-2025-39682, CVE-2025-39683, CVE-2025-39684, CVE-2025-39685, CVE-2025-39686, CVE-2025-39687, CVE-2025-39688, CVE-2025-39689, CVE-2025-39690, CVE-2025-39691, CVE-2025-39692, CVE-2025-39693, CVE-2025-39694, CVE-2025-39695, CVE-2025-39696, CVE-2025-39697, CVE-2025-39698, CVE-2025-39699, CVE-2025-39700, CVE-2025-39701, CVE-2025-39702, CVE-2025-39703, CVE-2025-39704, CVE-2025-39706, CVE-2025-39708, CVE-2025-39709, CVE-2025-39710, CVE-2025-39711, CVE-2025-39712, CVE-2025-39713, CVE-2025-39714, CVE-2025-39715, CVE-2025-39716, CVE-2025-39717, CVE-2025-39718, CVE-2025-39719, CVE-2025-39720, CVE-2025-39721, CVE-2025-39722, CVE-2025-39723, CVE-2025-39724, CVE-2025-39725, CVE-2025-39726, CVE-2025-39727, CVE-2025-39728, CVE-2025-39729, CVE-2025-39730, CVE-2025-39731, CVE-2025-39733, CVE-2025-39734, CVE-2025-39735, CVE-2025-39736, CVE-2025-39737, CVE-2025-39738, CVE-2025-39739, CVE-2025-39740, CVE-2025-39741, CVE-2025-39742, CVE-2025-39743, CVE-2025-39744, CVE-2025-39745, CVE-2025-39749, CVE-2025-39750, CVE-2025-39752, CVE-2025-39753, CVE-2025-39755, CVE-2025-39756, CVE-2025-39757, CVE-2025-39758, CVE-2025-39759, CVE-2025-39760, CVE-2025-39761, CVE-2025-39763, CVE-2025-39765, CVE-2025-39766, CVE-2025-39767, CVE-2025-39768, CVE-2025-39769, CVE-2025-39770, CVE-2025-39771, CVE-2025-39772, CVE-2025-39773, CVE-2025-39774, CVE-2025-39775, CVE-2025-39776, CVE-2025-39777, CVE-2025-39778, CVE-2025-39780, CVE-2025-39781, CVE-2025-39782, CVE-2025-39783, CVE-2025-39784, CVE-2025-39785, CVE-2025-39786, CVE-2025-39787, CVE-2025-39788, CVE-2025-39790, CVE-2025-39791, CVE-2025-39792, CVE-2025-39793, CVE-2025-39794, CVE-2025-39795, CVE-2025-39796, CVE-2025-39797, CVE-2025-39798, CVE-2025-39800, CVE-2025-39801, CVE-2025-39802, CVE-2025-39803, CVE-2025-39804, CVE-2025-39805, CVE-2025-39806, CVE-2025-39807, CVE-2025-39808, CVE-2025-39809, CVE-2025-39811, CVE-2025-39812, CVE-2025-39813, CVE-2025-39814, CVE-2025-39815, CVE-2025-39816, CVE-2025-39817, CVE-2025-39818, CVE-2025-39819, CVE-2025-39820, CVE-2025-39821, CVE-2025-39822, CVE-2025-39823, CVE-2025-39824, CVE-2025-39825, CVE-2025-39826, CVE-2025-39827, CVE-2025-39828, CVE-2025-39830, CVE-2025-39831, CVE-2025-39832, CVE-2025-39834, CVE-2025-39835, CVE-2025-39836, CVE-2025-39837, CVE-2025-39838, CVE-2025-39839, CVE-2025-39840, CVE-2025-39841, CVE-2025-39842, CVE-2025-39843, CVE-2025-39844, CVE-2025-39845, CVE-2025-39846, CVE-2025-39847, CVE-2025-39848, CVE-2025-39849, CVE-2025-39852, CVE-2025-39853, CVE-2025-39854, CVE-2025-39855, CVE-2025-39856, CVE-2025-39857, CVE-2025-39858, CVE-2025-39860, CVE-2025-39861, CVE-2025-39863, CVE-2025-39864, CVE-2025-39865, CVE-2025-39866, CVE-2025-39868, CVE-2025-39869, CVE-2025-39870, CVE-2025-39871, CVE-2025-39872, CVE-2025-39873, CVE-2025-39874, CVE-2025-39875, CVE-2025-39876, CVE-2025-39877, CVE-2025-39878, CVE-2025-39879, CVE-2025-39880, CVE-2025-39881, CVE-2025-39882, CVE-2025-39883, CVE-2025-39884, CVE-2025-39885, CVE-2025-39886, CVE-2025-39887, CVE-2025-39888, CVE-2025-39889, CVE-2025-39890, CVE-2025-39891, CVE-2025-39892, CVE-2025-39893, CVE-2025-39894, CVE-2025-39895, CVE-2025-39896, CVE-2025-39897, CVE-2025-39899, CVE-2025-39900, CVE-2025-39902, CVE-2025-39903, CVE-2025-39904, CVE-2025-39905, CVE-2025-39906, CVE-2025-39907, CVE-2025-39908, CVE-2025-39909, CVE-2025-39911, CVE-2025-39912, CVE-2025-39913, CVE-2025-39914, CVE-2025-39915, CVE-2025-39916, CVE-2025-39917, CVE-2025-39918, CVE-2025-39919, CVE-2025-39920, CVE-2025-39921, CVE-2025-39922, CVE-2025-39923, CVE-2025-39924, CVE-2025-39926, CVE-2025-39928, CVE-2025-39929, CVE-2025-39930, CVE-2025-39931, CVE-2025-39934, CVE-2025-39935, CVE-2025-39936, CVE-2025-39937, CVE-2025-39938, CVE-2025-39939, CVE-2025-39941, CVE-2025-39942, CVE-2025-39943, CVE-2025-39944, CVE-2025-39945, CVE-2025-39946, CVE-2025-39947, CVE-2025-39948, CVE-2025-39949, CVE-2025-39950, CVE-2025-39951, CVE-2025-39952, CVE-2025-39953, CVE-2025-39954, CVE-2025-39955, CVE-2025-39956, CVE-2025-39957, CVE-2025-39959, CVE-2025-39960, CVE-2025-39961, CVE-2025-39962, CVE-2025-39963, CVE-2025-39964, CVE-2025-39965, CVE-2025-39966, CVE-2025-39967, CVE-2025-39968, CVE-2025-39969, CVE-2025-39970, CVE-2025-39971, CVE-2025-39972, CVE-2025-39973, CVE-2025-39974, CVE-2025-39975, CVE-2025-39976, CVE-2025-39977, CVE-2025-39978, CVE-2025-39979, CVE-2025-39980, CVE-2025-39982, CVE-2025-39983, CVE-2025-39984, CVE-2025-39985, CVE-2025-39986, CVE-2025-39987, CVE-2025-39988, CVE-2025-39989, CVE-2025-39991, CVE-2025-39992, CVE-2025-39993, CVE-2025-39994, CVE-2025-39995, CVE-2025-39996, CVE-2025-39997, CVE-2025-39998, CVE-2025-39999, CVE-2025-40001, CVE-2025-40002, CVE-2025-40004, CVE-2025-40006, CVE-2025-40007, CVE-2025-40008, CVE-2025-40009, CVE-2025-40010, CVE-2025-40011, CVE-2025-40012, CVE-2025-40013, CVE-2025-40014, CVE-2025-40015, CVE-2025-40016, CVE-2025-40017, CVE-2025-40018, CVE-2025-40019, CVE-2025-40020, CVE-2025-40021, CVE-2025-40022, CVE-2025-40023, CVE-2025-40024, CVE-2025-40026, CVE-2025-40027, CVE-2025-40028, CVE-2025-40029, CVE-2025-40030, CVE-2025-40031, CVE-2025-40032, CVE-2025-40033, CVE-2025-40034, CVE-2025-40035, CVE-2025-40036, CVE-2025-40037, CVE-2025-40038, CVE-2025-40039, CVE-2025-40040, CVE-2025-40041, CVE-2025-40042, CVE-2025-40043, CVE-2025-40044, CVE-2025-40045, CVE-2025-40046, CVE-2025-40047, CVE-2025-40048, CVE-2025-40049, CVE-2025-40050, CVE-2025-40051, CVE-2025-40052, CVE-2025-40053, CVE-2025-40055, CVE-2025-40056, CVE-2025-40058, CVE-2025-40059, CVE-2025-40060, CVE-2025-40061, CVE-2025-40062, CVE-2025-40063, CVE-2025-40066, CVE-2025-40067, CVE-2025-40068, CVE-2025-40069 and CVE-2025-40070
linux-yocto/6.6: (Cont.) Ignore CVE-2025-40071, CVE-2025-40072, CVE-2025-40073, CVE-2025-40076, CVE-2025-40077, CVE-2025-40078, CVE-2025-40080, CVE-2025-40081, CVE-2025-40083, CVE-2025-40084, CVE-2025-40085, CVE-2025-40086, CVE-2025-40087, CVE-2025-40088, CVE-2025-40089, CVE-2025-40090, CVE-2025-40091, CVE-2025-40092, CVE-2025-40093, CVE-2025-40094, CVE-2025-40095, CVE-2025-40096, CVE-2025-40098, CVE-2025-40099, CVE-2025-40100, CVE-2025-40101, CVE-2025-40103, CVE-2025-40104, CVE-2025-40105, CVE-2025-40106, CVE-2025-40107, CVE-2025-40108, CVE-2025-40109, CVE-2025-40110, CVE-2025-40111, CVE-2025-40112, CVE-2025-40113, CVE-2025-40114, CVE-2025-40115, CVE-2025-40116, CVE-2025-40117, CVE-2025-40118, CVE-2025-40119, CVE-2025-40120, CVE-2025-40121, CVE-2025-40122, CVE-2025-40123, CVE-2025-40124, CVE-2025-40125, CVE-2025-40126, CVE-2025-40127, CVE-2025-40129, CVE-2025-40130, CVE-2025-40131, CVE-2025-40132, CVE-2025-40133, CVE-2025-40134, CVE-2025-40137, CVE-2025-40138, CVE-2025-40140, CVE-2025-40141, CVE-2025-40142, CVE-2025-40143, CVE-2025-40145, CVE-2025-40147, CVE-2025-40148, CVE-2025-40149, CVE-2025-40151, CVE-2025-40152, CVE-2025-40153, CVE-2025-40154, CVE-2025-40155, CVE-2025-40156, CVE-2025-40157, CVE-2025-40159, CVE-2025-40160, CVE-2025-40161, CVE-2025-40162, CVE-2025-40163, CVE-2025-40164, CVE-2025-40165, CVE-2025-40166, CVE-2025-40167, CVE-2025-40169, CVE-2025-40171, CVE-2025-40172, CVE-2025-40173, CVE-2025-40174, CVE-2025-40175, CVE-2025-40176, CVE-2025-40177, CVE-2025-40178, CVE-2025-40179, CVE-2025-40181, CVE-2025-40182, CVE-2025-40183, CVE-2025-40184, CVE-2025-40185, CVE-2025-40186, CVE-2025-40187, CVE-2025-40188, CVE-2025-40189, CVE-2025-40190, CVE-2025-40191, CVE-2025-40192, CVE-2025-40193, CVE-2025-40194, CVE-2025-40195, CVE-2025-40196, CVE-2025-40197, CVE-2025-40198, CVE-2025-40199, CVE-2025-40200, CVE-2025-40201, CVE-2025-40202, CVE-2025-40203, CVE-2025-40204, CVE-2025-40205, CVE-2025-40206, CVE-2025-40207, CVE-2025-40208, CVE-2025-40209, CVE-2025-40210, CVE-2025-40211, CVE-2025-40212, CVE-2025-40213, CVE-2025-40214, CVE-2025-40215, CVE-2025-40216, CVE-2025-40217, CVE-2025-40218, CVE-2025-40219, CVE-2025-40220, CVE-2025-40221, CVE-2025-40222, CVE-2025-40223, CVE-2025-40224, CVE-2025-40225, CVE-2025-40226, CVE-2025-40227, CVE-2025-40228, CVE-2025-40229, CVE-2025-40230, CVE-2025-40231, CVE-2025-40232, CVE-2025-40233, CVE-2025-40234, CVE-2025-40235, CVE-2025-40236, CVE-2025-40237, CVE-2025-40238, CVE-2025-40239, CVE-2025-40240, CVE-2025-40241, CVE-2025-40243, CVE-2025-40244, CVE-2025-40245, CVE-2025-40246, CVE-2025-40248, CVE-2025-40249, CVE-2025-40250, CVE-2025-40251, CVE-2025-40252, CVE-2025-40253, CVE-2025-40254, CVE-2025-40255, CVE-2025-40256, CVE-2025-40257, CVE-2025-40258, CVE-2025-40259, CVE-2025-40260, CVE-2025-40261, CVE-2025-40262, CVE-2025-40263, CVE-2025-40264, CVE-2025-40265, CVE-2025-40266, CVE-2025-40267, CVE-2025-40268, CVE-2025-40269, CVE-2025-40270, CVE-2025-40271, CVE-2025-40272, CVE-2025-40273, CVE-2025-40274, CVE-2025-40275, CVE-2025-40276, CVE-2025-40277, CVE-2025-40278, CVE-2025-40279, CVE-2025-40280, CVE-2025-40281, CVE-2025-40282, CVE-2025-40283, CVE-2025-40284, CVE-2025-40285, CVE-2025-40286, CVE-2025-40287, CVE-2025-40288, CVE-2025-40290, CVE-2025-40291, CVE-2025-40292, CVE-2025-40293, CVE-2025-40294, CVE-2025-40295, CVE-2025-40296, CVE-2025-40297, CVE-2025-40298, CVE-2025-40299, CVE-2025-40300, CVE-2025-40301, CVE-2025-40302, CVE-2025-40303, CVE-2025-40304, CVE-2025-40305, CVE-2025-40306, CVE-2025-40308, CVE-2025-40309, CVE-2025-40310, CVE-2025-40311, CVE-2025-40312, CVE-2025-40313, CVE-2025-40314, CVE-2025-40315, CVE-2025-40316, CVE-2025-40317, CVE-2025-40318, CVE-2025-40319, CVE-2025-40320, CVE-2025-40321, CVE-2025-40322, CVE-2025-40323, CVE-2025-40324, CVE-2025-40326, CVE-2025-40327, CVE-2025-40328, CVE-2025-40329, CVE-2025-40330, CVE-2025-40331, CVE-2025-40332, CVE-2025-40333, CVE-2025-40334, CVE-2025-40335, CVE-2025-40336, CVE-2025-40337, CVE-2025-40340, CVE-2025-40341, CVE-2025-40342, CVE-2025-40343, CVE-2025-40344, CVE-2025-40345, CVE-2025-40346, CVE-2025-40347, CVE-2025-40348, CVE-2025-40349, CVE-2025-40350, CVE-2025-40351, CVE-2025-40352, CVE-2025-40353, CVE-2025-40356, CVE-2025-40357, CVE-2025-40358, CVE-2025-40359, CVE-2025-40360, CVE-2025-40362, CVE-2025-40363, CVE-2025-40364, CVE-2025-68167, CVE-2025-68168, CVE-2025-68169, CVE-2025-68170, CVE-2025-68171, CVE-2025-68172, CVE-2025-68173, CVE-2025-68176, CVE-2025-68177, CVE-2025-68178, CVE-2025-68179, CVE-2025-68180, CVE-2025-68181, CVE-2025-68182, CVE-2025-68183, CVE-2025-68184, CVE-2025-68185, CVE-2025-68186, CVE-2025-68187, CVE-2025-68189, CVE-2025-68191, CVE-2025-68192, CVE-2025-68193, CVE-2025-68194, CVE-2025-68196, CVE-2025-68197, CVE-2025-68198, CVE-2025-68199, CVE-2025-68200, CVE-2025-68202, CVE-2025-68204, CVE-2025-68205, CVE-2025-68207, CVE-2025-68208, CVE-2025-68210, CVE-2025-68211, CVE-2025-68212, CVE-2025-68213, CVE-2025-68214, CVE-2025-68215, CVE-2025-68216, CVE-2025-68217, CVE-2025-68218, CVE-2025-68219, CVE-2025-68220, CVE-2025-68221, CVE-2025-68222, CVE-2025-68223, CVE-2025-68225, CVE-2025-68226, CVE-2025-68227, CVE-2025-68228, CVE-2025-68229, CVE-2025-68231, CVE-2025-68232, CVE-2025-68233, CVE-2025-68234, CVE-2025-68235, CVE-2025-68237, CVE-2025-68238, CVE-2025-68240, CVE-2025-68241, CVE-2025-68242, CVE-2025-68243, CVE-2025-68244, CVE-2025-68245, CVE-2025-68246, CVE-2025-68247, CVE-2025-68248, CVE-2025-68249, CVE-2025-68250, CVE-2025-68251, CVE-2025-68252, CVE-2025-68253, CVE-2025-68254, CVE-2025-68255, CVE-2025-68256, CVE-2025-68257, CVE-2025-68258, CVE-2025-68259, CVE-2025-68260, CVE-2025-68261, CVE-2025-68262, CVE-2025-68263, CVE-2025-68264, CVE-2025-68265, CVE-2025-68266, CVE-2025-68281, CVE-2025-68282, CVE-2025-68283, CVE-2025-68284, CVE-2025-68285, CVE-2025-68286, CVE-2025-68287, CVE-2025-68288, CVE-2025-68289, CVE-2025-68290, CVE-2025-68291, CVE-2025-68292, CVE-2025-68293, CVE-2025-68294, CVE-2025-68295, CVE-2025-68297, CVE-2025-68298, CVE-2025-68299, CVE-2025-68300, CVE-2025-68301, CVE-2025-68302, CVE-2025-68303, CVE-2025-68305, CVE-2025-68306, CVE-2025-68307, CVE-2025-68308, CVE-2025-68309, CVE-2025-68310, CVE-2025-68312, CVE-2025-68313, CVE-2025-68314, CVE-2025-68316, CVE-2025-68317, CVE-2025-68318, CVE-2025-68319, CVE-2025-68320, CVE-2025-68321, CVE-2025-68323, CVE-2025-68325, CVE-2025-68326, CVE-2025-68327, CVE-2025-68328, CVE-2025-68329, CVE-2025-68330, CVE-2025-68331, CVE-2025-68332, CVE-2025-68333, CVE-2025-68335, CVE-2025-68336, CVE-2025-68337, CVE-2025-68339, CVE-2025-68340, CVE-2025-68341, CVE-2025-68342, CVE-2025-68343, CVE-2025-68344, CVE-2025-68345, CVE-2025-68346, CVE-2025-68347, CVE-2025-68348, CVE-2025-68349, CVE-2025-68350, CVE-2025-68351, CVE-2025-68352, CVE-2025-68353, CVE-2025-68354, CVE-2025-68355, CVE-2025-68359, CVE-2025-68360, CVE-2025-68361, CVE-2025-68362, CVE-2025-68363, CVE-2025-68364, CVE-2025-68365, CVE-2025-68366, CVE-2025-68367, CVE-2025-68368, CVE-2025-68369, CVE-2025-68370, CVE-2025-68371, CVE-2025-68372, CVE-2025-68373, CVE-2025-68375, CVE-2025-68377, CVE-2025-68379, CVE-2025-68380, CVE-2025-68724, CVE-2025-68725, CVE-2025-68726, CVE-2025-68727, CVE-2025-68728, CVE-2025-68730, CVE-2025-68731, CVE-2025-68732, CVE-2025-68733, CVE-2025-68734, CVE-2025-68735, CVE-2025-68737, CVE-2025-68738, CVE-2025-68739, CVE-2025-68740, CVE-2025-68741, CVE-2025-68742, CVE-2025-68743, CVE-2025-68744, CVE-2025-68746, CVE-2025-68747, CVE-2025-68748, CVE-2025-68749, CVE-2025-68750, CVE-2025-68751, CVE-2025-68752, CVE-2025-68753, CVE-2025-68754, CVE-2025-68755, CVE-2025-68756, CVE-2025-68757, CVE-2025-68758, CVE-2025-68759, CVE-2025-68760, CVE-2025-68761, CVE-2025-68762, CVE-2025-68763, CVE-2025-68764, CVE-2025-68765, CVE-2025-68766, CVE-2025-68767, CVE-2025-68769, CVE-2025-68770, CVE-2025-68771, CVE-2025-68772, CVE-2025-68773, CVE-2025-68774, CVE-2025-68775, CVE-2025-68776, CVE-2025-68777, CVE-2025-68778, CVE-2025-68779, CVE-2025-68780, CVE-2025-68781, CVE-2025-68782, CVE-2025-68783, CVE-2025-68784, CVE-2025-68785, CVE-2025-68786, CVE-2025-68787, CVE-2025-68788, CVE-2025-68790, CVE-2025-68791, CVE-2025-68792, CVE-2025-68793, CVE-2025-68794, CVE-2025-68795, CVE-2025-68796, CVE-2025-68797, CVE-2025-68798, CVE-2025-68799, CVE-2025-68800, CVE-2025-68801, CVE-2025-68802, CVE-2025-68803, CVE-2025-68804, CVE-2025-68805, CVE-2025-68806, CVE-2025-68807, CVE-2025-68808, CVE-2025-68809, CVE-2025-68810, CVE-2025-68811, CVE-2025-68812, CVE-2025-68813, CVE-2025-68814, CVE-2025-68815, CVE-2025-68816, CVE-2025-68817, CVE-2025-68818, CVE-2025-68819, CVE-2025-68820 and CVE-2025-68821
linux-yocto/6.6: (Cont.) Ignore CVE-2025-71064, CVE-2025-71065, CVE-2025-71066, CVE-2025-71067, CVE-2025-71068, CVE-2025-71069, CVE-2025-71070, CVE-2025-71071, CVE-2025-71075, CVE-2025-71076, CVE-2025-71077, CVE-2025-71078, CVE-2025-71079, CVE-2025-71080, CVE-2025-71081, CVE-2025-71082, CVE-2025-71083, CVE-2025-71084, CVE-2025-71085, CVE-2025-71086, CVE-2025-71087, CVE-2025-71088, CVE-2025-71089, CVE-2025-71090, CVE-2025-71091, CVE-2025-71092, CVE-2025-71093, CVE-2025-71094, CVE-2025-71095, CVE-2025-71096, CVE-2025-71097, CVE-2025-71098, CVE-2025-71099, CVE-2025-71100, CVE-2025-71101, CVE-2025-71102, CVE-2025-71103, CVE-2025-71104, CVE-2025-71105, CVE-2025-71106, CVE-2025-71107, CVE-2025-71108, CVE-2025-71110, CVE-2025-71111, CVE-2025-71112, CVE-2025-71113, CVE-2025-71114, CVE-2025-71115, CVE-2025-71116, CVE-2025-71117, CVE-2025-71118, CVE-2025-71119, CVE-2025-71120, CVE-2025-71121, CVE-2025-71122, CVE-2025-71123, CVE-2025-71124, CVE-2025-71125, CVE-2025-71126, CVE-2025-71127, CVE-2025-71128, CVE-2025-71129, CVE-2025-71130, CVE-2025-71131, CVE-2025-71132, CVE-2025-71133, CVE-2025-71134, CVE-2025-71135, CVE-2025-71136, CVE-2025-71137, CVE-2025-71138, CVE-2025-71139, CVE-2025-71140, CVE-2025-71141, CVE-2025-71142, CVE-2025-71143, CVE-2025-71144, CVE-2025-71146, CVE-2025-71147, CVE-2025-71148, CVE-2025-71149, CVE-2025-71150, CVE-2025-71151, CVE-2025-71153, CVE-2025-71154, CVE-2025-71155, CVE-2025-71156, CVE-2025-71157, CVE-2025-71158, CVE-2025-71159, CVE-2025-71160, CVE-2025-71162, CVE-2025-71163, CVE-2025-71180, CVE-2025-71181, CVE-2025-71182, CVE-2025-71183, CVE-2025-71185, CVE-2025-71186, CVE-2025-71187, CVE-2025-71188, CVE-2025-71189, CVE-2025-71190, CVE-2025-71191, CVE-2025-71192, CVE-2025-71193, CVE-2025-71194, CVE-2025-71195, CVE-2025-71196, CVE-2025-71197, CVE-2025-71198, CVE-2025-71199, CVE-2025-71200, CVE-2025-71201, CVE-2025-71230, CVE-2025-71231, CVE-2025-71234, CVE-2026-22976, CVE-2026-22977, CVE-2026-22978, CVE-2026-22979, CVE-2026-22980, CVE-2026-22981, CVE-2026-22982, CVE-2026-22983, CVE-2026-22984, CVE-2026-22985, CVE-2026-22986, CVE-2026-22987, CVE-2026-22988, CVE-2026-22989, CVE-2026-22990, CVE-2026-22991, CVE-2026-22992, CVE-2026-22993, CVE-2026-22994, CVE-2026-22995, CVE-2026-22997, CVE-2026-22998, CVE-2026-22999, CVE-2026-23001, CVE-2026-23002, CVE-2026-23003, CVE-2026-23005, CVE-2026-23006, CVE-2026-23007, CVE-2026-23008, CVE-2026-23009, CVE-2026-23010, CVE-2026-23011, CVE-2026-23012, CVE-2026-23013, CVE-2026-23014, CVE-2026-23015, CVE-2026-23016, CVE-2026-23017, CVE-2026-23018, CVE-2026-23019, CVE-2026-23020, CVE-2026-23021, CVE-2026-23022, CVE-2026-23023, CVE-2026-23024, CVE-2026-23025, CVE-2026-23026, CVE-2026-23027, CVE-2026-23028, CVE-2026-23029, CVE-2026-23030, CVE-2026-23031, CVE-2026-23032, CVE-2026-23033, CVE-2026-23034, CVE-2026-23036, CVE-2026-23037, CVE-2026-23038, CVE-2026-23039, CVE-2026-23040, CVE-2026-23041, CVE-2026-23042, CVE-2026-23043, CVE-2026-23044, CVE-2026-23045, CVE-2026-23046, CVE-2026-23047, CVE-2026-23048, CVE-2026-23049, CVE-2026-23051, CVE-2026-23052, CVE-2026-23054, CVE-2026-23055, CVE-2026-23056, CVE-2026-23057, CVE-2026-23058, CVE-2026-23059, CVE-2026-23060, CVE-2026-23061, CVE-2026-23062, CVE-2026-23063, CVE-2026-23064, CVE-2026-23065, CVE-2026-23067, CVE-2026-23068, CVE-2026-23069, CVE-2026-23070, CVE-2026-23071, CVE-2026-23072, CVE-2026-23073, CVE-2026-23074, CVE-2026-23075, CVE-2026-23076, CVE-2026-23077, CVE-2026-23078, CVE-2026-23079, CVE-2026-23080, CVE-2026-23081, CVE-2026-23082, CVE-2026-23083, CVE-2026-23084, CVE-2026-23085, CVE-2026-23086, CVE-2026-23087, CVE-2026-23088, CVE-2026-23089, CVE-2026-23090, CVE-2026-23091, CVE-2026-23092, CVE-2026-23093, CVE-2026-23094, CVE-2026-23095, CVE-2026-23096, CVE-2026-23097, CVE-2026-23098, CVE-2026-23099, CVE-2026-23101, CVE-2026-23102, CVE-2026-23103, CVE-2026-23104, CVE-2026-23105, CVE-2026-23106, CVE-2026-23107, CVE-2026-23108, CVE-2026-23109, CVE-2026-23110, CVE-2026-23113, CVE-2026-23114, CVE-2026-23115, CVE-2026-23116, CVE-2026-23117, CVE-2026-23119, CVE-2026-23120, CVE-2026-23121, CVE-2026-23122, CVE-2026-23123, CVE-2026-23124, CVE-2026-23125, CVE-2026-23126, CVE-2026-23127, CVE-2026-23128, CVE-2026-23129, CVE-2026-23130, CVE-2026-23131, CVE-2026-23132, CVE-2026-23133, CVE-2026-23134, CVE-2026-23135, CVE-2026-23136, CVE-2026-23139, CVE-2026-23140, CVE-2026-23141, CVE-2026-23142, CVE-2026-23143, CVE-2026-23144, CVE-2026-23145, CVE-2026-23146, CVE-2026-23147, CVE-2026-23148, CVE-2026-23149, CVE-2026-23150, CVE-2026-23151, CVE-2026-23152, CVE-2026-23153, CVE-2026-23155, CVE-2026-23156, CVE-2026-23158, CVE-2026-23159, CVE-2026-23160, CVE-2026-23161, CVE-2026-23162, CVE-2026-23163, CVE-2026-23164, CVE-2026-23165, CVE-2026-23166, CVE-2026-23167, CVE-2026-23168, CVE-2026-23170, CVE-2026-23172, CVE-2026-23173, CVE-2026-23174, CVE-2026-23175, CVE-2026-23177, CVE-2026-23179, CVE-2026-23181, CVE-2026-23183, CVE-2026-23184, CVE-2026-23185, CVE-2026-23186, CVE-2026-23188, CVE-2026-23189, CVE-2026-23192, CVE-2026-23194, CVE-2026-23195, CVE-2026-23196, CVE-2026-23197, CVE-2026-23199, CVE-2026-23201, CVE-2026-23203, CVE-2026-23207, CVE-2026-23210, CVE-2026-23211, CVE-2026-23212, CVE-2026-23215, CVE-2026-23217, CVE-2026-23218, CVE-2026-23219, CVE-2026-23223, CVE-2026-23224, CVE-2026-23225, CVE-2026-23232, CVE-2026-23241, CVE-2026-23248, CVE-2026-23249, CVE-2026-23250, CVE-2026-23251, CVE-2026-23252, CVE-2026-23259, CVE-2026-23263, CVE-2026-23275, CVE-2026-23280, CVE-2026-23282, CVE-2026-23283, CVE-2026-23288, CVE-2026-23294, CVE-2026-23295, CVE-2026-23297, CVE-2026-23299, CVE-2026-23301, CVE-2026-23305, CVE-2026-23311, CVE-2026-23314, CVE-2026-23316, CVE-2026-23322, CVE-2026-23323, CVE-2026-23326, CVE-2026-23328, CVE-2026-23329, CVE-2026-23331, CVE-2026-23332, CVE-2026-23337, CVE-2026-23338, CVE-2026-23341, CVE-2026-23342, CVE-2026-23344, CVE-2026-23345, CVE-2026-23349, CVE-2026-23350, CVE-2026-23353, CVE-2026-23354, CVE-2026-23355, CVE-2026-23358, CVE-2026-23363, CVE-2026-23366, CVE-2026-23369, CVE-2026-23373, CVE-2026-23375, CVE-2026-23376, CVE-2026-23380, CVE-2026-23384, CVE-2026-23385, CVE-2026-23390, CVE-2026-23394, CVE-2026-23400, CVE-2026-23402, CVE-2026-23415, CVE-2026-23416 and CVE-2026-23417
ncurses: Fix CVE-2025-69720
nghttp2: Fix CVE-2026-27135
ovmf: Fix CVE-2024-38798 and CVE-2025-2296
python3-pyasn1: Fix CVE-2026-23490
python3-wheel: Fix CVE-2026-24049
rsync: Fix CVE-2026-41035
sqlite3: Fix CVE-2025-70873
sudo: Fix CVE-2026-35535
systemd: Fix CVE-2026-40225 and CVE-2026-40226
u-boot: Fix CVE-2025-24857
vim: Fix CVE-2026-25749, CVE-2026-26269, CVE-2026-28418, CVE-2026-28419, CVE-2026-33412 and CVE-2026-39881
Fixes in Yocto-5.0.18
apt: Add CVE_PRODUCT to support product name
apt: Fix build with GCC 15
archiver: Don’t try to preserve all attributes when copying files
base-passwd: upgrade 3.6.8
binutils: backport patch to fix build with glibc-2.43 on host
bitbake: fetch/git: Fix leaking of temporary directory
bitbake: fetch2/crate: use CDN for fetching crates
bitbake: runqueue.py: make sure we use bb multiprocessing
bitbake: tests/fetch: Avoid using git protocol in tests
build-appliance-image: switch SRC_URI to https protocol
build-appliance-image: Update to scarthgap head revisions
ca-certificates: upgrade to 20260223
cmake: backport a fix for gcc-16 on host
contributor-guide/submit-changes.rst: Added missing word
coreutils: set CVE_PRODUCT
db: Pin to use C99 std
dbus: gate user-session PACKAGECONFIG on systemd in DISTRO_FEATURES
dbus: use ${PN} in pkg_postinst instead of ‘dbus’
dev-manual: “–runonly” should be “–runall”
devtool: Disable gpg signing when setting up source tree repos
dtc: backport fix for build with glibc-2.43
elfutils: don’t add -Werror to avoid discarded-qualifiers
gcc: backport a fix for building with gcc-16
ghostscript: fix build with gcc-15 on host
ghostscript: Pin to C17 std
glibc: Fix recipe bug that disabled stack protector
grub: update search parameter
kernel-devsrc: make tools/Build optional
lib/oeqa/utils/httpserver: use multiprocessing from bb
libatomic-ops: upgrade to 7.8.4
liburcu: upgrade to 0.14.2
libxcrypt: avoid discarded-qualifiers build failure with glibc 2.43
libxcrypt: Fix build wrt C23 support
libxcrypt: Use configure knob to disable warnings as errors
license.py: Drop visit_Str from SeenVisitor in selftest
linux-yocto/6.6: update to v6.6.127
linux/generate-cve-exclusions: backport script from master branch
ltp: fix epoll_ctl04 failed
lttng-ust: upgrade to 2.13.10
mesa: fix build on host with glibc-2.43
meta/files/layers.example.json: switch to https clone URIs
migration-guide: add release notes for 4.0.33 4.0.34 5.0.17
oeqa/sdk: Default to https git protocol for YP/OE repos
oeqa/selftest/git-submodule-test: Default to https git protocol for YP/OE repos
openssl: upgrade to 3.5.6
overview-manual/concepts.rst: fix do_prepare_recipe_sysroot task description
ovmf: backport a fix for build with gcc-16
poky.conf: Bump version for 5.0.18 release
poky: Fix CentOS Stream distro names
pseudo: Add fix for glibc 2.43
python3: upgrade to 3.12.13
qemu: backport patches to support python 3.14
ref-manual/variables.rst: update COMPONENTS_DIR’s PKGDATA_DIR’s RECIPE_SYSROOT* STAGING_DIR* descriptions
scripts: Default to https git protocol for YP/OE repos
selftest/gdbserver: replace shutil.unpack_archive with tarfile extract
selftest/minidebuginfo: extract files from tar archive using tarfile module
selftest/scripts: Update old git protocol references
spdx30_tasks: fix condition in create_spdx
sphinx-static/theme_overrides.css: switch to a fixed width documentation
spirv-tools: backport a fix for building with gcc-16
sudo: upgrade to 1.9.17p2
tcl: skip http11 tests
texinfo: Backport patches for hosts with newer GCC
tzdata/tzcode-native: upgrade to 2026a
unfs3: Fix race issue causing a glibc test hang
variables.rst: expand explanation of RSUGGESTS
virglrenderer: Fix build with glibc 2.43+
yocto-uninative: Update to 5.1 for glibc 2.43
Known Issues in Yocto-5.0.18
N/A
Contributors to Yocto-5.0.18
Thanks to the following people who contributed to this release:
Adam Blank
Adarsh Jagadish Kamini
Alexander Kanavin
Andrej Kozemcak
Anil Dongare
Antonin Godard
Bruce Ashfield
Changqing Li
Daniel Turull
Dawid Bijak
Fabien Thomas
Guocai He
Hemanth Kumar M D
Himanshu Jadon
Hitendra Prajapati
Hongxu Jia
Hugo SIMELIERE
Ivan Nestlerode
Jhonata Poma-Hansen
Jiaying Song
Jinfeng Wang
Johan Anderholm
João Marcos Costa (Schneider Electric)
Khem Raj
Lee Chee Yang
Li Wang
Martin Jansa
Michael Halstead
Mingli Yu
Moritz Haase
Paul Barker
Peter Marko
Richard Purdie
Robert P. J. Day
Ross Burton
Sudhir Dumbhare
Sunil Dora
Trevor Gamblin
Vijay Anusuri
Xiangyu Chen
Yanis BINARD
Yoann Congal
Zhang Peng
Repositories / Downloads for Yocto-5.0.18
yocto-docs
Repository Location: https://git.yoctoproject.org/yocto-docs
Branch: scarthgap
Tag: yocto-5.0.18
Git Revision: 1c5e7f136d7460fa5ad4c8a49ab1de31bd670e59
Release Artefact: yocto-docs-1c5e7f136d7460fa5ad4c8a49ab1de31bd670e59
sha: 2787473919e2f72b3c35615b5406724f1f3e44f4573cad378fd3842f84a4ad16
Download Locations:
poky
Repository Location: https://git.yoctoproject.org/poky
Branch: scarthgap
Tag: yocto-5.0.18
Git Revision: 44dcf08572ce391d7c0df4f8c7510af5e096baca
Release Artefact: poky-44dcf08572ce391d7c0df4f8c7510af5e096baca
sha: dd1868e72511b07ae02744ac9f90b278fc06baeb2175f7ed31b2de1cd2531a98
Download Locations:
openembedded-core
Repository Location: https://git.openembedded.org/openembedded-core
Branch: scarthgap
Tag: yocto-5.0.18
Git Revision: ece80784b493c8b7493478fa2ba0dc1d6d80aa79
Release Artefact: oecore-ece80784b493c8b7493478fa2ba0dc1d6d80aa79
sha: 243fe6badad99538c88bea72338df13c8682868bb126c05819b837988b89aefa
Download Locations:
meta-yocto
Repository Location: https://git.yoctoproject.org/meta-yocto
Branch: scarthgap
Tag: yocto-5.0.18
Git Revision: ca5a51aadaf651881d640688dc3e1e123aa30bf6
Release Artefact: meta-yocto-ca5a51aadaf651881d640688dc3e1e123aa30bf6
sha: 30d5bc789b0c28a84b6333d7e81e204aac27d9ce7ffc265281952cba031dbe00
Download Locations:
meta-mingw
Repository Location: https://git.yoctoproject.org/meta-mingw
Branch: scarthgap
Tag: yocto-5.0.18
Git Revision: bd9fef71ec005be3c3a6d7f8b99d8116daf70c4f
Release Artefact: meta-mingw-bd9fef71ec005be3c3a6d7f8b99d8116daf70c4f
sha: ab073def6487f237ac125d239b3739bf02415270959546b6b287778664f0ae65
Download Locations:
bitbake
Repository Location: https://git.openembedded.org/bitbake
Branch: 2.8
Tag: yocto-5.0.18
Git Revision: 82abbfcdbda949851a03bb2cb2049ea689564ad6
Release Artefact: bitbake-82abbfcdbda949851a03bb2cb2049ea689564ad6
sha: e20ae44c0f4b0e921b23985f2b599a55a7d0cc114cbf709400e5c740691c4f56
Download Locations:
Release 4.3 (nanbield)
Release 4.3 (nanbield)
Migration notes for 4.3 (nanbield)
This section provides migration information for moving to the Yocto Project 4.3 Release (codename “nanbield”) from the prior release.
Supported kernel versions
The OLDEST_KERNEL setting has been changed to “5.15” in this release, meaning that out the box, older kernels are not supported. There were two reasons for this. Firstly it allows glibc optimisations that improve the performance of the system by removing compatibility code and using modern kernel APIs exclusively. The second issue was this allows 64 bit time support even on 32 bit platforms and resolves Y2038 issues.
It is still possible to override this value and build for older kernels, this is just no longer the default supported configuration. This setting does not affect which kernel versions SDKs will run against and does not affect which versions of the kernel can be used to run builds.
Layername override implications
Code can now know which layer a recipe is coming from through the newly added
FILE_LAYERNAME variable and the layer-<layername> override. This is being used
for enabling QA checks on a per layer basis. For existing code this has the
side effect that the QA checks will apply to recipes being bbappended
from other layers - for example, patches added through such bbappends will now
need to have the “Upstream-Status” specified in the patch header.
Compiling changes
Code on 32 bit platforms is now compiled with largefile support and 64 bit
time_t, to avoid the Y2038 time overflow issue. This breaks the ABI and could break existing programs in untested layers.
Supported distributions
This release supports running BitBake on new GNU/Linux distributions:
Ubuntu 22.10
Fedora 38
Debian 12
CentOS Stream 8
AlmaLinux 8.8
AlmaLinux 9.2
On the other hand, some earlier distributions are no longer supported:
Fedora 36
AlmaLinux 8.7
AlmaLinux 9.1
edgerouter machine removed
The edgerouter reference BSP for the MIPS architecture in meta-yocto-bsp
has been removed as the hardware has been unavailable for some time. There is no
suitable reference MIPS hardware to replace it with, but the MIPS architecture
will continue to get coverage via QEMU build/boot testing.
Go language changes
Support for the Glide package manager has been removed, as
go modhas become the standard.
systemd changes
Upstream systemd is now more strict on filesystem layout and the usrmerge
feature is therefore required alongside systemd. The Poky test configurations
have been updated accordingly for systemd.
Recipe changes
Runtime testing of ptest now fails if no test results are returned by any given ptest.
Deprecated variables
The following variables have been deprecated:
CVE_CHECK_IGNORE: use CVE_STATUS instead.
Removed variables
The following variables have been removed:
AUTHORPERLARCHPERLVERSIONQEMU_USE_SLIRP- addslirptoTEST_RUNQEMUPARAMSinstead.SERIAL_CONSOLES_CHECK- no longer necessary because all consoles listed in SERIAL_CONSOLES are checked for their existence before agettyis started.
Removed recipes
The following recipes have been removed in this release:
apmd: obsolete (apmin MACHINE_FEATURES also removed).cve-update-db-native: functionally replaced bycve-update-nvd2-nativegcr3: no longer needed by core recipes, moved to meta-gnome (gcr, i.e. version 4.x, is still provided).glide: as explained in Go language changes.libdmx: obsoletelinux-yoctoversion 5.15 (versions 6.1 and 6.5 provided instead).python3-async: obsolete - no longer needed bypython3-gitdbor any other core reciperust-hello-world: there are sufficient other Rust recipes and test cases such that this is no longer needed.
Removed classes
The following classes have been removed in this release:
glide: as explained in Go language changes.
Output file naming changes
In 4.3 there are some minor differences in image and SDK output file names. If you rely on the existing naming (e.g. in external scripts) you may need to either modify configuration or adapt to the new naming. Further details:
IMAGE_NAME and IMAGE_LINK_NAME now include the IMAGE_NAME_SUFFIX value directly. In practical terms, this means that
.rootfswill now appear in image output file names. If you do not wish to have the.rootfssuffix used, you can just set IMAGE_NAME_SUFFIX to “” and this will now be consistently respected in both the image file and image file symlink names. As part of this change, support for theimgsuffixtask varflag has been dropped (mostly an internal implementation detail, but if you were implementing a custom image construction with a task in a similar manner todo_bootimgyou may have been using this).SDK_NAME now includes the values of IMAGE_BASENAME and MACHINE so that they are unique when building SDKs for different images and machines.
Versioning changes
PR values have been removed from all core recipes - distro maintainers who make use of PR values would need to curate these already so the sparsely set base values would not be that useful anymore. If you have been relying on these (i.e. you are maintaining a binary package feed where package versions should only ever increase), double-check the output (perhaps with the help of the buildhistory class) to ensure that package versions are consistent.
The PR value can no longer be set from the recipe file name - this was rarely used, but in any case is no longer supported.
PE and PR are no longer included in the work directory path (WORKDIR). This may break some tool assumptions about directory paths, but those should really be querying paths from the build system (or not poking into WORKDIR externally).
Source revision information has been moved from PV to PKGV. The user visible effect of this change is that PV will no longer have revision information in it and this will now be appended to the PV value through PKGV when the packages are written out (as long as “+” is present in the PKGV value). Since PV is used in STAMP and WORKDIR, you may notice small directory naming and stamp naming changes.
The SRCPV variable is no longer needed in PV, but since the default SRCPV value is now “”, using it is effectively now just a null operation - you can remove it (leaving behind the “+”) , but it is not yet required to do so.
QEMU changes
The
runqemuscript no longer systematically adds two serial ports (--serial nulland-serial mon:stdio) to the QEMU emulated machine if the user already adds such ports through theQB_OPT_APPENDsetting.If the user adds one port, only
--serial nullis added, and-serial mon:stdiois no longer passed. If the user adds more than one port,--serial nullis no longer added either. This can break some existing QEMU based configurations expecting such serial ports to be added whenrunqemuis executed.This change was made to avoid exceeding two serial ports, which interferes with automated testing.
runqemunow uses theip tuntapcommand instead oftunctl, and thustunctlis no longer built by theqemu-helper-nativerecipe; if for some reason you were callingtunctldirectly from your own scripts you should switch to callingip tuntapinstead.
Miscellaneous changes
The
-crosssdksuffix and any MLPREFIX were removed fromvirtual/XXXprovider/dependencies where aPREFIXwas used as well, as we don’t need both and it made automated dependency rewriting unnecessarily complex. In general this only affects internal toolchain dependencies so isn’t end user visible, but if for some reason you have custom classes or recipes that rely upon the old providers then you will need to update those.
Release notes for 4.3 (nanbield)
New Features / Enhancements in 4.3
Linux kernel 6.5 and 6.1, gcc 13, glibc 2.38, LLVM 17, and over 300 other recipe upgrades
The autobuilder’s shared-state artefacts are now available over the jsDelivr Content Delivery Network (CDN). See SSTATE_MIRRORS.
New variables:
CVE_CHECK_STATUSMAP, CVE_STATUS, CVE_STATUS_GROUPS, replacing the deprecated CVE_CHECK_IGNORE.
FILE_LAYERNAME: bitbake now sets this to the name of the layer containing the recipe
FIT_ADDRESS_CELLS and UBOOT_FIT_ADDRESS_CELLS. See details below.
KERNEL_DTBDEST: directory where to install DTB files.
KERNEL_DTBVENDORED: whether to keep vendor subdirectories.
KERNEL_LOCALVERSION: to add a string to the kernel version information.
KERNEL_STRIP: to specify the command to strip the kernel binary.
LICENSE_FLAGS_DETAILS: add extra details about a recipe license in case it is not allowed by LICENSE_FLAGS_ACCEPTED.
MESON_TARGET: to compile a specific Meson target instead of the default ones.
OEQA_REPRODUCIBLE_TEST_PACKAGE: to restrict package managers used in reproducibility testing.
Layername functionality available through overrides
Code can now know which layer a recipe is coming from through the newly added FILE_LAYERNAME variable. This has been added as an override of the form
layer-<layername>. In particular, this means QA checks can now be layer specific, for example:ERROR_QA:layer-core:append = " patch-status"
This will enable the
patch-statusQA check for the core layer.Architecture-specific enhancements:
RISCV support is now enabled in LLVM 17.
Loongarch support in the linuxloader class and
core-image-minimal-initramfsimage.The
arch-armv8andarch-armv9architectures are now given Scalable Vector Extension (SVE) based tune options. Commits: 1, 2.Many changes to support 64-bit
time_ton 32-bit architectures
Kernel-related enhancements:
The default kernel is the current stable (6.5), and there is also support for the latest long-term release (6.1).
The list of fixed kernel CVEs is updated regularly using data from linuxkernelcves.com.
A
showconfigtask was added to the cml1 class, to easily examine the final generated.configfile.
New core recipes:
appstream: a collaborative effort for making machine-readable software metadata easily available (from meta-oe)
cargo-c-native: cargo applet to build and install C-ABI compatible dynamic and static libraries
libadwaita: Building blocks for modern GNOME applications (from meta-gnome)
libtraceevent: API to access the kernel tracefs directory (from meta-openembedded)
libxmlb: A library to help create and query binary XML blobs (from meta-oe)
musl-legacy-error: glibcerror()API implementation still needed by a few packages.python3-beartype, unbearably fast runtime type checking in pure Python.
python3-booleanpy: Define boolean algebras, create and parse boolean expressions and create custom boolean DSL (from meta-python)
python3-calver: Setuptools extension for CalVer package versions
python3-click: A simple wrapper around optparse for powerful command line utilities (from meta-python)
python3-dtc: Python Library for the Device Tree Compiler (from meta-virtualization)python3-isodate: ISO 8601 date/time parser (from meta-python)
python3-license-expression: Utility library to parse, compare, simplify and normalize license expressions (from meta-python)
python3-rdflib: a pure Python package for working with RDF (from meta-python)
python3-spdx-tools, tools for SPDX validation and conversion.
python3-trove-classifiers: Canonical source for classifiers on PyPI (pypi.org)
python3-uritools, replacement for the
urllib.parsemodule.python3-xmltodict: Makes working with XML feel like you are working with JSON (from meta-python)
ttyrun, starts
gettyprograms only when a terminal exists, preventing respawns through theinitprogram. This enabled removing theSERIAL_CONSOLES_CHECKvariable.vulkan-validation-layers: Khronos official validation layers to assist in verifying that applications correctly use the Vulkan API.xcb-util-cursor: XCB port of libXcursor (from meta-oe)
QEMU /
runqemuenhancements:QEMU has been upgraded to version 8.1
Many updates to the
runqemucommand.The
qemu-system-nativerecipe is now built with PNG support, which could be useful to grab screenshots for error reporting purposes.
Rust improvements:
Rust has been upgraded to version 1.70
New
ptest-cargoclass was added to allow Cargo based recipes to easily add ptestsNew cargo_c class was added to allow recipes to make Rust code available to C and C++ programs. See
meta-selftest/recipes-devtools/rust/rust-c-lib-example_git.bbfor an example.
wic Image Creator enhancements:
bootimg-efi: iffixed-sizeis set then use that for mkdosfsbootimg-efi: stop hardcoding VMA offsets, as required by systemd-boot v254 (and dracut/ukify)bootimg-pcbios: use kernel name from KERNEL_IMAGETYPE instead of hardcodingvmlinuzAdded new
gpt-hybridoption toptable_format(formatting a disk with a hybrid MBR and GPT partition scheme)Use
part_namein default imager when definedAdded
--hiddenargument to default imager to avoid MS Windows prompting to format partition after flashing to a USB stick/SD card
FIT image related improvements:
New FIT_ADDRESS_CELLS and UBOOT_FIT_ADDRESS_CELLS variables allowing to specify 64 bit addresses, typically for loading U-Boot.
Added
compatibleline to config section (with value from dtb) to allow bootloaders to select the best matching configuration.
SDK-related improvements:
Extended the following recipes to
nativesdk:libwebp,python3-ply
Testing:
The insane class now adds an unimplemented-ptest infrastructure to detect package sources with unit tests but no implemented ptests in the recipe.
A new task to perform recipe-wide QA checks was added:
do_recipe_qa.New build-time checks for set SUMMARY, HOMEPAGE, and RECIPE_MAINTAINER fields was added, and enabled for the core recipes.
The
parselogsruntime test was rewritten. Notably it no longer uses regular expressions, which may mean custom patterns need updating.A self-test to validate that the SPDX manifests generated by image builds are valid was added.
The
QEMU_USE_SLIRPvariable has been replaced by addingslirptoTEST_RUNQEMUPARAMS.
Utility script changes:
New
scripts/patchtestutility to check patches to the OpenEmbedded-Core project. See Validating Patches with Patchtest for details.scripts/bblockwas added, allowing the user to lock/unlock specific recipes from being built. This makes it possibly to work on thepython3recipe without causingpython3-nativeto rebuild.
BitBake improvements:
A fetcher for the Google Cloud Platform (
gs://) was added.The BitBake Cooker log now contains notes when the caches are invalidated which is useful for memory resident BitBake debugging.
BitBake no longer watches files with inotify for changes, as under load this can lead to races causing build instability.
Toaster’s dependencies were upgraded to current releases, specifically to Django 4.2.
Packaging changes:
FILES now accepts a
**wildcard, which matches zero or more subdirectories.The X server packagegroup now defaults to using the
modesettingX driver, which obsoletes thefbdevdriver.If a recipe uses LICENSE_FLAGS and the licenses are not accepted, it can set a custom message with LICENSE_FLAGS_DETAILS to be displayed to the users.
Recipes that fetch specific revisions no longer need to explicitly add SRCPV to PV as BitBake will now automatically add the revision information to PKGV if needed (as long as “+” is still present in the PKGV value, which is set from PV by default).
The default PR values in many recipes have been removed.
Security improvements:
Most repositories now include a SECURITY.md file with hints for security researchers and other parties who might report potential security vulnerabilities.
Prominent documentation updates:
New Yocto Project and OpenEmbedded Contributor Guide document.
New “Dealing with Vulnerability Reports” chapter in the Development Tasks Manual.
Long overdue documentation for the devicetree class.
New documentation for the uboot-sign class and its variables and for the kernel-devicetree class variables.
Miscellaneous changes:
Selecting systemd via INIT_MANAGER now adds
usrmergeto DISTRO_FEATURES as current versions of systemd now require merged/usr.Generation of SPDX manifests is now enabled by default.
Git based recipes in OE-Core which used the
gitprotocol have been changed to usehttpswhere possible, as it is typically faster and more reliable.The
os-releaserecipe added aCPE_NAMEto the fields provided, with the default being populated from DISTRO.The
psplashrecipe now accepts a PNG format image through SPLASH_IMAGES, instead of a harder to generate and modify.hfile.The ; character is no longer needed to separate functions specified in IMAGE_POSTPROCESS_COMMAND, IMAGE_PREPROCESS_COMMAND, POPULATE_SDK_POST_HOST_COMMAND, ROOTFS_POSTINSTALL_COMMAND etc. (If any are present they will be replaced with spaces, so existing metadata does not yet need to be changed.)
In the
Upstream-Statusfield in a patch header, “Accepted” is no longer a valid value since it is logically the same as “Backport”. Change any values you have (particularly in patches applied through bbappends for core recipes, since they will be validated as indicated above).
Known Issues in 4.3
N/A
Recipe License changes in 4.3
The following corrections have been made to the LICENSE values set by recipes:
glib-networking: make LICENSE more accurate (LGPL-2.1->LGPL-2.1-or-later) and add an exception for linking to OpenSSL if it is enabled (opensslis in PACKAGECONFIG)libbsd: set per-package licensing to clarify that BSD-4-Clause code is only in the-docpackageopenssh: BSD-4-Clause code has been removed completely from the codebase as part of 9.4p1 update - previously in the kirkstone release,BSD-4-Clausewas removed from the LICENSE value in our recipe, however some BSD-4-Clause code actually still remained upstream until 9.4p1.python3-sphinx: removeBSD-3-Clausefrom LICENSE - BSD-3-Clause code was removed as part of the python3-sphinx 7.0.1 release (see this upstream commit)
Security Fixes in 4.3
bind: CVE-2023-2911, CVE-2023-2828, CVE-2023-3341, CVE-2023-4236
binutils: CVE-2023-1972
connman: CVE-2023-28488
dbus: CVE-2023-34969
dmidecode: CVE-2023-30630
dropbear: CVE-2023-36328
erofs-utils: CVE-2023-33551, CVE-2023-33552
gcc: CVE-2023-4039
ghostscript: CVE-2023-28879, CVE-2023-36664, CVE-2023-38559; ignore CVE-2023-38560
git: CVE-2023-25652, CVE-2023-29007
glibc: CVE-2023-4527, CVE-2023-4806
gstreamer: CVE-2023-40475, CVE-2023-40476
inetutils: CVE-2023-40303
libarchive: ignore CVE-2023-30571
librsvg: CVE-2023-38633
libwebp: CVE-2023-1999, CVE-2023-4863
libx11: CVE-2023-3138, CVE-2023-43785, CVE-2023-43786, CVE-2023-43787
libxml2: CVE-2023-28484, CVE-2023-29469; ignore disputed CVE-2023-45322
libxpm: CVE-2023-43788, CVE-2023-43789, CVE-2022-44617
linux: update CVE exclusions
ncurses: CVE-2023-29491
nghttp2: CVE-2023-44487
ninja: ignore CVE-2021-4336, wrong ninja
openssh: CVE-2023-38408
openssl: CVE-2023-2650, CVE-2023-1255, CVE-2023-0466, CVE-2023-0465, CVE-2023-0464, CVE-2023-3817, CVE-2023-3446, CVE-2023-2975, CVE-2023-4807
perl: CVE-2023-31484, CVE-2023-31486
pixman: ignore CVE-2023-37769
procps: CVE-2023-4016
python3-git: CVE-2023-41040
python3: ignore CVE-2023-36632
python3-urllib3: CVE-2023-43804
qemu: CVE-2023-40360, CVE-2023-42467; ignore CVE-2023-0664 (Windows-specific), ignore CVE-2023-2680 (RHEL specific)
screen: CVE-2023-24626
shadow: CVE-2023-29383
sqlite3: ignore CVE-2023-36191
sysstat: CVE-2023-33204
tiff: CVE-2022-4645, CVE-2023-2731, CVE-2023-26965, CVE-2023-40745, CVE-2023-41175
vim: CVE-2023-2426, CVE-2023-2609, CVE-2023-2610, CVE-2023-3896, CVE-2023-5441, CVE-2023-5535
zlib: ignore CVE-2023-45853
Recipe Upgrades in 4.3
acpica: upgrade 20220331 -> 20230628
adwaita-icon-theme: 43 -> 45.0
alsa-lib: upgrade 1.2.8 -> 1.2.10
alsa-ucm-conf: upgrade 1.2.8 -> 1.2.10
alsa-utils: upgrade 1.2.8 -> 1.2.10
apr: upgrade 1.7.2 -> 1.7.4
apt: Upgrade to v2.6.0
at-spi2-core: update 2.46.0 -> 2.50.0
autoconf: Upgrade to 2.72c
babeltrace2: upgrade 2.0.4 -> 2.0.5
bind: upgrade 9.18.12 -> 9.18.19
binutils: Upgrade to 2.41 release
bluez5: upgrade 5.66 -> 5.69
boost: upgrade 1.81.0 -> 1.83.0
btrfs-tools: upgrade 6.1.3 -> 6.5.1
busybox: 1.36.0 -> 1.36.1
ccache: upgrade 4.7.4 -> 4.8.3
cmake: upgrade to 3.27.5
connman: update 1.41 -> 1.42
coreutils: upgrade 9.1 -> 9.4
cpio: upgrade to 2.14
cracklib: upgrade 2.9.10 -> 2.9.11
createrepo-c: update 0.20.1 -> 1.0.0
cryptodev: update to 1.13 + latest git
cups: upgrade to 2.4.6
curl: upgrade 8.0.1 -> 8.4.0
dbus: upgrade 1.14.6 -> 1.14.10
debianutils: upgrade 5.8 -> 5.13
dhcpcd: upgrade to 10.0.2
diffoscope: upgrade 236 -> 249
diffutils: update 3.9 -> 3.10
dmidecode: upgrade to 3.5
dnf: upgrade 4.14.0 -> 4.17.0
dos2unix: upgrade 7.4.4 -> 7.5.1
dpkg: upgrade to v1.22.0
efivar: Upgrade to tip of trunk
elfutils: upgrade 0.188 -> 0.189
ell: upgrade 0.56 -> 0.58
enchant2: upgrade 2.3.4 -> 2.6.1
epiphany: upgrade 43.1 -> 44.6
erofs-utils: update 1.5 -> 1.6
ethtool: upgrade 6.2 -> 6.5
eudev: Upgrade 3.2.11 -> 3.2.12
ffmpeg: update 5.1.2 -> 6.0
file: upgrade 5.44 -> 5.45
flac: Upgrade 1.4.2 -> 1.4.3
font-util: upgrade 1.4.0 -> 1.4.1
freetype: upgrade 2.13.0 -> 2.13.2
fribidi: upgrade 1.0.12 -> 1.0.13
gawk: upgrade 5.2.1 -> 5.2.2
gcc: upgrade to 13.2
gcompat: Upgrade to 1.1.0
gcr: update 4.0.0 -> 4.1.0
gdb: upgrade 13.1 -> 13.2
gettext: upgrade 0.21.1 -> 0.22
ghostscript: upgrade to 10.02.0
git: upgrade to 2.42.0
glib-2.0: upgrade 2.74.6 -> 2.78.0
glibc: upgrade to 2.38 + stable updates
glib-networking: upgrade 2.74.0 -> 2.76.1
glslang: upgrade to 1.3.243
gmp: upgrade 6.2.1 -> 6.3.0
gnu-efi: upgrade 3.0.15 -> 3.0.17
gnupg: upgrade 2.4.0 -> 2.4.3
gnutls: update 3.8.0 -> 3.8.1
gobject-introspection: upgrade 1.74.0 -> 1.78.1
go-helloworld: Upgrade to tip of trunk
go: update 1.20.1 -> 1.20.10
gpgme: update 1.18.0 -> 1.22.0
grep: upgrade 3.10 -> 3.11
groff: update 1.22.4 -> 1.23.0
gsettings-desktop-schemas: upgrade 43.0 -> 44.0
gstreamer1.0: upgrade 1.22.0 -> 1.22.5
gstreamer: upgrade 1.22.5 -> 1.22.6
gtk+3: upgrade 3.24.36 -> 3.24.38
gtk4: update 4.10.0 -> 4.12.3
gzip: update 1.12 -> 1.13
harfbuzz: upgrade 7.1.0 -> 8.2.1
icu: upgrade 72-1 -> 73-2
igt-gpu-tools: update 1.27.1 -> 1.28
iproute2: upgrade 6.2.0 -> 6.5.0
iso-codes: upgrade 4.13.0 -> 4.15.0
jquery: upgrade 3.6.3 -> 3.7.1
json-c: upgrade 0.16 -> 0.17
kbd: upgrade 2.5.1 -> 2.6.3
kea: upgrade to v2.4.0
kexec-tools: upgrade 2.0.26 -> 2.0.27
kmscube: upgrade to latest revision
less: update 608 -> 643
libadwaita: upgrade 1.3.3 -> 1.4.0
libarchive: upgrade 3.6.2 -> 3.7.2
libassuan: upgrade 2.5.5 -> 2.5.6
libatomic-ops: update 7.6.14 -> 7.8.0
libcap: upgrade 2.67 -> 2.69
libcgroup: update 3.0.0 -> 3.1.0
libconvert-asn1-perl: upgrade 0.33 -> 0.34
libdnf: update 0.70.1 -> 0.70.1
libdrm: upgrade 2.4.115 -> 2.4.116
libedit: upgrade 20221030-3.1 -> 20230828-3.1
libevdev: upgrade 1.13.0 -> 1.13.1
libgcrypt: update 1.10.1 -> 1.10.2
libgit2: upgrade 1.6.3 -> 1.7.1
libglu: update 9.0.2 -> 9.0.3
libgpg-error: update 1.46 -> 1.47
libgudev: upgrade 237 -> 238
libhandy: upgrade 1.8.1 -> 1.8.2
libinput: upgrade to 1.24.0
libjpeg-turbo: upgrade to 3.0.0
libksba: upgrade 1.6.3 -> 1.6.4
libmd: upgrade 1.0.4 -> 1.1.0
libmicrohttpd: upgrade 0.9.76 -> 0.9.77
libmodule-build-perl: upgrade 0.4232 -> 0.4234
libmodulemd: upgrade 2.14.0 -> 2.15.0
libnl: upgrade 3.7.0 -> 3.8.0
libnss-nis: upgrade 3.1 -> 3.2
libpam: update 1.5.2 -> 1.5.3
libpcap: upgrade 1.10.3 -> 1.10.4
libpng: upgrade 1.6.39 -> 1.6.40
libportal: upgrade 0.6 -> 0.7.1
libproxy: update 0.4.18 -> 0.5.3
libpthread-stubs: update 0.4 -> 0.5
librepo: upgrade 1.15.1 -> 1.16.0
librsvf: update 2.54.5 -> 2.56.0
librsvg: update 2.56.0 -> 2.56.3
libsdl2: upgrade 2.26.3 -> 2.28.3
libsecret: upgrade 0.20.5 -> 0.21.1
libsndfile1: upgrade 1.2.0 -> 1.2.2
libsolv: upgrade 0.7.23 -> 0.7.25
libsoup: upgrade 3.2.2 -> 3.4.2
libssh2: update 1.10.0 -> 1.11.0
libtraceevent: upgrade 1.7.2 -> 1.7.3
libubootenv: upgrade 0.3.3 -> 0.3.4
liburi-perl: update 5.17 -> 5.21
libuv: upgrade 1.44.2 -> 1.46.0
libva: update 2.16 -> 2.19.0
libva-utils: update 2.19.0 -> 2.20.0
libwebp: upgrade 1.3.0 -> 1.3.2
libx11: upgrade 1.8.4 -> 1.8.7
libxcb: upgrade 1.15 -> 1.16
libxcrypt: upgrade 4.4.33 -> 4.4.36
libxfixes: Upgrade to v6.0.1
libxft: upgrade 2.3.7 -> 2.3.8
libxi: upgrade to v1.8.1
libxml2: upgrade 2.10.3 -> 2.11.5
libxpm: upgrade 3.5.15 -> 3.5.17
libxslt: upgrade 1.1.37 -> 1.1.38
libxt: Upgrade to v1.3.0
lighttpd: upgrade 1.4.69 -> 1.4.71
linux-firmware: upgrade 20230210 -> 20230804
linux-libc-headers: uprev to v6.5
linux-yocto/6.1: update to v6.1.57
linux-yocto-dev: update to v6.6-rcX
linux-yocto: introduce 6.5 reference kernel recipes
llvm: Upgrade to 17.0.2
ltp: upgrade 20230127 -> 20230516
lttng-modules: Upgrade 2.13.9 -> 2.13.10
lttng-tools: Upgrade 2.13.9 -> 2.13.11
lttng-ust: upgrade 2.13.5 -> 2.13.6
lua: update 5.4.4 -> 5.4.6
man-pages: upgrade 6.03 -> 6.05.01
mc: upgrade 4.8.29 -> 4.8.30
mesa: upgrade 23.0.0 -> 23.2.1
meson: upgrade 1.0.1 -> 1.2.2
mmc-utils: upgrade to latest revision
mobile-broadband-provider-info: upgrade 20221107 -> 20230416
mpfr: upgrade 4.2.0 -> 4.2.1
mpg123: upgrade 1.31.2 -> 1.31.3
msmtp: upgrade 1.8.23 -> 1.8.24
mtd-utils: upgrade 2.1.5 -> 2.1.6
mtools: upgrade 4.0.42 -> 4.0.43
musl: update to latest master
neard: upgrade 0.18 -> 0.19
nettle: upgrade 3.8.1 -> 3.9.1
nfs-utils: upgrade 2.6.2 -> 2.6.3
nghttp2: upgrade 1.52.0 -> 1.57.0
ofono: upgrade 2.0 -> 2.1
openssh: upgrade to 9.5p1
openssl: upgrade 3.1.0 -> 3.1.3
opkg: upgrade 0.6.1 -> 0.6.2
opkg-utils: upgrade 0.5.0 -> 0.6.2
orc: upgrade 0.4.33 -> 0.4.34
ovmf: update 202211 -> 202305
ovmf: update edk2-stable202305 -> edk2-stable202308
p11-kit: upgrade 0.24.1 -> 0.25.0
pango: upgrade 1.50.13 -> 1.51.0
parted: upgrade 3.5 -> 3.6
patchelf: Upgrade 0.17.2 -> 0.18.0
pciutils: upgrade 3.9.0 -> 3.10.0
perlcross: update 1.4 -> 1.5
perl: update 5.36.0 -> 5.38.0
piglit: upgrade to latest revision
pigz: upgrade 2.7 -> 2.8
pkgconf: upgrade 1.9.4 -> 2.0.3
ppp: upgrade 2.4.9 -> 2.5.0
procps: update 4.0.3 -> 4.0.4
puzzles: upgrade to latest revision
python3-attrs: upgrade 22.2.0 -> 23.1.0
python3-build: upgrade to 1.0.3
python3-certifi: upgrade 2022.12.7 -> 2023.7.22
python3-chardet: upgrade 5.1.0 -> 5.2.0
python3-cryptography{-vectors}: upgrade 39.0.2 -> 41.0.4
python3-cython: upgrade 0.29.33 -> 0.29.36
python3-dbusmock: upgrade 0.28.7 -> 0.29.1
python3-docutils: upgrade 0.19 -> 0.20.1
python3-dtc: upgrade 1.6.1 -> 1.7.0
python3-dtschema: upgrade 2023.1 -> 2023.7
python3-editables: upgrade 0.3 -> 0.5
python3-flit-core: upgrade 3.8.0 -> 3.9.0
python3-git: upgrade 3.1.31 -> 3.1.36
python3-hatch-fancy-pypi-readme: upgrade 22.8.0 -> 23.1.0
python3-hatchling: upgrade 1.13.0 -> 1.18.0
python3-hypothesis: upgrade 6.68.2 -> 6.86.2
python3-importlib-metadata: upgrade 6.0.0 -> 6.8.0
python3-installer: upgrade 0.6.0 -> 0.7.0
python3-iso8601: upgrade 1.1.0 -> 2.0.0
python3-jsonpointer: upgrade to 2.4
python3-libarchive-c: upgrade 4.0 -> 5.0
python3-lxml: upgrade 4.9.2 -> 4.9.3
python3-markdown: upgrade 3.4.1 -> 3.4.4
python3-markupsafe: upgrade 2.1.2 -> 2.1.3
python3-more-itertools: upgrade 9.1.0 -> 10.1.0
python3-numpy: upgrade 1.24.2 -> 1.26.0
python3-packaging: upgrade 23.0 -> 23.1
python3-pathspec: upgrade 0.11.0 -> 0.11.2
python3-pip: upgrade 23.0.1 -> 23.2.1
python3-pluggy: upgrade 1.0.0 -> 1.3.0
python3-poetry-core: upgrade 1.5.2 -> 1.7.0
python3-psutil: upgrade 5.9.4 -> 5.9.5
python3-pyasn1: upgrade 0.4.8 -> 0.5.0
python3-pycairo: upgrade 1.23.0 -> 1.24.0
python3-pycryptodome: upgrade 3.17 -> 3.19.0
python3-pycryptodomex: upgrade 3.17 -> 3.19.0
python3-pyelftools: upgrade 0.29 -> 0.30
python3-pygments: upgrade 2.14.0 -> 2.16.1
python3-pygobject: upgrade 3.42.2 -> 3.46.0
python3-pyopenssl: upgrade 23.0.0 -> 23.2.0
python3-pyparsing: upgrade 3.0.9 -> 3.1.1
python3-pytest-subtests: upgrade 0.10.0 -> 0.11.0
python3-pytest: upgrade 7.2.2 -> 7.4.2
python3-pytz: upgrade 2022.7.1 -> 2023.3
python3-pyyaml: upgrade 6.0 -> 6.0.1
python3-requests: Upgrade to 2.31.0
python3-ruamel-yaml: upgrade 0.17.21 -> 0.17.32
python3-setuptools-rust: upgrade 1.5.2 -> 1.7.0
python3-setuptools: upgrade 67.6.0 -> 68.2.2
python3-smmap: upgrade 5.0.0 -> 6.0.0
python3-sphinx-rtd-theme: upgrade 1.2.0 -> 1.3.0
python3-sphinx: upgrade 6.1.3 -> 7.2.6
python3-trove-classifiers: upgrade 2023.4.29 -> 2023.9.19
python3-typing-extensions: upgrade 4.5.0 -> 4.8.0
python3: upgrade 3.11.2 -> 3.11.5
python3-urllib3: upgrade 1.26.15 -> 2.0.6
python3-webcolors: upgrade 1.12 -> 1.13
python3-wheel: upgrade 0.40.0 -> 0.41.2
python3-zipp: upgrade 3.15.0 -> 3.17.0
qemu: Upgrade 7.2.0 -> 8.1.0
re2c: upgrade 3.0 -> 3.1
repo: upgrade 2.32 -> 2.36.1
rpcsvc-proto: Upgrade to 1.4.4
rpm2cpio.sh: update to the last 4.x version
rpm: update 4.18.0 -> 4.18.1
ruby: upgrade 3.2.1 -> 3.2.2
rust: Upgrade 1.68.1 -> 1.70.0
screen: update 4.9.0 -> 4.9.1
seatd: upgrade 0.7.0 -> 0.8.0
serf: upgrade 1.3.9 -> 1.3.10
shaderc: upgrade 2023.2 -> 2023.6
spirv-headers: upgrade 1.3.239.0 -> 1.3.243.0
spirv-tools: upgrade 1.3.239.0 -> 1.3.243.0
sqlite3: upgrade 3.41.0 -> 3.43.1
squashfs-tools: upgrade 4.5.1 -> 4.6.1
sstatesig: Update to match bitbake changes to runtaskdeps
strace: upgrade 6.2 -> 6.5
stress-ng: upgrade 0.15.06 -> 0.16.05
sudo: update 1.9.13p3 -> 1.9.14p3
sysfsutils: update 2.1.0 -> 2.1.1
sysklogd: upgrade 2.4.4 -> 2.5.2
sysstat: update 12.6.2 -> 12.7.4
systemd: upgrade 253.1 -> 254.4
systemtap: upgrade 4.8 -> 4.9
taglib: upgrade 1.13 -> 1.13.1
tar: upgrade 1.34 -> 1.35
tcf-agent: Update to 1.8.0 release
texinfo: upgrade 7.0.2 -> 7.0.3
tiff: upgrade to 4.6.0
u-boot: Upgrade to 2023.10
util-linux: upgrade 2.38.1 -> 2.39.2
vala: upgrade 0.56.4 -> 0.56.13
valgrind: update 3.20.0 -> 3.21.0
vim: upgrade 9.0.1429 -> 9.0.2048
vte: upgrade 0.72.0 -> 0.72.2
vulkan-headers: upgrade to 1.3.243
vulkan-loader: upgrade to 1.3.243
vulkan-samples: update to latest SHA
vulkan-tools: upgrade to 1.3.243
vulkan: upgrade 1.3.243.0 -> 1.3.261.1
waffle: upgrade 1.7.0 -> 1.7.2
wayland-protocols: upgrade 1.31 -> 1.32
wayland: upgrade 1.21.0 -> 1.22.0
wayland-utils: upgrade 1.1.0 -> 1.2.0
webkitgtk: update 2.38.5 -> 2.40.5
weston: update 11.0.1 -> 12.0.2
wget: upgrade 1.21.3 -> 1.21.4
wireless-regdb: upgrade 2023.02.13 -> 2023.09.01
wpebackend-fdo: upgrade 1.14.0 -> 1.14.2
xcb-proto: upgrade 1.15.2 -> 1.16.0
xdpyinfo: upgrade 1.3.3 -> 1.3.4
xeyes: upgrade 1.2.0 -> 1.3.0
xf86-input-libinput: upgrade 1.2.1 -> 1.4.0
xf86-input-mouse: upgrade 1.9.4 -> 1.9.5
xinput: upgrade to v1.6.4
xkeyboard-config: upgrade 2.38 -> 2.39
xorgproto: upgrade 2022.2 -> 2023.2
xserver-xorg: upgrade 21.1.7 -> 21.1.8
xtrans: update 1.4.0 -> 1.5.0
xwayland: upgrade 22.1.8 -> 23.2.1
xwininfo: upgrade to v1.1.6
xxhash: upgrade 0.8.1 -> 0.8.2
xz: upgrade 5.4.2 -> 5.4.4
zlib: upgrade 1.2.13 -> 1.3
zstd: upgrade 1.5.4 -> 1.5.5
Contributors to 4.3
Thanks to the following people who contributed to this release:
Adrian Freihofer
Alassane Yattara
Alberto Pianon
Alberto Planas
Alejandro Hernandez Samaniego
Alexander Kanavin
Alexandre Belloni
Alexis Lothoré
Alex Kiernan
Andreas Cord-Landwehr
André Draszik
Andrej Valek
Andrew Jeffery
Andrey Zhizhikin
Angelo Ribeiro
Antoine Lubineau
Antonin Godard
Anuj Mittal
Archana Polampalli
Armin Kuster
Arne Schwerdt
Arno Baumfalk
Arslan Ahmad
Bartosz Golaszewski
BELHADJ SALEM Talel
BELOUARGA Mohamed
Benjamin Bara
Benjamin Bouvier
Bergin, Peter
Bruce Ashfield
Changhyeok Bae
Changqing Li
Charles-Antoine Couret
Charlie Wu
Chen Qi
Chi Xu
Chris Laplante
Christopher Larson
Daniel Ammann
Daniel McGregor
Daniel Semkowicz
David Reyna
Deepthi Hemraj
Denis OSTERLAND-HEIM
Denys Dmytriyenko
Derek Straka
Dit Kozmaj
Dmitry Baryshkov
Ed Beroset
Eero Aaltonen
Eilís ‘pidge’ Ní Fhlannagáin
Emil Ekmečić
Emil Kronborg Andersen
Enrico Jörns
Enrico Scholz
Etienne Cordonnier
Fabien Mahot
Fabio Estevam
Fahad Arslan
Frank WOLFF
Frederic Martinsons
Frieder Paape
Frieder Schrempf
Geoff Parker
Hannu Lounento
Ian Ray
Insu Park
Jaeyoon Jung
Jamin Lin
Jan Garcia
Jan Vermaete
Jasper Orschulko
Jean-Marie Lemetayer
Jérémy Rosen
Jermain Horsman
Jialing Zhang
Joel Stanley
Joe Slater
Johannes Schrimpf
Jon Mason
Jörg Sommer
Jose Quaresma
Joshua Watt
Julien Stephan
Kai Kang
Khem Raj
Kyle Russell
Lee Chee Yang
Lei Maohui
Leon Anavi
Lorenzo Arena
Louis Rannou
Luan Rafael Carneiro
Luca Boccassi
Luca Ceresoli
Marc Ferland
Marcus Flyckt
Marek Vasut
Mark Asselstine
Mark Hatle
Markus Niebel
Markus Volk
Marlon Rodriguez Garcia
Marta Rybczynska
Martijn de Gouw
Martin Jansa
Martin Siegumfeldt
Matthias Schnelte
Mauro Queiros
Max Krummenacher
Michael Halstead
Michael Opdenacker
Mickael RAMILISON
Mikko Rapeli
Ming Liu
Mingli Yu
Narpat Mali
Natasha Bailey
Nikhil R
Ninad Palsule
Ola x Nilsson
Oleksandr Hnatiuk
Otavio Salvador
Ovidiu Panait
Pascal Bach
Patrick Williams
Paul Eggleton
Paul Gortmaker
Paulo Neves
Pavel Zhukov
Pawan Badganchi
Peter Bergin
Peter Hoyes
Peter Kjellerstedt
Peter Marko
Peter Suti
Petr Gotthard
Petr Kubizňák
Piotr Łobacz
Poonam Jadhav
Qiu Tingting
Quentin Schulz
Randolph Sapp
Randy MacLeod
Ranjitsinh Rathod
Rasmus Villemoes
Remi Peuvergne
Richard Purdie
Riyaz Khan
Robert Joslyn
Robert P. J. Day
Robert Yang
Roland Hieber
Ross Burton
Ryan Eatmon
Sakib Sajal
Samantha Jalabert
Sanjay Chitroda
Sean Nyekjaer
Sergei Zhmylev
Siddharth Doshi
Soumya Sambu
Staffan Rydén
Stefano Babic
Stefan Tauner
Stéphane Veyret
Stephan Wurm
Sudip Mukherjee
Sundeep KOKKONDA
Svend Meyland Nicolaisen
Tan Wen Yan
Thomas Roos
Tim Orling
Tom Hochstein
Tom Isaacson
Trevor Gamblin
Ulrich Ölmann
Victor Kamensky
Vincent Davis Jr
Virendra Thakur
Wang Mingyu
Xiangyu Chen
Yang Xu
Yash Shinde
Yi Zhao
Yoann Congal
Yogita Urade
Yuta Hayama
Zang Ruochen
Zhixiong Chi
Repositories / Downloads for Yocto-4.3
poky
Repository Location: https://git.yoctoproject.org/poky
Branch: nanbield
Tag: yocto-4.3
Git Revision: 15b576c4101231d248fda7ae0824e1780e1a8901
Release Artefact: poky-15b576c4101231d248fda7ae0824e1780e1a8901
sha: 6b0ef7914d15db057f3efdf091b169a7361c74aac0abcfa717ef55d1a0adf74c
Download Locations: http://downloads.yoctoproject.org/releases/yocto/yocto-4.3/poky-15b576c4101231d248fda7ae0824e1780e1a8901.tar.bz2 http://mirrors.kernel.org/yocto/yocto/yocto-4.3/poky-15b576c4101231d248fda7ae0824e1780e1a8901.tar.bz2
openembedded-core
Repository Location: https://git.openembedded.org/openembedded-core
Branch: nanbield
Tag: yocto-4.3
Git Revision: 4c261f8cbdf0c7196a74daad041d04eb093015f3
Release Artefact: oecore-4c261f8cbdf0c7196a74daad041d04eb093015f3
sha: c9e6ac75d7848ce8844cb29c98659dd8f83b3de13b916124dff76abe034e6a5c
Download Locations: http://downloads.yoctoproject.org/releases/yocto/yocto-4.3/oecore-4c261f8cbdf0c7196a74daad041d04eb093015f3.tar.bz2 http://mirrors.kernel.org/yocto/yocto/yocto-4.3/oecore-4c261f8cbdf0c7196a74daad041d04eb093015f3.tar.bz2
meta-mingw
Repository Location: https://git.yoctoproject.org/meta-mingw
Branch: nanbield
Tag: yocto-4.3
Git Revision: 65ef95a74f6ae815f63f636ed53e140a26a014ce
Release Artefact: meta-mingw-65ef95a74f6ae815f63f636ed53e140a26a014ce
sha: fb2bf806941a00a1be6349c074379b63a76490bcf0f3b740d96d1aeeefa12286
Download Locations: http://downloads.yoctoproject.org/releases/yocto/yocto-4.3/meta-mingw-65ef95a74f6ae815f63f636ed53e140a26a014ce.tar.bz2 http://mirrors.kernel.org/yocto/yocto/yocto-4.3/meta-mingw-65ef95a74f6ae815f63f636ed53e140a26a014ce.tar.bz2
bitbake
Repository Location: https://git.openembedded.org/bitbake
Branch: 2.6
Tag: yocto-4.3
Git Revision: 5419a8473d6d4cd1d01537de68ad8d72cf5be0b2
Release Artefact: bitbake-5419a8473d6d4cd1d01537de68ad8d72cf5be0b2
sha: e5dab4b3345d91307860803e2ad73b2fcffa9d17dd3fde0e013ca0ebea0d05ca
Download Locations: http://downloads.yoctoproject.org/releases/yocto/yocto-4.3/bitbake-5419a8473d6d4cd1d01537de68ad8d72cf5be0b2.tar.bz2 http://mirrors.kernel.org/yocto/yocto/yocto-4.3/bitbake-5419a8473d6d4cd1d01537de68ad8d72cf5be0b2.tar.bz2
yocto-docs
Repository Location: https://git.yoctoproject.org/yocto-docs
Branch: nanbield
Tag: yocto-4.3
Git Revision: ceb1812e63b9fac062f886c2a1dde23137c0e1ed
Release notes for Yocto-4.3.1 (Nanbield)
Security Fixes in Yocto-4.3.1
libsndfile1: Fix CVE-2022-33065
libxml2: Ignore CVE-2023-45322
linux-yocto/6.1: Ignore CVE-2020-27418, CVE-2023-31085, CVE-2023-34324, CVE-2023-39189, CVE-2023-39192, CVE-2023-39193, CVE-2023-39194, CVE-2023-4244, CVE-2023-42754, CVE-2023-42756, CVE-2023-44466, CVE-2023-4563, CVE-2023-45862, CVE-2023-45863, CVE-2023-45871, CVE-2023-45898, CVE-2023-4732, CVE-2023-5158, CVE-2023-5197 and CVE-2023-5345
linux-yocto/6.5: Ignore CVE-2020-27418, CVE-2023-1193, CVE-2023-39191, CVE-2023-39194, CVE-2023-40791, CVE-2023-44466, CVE-2023-45862, CVE-2023-45863, CVE-2023-4610 and CVE-2023-4732
openssl: Fix CVE-2023-5363
pixman: Ignore CVE-2023-37769
vim: Fix CVE-2023-46246
zlib: Ignore CVE-2023-45853
Fixes in Yocto-4.3.1
baremetal-helloworld: Pull in fix for race condition on x86-64
base: Ensure recipes using mercurial-native have certificates
bb-matrix-plot.sh: Show underscores correctly in labels
bin_package.bbclass: revert “Inhibit the default dependencies”
bitbake: SECURITY.md: add file
brief-yoctoprojectqs: use new CDN mirror for sstate
bsp-guide: bsp.rst: update beaglebone example
bsp-guide: bsp: skip Intel machines no longer supported in Poky
build-appliance-image: Update to nanbield head revision
contributor-guide: add patchtest section
contributor-guide: clarify patchtest usage
cve-check: don’t warn if a patch is remote
cve-check: slightly more verbose warning when adding the same package twice
cve-check: sort the package list in the JSON report
dev-manual: add security team processes
dev-manual: extend the description of CVE patch preparation
dev-manual: layers: Add notes about layer.conf
dev-manual: new-recipe.rst: add missing parenthesis to “Patching Code” section
dev-manual: start.rst: remove obsolete reference
dev-manual: wic: update “wic list images” output
docs: add support for nanbield (4.3) release
documentation.conf: drop SERIAL_CONSOLES_CHECK
ell: Upgrade to 0.59
glib-2.0: Remove unnecessary assignement
goarch: Move Go architecture mapping to a library
kernel-arch: drop CCACHE from KERNEL_STRIP definition
kernel.bbclass: Use strip utility used for kernel build in do_package
layer.conf: Switch layer to nanbield series only
libsdl2: upgrade to 2.28.4
linux-yocto: make sure the pahole-native available before do_kernel_configme
llvm: Upgrade to 17.0.3
machine: drop obsolete SERIAL_CONSOLES_CHECK
manuals: correct “yocto-linux” by “linux-yocto”
manuals: improve description of CVE_STATUS and CVE_STATUS_GROUPS
manuals: Remove references to apm in MACHINE_FEATURES
manuals: update linux-yocto append examples
manuals: update list of supported machines
migration-4.3: additional migration items
migration-4.3: adjustments to existing text
migration-4.3: remove some unnecessary items
migration-guides: QEMU_USE_SLIRP variable removed
migration-guides: add BitBake changes
migration-guides: add debian 12 to newly supported distros
migration-guides: add kernel notes
migration-guides: add testing notes
migration-guides: add utility notes
migration-guides: edgerouter machine removed
migration-guides: enabling SPDX only for Poky, not a global default
migration-guides: fix empty sections
migration-guides: further updates for 4.3
migration-guides: further updates for release 4.3
migration-guides: git recipes reword
migration-guides: mention CDN
migration-guides: mention LLVM 17
migration-guides: mention runqemu change in serial port management
migration-guides: packaging changes
migration-guides: remove SERIAL_CONSOLES_CHECK
migration-guides: remove non-notable change
migration-guides: updates for 4.3
oeqa/selftest/debuginfod: improve selftest
oeqa/selftest/devtool: abort if a local workspace already exist
oeqa/ssh: Handle SSHCall timeout error code
openssl: Upgrade to 3.1.4
overview-manual: concepts: Add Bitbake Tasks Map
patchtest-send-results: add In-Reply-To
patchtest-send-results: check max line length, simplify responses
patchtest-send-results: fix sender parsing
patchtest-send-results: improve subject line
patchtest-send-results: send results to submitter
patchtest/selftest: add XSKIP, update test files
patchtest: disable merge test
patchtest: fix lic_files_chksum test regex
patchtest: make pylint tests compatible with 3.x
patchtest: reduce checksum test output length
patchtest: remove test for CVE tag in mbox
patchtest: remove unused imports
patchtest: rework license checksum tests
patchtest: shorten test result outputs
patchtest: simplify test directory structure
patchtest: skip merge test if not targeting master
patchtest: test regardless of mergeability
perl: fix intermittent test failure
poky.conf: bump version for 4.3.1 release
profile-manual: aesthetic cleanups
ref-manual: Add documentation for the unimplemented-ptest QA warning
ref-manual: Fix PACKAGECONFIG term and add an example
ref-manual: Warn about COMPATIBLE_MACHINE skipping native recipes
ref-manual: add systemd-resolved to distro features
ref-manual: classes: explain cml1 class name
ref-manual: document KERNEL_LOCALVERSION
ref-manual: document KERNEL_STRIP
ref-manual: document MESON_TARGET
ref-manual: document cargo_c class
ref-manual: remove semicolons from
*PROCESS_COMMANDvariablesref-manual: update SDK_NAME variable documentation
ref-manual: variables: add RECIPE_MAINTAINER
ref-manual: variables: add RECIPE_SYSROOT and RECIPE_SYSROOT_NATIVE
ref-manual: variables: add TOOLCHAIN_OPTIONS variable
ref-manual: variables: add example for SYSROOT_DIRS variable
ref-manual: variables: document OEQA_REPRODUCIBLE_TEST_PACKAGE
ref-manual: variables: mention new CDN for SSTATE_MIRRORS
ref-manual: variables: provide no-match example for COMPATIBLE_MACHINE
ref-manual: variables: remove SERIAL_CONSOLES_CHECK
release-notes-4.3: add CVEs, recipe upgrades, license changes, contributors
release-notes-4.3: add Repositories / Downloads section
release-notes-4.3: feature additions
release-notes-4.3: fix some typos
release-notes-4.3: move new classes to Rust section
release-notes-4.3: remove the Distribution section
release-notes-4.3: tweaks to existing text
sdk-manual: appendix-obtain: improve and update descriptions
test-manual: reproducible-builds: stop mentioning LTO bug
vim: Improve locale handling
vim: Upgrade to 9.0.2068
vim: use upstream generated .po files
Known Issues in Yocto-4.3.1
N/A
Contributors to Yocto-4.3.1
Alejandro Hernandez Samaniego
Alex Stewart
Archana Polampalli
Arne Schwerdt
BELHADJ SALEM Talel
Dmitry Baryshkov
Eero Aaltonen
Joshua Watt
Julien Stephan
Jérémy Rosen
Khem Raj
Lee Chee Yang
Marta Rybczynska
Max Krummenacher
Michael Halstead
Michael Opdenacker
Paul Eggleton
Peter Kjellerstedt
Peter Marko
Quentin Schulz
Richard Purdie
Robert P. J. Day
Ross Burton
Rouven Czerwinski
Steve Sakoman
Trevor Gamblin
Wang Mingyu
William Lyu
Xiangyu Chen
luca fancellu
Repositories / Downloads for Yocto-4.3.1
poky
Repository Location: https://git.yoctoproject.org/poky
Branch: nanbield
Tag: yocto-4.3.1
Git Revision: bf9f2f6f60387b3a7cd570919cef6c4570edcb82
Release Artefact: poky-bf9f2f6f60387b3a7cd570919cef6c4570edcb82
sha: 9b4351159d728fec2b63a50f1ac15edc412e2d726e9180a40afc06051fadb922
Download Locations: http://downloads.yoctoproject.org/releases/yocto/yocto-4.3.1/poky-bf9f2f6f60387b3a7cd570919cef6c4570edcb82.tar.bz2 http://mirrors.kernel.org/yocto/yocto/yocto-4.3.1/poky-bf9f2f6f60387b3a7cd570919cef6c4570edcb82.tar.bz2
openembedded-core
Repository Location: https://git.openembedded.org/openembedded-core
Branch: nanbield
Tag: yocto-4.3.1
Git Revision: cce77e8e79c860f4ef0ac4a86b9375bf87507360
Release Artefact: oecore-cce77e8e79c860f4ef0ac4a86b9375bf87507360
sha: e6cde08e7c549f57a67d833a36cdb942648fba81558dc8b0e65332d2a2c023cc
Download Locations: http://downloads.yoctoproject.org/releases/yocto/yocto-4.3.1/oecore-cce77e8e79c860f4ef0ac4a86b9375bf87507360.tar.bz2 http://mirrors.kernel.org/yocto/yocto/yocto-4.3.1/oecore-cce77e8e79c860f4ef0ac4a86b9375bf87507360.tar.bz2
meta-mingw
Repository Location: https://git.yoctoproject.org/meta-mingw
Branch: nanbield
Tag: yocto-4.3.1
Git Revision: 49617a253e09baabbf0355bc736122e9549c8ab2
Release Artefact: meta-mingw-49617a253e09baabbf0355bc736122e9549c8ab2
sha: 2225115b73589cdbf1e491115221035c6a61679a92a93b2a3cf761ff87bf4ecc
Download Locations: http://downloads.yoctoproject.org/releases/yocto/yocto-4.3.1/meta-mingw-49617a253e09baabbf0355bc736122e9549c8ab2.tar.bz2 http://mirrors.kernel.org/yocto/yocto/yocto-4.3.1/meta-mingw-49617a253e09baabbf0355bc736122e9549c8ab2.tar.bz2
bitbake
Repository Location: https://git.openembedded.org/bitbake
Branch: 2.6
Tag: yocto-4.3.1
Git Revision: 936fcec41efacc4ce988c81882a9ae6403702bea
Release Artefact: bitbake-936fcec41efacc4ce988c81882a9ae6403702bea
sha: efbdd5fe7f29227a3fd26d6a08a368bf8215083a588b4d23f3adf35044897520
Download Locations: http://downloads.yoctoproject.org/releases/yocto/yocto-4.3.1/bitbake-936fcec41efacc4ce988c81882a9ae6403702bea.tar.bz2 http://mirrors.kernel.org/yocto/yocto/yocto-4.3.1/bitbake-936fcec41efacc4ce988c81882a9ae6403702bea.tar.bz2
yocto-docs
Repository Location: https://git.yoctoproject.org/yocto-docs
Branch: nanbield
Tag: yocto-4.3.1
Git Revision: 6b98a6164263298648e89b5a5ae1260a58f1bb35
Release notes for Yocto-4.3.2 (Nanbield)
Security Fixes in Yocto-4.3.2
avahi: Fix CVE-2023-1981, CVE-2023-38469, CVE-2023-38470, CVE-2023-38471, CVE-2023-38472 and CVE-2023-38473
curl: Fix CVE-2023-46218
ghostscript: Fix CVE-2023-46751
grub: fix CVE-2023-4692 and CVE-2023-4693
gstreamer1.0: Fix CVE-2023-44446
linux-yocto/6.1: Ignore CVE-2023-39197, CVE-2023-39198, CVE-2023-5090, CVE-2023-5633, CVE-2023-6111, CVE-2023-6121 and CVE-2023-6176
linux-yocto/6.5: Ignore CVE-2022-44034, CVE-2023-39197, CVE-2023-39198, CVE-2023-5972, CVE-2023-6039, CVE-2023-6111 and CVE-2023-6176
perl: fix CVE-2023-47100
python3-urllib3: Fix CVE-2023-45803
rust: Fix CVE-2023-40030
vim: Fix CVE-2023-48231, CVE-2023-48232, CVE-2023-48233, CVE-2023-48234, CVE-2023-48235, CVE-2023-48236 and CVE-2023-48237
xserver-xorg: Fix CVE-2023-5367 and CVE-2023-5380
xwayland: Fix CVE-2023-5367
Fixes in Yocto-4.3.2
base-passwd: Upgrade to 3.6.2
bind: Upgrade to 9.18.20
binutils: stable 2.41 branch updates
bitbake: command: Make parseRecipeFile() handle virtual recipes correctly
bitbake: lib/bb: Add workaround for libgcc issues with python 3.8 and 3.9
bitbake: toastergui: verify that an existing layer path is given
bluez5: fix connection for ps5/dualshock controllers
build-appliance-image: Update to nanbield head revision
cmake: Upgrade to 3.27.7
contributor-guide: add License-Update tag
contributor-guide: fix command option
cups: Add root,sys,wheel to system groups
cve-update-nvd2-native: faster requests with API keys
cve-update-nvd2-native: increase the delay between subsequent request failures
cve-update-nvd2-native: make number of fetch attemtps configurable
cve-update-nvd2-native: remove unused variable CVE_SOCKET_TIMEOUT
dev-manual: Discourage the use of SRC_URI[md5sum]
dev-manual: layers: update link to YP Compatible form
dev-manual: runtime-testing: fix test module name
devtool: finish/update-recipe: restrict mode srcrev to recipes fetched from SCM
devtool: fix update-recipe dry-run mode
ell: Upgrade to 0.60
enchant2: Upgrade to 2.6.2
ghostscript: Upgrade to 10.02.1
glib-2.0: Upgrade to 2.78.1
glibc: stable 2.38 branch updates
gstreamer1.0: Upgrade to 1.22.7
gtk: Add rdepend on printbackend for cups
harfbuzz: Upgrade to 8.2.2
json-c: fix icecc compilation
kern-tools: bump SRCREV for queue processing changes
kern-tools: make lower context patches reproducible
kern-tools: update SRCREV to include SECURITY.md file
kernel-arch: use ccache only for compiler
kernel-yocto: improve metadata patching
lib/oe/buildcfg.py: Include missing import
lib/oe/buildcfg.py: Remove unused parameter
lib/oe/patch: ensure os.chdir restoring always happens
lib/oe/path: Deploy files can start only with a dot
libgcrypt: Upgrade to 1.10.3
libjpeg-turbo: Upgrade to 3.0.1
libnewt: Upgrade to 0.52.24
libnsl2: Upgrade to 2.0.1
libsolv: Upgrade to 0.7.26
libxslt: Upgrade to 1.1.39
linux-firmware: add audio topology symlink to the X13’s audio package
linux-firmware: add missing depenencies on license packages
linux-firmware: add new fw file to ${PN}-rtl8821
linux-firmware: add notice file to sdm845 modem firmware
linux-firmware: create separate packages
linux-firmware: package Qualcomm Venus 6.0 firmware
linux-firmware: package Robotics RB5 sensors DSP firmware
linux-firmware: package firmware for Qualcomm Adreno a702
linux-firmware: package firmware for Qualcomm QCM2290 / QRB4210
linux-firmware: Upgrade to 20231030
linux-yocto-rt/6.1: update to -rt18
linux-yocto/6.1: cfg: restore CONFIG_DEVMEM
linux-yocto/6.1: drop removed IMA option
linux-yocto/6.1: Upgrade to v6.1.68
linux-yocto/6.5: cfg: restore CONFIG_DEVMEM
linux-yocto/6.5: cfg: split runtime and symbol debug
linux-yocto/6.5: drop removed IMA option
linux-yocto/6.5: fix AB-INT: QEMU kernel panic: No irq handler for vector
linux-yocto/6.5: Upgrade to v6.5.13
linux/cve-exclusion6.1: Update to latest kernel point release
log4cplus: Upgrade to 2.1.1
lsb-release: use https for UPSTREAM_CHECK_URI
manuals: brief-yoctoprojectqs: align variable order with default local.conf
manuals: fix URL
meson: use correct targets for rust binaries
migration-guide: add release notes for 4.0.14, 4.0.15, 4.2.4, 4.3.1
migration-guides: release 3.5 is actually 4.0
migration-guides: reword fix in release-notes-4.3.1
msmtp: Upgrade to 1.8.25
oeqa/selftest/tinfoil: Add tests that parse virtual recipes
openssl: improve handshake test error reporting
package_ipk: Fix Source: field variable dependency
patchtest: shorten patch signed-off-by test output
perf: lift TARGET_CC_ARCH modification out of security_flags.inc
perl: Upgrade to 5.38.2
perlcross: Upgrade to 1.5.2
poky.conf: bump version for 4.3.2 release
python3-ptest: skip test_storlines
python3-urllib3: Upgrade to 2.0.7
qemu: Upgrade to 8.1.2
ref-manual: Fix reference to MIRRORS/PREMIRRORS defaults
ref-manual: releases.svg: update nanbield release status
useradd_base: sed -i destroys symlinks
rootfs-postcommands: sed -i destroys symlinks
sstate: Ensure sstate searches update file mtime
strace: backport fix for so_peerpidfd-test
systemd-boot: Fix build issues on armv7a-linux
systemd-compat-units.bb: fix postinstall script
systemd: fix DynamicUser issue
systemd: update LICENSE statement
tcl: skip async and event tests in run-ptest
tcl: skip timing-dependent tests in run-ptest
test-manual: add links to python unittest
test-manual: add or improve hyperlinks
test-manual: explicit or fix file paths
test-manual: resource updates
test-manual: text and formatting fixes
test-manual: use working example
testimage: Drop target_dumper and most of monitor_dumper
testimage: Exclude wtmp from target-dumper commands
tzdata: Upgrade to 2023d
update_gtk_icon_cache: Fix for GTK4-only builds
useradd_base: Fix sed command line for passwd-expire
vim: Upgrade to 9.0.2130
xserver-xorg: Upgrade to 21.1.9
xwayland: Upgrade to 23.2.2
Known Issues in Yocto-4.3.2
N/A
Contributors to Yocto-4.3.2
Adam Johnston
Alexander Kanavin
Anuj Mittal
Bastian Krause
Bruce Ashfield
Chen Qi
Deepthi Hemraj
Dhairya Nagodra
Dmitry Baryshkov
Fahad Arslan
Javier Tia
Jermain Horsman
Joakim Tjernlund
Julien Stephan
Justin Bronder
Khem Raj
Lee Chee Yang
Marco Felsch
Markus Volk
Marta Rybczynska
Massimiliano Minella
Michael Opdenacker
Paul Barker
Peter Kjellerstedt
Peter Marko
Randy MacLeod
Rasmus Villemoes
Richard Purdie
Ross Burton
Shubham Kulkarni
Simone Weiß
Steve Sakoman
Sundeep KOKKONDA
Tim Orling
Trevor Gamblin
Vijay Anusuri
Viswanath Kraleti
Vyacheslav Yurkov
Wang Mingyu
William Lyu
Zoltán Böszörményi
Repositories / Downloads for Yocto-4.3.2
poky
Repository Location: https://git.yoctoproject.org/poky
Branch: nanbield
Tag: yocto-4.3.2
Git Revision: f768ffb8916feb6542fcbe3e946cbf30e247b151
Release Artefact: poky-f768ffb8916feb6542fcbe3e946cbf30e247b151
sha: 21ca1695d70aba9b4bd8626d160111feab76206883cd14fe41eb024692bdfd7b
Download Locations: http://downloads.yoctoproject.org/releases/yocto/yocto-4.3.2/poky-f768ffb8916feb6542fcbe3e946cbf30e247b151.tar.bz2 http://mirrors.kernel.org/yocto/yocto/yocto-4.3.2/poky-f768ffb8916feb6542fcbe3e946cbf30e247b151.tar.bz2
openembedded-core
Repository Location: https://git.openembedded.org/openembedded-core
Branch: nanbield
Tag: yocto-4.3.2
Git Revision: ff595b937d37d2315386aebf315cea719e2362ea
Release Artefact: oecore-ff595b937d37d2315386aebf315cea719e2362ea
sha: a7c6332dc0e09ecc08221e78b11151e8e2a3fd9fa3eaad96a4c03b67012bfb97
Download Locations: http://downloads.yoctoproject.org/releases/yocto/yocto-4.3.2/oecore-ff595b937d37d2315386aebf315cea719e2362ea.tar.bz2 http://mirrors.kernel.org/yocto/yocto/yocto-4.3.2/oecore-ff595b937d37d2315386aebf315cea719e2362ea.tar.bz2
meta-mingw
Repository Location: https://git.yoctoproject.org/meta-mingw
Branch: nanbield
Tag: yocto-4.3.2
Git Revision: 49617a253e09baabbf0355bc736122e9549c8ab2
Release Artefact: meta-mingw-49617a253e09baabbf0355bc736122e9549c8ab2
sha: 2225115b73589cdbf1e491115221035c6a61679a92a93b2a3cf761ff87bf4ecc
Download Locations: http://downloads.yoctoproject.org/releases/yocto/yocto-4.3.2/meta-mingw-49617a253e09baabbf0355bc736122e9549c8ab2.tar.bz2 http://mirrors.kernel.org/yocto/yocto/yocto-4.3.2/meta-mingw-49617a253e09baabbf0355bc736122e9549c8ab2.tar.bz2
bitbake
Repository Location: https://git.openembedded.org/bitbake
Branch: 2.6
Tag: yocto-4.3.2
Git Revision: 72bf75f0b2e7f36930185e18a1de8277ce7045d8
Release Artefact: bitbake-72bf75f0b2e7f36930185e18a1de8277ce7045d8
sha: 0b6ccd4796ccd211605090348a3d4378358c839ae1bb4c35964d0f36f2663187
Download Locations: http://downloads.yoctoproject.org/releases/yocto/yocto-4.3.2/bitbake-72bf75f0b2e7f36930185e18a1de8277ce7045d8.tar.bz2 http://mirrors.kernel.org/yocto/yocto/yocto-4.3.2/bitbake-72bf75f0b2e7f36930185e18a1de8277ce7045d8.tar.bz2
yocto-docs
Repository Location: https://git.yoctoproject.org/yocto-docs
Branch: nanbield
Tag: yocto-4.3.2
Git Revision: fac88b9e80646a68b31975c915a718a9b6b2b439
Release notes for Yocto-4.3.3 (Nanbield)
Security Fixes in Yocto-4.3.3
curl: Fix CVE-2023-46219
glibc: Ignore fixed CVE-2023-0687 and CVE-2023-5156
linux-yocto/6.1: Ignore CVE-2022-48619, CVE-2023-4610, CVE-2023-5178, CVE-2023-5972, CVE-2023-6040, CVE-2023-6531, CVE-2023-6546, CVE-2023-6622, CVE-2023-6679, CVE-2023-6817, CVE-2023-6931, CVE-2023-6932, CVE-2023-7192, CVE-2024-0193 and CVE-2024-0443
linux-yocto/6.1: Fix CVE-2023-1193, CVE-2023-51779, CVE-2023-51780, CVE-2023-51781, CVE-2023-51782 and CVE-2023-6606
qemu: Fix CVE-2023-3019
shadow: Fix CVE-2023-4641
sqlite3: Fix CVE-2024-0232
sqlite3: drop obsolete CVE ignore CVE-2023-36191
sudo: Fix CVE-2023-42456 and CVE-2023-42465
tiff: Fix CVE-2023-6277
xwayland: Fix CVE-2023-6377 and CVE-2023-6478
Fixes in Yocto-4.3.3
aspell: upgrade to 0.60.8.1
avahi: update URL for new project location
base-passwd: upgrade to 3.6.3
bitbake: asyncrpc: Add context manager API
bitbake: toaster/toastergui: Bug-fix verify given layer path only if import/add local layer
build-appliance-image: Update to nanbield head revision
classes-global/sstate: Fix variable typo
cmake: Unset CMAKE_CXX_IMPLICIT_INCLUDE_DIRECTORIES
contributor-guide: fix lore URL
contributor-guide: use “apt” instead of “aptitude”
create-spdx-2.2: combine spdx can try to write before dir creation
curl: Disable test 1091 due to intermittent failures
curl: Disable two intermittently failing tests
dev-manual: gen-tapdevs need iptables installed
dev-manual: start.rst: Update use of Download page
dev-manual: update license manifest path
devtool: deploy: provide max_process to strip_execs
devtool: modify: Handle recipes with a menuconfig task correctly
docs: document VSCode extension
dtc: preserve version also from shallow git clones
elfutils: Update license information
glib-2.0: upgrade to 2.78.3
glibc-y2038-tests: do not run tests using 32 bit time APIs
go: upgrade to 1.20.12
grub: fs/fat: Don’t error when mtime is 0
gstreamer1.0: upgrade to 1.22.8
icon-naming-utils: take tarball from debian
kea: upgrade to 2.4.1
lib/prservice: Improve lock handling robustness
libadwaita: upgrade to 1.4.2
libatomic-ops: upgrade to 7.8.2
libva-utils: upgrade to 2.20.1
linux-firmware: Change bnx2 packaging
linux-firmware: Create bnx2x subpackage
linux-firmware: Fix the linux-firmware-bcm4373 FILES variable
linux-firmware: Package iwlwifi .pnvm files
linux-yocto/6.1: security/cfg: add configs to harden protection
linux-yocto/6.1: update to v6.1.73
meta/documentation.conf: fix do_menuconfig description
migration-guide: add release notes for 4.0.16
migration-guide: add release notes for 4.3.2
ncurses: Fix - tty is hung after reset
nfs-utils: Update Upstream-Status
nfs-utils: upgrade to 2.6.4
oeqa/selftest/prservice: Improve test robustness
package.py: OEHasPackage: Add MLPREFIX to packagename
poky.conf: bump version for 4.3.3 release
pseudo: Update to pull in syncfs probe fix
python3-license-expression: Fix the ptest failure
qemu.bbclass: fix a python TypeError
qemu: upgrade to 8.1.4
ref-manual: Add UBOOT_BINARY, extend UBOOT_CONFIG
ref-manual: classes: remove insserv bbclass
ref-manual: update tested and supported distros
release-notes-4.3: fix spacing
rootfs.py: check depmodwrapper execution result
rpcbind: Specify state directory under /run
scripts/runqemu: fix regex escape sequences
sqlite3: upgrade to 3.43.2
sstate: Fix dir ownership issues in SSTATE_DIR
sudo: upgrade to 1.9.15p5
tcl: Fix prepending to run-ptest script
uninative-tarball.xz - reproducibility fix
xwayland: upgrade to 23.2.3
zstd: fix LICENSE statement
Known Issues in Yocto-4.3.3
N/A
Contributors to Yocto-4.3.3
Alassane Yattara
Alexander Kanavin
Anuj Mittal
Baruch Siach
Bruce Ashfield
Chen Qi
Clay Chang
Enguerrand de Ribaucourt
Ilya A. Kriveshko
Jason Andryuk
Jeremy A. Puhlman
Joao Marcos Costa
Jose Quaresma
Joshua Watt
Jörg Sommer
Khem Raj
Lee Chee Yang
Markus Volk
Massimiliano Minella
Maxin B. John
Michael Opdenacker
Ming Liu
Mingli Yu
Peter Kjellerstedt
Peter Marko
Richard Purdie
Robert Berger
Robert Yang
Rodrigo M. Duarte
Ross Burton
Saul Wold
Simone Weiß
Soumya Sambu
Steve Sakoman
Trevor Gamblin
Wang Mingyu
William Lyu
Xiangyu Chen
Yang Xu
Zahir Hussain
Repositories / Downloads for Yocto-4.3.3
poky
Repository Location: https://git.yoctoproject.org/poky
Branch: nanbield
Tag: yocto-4.3.3
Git Revision: d3b27346c3a4a7ef7ec517e9d339d22bda74349d
Release Artefact: poky-d3b27346c3a4a7ef7ec517e9d339d22bda74349d
sha: 2db39f1bf7bbcee039e9970eed1f6f9233bcc95d675159647c9a2a334fc81eb0
Download Locations: http://downloads.yoctoproject.org/releases/yocto/yocto-4.3.3/poky-d3b27346c3a4a7ef7ec517e9d339d22bda74349d.tar.bz2 http://mirrors.kernel.org/yocto/yocto/yocto-4.3.3/poky-d3b27346c3a4a7ef7ec517e9d339d22bda74349d.tar.bz2
openembedded-core
Repository Location: https://git.openembedded.org/openembedded-core
Branch: nanbield
Tag: yocto-4.3.3
Git Revision: 0584d01f623e1f9b0fef4dfa95dd66de6cbfb7b3
Release Artefact: oecore-0584d01f623e1f9b0fef4dfa95dd66de6cbfb7b3
sha: 730de0d5744f139322402ff9a6b2483c6ab929f704cec06258ae51de1daebe3d
Download Locations: http://downloads.yoctoproject.org/releases/yocto/yocto-4.3.3/oecore-0584d01f623e1f9b0fef4dfa95dd66de6cbfb7b3.tar.bz2 http://mirrors.kernel.org/yocto/yocto/yocto-4.3.3/oecore-0584d01f623e1f9b0fef4dfa95dd66de6cbfb7b3.tar.bz2
meta-mingw
Repository Location: https://git.yoctoproject.org/meta-mingw
Branch: nanbield
Tag: yocto-4.3.3
Git Revision: 49617a253e09baabbf0355bc736122e9549c8ab2
Release Artefact: meta-mingw-49617a253e09baabbf0355bc736122e9549c8ab2
sha: 2225115b73589cdbf1e491115221035c6a61679a92a93b2a3cf761ff87bf4ecc
Download Locations: http://downloads.yoctoproject.org/releases/yocto/yocto-4.3.3/meta-mingw-49617a253e09baabbf0355bc736122e9549c8ab2.tar.bz2 http://mirrors.kernel.org/yocto/yocto/yocto-4.3.3/meta-mingw-49617a253e09baabbf0355bc736122e9549c8ab2.tar.bz2
bitbake
Repository Location: https://git.openembedded.org/bitbake
Branch: 2.6
Tag: yocto-4.3.3
Git Revision: 380a9ac97de5774378ded5e37d40b79b96761a0c
Release Artefact: bitbake-380a9ac97de5774378ded5e37d40b79b96761a0c
sha: 78f579b9d29e72d09b6fb10ac62aa925104335e92d2afb3155bc9ab1994e36c1
Download Locations: http://downloads.yoctoproject.org/releases/yocto/yocto-4.3.3/bitbake-380a9ac97de5774378ded5e37d40b79b96761a0c.tar.bz2 http://mirrors.kernel.org/yocto/yocto/yocto-4.3.3/bitbake-380a9ac97de5774378ded5e37d40b79b96761a0c.tar.bz2
yocto-docs
Repository Location: https://git.yoctoproject.org/yocto-docs
Branch: nanbield
Tag: yocto-4.3.3
Git Revision: dde4b815db82196af086847f68ee27d7902b4ffa
Release notes for Yocto-4.3.4 (Nanbield)
Security Fixes in Yocto-4.3.4
bind: Fix CVE-2023-4408, CVE-2023-5517, CVE-2023-5679 and CVE-2023-50387
gcc: Update CVE_STATUS for CVE-2023-4039 as fixed
glibc: Fix CVE-2023-6246, CVE-2023-6779 and CVE-2023-6780
gnutls: Fix CVE-2024-0553 and CVE-2024-0567
gstreamer: Fix CVE-2024-0444
libssh2: fix CVE-2023-48795
libxml2: Fix CVE-2024-25062
linux-yocto/6.1: Fix CVE-2023-6610, CVE-2023-6915, CVE-2023-46838, CVE-2023-50431, CVE-2024-1085, CVE-2024-1086 and CVE-2024-23849
linux-yocto/6.1: Ignore CVE-2021-33630, CVE-2021-33631, CVE-2022-36402, CVE-2023-5717, CVE-2023-6200, CVE-2023-35827, CVE-2023-40791, CVE-2023-46343, CVE-2023-46813, CVE-2023-46862, CVE-2023-51042, CVE-2023-51043, CVE-2023-52340, CVE-2024-0562, CVE-2024-0565, CVE-2024-0582, CVE-2024-0584, CVE-2024-0607, CVE-2024-0639, CVE-2024-0641, CVE-2024-0646, CVE-2024-0775 and CVE-2024-22705
openssl: fix CVE-2024-0727
python3-jinja2: Fix CVE-2024-22195
tiff: Fix CVE-2023-6228, CVE-2023-52355 and CVE-2023-52356
vim: Fix CVE-2024-22667
wpa-supplicant: Fix CVE-2023-52160
xserver-xorg: Fix CVE-2023-6377, CVE-2023-6478, CVE-2023-6816, CVE-2024-0229, CVE-2024-0408, CVE-2024-0409, CVE-2024-21885 and CVE-2024-21886
xwayland: Fix CVE-2023-6816, CVE-2024-0408 and CVE-2024-0409
zlib: Ignore CVE-2023-6992
Fixes in Yocto-4.3.4
allarch: Fix allarch corner case
at-spi2-core: Upgrade to 2.50.1
bind: Upgrade to 9.18.24
build-appliance-image: Update to nanbield head revision
contributor-guide: add notes for tests
contributor-guide: be more specific about meta-* trees
core-image-ptest: Increase disk size to 1.5G for strace ptest image
cpio: Upgrade to 2.15
curl: improve run-ptest
curl: increase test timeouts
cve-check: Log if CVE_STATUS set but not reported for component
cve-update-nvd2-native: Add an age threshold for incremental update
cve-update-nvd2-native: Fix CVE configuration update
cve-update-nvd2-native: Fix typo in comment
cve-update-nvd2-native: Remove duplicated CVE_CHECK_DB_FILE definition
cve-update-nvd2-native: Remove rejected CVE from database
cve-update-nvd2-native: nvd_request_next: Improve comment
cve_check: cleanup logging
cve_check: handle CVE_STATUS being set to the empty string
dev-manual: Rephrase spdx creation
dev-manual: improve descriptions of ‘bitbake -S printdiff’
dev-manual: packages: clarify shared PR service constraint
dev-manual: packages: fix capitalization
dev-manual: packages: need enough free space
docs: add initial stylechecks with Vale
docs: correct sdk installation default path
docs: document VIRTUAL-RUNTIME variables
docs: suppress excess use of “following” word
docs: use “manual page(s)”
docs: Makefile: remove releases.rst in “make clean”
externalsrc: fix task dependency for do_populate_lic
glibc: Remove duplicate CVE_STATUS for CVE-2023-4527
glibc: stable 2.38 branch updates (2.38+gitd37c2b20a4)
gnutls: Upgrade to 3.8.3
gstreamer1.0: skip a test that is known to be flaky
gstreamer: Upgrade to 1.22.9
gtk: Set CVE_PRODUCT
kernel.bbclass: Set pkg-config variables for building modules
libxml2: Upgrade to 2.11.7
linux-firmware: Upgrade to 20240220
linux-yocto/6.1: update to v6.1.78
mdadm: Disable ptests
migration-guides: add release notes for 4.3.3
migration-guides: add release notes for 4.0.17
migration-guides: fix release notes for 4.3.3 linux-yocto/6.1 CVE entries
multilib_global.bbclass: fix parsing error with no kernel module split
openssl: fix crash on aarch64 if BTI is enabled but no Crypto instructions
openssl: Upgrade to 3.1.5
overlayfs: add missing closing parenthesis in selftest
poky.conf: bump version for 4.3.4 release
profile-manual: usage.rst: fix reference to bug report
profile-manual: usage.rst: formatting fixes
profile-manual: usage.rst: further style improvements
pseudo: Update to pull in gcc14 fix and missing statvfs64 intercept
python3-jinja2: Upgrade to 3.1.3
ref-manual: release-process: grammar fix
ref-manual: system-requirements: update packages to build docs
ref-manual: tasks: do_cleanall: recommend using ‘-f’ instead
ref-manual: tasks: do_cleansstate: recommend using ‘-f’ instead for a shared sstate
ref-manual: variables: adding multiple groups in GROUPADD_PARAM
ref-manual: variables: add documentation of the variable SPDX_NAMESPACE_PREFIX
reproducible: Fix race with externalsrc/devtool over lockfile
sdk-manual: extensible: correctly describe separate build-sysroots tasks in direct sdk workflows
tzdata : Upgrade to 2024a
udev-extraconf: fix unmount directories containing octal-escaped chars
vim: Upgrade to v9.0.2190
wireless-regdb: Upgrade to 2024.01.23
xserver-xorg: Upgrade to 21.1.11
xwayland: Upgrade to 23.2.4
yocto-uninative: Update to 4.4 for glibc 2.39
Known Issues in Yocto-4.3.4
N/A
Contributors to Yocto-4.3.4
Alex Kiernan
Alexander Kanavin
Alexander Sverdlin
Baruch Siach
BELOUARGA Mohamed
Benjamin Bara
Bruce Ashfield
Chen Qi
Claus Stovgaard
Dhairya Nagodra
Geoff Parker
Johan Bezem
Jonathan GUILLOT
Julien Stephan
Kai Kang
Khem Raj
Lee Chee Yang
Luca Ceresoli
Martin Jansa
Michael Halstead
Michael Opdenacker
Munehisa Kamata
Pavel Zhukov
Peter Marko
Priyal Doshi
Richard Purdie
Robert Joslyn
Ross Burton
Simone Weiß
Soumya Sambu
Steve Sakoman
Tim Orling
Wang Mingyu
Yoann Congal
Yogita Urade
Repositories / Downloads for Yocto-4.3.4
poky
Repository Location: https://git.yoctoproject.org/poky
Branch: nanbield
Tag: yocto-4.3.4
Git Revision: 7b8aa378d069ee31373f22caba3bd7fc7863f447
Release Artefact: poky-7b8aa378d069ee31373f22caba3bd7fc7863f447
sha: 0cb14125f215cc9691cff43982e2c540a5b6018df4ed25c10933135b5bf21d0f
Download Locations: http://downloads.yoctoproject.org/releases/yocto/yocto-4.3.4/poky-7b8aa378d069ee31373f22caba3bd7fc7863f447.tar.bz2 http://mirrors.kernel.org/yocto/yocto/yocto-4.3.4/poky-7b8aa378d069ee31373f22caba3bd7fc7863f447.tar.bz2
openembedded-core
Repository Location: https://git.openembedded.org/openembedded-core
Branch: nanbield
Tag: yocto-4.3.4
Git Revision: d0e68072d138ccc1fb5957fdc46a91871eb6a3e1
Release Artefact: oecore-d0e68072d138ccc1fb5957fdc46a91871eb6a3e1
sha: d311fe22ff296c466f9bea1cd26343baee5630bc37f3dda42f2d9d8cc99e3add
Download Locations: http://downloads.yoctoproject.org/releases/yocto/yocto-4.3.4/oecore-d0e68072d138ccc1fb5957fdc46a91871eb6a3e1.tar.bz2 http://mirrors.kernel.org/yocto/yocto/yocto-4.3.4/oecore-d0e68072d138ccc1fb5957fdc46a91871eb6a3e1.tar.bz2
meta-mingw
Repository Location: https://git.yoctoproject.org/meta-mingw
Branch: nanbield
Tag: yocto-4.3.4
Git Revision: 49617a253e09baabbf0355bc736122e9549c8ab2
Release Artefact: meta-mingw-49617a253e09baabbf0355bc736122e9549c8ab2
sha: 2225115b73589cdbf1e491115221035c6a61679a92a93b2a3cf761ff87bf4ecc
Download Locations: http://downloads.yoctoproject.org/releases/yocto/yocto-4.3.4/meta-mingw-49617a253e09baabbf0355bc736122e9549c8ab2.tar.bz2 http://mirrors.kernel.org/yocto/yocto/yocto-4.3.4/meta-mingw-49617a253e09baabbf0355bc736122e9549c8ab2.tar.bz2
bitbake
Repository Location: https://git.openembedded.org/bitbake
Branch: 2.6
Tag: yocto-4.3.4
Git Revision: 380a9ac97de5774378ded5e37d40b79b96761a0c
Release Artefact: bitbake-380a9ac97de5774378ded5e37d40b79b96761a0c
sha: 78f579b9d29e72d09b6fb10ac62aa925104335e92d2afb3155bc9ab1994e36c1
Download Locations: http://downloads.yoctoproject.org/releases/yocto/yocto-4.3.4/bitbake-380a9ac97de5774378ded5e37d40b79b96761a0c.tar.bz2 http://mirrors.kernel.org/yocto/yocto/yocto-4.3.4/bitbake-380a9ac97de5774378ded5e37d40b79b96761a0c.tar.bz2
yocto-docs
Repository Location: https://git.yoctoproject.org/yocto-docs
Branch: nanbield
Tag: yocto-4.3.4
Git Revision: 05d08b0bbaef760157c8d35a78d7405bc5ffce55
Release 4.2 (mickledore)
Release 4.2 (mickledore)
Migration notes for 4.2 (mickledore)
This section provides migration information for moving to the Yocto Project 4.2 Release (codename “mickledore”) from the prior release.
Supported distributions
This release supports running BitBake on new GNU/Linux distributions:
Fedora 36 and 37
AlmaLinux 8.7 and 9.1
OpenSuse 15.4
On the other hand, some earlier distributions are no longer supported:
Debian 10.x
Fedora 34 and 35
AlmaLinux 8.5
Python 3.8 is now the minimum required Python version version
BitBake and OpenEmbedded-Core now require Python 3.8 or newer, making it a requirement to use a distribution providing at least this version, or to install a buildtools tarball.
gcc 8.0 is now the minimum required GNU C compiler version
This version, released in 2018, is a minimum requirement
to build the mesa-native recipe and as the latter is in the
default dependency chain when building QEMU this has now been
made a requirement for all builds.
In the event that your host distribution does not provide this or a newer version of gcc, you can install a buildtools-extended tarball.
Fetching the NVD vulnerability database through the 2.0 API
This new version adds a new fetcher for the NVD database using the 2.0 API, as the 1.0 API will be retired in 2023.
The implementation changes as little as possible, keeping the current database format (but using a different database file for the transition period), with a notable exception of not using the META table.
Here are minor changes that you may notice:
The database starts in 1999 instead of 2002
The complete fetch is longer (30 minutes typically)
Rust: mandatory checksums for crates
This release now supports checksums for Rust crates and makes them mandatory for each crate in a recipe. See python3_bcrypt recipe changes for example.
The cargo-update-recipe-crates utility
has been extended
to include such checksums. So, in case you need to add the list of checksums
to a recipe just inheriting the cargo class so far, you can
follow these steps:
Make the recipe inherit cargo-update-recipe-crates
Remove all
crate://lines from the recipeCreate an empty
${BPN}-crates.incfile and make your recipe require itExecute
bitbake -c update_crates your_recipeCopy and paste the output of BitBake about the missing checksums into the
${BPN}-crates.incfile.
Python library code extensions
BitBake in this release now supports a new addpylib directive to enable
Python libraries within layers.
This directive should be added to your layer configuration
as in the below example from meta/conf/layer.conf:
addpylib ${LAYERDIR}/lib oe
Layers currently adding a lib directory to extend Python library code should now use this directive as BBPATH is not going to be added automatically by OE-Core in future. Note that the directives are immediate operations, so it does make modules available for use sooner than the current BBPATH-based approach.
For more information, see Extending Python Library Code.
Removed variables
The following variables have been removed:
SERIAL_CONSOLE, deprecated since version 2.6, replaced by SERIAL_CONSOLES.PACKAGEBUILDPKGD, a mostly internal variable in the package class was rarely used to customise packaging. If you were using this in your custom recipes or bbappends, you will need to switch to using PACKAGE_PREPROCESS_FUNCS or PACKAGESPLITFUNCS instead.
Removed recipes
The following recipes have been removed in this release:
python3-picobuild: after switching topython3-buildpython3-strict-rfc3339: unmaintained and not needed by anything in openembedded-core or meta-openembedded.linux-yocto: removed version 5.19 recipes (6.1 and 5.15 still provided)
Removed classes
The following classes have been removed in this release:
rust-bin: no longer usedpackage_tar: could not be used for actual packaging, and thus not particularly useful.
LAYERSERIES_COMPAT for custom layers and devtool workspace
Some layer maintainers have been setting LAYERSERIES_COMPAT in their
layer’s conf/layer.conf to the value of LAYERSERIES_CORENAMES to
effectively bypass the compatibility check - this is no longer permitted.
Layer maintainers should set LAYERSERIES_COMPAT appropriately to
help users understand the compatibility status of the layer.
Additionally, the LAYERSERIES_COMPAT value for the devtool workspace
layer is now set at the time of creation, thus if you upgrade with the
workspace layer enabled and you wish to retain it, you will need to manually
update the LAYERSERIES_COMPAT value in workspace/conf/layer.conf
(or remove the path from BBLAYERS in conf/bblayers.conf and
delete/move the workspace directory out of the way if you no longer
need it).
runqemu now limits slirp host port forwarding to localhost
With default slirp port forwarding configuration in runqemu, qemu previously listened on TCP ports 2222 and 2323 on all IP addresses available on the build host. Most use cases with runqemu only need it for localhost and it is not safe to run qemu images with root login without password enabled and listening on all available, possibly Internet reachable network interfaces. Thus, in this release we limit qemu port forwarding to localhost (127.0.0.1).
However, if you need the qemu machine to be reachable from the
network, then it can be enabled via conf/local.conf or machine
config variable QB_SLIRP_OPT:
QB_SLIRP_OPT = "-netdev user,id=net0,hostfwd=tcp::2222-:22"
Patch QA checks
The QA checks for patch fuzz and Upstream-Status have been reworked
slightly in this release. The Upstream-Status checking is now configurable
from WARN_QA / ERROR_QA (patch-status-core for the
core layer, and patch-status-noncore for other layers).
The patch-fuzz and patch-status-core checks are now in the default
value of ERROR_QA so that they will cause the build to fail
if triggered. If you prefer to avoid this you will need to adjust the value
of ERROR_QA in your configuration as desired.
Native/nativesdk mesa usage and graphics drivers
This release includes mesa 23.0, and with that mesa release it is not longer possible to use drivers from the host system, as mesa upstream has added strict checks for matching builds between drivers and libraries that load them.
This is particularly relevant when running QEMU built within the build system. A check has been added to runqemu so that there is a helpful error when there is no native/nativesdk opengl/virgl support available.
To support this, a number of drivers have been enabled when building mesa-native.
The one major dependency pulled in by this change is llvm-native which will
add a few minutes to the build on a modern machine. If this is undesirable, you
can set the value of DISTRO_FEATURES_NATIVE in your configuration such
that opengl is excluded.
Miscellaneous changes
The IMAGE_NAME variable is now set based on IMAGE_LINK_NAME. This means that if you are setting IMAGE_LINK_NAME to “” to disable unversioned image symlink creation, you also now need to set IMAGE_NAME to still have a reasonable value e.g.:
IMAGE_LINK_NAME = "" IMAGE_NAME = "${IMAGE_BASENAME}${IMAGE_MACHINE_SUFFIX}${IMAGE_VERSION_SUFFIX}"
In
/etc/os-release, theVERSION_CODENAMEfield is now used instead ofDISTRO_CODENAME(though its value is still set from the DISTRO_CODENAME variable) for better conformance to standard os-release usage. If you have runtime code reading this from/etc/os-releaseit may need to be updated.The kmod recipe now enables OpenSSL support by default in order to support module signing. If you do not need this and wish to reclaim some space/avoid the dependency you should set PACKAGECONFIG in a kmod bbappend (or
PACKAGECONFIG:pn-kmodat the configuration level) to excludeopenssl.The
OEBasicsignature handler (see BB_SIGNATURE_HANDLER) has been removed. It is unlikely that you would have selected to use this, but if you have you will need to remove this setting.The package class now checks if package names conflict via
PKG:${PN}override duringdo_package. If you receive the associated error you will need to address the PKG usage so that the conflict is resolved.openssh no longer uses RRECOMMENDS to pull in
rng-tools, since rngd is no longer needed as of Linux kernel 5.6. If you still needrng-toolsinstalled for other reasons, you should addrng-toolsexplicitly to your image. If you additionally need rngd to be started as a service you will also need to add therng-tools-servicepackage as that has been split out.The cups recipe no longer builds with the web interface enabled, saving ~1.8M of space in the final image. If you wish to enable it, you should set PACKAGECONFIG in a cups bbappend (or
PACKAGECONFIG:pn-cupsat the configuration level) to includewebif.The scons class now passes a
MAXLINELENGTHargument to scons in order to fix an issue with scons and command line lengths when ccache is enabled. However, some recipes may be using older scons versions which don’t support this argument. If that is the case you can set the following in the recipe in order to disable this:SCONS_MAXLINELENGTH = ""
Release notes for 4.2 (mickledore)
New Features / Enhancements in 4.2
Linux kernel 6.1, glibc 2.37 and ~350 other recipe upgrades
Python 3.8+ and GCC 8.0+ are now the minimum required versions on the build host. For host distributions that do not provide it, this is included as part of the buildtools tarball.
BitBake in this release now supports a new
addpylibdirective to enable Python libraries within layers. For more information, see Extending Python Library Code.This directive should be added to your layer configuration as in the below example from
meta/conf/layer.conf:addpylib ${LAYERDIR}/lib oeBitBake has seen multiple internal changes that may improve memory and disk usage as well as parsing time, in particular:
BitBake’s Cooker server is now multithreaded.
Ctrl+C can now be used to interrupt some long-running operations that previously ignored it.
BitBake’s cache has been extended to include more hash debugging data, but has also been optimized to compress cache data.
BitBake’s UI will now ping the server regularly to ensure it is still alive.
New variables:
VOLATILE_TMP_DIRallows to specify whether/tmpshould be on persistent storage or in RAM.SPDX_CUSTOM_ANNOTATION_VARS allows to add specific comments to the SPDX description of a recipe.
Rust improvements:
This release adds Cargo support on the target, and includes automated QA tests for this functionality.
It also supports checksums for Rust crates and makes them mandatory for each crate in a recipe.
New cargo-update-recipe-crates class to enable updating SRC_URI crate lists from
Cargo.lockEnabled building Rust for baremetal targets
You can now also easily select to build beta or nightly versions of Rust with a new RUST_CHANNEL variable (use at own risk)
Support for local GitHub repos in SRC_URI as replacements for Cargo dependencies
Use built-in Rust targets for
-nativebuilds to save several minutes building the Rust toolchain
Architecture-specific enhancements:
This release adds initial support for the LoongArch (
loongarch64) architecture, though there is no testing for it yet.New
x86-64-v3tunes (AVX, AVX2, BMI1, BMI2, F16C, FMA, LZCNT, MOVBE, XSAVE)go: add support to build on ppc64le
rust: rustfmt now working and installed for riscv32
libpng: enable NEON for aarch64 to ensure consistency with arm32.
baremetal-helloworld: Enable x86 and x86-64 ports
Kernel-related enhancements:
Added some support for building 6.2/6.3-rc kernels
linux-yocto-dev: mark as compatible with qemuarm64 and qemuarmv5
Add kernel specific OBJCOPY to help switching toolchains cleanly for kernel build between gcc and clang
New core recipes:
debugeditgtk4(import from meta-gnome)gcr: add recipe for gcr-4graphene(import from meta-oe)libc-testlibportal(import from meta-gnome)libslirplibtest-fatal-perllibtest-warnings-perl(import from meta-perl)libtry-tiny-perlpython3-buildpython3-pyproject-hookspython3-hatch-fancy-pypi-readmepython3-unittest-automake
QEMU/runqemu enhancements:
Set
QB_SMPwith ?= to make it easier to modifySet
QB_CPUwith ?= to make it easier to modify (x86 configuration only)New
QB_NFSROOTFS_EXTRA_OPTto allow extra options to be appended to the NFS rootfs options in kernel boot args, e.g."wsize=4096,rsize=4096"New
QB_SETUP_CMDandQB_CLEANUP_CMDto enable running custom shell setup and cleanup commands before and after QEMU.QB_DEFAULT_KERNELnow defaults to pick the bundled initramfs kernel image if the Linux kernel image is generated with INITRAMFS_IMAGE_BUNDLE set to “1”Split out the QEMU guest agent to its own
qemu-guest-agentpackagerunqemu: new
guestagentoption to enable communication with the guest agentrunqemu: respect IMAGE_LINK_NAME when searching for image
Image-related enhancements:
Add 7-Zip support in image conversion types (
7zip)New IMAGE_MACHINE_SUFFIX variable to allow easily removing machine name suffix from image file names
wic Image Creator enhancements:
bootimg-efi.py: add support for directly loading Linux kernel UEFI stubbootimg-efi.py: implement--include-pathAllow usage of
fstype=noneto specify an unformatted partitionImplement repeatable disk identifiers based on SOURCE_DATE_EPOCH
FIT image related improvements:
FIT image signing support has been reworked to remove interdependencies and make it more easily extensible
Skip FDT section creation for applicable symlinks to avoid the same dtb being duplicated
New FIT_CONF_DEFAULT_DTB variable to enable selecting default dtb when multiple dtbs exist
SDK-related improvements:
Extended the following recipes to nativesdk:
bcgi-docgengperfpython3-iniconfigpython3-atomicwritespython3-markdownpython3-smartypantspython3-typogrifyrubyunifdef
New SDK_ZIP_OPTIONS variable to enable passing additional options to the zip command when preparing the SDK zip archive
New Rust SDK target packagegroup (
packagegroup-rust-sdk-target)
Testing:
The ptest images have changed structure in this release. The underlying
core-image-ptestrecipe now uses BBCLASSEXTEND to create a variant for each ptest enabled recipe in OE-Core.For example, this means that
core-image-ptest-bzip2,core-image-ptest-lttng-toolsand many more image targets now exist and can be built/tested individually.The
core-image-ptest-allandcore-image-ptest-fasttargets are now wrappers that target groups of individual images and means that the tests can be executed in parallel during our automated testing. This also means the dependencies are more accurately tested.It is now possible to track regression changes between releases using yocto_testresults_query.py, which is a thin wrapper over resulttool. Here is an example command, which allowed to spot and fix a regression in the
quiltptest:yocto_testresults_query.py regression-report 4.2_M1 4.2_M2
See this blog post about regression detection.
This release adds support for parallel ptest execution with a ptest per image. This takes ptest execution time from 3.5 hours to around 45 minutes on the autobuilder.
Basic Rust compile/run and cargo tests
New
python3-unittest-automakerecipe which provides modules for pytest and unittest to adjust their output to automake-style for easier integration with the ptest system.ptest support added to
bc,cpioandgnutls, and fixes made to ptests in numerous other recipes.ptest-runnernow adds a non-root “ptest” user to run tests.resulttool: add a--list-ptestoption to the log subcommand to list ptest names in a results fileresulttool: regression: add metadata filtering for oeselftest
New PACKAGECONFIG options in the following recipes:
at-spi2-corebase-passwdcroniecupscurlfilegstreamer1.0-plugins-goodgtk+3iproute2libsdl2libtiffllvmmesapsmiscqemusudosystemdtiffutil-linux
Extended the following recipes to native:
iso-codeslibxkbcommonp11-kitpython3-atomicwritespython3-dbusmockpython3-iniconfigxkeyboard-config
Utility script changes:
devtool: ignore patch-fuzz errors when extracting source in order to enable fixing fuzz issuesoe-setup-layers: make efficiently idempotentoe-setup-layers: print a note about submodules if presentNew
buildstats-summaryscript to show a summary of the buildstats datareport-error class: catch
Nothing PROVIDESerrorcombo-layer: addsync-revscommandconvert-overrides: allow command-line customizations
bitbake-layers improvements:
layerindex-fetch: checkout layer(s) branch when clone existscreate: add-a/--add-layer optionto add layer tobblayers.confafter creating layershow-layers: improve output layout
Other BitBake improvements:
Inline Python snippets can now include dictionary expressions
Evaluate the value of export/unexport/network flags so that they can be reset to “0”
Make EXCLUDE_FROM_WORLD boolean so that it can be reset to “0”
Support int values in
bb.utils.to_boolean()in addition to stringsbitbake-getvar: Add aquietcommand line argumentAllow the
@character in variable flag namesPython library code will now be included when calculating task hashes
fetch2/npmsw: add more short forms for git operationsDisplay a warning when
SRCREV = "${AUTOREV}"is set too late to be effectiveDisplay all missing SRC_URI checksums at once
Improve error message for a missing multiconfig
Switch to a new BB_CACHEDIR variable for codeparser cache location
Mechanism introduced to reduce the codeparser cache unnecessarily growing in size
Packaging changes:
rng-toolsis no longer recommended byopenssh, and therng-toolsservice files have been split out to their own packagelinux-firmware: splitrtl8761andamdgpufirmwarelinux-firmware: add new firmware file to${PN}-qcom-adreno-a530iproute2: separaterouteland add Python dependencyxinetd: movexconv.plscript to separate packageperf: enable debug/source packaging
Prominent documentation updates:
Substantially expanded the “Checking for Vulnerabilities” section.
Added a new “Creating a Software Bill of Materials” section about SPDX SBoM generation.
Expanded “Selecting an Initialization Manager” documentation.
New section about Long Term Support Releases.
System Requirements: details about Minimum System RAM.
Details about Building a Meson Package and the meson class.
Documentation about how to write recipes for Rust programs. See the cargo class.
Documentation about how to write recipes for Go programs. See the go class.
Variable index: added references to variables only documented in the BitBake manual. All variables should be easy to access through the Yocto Manual variable index.
Expanded the description of the BB_NUMBER_THREADS variable.
Miscellaneous changes:
Supporting 64 bit dates on 32 bit platforms: several packages have been updated to pass year 2038 tests, and a QA check for 32 bit time and file offset functions has been added (default off)
Patch fuzz/Upstream-Status checking has been reworked:
Many packages were updated to add large file support.
vulkan-loader: allow headless targets to build the loaderdhcpcd: fix to work with systemdu-boot: add /boot to SYSROOT_DIRS to allow boot files to be used by other recipeslinux-firmware: don’t put the firmware into the sysrootcups: add PACKAGECONFIG to control web interface and default to offbuildtools-tarball: export certificates to python and curlyocto-check-layer: allow OE-Core to be testedyocto-check-layer: check for patch file upstream statusboost: enable buildingBoost.URLlibrarynative: drop special variable handlingPoky: make it easier to set INIT_MANAGER from local.conf
create-spdx: add support for custom annotations (SPDX_CUSTOM_ANNOTATION_VARS)
create-spdx: report downloads as separate packages
create-spdx: remove the top-level image SPDX file and the JSON index file from DEPLOYDIR to avoid confusion
os-release: replaceDISTRO_CODENAMEwithVERSION_CODENAME(still set from DISTRO_CODENAME)weston: add kiosk shelloverlayfs: Allow unused mount points
sstatesig: emit more helpful error message when not finding sstate manifestpypi.bbclass: Set SRC_URI downloadfilename with an optional prefix
poky-bleedingdistro: update and reworkpackage.bbclass: check if package names conflict via
PKG:${PN}override in do_packagecve-update-nvd2-native: new NVD CVE database fetcher using the 2.0 APImirrors class: use shallow tarball for
binutils-native/nativesdk-binutilsmeta/conf: move default configuration templates intometa/conf/templates/defaultbinutils: enable--enable-new-dtagsas per many Linux distributionsbase-files: droplocalhost.localdomainfrom hosts file as per many Linux distributionspackagegroup-core-boot: makeinit-ifupdownpackage a recommendation
Known Issues in 4.2
N/A
Recipe License changes in 4.2
The following corrections have been made to the LICENSE values set by recipes:
Security Fixes in 4.2
binutils: CVE-2022-4285, CVE-2023-25586
curl: CVE-2022-32221, CVE-2022-35260, CVE-2022-42915, CVE-2022-42916
epiphany: CVE-2023-26081
expat: CVE-2022-43680
ffmpeg: CVE-2022-3964, CVE-2022-3965
git: CVE-2022-39260, CVE-2022-41903, CVE-2022-23521, CVE-2022-41953 (ignored)
glibc: CVE-2023-25139 (ignored)
grub2: CVE-2022-2601, CVE-2022-3775, CVE-2022-28736
inetutils: CVE-2019-0053
less: CVE-2022-46663
libarchive: CVE-2022-36227
libinput: CVE-2022-1215
libpam: CVE-2022-28321
libpng: CVE-2019-6129
libx11: CVE-2022-3554
openssh: CVE-2023-28531
openssl: CVE-2022-3358, CVE-2022-3786, CVE-2022-3602, CVE-2022-3996, CVE-2023-0286, CVE-2022-4304, CVE-2022-4203, CVE-2023-0215, CVE-2022-4450, CVE-2023-0216, CVE-2023-0217, CVE-2023-0401, CVE-2023-0464
ppp: CVE-2022-4603
python3-cryptography{-vectors}: CVE-2022-3602, CVE-2022-3786, CVE-2023-23931
python3: CVE-2022-37460
qemu: CVE-2022-3165
rust: CVE-2022-46176
rxvt-unicode: CVE-2022-4170
screen: CVE-2023-24626
shadow: CVE-2023-29383, CVE-2016-15024 (ignored)
sudo: CVE-2022-43995
systemd: CVE-2022-4415 (ignored)
tar: CVE-2022-48303
tiff: CVE-2022-3599, CVE-2022-3597, CVE-2022-3626, CVE-2022-3627, CVE-2022-3570, CVE-2022-3598, CVE-2022-3970, CVE-2022-48281
vim: CVE-2022-3352, CVE-2022-4141, CVE-2023-0049, CVE-2023-0051, CVE-2023-0054, CVE-2023-0288, CVE-2023-1127, CVE-2023-1170, CVE-2023-1175, CVE-2023-1127, CVE-2023-1170, CVE-2023-1175, CVE-2023-1264, CVE-2023-1355, CVE-2023-0433, CVE-2022-47024, CVE-2022-3705
xdg-utils: CVE-2022-4055
xserver-xorg: CVE-2022-3550, CVE-2022-3551, CVE-2023-1393, CVE-2023-0494, CVE-2022-3553 (ignored)
Recipe Upgrades in 4.2
acpid: upgrade 2.0.33 -> 2.0.34
adwaita-icon-theme: update 42.0 -> 43
alsa-lib: upgrade 1.2.7.2 -> 1.2.8
alsa-ucm-conf: upgrade 1.2.7.2 -> 1.2.8
alsa-utils: upgrade 1.2.7 -> 1.2.8
apr: update 1.7.0 -> 1.7.2
apr-util: update 1.6.1 -> 1.6.3
argp-standalone: replace with a maintained fork
at-spi2-core: upgrade 2.44.1 -> 2.46.0
autoconf-archive: upgrade 2022.09.03 -> 2023.02.20
babeltrace: upgrade 1.5.8 -> 1.5.11
base-passwd: Update to 3.6.1
bash: update 5.1.16 -> 5.2.15
bind: upgrade 9.18.7 -> 9.18.12
binutils: Upgrade to 2.40 release
bluez: update 5.65 -> 5.66
boost-build-native: update 1.80.0 -> 1.81.0
boost: upgrade 1.80.0 -> 1.81.0
btrfs-tools: upgrade 5.19.1 -> 6.1.3
busybox: 1.35.0 -> 1.36.0
ccache: upgrade 4.6.3 -> 4.7.4
cmake: update 3.24.0 -> 3.25.2
cracklib: upgrade to v2.9.10
curl: upgrade 7.86.0 -> 8.0.1
dbus: upgrade 1.14.0 -> 1.14.6
diffoscope: upgrade 221 -> 236
diffstat: upgrade 1.64 -> 1.65
diffutils: update 3.8 -> 3.9
dos2unix: upgrade 7.4.3 -> 7.4.4
dpkg: update 1.21.9 -> 1.21.21
dropbear: upgrade 2022.82 -> 2022.83
dtc: upgrade 1.6.1 -> 1.7.0
e2fsprogs: upgrade 1.46.5 -> 1.47.0
ed: upgrade 1.18 -> 1.19
elfutils: update 0.187 -> 0.188
ell: upgrade 0.53 -> 0.56
enchant2: upgrade 2.3.3 -> 2.3.4
encodings: update 1.0.6 -> 1.0.7
epiphany: update 42.4 -> 43.1
ethtool: upgrade 5.19 -> 6.2
expat: upgrade to 2.5.0
ffmpeg: upgrade 5.1.1 -> 5.1.2
file: upgrade 5.43 -> 5.44
flac: update 1.4.0 -> 1.4.2
font-alias: update 1.0.4 -> 1.0.5
fontconfig: upgrade 2.14.0 -> 2.14.2
font-util: upgrade 1.3.3 -> 1.4.0
freetype: update 2.12.1 -> 2.13.0
gawk: update 5.1.1 -> 5.2.1
gcr3: update 3.40.0 -> 3.41.1
gcr: rename gcr -> gcr3
gdb: Upgrade to 13.1
gdk-pixbuf: upgrade 2.42.9 -> 2.42.10
gettext: update 0.21 -> 0.21.1
ghostscript: update 9.56.1 -> 10.0.0
gi-docgen: upgrade 2022.1 -> 2023.1
git: upgrade 2.37.3 -> 2.39.2
glib-2.0: update 2.72.3 -> 2.74.6
glibc: upgrade to 2.37 release + stable updates
glib-networking: update 2.72.2 -> 2.74.0
glslang: upgrade 1.3.236.0 -> 1.3.239.0
gnu-config: upgrade to latest revision
gnupg: upgrade 2.3.7 -> 2.4.0
gnutls: upgrade 3.7.7 -> 3.8.0
gobject-introspection: upgrade 1.72.0 -> 1.74.0
go: update 1.19 -> 1.20.1
grep: update 3.7 -> 3.10
gsettings-desktop-schemas: upgrade 42.0 -> 43.0
gstreamer1.0: upgrade 1.20.3 -> 1.22.0
gtk+3: upgrade 3.24.34 -> 3.24.36
gtk4: update 4.8.2 -> 4.10.0
harfbuzz: upgrade 5.1.0 -> 7.1.0
hdparm: update 9.64 -> 9.65
help2man: upgrade 1.49.2 -> 1.49.3
icu: update 71.1 -> 72-1
ifupdown: upgrade 0.8.37 -> 0.8.41
igt-gpu-tools: upgrade 1.26 -> 1.27.1
inetutils: upgrade 2.3 -> 2.4
init-system-helpers: upgrade 1.64 -> 1.65.2
iproute2: upgrade 5.19.0 -> 6.2.0
iptables: update 1.8.8 -> 1.8.9
iputils: update to 20221126
iso-codes: upgrade 4.11.0 -> 4.13.0
jquery: upgrade 3.6.0 -> 3.6.3
kexec-tools: upgrade 2.0.25 -> 2.0.26
kmscube: upgrade to latest revision
libarchive: upgrade 3.6.1 -> 3.6.2
libbsd: upgrade 0.11.6 -> 0.11.7
libcap: upgrade 2.65 -> 2.67
libdnf: update 0.69.0 -> 0.70.0
libdrm: upgrade 2.4.113 -> 2.4.115
libedit: upgrade 20210910-3.1 -> 20221030-3.1
libepoxy: update 1.5.9 -> 1.5.10
libffi: upgrade 3.4.2 -> 3.4.4
libfontenc: upgrade 1.1.6 -> 1.1.7
libgit2: upgrade 1.5.0 -> 1.6.3
libgpg-error: update 1.45 -> 1.46
libhandy: update 1.6.3 -> 1.8.1
libical: upgrade 3.0.14 -> 3.0.16
libice: update 1.0.10 -> 1.1.1
libidn2: upgrade 2.3.3 -> 2.3.4
libinput: upgrade 1.19.4 -> 1.22.1
libjpeg-turbo: upgrade 2.1.4 -> 2.1.5.1
libksba: upgrade 1.6.0 -> 1.6.3
libmicrohttpd: upgrade 0.9.75 -> 0.9.76
libmodule-build-perl: update 0.4231 -> 0.4232
libmpc: upgrade 1.2.1 -> 1.3.1
libnewt: update 0.52.21 -> 0.52.23
libnotify: upgrade 0.8.1 -> 0.8.2
libpcap: upgrade 1.10.1 -> 1.10.3
libpciaccess: update 0.16 -> 0.17
libpcre2: upgrade 10.40 -> 10.42
libpipeline: upgrade 1.5.6 -> 1.5.7
libpng: upgrade 1.6.38 -> 1.6.39
libpsl: upgrade 0.21.1 -> 0.21.2
librepo: upgrade 1.14.5 -> 1.15.1
libsdl2: upgrade 2.24.1 -> 2.26.3
libsm: 1.2.3 > 1.2.4
libsndfile1: upgrade 1.1.0 -> 1.2.0
libsolv: upgrade 0.7.22 -> 0.7.23
libsoup-2.4: upgrade 2.74.2 -> 2.74.3
libsoup: upgrade 3.0.7 -> 3.2.2
libtest-fatal-perl: upgrade 0.016 -> 0.017
libtest-needs-perl: upgrade 0.002009 -> 0.002010
libunistring: upgrade 1.0 -> 1.1
liburcu: upgrade 0.13.2 -> 0.14.0
liburi-perl: upgrade 5.08 -> 5.17
libva: upgrade 2.15.0 -> 2.16.0
libva-utils: upgrade 2.15.0 -> 2.17.1
libwebp: upgrade 1.2.4 -> 1.3.0
libwpe: upgrade 1.12.3 -> 1.14.1
libx11: 1.8.1 -> 1.8.4
libx11-compose-data: 1.6.8 -> 1.8.4
libxau: upgrade 1.0.10 -> 1.0.11
libxcomposite: update 0.4.5 -> 0.4.6
libxcrypt-compat: upgrade 4.4.30 -> 4.4.33
libxcrypt: upgrade 4.4.28 -> 4.4.30
libxdamage: update 1.1.5 -> 1.1.6
libxdmcp: update 1.1.3 -> 1.1.4
libxext: update 1.3.4 -> 1.3.5
libxft: update 2.3.4 -> 2.3.6
libxft: upgrade 2.3.6 -> 2.3.7
libxinerama: update 1.1.4 -> 1.1.5
libxkbcommon: upgrade 1.4.1 -> 1.5.0
libxkbfile: update 1.1.0 -> 1.1.1
libxkbfile: upgrade 1.1.1 -> 1.1.2
libxml2: upgrade 2.9.14 -> 2.10.3
libxmu: update 1.1.3 -> 1.1.4
libxpm: update 3.5.13 -> 3.5.15
libxrandr: update 1.5.2 -> 1.5.3
libxrender: update 0.9.10 -> 0.9.11
libxres: update 1.2.1 -> 1.2.2
libxscrnsaver: update 1.2.3 -> 1.2.4
libxshmfence: update 1.3 -> 1.3.2
libxslt: upgrade 1.1.35 -> 1.1.37
libxtst: update 1.2.3 -> 1.2.4
libxv: update 1.0.11 -> 1.0.12
libxxf86vm: update 1.1.4 -> 1.1.5
lighttpd: upgrade 1.4.66 -> 1.4.69
linux-firmware: upgrade 20220913 -> 20230210
linux-libc-headers: bump to 6.1
linux-yocto/5.15: update genericx86* machines to v5.15.103
linux-yocto/5.15: update to v5.15.108
linux-yocto/6.1: update to v6.1.25
linux-yocto-dev: bump to v6.3
linux-yocto-rt/5.15: update to -rt59
linux-yocto-rt/6.1: update to -rt7
llvm: update 14.0.6 -> 15.0.7
log4cplus: upgrade 2.0.8 -> 2.1.0
logrotate: upgrade 3.20.1 -> 3.21.0
lsof: upgrade 4.95.0 -> 4.98.0
ltp: upgrade 20220527 -> 20230127
lttng-modules: upgrade 2.13.4 -> 2.13.9
lttng-tools: update 2.13.8 -> 2.13.9
lttng-ust: upgrade 2.13.4 -> 2.13.5
makedepend: upgrade 1.0.6 -> 1.0.8
make: update 4.3 -> 4.4.1
man-db: update 2.10.2 -> 2.11.2
man-pages: upgrade 5.13 -> 6.03
matchbox-config-gtk: Update to latest SRCREV
matchbox-desktop-2: Update 2.2 -> 2.3
matchbox-panel-2: Update 2.11 -> 2.12
matchbox-terminal: Update to latest SRCREV
matchbox-wm: Update 1.2.2 -> 1.2.3
mc: update 4.8.28 -> 4.8.29
mesa: update 22.2.0 -> 23.0.0
meson: upgrade 0.63.2 -> 1.0.1
mmc-utils: upgrade to latest revision
mobile-broadband-provider-info: upgrade 20220725 -> 20221107
mpfr: upgrade 4.1.0 -> 4.2.0
mpg123: upgrade 1.30.2 -> 1.31.2
msmtp: upgrade 1.8.22 -> 1.8.23
mtd-utils: upgrade 2.1.4 -> 2.1.5
mtools: upgrade 4.0.40 -> 4.0.42
musl-obstack: Update to 1.2.3
musl: Upgrade to latest master
nasm: update 2.15.05 -> 2.16.01
ncurses: upgrade 6.3+20220423 -> 6.4
netbase: upgrade 6.3 -> 6.4
newlib: Upgrade 4.2.0 -> 4.3.0
nghttp2: upgrade 1.49.0 -> 1.52.0
numactl: upgrade 2.0.15 -> 2.0.16
opensbi: Upgrade to 1.2 release
openssh: upgrade 9.0p1 -> 9.3p1
openssl: Upgrade 3.0.5 -> 3.1.0
opkg: upgrade to version 0.6.1
orc: upgrade 0.4.32 -> 0.4.33
ovmf: upgrade edk2-stable202205 -> edk2-stable202211
pango: upgrade 1.50.9 -> 1.50.13
patchelf: upgrade 0.15.0 -> 0.17.2
pciutils: upgrade 3.8.0 -> 3.9.0
piglit: upgrade to latest revision
pinentry: update 1.2.0 -> 1.2.1
pixman: upgrade 0.40.0 -> 0.42.2
pkgconf: upgrade 1.9.3 -> 1.9.4
popt: update 1.18 -> 1.19
powertop: upgrade 2.14 -> 2.15
procps: update 3.3.17 -> 4.0.3
psmisc: upgrade 23.5 -> 23.6
puzzles: upgrade to latest revision
python3-alabaster: upgrade 0.7.12 -> 0.7.13
python3-attrs: upgrade 22.1.0 -> 22.2.0
python3-babel: upgrade 2.10.3 -> 2.12.1
python3-bcrypt: upgrade 3.2.2 -> 4.0.1
python3-certifi: upgrade 2022.9.14 -> 2022.12.7
python3-chardet: upgrade 5.0.0 -> 5.1.0
python3-cryptography: upgrade 38.0.3 -> 39.0.4
python3-cryptography-vectors: upgrade 37.0.4 -> 39.0.2
python3-cython: upgrade 0.29.32 -> 0.29.33
python3-dbusmock: update 0.28.4 -> 0.28.7
python3-dbus: upgrade 1.2.18 -> 1.3.2
python3-dtschema: upgrade 2022.8.3 -> 2023.1
python3-flit-core: upgrade 3.7.1 -> 3.8.0
python3-gitdb: upgrade 4.0.9 -> 4.0.10
python3-git: upgrade 3.1.27 -> 3.1.31
python3-hatch-fancy-pypi-readme: upgrade 22.7.0 -> 22.8.0
python3-hatchling: upgrade 1.9.0 -> 1.13.0
python3-hatch-vcs: upgrade 0.2.0 -> 0.3.0
python3-hypothesis: upgrade 6.54.5 -> 6.68.2
python3-importlib-metadata: upgrade 4.12.0 -> 6.0.0
python3-iniconfig: upgrade 1.1.1 -> 2.0.0
python3-installer: update 0.5.1 -> 0.6.0
python3-iso8601: upgrade 1.0.2 -> 1.1.0
python3-jsonschema: upgrade 4.9.1 -> 4.17.3
python3-lxml: upgrade 4.9.1 -> 4.9.2
python3-mako: upgrade 1.2.2 -> 1.2.4
python3-markupsafe: upgrade 2.1.1 -> 2.1.2
python3-more-itertools: upgrade 8.14.0 -> 9.1.0
python3-numpy: upgrade 1.23.3 -> 1.24.2
python3-packaging: upgrade to 23.0
python3-pathspec: upgrade 0.10.1 -> 0.11.0
python3-pbr: upgrade 5.10.0 -> 5.11.1
python3-pip: upgrade 22.2.2 -> 23.0.1
python3-poetry-core: upgrade 1.0.8 -> 1.5.2
python3-psutil: upgrade 5.9.2 -> 5.9.4
python3-pycairo: upgrade 1.21.0 -> 1.23.0
python3-pycryptodome: upgrade 3.15.0 -> 3.17
python3-pycryptodomex: upgrade 3.15.0 -> 3.17
python3-pygments: upgrade 2.13.0 -> 2.14.0
python3-pyopenssl: upgrade 22.0.0 -> 23.0.0
python3-pyrsistent: upgrade 0.18.1 -> 0.19.3
python3-pytest-subtests: upgrade 0.8.0 -> 0.10.0
python3-pytest: upgrade 7.1.3 -> 7.2.2
python3-pytz: upgrade 2022.2.1 -> 2022.7.1
python3-requests: upgrade 2.28.1 -> 2.28.2
python3-scons: upgrade 4.4.0 -> 4.5.2
python3-setuptools-rust: upgrade 1.5.1 -> 1.5.2
python3-setuptools-scm: upgrade 7.0.5 -> 7.1.0
python3-setuptools: upgrade 65.0.2 -> 67.6.0
python3-sphinxcontrib-applehelp: update 1.0.2 -> 1.0.4
python3-sphinxcontrib-htmlhelp: 2.0.0 -> 2.0.1
python3-sphinx-rtd-theme: upgrade 1.0.0 -> 1.2.0
python3-sphinx: upgrade 5.1.1 -> 6.1.3
python3-subunit: upgrade 1.4.0 -> 1.4.2
python3-testtools: upgrade 2.5.0 -> 2.6.0
python3-typing-extensions: upgrade 4.3.0 -> 4.5.0
python3: update 3.10.6 -> 3.11.2
python3-urllib3: upgrade 1.26.12 -> 1.26.15
python3-wcwidth: upgrade 0.2.5 -> 0.2.6
python3-wheel: upgrade 0.37.1 -> 0.40.0
python3-zipp: upgrade 3.8.1 -> 3.15.0
qemu: update 7.1.0 -> 7.2.0
quota: update 4.06 -> 4.09
readline: update 8.1.2 -> 8.2
repo: upgrade 2.29.2 -> 2.32
rgb: update 1.0.6 -> 1.1.0
rng-tools: upgrade 6.15 -> 6.16
rsync: update 3.2.5 -> 3.2.7
rt-tests: update 2.4 -> 2.5
ruby: update 3.1.2 -> 3.2.1
rust: update 1.63.0 -> 1.68.1
rxvt-unicode: upgrade 9.30 -> 9.31
sed: update 4.8 -> 4.9
shaderc: upgrade 2022.2 -> 2023.2
shadow: update 4.12.1 -> 4.13
socat: upgrade 1.7.4.3 -> 1.7.4.4
spirv-headers: upgrade 1.3.236.0 -> 1.3.239.0
spirv-tools: upgrade 1.3.236.0 -> 1.3.239.0
sqlite3: upgrade 3.39.3 -> 3.41.0
strace: upgrade 5.19 -> 6.2
stress-ng: update 0.14.03 -> 0.15.06
sudo: upgrade 1.9.11p3 -> 1.9.13p3
swig: update 4.0.2 -> 4.1.1
sysstat: upgrade 12.6.0 -> 12.6.2
systemd: update 251.4 -> 253.1
systemtap: upgrade 4.7 -> 4.8
taglib: upgrade 1.12 -> 1.13
tcf-agent: Update to current version
tcl: update 8.6.11 -> 8.6.13
texinfo: update 6.8 -> 7.0.2
tiff: update 4.4.0 -> 4.5.0
tzdata: update 2022d -> 2023c
u-boot: upgrade 2022.07 -> 2023.01
unfs: update 0.9.22 -> 0.10.0
usbutils: upgrade 014 -> 015
util-macros: upgrade 1.19.3 -> 1.20.0
vala: upgrade 0.56.3 -> 0.56.4
valgrind: update to 3.20.0
vim: Upgrade 9.0.0598 -> 9.0.1429
virglrenderer: upgrade 0.10.3 -> 0.10.4
vte: update 0.68.0 -> 0.72.0
vulkan-headers: upgrade 1.3.236.0 -> 1.3.239.0
vulkan-loader: upgrade 1.3.236.0 -> 1.3.239.0
vulkan-samples: update to latest revision
vulkan-tools: upgrade 1.3.236.0 -> 1.3.239.0
vulkan: update 1.3.216.0 -> 1.3.236.0
wayland-protocols: upgrade 1.26 -> 1.31
wayland-utils: update 1.0.0 -> 1.1.0
webkitgtk: update 2.36.7 -> 2.38.5
weston: update 10.0.2 -> 11.0.1
wireless-regdb: upgrade 2022.08.12 -> 2023.02.13
wpebackend-fdo: upgrade 1.12.1 -> 1.14.0
xcb-util: update 0.4.0 -> 0.4.1
xcb-util-keysyms: 0.4.0 -> 0.4.1
xcb-util-renderutil: 0.3.9 -> 0.3.10
xcb-util-wm: 0.4.1 -> 0.4.2
xcb-util-image: 0.4.0 -> 0.4.1
xf86-input-mouse: update 1.9.3 -> 1.9.4
xf86-input-vmmouse: update 13.1.0 -> 13.2.0
xf86-video-vesa: update 2.5.0 -> 2.6.0
xf86-video-vmware: update 13.3.0 -> 13.4.0
xhost: update 1.0.8 -> 1.0.9
xinit: update 1.4.1 -> 1.4.2
xkbcomp: update 1.4.5 -> 1.4.6
xkeyboard-config: upgrade 2.36 -> 2.38
xprop: update 1.2.5 -> 1.2.6
xrandr: upgrade 1.5.1 -> 1.5.2
xserver-xorg: upgrade 21.1.4 -> 21.1.7
xset: update 1.2.4 -> 1.2.5
xvinfo: update 1.1.4 -> 1.1.5
xwayland: upgrade 22.1.3 -> 22.1.8
xz: upgrade 5.2.6 -> 5.4.2
zlib: upgrade 1.2.12 -> 1.2.13
zstd: upgrade 1.5.2 -> 1.5.4
Contributors to 4.2
Thanks to the following people who contributed to this release:
Adrian Freihofer
Ahmad Fatoum
Alejandro Hernandez Samaniego
Alexander Kanavin
Alexandre Belloni
Alexey Smirnov
Alexis Lothoré
Alex Kiernan
Alex Stewart
Andrej Valek
Andrew Geissler
Anton Antonov
Antonin Godard
Archana Polampalli
Armin Kuster
Arnout Vandecappelle
Arturo Buzarra
Atanas Bunchev
Benjamin Szőke
Benoît Mauduit
Bernhard Rosenkränzer
Bruce Ashfield
Caner Altinbasak
Carlos Alberto Lopez Perez
Changhyeok Bae
Changqing Li
Charlie Johnston
Chase Qi
Chee Yang Lee
Chen Qi
Chris Elledge
Christian Eggers
Christoph Lauer
Chuck Wolber
Ciaran Courtney
Claus Stovgaard
Clément Péron
Daniel Ammann
David Bagonyi
Denys Dmytriyenko
Denys Zagorui
Diego Sueiro
Dmitry Baryshkov
Ed Tanous
Enguerrand de Ribaucourt
Enrico Jörns
Enrico Scholz
Etienne Cordonnier
Fabio Estevam
Fabre Sébastien
Fawzi KHABER
Federico Pellegrin
Frank de Brabander
Frederic Martinsons
Geoffrey GIRY
George Kelly
Harald Seiler
He Zhe
Hitendra Prajapati
Jagadeesh Krishnanjanappa
James Raphael Tiovalen
Jan Kircher
Jan Luebbe
Jan-Simon Moeller
Javier Tia
Jeremy Puhlman
Jermain Horsman
Jialing Zhang
Joel Stanley
Joe Slater
Johan Korsnes
Jon Mason
Jordan Crouse
Jose Quaresma
Joshua Watt
Justin Bronder
Kai Kang
Kasper Revsbech
Keiya Nobuta
Kenfe-Mickael Laventure
Kevin Hao
Khem Raj
Konrad Weihmann
Lei Maohui
Leon Anavi
Liam Beguin
Louis Rannou
Luca Boccassi
Luca Ceresoli
Luis Martins
Maanya Goenka
Marek Vasut
Mark Asselstine
Mark Hatle
Markus Volk
Marta Rybczynska
Martin Jansa
Martin Larsson
Mateusz Marciniec
Mathieu Dubois-Briand
Mauro Queiros
Maxim Uvarov
Michael Halstead
Michael Opdenacker
Mike Crowe
Mikko Rapeli
Ming Liu
Mingli Yu
Narpat Mali
Nathan Rossi
Niko Mauno
Ola x Nilsson
Oliver Lang
Ovidiu Panait
Pablo Saavedra
Patrick Williams
Paul Eggleton
Paulo Neves
Pavel Zhukov
Pawel Zalewski
Pedro Baptista
Peter Bergin
Peter Kjellerstedt
Peter Marko
Petr Kubizňák
Petr Vorel
pgowda
Piotr Łobacz
Quentin Schulz
Randy MacLeod
Ranjitsinh Rathod
Ravineet Singh
Ravula Adhitya Siddartha
Richard Elberger
Richard Leitner
Richard Purdie
Robert Andersson
Robert Joslyn
Robert Yang
Romuald JEANNE
Ross Burton
Ryan Eatmon
Sakib Sajal
Sandeep Gundlupet Raju
Saul Wold
Sean Anderson
Sergei Zhmylev
Siddharth Doshi
Soumya
Sudip Mukherjee
Sundeep KOKKONDA
Teoh Jay Shen
Thomas De Schampheleire
Thomas Perrot
Thomas Roos
Tim Orling
Tobias Hagelborn
Tom Hochstein
Trevor Woerner
Ulrich Ölmann
Vincent Davis Jr
Vivek Kumbhar
Vyacheslav Yurkov
Wang Mingyu
Wentao Zhang
Xiangyu Chen
Xiaotian Wu
Yan Xinkuan
Yash Shinde
Yi Zhao
Yoann Congal
Yureka Lilian
Zang Ruochen
Zheng Qiu
Zheng Ruoqin
Zoltan Boszormenyi
张忠山
Repositories / Downloads for Yocto-4.2
poky
Repository Location: https://git.yoctoproject.org/poky
Branch: mickledore
Tag: yocto-4.2
Git Revision: 21790e71d55f417f27cd51fae9dd47549758d4a0
Release Artefact: poky-21790e71d55f417f27cd51fae9dd47549758d4a0
sha: 38606076765d912deec84e523403709ef1249122197e61454ae08818e60f83c2
Download Locations: http://downloads.yoctoproject.org/releases/yocto/yocto-4.2/poky-21790e71d55f417f27cd51fae9dd47549758d4a0.tar.bz2 http://mirrors.kernel.org/yocto/yocto/yocto-4.2/poky-21790e71d55f417f27cd51fae9dd47549758d4a0.tar.bz2
openembedded-core
Repository Location: https://git.openembedded.org/openembedded-core
Branch: mickledore
Tag: yocto-4.2
Git Revision: c57d1a561db563ed2f521bbac5fc12d4ac8e11a7
Release Artefact: oecore-c57d1a561db563ed2f521bbac5fc12d4ac8e11a7
sha: e8cdd870492017be7e7b74b8c2fb73ae6771b2d2125b2aa1f0e65d0689f96af8
Download Locations: http://downloads.yoctoproject.org/releases/yocto/yocto-4.2/oecore-c57d1a561db563ed2f521bbac5fc12d4ac8e11a7.tar.bz2 http://mirrors.kernel.org/yocto/yocto/yocto-4.2/oecore-c57d1a561db563ed2f521bbac5fc12d4ac8e11a7.tar.bz2
meta-mingw
Repository Location: https://git.yoctoproject.org/meta-mingw
Branch: mickledore
Tag: yocto-4.2
Git Revision: 250617ffa524c082b848487359b9d045703d59c2
Release Artefact: meta-mingw-250617ffa524c082b848487359b9d045703d59c2
sha: 873a97dfd5ed6fb26e1f6a2ddc2c0c9d7a7b3c7f5018588e912294618775c323
Download Locations: http://downloads.yoctoproject.org/releases/yocto/yocto-4.2/meta-mingw-250617ffa524c082b848487359b9d045703d59c2.tar.bz2 http://mirrors.kernel.org/yocto/yocto/yocto-4.2/meta-mingw-250617ffa524c082b848487359b9d045703d59c2.tar.bz2
bitbake
Repository Location: https://git.openembedded.org/bitbake
Branch: 2.4
Tag: yocto-4.2
Git Revision: d97d62e2cbe4bae17f0886f3b4759e8f9ba6d38c
Release Artefact: bitbake-d97d62e2cbe4bae17f0886f3b4759e8f9ba6d38c
sha: 5edcb97cb545011226b778355bb840ebcc790552d4a885a0d83178153697ba7a
Download Locations: http://downloads.yoctoproject.org/releases/yocto/yocto-4.2/bitbake-d97d62e2cbe4bae17f0886f3b4759e8f9ba6d38c.tar.bz2 http://mirrors.kernel.org/yocto/yocto/yocto-4.2/bitbake-d97d62e2cbe4bae17f0886f3b4759e8f9ba6d38c.tar.bz2
yocto-docs
Repository Location: https://git.yoctoproject.org/yocto-docs
Branch: mickledore
Tag: yocto-4.2
Git Revision: 4d6807e34adf5d92d9b6e5852736443a867c78fa
Release notes for Yocto-4.2.1 (Mickledore)
Security Fixes in Yocto-4.2.1
connman: Fix CVE-2023-28488
linux-yocto: Ignore CVE-2023-1652 and CVE-2023-1829
ghostscript: Fix CVE-2023-28879
qemu: Ignore CVE-2023-0664
ruby: Fix CVE-2022-28738 and CVE-2022-28739
tiff: Fix CVE-2022-4645
xwayland: Fix CVE-2023-1393
Fixes in Yocto-4.2.1
apr: upgrade to 1.7.3
bind: upgrade to 9.18.13
build-appliance-image: Update to mickledore head revision
cargo: Fix build on musl/riscv
cpio: fix appending to archives larger than 2GB
cracklib: upgrade to 2.9.11
cve-update-nvd2-native: added the missing http import
dev-manual: init-manager.rst: add summary
dhcpcd: use git instead of tarballs
docs: add support for mickledore (4.2) release
gawk: Add skipped.txt to emit test to ignore
gawk: Disable known ptest fails on musl
gawk: Remove redundant patch
glib-networking: Add test retry to avoid failures
glib-networking: Correct glib error handling in test patch
gtk4: upgrade to 4.10.3
kernel-devsrc: depend on python3-core instead of python3
kernel-fitimage: Fix the default dtb config check
kernel: improve initramfs bundle processing time
libarchive: Enable acls, xattr for native as well as target
libhandy: upgrade to 1.8.2
libnotify: remove dependency dbus
libpam: Fix the xtests/tst-pam_motd[1|3] failures
libpcap: upgrade to 1.10.4
libsdl2: upgrade to 2.26.5
libxml2: Disable icu tests on musl
license.bbclass: Include LICENSE in the output when it fails to parse
linux-firmware: upgrade to 20230404
machine/qemuarm*: don’t explicitly set vmalloc
maintainers.inc: Fix email address typo
maintainers.inc: Move repo to unassigned
man-pages: upgrade to 6.04
manuals: document SPDX_CUSTOM_ANNOTATION_VARS
manuals: expand init manager documentation
mesa: upgrade to 23.0.3
migration-guides: add release-notes for 4.1.4
migration-guides: fixes and improvements to 4.2 release notes
migration-guides: release-notes-4.0.9.rst: add missing SPDX info
migration-guides: release-notes-4.2: add doc improvement highlights
mpg123: upgrade to 1.31.3
mtools: upgrade to 4.0.43
oeqa/utils/metadata.py: Fix running oe-selftest running with no distro set
overview-manual: development-environment: update text and screenshots
overview-manual: update section about source archives
package_manager/ipk: fix config path generation in _create_custom_config()
pango: upgrade to 1.50.14
perl: patch out build paths from native binaries
poky.conf: bump version for 4.2.1 release
populate_sdk_ext.bbclass: redirect stderr to stdout so that both end in LOGFILE
populate_sdk_ext.bbclass: set METADATA_REVISION with an DISTRO override
python3targetconfig.bbclass: Extend PYTHONPATH instead of overwriting
qemu: Add fix for powerpc instruction fallback issue
qemu: Update ppc instruction fix to match revised upstream version
quilt: Fix merge.test race condition
recipes: Default to https git protocol where possible
ref-manual: add “Mixin” term
ref-manual: classes.rst: document devicetree.bbclass
ref-manual: classes: kernel: document automatic defconfig usage
ref-manual: classes: kernel: remove incorrect sentence opening
ref-manual: remove unused and obsolete file
ref-manual: system-requirements.rst: fix AlmaLinux variable name
ref-manual: variables.rst: add wikipedia shortcut for “getty”
ref-manual: variables.rst: document KERNEL_DANGLING_FEATURES_WARN_ONLY
ref-manual: variables.rst: don’t mention the INIT_MANAGER “none” option
release-notes-4.2: remove/merge duplicates entries
release-notes-4.2: update RC3 changes
release-notes-4.2: update known issues and Repositories/Downloads
releases.svg: fix and explain duration of Hardknott 3.3
ruby: upgrade to 3.2.2
rust: upgrade to 1.68.2
selftest/distrodata: clean up exception lists in recipe maintainers test
systemd-systemctl: fix instance template WantedBy symlink construction
texinfo: upgrade to 7.0.3
unfs3: fix symlink time setting issue
update-alternatives.bbclass: fix old override syntax
vala: upgrade to 0.56.6
waffle: upgrade to 1.7.2
weston: add xwayland to DEPENDS for PACKAGECONFIG xwayland
wpebackend-fdo: upgrade to 1.14.2
xserver-xorg: upgrade to 21.1.8
xwayland: upgrade to 23.1.1
Known Issues in Yocto-4.2.1
N/A
Contributors to Yocto-4.2.1
Alex Kiernan
Alexander Kanavin
Arslan Ahmad
Bruce Ashfield
Chen Qi
Dmitry Baryshkov
Enrico Jörns
Jan Vermaete
Joe Slater
Johannes Schrimpf
Kai Kang
Khem Raj
Kyle Russell
Lee Chee Yang
Luca Ceresoli
Markus Volk
Martin Jansa
Martin Siegumfeldt
Michael Halstead
Michael Opdenacker
Ming Liu
Otavio Salvador
Pawan Badganchi
Peter Bergin
Peter Kjellerstedt
Piotr Łobacz
Richard Purdie
Ross Burton
Steve Sakoman
Thomas Roos
Virendra Thakur
Wang Mingyu
Yoann Congal
Zhixiong Chi
Repositories / Downloads for Yocto-4.2.1
poky
Repository Location: https://git.yoctoproject.org/poky
Branch: mickledore
Tag: yocto-4.2.1
Git Revision: c5c69f78fc7ce4ba361363c14352e4264ce7813f
Release Artefact: poky-c5c69f78fc7ce4ba361363c14352e4264ce7813f
sha: 057d7771dceebb949a79359d7d028a733a29ae7ecd98b60fefcff83fecb22eb7
Download Locations: http://downloads.yoctoproject.org/releases/yocto/yocto-4.2.1/poky-c5c69f78fc7ce4ba361363c14352e4264ce7813f.tar.bz2 http://mirrors.kernel.org/yocto/yocto/yocto-4.2.1/poky-c5c69f78fc7ce4ba361363c14352e4264ce7813f.tar.bz2
openembedded-core
Repository Location: https://git.openembedded.org/openembedded-core
Branch: mickledore
Tag: yocto-4.2.1
Git Revision: 20cd64812d286c920bd766145ab1cd968e72667e
Release Artefact: oecore-20cd64812d286c920bd766145ab1cd968e72667e
sha: 877fb909af7aa51e1c962d33cfe91ba3e075c384716006aa1345b4bcb15a48ef
Download Locations: http://downloads.yoctoproject.org/releases/yocto/yocto-4.2.1/oecore-20cd64812d286c920bd766145ab1cd968e72667e.tar.bz2 http://mirrors.kernel.org/yocto/yocto/yocto-4.2.1/oecore-20cd64812d286c920bd766145ab1cd968e72667e.tar.bz2
meta-mingw
Repository Location: https://git.yoctoproject.org/meta-mingw
Branch: mickledore
Tag: yocto-4.2.1
Git Revision: cc9fd0a988dc1041035a6a6cafb2d1237ef38d8e
Release Artefact: meta-mingw-cc9fd0a988dc1041035a6a6cafb2d1237ef38d8e
sha: 69ccc3ee503b5c35602889e85d28df64a5422ad0f1e55c96c94135b837bb4a1c
Download Locations: http://downloads.yoctoproject.org/releases/yocto/yocto-4.2.1/meta-mingw-cc9fd0a988dc1041035a6a6cafb2d1237ef38d8e.tar.bz2 http://mirrors.kernel.org/yocto/yocto/yocto-4.2.1/meta-mingw-cc9fd0a988dc1041035a6a6cafb2d1237ef38d8e.tar.bz2
bitbake
Repository Location: https://git.openembedded.org/bitbake
Branch: 2.4
Tag: yocto-4.2.1
Git Revision: d97d62e2cbe4bae17f0886f3b4759e8f9ba6d38c
Release Artefact: bitbake-d97d62e2cbe4bae17f0886f3b4759e8f9ba6d38c
sha: 5edcb97cb545011226b778355bb840ebcc790552d4a885a0d83178153697ba7a
Download Locations: http://downloads.yoctoproject.org/releases/yocto/yocto-4.2.1/bitbake-d97d62e2cbe4bae17f0886f3b4759e8f9ba6d38c.tar.bz2 http://mirrors.kernel.org/yocto/yocto/yocto-4.2.1/bitbake-d97d62e2cbe4bae17f0886f3b4759e8f9ba6d38c.tar.bz2
yocto-docs
Repository Location: https://git.yoctoproject.org/yocto-docs
Branch: mickledore
Tag: yocto-4.2.1
Git Revision: 6b04269bba72311e83139cc88b7a3539a5d832e8
Release notes for Yocto-4.2.2 (Mickledore)
Security Fixes in Yocto-4.2.2
binutils: Fix CVE-2023-1972
cups: Fix CVE-2023-32324
curl: Fix CVE-2023-28319, CVE-2023-28320, CVE-2023-28321 and CVE-2023-28322
dbus: Fix CVE-2023-34969
git: Fix CVE-2023-25652 and CVE-2023-29007
git: Ignore CVE-2023-25815
libwebp: Fix CVE-2023-1999
libxml2: Fix CVE-2023-28484 and CVE-2023-29469
libxpm: Fix CVE-2022-44617
ninja: Ignore CVE-2021-4336
openssl: Fix CVE-2023-0464, CVE-2023-0465, CVE-2023-0466, CVE-2023-1255 and CVE-2023-2650
perl: Fix CVE-2023-31484 and CVE-2023-31486
sysstat: Fix CVE-2023-33204
tiff: Fix CVE-2023-25434, CVE-2023-26965 and CVE-2023-2731
vim: Fix CVE-2023-2426
Fixes in Yocto-4.2.2
apr: Upgrade to 1.7.4
avahi: fix D-Bus introspection
babeltrace2: Always use BFD linker when building tests with ld-is-lld distro feature
babeltrace2: Upgrade to 2.0.5
baremetal-helloworld: Update SRCREV to fix entry addresses for ARM architectures
bind: Upgrade to 9.18.15
binutils: move packaging of gprofng static lib into common .inc
binutils: package static libs from gprofng
binutils: stable 2.40 branch updates (7343182dd1)
bitbake.conf: add unzstd in HOSTTOOLS
bitbake: runqueue: Fix deferred task/multiconfig race issue
bno_plot.py, btt_plot.py: Ask for python3 specifically
build-appliance-image: Update to mickledore head revision
busybox: Upgrade to 1.36.1
cmake.bbclass: do not search host paths for find_program()
conf: add nice level to the hash config ignred variables
connman: fix warning by specifying runstatedir at configure time
cpio: Run ptests under ptest user
dbus: Upgrade to 1.14.8
devtool: Fix the wrong variable in srcuri_entry
dnf: only write the log lock to root for native dnf
docs: bsp-guide: bsp: fix typo
dpkg: Upgrade to v1.21.22
e2fsprogs: Fix error SRCDIR when using usrmerge DISTRO_FEATURES
e2fsprogs: fix ptest bug for second running
ell: Upgrade to 0.57
expect: Add ptest support
fribidi: Upgrade to 1.0.13
gawk: Upgrade to 5.2.2
gcc : upgrade to v12.3
gdb: fix crashes when debugging threads with Arm Pointer Authentication enabled
gdb: Upgrade to 13.2
git: Upgrade to 2.39.3
glib-networking: use correct error code in ptest
glibc: Pass linker choice via compiler flags
glibc: stable 2.37 branch updates.
gnupg: Upgrade to 2.4.2
go.bbclass: don’t use test to check output from ls
go: Upgrade to 1.20.5
go: Use -no-pie to build target cgo
gobject-introspection: remove obsolete DEPENDS
grub: submit determinism.patch upstream
gstreamer1.0: Upgrade to 1.22.3
gtk4: Upgrade to 4.10.4
image-live.bbclass: respect IMAGE_MACHINE_SUFFIX
image_types: Fix reproducible builds for initramfs and UKI img
inetutils: remove unused patch files
ipk: Revert Decode byte data to string in manifest handling
iso-codes: Upgrade to 4.15.0
kernel: don’t force PAHOLE=false
kmod: remove unused ptest.patch
kmscube: Correct DEPENDS to avoid overwrite
layer.conf: Add missing dependency exclusion
lib/terminal.py: Add urxvt terminal
libbsd: Add correct license for all packages
libdnf: Upgrade to 0.70.1
libgcrypt: Upgrade to 1.10.2
libgloss: remove unused patch file
libmicrohttpd: Upgrade to 0.9.77
libmodule-build-perl: Upgrade to 0.4234
libx11: remove unused patch and FILESEXTRAPATHS
libx11: Upgrade to 1.8.5
libxfixes: Upgrade to v6.0.1
libxft: Upgrade to 2.3.8
libxi: Upgrade to v1.8.1
libxml2: Do not use lld linker when building with tests on rv64
libxml2: Upgrade to 2.10.4
libxpm: Upgrade to 3.5.16
linux-firmware: Upgrade to 20230515
linux-yocto/5.15: cfg: fix DECNET configuration warning
linux-yocto/5.15: Upgrade to v5.15.118
linux-yocto/6.1: fix intermittent x86 boot hangs
linux-yocto/6.1: Upgrade to v6.1.35
linux-yocto: move build / debug dependencies to .inc
logrotate: Do not create logrotate.status file
maintainers.inc: correct Carlos Rafael Giani’s email address
maintainers.inc: correct unassigned entries
maintainers.inc: unassign Adrian Bunk from wireless-regdb
maintainers.inc: unassign Alistair Francis from opensbi
maintainers.inc: unassign Andreas Müller from itstool entry
maintainers.inc: unassign Chase Qi from libc-test
maintainers.inc: unassign Oleksandr Kravchuk from python3 and all other items
maintainers.inc: unassign Pascal Bach from cmake entry
maintainers.inc: unassign Ricardo Neri from ovmf
maintainers.inc: update version for gcc-source
maintainers.inc: unassign Richard Weinberger from erofs-utils entry
meta: depend on autoconf-archive-native, not autoconf-archive
meta: lib: oe: npm_registry: Add more safe caracters
migration-guides: add release notes for 4.2.1
minicom: remove unused patch files
mobile-broadband-provider-info: Upgrade to 20230416
musl: Correct SRC_URI
oeqa/selftest/bbtests: add non-existent prefile/postfile tests
oeqa/selftest/cases/devtool.py: skip all tests require folder a git repo
oeqa: adding selftest-hello and use it to speed up tests
openssh: Remove BSD-4-clause contents completely from codebase
openssl: fix building on riscv32
openssl: Upgrade to 3.1.1
overview-manual: concepts.rst: Fix a typo
parted: Add missing libuuid to linker cmdline for libparted-fs-resize.so
perf: Make built-in libtraceevent plugins cohabit with external libtraceevent
piglit: Add missing glslang dependencies
piglit: Fix c++11-narrowing warnings in tests
pkgconf: Upgrade to 1.9.5
pm-utils: fix multilib conflictions
poky.conf: bump version for 4.2.2 release
populate_sdk_base.bbclass: respect MLPREFIX for ptest-pkgs’s ptest-runner
profile-manual: fix blktrace remote usage instructions
psmisc: Set ALTERNATIVE for pstree to resolve conflict with busybox
ptest-runner: Ensure data writes don’t race
ptest-runner: Pull in “runner: Remove threads and mutexes” fix
ptest-runner: Pull in sync fix to improve log warnings
python3-bcrypt: Use BFD linker when building tests
python3-numpy: remove NPY_INLINE, use inline instead
qemu: a pending patch was submitted and accepted upstream
qemu: remove unused qemu-7.0.0-glibc-2.36.patch
qemurunner.py: fix error message about qmp
qemurunner: avoid leaking server_socket
ref-manual: add clarification for SRCREV
ref-manual: classes.rst: fix typo
rootfs-postcommands.bbclass: add post func remove_unused_dnf_log_lock
rpcsvc-proto: Upgrade to 1.4.4
rpm: drop unused 0001-Rip-out-partial-support-for-unused-MD2-and-RIPEMD160.patch
rpm: Upgrade to 4.18.1
rpm: write macros under libdir
runqemu-gen-tapdevs: Refactoring
runqemu-ifupdown/get-tapdevs: Add support for ip tuntap
scripts/runqemu: allocate unfsd ports in a way that doesn’t race or clash with unrelated processes
scripts/runqemu: split lock dir creation into a reusable function
scripts: fix buildstats diff/summary hard bound to host python3
sdk.py: error out when moving file fails
sdk.py: fix moving dnf contents
selftest/license: Exclude from world
selftest/reproducible: Allow native/cross reuse in test
serf: Upgrade to 1.3.10
staging.bbclass: do not add extend_recipe_sysroot to prefuncs of prepare_recipe_sysroot
strace: Disable failing test
strace: Merge two similar patches
strace: Update patches/tests with upstream fixes
sysfsutils: fetch a supported fork from github
systemd-systemctl: support instance expansion in WantedBy
systemd: Drop a backport
tiff: Remove unused patch from tiff
uninative: Upgrade to 3.10 to support gcc 13
uninative: Upgrade to 4.0 to include latest gcc 13.1.1
unzip: fix configure check for cross compilation
unzip: remove hardcoded LARGE_FILE_SUPPORT
useradd-example: package typo correction
useradd-staticids.bbclass: improve error message
v86d: Improve kernel dependency
vim: Upgrade to 9.0.1527
weston-init: add profile to point users to global socket
weston-init: add the weston user to the wayland group
weston-init: add weston user to the render group
weston-init: fix the mixed indentation
weston-init: guard against systemd configs
weston-init: make sure the render group exists
wget: Upgrade to 1.21.4
wireless-regdb: Upgrade to 2023.05.03
xdpyinfo: Upgrade to 1.3.4
xf86-video-intel: Use the HTTPS protocol to fetch the Git repositories
xinput: upgrade to v1.6.4
xwininfo: upgrade to v1.1.6
xz: Upgrade to 5.4.3
yocto-bsps: update to v5.15.106
zip: fix configure check by using _Static_assert
zip: remove unnecessary LARGE_FILE_SUPPORT CLFAGS
Known Issues in Yocto-4.2.2
N/A
Contributors to Yocto-4.2.2
Alberto Planas
Alejandro Hernandez Samaniego
Alexander Kanavin
Andrej Valek
Andrew Jeffery
Anuj Mittal
Archana Polampalli
BELOUARGA Mohamed
Bruce Ashfield
Changqing Li
Charlie Wu
Chen Qi
Chi Xu
Daniel Ammann
Deepthi Hemraj
Denys Dmytriyenko
Dmitry Baryshkov
Ed Beroset
Eero Aaltonen
Fabien Mahot
Frieder Paape
Frieder Schrempf
Hannu Lounento
Ian Ray
Jermain Horsman
Jörg Sommer
Kai Kang
Khem Raj
Lee Chee Yang
Lorenzo Arena
Marc Ferland
Markus Volk
Martin Jansa
Michael Halstead
Mikko Rapeli
Mingli Yu
Natasha Bailey
Nikhil R
Pablo Saavedra
Paul Gortmaker
Pavel Zhukov
Peter Kjellerstedt
Qiu Tingting
Quentin Schulz
Randolph Sapp
Randy MacLeod
Ranjitsinh Rathod
Richard Purdie
Riyaz Khan
Ross Burton
Sakib Sajal
Sanjay Chitroda
Siddharth Doshi
Soumya Sambu
Steve Sakoman
Sudip Mukherjee
Sundeep KOKKONDA
Thomas Roos
Tim Orling
Tom Hochstein
Trevor Gamblin
Ulrich Ölmann
Wang Mingyu
Xiangyu Chen
Repositories / Downloads for Yocto-4.2.2
poky
Repository Location: https://git.yoctoproject.org/poky
Branch: mickledore
Tag: yocto-4.2.2
Git Revision: 6e17b3e644ca15b8b4afd071ccaa6f172a0e681a
Release Artefact: poky-6e17b3e644ca15b8b4afd071ccaa6f172a0e681a
sha: c0b4dadcf00b97d866dd4cc2f162474da2c3e3289badaa42a978bff1d479af99
Download Locations: http://downloads.yoctoproject.org/releases/yocto/yocto-4.2.2/poky-6e17b3e644ca15b8b4afd071ccaa6f172a0e681a.tar.bz2 http://mirrors.kernel.org/yocto/yocto/yocto-4.2.2/poky-6e17b3e644ca15b8b4afd071ccaa6f172a0e681a.tar.bz2
openembedded-core
Repository Location: https://git.openembedded.org/openembedded-core
Branch: mickledore
Tag: yocto-4.2.2
Git Revision: 3ef283e02b0b91daf64c3a589e1f6bb68d4f5aa1
Release Artefact: oecore-3ef283e02b0b91daf64c3a589e1f6bb68d4f5aa1
sha: d2fd127f46e626fa4456c193af3dbd25d4b2565db59bc23be69a3b2dd4febed5
Download Locations: http://downloads.yoctoproject.org/releases/yocto/yocto-4.2.2/oecore-3ef283e02b0b91daf64c3a589e1f6bb68d4f5aa1.tar.bz2 http://mirrors.kernel.org/yocto/yocto/yocto-4.2.2/oecore-3ef283e02b0b91daf64c3a589e1f6bb68d4f5aa1.tar.bz2
meta-mingw
Repository Location: https://git.yoctoproject.org/meta-mingw
Branch: mickledore
Tag: yocto-4.2.2
Git Revision: 4608d0bb7e47c52b8f6e9be259bfb1716fda9fd6
Release Artefact: meta-mingw-4608d0bb7e47c52b8f6e9be259bfb1716fda9fd6
sha: fcbae0dedb363477492b86b8f997e06f995793285535b24dc66038845483eeef
Download Locations: http://downloads.yoctoproject.org/releases/yocto/yocto-4.2.2/meta-mingw-4608d0bb7e47c52b8f6e9be259bfb1716fda9fd6.tar.bz2 http://mirrors.kernel.org/yocto/yocto/yocto-4.2.2/meta-mingw-4608d0bb7e47c52b8f6e9be259bfb1716fda9fd6.tar.bz2
bitbake
Repository Location: https://git.openembedded.org/bitbake
Branch: 2.4
Tag: yocto-4.2.2
Git Revision: 08033b63ae442c774bd3fce62844eac23e6882d7
Release Artefact: bitbake-08033b63ae442c774bd3fce62844eac23e6882d7
sha: 1d070c133bfb6502ac04befbf082cbfda7582c8b1c48296a788384352e5061fd
Download Locations: http://downloads.yoctoproject.org/releases/yocto/yocto-4.2.2/bitbake-08033b63ae442c774bd3fce62844eac23e6882d7.tar.bz2 http://mirrors.kernel.org/yocto/yocto/yocto-4.2.2/bitbake-08033b63ae442c774bd3fce62844eac23e6882d7.tar.bz2
yocto-docs
Repository Location: https://git.yoctoproject.org/yocto-docs
Branch: mickledore
Tag: yocto-4.2.2
Git Revision: 54d849d259a332389beea159d789f8fa92871475
Release notes for Yocto-4.2.3 (Mickledore)
Security Fixes in Yocto-4.2.3
bind: Fix CVE-2023-2828 and CVE-2023-2911
cups: Fix CVE-2023-34241
dmidecode: Fix CVE-2023-30630
erofs-utils: Fix CVE-2023-33551 and CVE-2023-33552
ghostscript: Fix CVE-2023-36664
go: Fix CVE-2023-24531
libarchive: ignore CVE-2023-30571
libjpeg-turbo: Fix CVE-2023-2804
libx11: Fix CVE-2023-3138
ncurses: Fix CVE-2023-29491
openssh: Fix CVE-2023-38408
python3-certifi: Fix CVE-2023-37920
python3-requests: Fix CVE-2023-32681
python3: Ignore CVE-2023-36632
qemu: fix CVE-2023-0330, CVE-2023-2861, CVE-2023-3255 and CVE-2023-3301
ruby: Fix CVE-2023-36617
vim: Fix CVE-2023-2609 and CVE-2023-2610
webkitgtk: Fix CVE-2023-27932 and CVE-2023-27954
Fixes in Yocto-4.2.3
acpica: Update SRC_URI
automake: fix buildtest patch
baremetal-helloworld: Fix race condition
bind: upgrade to v9.18.17
binutils: stable 2.40 branch updates
build-appliance-image: Update to mickledore head revision
cargo.bbclass: set up cargo environment in common do_compile
conf.py: add macro for Mitre CVE links
curl: ensure all ptest failures are caught
cve-update-nvd2-native: actually use API keys
cve-update-nvd2-native: fix cvssV3 metrics
cve-update-nvd2-native: handle all configuration nodes, not just first
cve-update-nvd2-native: increase retry count
cve-update-nvd2-native: log a little more
cve-update-nvd2-native: retry all errors and sleep between retries
cve-update-nvd2-native: use exact times, don’t truncate
dev-manual: wic.rst: Update native tools build command
devtool/upgrade: raise an error if extracting source produces more than one directory
diffutils: upgrade to 3.10
docs: ref-manual: terms: fix typos in SPDX term
file: fix the way path is written to environment-setup.d
file: return wrapper to fix builds when file is in buildtools-tarball
freetype: upgrade to 2.13.1
gcc-testsuite: Fix ppc cpu specification
gcc: don’t pass –enable-standard-branch-protection
glibc-locale: use stricter matching for metapackages’ runtime dependencies
glibc-testsuite: Fix network restrictions causing test failures
glibc/check-test-wrapper: don’t emit warnings from ssh
go: upgrade to 1.20.6
gstreamer1.0: upgrade to 1.22.4
ifupdown: install missing directories
kernel-module-split add systemd modulesloaddir and modprobedir config
kernel-module-split: install config modules directories only when they are needed
kernel-module-split: make autoload and probeconf distribution specific
kernel-module-split: use context manager to open files
kernel: Fix path comparison in kernel staging dir symlinking
kernel: config modules directories are handled by kernel-module-split
kernel: don’t fail if Modules.symvers doesn’t exist
libassuan: upgrade to 2.5.6
libksba: upgrade to 1.6.4
libnss-nis: upgrade to 3.2
libproxy: fetch from git
libwebp: upgrade to 1.3.1
libx11: upgrade to 1.8.6
libxcrypt: fix hard-coded “.so” extension
linux-firmware : Add firmware of RTL8822 serie
linux-firmware: Fix mediatek mt7601u firmware path
linux-firmware: package firmare for Dragonboard 410c
linux-firmware: split platform-specific Adreno shaders to separate packages
linux-firmware: upgrade to 20230625
linux-yocto/5.15: update to v5.15.124
linux-yocto/6.1: cfg: update ima.cfg to match current meta-integrity
linux-yocto/6.1: upgrade to v6.1.38
ltp: Add kernel loopback module dependency
ltp: add RDEPENDS on findutils
lttng-ust: upgrade to 2.13.6
machine/arch-arm64: add -mbranch-protection=standard
maintainers.inc: Modify email address
mdadm: add util-linux-blockdev ptest dependency
mdadm: fix 07revert-inplace ptest
mdadm: fix segfaults when running ptests
mdadm: fix util-linux ptest dependency
mdadm: re-add mdadm-ptest to PTESTS_SLOW
mdadm: skip running known broken ptests
meson.bbclass: Point to llvm-config from native sysroot
migration-guides: add release notes for 4.0.10
migration-guides: add release notes for 4.0.11
migration-guides: add release notes for 4.2.2
oeqa/runtime/cases/rpm: fix wait_for_no_process_for_user failure case
oeqa/runtime/ltp: Increase ltp test output timeout
oeqa/selftest/devtool: add unit test for “devtool add -b”
oeqa/ssh: Further improve process exit handling
oeqa/target/ssh: Ensure EAGAIN doesn’t truncate output
oeqa/utils/nfs: allow requesting non-udp ports
openssh: upgrade to 9.3p2
openssl: add PERLEXTERNAL path to test its existence
openssl: use a glob on the PERLEXTERNAL to track updates on the path
opkg-utils: upgrade to 0.6.2
opkg: upgrade to 0.6.2
pkgconf: update SRC_URI
poky.conf: bump version for 4.2.3 release
poky.conf: update SANITY_TESTED_DISTROS to match autobuilder
ptest-runner: Pull in parallel test fixes and output handling
python3-certifi: upgrade to 2023.7.22
python3: fix missing comma in get_module_deps3.py
recipetool: Fix inherit in created -native* recipes
ref-manual: LTS releases now supported for 4 years
ref-manual: document image-specific variant of INCOMPATIBLE_LICENSE
ref-manual: releases.svg: updates
resulttool/resultutils: allow index generation despite corrupt json
rootfs-postcommands.bbclass: Revert “add post func remove_unused_dnf_log_lock”
rootfs: Add debugfs package db file copy and cleanup
rootfs_rpm: don’t depend on opkg-native for update-alternatives
rpm: Pick debugfs package db files/dirs explicitly
rust-common.bbclass: move musl-specific linking fix from rust-source.inc
scripts/oe-setup-builddir: copy conf-notes.txt to build dir
scripts/resulttool: add mention about new detected tests
selftest/cases/glibc.py: fix the override syntax
selftest/cases/glibc.py: increase the memory for testing
selftest/cases/glibc.py: switch to using NFS over TCP
shadow-sysroot: add license information
systemd-systemctl: fix errors in instance name expansion
taglib: upgrade to 1.13.1
target/ssh: Ensure exit code set for commands
tcf-agent: upgrade to 1.8.0
testimage/oeqa: Drop testimage_dump_host functionality
tiff: upgrade to 4.5.1
uboot-extlinux-config.bbclass: fix old override syntax in comment
util-linux: add alternative links for ipcs,ipcrm
vim: upgrade to 9.0.1592
webkitgtk: upgrade to 2.38.6
weston: Cleanup and fix x11 and xwayland dependencies
Known Issues in Yocto-4.2.3
N/A
Contributors to Yocto-4.2.3
Alejandro Hernandez Samaniego
Alex Kiernan
Alexander Kanavin
Alexis Lothoré
Andrej Valek
Anuj Mittal
Archana Polampalli
BELOUARGA Mohamed
Benjamin Bouvier
Bruce Ashfield
Changqing Li
Chen Qi
Daniel Semkowicz
Dmitry Baryshkov
Enrico Scholz
Etienne Cordonnier
Joe Slater
Joel Stanley
Jose Quaresma
Julien Stephan
Kai Kang
Khem Raj
Lee Chee Yang
Marek Vasut
Mark Hatle
Michael Halstead
Michael Opdenacker
Mingli Yu
Narpat Mali
Oleksandr Hnatiuk
Ovidiu Panait
Peter Marko
Quentin Schulz
Richard Purdie
Ross Burton
Sanjana
Sakib Sajal
Staffan Rydén
Steve Sakoman
Stéphane Veyret
Sudip Mukherjee
Thomas Roos
Tom Hochstein
Trevor Gamblin
Wang Mingyu
Yi Zhao
Yoann Congal
Yogita Urade
Yuta Hayama
Repositories / Downloads for Yocto-4.2.3
poky
Repository Location: https://git.yoctoproject.org/poky
Branch: mickledore
Tag: yocto-4.2.3
Git Revision: aa63b25cbe25d89ab07ca11ee72c17cab68df8de
Release Artefact: poky-aa63b25cbe25d89ab07ca11ee72c17cab68df8de
sha: 9e2b40fc25f7984b3227126ec9b8aa68d3747c8821fb7bf8cb635fc143f894c3
Download Locations: http://downloads.yoctoproject.org/releases/yocto/yocto-4.2.3/poky-aa63b25cbe25d89ab07ca11ee72c17cab68df8de.tar.bz2 http://mirrors.kernel.org/yocto/yocto/yocto-4.2.3/poky-aa63b25cbe25d89ab07ca11ee72c17cab68df8de.tar.bz2
openembedded-core
Repository Location: https://git.openembedded.org/openembedded-core
Branch: mickledore
Tag: yocto-4.2.3
Git Revision: 7e3489c0c5970389c8a239dc7b367bcadf554eb5
Release Artefact: oecore-7e3489c0c5970389c8a239dc7b367bcadf554eb5
sha: 68620aca7c9db6b9a65d9853cacff4e60578f0df39e3e37114e062e1667ba724
Download Locations: http://downloads.yoctoproject.org/releases/yocto/yocto-4.2.3/oecore-7e3489c0c5970389c8a239dc7b367bcadf554eb5.tar.bz2 http://mirrors.kernel.org/yocto/yocto/yocto-4.2.3/oecore-7e3489c0c5970389c8a239dc7b367bcadf554eb5.tar.bz2
meta-mingw
Repository Location: https://git.yoctoproject.org/meta-mingw
Branch: mickledore
Tag: yocto-4.2.3
Git Revision: 92258028e1b5664a9f832541d5c4f6de0bd05e07
Release Artefact: meta-mingw-92258028e1b5664a9f832541d5c4f6de0bd05e07
sha: ee081460b5dff4fb8dd4869ce5631718dbaaffbede9532b879b854c18f1b3f5d
Download Locations: http://downloads.yoctoproject.org/releases/yocto/yocto-4.2.3/meta-mingw-92258028e1b5664a9f832541d5c4f6de0bd05e07.tar.bz2 http://mirrors.kernel.org/yocto/yocto/yocto-4.2.3/meta-mingw-92258028e1b5664a9f832541d5c4f6de0bd05e07.tar.bz2
bitbake
Repository Location: https://git.openembedded.org/bitbake
Branch: 2.4
Tag: yocto-4.2.3
Git Revision: 08033b63ae442c774bd3fce62844eac23e6882d7
Release Artefact: bitbake-08033b63ae442c774bd3fce62844eac23e6882d7
sha: 1d070c133bfb6502ac04befbf082cbfda7582c8b1c48296a788384352e5061fd
Download Locations: http://downloads.yoctoproject.org/releases/yocto/yocto-4.2.3/bitbake-08033b63ae442c774bd3fce62844eac23e6882d7.tar.bz2 http://mirrors.kernel.org/yocto/yocto/yocto-4.2.3/bitbake-08033b63ae442c774bd3fce62844eac23e6882d7.tar.bz2
yocto-docs
Repository Location: https://git.yoctoproject.org/yocto-docs
Branch: mickledore
Tag: yocto-4.2.3
Git Revision: 8e6752a9e55d16f3713e248b37f9d4d2745a2375
Release notes for Yocto-4.2.4 (Mickledore)
Security Fixes in Yocto-4.2.4
bind: Fix CVE-2023-3341 and CVE-2023-4236
binutils: Fix CVE-2023-39128
cups: fix CVE-2023-4504
curl: Fix CVE-2023-28320, CVE-2023-32001, CVE-2023-38039, CVE-2023-38545 and CVE-2023-38546
dmidecode: fix for CVE-2023-30630
dropbear: fix CVE-2023-36328
ffmpeg: Ignore CVE-2023-39018
gcc: Fix CVE-2023-4039
gdb: Fix CVE-2023-39128
ghostscript: Fix CVE-2023-38559 and CVE-2023-43115
glibc: Fix CVE-2023-4527 and CVE-2023-4806
go: Fix CVE-2023-29409 and CVE-2023-39533
grub: Fix CVE-2023-4692 and CVE-2023-4693
gstreamer: Fix CVE-2023-40474, CVE-2023-40475 and CVE-2023-40476
inetutils: fix CVE-2023-40303
librsvg: Fix CVE-2023-38633
libssh2: Fix CVE-2020-22218
libwebp: Fix CVE-2023-4863 and CVE-2023-5129
libx11: Fix CVE-2023-43785, CVE-2023-43786 and CVE-2023-43787
libxpm: Fix CVE-2023-43788 and CVE-2023-43789
linux-yocto/6.1: Ignore CVE-2003-1604, CVE-2004-0230, CVE-2006-3635, CVE-2006-5331, CVE-2006-6128, CVE-2007-4774, CVE-2007-6761, CVE-2007-6762, CVE-2008-7316, CVE-2009-2692, CVE-2010-0008, CVE-2010-3432, CVE-2010-4648, CVE-2010-5313, CVE-2010-5328, CVE-2010-5329, CVE-2010-5331, CVE-2010-5332, CVE-2011-4098, CVE-2011-4131, CVE-2011-4915, CVE-2011-5321, CVE-2011-5327, CVE-2012-0957, CVE-2012-2119, CVE-2012-2136, CVE-2012-2137, CVE-2012-2313, CVE-2012-2319, CVE-2012-2372, CVE-2012-2375, CVE-2012-2390, CVE-2012-2669, CVE-2012-2744, CVE-2012-2745, CVE-2012-3364, CVE-2012-3375, CVE-2012-3400, CVE-2012-3412, CVE-2012-3430, CVE-2012-3510, CVE-2012-3511, CVE-2012-3520, CVE-2012-3552, CVE-2012-4398, CVE-2012-4444, CVE-2012-4461, CVE-2012-4467, CVE-2012-4508, CVE-2012-4530, CVE-2012-4565, CVE-2012-5374, CVE-2012-5375, CVE-2012-5517, CVE-2012-6536, CVE-2012-6537, CVE-2012-6538, CVE-2012-6539, CVE-2012-6540, CVE-2012-6541, CVE-2012-6542, CVE-2012-6543, CVE-2012-6544, CVE-2012-6545, CVE-2012-6546, CVE-2012-6547, CVE-2012-6548, CVE-2012-6549, CVE-2012-6638, CVE-2012-6647, CVE-2012-6657, CVE-2012-6689, CVE-2012-6701, CVE-2012-6703, CVE-2012-6704, CVE-2012-6712, CVE-2013-0160, CVE-2013-0190, CVE-2013-0216, CVE-2013-0217, CVE-2013-0228, CVE-2013-0231, CVE-2013-0268, CVE-2013-0290, CVE-2013-0309, CVE-2013-0310, CVE-2013-0311, CVE-2013-0313, CVE-2013-0343, CVE-2013-0349, CVE-2013-0871, CVE-2013-0913, CVE-2013-0914, CVE-2013-1059, CVE-2013-1763, CVE-2013-1767, CVE-2013-1772, CVE-2013-1773, CVE-2013-1774, CVE-2013-1792, CVE-2013-1796, CVE-2013-1797, CVE-2013-1798, CVE-2013-1819, CVE-2013-1826, CVE-2013-1827, CVE-2013-1828, CVE-2013-1848, CVE-2013-1858, CVE-2013-1860, CVE-2013-1928, CVE-2013-1929, CVE-2013-1943, CVE-2013-1956, CVE-2013-1957, CVE-2013-1958, CVE-2013-1959, CVE-2013-1979, CVE-2013-2015, CVE-2013-2017, CVE-2013-2058, CVE-2013-2094, CVE-2013-2128, CVE-2013-2140, CVE-2013-2141, CVE-2013-2146, CVE-2013-2147, CVE-2013-2148, CVE-2013-2164, CVE-2013-2206, CVE-2013-2232, CVE-2013-2234, CVE-2013-2237, CVE-2013-2546, CVE-2013-2547, CVE-2013-2548, CVE-2013-2596, CVE-2013-2634, CVE-2013-2635, CVE-2013-2636, CVE-2013-2850, CVE-2013-2851, CVE-2013-2852, CVE-2013-2888, CVE-2013-2889, CVE-2013-2890, CVE-2013-2891, CVE-2013-2892, CVE-2013-2893, CVE-2013-2894, CVE-2013-2895, CVE-2013-2896, CVE-2013-2897, CVE-2013-2898, CVE-2013-2899, CVE-2013-2929, CVE-2013-2930, CVE-2013-3076, CVE-2013-3222, CVE-2013-3223, CVE-2013-3224, CVE-2013-3225, CVE-2013-3226, CVE-2013-3227, CVE-2013-3228, CVE-2013-3229, CVE-2013-3230, CVE-2013-3231, CVE-2013-3232, CVE-2013-3233, CVE-2013-3234, CVE-2013-3235, CVE-2013-3236, CVE-2013-3237, CVE-2013-3301, CVE-2013-3302, CVE-2013-4125, CVE-2013-4127, CVE-2013-4129, CVE-2013-4162, CVE-2013-4163, CVE-2013-4205, CVE-2013-4220, CVE-2013-4247, CVE-2013-4254, CVE-2013-4270, CVE-2013-4299, CVE-2013-4300, CVE-2013-4312, CVE-2013-4343, CVE-2013-4345, CVE-2013-4348, CVE-2013-4350, CVE-2013-4387, CVE-2013-4470, CVE-2013-4483, CVE-2013-4511, CVE-2013-4512, CVE-2013-4513, CVE-2013-4514, CVE-2013-4515, CVE-2013-4516, CVE-2013-4563, CVE-2013-4579, CVE-2013-4587, CVE-2013-4588, CVE-2013-4591, CVE-2013-4592, CVE-2013-5634, CVE-2013-6282, CVE-2013-6367, CVE-2013-6368, CVE-2013-6376, CVE-2013-6378, CVE-2013-6380, CVE-2013-6381, CVE-2013-6382, CVE-2013-6383, CVE-2013-6431, CVE-2013-6432, CVE-2013-6885, CVE-2013-7026, CVE-2013-7027, CVE-2013-7263, CVE-2013-7264, CVE-2013-7265, CVE-2013-7266, CVE-2013-7267, CVE-2013-7268, CVE-2013-7269, CVE-2013-7270, CVE-2013-7271, CVE-2013-7281, CVE-2013-7339, CVE-2013-7348, CVE-2013-7421, CVE-2013-7446, CVE-2013-7470, CVE-2014-0038, CVE-2014-0049, CVE-2014-0055, CVE-2014-0069, CVE-2014-0077, CVE-2014-0100, CVE-2014-0101, CVE-2014-0102, CVE-2014-0131, CVE-2014-0155, CVE-2014-0181, CVE-2014-0196, CVE-2014-0203, CVE-2014-0205, CVE-2014-0206, CVE-2014-1438, CVE-2014-1444, CVE-2014-1445, CVE-2014-1446, CVE-2014-1690, CVE-2014-1737, CVE-2014-1738, CVE-2014-1739, CVE-2014-1874, CVE-2014-2038, CVE-2014-2039, CVE-2014-2309, CVE-2014-2523, CVE-2014-2568, CVE-2014-2580, CVE-2014-2672, CVE-2014-2673, CVE-2014-2678, CVE-2014-2706, CVE-2014-2739, CVE-2014-2851, CVE-2014-2889, CVE-2014-3122, CVE-2014-3144, CVE-2014-3145, CVE-2014-3153, CVE-2014-3180, CVE-2014-3181, CVE-2014-3182, CVE-2014-3183, CVE-2014-3184, CVE-2014-3185, CVE-2014-3186, CVE-2014-3534, CVE-2014-3535, CVE-2014-3601, CVE-2014-3610, CVE-2014-3611, CVE-2014-3631, CVE-2014-3645, CVE-2014-3646, CVE-2014-3647, CVE-2014-3673, CVE-2014-3687, CVE-2014-3688, CVE-2014-3690, CVE-2014-3917, CVE-2014-3940, CVE-2014-4014, CVE-2014-4027, CVE-2014-4157, CVE-2014-4171, CVE-2014-4508, CVE-2014-4608, CVE-2014-4611, CVE-2014-4652, CVE-2014-4653, CVE-2014-4654, CVE-2014-4655, CVE-2014-4656, CVE-2014-4667, CVE-2014-4699, CVE-2014-4943, CVE-2014-5045, CVE-2014-5077, CVE-2014-5206, CVE-2014-5207, CVE-2014-5471, CVE-2014-5472, CVE-2014-6410, CVE-2014-6416, CVE-2014-6417, CVE-2014-6418, CVE-2014-7145, CVE-2014-7283, CVE-2014-7284, CVE-2014-7822, CVE-2014-7825, CVE-2014-7826, CVE-2014-7841, CVE-2014-7842, CVE-2014-7843, CVE-2014-7970, CVE-2014-7975, CVE-2014-8086, CVE-2014-8133, CVE-2014-8134, CVE-2014-8159, CVE-2014-8160, CVE-2014-8171, CVE-2014-8172, CVE-2014-8173, CVE-2014-8369, CVE-2014-8480, CVE-2014-8481, CVE-2014-8559, CVE-2014-8709, CVE-2014-8884, CVE-2014-8989, CVE-2014-9090, CVE-2014-9322, CVE-2014-9419, CVE-2014-9420, CVE-2014-9428, CVE-2014-9529, CVE-2014-9584, CVE-2014-9585, CVE-2014-9644, CVE-2014-9683, CVE-2014-9710, CVE-2014-9715, CVE-2014-9717, CVE-2014-9728, CVE-2014-9729, CVE-2014-9730, CVE-2014-9731, CVE-2014-9803, CVE-2014-9870, CVE-2014-9888, CVE-2014-9895, CVE-2014-9903, CVE-2014-9904, CVE-2014-9914, CVE-2014-9922, CVE-2014-9940, CVE-2015-0239, CVE-2015-0274, CVE-2015-0275, CVE-2015-1333, CVE-2015-1339, CVE-2015-1350, CVE-2015-1420, CVE-2015-1421, CVE-2015-1465, CVE-2015-1573, CVE-2015-1593, CVE-2015-1805, CVE-2015-2041, CVE-2015-2042, CVE-2015-2150, CVE-2015-2666, CVE-2015-2672, CVE-2015-2686, CVE-2015-2830, CVE-2015-2922, CVE-2015-2925, CVE-2015-3212, CVE-2015-3214, CVE-2015-3288, CVE-2015-3290, CVE-2015-3291, CVE-2015-3331, CVE-2015-3339, CVE-2015-3636, CVE-2015-4001, CVE-2015-4002, CVE-2015-4003, CVE-2015-4004, CVE-2015-4036, CVE-2015-4167, CVE-2015-4170, CVE-2015-4176, CVE-2015-4177, CVE-2015-4178, CVE-2015-4692, CVE-2015-4700, CVE-2015-5156, CVE-2015-5157, CVE-2015-5257, CVE-2015-5283, CVE-2015-5307, CVE-2015-5327, CVE-2015-5364, CVE-2015-5366, CVE-2015-5697, CVE-2015-5706, CVE-2015-5707, CVE-2015-6252, CVE-2015-6526, CVE-2015-6937, CVE-2015-7509, CVE-2015-7513, CVE-2015-7515, CVE-2015-7550, CVE-2015-7566, CVE-2015-7613, CVE-2015-7799, CVE-2015-7833, CVE-2015-7872, CVE-2015-7884, CVE-2015-7885, CVE-2015-7990, CVE-2015-8104, CVE-2015-8215, CVE-2015-8324, CVE-2015-8374, CVE-2015-8539, CVE-2015-8543, CVE-2015-8550, CVE-2015-8551, CVE-2015-8552, CVE-2015-8553, CVE-2015-8569, CVE-2015-8575, CVE-2015-8660, CVE-2015-8709, CVE-2015-8746, CVE-2015-8767, CVE-2015-8785, CVE-2015-8787, CVE-2015-8812, CVE-2015-8816, CVE-2015-8830, CVE-2015-8839, CVE-2015-8844, CVE-2015-8845, CVE-2015-8950, CVE-2015-8952, CVE-2015-8953, CVE-2015-8955, CVE-2015-8956, CVE-2015-8961, CVE-2015-8962, CVE-2015-8963, CVE-2015-8964, CVE-2015-8966, CVE-2015-8967, CVE-2015-8970, CVE-2015-9004, CVE-2015-9016, CVE-2015-9289, CVE-2016-0617, CVE-2016-0723, CVE-2016-0728, CVE-2016-0758, CVE-2016-0821, CVE-2016-0823, CVE-2016-10044, CVE-2016-10088, CVE-2016-10147, CVE-2016-10150, CVE-2016-10153, CVE-2016-10154, CVE-2016-10200, CVE-2016-10208, CVE-2016-10229, CVE-2016-10318, CVE-2016-10723, CVE-2016-10741, CVE-2016-10764, CVE-2016-10905, CVE-2016-10906, CVE-2016-10907, CVE-2016-1237, CVE-2016-1575, CVE-2016-1576, CVE-2016-1583, CVE-2016-2053, CVE-2016-2069, CVE-2016-2070, CVE-2016-2085, CVE-2016-2117, CVE-2016-2143, CVE-2016-2184, CVE-2016-2185, CVE-2016-2186, CVE-2016-2187, CVE-2016-2188, CVE-2016-2383, CVE-2016-2384, CVE-2016-2543, CVE-2016-2544, CVE-2016-2545, CVE-2016-2546, CVE-2016-2547, CVE-2016-2548, CVE-2016-2549, CVE-2016-2550, CVE-2016-2782, CVE-2016-2847, CVE-2016-3044, CVE-2016-3070, CVE-2016-3134, CVE-2016-3135, CVE-2016-3136, CVE-2016-3137, CVE-2016-3138, CVE-2016-3139, CVE-2016-3140, CVE-2016-3156, CVE-2016-3157, CVE-2016-3672, CVE-2016-3689, CVE-2016-3713, CVE-2016-3841, CVE-2016-3857, CVE-2016-3951, CVE-2016-3955, CVE-2016-3961, CVE-2016-4440, CVE-2016-4470, CVE-2016-4482, CVE-2016-4485, CVE-2016-4486, CVE-2016-4557, CVE-2016-4558, CVE-2016-4565, CVE-2016-4568, CVE-2016-4569, CVE-2016-4578, CVE-2016-4580, CVE-2016-4581, CVE-2016-4794, CVE-2016-4805, CVE-2016-4913, CVE-2016-4951, CVE-2016-4997, CVE-2016-4998, CVE-2016-5195, CVE-2016-5243, CVE-2016-5244, CVE-2016-5400, CVE-2016-5412, CVE-2016-5696, CVE-2016-5728, CVE-2016-5828, CVE-2016-5829, CVE-2016-6130, CVE-2016-6136, CVE-2016-6156, CVE-2016-6162, CVE-2016-6187, CVE-2016-6197, CVE-2016-6198, CVE-2016-6213, CVE-2016-6327, CVE-2016-6480, CVE-2016-6516, CVE-2016-6786, CVE-2016-6787, CVE-2016-6828, CVE-2016-7039, CVE-2016-7042, CVE-2016-7097, CVE-2016-7117, CVE-2016-7425, CVE-2016-7910, CVE-2016-7911, CVE-2016-7912, CVE-2016-7913, CVE-2016-7914, CVE-2016-7915, CVE-2016-7916, CVE-2016-7917, CVE-2016-8399, CVE-2016-8405, CVE-2016-8630, CVE-2016-8632, CVE-2016-8633, CVE-2016-8636, CVE-2016-8645, CVE-2016-8646, CVE-2016-8650, CVE-2016-8655, CVE-2016-8658, CVE-2016-8666, CVE-2016-9083, CVE-2016-9084, CVE-2016-9120, CVE-2016-9178, CVE-2016-9191, CVE-2016-9313, CVE-2016-9555, CVE-2016-9576, CVE-2016-9588, CVE-2016-9604, CVE-2016-9685, CVE-2016-9754, CVE-2016-9755, CVE-2016-9756, CVE-2016-9777, CVE-2016-9793, CVE-2016-9794, CVE-2016-9806, CVE-2016-9919, CVE-2017-0605, CVE-2017-0627, CVE-2017-0750, CVE-2017-0786, CVE-2017-0861, CVE-2017-1000, CVE-2017-1000111, CVE-2017-1000112, CVE-2017-1000251, CVE-2017-1000252, CVE-2017-1000253, CVE-2017-1000255, CVE-2017-1000363, CVE-2017-1000364, CVE-2017-1000365, CVE-2017-1000370, CVE-2017-1000371, CVE-2017-1000379, CVE-2017-1000380, CVE-2017-1000405, CVE-2017-1000407, CVE-2017-1000410, CVE-2017-10661, CVE-2017-10662, CVE-2017-10663, CVE-2017-10810, CVE-2017-10911, CVE-2017-11089, CVE-2017-11176, CVE-2017-11472, CVE-2017-11473, CVE-2017-11600, CVE-2017-12134, CVE-2017-12146, CVE-2017-12153, CVE-2017-12154, CVE-2017-12168, CVE-2017-12188, CVE-2017-12190, CVE-2017-12192, CVE-2017-12193, CVE-2017-12762, CVE-2017-13080, CVE-2017-13166, CVE-2017-13167, CVE-2017-13168, CVE-2017-13215, CVE-2017-13216, CVE-2017-13220, CVE-2017-13305, CVE-2017-13686, CVE-2017-13695, CVE-2017-13715, CVE-2017-14051, CVE-2017-14106, CVE-2017-14140, CVE-2017-14156, CVE-2017-14340, CVE-2017-14489, CVE-2017-14497, CVE-2017-14954, CVE-2017-14991, CVE-2017-15102, CVE-2017-15115, CVE-2017-15116, CVE-2017-15121, CVE-2017-15126, CVE-2017-15127, CVE-2017-15128, CVE-2017-15129, CVE-2017-15265, CVE-2017-15274, CVE-2017-15299, CVE-2017-15306, CVE-2017-15537, CVE-2017-15649, CVE-2017-15868, CVE-2017-15951, CVE-2017-16525, CVE-2017-16526, CVE-2017-16527, CVE-2017-16528, CVE-2017-16529, CVE-2017-16530, CVE-2017-16531, CVE-2017-16532, CVE-2017-16533, CVE-2017-16534, CVE-2017-16535, CVE-2017-16536, CVE-2017-16537, CVE-2017-16538, CVE-2017-16643, CVE-2017-16644, CVE-2017-16645, CVE-2017-16646, CVE-2017-16647, CVE-2017-16648, CVE-2017-16649, CVE-2017-16650, CVE-2017-16911, CVE-2017-16912, CVE-2017-16913, CVE-2017-16914, CVE-2017-16939, CVE-2017-16994, CVE-2017-16995, CVE-2017-16996, CVE-2017-17052, CVE-2017-17053, CVE-2017-17448, CVE-2017-17449, CVE-2017-17450, CVE-2017-17558, CVE-2017-17712, CVE-2017-17741, CVE-2017-17805, CVE-2017-17806, CVE-2017-17807, CVE-2017-17852, CVE-2017-17853, CVE-2017-17854, CVE-2017-17855, CVE-2017-17856, CVE-2017-17857, CVE-2017-17862, CVE-2017-17863, CVE-2017-17864, CVE-2017-17975, CVE-2017-18017, CVE-2017-18075, CVE-2017-18079, CVE-2017-18174, CVE-2017-18193, CVE-2017-18200, CVE-2017-18202, CVE-2017-18203, CVE-2017-18204, CVE-2017-18208, CVE-2017-18216, CVE-2017-18218, CVE-2017-18221, CVE-2017-18222, CVE-2017-18224, CVE-2017-18232, CVE-2017-18241, CVE-2017-18249, CVE-2017-18255, CVE-2017-18257, CVE-2017-18261, CVE-2017-18270, CVE-2017-18344, CVE-2017-18360, CVE-2017-18379, CVE-2017-18509, CVE-2017-18549, CVE-2017-18550, CVE-2017-18551, CVE-2017-18552, CVE-2017-18595, CVE-2017-2583, CVE-2017-2584, CVE-2017-2596, CVE-2017-2618, CVE-2017-2634, CVE-2017-2636, CVE-2017-2647, CVE-2017-2671, CVE-2017-5123, CVE-2017-5546, CVE-2017-5547, CVE-2017-5548, CVE-2017-5549, CVE-2017-5550, CVE-2017-5551, CVE-2017-5576, CVE-2017-5577, CVE-2017-5669, CVE-2017-5715, CVE-2017-5753, CVE-2017-5754, CVE-2017-5897, CVE-2017-5967, CVE-2017-5970, CVE-2017-5972, CVE-2017-5986, CVE-2017-6001, CVE-2017-6074, CVE-2017-6214, CVE-2017-6345, CVE-2017-6346, CVE-2017-6347, CVE-2017-6348, CVE-2017-6353, CVE-2017-6874, CVE-2017-6951, CVE-2017-7184, CVE-2017-7187, CVE-2017-7261, CVE-2017-7273, CVE-2017-7277, CVE-2017-7294, CVE-2017-7308, CVE-2017-7346, CVE-2017-7374, CVE-2017-7472, CVE-2017-7477, CVE-2017-7482, CVE-2017-7487, CVE-2017-7495, CVE-2017-7518, CVE-2017-7533, CVE-2017-7541, CVE-2017-7542, CVE-2017-7558, CVE-2017-7616, CVE-2017-7618, CVE-2017-7645, CVE-2017-7889, CVE-2017-7895, CVE-2017-7979, CVE-2017-8061, CVE-2017-8062, CVE-2017-8063, CVE-2017-8064, CVE-2017-8065, CVE-2017-8066, CVE-2017-8067, CVE-2017-8068, CVE-2017-8069, CVE-2017-8070, CVE-2017-8071, CVE-2017-8072, CVE-2017-8106, CVE-2017-8240, CVE-2017-8797, CVE-2017-8824, CVE-2017-8831, CVE-2017-8890, CVE-2017-8924, CVE-2017-8925, CVE-2017-9059, CVE-2017-9074, CVE-2017-9075, CVE-2017-9076, CVE-2017-9077, CVE-2017-9150, CVE-2017-9211, CVE-2017-9242, CVE-2017-9605, CVE-2017-9725, CVE-2017-9984, CVE-2017-9985, CVE-2017-9986, CVE-2018-1000004, CVE-2018-1000026, CVE-2018-1000028, CVE-2018-1000199, CVE-2018-1000200, CVE-2018-1000204, CVE-2018-10021, CVE-2018-10074, CVE-2018-10087, CVE-2018-10124, CVE-2018-10322, CVE-2018-10323, CVE-2018-1065, CVE-2018-1066, CVE-2018-10675, CVE-2018-1068, CVE-2018-10840, CVE-2018-10853, CVE-2018-1087, CVE-2018-10876, CVE-2018-10877, CVE-2018-10878, CVE-2018-10879, CVE-2018-10880, CVE-2018-10881, CVE-2018-10882, CVE-2018-10883, CVE-2018-10901, CVE-2018-10902, CVE-2018-1091, CVE-2018-1092, CVE-2018-1093, CVE-2018-10938, CVE-2018-1094, CVE-2018-10940, CVE-2018-1095, CVE-2018-1108, CVE-2018-1118, CVE-2018-1120, CVE-2018-11232, CVE-2018-1128, CVE-2018-1129, CVE-2018-1130, CVE-2018-11412, CVE-2018-11506, CVE-2018-11508, CVE-2018-12126, CVE-2018-12127, CVE-2018-12130, CVE-2018-12207, CVE-2018-12232, CVE-2018-12233, CVE-2018-12633, CVE-2018-12714, CVE-2018-12896, CVE-2018-12904, CVE-2018-13053, CVE-2018-13093, CVE-2018-13094, CVE-2018-13095, CVE-2018-13096, CVE-2018-13097, CVE-2018-13098, CVE-2018-13099, CVE-2018-13100, CVE-2018-13405, CVE-2018-13406, CVE-2018-14609, CVE-2018-14610, CVE-2018-14611, CVE-2018-14612, CVE-2018-14613, CVE-2018-14614, CVE-2018-14615, CVE-2018-14616, CVE-2018-14617, CVE-2018-14619, CVE-2018-14625, CVE-2018-14633, CVE-2018-14634, CVE-2018-14641, CVE-2018-14646, CVE-2018-14656, CVE-2018-14678, CVE-2018-14734, CVE-2018-15471, CVE-2018-15572, CVE-2018-15594, CVE-2018-16276, CVE-2018-16597, CVE-2018-16658, CVE-2018-16862, CVE-2018-16871, CVE-2018-16880, CVE-2018-16882, CVE-2018-16884, CVE-2018-17182, CVE-2018-17972, CVE-2018-18021, CVE-2018-18281, CVE-2018-18386, CVE-2018-18397, CVE-2018-18445, CVE-2018-18559, CVE-2018-18690, CVE-2018-18710, CVE-2018-18955, CVE-2018-19406, CVE-2018-19407, CVE-2018-19824, CVE-2018-19854, CVE-2018-19985, CVE-2018-20169, CVE-2018-20449, CVE-2018-20509, CVE-2018-20510, CVE-2018-20511, CVE-2018-20669, CVE-2018-20784, CVE-2018-20836, CVE-2018-20854, CVE-2018-20855, CVE-2018-20856, CVE-2018-20961, CVE-2018-20976, CVE-2018-21008, CVE-2018-25015, CVE-2018-25020, CVE-2018-3620, CVE-2018-3639, CVE-2018-3646, CVE-2018-3665, CVE-2018-3693, CVE-2018-5332, CVE-2018-5333, CVE-2018-5344, CVE-2018-5390, CVE-2018-5391, CVE-2018-5703, CVE-2018-5750, CVE-2018-5803, CVE-2018-5814, CVE-2018-5848, CVE-2018-5873, CVE-2018-5953, CVE-2018-5995, CVE-2018-6412, CVE-2018-6554, CVE-2018-6555, CVE-2018-6927, CVE-2018-7191, CVE-2018-7273, CVE-2018-7480, CVE-2018-7492, CVE-2018-7566, CVE-2018-7740, CVE-2018-7754, CVE-2018-7755, CVE-2018-7757, CVE-2018-7995, CVE-2018-8043, CVE-2018-8087, CVE-2018-8781, CVE-2018-8822, CVE-2018-8897, CVE-2018-9363, CVE-2018-9385, CVE-2018-9415, CVE-2018-9422, CVE-2018-9465, CVE-2018-9516, CVE-2018-9517, CVE-2018-9518 and CVE-2018-9568
linux-yocto/6.1 (Continued): Ignore CVE-2019-0136, CVE-2019-0145, CVE-2019-0146, CVE-2019-0147, CVE-2019-0148, CVE-2019-0149, CVE-2019-0154, CVE-2019-0155, CVE-2019-10124, CVE-2019-10125, CVE-2019-10126, CVE-2019-10142, CVE-2019-10207, CVE-2019-10220, CVE-2019-10638, CVE-2019-10639, CVE-2019-11085, CVE-2019-11091, CVE-2019-11135, CVE-2019-11190, CVE-2019-11191, CVE-2019-1125, CVE-2019-11477, CVE-2019-11478, CVE-2019-11479, CVE-2019-11486, CVE-2019-11487, CVE-2019-11599, CVE-2019-11683, CVE-2019-11810, CVE-2019-11811, CVE-2019-11815, CVE-2019-11833, CVE-2019-11884, CVE-2019-12378, CVE-2019-12379, CVE-2019-12380, CVE-2019-12381, CVE-2019-12382, CVE-2019-12454, CVE-2019-12455, CVE-2019-12614, CVE-2019-12615, CVE-2019-12817, CVE-2019-12818, CVE-2019-12819, CVE-2019-12881, CVE-2019-12984, CVE-2019-13233, CVE-2019-13272, CVE-2019-13631, CVE-2019-13648, CVE-2019-14283, CVE-2019-14284, CVE-2019-14615, CVE-2019-14763, CVE-2019-14814, CVE-2019-14815, CVE-2019-14816, CVE-2019-14821, CVE-2019-14835, CVE-2019-14895, CVE-2019-14896, CVE-2019-14897, CVE-2019-14901, CVE-2019-15030, CVE-2019-15031, CVE-2019-15090, CVE-2019-15098, CVE-2019-15099, CVE-2019-15117, CVE-2019-15118, CVE-2019-15211, CVE-2019-15212, CVE-2019-15213, CVE-2019-15214, CVE-2019-15215, CVE-2019-15216, CVE-2019-15217, CVE-2019-15218, CVE-2019-15219, CVE-2019-15220, CVE-2019-15221, CVE-2019-15222, CVE-2019-15223, CVE-2019-15291, CVE-2019-15292, CVE-2019-15504, CVE-2019-15505, CVE-2019-15538, CVE-2019-15666, CVE-2019-15794, CVE-2019-15807, CVE-2019-15916, CVE-2019-15917, CVE-2019-15918, CVE-2019-15919, CVE-2019-15920, CVE-2019-15921, CVE-2019-15922, CVE-2019-15923, CVE-2019-15924, CVE-2019-15925, CVE-2019-15926, CVE-2019-15927, CVE-2019-16229, CVE-2019-16230, CVE-2019-16231, CVE-2019-16232, CVE-2019-16233, CVE-2019-16234, CVE-2019-16413, CVE-2019-16714, CVE-2019-16746, CVE-2019-16921, CVE-2019-16994, CVE-2019-16995, CVE-2019-17052, CVE-2019-17053, CVE-2019-17054, CVE-2019-17055, CVE-2019-17056, CVE-2019-17075, CVE-2019-17133, CVE-2019-17351, CVE-2019-17666, CVE-2019-18198, CVE-2019-18282, CVE-2019-18660, CVE-2019-18675, CVE-2019-18683, CVE-2019-18786, CVE-2019-18805, CVE-2019-18806, CVE-2019-18807, CVE-2019-18808, CVE-2019-18809, CVE-2019-18810, CVE-2019-18811, CVE-2019-18812, CVE-2019-18813, CVE-2019-18814, CVE-2019-18885, CVE-2019-19036, CVE-2019-19037, CVE-2019-19039, CVE-2019-19043, CVE-2019-19044, CVE-2019-19045, CVE-2019-19046, CVE-2019-19047, CVE-2019-19048, CVE-2019-19049, CVE-2019-19050, CVE-2019-19051, CVE-2019-19052, CVE-2019-19053, CVE-2019-19054, CVE-2019-19055, CVE-2019-19056, CVE-2019-19057, CVE-2019-19058, CVE-2019-19059, CVE-2019-19060, CVE-2019-19061, CVE-2019-19062, CVE-2019-19063, CVE-2019-19064, CVE-2019-19065, CVE-2019-19066, CVE-2019-19067, CVE-2019-19068, CVE-2019-19069, CVE-2019-19070, CVE-2019-19071, CVE-2019-19072, CVE-2019-19073, CVE-2019-19074, CVE-2019-19075, CVE-2019-19076, CVE-2019-19077, CVE-2019-19078, CVE-2019-19079, CVE-2019-19080, CVE-2019-19081, CVE-2019-19082, CVE-2019-19083, CVE-2019-19227, CVE-2019-19241, CVE-2019-19252, CVE-2019-19318, CVE-2019-19319, CVE-2019-19332, CVE-2019-19338, CVE-2019-19377, CVE-2019-19447, CVE-2019-19448, CVE-2019-19449, CVE-2019-19462, CVE-2019-19523, CVE-2019-19524, CVE-2019-19525, CVE-2019-19526, CVE-2019-19527, CVE-2019-19528, CVE-2019-19529, CVE-2019-19530, CVE-2019-19531, CVE-2019-19532, CVE-2019-19533, CVE-2019-19534, CVE-2019-19535, CVE-2019-19536, CVE-2019-19537, CVE-2019-19543, CVE-2019-19602, CVE-2019-19767, CVE-2019-19768, CVE-2019-19769, CVE-2019-19770, CVE-2019-19807, CVE-2019-19813, CVE-2019-19815, CVE-2019-19816, CVE-2019-19922, CVE-2019-19927, CVE-2019-19947, CVE-2019-19965, CVE-2019-19966, CVE-2019-1999, CVE-2019-20054, CVE-2019-20095, CVE-2019-20096, CVE-2019-2024, CVE-2019-2025, CVE-2019-20422, CVE-2019-2054, CVE-2019-20636, CVE-2019-20806, CVE-2019-20810, CVE-2019-20811, CVE-2019-20812, CVE-2019-20908, CVE-2019-20934, CVE-2019-2101, CVE-2019-2181, CVE-2019-2182, CVE-2019-2213, CVE-2019-2214, CVE-2019-2215, CVE-2019-25044, CVE-2019-25045, CVE-2019-3016, CVE-2019-3459, CVE-2019-3460, CVE-2019-3701, CVE-2019-3819, CVE-2019-3837, CVE-2019-3846, CVE-2019-3874, CVE-2019-3882, CVE-2019-3887, CVE-2019-3892, CVE-2019-3896, CVE-2019-3900, CVE-2019-3901, CVE-2019-5108, CVE-2019-6133, CVE-2019-6974, CVE-2019-7221, CVE-2019-7222, CVE-2019-7308, CVE-2019-8912, CVE-2019-8956, CVE-2019-8980, CVE-2019-9003, CVE-2019-9162, CVE-2019-9213, CVE-2019-9245, CVE-2019-9444, CVE-2019-9445, CVE-2019-9453, CVE-2019-9454, CVE-2019-9455, CVE-2019-9456, CVE-2019-9457, CVE-2019-9458, CVE-2019-9466, CVE-2019-9500, CVE-2019-9503, CVE-2019-9506, CVE-2019-9857, CVE-2020-0009, CVE-2020-0030, CVE-2020-0041, CVE-2020-0066, CVE-2020-0067, CVE-2020-0110, CVE-2020-0255, CVE-2020-0305, CVE-2020-0404, CVE-2020-0423, CVE-2020-0427, CVE-2020-0429, CVE-2020-0430, CVE-2020-0431, CVE-2020-0432, CVE-2020-0433, CVE-2020-0435, CVE-2020-0444, CVE-2020-0465, CVE-2020-0466, CVE-2020-0543, CVE-2020-10135, CVE-2020-10690, CVE-2020-10711, CVE-2020-10720, CVE-2020-10732, CVE-2020-10742, CVE-2020-10751, CVE-2020-10757, CVE-2020-10766, CVE-2020-10767, CVE-2020-10768, CVE-2020-10769, CVE-2020-10773, CVE-2020-10781, CVE-2020-10942, CVE-2020-11494, CVE-2020-11565, CVE-2020-11608, CVE-2020-11609, CVE-2020-11668, CVE-2020-11669, CVE-2020-11884, CVE-2020-12114, CVE-2020-12351, CVE-2020-12352, CVE-2020-12362, CVE-2020-12363, CVE-2020-12364, CVE-2020-12464, CVE-2020-12465, CVE-2020-12652, CVE-2020-12653, CVE-2020-12654, CVE-2020-12655, CVE-2020-12656, CVE-2020-12657, CVE-2020-12659, CVE-2020-12768, CVE-2020-12769, CVE-2020-12770, CVE-2020-12771, CVE-2020-12826, CVE-2020-12888, CVE-2020-12912, CVE-2020-13143, CVE-2020-13974, CVE-2020-14305, CVE-2020-14314, CVE-2020-14331, CVE-2020-14351, CVE-2020-14353, CVE-2020-14356, CVE-2020-14381, CVE-2020-14385, CVE-2020-14386, CVE-2020-14390, CVE-2020-14416, CVE-2020-15393, CVE-2020-15436, CVE-2020-15437, CVE-2020-15780, CVE-2020-15852, CVE-2020-16119, CVE-2020-16120, CVE-2020-16166, CVE-2020-1749, CVE-2020-24394, CVE-2020-24490, CVE-2020-24504, CVE-2020-24586, CVE-2020-24587, CVE-2020-24588, CVE-2020-25211, CVE-2020-25212, CVE-2020-25221, CVE-2020-25284, CVE-2020-25285, CVE-2020-25639, CVE-2020-25641, CVE-2020-25643, CVE-2020-25645, CVE-2020-25656, CVE-2020-25668, CVE-2020-25669, CVE-2020-25670, CVE-2020-25671, CVE-2020-25672, CVE-2020-25673, CVE-2020-25704, CVE-2020-25705, CVE-2020-26088, CVE-2020-26139, CVE-2020-26141, CVE-2020-26145, CVE-2020-26147, CVE-2020-26541, CVE-2020-26555, CVE-2020-26558, CVE-2020-27066, CVE-2020-27067, CVE-2020-27068, CVE-2020-27152, CVE-2020-27170, CVE-2020-27171, CVE-2020-27194, CVE-2020-2732, CVE-2020-27673, CVE-2020-27675, CVE-2020-27777, CVE-2020-27784, CVE-2020-27786, CVE-2020-27815, CVE-2020-27820, CVE-2020-27825, CVE-2020-27830, CVE-2020-27835, CVE-2020-28097, CVE-2020-28374, CVE-2020-28588, CVE-2020-28915, CVE-2020-28941, CVE-2020-28974, CVE-2020-29368, CVE-2020-29369, CVE-2020-29370, CVE-2020-29371, CVE-2020-29372, CVE-2020-29373, CVE-2020-29374, CVE-2020-29534, CVE-2020-29568, CVE-2020-29569, CVE-2020-29660, CVE-2020-29661, CVE-2020-35499, CVE-2020-35508, CVE-2020-35513, CVE-2020-35519, CVE-2020-36158, CVE-2020-36310, CVE-2020-36311, CVE-2020-36312, CVE-2020-36313, CVE-2020-36322, CVE-2020-36385, CVE-2020-36386, CVE-2020-36387, CVE-2020-36516, CVE-2020-36557, CVE-2020-36558, CVE-2020-36691, CVE-2020-36694, CVE-2020-36766, CVE-2020-3702, CVE-2020-4788, CVE-2020-7053, CVE-2020-8428, CVE-2020-8647, CVE-2020-8648, CVE-2020-8649, CVE-2020-8694, CVE-2020-8834, CVE-2020-8835, CVE-2020-8992, CVE-2020-9383, CVE-2020-9391, CVE-2021-0129, CVE-2021-0342, CVE-2021-0447, CVE-2021-0448, CVE-2021-0512, CVE-2021-0605, CVE-2021-0707, CVE-2021-0920, CVE-2021-0929, CVE-2021-0935, CVE-2021-0937, CVE-2021-0938, CVE-2021-0941, CVE-2021-1048, CVE-2021-20177, CVE-2021-20194, CVE-2021-20226, CVE-2021-20239, CVE-2021-20261, CVE-2021-20265, CVE-2021-20268, CVE-2021-20292, CVE-2021-20317, CVE-2021-20320, CVE-2021-20321, CVE-2021-20322, CVE-2021-21781, CVE-2021-22543, CVE-2021-22555, CVE-2021-22600, CVE-2021-23133, CVE-2021-23134, CVE-2021-26401, CVE-2021-26708, CVE-2021-26930, CVE-2021-26931, CVE-2021-26932, CVE-2021-27363, CVE-2021-27364, CVE-2021-27365, CVE-2021-28038, CVE-2021-28039, CVE-2021-28375, CVE-2021-28660, CVE-2021-28688, CVE-2021-28691, CVE-2021-28711, CVE-2021-28712, CVE-2021-28713, CVE-2021-28714, CVE-2021-28715, CVE-2021-28950, CVE-2021-28951, CVE-2021-28952, CVE-2021-28964, CVE-2021-28971, CVE-2021-28972, CVE-2021-29154, CVE-2021-29155, CVE-2021-29264, CVE-2021-29265, CVE-2021-29266, CVE-2021-29646, CVE-2021-29647, CVE-2021-29648, CVE-2021-29649, CVE-2021-29650, CVE-2021-29657, CVE-2021-30002, CVE-2021-30178, CVE-2021-31440, CVE-2021-3178, CVE-2021-31829, CVE-2021-31916, CVE-2021-32078, CVE-2021-32399, CVE-2021-32606, CVE-2021-33033, CVE-2021-33034, CVE-2021-33061, CVE-2021-33098, CVE-2021-33135, CVE-2021-33200, CVE-2021-3347, CVE-2021-3348, CVE-2021-33624, CVE-2021-33655, CVE-2021-33656, CVE-2021-33909, CVE-2021-3411, CVE-2021-3428, CVE-2021-3444, CVE-2021-34556, CVE-2021-34693, CVE-2021-3483, CVE-2021-34866, CVE-2021-3489, CVE-2021-3490, CVE-2021-3491, CVE-2021-3493, CVE-2021-34981, CVE-2021-3501, CVE-2021-35039, CVE-2021-3506, CVE-2021-3543, CVE-2021-35477, CVE-2021-3564, CVE-2021-3573, CVE-2021-3587, CVE-2021-3600, CVE-2021-3609, CVE-2021-3612, CVE-2021-3635, CVE-2021-3640, CVE-2021-3653, CVE-2021-3655, CVE-2021-3656, CVE-2021-3659, CVE-2021-3669, CVE-2021-3679, CVE-2021-3715, CVE-2021-37159, CVE-2021-3732, CVE-2021-3736, CVE-2021-3739, CVE-2021-3743, CVE-2021-3744, CVE-2021-3752, CVE-2021-3753, CVE-2021-37576, CVE-2021-3759, CVE-2021-3760, CVE-2021-3764, CVE-2021-3772, CVE-2021-38160, CVE-2021-38166, CVE-2021-38198, CVE-2021-38199, CVE-2021-38200, CVE-2021-38201, CVE-2021-38202, CVE-2021-38203, CVE-2021-38204, CVE-2021-38205, CVE-2021-38206, CVE-2021-38207, CVE-2021-38208, CVE-2021-38209, CVE-2021-38300, CVE-2021-3894, CVE-2021-3896, CVE-2021-3923, CVE-2021-39633, CVE-2021-39634, CVE-2021-39636, CVE-2021-39648, CVE-2021-39656, CVE-2021-39657, CVE-2021-39685, CVE-2021-39686, CVE-2021-39698, CVE-2021-39711, CVE-2021-39713, CVE-2021-39714, CVE-2021-4001, CVE-2021-4002, CVE-2021-4023, CVE-2021-4028, CVE-2021-4032, CVE-2021-4037, CVE-2021-40490, CVE-2021-4083, CVE-2021-4090, CVE-2021-4093, CVE-2021-4095, CVE-2021-41073, CVE-2021-4135, CVE-2021-4148, CVE-2021-4149, CVE-2021-4150, CVE-2021-4154, CVE-2021-4155, CVE-2021-4157, CVE-2021-4159, CVE-2021-41864, CVE-2021-4197, CVE-2021-42008, CVE-2021-4202, CVE-2021-4203, CVE-2021-4204, CVE-2021-4218, CVE-2021-42252, CVE-2021-42327, CVE-2021-42739, CVE-2021-43056, CVE-2021-43057, CVE-2021-43267, CVE-2021-43389, CVE-2021-43975, CVE-2021-43976, CVE-2021-44733, CVE-2021-44879, CVE-2021-45095, CVE-2021-45100, CVE-2021-45402, CVE-2021-45469, CVE-2021-45480, CVE-2021-45485, CVE-2021-45486, CVE-2021-45868, CVE-2021-46283, CVE-2022-0001, CVE-2022-0002, CVE-2022-0168, CVE-2022-0171, CVE-2022-0185, CVE-2022-0264, CVE-2022-0286, CVE-2022-0322, CVE-2022-0330, CVE-2022-0382, CVE-2022-0433, CVE-2022-0435, CVE-2022-0480, CVE-2022-0487, CVE-2022-0492, CVE-2022-0494, CVE-2022-0500, CVE-2022-0516, CVE-2022-0617, CVE-2022-0644, CVE-2022-0646, CVE-2022-0742, CVE-2022-0812, CVE-2022-0847, CVE-2022-0850, CVE-2022-0854, CVE-2022-0995, CVE-2022-0998, CVE-2022-1011, CVE-2022-1012, CVE-2022-1015, CVE-2022-1016, CVE-2022-1043, CVE-2022-1048, CVE-2022-1055, CVE-2022-1158, CVE-2022-1184, CVE-2022-1195, CVE-2022-1198, CVE-2022-1199, CVE-2022-1204, CVE-2022-1205, CVE-2022-1263, CVE-2022-1280, CVE-2022-1353, CVE-2022-1419, CVE-2022-1462, CVE-2022-1508, CVE-2022-1516, CVE-2022-1651, CVE-2022-1652, CVE-2022-1671, CVE-2022-1678, CVE-2022-1679, CVE-2022-1729, CVE-2022-1734, CVE-2022-1786, CVE-2022-1789, CVE-2022-1836, CVE-2022-1852, CVE-2022-1882, CVE-2022-1943, CVE-2022-1966, CVE-2022-1972, CVE-2022-1973, CVE-2022-1974, CVE-2022-1975, CVE-2022-1976, CVE-2022-1998, CVE-2022-20008, CVE-2022-20132, CVE-2022-20141, CVE-2022-20148, CVE-2022-20153, CVE-2022-20154, CVE-2022-20158, CVE-2022-20166, CVE-2022-20368, CVE-2022-20369, CVE-2022-20409, CVE-2022-20421, CVE-2022-20422, CVE-2022-20423, CVE-2022-20424, CVE-2022-20565, CVE-2022-20566, CVE-2022-20567, CVE-2022-20568, CVE-2022-20572, CVE-2022-2078, CVE-2022-21123, CVE-2022-21125, CVE-2022-21166, CVE-2022-21385, CVE-2022-21499, CVE-2022-21505, CVE-2022-2153, CVE-2022-2196, CVE-2022-22942, CVE-2022-23036, CVE-2022-23037, CVE-2022-23038, CVE-2022-23039, CVE-2022-23040, CVE-2022-23041, CVE-2022-23042, CVE-2022-2308, CVE-2022-2318, CVE-2022-23222, CVE-2022-2327, CVE-2022-2380, CVE-2022-23816, CVE-2022-23960, CVE-2022-24122, CVE-2022-24448, CVE-2022-24958, CVE-2022-24959, CVE-2022-2503, CVE-2022-25258, CVE-2022-25375, CVE-2022-25636, CVE-2022-2585, CVE-2022-2586, CVE-2022-2588, CVE-2022-2590, CVE-2022-2602, CVE-2022-26365, CVE-2022-26373, CVE-2022-2639, CVE-2022-26490, CVE-2022-2663, CVE-2022-26966, CVE-2022-27223, CVE-2022-27666, CVE-2022-27672, CVE-2022-2785, CVE-2022-27950, CVE-2022-28356, CVE-2022-28388, CVE-2022-28389, CVE-2022-28390, CVE-2022-2873, CVE-2022-28796, CVE-2022-28893, CVE-2022-2905, CVE-2022-29156, CVE-2022-2938, CVE-2022-29581, CVE-2022-29582, CVE-2022-2959, CVE-2022-2964, CVE-2022-2977, CVE-2022-2978, CVE-2022-29900, CVE-2022-29901, CVE-2022-2991, CVE-2022-29968, CVE-2022-3028, CVE-2022-30594, CVE-2022-3061, CVE-2022-3077, CVE-2022-3078, CVE-2022-3103, CVE-2022-3104, CVE-2022-3105, CVE-2022-3106, CVE-2022-3107, CVE-2022-3108, CVE-2022-3110, CVE-2022-3111, CVE-2022-3112, CVE-2022-3113, CVE-2022-3114, CVE-2022-3115, CVE-2022-3169, CVE-2022-3170, CVE-2022-3176, CVE-2022-3202, CVE-2022-32250, CVE-2022-32296, CVE-2022-3239, CVE-2022-32981, CVE-2022-3303, CVE-2022-3344, CVE-2022-33740, CVE-2022-33741, CVE-2022-33742, CVE-2022-33743, CVE-2022-33744, CVE-2022-33981, CVE-2022-3424, CVE-2022-3435, CVE-2022-34494, CVE-2022-34495, CVE-2022-34918, CVE-2022-3521, CVE-2022-3522, CVE-2022-3524, CVE-2022-3526, CVE-2022-3531, CVE-2022-3532, CVE-2022-3534, CVE-2022-3535, CVE-2022-3541, CVE-2022-3542, CVE-2022-3543, CVE-2022-3545, CVE-2022-3564, CVE-2022-3565, CVE-2022-3577, CVE-2022-3586, CVE-2022-3594, CVE-2022-3595, CVE-2022-36123, CVE-2022-3619, CVE-2022-3621, CVE-2022-3623, CVE-2022-3624, CVE-2022-3625, CVE-2022-3628, CVE-2022-36280, CVE-2022-3629, CVE-2022-3630, CVE-2022-3633, CVE-2022-3635, CVE-2022-3636, CVE-2022-3640, CVE-2022-3643, CVE-2022-3646, CVE-2022-3649, CVE-2022-36879, CVE-2022-36946, CVE-2022-3707, CVE-2022-38457, CVE-2022-3903, CVE-2022-3910, CVE-2022-39188, CVE-2022-39189, CVE-2022-39190, CVE-2022-3977, CVE-2022-39842, CVE-2022-40133, CVE-2022-40307, CVE-2022-40476, CVE-2022-40768, CVE-2022-4095, CVE-2022-40982, CVE-2022-41218, CVE-2022-41222, CVE-2022-4127, CVE-2022-4128, CVE-2022-4129, CVE-2022-4139, CVE-2022-41674, CVE-2022-41849, CVE-2022-41850, CVE-2022-41858, CVE-2022-42328, CVE-2022-42329, CVE-2022-42432, CVE-2022-4269, CVE-2022-42703, CVE-2022-42719, CVE-2022-42720, CVE-2022-42721, CVE-2022-42722, CVE-2022-42895, CVE-2022-42896, CVE-2022-43750, CVE-2022-4378, CVE-2022-4379, CVE-2022-4382, CVE-2022-43945, CVE-2022-45869, CVE-2022-45886, CVE-2022-45887, CVE-2022-45919, CVE-2022-45934, CVE-2022-4662, CVE-2022-4696, CVE-2022-4744, CVE-2022-47518, CVE-2022-47519, CVE-2022-47520, CVE-2022-47521, CVE-2022-47929, CVE-2022-47938, CVE-2022-47939, CVE-2022-47940, CVE-2022-47941, CVE-2022-47942, CVE-2022-47943, CVE-2022-47946, CVE-2022-4842, CVE-2022-48423, CVE-2022-48424, CVE-2022-48425, CVE-2022-48502, CVE-2023-0030, CVE-2023-0045, CVE-2023-0047, CVE-2023-0122, CVE-2023-0160, CVE-2023-0179, CVE-2023-0210, CVE-2023-0240, CVE-2023-0266, CVE-2023-0386, CVE-2023-0394, CVE-2023-0458, CVE-2023-0459, CVE-2023-0461, CVE-2023-0468, CVE-2023-0469, CVE-2023-0590, CVE-2023-0615, CVE-2023-1032, CVE-2023-1073, CVE-2023-1074, CVE-2023-1076, CVE-2023-1077, CVE-2023-1078, CVE-2023-1079, CVE-2023-1095, CVE-2023-1118, CVE-2023-1192, CVE-2023-1194, CVE-2023-1195, CVE-2023-1206, CVE-2023-1249, CVE-2023-1252, CVE-2023-1281, CVE-2023-1295, CVE-2023-1380, CVE-2023-1382, CVE-2023-1390, CVE-2023-1513, CVE-2023-1582, CVE-2023-1583, CVE-2023-1611, CVE-2023-1637, CVE-2023-1652, CVE-2023-1670, CVE-2023-1829, CVE-2023-1838, CVE-2023-1855, CVE-2023-1859, CVE-2023-1872, CVE-2023-1989, CVE-2023-1990, CVE-2023-1998, CVE-2023-2002, CVE-2023-2006, CVE-2023-2007, CVE-2023-2008, CVE-2023-2019, CVE-2023-20569, CVE-2023-20588, CVE-2023-20593, CVE-2023-20928, CVE-2023-20938, CVE-2023-21102, CVE-2023-21106, CVE-2023-2124, CVE-2023-21255, CVE-2023-2156, CVE-2023-2162, CVE-2023-2163, CVE-2023-2166, CVE-2023-2177, CVE-2023-2194, CVE-2023-2235, CVE-2023-2236, CVE-2023-2248, CVE-2023-2269, CVE-2023-22995, CVE-2023-22996, CVE-2023-22997, CVE-2023-22998, CVE-2023-22999, CVE-2023-23000, CVE-2023-23001, CVE-2023-23002, CVE-2023-23003, CVE-2023-23004, CVE-2023-23006, CVE-2023-23454, CVE-2023-23455, CVE-2023-23559, CVE-2023-23586, CVE-2023-2430, CVE-2023-2483, CVE-2023-25012, CVE-2023-2513, CVE-2023-25775, CVE-2023-2598, CVE-2023-26544, CVE-2023-26545, CVE-2023-26605, CVE-2023-26606, CVE-2023-26607, CVE-2023-28327, CVE-2023-28328, CVE-2023-28410, CVE-2023-28464, CVE-2023-28466, CVE-2023-2860, CVE-2023-28772, CVE-2023-28866, CVE-2023-2898, CVE-2023-2985, CVE-2023-3006, CVE-2023-30456, CVE-2023-30772, CVE-2023-3090, CVE-2023-3106, CVE-2023-3111, CVE-2023-3117, CVE-2023-31248, CVE-2023-3141, CVE-2023-31436, CVE-2023-3159, CVE-2023-3161, CVE-2023-3212, CVE-2023-3220, CVE-2023-32233, CVE-2023-32247, CVE-2023-32248, CVE-2023-32250, CVE-2023-32252, CVE-2023-32254, CVE-2023-32257, CVE-2023-32258, CVE-2023-32269, CVE-2023-3268, CVE-2023-3269, CVE-2023-3312, CVE-2023-3317, CVE-2023-33203, CVE-2023-33250, CVE-2023-33288, CVE-2023-3338, CVE-2023-3355, CVE-2023-3357, CVE-2023-3358, CVE-2023-3359, CVE-2023-3389, CVE-2023-3390, CVE-2023-33951, CVE-2023-33952, CVE-2023-34255, CVE-2023-34256, CVE-2023-34319, CVE-2023-3439, CVE-2023-35001, CVE-2023-3567, CVE-2023-35788, CVE-2023-35823, CVE-2023-35824, CVE-2023-35826, CVE-2023-35828, CVE-2023-35829, CVE-2023-3609, CVE-2023-3610, CVE-2023-3611, CVE-2023-37453, CVE-2023-3772, CVE-2023-3773, CVE-2023-3776, CVE-2023-3777, CVE-2023-3812, CVE-2023-38409, CVE-2023-38426, CVE-2023-38427, CVE-2023-38428, CVE-2023-38429, CVE-2023-38430, CVE-2023-38431, CVE-2023-38432, CVE-2023-3863, CVE-2023-3865, CVE-2023-3866, CVE-2023-3867, CVE-2023-4004, CVE-2023-4015, CVE-2023-40283, CVE-2023-4128, CVE-2023-4132, CVE-2023-4147, CVE-2023-4155, CVE-2023-4194, CVE-2023-4206, CVE-2023-4207, CVE-2023-4208, CVE-2023-4273, CVE-2023-42752, CVE-2023-42753, CVE-2023-4385, CVE-2023-4387, CVE-2023-4389, CVE-2023-4394, CVE-2023-4459, CVE-2023-4569, CVE-2023-4611 and CVE-2023-4623
nghttp2: Fix CVE-2023-35945
openssl: Fix CVE-2023-2975, CVE-2023-3446, CVE-2023-3817, CVE-2023-4807 and CVE-2023-5363
pixman: Ignore CVE-2023-37769
procps: Fix CVE-2023-4016
python3-git: Fix CVE-2023-40267, CVE-2023-40590 and CVE-2023-41040
python3-pygments: Fix CVE-2022-40896
python3-urllib3: Fix CVE-2023-43804 and CVE-2023-45803
python3: Fix CVE-2023-24329 and CVE-2023-40217
qemu: Fix CVE-2023-3180, CVE-2023-3354 and CVE-2023-42467
qemu: Ignore CVE-2023-2680
screen: Fix CVE-2023-24626
shadow: Fix CVE-2023-4641
tiff: Fix CVE-2023-40745 and CVE-2023-41175
vim: Fix CVE-2023-3896, CVE-2023-4733, CVE-2023-4734, CVE-2023-4735, CVE-2023-4736, CVE-2023-4738, CVE-2023-4750, CVE-2023-4752, CVE-2023-4781, CVE-2023-5441 and CVE-2023-5535
webkitgtk: Fix CVE-2023-32435 and CVE-2023-32439
xserver-xorg: Fix CVE-2023-5367 and CVE-2023-5380
Fixes in Yocto-4.2.4
README: Update to point to new contributor guide
README: fix mail address in git example command
SECURITY.md: Add file
avahi: handle invalid service types gracefully
bind: upgrade to 9.18.19
bitbake.conf: add bunzip2 in HOSTTOOLS
bitbake: Fix disk space monitoring on cephfs
bitbake: SECURITY.md: add file
brief-yoctoprojectqs: use new CDN mirror for sstate
bsp-guide: bsp.rst: replace reference to wiki
bsp-guide: bsp: skip Intel machines no longer supported in Poky
build-appliance-image: Update to mickledore head revision
build-sysroots: Add SUMMARY field
build-sysroots: Ensure dependency chains are minimal
build-sysroots: target or native sysroot population need to be selected explicitly
buildtools-tarball: Add libacl
busybox: Set PATH in syslog initscript
busybox: remove coreutils dependency in busybox-ptest
cmake.bbclass: fix allarch override syntax
cml1: Fix KCONFIG_CONFIG_COMMAND not conveyed fully in do_menuconfig
contributor-guide/style-guide: Add a note about task idempotence
contributor-guide/style-guide: Refer to recipes, not packages
contributor-guide: deprecate “Accepted” patch status
contributor-guide: discourage marking patches as Inappropriate
contributor-guide: recipe-style-guide: add Upstream-Status
contributor-guide: recipe-style-guide: add more patch tagging examples
contributor-guide: recipe-style-guide: add section about CVE patches
contributor-guide: style-guide: discourage using Pending patch status
core-image-ptest: Define a fallback for SUMMARY field
cve-check: add CVSS vector string to CVE database and reports
cve-check: don’t warn if a patch is remote
cve-check: slightly more verbose warning when adding the same package twice
cve-check: sort the package list in the JSON report
cve-exclusion_6.1.inc: update for 6.1.57
dbus: add additional entries to CVE_PRODUCT
dbus: upgrade to 1.14.10
dev-manual: add security team processes
dev-manual: disk-space: improve wording for obsolete sstate cache files
dev-manual: disk-space: mention faster “find” command to trim sstate cache
dev-manual: fix testimage usage instructions
dev-manual: layers: Add notes about layer.conf
dev-manual: licenses: mention SPDX for license compliance
dev-manual: new-recipe.rst fix inconsistency with contributor guide
dev-manual: new-recipe.rst: add missing parenthesis to “Patching Code” section
dev-manual: new-recipe.rst: replace reference to wiki
dev-manual: remove unsupported :term: markup inside markup
dev-manual: start.rst: remove obsolete reference
ell: upgrade to 0.58
externalsrc: fix dependency chain issues
ffmpeg: upgrade to 5.1.3
ffmpeg: avoid neon on unsupported machines
file: fix call to localtime_r()
file: upgrade to 5.45
fontcache.bbclass: avoid native recipes depending on target fontconfig
gcc-crosssdk: ignore MULTILIB_VARIANTS in signature computation
gcc-runtime: remove bashism
gcc: backport a fix for ICE caused by CVE-2023-4039.patch
gcc: depend on zstd
gdb: fix RDEPENDS for PACKAGECONFIG[tui]
glib-2.0: libelf has a configure option now, specify it
glibc: stable 2.37 branch updates
gnupg: Fix reproducibility failure
gnupg: upgrade to 2.4.3
go: upgrade to 1.20.7
graphene: fix runtime detection of IEEE754 behaviour
gstreamer: upgrade to 1.22.6
gtk4: upgrade to 4.10.5
gzip: upgrade to 1.13
igt-gpu-tools: do not write shortened git commit hash into binaries
inetutils: don’t guess target paths
inetutils: remove obsolete cruft from do_configure
insane.bbclass: Count raw bytes in shebang-size
kernel.bbclass: Add force flag to rm calls
lib/package_manager: Improve repo artefact filtering
libc-test: Run as non-root user
libconvert-asn1-perl: upgrade to 0.34
libevent: fix patch Upstream-Status
libgudev: explicitly disable tests and vapi
librepo: upgrade to 1.15.2
librsvg: upgrade to 2.54.6
libsndfile1: upgrade to 1.2.2
libsoup-2.4: Only specify –cross-file when building for target
libsoup-2.4: update PACKAGECONFIG
libx11: upgrade to 1.8.7
libxkbcommon: add CVE_PRODUCT
libxpm: upgrade to 3.5.17
linux-firmware: add firmware files for NXP BT chipsets
linux-firmware: package Dragonboard 845c sensors DSP firmware
linux-firmware: package audio topology for Lenovo X13s
linux-firmware: upgrade to 20230804
linux-yocto/5.15: update to v5.15.133
linux-yocto/6.1: fix CONFIG_F2FS_IO_TRACE configuration warning
linux-yocto/6.1: fix IRQ-80 warnings
linux-yocto/6.1: fix uninitialized read in nohz_full/isolcpus setup
linux-yocto/6.1: tiny: fix arm 32 boot
linux-yocto/6.1: update to v6.1.57
linux-yocto: add script to generate kernel CVE_CHECK_IGNORE entries
linux-yocto: make sure the pahole-native available before do_kernel_configme
linux/cve-exclusion: add generated CVE_CHECK_IGNOREs
linux/generate-cve-exclusions: fix mishandling of boundary values
linux/generate-cve-exclusions: print the generated time in UTC
manuals: add new contributor guide
manuals: correct “yocto-linux” by “linux-yocto”
mdadm: Disable further tests due to intermittent failures
mdadm: skip running 04update-uuid and 07revert-inplace testcases
migration-guides: add release notes for 4.0.12
migration-guides: add release notes for 4.0.13
migration-guides: add release notes for 4.2.3
mpfr: upgrade to 4.2.1
multilib.conf: explicitly make MULTILIB_VARIANTS vardeps on MULTILIBS
nativesdk-intercept: Fix bad intercept chgrp/chown logic
nettle: avoid neon on unsupported machines
oe-depends-dot: improve ‘-w’ behavior
oeqa dnf_runtime.py: fix HTTP server IP address and port
oeqa selftest context.py: remove warning from missing meta-selftest
oeqa selftest context.py: whitespace fix
oeqa/concurrencytest: Remove invalid buffering option
oeqa/selftest/context.py: check git command return values
oeqa/selftest/wic: Improve assertTrue calls
oeqa/selftest: Fix broken symlink removal handling
oeqa/utils/gitarchive: Handle broken commit counts in results repo
openssl: upgrade to 3.1.4
openssl: build and install manpages only if they are enabled
openssl: ensure all ptest fails are caught
openssl: parallelize tests
overview: Add note about non-reproducibility side effects
packages.bbclass: Correct the check for conflicts with renamed packages
pango: explictly enable/disable libthai
patch.py: use –absolute-git-dir instead of –show-toplevel to retrieve gitdir
pixman: Remove duplication of license MIT
pixman: avoid neon on unsupported machines
poky.conf: bump version for 4.2.4 release
profile-manual: aesthetic cleanups
pseudo: Fix to work with glibc 2.38
ptest: report tests that were killed on timeout
python3-git: upgrade to 3.1.37
python3-urllib3: update to v1.26.18
python3: upgrade to 3.11.5
qemu: fix “Bad FPU state detected” fault on qemu-system-i386
ref-manual: Fix PACKAGECONFIG term and add an example
ref-manual: Warn about COMPATIBLE_MACHINE skipping native recipes
ref-manual: point outdated link to the new location
ref-manual: releases.svg: Scarthgap is now version 5.0
ref-manual: system-requirements: update supported distros
ref-manual: variables: add RECIPE_SYSROOT and RECIPE_SYSROOT_NATIVE
ref-manual: variables: add TOOLCHAIN_OPTIONS variable
ref-manual: variables: add example for SYSROOT_DIRS variable
ref-manual: variables: provide no-match example for COMPATIBLE_MACHINE
resulttool/report: Avoid divide by zero
runqemu: check permissions of available render nodes as well as their presence
screen: upgrade to 4.9.1
scripts/create-pull-request: update URLs to git repositories
sdk-manual: appendix-obtain: improve and update descriptions
sdk-manual: extensible.rst: fix multiple formatting issues
shadow: fix patch Upstream-Status
strace: parallelize ptest
sudo: upgrade to 1.9.15p2
systemd-bootchart: musl fixes have been rejected upstream
systemd: backport patch to fix warning in systemd-vconsole-setup
tar: upgrade to 1.35
tcl: Add a way to skip ptests
tcl: prevent installing another copy of tzdata
template: fix typo in section header
test-manual: reproducible-builds: stop mentioning LTO bug
uboot-extlinux-config.bbclass: fix missed override syntax migration
vim: upgrade to 9.0.2048
vim: update obsolete comment
wayland-utils: add libdrm PACKAGECONFIG
weston-init: fix init code indentation
weston-init: remove misleading comment about udev rule
wic: bootimg-partition: Fix file name in debug message
wic: fix wrong attempt to create file system in upartitioned regions
wireless-regdb: upgrade to 2023.09.01
xz: upgrade to 5.4.4
yocto-uninative: Update to 4.2 for glibc 2.38
yocto-uninative: Update to 4.3
Known Issues in Yocto-4.2.4
N/A
Contributors to Yocto-4.2.4
Alberto Planas
Alexander Kanavin
Alexis Lothoré
Antoine Lubineau
Anuj Mittal
Archana Polampalli
Arne Schwerdt
BELHADJ SALEM Talel
Benjamin Bara
Bruce Ashfield
Chen Qi
Colin McAllister
Daniel Semkowicz
Dmitry Baryshkov
Eilís ‘pidge’ Ní Fhlannagáin
Emil Kronborg Andersen
Etienne Cordonnier
Jaeyoon Jung
Jan Garcia
Joe Slater
Joshua Watt
Julien Stephan
Kai Kang
Khem Raj
Lee Chee Yang
Markus Niebel
Markus Volk
Marta Rybczynska
Martijn de Gouw
Martin Jansa
Michael Halstead
Michael Opdenacker
Mikko Rapeli
Mingli Yu
Narpat Mali
Otavio Salvador
Ovidiu Panait
Peter Kjellerstedt
Peter Marko
Peter Suti
Poonam Jadhav
Quentin Schulz
Richard Purdie
Robert P. J. Day
Roland Hieber
Ross Burton
Ryan Eatmon
Sakib Sajal
Samantha Jalabert
Sanjana
Sanjay Chitroda
Sean Nyekjaer
Siddharth Doshi
Soumya Sambu
Stefan Tauner
Steve Sakoman
Tan Wen Yan
Tom Hochstein
Trevor Gamblin
Vijay Anusuri
Wang Mingyu
Xiangyu Chen
Yash Shinde
Yoann Congal
Yogita Urade
Yuta Hayama
Repositories / Downloads for Yocto-4.2.4
poky
Repository Location: https://git.yoctoproject.org/poky
Branch: mickledore
Tag: yocto-4.2.4
Git Revision: 7235399a86b134e57d5eb783d7f1f57ca0439ae5
Release Artefact: poky-7235399a86b134e57d5eb783d7f1f57ca0439ae5
sha: 3d56bb4232ab29ae18249529856f0e638c50c764fc495d6beb1ecd295fa5e5e3
Download Locations: http://downloads.yoctoproject.org/releases/yocto/yocto-4.2.4/poky-7235399a86b134e57d5eb783d7f1f57ca0439ae5.tar.bz2 http://mirrors.kernel.org/yocto/yocto/yocto-4.2.4/poky-7235399a86b134e57d5eb783d7f1f57ca0439ae5.tar.bz2
openembedded-core
Repository Location: https://git.openembedded.org/openembedded-core
Branch: mickledore
Tag: yocto-4.2.4
Git Revision: 23b5141400b2c676c806df3308f023f7c04e34e0
Release Artefact: oecore-23b5141400b2c676c806df3308f023f7c04e34e0
sha: 152f4ee3cdd2e159f6bd34b01d517de44dfe670d35a5e3c84cc32ee7842d9741
Download Locations: http://downloads.yoctoproject.org/releases/yocto/yocto-4.2.4/oecore-23b5141400b2c676c806df3308f023f7c04e34e0.tar.bz2 http://mirrors.kernel.org/yocto/yocto/yocto-4.2.4/oecore-23b5141400b2c676c806df3308f023f7c04e34e0.tar.bz2
meta-mingw
Repository Location: https://git.yoctoproject.org/meta-mingw
Branch: mickledore
Tag: yocto-4.2.4
Git Revision: d87d4f00b9c6068fff03929a4b0f231a942d3873
Release Artefact: meta-mingw-d87d4f00b9c6068fff03929a4b0f231a942d3873
sha: 8036847cf5bf3da9db4bad13aac9080d559848679f0ae03694d55a576bcaf75f
Download Locations: http://downloads.yoctoproject.org/releases/yocto/yocto-4.2.4/meta-mingw-d87d4f00b9c6068fff03929a4b0f231a942d3873.tar.bz2 http://mirrors.kernel.org/yocto/yocto/yocto-4.2.4/meta-mingw-d87d4f00b9c6068fff03929a4b0f231a942d3873.tar.bz2
bitbake
Repository Location: https://git.openembedded.org/bitbake
Branch: 2.4
Tag: yocto-4.2.4
Git Revision: c7e094ec3beccef0bbbf67c100147c449d9c6836
Release Artefact: bitbake-c7e094ec3beccef0bbbf67c100147c449d9c6836
sha: 6a35a62bee3446cd0f9e0ec1de9b8f60fc396109075b37d7c4a1f2e6d63271c6
Download Locations: http://downloads.yoctoproject.org/releases/yocto/yocto-4.2.4/bitbake-c7e094ec3beccef0bbbf67c100147c449d9c6836.tar.bz2 http://mirrors.kernel.org/yocto/yocto/yocto-4.2.4/bitbake-c7e094ec3beccef0bbbf67c100147c449d9c6836.tar.bz2
yocto-docs
Repository Location: https://git.yoctoproject.org/yocto-docs
Branch: mickledore
Tag: yocto-4.2.4
Git Revision: 91a29ca94314c87fd3dc68601cd4932bdfffde35
Release 4.1 (langdale)
Release 4.1 (langdale)
Migration notes for 4.1 (langdale)
This section provides migration information for moving to the Yocto Project 4.1 Release (codename “langdale”) from the prior release.
make 4.0 is now the minimum required make version
glibc now requires make 4.0 to build, thus it is now the version required to
be installed on the build host. A new buildtools-make tarball has been
introduced to provide just make 4.0 for host distros without a current/working
make 4.x version; if you also need other tools you can use the updated
buildtools tarball. For more information see
Required Packages for the Build Host.
Complementary package installation ignores recommends
When installing complementary packages (e.g. -dev and -dbg packages when
building an SDK, or if you have added dev-deps to IMAGE_FEATURES),
recommends (as defined by RRECOMMENDS) are no longer installed.
If you wish to double-check the contents of your images after this change, see Checking Image / SDK Changes. If needed you can explicitly install items by adding them to IMAGE_INSTALL in image recipes or TOOLCHAIN_TARGET_TASK for the SDK.
dev dependencies are now recommends
The default for ${PN}-dev package is now to use RRECOMMENDS instead
of RDEPENDS to pull in the main package. This takes advantage of a
change to complimentary package installation to not follow RRECOMMENDS
(as mentioned above) and for example means an SDK for an image with both openssh
and dropbear components will now build successfully.
dropbear now recommends openssh-sftp-server
openssh has switched the scp client to use the sftp protocol instead of scp to move files. This means scp from Fedora 36 and other current distributions will no longer be able to move files to/from a system running dropbear with no sftp server installed.
The sftp server from openssh is small (200kb uncompressed) and standalone, so adding it to the packagegroup seems to be the best way to preserve the functionality for user sanity. However, if you wish to avoid this dependency, you can either:
Use
dropbearin IMAGE_INSTALL instead ofpackagegroup-core-ssh-dropbear(orssh-server-dropbearin IMAGE_FEATURES), orAdd
openssh-sftp-serverto BAD_RECOMMENDATIONS.
Classes now split by usage context
A split directory structure has now been set up for .bbclass files - classes
that are intended to be inherited only by recipes (e.g. inherit in a recipe
file, IMAGE_CLASSES or KERNEL_CLASSES) should be in a
classes-recipe subdirectory and classes that are intended to be inherited
globally (e.g. via INHERIT +=, PACKAGE_CLASSES, USER_CLASSES
or INHERIT_DISTRO) should be in classes-global. Classes in the
existing classes subdirectory will continue to work in any context as before.
Other than knowing where to look when manually browsing the class files, this is
not likely to require any changes to your configuration. However, if in your
configuration you were using some classes in the incorrect context, you will now
receive an error during parsing. For example, the following in local.conf will
now cause an error:
INHERIT += "testimage"
Since testimage is a class intended solely to affect image recipes, this would be correctly specified as:
IMAGE_CLASSES += "testimage"
Missing local files in SRC_URI now triggers an error
If a file referenced in SRC_URI does not exist, in 4.1 this will trigger an error at parse time where previously this only triggered a warning. In the past you could ignore these warnings for example if you have multiple build configurations (e.g. for several different target machines) and there were recipes that you were not building in one of the configurations. If you have this scenario you will now need to conditionally add entries to SRC_URI where they are valid, or use COMPATIBLE_MACHINE / COMPATIBLE_HOST to prevent the recipe from being available (and therefore avoid it being parsed) in configurations where the files aren’t available.
QA check changes
The buildpaths QA check is now enabled by default in WARN_QA, and thus any build system paths found in output files will trigger a warning. If you see these warnings for your own recipes, for full binary reproducibility you should make the necessary changes to the recipe build to remove these paths. If you wish to disable the warning for a particular recipe you can use INSANE_SKIP, or for the entire build you can adjust WARN_QA. For more information, see the buildpaths QA check section.
do_qa_stagingnow checks shebang length in all directories specified by SYSROOT_DIRS, since there is a maximum length defined in the kernel. For native recipes which write scripts to the sysroot, if the shebang line in one of these scripts is too long you will get an error. This can be skipped using INSANE_SKIP if necessary, but the best course of action is of course to fix the script. There is now also acreate_cmdline_shebang_wrapperfunction that you can call e.g. fromdo_install(ordo_install:append) within a recipe to create a wrapper to fix such scripts - see thelibcheckrecipe for an example usage.
Miscellaneous changes
mount.blacklisthas been renamed tomount.ignorelistinudev-extraconf. If you are customising this file viaudev-extraconfthen you will need to update yourudev-extraconf.bbappendas appropriate.help2man-nativehas been removed from implicit sysroot dependencies. If a recipe needshelp2man-nativeit should now be explicitly added to DEPENDS within the recipe.For images using systemd, the reboot watchdog timeout has been set to 60 seconds (from the upstream default of 10 minutes). If you wish to override this you can set WATCHDOG_TIMEOUT to the desired timeout in seconds. Note that the same WATCHDOG_TIMEOUT variable also specifies the timeout used for the
watchdogtool (if that is being built).The image-buildinfo class now writes to
${sysconfdir}/buildinfoinstead of${sysconfdir}/buildby default (i.e. the default value of IMAGE_BUILDINFO_FILE has been changed). If you have code that reads this from images at build or runtime you will need to update it or specify your own value for IMAGE_BUILDINFO_FILE.In the archiver class, the default
ARCHIVER_OUTDIRvalue no longer includes the MACHINE value in order to avoid the archive task running multiple times in a multiconfig setup. If you have custom code that does something with the files archived by the archiver class then you may need to adjust it to the new structure.If you are not using systemd then udev is now configured to use labels (
LABELorPARTLABEL) to set the mount point for the device. For example:/run/media/rootfs-sda2
instead of:
/run/media/sda2
icuno longer provides theicu-configconfiguration tool - upstream have indicatedicu-configis deprecated and should no longer be used. Code with references to it will need to be updated, for example to usepkg-configinstead.The
rng-toolssystemd service name has changed fromrngdtorng-toolsThe
largefileDISTRO_FEATURES item has been removed, large file support is now always enabled where it was previously optional.The Python
zoneinfomodule is now split out to its ownpython3-zoneinfopackage.The PACKAGECONFIG option to enable wpa_supplicant in the
connmanrecipe has been renamed to “wpa-supplicant”. If you have set PACKAGECONFIG for theconnmanrecipe to include this option you will need to update your configuration. Related to this, the WIRELESS_DAEMON variable now expects the newwpa-supplicantnaming and affectspackagegroup-baseas well asconnman.The
wpa-supplicantrecipe no longer uses a static (and stale)defconfigfile, instead it uses the upstream version with appropriate edits for the PACKAGECONFIG. If you are customising this file you will need to update your customisations.With the introduction of picobuild in python_pep517, The
PEP517_BUILD_APIvariable is no longer supported. If you have any references to this variable you should remove them.
Removed recipes
The following recipes have been removed in this release:
alsa-utils-scripts: merged into alsa-utilscargo-cross-canadian: optimised outlzop: obsolete, unmaintained upstreamlinux-yocto (5.10): 5.15 and 5.19 are currently providedrust-cross: optimised outrust-crosssdk: optimised outrust-tools-cross-canadian: optimised outxf86-input-keyboard: obsolete (replaced by libinput/evdev)
Release notes for 4.1 (langdale)
New Features / Enhancements in 4.1
Linux kernel 5.19, glibc 2.36 and ~260 other recipe upgrades
make4.0 is now the minimum make version required on the build host. For host distros that do not provide it, this is included as part of the buildtools tarball, and additionally a new buildtools-make tarball has been introduced to provide this in particular for host distros with a broken make 4.x version. For more details see Required Git, tar, Python, make and gcc Versions.New layer setup tooling:
New
scripts/oe-setup-layersstandalone script to restore the layer configuration from a json fileNew
bitbake-layers create-layers-setupcommand to save the layer configuration to a json fileNew
bitbake-layers save-build-confcommand to save the active build configuration as a template into a layer
Rust-related enhancements:
Support for building rust for the target
Significant SDK toolchain build optimisation
Support for building native components in the SDK
Support
crate://fetcher with externalsrc
New core recipes:
buildtools-make-tarballicon-naming-utils(previously removed)musl-localespython3-editables(originally in meta-python)python3-hatch-vcspython3-hatchling(originally in meta-oe)python3-lxml(originally in meta-python)python3-pathspec(originally in meta-python)python3-picobuildsato-icon-theme(previously removed)
CVE checking enhancements:
New
CVE_DB_UPDATE_INTERVALvariable to allow specifying the CVE database minimum update interval (and default to once per day)Added JSON format to summary output
Added support for Ignored CVEs
Enable recursive CVE checking also for
do_populate_sdkNew
CVE_CHECK_SHOW_WARNINGSvariable to disable unpatched CVE warning messagesThe pypi class now defaults CVE_PRODUCT from PYPI_PACKAGE
Added current kernel CVEs to ignore list since we stay as close to the kernel stable releases as we can
Optimisations to avoid dependencies on fetching
Complementary package installation (as used in SDKs and images) no longer installs recommended packages, in order to avoid conflicts
Dependency of -dev package on main package is now an RRECOMMENDS and can be easily set via new DEV_PKG_DEPENDENCY variable
Support for CPU, I/O and memory pressure regulation in BitBake
Pressure data gathering in buildstats and rendering in
pybootchartguiNew Picobuild system for lightweight Python PEP-517 build support in the python_pep517 class
Many classes are now split into global and recipe contexts for better validation. For more information, see Classes now split by usage context.
Architecture-specific enhancements:
arch-armv8-4a.inc: add tune include for armv8.4a
tune-neoversen2: support tune-neoversen2 base on armv9a
riscv: Add tunes for rv64 without compressed instructions
gnu-efi: enable for riscv64
shadow-securetty: allow ttyS4 for amd-snowyowl-64
Kernel-related enhancements:
linux-yocto/5.15: cfg/xen: Move x86 configs to separate file
linux-yocto/5.15: Enabled MDIO bus config
linux-yocto: Enable mdio for qemu
linux-yocto/5.15: base: enable kernel crypto userspace API
kern-tools: allow ‘y’ or ‘m’ to avoid config audit warnings
kernel-yocto.bbclass: say what SRC_URI entry is being dropped
kernel.bbclass: Do not overwrite recipe’s custom postinst
kmod: Enable xz support by default
Run depmod(wrapper) against each compiled kernel when multiple kernels are enabled
linux-yocto-tiny: enable qemuarmv5/qemuarm64
wic Image Creator enhancements:
Added dependencies to support erofs
Added
fspassnoparameter to partition to allow specifying the value of the last column (fs_passno) in/etc/fstab.bootimg-efi: added support for loading devicetree files
Added
nonefstype for custom image (for use in conjunction withrawcopy)
SDK-related enhancements:
image-buildinfo class now also writes build information to SDKs
New SDK_TOOLCHAIN_LANGS variable to control support of rust / go in SDK
rust-llvm: enabled nativesdk variant
QEMU/runqemu enhancements:
qemux86-64: Allow higher tunes
runqemu: display host uptime when starting
runqemu: add
QB_KERNEL_CMDLINEthat can be set to “none” to avoid overriding kernel command line specified in dtb
Image-related enhancements:
New variable UBOOT_MKIMAGE_KERNEL_TYPE
New variable FIT_PAD_ALG to control FIT image padding algorithm
New KERNEL_DEPLOY_DEPEND variable to allow disabling image dependency on deploying the kernel
image_types: isolate the write of UBI configuration to a
write_ubi_configfunction that can be easily overridden
openssh: add support for config snippet includes to ssh and sshd
create-spdx: Add SPDX_PRETTY option
wpa-supplicant: build static library if not disabled via DISABLE_STATIC
wpa-supplicant: package dynamic modules
openssl: extract legacy provider module to a separate package
linux-firmware: split out ath3k firmware
linux-firmware: add support for building snapshots
eudev: create static-nodes in init script
udev-extraconf: new MOUNT_BASE variable allows configuring automount base directory
udev-extraconf/mount.sh: use partition labels in mountpoint paths
systemd: Set RebootWatchdogSec to 60s by default
systemd: systemd-systemctl: Support instance conf files during enable
weston.init: enable
xwaylandin weston.ini ifx11is in DISTRO_FEATURESNew
npm_registryPython module to enable caching with nodejs 16+npm: replaced
npm packcall withtar czffor nodejs 16+ compatibility and improveddo_configureperformanceEnabled bin_package class to work properly in the native case
Enabled buildpaths QA check as a warning by default
New OVERLAYFS_ETC_EXPOSE_LOWER to provide read-only access to the original
/etccontent with overlayfs-etcNew OVERLAYFS_QA_SKIP variable to allow skipping check on overlayfs mounts
New PACKAGECONFIG options for individual recipes:
apr: xsi-strerror
btrfs-tools: lzo
connman: iwd
coreutils: openssl
dropbear: enable-x11-forwarding
eudev: blkid, kmod, rule-generator
eudev: manpages, selinux
flac: avx, ogg
gnutls: fips
gstreamer1.0-plugins-bad: avtp
libsdl2: libusb
llvm: optviewer
mesa: vulkan, vulkan-beta, zink
perf: bfd
piglit: glx, opencl
python3: editline
qemu: bpf, brlapi, capstone, rdma, slirp, uring, vde
rpm: readline
ruby: capstone
systemd: no-dns-fallback, sysext
tiff: jbig
ptest enhancements in
curl,json-c,libgcrypt,libgpg-error,libxml2ptest compile/install functions now use PARALLEL_MAKE and PARALLEL_MAKEINST in ptest for significant speedup
New TC_CXX_RUNTIME variable to enable other layers to more easily control C++ runtime
Set BB_DEFAULT_UMASK using ??= to make it easier to override
Set TCLIBC and TCMODE using ??= to make them easier to override
squashfs-tools: build with lzo support by default
insane.bbclass: make
do_qa_stagingcheck shebang length for native scripts in all SYSROOT_DIRSutils: Add
create_cmdline_shebang_wrapperfunction to allow recipes to easily create a wrapper to fix long shebang linesmeson: provide relocation script and native/cross wrappers also for meson-native
meson.bbclass: add cython binary to cross/native toolchain config
New
musl-localesrecipe to provide a limited set of locale data for musl based systemsgobject-introspection: use OBJDUMP environment variable so that objdump tool can be picked up from the environment
The Python
zoneinfomodule is now split out to its ownpython3-zoneinfopackage.busybox: added devmem 128-bit support
vim: split xxd out into its own package
New github-releases class to consolidate version checks for github-based packages
devtool resetnow preservesworkspace/sourcessource trees inworkspace/attic/sources/instead of leaving them in-placescripts/patchreview: Add commit to stored json data
scripts/patchreview: Make json output human parsable
wpa-supplicantrecipe now uses the upstreamdefconfigmodified based upon PACKAGECONFIG instead of a staledefconfigfilebitbake: build: prefix the tasks with a timestamp in the log.task_order
bitbake: fetch2/osc: Add support to query latest revision
bitbake: utils: Pass lock argument in fileslocked
bitbake: utils: Add enable_loopback_networking()
Known Issues in 4.1
The change to Complementary package installation ignores recommends means that images built with the
ptest-pkgsIMAGE_FEATURES don’t automatically installptest-runner, as that package is a recommendation of the individual-ptestpackages. This will be resolved in the next point release, and can be worked around by explicitly installingptest-runnerinto the image. Filed as bug 14928.There is a known issue with eSDKs where sstate objects may be missing, resulting in packages being unavailable to install in the sysroot. This is due to image generation optimisations having unintended consequences in eSDK generation. This will be resolved in the next point release. Filed as bug 14626, which also details the fix.
The change to Classes now split by usage context inadvertently moved the externalsrc class to
meta/classes-recipe, when it is not recipe-specific and can also be used in a global context. The class will be moved back tometa/classesin the next point release. Filed as bug 14940.
Recipe License changes in 4.1
The following corrections have been made to the LICENSE values set by recipes:
alsa-state: add GPL-2.0-or-later because of alsa-state-init file
git: add GPL-2.0-or-later & BSD-3-Clause & MIT & BSL-1.0 & LGPL-2.1-or-later due to embedded code
libgcrypt: dropped GPLv3 license after upstream changes
linux-firmware: correct license for ar3k firmware (specific “ar3k” license)
Security Fixes in 4.1
bind: CVE-2022-1183, CVE-2022-2795, CVE-2022-2881, CVE-2022-2906, CVE-2022-3080, CVE-2022-38178
binutils: CVE-2019-1010204, CVE-2022-38126, CVE-2022-38127, CVE-2022-38128, CVE-2022-38533
busybox: CVE-2022-30065
connman: CVE-2022-32292, CVE-2022-32293
cups: CVE-2022-26691
e2fsprogs: CVE-2022-1304
expat: CVE-2022-40674
freetype: CVE-2022-27404
glibc: CVE-2022-39046
gnupg: CVE-2022-34903
grub2: CVE-2021-3695, CVE-2021-3696, CVE-2021-3697, CVE-2022-28733, CVE-2022-28734, CVE-2022-28735
inetutils: CVE-2022-39028
libtirpc: CVE-2021-46828
libxml2: CVE-2016-3709 (ignored)
libxslt: CVE-2022-29824 (not applicable)
linux-yocto/5.15: CVE-2022-28796
logrotate: CVE-2022-1348
lua: CVE-2022-33099
nasm: CVE-2020-18974 (ignored)
ncurses: CVE-2022-29458
openssl: CVE-2022-1292, CVE-2022-1343, CVE-2022-1434, CVE-2022-1473, CVE-2022-2068, CVE-2022-2274, CVE-2022-2097
python3: CVE-2015-20107 (ignored)
qemu: CVE-2021-20255 (ignored), CVE-2019-12067 (ignored), CVE-2021-3507, CVE-2022-0216, CVE-2022-2962, CVE-2022-35414
rsync: CVE-2022-29154
subversion: CVE-2021-28544, CVE-2022-24070
tiff: CVE-2022-1210 (not applicable), CVE-2022-1622, CVE-2022-1623 (invalid), CVE-2022-2056, CVE-2022-2057, CVE-2022-2058, CVE-2022-2953, CVE-2022-34526
unzip: CVE-2022-0529, CVE-2022-0530
vim: CVE-2022-1381, CVE-2022-1420, CVE-2022-1621, CVE-2022-1629, CVE-2022-1674, CVE-2022-1733, CVE-2022-1735, CVE-2022-1769, CVE-2022-1771, CVE-2022-1785, CVE-2022-1796, CVE-2022-1927, CVE-2022-1942, CVE-2022-2257, CVE-2022-2264, CVE-2022-2284, CVE-2022-2285, CVE-2022-2286, CVE-2022-2287, CVE-2022-2816, CVE-2022-2817, CVE-2022-2819, CVE-2022-2845, CVE-2022-2849, CVE-2022-2862, CVE-2022-2874, CVE-2022-2889, CVE-2022-2980, CVE-2022-2946, CVE-2022-2982, CVE-2022-3099, CVE-2022-3134, CVE-2022-3234, CVE-2022-3278
zlib: CVE-2022-37434
Recipe Upgrades in 4.1
acpica 20211217 -> 20220331
adwaita-icon-theme 41.0 -> 42.0
alsa-lib 1.2.6.1 -> 1.2.7.2
alsa-plugins 1.2.6 -> 1.2.7.1
alsa-ucm-conf 1.2.6.3 -> 1.2.7.2
alsa-utils 1.2.6 -> 1.2.7
asciidoc 10.1.4 -> 10.2.0
at-spi2-core 2.42.0 -> 2.44.1
autoconf-archive 2022.02.11 -> 2022.09.03
base-passwd 3.5.29 -> 3.5.52
bind 9.18.5 -> 9.18.7
binutils 2.38 -> 2.39
boost 1.78.0 -> 1.80.0
boost-build-native 4.4.1 -> 1.80.0
btrfs-tools 5.16.2 -> 5.19.1
cargo 1.59.0 -> 1.63.0
ccache 4.6 -> 4.6.3
cmake 3.22.3 -> 3.24.0
cmake-native 3.22.3 -> 3.24.0
coreutils 9.0 -> 9.1
createrepo-c 0.19.0 -> 0.20.1
cross-localedef-native 2.35 -> 2.36
curl 7.82.0 -> 7.85.0
diffoscope 208 -> 221
dmidecode 3.3 -> 3.4
dnf 4.11.1 -> 4.14.0
dos2unix 7.4.2 -> 7.4.3
dpkg 1.21.4 -> 1.21.9
dropbear 2020.81 -> 2022.82
efibootmgr 17 -> 18
elfutils 0.186 -> 0.187
ell 0.50 -> 0.53
enchant2 2.3.2 -> 2.3.3
erofs-utils 1.4 -> 1.5
ethtool 5.16 -> 5.19
eudev 3.2.10 -> 3.2.11
ffmpeg 5.0.1 -> 5.1.1
file 5.41 -> 5.43
flac 1.3.4 -> 1.4.0
fontconfig 2.13.1 -> 2.14.0
freetype 2.11.1 -> 2.12.1
gcc 11.3.0 -> 12.2.0
gcompat 1.0.0+1.1+gitX (4d6a5156a6eb…) -> 1.0.0+1.1+gitX (c6921a1aa454…)
gdb 11.2 -> 12.1
ghostscript 9.55.0 -> 9.56.1
git 2.35.4 -> 2.37.3
glibc 2.35 -> 2.36
glslang 1.3.204.1 -> 1.3.216.0
gnu-config 20211108+gitX -> 20220525+gitX
gnu-efi 3.0.14 -> 3.0.15
gnutls 3.7.4 -> 3.7.7
go 1.17.13 -> 1.19
go-helloworld 0.1 (787a929d5a0d…) -> 0.1 (2e68773dfca0…)
gpgme 1.17.1 -> 1.18.0
gptfdisk 1.0.8 -> 1.0.9
harfbuzz 4.0.1 -> 5.1.0
hdparm 9.63 -> 9.64
help2man 1.49.1 -> 1.49.2
hwlatdetect 2.3 -> 2.4
icu 70.1 -> 71.1
inetutils 2.2 -> 2.3
init-system-helpers 1.62 -> 1.64
iproute2 5.17.0 -> 5.19.0
iptables 1.8.7 -> 1.8.8
iw 5.16 -> 5.19
json-c 0.15 -> 0.16
kbd 2.4.0 -> 2.5.1
kea 2.0.2 -> 2.2.0
kexec-tools 2.0.23 -> 2.0.25
kmod 29 -> 30
kmscube git (9f63f359fab1…) -> git (3bf6ee1a0233…)
less 600 -> 608
libaio 0.3.112 -> 0.3.113
libbsd 0.11.5 -> 0.11.6
libcap-ng 0.8.2 -> 0.8.3
libcap-ng-python 0.8.2 -> 0.8.3
libcgroup 2.0.2 -> 3.0.0
libcomps 0.1.18 -> 0.1.19
libdnf 0.66.0 -> 0.69.0
libdrm 2.4.110 -> 2.4.113
libevdev 1.12.1 -> 1.13.0
libfontenc 1.1.4 -> 1.1.6
libgcc 11.3.0 -> 12.2.0
libgcc-initial 11.3.0 -> 12.2.0
libgcrypt 1.9.4 -> 1.10.1
libgfortran 11.3.0 -> 12.2.0
libgit2 1.4.3 -> 1.5.0
libgpg-error 1.44 -> 1.45
libhandy 1.5.0 -> 1.6.3
libidn2 2.3.2 -> 2.3.3
libjitterentropy 3.4.0 -> 3.4.1
libmnl 1.0.4 -> 1.0.5
libnl 3.5.0 -> 3.7.0
libnotify 0.7.9 -> 0.8.1
libpipeline 1.5.5 -> 1.5.6
libproxy 0.4.17 -> 0.4.18
librepo 1.14.3 -> 1.14.5
librsvg 2.52.7 -> 2.54.5
libsdl2 2.0.20 -> 2.24.0
libseccomp 2.5.3 -> 2.5.4
libsndfile1 1.0.31 -> 1.1.0
libstd-rs 1.59.0 -> 1.63.0
libtirpc 1.3.2 -> 1.3.3
libubootenv 0.3.2 -> 0.3.3
libva 2.14.0 -> 2.15.0
libva-utils 2.14.0 -> 2.15.0
libx11 1.7.3.1 -> 1.8.1
libxau 1.0.9 -> 1.0.10
libxcb 1.14 -> 1.15
libxcursor 1.2.0 -> 1.2.1
libxcvt 0.1.1 -> 0.1.2
libxfont2 2.0.5 -> 2.0.6
libxvmc 1.0.12 -> 1.0.13
linux-libc-headers 5.16 -> 5.19
linux-yocto 5.10.143+gitX, 5.15.68+gitX -> 5.15.68+gitX, 5.19.9+gitX
linux-yocto-dev 5.18++gitX -> 5.19++gitX
linux-yocto-rt 5.10.143+gitX, 5.15.68+gitX -> 5.15.68+gitX, 5.19.9+gitX
linux-yocto-tiny 5.10.143+gitX, 5.15.68+gitX -> 5.15.68+gitX, 5.19.9+gitX
llvm 13.0.1 -> 14.0.6
lsof 4.94.0 -> 4.95.0
ltp 20220121 -> 20220527
lttng-tools 2.13.4 -> 2.13.8
lttng-ust 2.13.3 -> 2.13.4
mc 4.8.27 -> 4.8.28
mesa 22.0.3 -> 22.2.0
mesa-demos 8.4.0 -> 8.5.0
mesa-gl 22.0.3 -> 22.2.0
meson 0.61.3 -> 0.63.2
mmc-utils 0.1+gitX (b7e4d5a6ae99…) -> 0.1+gitX (d7b343fd2628…)
mpg123 1.29.3 -> 1.30.2
msmtp 1.8.20 -> 1.8.22
mtools 4.0.38 -> 4.0.40
musl 1.2.3+gitX (7a43f6fea908…) -> 1.2.3+gitX (37e18b7bf307…)
musl-obstack 1.1 -> 1.2
ncurses 6.3+20220423 (a0bc708bc695…) -> 6.3+20220423 (20db1fb41ec9…)
neard 0.16 -> 0.18
nettle 3.7.3 -> 3.8.1
nfs-utils 2.6.1 -> 2.6.2
nghttp2 1.47.0 -> 1.49.0
ninja 1.10.2 -> 1.11.1
numactl 2.0.14 -> 2.0.15
ofono 1.34 -> 2.0
opensbi 1.0 -> 1.1
openssh 8.9p1 -> 9.0p1
opkg 0.5.0 -> 0.6.0
ovmf edk2-stable202202 -> edk2-stable202205
pango 1.50.4 -> 1.50.9
parted 3.4 -> 3.5
patchelf 0.14.5 -> 0.15.0
pciutils 3.7.0 -> 3.8.0
perl 5.34.1 -> 5.36.0
perlcross 1.3.7 -> 1.4
piglit 1.0+gitrX (2f80c7cc9c02…) -> 1.0+gitrX (265896c86f90…)
pkgconf 1.8.0 -> 1.9.3
psmisc 23.4 -> 23.5
pulseaudio 15.0 -> 16.1
puzzles 0.0+gitX (c43a34fbfe43…) -> 0.0+gitX (8399cff6a3b9…)
python3 3.10.4 -> 3.10.6
python3-atomicwrites 1.4.0 -> 1.4.1
python3-attrs 21.4.0 -> 22.1.0
python3-babel 2.9.1 -> 2.10.3
python3-bcrypt 3.2.0 -> 3.2.2
python3-certifi 2021.10.8 -> 2022.9.14
python3-cffi 1.15.0 -> 1.15.1
python3-chardet 4.0.0 -> 5.0.0
python3-cryptography 36.0.2 -> 37.0.4
python3-cryptography-vectors 36.0.2 -> 37.0.4
python3-cython 0.29.28 -> 0.29.32
python3-dbusmock 0.27.3 -> 0.28.4
python3-docutils 0.18.1 -> 0.19
python3-dtschema 2022.1 -> 2022.8.3
python3-hypothesis 6.39.5 -> 6.54.5
python3-idna 3.3 -> 3.4
python3-imagesize 1.3.0 -> 1.4.1
python3-importlib-metadata 4.11.3 -> 4.12.0
python3-jinja2 3.1.1 -> 3.1.2
python3-jsonpointer 2.2 -> 2.3
python3-jsonschema 4.4.0 -> 4.9.1
python3-magic 0.4.25 -> 0.4.27
python3-mako 1.1.6 -> 1.2.2
python3-markdown 3.3.6 -> 3.4.1
python3-more-itertools 8.12.0 -> 8.14.0
python3-numpy 1.22.3 -> 1.23.3
python3-pbr 5.8.1 -> 5.10.0
python3-pip 22.0.3 -> 22.2.2
python3-psutil 5.9.0 -> 5.9.2
python3-pycryptodome 3.14.1 -> 3.15.0
python3-pycryptodomex 3.14.1 -> 3.15.0
python3-pyelftools 0.28 -> 0.29
python3-pygments 2.11.2 -> 2.13.0
python3-pygobject 3.42.0 -> 3.42.2
python3-pyparsing 3.0.7 -> 3.0.9
python3-pytest 7.1.1 -> 7.1.3
python3-pytest-subtests 0.7.0 -> 0.8.0
python3-pytz 2022.1 -> 2022.2.1
python3-requests 2.27.1 -> 2.28.1
python3-scons 4.3.0 -> 4.4.0
python3-semantic-version 2.9.0 -> 2.10.0
python3-setuptools 59.5.0 -> 65.0.2
python3-setuptools-scm 6.4.2 -> 7.0.5
python3-sphinx 4.4.0 -> 5.1.1
python3-sphinx-rtd-theme 0.5.0 -> 1.0.0
python3-typing-extensions 3.10.0.0 -> 4.3.0
python3-urllib3 1.26.9 -> 1.26.12
python3-webcolors 1.11.1 -> 1.12
python3-zipp 3.7.0 -> 3.8.1
qemu 6.2.0 -> 7.1.0
repo 2.22 -> 2.29.2
rpm 4.17.0 -> 4.18.0
rsync 3.2.3 -> 3.2.5
rt-tests 2.3 -> 2.4
rust 1.59.0 -> 1.63.0
rust-llvm 1.59.0 -> 1.63.0
sbc 1.5 -> 2.0
seatd 0.6.4 -> 0.7.0
shaderc 2022.1 -> 2022.2
shadow 4.11.1 -> 4.12.1
shared-mime-info 2.1 -> 2.2
slang 2.3.2 -> 2.3.3
speex 1.2.0 -> 1.2.1
speexdsp 1.2.0 -> 1.2.1
spirv-headers 1.3.204.1 -> 1.3.216.0
spirv-tools 1.3.204.1 -> 1.3.216.0
sqlite3 3.38.5 -> 3.39.3
squashfs-tools 4.5 -> 4.5.1
strace 5.16 -> 5.19
stress-ng 0.13.12 -> 0.14.03
sudo 1.9.10 -> 1.9.11p3
sysklogd 2.3.0 -> 2.4.4
sysstat 12.4.5 -> 12.6.0
systemd 250.5 -> 251.4
systemd-boot 250.5 -> 251.4
systemtap 4.6 -> 4.7
systemtap-native 4.6 -> 4.7
systemtap-uprobes 4.6 -> 4.7
sysvinit 3.01 -> 3.04
tiff 4.3.0 -> 4.4.0
tzcode-native 2022c -> 2022d
tzdata 2022c -> 2022d
u-boot 2022.01 -> 2022.07
u-boot-tools 2022.01 -> 2022.07
util-linux 2.37.4 -> 2.38.1
util-linux-libuuid 2.37.4 -> 2.38.1
valgrind 3.18.1 -> 3.19.0
vim 9.0.0541 -> 9.0.0598
vim-tiny 9.0.0541 -> 9.0.0598
virglrenderer 0.9.1 -> 0.10.3
vte 0.66.2 -> 0.68.0
vulkan-headers 1.3.204.1 -> 1.3.216.0
vulkan-loader 1.3.204.1 -> 1.3.216.0
vulkan-samples git (28ca2dad83ce…) -> git (74d45aace02d…)
vulkan-tools 1.3.204.1 -> 1.3.216.0
wayland 1.20.0 -> 1.21.0
wayland-protocols 1.25 -> 1.26
webkitgtk 2.36.5 -> 2.36.7
x264 r3039+gitX (5db6aa6cab1b…) -> r3039+gitX (baee400fa9ce…)
xauth 1.1.1 -> 1.1.2
xcb-proto 1.14.1 -> 1.15.2
xf86-video-cirrus 1.5.3 -> 1.6.0
xkeyboard-config 2.35.1 -> 2.36
xmlto 0.0.28 -> 0.0.28+0.0.29+gitX
xorgproto 2021.5 -> 2022.2
zlib 1.2.11 -> 1.2.12
Contributors to 4.1
Thanks to the following people who contributed to this release:
Aatir Manzur
Ahmed Hossam
Alejandro Hernandez Samaniego
Alexander Kanavin
Alexandre Belloni
Alex Kiernan
Alex Stewart
Andrei Gherzan
Andrej Valek
Andrey Konovalov
Aníbal Limón
Anuj Mittal
Arkadiusz Drabczyk
Armin Kuster
Aryaman Gupta
Awais Belal
Beniamin Sandu
Bertrand Marquis
Bob Henz
Bruce Ashfield
Carlos Rafael Giani
Changhyeok Bae
Changqing Li
Chanho Park
Chen Qi
Christoph Lauer
Claudius Heine
Daiane Angolini
Daniel Gomez
Daniel McGregor
David Bagonyi
Davide Gardenal
Denys Dmytriyenko
Dmitry Baryshkov
Drew Moseley
Enrico Scholz
Ernst Sjöstrand
Etienne Cordonnier
Fabio Estevam
Federico Pellegrin
Felix Moessbauer
Ferry Toth
Florin Diaconescu
Gennaro Iorio
Grygorii Tertychnyi
Gunjan Gupta
Henning Schild
He Zhe
Hitendra Prajapati
Jack Mitchell
Jacob Kroon
Jan Kiszka
Jan Luebbe
Jan Vermaete
Jasper Orschulko
JeongBong Seo
Jeremy Puhlman
Jiaqing Zhao
Joerg Vehlow
Johan Korsnes
Johannes Schneider
John Edward Broadbent
Jon Mason
Jose Quaresma
Joshua Watt
Justin Bronder
Kai Kang
Kevin Hao
Khem Raj
Konrad Weihmann
Kory Maincent
Kristian Amlie
Lee Chee Yang
Lei Maohui
Leon Anavi
Luca Ceresoli
Lucas Stach
LUIS ENRIQUEZ
Marcel Ziswiler
Marius Kriegerowski
Mark Hatle
Markus Volk
Marta Rybczynska
Martin Beeger
Martin Jansa
Mateusz Marciniec
Mattias Jernberg
Matt Madison
Maxime Roussin-Bélanger
Michael Halstead
Michael Opdenacker
Mihai Lindner
Mikko Rapeli
Ming Liu
Mingli Yu
Muhammad Hamza
Naveen Saini
Neil Horman
Nick Potenski
Nicolas Dechesne
Niko Mauno
Ola x Nilsson
Otavio Salvador
Pascal Bach
Paul Eggleton
Paul Gortmaker
Paulo Neves
Pavel Zhukov
Peter Bergin
Peter Kjellerstedt
Peter Marko
Petr Vorel
Pgowda
Portia Stephens
Quentin Schulz
Rahul Kumar
Raju Kumar Pothuraju
Randy MacLeod
Raphael Teller
Rasmus Villemoes
Ricardo Salveti
Richard Purdie
Robert Joslyn
Robert Yang
Roland Hieber
Ross Burton
Rouven Czerwinski
Ruiqiang Hao
Russ Dill
Rusty Howell
Sakib Sajal
Samuli Piippo
Schmidt, Adriaan
Sean Anderson
Shruthi Ravichandran
Shubham Kulkarni
Simone Weiss
Sebastian Suesens
Stefan Herbrechtsmeier
Stefano Babic
Stefan Wiehler
Steve Sakoman
Sundeep KOKKONDA
Teoh Jay Shen
Thomas Epperson
Thomas Perrot
Thomas Roos
Tobias Schmidl
Tomasz Dziendzielski
Tom Hochstein
Tom Rini
Trevor Woerner
Ulrich Ölmann
Vyacheslav Yurkov
Wang Mingyu
William A. Kennington III
Xiaobing Luo
Xu Huan
Yang Xu
Yi Zhao
Yogesh Tyagi
Yongxin Liu
Yue Tao
Yulong (Kevin) Liu
Zach Welch
Zheng Ruoqin
Zoltán Böszörményi
Repositories / Downloads for 4.1
poky
Repository Location: https://git.yoctoproject.org/poky
Branch: langdale
Tag: yocto-4.1
Git Revision: 5200799866b92259e855051112520006e1aaaac0
Release Artefact: poky-5200799866b92259e855051112520006e1aaaac0
sha: 9d9a2f7ecf2502f89f43bf45d63e6b61cdcb95ed1d75c8281372f550d809c823
Download Locations: http://downloads.yoctoproject.org/releases/yocto/yocto-4.1/poky-5200799866b92259e855051112520006e1aaaac0.tar.bz2 http://mirrors.kernel.org/yocto/yocto/yocto-4.1/poky-5200799866b92259e855051112520006e1aaaac0.tar.bz2
openembedded-core
Repository Location: https://git.openembedded.org/openembedded-core
Branch: langdale
Tag: yocto-4.1
Git Revision: 744a2277844ec9a384a9ca7dae2a634d5a0d3590
Release Artefact: oecore-744a2277844ec9a384a9ca7dae2a634d5a0d3590
sha: 34f1fd5bb83514bf0ec8ad7f8cce088a8e28677e1338db94c188283da704c663
Download Locations: http://downloads.yoctoproject.org/releases/yocto/yocto-4.1/oecore-744a2277844ec9a384a9ca7dae2a634d5a0d3590.tar.bz2 http://mirrors.kernel.org/yocto/yocto/yocto-4.1/oecore-744a2277844ec9a384a9ca7dae2a634d5a0d3590.tar.bz2
meta-mingw
Repository Location: https://git.yoctoproject.org/meta-mingw
Branch: langdale
Tag: yocto-4.1
Git Revision: b0067202db8573df3d23d199f82987cebe1bee2c
Release Artefact: meta-mingw-b0067202db8573df3d23d199f82987cebe1bee2c
sha: 704f2940322b81ce774e9cbd27c3cfa843111d497dc7b1eeaa39cd694d9a2366
Download Locations: http://downloads.yoctoproject.org/releases/yocto/yocto-4.1/meta-mingw-b0067202db8573df3d23d199f82987cebe1bee2c.tar.bz2 http://mirrors.kernel.org/yocto/yocto/yocto-4.1/meta-mingw-b0067202db8573df3d23d199f82987cebe1bee2c.tar.bz2
bitbake
Repository Location: https://git.openembedded.org/bitbake
Branch: 2.2
Tag: yocto-4.1
Git Revision: 074da4c469d1f4177a1c5be72b9f3ccdfd379d67
Release Artefact: bitbake-074da4c469d1f4177a1c5be72b9f3ccdfd379d67
sha: e32c300e0c8522d8d49ef10aae473bd5f293202672eb9d38e90ed92594ed1fe8
Download Locations: http://downloads.yoctoproject.org/releases/yocto/yocto-4.1/bitbake-074da4c469d1f4177a1c5be72b9f3ccdfd379d67.tar.bz2 http://mirrors.kernel.org/yocto/yocto/yocto-4.1/bitbake-074da4c469d1f4177a1c5be72b9f3ccdfd379d67.tar.bz2
yocto-docs
Repository Location: https://git.yoctoproject.org/yocto-docs
Branch: langdale
Tag: yocto-4.1
Git Revision: 42d3e26a0d04bc5951e640b471686f347dc9b74a
Release notes for Yocto-4.1.1 (Langdale)
Security Fixes in Yocto-4.1.1
curl: Fix CVE-2022-32221, CVE-2022-35260, CVE-2022-42915 and CVE-2022-42916
libx11: Fix CVE-2022-3554
lighttpd: Fix CVE-2022-41556
openssl: Fix CVE-2022-3358, CVE-2022-3602 and CVE-2022-3786
pixman: Fix CVE-2022-44638
qemu: Fix CVE-2022-3165
sudo: Fix CVE-2022-43995
tiff: Fix CVE-2022-3599, CVE-2022-3597, CVE-2022-3626, CVE-2022-3627, CVE-2022-3570 and CVE-2022-3598
xserver-xorg: Fix CVE-2022-3550 and CVE-2022-3551
xserver-xorg: Ignore CVE-2022-3553
Fixes in Yocto-4.1.1
Add 4.1 migration guide & release notes
bitbake: asyncrpc: serv: correct closed client socket detection
bitbake: bitbake-user-manual: details about variable flags starting with underscore
bitbake: bitbake: bitbake-layers: checkout layer(s) branch when clone exists
bitbake: bitbake: user-manual: inform about spaces in :remove
bitbake: doc: bitbake-user-manual: expand description of BB_PRESSURE_MAX variables
bitbake: fetch2/git: don’t set core.fsyncobjectfiles=0
bitbake: tests/fetch: Allow handling of a file:// url within a submodule
bitbake: tests: bb.tests.fetch.URLHandle: add 2 new tests
bitbake: utils/ply: Update md5 to better report errors with hashlib
bluez5: add dbus to RDEPENDS
build-appliance-image: Update to langdale head revision
buildconf: compare abspath
buildtools-tarball: export certificates to python and curl
cmake-native: Fix host tool contamination
create-spdx.bbclass: remove unused SPDX_INCLUDE_PACKAGED
create-spdx: Remove “;name=…” for downloadLocation
cve-update-db-native: add timeout to urlopen() calls
dev-manual: common-tasks.rst: add reference to “do_clean” task
dev-manual: common-tasks.rst: add reference to “do_listtasks” task
docs: add support for langdale (4.1) release
dropbear: add pam to PACKAGECONFIG
externalsrc.bbclass: fix git repo detection
externalsrc.bbclass: Remove a trailing slash from ${B}
externalsrc: move back to classes
gcc: Allow -Wno-error=poison-system-directories to take effect
glib-2.0: fix rare GFileInfo test case failure
gnutls: Unified package names to lower-case
gnutls: upgrade 3.7.7 -> 3.7.8
grub: disable build on armv7ve/a with hardfp
gstreamer1.0-libav: fix errors with ffmpeg 5.x
ifupdown: upgrade 0.8.37 -> 0.8.39
insane.bbclass: Allow hashlib version that only accepts on parameter
install-buildtools: support buildtools-make-tarball and update to 4.1
kern-tools: fix relative path processing
kernel-fitimage: Use KERNEL_OUTPUT_DIR where appropriate
kernel-yocto: improve fatal error messages of symbol_why.py
kernel: Clear SYSROOT_DIRS instead of replacing sysroot_stage_all
libcap: upgrade 2.65 -> 2.66
libical: upgrade 3.0.14 -> 3.0.15
libksba: upgrade 1.6.0 -> 1.6.2
libsdl2: upgrade 2.24.0 -> 2.24.1
lighttpd: upgrade 1.4.66 -> 1.4.67
linux-firmware: package amdgpu firmware
linux-firmware: split rtl8761 firmware
linux-yocto/5.15: update to v5.15.72
linux-yocto/5.19: update to v5.19.14
linux-yocto: add efi entry for machine features
lttng-modules: upgrade 2.13.4 -> 2.13.5
lttng-ust: upgrade 2.13.4 -> 2.13.5
manuals: add reference to “do_configure” task
manuals: add reference to the “do_compile” task
manuals: add reference to the “do_install” task
manuals: add reference to the “do_kernel_configcheck” task
manuals: add reference to the “do_populate_sdk” task
manuals: add references to “do_package_write_*” tasks
manuals: add references to “do_populate_sysroot” task
manuals: add references to the “do_build” task
manuals: add references to the “do_bundle_initramfs” task
manuals: add references to the “do_cleanall” task
manuals: add references to the “do_deploy” task
manuals: add references to the “do_devshell” task
manuals: add references to the “do_fetch” task
manuals: add references to the “do_image” task
manuals: add references to the “do_kernel_configme” task
manuals: add references to the “do_package” task
manuals: add references to the “do_package_qa” task
manuals: add references to the “do_patch” task
manuals: add references to the “do_rootfs” task
manuals: add references to the “do_unpack” task
manuals: fix misc typos
manuals: improve initramfs details
manuals: updates for building on Windows (WSL 2)
mesa: only apply patch to fix ALWAYS_INLINE for native
mesa: update 22.2.0 -> 22.2.2
meson: make wrapper options sub-command specific
meson: upgrade 0.63.2 -> 0.63.3
migration guides: 3.4: remove spurious space in example
migration guides: add release notes for 4.0.4
migration-general: add section on using buildhistory
migration-guides/release-notes-4.1.rst: add more known issues
migration-guides/release-notes-4.1.rst: update Repositories / Downloads
migration-guides: add known issues for 4.1
migration-guides: add reference to the “do_shared_workdir” task
migration-guides: use contributor real name
migration-guides: use contributor real name
mirrors.bbclass: use shallow tarball for binutils-native
mtools: upgrade 4.0.40 -> 4.0.41
numactl: upgrade 2.0.15 -> 2.0.16
oe/packagemanager/rpm: don’t leak file objects
openssl: export necessary env vars in SDK
openssl: Fix SSL_CERT_FILE to match ca-certs location
openssl: Upgrade 3.0.5 -> 3.0.7
opkg-utils: use a git clone, not a dynamic snapshot
overlayfs: Allow not used mount points
overview-manual: concepts.rst: add reference to “do_packagedata” task
overview-manual: concepts.rst: add reference to “do_populate_sdk_ext” task
overview-manual: concepts.rst: fix formating and add references
own-mirrors: add crate
pango: upgrade 1.50.9 -> 1.50.10
perf: Depend on native setuptools3
poky.conf: bump version for 4.1.1
poky.conf: remove Ubuntu 21.10
populate_sdk_base: ensure ptest-pkgs pulls in ptest-runner
psplash: add psplash-default in rdepends
qemu-native: Add PACKAGECONFIG option for jack
quilt: backport a patch to address grep 3.8 failures
ref-manual/faq.rst: update references to products built with OE / Yocto Project
ref-manual/variables.rst: clarify sentence
ref-manual: add a note to ssh-server-dropbear feature
ref-manual: add
CVE_CHECK_SHOW_WARNINGSref-manual: add
CVE_DB_UPDATE_INTERVALref-manual: add DEV_PKG_DEPENDENCY
ref-manual: add DISABLE_STATIC
ref-manual: add FIT_PAD_ALG
ref-manual: add KERNEL_DEPLOY_DEPEND
ref-manual: add missing features
ref-manual: add MOUNT_BASE variable
ref-manual: add overlayfs class variables
ref-manual: add OVERLAYFS_ETC_EXPOSE_LOWER
ref-manual: add OVERLAYFS_QA_SKIP
ref-manual: add previous overlayfs-etc variables
ref-manual: add pypi class
ref-manual: add SDK_TOOLCHAIN_LANGS
ref-manual: add section for create-spdx class
ref-manual: add serial-autologin-root to IMAGE_FEATURES documentation
ref-manual: add UBOOT_MKIMAGE_KERNEL_TYPE
ref-manual: add WATCHDOG_TIMEOUT to variable glossary
ref-manual: add WIRELESS_DAEMON
ref-manual: classes.rst: add links to all references to a class
ref-manual: complementary package installation recommends
ref-manual: correct default for BUILDHISTORY_COMMIT
ref-manual: document new github-releases class
ref-manual: expand documentation on image-buildinfo class
ref-manual: faq.rst: reorganize into subsections, contents at top
ref-manual: remove reference to largefile in DISTRO_FEATURES
ref-manual: remove reference to testimage-auto class
ref-manual: system-requirements: Ubuntu 22.04 now supported
ref-manual: tasks.rst: add reference to the “do_image_complete” task
ref-manual: tasks.rst: add reference to the “do_kernel_checkout” task
ref-manual: tasks.rst: add reference to the “do_kernel_metadata” task
ref-manual: tasks.rst: add reference to the “do_validate_branches” task
ref-manual: tasks.rst: add references to the “do_cleansstate” task
ref-manual: update buildpaths QA check documentation
ref-manual: update pypi documentation for CVE_PRODUCT default in 4.1
ref-manual: variables.rst: add reference to “do_populate_lic” task
release-notes-4.1.rst remove bitbake-layers subcommand argument
runqemu: Do not perturb script environment
runqemu: Fix gl-es argument from causing other arguments to be ignored
rust-target-config: match riscv target names with what rust expects
rust: install rustfmt for riscv32 as well
sanity: check for GNU tar specifically
scripts/oe-check-sstate: cleanup
scripts/oe-check-sstate: force build to run for all targets, specifically populate_sysroot
sdk-manual: correct the bitbake target for a unified sysroot build
shadow: update 4.12.1 -> 4.12.3
systemd: add systemd-creds and systemd-cryptenroll to systemd-extra-utils
test-manual: fix typo in machine name
tiff: fix a typo for CVE-2022-2953.patch
u-boot: Add savedefconfig task
u-boot: Remove duplicate inherit of cml1
uboot-sign: Fix using wrong KEY_REQ_ARGS
Update documentation for classes split
vim: upgrade to 9.0.0820
vulkan-samples: add lfs=0 to SRC_URI to avoid git smudge errors in do_unpack
wic: honor the SOURCE_DATE_EPOCH in case of updated fstab
wic: swap partitions are not added to fstab
wpebackend-fdo: upgrade 1.12.1 -> 1.14.0
xserver-xorg: move some recommended dependencies in required
zlib: do out-of-tree builds
zlib: upgrade 1.2.12 -> 1.2.13
zlib: use .gz archive and set a PREMIRROR
Known Issues in Yocto-4.1.1
N/A
Contributors to Yocto-4.1.1
Adrian Freihofer
Alex Kiernan
Alexander Kanavin
Bartosz Golaszewski
Bernhard Rosenkränzer
Bruce Ashfield
Chen Qi
Christian Eggers
Claus Stovgaard
Ed Tanous
Etienne Cordonnier
Frank de Brabander
Hitendra Prajapati
Jan-Simon Moeller
Jeremy Puhlman
Johan Korsnes
Jon Mason
Jose Quaresma
Joshua Watt
Justin Bronder
Kai Kang
Keiya Nobuta
Khem Raj
Lee Chee Yang
Liam Beguin
Luca Boccassi
Mark Asselstine
Mark Hatle
Markus Volk
Martin Jansa
Michael Opdenacker
Ming Liu
Mingli Yu
Paul Eggleton
Peter Kjellerstedt
Qiu, Zheng
Quentin Schulz
Richard Purdie
Robert Joslyn
Ross Burton
Sean Anderson
Sergei Zhmylev
Steve Sakoman
Takayasu Ito
Teoh Jay Shen
Thomas Perrot
Tim Orling
Vincent Davis Jr
Vyacheslav Yurkov
Ciaran Courtney
Wang Mingyu
Repositories / Downloads for Yocto-4.1.1
poky
Repository Location: https://git.yoctoproject.org/poky
Branch: langdale
Tag: yocto-4.1.1
Git Revision: d3cda9a3e0837eb2ac5482f5f2bd8e55e874feff
Release Artefact: poky-d3cda9a3e0837eb2ac5482f5f2bd8e55e874feff
sha: e92b694fbb74a26c7a875936dfeef4a13902f24b06127ee52f4d1c1e4b03ec24
Download Locations: http://downloads.yoctoproject.org/releases/yocto/yocto-4.1.1/poky-d3cda9a3e0837eb2ac5482f5f2bd8e55e874feff.tar.bz2 http://mirrors.kernel.org/yocto/yocto/yocto-4.1.1/poky-d3cda9a3e0837eb2ac5482f5f2bd8e55e874feff.tar.bz2
openembedded-core
Repository Location: https://git.openembedded.org/openembedded-core
Branch: langdale
Tag: yocto-4.1.1
Git Revision: 9237ffc4feee2dd6ff5bdd672072509ef9e82f6d
Release Artefact: oecore-9237ffc4feee2dd6ff5bdd672072509ef9e82f6d
sha: d73198aef576f0fca0d746f9d805b1762c19c31786bc3f7d7326dfb2ed6fc1be
Download Locations: http://downloads.yoctoproject.org/releases/yocto/yocto-4.1.1/oecore-9237ffc4feee2dd6ff5bdd672072509ef9e82f6d.tar.bz2 http://mirrors.kernel.org/yocto/yocto/yocto-4.1.1/oecore-9237ffc4feee2dd6ff5bdd672072509ef9e82f6d.tar.bz2
meta-mingw
Repository Location: https://git.yoctoproject.org/meta-mingw
Branch: langdale
Tag: yocto-4.1.1
Git Revision: b0067202db8573df3d23d199f82987cebe1bee2c
Release Artefact: meta-mingw-b0067202db8573df3d23d199f82987cebe1bee2c
sha: 704f2940322b81ce774e9cbd27c3cfa843111d497dc7b1eeaa39cd694d9a2366
Download Locations: http://downloads.yoctoproject.org/releases/yocto/yocto-4.1.1/meta-mingw-b0067202db8573df3d23d199f82987cebe1bee2c.tar.bz2 http://mirrors.kernel.org/yocto/yocto/yocto-4.1.1/meta-mingw-b0067202db8573df3d23d199f82987cebe1bee2c.tar.bz2
bitbake
Repository Location: https://git.openembedded.org/bitbake
Branch: 2.2
Tag: yocto-4.1.1
Git Revision: 138dd7883ee2c521900b29985b6d24a23d96563c
Release Artefact: bitbake-138dd7883ee2c521900b29985b6d24a23d96563c
sha: 5dc5aff4b4a801253c627cdaab6b1a0ceee2c531f1a6b166d85d1265a35d4be5
Download Locations: http://downloads.yoctoproject.org/releases/yocto/yocto-4.1.1/bitbake-138dd7883ee2c521900b29985b6d24a23d96563c.tar.bz2 http://mirrors.kernel.org/yocto/yocto/yocto-4.1.1/bitbake-138dd7883ee2c521900b29985b6d24a23d96563c.tar.bz2
yocto-docs
Repository Location: https://git.yoctoproject.org/yocto-docs
Branch: langdale
Tag: yocto-4.1.1
Git Revision: 8e0841c3418caa227c66a60327db09dfbe72054a
Release notes for Yocto-4.1.2 (Langdale)
Security Fixes in Yocto-4.1.2
sudo: Fix CVE-2022-43995
binutils: Fix CVE-2022-4285
cairo: update patch for CVE-2019-6461 with upstream solution
expat: Fix CVE-2022-43680
ffmpeg: Fix CVE-2022-3964 and CVE-2022-3965
grub: Fix CVE-2022-28736
libarchive: Fix CVE-2022-36227
libpam: Fix CVE-2022-28321
libpng: Fix CVE-2019-6129
ruby: Fix CVE-2022-28738 and CVE-2022-28739
tiff: Fix CVE-2022-3970
vim: Fix CVE-2022-4141
Fixes in Yocto-4.1.2
Expand create-spdx class documentation
Expand cve-check class documentation
archiver: avoid using machine variable as it breaks multiconfig
babeltrace: Upgrade to 1.5.11
backport SPDX documentation and vulnerability improvements
baremetal-image: Avoid overriding qemu variables from IMAGE_CLASSES
bc: extend to nativesdk
bind: Upgrade to 9.18.9
bitbake.conf: Drop export of SOURCE_DATE_EPOCH_FALLBACK
bitbake: gitsm: Fix regression in gitsm submodule path parsing
bitbake: runqueue: Fix race issues around hash equivalence and sstate reuse
bluez5: Point hciattach bcm43xx firmware search path to /lib/firmware
build-appliance-image: Update to langdale head revision
cargo_common.bbclass: Fix typos
classes: make TOOLCHAIN more permissive for kernel
cmake: Upgrade to 3.24.2
combo-layer: add sync-revs command
combo-layer: dont use bb.utils.rename
combo-layer: remove unused import
common-tasks.rst: fix oeqa runtime test path
create-spdx: default share_src for shared sources
curl: Correct LICENSE from MIT-open-group to curl
dbus: Add missing CVE product name
devtool/upgrade: correctly handle recipes where S is a subdir of upstream tree
dhcpcd: fix to work with systemd
docs: kernel-dev: faq: update tip on how to not include kernel in image
docs: migration-4.0: specify variable name change for kernel inclusion in image recipe
expat: upgrade to 2.5.0
externalsrc: fix lookup for .gitmodules
ffmpeg: Upgrade to 5.1.2
gcc-shared-source: Fix source date epoch handling
gcc-source: Drop gengtype manipulation
gcc-source: Ensure deploy_source_date_epoch sstate hash doesn’t change
gcc-source: Fix gengtypes race
gdk-pixbuf: Upgrade to 2.42.10
get_module_deps3.py: Check attribute ‘__file__’
glibc-tests: correctly pull in the actual tests when installing -ptest package
gnomebase.bbclass: return the whole version for tarball directory if it is a number
go-crosssdk: avoid host contamination by GOCACHE
go: Update reproducibility patch to fix panic errors
go: submit patch upstream
go: Upgrade to 1.19.3
gptfdisk: remove warning message from target system
groff: submit patches upstream
gstreamer1.0: Upgrade to 1.20.5
help2man: Upgrade to 1.49.3
insane: add codeload.github.com to src-uri-bad checkz
inetutils: Upgrade to 2.4
iso-codes: Upgrade to 4.12.0
kbd: Don’t build tests
kea: submit patch upstream
kern-tools: integrate ZFS speedup patch
kernel.bbclass: Include randstruct seed assets in STAGING_KERNEL_BUILDDIR
kernel.bbclass: make KERNEL_DEBUG_TIMESTAMPS work at rebuild
kernel.bbclass: remove empty module directories to prevent QA issues
lib/buildstats: fix parsing of trees with reduced_proc_pressure directories
libdrm: Remove libdrm-kms package
libepoxy: convert to git
libepoxy: remove upstreamed patch
libepoxy: Upgrade to 1.5.10
libffi: submit patch upstream
libffi: Upgrade to 3.4.4
libical: Upgrade to 3.0.16
libnewt: Upgrade to 0.52.23
libsdl2: Upgrade to 2.24.2
libpng: Upgrade to 1.6.39
libuv: fixup SRC_URI
libxcrypt-compat: Upgrade to 4.4.33
libxcrypt: Upgrade to 4.4.30
libxml2: fix test data checksums
linux-firmware: add new fw file to ${PN}-qcom-adreno-a530
linux-firmware: don’t put the firmware into the sysroot
linux-firmware: Upgrade to 20221109
linux-yocto/5.15: fix CONFIG_CRYPTO_CCM mismatch warnings
linux-yocto/5.15: update genericx86* machines to v5.15.72
linux-yocto/5.15: Upgrade to v5.15.78
linux-yocto/5.19: cfg: intel and vesa updates
linux-yocto/5.19: fix CONFIG_CRYPTO_CCM mismatch warnings
linux-yocto/5.19: fix elfutils run-backtrace-native-core ptest failure
linux-yocto/5.19: security.cfg: remove configs which have been dropped
linux-yocto/5.19: update genericx86* machines to v5.19.14
linux-yocto/5.19: Upgrade to v5.19.17
lsof: add update-alternatives logic
lttng-modules: Upgrade to 2.13.7
lttng-tools: submit determinism.patch upstream
manuals: add 4.0.5 and 4.0.6 release notes
mesa: do not rely on native llvm-config in target sysroot
mesa: Upgrade to 22.2.3
meta-selftest/staticids: add render group for systemd
mirrors.bbclass: update CPAN_MIRROR
mobile-broadband-provider-info: Upgrade to 20221107
mpfr: Upgrade to 4.1.1
mtd-utils: Upgrade to 2.1.5
oeqa/concurrencytest: Add number of failures to summary output
oeqa/runtime/dnf: rewrite test_dnf_installroot_usrmerge
oeqa/selftest/externalsrc: add test for srctree_hash_files
oeqa/selftest/lic_checksum: Cleanup changes to emptytest include
openssh: remove RRECOMMENDS to rng-tools for sshd package
opkg: Set correct info_dir and status_file in opkg.conf
opkg: Upgrade to 0.6.1
ovmf: correct patches status
package: Fix handling of minidebuginfo with newer binutils
pango: Make it build with ptest disabled
pango: replace a recipe fix with an upstream submitted patch
pango: Upgrade to 1.50.11
poky.conf: bump version for 4.1.2
psplash: consider the situation of psplash not exist for systemd
python3-mako: Upgrade to 1.2.3
qemu-helper-native: Correctly pass program name as argv[0]
qemu-helper-native: Re-write bridge helper as C program
qemu: Ensure libpng dependency is deterministic
qemuboot.bbclass: make sure runqemu boots bundled initramfs kernel image
resolvconf: make it work
rm_work: adjust dependency to make do_rm_work_all depend on do_rm_work
rm_work: exclude the SSTATETASKS from the rm_work tasks sinature
ruby: merge .inc into .bb
ruby: Upgrade to 3.1.3
rust: submit a rewritten version of crossbeam_atomic.patch upstream
sanity: Drop data finalize call
scripts: convert-overrides: Allow command-line customizations
selftest: add a copy of previous mtd-utils version to meta-selftest
socat: Upgrade to 1.7.4.4
sstate: Allow optimisation of do_deploy_archives task dependencies
sstatesig: emit more helpful error message when not finding sstate manifest
sstatesig: skip the rm_work task signature
sudo: Upgrade to 1.9.12p1
sysstat: Upgrade to 12.6.1
systemd: Consider PACKAGECONFIG in RRECOMMENDS
systemd: Make importd depend on glib-2.0 again
systemd: add group render to udev package
systemd: Upgrade to 251.8
tcl: correct patch status
tzdata: Upgrade to 2022g
vala: install vapigen-wrapper into /usr/bin/crosscripts and stage only that
valgrind: skip the boost_thread test on arm
vim: Upgrade to 9.0.0947
wic: make ext2/3/4 images reproducible
xwayland: libxshmfence is needed when dri3 is enabled
xwayland: Upgrade to 22.1.5
yocto-check-layer: Allow OE-Core to be tested
Known Issues in Yocto-4.1.2
N/A
Contributors to Yocto-4.1.2
Alejandro Hernandez Samaniego
Alex Kiernan
Alex Stewart
Alexander Kanavin
Alexey Smirnov
Bruce Ashfield
Carlos Alberto Lopez Perez
Chen Qi
Diego Sueiro
Dmitry Baryshkov
Enrico Jörns
Harald Seiler
Hitendra Prajapati
Jagadeesh Krishnanjanappa
Jose Quaresma
Joshua Watt
Kai Kang
Konrad Weihmann
Leon Anavi
Marek Vasut
Martin Jansa
Mathieu Dubois-Briand
Michael Opdenacker
Mikko Rapeli
Narpat Mali
Nathan Rossi
Niko Mauno
Ola x Nilsson
Ovidiu Panait
Pavel Zhukov
Peter Bergin
Peter Kjellerstedt
Peter Marko
Polampalli, Archana
Qiu, Zheng
Quentin Schulz
Randy MacLeod
Ranjitsinh Rathod
Ravula Adhitya Siddartha
Richard Purdie
Robert Andersson
Ross Burton
Ryan Eatmon
Sakib Sajal
Sandeep Gundlupet Raju
Sergei Zhmylev
Steve Sakoman
Tim Orling
Wang Mingyu
Xiangyu Chen
pgowda
Repositories / Downloads for Yocto-4.1.2
poky
Repository Location: https://git.yoctoproject.org/poky
Branch: langdale
Tag: yocto-4.1.2
Git Revision: 74c92e38c701e268406bb656b45ccd68471c217e
Release Artefact: poky-74c92e38c701e268406bb656b45ccd68471c217e
sha: 06a2b304d0e928b62d81087797ae86115efe925c506bcb40c7d4747e14790bb0
Download Locations: http://downloads.yoctoproject.org/releases/yocto/yocto-4.1.2/poky-74c92e38c701e268406bb656b45ccd68471c217e.tar.bz2 http://mirrors.kernel.org/yocto/yocto/yocto-4.1.2/poky-74c92e38c701e268406bb656b45ccd68471c217e.tar.bz2
openembedded-core
Repository Location: https://git.openembedded.org/openembedded-core
Branch: langdale
Tag: yocto-4.1.2
Git Revision: 670f4f103b25897524d115c1f290ecae441fe4bd
Release Artefact: oecore-670f4f103b25897524d115c1f290ecae441fe4bd
sha: 09d77700e84efc738aef5713c5e86f19fa092f876d44b870789155cc1625ef04
Download Locations: http://downloads.yoctoproject.org/releases/yocto/yocto-4.1.2/oecore-670f4f103b25897524d115c1f290ecae441fe4bd.tar.bz2 http://mirrors.kernel.org/yocto/yocto/yocto-4.1.2/oecore-670f4f103b25897524d115c1f290ecae441fe4bd.tar.bz2
meta-mingw
Repository Location: https://git.yoctoproject.org/meta-mingw
Branch: langdale
Tag: yocto-4.1.2
Git Revision: b0067202db8573df3d23d199f82987cebe1bee2c
Release Artefact: meta-mingw-b0067202db8573df3d23d199f82987cebe1bee2c
sha: 704f2940322b81ce774e9cbd27c3cfa843111d497dc7b1eeaa39cd694d9a2366
Download Locations: http://downloads.yoctoproject.org/releases/yocto/yocto-4.1.2/meta-mingw-b0067202db8573df3d23d199f82987cebe1bee2c.tar.bz2 http://mirrors.kernel.org/yocto/yocto/yocto-4.1.2/meta-mingw-b0067202db8573df3d23d199f82987cebe1bee2c.tar.bz2
bitbake
Repository Location: https://git.openembedded.org/bitbake
Branch: 2.2
Tag: yocto-4.1.2
Git Revision: f0f166aee766b4bb1f8cf8b35dfc7d406c75e6a4
Release Artefact: bitbake-f0f166aee766b4bb1f8cf8b35dfc7d406c75e6a4
sha: 7faf97eca78afd3994e4e126e5f5908617408c340c6eff8cd7047e0b961e2d10
Download Locations: http://downloads.yoctoproject.org/releases/yocto/yocto-4.1.2/bitbake-f0f166aee766b4bb1f8cf8b35dfc7d406c75e6a4.tar.bz2 http://mirrors.kernel.org/yocto/yocto/yocto-4.1.2/bitbake-f0f166aee766b4bb1f8cf8b35dfc7d406c75e6a4.tar.bz2
yocto-docs
Repository Location: https://git.yoctoproject.org/yocto-docs
Branch: langdale
Tag: yocto-4.1.2
Git Revision: 30f5f9ece260fd600f0c0fa32fc2f1fc61cf7d1b
Release notes for Yocto-4.1.3 (Langdale)
Security Fixes in Yocto-4.1.3
apr-util: Fix CVE-2022-25147
apr: Fix CVE-2022-24963 and CVE-2022-28331
bind: Fix CVE-2022-3094, CVE-2022-3736 and CVE-2022-3924
curl: Fix CVE-2022-43551 and CVE-2022-43552
dbus: Fix CVE-2022-42010, CVE-2022-42011 and CVE-2022-42012
git: Fix CVE-2022-23521, CVE-2022-39253, CVE-2022-39260 and CVE-2022-41903
git: Ignore CVE-2022-41953
go: Fix CVE-2022-41717 and CVE-2022-41720
grub2: Fix CVE-2022-2601 and CVE-2022-3775
less: Fix CVE-2022-46663
libarchive: Fix CVE-2022-36227
libksba: Fix CVE-2022-47629
openssl: Fix CVE-2022-3996
pkgconf: Fix CVE-2023-24056
ppp: Fix CVE-2022-4603
sudo: Fix CVE-2023-22809
tar: Fix CVE-2022-48303
vim: Fix CVE-2023-0049, CVE-2023-0051, CVE-2023-0054, CVE-2023-0288, CVE-2023-0433 and CVE-2023-0512
xserver-xorg: Fix CVE-2023-0494
xwayland: Fix CVE-2023-0494
Fixes in Yocto-4.1.3
apr-util: Upgrade to 1.6.3
apr: Upgrade to 1.7.2
apt: fix do_package_qa failure
at: Change when files are copied
base.bbclass: Fix way to check ccache path
bblayers/makesetup: skip git repos that are submodules
bblayers/setupwriters/oe-setup-layers: create dir if not exists
bind: Upgrade to 9.18.11
bitbake-layers: fix a typo
bitbake: bb/utils: include SSL certificate paths in export_proxies
bitbake: fetch2/git: Clarify the meaning of namespace
bitbake: fetch2/git: Prevent git fetcher from fetching gitlab repository metadata
bitbake: process: log odd unlink events with bitbake.sock
bitbake: server/process: Add bitbake.sock race handling
bitbake: siggen: Fix inefficient string concatenation
bootchart2: Fix usrmerge support
bsp-guide: fix broken git URLs and missing word
build-appliance-image: Update to langdale head revision
buildtools-tarball: set pkg-config search path
busybox: Fix depmod patch
busybox: always start do_compile with orig config files
busybox: rm temporary files if do_compile was interrupted
cairo: fix CVE patches assigned wrong CVE number
classes/fs-uuid: Fix command output decoding issue
classes/populate_sdk_base: Append cleandirs
classes: image: Set empty weak default IMAGE_LINGUAS
cml1: remove redundant addtask
core-image.bbclass: Fix missing leading whitespace with ‘:append’
createrepo-c: Include missing rpm/rpmstring.h
curl: don’t enable debug builds
curl: fix dependencies when building with ldap/ldaps
cve-check: write the cve manifest to IMGDEPLOYDIR
cve-update-db-native: avoid incomplete updates
cve-update-db-native: show IP on failure
dbus: Upgrade to 1.14.6
dev-manual: common-tasks.rst: add link to FOSDEM 2023 video
dev-manual: fix old override syntax
devshell: Do not add scripts/git-intercept to PATH
devtool: fix devtool finish when gitmodules file is empty
devtool: process local files only for the main branch
dhcpcd: backport two patches to fix runtime error
dhcpcd: fix dhcpcd start failure on qemuppc64
diffutils: Upgrade to 3.9
ffmpeg: fix configure failure on noexec /tmp host
gdk-pixbuf: do not use tools from gdk-pixbuf-native when building tests
git: Upgrade to 2.37.6
glslang: branch rename master -> main
go: Upgrade to 1.19.4
gstreamer1.0 : Revert “disable flaky gstbin:test_watch_for_state_change test” and Fix race conditions in gstbin tests with upstream solution
harfbuzz: remove bindir only if it exists
httpserver: add error handler that write to the logger
image.bbclass: print all QA functions exceptions
kernel-fitimage: Adjust order of dtb/dtbo files
kernel-fitimage: Allow user to select dtb when multiple dtb exists
kernel-yocto: fix kernel-meta data detection
kernel/linux-kernel-base: Fix kernel build artefact determinism issues
lib/buildstats: handle tasks that never finished
lib/oe/reproducible: Use git log without gpg signature
libarchive: Upgrade to 3.6.2
libc-locale: Fix on target locale generation
libgit2: Upgrade to 1.5.1
libjpeg-turbo: Upgrade to 2.1.5.1
libksba: Upgrade to 1.6.3
libpng: Enable NEON for aarch64 to enensure consistency with arm32.
librsvg: Only enable the Vala bindings if GObject Introspection is enabled
librsvg: enable vapi build
libseccomp: fix for the ptest result format
libseccomp: fix typo in DESCRIPTION
libssh2: Clean up ptest patch/coverage
libtirpc: Check if file exists before operating on it
libusb1: Link with latomic only if compiler has no atomic builtins
libusb1: Strip trailing whitespaces
linux-firmware: add yamato fw files to qcom-adreno-a2xx package
linux-firmware: properly set license for all Qualcomm firmware
linux-firmware: Upgrade to 20230210
linux-yocto/5.15: fix perf build with clang
linux-yocto/5.15: libbpf: Fix build warning on ref_ctr_off
linux-yocto/5.15: ltp and squashfs fixes
linux-yocto/5.15: powerpc: Fix reschedule bug in KUAP-unlocked user copy
linux-yocto/5.15: Upgrade to v5.15.91
linux-yocto/5.19: fix perf build with clang
linux-yocto/5.19: powerpc: Fix reschedule bug in KUAP-unlocked user copy
lsof: fix old override syntax
lttng-modules: Fix for 5.10.163 kernel version
lttng-modules: fix for kernel 6.2+
lttng-modules: Upgrade to 2.13.8
lttng-tools: Upgrade to 2.13.9
make-mod-scripts: Ensure kernel build output is deterministic
manuals: update patchwork instance URL
mesa-gl: gallium is required when enabling x11
meta: remove True option to getVar and getVarFlag calls (again)
migration-guides: add release-notes for 4.0.7
native: Drop special variable handling
numactl: skip test case when target platform doesn’t have 2 CPU node
oeqa context.py: fix –target-ip comment to include ssh port number
oeqa dump.py: add error counter and stop after 5 failures
oeqa qemurunner.py: add timeout to QMP calls
oeqa qemurunner.py: try to avoid reading one character at a time
oeqa qemurunner: read more data at a time from serial
oeqa ssh.py: add connection keep alive options to ssh client
oeqa ssh.py: fix hangs in run()
oeqa ssh.py: move output prints to new line
oeqa/qemurunner: do not use Popen.poll() when terminating runqemu with a signal
oeqa/rpm.py: Increase timeout and add debug output
oeqa/selftest/debuginfod: improve testcase
oeqa/selftest/locales: Add selftest for locale generation/presence
oeqa/selftest/resulttooltests: fix minor typo
openssl: Upgrade to 3.0.8
opkg: ensure opkg uses private gpg.conf when applying keys.
pango: Upgrade to 1.50.12
perf: Enable debug/source packaging
pkgconf: Upgrade to 1.9.4
poky.conf: Update SANITY_TESTED_DISTROS to match autobuilder
poky.conf: bump version for 4.1.3
populate_sdk_ext.bbclass: Fix missing leading whitespace with ‘:append’
profile-manual: update WireShark hyperlinks
ptest-packagelists.inc: Fix missing leading whitespace with ‘:append’
python3-pytest: depend on python3-tomli instead of python3-toml
quilt: fix intermittent failure in faildiff.test
quilt: use upstreamed faildiff.test fix
recipe_sanity: fix old override syntax
ref-manual: Fix invalid feature name
ref-manual: update DEV_PKG_DEPENDENCY in variables
ref-manual: variables.rst: fix broken hyperlink
rm_work.bbclass: use HOSTTOOLS ‘rm’ binary exclusively
runqemu: kill qemu if it hangs
rust: Do not use default compiler flags defined in CC crate
scons.bbclass: Make MAXLINELENGTH overridable
scons: Pass MAXLINELENGTH to scons invocation
sdkext/cases/devtool: pass a logger to HTTPService
selftest/virgl: use pkg-config from the host
spirv-headers/spirv-tools: set correct branch name
sstate.bbclass: Fetch non-existing local .sig files if needed
sstatesig: Improve output hash calculation
sudo: Upgrade to 1.9.12p2
system-requirements.rst: Add Fedora 36, AlmaLinux 8.7 & 9.1, and OpenSUSE 15.4 to list of supported distros
testimage: Fix error message to reflect new syntax
tiff: Add packageconfig knob for webp
toolchain-scripts: compatibility with unbound variable protection
uninative: Upgrade to 3.8.1 to include libgcc
update-alternatives: fix typos
vim: Upgrade to 9.0.1293
vulkan-samples: branch rename master -> main
wic: Fix usage of fstype=none in wic
wireless-regdb: Upgrade to 2023.02.13
xserver-xorg: Upgrade to 21.1.7
xwayland: Upgrade to 22.1.8
Known Issues in Yocto-4.1.3
N/A
Contributors to Yocto-4.1.3
Adrian Freihofer
Alejandro Hernandez Samaniego
Alex Kiernan
Alexander Kanavin
Alexis Lothoré
Anton Antonov
Antonin Godard
Armin Kuster
Arnout Vandecappelle
Benoît Mauduit
Bruce Ashfield
Carlos Alberto Lopez Perez
Changqing Li
Charlie Johnston
Chee Yang Lee
Chen Qi
Dmitry Baryshkov
Enguerrand de Ribaucourt
Etienne Cordonnier
Fawzi KHABER
Federico Pellegrin
Frank de Brabander
Harald Seiler
He Zhe
Jan Kircher
Jermain Horsman
Jose Quaresma
Joshua Watt
Kai Kang
Khem Raj
Lei Maohui
Louis Rannou
Luis
Marek Vasut
Markus Volk
Marta Rybczynska
Martin Jansa
Mateusz Marciniec
Mauro Queiros
Michael Halstead
Michael Opdenacker
Mikko Rapeli
Mingli Yu
Narpat Mali
Niko Mauno
Pavel Zhukov
Pawel Zalewski
Peter Kjellerstedt
Petr Kubizňák
Quentin Schulz
Randy MacLeod
Richard Purdie
Robert Joslyn
Rodolfo Quesada Zumbado
Ross Burton
Sakib Sajal
Sandeep Gundlupet Raju
Saul Wold
Siddharth Doshi
Steve Sakoman
Thomas Roos
Tobias Hagelborn
Ulrich Ölmann
Vivek Kumbhar
Wang Mingyu
Xiangyu Chen
Repositories / Downloads for Yocto-4.1.3
poky
Repository Location: https://git.yoctoproject.org/poky
Branch: langdale
Tag: yocto-4.1.3
Git Revision: 91d0157d6daf4ea61d6b4e090c0b682d3f3ca60f
Release Artefact: poky-91d0157d6daf4ea61d6b4e090c0b682d3f3ca60f
sha: 94e4615eba651fe705436b29b854458be050cc39db936295f9d5eb7e85d3eff1
Download Locations: http://downloads.yoctoproject.org/releases/yocto/yocto-4.1.3/poky-91d0157d6daf4ea61d6b4e090c0b682d3f3ca60f.tar.bz2 http://mirrors.kernel.org/yocto/yocto/yocto-4.1.3/poky-91d0157d6daf4ea61d6b4e090c0b682d3f3ca60f.tar.bz2
openembedded-core
Repository Location: https://git.openembedded.org/openembedded-core
Branch: langdale
Tag: yocto-4.1.3
Git Revision: b995ea45773211bd7bdd60eabcc9bbffda6beb5c
Release Artefact: oecore-b995ea45773211bd7bdd60eabcc9bbffda6beb5c
sha: 952e19361f205ee91b74e5caaa835d58fa6dd0d92ddaed50d4cd3f3fa56fab63
Download Locations: http://downloads.yoctoproject.org/releases/yocto/yocto-4.1.3/oecore-b995ea45773211bd7bdd60eabcc9bbffda6beb5c.tar.bz2 http://mirrors.kernel.org/yocto/yocto/yocto-4.1.3/oecore-b995ea45773211bd7bdd60eabcc9bbffda6beb5c.tar.bz2
meta-mingw
Repository Location: https://git.yoctoproject.org/meta-mingw
Branch: langdale
Tag: yocto-4.1.3
Git Revision: b0067202db8573df3d23d199f82987cebe1bee2c
Release Artefact: meta-mingw-b0067202db8573df3d23d199f82987cebe1bee2c
sha: 704f2940322b81ce774e9cbd27c3cfa843111d497dc7b1eeaa39cd694d9a2366
Download Locations: http://downloads.yoctoproject.org/releases/yocto/yocto-4.1.3/meta-mingw-b0067202db8573df3d23d199f82987cebe1bee2c.tar.bz2 http://mirrors.kernel.org/yocto/yocto/yocto-4.1.3/meta-mingw-b0067202db8573df3d23d199f82987cebe1bee2c.tar.bz2
bitbake
Repository Location: https://git.openembedded.org/bitbake
Branch: 2.2
Tag: yocto-4.1.3
Git Revision: 592ee222a1c6da42925fb56801f226884b6724ec
Release Artefact: bitbake-592ee222a1c6da42925fb56801f226884b6724ec
sha: 79c32f2ca66596132e32a45654ce0e9dd42b6b39186eff3540a9d6b499fe952c
Download Locations: http://downloads.yoctoproject.org/releases/yocto/yocto-4.1.3/bitbake-592ee222a1c6da42925fb56801f226884b6724ec.tar.bz2 http://mirrors.kernel.org/yocto/yocto/yocto-4.1.3/bitbake-592ee222a1c6da42925fb56801f226884b6724ec.tar.bz2
yocto-docs
Repository Location: https://git.yoctoproject.org/yocto-docs
Branch: langdale
Tag: yocto-4.1.3
Git Revision: 3de2ad1f8ff87aeec30088779267880306a0f31a
Release notes for Yocto-4.1.4 (Langdale)
Security Fixes in Yocto-4.1.4
cve-extra-exclusions/linux-yocto: Ignore CVE-2020-27784, CVE-2021-3669, CVE-2021-3759, CVE-2021-4218, CVE-2022-0480, CVE-2022-1184, CVE-2022-1462, CVE-2022-2308, CVE-2022-2327, CVE-2022-26365, CVE-2022-2663, CVE-2022-2785, CVE-2022-3176, CVE-2022-33740, CVE-2022-33741, CVE-2022-33742, CVE-2022-3526, CVE-2022-3563, CVE-2022-3621, CVE-2022-3623, CVE-2022-3624, CVE-2022-3625, CVE-2022-3629, CVE-2022-3630, CVE-2022-3633, CVE-2022-3635, CVE-2022-3636, CVE-2022-3637, CVE-2022-3646 and CVE-2022-3649
cve-extra-exclusions/linux-yocto 5.15: Ignore CVE-2022-3435, CVE-2022-3534, CVE-2022-3564, CVE-2022-3564, CVE-2022-3619, CVE-2022-3640, CVE-2022-42895, CVE-2022-42896, CVE-2022-4382, CVE-2023-0266 and CVE-2023-0394
epiphany: Fix CVE-2023-26081
git: Ignore CVE-2023-22743
go: Fix CVE-2022-41722, CVE-2022-41723, CVE-2022-41724, CVE-2022-41725 and CVE-2023-24532
harfbuzz: Fix CVE-2023-25193
libmicrohttpd: Fix CVE-2023-27371
libxml2: Fix CVE-2022-40303 and CVE-2022-40304
openssl: Fix CVE-2023-0464, CVE-2023-0465 and CVE-2023-0466
python3-setuptools: Fix CVE-2022-40897
qemu: Fix CVE-2022-4144
screen: Fix CVE-2023-24626
shadow: Ignore CVE-2016-15024
tiff: Fix CVE-2022-48281, CVE-2023-0795, CVE-2023-0796, CVE-2023-0797, CVE-2023-0798, CVE-2023-0799, CVE-2023-0800, CVE-2023-0801, CVE-2023-0802, CVE-2023-0803 and CVE-2023-0804
vim: Fix CVE-2023-1127, CVE-2023-1170, CVE-2023-1175, CVE-2023-1264 and CVE-2023-1355
xdg-utils: Fix CVE-2022-4055
xserver-xorg: Fix for CVE-2023-1393
Fixes in Yocto-4.1.4
apt: re-enable version check
base-files: Drop localhost.localdomain from hosts file
binutils: Fix nativesdk ld.so search
bitbake: bin/utils: Ensure locale en_US.UTF-8 is available on the system
bitbake: cookerdata: Drop dubious exception handling code
bitbake: cookerdata: Improve early exception handling
bitbake: cookerdata: Remove incorrect SystemExit usage
bitbake: fetch/git: Fix local clone url to make it work with repo
bitbake: toaster: Add refreshed oe-core and poky fixtures
bitbake: toaster: fixtures/README: django 1.8 -> 3.2
bitbake: toaster: fixtures/gen_fixtures.py: update branches
bitbake: utils: Allow to_boolean to support int values
bmap-tools: switch to main branch
build-appliance-image: Update to langdale head revision
buildtools-tarball: Handle spaces within user $PATH
busybox: move hwclock init earlier in startup
cargo.bbclass: use offline mode for building
cpio: Fix wrong CRC with ASCII CRC for large files
cracklib: update github branch to ‘main’
cups: add/fix web interface packaging
cups: check PACKAGECONFIG for pam feature
cups: use BUILDROOT instead of DESTDIR
cve-check: Fix false negative version issue
devtool/upgrade: do not delete the workspace/recipes directory
dhcpcd: Fix install conflict when enable multilib.
ffmpeg: fix build failure when vulkan is enabled
filemap.py: enforce maximum of 4kb block size
gcc-shared-source: do not use ${S}/.. in deploy_source_date_epoch
glibc: Add missing binutils dependency
go: upgrade to 1.19.7
image_types: fix multiubi var init
image_types: fix vname var init in multiubi_mkfs() function
iso-codes: upgrade to 4.13.0
kernel-devsrc: fix mismatched compiler warning
lib/oe/gpg_sign.py: Avoid race when creating .sig files in detach_sign
lib/resulttool: fix typo breaking resulttool log –ptest
libcomps: Fix callback function prototype for PyCOMPS_hash
libdnf: upgrade to 0.70.0
libgit2: update license information
libmicrohttpd: upgrade to 0.9.76
linux-yocto-rt/5.15: upgrade to -rt59
linux-yocto/5.15: upgrade to v5.15.108
linux: inherit pkgconfig in kernel.bbclass
lttng-modules: upgrade to v2.13.9
lua: Fix install conflict when enable multilib.
mdadm: Fix raid0, 06wrmostly and 02lineargrow tests
mesa-demos: packageconfig weston should have a dependency on wayland-protocols
meson: Fix wrapper handling of implicit setup command
meson: remove obsolete RPATH stripping patch
migration-guides: update release notes
oeqa ping.py: avoid busylooping failing ping command
oeqa ping.py: fail test if target IP address has not been set
oeqa rtc.py: skip if read-only-rootfs
oeqa/runtime: clean up deprecated backslash expansion
oeqa/sdk: Improve Meson test
oeqa/selftest/cases/package.py: adding unittest for package rename conflicts
oeqa/selftest/cases/runqemu: update imports
oeqa/selftest/prservice: Improve debug output for failure
oeqa/selftest/reproducible: Split different packages from missing packages output
oeqa/selftest: OESelftestTestContext: convert relative to full path when newbuilddir is provided
oeqa/targetcontrol: do not set dump_host_cmds redundantly
oeqa/targetcontrol: fix misspelled RuntimeError
oeqa/targetcontrol: remove unused imports
oeqa/utils/commands: fix usage of undefined EPIPE
oeqa/utils/commands: remove unused imports
oeqa/utils/qemurunner: replace hard-coded user ‘root’ in debug output
oeqs/selftest: OESelftestTestContext: replace the os.environ after subprocess.check_output
package.bbclass: check packages name conflict in do_package
pango: upgrade to 1.50.13
piglit: Fix build time dependency
poky.conf: bump version for 4.1.4
populate_sdk_base: add zip options
populate_sdk_ext: Handle spaces within user $PATH
pybootchart: Fix extents handling to account for cpu/io/mem pressure changes
pybootchartui: Fix python syntax issue
report-error: catch Nothing PROVIDES error
rpm: Fix hdr_hash function prototype
run-postinsts: Set dependency for ldconfig to avoid boot issues
runqemu: respect IMAGE_LINK_NAME
runqemu: Revert “workaround for APIC hang on pre 4.15 kernels on qemux86q”
scripts/lib/buildstats: handle top-level build_stats not being complete
selftest/recipetool: Stop test corrupting tinfoil class
selftest/runtime_test/virgl: Disable for all Rocky Linux
selftest: devtool: set BB_HASHSERVE_UPSTREAM when setting SSTATE_MIRRORS
selftest: runqemu: better check for ROOTFS: in the log
selftest: runqemu: use better error message when asserts fail
shadow: Fix can not print full login timeout message
staging/multilib: Fix manifest corruption
staging: Separate out different multiconfig manifests
sudo: upgrade to 1.9.13p3
systemd.bbclass: Add /usr/lib/systemd to searchpaths as well
systemd: add group sgx to udev package
systemd: fix wrong nobody-group assignment
timezone: use ‘tz’ subdir instead of ${WORKDIR} directly
toolchain-scripts: Handle spaces within user $PATH
tzcode-native: fix build with gcc-13 on host
tzdata: upgrade to 2023c
u-boot: Map arm64 into map for u-boot dts installation
uninative: Upgrade to 3.9 to include glibc 2.37
vala: Fix install conflict when enable multilib.
vim: add missing pkgconfig inherit
vim: set modified-by to the recipe MAINTAINER
vim: upgrade to 9.0.1429
xcb-proto: Fix install conflict when enable multilib.
Known Issues in Yocto-4.1.4
N/A
Contributors to Yocto-4.1.4
Alexander Kanavin
Andrew Geissler
Arturo Buzarra
Bhabu Bindu
Bruce Ashfield
Carlos Alberto Lopez Perez
Chee Yang Lee
Chris Elledge
Christoph Lauer
Dmitry Baryshkov
Enrico Jörns
Fawzi KHABER
Frank de Brabander
Frederic Martinsons
Geoffrey GIRY
Hitendra Prajapati
Jose Quaresma
Kenfe-Mickael Laventure
Khem Raj
Marek Vasut
Martin Jansa
Michael Halstead
Michael Opdenacker
Mikko Rapeli
Ming Liu
Mingli Yu
Narpat Mali
Pavel Zhukov
Peter Marko
Piotr Łobacz
Randy MacLeod
Richard Purdie
Robert Yang
Romuald JEANNE
Romuald Jeanne
Ross Burton
Siddharth
Siddharth Doshi
Soumya
Steve Sakoman
Sudip Mukherjee
Tim Orling
Tobias Hagelborn
Tom Hochstein
Trevor Woerner
Wang Mingyu
Xiangyu Chen
Zoltan Boszormenyi
Repositories / Downloads for Yocto-4.1.4
poky
Repository Location: https://git.yoctoproject.org/poky
Branch: langdale
Tag: yocto-4.1.4
Git Revision: 3e95f268ce04b49ba6731fd4bbc53b1693c21963
Release Artefact: poky-3e95f268ce04b49ba6731fd4bbc53b1693c21963
sha: 54798c4b519f5e11f409e1fd074bea1bc0a1b80672aa60dddbac772c8e4d838b
Download Locations: http://downloads.yoctoproject.org/releases/yocto/yocto-4.1.4/poky-3e95f268ce04b49ba6731fd4bbc53b1693c21963.tar.bz2 http://mirrors.kernel.org/yocto/yocto/yocto-4.1.4/poky-3e95f268ce04b49ba6731fd4bbc53b1693c21963.tar.bz2
openembedded-core
Repository Location: https://git.openembedded.org/openembedded-core
Branch: langdale
Tag: yocto-4.1.4
Git Revision: 78211cda40eb018a3aa535c75b61e87337236628
Release Artefact: oecore-78211cda40eb018a3aa535c75b61e87337236628
sha: 1303d836bae54c438c64d6b9f068eb91c32be4cc1779e89d0f2d915a55d59b15
Download Locations: http://downloads.yoctoproject.org/releases/yocto/yocto-4.1.4/oecore-78211cda40eb018a3aa535c75b61e87337236628.tar.bz2 http://mirrors.kernel.org/yocto/yocto/yocto-4.1.4/oecore-78211cda40eb018a3aa535c75b61e87337236628.tar.bz2
meta-mingw
Repository Location: https://git.yoctoproject.org/meta-mingw
Branch: langdale
Tag: yocto-4.1.4
Git Revision: b0067202db8573df3d23d199f82987cebe1bee2c
Release Artefact: meta-mingw-b0067202db8573df3d23d199f82987cebe1bee2c
sha: 704f2940322b81ce774e9cbd27c3cfa843111d497dc7b1eeaa39cd694d9a2366
Download Locations: http://downloads.yoctoproject.org/releases/yocto/yocto-4.1.4/meta-mingw-b0067202db8573df3d23d199f82987cebe1bee2c.tar.bz2 http://mirrors.kernel.org/yocto/yocto/yocto-4.1.4/meta-mingw-b0067202db8573df3d23d199f82987cebe1bee2c.tar.bz2
bitbake
Repository Location: https://git.openembedded.org/bitbake
Branch: 2.2
Tag: yocto-4.1.4
Git Revision: 5b105e76dd7de3b9a25b17b397f2c12c80048894
Release Artefact: bitbake-5b105e76dd7de3b9a25b17b397f2c12c80048894
sha: 2cd6448138816f5a906f9927c6b6fdc5cf24981ef32b6402312f52ca490edb4f
Download Locations: http://downloads.yoctoproject.org/releases/yocto/yocto-4.1.4/bitbake-5b105e76dd7de3b9a25b17b397f2c12c80048894.tar.bz2 http://mirrors.kernel.org/yocto/yocto/yocto-4.1.4/bitbake-5b105e76dd7de3b9a25b17b397f2c12c80048894.tar.bz2
yocto-docs
Repository Location: https://git.yoctoproject.org/yocto-docs
Branch: langdale
Tag: yocto-4.1.4
Git Revision: da685fc5e69d49728e3ffd6c4d623e7e1745059d
Release 4.0 (kirkstone)
Release 4.0 (kirkstone)
Migration notes for 4.0 (kirkstone)
This section provides migration information for moving to the Yocto Project 4.0 Release (codename “kirkstone”) from the prior release.
Inclusive language improvements
To use more inclusive language in the code and documentation, some variables have been renamed, and some have been deleted where they are no longer needed. In many cases the new names are also easier to understand. BitBake will stop with an error when renamed or removed variables still exist in your recipes or configuration.
Please note that the change applies also to environmental variables, so make sure you use a fresh environment for your build.
The following variables have changed their names:
BB_ENV_WHITELISTbecame BB_ENV_PASSTHROUGHBB_ENV_EXTRAWHITEbecame BB_ENV_PASSTHROUGH_ADDITIONSBB_HASHBASE_WHITELISTbecame BB_BASEHASH_IGNORE_VARSBB_HASHCONFIG_WHITELISTbecame BB_HASHCONFIG_IGNORE_VARSBB_HASHTASK_WHITELISTbecameBB_TASKHASH_IGNORE_TASKSBB_SETSCENE_ENFORCE_WHITELISTbecameBB_SETSCENE_ENFORCE_IGNORE_TASKSCVE_CHECK_PN_WHITELISTbecame CVE_CHECK_SKIP_RECIPECVE_CHECK_WHITELISTbecame CVE_CHECK_IGNOREICECC_USER_CLASS_BLbecameICECC_CLASS_DISABLEICECC_SYSTEM_CLASS_BLbecameICECC_CLASS_DISABLEICECC_USER_PACKAGE_WLbecameICECC_RECIPE_ENABLEICECC_USER_PACKAGE_BLbecameICECC_RECIPE_DISABLEICECC_SYSTEM_PACKAGE_BLbecameICECC_RECIPE_DISABLELICENSE_FLAGS_WHITELISTbecame LICENSE_FLAGS_ACCEPTEDMULTI_PROVIDER_WHITELISTbecame BB_MULTI_PROVIDER_ALLOWEDPNBLACKLISTbecame SKIP_RECIPESDK_LOCAL_CONF_BLACKLISTbecame ESDK_LOCALCONF_REMOVESDK_LOCAL_CONF_WHITELISTbecame ESDK_LOCALCONF_ALLOWSDK_INHERIT_BLACKLISTbecame ESDK_CLASS_INHERIT_DISABLESSTATE_DUPWHITELISTbecameSSTATE_ALLOW_OVERLAP_FILESSYSROOT_DIRS_BLACKLISTbecame SYSROOT_DIRS_IGNOREUNKNOWN_CONFIGURE_WHITELISTbecame UNKNOWN_CONFIGURE_OPT_IGNOREWHITELIST_<license>became INCOMPATIBLE_LICENSE_EXCEPTIONS
In addition, BB_STAMP_WHITELIST, BB_STAMP_POLICY, INHERIT_BLACKLIST,
TUNEABI, TUNEABI_WHITELIST, and TUNEABI_OVERRIDE have been removed.
Many internal variable names have been also renamed accordingly.
In addition, in the cve-check output, the CVE issue status Whitelisted
has been renamed to Ignored.
The BB_DISKMON_DIRS variable value now uses the term HALT
instead of ABORT.
A convert-variable-renames.py script is provided to convert your recipes and configuration, and also warns you about the use of problematic words. The script performs changes and you need to review them before committing. An example warning looks like:
poky/scripts/lib/devtool/upgrade.py needs further work at line 275 since it contains abort
Fetching changes
Because of the uncertainty in future default branch names in git repositories, it is now required to add a branch name to all URLs described by
git://andgitsm://SRC_URI entries. For example:SRC_URI = "git://git.denx.de/u-boot.git;branch=master"
A convert-srcuri script to convert your recipes is available in OpenEmbedded-Core (OE-Core) and in Poky.
Because of GitHub dropping support for the git: protocol, recipes now need to use
;protocol=httpsat the end of GitHub URLs. The sameconvert-srcuriscript mentioned above can be used to convert your recipes.Network access from tasks is now disabled by default on kernels which support this feature (on most recent distros such as CentOS 8 and Debian 11 onwards). This means that tasks accessing the network need to be marked as such with the
networkflag. For example:do_mytask[network] = "1"
This is allowed by default from do_fetch but not from any of our other standard tasks. Recipes shouldn’t be accessing the network outside of do_fetch as it usually undermines fetcher source mirroring, image and licence manifests, software auditing and supply chain security.
License changes
The ambiguous “BSD” license has been removed from the
common-licensesdirectory. Each recipe that fetches or builds BSD-licensed code should specify the proper version of the BSD license in its LICENSE value.LICENSE variable values should now use SPDX identifiers. If they do not, by default a warning will be shown. A convert-spdx-licenses.py script can be used to update your recipes.
INCOMPATIBLE_LICENSE should now use SPDX identifiers. Additionally, wildcarding is now limited to specifically supported values - see the INCOMPATIBLE_LICENSE documentation for further information.
The
AVAILABLE_LICENSESvariable has been removed. This variable was a performance liability and is highly dependent on which layers are added to the configuration, which can cause signature issues for users. In addition theavailable_licenses()function has been removed from the license class as it is no longer needed.
Removed recipes
The following recipes have been removed in this release:
dbus-test: merged into main dbus recipelibid3tag: moved to meta-oe - no longer needed by anything in OE-Corelibportal: moved to meta-gnome - no longer needed by anything in OE-Corelinux-yocto: removed version 5.14 recipes (5.15 and 5.10 still provided)python3-nose: has not changed since 2016 upstream, and no longer needed by anything in OE-Corerustfmt: not especially useful as a standalone recipe
Python changes
distutilshas been deprecated upstream in Python 3.10 and thus thedistutils*classes have been moved tometa-python. Recipes that inherit thedistutils*classes should be updated to inheritsetuptools*equivalents instead.The Python package build process is now based on wheels. The new Python packaging classes that should be used are python_flit_core, python_setuptools_build_meta and python_poetry_core.
The setuptools3 class do_install task now installs the
wheelbinary archive. In current versions ofsetuptoolsthe legacysetup.py installmethod is deprecated. If thesetup.pycannot be used with wheels, for example it creates files outside of the Python module or standard entry points, then setuptools3_legacy should be used instead.
Prelink removed
Prelink has been dropped by glibc upstream in 2.36. It already caused issues with
binary corruption, has a number of open bugs and is of questionable benefit
without disabling load address randomization and PIE executables.
We disabled prelinking by default in the honister (3.4) release, but left it able
to be enabled if desired. However, without glibc support it cannot be maintained
any further, so all of the prelinking functionality has been removed in this release.
If you were enabling the image-prelink class in INHERIT, IMAGE_CLASSES,
USER_CLASSES etc in your configuration, then you will need to remove the
reference(s).
Reproducible as standard
Reproducibility is now considered as standard functionality, thus the
reproducible class has been removed and its previous contents merged into the
base class. If you have references in your configuration to
reproducible in INHERIT, USER_CLASSES etc. then they should be
removed.
Additionally, the BUILD_REPRODUCIBLE_BINARIES variable is no longer used.
Specifically for the kernel, if you wish to enable build timestamping functionality
that is normally disabled for reproducibility reasons, you can do so by setting
a new KERNEL_DEBUG_TIMESTAMPS variable to “1”.
Supported host distribution changes
Support for AlmaLinux hosts replacing CentOS. The following distribution versions were dropped: CentOS 8, Ubuntu 16.04 and Fedora 30, 31 and 32.
gccversion 7.5 is now required at minimum on the build host. For older host distributions where this is not available, you can use the buildtools-extended tarball (easily installable usingscripts/install-buildtools).
:append/:prepend in combination with other operators
The append, prepend and remove operators can now only be combined with
= and := operators. To the exception of the append plus += and
prepend plus =+ combinations, all combinations could be factored up to the
append, prepend or remove in the combination. This brought a lot of
confusion on how the override style syntax operators work and should be used.
Therefore, those combinations should be replaced by a single append,
prepend or remove operator without any additional change.
For the append plus += (and prepend plus =+) combinations,
the content should be prefixed (respectively suffixed) by a space to maintain
the same behavior. You can learn more about override style syntax operators
(append, prepend and remove) in the BitBake documentation:
Appending and Prepending (Override Style Syntax)
and Removal (Override Style Syntax).
Miscellaneous changes
blacklist.bbclassis removed and the functionality moved to the base class with a more descriptivevarflagvariable named SKIP_RECIPE which will use the bb.parse.SkipRecipe() function. The usage remains the same, for example:SKIP_RECIPE[my-recipe] = "Reason for skipping recipe"
allarch packagegroups can no longer depend on packages which use PKG renaming such as debian. Such packagegroups recipes should be changed to avoid inheriting allarch.
The
lnrscript has been removed.lnrimplemented the same behaviour as ln –relative –symbolic, since at the time of creation –relative was only available in coreutils 8.16 onwards which was too new for the older supported distros. Current supported host distros have a new enough version of coreutils, so it is no longer needed. If you have any calls tolnrin your recipes or classes, they should be replaced with ln –relative –symbolic or ln -rs if you prefer the short version.The
package_qa_handle_error()function formerly in the insane class has been moved and renamed - if you have any references in your own custom classes they should be changed tooe.qa.handle_error().When building
perl, Berkeley db support is no longer enabled by default, since Berkeley db is largely obsolete. If you wish to reenable it, you can appendbdbto PACKAGECONFIG in aperlbbappend orPACKAGECONFIG:pn-perlat the configuration level.For the
xserver-xorgrecipe, thexshmfence,xmltoandsystemdoptions previously supported in PACKAGECONFIG have been removed, as they are no longer supported since the move from building it with autotools to meson in this release.For the
libsdl2recipe, various X11 features are now disabled by default (primarily for reproducibility purposes in the native case) with options in EXTRA_OECMAKE within the recipe. These can be changed within a bbappend if desired. See thelibsdl2recipe for more details.The
cortexa72-crcandcortexa72-crc-cryptotunes have been removed since the crc extension is now enabled by default for cortexa72. Replace any references to these withcortexa72andcortexa72-cryptorespectively.The Python development shell (previously known as
devpyshell) feature has been renamed topydevshell. To start it you should now run:bitbake <target> -c pydevshell
The
packagegroups-core-full-cmdline-libspackagegroup is no longer produced, as libraries should normally be brought in via dependencies. If you have any references to this then remove them.The TOPDIR variable and the current working directory are no longer modified when parsing recipes. Any code depending on the previous behaviour will no longer work - change any such code to explicitly use appropriate path variables instead.
In order to exclude the kernel image from the image rootfs, RRECOMMENDS
:${KERNEL_PACKAGE_NAME}-baseshould be set instead of RDEPENDS:${KERNEL_PACKAGE_NAME}-base.
Release notes for 4.0 (kirkstone)
This is a Long Term Support release, published in April 2022, and supported at least for two years (April 2024).
New Features / Enhancements in 4.0
Linux kernel 5.15, glibc 2.35 and ~300 other recipe upgrades
Reproducibility: this release fixes the reproducibility issues with
rust-llvmandgolang. Recipes in OpenEmbedded-Core are now fully reproducible. Functionality previously in the optional “reproducible” class has been merged into the base class.Network access is now disabled by default for tasks other than where it is expected to ensure build integrity (where host kernel supports it)
The Yocto Project now allows you to reuse the Shared State cache from its autobuilder. If the network connection between our server and your machine is faster than you would build recipes from source, you can try to speed up your builds by using such Shared State and Hash Equivalence by setting:
BB_SIGNATURE_HANDLER = "OEEquivHash" BB_HASHSERVE = "auto" BB_HASHSERVE_UPSTREAM = "hashserv.yoctoproject.org:8686" SSTATE_MIRRORS ?= "file://.* https://sstate.yoctoproject.org/all/PATH;downloadfilename=PATH"
The Python package build process is now based on wheels in line with the upstream direction.
New overlayfs and overlayfs-etc classes and
overlayrootsupport in the Initramfs framework to make it easier to overlay read-only filesystems (for example) with OverlayFS.Inclusive language adjustments to some variable names - see the 4.0 migration guide for details.
New recipes:
buildtools-docs-tarballlibptyttylibxcvtluanghttp2python3-alabasterpython3-asn1cryptopython3-babelpython3-bcryptpython3-certifipython3-cffipython3-chardetpython3-cryptographypython3-cryptography-vectorspython3-dtschemapython3-flit-corepython3-idnapython3-imagesizepython3-installerpython3-iso8601python3-jsonpointerpython3-jsonschemapython3-ndg-httpsclientpython3-plypython3-poetry-corepython3-pretendpython3-psutilpython3-pyasn1python3-pycparserpython3-pyopensslpython3-pyrsistentpython3-pysockspython3-pytest-runnerpython3-pytest-subtestspython3-pytzpython3-requestspython3-rfc3339-validatorpython3-rfc3986-validatorpython3-rfc3987python3-ruamel-yamlpython3-semantic-versionpython3-setuptools-rust-nativepython3-snowballstemmerpython3-sphinxpython3-sphinxcontrib-applehelppython3-sphinxcontrib-devhelppython3-sphinxcontrib-htmlhelppython3-sphinxcontrib-jsmathpython3-sphinxcontrib-qthelppython3-sphinxcontrib-serializinghtmlpython3-sphinx-rtd-themepython3-strict-rfc3339python3-tomlipython3-typing-extensionspython3-urllib3python3-vcversionerpython3-webcolorspython3-wheelreposeatd
Extended recipes to
native:wayland,wayland-protocolsShared state (sstate) improvements:
Switched to ZStandard (zstd) instead of Gzip, for better performance.
Allow validation of sstate signatures against a list of keys
Improved error messages and exception handling
BitBake enhancements:
Fetcher enhancements:
New Crate Fetcher (crate://) for Rust packages
Added striplevel support to unpack
git: Add a warning asking users to set a branch in git urls
git: Allow git fetcher to support subdir param
git: canonicalize ids in generated tarballs
git: stop generated tarballs from leaking info
npm: Put all downloaded files in the npm2 directory
npmsw: Add support for duplicate dependencies without url
npmsw: Add support for github prefix in npm shrinkwrap version
ssh: now supports checkstatus, allows : in URLs (both required for use with sstate) and no longer requires username
wget: add redirectauth parameter
wget: add 30s timeout for checkstatus calls
Show warnings for append/prepend/remove operators combined with +=/.=
Add bb.warnonce() and bb.erroronce() log methods
Improved setscene task display
Show elapsed time also for tasks with progress bars
Improved cleanup on forced shutdown (either because of errors or Ctrl+C)
contrib: Add Dockerfile for building PR service container
Change file format of siginfo files to use zstd compressed json
Display active tasks when printing keep-alive message to help debugging
Architecture-specific enhancements:
ARM:
tune-cortexa72: Enable the crc extension by default for cortexa72
qemuarm64: Add tiny ktype to qemuarm64 bsp
armv9a/tune: Add the support for the Neoverse N2 core
arch-armv8-5a.inc: Add tune include for armv8.5a
grub-efi: Add xen_boot support when ‘xen’ is in DISTRO_FEATURES for aarch64
tune-cortexa73: Introduce cortexa73-crypto tune
libacpi: Build libacpi also for ‘aarch64’ machines
core-image-tiny-initramfs: Mark recipe as 32 bit ARM compatible
PowerPC:
weston-init: Use pixman rendering for qemuppc64
rust: add support for big endian 64-bit PowerPC
rust: Add snapshot checksums for powerpc64le
RISC-V:
libunwind: Enable for rv64
systemtap: Enable for riscv64
linux-yocto-dev: add qemuriscv32
packagegroup-core-tools-profile: Enable systemtap for riscv64
qemuriscv: Use virtio-tablet-pci for mouse
x86:
kernel-yocto: conditionally enable stack protection checking on x86-64
Kernel-related enhancements:
Allow Initramfs to be built from a separate multiconfig
Make kernel-base recommend kernel-image, not depend (allowing images containing kernel modules without kernel image)
linux-yocto: split vtpm for more granular inclusion
linux-yocto: cfg/debug: add configs for kcsan
linux-yocto: cfg: add kcov feature fragment
linux-yocto: export pkgconfig variables to devshell
linux-yocto-dev: use versioned branch as default
New KERNEL_DEBUG_TIMESTAMPS variable (to replace removed
BUILD_REPRODUCIBLE_BINARIESfor the kernel)Introduce python3-dtschema-wrapper in preparation for mandatory schema checking on dtb files in 5.16
Allow disabling kernel artifact symlink creation
Allow changing default .bin kernel artifact extension
FIT image related enhancements:
New
FIT_SUPPORTED_INITRAMFS_FSTYPESvariable to allow extending Initramfs image types to look forNew
FIT_CONF_PREFIXvariable to allow overriding FIT configuration prefixUse ‘bbnote’ for better logging
New PACKAGECONFIG options in
curl,dtc,epiphany,git,git,gstreamer1.0-plugins-bad,linux-yocto-dev,kmod,mesa,piglit,qemu,rpm,systemd,webkitgtk,weston-initptest enhancements in
findutils,lttng-tools,openssl,gawk,strace,lttng-tools,valgrind,perl,libxml-parser-perl,openssh,python3-cryptography,poptSysroot dependencies have been further optimised
Significant effort to upstream / rationalise patches across a variety of recipes
Allow the creation of block devices on top of UBI volumes
archiver: new ARCHIVER_MODE[compression] to set tarball compression, and switch default to xz
yocto-check-layer: add ability to perform tests from a global bbclass
yocto-check-layer: improved README checks
cve-check: add json output format
cve-check: add coverage statistics on recipes with/without CVEs
Added mirrors for kernel sources and uninative binaries on kernel.org
glibc and binutils recipes now use shallow mirror tarballs for faster fetching
When patching fails, show more information on the fatal error
wic Image Creator enhancements:
Support rootdev identified by partition label
rawcopy: Add support for packed images
partition: Support valueless keys in sourceparams
QA check enhancements:
Allow treating license issues as errors
Added a check that Upstream-Status patch tag is present and correctly formed
Added a check for directories that are expected to be empty
Ensure addition of patch-fuzz retriggers do_qa_patch
Added a sanity check for allarch packagegroups
create-spdx class improvements:
Get SPDX-License-Identifier from source files
Generate manifest also for SDKs
New SPDX_ORG variable to allow changing the Organization field value
Added packageSupplier field
Added create_annotation function
devtool add / recipetool create enhancements:
Extend curl detection when creating recipes
Handle GitLab URLs like we do GitHub
Recognize more standard license text variants
Separate licenses with & operator
Detect more known licenses in Python code
Move license md5sums data into CSV files
npm: Use README as license fallback
SDK-related enhancements:
Rust enhancements:
New python_setuptools3_rust class to enable building python extensions in Rust
classes/meson: Add optional rust definitions
QEMU / runqemu enhancements:
qemu: Add knob for enabling PMDK pmem support
qemu: add tpm string section to qemu acpi table
qemu: Build on musl targets
runqemu: support rootfs mounted ro
runqemu: add DEPLOY_DIR_IMAGE replacement in QB_OPT_APPEND
runqemu: Allow auto-detection of the correct graphics options
Capped
cpu_count()(used to set parallelisation defaults) to 64 since any higher usually hurts parallelisationAdjust some GL-using recipes so that they only require virtual/egl
package_rpm: use zstd instead of xz
npm: new
EXTRA_OENPMvariable (to set node-gyp variables for example)npm: new
NPM_NODEDIRvariableperl: Enable threading
u-boot: Convert ${UBOOT_ENV}.cmd into ${UBOOT_ENV}.scr
u-boot: Split do_configure logic into separate file
go.bbclass: Allow adding parameters to go ldflags
go: log build id computations
scons: support out-of-tree builds
scripts: Add a conversion script to use SPDX license names
scripts: Add convert-variable-renames script for inclusive language variable renaming
binutils-cross-canadian: enable gold for mingw
grub-efi: Add option to include all available modules
bitbake.conf: allow wayland distro feature through for native/SDK builds
weston-init: Pass –continue-without-input when launching weston
weston: wrapper for weston modules argument
weston: Add a knob to control simple clients
uninative: Add version to uninative tarball name
volatile-binds: SELinux and overlayfs extensions in mount-copybind
gtk-icon-cache: Allow using gtk4
kmod: Add an exclude directive to depmod
os-release: add os-release-initrd package for use in systemd-based Initramfs images
gstreamer1.0-plugins-base: add support for graphene
gpg-sign: Add parameters to gpg signature function
package_manager: sign DEB package feeds
zstd: add libzstd package
libical: build gobject and vala introspection
dhcpcd: add option to set DBDIR location
rpcbind: install rpcbind.conf
mdadm: install mdcheck
boost: add json lib
libxkbcommon: allow building of API documentation
libxkbcommon: split libraries and xkbcli into separate packages
systemd: move systemd shared library into its own package
systemd: Minimize udev package size if DISTRO_FEATURES doen’t contain sysvinit
Known Issues in 4.0
makeversion 4.2.1 is known to be buggy on non-Ubuntu systems. If thismakeversion is detected on host distributions other than Ubuntu at build start time, then a warning will be displayed.
Recipe License changes in 4.0
The following corrections have been made to the LICENSE values set by recipes:
cmake: add BSD-1-Clause & MIT & BSD-2-Clause to LICENSE due to additional vendored libraries in native/target context
gettext: extend LICENSE conditional upon PACKAGECONFIG (due to vendored libraries)
gstreamer1.0: update licenses of all modules to LGPL-2.1-or-later (with some exceptions that are GPL-2.0-or-later)
gstreamer1.0-plugins-bad/ugly: use the GPL-2.0-or-later only when it is in use
kern-tools-native: add missing MIT license due to Kconfiglib
libcap: add pam_cap license to LIC_FILES_CHKSUM if pam is enabled
libidn2: add Unicode-DFS-2016 license
libsdl2: add BSD-2-Clause to LICENSE due to default yuv2rgb and hidapi inclusion
libx11-compose-data: update LICENSE to “MIT & MIT-style & BSD-1-Clause & HPND & HPND-sell-variant” to better reflect reality
libx11: update LICENSE to “MIT & MIT-style & BSD-1-Clause & HPND & HPND-sell-variant” to better reflect reality
libxshmfence: correct LICENSE - MIT -> HPND
newlib: add BSD-3-Clause to LICENSE
python3-idna: correct LICENSE - Unicode -> Unicode-TOU
python3-pip: add “Apache-2.0 & MPL-2.0 & LGPL-2.1-only & BSD-3-Clause & PSF-2.0 & BSD-2-Clause” to LICENSE due to vendored libraries
Other license-related notes:
The ambiguous “BSD” license has been removed from the
common-licensesdirectory. Each recipe that fetches or builds BSD-licensed code should specify the proper version of the BSD license in its LICENSE value.LICENSE definitions now have to use SPDX identifiers. A convert-spdx-licenses.py script can be used to update your recipes.
Security Fixes in 4.0
binutils: CVE-2021-42574, CVE-2021-45078
epiphany: CVE-2021-45085, CVE-2021-45086, CVE-2021-45087, CVE-2021-45088
expat: CVE-2021-45960, CVE-2021-46143, CVE-2022-22822, CVE-2022-22823, CVE-2022-22824, CVE-2022-22825, CVE-2022-22826, CVE-2022-22827, CVE-2022-23852, CVE-2022-23990, CVE-2022-25235, CVE-2022-25236, CVE-2022-25313, CVE-2022-25314, CVE-2022-25315
ffmpeg: CVE-2021-38114
gcc: CVE-2021-35465, CVE-2021-42574, CVE-2021-46195, CVE-2022-24765
glibc: CVE-2021-3998, CVE-2021-3999, CVE-2021-43396, CVE-2022-23218, CVE-2022-23219
gmp: CVE-2021-43618
go: CVE-2021-41771 and CVE-2021-41772
grub2: CVE-2021-3981
gzip: CVE-2022-1271
libarchive : CVE-2021-31566, CVE-2021-36976
libxml2: CVE-2022-23308
libxslt: CVE-2021-30560
lighttpd: CVE-2022-22707
linux-yocto/5.10: amdgpu: CVE-2021-42327
lua: CVE-2021-43396
openssl: CVE-2021-4044, CVE-2022-0778
rpm: CVE-2021-3521
seatd: CVE-2022-25643
speex: CVE-2020-23903
squashfs-tools: CVE-2021-41072
systemd: CVE-2021-4034
tiff: CVE-2022-0561, CVE-2022-0562, CVE-2022-0865, CVE-2022-0891, CVE-2022-0907, CVE-2022-0908, CVE-2022-0909, CVE-2022-0924, CVE-2022-1056, CVE-2022-22844
unzip: CVE-2021-4217
vim: CVE-2021-3796, CVE-2021-3872, CVE-2021-3875, CVE-2021-3927, CVE-2021-3928, CVE-2021-3968, CVE-2021-3973, CVE-2021-4187, CVE-2022-0128, CVE-2022-0156, CVE-2022-0158, CVE-2022-0261, CVE-2022-0318, CVE-2022-0319, CVE-2022-0554, CVE-2022-0696, CVE-2022-0714, CVE-2022-0729, CVE-2022-0943
virglrenderer: CVE-2022-0135, CVE-2022-0175
webkitgtk: CVE-2022-22589, CVE-2022-22590, CVE-2022-22592
xz: CVE-2022-1271
zlib: CVE-2018-25032
Recipe Upgrades in 4.0
acpica: upgrade 20210730 -> 20211217
acpid: upgrade 2.0.32 -> 2.0.33
adwaita-icon-theme: update 3.34/38 -> 41.0
alsa-ucm-conf: upgrade 1.2.6.2 -> 1.2.6.3
alsa: upgrade 1.2.5 -> 1.2.6
apt: upgrade 2.2.4 -> 2.4.3
asciidoc: upgrade 9.1.0 -> 10.0.0
atk: upgrade 2.36.0 -> 2.38.0
at-spi2-core: upgrade 2.40.3 -> 2.42.0
at: update 3.2.2 -> 3.2.5
autoconf-archive: upgrade 2021.02.19 -> 2022.02.11
automake: update 1.16.3 -> 1.16.5
bash: upgrade 5.1.8 -> 5.1.16
bind: upgrade 9.16.20 -> 9.18.1
binutils: Bump to latest 2.38 release branch
bison: upgrade 3.7.6 -> 3.8.2
bluez5: upgrade 5.61 -> 5.64
boost: update 1.77.0 -> 1.78.0
btrfs-tools: upgrade 5.13.1 -> 5.16.2
buildtools-installer: Update to use 3.4
busybox: 1.34.0 -> 1.35.0
ca-certificates: update 20210119 -> 20211016
cantarell-fonts: update 0.301 -> 0.303.1
ccache: upgrade 4.4 -> 4.6
cmake: update 3.21.1 -> 3.22.3
connman: update 1.40 -> 1.41
coreutils: update 8.32 -> 9.0
cracklib: update 2.9.5 -> 2.9.7
createrepo-c: upgrade 0.17.4 -> 0.19.0
cronie: upgrade 1.5.7 -> 1.6.0
cups: update 2.3.3op2 -> 2.4.1
curl: update 7.78.0 -> 7.82.0
dbus: upgrade 1.12.20 -> 1.14.0
debianutils: update 4.11.2 -> 5.7
dhcpcd: upgrade 9.4.0 -> 9.4.1
diffoscope: upgrade 181 -> 208
dnf: upgrade 4.8.0 -> 4.11.1
dpkg: update 1.20.9 -> 1.21.4
e2fsprogs: upgrade 1.46.4 -> 1.46.5
ed: upgrade 1.17 -> 1.18
efivar: update 37 -> 38
elfutils: update 0.185 -> 0.186
ell: upgrade 0.43 -> 0.49
enchant2: upgrade 2.3.1 -> 2.3.2
epiphany: update 40.3 -> 42.0
erofs-utils: update 1.3 -> 1.4
ethtool: update to 5.16
expat: upgrade 2.4.1 -> 2.4.7
ffmpeg: update 4.4 -> 5.0
file: upgrade 5.40 -> 5.41
findutils: upgrade 4.8.0 -> 4.9.0
flac: upgrade 1.3.3 -> 1.3.4
freetype: upgrade 2.11.0 -> 2.11.1
fribidi: upgrade 1.0.10 -> 1.0.11
gawk: update 5.1.0 -> 5.1.1
gcompat: Update to latest
gdbm: upgrade 1.19 -> 1.23
gdb: Upgrade to 11.2
ghostscript: update 9.54.0 -> 9.55.0
gi-docgen: upgrade 2021.7 -> 2022.1
git: update 2.33.0 -> 2.35.2
glib-2.0: update 2.68.4 -> 2.72.0
glibc: Upgrade to 2.35
glib-networking: update 2.68.2 -> 2.72.0
glslang: update 11.5.0 -> 11.8.0
gnu-config: update to latest revision
gnupg: update 2.3.1 -> 2.3.4
gnutls: update 3.7.2 -> 3.7.4
gobject-introspection: upgrade 1.68.0 -> 1.72.0
go-helloworld: update to latest revision
go: update 1.16.7 -> 1.17.8
gpgme: upgrade 1.16.0 -> 1.17.1
gsettings-desktop-schemas: upgrade 40.0 -> 42.0
gst-devtools: 1.18.4 -> 1.20.1
gst-examples: 1.18.4 -> 1.18.6
gstreamer1.0: 1.18.4 -> 1.20.1
gstreamer1.0-libav: 1.18.4 -> 1.20.1
gstreamer1.0-omx: 1.18.4 -> 1.20.1
gstreamer1.0-plugins-bad: 1.18.4 1.20.1
gstreamer1.0-plugins-base: 1.18.4 -> 1.20.1
gstreamer1.0-plugins-good: 1.18.4 -> 1.20.1
gstreamer1.0-plugins-ugly: 1.18.4 -> 1.20.1
gstreamer1.0-python: 1.18.4 -> 1.20.1
gstreamer1.0-rtsp-server: 1.18.4 -> 1.20.1
gstreamer1.0-vaapi: 1.18.4 -> 1.20.1
gtk+3: upgrade 3.24.30 -> 3.24.33
gzip: upgrade 1.10 -> 1.12
harfbuzz: upgrade 2.9.0 -> 4.0.1
hdparm: upgrade 9.62 -> 9.63
help2man: upgrade 1.48.4 -> 1.49.1
icu: update 69.1 -> 70.1
ifupdown: upgrade 0.8.36 -> 0.8.37
inetutils: update 2.1 -> 2.2
init-system-helpers: upgrade 1.60 -> 1.62
iproute2: update to 5.17.0
iputils: update 20210722 to 20211215
iso-codes: upgrade 4.6.0 -> 4.9.0
itstool: update 2.0.6 -> 2.0.7
iw: upgrade 5.9 -> 5.16
json-glib: upgrade 1.6.4 -> 1.6.6
kea: update 1.8.2 -> 2.0.2
kexec-tools: update 2.0.22 -> 2.0.23
less: upgrade 590 -> 600
libarchive: upgrade 3.5.1 -> 3.6.1
libatomic-ops: upgrade 7.6.10 -> 7.6.12
libbsd: upgrade 0.11.3 -> 0.11.5
libcap: update 2.51 -> 2.63
libcgroup: upgrade 2.0 -> 2.0.1
libcomps: upgrade 0.1.17 -> 0.1.18
libconvert-asn1-perl: upgrade 0.31 -> 0.33
libdazzle: upgrade 3.40.0 -> 3.44.0
libdnf: update 0.63.1 -> 0.66.0
libdrm: upgrade 2.4.107 -> 2.4.110
libedit: upgrade 20210714-3.1 -> 20210910-3.1
liberation-fonts: update 2.1.4 -> 2.1.5
libevdev: upgrade 1.11.0 -> 1.12.1
libexif: update 0.6.22 -> 0.6.24
libgit2: update 1.1.1 -> 1.4.2
libgpg-error: update 1.42 -> 1.44
libhandy: update 1.2.3 -> 1.5.0
libical: upgrade 3.0.10 -> 3.0.14
libinput: update to 1.19.3
libjitterentropy: update 3.1.0 -> 3.4.0
libjpeg-turbo: upgrade 2.1.1 -> 2.1.3
libmd: upgrade 1.0.3 -> 1.0.4
libmicrohttpd: upgrade 0.9.73 -> 0.9.75
libmodulemd: upgrade 2.13.0 -> 2.14.0
libpam: update 1.5.1 -> 1.5.2
libpcre2: upgrade 10.37 -> 10.39
libpipeline: upgrade 1.5.3 -> 1.5.5
librepo: upgrade 1.14.1 -> 1.14.2
librsvg: update 2.40.21 -> 2.52.7
libsamplerate0: update 0.1.9 -> 0.2.2
libsdl2: update 2.0.16 -> 2.0.20
libseccomp: update to 2.5.3
libsecret: upgrade 0.20.4 -> 0.20.5
libsndfile1: bump to version 1.0.31
libsolv: upgrade 0.7.19 -> 0.7.22
libsoup-2.4: upgrade 2.72.0 -> 2.74.2
libsoup: add a recipe for 3.0.5
libssh2: update 1.9.0 -> 1.10.0
libtasn1: upgrade 4.17.0 -> 4.18.0
libtool: Upgrade 2.4.6 -> 2.4.7
libucontext: Upgrade to 1.2 release
libunistring: update 0.9.10 -> 1.0
libunwind: upgrade 1.5.0 -> 1.6.2
liburcu: upgrade 0.13.0 -> 0.13.1
libusb1: upgrade 1.0.24 -> 1.0.25
libuv: update 1.42.0 -> 1.44.1
libva: update 2.12.0 -> 2.14.0
libva-utils: upgrade 2.13.0 -> 2.14.0
libwebp: 1.2.1 -> 1.2.2
libwpe: upgrade 1.10.1 -> 1.12.0
libx11: update to 1.7.3.1
libxcrypt: upgrade 4.4.26 -> 4.4.27
libxcrypt-compat: upgrade 4.4.26 -> 4.4.27
libxi: update to 1.8
libxkbcommon: update to 1.4.0
libxml2: update to 2.9.13
libxslt: update to v1.1.35
lighttpd: update 1.4.59 -> 1.4.64
linux-firmware: upgrade 20210818 -> 20220310
linux-libc-headers: update to v5.16
linux-yocto/5.10: update to v5.10.109
linux-yocto/5.15: introduce recipes (v5.15.32)
linux-yocto-dev: update to v5.18+
linux-yocto-rt/5.10: update to -rt61
linux-yocto-rt/5.15: update to -rt34
llvm: update 12.0.1 -> 13.0.1
logrotate: update 3.18.1 -> 3.19.0
lsof: update 4.91 -> 4.94.0
ltp: update 20210927 -> 20220121
ltp: Update to 20210927
lttng-modules: update devupstream to latest 2.13
lttng-modules: update to 2.13.3
lttng-tools: upgrade 2.13.0 -> 2.13.4
lttng-ust: upgrade 2.13.0 -> 2.13.2
lua: update 5.3.6 -> 5.4.4
lzip: upgrade 1.22 -> 1.23
man-db: upgrade 2.9.4 -> 2.10.2
man-pages: update to 5.13
mdadm: update 4.1 -> 4.2
mesa: upgrade 21.2.1 -> 22.0.0
meson: update 0.58.1 -> 0.61.3
minicom: Upgrade 2.7.1 -> 2.8
mmc-utils: upgrade to latest revision
mobile-broadband-provider-info: upgrade 20210805 -> 20220315
mpg123: upgrade 1.28.2 -> 1.29.3
msmtp: upgrade 1.8.15 -> 1.8.20
mtd-utils: upgrade 2.1.3 -> 2.1.4
mtools: upgrade 4.0.35 -> 4.0.38
musl: Update to latest master
ncurses: update 6.2 -> 6.3
newlib: Upgrade 4.1.0 -> 4.2.0
nfs-utils: upgrade 2.5.4 -> 2.6.1
nghttp2: upgrade 1.45.1 -> 1.47.0
ofono: upgrade 1.32 -> 1.34
opensbi: Upgrade to 1.0
openssh: upgrade 8.7p1 -> 8.9
openssl: update 1.1.1l -> 3.0.2
opkg: upgrade 0.4.5 -> 0.5.0
opkg-utils: upgrade 0.4.5 -> 0.5.0
ovmf: update 202105 -> 202202
p11-kit: update 0.24.0 -> 0.24.1
pango: upgrade 1.48.9 -> 1.50.4
patchelf: upgrade 0.13 -> 0.14.5
perl-cross: update 1.3.6 -> 1.3.7
perl: update 5.34.0 -> 5.34.1
piglit: upgrade to latest revision
pigz: upgrade 2.6 -> 2.7
pinentry: update 1.1.1 -> 1.2.0
pkgconfig: Update to latest
psplash: upgrade to latest revision
puzzles: upgrade to latest revision
python3-asn1crypto: upgrade 1.4.0 -> 1.5.1
python3-attrs: upgrade 21.2.0 -> 21.4.0
python3-cryptography: Upgrade to 36.0.2
python3-cryptography-vectors: upgrade to 36.0.2
python3-cython: upgrade 0.29.24 -> 0.29.28
python3-dbusmock: update to 0.27.3
python3-docutils: upgrade 0.17.1 0.18.1
python3-dtschema: upgrade 2021.10 -> 2022.1
python3-gitdb: upgrade 4.0.7 -> 4.0.9
python3-git: update to 3.1.27
python3-hypothesis: upgrade 6.15.0 -> 6.39.5
python3-imagesize: upgrade 1.2.0 -> 1.3.0
python3-importlib-metadata: upgrade 4.6.4 -> 4.11.3
python3-jinja2: upgrade 3.0.1 -> 3.1.1
python3-jsonschema: upgrade 3.2.0 -> 4.4.0
python3-libarchive-c: upgrade 3.1 -> 4.0
python3-magic: upgrade 0.4.24 -> 0.4.25
python3-mako: upgrade 1.1.5 -> 1.1.6
python3-markdown: upgrade 3.3.4 -> 3.3.6
python3-markupsafe: upgrade 2.0.1 -> 2.1.1
python3-more-itertools: upgrade 8.8.0 -> 8.12.0
python3-numpy: upgrade 1.21.2 -> 1.22.3
python3-packaging: upgrade 21.0 -> 21.3
python3-pathlib2: upgrade 2.3.6 -> 2.3.7
python3-pbr: upgrade 5.6.0 -> 5.8.1
python3-pip: update 21.2.4 -> 22.0.3
python3-pycairo: upgrade 1.20.1 -> 1.21.0
python3-pycryptodome: upgrade 3.10.1 -> 3.14.1
python3-pyelftools: upgrade 0.27 -> 0.28
python3-pygments: upgrade 2.10.0 -> 2.11.2
python3-pygobject: upgrade 3.40.1 -> 3.42.0
python3-pyparsing: update to 3.0.7
python3-pyrsistent: upgrade 0.18.0 -> 0.18.1
python3-pytest-runner: upgrade 5.3.1 -> 6.0.0
python3-pytest-subtests: upgrade 0.6.0 -> 0.7.0
python3-pytest: upgrade 6.2.4 -> 7.1.1
python3-pytz: upgrade 2021.3 -> 2022.1
python3-py: upgrade 1.10.0 -> 1.11.0
python3-pyyaml: upgrade 5.4.1 -> 6.0
python3-ruamel-yaml: upgrade 0.17.16 -> 0.17.21
python3-scons: upgrade 4.2.0 -> 4.3.0
python3-setuptools-scm: upgrade 6.0.1 -> 6.4.2
python3-setuptools: update to 59.5.0
python3-smmap: update to 5.0.0
python3-tomli: upgrade 1.2.1 -> 2.0.1
python3: update to 3.10.3
python3-urllib3: upgrade 1.26.8 -> 1.26.9
python3-zipp: upgrade 3.5.0 -> 3.7.0
qemu: update 6.0.0 -> 6.2.0
quilt: upgrade 0.66 -> 0.67
re2c: upgrade 2.2 -> 3.0
readline: upgrade 8.1 -> 8.1.2
repo: upgrade 2.17.3 -> 2.22
resolvconf: update 1.87 -> 1.91
rng-tools: upgrade 6.14 -> 6.15
rpcsvc-proto: upgrade 1.4.2 -> 1.4.3
rpm: update 4.16.1.3 -> 4.17.0
rt-tests: update 2.1 -> 2.3
ruby: update 3.0.2 -> 3.1.1
rust: update 1.54.0 -> 1.59.0
rxvt-unicode: upgrade 9.26 -> 9.30
screen: upgrade 4.8.0 -> 4.9.0
shaderc: update 2021.1 -> 2022.1
shadow: upgrade 4.9 -> 4.11.1
socat: upgrade 1.7.4.1 -> 1.7.4.3
spirv-headers: bump to b42ba6 revision
spirv-tools: update 2021.2 -> 2022.1
sqlite3: upgrade 3.36.0 -> 3.38.2
strace: update 5.14 -> 5.16
stress-ng: upgrade 0.13.00 -> 0.13.12
sudo: update 1.9.7p2 -> 1.9.10
sysklogd: upgrade 2.2.3 -> 2.3.0
sysstat: upgrade 12.4.3 -> 12.4.5
systemd: update 249.3 -> 250.4
systemtap: upgrade 4.5 -> 4.6
sysvinit: upgrade 2.99 -> 3.01
tzdata: update to 2022a
u-boot: upgrade 2021.07 -> 2022.01
uninative: Upgrade to 3.6 with gcc 12 support
util-linux: update 2.37.2 -> 2.37.4
vala: upgrade 0.52.5 -> 0.56.0
valgrind: update 3.17.0 -> 3.18.1
vim: upgrade to 8.2 patch 4681
vte: upgrade 0.64.2 -> 0.66.2
vulkan-headers: upgrade 1.2.182 -> 1.2.191
vulkan-loader: upgrade 1.2.182 -> 1.2.198.1
vulkan-samples: update to latest revision
vulkan-tools: upgrade 1.2.182 -> 1.2.191
vulkan: update 1.2.191.0 -> 1.3.204.1
waffle: update 1.6.1 -> 1.7.0
wayland-protocols: upgrade 1.21 -> 1.25
wayland: upgrade 1.19.0 -> 1.20.0
webkitgtk: upgrade 2.34.0 -> 2.36.0
weston: upgrade 9.0.0 -> 10.0.0
wget: update 1.21.1 -> 1.21.3
wireless-regdb: upgrade 2021.07.14 -> 2022.02.18
wpa-supplicant: update 2.9 -> 2.10
wpebackend-fdo: upgrade 1.10.0 -> 1.12.0
xauth: upgrade 1.1 -> 1.1.1
xf86-input-libinput: update to 1.2.1
xf86-video-intel: update to latest commit
xkeyboard-config: update to 2.35.1
xorgproto: update to 2021.5
xserver-xorg: update 1.20.13 -> 21.1.3
xwayland: update 21.1.2 -> 22.1.0
xxhash: upgrade 0.8.0 -> 0.8.1
zstd: update 1.5.0 -> 1.5.2
Contributors to 4.0
Thanks to the following people who contributed to this release:
Abongwa Amahnui Bonalais
Adriaan Schmidt
Adrian Freihofer
Ahmad Fatoum
Ahmed Hossam
Ahsan Hussain
Alejandro Hernandez Samaniego
Alessio Igor Bogani
Alexander Kanavin
Alexandre Belloni
Alexandru Ardelean
Alexey Brodkin
Alex Stewart
Andreas Müller
Andrei Gherzan
Andrej Valek
Andres Beltran
Andrew Jeffery
Andrey Zhizhikin
Anton Mikanovich
Anuj Mittal
Bill Pittman
Bruce Ashfield
Caner Altinbasak
Carlos Rafael Giani
Chaitanya Vadrevu
Changhyeok Bae
Changqing Li
Chen Qi
Christian Eggers
Claudius Heine
Claus Stovgaard
Daiane Angolini
Daniel Ammann
Daniel Gomez
Daniel McGregor
Daniel Müller
Daniel Wagenknecht
David Joyner
David Reyna
Denys Dmytriyenko
Dhruva Gole
Diego Sueiro
Dmitry Baryshkov
Ferry Toth
Florian Amstutz
Henry Kleynhans
He Zhe
Hongxu Jia
Hsia-Jun(Randy) Li
Ian Ray
Jacob Kroon
Jagadeesh Krishnanjanappa
Jasper Orschulko
Jim Wilson
Joel Winarske
Joe Slater
Jon Mason
Jose Quaresma
Joshua Watt
Justin Bronder
Kai Kang
Kamil Dziezyk
Kevin Hao
Khairul Rohaizzat Jamaluddin
Khem Raj
Kiran Surendran
Konrad Weihmann
Kory Maincent
Lee Chee Yang
Leif Middelschulte
Lei Maohui
Li Wang
Liwei Song
Luca Boccassi
Lukasz Majewski
Luna Gräfje
Manuel Leonhardt
Marek Vasut
Mark Hatle
Markus Niebel
Markus Volk
Marta Rybczynska
Martin Beeger
Martin Jansa
Matthias Klein
Matt Madison
Maximilian Blenk
Max Krummenacher
Michael Halstead
Michael Olbrich
Michael Opdenacker
Mike Crowe
Ming Liu
Mingli Yu
Minjae Kim
Nicholas Sielicki
Olaf Mandel
Oleh Matiusha
Oleksandr Kravchuk
Oleksandr Ocheretnyi
Oleksandr Suvorov
Oleksiy Obitotskyy
Otavio Salvador
Pablo Saavedra
Paul Barker
Paul Eggleton
Pavel Zhukov
Peter Hoyes
Peter Kjellerstedt
Petr Vorel
Pgowda
Quentin Schulz
Ralph Siemsen
Randy Li
Randy MacLeod
Rasmus Villemoes
Ricardo Salveti
Richard Neill
Richard Purdie
Robert Joslyn
Robert P. J. Day
Robert Yang
Ross Burton
Rudolf J Streif
Sakib Sajal
Samuli Piippo
Saul Wold
Scott Murray
Sean Anderson
Simone Weiss
Simon Kuhnle
Lockwood-Childs
Stefan Herbrechtsmeier
Steve Sakoman
Sundeep KOKKONDA
Tamizharasan Kumar
Tean Cunningham
Teoh Jay Shen
Thomas Perrot
Tim Orling
Tobias Kaufmann
Tom Hochstein
Tony McDowell
Trevor Gamblin
Ulrich Ölmann
Valerii Chernous
Vivien Didelot
Vyacheslav Yurkov
Wang Mingyu
Xavier Berger
Yi Zhao
Yongxin Liu
Yureka
Zev Weiss
Zheng Ruoqin
Zoltán Böszörményi
Zygmunt Krynicki
Repositories / Downloads for 4.0
poky
Repository Location: https://git.yoctoproject.org/poky
Branch: kirkstone
Tag: yocto-4.0
Git Revision: 00cfdde791a0176c134f31e5a09eff725e75b905
Release Artefact: poky-00cfdde791a0176c134f31e5a09eff725e75b905
sha: 4cedb491b7bf0d015768c61690f30d7d73f4266252d6fba907bba97eac83648c
Download Locations: http://downloads.yoctoproject.org/releases/yocto/yocto-4.0/poky-00cfdde791a0176c134f31e5a09eff725e75b905.tar.bz2 http://mirrors.kernel.org/yocto/yocto/yocto-4.0/poky-00cfdde791a0176c134f31e5a09eff725e75b905.tar.bz2
openembedded-core
Repository Location: https://git.openembedded.org/openembedded-core
Branch: kirkstone
Tag: yocto-4.0
Git Revision: 92fcb6570bddd0c5717d8cfdf38ecf3e44942b0f
Release Artefact: oecore-92fcb6570bddd0c5717d8cfdf38ecf3e44942b0f
sha: c042629752543a10b0384b2076b1ee8742fa5e8112aef7b00b3621f8387a51c6
Download Locations: http://downloads.yoctoproject.org/releases/yocto/yocto-4.0/oecore-92fcb6570bddd0c5717d8cfdf38ecf3e44942b0f.tar.bz2 http://mirrors.kernel.org/yocto/yocto/yocto-4.0/oecore-92fcb6570bddd0c5717d8cfdf38ecf3e44942b0f.tar.bz2
meta-mingw
Repository Location: https://git.yoctoproject.org/meta-mingw
Branch: kirkstone
Tag: yocto-4.0
Git Revision: a90614a6498c3345704e9611f2842eb933dc51c1
Release Artefact: meta-mingw-a90614a6498c3345704e9611f2842eb933dc51c1
sha: 49f9900bfbbc1c68136f8115b314e95d0b7f6be75edf36a75d9bcd1cca7c6302
Download Locations: http://downloads.yoctoproject.org/releases/yocto/yocto-4.0/meta-mingw-a90614a6498c3345704e9611f2842eb933dc51c1.tar.bz2 http://mirrors.kernel.org/yocto/yocto/yocto-4.0/meta-mingw-a90614a6498c3345704e9611f2842eb933dc51c1.tar.bz2
meta-gplv2
Repository Location: https://git.yoctoproject.org/meta-gplv2
Branch: kirkstone
Tag: yocto-4.0
Git Revision: d2f8b5cdb285b72a4ed93450f6703ca27aa42e8a
Release Artefact: meta-gplv2-d2f8b5cdb285b72a4ed93450f6703ca27aa42e8a
sha: c386f59f8a672747dc3d0be1d4234b6039273d0e57933eb87caa20f56b9cca6d
Download Locations: http://downloads.yoctoproject.org/releases/yocto/yocto-4.0/meta-gplv2-d2f8b5cdb285b72a4ed93450f6703ca27aa42e8a.tar.bz2 http://mirrors.kernel.org/yocto/yocto/yocto-4.0/meta-gplv2-d2f8b5cdb285b72a4ed93450f6703ca27aa42e8a.tar.bz2
bitbake
Repository Location: https://git.openembedded.org/bitbake
Branch: 2.0
Tag: yocto-4.0
Git Revision: c212b0f3b542efa19f15782421196b7f4b64b0b9
Release Artefact: bitbake-c212b0f3b542efa19f15782421196b7f4b64b0b9
sha: 6872095c7d7be5d791ef3e18b6bab2d1e0e237962f003d2b00dc7bd6fb6d2ef7
Download Locations: http://downloads.yoctoproject.org/releases/yocto/yocto-4.0/bitbake-c212b0f3b542efa19f15782421196b7f4b64b0b9.tar.bz2 http://mirrors.kernel.org/yocto/yocto/yocto-4.0/bitbake-c212b0f3b542efa19f15782421196b7f4b64b0b9.tar.bz2
yocto-docs
Repository Location: https://git.yoctoproject.org/yocto-docs
Branch: kirkstone
Tag: yocto-4.0
Git Revision: a6f571ad5b087385cad8765ed455c4b4eaeebca6
Release notes for 4.0.1 (kirkstone)
Security Fixes in 4.0.1
linux-yocto/5.15: fix CVE-2022-28796
python3: ignore CVE-2015-20107
e2fsprogs: fix CVE-2022-1304
lua: fix CVE-2022-28805
busybox: fix CVE-2022-28391
Fixes in 4.0.1
abi_version/sstate: Bump hashequiv and sstate versions due to git changes
apt: add apt selftest to test signed package feeds
apt: upgrade 2.4.4 -> 2.4.5
arch-armv8-2a.inc: fix a typo in TUNEVALID variable
babeltrace: Disable warnings as errors
base: Avoid circular references to our own scripts
base: Drop git intercept
build-appliance-image: Update to kirkstone head revision
build-appliance: Switch to kirkstone branch
buildtools-tarball: Only add cert envvars if certs are included
busybox: Use base_bindir instead of hardcoding /bin path
cases/buildepoxy.py: fix typo
create-spdx: delete virtual/kernel dependency to fix FreeRTOS build
create-spdx: fix error when symlink cannot be created
cve-check: add JSON format to summary output
cve-check: fix symlinks where link and output path are equal
cve-check: no need to depend on the fetch task
cve-update-db-native: let the user to drive the update interval
cve-update-db-native: update the CVE database once a day only
cve_check: skip remote patches that haven’t been fetched when searching for CVE tags
dev-manual: add command used to add the signed-off-by line.
devshell.bbclass: Allow devshell & pydevshell to use the network
docs: conf.py: fix cve extlinks caption for sphinx <4.0
docs: migration-guides: migration-3.4: mention that hardcoded password are supported if hashed
docs: migration-guides: release-notes-4.0: fix risc-v typo
docs: migration-guides: release-notes-4.0: replace kernel placeholder with correct recipe name
docs: ref-manual: variables: add hashed password example in EXTRA_USERS_PARAMS
docs: set_versions.py: add information about obsolescence of a release
docs: set_versions.py: fix latest release of a branch being shown twice in switchers.js
docs: set_versions.py: fix latest version of an active release shown as obsolete
docs: set_versions.py: mark as obsolete only branches and old tags from obsolete releases
docs: sphinx-static: switchers.js.in: do not mark branches as outdated
docs: sphinx-static: switchers.js.in: fix broken switcher for branches
docs: sphinx-static: switchers.js.in: improve obsolete version detection
docs: sphinx-static: switchers.js.in: remove duplicate for outdated versions
docs: sphinx-static: switchers.js.in: rename all_versions to switcher_versions
docs: update Bitbake objects.inv location for master branch
documentation/brief-yoctoprojectqs: add directory for local.conf
gcompat: Fix build when usrmerge distro feature is enabled
git: correct license
git: upgrade 2.35.2 -> 2.35.3
glib: upgrade 2.72.0 -> 2.72.1
glibc: ptest: Fix glibc-tests package issue
gnupg: Disable FORTIFY_SOURCES on mips
go.bbclass: disable the use of the default configuration file
gstreamer1.0-plugins-bad: drop patch
gstreamer1.0-plugins-good: Fix libsoup dependency
gstreamer1.0: Minor documentation addition
install/devshell: Introduce git intercept script due to fakeroot issues
kernel-yocto.bbclass: Fixup do_kernel_configcheck usage of KMETA
libc-glibc: Use libxcrypt to provide virtual/crypt
libgit2: upgrade 1.4.2 -> 1.4.3
libsoup: upgrade 3.0.5 -> 3.0.6
libusb1: upgrade 1.0.25 -> 1.0.26
linux-firmware: correct license for ar3k firmware
linux-firmware: upgrade 20220310 -> 20220411
linux-yocto/5.10: base: enable kernel crypto userspace API
linux-yocto/5.10: update to v5.10.112
linux-yocto/5.15: arm: poky-tiny cleanup and fixes
linux-yocto/5.15: base: enable kernel crypto userspace API
linux-yocto/5.15: fix -standard kernel build issue
linux-yocto/5.15: fix ppc boot
linux-yocto/5.15: fix qemuarm graphical boot
linux-yocto/5.15: kasan: fix BUG: sleeping function called from invalid context
linux-yocto/5.15: netfilter: conntrack: avoid useless indirection during conntrack destruction
linux-yocto/5.15: update to v5.15.36
linux-yocto: enable powerpc-debug fragment
mdadm: Drop clang specific cflags
migration-3.4: add missing entry on EXTRA_USERS_PARAMS
migration-guides: add release notes for 4.0
migration-guides: complete migration guide for 4.0
migration-guides: release-notes-4.0: mention LTS release
migration-guides: release-notes-4.0: update ‘Repositories / Downloads’ section
migration-guides: stop including documents with “.. include”
musl: Fix build when usrmerge distro feature is enabled
ncurses: use COPYING file
neard: Switch SRC_URI to git repo
oeqa/selftest: add test for git working correctly inside pseudo
openssl: minor security upgrade 3.0.2 -> 3.0.3
package.bbclass: Prevent perform_packagecopy from removing /sysroot-only
package: Ensure we track whether PRSERV was active or not
package_manager: fix missing dependency on gnupg when signing deb package feeds
poky-tiny: enable qemuarmv5/qemuarm64 and cleanups
poky.conf: bump version for 4.0.1 release
qemu.bbclass: Extend ppc/ppc64 extra options
qemuarm64: use virtio pci interfaces
qemuarmv5: use arm-versatile-926ejs KMACHINE
ref-manual: Add XZ_THREADS and XZ_MEMLIMIT
ref-manual: add KERNEL_DEBUG_TIMESTAMPS
ref-manual: add ZSTD_THREADS
ref-manual: add a note about hard-coded passwords
ref-manual: add empty-dirs QA check and QA_EMPTY_DIRS*
ref-manual: add mention of vendor filtering to CVE_PRODUCT
ref-manual: mention wildcarding support in INCOMPATIBLE_LICENSE
releases: update for yocto 4.0
rootfs-postcommands: fix symlinks where link and output path are equal
ruby: upgrade 3.1.1 -> 3.1.2
sanity: skip make 4.2.1 warning for debian
scripts/git: Ensure we don’t have circular references
scripts: Make git intercept global
seatd: Disable overflow warning as error on ppc64/musl
selftest/lic_checksum: Add test for filename containing space
set_versions: update for 4.0 release
staging: Ensure we filter out ourselves
strace: fix ptest failure in landlock
subversion: upgrade to 1.14.2
systemd-boot: remove outdated EFI_LD comment
systemtap: Fix build with gcc-12
terminal.py: Restore error output from Terminal
u-boot: Correct the SRC_URI
u-boot: Inherit pkgconfig
update_udev_hwdb: fix multilib issue with systemd
util-linux: Create u-a symlink for findfs utility
virgl: skip headless test on alma 8.6
webkitgtk: adjust patch status
wic: do not use PARTLABEL for msdos partition tables
wireless-regdb: upgrade 2022.02.18 -> 2022.04.08
xserver-xorg: Fix build with gcc12
yocto-bsps: update to v5.15.36
Contributors to 4.0.1
Abongwa Amahnui Bonalais
Alexander Kanavin
Bruce Ashfield
Carlos Rafael Giani
Chen Qi
Davide Gardenal
Dmitry Baryshkov
Ferry Toth
Henning Schild
Jon Mason
Justin Bronder
Kai Kang
Khem Raj
Konrad Weihmann
Lee Chee Yang
Marta Rybczynska
Martin Jansa
Matt Madison
Michael Halstead
Michael Opdenacker
Naveen Saini
Nicolas Dechesne
Paul Eggleton
Paul Gortmaker
Paulo Neves
Peter Kjellerstedt
Peter Marko
Pgowda
Portia
Quentin Schulz
Rahul Kumar
Richard Purdie
Robert Joslyn
Robert Yang
Roland Hieber
Ross Burton
Russ Dill
Steve Sakoman
Wang Mingyu
Zheng Ruoqin
Repositories / Downloads for 4.0.1
poky
Repository Location: https://git.yoctoproject.org/poky
Branch: kirkstone
Tag: yocto-4.0.1
Git Revision: 8c489602f218bcf21de0d3c9f8cf620ea5f06430
Release Artefact: poky-8c489602f218bcf21de0d3c9f8cf620ea5f06430
sha: 65c545a316bd8efb13ae1358eeccc8953543be908008103b51f7f90aed960d00
Download Locations: http://downloads.yoctoproject.org/releases/yocto/yocto-4.0.1/poky-8c489602f218bcf21de0d3c9f8cf620ea5f06430.tar.bz2, http://mirrors.kernel.org/yocto/yocto/yocto-4.0.1/poky-8c489602f218bcf21de0d3c9f8cf620ea5f06430.tar.bz2
openembedded-core
Repository Location: https://git.openembedded.org/openembedded-core
Branch: kirkstone
Tag: yocto-4.0.1
Git Revision: cb8647c08959abb1d6b7c2b3a34b4b415f66d7ee
Release Artefact: oecore-cb8647c08959abb1d6b7c2b3a34b4b415f66d7ee
sha: 43981b8fad82f601618a133dffbec839524f0d0a055efc3d8f808cbfd811ab17
Download Locations: http://downloads.yoctoproject.org/releases/yocto/yocto-4.0.1/oecore-cb8647c08959abb1d6b7c2b3a34b4b415f66d7ee.tar.bz2, http://mirrors.kernel.org/yocto/yocto/yocto-4.0.1/oecore-cb8647c08959abb1d6b7c2b3a34b4b415f66d7ee.tar.bz2
meta-mingw
Repository Location: https://git.yoctoproject.org/meta-mingw
Branch: kirkstone
Tag: yocto-4.0.1
Git Revision: a90614a6498c3345704e9611f2842eb933dc51c1
Release Artefact: meta-mingw-a90614a6498c3345704e9611f2842eb933dc51c1
sha: 49f9900bfbbc1c68136f8115b314e95d0b7f6be75edf36a75d9bcd1cca7c6302
Download Locations: http://downloads.yoctoproject.org/releases/yocto/yocto-4.0.1/meta-mingw-a90614a6498c3345704e9611f2842eb933dc51c1.tar.bz2 http://mirrors.kernel.org/yocto/yocto/yocto-4.0.1/meta-mingw-a90614a6498c3345704e9611f2842eb933dc51c1.tar.bz2
meta-gplv2
Repository Location: https://git.yoctoproject.org/meta-gplv2
Branch: kirkstone
Tag: yocto-4.0.1
Git Revision: d2f8b5cdb285b72a4ed93450f6703ca27aa42e8a
Release Artefact: meta-gplv2-d2f8b5cdb285b72a4ed93450f6703ca27aa42e8a
sha: c386f59f8a672747dc3d0be1d4234b6039273d0e57933eb87caa20f56b9cca6d
Download Locations: http://downloads.yoctoproject.org/releases/yocto/yocto-4.0.1/meta-gplv2-d2f8b5cdb285b72a4ed93450f6703ca27aa42e8a.tar.bz2 http://mirrors.kernel.org/yocto/yocto/yocto-4.0.1/meta-gplv2-d2f8b5cdb285b72a4ed93450f6703ca27aa42e8a.tar.bz2
bitbake
Repository Location: https://git.openembedded.org/bitbake
Branch: 2.0
Tag: yocto-4.0
Git Revision: 59c16ae6c55c607c56efd2287537a1b97ba2bf52
Release Artefact: bitbake-59c16ae6c55c607c56efd2287537a1b97ba2bf52
sha: 3ae466c31f738fc45c3d7c6f665952d59f01697f2667ea42f0544d4298dd6ef0
Download Locations: http://downloads.yoctoproject.org/releases/yocto/yocto-4.0.1/bitbake-59c16ae6c55c607c56efd2287537a1b97ba2bf52.tar.bz2, http://mirrors.kernel.org/yocto/yocto/yocto-4.0.1/bitbake-59c16ae6c55c607c56efd2287537a1b97ba2bf52.tar.bz2
yocto-docs
Repository Location: https://git.yoctoproject.org/yocto-docs
Branch: kirkstone
Tag: yocto-4.0.1
Git Revision: 4ec9df3336a425719a9a35532504731ce56984ca
Release notes for Yocto-4.0.2 (Kirkstone)
Security Fixes in Yocto-4.0.2
libxslt: Mark CVE-2022-29824 as not applying
tiff: Add jbig PACKAGECONFIG and clarify IGNORE CVE-2022-1210
tiff: mark CVE-2022-1622 and CVE-2022-1623 as invalid
pcre2:fix CVE-2022-1586 Out-of-bounds read
curl: fix CVE-2022-22576, CVE-2022-27775, CVE-2022-27776, CVE-2022-27774, CVE-2022-30115, CVE-2022-27780, CVE-2022-27781, CVE-2022-27779 and CVE-2022-27782
qemu: fix CVE-2021-4206 and CVE-2021-4207
freetype: fix CVE-2022-27404, CVE-2022-27405 and CVE-2022-27406
Fixes in Yocto-4.0.2
alsa-plugins: fix libavtp vs. avtp packageconfig
archiver: don’t use machine variables in shared recipes
archiver: use bb.note instead of echo
baremetal-image: fix broken symlink in do_rootfs
base-passwd: Disable shell for default users
bash: submit patch upstream
bind: upgrade 9.18.1 -> 9.18.2
binutils: Bump to latest 2.38 release branch
bitbake: build: Add clean_stamp API function to allow removal of task stamps
bitbake: data: Do not depend on vardepvalueexclude flag
bitbake: fetch2/osc: Small fixes for osc fetcher
bitbake: server/process: Fix logging issues where only the first message was displayed
build-appliance-image: Update to kirkstone head revision
buildhistory.bbclass: fix shell syntax when using dash
cairo: Add missing GPLv3 license checksum entry
classes: rootfs-postcommands: add skip option to overlayfs_qa_check
cronie: upgrade 1.6.0 -> 1.6.1
cups: upgrade 2.4.1 -> 2.4.2
cve-check.bbclass: Added do_populate_sdk[recrdeptask].
cve-check: Add helper for symlink handling
cve-check: Allow warnings to be disabled
cve-check: Fix report generation
cve-check: Only include installed packages for rootfs manifest
cve-check: add support for Ignored CVEs
cve-check: fix return type in check_cves
cve-check: move update_symlinks to a library
cve-check: write empty fragment files in the text mode
cve-extra-exclusions: Add kernel CVEs
cve-update-db-native: make it possible to disable database updates
devtool: Fix _copy_file() TypeError
e2fsprogs: add alternatives handling of lsattr as well
e2fsprogs: update upstream status
efivar: add musl libc compatibility
epiphany: upgrade 42.0 -> 42.2
ffmpeg: upgrade 5.0 -> 5.0.1
fribidi: upgrade 1.0.11 -> 1.0.12
gcc-cross-canadian: Add nativesdk-zstd dependency
gcc-source: Fix incorrect task dependencies from ${B}
gcc: Upgrade to 11.3 release
gcc: depend on zstd-native
git: fix override syntax in RDEPENDS
glib-2.0: upgrade 2.72.1 -> 2.72.2
glibc: Drop make-native dependency
go: upgrade 1.17.8 -> 1.17.10
gst-devtools: upgrade 1.20.1 -> 1.20.2
gstreamer1.0-libav: upgrade 1.20.1 -> 1.20.2
gstreamer1.0-omx: upgrade 1.20.1 -> 1.20.2
gstreamer1.0-plugins-bad: upgrade 1.20.1 -> 1.20.2
gstreamer1.0-plugins-base: upgrade 1.20.1 -> 1.20.2
gstreamer1.0-plugins-good: upgrade 1.20.1 -> 1.20.2
gstreamer1.0-plugins-ugly: upgrade 1.20.1 -> 1.20.2
gstreamer1.0-python: upgrade 1.20.1 -> 1.20.2
gstreamer1.0-rtsp-server: upgrade 1.20.1 -> 1.20.2
gstreamer1.0-vaapi: upgrade 1.20.1 -> 1.20.2
gstreamer1.0: upgrade 1.20.1 -> 1.20.2
gtk+3: upgrade 3.24.33 -> 3.24.34
gtk-doc: Fix potential shebang overflow on gtkdoc-mkhtml2
image.bbclass: allow overriding dependency on virtual/kernel:do_deploy
insane.bbclass: make sure to close .patch files
iso-codes: upgrade 4.9.0 -> 4.10.0
kernel-yocto.bbclass: Reset to exiting on non-zero return code at end of task
libcgroup: upgrade 2.0.1 -> 2.0.2
liberror-perl: Update sstate/equiv versions to clean cache
libinput: upgrade 1.19.3 -> 1.19.4
libpcre2: upgrade 10.39 -> 10.40
librepo: upgrade 1.14.2 -> 1.14.3
libseccomp: Add missing files for ptests
libseccomp: Correct LIC_FILES_CHKSUM
libxkbcommon: upgrade 1.4.0 -> 1.4.1
libxml2: Upgrade 2.9.13 -> 2.9.14
license.bbclass: Bound beginline and endline in copy_license_files()
license_image.bbclass: Make QA errors fail the build
linux-firmware: add support for building snapshots
linux-firmware: package new Qualcomm firmware
linux-firmware: replace mkdir by install
linux-firmware: split ath3k firmware
linux-firmware: upgrade to 20220610
linux-yocto/5.10: update to v5.10.119
linux-yocto/5.15: Enable MDIO bus config
linux-yocto/5.15: bpf: explicitly disable unpriv eBPF by default
linux-yocto/5.15: cfg/xen: Move x86 configs to separate file
linux-yocto/5.15: update to v5.15.44
local.conf.sample: Update sstate url to new ‘all’ path
logrotate: upgrade 3.19.0 -> 3.20.1
lttng-modules: Fix build failure for 5.10.119+ and 5.15.44+ kernel
lttng-modules: fix build against 5.18-rc7+
lttng-modules: fix shell syntax
lttng-ust: upgrade 2.13.2 -> 2.13.3
lzo: Add further info to a patch and mark as Inactive-Upstream
makedevs: Don’t use COPYING.patch just to add license file into ${S}
manuals: switch to the sstate mirror shared between all versions
mesa.inc: package 00-radv-defaults.conf
mesa: backport a patch to support compositors without zwp_linux_dmabuf_v1 again
mesa: upgrade to 22.0.3
meson.bbclass: add cython binary to cross/native toolchain config
mmc-utils: upgrade to latest revision
mobile-broadband-provider-info: upgrade 20220315 -> 20220511
ncurses: update to patchlevel 20220423
oeqa/selftest/cve_check: add tests for Ignored and partial reports
oeqa/selftest/cve_check: add tests for recipe and image reports
oescripts: change compare logic in OEListPackageconfigTests
openssl: Backport fix for ptest cert expiry
overlayfs: add docs about skipping QA check & service dependencies
ovmf: Fix native build with gcc-12
patch.py: make sure that patches/series file exists before quilt pop
pciutils: avoid lspci conflict with busybox
perl: Add dependency on make-native to avoid race issues
perl: Fix build with gcc-12
poky.conf: bump version for 4.0.2
popt: fix override syntax in RDEPENDS
pypi.bbclass: Set CVE_PRODUCT to PYPI_PACKAGE
python3: Ensure stale empty python module directories don’t break the build
python3: Remove problematic paths from sysroot files
python3: fix reproducibility issue with python3-core
python3: use built-in distutils for ptest, rather than setuptools’ ‘fork’
python: Avoid shebang overflow on python-config.py
rootfs-postcommands.bbclass: correct comments
rootfs.py: close kernel_abi_ver_file
rootfs.py: find .ko.zst kernel modules
rust-common: Drop LLVM_TARGET and simplify
rust-common: Ensure sstate signatures have correct dependencues for do_rust_gen_targets
rust-common: Fix for target definitions returning ‘NoneType’ for arm
rust-common: Fix native signature dependency issues
rust-common: Fix sstate signatures between arm hf and non-hf
sanity: Don’t warn about make 4.2.1 for mint
sanity: Switch to make 4.0 as a minimum version
sed: Specify shell for “nobody” user in run-ptest
selftest/imagefeatures/overlayfs: Always append to DISTRO_FEATURES
selftest/multiconfig: Test that multiconfigs in separate layers works
sqlite3: upgrade to 3.38.5
staging.bbclass: process direct dependencies in deterministic order
staging: Fix rare sysroot corruption issue
strace: Don’t run ptest as “nobody”
systemd: Correct 0001-pass-correct-parameters-to-getdents64.patch
systemd: Correct path returned in sd_path_lookup()
systemd: Document future actions needed for set of musl patches
systemd: Drop 0001-test-parse-argument-Include-signal.h.patch
systemd: Drop 0002-don-t-use-glibc-specific-qsort_r.patch
systemd: Drop 0016-Hide-__start_BUS_ERROR_MAP-and-__stop_BUS_ERROR_MAP.patch
systemd: Drop redundant musl patches
systemd: Fix build regression with latest update
systemd: Remove __compare_fn_t type in musl-specific patch
systemd: Update patch status
systemd: systemd-systemctl: Support instance conf files during enable
systemd: update
0008-add-missing-FTW_-macros-for-musl.patchsystemd: upgrade 250.4 -> 250.5
uboot-sign: Fix potential index error issues
valgrind: submit arm patches upstream
vim: Upgrade to 8.2.5083
webkitgtk: upgrade to 2.36.3
wic/plugins/rootfs: Fix permissions when splitting rootfs folders across partitions
xwayland: upgrade 22.1.0 -> 22.1.1
xxhash: fix build with gcc 12
zip/unzip: mark all submittable patches as Inactive-Upstream
Known Issues in Yocto-4.0.2
There were build failures at the autobuilder due to a known scp issue on Fedora-36 hosts.
Contributors to Yocto-4.0.2
Alex Kiernan
Alexander Kanavin
Aryaman Gupta
Bruce Ashfield
Claudius Heine
Davide Gardenal
Dmitry Baryshkov
Ernst Sjöstrand
Felix Moessbauer
Gunjan Gupta
He Zhe
Hitendra Prajapati
Jack Mitchell
Jeremy Puhlman
Jiaqing Zhao
Joerg Vehlow
Jose Quaresma
Kai Kang
Khem Raj
Konrad Weihmann
Marcel Ziswiler
Markus Volk
Marta Rybczynska
Martin Jansa
Michael Opdenacker
Mingli Yu
Naveen Saini
Nick Potenski
Paulo Neves
Pavel Zhukov
Peter Kjellerstedt
Rasmus Villemoes
Richard Purdie
Robert Joslyn
Ross Burton
Samuli Piippo
Sean Anderson
Stefan Wiehler
Steve Sakoman
Sundeep Kokkonda
Tomasz Dziendzielski
Xiaobing Luo
Yi Zhao
leimaohui
Wang Mingyu
Repositories / Downloads for Yocto-4.0.2
poky
Repository Location: https://git.yoctoproject.org/poky
Branch: kirkstone
Tag: yocto-4.0.2
Git Revision: a5ea426b1da472fc8549459fff3c1b8c6e02f4b5
Release Artefact: poky-a5ea426b1da472fc8549459fff3c1b8c6e02f4b5
sha: 474ddfacfed6661be054c161597a1a5273188dfe021b31d6156955d93c6b7359
Download Locations: http://downloads.yoctoproject.org/releases/yocto/yocto-4.0.2/poky-a5ea426b1da472fc8549459fff3c1b8c6e02f4b5.tar.bz2 http://mirrors.kernel.org/yocto/yocto/yocto-4.0.2/poky-a5ea426b1da472fc8549459fff3c1b8c6e02f4b5.tar.bz2
openembedded-core
Repository Location: https://git.openembedded.org/openembedded-core
Branch: kirkstone
Tag: yocto-4.0.2
Git Revision: eea52e0c3d24c79464f4afdbc3c397e1cb982231
Release Artefact: oecore-eea52e0c3d24c79464f4afdbc3c397e1cb982231
sha: 252d5c2c2db7e14e7365fcc69d32075720b37d629894bae36305eba047a39907
Download Locations: http://downloads.yoctoproject.org/releases/yocto/yocto-4.0.2/oecore-eea52e0c3d24c79464f4afdbc3c397e1cb982231.tar.bz2 http://mirrors.kernel.org/yocto/yocto/yocto-4.0.2/oecore-eea52e0c3d24c79464f4afdbc3c397e1cb982231.tar.bz2
meta-mingw
Repository Location: https://git.yoctoproject.org/meta-mingw
Branch: kirkstone
Tag: yocto-4.0.2
Git Revision: a90614a6498c3345704e9611f2842eb933dc51c1
Release Artefact: meta-mingw-a90614a6498c3345704e9611f2842eb933dc51c1
sha: 49f9900bfbbc1c68136f8115b314e95d0b7f6be75edf36a75d9bcd1cca7c6302
Download Locations: http://downloads.yoctoproject.org/releases/yocto/yocto-4.0.2/meta-mingw-a90614a6498c3345704e9611f2842eb933dc51c1.tar.bz2 http://mirrors.kernel.org/yocto/yocto/yocto-4.0.2/meta-mingw-a90614a6498c3345704e9611f2842eb933dc51c1.tar.bz2
meta-gplv2
Repository Location: https://git.yoctoproject.org/meta-gplv2
Branch: kirkstone
Tag: yocto-4.0.2
Git Revision: d2f8b5cdb285b72a4ed93450f6703ca27aa42e8a
Release Artefact: meta-gplv2-d2f8b5cdb285b72a4ed93450f6703ca27aa42e8a
sha: c386f59f8a672747dc3d0be1d4234b6039273d0e57933eb87caa20f56b9cca6d
Download Locations: http://downloads.yoctoproject.org/releases/yocto/yocto-4.0.2/meta-gplv2-d2f8b5cdb285b72a4ed93450f6703ca27aa42e8a.tar.bz2 http://mirrors.kernel.org/yocto/yocto/yocto-4.0.2/meta-gplv2-d2f8b5cdb285b72a4ed93450f6703ca27aa42e8a.tar.bz2
bitbake
Repository Location: https://git.openembedded.org/bitbake
Branch: 2.0
Tag: yocto-4.0.2
Git Revision: b8fd6f5d9959d27176ea016c249cf6d35ac8ba03
Release Artefact: bitbake-b8fd6f5d9959d27176ea016c249cf6d35ac8ba03
sha: 373818b1dee2c502264edf654d6d8f857b558865437f080e02d5ba6bb9e72cc3
Download Locations: http://downloads.yoctoproject.org/releases/yocto/yocto-4.0.2/bitbake-b8fd6f5d9959d27176ea016c249cf6d35ac8ba03.tar.bz2 http://mirrors.kernel.org/yocto/yocto/yocto-4.0.2/bitbake-b8fd6f5d9959d27176ea016c249cf6d35ac8ba03.tar.bz2
yocto-docs
Repository Location: https://git.yoctoproject.org/yocto-docs
Branch: kirkstone
Tag: yocto-4.0.2
Git Revision: 662294dccd028828d5c7e9fd8f5c8e14df53df4b
Release notes for Yocto-4.0.3 (Kirkstone)
Security Fixes in Yocto-4.0.3
binutils: fix CVE-2019-1010204
busybox: fix CVE-2022-30065
cups: ignore CVE-2022-26691
curl: Fix CVE-2022-32205, CVE-2022-32206, CVE-2022-32207 and CVE-2022-32208
dpkg: fix CVE-2022-1664
ghostscript: fix CVE-2022-2085
harfbuzz: fix CVE-2022-33068
libtirpc: fix CVE-2021-46828
lua: fix CVE-2022-33099
nasm: ignore CVE-2020-18974
qemu: fix CVE-2022-35414
qemu: ignore CVE-2021-20255 and CVE-2019-12067
tiff: fix CVE-2022-1354, CVE-2022-1355, CVE-2022-2056, CVE-2022-2057 and CVE-2022-2058
u-boot: fix CVE-2022-34835
unzip: fix CVE-2022-0529 and CVE-2022-0530
Fixes in Yocto-4.0.3
alsa-state: correct license
at: take tarballs from debian
base.bbclass: Correct the test for obsolete license exceptions
base/reproducible: Change Source Date Epoch generation methods
bin_package: install into base_prefix
bind: Remove legacy python3 PACKAGECONFIG code
bind: upgrade to 9.18.4
binutils: stable 2.38 branch updates
build-appliance-image: Update to kirkstone head revision
cargo_common.bbclass: enable bitbake vendoring for externalsrc
coreutils: Tweak packaging variable names for coreutils-dev
curl: backport openssl fix CN check error code
cve-check: hook cleanup to the BuildCompleted event, not CookerExit
cve-extra-exclusions: Clean up and ignore three CVEs (2xqemu and nasm)
devtool: finish: handle patching when S points to subdir of a git repo
devtool: ignore pn- overrides when determining SRC_URI overrides
docs: BB_HASHSERVE_UPSTREAM: update to new host
dropbear: break dependency on base package for -dev package
efivar: fix import functionality
encodings: update to 1.0.6
epiphany: upgrade to 42.3
externalsrc.bbclass: support crate fetcher on externalsrc
font-util: update 1.3.2 -> 1.3.3
gcc-runtime: Fix build when using gold
gcc-runtime: Fix missing MLPREFIX in debug mappings
gcc-runtime: Pass -nostartfiles when building dummy libstdc++.so
gcc: Backport a fix for gcc bug 105039
git: upgrade to v2.35.4
glib-2.0: upgrade to 2.72.3
glib-networking: upgrade to 2.72.1
glibc : stable 2.35 branch updates
glibc-tests: Avoid reproducibility issues
glibc-tests: not clear BBCLASSEXTEND
glibc: revert one upstream change to work around broken DEBUG_BUILD build
glibc: stable 2.35 branch updates
gnupg: upgrade to 2.3.7
go: upgrade to v1.17.12
gobject-introspection-data: Disable cache for g-ir-scanner
gperf: Add a patch to work around reproducibility issues
gperf: Switch to upstream patch
gst-devtools: upgrade to 1.20.3
gstreamer1.0-libav: upgrade to 1.20.3
gstreamer1.0-omx: upgrade to 1.20.3
gstreamer1.0-plugins-bad: upgrade to 1.20.3
gstreamer1.0-plugins-base: upgrade to 1.20.3
gstreamer1.0-plugins-good: upgrade to 1.20.3
gstreamer1.0-plugins-ugly: upgrade to 1.20.3
gstreamer1.0-python: upgrade to 1.20.3
gstreamer1.0-rtsp-server: upgrade to 1.20.3
gstreamer1.0-vaapi: upgrade to 1.20.3
gstreamer1.0: upgrade to 1.20.3
gtk-doc: Remove hardcoded buildpath
harfbuzz: Fix compilation with clang
initramfs-framework: move storage mounts to actual rootfs
initscripts: run umountnfs as a KILL script
insane.bbclass: host-user-contaminated: Correct per package home path
insane: Fix buildpaths test to work with special devices
kernel-arch: Fix buildpaths leaking into external module compiles
kernel-devsrc: fix reproducibility and buildpaths QA warning
kernel-devsrc: ppc32: fix reproducibility
kernel-uboot.bbclass: Use vmlinux.initramfs when INITRAMFS_IMAGE_BUNDLE set
kernel.bbclass: pass LD also in savedefconfig
libffi: fix native build being not portable
libgcc: Fix standalone target builds with usrmerge distro feature
libmodule-build-perl: Use env utility to find perl interpreter
libsoup: upgrade to 3.0.7
libuv: upgrade to 1.44.2
linux-firmware: upgrade to 20220708
linux-firwmare: restore WHENCE_CHKSUM variable
linux-yocto-rt/5.15: update to -rt48 (and fix -stable merge)
linux-yocto/5.10: fix build_OID_registry/conmakehash buildpaths warning
linux-yocto/5.10: fix buildpaths issue with gen-mach-types
linux-yocto/5.10: fix buildpaths issue with pnmtologo
linux-yocto/5.10: update to v5.10.135
linux-yocto/5.15: drop obselete GPIO sysfs ABI
linux-yocto/5.15: fix build_OID_registry buildpaths warning
linux-yocto/5.15: fix buildpaths issue with gen-mach-types
linux-yocto/5.15: fix buildpaths issue with pnmtologo
linux-yocto/5.15: fix qemuppc buildpaths warning
linux-yocto/5.15: fix reproducibility issues
linux-yocto/5.15: update to v5.15.59
log4cplus: upgrade to 2.0.8
lttng-modules: Fix build failure for kernel v5.15.58
lttng-modules: upgrade to 2.13.4
lua: Fix multilib buildpath reproducibility issues
mkfontscale: upgrade to 1.2.2
oe-selftest-image: Ensure the image has sftp as well as dropbear
oe-selftest: devtool: test modify git recipe building from a subdir
oeqa/runtime/scp: Disable scp test for dropbear
oeqa/runtime: add test that the kernel has CONFIG_PREEMPT_RT enabled
oeqa/sdk: drop the nativesdk-python 2.x test
openssh: Add openssh-sftp-server to openssh RDEPENDS
openssh: break dependency on base package for -dev package
openssl: update to 3.0.5
package.bbclass: Avoid stripping signed kernel modules in splitdebuginfo
package.bbclass: Fix base directory for debugsource files when using externalsrc
package.bbclass: Fix kernel source handling when not using externalsrc
package_manager/ipk: do not pipe stderr to stdout
packagegroup-core-ssh-dropbear: Add openssh-sftp-server recommendation
patch: handle if S points to a subdirectory of a git repo
perf: fix reproducibility in 5.19+
perf: fix reproduciblity in older releases of Linux
perf: sort-pmuevents: really keep array terminators
perl: don’t install Makefile.old into perl-ptest
poky.conf: bump version for 4.0.3
pulseaudio: add m4-native to DEPENDS
python3: Backport patch to fix an issue in subinterpreters
qemu: Add PACKAGECONFIG for brlapi
qemu: Avoid accidental librdmacm linkage
qemu: Avoid accidental libvdeplug linkage
qemu: Fix slirp determinism issue
qemu: add PACKAGECONFIG for capstone
recipetool/devtool: Fix python egg whitespace issues in PACKAGECONFIG
ref-manual: variables: remove sphinx directive from literal block
rootfs-postcommands.bbclass: move host-user-contaminated.txt to ${S}
ruby: add PACKAGECONFIG for capstone
rust: fix issue building cross-canadian tools for aarch64 on x86_64
sanity.bbclass: Add ftps to accepted URI protocols for mirrors sanity
selftest/runtime_test/virgl: Disable for all almalinux
sstatesig: Include all dependencies in SPDX task signatures
strace: set COMPATIBLE_HOST for riscv32
systemd: Added base_bindir into pkg_postinst:udev-hwdb.
udev-extraconf/initrdscripts/parted: Rename mount.blacklist -> mount.ignorelist
udev-extraconf/mount.sh: add LABELs to mountpoints
udev-extraconf/mount.sh: ignore lvm in automount
udev-extraconf/mount.sh: only mount devices on hotplug
udev-extraconf/mount.sh: save mount name in our tmp filecache
udev-extraconf: fix some systemd automount issues
udev-extraconf: force systemd-udevd to use shared MountFlags
udev-extraconf: let automount base directory configurable
udev-extraconf:mount.sh: fix a umount issue
udev-extraconf:mount.sh: fix path mismatching issues
vala: Fix on target wrapper buildpaths issue
vala: upgrade to 0.56.2
vim: upgrade to 9.0.0063
waffle: correctly request wayland-scanner executable
webkitgtk: upgrade to 2.36.4
weston: upgrade to 10.0.1
wic/plugins/rootfs: Fix NameError for ‘orig_path’
wic: fix WicError message
wireless-regdb: upgrade to 2022.06.06
xdpyinfo: upgrade to 1.3.3
xev: upgrade to 1.2.5
xf86-input-synaptics: upgrade to 1.9.2
xmodmap: upgrade to 1.0.11
xorg-app: Tweak handling of compression changes in SRC_URI
xserver-xorg: upgrade to 21.1.4
xwayland: upgrade to 22.1.3
yocto-bsps/5.10: fix buildpaths issue with gen-mach-types
yocto-bsps/5.10: fix buildpaths issue with pnmtologo
yocto-bsps/5.15: fix buildpaths issue with gen-mach-types
yocto-bsps/5.15: fix buildpaths issue with pnmtologo
yocto-bsps: buildpaths fixes
yocto-bsps: update to v5.10.130
yocto-bsps: buildpaths fixes
yocto-bsps: update to v5.15.54
Known Issues in Yocto-4.0.3
N/A
Contributors to Yocto-4.0.3
Ahmed Hossam
Alejandro Hernandez Samaniego
Alex Kiernan
Alexander Kanavin
Bruce Ashfield
Chanho Park
Christoph Lauer
David Bagonyi
Dmitry Baryshkov
He Zhe
Hitendra Prajapati
Jose Quaresma
Joshua Watt
Kai Kang
Khem Raj
Lee Chee Yang
Lucas Stach
Markus Volk
Martin Jansa
Maxime Roussin-Bélanger
Michael Opdenacker
Mihai Lindner
Ming Liu
Mingli Yu
Muhammad Hamza
Naveen
Pascal Bach
Paul Eggleton
Pavel Zhukov
Peter Bergin
Peter Kjellerstedt
Peter Marko
Pgowda
Raju Kumar Pothuraju
Richard Purdie
Robert Joslyn
Ross Burton
Sakib Sajal
Shruthi Ravichandran
Steve Sakoman
Sundeep Kokkonda
Thomas Roos
Tom Hochstein
Wentao Zhang
Yi Zhao
Yue Tao
gr embeter
leimaohui
Wang Mingyu
Repositories / Downloads for Yocto-4.0.3
poky
Repository Location: https://git.yoctoproject.org/poky
Branch: kirkstone
Tag: yocto-4.0.3
Git Revision: 387ab5f18b17c3af3e9e30dc58584641a70f359f
Release Artefact: poky-387ab5f18b17c3af3e9e30dc58584641a70f359f
sha: fe674186bdb0684313746caa9472134fc19e6f1443c274fe02c06cb1e675b404
Download Locations: http://downloads.yoctoproject.org/releases/yocto/yocto-4.0.3/poky-387ab5f18b17c3af3e9e30dc58584641a70f359f.tar.bz2 http://mirrors.kernel.org/yocto/yocto/yocto-4.0.3/poky-387ab5f18b17c3af3e9e30dc58584641a70f359f.tar.bz2
openembedded-core
Repository Location: https://git.openembedded.org/openembedded-core
Branch: kirkstone
Tag: yocto-4.0.3
Git Revision: 2cafa6ed5f0aa9df5a120b6353755d56c7c7800d
Release Artefact: oecore-2cafa6ed5f0aa9df5a120b6353755d56c7c7800d
sha: 5181d3e8118c6112936637f01a07308b715e0e3d12c7eba338556747dfcabe92
Download Locations: http://downloads.yoctoproject.org/releases/yocto/yocto-4.0.3/oecore-2cafa6ed5f0aa9df5a120b6353755d56c7c7800d.tar.bz2 http://mirrors.kernel.org/yocto/yocto/yocto-4.0.3/oecore-2cafa6ed5f0aa9df5a120b6353755d56c7c7800d.tar.bz2
meta-mingw
Repository Location: https://git.yoctoproject.org/meta-mingw
Branch: kirkstone
Tag: yocto-4.0.3
Git Revision: a90614a6498c3345704e9611f2842eb933dc51c1
Release Artefact: meta-mingw-a90614a6498c3345704e9611f2842eb933dc51c1
sha: 49f9900bfbbc1c68136f8115b314e95d0b7f6be75edf36a75d9bcd1cca7c6302
Download Locations: http://downloads.yoctoproject.org/releases/yocto/yocto-4.0.3/meta-mingw-a90614a6498c3345704e9611f2842eb933dc51c1.tar.bz2 http://mirrors.kernel.org/yocto/yocto/yocto-4.0.3/meta-mingw-a90614a6498c3345704e9611f2842eb933dc51c1.tar.bz2
meta-gplv2
Repository Location: https://git.yoctoproject.org/meta-gplv2
Branch: kirkstone
Tag: yocto-4.0.3
Git Revision: d2f8b5cdb285b72a4ed93450f6703ca27aa42e8a
Release Artefact: meta-gplv2-d2f8b5cdb285b72a4ed93450f6703ca27aa42e8a
sha: c386f59f8a672747dc3d0be1d4234b6039273d0e57933eb87caa20f56b9cca6d
Download Locations: http://downloads.yoctoproject.org/releases/yocto/yocto-4.0.3/meta-gplv2-d2f8b5cdb285b72a4ed93450f6703ca27aa42e8a.tar.bz2 http://mirrors.kernel.org/yocto/yocto/yocto-4.0.3/meta-gplv2-d2f8b5cdb285b72a4ed93450f6703ca27aa42e8a.tar.bz2
bitbake
Repository Location: https://git.openembedded.org/bitbake
Branch: 2.0
Tag: yocto-4.0.3
Git Revision: b8fd6f5d9959d27176ea016c249cf6d35ac8ba03
Release Artefact: bitbake-b8fd6f5d9959d27176ea016c249cf6d35ac8ba03
sha: 373818b1dee2c502264edf654d6d8f857b558865437f080e02d5ba6bb9e72cc3
Download Locations: http://downloads.yoctoproject.org/releases/yocto/yocto-4.0.3/bitbake-b8fd6f5d9959d27176ea016c249cf6d35ac8ba03.tar.bz2 http://mirrors.kernel.org/yocto/yocto/yocto-4.0.3/bitbake-b8fd6f5d9959d27176ea016c249cf6d35ac8ba03.tar.bz2
yocto-docs
Repository Location: https://git.yoctoproject.org/yocto-docs
Branch: kirkstone
Tag: yocto-4.0.3
Git Revision: d9b3dcf65ef25c06f552482aba460dd16862bf96
Release notes for Yocto-4.0.4 (Kirkstone)
Security Fixes in Yocto-4.0.4
binutils : fix CVE-2022-38533
curl: fix CVE-2022-35252
sqlite: fix CVE-2022-35737
grub2: fix CVE-2021-3695, CVE-2021-3696, CVE-2021-3697, CVE-2022-28733, CVE-2022-28734 and CVE-2022-28735
u-boot: fix CVE-2022-30552 and CVE-2022-33967
libxml2: Ignore CVE-2016-3709
libtiff: fix CVE-2022-34526
zlib: fix CVE-2022-37434
gnutls: fix CVE-2022-2509
u-boot: fix CVE-2022-33103
qemu: fix CVE-2021-3507, CVE-2021-3929, CVE-2021-4158, CVE-2022-0216 and CVE-2022-0358
Fixes in Yocto-4.0.4
apr: Cache configure tests which use AC_TRY_RUN
apr: Use correct strerror_r implementation based on libc type
apt: fix nativesdk-apt build failure during the second time build
archiver.bbclass: remove unsed do_deploy_archives[dirs]
archiver.bbclass: some recipes that uses the kernelsrc bbclass uses the shared source
autoconf: Fix strict prototype errors in generated tests
autoconf: Update K & R stype functions
bind: upgrade to 9.18.5
bitbake.conf: set BB_DEFAULT_UMASK using ??=
bitbake: ConfHandler/BBHandler: Improve comment error messages and add tests
bitbake: ConfHandler: Remove lingering close
bitbake: bb/utils: movefile: use the logger for printing
bitbake: bb/utils: remove: check the path again the expand python glob
bitbake: bitbake-user-manual: Correct description of the ??= operator
bitbake: bitbake-user-manual: npm fetcher: improve description of SRC_URI format
bitbake: bitbake: bitbake-user-manual: hashserv can be accessed on a dedicated domain
bitbake: bitbake: runqueue: add cpu/io pressure regulation
bitbake: bitbake: runqueue: add memory pressure regulation
bitbake: cooker: Drop sre_constants usage
bitbake: doc: bitbake-user-manual: add explicit target for crates fetcher
bitbake: doc: bitbake-user-manual: document npm and npmsw fetchers
bitbake: event.py: ignore exceptions from stdout and sterr operations in atexit
bitbake: fetch2: Ensure directory exists before creating symlink
bitbake: fetch2: gitsm: fix incorrect handling of git submodule relative urls
bitbake: runqueue: Change pressure file warning to a note
bitbake: runqueue: Fix unihash cache mismatch issues
bitbake: toaster: fix kirkstone version
bitbake: utils: Pass lock argument in fileslocked
bluez5: upgrade to 5.65
boost: fix install of fiber shared libraries
cairo: Adapt the license information based on what is being built
classes: cve-check: Get shared database lock
cmake: remove CMAKE_ASM_FLAGS variable in toolchain file
connman: Backports for security fixes
core-image.bbclass: Exclude openssh complementary packages
cracklib: Drop using register keyword
cracklib: upgrade to 2.9.8
create-spdx: Fix supplier field
create-spdx: handle links to inaccessible locations
create-spdx: ignore packing control files from ipk and deb
cve-check: Don’t use f-strings
cve-check: close cursors as soon as possible
devtool/upgrade: catch bb.fetch2.decodeurl errors
devtool/upgrade: correctly clean up when recipe filename isn’t yet known
devtool: error out when workspace is using old override syntax
ell: upgrade to 0.50
epiphany: upgrade to 42.4
externalsrc: Don’t wipe out src dir when EXPORT_FUNCTIONS is used.
gcc-multilib-config: Fix i686 toolchain relocation issues
gcr: Define _GNU_SOURCE
gdk-pixbuf: upgrade to 2.42.9
glib-networking: upgrade to 2.72.2
go: upgrade to v1.17.13
insane.bbclass: Skip patches not in oe-core by full path
iso-codes: upgrade to 4.11.0
kernel-fitimage.bbclass: add padding algorithm property in config nodes
kernel-fitimage.bbclass: only package unique DTBs
kernel: Use consistent make flags for menuconfig
lib:npm_registry: initial checkin
libatomic-ops: upgrade to 7.6.14
libcap: upgrade to 2.65
libjpeg-turbo: upgrade to 2.1.4
libpam: use /run instead of /var/run in systemd tmpfiles
libtasn1: upgrade to 4.19.0
liburcu: upgrade to 0.13.2
libwebp: upgrade to 1.2.4
libwpe: upgrade to 1.12.3
libxml2: Port gentest.py to Python-3
lighttpd: upgrade to 1.4.66
linux-yocto/5.10: update genericx86* machines to v5.10.135
linux-yocto/5.10: update to v5.10.137
linux-yocto/5.15: update genericx86* machines to v5.15.59
linux-yocto/5.15: update to v5.15.62
linux-yocto: Fix COMPATIBLE_MACHINE regex match
linux-yocto: prepend the value with a space when append to KERNEL_EXTRA_ARGS
lttng-modules: fix 5.19+ build
lttng-modules: fix build against mips and v5.19 kernel
lttng-modules: fix build for kernel 5.10.137
lttng-modules: replace mips compaction fix with upstream change
lz4: upgrade to 1.9.4
maintainers: update opkg maintainer
meta: introduce UBOOT_MKIMAGE_KERNEL_TYPE
migration guides: add missing release notes
mobile-broadband-provider-info: upgrade to 20220725
nativesdk: Clear TUNE_FEATURES
npm: replace ‘npm pack’ call by ‘tar czf’
npm: return content of ‘package.json’ in ‘npm_pack’
npm: take ‘version’ directly from ‘package.json’
npm: use npm_registry to cache package
oeqa/gotoolchain: put writable files in the Go module cache
oeqa/gotoolchain: set CGO_ENABLED=1
oeqa/parselogs: add qemuarmv5 arm-charlcd masking
oeqa/qemurunner: add run_serial() comment
oeqa/selftest: rename git.py to intercept.py
oeqa: qemurunner: Report UNIX Epoch timestamp on login
package_rpm: Do not replace square brackets in %files
packagegroup-self-hosted: update for strace
parselogs: Ignore xf86OpenConsole error
perf: Fix reproducibility issues with 5.19 onwards
pinentry: enable _XOPEN_SOURCE on musl for wchar usage in curses
poky.conf: add ubuntu-22.04 to tested distros
poky.conf: bump version for 4.0.4
pseudo: Update to include recent upstream minor fixes
python3-pip: Fix RDEPENDS after the update
ref-manual: add numa to machine features
relocate_sdk.py: ensure interpreter size error causes relocation to fail
rootfs-postcommands.bbclass: avoid moving ssh host keys if etc is writable
rootfs.py: dont try to list installed packages for baremetal images
rootfspostcommands.py: Cleanup subid backup files generated by shadow-utils
ruby: drop capstone support
runqemu: Add missing space on default display option
runqemu: display host uptime when starting
sanity: add a comment to ensure CONNECTIVITY_CHECK_URIS is correct
scripts/oe-setup-builddir: make it known where configurations come from
scripts/runqemu.README: fix typos and trailing whitespaces
selftest/wic: Tweak test case to not depend on kernel size
shadow: Avoid nss warning/error with musl
shadow: Enable subid support
system-requirements.rst: Add Ubuntu 22.04 to list of supported distros
systemd: Add ‘no-dns-fallback’ PACKAGECONFIG option
systemd: Fix unwritable /var/lock when no sysvinit handling
sysvinit-inittab/start_getty: Fix respawn too fast
tcp-wrappers: Fix implicit-function-declaration warnings
tzdata: upgrade to 2022b
util-linux: Remove –enable-raw from EXTRA_OECONF
vala: upgrade to 0.56.3
vim: Upgrade to 9.0.0453
watchdog: Include needed system header for function decls
webkitgtk: upgrade to 2.36.5
weston: upgrade to 10.0.2
wic/bootimg-efi: use cross objcopy when building unified kernel image
wic: add target tools to PATH when executing native commands
wic: depend on cross-binutils
wireless-regdb: upgrade to 2022.08.12
wpebackend-fdo: upgrade to 1.12.1
xinetd: Pass missing -D_GNU_SOURCE
xz: update to 5.2.6
Known Issues in Yocto-4.0.4
N/A
Contributors to Yocto-4.0.4
Alejandro Hernandez Samaniego
Alex Stewart
Alexander Kanavin
Alexandre Belloni
Andrei Gherzan
Anuj Mittal
Aryaman Gupta
Awais Belal
Beniamin Sandu
Bertrand Marquis
Bruce Ashfield
Changqing Li
Chee Yang Lee
Daiane Angolini
Enrico Scholz
Ernst Sjöstrand
Gennaro Iorio
Hitendra Prajapati
Jacob Kroon
Jon Mason
Jose Quaresma
Joshua Watt
Kai Kang
Khem Raj
Kristian Amlie
LUIS ENRIQUEZ
Mark Hatle
Martin Beeger
Martin Jansa
Mateusz Marciniec
Michael Opdenacker
Mihai Lindner
Mikko Rapeli
Ming Liu
Niko Mauno
Ola x Nilsson
Otavio Salvador
Paul Eggleton
Pavel Zhukov
Peter Bergin
Peter Kjellerstedt
Peter Marko
Rajesh Dangi
Randy MacLeod
Rasmus Villemoes
Richard Purdie
Robert Joslyn
Roland Hieber
Ross Burton
Sakib Sajal
Shubham Kulkarni
Steve Sakoman
Ulrich Ölmann
Yang Xu
Yongxin Liu
ghassaneben
pgowda
Wang Mingyu
Repositories / Downloads for Yocto-4.0.4
poky
Repository Location: https://git.yoctoproject.org/poky
Branch: kirkstone
Tag: yocto-4.0.4
Git Revision: d64bef1c7d713b92a51228e5ade945835e5a94a4
Release Artefact: poky-d64bef1c7d713b92a51228e5ade945835e5a94a4
sha: b5e92506b31f88445755bad2f45978b747ad1a5bea66ca897370542df5f1e7db
Download Locations: http://downloads.yoctoproject.org/releases/yocto/yocto-4.0.4/poky-d64bef1c7d713b92a51228e5ade945835e5a94a4.tar.bz2 http://mirrors.kernel.org/yocto/yocto/yocto-4.0.4/poky-d64bef1c7d713b92a51228e5ade945835e5a94a4.tar.bz2
openembedded-core
Repository Location: https://git.openembedded.org/openembedded-core
Branch: kirkstone
Tag: yocto-4.0.4
Git Revision: f7766da462905ec67bf549d46b8017be36cd5b2a
Release Artefact: oecore-f7766da462905ec67bf549d46b8017be36cd5b2a
sha: ce0ac011474db5e5f0bb1be3fb97f890a02e46252a719dbcac5813268e48ff16
Download Locations: http://downloads.yoctoproject.org/releases/yocto/yocto-4.0.4/oecore-f7766da462905ec67bf549d46b8017be36cd5b2a.tar.bz2 http://mirrors.kernel.org/yocto/yocto/yocto-4.0.4/oecore-f7766da462905ec67bf549d46b8017be36cd5b2a.tar.bz2
meta-mingw
Repository Location: https://git.yoctoproject.org/meta-mingw
Branch: kirkstone
Tag: yocto-4.0.4
Git Revision: a90614a6498c3345704e9611f2842eb933dc51c1
Release Artefact: meta-mingw-a90614a6498c3345704e9611f2842eb933dc51c1
sha: 49f9900bfbbc1c68136f8115b314e95d0b7f6be75edf36a75d9bcd1cca7c6302
Download Locations: http://downloads.yoctoproject.org/releases/yocto/yocto-4.0.4/meta-mingw-a90614a6498c3345704e9611f2842eb933dc51c1.tar.bz2 http://mirrors.kernel.org/yocto/yocto/yocto-4.0.4/meta-mingw-a90614a6498c3345704e9611f2842eb933dc51c1.tar.bz2
meta-gplv2
Repository Location: https://git.yoctoproject.org/meta-gplv2
Branch: kirkstone
Tag: yocto-4.0.4
Git Revision: d2f8b5cdb285b72a4ed93450f6703ca27aa42e8a
Release Artefact: meta-gplv2-d2f8b5cdb285b72a4ed93450f6703ca27aa42e8a
sha: c386f59f8a672747dc3d0be1d4234b6039273d0e57933eb87caa20f56b9cca6d
Download Locations: http://downloads.yoctoproject.org/releases/yocto/yocto-4.0.4/meta-gplv2-d2f8b5cdb285b72a4ed93450f6703ca27aa42e8a.tar.bz2 http://mirrors.kernel.org/yocto/yocto/yocto-4.0.4/meta-gplv2-d2f8b5cdb285b72a4ed93450f6703ca27aa42e8a.tar.bz2
bitbake
Repository Location: https://git.openembedded.org/bitbake
Branch: 2.0
Tag: yocto-4.0.4
Git Revision: ac576d6fad6bba0cfea931883f25264ea83747ca
Release Artefact: bitbake-ac576d6fad6bba0cfea931883f25264ea83747ca
sha: 526c2768874eeda61ade8c9ddb3113c90d36ef44a026d6690f02de6f3dd0ea12
Download Locations: http://downloads.yoctoproject.org/releases/yocto/yocto-4.0.4/bitbake-ac576d6fad6bba0cfea931883f25264ea83747ca.tar.bz2 http://mirrors.kernel.org/yocto/yocto/yocto-4.0.4/bitbake-ac576d6fad6bba0cfea931883f25264ea83747ca.tar.bz2
yocto-docs
Repository Location: https://git.yoctoproject.org/yocto-docs
Branch: kirkstone
Tag: yocto-4.0.4
Git Revision: f632dad24c39778f948014029e74db3c871d9d21
Release notes for Yocto-4.0.5 (Kirkstone)
Security Fixes in Yocto-4.0.5
qemu: fix CVE-2021-3750, CVE-2021-3611 and CVE-2022-2962
binutils : fix CVE-2022-38126, CVE-2022-38127 and CVE-2022-38128
tff: fix CVE-2022-2867, CVE-2022-2868 and CVE-2022-2869
inetutils: fix CVE-2022-39028
go: fix CVE-2022-27664
Fixes in Yocto-4.0.5
Revert “gcc-cross-canadian: Add symlink to real-ld alongside other symlinks”
bind: upgrade to 9.18.7
binutils: stable 2.38 branch updates (dc2474e7)
bitbake: Fix npm to use https rather than http
bitbake: asyncrpc/client: Fix unix domain socket chdir race issues
bitbake: bitbake: Add copyright headers where missing
bitbake: gitsm: Error out if submodule refers to parent repo
bitbake: runqueue: Drop deadlock breaking force fail
bitbake: runqueue: Ensure deferred tasks are sorted by multiconfig
bitbake: runqueue: Improve deadlock warning messages
bitbake: siggen: Fix insufficent entropy in sigtask file names
bitbake: tests/fetch: Allow handling of a file:// url within a submodule
build-appliance-image: Update to kirkstone head revision (4a88ada)
busybox: add devmem 128-bit support
classes: files: Extend overlayfs-etc class
coreutils: add openssl PACKAGECONFIG
create-pull-request: don’t switch the git remote protocol to git://
dev-manual: fix reference to BitBake user manual
expat: upgrade 2.4.8 -> 2.4.9
files: overlayfs-etc: refactor preinit template
gcc-cross-canadian: add default plugin linker
gcc: add arm-v9 support
git: upgrade 2.35.4 -> 2.35.5
glibc-locale: explicitly remove empty dirs in ${libdir}
glibc-tests: use += instead of :append
glibc: stable 2.35 branch updates.(8d125a1f)
go-native: switch from SRC_URI:append to SRC_URI +=
image_types_wic.bbclass: fix cross binutils dependency
kern-tools: allow ‘y’ or ‘m’ to avoid config audit warnings
kern-tools: fix queue processing in relative TOPDIR configurations
kernel-yocto: allow patch author date to be commit date
libpng: upgrade to 1.6.38
linux-firmware: package new Qualcomm firmware
linux-firmware: upgrade 20220708 -> 20220913
linux-libc-headers: switch from SRC_URI:append to SRC_URI +=
linux-yocto-dev: add qemuarm64
linux-yocto/5.10: update to v5.10.149
linux-yocto/5.15: cfg: fix ACPI warnings for -tiny
linux-yocto/5.15: update to v5.15.68
local.conf.sample: correct the location of public hashserv
ltp: Fix pread02 case trigger the glibc overflow detection
lttng-modules: Fix crash on powerpc64
lttng-tools: Disable on qemuriscv32
lttng-tools: Disable on riscv32
migration-guides: add 4.0.4 release notes
oeqa/runtime/dnf: fix typo
own-mirrors: add crate
perf: Fix for recent kernel upgrades
poky.conf: bump version for 4.0.5
poky.yaml.in: update version requirements
python3-rfc3986-validator: switch from SRC_URI:append to SRC_URI +=
python3: upgrade 3.10.4 -> 3.10.7
qemu: Backport patches from upstream to support float128 on qemu-ppc64
rpm: Remove -Wimplicit-function-declaration warnings
rpm: update to 4.17.1
rsync: update to 3.2.5
stress-cpu: disable float128 math on powerpc64 to avoid SIGILL
tune-neoversen2: support tune-neoversen2 base on armv9a
tzdata: update to 2022d
u-boot: switch from append to += in SRC_URI
uninative: Upgrade to 3.7 to work with glibc 2.36
vim: Upgrade to 9.0.0598
webkitgtk: Update to 2.36.7
Known Issues in Yocto-4.0.5
There are recent CVEs in key components such as openssl. They are not included in this release as it was built before the issues were known and fixes were available but these are now available on the kirkstone branch.
Contributors to Yocto-4.0.5
Adrian Freihofer
Alexander Kanavin
Alexandre Belloni
Bhabu Bindu
Bruce Ashfield
Chen Qi
Daniel McGregor
Denys Dmytriyenko
Dmitry Baryshkov
Florin Diaconescu
He Zhe
Joshua Watt
Khem Raj
Martin Jansa
Michael Halstead
Michael Opdenacker
Mikko Rapeli
Mingli Yu
Neil Horman
Pavel Zhukov
Richard Purdie
Robert Joslyn
Ross Burton
Ruiqiang Hao
Samuli Piippo
Steve Sakoman
Sundeep KOKKONDA
Teoh Jay Shen
Tim Orling
Virendra Thakur
Vyacheslav Yurkov
Xiangyu Chen
Yash Shinde
pgowda
Wang Mingyu
Repositories / Downloads for Yocto-4.0.5
poky
Repository Location: https://git.yoctoproject.org/poky
Branch: kirkstone
Tag: yocto-4.0.5
Git Revision: 2e79b199114b25d81bfaa029ccfb17676946d20d
Release Artefact: poky-2e79b199114b25d81bfaa029ccfb17676946d20d
sha: 7bcf3f901d4c5677fc95944ab096e9e306f4c758a658dde5befd16861ad2b8ea
Download Locations: http://downloads.yoctoproject.org/releases/yocto/yocto-4.0.5/poky-2e79b199114b25d81bfaa029ccfb17676946d20d.tar.bz2 http://mirrors.kernel.org/yocto/yocto/yocto-4.0.5/poky-2e79b199114b25d81bfaa029ccfb17676946d20d.tar.bz2
openembedded-core
Repository Location: https://git.openembedded.org/openembedded-core
Branch: kirkstone
Tag: yocto-4.0.5
Git Revision: fbdf93f43ff4b876487e1f26752598ec8abcb46e
Release Artefact: oecore-fbdf93f43ff4b876487e1f26752598ec8abcb46e
sha: 2d9b5a8e9355b633bb57633cc8c2d319ba13fe4721f79204e61116b3faa6cbf1
Download Locations: http://downloads.yoctoproject.org/releases/yocto/yocto-4.0.5/oecore-fbdf93f43ff4b876487e1f26752598ec8abcb46e.tar.bz2 http://mirrors.kernel.org/yocto/yocto/yocto-4.0.5/oecore-fbdf93f43ff4b876487e1f26752598ec8abcb46e.tar.bz2
meta-mingw
Repository Location: https://git.yoctoproject.org/meta-mingw
Branch: kirkstone
Tag: yocto-4.0.5
Git Revision: a90614a6498c3345704e9611f2842eb933dc51c1
Release Artefact: meta-mingw-a90614a6498c3345704e9611f2842eb933dc51c1
sha: 49f9900bfbbc1c68136f8115b314e95d0b7f6be75edf36a75d9bcd1cca7c6302
Download Locations: http://downloads.yoctoproject.org/releases/yocto/yocto-4.0.5/meta-mingw-a90614a6498c3345704e9611f2842eb933dc51c1.tar.bz2 http://mirrors.kernel.org/yocto/yocto/yocto-4.0.5/meta-mingw-a90614a6498c3345704e9611f2842eb933dc51c1.tar.bz2
meta-gplv2
Repository Location: https://git.yoctoproject.org/meta-gplv2
Branch: kirkstone
Tag: yocto-4.0.5
Git Revision: d2f8b5cdb285b72a4ed93450f6703ca27aa42e8a
Release Artefact: meta-gplv2-d2f8b5cdb285b72a4ed93450f6703ca27aa42e8a
sha: c386f59f8a672747dc3d0be1d4234b6039273d0e57933eb87caa20f56b9cca6d
Download Locations: http://downloads.yoctoproject.org/releases/yocto/yocto-4.0.5/meta-gplv2-d2f8b5cdb285b72a4ed93450f6703ca27aa42e8a.tar.bz2 http://mirrors.kernel.org/yocto/yocto/yocto-4.0.5/meta-gplv2-d2f8b5cdb285b72a4ed93450f6703ca27aa42e8a.tar.bz2
bitbake
Repository Location: https://git.openembedded.org/bitbake
Branch: 2.0
Tag: yocto-4.0.5
Git Revision: c90d57497b9bcd237c3ae810ee8edb5b0d2d575a
Release Artefact: bitbake-c90d57497b9bcd237c3ae810ee8edb5b0d2d575a
sha: 5698d548ce179036e46a24f80b213124c8825a4f443fa1d6be7ab0f70b01a9ff
Download Locations: http://downloads.yoctoproject.org/releases/yocto/yocto-4.0.5/bitbake-c90d57497b9bcd237c3ae810ee8edb5b0d2d575a.tar.bz2 http://mirrors.kernel.org/yocto/yocto/yocto-4.0.5/bitbake-c90d57497b9bcd237c3ae810ee8edb5b0d2d575a.tar.bz2
yocto-docs
Repository Location: https://git.yoctoproject.org/yocto-docs
Branch: kirkstone
Tag: yocto-4.0.5
Git Revision: 8c2f9f54e29781f4ee72e81eeaa12ceaa82dc2d3
Release notes for Yocto-4.0.6 (Kirkstone)
Security Fixes in Yocto-4.0.6
bash: Fix CVE-2022-3715
curl: Fix CVE-2022-32221, CVE-2022-42915 and CVE-2022-42916
dbus: Fix CVE-2022-42010, CVE-2022-42011 and CVE-2022-42012
dropbear: Fix CVE-2021-36369
ffmpeg: Fix CVE-2022-3964, CVE-2022-3965
go: Fix CVE-2022-2880
grub2: Fix CVE-2022-2601, CVE-2022-3775 and CVE-2022-28736
libarchive: Fix CVE-2022-36227
libpam: Fix CVE-2022-28321
libsndfile1: Fix CVE-2021-4156
lighttpd: Fix CVE-2022-41556
openssl: Fix CVE-2022-3358
pixman: Fix CVE-2022-44638
python3-mako: Fix CVE-2022-40023
python3: Fix CVE-2022-42919
qemu: Fix CVE-2022-3165
sysstat: Fix CVE-2022-39377
systemd: Fix CVE-2022-3821
tiff: Fix CVE-2022-2953, CVE-2022-3599, CVE-2022-3597, CVE-2022-3626, CVE-2022-3627, CVE-2022-3570, CVE-2022-3598 and CVE-2022-3970
vim: Fix CVE-2022-3352, CVE-2022-3705 and CVE-2022-4141
wayland: Fix CVE-2021-3782
xserver-xorg: Fix CVE-2022-3550 and CVE-2022-3551
Fixes in Yocto-4.0.6
archiver: avoid using machine variable as it breaks multiconfig
babeltrace: upgrade to 1.5.11
bind: upgrade to 9.18.8
bitbake.conf: Drop export of SOURCE_DATE_EPOCH_FALLBACK
bitbake: gitsm: Fix regression in gitsm submodule path parsing
bitbake: runqueue: Fix race issues around hash equivalence and sstate reuse
bluez5: Point hciattach bcm43xx firmware search path to /lib/firmware
bluez5: add dbus to RDEPENDS
build-appliance-image: Update to kirkstone head revision
buildtools-tarball: export certificates to python and curl
cargo_common.bbclass: Fix typos
classes: make TOOLCHAIN more permissive for kernel
cmake-native: Fix host tool contamination (Bug: 14951)
common-tasks.rst: fix oeqa runtime test path
create-spdx.bbclass: remove unused SPDX_INCLUDE_PACKAGED
create-spdx: Remove “;name=…” for downloadLocation
create-spdx: default share_src for shared sources
cve-update-db-native: add timeout to urlopen() calls
dbus: upgrade to 1.14.4
dhcpcd: fix to work with systemd
expat: upgrade to 2.5.0
externalsrc.bbclass: Remove a trailing slash from ${B}
externalsrc.bbclass: fix git repo detection
externalsrc: git submodule–helper list unsupported
gcc-shared-source: Fix source date epoch handling
gcc-source: Drop gengtype manipulation
gcc-source: Ensure deploy_source_date_epoch sstate hash doesn’t change
gcc-source: Fix gengtypes race
gdk-pixbuf: upgrade to 2.42.10
get_module_deps3.py: Check attribute ‘__file__’
glib-2.0: fix rare GFileInfo test case failure
glibc-locale: Do not INHIBIT_DEFAULT_DEPS
gnomebase.bbclass: return the whole version for tarball directory if it is a number
gnutls: Unified package names to lower-case
groff: submit patches upstream
gstreamer1.0-libav: fix errors with ffmpeg 5.x
gstreamer1.0: upgrade to 1.20.4
ifupdown: upgrade to 0.8.39
insane.bbclass: Allow hashlib version that only accepts on parameter
iso-codes: upgrade to 4.12.0
kea: submit patch upstream (fix-multilib-conflict.patch)
kern-tools: fix relative path processing
kern-tools: integrate ZFS speedup patch
kernel-yocto: improve fatal error messages of symbol_why.py
kernel.bbclass: Include randstruct seed assets in STAGING_KERNEL_BUILDDIR
kernel.bbclass: make KERNEL_DEBUG_TIMESTAMPS work at rebuild
kernel: Clear SYSROOT_DIRS instead of replacing sysroot_stage_all
libcap: upgrade to 2.66
libepoxy: convert to git
libepoxy: update to 1.5.10
libffi: submit patch upstream (0001-arm-sysv-reverted-clang-VFP-mitigation.patch )
libffi: upgrade to 3.4.4
libical: upgrade to 3.0.16
libksba: upgrade to 1.6.2
libuv: fixup SRC_URI
libxcrypt: upgrade to 4.4.30
lighttpd: upgrade to 1.4.67
linux-firmware: add new fw file to ${PN}-qcom-adreno-a530
linux-firmware: don’t put the firmware into the sysroot
linux-firmware: package amdgpu firmware
linux-firmware: split rtl8761 firmware
linux-firmware: upgrade to 20221109
linux-yocto/5.10: update genericx86* machines to v5.10.149
linux-yocto/5.15: fix CONFIG_CRYPTO_CCM mismatch warnings
linux-yocto/5.15: update genericx86* machines to v5.15.72
linux-yocto/5.15: update to v5.15.78
ltp: backport clock_gettime04 fix from upstream
lttng-modules: upgrade to 2.13.7
lttng-tools: Upgrade to 2.13.8
lttng-tools: submit determinism.patch upstream
lttng-ust: upgrade to 2.13.5
meson: make wrapper options sub-command specific
meta-selftest/staticids: add render group for systemd
mirrors.bbclass: update CPAN_MIRROR
mirrors.bbclass: use shallow tarball for binutils-native
mobile-broadband-provider-info: upgrade 20220725 -> 20221107
mtd-utils: upgrade 2.1.4 -> 2.1.5
numactl: upgrade to 2.0.16
oe/packagemanager/rpm: don’t leak file objects
oeqa/selftest/lic_checksum: Cleanup changes to emptytest include
oeqa/selftest/minidebuginfo: Create selftest for minidebuginfo
oeqa/selftest/tinfoil: Add test for separate config_data with recipe_parse_file()
openssl: Fix SSL_CERT_FILE to match ca-certs location
openssl: upgrade to 3.0.7
openssl: export necessary env vars in SDK
opkg-utils: use a git clone, not a dynamic snapshot
opkg: Set correct info_dir and status_file in opkg.conf
overlayfs: Allow not used mount points
ovmf: correct patches status
package: Fix handling of minidebuginfo with newer binutils
perf: Depend on native setuptools3
poky.conf: bump version for 4.0.6
psplash: add psplash-default in rdepends
psplash: consider the situation of psplash not exist for systemd
python3: advance to version 3.10.8
qemu-helper-native: Correctly pass program name as argv[0]
qemu-helper-native: Re-write bridge helper as C program
qemu-native: Add PACKAGECONFIG option for jack
qemu: add io_uring PACKAGECONFIG
quilt: backport a patch to address grep 3.8 failures
resolvconf: make it work
rm_work: exclude the SSTATETASKS from the rm_work tasks sinature
runqemu: Do not perturb script environment
runqemu: Fix gl-es argument from causing other arguments to be ignored
sanity: Drop data finalize call
sanity: check for GNU tar specifically
scripts/oe-check-sstate: cleanup
scripts/oe-check-sstate: force build to run for all targets, specifically populate_sysroot
scripts: convert-overrides: Allow command-line customizations
socat: upgrade to 1.7.4.4
SPDX and CVE documentation updates
sstate: Allow optimisation of do_deploy_archives task dependencies
sstatesig: emit more helpful error message when not finding sstate manifest
sstatesig: skip the rm_work task signature
sudo: upgrade to 1.9.12p1
systemd: Consider PACKAGECONFIG in RRECOMMENDS
systemd: add group render to udev package
tcl: correct patch status
tiff: refresh with devtool
tiff: add CVE tag to b258ed69a485a9cfb299d9f060eb2a46c54e5903.patch
u-boot: Remove duplicate inherit of cml1
uboot-sign: Fix using wrong KEY_REQ_ARGS
vala: install vapigen-wrapper into /usr/bin/crosscripts and stage only that
valgrind: remove most hidden tests for arm64
vim: Upgrade to 9.0.0947
vulkan-samples: add lfs=0 to SRC_URI to avoid git smudge errors in do_unpack
wic: honor the SOURCE_DATE_EPOCH in case of updated fstab
wic: make ext2/3/4 images reproducible
wic: swap partitions are not added to fstab
wpebackend-fdo: upgrade to 1.14.0
xserver-xorg: move some recommended dependencies in required
xwayland: upgrade to 22.1.5
Known Issues in Yocto-4.0.6
N/A
Contributors to Yocto-4.0.6
Alex Kiernan
Alexander Kanavin
Alexey Smirnov
Bartosz Golaszewski
Bernhard Rosenkränzer
Bhabu Bindu
Bruce Ashfield
Chee Yang Lee
Chen Qi
Christian Eggers
Claus Stovgaard
Diego Sueiro
Dmitry Baryshkov
Ed Tanous
Enrico Jörns
Etienne Cordonnier
Frank de Brabander
Harald Seiler
Hitendra Prajapati
Jan-Simon Moeller
Jeremy Puhlman
Joe Slater
John Edward Broadbent
Jose Quaresma
Joshua Watt
Kai Kang
Keiya Nobuta
Khem Raj
Konrad Weihmann
Leon Anavi
Liam Beguin
Marek Vasut
Mark Hatle
Martin Jansa
Michael Opdenacker
Mikko Rapeli
Narpat Mali
Nathan Rossi
Niko Mauno
Pavel Zhukov
Peter Kjellerstedt
Peter Marko
Polampalli, Archana
Qiu, Zheng
Ravula Adhitya Siddartha
Richard Purdie
Ross Burton
Sakib Sajal
Sean Anderson
Sergei Zhmylev
Steve Sakoman
Teoh Jay Shen
Thomas Perrot
Tim Orling
Vincent Davis Jr
Vivek Kumbhar
Vyacheslav Yurkov
Wang Mingyu
Xiangyu Chen
Zheng Qiu
Ciaran Courtney
Wang Mingyu
Repositories / Downloads for Yocto-4.0.6
poky
Repository Location: https://git.yoctoproject.org/poky
Branch: kirkstone
Tag: yocto-4.0.6
Git Revision: c4e08719a782fd4119eaf643907b80cebf57f88f
Release Artefact: poky-c4e08719a782fd4119eaf643907b80cebf57f88f
sha: 2eb3b323dd2ccd25f9442bfbcbde82bc081fad5afd146a8e6dde439db24a99d4
Download Locations: http://downloads.yoctoproject.org/releases/yocto/yocto-4.0.6/poky-c4e08719a782fd4119eaf643907b80cebf57f88f.tar.bz2 http://mirrors.kernel.org/yocto/yocto/yocto-4.0.6/poky-c4e08719a782fd4119eaf643907b80cebf57f88f.tar.bz2
openembedded-core
Repository Location: https://git.openembedded.org/openembedded-core
Branch: kirkstone
Tag: yocto-4.0.6
Git Revision: 45a8b4101b14453aa3020d3f2b8a76b4dc0ae3f2
Release Artefact: oecore-45a8b4101b14453aa3020d3f2b8a76b4dc0ae3f2
sha: de8b443365927befe67cc443b60db57563ff0726377223f836a3f3971cf405ec
Download Locations: http://downloads.yoctoproject.org/releases/yocto/yocto-4.0.6/oecore-45a8b4101b14453aa3020d3f2b8a76b4dc0ae3f2.tar.bz2 http://mirrors.kernel.org/yocto/yocto/yocto-4.0.6/oecore-45a8b4101b14453aa3020d3f2b8a76b4dc0ae3f2.tar.bz2
meta-mingw
Repository Location: https://git.yoctoproject.org/meta-mingw
Branch: kirkstone
Tag: yocto-4.0.6
Git Revision: a90614a6498c3345704e9611f2842eb933dc51c1
Release Artefact: meta-mingw-a90614a6498c3345704e9611f2842eb933dc51c1
sha: 49f9900bfbbc1c68136f8115b314e95d0b7f6be75edf36a75d9bcd1cca7c6302
Download Locations: http://downloads.yoctoproject.org/releases/yocto/yocto-4.0.6/meta-mingw-a90614a6498c3345704e9611f2842eb933dc51c1.tar.bz2 http://mirrors.kernel.org/yocto/yocto/yocto-4.0.6/meta-mingw-a90614a6498c3345704e9611f2842eb933dc51c1.tar.bz2
meta-gplv2
Repository Location: https://git.yoctoproject.org/meta-gplv2
Branch: kirkstone
Tag: yocto-4.0.6
Git Revision: d2f8b5cdb285b72a4ed93450f6703ca27aa42e8a
Release Artefact: meta-gplv2-d2f8b5cdb285b72a4ed93450f6703ca27aa42e8a
sha: c386f59f8a672747dc3d0be1d4234b6039273d0e57933eb87caa20f56b9cca6d
Download Locations: http://downloads.yoctoproject.org/releases/yocto/yocto-4.0.6/meta-gplv2-d2f8b5cdb285b72a4ed93450f6703ca27aa42e8a.tar.bz2 http://mirrors.kernel.org/yocto/yocto/yocto-4.0.6/meta-gplv2-d2f8b5cdb285b72a4ed93450f6703ca27aa42e8a.tar.bz2
bitbake
Repository Location: https://git.openembedded.org/bitbake
Branch: 2.0
Tag: yocto-4.0.6
Git Revision: 7e268c107bb0240d583d2c34e24a71e373382509
Release Artefact: bitbake-7e268c107bb0240d583d2c34e24a71e373382509
sha: c3e2899012358c95962c7a5c85cf98dc30c58eae0861c374124e96d9556bb901
Download Locations: http://downloads.yoctoproject.org/releases/yocto/yocto-4.0.6/bitbake-7e268c107bb0240d583d2c34e24a71e373382509.tar.bz2 http://mirrors.kernel.org/yocto/yocto/yocto-4.0.6/bitbake-7e268c107bb0240d583d2c34e24a71e373382509.tar.bz2
yocto-docs
Repository Location: https://git.yoctoproject.org/yocto-docs
Branch: kirkstone
Tag: yocto-4.0.6
Git Revision: c10d65ef3bbdf4fe3abc03e3aef3d4ca8c2ad87f
Release notes for Yocto-4.0.7 (Kirkstone)
Security Fixes in Yocto-4.0.7
binutils: Fix CVE-2022-4285
curl: Fix CVE-2022-43551 and CVE-2022-43552
ffmpeg: Fix CVE-2022-3109 and CVE-2022-3341
go: Fix CVE-2022-41715 and CVE-2022-41717
libX11: Fix CVE-2022-3554 and CVE-2022-3555
libarchive: Fix CVE-2022-36227
libksba: Fix CVE-2022-47629
libpng: Fix CVE-2019-6129
libxml2: Fix CVE-2022-40303 and CVE-2022-40304
openssl: Fix CVE-2022-3996
python3: Fix CVE-2022-45061
python3-git: Fix CVE-2022-24439
python3-setuptools: Fix CVE-2022-40897
python3-wheel: Fix CVE-2022-40898
qemu: Fix CVE-2022-4144
sqlite: Fix CVE-2022-46908
systemd: Fix CVE-2022-45873
vim: Fix CVE-2023-0049, CVE-2023-0051, CVE-2023-0054 and CVE-2023-0088
webkitgtk: Fix CVE-2022-32886, CVE-2022-32891 and CVE-2022-32912
Fixes in Yocto-4.0.7
Revert “gstreamer1.0: disable flaky gstbin:test_watch_for_state_change test”
at: Change when files are copied
baremetal-image: Avoid overriding qemu variables from IMAGE_CLASSES
base.bbclass: Fix way to check ccache path
bc: extend to nativesdk
bind: upgrade to 9.18.10
busybox: always start do_compile with orig config files
busybox: rm temporary files if do_compile was interrupted
cairo: fix CVE patches assigned wrong CVE number
cairo: update patch for CVE-2019-6461 with upstream solution
classes/create-spdx: Add SPDX_PRETTY option
classes: image: Set empty weak default IMAGE_LINGUAS
combo-layer: add sync-revs command
combo-layer: dont use bb.utils.rename
combo-layer: remove unused import
curl: Correct LICENSE from MIT-open-group to curl
cve-check: write the cve manifest to IMGDEPLOYDIR
cve-update-db-native: avoid incomplete updates
cve-update-db-native: show IP on failure
dbus: Add missing CVE product name
devtool/upgrade: correctly handle recipes where S is a subdir of upstream tree
devtool: process local files only for the main branch
dhcpcd: backport two patches to fix runtime error
docs: kernel-dev: faq: update tip on how to not include kernel in image
docs: migration-4.0: specify variable name change for kernel inclusion in image recipe
efibootmgr: update compilation with musl
externalsrc: fix lookup for .gitmodules
ffmpeg: refresh patches to apply cleanly
freetype:update mirror site.
gcc: Refactor linker patches and fix linker on arm with usrmerge
glibc: stable 2.35 branch updates.
go-crosssdk: avoid host contamination by GOCACHE
gstreamer1.0: Fix race conditions in gstbin tests
gstreamer1.0: upgrade to 1.20.5
gtk-icon-cache: Fix GTKIC_CMD if-else condition
harfbuzz: remove bindir only if it exists
kernel-fitimage: Adjust order of dtb/dtbo files
kernel-fitimage: Allow user to select dtb when multiple dtb exists
kernel.bbclass: remove empty module directories to prevent QA issues
lib/buildstats: fix parsing of trees with reduced_proc_pressure directories
lib/oe/reproducible: Use git log without gpg signature
libepoxy: remove upstreamed patch
libnewt: update 0.52.21 -> 0.52.23
libseccomp: fix typo in DESCRIPTION
libxcrypt-compat: upgrade 4.4.30 -> 4.4.33
libxml2: fix test data checksums
linux-firmware: upgrade 20221109 -> 20221214
linux-yocto/5.10: update to v5.10.152
linux-yocto/5.10: update to v5.10.154
linux-yocto/5.10: update to v5.10.160
linux-yocto/5.15: fix perf build with clang
linux-yocto/5.15: libbpf: Fix build warning on ref_ctr_off
linux-yocto/5.15: ltp and squashfs fixes
linux-yocto/5.15: powerpc: Fix reschedule bug in KUAP-unlocked user copy
linux-yocto/5.15: update to v5.15.84
lsof: add update-alternatives logic
lttng-modules: update 2.13.7 -> 2.13.8
manuals: add 4.0.5 and 4.0.6 release notes
manuals: document SPDX_PRETTY variable
mpfr: upgrade 4.1.0 -> 4.1.1
oeqa/concurrencytest: Add number of failures to summary output
oeqa/rpm.py: Increase timeout and add debug output
oeqa/selftest/externalsrc: add test for srctree_hash_files
openssh: remove RRECOMMENDS to rng-tools for sshd package
poky.conf: bump version for 4.0.7
qemuboot.bbclass: make sure runqemu boots bundled initramfs kernel image
rm_work.bbclass: use HOSTTOOLS ‘rm’ binary exclusively
rm_work: adjust dependency to make do_rm_work_all depend on do_rm_work
ruby: merge .inc into .bb
ruby: update 3.1.2 -> 3.1.3
selftest/virgl: use pkg-config from the host
tiff: Add packageconfig knob for webp
toolchain-scripts: compatibility with unbound variable protection
tzdata: update 2022d -> 2022g
valgrind: skip the boost_thread test on arm
xserver-xorg: upgrade 21.1.4 -> 21.1.6
xwayland: libxshmfence is needed when dri3 is enabled
xwayland: upgrade 22.1.5 -> 22.1.7
yocto-check-layer: Allow OE-Core to be tested
Known Issues in Yocto-4.0.7
N/A
Contributors to Yocto-4.0.7
Alejandro Hernandez Samaniego
Alex Kiernan
Alex Stewart
Alexander Kanavin
Antonin Godard
Benoît Mauduit
Bhabu Bindu
Bruce Ashfield
Carlos Alberto Lopez Perez
Changqing Li
Chen Qi
Daniel Gomez
Florin Diaconescu
He Zhe
Hitendra Prajapati
Jagadeesh Krishnanjanappa
Jan Kircher
Jermain Horsman
Jose Quaresma
Joshua Watt
KARN JYE LAU
Kai Kang
Khem Raj
Luis
Marta Rybczynska
Martin Jansa
Mathieu Dubois-Briand
Michael Opdenacker
Narpat Mali
Ovidiu Panait
Pavel Zhukov
Peter Marko
Petr Kubizňák
Quentin Schulz
Randy MacLeod
Ranjitsinh Rathod
Richard Purdie
Robert Andersson
Ross Burton
Sandeep Gundlupet Raju
Saul Wold
Steve Sakoman
Vivek Kumbhar
Wang Mingyu
Xiangyu Chen
Yash Shinde
Yogita Urade
Repositories / Downloads for Yocto-4.0.7
poky
Repository Location: https://git.yoctoproject.org/poky
Branch: kirkstone
Tag: yocto-4.0.7
Git Revision: 65dafea22018052fe7b2e17e6e4d7eb754224d38
Release Artefact: poky-65dafea22018052fe7b2e17e6e4d7eb754224d38
sha: 6b1b67600b84503e2d5d29bcd6038547339f4f9413b830cd2408df825eda642d
Download Locations: http://downloads.yoctoproject.org/releases/yocto/yocto-4.0.7/poky-65dafea22018052fe7b2e17e6e4d7eb754224d38.tar.bz2 http://mirrors.kernel.org/yocto/yocto/yocto-4.0.7/poky-65dafea22018052fe7b2e17e6e4d7eb754224d38.tar.bz2
openembedded-core
Repository Location: https://git.openembedded.org/openembedded-core
Branch: kirkstone
Tag: yocto-4.0.7
Git Revision: a8c82902384f7430519a31732a4bb631f21693ac
Release Artefact: oecore-a8c82902384f7430519a31732a4bb631f21693ac
sha: 6f2dbc4ea1e388620ef77ac3a7bbb2b5956bb8bf9349b0c16cd7610e9996f5ea
Download Locations: http://downloads.yoctoproject.org/releases/yocto/yocto-4.0.7/oecore-a8c82902384f7430519a31732a4bb631f21693ac.tar.bz2 http://mirrors.kernel.org/yocto/yocto/yocto-4.0.7/oecore-a8c82902384f7430519a31732a4bb631f21693ac.tar.bz2
meta-mingw
Repository Location: https://git.yoctoproject.org/meta-mingw
Branch: kirkstone
Tag: yocto-4.0.7
Git Revision: a90614a6498c3345704e9611f2842eb933dc51c1
Release Artefact: meta-mingw-a90614a6498c3345704e9611f2842eb933dc51c1
sha: 49f9900bfbbc1c68136f8115b314e95d0b7f6be75edf36a75d9bcd1cca7c6302
Download Locations: http://downloads.yoctoproject.org/releases/yocto/yocto-4.0.7/meta-mingw-a90614a6498c3345704e9611f2842eb933dc51c1.tar.bz2 http://mirrors.kernel.org/yocto/yocto/yocto-4.0.7/meta-mingw-a90614a6498c3345704e9611f2842eb933dc51c1.tar.bz2
meta-gplv2
Repository Location: https://git.yoctoproject.org/meta-gplv2
Branch: kirkstone
Tag: yocto-4.0.7
Git Revision: d2f8b5cdb285b72a4ed93450f6703ca27aa42e8a
Release Artefact: meta-gplv2-d2f8b5cdb285b72a4ed93450f6703ca27aa42e8a
sha: c386f59f8a672747dc3d0be1d4234b6039273d0e57933eb87caa20f56b9cca6d
Download Locations: http://downloads.yoctoproject.org/releases/yocto/yocto-4.0.7/meta-gplv2-d2f8b5cdb285b72a4ed93450f6703ca27aa42e8a.tar.bz2 http://mirrors.kernel.org/yocto/yocto/yocto-4.0.7/meta-gplv2-d2f8b5cdb285b72a4ed93450f6703ca27aa42e8a.tar.bz2
bitbake
Repository Location: https://git.openembedded.org/bitbake
Branch: 2.0
Tag: yocto-4.0.7
Git Revision: 7e268c107bb0240d583d2c34e24a71e373382509
Release Artefact: bitbake-7e268c107bb0240d583d2c34e24a71e373382509
sha: c3e2899012358c95962c7a5c85cf98dc30c58eae0861c374124e96d9556bb901
Download Locations: http://downloads.yoctoproject.org/releases/yocto/yocto-4.0.7/bitbake-7e268c107bb0240d583d2c34e24a71e373382509.tar.bz2 http://mirrors.kernel.org/yocto/yocto/yocto-4.0.7/bitbake-7e268c107bb0240d583d2c34e24a71e373382509.tar.bz2
yocto-docs
Repository Location: https://git.yoctoproject.org/yocto-docs
Branch: kirkstone
Tag: yocto-4.0.7
Git Revision: 5883e897c34f25401b358a597fb6e18d80f7f90b
Release notes for Yocto-4.0.8 (Kirkstone)
Security Fixes in Yocto-4.0.8
apr-util: Fix CVE-2022-25147
apr: Fix CVE-2022-24963, CVE-2022-28331 and CVE-2021-35940
bind: Fix CVE-2022-3094, CVE-2022-3736 and CVE-2022-3924
git: Ignore CVE-2022-41953
git: Fix CVE-2022-23521 and CVE-2022-41903
libgit2: Fix CVE-2023-22742
ppp: Fix CVE-2022-4603
python3-certifi: Fix CVE-2022-23491
sudo: Fix CVE-2023-22809
tar: Fix CVE-2022-48303
Fixes in Yocto-4.0.8
core-image.bbclass: Fix missing leading whitespace with ‘:append’
populate_sdk_ext.bbclass: Fix missing leading whitespace with ‘:append’
ptest-packagelists.inc: Fix missing leading whitespace with ‘:append’
apr-util: upgrade to 1.6.3
apr: upgrade to 1.7.2
apt: fix do_package_qa failure
bind: upgrade to 9.18.11
bitbake: bb/utils: include SSL certificate paths in export_proxies
bitbake: bitbake-diffsigs: Make PEP8 compliant
bitbake: bitbake-diffsigs: break on first dependent task difference
bitbake: fetch2/git: Clarify the meaning of namespace
bitbake: fetch2/git: Prevent git fetcher from fetching gitlab repository metadata
bitbake: fetch2/git: show SRCREV and git repo in error message about fixed SRCREV
bitbake: siggen: Fix inefficient string concatenation
bitbake: utils/ply: Update md5 to better report errors with hashlib
bootchart2: Fix usrmerge support
bsp-guide: fix broken git URLs and missing word
build-appliance-image: Update to kirkstone head revision
buildtools-tarball: set pkg-config search path
classes/fs-uuid: Fix command output decoding issue
dev-manual: common-tasks.rst: add link to FOSDEM 2023 video
dev-manual: fix old override syntax
devshell: Do not add scripts/git-intercept to PATH
devtool: fix devtool finish when gitmodules file is empty
diffutils: upgrade to 3.9
gdk-pixbuf: do not use tools from gdk-pixbuf-native when building tests
git: upgrade to 2.35.7
glslang: branch rename master -> main
httpserver: add error handler that write to the logger
image.bbclass: print all QA functions exceptions
kernel/linux-kernel-base: Fix kernel build artefact determinism issues
libc-locale: Fix on target locale generation
libgit2: upgrade to 1.4.5
libjpeg-turbo: upgrade to 2.1.5
libtirpc: Check if file exists before operating on it
libusb1: Link with latomic only if compiler has no atomic builtins
libusb1: Strip trailing whitespaces
linux-firmware: upgrade to 20230117
linux-yocto/5.15: update to v5.15.91
lsof: fix old override syntax
lttng-modules: Fix for 5.10.163 kernel version
lttng-tools: upgrade to 2.13.9
make-mod-scripts: Ensure kernel build output is deterministic
manuals: update patchwork instance URL
meta: remove True option to getVar and getVarFlag calls (again)
migration-guides: add release-notes for 4.0.7
native: Drop special variable handling
numactl: skip test case when target platform doesn’t have 2 CPU node
oeqa context.py: fix –target-ip comment to include ssh port number
oeqa dump.py: add error counter and stop after 5 failures
oeqa qemurunner.py: add timeout to QMP calls
oeqa qemurunner.py: try to avoid reading one character at a time
oeqa qemurunner: read more data at a time from serial
oeqa ssh.py: add connection keep alive options to ssh client
oeqa ssh.py: move output prints to new line
oeqa/qemurunner: do not use Popen.poll() when terminating runqemu with a signal
oeqa/selftest/bbtests: Update message lookup for test_git_unpack_nonetwork_fail
oeqa/selftest/locales: Add selftest for locale generation/presence
poky.conf: Update SANITY_TESTED_DISTROS to match autobuilder
poky.conf: bump version for 4.0.8
profile-manual: update WireShark hyperlinks
python3-pytest: depend on python3-tomli instead of python3-toml
qemu: fix compile error
quilt: fix intermittent failure in faildiff.test
quilt: use upstreamed faildiff.test fix
recipe_sanity: fix old override syntax
ref-manual: document SSTATE_EXCLUDEDEPS_SYSROOT
scons.bbclass: Make MAXLINELENGTH overridable
scons: Pass MAXLINELENGTH to scons invocation
sdkext/cases/devtool: pass a logger to HTTPService
spirv-headers: set correct branch name
sudo: upgrade to 1.9.12p2
system-requirements.rst: add Fedora 36 and AlmaLinux 8.7 to list of supported distros
testimage: Fix error message to reflect new syntax
update-alternatives: fix typos
vulkan-samples: branch rename master -> main
Known Issues in Yocto-4.0.8
N/A
Contributors to Yocto-4.0.8
Alejandro Hernandez Samaniego
Alexander Kanavin
Alexandre Belloni
Armin Kuster
Arnout Vandecappelle
Bruce Ashfield
Changqing Li
Chee Yang Lee
Etienne Cordonnier
Harald Seiler
Kai Kang
Khem Raj
Lee Chee Yang
Louis Rannou
Marek Vasut
Marius Kriegerowski
Mark Hatle
Martin Jansa
Mauro Queiros
Michael Opdenacker
Mikko Rapeli
Mingli Yu
Narpat Mali
Niko Mauno
Pawel Zalewski
Peter Kjellerstedt
Richard Purdie
Rodolfo Quesada Zumbado
Ross Burton
Sakib Sajal
Schmidt, Adriaan
Steve Sakoman
Thomas Roos
Ulrich Ölmann
Xiangyu Chen
Repositories / Downloads for Yocto-4.0.8
poky
Repository Location: https://git.yoctoproject.org/poky
Branch: kirkstone
Tag: yocto-4.0.8
Git Revision: a361fb3df9c87cf12963a9d785a9f99faa839222
Release Artefact: poky-a361fb3df9c87cf12963a9d785a9f99faa839222
sha: af4e8d64be27d3a408357c49b7952ce04c6d8bb0b9d7b50c48848d9355de7fc2
Download Locations: http://downloads.yoctoproject.org/releases/yocto/yocto-4.0.8/poky-a361fb3df9c87cf12963a9d785a9f99faa839222.tar.bz2 http://mirrors.kernel.org/yocto/yocto/yocto-4.0.8/poky-a361fb3df9c87cf12963a9d785a9f99faa839222.tar.bz2
openembedded-core
Repository Location: https://git.openembedded.org/openembedded-core
Branch: kirkstone
Tag: yocto-4.0.8
Git Revision: b20e2134daec33fbb8ce358d984751d887752bd5
Release Artefact: oecore-b20e2134daec33fbb8ce358d984751d887752bd5
sha: 63cce6f1caf8428eefc1471351ab024affc8a41d8d7777f525e3aa9ea454d2cd
Download Locations: http://downloads.yoctoproject.org/releases/yocto/yocto-4.0.8/oecore-b20e2134daec33fbb8ce358d984751d887752bd5.tar.bz2 http://mirrors.kernel.org/yocto/yocto/yocto-4.0.8/oecore-b20e2134daec33fbb8ce358d984751d887752bd5.tar.bz2
meta-mingw
Repository Location: https://git.yoctoproject.org/meta-mingw
Branch: kirkstone
Tag: yocto-4.0.8
Git Revision: a90614a6498c3345704e9611f2842eb933dc51c1
Release Artefact: meta-mingw-a90614a6498c3345704e9611f2842eb933dc51c1
sha: 49f9900bfbbc1c68136f8115b314e95d0b7f6be75edf36a75d9bcd1cca7c6302
Download Locations: http://downloads.yoctoproject.org/releases/yocto/yocto-4.0.8/meta-mingw-a90614a6498c3345704e9611f2842eb933dc51c1.tar.bz2 http://mirrors.kernel.org/yocto/yocto/yocto-4.0.8/meta-mingw-a90614a6498c3345704e9611f2842eb933dc51c1.tar.bz2
meta-gplv2
Repository Location: https://git.yoctoproject.org/meta-gplv2
Branch: kirkstone
Tag: yocto-4.0.8
Git Revision: d2f8b5cdb285b72a4ed93450f6703ca27aa42e8a
Release Artefact: meta-gplv2-d2f8b5cdb285b72a4ed93450f6703ca27aa42e8a
sha: c386f59f8a672747dc3d0be1d4234b6039273d0e57933eb87caa20f56b9cca6d
Download Locations: http://downloads.yoctoproject.org/releases/yocto/yocto-4.0.8/meta-gplv2-d2f8b5cdb285b72a4ed93450f6703ca27aa42e8a.tar.bz2 http://mirrors.kernel.org/yocto/yocto/yocto-4.0.8/meta-gplv2-d2f8b5cdb285b72a4ed93450f6703ca27aa42e8a.tar.bz2
bitbake
Repository Location: https://git.openembedded.org/bitbake
Branch: 2.0
Tag: yocto-4.0.8
Git Revision: 9bbdedc0ba7ca819b898e2a29a151d6a2014ca11
Release Artefact: bitbake-9bbdedc0ba7ca819b898e2a29a151d6a2014ca11
sha: 8e724411f4df00737e81b33eb568f1f97d2a00d5364342c0a212c46abb7b005b
Download Locations: http://downloads.yoctoproject.org/releases/yocto/yocto-4.0.8/bitbake-9bbdedc0ba7ca819b898e2a29a151d6a2014ca11.tar.bz2 http://mirrors.kernel.org/yocto/yocto/yocto-4.0.8/bitbake-9bbdedc0ba7ca819b898e2a29a151d6a2014ca11.tar.bz2
yocto-docs
Repository Location: https://git.yoctoproject.org/yocto-docs
Branch: kirkstone
Tag: yocto-4.0.8
Git Revision: 16ecbe028f2b9cc021267817a5413054e070b563
Release notes for Yocto-4.0.9 (Kirkstone)
Security Fixes in Yocto-4.0.9
binutils: Fix CVE-2023-22608
curl: Fix CVE-2023-23914, CVE-2023-23915 and CVE-2023-23916
epiphany: Fix CVE-2023-26081
git: Ignore CVE-2023-22743
glibc: Fix CVE-2023-0687
gnutls: Fix CVE-2023-0361
go: Fix CVE-2022-2879, CVE-2022-41720 and CVE-2022-41723
harfbuzz: Fix CVE-2023-25193
less: Fix CVE-2022-46663
libmicrohttpd: Fix CVE-2023-27371
libsdl2: Fix CVE-2022-4743
openssl: Fix CVE-2022-3996, CVE-2023-0464, CVE-2023-0465 and CVE-2023-0466
pkgconf: Fix CVE-2023-24056
python3: Fix CVE-2023-24329
shadow: Ignore CVE-2016-15024
systemd: Fix CVE-2022-4415
tiff: Fix CVE-2023-0800, CVE-2023-0801, CVE-2023-0802, CVE-2023-0803 and CVE-2023-0804
vim: Fix CVE-2023-0433, CVE-2023-0512, CVE-2023-1127, CVE-2023-1170, CVE-2023-1175, CVE-2023-1264 and CVE-2023-1355
xserver-xorg: Fix CVE-2023-0494
xwayland: Fix CVE-2023-0494
Fixes in Yocto-4.0.9
base-files: Drop localhost.localdomain from hosts file
binutils: Fix nativesdk ld.so search
bitbake: cookerdata: Drop dubious exception handling code
bitbake: cookerdata: Improve early exception handling
bitbake: cookerdata: Remove incorrect SystemExit usage
bitbake: fetch/git: Fix local clone url to make it work with repo
bitbake: utils: Allow to_boolean to support int values
bmap-tools: switch to main branch
buildtools-tarball: Handle spaces within user $PATH
busybox: Fix depmod patch
cracklib: update github branch to ‘main’
cups: add/fix web interface packaging
cups: check PACKAGECONFIG for pam feature
cups: use BUILDROOT instead of DESTDIR
curl: fix dependencies when building with ldap/ldaps
cve-check: Fix false negative version issue
dbus: upgrade to 1.14.6
devtool/upgrade: do not delete the workspace/recipes directory
dhcpcd: Fix install conflict when enable multilib.
dhcpcd: fix dhcpcd start failure on qemuppc64
gcc-shared-source: do not use ${S}/.. in deploy_source_date_epoch
glibc: Add missing binutils dependency
image_types: fix multiubi var init
iso-codes: upgrade to 4.13.0
json-c: Add ptest for json-c
kernel-yocto: fix kernel-meta data detection
lib/buildstats: handle tasks that never finished
lib/resulttool: fix typo breaking resulttool log –ptest
libjpeg-turbo: upgrade to 2.1.5.1
libmicrohttpd: upgrade to 0.9.76
libseccomp: fix for the ptest result format
libssh2: Clean up ptest patch/coverage
linux-firmware: add yamato fw files to qcom-adreno-a2xx package
linux-firmware: properly set license for all Qualcomm firmware
linux-firmware: upgrade to 20230210
linux-yocto-rt/5.15: update to -rt59
linux-yocto/5.10: upgrade to v5.10.175
linux-yocto/5.15: upgrade to v5.15.103
linux: inherit pkgconfig in kernel.bbclass
lttng-modules: fix for kernel 6.2+
lttng-modules: upgrade to v2.13.9
lua: Fix install conflict when enable multilib.
mdadm: Fix raid0, 06wrmostly and 02lineargrow tests
meson: Fix wrapper handling of implicit setup command
migration-guides: add 4.0.8 release notes
nghttp2: never build python bindings
oeqa rtc.py: skip if read-only-rootfs
oeqa ssh.py: fix hangs in run()
oeqa/sdk: Improve Meson test
oeqa/selftest/prservice: Improve debug output for failure
oeqa/selftest/resulttooltests: fix minor typo
openssl: upgrade to 3.0.8
package.bbclase: Add check for /build in copydebugsources()
patchelf: replace a rejected patch with an equivalent uninative.bbclass tweak
poky.conf: bump version for 4.0.9
populate_sdk_ext: Handle spaces within user $PATH
pybootchartui: Fix python syntax issue
python3-git: fix indent error
python3-setuptools-rust-native: Add direct dependency of native python3 modules
qemu: Revert “fix CVE-2021-3507” as not applicable for qemu 6.2
rsync: Add missing prototypes to function declarations
rsync: Turn on -pedantic-errors at the end of ‘configure’
runqemu: kill qemu if it hangs
scripts/lib/buildstats: handle top-level build_stats not being complete
selftest/recipetool: Stop test corrupting tinfoil class
selftest/runtime_test/virgl: Disable for all Rocky Linux
selftest: devtool: set BB_HASHSERVE_UPSTREAM when setting SSTATE_MIRROR
sstatesig: Improve output hash calculation
staging/multilib: Fix manifest corruption
staging: Separate out different multiconfig manifests
sudo: update 1.9.12p2 -> 1.9.13p3
systemd.bbclass: Add /usr/lib/systemd to searchpaths as well
systemd: add group sgx to udev package
systemd: fix wrong nobody-group assignment
timezone: use ‘tz’ subdir instead of ${WORKDIR} directly
toolchain-scripts: Handle spaces within user $PATH
tzcode-native: fix build with gcc-13 on host
tzdata: use separate B instead of WORKDIR for zic output
uninative: upgrade to 3.9 to include libgcc and glibc 2.37
vala: Fix install conflict when enable multilib.
vim: add missing pkgconfig inherit
vim: set modified-by to the recipe MAINTAINER
vim: upgrade to 9.0.1429
wic: Fix usage of fstype=none in wic
wireless-regdb: upgrade to 2023.02.13
xserver-xorg: upgrade to 21.1.7
xwayland: upgrade to 22.1.8
Known Issues in Yocto-4.0.9
N/A
Contributors to Yocto-4.0.9
Alexander Kanavin
Alexis Lothoré
Bruce Ashfield
Changqing Li
Chee Yang Lee
Dmitry Baryshkov
Federico Pellegrin
Geoffrey GIRY
Hitendra Prajapati
Hongxu Jia
Joe Slater
Kai Kang
Kenfe-Mickael Laventure
Khem Raj
Martin Jansa
Mateusz Marciniec
Michael Halstead
Michael Opdenacker
Mikko Rapeli
Ming Liu
Mingli Yu
Narpat Mali
Pavel Zhukov
Pawan Badganchi
Peter Marko
Piotr Łobacz
Poonam Jadhav
Randy MacLeod
Richard Purdie
Robert Yang
Romuald Jeanne
Ross Burton
Sakib Sajal
Saul Wold
Shubham Kulkarni
Siddharth Doshi
Simone Weiss
Steve Sakoman
Tim Orling
Tom Hochstein
Trevor Woerner
Ulrich Ölmann
Vivek Kumbhar
Wang Mingyu
Xiangyu Chen
Yash Shinde
Repositories / Downloads for Yocto-4.0.9
poky
Repository Location: https://git.yoctoproject.org/poky
Branch: kirkstone
Tag: yocto-4.0.9
Git Revision: 09def309f91929f47c6cce386016ccb777bd2cfc
Release Artefact: poky-09def309f91929f47c6cce386016ccb777bd2cfc
sha: 5c7ce209c8a6b37ec2898e5ca21858234d91999c11fa862880ba98e8bde62f63
Download Locations: http://downloads.yoctoproject.org/releases/yocto/yocto-4.0.9/poky-09def309f91929f47c6cce386016ccb777bd2cfc.tar.bz2 http://mirrors.kernel.org/yocto/yocto/yocto-4.0.9/poky-09def309f91929f47c6cce386016ccb777bd2cfc.tar.bz2
openembedded-core
Repository Location: https://git.openembedded.org/openembedded-core
Branch: kirkstone
Tag: yocto-4.0.9
Git Revision: ff4b57ffff903a93b710284c7c7f916ddd74712f
Release Artefact: oecore-ff4b57ffff903a93b710284c7c7f916ddd74712f
sha: 726778ffc291136db1704316b196de979f68df9f96476b785e1791957fbb66b3
Download Locations: http://downloads.yoctoproject.org/releases/yocto/yocto-4.0.9/oecore-ff4b57ffff903a93b710284c7c7f916ddd74712f.tar.bz2 http://mirrors.kernel.org/yocto/yocto/yocto-4.0.9/oecore-ff4b57ffff903a93b710284c7c7f916ddd74712f.tar.bz2
meta-mingw
Repository Location: https://git.yoctoproject.org/meta-mingw
Branch: kirkstone
Tag: yocto-4.0.9
Git Revision: a90614a6498c3345704e9611f2842eb933dc51c1
Release Artefact: meta-mingw-a90614a6498c3345704e9611f2842eb933dc51c1
sha: 49f9900bfbbc1c68136f8115b314e95d0b7f6be75edf36a75d9bcd1cca7c6302
Download Locations: http://downloads.yoctoproject.org/releases/yocto/yocto-4.0.9/meta-mingw-a90614a6498c3345704e9611f2842eb933dc51c1.tar.bz2 http://mirrors.kernel.org/yocto/yocto/yocto-4.0.9/meta-mingw-a90614a6498c3345704e9611f2842eb933dc51c1.tar.bz2
meta-gplv2
Repository Location: https://git.yoctoproject.org/meta-gplv2
Branch: kirkstone
Tag: yocto-4.0.9
Git Revision: d2f8b5cdb285b72a4ed93450f6703ca27aa42e8a
Release Artefact: meta-gplv2-d2f8b5cdb285b72a4ed93450f6703ca27aa42e8a
sha: c386f59f8a672747dc3d0be1d4234b6039273d0e57933eb87caa20f56b9cca6d
Download Locations: http://downloads.yoctoproject.org/releases/yocto/yocto-4.0.9/meta-gplv2-d2f8b5cdb285b72a4ed93450f6703ca27aa42e8a.tar.bz2 http://mirrors.kernel.org/yocto/yocto/yocto-4.0.9/meta-gplv2-d2f8b5cdb285b72a4ed93450f6703ca27aa42e8a.tar.bz2
bitbake
Repository Location: https://git.openembedded.org/bitbake
Branch: 2.0
Tag: yocto-4.0.9
Git Revision: 2802adb572eb73a3eb2725a74a9bbdaafc543fa7
Release Artefact: bitbake-2802adb572eb73a3eb2725a74a9bbdaafc543fa7
sha: 5c6e713b5e26b3835c0773095c7a1bc1f8affa28316b33597220ed86f1f1b643
Download Locations: http://downloads.yoctoproject.org/releases/yocto/yocto-4.0.9/bitbake-2802adb572eb73a3eb2725a74a9bbdaafc543fa7.tar.bz2 http://mirrors.kernel.org/yocto/yocto/yocto-4.0.9/bitbake-2802adb572eb73a3eb2725a74a9bbdaafc543fa7.tar.bz2
yocto-docs
Repository Location: https://git.yoctoproject.org/yocto-docs
Branch: kirkstone
Tag: yocto-4.0.9
Git Revision: 86d0b38a97941ad52b1af220c7b801a399d50e93
Release notes for Yocto-4.0.10 (Kirkstone)
Security Fixes in Yocto-4.0.10
binutils: Fix CVE-2023-1579, CVE-2023-1972, CVE-2023-25584, CVE-2023-25585 and CVE-2023-25588
cargo : Ignore CVE-2022-46176
connman: Fix CVE-2023-28488
curl: Fix CVE-2023-27533, CVE-2023-27534, CVE-2023-27535, CVE-2023-27536 and CVE-2023-27538
ffmpeg: Fix CVE-2022-48434
freetype: Fix CVE-2023-2004
ghostscript: Fix CVE-2023-29979
git: Fix CVE-2023-25652 and CVE-2023-29007
go: Fix CVE-2022-41722, CVE-2022-41724, CVE-2022-41725, CVE-2023-24534, CVE-2023-24537 and CVE-2023-24538
go: Ignore CVE-2022-41716
libxml2: Fix CVE-2023-28484 and CVE-2023-29469
libxpm: Fix CVE-2022-44617, CVE-2022-46285 and CVE-2022-4883
linux-yocto: Ignore CVE-2021-3759, CVE-2021-4135, CVE-2021-4155, CVE-2022-0168, CVE-2022-0171, CVE-2022-1016, CVE-2022-1184, CVE-2022-1198, CVE-2022-1199, CVE-2022-1462, CVE-2022-1734, CVE-2022-1852, CVE-2022-1882, CVE-2022-1998, CVE-2022-2078, CVE-2022-2196, CVE-2022-2318, CVE-2022-2380, CVE-2022-2503, CVE-2022-26365, CVE-2022-2663, CVE-2022-2873, CVE-2022-2905, CVE-2022-2959, CVE-2022-3028, CVE-2022-3078, CVE-2022-3104, CVE-2022-3105, CVE-2022-3106, CVE-2022-3107, CVE-2022-3111, CVE-2022-3112, CVE-2022-3113, CVE-2022-3115, CVE-2022-3202, CVE-2022-32250, CVE-2022-32296, CVE-2022-32981, CVE-2022-3303, CVE-2022-33740, CVE-2022-33741, CVE-2022-33742, CVE-2022-33743, CVE-2022-33744, CVE-2022-33981, CVE-2022-3424, CVE-2022-3435, CVE-2022-34918, CVE-2022-3521, CVE-2022-3545, CVE-2022-3564, CVE-2022-3586, CVE-2022-3594, CVE-2022-36123, CVE-2022-3621, CVE-2022-3623, CVE-2022-3629, CVE-2022-3633, CVE-2022-3635, CVE-2022-3646, CVE-2022-3649, CVE-2022-36879, CVE-2022-36946, CVE-2022-3707, CVE-2022-39188, CVE-2022-39190, CVE-2022-39842, CVE-2022-40307, CVE-2022-40768, CVE-2022-4095, CVE-2022-41218, CVE-2022-4139, CVE-2022-41849, CVE-2022-41850, CVE-2022-41858, CVE-2022-42328, CVE-2022-42329, CVE-2022-42703, CVE-2022-42721, CVE-2022-42722, CVE-2022-42895, CVE-2022-4382, CVE-2022-4662, CVE-2022-47518, CVE-2022-47519, CVE-2022-47520, CVE-2022-47929, CVE-2023-0179, CVE-2023-0394, CVE-2023-0461, CVE-2023-0590, CVE-2023-1073, CVE-2023-1074, CVE-2023-1077, CVE-2023-1078, CVE-2023-1079, CVE-2023-1095, CVE-2023-1118, CVE-2023-1249, CVE-2023-1252, CVE-2023-1281, CVE-2023-1382, CVE-2023-1513, CVE-2023-1829, CVE-2023-1838, CVE-2023-1998, CVE-2023-2006, CVE-2023-2008, CVE-2023-2162, CVE-2023-2166, CVE-2023-2177, CVE-2023-22999, CVE-2023-23002, CVE-2023-23004, CVE-2023-23454, CVE-2023-23455, CVE-2023-23559, CVE-2023-25012, CVE-2023-26545, CVE-2023-28327 and CVE-2023-28328
nasm: Fix CVE-2022-44370
python3-cryptography: Fix CVE-2023-23931
qemu: Ignore CVE-2023-0664
ruby: Fix CVE-2023-28755 and CVE-2023-28756
screen: Fix CVE-2023-24626
shadow: Fix CVE-2023-29383
tiff: Fix CVE-2022-4645
webkitgtk: Fix CVE-2022-32888 and CVE-2022-32923
xserver-xorg: Fix CVE-2023-1393
Fixes in Yocto-4.0.10
bitbake: bin/utils: Ensure locale en_US.UTF-8 is available on the system
build-appliance-image: Update to kirkstone head revision
cmake: add CMAKE_SYSROOT to generated toolchain file
glibc: stable 2.35 branch updates.
kernel-devsrc: depend on python3-core instead of python3
kernel: improve initramfs bundle processing time
libarchive: Enable acls, xattr for native as well as target
libbsd: Add correct license for all packages
libpam: Fix the xtests/tst-pam_motd[1|3] failures
libxpm: upgrade to 3.5.15
linux-firmware: upgrade to 20230404
linux-yocto/5.15: upgrade to v5.15.108
migration-guides: add release-notes for 4.0.9
oeqa/utils/metadata.py: Fix running oe-selftest running with no distro set
openssl: Move microblaze to linux-latomic config
package.bbclass: correct check for /build in copydebugsources()
poky.conf: bump version for 4.0.10
populate_sdk_base: add zip options
populate_sdk_ext.bbclass: set METADATA_REVISION with an DISTRO override
run-postinsts: Set dependency for ldconfig to avoid boot issues
update-alternatives.bbclass: fix old override syntax
wic/bootimg-efi: if fixed-size is set then use that for mkdosfs
wpebackend-fdo: upgrade to 1.14.2
xorg-lib-common: Add variable to set tarball type
xserver-xorg: upgrade to 21.1.8
Known Issues in Yocto-4.0.10
N/A
Contributors to Yocto-4.0.10
Archana Polampalli
Arturo Buzarra
Bruce Ashfield
Christoph Lauer
Deepthi Hemraj
Dmitry Baryshkov
Frank de Brabander
Hitendra Prajapati
Joe Slater
Kai Kang
Kyle Russell
Lee Chee Yang
Mark Hatle
Martin Jansa
Mingli Yu
Narpat Mali
Pascal Bach
Pawan Badganchi
Peter Bergin
Peter Marko
Piotr Łobacz
Randolph Sapp
Ranjitsinh Rathod
Ross Burton
Shubham Kulkarni
Siddharth Doshi
Steve Sakoman
Sundeep KOKKONDA
Thomas Roos
Virendra Thakur
Vivek Kumbhar
Wang Mingyu
Xiangyu Chen
Yash Shinde
Yoann Congal
Yogita Urade
Zhixiong Chi
Repositories / Downloads for Yocto-4.0.10
poky
Repository Location: https://git.yoctoproject.org/poky
Branch: kirkstone
Tag: yocto-4.0.10
Git Revision: f53ab3a2ff206a130cdc843839dd0ea5ec4ad02f
Release Artefact: poky-f53ab3a2ff206a130cdc843839dd0ea5ec4ad02f
sha: 8820aeac857ce6bbd1c7ef26cadbb86eca02be93deded253b4a5f07ddd69255d
Download Locations: http://downloads.yoctoproject.org/releases/yocto/yocto-4.0.10/poky-f53ab3a2ff206a130cdc843839dd0ea5ec4ad02f.tar.bz2 http://mirrors.kernel.org/yocto/yocto/yocto-4.0.10/poky-f53ab3a2ff206a130cdc843839dd0ea5ec4ad02f.tar.bz2
openembedded-core
Repository Location: https://git.openembedded.org/openembedded-core
Branch: kirkstone
Tag: yocto-4.0.10
Git Revision: d2713785f9cd2d58731df877bc8b7bcc71b6c8e6
Release Artefact: oecore-d2713785f9cd2d58731df877bc8b7bcc71b6c8e6
sha: 78e084a1aceaaa6ec022702f29f80eaffade3159e9c42b6b8985c1b7ddd2fbab
Download Locations: http://downloads.yoctoproject.org/releases/yocto/yocto-4.0.10/oecore-d2713785f9cd2d58731df877bc8b7bcc71b6c8e6.tar.bz2 http://mirrors.kernel.org/yocto/yocto/yocto-4.0.10/oecore-d2713785f9cd2d58731df877bc8b7bcc71b6c8e6.tar.bz2
meta-mingw
Repository Location: https://git.yoctoproject.org/meta-mingw
Branch: kirkstone
Tag: yocto-4.0.10
Git Revision: a90614a6498c3345704e9611f2842eb933dc51c1
Release Artefact: meta-mingw-a90614a6498c3345704e9611f2842eb933dc51c1
sha: 49f9900bfbbc1c68136f8115b314e95d0b7f6be75edf36a75d9bcd1cca7c6302
Download Locations: http://downloads.yoctoproject.org/releases/yocto/yocto-4.0.10/meta-mingw-a90614a6498c3345704e9611f2842eb933dc51c1.tar.bz2 http://mirrors.kernel.org/yocto/yocto/yocto-4.0.10/meta-mingw-a90614a6498c3345704e9611f2842eb933dc51c1.tar.bz2
meta-gplv2
Repository Location: https://git.yoctoproject.org/meta-gplv2
Branch: kirkstone
Tag: yocto-4.0.10
Git Revision: d2f8b5cdb285b72a4ed93450f6703ca27aa42e8a
Release Artefact: meta-gplv2-d2f8b5cdb285b72a4ed93450f6703ca27aa42e8a
sha: c386f59f8a672747dc3d0be1d4234b6039273d0e57933eb87caa20f56b9cca6d
Download Locations: http://downloads.yoctoproject.org/releases/yocto/yocto-4.0.10/meta-gplv2-d2f8b5cdb285b72a4ed93450f6703ca27aa42e8a.tar.bz2 http://mirrors.kernel.org/yocto/yocto/yocto-4.0.10/meta-gplv2-d2f8b5cdb285b72a4ed93450f6703ca27aa42e8a.tar.bz2
bitbake
Repository Location: https://git.openembedded.org/bitbake
Branch: 2.0
Tag: yocto-4.0.10
Git Revision: 0c6f86b60cfba67c20733516957c0a654eb2b44c
Release Artefact: bitbake-0c6f86b60cfba67c20733516957c0a654eb2b44c
sha: 4caa94ee4d644017b0cc51b702e330191677f7d179018cbcec8b1793949ebc74
Download Locations: http://downloads.yoctoproject.org/releases/yocto/yocto-4.0.10/bitbake-0c6f86b60cfba67c20733516957c0a654eb2b44c.tar.bz2 http://mirrors.kernel.org/yocto/yocto/yocto-4.0.10/bitbake-0c6f86b60cfba67c20733516957c0a654eb2b44c.tar.bz2
yocto-docs
Repository Location: https://git.yoctoproject.org/yocto-docs
Branch: kirkstone
Tag: yocto-4.0.10
Git Revision: 8388be749806bd0bf4fccf1005dae8f643aa4ef4
Release notes for Yocto-4.0.11 (Kirkstone)
Security Fixes in Yocto-4.0.11
cups: Fix CVE-2023-32324
curl: Fix CVE-2023-28319, CVE-2023-28320, CVE-2023-28321 and CVE-2023-28322
git: Ignore CVE-2023-25815
go: Fix CVE-2023-24539 and CVE-2023-24540
nasm: Fix CVE-2022-46457
openssh: Fix CVE-2023-28531
openssl: Fix CVE-2023-1255 and CVE-2023-2650
perl: Fix CVE-2023-31484
python3-requests: Fix for CVE-2023-32681
sysstat: Fix CVE-2023-33204
vim: Fix CVE-2023-2426
webkitgtk: fix CVE-2022-42867, CVE-2022-46691, CVE-2022-46699 and CVE-2022-46700
Fixes in Yocto-4.0.11
Revert “docs: conf.py: fix cve extlinks caption for sphinx <4.0”
Revert “ipk: Decode byte data to string in manifest handling”
avahi: fix D-Bus introspection
build-appliance-image: Update to kirkstone head revision
conf.py: add macro for Mitre CVE links
conf: add nice level to the hash config ignred variables
cpio: Fix wrong CRC with ASCII CRC for large files
cve-update-nvd2-native: added the missing http import
cve-update-nvd2-native: new CVE database fetcher
dhcpcd: use git instead of tarballs
e2fsprogs: fix ptest bug for second running
gcc-runtime: Use static dummy libstdc++
glibc: stable 2.35 branch updates (cbceb903c4d7)
go.bbclass: don’t use test to check output from ls
gstreamer1.0: Upgrade to 1.20.6
iso-codes: Upgrade to 4.15.0
kernel-devicetree: allow specification of dtb directory
kernel-devicetree: make shell scripts posix compliant
kernel-devicetree: recursively search for dtbs
kernel: don’t force PAHOLE=false
kmscube: Correct DEPENDS to avoid overwrite
lib/terminal.py: Add urxvt terminal
license.bbclass: Include LICENSE in the output when it fails to parse
linux-yocto/5.10: Upgrade to v5.10.180
linux-yocto/5.15: Upgrade to v5.15.113
llvm: backport a fix for build with gcc-13
maintainers.inc: Fix email address typo
maintainers.inc: Move repo to unassigned
migration-guides: add release notes for 4.0.10
migration-guides: use new cve_mitre macro
nghttp2: Deleted the entries for -client and -server, and removed a dependency on them from the main package.
oeqa/selftest/cases/devtool.py: skip all tests require folder a git repo
openssh: Remove BSD-4-clause contents completely from codebase
openssl: Upgrade to 3.0.9
overview-manual: concepts.rst: Fix a typo
p11-kit: add native to BBCLASSEXTEND
package: enable recursion on file globs
package_manager/ipk: fix config path generation in _create_custom_config()
piglit: Add PACKAGECONFIG for glx and opencl
piglit: Add missing glslang dependencies
piglit: Fix build time dependency
poky.conf: bump version for 4.0.11
profile-manual: fix blktrace remote usage instructions
quilt: Fix merge.test race condition
ref-manual: add clarification for SRCREV
selftest/reproducible: Allow native/cross reuse in test
staging.bbclass: do not add extend_recipe_sysroot to prefuncs of prepare_recipe_sysroot
systemd-networkd: backport fix for rm unmanaged wifi
systemd-systemctl: fix instance template WantedBy symlink construction
systemd-systemctl: support instance expansion in WantedBy
uninative: Upgrade to 3.10 to support gcc 13
uninative: Upgrade to 4.0 to include latest gcc 13.1.1
vim: Upgrade to 9.0.1527
waffle: Upgrade to 1.7.2
weston: add xwayland to DEPENDS for PACKAGECONFIG xwayland
Known Issues in Yocto-4.0.11
N/A
Contributors to Yocto-4.0.11
Alexander Kanavin
Andrew Jeffery
Archana Polampalli
Bhabu Bindu
Bruce Ashfield
Andy Martin
Chen Qi
Daniel Ammann
Deepthi Hemraj
Ed Beroset
Eero Aaltonen
Enrico Jörns
Hannu Lounento
Hitendra Prajapati
Ian Ray
Jan Luebbe
Jan Vermaete
Khem Raj
Lee Chee Yang
Lei Maohui
Lorenzo Arena
Marek Vasut
Marta Rybczynska
Martin Jansa
Martin Siegumfeldt
Michael Halstead
Michael Opdenacker
Ming Liu
Narpat Mali
Omkar Patil
Pablo Saavedra
Pavel Zhukov
Peter Kjellerstedt
Peter Marko
Qiu Tingting
Quentin Schulz
Randolph Sapp
Randy MacLeod
Ranjitsinh Rathod
Richard Purdie
Riyaz Khan
Sakib Sajal
Sanjay Chitroda
Soumya Sambu
Steve Sakoman
Thomas Roos
Tom Hochstein
Vivek Kumbhar
Wang Mingyu
Yogita Urade
Zoltan Boszormenyi
Repositories / Downloads for Yocto-4.0.11
poky
Repository Location: https://git.yoctoproject.org/poky
Branch: kirkstone
Tag: yocto-4.0.11
Git Revision: fc697fe87412b9b179ae3a68d266ace85bb1fcc6
Release Artefact: poky-fc697fe87412b9b179ae3a68d266ace85bb1fcc6
sha: d42ab1b76b9d8ab164d86dc0882c908658f6b5be0742b13a71531068f6a5ee98
Download Locations: http://downloads.yoctoproject.org/releases/yocto/yocto-4.0.11/poky-fc697fe87412b9b179ae3a68d266ace85bb1fcc6.tar.bz2 http://mirrors.kernel.org/yocto/yocto/yocto-4.0.11/poky-fc697fe87412b9b179ae3a68d266ace85bb1fcc6.tar.bz2
openembedded-core
Repository Location: https://git.openembedded.org/openembedded-core
Branch: kirkstone
Tag: yocto-4.0.11
Git Revision: 7949e786cf8e50f716ff1f1c4797136637205e0c
Release Artefact: oecore-7949e786cf8e50f716ff1f1c4797136637205e0c
sha: 3bda3f7d15961bad5490faf3194709528591a97564b5eae3da7345b63be20334
Download Locations: http://downloads.yoctoproject.org/releases/yocto/yocto-4.0.11/oecore-7949e786cf8e50f716ff1f1c4797136637205e0c.tar.bz2 http://mirrors.kernel.org/yocto/yocto/yocto-4.0.11/oecore-7949e786cf8e50f716ff1f1c4797136637205e0c.tar.bz2
meta-mingw
Repository Location: https://git.yoctoproject.org/meta-mingw
Branch: kirkstone
Tag: yocto-4.0.11
Git Revision: a90614a6498c3345704e9611f2842eb933dc51c1
Release Artefact: meta-mingw-a90614a6498c3345704e9611f2842eb933dc51c1
sha: 49f9900bfbbc1c68136f8115b314e95d0b7f6be75edf36a75d9bcd1cca7c6302
Download Locations: http://downloads.yoctoproject.org/releases/yocto/yocto-4.0.11/meta-mingw-a90614a6498c3345704e9611f2842eb933dc51c1.tar.bz2 http://mirrors.kernel.org/yocto/yocto/yocto-4.0.11/meta-mingw-a90614a6498c3345704e9611f2842eb933dc51c1.tar.bz2
meta-gplv2
Repository Location: https://git.yoctoproject.org/meta-gplv2
Branch: kirkstone
Tag: yocto-4.0.11
Git Revision: d2f8b5cdb285b72a4ed93450f6703ca27aa42e8a
Release Artefact: meta-gplv2-d2f8b5cdb285b72a4ed93450f6703ca27aa42e8a
sha: c386f59f8a672747dc3d0be1d4234b6039273d0e57933eb87caa20f56b9cca6d
Download Locations: http://downloads.yoctoproject.org/releases/yocto/yocto-4.0.11/meta-gplv2-d2f8b5cdb285b72a4ed93450f6703ca27aa42e8a.tar.bz2 http://mirrors.kernel.org/yocto/yocto/yocto-4.0.11/meta-gplv2-d2f8b5cdb285b72a4ed93450f6703ca27aa42e8a.tar.bz2
bitbake
Repository Location: https://git.openembedded.org/bitbake
Branch: 2.0
Tag: yocto-4.0.11
Git Revision: 0c6f86b60cfba67c20733516957c0a654eb2b44c
Release Artefact: bitbake-0c6f86b60cfba67c20733516957c0a654eb2b44c
sha: 4caa94ee4d644017b0cc51b702e330191677f7d179018cbcec8b1793949ebc74
Download Locations: http://downloads.yoctoproject.org/releases/yocto/yocto-4.0.11/bitbake-0c6f86b60cfba67c20733516957c0a654eb2b44c.tar.bz2 http://mirrors.kernel.org/yocto/yocto/yocto-4.0.11/bitbake-0c6f86b60cfba67c20733516957c0a654eb2b44c.tar.bz2
yocto-docs
Repository Location: https://git.yoctoproject.org/yocto-docs
Branch: kirkstone
Tag: yocto-4.0.11
Git Revision: 6d16d2bde0aa32276a035ee49703e6eea7c7b29a
Release notes for Yocto-4.0.12 (Kirkstone)
Security Fixes in Yocto-4.0.12
bind: Fix CVE-2023-2828 and CVE-2023-2911
cups: Fix CVE-2023-34241
curl: Added CVE-2023-28320 Follow-up patch
dbus: Fix CVE-2023-34969
dmidecode: fix CVE-2023-30630
ghostscript: fix CVE-2023-36664
go: fix CVE-2023-24531, CVE-2023-24536, CVE-2023-29400, CVE-2023-29402, CVE-2023-29404, CVE-2023-29405 and CVE-2023-29406
libarchive: Ignore CVE-2023-30571
libcap: Fix CVE-2023-2602 and CVE-2023-2603
libjpeg-turbo: Fix CVE-2023-2804
libpcre2: Fix CVE-2022-41409
libtiff: fix CVE-2023-26965
libwebp: Fix CVE-2023-1999
libx11: Fix CVE-2023-3138
libxpm: Fix CVE-2022-44617
ninja: Ignore CVE-2021-4336
openssh: Fix CVE-2023-38408
openssl: Fix CVE-2023-2975, CVE-2023-3446 and CVE-2023-3817
perl: Fix CVE-2023-31486
python3: Ignore CVE-2023-36632
qemu: Fix CVE-2023-0330, CVE-2023-2861, CVE-2023-3255 and CVE-2023-3301
sqlite3: Fix CVE-2023-36191
tiff: Fix CVE-2023-0795, CVE-2023-0796, CVE-2023-0797, CVE-2023-0798, CVE-2023-0799, CVE-2023-25433, CVE-2023-25434 and CVE-2023-25435
vim: CVE-2023-2609 and CVE-2023-2610
Fixes in Yocto-4.0.12
babeltrace2: Always use BFD linker when building tests with ld-is-lld distro feature
babeltrace2: upgrade to 2.0.5
bitbake.conf: add unzstd in HOSTTOOLS
bitbake: bitbake-layers: initialize tinfoil before registering command line arguments
bitbake: runqueue: Fix deferred task/multiconfig race issue
blktrace: ask for python3 specifically
build-appliance-image: Update to kirkstone head revision
cmake: Fix CMAKE_SYSTEM_PROCESSOR setting for SDK
connman: fix warning by specifying runstatedir at configure time
cpio: Replace fix wrong CRC with ASCII CRC for large files with upstream backport
cve-update-nvd2-native: actually use API keys
cve-update-nvd2-native: always pass str for json.loads()
cve-update-nvd2-native: fix cvssV3 metrics
cve-update-nvd2-native: handle all configuration nodes, not just first
cve-update-nvd2-native: increase retry count
cve-update-nvd2-native: log a little more
cve-update-nvd2-native: retry all errors and sleep between retries
cve-update-nvd2-native: use exact times, don’t truncate
dbus: upgrade to 1.14.8
devtool: Fix the wrong variable in srcuri_entry
diffutils: upgrade to 3.10
docs: ref-manual: terms: fix typos in SPDX term
fribidi: upgrade to 1.0.13
gcc: upgrade to v11.4
gcc-testsuite: Fix ppc cpu specification
gcc: don’t pass –enable-standard-branch-protection
gcc: fix runpath errors in cc1 binary
grub: submit determinism.patch upstream
image_types: Fix reproducible builds for initramfs and UKI img
kernel: add missing path to search for debug files
kmod: remove unused ptest.patch
layer.conf: Add missing dependency exclusion
libassuan: upgrade to 2.5.6
libksba: upgrade to 1.6.4
libpng: Add ptest for libpng
libxcrypt: fix build with perl-5.38 and use master branch
libxcrypt: fix hard-coded “.so” extension
libxpm: upgrade to 3.5.16
linux-firmware: upgrade to 20230515
linux-yocto/5.10: cfg: fix DECNET configuration warning
linux-yocto/5.10: update to v5.10.185
linux-yocto/5.15: cfg: fix DECNET configuration warning
linux-yocto/5.15: update to v5.15.120
logrotate: Do not create logrotate.status file
lttng-ust: upgrade to 2.13.6
machine/arch-arm64: add -mbranch-protection=standard
maintainers.inc: correct Carlos Rafael Giani’s email address
maintainers.inc: correct unassigned entries
maintainers.inc: unassign Adrian Bunk from wireless-regdb
maintainers.inc: unassign Alistair Francis from opensbi
maintainers.inc: unassign Andreas Müller from itstool entry
maintainers.inc: unassign Pascal Bach from cmake entry
maintainers.inc: unassign Ricardo Neri from ovmf
maintainers.inc: unassign Richard Weinberger from erofs-utils entry
mdadm: fix 07revert-inplace ptest
mdadm: fix segfaults when running ptests
mdadm: fix util-linux ptest dependency
mdadm: skip running known broken ptests
meson.bbclass: Point to llvm-config from native sysroot
meta: lib: oe: npm_registry: Add more safe caracters
migration-guides: add release notes for 4.0.11
minicom: remove unused patch files
mobile-broadband-provider-info: upgrade to 20230416
oe-depends-dot: Handle new format for task-depends.dot
oeqa/runtime/cases/rpm: fix wait_for_no_process_for_user failure case
oeqa/selftest/bbtests: add non-existent prefile/postfile tests
oeqa/selftest/devtool: add unit test for “devtool add -b”
openssl: Upgrade to 3.0.10
openssl: add PERLEXTERNAL path to test its existence
openssl: use a glob on the PERLEXTERNAL to track updates on the path
package.bbclass: moving field data process before variable process in process_pkgconfig
pm-utils: fix multilib conflictions
poky.conf: bump version for 4.0.12
psmisc: Set ALTERNATIVE for pstree to resolve conflict with busybox
pybootchartgui: show elapsed time for each task
python3: fix missing comma in get_module_deps3.py
python3: upgrade to 3.10.12
recipetool: Fix inherit in created -native* recipes
ref-manual: add LTS and Mixin terms
ref-manual: document image-specific variant of INCOMPATIBLE_LICENSE
ref-manual: release-process: update for LTS releases
rust-llvm: backport a fix for build with gcc-13
scripts/runqemu: allocate unfsd ports in a way that doesn’t race or clash with unrelated processes
scripts/runqemu: split lock dir creation into a reusable function
sdk.py: error out when moving file fails
sdk.py: fix moving dnf contents
selftest reproducible.py: support different build targets
selftest/license: Exclude from world
selftest/reproducible: Allow chose the package manager
serf: upgrade to 1.3.10
strace: Disable failing test
strace: Merge two similar patches
strace: Update patches/tests with upstream fixes
sysfsutils: fetch a supported fork from github
systemd-systemctl: fix errors in instance name expansion
systemd: Backport nspawn: make sure host root can write to the uidmapped mounts we prepare for the container payload
tzdata: upgrade to 2023c
uboot-extlinux-config.bbclass: fix old override syntax in comment
unzip: fix configure check for cross compilation
useradd-staticids.bbclass: improve error message
util-linux: add alternative links for ipcs,ipcrm
v86d: Improve kernel dependency
vim: upgrade to 9.0.1592
wget: upgrade to 1.21.4
wic: Add dependencies for erofs-utils
wireless-regdb: upgrade to 2023.05.03
xdpyinfo: upgrade to 1.3.4
zip: fix configure check by using _Static_assert
Known Issues in Yocto-4.0.12
N/A
Contributors to Yocto-4.0.12
Alberto Planas
Alexander Kanavin
Alexander Sverdlin
Andrej Valek
Archana Polampalli
BELOUARGA Mohamed
Benjamin Bouvier
Bruce Ashfield
Charlie Wu
Chen Qi
Etienne Cordonnier
Fabien Mahot
Frieder Paape
Frieder Schrempf
Heiko Thole
Hitendra Prajapati
Jermain Horsman
Jose Quaresma
Kai Kang
Khem Raj
Lee Chee Yang
Marc Ferland
Marek Vasut
Martin Jansa
Mauro Queiros
Michael Opdenacker
Mikko Rapeli
Nikhil R
Ovidiu Panait
Peter Marko
Poonam Jadhav
Quentin Schulz
Richard Purdie
Ross Burton
Rusty Howell
Sakib Sajal
Soumya Sambu
Steve Sakoman
Sundeep KOKKONDA
Tim Orling
Tom Hochstein
Trevor Gamblin
Vijay Anusuri
Vivek Kumbhar
Wang Mingyu
Xiangyu Chen
Yoann Congal
Yogita Urade
Yuta Hayama
Repositories / Downloads for Yocto-4.0.12
poky
Repository Location: https://git.yoctoproject.org/poky
Branch: kirkstone
Tag: yocto-4.0.12
Git Revision: d6b8790370500b99ca11f0d8a05c39b661ab2ba6
Release Artefact: poky-d6b8790370500b99ca11f0d8a05c39b661ab2ba6
sha: 35f0390e0c5a12f403ed471c0b1254c13cbb9d7c7b46e5a3538e63e36c1ac280
Download Locations: http://downloads.yoctoproject.org/releases/yocto/yocto-4.0.12/poky-d6b8790370500b99ca11f0d8a05c39b661ab2ba6.tar.bz2 http://mirrors.kernel.org/yocto/yocto/yocto-4.0.12/poky-d6b8790370500b99ca11f0d8a05c39b661ab2ba6.tar.bz2
openembedded-core
Repository Location: https://git.openembedded.org/openembedded-core
Branch: kirkstone
Tag: yocto-4.0.12
Git Revision: e1a604db8d2cf8782038b4016cc2e2052467333b
Release Artefact: oecore-e1a604db8d2cf8782038b4016cc2e2052467333b
sha: 8b302eb3f3ffe5643f88bc6e4ae8f9a5cda63544d67e04637ecc4197e9750a1d
Download Locations: http://downloads.yoctoproject.org/releases/yocto/yocto-4.0.12/oecore-e1a604db8d2cf8782038b4016cc2e2052467333b.tar.bz2 http://mirrors.kernel.org/yocto/yocto/yocto-4.0.12/oecore-e1a604db8d2cf8782038b4016cc2e2052467333b.tar.bz2
meta-mingw
Repository Location: https://git.yoctoproject.org/meta-mingw
Branch: kirkstone
Tag: yocto-4.0.12
Git Revision: a90614a6498c3345704e9611f2842eb933dc51c1
Release Artefact: meta-mingw-a90614a6498c3345704e9611f2842eb933dc51c1
sha: 49f9900bfbbc1c68136f8115b314e95d0b7f6be75edf36a75d9bcd1cca7c6302
Download Locations: http://downloads.yoctoproject.org/releases/yocto/yocto-4.0.12/meta-mingw-a90614a6498c3345704e9611f2842eb933dc51c1.tar.bz2 http://mirrors.kernel.org/yocto/yocto/yocto-4.0.12/meta-mingw-a90614a6498c3345704e9611f2842eb933dc51c1.tar.bz2
meta-gplv2
Repository Location: https://git.yoctoproject.org/meta-gplv2
Branch: kirkstone
Tag: yocto-4.0.12
Git Revision: d2f8b5cdb285b72a4ed93450f6703ca27aa42e8a
Release Artefact: meta-gplv2-d2f8b5cdb285b72a4ed93450f6703ca27aa42e8a
sha: c386f59f8a672747dc3d0be1d4234b6039273d0e57933eb87caa20f56b9cca6d
Download Locations: http://downloads.yoctoproject.org/releases/yocto/yocto-4.0.12/meta-gplv2-d2f8b5cdb285b72a4ed93450f6703ca27aa42e8a.tar.bz2 http://mirrors.kernel.org/yocto/yocto/yocto-4.0.12/meta-gplv2-d2f8b5cdb285b72a4ed93450f6703ca27aa42e8a.tar.bz2
bitbake
Repository Location: https://git.openembedded.org/bitbake
Branch: 2.0
Tag: yocto-4.0.12
Git Revision: 41b6684489d0261753344956042be2cc4adb0159
Release Artefact: bitbake-41b6684489d0261753344956042be2cc4adb0159
sha: efa2b1c4d0be115ed3960750d1e4ed958771b2db6d7baee2d13ad386589376e8
Download Locations: http://downloads.yoctoproject.org/releases/yocto/yocto-4.0.12/bitbake-41b6684489d0261753344956042be2cc4adb0159.tar.bz2 http://mirrors.kernel.org/yocto/yocto/yocto-4.0.12/bitbake-41b6684489d0261753344956042be2cc4adb0159.tar.bz2
yocto-docs
Repository Location: https://git.yoctoproject.org/yocto-docs
Branch: kirkstone
Tag: yocto-4.0.12
Git Revision: 4dfef81ac6164764c6541e39a9fef81d49227096
Release notes for Yocto-4.0.13 (Kirkstone)
Security Fixes in Yocto-4.0.13
bind: Fix CVE-2023-2829
binutils: Fix CVE-2022-48065
busybox: Fix CVE-2022-48174
cups: Fix CVE-2023-32360
curl: Fix CVE-2023-32001
dmidecode: Fix CVE-2023-30630
dropbear: Fix CVE-2023-36328
ffmpeg: Ignored CVE-2023-39018
file: Fix CVE-2022-48554
flac: Fix CVE-2020-22219
gcc: Fix CVE-2023-4039
gdb: Fix CVE-2023-39128
ghostscript: Fix CVE-2023-38559
glib-2.0: Fix CVE-2023-29499, CVE-2023-32611, CVE-2023-32636, CVE-2023-32643 and CVE-2023-32665
go: Fix CVE-2023-29409 and CVE-2023-39319
gstreamer1.0-plugins-bad: Fix CVE-2023-37329
gstreamer1.0-plugins-base: Fix CVE-2023-37328
gstreamer1.0-plugins-good: Fix CVE-2023-37327
inetutils: Fix CVE-2023-40303
json-c: Fix CVE-2021-32292
librsvg: Fix CVE-2023-38633
libssh2: Fix CVE-2020-22218
libtiff: Fix CVE-2023-26966
libxml2: Fix CVE-2023-39615
linux-yocto/5.15: Ignore CVE-2003-1604, CVE-2004-0230, CVE-2006-3635, CVE-2006-5331, CVE-2006-6128, CVE-2007-4774, CVE-2007-6761, CVE-2007-6762, CVE-2008-7316, CVE-2009-2692, CVE-2010-0008, CVE-2010-3432, CVE-2010-4648, CVE-2010-5313, CVE-2010-5328, CVE-2010-5329, CVE-2010-5331, CVE-2010-5332, CVE-2011-4098, CVE-2011-4131, CVE-2011-4915, CVE-2011-5321, CVE-2011-5327, CVE-2012-0957, CVE-2012-2119, CVE-2012-2136, CVE-2012-2137, CVE-2012-2313, CVE-2012-2319, CVE-2012-2372, CVE-2012-2375, CVE-2012-2390, CVE-2012-2669, CVE-2012-2744, CVE-2012-2745, CVE-2012-3364, CVE-2012-3375, CVE-2012-3400, CVE-2012-3412, CVE-2012-3430, CVE-2012-3510, CVE-2012-3511, CVE-2012-3520, CVE-2012-3552, CVE-2012-4398, CVE-2012-4444, CVE-2012-4461, CVE-2012-4467, CVE-2012-4508, CVE-2012-4530, CVE-2012-4565, CVE-2012-5374, CVE-2012-5375, CVE-2012-5517, CVE-2012-6536, CVE-2012-6537, CVE-2012-6538, CVE-2012-6539, CVE-2012-6540, CVE-2012-6541, CVE-2012-6542, CVE-2012-6543, CVE-2012-6544, CVE-2012-6545, CVE-2012-6546, CVE-2012-6547, CVE-2012-6548, CVE-2012-6549, CVE-2012-6638, CVE-2012-6647, CVE-2012-6657, CVE-2012-6689, CVE-2012-6701, CVE-2012-6703, CVE-2012-6704, CVE-2012-6712, CVE-2013-0160, CVE-2013-0190, CVE-2013-0216, CVE-2013-0217, CVE-2013-0228, CVE-2013-0231, CVE-2013-0268, CVE-2013-0290, CVE-2013-0309, CVE-2013-0310, CVE-2013-0311, CVE-2013-0313, CVE-2013-0343, CVE-2013-0349, CVE-2013-0871, CVE-2013-0913, CVE-2013-0914, CVE-2013-1059, CVE-2013-1763, CVE-2013-1767, CVE-2013-1772, CVE-2013-1773, CVE-2013-1774, CVE-2013-1792, CVE-2013-1796, CVE-2013-1797, CVE-2013-1798, CVE-2013-1819, CVE-2013-1826, CVE-2013-1827, CVE-2013-1828, CVE-2013-1848, CVE-2013-1858, CVE-2013-1860, CVE-2013-1928, CVE-2013-1929, CVE-2013-1943, CVE-2013-1956, CVE-2013-1957, CVE-2013-1958, CVE-2013-1959, CVE-2013-1979, CVE-2013-2015, CVE-2013-2017, CVE-2013-2058, CVE-2013-2094, CVE-2013-2128, CVE-2013-2140, CVE-2013-2141, CVE-2013-2146, CVE-2013-2147, CVE-2013-2148, CVE-2013-2164, CVE-2013-2206, CVE-2013-2232, CVE-2013-2234, CVE-2013-2237, CVE-2013-2546, CVE-2013-2547, CVE-2013-2548, CVE-2013-2596, CVE-2013-2634, CVE-2013-2635, CVE-2013-2636, CVE-2013-2850, CVE-2013-2851, CVE-2013-2852, CVE-2013-2888, CVE-2013-2889, CVE-2013-2890, CVE-2013-2891, CVE-2013-2892, CVE-2013-2893, CVE-2013-2894, CVE-2013-2895, CVE-2013-2896, CVE-2013-2897, CVE-2013-2898, CVE-2013-2899, CVE-2013-2929, CVE-2013-2930, CVE-2013-3076, CVE-2013-3222, CVE-2013-3223, CVE-2013-3224, CVE-2013-3225, CVE-2013-3226, CVE-2013-3227, CVE-2013-3228, CVE-2013-3229, CVE-2013-3230, CVE-2013-3231, CVE-2013-3232, CVE-2013-3233, CVE-2013-3234, CVE-2013-3235, CVE-2013-3236, CVE-2013-3237, CVE-2013-3301, CVE-2013-3302, CVE-2013-4125, CVE-2013-4127, CVE-2013-4129, CVE-2013-4162, CVE-2013-4163, CVE-2013-4205, CVE-2013-4220, CVE-2013-4247, CVE-2013-4254, CVE-2013-4270, CVE-2013-4299, CVE-2013-4300, CVE-2013-4312, CVE-2013-4343, CVE-2013-4345, CVE-2013-4348, CVE-2013-4350, CVE-2013-4387, CVE-2013-4470, CVE-2013-4483, CVE-2013-4511, CVE-2013-4512, CVE-2013-4513, CVE-2013-4514, CVE-2013-4515, CVE-2013-4516, CVE-2013-4563, CVE-2013-4579, CVE-2013-4587, CVE-2013-4588, CVE-2013-4591, CVE-2013-4592, CVE-2013-5634, CVE-2013-6282, CVE-2013-6367, CVE-2013-6368, CVE-2013-6376, CVE-2013-6378, CVE-2013-6380, CVE-2013-6381, CVE-2013-6382, CVE-2013-6383, CVE-2013-6431, CVE-2013-6432, CVE-2013-6885, CVE-2013-7026, CVE-2013-7027, CVE-2013-7263, CVE-2013-7264, CVE-2013-7265, CVE-2013-7266, CVE-2013-7267, CVE-2013-7268, CVE-2013-7269, CVE-2013-7270, CVE-2013-7271, CVE-2013-7281, CVE-2013-7339, CVE-2013-7348, CVE-2013-7421, CVE-2013-7446, CVE-2013-7470, CVE-2014-0038, CVE-2014-0049, CVE-2014-0055, CVE-2014-0069, CVE-2014-0077, CVE-2014-0100, CVE-2014-0101, CVE-2014-0102, CVE-2014-0131, CVE-2014-0155, CVE-2014-0181, CVE-2014-0196, CVE-2014-0203, CVE-2014-0205, CVE-2014-0206, CVE-2014-1438, CVE-2014-1444, CVE-2014-1445, CVE-2014-1446, CVE-2014-1690, CVE-2014-1737, CVE-2014-1738, CVE-2014-1739, CVE-2014-1874, CVE-2014-2038, CVE-2014-2039, CVE-2014-2309, CVE-2014-2523, CVE-2014-2568, CVE-2014-2580, CVE-2014-2672, CVE-2014-2673, CVE-2014-2678, CVE-2014-2706, CVE-2014-2739, CVE-2014-2851, CVE-2014-2889, CVE-2014-3122, CVE-2014-3144, CVE-2014-3145, CVE-2014-3153, CVE-2014-3180, CVE-2014-3181, CVE-2014-3182, CVE-2014-3183, CVE-2014-3184, CVE-2014-3185, CVE-2014-3186, CVE-2014-3534, CVE-2014-3535, CVE-2014-3601, CVE-2014-3610, CVE-2014-3611, CVE-2014-3631, CVE-2014-3645, CVE-2014-3646, CVE-2014-3647, CVE-2014-3673, CVE-2014-3687, CVE-2014-3688, CVE-2014-3690, CVE-2014-3917, CVE-2014-3940, CVE-2014-4014, CVE-2014-4027, CVE-2014-4157, CVE-2014-4171, CVE-2014-4508, CVE-2014-4608, CVE-2014-4611, CVE-2014-4652, CVE-2014-4653, CVE-2014-4654, CVE-2014-4655, CVE-2014-4656, CVE-2014-4667, CVE-2014-4699, CVE-2014-4943, CVE-2014-5045, CVE-2014-5077, CVE-2014-5206, CVE-2014-5207, CVE-2014-5471, CVE-2014-5472, CVE-2014-6410, CVE-2014-6416, CVE-2014-6417, CVE-2014-6418, CVE-2014-7145, CVE-2014-7283, CVE-2014-7284, CVE-2014-7822, CVE-2014-7825, CVE-2014-7826, CVE-2014-7841, CVE-2014-7842, CVE-2014-7843, CVE-2014-7970, CVE-2014-7975, CVE-2014-8086, CVE-2014-8133, CVE-2014-8134, CVE-2014-8159, CVE-2014-8160, CVE-2014-8171, CVE-2014-8172, CVE-2014-8173, CVE-2014-8369, CVE-2014-8480, CVE-2014-8481, CVE-2014-8559, CVE-2014-8709, CVE-2014-8884, CVE-2014-8989, CVE-2014-9090, CVE-2014-9322, CVE-2014-9419, CVE-2014-9420, CVE-2014-9428, CVE-2014-9529, CVE-2014-9584, CVE-2014-9585, CVE-2014-9644, CVE-2014-9683, CVE-2014-9710, CVE-2014-9715, CVE-2014-9717, CVE-2014-9728, CVE-2014-9729, CVE-2014-9730, CVE-2014-9731, CVE-2014-9803, CVE-2014-9870, CVE-2014-9888, CVE-2014-9895, CVE-2014-9903, CVE-2014-9904, CVE-2014-9914, CVE-2014-9922, CVE-2014-9940, CVE-2015-0239, CVE-2015-0274, CVE-2015-0275, CVE-2015-1333, CVE-2015-1339, CVE-2015-1350, CVE-2015-1420, CVE-2015-1421, CVE-2015-1465, CVE-2015-1573, CVE-2015-1593, CVE-2015-1805, CVE-2015-2041, CVE-2015-2042, CVE-2015-2150, CVE-2015-2666, CVE-2015-2672, CVE-2015-2686, CVE-2015-2830, CVE-2015-2922, CVE-2015-2925, CVE-2015-3212, CVE-2015-3214, CVE-2015-3288, CVE-2015-3290, CVE-2015-3291, CVE-2015-3331, CVE-2015-3339, CVE-2015-3636, CVE-2015-4001, CVE-2015-4002, CVE-2015-4003, CVE-2015-4004, CVE-2015-4036, CVE-2015-4167, CVE-2015-4170, CVE-2015-4176, CVE-2015-4177, CVE-2015-4178, CVE-2015-4692, CVE-2015-4700, CVE-2015-5156, CVE-2015-5157, CVE-2015-5257, CVE-2015-5283, CVE-2015-5307, CVE-2015-5327, CVE-2015-5364, CVE-2015-5366, CVE-2015-5697, CVE-2015-5706, CVE-2015-5707, CVE-2015-6252, CVE-2015-6526, CVE-2015-6937, CVE-2015-7509, CVE-2015-7513, CVE-2015-7515, CVE-2015-7550, CVE-2015-7566, CVE-2015-7613, CVE-2015-7799, CVE-2015-7833, CVE-2015-7872, CVE-2015-7884, CVE-2015-7885, CVE-2015-7990, CVE-2015-8104, CVE-2015-8215, CVE-2015-8324, CVE-2015-8374, CVE-2015-8539, CVE-2015-8543, CVE-2015-8550, CVE-2015-8551, CVE-2015-8552, CVE-2015-8553, CVE-2015-8569, CVE-2015-8575, CVE-2015-8660, CVE-2015-8709, CVE-2015-8746, CVE-2015-8767, CVE-2015-8785, CVE-2015-8787, CVE-2015-8812, CVE-2015-8816, CVE-2015-8830, CVE-2015-8839, CVE-2015-8844, CVE-2015-8845, CVE-2015-8950, CVE-2015-8952, CVE-2015-8953, CVE-2015-8955, CVE-2015-8956, CVE-2015-8961, CVE-2015-8962, CVE-2015-8963, CVE-2015-8964, CVE-2015-8966, CVE-2015-8967, CVE-2015-8970, CVE-2015-9004, CVE-2015-9016, CVE-2015-9289, CVE-2016-0617, CVE-2016-0723, CVE-2016-0728, CVE-2016-0758, CVE-2016-0821, CVE-2016-0823, CVE-2016-10044, CVE-2016-10088, CVE-2016-10147, CVE-2016-10150, CVE-2016-10153, CVE-2016-10154, CVE-2016-10200, CVE-2016-10208, CVE-2016-10229, CVE-2016-10318, CVE-2016-10723, CVE-2016-10741, CVE-2016-10764, CVE-2016-10905, CVE-2016-10906, CVE-2016-10907, CVE-2016-1237, CVE-2016-1575, CVE-2016-1576, CVE-2016-1583, CVE-2016-2053, CVE-2016-2069, CVE-2016-2070, CVE-2016-2085, CVE-2016-2117, CVE-2016-2143, CVE-2016-2184, CVE-2016-2185, CVE-2016-2186, CVE-2016-2187, CVE-2016-2188, CVE-2016-2383, CVE-2016-2384, CVE-2016-2543, CVE-2016-2544, CVE-2016-2545, CVE-2016-2546, CVE-2016-2547, CVE-2016-2548, CVE-2016-2549, CVE-2016-2550, CVE-2016-2782, CVE-2016-2847, CVE-2016-3044, CVE-2016-3070, CVE-2016-3134, CVE-2016-3135, CVE-2016-3136, CVE-2016-3137, CVE-2016-3138, CVE-2016-3139, CVE-2016-3140, CVE-2016-3156, CVE-2016-3157, CVE-2016-3672, CVE-2016-3689, CVE-2016-3713, CVE-2016-3841, CVE-2016-3857, CVE-2016-3951, CVE-2016-3955, CVE-2016-3961, CVE-2016-4440, CVE-2016-4470, CVE-2016-4482, CVE-2016-4485, CVE-2016-4486, CVE-2016-4557, CVE-2016-4558, CVE-2016-4565, CVE-2016-4568, CVE-2016-4569, CVE-2016-4578, CVE-2016-4580, CVE-2016-4581, CVE-2016-4794, CVE-2016-4805, CVE-2016-4913, CVE-2016-4951, CVE-2016-4997, CVE-2016-4998, CVE-2016-5195, CVE-2016-5243, CVE-2016-5244, CVE-2016-5400, CVE-2016-5412, CVE-2016-5696, CVE-2016-5728, CVE-2016-5828, CVE-2016-5829, CVE-2016-6130, CVE-2016-6136, CVE-2016-6156, CVE-2016-6162, CVE-2016-6187, CVE-2016-6197, CVE-2016-6198, CVE-2016-6213, CVE-2016-6327, CVE-2016-6480, CVE-2016-6516, CVE-2016-6786, CVE-2016-6787, CVE-2016-6828, CVE-2016-7039, CVE-2016-7042, CVE-2016-7097, CVE-2016-7117, CVE-2016-7425, CVE-2016-7910, CVE-2016-7911, CVE-2016-7912, CVE-2016-7913, CVE-2016-7914, CVE-2016-7915, CVE-2016-7916, CVE-2016-7917, CVE-2016-8399, CVE-2016-8405, CVE-2016-8630, CVE-2016-8632, CVE-2016-8633, CVE-2016-8636, CVE-2016-8645, CVE-2016-8646, CVE-2016-8650, CVE-2016-8655, CVE-2016-8658, CVE-2016-8666, CVE-2016-9083, CVE-2016-9084, CVE-2016-9120, CVE-2016-9178, CVE-2016-9191, CVE-2016-9313, CVE-2016-9555, CVE-2016-9576, CVE-2016-9588, CVE-2016-9604, CVE-2016-9685, CVE-2016-9754, CVE-2016-9755, CVE-2016-9756, CVE-2016-9777, CVE-2016-9793, CVE-2016-9794, CVE-2016-9806, CVE-2016-9919, CVE-2017-0605, CVE-2017-0627, CVE-2017-0750, CVE-2017-0786, CVE-2017-0861, CVE-2017-1000, CVE-2017-1000111, CVE-2017-1000112, CVE-2017-1000251, CVE-2017-1000252, CVE-2017-1000253, CVE-2017-1000255, CVE-2017-1000363, CVE-2017-1000364, CVE-2017-1000365, CVE-2017-1000370, CVE-2017-1000371, CVE-2017-1000379, CVE-2017-1000380, CVE-2017-1000405, CVE-2017-1000407, CVE-2017-1000410, CVE-2017-10661, CVE-2017-10662, CVE-2017-10663, CVE-2017-10810, CVE-2017-10911, CVE-2017-11089, CVE-2017-11176, CVE-2017-11472, CVE-2017-11473, CVE-2017-11600, CVE-2017-12134, CVE-2017-12146, CVE-2017-12153, CVE-2017-12154, CVE-2017-12168, CVE-2017-12188, CVE-2017-12190, CVE-2017-12192, CVE-2017-12193, CVE-2017-12762, CVE-2017-13080, CVE-2017-13166, CVE-2017-13167, CVE-2017-13168, CVE-2017-13215, CVE-2017-13216, CVE-2017-13220, CVE-2017-13305, CVE-2017-13686, CVE-2017-13695, CVE-2017-13715, CVE-2017-14051, CVE-2017-14106, CVE-2017-14140, CVE-2017-14156, CVE-2017-14340, CVE-2017-14489, CVE-2017-14497, CVE-2017-14954, CVE-2017-14991, CVE-2017-15102, CVE-2017-15115, CVE-2017-15116, CVE-2017-15121, CVE-2017-15126, CVE-2017-15127, CVE-2017-15128, CVE-2017-15129, CVE-2017-15265, CVE-2017-15274, CVE-2017-15299, CVE-2017-15306, CVE-2017-15537, CVE-2017-15649, CVE-2017-15868, CVE-2017-15951, CVE-2017-16525, CVE-2017-16526, CVE-2017-16527, CVE-2017-16528, CVE-2017-16529, CVE-2017-16530, CVE-2017-16531, CVE-2017-16532, CVE-2017-16533, CVE-2017-16534, CVE-2017-16535, CVE-2017-16536, CVE-2017-16537, CVE-2017-16538, CVE-2017-16643, CVE-2017-16644, CVE-2017-16645, CVE-2017-16646, CVE-2017-16647, CVE-2017-16648, CVE-2017-16649, CVE-2017-16650, CVE-2017-16911, CVE-2017-16912, CVE-2017-16913, CVE-2017-16914, CVE-2017-16939, CVE-2017-16994, CVE-2017-16995, CVE-2017-16996, CVE-2017-17052, CVE-2017-17053, CVE-2017-17448, CVE-2017-17449, CVE-2017-17450, CVE-2017-17558, CVE-2017-17712, CVE-2017-17741, CVE-2017-17805, CVE-2017-17806, CVE-2017-17807, CVE-2017-17852, CVE-2017-17853, CVE-2017-17854, CVE-2017-17855, CVE-2017-17856, CVE-2017-17857, CVE-2017-17862, CVE-2017-17863, CVE-2017-17864, CVE-2017-17975, CVE-2017-18017, CVE-2017-18075, CVE-2017-18079, CVE-2017-18174, CVE-2017-18193, CVE-2017-18200, CVE-2017-18202, CVE-2017-18203, CVE-2017-18204, CVE-2017-18208, CVE-2017-18216, CVE-2017-18218, CVE-2017-18221, CVE-2017-18222, CVE-2017-18224, CVE-2017-18232, CVE-2017-18241, CVE-2017-18249, CVE-2017-18255, CVE-2017-18257, CVE-2017-18261, CVE-2017-18270, CVE-2017-18344, CVE-2017-18360, CVE-2017-18379, CVE-2017-18509, CVE-2017-18549, CVE-2017-18550, CVE-2017-18551, CVE-2017-18552, CVE-2017-18595, CVE-2017-2583, CVE-2017-2584, CVE-2017-2596, CVE-2017-2618, CVE-2017-2634, CVE-2017-2636, CVE-2017-2647, CVE-2017-2671, CVE-2017-5123, CVE-2017-5546, CVE-2017-5547, CVE-2017-5548, CVE-2017-5549, CVE-2017-5550, CVE-2017-5551, CVE-2017-5576, CVE-2017-5577, CVE-2017-5669, CVE-2017-5715, CVE-2017-5753, CVE-2017-5754, CVE-2017-5897, CVE-2017-5967, CVE-2017-5970, CVE-2017-5972, CVE-2017-5986, CVE-2017-6001, CVE-2017-6074, CVE-2017-6214, CVE-2017-6345, CVE-2017-6346, CVE-2017-6347, CVE-2017-6348, CVE-2017-6353, CVE-2017-6874, CVE-2017-6951, CVE-2017-7184, CVE-2017-7187, CVE-2017-7261, CVE-2017-7273, CVE-2017-7277, CVE-2017-7294, CVE-2017-7308, CVE-2017-7346, CVE-2017-7374, CVE-2017-7472, CVE-2017-7477, CVE-2017-7482, CVE-2017-7487, CVE-2017-7495, CVE-2017-7518, CVE-2017-7533, CVE-2017-7541, CVE-2017-7542, CVE-2017-7558, CVE-2017-7616, CVE-2017-7618, CVE-2017-7645, CVE-2017-7889, CVE-2017-7895, CVE-2017-7979, CVE-2017-8061, CVE-2017-8062, CVE-2017-8063, CVE-2017-8064, CVE-2017-8065, CVE-2017-8066, CVE-2017-8067, CVE-2017-8068, CVE-2017-8069, CVE-2017-8070, CVE-2017-8071, CVE-2017-8072, CVE-2017-8106, CVE-2017-8240, CVE-2017-8797, CVE-2017-8824, CVE-2017-8831, CVE-2017-8890, CVE-2017-8924, CVE-2017-8925, CVE-2017-9059, CVE-2017-9074, CVE-2017-9075, CVE-2017-9076, CVE-2017-9077, CVE-2017-9150, CVE-2017-9211, CVE-2017-9242, CVE-2017-9605, CVE-2017-9725, CVE-2017-9984, CVE-2017-9985, CVE-2017-9986, CVE-2018-1000004, CVE-2018-1000026, CVE-2018-1000028, CVE-2018-1000199, CVE-2018-1000200, CVE-2018-1000204, CVE-2018-10021, CVE-2018-10074, CVE-2018-10087, CVE-2018-10124, CVE-2018-10322, CVE-2018-10323, CVE-2018-1065, CVE-2018-1066, CVE-2018-10675, CVE-2018-1068, CVE-2018-10840, CVE-2018-10853, CVE-2018-1087, CVE-2018-10876, CVE-2018-10877, CVE-2018-10878, CVE-2018-10879, CVE-2018-10880, CVE-2018-10881, CVE-2018-10882, CVE-2018-10883, CVE-2018-10901, CVE-2018-10902, CVE-2018-1091, CVE-2018-1092, CVE-2018-1093, CVE-2018-10938, CVE-2018-1094, CVE-2018-10940, CVE-2018-1095, CVE-2018-1108, CVE-2018-1118, CVE-2018-1120, CVE-2018-11232, CVE-2018-1128, CVE-2018-1129, CVE-2018-1130, CVE-2018-11412, CVE-2018-11506, CVE-2018-11508, CVE-2018-12126, CVE-2018-12127, CVE-2018-12130, CVE-2018-12207, CVE-2018-12232, CVE-2018-12233, CVE-2018-12633, CVE-2018-12714, CVE-2018-12896, CVE-2018-12904, CVE-2018-13053, CVE-2018-13093, CVE-2018-13094, CVE-2018-13095, CVE-2018-13096, CVE-2018-13097, CVE-2018-13098, CVE-2018-13099, CVE-2018-13100, CVE-2018-13405, CVE-2018-13406, CVE-2018-14609, CVE-2018-14610, CVE-2018-14611, CVE-2018-14612, CVE-2018-14613, CVE-2018-14614, CVE-2018-14615, CVE-2018-14616, CVE-2018-14617, CVE-2018-14619, CVE-2018-14625, CVE-2018-14633, CVE-2018-14634, CVE-2018-14641, CVE-2018-14646, CVE-2018-14656, CVE-2018-14678, CVE-2018-14734, CVE-2018-15471, CVE-2018-15572, CVE-2018-15594, CVE-2018-16276, CVE-2018-16597, CVE-2018-16658, CVE-2018-16862, CVE-2018-16871, CVE-2018-16880, CVE-2018-16882, CVE-2018-16884, CVE-2018-17182, CVE-2018-17972, CVE-2018-18021, CVE-2018-18281, CVE-2018-18386, CVE-2018-18397, CVE-2018-18445, CVE-2018-18559, CVE-2018-18690, CVE-2018-18710, CVE-2018-18955, CVE-2018-19406, CVE-2018-19407, CVE-2018-19824, CVE-2018-19854, CVE-2018-19985, CVE-2018-20169, CVE-2018-20449, CVE-2018-20509, CVE-2018-20510, CVE-2018-20511, CVE-2018-20669, CVE-2018-20784, CVE-2018-20836, CVE-2018-20854, CVE-2018-20855, CVE-2018-20856, CVE-2018-20961, CVE-2018-20976, CVE-2018-21008, CVE-2018-25015, CVE-2018-25020, CVE-2018-3620, CVE-2018-3639, CVE-2018-3646, CVE-2018-3665, CVE-2018-3693, CVE-2018-5332, CVE-2018-5333, CVE-2018-5344, CVE-2018-5390, CVE-2018-5391, CVE-2018-5703, CVE-2018-5750, CVE-2018-5803, CVE-2018-5814, CVE-2018-5848, CVE-2018-5873, CVE-2018-5953, CVE-2018-5995, CVE-2018-6412, CVE-2018-6554, CVE-2018-6555, CVE-2018-6927, CVE-2018-7191, CVE-2018-7273, CVE-2018-7480, CVE-2018-7492, CVE-2018-7566, CVE-2018-7740, CVE-2018-7754, CVE-2018-7755, CVE-2018-7757, CVE-2018-7995, CVE-2018-8043, CVE-2018-8087, CVE-2018-8781, CVE-2018-8822, CVE-2018-8897, CVE-2018-9363, CVE-2018-9385, CVE-2018-9415, CVE-2018-9422, CVE-2018-9465, CVE-2018-9516, CVE-2018-9517, CVE-2018-9518, CVE-2018-9568, CVE-2019-0136, CVE-2019-0145, CVE-2019-0146, CVE-2019-0147, CVE-2019-0148, CVE-2019-0149, CVE-2019-0154, CVE-2019-0155, CVE-2019-10124, CVE-2019-10125, CVE-2019-10126, CVE-2019-10142, CVE-2019-10207, CVE-2019-10220, CVE-2019-10638, CVE-2019-10639, CVE-2019-11085, CVE-2019-11091, CVE-2019-11135, CVE-2019-11190, CVE-2019-11191, CVE-2019-1125, CVE-2019-11477, CVE-2019-11478, CVE-2019-11479, CVE-2019-11486, CVE-2019-11487, CVE-2019-11599, CVE-2019-11683, CVE-2019-11810, CVE-2019-11811, CVE-2019-11815, CVE-2019-11833, CVE-2019-11884, CVE-2019-12378, CVE-2019-12379, CVE-2019-12380, CVE-2019-12381, CVE-2019-12382, CVE-2019-12454, CVE-2019-12455, CVE-2019-12614, CVE-2019-12615, CVE-2019-12817, CVE-2019-12818, CVE-2019-12819, CVE-2019-12881, CVE-2019-12984, CVE-2019-13233, CVE-2019-13272, CVE-2019-13631, CVE-2019-13648, CVE-2019-14283, CVE-2019-14284, CVE-2019-14615, CVE-2019-14763, CVE-2019-14814, CVE-2019-14815, CVE-2019-14816, CVE-2019-14821, CVE-2019-14835, CVE-2019-14895, CVE-2019-14896, CVE-2019-14897, CVE-2019-14901, CVE-2019-15030, CVE-2019-15031, CVE-2019-15090, CVE-2019-15098, CVE-2019-15099, CVE-2019-15117, CVE-2019-15118, CVE-2019-15211, CVE-2019-15212, CVE-2019-15213, CVE-2019-15214, CVE-2019-15215, CVE-2019-15216, CVE-2019-15217, CVE-2019-15218, CVE-2019-15219, CVE-2019-15220, CVE-2019-15221, CVE-2019-15222, CVE-2019-15223, CVE-2019-15291, CVE-2019-15292, CVE-2019-15504, CVE-2019-15505, CVE-2019-15538, CVE-2019-15666, CVE-2019-15794, CVE-2019-15807, CVE-2019-15916, CVE-2019-15917, CVE-2019-15918, CVE-2019-15919, CVE-2019-15920, CVE-2019-15921, CVE-2019-15922, CVE-2019-15923, CVE-2019-15924, CVE-2019-15925, CVE-2019-15926, CVE-2019-15927, CVE-2019-16229, CVE-2019-16230, CVE-2019-16231, CVE-2019-16232, CVE-2019-16233, CVE-2019-16234, CVE-2019-16413, CVE-2019-16714, CVE-2019-16746, CVE-2019-16921, CVE-2019-16994, CVE-2019-16995, CVE-2019-17052, CVE-2019-17053, CVE-2019-17054, CVE-2019-17055, CVE-2019-17056, CVE-2019-17075, CVE-2019-17133, CVE-2019-17351, CVE-2019-17666, CVE-2019-18198, CVE-2019-18282, CVE-2019-18660, CVE-2019-18675, CVE-2019-18683, CVE-2019-18786, CVE-2019-18805, CVE-2019-18806, CVE-2019-18807, CVE-2019-18808, CVE-2019-18809, CVE-2019-18810, CVE-2019-18811, CVE-2019-18812, CVE-2019-18813, CVE-2019-18814, CVE-2019-18885, CVE-2019-19036, CVE-2019-19037, CVE-2019-19039, CVE-2019-19043, CVE-2019-19044, CVE-2019-19045, CVE-2019-19046, CVE-2019-19047, CVE-2019-19048, CVE-2019-19049, CVE-2019-19050, CVE-2019-19051, CVE-2019-19052, CVE-2019-19053, CVE-2019-19054, CVE-2019-19055, CVE-2019-19056, CVE-2019-19057, CVE-2019-19058, CVE-2019-19059, CVE-2019-19060, CVE-2019-19061, CVE-2019-19062, CVE-2019-19063, CVE-2019-19064, CVE-2019-19065, CVE-2019-19066, CVE-2019-19067, CVE-2019-19068, CVE-2019-19069, CVE-2019-19070, CVE-2019-19071, CVE-2019-19072, CVE-2019-19073, CVE-2019-19074, CVE-2019-19075, CVE-2019-19076, CVE-2019-19077, CVE-2019-19078, CVE-2019-19079, CVE-2019-19080, CVE-2019-19081, CVE-2019-19082, CVE-2019-19083, CVE-2019-19227, CVE-2019-19241, CVE-2019-19252, CVE-2019-19318, CVE-2019-19319, CVE-2019-19332, CVE-2019-19338, CVE-2019-19377, CVE-2019-19447, CVE-2019-19448, CVE-2019-19449, CVE-2019-19462, CVE-2019-19523, CVE-2019-19524, CVE-2019-19525, CVE-2019-19526, CVE-2019-19527, CVE-2019-19528, CVE-2019-19529, CVE-2019-19530, CVE-2019-19531, CVE-2019-19532, CVE-2019-19533, CVE-2019-19534, CVE-2019-19535, CVE-2019-19536, CVE-2019-19537, CVE-2019-19543, CVE-2019-19602, CVE-2019-19767, CVE-2019-19768, CVE-2019-19769, CVE-2019-19770, CVE-2019-19807, CVE-2019-19813, CVE-2019-19815, CVE-2019-19816, CVE-2019-19922, CVE-2019-19927, CVE-2019-19947, CVE-2019-19965 and CVE-2019-1999
nasm: Fix CVE-2020-21528
ncurses: Fix CVE-2023-29491
nghttp2: Fix CVE-2023-35945
procps: Fix CVE-2023-4016
python3-certifi: Fix CVE-2023-37920
python3-git: Fix CVE-2022-24439 and CVE-2023-40267
python3-pygments: Fix CVE-2022-40896
python3: Fix CVE-2023-40217
qemu: Fix CVE-2020-14394, CVE-2021-3638, CVE-2023-2861, CVE-2023-3180 and CVE-2023-3354
tiff: fix CVE-2023-2908, CVE-2023-3316 and CVE-2023-3618
vim: Fix CVE-2023-3896, CVE-2023-4733, CVE-2023-4734, CVE-2023-4735, CVE-2023-4736, CVE-2023-4738, CVE-2023-4750 and CVE-2023-4752
webkitgtk: fix CVE-2022-48503 and CVE-2023-23529
Fixes in Yocto-4.0.13
acl/attr: ptest fixes and improvements
automake: fix buildtest patch
bind: Upgrade to 9.18.17
binutils: stable 2.38 branch updates
build-appliance-image: Update to kirkstone head revision
build-sysroots: Add SUMMARY field
cargo.bbclass: set up cargo environment in common do_compile
contributor-guide: recipe-style-guide: add Upstream-Status
dbus: Specify runstatedir configure option
dev-manual: common-tasks: mention faster “find” command to trim sstate cache
dev-manual: disk-space: improve wording for obsolete sstate cache files
dev-manual: licenses: mention SPDX for license compliance
dev-manual: licenses: update license manifest location
dev-manual: new-recipe.rst fix inconsistency with contributor guide
dev-manual: split common-tasks.rst
dev-manual: wic.rst: Update native tools build command
documentation/README: align with master
efivar: backport 5 patches to fix build with gold
externalsrc: fix dependency chain issues
glibc-locale: use stricter matching for metapackages’ runtime dependencies
glibc/check-test-wrapper: don’t emit warnings from ssh
glibc: stable 2.35 branch updates
gst-devtools: Upgrade to 1.20.7
gstreamer1.0-libav: Upgrade to 1.20.7
gstreamer1.0-omx: Upgrade to 1.20.7
gstreamer1.0-plugins-bad: Upgrade to 1.20.7
gstreamer1.0-plugins-base: Upgrade to 1.20.7
gstreamer1.0-plugins-good: Upgrade to 1.20.7
gstreamer1.0-plugins-ugly: Upgrade to 1.20.7
gstreamer1.0-python: Upgrade to 1.20.7
gstreamer1.0-rtsp-server: Upgrade to 1.20.7
gstreamer1.0-vaapi: Upgrade to 1.20.7
gstreamer1.0: Upgrade to 1.20.7
kernel: Fix path comparison in kernel staging dir symlinking
lib/package_manager: Improve repo artefact filtering
libdnf: resolve cstdint inclusion for newer gcc versions
libnss-nis: Upgrade to 3.2
librsvg: Upgrade to 2.52.10
linux-firmware : Add firmware of RTL8822 serie
linux-firmware: Fix mediatek mt7601u firmware path
linux-firmware: package firmware for Dragonboard 410c
linux-firmware: split platform-specific Adreno shaders to separate packages
linux-firmware: Upgrade to 20230625
linux-yocto/5.10: update to v5.10.188
linux-yocto/5.15: update to v5.15.124
linux-yocto: add script to generate kernel CVE_CHECK_IGNORE entries
linux/cve-exclusion: add generated CVE_CHECK_IGNORES.
linux/cve-exclusion: remove obsolete manual entries
manuals: add new contributor guide
manuals: document “mime-xdg” class and MIME_XDG_PACKAGES
manuals: update former references to dev-manual/common-tasks
mdadm: add util-linux-blockdev ptest dependency
migration-guides: add release notes for 4.0.12
npm.bbclass: avoid DeprecationWarning with new python
oeqa/runtime/ltp: Increase ltp test output timeout
oeqa/ssh: Further improve process exit handling
oeqa/target/ssh: Ensure EAGAIN doesn’t truncate output
oeqa/utils/nfs: allow requesting non-udp ports
pixman: Remove duplication of license MIT
poky.conf: bump version for 4.0.13
poky.conf: update SANITY_TESTED_DISTROS to match autobuilder
pseudo: Fix to work with glibc 2.38
python3-git: Upgrade to 3.1.32
python3: upgrade to 3.10.13
ref-manual: add Initramfs term
ref-manual: add meson class and variables
ref-manual: add new variables
ref-manual: qa-checks: align with master
ref-manual: system-requirements: update supported distros
resulttool/report: Avoid divide by zero
resulttool/resultutils: allow index generation despite corrupt json
rootfs: Add debugfs package db file copy and cleanup
rpm2cpio.sh: update to the last 4.x version
rpm: Pick debugfs package db files/dirs explicitly
scripts/create-pull-request: update URLs to git repositories
scripts/rpm2cpio.sh: Use bzip2 instead of bunzip2
sdk-manual: extensible.rst: align with master branch
selftest/cases/glibc.py: fix the override syntax
selftest/cases/glibc.py: increase the memory for testing
selftest/cases/glibc.py: switch to using NFS over TCP
shadow-sysroot: add license information
sysklogd: fix integration with systemd-journald
tar: Upgrade to 1.35
target/ssh: Ensure exit code set for commands
tcl: prevent installing another copy of tzdata
template: fix typo in section header
vim: Upgrade to 9.0.1894
vim: update obsolete comment
wic: fix wrong attempt to create file system in unpartitioned regions
yocto-uninative: Update to 4.2 for glibc 2.38
yocto-uninative: Update to 4.3
Known Issues in Yocto-4.0.13
N/A
Contributors to Yocto-4.0.13
Abe Kohandel
Adrian Freihofer
Alberto Planas
Alex Kiernan
Alexander Kanavin
Alexis Lothoré
Anuj Mittal
Archana Polampalli
Ashish Sharma
BELOUARGA Mohamed
Bruce Ashfield
Changqing Li
Dmitry Baryshkov
Enrico Scholz
Etienne Cordonnier
Hitendra Prajapati
Julien Stephan
Kai Kang
Khem Raj
Lee Chee Yang
Marek Vasut
Markus Niebel
Martin Jansa
Meenali Gupta
Michael Halstead
Michael Opdenacker
Narpat Mali
Ovidiu Panait
Pavel Zhukov
Peter Marko
Peter Suti
Poonam Jadhav
Richard Purdie
Roland Hieber
Ross Burton
Sanjana
Siddharth Doshi
Soumya Sambu
Staffan Rydén
Steve Sakoman
Trevor Gamblin
Vijay Anusuri
Vivek Kumbhar
Wang Mingyu
Yogita Urade
Repositories / Downloads for Yocto-4.0.13
poky
Repository Location: https://git.yoctoproject.org/poky
Branch: kirkstone
Tag: yocto-4.0.13
Git Revision: e51bf557f596c4da38789a948a3228ba11455e3c
Release Artefact: poky-e51bf557f596c4da38789a948a3228ba11455e3c
sha: afddadb367a90154751f04993077bceffdc1413f9ba9b8c03acb487d0437286e
Download Locations: http://downloads.yoctoproject.org/releases/yocto/yocto-4.0.13/poky-e51bf557f596c4da38789a948a3228ba11455e3c.tar.bz2 http://mirrors.kernel.org/yocto/yocto/yocto-4.0.13/poky-e51bf557f596c4da38789a948a3228ba11455e3c.tar.bz2
openembedded-core
Repository Location: https://git.openembedded.org/openembedded-core
Branch: kirkstone
Tag: yocto-4.0.13
Git Revision: d90e4d5e3cca9cffe8f60841afc63667a9ac39fa
Release Artefact: oecore-d90e4d5e3cca9cffe8f60841afc63667a9ac39fa
sha: 56e3bdac81b3628e74dfef2132a54be4db7d87373139a00ed64f5c9a354d716a
Download Locations: http://downloads.yoctoproject.org/releases/yocto/yocto-4.0.13/oecore-d90e4d5e3cca9cffe8f60841afc63667a9ac39fa.tar.bz2 http://mirrors.kernel.org/yocto/yocto/yocto-4.0.13/oecore-d90e4d5e3cca9cffe8f60841afc63667a9ac39fa.tar.bz2
meta-mingw
Repository Location: https://git.yoctoproject.org/meta-mingw
Branch: kirkstone
Tag: yocto-4.0.13
Git Revision: a90614a6498c3345704e9611f2842eb933dc51c1
Release Artefact: meta-mingw-a90614a6498c3345704e9611f2842eb933dc51c1
sha: 49f9900bfbbc1c68136f8115b314e95d0b7f6be75edf36a75d9bcd1cca7c6302
Download Locations: http://downloads.yoctoproject.org/releases/yocto/yocto-4.0.13/meta-mingw-a90614a6498c3345704e9611f2842eb933dc51c1.tar.bz2 http://mirrors.kernel.org/yocto/yocto/yocto-4.0.13/meta-mingw-a90614a6498c3345704e9611f2842eb933dc51c1.tar.bz2
meta-gplv2
Repository Location: https://git.yoctoproject.org/meta-gplv2
Branch: kirkstone
Tag: yocto-4.0.13
Git Revision: d2f8b5cdb285b72a4ed93450f6703ca27aa42e8a
Release Artefact: meta-gplv2-d2f8b5cdb285b72a4ed93450f6703ca27aa42e8a
sha: c386f59f8a672747dc3d0be1d4234b6039273d0e57933eb87caa20f56b9cca6d
Download Locations: http://downloads.yoctoproject.org/releases/yocto/yocto-4.0.13/meta-gplv2-d2f8b5cdb285b72a4ed93450f6703ca27aa42e8a.tar.bz2 http://mirrors.kernel.org/yocto/yocto/yocto-4.0.13/meta-gplv2-d2f8b5cdb285b72a4ed93450f6703ca27aa42e8a.tar.bz2
bitbake
Repository Location: https://git.openembedded.org/bitbake
Branch: 2.0
Tag: yocto-4.0.13
Git Revision: 41b6684489d0261753344956042be2cc4adb0159
Release Artefact: bitbake-41b6684489d0261753344956042be2cc4adb0159
sha: efa2b1c4d0be115ed3960750d1e4ed958771b2db6d7baee2d13ad386589376e8
Download Locations: http://downloads.yoctoproject.org/releases/yocto/yocto-4.0.13/bitbake-41b6684489d0261753344956042be2cc4adb0159.tar.bz2 http://mirrors.kernel.org/yocto/yocto/yocto-4.0.13/bitbake-41b6684489d0261753344956042be2cc4adb0159.tar.bz2
yocto-docs
Repository Location: https://git.yoctoproject.org/yocto-docs
Branch: kirkstone
Tag: yocto-4.0.13
Git Revision: 8f02741de867125f11a37822b2d206be180d4ee3
Release notes for Yocto-4.0.14 (Kirkstone)
Security Fixes in Yocto-4.0.14
bind: Fix CVE-2023-3341 and CVE-2023-4236
binutils: Fix CVE-2022-44840, CVE-2022-45703, CVE-2022-47008, CVE-2022-47011, CVE-2022-47673, CVE-2022-47695, CVE-2022-47696 and CVE-2022-48063
cups: Fix CVE-2023-4504
curl: Fix CVE-2023-38545 and CVE-2023-38546
gawk: Fix CVE-2023-4156
ghostscript: Fix CVE-2023-43115
glibc: Fix CVE-2023-4806, CVE-2023-4813, CVE-2023-4911 and CVE-2023-5156
glibc: Ignore CVE-2023-4527
go: Fix CVE-2023-24538 and CVE-2023-39318
gstreamer1.0-plugins-bad: fix CVE-2023-40474, CVE-2023-40475 and CVE-2023-40476
libtiff: Fix CVE-2022-40090 and CVE-2023-1916
libwebp: Fix CVE-2023-5129
libx11: Fix CVE-2023-43785, CVE-2023-43786 and CVE-2023-43787
libxml2: Fix CVE-2023-45322
libxpm: Fix CVE-2023-43788 and CVE-2023-43789
linux-firmware: Fix CVE-2022-40982, CVE-2023-20569 and CVE-2023-20593
linux-yocto: update CVE exclusions
linux-yocto/5.10: Ignore CVE-2003-1604, CVE-2004-0230, CVE-2006-3635, CVE-2006-5331, CVE-2006-6128, CVE-2007-4774, CVE-2007-6761, CVE-2007-6762, CVE-2008-7316, CVE-2009-2692, CVE-2010-0008, CVE-2010-3432, CVE-2010-4648, CVE-2010-5313, CVE-2010-5328, CVE-2010-5329, CVE-2010-5331, CVE-2010-5332, CVE-2011-4098, CVE-2011-4131, CVE-2011-4915, CVE-2011-5321, CVE-2011-5327, CVE-2012-0957, CVE-2012-2119, CVE-2012-2136, CVE-2012-2137, CVE-2012-2313, CVE-2012-2319, CVE-2012-2372, CVE-2012-2375, CVE-2012-2390, CVE-2012-2669, CVE-2012-2744, CVE-2012-2745, CVE-2012-3364, CVE-2012-3375, CVE-2012-3400, CVE-2012-3412, CVE-2012-3430, CVE-2012-3510, CVE-2012-3511, CVE-2012-3520, CVE-2012-3552, CVE-2012-4398, CVE-2012-4444, CVE-2012-4461, CVE-2012-4467, CVE-2012-4508, CVE-2012-4530, CVE-2012-4565, CVE-2012-5374, CVE-2012-5375, CVE-2012-5517, CVE-2012-6536, CVE-2012-6537, CVE-2012-6538, CVE-2012-6539, CVE-2012-6540, CVE-2012-6541, CVE-2012-6542, CVE-2012-6543, CVE-2012-6544, CVE-2012-6545, CVE-2012-6546, CVE-2012-6547, CVE-2012-6548, CVE-2012-6549, CVE-2012-6638, CVE-2012-6647, CVE-2012-6657, CVE-2012-6689, CVE-2012-6701, CVE-2012-6703, CVE-2012-6704, CVE-2012-6712, CVE-2013-0160, CVE-2013-0190, CVE-2013-0216, CVE-2013-0217, CVE-2013-0228, CVE-2013-0231, CVE-2013-0268, CVE-2013-0290, CVE-2013-0309, CVE-2013-0310, CVE-2013-0311, CVE-2013-0313, CVE-2013-0343, CVE-2013-0349, CVE-2013-0871, CVE-2013-0913, CVE-2013-0914, CVE-2013-1059, CVE-2013-1763, CVE-2013-1767, CVE-2013-1772, CVE-2013-1773, CVE-2013-1774, CVE-2013-1792, CVE-2013-1796, CVE-2013-1797, CVE-2013-1798, CVE-2013-1819, CVE-2013-1826, CVE-2013-1827, CVE-2013-1828, CVE-2013-1848, CVE-2013-1858, CVE-2013-1860, CVE-2013-1928, CVE-2013-1929, CVE-2013-1943, CVE-2013-1956, CVE-2013-1957, CVE-2013-1958, CVE-2013-1959, CVE-2013-1979, CVE-2013-2015, CVE-2013-2017, CVE-2013-2058, CVE-2013-2094, CVE-2013-2128, CVE-2013-2140, CVE-2013-2141, CVE-2013-2146, CVE-2013-2147, CVE-2013-2148, CVE-2013-2164, CVE-2013-2206, CVE-2013-2232, CVE-2013-2234, CVE-2013-2237, CVE-2013-2546, CVE-2013-2547, CVE-2013-2548, CVE-2013-2596, CVE-2013-2634, CVE-2013-2635, CVE-2013-2636, CVE-2013-2850, CVE-2013-2851, CVE-2013-2852, CVE-2013-2888, CVE-2013-2889, CVE-2013-2890, CVE-2013-2891, CVE-2013-2892, CVE-2013-2893, CVE-2013-2894, CVE-2013-2895, CVE-2013-2896, CVE-2013-2897, CVE-2013-2898, CVE-2013-2899, CVE-2013-2929, CVE-2013-2930, CVE-2013-3076, CVE-2013-3222, CVE-2013-3223, CVE-2013-3224, CVE-2013-3225, CVE-2013-3226, CVE-2013-3227, CVE-2013-3228, CVE-2013-3229, CVE-2013-3230, CVE-2013-3231, CVE-2013-3232, CVE-2013-3233, CVE-2013-3234, CVE-2013-3235, CVE-2013-3236, CVE-2013-3237, CVE-2013-3301, CVE-2013-3302, CVE-2013-4125, CVE-2013-4127, CVE-2013-4129, CVE-2013-4162, CVE-2013-4163, CVE-2013-4205, CVE-2013-4220, CVE-2013-4247, CVE-2013-4254, CVE-2013-4270, CVE-2013-4299, CVE-2013-4300, CVE-2013-4312, CVE-2013-4343, CVE-2013-4345, CVE-2013-4348, CVE-2013-4350, CVE-2013-4387, CVE-2013-4470, CVE-2013-4483, CVE-2013-4511, CVE-2013-4512, CVE-2013-4513, CVE-2013-4514, CVE-2013-4515, CVE-2013-4516, CVE-2013-4563, CVE-2013-4579, CVE-2013-4587, CVE-2013-4588, CVE-2013-4591, CVE-2013-4592, CVE-2013-5634, CVE-2013-6282, CVE-2013-6367, CVE-2013-6368, CVE-2013-6376, CVE-2013-6378, CVE-2013-6380, CVE-2013-6381, CVE-2013-6382, CVE-2013-6383, CVE-2013-6431, CVE-2013-6432, CVE-2013-6885, CVE-2013-7026, CVE-2013-7027, CVE-2013-7263, CVE-2013-7264, CVE-2013-7265, CVE-2013-7266, CVE-2013-7267, CVE-2013-7268, CVE-2013-7269, CVE-2013-7270, CVE-2013-7271, CVE-2013-7281, CVE-2013-7339, CVE-2013-7348, CVE-2013-7421, CVE-2013-7446, CVE-2013-7470, CVE-2014-0038, CVE-2014-0049, CVE-2014-0055, CVE-2014-0069, CVE-2014-0077, CVE-2014-0100, CVE-2014-0101, CVE-2014-0102, CVE-2014-0131, CVE-2014-0155, CVE-2014-0181, CVE-2014-0196, CVE-2014-0203, CVE-2014-0205, CVE-2014-0206, CVE-2014-1438, CVE-2014-1444, CVE-2014-1445, CVE-2014-1446, CVE-2014-1690, CVE-2014-1737, CVE-2014-1738, CVE-2014-1739, CVE-2014-1874, CVE-2014-2038, CVE-2014-2039, CVE-2014-2309, CVE-2014-2523, CVE-2014-2568, CVE-2014-2580, CVE-2014-2672, CVE-2014-2673, CVE-2014-2678, CVE-2014-2706, CVE-2014-2739, CVE-2014-2851, CVE-2014-2889, CVE-2014-3122, CVE-2014-3144, CVE-2014-3145, CVE-2014-3153, CVE-2014-3180, CVE-2014-3181, CVE-2014-3182, CVE-2014-3183, CVE-2014-3184, CVE-2014-3185, CVE-2014-3186, CVE-2014-3534, CVE-2014-3535, CVE-2014-3601, CVE-2014-3610, CVE-2014-3611, CVE-2014-3631, CVE-2014-3645, CVE-2014-3646, CVE-2014-3647, CVE-2014-3673, CVE-2014-3687, CVE-2014-3688, CVE-2014-3690, CVE-2014-3917, CVE-2014-3940, CVE-2014-4014, CVE-2014-4027, CVE-2014-4157, CVE-2014-4171, CVE-2014-4508, CVE-2014-4608, CVE-2014-4611, CVE-2014-4652, CVE-2014-4653, CVE-2014-4654, CVE-2014-4655, CVE-2014-4656, CVE-2014-4667, CVE-2014-4699, CVE-2014-4943, CVE-2014-5045, CVE-2014-5077, CVE-2014-5206, CVE-2014-5207, CVE-2014-5471, CVE-2014-5472, CVE-2014-6410, CVE-2014-6416, CVE-2014-6417, CVE-2014-6418, CVE-2014-7145, CVE-2014-7283, CVE-2014-7284, CVE-2014-7822, CVE-2014-7825, CVE-2014-7826, CVE-2014-7841, CVE-2014-7842, CVE-2014-7843, CVE-2014-7970, CVE-2014-7975, CVE-2014-8086, CVE-2014-8133, CVE-2014-8134, CVE-2014-8159, CVE-2014-8160, CVE-2014-8171, CVE-2014-8172, CVE-2014-8173, CVE-2014-8369, CVE-2014-8480, CVE-2014-8481, CVE-2014-8559, CVE-2014-8709, CVE-2014-8884, CVE-2014-8989, CVE-2014-9090, CVE-2014-9322, CVE-2014-9419, CVE-2014-9420, CVE-2014-9428, CVE-2014-9529, CVE-2014-9584, CVE-2014-9585, CVE-2014-9644, CVE-2014-9683, CVE-2014-9710, CVE-2014-9715, CVE-2014-9717, CVE-2014-9728, CVE-2014-9729, CVE-2014-9730, CVE-2014-9731, CVE-2014-9803, CVE-2014-9870, CVE-2014-9888, CVE-2014-9895, CVE-2014-9903, CVE-2014-9904, CVE-2014-9914, CVE-2014-9922, CVE-2014-9940, CVE-2015-0239, CVE-2015-0274, CVE-2015-0275, CVE-2015-1333, CVE-2015-1339, CVE-2015-1350, CVE-2015-1420, CVE-2015-1421, CVE-2015-1465, CVE-2015-1573, CVE-2015-1593, CVE-2015-1805, CVE-2015-2041, CVE-2015-2042, CVE-2015-2150, CVE-2015-2666, CVE-2015-2672, CVE-2015-2686, CVE-2015-2830, CVE-2015-2922, CVE-2015-2925, CVE-2015-3212, CVE-2015-3214, CVE-2015-3288, CVE-2015-3290, CVE-2015-3291, CVE-2015-3331, CVE-2015-3339, CVE-2015-3636, CVE-2015-4001, CVE-2015-4002, CVE-2015-4003, CVE-2015-4004, CVE-2015-4036, CVE-2015-4167, CVE-2015-4170, CVE-2015-4176, CVE-2015-4177, CVE-2015-4178, CVE-2015-4692, CVE-2015-4700, CVE-2015-5156, CVE-2015-5157, CVE-2015-5257, CVE-2015-5283, CVE-2015-5307, CVE-2015-5327, CVE-2015-5364, CVE-2015-5366, CVE-2015-5697, CVE-2015-5706, CVE-2015-5707, CVE-2015-6252, CVE-2015-6526, CVE-2015-6937, CVE-2015-7509, CVE-2015-7513, CVE-2015-7515, CVE-2015-7550, CVE-2015-7566, CVE-2015-7613, CVE-2015-7799, CVE-2015-7833, CVE-2015-7872, CVE-2015-7884, CVE-2015-7885, CVE-2015-7990, CVE-2015-8104, CVE-2015-8215, CVE-2015-8324, CVE-2015-8374, CVE-2015-8539, CVE-2015-8543, CVE-2015-8550, CVE-2015-8551, CVE-2015-8552, CVE-2015-8553, CVE-2015-8569, CVE-2015-8575, CVE-2015-8660, CVE-2015-8709, CVE-2015-8746, CVE-2015-8767, CVE-2015-8785, CVE-2015-8787, CVE-2015-8812, CVE-2015-8816, CVE-2015-8830, CVE-2015-8839, CVE-2015-8844, CVE-2015-8845, CVE-2015-8950, CVE-2015-8952, CVE-2015-8953, CVE-2015-8955, CVE-2015-8956, CVE-2015-8961, CVE-2015-8962, CVE-2015-8963, CVE-2015-8964, CVE-2015-8966, CVE-2015-8967, CVE-2015-8970, CVE-2015-9004, CVE-2015-9016, CVE-2015-9289, CVE-2016-0617, CVE-2016-0723, CVE-2016-0728, CVE-2016-0758, CVE-2016-0821, CVE-2016-0823, CVE-2016-10044, CVE-2016-10088, CVE-2016-10147, CVE-2016-10150, CVE-2016-10153, CVE-2016-10154, CVE-2016-10200, CVE-2016-10208, CVE-2016-10229, CVE-2016-10318, CVE-2016-10723, CVE-2016-10741, CVE-2016-10764, CVE-2016-10905, CVE-2016-10906, CVE-2016-10907, CVE-2016-1237, CVE-2016-1575, CVE-2016-1576, CVE-2016-1583, CVE-2016-2053, CVE-2016-2069, CVE-2016-2070, CVE-2016-2085, CVE-2016-2117, CVE-2016-2143, CVE-2016-2184, CVE-2016-2185, CVE-2016-2186, CVE-2016-2187, CVE-2016-2188, CVE-2016-2383, CVE-2016-2384, CVE-2016-2543, CVE-2016-2544, CVE-2016-2545, CVE-2016-2546, CVE-2016-2547, CVE-2016-2548, CVE-2016-2549, CVE-2016-2550, CVE-2016-2782, CVE-2016-2847, CVE-2016-3044, CVE-2016-3070, CVE-2016-3134, CVE-2016-3135, CVE-2016-3136, CVE-2016-3137, CVE-2016-3138, CVE-2016-3139, CVE-2016-3140, CVE-2016-3156, CVE-2016-3157, CVE-2016-3672, CVE-2016-3689, CVE-2016-3713, CVE-2016-3841, CVE-2016-3857, CVE-2016-3951, CVE-2016-3955, CVE-2016-3961, CVE-2016-4440, CVE-2016-4470, CVE-2016-4482, CVE-2016-4485, CVE-2016-4486, CVE-2016-4557, CVE-2016-4558, CVE-2016-4565, CVE-2016-4568, CVE-2016-4569, CVE-2016-4578, CVE-2016-4580, CVE-2016-4581, CVE-2016-4794, CVE-2016-4805, CVE-2016-4913, CVE-2016-4951, CVE-2016-4997, CVE-2016-4998, CVE-2016-5195, CVE-2016-5243, CVE-2016-5244, CVE-2016-5400, CVE-2016-5412, CVE-2016-5696, CVE-2016-5728, CVE-2016-5828, CVE-2016-5829, CVE-2016-6130, CVE-2016-6136, CVE-2016-6156, CVE-2016-6162, CVE-2016-6187, CVE-2016-6197, CVE-2016-6198, CVE-2016-6213, CVE-2016-6327, CVE-2016-6480, CVE-2016-6516, CVE-2016-6786, CVE-2016-6787, CVE-2016-6828, CVE-2016-7039, CVE-2016-7042, CVE-2016-7097, CVE-2016-7117, CVE-2016-7425, CVE-2016-7910, CVE-2016-7911, CVE-2016-7912, CVE-2016-7913, CVE-2016-7914, CVE-2016-7915, CVE-2016-7916, CVE-2016-7917, CVE-2016-8399, CVE-2016-8405, CVE-2016-8630, CVE-2016-8632, CVE-2016-8633, CVE-2016-8636, CVE-2016-8645, CVE-2016-8646, CVE-2016-8650, CVE-2016-8655, CVE-2016-8658, CVE-2016-8666, CVE-2016-9083, CVE-2016-9084, CVE-2016-9120, CVE-2016-9178, CVE-2016-9191, CVE-2016-9313, CVE-2016-9555, CVE-2016-9576, CVE-2016-9588, CVE-2016-9604, CVE-2016-9685, CVE-2016-9754, CVE-2016-9755, CVE-2016-9756, CVE-2016-9777, CVE-2016-9793, CVE-2016-9794, CVE-2016-9806, CVE-2016-9919, CVE-2017-0605, CVE-2017-0627, CVE-2017-0750, CVE-2017-0786, CVE-2017-0861, CVE-2017-1000, CVE-2017-1000111, CVE-2017-1000112, CVE-2017-1000251, CVE-2017-1000252, CVE-2017-1000253, CVE-2017-1000255, CVE-2017-1000363, CVE-2017-1000364, CVE-2017-1000365, CVE-2017-1000370, CVE-2017-1000371, CVE-2017-1000379, CVE-2017-1000380, CVE-2017-1000405, CVE-2017-1000407, CVE-2017-1000410, CVE-2017-10661, CVE-2017-10662, CVE-2017-10663, CVE-2017-10810, CVE-2017-10911, CVE-2017-11089, CVE-2017-11176, CVE-2017-11472, CVE-2017-11473, CVE-2017-11600, CVE-2017-12134, CVE-2017-12146, CVE-2017-12153, CVE-2017-12154, CVE-2017-12168, CVE-2017-12188, CVE-2017-12190, CVE-2017-12192, CVE-2017-12193, CVE-2017-12762, CVE-2017-13080, CVE-2017-13166, CVE-2017-13167, CVE-2017-13168, CVE-2017-13215, CVE-2017-13216, CVE-2017-13220, CVE-2017-13305, CVE-2017-13686, CVE-2017-13695, CVE-2017-13715, CVE-2017-14051, CVE-2017-14106, CVE-2017-14140, CVE-2017-14156, CVE-2017-14340, CVE-2017-14489, CVE-2017-14497, CVE-2017-14954, CVE-2017-14991, CVE-2017-15102, CVE-2017-15115, CVE-2017-15116, CVE-2017-15121, CVE-2017-15126, CVE-2017-15127, CVE-2017-15128, CVE-2017-15129, CVE-2017-15265, CVE-2017-15274, CVE-2017-15299, CVE-2017-15306, CVE-2017-15537, CVE-2017-15649, CVE-2017-15868, CVE-2017-15951, CVE-2017-16525, CVE-2017-16526, CVE-2017-16527, CVE-2017-16528, CVE-2017-16529, CVE-2017-16530, CVE-2017-16531, CVE-2017-16532, CVE-2017-16533, CVE-2017-16534, CVE-2017-16535, CVE-2017-16536, CVE-2017-16537, CVE-2017-16538, CVE-2017-16643, CVE-2017-16644, CVE-2017-16645, CVE-2017-16646, CVE-2017-16647, CVE-2017-16648, CVE-2017-16649, CVE-2017-16650, CVE-2017-16911, CVE-2017-16912, CVE-2017-16913, CVE-2017-16914, CVE-2017-16939, CVE-2017-16994, CVE-2017-16995, CVE-2017-16996, CVE-2017-17052, CVE-2017-17053, CVE-2017-17448, CVE-2017-17449, CVE-2017-17450, CVE-2017-17558, CVE-2017-17712, CVE-2017-17741, CVE-2017-17805, CVE-2017-17806, CVE-2017-17807, CVE-2017-17852, CVE-2017-17853, CVE-2017-17854, CVE-2017-17855, CVE-2017-17856, CVE-2017-17857, CVE-2017-17862, CVE-2017-17863, CVE-2017-17864, CVE-2017-17975, CVE-2017-18017, CVE-2017-18075, CVE-2017-18079, CVE-2017-18174, CVE-2017-18193, CVE-2017-18200, CVE-2017-18202, CVE-2017-18203, CVE-2017-18204, CVE-2017-18208, CVE-2017-18216, CVE-2017-18218, CVE-2017-18221, CVE-2017-18222, CVE-2017-18224, CVE-2017-18232, CVE-2017-18241, CVE-2017-18249, CVE-2017-18255, CVE-2017-18257, CVE-2017-18261, CVE-2017-18270, CVE-2017-18344, CVE-2017-18360, CVE-2017-18379, CVE-2017-18509, CVE-2017-18549, CVE-2017-18550, CVE-2017-18551, CVE-2017-18552, CVE-2017-18595, CVE-2017-2583, CVE-2017-2584, CVE-2017-2596, CVE-2017-2618, CVE-2017-2634, CVE-2017-2636, CVE-2017-2647, CVE-2017-2671, CVE-2017-5123, CVE-2017-5546, CVE-2017-5547, CVE-2017-5548, CVE-2017-5549, CVE-2017-5550, CVE-2017-5551, CVE-2017-5576, CVE-2017-5577, CVE-2017-5669, CVE-2017-5715, CVE-2017-5753, CVE-2017-5754, CVE-2017-5897, CVE-2017-5967, CVE-2017-5970, CVE-2017-5972, CVE-2017-5986, CVE-2017-6001, CVE-2017-6074, CVE-2017-6214, CVE-2017-6345, CVE-2017-6346, CVE-2017-6347, CVE-2017-6348, CVE-2017-6353, CVE-2017-6874, CVE-2017-6951, CVE-2017-7184, CVE-2017-7187, CVE-2017-7261, CVE-2017-7273, CVE-2017-7277, CVE-2017-7294, CVE-2017-7308, CVE-2017-7346, CVE-2017-7374, CVE-2017-7472, CVE-2017-7477, CVE-2017-7482, CVE-2017-7487, CVE-2017-7495, CVE-2017-7518, CVE-2017-7533, CVE-2017-7541, CVE-2017-7542, CVE-2017-7558, CVE-2017-7616, CVE-2017-7618, CVE-2017-7645, CVE-2017-7889, CVE-2017-7895, CVE-2017-7979, CVE-2017-8061, CVE-2017-8062, CVE-2017-8063, CVE-2017-8064, CVE-2017-8065, CVE-2017-8066, CVE-2017-8067, CVE-2017-8068, CVE-2017-8069, CVE-2017-8070, CVE-2017-8071, CVE-2017-8072, CVE-2017-8106, CVE-2017-8240, CVE-2017-8797, CVE-2017-8824, CVE-2017-8831, CVE-2017-8890, CVE-2017-8924, CVE-2017-8925, CVE-2017-9059, CVE-2017-9074, CVE-2017-9075, CVE-2017-9076, CVE-2017-9077, CVE-2017-9150, CVE-2017-9211, CVE-2017-9242, CVE-2017-9605, CVE-2017-9725, CVE-2017-9984, CVE-2017-9985, CVE-2017-9986, CVE-2018-1000004, CVE-2018-1000026, CVE-2018-1000028, CVE-2018-1000199, CVE-2018-1000200, CVE-2018-1000204, CVE-2018-10021, CVE-2018-10074, CVE-2018-10087, CVE-2018-10124, CVE-2018-10322, CVE-2018-10323, CVE-2018-1065, CVE-2018-1066, CVE-2018-10675, CVE-2018-1068, CVE-2018-10840, CVE-2018-10853, CVE-2018-1087, CVE-2018-10876, CVE-2018-10877, CVE-2018-10878, CVE-2018-10879, CVE-2018-10880, CVE-2018-10881, CVE-2018-10882, CVE-2018-10883, CVE-2018-10901, CVE-2018-10902, CVE-2018-1091, CVE-2018-1092, CVE-2018-1093, CVE-2018-10938, CVE-2018-1094, CVE-2018-10940, CVE-2018-1095, CVE-2018-1108, CVE-2018-1118, CVE-2018-1120, CVE-2018-11232, CVE-2018-1128, CVE-2018-1129, CVE-2018-1130, CVE-2018-11412, CVE-2018-11506, CVE-2018-11508, CVE-2018-12126, CVE-2018-12127, CVE-2018-12130, CVE-2018-12207, CVE-2018-12232, CVE-2018-12233, CVE-2018-12633, CVE-2018-12714, CVE-2018-12896, CVE-2018-12904, CVE-2018-13053, CVE-2018-13093, CVE-2018-13094, CVE-2018-13095, CVE-2018-13096, CVE-2018-13097, CVE-2018-13098, CVE-2018-13099, CVE-2018-13100, CVE-2018-13405, CVE-2018-13406, CVE-2018-14609, CVE-2018-14610, CVE-2018-14611, CVE-2018-14612, CVE-2018-14613, CVE-2018-14614, CVE-2018-14615, CVE-2018-14616, CVE-2018-14617, CVE-2018-14619, CVE-2018-14625, CVE-2018-14633, CVE-2018-14634, CVE-2018-14641, CVE-2018-14646, CVE-2018-14656, CVE-2018-14678, CVE-2018-14734, CVE-2018-15471, CVE-2018-15572, CVE-2018-15594, CVE-2018-16276, CVE-2018-16597, CVE-2018-16658, CVE-2018-16862, CVE-2018-16871, CVE-2018-16880, CVE-2018-16882, CVE-2018-16884, CVE-2018-17182, CVE-2018-17972, CVE-2018-18021, CVE-2018-18281, CVE-2018-18386, CVE-2018-18397, CVE-2018-18445, CVE-2018-18559, CVE-2018-18690, CVE-2018-18710, CVE-2018-18955, CVE-2018-19406, CVE-2018-19407, CVE-2018-19824, CVE-2018-19854, CVE-2018-19985, CVE-2018-20169, CVE-2018-20449, CVE-2018-20509, CVE-2018-20510, CVE-2018-20511, CVE-2018-20669, CVE-2018-20784, CVE-2018-20836, CVE-2018-20854, CVE-2018-20855, CVE-2018-20856, CVE-2018-20961, CVE-2018-20976, CVE-2018-21008, CVE-2018-25015, CVE-2018-25020, CVE-2018-3620, CVE-2018-3639, CVE-2018-3646, CVE-2018-3665, CVE-2018-3693, CVE-2018-5332, CVE-2018-5333, CVE-2018-5344, CVE-2018-5390, CVE-2018-5391, CVE-2018-5703, CVE-2018-5750, CVE-2018-5803, CVE-2018-5814, CVE-2018-5848, CVE-2018-5873, CVE-2018-5953, CVE-2018-5995, CVE-2018-6412, CVE-2018-6554, CVE-2018-6555, CVE-2018-6927, CVE-2018-7191, CVE-2018-7273, CVE-2018-7480, CVE-2018-7492, CVE-2018-7566, CVE-2018-7740, CVE-2018-7754, CVE-2018-7755, CVE-2018-7757, CVE-2018-7995, CVE-2018-8043, CVE-2018-8087, CVE-2018-8781, CVE-2018-8822, CVE-2018-8897, CVE-2018-9363, CVE-2018-9385, CVE-2018-9415, CVE-2018-9422, CVE-2018-9465, CVE-2018-9516, CVE-2018-9517, CVE-2018-9518, CVE-2018-9568, CVE-2019-0136, CVE-2019-0145, CVE-2019-0146, CVE-2019-0147, CVE-2019-0148, CVE-2019-0149, CVE-2019-0154, CVE-2019-0155, CVE-2019-10124, CVE-2019-10125, CVE-2019-10126, CVE-2019-10142, CVE-2019-10207, CVE-2019-10220, CVE-2019-10638, CVE-2019-10639, CVE-2019-11085, CVE-2019-11091, CVE-2019-11135, CVE-2019-11190, CVE-2019-11191, CVE-2019-1125, CVE-2019-11477, CVE-2019-11478, CVE-2019-11479, CVE-2019-11486, CVE-2019-11487, CVE-2019-11599, CVE-2019-11683, CVE-2019-11810, CVE-2019-11811, CVE-2019-11815, CVE-2019-11833, CVE-2019-11884, CVE-2019-12378, CVE-2019-12379, CVE-2019-12380, CVE-2019-12381, CVE-2019-12382, CVE-2019-12454, CVE-2019-12455, CVE-2019-12614, CVE-2019-12615, CVE-2019-12817, CVE-2019-12818, CVE-2019-12819, CVE-2019-12881, CVE-2019-12984, CVE-2019-13233, CVE-2019-13272, CVE-2019-13631, CVE-2019-13648, CVE-2019-14283, CVE-2019-14284, CVE-2019-14615, CVE-2019-14763, CVE-2019-14814, CVE-2019-14815, CVE-2019-14816, CVE-2019-14821, CVE-2019-14835, CVE-2019-14895, CVE-2019-14896, CVE-2019-14897, CVE-2019-14901, CVE-2019-15030, CVE-2019-15031, CVE-2019-15090, CVE-2019-15098, CVE-2019-15099, CVE-2019-15117, CVE-2019-15118, CVE-2019-15211, CVE-2019-15212, CVE-2019-15213, CVE-2019-15214, CVE-2019-15215, CVE-2019-15216, CVE-2019-15217, CVE-2019-15218, CVE-2019-15219, CVE-2019-15220, CVE-2019-15221, CVE-2019-15222, CVE-2019-15223, CVE-2019-15291, CVE-2019-15292, CVE-2019-15504, CVE-2019-15505, CVE-2019-15538, CVE-2019-15666, CVE-2019-15807, CVE-2019-15916, CVE-2019-15917, CVE-2019-15918, CVE-2019-15919, CVE-2019-15920, CVE-2019-15921, CVE-2019-15922, CVE-2019-15923, CVE-2019-15924, CVE-2019-15925, CVE-2019-15926, CVE-2019-15927, CVE-2019-16229, CVE-2019-16230, CVE-2019-16231, CVE-2019-16232, CVE-2019-16233, CVE-2019-16234, CVE-2019-16413, CVE-2019-16714, CVE-2019-16746, CVE-2019-16921, CVE-2019-16994, CVE-2019-16995, CVE-2019-17052, CVE-2019-17053, CVE-2019-17054, CVE-2019-17055, CVE-2019-17056, CVE-2019-17075, CVE-2019-17133, CVE-2019-17351, CVE-2019-17666, CVE-2019-18198, CVE-2019-18282, CVE-2019-18660, CVE-2019-18675, CVE-2019-18683, CVE-2019-18786, CVE-2019-18805, CVE-2019-18806, CVE-2019-18807, CVE-2019-18808, CVE-2019-18809, CVE-2019-18810, CVE-2019-18811, CVE-2019-18812, CVE-2019-18813, CVE-2019-18814, CVE-2019-18885, CVE-2019-19036, CVE-2019-19037, CVE-2019-19039, CVE-2019-19043, CVE-2019-19044, CVE-2019-19045, CVE-2019-19046, CVE-2019-19047, CVE-2019-19048, CVE-2019-19049, CVE-2019-19050, CVE-2019-19051, CVE-2019-19052, CVE-2019-19053, CVE-2019-19054, CVE-2019-19055, CVE-2019-19056, CVE-2019-19057, CVE-2019-19058, CVE-2019-19059, CVE-2019-19060, CVE-2019-19061, CVE-2019-19062, CVE-2019-19063, CVE-2019-19064, CVE-2019-19065, CVE-2019-19066, CVE-2019-19067, CVE-2019-19068, CVE-2019-19069, CVE-2019-19070, CVE-2019-19071, CVE-2019-19072, CVE-2019-19073, CVE-2019-19074, CVE-2019-19075, CVE-2019-19076, CVE-2019-19077, CVE-2019-19078, CVE-2019-19079, CVE-2019-19080, CVE-2019-19081, CVE-2019-19082, CVE-2019-19083, CVE-2019-19227, CVE-2019-19241, CVE-2019-19252, CVE-2019-19318, CVE-2019-19319, CVE-2019-19332, CVE-2019-19338, CVE-2019-19377, CVE-2019-19447, CVE-2019-19448, CVE-2019-19449, CVE-2019-19462, CVE-2019-19523, CVE-2019-19524, CVE-2019-19525, CVE-2019-19526, CVE-2019-19527, CVE-2019-19528, CVE-2019-19529, CVE-2019-19530, CVE-2019-19531, CVE-2019-19532, CVE-2019-19533, CVE-2019-19534, CVE-2019-19535, CVE-2019-19536, CVE-2019-19537, CVE-2019-19543, CVE-2019-19602, CVE-2019-19767, CVE-2019-19768, CVE-2019-19769, CVE-2019-19770, CVE-2019-19807, CVE-2019-19813, CVE-2019-19815, CVE-2019-19816, CVE-2019-19922, CVE-2019-19927, CVE-2019-19947, CVE-2019-19965, CVE-2019-19966, CVE-2019-1999, CVE-2019-20054, CVE-2019-20095, CVE-2019-20096, CVE-2019-2024, CVE-2019-2025, CVE-2019-20422, CVE-2019-2054, CVE-2019-20636, CVE-2019-20806, CVE-2019-20810, CVE-2019-20811, CVE-2019-20812, CVE-2019-20908, CVE-2019-20934, CVE-2019-2101, CVE-2019-2181, CVE-2019-2182, CVE-2019-2213, CVE-2019-2214, CVE-2019-2215, CVE-2019-25044, CVE-2019-25045, CVE-2019-3016, CVE-2019-3459, CVE-2019-3460, CVE-2019-3701, CVE-2019-3819, CVE-2019-3837, CVE-2019-3846, CVE-2019-3874, CVE-2019-3882, CVE-2019-3887, CVE-2019-3892, CVE-2019-3896, CVE-2019-3900, CVE-2019-3901, CVE-2019-5108, CVE-2019-6133, CVE-2019-6974, CVE-2019-7221, CVE-2019-7222, CVE-2019-7308, CVE-2019-8912, CVE-2019-8956, CVE-2019-8980, CVE-2019-9003, CVE-2019-9162, CVE-2019-9213, CVE-2019-9245, CVE-2019-9444, CVE-2019-9445, CVE-2019-9453, CVE-2019-9454, CVE-2019-9455, CVE-2019-9456, CVE-2019-9457, CVE-2019-9458, CVE-2019-9466, CVE-2019-9500, CVE-2019-9503, CVE-2019-9506, CVE-2019-9857, CVE-2020-0009, CVE-2020-0030, CVE-2020-0041, CVE-2020-0066, CVE-2020-0067, CVE-2020-0110, CVE-2020-0255, CVE-2020-0305, CVE-2020-0404, CVE-2020-0423, CVE-2020-0427, CVE-2020-0429, CVE-2020-0430, CVE-2020-0431, CVE-2020-0432, CVE-2020-0433, CVE-2020-0435, CVE-2020-0444, CVE-2020-0465, CVE-2020-0466, CVE-2020-0543, CVE-2020-10135, CVE-2020-10690, CVE-2020-10711, CVE-2020-10720, CVE-2020-10732, CVE-2020-10742, CVE-2020-10751, CVE-2020-10757, CVE-2020-10766, CVE-2020-10767, CVE-2020-10768, CVE-2020-10769, CVE-2020-10773, CVE-2020-10781, CVE-2020-10942, CVE-2020-11494, CVE-2020-11565, CVE-2020-11608, CVE-2020-11609, CVE-2020-11668, CVE-2020-11669, CVE-2020-11884, CVE-2020-12114, CVE-2020-12351, CVE-2020-12352, CVE-2020-12464, CVE-2020-12465, CVE-2020-12652, CVE-2020-12653, CVE-2020-12654, CVE-2020-12655, CVE-2020-12656, CVE-2020-12657, CVE-2020-12659, CVE-2020-12768, CVE-2020-12769, CVE-2020-12770, CVE-2020-12771, CVE-2020-12826, CVE-2020-12888, CVE-2020-12912, CVE-2020-13143, CVE-2020-13974, CVE-2020-14305, CVE-2020-14314, CVE-2020-14331, CVE-2020-14351, CVE-2020-14353, CVE-2020-14356, CVE-2020-14381, CVE-2020-14385, CVE-2020-14386, CVE-2020-14390, CVE-2020-14416, CVE-2020-15393, CVE-2020-15436, CVE-2020-15437, CVE-2020-15780, CVE-2020-15852, CVE-2020-16119, CVE-2020-16120, CVE-2020-16166, CVE-2020-1749, CVE-2020-24394, CVE-2020-24490, CVE-2020-24586, CVE-2020-24587, CVE-2020-24588, CVE-2020-25211, CVE-2020-25212, CVE-2020-25221, CVE-2020-25284, CVE-2020-25285, CVE-2020-25639, CVE-2020-25641, CVE-2020-25643, CVE-2020-25645, CVE-2020-25656, CVE-2020-25668, CVE-2020-25669, CVE-2020-25670, CVE-2020-25671, CVE-2020-25672, CVE-2020-25673, CVE-2020-25704, CVE-2020-25705, CVE-2020-26088, CVE-2020-26139, CVE-2020-26141, CVE-2020-26145, CVE-2020-26147, CVE-2020-26541, CVE-2020-26555, CVE-2020-26558, CVE-2020-27066, CVE-2020-27067, CVE-2020-27068, CVE-2020-27152, CVE-2020-27170, CVE-2020-27171, CVE-2020-27194, CVE-2020-2732, CVE-2020-27418, CVE-2020-27673, CVE-2020-27675, CVE-2020-27777, CVE-2020-27784, CVE-2020-27786, CVE-2020-27815, CVE-2020-27820, CVE-2020-27825, CVE-2020-27830, CVE-2020-27835, CVE-2020-28097, CVE-2020-28374, CVE-2020-28588, CVE-2020-28915, CVE-2020-28941, CVE-2020-28974, CVE-2020-29368, CVE-2020-29369, CVE-2020-29370, CVE-2020-29371, CVE-2020-29372, CVE-2020-29373, CVE-2020-29374, CVE-2020-29534, CVE-2020-29568, CVE-2020-29569, CVE-2020-29660, CVE-2020-29661, CVE-2020-35499, CVE-2020-35508, CVE-2020-35513, CVE-2020-35519, CVE-2020-36158, CVE-2020-36310, CVE-2020-36311, CVE-2020-36312, CVE-2020-36313, CVE-2020-36322, CVE-2020-36385, CVE-2020-36386, CVE-2020-36387, CVE-2020-36516, CVE-2020-36557, CVE-2020-36558, CVE-2020-36691, CVE-2020-36694, CVE-2020-36766, CVE-2020-3702, CVE-2020-4788, CVE-2020-7053, CVE-2020-8428, CVE-2020-8647, CVE-2020-8648, CVE-2020-8649, CVE-2020-8694, CVE-2020-8834, CVE-2020-8835, CVE-2020-8992, CVE-2020-9383, CVE-2020-9391, CVE-2021-0129, CVE-2021-0342, CVE-2021-0447, CVE-2021-0448, CVE-2021-0512, CVE-2021-0605, CVE-2021-0707, CVE-2021-0920, CVE-2021-0929, CVE-2021-0935, CVE-2021-0937, CVE-2021-0938, CVE-2021-0941, CVE-2021-1048, CVE-2021-20177, CVE-2021-20194, CVE-2021-20226, CVE-2021-20239, CVE-2021-20261, CVE-2021-20265, CVE-2021-20268, CVE-2021-20292, CVE-2021-20317, CVE-2021-20320, CVE-2021-20321, CVE-2021-20322, CVE-2021-21781, CVE-2021-22543, CVE-2021-22555, CVE-2021-22600, CVE-2021-23133, CVE-2021-23134, CVE-2021-26401, CVE-2021-26708, CVE-2021-26930, CVE-2021-26931, CVE-2021-26932, CVE-2021-27363, CVE-2021-27364, CVE-2021-27365, CVE-2021-28038, CVE-2021-28039, CVE-2021-28375, CVE-2021-28660, CVE-2021-28688, CVE-2021-28691, CVE-2021-28711, CVE-2021-28712, CVE-2021-28713, CVE-2021-28714, CVE-2021-28715, CVE-2021-28950, CVE-2021-28951, CVE-2021-28952, CVE-2021-28964, CVE-2021-28971, CVE-2021-28972, CVE-2021-29154, CVE-2021-29155, CVE-2021-29264, CVE-2021-29265, CVE-2021-29266, CVE-2021-29646, CVE-2021-29647, CVE-2021-29648, CVE-2021-29649, CVE-2021-29650, CVE-2021-29657, CVE-2021-30002, CVE-2021-30178, CVE-2021-31440, CVE-2021-3178, CVE-2021-31829, CVE-2021-31916, CVE-2021-32399, CVE-2021-32606, CVE-2021-33033, CVE-2021-33034, CVE-2021-33098, CVE-2021-33135, CVE-2021-33200, CVE-2021-3347, CVE-2021-3348, CVE-2021-33624, CVE-2021-33655, CVE-2021-33656, CVE-2021-33909, CVE-2021-3411, CVE-2021-3428, CVE-2021-3444, CVE-2021-34556, CVE-2021-34693, CVE-2021-3483, CVE-2021-34866, CVE-2021-3489, CVE-2021-3490, CVE-2021-3491, CVE-2021-34981, CVE-2021-3501, CVE-2021-35039, CVE-2021-3506, CVE-2021-3543, CVE-2021-35477, CVE-2021-3564, CVE-2021-3573, CVE-2021-3587, CVE-2021-3600, CVE-2021-3609, CVE-2021-3612, CVE-2021-3635, CVE-2021-3640, CVE-2021-3653, CVE-2021-3655, CVE-2021-3656, CVE-2021-3659, CVE-2021-3679, CVE-2021-3715, CVE-2021-37159, CVE-2021-3732, CVE-2021-3736, CVE-2021-3739, CVE-2021-3743, CVE-2021-3744, CVE-2021-3752, CVE-2021-3753, CVE-2021-37576, CVE-2021-3759, CVE-2021-3760, CVE-2021-3764, CVE-2021-3772, CVE-2021-38160, CVE-2021-38166, CVE-2021-38198, CVE-2021-38199, CVE-2021-38200, CVE-2021-38201, CVE-2021-38202, CVE-2021-38203, CVE-2021-38204, CVE-2021-38205, CVE-2021-38206, CVE-2021-38207, CVE-2021-38208, CVE-2021-38209, CVE-2021-38300, CVE-2021-3894, CVE-2021-3896, CVE-2021-3923, CVE-2021-39633, CVE-2021-39634, CVE-2021-39636, CVE-2021-39648, CVE-2021-39656, CVE-2021-39657, CVE-2021-39685, CVE-2021-39686, CVE-2021-39698, CVE-2021-39711, CVE-2021-39713, CVE-2021-39714, CVE-2021-4001, CVE-2021-4002, CVE-2021-4028, CVE-2021-4032, CVE-2021-4037, CVE-2021-40490, CVE-2021-4083, CVE-2021-4090, CVE-2021-4093, CVE-2021-4095, CVE-2021-41073, CVE-2021-4135, CVE-2021-4148, CVE-2021-4149, CVE-2021-4154, CVE-2021-4155, CVE-2021-4157, CVE-2021-4159, CVE-2021-41864, CVE-2021-4197, CVE-2021-42008, CVE-2021-4202, CVE-2021-4203, CVE-2021-4218, CVE-2021-42252, CVE-2021-42327, CVE-2021-42739, CVE-2021-43056, CVE-2021-43057, CVE-2021-43267, CVE-2021-43389, CVE-2021-43975, CVE-2021-43976, CVE-2021-44733, CVE-2021-45095, CVE-2021-45100, CVE-2021-45402, CVE-2021-45469, CVE-2021-45480, CVE-2021-45485, CVE-2021-45486, CVE-2021-45868, CVE-2021-46283, CVE-2022-0001, CVE-2022-0002, CVE-2022-0168, CVE-2022-0171, CVE-2022-0185, CVE-2022-0264, CVE-2022-0286, CVE-2022-0322, CVE-2022-0330, CVE-2022-0433, CVE-2022-0435, CVE-2022-0487, CVE-2022-0492, CVE-2022-0494, CVE-2022-0516, CVE-2022-0617, CVE-2022-0644, CVE-2022-0646, CVE-2022-0742, CVE-2022-0812, CVE-2022-0847, CVE-2022-0850, CVE-2022-0854, CVE-2022-0995, CVE-2022-1011, CVE-2022-1012, CVE-2022-1015, CVE-2022-1016, CVE-2022-1043, CVE-2022-1048, CVE-2022-1055, CVE-2022-1158, CVE-2022-1184, CVE-2022-1195, CVE-2022-1198, CVE-2022-1199, CVE-2022-1204, CVE-2022-1205, CVE-2022-1353, CVE-2022-1419, CVE-2022-1462, CVE-2022-1516, CVE-2022-1651, CVE-2022-1652, CVE-2022-1671, CVE-2022-1678, CVE-2022-1679, CVE-2022-1729, CVE-2022-1734, CVE-2022-1786, CVE-2022-1789, CVE-2022-1836, CVE-2022-1852, CVE-2022-1882, CVE-2022-1943, CVE-2022-1966, CVE-2022-1972, CVE-2022-1973, CVE-2022-1974, CVE-2022-1975, CVE-2022-1976, CVE-2022-1998, CVE-2022-20008, CVE-2022-20132, CVE-2022-20141, CVE-2022-20153, CVE-2022-20154, CVE-2022-20158, CVE-2022-20166, CVE-2022-20368, CVE-2022-20369, CVE-2022-20421, CVE-2022-20422, CVE-2022-20423, CVE-2022-20565, CVE-2022-20566, CVE-2022-20567, CVE-2022-20572, CVE-2022-2078, CVE-2022-21123, CVE-2022-21125, CVE-2022-21166, CVE-2022-21385, CVE-2022-21499, CVE-2022-21505, CVE-2022-2153, CVE-2022-2196, CVE-2022-22942, CVE-2022-23036, CVE-2022-23037, CVE-2022-23038, CVE-2022-23039, CVE-2022-23040, CVE-2022-23041, CVE-2022-23042, CVE-2022-2308, CVE-2022-2318, CVE-2022-2380, CVE-2022-23816, CVE-2022-23960, CVE-2022-24122, CVE-2022-24448, CVE-2022-24958, CVE-2022-24959, CVE-2022-2503, CVE-2022-25258, CVE-2022-25375, CVE-2022-25636, CVE-2022-2585, CVE-2022-2586, CVE-2022-2588, CVE-2022-2590, CVE-2022-2602, CVE-2022-26365, CVE-2022-26373, CVE-2022-2639, CVE-2022-26490, CVE-2022-2663, CVE-2022-26966, CVE-2022-27223, CVE-2022-27666, CVE-2022-2785, CVE-2022-27950, CVE-2022-28356, CVE-2022-28388, CVE-2022-28389, CVE-2022-28390, CVE-2022-2873, CVE-2022-28796, CVE-2022-28893, CVE-2022-2905, CVE-2022-29156, CVE-2022-2938, CVE-2022-29581, CVE-2022-29582, CVE-2022-2959, CVE-2022-2964, CVE-2022-2977, CVE-2022-2978, CVE-2022-29900, CVE-2022-29901, CVE-2022-29968, CVE-2022-3028, CVE-2022-30594, CVE-2022-3061, CVE-2022-3077, CVE-2022-3078, CVE-2022-3103, CVE-2022-3104, CVE-2022-3105, CVE-2022-3106, CVE-2022-3107, CVE-2022-3110, CVE-2022-3111, CVE-2022-3112, CVE-2022-3113, CVE-2022-3114, CVE-2022-3115, CVE-2022-3169, CVE-2022-3170, CVE-2022-3202, CVE-2022-32250, CVE-2022-32296, CVE-2022-3239, CVE-2022-32981, CVE-2022-3303, CVE-2022-33740, CVE-2022-33741, CVE-2022-33742, CVE-2022-33743, CVE-2022-33744, CVE-2022-33981, CVE-2022-3424, CVE-2022-3435, CVE-2022-34494, CVE-2022-34495, CVE-2022-34918, CVE-2022-3521, CVE-2022-3524, CVE-2022-3526, CVE-2022-3531, CVE-2022-3532, CVE-2022-3534, CVE-2022-3535, CVE-2022-3541, CVE-2022-3542, CVE-2022-3543, CVE-2022-3545, CVE-2022-3564, CVE-2022-3565, CVE-2022-3577, CVE-2022-3586, CVE-2022-3594, CVE-2022-36123, CVE-2022-3619, CVE-2022-3621, CVE-2022-3623, CVE-2022-3625, CVE-2022-3628, CVE-2022-36280, CVE-2022-3629, CVE-2022-3630, CVE-2022-3633, CVE-2022-3635, CVE-2022-3640, CVE-2022-3643, CVE-2022-3646, CVE-2022-3649, CVE-2022-36879, CVE-2022-36946, CVE-2022-3707, CVE-2022-3910, CVE-2022-39189, CVE-2022-39190, CVE-2022-3977, CVE-2022-39842, CVE-2022-40307, CVE-2022-40476, CVE-2022-40768, CVE-2022-4095, CVE-2022-40982, CVE-2022-41218, CVE-2022-41222, CVE-2022-4127, CVE-2022-4128, CVE-2022-4129, CVE-2022-4139, CVE-2022-41674, CVE-2022-41849, CVE-2022-41850, CVE-2022-41858, CVE-2022-42328, CVE-2022-42329, CVE-2022-42432, CVE-2022-4269, CVE-2022-42703, CVE-2022-42719, CVE-2022-42720, CVE-2022-42721, CVE-2022-42722, CVE-2022-42895, CVE-2022-42896, CVE-2022-43750, CVE-2022-4378, CVE-2022-4379, CVE-2022-4382, CVE-2022-43945, CVE-2022-45869, CVE-2022-45886, CVE-2022-45887, CVE-2022-45888, CVE-2022-45919, CVE-2022-45934, CVE-2022-4662, CVE-2022-4744, CVE-2022-47518, CVE-2022-47519, CVE-2022-47520, CVE-2022-47521, CVE-2022-47929, CVE-2022-47938, CVE-2022-47939, CVE-2022-47940, CVE-2022-47941, CVE-2022-47942, CVE-2022-47943, CVE-2022-4842, CVE-2022-48423, CVE-2022-48424, CVE-2022-48425, CVE-2022-48502, CVE-2023-0030, CVE-2023-0045, CVE-2023-0047, CVE-2023-0122, CVE-2023-0160, CVE-2023-0179, CVE-2023-0210, CVE-2023-0240, CVE-2023-0266, CVE-2023-0394, CVE-2023-0458, CVE-2023-0459, CVE-2023-0461, CVE-2023-0468, CVE-2023-0469, CVE-2023-0590, CVE-2023-0615, CVE-2023-1032, CVE-2023-1073, CVE-2023-1074, CVE-2023-1076, CVE-2023-1077, CVE-2023-1078, CVE-2023-1079, CVE-2023-1095, CVE-2023-1118, CVE-2023-1192, CVE-2023-1194, CVE-2023-1195, CVE-2023-1206, CVE-2023-1249, CVE-2023-1252, CVE-2023-1281, CVE-2023-1380, CVE-2023-1382, CVE-2023-1390, CVE-2023-1513, CVE-2023-1582, CVE-2023-1583, CVE-2023-1611, CVE-2023-1637, CVE-2023-1652, CVE-2023-1670, CVE-2023-1829, CVE-2023-1838, CVE-2023-1855, CVE-2023-1859, CVE-2023-1989, CVE-2023-1990, CVE-2023-1998, CVE-2023-2002, CVE-2023-2006, CVE-2023-2008, CVE-2023-2019, CVE-2023-20569, CVE-2023-20588, CVE-2023-20593, CVE-2023-20938, CVE-2023-21102, CVE-2023-21106, CVE-2023-2124, CVE-2023-21255, CVE-2023-21264, CVE-2023-2156, CVE-2023-2162, CVE-2023-2163, CVE-2023-2166, CVE-2023-2177, CVE-2023-2194, CVE-2023-2235, CVE-2023-2236, CVE-2023-2248, CVE-2023-2269, CVE-2023-22996, CVE-2023-22997, CVE-2023-22998, CVE-2023-22999, CVE-2023-23001, CVE-2023-23002, CVE-2023-23003, CVE-2023-23004, CVE-2023-23005, CVE-2023-23006, CVE-2023-23454, CVE-2023-23455, CVE-2023-23559, CVE-2023-2483, CVE-2023-25012, CVE-2023-2513, CVE-2023-25775, CVE-2023-2598, CVE-2023-26544, CVE-2023-26545, CVE-2023-26605, CVE-2023-26606, CVE-2023-26607, CVE-2023-28327, CVE-2023-28328, CVE-2023-28410, CVE-2023-28464, CVE-2023-28466, CVE-2023-2860, CVE-2023-28772, CVE-2023-28866, CVE-2023-2898, CVE-2023-2985, CVE-2023-3006, CVE-2023-30456, CVE-2023-30772, CVE-2023-3090, CVE-2023-3106, CVE-2023-3111, CVE-2023-3117, CVE-2023-31248, CVE-2023-3141, CVE-2023-31436, CVE-2023-3159, CVE-2023-3161, CVE-2023-3212, CVE-2023-3220, CVE-2023-32233, CVE-2023-32247, CVE-2023-32248, CVE-2023-32250, CVE-2023-32252, CVE-2023-32254, CVE-2023-32257, CVE-2023-32258, CVE-2023-32269, CVE-2023-3268, CVE-2023-3269, CVE-2023-3312, CVE-2023-3317, CVE-2023-33203, CVE-2023-33250, CVE-2023-33288, CVE-2023-3338, CVE-2023-3355, CVE-2023-3357, CVE-2023-3358, CVE-2023-3359, CVE-2023-3390, CVE-2023-33951, CVE-2023-33952, CVE-2023-34255, CVE-2023-34256, CVE-2023-34319, CVE-2023-3439, CVE-2023-35001, CVE-2023-3567, CVE-2023-35788, CVE-2023-35823, CVE-2023-35824, CVE-2023-35826, CVE-2023-35828, CVE-2023-35829, CVE-2023-3609, CVE-2023-3610, CVE-2023-3611, CVE-2023-37453, CVE-2023-3772, CVE-2023-3773, CVE-2023-3776, CVE-2023-3777, CVE-2023-3812, CVE-2023-38409, CVE-2023-38426, CVE-2023-38427, CVE-2023-38428, CVE-2023-38429, CVE-2023-38430, CVE-2023-38431, CVE-2023-38432, CVE-2023-3863, CVE-2023-3865, CVE-2023-3866, CVE-2023-3867, CVE-2023-39189, CVE-2023-39192, CVE-2023-39193, CVE-2023-39194, CVE-2023-4004, CVE-2023-4015, CVE-2023-40283, CVE-2023-4128, CVE-2023-4132, CVE-2023-4147, CVE-2023-4155, CVE-2023-4194, CVE-2023-4206, CVE-2023-4207, CVE-2023-4208, CVE-2023-4273, CVE-2023-42752, CVE-2023-42753, CVE-2023-42755, CVE-2023-42756, CVE-2023-4385, CVE-2023-4387, CVE-2023-4389, CVE-2023-4394, CVE-2023-44466, CVE-2023-4459, CVE-2023-4569, CVE-2023-45862, CVE-2023-45871, CVE-2023-4611, CVE-2023-4623, CVE-2023-4732, CVE-2023-4921 and CVE-2023-5345
linux-yocto/5.15: Ignore CVE-2022-45886, CVE-2022-45887, CVE-2022-45919, CVE-2022-48502, CVE-2023-0160, CVE-2023-1206, CVE-2023-20593, CVE-2023-21264, CVE-2023-2898, CVE-2023-31248, CVE-2023-33250, CVE-2023-34319, CVE-2023-35001, CVE-2023-3611, CVE-2023-37453, CVE-2023-3773, CVE-2023-3776, CVE-2023-3777, CVE-2023-38432, CVE-2023-3863, CVE-2023-3865, CVE-2023-3866, CVE-2023-4004, CVE-2023-4015, CVE-2023-4132, CVE-2023-4147, CVE-2023-4194, CVE-2023-4385, CVE-2023-4387, CVE-2023-4389, CVE-2023-4394, CVE-2023-4459 and CVE-2023-4611
openssl: Fix CVE-2023-4807 and CVE-2023-5363
python3-git: Fix CVE-2023-40590 and CVE-2023-41040
python3-urllib3: Fix CVE-2023-43804
qemu: Ignore CVE-2023-2680
ruby: Fix CVE-2023-36617
shadow: Fix CVE-2023-4641
tiff: Fix CVE-2023-3576 and CVE-2023-40745
vim: Fix CVE-2023-5441 and CVE-2023-5535
webkitgtk: Fix CVE-2023-32439
xdg-utils: Fix CVE-2022-4055
xserver-xorg: ignore CVE-2022-3553 (XQuartz-specific)
zlib: Fix CVE-2023-45853
Fixes in Yocto-4.0.14
SECURITY.md: Add file
apt: add missing <cstdint> for uint16_t
bind: update to 9.18.19
bitbake: SECURITY.md: add file
bitbake: bitbake-getvar: Add a quiet command line argument
bitbake: bitbake-worker/runqueue: Avoid unnecessary bytes object copies
brief-yoctoprojectqs: use new CDN mirror for sstate
bsp-guide: bsp.rst: replace reference to wiki
bsp-guide: bsp: skip Intel machines no longer supported in Poky
build-appliance-image: Update to kirkstone head revision
ccache: fix build with gcc-13
cml1: Fix KCONFIG_CONFIG_COMMAND not conveyed fully in do_menuconfig
contributor-guide/style-guide: Add a note about task idempotence
contributor-guide/style-guide: Refer to recipes, not packages
contributor-guide: deprecate “Accepted” patch status
contributor-guide: discourage marking patches as Inappropriate
contributor-guide: recipe-style-guide: add more patch tagging examples
contributor-guide: recipe-style-guide: add section about CVE patches
contributor-guide: style-guide: discourage using Pending patch status
dev-manual: add security team processes
dev-manual: fix testimage usage instructions
dev-manual: layers: Add notes about layer.conf
dev-manual: new-recipe.rst: add missing parenthesis to “Patching Code” section
dev-manual: new-recipe.rst: replace reference to wiki
dev-manual: start.rst: remove obsolete reference
dev-manual: wic: update “wic list images” output
dev/ref-manual: Document INIT_MANAGER
fontcache.bbclass: avoid native recipes depending on target fontconfig
glibc: Update to latest on stable 2.35 branch (c84018a05aec..)
json-c: define CVE_VERSION
kernel.bbclass: Add force flag to rm calls
libxpm: upgrade to 3.5.17
linux-firmware: create separate packages
linux-firmware: upgrade to 20230804
linux-yocto/5.10: update to v5.10.197
linux-yocto: update CVE exclusions
manuals: correct “yocto-linux” by “linux-yocto”
manuals: update linux-yocto append examples
migration-guides: add release notes for 4.0.13
openssl: Upgrade to 3.0.12
overview: Add note about non-reproducibility side effects
package_rpm: Allow compression mode override
poky.conf: bump version for 4.0.14
profile-manual: aesthetic cleanups
python3-git: upgrade to 3.1.37
python3-jinja2: fix for the ptest result format
python3-urllib3: upgrade to 1.26.17
ref-manual: Fix PACKAGECONFIG term and add an example
ref-manual: Warn about COMPATIBLE_MACHINE skipping native recipes
ref-manual: releases.svg: Scarthgap is now version 5.0
ref-manual: variables: add RECIPE_SYSROOT and RECIPE_SYSROOT_NATIVE
ref-manual: variables: add TOOLCHAIN_OPTIONS variable
ref-manual: variables: add example for SYSROOT_DIRS variable
ref-manual: variables: provide no-match example for COMPATIBLE_MACHINE
sdk-manual: appendix-obtain: improve and update descriptions
test-manual: reproducible-builds: stop mentioning LTO bug
uboot-extlinux-config.bbclass: fix missed override syntax migration
vim: Upgrade to 9.0.2048
Known Issues in Yocto-4.0.14
N/A
Contributors to Yocto-4.0.14
Alexander Kanavin
Archana Polampalli
Armin Kuster
Arne Schwerdt
BELHADJ SALEM Talel
Bruce Ashfield
Chaitanya Vadrevu
Colin McAllister
Deepthi Hemraj
Etienne Cordonnier
Fahad Arslan
Hitendra Prajapati
Jaeyoon Jung
Joshua Watt
Khem Raj
Lee Chee Yang
Marta Rybczynska
Martin Jansa
Meenali Gupta
Michael Opdenacker
Narpat Mali
Niko Mauno
Paul Eggleton
Paulo Neves
Peter Marko
Quentin Schulz
Richard Purdie
Robert P. J. Day
Roland Hieber
Ross Burton
Ryan Eatmon
Shubham Kulkarni
Siddharth Doshi
Soumya Sambu
Steve Sakoman
Tim Orling
Trevor Gamblin
Vijay Anusuri
Wang Mingyu
Yash Shinde
Yogita Urade
Repositories / Downloads for Yocto-4.0.14
poky
Repository Location: https://git.yoctoproject.org/poky
Branch: kirkstone
Tag: yocto-4.0.14
Git Revision: d8d6d921fad14b82167d9f031d4fca06b5e01883
Release Artefact: poky-d8d6d921fad14b82167d9f031d4fca06b5e01883
sha: 46a6301e3921ee67cfe6be7ea544d6257f0c0f02ef15c5091287e024ff02d5f5
Download Locations: http://downloads.yoctoproject.org/releases/yocto/yocto-4.0.14/poky-d8d6d921fad14b82167d9f031d4fca06b5e01883.tar.bz2 http://mirrors.kernel.org/yocto/yocto/yocto-4.0.14/poky-d8d6d921fad14b82167d9f031d4fca06b5e01883.tar.bz2
openembedded-core
Repository Location: https://git.openembedded.org/openembedded-core
Branch: kirkstone
Tag: yocto-4.0.14
Git Revision: 0eb8e67aa6833df0cde29833568a70e65c21d7e5
Release Artefact: oecore-0eb8e67aa6833df0cde29833568a70e65c21d7e5
sha: d510a7067b87ba935b8a7c9f9608d0e06b057009ea753ed190ddfacc7195ecc5
Download Locations: http://downloads.yoctoproject.org/releases/yocto/yocto-4.0.14/oecore-0eb8e67aa6833df0cde29833568a70e65c21d7e5.tar.bz2 http://mirrors.kernel.org/yocto/yocto/yocto-4.0.14/oecore-0eb8e67aa6833df0cde29833568a70e65c21d7e5.tar.bz2
meta-mingw
Repository Location: https://git.yoctoproject.org/meta-mingw
Branch: kirkstone
Tag: yocto-4.0.14
Git Revision: f6b38ce3c90e1600d41c2ebb41e152936a0357d7
Release Artefact: meta-mingw-f6b38ce3c90e1600d41c2ebb41e152936a0357d7
sha: 7d57167c19077f4ab95623d55a24c2267a3a3fb5ed83688659b4c03586373b25
Download Locations: http://downloads.yoctoproject.org/releases/yocto/yocto-4.0.14/meta-mingw-f6b38ce3c90e1600d41c2ebb41e152936a0357d7.tar.bz2 http://mirrors.kernel.org/yocto/yocto/yocto-4.0.14/meta-mingw-f6b38ce3c90e1600d41c2ebb41e152936a0357d7.tar.bz2
meta-gplv2
Repository Location: https://git.yoctoproject.org/meta-gplv2
Branch: kirkstone
Tag: yocto-4.0.14
Git Revision: d2f8b5cdb285b72a4ed93450f6703ca27aa42e8a
Release Artefact: meta-gplv2-d2f8b5cdb285b72a4ed93450f6703ca27aa42e8a
sha: c386f59f8a672747dc3d0be1d4234b6039273d0e57933eb87caa20f56b9cca6d
Download Locations: http://downloads.yoctoproject.org/releases/yocto/yocto-4.0.14/meta-gplv2-d2f8b5cdb285b72a4ed93450f6703ca27aa42e8a.tar.bz2 http://mirrors.kernel.org/yocto/yocto/yocto-4.0.14/meta-gplv2-d2f8b5cdb285b72a4ed93450f6703ca27aa42e8a.tar.bz2
bitbake
Repository Location: https://git.openembedded.org/bitbake
Branch: 2.0
Tag: yocto-4.0.14
Git Revision: 6c1ffa9091d0c53a100e8c8c15122d28642034bd
Release Artefact: bitbake-6c1ffa9091d0c53a100e8c8c15122d28642034bd
sha: 1ceffc3b3359063341530c989a3606c897d862b61111538e683f101b02a360a2
Download Locations: http://downloads.yoctoproject.org/releases/yocto/yocto-4.0.14/bitbake-6c1ffa9091d0c53a100e8c8c15122d28642034bd.tar.bz2 http://mirrors.kernel.org/yocto/yocto/yocto-4.0.14/bitbake-6c1ffa9091d0c53a100e8c8c15122d28642034bd.tar.bz2
yocto-docs
Repository Location: https://git.yoctoproject.org/yocto-docs
Branch: kirkstone
Tag: yocto-4.0.14
Git Revision: 260b446a1a75d99399a3421cd8d6ba276f508f37
Release notes for Yocto-4.0.15 (Kirkstone)
Security Fixes in Yocto-4.0.15
avahi: Fix CVE-2023-1981, CVE-2023-38469, CVE-2023-38470, CVE-2023-38471, CVE-2023-38472 and CVE-2023-38473
binutils: Fix CVE-2022-47007, CVE-2022-47010 and CVE-2022-48064
bluez5: Fix CVE-2023-45866
ghostscript: Ignore GhostPCL CVE-2023-38560
gnutls: Fix CVE-2023-5981
go: Ignore CVE-2023-45283 and CVE-2023-45284
grub: Fix CVE-2023-4692 and CVE-2023-4693
gstreamer1.0-plugins-bad: Fix CVE-2023-44429
libsndfile: Fix CVE-2022-33065
libwebp: Fix CVE-2023-4863
openssl: Fix CVE-2023-5678
python3-cryptography: Fix CVE-2023-49083
qemu: Fix CVE-2023-1544
sudo: CVE-2023-42456 and CVE-2023-42465
tiff: Fix CVE-2023-41175
vim: Fix CVE-2023-46246, CVE-2023-48231, CVE-2023-48232, CVE-2023-48233, CVE-2023-48234, CVE-2023-48235, CVE-2023-48236, CVE-2023-48237 and CVE-2023-48706
xserver-xorg: Fix CVE-2023-5367 and CVE-2023-5380
xwayland: Fix CVE-2023-5367
Fixes in Yocto-4.0.15
bash: changes to SIGINT handler while waiting for a child
bitbake: Fix disk space monitoring on cephfs
bitbake: bitbake-getvar: Make –quiet work with –recipe
bitbake: runqueue.py: fix PSI check logic
bitbake: runqueue: Add pressure change logging
bitbake: runqueue: convert deferral messages from bb.note to bb.debug
bitbake: runqueue: fix PSI check calculation
bitbake: runqueue: show more pressure data
bitbake: runqueue: show number of currently running bitbake threads when pressure changes
bitbake: tinfoil: Do not fail when logging is disabled and full config is used
build-appliance-image: Update to kirkstone head revision
cve-check: don’t warn if a patch is remote
cve-check: slightly more verbose warning when adding the same package twice
cve-check: sort the package list in the JSON report
cve-exclusion_5.10.inc: update for 5.10.202
go: Fix issue in DNS resolver
goarch: Move Go architecture mapping to a library
gstreamer1.0-plugins-base: enable glx/opengl support
linux-yocto/5.10: update to v5.10.202
manuals: update class references
migration-guide: add release notes for 4.0.14
native: Clear TUNE_FEATURES/ABIEXTENSION
openssh: drop sudo from ptest dependencies
overview-manual: concepts: Add Bitbake Tasks Map
poky.conf: bump version for 4.0.15
python3-jinja2: Fixed ptest result output as per the standard
ref-manual: classes: explain cml1 class name
ref-manual: update SDK_NAME variable documentation
ref-manual: variables: add RECIPE_MAINTAINER
ref-manual: variables: document OEQA_REPRODUCIBLE_* variables
ref-manual: variables: mention new CDN for SSTATE_MIRRORS
rust-common: Set llvm-target correctly for cross SDK targets
rust-cross-canadian: Fix ordering of target json config generation
rust-cross/rust-common: Merge arm target handling code to fix cross-canadian
rust-cross: Simplfy the rust_gen_target calls
rust-llvm: Allow overriding LLVM target archs
sdk-manual: extensible.rst: remove instructions for using SDK functionality directly in a yocto build
sudo: upgrade to 1.9.15p2
systemtap_git: fix used uninitialized error
vim: Improve locale handling
vim: Upgrade to 9.0.2130
vim: use upstream generated .po files
Known Issues in Yocto-4.0.15
N/A
Contributors to Yocto-4.0.15
Alexander Kanavin
Archana Polampalli
BELHADJ SALEM Talel
Bruce Ashfield
Chaitanya Vadrevu
Chen Qi
Deepthi Hemraj
Denys Dmytriyenko
Hitendra Prajapati
Lee Chee Yang
Li Wang
Martin Jansa
Meenali Gupta
Michael Opdenacker
Mikko Rapeli
Narpat Mali
Niko Mauno
Ninad Palsule
Niranjan Pradhan
Paul Eggleton
Peter Kjellerstedt
Peter Marko
Richard Purdie
Ross Burton
Samantha Jalabert
Sanjana
Soumya Sambu
Steve Sakoman
Tim Orling
Vijay Anusuri
Vivek Kumbhar
Wenlin Kang
Yogita Urade
Repositories / Downloads for Yocto-4.0.15
poky
Repository Location: https://git.yoctoproject.org/poky
Branch: kirkstone
Tag: yocto-4.0.15
Git Revision: 755632c2fcab43aa05cdcfa529727064b045073c
Release Artefact: poky-755632c2fcab43aa05cdcfa529727064b045073c
sha: b40b43bd270d21a420c399981f9cfe0eb999f15e051fc2c89d124f249cdc0bd5
Download Locations: http://downloads.yoctoproject.org/releases/yocto/yocto-4.0.15/poky-755632c2fcab43aa05cdcfa529727064b045073c.tar.bz2 http://mirrors.kernel.org/yocto/yocto/yocto-4.0.15/poky-755632c2fcab43aa05cdcfa529727064b045073c.tar.bz2
openembedded-core
Repository Location: https://git.openembedded.org/openembedded-core
Branch: kirkstone
Tag: yocto-4.0.15
Git Revision: eea685e1caafd8e8121006d3f8b5d0b8a4f2a933
Release Artefact: oecore-eea685e1caafd8e8121006d3f8b5d0b8a4f2a933
sha: ddc3d4a2c8a097f2aa7132ae716affacc44b119c616a1eeffb7db56caa7fc79e
Download Locations: http://downloads.yoctoproject.org/releases/yocto/yocto-4.0.15/oecore-eea685e1caafd8e8121006d3f8b5d0b8a4f2a933.tar.bz2 http://mirrors.kernel.org/yocto/yocto/yocto-4.0.15/oecore-eea685e1caafd8e8121006d3f8b5d0b8a4f2a933.tar.bz2
meta-mingw
Repository Location: https://git.yoctoproject.org/meta-mingw
Branch: kirkstone
Tag: yocto-4.0.15
Git Revision: f6b38ce3c90e1600d41c2ebb41e152936a0357d7
Release Artefact: meta-mingw-f6b38ce3c90e1600d41c2ebb41e152936a0357d7
sha: 7d57167c19077f4ab95623d55a24c2267a3a3fb5ed83688659b4c03586373b25
Download Locations: http://downloads.yoctoproject.org/releases/yocto/yocto-4.0.15/meta-mingw-f6b38ce3c90e1600d41c2ebb41e152936a0357d7.tar.bz2 http://mirrors.kernel.org/yocto/yocto/yocto-4.0.15/meta-mingw-f6b38ce3c90e1600d41c2ebb41e152936a0357d7.tar.bz2
meta-gplv2
Repository Location: https://git.yoctoproject.org/meta-gplv2
Branch: kirkstone
Tag: yocto-4.0.15
Git Revision: d2f8b5cdb285b72a4ed93450f6703ca27aa42e8a
Release Artefact: meta-gplv2-d2f8b5cdb285b72a4ed93450f6703ca27aa42e8a
sha: c386f59f8a672747dc3d0be1d4234b6039273d0e57933eb87caa20f56b9cca6d
Download Locations: http://downloads.yoctoproject.org/releases/yocto/yocto-4.0.15/meta-gplv2-d2f8b5cdb285b72a4ed93450f6703ca27aa42e8a.tar.bz2 http://mirrors.kernel.org/yocto/yocto/yocto-4.0.15/meta-gplv2-d2f8b5cdb285b72a4ed93450f6703ca27aa42e8a.tar.bz2
bitbake
Repository Location: https://git.openembedded.org/bitbake
Branch: 2.0
Tag: yocto-4.0.15
Git Revision: 42a1c9fe698a03feb34c5bba223c6e6e0350925b
Release Artefact: bitbake-42a1c9fe698a03feb34c5bba223c6e6e0350925b
sha: 64c684ccd661fa13e25c859dfc68d66bec79281da0f4f81b0d6a9995acb659b5
Download Locations: http://downloads.yoctoproject.org/releases/yocto/yocto-4.0.15/bitbake-42a1c9fe698a03feb34c5bba223c6e6e0350925b.tar.bz2 http://mirrors.kernel.org/yocto/yocto/yocto-4.0.15/bitbake-42a1c9fe698a03feb34c5bba223c6e6e0350925b.tar.bz2
yocto-docs
Repository Location: https://git.yoctoproject.org/yocto-docs
Branch: kirkstone
Tag: yocto-4.0.15
Git Revision: 08fda7a5601393617b1ecfe89229459e14a90b1d
Release notes for Yocto-4.0.16 (Kirkstone)
Security Fixes in Yocto-4.0.16
cpio: Fix CVE-2023-7207
curl: Revert “curl: Backport fix CVE-2023-32001”
curl: Fix CVE-2023-46218
dropbear:Fix CVE-2023-48795
ffmpeg: Fix CVE-2022-3964 and CVE-2022-3965
ghostscript: Fix CVE-2023-46751
gnutls: Fix CVE-2024-0553 and CVE-2024-0567
go: Fix CVE-2023-39326
openssh: Fix CVE-2023-48795, CVE-2023-51384 and CVE-2023-51385
openssl: Fix CVE-2023-6129 and CVE-2023-6237
pam: Fix CVE-2024-22365
perl: Fix CVE-2023-47038
qemu: Fix CVE-2023-5088
sqlite3: Fix CVE-2023-7104
systemd: Fix CVE-2023-7008
tiff: Fix CVE-2023-6228
xserver-xorg: Fix CVE-2023-6377, CVE-2023-6478, CVE-2023-6816, CVE-2024-0229, CVE-2024-0408, CVE-2024-0409, CVE-2024-21885 and CVE-2024-21886
zlib: Ignore CVE-2023-6992
Fixes in Yocto-4.0.16
bitbake: asyncrpc: Add context manager API
bitbake: data: Add missing dependency handling of remove operator
bitbake: lib/bb: Add workaround for libgcc issues with python 3.8 and 3.9
bitbake: toastergui: verify that an existing layer path is given
build-appliance-image: Update to kirkstone head revision
contributor-guide: add License-Update tag
contributor-guide: fix command option
contributor-guide: use “apt” instead of “aptitude”
cpio: upgrade to 2.14
cve-update-nvd2-native: faster requests with API keys
cve-update-nvd2-native: increase the delay between subsequent request failures
cve-update-nvd2-native: make number of fetch attemtps configurable
cve-update-nvd2-native: remove unused variable CVE_SOCKET_TIMEOUT
dev-manual: Discourage the use of SRC_URI[md5sum]
dev-manual: layers: update link to YP Compatible form
dev-manual: runtime-testing: fix test module name
dev-manual: start.rst: update use of Download page
docs:what-i-wish-id-known.rst: fix URL
docs: document VSCode extension
docs:brief-yoctoprojectqs:index.rst: align variable order with default local.conf
docs:migration-guides: add release notes for 4.0.15
docs:migration-guides: release 3.5 is actually 4.0
elfutils: Disable stringop-overflow warning for build host
externalsrc: Ensure SRCREV is processed before accessing SRC_URI
linux-firmware: upgrade to 20231030
manuals: Add CONVERSION_CMD definition
manuals: Add UBOOT_BINARY, extend UBOOT_CONFIG
perl: upgrade to 5.34.3
poky.conf: bump version for 4.0.16
pybootchartgui: fix 2 SyntaxWarnings
python3-ptest: skip test_storlines
ref-manual: Fix reference to MIRRORS/PREMIRRORS defaults
ref-manual: classes: remove insserv bbclass
ref-manual: releases.svg: update nanbield release status
ref-manual: resources: sync with master branch
ref-manual: update tested and supported distros
test-manual: add links to python unittest
test-manual: add or improve hyperlinks
test-manual: explicit or fix file paths
test-manual: resource updates
test-manual: text and formatting fixes
test-manual: use working example
testimage: Exclude wtmp from target-dumper commands
testimage: drop target_dumper, host_dumper, and monitor_dumper
tzdata: Upgrade to 2023d
Known Issues in Yocto-4.0.16
N/A
Contributors to Yocto-4.0.16
Aatir Manzur
Archana Polampalli
Dhairya Nagodra
Dmitry Baryshkov
Enguerrand de Ribaucourt
Hitendra Prajapati
Insu Park
Joshua Watt
Justin Bronder
Jörg Sommer
Khem Raj
Lee Chee Yang
mark.yang
Marta Rybczynska
Martin Jansa
Maxin B. John
Michael Opdenacker
Paul Barker
Peter Kjellerstedt
Peter Marko
Poonam Jadhav
Richard Purdie
Shubham Kulkarni
Simone Weiß
Soumya Sambu
Sourav Pramanik
Steve Sakoman
Trevor Gamblin
Vijay Anusuri
Vivek Kumbhar
Yoann Congal
Yogita Urade
Repositories / Downloads for Yocto-4.0.16
poky
Repository Location: https://git.yoctoproject.org/poky
Branch: kirkstone
Tag: yocto-4.0.16
Git Revision: 54af8c5e80ebf63707ef4e51cc9d374f716da603
Release Artefact: poky-54af8c5e80ebf63707ef4e51cc9d374f716da603
sha: a53ec3a661cf56ca40c0fbf1500288c2c20abe94896d66a572bc5ccf5d92e9d6
Download Locations: http://downloads.yoctoproject.org/releases/yocto/yocto-4.0.16/poky-54af8c5e80ebf63707ef4e51cc9d374f716da603.tar.bz2 http://mirrors.kernel.org/yocto/yocto/yocto-4.0.16/poky-54af8c5e80ebf63707ef4e51cc9d374f716da603.tar.bz2
openembedded-core
Repository Location: https://git.openembedded.org/openembedded-core
Branch: kirkstone
Tag: yocto-4.0.16
Git Revision: a744a897f0ea7d34c31c024c13031221f9a85f24
Release Artefact: oecore-a744a897f0ea7d34c31c024c13031221f9a85f24
sha: 8c2bc9487597b0caa9f5a1d72b18cfcd1ddc7e6d91f0f051313563d6af95aeec
Download Locations: http://downloads.yoctoproject.org/releases/yocto/yocto-4.0.16/oecore-a744a897f0ea7d34c31c024c13031221f9a85f24.tar.bz2 http://mirrors.kernel.org/yocto/yocto/yocto-4.0.16/oecore-a744a897f0ea7d34c31c024c13031221f9a85f24.tar.bz2
meta-mingw
Repository Location: https://git.yoctoproject.org/meta-mingw
Branch: kirkstone
Tag: yocto-4.0.16
Git Revision: f6b38ce3c90e1600d41c2ebb41e152936a0357d7
Release Artefact: meta-mingw-f6b38ce3c90e1600d41c2ebb41e152936a0357d7
sha: 7d57167c19077f4ab95623d55a24c2267a3a3fb5ed83688659b4c03586373b25
Download Locations: http://downloads.yoctoproject.org/releases/yocto/yocto-4.0.16/meta-mingw-f6b38ce3c90e1600d41c2ebb41e152936a0357d7.tar.bz2 http://mirrors.kernel.org/yocto/yocto/yocto-4.0.16/meta-mingw-f6b38ce3c90e1600d41c2ebb41e152936a0357d7.tar.bz2
meta-gplv2
Repository Location: https://git.yoctoproject.org/meta-gplv2
Branch: kirkstone
Tag: yocto-4.0.16
Git Revision: d2f8b5cdb285b72a4ed93450f6703ca27aa42e8a
Release Artefact: meta-gplv2-d2f8b5cdb285b72a4ed93450f6703ca27aa42e8a
sha: c386f59f8a672747dc3d0be1d4234b6039273d0e57933eb87caa20f56b9cca6d
Download Locations: http://downloads.yoctoproject.org/releases/yocto/yocto-4.0.16/meta-gplv2-d2f8b5cdb285b72a4ed93450f6703ca27aa42e8a.tar.bz2 http://mirrors.kernel.org/yocto/yocto/yocto-4.0.16/meta-gplv2-d2f8b5cdb285b72a4ed93450f6703ca27aa42e8a.tar.bz2
bitbake
Repository Location: https://git.openembedded.org/bitbake
Branch: 2.0
Tag: yocto-4.0.16
Git Revision: ee090484cc25d760b8c20f18add17b5eff485b40
Release Artefact: bitbake-ee090484cc25d760b8c20f18add17b5eff485b40
sha: 479e3a57ae9fbc2aa95292a7554caeef113bbfb28c226ed19547b8dde1c95314
Download Locations: http://downloads.yoctoproject.org/releases/yocto/yocto-4.0.16/bitbake-ee090484cc25d760b8c20f18add17b5eff485b40.tar.bz2 http://mirrors.kernel.org/yocto/yocto/yocto-4.0.16/bitbake-ee090484cc25d760b8c20f18add17b5eff485b40.tar.bz2
yocto-docs
Repository Location: https://git.yoctoproject.org/yocto-docs
Branch: kirkstone
Tag: yocto-4.0.16
Git Revision: aba67b58711019a6ba439b2b77337f813ed799ac
Release notes for Yocto-4.0.17 (Kirkstone)
Security Fixes in Yocto-4.0.17
bind: Fix CVE-2023-4408, CVE-2023-5517, CVE-2023-5679, CVE-2023-50868 and CVE-2023-50387
binutils: Fix CVE-2023-39129 and CVE-2023-39130
curl: Fix CVE-2023-46219
curl: Ignore CVE-2023-42915
gcc: Ignore CVE-2023-4039
gdb: Fix CVE-2023-39129 and CVE-2023-39130
glibc: Ignore CVE-2023-0687
go: Fix CVE-2023-29406, CVE-2023-45285, CVE-2023-45287, CVE-2023-45289, CVE-2023-45290, CVE-2024-24784 and CVE-2024-24785
less: Fix CVE-2022-48624
libgit2: Fix CVE-2024-24575 and CVE-2024-24577
libuv: fix CVE-2024-24806
libxml2: Fix for CVE-2024-25062
linux-yocto/5.15: Fix CVE-2022-36402, CVE-2022-40982, CVE-2022-47940, CVE-2023-1193, CVE-2023-1194, CVE-2023-3772, CVE-2023-3867, CVE-2023-4128, CVE-2023-4206, CVE-2023-4207, CVE-2023-4208, CVE-2023-4244, CVE-2023-4273, CVE-2023-4563, CVE-2023-4569, CVE-2023-4623, CVE-2023-4881, CVE-2023-4921, CVE-2023-5158, CVE-2023-5717, CVE-2023-6040, CVE-2023-6121, CVE-2023-6176, CVE-2023-6546, CVE-2023-6606, CVE-2023-6622, CVE-2023-6817, CVE-2023-6915, CVE-2023-6931, CVE-2023-6932, CVE-2023-20569, CVE-2023-20588, CVE-2023-25775, CVE-2023-31085, CVE-2023-32247, CVE-2023-32250, CVE-2023-32252, CVE-2023-32254, CVE-2023-32257, CVE-2023-32258, CVE-2023-34324, CVE-2023-35827, CVE-2023-38427, CVE-2023-38430, CVE-2023-38431, CVE-2023-39189, CVE-2023-39192, CVE-2023-39193, CVE-2023-39194, CVE-2023-39198, CVE-2023-40283, CVE-2023-42752, CVE-2023-42753, CVE-2023-42754, CVE-2023-42755, CVE-2023-45871, CVE-2023-46343, CVE-2023-46813, CVE-2023-46838, CVE-2023-46862, CVE-2023-51042, CVE-2023-51779, CVE-2023-52340, CVE-2023-52429, CVE-2023-52435, CVE-2023-52436, CVE-2023-52438, CVE-2023-52439, CVE-2023-52441, CVE-2023-52442, CVE-2023-52443, CVE-2023-52444, CVE-2023-52445, CVE-2023-52448, CVE-2023-52449, CVE-2023-52451, CVE-2023-52454, CVE-2023-52456, CVE-2023-52457, CVE-2023-52458, CVE-2023-52463, CVE-2023-52464, CVE-2024-0340, CVE-2024-0584, CVE-2024-0607, CVE-2024-0641, CVE-2024-0646, CVE-2024-1085, CVE-2024-1086, CVE-2024-1151, CVE-2024-22705, CVE-2024-23849, CVE-2024-23850, CVE-2024-23851, CVE-2024-24860, CVE-2024-26586, CVE-2024-26589, CVE-2024-26591, CVE-2024-26592, CVE-2024-26593, CVE-2024-26594, CVE-2024-26597 and CVE-2024-26598
linux-yocto/5.15: Ignore CVE-2020-27418, CVE-2020-36766, CVE-2021-33630, CVE-2021-33631, CVE-2022-48619, CVE-2023-2430, CVE-2023-4610, CVE-2023-4732, CVE-2023-5090, CVE-2023-5178, CVE-2023-5197, CVE-2023-5345, CVE-2023-5633, CVE-2023-5972, CVE-2023-6111, CVE-2023-6200, CVE-2023-6531, CVE-2023-6679, CVE-2023-7192, CVE-2023-40791, CVE-2023-42756, CVE-2023-44466, CVE-2023-45862, CVE-2023-45863, CVE-2023-45898, CVE-2023-51043, CVE-2023-51780, CVE-2023-51781, CVE-2023-51782, CVE-2023-52433, CVE-2023-52440, CVE-2023-52446, CVE-2023-52450, CVE-2023-52453, CVE-2023-52455, CVE-2023-52459, CVE-2023-52460, CVE-2023-52461, CVE-2023-52462, CVE-2024-0193, CVE-2024-0443, CVE-2024-0562, CVE-2024-0582, CVE-2024-0639, CVE-2024-0775, CVE-2024-26581, CVE-2024-26582, CVE-2024-26590, CVE-2024-26596 and CVE-2024-26599
linux-yocto/5.10: Fix CVE-2023-6040, CVE-2023-6121, CVE-2023-6606, CVE-2023-6817, CVE-2023-6915, CVE-2023-6931, CVE-2023-6932, CVE-2023-39198, CVE-2023-46838, CVE-2023-51779, CVE-2023-51780, CVE-2023-51781, CVE-2023-51782, CVE-2023-52340, CVE-2024-0584 and CVE-2024-0646
linux-yocto/5.10: Ignore CVE-2021-33630, CVE-2021-33631, CVE-2022-1508, CVE-2022-36402, CVE-2022-48619, CVE-2023-2430, CVE-2023-4610, CVE-2023-5972, CVE-2023-6039, CVE-2023-6200, CVE-2023-6531, CVE-2023-6546, CVE-2023-6622, CVE-2023-6679, CVE-2023-7192, CVE-2023-46343, CVE-2023-51042, CVE-2023-51043, CVE-2024-0193, CVE-2024-0443, CVE-2024-0562, CVE-2024-0582, CVE-2024-0639, CVE-2024-0641, CVE-2024-0775, CVE-2024-1085 and CVE-2024-22705
openssl: Fix CVE-2024-0727
python3-pycryptodome: Fix CVE-2023-52323
qemu: Fix CVE-2023-6693, CVE-2023-42467 and CVE-2024-24474
vim: Fix CVE-2024-22667
xwayland: Fix CVE-2023-6377 and CVE-2023-6478
Fixes in Yocto-4.0.17
bind: Upgrade to 9.18.24
bitbake: bitbake/codeparser.py: address ast module deprecations in py 3.12
bitbake: bitbake/lib/bs4/tests/test_tree.py: python 3.12 regex
bitbake: codeparser: replace deprecated ast.Str and ‘s’
bitbake: fetch2: Ensure that git LFS objects are available
bitbake: tests/fetch: Add real git lfs tests and decorator
bitbake: tests/fetch: git-lfs restore _find_git_lfs
bitbake: toaster/toastergui: Bug-fix verify given layer path only if import/add local layer
build-appliance-image: Update to kirkstone head revision
cmake: Unset CMAKE_CXX_IMPLICIT_INCLUDE_DIRECTORIES
contributor-guide: fix lore URL
curl: don’t enable debug builds
cve_check: cleanup logging
dbus: Add missing CVE_PRODUCT
dev-manual: sbom: Rephrase spdx creation
dev-manual: runtime-testing: gen-tapdevs need iptables installed
dev-manual: packages: clarify shared PR service constraint
dev-manual: packages: need enough free space
dev-manual: start: remove idle line
feature-microblaze-versions.inc: python 3.12 regex
ghostscript: correct LICENSE with AGPLv3
image-live.bbclass: LIVE_ROOTFS_TYPE support compression
kernel.bbclass: Set pkg-config variables for building modules
kernel.bbclass: introduce KERNEL_LOCALVERSION
kernel: fix localversion in v6.3+
kernel: make LOCALVERSION consistent between recipes
ldconfig-native: Fix to point correctly on the DT_NEEDED entries in an ELF file
librsvg: Fix do_package_qa error for librsvg
linux-firmware: upgrade to 20231211
linux-yocto/5.10: update to v5.10.210
linux-yocto/5.15: update to v5.15.150
manuals: add minimum RAM requirements
manuals: suppress excess use of “following” word
manuals: update disk space requirements
manuals: update references to buildtools
manuals: updates for building on Windows (WSL 2)
meta/lib/oeqa: python 3.12 regex
meta/recipes: python 3.12 regex
migration-guide: add release notes for 4.0.16
oeqa/selftest/oelib/buildhistory: git default branch
oeqa/selftest/recipetool: downgrade meson version to not use pyproject.toml
oeqa/selftest/recipetool: expect meson.bb
oeqa/selftest/recipetool: fix for python 3.12
oeqa/selftest/runtime_test: only run the virgl tests on qemux86-64
oeqa: replace deprecated assertEquals
openssl: Upgrade to 3.0.13
poky.conf: bump version for 4.0.17
populate_sdk_ext: use ConfigParser instead of SafeConfigParser
python3-jinja2: upgrade to 3.1.3
recipetool/create_buildsys_python: use importlib instead of imp
ref-manual: system-requirements: recommend buildtools for not supported distros
ref-manual: system-requirements: add info on buildtools-make-tarball
ref-manual: release-process: grammar fix
ref-manual: system-requirements: fix AlmaLinux variable name
ref-manual: system-requirements: modify anchor
ref-manual: system-requirements: remove outdated note
ref-manual: system-requirements: simplify supported distro requirements
ref-manual: system-requirements: update packages to build docs
scripts/runqemu: add qmp socket support
scripts/runqemu: direct mesa to use its own drivers, rather than ones provided by host distro
scripts/runqemu: fix regex escape sequences
scripts: python 3.12 regex
selftest: skip virgl gtk/sdl test on ubuntu 18.04
systemd: Only add myhostname to nsswitch.conf if in PACKAGECONFIG
tzdata : Upgrade to 2024a
u-boot: Move UBOOT_INITIAL_ENV back to u-boot.inc
useradd-example: do not use unsupported clear text password
vim: upgrade to v9.0.2190
yocto-bsp: update to v5.15.150
Known Issues in Yocto-4.0.17
N/A
Contributors to Yocto-4.0.17
Adrian Freihofer
Alassane Yattara
Alexander Kanavin
Alexander Sverdlin
Archana Polampalli
Baruch Siach
Bruce Ashfield
Chen Qi
Chris Laplante
Deepthi Hemraj
Dhairya Nagodra
Fabien Mahot
Fabio Estevam
Hitendra Prajapati
Hugo SIMELIERE
Jermain Horsman
Kai Kang
Lee Chee Yang
Ludovic Jozeau
Michael Opdenacker
Ming Liu
Munehisa Kamata
Narpat Mali
Nikhil R
Paul Eggleton
Paulo Neves
Peter Marko
Philip Lorenz
Poonam Jadhav
Priyal Doshi
Ross Burton
Simone Weiß
Soumya Sambu
Steve Sakoman
Tim Orling
Trevor Gamblin
Vijay Anusuri
Vivek Kumbhar
Wang Mingyu
Zahir Hussain
Repositories / Downloads for Yocto-4.0.17
poky
Repository Location: https://git.yoctoproject.org/poky
Branch: kirkstone
Tag: yocto-4.0.17
Git Revision: 6d1a878bbf24c66f7186b270f823fcdf82e35383
Release Artefact: poky-6d1a878bbf24c66f7186b270f823fcdf82e35383
sha: 3bc3010340b674f7b0dd0a7997f0167b2240b794fbd4aa28c0c4217bddd15e30
Download Locations: http://downloads.yoctoproject.org/releases/yocto/yocto-4.0.17/poky-6d1a878bbf24c66f7186b270f823fcdf82e35383.tar.bz2 http://mirrors.kernel.org/yocto/yocto/yocto-4.0.17/poky-6d1a878bbf24c66f7186b270f823fcdf82e35383.tar.bz2
openembedded-core
Repository Location: https://git.openembedded.org/openembedded-core
Branch: kirkstone
Tag: yocto-4.0.17
Git Revision: 2501534c9581c6c3439f525d630be11554a57d24
Release Artefact: oecore-2501534c9581c6c3439f525d630be11554a57d24
sha: 52cc6cce9e920bdce078584b89136e81cc01e0c55616fab5fca6c3e04264c88e
Download Locations: http://downloads.yoctoproject.org/releases/yocto/yocto-4.0.17/oecore-2501534c9581c6c3439f525d630be11554a57d24.tar.bz2 http://mirrors.kernel.org/yocto/yocto/yocto-4.0.17/oecore-2501534c9581c6c3439f525d630be11554a57d24.tar.bz2
meta-mingw
Repository Location: https://git.yoctoproject.org/meta-mingw
Branch: kirkstone
Tag: yocto-4.0.17
Git Revision: f6b38ce3c90e1600d41c2ebb41e152936a0357d7
Release Artefact: meta-mingw-f6b38ce3c90e1600d41c2ebb41e152936a0357d7
sha: 7d57167c19077f4ab95623d55a24c2267a3a3fb5ed83688659b4c03586373b25
Download Locations: http://downloads.yoctoproject.org/releases/yocto/yocto-4.0.17/meta-mingw-f6b38ce3c90e1600d41c2ebb41e152936a0357d7.tar.bz2 http://mirrors.kernel.org/yocto/yocto/yocto-4.0.17/meta-mingw-f6b38ce3c90e1600d41c2ebb41e152936a0357d7.tar.bz2
meta-gplv2
Repository Location: https://git.yoctoproject.org/meta-gplv2
Branch: kirkstone
Tag: yocto-4.0.17
Git Revision: d2f8b5cdb285b72a4ed93450f6703ca27aa42e8a
Release Artefact: meta-gplv2-d2f8b5cdb285b72a4ed93450f6703ca27aa42e8a
sha: c386f59f8a672747dc3d0be1d4234b6039273d0e57933eb87caa20f56b9cca6d
Download Locations: http://downloads.yoctoproject.org/releases/yocto/yocto-4.0.17/meta-gplv2-d2f8b5cdb285b72a4ed93450f6703ca27aa42e8a.tar.bz2 http://mirrors.kernel.org/yocto/yocto/yocto-4.0.17/meta-gplv2-d2f8b5cdb285b72a4ed93450f6703ca27aa42e8a.tar.bz2
meta-clang
Repository Location: https://git.yoctoproject.org/meta-clang
Branch: kirkstone
Tag: yocto-4.0.17
Git Revision: eebe4ff2e539f3ffb01c5060cc4ca8b226ea8b52
Release Artefact: meta-clang-eebe4ff2e539f3ffb01c5060cc4ca8b226ea8b52
sha: 3299e96e069a22c0971e903fbc191f2427efffc83d910ac51bf0237caad01d17
Download Locations: http://downloads.yoctoproject.org/releases/yocto/yocto-4.0.17/meta-clang-eebe4ff2e539f3ffb01c5060cc4ca8b226ea8b52.tar.bz2 http://mirrors.kernel.org/yocto/yocto/yocto-4.0.17/meta-clang-eebe4ff2e539f3ffb01c5060cc4ca8b226ea8b52.tar.bz2
bitbake
Repository Location: https://git.openembedded.org/bitbake
Branch: 2.0
Tag: yocto-4.0.17
Git Revision: 40fd5f4eef7460ca67f32cfce8e229e67e1ff607
Release Artefact: bitbake-40fd5f4eef7460ca67f32cfce8e229e67e1ff607
sha: 5d20a0e4c5d0fce44bd84778168714a261a30a4b83f67c88df3b8a7e7115e444
Download Locations: http://downloads.yoctoproject.org/releases/yocto/yocto-4.0.17/bitbake-40fd5f4eef7460ca67f32cfce8e229e67e1ff607.tar.bz2 http://mirrors.kernel.org/yocto/yocto/yocto-4.0.17/bitbake-40fd5f4eef7460ca67f32cfce8e229e67e1ff607.tar.bz2
yocto-docs
Repository Location: https://git.yoctoproject.org/yocto-docs
Branch: kirkstone
Tag: yocto-4.0.17
Git Revision: 08ce7db2aa3a38deb8f5aa59bafc78542986babb
Release notes for Yocto-4.0.18 (Kirkstone)
Security Fixes in Yocto-4.0.18
curl: Fix CVE-2024-2398
expat: fix CVE-2023-52426 and CVE-2024-28757
libssh2: fix CVE-2023-48795
ncurses: Fix CVE-2023-50495
nghttp2: Fix CVE-2024-28182 and CVE-2023-44487
openssh: Ignore CVE-2023-51767
openssl: Fix CVE-2024-2511
perl: Ignore CVE-2023-47100
python3-cryptography: Fix CVE-2024-26130
python3-urllib3: Fix CVE-2023-45803
qemu: Fix CVE-2023-6683
ruby: fix CVE-2024-27281
rust: Ignore CVE-2024-24576
tiff: Fix CVE-2023-52356 and CVE-2023-6277
xserver-xorg: Fix CVE-2024-31080 and CVE-2024-31081
xwayland: Fix CVE-2023-6816, CVE-2024-0408 and CVE-2024-0409
Fixes in Yocto-4.0.18
build-appliance-image: Update to kirkstone head revision
common-licenses: backport LGPL-3.0-with-zeromq-exception license
contributor-guide: add notes for tests
contributor-guide: be more specific about meta-* trees
cups: fix typo in CVE-2023-32360 backport patch
cve-update-nvd2-native: Add an age threshold for incremental update
cve-update-nvd2-native: Fix CVE configuration update
cve-update-nvd2-native: Fix typo in comment
cve-update-nvd2-native: Remove duplicated CVE_CHECK_DB_FILE definition
cve-update-nvd2-native: Remove rejected CVE from database
cve-update-nvd2-native: nvd_request_next: Improve comment
dev-manual: improve descriptions of ‘bitbake -S printdiff’
dev-manual: packages: fix capitalization
docs: conf.py: properly escape backslashes for latex_elements
gcc: Backport sanitizer fix for 32-bit ALSR
glibc: Fix subscript typos for get_nscd_addresses
kernel-dev: join mkdir commands with -p
linux-firmware: Upgrade to 20240220
manuals: add initial sphinx-lint support
manuals: add initial stylechecks with Vale
manuals: document VIRTUAL-RUNTIME variables
manuals: fix duplicate “stylecheck” target
manuals: fix incorrect double backticks
manuals: fix trailing spaces
manuals: refer to new yocto-patches mailing list wherever appropriate
manuals: remove tab characters
manuals: replace hyphens with em dashes
manuals: use “manual page(s)”
migration-guides: add release notes for 4.0.17
poky.conf: bump version for 4.0.18
profile-manual: usage.rst: fix reference to bug report
profile-manual: usage.rst: formatting fixes
profile-manual: usage.rst: further style improvements
python3-urllib3: Upgrade to v1.26.18
ref-manual: add documentation of the variable SPDX_NAMESPACE_PREFIX
ref-manual: tasks: do_cleanall: recommend using ‘-f’ instead
ref-manual: tasks: do_cleansstate: recommend using ‘-f’ instead for a shared sstate
ref-manual: variables: adding multiple groups in GROUPADD_PARAM
ref-manual: variables: correct sdk installation default path
stress-ng: avoid calling sync during do_compile
systemd: Fix vlan qos mapping
tcl: Add a way to skip ptests
tcl: skip async and event tests in run-ptest
tcl: skip timing-dependent tests in run-ptest
valgrind: skip intermittently failing ptest
wireless-regdb: Upgrade to 2024.01.23
yocto-uninative: Update to 4.4 for glibc 2.39
Known Issues in Yocto-4.0.18
N/A
Contributors to Yocto-4.0.18
Alex Kiernan
Alex Stewart
Alexander Kanavin
BELOUARGA Mohamed
Claus Stovgaard
Colin McAllister
Geoff Parker
Haitao Liu
Harish Sadineni
Johan Bezem
Jonathan GUILLOT
Jörg Sommer
Khem Raj
Lee Chee Yang
Luca Ceresoli
Martin Jansa
Meenali Gupta
Michael Halstead
Michael Opdenacker
Peter Marko
Quentin Schulz
Ross Burton
Sana Kazi
Simone Weiß
Soumya Sambu
Steve Sakoman
Tan Wen Yan
Vijay Anusuri
Wang Mingyu
Yoann Congal
Yogita Urade
Zahir Hussain
Repositories / Downloads for Yocto-4.0.18
poky
Repository Location: https://git.yoctoproject.org/poky
Branch: kirkstone
Tag: yocto-4.0.18
Git Revision: 31751bba1c789f15f574773a659b8017d7bcf440
Release Artefact: poky-31751bba1c789f15f574773a659b8017d7bcf440
sha: 72d5aa65c3c37766ebc24b212740272c1d52342468548f9c070241d3522ad2ca
Download Locations: http://downloads.yoctoproject.org/releases/yocto/yocto-4.0.18/poky-31751bba1c789f15f574773a659b8017d7bcf440.tar.bz2 http://mirrors.kernel.org/yocto/yocto/yocto-4.0.18/poky-31751bba1c789f15f574773a659b8017d7bcf440.tar.bz2
openembedded-core
Repository Location: https://git.openembedded.org/openembedded-core
Branch: kirkstone
Tag: yocto-4.0.18
Git Revision: b7182571242dc4e23e5250a449d90348e62a6abc
Release Artefact: oecore-b7182571242dc4e23e5250a449d90348e62a6abc
sha: 6f257e50c10ebae673dcf61a833b3270db6d22781f02f6794a370aac839f1020
Download Locations: http://downloads.yoctoproject.org/releases/yocto/yocto-4.0.18/oecore-b7182571242dc4e23e5250a449d90348e62a6abc.tar.bz2 http://mirrors.kernel.org/yocto/yocto/yocto-4.0.18/oecore-b7182571242dc4e23e5250a449d90348e62a6abc.tar.bz2
meta-mingw
Repository Location: https://git.yoctoproject.org/meta-mingw
Branch: kirkstone
Tag: yocto-4.0.18
Git Revision: f6b38ce3c90e1600d41c2ebb41e152936a0357d7
Release Artefact: meta-mingw-f6b38ce3c90e1600d41c2ebb41e152936a0357d7
sha: 7d57167c19077f4ab95623d55a24c2267a3a3fb5ed83688659b4c03586373b25
Download Locations: http://downloads.yoctoproject.org/releases/yocto/yocto-4.0.18/meta-mingw-f6b38ce3c90e1600d41c2ebb41e152936a0357d7.tar.bz2 http://mirrors.kernel.org/yocto/yocto/yocto-4.0.18/meta-mingw-f6b38ce3c90e1600d41c2ebb41e152936a0357d7.tar.bz2
meta-gplv2
Repository Location: https://git.yoctoproject.org/meta-gplv2
Branch: kirkstone
Tag: yocto-4.0.18
Git Revision: d2f8b5cdb285b72a4ed93450f6703ca27aa42e8a
Release Artefact: meta-gplv2-d2f8b5cdb285b72a4ed93450f6703ca27aa42e8a
sha: c386f59f8a672747dc3d0be1d4234b6039273d0e57933eb87caa20f56b9cca6d
Download Locations: http://downloads.yoctoproject.org/releases/yocto/yocto-4.0.18/meta-gplv2-d2f8b5cdb285b72a4ed93450f6703ca27aa42e8a.tar.bz2 http://mirrors.kernel.org/yocto/yocto/yocto-4.0.18/meta-gplv2-d2f8b5cdb285b72a4ed93450f6703ca27aa42e8a.tar.bz2
bitbake
Repository Location: https://git.openembedded.org/bitbake
Branch: 2.0
Tag: yocto-4.0.18
Git Revision: 40fd5f4eef7460ca67f32cfce8e229e67e1ff607
Release Artefact: bitbake-40fd5f4eef7460ca67f32cfce8e229e67e1ff607
sha: 5d20a0e4c5d0fce44bd84778168714a261a30a4b83f67c88df3b8a7e7115e444
Download Locations: http://downloads.yoctoproject.org/releases/yocto/yocto-4.0.18/bitbake-40fd5f4eef7460ca67f32cfce8e229e67e1ff607.tar.bz2 http://mirrors.kernel.org/yocto/yocto/yocto-4.0.18/bitbake-40fd5f4eef7460ca67f32cfce8e229e67e1ff607.tar.bz2
yocto-docs
Repository Location: https://git.yoctoproject.org/yocto-docs
Branch: kirkstone
Tag: yocto-4.0.18
Git Revision: fd1423141e7458ba557db465c171b0b4e9063987
Release notes for Yocto-4.0.19 (Kirkstone)
Security Fixes in Yocto-4.0.19
bluez5: Fix CVE-2023-27349, CVE-2023-50229 and CVE-2023-50230
ghostscript: Fix CVE-2023-52722, CVE-2024-29510, CVE-2024-33869, CVE-2024-33870 and CVE-2024-33871
git: Fix CVE-2024-32002, CVE-2024-32004, CVE-2024-32020, CVE-2024-32021 and CVE-2024-32465
glibc: Fix CVE-2024-2961, CVE-2024-33599, CVE-2024-33600, CVE-2024-33601 and CVE-2024-33602
gnutls: Fix CVE-2024-28834 and CVE-2024-28835
go: Fix CVE-2023-45288
gstreamer1.0-plugins-bad: Fix CVE-2023-44446, CVE-2023-50186 and CVE-2024-0444
less: Fix CVE-2024-32487
libarchive: Fix CVE-2024-26256
libarchive: Fix multiple null deference and heap overflow in pax writer (no CVE assigned)
linux-yocto/5.15: Fix CVE-2023-6270, CVE-2023-7042, CVE-2023-52447, CVE-2023-52620, CVE-2024-22099, CVE-2024-26622, CVE-2024-26651, CVE-2024-26659, CVE-2024-26688, CVE-2024-26782, CVE-2024-26787, CVE-2024-26788, CVE-2024-26790, CVE-2024-26791, CVE-2024-26793, CVE-2024-26795, CVE-2024-26798, CVE-2024-26801, CVE-2024-26802, CVE-2024-26803, CVE-2024-26804, CVE-2024-26805 and CVE-2024-26809
linux-yocto/5.15: Ignore CVE-2019-25160, CVE-2019-25162, CVE-2020-36775, CVE-2020-36776, CVE-2020-36777, CVE-2020-36778, CVE-2020-36779, CVE-2020-36780, CVE-2020-36781, CVE-2020-36782, CVE-2020-36783, CVE-2020-36784, CVE-2020-36785, CVE-2020-36786, CVE-2020-36787, CVE-2021-46904, CVE-2021-46905, CVE-2021-46906, CVE-2021-46908, CVE-2021-46909, CVE-2021-46910, CVE-2021-46911, CVE-2021-46912, CVE-2021-46913, CVE-2021-46914, CVE-2021-46915, CVE-2021-46916, CVE-2021-46917, CVE-2021-46918, CVE-2021-46919, CVE-2021-46920, CVE-2021-46921, CVE-2021-46922, CVE-2021-46923, CVE-2021-46924, CVE-2021-46925, CVE-2021-46926, CVE-2021-46927, CVE-2021-46928, CVE-2021-46929, CVE-2021-46930, CVE-2021-46931, CVE-2021-46932, CVE-2021-46933, CVE-2021-46934, CVE-2021-46935, CVE-2021-46936, CVE-2021-46937, CVE-2021-46938, CVE-2021-46939, CVE-2021-46940, CVE-2021-46941, CVE-2021-46942, CVE-2021-46943, CVE-2021-46944, CVE-2021-46945, CVE-2021-46947, CVE-2021-46948, CVE-2021-46949, CVE-2021-46950, CVE-2021-46951, CVE-2021-46952, CVE-2021-46953, CVE-2021-46954, CVE-2021-46955, CVE-2021-46956, CVE-2021-46957, CVE-2021-46958, CVE-2021-46959, CVE-2021-46960, CVE-2021-46961, CVE-2021-46962, CVE-2021-46963, CVE-2021-46964, CVE-2021-46965, CVE-2021-46966, CVE-2021-46967, CVE-2021-46968, CVE-2021-46969, CVE-2021-46970, CVE-2021-46971, CVE-2021-46972, CVE-2021-46973, CVE-2021-46974, CVE-2021-46976, CVE-2021-46977, CVE-2021-46978, CVE-2021-46979, CVE-2021-46980, CVE-2021-46981, CVE-2021-46982, CVE-2021-46983, CVE-2021-46984, CVE-2021-46985, CVE-2021-46986, CVE-2021-46987, CVE-2021-46988, CVE-2021-46989, CVE-2021-46990, CVE-2021-46991, CVE-2021-46992, CVE-2021-46993, CVE-2021-46994, CVE-2021-46995, CVE-2021-46996, CVE-2021-46997, CVE-2021-46998, CVE-2021-46999, CVE-2021-47000, CVE-2021-47001, CVE-2021-47002, CVE-2021-47003, CVE-2021-47004, CVE-2021-47005, CVE-2021-47006, CVE-2021-47007, CVE-2021-47008, CVE-2021-47009, CVE-2021-47010, CVE-2021-47011, CVE-2021-47012, CVE-2021-47013, CVE-2021-47014, CVE-2021-47015, CVE-2021-47016, CVE-2021-47017, CVE-2021-47018, CVE-2021-47019, CVE-2021-47020, CVE-2021-47021, CVE-2021-47022, CVE-2021-47023, CVE-2021-47024, CVE-2021-47025, CVE-2021-47026, CVE-2021-47027, CVE-2021-47028, CVE-2021-47029, CVE-2021-47030, CVE-2021-47031, CVE-2021-47032, CVE-2021-47033, CVE-2021-47034, CVE-2021-47035, CVE-2021-47036, CVE-2021-47037, CVE-2021-47038, CVE-2021-47039, CVE-2021-47040, CVE-2021-47041, CVE-2021-47042, CVE-2021-47043, CVE-2021-47044, CVE-2021-47045, CVE-2021-47046, CVE-2021-47047, CVE-2021-47048, CVE-2021-47049, CVE-2021-47050, CVE-2021-47051, CVE-2021-47052, CVE-2021-47053, CVE-2021-47054, CVE-2021-47055, CVE-2021-47056, CVE-2021-47057, CVE-2021-47058, CVE-2021-47059, CVE-2021-47060, CVE-2021-47061, CVE-2021-47062, CVE-2021-47063, CVE-2021-47064, CVE-2021-47065, CVE-2021-47066, CVE-2021-47067, CVE-2021-47068, CVE-2021-47069, CVE-2021-47070, CVE-2021-47071, CVE-2021-47072, CVE-2021-47073, CVE-2021-47074, CVE-2021-47075, CVE-2021-47076, CVE-2021-47077, CVE-2021-47078, CVE-2021-47079, CVE-2021-47080, CVE-2021-47081, CVE-2021-47082, CVE-2021-47083, CVE-2021-47086, CVE-2021-47087, CVE-2021-47088, CVE-2021-47089, CVE-2021-47090, CVE-2021-47091, CVE-2021-47092, CVE-2021-47093, CVE-2021-47094, CVE-2021-47095, CVE-2021-47096, CVE-2021-47097, CVE-2021-47098, CVE-2021-47099, CVE-2021-47100, CVE-2021-47101, CVE-2021-47102, CVE-2021-47103, CVE-2021-47104, CVE-2021-47105, CVE-2021-47106, CVE-2021-47107, CVE-2021-47108, CVE-2021-47109, CVE-2021-47110, CVE-2021-47111, CVE-2021-47112, CVE-2021-47113, CVE-2021-47114, CVE-2021-47116, CVE-2021-47117, CVE-2021-47118, CVE-2021-47119, CVE-2021-47120, CVE-2021-47121, CVE-2021-47122, CVE-2021-47123, CVE-2021-47124, CVE-2021-47125, CVE-2021-47126, CVE-2021-47127, CVE-2021-47128, CVE-2021-47129, CVE-2021-47130, CVE-2021-47131, CVE-2021-47132, CVE-2021-47133, CVE-2021-47134, CVE-2021-47135, CVE-2021-47136, CVE-2021-47137, CVE-2021-47138, CVE-2021-47139, CVE-2021-47140, CVE-2021-47141, CVE-2021-47142, CVE-2021-47143, CVE-2021-47144, CVE-2021-47145, CVE-2021-47146, CVE-2021-47147, CVE-2021-47148, CVE-2021-47149, CVE-2021-47150, CVE-2021-47151, CVE-2021-47152, CVE-2021-47153, CVE-2021-47158, CVE-2021-47159, CVE-2021-47160, CVE-2021-47161, CVE-2021-47162, CVE-2021-47163, CVE-2021-47164, CVE-2021-47165, CVE-2021-47166, CVE-2021-47167, CVE-2021-47168, CVE-2021-47169, CVE-2021-47170, CVE-2021-47171, CVE-2021-47172, CVE-2021-47173, CVE-2021-47174, CVE-2021-47175, CVE-2021-47176, CVE-2021-47177, CVE-2021-47178, CVE-2021-47179 and CVE-2021-47180
linux-yocto/5.15 (cont.): Ignore CVE-2022-48626, CVE-2022-48627, CVE-2022-48629, CVE-2022-48630, CVE-2023-6356, CVE-2023-6536, CVE-2023-52434, CVE-2023-52465, CVE-2023-52467, CVE-2023-52468, CVE-2023-52469, CVE-2023-52470, CVE-2023-52471, CVE-2023-52472, CVE-2023-52473, CVE-2023-52474, CVE-2023-52475, CVE-2023-52476, CVE-2023-52477, CVE-2023-52478, CVE-2023-52479, CVE-2023-52480, CVE-2023-52482, CVE-2023-52483, CVE-2023-52484, CVE-2023-52486, CVE-2023-52487, CVE-2023-52489, CVE-2023-52490, CVE-2023-52491, CVE-2023-52492, CVE-2023-52493, CVE-2023-52494, CVE-2023-52495, CVE-2023-52497, CVE-2023-52498, CVE-2023-52499, CVE-2023-52500, CVE-2023-52501, CVE-2023-52502, CVE-2023-52503, CVE-2023-52504, CVE-2023-52505, CVE-2023-52507, CVE-2023-52509, CVE-2023-52510, CVE-2023-52511, CVE-2023-52512, CVE-2023-52513, CVE-2023-52515, CVE-2023-52516, CVE-2023-52517, CVE-2023-52518, CVE-2023-52519, CVE-2023-52520, CVE-2023-52522, CVE-2023-52523, CVE-2023-52524, CVE-2023-52525, CVE-2023-52526, CVE-2023-52527, CVE-2023-52528, CVE-2023-52529, CVE-2023-52531, CVE-2023-52559, CVE-2023-52560, CVE-2023-52562, CVE-2023-52563, CVE-2023-52564, CVE-2023-52566, CVE-2023-52567, CVE-2023-52570, CVE-2023-52573, CVE-2023-52574, CVE-2023-52575, CVE-2023-52577, CVE-2023-52578, CVE-2023-52580, CVE-2023-52581, CVE-2023-52583, CVE-2023-52587, CVE-2023-52588, CVE-2023-52594, CVE-2023-52595, CVE-2023-52597, CVE-2023-52598, CVE-2023-52599, CVE-2023-52600, CVE-2023-52601, CVE-2023-52602, CVE-2023-52603, CVE-2023-52604, CVE-2023-52606, CVE-2023-52607, CVE-2023-52608, CVE-2023-52609, CVE-2023-52610, CVE-2023-52611, CVE-2023-52612, CVE-2023-52613, CVE-2023-52614, CVE-2023-52615, CVE-2023-52616, CVE-2023-52617, CVE-2023-52618, CVE-2023-52619, CVE-2023-52622, CVE-2023-52623, CVE-2023-52626, CVE-2023-52627, CVE-2023-52628, CVE-2023-52630, CVE-2023-52631, CVE-2023-52633, CVE-2023-52635, CVE-2023-52636, CVE-2023-52637, CVE-2023-52638, CVE-2023-52640, CVE-2023-52641, CVE-2024-0565, CVE-2024-0841, CVE-2024-23196, CVE-2024-26587, CVE-2024-26588, CVE-2024-26600, CVE-2024-26601, CVE-2024-26602, CVE-2024-26603, CVE-2024-26604, CVE-2024-26605, CVE-2024-26606, CVE-2024-26608, CVE-2024-26610, CVE-2024-26611, CVE-2024-26612, CVE-2024-26614, CVE-2024-26615, CVE-2024-26616, CVE-2024-26617, CVE-2024-26618, CVE-2024-26619, CVE-2024-26620, CVE-2024-26621, CVE-2024-26625, CVE-2024-26626, CVE-2024-26627, CVE-2024-26629, CVE-2024-26630, CVE-2024-26631, CVE-2024-26632, CVE-2024-26633, CVE-2024-26634, CVE-2024-26635, CVE-2024-26636, CVE-2024-26637, CVE-2024-26638, CVE-2024-26639, CVE-2024-26640, CVE-2024-26641, CVE-2024-26643, CVE-2024-26644, CVE-2024-26645, CVE-2024-26649, CVE-2024-26652, CVE-2024-26653, CVE-2024-26657, CVE-2024-26660, CVE-2024-26663, CVE-2024-26664, CVE-2024-26665, CVE-2024-26666, CVE-2024-26667, CVE-2024-26668, CVE-2024-26670, CVE-2024-26671, CVE-2024-26673, CVE-2024-26674, CVE-2024-26675, CVE-2024-26676, CVE-2024-26678, CVE-2024-26679, CVE-2024-26681, CVE-2024-26682, CVE-2024-26683, CVE-2024-26684, CVE-2024-26685, CVE-2024-26689, CVE-2024-26690, CVE-2024-26692, CVE-2024-26693, CVE-2024-26694, CVE-2024-26695, CVE-2024-26696, CVE-2024-26697, CVE-2024-26698, CVE-2024-26702, CVE-2024-26703, CVE-2024-26704, CVE-2024-26705, CVE-2024-26707, CVE-2024-26708, CVE-2024-26709, CVE-2024-26710, CVE-2024-26711, CVE-2024-26712, CVE-2024-26715, CVE-2024-26716, CVE-2024-26717, CVE-2024-26720, CVE-2024-26721, CVE-2024-26722, CVE-2024-26723, CVE-2024-26724, CVE-2024-26725, CVE-2024-26727, CVE-2024-26728, CVE-2024-26729, CVE-2024-26730, CVE-2024-26731, CVE-2024-26732, CVE-2024-26733, CVE-2024-26734, CVE-2024-26735, CVE-2024-26736, CVE-2024-26737, CVE-2024-26741, CVE-2024-26742, CVE-2024-26743, CVE-2024-26744, CVE-2024-26746, CVE-2024-26747, CVE-2024-26748, CVE-2024-26749, CVE-2024-26750, CVE-2024-26751, CVE-2024-26752, CVE-2024-26753, CVE-2024-26754, CVE-2024-26755, CVE-2024-26760, CVE-2024-26761, CVE-2024-26762, CVE-2024-26763, CVE-2024-26764, CVE-2024-26766, CVE-2024-26769, CVE-2024-26771, CVE-2024-26772, CVE-2024-26773, CVE-2024-26774, CVE-2024-26776, CVE-2024-26777, CVE-2024-26778, CVE-2024-26779, CVE-2024-26780, CVE-2024-26781, CVE-2024-26783, CVE-2024-26785, CVE-2024-26786, CVE-2024-26792, CVE-2024-26794, CVE-2024-26796, CVE-2024-26799, CVE-2024-26800, CVE-2024-26807 and CVE-2024-26808
ncurses: Fix CVE-2023-45918
ofono: Fix CVE-2023-4233 and CVE-2023-4234
openssl: Fix CVE-2024-4603
util-linux: Fix CVE-2024-28085
xserver-xorg: Fix CVE-2024-31082 and CVE-2024-31083
Fixes in Yocto-4.0.19
binutils: Rename CVE-2022-38126 patch to CVE-2022-35205
bitbake: parse: Improve/fix cache invalidation via mtime
build-appliance-image: Update to kirkstone head revision
go-mod.bbclass: do not pack go mod cache
dev-manual: update custom distribution section
docs: poky.yaml.in: drop mesa/sdl from essential host packages
docs: standards.md: align with master branch
glibc: Update to latest on stable 2.35 branch (54a666dc5c…)
go.bbclass: fix path to linker in native Go builds
go.bbclass: Always pass interpreter to linker
initscripts: Add custom mount args for /var/lib
kernel.bbclass: check if directory exists before removing empty module directory
libpciaccess: Remove duplicated license entry
linux-yocto/5.15: cfg: remove obselete CONFIG_NFSD_V3 option
linux-yocto/5.15: update to v5.15.157
migration-notes: add release notes for 4.0.18
poky.conf: bump version for 4.0.19
ppp: Add RSA-MD in LICENSE
python3: Upgrade to 3.10.14
ref-manual: update releases.svg
ref-manual: variables: Update default INHERIT_DISTRO value
rootfs-postcommands.bbclass: Only set DROPBEAR_RSAKEY_DIR once
systemd-systemctl: Fix WantedBy processing
Known Issues in Yocto-4.0.19
N/A
Contributors to Yocto-4.0.19
Alexander Kanavin
Archana Polampalli
Bhabu Bindu
Bob Henz
Bruce Ashfield
Colin McAllister
Dmitry Baryshkov
Geoff Parker
Heiko Thole
Joerg Vehlow
Lee Chee Yang
Michael Glembotzki
Michael Opdenacker
Paul Eggleton
Peter Marko
Poonam Jadhav
Richard Purdie
Soumya Sambu
Stefan Herbrechtsmeier
Steve Sakoman
Vijay Anusuri
Yogita Urade
Repositories / Downloads for Yocto-4.0.19
poky
Repository Location: https://git.yoctoproject.org/poky
Branch: kirkstone
Tag: yocto-4.0.19
Git Revision: e139e9d0ce343ba77a09601a976c92acd562c9df
Release Artefact: poky-e139e9d0ce343ba77a09601a976c92acd562c9df
sha: 3e568af60ee599e262a359b50446c6cbe239481d8be2ee55403bda497735d636
Download Locations: http://downloads.yoctoproject.org/releases/yocto/yocto-4.0.19/poky-e139e9d0ce343ba77a09601a976c92acd562c9df.tar.bz2 http://mirrors.kernel.org/yocto/yocto/yocto-4.0.19/poky-e139e9d0ce343ba77a09601a976c92acd562c9df.tar.bz2
openembedded-core
Repository Location: https://git.openembedded.org/openembedded-core
Branch: kirkstone
Tag: yocto-4.0.19
Git Revision: ab2649ef6c83f0ae7cac554a72e6bea4dcda0e99
Release Artefact: oecore-ab2649ef6c83f0ae7cac554a72e6bea4dcda0e99
sha: abc7601650651a2d2260f7e7e9e2e0709f25233148d66cb2d9481775b7b59a0c
Download Locations: http://downloads.yoctoproject.org/releases/yocto/yocto-4.0.19/oecore-ab2649ef6c83f0ae7cac554a72e6bea4dcda0e99.tar.bz2 http://mirrors.kernel.org/yocto/yocto/yocto-4.0.19/oecore-ab2649ef6c83f0ae7cac554a72e6bea4dcda0e99.tar.bz2
meta-mingw
Repository Location: https://git.yoctoproject.org/meta-mingw
Branch: kirkstone
Tag: yocto-4.0.19
Git Revision: f6b38ce3c90e1600d41c2ebb41e152936a0357d7
Release Artefact: meta-mingw-f6b38ce3c90e1600d41c2ebb41e152936a0357d7
sha: 7d57167c19077f4ab95623d55a24c2267a3a3fb5ed83688659b4c03586373b25
Download Locations: http://downloads.yoctoproject.org/releases/yocto/yocto-4.0.19/meta-mingw-f6b38ce3c90e1600d41c2ebb41e152936a0357d7.tar.bz2 http://mirrors.kernel.org/yocto/yocto/yocto-4.0.19/meta-mingw-f6b38ce3c90e1600d41c2ebb41e152936a0357d7.tar.bz2
meta-gplv2
Repository Location: https://git.yoctoproject.org/meta-gplv2
Branch: kirkstone
Tag: yocto-4.0.19
Git Revision: d2f8b5cdb285b72a4ed93450f6703ca27aa42e8a
Release Artefact: meta-gplv2-d2f8b5cdb285b72a4ed93450f6703ca27aa42e8a
sha: c386f59f8a672747dc3d0be1d4234b6039273d0e57933eb87caa20f56b9cca6d
Download Locations: http://downloads.yoctoproject.org/releases/yocto/yocto-4.0.19/meta-gplv2-d2f8b5cdb285b72a4ed93450f6703ca27aa42e8a.tar.bz2 http://mirrors.kernel.org/yocto/yocto/yocto-4.0.19/meta-gplv2-d2f8b5cdb285b72a4ed93450f6703ca27aa42e8a.tar.bz2
bitbake
Repository Location: https://git.openembedded.org/bitbake
Branch: 2.0
Tag: yocto-4.0.19
Git Revision: 5a90927f31c4f9fccbe5d9d07d08e6e69485baa8
Release Artefact: bitbake-5a90927f31c4f9fccbe5d9d07d08e6e69485baa8
sha: e64b7f747718d10565d733057a8e6ee592c6b64983c7ffe623f9315ad35b6e0c
Download Locations: http://downloads.yoctoproject.org/releases/yocto/yocto-4.0.19/bitbake-5a90927f31c4f9fccbe5d9d07d08e6e69485baa8.tar.bz2 http://mirrors.kernel.org/yocto/yocto/yocto-4.0.19/bitbake-5a90927f31c4f9fccbe5d9d07d08e6e69485baa8.tar.bz2
yocto-docs
Repository Location: https://git.yoctoproject.org/yocto-docs
Branch: kirkstone
Tag: yocto-4.0.19
Git Revision: 78b8d5b18274a41ffec43ca4e136abc717585f6d
Release notes for Yocto-4.0.20 (Kirkstone)
Security Fixes in Yocto-4.0.20
acpica: Fix CVE-2024-24856
glib-2.0: Fix CVE-2024-34397
gstreamer1.0-plugins-base: Fix CVE-2024-4453
libxml2: Fix CVE-2024-34459
openssh: fix CVE-2024-6387
openssl: Fix CVE-2024-4741 and CVE-2024-5535
ruby: fix CVE-2024-27280
wget: Fix for CVE-2024-38428
Fixes in Yocto-4.0.20
bitbake: tests/fetch: Tweak test to match upstream repo url change Upstream changed their urls, update our test to match.
build-appliance-image: Update to kirkstone head revision
glibc-tests: Add missing bash ptest dependency
glibc-tests: correctly pull in the actual tests when installing -ptest package
glibc: stable 2.35 branch updates
gobject-introspection: Do not hardcode objdump name
linuxloader: add -armhf on arm only for TARGET_FPU ‘hard’
man-pages: add an alternative link name for crypt_r.3
man-pages: remove conflict pages
migration-guides: add release notes for 4.0.19
openssl: Upgrade 3.0.13 -> 3.0.14
poky.conf: bump version for 4.0.20
Known Issues in Yocto-4.0.20
N/A
Contributors to Yocto-4.0.20
Archana Polampalli
Changqing Li
Deepthi Hemraj
Jonas Gorski
Jose Quaresma
Khem Raj
Lee Chee Yang
Peter Marko
Poonam Jadhav
Siddharth Doshi
Steve Sakoman
Thomas Perrot
Vijay Anusuri
Yogita Urade
Repositories / Downloads for Yocto-4.0.20
poky
Repository Location: https://git.yoctoproject.org/poky
Branch: kirkstone
Tag: yocto-4.0.20
Git Revision: 6bd3969d32730538608e680653e032e66958fe84
Release Artefact: poky-6bd3969d32730538608e680653e032e66958fe84
sha: b7ef1bd5ba1af257c4eb07a59b51d69e147723aea010eb2da99ea30dcbbbe2d9
Download Locations: http://downloads.yoctoproject.org/releases/yocto/yocto-4.0.20/poky-6bd3969d32730538608e680653e032e66958fe84.tar.bz2 http://mirrors.kernel.org/yocto/yocto/yocto-4.0.20/poky-6bd3969d32730538608e680653e032e66958fe84.tar.bz2
openembedded-core
Repository Location: https://git.openembedded.org/openembedded-core
Branch: kirkstone
Tag: yocto-4.0.20
Git Revision: 5d97b0576e98a2cf402abab1a1edcab223545d87
Release Artefact: oecore-5d97b0576e98a2cf402abab1a1edcab223545d87
sha: 4064a32b8ff1ad8a98aa15e75b27585d2b27236c8cdfa4a28af6d6fef99b93c0
Download Locations: http://downloads.yoctoproject.org/releases/yocto/yocto-4.0.20/oecore-5d97b0576e98a2cf402abab1a1edcab223545d87.tar.bz2 http://mirrors.kernel.org/yocto/yocto/yocto-4.0.20/oecore-5d97b0576e98a2cf402abab1a1edcab223545d87.tar.bz2
meta-mingw
Repository Location: https://git.yoctoproject.org/meta-mingw
Branch: kirkstone
Tag: yocto-4.0.20
Git Revision: f6b38ce3c90e1600d41c2ebb41e152936a0357d7
Release Artefact: meta-mingw-f6b38ce3c90e1600d41c2ebb41e152936a0357d7
sha: 7d57167c19077f4ab95623d55a24c2267a3a3fb5ed83688659b4c03586373b25
Download Locations: http://downloads.yoctoproject.org/releases/yocto/yocto-4.0.20/meta-mingw-f6b38ce3c90e1600d41c2ebb41e152936a0357d7.tar.bz2 http://mirrors.kernel.org/yocto/yocto/yocto-4.0.20/meta-mingw-f6b38ce3c90e1600d41c2ebb41e152936a0357d7.tar.bz2
meta-gplv2
Repository Location: https://git.yoctoproject.org/meta-gplv2
Branch: kirkstone
Tag: yocto-4.0.20
Git Revision: d2f8b5cdb285b72a4ed93450f6703ca27aa42e8a
Release Artefact: meta-gplv2-d2f8b5cdb285b72a4ed93450f6703ca27aa42e8a
sha: c386f59f8a672747dc3d0be1d4234b6039273d0e57933eb87caa20f56b9cca6d
Download Locations: http://downloads.yoctoproject.org/releases/yocto/yocto-4.0.20/meta-gplv2-d2f8b5cdb285b72a4ed93450f6703ca27aa42e8a.tar.bz2 http://mirrors.kernel.org/yocto/yocto/yocto-4.0.20/meta-gplv2-d2f8b5cdb285b72a4ed93450f6703ca27aa42e8a.tar.bz2
bitbake
Repository Location: https://git.openembedded.org/bitbake
Branch: 2.0
Tag: yocto-4.0.20
Git Revision: 734b0ea3dfe45eb16ee60f0c2c388e22af4040e0
Release Artefact: bitbake-734b0ea3dfe45eb16ee60f0c2c388e22af4040e0
sha: 99f4c6786fec790fd6c4577b5dea3c97c580cc4815bd409ce554a68ee99b0180
Download Locations: http://downloads.yoctoproject.org/releases/yocto/yocto-4.0.20/bitbake-734b0ea3dfe45eb16ee60f0c2c388e22af4040e0.tar.bz2 http://mirrors.kernel.org/yocto/yocto/yocto-4.0.20/bitbake-734b0ea3dfe45eb16ee60f0c2c388e22af4040e0.tar.bz2
yocto-docs
Repository Location: https://git.yoctoproject.org/yocto-docs
Branch: kirkstone
Tag: yocto-4.0.20
Git Revision: b15b1d369edf33cd91232fefa0278e7e89653a01
Release notes for Yocto-4.0.21 (Kirkstone)
Security Fixes in Yocto-4.0.21
bind: Fix CVE-2024-4076, CVE-2024-1737, CVE-2024-0760 and CVE-2024-1975
apr: Fix CVE-2023-49582
busybox: Fix CVE-2023-42363, CVE-2023-42364, CVE-2023-42365, CVE-2023-42366 and CVE-2021-42380
curl: Ignore CVE-2024-32928
curl: Fix CVE-2024-7264
ghostscript: Fix CVE-2024-29506, CVE-2024-29509 and CVE-2024-29511
go: Fix CVE-2024-24789 and CVE-2024-24791
gtk+3: Fix CVE-2024-6655
libarchive: Ignore CVE-2024-37407
libyaml: Ignore CVE-2024-35325, CVE-2024-35326 and CVE-2024-35328
linux-yocto/5.15: Fix CVE-2022-48772, CVE-2024-35972, CVE-2024-35984, CVE-2024-35990, CVE-2024-35997, CVE-2024-36008, CVE-2024-36270, CVE-2024-36489, CVE-2024-36897, CVE-2024-36938, CVE-2024-36965, CVE-2024-36967, CVE-2024-36969, CVE-2024-36971, CVE-2024-36978, CVE-2024-38546, CVE-2024-38547, CVE-2024-38549, CVE-2024-38552, CVE-2024-38555, CVE-2024-38571, CVE-2024-38583, CVE-2024-38591, CVE-2024-38597, CVE-2024-38598, CVE-2024-38600, CVE-2024-38627, CVE-2024-38633, CVE-2024-38661, CVE-2024-38662, CVE-2024-38780, CVE-2024-39277, CVE-2024-39292, CVE-2024-39301, CVE-2024-39466, CVE-2024-39468, CVE-2024-39471, CVE-2024-39475, CVE-2024-39476, CVE-2024-39480, CVE-2024-39482, CVE-2024-39484, CVE-2024-39487, CVE-2024-39489, CVE-2024-39493, CVE-2024-39495, CVE-2024-39506, CVE-2024-40902, CVE-2024-40911, CVE-2024-40912, CVE-2024-40932, CVE-2024-40934, CVE-2024-40954, CVE-2024-40956, CVE-2024-40957, CVE-2024-40958, CVE-2024-40959, CVE-2024-40960, CVE-2024-40961, CVE-2024-40967, CVE-2024-40970, CVE-2024-40980, CVE-2024-40981, CVE-2024-40994, CVE-2024-40995, CVE-2024-41000, CVE-2024-41002, CVE-2024-41006, CVE-2024-41007, CVE-2024-41046, CVE-2024-41049, CVE-2024-41055, CVE-2024-41064, CVE-2024-41070, CVE-2024-41073, CVE-2024-41087, CVE-2024-41089, CVE-2024-41092, CVE-2024-41093, CVE-2024-41095, CVE-2024-41097, CVE-2024-42068, CVE-2024-42070, CVE-2024-42076, CVE-2024-42077, CVE-2024-42080, CVE-2024-42082, CVE-2024-42085, CVE-2024-42090, CVE-2024-42093, CVE-2024-42094, CVE-2024-42101, CVE-2024-42102, CVE-2024-42104, CVE-2024-42109, CVE-2024-42140, CVE-2024-42148, CVE-2024-42152, CVE-2024-42153, CVE-2024-42154, CVE-2024-42157, CVE-2024-42161, CVE-2024-42223, CVE-2024-42224, CVE-2024-42225, CVE-2024-42229, CVE-2024-42232, CVE-2024-42236, CVE-2024-42244 and CVE-2024-42247
llvm: Fix CVE-2023-46049 and CVE-2024-31852
ofono: fix CVE-2023-2794
orc: Fix CVE-2024-40897
python3-certifi: Fix CVE-2024-39689
python3-jinja2: Fix CVE-2024-34064
python3: Fix CVE-2024-8088
qemu: Fix CVE-2024-7409
ruby: Fix for CVE-2024-27282
tiff: Fix CVE-2024-7006
vim: Fix CVE-2024-22667, CVE-2024-41957, CVE-2024-41965 and CVE-2024-43374
wpa-supplicant: Fix CVE-2023-52160
Fixes in Yocto-4.0.21
apr: upgrade to 1.7.5
bind: Upgrade to 9.18.28
bitbake: data_smart: Improve performance for VariableHistory
build-appliance-image: Update to kirkstone head revision
cryptodev-module: Fix build for linux 5.10.220
gcc-runtime: remove bashism
grub: fs/fat: Don’t error when mtime is 0
image_types.bbclass: Use –force also with lz4,lzop
libsoup: fix compile error on centos7
linux-yocto/5.15: upgrade to v5.15.164
lttng-modules: Upgrade to 2.13.14
migration-guide: add release notes for 4.0.20
orc: upgrade to 0.4.39
poky.conf: bump version for 4.0.21
python3-jinja2: upgrade to 3.1.4
python3-pycryptodome(x): use python_setuptools_build_meta build class
python3: add PACKAGECONFIG[editline]
ref-manual: fix typo and move SYSROOT_DIRS example
sqlite3: CVE_ID correction for CVE-2023-7104 as patched
sqlite3: Rename patch for CVE-2022-35737
uboot-sign: Fix index error in concat_dtb_helper() with multiple configs
vim: upgrade to 9.1.0682
wireless-regdb: upgrade to 2024.07.04
Known Issues in Yocto-4.0.21
N/A
Contributors to Yocto-4.0.21
Archana Polampalli
Ashish Sharma
Bruce Ashfield
Deepthi Hemraj
Divya Chellam
Florian Amstutz
Guocai He
Hitendra Prajapati
Hugo SIMELIERE
Lee Chee Yang
Leon Anavi
Matthias Pritschet
Ming Liu
Niko Mauno
Peter Marko
Robert Yang
Rohini Sangam
Ross Burton
Siddharth Doshi
Soumya Sambu
Steve Sakoman
Vijay Anusuri
Vrushti Dabhi
Wang Mingyu
Yogita Urade
Repositories / Downloads for Yocto-4.0.21
poky
Repository Location: https://git.yoctoproject.org/poky
Branch: kirkstone
Tag: yocto-4.0.21
Git Revision: 4cdc553814640851cce85f84ee9c0b58646cd33b
Release Artefact: poky-4cdc553814640851cce85f84ee9c0b58646cd33b
sha: 460e3a4ede491a9b66c5d262cd9498d5bcca1f2d880885342b08dc32b967f33d
Download Locations: http://downloads.yoctoproject.org/releases/yocto/yocto-4.0.21/poky-4cdc553814640851cce85f84ee9c0b58646cd33b.tar.bz2 http://mirrors.kernel.org/yocto/yocto/yocto-4.0.21/poky-4cdc553814640851cce85f84ee9c0b58646cd33b.tar.bz2
openembedded-core
Repository Location: https://git.openembedded.org/openembedded-core
Branch: kirkstone
Tag: yocto-4.0.21
Git Revision: c40a3fec49942ac6d25ba33e57e801a550e252c9
Release Artefact: oecore-c40a3fec49942ac6d25ba33e57e801a550e252c9
sha: afc2aaf312f9fb2590ae006615557ec605c98eff42bc380a1b2d6e39cfdf8930
Download Locations: http://downloads.yoctoproject.org/releases/yocto/yocto-4.0.21/oecore-c40a3fec49942ac6d25ba33e57e801a550e252c9.tar.bz2 http://mirrors.kernel.org/yocto/yocto/yocto-4.0.21/oecore-c40a3fec49942ac6d25ba33e57e801a550e252c9.tar.bz2
meta-mingw
Repository Location: https://git.yoctoproject.org/meta-mingw
Branch: kirkstone
Tag: yocto-4.0.21
Git Revision: f6b38ce3c90e1600d41c2ebb41e152936a0357d7
Release Artefact: meta-mingw-f6b38ce3c90e1600d41c2ebb41e152936a0357d7
sha: 7d57167c19077f4ab95623d55a24c2267a3a3fb5ed83688659b4c03586373b25
Download Locations: http://downloads.yoctoproject.org/releases/yocto/yocto-4.0.21/meta-mingw-f6b38ce3c90e1600d41c2ebb41e152936a0357d7.tar.bz2 http://mirrors.kernel.org/yocto/yocto/yocto-4.0.21/meta-mingw-f6b38ce3c90e1600d41c2ebb41e152936a0357d7.tar.bz2
meta-gplv2
Repository Location: https://git.yoctoproject.org/meta-gplv2
Branch: kirkstone
Tag: yocto-4.0.21
Git Revision: d2f8b5cdb285b72a4ed93450f6703ca27aa42e8a
Release Artefact: meta-gplv2-d2f8b5cdb285b72a4ed93450f6703ca27aa42e8a
sha: c386f59f8a672747dc3d0be1d4234b6039273d0e57933eb87caa20f56b9cca6d
Download Locations: http://downloads.yoctoproject.org/releases/yocto/yocto-4.0.21/meta-gplv2-d2f8b5cdb285b72a4ed93450f6703ca27aa42e8a.tar.bz2 http://mirrors.kernel.org/yocto/yocto/yocto-4.0.21/meta-gplv2-d2f8b5cdb285b72a4ed93450f6703ca27aa42e8a.tar.bz2
bitbake
Repository Location: https://git.openembedded.org/bitbake
Branch: 2.0
Tag: yocto-4.0.21
Git Revision: ec2a99a077da9aa0e99e8b05e0c65dcbd45864b1
Release Artefact: bitbake-ec2a99a077da9aa0e99e8b05e0c65dcbd45864b1
sha: 1cb102f4c8dbd067f0262072e4e629ec7cb423103111ccdde75a09fcb8f55e5f
Download Locations: http://downloads.yoctoproject.org/releases/yocto/yocto-4.0.21/bitbake-ec2a99a077da9aa0e99e8b05e0c65dcbd45864b1.tar.bz2 http://mirrors.kernel.org/yocto/yocto/yocto-4.0.21/bitbake-ec2a99a077da9aa0e99e8b05e0c65dcbd45864b1.tar.bz2
yocto-docs
Repository Location: https://git.yoctoproject.org/yocto-docs
Branch: kirkstone
Tag: yocto-4.0.21
Git Revision: 512025edd9b3b6b8d0938b35bb6188c9f3b7f17d
Release notes for Yocto-4.0.22 (Kirkstone)
Security Fixes in Yocto-4.0.22
cups: Fix CVE-2024-35235 and CVE-2024-47175
curl: Fix CVE-2024-8096
expat: Fix CVE-2024-45490, CVE-2024-45491 and CVE-2024-45492
gnupg: Ignore CVE-2022-3219
libpcap: Fix CVE-2023-7256 and CVE-2024-8006
linux-yocto/5.10: Fix CVE-2022-48772, CVE-2023-52434, CVE-2023-52447, CVE-2023-52458, CVE-2024-0841, CVE-2024-26601, CVE-2024-26882, CVE-2024-26883, CVE-2024-26884, CVE-2024-26885, CVE-2024-26898, CVE-2024-26901, CVE-2024-26903, CVE-2024-26907, CVE-2024-26934, CVE-2024-26978, CVE-2024-27013, CVE-2024-27020, CVE-2024-35972, CVE-2024-35978, CVE-2024-35982, CVE-2024-35984, CVE-2024-35990, CVE-2024-35997, CVE-2024-36008, CVE-2024-36270, CVE-2024-36489, CVE-2024-36902, CVE-2024-36971, CVE-2024-36978, CVE-2024-38546, CVE-2024-38547, CVE-2024-38549, CVE-2024-38552, CVE-2024-38555, CVE-2024-38583, CVE-2024-38590, CVE-2024-38597, CVE-2024-38598, CVE-2024-38627, CVE-2024-38633, CVE-2024-38661, CVE-2024-38662, CVE-2024-38780, CVE-2024-39292, CVE-2024-39301, CVE-2024-39468, CVE-2024-39471, CVE-2024-39475, CVE-2024-39476, CVE-2024-39480, CVE-2024-39482, CVE-2024-39484, CVE-2024-39487, CVE-2024-39489, CVE-2024-39495, CVE-2024-39506, CVE-2024-40902, CVE-2024-40904, CVE-2024-40905, CVE-2024-40912, CVE-2024-40932, CVE-2024-40934, CVE-2024-40958, CVE-2024-40959, CVE-2024-40960, CVE-2024-40961, CVE-2024-40980, CVE-2024-40981, CVE-2024-40995, CVE-2024-41000, CVE-2024-41006, CVE-2024-41007, CVE-2024-41012, CVE-2024-41040, CVE-2024-41046, CVE-2024-41049, CVE-2024-41059, CVE-2024-41063, CVE-2024-41064, CVE-2024-41070, CVE-2024-41087, CVE-2024-41089, CVE-2024-41092, CVE-2024-41095, CVE-2024-41097, CVE-2024-42070, CVE-2024-42076, CVE-2024-42077, CVE-2024-42082, CVE-2024-42090, CVE-2024-42093, CVE-2024-42094, CVE-2024-42101, CVE-2024-42102, CVE-2024-42104, CVE-2024-42131, CVE-2024-42137, CVE-2024-42148, CVE-2024-42152, CVE-2024-42153, CVE-2024-42154, CVE-2024-42157, CVE-2024-42161, CVE-2024-42223, CVE-2024-42224, CVE-2024-42229, CVE-2024-42232, CVE-2024-42236, CVE-2024-42244 and CVE-2024-42247
linux-yocto/5.15: Fix CVE-2023-52889, CVE-2024-41011, CVE-2024-42114, CVE-2024-42259, CVE-2024-42271, CVE-2024-42272, CVE-2024-42277, CVE-2024-42280, CVE-2024-42283, CVE-2024-42284, CVE-2024-42285, CVE-2024-42286, CVE-2024-42287, CVE-2024-42288, CVE-2024-42289, CVE-2024-42301, CVE-2024-42302, CVE-2024-42309, CVE-2024-42310, CVE-2024-42311, CVE-2024-42313, CVE-2024-43817, CVE-2024-43828, CVE-2024-43854, CVE-2024-43856, CVE-2024-43858, CVE-2024-43860, CVE-2024-43861, CVE-2024-43863, CVE-2024-43871, CVE-2024-43873, CVE-2024-43882, CVE-2024-43889, CVE-2024-43890, CVE-2024-43893, CVE-2024-43894, CVE-2024-43902, CVE-2024-43907, CVE-2024-43908, CVE-2024-43909, CVE-2024-43914, CVE-2024-44934, CVE-2024-44935, CVE-2024-44944, CVE-2024-44947, CVE-2024-44952, CVE-2024-44954, CVE-2024-44958, CVE-2024-44960, CVE-2024-44965, CVE-2024-44966, CVE-2024-44969, CVE-2024-44971, CVE-2024-44982, CVE-2024-44983, CVE-2024-44985, CVE-2024-44986, CVE-2024-44987, CVE-2024-44988, CVE-2024-44989, CVE-2024-44990, CVE-2024-44995, CVE-2024-44998, CVE-2024-44999, CVE-2024-45003, CVE-2024-45006, CVE-2024-45011, CVE-2024-45016, CVE-2024-45018, CVE-2024-45021, CVE-2024-45025, CVE-2024-45026, CVE-2024-45028, CVE-2024-46673, CVE-2024-46674, CVE-2024-46675, CVE-2024-46676, CVE-2024-46677, CVE-2024-46679, CVE-2024-46685, CVE-2024-46689, CVE-2024-46702 and CVE-2024-46707
openssl: Fix CVE-2024-6119
procps: Fix CVE-2023-4016
python3: Fix CVE-2023-27043, CVE-2024-4030, CVE-2024-4032, CVE-2024-6923, CVE-2024-6232, CVE-2024-7592 and CVE-2024-8088
qemu: Fix CVE-2024-4467
rust: Ignore CVE-2024-43402
webkitgtk: Fix CVE-2024-40779
wpa-supplicant: Ignore CVE-2024-5290
wpa-supplicant: Fix CVE-2024-3596
Fixes in Yocto-4.0.22
bintuils: stable 2.38 branch update
bitbake: fetch2/wget: Canonicalize DL_DIR paths for wget2 compatibility
bitbake: fetch/wget: Move files into place atomically
bitbake: hashserv: tests: Omit client in slow server start test
bitbake: tests/fetch: Tweak to work on Fedora40
bitbake: wget: Make wget –passive-ftp option conditional on ftp/ftps
build-appliance-image: Update to kirkstone head revision
buildhistory: Fix intermittent package file list creation
buildhistory: Restoring files from preserve list
buildhistory: Simplify intercept call sites and drop SSTATEPOSTINSTFUNC usage
busybox: Fix cut with “-s” flag
cdrtools-native: fix build with gcc-14
curl: free old conn better on reuse
cve-exclusion: Drop the version comparision/warning
dejagnu: Fix LICENSE (change to GPL-3.0-only)
doc/features: remove duplicate word in distribution feature ext2
gcc: upgrade to v11.5
gcr: Fix LICENSE (change to LGPL-2.0-only)
glibc: stable 2.35 branch updates
install-buildtools: fix “test installation” step
install-buildtools: remove md5 checksum validation
install-buildtools: support buildtools-make-tarball and update to 4.1
iw: Fix LICENSE (change to ISC)
kmscube: Add patch to fix -int-conversion build error
lib/oeqa: rename assertRaisesRegexp to assertRaisesRegex
libedit: Make docs generation deterministic
linux-yocto/5.10: fix NFSV3 config warning
linux-yocto/5.10: remove obsolete options
linux-yocto/5.10: update to v5.10.223
linux-yocto/5.15: update to v5.15.166
meta-world-pkgdata: Inherit nopackages
migration-guide: add release notes for 4.0.21
openssl: Upgrade to 3.0.15
poky.conf: bump version for 4.0.22
populate_sdk_base: inherit nopackages
python3: Upgrade to 3.10.15
ruby: Make docs generation deterministic
runqemu: keep generating tap devices
scripts/install-buildtools: Update to 4.0.21
selftest/runtime_test/virgl: Disable for all fedora
testexport: fallback for empty IMAGE_LINK_NAME
testimage: fallback for empty IMAGE_LINK_NAME
tiff: Fix LICENSE (change to libtiff)
udev-extraconf: Add collect flag to mount
unzip: Fix LICENSE (change to Info-ZIP)
valgrind: disable avx_estimate_insn.vgtest
wpa-supplicant: Patch security advisory 2024-2
yocto-uninative: Update to 4.5 for gcc 14
yocto-uninative: Update to 4.6 for glibc 2.40
zip: Fix LICENSE (change to Info-ZIP)
zstd: fix LICENSE statement (change to “BSD-3-Clause | GPL-2.0-only”)
Known Issues in Yocto-4.0.22
oeqa/runtime: thebeaglebone-yoctotarget fails theparselogsruntime test due to unexpected kernel error messages in the log (see bug 15624 on Bugzilla).
Contributors to Yocto-4.0.22
Aleksandar Nikolic
Alexandre Belloni
Archana Polampalli
Bruce Ashfield
Colin McAllister
Deepthi Hemraj
Divya Chellam
Hitendra Prajapati
Hugo SIMELIERE
Jinfeng Wang
Joshua Watt
Jörg Sommer
Konrad Weihmann
Lee Chee Yang
Martin Jansa
Massimiliano Minella
Michael Halstead
Mingli Yu
Niko Mauno
Paul Eggleton
Pedro Ferreira
Peter Marko
Purushottam Choudhary
Richard Purdie
Rob Woolley
Rohini Sangam
Ross Burton
Rudolf J Streif
Siddharth Doshi
Steve Sakoman
Vijay Anusuri
Vivek Kumbhar
Repositories / Downloads for Yocto-4.0.22
poky
Repository Location: https://git.yoctoproject.org/poky
Branch: kirkstone
Tag: yocto-4.0.22
Git Revision: 7e87dc422d972e0dc98372318fcdc63a76347d16
Release Artefact: poky-7e87dc422d972e0dc98372318fcdc63a76347d16
sha: 5058e7b2474f8cb73c19e776ef58d9784321ef42109d5982747c8c432531239f
Download Locations: http://downloads.yoctoproject.org/releases/yocto/yocto-4.0.22/poky-7e87dc422d972e0dc98372318fcdc63a76347d16.tar.bz2 http://mirrors.kernel.org/yocto/yocto/yocto-4.0.22/poky-7e87dc422d972e0dc98372318fcdc63a76347d16.tar.bz2
openembedded-core
Repository Location: https://git.openembedded.org/openembedded-core
Branch: kirkstone
Tag: yocto-4.0.22
Git Revision: f09fca692f96c9c428e89c5ef53fbcb92ac0c9bf
Release Artefact: oecore-f09fca692f96c9c428e89c5ef53fbcb92ac0c9bf
sha: 378bcc840ba9fbf06a15fea1b5dacdd446f3ad4d85115d708e7bbb20629cdeb4
Download Locations: http://downloads.yoctoproject.org/releases/yocto/yocto-4.0.22/oecore-f09fca692f96c9c428e89c5ef53fbcb92ac0c9bf.tar.bz2 http://mirrors.kernel.org/yocto/yocto/yocto-4.0.22/oecore-f09fca692f96c9c428e89c5ef53fbcb92ac0c9bf.tar.bz2
meta-mingw
Repository Location: https://git.yoctoproject.org/meta-mingw
Branch: kirkstone
Tag: yocto-4.0.22
Git Revision: f6b38ce3c90e1600d41c2ebb41e152936a0357d7
Release Artefact: meta-mingw-f6b38ce3c90e1600d41c2ebb41e152936a0357d7
sha: 7d57167c19077f4ab95623d55a24c2267a3a3fb5ed83688659b4c03586373b25
Download Locations: http://downloads.yoctoproject.org/releases/yocto/yocto-4.0.22/meta-mingw-f6b38ce3c90e1600d41c2ebb41e152936a0357d7.tar.bz2 http://mirrors.kernel.org/yocto/yocto/yocto-4.0.22/meta-mingw-f6b38ce3c90e1600d41c2ebb41e152936a0357d7.tar.bz2
meta-gplv2
Repository Location: https://git.yoctoproject.org/meta-gplv2
Branch: kirkstone
Tag: yocto-4.0.22
Git Revision: d2f8b5cdb285b72a4ed93450f6703ca27aa42e8a
Release Artefact: meta-gplv2-d2f8b5cdb285b72a4ed93450f6703ca27aa42e8a
sha: c386f59f8a672747dc3d0be1d4234b6039273d0e57933eb87caa20f56b9cca6d
Download Locations: http://downloads.yoctoproject.org/releases/yocto/yocto-4.0.22/meta-gplv2-d2f8b5cdb285b72a4ed93450f6703ca27aa42e8a.tar.bz2 http://mirrors.kernel.org/yocto/yocto/yocto-4.0.22/meta-gplv2-d2f8b5cdb285b72a4ed93450f6703ca27aa42e8a.tar.bz2
bitbake
Repository Location: https://git.openembedded.org/bitbake
Branch: 2.0
Tag: yocto-4.0.22
Git Revision: eb5c1ce6b1b8f33535ff7b9263ec7648044163ea
Release Artefact: bitbake-eb5c1ce6b1b8f33535ff7b9263ec7648044163ea
sha: 473d3e9539160633f3de9d88cce69123f6c623e4c8ab35beb7875868564593cf
Download Locations: http://downloads.yoctoproject.org/releases/yocto/yocto-4.0.22/bitbake-eb5c1ce6b1b8f33535ff7b9263ec7648044163ea.tar.bz2 http://mirrors.kernel.org/yocto/yocto/yocto-4.0.22/bitbake-eb5c1ce6b1b8f33535ff7b9263ec7648044163ea.tar.bz2
yocto-docs
Repository Location: https://git.yoctoproject.org/yocto-docs
Branch: kirkstone
Tag: yocto-4.0.22
Git Revision: 2169a52a24ebd1906039c42632bae6c4285a3aca
Release notes for Yocto-4.0.23 (Kirkstone)
Security Fixes in Yocto-4.0.23
curl: Fix CVE-2024-9681expat: Fix CVE-2024-50602gcc: Ignore CVE-2023-4039ghostscript: Fix CVE-2023-46361 and CVE-2024-29508gstreamer1.0: Ignore CVE-2024-0444libarchive: Fix CVE-2024-48957 and CVE-2024-48958openssl: Fix CVE-2024-9143orc: Fix CVE-2024-40897python3: Ignore CVE-2023-27043, CVE-2024-6232 and CVE-2024-7592qemu: Fix CVE-2023-3019vim: Fix CVE-2024-43790, CVE-2024-43802, CVE-2024-45306 and CVE-2024-47814zstd: Fix CVE-2022-4899
Fixes in Yocto-4.0.23
at-spi2-core: backport a patch to fix build with gcc-14 on host
bitbake: bitbake: doc/user-manual: Update the BB_HASHSERVE_UPSTREAM
bitbake: codeparser: Fix handling of string AST nodes with older Python versions
bitbake: fetch2/git: Use quote from shlex, not pipes
bitbake: gitsm: Add call_process_submodules() to remove duplicated code
bitbake: gitsm: Remove downloads/tmpdir when failed
bitbake: tests/fetch: Use our own mirror of mobile-broadband-provider to decouple from gnome gitlab
bitbake: tests/fetch: Use our own mirror of sysprof to decouple from gnome gitlab
build-appliance-image: Update to kirkstone head revision
cmake: Fix sporadic issues when determining compiler internals
cracklib: Modify patch to compile with GCC 14
cve-check: add CVSS vector string to CVE database and reports
cve-check: add support for cvss v4.0
cve_check: Use a local copy of the database during builds
dev-manual: document how to provide confs from layer.conf
documentation: Makefile: add SPHINXLINTDOCS to specify subset to sphinx-lint
documentation: Makefile: fix epub and latexpdf targets
documentation: README: add instruction to run Vale on a subset
documentation: brief-yoctoprojectqs: update BB_HASHSERVE_UPSTREAM for new infrastructure
documentation: conf.py: add a bitbake_git extlink
documentation: rename :cve: role to :cve_nist:
documentation: styles: vocabularies: Yocto: add sstate
documnetation: contributor-guide: Remove duplicated words
gcc: restore a patch for Neoverse N2 core
glib-2.0: patch regression of CVE-2023-32665
kmscube: create_framebuffer: backport modifier fix
libffi: backport a fix to build libffi-native with gcc-14
linux-firmware: Upgrade to 20240909
local.conf.sample: update BB_HASHSERVE_UPSTREAM for new infrastructure
migration-guide: add release notes for 4.0.22
migration-guide: release-notes-4.0: update BB_HASHSERVE_UPSTREAM for new infrastructure
nativesdk-intercept: Fix bad intercept chgrp/chown logic
orc: Upgrade to 0.4.40
overlayfs-etc: add option to skip creation of mount dirs
overview-manual: concepts: add details on package splitting
package: Switch debug source handling to use prefix map
patch.py: Use shlex instead of deprecated pipe
poky.conf: bump version for 4.0.23
pseudo: Disable LFS on 32bit arches
pseudo: Fix envp bug and add posix_spawn wrapper
pseudo: Fix to work with glibc 2.40
pseudo: Switch back to the master branch
pseudo: Update to include logic fix
pseudo: Update to include open symlink handling bugfix
pseudo: Update to pull in fchmodat fix
pseudo: Update to pull in fd leak fix
pseudo: Update to pull in gcc14 fix and missing statvfs64 intercept
pseudo: Update to pull in linux-libc-headers race fix
pseudo: Update to pull in python 3.12+ fix
pseudo: Update to pull in syncfs probe fix
ref-manual: add description for the “sysroot” term
ref-manual: add missing CVE_CHECK manifest variables
ref-manual: add missing EXTERNAL_KERNEL_DEVICETREE variable
ref-manual: add missing OPKGBUILDCMD variable
ref-manual: devtool-reference: document missing commands
ref-manual: devtool-reference: refresh example outputs
ref-manual: introduce
CVE_CHECK_REPORT_PATCHEDvariableref-manual: release-process: add a reference to the doc’s release
ref-manual: release-process: refresh the current LTS releases
ref-manual: release-process: update releases.svg
ref-manual: release-process: update releases.svg with month after “Current”
ref-manual: structure.rst: document missing tmp/ dirs
ref-manual: variables: add SIGGEN_LOCKEDSIGS* variables
syslinux: Disable error on implicit-function-declaration
util-linux: Define pidfd_* function signatures
vala: add -Wno-error=incompatible-pointer-types work around
vim: Upgrade to 9.1.0764
xmlto: backport a patch to fix build with gcc-14 on host
zip: Fix build with gcc-14
zip: Make configure checks to be more robust
Known Issues in Yocto-4.0.23
-N/A
Contributors to Yocto-4.0.23
Aleksandar Nikolic
Alexandre Belloni
Antoine Lubineau
Antonin Godard
Archana Polampalli
Ashish Sharma
Baruch Siach
Eilís ‘pidge’ Ní Fhlannagáin
Jose Quaresma
Julien Stephan
Khem Raj
Lee Chee Yang
Macpaul Lin
Martin Jansa
Michael Opdenacker
Ola x Nilsson
Peter Marko
Philip Lorenz
Randolph Sapp
Richard Purdie
Robert Yang
Rohini Sangam
Ruiqiang Hao
Siddharth Doshi
Steve Sakoman
Talel BELHAJSALEM
Wang Mingyu
Yogita Urade
Zoltan Boszormenyi
Repositories / Downloads for Yocto-4.0.23
poky
Repository Location: https://git.yoctoproject.org/poky
Branch: kirkstone
Tag: yocto-4.0.23
Git Revision: 8e092852b63e998d990b8f8e1aa91297dec4430f
Release Artefact: poky-8e092852b63e998d990b8f8e1aa91297dec4430f
sha: 339d34d8432070dac948449e732ebf06a888eeb27ff548958b2395c9446b029d
Download Locations: https://downloads.yoctoproject.org/releases/yocto/yocto-4.0.23/poky-8e092852b63e998d990b8f8e1aa91297dec4430f.tar.bz2 https://mirrors.kernel.org/yocto/yocto/yocto-4.0.23/poky-8e092852b63e998d990b8f8e1aa91297dec4430f.tar.bz2
openembedded-core
Repository Location: https://git.openembedded.org/openembedded-core
Branch: kirkstone
Tag: yocto-4.0.23
Git Revision: fb45c5cf8c2b663af293acb069d446610f77ff1a
Release Artefact: oecore-fb45c5cf8c2b663af293acb069d446610f77ff1a
sha: 1d394370ea7d43fb885ab8a952d6d1e43f1a850745a5152d5ead5565a283a0f5
Download Locations: https://downloads.yoctoproject.org/releases/yocto/yocto-4.0.23/oecore-fb45c5cf8c2b663af293acb069d446610f77ff1a.tar.bz2 https://mirrors.kernel.org/yocto/yocto/yocto-4.0.23/oecore-fb45c5cf8c2b663af293acb069d446610f77ff1a.tar.bz2
meta-mingw
Repository Location: https://git.yoctoproject.org/meta-mingw
Branch: kirkstone
Tag: yocto-4.0.23
Git Revision: 87c22abb1f11be430caf4372e6b833dc7d77564e
Release Artefact: meta-mingw-87c22abb1f11be430caf4372e6b833dc7d77564e
sha: f0bc4873e2e0319fb9d6d6ab9b98eb3f89664d4339a167d2db6a787dd12bc1a8
Download Locations: https://downloads.yoctoproject.org/releases/yocto/yocto-4.0.23/meta-mingw-87c22abb1f11be430caf4372e6b833dc7d77564e.tar.bz2 https://mirrors.kernel.org/yocto/yocto/yocto-4.0.23/meta-mingw-87c22abb1f11be430caf4372e6b833dc7d77564e.tar.bz2
meta-gplv2
Repository Location: https://git.yoctoproject.org/meta-gplv2
Branch: kirkstone
Tag: yocto-4.0.23
Git Revision: d2f8b5cdb285b72a4ed93450f6703ca27aa42e8a
Release Artefact: meta-gplv2-d2f8b5cdb285b72a4ed93450f6703ca27aa42e8a
sha: c386f59f8a672747dc3d0be1d4234b6039273d0e57933eb87caa20f56b9cca6d
Download Locations: https://downloads.yoctoproject.org/releases/yocto/yocto-4.0.23/meta-gplv2-d2f8b5cdb285b72a4ed93450f6703ca27aa42e8a.tar.bz2 https://mirrors.kernel.org/yocto/yocto/yocto-4.0.23/meta-gplv2-d2f8b5cdb285b72a4ed93450f6703ca27aa42e8a.tar.bz2
bitbake
Repository Location: https://git.openembedded.org/bitbake
Branch: 2.0
Tag: yocto-4.0.23
Git Revision: fb73c495c45d1d4107cfd60b67a5b4f11a99647b
Release Artefact: bitbake-fb73c495c45d1d4107cfd60b67a5b4f11a99647b
sha: 5cd271299951f25912a2e8d4de6d8769a4c0bb3bbcfc90815be41f23fd299a0b
Download Locations: https://downloads.yoctoproject.org/releases/yocto/yocto-4.0.23/bitbake-fb73c495c45d1d4107cfd60b67a5b4f11a99647b.tar.bz2 https://mirrors.kernel.org/yocto/yocto/yocto-4.0.23/bitbake-fb73c495c45d1d4107cfd60b67a5b4f11a99647b.tar.bz2
yocto-docs
Repository Location: https://git.yoctoproject.org/yocto-docs
Branch: kirkstone
Tag: yocto-4.0.23
Git Revision: TBD
Release notes for Yocto-4.0.24 (Kirkstone)
Security Fixes in Yocto-4.0.24
coreutils: Fix CVE-2024-0684
cpio: Ignore CVE-2023-7216
diffoscope: Fix CVE-2024-25711
ffmpeg: fix CVE-2023-47342, CVE-2023-50007, CVE-2023-50008, CVE-2023-51793, CVE-2023-51794, CVE-2023-51796, CVE-2023-51798, CVE-2024-7055, CVE-2024-31578, CVE-2024-31582, CVE-2024-32230, CVE-2024-35366, CVE-2024-35367 and CVE-2024-35368
ghostscript: Fix CVE-2024-46951, CVE-2024-46952, CVE-2024-46953, CVE-2024-46955 and CVE-2024-46956
ghostscript: Ignore CVE-2024-46954
glib-2.0: Fix CVE-2024-52533
gnupg: Ignore CVE-2022-3515
grub: Ignore CVE-2024-1048 and CVE-2023-4001
gstreame1.0: Ignore CVE-2023-40474, CVE-2023-40475, CVE-2023-40476, CVE-2023-44429, CVE-2023-44446, CVE-2023-50186 and CVE-2024-0444
gstreamer1.0-plugins-base: Fix CVE-2024-47538, CVE-2024-47541, CVE-2024-47542, CVE-2024-47600, CVE-2024-47607, CVE-2024-47615 and CVE-2024-47835
gstreamer1.0-plugins-good: Fix CVE-2024-47537, CVE-2024-47539, CVE-2024-47540, CVE-2024-47543, CVE-2024-47544, CVE-2024-47545, CVE-2024-47546, CVE-2024-47596, CVE-2024-47597, CVE-2024-47598, CVE-2024-47599, CVE-2024-47601, CVE-2024-47602, CVE-2024-47603, CVE-2024-47606, CVE-2024-47613, CVE-2024-47774, CVE-2024-47775, CVE-2024-47776, CVE-2024-47777, CVE-2024-47778 and CVE-2024-47834
gstreamer1.0: Fix CVE-2024-47606
libarchive: Fix CVE-2024-20696
libpam: Fix CVE-2024-10041
libsdl2: Ignore CVE-2020-14409 and CVE-2020-14410
libsndfile1: Fix CVE-2022-33065 and CVE-2024-50612
libsoup-2.4: Fix CVE-2024-52530, CVE-2024-52531 and CVE-2024-52532
libsoup: Fix CVE-2024-52530, CVE-2024-52531 and CVE-2024-52532
linux-yocto/5.10: Fix CVE-2023-52889, CVE-2023-52917, CVE-2023-52918, CVE-2024-41011, CVE-2024-42259, CVE-2024-42271, CVE-2024-42272, CVE-2024-42280, CVE-2024-42283, CVE-2024-42284, CVE-2024-42285, CVE-2024-42286, CVE-2024-42287, CVE-2024-42288, CVE-2024-42289, CVE-2024-42301, CVE-2024-42302, CVE-2024-42309, CVE-2024-42310, CVE-2024-42311, CVE-2024-42313, CVE-2024-43828, CVE-2024-43856, CVE-2024-43858, CVE-2024-43860, CVE-2024-43861, CVE-2024-43871, CVE-2024-43882, CVE-2024-43889, CVE-2024-43890, CVE-2024-43893, CVE-2024-43894, CVE-2024-43907, CVE-2024-43908, CVE-2024-43914, CVE-2024-44935, CVE-2024-44944, CVE-2024-44947, CVE-2024-44954, CVE-2024-44960, CVE-2024-44965, CVE-2024-44969, CVE-2024-44971, CVE-2024-44987, CVE-2024-44988, CVE-2024-44989, CVE-2024-44990, CVE-2024-44995, CVE-2024-44998, CVE-2024-44999, CVE-2024-45003, CVE-2024-45006, CVE-2024-45016, CVE-2024-45018, CVE-2024-45021, CVE-2024-45025, CVE-2024-45026, CVE-2024-45028, CVE-2024-46673, CVE-2024-46674, CVE-2024-46675, CVE-2024-46676, CVE-2024-46677, CVE-2024-46679, CVE-2024-46685, CVE-2024-46689, CVE-2024-46702, CVE-2024-46707, CVE-2024-46714, CVE-2024-46719, CVE-2024-46721, CVE-2024-46722, CVE-2024-46723, CVE-2024-46724, CVE-2024-46725, CVE-2024-46731, CVE-2024-46737, CVE-2024-46738, CVE-2024-46739, CVE-2024-46740, CVE-2024-46743, CVE-2024-46744, CVE-2024-46747, CVE-2024-46750, CVE-2024-46755, CVE-2024-46759, CVE-2024-46761, CVE-2024-46763, CVE-2024-46771, CVE-2024-46777, CVE-2024-46780, CVE-2024-46781, CVE-2024-46782, CVE-2024-46783, CVE-2024-46791, CVE-2024-46798, CVE-2024-46800, CVE-2024-46804, CVE-2024-46814, CVE-2024-46815, CVE-2024-46817, CVE-2024-46818, CVE-2024-46819, CVE-2024-46822, CVE-2024-46828, CVE-2024-46829, CVE-2024-46832, CVE-2024-46840, CVE-2024-46844, CVE-2024-47659, CVE-2024-47660, CVE-2024-47663, CVE-2024-47667, CVE-2024-47668, CVE-2024-47669, CVE-2024-47679, CVE-2024-47684, CVE-2024-47685, CVE-2024-47692, CVE-2024-47697, CVE-2024-47698, CVE-2024-47699, CVE-2024-47701, CVE-2024-47705, CVE-2024-47706, CVE-2024-47710, CVE-2024-47712, CVE-2024-47713, CVE-2024-47718, CVE-2024-47723, CVE-2024-47735, CVE-2024-47737, CVE-2024-47739, CVE-2024-47742, CVE-2024-47747, CVE-2024-47748, CVE-2024-47749, CVE-2024-47757, CVE-2024-49851, CVE-2024-49858, CVE-2024-49860, CVE-2024-49863, CVE-2024-49867, CVE-2024-49868, CVE-2024-49875, CVE-2024-49877, CVE-2024-49878, CVE-2024-49879, CVE-2024-49881, CVE-2024-49882, CVE-2024-49883, CVE-2024-49884, CVE-2024-49889, CVE-2024-49890, CVE-2024-49892, CVE-2024-49894, CVE-2024-49895, CVE-2024-49896, CVE-2024-49900, CVE-2024-49902, CVE-2024-49903, CVE-2024-49907, CVE-2024-49913, CVE-2024-49924, CVE-2024-49930, CVE-2024-49933, CVE-2024-49936, CVE-2024-49938, CVE-2024-49944, CVE-2024-49948, CVE-2024-49949, CVE-2024-49952, CVE-2024-49955, CVE-2024-49957, CVE-2024-49958, CVE-2024-49959, CVE-2024-49962, CVE-2024-49963, CVE-2024-49965, CVE-2024-49966, CVE-2024-49969, CVE-2024-49973, CVE-2024-49975, CVE-2024-49977, CVE-2024-49981, CVE-2024-49982, CVE-2024-49983, CVE-2024-49985, CVE-2024-49995, CVE-2024-49997, CVE-2024-50001, CVE-2024-50006, CVE-2024-50007, CVE-2024-50008, CVE-2024-50013, CVE-2024-50015, CVE-2024-50024, CVE-2024-50033, CVE-2024-50035, CVE-2024-50039, CVE-2024-50040, CVE-2024-50044, CVE-2024-50045, CVE-2024-50046, CVE-2024-50049, CVE-2024-50059, CVE-2024-50095, CVE-2024-50096, CVE-2024-50179, CVE-2024-50180, CVE-2024-50181, CVE-2024-50184 and CVE-2024-50188
linux-yocto/5.15: Fix CVE-2022-48695, CVE-2023-52530, CVE-2023-52917, CVE-2024-45009, CVE-2024-46714, CVE-2024-46719, CVE-2024-46721, CVE-2024-46722, CVE-2024-46723, CVE-2024-46724, CVE-2024-46725, CVE-2024-46731, CVE-2024-46732, CVE-2024-46737, CVE-2024-46738, CVE-2024-46739, CVE-2024-46740, CVE-2024-46743, CVE-2024-46744, CVE-2024-46746, CVE-2024-46747, CVE-2024-46750, CVE-2024-46755, CVE-2024-46759, CVE-2024-46761, CVE-2024-46763, CVE-2024-46771, CVE-2024-46777, CVE-2024-46780, CVE-2024-46781, CVE-2024-46782, CVE-2024-46783, CVE-2024-46791, CVE-2024-46795, CVE-2024-46798, CVE-2024-46800, CVE-2024-46804, CVE-2024-46805, CVE-2024-46807, CVE-2024-46810, CVE-2024-46814, CVE-2024-46815, CVE-2024-46817, CVE-2024-46818, CVE-2024-46819, CVE-2024-46822, CVE-2024-46828, CVE-2024-46829, CVE-2024-46832, CVE-2024-46840, CVE-2024-46844, CVE-2024-47659, CVE-2024-47660, CVE-2024-47663, CVE-2024-47665, CVE-2024-47667, CVE-2024-47668, CVE-2024-47669, CVE-2024-47674, CVE-2024-47679, CVE-2024-47684, CVE-2024-47685, CVE-2024-47690, CVE-2024-47692, CVE-2024-47693, CVE-2024-47695, CVE-2024-47696, CVE-2024-47697, CVE-2024-47698, CVE-2024-47699, CVE-2024-47701, CVE-2024-47705, CVE-2024-47706, CVE-2024-47710, CVE-2024-47712, CVE-2024-47713, CVE-2024-47718, CVE-2024-47720, CVE-2024-47723, CVE-2024-47734, CVE-2024-47735, CVE-2024-47737, CVE-2024-47739, CVE-2024-47742, CVE-2024-47747, CVE-2024-47748, CVE-2024-47749, CVE-2024-47757, CVE-2024-49851, CVE-2024-49852, CVE-2024-49854, CVE-2024-49856, CVE-2024-49858, CVE-2024-49860, CVE-2024-49863, CVE-2024-49866, CVE-2024-49867, CVE-2024-49868, CVE-2024-49871, CVE-2024-49875, CVE-2024-49877, CVE-2024-49878, CVE-2024-49879, CVE-2024-49881, CVE-2024-49882, CVE-2024-49883, CVE-2024-49884, CVE-2024-49886, CVE-2024-49889, CVE-2024-49890, CVE-2024-49892, CVE-2024-49894, CVE-2024-49895, CVE-2024-49896, CVE-2024-49900, CVE-2024-49902, CVE-2024-49903, CVE-2024-49907, CVE-2024-49913, CVE-2024-49924, CVE-2024-49927, CVE-2024-49930, CVE-2024-49933, CVE-2024-49935, CVE-2024-49936, CVE-2024-49938, CVE-2024-49944, CVE-2024-49946, CVE-2024-49948, CVE-2024-49949, CVE-2024-49952, CVE-2024-49954, CVE-2024-49955, CVE-2024-49957, CVE-2024-49958, CVE-2024-49959, CVE-2024-49962, CVE-2024-49963, CVE-2024-49965, CVE-2024-49966, CVE-2024-49969, CVE-2024-49973, CVE-2024-49975, CVE-2024-49977, CVE-2024-49981, CVE-2024-49982, CVE-2024-49983, CVE-2024-49985, CVE-2024-49995, CVE-2024-49997, CVE-2024-50000, CVE-2024-50001, CVE-2024-50002, CVE-2024-50003, CVE-2024-50006, CVE-2024-50007, CVE-2024-50008, CVE-2024-50013, CVE-2024-50015, CVE-2024-50019, CVE-2024-50024, CVE-2024-50031, CVE-2024-50033, CVE-2024-50035, CVE-2024-50038, CVE-2024-50039, CVE-2024-50040, CVE-2024-50041, CVE-2024-50044, CVE-2024-50045, CVE-2024-50046, CVE-2024-50049, CVE-2024-50059, CVE-2024-50062, CVE-2024-50074, CVE-2024-50082, CVE-2024-50083, CVE-2024-50093, CVE-2024-50095, CVE-2024-50096, CVE-2024-50099, CVE-2024-50101, CVE-2024-50103, CVE-2024-50110, CVE-2024-50115, CVE-2024-50116, CVE-2024-50117, CVE-2024-50127, CVE-2024-50128, CVE-2024-50131, CVE-2024-50134, CVE-2024-50141, CVE-2024-50142, CVE-2024-50143, CVE-2024-50148, CVE-2024-50150, CVE-2024-50151, CVE-2024-50153, CVE-2024-50154, CVE-2024-50156, CVE-2024-50160, CVE-2024-50162, CVE-2024-50163, CVE-2024-50167, CVE-2024-50168, CVE-2024-50171, CVE-2024-50179, CVE-2024-50180, CVE-2024-50181, CVE-2024-50182, CVE-2024-50184, CVE-2024-50185, CVE-2024-50186, CVE-2024-50188, CVE-2024-50189, CVE-2024-50191, CVE-2024-50192, CVE-2024-50193, CVE-2024-50194, CVE-2024-50195, CVE-2024-50196, CVE-2024-50198, CVE-2024-50201, CVE-2024-50202, CVE-2024-50205, CVE-2024-50208, CVE-2024-50209, CVE-2024-50229, CVE-2024-50230, CVE-2024-50232, CVE-2024-50233, CVE-2024-50234, CVE-2024-50236, CVE-2024-50237, CVE-2024-50244, CVE-2024-50245, CVE-2024-50247, CVE-2024-50251, CVE-2024-50257, CVE-2024-50259, CVE-2024-50262, CVE-2024-50264, CVE-2024-50265, CVE-2024-50267, CVE-2024-50268, CVE-2024-50269, CVE-2024-50273, CVE-2024-50278, CVE-2024-50279, CVE-2024-50282, CVE-2024-50287, CVE-2024-50292, CVE-2024-50296, CVE-2024-50299, CVE-2024-50301, CVE-2024-50302, CVE-2024-53052, CVE-2024-53055, CVE-2024-53057, CVE-2024-53058, CVE-2024-53059, CVE-2024-53060, CVE-2024-53061, CVE-2024-53063, CVE-2024-53066, CVE-2024-53088, CVE-2024-53096, CVE-2024-53101, CVE-2024-53103, CVE-2024-53145, CVE-2024-53146, CVE-2024-53150, CVE-2024-53151, CVE-2024-53155, CVE-2024-53156, CVE-2024-53157, CVE-2024-53165, CVE-2024-53171, CVE-2024-53173, CVE-2024-53226, CVE-2024-53227, CVE-2024-53237, CVE-2024-56567, CVE-2024-56572, CVE-2024-56574, CVE-2024-56578, CVE-2024-56581, CVE-2024-56593, CVE-2024-56600, CVE-2024-56601, CVE-2024-56602, CVE-2024-56603, CVE-2024-56605, CVE-2024-56606, CVE-2024-56614, CVE-2024-56622, CVE-2024-56623, CVE-2024-56629, CVE-2024-56634, CVE-2024-56640, CVE-2024-56642, CVE-2024-56643, CVE-2024-56648, CVE-2024-56650, CVE-2024-56659, CVE-2024-56662, CVE-2024-56670, CVE-2024-56688, CVE-2024-56694, CVE-2024-56704, CVE-2024-56708, CVE-2024-56720, CVE-2024-56723, CVE-2024-56724, CVE-2024-56726, CVE-2024-56728, CVE-2024-56739, CVE-2024-56741, CVE-2024-56745, CVE-2024-56746, CVE-2024-56747, CVE-2024-56748, CVE-2024-56754, CVE-2024-56756, CVE-2024-56770, CVE-2024-56774, CVE-2024-56776, CVE-2024-56777, CVE-2024-56778, CVE-2024-56779, CVE-2024-56780, CVE-2024-56781, CVE-2024-56785 and CVE-2024-56787
ovmf: Fix CVE-2022-36763, CVE-2022-36764, CVE-2022-36765, CVE-2023-45229, CVE-2023-45230, CVE-2023-45231, CVE-2023-45232, CVE-2023-45233, CVE-2023-45234, CVE-2023-45235, CVE-2023-45236, CVE-2023-45237, CVE-2024-1298 and CVE-2024-38796
pixman: Ignore CVE-2023-37769
python3: Fix CVE-2024-9287, CVE-2024-11168 and CVE-2024-50602
python3-pip: Fix CVE-2023-5752
python3-requests: Fix CVE-2024-35195
python3-zipp: Fix CVE-2024-5569
qemu: Fix CVE-2024-3446, CVE-2024-3447 and CVE-2024-6505
qemu: Ignore CVE-2022-36648
subversion: Fix CVE-2024-46901
tiff: Fix CVE-2023-3164
tiff: Ignore CVE-2023-2731
webkitgtk: Fix CVE-2024-40776 and CVE-2024-40780
xserver-xorg: Fix CVE-2024-9632
xwayland: Fix CVE-2023-5380 and CVE-2024-0229
Fixes in Yocto-4.0.24
base-passwd: Add the sgx group
base-passwd: Regenerate the patches
base-passwd: Update the status for two patches
base-passwd: Update to 3.5.52
base-passwd: add the wheel group
base-passwd: fix patchreview warning
bitbake: fetch2: use persist_data context managers
bitbake: fetch/wget: Increase timeout to 100s from 30s
bitbake: persist_data: close connection in SQLTable __exit__
build-appliance-image: Update to kirkstone head revision
builder: set CVE_PRODUCT
contributor-guide: submit-changes.rst: suggest to remove the git signature
cve-update-nvd2-native: Tweak to work better with NFS DL_DIR
dbus: disable assertions and enable only modular tests
do_package/sstate/sstatesig: Change timestamp clamping to hash output only
docs: Gather dependencies in poky.yaml.in
docs: standards.md: add a section on admonitions
gstreamer1.0: improve test reliability
linux-yocto/5.10: update to v5.10.227
linux-yocto/5.15: update to v5.15.175
llvm: reduce size of -dbg package
lttng-modules: fix build error after kernel update to 5.15.171
migration-guides: add release notes for 4.0.23
ninja: fix build with python 3.13
oeqa/utils/gitarchive: Return tag name and improve exclude handling
ovmf-native: remove .pyc files from install
package.bbclass: Use shlex instead of deprecated pipes
package_rpm: restrict rpm to 4 threads
package_rpm: use zstd’s default compression level
poky.conf: add new tested distros
poky.conf: bump version for 4.0.24
poky.yaml.in: add missing locales dependency
python3: upgrade to 3.10.16
ref-manual: SSTATE_MIRRORS/SOURCE_MIRROR_URL: add instructions for mirror authentication
ref-manual: classes: fix bin_package description
ref-manual: devtool-reference: add warning note on deploy-target and shared objects
ref-manual: move runtime-testing section to the test-manual
ref-manual: packages: move ptest section to the test-manual
ref-manual: system-requirements: update list of supported distros
ref-manual: use standardized method accross both ubuntu and debian for locale install
resulttool: Add –logfile-archive option to store mode
resulttool: Allow store to filter to specific revisions
resulttool: Clean up repoducible build logs
resulttool: Fix passthrough of –all files in store mode
resulttool: Handle ltp rawlogs as well as ptest
resulttool: Improve repo layout for oeselftest results
resulttool: Trim the precision of duration information
resulttool: Use single space indentation in json output
rootfs-postcommands.bbclass: make opkg status reproducible
rxvt-unicode.inc: disable the terminfo installation by setting TIC to :
sanity: check for working user namespaces
scripts/install-buildtools: Update to 4.0.22
selftest/reproducible: Clean up pathnames
selftest/reproducible: Drop rawlogs
test-manual: reproducible-builds.rst: document OEQA_REPRODUCIBLE_TEST_TARGET and OEQA_REPRODUCIBLE_TEST_SSTATE_TARGETS
test-manual: reproducible-builds.rst: show how to build a single package
toolchain-shar-extract.sh: exit when post-relocate-setup.sh fails
tzdata & tzcode-native: upgrade 2024b
udev-extraconf: fix network.sh script did not configure hotplugged interfaces
unzip: Fix configure tests to use modern C
webkitgtk: Fix build on 32bit arm
webkitgtk: fix perl-native dependency
webkitgtk: reduce size of -dbg package
wireless-regdb: upgrade to 2024.10.07
Known Issues in Yocto-4.0.24
N/A
Contributors to Yocto-4.0.24
Thanks to the following people who contributed to this release:
Aleksandar Nikolic
Alex Kiernan
Alexander Kanavin
Alexandre Belloni
Antonin Godard
Archana Polampalli
Bruce Ashfield
Changqing Li
Chen Qi
Chris Laplante
Divya Chellam
Ernst Persson
Guénaël Muller
Hitendra Prajapati
Hongxu Jia
Jiaying Song
Jinfeng Wang
Khem Raj
Lee Chee Yang
Liyin Zhang
Louis Rannou
Markus Volk
Mikko Rapeli
Ovidiu Panait
Peter Kjellerstedt
Peter Marko
Regis Dargent
Richard Purdie
Rohini Sangam
Ross Burton
Soumya Sambu
Steve Sakoman
Trevor Gamblin
Vijay Anusuri
Wang Mingyu
Yogita Urade
Zahir Hussain
Repositories / Downloads for Yocto-4.0.24
poky
Repository Location: https://git.yoctoproject.org/poky
Branch: kirkstone
Tag: yocto-4.0.24
Git Revision: f50532593651dff82bc952288d786c55038c2c86
Release Artefact: poky-f50532593651dff82bc952288d786c55038c2c86
sha: 0aa062d19510394748db9a2d6ded2d764f435383296d9c94fb6b25755280556e
Download Locations: https://downloads.yoctoproject.org/releases/yocto/yocto-4.0.24/poky-f50532593651dff82bc952288d786c55038c2c86.tar.bz2 https://mirrors.kernel.org/yocto/yocto/yocto-4.0.24/poky-f50532593651dff82bc952288d786c55038c2c86.tar.bz2
openembedded-core
Repository Location: https://git.openembedded.org/openembedded-core
Branch: kirkstone
Tag: yocto-4.0.24
Git Revision: a270d4c957259761bcc7382fcc54642a02f9fc7d
Release Artefact: oecore-a270d4c957259761bcc7382fcc54642a02f9fc7d
sha: b08b9b16c8ffa587d521ad28e24e38c79d757a6f0839d18165ebac3081a34b68
Download Locations: https://downloads.yoctoproject.org/releases/yocto/yocto-4.0.24/oecore-a270d4c957259761bcc7382fcc54642a02f9fc7d.tar.bz2 https://mirrors.kernel.org/yocto/yocto/yocto-4.0.24/oecore-a270d4c957259761bcc7382fcc54642a02f9fc7d.tar.bz2
meta-mingw
Repository Location: https://git.yoctoproject.org/meta-mingw
Branch: kirkstone
Tag: yocto-4.0.24
Git Revision: 87c22abb1f11be430caf4372e6b833dc7d77564e
Release Artefact: meta-mingw-87c22abb1f11be430caf4372e6b833dc7d77564e
sha: f0bc4873e2e0319fb9d6d6ab9b98eb3f89664d4339a167d2db6a787dd12bc1a8
Download Locations: https://downloads.yoctoproject.org/releases/yocto/yocto-4.0.24/meta-mingw-87c22abb1f11be430caf4372e6b833dc7d77564e.tar.bz2 https://mirrors.kernel.org/yocto/yocto/yocto-4.0.24/meta-mingw-87c22abb1f11be430caf4372e6b833dc7d77564e.tar.bz2
meta-gplv2
Repository Location: https://git.yoctoproject.org/meta-gplv2
Branch: kirkstone
Tag: yocto-4.0.24
Git Revision: d2f8b5cdb285b72a4ed93450f6703ca27aa42e8a
Release Artefact: meta-gplv2-d2f8b5cdb285b72a4ed93450f6703ca27aa42e8a
sha: c386f59f8a672747dc3d0be1d4234b6039273d0e57933eb87caa20f56b9cca6d
Download Locations: https://downloads.yoctoproject.org/releases/yocto/yocto-4.0.24/meta-gplv2-d2f8b5cdb285b72a4ed93450f6703ca27aa42e8a.tar.bz2 https://mirrors.kernel.org/yocto/yocto/yocto-4.0.24/meta-gplv2-d2f8b5cdb285b72a4ed93450f6703ca27aa42e8a.tar.bz2
bitbake
Repository Location: https://git.openembedded.org/bitbake
Branch: 2.0
Tag: yocto-4.0.24
Git Revision: 3f88b005244a0afb5d5c7260e54a94a453ec9b3e
Release Artefact: bitbake-3f88b005244a0afb5d5c7260e54a94a453ec9b3e
sha: 31f442b72ec7d81ca75509b1a7179c3fe3942528b1e31c823b21a413244bd15b
Download Locations: https://downloads.yoctoproject.org/releases/yocto/yocto-4.0.24/bitbake-3f88b005244a0afb5d5c7260e54a94a453ec9b3e.tar.bz2 https://mirrors.kernel.org/yocto/yocto/yocto-4.0.24/bitbake-3f88b005244a0afb5d5c7260e54a94a453ec9b3e.tar.bz2
yocto-docs
Repository Location: https://git.yoctoproject.org/yocto-docs
Branch: kirkstone
Tag: yocto-4.0.24
Git Revision: 3128bf149f40928e6c2a3e264590a0c6c9778c6a
Release notes for Yocto-4.0.25 (Kirkstone)
Security Fixes in Yocto-4.0.25
avahi: Fix CVE-2024-52616
binutils: Fix CVE-2024-53589
gdb: Fix CVE-2024-53589
go: Fix CVE-2024-34155, CVE-2024-34156, CVE-2024-34158 and CVE-2024-45336
gstreamer1.0: Ignore CVE-2024-47537, CVE-2024-47539, CVE-2024-47540, CVE-2024-47543, CVE-2024-47544, CVE-2024-47545, CVE-2024-47538, CVE-2024-47541, CVE-2024-47542, CVE-2024-47600, CVE-2024-47607, CVE-2024-47615, CVE-2024-47835, CVE-2024-47546, CVE-2024-47596, CVE-2024-47597, CVE-2024-47598, CVE-2024-47599, CVE-2024-47601, CVE-2024-47777, CVE-2024-47778, CVE-2024-47834, CVE-2024-47602, CVE-2024-47603, CVE-2024-47613, CVE-2024-47774, CVE-2024-47775 and CVE-2024-47776
linux-yocto/5.15: Fix CVE-2024-36476, CVE-2024-55916, CVE-2024-56369, CVE-2024-56626, CVE-2024-56627, CVE-2024-56715, CVE-2024-56716, CVE-2024-57802, CVE-2024-57807, CVE-2024-57841, CVE-2024-57890, CVE-2024-57896, CVE-2024-57900, CVE-2024-57910, CVE-2024-57911, CVE-2024-57938, CVE-2024-57951, CVE-2025-21631, CVE-2025-21665, CVE-2025-21666, CVE-2025-21669, CVE-2025-21680, CVE-2025-21683, CVE-2025-21694, CVE-2025-21697 and CVE-2025-21699
ofono: Fix CVE-2024-7539, CVE-2024-7540, CVE-2024-7541, CVE-2024-7542, CVE-2024-7543, CVE-2024-7544, CVE-2024-7545, CVE-2024-7546 and CVE-2024-7547
openssl: Fix CVE-2024-13176
rsync: Fix CVE-2024-12084, CVE-2024-12085, CVE-2024-12086, CVE-2024-12087, CVE-2024-12088 and CVE-2024-12747
ruby: Fix CVE-2024-49761
socat: Fix CVE-2024-54661
vte: Fix CVE-2024-37535
wget: Fix CVE-2024-10524
Fixes in Yocto-4.0.25
bitbake: tests/fetch: Fix git shallow test failure with git >= 2.48
build-appliance-image: Update to kirkstone head revision
classes-global/insane: Look up all runtime providers for file-rdeps
classes/nativesdk: also override TUNE_PKGARCH
classes/qemu: use tune to select QEMU_EXTRAOPTIONS, not package architecture
cmake: apply parallel build settings to ptest tasks
dev-manual/building: document the initramfs-framework recipe
docs: Update autobuilder URLs to valkyrie
documentation: Fix typo in standards.md
glibc: Suppress GCC -Os warning on user2netname for sunrpc
glibc: stable 2.35 branch updates
lib/packagedata.py: Add API to iterate over rprovides
linux-yocto/5.15: upgrade to v5.15.178
migration-guides: add release notes for 4.0.24
openssl: upgrade to 3.0.16
poky.conf: bump version for 4.0.25
python3: Treat UID/GID overflow as failure
rsync: Delete pedantic errors re-ordering patch
rsync: upgrade to 3.2.7
rust-common.bbclass: soft assignment for RUSTLIB path
scripts/install-buildtools: Update to 4.0.23
test-manual/reproducible-builds: fix reproducible links
Known Issues in Yocto-4.0.25
N/A
Contributors to Yocto-4.0.25
Aleksandar Nikolic
Alexander Kanavin
Antonin Godard
Archana Polampalli
Bruce Ashfield
Deepesh Varatharajan
Divya Chellam
Joshua Watt
Khem Raj
Lee Chee Yang
Nikhil R
Pedro Ferreira
Peter Marko
Praveen Kumar
Richard Purdie
Ross Burton
Simon A. Eugster
Steve Sakoman
Yash Shinde
Yogita Urade
Zhang Peng
Repositories / Downloads for Yocto-4.0.25
poky
Repository Location: https://git.yoctoproject.org/poky
Branch: kirkstone
Tag: yocto-4.0.25
Git Revision: b5aa03f336c121269551f9e7baed4c677c76bb39
Release Artefact: poky-b5aa03f336c121269551f9e7baed4c677c76bb39
sha: 7afbcb25f0dd89a4fb6dd4c5945061705ef9ce79a6863806278603273c2b3b4a
Download Locations: https://downloads.yoctoproject.org/releases/yocto/yocto-4.0.25/poky-b5aa03f336c121269551f9e7baed4c677c76bb39.tar.bz2 https://mirrors.kernel.org/yocto/yocto/yocto-4.0.25/poky-b5aa03f336c121269551f9e7baed4c677c76bb39.tar.bz2
openembedded-core
Repository Location: https://git.openembedded.org/openembedded-core
Branch: kirkstone
Tag: yocto-4.0.25
Git Revision: 5a794fd244f7fdeb426bd5e3def6b4effc0e8c62
Release Artefact: oecore-5a794fd244f7fdeb426bd5e3def6b4effc0e8c62
sha: 8fc93109693e5f4702b3fe0633b6be833605291b3d595dc8bdeb6379f40cd2de
Download Locations: https://downloads.yoctoproject.org/releases/yocto/yocto-4.0.25/oecore-5a794fd244f7fdeb426bd5e3def6b4effc0e8c62.tar.bz2 https://mirrors.kernel.org/yocto/yocto/yocto-4.0.25/oecore-5a794fd244f7fdeb426bd5e3def6b4effc0e8c62.tar.bz2
meta-mingw
Repository Location: https://git.yoctoproject.org/meta-mingw
Branch: kirkstone
Tag: yocto-4.0.25
Git Revision: 87c22abb1f11be430caf4372e6b833dc7d77564e
Release Artefact: meta-mingw-87c22abb1f11be430caf4372e6b833dc7d77564e
sha: f0bc4873e2e0319fb9d6d6ab9b98eb3f89664d4339a167d2db6a787dd12bc1a8
Download Locations: https://downloads.yoctoproject.org/releases/yocto/yocto-4.0.25/meta-mingw-87c22abb1f11be430caf4372e6b833dc7d77564e.tar.bz2 https://mirrors.kernel.org/yocto/yocto/yocto-4.0.25/meta-mingw-87c22abb1f11be430caf4372e6b833dc7d77564e.tar.bz2
meta-gplv2
Repository Location: https://git.yoctoproject.org/meta-gplv2
Branch: kirkstone
Tag: yocto-4.0.25
Git Revision: d2f8b5cdb285b72a4ed93450f6703ca27aa42e8a
Release Artefact: meta-gplv2-d2f8b5cdb285b72a4ed93450f6703ca27aa42e8a
sha: c386f59f8a672747dc3d0be1d4234b6039273d0e57933eb87caa20f56b9cca6d
Download Locations: https://downloads.yoctoproject.org/releases/yocto/yocto-4.0.25/meta-gplv2-d2f8b5cdb285b72a4ed93450f6703ca27aa42e8a.tar.bz2 https://mirrors.kernel.org/yocto/yocto/yocto-4.0.25/meta-gplv2-d2f8b5cdb285b72a4ed93450f6703ca27aa42e8a.tar.bz2
bitbake
Repository Location: https://git.openembedded.org/bitbake
Branch: 2.0
Tag: yocto-4.0.25
Git Revision: e71f1ce53cf3b8320caa481ae62d1ce2900c4670
Release Artefact: bitbake-e71f1ce53cf3b8320caa481ae62d1ce2900c4670
sha: 007eef35174586c85b233f4ec91578956fe21e0236f7ca2c3f90f9d034f94b5b
Download Locations: https://downloads.yoctoproject.org/releases/yocto/yocto-4.0.25/bitbake-e71f1ce53cf3b8320caa481ae62d1ce2900c4670.tar.bz2 https://mirrors.kernel.org/yocto/yocto/yocto-4.0.25/bitbake-e71f1ce53cf3b8320caa481ae62d1ce2900c4670.tar.bz2
yocto-docs
Repository Location: https://git.yoctoproject.org/yocto-docs
Branch: kirkstone
Tag: yocto-4.0.25
Git Revision: c6dce0c77481dee7b0a0fcdc803f755ceccef234
Release notes for Yocto-4.0.26 (Kirkstone)
Security Fixes in Yocto-4.0.26
bind: Fix CVE-2024-11187 and CVE-2024-12705
binutils: Fix CVE-2025-0840
elfutils: Fix CVE-2025-1352 and CVE-2025-1372
ffmpeg: Fix CVE-2024-28661, CVE-2024-35369, CVE-2024-36613, CVE-2024-36616, CVE-2024-36617, CVE-2024-36618, CVE-2025-0518 and CVE-2025-25473
ffmpeg: Ignore CVE-2023-46407, CVE-2023-47470, CVE-2024-7272, CVE-2024-22860, CVE-2024-22861 and CVE-2024-22862
freetype: Fix CVE-2025-27363
gnutls: Fix CVE-2024-12243
grub: Fix CVE-2024-45774, CVE-2024-45775, CVE-2024-45776, CVE-2024-45777, CVE-2024-45778, CVE-2024-45779, CVE-2024-45780, CVE-2024-45781, CVE-2024-45782, CVE-2024-45783, CVE-2024-56737, CVE-2025-0622, CVE-2025-0624, CVE-2025-0677, CVE-2025-0684, CVE-2025-0685, CVE-2025-0686, CVE-2025-0689, CVE-2025-0678, CVE-2025-0690, CVE-2025-1118 and CVE-2025-1125
gstreamer1.0-rtsp-server: fix CVE-2024-44331
libarchive: Fix CVE-2025-25724
libarchive: Ignore CVE-2025-1632
libcap: Fix CVE-2025-1390
linux-yocto/5.10: Fix CVE-2024-36476, CVE-2024-43098, CVE-2024-47143, CVE-2024-48881, CVE-2024-50051, CVE-2024-50074, CVE-2024-50082, CVE-2024-50083, CVE-2024-50099, CVE-2024-50115, CVE-2024-50116, CVE-2024-50117, CVE-2024-50142, CVE-2024-50148, CVE-2024-50150, CVE-2024-50151, CVE-2024-50167, CVE-2024-50168, CVE-2024-50171, CVE-2024-50185, CVE-2024-50192, CVE-2024-50193, CVE-2024-50194, CVE-2024-50195, CVE-2024-50198, CVE-2024-50201, CVE-2024-50202, CVE-2024-50205, CVE-2024-50208, CVE-2024-50209, CVE-2024-50229, CVE-2024-50230, CVE-2024-50233, CVE-2024-50234, CVE-2024-50236, CVE-2024-50237, CVE-2024-50251, CVE-2024-50262, CVE-2024-50264, CVE-2024-50265, CVE-2024-50267, CVE-2024-50268, CVE-2024-50269, CVE-2024-50273, CVE-2024-50278, CVE-2024-50279, CVE-2024-50282, CVE-2024-50287, CVE-2024-50292, CVE-2024-50296, CVE-2024-50299, CVE-2024-50301, CVE-2024-50302, CVE-2024-53042, CVE-2024-53052, CVE-2024-53057, CVE-2024-53059, CVE-2024-53060, CVE-2024-53061, CVE-2024-53063, CVE-2024-53066, CVE-2024-53096, CVE-2024-53097, CVE-2024-53101, CVE-2024-53103, CVE-2024-53104, CVE-2024-53145, CVE-2024-53146, CVE-2024-53150, CVE-2024-53155, CVE-2024-53156, CVE-2024-53157, CVE-2024-53161, CVE-2024-53165, CVE-2024-53171, CVE-2024-53173, CVE-2024-53174, CVE-2024-53194, CVE-2024-53197, CVE-2024-53217, CVE-2024-53226, CVE-2024-53227, CVE-2024-53237, CVE-2024-53239, CVE-2024-55916, CVE-2024-56548, CVE-2024-56558, CVE-2024-56567, CVE-2024-56568, CVE-2024-56569, CVE-2024-56572, CVE-2024-56574, CVE-2024-56581, CVE-2024-56587, CVE-2024-56593, CVE-2024-56595, CVE-2024-56596, CVE-2024-56598, CVE-2024-56600, CVE-2024-56601, CVE-2024-56602, CVE-2024-56603, CVE-2024-56605, CVE-2024-56606, CVE-2024-56615, CVE-2024-56619, CVE-2024-56623, CVE-2024-56629, CVE-2024-56634, CVE-2024-56642, CVE-2024-56643, CVE-2024-56648, CVE-2024-56650, CVE-2024-56659, CVE-2024-56662, CVE-2024-56670, CVE-2024-56688, CVE-2024-56698, CVE-2024-56704, CVE-2024-56716, CVE-2024-56720, CVE-2024-56723, CVE-2024-56724, CVE-2024-56728, CVE-2024-56739, CVE-2024-56746, CVE-2024-56747, CVE-2024-56748, CVE-2024-56754, CVE-2024-56756, CVE-2024-56770, CVE-2024-56779, CVE-2024-56780, CVE-2024-56781, CVE-2024-56785, CVE-2024-57802, CVE-2024-57807, CVE-2024-57850, CVE-2024-57874, CVE-2024-57890, CVE-2024-57896, CVE-2024-57900, CVE-2024-57901, CVE-2024-57902, CVE-2024-57910, CVE-2024-57911, CVE-2024-57913, CVE-2024-57922, CVE-2024-57938, CVE-2024-57939, CVE-2024-57946, CVE-2024-57951, CVE-2025-21638, CVE-2025-21687, CVE-2025-21689, CVE-2025-21692, CVE-2025-21694, CVE-2025-21697 and CVE-2025-21699
linux-yocto/5.15: Fix CVE-2024-57979, CVE-2024-58034, CVE-2024-58052, CVE-2024-58055, CVE-2024-58058, CVE-2024-58063, CVE-2024-58069, CVE-2024-58071, CVE-2024-58076, CVE-2024-58083, CVE-2025-21700, CVE-2025-21703, CVE-2025-21715, CVE-2025-21722, CVE-2025-21727, CVE-2025-21731, CVE-2025-21753, CVE-2025-21756, CVE-2025-21760, CVE-2025-21761, CVE-2025-21762, CVE-2025-21763, CVE-2025-21764, CVE-2025-21796, CVE-2025-21811, CVE-2025-21887, CVE-2025-21898, CVE-2025-21904, CVE-2025-21905, CVE-2025-21912, CVE-2025-21917, CVE-2025-21919, CVE-2025-21920, CVE-2025-21922, CVE-2025-21934, CVE-2025-21943, CVE-2025-21948 and CVE-2025-21951
libpcre2: Ignore CVE-2022-1586
libtasn1: Fix CVE-2024-12133
libxml2: Fix CVE-2022-49043, CVE-2024-56171, CVE-2025-24928 and CVE-2025-27113
libxslt: Fix CVE-2024-55549 and CVE-2025-24855
llvm: Fix CVE-2024-0151
mpg123: Fix CVE-2024-10573
openssh: Fix CVE-2025-26465
ovmf: Revert Fix for CVE-2023-45236 CVE-2023-45237
perl: Ignore CVE-2023-47038
puzzles: Ignore CVE-2024-13769, CVE-2024-13770 and CVE-2025-0837
python3: Fix CVE-2025-0938
ruby: Fix CVE-2024-41946, CVE-2025-27219 and CVE-2025-27220
subversion: Ignore CVE-2024-45720
systemd: Fix CVE-2022-3821, CVE-2022-4415, CVE-2022-45873 and CVE-2023-7008
tiff: mark CVE-2023-30774 as patched with existing patch
u-boot: Fix CVE-2022-2347, CVE-2022-30767, CVE-2022-30790, CVE-2024-57254, CVE-2024-57255, CVE-2024-57256, CVE-2024-57257, CVE-2024-57258 and CVE-2024-57259
vim: Fix CVE-2025-1215, CVE-2025-22134, CVE-2025-24014, CVE-2025-26603, CVE-2025-27423 and CVE-2025-29768
xserver-xorg: Fix CVE-2022-49737, CVE-2025-26594, CVE-2025-26595, CVE-2025-26596, CVE-2025-26597, CVE-2025-26598, CVE-2025-26599, CVE-2025-26600 and CVE-2025-26601
xwayland: Fix CVE-2022-49737, CVE-2024-9632, CVE-2024-21885, CVE-2024-21886, CVE-2024-31080, CVE-2024-31081, CVE-2024-31083, CVE-2025-26594, CVE-2025-26595, CVE-2025-26596, CVE-2025-26597, CVE-2025-26598, CVE-2025-26599, CVE-2025-26600 and CVE-2025-26601
zlib: Fix CVE-2014-9485
Fixes in Yocto-4.0.26
bind: Upgrade to 9.18.33
bitbake: cache: bump cache version
bitbake: siggen.py: Improve taskhash reproducibility
boost: fix do_fetch error
build-appliance-image: Update to kirkstone head revision
contributor-guide/submit-changes: add policy on AI generated code
cve-update-nvd2-native: handle missing vulnStatus
docs: Add favicon for the documentation html
docs: Remove all mention of core-image-lsb
libtasn1: upgrade to 4.20.0
libxcrypt-compat: Remove libcrypt.so to fix conflict with libcrypt
libxml2: fix compilation of explicit child axis in pattern
linux-yocto/5.10: update to v5.10.234
linux-yocto/5.15: update to v5.15.179
mesa: Fix missing GLES3 headers in SDK sysroot
mesa: Update SRC_URI
meta: Enable ‘-o pipefail’ for the SDK installer
migration-guides: add release notes for 4.0.25
poky.conf: add ubuntu2404 to SANITY_TESTED_DISTROS
poky.conf: bump version for 4.0.26
procps: replaced one use of fputs(3) with a write(2) call
ref-manual: don’t refer to poky-lsb
scripts/install-buildtools: Update to 4.0.24
scritps/runqemu: Ensure we only have two serial ports
systemd: upgrade to 250.14
tzcode-native: Fix compiler setting from 2023d version
tzcode: Update SRC_URI
tzdata/tzcode-native: upgrade 2025a
vim: Upgrade to 9.1.1198
virglrenderer: fix do_fetch error
vulnerabilities/classes: remove references to cve-check text format
xz: Update SRC_URI
yocto-uninative: Update to 4.7 for glibc 2.41
Known Issues in Yocto-4.0.26
N/A
Contributors to Yocto-4.0.26
Thanks to the following people who contributed to this release:
Aleksandar Nikolic
Alessio Cascone
Antonin Godard
Archana Polampalli
Ashish Sharma
Bruce Ashfield
Carlos Dominguez
Deepesh Varatharajan
Divya Chellam
Guocai He
Hitendra Prajapati
Hongxu Jia
Jiaying Song
Johannes Kauffmann
Kai Kang
Lee Chee Yang
Libo Chen
Marta Rybczynska
Michael Halstead
Mingli Yu
Moritz Haase
Narpat Mali
Paulo Neves
Peter Marko
Priyal Doshi
Richard Purdie
Robert Yang
Ross Burton
Sakib Sajal
Steve Sakoman
Vijay Anusuri
Yogita Urade
Zhang Peng
Repositories / Downloads for Yocto-4.0.26
poky
Repository Location: https://git.yoctoproject.org/poky
Branch: kirkstone
Tag: yocto-4.0.26
Git Revision: d70d287a77d5026b698ac237ab865b2dafd36bb8
Release Artefact: poky-d70d287a77d5026b698ac237ab865b2dafd36bb8
sha: 3ebfadb8bff4c1ca12b3cf3e4ef6e3ac2ce52b73570266daa98436c9959249f2
Download Locations: https://downloads.yoctoproject.org/releases/yocto/yocto-4.0.26/poky-d70d287a77d5026b698ac237ab865b2dafd36bb8.tar.bz2 https://mirrors.kernel.org/yocto/yocto/yocto-4.0.26/poky-d70d287a77d5026b698ac237ab865b2dafd36bb8.tar.bz2
openembedded-core
Repository Location: https://git.openembedded.org/openembedded-core
Branch: kirkstone
Tag: yocto-4.0.26
Git Revision: 1efbe1004bc82e7c14c1e8bd4ce644f5015c3346
Release Artefact: oecore-1efbe1004bc82e7c14c1e8bd4ce644f5015c3346
sha: d3805e034dabd0865dbf55488b2c16d4ea0351d37aa826f0054a6bfdde5a8be9
Download Locations: https://downloads.yoctoproject.org/releases/yocto/yocto-4.0.26/oecore-1efbe1004bc82e7c14c1e8bd4ce644f5015c3346.tar.bz2 https://mirrors.kernel.org/yocto/yocto/yocto-4.0.26/oecore-1efbe1004bc82e7c14c1e8bd4ce644f5015c3346.tar.bz2
meta-mingw
Repository Location: https://git.yoctoproject.org/meta-mingw
Branch: kirkstone
Tag: yocto-4.0.26
Git Revision: 87c22abb1f11be430caf4372e6b833dc7d77564e
Release Artefact: meta-mingw-87c22abb1f11be430caf4372e6b833dc7d77564e
sha: f0bc4873e2e0319fb9d6d6ab9b98eb3f89664d4339a167d2db6a787dd12bc1a8
Download Locations: https://downloads.yoctoproject.org/releases/yocto/yocto-4.0.26/meta-mingw-87c22abb1f11be430caf4372e6b833dc7d77564e.tar.bz2 https://mirrors.kernel.org/yocto/yocto/yocto-4.0.26/meta-mingw-87c22abb1f11be430caf4372e6b833dc7d77564e.tar.bz2
meta-gplv2
Repository Location: https://git.yoctoproject.org/meta-gplv2
Branch: kirkstone
Tag: yocto-4.0.26
Git Revision: d2f8b5cdb285b72a4ed93450f6703ca27aa42e8a
Release Artefact: meta-gplv2-d2f8b5cdb285b72a4ed93450f6703ca27aa42e8a
sha: c386f59f8a672747dc3d0be1d4234b6039273d0e57933eb87caa20f56b9cca6d
Download Locations: https://downloads.yoctoproject.org/releases/yocto/yocto-4.0.26/meta-gplv2-d2f8b5cdb285b72a4ed93450f6703ca27aa42e8a.tar.bz2 https://mirrors.kernel.org/yocto/yocto/yocto-4.0.26/meta-gplv2-d2f8b5cdb285b72a4ed93450f6703ca27aa42e8a.tar.bz2
bitbake
Repository Location: https://git.openembedded.org/bitbake
Branch: 2.0
Tag: yocto-4.0.26
Git Revision: 046871d9fd76efdca7b72718b328d8f545523f7e
Release Artefact: bitbake-046871d9fd76efdca7b72718b328d8f545523f7e
sha: e9df0a9f5921b583b539188d66b23f120e1751000e7822e76c3391d5c76ee21a
Download Locations: https://downloads.yoctoproject.org/releases/yocto/yocto-4.0.26/bitbake-046871d9fd76efdca7b72718b328d8f545523f7e.tar.bz2 https://mirrors.kernel.org/yocto/yocto/yocto-4.0.26/bitbake-046871d9fd76efdca7b72718b328d8f545523f7e.tar.bz2
yocto-docs
Repository Location: https://git.yoctoproject.org/yocto-docs
Branch: kirkstone
Tag: yocto-4.0.26
Git Revision: 9b4c36f7b02dd4bedfec90206744a1e90e37733c
Release notes for Yocto-4.0.27 (Kirkstone)
Security Fixes in Yocto-4.0.27
binutils: Fix CVE-2025-1178
busybox: fix CVE-2023-39810
connman :fix CVE-2025-32743
curl: Ignore CVE-2025-0725
ghostscript: Fix CVE-2025-27830, CVE-2025-27831, CVE-2025-27832, CVE-2025-27834, CVE-2025-27835 and CVE-2025-27836
ghostscript: Ignore CVE-2024-29507, CVE-2025-27833 and CVE-2025-27837
glib-2.0: Fix CVE-2025-3360
go: Fix CVE-2025-22871
libarchive: Ignore CVE-2024-48615
libpam: Fix CVE-2024-10041
libsoup-2.4: Fix CVE-2024-52532, CVE-2025-32906 and CVE-2025-32909
libsoup: Fix CVE-2024-52532, CVE-2025-32906, CVE-2025-32909, CVE-2025-32910, CVE-2025-32911, CVE-2025-32912, CVE-2025-32913 and CVE-2025-32914
libxml2: Fix CVE-2025-32414 and CVE-2025-32415
ofono: Fix CVE-2024-7537
perl: Fix CVE-2024-56406
ppp: Fix CVE-2024-58250
python3-setuptools: Fix CVE-2024-6345
qemu: Ignore CVE-2023-1386
ruby: Fix CVE-2024-43398
sqlite3: Fix CVE-2025-29088
systemd: Ignore CVE-2022-3821, CVE-2022-4415 and CVE-2022-45873
Fixes in Yocto-4.0.27
Revert “cve-update-nvd2-native: Tweak to work better with NFS DL_DIR”
build-appliance-image: Update to kirkstone head revision
cve-update-nvd2-native: add workaround for json5 style list
docs: Fix dead links that use the DISTRO macro
docs: manuals: remove repeated word
docs: poky.yaml: introduce DISTRO_LATEST_TAG
glibc: Add single-threaded fast path to rand()
glibc: stable 2.35 branch updates
module.bbclass: add KBUILD_EXTRA_SYMBOLS to install
perl: enable _GNU_SOURCE define via d_gnulibc
poky.conf: bump version for 4.0.27
ref-manual/variables.rst: document autotools class related variables
scripts/install-buildtools: Update to 4.0.26
systemd: backport patch to fix journal issue
systemd: systemd-journald fails to setup LogNamespace
tzdata/tzcode-native: upgrade to 2025b
Known Issues in Yocto-4.0.27
N/A
Contributors to Yocto-4.0.27
Aleksandar Nikolic
Alexander Kanavin
Alon Bar-Lev
Andrew Kreimer
Antonin Godard
Chen Qi
Deepesh Varatharajan
Divya Chellam
Haitao Liu
Haixiao Yan
Hitendra Prajapati
Peter Marko
Praveen Kumar
Priyal Doshi
Shubham Kulkarni
Soumya Sambu
Steve Sakoman
Vijay Anusuri
Yogita Urade
Repositories / Downloads for Yocto-4.0.27
poky
Repository Location: https://git.yoctoproject.org/poky
Branch: kirkstone
Tag: yocto-4.0.27
Git Revision: ab9a994a8cd8e06b519a693db444030999d273b7
Release Artefact: poky-ab9a994a8cd8e06b519a693db444030999d273b7
sha: 77a366c17cf29eef15c6ff3f44e73f81c07288c723fd4a6dbd8c7ee9b79933f3
Download Locations: https://downloads.yoctoproject.org/releases/yocto/yocto-4.0.27/poky-ab9a994a8cd8e06b519a693db444030999d273b7.tar.bz2 https://mirrors.kernel.org/yocto/yocto/yocto-4.0.27/poky-ab9a994a8cd8e06b519a693db444030999d273b7.tar.bz2
openembedded-core
Repository Location: https://git.openembedded.org/openembedded-core
Branch: kirkstone
Tag: yocto-4.0.27
Git Revision: e8be08a624b2d024715a5c8b0c37f2345a02336b
Release Artefact: oecore-e8be08a624b2d024715a5c8b0c37f2345a02336b
sha: cc5b0fadab021c6dc61f37fc4ff01a1cf657e7c219488ce264bede42f7f6212f
Download Locations: https://downloads.yoctoproject.org/releases/yocto/yocto-4.0.27/oecore-e8be08a624b2d024715a5c8b0c37f2345a02336b.tar.bz2 https://mirrors.kernel.org/yocto/yocto/yocto-4.0.27/oecore-e8be08a624b2d024715a5c8b0c37f2345a02336b.tar.bz2
meta-mingw
Repository Location: https://git.yoctoproject.org/meta-mingw
Branch: kirkstone
Tag: yocto-4.0.27
Git Revision: 87c22abb1f11be430caf4372e6b833dc7d77564e
Release Artefact: meta-mingw-87c22abb1f11be430caf4372e6b833dc7d77564e
sha: f0bc4873e2e0319fb9d6d6ab9b98eb3f89664d4339a167d2db6a787dd12bc1a8
Download Locations: https://downloads.yoctoproject.org/releases/yocto/yocto-4.0.27/meta-mingw-87c22abb1f11be430caf4372e6b833dc7d77564e.tar.bz2 https://mirrors.kernel.org/yocto/yocto/yocto-4.0.27/meta-mingw-87c22abb1f11be430caf4372e6b833dc7d77564e.tar.bz2
meta-gplv2
Repository Location: https://git.yoctoproject.org/meta-gplv2
Branch: kirkstone
Tag: yocto-4.0.27
Git Revision: d2f8b5cdb285b72a4ed93450f6703ca27aa42e8a
Release Artefact: meta-gplv2-d2f8b5cdb285b72a4ed93450f6703ca27aa42e8a
sha: c386f59f8a672747dc3d0be1d4234b6039273d0e57933eb87caa20f56b9cca6d
Download Locations: https://downloads.yoctoproject.org/releases/yocto/yocto-4.0.27/meta-gplv2-d2f8b5cdb285b72a4ed93450f6703ca27aa42e8a.tar.bz2 https://mirrors.kernel.org/yocto/yocto/yocto-4.0.27/meta-gplv2-d2f8b5cdb285b72a4ed93450f6703ca27aa42e8a.tar.bz2
bitbake
Repository Location: https://git.openembedded.org/bitbake
Branch: 2.0
Tag: yocto-4.0.27
Git Revision: 046871d9fd76efdca7b72718b328d8f545523f7e
Release Artefact: bitbake-046871d9fd76efdca7b72718b328d8f545523f7e
sha: e9df0a9f5921b583b539188d66b23f120e1751000e7822e76c3391d5c76ee21a
Download Locations: https://downloads.yoctoproject.org/releases/yocto/yocto-4.0.27/bitbake-046871d9fd76efdca7b72718b328d8f545523f7e.tar.bz2 https://mirrors.kernel.org/yocto/yocto/yocto-4.0.27/bitbake-046871d9fd76efdca7b72718b328d8f545523f7e.tar.bz2
yocto-docs
Repository Location: https://git.yoctoproject.org/yocto-docs
Branch: kirkstone
Tag: yocto-4.0.27
Git Revision: 0d51e553d5f83eea6634e03ddc9c7740bf72fcea
Release notes for Yocto-4.0.28 (Kirkstone)
Security Fixes in Yocto-4.0.28
binutils: Fix CVE-2025-1180, CVE-2025-1182, CVE-2025-5244 and CVE-2025-5245
connman: Fix CVE-2025-32366
ffmpeg: Fix CVE-2025-1373, CVE-2025-22919 and CVE-2025-22921
ffmpeg: Ignore CVE-2022-48434
ghostscript: Fix CVE-2025-48708
git: Fix CVE-2024-50349 and CVE-2024-52006
glib-2.0: Fix CVE-2025-4373
glibc: Fix for CVE-2025-4802
go: Fix CVE-2025-4673
go: ignore CVE-2024-3566
icu: Fix CVE-2025-5222
iputils: Fix CVE-2025-47268
libsoup-2.4: Fix CVE-2025-2784, CVE-2025-4476, CVE-2025-4948, CVE-2025-4969, CVE-2025-32050, CVE-2025-32052, CVE-2025-32053, CVE-2025-32907, CVE-2025-32910, CVE-2025-32911, CVE-2025-32912, CVE-2025-32913, CVE-2025-32914, CVE-2025-46420 and CVE-2025-46421
libsoup: Fix CVE-2025-2784, CVE-2025-4476, CVE-2025-4948, CVE-2025-4969, CVE-2025-32050, CVE-2025-32051, CVE-2025-32052, CVE-2025-32053, CVE-2025-32907, CVE-2025-46420 and CVE-2025-46421
linux-yocto/5.15: Fix CVE-2024-26952, CVE-2025-21941, CVE-2025-21957, CVE-2025-21959, CVE-2025-21962, CVE-2025-21963, CVE-2025-21964, CVE-2025-21968, CVE-2025-21996, CVE-2025-22018, CVE-2025-22020, CVE-2025-22035, CVE-2025-22054, CVE-2025-22056, CVE-2025-22063, CVE-2025-22066, CVE-2025-22081, CVE-2025-22097, CVE-2025-23136, CVE-2025-37785, CVE-2025-37803, CVE-2025-37805, CVE-2025-38152, CVE-2025-39728 and CVE-2025-39735
net-tools: Fix CVE-2025-46836
openssh: Fix CVE-2025-32728
python3: Fix CVE-2024-12718, CVE-2025-0938, CVE-2025-4138, CVE-2025-4330, CVE-2025-4435, CVE-2025-4516 and CVE-2025-4517
python3-requests: Fix CVE-2024-47081
python3-setuptools: Fix CVE-2025-47273
ruby: Fix CVE-2025-27221
screen: Fix CVE-2025-46802, CVE-2025-46804 and CVE-2025-46805
taglib: Fix CVE-2023-47466
Fixes in Yocto-4.0.28
babeltrace/libatomic-ops: correct the SRC_URI
brief-yoctoprojectqs/ref-manual: Switch to new CDN
bsp guide: update kernel version example to 6.12
bsp-guide: update lonely “4.12” kernel reference to “6.12”
build-appliance-image: Update to kirkstone head revision
cmake: Correctly handle cost data of tests with arbitrary chars in name
conf.py: tweak SearchEnglish to be hyphen-friendly
contributor-guide/submit-changes: encourage patch version changelogs
dev-manual/sbom.rst: fix wrong build outputs
docs: Clean up explanation of minimum required version numbers
docs: README: specify how to contribute instead of pointing at another file
docs: conf.py: silence SyntaxWarning on js_splitter_code
e2fsprogs: removed ‘sed -u’ option
ffmpeg: Add “libswresample libavcodec” to CVE_PRODUCT
ffmpeg: upgrade to 5.0.3
gcc: AArch64 - Fix strict-align cpymem/setmem
glibc: nptl Fix indentation
glibc: nptl Remove unnecessary catch-all-wake in condvar group switch
glibc: nptl Remove unnecessary quadruple check in pthread_cond_wait
glibc: nptl Update comments and indentation for new condvar implementation
glibc: nptl Use a single loop in pthread_cond_wait instaed of a nested loop
glibc: nptl Use all of g1_start and g_signals
glibc: nptl rename __condvar_quiesce_and_switch_g1
glibc: pthreads NPTL lost wakeup fix 2
kernel.bbclass: add original package name to RPROVIDES for -image and -base
libpng: Improve ptest
linux-yocto/5.15: update to v5.15.184
migration-guides: add release notes for 4.0.26 and 4.0.27
nfs-utils: don’t use signals to shut down nfs server.
poky.conf: bump version for 4.0.28
python3: upgrade to 3.10.18
ref-manual/release-process: update releases.svg
ref-manual/variables.rst: document INHIBIT_DEFAULT_RUST_DEPS INHIBIT_UPDATERCD_BBCLASS SSTATE_SKIP_CREATION WIC_CREATE_EXTRA_ARGS IMAGE_ROOTFS_MAXSIZE INITRAMFS_MAXSIZE
ref-manual: clarify KCONFIG_MODE default behaviour
ref-manual: classes: nativesdk: move note to appropriate section
ref-manual: classes: reword to clarify that native/nativesdk options are exclusive
ref-manual: kernel-fitimage.bbclass does not use SPL_SIGN_KEYNAME
scripts/install-buildtools: Update to 4.0.27
sphinx-lint: role missing opening tag colon
sphinx-lint: trailing whitespace
sphinx-lint: unbalanced inline literal markup
sysstat: correct the SRC_URI
systemtap: add sysroot Python paths to configure flags
test-manual/intro: remove Buildbot version used
util-linux: Add fix to isolate test fstab entries using CUSTOM_FSTAB
xz: Update LICENSE variable for xz packages
Known Issues in Yocto-4.0.28
N/A
Contributors to Yocto-4.0.28
Aditya Tayade
Adrian Freihofer
Aleksandar Nikolic
Alper Ak
Antonin Godard
Archana Polampalli
Ashish Sharma
Bruce Ashfield
Carlos Sánchez de La Lama
Changqing Li
Christos Gavros
Colin Pinnell McAllister
Deepesh Varatharajan
Divya Chellam
Enrico Jörns
Etienne Cordonnier
Guocai He
Harish Sadineni
Hitendra Prajapati
Jiaying Song
Lee Chee Yang
Martin Jansa
Moritz Haase
NeilBrown
Peter Marko
Poonam Jadhav
Praveen Kumar
Quentin Schulz
Richard Purdie
Robert P. J. Day
Soumya Sambu
Steve Sakoman
Sundeep KOKKONDA
Sunil Dora
Trevor Woerner
Vijay Anusuri
Virendra Thakur
Yi Zhao
aszh07
Repositories / Downloads for Yocto-4.0.28
poky
Repository Location: https://git.yoctoproject.org/poky
Branch: kirkstone
Tag: yocto-4.0.28
Git Revision: 78c9cb3eaf071932567835742608404d5ce23cc4
Release Artefact: poky-78c9cb3eaf071932567835742608404d5ce23cc4
sha: 9c73c6f89e70c2041a52851e5cc582e5a2f05ad2fdc110d2c518f2c4994e8de3
Download Locations: https://downloads.yoctoproject.org/releases/yocto/yocto-4.0.28/poky-78c9cb3eaf071932567835742608404d5ce23cc4.tar.bz2 https://mirrors.kernel.org/yocto/yocto/yocto-4.0.28/poky-78c9cb3eaf071932567835742608404d5ce23cc4.tar.bz2
openembedded-core
Repository Location: https://git.openembedded.org/openembedded-core
Branch: kirkstone
Tag: yocto-4.0.28
Git Revision: 75e54301c5076eb0454aee33c870adf078f563fd
Release Artefact: oecore-75e54301c5076eb0454aee33c870adf078f563fd
sha: c5ffceab90881c4041ec4304da8b7b32d9c1f89a4c63ee7b8cbd53c796b0187b
Download Locations: https://downloads.yoctoproject.org/releases/yocto/yocto-4.0.28/oecore-75e54301c5076eb0454aee33c870adf078f563fd.tar.bz2 https://mirrors.kernel.org/yocto/yocto/yocto-4.0.28/oecore-75e54301c5076eb0454aee33c870adf078f563fd.tar.bz2
meta-mingw
Repository Location: https://git.yoctoproject.org/meta-mingw
Branch: kirkstone
Tag: yocto-4.0.28
Git Revision: 87c22abb1f11be430caf4372e6b833dc7d77564e
Release Artefact: meta-mingw-87c22abb1f11be430caf4372e6b833dc7d77564e
sha: f0bc4873e2e0319fb9d6d6ab9b98eb3f89664d4339a167d2db6a787dd12bc1a8
Download Locations: https://downloads.yoctoproject.org/releases/yocto/yocto-4.0.28/meta-mingw-87c22abb1f11be430caf4372e6b833dc7d77564e.tar.bz2 https://mirrors.kernel.org/yocto/yocto/yocto-4.0.28/meta-mingw-87c22abb1f11be430caf4372e6b833dc7d77564e.tar.bz2
meta-gplv2
Repository Location: https://git.yoctoproject.org/meta-gplv2
Branch: kirkstone
Tag: yocto-4.0.28
Git Revision: d2f8b5cdb285b72a4ed93450f6703ca27aa42e8a
Release Artefact: meta-gplv2-d2f8b5cdb285b72a4ed93450f6703ca27aa42e8a
sha: c386f59f8a672747dc3d0be1d4234b6039273d0e57933eb87caa20f56b9cca6d
Download Locations: https://downloads.yoctoproject.org/releases/yocto/yocto-4.0.28/meta-gplv2-d2f8b5cdb285b72a4ed93450f6703ca27aa42e8a.tar.bz2 https://mirrors.kernel.org/yocto/yocto/yocto-4.0.28/meta-gplv2-d2f8b5cdb285b72a4ed93450f6703ca27aa42e8a.tar.bz2
bitbake
Repository Location: https://git.openembedded.org/bitbake
Branch: 2.0
Tag: yocto-4.0.28
Git Revision: 046871d9fd76efdca7b72718b328d8f545523f7e
Release Artefact: bitbake-046871d9fd76efdca7b72718b328d8f545523f7e
sha: e9df0a9f5921b583b539188d66b23f120e1751000e7822e76c3391d5c76ee21a
Download Locations: https://downloads.yoctoproject.org/releases/yocto/yocto-4.0.28/bitbake-046871d9fd76efdca7b72718b328d8f545523f7e.tar.bz2 https://mirrors.kernel.org/yocto/yocto/yocto-4.0.28/bitbake-046871d9fd76efdca7b72718b328d8f545523f7e.tar.bz2
meta-yocto
Repository Location: https://git.yoctoproject.org/meta-yocto
Branch: kirkstone
Tag: yocto-4.0.28
Git Revision: 0bf3dcef1caa80fb047bf9c3514314ab658e30ea
yocto-docs
Repository Location: https://git.yoctoproject.org/yocto-docs
Branch: kirkstone
Tag: yocto-4.0.28
Git Revision: 97cd3ee7f3bf1de8454708d1852ea9cdbd45c39b
Release notes for Yocto-4.0.29 (Kirkstone)
Security Fixes in Yocto-4.0.29
avahi: Fix CVE-2024-52615
binutils: Fix CVE-2025-7545 and CVE-2025-7546
coreutils: Fix CVE-2025-5278
curl: Fix CVE-2024-11053 and CVE-2025-0167
dropbear: Fix CVE-2025-47203
ffmpeg: Ignore CVE-2022-3109 and CVE-2022-3341
gdk-pixbuf: Fix CVE-2025-7345
ghostscript: Ignore CVE-2025-46646
gnupg: Fix CVE-2025-30258
gnutls: Fix CVE-2025-6395, CVE-2025-32988, CVE-2025-32989 and CVE-2025-32990
iputils: Fix CVE-2025-48964
libarchive: Fix CVE-2025-5914, CVE-2025-5915, CVE-2025-5916 and CVE-2025-5917
libpam: Fix CVE-2025-6020
libsoup-2.4: Fix CVE-2025-4945
libsoup-2.4: Fix CVE-2025-4969 (update patch)
libsoup: Fix CVE-2025-4945, CVE-2025-6021, CVE-2025-6170, CVE-2025-49794 and CVE-2025-49796
ncurses: Fix CVE-2025-6141
ofono: Fix CVE-2023-4232 and CVE-2023-4235
openssl: Fix CVE-2024-41996
python3-urllib3: Fix CVE-2025-50181
ruby: Fix CVE-2024-43398 (update patches)
sqlite3: Fix CVE-2025-6965 and CVE-2025-7458
sqlite3: Ignore CVE-2025-3277
systemd: Fix CVE-2025-4598
xwayland: Fix CVE-2025-49175, CVE-2025-49176, CVE-2025-49177, CVE-2025-49178, CVE-2025-49179 and CVE-2025-49180
Fixes in Yocto-4.0.29
bintuils: stable 2.38 branch update
bitbake: test/fetch: Switch u-boot based test to use our own mirror
build-appliance-image: Update to kirkstone head revision
conf.py: improve SearchEnglish to handle terms with dots
db: ignore implicit-int and implicit-function-declaration issues fatal with gcc-14
dev-manual/start.rst: added missing command in Optimize your VHDX file using DiskPart
glibc: stable 2.35 branch updates
gnutls: patch read buffer overrun in the “pre_shared_key” extension
gnutls: patch reject zero-length version in certificate request
linux-yocto/5.15: update to v5.15.186
migration-guides: add release notes for 4.0.28
oeqa/core/decorator: add decorators to skip based on HOST_ARCH
openssl: upgrade to 3.0.17
orc: set CVE_PRODUCT
overview-manual/concepts.rst: fix sayhello hardcoded bindir
poky.conf: bump version for 4.0.29
python3: update CVE product
ref-manual: document KERNEL_SPLIT_MODULES variable
scripts/install-buildtools: Update to 4.0.28
sudo: upgrade to 1.9.17p1
tcf-agent: correct the SRC_URI
Known Issues in Yocto-4.0.29
N/A
Contributors to Yocto-4.0.29
Aleksandar Nikolic
Antonin Godard
Archana Polampalli
Bruce Ashfield
Changqing Li
Chen Qi
Colin Pinnell McAllister
Daniel Díaz
Deepesh Varatharajan
Divya Chellam
Dixit Parmar
Enrico Jörns
Guocai He
Hitendra Prajapati
Lee Chee Yang
Marco Cavallini
Martin Jansa
Peter Marko
Praveen Kumar
Richard Purdie
Rob Woolley
Ross Burton
Steve Sakoman
Vijay Anusuri
Yash Shinde
Yogita Urade
Zhang Peng
Repositories / Downloads for Yocto-4.0.29
poky
Repository Location: https://git.yoctoproject.org/poky
Branch: kirkstone
Tag: yocto-4.0.29
Git Revision: 81ab000fa437ca04f584a3327b076f7a512dc6d0
Release Artefact: poky-81ab000fa437ca04f584a3327b076f7a512dc6d0
sha: 2fecf3cac5c2361c201b5ae826960af92289862ec9be13837a8431138e534fd2
Download Locations: https://downloads.yoctoproject.org/releases/yocto/yocto-4.0.29/poky-81ab000fa437ca04f584a3327b076f7a512dc6d0.tar.bz2 https://mirrors.kernel.org/yocto/yocto/yocto-4.0.29/poky-81ab000fa437ca04f584a3327b076f7a512dc6d0.tar.bz2
openembedded-core
Repository Location: https://git.openembedded.org/openembedded-core
Branch: kirkstone
Tag: yocto-4.0.29
Git Revision: bd620eb14660075fd0f7476bbbb65d5da6293874
Release Artefact: oecore-bd620eb14660075fd0f7476bbbb65d5da6293874
sha: f32ab195c7090268e6e87ccf8db2813cf705c517030654326d14b25d926de88e
Download Locations: https://downloads.yoctoproject.org/releases/yocto/yocto-4.0.29/oecore-bd620eb14660075fd0f7476bbbb65d5da6293874.tar.bz2 https://mirrors.kernel.org/yocto/yocto/yocto-4.0.29/oecore-bd620eb14660075fd0f7476bbbb65d5da6293874.tar.bz2
meta-mingw
Repository Location: https://git.yoctoproject.org/meta-mingw
Branch: kirkstone
Tag: yocto-4.0.29
Git Revision: 87c22abb1f11be430caf4372e6b833dc7d77564e
Release Artefact: meta-mingw-87c22abb1f11be430caf4372e6b833dc7d77564e
sha: f0bc4873e2e0319fb9d6d6ab9b98eb3f89664d4339a167d2db6a787dd12bc1a8
Download Locations: https://downloads.yoctoproject.org/releases/yocto/yocto-4.0.29/meta-mingw-87c22abb1f11be430caf4372e6b833dc7d77564e.tar.bz2 https://mirrors.kernel.org/yocto/yocto/yocto-4.0.29/meta-mingw-87c22abb1f11be430caf4372e6b833dc7d77564e.tar.bz2
meta-gplv2
Repository Location: https://git.yoctoproject.org/meta-gplv2
Branch: kirkstone
Tag: yocto-4.0.29
Git Revision: d2f8b5cdb285b72a4ed93450f6703ca27aa42e8a
Release Artefact: meta-gplv2-d2f8b5cdb285b72a4ed93450f6703ca27aa42e8a
sha: c386f59f8a672747dc3d0be1d4234b6039273d0e57933eb87caa20f56b9cca6d
Download Locations: https://downloads.yoctoproject.org/releases/yocto/yocto-4.0.29/meta-gplv2-d2f8b5cdb285b72a4ed93450f6703ca27aa42e8a.tar.bz2 https://mirrors.kernel.org/yocto/yocto/yocto-4.0.29/meta-gplv2-d2f8b5cdb285b72a4ed93450f6703ca27aa42e8a.tar.bz2
bitbake
Repository Location: https://git.openembedded.org/bitbake
Branch: 2.0
Tag: yocto-4.0.29
Git Revision: 8e2d1f8de055549b2101614d85454fcd1d0f94b2
Release Artefact: bitbake-8e2d1f8de055549b2101614d85454fcd1d0f94b2
sha: fad4e7699bae62082118e89785324b031b0af0743064caee87c91ba28549afb0
Download Locations: https://downloads.yoctoproject.org/releases/yocto/yocto-4.0.29/bitbake-8e2d1f8de055549b2101614d85454fcd1d0f94b2.tar.bz2 https://mirrors.kernel.org/yocto/yocto/yocto-4.0.29/bitbake-8e2d1f8de055549b2101614d85454fcd1d0f94b2.tar.bz2
meta-yocto
Repository Location: https://git.yoctoproject.org/meta-yocto
Branch: kirkstone
Tag: yocto-4.0.29
Git Revision: e916d3bad58f955b73e2c67aba975e63cd191394
yocto-docs
Repository Location: https://git.yoctoproject.org/yocto-docs
Branch: kirkstone
Tag: yocto-4.0.29
Git Revision: bf855ecaf4bec4cef9bbfea2e50caa65a8339828
Release notes for Yocto-4.0.30 (Kirkstone)
Security Fixes in Yocto-4.0.30
cups: Fix CVE-2025-58060 and CVE-2025-58364
dpkg: Fix CVE-2025-6297
ffmpeg: Fix CVE-2023-6602, CVE-2023-6604, CVE-2023-6605, CVE-2025-1594 and CVE-2025-7700
git: Fix CVE-2025-27613, CVE-2025-27614, CVE-2025-46334, CVE-2025-46835 and CVE-2025-48384
glib-2.0: Fix CVE-2025-7039
glib-2.0: Ignore CVE-2025-4056
go: Ignore CVE-2024-24790 and CVE-2025-0913
gstreamer1.0-plugins-base: Fix CVE-2025-47806, CVE-2025-47807 and CVE-2025-47808
gstreamer1.0-plugins-good: Fix CVE-2025-47183 and CVE-2025-47219
libarchive: Fix CVE-2025-5918
libxslt: Fix CVE-2023-40403
openssl: Fix CVE-2023-50781
python3: Fix CVE-2025-8194
qemu: Ignore CVE-2024-7730
sqlite3: Revert “sqlite3: patch CVE-2025-7458”
tiff: Fix CVE-2024-13978, CVE-2025-8176, CVE-2025-8177, CVE-2025-8534 and CVE-2025-8851
vim: Fix CVE-2025-53905 and CVE-2025-53906
wpa-supplicant: Fix CVE-2022-37660
xserver-xorg: Fix CVE-2025-49175, CVE-2025-49176, CVE-2025-49177, CVE-2025-49178, CVE-2025-49179 and CVE-2025-49180
Fixes in Yocto-4.0.30
build-appliance-image: Update to kirkstone head revision
default-distrovars.inc: Fix CONNECTIVITY_CHECK_URIS redirect issue
dev-manual/security-subjects.rst: update mailing lists
gnupg: disable tests to avoid running target binaries at build time
go-helloworld: fix license
insane: Ensure that src-uri-bad fails correctly
insane: Improve patch warning/error handling
libubootenv: backport patch to fix unknown type name ‘size_t’
llvm: fix typo in CVE-2024-0151.patch
migration-guides: add release notes for 4.0.29
overview-manual/yp-intro.rst: fix broken link to article
poky.conf: bump version for 4.0.30
pulseaudio: Add audio group explicitly
ref-manual/classes.rst: document the testexport class
ref-manual/system-requirements.rst: update supported distributions
ref-manual/variables.rst: document FIT_CONF_PREFIX SPL_DTB_BINARY variable
ref-manual/variables.rst: expand IMAGE_OVERHEAD_FACTOR glossary entry
sdk: The main in the C example should return an int
sudo: remove devtool FIXME comment
systemd: Fix manpage build after CVE-2025-4598
vim: not adjust script pathnames for native scripts either
vim: upgrade to 9.1.1652
Known Issues in Yocto-4.0.30
N/A
Contributors to Yocto-4.0.30
Antonin Godard
Archana Polampalli
Dan McGregor
Deepak Rathore
Divya Chellam
Erik Lindsten
Guocai He
Gyorgy Sarvari
Hitendra Prajapati
Jan Vermaete
Jiaying Song
Joao Marcos Costa
Kyungjik Min
Lee Chee Yang
Mingli Yu
Peter Marko
Philip Lorenz
Praveen Kumar
Quentin Schulz
Richard Purdie
Steve Sakoman
Vijay Anusuri
Yogita Urade
Youngseok Jeong
Repositories / Downloads for Yocto-4.0.30
poky
Repository Location: https://git.yoctoproject.org/poky
Branch: kirkstone
Tag: yocto-4.0.30
Git Revision: 51dc9c464de0703bfbc6f1ee71ac9bea20933a45
Release Artefact: poky-51dc9c464de0703bfbc6f1ee71ac9bea20933a45
sha: 2b5db0a07598df7684975c0839e6f31515a8e78d366503feb9917ef1ca56c0b2
Download Locations: https://downloads.yoctoproject.org/releases/yocto/yocto-4.0.30/poky-51dc9c464de0703bfbc6f1ee71ac9bea20933a45.tar.bz2 https://mirrors.kernel.org/yocto/yocto/yocto-4.0.30/poky-51dc9c464de0703bfbc6f1ee71ac9bea20933a45.tar.bz2
openembedded-core
Repository Location: https://git.openembedded.org/openembedded-core
Branch: kirkstone
Tag: yocto-4.0.30
Git Revision: d381eeb5e70bd0ce9e78032c909e4a23564f4dd7
Release Artefact: oecore-d381eeb5e70bd0ce9e78032c909e4a23564f4dd7
sha: 022ab4ef5ac59ac3f01a9dacd8b1d6310cc117c6bed2e86e195ced88e0689c85
Download Locations: https://downloads.yoctoproject.org/releases/yocto/yocto-4.0.30/oecore-d381eeb5e70bd0ce9e78032c909e4a23564f4dd7.tar.bz2 https://mirrors.kernel.org/yocto/yocto/yocto-4.0.30/oecore-d381eeb5e70bd0ce9e78032c909e4a23564f4dd7.tar.bz2
meta-mingw
Repository Location: https://git.yoctoproject.org/meta-mingw
Branch: kirkstone
Tag: yocto-4.0.30
Git Revision: 87c22abb1f11be430caf4372e6b833dc7d77564e
Release Artefact: meta-mingw-87c22abb1f11be430caf4372e6b833dc7d77564e
sha: f0bc4873e2e0319fb9d6d6ab9b98eb3f89664d4339a167d2db6a787dd12bc1a8
Download Locations: https://downloads.yoctoproject.org/releases/yocto/yocto-4.0.30/meta-mingw-87c22abb1f11be430caf4372e6b833dc7d77564e.tar.bz2 https://mirrors.kernel.org/yocto/yocto/yocto-4.0.30/meta-mingw-87c22abb1f11be430caf4372e6b833dc7d77564e.tar.bz2
meta-gplv2
Repository Location: https://git.yoctoproject.org/meta-gplv2
Branch: kirkstone
Tag: yocto-4.0.30
Git Revision: d2f8b5cdb285b72a4ed93450f6703ca27aa42e8a
Release Artefact: meta-gplv2-d2f8b5cdb285b72a4ed93450f6703ca27aa42e8a
sha: c386f59f8a672747dc3d0be1d4234b6039273d0e57933eb87caa20f56b9cca6d
Download Locations: https://downloads.yoctoproject.org/releases/yocto/yocto-4.0.30/meta-gplv2-d2f8b5cdb285b72a4ed93450f6703ca27aa42e8a.tar.bz2 https://mirrors.kernel.org/yocto/yocto/yocto-4.0.30/meta-gplv2-d2f8b5cdb285b72a4ed93450f6703ca27aa42e8a.tar.bz2
bitbake
Repository Location: https://git.openembedded.org/bitbake
Branch: 2.0
Tag: yocto-4.0.30
Git Revision: 8e2d1f8de055549b2101614d85454fcd1d0f94b2
Release Artefact: bitbake-8e2d1f8de055549b2101614d85454fcd1d0f94b2
sha: fad4e7699bae62082118e89785324b031b0af0743064caee87c91ba28549afb0
Download Locations: https://downloads.yoctoproject.org/releases/yocto/yocto-4.0.30/bitbake-8e2d1f8de055549b2101614d85454fcd1d0f94b2.tar.bz2 https://mirrors.kernel.org/yocto/yocto/yocto-4.0.30/bitbake-8e2d1f8de055549b2101614d85454fcd1d0f94b2.tar.bz2
meta-yocto
Repository Location: https://git.yoctoproject.org/meta-yocto
Branch: kirkstone
Tag: yocto-4.0.30
Git Revision: edf7950e4d81dd31f29a58acdd8022dabd2be494
yocto-docs
Repository Location: https://git.yoctoproject.org/yocto-docs
Branch: kirkstone
Tag: yocto-4.0.30
Git Revision: 71a3933c609ce73ff07e5be48d9e7b03f22ef8d7
Release notes for Yocto-4.0.31 (Kirkstone)
Security Fixes in Yocto-4.0.31
binutils: Fix CVE-2025-8225, CVE-2025-11081, CVE-2025-11082 and CVE-2025-11083
busybox: Fix CVE-2025-46394
cmake: Fix CVE-2025-9301
curl: Fix CVE-2025-9086
ffmpeg: Ignore CVE-2023-6603
ffmpeg: mark CVE-2023-6601 as Fixed
ghostscript: Fix CVE-2025-59798, CVE-2025-59799 and CVE-2025-59800
git: Fix CVE-2025-48386
glib-networking: Fix CVE-2025-60018 and CVE-2025-60019
go: Fix CVE-2025-47906 and CVE-2025-47907
grub2: Fix CVE-2024-56738
grub: Ignore CVE-2024-2312
gstreamer1.0-plugins-bad: Fix CVE-2025-3887
gstreamer1.0: Ignore CVE-2025-2759, CVE-2025-3887, CVE-2025-47183, CVE-2025-47219, CVE-2025-47806, CVE-2025-47807 and CVE-2025-47808
python3-jinja2: Fix CVE-2024-56201, CVE-2024-56326 and CVE-2025-27516
libxml2: Fix CVE-2025-9714
libxslt: Fix CVE-2025-7424
lz4: Fix CVE-2025-62813
openssl: Fix CVE-2025-9230 and CVE-2025-9232
pulseaudio: Ignore CVE-2024-11586
python3: Fix CVE-2024-6345, CVE-2025-47273 and CVE-2025-59375
qemu: Fix CVE-2024-8354
tiff: Fix CVE-2025-8961, CVE-2025-9165 and CVE-2025-9900
vim: Fix CVE-2025-9389
Fixes in Yocto-4.0.31
build-appliance-image: Update to kirkstone head revision
poky.conf: bump version for 4.0.31
ref-manual/classes.rst: document the relative_symlinks class
ref-manual/classes.rst: gettext: extend the documentation of the class
ref-manual/variables.rst: document the CCACHE_DISABLE, UNINATIVE_CHECKSUM, UNINATIVE_URL, USE_NLS, REQUIRED_COMBINED_FEATURES, REQUIRED_IMAGE_FEATURES, REQUIRED_MACHINE_FEATURES variable
ref-manual/variables.rst: fix LAYERDEPENDS description
dev-manual, test-manual: Update autobuilder output links
ref-manual/classes.rst: extend the uninative class documentation
python3: upgrade to 3.10.19
linux-yocto/5.15: update to v5.15.194
glibc: : PTHREAD_COND_INITIALIZER compatibility with pre-2.41 versions (bug 32786)
glibc: nptl Use all of g1_start and g_signals
glibc: nptl rename __condvar_quiesce_and_switch_g1
glibc: nptl Fix indentation
glibc: nptl Use a single loop in pthread_cond_wait instaed of a nested loop
glibc: Remove g_refs from condition variables
glibc: nptl Remove unnecessary quadruple check in pthread_cond_wait
glibc: nptl Remove unnecessary catch-all-wake in condvar group switch
glibc: nptl Update comments and indentation for new condvar implementation
glibc: pthreads NPTL lost wakeup fix 2
glibc: Remove partial BZ#25847 backport patches
vulnerabilities: update nvdcve file name
migration-guides: add release notes for 4.0.30
oeqa/sdk/cases/buildcpio.py: use gnu mirror instead of main server
selftest/cases/meta_ide.py: use use gnu mirror instead of main server
conf/bitbake.conf: use gnu mirror instead of main server
p11-kit: backport fix for handle USE_NLS from master
systemd: backport fix for handle USE_NLS from master
glibc: stable 2.35 branch updates
openssl: upgrade to 3.0.18
scripts/install-buildtools: Update to 4.0.30
ref-manual/variables.rst: fix the description of STAGING_DIR
ref-manual/structure: document the auto.conf file
dev-manual/building.rst: add note about externalsrc variables absolute paths
ref-manual/variables.rst: fix the description of KBUILD_DEFCONFIG
kernel-dev/common.rst: fix the in-tree defconfig description
test-manual/yocto-project-compatible.rst: fix a typo
contributor-guide: submit-changes: make “Crediting contributors” part of “Commit your changes”
contributor-guide: submit-changes: number instruction list in commit your changes
contributor-guide: submit-changes: reword commit message instructions
contributor-guide: submit-changes: make the Cc tag follow kernel guidelines
contributor-guide: submit-changes: align CC tag description
contributor-guide: submit-changes: clarify example with Yocto bug ID
contributor-guide: submit-changes: fix improper bold string
libhandy: update git branch name
python3-jinja2: upgrade to 3.1.6
vim: upgrade to 9.1.1683
Known Issues in Yocto-4.0.31
N/A
Contributors to Yocto-4.0.31
Adam Blank
Aleksandar Nikolic
Antonin Godard
Archana Polampalli
AshishKumar Mishra
Bruce Ashfield
Deepesh Varatharajan
Divya Chellam
Gyorgy Sarvari
Hitendra Prajapati
João Marcos Costa
Lee Chee Yang
Paul Barker
Peter Marko
Praveen Kumar
Quentin Schulz
Rajeshkumar Ramasamy
Saravanan
Soumya Sambu
Steve Sakoman
Sunil Dora
Talel BELHAJ SALEM
Theo GAIGE
Vijay Anusuri
Yash Shinde
Yogita Urade
Repositories / Downloads for Yocto-4.0.31
yocto-docs
Repository Location: https://git.yoctoproject.org/yocto-docs
Branch: kirkstone
Tag: yocto-4.0.31
Git Revision: 073f3bca4c374b03398317e7f445d2440a287741
Release Artefact: yocto-docs-073f3bca4c374b03398317e7f445d2440a287741
sha: 3bfde9b6ad310dd42817509b67f61cd69552f74b2bc5011bd20788fe96d6823b
Download Locations: https://downloads.yoctoproject.org/releases/yocto/yocto-4.0.31/yocto-docs-073f3bca4c374b03398317e7f445d2440a287741.tar.bz2 https://mirrors.edge.kernel.org/yocto/yocto/yocto-4.0.31/yocto-docs-073f3bca4c374b03398317e7f445d2440a287741.tar.bz2
poky
Repository Location: https://git.yoctoproject.org/poky
Branch: kirkstone
Tag: yocto-4.0.31
Git Revision: 04b39e5b7eb19498215d85c88a5fffb460fea1eb
Release Artefact: poky-04b39e5b7eb19498215d85c88a5fffb460fea1eb
sha: 0ca18ab1ed25c0d77412ba30dbb03d74811756c7c2fe2401940f848a5e734930
Download Locations: https://downloads.yoctoproject.org/releases/yocto/yocto-4.0.31/poky-04b39e5b7eb19498215d85c88a5fffb460fea1eb.tar.bz2 https://mirrors.edge.kernel.org/yocto/yocto/yocto-4.0.31/poky-04b39e5b7eb19498215d85c88a5fffb460fea1eb.tar.bz2
openembedded-core
Repository Location: https://git.openembedded.org/openembedded-core
Branch: kirkstone
Tag: yocto-4.0.31
Git Revision: 99204008786f659ab03538cd2ae2fd23ed4164c5
Release Artefact: oecore-99204008786f659ab03538cd2ae2fd23ed4164c5
sha: aa97bf826ad217b3a5278b4ad60bef4d194f0f1ff617677cf2323d3cc4897687
Download Locations: https://downloads.yoctoproject.org/releases/yocto/yocto-4.0.31/oecore-99204008786f659ab03538cd2ae2fd23ed4164c5.tar.bz2 https://mirrors.edge.kernel.org/yocto/yocto/yocto-4.0.31/oecore-99204008786f659ab03538cd2ae2fd23ed4164c5.tar.bz2
meta-yocto
Repository Location: https://git.yoctoproject.org/meta-yocto
Branch: kirkstone
Tag: yocto-4.0.31
Git Revision: 3b2df00345b46479237fe0218675a818249f891c
Release Artefact: meta-yocto-3b2df00345b46479237fe0218675a818249f891c
sha: 630e99e0f515bab8a316b2e32aff1352b4404f15aa087e8821b84093596a08ce
Download Locations: https://downloads.yoctoproject.org/releases/yocto/yocto-4.0.31/meta-yocto-3b2df00345b46479237fe0218675a818249f891c.tar.bz2 https://mirrors.edge.kernel.org/yocto/yocto/yocto-4.0.31/meta-yocto-3b2df00345b46479237fe0218675a818249f891c.tar.bz2
meta-mingw
Repository Location: https://git.yoctoproject.org/meta-mingw
Branch: kirkstone
Tag: yocto-4.0.31
Git Revision: 87c22abb1f11be430caf4372e6b833dc7d77564e
Release Artefact: meta-mingw-87c22abb1f11be430caf4372e6b833dc7d77564e
sha: f0bc4873e2e0319fb9d6d6ab9b98eb3f89664d4339a167d2db6a787dd12bc1a8
Download Locations: https://downloads.yoctoproject.org/releases/yocto/yocto-4.0.31/meta-mingw-87c22abb1f11be430caf4372e6b833dc7d77564e.tar.bz2 https://mirrors.edge.kernel.org/yocto/yocto/yocto-4.0.31/meta-mingw-87c22abb1f11be430caf4372e6b833dc7d77564e.tar.bz2
meta-gplv2
Repository Location: https://git.yoctoproject.org/meta-gplv2
Branch: kirkstone
Tag: yocto-4.0.31
Git Revision: d2f8b5cdb285b72a4ed93450f6703ca27aa42e8a
Release Artefact: meta-gplv2-d2f8b5cdb285b72a4ed93450f6703ca27aa42e8a
sha: c386f59f8a672747dc3d0be1d4234b6039273d0e57933eb87caa20f56b9cca6d
Download Locations: https://downloads.yoctoproject.org/releases/yocto/yocto-4.0.31/meta-gplv2-d2f8b5cdb285b72a4ed93450f6703ca27aa42e8a.tar.bz2 https://mirrors.edge.kernel.org/yocto/yocto/yocto-4.0.31/meta-gplv2-d2f8b5cdb285b72a4ed93450f6703ca27aa42e8a.tar.bz2
bitbake
Repository Location: https://git.openembedded.org/bitbake
Branch: 2.0
Tag: yocto-4.0.31
Git Revision: 8e2d1f8de055549b2101614d85454fcd1d0f94b2
Release Artefact: bitbake-8e2d1f8de055549b2101614d85454fcd1d0f94b2
sha: fad4e7699bae62082118e89785324b031b0af0743064caee87c91ba28549afb0
Download Locations: https://downloads.yoctoproject.org/releases/yocto/yocto-4.0.31/bitbake-8e2d1f8de055549b2101614d85454fcd1d0f94b2.tar.bz2 https://mirrors.edge.kernel.org/yocto/yocto/yocto-4.0.31/bitbake-8e2d1f8de055549b2101614d85454fcd1d0f94b2.tar.bz2
Release notes for Yocto-4.0.32 (Kirkstone)
Security Fixes in Yocto-4.0.32
bind: Fix CVE-2025-8677, CVE-2025-40778 and CVE-2025-40780
binutils: Fix CVE-2025-11412 and CVE-2025-11413
curl: Ignore CVE-2025-10966
elfutils: Fix CVE-2025-1376 and CVE-2025-1377
gnutls: Fix CVE-2025-9820
go: Fix CVE-2024-24783, CVE-2025-58187, CVE-2025-58189, CVE-2025-61723 and CVE-2025-61724
libarchive: Fix CVE-2025-60753
libarchive: Fix 2 security issue (https://github.com/libarchive/libarchive/pull/2753 and https://github.com/libarchive/libarchive/pull/2768)
libpng: Fix CVE-2025-64505, CVE-2025-64506, CVE-2025-64720, CVE-2025-65018 and CVE-2025-66293
libxml2: Fix CVE-2025-7425
musl: Fix CVE-2025-26519
openssh: Fix CVE-2025-61984 and CVE-2025-61985
python3-idna: Fix CVE-2024-3651
python3-urllib3: Fix CVE-2024-37891
python3: fix CVE-2025-6075
ruby: Fix CVE-2024-35176, CVE-2024-39908 and CVE-2024-41123
rust-cross-canadian: Ignore CVE-2024-43402
u-boot: Fix CVE-2024-42040
wpa-supplicant: Fix CVE-2025-24912
xserver-xorg: Fix CVE-2025-62229, CVE-2025-62230 and CVE-2025-62231
xwayland: Fix CVE-2025-62229, CVE-2025-62230 and CVE-2025-62231
Fixes in Yocto-4.0.32
babeltrace2: fetch with https protocol
bind: upgrade to 9.18.41
build-appliance-image: Update to kirkstone head revision
dev-manual/layers.rst: document “bitbake-layers show-machines”
dev-manual/new-recipe.rst: replace ‘bitbake -e’ with ‘bitbake-getvar’
dev-manual/new-recipe.rst: typo, “whith” -> “which”
dev-manual/new-recipe.rst: update “recipetool -h” output
dev-manual: debugging: use bitbake-getvar in Viewing Variable Values section
documentation: link to the Releases page on yoctoproject.org instead of wiki
efibootmgr: update SRC_URI branch
flac: patch seeking bug
goarch.bbclass: do not leak TUNE_FEATURES into crosssdk task signatures
kernel-dev: add disable config example
kernel-dev: common: migrate bitbake -e to bitbake-getvar
libmicrohttpd: disable experimental code by default
migration-guides: add release notes for 4.0.31
oe-build-perf-report: relax metadata matching rules
overview-manual: migrate to SVG + fix typo
poky.conf: bump version for 4.0.32
python3-urllib3: upgrade to 1.26.20
recipes: Don’t use ftp.gnome.org
ref-manual: variables: migrate the OVERRIDES note to bitbake-getvar
systemd-bootchart: update SRC_URI branch
xf86-video-intel: correct SRC_URI as freedesktop anongit is down
Known Issues in Yocto-4.0.32
N/A
Contributors to Yocto-4.0.32
Thanks to the following people who contributed to this release:
Alexander Kanavin
Archana Polampalli
Divya Chellam
Gyorgy Sarvari
Hitendra Prajapati
Hongxu Jia
Jason Schonberg
Lee Chee Yang
Peter Marko
Praveen Kumar
Quentin Schulz
Richard Purdie
Robert P. J. Day
Ross Burton
Saquib Iltaf
Soumya Sambu
Steve Sakoman
Vijay Anusuri
Walter Werner SCHNEIDER
Repositories / Downloads for Yocto-4.0.32
yocto-docs
Repository Location: https://git.yoctoproject.org/yocto-docs
Branch: kirkstone
Tag: yocto-4.0.32
Git Revision: 4b9df539fa06fb19ed8b51ef2d46e5c56779de81
Release Artefact: yocto-docs-4b9df539fa06fb19ed8b51ef2d46e5c56779de81
sha: 70ee2caf576683c5f31ac5a592cde1c0650ece25cfcd5ff3cc7eedf531575611
Download Locations:
poky
Repository Location: https://git.yoctoproject.org/poky
Branch: kirkstone
Tag: yocto-4.0.32
Git Revision: 2c05660b21c7cc1082aeac8b75d8a2d82e249f63
Release Artefact: poky-2c05660b21c7cc1082aeac8b75d8a2d82e249f63
sha: d7a55a18a597a7b140a81586b7ca6379c208ebbb3285de36c48fde10882947d8
Download Locations:
openembedded-core
Repository Location: https://git.openembedded.org/openembedded-core
Branch: kirkstone
Tag: yocto-4.0.32
Git Revision: 2ed3f8b938579dbbb804e04c45a968cc57761db7
Release Artefact: oecore-2ed3f8b938579dbbb804e04c45a968cc57761db7
sha: 11b9632586dfbf3f0ef69eca2014a8002f25ca8d53cfe9424e27361ba3a20831
Download Locations:
meta-yocto
Repository Location: https://git.yoctoproject.org/meta-yocto
Branch: kirkstone
Tag: yocto-4.0.32
Git Revision: 77b40877c179ea3ce5c37c7ba1831e9c0e289266
Release Artefact: meta-yocto-77b40877c179ea3ce5c37c7ba1831e9c0e289266
sha: e908d42690881cd6e07b9ca18a21eb8761a0ec72d940b12905622e75ba913974
Download Locations:
meta-mingw
Repository Location: https://git.yoctoproject.org/meta-mingw
Branch: kirkstone
Tag: yocto-4.0.32
Git Revision: 87c22abb1f11be430caf4372e6b833dc7d77564e
Release Artefact: meta-mingw-87c22abb1f11be430caf4372e6b833dc7d77564e
sha: f0bc4873e2e0319fb9d6d6ab9b98eb3f89664d4339a167d2db6a787dd12bc1a8
Download Locations:
meta-gplv2
Repository Location: https://git.yoctoproject.org/meta-gplv2
Branch: kirkstone
Tag: yocto-4.0.32
Git Revision: d2f8b5cdb285b72a4ed93450f6703ca27aa42e8a
Release Artefact: meta-gplv2-d2f8b5cdb285b72a4ed93450f6703ca27aa42e8a
sha: c386f59f8a672747dc3d0be1d4234b6039273d0e57933eb87caa20f56b9cca6d
Download Locations:
bitbake
Repository Location: https://git.openembedded.org/bitbake
Branch: 2.0
Tag: yocto-4.0.32
Git Revision: 8e2d1f8de055549b2101614d85454fcd1d0f94b2
Release Artefact: bitbake-8e2d1f8de055549b2101614d85454fcd1d0f94b2
sha: fad4e7699bae62082118e89785324b031b0af0743064caee87c91ba28549afb0
Download Locations:
Release notes for Yocto-4.0.33 (Kirkstone)
Security Fixes in Yocto-4.0.33
binutils: Fix CVE-2025-1181, CVE-2025-11494, CVE-2025-11839 and CVE-2025-11840
cups: Fix CVE-2025-58436 and CVE-2025-61915
curl: Fix CVE-2025-14017, CVE-2025-15079 and CVE-2025-15224
dropbear: Fix CVE-2019-6111
glib-2.0: Fix CVE-2025-13601, CVE-2025-14087 and CVE-2025-14512
gnupg: Fix CVE-2025-68973
go: Fix CVE-2023-39323, CVE-2025-61727 and CVE-2025-61729
go: Fix CVE-2025-58187 (update patch)
grub: Fix CVE-2025-61661, CVE-2025-61662, CVE-2025-61663 and CVE-2025-61664
libarchive: Fix CVE-2025-60753 (update patch)
libpcap: Fix CVE-2025-11961 and CVE-2025-11964
libsoup: fix CVE-2025-12105
libxslt: Fix CVE-2025-11731
python3: Fix CVE-2025-13836
python3-urllib3: Fix CVE-2025-66418
qemu: Fix CVE-2025-12464
qemu: Ignore CVE-2025-54566 and CVE-2025-54567
rsync: Fix CVE-2025-10158
util-linux: Fix CVE-2025-14104
Fixes in Yocto-4.0.33
build-appliance-image: Update to kirkstone head revision
contributor-guide/recipe-style-guide.rst: explain difference between layer and recipe license(s)
cross.bbclass: Propagate dependencies to outhash
cups: allow unknown directives in conf files
docs: Add a new “Security” section
oeqa: Use 2.14 release of cpio instead of 2.13
overview-manual/yp-intro.rst: change removed ECOSYSTEM to ABOUT
overview-manual/yp-intro.rst: fix SDK type in bullet list
overview-manual/yp-intro.rst: link to YP members and participants
overview-manual: convert YP-flow-diagram.png to SVG
poky.conf: Bump version for 4.0.33 release
pseudo: Upgrade to 1.9.2+git125b020dd2
ref-manual/classes.rst: document the image-container class
ref-manual/release-process.rst: add a “Development Cycle” section
ref-manual/svg/releases.svg: mark styhead and walnascar EOL
ref-manual/svg/releases.svg: mark whinlatter as current release
ref-manual/variables.rst: document the CCACHE_TOP_DIR variable
scripts/install-buildtools: Update to 4.0.31
test-manual/ptest.rst: detail the exit code and output requirements
Known Issues in Yocto-4.0.33
N/A
Contributors to Yocto-4.0.33
Aleksandar Nikolic
Antonin Godard
Changqing Li
Deepesh Varatharajan
Hitendra Prajapati
Jiaying Song
Kai Kang
Khem Raj
Libo Chen
Liyin Zhang
Martin Jansa
Mingli Yu
Paul Barker
Peter Marko
Richard Purdie
Robert Yang
Vijay Anusuri
Yash Shinde
Repositories / Downloads for Yocto-4.0.33
yocto-docs
Repository Location: https://git.yoctoproject.org/yocto-docs
Branch: kirkstone
Tag: yocto-4.0.33
Git Revision: 6799b1be5d48f4bf5dcd0b16c2dbc2e297d4ecd9
Release Artefact: yocto-docs-6799b1be5d48f4bf5dcd0b16c2dbc2e297d4ecd9
sha: 42a0eb89c8f87a9a966aecb8265f463486d4383cb67d1e67382ddf9d4d7f88b5
Download Locations:
poky
Repository Location: https://git.yoctoproject.org/poky
Branch: kirkstone
Tag: yocto-4.0.33
Git Revision: ff118ede826a9ae45eb35025a5f7f612880fba01
Release Artefact: poky-ff118ede826a9ae45eb35025a5f7f612880fba01
sha: 2a8c24406fa96fc52728a96f25136a3fd7ee652eea6e12319a6b7c0457ccfdfd
Download Locations:
openembedded-core
Repository Location: https://git.openembedded.org/openembedded-core
Branch: kirkstone
Tag: yocto-4.0.33
Git Revision: 036f76ea35c49a78d612093dcd8eb1fac7ded8d7
Release Artefact: oecore-036f76ea35c49a78d612093dcd8eb1fac7ded8d7
sha: fc180ff224529fd73a7aec4a4cf5beb40fba17646ee694715cf603baba26610c
Download Locations:
meta-yocto
Repository Location: https://git.yoctoproject.org/meta-yocto
Branch: kirkstone
Tag: yocto-4.0.33
Git Revision: 677379f21941363d50f9d946963542b4ccb7e27c
Release Artefact: meta-yocto-677379f21941363d50f9d946963542b4ccb7e27c
sha: 90f52c406f4e69748b8d73eee07b8a1247d19cc29f4893174f110a034b10415f
Download Locations:
meta-mingw
Repository Location: https://git.yoctoproject.org/meta-mingw
Branch: kirkstone
Tag: yocto-4.0.33
Git Revision: 87c22abb1f11be430caf4372e6b833dc7d77564e
Release Artefact: meta-mingw-87c22abb1f11be430caf4372e6b833dc7d77564e
sha: f0bc4873e2e0319fb9d6d6ab9b98eb3f89664d4339a167d2db6a787dd12bc1a8
Download Locations:
meta-gplv2
Repository Location: https://git.yoctoproject.org/meta-gplv2
Branch: kirkstone
Tag: yocto-4.0.33
Git Revision: d2f8b5cdb285b72a4ed93450f6703ca27aa42e8a
Release Artefact: meta-gplv2-d2f8b5cdb285b72a4ed93450f6703ca27aa42e8a
sha: c386f59f8a672747dc3d0be1d4234b6039273d0e57933eb87caa20f56b9cca6d
Download Locations:
bitbake
Repository Location: https://git.openembedded.org/bitbake
Branch: 2.0
Tag: yocto-4.0.33
Git Revision: 8e2d1f8de055549b2101614d85454fcd1d0f94b2
Release Artefact: bitbake-8e2d1f8de055549b2101614d85454fcd1d0f94b2
sha: fad4e7699bae62082118e89785324b031b0af0743064caee87c91ba28549afb0
Download Locations:
Release notes for Yocto-4.0.34 (Kirkstone)
Security Fixes in Yocto-4.0.34
avahi: Fix CVE-2026-24401, CVE-2025-68276, CVE-2025-68468 and CVE-2025-68471
bind: Fix CVE-2025-13878
expat: Fix CVE-2026-24515 and CVE-2026-25210
ffmpeg: Ignore CVE-2025-25468 and CVE-2025-25469
glib-2.0: Fix CVE-2026-0988, CVE-2026-1484, CVE-2026-1485 and CVE-2026-1489
glibc: Fix CVE-2025-15281, CVE-2026-0861 and CVE-2026-0915
harfbuzz: Ignore CVE-2026-22693
inetutils: Fix CVE-2026-24061
libpng: Fix CVE-2026-22695, CVE-2026-22801 and CVE-2026-25646
libtasn1: Fix CVE-2025-13151
libxml2: Fix CVE-2026-0990 and CVE-2026-0992
linux-yocto/5.15: Fix CVE-2022-49465, CVE-2023-54207, CVE-2025-22058, CVE-2025-40040, CVE-2025-40149, CVE-2025-40164, CVE-2025-68211, CVE-2025-68340, CVE-2025-68365, CVE-2025-68725, CVE-2025-68817, CVE-2025-71147, CVE-2025-71154, CVE-2025-71162, CVE-2025-71163, CVE-2026-22976, CVE-2026-22977, CVE-2026-22978, CVE-2026-22980, CVE-2026-22982, CVE-2026-22984, CVE-2026-22990, CVE-2026-22991, CVE-2026-22992, CVE-2026-22997, CVE-2026-22998, CVE-2026-22999, CVE-2026-23060, CVE-2026-23061, CVE-2026-23063, CVE-2026-23064, CVE-2026-23076, CVE-2026-23078, CVE-2026-23080, CVE-2026-23083, CVE-2026-23084, CVE-2026-23085, CVE-2026-23087, CVE-2026-23089, CVE-2026-23090, CVE-2026-23091, CVE-2026-23093, CVE-2026-23095, CVE-2026-23096, CVE-2026-23097, CVE-2026-23119, CVE-2026-23120, CVE-2026-23121, CVE-2026-23124, CVE-2026-23125, CVE-2026-23133, CVE-2026-23146, CVE-2026-23150, CVE-2026-23164, CVE-2026-23167 and CVE-2026-23170
openssl: Fix CVE-2025-15467, CVE-2026-22795, CVE-2026-22796, CVE-2025-68160, CVE-2025-69418, CVE-2025-69419, CVE-2025-69420 and CVE-2025-69421
python3: Fix CVE-2025-12084 and CVE-2025-13837
vim: Ignore CVE-2025-66476
zlib: Ignore CVE-2026-22184
Fixes in Yocto-4.0.34
bind: Upgrade to 9.18.44
build-appliance-image: Update to kirkstone head revision
classes/buildhistory: Do not sign buildhistory commits
dev-manual/packages.rst: fix example recipe version
dev-manual/packages.rst: pr server: fix and explain why r0.X increments on SRCREV change
dev-manual/packages.rst: rename r0.0 to r0 when PR server is not enabled
glibc: stable 2.35 branch updates
linux-yocto/5.15: update to v5.15.199
migration-guides: add release notes for 4.0.32
openssl: upgrade to 3.0.19
poky.conf: Bump version for 4.0.34 release
poky.conf: add fedora-41, debian-12, rocky-8&9 to SANITY_TESTED_DISTROS
pseudo: Update to 1.9.3+git43cbd8fb49
ref-manual/classes.rst: fix broken links to U-Boot documentation
ref-manual/system-requirements.rst: update untested distros
scripts/install-buildtools: Update to 4.0.32
u-boot: move CVE patch out of u-boot-common.inc
what-i-wish-id-known.rst: replace figure by the new SVG
Known Issues in Yocto-4.0.34
N/A
Contributors to Yocto-4.0.34
Aleksandar Nikolic
Amaury Couderc
Ankur Tyagi
Antonin Godard
Bruce Ashfield
Fabio Berton
Hugo SIMELIERE
Lee Chee Yang
Michael Opdenacker
Paul Barker
Peter Marko
Richard Purdie
Scott Murray
Vijay Anusuri
Yoann Congal
Repositories / Downloads for Yocto-4.0.34
yocto-docs
Repository Location: https://git.yoctoproject.org/yocto-docs
Branch: kirkstone
Tag: yocto-4.0.34
Git Revision: 7c348dd67cfd169b1a56bf969606b03dccb76c56
Release Artefact: yocto-docs-7c348dd67cfd169b1a56bf969606b03dccb76c56
sha: 0677fc3aee3c936599f3bcffbe16792494058bd3506ca3ab1697ceac1822829b
Download Locations:
poky
Repository Location: https://git.yoctoproject.org/poky
Branch: kirkstone
Tag: yocto-4.0.34
Git Revision: 8334e82e1d85e50557bd3da64054fc9e3eafc495
Release Artefact: poky-8334e82e1d85e50557bd3da64054fc9e3eafc495
sha: 74fcc57d1dd3bb0c6ef77bfaaeca7504f393e705a55149cf52d4b61981c9c387
Download Locations:
openembedded-core
Repository Location: https://git.openembedded.org/openembedded-core
Branch: kirkstone
Tag: yocto-4.0.34
Git Revision: 7b6c9faa301a6d058ca34e230586f6a81ffa3ffb
Release Artefact: oecore-7b6c9faa301a6d058ca34e230586f6a81ffa3ffb
sha: 375a22e3e229064749e78c80c44cde95adcedd26df76045fccefa3a9d3fa14ad
Download Locations:
meta-yocto
Repository Location: https://git.yoctoproject.org/meta-yocto
Branch: kirkstone
Tag: yocto-4.0.34
Git Revision: 1d3874a383023a5e2433e0fcfd87ac5d1e6d341d
Release Artefact: meta-yocto-1d3874a383023a5e2433e0fcfd87ac5d1e6d341d
sha: baf48bbe1f29686d502c0c6f311c7723b0a18f08e7efbf89c150589102285dbe
Download Locations:
meta-mingw
Repository Location: https://git.yoctoproject.org/meta-mingw
Branch: kirkstone
Tag: yocto-4.0.34
Git Revision: 87c22abb1f11be430caf4372e6b833dc7d77564e
Release Artefact: meta-mingw-87c22abb1f11be430caf4372e6b833dc7d77564e
sha: f0bc4873e2e0319fb9d6d6ab9b98eb3f89664d4339a167d2db6a787dd12bc1a8
Download Locations:
meta-gplv2
Repository Location: https://git.yoctoproject.org/meta-gplv2
Branch: kirkstone
Tag: yocto-4.0.34
Git Revision: d2f8b5cdb285b72a4ed93450f6703ca27aa42e8a
Release Artefact: meta-gplv2-d2f8b5cdb285b72a4ed93450f6703ca27aa42e8a
sha: c386f59f8a672747dc3d0be1d4234b6039273d0e57933eb87caa20f56b9cca6d
Download Locations:
bitbake
Repository Location: https://git.openembedded.org/bitbake
Branch: 2.0
Tag: yocto-4.0.34
Git Revision: 8e2d1f8de055549b2101614d85454fcd1d0f94b2
Release Artefact: bitbake-8e2d1f8de055549b2101614d85454fcd1d0f94b2
sha: fad4e7699bae62082118e89785324b031b0af0743064caee87c91ba28549afb0
Download Locations:
Release notes for Yocto-4.0.35 (Kirkstone)
Security Fixes in Yocto-4.0.35
alsa-lib: Fix CVE-2026-25068
busybox: Fix CVE-2025-60876
curl: Fix CVE-2025-14524, CVE-2026-1965, CVE-2026-3783 and CVE-2026-3784
ffmpeg: Fix CVE-2025-10256
gdk-pixbuf: Fix CVE-2025-6199
inetutils: Fix CVE-2026-28372
libarchive: Fix CVE-2026-4111
libpam: Fix CVE-2024-10963
linux-yocto/5.15: Fix CVE-2025-40082, CVE-2025-68358, CVE-2025-71089, CVE-2025-71220, CVE-2025-71222, CVE-2025-71232, CVE-2025-71233, CVE-2025-71235, CVE-2025-71236, CVE-2025-71237, CVE-2025-71238, CVE-2026-23111, CVE-2026-23112, CVE-2026-23169, CVE-2026-23190, CVE-2026-23193, CVE-2026-23198, CVE-2026-23202, CVE-2026-23206, CVE-2026-23209, CVE-2026-23216, CVE-2026-23221, CVE-2026-23222, CVE-2026-23228, CVE-2026-23229, CVE-2026-23231, CVE-2026-23234, CVE-2026-23235, CVE-2026-23236, CVE-2026-23237 and CVE-2026-23238
ncurses: Fix CVE-2025-69720
python3: Fix CVE-2024-6923, CVE-2025-15282, CVE-2025-59375, CVE-2026-0865, CVE-2026-24515 and CVE-2026-25210
python3-pip: Fix CVE-2026-1703
python3-pyopenssl: Fix CVE-2026-27448 and CVE-2026-27459
sqlite3: Fix CVE-2025-70873
tiff: Fix CVE-2025-61143 and CVE-2025-61144
vim: Fix CVE-2026-25749, CVE-2026-26269, CVE-2026-28418, CVE-2026-28419 and CVE-2026-33412
Fixes in Yocto-4.0.35
bitbake: tests/fetch: Avoid using git protocol in tests
build-appliance-image: Update to kirkstone head revision
contributor-guide/submit-changes.rst: Added missing word
create-pull-request: Keep commit hash to be pulled in cover email
createrepo-c: Fix createrepo-c-native build on GCC14 hosts (e.g. Fedora 41)
gtk+3: fix incompatible-pointer-types errors for native build on Fedora 41
libcomps: Fix libcomps-native build on GCC14 hosts (e.g. Fedora 41)
libpam: re-add missing libgen include
libtheora: set CVE_PRODUCT
linux-yocto/5.15: update to v5.15.201
lsb.py: strip ‘ from os-release file
migration-guide: add release notes for 4.0.33 4.0.34
oeqa/manual: Default to https git protocol for YP/OE repos
oeqa/sdk: Default to https git protocol for YP/OE repos
oeqa/selftest/git-submodule-test: Default to https git protocol for YP/OE repos
overview-manual: escape wildcard in inline markup
poky.conf: Bump version for 4.0.35 release
python3: upgrade to 3.10.20
README.OE-Core: update contributor links and add kirkstone prefix
recipes: Default to https git protocol for YP/OE repos
recipetool: Recognise https://git. as git urls
ref-manual/system-requirements.rst: update end-of-life distros
scripts/install-buildtools: Update to 4.0.34
scripts: Default to https git protocol for YP/OE repos
selftest/scripts: Update old git protocol references
tcl: skip http11 tests
tiff: set status of CVE-2025-61145 as fixed by patch for CVE-2025-8961
tzdata,tzcode-native: Upgrade to 2026a
Known Issues in Yocto-4.0.35
N/A
Contributors to Yocto-4.0.35
Aleksandar Nikolic
Antonin Godard
Bruce Ashfield
Fabien Thomas
Hitendra Prajapati
Jinfeng Wang
Ken Kurematsu
Kristiyan Chakarov
Lee Chee Yang
Martin Jansa
Paul Barker
Peter Marko
Richard Purdie
Ross Burton
Shaik Moin
Vijay Anusuri
Yanis BINARD
Yoann Congal
Repositories / Downloads for Yocto-4.0.35
yocto-docs
Repository Location: https://git.yoctoproject.org/yocto-docs
Branch: kirkstone
Tag: yocto-4.0.35
Git Revision: ce6734c68649739c635675a133fa77edb9865028
Release Artefact: yocto-docs-ce6734c68649739c635675a133fa77edb9865028
sha: ddb6fac4d257f4f76836055cafad529729e99c293d3b8d3dabef926fad5e725f
Download Locations:
poky
Repository Location: https://git.yoctoproject.org/poky
Branch: kirkstone
Tag: yocto-4.0.35
Git Revision: 93431249a6260da7bd29ee3ca32145d89e5b8259
Release Artefact: poky-93431249a6260da7bd29ee3ca32145d89e5b8259
sha: a8e95213248c5400276611754f2c98b8d8972e166bdf41433c45fcdd2bf668cb
Download Locations:
openembedded-core
Repository Location: https://git.openembedded.org/openembedded-core
Branch: kirkstone
Tag: yocto-4.0.35
Git Revision: 51259c7e933a2ac8ebc01604d6e65607b76b7b56
Release Artefact: oecore-51259c7e933a2ac8ebc01604d6e65607b76b7b56
sha: 2cd531e2a107849e7a452e71e41f22b42160979066e10d0661e97acfab125b1f
Download Locations:
meta-yocto
Repository Location: https://git.yoctoproject.org/meta-yocto
Branch: kirkstone
Tag: yocto-4.0.35
Git Revision: 34e3c9a19b8b955116109a2e9528966db3fced37
Release Artefact: meta-yocto-34e3c9a19b8b955116109a2e9528966db3fced37
sha: 18da6dbb745d5e4e42a93527c36751778155e3762728b0b1020b890480402dde
Download Locations:
meta-mingw
Repository Location: https://git.yoctoproject.org/meta-mingw
Branch: kirkstone
Tag: yocto-4.0.35
Git Revision: 87c22abb1f11be430caf4372e6b833dc7d77564e
Release Artefact: meta-mingw-87c22abb1f11be430caf4372e6b833dc7d77564e
sha: f0bc4873e2e0319fb9d6d6ab9b98eb3f89664d4339a167d2db6a787dd12bc1a8
Download Locations:
meta-gplv2
Repository Location: https://git.yoctoproject.org/meta-gplv2
Branch: kirkstone
Tag: yocto-4.0.35
Git Revision: d2f8b5cdb285b72a4ed93450f6703ca27aa42e8a
Release Artefact: meta-gplv2-d2f8b5cdb285b72a4ed93450f6703ca27aa42e8a
sha: c386f59f8a672747dc3d0be1d4234b6039273d0e57933eb87caa20f56b9cca6d
Download Locations:
bitbake
Repository Location: https://git.openembedded.org/bitbake
Branch: 2.0
Tag: yocto-4.0.35
Git Revision: 7fd0197fd5fedd23cc885b5e7e816d86a392fdf9
Release Artefact: bitbake-7fd0197fd5fedd23cc885b5e7e816d86a392fdf9
sha: 6c01ff2b4b0060ef3d6d3f1fc11690094b22865af4989946544d08d74b473ec9
Download Locations:
Release 3.4 (honister)
Migration notes for 3.4 (honister)
This section provides migration information for moving to the Yocto Project 3.4 Release (codename “honister”) from the prior release.
Override syntax changes
In this release, the : character replaces the use of _ to
refer to an override, most commonly when making a conditional assignment
of a variable. This means that an entry like:
SRC_URI_qemux86 = "file://somefile"
now becomes:
SRC_URI:qemux86 = "file://somefile"
since qemux86 is an override. This applies to any use of override
syntax, so the following:
SRC_URI_append = " file://somefile"
SRC_URI_append_qemux86 = " file://somefile2"
SRC_URI_remove_qemux86-64 = "file://somefile3"
SRC_URI_prepend_qemuarm = "file://somefile4 "
FILES_${PN}-ptest = "${bindir}/xyz"
IMAGE_CMD_tar = "tar"
BASE_LIB_tune-cortexa76 = "lib"
SRCREV_pn-bash = "abc"
BB_TASK_NICE_LEVEL_task-testimage = '0'
would now become:
SRC_URI:append = " file://somefile"
SRC_URI:append:qemux86 = " file://somefile2"
SRC_URI:remove:qemux86-64 = "file://somefile3"
SRC_URI:prepend:qemuarm = "file://somefile4 "
FILES:${PN}-ptest = "${bindir}/xyz"
IMAGE_CMD:tar = "tar"
BASE_LIB:tune-cortexa76 = "lib"
SRCREV:pn-bash = "abc"
BB_TASK_NICE_LEVEL:task-testimage = '0'
This also applies to
variable queries to the datastore,
for example using getVar and similar so d.getVar("RDEPENDS_${PN}")
becomes d.getVar("RDEPENDS:${PN}").
Whilst some of these are fairly obvious such as MACHINE and DISTRO
overrides, some are less obvious, for example the packaging variables such as
RDEPENDS, FILES and so on taking package names (e.g. ${PN},
${PN}-ptest) as overrides. These overrides are not always in
OVERRIDES but applied conditionally in specific contexts
such as packaging. task-<taskname> is another context specific override, the
context being specific tasks in that case. Tune overrides are another special
case where some code does use them as overrides but some does not. We plan to try
and make the tune code use overrides more consistently in the future.
There are some variables which do not use override syntax which include the
suffix to variables in layer.conf files such as BBFILE_PATTERN,
SRCREV_xxx where xxx is a name from SRC_URI and
PREFERRED_VERSION_xxx. In particular, layer.conf suffixes
may be the same as a DISTRO override causing some confusion. We do
plan to try and improve consistency as these issues are identified.
To help with migration of layers, a script has been provided in OE-Core. Once configured with the overrides used by a layer, this can be run as:
<oe-core>/scripts/contrib/convert-overrides.py <layerdir>
Note
Please read the notes in the script as it isn’t entirely automatic and it isn’t
expected to handle every case. In particular, it needs to be told which overrides
the layer uses (usually machine and distro names/overrides) and the result should
be carefully checked since it can be a little enthusiastic and will convert
references to _append, _remove and _prepend in function and variable
names.
For reference, this conversion is important as it allows BitBake to more reliably
determine what is an override and what is not, as underscores are also used in
variable names without intending to be overrides. This should allow us to proceed
with other syntax improvements and simplifications for usability. It also means
BitBake no longer has to guess and maintain large lookup lists just in case
e.g. functionname in my_functionname is an override, and thus should improve
efficiency.
New host dependencies
The lz4c, pzstd and zstd commands are now required to be
installed on the build host to support LZ4 and Zstandard compression
functionality. These are typically provided by lz4 and zstd
packages in most Linux distributions. Alternatively they are available
as part of buildtools tarball if your distribution does not provide
them. For more information see
Required Packages for the Build Host.
Removed recipes
The following recipes have been removed in this release:
assimp: problematic from a licensing perspective and no longer needed by anything elseclutter-1.0: legacy component moved to meta-gnomeclutter-gst-3.0: legacy component moved to meta-gnomeclutter-gtk-1.0: legacy component moved to meta-gnomecogl-1.0: legacy component moved to meta-gnomecore-image-clutter: removed along with clutterlinux-yocto: removed version 5.4 recipes (5.14 and 5.10 still provided)mklibs-native: not actively tested and upstream mklibs still requires Python 2mx-1.0: obsolete (last release 2012) and isn’t used by anything in any known layerpackagegroup-core-clutter: removed along with clutter
Removed classes
clutter: moved to meta-gnome along with clutter itselfimage-mklibs: not actively tested and upstream mklibs still requires Python 2meta: no longer useful. Recipes that need to skip installing packages should inherit nopackages instead.
Prelinking disabled by default
Recent tests have shown that prelinking works only when PIE is not enabled (see here and here), and as PIE is both a desirable security feature, and the only configuration provided and tested by the Yocto Project, there is simply no sense in continuing to enable prelink.
There’s also a concern that no one is maintaining the code, and there are open bugs (including this serious one). Given that prelink does intricate address arithmetic and rewriting of binaries the best option is to disable the feature. It is recommended that you consider disabling this feature in your own configuration if it is currently enabled.
Virtual runtime provides
Recipes shouldn’t use the virtual/ string in RPROVIDES and
RDEPENDS — it is confusing because virtual/ has no special
meaning in RPROVIDES and RDEPENDS (unlike in the
corresponding build-time PROVIDES and DEPENDS).
Tune files moved to architecture-specific directories
The tune files found in conf/machine/include have now been moved
into their respective architecture name directories under that same
location; e.g. x86 tune files have moved into an x86 subdirectory,
MIPS tune files have moved into a mips subdirectory, etc.
The ARM tunes have an extra level (armv8a, armv8m, etc.) and
some have been renamed to make them uniform with the rest of the tunes.
See this commit
for reference.
If you have any references to tune files (e.g. in custom machine configuration files) they will need to be updated.
Extensible SDK host extension
For a normal SDK, some layers append to TOOLCHAIN_HOST_TASK unconditionally which is fine, until the eSDK tries to override the variable to its own values. Instead of installing packages specified in this variable it uses native recipes instead — a very different approach. This has led to confusing errors when binaries are added to the SDK but not relocated.
To avoid these issues, a new TOOLCHAIN_HOST_TASK_ESDK variable has been created. If you wish to extend what is installed in the host portion of the eSDK then you will now need to set this variable.
Package/recipe splitting
perl-crosshas been split out from the mainperlrecipe to its ownperlcrossrecipe for maintenance reasons. If you have bbappends for the perl recipe then these may need extending.The
waylandrecipe now packages its binaries in awayland-toolspackage rather than putting them intowayland-dev.Xwayland has been split out of the xserver-xorg tree and thus is now in its own
xwaylandrecipe. If you need Xwayland in your image then you may now need to add it explicitly.The
rpmpackage no longer hasrpm-buildin its RRECOMMENDS; if by chance you still need rpm package building functionality in your image and you have not already done so then you should addrpm-buildto your image explicitly.The Python
statisticsstandard module is now packaged in its ownpython3-statisticspackage instead ofpython3-miscas previously.
Image / SDK generation changes
Recursive dependencies on the do_build task are now disabled when building SDKs. These are generally not needed; in the unlikely event that you do encounter problems then it will probably be as a result of missing explicit dependencies that need to be added.
Errors during “complementary” package installation (e.g. for
*-dbgand*-devpackages) during image construction are no longer ignored. Historically some of these packages had installation problems, that is no longer the case. In the unlikely event that you see errors as a result, you will need to fix the installation/packaging issues.When building an image, only packages that will be used in building the image (i.e. the first entry in PACKAGE_CLASSES) will be produced if multiple package types are enabled (which is not a typical configuration). If in your CI system you need to have the original behaviour, use
bitbake --runall build <target>.The
-licpackage is no longer automatically added to RRECOMMENDS for every other package when LICENSE_CREATE_PACKAGE is set to “1”. If you wish all license packages to be installed corresponding to packages in your image, then you should instead add the newlic-pkgsfeature to IMAGE_FEATURES.
Miscellaneous
Certificates are now properly checked when BitBake fetches sources over HTTPS. If you receive errors as a result for your custom recipes, you will need to use a mirror or address the issue with the operators of the server in question.
avahihas had its GTK+ support disabled by default. If you wish to re-enable it, setAVAHI_GTK = "gtk3"in a bbappend for theavahirecipe or in your custom distro configuration file.Setting the
BUILD_REPRODUCIBLE_BINARIESvariable to “0” no longer uses a strangely old fallback date of April 2011, it instead disables building reproducible binaries as you would logically expect.Setting noexec/nostamp/fakeroot varflags to any value besides “1” will now trigger a warning. These should be either set to “1” to enable, or not set at all to disable.
The previously deprecated
COMPRESS_CMDandCVE_CHECK_CVE_WHITELISTvariables have been removed. Use CONVERSION_CMD andCVE_CHECK_WHITELIST(replaced by CVE_CHECK_IGNORE in version 4.0) respectively instead.The obsolete
oe_machinstallfunction previously provided in the utils class has been removed. For machine-specific installation it is recommended that you use the built-in override support in the fetcher or overrides in general instead.The
-P(--clear-password) option can no longer be used withuseraddandusermodentries in EXTRA_USERS_PARAMS. It was being implemented using a custom patch to theshadowrecipe which clashed with a-Poption that was added upstream inshadowversion 4.9, and in any case is fundamentally insecure. Hardcoded passwords are still supported but they need to be hashed, see examples in EXTRA_USERS_PARAMS.
Release notes for 3.4 (honister)
New Features / Enhancements in 3.4
Linux kernel 5.14, glibc 2.34 and ~280 other recipe upgrades
Switched override character to ‘:’ (replacing ‘_’) for more robust parsing and improved performance — see the above migration guide for help
Rust integrated into core, providing rust support for cross-compilation and SDK
New create-spdx class for creating SPDX SBoM documents
New recipes: cargo, core-image-ptest-all, core-image-ptest-fast, core-image-weston-sdk, erofs-utils, gcompat, gi-docgen, libmicrohttpd, libseccomp, libstd-rs, perlcross, python3-markdown, python3-pyyaml, python3-smartypants, python3-typogrify, rust, rust-cross, rust-cross-canadian, rust-hello-world, rust-llvm, rust-tools-cross-canadian, rustfmt, xwayland
Several optimisations to reduce unnecessary task dependencies for faster builds
seccomp integrated into core, with additional enabling for gnutls, systemd, qemu
New overlayfs class to help generate overlayfs mount units
debuginfod support now enabled by default
Switched several recipes over to using OpenSSL instead of GnuTLS (wpa-supplicant, curl, glib-networking) or disable GnuTLS (cups) by default
Improvements to LTO plugin installation and reproducibility
Architecture-specific enhancements:
glibc: Enable memory tagging for aarch64
testimage: remove aarch64 xorg exclusion
arch-arm*: add better support for gcc march extensions
tune-cortexm*: add support for all Arm Cortex-M processors
tune-cortexr*: add support for all Arm Cortex-R processors
arch-armv4: Allow -march=armv4
qemuarm*: use virtio graphics
baremetal-helloworld: Enable RISC-V 64/32 port
ldconfig-native: Add RISC-V support
qemuriscv: Enable 4 core emulation
Add ARC support in gdb, dpkg, dhcpcd
conf/machine-sdk: Add ppc64 SDK machine
libjpeg-turbo: Handle powerpc64le without Altivec
pixman: Handle PowerPC without Altivec
mesa: enable gallium Intel drivers when building for x86
mesa: enable crocus driver for older Intel graphics
Kernel-related enhancements:
Support zstd-compressed modules and Initramfs images
Allow opt-out of split kernel modules
linux-yocto-dev: base AUTOREV on specified version
kernel-yocto: provide debug / summary information for metadata
kernel-uboot: Handle gzip and lzo compression options
linux-yocto/5.14: added devupstream support
linux-yocto: add vfat to KERNEL_FEATURES when MACHINE_FEATURES include vfat
linux-yocto: enable TYPEC_TCPCI in usbc fragment
Image-related enhancements:
New erofs, erofs-lz4 and erofs-lz4hc image types
New squashfs-zst and cpio.zst image types
New lic-pkgs IMAGE_FEATURES item to install all license packages
Added zsync metadata conversion support
Use xargs to set file timestamps for significant (>90%) do_image speedup
Find .ko.gz and .ko.xz kernel modules as well when determining need to run depmod on an image
Show formatted error messages instead of tracebacks for systemctl errors
No longer ignore installation failures in complementary package installation
Remove ldconfig auxiliary cache when not needed
wic enhancements:
Added erofs filesystem support
Added
--extra-space argumentto leave extra space after last partitionAdded
--no-fstab-updatepart option to allow using the stock fstabbootimg-efi: added Unified Kernel Image option
bootimg-pcbios: use label provided when formatting a DOS partition
SDK-related enhancements:
Enable do_populate_sdk with multilibs
New
SDKPATHINSTALLvariable decouples default install path from built in path to avoid rebuilding nativesdk components on e.g. DISTRO_VERSION changeseSDK: Error if trying to generate an eSDK from a multiconfig
eSDK: introduce TOOLCHAIN_HOST_TASK_ESDK to be used in place of TOOLCHAIN_HOST_TASK to add components to the host part of the eSDK
BitBake enhancements:
New bitbake-getvar helper command to query a variable value (with history)
bitbake-layers: layerindex-fetch: add
--fetchdirparameterbitbake-layers: show-recipes: add skip reason to output
bitbake-diffsigs: sort diff output for consistency
Allow setting upstream for local hash equivalence server
fetch2/s3: allow to use credentials and switch profile from environment variables
fetch2/s3: Add progress handler for S3 cp command
fetch2/npm: Support npm archives with missing search directory mode
fetch2/npmsw: Add support for local tarball and link sources
fetch2/svn: Allow peg-revision functionality to be disabled
fetch2/wget: verify certificates for HTTPS/FTPS by default
fetch2/wget: Enable FTPS
prserv: added read-only mode
prserv: replaced XML RPC with modern asyncrpc implementation
Numerous warning/error message improvements
New PACKAGECONFIG options in btrfs-tools, ccache, coreutils, cups, dbus, elfutils, ffmpeg, findutils, glib-2.0, gstreamer1.0-plugins-bad, gstreamer1.0-plugins-base, libarchive, libnotify, libpsl, man-db, mesa, ovmf, parted, prelink, qemu, rpm, shadow, systemd, tar, vim, weston
u-boot enhancements:
Make SPL suffix configurable
Make
UBOOT_BINARYNAMEconfigurablePackage
extlinux.confseparatelyAllow deploying the u-boot DTB
opensbi: Add support for specifying a device tree
busybox enhancements:
Added tmpdir option into mktemp applet
Support mounting swap via labels
Enable long options for enabled applets
Move tune files to architecture subdirectories
buildstats: log host data on failure separately to task specific file
buildstats: collect “at interval” and “on failure” logs in the same file
Ptest enhancements:
ptest-runner: install script to collect system data on failure
Added ptest support to python3-hypothesis, python3-jinja2, python3-markupsafe
Enhanced ptest support in lttng, util-linux, and others
New leaner ptest image recipes based upon core-image-minimal
scripts/contrib/image-manifest: add new script
Add beginnings of Android target support
devtool upgrade: rebase override-only patches as well
devtool: print a warning on upgrades if PREFERRED_VERSION is set
systemd: set zstd as default compression option
init-manager-systemd: add a weak VIRTUAL-RUNTIME_dev_manager assignment
Add proper unpack dependency for .zst compressed archives
util-linux: build chfn and chsh by default
qemu: use 4 cores in qemu guests
runqemu: decouple bios and kernel options
qemu: add a hint on how to enable CPU render nodes when a suitable GPU is absent
devupstream: Allow support of native class extensions
Prelinking now disabled in default configuration
python3: statistics module moved to its own python3-statistics package
pypi: allow override of PyPI archive name
Allow global override of golang GO_DYNLINK
buildhistory enhancements:
Add option to strip path prefix
Add output file listing package information
Label packages providing per-file dependencies in depends.dot
New gi-docgen class for GNOME library documentation
meson.bbclass: Make the default buildtype “debug” if DEBUG_BUILD is 1
distro_features_check: expand with IMAGE_FEATURES
Add extended packagedata in JSON format
local.conf.sample: Update sstate mirror entry with new hash equivalence setting
poky: Use https in default PREMIRRORS
reproducible_build.bbclass: Enable -Wdate-time
yocto-check-layer: ensure that all layer dependencies are tested too
core-image-multilib-example: base on weston, and not sato
npm.bbclass: Allow nodedir to be overridden by
NPM_NODEDIRcve-extra-exclusions.inc: add exclusion list for intractable CVE’s
license_image.bbclass: Detect broken symlinks
sysstat: make the service start automatically
sanity: Add error check for ‘%’ in build path
sanity: Further improve directory sanity tests
sanity.bbclass: mention
CONNECTIVITY_CHECK_URISin network failure messagetzdata: Allow controlling zoneinfo binary format
oe-time-dd-test.sh: add options and refactor
vim: add option to disable NLS support
zstd: Include pzstd in the build
mirrors.bbclass: provide additional rule for git repo fallbacks
own-mirrors: Add support for s3:// scheme in SOURCE_MIRROR_URL
common-licenses: add missing SPDX licences
Add MAINTAINERS.md file to record subsystem maintainers
Known Issues in 3.4
Build failures have been reported when running on host Linux systems with FIPS enabled (such as RHEL 8.0 with the FIPS mode enabled). For more details please see bug #14609.
Recipe Licenses changes in 3.4
The following corrections have been made to the LICENSE values set by recipes:
acpica: correct LICENSE to “Intel | BSD-3-Clause | GPLv2”
dtc: correct LICENSE to “GPLv2 | BSD-2-Clause”
e2fsprogs: correct LICENSE to “GPLv2 & LGPLv2 & BSD-3-Clause & MIT”
ffmpeg: correct LICENSE to “GPLv2+ & LGPLv2.1+ & ISC & MIT & BSD-2-Clause & BSD-3-Clause & IJG”
flac: correct LICENSE to “GFDL-1.2 & GPLv2+ & LGPLv2.1+ & BSD-3-Clause”
flex: correct LICENSE to “BSD-3-Clause & LGPL-2.0+”
font-util: correct LICENSE to “MIT & MIT-style & BSD-4-Clause & BSD-2-Clause”
glib-2.0: correct LICENSE to “LGPLv2.1+ & BSD-3-Clause & PD”
gobject-introspection: correct LICENSE to “LGPLv2+ & GPLv2+ & MIT” (add MIT license)
hdparm: correct LICENSE to “BSD-2-Clause & GPLv2 & hdparm”
iputils: correct LICENSE to “BSD-3-Clause & GPLv2+”
libcap: correct LICENSE to “BSD-3-Clause | GPLv2”
libevent: correct LICENSE to “BSD-3-Clause & MIT”
libjitterentropy: correct LICENSE to “GPLv2+ | BSD-3-Clause”
libpam: correct LICENSE to “GPLv2+ | BSD-3-Clause”
libwpe: correct LICENSE to “BSD-2-Clause”
libx11-compose-data: correct LICENSE to “MIT & MIT-style & BSD-4-Clause & BSD-2-Clause”
libx11: correct LICENSE to “MIT & MIT-style & BSD-4-Clause & BSD-2-Clause”
libxfont2: correct LICENSE to “MIT & MIT-style & BSD-4-Clause & BSD-2-Clause”
libxfont: correct LICENSE to “MIT & MIT-style & BSD-3-Clause”
lsof: correct LICENSE to reflect that it uses a BSD-like (but not exactly BSD) license (“Spencer-94”)
nfs-utils: correct LICENSE to “MIT & GPLv2+ & BSD-3-Clause”
ovmf: correct license to “BSD-2-Clause-Patent”
ppp: correct LICENSE to “BSD-3-Clause & BSD-3-Clause-Attribution & GPLv2+ & LGPLv2+ & PD”
python3-packaging: correct LICENSE to “Apache-2.0 | BSD-2-Clause”
python-async-test: correct LICENSE to “BSD-3-Clause”
quota: remove BSD license (only BSD licensed part of the code was removed in 4.05)
shadow: correct LICENSE to “BSD-3-Clause | Artistic-1.0”
shadow-sysroot: set LICENSE the same as shadow
sudo: correct LICENSE to “ISC & BSD-3-Clause & BSD-2-Clause & Zlib”
swig: correct LICENSE to “BSD-3-Clause & GPLv3”
valgrind: correct license to “GPLv2 & GPLv2+ & BSD-3-Clause”
webkitgtk: correct LICENSE to “BSD-2-Clause & LGPLv2+”
wpebackend-fdo: correct LICENSE to “BSD-2-Clause”
xinetd: correct LICENSE to reflect that it uses a unique BSD-like (but not exactly BSD) license
Other license-related notes:
When creating recipes for Python software, recipetool will now treat “BSD” as “BSD-3-Clause” for the purposes of setting LICENSE, as that is the most common understanding.
Please be aware that an Initramfs bundled with the kernel using INITRAMFS_IMAGE_BUNDLE should only contain GPLv2-compatible software; this is now mentioned in the documentation.
Security Fixes in 3.4
apr: CVE-2021-35940
aspell: CVE-2019-25051
avahi: CVE-2021-3468, CVE-2021-36217
binutils: CVE-2021-20197
bluez: CVE-2021-3658
busybox: CVE-2021-28831
cairo: CVE-2020-35492
cpio: CVE-2021-38185
expat: CVE-2013-0340
ffmpeg: CVE-2020-20446, CVE-2020-22015, CVE-2020-22021, CVE-2020-22033, CVE-2020-22019, CVE-2021-33815, CVE-2021-38171, CVE-2020-20453
glibc: CVE-2021-33574, CVE-2021-38604
inetutils: CVE-2021-40491
libgcrypt: CVE-2021-40528
linux-yocto/5.10, 5.14: CVE-2021-3653, CVE-2021-3656
lz4: CVE-2021-3520
nettle: CVE-2021-20305
openssl: CVE-2021-3711, CVE-2021-3712
perl: CVE-2021-36770
python3: CVE-2021-29921
python3-pip: CVE-2021-3572
qemu: CVE-2020-27821, CVE-2020-29443, CVE-2020-35517, CVE-2021-3392, CVE-2021-3409, CVE-2021-3416, CVE-2021-3527, CVE-2021-3544, CVE-2021-3545, CVE-2021-3546, CVE-2021-3682, CVE-2021-20181, CVE-2021-20221, CVE-2021-20257, CVE-2021-20263
rpm: CVE-2021-3421, CVE-2021-20271
rsync: CVE-2020-14387
util-linux: CVE-2021-37600
vim: CVE-2021-3770, CVE-2021-3778
wpa-supplicant: CVE-2021-30004
xdg-utils: CVE-2020-27748
xserver-xorg: CVE-2021-3472
Recipe Upgrades in 3.4
acl 2.2.53 -> 2.3.1
acpica 20210105 -> 20210730
alsa-lib 1.2.4 -> 1.2.5.1
alsa-plugins 1.2.2 -> 1.2.5
alsa-tools 1.2.2 -> 1.2.5
alsa-topology-conf 1.2.4 -> 1.2.5.1
alsa-ucm-conf 1.2.4 -> 1.2.5.1
alsa-utils 1.2.4 -> 1.2.5.1
alsa-utils-scripts 1.2.4 -> 1.2.5.1
apt 2.2.2 -> 2.2.4
at 3.2.1 -> 3.2.2
at-spi2-core 2.38.0 -> 2.40.3
autoconf-archive 2019.01.06 -> 2021.02.19
babeltrace2 2.0.3 -> 2.0.4
bash 5.1 -> 5.1.8
bind 9.16.16 -> 9.16.20
binutils 2.36.1 -> 2.37
binutils-cross 2.36.1 -> 2.37
binutils-cross-canadian 2.36.1 -> 2.37
binutils-cross-testsuite 2.36.1 -> 2.37
binutils-crosssdk 2.36.1 -> 2.37
bison 3.7.5 -> 3.7.6
blktrace 1.2.0+gitX -> 1.3.0+gitX
bluez5 5.56 -> 5.61
boost 1.75.0 -> 1.77.0
boost-build-native 4.3.0 -> 4.4.1
btrfs-tools 5.10.1 -> 5.13.1
busybox 1.33.1 -> 1.34.0
busybox-inittab 1.33.0 -> 1.34.0
ccache 4.2 -> 4.4
cmake 3.19.5 -> 3.21.1
cmake-native 3.19.5 -> 3.21.1
connman 1.39 -> 1.40
createrepo-c 0.17.0 -> 0.17.4
cronie 1.5.5 -> 1.5.7
cross-localedef-native 2.33 -> 2.34
cups 2.3.3 -> 2.3.3op2
curl 7.75.0 -> 7.78.0
dbus-glib 0.110 -> 0.112
dejagnu 1.6.2 -> 1.6.3
diffoscope 172 -> 181
diffutils 3.7 -> 3.8
distcc 3.3.5 -> 3.4
dnf 4.6.0 -> 4.8.0
dpkg 1.20.7.1 -> 1.20.9
dtc 1.6.0 -> 1.6.1
e2fsprogs 1.46.1 -> 1.46.4
elfutils 0.183 -> 0.185
ell 0.38 -> 0.43
enchant2 2.2.15 -> 2.3.1
epiphany 3.38.2 -> 40.3
ethtool 5.10 -> 5.13
expat 2.2.10 -> 2.4.1
ffmpeg 4.3.2 -> 4.4
file 5.39 -> 5.40
freetype 2.10.4 -> 2.11.0
gcc 10.2.0 -> 11.2.0
gcc-cross 10.2.0 -> 11.2.0
gcc-cross-canadian 10.2.0 -> 11.2.0
gcc-crosssdk 10.2.0 -> 11.2.0
gcc-runtime 10.2.0 -> 11.2.0
gcc-sanitizers 10.2.0 -> 11.2.0
gcc-source 10.2.0 -> 11.2.0
gcr 3.38.1 -> 3.40.0
gdb 10.1 -> 10.2
gdb-cross 10.1 -> 10.2
gdb-cross-canadian 10.1 -> 10.2
gdk-pixbuf 2.40.0 -> 2.42.6
ghostscript 9.53.3 -> 9.54.0
git 2.31.1 -> 2.33.0
glib-2.0 2.66.7 -> 2.68.4
glib-networking 2.66.0 -> 2.68.2
glibc 2.33 -> 2.34
glibc-locale 2.33 -> 2.34
glibc-mtrace 2.33 -> 2.34
glibc-scripts 2.33 -> 2.34
glibc-testsuite 2.33 -> 2.34
glslang 11.2.0 -> 11.5.0
gnome-desktop-testing 2018.1 -> 2021.1
gnu-config 20210125+gitX -> 20210722+gitX
gnu-efi 3.0.12 -> 3.0.14
gnupg 2.2.27 -> 2.3.1
gobject-introspection 1.66.1 -> 1.68.0
gpgme 1.15.1 -> 1.16.0
gptfdisk 1.0.7 -> 1.0.8
grep 3.6 -> 3.7
grub 2.04+2.06~rc1 -> 2.06
grub-efi 2.04+2.06~rc1 -> 2.06
gsettings-desktop-schemas 3.38.0 -> 40.0
gtk+3 3.24.25 -> 3.24.30
harfbuzz 2.7.4 -> 2.9.0
hdparm 9.60 -> 9.62
help2man 1.48.2 -> 1.48.4
hwlatdetect 1.10 -> 2.1
i2c-tools 4.2 -> 4.3
icu 68.2 -> 69.1
igt-gpu-tools 1.25+gitX -> 1.26
inetutils 2.0 -> 2.1
iproute2 5.11.0 -> 5.13.0
iputils s20200821 -> 20210722
json-glib 1.6.2 -> 1.6.4
kexec-tools 2.0.21 -> 2.0.22
kmod 28 -> 29
kmod-native 28 -> 29
less 563 -> 590
libassuan 2.5.4 -> 2.5.5
libcap 2.48 -> 2.51
libcgroup 0.41 -> 2.0
libcomps 0.1.15 -> 0.1.17
libconvert-asn1-perl 0.27 -> 0.31
libdazzle 3.38.0 -> 3.40.0
libdnf 0.58.0 -> 0.63.1
libdrm 2.4.104 -> 2.4.107
libedit 20210216-3.1 -> 20210714-3.1
libepoxy 1.5.5 -> 1.5.9
liberation-fonts 2.00.1 -> 2.1.4
libffi 3.3 -> 3.4.2
libfm 1.3.1 -> 1.3.2
libgcc 10.2.0 -> 11.2.0
libgcc-initial 10.2.0 -> 11.2.0
libgcrypt 1.9.3 -> 1.9.4
libgfortran 10.2.0 -> 11.2.0
libgit2 1.1.0 -> 1.1.1
libglu 9.0.1 -> 9.0.2
libgpg-error 1.41 -> 1.42
libgudev 234 -> 237
libhandy 1.2.0 -> 1.2.3
libical 3.0.9 -> 3.0.10
libidn2 2.3.0 -> 2.3.2
libinput 1.16.4 -> 1.18.1
libjitterentropy 3.0.1 -> 3.1.0
libjpeg-turbo 2.0.6 -> 2.1.1
libksba 1.5.0 -> 1.6.0
libmodulemd 2.12.0 -> 2.13.0
libnsl2 1.3.0 -> 2.0.0
libnss-mdns 0.14.1 -> 0.15.1
libogg 1.3.4 -> 1.3.5
libpcap 1.10.0 -> 1.10.1
libpcre 8.44 -> 8.45
libpcre2 10.36 -> 10.37
libportal 0.3 -> 0.4
librepo 1.13.0 -> 1.14.1
libsdl2 2.0.14 -> 2.0.16
libsolv 0.7.17 -> 0.7.19
libtasn1 4.16.0 -> 4.17.0
libtest-needs-perl 0.002006 -> 0.002009
libtirpc 1.3.1 -> 1.3.2
libubootenv 0.3.1 -> 0.3.2
libucontext 0.10+X -> 1.1+X
liburcu 0.12.2 -> 0.13.0
libuv 1.41.0 -> 1.42.0
libva 2.10.0 -> 2.12.0
libva-initial 2.10.0 -> 2.12.0
libva-utils 2.10.0 -> 2.12.0
libwebp 1.2.0 -> 1.2.1
libwpe 1.8.0 -> 1.10.1
libx11 1.7.0 -> 1.7.2
libxcrypt 4.4.18 -> 4.4.25
libxcrypt-compat 4.4.18 -> 4.4.25
libxfixes 5.0.3 -> 6.0.0
libxfont2 2.0.4 -> 2.0.5
libxft 2.3.3 -> 2.3.4
libxi 1.7.10 -> 1.7.99.2
libxkbcommon 1.0.3 -> 1.3.0
libxml2 2.9.10 -> 2.9.12
libxres 1.2.0 -> 1.2.1
linux-libc-headers 5.10 -> 5.14
linux-yocto 5.4.144+gitX, 5.10.63+gitX -> 5.10.70+gitX, 5.14.9+gitX
linux-yocto-dev 5.12++gitX -> 5.15++gitX
linux-yocto-rt 5.4.144+gitX, 5.10.63+gitX -> 5.10.70+gitX, 5.14.9+gitX
linux-yocto-tiny 5.4.144+gitX, 5.10.63+gitX -> 5.10.70+gitX, 5.14.9+gitX
llvm 11.1.0 -> 12.0.1
log4cplus 2.0.6 -> 2.0.7
logrotate 3.18.0 -> 3.18.1
ltp 20210121 -> 20210524
lttng-modules 2.12.6 -> 2.13.0
lttng-tools 2.12.4 -> 2.13.0
lttng-ust 2.12.1 -> 2.13.0
m4 1.4.18 -> 1.4.19
m4-native 1.4.18 -> 1.4.19
man-pages 5.10 -> 5.12
mc 4.8.26 -> 4.8.27
mesa 21.0.3 -> 21.2.1
mesa-gl 21.0.3 -> 21.2.1
meson 0.57.1 -> 0.58.1
mmc-utils 0.1+gitX (73d6c59af8d1…) -> 0.1+gitX (43282e80e174…)
mobile-broadband-provider-info 20201225 -> 20210805
mpg123 1.26.4 -> 1.28.2
mtd-utils 2.1.2 -> 2.1.3
mtools 4.0.26 -> 4.0.35
musl 1.2.2+gitX (e5d2823631bb…) -> 1.2.2+gitX (3f701faace7a…)
nativesdk-meson 0.57.1 -> 0.58.1
netbase 6.2 -> 6.3
nfs-utils 2.5.3 -> 2.5.4
ofono 1.31 -> 1.32
openssh 8.5p1 -> 8.7p1
opkg 0.4.4 -> 0.4.5
opkg-utils 0.4.3 -> 0.4.5
ovmf edk2-stable202102 -> edk2-stable202105
p11-kit 0.23.22 -> 0.24.0
pango 1.48.2 -> 1.48.9
patchelf 0.12 -> 0.13
perl 5.32.1 -> 5.34.0
piglit 1.0+gitrX (d4d9353b7290…) -> 1.0+gitrX (6a4be9e9946d…)
pkgconf 1.7.3 -> 1.8.0
powertop 2.13 -> 2.14
pseudo 1.9.0+gitX (b988b0a6b8af…) -> 1.9.0+gitX (0cda3ba5f94a…)
pulseaudio 14.2 -> 15.0
puzzles 0.0+gitX (84cb4c6701e0…) -> 0.0+gitX (8f3413c31ffd…)
python3 3.9.5 -> 3.9.6
python3-attrs 20.3.0 -> 21.2.0
python3-cython 0.29.22 -> 0.29.24
python3-dbus 1.2.16 -> 1.2.18
python3-dbusmock 0.22.0 -> 0.23.1
python3-docutils 0.16 -> 0.17.1
python3-git 3.1.14 -> 3.1.20
python3-gitdb 4.0.5 -> 4.0.7
python3-hypothesis 6.2.0 -> 6.15.0
python3-importlib-metadata 3.4.0 -> 4.6.4
python3-iniparse 0.4 -> 0.5
python3-jinja2 2.11.3 -> 3.0.1
python3-libarchive-c 2.9 -> 3.1
python3-magic 0.4.22 -> 0.4.24
python3-mako 1.1.4 -> 1.1.5
python3-markupsafe 1.1.1 -> 2.0.1
python3-more-itertools 8.7.0 -> 8.8.0
python3-numpy 1.20.1 -> 1.21.2
python3-packaging 20.9 -> 21.0
python3-pathlib2 2.3.5 -> 2.3.6
python3-pbr 5.4.4 -> 5.6.0
python3-pip 20.0.2 -> 21.2.4
python3-pluggy 0.13.1 -> 1.0.0
python3-pycairo 1.20.0 -> 1.20.1
python3-pygments 2.8.1 -> 2.10.0
python3-pygobject 3.38.0 -> 3.40.1
python3-pytest 6.2.2 -> 6.2.4
python3-scons 3.1.2 -> 4.2.0
python3-scons-native 3.1.2 -> 4.2.0
python3-setuptools 54.1.1 -> 57.4.0
python3-setuptools-scm 5.0.1 -> 6.0.1
python3-six 1.15.0 -> 1.16.0
python3-sortedcontainers 2.3.0 -> 2.4.0
python3-testtools 2.4.0 -> 2.5.0
python3-zipp 3.4.1 -> 3.5.0
qemu 5.2.0 -> 6.0.0
qemu-native 5.2.0 -> 6.0.0
qemu-system-native 5.2.0 -> 6.0.0
re2c 2.0.3 -> 2.2
rng-tools 6.11 -> 6.14
rpcbind 1.2.5 -> 1.2.6
rt-tests 1.10 -> 2.1
ruby 3.0.1 -> 3.0.2
rxvt-unicode 9.22 -> 9.26
shaderc 2020.5 -> 2021.1
shadow 4.8.1 -> 4.9
spirv-tools 2020.7 -> 2021.2
sqlite3 3.35.0 -> 3.36.0
squashfs-tools 4.4 -> 4.5
strace 5.11 -> 5.14
stress-ng 0.12.05 -> 0.13.00
sudo 1.9.6p1 -> 1.9.7p2
swig 3.0.12 -> 4.0.2
sysklogd 2.2.2 -> 2.2.3
systemd 247.6 -> 249.3
systemd-boot 247.6 -> 249.3
systemd-conf 247.6 -> 1.0
systemtap 4.4 -> 4.5
systemtap-native 4.4 -> 4.5
systemtap-uprobes 4.4 -> 4.5
tcf-agent 1.7.0+gitX (a022ef2f1acf…) -> 1.7.0+gitX (2735e3d6b7ec…)
texinfo 6.7 -> 6.8
tiff 4.2.0 -> 4.3.0
u-boot 2021.01 -> 2021.07
u-boot-tools 2021.01 -> 2021.07
usbutils 013 -> 014
util-linux 2.36.2 -> 2.37.2
util-linux-libuuid 2.36.2 -> 2.37.2
vala 0.50.4 -> 0.52.5
valgrind 3.16.1 -> 3.17.0
virglrenderer 0.8.2 -> 0.9.1
vte 0.62.2 -> 0.64.2
vulkan-headers 1.2.170.0 -> 1.2.182.0
vulkan-loader 1.2.170.0 -> 1.2.182.0
vulkan-samples git (55cebd9e7cc4…) -> git (d2187278cb66…)
vulkan-tools 1.2.170.0 -> 1.2.182.0
wayland-protocols 1.20 -> 1.21
webkitgtk 2.30.5 -> 2.32.3
wireless-regdb 2021.04.21 -> 2021.07.14
wpebackend-fdo 1.8.0 -> 1.10.0
x264 r3039+gitX (544c61f08219…) -> r3039+gitX (5db6aa6cab1b…)
xeyes 1.1.2 -> 1.2.0
xf86-input-libinput 0.30.0 -> 1.1.0
xkbcomp 1.4.4 -> 1.4.5
xkeyboard-config 2.32 -> 2.33
xorgproto 2020.1 -> 2021.4.99.2
xserver-xorg 1.20.10 -> 1.20.13
zstd 1.4.9 -> 1.5.0
Contributors to 3.4
Thanks to the following people who contributed to this release:
Adam Romanek
Alejandro Hernandez Samaniego
Alexander Kanavin
Alexandre Belloni
Alexey Brodkin
Alex Stewart
Alistair Francis
Anatol Belski
Anders Wallin
Andrea Adami
Andreas Müller
Andrej Valek
Andres Beltran
Andrey Zhizhikin
Anibal Limon
Anthony Bagwell
Anton Blanchard
Anuj Mittal
Armin Kuster
Asfak Rahman
Bastian Krause
Bernhard Rosenkränzer
Bruce Ashfield
Carlos Rafael Giani
Chandana kalluri
Changhyeok Bae
Changqing Li
Chanho Park
Chen Qi
Chris Laplante
Christophe Chapuis
Christoph Muellner
Claudius Heine
Damian Wrobel
Daniel Ammann
Daniel Gomez
Daniel McGregor
Daniel Wagenknecht
Denys Dmytriyenko
Devendra Tewari
Diego Sueiro
Dmitry Baryshkov
Douglas Royds
Dragos-Marian Panait
Drew Moseley
Enrico Scholz
Fabio Berton
Florian Amstutz
Gavin Li
Guillaume Champagne
Harald Brinkmann
Henning Schild
He Zhe
Hongxu Jia
Hsia-Jun (Randy) Li
Jean Bouchard
Joe Slater
Jonas Höppner
Jon Mason
Jose Quaresma
Joshua Watt
Justin Bronder
Kai Kang
Kenfe-Mickael Laventure
Kevin Hao
Khairul Rohaizzat Jamaluddin
Khem Raj
Kiran Surendran
Konrad Weihmann
Kristian Klausen
Kyle Russell
Lee Chee Yang
Lei Maohui
Luca Boccassi
Marco Felsch
Marcus Comstedt
Marek Vasut
Mark Hatle
Markus Volk
Marta Rybczynska
Martin Jansa
Matthias Klein
Matthias Schiffer
Matt Madison
Matt Spencer
Max Krummenacher
Michael Halstead
Michael Ho
Michael Opdenacker
Mike Crowe
Mikko Rapeli
Ming Liu
Mingli Yu
Minjae Kim
Nicolas Dechesne
Niels Avonds
Nikolay Papenkov
Nisha Parrakat
Olaf Mandel
Oleksandr Kravchuk
Oleksandr Popovych
Oliver Kranz
Otavio Salvador
Patrick Williams
Paul Barker
Paul Eggleton
Paul Gortmaker
Paulo Cesar Zaneti
Peter Bergin
Peter Budny
Peter Kjellerstedt
Petr Vorel
Przemyslaw Gorszkowski
Purushottam Choudhary
Qiang Zhang
Quentin Schulz
Ralph Siemsen
Randy MacLeod
Ranjitsinh Rathod
Rasmus Villemoes
Reto Schneider
Richard Purdie
Richard Weinberger
Robert Joslyn
Robert P. J. Day
Robert Yang
Romain Naour
Ross Burton
Sakib Sajal
Samuli Piippo
Saul Wold
Scott Murray
Scott Weaver
Stefan Ghinea
Stefan Herbrechtsmeier
Stefano Babic
Stefan Wiehler
Steve Sakoman
Teoh Jay Shen
Thomas Perrot
Tim Orling
Tom Pollard
Tom Rini
Tony Battersby
Tony Tascioglu
Trevor Gamblin
Trevor Woerner
Ulrich Ölmann
Valentin Danaila
Vinay Kumar
Vineela Tummalapalli
Vinícius Ossanes Aquino
Vivien Didelot
Vyacheslav Yurkov
Wang Mingyu
Wes Lindauer
William A. Kennington III
Yanfei Xu
Yann Dirson
Yi Fan Yu
Yi Zhao
Zang Ruochen
Zheng Ruoqin
Zoltan Boszormenyi
Repositories / Downloads for 3.4
poky
Repository Location: https://git.yoctoproject.org/poky
Branch: honister
Tag: yocto-3.4
Git Revision: f6d1126fff213460dc6954a5d5fc168606d76b66
Release Artefact: poky-f6d1126fff213460dc6954a5d5fc168606d76b66
sha: 11e8f5760f704eed1ac37a5b09b1a831b5254d66459be75b06a72128c63e0411
Download Locations: http://downloads.yoctoproject.org/releases/yocto/yocto-3.4/poky-f6d1126fff213460dc6954a5d5fc168606d76b66.tar.bz2, http://mirrors.kernel.org/yocto/yocto/yocto-3.4/poky-f6d1126fff213460dc6954a5d5fc168606d76b66.tar.bz2
openembedded-core
Repository Location: https://git.openembedded.org/openembedded-core
Branch: honister
Tag: 2021-10-honister
Git Revision: bb1dea6806f084364b6017db2567f438e805aef0
Release Artefact: oecore-bb1dea6806f084364b6017db2567f438e805aef0
sha: 9a356c407c567b1c26e535cad235204b0462cb79321fefb0844324a6020b31f4
Download Locations: http://downloads.yoctoproject.org/releases/yocto/yocto-3.4/oecore-bb1dea6806f084364b6017db2567f438e805aef0.tar.bz2, http://mirrors.kernel.org/yocto/yocto/yocto-3.4/oecore-bb1dea6806f084364b6017db2567f438e805aef0.tar.bz2
meta-mingw
Repository Location: https://git.yoctoproject.org/meta-mingw
Branch: honister
Tag: yocto-3.4
Git Revision: f5d761cbd5c957e4405c5d40b0c236d263c916a8
Release Artefact: meta-mingw-f5d761cbd5c957e4405c5d40b0c236d263c916a8
sha: d4305d638ef80948584526c8ca386a8cf77933dffb8a3b8da98d26a5c40fcc11
Download Locations: http://downloads.yoctoproject.org/releases/yocto/yocto-3.4/meta-mingw-f5d761cbd5c957e4405c5d40b0c236d263c916a8.tar.bz2, http://mirrors.kernel.org/yocto/yocto/yocto-3.4/meta-mingw-f5d761cbd5c957e4405c5d40b0c236d263c916a8.tar.bz2
meta-intel
Repository Location: https://git.yoctoproject.org/meta-intel
Branch: honister
Tag: yocto-3.4
Git Revision: 90170cf85fe35b4e8dc00eee50053c0205276b63
Release Artefact: meta-intel-90170cf85fe35b4e8dc00eee50053c0205276b63
sha: 2b3b43386dfcaaa880d819c1ae88b1251b55fb12c622af3d0936c3dc338491fc
Download Locations: http://downloads.yoctoproject.org/releases/yocto/yocto-3.4/meta-intel-90170cf85fe35b4e8dc00eee50053c0205276b63.tar.bz2, http://mirrors.kernel.org/yocto/yocto/yocto-3.4/meta-intel-90170cf85fe35b4e8dc00eee50053c0205276b63.tar.bz2
meta-gplv2
Repository Location: https://git.yoctoproject.org/meta-gplv2
Branch: honister
Tag: yocto-3.4
Git Revision: f04e4369bf9dd3385165281b9fa2ed1043b0e400
Release Artefact: meta-gplv2-f04e4369bf9dd3385165281b9fa2ed1043b0e400
sha: ef8e2b1ec1fb43dbee4ff6990ac736315c7bc2d8c8e79249e1d337558657d3fe
Download Locations: http://downloads.yoctoproject.org/releases/yocto/yocto-3.4/meta-gplv2-f04e4369bf9dd3385165281b9fa2ed1043b0e400.tar.bz2, http://mirrors.kernel.org/yocto/yocto/yocto-3.4/meta-gplv2-f04e4369bf9dd3385165281b9fa2ed1043b0e400.tar.bz2
bitbake
Repository Location: https://git.openembedded.org/bitbake
Branch: 1.52
Tag: 2021-10-honister
Git Revision: c78ebac71ec976fdf27ea24767057882870f5c60
Release Artefact: bitbake-c78ebac71ec976fdf27ea24767057882870f5c60
sha: 8077c7e7528cd73ef488ef74de3943ec66cae361459e5b630fb3cbe89c498d3d
Download Locations: http://downloads.yoctoproject.org/releases/yocto/yocto-3.4/bitbake-c78ebac71ec976fdf27ea24767057882870f5c60.tar.bz2, http://mirrors.kernel.org/yocto/yocto/yocto-3.4/bitbake-c78ebac71ec976fdf27ea24767057882870f5c60.tar.bz2
yocto-docs
Repository Location: https://git.yoctoproject.org/yocto-docs
Branch: honister
Tag: yocto-3.4
Git Revision: d75c5450ecf56c8ac799a633ee9ac459e88f91fc
Release notes for 3.4.1 (honister)
Known Issues in 3.4.1
Security Fixes in 3.4.1
glibc: Backport fix for CVE-2021-43396
vim: add patch number to CVE-2021-3778 patch
vim: fix CVE-2021-3796, CVE-2021-3872, and CVE-2021-3875
squashfs-tools: follow-up fix for CVE-2021-41072
avahi: update CVE id fixed by local-ping.patch
squashfs-tools: fix CVE-2021-41072
ffmpeg: fix CVE-2021-38114
curl: fix CVE-2021-22945, CVE-2021-22946 and CVE-2021-22947
Fixes in 3.4.1
bitbake.conf: Fix corruption of GNOME mirror url
bitbake.conf: Use wayland distro feature for native builds
bitbake: Revert “parse/ast: Show errors for append/prepend/remove operators combined with +=/.=”
bitbake: bitbake-worker: Add debug when unpickle fails
bitbake: cooker: Fix task-depends.dot for multiconfig targets
bitbake: cooker: Handle parse threads disappearing to avoid hangs
bitbake: cooker: Handle parsing results queue race
bitbake: cooker: Remove debug code, oops :(
bitbake: cooker: check if upstream hash equivalence server is available
bitbake: fetch/git: Handle github dropping git:// support
bitbake: fetch/wget: Add timeout for checkstatus calls (30s)
bitbake: fetch2/perforce: Fix typo
bitbake: fetch2: Fix url remap issue and add testcase
bitbake: fetch2: fix downloadfilename issue with premirror
bitbake: fetch: Handle mirror user/password replacements correctly
bitbake: parse/ast: Show errors for append/prepend/remove operators combined with +=/.=
bitbake: runqueue: Fix runall option handling
bitbake: runqueue: Fix runall option task deletion ordering issue
bitbake: test/fetch: Update urls to match upstream branch name changes
bitbake: tests/fetch.py: add test case to ensure downloadfilename is used for premirror
bitbake: tests/fetch.py: fix premirror test cases
bitbake: tests/fetch: Update github urls
bitbake: tests/fetch: Update pcre.org address after github changes
bitbake: tests/runqueue: Ensure hashserv exits before deleting files
bitbake: utils: Handle lockfile filenames that are too long for filesystems
bootchart2: Don’t compile Python modules
build-appliance-image: Update to honister head revision
buildhistory: Fix package output files for SDKs
busybox: 1.34.0 -> 1.34.1
ca-certificates: update 20210119 -> 20211016
classes/populate_sdk_base: Add setscene tasks
conf: update for release 3.4
convert-srcuri.py: use regex to check space in SRC_URI
create-spdx: Fix key errors in do_create_runtime_spdx
create-spdx: Protect against None from LICENSE_PATH
create-spdx: Set the Organization field via a variable
create-spdx: add create_annotation function
create-spdx: cross recipes are native also
create_spdx: ensure is_work_shared() is unique
cups: Fix missing installation of cups sysv init scripts
docs: poky.yaml: updates for 3.4
dpkg: Install dkpg-perl scripts to versioned perl directory
glibc-version.inc: remove branch= from GLIBC_GIT_URI
go-helloworld/glide: Fix urls
go.bbclass: Allow adding parameters to go ldflags
go: upgrade 1.16.7 -> 1.16.8
gst-devtools: 1.18.4 -> 1.18.5
gst-examples: 1.18.4 -> 1.18.5
gstreamer1.0-libav: 1.18.4 -> 1.18.5
gstreamer1.0-omx: 1.18.4 -> 1.18.5
gstreamer1.0-plugins-bad: 1.18.4 -> 1.18.5
gstreamer1.0-plugins-base: 1.18.4 -> 1.18.5
gstreamer1.0-plugins-good: 1.18.4 -> 1.18.5
gstreamer1.0-plugins-ugly: 1.18.4 -> 1.18.5
gstreamer1.0-python: 1.18.4 -> 1.18.5
gstreamer1.0-rtsp-server: 1.18.4 -> 1.18.5
gstreamer1.0-vaapi: 1.18.4 -> 1.18.5
gstreamer1.0: 1.18.4 -> 1.18.5
insane.bbclass: Add a check for directories that are expected to be empty
kernel-devsrc: Add vdso.lds and other build files for riscv64 as well
libnewt: Use python3targetconfig to fix reproducibility issue
libpcre/libpcre2: correct SRC_URI
libx11-compose-data: Update LICENSE to better reflect reality
libx11: Update LICENSE to better reflect reality
libxml2: Use python3targetconfig to fix reproducibility issue
linunistring: Add missing gperf-native dependency
linux-firmware: upgrade to 20211027
linux-yocto-dev: Ensure DEPENDS matches recent 5.14 kernel changes
linux-yocto-rt/5.10: update to -rt54
linux-yocto/5.10: update to v5.10.78
linux-yocto/5.14: common-pc: enable CONFIG_ATA_PIIX as built-in
linux-yocto/5.14: update to v5.14.17
linux-yocto: add libmpc-native to DEPENDS
lttng-tools: replace ad hoc ptest fixup with upstream fixes
manuals: releases.rst: move gatesgarth to outdated releases section
mesa: Enable svga for x86 only
mesa: upgrade 21.2.1 -> 21.2.4
meson.bblcass: Remove empty egg-info directories before running meson
meson: install native file in sdk
meson: move lang args to the right section
meson: set objcopy in the cross and native toolchain files
meta/scripts: Manual git url branch additions
meta: Add explict branch to git SRC_URIs
migration-3.4: add additional migration info
migration-3.4: add some extra packaging notes
migration-3.4: tweak overrides change section
migration: tweak introduction section
mirrors: Add kernel.org sources mirror for downloads.yoctoproject.org
mirrors: Add uninative mirror on kernel.org
nativesdk-packagegroup-sdk-host.bb: Update host tools for wayland
oeqa/runtime/parselogs: modified drm error in common errors list
oeqa/selftest/sstatetests: fix typo ware -> were
oeqa: Update cleanup code to wait for hashserv exit
opkg: Fix poor operator combination choice
ovmf: update 202105 -> 202108
patch.bbclass: when the patch fails show more info on the fatal error
poky.conf: bump version for 3.4.1 honister release
poky.yaml: add lz4 and zstd to essential host packages
poky.yaml: fix lz4 package name for older Ubuntu versions
pseudo: Add fcntl64 wrapper
python3-setuptools: _distutils/sysconfig fix
python3: update to 3.9.7
qemu.inc: Remove empty egg-info directories before running meson
recipes: Update github.com urls to use https
ref-manual: Update how to set a useradd password
ref-manual: document “reproducible_build” class and SOURCE_DATE_EPOCH
ref-manual: document BUILD_REPRODUCIBLE_BINARIES
ref-manual: document TOOLCHAIN_HOST_TASK_ESDK
ref-manual: remove meta class
ref-manual: update system requirements
releases.rst: fix release number for 3.3.3
scripts/convert-srcuri: Update SRC_URI conversion script to handle github url changes
scripts/lib/wic/help.py: Update Fedora Kickstart URLs
scripts/oe-package-browser: Fix after overrides change
scripts/oe-package-browser: Handle no packages being built
spdx.py: Add annotation to relationship
sstate: Account for reserved characters when shortening sstate filenames
sstate: another fix for touching files inside pseudo
sstate: fix touching files inside pseudo
staging: Fix autoconf-native rebuild failure
strace: fix build against 5.15 kernel/kernel-headers
strace: show test suite log on failure
stress-ng: convert to git, website is down
systemd: add missing include for musl
tar: filter CVEs using vendor name
test-manual: how to enable reproducible builds
testimage: fix unclosed testdata file
tzdata: update 2021d to 2021d
uninative: Add version to uninative tarball name
waffle: convert to git, website is down
wayland: Fix wayland-tools packaging
wireless-regdb: upgrade 2021.07.14 -> 2021.08.28
wpa-supplicant: Match package override to PACKAGES for pkg_postinst
Contributors to 3.4.1
Ahmed Hossam
Alexander Kanavin
Alexandre Belloni
Andrej Valek
Andres Beltran
Anuj Mittal
Bruce Ashfield
Chen Qi
Claus Stovgaard
Daiane Angolini
Hsia-Jun(Randy) Li
Jon Mason
Jose Quaresma
Joshua Watt
Kai Kang
Khem Raj
Kiran Surendran
Manuel Leonhardt
Michael Opdenacker
Oleksandr Kravchuk
Pablo Saavedra
Paul Eggleton
Peter Kjellerstedt
Quentin Schulz
Ralph Siemsen
Randy Li
Richard Purdie
Ross Burton
Sakib Sajal
Saul Wold
Teoh Jay Shen
Tim Orling
Tom Hochstein
Yureka
Repositories / Downloads for 3.4.1
poky
Repository Location: https://git.yoctoproject.org/poky
Branch: honister
Tag: yocto-3.4.1
Git Revision: b53230c08d9f02ecaf35b4f0b70512abbf10ae11
Release Artefact: poky-b53230c08d9f02ecaf35b4f0b70512abbf10ae11
sha: 57d49e2afafb555baf65643acf752464f0eb7842b964713a5de7530c392de159
Download Locations: http://downloads.yoctoproject.org/releases/yocto/yocto-3.4.1/poky-b53230c08d9f02ecaf35b4f0b70512abbf10ae11.tar.bz2, http://mirrors.kernel.org/yocto/yocto/yocto-3.4.1/poky-b53230c08d9f02ecaf35b4f0b70512abbf10ae11.tar.bz2
meta-mingw
Repository Location: https://git.yoctoproject.org/meta-mingw
Branch: honister
Tag: yocto-3.4.1
Git Revision: f5d761cbd5c957e4405c5d40b0c236d263c916a8
Release Artefact: meta-mingw-f5d761cbd5c957e4405c5d40b0c236d263c916a8
sha: d4305d638ef80948584526c8ca386a8cf77933dffb8a3b8da98d26a5c40fcc11
Download Locations: http://downloads.yoctoproject.org/releases/yocto/yocto-3.4.1/meta-mingw-f5d761cbd5c957e4405c5d40b0c236d263c916a8.tar.bz2, http://mirrors.kernel.org/yocto/yocto/yocto-3.4.1/meta-mingw-f5d761cbd5c957e4405c5d40b0c236d263c916a8.tar.bz2
meta-gplv2
Repository Location: https://git.yoctoproject.org/meta-gplv2
Branch: honister
Tag: yocto-3.4.1
Git Revision: f04e4369bf9dd3385165281b9fa2ed1043b0e400
Release Artefact: meta-gplv2-f04e4369bf9dd3385165281b9fa2ed1043b0e400
sha: ef8e2b1ec1fb43dbee4ff6990ac736315c7bc2d8c8e79249e1d337558657d3fe
Download Locations: http://downloads.yoctoproject.org/releases/yocto/yocto-3.4/meta-gplv2-f04e4369bf9dd3385165281b9fa2ed1043b0e400.tar.bz2, http://mirrors.kernel.org/yocto/yocto/yocto-3.4/meta-gplv2-f04e4369bf9dd3385165281b9fa2ed1043b0e400.tar.bz2
bitbake
Repository Location: https://git.openembedded.org/bitbake
Branch: 1.52
Tag: yocto-3.4.1
Git Revision: 44a83b373e1fc34c93cd4a6c6cf8b73b230c1520
Release Artefact: bitbake-44a83b373e1fc34c93cd4a6c6cf8b73b230c1520
sha: 03d50c1318d88d62eb01d359412ea5a8014ef506266629a2bd43ab3a2ef19430
Download Locations: http://downloads.yoctoproject.org/releases/yocto/yocto-3.4.1/bitbake-44a83b373e1fc34c93cd4a6c6cf8b73b230c1520.tar.bz2, http://mirrors.kernel.org/yocto/yocto/yocto-3.4.1/bitbake-44a83b373e1fc34c93cd4a6c6cf8b73b230c1520.tar.bz2
yocto-docs
Repository Location: https://git.yoctoproject.org/yocto-docs
Branch: honister
Tag: yocto-3.4.1
Git Revision: b250eda5a0beba8acc9641c55a5b0e30594b5178
Release notes for 3.4.2 (honister)
Security Fixes in 3.4.2
tiff: backport fix for CVE-2022-22844
glibc : Fix CVE-2021-3999
glibc : Fix CVE-2021-3998
glibc : Fix CVE-2022-23219
glibc : Fix CVE-2022-23218
lighttpd: backport a fix for CVE-2022-22707
speex: fix CVE-2020-23903
linux-yocto/5.10: amdgpu: updates for CVE-2021-42327
libsndfile1: fix CVE-2021-4156
xserver-xorg: whitelist two CVEs
grub2: fix CVE-2021-3981
xserver-xorg: update CVE_PRODUCT
binutils: CVE-2021-42574
gcc: Fix CVE-2021-42574
gcc: Fix CVE-2021-35465
cve-extra-exclusions: add db CVEs to exclusion list
gcc: Add CVE-2021-37322 to the list of CVEs to ignore
bind: fix CVE-2021-25219
openssh: fix CVE-2021-41617
ncurses: fix CVE-2021-39537
vim: fix CVE-2021-3968 and CVE-2021-3973
vim: fix CVE-2021-3927 and CVE-2021-3928
gmp: fix CVE-2021-43618
Fixes in 3.4.2
build-appliance-image: Update to honister head revision
poky.conf: bump version for 3.4.2 release
libxml2: Backport python3-lxml workaround patch
core-image-sato-sdk: allocate more memory when in qemu
vim: upgrade to patch 4269
vim: update to include latest CVE fixes
expat: upgrade to 2.4.4
libusb1: correct SRC_URI
yocto-check-layer: add debug output for the layers that were found
linux-firmware: Add CLM blob to linux-firmware-bcm4373 package
linux-yocto/5.10: update to v5.10.93
icu: fix make_icudata dependencies
sstate: Improve failure to obtain archive message/handling
insane.bbclass: Correct package_qa_check_empty_dirs()
sstate: A third fix for for touching files inside pseudo
kernel: introduce python3-dtschema-wrapper
vim: upgrade to 8.2 patch 3752
bootchart2: Add missing python3-math dependency
socat: update SRC_URI
pigz: fix one failure of command “unpigz -l”
linux-yocto/5.14: update genericx86* machines to v5.14.21
linux-yocto/5.10: update genericx86* machines to v5.10.87
go: upgrade 1.16.10 -> 1.16.13
linux-yocto/5.10/cfg: add kcov feature fragment
linux-yocto/5.14: fix arm 32bit -rt warnings
oeqa/sstate: Fix allarch samesigs test
rootfs-postcommands.bbclass: Make two comments use the new variable syntax
cve-check: add lockfile to task
lib/oe/reproducible: correctly set .git location when recursively looking for git repos
epiphany: Update 40.3 -> 40.6
scripts/buildhistory-diff: drop use of distutils
scripts: Update to use exec_module() instead of load_module()
vulkan-loader: inherit pkgconfig
webkitgtk: Add reproducibility fix
openssl: Add reproducibility fix
rpm: remove tmp folder created during install
package_manager: ipk: Fix host manifest generation
bitbake: utils: Update to use exec_module() instead of load_module()
linux-yocto: add libmpc-native to DEPENDS
ref-manual: fix patch documentation
bitbake: tests/fetch: Drop gnu urls from wget connectivity test
bitbake: fetch: npm: Use temporary file for empty user config
bitbake: fetch: npm: Quote destdir in run chmod command
bitbake: process: Do not mix stderr with stdout
xserver-xorg: upgrade 1.20.13 -> 1.20.14
python3-pyelftools: Depend on debugger, pprint
linux-firmware: upgrade 20211027 -> 20211216
oeqa/selftest/bbtests: Use YP sources mirror instead of GNU
systemd: Fix systemd-journal-gateway user/groups
license.bbclass: implement ast.NodeVisitor.visit_Constant
oe/license: implement ast.NodeVisitor.visit_Constant
packagedata.py: silence a DeprecationWarning
uboot-sign: fix the concatenation when multiple U-BOOT configurations are specified
runqemu: check the qemu PID has been set before kill()ing it
selftest/devtool: Check branch in git fetch
recipetool: Set master branch only as fallback
kern-tools: bug fixes and kgit-gconfig
linux-yocto-rt/5.10: update to -rt56
linux-yocto/5.14: update to v5.14.21
python3: upgrade 3.9.7 -> 3.9.9
bitbake: lib/pyinotify.py: Remove deprecated module asyncore
updates for recent releases
libdrm: upgrade 2.4.108 -> 2.4.109
patch.py: Initialize git repo before patching
boost: Fix build on arches with no atomics
boost: allow searching for python310
recipetool: extend curl detection when creating recipes
recipetool: handle GitLab URLs like we do GitHub
README.OE-Core.md: update URLs
libtool: change the default AR_FLAGS from “cru” to “cr”
libtool: Update patchset to match those submitted upstream
scripts/checklayer/common.py: Fixed a minor grammatical error
oeqa/parselogs: Fix quoting
oeqa/utils/dump: Fix typo
systemd: update 249.6 -> 249.7
glibc: Fix i586/c3 support
wic: support rootdev identified by partition label
buildhistory: Fix srcrevs output
classes/crate-fetch: Ensure crate fetcher is available
rootfs-postcommands: update systemd_create_users
classes/meson: Add optional rust definitions
rust-cross: Replace TARGET_ARCH with TUNE_PKGARCH
maintainers.inc: fix up rust-cross entry
rust-cross: Fix directory not deleted for race glibc vs. musl
wic: use shutil.which
bitbake: data_smart.py: Skip old override syntax checking for anonymous functions
documentation: conf.py: fix version of bitbake objects.inv
updates for release 3.3.4
Contributors to 3.4.2
Alexander Kanavin
Alexandre Belloni
Anton Mikanovich
Anuj Mittal
Bruce Ashfield
Carlos Rafael Giani
Chaitanya Vadrevu
Changqing Li
Dhruva Gole
Florian Amstutz
Joshua Watt
Kai Kang
Khairul Rohaizzat Jamaluddin
Khem Raj
Konrad Weihmann
Kory Maincent
Li Wang
Marek Vasut
Markus Volk
Martin Jansa
Max Krummenacher
Michael Opdenacker
Mingli Yu
Oleksiy Obitotskyy
Pavel Zhukov
Peter Kjellerstedt
Pgowda
Quentin Schulz
Richard Purdie
Robert Yang
Ross Burton
Rudolf J Streif
Sakib Sajal
Samuli Piippo
Schmidt, Adriaan
Stefan Herbrechtsmeier
Steve Sakoman
Sundeep KOKKONDA
Teoh Jay Shen
Thomas Perrot
Tim Orling
Vyacheslav Yurkov
Yongxin Liu
pgowda
Wang Mingyu
Repositories / Downloads for 3.4.2
poky
Repository Location: https://git.yoctoproject.org/poky
Branch: honister
Tag: yocto-3.4.2
Git Revision: e0ab08bb6a32916b457d221021e7f402ffa36b1a
Release Artefact: poky-e0ab08bb6a32916b457d221021e7f402ffa36b1a
sha: 8580dc5067ee426fe347a0d0f7a74c29ba539120bbe8438332339a9c8bce00fd
Download Locations: http://downloads.yoctoproject.org/releases/yocto/yocto-3.4.2/poky-e0ab08bb6a32916b457d221021e7f402ffa36b1a.tar.bz2, http://mirrors.kernel.org/yocto/yocto/yocto-3.4.2/poky-e0ab08bb6a32916b457d221021e7f402ffa36b1a.tar.bz2
openembedded-core
Repository Location: https://git.openembedded.org/openembedded-core
Branch: honister
Tag: yocto-3.4.2
Git Revision: 418a9c4c31615a9e3e011fc2b21fb7154bc6c93a
Release Artefact: oecore-418a9c4c31615a9e3e011fc2b21fb7154bc6c93a
sha: f2ca94a5a7ec669d4c208d1729930dfc1b917846dbb2393d01d6d5856fcbc6de
Download Locations: http://downloads.yoctoproject.org/releases/yocto/yocto-3.4.2/oecore-418a9c4c31615a9e3e011fc2b21fb7154bc6c93a.tar.bz2, http://mirrors.kernel.org/yocto/yocto/yocto-3.4.2/oecore-418a9c4c31615a9e3e011fc2b21fb7154bc6c93a.tar.bz2
meta-mingw
Repository Location: https://git.yoctoproject.org/meta-mingw
Branch: honister
Tag: yocto-3.4.2
Git Revision: f5d761cbd5c957e4405c5d40b0c236d263c916a8
Release Artefact: meta-mingw-f5d761cbd5c957e4405c5d40b0c236d263c916a8
sha: d4305d638ef80948584526c8ca386a8cf77933dffb8a3b8da98d26a5c40fcc11
Download Locations: http://downloads.yoctoproject.org/releases/yocto/yocto-3.4.2/meta-mingw-f5d761cbd5c957e4405c5d40b0c236d263c916a8.tar.bz2, http://mirrors.kernel.org/yocto/yocto/yocto-3.4.2/meta-mingw-f5d761cbd5c957e4405c5d40b0c236d263c916a8.tar.bz2
meta-gplv2
Repository Location: https://git.yoctoproject.org/meta-gplv2
Branch: honister
Tag: yocto-3.4.2
Git Revision: f04e4369bf9dd3385165281b9fa2ed1043b0e400
Release Artefact: meta-gplv2-f04e4369bf9dd3385165281b9fa2ed1043b0e400
sha: ef8e2b1ec1fb43dbee4ff6990ac736315c7bc2d8c8e79249e1d337558657d3fe
Download Locations: http://downloads.yoctoproject.org/releases/yocto/yocto-3.4.2/meta-gplv2-f04e4369bf9dd3385165281b9fa2ed1043b0e400.tar.bz2, http://mirrors.kernel.org/yocto/yocto/yocto-3.4.2/meta-gplv2-f04e4369bf9dd3385165281b9fa2ed1043b0e400.tar.bz2
bitbake
Repository Location: https://git.openembedded.org/bitbake
Branch: 1.52
Tag: yocto-3.4.2
Git Revision: c039182c79e2ccc54fff5d7f4f266340014ca6e0
Release Artefact: bitbake-c039182c79e2ccc54fff5d7f4f266340014ca6e0
sha: bd80297f8d8aa40cbcc8a3d4e23a5223454b305350adf34cd29b5fb65c1b4c52
Download Locations: http://downloads.yoctoproject.org/releases/yocto/yocto-3.4.2/bitbake-c039182c79e2ccc54fff5d7f4f266340014ca6e0.tar.bz2, http://mirrors.kernel.org/yocto/yocto/yocto-3.4.2/bitbake-c039182c79e2ccc54fff5d7f4f266340014ca6e0.tar.bz2
yocto-docs
Repository Location: https://git.yoctoproject.org/yocto-docs
Branch: honister
Tag: yocto-3.4.2
Git Revision: 3061d3d62054a5c3b9e16bfce4bcd186fa7a23d2
Release notes for 3.4.3 (honister)
Security Fixes in 3.4.3
ghostscript: fix CVE-2021-3781
ghostscript: fix CVE-2021-45949
tiff: Add backports for two CVEs from upstream (CVE-2022-0561 & CVE-2022-0562)
gcc : Fix CVE-2021-46195
virglrenderer: fix CVE-2022-0135 and CVE-2022-0175
binutils: Add fix for CVE-2021-45078
Fixes in 3.4.3
Revert “cve-check: add lockfile to task”
asciidoc: update git repository
bitbake: build: Tweak exception handling for setscene tasks
bitbake: contrib: Fix hash server Dockerfile dependencies
bitbake: cooker: Improve parsing failure from handled exception usability
bitbake: data_smart: Fix overrides file/line message additions
bitbake: fetch2: ssh: username and password are optional
bitbake: tests/fetch: Handle upstream master -> main branch change
bitbake: utils: Ensure shell function failure in python logging is correct
build-appliance-image: Update to honister head revision
build-appliance-image: Update to honister head revision
coreutils: remove obsolete ignored CVE list
crate-fetch: fix setscene failures
cups: Add –with-dbusdir to EXTRA_OECONF for deterministic build
cve-check: create directory of CVE_CHECK_MANIFEST before copy
cve-check: get_cve_info should open the database read-only
default-distrovars.inc: Switch connectivity check to a yoctoproject.org page
depmodwrapper-cross: add config directory option
devtool: deploy-target: Remove stripped binaries in pseudo context
devtool: explicitly set main or master branches in upgrades when available
docs: fix hardcoded link warning messages
documentation: conf.py: update for 3.4.2
documentation: prepare for 3.4.3 release
expat: Upgrade to 2.4.7
gcc-target: fix glob to remove gcc-<version> binary
gcsections: add nativesdk-cairo to exclude list
go: update to 1.16.15
gst-devtools: 1.18.5 -> 1.18.6
gst-examples: 1.18.5 -> 1.18.6
gstreamer1.0-libav: 1.18.5 -> 1.18.6
gstreamer1.0-omx: 1.18.5 -> 1.18.6
gstreamer1.0-plugins-bad: 1.18.5 -> 1.18.6
gstreamer1.0-plugins-base: 1.18.5 -> 1.18.6
gstreamer1.0-plugins-good: 1.18.5 -> 1.18.6
gstreamer1.0-plugins-ugly: 1.18.5 -> 1.18.6
gstreamer1.0-python: 1.18.5 -> 1.18.6
gstreamer1.0-rtsp-server: 1.18.5 -> 1.18.6
gstreamer1.0-vaapi: 1.18.5 -> 1.18.6
gstreamer1.0: 1.18.5 -> 1.18.6
harfbuzz: upgrade 2.9.0 -> 2.9.1
initramfs-framework: unmount automounts before switch_root
kernel-devsrc: do not copy Module.symvers file during install
libarchive : update to 3.5.3
libpcap: Disable DPDK explicitly
libxml-parser-perl: Add missing RDEPENDS
linux-firmware: upgrade 20211216 -> 20220209
linux-yocto/5.10: Fix ramoops/ftrace
linux-yocto/5.10: features/zram: remove CONFIG_ZRAM_DEF_COMP
linux-yocto/5.10: fix dssall build error with binutils 2.3.8
linux-yocto/5.10: ppc/riscv: fix build with binutils 2.3.8
linux-yocto/5.10: update genericx86* machines to v5.10.99
linux-yocto/5.10: update to v5.10.103
mc: fix build if ncurses have been configured without wide characters
oeqa/buildtools: Switch to our webserver instead of example.com
patch.py: Prevent git repo reinitialization
perl: Improve and update module RPDEPENDS
poky.conf: bump version for 3.4.3 honister release
qemuboot: Fix build error if UNINATIVE_LOADER is unset
quilt: Disable external sendmail for deterministic build
recipetool: Fix circular reference in SRC_URI
releases: update to include 3.3.5
releases: update to include 3.4.2
rootfs-postcommands: amend systemd_create_users add user to group check
ruby: update 3.0.2 -> 3.0.3
scripts/runqemu-ifdown: Don’t treat the last iptables command as special
sdk: fix search for dynamic loader
selftest: recipetool: Correct the URI for socat
sstate: inside the threadedpool don’t write to the shared localdata
uninative: Upgrade to 3.5
util-linux: upgrade to 2.37.4
vim: Update to 8.2.4524 for further CVE fixes
wic: Use custom kernel path if provided
wireless-regdb: upgrade 2021.08.28 -> 2022.02.18
zip: modify when match.S is built
Contributors to 3.4.3
Alexander Kanavin
Anuj Mittal
Bill Pittman
Bruce Ashfield
Chee Yang Lee
Christian Eggers
Daniel Gomez
Daniel Müller
Daniel Wagenknecht
Florian Amstutz
Joe Slater
Jose Quaresma
Justin Bronder
Lee Chee Yang
Michael Halstead
Michael Opdenacker
Oleksandr Ocheretnyi
Oleksandr Suvorov
Pavel Zhukov
Peter Kjellerstedt
Richard Purdie
Robert Yang
Ross Burton
Sakib Sajal
Saul Wold
Sean Anderson
Stefan Herbrechtsmeier
Tamizharasan Kumar
Tean Cunningham
Zoltán Böszörményi
pgowda
Wang Mingyu
Repositories / Downloads for 3.4.3
poky
Repository Location: https://git.yoctoproject.org/poky
Branch: honister
Tag: yocto-3.4.3
Git Revision: ee68ae307fd951b9de6b31dc6713ea29186b7749
Release Artefact: poky-ee68ae307fd951b9de6b31dc6713ea29186b7749
sha: 92c3d73c3e74f0e1d5c2ab2836ce3a3accbe47772cea70df3755845e0db1379b
Download Locations: http://downloads.yoctoproject.org/releases/yocto/yocto-3.4.3/poky-ee68ae307fd951b9de6b31dc6713ea29186b7749.tar.bz2, http://mirrors.kernel.org/yocto/yocto/yocto-3.4.3/poky-ee68ae307fd951b9de6b31dc6713ea29186b7749.tar.bz2
openembedded-core
Repository Location: https://git.openembedded.org/openembedded-core
Branch: honister
Tag: yocto-3.4.3
Git Revision: ebca8f3ac9372b7ebb3d39e8f7f930b63b481448
Release Artefact: oecore-ebca8f3ac9372b7ebb3d39e8f7f930b63b481448
sha: f28e503f6f6c0bcd9192dbd528f8e3c7bcea504c089117e0094d9a4f315f4b9f
Download Locations: http://downloads.yoctoproject.org/releases/yocto/yocto-3.4.3/oecore-ebca8f3ac9372b7ebb3d39e8f7f930b63b481448.tar.bz2, http://mirrors.kernel.org/yocto/yocto/yocto-3.4.3/oecore-ebca8f3ac9372b7ebb3d39e8f7f930b63b481448.tar.bz2
meta-mingw
Repository Location: https://git.yoctoproject.org/meta-mingw
Branch: honister
Tag: yocto-3.4.3
Git Revision: f5d761cbd5c957e4405c5d40b0c236d263c916a8
Release Artefact: meta-mingw-f5d761cbd5c957e4405c5d40b0c236d263c916a8
sha: d4305d638ef80948584526c8ca386a8cf77933dffb8a3b8da98d26a5c40fcc11
Download Locations: http://downloads.yoctoproject.org/releases/yocto/yocto-3.4.3/meta-mingw-f5d761cbd5c957e4405c5d40b0c236d263c916a8.tar.bz2, http://mirrors.kernel.org/yocto/yocto/yocto-3.4.3/meta-mingw-f5d761cbd5c957e4405c5d40b0c236d263c916a8.tar.bz2
meta-gplv2
Repository Location: https://git.yoctoproject.org/meta-gplv2
Branch: honister
Tag: yocto-3.4.3
Git Revision: f04e4369bf9dd3385165281b9fa2ed1043b0e400
Release Artefact: meta-gplv2-f04e4369bf9dd3385165281b9fa2ed1043b0e400
sha: ef8e2b1ec1fb43dbee4ff6990ac736315c7bc2d8c8e79249e1d337558657d3fe
Download Locations: http://downloads.yoctoproject.org/releases/yocto/yocto-3.4.3/meta-gplv2-f04e4369bf9dd3385165281b9fa2ed1043b0e400.tar.bz2, http://mirrors.kernel.org/yocto/yocto/yocto-3.4.3/meta-gplv2-f04e4369bf9dd3385165281b9fa2ed1043b0e400.tar.bz2
bitbake
Repository Location: https://git.openembedded.org/bitbake
Branch: 1.52
Tag: yocto-3.4.3
Git Revision: 43dcb2b2a2b95a5c959be57bca94fb7190ea6257
Release Artefact: bitbake-43dcb2b2a2b95a5c959be57bca94fb7190ea6257
sha: 92497ff97fed81dcc6d3e202969fb63ca983a8f5d9d91cafc6aee88312f79cf9
Download Locations: http://downloads.yoctoproject.org/releases/yocto/yocto-3.4.3/bitbake-43dcb2b2a2b95a5c959be57bca94fb7190ea6257.tar.bz2, http://mirrors.kernel.org/yocto/yocto/yocto-3.4.3/bitbake-43dcb2b2a2b95a5c959be57bca94fb7190ea6257.tar.bz2
yocto-docs
Repository Location: https://git.yoctoproject.org/yocto-docs
Branch: honister
Tag: yocto-3.4.3
Git Revision: 15f46f97d9cad558c19fc1dc19cfbe3720271d04
Release notes for 3.4.4 (honister)
Security Fixes in 3.4.4
tiff: fix CVE-2022-0865, CVE-2022-0891, CVE-2022-0907, CVE-2022-0908, CVE-2022-0909 and CVE-2022-0924
xz: fix CVE-2022-1271
unzip: fix CVE-2021-4217
zlib: fix CVE-2018-25032
grub: ignore CVE-2021-46705
Fixes in 3.4.4
alsa-tools: Ensure we install correctly
bitbake.conf: mark all directories as safe for git to read
bitbake: knotty: display active tasks when printing keepAlive() message
bitbake: knotty: reduce keep-alive timeout from 5000s (83 minutes) to 10 minutes
bitbake: server/process: Disable gc around critical section
bitbake: server/xmlrpcserver: Add missing xmlrpcclient import
bitbake: toaster: Fix IMAGE_INSTALL issues with _append vs :append
bitbake: toaster: fixtures replace gatesgarth
build-appliance-image: Update to honister head revision
conf.py/poky.yaml: Move version information to poky.yaml and read in conf.py
conf/machine: fix QEMU x86 sound options
devupstream: fix handling of SRC_URI
documentation: update for 3.4.4 release
externalsrc/devtool: Fix to work with fixed export funcition flags handling
gmp: add missing COPYINGv3
gnu-config: update SRC_URI
libxml2: fix CVE-2022-23308 regression
libxml2: move to gitlab.gnome.org
libxml2: update to 2.9.13
libxshmfence: Correct LICENSE to HPND
license_image.bbclass: close package.manifest file
linux-firmware: correct license for ar3k firmware
linux-firmware: upgrade 20220310 -> 20220411
linux-yocto-rt/5.10: update to -rt61
linux-yocto/5.10: cfg/debug: add configs for kcsan
linux-yocto/5.10: split vtpm for more granular inclusion
linux-yocto/5.10: update to v5.10.109
linux-yocto: nohz_full boot arg fix
oe-pkgdata-util: Adapt to the new variable override syntax
oeqa/selftest/devtool: ensure Git username is set before upgrade tests
poky.conf: bump version for 3.4.4 release
pseudo: Add patch to workaround paths with crazy lengths
pseudo: Fix handling of absolute links
sanity: Add warning for local hasheqiv server with remote sstate mirrors
scripts/runqemu: Fix memory limits for qemux86-64
shadow-native: Simplify and fix syslog disable patch
tiff: Add marker for CVE-2022-1056 being fixed
toaster: Fix broken overrides usage
u-boot: Inherit pkgconfig
uninative: Upgrade to 3.6 with gcc 12 support
vim: Upgrade 8.2.4524 -> 8.2.4681
virglrenderer: update SRC_URI
webkitgtk: update to 2.32.4
wireless-regdb: upgrade 2022.02.18 -> 2022.04.08
Known Issues
There were a couple of known autobuilder intermittent bugs that occurred during release testing but these are not regressions in the release.
Contributors to 3.4.4
Alexandre Belloni
Anuj Mittal
Bruce Ashfield
Chee Yang Lee
Dmitry Baryshkov
Joe Slater
Konrad Weihmann
Martin Jansa
Michael Opdenacker
Minjae Kim
Peter Kjellerstedt
Ralph Siemsen
Richard Purdie
Ross Burton
Tim Orling
Wang Mingyu
Zheng Ruoqin
Repositories / Downloads for 3.4.4
poky
Repository Location: https://git.yoctoproject.org/poky
Branch: honister
Tag: yocto-3.4.4
Git Revision: 780eeec8851950ee6ac07a2a398ba937206bd2e4
Release Artefact: poky-780eeec8851950ee6ac07a2a398ba937206bd2e4
sha: 09558927064454ec2492da376156b716d9fd14aae57196435d742db7bfdb4b95
Download Locations: http://downloads.yoctoproject.org/releases/yocto/yocto-3.4.4/poky-780eeec8851950ee6ac07a2a398ba937206bd2e4.tar.bz2, http://mirrors.kernel.org/yocto/yocto/yocto-3.4.4/poky-780eeec8851950ee6ac07a2a398ba937206bd2e4.tar.bz2
openembedded-core
Repository Location: https://git.openembedded.org/openembedded-core
Branch: honister
Tag: yocto-3.4.4
Git Revision: 1a6f5e27249afb6fb4d47c523b62b5dd2482a69d
Release Artefact: oecore-1a6f5e27249afb6fb4d47c523b62b5dd2482a69d
sha: b8354ca457756384139a579b9e51f1ba854013c99add90c0c4c6ef68421fede5
Download Locations: http://downloads.yoctoproject.org/releases/yocto/yocto-3.4.4/oecore-1a6f5e27249afb6fb4d47c523b62b5dd2482a69d.tar.bz2, http://mirrors.kernel.org/yocto/yocto/yocto-3.4.4/oecore-1a6f5e27249afb6fb4d47c523b62b5dd2482a69d.tar.bz2
meta-mingw
Repository Location: https://git.yoctoproject.org/meta-mingw
Branch: honister
Tag: yocto-3.4.4
Git Revision: f5d761cbd5c957e4405c5d40b0c236d263c916a8
Release Artefact: meta-mingw-f5d761cbd5c957e4405c5d40b0c236d263c916a8
sha: d4305d638ef80948584526c8ca386a8cf77933dffb8a3b8da98d26a5c40fcc11
Download Locations: http://downloads.yoctoproject.org/releases/yocto/yocto-3.4.4/meta-mingw-f5d761cbd5c957e4405c5d40b0c236d263c916a8.tar.bz2 http://mirrors.kernel.org/yocto/yocto/yocto-3.4.4/meta-mingw-f5d761cbd5c957e4405c5d40b0c236d263c916a8.tar.bz2
meta-gplv2
Repository Location: https://git.yoctoproject.org/meta-gplv2
Branch: honister
Tag: yocto-3.4.4
Git Revision: f04e4369bf9dd3385165281b9fa2ed1043b0e400
Release Artefact: meta-gplv2-f04e4369bf9dd3385165281b9fa2ed1043b0e400
sha: ef8e2b1ec1fb43dbee4ff6990ac736315c7bc2d8c8e79249e1d337558657d3fe
Download Locations: http://downloads.yoctoproject.org/releases/yocto/yocto-3.4.4/meta-gplv2-f04e4369bf9dd3385165281b9fa2ed1043b0e400.tar.bz2, http://mirrors.kernel.org/yocto/yocto/yocto-3.4.4/meta-gplv2-f04e4369bf9dd3385165281b9fa2ed1043b0e400.tar.bz2
bitbake
Repository Location: https://git.openembedded.org/bitbake
Branch: 1.52
Tag: yocto-3.4.4
Git Revision: c2d8f9b2137bd4a98eb0f51519493131773e7517
Release Artefact: bitbake-c2d8f9b2137bd4a98eb0f51519493131773e7517
sha: a8b6217f2d63975bbf49f430e11046608023ee2827faa893b15d9a0d702cf833
Download Locations: http://downloads.yoctoproject.org/releases/yocto/yocto-3.4.4/bitbake-c2d8f9b2137bd4a98eb0f51519493131773e7517.tar.bz2, http://mirrors.kernel.org/yocto/yocto/yocto-3.4.4/bitbake-c2d8f9b2137bd4a98eb0f51519493131773e7517.tar.bz2
yocto-docs
Repository Location: https://git.yoctoproject.org/yocto-docs
Branch: honister
Tag: yocto-3.4.4
Git Revision: 5ead7d39aaf9044078dff27f462e29a8e31d89e4
Release 3.3 (hardknott)
This section provides migration information for moving to the Yocto Project 3.3 Release (codename “hardknott”) from the prior release.
Minimum system requirements
You will now need at least Python 3.6 installed on your build host. Most recent
distributions provide this, but should you be building on a distribution that
does not have it, you can use the buildtools tarball (easily installable
using scripts/install-buildtools) — see
Required Git, tar, Python, make and gcc Versions
for details.
Removed recipes
The following recipes have been removed:
go-dep: obsolete with the advent of go modulesgst-validate: replaced bygst-devtoolslinux-yocto: removed 5.8 version recipes (5.4 / 5.10 still provided)vulkan-demos: replaced byvulkan-samples
Single version common license file naming
Some license files in meta/files/common-licenses have been renamed to match
current SPDX naming conventions:
AGPL-3.0 -> AGPL-3.0-only
GPL-1.0 -> GPL-1.0-only
GPL-2.0 -> GPL-2.0-only
GPL-3.0 -> GPL-3.0-only
LGPL-2.0 -> LGPL-2.0-only
LGPL-2.1 -> LGPL-2.1-only
LGPL-3.0 -> LGPL-3.0-only
Additionally, corresponding “-or-later” suffixed files have been added e.g.
GPL-2.0-or-later.
It is not required that you change LICENSE values as there are mappings
from the original names in place; however, in rare cases where you have a recipe
which sets LIC_FILES_CHKSUM to point to file(s) in
meta/files/common-licenses (which in any case is not recommended) you will
need to update those.
New python3targetconfig class
A new python3targetconfig class has
been created for situations where you would previously have inherited the
python3native class but need access to
target configuration data (such as correct installation directories). Recipes
where this situation applies should be changed to inherit
python3targetconfig instead of
python3native. This also adds a dependency
on target python3, so it should only be used where appropriate in order to
avoid unnecessarily lengthening builds.
Some example recipes where this change has been made: gpgme, libcap-ng,
python3-pycairo.
setup.py path for Python modules
In a Python module, sometimes setup.py can be buried deep in the
source tree. Previously this was handled in recipes by setting S to
point to the subdirectory within the source where setup.py is located.
However with the recent pseudo
changes, some Python modules make changes to files beneath ${S}, for
example:
S = "${WORKDIR}/git/python/pythonmodule"
then in setup.py it works with source code in a relative fashion, such
as ../../src. This causes pseudo to fail as it isn’t able to track
the paths properly. This release introduces a new DISTUTILS_SETUP_PATH
variable so that recipes can specify it explicitly, for example:
S = "${WORKDIR}/git"
DISTUTILS_SETUP_PATH = "${S}/python/pythonmodule"
Recipes that inherit from distutils3 (or setuptools3
which itself inherits distutils3) that also set S to point to a
Python module within a subdirectory in the aforementioned manner should be
changed to set DISTUTILS_SETUP_PATH instead.
BitBake changes
BitBake is now configured to use a default
umaskof022for all tasks (specified via a new BB_DEFAULT_UMASK variable). If needed,umaskcan still be set on a per-task basis via theumaskvarflag on the task function, but that is unlikely to be necessary in most cases.If a version specified in PREFERRED_VERSION is not available this will now trigger a warning instead of just a note, making such issues more visible.
Packaging changes
The following packaging changes have been made; in all cases the main package still depends upon the split out packages so you should not need to do anything unless you want to take advantage of the improved granularity:
dbus:-commonand-toolssplit outiproute2: splitipbinary to its own packagenet-tools: splitmii-toolinto its own packageprocps: splitpsandsysctlinto their own packagesrpm: split build and extra functionality into separate packagessudo: splitsudobinary intosudo-sudoand libs intosudo-libsystemtap: examples, Python scripts and runtime material split oututil-linux:libuuidhas been split out to its ownutil-linux-libuuidrecipe (and corresponding packages) to avoid circular dependencies iflibgcryptsupport is enabled inutil-linux. (util-linuxdepends uponutil-linux-libuuid.)
Miscellaneous changes
The default poky DISTRO_VERSION value now uses the core metadata’s git hash (i.e. METADATA_REVISION) rather than the date (i.e. DATE) to reduce one small source of non-reproducibility. You can of course specify your own DISTRO_VERSION value as desired (particularly if you create your own custom distro configuration).
adwaita-icon-themeversion 3.34.3 has been added back, and is selected as the default via PREFERRED_VERSION inmeta/conf/distro/include/default-versions.incdue to newer versions not working well withlibrsvg2.40.librsvgis not practically upgradeable at the moment as it has been ported to Rust, and Rust is not (yet) in OE-Core, but this will change in a future release.ffmpegis now configured to disable GPL-licensed portions by default to make it harder to accidentally violate the GPL. To explicitly enable GPL licensed portions, addgplto PACKAGECONFIG forffmpegusing a bbappend (or usePACKAGECONFIG_append_pn-ffmpeg = " gpl"in your configuration.)connmanis now set to conflict withsystemd-networkdas they overlap functionally and may interfere with each other at runtime.Canonical SPDX license names are now used in image license manifests in order to avoid aliases of the same license from showing up together (e.g.
GPLv2andGPL-2.0)
Release 3.2 (gatesgarth)
This section provides migration information for moving to the Yocto Project 3.2 Release (codename “gatesgarth”) from the prior release.
Minimum system requirements
gcc version 6.0 is now required at minimum on the build host. For older
host distributions where this is not available, you can use the
buildtools-extended tarball (easily installable using
scripts/install-buildtools).
Removed recipes
The following recipes have been removed:
bjam-native: replaced byboost-build-nativeavahi-ui: folded into the mainavahirecipe — the GTK UI can be disabled using PACKAGECONFIG foravahi.build-compare: no longer needed with the removal of thepackagefeed-stabilityclassdhcp: obsolete, functionally replaced bydhcpcdandkealibmodulemd-v1: replaced bylibmodulemdpackagegroup-core-device-devel: obsolete
Removed classes
The following classes (.bbclass files) have been removed:
spdx: obsolete — the Yocto Project is a strong supporter of SPDX, but this class was old code using a dated approach and had the potential to be misleading. Themeta-sdpxscannerlayer is a much more modern and active approach to handling this and is recommended as a replacement.packagefeed-stability: this class had become obsolete with the advent of hash equivalence and reproducible builds.
pseudo path filtering and mismatch behaviour
pseudo now operates on a filtered subset of files. This is a significant change
to the way pseudo operates within OpenEmbedded — by default, pseudo monitors and
logs (adds to its database) any file created or modified whilst in a fakeroot
environment. However, there are large numbers of files that we simply don’t care
about the permissions of whilst in that fakeroot context, for example ${S}, ${B}, ${T},
${SSTATE_DIR}, the central sstate control directories, and others.
As of this release, new functionality in pseudo is enabled to ignore these directory trees (controlled using a new PSEUDO_IGNORE_PATHS variable) resulting in a cleaner database with less chance of “stray” mismatches if files are modified outside pseudo context. It also should reduce some overhead from pseudo as the interprocess round trip to the server is avoided.
There is a possible complication where some existing recipe may break, for
example, a recipe was found to be writing to ${B}/install for
make install in do_install and since ${B} is listed as not to be tracked,
there were errors trying to chown root for files in this location. Another
example was the tcl recipe where the source directory S is set to a
subdirectory of the source tree but files were written out to the directory
structure above that subdirectory. For these types of cases in your own recipes,
extend PSEUDO_IGNORE_PATHS to cover additional paths that pseudo should not
be monitoring.
In addition, pseudo’s behaviour on mismatches has now been changed — rather
than doing what turns out to be a rather dangerous “fixup” if it sees a file
with a different path but the same inode as another file it has previously seen,
pseudo will throw an abort() and direct you to a wiki page
that explains how to deal with this.
MLPREFIX now required for multilib when runtime dependencies conditionally added
In order to solve some previously intractable problems with runtime dependencies and multilib, a change was made that now requires the MLPREFIX value to be explicitly prepended to package names being added as dependencies (e.g. in RDEPENDS and RRECOMMENDS values) where the dependency is conditionally added.
If you have anonymous Python or in-line Python conditionally adding
dependencies in your custom recipes, and you intend for those recipes to
work with multilib, then you will need to ensure that ${MLPREFIX}
is prefixed on the package names in the dependencies, for example
(from the glibc recipe):
RRECOMMENDS_${PN} = "${@bb.utils.contains('DISTRO_FEATURES', 'ldconfig', '${MLPREFIX}ldconfig', '', d)}"
This also applies when conditionally adding packages to PACKAGES where
those packages have dependencies, for example (from the alsa-plugins recipe):
PACKAGES += "${@bb.utils.contains('PACKAGECONFIG', 'pulseaudio', 'alsa-plugins-pulseaudio-conf', '', d)}"
...
RDEPENDS_${PN}-pulseaudio-conf += "\
${MLPREFIX}libasound-module-conf-pulse \
${MLPREFIX}libasound-module-ctl-pulse \
${MLPREFIX}libasound-module-pcm-pulse \
"
packagegroup-core-device-devel no longer included in images built for qemu* machines
packagegroup-core-device-devel was previously added automatically to
images built for qemu* machines, however the purpose of the group and what
it should contain is no longer clear, and in general, adding userspace
development items to images is best done at the image/class level; thus this
packagegroup was removed.
This packagegroup previously pulled in the following:
distcc-confignfs-export-rootbashbinutils-symlinks
If you still need any of these in your image built for a qemu* machine
then you will add them explicitly to IMAGE_INSTALL or another
appropriate place in the dependency chain for your image (if you have not
already done so).
DHCP server/client replaced
The dhcp software package has become unmaintained and thus has been
functionally replaced by dhcpcd (client) and kea (server). You will
need to replace references to the recipe/package names as appropriate — most
commonly, at the package level dhcp-client should be replaced by
dhcpcd and dhcp-server should be replaced by kea. If you have any
custom configuration files for these they will need to be adapted — refer to
the upstream documentation for dhcpcd and kea for further details.
Packaging changes
python3: theurllibPython package has now moved into the core package, as it is used more commonly than just netclient (e.g. email, xml, mimetypes, pydoc). In addition, thepathlibmodule is now also part of the core package.iptables:iptables-applyandip6tables-applyhave been split out to their own package to avoid a bash dependency in the mainiptablespackage
Package QA check changes
Previously, the following package QA checks triggered warnings, however they can be indicators of genuine underlying problems and are therefore now treated as errors:
compile-host-path
In addition, the following new checks were added and default to triggering an error:
shebang-size: Check for shebang (#!) lines longer than 128 characters, which can give an error at runtime depending on the operating system.
unhandled-features-check: Check if any of the variables supported by the features_check class is set while not inheriting the class itself.
missing-update-alternatives: Check if the recipe sets the ALTERNATIVE variable for any of its packages, and does not inherit the update-alternatives class.
A trailing slash or duplicated slashes in the value of S or B will now trigger a warning so that they can be removed and path comparisons can be more reliable — remove any instances of these in your recipes if the warning is displayed.
Globbing no longer supported in file:// entries in SRC_URI
Globbing (* and ? wildcards) in file:// URLs within SRC_URI
did not properly support file checksums, thus changes to the source files
would not always change the do_fetch task checksum, and consequently would
not ensure that the changed files would be incorporated in subsequent builds.
Unfortunately it is not practical to make globbing work generically here, so
the decision was taken to remove support for globs in file:// URLs.
If you have any usage of these in your recipes, then you will now need to
either add each of the files that you expect to match explicitly, or
alternatively if you still need files to be pulled in dynamically, put the
files into a subdirectory and reference that instead.
deploy class now cleans DEPLOYDIR before do_deploy
do_deploy as implemented in the deploy class now cleans up ${DEPLOYDIR} before running, just as do_install cleans up ${D} before running. This reduces the risk of DEPLOYDIR being accidentally contaminated by files from previous runs, possibly even with different config, in case of incremental builds.
Most recipes and classes that inherit the deploy class or
interact with do_deploy are unlikely to be affected by this
unless they add prefuncs to do_deploy which also put files
into ${DEPLOYDIR} — these should be refactored to use
do_deploy_prepend instead.
Custom SDK / SDK-style recipes need to include nativesdk-sdk-provides-dummy
All nativesdk packages require /bin/sh due
to their postinstall scriptlets, thus this package has to be dummy-provided
within the SDK and nativesdk-sdk-provides-dummy now does this. If you have
a custom SDK recipe (or your own SDK-style recipe similar to e.g.
buildtools-tarball), you will need to ensure
nativesdk-sdk-provides-dummy or an equivalent is included in
TOOLCHAIN_HOST_TASK.
ld.so.conf now moved back to main glibc package
There are cases where one doesn’t want ldconfig on target (e.g. for
read-only root filesystems, it’s rather pointless), yet one still
needs /etc/ld.so.conf to be present at image build time:
When some recipe installs libraries to a non-standard location, and
therefore installs in a file in /etc/ld.so.conf.d/foo.conf, we
need /etc/ld.so.conf containing:
include /etc/ld.so.conf.d/*.conf
in order to get those other locations picked up.
Thus /etc/ld.so.conf is now in the main glibc package so that
there’s always an ld.so.conf present when the build-time ldconfig
runs towards the end of image construction.
The ld.so.conf and ld.so.conf.d/*.conf files do not take up
significant space (at least not compared to the ~700kB ldconfig binary), and they
might be needed in case ldconfig is installable, so they are left
in place after the image is built. Technically it would be possible to
remove them if desired, though it would not be trivial if you still
wanted the build-time ldconfig to function (ROOTFS_POSTPROCESS_COMMAND
will not work as ldconfig is run after the functions referred to
by that variable).
Host DRI drivers now used for GL support within runqemu
runqemu now uses the mesa-native libraries everywhere virgl is used
(i.e. when gl, gl-es or egl-headless options are specified),
but instructs them to load DRI drivers from the host. Unfortunately this
may not work well with proprietary graphics drivers such as those from
Nvidia; if you are using such drivers then you may need to switch to an
alternative (such as Nouveau in the case of Nvidia hardware) or avoid
using the GL options.
Initramfs images now use a blank suffix
The reference Initramfs images (core-image-minimal-initramfs,
core-image-tiny-initramfs and core-image-testmaster-initramfs) now
set an empty string for IMAGE_NAME_SUFFIX, which otherwise defaults
to ".rootfs". These images aren’t root filesystems and thus the rootfs
label didn’t make sense. If you are looking for the output files generated
by these image recipes directly then you will need to adapt to the new
naming without the .rootfs part.
Image artifact name variables now centralised in image-artifact-names class
The defaults for the following image artifact name variables have been moved
from bitbake.conf to a new image-artifact-names class:
Image-related classes now inherit this class, and typically these variables
are only referenced within image recipes so those will be unaffected by this
change. However if you have references to these variables in either a recipe
that is not an image or a class that is enabled globally, then those will
now need to be changed to inherit image-artifact-names.
Miscellaneous changes
Support for the long-deprecated
PACKAGE_GROUPvariable has now been removed — replace any remaining instances with FEATURE_PACKAGES.The
FILESPATHPKGvariable, having been previously deprecated, has now been removed. Replace any remaining references with appropriate use of FILESEXTRAPATHS.Erroneous use of
inherit +=(instead ofINHERIT +=) in a configuration file now triggers an error instead of silently being ignored.ptest support has been removed from the
kbdrecipe, as upstream has moved to autotest which is difficult to work with in a cross-compilation environment.oe.utils.is_machine_specific()andoe.utils.machine_paths()have been removed as their utility was questionable. In the unlikely event that you have references to these in your own code, then the code will need to be reworked.The
i2ctransfermodule is now disabled by default when buildingbusyboxin order to be consistent with disabling the other i2c tools there. If you do wish the i2ctransfer module to be built in BusyBox then addCONFIG_I2CTRANSFER=yto your custom BusyBox configuration.In the
Upstream-Statusheader convention for patches,Acceptedhas been replaced withBackportas these almost always mean the same thing i.e. the patch is already upstream and may need to be removed in a future recipe upgrade. If you are adding these headers to your own patches then useBackportto indicate that the patch has been sent upstream.The
tune-supersparc.inctune file has been removed as it does not appear to be widely used and no longer works.
Release 3.1 (dunfell)
This section provides migration information for moving to the Yocto Project 3.1 Release (codename “dunfell”) from the prior release.
Minimum system requirements
The following versions / requirements of build host components have been updated:
gcc 5.0
python 3.5
tar 1.28
rpcgenis now required on the host (part of thelibc-dev-binpackage on Ubuntu, Debian and related distributions, and theglibcpackage on RPM-based distributions).
Additionally, the makeinfo and pod2man tools are no longer
required on the host.
mpc8315e-rdb machine removed
The MPC8315E-RDB machine is old/obsolete and unobtainable, thus given
the maintenance burden the mpc8315e-rdb machine configuration that
supported it has been removed in this release. The removal does leave a
gap in official PowerPC reference hardware support; this may change in
future if a suitable machine with accompanying support resources is
found.
Python 2 removed
Due to the expiration of upstream support in January 2020, support for Python 2 has now been removed; it is recommended that you use Python 3 instead. If absolutely needed there is a meta-python2 community layer containing Python 2, related classes and various Python 2-based modules, however it should not be considered as supported.
Reproducible builds now enabled by default
In order to avoid unnecessary differences in output files (aiding binary
reproducibility), the Poky distribution configuration
(DISTRO = "poky") now inherits the reproducible_build class by
default.
Impact of ptest feature is now more significant
The Poky distribution configuration (DISTRO = "poky") enables ptests
by default to enable runtime testing of various components. In this
release, a dependency needed to be added that has resulted in a
significant increase in the number of components that will be built just
when building a simple image such as core-image-minimal. If you do not
need runtime tests enabled for core components, then it is recommended
that you remove “ptest” from
DISTRO_FEATURES to save a significant
amount of build time e.g. by adding the following in your configuration:
DISTRO_FEATURES_remove = "ptest"
Removed recipes
The following recipes have been removed:
chkconfig: obsoleteconsole-tools: obsoleteenchant: replaced byenchant2foomatic-filters: obsoletelibidn: no longer needed, moved to meta-oelibmodulemd: replaced bylibmodulemd-v1linux-yocto: drop 4.19, 5.2 version recipes (5.4 now provided)nspr: no longer needed, moved to meta-oenss: no longer needed, moved to meta-oepython: Python 2 removed (Python 3 preferred)python-setuptools: Python 2 version removed (python3-setuptools preferred)sysprof: no longer needed, moved to meta-oetexi2html: obsoleteu-boot-fw-utils: functionally replaced bylibubootenv
features_check class replaces distro_features_check
The distro_features_check class has had its functionality expanded,
now supporting ANY_OF_MACHINE_FEATURES,
REQUIRED_MACHINE_FEATURES, CONFLICT_MACHINE_FEATURES,
ANY_OF_COMBINED_FEATURES, REQUIRED_COMBINED_FEATURES,
CONFLICT_COMBINED_FEATURES. As a result the class has now been
renamed to features_check; the distro_features_check class still
exists but generates a warning and redirects to the new class. In
preparation for a future removal of the old class it is recommended that
you update recipes currently inheriting distro_features_check to
inherit features_check instead.
Removed classes
The following classes have been removed:
distutils-base: moved to meta-python2distutils: moved to meta-python2libc-common: merged into the glibc recipe as nothing else used it.python-dir: moved to meta-python2pythonnative: moved to meta-python2setuptools: moved to meta-python2tinderclient: dropped as it was obsolete.
SRC_URI checksum behaviour
Previously, recipes by tradition included both SHA256 and MD5 checksums for remotely fetched files in SRC_URI, even though only one is actually mandated. However, the MD5 checksum does not add much given its inherent weakness; thus when a checksum fails only the SHA256 sum will now be printed. The md5sum will still be verified if it is specified.
npm fetcher changes
The npm fetcher has been completely reworked in this release. The npm
fetcher now only fetches the package source itself and no longer the
dependencies; there is now also an npmsw fetcher which explicitly
fetches the shrinkwrap file and the dependencies. This removes the
slightly awkward NPM_LOCKDOWN and NPM_SHRINKWRAP variables which
pointed to local files; the lockdown file is no longer needed at all.
Additionally, the package name in npm:// entries in
SRC_URI is now specified using a package
parameter instead of the earlier name which overlapped with the
generic name parameter. All recipes using the npm fetcher will need
to be changed as a result.
An example of the new scheme:
SRC_URI = "npm://registry.npmjs.org;package=array-flatten;version=1.1.1 \
npmsw://${THISDIR}/npm-shrinkwrap.json"
Another example where the sources are fetched from git rather than an npm repository:
SRC_URI = "git://github.com/foo/bar.git;protocol=https \
npmsw://${THISDIR}/npm-shrinkwrap.json"
devtool and recipetool have also been updated to match with the npm
fetcher changes. Other than producing working and more complete recipes
for npm sources, there is also a minor change to the command line for
devtool: the --fetch-dev option has been renamed to --npm-dev as
it is npm-specific.
Packaging changes
intltoolhas been removed frompackagegroup-core-sdkas it is rarely needed to build modern software — gettext can do most of the things it used to be needed for.intltoolhas also been removed frompackagegroup-core-self-hostedas it is not needed to for standard builds.git:
git-am,git-difftool,git-submodule, andgit-request-pullare no longer perl-based, so are now installed with the maingitpackage instead of withingit-perltools.The
ldconfigbinary built as part of glibc has now been moved to its ownldconfigpackage (note noglibc-prefix). This package is in the RRECOMMENDS of the mainglibcpackage ifldconfigis present in DISTRO_FEATURES.libeventnow splits each shared library into its own package (as Debian does). Since these are shared libraries and will be pulled in through the normal shared library dependency handling, there should be no impact to existing configurations other than less unnecessary libraries being installed in some cases.linux-firmware now has a new package for
bcm4366cand includes available NVRAM config files into thebcm43340,bcm43362,bcm43430andbcm4356-pciepackages.harfbuzznow splits the newlibharfbuzz-subset.solibrary into its own package to reduce the main package size in cases wherelibharfbuzz-subset.sois not needed.
Additional warnings
Warnings will now be shown at do_package_qa time in the following circumstances:
wic image type now used instead of live by default for x86
conf/machine/include/x86-base.inc (inherited by most x86 machine
configurations) now specifies wic instead of live by default in
IMAGE_FSTYPES. The live image type will
likely be removed in a future release so it is recommended that you use
wic instead.
Miscellaneous changes
The undocumented
SRC_DISTRIBUTE_LICENSESvariable has now been removed in favour of a newAVAILABLE_LICENSESvariable which is dynamically set based upon license files found in${COMMON_LICENSE_DIR}and${LICENSE_PATH}.The tune definition for big-endian microblaze machines is now
microblazeinstead ofmicroblazeeb.newlibno longer has built-in syscalls.libglossshould then provide the syscalls,crt0.oand other functions that are no longer part ofnewlibitself. If you are usingTCLIBC = "newlib"this now means that you must link applications with bothnewlibandlibgloss, whereas beforenewlibwould run in many configurations by itself.
Release 3.0 (zeus)
This section provides migration information for moving to the Yocto Project 3.0 Release (codename “zeus”) from the prior release.
Init System Selection
Changing the init system manager previously required setting a number of
different variables. You can now change the manager by setting the
INIT_MANAGER variable and the corresponding include files (i.e.
conf/distro/include/init-manager-*.conf). Include files are provided
for four values: “none”, “sysvinit”, “systemd”, and “mdev-busybox”. The
default value, “none”, for INIT_MANAGER should allow your current
settings to continue working. However, it is advisable to explicitly set
INIT_MANAGER.
LSB Support Removed
Linux Standard Base (LSB) as a standard is not current, and is not well suited for embedded applications. Support can be continued in a separate layer if needed. However, presently LSB support has been removed from the core.
As a result of this change, the poky-lsb derivative distribution
configuration that was also used for testing alternative configurations
has been replaced with a poky-altcfg distribution that has LSB parts
removed.
Removed Recipes
The following recipes have been removed.
core-image-lsb-dev: Part of removed LSB support.core-image-lsb: Part of removed LSB support.core-image-lsb-sdk: Part of removed LSB support.cve-check-tool: Functionally replaced by thecve-update-dbrecipe andcve-checkclass.eglinfo: No longer maintained.eglinfofrommesa-demosis an adequate and maintained alternative.gcc-8.3: Version 8.3 removed. Replaced by 9.2.gnome-themes-standard: Only needed by gtk+ 2.x, which has been removed.gtk+: GTK+ 2 is obsolete and has been replaced by gtk+3.irda-utils: Has become obsolete. IrDA support has been removed from the Linux kernel in version 4.17 and later.libnewt-python:libnewtPython support merged into mainlibnewtrecipe.libsdl: Replaced by newerlibsdl2.libx11-diet: Became obsolete.libxx86dga: Removed obsolete client library.libxx86misc: Removed. Library is redundant.linux-yocto: Version 5.0 removed, which is now redundant (5.2 / 4.19 present).lsbinitscripts: Part of removed LSB support.lsb: Part of removed LSB support.lsbtest: Part of removed LSB support.openssl10: Replaced by neweropensslversion 1.1.packagegroup-core-lsb: Part of removed LSB support.python-nose: Removed the Python 2.x version of the recipe.python-numpy: Removed the Python 2.x version of the recipe.python-scons: Removed the Python 2.x version of the recipe.source-highlight: No longer needed.stress: Replaced bystress-ng.vulkan: Split intovulkan-loader,vulkan-headers, andvulkan-tools.weston-conf: Functionality moved toweston-init.
Packaging Changes
The following packaging changes have occurred.
The Epiphany browser has been dropped from
packagegroup-self-hostedas it has not been needed insidebuild-appliance-imagefor quite some time and was causing resource problems.libcap-ngPython support has been moved to a separatelibcap-ng-pythonrecipe to streamline the build process when the Python bindings are not needed.libdrmnow packages the fileamdgpu.idsinto a separatelibdrm-amdgpupackage.python3: Therunpymodule is now in thepython3-corepackage as it is required to support the common “python3 -m” command usage.distccnow provides separatedistcc-clientanddistcc-serverpackages as typically one or the other are needed, rather than both.python*-setuptoolsrecipes now separately package thepkg_resourcesmodule in apython-pkg-resources/python3-pkg-resourcespackage as the module is useful independent of the rest of the setuptools package. The mainpython-setuptools/python3-setuptoolspackage depends on this new package so you should only need to update dependencies unless you want to take advantage of the increased granularity.
CVE Checking
cve-check-tool has been functionally replaced by a new
cve-update-db recipe and functionality built into the cve-check
class. The result uses NVD JSON data feeds rather than the deprecated
XML feeds that cve-check-tool was using, supports CVSSv3 scoring,
and makes other improvements.
Additionally, the CVE_CHECK_CVE_WHITELIST variable has been replaced
by CVE_CHECK_WHITELIST (replaced by CVE_CHECK_IGNORE in version 4.0).
BitBake Changes
The following BitBake changes have occurred.
addtaskstatements now properly validate dependent tasks. Previously, an invalid task was silently ignored. With this change, the invalid task generates a warning.Other invalid
addtaskanddeltaskusages now trigger these warnings: “multiple target tasks arguments with addtask / deltask”, and “multiple before/after clauses”.The “multiconfig” prefix is now shortened to “mc”. “multiconfig” will continue to work, however it may be removed in a future release.
The
bitbake -gcommand no longer generates arecipe-depends.dotfile as the contents (i.e. a reprocessed version oftask-depends.dot) were confusing.The
bb.build.FuncFailedexception, previously raised bybb.build.exec_func()when certain other exceptions have occurred, has been removed. The real underlying exceptions will be raised instead. If you have calls tobb.build.exec_func()in custom classes ortinfoil-usingscripts, any references tobb.build.FuncFailedshould be cleaned up.Additionally, the
bb.build.exec_func()no longer accepts the “pythonexception” parameter. The function now always raises exceptions. Remove this argument in any calls tobb.build.exec_func()in custom classes or scripts.The
BB_SETSCENE_VERIFY_FUNCTION2variable is no longer used. In the unlikely event that you have any references to it, they should be removed.The
RunQueueExecuteScenequeueandRunQueueExecuteTasksevents have been removed since setscene tasks are now executed as part of the normal runqueue. Any event handling code in custom classes or scripts that handles these two events need to be updated.The arguments passed to functions used with BB_HASHCHECK_FUNCTION have changed. If you are using your own custom hash check function, see https://git.yoctoproject.org/poky/commit/?id=40a5e193c4ba45c928fccd899415ea56b5417725 for details.
Task specifications in
BB_TASKDEPDATAand class implementations used in signature generator classes now use “<fn>:<task>” everywhere rather than the “.” delimiter that was being used in some places. This change makes it consistent with all areas in the code. Custom signature generator classes and code that readsBB_TASKDEPDATAneed to be updated to use ‘:’ as a separator rather than ‘.’.
Sanity Checks
The following sanity check changes occurred.
SRC_URI is now checked for usage of two problematic items:
“${PN}” prefix/suffix use — warnings always appear if ${PN} is used. You must fix the issue regardless of whether multiconfig or anything else that would cause prefixing/suffixing to happen.
Github archive tarballs — these are not guaranteed to be stable. Consequently, it is likely that the tarballs will be refreshed and thus the SRC_URI checksums will fail to apply. It is recommended that you fetch either an official release tarball or a specific revision from the actual Git repository instead.
Either one of these items now trigger a warning by default. If you wish to disable this check, remove
src-uri-badfrom WARN_QA.The
file-rdepsruntime dependency check no longer expands RDEPENDS recursively as there is no mechanism to ensure they can be fully computed, and thus races sometimes result in errors either showing up or not. Thus, you might now see errors for missing runtime dependencies that were previously satisfied recursively. Here is an example: package A contains a shell script starting with#!/bin/bashbut has no dependency on bash. However, package A depends on package B, which does depend on bash. You need to add the missing dependency or dependencies to resolve the warning.Setting
DEPENDS_${PN}anywhere (i.e. typically in a recipe) now triggers an error. The error is triggered because DEPENDS is not a package-specific variable unlike RDEPENDS. You should set DEPENDS instead.systemd currently does not work well with the musl C library because only upstream officially supports linking the library with glibc. Thus, a warning is shown when building systemd in conjunction with musl.
Miscellaneous Changes
The following miscellaneous changes have occurred.
The
gnomeclass has been removed because it now does very little. You should update recipes that previously inherited this class to do the following:inherit gnomebase gtk-icon-cache gconf mime
The
meta/recipes-kernel/linux/linux-dtb.incfile has been removed. This file was previously deprecated in favor of setting KERNEL_DEVICETREE in any kernel recipe and only produced a warning. Remove anyincludeorrequirestatements pointing to this file.TARGET_CFLAGS, TARGET_CPPFLAGS, TARGET_CXXFLAGS, and TARGET_LDFLAGS are no longer exported to the external environment. This change did not require any changes to core recipes, which is a good indicator that no changes will be required. However, if for some reason the software being built by one of your recipes is expecting these variables to be set, then building the recipe will fail. In such cases, you must either export the variable or variables in the recipe or change the scripts so that exporting is not necessary.
You must change the host distro identifier used in NATIVELSBSTRING to use all lowercase characters even if it does not contain a version number. This change is necessary only if you are not using uninative and SANITY_TESTED_DISTROS.
In the
base-filesrecipe, writing the hostname into/etc/hostsand/etc/hostnameis now done within the main do_install function rather than in thedo_install_basefilesissuefunction. The reason for the change is becausedo_install_basefilesissueis more easily overridden without having to duplicate the hostname functionality. If you have done the latter (e.g. in abase-filesbbappend), then you should remove it from your customizeddo_install_basefilesissuefunction.The
wic --expandcommand now uses commas to separate “key:value” pairs rather than hyphens.Note
The wic command-line help is not updated.
You must update any scripts or commands where you use
wic --expandwith multiple “key:value” pairs.UEFI image variable settings have been moved from various places to a central
conf/image-uefi.conf. This change should not influence any existing configuration as themeta/conf/image-uefi.confin the core metadata sets defaults that can be overridden in the same manner as before.conf/distro/include/world-broken.inchas been removed. For cases where certain recipes need to be disabled when using the musl C library, these recipes now haveCOMPATIBLE_HOST_libc-muslset with a comment that explains why.
Release 2.7 (warrior)
This section provides migration information for moving to the Yocto Project 2.7 Release (codename “warrior”) from the prior release.
BitBake Changes
The following changes have been made to BitBake:
BitBake now checks anonymous Python functions and pure Python functions (e.g.
def funcname:) in the metadata for tab indentation. If found, BitBake produces a warning.BitBake now checks BBFILE_COLLECTIONS for duplicate entries and triggers an error if any are found.
Eclipse Support Removed
Support for the Eclipse IDE has been removed. Support continues for those releases prior to 2.7 that did include support. The 2.7 release does not include the Eclipse Yocto plugin.
qemu-native Splits the System and User-Mode Parts
The system and user-mode parts of qemu-native are now split.
qemu-native provides the user-mode components and
qemu-system-native provides the system components. If you have
recipes that depend on QEMU’s system emulation functionality at build
time, they should now depend upon qemu-system-native instead of
qemu-native.
The upstream-tracking.inc File Has Been Removed
The previously deprecated upstream-tracking.inc file is now removed.
Any UPSTREAM_TRACKING* variables are now set in the corresponding
recipes instead.
Remove any references you have to the upstream-tracking.inc file in
your configuration.
The DISTRO_FEATURES_LIBC Variable Has Been Removed
The DISTRO_FEATURES_LIBC variable is no longer used. The ability to
configure glibc using kconfig has been removed for quite some time
making the libc-* features set no longer effective.
Remove any references you have to DISTRO_FEATURES_LIBC in your own
layers.
License Value Corrections
The following corrections have been made to the LICENSE values set by recipes:
socat: Corrected LICENSE to be “GPLv2” rather than “GPLv2+”.
libgfortran: Set license to “GPL-3.0-with-GCC-exception”.
elfutils: Removed “Elfutils-Exception” and set to “GPLv2” for shared libraries
Packaging Changes
This section provides information about packaging changes.
bind: Thensupdatebinary has been moved to thebind-utilspackage.Debug split: The default debug split has been changed to create separate source packages (i.e.
package_name-dbgandpackage_name-src). If you are currently usingdbg-pkgsin IMAGE_FEATURES to bring in debug symbols and you still need the sources, you must now also addsrc-pkgsto IMAGE_FEATURES. Source packages remain in the target portion of the SDK by default, unless you have set your own value for SDKIMAGE_FEATURES that does not includesrc-pkgs.Mount all using
util-linux:/etc/default/mountallhas moved into the -mount sub-package.Splitting binaries using
util-linux:util-linuxnow splits each binary into its own package for fine-grained control. The mainutil-linuxpackage pulls in the individual binary packages using the RRECOMMENDS and RDEPENDS variables. As a result, existing images should not see any changes assuming NO_RECOMMENDATIONS is not set.netbase/base-files:/etc/hostshas moved fromnetbasetobase-files.tzdata: The main package has been converted to an empty meta package that pulls in alltzdatapackages by default.lrzsz: This package has been removed frompackagegroup-self-hostedandpackagegroup-core-tools-testapps. The X/Y/ZModem support is less likely to be needed on modern systems. If you are relying on these packagegroups to include thelrzszpackage in your image, you now need to explicitly add the package.
Removed Recipes
The following recipes have been removed:
gcc: Drop version 7.3 recipes. Version 8.3 now remains.
linux-yocto: Drop versions 4.14 and 4.18 recipes. Versions 4.19 and 5.0 remain.
go: Drop version 1.9 recipes. Versions 1.11 and 1.12 remain.
xvideo-tests: Became obsolete.
libart-lgpl: Became obsolete.
gtk-icon-utils-native: These tools are now provided by gtk+3-native
gcc-cross-initial: No longer needed. gcc-cross/gcc-crosssdk is now used instead.
gcc-crosssdk-initial: No longer needed. gcc-cross/gcc-crosssdk is now used instead.
glibc-initial: Removed because the benefits of having it for site_config are currently outweighed by the cost of building the recipe.
Removed Classes
The following classes have been removed:
distutils-tools: This class was never used.
bugzilla.bbclass: Became obsolete.
distrodata: This functionally has been replaced by a more modern tinfoil-based implementation.
Miscellaneous Changes
The following miscellaneous changes occurred:
The
distrosubdirectory of the Poky repository has been removed from the top-levelscriptsdirectory.Perl now builds for the target using perl-cross for better maintainability and improved build performance. This change should not present any problems unless you have heavily customized your Perl recipe.
arm-tunes: Removed the “-march” option if mcpu is already added.update-alternatives: Convert file renames to PACKAGE_PREPROCESS_FUNCSbase/pixbufcache: Obsoletesstatecompletionscode has been removed.inetutils: This recipe has rsh disabled.
Release 2.6 (thud)
This section provides migration information for moving to the Yocto Project 2.6 Release (codename “thud”) from the prior release.
GCC 8.2 is Now Used by Default
The GNU Compiler Collection version 8.2 is now used by default for compilation. For more information on what has changed in the GCC 8.x release, see https://gcc.gnu.org/gcc-8/changes.html.
If you still need to compile with version 7.x, GCC 7.3 is also provided. You can select this version by setting the and can be selected by setting the GCCVERSION variable to “7.%” in your configuration.
Removed Recipes
The following recipes have been removed:
beecrypt: No longer needed since moving to RPM 4.
bigreqsproto: Replaced by
xorgproto.calibrateproto: Removed in favor of
xinput.compositeproto: Replaced by
xorgproto.damageproto: Replaced by
xorgproto.dmxproto: Replaced by
xorgproto.dri2proto: Replaced by
xorgproto.dri3proto: Replaced by
xorgproto.eee-acpi-scripts: Became obsolete.
fixesproto: Replaced by
xorgproto.fontsproto: Replaced by
xorgproto.fstests: Became obsolete.
gccmakedep: No longer used.
glproto: Replaced by
xorgproto.gnome-desktop3: No longer needed. This recipe has moved to
meta-oe.icon-naming-utils: No longer used since the Sato theme was removed in 2016.
inputproto: Replaced by
xorgproto.kbproto: Replaced by
xorgproto.libusb-compat: Became obsolete.
libuser: Became obsolete.
libnfsidmap: No longer an external requirement since
nfs-utils2.2.1.libnfsidmapis now integrated.libxcalibrate: No longer needed with
xinputmktemp: Became obsolete. The
mktempcommand is provided by bothbusyboxandcoreutils.ossp-uuid: Is not being maintained and has mostly been replaced by
uuid.hinutil-linux.pax-utils: No longer needed. Previous QA tests that did use this recipe are now done at build time.
pcmciautils: Became obsolete.
pixz: No longer needed.
xznow supports multi-threaded compression.presentproto: Replaced by
xorgproto.randrproto: Replaced by
xorgproto.recordproto: Replaced by
xorgproto.renderproto: Replaced by
xorgproto.resourceproto: Replaced by
xorgproto.scrnsaverproto: Replaced by
xorgproto.trace-cmd: Became obsolete.
perfreplaced this recipe’s functionally.videoproto: Replaced by
xorgproto.wireless-tools: Became obsolete. Superseded by
iw.xcmiscproto: Replaced by
xorgproto.xextproto: Replaced by
xorgproto.xf86dgaproto: Replaced by
xorgproto.xf86driproto: Replaced by
xorgproto.xf86miscproto: Replaced by
xorgproto.xf86-video-omapfb: Became obsolete. Use kernel modesetting driver instead.
xf86-video-omap: Became obsolete. Use kernel modesetting driver instead.
xf86vidmodeproto: Replaced by
xorgproto.xineramaproto: Replaced by
xorgproto.xproto: Replaced by
xorgproto.yasm: No longer needed since previous usages are now satisfied by
nasm.
Packaging Changes
The following packaging changes have been made:
cmake:
cmake.m4andtoolchainfiles have been moved to the main package.iptables: The
iptablesmodules have been split into separate packages.alsa-lib:
libasoundis now in the mainalsa-libpackage instead oflibasound.glibc:
libnss-dbis now in its own package along with a/var/db/makedbs.shscript to update databases.python and python3: The main package has been removed from the recipe. You must install specific packages or
python-modules/python3-modulesfor everything.systemtap: Moved
systemtap-exporterinto its own package.
XOrg Protocol dependencies
The *proto upstream repositories have been combined into one
“xorgproto” repository. Thus, the corresponding recipes have also been
combined into a single xorgproto recipe. Any recipes that depend
upon the older *proto recipes need to be changed to depend on the
newer xorgproto recipe instead.
For names of recipes removed because of this repository change, see the Removed Recipes section.
distutils and distutils3 Now Prevent Fetching Dependencies During the do_configure Task
Previously, it was possible for Python recipes that inherited the
distutils and distutils3 classes to fetch code
during the do_configure task to satisfy
dependencies mentioned in setup.py if those dependencies were not
provided in the sysroot (i.e. recipes providing the dependencies were
missing from DEPENDS).
Note
This change affects classes beyond just the two mentioned (i.e. distutils
and distutils3). Any recipe that inherits distutils* classes are
affected. For example, the setuptools and setuptools3
recipes are affected since they inherit the distutils* classes.
Fetching these types of dependencies that are not provided in the sysroot negatively affects the ability to reproduce builds. This type of fetching is now explicitly disabled. Consequently, any missing dependencies in Python recipes that use these classes now result in an error during the do_configure task.
linux-yocto Configuration Audit Issues Now Correctly Reported
Due to a bug, the kernel configuration audit functionality was not
writing out any resulting warnings during the build. This issue is now
corrected. You might notice these warnings now if you have a custom
kernel configuration with a linux-yocto style kernel recipe.
Image/Kernel Artifact Naming Changes
The following changes have been made:
Name variables (e.g. IMAGE_NAME) use a new IMAGE_VERSION_SUFFIX variable instead of DATETIME. Using IMAGE_VERSION_SUFFIX allows easier and more direct changes.
The IMAGE_VERSION_SUFFIX variable is set in the
bitbake.confconfiguration file as follows:IMAGE_VERSION_SUFFIX = "-${DATETIME}"
Several variables have changed names for consistency:
Old Variable Name New Variable Name ======================================================== KERNEL_IMAGE_BASE_NAME KERNEL_IMAGE_NAME KERNEL_IMAGE_SYMLINK_NAME KERNEL_IMAGE_LINK_NAME MODULE_TARBALL_BASE_NAME MODULE_TARBALL_NAME MODULE_TARBALL_SYMLINK_NAME MODULE_TARBALL_LINK_NAME INITRAMFS_BASE_NAME INITRAMFS_NAME
The
MODULE_IMAGE_BASE_NAMEvariable has been removed. The module tarball name is now controlled directly with the MODULE_TARBALL_NAME variable.The KERNEL_DTB_NAME and KERNEL_DTB_LINK_NAME variables have been introduced to control kernel Device Tree Binary (DTB) artifact names instead of mangling
KERNEL_IMAGE_*variables.The KERNEL_FIT_NAME and KERNEL_FIT_LINK_NAME variables have been introduced to specify the name of flattened image tree (FIT) kernel images similar to other deployed artifacts.
The MODULE_TARBALL_NAME and MODULE_TARBALL_LINK_NAME variable values no longer include the “module-” prefix or “.tgz” suffix. These parts are now hardcoded so that the values are consistent with other artifact naming variables.
Added the INITRAMFS_LINK_NAME variable so that the symlink can be controlled similarly to other artifact types.
INITRAMFS_NAME now uses “${PKGE}-${PKGV}-${PKGR}-${MACHINE}${IMAGE_VERSION_SUFFIX}” instead of “${PV}-${PR}-${MACHINE}-${DATETIME}”, which makes it consistent with other variables.
SERIAL_CONSOLE Deprecated
The SERIAL_CONSOLE variable has been functionally replaced by the
SERIAL_CONSOLES variable for some time. With the Yocto Project 2.6
release, SERIAL_CONSOLE has been officially deprecated.
SERIAL_CONSOLE will continue to work as before for the 2.6 release.
However, for the sake of future compatibility, it is recommended that
you replace all instances of SERIAL_CONSOLE with SERIAL_CONSOLES.
Note
The only difference in usage is that SERIAL_CONSOLES
expects entries to be separated using semicolons as compared to
SERIAL_CONSOLE, which expects spaces.
Configure Script Reports Unknown Options as Errors
If the configure script reports an unknown option, this now triggers a QA error instead of a warning. Any recipes that previously got away with specifying such unknown options now need to be fixed.
Override Changes
The following changes have occurred:
The
virtclass-nativeandvirtclass-nativesdkOverrides Have Been Removed: Thevirtclass-nativeandvirtclass-nativesdkoverrides have been deprecated since 2012 in favor ofclass-nativeandclass-nativesdk, respectively. Bothvirtclass-nativeandvirtclass-nativesdkare now dropped.Note
The
virtclass-multilib-overrides for multilib are still valid.The
forcevariableOverride Now Has a Higher Priority ThanlibcOverrides: Theforcevariableoverride is documented to be the highest priority override. However, due to a long-standing quirk of how OVERRIDES is set, thelibcoverrides (e.g.libc-glibc,libc-musl, and so forth) erroneously had a higher priority. This issue is now corrected.It is likely this change will not cause any problems. However, it is possible with some unusual configurations that you might see a change in behavior if you were relying on the previous behavior. Be sure to check how you use
forcevariableandlibc-*overrides in your custom layers and configuration files to ensure they make sense.The
build-${BUILD_OS}Override Has Been Removed: Thebuild-${BUILD_OS}, which is typicallybuild-linux, override has been removed because building on a host operating system other than a recent version of Linux is neither supported nor recommended. Dropping the override avoids giving the impression that other host operating systems might be supported.The “_remove” operator now preserves whitespace. Consequently, when specifying list items to remove, be aware that leading and trailing whitespace resulting from the removal is retained.
See the “Removal (Override Style Syntax)” section in the BitBake User Manual for a detailed example.
systemd Configuration is Now Split Into systemd-conf
The configuration for the systemd recipe has been moved into a
systemd-conf recipe. Moving this configuration to a separate recipe
avoids the systemd recipe from becoming machine-specific for cases
where machine-specific configurations need to be applied (e.g. for
qemu* machines).
Currently, the new recipe packages the following files:
${sysconfdir}/machine-id
${sysconfdir}/systemd/coredump.conf
${sysconfdir}/systemd/journald.conf
${sysconfdir}/systemd/logind.conf
${sysconfdir}/systemd/system.conf
${sysconfdir}/systemd/user.conf
If you previously used bbappend files to append the systemd recipe to
change any of the listed files, you must do so for the systemd-conf
recipe instead.
Automatic Testing Changes
This section provides information about automatic testing changes:
TEST_IMAGEVariable Removed: Prior to this release, you set theTEST_IMAGEvariable to “1” to enable automatic testing for successfully built images. TheTEST_IMAGEvariable no longer exists and has been replaced by the TESTIMAGE_AUTO variable.Inheriting the testimage and testsdk classes: best practices now dictate that you use the IMAGE_CLASSES variable rather than the INHERIT variable when you inherit the testimage and testsdk classes used for automatic testing.
OpenSSL Changes
OpenSSL has been upgraded from 1.0 to 1.1. By default, this upgrade could cause problems for recipes that have both versions in their dependency chains. The problem is that both versions cannot be installed together at build time.
Note
It is possible to have both versions of the library at runtime.
BitBake Changes
The server logfile bitbake-cookerdaemon.log is now always placed in
the Build Directory instead of the current directory.
Security Changes
The Poky distribution now uses security compiler flags by default. Inclusion of these flags could cause new failures due to stricter checking for various potential security issues in code.
Post Installation Changes
You must explicitly mark post installs to defer to the target. If you
want to explicitly defer a postinstall to first boot on the target
rather than at root filesystem creation time, use pkg_postinst_ontarget() or
call postinst_intercept delay_to_first_boot from pkg_postinst().
Any failure of a pkg_postinst() script (including exit 1) triggers
an error during the do_rootfs task.
For more information on post-installation behavior, see the “Post-Installation Scripts” section in the Yocto Project Development Tasks Manual.
Python 3 Profile-Guided Optimization
The python3 recipe now enables profile-guided optimization. Using
this optimization requires a little extra build time in exchange for
improved performance on the target at runtime. Additionally, the
optimization is only enabled if the current
MACHINE has support for user-mode emulation in
QEMU (i.e. “qemu-usermode” is in
MACHINE_FEATURES, which it is by
default).
If you wish to disable Python profile-guided optimization regardless of
the value of MACHINE_FEATURES, then ensure that
PACKAGECONFIG for the python3 recipe
does not contain “pgo”. You could accomplish the latter using the
following at the configuration level:
PACKAGECONFIG_remove_pn-python3 = "pgo"
Alternatively, you can set PACKAGECONFIG using an append file
for the python3 recipe.
Miscellaneous Changes
The following miscellaneous changes occurred:
Default to using the Thumb-2 instruction set for armv7a and above. If you have any custom recipes that build software that needs to be built with the ARM instruction set, change the recipe to set the instruction set as follows:
ARM_INSTRUCTION_SET = "arm"
run-postinstsno longer uses/etc/*-postinstsfordpkg/opkgin favor of built-in postinst support. RPM behavior remains unchanged.The
NOISOandNOHDDvariables are no longer used. You now control building*.isoand*.hddimgimage types directly by using the IMAGE_FSTYPES variable.The
scripts/contrib/mkefidisk.shhas been removed in favor of Wic.kernel-moduleshas been removed from RRECOMMENDS forqemumipsandqemumips64machines. Removal also impacts thex86-base.incfile.Note
genericx86andgenericx86-64retainkernel-modulesas part of the RRECOMMENDS variable setting.The
LGPLv2_WHITELIST_GPL-3.0variable has been removed. If you are setting this variable in your configuration, set or append it to theWHITELIST_GPL-3.0variable instead.${ASNEEDED}is now included in the TARGET_LDFLAGS variable directly. The remaining definitions frommeta/conf/distro/include/as-needed.inchave been moved to corresponding recipes.Support for DSA host keys has been dropped from the OpenSSH recipes. If you are still using DSA keys, you must switch over to a more secure algorithm as recommended by OpenSSH upstream.
The
dhcprecipe now uses thedhcpd6.confconfiguration file indhcpd6.servicefor IPv6 DHCP rather than re-usingdhcpd.conf, which is now reserved for IPv4.
Release 2.5 (sumo)
This section provides migration information for moving to the Yocto Project 2.5 Release (codename “sumo”) from the prior release.
Packaging Changes
This section provides information about packaging changes that have occurred:
bind-libs: The libraries packaged by the bind recipe are in a separatebind-libspackage.libfm-gtk: ThelibfmGTK+ bindings are split into a separatelibfm-gtkpackage.flex-libfl: The flex recipe splits out libfl into a separateflex-libflpackage to avoid too many dependencies being pulled in where only the library is needed.grub-efi: Thegrub-eficonfiguration is split into a separategrub-bootconfrecipe. However, the dependency relationship fromgrub-efiis through a virtual/grub-bootconf provider making it possible to have your own recipe provide the dependency. Alternatively, you can use a BitBake append file to bring the configuration back into thegrub-efirecipe.armv7a Legacy Package Feed Support: Legacy support is removed for transitioning from
armv7atoarmv7a-vfp-neonin package feeds, which was previously enabled by settingPKGARCHCOMPAT_ARMV7A. This transition occurred in 2011 and active package feeds should by now be updated to the new naming.
Removed Recipes
The following recipes have been removed:
gcc: The version 6.4 recipes are replaced by 7.x.gst-player: Renamed togst-examplesas per upstream.hostap-utils: This software package is obsolete.latencytop: This recipe is no longer maintained upstream. The last release was in 2009.libpfm4: The only file that requires this recipe isoprofile, which has been removed.linux-yocto: The version 4.4, 4.9, and 4.10 recipes have been removed. Versions 4.12, 4.14, and 4.15 remain.man: This recipe has been replaced by modernman-dbmkelfimage: This tool has been removed in the upstream coreboot project, and is no longer needed with the removal of the ELF image type.nativesdk-postinst-intercept: This recipe is not maintained.neon: This software package is no longer maintained upstream and is no longer needed by anything in OpenEmbedded-Core.oprofile: The functionality of this recipe is replaced byperfand keeping compatibility on an ongoing basis withmuslis difficult.pax: This software package is obsolete.stat: This software package is not maintained upstream.coreutilsprovides a modern stat binary.zisofs-tools-native: This recipe is no longer needed because the compressed ISO image feature has been removed.
Scripts and Tools Changes
yocto-bsp,yocto-kernel, andyocto-layer: Theyocto-bsp,yocto-kernel, andyocto-layerscripts previously shipped with poky but not in OpenEmbedded-Core have been removed. These scripts are not maintained and are outdated. In many cases, they are also limited in scope. Thebitbake-layers create-layercommand is a direct replacement foryocto-layer. See the documentation to create a BSP or kernel recipe in the “BSP Kernel Recipe Example” section.devtool finish:devtool finishnow exits with an error if there are uncommitted changes or a rebase/am in progress in the recipe’s source repository. If this error occurs, there might be uncommitted changes that will not be included in updates to the patches applied by the recipe. A -f/–force option is provided for situations that the uncommitted changes are inconsequential and you want to proceed regardless.scripts/oe-setup-rpmreposcript: The functionality ofscripts/oe-setup-rpmrepois replaced bybitbake package-index.scripts/test-dependencies.shscript: The script is largely made obsolete by the recipe-specific sysroots functionality introduced in the previous release.
BitBake Changes
The
--runalloption has changed. There are two different behaviors people might want:Behavior A: For a given target (or set of targets) look through the task graph and run task X only if it is present and will be built.
Behavior B: For a given target (or set of targets) look through the task graph and run task X if any recipe in the taskgraph has such a target, even if it is not in the original task graph.
The
--runalloption now performs “Behavior B”. Previously--runallbehaved like “Behavior A”. A--runonlyoption has been added to retain the ability to perform “Behavior A”.Several explicit “run this task for all recipes in the dependency tree” tasks have been removed (e.g.
fetchall,checkuriall, and the*alltasks provided by thedistrodataand archiver classes). There is a BitBake option to complete this for any arbitrary task. For example:bitbake <target> -c fetchall
should now be replaced with:
bitbake <target> --runall=fetch
Python and Python 3 Changes
Here are auto-packaging changes to Python and Python 3:
The script-managed python-*-manifest.inc files that were previously
used to generate Python and Python 3 packages have been replaced with a
JSON-based file that is easier to read and maintain. A new task is
available for maintainers of the Python recipes to update the JSON file
when upgrading to new Python versions. You can now edit the file
directly instead of having to edit a script and run it to update the
file.
One particular change to note is that the Python recipes no longer have
build-time provides for their packages. This assumes python-foo is
one of the packages provided by the Python recipe. You can no longer run
bitbake python-foo or have a
DEPENDS on python-foo,
but doing either of the following causes the package to work as
expected:
IMAGE_INSTALL_append = " python-foo"
or
RDEPENDS_${PN} = "python-foo"
The earlier build-time provides behavior was a quirk of the way the Python manifest file was created. For more information on this change please see this commit.
Miscellaneous Changes
The kernel class supports building packages for multiple kernels. If your kernel recipe or
.bbappendfile mentions packaging at all, you should replace references to the kernel in package names with${KERNEL_PACKAGE_NAME}. For example, if you disable automatic installation of the kernel image usingRDEPENDS_kernel-base = ""you can avoid warnings usingRDEPENDS_${KERNEL_PACKAGE_NAME}-base = ""instead.The buildhistory class commits changes to the repository by default so you no longer need to set
BUILDHISTORY_COMMIT = "1". If you want to disable commits you need to setBUILDHISTORY_COMMIT = "0"in your configuration.The
beaglebonereference machine has been renamed tobeaglebone-yocto. Thebeaglebone-yoctoBSP is a reference implementation using only mainline components available in OpenEmbedded-Core andmeta-yocto-bsp, whereas Texas Instruments maintains a full-featured BSP in themeta-tilayer. This rename avoids the previous name clash that existed between the two BSPs.The update-alternatives class no longer works with SysV
initscripts because this usage has been problematic. Also, thesysklogdrecipe no longer usesupdate-alternativesbecause it is incompatible with other implementations.By default, the cmake class uses
ninjainstead ofmakefor building. This improves build performance. If a recipe is broken withninja, then the recipe can setOECMAKE_GENERATOR = "Unix Makefiles"to change back tomake.The previously deprecated
base_*functions have been removed in favor of their replacements inmeta/lib/oeandbitbake/lib/bb. These are typically used from recipes and classes. Any references to the old functions must be updated. The following table shows the removed functions and their replacements:Removed
Replacement
base_path_join()
oe.path.join()
base_path_relative()
oe.path.relative()
base_path_out()
oe.path.format_display()
base_read_file()
oe.utils.read_file()
base_ifelse()
oe.utils.ifelse()
base_conditional()
oe.utils.conditional()
base_less_or_equal()
oe.utils.less_or_equal()
base_version_less_or_equal()
oe.utils.version_less_or_equal()
base_contains()
bb.utils.contains()
base_both_contain()
oe.utils.both_contain()
base_prune_suffix()
oe.utils.prune_suffix()
oe_filter()
oe.utils.str_filter()
oe_filter_out()
oe.utils.str_filter_out() (or use the _remove operator)
Using
exit 1to explicitly defer a postinstall script until first boot is now deprecated since it is not an obvious mechanism and can mask actual errors. If you want to explicitly defer a postinstall to first boot on the target rather than atrootfscreation time, usepkg_postinst_ontarget()or callpostinst_intercept delay_to_first_bootfrompkg_postinst(). Any failure of apkg_postinst()script (includingexit 1) will trigger a warning during do_rootfs.For more information, see the “Post-Installation Scripts” section in the Yocto Project Development Tasks Manual.
The
elfimage type has been removed. This image type was removed because themkelfimagetool that was required to create it is no longer provided by coreboot upstream and required updating every timebinutilsupdated.Support for .iso image compression (previously enabled through
COMPRESSISO = "1") has been removed. The userspace tools (zisofs-tools) are unmaintained andsquashfsprovides better performance and compression. In order to build a live image with squashfs+lz4 compression enabled you should now setLIVE_ROOTFS_TYPE = "squashfs-lz4"and ensure thatliveis in IMAGE_FSTYPES.Recipes with an unconditional dependency on
libpamare only buildable withpamin DISTRO_FEATURES. If the dependency is truly optional then it is recommended that the dependency be conditional uponpambeing in DISTRO_FEATURES.For EFI-based machines, the bootloader (
grub-efiby default) is installed into the image at /boot. Wic can be used to split the bootloader into separate boot and root filesystem partitions if necessary.Patches whose context does not match exactly (i.e. where patch reports “fuzz” when applying) will generate a warning. For an example of this see this commit.
Layers are expected to set
LAYERSERIES_COMPAT_layernameto match the version(s) of OpenEmbedded-Core they are compatible with. This is specified as codenames using spaces to separate multiple values (e.g. “rocko sumo”). If a layer does not setLAYERSERIES_COMPAT_layername, a warning will is shown. If a layer sets a value that does not include the current version (“sumo” for the 2.5 release), then an error will be produced.The
TZenvironment variable is set to “UTC” within the build environment in order to fix reproducibility problems in some recipes.
Release 2.4 (rocko)
This section provides migration information for moving to the Yocto Project 2.4 Release (codename “rocko”) from the prior release.
Memory Resident Mode
A persistent mode is now available in BitBake’s default operation,
replacing its previous “memory resident mode” (i.e.
oe-init-build-env-memres). Now you only need to set
BB_SERVER_TIMEOUT to a timeout (in
seconds) and BitBake’s server stays resident for that amount of time
between invocations. The oe-init-build-env-memres script has been
removed since a separate environment setup script is no longer needed.
Packaging Changes
This section provides information about packaging changes that have occurred:
python3Changes:The main “python3” package now brings in all of the standard Python 3 distribution rather than a subset. This behavior matches what is expected based on traditional Linux distributions. If you wish to install a subset of Python 3, specify
python-coreplus one or more of the individual packages that are still produced.python3: Thebz2.py,lzma.py, and_compression.pyscripts have been moved from thepython3-miscpackage to thepython3-compressionpackage.
binutils: Thelibbfdlibrary is now packaged in a separate “libbfd” package. This packaging saves space when certain tools (e.g.perf) are installed. In such cases, the tools only needlibbfdrather than all the packages inbinutils.util-linuxChanges:The
suprogram is now packaged in a separate “util-linux-su” package, which is only built when “pam” is listed in the DISTRO_FEATURES variable.util-linuxshould not be installed unless it is needed becausesuis normally provided through the shadow file format. The mainutil-linuxpackage has runtime dependencies (i.e. RDEPENDS) on theutil-linux-supackage when “pam” is in DISTRO_FEATURES.The
switch_rootprogram is now packaged in a separate “util-linux-switch-root” package for small Initramfs images that do not need the wholeutil-linuxpackage or the busybox binary, which are both much larger thanswitch_root. The mainutil-linuxpackage has a recommended runtime dependency (i.e. RRECOMMENDS) on theutil-linux-switch-rootpackage.The
ioniceprogram is now packaged in a separate “util-linux-ionice” package. The mainutil-linuxpackage has a recommended runtime dependency (i.e. RRECOMMENDS) on theutil-linux-ionicepackage.
initscripts: Thesushellprogram is now packaged in a separate “initscripts-sushell” package. This packaging change allows systems to pullsushellin whenselinuxis enabled. The change also eliminates needing to pull in the entireinitscriptspackage. The maininitscriptspackage has a runtime dependency (i.e. RDEPENDS) on thesushellpackage when “selinux” is in DISTRO_FEATURES.glib-2.0: Theglib-2.0package now has a recommended runtime dependency (i.e. RRECOMMENDS) on theshared-mime-infopackage, since large portions of GIO are not useful without the MIME database. You can remove the dependency by using the BAD_RECOMMENDATIONS variable ifshared-mime-infois too large and is not required.Go Standard Runtime: The Go standard runtime has been split out from the main
gorecipe into a separatego-runtimerecipe.
Removed Recipes
acpitests: This recipe is not maintained.autogen-native: No longer required by Grub, oe-core, or meta-oe.bdwgc: Nothing in OpenEmbedded-Core requires this recipe. It has moved to meta-oe.byacc: This recipe was only needed by rpm 5.x and has moved to meta-oe.gcc (5.4): The 5.4 series dropped the recipe in favor of 6.3 / 7.2.gnome-common: Deprecated upstream and no longer needed.go-bootstrap-native: Go 1.9 does its own bootstrapping so this recipe has been removed.guile: This recipe was only needed byautogen-nativeandremake. The recipe is no longer needed by either of these programs.libclass-isa-perl: This recipe was previously needed for LSB 4, no longer needed.libdumpvalue-perl: This recipe was previously needed for LSB 4, no longer needed.libenv-perl: This recipe was previously needed for LSB 4, no longer needed.libfile-checktree-perl: This recipe was previously needed for LSB 4, no longer needed.libi18n-collate-perl: This recipe was previously needed for LSB 4, no longer needed.libiconv: This recipe was only needed foruclibc, which was removed in the previous release.glibcandmuslhave their own implementations.meta-mingwstill needslibiconv, so it has been moved tometa-mingw.libpng12: This recipe was previously needed for LSB. The currentlibpngis 1.6.x.libpod-plainer-perl: This recipe was previously needed for LSB 4, no longer needed.linux-yocto (4.1): This recipe was removed in favor of 4.4, 4.9, 4.10 and 4.12.mailx: This recipe was previously only needed for LSB compatibility, and upstream is defunct.mesa (git version only): The git version recipe was stale with respect to the release version.ofono (git version only): The git version recipe was stale with respect to the release version.portmap: This recipe is obsolete and is superseded byrpcbind.python3-pygpgme: This recipe is old and unmaintained. It was previously required bydnf, which has switched to officialgpgmePython bindings.python-async: This recipe has been removed in favor of the Python 3 version.python-gitdb: This recipe has been removed in favor of the Python 3 version.python-git: This recipe was removed in favor of the Python 3 version.python-mako: This recipe was removed in favor of the Python 3 version.python-pexpect: This recipe was removed in favor of the Python 3 version.python-ptyprocess: This recipe was removed in favor of Python the 3 version.python-pycurl: Nothing is using this recipe in OpenEmbedded-Core (i.e.meta-oe).python-six: This recipe was removed in favor of the Python 3 version.python-smmap: This recipe was removed in favor of the Python 3 version.remake: Usingremakeas the provider ofvirtual/makeis broken. Consequently, this recipe is not needed in OpenEmbedded-Core.
Kernel Device Tree Move
Kernel Device Tree support is now easier to enable in a kernel recipe.
The Device Tree code has moved to a kernel-devicetree class.
Functionality is automatically enabled for any recipe that inherits the
kernel class and sets the KERNEL_DEVICETREE
variable. The previous mechanism for doing this,
meta/recipes-kernel/linux/linux-dtb.inc, is still available to avoid
breakage, but triggers a deprecation warning. Future releases of the
Yocto Project will remove meta/recipes-kernel/linux/linux-dtb.inc.
It is advisable to remove any require statements that request
meta/recipes-kernel/linux/linux-dtb.inc from any custom kernel
recipes you might have. This will avoid breakage in post 2.4 releases.
Package QA Changes
The “unsafe-references-in-scripts” QA check has been removed.
If you refer to
${COREBASE}/LICENSEwithin LIC_FILES_CHKSUM you receive a warning because this file is a description of the license for OE-Core. Use${COMMON_LICENSE_DIR}/MITif your recipe is MIT-licensed and you cannot use the preferred method of referring to a file within the source tree.
README File Changes
The main Poky
READMEfile has been moved to themeta-pokylayer and has been renamedREADME.poky. A symlink has been created so that references to the old location work.The
README.hardwarefile has been moved tometa-yocto-bsp. A symlink has been created so that references to the old location work.A
README.qemufile has been created with coverage of theqemu*machines.
Miscellaneous Changes
The
ROOTFS_PKGMANAGE_BOOTSTRAPvariable and any references to it have been removed. You should remove this variable from any custom recipes.The
meta-yoctodirectory has been removed.Note
In the Yocto Project 2.1 release meta-yocto was renamed to meta-poky and the meta-yocto subdirectory remained to avoid breaking existing configurations.
The
maintainers.incfile, which tracks maintainers by listing a primary person responsible for each recipe in OE-Core, has been moved frommeta-pokyto OE-Core (i.e. frommeta-poky/conf/distro/includetometa/conf/distro/include).The buildhistory class now makes a single commit per build rather than one commit per subdirectory in the repository. This behavior assumes the commits are enabled with BUILDHISTORY_COMMIT = “1”, which is typical. Previously, the buildhistory class made one commit per subdirectory in the repository in order to make it easier to see the changes for a particular subdirectory. To view a particular change, specify that subdirectory as the last parameter on the
git showorgit diffcommands.The
x86-base.incfile, which is included by all x86-based machine configurations, now sets IMAGE_FSTYPES using?=to “live” rather than appending with+=. This change makes the default easier to override.BitBake fires multiple “BuildStarted” events when multiconfig is enabled (one per configuration). For more information, see the “Events” section in the BitBake User Manual.
By default, the
security_flags.incfile sets a GCCPIE variable with an option to enable Position Independent Executables (PIE) withingcc. Enabling PIE in the GNU C Compiler (GCC), makes Return Oriented Programming (ROP) attacks much more difficult to execute.OE-Core now provides a
bitbake-layersplugin that implements a “create-layer” subcommand. The implementation of this subcommand has resulted in theyocto-layerscript being deprecated and will likely be removed in the next Yocto Project release.The
vmdk,vdi, andqcow2image file types are now used in conjunction with the “wic” image type through CONVERSION_CMD. Consequently, the equivalent image types are nowwic.vmdk,wic.vdi, andwic.qcow2, respectively.do_image_<type>[depends]has replacedIMAGE_DEPENDS_<type>. If you have your own classes that implement custom image types, then you need to update them.OpenSSL 1.1 has been introduced. However, the default is still 1.0.x through the PREFERRED_VERSION variable. This preference is set is due to the remaining compatibility issues with other software. The PROVIDES variable in the openssl 1.0 recipe now includes “openssl10” as a marker that can be used in DEPENDS within recipes that build software that still depend on OpenSSL 1.0.
To ensure consistent behavior, BitBake’s “-r” and “-R” options (i.e. prefile and postfile), which are used to read or post-read additional configuration files from the command line, now only affect the current BitBake command. Before these BitBake changes, these options would “stick” for future executions.
Release 2.3 (pyro)
This section provides migration information for moving to the Yocto Project 2.3 Release (codename “pyro”) from the prior release.
Recipe-specific Sysroots
The OpenEmbedded build system now uses one sysroot per recipe to resolve long-standing issues with configuration script auto-detection of undeclared dependencies. Consequently, you might find that some of your previously written custom recipes are missing declared dependencies, particularly those dependencies that are incidentally built earlier in a typical build process and thus are already likely to be present in the shared sysroot in previous releases.
Consider the following:
Declare Build-Time Dependencies: Because of this new feature, you must explicitly declare all build-time dependencies for your recipe. If you do not declare these dependencies, they are not populated into the sysroot for the recipe.
Specify Pre-Installation and Post-Installation Native Tool Dependencies: You must specifically specify any special native tool dependencies of
pkg_preinstandpkg_postinstscripts by using the PACKAGE_WRITE_DEPS variable. Specifying these dependencies ensures that these tools are available if these scripts need to be run on the build host during the do_rootfs task.As an example, see the
dbusrecipe. You will see that this recipe has apkg_postinstthat callssystemctlif “systemd” is in DISTRO_FEATURES. In the example,systemd-systemctl-nativeis added to PACKAGE_WRITE_DEPS, which is also conditional on “systemd” being in DISTRO_FEATURES.Examine Recipes that Use
SSTATEPOSTINSTFUNCS: You need to examine any recipe that usesSSTATEPOSTINSTFUNCSand determine steps to take.Functions added to
SSTATEPOSTINSTFUNCSare still called as they were in previous Yocto Project releases. However, since a separate sysroot is now being populated for every recipe and if existing functions being called throughSSTATEPOSTINSTFUNCSare doing relocation, then you will need to change these to use a post-installation script that is installed by a function added to SYSROOT_PREPROCESS_FUNCS.For an example, see the pixbufcache class in
meta/classes/in the Yocto Project Source Repositories.Note
The SSTATEPOSTINSTFUNCS variable itself is now deprecated in favor of the do_populate_sysroot[postfuncs] task. Consequently, if you do still have any function or functions that need to be called after the sysroot component is created for a recipe, then you would be well advised to take steps to use a post installation script as described previously. Taking these steps prepares your code for when SSTATEPOSTINSTFUNCS is removed in a future Yocto Project release.
Specify the Sysroot when Using Certain External Scripts: Because the shared sysroot is now gone, the scripts
oe-find-native-sysrootandoe-run-nativehave been changed such that you need to specify which recipe’s STAGING_DIR_NATIVE is used.
Note
You can find more information on how recipe-specific sysroots work in the “staging” section.
PATH Variable
Within the environment used to run build tasks, the environment variable
PATH is now sanitized such that the normal native binary paths
(/bin, /sbin, /usr/bin and so forth) are removed and a
directory containing symbolic links linking only to the binaries from
the host mentioned in the HOSTTOOLS and
HOSTTOOLS_NONFATAL variables is added
to PATH.
Consequently, any native binaries provided by the host that you need to call needs to be in one of these two variables at the configuration level.
Alternatively, you can add a native recipe (i.e. -native) that
provides the binary to the recipe’s DEPENDS
value.
Note
PATH
is not sanitized in the same way within devshell.
If it were, you would have difficulty running host tools for
development and debugging within the shell.
Changes to Scripts
The following changes to scripts took place:
oe-find-native-sysroot: The usage for theoe-find-native-sysrootscript has changed to the following:$ . oe-find-native-sysroot recipe
You must now supply a recipe for recipe as part of the command. Prior to the Yocto Project 2.3 release, it was not necessary to provide the script with the command.
oe-run-native: The usage for theoe-run-nativescript has changed to the following:$ oe-run-native native_recipe tool
You must supply the name of the native recipe and the tool you want to run as part of the command. Prior to the Yocto Project 2.3 release, it was not necessary to provide the native recipe with the command.
cleanup-workdir: Thecleanup-workdirscript has been removed because the script was found to be deleting files it should not have, which lead to broken build trees. Rather than trying to delete portions of TMPDIR and getting it wrong, it is recommended that you delete TMPDIR and have it restored from shared state (sstate) on subsequent builds.wipe-sysroot: Thewipe-sysrootscript has been removed as it is no longer needed with recipe-specific sysroots.
Changes to Functions
The previously deprecated bb.data.getVar(), bb.data.setVar(),
and related functions have been removed in favor of d.getVar(),
d.setVar(), and so forth.
You need to fix any references to these old functions.
BitBake Changes
The following changes took place for BitBake:
BitBake’s Graphical Dependency Explorer UI Replaced: BitBake’s graphical dependency explorer UI
depexpwas replaced bytaskexp(“Task Explorer”), which provides a graphical way of exploring thetask-depends.dotfile. The data presented by Task Explorer is much more accurate than the data that was presented bydepexp. Being able to visualize the data is an often requested feature as standard*.dotfile viewers cannot usual cope with the size of thetask-depends.dotfile.BitBake “-g” Output Changes: The
package-depends.dotandpn-depends.dotfiles as previously generated using thebitbake -gcommand have been removed. Arecipe-depends.dotfile is now generated as a collapsed version oftask-depends.dotinstead.The reason for this change is because
package-depends.dotandpn-depends.dotlargely date back to a time before task-based execution and do not take into account task-level dependencies between recipes, which could be misleading.Mirror Variable Splitting Changes: Mirror variables including MIRRORS, PREMIRRORS, and SSTATE_MIRRORS can now separate values entirely with spaces. Consequently, you no longer need “\n”. BitBake looks for pairs of values, which simplifies usage. There should be no change required to existing mirror variable values themselves.
The Subversion (SVN) Fetcher Uses an “ssh” Parameter and Not an “rsh” Parameter: The SVN fetcher now takes an “ssh” parameter instead of an “rsh” parameter. This new optional parameter is used when the “protocol” parameter is set to “svn+ssh”. You can only use the new parameter to specify the
sshprogram used by SVN. The SVN fetcher passes the new parameter through theSVN_SSHenvironment variable during the do_fetch task.See the “Subversion (SVN) Fetcher (svn://)” section in the BitBake User Manual for additional information.
BB_SETSCENE_VERIFY_FUNCTIONandBB_SETSCENE_VERIFY_FUNCTION2Removed: Because the mechanism they were part of is no longer necessary with recipe-specific sysroots, theBB_SETSCENE_VERIFY_FUNCTIONandBB_SETSCENE_VERIFY_FUNCTION2variables have been removed.
Absolute Symbolic Links
Absolute symbolic links (symlinks) within staged files are no longer
permitted and now trigger an error. Any explicit creation of symlinks
can use the lnr script, which is a replacement for ln -r.
If the build scripts in the software that the recipe is building are
creating a number of absolute symlinks that need to be corrected, you
can inherit relative_symlinks within the recipe to turn those
absolute symlinks into relative symlinks.
GPLv2 Versions of GPLv3 Recipes Moved
Older GPLv2 versions of GPLv3 recipes have moved to a separate
meta-gplv2 layer.
If you use INCOMPATIBLE_LICENSE to
exclude GPLv3 or set PREFERRED_VERSION
to substitute a GPLv2 version of a GPLv3 recipe, then you must add the
meta-gplv2 layer to your configuration.
Note
You can find meta-gplv2 layer in the OpenEmbedded layer index at
https://layers.openembedded.org/layerindex/branch/master/layer/meta-gplv2.
These relocated GPLv2 recipes do not receive the same level of maintenance as other core recipes. The recipes do not get security fixes and upstream no longer maintains them. In fact, the upstream community is actively hostile towards people that use the old versions of the recipes. Moving these recipes into a separate layer both makes the different needs of the recipes clearer and clearly identifies the number of these recipes.
Note
The long-term solution might be to move to BSD-licensed replacements of the GPLv3 components for those that need to exclude GPLv3-licensed components from the target system. This solution will be investigated for future Yocto Project releases.
Package Management Changes
The following package management changes took place:
Smart package manager is replaced by DNF package manager. Smart has become unmaintained upstream, is not ported to Python 3.x. Consequently, Smart needed to be replaced. DNF is the only feasible candidate.
The change in functionality is that the on-target runtime package management from remote package feeds is now done with a different tool that has a different set of command-line options. If you have scripts that call the tool directly, or use its API, they need to be fixed.
For more information, see the DNF Documentation.
Rpm 5.x is replaced with Rpm 4.x. This is done for two major reasons:
DNF is API-incompatible with Rpm 5.x and porting it and maintaining the port is non-trivial.
Rpm 5.x itself has limited maintenance upstream, and the Yocto Project is one of the very few remaining users.
Berkeley DB 6.x is removed and Berkeley DB 5.x becomes the default:
Version 6.x of Berkeley DB has largely been rejected by the open source community due to its AGPLv3 license. As a result, most mainstream open source projects that require DB are still developed and tested with DB 5.x.
In OE-core, the only thing that was requiring DB 6.x was Rpm 5.x. Thus, no reason exists to continue carrying DB 6.x in OE-core.
createrepois replaced withcreaterepo_c.createrepo_cis the current incarnation of the tool that generates remote repository metadata. It is written in C as compared tocreaterepo, which is written in Python.createrepo_cis faster and is maintained.Architecture-independent RPM packages are “noarch” instead of “all”.
This change was made because too many places in DNF/RPM4 stack already make that assumption. Only the filenames and the architecture tag has changed. Nothing else has changed in OE-core system, particularly in the allarch class.
Signing of remote package feeds using
PACKAGE_FEED_SIGNis not currently supported. This issue will be fully addressed in a future Yocto Project release. See defect 11209 for more information on a solution to package feed signing with RPM in the Yocto Project 2.3 release.OPKG now uses the libsolv backend for resolving package dependencies by default. This is vastly superior to OPKG’s internal ad-hoc solver that was previously used. This change does have a small impact on disk (around 500 KB) and memory footprint.
Note
For further details on this change, see the commit message.
Removed Recipes
The following recipes have been removed:
linux-yocto 4.8: Version 4.8 has been removed. Versions 4.1 (LTSI), 4.4 (LTS), 4.9 (LTS/LTSI) and 4.10 are now present.python-smartpm: Functionally replaced bydnf.createrepo: Replaced by thecreaterepo-crecipe.rpmresolve: No longer needed with the move to RPM 4 as RPM itself is used instead.gstreamer: Removed the GStreamer Git version recipes as they have been stale.1.10.x recipes are still present.alsa-conf-base: Merged intoalsa-confsincelibasounddepended on both. Essentially, no way existed to install only one of these.tremor: Moved tometa-multimedia. Fixed-integer Vorbis decoding is not needed by current hardware. Thus, GStreamer’s ivorbis plugin has been disabled by default eliminating the need for thetremorrecipe in OpenEmbedded-Core (OE-Core).gummiboot: Replaced bysystemd-boot.
Wic Changes
The following changes have been made to Wic:
Note
For more information on Wic, see the “Creating Partitioned Images Using Wic” section in the Yocto Project Development Tasks Manual.
Default Output Directory Changed: Wic’s default output directory is now the current directory by default instead of the unusual
/var/tmp/wic.The
-oand--outdiroptions remain unchanged and are used to specify your preferred output directory if you do not want to use the default directory.fsimage Plug-in Removed: The Wic fsimage plugin has been removed as it duplicates functionality of the rawcopy plugin.
QA Changes
The following QA checks have changed:
unsafe-references-in-binaries: Theunsafe-references-in-binariesQA check, which was disabled by default, has now been removed. This check was intended to detect binaries in/binthat link to libraries in/usr/liband have the case where the user has/usron a separate filesystem to/.The removed QA check was buggy. Additionally,
/usrresiding on a separate partition from/is now a rare configuration. Consequently,unsafe-references-in-binarieswas removed.file-rdeps: Thefile-rdepsQA check is now an error by default instead of a warning. Because it is an error instead of a warning, you need to address missing runtime dependencies.For additional information, see the insane class and the “Errors and Warnings” section.
Miscellaneous Changes
The following miscellaneous changes have occurred:
In this release, a number of recipes have been changed to ignore the
largefileDISTRO_FEATURES item, enabling large file support unconditionally. This feature has always been enabled by default. Disabling the feature has not been widely tested.Note
Future releases of the Yocto Project will remove entirely the ability to disable the largefile feature, which would make it unconditionally enabled everywhere.
If the DISTRO_VERSION value contains the value of the DATE variable, which is the default between Poky releases, the DATE value is explicitly excluded from
/etc/issueand/etc/issue.net, which is displayed at the login prompt, in order to avoid conflicts with Multilib enabled. Regardless, the DATE value is inaccurate if thebase-filesrecipe is restored from shared state (sstate) rather than rebuilt.If you need the build date recorded in
/etc/issue*or anywhere else in your image, a better method is to define a post-processing function to do it and have the function called from ROOTFS_POSTPROCESS_COMMAND. Doing so ensures the value is always up-to-date with the created image.Dropbear’s
initscript now disables DSA host keys by default. This change is in line with the systemd service file, which supports RSA keys only, and with recent versions of OpenSSH, which deprecates DSA host keys.The buildhistory class now correctly uses tabs as separators between all columns in
installed-package-sizes.txtin order to aid import into other tools.The
USE_LDCONFIGvariable has been replaced with the “ldconfig” DISTRO_FEATURES feature. Distributions that previously set:USE_LDCONFIG = "0"
should now instead use the following:
DISTRO_FEATURES_BACKFILL_CONSIDERED_append = " ldconfig"
The default value of COPYLEFT_LICENSE_INCLUDE now includes all versions of AGPL licenses in addition to GPL and LGPL.
Note
The default list is not intended to be guaranteed as a complete safe list. You should seek legal advice based on what you are distributing if you are unsure.
Kernel module packages are now suffixed with the kernel version in order to allow module packages from multiple kernel versions to co-exist on a target system. If you wish to return to the previous naming scheme that does not include the version suffix, use the following:
KERNEL_MODULE_PACKAGE_SUFFIX = ""
Removal of
libtool*.lafiles is now enabled by default. The*.lafiles are not actually needed on Linux and relocating them is an unnecessary burden.If you need to preserve these
.lafiles (e.g. in a custom distribution), you must change INHERIT_DISTRO such that “remove-libtool” is not included in the value.Extensible SDKs built for GCC 5+ now refuse to install on a distribution where the host GCC version is 4.8 or 4.9. This change resulted from the fact that the installation is known to fail due to the way the
uninativeshared state (sstate) package is built. See the uninative class for additional information.All native and nativesdk recipes now use a separate DISTRO_FEATURES value instead of sharing the value used by recipes for the target, in order to avoid unnecessary rebuilds.
The DISTRO_FEATURES for native recipes is DISTRO_FEATURES_NATIVE added to an intersection of DISTRO_FEATURES and DISTRO_FEATURES_FILTER_NATIVE.
For nativesdk recipes, the corresponding variables are DISTRO_FEATURES_NATIVESDK and DISTRO_FEATURES_FILTER_NATIVESDK.
The
FILESDIRvariable, which was previously deprecated and rarely used, has now been removed. You should change any recipes that setFILESDIRto set FILESPATH instead.The
MULTIMACH_HOST_SYSvariable has been removed as it is no longer needed with recipe-specific sysroots.
Release 2.2 (morty)
This section provides migration information for moving to the Yocto Project 2.2 Release (codename “morty”) from the prior release.
Minimum Kernel Version
The minimum kernel version for the target system and for SDK is now
3.2.0, due to the upgrade to glibc 2.24. Specifically, for
AArch64-based targets the version is 3.14. For Nios II-based targets,
the minimum kernel version is 3.19.
Note
For x86 and x86_64, you can reset OLDEST_KERNEL to anything down to 2.6.32 if desired.
Staging Directories in Sysroot Has Been Simplified
The way directories are staged in sysroot has been simplified and
introduces the new SYSROOT_DIRS,
SYSROOT_DIRS_NATIVE, and SYSROOT_DIRS_BLACKLIST
(replaced by SYSROOT_DIRS_IGNORE in version 4.0). See the
v2 patch series on the OE-Core Mailing List
for additional information.
Removal of Old Images and Other Files in tmp/deploy Now Enabled
Removal of old images and other files in tmp/deploy/ is now enabled
by default due to a new staging method used for those files. As a result
of this change, the RM_OLD_IMAGE variable is now redundant.
Python Changes
The following changes for Python occurred:
BitBake Now Requires Python 3.4+
BitBake requires Python 3.4 or greater.
UTF-8 Locale Required on Build Host
A UTF-8 locale is required on the build host due to Python 3. Since C.UTF-8 is not a standard, the default is en_US.UTF-8.
Metadata Must Now Use Python 3 Syntax
The metadata is now required to use Python 3 syntax. For help preparing metadata, see any of the many Python 3 porting guides available. Alternatively, you can reference the conversion commits for BitBake and you can use OpenEmbedded-Core (OE-Core) as a guide for changes. Particular areas of interest are:
subprocess command-line pipes needing locale decoding
the syntax for octal values changed
the
iter*()functions changed nameiterators now return views, not lists
changed names for Python modules
Target Python Recipes Switched to Python 3
Most target Python recipes have now been switched to Python 3. Unfortunately, systems using RPM as a package manager and providing online package-manager support through SMART still require Python 2.
Note
Python 2 and recipes that use it can still be built for the target as with previous versions.
buildtools-tarball Includes Python 3
The buildtools tarball now includes Python 3.
uClibc Replaced by musl
uClibc has been removed in favor of musl. Musl has matured, is better maintained, and is compatible with a wider range of applications as compared to uClibc.
${B} No Longer Default Working Directory for Tasks
${B} is no longer the default working directory for tasks.
Consequently, any custom tasks you define now need to either have the
[dirs]
flag set, or the task needs to change into the appropriate working directory
manually (e.g using cd for a shell task).
Note
The preferred method is to use the [dirs] flag.
runqemu Ported to Python
runqemu has been ported to Python and has changed behavior in some
cases. Previous usage patterns continue to be supported.
The new runqemu is a Python script. Machine knowledge is no longer
hardcoded into runqemu. You can choose to use the qemuboot
configuration file to define the BSP’s own arguments and to make it
bootable with runqemu. If you use a configuration file, use the
following form:
image-name-machine.qemuboot.conf
The configuration file
enables fine-grained tuning of options passed to QEMU without the
runqemu script hard-coding any knowledge about different machines.
Using a configuration file is particularly convenient when trying to use
QEMU with machines other than the qemu* machines in
OpenEmbedded-Core (OE-Core). The qemuboot.conf file is generated by the
qemuboot class when the root filesystem is being built (i.e. build
rootfs). QEMU boot arguments can be set in BSP’s configuration file and
the qemuboot class will save them to qemuboot.conf.
If you want to use runqemu without a configuration file, use the
following command form:
$ runqemu machine rootfs kernel [options]
Supported machines are as follows:
qemuarm
qemuarm64
qemux86
qemux86-64
qemuppc
qemumips
qemumips64
qemumipsel
qemumips64el
Consider the
following example, which uses the qemux86-64 machine, provides a
root filesystem, provides an image, and uses the nographic option:
$ runqemu qemux86-64 tmp/deploy/images/qemux86-64/core-image-minimal-qemux86-64.ext4 tmp/deploy/images/qemux86-64/bzImage nographic
Here is a list of variables that can be set in configuration files
such as bsp.conf to enable the BSP to be booted by runqemu:
QB_SYSTEM_NAME: QEMU name (e.g. "qemu-system-i386")
QB_OPT_APPEND: Options to append to QEMU (e.g. "-show-cursor")
QB_DEFAULT_KERNEL: Default kernel to boot (e.g. "bzImage")
QB_DEFAULT_FSTYPE: Default FSTYPE to boot (e.g. "ext4")
QB_MEM: Memory (e.g. "-m 512")
QB_MACHINE: QEMU machine (e.g. "-machine virt")
QB_CPU: QEMU cpu (e.g. "-cpu qemu32")
QB_CPU_KVM: Similar to QB_CPU except used for kvm support (e.g. "-cpu kvm64")
QB_KERNEL_CMDLINE_APPEND: Options to append to the kernel's -append
option (e.g. "console=ttyS0 console=tty")
QB_DTB: QEMU dtb name
QB_AUDIO_DRV: QEMU audio driver (e.g. "alsa", set it when support audio)
QB_AUDIO_OPT: QEMU audio option (e.g. "-soundhw ac97,es1370"), which is used
when QB_AUDIO_DRV is set.
QB_KERNEL_ROOT: Kernel's root (e.g. /dev/vda)
QB_TAP_OPT: Network option for 'tap' mode (e.g.
"-netdev tap,id=net0,ifname=@TAP@,script=no,downscript=no -device virtio-net-device,netdev=net0").
runqemu will replace "@TAP@" with the one that is used, such as tap0, tap1 ...
QB_SLIRP_OPT: Network option for SLIRP mode (e.g. "-netdev user,id=net0 -device virtio-net-device,netdev=net0")
QB_ROOTFS_OPT: Used as rootfs (e.g.
"-drive id=disk0,file=@ROOTFS@,if=none,format=raw -device virtio-blk-device,drive=disk0").
runqemu will replace "@ROOTFS@" with the one which is used, such as
core-image-minimal-qemuarm64.ext4.
QB_SERIAL_OPT: Serial port (e.g. "-serial mon:stdio")
QB_TCPSERIAL_OPT: tcp serial port option (e.g.
" -device virtio-serial-device -chardev socket,id=virtcon,port=@PORT@,host=127.0.0.1 -device virtconsole,chardev=virtcon"
runqemu will replace "@PORT@" with the port number which is used.
To use runqemu, set IMAGE_CLASSES as
follows and run runqemu:
Note
“QB” means “QEMU Boot”.
Note
For command-line syntax, use runqemu help.
IMAGE_CLASSES += "qemuboot"
Default Linker Hash Style Changed
The default linker hash style for gcc-cross is now “sysv” in order
to catch recipes that are building software without using the
OpenEmbedded LDFLAGS. This change could result in
seeing some “No GNU_HASH in the elf binary” QA issues when building such
recipes. You need to fix these recipes so that they use the expected
LDFLAGS. Depending on how the software is built, the build system
used by the software (e.g. a Makefile) might need to be patched.
However, sometimes making this fix is as simple as adding the following
to the recipe:
TARGET_CC_ARCH += "${LDFLAGS}"
KERNEL_IMAGE_BASE_NAME no Longer Uses KERNEL_IMAGETYPE
The KERNEL_IMAGE_BASE_NAME variable no longer uses the
KERNEL_IMAGETYPE variable to create the
image’s base name. Because the OpenEmbedded build system can now build
multiple kernel image types, this part of the kernel image base name as
been removed leaving only the following:
KERNEL_IMAGE_BASE_NAME ?= "${PKGE}-${PKGV}-${PKGR}-${MACHINE}-${DATETIME}"
If you have recipes or
classes that use KERNEL_IMAGE_BASE_NAME directly, you might need to
update the references to ensure they continue to work.
IMGDEPLOYDIR Replaces DEPLOY_DIR_IMAGE for Most Use Cases
The IMGDEPLOYDIR variable was introduced to allow sstate caching of image creation results. Image recipes defining custom IMAGE_CMD or doing postprocessing on the generated images need to be adapted to use IMGDEPLOYDIR instead of DEPLOY_DIR_IMAGE. IMAGE_MANIFEST creation and symlinking of the most recent image file will fail otherwise.
BitBake Changes
The following changes took place for BitBake:
The “goggle” UI and standalone image-writer tool have been removed as they both require GTK+ 2.0 and were not being maintained.
The Perforce fetcher now supports SRCREV for specifying the source revision to use, be it
${AUTOREV}, changelist number, p4date, or label, in preference to separate SRC_URI parameters to specify these. This change is more in-line with how the other fetchers work for source control systems. Recipes that fetch from Perforce will need to be updated to use SRCREV in place of specifying the source revision within SRC_URI.Some of BitBake’s internal code structures for accessing the recipe cache needed to be changed to support the new multi-configuration functionality. These changes will affect external tools that use BitBake’s tinfoil module. For information on these changes, see the changes made to the scripts supplied with OpenEmbedded-Core: 1 and 2.
The task management code has been rewritten to avoid using ID indirection in order to improve performance. This change is unlikely to cause any problems for most users. However, the setscene verification function as pointed to by
BB_SETSCENE_VERIFY_FUNCTIONneeded to change signature. Consequently, a new variable namedBB_SETSCENE_VERIFY_FUNCTION2has been added allowing multiple versions of BitBake to work with suitably written metadata, which includes OpenEmbedded-Core and Poky. Anyone with custom BitBake task scheduler code might also need to update the code to handle the new structure.
Swabber has Been Removed
Swabber, a tool that was intended to detect host contamination in the build process, has been removed, as it has been unmaintained and unused for some time and was never particularly effective. The OpenEmbedded build system has since incorporated a number of mechanisms including enhanced QA checks that mean that there is less of a need for such a tool.
Removed Recipes
The following recipes have been removed:
augeas: No longer needed and has been moved tometa-oe.directfb: Unmaintained and has been moved tometa-oe.gcc: Removed 4.9 version. Versions 5.4 and 6.2 are still present.gnome-doc-utils: No longer needed.gtk-doc-stub: Replaced bygtk-doc.gtk-engines: No longer needed and has been moved tometa-gnome.gtk-sato-engine: Became obsolete.libglade: No longer needed and has been moved tometa-oe.libmad: Unmaintained and functionally replaced bylibmpg123.libmadhas been moved tometa-oe.libowl: Became obsolete.libxsettings-client: No longer needed.oh-puzzles: Functionally replaced bypuzzles.oprofileui: Became obsolete. OProfile has been largely supplanted by perf.packagegroup-core-directfb.bb: Removed.core-image-directfb.bb: Removed.pointercal: No longer needed and has been moved tometa-oe.python-imaging: No longer needed and moved tometa-pythonpython-pyrex: No longer needed and moved tometa-python.sato-icon-theme: Became obsolete.swabber-native: Swabber has been removed. See the entry on Swabber.tslib: No longer needed and has been moved tometa-oe.uclibc: Removed in favor of musl.xtscal: No longer needed and moved tometa-oe
Removed Classes
The following classes have been removed:
distutils-native-base: No longer needed.distutils3-native-base: No longer needed.sdl: Only set DEPENDS and SECTION, which are better set within the recipe instead.sip: Mostly unused.swabber: See the entry on Swabber.
Minor Packaging Changes
The following minor packaging changes have occurred:
grub: Splitgrub-editenvinto its own package.systemd: Split container and vm related units into a new package, systemd-container.util-linux: Movedprlimitto a separateutil-linux-prlimitpackage.
Miscellaneous Changes
The following miscellaneous changes have occurred:
package_regex.inc: Removed because the definitionspackage_regex.incpreviously contained have been moved to their respective recipes.Both
devtool addandrecipetool createnow use a fixed SRCREV by default when fetching from a Git repository. You can override this in either case to use${AUTOREV}instead by using the-aor--autorevcommand-line optiondistcc: GTK+ UI is now disabled by default.packagegroup-core-tools-testapps: Removed Piglit.image: Renamed COMPRESS(ION) to CONVERSION. This change means that
COMPRESSIONTYPES,COMPRESS_DEPENDSandCOMPRESS_CMDare deprecated in favor ofCONVERSIONTYPES,CONVERSION_DEPENDSand CONVERSION_CMD. TheCOMPRESS*variable names will still work in the 2.2 release but metadata that does not need to be backwards-compatible should be changed to use the new names as theCOMPRESS*ones will be removed in a future release.gtk-doc: A full version ofgtk-docis now made available. However, some old software might not be capable of using the current version ofgtk-docto build documentation. You need to change recipes that build such software so that they explicitly disable building documentation withgtk-doc.
Release 2.1 (krogoth)
This section provides migration information for moving to the Yocto Project 2.1 Release (codename “krogoth”) from the prior release.
Variable Expansion in Python Functions
Variable expressions, such as ${VARNAME} no longer expand
automatically within Python functions. Suppressing expansion was done to
allow Python functions to construct shell scripts or other code for
situations in which you do not want such expressions expanded. For any
existing code that relies on these expansions, you need to change the
expansions to expand the value of individual variables through
d.getVar(). To alternatively expand more complex expressions, use
d.expand().
Overrides Must Now be Lower-Case
The convention for overrides has always been for them to be lower-case
characters. This practice is now a requirement as BitBake’s datastore
now assumes lower-case characters in order to give a slight performance
boost during parsing. In practical terms, this requirement means that
anything that ends up in OVERRIDES must now
appear in lower-case characters (e.g. values for MACHINE,
TARGET_ARCH, DISTRO, and also recipe names if
_pn-recipename overrides are to be effective).
Expand Parameter to getVar() and getVarFlag() is Now Mandatory
The expand parameter to getVar() and getVarFlag() previously
defaulted to False if not specified. Now, however, no default exists so
one must be specified. You must change any getVar() calls that do
not specify the final expand parameter to calls that do specify the
parameter. You can run the following sed command at the base of a
layer to make this change:
sed -e 's:\(\.getVar([^,()]*\)):\1, False):g' -i `grep -ril getVar *`
sed -e 's:\(\.getVarFlag([^,()]*,[^,()]*\)):\1, False):g' -i `grep -ril getVarFlag *`
Note
The reason for this change is that it prepares the way for changing the default to True in a future Yocto Project release. This future change is a much more sensible default than False. However, the change needs to be made gradually as a sudden change of the default would potentially cause side-effects that would be difficult to detect.
Makefile Environment Changes
EXTRA_OEMAKE now defaults to “” instead of
“-e MAKEFLAGS=”. Setting EXTRA_OEMAKE to “-e MAKEFLAGS=” by default
was a historical accident that has required many classes (e.g.
autotools*, module) and recipes to override this default in order
to work with sensible build systems. When upgrading to the release, you
must edit any recipe that relies upon this old default by either setting
EXTRA_OEMAKE back to “-e MAKEFLAGS=” or by explicitly setting any
required variable value overrides using EXTRA_OEMAKE, which is
typically only needed when a Makefile sets a default value for a
variable that is inappropriate for cross-compilation using the “=”
operator rather than the “?=” operator.
libexecdir Reverted to ${prefix}/libexec
The use of ${libdir}/${BPN} as libexecdir is different as
compared to all other mainstream distributions, which either uses
${prefix}/libexec or ${libdir}. The use is also contrary to the
GNU Coding Standards (i.e.
https://www.gnu.org/prep/standards/html_node/Directory-Variables.html)
that suggest ${prefix}/libexec and also notes that any
package-specific nesting should be done by the package itself. Finally,
having libexecdir change between recipes makes it very difficult for
different recipes to invoke binaries that have been installed into
libexecdir. The Filesystem Hierarchy Standard (i.e.
https://refspecs.linuxfoundation.org/FHS_3.0/fhs/ch04s07.html) now
recognizes the use of ${prefix}/libexec/, giving distributions the
choice between ${prefix}/lib or ${prefix}/libexec without
breaking FHS.
ac_cv_sizeof_off_t is No Longer Cached in Site Files
For recipes inheriting the autotools*
class, ac_cv_sizeof_off_t is no longer cached in the site files for
autoconf. The reason for this change is because the
ac_cv_sizeof_off_t value is not necessarily static per architecture
as was previously assumed. Rather, the value changes based on whether
large file support is enabled. For most software that uses autoconf,
this change should not be a problem. However, if you have a recipe that
bypasses the standard do_configure task
from the autotools* class and the software the recipe is building
uses a very old version of autoconf, the recipe might be incapable
of determining the correct size of off_t during do_configure.
The best course of action is to patch the software as necessary to allow
the default implementation from the autotools* class to work such
that autoreconf succeeds and produces a working configure script,
and to remove the overridden do_configure task such that the default
implementation does get used.
Image Generation is Now Split Out from Filesystem Generation
Previously, for image recipes the do_rootfs task assembled the filesystem and then from that filesystem generated images. With this Yocto Project release, image generation is split into separate do_image tasks for clarity both in operation and in the code.
For most cases, this change does not present any problems. However, if you have made customizations that directly modify the do_rootfs task or that mention do_rootfs, you might need to update those changes. In particular, if you had added any tasks after do_rootfs, you should make edits so that those tasks are after the do_image_complete task rather than after do_rootfs so that your added tasks run at the correct time.
A minor part of this restructuring is that the post-processing definitions and functions have been moved from the image class to the rootfs-postcommands class. Functionally, however, they remain unchanged.
Removed Recipes
The following recipes have been removed in the 2.1 release:
gccversion 4.8: Versions 4.9 and 5.3 remain.qt4: All support for Qt 4.x has been moved out to a separatemeta-qt4layer because Qt 4 is no longer supported upstream.x11vnc: Moved to themeta-oelayer.linux-yocto-3.14: No longer supported.linux-yocto-3.19: No longer supported.libjpeg: Replaced by thelibjpeg-turborecipe.pth: Became obsolete.liboil: Recipe is no longer needed and has been moved to themeta-multimedialayer.gtk-theme-torturer: Recipe is no longer needed and has been moved to themeta-gnomelayer.gnome-mime-data: Recipe is no longer needed and has been moved to themeta-gnomelayer.udev: Replaced by theeudevrecipe for compatibility when usingsysvinitwith newer kernels.python-pygtk: Recipe became obsolete.adt-installer: Recipe became obsolete. See the “ADT Removed” section for more information.
Class Changes
The following classes have changed:
autotools_stage: Removed because the autotools* class now provides its functionality. Recipes that inherited fromautotools_stageshould now inherit from autotools* instead.boot-directdisk: Merged into theimage-vmclass. Theboot-directdiskclass was rarely directly used. Consequently, this change should not cause any issues.bootimg: Merged into the image-live class. Thebootimgclass was rarely directly used. Consequently, this change should not cause any issues.packageinfo: Removed due to its limited use by the Hob UI, which has itself been removed.
Build System User Interface Changes
The following changes have been made to the build system user interface:
Hob GTK+-based UI: Removed because it is unmaintained and based on the outdated GTK+ 2 library. The Toaster web-based UI is much more capable and is actively maintained. See the “Using the Toaster Web Interface” section in the Toaster User Manual for more information on this interface.
“puccho” BitBake UI: Removed because is unmaintained and no longer useful.
ADT Removed
The Application Development Toolkit (ADT) has been removed because its functionality almost completely overlapped with the standard SDK and the extensible SDK. For information on these SDKs and how to build and use them, see the Yocto Project Application Development and the Extensible Software Development Kit (eSDK) manual.
Note
The Yocto Project Eclipse IDE Plug-in is still supported and is not affected by this change.
Poky Reference Distribution Changes
The following changes have been made for the Poky distribution:
The
meta-yoctolayer has been renamed tometa-pokyto better match its purpose, which is to provide the Poky reference distribution. Themeta-yocto-bsplayer retains its original name since it provides reference machines for the Yocto Project and it is otherwise unrelated to Poky. References tometa-yoctoin yourconf/bblayers.confshould automatically be updated, so you should not need to change anything unless you are relying on this naming elsewhere.The uninative class is now enabled by default in Poky. This class attempts to isolate the build system from the host distribution’s C library and makes re-use of native shared state artifacts across different host distributions practical. With this class enabled, a tarball containing a pre-built C library is downloaded at the start of the build.
The uninative class is enabled through the
meta/conf/distro/include/yocto-uninative.incfile, which for those not using the Poky distribution, can include to easily enable the same functionality.Alternatively, if you wish to build your own
uninativetarball, you can do so by building theuninative-tarballrecipe, making it available to your build machines (e.g. over HTTP/HTTPS) and setting a similar configuration as the one set byyocto-uninative.inc.Static library generation, for most cases, is now disabled by default in the Poky distribution. Disabling this generation saves some build time as well as the size used for build output artifacts.
Disabling this library generation is accomplished through a
meta/conf/distro/include/no-static-libs.inc, which for those not using the Poky distribution can easily include to enable the same functionality.Any recipe that needs to opt-out of having the
--disable-staticoption specified on the configure command line either because it is not a supported option for the configure script or because static libraries are needed should set the following variable:DISABLE_STATIC = ""
The separate
poky-tinydistribution now uses the musl C library instead of a heavily pared downglibc. Using musl results in a smaller distribution and facilitates much greater maintainability because musl is designed to have a small footprint.If you have used
poky-tinyand have customized theglibcconfiguration you will need to redo those customizations with musl when upgrading to the new release.
Packaging Changes
The following changes have been made to packaging:
The
runuserandmountpointbinaries, which were previously in the mainutil-linuxpackage, have been split out into theutil-linux-runuserandutil-linux-mountpointpackages, respectively.The
python-elementtreepackage has been merged into thepython-xmlpackage.
Tuning File Changes
The following changes have been made to the tuning files:
The “no-thumb-interwork” tuning feature has been dropped from the ARM tune include files. Because interworking is required for ARM EABI, attempting to disable it through a tuning feature no longer makes sense.
Note
Support for ARM OABI was deprecated in gcc 4.7.
The
tune-cortexm*.incandtune-cortexr4.incfiles have been removed because they are poorly tested. Until the OpenEmbedded build system officially gains support for CPUs without an MMU, these tuning files would probably be better maintained in a separate layer if needed.
Supporting GObject Introspection
This release supports generation of GLib Introspective Repository (GIR) files through GObject introspection, which is the standard mechanism for accessing GObject-based software from runtime environments. You can enable, disable, and test the generation of this data. See the “Enabling GObject Introspection Support” section in the Yocto Project Development Tasks Manual for more information.
Miscellaneous Changes
These additional changes exist:
The minimum Git version has been increased to 1.8.3.1. If your host distribution does not provide a sufficiently recent version, you can install the buildtools, which will provide it. See the Required Git, tar, Python, make and gcc Versions section for more information on the buildtools tarball.
The buggy and incomplete support for the RPM version 4 package manager has been removed. The well-tested and maintained support for RPM version 5 remains.
Previously, the following list of packages were removed if package-management was not in IMAGE_FEATURES, regardless of any dependencies:
update-rc.d base-passwd shadow update-alternatives run-postinsts
With the Yocto Project 2.1 release, these packages are only removed if “read-only-rootfs” is in IMAGE_FEATURES, since they might still be needed for a read-write image even in the absence of a package manager (e.g. if users need to be added, modified, or removed at runtime).
The devtool modify command now defaults to extracting the source since that is most commonly expected. The
-xor--extractoptions are now no-ops. If you wish to provide your own existing source tree, you will now need to specify either the-nor--no-extractoptions when runningdevtool modify.If the formfactor for a machine is either not supplied or does not specify whether a keyboard is attached, then the default is to assume a keyboard is attached rather than assume no keyboard. This change primarily affects the Sato UI.
The
.debugdirectory packaging is now automatic. If your recipe builds software that installs binaries into directories other than the standard ones, you no longer need to take care of settingFILES_${PN}-dbgto pick up the resulting.debugdirectories as these directories are automatically found and added.Inaccurate disk and CPU percentage data has been dropped from buildstats output. This data has been replaced with
getrusage()data and corrected IO statistics. You will probably need to update any custom code that reads the buildstats data.The
meta/conf/distro/include/package_regex.incis now deprecated. The contents of this file have been moved to individual recipes.Note
Because this file will likely be removed in a future Yocto Project release, it is suggested that you remove any references to the file that might be in your configuration.
The
v86d/uvesafbhas been removed from thegenericx86andgenericx86-64reference machines, which are provided by themeta-yocto-bsplayer. Most modern x86 boards do not rely on this file and it only adds kernel error messages during startup. If you do still need to supportuvesafb, you can simply addv86dto your image.Build sysroot paths are now removed from debug symbol files. Removing these paths means that remote GDB using an unstripped build system sysroot will no longer work (although this was never documented to work). The supported method to accomplish something similar is to set
IMAGE_GEN_DEBUGFSto “1”, which will generate a companion debug image containing unstripped binaries and associated debug sources alongside the image.
Release 2.0 (jethro)
This section provides migration information for moving to the Yocto Project 2.0 Release (codename “jethro”) from the prior release.
GCC 5
The default compiler is now GCC 5.2. This change has required fixes for compilation errors in a number of other recipes.
One important example is a fix for when the Linux kernel freezes at boot
time on ARM when built with GCC 5. If you are using your own kernel
recipe or source tree and building for ARM, you will likely need to
apply this
patch.
The standard linux-yocto kernel source tree already has a workaround
for the same issue.
For further details, see https://gcc.gnu.org/gcc-5/changes.html and the porting guide at https://gcc.gnu.org/gcc-5/porting_to.html.
Alternatively, you can switch back to GCC 4.9 or 4.8 by setting GCCVERSION in your configuration, as follows:
GCCVERSION = "4.9%"
Gstreamer 0.10 Removed
Gstreamer 0.10 has been removed in favor of Gstreamer 1.x. As part of
the change, recipes for Gstreamer 0.10 and related software are now
located in meta-multimedia. This change results in Qt4 having Phonon
and Gstreamer support in QtWebkit disabled by default.
Removed Recipes
The following recipes have been moved or removed:
bluez4: The recipe is obsolete and has been moved due tobluez5becoming fully integrated. Thebluez4recipe now resides inmeta-oe.gamin: The recipe is obsolete and has been removed.gnome-icon-theme: The recipe’s functionally has been replaced byadwaita-icon-theme.Gstreamer 0.10 Recipes: Recipes for Gstreamer 0.10 have been removed in favor of the recipes for Gstreamer 1.x.
insserv: The recipe is obsolete and has been removed.libunique: The recipe is no longer used and has been moved tometa-oe.midori: The recipe’s functionally has been replaced byepiphany.python-gst: The recipe is obsolete and has been removed since it only contains bindings for Gstreamer 0.10.qt-mobility: The recipe is obsolete and has been removed since it requiresGstreamer 0.10, which has been replaced.subversion: All 1.6.x versions of this recipe have been removed.webkit-gtk: The older 1.8.3 version of this recipe has been removed in favor ofwebkitgtk.
BitBake datastore improvements
The method by which BitBake’s datastore handles overrides has changed.
Overrides are now applied dynamically and bb.data.update_data() is
now a no-op. Thus, bb.data.update_data() is no longer required in
order to apply the correct overrides. In practice, this change is
unlikely to require any changes to Metadata. However, these minor
changes in behavior exist:
All potential overrides are now visible in the variable history as seen when you run the following:
$ bitbake -e
d.delVar('VARNAME')andd.setVar('VARNAME', None)result in the variable and all of its overrides being cleared out. Before the change, only the non-overridden values were cleared.
Shell Message Function Changes
The shell versions of the BitBake message functions (i.e. bbdebug,
bbnote, bbwarn, bbplain, bberror, and bbfatal) are
now connected through to their BitBake equivalents bb.debug(),
bb.note(), bb.warn(), bb.plain(), bb.error(), and
bb.fatal(), respectively. Thus, those message functions that you
would expect to be printed by the BitBake UI are now actually printed.
In practice, this change means two things:
If you now see messages on the console that you did not previously see as a result of this change, you might need to clean up the calls to
bbwarn,bberror, and so forth. Or, you might want to simply remove the calls.The
bbfatalmessage function now suppresses the full error log in the UI, which means any calls tobbfatalwhere you still wish to see the full error log should be replaced bydieorbbfatal_log.
Extra Development/Debug Package Cleanup
The following recipes have had extra dev/dbg packages removed:
aclapmdaspellattraugeasbzip2coglcurlelfutilsgcc-targetlibgcclibtoollibxmuopkgpciutilsrpmsysfsutilstiffxz
All of the above recipes now conform to the standard packaging scheme
where a single -dev, -dbg, and -staticdev package exists per
recipe.
Recipe Maintenance Tracking Data Moved to OE-Core
Maintenance tracking data for recipes that was previously part of
meta-yocto has been moved to OpenEmbedded-Core (OE-Core). The change
includes package_regex.inc and distro_alias.inc, which are
typically enabled when using the distrodata class. Additionally, the
contents of upstream_tracking.inc has now been split out to the
relevant recipes.
Automatic Stale Sysroot File Cleanup
Stale files from recipes that no longer exist in the current
configuration are now automatically removed from sysroot as well as
removed from any other place managed by shared state. This automatic
cleanup means that the build system now properly handles situations such
as renaming the build system side of recipes, removal of layers from
bblayers.conf, and DISTRO_FEATURES
changes.
Additionally, work directories for old versions of recipes are now pruned. If you wish to disable pruning old work directories, you can set the following variable in your configuration:
SSTATE_PRUNE_OBSOLETEWORKDIR = "0"
linux-yocto Kernel Metadata Repository Now Split from Source
The linux-yocto tree has up to now been a combined set of kernel
changes and configuration (meta) data carried in a single tree. While
this format is effective at keeping kernel configuration and source
modifications synchronized, it is not always obvious to developers how
to manipulate the Metadata as compared to the source.
Metadata processing has now been removed from the
kernel-yocto class and the external
Metadata repository yocto-kernel-cache, which has always been used
to seed the linux-yocto “meta” branch. This separate linux-yocto
cache repository is now the primary location for this data. Due to this
change, linux-yocto is no longer able to process combined trees.
Thus, if you need to have your own combined kernel repository, you must
do the split there as well and update your recipes accordingly. See the
meta/recipes-kernel/linux/linux-yocto_4.1.bb recipe for an example.
Additional QA checks
The following QA checks have been added:
Added a “host-user-contaminated” check for ownership issues for packaged files outside of
/home. The check looks for files that are incorrectly owned by the user that ran BitBake instead of owned by a valid user in the target system.Added an “invalid-chars” check for invalid (non-UTF8) characters in recipe metadata variable values (i.e. DESCRIPTION, SUMMARY, LICENSE, and SECTION). Some package managers do not support these characters.
Added an “invalid-packageconfig” check for any options specified in PACKAGECONFIG that do not match any PACKAGECONFIG option defined for the recipe.
Miscellaneous Changes
These additional changes exist:
gtk-update-icon-cachehas been renamed togtk-icon-utils.The
tools-profileIMAGE_FEATURES item as well as its corresponding packagegroup andpackagegroup-core-tools-profileno longer bring inoprofile. Bringing inoprofilewas originally added to aid compilation on resource-constrained targets. However, this aid has not been widely used and is not likely to be used going forward due to the more powerful target platforms and the existence of better cross-compilation tools.The IMAGE_FSTYPES variable’s default value now specifies
ext4instead ofext3.All support for the
PRINCvariable has been removed.The
packagegroup-core-full-cmdlinepackagegroup no longer brings inlighttpddue to the fact that bringing inlighttpdis not really in line with the packagegroup’s purpose, which is to add full versions of command-line tools that by default are provided bybusybox.
Release 1.8 (fido)
This section provides migration information for moving to the Yocto Project 1.8 Release (codename “fido”) from the prior release.
Removed Recipes
The following recipes have been removed:
owl-video: Functionality replaced bygst-player.gaku: Functionality replaced bygst-player.gnome-desktop: This recipe is now available inmeta-gnomeand is no longer needed.gsettings-desktop-schemas: This recipe is now available inmeta-gnomeand is no longer needed.python-argparse: Theargparsemodule is already provided in the default Python distribution in a package namedpython-argparse. Consequently, the separatepython-argparserecipe is no longer needed.telepathy-python, libtelepathy, telepathy-glib, telepathy-idle, telepathy-mission-control: All these recipes have moved tometa-oeand are consequently no longer needed by any recipes in OpenEmbedded-Core.linux-yocto_3.10andlinux-yocto_3.17: Support for the linux-yocto 3.10 and 3.17 kernels has been dropped. Support for the 3.14 kernel remains, while support for 3.19 kernel has been added.poky-feed-config-opkg: This recipe has become obsolete and is no longer needed. Usedistro-feed-configfrommeta-oeinstead.libav 0.8.x:libav 9.xis now used.sed-native: No longer needed. A working version ofsedis expected to be provided by the host distribution.
BlueZ 4.x / 5.x Selection
Proper built-in support for selecting BlueZ 5.x in preference to the
default of 4.x now exists. To use BlueZ 5.x, simply add “bluez5” to your
DISTRO_FEATURES value. If you had
previously added append files (*.bbappend) to make this selection,
you can now remove them.
Additionally, a bluetooth class has been added to make selection of
the appropriate bluetooth support within a recipe a little easier. If
you wish to make use of this class in a recipe, add something such as
the following:
inherit bluetooth
PACKAGECONFIG ??= "${@bb.utils.contains('DISTRO_FEATURES', 'bluetooth', '${BLUEZ}', '', d)}"
PACKAGECONFIG[bluez4] = "--enable-bluetooth,--disable-bluetooth,bluez4"
PACKAGECONFIG[bluez5] = "--enable-bluez5,--disable-bluez5,bluez5"
Kernel Build Changes
The kernel build process was changed to place the source in a common shared work
area and to place build artifacts separately in the source code tree. In theory,
migration paths have been provided for most common usages in kernel recipes but
this might not work in all cases. In particular, users need to ensure that
${S} (source files) and ${B} (build artifacts) are used correctly in
functions such as do_configure and do_install. For
kernel recipes that do not inherit from kernel-yocto or
include linux-yocto.inc, you might wish to refer to the linux.inc file
in the meta-oe layer for the kinds of changes you need to make. For reference,
here is the
commit
where the linux.inc file in meta-oe was updated.
Recipes that rely on the kernel source code and do not inherit the module classes might need to add explicit dependencies on the do_shared_workdir kernel task, for example:
do_configure[depends] += "virtual/kernel:do_shared_workdir"
SSL 3.0 is Now Disabled in OpenSSL
SSL 3.0 is now disabled when building OpenSSL. Disabling SSL 3.0 avoids
any lingering instances of the POODLE vulnerability. If you feel you
must re-enable SSL 3.0, then you can add an append file (*.bbappend)
for the openssl recipe to remove “-no-ssl3” from
EXTRA_OECONF.
Default Sysroot Poisoning
gcc's default sysroot and include directories are now “poisoned”. In
other words, the sysroot and include directories are being redirected to
a non-existent location in order to catch when host directories are
being used due to the correct options not being passed. This poisoning
applies both to the cross-compiler used within the build and to the
cross-compiler produced in the SDK.
If this change causes something in the build to fail, it almost certainly means the various compiler flags and commands are not being passed correctly to the underlying piece of software. In such cases, you need to take corrective steps.
Rebuild Improvements
Changes have been made to the base, autotools*, and cmake classes to clean out generated files when the do_configure task needs to be re-executed.
One of the improvements is to attempt to run “make clean” during the
do_configure task if a Makefile exists. Some software packages
do not provide a working clean target within their make files. If you
have such recipes, you need to set
CLEANBROKEN to “1” within the recipe, for example:
CLEANBROKEN = "1"
QA Check and Validation Changes
The following QA Check and Validation Changes have occurred:
Usage of
PRINCpreviously triggered a warning. It now triggers an error. You should remove any remaining usage ofPRINCin any recipe or append file.An additional QA check has been added to detect usage of
${D}in FILES values where D values should not be used at all. The same check ensures that$Dis used inpkg_preinst/pkg_postinst/pkg_prerm/pkg_postrmfunctions instead of${D}.S now needs to be set to a valid value within a recipe. If S is not set in the recipe, the directory is not automatically created. If S does not point to a directory that exists at the time the do_unpack task finishes, a warning will be shown.
LICENSE is now validated for correct formatting of multiple licenses. If the format is invalid (e.g. multiple licenses are specified with no operators to specify how the multiple licenses interact), then a warning will be shown.
Miscellaneous Changes
The following miscellaneous changes have occurred:
The
send-error-reportscript now expects a “-s” option to be specified before the server address. This assumes a server address is being specified.The
oe-pkgdata-utilscript now expects a “-p” option to be specified before thepkgdatadirectory, which is now optional. If thepkgdatadirectory is not specified, the script will run BitBake to query PKGDATA_DIR from the build environment.
Release 1.7 (dizzy)
This section provides migration information for moving to the Yocto Project 1.7 Release (codename “dizzy”) from the prior release.
Changes to Setting QEMU PACKAGECONFIG Options in local.conf
The QEMU recipe now uses a number of
PACKAGECONFIG options to enable various
optional features. The method used to set defaults for these options
means that existing local.conf files will need to be modified to
append to PACKAGECONFIG for qemu-native and nativesdk-qemu
instead of setting it. In other words, to enable graphical output for
QEMU, you should now have these lines in local.conf:
PACKAGECONFIG_append_pn-qemu-native = " sdl"
PACKAGECONFIG_append_pn-nativesdk-qemu = " sdl"
Minimum Git version
The minimum Git
version required on the
build host is now 1.7.8 because the --list option is now required by
BitBake’s Git fetcher. As always, if your host distribution does not
provide a version of Git that meets this requirement, you can use the
buildtools tarball that does. See the
“Required Git, tar, Python, make and gcc Versions”
section for more information.
Autotools Class Changes
The following autotools* class changes occurred:
A separate :term:`Build Directory` is now used by default: The autotools* class has been changed to use a directory for building (B), which is separate from the source directory (S). This is commonly referred to as
B != S, or an out-of-tree build.If the software being built is already capable of building in a directory separate from the source, you do not need to do anything. However, if the software is not capable of being built in this manner, you will need to either patch the software so that it can build separately, or you will need to change the recipe to inherit the autotools-brokensep class instead of the autotools* or
autotools_stageclasses.The
--foreignoption is no longer passed toautomakewhen runningautoconf: This option tellsautomakethat a particular software package does not follow the GNU standards and therefore should not be expected to distribute certain files such asChangeLog,AUTHORS, and so forth. Because the majority of upstream software packages already tellautomaketo enable foreign mode themselves, the option is mostly superfluous. However, some recipes will need patches for this change. You can easily make the change by patchingconfigure.acso that it passes “foreign” toAM_INIT_AUTOMAKE(). See this commit for an example showing how to make the patch.
Binary Configuration Scripts Disabled
Some of the core recipes that package binary configuration scripts now
disable the scripts due to the scripts previously requiring error-prone
path substitution. Software that links against these libraries using
these scripts should use the much more robust pkg-config instead.
The list of recipes changed in this version (and their configuration
scripts) is as follows:
directfb (directfb-config)
freetype (freetype-config)
gpgme (gpgme-config)
libassuan (libassuan-config)
libcroco (croco-6.0-config)
libgcrypt (libgcrypt-config)
libgpg-error (gpg-error-config)
libksba (ksba-config)
libpcap (pcap-config)
libpcre (pcre-config)
libpng (libpng-config, libpng16-config)
libsdl (sdl-config)
libusb-compat (libusb-config)
libxml2 (xml2-config)
libxslt (xslt-config)
ncurses (ncurses-config)
neon (neon-config)
npth (npth-config)
pth (pth-config)
taglib (taglib-config)
Additionally, support for pkg-config has been added to some recipes in the
previous list in the rare cases where the upstream software package does
not already provide it.
eglibc 2.19 Replaced with glibc 2.20
Because eglibc and glibc were already fairly close, this
replacement should not require any significant changes to other software
that links to eglibc. However, there were a number of minor changes
in glibc 2.20 upstream that could require patching some software
(e.g. the removal of the _BSD_SOURCE feature test macro).
glibc 2.20 requires version 2.6.32 or greater of the Linux kernel.
Thus, older kernels will no longer be usable in conjunction with it.
For full details on the changes in glibc 2.20, see the upstream
release notes
here.
Kernel Module Autoloading
The module_autoload_* variable is now
deprecated and a new
KERNEL_MODULE_AUTOLOAD variable
should be used instead. Also, module_conf_*
must now be used in conjunction with a new
KERNEL_MODULE_PROBECONF variable.
The new variables no longer require you to specify the module name as
part of the variable name. This change not only simplifies usage but
also allows the values of these variables to be appropriately
incorporated into task signatures and thus trigger the appropriate tasks
to re-execute when changed. You should replace any references to
module_autoload_* with KERNEL_MODULE_AUTOLOAD, and add any
modules for which module_conf_* is specified to
KERNEL_MODULE_PROBECONF.
QA Check Changes
The following changes have occurred to the QA check process:
Additional QA checks
file-rdepsandbuild-depshave been added in order to verify that file dependencies are satisfied (e.g. package contains a script requiring/bin/bash) and build-time dependencies are declared, respectively. For more information, please see the “QA Error and Warning Messages” chapter.Package QA checks are now performed during a new do_package_qa task rather than being part of the do_package task. This allows more parallel execution. This change is unlikely to be an issue except for highly customized recipes that disable packaging tasks themselves by marking them as
noexec. For those packages, you will need to disable the do_package_qa task as well.Files being overwritten during the do_populate_sysroot task now trigger an error instead of a warning. Recipes should not be overwriting files written to the sysroot by other recipes. If you have these types of recipes, you need to alter them so that they do not overwrite these files.
You might now receive this error after changes in configuration or metadata resulting in orphaned files being left in the sysroot. If you do receive this error, the way to resolve the issue is to delete your TMPDIR or to move it out of the way and then re-start the build. Anything that has been fully built up to that point and does not need rebuilding will be restored from the shared state cache and the rest of the build will be able to proceed as normal.
Removed Recipes
The following recipes have been removed:
x-load: This recipe has been superseded by U-Boot SPL for all Cortex-based TI SoCs. For legacy boards, themeta-tilayer, which contains a maintained recipe, should be used instead.ubootchart: This recipe is obsolete. Abootchart2recipe has been added to functionally replace it.linux-yocto 3.4: Support for the linux-yocto 3.4 kernel has been dropped. Support for the 3.10 and 3.14 kernels remains, while support for version 3.17 has been added.eglibchas been removed in favor ofglibc. See the “eglibc 2.19 Replaced with glibc 2.20” section for more information.
Miscellaneous Changes
The following miscellaneous change occurred:
The build history feature now writes
build-id.txtinstead ofbuild-id. Additionally,build-id.txtnow contains the full build header as printed by BitBake upon starting the build. You should manually remove old “build-id” files from your existing build history repositories to avoid confusion. For information on the build history feature, see the “Maintaining Build Output Quality” section in the Yocto Project Development Tasks Manual.
Release 1.6 (daisy)
This section provides migration information for moving to the Yocto Project 1.6 Release (codename “daisy”) from the prior release.
archiver Class
The archiver class has been rewritten and its configuration has been simplified. For more details on the source archiver, see the “Maintaining Open Source License Compliance During Your Product’s Lifecycle” section in the Yocto Project Development Tasks Manual.
Packaging Changes
The following packaging changes have been made:
The
binutilsrecipe no longer produces abinutils-symlinkspackage.update-alternativesis now used to handle the preferredbinutilsvariant on the target instead.The tc (traffic control) utilities have been split out of the main
iproute2package and put into theiproute2-tcpackage.The
gtk-enginesschemas have been moved to a dedicatedgtk-engines-schemaspackage.The
armv7awith thumb package architecture suffix has changed. The suffix for these packages with the thumb optimization enabled is “t2” as it should be. Use of this suffix was not the case in the 1.5 release. Architecture names will change within package feeds as a result.
BitBake
The following changes have been made to BitBake.
Matching Branch Requirement for Git Fetching
When fetching source from a Git repository using SRC_URI, BitBake will now validate the SRCREV value against the branch. You can specify the branch using the following form:
SRC_URI = "git://server.name/repository;branch=branchname"
If you do not specify a branch, BitBake looks in the default “master” branch.
Alternatively, if you need to bypass this check (e.g. if you are fetching a revision corresponding to a tag that is not on any branch), you can add “;nobranch=1” to the end of the URL within SRC_URI.
Python Definition substitutions
BitBake had some previously deprecated Python definitions within its
bb module removed. You should use their sub-module counterparts
instead:
bb.MalformedUrl: Usebb.fetch.MalformedUrl.bb.encodeurl: Usebb.fetch.encodeurl.bb.decodeurl: Usebb.fetch.decodeurlbb.mkdirhier: Usebb.utils.mkdirhier.bb.movefile: Usebb.utils.movefile.bb.copyfile: Usebb.utils.copyfile.bb.which: Usebb.utils.which.bb.vercmp_string: Usebb.utils.vercmp_string.bb.vercmp: Usebb.utils.vercmp.
SVK Fetcher
The SVK fetcher has been removed from BitBake.
Console Output Error Redirection
The BitBake console UI will now output errors to stderr instead of
stdout. Consequently, if you are piping or redirecting the output of
bitbake to somewhere else, and you wish to retain the errors, you
will need to add 2>&1 (or something similar) to the end of your
bitbake command line.
task-taskname Overrides
task-taskname overrides have been adjusted so that tasks whose
names contain underscores have the underscores replaced by hyphens for
the override so that they now function properly. For example, the task
override for do_populate_sdk is
task-populate-sdk.
Changes to Variables
The following variables have changed. For information on the OpenEmbedded build system variables, see the “Variables Glossary” Chapter.
TMPDIR
TMPDIR can no longer be on an NFS mount. NFS does not offer full POSIX locking and inode consistency and can cause unexpected issues if used to store TMPDIR.
The check for this occurs on startup. If TMPDIR is detected on an NFS mount, an error occurs.
PRINC
The PRINC variable has been deprecated and triggers a warning if
detected during a build. For PR increments on changes,
use the PR service instead. You can find out more about this service in
the “Working With a PR Service”
section in the Yocto Project Development Tasks Manual.
IMAGE_TYPES
The “sum.jffs2” option for IMAGE_TYPES has been replaced by the “jffs2.sum” option, which fits the processing order.
COPY_LIC_MANIFEST
The COPY_LIC_MANIFEST variable must now be set to “1” rather than any value in order to enable it.
COPY_LIC_DIRS
The COPY_LIC_DIRS variable must now be set to “1” rather than any value in order to enable it.
PACKAGE_GROUP
The PACKAGE_GROUP variable has been renamed to
FEATURE_PACKAGES to more accurately
reflect its purpose. You can still use PACKAGE_GROUP but the
OpenEmbedded build system produces a warning message when it encounters
the variable.
Preprocess and Post Process Command Variable Behavior
The following variables now expect a semicolon separated list of functions to call and not arbitrary shell commands:
For migration purposes, you can simply wrap shell commands in a shell function and then call the function. Here is an example:
my_postprocess_function() {
echo "hello" > ${IMAGE_ROOTFS}/hello.txt
}
ROOTFS_POSTPROCESS_COMMAND += "my_postprocess_function; "
Package Test (ptest)
Package Tests (ptest) are built but not installed by default. For information on using Package Tests, see the “Testing Packages With ptest” section in the Yocto Project Development Tasks Manual. See also the “ptest” section.
Build Changes
Separate build and source directories have been enabled by default for
selected recipes where it is known to work and for all
recipes that inherit the cmake class. In
future releases the autotools* class
will enable a separate Build Directory by default as well. Recipes
building Autotools-based software that fails to build with a separate
Build Directory should be changed to inherit from the
autotools-brokensep class instead of
the autotools* or autotools_stage classes.
qemu-native
qemu-native now builds without SDL-based graphical output support by
default. The following additional lines are needed in your
local.conf to enable it:
PACKAGECONFIG_pn-qemu-native = "sdl"
ASSUME_PROVIDED += "libsdl-native"
Note
The default local.conf contains these statements. Consequently, if you
are building a headless system and using a default local.conf
file, you will need comment these two lines out.
core-image-basic
core-image-basic has been renamed to core-image-full-cmdline.
In addition to core-image-basic being renamed,
packagegroup-core-basic has been renamed to
packagegroup-core-full-cmdline to match.
Licensing
The top-level LICENSE file has been changed to better describe the license of the various components of OpenEmbedded-Core (OE-Core). However, the licensing itself remains unchanged.
Normally, this change would not cause any side-effects. However, some
recipes point to this file within
LIC_FILES_CHKSUM (as
${COREBASE}/LICENSE) and thus the accompanying checksum must be
changed from 3f40d7994397109285ec7b81fdeb3b58 to
4d92cd373abda3937c2bc47fbc49d690. A better alternative is to have
LIC_FILES_CHKSUM point to a file describing the license that is
distributed with the source that the recipe is building, if possible,
rather than pointing to ${COREBASE}/LICENSE.
CFLAGS Options
The “-fpermissive” option has been removed from the default CFLAGS value. You need to take action on individual recipes that fail when building with this option. You need to either patch the recipes to fix the issues reported by the compiler, or you need to add “-fpermissive” to CFLAGS in the recipes.
Custom Image Output Types
Custom image output types, as selected using IMAGE_FSTYPES, must declare their dependencies on other image types (if any) using a new IMAGE_TYPEDEP variable.
Tasks
The do_package_write task has been removed. The task is no longer
needed.
update-alternative Provider
The default update-alternatives provider has been changed from
opkg to opkg-utils. This change resolves some troublesome
circular dependencies. The runtime package has also been renamed from
update-alternatives-cworth to update-alternatives-opkg.
virtclass Overrides
The virtclass overrides are now deprecated. Use the equivalent class
overrides instead (e.g. virtclass-native becomes class-native.)
Removed and Renamed Recipes
The following recipes have been removed:
packagegroup-toolset-native— this recipe is largely unused.linux-yocto-3.8— support for the Linux yocto 3.8 kernel has been dropped. Support for the 3.10 and 3.14 kernels have been added with thelinux-yocto-3.10andlinux-yocto-3.14recipes.ocf-linux— this recipe has been functionally replaced usingcryptodev-linux.genext2fs—genext2fsis no longer used by the build system and is unmaintained upstream.js— this provided an ancient version of Mozilla’s javascript engine that is no longer needed.zaurusd— the recipe has been moved to themeta-handheldlayer.eglibc 2.17— replaced by theeglibc 2.19recipe.gcc 4.7.2— replaced by the now stablegcc 4.8.2.external-sourcery-toolchain— this recipe is now maintained in themeta-sourcerylayer.linux-libc-headers-yocto 3.4+git— now using version 3.10 of thelinux-libc-headersby default.meta-toolchain-gmae— this recipe is obsolete.packagegroup-core-sdk-gmae— this recipe is obsolete.packagegroup-core-standalone-gmae-sdk-target— this recipe is obsolete.
Removed Classes
The following classes have become obsolete and have been removed:
module_strippkg_metainfopkg_distributeimage-empty
Reference Board Support Packages (BSPs)
The following reference BSPs changes occurred:
The BeagleBoard (
beagleboard) ARM reference hardware has been replaced by the BeagleBone (beaglebone) hardware.The RouterStation Pro (
routerstationpro) MIPS reference hardware has been replaced by the EdgeRouter Lite (edgerouter) hardware.
The previous reference BSPs for the beagleboard and
routerstationpro machines are still available in a new
meta-yocto-bsp-old layer in the
Source Repositories at
https://git.yoctoproject.org/meta-yocto-bsp-old/.
Release 1.5 (dora)
This section provides migration information for moving to the Yocto Project 1.5 Release (codename “dora”) from the prior release.
Host Dependency Changes
The OpenEmbedded build system now has some additional requirements on the host system:
Python 2.7.3+
Tar 1.24+
Git 1.7.8+
Patched version of Make if you are using 3.82. Most distributions that provide Make 3.82 use the patched version.
If the Linux distribution you are using on your build host does not provide packages for these, you can install and use the Buildtools tarball, which provides an SDK-like environment containing them.
For more information on this requirement, see the “Required Git, tar, Python, make and gcc Versions” section.
atom-pc Board Support Package (BSP)
The atom-pc hardware reference BSP has been replaced by a
genericx86 BSP. This BSP is not necessarily guaranteed to work on
all x86 hardware, but it will run on a wider range of systems than the
atom-pc did.
Note
Additionally, a genericx86-64 BSP has been added for 64-bit Atom
systems.
BitBake
The following changes have been made that relate to BitBake:
BitBake now supports a
_removeoperator. The addition of this operator means you will have to rename any items in recipe space (functions, variables) whose names currently contain_remove_or end with_removeto avoid unexpected behavior.BitBake’s global method pool has been removed. This method is not particularly useful and led to clashes between recipes containing functions that had the same name.
The “none” server backend has been removed. The “process” server backend has been serving well as the default for a long time now.
The
bitbake-runtaskscript has been removed.${P}and${PF}are no longer added to PROVIDES by default inbitbake.conf. These version-specific PROVIDES items were seldom used. Attempting to use them could result in two versions being built simultaneously rather than just one version due to the way BitBake resolves dependencies.
QA Warnings
The following changes have been made to the package QA checks:
If you have customized ERROR_QA or WARN_QA values in your configuration, check that they contain all of the issues that you wish to be reported. Previous Yocto Project versions contained a bug that meant that any item not mentioned in ERROR_QA or WARN_QA would be treated as a warning. Consequently, several important items were not already in the default value of WARN_QA. All of the possible QA checks are now documented in the “insane” section.
An additional QA check has been added to check if
/usr/share/info/diris being installed. Your recipe should delete this file within do_install if “make install” is installing it.If you are using the buildhistory class, the check for the package version going backwards is now controlled using a standard QA check. Thus, if you have customized your ERROR_QA or WARN_QA values and still wish to have this check performed, you should add “version-going-backwards” to your value for one or the other variables depending on how you wish it to be handled. See the documented QA checks in the “insane” section.
Directory Layout Changes
The following directory changes exist:
Output SDK installer files are now named to include the image name and tuning architecture through the SDK_NAME variable.
Images and related files are now installed into a directory that is specific to the machine, instead of a parent directory containing output files for multiple machines. The DEPLOY_DIR_IMAGE variable continues to point to the directory containing images for the current MACHINE and should be used anywhere there is a need to refer to this directory. The
runqemuscript now uses this variable to find images and kernel binaries and will use BitBake to determine the directory. Alternatively, you can set the DEPLOY_DIR_IMAGE variable in the external environment.When buildhistory is enabled, its output is now written under the Build Directory rather than TMPDIR. Doing so makes it easier to delete TMPDIR and preserve the build history. Additionally, data for produced SDKs is now split by IMAGE_NAME.
When buildhistory is enabled, its output is now written under the Build Directory rather than TMPDIR. Doing so makes it easier to delete TMPDIR and preserve the build history. Additionally, data for produced SDKs is now split by IMAGE_NAME.
The
pkgdatadirectory produced as part of the packaging process has been collapsed into a single machine-specific directory. This directory is located undersysrootsand uses a machine-specific name (i.e.tmp/sysroots/machine/pkgdata).
Shortened Git SRCREV Values
BitBake will now shorten revisions from Git repositories from the normal 40 characters down to 10 characters within SRCPV for improved usability in path and filenames. This change should be safe within contexts where these revisions are used because the chances of spatially close collisions is very low. Distant collisions are not a major issue in the way the values are used.
IMAGE_FEATURES
The following changes have been made that relate to IMAGE_FEATURES:
The value of IMAGE_FEATURES is now validated to ensure invalid feature items are not added. Some users mistakenly add package names to this variable instead of using IMAGE_INSTALL in order to have the package added to the image, which does not work. This change is intended to catch those kinds of situations. Valid IMAGE_FEATURES are drawn from
PACKAGE_GROUPdefinitions, COMPLEMENTARY_GLOB and a new “validitems” varflag on IMAGE_FEATURES. The “validitems” varflag change allows additional features to be added if they are not provided using the previous two mechanisms.The previously deprecated “apps-console-core” IMAGE_FEATURES item is no longer supported. Add “splash” to IMAGE_FEATURES if you wish to have the splash screen enabled, since this is all that apps-console-core was doing.
/run
The /run directory from the Filesystem Hierarchy Standard 3.0 has
been introduced. You can find some of the implications for this change
here.
The change also means that recipes that install files to /var/run
must be changed. You can find a guide on how to make these changes
here.
Removal of Package Manager Database Within Image Recipes
The image core-image-minimal no longer adds
remove_packaging_data_files to
ROOTFS_POSTPROCESS_COMMAND.
This addition is now handled automatically when “package-management” is
not in IMAGE_FEATURES. If you have custom
image recipes that make this addition, you should remove the lines, as
they are not needed and might interfere with correct operation of
postinstall scripts.
Images Now Rebuild Only on Changes Instead of Every Time
The do_rootfs and other related image construction tasks are no longer marked as “nostamp”. Consequently, they will only be re-executed when their inputs have changed. Previous versions of the OpenEmbedded build system always rebuilt the image when requested rather when necessary.
Task Recipes
The previously deprecated task.bbclass has now been dropped. For
recipes that previously inherited from this class, you should rename
them from task-* to packagegroup-* and inherit
packagegroup instead.
For more information, see the “packagegroup” section.
BusyBox
By default, we now split BusyBox into two binaries: one that is suid
root for those components that need it, and another for the rest of the
components. Splitting BusyBox allows for optimization that eliminates
the tinylogin recipe as recommended by upstream. You can disable
this split by setting
BUSYBOX_SPLIT_SUID to “0”.
Automated Image Testing
A new automated image testing framework has been added through the
testimage classes. This
framework replaces the older imagetest-qemu framework.
You can learn more about performing automated image tests in the “Performing Automated Runtime Testing” section in the Yocto Project Test Environment Manual.
Build History
The changes to Build History are:
Installed package sizes:
installed-package-sizes.txtfor an image now records the size of the files installed by each package instead of the size of each compressed package archive file.The dependency graphs (
depends*.dot) now use the actual package names instead of replacing dashes, dots and plus signs with underscores.The
buildhistory-diffandbuildhistory-collect-srcrevsutilities have improved command-line handling. Use the--helpoption for each utility for more information on the new syntax.
For more information on Build History, see the “Maintaining Build Output Quality” section in the Yocto Project Development Tasks Manual.
udev
The changes to udev are:
udevno longer brings inudev-extraconfautomatically through RRECOMMENDS, since this was originally intended to be optional. If you need the extra rules, then addudev-extraconfto your image.udevno longer brings inpciutils-idsorusbutils-idsthrough RRECOMMENDS. These are not needed byudevitself and removing them saves around 350KB.
Removed and Renamed Recipes
The
linux-yocto3.2 kernel has been removed.libtool-nativesdkhas been renamed tonativesdk-libtool.tinyloginhas been removed. It has been replaced by a suid portion of Busybox. See the “BusyBox” section for more information.external-python-tarballhas been renamed tobuildtools-tarball.web-webkithas been removed. It has been functionally replaced bymidori.imakehas been removed. It is no longer needed by any other recipe.transfig-nativehas been removed. It is no longer needed by any other recipe.anjuta-remote-runhas been removed. Anjuta IDE integration has not been officially supported for several releases.
Other Changes
Here is a list of short entries describing other changes:
run-postinsts: Make this generic.base-files: Remove the unnecessarymedia/xxx directories.alsa-state: Provide an emptyasound.confby default.classes/image: Ensure BAD_RECOMMENDATIONS supports pre-renamed package names.classes/rootfs_rpm: Implement BAD_RECOMMENDATIONS for RPM.systemd: Removesystemd_unitdirifsystemdis not in DISTRO_FEATURES.systemd: Removeinit.ddir ifsystemdunit file is present andsysvinitis not a distro feature.libpam: Deny all services for theOTHERentries.image: Move
runtime_mapping_renameto avoid conflict withmultilib. See YOCTO #4993 in Bugzilla for more information.linux-dtb: Use kernel build system to generate thedtbfiles.kern-tools: Switch from guilt to newkgit-s2qtool.
Release 1.4 (dylan)
This section provides migration information for moving to the Yocto Project 1.4 Release (codename “dylan”) from the prior release.
BitBake
Differences include the following:
Comment Continuation: If a comment ends with a line continuation (\) character, then the next line must also be a comment. Any instance where this is not the case, now triggers a warning. You must either remove the continuation character, or be sure the next line is a comment.
Package Name Overrides: The runtime package specific variables RDEPENDS, RRECOMMENDS, RSUGGESTS, RPROVIDES, RCONFLICTS, RREPLACES, FILES, ALLOW_EMPTY, and the pre, post, install, and uninstall script functions
pkg_preinst,pkg_postinst,pkg_prerm, andpkg_postrmshould always have a package name override. For example, useRDEPENDS_${PN}for the main package instead of RDEPENDS. BitBake uses more strict checks when it parses recipes.
Build Behavior
Differences include the following:
Shared State Code: The shared state code has been optimized to avoid running unnecessary tasks. For example, the following no longer populates the target sysroot since that is not necessary:
$ bitbake -c rootfs some-image
Instead, the system just needs to extract the output package contents, re-create the packages, and construct the root filesystem. This change is unlikely to cause any problems unless you have missing declared dependencies.
Scanning Directory Names: When scanning for files in SRC_URI, the build system now uses FILESOVERRIDES instead of OVERRIDES for the directory names. In general, the values previously in OVERRIDES are now in FILESOVERRIDES as well. However, if you relied upon an additional value you previously added to OVERRIDES, you might now need to add it to FILESOVERRIDES unless you are already adding it through the MACHINEOVERRIDES or DISTROOVERRIDES variables, as appropriate. For more related changes, see the “Variables” section.
Proxies and Fetching Source
A new oe-git-proxy script has been added to replace previous methods
of handling proxies and fetching source from Git. See the
meta-yocto/conf/site.conf.sample file for information on how to use
this script.
Custom Interfaces File (netbase change)
If you have created your own custom etc/network/interfaces file by
creating an append file for the netbase recipe, you now need to
create an append file for the init-ifupdown recipe instead, which
you can find in OpenEmbedded-Core (OE-Core) at
meta/recipes-core/init-ifupdown. For information on how to use
append files, see the
“Appending Other Layers Metadata With Your Layer”
section in the Yocto Project Development Tasks Manual.
Remote Debugging
Support for remote debugging with the Eclipse IDE is now separated into
an image feature (eclipse-debug) that corresponds to the
packagegroup-core-eclipse-debug package group. Previously, the
debugging feature was included through the tools-debug image
feature, which corresponds to the packagegroup-core-tools-debug
package group.
Variables
The following variables have changed:
SANITY_TESTED_DISTROS: This variable now uses a distribution ID, which is composed of the host distributor ID followed by the release. Previously, SANITY_TESTED_DISTROS was composed of the description field. For example, “Ubuntu 12.10” becomes “Ubuntu-12.10”. You do not need to worry about this change if you are not specifically setting this variable, or if you are specifically setting it to “”.
SRC_URI: The
${PN},${PF},${P}, andFILE_DIRNAMEdirectories have been dropped from the default value of the FILESPATH variable, which is used as the search path for finding files referred to in SRC_URI. If you have a recipe that relied upon these directories, which would be unusual, then you will need to add the appropriate paths within the recipe or, alternatively, rearrange the files. The most common locations are still covered by${BP},${BPN}, and “files”, which all remain in the default value of FILESPATH.
Target Package Management with RPM
If runtime package management is enabled and the RPM backend is selected, Smart is now installed for package download, dependency resolution, and upgrades instead of Zypper. For more information on how to use Smart, run the following command on the target:
smart --help
Recipes Moved
The following recipes were moved from their previous locations because they are no longer used by anything in the OpenEmbedded-Core:
clutter-box2d: Now resides in themeta-oelayer.evolution-data-server: Now resides in themeta-gnomelayer.gthumb: Now resides in themeta-gnomelayer.gtkhtml2: Now resides in themeta-oelayer.gupnp: Now resides in themeta-multimedialayer.gypsy: Now resides in themeta-oelayer.libcanberra: Now resides in themeta-gnomelayer.libgdata: Now resides in themeta-gnomelayer.libmusicbrainz: Now resides in themeta-multimedialayer.metacity: Now resides in themeta-gnomelayer.polkit: Now resides in themeta-oelayer.zeroconf: Now resides in themeta-networkinglayer.
Removals and Renames
The following list shows what has been removed or renamed:
evieext: Removed because it has been removed fromxserversince 2008.Gtk+ DirectFB: Removed support because upstream Gtk+ no longer supports it as of version 2.18.
libxfontcache / xfontcacheproto: Removed because they were removed from the Xorg server in 2008.libxp / libxprintapputil / libxprintutil / printproto: Removed because the XPrint server was removed from Xorg in 2008.libxtrap / xtrapproto: Removed because their functionality was broken upstream.linux-yocto 3.0 kernel: Removed with linux-yocto 3.8 kernel being added. The linux-yocto 3.2 and linux-yocto 3.4 kernels remain as part of the release.
lsbsetup: Removed with functionality now provided bylsbtest.matchbox-stroke: Removed because it was never more than a proof-of-concept.matchbox-wm-2 / matchbox-theme-sato-2: Removed because they are not maintained. However,matchbox-wmandmatchbox-theme-satoare still provided.mesa-dri: Renamed tomesa.mesa-xlib: Removed because it was no longer useful.mutter: Removed because nothing ever uses it and the recipe is very old.orinoco-conf: Removed because it has become obsolete.update-modules: Removed because it is no longer used. The kernel modulepostinstallandpostrmscripts can now do the same task without the use of this script.web: Removed because it is not maintained. Superseded byweb-webkit.xf86bigfontproto: Removed because upstream it has been disabled by default since 2007. Nothing usesxf86bigfontproto.xf86rushproto: Removed because its dependency inxserverwas spurious and it was removed in 2005.zypper / libzypp / sat-solver: Removed and been functionally replaced with Smart (python-smartpm) when RPM packaging is used and package management is enabled on the target.
Release 1.3 (danny)
This section provides migration information for moving to the Yocto Project 1.3 Release (codename “danny”) from the prior release.
Local Configuration
Differences include changes for
SSTATE_MIRRORS and bblayers.conf.
SSTATE_MIRRORS
The shared state cache (sstate-cache), as pointed to by SSTATE_DIR, by default now has two-character subdirectories to prevent issues arising from too many files in the same directory. Also, native sstate-cache packages, which are built to run on the host system, will go into a subdirectory named using the distro ID string. If you copy the newly structured sstate-cache to a mirror location (either local or remote) and then point to it in SSTATE_MIRRORS, you need to append “PATH” to the end of the mirror URL so that the path used by BitBake before the mirror substitution is appended to the path used to access the mirror. Here is an example:
SSTATE_MIRRORS = "file://.* http://someserver.tld/share/sstate/PATH"
bblayers.conf
The meta-yocto layer consists of two parts that correspond to the
Poky reference distribution and the reference hardware Board Support
Packages (BSPs), respectively: meta-yocto and meta-yocto-bsp.
When running BitBake for the first time after upgrading, your
conf/bblayers.conf file will be updated to handle this change and
you will be asked to re-run or restart for the changes to take effect.
Recipes
Differences include changes for the following:
Python Function Whitespace
All Python functions must now use four spaces for indentation.
Previously, an inconsistent mix of spaces and tabs existed, which made
extending these functions using _append or _prepend complicated
given that Python treats whitespace as syntactically significant. If you
are defining or extending any Python functions (e.g.
populate_packages, do_unpack, do_patch and so forth) in
custom recipes or classes, you need to ensure you are using consistent
four-space indentation.
proto= in SRC_URI
Any use of proto= in SRC_URI needs to be
changed to protocol=. In particular, this applies to the following
URIs:
svn://hg://osc://
Other URIs were already using protocol=. This change improves
consistency.
nativesdk
The suffix nativesdk is now implemented as a prefix, which simplifies a lot
of the packaging code for nativesdk recipes. All custom
nativesdk recipes, which are relocatable packages that are
native to SDK_ARCH, and any references need to be updated to use
nativesdk-* instead of *-nativesdk.
Task Recipes
“Task” recipes are now known as “Package groups” and have been renamed
from task-*.bb to packagegroup-*.bb. Existing references to the
previous task-* names should work in most cases as there is an
automatic upgrade path for most packages. However, you should update
references in your own recipes and configurations as they could be
removed in future releases. You should also rename any custom task-*
recipes to packagegroup-*, and change them to inherit
packagegroup instead of task, as well
as taking the opportunity to remove anything now handled by
packagegroup, such as providing -dev and -dbg
packages, setting LIC_FILES_CHKSUM, and so forth. See the
packagegroup section for further details.
IMAGE_FEATURES
Image recipes that previously included apps-console-core in
IMAGE_FEATURES should now include splash
instead to enable the boot-up splash screen. Retaining
apps-console-core will still include the splash screen but generates a
warning. The apps-x11-core and apps-x11-games IMAGE_FEATURES
features have been removed.
Removed Recipes
The following recipes have been removed. For most of them, it is unlikely that you would have any references to them in your own Metadata. However, you should check your metadata against this list to be sure:
libx11-trim: Replaced bylibx11, which has a negligible size difference with modern Xorg.xserver-xorg-lite: Usexserver-xorg, which has a negligible size difference when DRI and GLX modules are not installed.xserver-kdrive: Effectively unmaintained for many years.mesa-xlib: No longer serves any purpose.galago: Replaced by telepathy.gail: Functionality was integrated into GTK+ 2.13.eggdbus: No longer needed.gcc-*-intermediate: The build has been restructured to avoid the need for this step.libgsmd: Unmaintained for many years. Functionality now provided byofonoinstead.contacts, dates, tasks, eds-tools: Largely unmaintained PIM application suite. It has been moved to
meta-gnomeinmeta-openembedded.
In addition to the previously listed changes, the meta-demoapps
directory has also been removed because the recipes in it were not being
maintained and many had become obsolete or broken. Additionally, these
recipes were not parsed in the default configuration. Many of these
recipes are already provided in an updated and maintained form within
the OpenEmbedded community layers such as meta-oe and
meta-gnome. For the remainder, you can now find them in the
meta-extras repository, which is in the
Source Repositories at
https://git.yoctoproject.org/meta-extras/.
Linux Kernel Naming
The naming scheme for kernel output binaries has been changed to now include PE as part of the filename:
KERNEL_IMAGE_BASE_NAME ?= "${KERNEL_IMAGETYPE}-${PE}-${PV}-${PR}-${MACHINE}-${DATETIME}"
Because the PE variable is not set by default, these binary files could result with names that include two dash characters. Here is an example:
bzImage--3.10.9+git0+cd502a8814_7144bcc4b8-r0-qemux86-64-20130830085431.bin
Permission is granted to copy, distribute and/or modify this document under the terms of the Creative Commons Attribution-Share Alike 2.0 UK: England & Wales as published by Creative Commons.
To report any inaccuracies or problems with this (or any other Yocto Project)
manual, or to send additions or changes, please send email/patches to the Yocto
Project documentation mailing list at docs@lists.yoctoproject.org or
log into the Libera Chat #yocto channel.