5 Obtaining the SDK
5.1 Locating Pre-Built SDK Installers
You can use existing, pre-built toolchains by locating and running an SDK installer script that ships with the Yocto Project. Using this method, you select and download an architecture-specific SDK installer and then run the script to hand-install the toolchain.
Follow these steps to locate and hand-install the toolchain:
Go to the Installers Directory: Go to https://downloads.yoctoproject.org/releases/yocto/yocto-3.1.2/toolchain/
Open the Folder for Your Build Host: Open the folder that matches your Build Host (i.e.
i686for 32-bit machines orx86_64for 64-bit machines).Locate and Download the SDK Installer: You need to find and download the installer appropriate for your build host, target hardware, and image type.
The installer files (
*.sh) follow this naming convention:poky-glibc-host_system-core-image-type-arch-toolchain[-ext]-release.sh Where: host_system is a string representing your development system: "i686" or "x86_64" type is a string representing the image: "sato" or "minimal" arch is a string representing the target architecture: "aarch64", "armv5e", "core2-64", "coretexa8hf-neon", "i586", "mips32r2", "mips64", or "ppc7400" release is the version of Yocto Project. NOTE: The standard SDK installer does not have the "-ext" string as part of the filename.
The toolchains provided by the Yocto Project are based off of the
core-image-satoandcore-image-minimalimages and contain libraries appropriate for developing against those images.For example, if your build host is a 64-bit x86 system and you need an extended SDK for a 64-bit core2 target, go into the
x86_64folder and download the following installer:poky-glibc-x86_64-core-image-sato-core2-64-toolchain-ext-DISTRO.sh
Run the Installer: Be sure you have execution privileges and run the installer. Following is an example from the
Downloadsdirectory:$ ~/Downloads/poky-glibc-x86_64-core-image-sato-core2-64-toolchain-ext-DISTRO.sh
During execution of the script, you choose the root location for the toolchain. See the “Installed Standard SDK Directory Structure” section and the “Installed Extensible SDK Directory Structure” section for more information.
5.2 Building an SDK Installer
As an alternative to locating and downloading an SDK installer, you can build the SDK installer. Follow these steps:
Set Up the Build Environment: Be sure you are set up to use BitBake in a shell. See the “Preparing the Build Host” section in the Yocto Project Development Tasks Manual for information on how to get a build host ready that is either a native Linux machine or a machine that uses CROPS.
Clone the ``poky`` Repository: You need to have a local copy of the Yocto Project Source Directory (i.e. a local
pokyrepository). See the “Cloning the poky Repository” and possibly the “Checking Out by Branch in Poky” and “Checking Out by Tag in Poky” sections all in the Yocto Project Development Tasks Manual for information on how to clone thepokyrepository and check out the appropriate branch for your work.Initialize the Build Environment: While in the root directory of the Source Directory (i.e.
poky), run the oe-init-build-env environment setup script to define the OpenEmbedded build environment on your build host.$ source oe-init-build-env
Among other things, the script creates the Build Directory, which is
buildin this case and is located in the Source Directory. After the script runs, your current working directory is set to thebuilddirectory.Make Sure You Are Building an Installer for the Correct Machine: Check to be sure that your MACHINE variable in the
local.conffile in your Build Directory matches the architecture for which you are building.Make Sure Your SDK Machine is Correctly Set: If you are building a toolchain designed to run on an architecture that differs from your current development host machine (i.e. the build host), be sure that the SDKMACHINE variable in the
local.conffile in your Build Directory is correctly set.Note
If you are building an SDK installer for the Extensible SDK, the SDKMACHINE value must be set for the architecture of the machine you are using to build the installer. If SDKMACHINE is not set appropriately, the build fails and provides an error message similar to the following:
The extensible SDK can currently only be built for the same architecture as the machine being built on - SDK_ARCH is
set to i686 (likely via setting SDKMACHINE) which is different from the architecture of the build machine (x86_64).
Unable to continue.
Build the SDK Installer: To build the SDK installer for a standard SDK and populate the SDK image, use the following command form. Be sure to replace image with an image (e.g. “core-image-sato”): $ bitbake image -c populate_sdk You can do the same for the extensible SDK using this command form:
$ bitbake image -c populate_sdk_ext
These commands produce an SDK installer that contains the sysroot that matches your target root filesystem.
When the
bitbakecommand completes, the SDK installer will be intmp/deploy/sdkin the Build Directory.Note
By default, the previous BitBake command does not build static binaries. If you want to use the toolchain to build these types of libraries, you need to be sure your SDK has the appropriate static development libraries. Use the TOOLCHAIN_TARGET_TASK variable inside your
local.conffile before building the SDK installer. Doing so ensures that the eventual SDK installation process installs the appropriate library packages as part of the SDK. Following is an example usinglibcstatic development libraries: TOOLCHAIN_TARGET_TASK_append = ” libc-staticdev”
Run the Installer: You can now run the SDK installer from
tmp/deploy/sdkin the Build Directory. Following is an example:$ cd ~/poky/build/tmp/deploy/sdk $ ./poky-glibc-x86_64-core-image-sato-core2-64-toolchain-ext-DISTRO.sh
During execution of the script, you choose the root location for the toolchain. See the “Installed Standard SDK Directory Structure” section and the “Installed Extensible SDK Directory Structure” section for more information.
5.3 Extracting the Root Filesystem
After installing the toolchain, for some use cases you might need to separately extract a root filesystem:
You want to boot the image using NFS.
You want to use the root filesystem as the target sysroot.
You want to develop your target application using the root filesystem as the target sysroot.
Follow these steps to extract the root filesystem:
Locate and Download the Tarball for the Pre-Built Root Filesystem Image File: You need to find and download the root filesystem image file that is appropriate for your target system. These files are kept in machine-specific folders in the Index of Releases in the “machines” directory.
The machine-specific folders of the “machines” directory contain tarballs (
*.tar.bz2) for supported machines. These directories also contain flattened root filesystem image files (*.ext4), which you can use with QEMU directly.The pre-built root filesystem image files follow these naming conventions:
core-image-profile-arch.tar.bz2

Where:
    profile is the filesystem image's profile:
              lsb, lsb-dev, lsb-sdk, minimal, minimal-dev, minimal-initramfs,
              sato, sato-dev, sato-sdk, sato-sdk-ptest. For information on
              these types of image profiles, see the "Images" chapter in
              the Yocto Project Reference Manual.

    arch is a string representing the target architecture:
              beaglebone-yocto, beaglebone-yocto-lsb, edgerouter, edgerouter-lsb,
              genericx86, genericx86-64, genericx86-64-lsb, genericx86-lsb and qemu*.
The root filesystems provided by the Yocto Project are based off of the
core-image-satoandcore-image-minimalimages.For example, if you plan on using a BeagleBone device as your target hardware and your image is a
core-image-sato-sdkimage, you can download the following file:core-image-sato-sdk-beaglebone-yocto.tar.bz2
Initialize the Cross-Development Environment: You must
sourcethe cross-development environment setup script to establish necessary environment variables.This script is located in the top-level directory in which you installed the toolchain (e.g.
poky_sdk).Following is an example based on the toolchain installed in the “Locating Pre-Built SDK Installers” section:
$ source ~/poky_sdk/environment-setup-core2-64-poky-linux
Extract the Root Filesystem: Use the
runqemu-extract-sdkcommand and provide the root filesystem image.Following is an example command that extracts the root filesystem from a previously built root filesystem image that was downloaded from the Index of Releases. This command extracts the root filesystem into the
core2-64-satodirectory:$ runqemu-extract-sdk ~/Downloads/core-image-sato-sdk-beaglebone-yocto.tar.bz2 ~/beaglebone-sato
You could now point to the target sysroot at
beablebone-sato.
5.4 Installed Standard SDK Directory Structure
The following figure shows the resulting directory structure after you
install the Standard SDK by running the *.sh SDK installation
script:
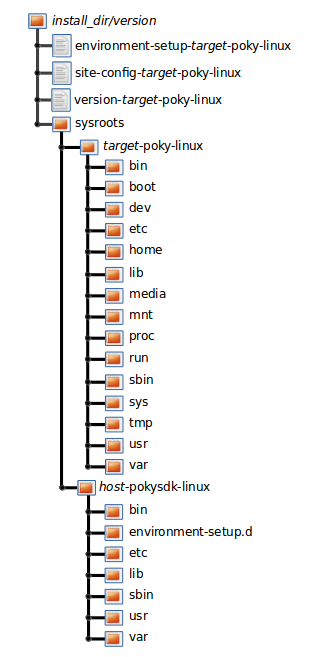
The installed SDK consists of an environment setup script for the SDK, a
configuration file for the target, a version file for the target, and
the root filesystem (sysroots) needed to develop objects for the
target system.
Within the figure, italicized text is used to indicate replaceable
portions of the file or directory name. For example, install_dir/version
is the directory where the SDK is installed. By default, this directory
is /opt/poky/. And, version represents the specific snapshot of the
SDK (e.g. 3.1.2). Furthermore, target represents the target architecture
(e.g. i586) and host represents the development system’s
architecture (e.g. x86_64). Thus, the complete names of the two
directories within the sysroots could be i586-poky-linux and
x86_64-pokysdk-linux for the target and host, respectively.
5.5 Installed Extensible SDK Directory Structure
The following figure shows the resulting directory structure after you
install the Extensible SDK by running the *.sh SDK installation
script:
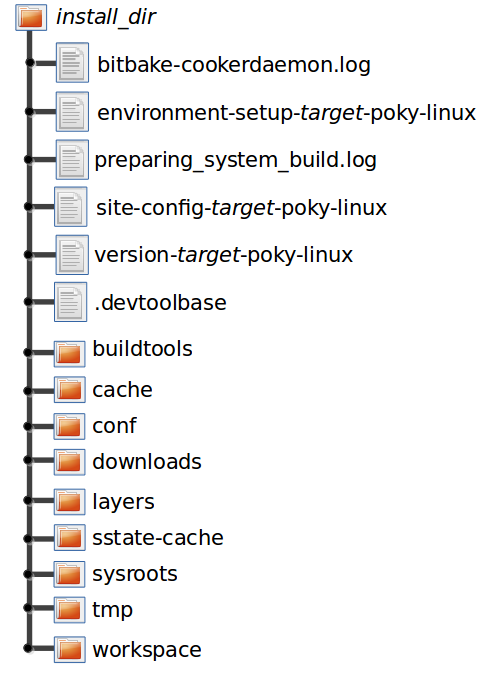
The installed directory structure for the extensible SDK is quite different than the installed structure for the standard SDK. The extensible SDK does not separate host and target parts in the same manner as does the standard SDK. The extensible SDK uses an embedded copy of the OpenEmbedded build system, which has its own sysroots.
Of note in the directory structure are an environment setup script for the SDK, a configuration file for the target, a version file for the target, and log files for the OpenEmbedded build system preparation script run by the installer and BitBake.
Within the figure, italicized text is used to indicate replaceable
portions of the file or directory name. For example, install_dir is the
directory where the SDK is installed, which is poky_sdk by default,
and target represents the target architecture (e.g. i586).