1 Board Support Packages (BSP) — Developer’s Guide
A Board Support Package (BSP) is a collection of information that defines how to support a particular hardware device, set of devices, or hardware platform. The BSP includes information about the hardware features present on the device, any essential bootloader, kernel and device tree configuration, along with any additional hardware drivers required. The BSP also lists any additional software components required in addition to a generic Linux software stack for both essential and optional platform features.
This guide presents information about BSP layers, defines a structure for components so that BSPs follow a commonly understood layout, discusses how to customize a recipe for a BSP, addresses BSP licensing, and provides information that shows you how to create a BSP Layer using the bitbake-layers tool.
1.1 BSP Layers
A BSP consists of a file structure inside a base directory. Collectively, you can think of the base directory, its file structure, and the contents as a BSP layer. Although not a strict requirement, BSP layers in the Yocto Project use the following well-established naming convention:
meta-bsp_root_name
The string “meta-” is prepended to the machine or platform name, which is “bsp_root_name” in the above form.
Note
Because the BSP layer naming convention is well-established, it is
advisable to follow it when creating layers. Technically speaking, a
BSP layer name does not need to start with meta-.
However, various scripts and tools in the Yocto Project development
environment assume this convention.
To help understand the BSP layer concept, consider the BSPs that the Yocto Project supports and provides with each release. You can see the layers in the Yocto Project Source Repositories through a web interface at https://git.yoctoproject.org/. If you go to that interface, you will find a list of repositories under “Yocto Metadata Layers”.
Note
Layers that are no longer actively supported as part of the Yocto Project appear under the heading “Yocto Metadata Layer Archive.”
Each repository is a BSP layer supported by the Yocto Project (e.g.
meta-raspberrypi and meta-intel). Each of these layers is a
repository unto itself and clicking on the layer name displays two URLs
from which you can clone the layer’s repository to your local system.
Here is an example that clones the Raspberry Pi BSP layer:
$ git clone git://git.yoctoproject.org/meta-raspberrypi
In addition to BSP layers, the meta-yocto-bsp layer is part of
meta-yocto. The meta-yocto-bsp layer maintains
several “reference” BSPs including the ARM-based Beaglebone and generic
versions of both 32-bit and 64-bit IA machines.
For information on typical BSP development workflow, see the Developing a Board Support Package (BSP) section. For more information on how to set up a local copy of source files from a Git repository, see the Setting Up the Poky Reference Distro Manually section in the Yocto Project Development Tasks Manual.
The BSP layer’s base directory (meta-bsp_root_name) is the root
directory of that Layer. This directory is what you add to the
BBLAYERS variable in the
conf/bblayers.conf file found in your
Build Directory, which is
established after you run the OpenEmbedded build environment setup
script (i.e. oe-init-build-env).
Adding the root directory allows the OpenEmbedded Build System
to recognize the BSP
layer and from it build an image. Here is an example:
BBLAYERS ?= " \
   /usr/local/src/yocto/meta \
   /usr/local/src/yocto/meta-poky \
   /usr/local/src/yocto/meta-yocto-bsp \
   /usr/local/src/yocto/meta-mylayer \
   "
Note
Ordering and BBFILE_PRIORITY for the layers listed in BBLAYERS matter. For example, if multiple layers define a machine configuration, the OpenEmbedded build system uses the last layer searched given similar layer priorities. The build system works from the top-down through the layers listed in BBLAYERS.
Some BSPs require or depend on additional layers beyond the BSP’s root
layer in order to be functional. In this case, you need to specify these
layers in the README “Dependencies” section of the BSP’s root layer.
Additionally, if any build instructions exist for the BSP, you must add
them to the “Dependencies” section.
Some layers function as a layer to hold other BSP layers. These layers
are known as “container layers”. An example of
this type of layer is OpenEmbedded’s meta-openembedded
layer. The meta-openembedded layer contains many meta-* layers.
In cases like this, you need to include the names of the actual layers
you want to work with, such as:
BBLAYERS ?= " \
  /usr/local/src/yocto/meta \
  /usr/local/src/yocto/meta-poky \
  /usr/local/src/yocto/meta-yocto-bsp \
  /usr/local/src/yocto/meta-mylayer \
  .../meta-openembedded/meta-oe \
  .../meta-openembedded/meta-perl \
  .../meta-openembedded/meta-networking \
  "
and so on.
For more information on layers, see the “Understanding and Creating Layers” section of the Yocto Project Development Tasks Manual.
1.2 Preparing Your Build Host to Work With BSP Layers
This section describes how to get your build host ready to work with BSP layers. Once you have the host set up, you can create the layer as described in the “Creating a new BSP Layer Using the bitbake-layers Script” section.
Note
For structural information on BSPs, see the Example Filesystem Layout section.
Set Up the Build Environment: Be sure you are set up to use BitBake in a shell. See the “Preparing the Build Host” section in the Yocto Project Development Tasks Manual for information on how to get a build host ready that is either a native Linux machine or a machine that uses CROPS.
Prepare the Source Repositories:
There are two ways of setting up the Poky reference distro:
Using the
bitbake-setupcommand-line utility from BitBake. Follow:Manually cloning the required repositories. Follow:
Determine the BSP Layer You Want: The Yocto Project supports many BSPs, which are maintained in their own layers or in layers designed to contain several BSPs. The Layer Index can help finding BSP layers to use.
Optionally Clone the meta-intel BSP Layer: If your hardware is based on current Intel CPUs and devices, you can leverage this BSP layer. For details on the
meta-intelBSP layer, see the layer’s README file.Navigate to Your Source Directory: Typically, you set up the
meta-intelGit repository next to the other layers in your build.Clone the Layer:
$ git clone git://git.yoctoproject.org/meta-intel.git
Cloning into 'meta-intel'...
remote: Counting objects: 15585, done.
remote: Compressing objects: 100% (5056/5056), done.
remote: Total 15585 (delta 9123), reused 15329 (delta 8867)
Receiving objects: 100% (15585/15585), 4.51 MiB | 3.19 MiB/s, done.
Resolving deltas: 100% (9123/9123), done.
Checking connectivity... done.
Check Out the Proper Branch: The branch you check out for
meta-intelmust match the same branch you are using for the Yocto Project release (e.g.wrynose):$ cd meta-intel $ git checkout -b wrynose remotes/origin/wrynose Branch wrynose set up to track remote branch wrynose from origin. Switched to a new branch 'wrynose'
Note
To see the available branch names in a cloned repository, use the
git
branch -a
command.
Optionally Set Up an Alternative BSP Layer: If your hardware can be more closely leveraged to an existing BSP not within the
meta-intelBSP layer, you can clone that BSP layer.The process is identical to the process used for the
meta-intellayer except for the layer’s name. For example, if you determine that your hardware most closely matches themeta-raspberrypi, clone that layer:$ git clone git://git.yoctoproject.org/meta-raspberrypi Cloning into 'meta-raspberrypi'... remote: Counting objects: 4743, done. remote: Compressing objects: 100% (2185/2185), done. remote: Total 4743 (delta 2447), reused 4496 (delta 2258) Receiving objects: 100% (4743/4743), 1.18 MiB | 0 bytes/s, done. Resolving deltas: 100% (2447/2447), done. Checking connectivity... done.
Initialize the Build Environment: While in the Source Directory, run the oe-init-build-env environment setup script located in OpenEmbedded-Core (OE-Core) to define the OpenEmbedded build environment on your build host.
$ source layers/openembedded-core/oe-init-build-env
Among other things, the script creates the Build Directory, which is “build”. After the script runs, your current working directory is set to the Build Directory.
Note
Alternatively, you can source the
init-build-envfile provided by bitbake-setup
1.3 Example Filesystem Layout
Defining a common BSP directory structure allows end-users to understand and become familiar with that standard. A common format also encourages standardization of software support for hardware.
The proposed form described in this section does have elements that are specific to the OpenEmbedded build system. It is intended that developers can use this structure with other build systems besides the OpenEmbedded build system. It is also intended that it will be simple to extract information and convert it to other formats if required. The OpenEmbedded build system, through its standard layers mechanism, can directly accept the format described as a layer. The BSP layer captures all the hardware-specific details in one place using a standard format, which is useful for any person wishing to use the hardware platform regardless of the build system they are using.
The BSP specification does not include a build system or other tools - the specification is concerned with the hardware-specific components only. At the end-distribution point, you can ship the BSP layer combined with a build system and other tools. Realize that it is important to maintain the distinction that the BSP layer, a build system, and tools are separate components that could be combined in certain end products.
Before looking at the recommended form for the directory structure inside a BSP layer, you should be aware that there are some requirements in order for a BSP layer to be considered compliant with the Yocto Project. For that list of requirements, see the “Released BSP Requirements” section.
Below is the typical directory structure for a BSP layer. While this basic form represents the standard, realize that the actual layout for individual BSPs could differ.
meta-bsp_root_name/
meta-bsp_root_name/bsp_license_file
meta-bsp_root_name/README
meta-bsp_root_name/README.sources
meta-bsp_root_name/binary/bootable_images
meta-bsp_root_name/conf/layer.conf
meta-bsp_root_name/conf/machine/*.conf
meta-bsp_root_name/recipes-bsp/*
meta-bsp_root_name/recipes-core/*
meta-bsp_root_name/recipes-graphics/*
meta-bsp_root_name/recipes-kernel/linux/linux-yocto_kernel_rev.bbappend
Below is an example of the Raspberry Pi BSP layer that is available from the Source Repositories:
meta-raspberrypi/COPYING.MIT
meta-raspberrypi/README.md
meta-raspberrypi/classes
meta-raspberrypi/classes/sdcard_image-rpi.bbclass
meta-raspberrypi/conf/
meta-raspberrypi/conf/layer.conf
meta-raspberrypi/conf/machine/
meta-raspberrypi/conf/machine/raspberrypi-cm.conf
meta-raspberrypi/conf/machine/raspberrypi-cm3.conf
meta-raspberrypi/conf/machine/raspberrypi.conf
meta-raspberrypi/conf/machine/raspberrypi0-wifi.conf
meta-raspberrypi/conf/machine/raspberrypi0.conf
meta-raspberrypi/conf/machine/raspberrypi2.conf
meta-raspberrypi/conf/machine/raspberrypi3-64.conf
meta-raspberrypi/conf/machine/raspberrypi3.conf
meta-raspberrypi/conf/machine/include
meta-raspberrypi/conf/machine/include/rpi-base.inc
meta-raspberrypi/conf/machine/include/rpi-default-providers.inc
meta-raspberrypi/conf/machine/include/rpi-default-settings.inc
meta-raspberrypi/conf/machine/include/rpi-default-versions.inc
meta-raspberrypi/conf/machine/include/tune-arm1176jzf-s.inc
meta-raspberrypi/docs
meta-raspberrypi/docs/Makefile
meta-raspberrypi/docs/conf.py
meta-raspberrypi/docs/contributing.md
meta-raspberrypi/docs/extra-apps.md
meta-raspberrypi/docs/extra-build-config.md
meta-raspberrypi/docs/index.rst
meta-raspberrypi/docs/layer-contents.md
meta-raspberrypi/docs/readme.md
meta-raspberrypi/files
meta-raspberrypi/files/custom-licenses
meta-raspberrypi/files/custom-licenses/Broadcom
meta-raspberrypi/recipes-bsp
meta-raspberrypi/recipes-bsp/bootfiles
meta-raspberrypi/recipes-bsp/bootfiles/bcm2835-bootfiles.bb
meta-raspberrypi/recipes-bsp/bootfiles/rpi-config_git.bb
meta-raspberrypi/recipes-bsp/common
meta-raspberrypi/recipes-bsp/common/firmware.inc
meta-raspberrypi/recipes-bsp/formfactor
meta-raspberrypi/recipes-bsp/formfactor/formfactor
meta-raspberrypi/recipes-bsp/formfactor/formfactor/raspberrypi
meta-raspberrypi/recipes-bsp/formfactor/formfactor/raspberrypi/machconfig
meta-raspberrypi/recipes-bsp/formfactor/formfactor_%.bbappend
meta-raspberrypi/recipes-bsp/rpi-u-boot-src
meta-raspberrypi/recipes-bsp/rpi-u-boot-src/files
meta-raspberrypi/recipes-bsp/rpi-u-boot-src/files/boot.cmd.in
meta-raspberrypi/recipes-bsp/rpi-u-boot-src/rpi-u-boot-scr.bb
meta-raspberrypi/recipes-bsp/u-boot
meta-raspberrypi/recipes-bsp/u-boot/u-boot
meta-raspberrypi/recipes-bsp/u-boot/u-boot/*.patch
meta-raspberrypi/recipes-bsp/u-boot/u-boot_%.bbappend
meta-raspberrypi/recipes-connectivity
meta-raspberrypi/recipes-connectivity/bluez5
meta-raspberrypi/recipes-connectivity/bluez5/bluez5
meta-raspberrypi/recipes-connectivity/bluez5/bluez5/*.patch
meta-raspberrypi/recipes-connectivity/bluez5/bluez5/BCM43430A1.hcd
meta-raspberrypi/recipes-connectivity/bluez5/bluez5brcm43438.service
meta-raspberrypi/recipes-connectivity/bluez5/bluez5_%.bbappend
meta-raspberrypi/recipes-core
meta-raspberrypi/recipes-core/images
meta-raspberrypi/recipes-core/images/rpi-basic-image.bb
meta-raspberrypi/recipes-core/images/rpi-hwup-image.bb
meta-raspberrypi/recipes-core/images/rpi-test-image.bb
meta-raspberrypi/recipes-core/packagegroups
meta-raspberrypi/recipes-core/packagegroups/packagegroup-rpi-test.bb
meta-raspberrypi/recipes-core/psplash
meta-raspberrypi/recipes-core/psplash/files
meta-raspberrypi/recipes-core/psplash/files/psplash-raspberrypi-img.h
meta-raspberrypi/recipes-core/psplash/psplash_git.bbappend
meta-raspberrypi/recipes-core/udev
meta-raspberrypi/recipes-core/udev/udev-rules-rpi
meta-raspberrypi/recipes-core/udev/udev-rules-rpi/99-com.rules
meta-raspberrypi/recipes-core/udev/udev-rules-rpi.bb
meta-raspberrypi/recipes-devtools
meta-raspberrypi/recipes-devtools/bcm2835
meta-raspberrypi/recipes-devtools/bcm2835/bcm2835_1.52.bb
meta-raspberrypi/recipes-devtools/pi-blaster
meta-raspberrypi/recipes-devtools/pi-blaster/files
meta-raspberrypi/recipes-devtools/pi-blaster/files/*.patch
meta-raspberrypi/recipes-devtools/pi-blaster/pi-blaster_git.bb
meta-raspberrypi/recipes-devtools/python
meta-raspberrypi/recipes-devtools/python/python-rtimu
meta-raspberrypi/recipes-devtools/python/python-rtimu/*.patch
meta-raspberrypi/recipes-devtools/python/python-rtimu_git.bb
meta-raspberrypi/recipes-devtools/python/python-sense-hat_2.2.0.bb
meta-raspberrypi/recipes-devtools/python/rpi-gpio
meta-raspberrypi/recipes-devtools/python/rpi-gpio/*.patch
meta-raspberrypi/recipes-devtools/python/rpi-gpio_0.6.3.bb
meta-raspberrypi/recipes-devtools/python/rpio
meta-raspberrypi/recipes-devtools/python/rpio/*.patch
meta-raspberrypi/recipes-devtools/python/rpio_0.10.0.bb
meta-raspberrypi/recipes-devtools/wiringPi
meta-raspberrypi/recipes-devtools/wiringPi/files
meta-raspberrypi/recipes-devtools/wiringPi/files/*.patch
meta-raspberrypi/recipes-devtools/wiringPi/wiringpi_git.bb
meta-raspberrypi/recipes-graphics
meta-raspberrypi/recipes-graphics/eglinfo
meta-raspberrypi/recipes-graphics/eglinfo/eglinfo-fb_%.bbappend
meta-raspberrypi/recipes-graphics/eglinfo/eglinfo-x11_%.bbappend
meta-raspberrypi/recipes-graphics/mesa
meta-raspberrypi/recipes-graphics/mesa/mesa-gl_%.bbappend
meta-raspberrypi/recipes-graphics/mesa/mesa_%.bbappend
meta-raspberrypi/recipes-graphics/userland
meta-raspberrypi/recipes-graphics/userland/userland
meta-raspberrypi/recipes-graphics/userland/userland/*.patch
meta-raspberrypi/recipes-graphics/userland/userland_git.bb
meta-raspberrypi/recipes-graphics/vc-graphics
meta-raspberrypi/recipes-graphics/vc-graphics/files
meta-raspberrypi/recipes-graphics/vc-graphics/files/egl.pc
meta-raspberrypi/recipes-graphics/vc-graphics/files/vchiq.sh
meta-raspberrypi/recipes-graphics/vc-graphics/vc-graphics-hardfp.bb
meta-raspberrypi/recipes-graphics/vc-graphics/vc-graphics.bb
meta-raspberrypi/recipes-graphics/vc-graphics/vc-graphics.inc
meta-raspberrypi/recipes-graphics/wayland
meta-raspberrypi/recipes-graphics/wayland/weston_%.bbappend
meta-raspberrypi/recipes-graphics/xorg-xserver
meta-raspberrypi/recipes-graphics/xorg-xserver/xserver-xf86-config
meta-raspberrypi/recipes-graphics/xorg-xserver/xserver-xf86-config/rpi
meta-raspberrypi/recipes-graphics/xorg-xserver/xserver-xf86-config/rpi/xorg.conf
meta-raspberrypi/recipes-graphics/xorg-xserver/xserver-xf86-config/rpi/xorg.conf.d
meta-raspberrypi/recipes-graphics/xorg-xserver/xserver-xf86-config/rpi/xorg.conf.d/10-evdev.conf
meta-raspberrypi/recipes-graphics/xorg-xserver/xserver-xf86-config/rpi/xorg.conf.d/98-pitft.conf
meta-raspberrypi/recipes-graphics/xorg-xserver/xserver-xf86-config/rpi/xorg.conf.d/99-calibration.conf
meta-raspberrypi/recipes-graphics/xorg-xserver/xserver-xf86-config_0.1.bbappend
meta-raspberrypi/recipes-graphics/xorg-xserver/xserver-xorg_%.bbappend
meta-raspberrypi/recipes-kernel
meta-raspberrypi/recipes-kernel/linux-firmware
meta-raspberrypi/recipes-kernel/linux-firmware/files
meta-raspberrypi/recipes-kernel/linux-firmware/files/brcmfmac43430-sdio.bin
meta-raspberrypi/recipes-kernel/linux-firmware/files/brcfmac43430-sdio.txt
meta-raspberrypi/recipes-kernel/linux-firmware/linux-firmware_%.bbappend
meta-raspberrypi/recipes-kernel/linux
meta-raspberrypi/recipes-kernel/linux/linux-raspberrypi-dev.bb
meta-raspberrypi/recipes-kernel/linux/linux-raspberrypi.inc
meta-raspberrypi/recipes-kernel/linux/linux-raspberrypi_4.14.bb
meta-raspberrypi/recipes-kernel/linux/linux-raspberrypi_4.9.bb
meta-raspberrypi/recipes-multimedia
meta-raspberrypi/recipes-multimedia/gstreamer
meta-raspberrypi/recipes-multimedia/gstreamer/gstreamer1.0-omx
meta-raspberrypi/recipes-multimedia/gstreamer/gstreamer1.0-omx/*.patch
meta-raspberrypi/recipes-multimedia/gstreamer/gstreamer1.0-omx_%.bbappend
meta-raspberrypi/recipes-multimedia/gstreamer/gstreamer1.0-plugins-bad_%.bbappend
meta-raspberrypi/recipes-multimedia/gstreamer/gstreamer1.0-omx-1.12
meta-raspberrypi/recipes-multimedia/gstreamer/gstreamer1.0-omx-1.12/*.patch
meta-raspberrypi/recipes-multimedia/omxplayer
meta-raspberrypi/recipes-multimedia/omxplayer/omxplayer
meta-raspberrypi/recipes-multimedia/omxplayer/omxplayer/*.patch
meta-raspberrypi/recipes-multimedia/omxplayer/omxplayer_git.bb
meta-raspberrypi/recipes-multimedia/x264
meta-raspberrypi/recipes-multimedia/x264/x264_git.bbappend
meta-raspberrypi/wic
meta-raspberrypi/wic/sdimage-raspberrypi.wks
The following sections describe each part of the proposed BSP format.
1.3.1 License Files
You can find these files in the BSP Layer at:
meta-bsp_root_name/bsp_license_file
These optional files satisfy licensing requirements for the BSP. The
type or types of files here can vary depending on the licensing
requirements. For example, in the Raspberry Pi BSP, all licensing
requirements are handled with the COPYING.MIT file.
Licensing files can be MIT, BSD, GPLv*, and so forth. These files are recommended for the BSP but are optional and totally up to the BSP developer. For information on how to maintain license compliance, see the “Maintaining Open Source License Compliance During Your Product’s Lifecycle” section in the Yocto Project Development Tasks Manual.
1.3.2 README File
You can find this file in the BSP Layer at:
meta-bsp_root_name/README
This file provides information on how to boot the live images that are
optionally included in the binary/ directory. The README file
also provides information needed for building the image.
At a minimum, the README file must contain a list of dependencies,
such as the names of any other layers on which the BSP depends and the
name of the BSP maintainer with his or her contact information.
1.3.3 README.sources File
You can find this file in the BSP Layer at:
meta-bsp_root_name/README.sources
This file provides information on where to locate the BSP source files
used to build the images (if any) that reside in
meta-bsp_root_name/binary. Images in the binary would be images
released with the BSP. The information in the README.sources file
also helps you find the Metadata
used to generate the images that ship with the BSP.
Note
If the BSP’s binary directory is missing or the directory has no images, an
existing README.sources file is meaningless and usually does not exist.
1.3.4 Pre-built User Binaries
You can find these files in the BSP Layer at:
meta-bsp_root_name/binary/bootable_images
This optional area contains useful pre-built kernels and user-space filesystem images released with the BSP that are appropriate to the target system. This directory typically contains graphical (e.g. Sato) and minimal live images when the BSP tarball has been created and made available in the Yocto Project website. You can use these kernels and images to get a system running and quickly get started on development tasks.
The exact types of binaries present are highly hardware-dependent. The README file should be present in the BSP Layer and it explains how to use the images with the target hardware. Additionally, the README.sources file should be present to locate the sources used to build the images and provide information on the Metadata.
1.3.5 Layer Configuration File
You can find this file in the BSP Layer at:
meta-bsp_root_name/conf/layer.conf
The conf/layer.conf file identifies the file structure as a layer,
identifies the contents of the layer, and contains information about how
the build system should use it. Generally, a standard boilerplate file
such as the following works. In the following example, you would replace
“bsp” with the actual name of the BSP (i.e. “bsp_root_name” from the example
template).
# We have a conf and classes directory, add to BBPATH
BBPATH .= ":${LAYERDIR}"

# We have a recipes directory containing .bb and .bbappend files, add to BBFILES
BBFILES += "${LAYERDIR}/recipes-*/*/*.bb \
            ${LAYERDIR}/recipes-*/*/*.bbappend"

BBFILE_COLLECTIONS += "bsp"
BBFILE_PATTERN_bsp = "^${LAYERDIR}/"
BBFILE_PRIORITY_bsp = "6"
LAYERDEPENDS_bsp = "intel"
To illustrate the string substitutions, here are the corresponding
statements from the Raspberry Pi conf/layer.conf file:
# We have a conf and classes directory, append to BBPATH
BBPATH .= ":${LAYERDIR}"

# We have a recipes directory containing .bb and .bbappend files, add to BBFILES
BBFILES += "${LAYERDIR}/recipes*/*/*.bb \
            ${LAYERDIR}/recipes*/*/*.bbappend"

BBFILE_COLLECTIONS += "raspberrypi"
BBFILE_PATTERN_raspberrypi := "^${LAYERDIR}/"
BBFILE_PRIORITY_raspberrypi = "9"

# Additional license directories.
LICENSE_PATH += "${LAYERDIR}/files/custom-licenses"
.
.
.
This file simply makes BitBake aware of the recipes and configuration directories. The file must exist so that the OpenEmbedded build system can recognize the BSP.
1.3.6 Hardware Configuration Options
You can find these files in the BSP Layer at:
meta-bsp_root_name/conf/machine/*.conf
The machine files bind together all the information contained elsewhere in the BSP into a format that the build system can understand. Each BSP Layer requires at least one machine file. If the BSP supports multiple machines, multiple machine configuration files can exist. These filenames correspond to the values to which users have set the MACHINE variable.
These files define things such as the kernel package to use (PREFERRED_PROVIDER of virtual/kernel), the hardware drivers to include in different types of images, any special software components that are needed, any bootloader information, and also any special image format requirements.
This configuration file could also include a hardware “tuning” file that is commonly used to define the package architecture and specify optimization flags, which are carefully chosen to give best performance on a given processor.
Tuning files are found in the meta/conf/machine/include directory
within OpenEmbedded-Core (OE-Core).
For example, many tune-* files (e.g. tune-arm1136jf-s.inc,
tune-1586-nlp.inc, and so forth) reside in the
meta/conf/machine/include directory.
To use an include file, you simply include them in the machine
configuration file. For example, the Raspberry Pi BSP
raspberrypi3.conf contains the following statement:
include conf/machine/include/rpi-base.inc
1.3.7 Miscellaneous BSP-Specific Recipe Files
You can find these files in the BSP Layer at:
meta-bsp_root_name/recipes-bsp/*
This optional directory contains miscellaneous recipe files for the BSP.
Most notably would be the formfactor files. For example, in the
Raspberry Pi BSP, there is the formfactor_%.bbappend file, which
is an append file used to augment the recipe that starts the build.
Furthermore, there are machine-specific settings used during the build
that are defined by the machconfig file further down in the
directory. Here is the machconfig file for the Raspberry Pi BSP:
HAVE_TOUCHSCREEN=0
HAVE_KEYBOARD=1

DISPLAY_CAN_ROTATE=0
DISPLAY_ORIENTATION=0
DISPLAY_DPI=133
Note
If a BSP does not have a formfactor entry, defaults are established
according to the formfactor configuration file that is installed by
the main formfactor recipe
meta/recipes-bsp/formfactor/formfactor_0.0.bb, which is found in
OpenEmbedded-Core (OE-Core).
1.3.8 Display Support Files
You can find these files in the BSP Layer at:
meta-bsp_root_name/recipes-graphics/*
This optional directory contains recipes for the BSP if it has special requirements for graphics support. All files that are needed for the BSP to support a display are kept here.
1.3.9 Linux Kernel Configuration
You can find these files in the BSP Layer at:
meta-bsp_root_name/recipes-kernel/linux/linux*.bbappend
meta-bsp_root_name/recipes-kernel/linux/*.bb
Append files (*.bbappend) modify the main kernel recipe being used
to build the image. The *.bb files would be a developer-supplied
kernel recipe. This area of the BSP hierarchy can contain both these
types of files although, in practice, it is likely that you would have
one or the other.
For your BSP, you typically want to use an existing Yocto Project kernel
recipe found in OpenEmbedded-Core (OE-Core)
at
meta/recipes-kernel/linux. You can append machine-specific changes
to the kernel recipe by using a similarly named append file, which is
located in the BSP Layer for your target device (e.g. the
meta-bsp_root_name/recipes-kernel/linux directory).
Suppose you are using the linux-yocto_6.12.bb recipe to build the
kernel. In other words, you have selected the kernel in your
"bsp_root_name".conf file by adding
PREFERRED_PROVIDER and PREFERRED_VERSION
statements as follows:
PREFERRED_PROVIDER_virtual/kernel ?= "linux-yocto"
PREFERRED_VERSION_linux-yocto ?= "6.12%"
Note
When the preferred provider is assumed by default, the PREFERRED_PROVIDER
statement does not appear in the "bsp_root_name".conf file.
You would use the linux-yocto_6.12.bbappend file to append specific
BSP settings to the kernel, thus configuring the kernel for your
particular BSP.
You can find more information on what your append file should contain in the “Creating the Append File” section in the Yocto Project Linux Kernel Development Manual.
An alternate scenario is when you create your own kernel recipe for the
BSP. A good example of this is the Raspberry Pi BSP. If you examine the
recipes-kernel/linux directory in that layer you see the following
Raspberry Pi-specific recipes and associated files:
files/
linux-raspberrypi_6.12.bb
linux-raspberrypi_6.1.bb
linux-raspberrypi_6.6.bb
linux-raspberrypi-dev.bb
linux-raspberrypi.inc
linux-raspberrypi-v7_6.12.bb
linux-raspberrypi-v7_6.1.bb
linux-raspberrypi-v7_6.6.bb
linux-raspberrypi-v7.inc
1.4 Developing a Board Support Package (BSP)
This section describes the high-level procedure you can follow to create
a BSP. Although not required for BSP creation, the meta-intel
repository, which contains many BSPs supported by the Yocto Project, is
part of the example.
For an example that shows how to create a new layer using the tools, see the “Creating a new BSP Layer Using the bitbake-layers Script” section.
The following illustration and list summarize the BSP creation general workflow.
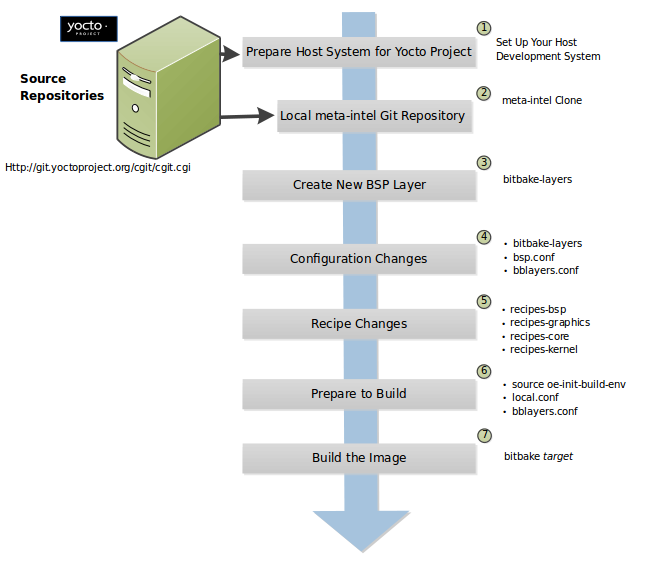
Set up Your Host Development System to Support Development Using the Yocto Project: See the “Preparing the Build Host” section in the Yocto Project Development Tasks Manual for options on how to get a system ready to use the Yocto Project.
Establish the meta-intel Repository on Your System: Having local copies of these supported BSP layers on your system gives you access to layers you might be able to leverage when creating your BSP. For information on how to get these files, see the “Preparing Your Build Host to Work With BSP Layers” section.
Create Your Own BSP Layer Using the bitbake-layers Script: Layers are ideal for isolating and storing work for a given piece of hardware. A layer is really just a location or area in which you place the recipes and configurations for your BSP. In fact, a BSP is, in itself, a special type of layer. The simplest way to create a new BSP layer that is compliant with the Yocto Project is to use the
bitbake-layersscript. For information about that script, see the “Creating a new BSP Layer Using the bitbake-layers Script” section.Another example that illustrates a layer is an application. Suppose you are creating an application that has library or other dependencies in order for it to compile and run. The layer, in this case, would be where all the recipes that define those dependencies are kept. The key point for a layer is that it is an isolated area that contains all the relevant information for the project that the OpenEmbedded build system knows about. For more information on layers, see the “The Yocto Project Layer Model” section in the Yocto Project Overview and Concepts Manual. You can also reference the “Understanding and Creating Layers” section in the Yocto Project Development Tasks Manual. For more information on BSP layers, see the “BSP Layers” section.
Note
There are four hardware reference BSPs in the Yocto Project release, located in the meta-yocto-bsp BSP layer:
Texas Instruments Beaglebone (
beaglebone-yocto)Two generic IA platforms (
genericx86andgenericx86-64)A generic ARM 64 platform (
genericarm64)
When you set up a layer for a new BSP, you should follow a standard layout. This layout is described in the “Example Filesystem Layout” section. In the standard layout, notice the suggested structure for recipes and configuration information. You can see the standard layout for a BSP by examining any supported BSP found in the meta-intel layer.
Make Configuration Changes to Your New BSP Layer: The standard BSP layer structure organizes the files you need to edit in
confand severalrecipes-*directories within the BSP layer. Configuration changes identify where your new layer is on the local system and identifies the kernel you are going to use. When you run thebitbake-layersscript, you are able to interactively configure many things for the BSP (e.g. keyboard, touchscreen, and so forth).Make Recipe Changes to Your New BSP Layer: Recipe changes include altering recipes (
*.bbfiles), removing recipes you do not use, and adding new recipes or append files (.bbappend) that support your hardware.Prepare for the Build: Once you have made all the changes to your BSP layer, there remains a few things you need to do for the OpenEmbedded build system in order for it to create your image. You need to get the build environment ready by sourcing an environment setup script (i.e.
oe-init-build-env) and you need to be sure two key configuration files are configured appropriately: theconf/local.confand theconf/bblayers.conffile. You must make the OpenEmbedded build system aware of your new layer. See the “Enabling Your Layer” section in the Yocto Project Development Tasks Manual for information on how to let the build system know about your new layer.Build the Image: The OpenEmbedded build system uses the BitBake tool to build images based on the type of image you want to create. You can find more information about BitBake in the BitBake User Manual.
The build process supports several types of images to satisfy different needs. See the “Images” chapter in the Yocto Project Reference Manual for information on supported images.
1.5 Requirements and Recommendations for Released BSPs
This section describes requirements and recommendations for a released BSP to be considered compliant with the Yocto Project.
1.5.1 Released BSP Requirements
Before looking at BSP requirements, you should consider the following:
The requirements here assume the BSP layer is a well-formed, “legal” layer that can be added to the Yocto Project. For guidelines on creating a layer that meets these base requirements, see the “BSP Layers” section in this manual and the “Understanding and Creating Layers” section in the Yocto Project Development Tasks Manual.
The requirements in this section apply regardless of how you package a BSP. You should consult the packaging and distribution guidelines for your specific release process. For an example of packaging and distribution requirements, see the “Third Party BSP Release Process” wiki page.
The requirements for the BSP as it is made available to a developer are completely independent of the released form of the BSP. For example, the BSP Metadata can be contained within a Git repository and could have a directory structure completely different from what appears in the officially released BSP layer.
It is not required that specific packages or package modifications exist in the BSP layer, beyond the requirements for general compliance with the Yocto Project. For example, there is no requirement dictating that a specific kernel or kernel version be used in a given BSP.
The requirements for a released BSP that conform to the Yocto Project are:
Layer Name: The BSP must have a layer name that follows the Yocto Project standards. For information on BSP layer names, see the “BSP Layers” section.
File System Layout: When possible, use the same directory names in your BSP layer as listed in the
recipes.txtfile, which is found in meta directory of OpenEmbedded-Core (OE-Core).You should place recipes (
*.bbfiles) and recipe modifications (*.bbappendfiles) intorecipes-*subdirectories by functional area as outlined inrecipes.txt. If you cannot find a category inrecipes.txtto fit a particular recipe, you can make up your ownrecipes-*subdirectory.Within any particular
recipes-*category, the layout should match what is found in the OpenEmbedded-Core (OE-Core) Git repository. In other words, make sure you place related files in appropriately-relatedrecipes-*subdirectories specific to the recipe’s function, or within a subdirectory containing a set of closely-related recipes. The recipes themselves should follow the general guidelines for recipes found in the “Recipe Style Guide” in the Yocto Project and OpenEmbedded Contributor Guide.License File: You must include a license file in the
meta-bsp_root_namedirectory. This license covers the BSP Metadata as a whole. You must specify which license to use since no default license exists. See the COPYING.MIT file for the Raspberry Pi BSP in themeta-raspberrypiBSP layer as an example.README File: You must include a
READMEfile in themeta-bsp_root_namedirectory. See the README.md file for the Raspberry Pi BSP in themeta-raspberrypiBSP layer as an example.At a minimum, the
READMEfile should contain the following:A brief description of the target hardware.
A list of all the dependencies of the BSP. These dependencies are typically a list of required layers needed to build the BSP. However, the dependencies should also contain information regarding any other dependencies the BSP might have.
Any required special licensing information. For example, this information includes information on special variables needed to satisfy a EULA, or instructions on information needed to build or distribute binaries built from the BSP Metadata.
The name and contact information for the BSP layer maintainer. This is the person to whom patches and questions should be sent. For information on how to find the right person, see the Contributing Changes to a Component section in the Yocto Project and OpenEmbedded Contributor Guide.
Instructions on how to build the BSP using the BSP layer.
Instructions on how to boot the BSP build from the BSP layer.
Instructions on how to boot the binary images contained in the
binarydirectory, if present.Information on any known bugs or issues that users should know about when either building or booting the BSP binaries.
README.sources File: If your BSP contains binary images in the
binarydirectory, you must include aREADME.sourcesfile in themeta-bsp_root_namedirectory. This file specifies exactly where you can find the sources used to generate the binary images.Layer Configuration File: You must include a
conf/layer.conffile in themeta-bsp_root_namedirectory. This file identifies themeta-bsp_root_nameBSP layer as a layer to the build system.Machine Configuration File: You must include one or more
conf/machine/bsp_root_name.conffiles in themeta-bsp_root_namedirectory. These configuration files define machine targets that can be built using the BSP layer. Multiple machine configuration files define variations of machine configurations that the BSP supports. If a BSP supports multiple machine variations, you need to adequately describe each variation in the BSPREADMEfile. Do not use multiple machine configuration files to describe disparate hardware. If you do have very different targets, you should create separate BSP layers for each target.Note
It is completely possible for a developer to structure the working repository as a conglomeration of unrelated BSP files, and to possibly generate BSPs targeted for release from that directory using scripts or some other mechanism (e.g.
meta-yocto-bsplayer). Such considerations are outside the scope of this document.
1.5.2 Released BSP Recommendations
Here are recommendations for released BSPs that conform to the Yocto Project:
Bootable Images: Released BSPs can contain one or more bootable images. Including bootable images allows users to easily try out the BSP using their own hardware.
In some cases, it might not be convenient to include a bootable image. If so, you might want to make two versions of the BSP available: one that contains binary images, and one that does not. The version that does not contain bootable images avoids unnecessary download times for users not interested in the images.
If you need to distribute a BSP and include bootable images or build kernel and filesystems meant to allow users to boot the BSP for evaluation purposes, you should put the images and artifacts within a
binary/subdirectory located in themeta-bsp_root_namedirectory.Note
If you do include a bootable image as part of the BSP and the image was built by software covered by the GPL or other open source licenses, it is your responsibility to understand and meet all licensing requirements, which could include distribution of source files.
Use a Yocto Linux Kernel: Kernel recipes in the BSP should be based on a Yocto Linux kernel. Basing your recipes on these kernels reduces the costs for maintaining the BSP and increases its scalability. See the
Yocto Linux Kernelcategory in the Source Repositories for these kernels.
1.6 Customizing a Recipe for a BSP
If you plan on customizing a recipe for a particular BSP, you need to do the following:
Create a
*.bbappendfile for the modified recipe. For information on using append files, see the “Appending Other Layers Metadata With Your Layer” section in the Yocto Project Development Tasks Manual.Ensure your directory structure in the BSP layer that supports your machine is such that the OpenEmbedded build system can find it. See the example later in this section for more information.
Put the append file in a directory whose name matches the machine’s name and is located in an appropriate sub-directory inside the BSP layer (i.e.
recipes-bsp,recipes-graphics,recipes-core, and so forth).Place the BSP-specific files in the proper directory inside the BSP layer. How expansive the layer is affects where you must place these files. For example, if your layer supports several different machine types, you need to be sure your layer’s directory structure includes hierarchy that separates the files according to machine. If your layer does not support multiple machines, the layer would not have that additional hierarchy and the files would obviously not be able to reside in a machine-specific directory.
Here is a specific example to help you better understand the
process. This example customizes a recipe by adding a
BSP-specific configuration file named interfaces to the
init-ifupdown_1.0.bb recipe for machine “xyz” where the BSP layer
also supports several other machines:
Edit the
init-ifupdown_1.0.bbappendfile so that it contains the following:FILESEXTRAPATHS:prepend := "${THISDIR}/files:"
The append file needs to be in the
meta-xyz/recipes-core/init-ifupdowndirectory.Create and place the new
interfacesconfiguration file in the BSP’s layer here:meta-xyz/recipes-core/init-ifupdown/files/xyz-machine-one/interfaces
Note
If the
meta-xyzlayer did not support multiple machines, you would place the interfaces configuration file in the layer here:meta-xyz/recipes-core/init-ifupdown/files/interfaces
The FILESEXTRAPATHS variable in the append files extends the search path the build system uses to find files during the build. Consequently, for this example you need to have the
filesdirectory in the same location as your append file.
1.7 BSP Licensing Considerations
In some cases, a BSP contains separately-licensed Intellectual Property (IP) for a component or components. For these cases, you are required to accept the terms of a commercial or other type of license that requires some kind of explicit End User License Agreement (EULA). Once you accept the license, the OpenEmbedded build system can then build and include the corresponding component in the final BSP image. If the BSP is available as a pre-built image, you can download the image after agreeing to the license or EULA.
You could find that some separately-licensed components that are essential for normal operation of the system might not have an unencumbered (or free) substitute. Without these essential components, the system would be non-functional. Then again, you might find that other licensed components that are simply ‘good-to-have’ or purely elective do have an unencumbered, free replacement component that you can use rather than agreeing to the separately-licensed component. Even for components essential to the system, you might find an unencumbered component that is not identical but will work as a less-capable version of the licensed version in the BSP recipe.
For cases where you can substitute a free component and still maintain the system’s functionality, the “DOWNLOADS” selection from the “SOFTWARE” tab on the Yocto Project Website makes available de-featured BSPs that are completely free of any IP encumbrances. For these cases, you can use the substitution directly and without any further licensing requirements. If present, these fully de-featured BSPs are named appropriately different as compared to the names of their respective encumbered BSPs. If available, these substitutions are your simplest and most preferred options. Obviously, use of these substitutions assumes the resulting functionality meets system requirements.
Note
If however, a non-encumbered version is unavailable or it provides unsuitable functionality or quality, you can use an encumbered version.
There are two different methods within the OpenEmbedded build system to satisfy the licensing requirements for an encumbered BSP. The following list describes them in order of preference:
Use the LICENSE_FLAGS Variable to Define the Recipes that Have Commercial or Other Types of Specially-Licensed Packages: For each of those recipes, you can specify a matching license string in a
local.confvariable named LICENSE_FLAGS_ACCEPTED. Specifying the matching license string signifies that you agree to the license. Thus, the build system can build the corresponding recipe and include the component in the image. See the “Enabling Commercially Licensed Recipes” section in the Yocto Project Development Tasks Manual for details on how to use these variables.If you build as you normally would, without specifying any recipes in the LICENSE_FLAGS_ACCEPTED variable, the build stops and provides you with the list of recipes that you have tried to include in the image that need entries in the LICENSE_FLAGS_ACCEPTED variable. Once you enter the appropriate license flags into it, restart the build to continue where it left off. During the build, the prompt will not appear again since you have satisfied the requirement.
Once the appropriate license flags are on the white list in the LICENSE_FLAGS_ACCEPTED variable, you can build the encumbered image with no change at all to the normal build process.
Get a Pre-Built Version of the BSP: You can get this type of BSP by selecting the “DOWNLOADS” item from the “SOFTWARE” tab on the Yocto Project website. You can download BSP tarballs that contain proprietary components after agreeing to the licensing requirements of each of the individually encumbered packages as part of the download process. Obtaining the BSP this way allows you to access an encumbered image immediately after agreeing to the click-through license agreements presented by the website. If you want to build the image yourself using the recipes contained within the BSP tarball, you will still need to create an appropriate LICENSE_FLAGS_ACCEPTED to match the encumbered recipes in the BSP.
Note
Pre-compiled images are bundled with a time-limited kernel that runs for a predetermined amount of time (10 days) before it forces the system to reboot. This limitation is meant to discourage direct redistribution of the image. You must eventually rebuild the image if you want to remove this restriction.
1.8 Creating a new BSP Layer Using the bitbake-layers Script
The bitbake-layers create-layer script automates creating a BSP
layer. What makes a layer a “BSP layer” is the presence of at least one
machine configuration file. Additionally, a BSP layer usually has a
kernel recipe or an append file that leverages off an existing kernel
recipe. The primary requirement, however, is the machine configuration.
Use these steps to create a BSP layer:
Create a General Layer: Use the
bitbake-layersscript with thecreate-layersubcommand to create a new general layer. For instructions on how to create a general layer using thebitbake-layersscript, see the “Creating Your Own Layer” section in the Yocto Project Development Tasks Manual.Create a Layer Configuration File: Every layer needs a layer configuration file. This configuration file establishes locations for the layer’s recipes, priorities for the layer, and so forth. You can find examples of
layer.conffiles in the Yocto Project Source Repositories. To get examples of what you need in your configuration file, locate a layer (e.g. “meta-ti”) and examine the local.conf file.Create a Machine Configuration File: Create a
conf/machine/bsp_root_name.conffile. See meta-yocto-bsp/conf/machine for samplebsp_root_name.conffiles. There are other samples such as meta-ti and meta-freescale from other vendors that have more specific machine and tuning examples.Create a Kernel Recipe: Create a kernel recipe in
recipes-kernel/linuxby either using a kernel append file or a new custom kernel recipe file (e.g.linux-yocto_6.12.bb). The BSP layers mentioned in the previous step also contain different kernel examples. See the “Modifying an Existing Recipe” section in the Yocto Project Linux Kernel Development Manual for information on how to create a custom kernel.
The remainder of this section provides a description of the Yocto Project reference BSP for Beaglebone, which resides in the meta-yocto-bsp layer.
1.8.1 BSP Layer Configuration Example
The layer’s conf directory contains the layer.conf configuration
file. In this example, the conf/layer.conf file is the following:
# We have a conf and classes directory, add to BBPATH
BBPATH .= ":${LAYERDIR}"

# We have a recipes directory containing .bb and .bbappend files, add to BBFILES
BBFILES += "${LAYERDIR}/recipes-*/*/*.bb \
            ${LAYERDIR}/recipes-*/*/*.bbappend"

BBFILE_COLLECTIONS += "yoctobsp"
BBFILE_PATTERN_yoctobsp = "^${LAYERDIR}/"
BBFILE_PRIORITY_yoctobsp = "5"
LAYERVERSION_yoctobsp = "4"
LAYERSERIES_COMPAT_yoctobsp = "wrynose"
The variables used in this file configure the layer. A good way to learn about layer configuration files is to examine various files for BSP from the Source Repositories.
For a detailed description of this particular layer configuration file, see “step 3” in the discussion that describes how to create layers in the Yocto Project Development Tasks Manual.
1.8.2 BSP Machine Configuration Example
As mentioned earlier in this section, the existence of at least one machine configuration file is what makes a layer a BSP layer as compared to a general or kernel layer.
As an actual example, consider the relevant content from the
/meta-yocto/tree/meta-yocto-bsp/conf/ directory of the
meta-yocto-bsp BSP layer:
$ tree -F conf
conf/
├── layer.conf
└── machine/
    ├── beaglebone-yocto.conf
    ├── genericarm64.conf
    ├── genericx86-64.conf
    ├── genericx86.conf
    └── include/
        └── genericx86-common.inc
showing four machine configuration files along with a lower-level tuning configuration file.
The variables used to configure the machine define machine-specific properties; for example, machine-dependent packages, machine tunings, the type of kernel to build, and U-Boot configurations.
The following list provides some explanation for the statements found in the example reference machine configuration file for the BeagleBone development board. Realize that much more can be defined as part of a machine’s configuration file. In general, you can learn about related variables that this example does not have by locating the variables in the “Variables Glossary” in the Yocto Project Reference Manual.
PREFERRED_PROVIDER_virtual/xserver: The recipe that provides “virtual/xserver” when more than one provider is found. In this case, the recipe that provides “virtual/xserver” is “xserver-xorg”, available in
meta/recipes-graphics/xorg-xserverin OpenEmbedded-Core (OE-Core).MACHINE_EXTRA_RRECOMMENDS: A list of machine-dependent packages not essential for booting the image. Thus, the build does not fail if the packages do not exist. However, the packages are required for a fully-featured image.
Tip
There are many
MACHINE*variables that help you configure a particular piece of hardware.EXTRA_IMAGEDEPENDS: Recipes to build that do not provide packages for installing into the root filesystem but building the image depends on the recipes. Sometimes a recipe is required to build the final image but is not needed in the root filesystem. In this case, the U-Boot recipe must be built for the image.
At the end of the file, we also use this setting to implement
runqemusupport on the host machine.DEFAULTTUNE: Machines use tunings to optimize machine, CPU, and application performance. These features — collectively known as “tuning features” — are set in the OpenEmbedded-Core (OE-Core) layer. In this example, the default tuning file is tune-cortexa8.
Note
The include statement that pulls in the
conf/machine/include/arm/tune-cortexa8.incfile provides many tuning possibilities.IMAGE_FSTYPES: The formats the OpenEmbedded build system uses during the build when creating the root filesystem. In this example, four types of images are supported.
EXTRA_IMAGECMD: Specifies additional options for image creation commands. In this example, the “-lnp “ option is used when creating the JFFS2 image.
WKS_FILE: The location of the Wic kickstart file used by the OpenEmbedded build system to create a partitioned image.
do_image_wic[depends]: A task that is constructed during the build. In this example, the task depends on specific tools in order to create the sysroot when building a Wic image.SERIAL_CONSOLES: Defines one or more serial consoles (TTYs) to enable using getty.
PREFERRED_PROVIDER_virtual/kernel: Specifies the recipe that provides “virtual/kernel” when more than one provider is found. In this case, the recipe that provides “virtual/kernel” is “linux-yocto”, which exists in the layer’s
recipes-kernel/linuxdirectory.PREFERRED_VERSION_linux-yocto: Defines the version of the recipe used to build the kernel, which is “6.18%” in this case.
KERNEL_IMAGETYPE: The type of kernel to build for the device. In this case, the OpenEmbedded build system creates a “zImage” image type.
KERNEL_DEVICETREE: The names of the generated Linux kernel device trees (i.e. the
*.dtb) files. All the device trees for the various BeagleBone devices are included.KERNEL_EXTRA_ARGS: Additional
makecommand-line arguments the OpenEmbedded build system passes on when compiling the kernel. In this example,LOADADDR=${UBOOT_ENTRYPOINT}is passed as a command-line argument.SPL_BINARY: Defines the Secondary Program Loader (SPL) binary type. In this case, the SPL binary is set to “MLO”, which stands for Multimedia card LOader.
The BeagleBone development board requires an SPL to boot and that SPL file type must be MLO. Consequently, the machine configuration needs to define SPL_BINARY as
MLO.Note
For more information on how the SPL variables are used, see the u-boot.inc include file.
UBOOT_*: Defines various U-Boot configurations needed to build a U-Boot image. In this example, a U-Boot image is required to boot the BeagleBone device. See the following variables for more information:
UBOOT_SUFFIX: Points to the generated U-Boot extension.
UBOOT_MACHINE: Specifies the value passed on the make command line when building a U-Boot image.
MACHINE_FEATURES: Specifies the list of hardware features the BeagleBone device is capable of supporting. In this case, the device supports “usbgadget usbhost vfat alsa”.
IMAGE_BOOT_FILES: Files installed into the device’s boot partition when preparing the image using the Wic tool with the
bootimg_partitionorbootimg_efisource plugin.
1.8.3 BSP Kernel Recipe Example
The kernel recipe used to build the kernel image for the BeagleBone device was established in the machine configuration:
PREFERRED_PROVIDER_virtual/kernel ?= "linux-yocto"
PREFERRED_VERSION_linux-yocto ?= "6.18%"
The meta-yocto-bsp/recipes-kernel/linux directory in the layer contains
metadata used to build the kernel. In this case, a kernel append file
(i.e. linux-yocto_6.18.bbappend) is used to override an established
kernel recipe (i.e. linux-yocto_6.18.bb), which is located in
https://git.openembedded.org/openembedded-core/tree/meta/recipes-kernel/linux.
The contents of the append file are:
COMPATIBLE_MACHINE:genericarm64 = "genericarm64"
COMPATIBLE_MACHINE:beaglebone-yocto = "beaglebone-yocto"
COMPATIBLE_MACHINE:genericx86 = "genericx86"
COMPATIBLE_MACHINE:genericx86-64 = "genericx86-64"

KMACHINE:beaglebone-yocto ?= "beaglebone"
KMACHINE:genericx86 ?= "common-pc"
KMACHINE:genericx86-64 ?= "common-pc-64"

KBRANCH:genericarm64 ?= "v6.18/standard/genericarm64"
SRCREV_machine:genericarm64 ?= "5cd75b0b5da06045acdd0c66e50656ab82cb880f"
This particular append file works for all the machines that are
part of the meta-yocto-bsp layer. The relevant statements are
appended with the “beaglebone-yocto” string. The OpenEmbedded build
system uses these statements to override similar statements in the
kernel recipe:
KBRANCH: Identifies the kernel branch that is validated, patched, and configured during the build.
KMACHINE: Identifies the machine name as known by the kernel, which is sometimes a different name than what is known by the OpenEmbedded build system.
SRCREV: Identifies the revision of the source code used to build the image.
COMPATIBLE_MACHINE: A regular expression that resolves to one or more target machines with which the recipe is compatible.
LINUX_VERSION: The Linux version from kernel.org used by the OpenEmbedded build system to build the kernel image.